


Disclaimer
Document Part Number: 900587-001 Rev 03 June 2012
TouchTunes and the TouchTunes logo are trademarks of TouchTunes Interactive Networks.
All other brand and product names are trademarks or registered trademarks of their respective corporations.
The mention of any product does not constitute an endorsement by TouchTunes Interactive Networks.
This manual is furnished under a lease agreement and may only be copied or used within accordance with the
terms of such lease agreement. The content of this manual is furnished for informational use only, is subject to
change without notice, and should not be construed as a commitment by TouchTunes Interactive Networks.
TouchTunes Interactive Networks assumes no responsibility or liability for any errors or inaccuracies that may
appear in this document.
Except as permitted by such lease agreement, no part of this publication may be reproduced, stored in any
retrieval system, or transmitted, in any form or by any means, electronic, mechanical, recording, or otherwise,
without prior written consent of TouchTunes Interactive Networks.
Changes are periodically made to the information herein; these changes will be incorporated into new editions of
this publication. TouchTunes may make improvements and/or changes in the products and/or software programs
described in this publication at any time.
If you have comments on this manual or the products it describes, address them to:
TouchTunes Interactive Networks
Attention: Publications
400 Sainte Croix Avenue, Suite 200 E
Montreal, Quebec, Canada H4N 3L4
Service Hotline: 1-847-353-1954
Fax: (847) 419-3304
TouchTunes may use or distribute whatever information you supply in any way it believes appropriate without
incurring any obligations to you.
Copyright © 2012 TouchTunes Interactive Networks. All rights reserved, including those to reproduce this
publication or parts thereof in any form without permission in writing from TouchTunes Interactive Networks.

Contents
1 Welcome to TouchTunes Karaoke 3
Welcome to TouchTunes Karaoke . . . . . . . . . . . . . . . . . . . . . . . . . . . . . . . . . . . . . . . . . . . . . . 3
Karaoke Service Requirements Reminder . . . . . . . . . . . . . . . . . . . . . . . . . . . . . . . . . . . . . . . . 3
About this guide . . . . . . . . . . . . . . . . . . . . . . . . . . . . . . . . . . . . . . . . . . . . . . . . . . . . . . . . . . . . 3
Disclaimer and safety information . . . . . . . . . . . . . . . . . . . . . . . . . . . . . . . . . . . . . . . . . . . . . . 4
Contacting TouchTunes . . . . . . . . . . . . . . . . . . . . . . . . . . . . . . . . . . . . . . . . . . . . . . . . . . . . . . 5
2 Installing TouchTunes Karaoke 7
Karaoke Kit Contents . . . . . . . . . . . . . . . . . . . . . . . . . . . . . . . . . . . . . . . . . . . . . . . . . . . . . . . . 7
Marketing Kit . . . . . . . . . . . . . . . . . . . . . . . . . . . . . . . . . . . . . . . . . . . . . . . . . . . . . . . . . . . 8
Unpacking the Karaoke Equipment . . . . . . . . . . . . . . . . . . . . . . . . . . . . . . . . . . . . . . . . . . . . . 8
Main Packaging . . . . . . . . . . . . . . . . . . . . . . . . . . . . . . . . . . . . . . . . . . . . . . . . . . . . . . . . . 8
Inner White Box 1 - Microphone Receiver Box . . . . . . . . . . . . . . . . . . . . . . . . . . . . . . . . . 9
Inner White Box 2 - Video Interface Module (VIM) Box . . . . . . . . . . . . . . . . . . . . . . . . . . . 10
Metallic Case . . . . . . . . . . . . . . . . . . . . . . . . . . . . . . . . . . . . . . . . . . . . . . . . . . . . . . . . . . . 11
Connectivity Overview . . . . . . . . . . . . . . . . . . . . . . . . . . . . . . . . . . . . . . . . . . . . . . . . . . . . . . . 12
Connecting the Wireless Microphone Receiver . . . . . . . . . . . . . . . . . . . . . . . . . . . . . . . . . . . . 13
Connecting the Video Interface Module (VIM) to the location’s TV . . . . . . . . . . . . . . . . . . . . . 14
Connecting Virtuo to the Location’s DHCP Network (if required) . . . . . . . . . . . . . . . . . . . . . . . 16
Connecting the Video Interface Module (VIM) to the DHCP Network . . . . . . . . . . . . . . . . . . . 16
Installing the “TouchTunes Karaoke” Hard Drive . . . . . . . . . . . . . . . . . . . . . . . . . . . . . . . . . . . 17
3 Configuring TouchTunes Karaoke 21
Operator Menu Settings . . . . . . . . . . . . . . . . . . . . . . . . . . . . . . . . . . . . . . . . . . . . . . . . . . . 21
Learning the New Virtuo Remote . . . . . . . . . . . . . . . . . . . . . . . . . . . . . . . . . . . . . . . . . . . . 22
Virtuo Volume and Microphone Gain Adjustment . . . . . . . . . . . . . . . . . . . . . . . . . . . . . . . 23
Television (Second Screen) Verification . . . . . . . . . . . . . . . . . . . . . . . . . . . . . . . . . . . . . . 25

2
4 Karaoke Event Manager 27
Providing Locations with Access to the Karaoke Event Manager . . . . . . . . . . . . . . . . . . . . . . . 27
Linking your Dashboard and myTouchTunes accounts: . . . . . . . . . . . . . . . . . . . . . . . . . . . . . . 28
Logging into the Karaoke Event Manager Website . . . . . . . . . . . . . . . . . . . . . . . . . . . . . . . . . . 29
Assigning Location Managers to Locations . . . . . . . . . . . . . . . . . . . . . . . . . . . . . . . . . . . . . . . . 30
5 Replacement Microphones 33
Microphone Frequencies and Colors . . . . . . . . . . . . . . . . . . . . . . . . . . . . . . . . . . . . . . . . . . . . 33

Welcome to TouchTunes Karaoke
Welcome to TouchTunes Karaoke
Welcome to TouchTunes’ cutting-edge, interactive Karaoke service. With TouchTunes Karaoke, your locations can
search, browse and play Karaoke songs on your Virtuo SmartJuke or from their mobile devices using the TouchTunes
Karaoke mobile app!
This guide will show you how to install and configure the equipment your locations will use to host their own Karaoke
events.
Karaoke Service Requirements Reminder
This manual was packaged with a one-page README document that explains what you will need to do, apart from
setting up the Karaoke equipment, to provide your locations with the Karaoke service.
Please ensure you have read this README before visiting your locations to install Karaoke equipment.
About this guide
This guide is for Operators of Virtuo SmartJukes and their technicians, and TouchTunes technical support and field
service personnel. It provides important information about the installation and setup of TouchTunes Karaoke.
TouchTunes Karaoke Installation and Setup Guide 900587-001 Rev 03
4
Welcome to TouchTunes Karaoke
Disclaimer and safety information
Disclaimer and safety information
TouchTunes Interactive Networks is not responsible for any damage resulting from the improper installation or
connection of test kit components or any other external equipment to your Virtuo, nor is TouchTunes responsible for
any damage caused during shipment (except the shipment to the original purchaser) or any damage caused by:
• impacts, fluids, fire, flood, wind, earthquake, lightning or similar disaster
• unauthorized modifications, attachments or peripherals, improper use, environment, installation or electrical
supply
• improper maintenance
• any other misuse, abuse, or mishandling
Familiarize yourself with this important safety information before proceeding with product installation.
WARNING: This symbol alerts you to the presence of dangerous voltage within the product
enclosure that may be of sufficient magnitude to constitute a risk of electrical shock. Do not
remove the cover or back of the TouchTunes Karaoke wireless microphone receiver or video
interface module. There are no user-serviceable parts inside. Servicing must be performed
by qualified personnel only.
CAUTION: Do not install TouchTunes Karaoke equipment near any heat sources, such as
radiators, heat registers, stoves, or other apparatus (including amplifiers) that produce heat.
To prevent risk of fire or electric shock, avoid overloading wall outlets, extension cords,
integral convenience receptacles.
Protect all power cords from being walked on or pinched, particularly at plugs, convenience
receptacles, and the point where they exit from the apparatus.
Do not let objects or liquids enter these products—as they may touch dangerous voltage
points or short-out parts that could result in a fire or electric shock.
Refer all service to qualified service personnel. Service is required when this equipment has
been damaged in any way, including but not limited to: power-supply cord or plug damage;
liquid has been spilled or objects have fallen into the equipment; the equipment has been
exposed to rain or moisture, or has been dropped.
TouchTunes Karaoke Installation and Setup Guide

Welcome to TouchTunes Karaoke
Contacting TouchTunes
Contacting TouchTunes
If you need help with or have questions about this document, contact TouchTunes by:
• using the email links on the Contacts page on the TouchTunes Dashboard at
https://operator.touchtunes.com
• calling the TouchTunes 24/7 Service Hotline at 847-353-1954.
To help us assist you more effectively with problem reports, the following information may be required when contacting
TouchTunes Support:
• SmartJuke ID.
• SmartJuke model.
• The serial number of any component you believe to be defective.
• The date/time of the problem.
• Actions performed immediately before the problem occurred.
• Any additional comments.
If you need assistance with this or any other TouchTunes product, please call or email technical support. We value
your comments.
.
5
TouchTunes Karaoke Installation and Setup Guide 900587-001 Rev 03

6
Welcome to TouchTunes Karaoke
Contacting TouchTunes
TouchTunes Karaoke Installation and Setup Guide

Installing TouchTunes Karaoke
Topics
• Karaoke Kit Contents
• Unpacking the Karaoke Equipment
• Connectivity Overview
• Connecting the Wireless Microphone Receiver
• Connecting the Video Interface Module (VIM) to the location’s TV
• Connecting Virtuo to the Location’s DHCP Network (if required)
• Installing the “TouchTunes Karaoke” Hard Drive
Karaoke Kit Contents
The TouchTunes Karaoke Kit consists of the following:
• a video interface module (VIM)
• a power supply adapter for the video interface module
• a wireless microphone receiver
• a 50-foot CAT-5 Ethernet cable
• a 15-foot CAT-5 Ethernet cable
•an HDMI cable
• a component video connection cable
• a component audio connection cable
The TouchTunes Karaoke Kit also includes a Karaoke “briefcase” to leave with locations that includes:
• two wireless microphones (plus batteries and spare batteries)
• a Karaoke remote control for Virtuo (plus batteries and spare batteries)
• a Host guide
• a remote control cheat sheet and quick start guide
NOTE: A network running DHCP is required for each location using the Karaoke Service.
The TouchTunes Karaoke Kit does not
include a switch or a router.
TouchTunes Karaoke Installation and Setup Guide 900587-001 Rev 03

8
The entire Karaoke Kit arrives
packaged in a single white box
Within the main Karaoke box are two smaller white boxes and
an attractive metallic case that will be left with the location.
Installing TouchTunes Karaoke
Unpacking the Karaoke Equipment
Marketing Kit
In addition to the hardware components in the main kit, you will also receive a Karaoke Marketing kit containing
promotional materials to be used at locations. You will receive one Karaoke Marketing kit for each Karaoke kit
ordered.
The Karaoke Marketing Kit includes:
• 5 “Liquid Courage” shot glasses
• 3 posters
• 25 table tents
Unpacking the Karaoke Equipment
Main Packaging
All the equipment that is required to run the Karaoke Service arrives in a single white box.
Within this larger box are two smaller, similar white boxes and a customized TouchTunes case that venue owners will
use to house the Karaoke microphones and remote control.
• Remove the 2 smaller white boxes and the metallic case from the larger white box.
TouchTunes Karaoke Installation and Setup Guide
Installing TouchTunes Karaoke
Top level - The wireless microphone
receiver
Bottom level - 15 foot Cat-5 cable
Unpacking the Karaoke Equipment
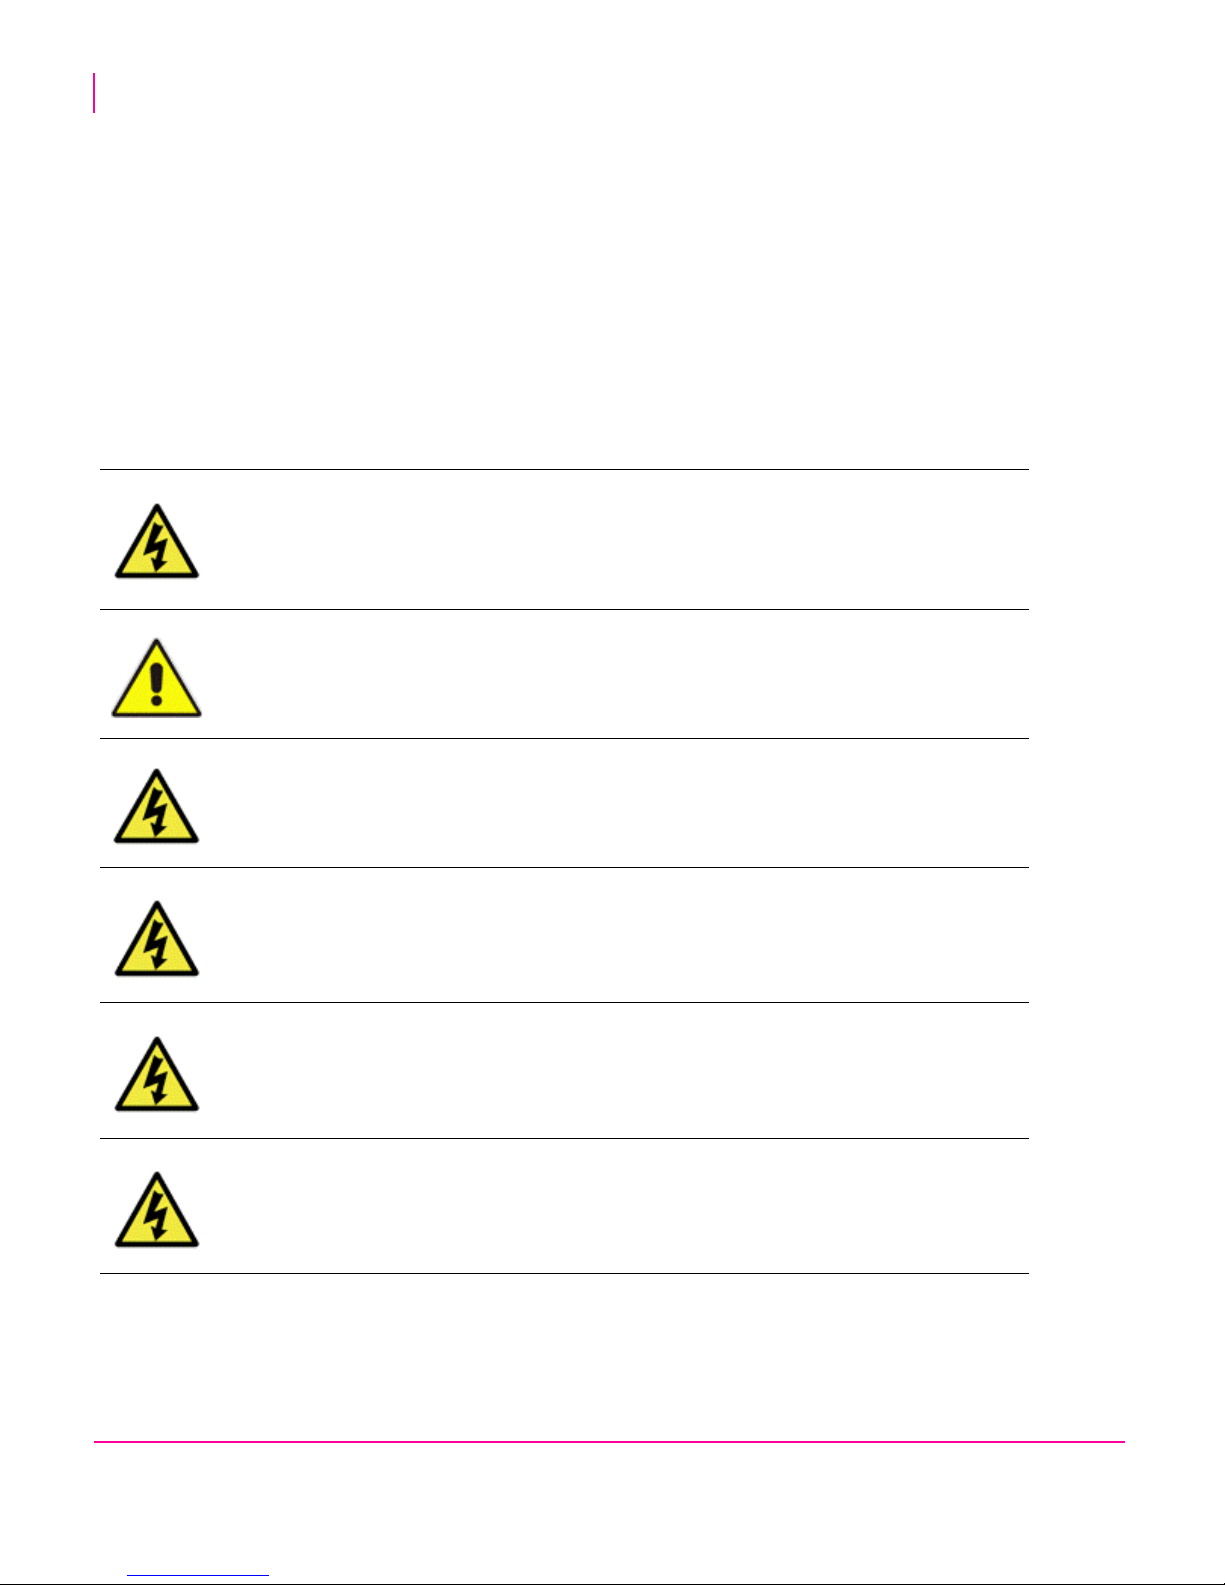
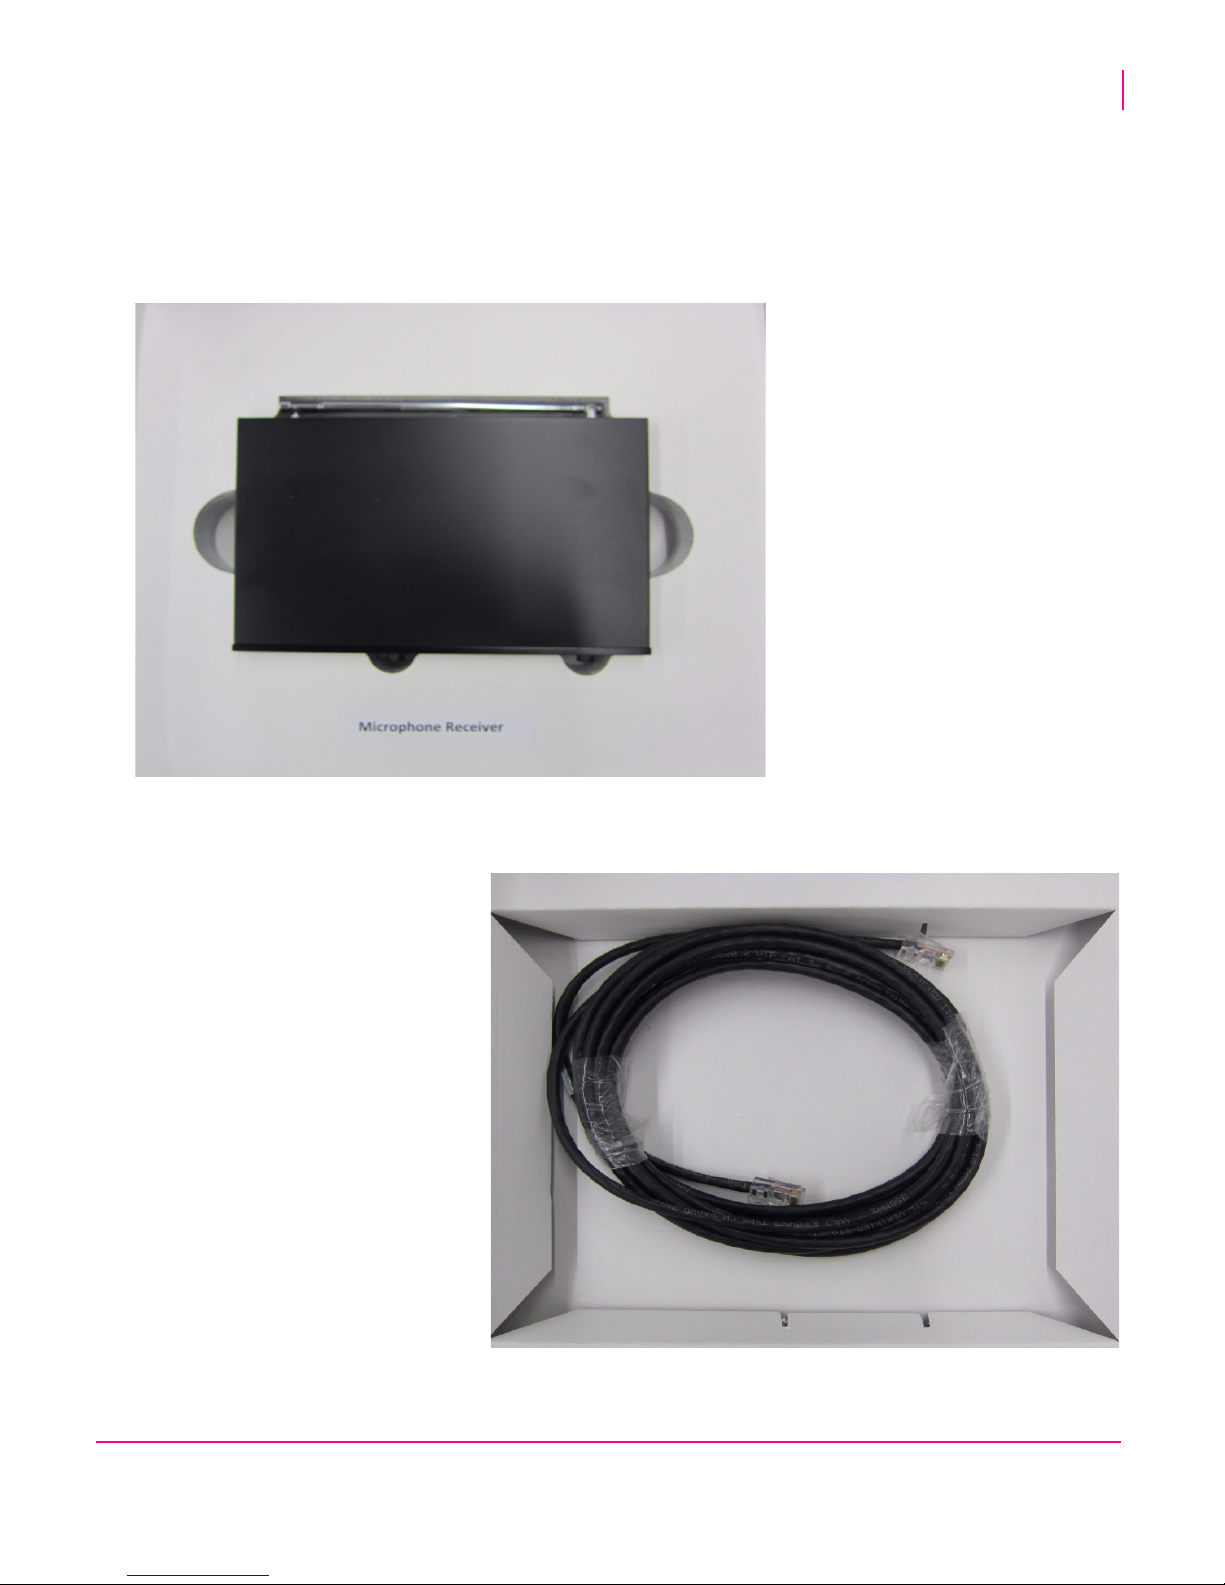
Inner White Box 1 - Microphone Receiver Box
The microphone receiver box is a white, two-layered box; the top layer contains the microphone receiver and beneath
it lies the 15 foot CAT-5 Ethernet cable for connecting the wireless microphone receiver to Virtuo’s IO board.
• Remove the wireless microphone receiver and 15 foot CAT-5 Ethernet cable from this box.
9
TouchTunes Karaoke Installation and Setup Guide 900587-001 Rev 03
10
Top level - The Video Interface Module (VIM)
Middle level - The VIM’s power supply and cabling
for connecting the VIM to a television
For a given location, you will only need either the
HDMI cable or the component cables
Bottom level - 50 foot Cat 5 cable
Installing TouchTunes Karaoke
Unpacking the Karaoke Equipment
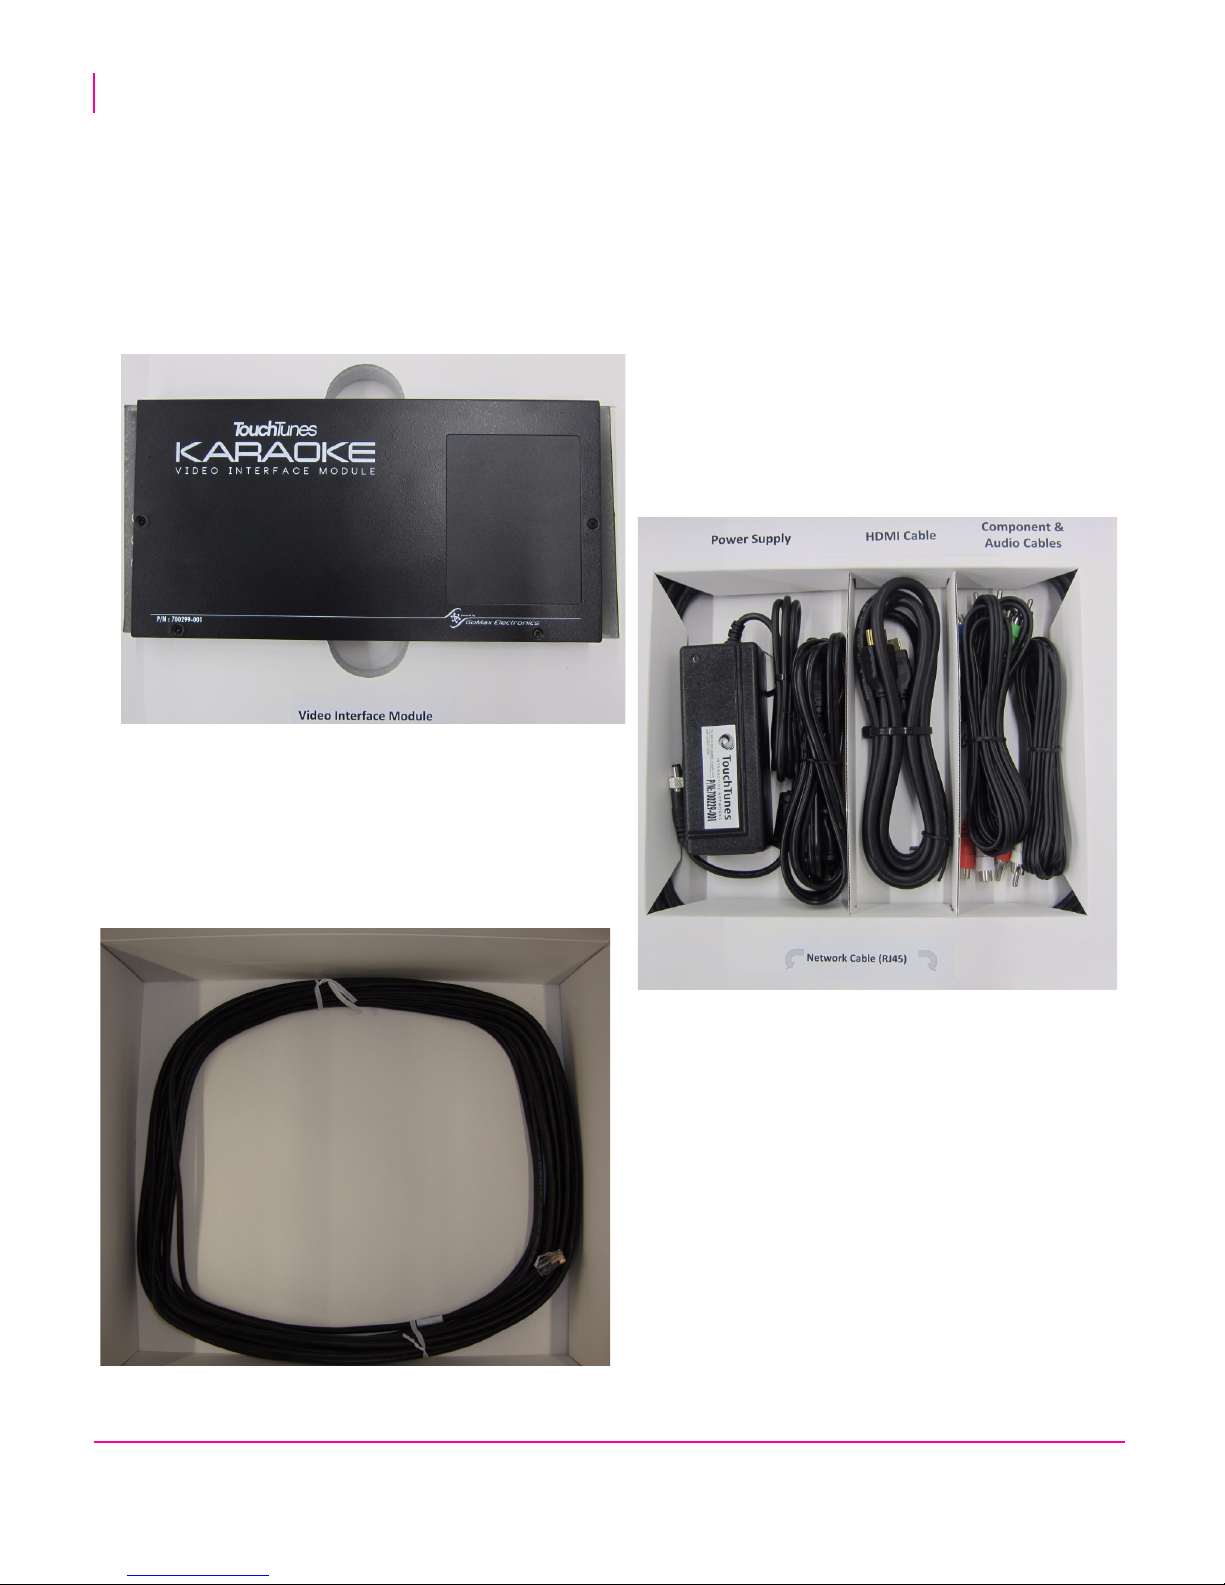
Inner White Box 2 - Video Interface Module (VIM) Box
The Video Interface Module box is a three-layered box; the top layer contains the VIM, the middle layer contains the
VIM power supply adapter and cabling for connecting the VIM to the location’s television, and the bottom layer
contains a 50 foot Cat-5 Ethernet cable.
• Remove the VIM, VIM power supply adapter, 15 foot Cat-5 Ethernet cable, and either the HDMI cable or 2
component cables from this box.
TouchTunes Karaoke Installation and Setup Guide

Installing TouchTunes Karaoke
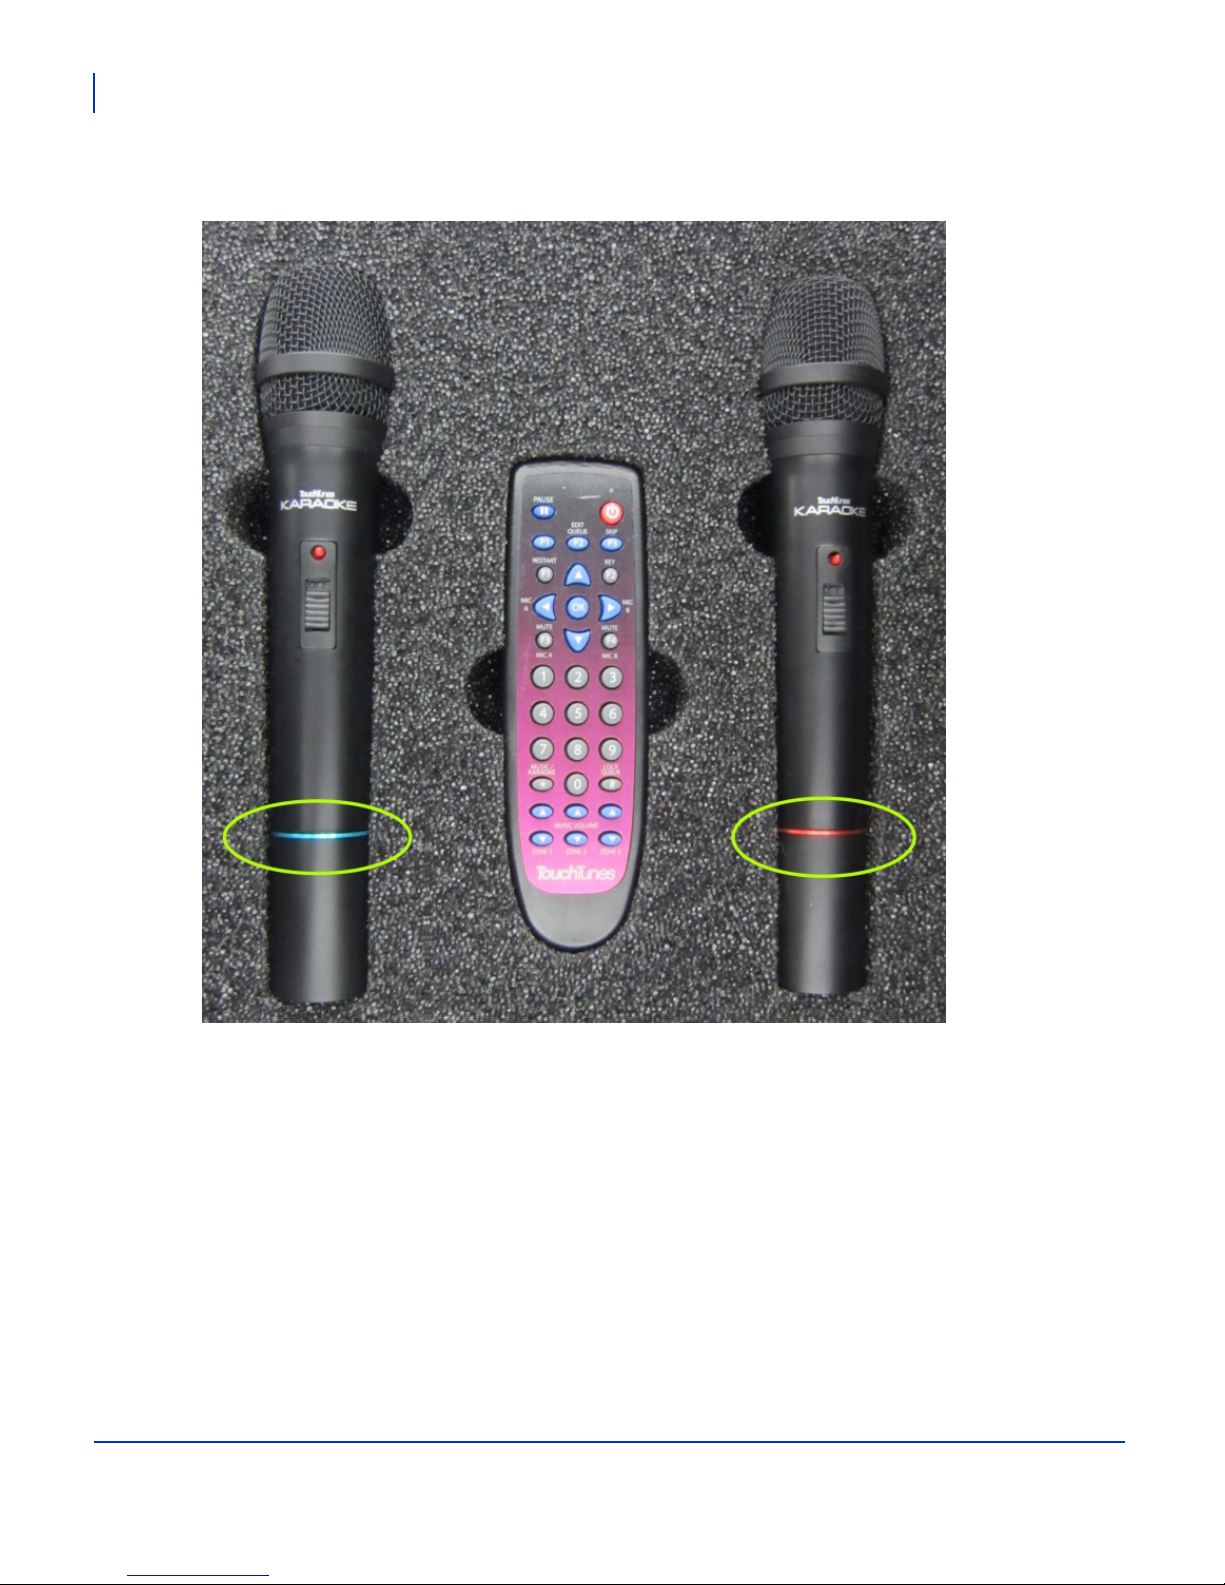
• Unscrew and remove the base of
each microphone and insert the
included alkaline 9V batteries.
• Remove the Karaoke remote
control and insert two of the 1.5V
AAA batteries included
Unpacking the Karaoke Equipment
Metallic Case
The Karaoke Kit also includes a metallic case that should be left with the location for hosting Karaoke events.
Once you have set up Karaoke and provided the location with access to the Karaoke Event Manager website (as
discussed in Chapter 4), this case contains everything a location will need to run Karaoke events autonomously.
This case includes:
• Two wireless microphones
• A Karaoke remote control for Virtuo
•A one-page remote control and quick start reference guide
• A full-colored guide comprehensive Host guide explaining how to host the perfect Karaoke event
• High quality alkaline batteries (plus spares) for the wireless microphones and remote control
11
TouchTunes Karaoke Installation and Setup Guide 900587-001 Rev 03

12
Installing TouchTunes Karaoke
Connectivity Overview
Connectivity Overview
The following diagram is an overview of how the Karaoke kit components, television, network and Virtuo are
connected to each other.
You should study this diagram carefully to determine where you will install each of the components for Karaoke.
NOTE: This diagram is also printed on the inside of the Video Interface Module and Wireless Microphone Receiver
white boxes.
TouchTunes Karaoke Installation and Setup Guide

Installing TouchTunes Karaoke
Connecting the Wireless Microphone Receiver
Connecting the Wireless Microphone Receiver
Before proceeding, turn off the main power to Virtuo using the rocker switch on the power bar:
1. Consider the following caveats, then determine where you will be placing the wireless microphone receiver.
• The receiver should be placed in a location where patrons will not be able to access it.
• The Karaoke kit contains a 15-foot cat-5 Ethernet cable for connecting the Wireless Microphone Receiver to
Virtuo.
• The wireless microphone receiver does not
ethernet cable.
• There should be no obstructions between the wireless microphone receiver and where the performers will be
positioned when singing.
• Although unlikely, the location may need to adjust the gain on the wireless microphone receiver.
2. After you select a location for the receiver, connect it to the Virtuo using the 15-foot Cat-5 Ethernet cable. The
cable connects to Virtuo’s I/O board in the port labeled
require an additional power source, as power is supplied over the
Mic 1.
13
3. The Cat-5 cable exits the Virtuo through its rear opening.
TouchTunes Karaoke Installation and Setup Guide 900587-001 Rev 03

14
Installing TouchTunes Karaoke
Connecting the Video Interface Module (VIM) to the location’s TV
Connecting the Video Interface Module (VIM) to the location’s TV
1. Consider the following, then determine where you will be placing the video interface module.
• The VIM should not be in the way of performers, and it should placed relatively close to the components it
must connect to (i.e. the location’s television and network hub).
• TouchTunes recommends mounting the VIM behind the location’s television.
2. Plug one end of the 50 foot cat-5 RJ-45 Ethernet cable into the VIM’s Ethernet port.
3. Plug the other end of the 50 foot cat-5 RJ-45 cable into the router that the Virtuo is also connected to.
4. Plug the VIM’s power supply adapter into the VIM, and plug the power supply adapter into a power socket.
5. Connect the location’s television to the VIM:
If the location’s television supports HDMI
• Unplug the HDMI cable from the IN port on the location’s television
• Connect the HDMI cable from your location’s source to the VIM’s HDMI IN port
• Plug one end of the HDMI cable provided into the VIM’s HDMI OUT port and the other end into the television’s
HDMI IN port.
TouchTunes Karaoke Installation and Setup Guide

Installing TouchTunes Karaoke
Connecting the Video Interface Module (VIM) to the location’s TV
If the location’s television supports Component, but not HDMI:
• Unplug the component cables from the IN ports on the location’s television
• Connect the component cabling from your location’s source to the VIM’s yPbPr IN ports
• Plug the three color-coded component cables into the VIM’s yPbPr OUT ports, and the other end into the
television’s color-coded yPbPr IN ports.
• Plug the color-coded white and red audio cables into the VIM’s left and right Audio OUT ports, and the other end
into the television’s color-coded left and right Audio IN ports.
15
NOTE: The VIM has no ON/OFF switch, as it is intended to remain powered on.
TouchTunes Karaoke Installation and Setup Guide 900587-001 Rev 03

16
Installing TouchTunes Karaoke
Connecting Virtuo to the Location’s DHCP Network (if required)
Connecting Virtuo to the Location’s DHCP Network (if required)
A network running DHCP is required for each location using the Karaoke Service. The Virtuo and the VIM
must be connected to the same DHCP network.
1. If your location has a network but currently does not have any open network ports, you will be required to install
a network switch.
2. If your location has a network, but is not running DHCP, you will be required to install a router with a connection
for the Virtuo and VIM.
3. If your location has no network (i.e. a Wireless modem), you will be required to install a router with a connection
for the Virtuo and VIM.
Connecting the Video Interface Module (VIM) to the DHCP
Network
The Karaoke Kit includes a 50-foot Cat-5 Ethernet cable for connecting the VIM to the same DHCP network as the
Virtuo.
• Plug one end of the 50-foot Cat-5 Ethernet cable into the VIM’s ethernet port, and plug the other end into your
DHCP network.
For more information on connecting Virtuo to the Internet, consult the latest revision of the Virtuo Installation &
Setup Guide (900475-001) on the Operator Dashboard. This manual was also printed and packaged with your
Virtuo.
TouchTunes Karaoke Installation and Setup Guide

Installing TouchTunes Karaoke
Installing the “TouchTunes Karaoke” Hard Drive
Installing the “TouchTunes Karaoke” Hard Drive
In order to run the Karaoke service, Virtuo must be equipped with a hard drive labeled “TouchTunes Karaoke”. As of
May 2012, this is the standard drive shipped with all new Virtuos.
A “TouchTunes Karaoke” hard drive contains the standard Virtuo software and song library, as well as the Karaoke
software and song library. It is therefore not necessary to re-swap drives once you have installed a “TouchTunes
Karaoke” hard drive.
17
To install the “Karaoke Enabled” hard drive (if required):
1. Turn off the main power to Virtuo using the rocker switch on the power bar.
2. Unlock and open Virtuo.
3. Ground yourself by touching an exposed piece of metal in the Virtuo case.
4. Ensure that the computer is powered OFF at the switch on the power supply.
5. Locate the hard drive bay.
6. Using your fingers, loosen the thumb screw by turning it counterclockwise and remove the original Virtuo drive (if
one is present).
7. Align the TouchTunes Karaoke hard drive enclosure with its slot on the left-hand panel of the computer.
The hard drive enclosure cannot be inserted in its slot until it is properly aligned.
8. Insert the hard drive enclosure in the slot and then gently push the enclosure in until it is completely seated.
TouchTunes Karaoke Installation and Setup Guide 900587-001 Rev 03

18
Installing TouchTunes Karaoke
Installing the “TouchTunes Karaoke” Hard Drive
9. Using your fingers, push in and then tighten the thumb screw (clockwise) on the Karaoke hard drive tray until the
thumb screw is securely tightened.
Tightening the hard drive thumb screw
CAUTION: Using a screwdriver on the thumb screw is not necessary and applies
significantly more torque than is required. Do not over-tighten.
10. Test whether the hard drive is firmly seated by pulling out firmly on the handle of the hard drive tray.
The hard drive is secured properly when:
• the thumb screw is completely compressed and covered by the cowl head of the thumbs screw, that is, the
spring is not visible.
• there is no gap between the edge of the hard drive tray and the computer.
• there is no play between the hard drive and the computer when you pull outward on the handle of the hard
drive tray.
11. Reboot the Virtuo.
12. After the reboot, you will be prompted onscreen with three options: Select the THIRD option.
TouchTunes Karaoke Installation and Setup Guide

13. Virtuo will boot into the standard OpenStage home screen.
Installing TouchTunes Karaoke
Installing the “TouchTunes Karaoke” Hard Drive
19
14. Update to the latest version of OpenStage immediately by doing the following:
• Press the Manager button on Virtuo’s I/O board
• Touch the Diagnostic tab at the left.
• Touch the Call Now button.
If Virtuo is connected to the Internet, it will download the latest version of OpenStage, upgrade and reboot.
15. Once the Virtuo has rebooted into the home screen, proceed to the next section, where you will switch Virtuo to
Karaoke mode and configure it for the location.
TouchTunes Karaoke Installation and Setup Guide 900587-001 Rev 03

20
Installing TouchTunes Karaoke
Installing the “TouchTunes Karaoke” Hard Drive
TouchTunes Karaoke Installation and Setup Guide

Configuring TouchTunes Karaoke
Topics
Operator Menu Settings
Learning the New Virtuo Remote
Virtuo Volume and Microphone Gain Adjustment
In order to provide your locations with optimal sound, you will need to enable Karaoke on the Virtuo, modify some
settings, and adjust the Karaoke-specific volume levels.
Operator Menu Settings
If you have not already booted up Virtuo with the new drive and updated the software (as discussed in the previous
chapter), do so now.
Once the Virtuo is completely booted, do the following:
1. Launch the Operator Menu by pressing the Manager button on Virtuo’s I/O board.
2. Navigate to Services > Karaoke Options.
TouchTunes Karaoke Installation and Setup Guide 900587-001 Rev 03

22
Configuring TouchTunes Karaoke
3. Enable Karaoke by touching the ON button.
4. Select whether or not Explicit Karaoke songs will be available to patrons.
If OFF is selected, explicit Karaoke songs will be hidden from patrons.
5. Set the surcharge for Karaoke plays to add extra credits to the base cost of a Karaoke play.
The base cost of a play is automatically set at the credit equivalent of $1. To set the surcharge, use the + and buttons. There is no Play Next feature with the Karaoke service.
Learning the New Virtuo Remote
By default, the remote control ID is set to 000. To change it, do the following:
1. On the remote, press the
blinks two times.
2. Enter the new three-digit code to use. The new code must be in the range
3. The red indicator light lights up for three seconds to confirm your selection (if you enter an invalid code the light
blinks five times.)
4. You must force Virtuo to re-learn the remote ID.
On the Operator Interface, press Hardware to display the Hardware Options screen.
5. Press the LEARN button.
6. Watch the display.
When prompted, press the MIC VOL UP key on the remote control.
The display shows a confirmation message and returns to the Options screen.
POWER and F4 keys at the same time and hold them down until the red indicator light
000 to 255.
NOTE: Repeat steps 1 through 6 with the location’s existing Virtuo remote control to ensure both remotes continue
to function with the location’s Virtuo.
TouchTunes Karaoke Installation and Setup Guide

Configuring TouchTunes Karaoke
Virtuo Volume and Microphone Gain Adjustment
To set the volume for Karaoke microphones:
1. Navigate to Services > Karaoke Zone 1.
2. Set the Karaoke Volume to MAX (0 dB) and set the Karaoke CMP slider to the same level you are currently
using for standard CMP music.
3. Set the Karaoke MIC A and Karaoke MIC B sliders to the maximum (by dragging the sliders to the top, or 0 dB).
23
4. Repeat steps 1 through 3 for each zone that will be used for Karaoke.
5. On the Operator Menu, add service credits to Virtuo from the Money > Options screen (if needed).
6. Exit the Operator Screens by touching the EXIT button at the top-left.
7. On the wireless microphone receiver, set the volume (gain) for both microphones all the way to 0.
8. Press the
* button on the Karaoke remote control to switch Virtuo to Karaoke mode.
TouchTunes Karaoke Installation and Setup Guide 900587-001 Rev 03

24
Configuring TouchTunes Karaoke
9. On the confirmation screen, select Yes using the remote control or by touching the screen.
10. Queue up 3 to 4 Karaoke songs.
11. Turn on both microphones and position them where the patrons will be singing.
12. When the music begins playing, raise the gain of the two microphones slowly on the wireless microphone
receiver until you start hearing feedback. This represents the maximum gain you should apply to both channels.
TouchTunes Karaoke Installation and Setup Guide

Configuring TouchTunes Karaoke
Television (Second Screen) Verification
As part of your Karaoke setup testing, you should confirm that the location’s television is properly displaying the output
of the Video Interface Module (VIM).
1. Set the location’s television to HDMI or Component (depending on how you connected the VIM to the television).
2. Confirm the Karaoke lyrics are being properly displayed onscreen.
• While a Karaoke song is playing, the onscreen lyrics scroll in sync with the current song.
25
• If Virtuo is in Karaoke mode but not playing a Karaoke song at that moment, it is normal for the television
screen to display the following.
If you do not see the Karaoke lyrics on the television screen:
• Verify that all cabling from the VIM to the television is securely connected
• Check that the VIM is powered on (the small green LED should be illuminated)
• Ensure the VIM is on the same DHCP network as Virtuo
TouchTunes Karaoke Installation and Setup Guide 900587-001 Rev 03

26
Configuring TouchTunes Karaoke
TouchTunes Karaoke Installation and Setup Guide

Karaoke Event Manager
Topics
Providing Locations with Access to the Karaoke Event Manager
Linking your Dashboard and myTouchTunes accounts:
Logging into the Karaoke Event Manager Website
Assigning Location Managers to Locations
Providing Locations with Access to the Karaoke Event Manager
The Karaoke Event Manager website is a one-stop shop for your location’s TouchTunes Karaoke needs.
Once you have set them up with the equipment and provisioned them to use the Karaoke Event Manager website,
your locations will be able to schedule and host Karaoke events autonomously.
To give locations access and permission to create and host Karaoke events, you will need to do the following:
1. Make sure you have created a myTouchTunes account. You should also make sure that the location manager
who will be running Karaoke at the venue has a myTouchTunes account.
2. Link your Operator Dashboard account to your myTouchTunes account (so you will be recognized when you log
into the Karaoke Event Manager website).
3. Log into the Karaoke Event Manager website.
4. Obtain the myTouchTunes logins of your Location Managers and use them to give them access to the Karaoke
Event Manager.
TouchTunes Karaoke Installation and Setup Guide 900587-001 Rev 03

28
Karaoke Event Manager
Linking your Dashboard and myTouchTunes accounts:
Linking your Dashboard and myTouchTunes accounts:
1. Create a myTouchTunes account, if you do not already have one.
2. Open a web browser and navigate to the Operator Dashboard at https://dashboard.touchtunes.com/
3. Log in using your Operator Dashboard credentials.
4. Open the tab My Info > Edit Account
5. Add your myTouchTunes login and password to your Dashboard account profile and click Save User Info.
By linking your Dashboard account to your myTouchTunes account, you will now be recognized as an operator when
you log into the Karaoke Event Manager website.
Since your accounts are now linked, the Karaoke Event Manager can access and display your list of locations.
TouchTunes Karaoke Installation and Setup Guide

Logging into the Karaoke Event Manager Website
Logging into the Karaoke Event Manager Website
1. Open a web browser and navigate to the Karaoke Event Manager website at:
https://karaoke.touchtunes.com/login
2. Log in to the site using your myTouchTunes account.
Karaoke Event Manager
29
NOTE: The Link and Sign Up buttons on the right of the page are reminders only, in case you have arrived at
this page without first linking your myTouchTunes account to your Operator Dashboard account.
TouchTunes Karaoke Installation and Setup Guide 900587-001 Rev 03

30
Karaoke Event Manager
Assigning Location Managers to Locations
Assigning Location Managers to Locations
1. For each of your karaoke locations, click Add Location Owner to assign Location Owners to your venues by
linking their myTouchTunes accounts to the location.
Clicking Add location Owner to assign an owner to Ray’s Magic Kingdom.
TouchTunes Karaoke Installation and Setup Guide

Assigning Location Managers to Locations
2. To add a Location Owner to a location, enter their myTouchTunes account and click Save.
Karaoke Event Manager
31
Adding a myTouchTunes username to the location Final Fantasy Destination
If the myTouchTunes username or email address is not recognized, you will see the following message:
TouchTunes Karaoke Installation and Setup Guide 900587-001 Rev 03

32
Karaoke Event Manager
Assigning Location Managers to Locations
Once a Location Owner has been successfully added to a location, they will be able to log into the Karaoke Event
Manager website using their myTouchTunes account.
TouchTunes Karaoke Installation and Setup Guide

Replacement Microphones
Kit 1
Kit 2
Kit 3
AB
CD
EF
Topics
Microphone Frequencies and Colors
Microphone Frequencies and Colors
In order to reduce the possibility of interference with other locations (or a second Karaoke installation within a single
location), TouchTunes Karaoke has three distinct frequency pairings of microphones and wireless microphone
receivers.
Each wireless receiver is pre-configured to operate with two microphones of
a set frequency,. The microphones within a pairing are color coded with a ring
around the center.
Wireless Receiver Part Number Wireless Microphone Operating Frequency
KIT 1 - 700297-001 Microphone A - RED - 184.32MHz
Microphone B - Blue - 175.60MHz
KIT 2 - 700297-002 Microphone C- Green - 215.80MHz
Microphone D - Gold - 174.10MHz
KIT 3 - 700297-003 Microphone E - Black - 197.60MHz
Microphone F - Silver - 192.70MHz
• If a location requires a single replacement microphone due to damage, note the color ring of the damaged
microphone to order a replacement microphone
• If the location has lost a microphone, you can consult the table below to determine the color of microphone that
was lost (for example, if they still have a blue microphone, you can assume they lost a red microphone)
• If both microphones are lost, ask the location to examine the sticker on the reverse of the wireless microphone
receiver. This sticker bears a kit part number, as well as two color coded dots which represent the color rings of
the compatible microphones.
TouchTunes Karaoke Installation and Setup Guide 900587-001 Rev 03
34
Replacement Microphones
Microphone Frequencies and Colors
• If the microphones are not damaged, but during testing you determine that interference is preventing them from
functioning normally, you should order an alternate kit (consisting of a wireless receiver and two wireless
microphones) that operate on a different frequency.
The color rings for these microphones are blue and red, indicating they are part of a Kit 1
TouchTunes Karaoke Installation and Setup Guide

 Loading...