

Page 1
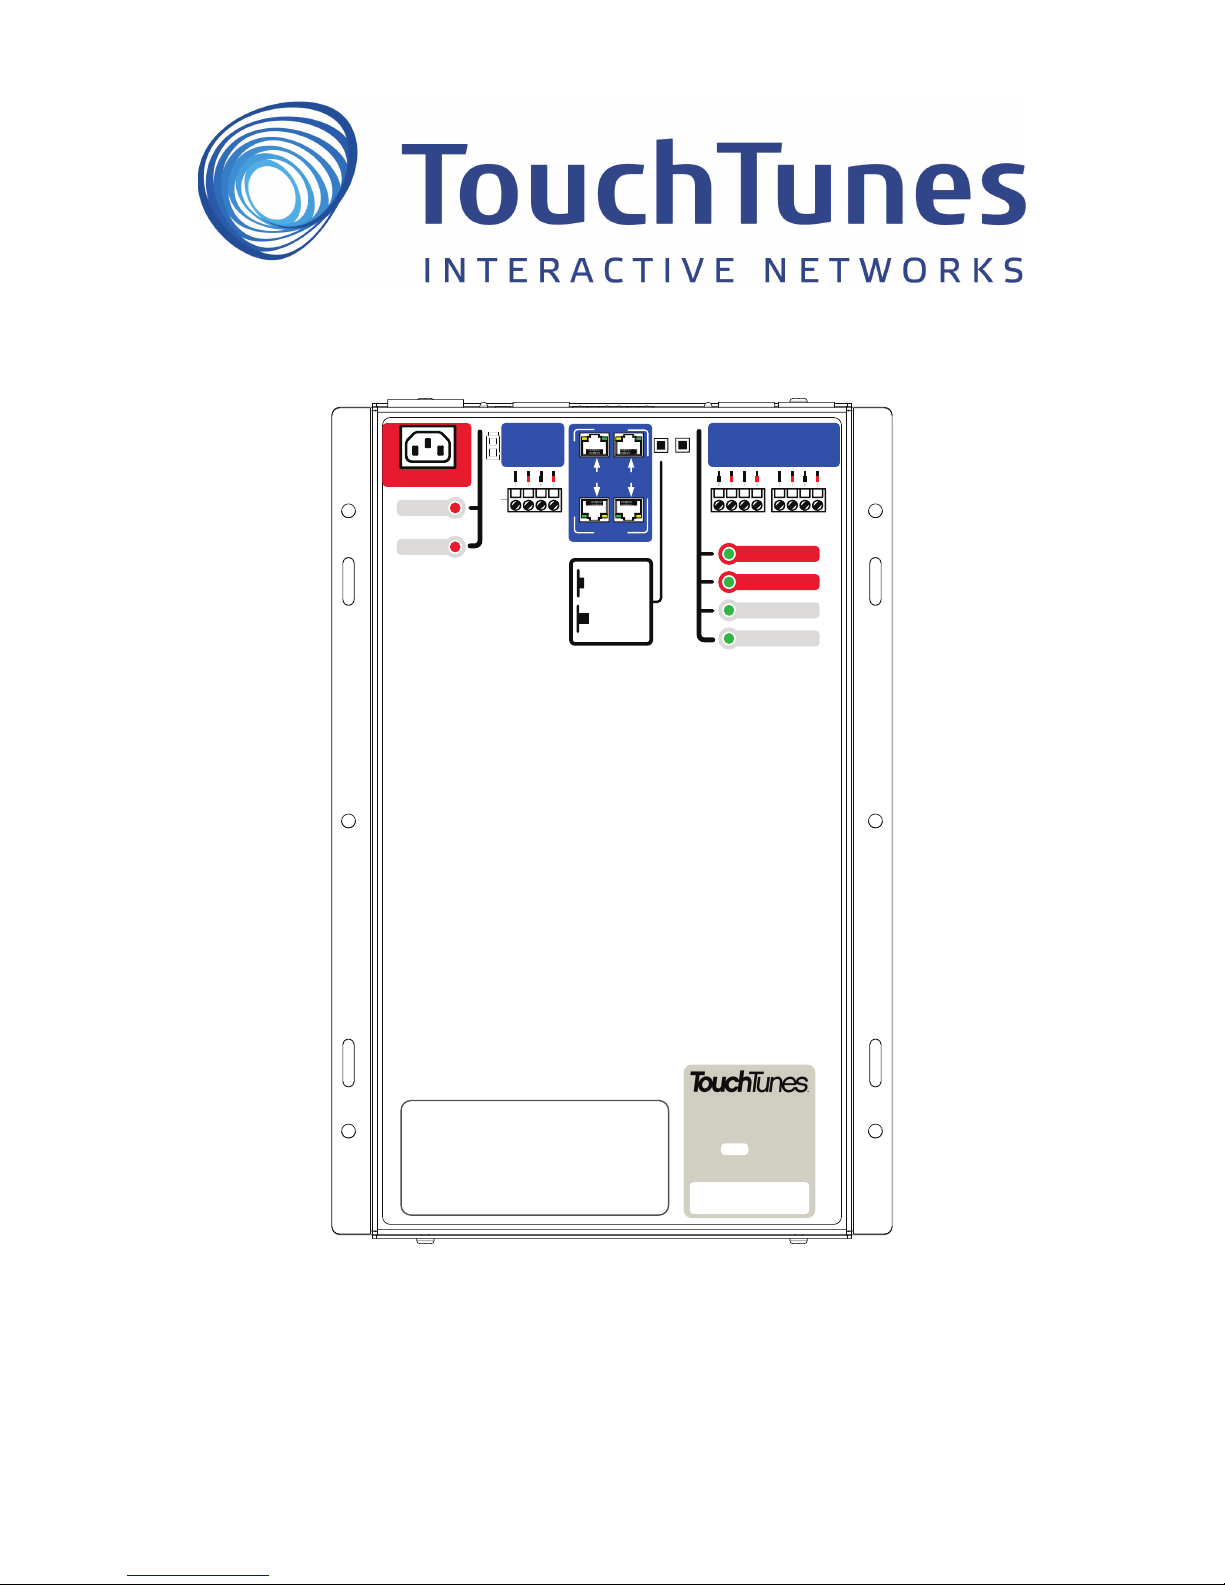
~ AC IN
OVER #2
OVER #1
SPEAKERS
+
-
3-CH MODE SUBWOOFER
ZONE 1
+
-
L
+
R
ZONE 1 / 3-CH
THROUGH
3-CH MODE
4-CH MODE
IN
INPUT
THROUGH
IN
ZONE 2
ZONE 2 / 3CH SAT
BASS BOOST
-
L
SPEAKERS
+
+
R
POWER AM P #2
POWER AM P #1
3-CH MODE
BASS BOST
+
-
+
R
L
DA950-U Amplifier
REFER TO YOUR INSTRUCTION MANUAL FOR
PROPER INSTALLATION, OPERATING
PROCEDURES AND DETAILED INFORMATION
ABOUT CONNECTIVITY AND FEATURES.
INCORRECT WIRING MAY RESULT IN DAMAGE
AND / OR POOR PERFORMANCE.
DA950-U Amplifier
AMPLIFIER
P/N: 700720-001
REV:
SERIAL NUMBER
900697-001 R0J
User Guide
Page 2

Disclaimer
Document Part Number: 900701-001 Rev. 02 (February 2013)
TouchTunes and the TouchTunes logo are trademarks of TouchTunes Interactive Networks.
All other brand and product names are trademarks or registered trademarks of their respective corporations.
The mention of any product does not constitute an endorsement by TouchTunes Interactive Networks.
This manual is furnished under a lease agreement and may only be copied or used within accordance with the
terms of such lease agreement. The content of this manual is furnished for informational use only, is subject to
change without notice, and should not be construed as a commitment by TouchTunes Interactive Networks.
TouchTunes Interactive Networks assumes no responsibility or liability for any errors or inaccuracies that may
appear in this document.
Except as permitted by such lease agreement, no part of this publication may be reproduced, stored in any
retrieval system, or transmitted, in any form or by any means, electronic, mechanical, recording, or otherwise,
without prior written consent of TouchTunes Interactive Networks.
Changes are periodically made to the information herein; these changes will be incorporated into new editions
of this publication. TouchTunes may make improvements and/or changes in the products and/or software
programs described in this publication at any time.
If you have comments on this manual or the products it describes, address them to:
TouchTunes Interactive Networks
Attention: Publications
400 Sainte-Croix Avenue, Suite 200 E
Montreal, Quebec, Canada H4N 3L4
Telephone: 1-847-419-3300
Fax: (847) 419-3304
TouchTunes may use or distribute whatever information you supply in any way it believes appropriate without
incurring any obligations to you.
Copyright © 2013 TouchTunes Interactive Networks. All rights reserved, including those to reproduce this
publication or parts thereof in any form without permission in writing from TouchTunes Interactive Networks.
Page 3

Table of Contents
toc
1 Introduction 1
About This Guide . . . . . . . . . . . . . . . . . . . . . . . . . . . . . . . . . . . . . . . . . . . . . . . . . . . . . . . . . . . . . . . . . . . 1
Package Contents . . . . . . . . . . . . . . . . . . . . . . . . . . . . . . . . . . . . . . . . . . . . . . . . . . . . . . . . . . . . . . . . . . 2
Specifications . . . . . . . . . . . . . . . . . . . . . . . . . . . . . . . . . . . . . . . . . . . . . . . . . . . . . . . . . . . . . . . . . . . . . . 2
Important Safety Instructions . . . . . . . . . . . . . . . . . . . . . . . . . . . . . . . . . . . . . . . . . . . . . . . . . . . . . . . . . . 2
Contacting TouchTunes . . . . . . . . . . . . . . . . . . . . . . . . . . . . . . . . . . . . . . . . . . . . . . . . . . . . . . . . . . . . . . 5
2 Hardware Overview and Installation 7
Overview . . . . . . . . . . . . . . . . . . . . . . . . . . . . . . . . . . . . . . . . . . . . . . . . . . . . . . . . . . . . . . . . . . . . . . . . . 7
Features . . . . . . . . . . . . . . . . . . . . . . . . . . . . . . . . . . . . . . . . . . . . . . . . . . . . . . . . . . . . . . . . . . . . . . . . . . 8
Connectors and Controls . . . . . . . . . . . . . . . . . . . . . . . . . . . . . . . . . . . . . . . . . . . . . . . . . . . . . . . . . . . . . 9
Speaker Wiring Guide . . . . . . . . . . . . . . . . . . . . . . . . . . . . . . . . . . . . . . . . . . . . . . . . . . . . . . . . . . . . . . 11
Software Audio Settings. . . . . . . . . . . . . . . . . . . . . . . . . . . . . . . . . . . . . . . . . . . . . . . . . . . . . . . . . . . . . 13
3 Configurations 15
General Considerations . . . . . . . . . . . . . . . . . . . . . . . . . . . . . . . . . . . . . . . . . . . . . . . . . . . . . . . . . . . . . 15
Allegro MX-1 / MX-1v . . . . . . . . . . . . . . . . . . . . . . . . . . . . . . . . . . . . . . . . . . . . . . . . . . . . . . . . . . . . . . . 16
Ovation & Ovation II . . . . . . . . . . . . . . . . . . . . . . . . . . . . . . . . . . . . . . . . . . . . . . . . . . . . . . . . . . . . . . . . 18
Virtuo Floor Stand . . . . . . . . . . . . . . . . . . . . . . . . . . . . . . . . . . . . . . . . . . . . . . . . . . . . . . . . . . . . . . . . . 19
PerforMax Quad. . . . . . . . . . . . . . . . . . . . . . . . . . . . . . . . . . . . . . . . . . . . . . . . . . . . . . . . . . . . . . . . . . . 20
PowerPack 725 . . . . . . . . . . . . . . . . . . . . . . . . . . . . . . . . . . . . . . . . . . . . . . . . . . . . . . . . . . . . . . . . . . . 21
iii
Page 4

iv
Page 5

Introduction
1
This section introduces the TouchTunes DA950-U digital audio amplifier, provides important
safety information, and describes how to get customer support.
Topics
About This Guide
Package Contents
Specifications
Important Safety Instructions
Contacting TouchTunes
About This Guide
This guide is intended for Operators of TouchTunes digital jukeboxes and TouchTunes
technical support and field service personnel. It explains how to install and use the
TouchTunes DA950-U digital audio amplifier.
This amplifier features:
• The DA950-U is a drop-in replacement for all existing configurations of the DA415
amplifier.
• The DA950-U amplifier can be used as a 3-channel amplifier (to power a subwoofer and
stereo satellites) or a 4-channel amplifier (to power two separate stereo zones.)
• Low power consumption
• High-fidelity signal processing similar to AB type amplifiers
• Small footprint
• Overload protection
• Overheating protection
1
Page 6
Introduction
Package Contents
The DA950-U package (TouchTunes P/N 600170-001) contains the following components:
Part No. Description Quantity
700720-001 DA950-U amplifier 1
300615-035 AC power cable 1
100000-001 Euroblock connectors (pre-installed
900701-001 This document 1
Specifications
• Left channel / Right channel: 125W (RMS), 4 ohms per channel.
• Bridged bass channel: 475W (RMS), total load 4 ohms (3-channel mode).
• Total harmonic distortion: 0.002%.
• Frequency response (all channels): 20Hz- 20KHz, ± 0.15 dB.
3
in their sockets on the DA950-U)
• Signal to noise ratio: 96 dB.
• Dynamic Range: 117 dB.
• Input ± 7V RMS balanced.
• Power: 100 to 120 V AC.
• Dimensions: Width=8 3/4” (222mm), Height=2 9/16” (65mm), Depth=13” (331mm).
• Weight: 6.2 lbs (2.8 kg).
Important Safety Instructions
Please read the following important safety instructions before proceeding with product
installation.
The Lightning Flash with arrow head symbol within an equilateral triangle is
intended to alert the user to the presence of un-insulated "dangerous voltage"
within the product enclosure that may be of sufficient magnitude to constitute
a risk of shock to persons".
The exclamation point within an equilateral triangle is intended to alert the user
to the presence of important operating and maintenance (servicing)
instructions in the literature accompanying the product".
2
Page 7

Important Safety Instructions
WARNING: Do not defeat the safety purpose of the polarized or groundingtype plug. A polarized plug has two blades with one wider than the other. A
grounding type plug has two blades and a third grounding prong. The wide
blade or the third prong are provided for your safety. If the provided plug does
not fit into your outlet, consult an electrician for replacement of the obsolete
outlet.
WARNING: TO REDUCE THE RISK OF FIRE OR ELECTRIC SHOCK, DO
NOT EXPOSE THIS APPARATUS TO RAIN OR MOISTURE AND OBJECTS
FILLED WITH LIQUIDS, SUCH AS VASES, SHOULD NOT BE PLACED ON
THIS APPARATUS
DO NOT USE THIS APPARATUS NEAR WATER.
WARNING: TO REDUCE THE RISK OF FIRE OR ELECTRIC SHOCK, THIS
APPARATUS SHALL BE CONNECTED TO A MAINS SOCKET OUTLET
WITH A PROTECTIVE EARTHING CONNECTION.
WARNING: This symbol alerts you to the presence of “dangerous voltage”
within the product enclosure that may be of sufficient magnitude to constitute
a risk of electrical shock. Do not remove the cover or back. There are no userserviceable parts inside. Servicing must be performed by qualified personnel
only.
WARNING: The speaker output of this unit can exceed 10 Watts and could be
a shock injury. Connection to speakers should be performed by a skilled
person in compliance with local building codes. Class 2 wiring is required for
speaker cables. Use of external speakers outside the ratings stated at the
speaker jack may result in a shock injury or damage to the unit, or equivalent.
CAUTION: Do not use the DA950-U immediately after transferring the unit
from a cold place to a warm place as condensation may have occurred on
internal components. Wait for the unit to reach room temperature before using
it.
IMPORTANT: See product enclosure for safety related markings.
TO COMPLETELY DISCONNECT THIS APPARATUS FROM THE AC
MAINS, DISCONNECT THE POWER SUPPLY CORD PLUG FROM THE AC
RECEPTACLE
THE MAINS PLUG OF THE POWER SUPPLY CORD OR APPLIANCE
COUPLER SHALL REMAIN READILY ACCESSIBLE
No serviceable parts inside, please contact TouchTunes Customer Support for
service.
3
Page 8

Introduction
• Read these instructions.
• Keep these instructions.
• Heed all warnings.
• Follow all instructions.
Clean only with dry cloth.
Do not block any ventilation openings. Install in accordance with the
manufacturer’s instructions.
Do not install near any heat sources such as radiators, heat registers, stoves,
or other apparatus (including amplifiers) that produce heat.
Protect the power cord from being walked on or pinched particularly at plugs,
convenience receptacles, and the point where they exit from the apparatus.
Only use attachments/accessories specified by the manufacturer.
Unplug this apparatus during lightning storms or when unused for long periods
of time.
Refer all servicing to qualified service personnel. Servicing is required when
the apparatus has been damaged in any way, such as power-supply cord or
plug is damaged, liquid has been spilled or objects have fallen into the
apparatus, the apparatus has been exposed to rain or moisture, does not
operate normally, or has been dropped.
4
Page 9

Contacting TouchTunes
Contacting TouchTunes
If you need help with or have questions about this document, contact TouchTunes by:
• Using the email links on the Contacts page on the TouchTunes Dashboard at
https://operator.touchtunes.com.
• Calling TouchTunes 24/7 Service Hotline at 847-419-3300.
To help us assist you more effectively with problem reports, the following information may be required
when contacting TouchTunes Support:
• Jukebox ID and model (e.g., Virtuo, Allegro MX-1, Allegro, Ovation, Maestro
• The serial number of any component you believe to be defective.
• The date/time of the problem.
• Actions performed immediately before the problem occurred.
• Any additional comments.
If you require assistance with this or any other TouchTunes product, please call or email technical support.
We value your comments.
II
).
5
Page 10

Introduction
6
Page 11

Hardware Overview and Installation
2
This section provides an overview of the DA950-U amplifier, and explains important installation
procedures.
Topics
Overview
Features
Connectors and Controls
Speaker Wiring Guide
Overview
The TouchTunes DA950-U is a Class-D digital audio amplifier that uses Bang & Olufsen
ICEpower
® technology.
7
Page 12

Hardware Overview and Installation
Features
The DA950-U amplifier incorporates the following features:
• Class-D Architecture
• Dynamic range of 117dB
• Over-current protection
• Thermal protection shutdow
• Mute input
• Turn-on and turn-off pop suppression
• High speed switching power supply
• Total harmonic distortion ≤ 0.002% (1W)
• Signal-to-noise ratio 100dB (A-weighted)
• Two balanced inputs supporting daisy-chaining
• 4-Channel mode: Two stereo outputs (full-range)
• 3-Channel mode: One stereo output (midrange and high frequencies) and one bass
output (low frequency)
• AC line voltage and frequency configurations: 100 to 120V AC
• 4-ohm (minimum) stereo per channel (125W)
• 8-ohm per channel (65W)
Benefits of the DA950-U amplifier include:
• Drop-in replacement for DA415 3-channel and 4-channel amplifier
• Signal fidelity equal to high-quality linear amplifiers
8
Page 13

Connectors and Controls
The DA950-U amplifier connectors and controls are shown in the figure below:
6
DA950-U amplifier connectors and controls
1. Power connector: Connect the supplied power cord here. The DA950-U will
automatically turn on when the power cord is plugged into a wall outlet (AC 120V /60Hz
MAX 1000W). There is no power switch.
2
Connectors and Controls
10
9
3
8
1
4
5
7
CAUTION: Do not connect the AC power cord to a wall outlet until all audio
connections have been completed.
2. Power / Settings Lights:
• Bass Boost: lights up when bass boost is on
• 3-CH Mode: lights up when 3-channel mode is on
• Power Amp #1: lights up when power amp #1 (Zone 1) is on
• Power Amp #2: lights up when power amp #2 (Zone 2) is on
3. Protection mode indicators, channels #1 and #2: lights up when a channel has gone
into over-current protection mode or thermal protection mode.
4. Balanced audio input/output connectors, Zone 1: T
wo RJ45 connectors are
provided to connect the DA950-U to other audio equipment via standard category 5
cable. Wired in parellel. One should be used as input, and the other can then be used
as a "thru" connection. Only used in 4-channel mode.
5. Balanced audio input/output connectors, Zone 2: T
wo RJ45 connectors are
provided to connect the DA950-U to other audio equipment via standard category 5
cable. Wired in parellel. One should be used as input, and the other can then be used
as a "thru" connection. When in 3-channel mode, you must use this input. In 4-channel
mode, this input usually receives the Zone 2 or 3 audio signals from the jukebox
computer or I/O board.
9
Page 14
Hardware Overview and Installation
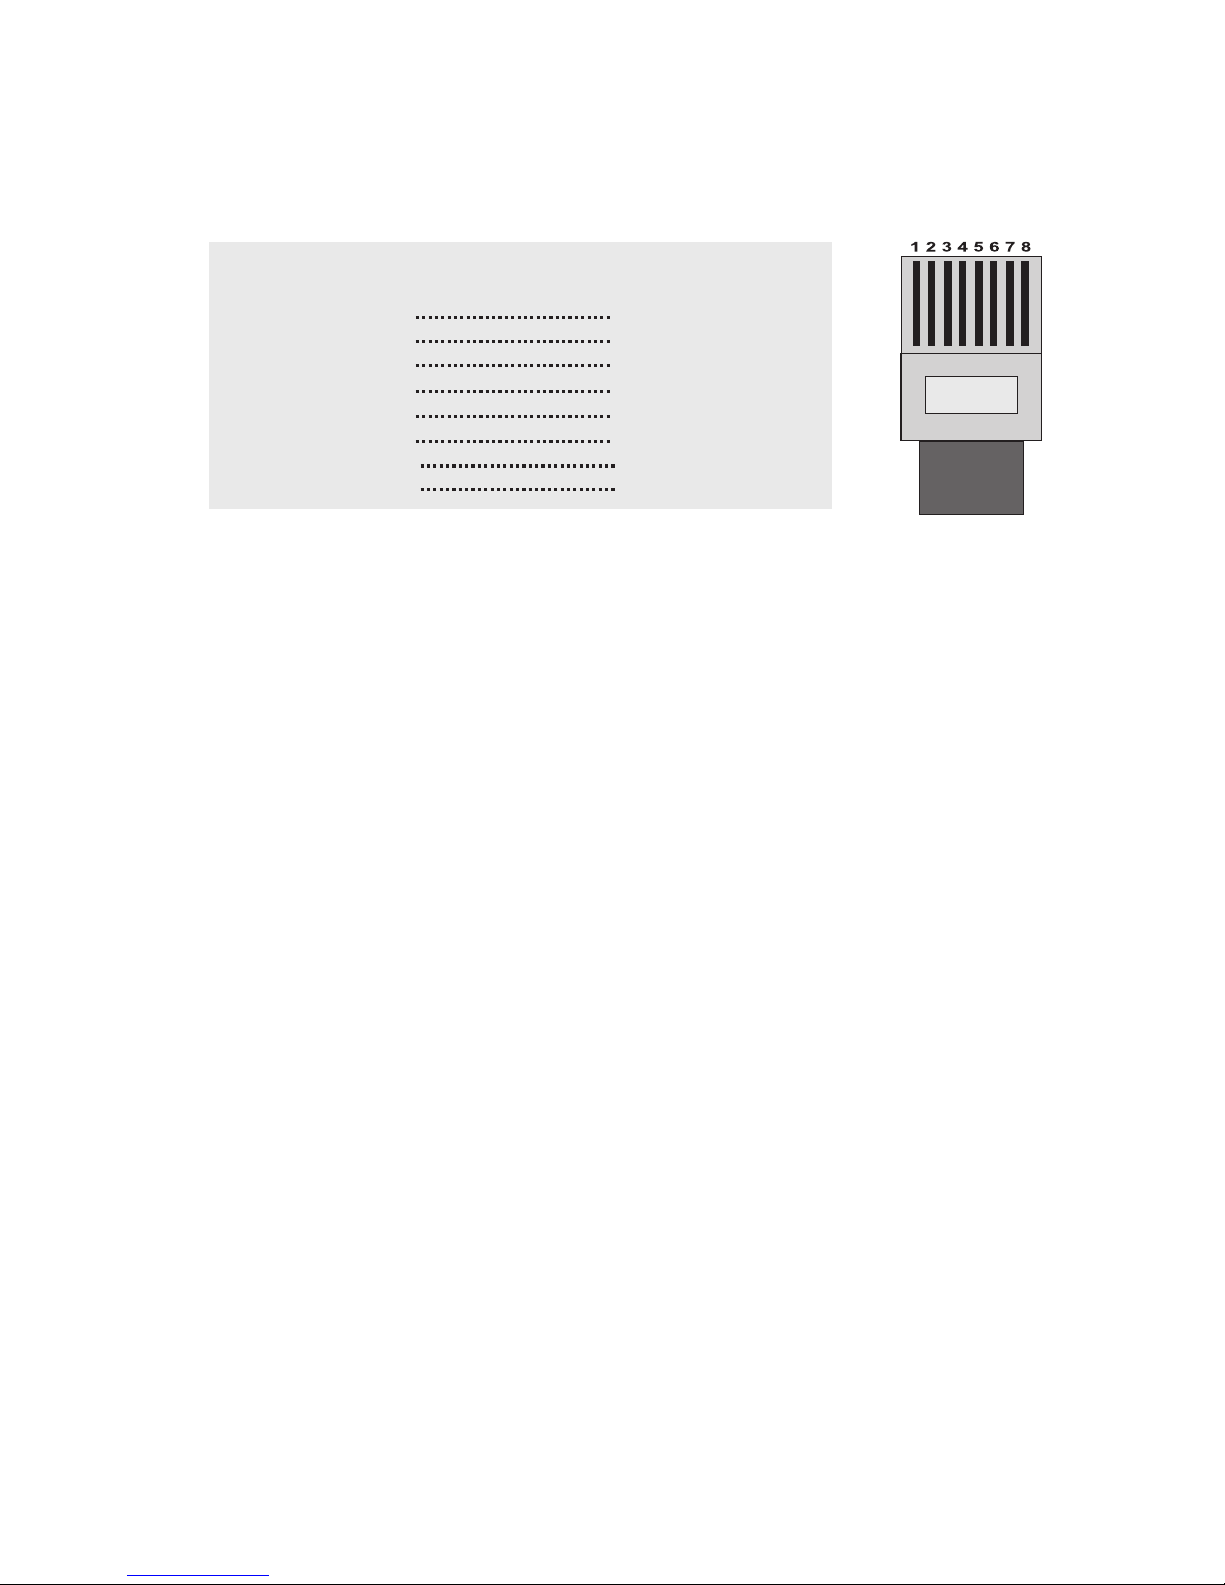
You can purchase pre-wired cable, or you can wire your own cable as follows:
Straight-through category 5 cable wiring
Color Color
white + orange
orange
white + green
blue
white + blue
green
white + brown
brown
RJ45 Cable Wiring
Near
End
1
2
3
4
5
6
7
8
Far
End
white + orange
1
orange
2
white + green
3
blue
4
white + blue
5
green
6
white + brown
7
brown
8
RJ45 connector
6. Zone 1 speaker outputs: The two connectors are wired in parallel. Provides two
channels (stereo) of output, making it easy to wire up to two speakers per channel for a
total of four speakers. 125W / 4 ohms per channel.
7. Zone 2 speaker outputs: Provides two channels (stereo) of output. 125W / 4 ohms per
channel. Only used in 4-channel mode.
8. Bass channel audio output connector: Provides audio out at 475W / 4 ohms for a
subwoofer
. Only used in 3-channel mode.
9. Bass Boost:
Activates bass boost when pushed in.
10.Channel Mode: 3-channel mode when pushed in, 4-channel mode otherwise.
10
Page 15

Speaker Wiring Guide
This section provides important information concerning connecting speakers to the
DA950-U amplifier. Before continuing with speaker connections, you must read this
section thoroughly.
CAUTION: The DA950-U amplifier has been specifically designed for use with
4-ohm speakers (3-ohm minimum). Using speakers of a lower impedance may
cause overcurrent protection to activate.
Furthermore, if 8-ohm speakers are to be used, they must be wired in parallel
in order to provide a 4-ohm load to the amplifier. This will ensure full power is
obtained from the amplifier.
CAUTION: Always check the impedance of your speaker setup before
connecting it to the DA950-U amplifier. Some setups have lower impedance
than what the amplifier can support, which can activate the over-current
protection, or higher impedance, which causes lower power. Each speaker
circuit should fall between 4 and 8 ohms for best performance.
Speaker Wiring Guide
NOTE: When using the DA950-U as a 4-channel amplifier, be sure to use fullrange speakers. Using satellites designed to be used along with a subwoofer
will lead to degraded audio.
Touchtunes recommends using speakers with the following specs:
• Impedance: 4 to 8 Ohms ±20%
• Sensitivity: 95 ±3dB
• Frequency Response: 45Hz - 20kHz
• Max Power: 600W
• RMS Power: 300W
11
Page 16
Hardware Overview and Installation
Example 1: TouchTunes 2-Way Speakers
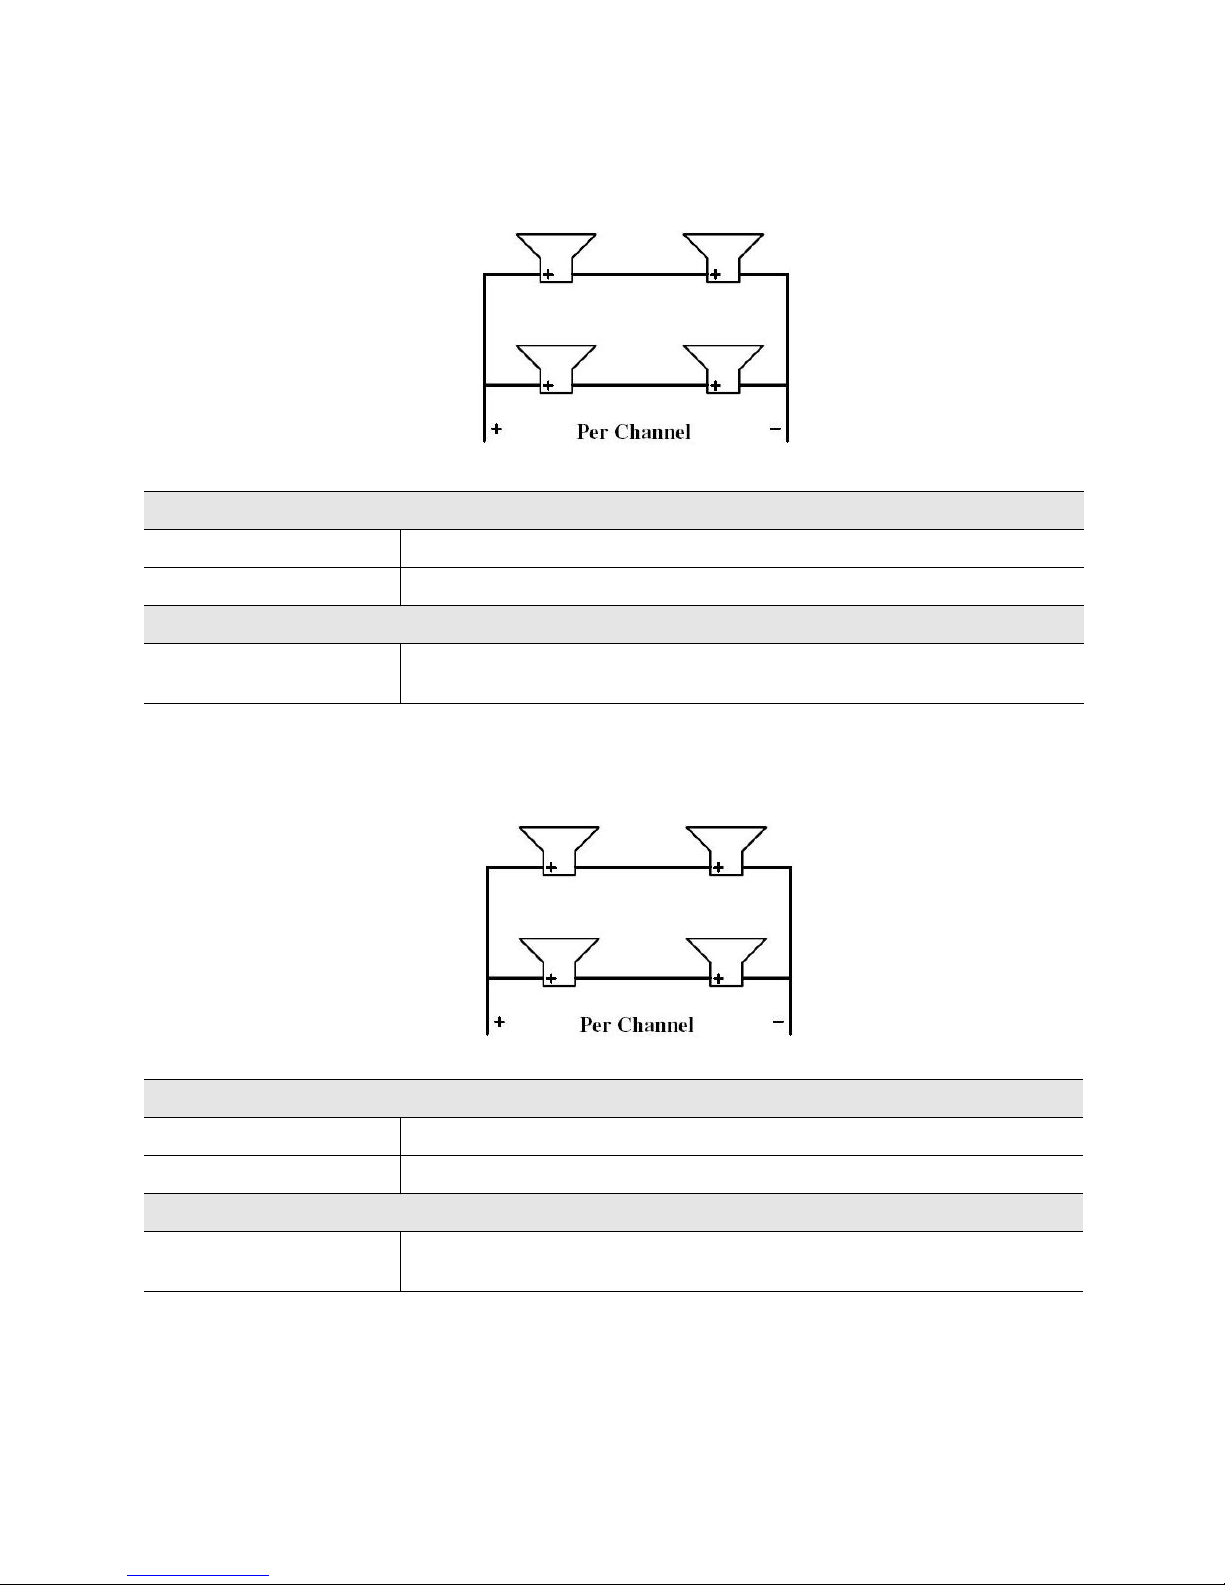
This example illustrates wiring of TouchTunes 2-way speakers (maximum 4 per channel)
for a total impedance load of 4 ohms. Requires setting 4-channel mode on the DA950-U.
Row 1
Row 2
TouchTunes 2-Way Speakers Wiring
Row (series) impedance specifications
Row 1 2 speakers in series: 4.0 ohms + 4.0 ohms for a total of 8 ohms per row.
Row 2
Total impedance specifications
Connecting Rows 1 and 2 in
Parallel
2 speakers in series: 4.0 ohms + 4.0 ohms for a total of 8 ohms per row.
4.0 ohms total for this combination.
Power over 4 ohms = 125W/channel.
Example 2: Standard 6-Ohm Speakers
This example illustrates wiring of standard 6-ohm speakers (maximum 4 per channel) for
a total impedance load of 6 ohms. Requires setting 4-channel mode on the DA950-U.
Row 1
Row 2
Standard 6-Ohm Speakers Wiring
Row (series) impedance specifications
Row 1 2 speakers in series: 6.0 ohms + 6.0 ohms for a total of 12 ohms per row.
Row 2
Total impedance specifications
Connecting Rows 1 and 2 in
Parallel
12
2 speakers in series: 6.0 ohms + 6.0 ohms for a total of 12 ohms per row.
6.0 ohms total for this combination.
Power over 6 ohms = 100W/channel.
Page 17

Software Audio Settings
This section offers some insight in how to configure the software settings for best audio
quality results, once the speakers are connected to the DA950-U and the jukebox has
been turned on.
Levels
In cases where you will be replacing a DA415 amplifier with a DA950-U, following the
replacement, you will have to adjust the volume and tone levels.
When adjusting the audio levels for the zone(s) using the DA950-U, set the levels to the
highest volume that the location will use. Then adjust the bass and treble levels to minimize
distortion and obtain the ideal sound for the listening environment. Play multiple test
songs, and adjust the levels for optimal sound across music genres.
Bass Boost
There is a bass boost setting on the DA950-U, and there is also a Bass Boost setting on
Virtuo, as well as an equivalent setting labeled "DSP EQ" on some JCB-based Gen3
jukeboxes. You should not turn both the amplifier bass boost and this software setting
ONat the same time, unless specifically indicated by TouchTunes. Having both settings
turned on could damage some speakers, or reduce their life expectancy.
Software Audio Settings
When Bass Boost is ON (either in software or on the DA950-U) it is not recommended that
you increase the bass tone control above its neutral setting. You can still use the bass tone
control to reduce the bass content below its neutral setting. Adding too much bass tends
to push speakers past their limits, reducing their life expectancy. It also increases distortion
at higher listening levels, which negatively affects audio quality.
13
Page 18

Hardware Overview and Installation
14
Page 19

Configurations
3
This section presents each of the configurations where a DA950-U amplifier can be used, and
specifies the correct wiring and settings configuration in each case.
Topics
General Considerations
Allegro MX-1 / MX-1v
• Replacing the 3-Channel DA415
• Replacing the 4-Channel DA415
Ovation & Ovation II
Virtuo Floor Stand
PerforMax Quad
PowerPack 725
General Considerations
• When the DA950-U amplifier is used to power a subwoofer and satellites, 3-channel mode should be used.
• When using 3-channel mode, Zone 2 input is disabled. Use Zone 1 input. The DA950-U will output the bass
signal to the dedicated subwoofer connector, and the mid/high signal to the “Zone 2 / 3-CH SAT” outputs.
• Some rewiring on the euroblock connectors will be necessary when replacing a 3-channel DA-415. This
rewiring is indicated on each diagram, where applicable.
• When the DA950-U is used to power full-range speakers (no subwoofer) 4-channel mode should be used.
• Bass Boost mode should only be used with the Virtuo Floor Stand acoustics, or with the PowerPack 725 (or
other speaker systems as specified by TouchTunes.) Activating this mode for non-indicated speakers could
lead to degraded sound quality, and even damage to the connected speakers.
• For configurations that predate Virtuo, the schematics in the following pages show a JCB computer’s
connections panel, but it’s also possible to connect to an MJS computer, as the only difference is in the
position of the audio zone connectors.
• Always turn off the DSP EQ / Bass Boost software option in the operator interface of the jukebox before
proceeding with the installation or replacement of a DA950-U. Only turn it back on after testing the sound and
determining that it is necessary.
• Except for the PowerPack 725 section, the following pages cover the replacement of a DA415 with a DA950U. If you are replacing a DA950-U with another DA950-U, simply set and wire the replacement exactly like the
original.
15
Page 20

Configurations
Allegro MX-1 / MX-1v
The Allegro MX-1 contains two DA415 amps: one is assigned to one zone and drives the internal subwoofer
and satellite speakers and is referred to as 3-Channel, and one is assigned to drive the remaining two zones,
as two full-range stereo pairs and is referred to as 4-channel. We will cover both amps separately, while
highlighting the fact that the DA950-U can replace either the 3-Channel DA415 or the 4-Channel DA415 (i.e.,
two identical DA950-U will be able to replace both amps in the MX-1.)
Replacing the 3-Channel DA415
1. Turn off MX-1 jukebox.
2. Disconnect all cables connected to the DA415 amplifier:
a) Euroblock
b) Subwoofer wire
c) Power cable
d) CAT-5/RJ-45 cable/connector coming from JCB computer
3. Remove the four screws that hold the amplifier in place.
4. Pull the DA415 out of the jukebox.
5. Set the switches on the DA950-U to 3-channel and Bass Boost OFF.
6. Place the DA950-U into the position previously occupied by the DA415.
7. Fasten the DA950-U using the screws you just removed from the DA415.
8. Reconnect all the cables.
a) Euroblock
b) Subwoofer wire
c) Power cable
d) CAT-5/RJ-45 cable/connector coming from JCB computer to zone 1 on DA950-U
Note: Some wires may have to be moved on their euroblock connectors due to differences between
the two amplifiers. See the wiring schematic below.
9. Check that the switches on the amplifier are set to 3-channel and Bass Boost OFF.
10.
Turn the MX-1 jukebox on, wait for it to boot, then play a song to verify that the internal subwoofer and
satellites inside the MX-1 are playing the music normally.
Settings and Wiring
B: Bass Boost
set to OFF
M: Mode
3-Channel
B
M
DA415 3-ch DA950-U
RIGHT-LEFT
+
REQUIRED REWIRING
+
-
+
-
-
+
+
-
+
L
R
+
-
-
-
+
L
R
16
1234 5678 12563478
Page 21
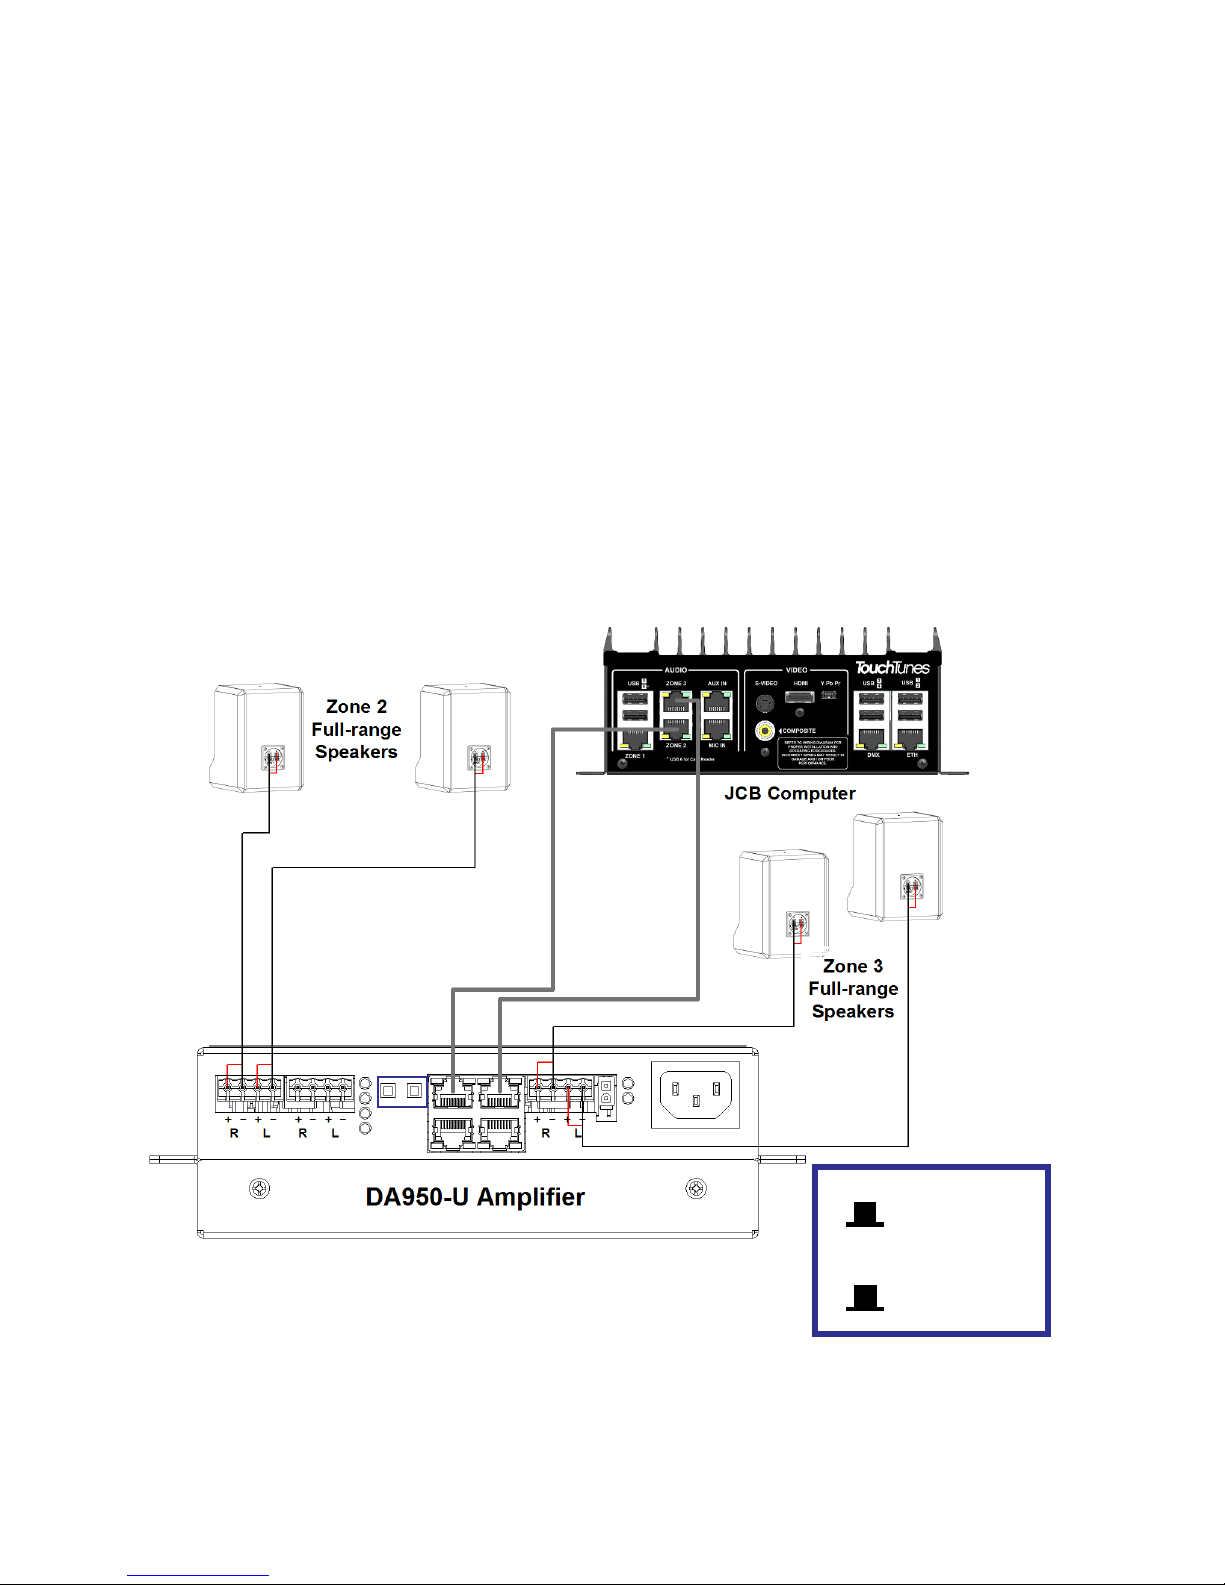
Allegro MX-1 / MX-1v
Replacing the 4-Channel DA415
1. Turn off MX-1 jukebox.
2. Disconnect all cables connected to the DA415 amplifier:
a) Up to 2 euroblocks
b) Power cable
c) CAT-5/RJ-45 cable/connector coming from JCB computer
3. Remove the four screws that hold the amplifier in place.
4. Pull the DA415 out of the jukebox.
5. Set the switches on the DA950-U to 4-channel and Bass Boost OFF.
6. Place the DA950-U into the position previously occupied by the DA415.
7. Fasten the DA950-U using the screws you just removed from the DA415.
8. Reconnect all the cables.
a) Up to 2 euroblocks (to reproduce the previous configuration, connect one into one of the Zone 1
connectors, and one into the Zone 2 connector.)
b) Power cable
c) CAT-5/RJ-45 cable(s)/connector(s) coming from JCB computer
9. Check that the switches on the amplifier are set to 4-channel and Bass Boost OFF.
10. Turn the MX-1 jukebox on, wait for it to boot, then play a song to verify that the speakers connected to the
replacement amplifier are playing the music normally.
Settings and Wiring
BM
B: Bass Boost
set to OFF
M: Mode
4-Channel
17
Page 22

Configurations
Ovation & Ovation II
Installing the DA950-U
1. Turn off the Ovation jukebox.
2. Disconnect all cables connected to the DA415 amplifier:
a) Up to 2 euroblocks
b) Power cable
c) CAT-5/RJ-45 cable/connector coming from JCB or MJS computer
3. Remove the four screws that hold the amplifier in place.
4. Pull the DA415 out of the jukebox.
5. Set the switches on the DA950-U to 4-channel and Bass Boost OFF.
6. Place the DA950-U into the position previously occupied by the DA415.
7. Fasten the DA950-U using the screws you just removed from the DA415.
8. Reconnect all the cables.
a) Up to 2 euroblocks (to reproduce the previous configuration, connect one into one of the Zone 1
connectors, and one into the Zone 2 connector.)
b) Power cable
c) CAT-5/RJ-45 cable(s)/connector(s) coming from JCB or MJS computer
9. Check that the switches on the amplifier are set to 4-channel and Bass Boost OFF.
10. Turn the Ovation jukebox on, wait for it to boot, then play a song to verify that the speakers connected to
the replacement amplifier are playing the music normally.
Settings and Wiring
BM
18
B: Bass Boost
set to OFF
M: Mode
4-Channel
Page 23

Virtuo Floor Stand
Installing the DA950-U
1. Turn off Virtuo.
2. Remove the screws that hold the floor stand’s back panel in place.
3. Disconnect all cables connected to the DA415 amplifier:
a) Up to 2 euroblocks
b) Power cable
c) 1 or 2 CAT-5/RJ-45 cable(s)/connector(s) coming from Virtuo (zones 2&3)
4. Remove the four screws that hold the amplifier in place.
5. Pull the DA415 out of the floor stand.
6. Set the switches on the DA950-U to 4-channel and Bass Boost OFF.
7. Place the DA950-U into the position previously occupied by the DA415.
8. Fasten the DA950-U using the screws you just removed from the DA415.
9. Reconnect all the cables.
a) Up to 2 euroblocks (to reproduce the previous configuration, connect one into one of the Zone 1
connectors, and one into the Zone 2 connector.)
b) Power cable
c) 1 or 2 CAT-5/RJ-45 cable(s)/connector(s) coming from Virtuo (zones 2&3)
10. Check that the switches on the amplifier are set to 4-channel and Bass Boost OFF.
11. Turn Virtuo on, wait for it to boot, then play a song to verify that the speakers connected to the replacement
amplifier are playing the music normally.
Virtuo Floor Stand
Settings and Wiring
BM
B: Bass Boost
set to OFF
M: Mode
4-Channel
19
Page 24

Configurations
PerforMax Quad
Installing the DA950-U
1. Unplug the PerforMax Quad from its power outlet.
2. Remove the screws that hold the grating above the amplifier in place, then remove the grating.
3. Reach into the opening, and disconnect all cables connected to the DA415 amplifier:
4. Remove the eight screws that hold the panel with the amplifier to the rest of the bass box.
5. Remove the two screws that hold the DA415 amplifier to the panel, then pull the DA415 out of the panel.
6. Set the switches on the DA950-U to 3-channel and Bass Boost OFF.
7. Place the DA950-U into the position previously occupied by the DA415 on the panel, then fasten using the
screws you removed at step 5.
8. Fasten the panel with the DA950-U to the bass box using the screws you removed at step 4.
9. Reconnect all the cables.
a) Up to 2 euroblocks
b) Subwoofer cable
c) Power cable
d) CAT-5/RJ-45 cable/connector coming from jukebox
a) Up to 2 euroblocks
b) Subwoofer cable
c) Power cable
d) CAT-5/RJ-45 cable/connector coming from jukebox (into zone 1 input)
Note: Some wires may have to be moved on their euroblock connectors due to differences between
the two amplifiers. See the wiring schematic below.
10. Check that the switches on the amplifier are set to 3-channel and Bass Boost OFF.
1
1. Plug the PerforMax Quad back into its power outlet, then verify that its subwoofer and the speakers
connected to it are playing the music normally.
Settings and Wiring
B: Bass Boost
set to OFF
M: Mode
3-Channel
M
B
REQUIRED REWIRING
DA415 3-ch DA950-U
RIGHT-LEFT
+
+
-
+
-
-
+
+
-
-
+
L
R
+
-
-
+
L
R
20
1234 5678 12563478
Page 25

PowerPack 725
Installing the DA950-U
1. Unplug the PowerPack 725 from its power outlet.
2. Open the unit to access the connections and the amplifier inside.
3. Disconnect all cables connected to the amplifier:
a) Up to 2 euroblocks
b) Subwoofer cable
c) Power cable
d) CAT-5/RJ-45 cable/connector coming from jukebox
4. Remove the four screws that hold the amplifier in place.
5. Pull the DA950-U out of the PowerPack 725.
6. Set the switches on the replacement DA950-U to 3-channel and Bass Boost ON.
7. Position the replacement DA950-U into the spot previously occupied by the original DA950-U.
8. Fasten the replacement DA950-U using the screws you just removed from the original DA950-U.
9. Reconnect all the cables.
a) Up to 2 euroblocks
b) Subwoofer cable
c) Power cable
d) CAT-5/RJ-45 cable/connector coming from jukebox (into zone 1 input)
10. Check that the switches on the amplifier are set to 3-channel and Bass Boost ON.
11. Plug the PowerPack 725 back into its power outlet, then verify that its subwoofer and the speakers
connected to it are playing the music normally.
PowerPack 725
Settings and Wiring
B
M
B: Bass Boost
set to ON
M: Mode
3-Channel
21
Page 26

Configurations
22
Page 27

Page 28

Page 29

Page 30

TouchTunes Interactive Networks, Inc.
400 Sainte Croix Avenue, Suite 200 E
Montreal, Quebec,
Canada, H4N 3L4
Copyright © 2013 TouchTunes Interactive Networks
TouchTunes Interactive Networks, Inc.
3455 Salt Creek Lane, Suite 100
Arlington Heights, IL 60005
USA
Technical Support
847-353-1954
www.touchtunes.com
Page 31

Page 32

 Loading...