

Page 1

Page 2

Touchstone Elevate
2
www.touchstonehomeproducts.com 800.215.1990
Page 3

Touchstone Elevate
3
Table of Contents
Contents
Safety ............................................................................................................................................................................ 5
Lift Components & TV Installation Hardware........................................................................................................ 6
Components .............................................................................................................................................................. 6
Hardware ................................................................................................................................................................... 6
Tools ......................................................................................................................................................................... 6
Installing Adjustable Feet .......................................................................................................................................... 7
Assembling Your Whisper Lift II .............................................................................................................................. 8
Adjusting Lift Mounting Supports ............................................................................................................................ 8
Installing Crossbrackets on TV Lift .......................................................................................................................... 9
Fasten Lift To Elevate Cabinet ............................................................................................................................... 11
Hookup Lift Control Box and Power Supply ......................................................................................................... 14
Mounting and Installing the TV .............................................................................................................................. 15
Attaching TV Mounting Brackets to Flat Panel TV ............................................................................................... 15
Installing TV on Lift ............................................................................................................................................... 17
Installing Locking Brackets on Whisper Lift II TV Lift ......................................................................................... 18
Setting Height of Adjustable Roller Assembly ....................................................................................................... 20
Removing Front Access Panel ................................................................................................................................ 21
Operating the Whisper Lift II ................................................................................................................................. 22
Operating the Wireless Remote .............................................................................................................................. 22
Operating the Wired Remote .................................................................................................................................. 22
Optional Whisper Lift II Accessories ...................................................................................................................... 24
Assembling Component Shelf (Optional) ............................................................................................................... 24
IR Repeater Kit (optional) ...................................................................................................................................... 26
Technical Support ..................................................................................................................................................... 26
Warranty ................................................................................................................................................................... 26
Warranty Registration ............................................................................................................................................. 27
www.touchstonehomeproducts.com 800.215.1990
Page 4

Touchstone Elevate
AboutYourTouchstoneElevateTVLiftCabinet
Congratulations on the purchase of your Touchstone Elevate TV Lift Cabinet. Touchstone Home Products takes
pride in the quality of our cabinet craftsmanship and the smooth functionality of our TV lift mechanism. Please
take a few minutes to learn about the features of your TV lift cabinet to insure you get the optimum use and
performance from your new purchase.
Cabinet Features
- The Elevate TV Lift Cabinet features Touchstone’s new Whisper Lift II technology in a fully finished wood
cabinet that fully cycles up or down in under 30 seconds at the push of a button.
- Easily conceal your cables with the Elevate. Cables can be neatly tucked away by feeding them through an
opening in the bottom of the cabinet.
- Cable boxes and other media components can be controlled with our IR Repeater kit, which installs easily in a
pre-drilled hole in the front of the cabinet and extends your remote control range. See Installing Components
section for more information.
4
www.touchstonehomeproducts.com 800.215.1990
Page 5

Touchstone Elevate
5
Safety
Installing your Flat Screen TV in your Touchstone Elevate TV lift cabinet is fast and easy. Operating your lift is
very straightforward. However, to avoid the risk of personal injury and to insure optimum performance of your TV
lift mechanism, please pay particular attention to the warnings and safety notices throughout this manual.
IMPORTANT SAFETY and PRE-INSTALLATION INSTRUCTIONS
1. Please adhere to the proper installation procedure as detailed in the installation instructions.
2. Safety precaution measures must be practiced at all times during installation of this product.
3. The entire installation instructions should be fully read and understood before beginning installation.
4. At least two people should be available to mount the TV on the lift mechanism. Please take care when
handling your flat screen TV as injury and damage can result from dropping or mishandling of the TV.
5. Plasma screen TV’s should remain upright at all times. Never place screen face down on the floor. This
could cause damage to the TV.
6. The stand on your flat screen TV is removable! Please remove the stand prior to installing the TV on the
lift mechanism. Consult your TV’s owner’s manual for instructions for removing the stand.
7. Carefully measure all dimensions of your LCD, PLASMA, or LED TV before proceeding. Then consult the
Mounting and Installing the TV section of this manual for maximum TV size.
IMPORTANT!: After installing your TV, you may find there is room in the bottom of the cabinet to install
a small cable/satellite TV box. Once the TV is mounted, remove the front panel on the Elevate TV Lift
Cabinet and completely lower the lift. Carefully inspect the space between the bottom of the TV and the
bottom of the cabinet to see if your component will fit in the bottom of the cabinet. Consult the Mounting
and Installing the TV section of this manual for more information.
8. All cords connecting components to the TV should be a minimum of 72” (6 feet) in length when installing
component inside of cabinet or a minimum of 144” (12 feet) in length when installing component outside of
cabinet (length of cable will depend on placement of your comonent).
9. WARNING!: TV Lift Mechanism contains moving parts. Please keep hands, arms, and fingers away from
the lift and cabinet lid opening when the lift is in motion. Cables should be wire-tied or secured neatly so
lift does not contact them during operation.
Contact Touchstone Customer Service at 1-800-215-1990 for any questions regarding the operation of your TV lift
cabinet. We are also available on the web at www.touchstonehomeproducts.com
www.touchstonehomeproducts.com 800.215.1990
Page 6
Touchstone Elevate
Lift Components & TV Installation Hardware
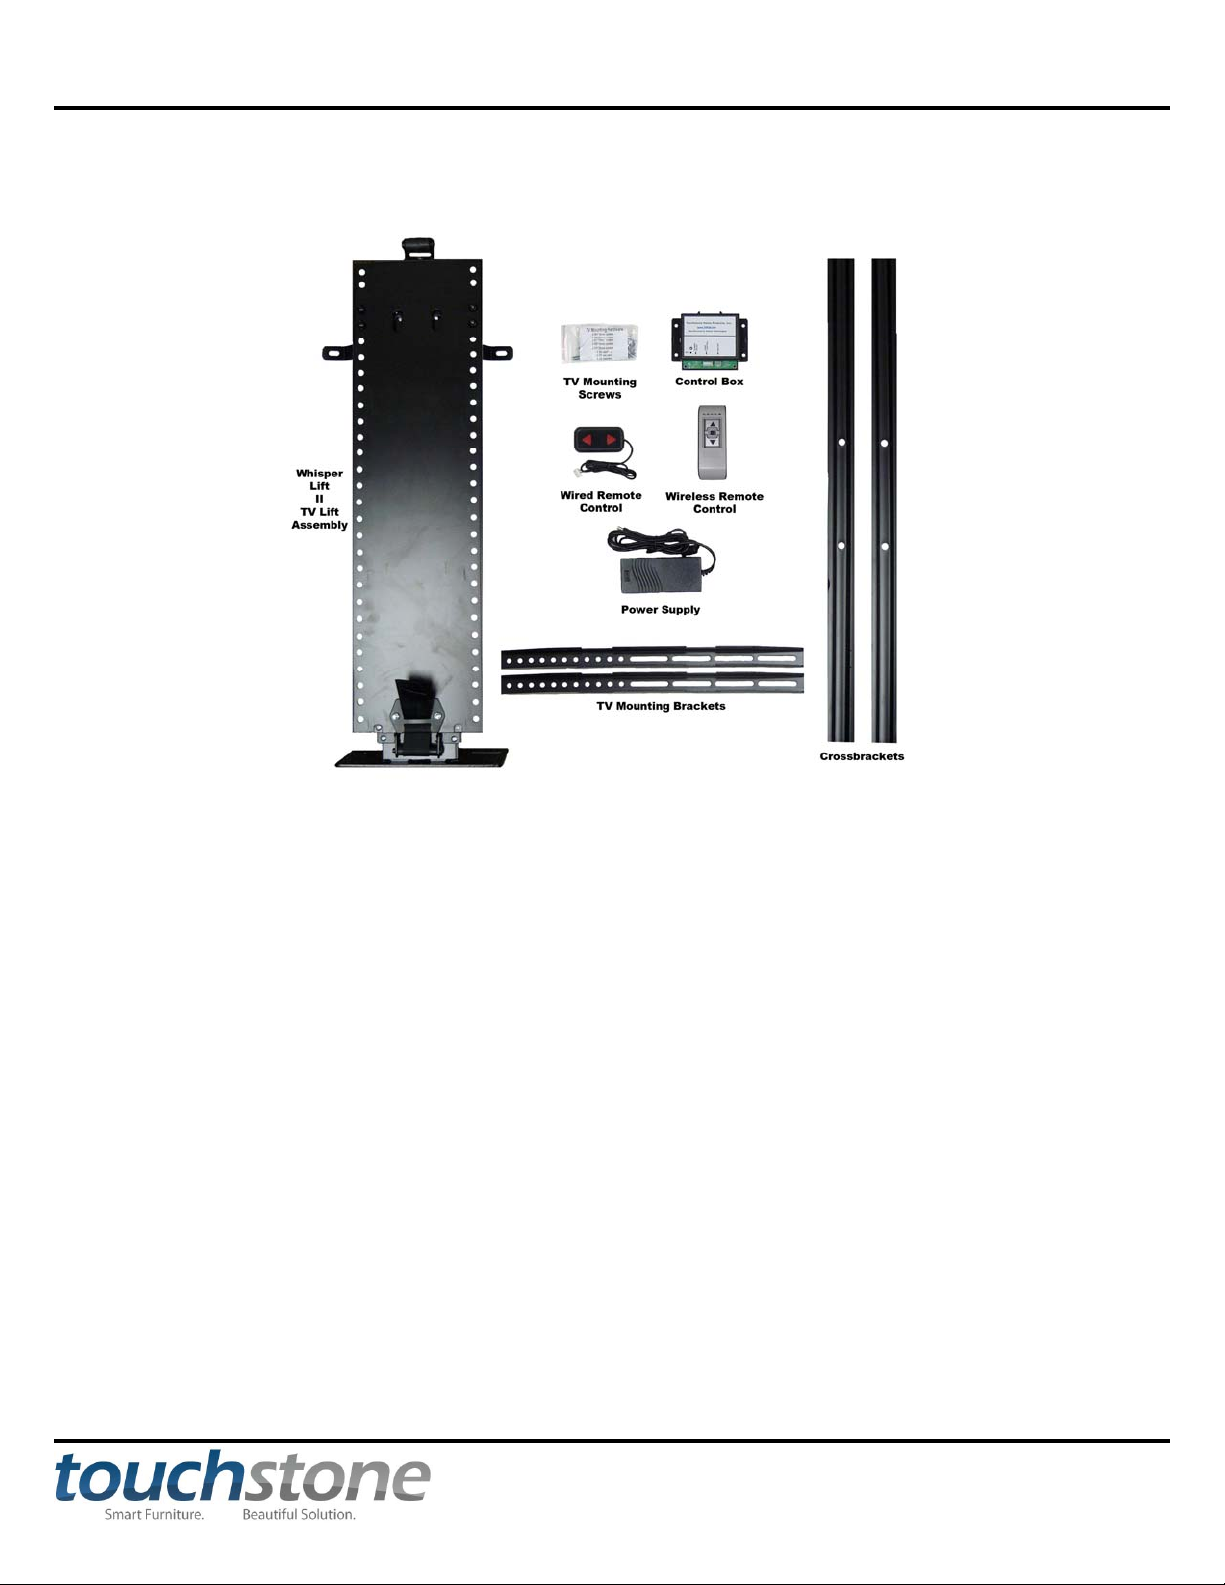
Components
6
Hardware
- Lift Mounting Screws
- located in a orange back taped to the outside bottom of the cabinet.
- includes 6 hex bolts, washers, and locking washers
- TV Mounting Screws
-> Please consult your TV manufacturer for the size and length of the mounting screw for your TV.
Included is a basic set of mounting screws that accommodates most LCD/Plasma TVs. Depending on your
television, the screws included in the kit may not fit your television. If that is the case, these screws can be
purchased at most hardware/home improvement stores.
- 4 Adjustable Feet
Tools
In order to assemble the Whisper Lift II with component shelf, you will need the following tools:
- size 4 metric hex wrench - level
- size 5 metric hex wrench - adjustable wrench
www.touchstonehomeproducts.com 800.215.1990
Page 7
Touchstone Elevate
7
Installing Adjustable Feet
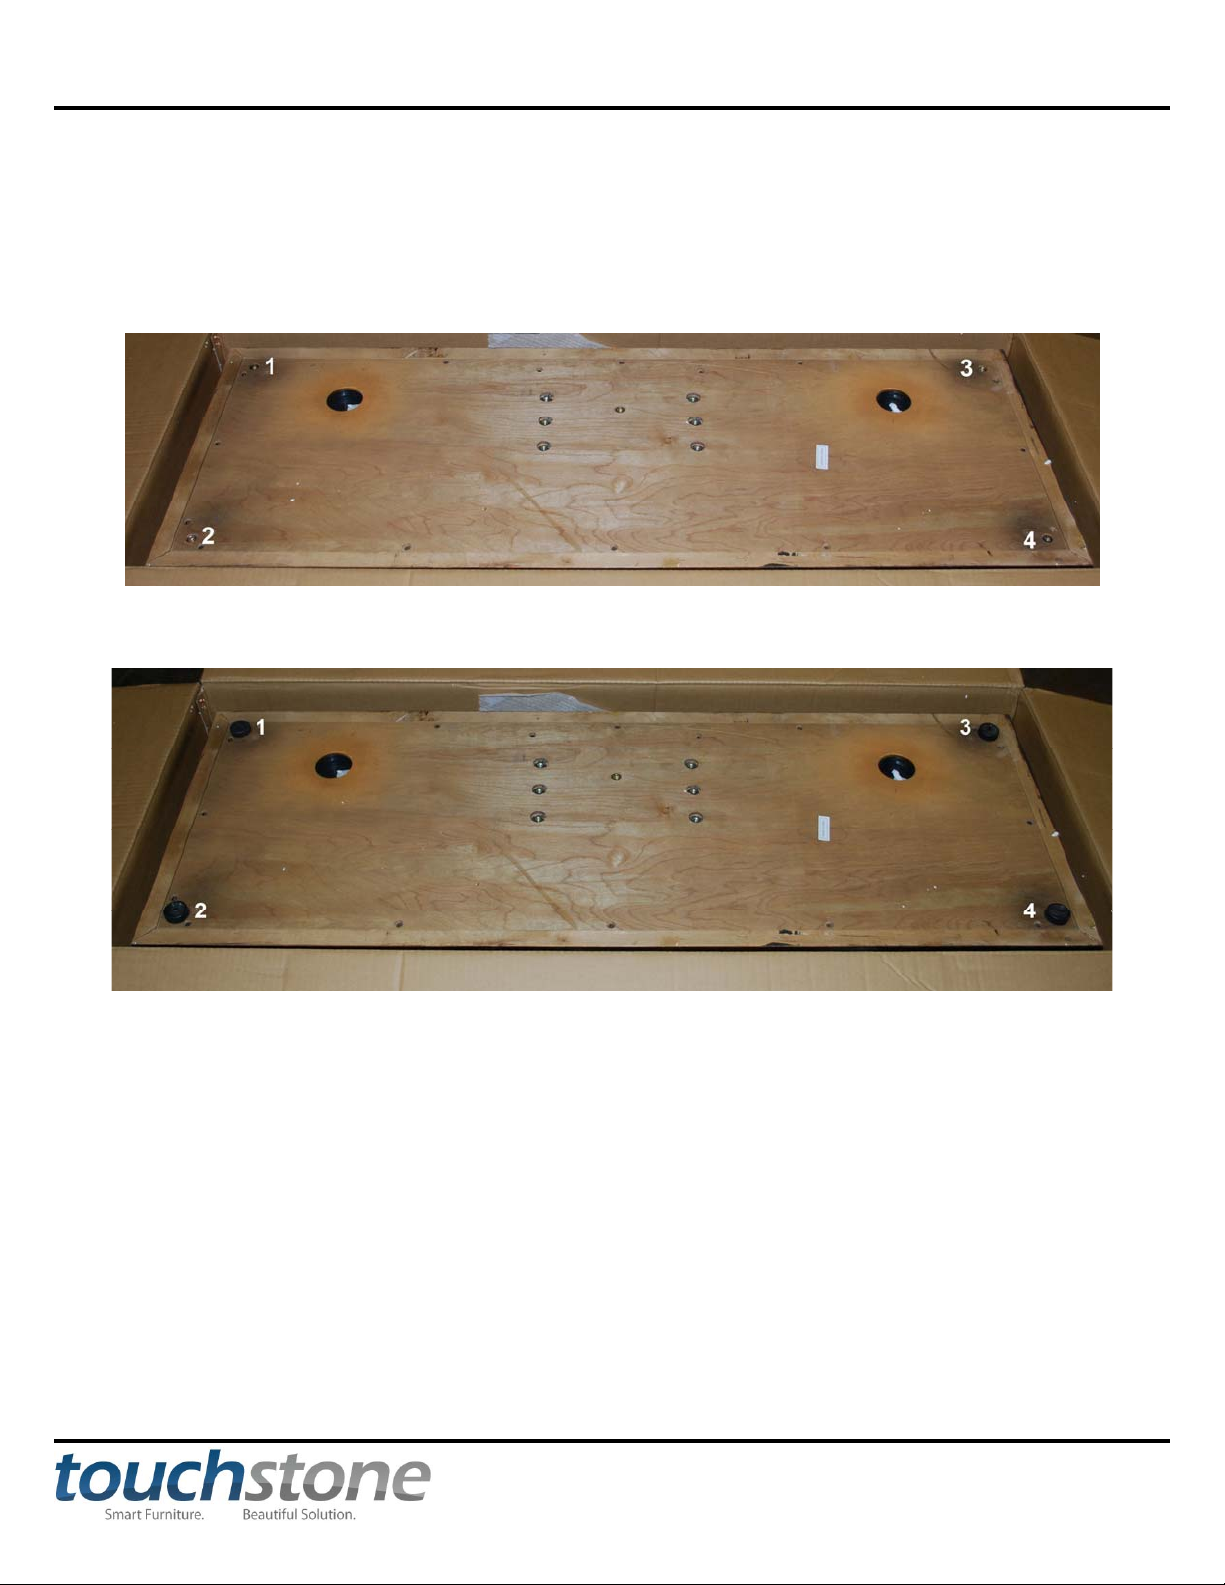
The hardware pack included with your Elevate TV Lift Cabinet will come with 4 adjustable feet. To install the feet,
turn the cabinet over and follow the instructions below:
1. On the bottom of the cabinet locate the 4 holes on the bottom of the cabinet for the feet
2. Install the 4 adjustable feet in each hole in the bottom of the cabinet.
3. Adjust feet to desired height and turn cabinet upright when complete.
www.touchstonehomeproducts.com 800.215.1990
Page 8
Touchstone Elevate
Assembling Your Whisper Lift II
Adjusting Lift Mounting Supports
Tools Needed:
- adjustable wrench
Instructions:
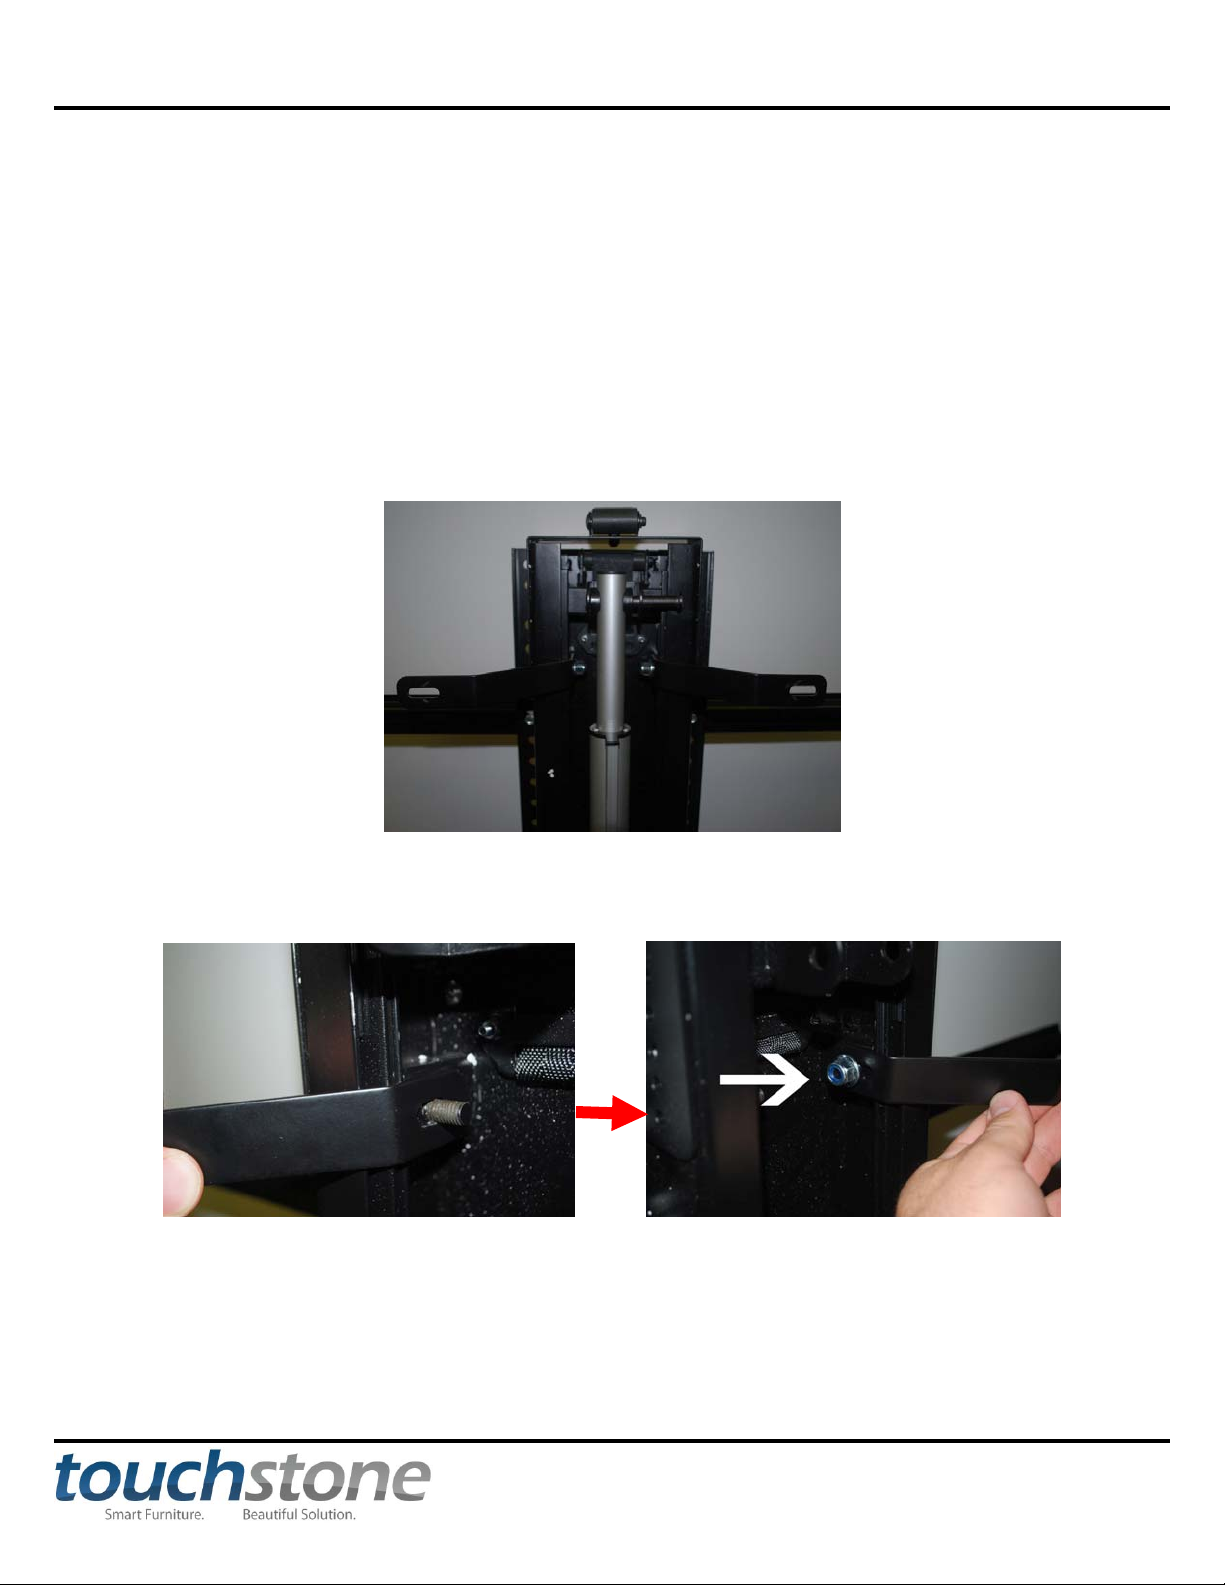
The Whisper Lift II ships with 2 mounting brackets pre-installed on the back of the lift as shown in the picture
below:
8
Typically, these brackets do not require any adjusting by the customer. Should you need to adjust these brackets to
level the lift, loose the nuts holding the bracket to the lift and move the bracket accordingly.
Once adjusted, the lift is ready for installation.
www.touchstonehomeproducts.com 800.215.1990
Page 9
Touchstone Elevate
Installing Crossbrackets on TV Lift
Tools Needed:
- adjustable wrench
- size 5 metric hex wrench
Parts Needed During This Step:
- TV Lift
- 2 cross brackets
- 4 large hex screws- size 5
- 4 large lock nuts
Instructions:
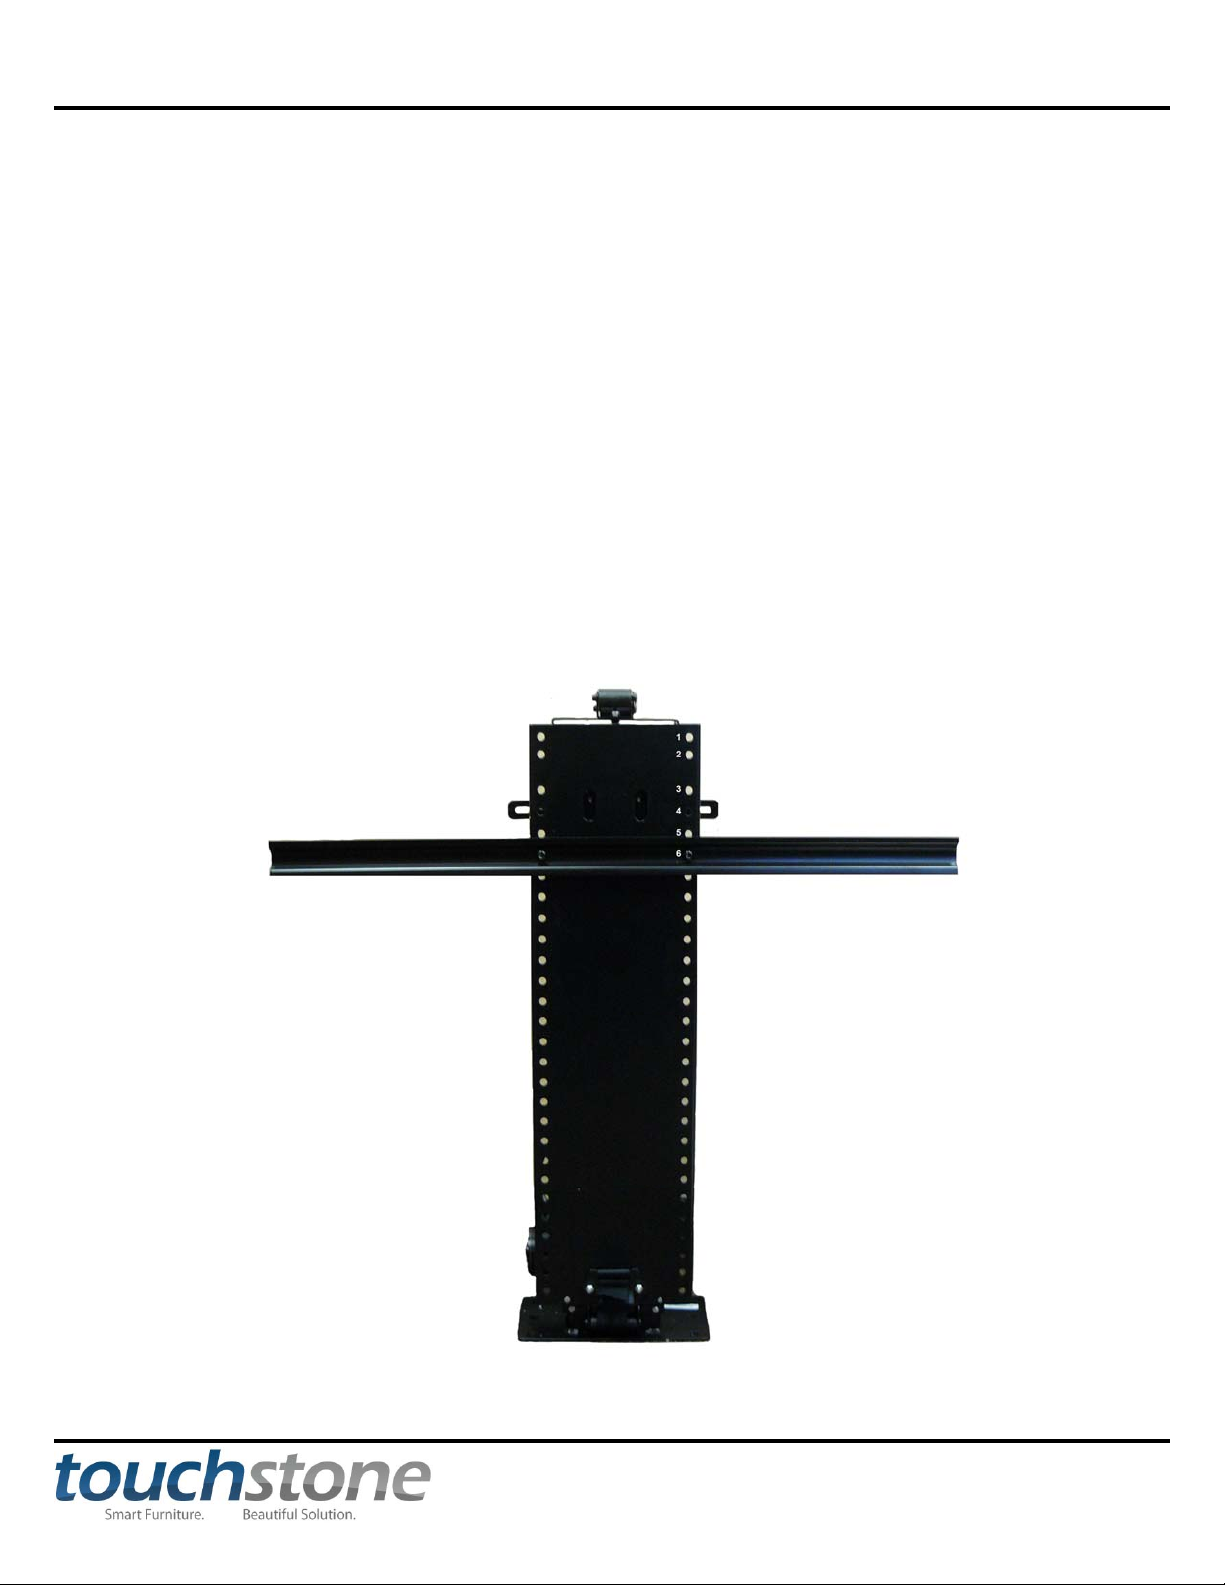
1. Gather the 2 long crossbrackets, 4 large hex screws, and 4 large lock nuts.
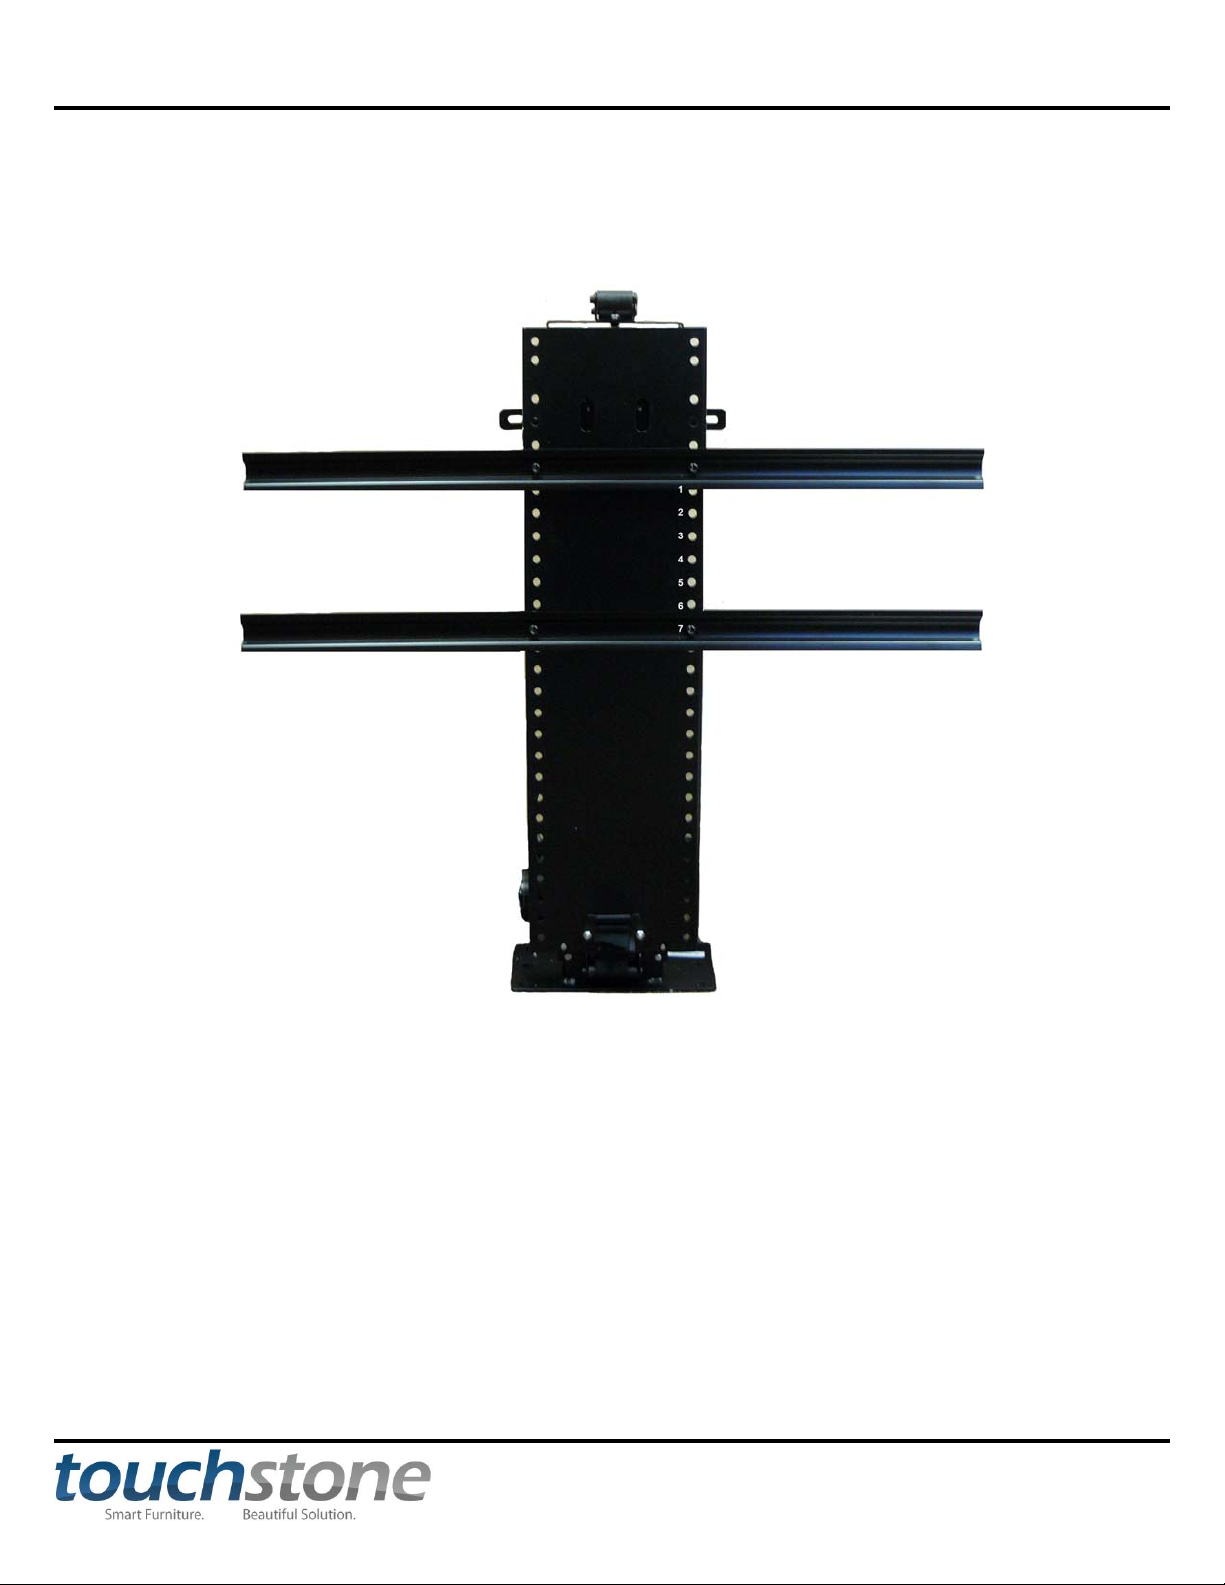
2. Mount the top crossbracket in the 6th set of holes from the top of the lift. Use 2 large hex screws and 2 lock nuts
to secure the crossbracket to the lift.
9
www.touchstonehomeproducts.com 800.215.1990
Page 10
Touchstone Elevate
10
Installing Crossbrackets on TV Lift – cont
3. Mount the bottom crossbracket 7 holes down from the top crossbracket. Use the remaining 2 large hex screws
and 2 lock nuts to secure the crossbracket to the lift.
**NOTE: Make sure that the brackets are secured tightly to the lift prior to operation.
www.touchstonehomeproducts.com 800.215.1990
Page 11
Touchstone Elevate
Fasten Lift To Elevate Cabinet
Tools Needed:
- Hex wrench (provided)
- level
Parts Needed During This Step:
- 2 long hex bolts (provided)
- 6 hex bolts (provided)
Instructions:
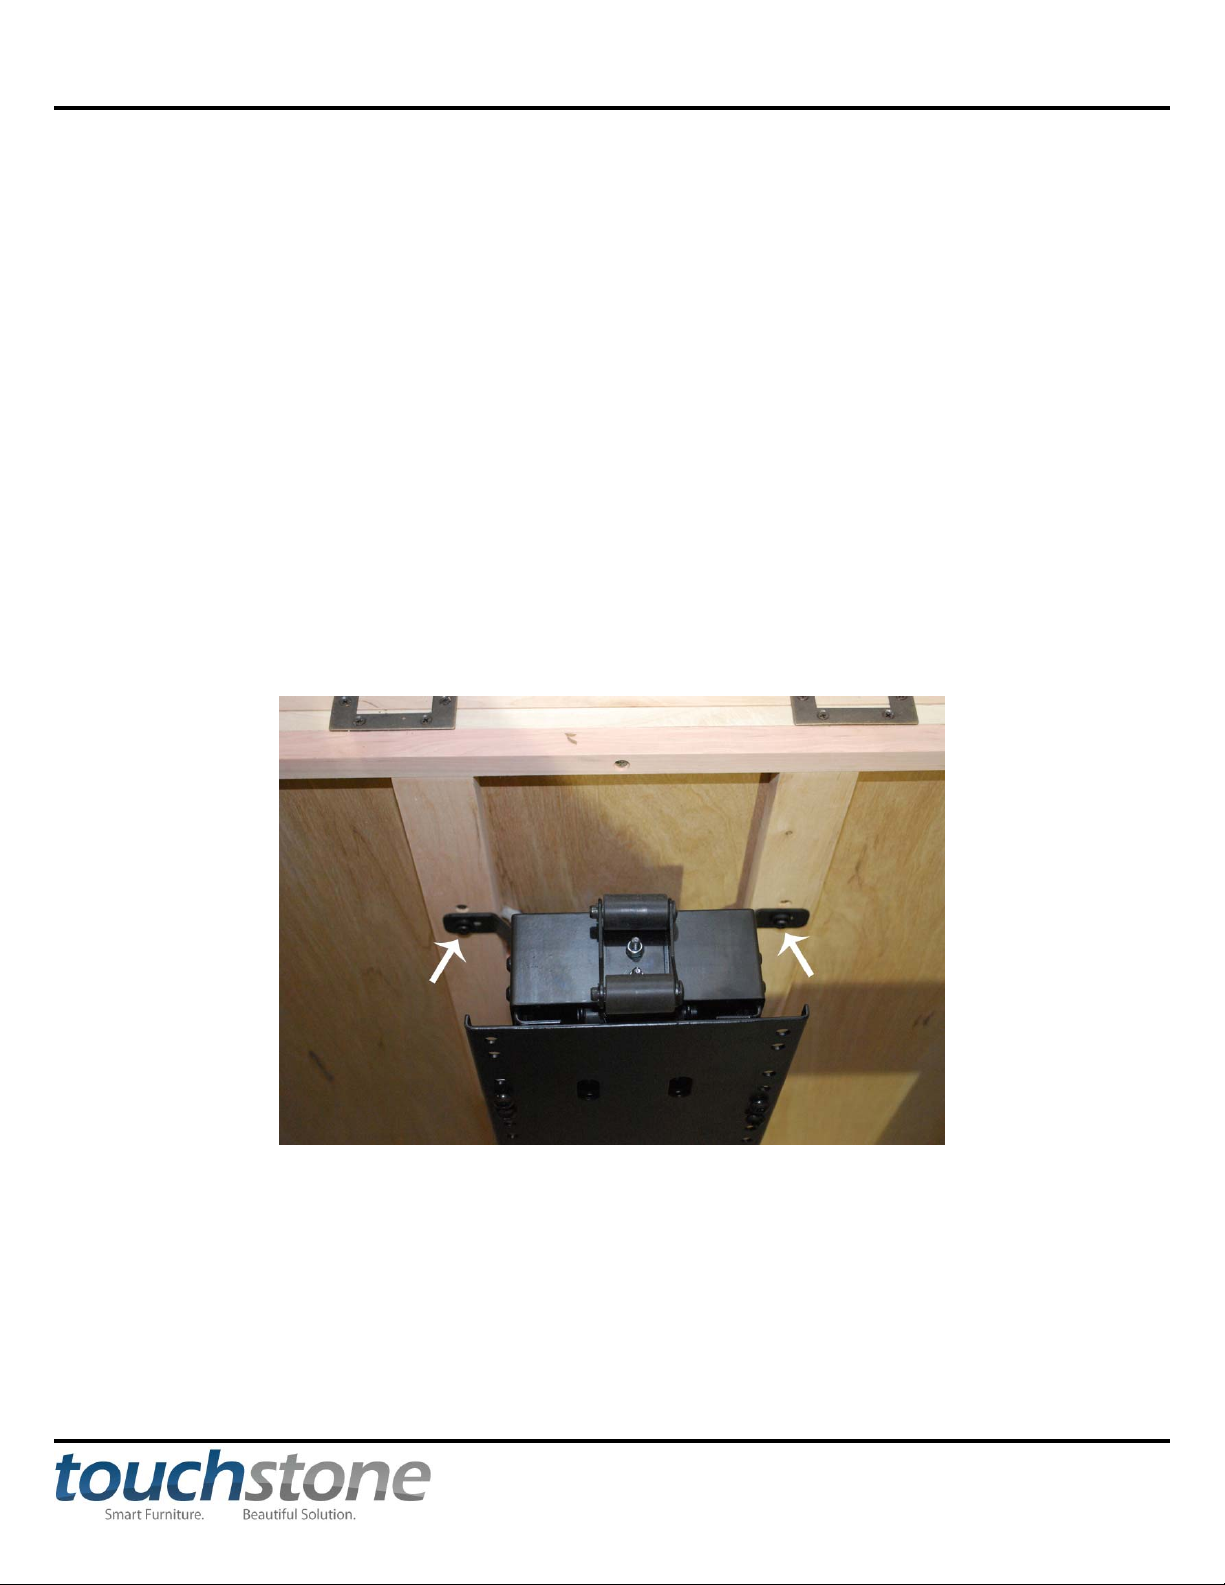
1. Remove front panel from cabinet. See page 20 for instructions on removing the front panel.
2. Open cabinet lid and place lift in cabinet through lid.
3. Align lift with mounting holes on the back of the cabinet.
4. Using the long hex bolts, mount the lift to the back of the cabinet.
11
www.touchstonehomeproducts.com 800.215.1990
Page 12
Touchstone Elevate
12
Fasten Lift To Elevate Cabinet - cont
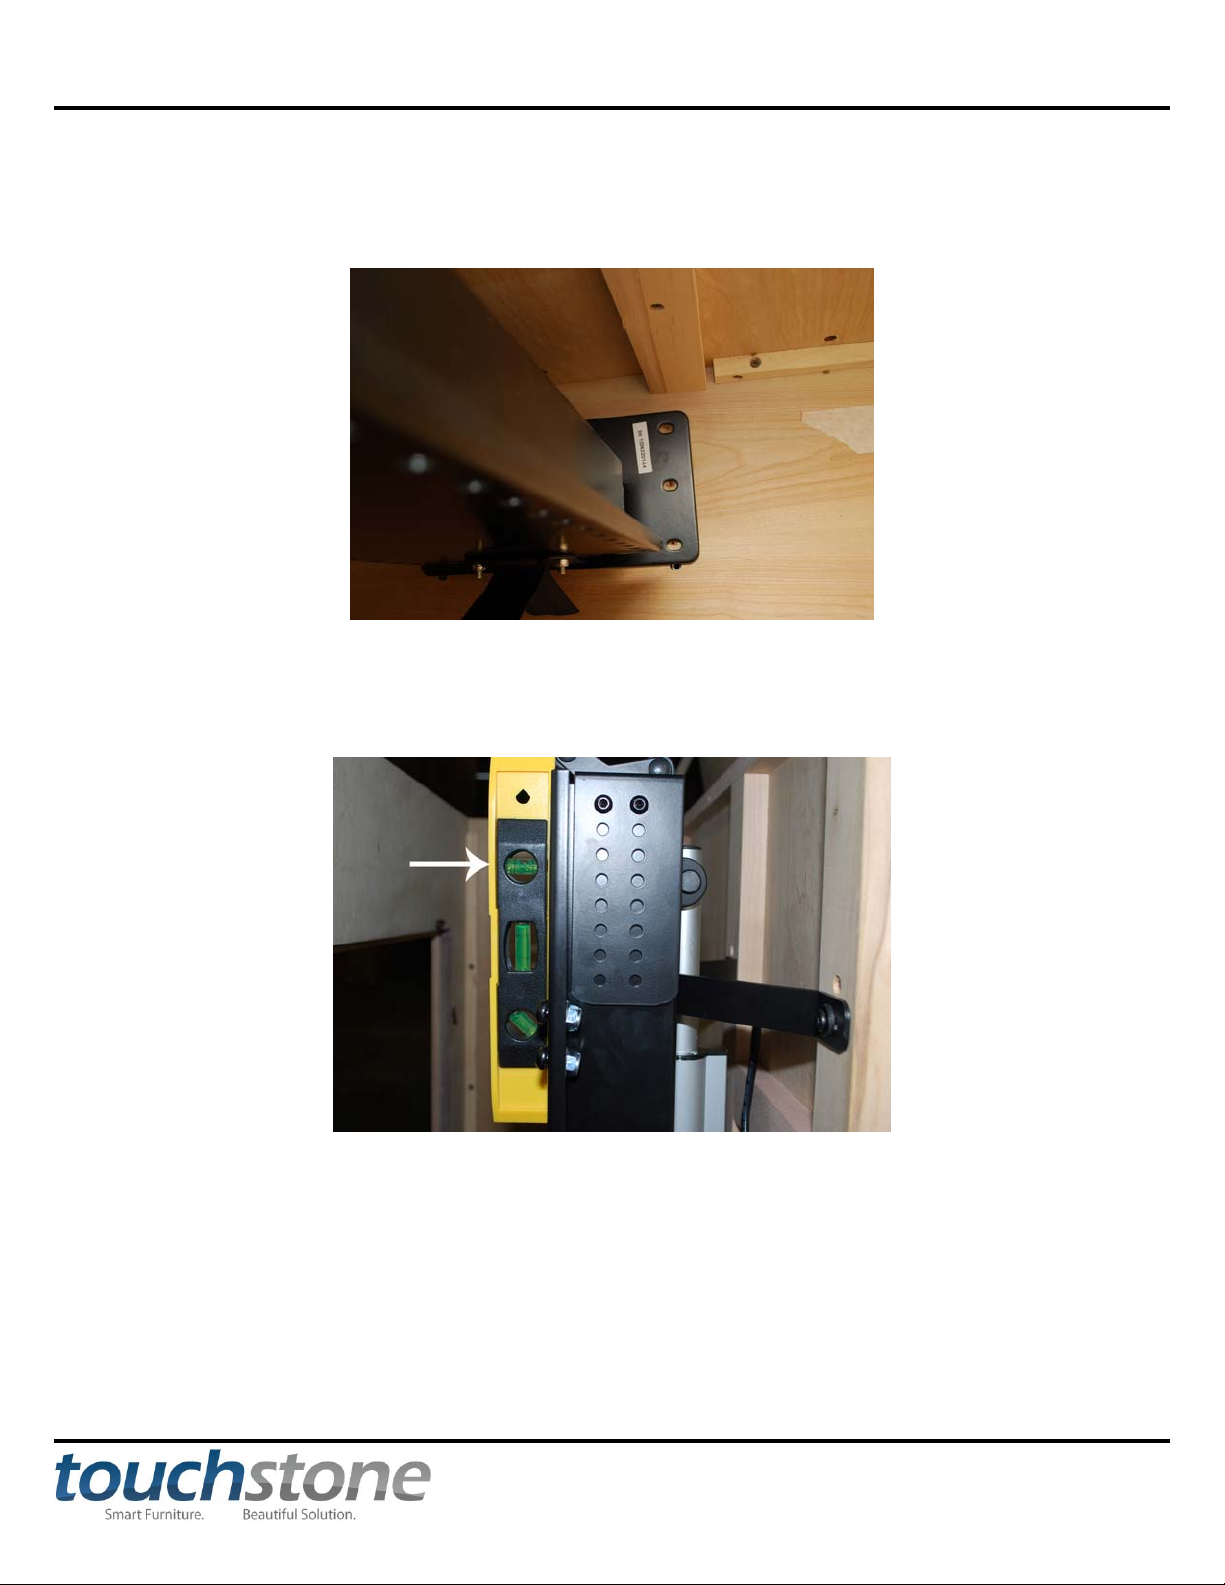
5. After mounting the lift to the back of the cabinet, push the lift toward the back wall of the cabinet. The holes in
the bottom of the lift will match up with the 6 holes in the floor of the cabinet (fig A).
(fig A)
6. Using a level, make sure that the lift is level to the cabinet. If the lift is not level, adjust accordingly the 2 back
brackets accordingly to adjust the lift. See p8 for more information on adjusting the rear brackets.
www.touchstonehomeproducts.com 800.215.1990
Page 13
Touchstone Elevate
Fasten Lift To Elevate Cabinet - cont
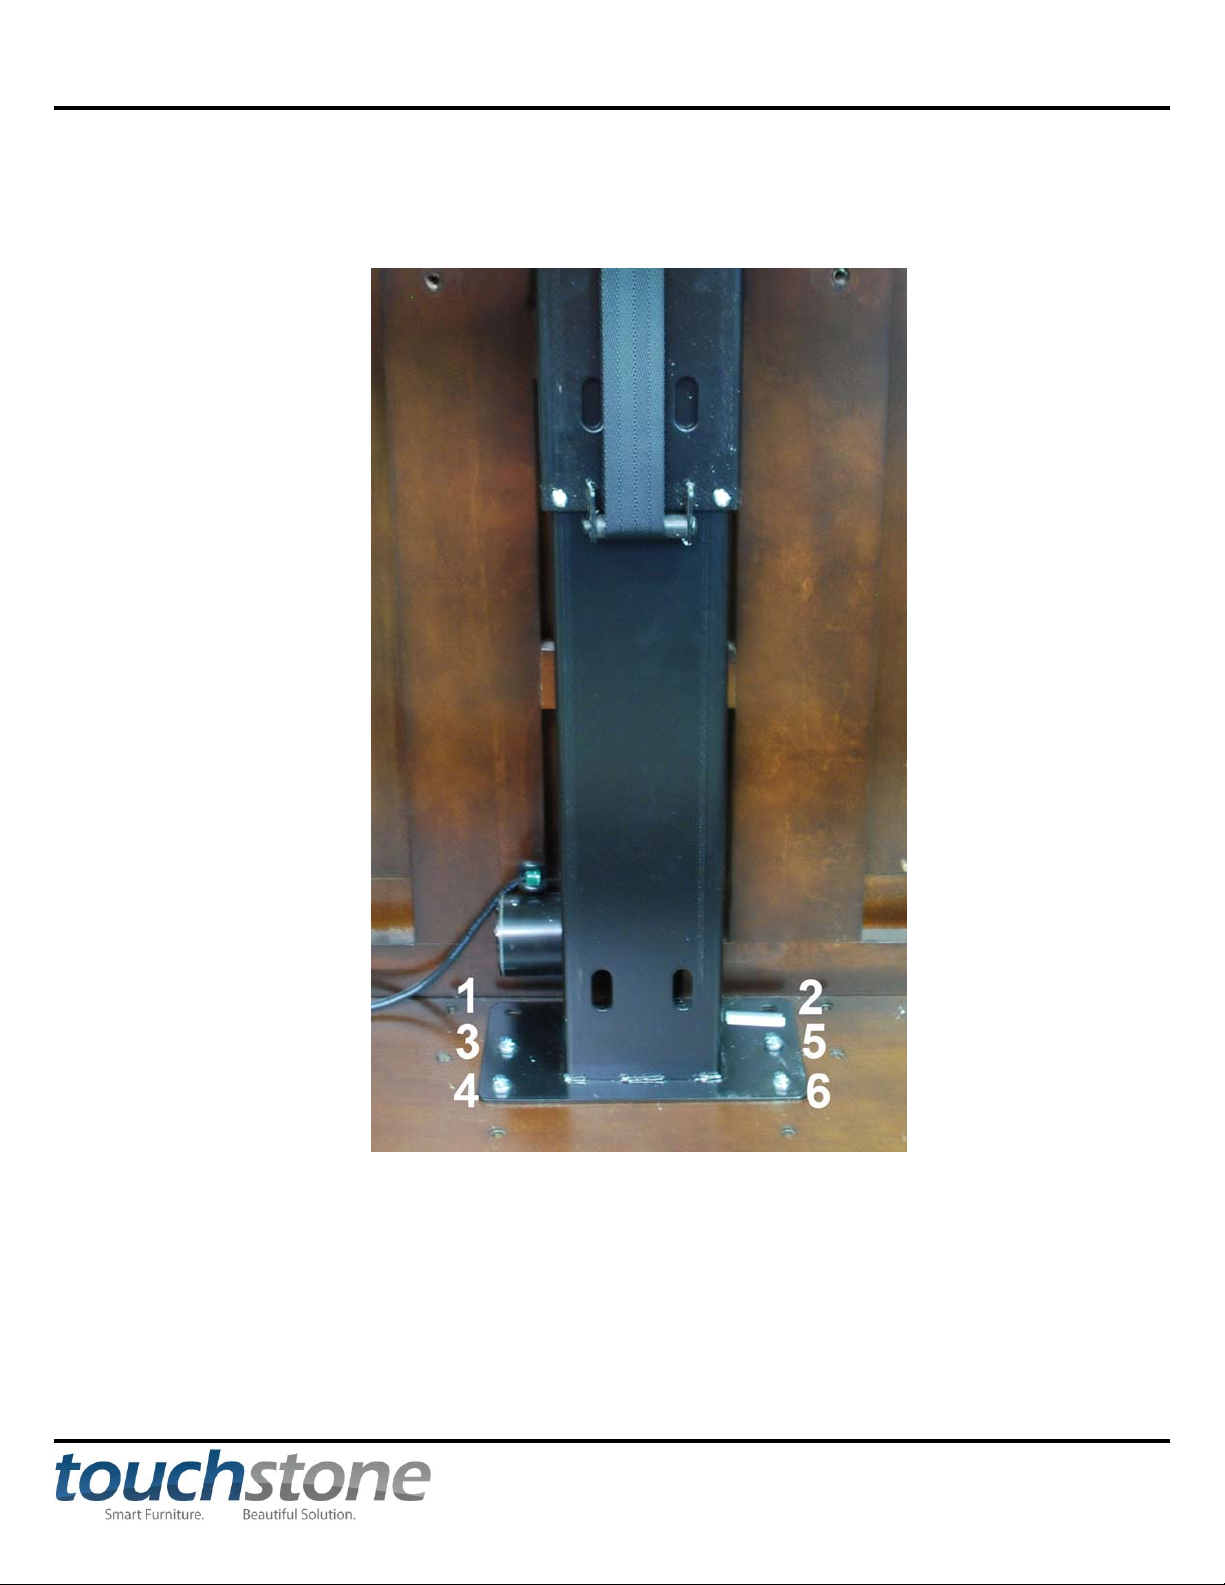
7. Install 6 bolts to fasten the lift to the floor of the cabinet. Fasten screws tightly to secure lift to floor of the
cabinet.
13
www.touchstonehomeproducts.com 800.215.1990
Page 14
Touchstone Elevate
Hookup Lift Control Box and Power Supply
Tools Needed:
none
Parts Needed During This Step:
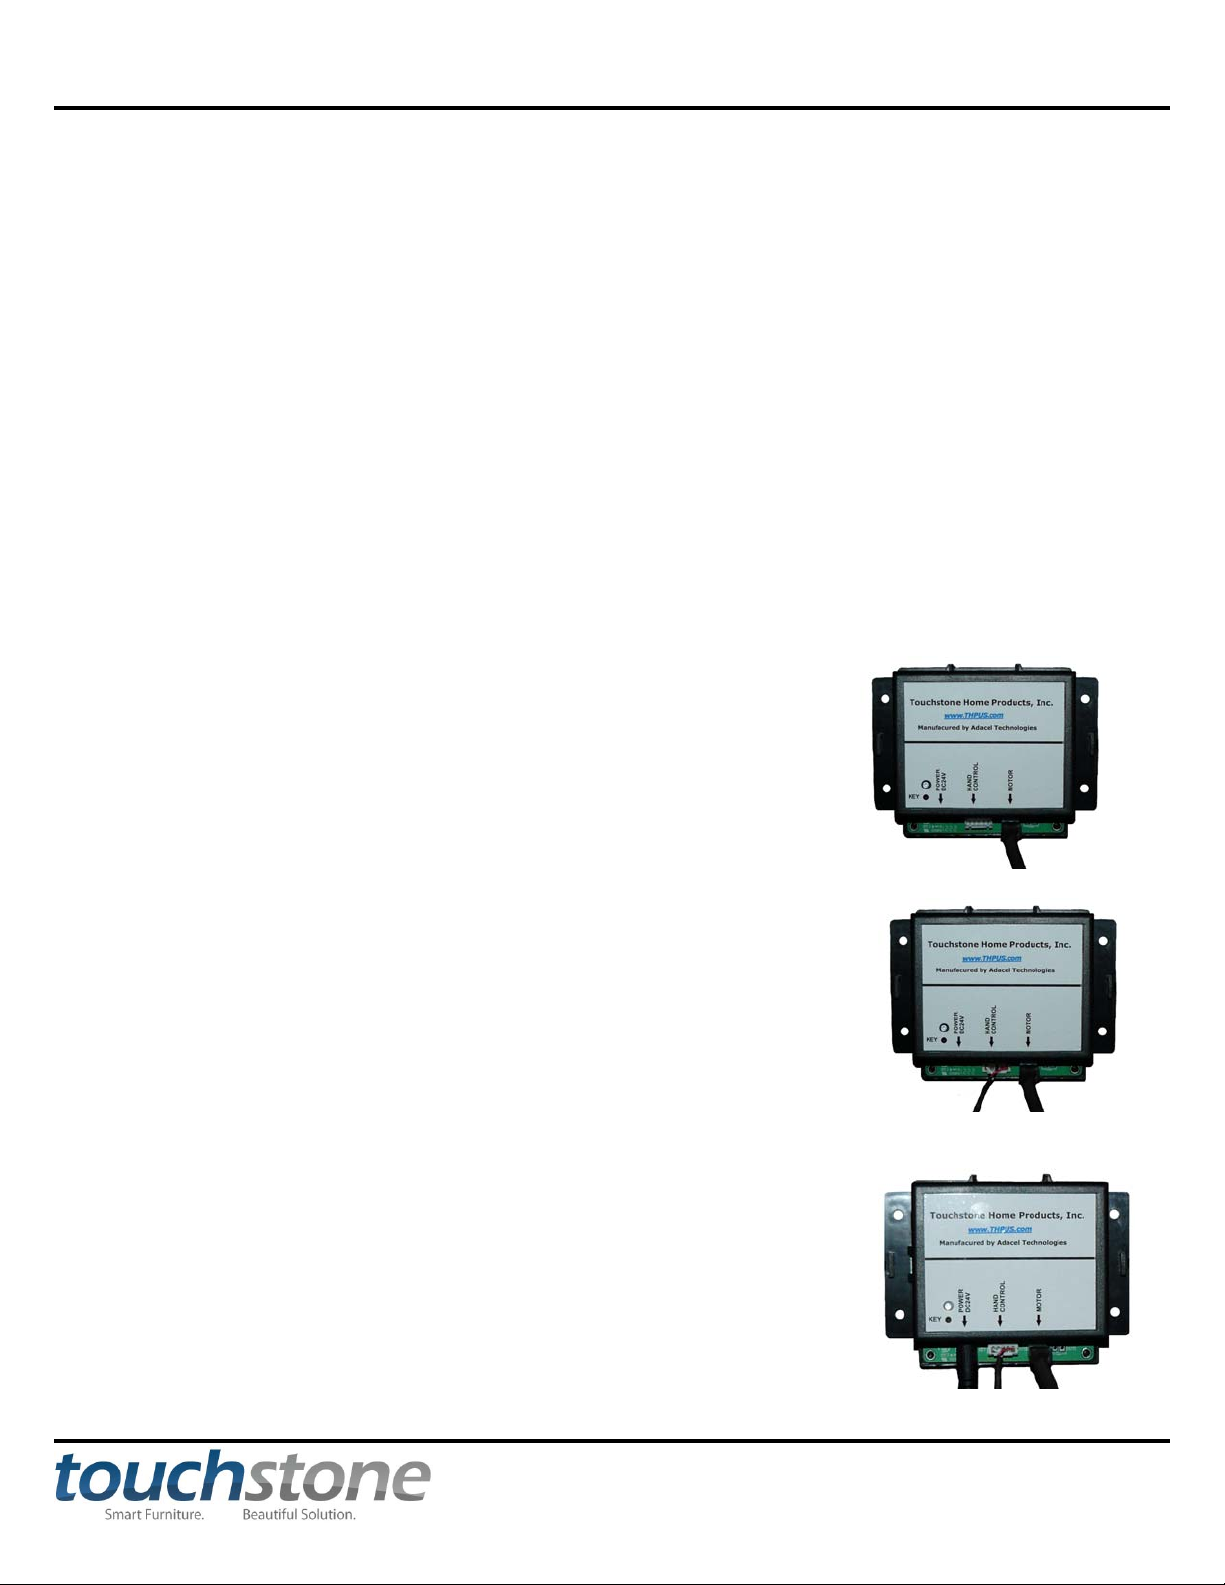
- Control box
- Power supply
- Wired remote
Instructions:
Installing Control Box
1. Remove the backing from the Velcro on the back of the control box.
2. Place control box in the location of your choosing on the floor of cabinet.
Attach Lift Cable into Control Box
1. Attach the lift cable to the Motor port on the control box.
Install Wired Remote
1. Remove the backing from the Velcro attached to the wired remote
2. Place the wired remove in a location of your choosing on the wall on the inside
of the cabinet
3. Attach the cable for the wired remote to the control box.
Install Power Cable
1. Remove the backing from the Velcro attached to the power supply.
2. Place the power supply in a location of your choosing on the floor
of the cabinet.
3. Attach the cable from the power supply to the power port on the control
box and plug the power cable into the wall outlet.
14
www.touchstonehomeproducts.com 800.215.1990
Page 15
Touchstone Elevate
15
Mounting and Installing the TV
IMPORTANT: Prior to installing the TV onto the lift, please ensure the following:
- If you have not done so already, remove the stand from your flat screen TV.
- TV weight needs to be under 100lbs.
- TV has VESA compliant mounting pattern.
Attaching TV Mounting Brackets to Flat Panel TV
Tools Required
- Phillips head screwdriver
Parts Required
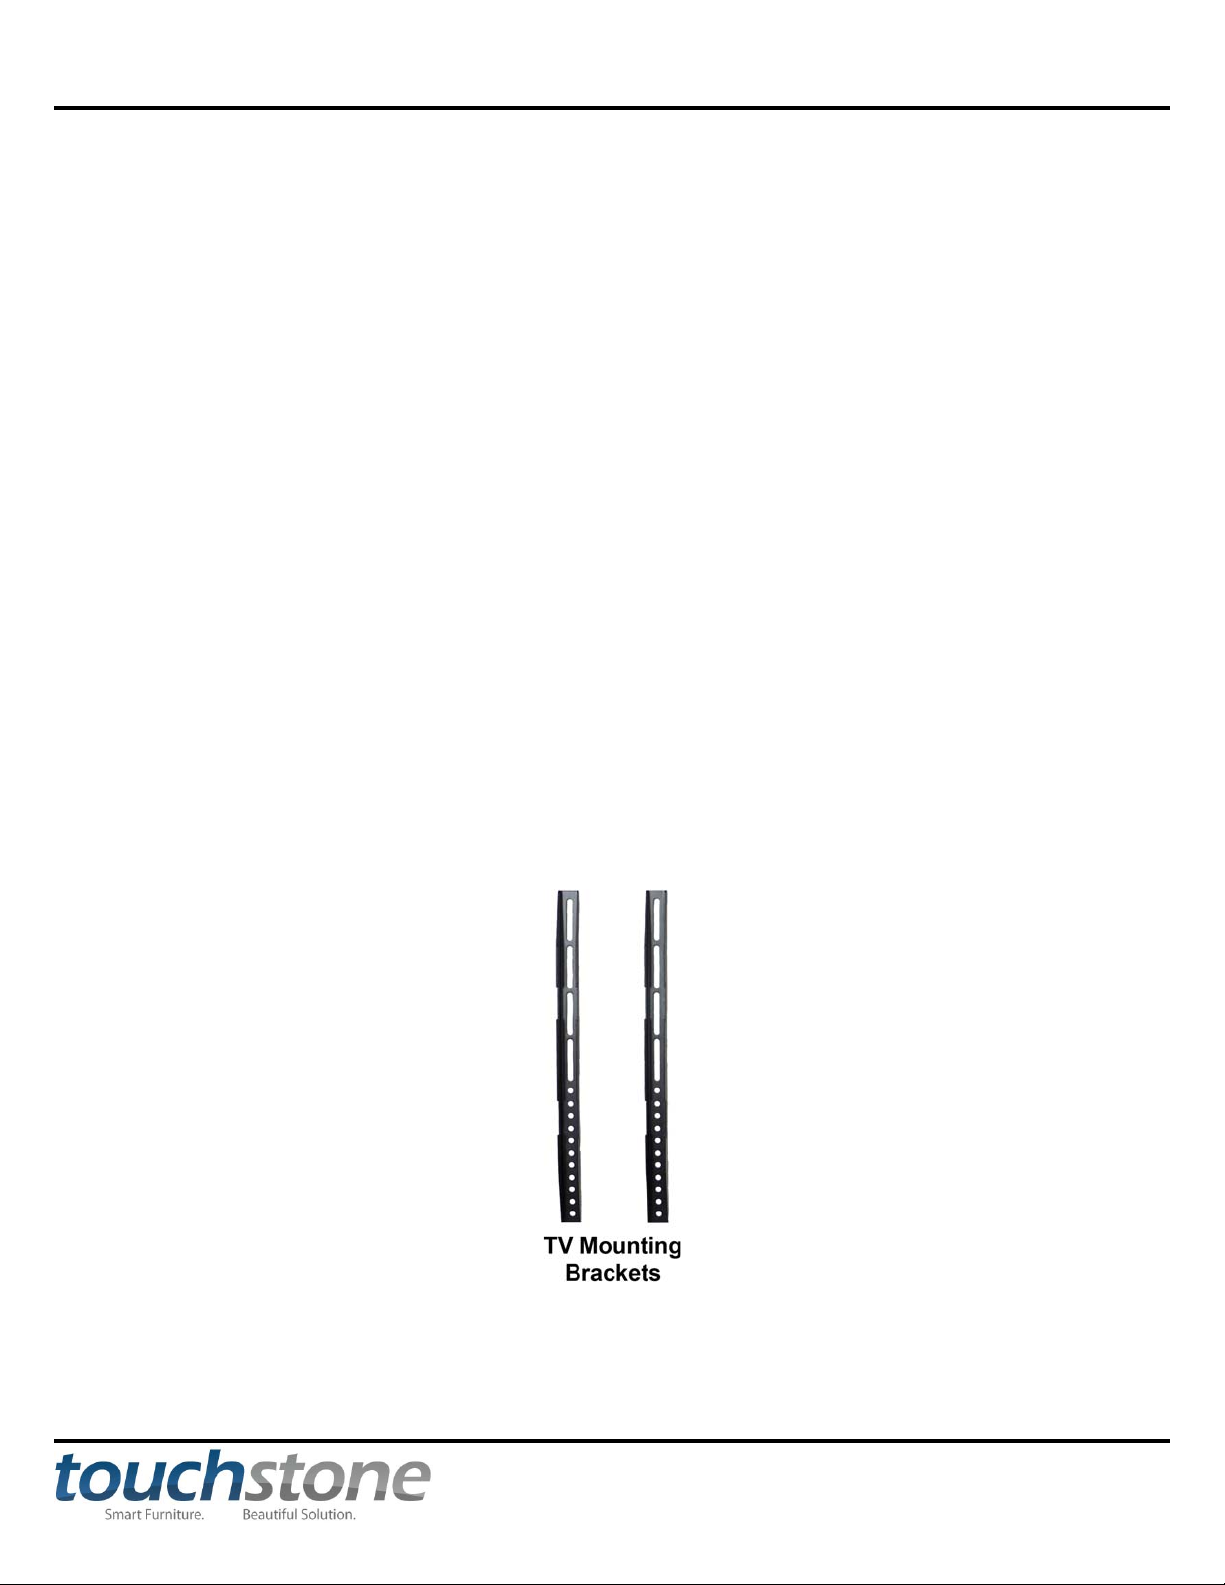
- TV mounting brackets
- TV mounting screws
***Note: Touchstone Home Products includes a screw pack containing some of the most popular sizes of
mounting screws, used by most TVs on the market. Due to the amount of TVs in the marketplace and no standard
for mounting screw size, Touchstone Home Products cannot guarantee that the screws required for your TV are
included in the screw pack. Please consult your TV manufacturer for the size of the mounting holes in the back of
your TV and use the appropriate size screws. Touchstone Home Products assumes no liability for damage to a TV.
Instructions
1. Remove stand from TV. Consult TV manual for instructions on removing the stand from the TV.
2. Located the TV mounting brackets. They are pictured below.
www.touchstonehomeproducts.com 800.215.1990
Page 16
Touchstone Elevate
16
Attaching TV Mounting Brackets to Flat Panel TV- cont
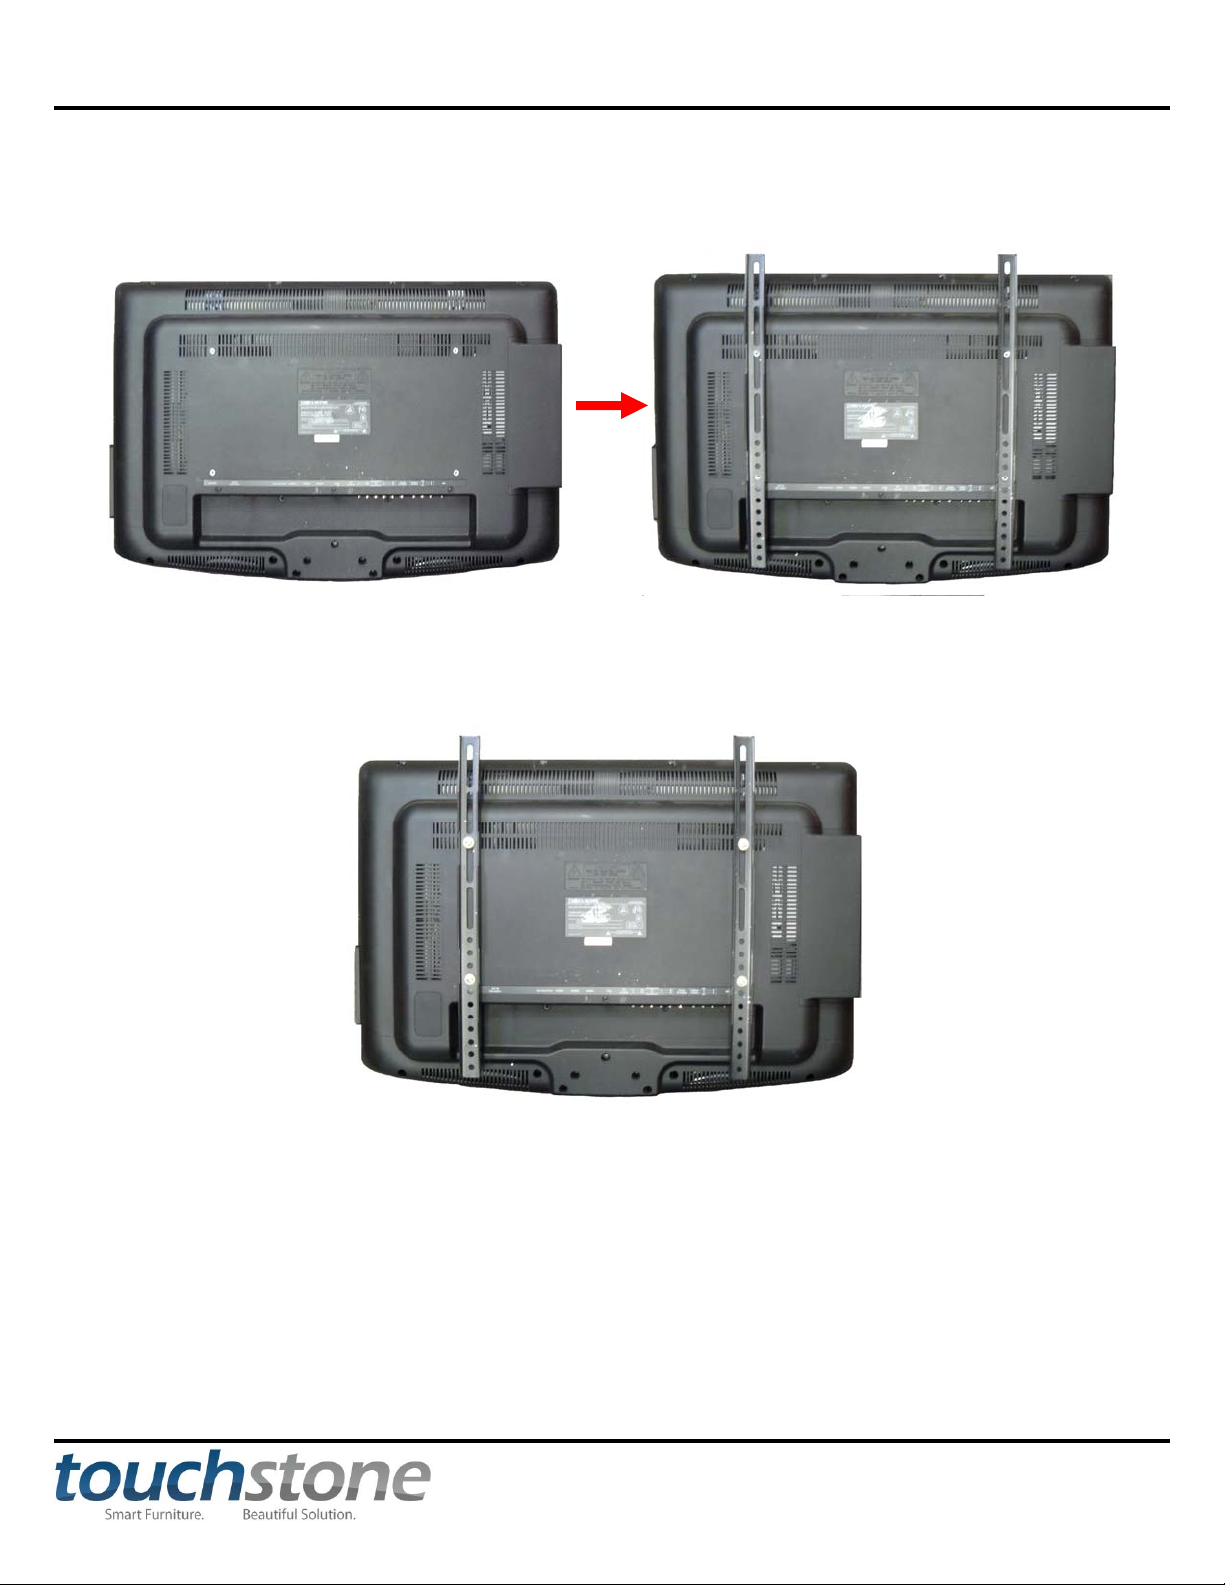
3. Align TV mounting brackets so that brackets are centered on the back of the TV. Place the TV mounting bracket
so that the slotted holes are toward the top of the TV, while the round holes are toward the bottom of the TV.
3. Attach TV mounting brackets to back of TV. Consult your TV owner’s manual for the proper size mounting
screw.
www.touchstonehomeproducts.com 800.215.1990
Page 17
Touchstone Elevate
Installing TV on Lift
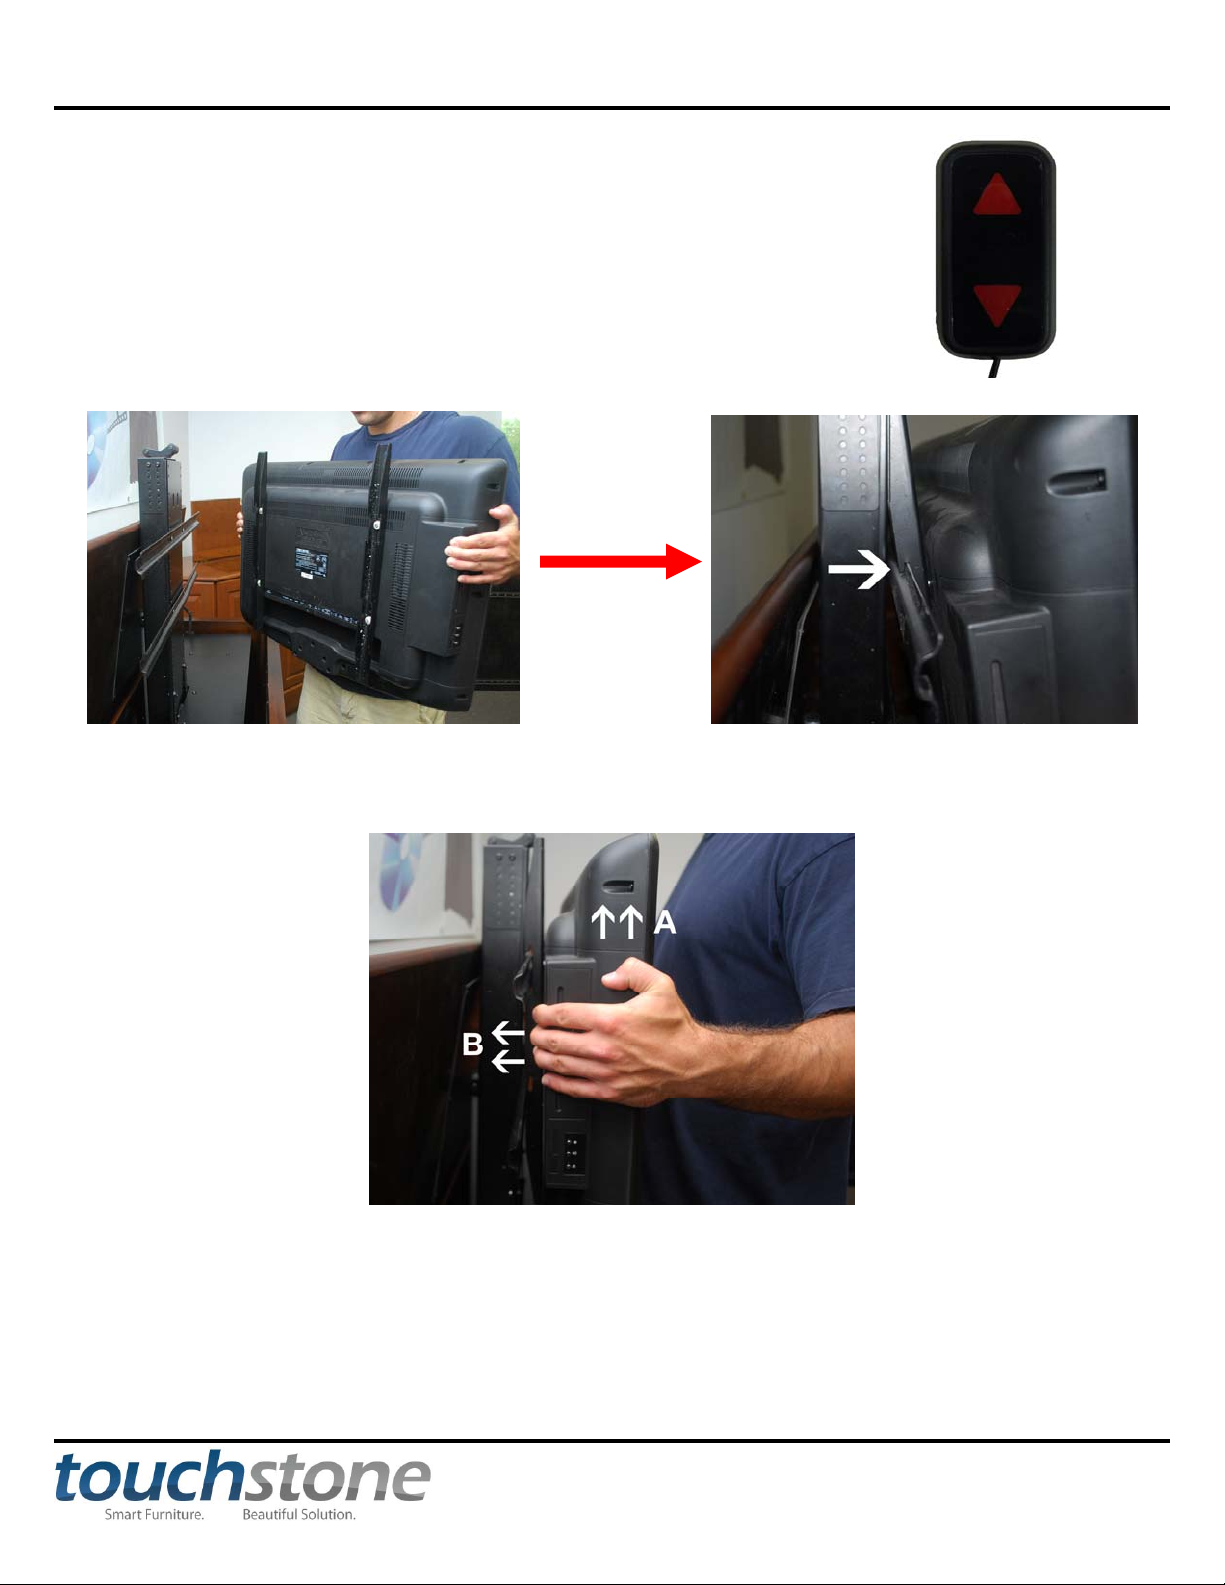
1. Using the internal wired control, move the lift to the up position. The UP button
is the button opposite of the cable side of the wired remote.
2. Hang TV on top crossbracket.
17
UP
DOWN
3 With TV hanging on top crossbracket, slightly raise the TV (A) and push it back toward the lift (B) so that the
bottom crossbracket is centered between the bottom set of hooks on the back of the TV mounting brackets.
4. Move the TV down slightly to fully attach TV to crossbrackets. The TV will hang on the top crossbracket and
the upper set of hooks on the bottom of the TV mounting brackets will lock the TV in place from moving while on
the lift.
www.touchstonehomeproducts.com 800.215.1990
Page 18
Touchstone Elevate
18
Installing Locking Brackets on Whisper Lift II TV Lift
Tools Needed:
- Philips-head screwdriver
Instructions
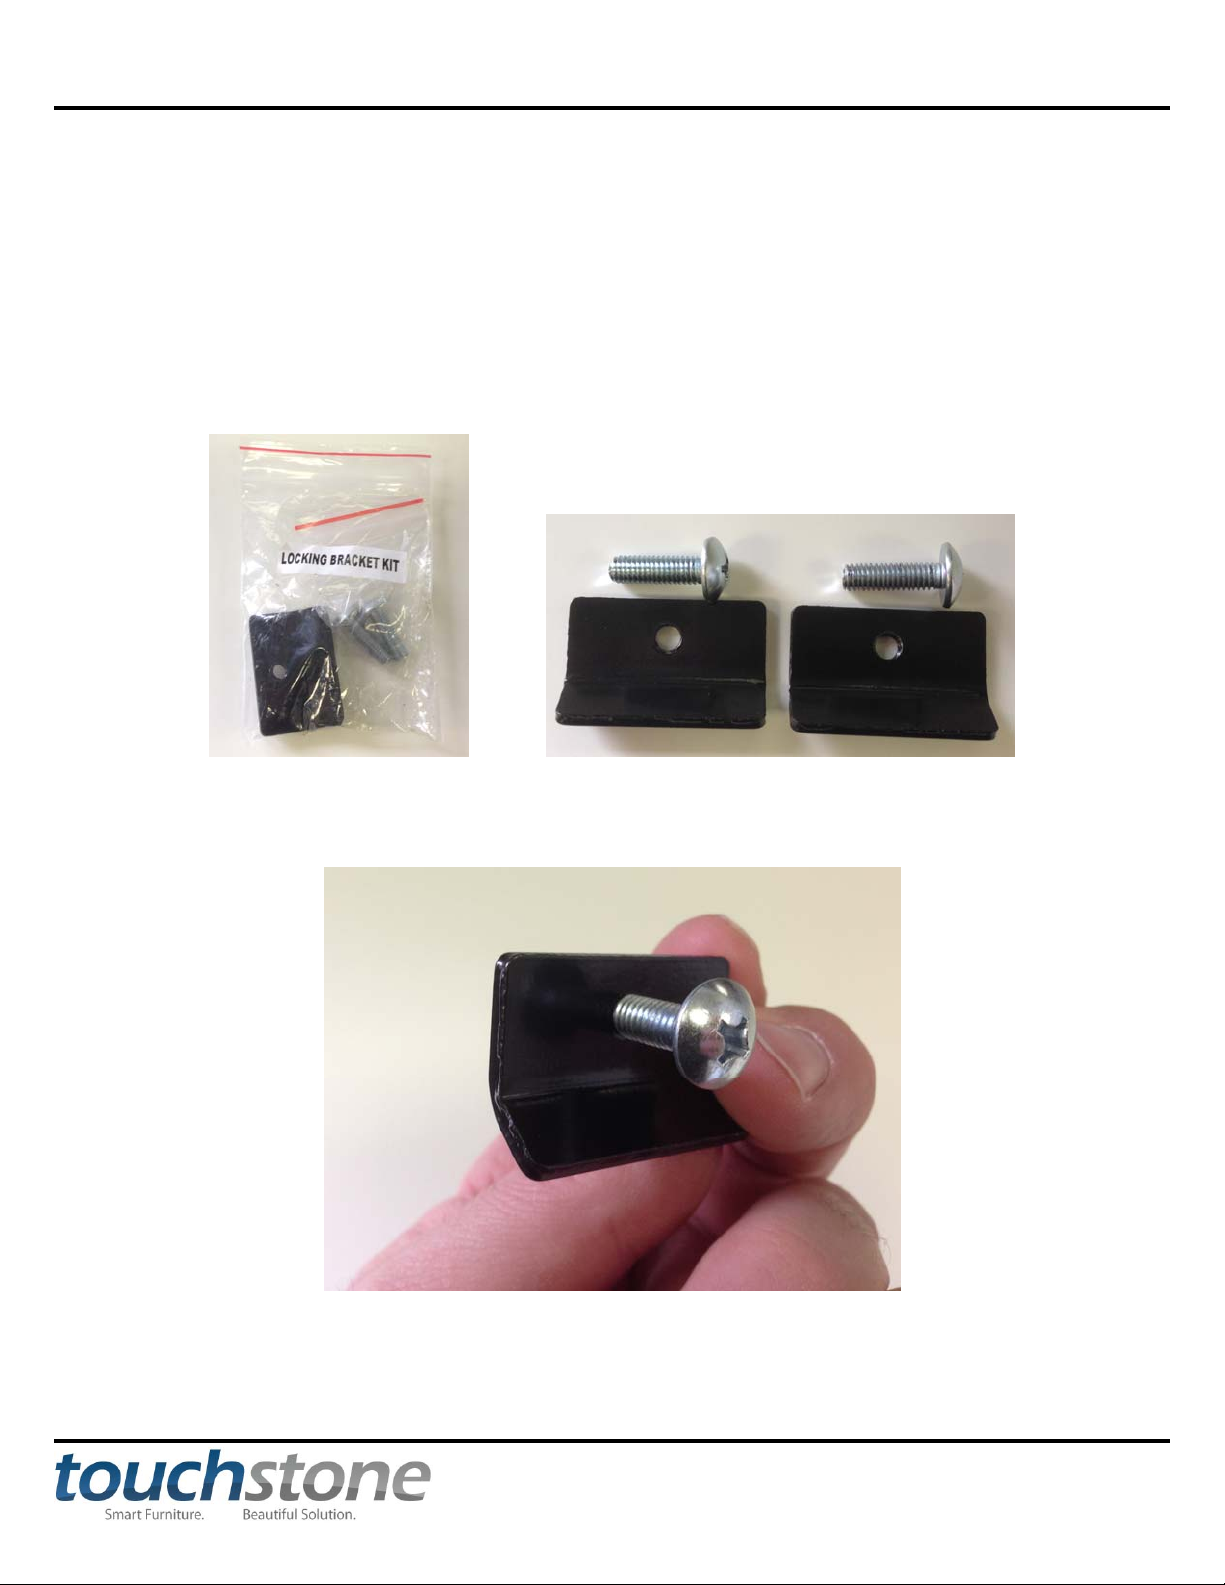
1. Locate the bag with the Locking Bracket Kit included with your lift. In this bag, there will be 2 brackets and 2
philips-head screws.
2. Install the screw in each bracket so that the end opposite of the head of the screw is just slightly through the
bracket.
www.touchstonehomeproducts.com 800.215.1990
Page 19
Touchstone Elevate
19
Installing Locking Brackets on Whisper Lift II TV Lift – cont.
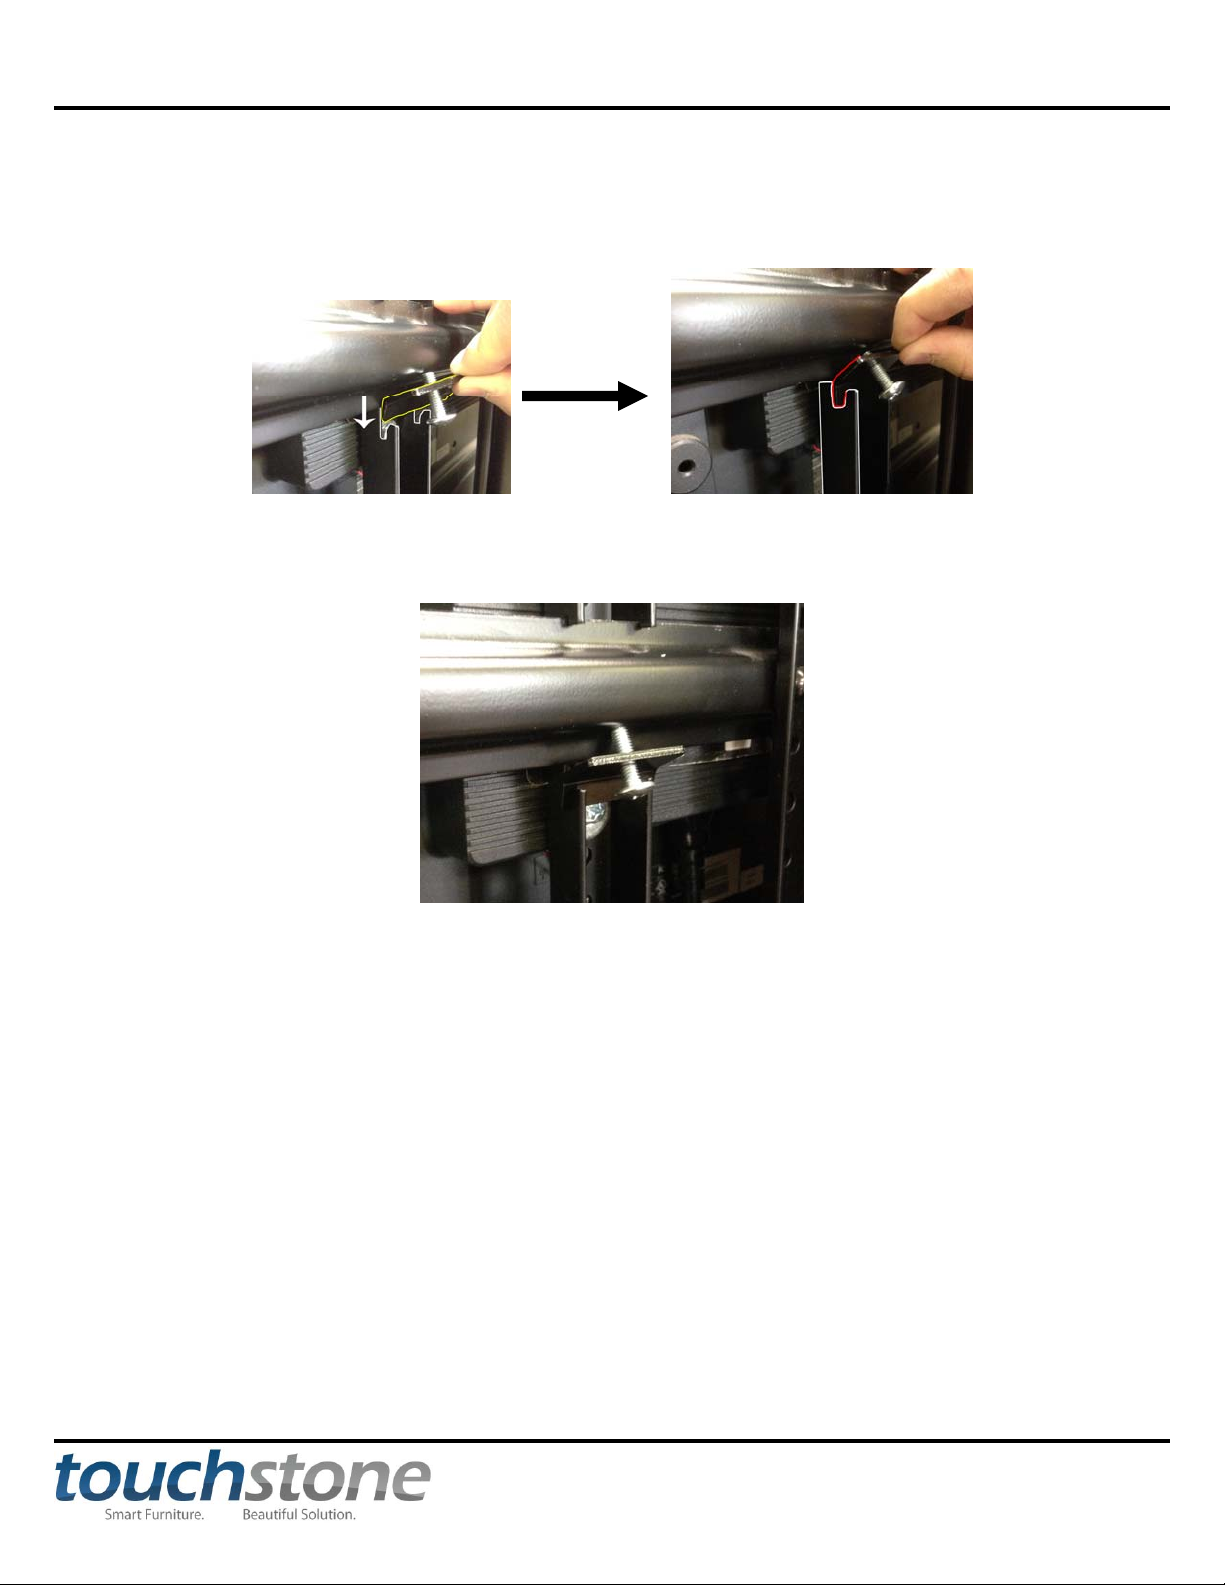
3. Place the angled end of the bracket into the slots in the TV mounting bracket just below the bottom cross bracket
on the lift, as shown in the diagram below.
4. With a Philips-head screwdriver, tighten the screw so that the screw is tight against the cross bracket, as shown in
the picture below.
5. After installing the first locking bracket, install the 2nd locking bracket on the other TV bracket in the same
manner. Your TV should now be locked in place and not more from side to side.
www.touchstonehomeproducts.com 800.215.1990
Page 20
Touchstone Elevate
20
Setting Height of Adjustable Roller Assembly
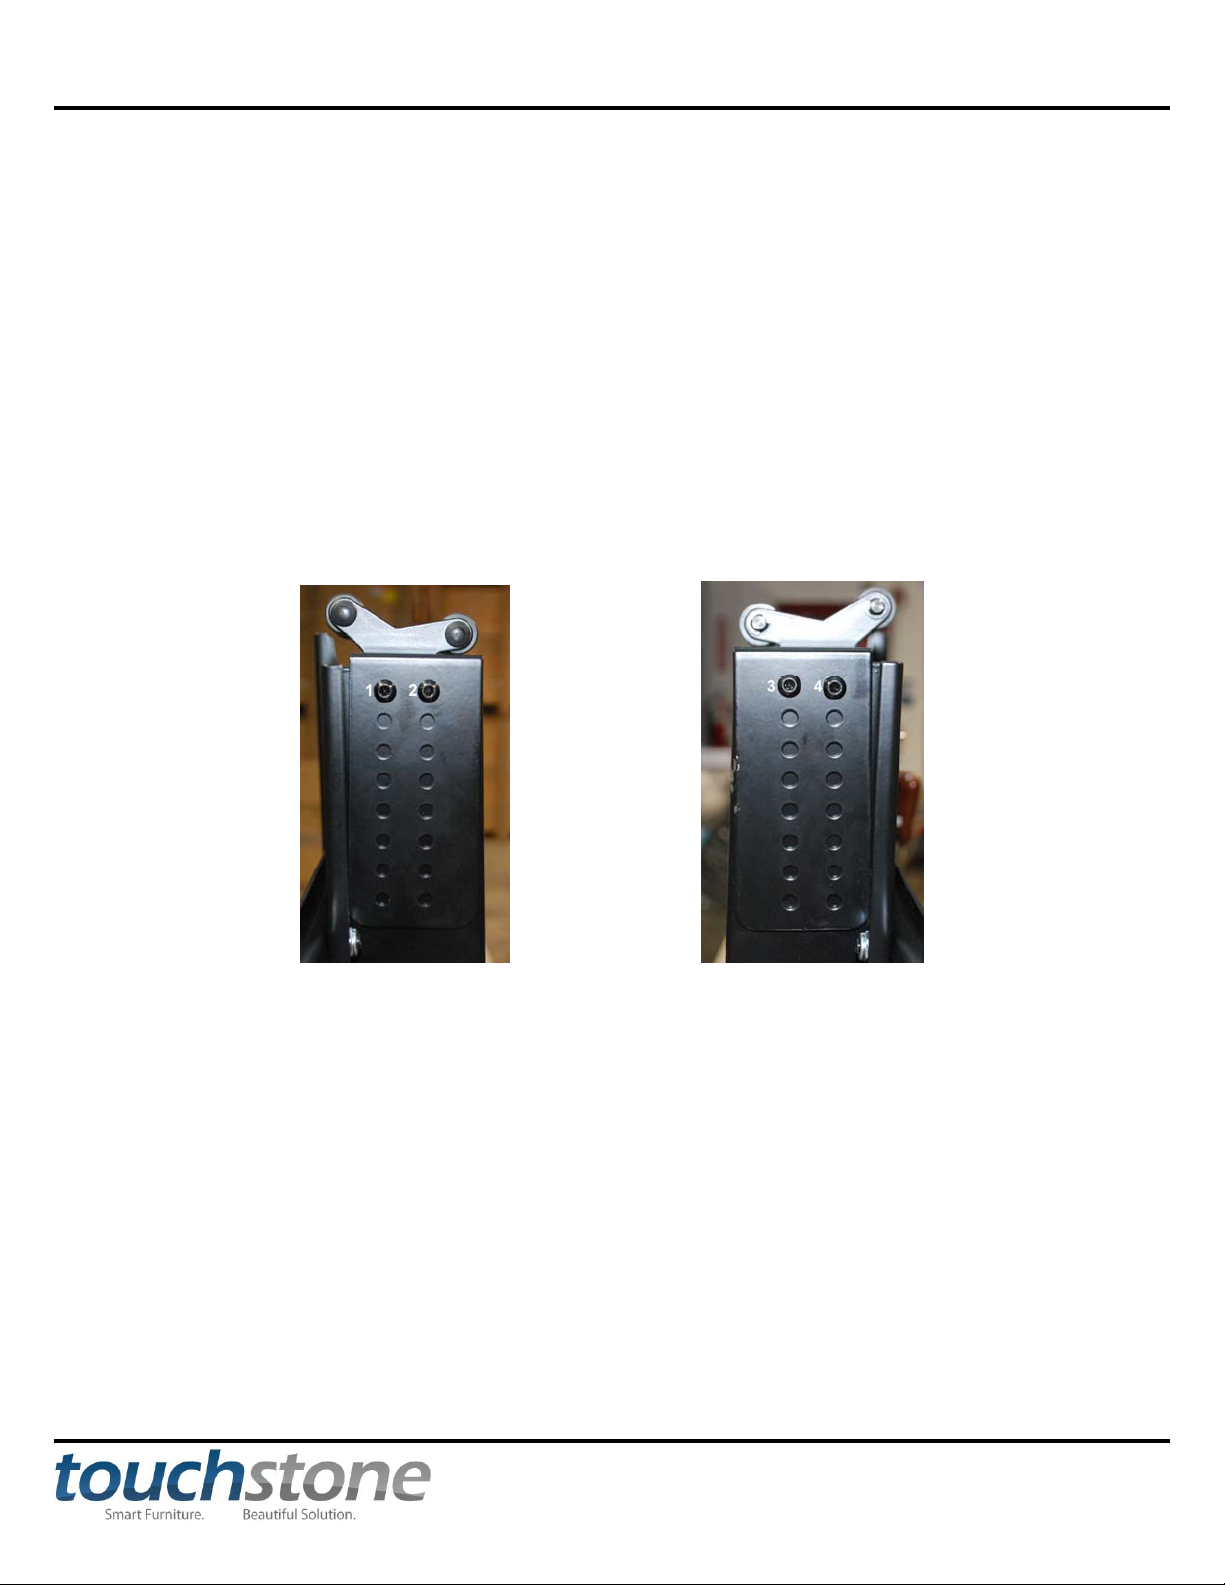
Each Whisper Lift II comes with an adjustable roller assembly that allows you to set the maximum height of the
lift.
Tools Needed:
- adjustable wrench or 4mm socket wrench
- size 4 metric hex wrench
Instructions:
1. Raise the lift to a height that is comfortable for you to work at.
2. The adjustable roller is held in place by 2 4mm hex screws on either side of the lift. Using the size 4 metric hex
wrench and adjustable wrench/socket wrench, remove all 4 screws holding the adjustable roller in place.
3. Raise the adjustable roller to the desired level and refasten the adjustable roller to the lift using the screws/nuts
removed in step 2.
4. Adjust height of adjustable roller as needed so that the lid of the cabinet closes flush.
www.touchstonehomeproducts.com 800.215.1990
Page 21
Touchstone Elevate
Removing Front Access Panel
The front access panel can easily be removed for access to the inside of the unit.
1. Raise lid and brace the lid so that it stays open
***CAUTION: Lid will not stay up on its own. Brace the lid by placing something between the lid hinge
and the cabinet to stop the lid from falling or have another person hold the lid while you work inside of
the cabinet.
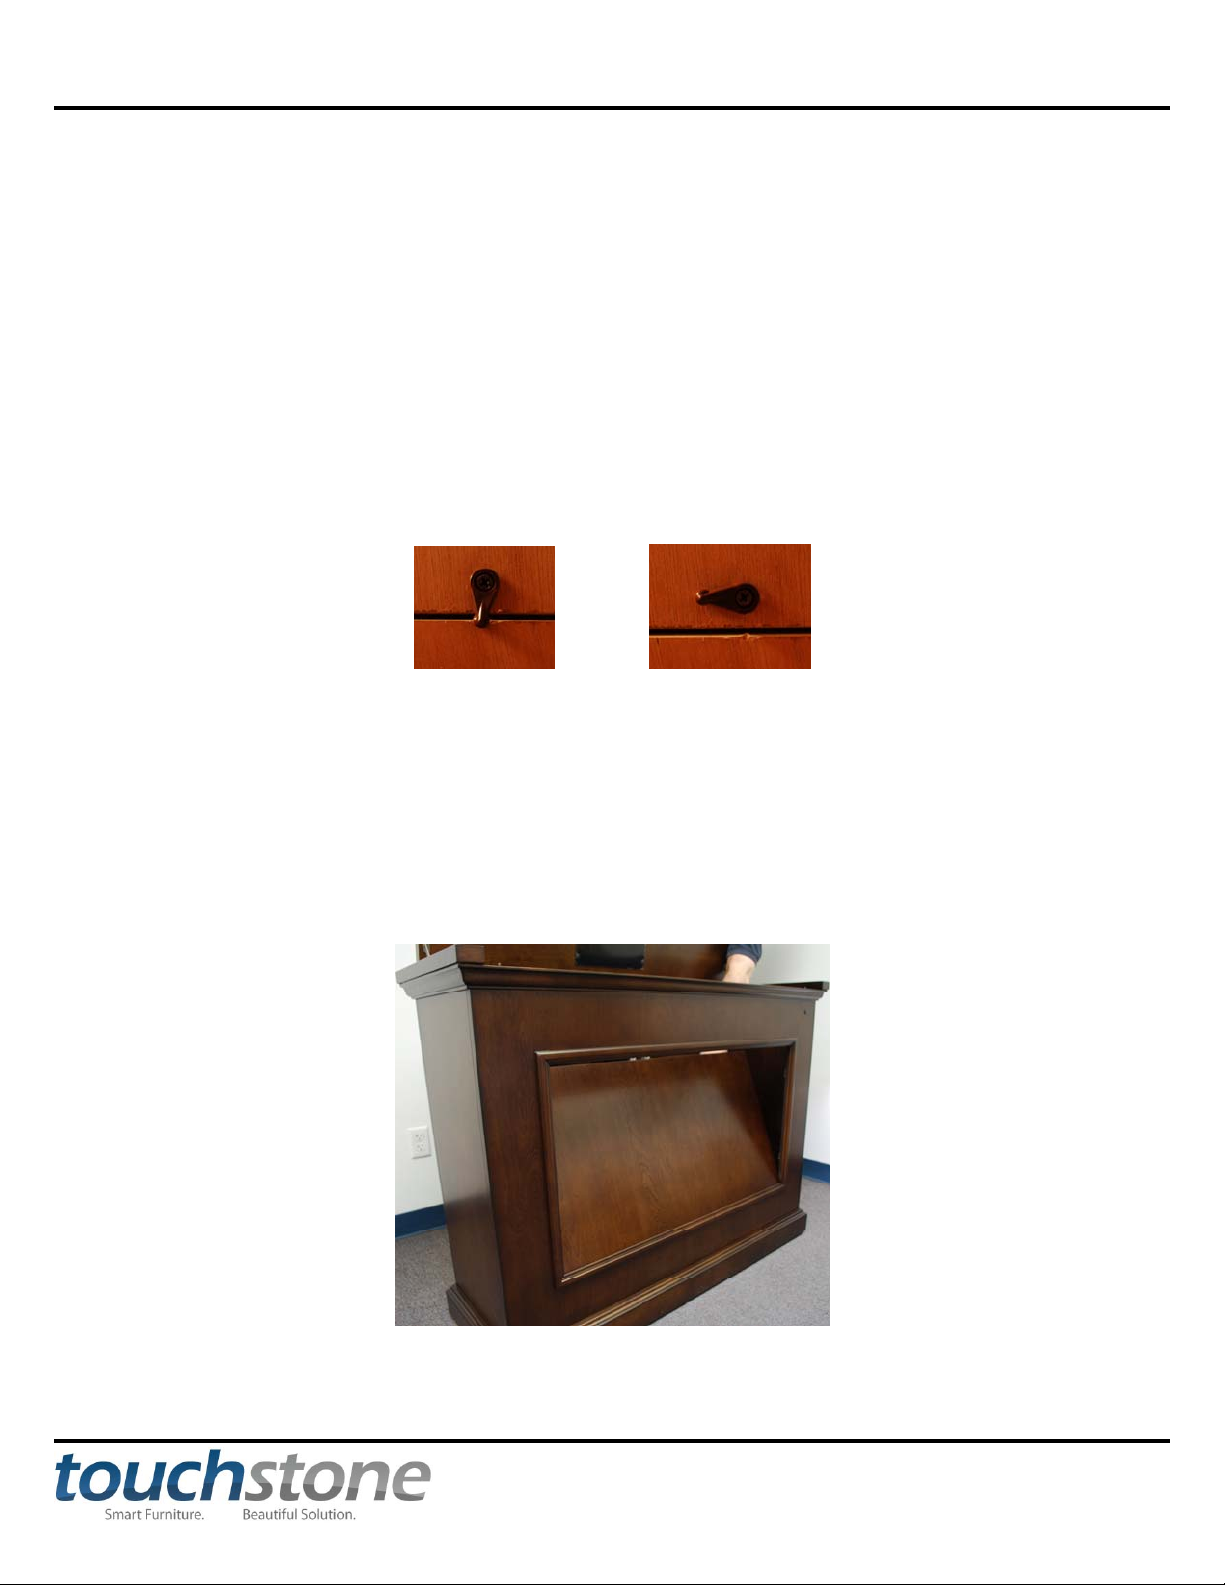
2. Locate the panel clips on the inside front panel of the cabinet. Turn the clips to the open position so that
they are either facing the left or the right.
Panel Clip
21
Closed Position Open Position
***CAUTION: Once all of the clips are turned to the UNLOCKED position, the panel may fall in towards
the center of the cabinet. Please be sure to brace the panel so that it does not fall into the cabinet and
damage the TV or any components installed inside of the cabinet.
3. Remove panel by tilting panel towards inside of unit and lifting out through the top of the unit.
www.touchstonehomeproducts.com 800.215.1990
Page 22
Touchstone Elevate
22
Operating the Whisper Lift II
Operating the Wireless Remote
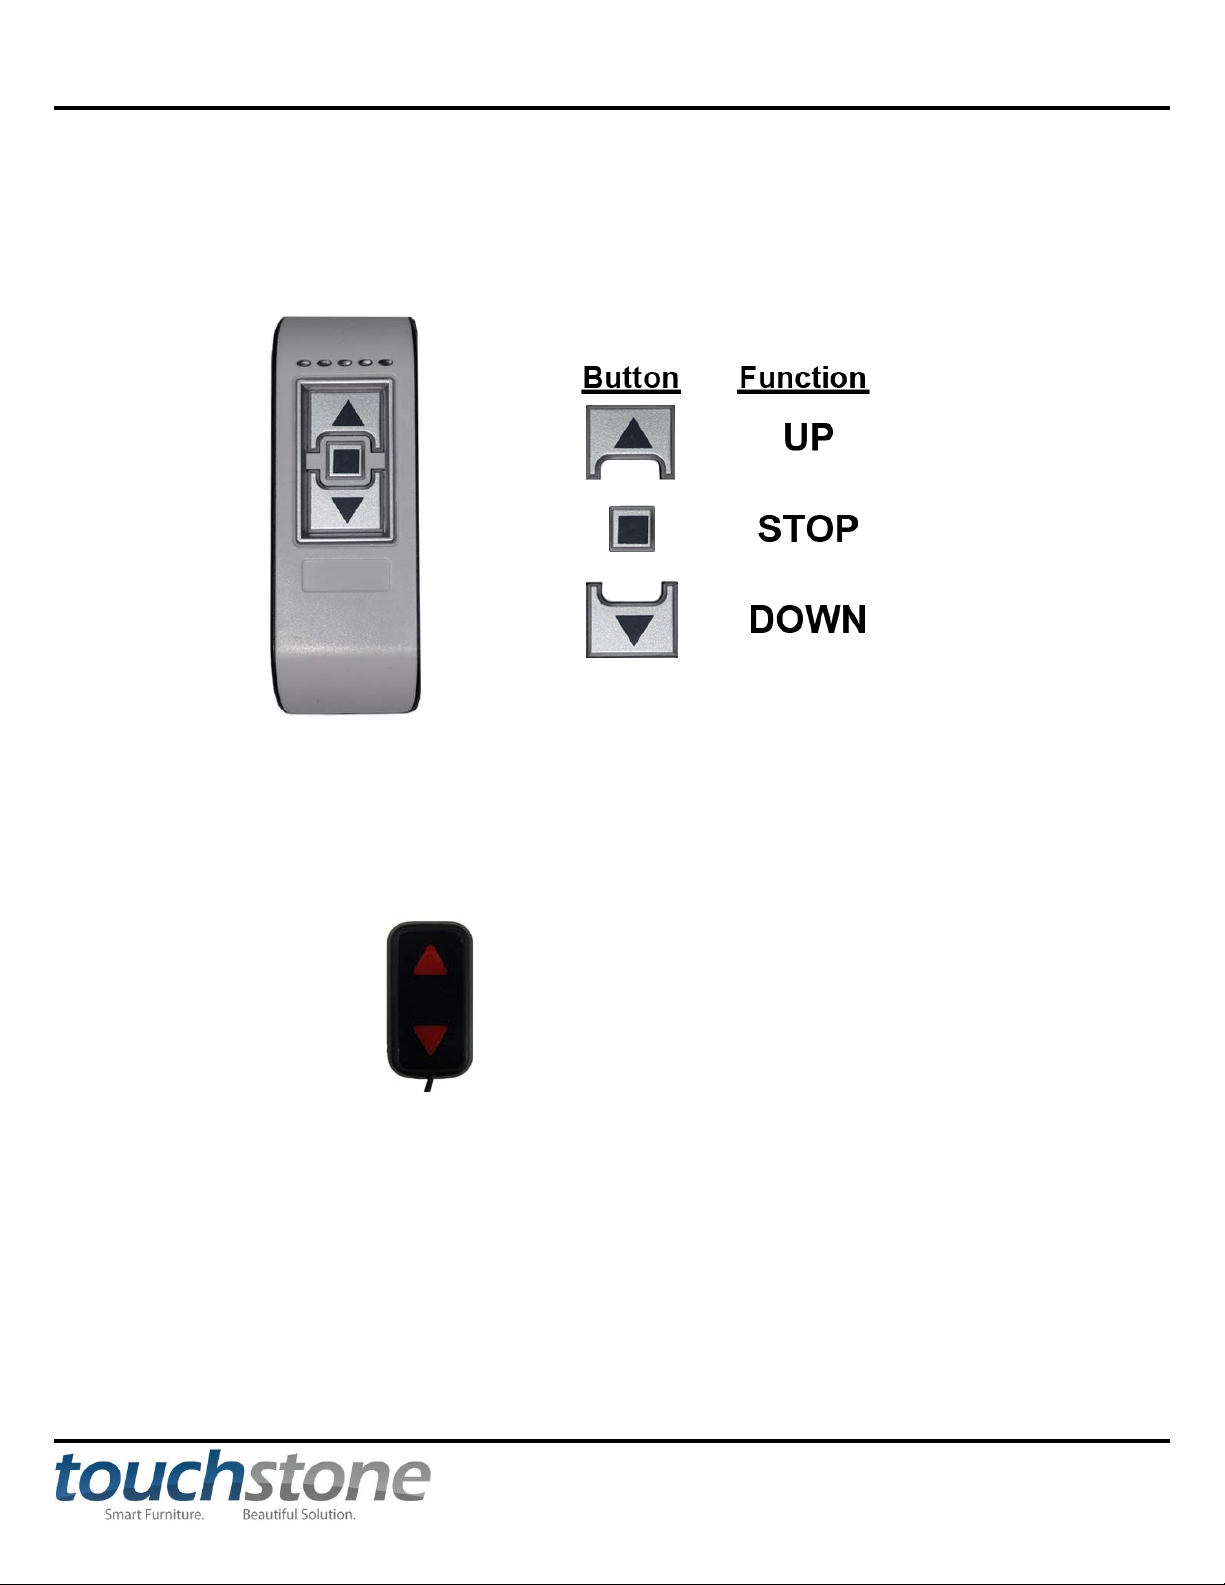
The remote control for your Touchstone Whisper Lift II is controlled via radio frequency. You do not need to point
the remote control directly at the cabinet to operate the lift.
Operating the Wired Remote
A wired control is included with your Touchstone Whisper Lift II, which can be mounted inside of the cabinet and
control the lift should you misplace the wireless remote control.
UP
DOWN
When installing the wired remote in the cabinet, the DOWN arrow points toward the wire and the UP arrow points
away from the wire.
www.touchstonehomeproducts.com 800.215.1990
Page 23

Touchstone Elevate
23
www.touchstonehomeproducts.com 800.215.1990
Page 24
Touchstone Elevate
Optional Whisper Lift II Accessories
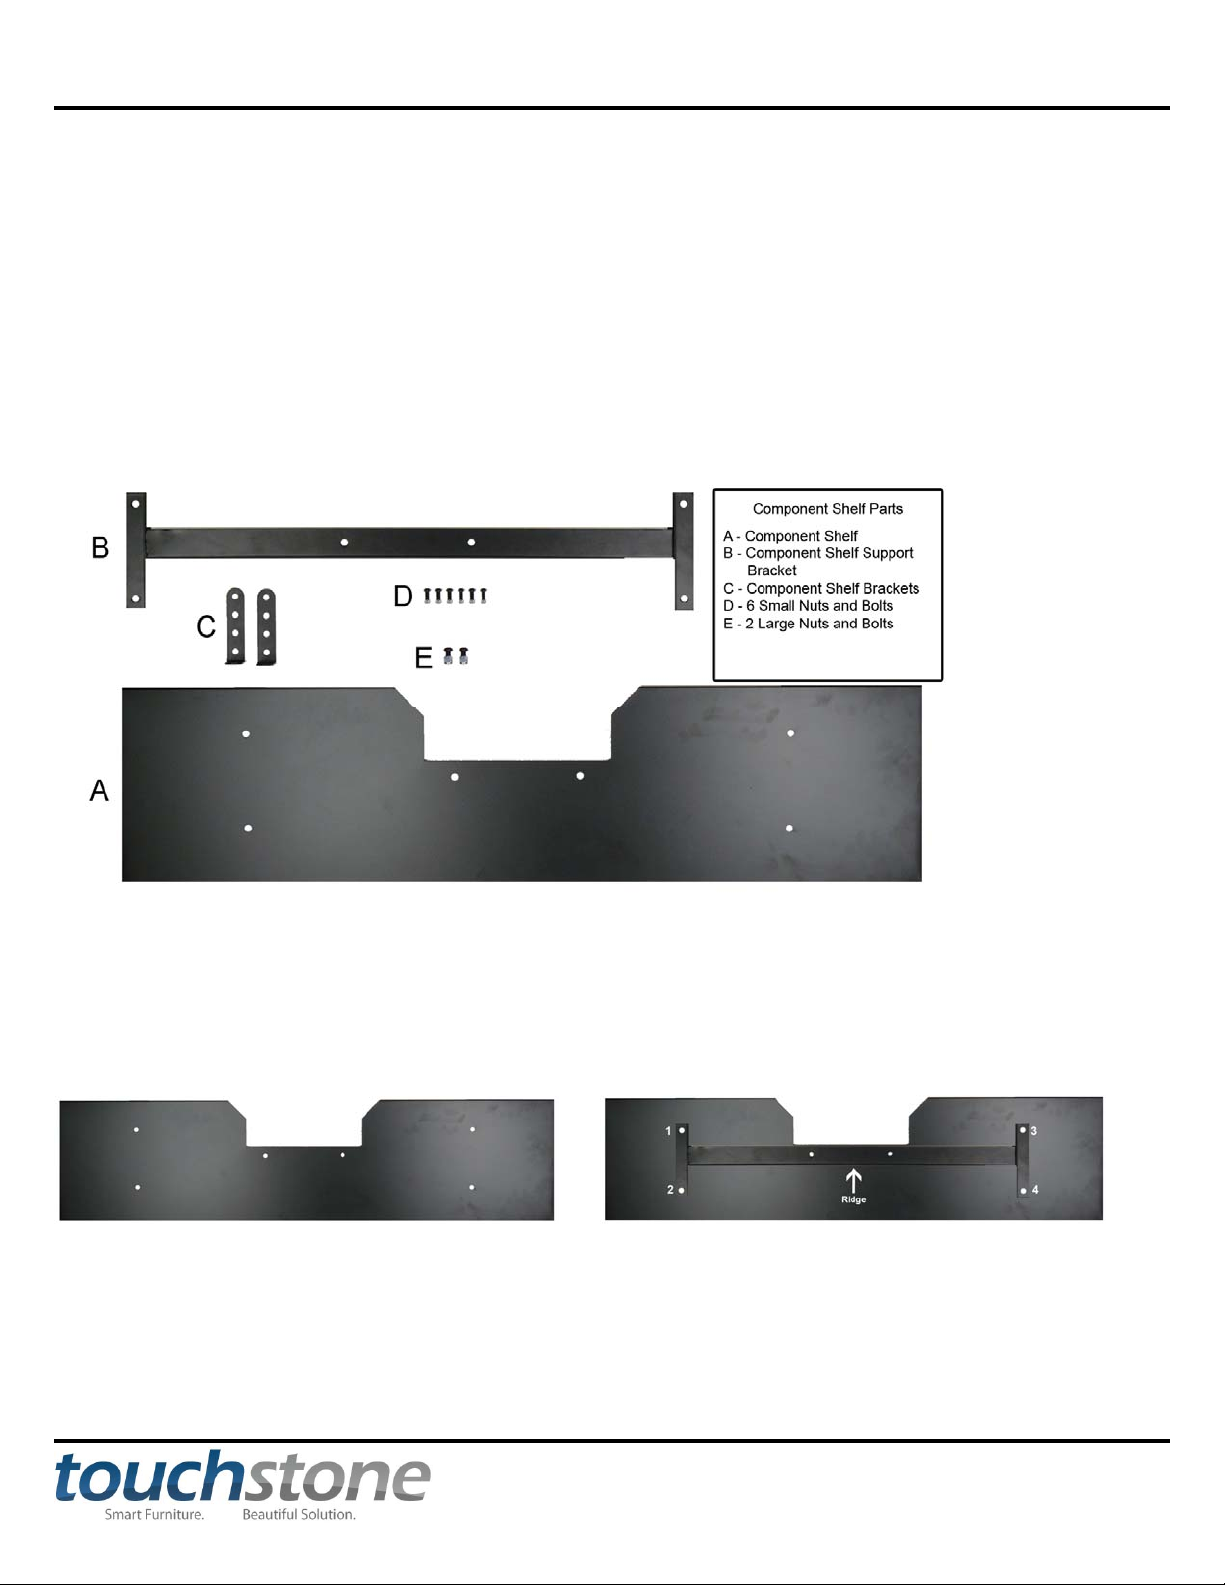
Assembling Component Shelf (Optional)
Tools Needed:
- adjustable wrench
- size 5 metric hex wrench
- size 4 metric hex wrench
Component Shelf Parts
24
Instructions:
1. Using 4 small nuts and bolts (D), attach the shelf support (B) to the underside of the component shelf (A). Orient
the shelf support so that the ridge near the center of the shelf, away from the cutout in the shelf.
www.touchstonehomeproducts.com 800.215.1990
Page 25
Touchstone Elevate
Assembling Component Shelf – cont
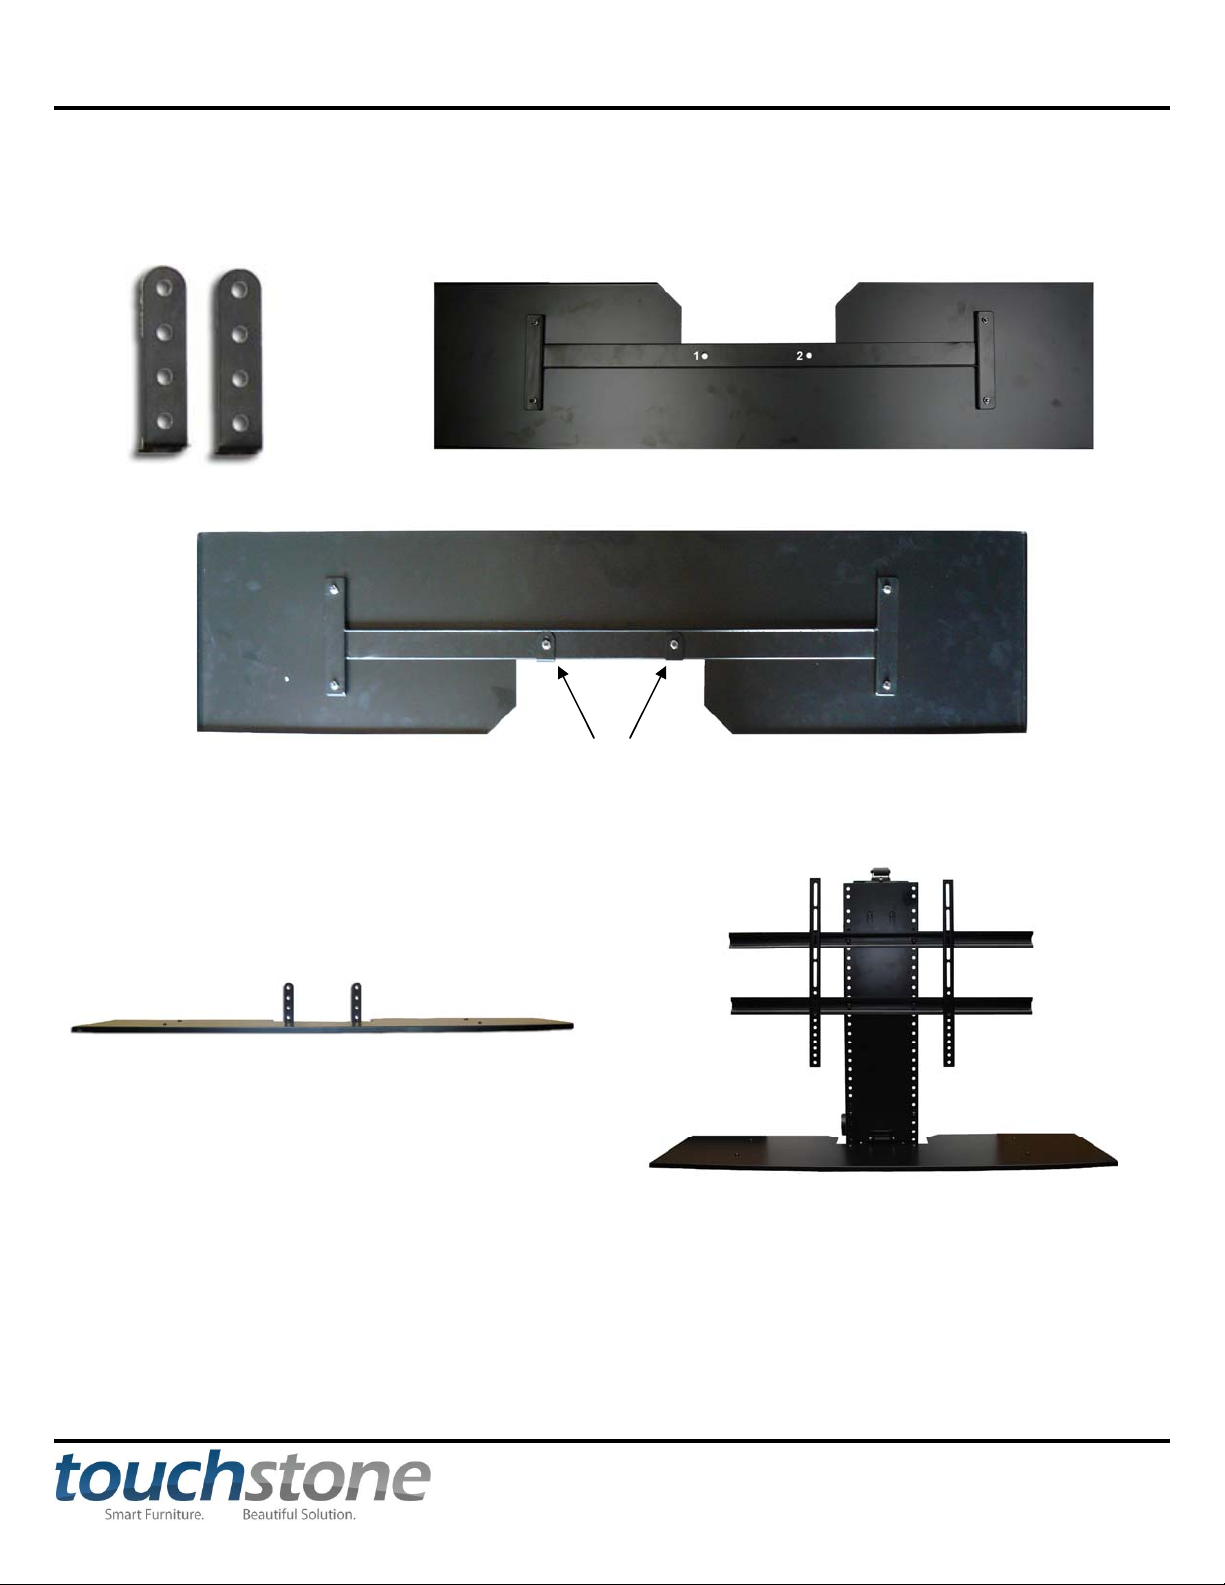
2. Using the 2 remaining small nuts and bolts (D), attach the shelf brackets (C) to the lift. The shorter end of the
shelf bracket attaches underneath of the shelf.
Shelf Brackets
25
3. When completed, attach the component shelf to the lift using the 2 large hex bolts (E) and nuts provided.
Assembled Component
Shelf
Shelf Brackets
Component Shelf
Attached to Lift
***CAUTION: After attaching the component shelf to the lift, please check to ensure that the
component shelf clears the front of the cabinet when lowered. Do not attempt to lower lift if it appears
the shelf will hit the front of the cabinet. If the shelf does not clear the front of the cabinet, revert back
to the Installing Lift In Elevate Cabinet section and check to make sure the shelf and lift are aligned.
www.touchstonehomeproducts.com 800.215.1990
Page 26

Touchstone Elevate
26
IR Repeater Kit (optional)
The Touchstone Infrared Repeater allows the customer to install a small satellite TV/cable box in the bottom of the
cabinet. The Touchstone Infrared Repeater allows the you to change the channel on their box without having direct
line of sight to the component.
For more information on the Touchstone Infrared Repeater Kit, please visit
http://www.touchstonehomeproducts.com/irrepeaterkit.html or call our Customer Service Department at 1-800-215-
1990 for more information and pricing.
Technical Support
Should you have any problems with your Touchstone Home Products Whisper Lift II, our technical support staff is
here to help. Our technical support reps are available for phone assistance at 1-800-215-1990 Monday to Friday,
from 8:00am to 5:00pm EST. We also can be reached via email at [email protected]
Warranty
Touchstone Home Products warrants the Elevate TV Lift Cabinet and Whisper Lift II TV Lift to be free from
defects in material and workmanship for two years from date of purchase. The warranty includes all parts,
motorized components, electronics, wood cabinet, and metal. If the Elevate TV Lift Cabinet or Whisper Lift II
proves to be defective in material or workmanship during the warranty period, Touchstone Home Products will
replace the defective part free of charge. The replacement part will then be covered by the balance of the time
remaining on the customer’s original warranty.
Touchstone Home Products’ warranty does NOT cover: any product on which the serial number has been defaced,
modified or removed; damage, deterioration or malfunction resulting from accident, misuse, neglect, power surges,
fire, water, lighting, or other acts of nature, unauthorized product modification, failure to follow instructions
supplied with the product, repair or attempted repair by anyone not authorized by Touchstone Home Products,
causes external to the product such as electric power fluctuations or failure, use of supplies or parts not meeting
Touchstone Home Products specifications, or any other cause which does not relate to a product defect.
www.touchstonehomeproducts.com 800.215.1990
Page 27
Touchstone Elevate
27
Warranty Registration
To register your Touchstone TV Lift cabinet, please go to our website at
http://www.touchstonehomeproducts.com/warranty-registration.html
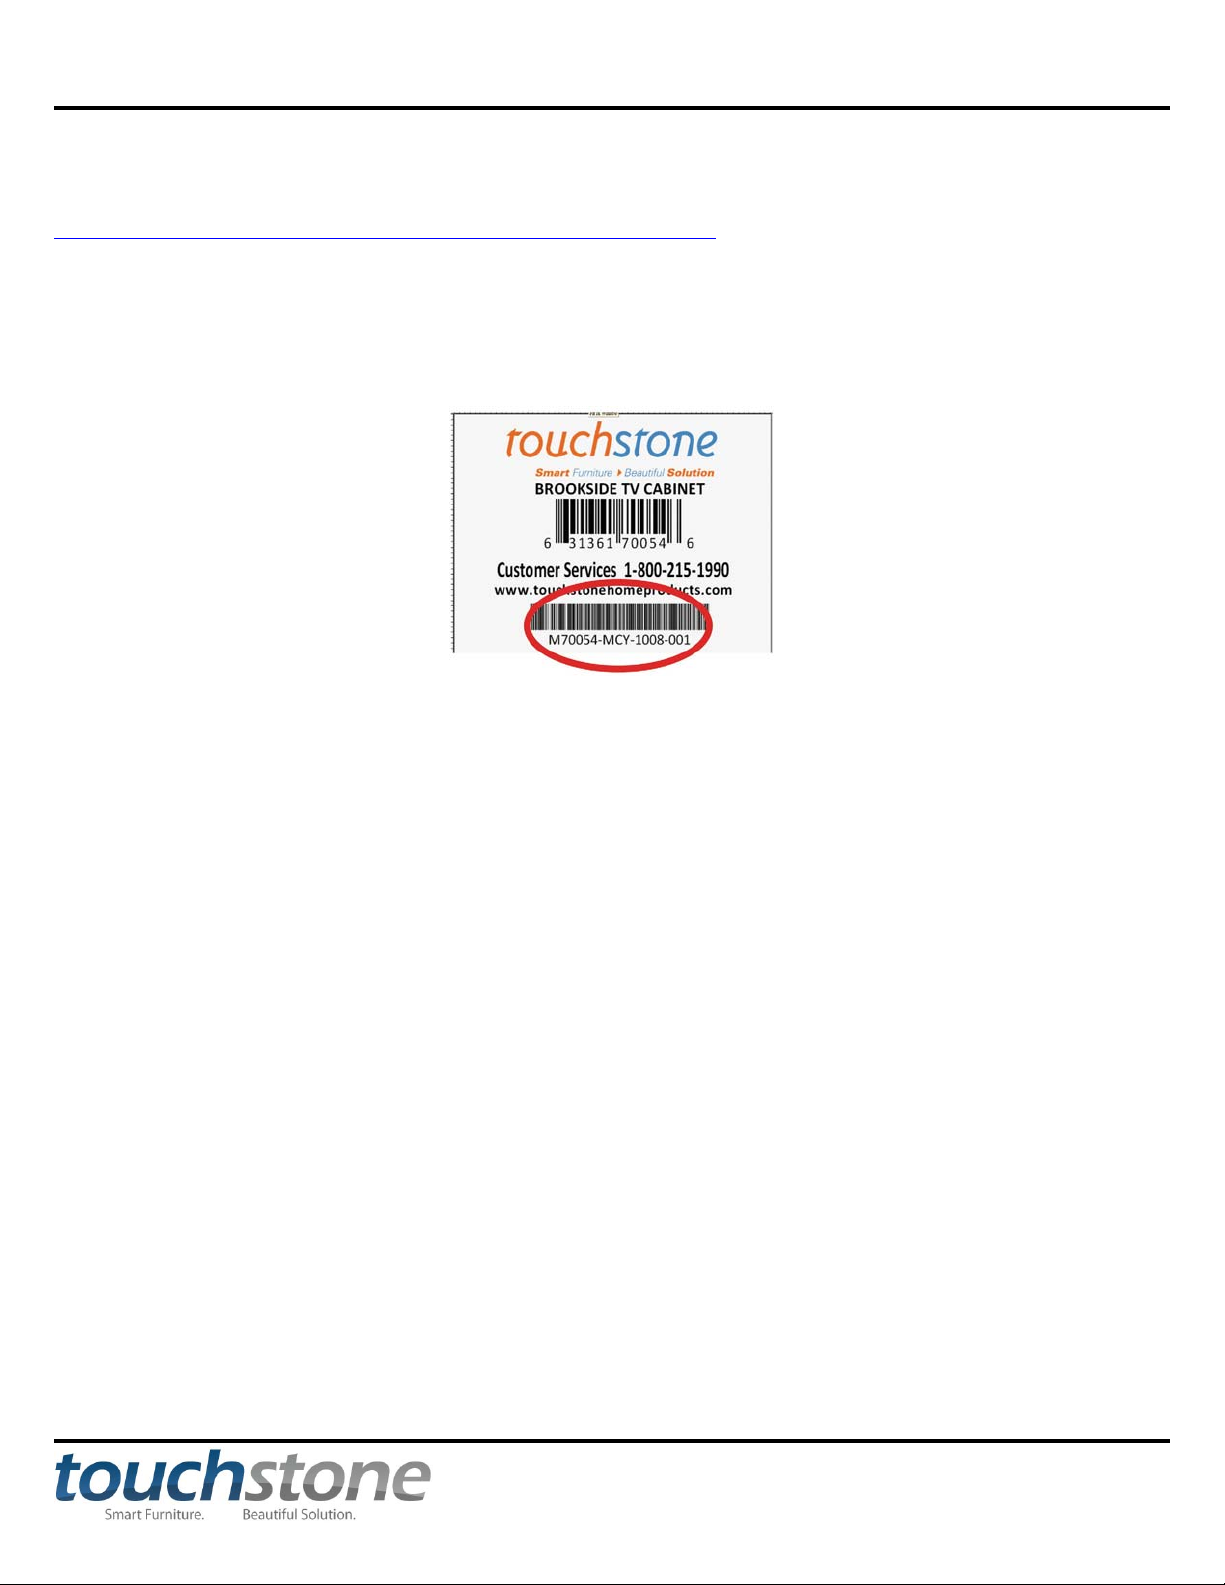
Prior to registering, make note of your cabinet serial number which can be found on the 3x3 white rectangular label
affixed prominently on the inside of the cabinet under the lid. The bottom line set of numbers on this label is the
cabinet serial number.
Cabinet Serial Number
www.touchstonehomeproducts.com 800.215.1990
Page 28

Touchstone Elevate
28
www.touchstonehomeproducts.com 800.215.1990
 Loading...