

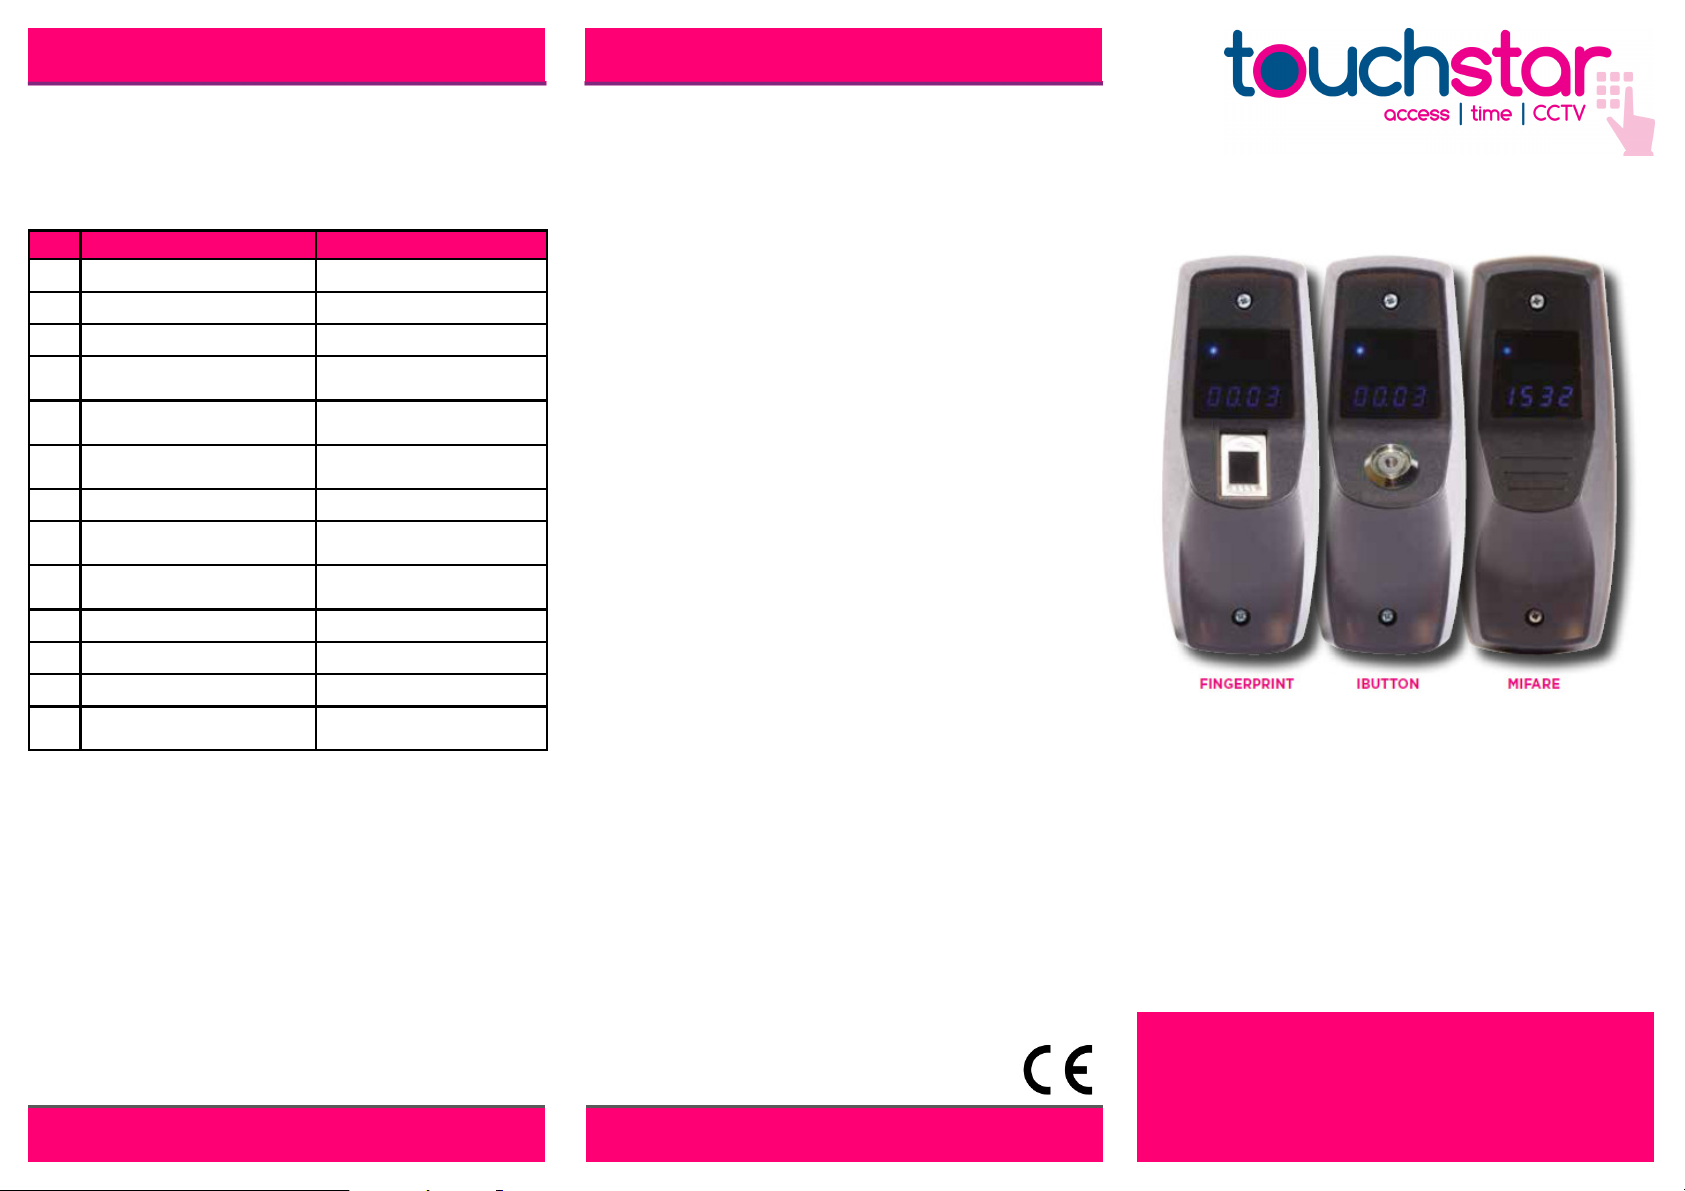
TouchStar Nohmad Fingerprint, Nohmad iButton, Nohmad Mifare User Manual
Nohmad GPRS Terminal
INDICATORS...The Nohmad
tus indicators.
LH LED flashing Blue
LH LED flashing Blue: Valid connection to the GSM network.
LH LED flashing BlueLH LED flashing Blue
LH LED steady Blue
LH LED steady Blue: Invalid connection to the GSM network.
LH LED steady BlueLH LED steady Blue
RH LED off
RH LED off: Normal operation, flashes once when media is read.
RH LED offRH LED off
RH LED flashes repeatedly
RH LED flashes repeatedly: See table below:
RH LED flashes repeatedlyRH LED flashes repeatedly
NO: CONDITION ACTION
2222 No TCP/IP connection
3333 No GPRS connection
LH LED steady: Check signal strength
LH LED flashing:
Memory full, no TCP/IP
4444
connection
Memory full, no GPRS con-
5555
nection
LH LED steady: Check signal strength
LH LED flashing:
Memory full, connected, no
6666
server response
7777 PIN required Enter a correct PIN
8888 SIM fault Contact supplier
9999 SIM fault Check SIM is fitted
Memory full, connected,
10
10
1010
faulty server response
REFERENCES...
the Nohmad
Nohmad depending on how it is being used:
Nohmad Nohmad
For use with our Fastlane product MAN060
MAN062
For use with customer software SDK download
MAN050
MAN051
MAN052
MAN058
Nohmad terminal is fitted with two LED sta-
Nohmad Nohmad
Check SIM/network parameters
Check parameters and
host server
Check SIM/network parameters
Check host software application
Check host software application
...Other documentation and utilities will relate to
......
MAN060----XX
MAN060MAN060
MAN062----XX
MAN062MAN062
SDK download
SDK downloadSDK download
MAN050----XX
MAN050MAN050
MAN051----XX
MAN051MAN051
MAN052----XX
MAN052MAN052
MAN058----XX
MAN058MAN058
XX
XXXX
XX
XXXX
XX
XXXX
XX
XXXX
XX
XXXX
XX
XXXX
Nohmad GPRS Terminal
SPECIFICATION:
Power:
Power: Low power 5v DC mains
Power:Power:
adaptor, 0.5W average
Dimensions:
Dimensions: 165mm x 66mm x 50mm
Dimensions:Dimensions:
Installation:
Installation: 2 x No. 6 screws or adhesive pad
Installation:Installation:
Media:
Media: iButton™, Fingerprint, Mifare
Media:Media:
Indicators:
Indicators: 4 digit numeric display
Indicators:Indicators:
Two single-colour LED status
indicators, Audible buzzer
SIM card:
SIM card: Easy-install caged SIM
SIM card:SIM card:
connector
Cellular radio:
Cellular radio: Quad GSM band
Cellular radio:Cellular radio:
(800/900/1800/1900 MHz)
Cellular data:
Cellular data: GPRS class 10 (packet)
Cellular data:Cellular data:
RF connection:
RF connection: Built-in dual-band antenna
RF connection:RF connection:
(900/1800 MHz)
External antenna connection and
optional high-gain external antenna
Processing:
Processing: 104MHz, 32 bit ARM9 wireless
Processing:Processing:
processor
Clock:
Clock: Battery-backed Real Time Clock
Clock:Clock:
with calendar
IMPORTANT SAFETY INFORMATION...This terminal has been
designed to meet international safety standards but, like any electrical equipment,
care must be taken if safety is to be assured. read these safety instructions before
installation and operation of the terminal. Retain this installation guide for future
use.
DO
DO ensure that all the electrical connections (including
DODO
power connections and interconnections between
pieces of equipment) are properly made in accordance
with the manufacturers instructions. Equipment
provided with a safety earth connection must be
provided with a safety earth connection must be
provided with a safety earth connection must be provided with a safety earth connection must be
earthed
earthed
earthedearthed
DO
DO consult your dealer if you are in any doubt about
DODO
installation, operation or safety of the equipment
DO
DO remember that some equipment continues to
DODO
operate after mains power has been removed, because
of an internal battery. In such cases a qualified Service
Engineer must disconnect the battery before
attempting to service the equipment
DO NOT
DO NOT continue to operate the equipment if you are
DO NOTDO NOT
in any doubt about it working normally
DO NOT
DO NOT remove any cover fastenings unless you are
DO NOTDO NOT
suitably qualified to do so. Even then isolate from the
power connection before you start
DO NOT
DO NOT allow the equipment to be exposed to rain or
DO NOTDO NOT
moisture other than permitted by the equipment's
specification
DO NOT
DO NOT attempt to service any battery fitted to the
DO NOTDO NOT
equipment. If the battery fitted to the circuit board is
faulty, return the complete circuit board to an
approved Service Centre. Removable batteries may be
WARNING...To comply with international safety standards the a.c. supply must
be routed via an easily accessible isolating device. This device must have a contact
gap of at least 3mm (three millimetres) and should break both Live and Neutral
conductors simultaneously. If the Neutral conductor can be reliably identified the
device may be in the Live conductor only.
POWER REQUIREMENT...The Nohmad
with an external low power 5v DC mains adaptor, 0.5W average.
replaced by suitably qualified Personnel
Nohmad Attendance Terminal is supplied
NohmadNohmad
Equipment
Equipment Equipment
NOHMAD GPRS TERMINAL
USER GUIDE
5
5 6
www.touchstar-atc.com
MAN061-04
6
www.touchstar-atc.com
SEPTEMBER 2016
Nohmad GPRS Terminal
Nohmad GPRS Terminal
www.feedback-group.com
Nohmad GPRS Terminal
INTRODUCTION...
minal. To ensure you get the best from this product, some
careful system configuration is required. Please take time to
read the setup notes fully below before proceeding.
CONTENTS...
everything is present before continuing. There should be 1 x
terminal, 1 x power supply, 1 x packet of fixing screws and adhesive pads, 1 x user guide.
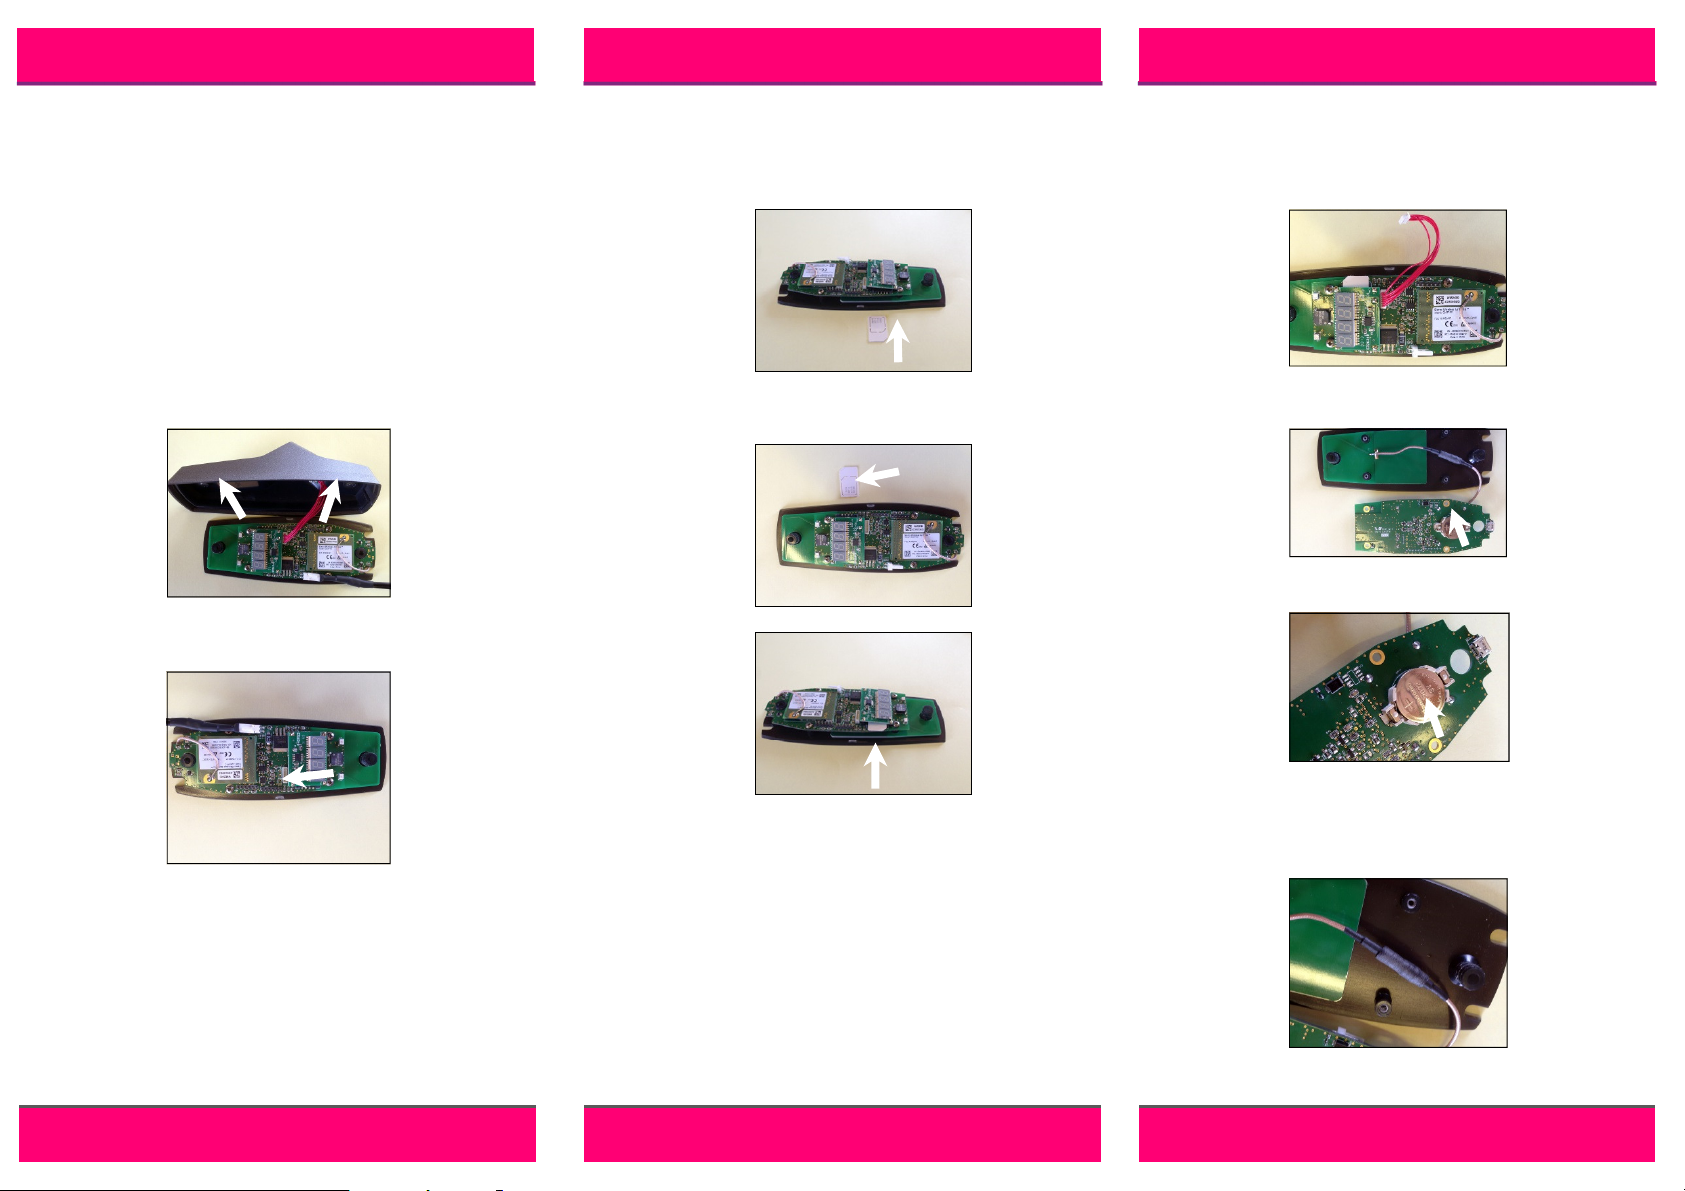
PREPARATION...
Nohmad
Nohmad GPRS terminal must be opened up by separating the
Nohmad Nohmad
front case from the rear. Carefully undo the two screws holding them together making sure not to pull the cable connecting the reading device on the front cover and it’s connection
to the circuit board whilst doing this.
The circuit board will be revealed. All connections are made to
this including the power supply, SIM card and backup battery
on the rear of the board.
POWER SUPPLY CONNECTION...
power supply to the terminal at this stage so that the setup
procedure can continue.
PLEASE NOTE: Ensure the power supply is turned off before
connecting it to the Nohmad
place as shown.
The cable can be routed through the back of the terminal or
by the cut-out on the side of the case.
...Thank you for purchasing the Nohmad
......
...Carefully remove the contents and check that
......
...Before anything else can be carried out, the
......
...You need to attach the
......
Nohmad terminal. Push the connector into
NohmadNohmad
Nohmad ter-
NohmadNohmad
SIM CARD FITTING...
card carefully from the outer card making sure that you note
the PIN and PUK number. On the Nohmad
SIM slot as indicated. Always observe normal good practices
when handling the SIM and avoid leaving fingerprints on the
gold contacts.
Insert the SIM card into the carrier ensuring correct orientation.
Ensure it fully seated.
PLEASE NOTE: It is likely that the Nohmad
ready have the SIM card fitted if it has been Fastlane enabled.
For more information on our Fastlane cloud service see our
document MAN060
MAN060----XX
MAN060MAN060
...If not already fitted, remove the SIM
......
Nohmad terminal locate the
NohmadNohmad
Nohmad terminal will al-
Nohmad Nohmad
XX.
XXXX
BATTERY REPLACEMENT...
internal battery, turn the Nohmad
first. Remove the front cover carefully remembering not to pull
the cable connecting the reading device to the circuit board.
Unplug this cable and then the power cable.
Undo and remove the 4 screws holding the circuit board to the
rear of the terminal. Turn the board upside down to reveal the
battery.
Remove the old battery and replace with the correct type
(CR2032, 3V Lithium). Re-assemble the Nohmad
EXTERNAL ANTENNA...
the internal connection by unplugging it and then fit a suitable
external one. Please contact TouchStar for further information
on this.
...If it is necessary to replace the
......
Nohmad terminal off at the mains
Nohmad Nohmad
Nohmad terminal.
Nohmad Nohmad
...To fit an external antenna, detach
......
2
2 3 4
www.touchstar-atc.com
3
www.touchstar-atc.com
4
www.touchstar-atc.com
 Loading...