

Page 1
V 1.0.1
Touch Screens Inc.
ELLIPSIS
(Model Name: Ellipsis Touch Computer)
All-In-One 17”& 19" TFT-LCD Panel PC
User’s Guide
Version: 1.0.1
Users guide-V1.0.1
January, 2005
Page 2

ii
Touch Screens Inc.
V 1.0.1
Notice: The use of these pages are protected by copyright laws .
Copyright
The contents may not be modi fied without permission by owner
of said product
We do not guarantee the prevention of data loss. Please be cautious
not to lose important data and keep back-ups at all times.
Even though we did our best in drawing up this user’s guide, there
may be omissions and errors we failed to notice. Manufacturers and
suppliers cannot be held liable for problems stemming from those
errors and omissions.
Registered Trademark
Microsoft Windows XP is a registered trademark of Microsoft.
Intel Pentium and Celeron are registered trademarks of Intel.
Company names and product names mentioned in this document
are used to help your understanding and are registered t rademarks.
The permissible level (Class B) of ele ctromagnetic waves
The product was tes ted for electrom agnetic waves and was rate d as
class B, which means it is saf e t o us e anywhere.
Page 3

iii
V 1.0.1
Touch Screens Inc.
Caution
For safe and proper installation and use of this product, please read
this guide carefully.
Even though th is product is equipped with a s afety device to prevent
users from getting injured, please keep the following instructions in
mind.
Caution during installation
Install on an even an d stable place to prevent product damage
and injury.
Install in a place with good v entilation to reduce humidit y and to
prevent overheating.
Keep objects with magnetic properties away from this product.
Check the operational voltage before plugging the power cord
into the outlet.
Use the power co rd that is included with t he product and do not
place heavy things on it.
To prevent electric shock and fire, do not use an outlet that is
damaged or that is not standard.
If you plug the power cord into an extension cord, be sure that
the total voltage of all the devices connected to the cord does
not exceed the number specified on it.
Caution during use
If peripheral equi pment is connec ted to this prod uct, turn on the
power source of the perip h eral eq uipme nt firs t when you s tart ing
up. On the contrary, when shutting down, turn off the power
source of this product f i rst to prevent damage to the product.
Please make sure t hat no liquid enters into the pr oduct. This can
cause damage to the product, fire, or electric shock.
Unplug the power cord before cleaning this product. Please
wipe with tissu es or fabrics that are sprayed with a PC cleaner
and do not directly spray the product.
Page 4

iv
Touch Screens Inc.
V 1.0.1
When this product will be idle for an extended period of time,
unplug the power cord to pr event da mage st emming f rom power
surges.
When unplugging the power cord, pull by the plug, not the wire.
Do not place this product in a place where the temperature is
over 60
o
C (140 oF) and ventilation is poor. This may damage
the product.
The optimum temperature for the operation of this product is
35
o
C, so keep electric he aters away from this product.
Take precautions to avoid losing d ata stored on the h ard disc of
this PC and back-up important data at all times in case of an
unforeseen accident.
Do not attempt to disassemble this product. When this PC
needs repairs or updates, request warranty service and have a
service person do the work.
Should the following s ituations occur, contact one of our qualit y
assurance divisions.
When liquid gets into the product or when it is exposed to
humidity for an extended time
When this PC does not operate well even though you are
following the instructions
When this product has fallen an d broken or becom e cracked
during delivery.
Page 5

v
Touch Screens Inc.
V 1.0.1
Table of contents
Notice .........................................................................
Copyright.................................................................................................ii
Registered Trademark...........................................................................iii
The Permissible level (Class B) of electromagnetic waves ....................ii
Caution...................................................................................................iii
Caution during installa tion.......... ....... ....... ...... ....................................iii
Caution during use........................ ...... ...............................................ii i
Table of contents ....................................................... v
Chapter 1. Introduction .............................................. 1
Product features..................................................................................... 1
Unpacking.............................................................................................. 2
Optional devices .................................................................................... 2
Other peripherals .............................. ...... ...... ....... .................................. 3
Chapter 2. About the computer ................................... 4
The front of the main body (control panel)............................................. 4
The rear panel of the computer (Input/output connections)................... 5
The rear panel of the computer stand (power cord connections).......... 6
Chapter 3. Starting up the computer for the first time .. 9
For Windows XP Home Edition.............................................................. 9
Step 0: Windows XP and basic driver pre-setup............................. 9
Step 1: To set up the computer..................................................... 10
Step 2: The installation of drivers for other peripherals................. 11
Step 3: The installation of software for other peripherals.............. 12
Step 4: Completion of setup .......................................................... 12
Chapter 4. Using the computer...................................13
To Use Windows XP Home Edition ..................................................... 13
Using other applications....................................................................... 14
Partitioning the hard disk ..................................................................... 14
Chapter 5. Changing the setup...................................15
BIOS CMOS setup utility...................................................................... 15
How to change BIOS CMOS setup.................................................. 15
System upgrades.... .......................................................... ...... ...... ....... 19
Hardware upgrades.......................................................................... 19
Software upgrades........................................................................... 19
BIOS Upgrade.................................................................................. 19
Chapter 6. Reinstalling the OS...................................22
How to reinstalling Windows XP.......................................................... 22
Appendix 1. Troubleshooting ......................................... 24
Appendix 2. Product s pecifications and system diagram.. 27
Appendix 3. Product warranty........................................ 31
Page 6

1
Touch Screens Inc.
V 1.0.1
Chapter 1. Introduction
Congratulations on your purchase of the Touch Screens Inc.
All-In-One 17”& 19" TFT-LCD Panel PC.
Product features
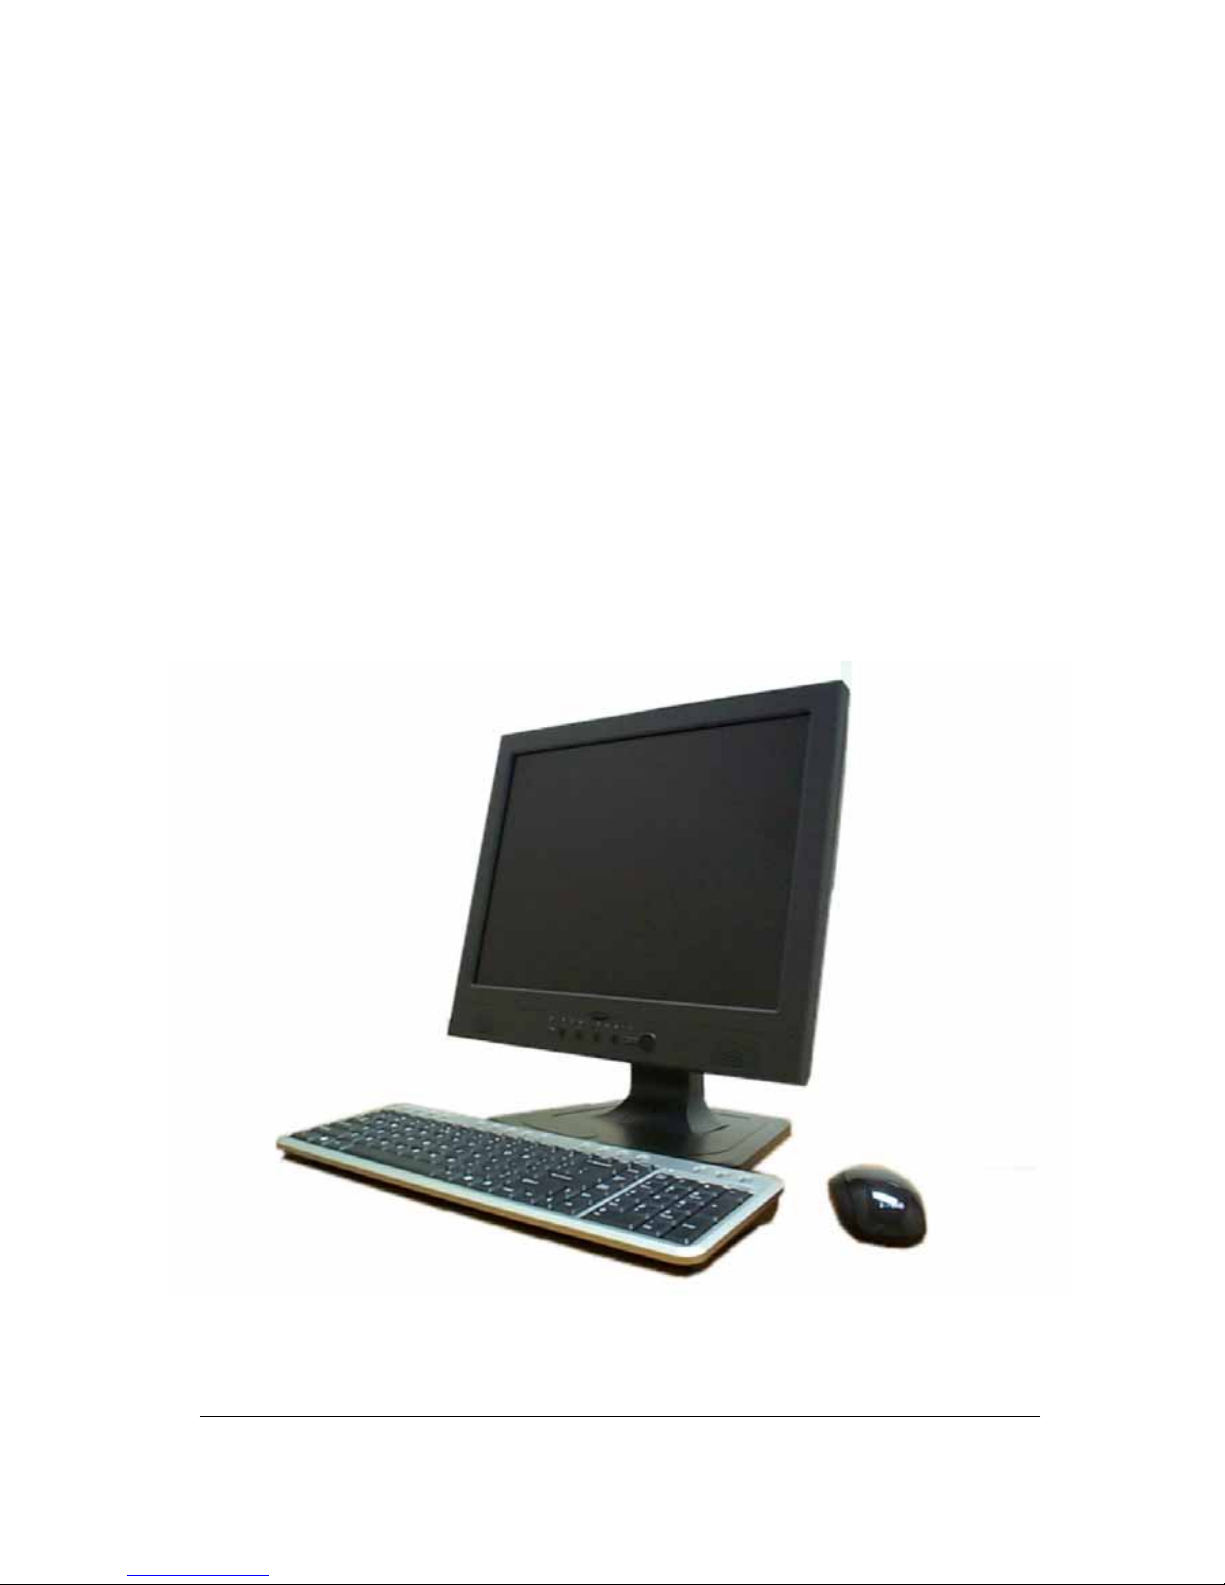
The Ellipsis computer is the all-in-one PC that co mbines a 17” TFT-LCD
monitor and a desktop computer, offering an ultra light weight of 10Kg
and a modern design that suits any working conditions.
The Ellipsis computer is so user-friendly that anyone can use it without
difficulty because it has all major components in its all-in-one main body.
Even though the Ellipsis computer is very co mpact, its functionality is
limitless. It supports out-dated and conventional peripheral devices,
adapting to users’ working environments. It also supports the latest
peripheral devices with its four built-i n U SB po rts
(compatible with USB v2.0) and one IEEE1394 adaptor.
The Ellipsis 17”& 19" TFT-LCD display, directly driven by digital
signals, offers a clearer image than that of separate TFT-LCD monitor
of the same class, which is driven by analog s ignals. Furthermore, it
allows for the use of extended screens and has multi monitor
functionality because it is equipped with an extension po rt for connect ing
to TVs or other external monitors.
This PC is designed to run best using Windo ws XP, Microsoft’s latest
operating system. W hen us ed with t he Wi ndows XP operati ng s ystem,
you can get a more stable and diverse computing environment .
The adoption of a 17”&19" TFT-LCD monitor minimizes harmful
electromagnetic waves and power consumption. Its design is
engineered for the human body to minimize eyestrain.
Page 7

2
Touch Screens Inc.
V 1.0.1
Unpacking
This product is packaged with cardboard paper for safe delivery. If
there is a defect or missing part, contact the agency where you
purchased the product.
The box should contain the following items.
17”
or19" TFT-LCD monitor all-in-one PC main body
PS-2 wheel mouse (barebone systems will not include this)
PS-2 keyboard (barebone systems will not include this)
150W AC/DC power adapter
AC power cord
Composite cable for TV connection
Manual and Driver CD
Wireless LAN mini-pci card & Ant enna (Optio n, built in the mai n
body)
TV Tuner mini-pci card (Option, built in the main body)
TV cable connector and remote c ont rol (Option for TV Tuner)
Microsoft Windows XP Home Edition installation CD / Driver
Recovery CD (barebone systems will not include this)
RISETOP Users Guide (This document)
RISETOP Master CD (with the driver file for backup)
Optional devices
A touch screen is optional and you can order it before the product is
shipped. To enable touch screen, you need to have the following
device;
17”
or 19" Touch Screen
Manufacturer:
Touch Screens Inc.
Model name: 31-5W1700N-834-010
[For reference]
This PC has a mini-PCI slot in its main body allowing for expandability with
peripheral devices that have a mini-PCI card. Our company will launch new
models
that
can support wireless LAN or TV-tuner.
Page 8

3
Touch Screens Inc.
V 1.0.1
Other peripherals
This PC supports the following peripheral devices
PS/2 Keyboard and Mouse
Printer (LPT1)
One serial communication port (COM1)
Four USB devices (compatible with USB 2.0)
IEEE 1394 devices
External speakers/headphones
External microphones
External audio devices
External monitors
External TVs
External TV cable input (Option)
[For reference]
What is USB?
USB is a high-speed serial bus standard for the connection of
peripheral devices that reduces the use of valuable system resources.
Devices that support USB are USB mice, USB keyboards, USB PC
cameras, USB HDDs, and USB memory sticks.
What is IEEE 1394?
IEEE 1394, an input/output serial bus standard created to connect highspeed peripheral devices to a computer, can transmit data at 400 Mbps.
Devices that support IEEE 1394 are digital cameras, digital camcorders,
HDDs, and DVDs that have adopted the IEEE 1 394 standard.
Page 9
4
Touch Screens Inc.
V 1.0.1
Chapter 2. About the computer
This chapter will briefly outline the computer exterior, buttons, LED
indicator devices, and additional input/output connection devices.
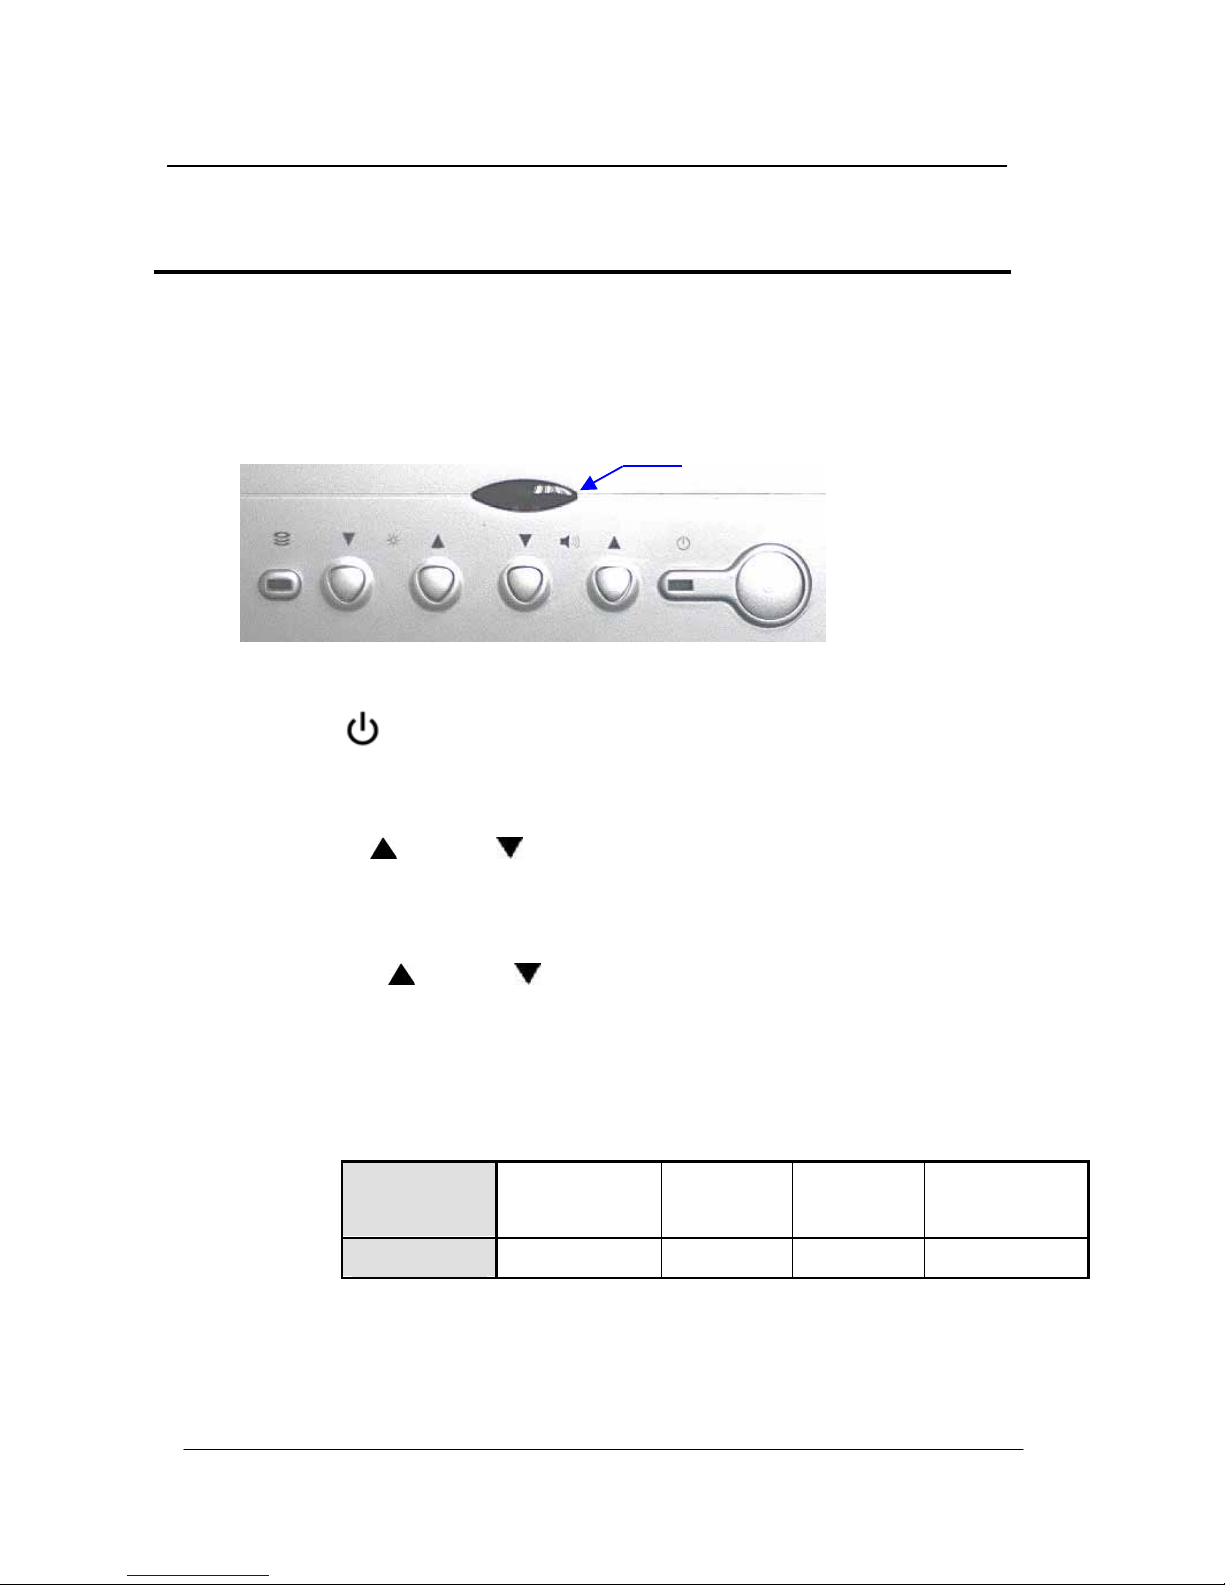
The front of the main body (control panel)
Power button
: Turns the computer on and off.
Buttons for adjusting the screen contrast
Up(
)/Down( ) :
Adjusts the contrast of the TF T-LCD di spl ay.
Buttons for adjusting the speaker volume
Up(
)/Down( ) :
Adjusts the sound volume of the internal
speaker.
LED indicator lights
POWER :
Indicates power status.
Power
status
Working
(G0/S0)
Sleeping
(S1~S4)
Soft Off
(G2/S5)
Mechanical
Off (G3)
LED Color
Yellow Red Red Off
HDD :
Indicates the hard disc is working, LED Color : Green.
Remote Control Window
Page 10
5
Touch Screens Inc.
V 1.0.1
The rear panel of the computer
(Input/output connections)
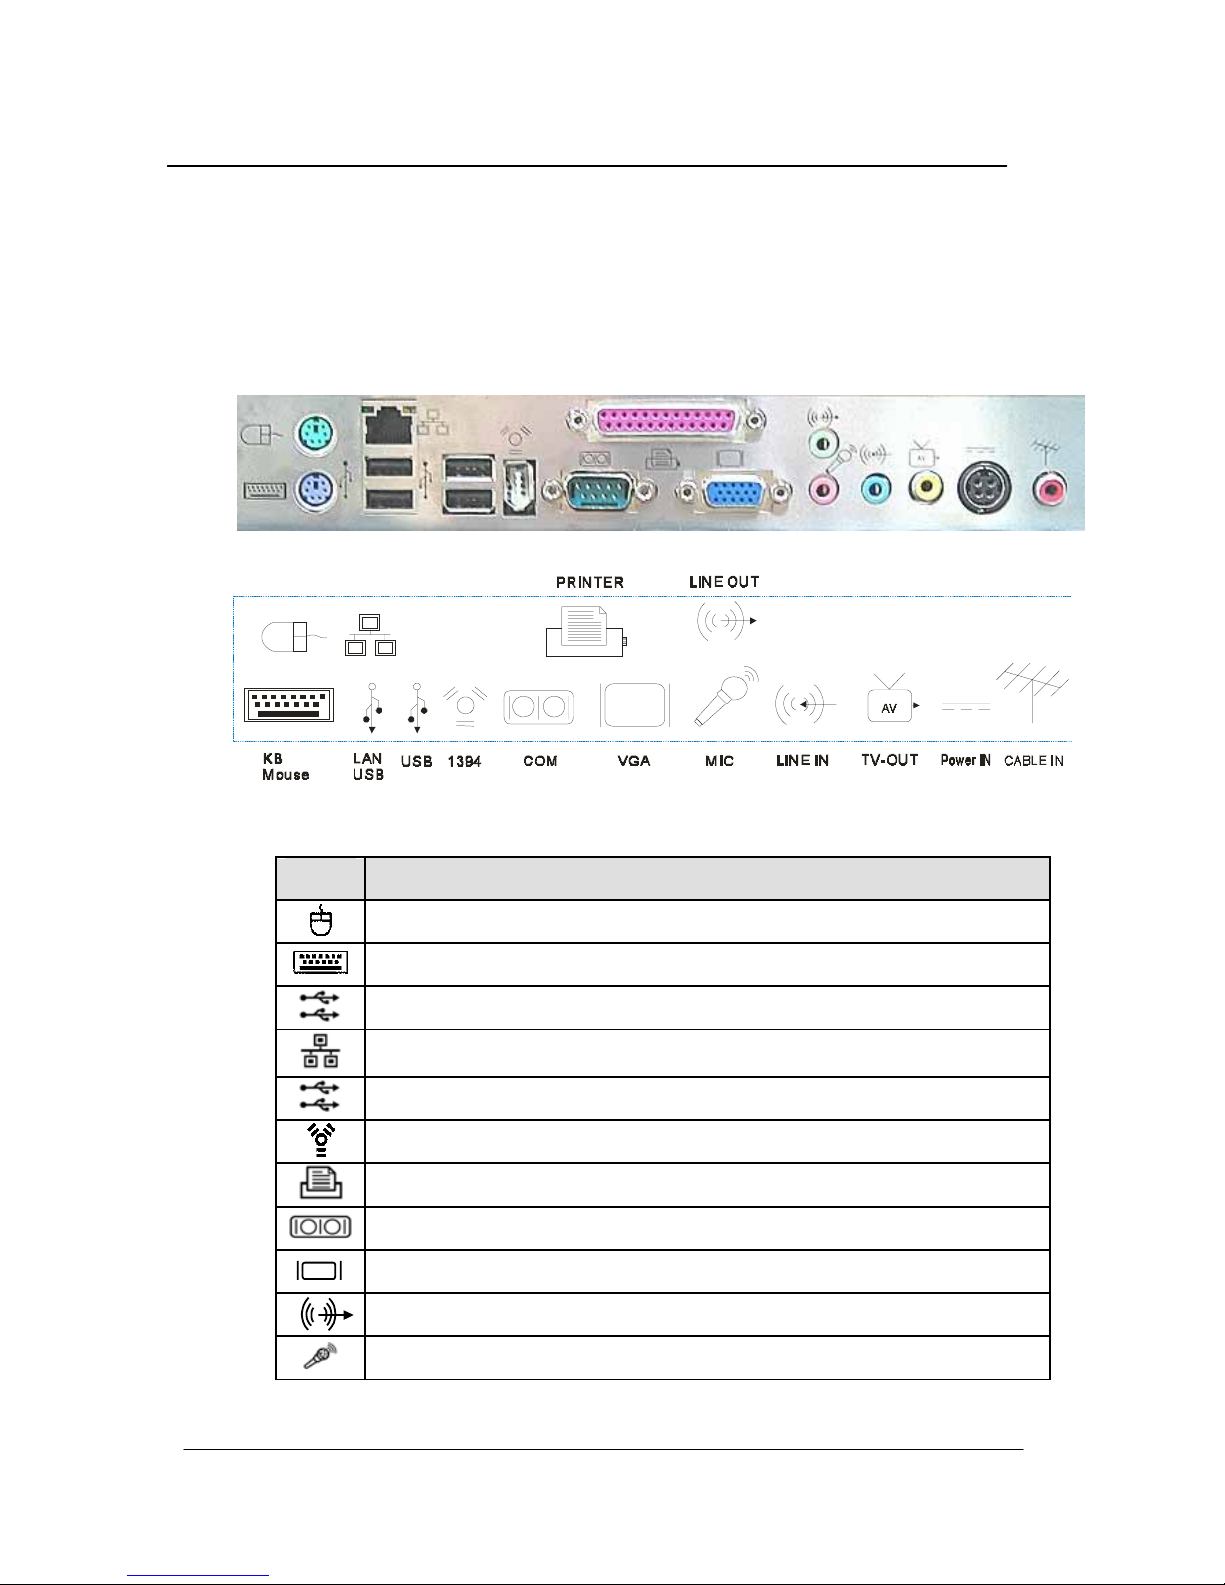
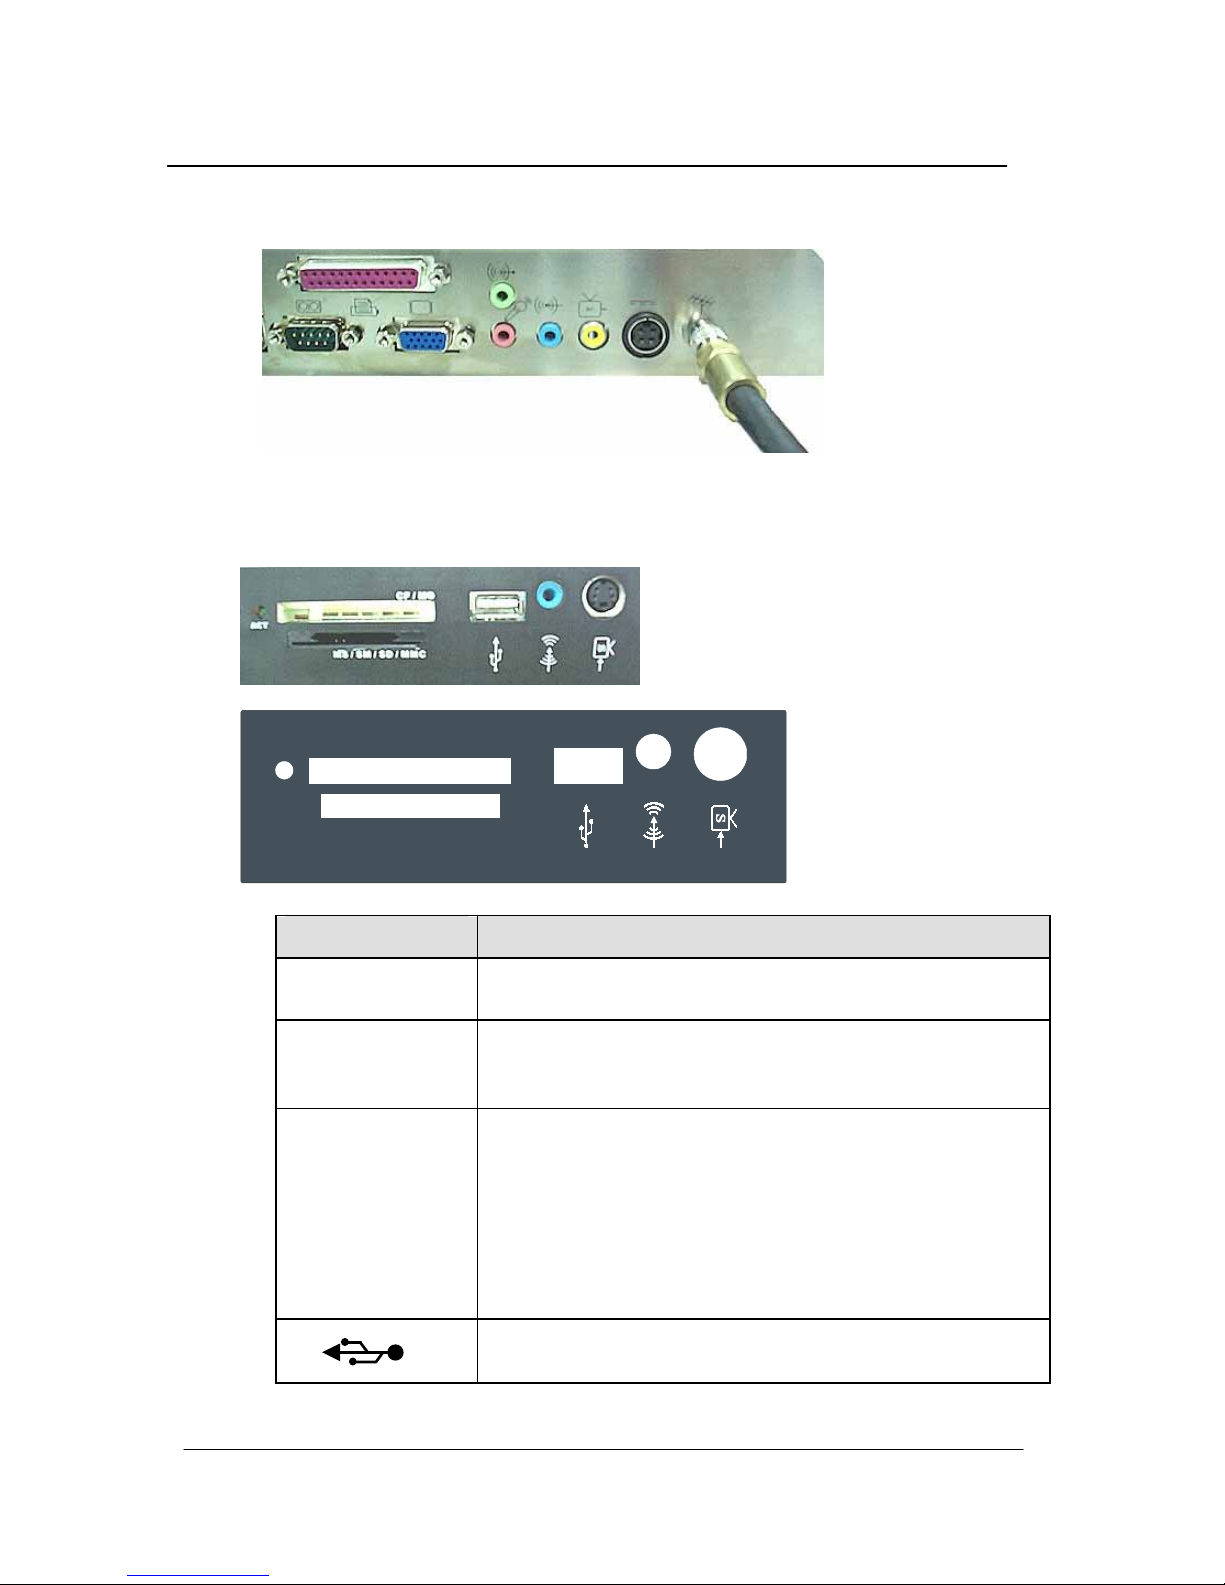
The following picture shows connectors that are for input/output
connections located at the rear of the main body. Here we provide a
brief explanation about the n ame and func tio n of each c onnecti on port.
Icon Connections
PS/2 mouse connection
PS/2 keyboard connection
USB device (1, 2) connection
10/100 /1000 Mbps network (LAN) cable connection
USB device (3, 4) connection
IEEE 1394 device connection
Printer cable connect ion
Serial commu nication de vice connection
Exterior monitor connection
External speaker or headphone connection
External microphone device connection
Page 11
6
Touch Screens Inc.
V 1.0.1
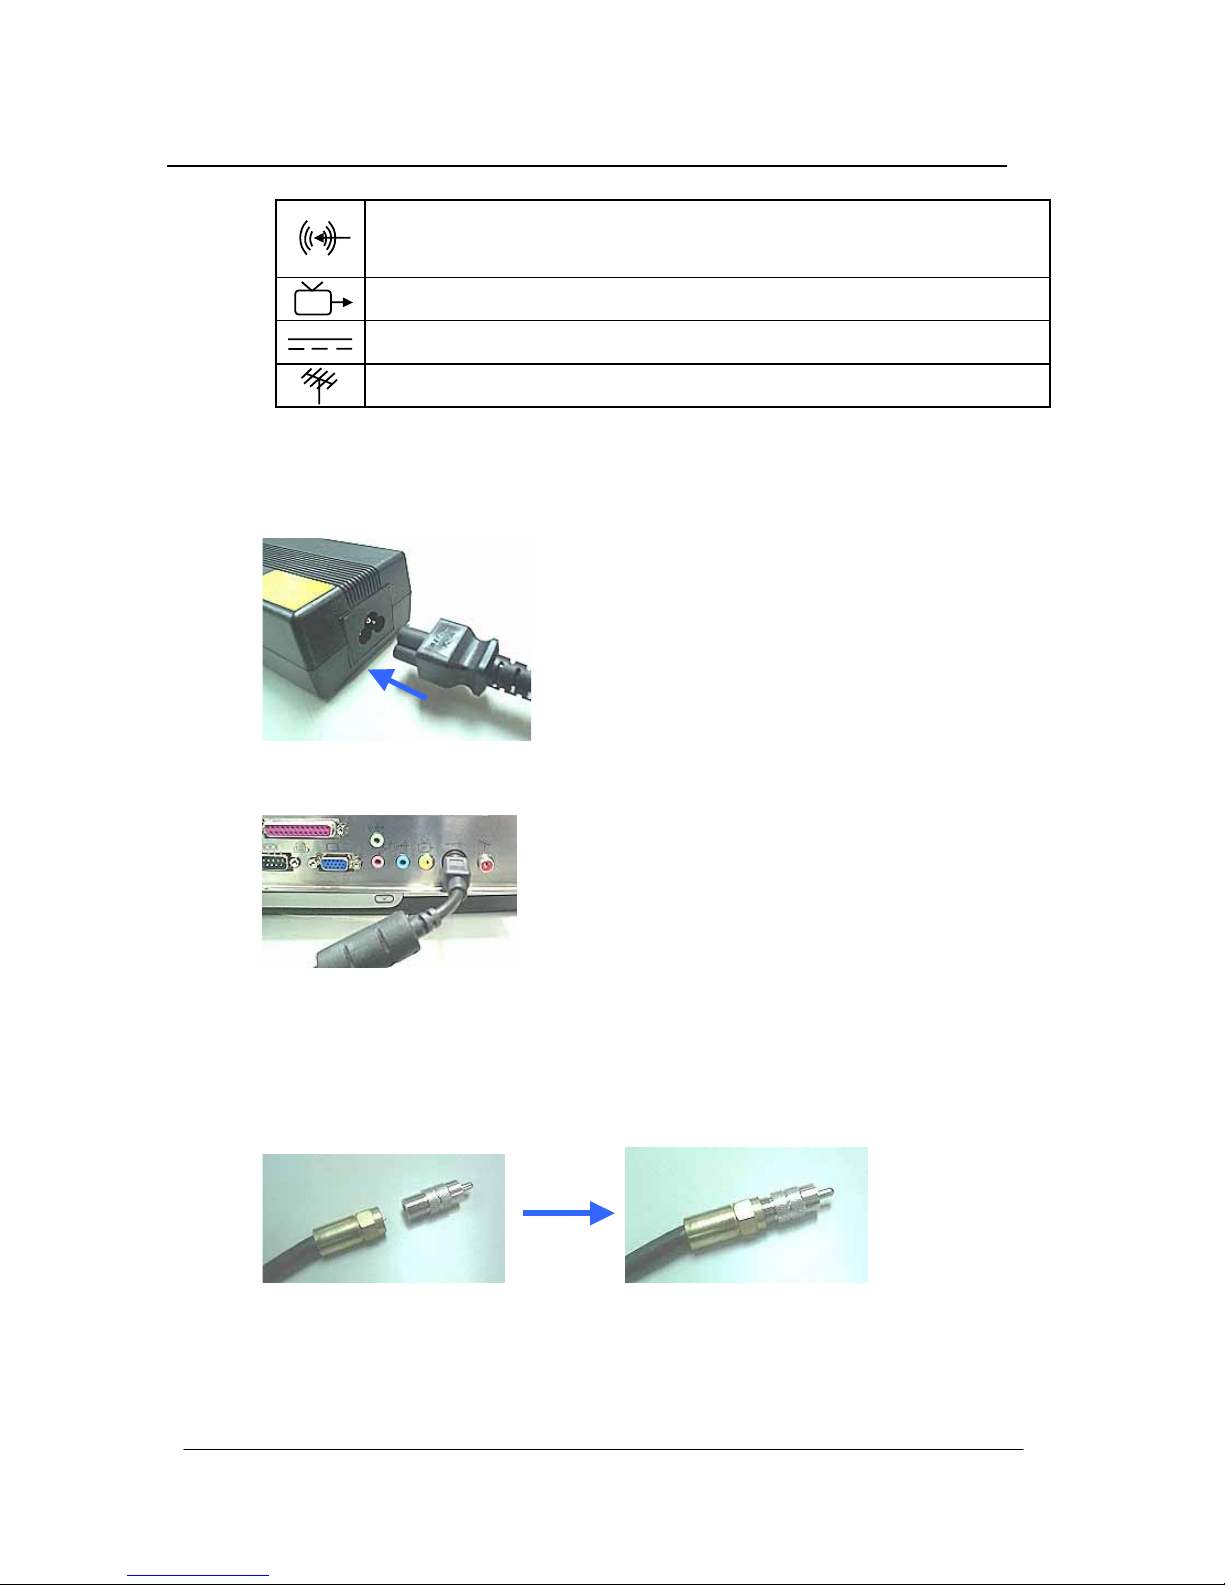
Audio input connections for external AV device
connection
Cable for external TV connection
Power Adapter Input
TV Cable Input
Install Power Adapter Step:
1. Insert power cord into power adapter
2. Insert power adapter cable into “Power Adapter Input” of rear panel
3. Insert power cord into AC power socket
Install TV Cable Step :
1. Install TV connector on TV cable
AV
Page 12
7
Touch Screens Inc.
V 1.0.1
2. Insert TV cable into “TV Cable Input” of rear panel
The Left Side of the main body (card reader panel)
CF / MD
ACT
MS / SM / SD / MMC
Item Connections
ACT
Indicates the card reader is working, LED Color :
Green.
CF/MD
Card Reader :
1. Compact Flash
TM
(CF) Interface, Type I & Type II
2. Micro Drive Interface
MS/SM/SD/MMC
Card Reader :
1. Memory Stick
TM
(MS)
Memory Stick
TM
Pro (MS Pro) Interfaces
2. Smart Media
TM
(SM) /xD Picture CardTM (xD)
Interfaces
3. Secure Digital
TM
(SD) Interface
4. Multi Media Card
TM
(MMC) Interface
USB device 1 connection
Page 13

8
Touch Screens Inc.
V 1.0.1
Audio Signal Input : (Option)
Audio signal input to TV tuner for DV or others video
devices.
S-Video Signal Input : (Option)
Video or Image’s signal input to TV tuner for DV or
others video devices.
S
Page 14

9
Touch Screens Inc.
V 1.0.1
Chapter 3. Starting up the computer for the first time
This chapter will show you how to register a user ID for Windows and for
this computer, and how to set up additional drive rs and applicat ions step b y
step.
For Windows XP Home Edition
Step 0: Windows XP and basic driver pre-setup
This product is pre-setup with the latest driver file for Windows XP
Home Edition, basic specifications and other optional specifications
chosen by the user before shipping.
The following is a list of operating systems and basic driver files that
are pre-setup.
Microsoft Windows XP Home Edition
SiS Video driver
SiS Audio driver
SiS Mini IDE driver
REALTEK RTL8100C PCI Fast Ethernet NIC driver
SiS USB 2.0 driver
Microsoft DirectX
TV tuner driver (option)
One Touch screen driver (option)
[For reference]
The touch screen, wireless LAN, TV tuner (option) must be ordered
before the product is packaged and shipped. We regret to inform you
that we cannot separately supply a touch screen for products sold
without this feature.
Page 15

10
Touch Screens Inc.
V 1.0.1
Step 1: To set up the computer
To set up the computer that is pre-setup with Microsoft Windows XP
Home Edition in step 0:
1.
Connect the mouse and keyboard that come with the main body
and turn on the power of the main body. The following “Microsoft
Windows Start ” dialog bo x will be di splaye d. To contin ue the s etup,
click <Next> at the bottom of the screen.
2. When the “User’s Time Zone” dialog box is displayed, select the
proper time zone for your location and select <Next>.
3.
When the “ End Users’ License Agreement” menu is displayed,
select “I accept t his agreement” and then click <Next>.
4.
When you see the “Your Product Key” page on the screen, enter
the product key specified in Windows XP Home Edition user’s
guide that comes with the purchase of this PC and select <Next>.
5.
A dialog box will appear asking you to designate a computer name.
Enter a computer name and computer description in the blanks
and click <Next>.
6. A dialo g bo x will app ear as ki ng yo u ho w you want to con nect to t he
Internet. Select the one that best suits your connection and press
<Next>. If your co mputer is not connected t o a network or failed to
establish a network connection, a dialog box with “failed to
establish an Internet connection” will pop up. If you wish to set up
the Internet conne ct ion later, click <Skip>. In that case, you can set
up or change the network configuration at [Start]-[Control panel][Network and Internet connection] after you are finished installing
Windows.
7.
If you chose a LA N connection f or accessing the Int ernet, a dialog
box reading “High speed connection setup” will be displayed. Fill in
the fields and press < Next>.
Page 16

11
Touch Screens Inc.
V 1.0.1
If you chose DSL or cable modem connections, the below dialog
box will pop up. Follow the instructions to continue the network
connection setup.
8.
When you are finished with the Internet conn ection setup, a dialog
box reading, “Are you going to recei ve verific ation service?” will be
displayed. Even t hough you can have th e verification right a way to
know whether your copy of Windows is licensed or not, you are
recommended to selec t “No, not at this time.” This is because it is
better to activat e Windows when yo u test the computer f or a while
and you are sure that there are no problems with your new PC.
However, you must ac tivate Windows within 30 days.
9.
Lastly, you will see a dialog box asking who will use this computer.
Enter names of users who will share the computer and press
<Next>. To proce ed to the next step you h ave to enter at leas t one
name.
10.
When a dialog box that reads “Thank you!” pops up, this means
the basic setup is complete. Press <Finish> to reboot your
computer and to run Windows XP.
Step 2: The installation of drivers for other peripherals
Skip this step if you do not use other peripherals.
To use other peripherals this PC supports such as printers, serial
communication devices, USB devices, IEEE 1394 devices, and game
consoles/ MIDI devices, connect the device to the main body, press
the power button and boot the PC. When booting is complete, install
the pertinent driver in the system. Because the system automatically
senses and installs plug-and-play peripherals, follow the instructions
displayed on the setup menu and refer to the device’s user’s guide.
For peripherals that are not plug-and-play, users have to install the
device and reboot the system for normal operation.
Refer to the user’s guide of each device for detailed instruc tions.
Page 17

12
Touch Screens Inc.
V 1.0.1
Step 3: The installation of software for other peripherals
Skip this step if you do not use ot her peripherals and go to step 4.
For efficient use of other peripherals (printers, serial communication
devices, USB devices, IEEE 139 4 devices, and game consoles/ MIDI
devices), install the appropriate software (e.g. utilities or other
applications pro vided by the manufacture r of the device) following th e
instructions displayed on the setup menu and referring to the user’s
guide.
Step 4: Completion of setup
When you are finished with step 3, basic installation is complete and
the computer is ready to use once it is rebooted.
Page 18

13
Touch Screens Inc.
V 1.0.1
Chapter 4. Using the computer
In this chapter, we will give a brief explanation about the use of the
computer
To Use Windows XP Home Edit ion
To use basic Microsoft Windows XP Home Edition programs and
applications that are available with this OS, refer to the user’s guide
(booklet), or the ‘Help and Support Center’.
To refer to the ‘Help and Support Center’, click [Start]-[Help and
Support] on the desktop and click on topics you need to refer to.
Microsoft Windows XP Home Edition’s ‘Help and Support Center’
provides the following information on a variety of features and other
basic operations of Windows XP Home Edition.
What’s new in Windows XP
Confirmation of license and registration
Windows components
Music, video, games and phot os
Windows Basics
Networking and the Web
Electronic mail and the Web
Home network or small scale network
The sharing of files, printers, and other resources
Cipher and security
Networking (including Internet connecti on)
Working remotely
Designation of computer users
Customizing your computer
Printing and faxing
Performance and maintenance
Fixing a problem
Send your feedback to Microsoft
Page 19

14
Touch Screens Inc.
V 1.0.1
Using other applications
To use other applications obtained or purchased separately, refer to
the user’s guide of each application provided by the software
manufacturer.
Partitioning the hard disk
For user ’s convenience, t he hard disk built into this product is divided
into two partitions (drive C and drive D). Drive C, a system drive, is
installed with a Windows operating system, a variety of drivers, and
other applications when you receive t he computer. In contrast, drive D,
a usual data drive, is empty.
This is to let users st ore data in dri ve D to b e protec ted in the even t of
a system failure. When the hard disk must be reformatted and the
system must be r einstalled due to serio us damage t o the s ystem, onl y
drive C needs to be reformatted while data stored in drive D is kept
intact without any intervention.
Page 20

15
Touch Screens Inc.
V 1.0.1
Chapter 5. Changing the setup
This chapter will briefly outline how to chang e the setup to suits each user
using BIOS CMOS setup utili ty programs. This cha pter also covers how to
upgrade your computer system.
BIOS CMOS setup utility
This PC adopts BIOS based on Phoenix Technology’s latest Award BIOS
6.0 version. The opti mum settings for this product are given for eac h as
default.
Users can change s ett ings us i ng the BI O S CMOS s etu p ut ili ty incl uded wi
th this product. The BIOS CMOS se tup utility is also us eful when making
changes to the booting order, when selecting a password, or when adding
a new device.
However, if the BIOS CMOS utility setup is wrongly configu red, a seriou s
system error can t ake place suc h as “unable t o boot the s ystem”, s o be c
areful when changing the settings.
[For reference]
BIOS CMOS setup refers to setting up the components of the system
hardware and saving them. The settings are saved even when the power is off
because the settings are stored in CMOS RAM built into the system and
powered by internal batteries.
How to change BIOS CMOS setup
Here is a brief outline of how to change CMOS settings using the
BIOS CMOS setup utility.
1. Turn on the computer.
2.
When the startup page appears, press <Del> to activate the BIOS
CMOS setup utility. If you press the <Del> key too late, it
automatically boots Windows. Should that occur, reset the
computer and press <Del> once again.
Page 21
16
Touch Screens Inc.
V 1.0.1
3.
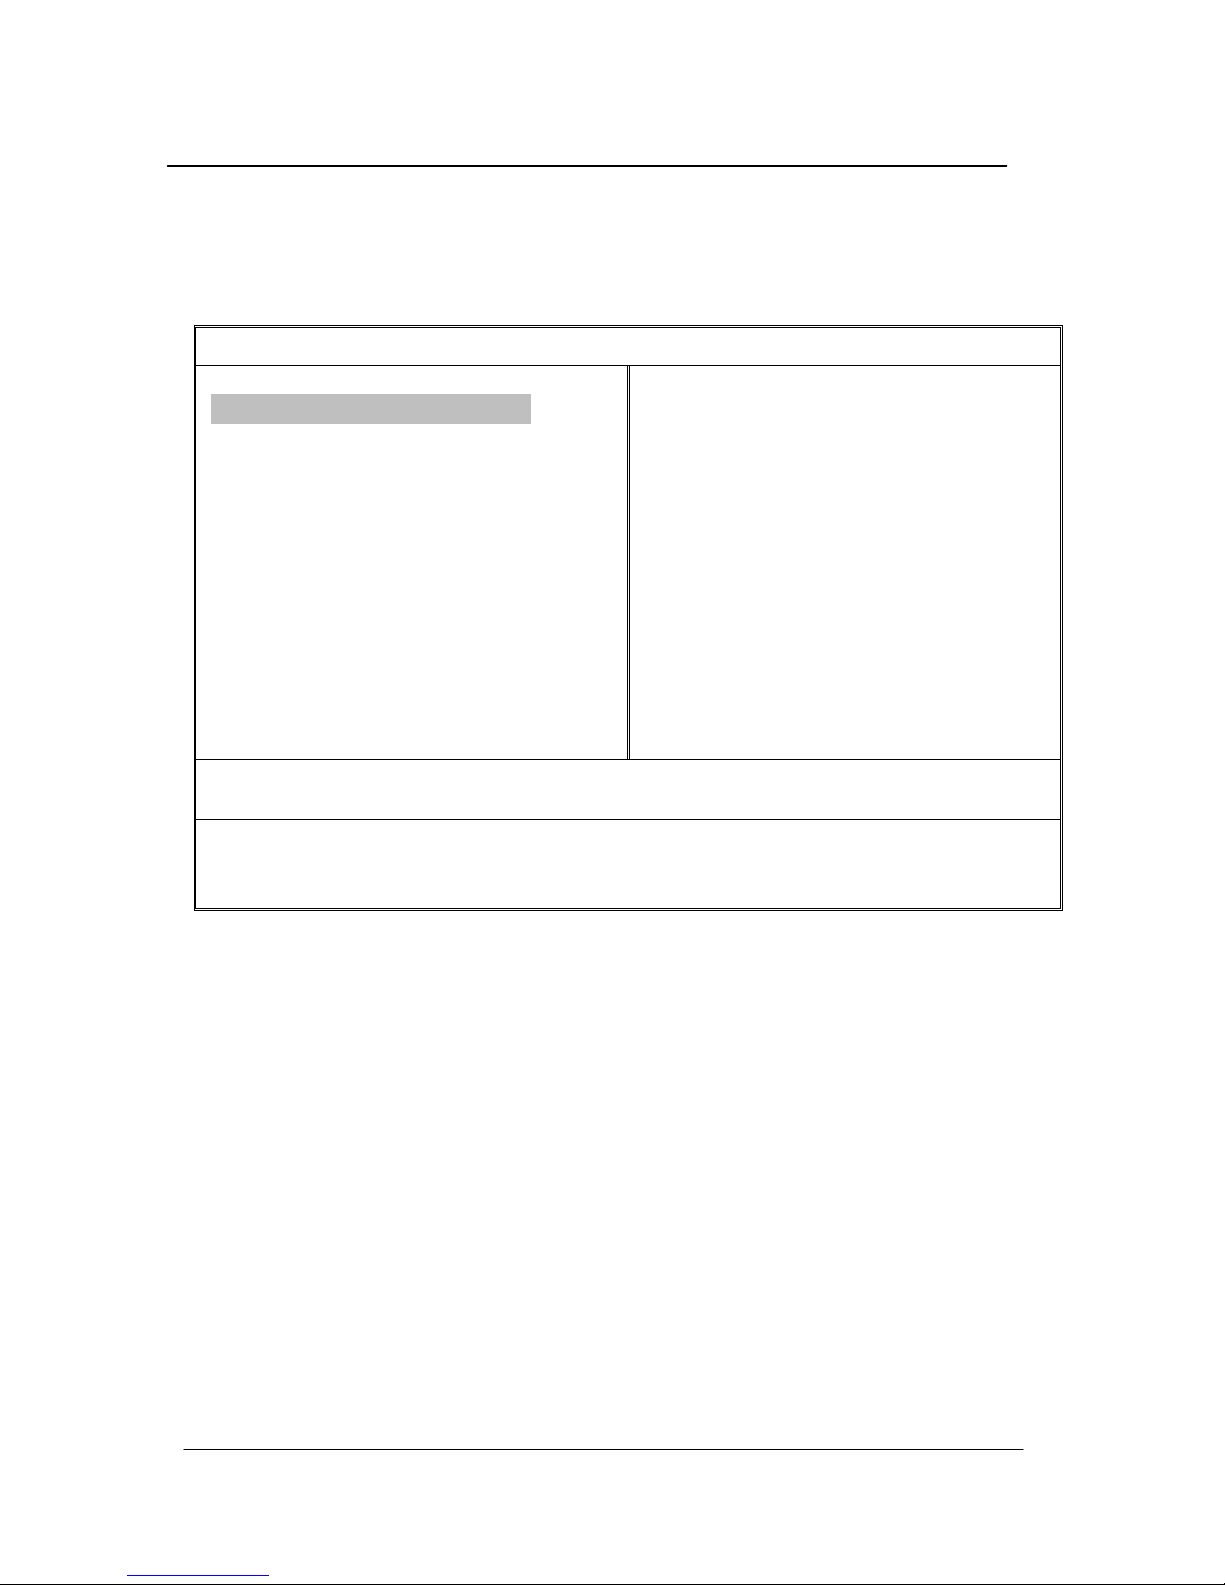
After a while, th e following Award BIOS CMOS setup utility mai n
menu will appear.
Phoenix – AwardBIOS CMOS Setup Utility
► Standard CMOS Features
► Advanced BIOS Features
► Advanced Chipset Features
► Integrated Peripherals
► Power Management Setup
► PnP/PCI Configurations
► PC Health Status
► Frequency/Voltage Control
► Load Optimized Defaults
► Set Password
► Save & Exit Setup
► Exit Without Saving
Esc : Quit ↑↓→← : Select Item
F10 : Save & Exit Setup
Time, Date, Hard Disk Type…
Page 22

17
V 1.0.1
Touch Screens Inc.
The Award BIOS CMOS setup utility offers the following 12 menus.
Menu Menu descriptions
Standard CMOS Features You can check basic specifications of the computer
and change the settings.
Advanced BIOS Features You can set up advanced features that are capable
of upgrading the system and the booting order.
Advanced Chipset Features You can set up major chip sets.
Integrated Peripherals You can set up major peripherals that are built into
the system.
Power Management Setup You can set up the po wer mo de .
PnP/PCI Configurations You can set up PnP/PCI configuration including
IRQ settings.
PC Health Status You can check the condition of the computer: CPU,
system temperature, cooling pan temperature
Frequency/Voltage Control You can control the clock and voltage of the CPU.
Load Optimized Defaults You can change every CMOS setting to the
defaults set before shipping.
Set Password You can set up a password for the CMOS setup
utility program
Save & Exit Setup Yo u can save the current CM OS settings and end
the setup utility program.
Exit without Saving You can end the setup utility program without
saving the changed CMOS settings.
Page 23

18
V 1.0.1
Touch Screens Inc.
4.
To change the CMOS sett i ngs using the keyboard.
The keys used to m odify CMOS setti ngs and their fun ctions are as
follows.
Features How to use the keyboard
To use ‘Help’ Press the <F1> key.
To shift headings in ‘Menu/Topics’ Use the arrow keys.
To select ‘Menu/Topics’ headings Press <Enter>.
To change the settings
Use the(+) (-) keys.
[To use ‘Help’ for individual topics, refer to
the ‘help’ menu on the right side of the
screen]
To enter a sub menu
Press <Enter>.
[Topics with () means there are sub
menus.]
To shift to main menu from sub menu
Press <Esc>.
To return to the default setting Press <F7>.
To save changes to the settings and exit
Press <F10>.
5.
To save all the modifications in CMOS RAM and exit the setup,
press <F10>. When a dialog box reconfirming the modifications
appears, select <Y>. The system will reboot according to the
modifications.
[For reference]
If you want more detailed information about the Award BIOS setup utility for
this PC, contact our customer support center.
Page 24

19
V 1.0.1
Touch Screens Inc.
System upgrades
Hardware upgrades
In order to maintain this product’s normal operation and the user’s
safety, we do not provide warranty services when users upgrade the
system on their own. If you disassemble the computer, it may cause
system damage or electrical shock.
Please contact on e of our sales agenci es or cust omer support c enters
to upgrade the CPU, hard disk, or memory.
Software upgrades
This product is inst al led with t he lat e st versi on of W i ndows XP OS and
bas ic driver files befo re it is shipped. Ho wever, manufacturers releas
e new improved versions all the time to me et the user ’s growing need
s, so please up grade to th e latest vers ion for major s oftware th at is al r
eady installed on this PC on a regular basis at the following sites.
Windows XP Home Edition
http://windowsupdate.microsoft.com/Default.htm
Basic driver files (SiS video driver, SiS audio driver)
http://www.
touchwindow.com
(our company web site)
BIOS Upgrade
With this PC, you can upgrade BIOS using the BIOS flash utility.
Visit our Web site on a regular basis to check for latest BIOS file
versions our cust omer support center offers. If there is a most recent
version than th e one that is displayed on the startup screen of your PC,
download it and upgrade.
However, the BIOS upgrade, carried out by electrically refreshing
Flash ROM for BIOS can sto p the system in the middle of refres hing.
Page 25
20
Touch Screens Inc.
V 1.0.1
Or when the power is t urne d off in the middle of refr eshi ng, it becomes
impossible to boot the computer. Therefore, if your computer is
working well with the current BIOS file, avoid upgrading BI OS.
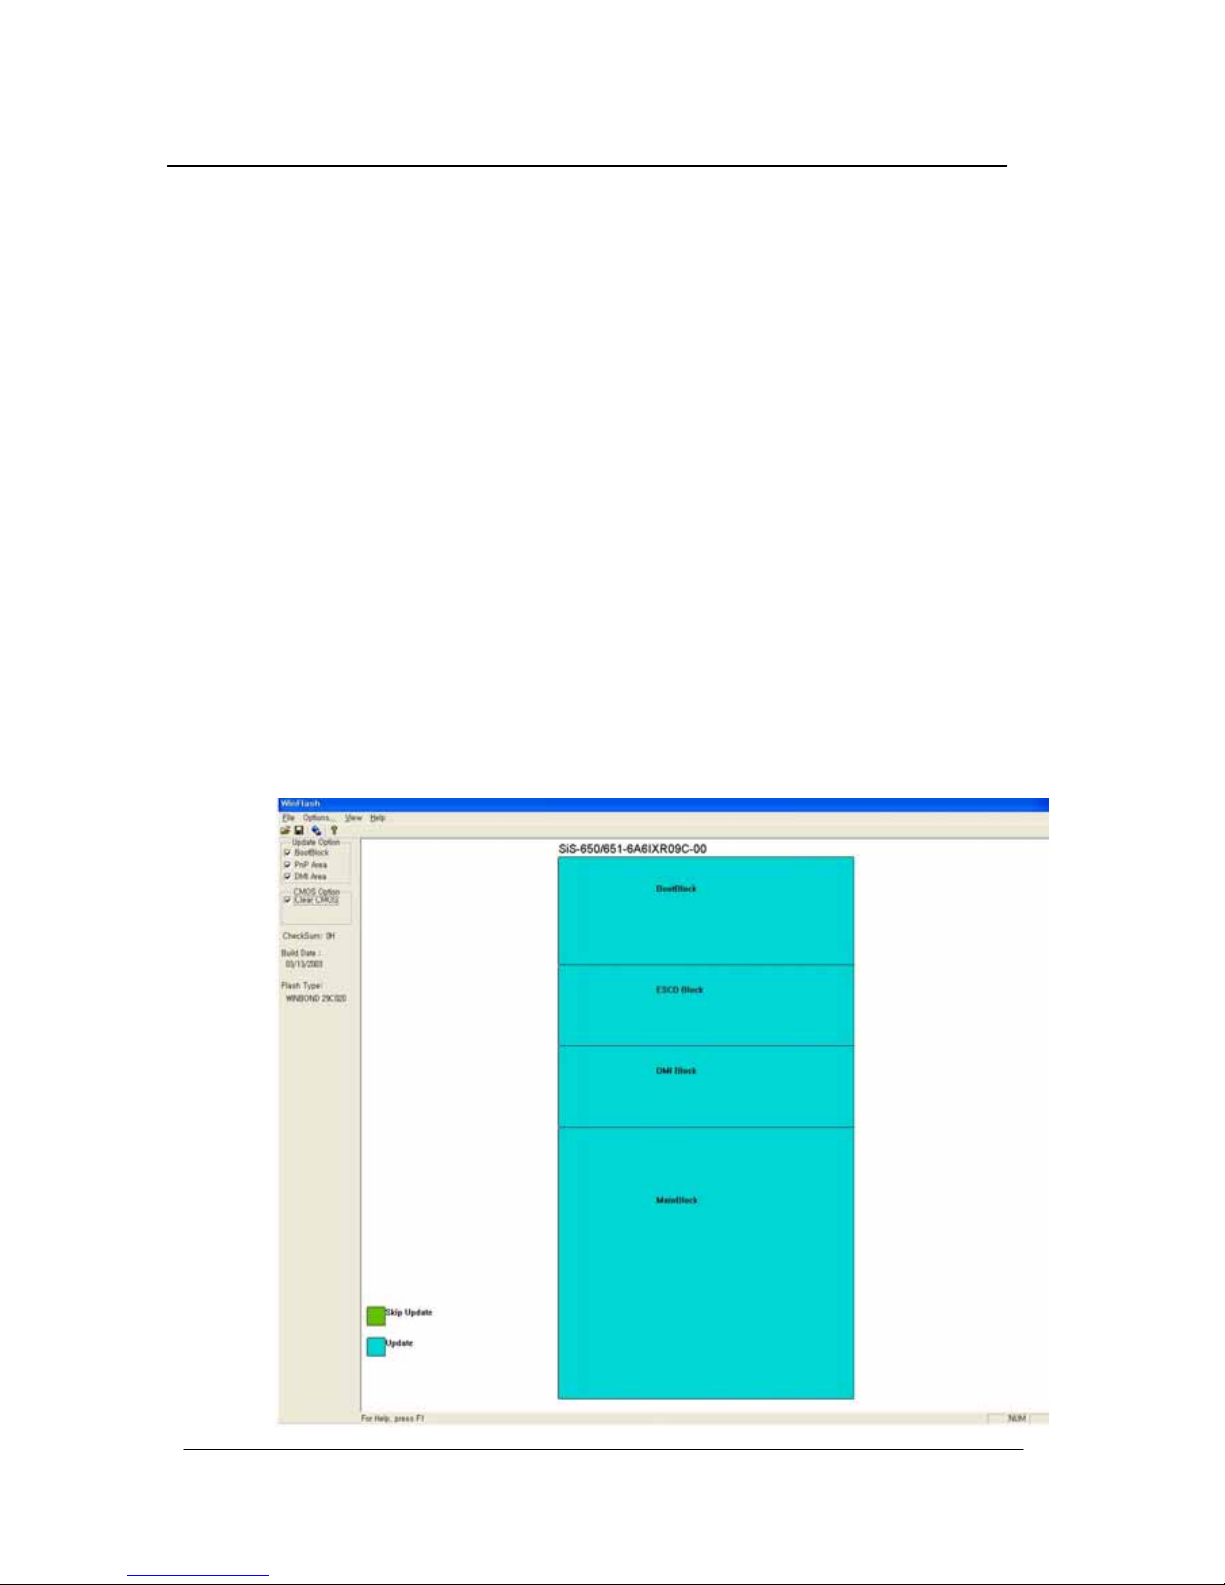
How to upgrade BIOS using the BIOS flash utility program for
Windows:
1. First, download an upgraded BIOS file (R862-xM4.BIN) and BIOS
flash utility program for Windows (Flash.exe & Winflash.sys) at our
Web site (www.rise.com.tw).
[For reference]
You can also find a BIOS flash utility for Windows in the ‘ Software
installation’ folder on the
Touch Screens Inc. Master CD that is included
with this product.
2.
Move to the directory where the downloaded file is located and
execute the BIOS flas h ut ility program (Flash.exe).
Page 26

21
Touch Screens Inc.
V 1.0.1
3.
Update BIOS following the instr uctions displayed on the execution
screen and restart the system t o reflect the updated BIOS.
Page 27

22
V 1.0.1
Touch Screens Inc.
Chapte r 6. Reinstalling t he OS
Should serious irrepar able problems occ ur, us ers must reinstall a W indows
operating system. This chapter will explain how to do that.
To reinstall the OS, you will need the Microsoft W indows instal lation CD and
the
Touch Screens Inc. Master CD that comes with this product. Please
have these at hand before attempting to reinstall the OS.
It is important to note that users need to back up important data stored in
the hard disk prior to formatting the hard disc drive and reinstalling the
operating system.
How to reinstalling Windows XP
1. I nsert the W indo ws XP Home Edition in stallati on CD i nto the CD-ROM
drive and start up the computer. The “Windows Setup” screen will
appear, automatically starting the installation.
2.
Continue installing the Windows XP Home Edition following the
instructions displayed on the screen.
3.
When installation is complete, the computer will restart running
Windows XP and the des ktop will appear. Insert the Touch Screens Inc.
Master CD and wait for the automatic execution screen to appear.
Choose each driver and application from the automatic execution
screen’s selection menu and install them in the following order.
Install SiS video (required)
Install SiS audio driver (required)
Install SiS Mini IDE driver (required)
Install REALTEK RTL8100 PCI Fast Ethernet NIC driver (required)
Install SiS USB 2.0 driver (required)
Install Microsoft DirectX (optional)
Install One touch screen driver (essential when installing touch
screen)
[Caution]
Page 28

23
Touch Screens Inc.
V 1.0.1
In most cases, it is necessary to restart the computer after installing
drivers or utilities using the
Touch Screens Inc. Master CD.
[For reference]
When the video driver is installed, click [Start]-[Control panel]-[Appearance
and themes]-[Display] to bring up the “Display Registration Information”
screen and choose the desired color quality or screen resolution from the
[setting] tab. We suggest that users choose high color (16 bit) or true color
(24 bit) for color quality, and 1280 X 1024 pixels for screen resolution.
Click on t h e [ A dv a nce] butto n at t he lower part of t h e [ S etu p ] ta b to bring up
the ‘basic monitor and SiS M661FX_740 registration information’ page. On
this page users can choose from among single mode, mirror mode, and
multi mode under “Utility Administrator” in the [Driver Mode Setup] menu.
Here, it is possible to set up an output to an external monitor or TV.
The REALTEK R8100 LAN driver does not need to be installed since
Windows XP provides the same basic functions. However, if users want to
use a variety of functions REALTEK offers with the driver, it is
recommended that they install it.
4.
To check the status of each system device after users are finished
installing the above mentioned drivers and programs, click [Start][Control panel]-[Performance and maintenance]-[System] to bring up
the [Hardware] screen in ‘System registration information’. Here click
‘Device administrator’ to check whether each device is working
properly. If the yellow exclamation mark is in front of the device’s
name or if the name of the device is not displayed, this means the
pertinent device is not functioning normally or it is not properly
installed. In this case, users have to update or reinstall the driver for
that device.
Page 29

24
Touch Screens Inc.
V 1.0.1
Appendix 1. Troubleshooting
The table below is an outli ne of gener al problems t hat ma y occ ur durin g the
use of
Touch Screens Inc.
along with suggested solutions. If any of these
problems should occur, proceed with the instructions in the table bel ow or
refer to the ‘Troubleshooting” t opic in Windows’ online ‘Help’. If the problem
persists or if problem descriptions do not describe your problem, contact
one of our sales agency or the Cus t omer Support Center.
Problem Solution
Table. Trouble shooting
Problem Countermeasure
Erro r mess age rea ding
‘Operating system not
found’ appears when
booting.
Check if the BIOS setup utility properly reads the hard
disk. I f it tur ns ou t that t he har d disk is no t being read
properly, contact the Customer Support Center.
Error message ‘CMOS
checksum error’
appears when booting.
This can occur when the motherboard’s CMOS backup
batteri es have run out. Contact the Cu stomer Support
Center to replace the batteries.
Booting to safety
mode.
1. This can be caused when the computer was not
properly shut down. Click [Start]-[End] to shut off
the computer and reboot.
2. This may stem from the failure to read the system
environment. Click and execute [Start]-[Program][Sub program]-[System tool]-[Disk inspection] and
reboot the computer.
3. This may occur when there is a problem with a
system device. Click [Start]-[Control panel][Performance and maintenance]-[System] and
select ‘device administrator’ under the hardware
tab. If you find a problem with a certain device,
reinstall the device.
Page 30

25
Touch Screens Inc.
V 1.0.1
The monitor appears
blank or the screen is
too dark.
Adjust the screen contrast using the buttons on the
front panel of the computer monitor. Should problems
persist, contact the Customer S u pport Center.
Mouse is not working. 1. Check if the mouse is properly connected to the
PS/2 port located at the rear of the monitor. The
USB cable must be connected to the USB port.
2. This can occur when there is a problem with the
mouse device administrator. Click [Start]-[Control
panel]-[Performance and maintenance]-[System]
and then click on [Device administrator]-[Mouse
and other pointing devices] in ‘hardware’ tab.
Remove the mouse item and restart the computer.
Keyboard is not
working.
1. Check if the keyboard is prope rly connected to the
PS/2 port located at the rear of the monitor. The
USB type must be connected to the USB port.
2. When the system is down, this may occur. Restart
the computer and check whether the keyboard is
working.
USB device is not
working.
1. If the USB device manufacturer provides the
driver, install the driver first and restart the
computer.
2. Disconnect the USB device and then reconnect it
and check if it works properly. (Re-execute the
plug-and-play functionality)
3. This may be caused if the system fails to read the
USB device or USB device administra tor , restart the
computer and check if it works properly.
4. To check if there is the problem with the USB
device, try connecting it to another computer. If it
works fine with the other computer, contact the
Customer Support Center.
IEEE 1394 device is
not working.
Follow the above instructions as for the USB device.
Should problems persist, contact the Customer
Support Center.
Page 31

26
Touch Screens Inc.
V 1.0.1
Unable to shut off the
computer.
This could stem from a number of reasons. First, turn
off the computer by pressing the power button for
more than four seconds. If this does not work, unplug
the power cord. If you turn on the computer this time,
‘scan disc’ will automatically be carried out. If this
symptom should repeat, contact the Customer
Support Center.
The computer
suddenly freezes wile
in use.
1. This may be cau sed by an error in a program. Press
<Ctrl>+<Alt>+<Del> and click on ‘End now’ on
the [Windows Task Manager] dialog box.
2. This can be caused by an error in Windows. Restart
the computer by pressing the power button for
more than four seconds.
Page 32

27
Touch Screens Inc.
V 1.0.1
Appendix 2. Product specifications and system
diagram
HARDWARE
CPU
Intel Pentium-IV (up to 3.6GHz ) / Celeron (up to 2.8GHz) processor
Socket 478 type
System Bus(FSB) : 800/533/400MHz
L2 Cache : 128KB (Celeron) / 512KB (P-IV)
Chipset
SiS M661FX(North bridge) + SiS 963(South bridge)
System Memory
DIMM x 2 (up to 2GB)
DDR400/333/266/200
System BIOS
Award BIOS : ACPI 1.0b & USB-FDD Booting Support
Display
Built-in 17” TFT-LCD Display Monitor (1280x1024, LVDS Interface)
Integrated SiS 315 graphic core
VGA Out : UXGA(1600x1200) Support
Shared VGA Memory(16~128MB) with System Memory
2D & 3D Graphics Support
TV-Out (Composite Video) Support
Audio
AC’97 v2.2 compliant (RealTek ALC201)
16bit Stereo Sound
Built-in 2 Speakers (3W /3W, total 6W)
Storage
HDD : 3.5” siz e, Ultra ATA/100/133 (up to 160GB)
Integrated Slim CD-ROM dri ve: Opt i onal DV D -RO M & C ombo(D VD & CDRW) drive
Input / Output / Peripherals
PS/2 Keyboard and Mouse port
Page 33

28
Touch Screens Inc.
V 1.0.1
Two Serial RS-232C port (1 Internal port for Touch screen support)
One DB-25F Parallel port
Microphone in / Speaker out / Line in
One RJ-45 Ethernet connector
Four USB port (USB v2.0 compliant)
One IEEE 1394 port
One VGA Out
TV-Out : Composite Video(default)
TV Cable In (optional)
Touch screen (optional)
NETWORKING & COMMUNICATION
Networking
TCP/IP, 10/100/1000 Base-T Fast Ethernet
Built-in Ethernet Controller: RealTek® RTL8100C/RTL8110S
SOFTWARE
Operating System
Microsoft Windows XP Home / Professional Edit ion
BIOS Utility Program
Hardware monitoring utility (CPU Temperature & Voltage, Fan Speed,
System voltage)
ENVIRONMENTAL
Environmental Specifications
Operating temperature 5° to 35°C
Storage temperature 0° to 60°C
Humidity 30% to 80% non-condensing
Power Specifications
AC to DC adapter
100-240 VA C at 50-60Hz
Max 150W
Page 34
29
Touch Screens Inc.
V 1.0.1
REGULATORY COMPLIANCE
EMC / Safety
CCC
CE EMC
UL & FCC
PHYSICAL CHARACTERISTICS
Weight: 10 kg (Main Body only)
Height: 455 mm
Width: 425 mm
Depth : 260 mm
WARRANTY
1 year warranty standard
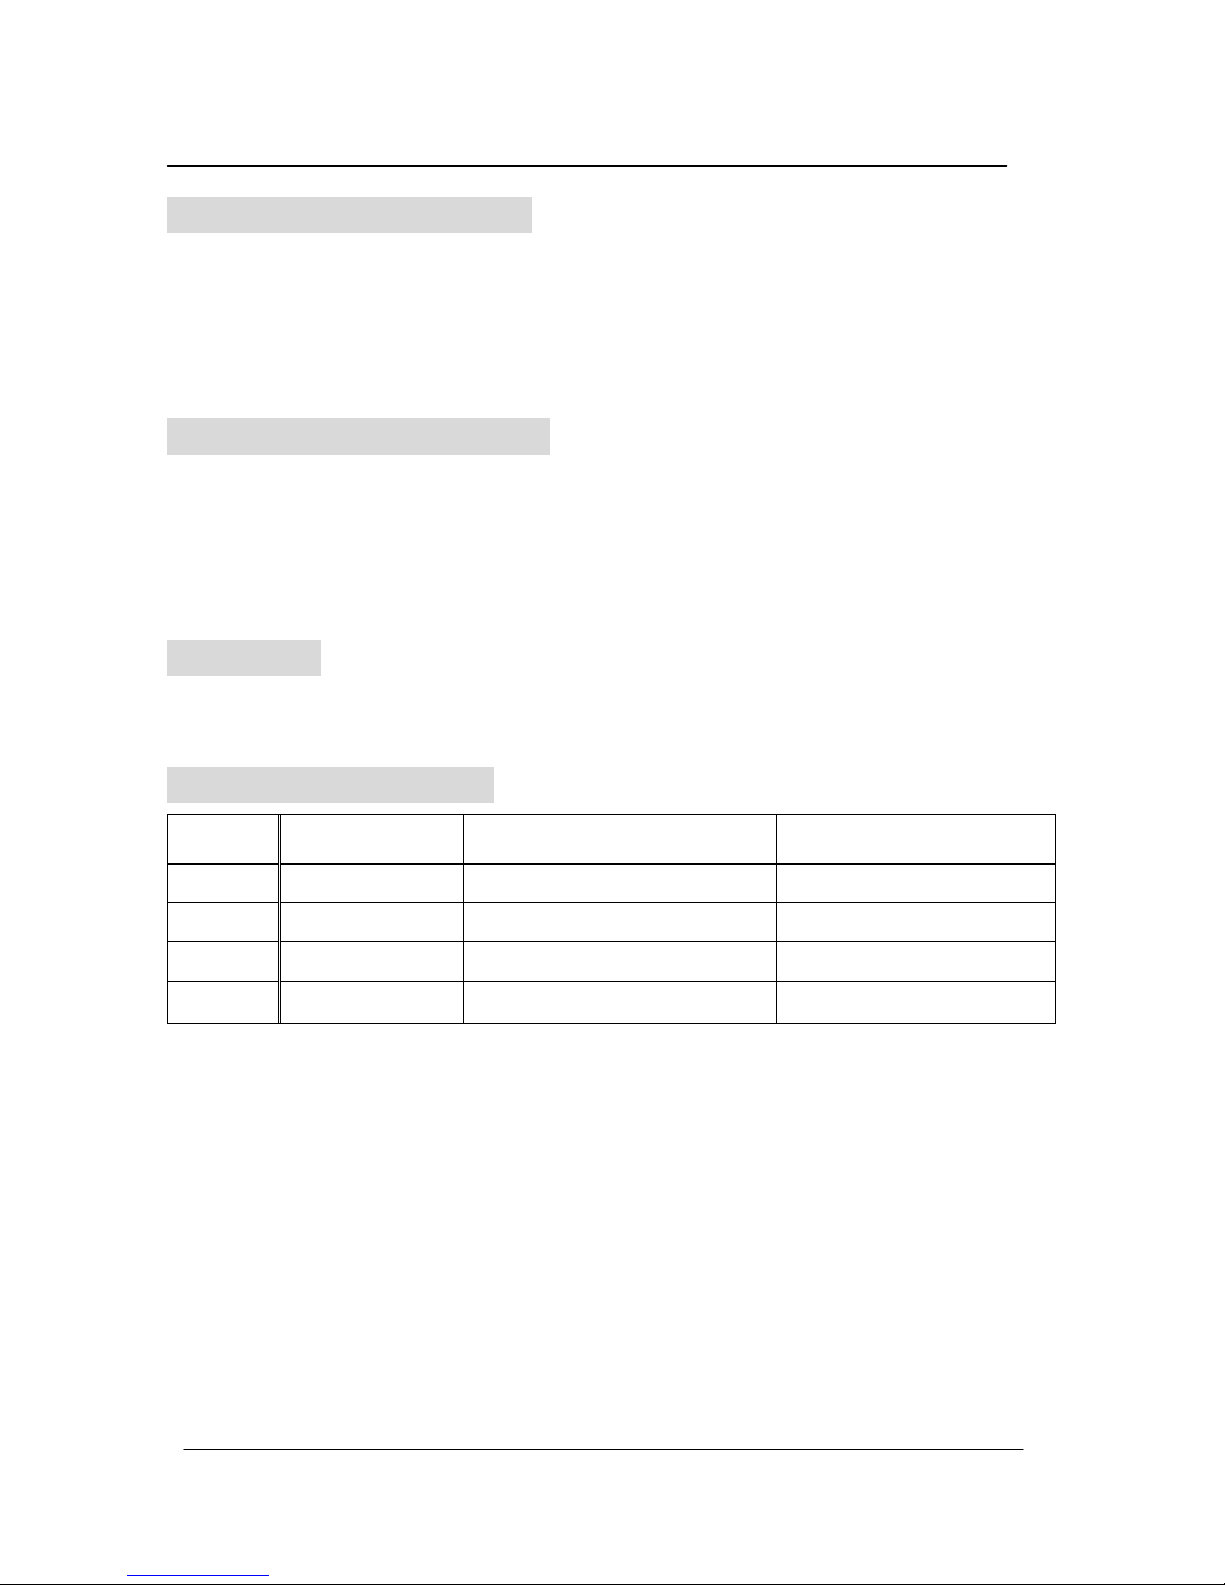
MODEL CONFIGURATION
Model CPU DDR SDRAM / HDD ODD / OS
Page 35
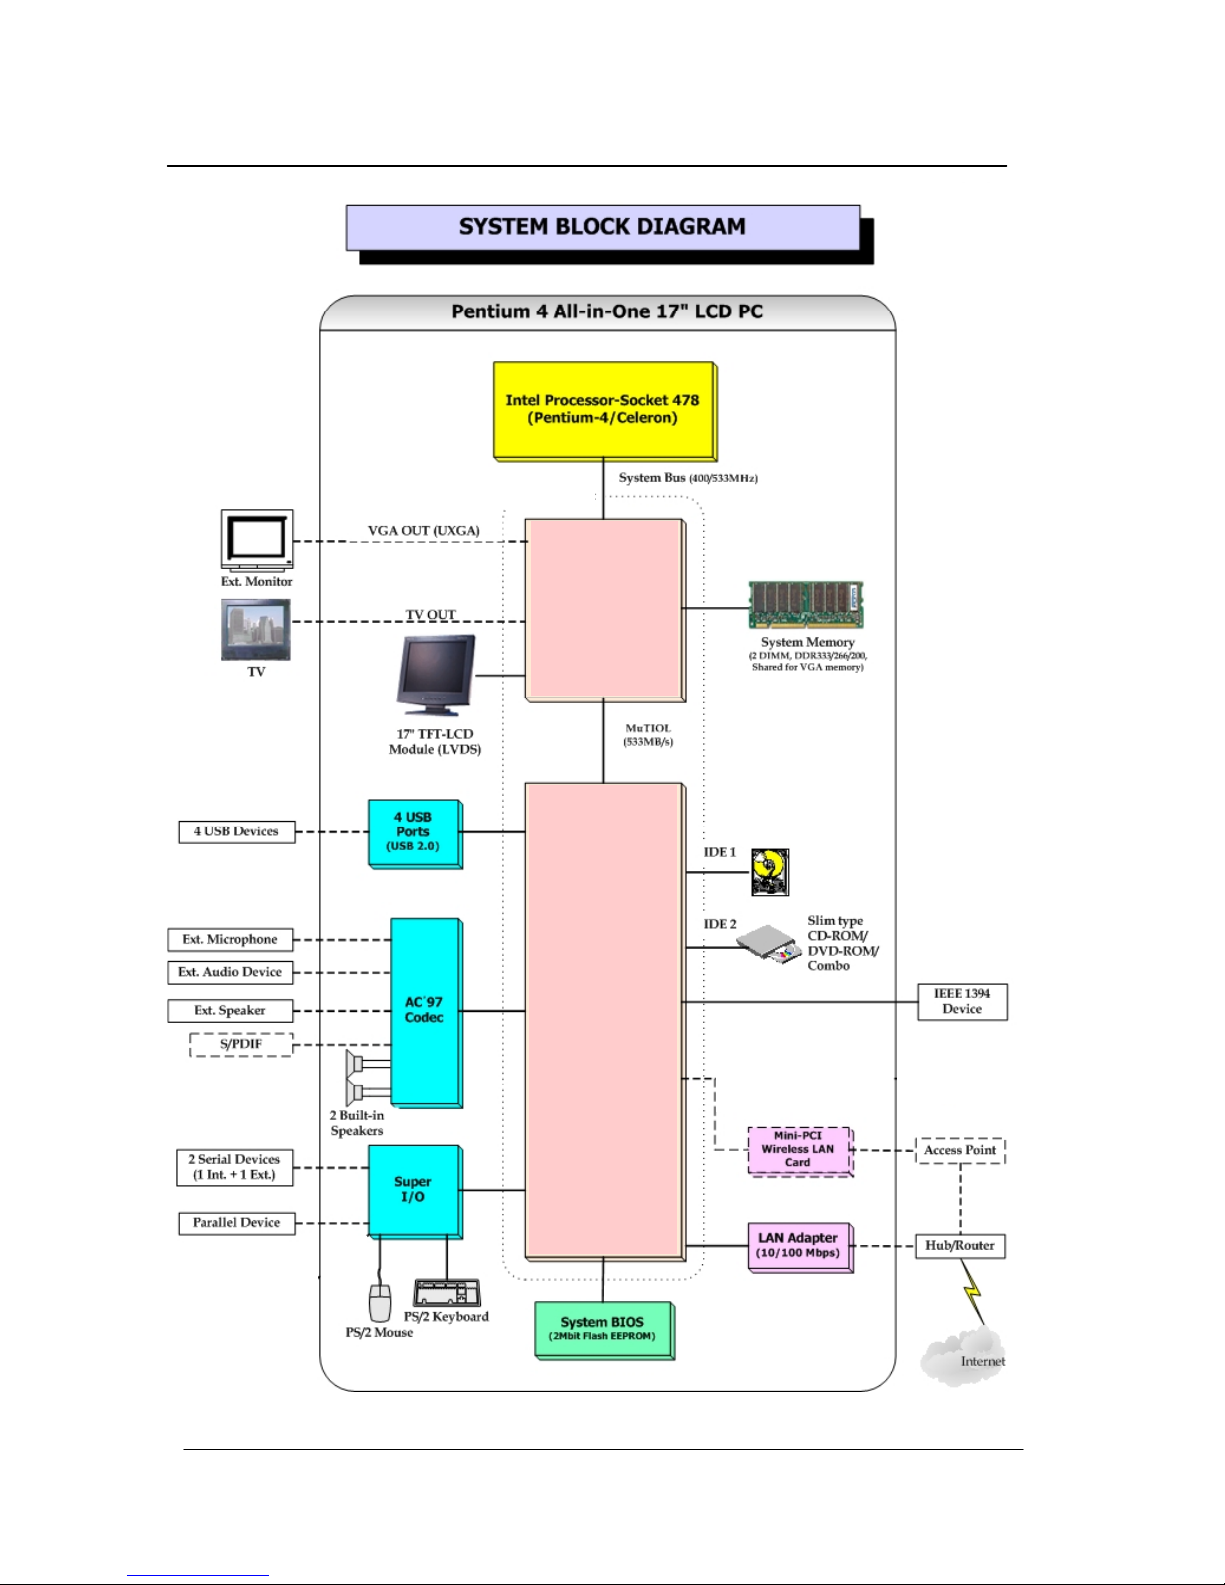
30
Touch Screens Inc.
V 1.0.1
SiSM661FX & 963 Chipset
SiS M661FX
(Internal Garphic
Engine SiS 315)
SiS 963
(South Bridge)
3.5” HDD
Page 36

31
Touch Screens Inc.
V 1.0.1
Appendix 3. Product warranty
About the product warranty
1.
Keep the product warranty document and complete it with the neces sary
information when you make the purchase.
2. We do our best to provide the best quality ass urance.
3. Even within the warranty period, charges can be applied for th ose
services, which are charge-based.
4.
We do not make compensation for all the dependent losses due to
trouble of the product.
Product warranty
We guarantee as follows.
1)
This product is manufactured with strict quality assurance and
inspections
2)
The free warranty service period is one year from the date of
purchase.
3)
When requesting repair, please s how the warranty document to
the service representative.
4)
We do not reissue warranty documents, so keep t hem with care.
5)
Contact the agency from which you made the purchase if there is
problem with this PC. If i t is somet hing that cann ot be ha ndled b y
the agency, contact our Customer Support Center to ask for
technical support. This way, your needs will be looked after
appropriately.
Charge-based service
The following services are charge-based.
Malfunction or damage to the product due t o careless handling by
the user.
Problems caused by software
Damage caused by natural disas ter
Damage or changes to the produc t that is done by people other
than our service representative.
Page 37

32
Touch Screens Inc.
V 1.0.1
Problems resulting from trouble with the power source
Recommendations and caution
1)
Position this product away from direct sunlight or magnetic waves.
If those factors are unavoidable, find ways to protect the product.
2)
Please equip with (A.V.R) or (Power Conditioner) with enough
capacity for a stable operation.
3)
If users do not have the warranty document or have not completed
the warranty document, they can receive free or charge-based
warranty services according to the guidelines specified in the
Consumer Protection Law.
Page 38

Model Name
Touch Screens Inc.
Ellipsis All-In-One Computer
Customer Support Center
e-mail: support@touchwindow.com
www.touchwindow.com.
 Loading...