

Page 1

Getting Started Guide
Contents
Introduction
Health and safety information
WAVE usage precautions
Components
Step 1: before you begin
Step 2: center and secure the Android Box
Step 3: connect to HDMI and power
Step 4: connect the WAVE Arm and align the infrared wall
Step 5: Pairing the WAVE with your phone or tablet
Step 6: Adjust your screen size
Step 7: Touchscreen calibration
Step 8: Setting up Wi-Fi
Step 9: How to add or remove apps from the home screen
2
3
5
6
7
8
10
11
13
14
15
17
19
© 2018 Touchjet™ All Rights Reserved 1
Page 2
Introduction
Watch our FAQ Videos for help with setting up your Touchjet WAVE™
Turorial videos
http://bit.ly/TJFAQ
Download the free Touchjet App to your smartphone or tablet to use as a
smart remote during setup.
User Manual
http://bit.ly/TJGuide
Need Help or Have Questions?
© 2018 Touchjet™ All Rights Reserved2
Page 3
Health and Safety Information
Important Safety Information - Read the following warnings before setup
or use of the Touchjet WAVE. If this product will be used by young children,
this manual should be read and explained to them by an adult. Failing to do
so may cause injury.
WARNING - Seizures
Some people (about 1 in 4,000) may have blackouts triggered by ashing lights or patterns. This
may occur while they are watching TV or playing video games, even if they have never had a
seizure before.
Anyone who has had a seizure, loss of awareness, or other symptom linked to an epileptic
condition should consult a doctor before playing a video game.
Parents should watch their children play video games. Stop playing and consult a doctor if you
or your child has any of the following symptoms:
Convulsions
Altered vision
Eye or muscle twitching
Involuntary movements
Loss of awareness
Disorientation
© 2018 Touchjet™ All Rights Reserved 3
Page 4
WARNING - Electric Shock
To avoid electric shock when you use this system:
• Do not use the WAVE during a lightning storm. There may be a risk of electric shock from
lightning.
• Use only the AC Adapter that comes with your system.
• Do not use the AC Adapter if it has damaged, split or broken cords or wires.
• Make sure the AC Adapter cord is fully inserted into the wall outlet or extension cord.
• Always carefully disconnect all plugs by pulling on the plug and not on the cord.
CAUTION - Laser Device
The Touchjet WAVE is a Class I laser product. Do not attempt to disassemble the WAVE system.
Refer servicing to Touchjet Support at [email protected].
© 2018 Touchjet™ All Rights Reserved4
Page 5
WAVE Usage Precautions
Please read and follow the precautions listed below when setting up and
using the WAVE. Failure to do so may result in damage to your WAVE or
accessories.
• Do not use any AC adapter other than the one provided with your system.
• Do not disassemble or try to repair the WAVE, accessories or components. Doing so
voids your warranty.
• Do not drop, hit or otherwise abuse the WAVE, components or accessories.
• When disconnecting any plugs from the WAVE or wall outlet, carefully pull the plug itself
rather than by the cord.
• Do not step on, sharply pull or bend any wire or cables.
• Do not expose the WAVE, components or accessories to extreme heat or cold.
• Do not spill any liquids on the WAVE, components or accessories. To clean, use a soft
slightly damp cloth. Use water only. Allow to dry completely before using.
• Prior to installing the WAVE to your television or display monitor, rmly secure your
television or display monitor to a stand, table, entertainment center or a wall with straps
designed for a television.
• The WAVE has intake and exhaust vents designed to maintain adequate ventilation.
CAUTION - TV Screen Damage
Some televisions can be damaged by the display of a stationary image, because the image may be
permanently “burned” into the screen. Playing video games with stationary images or patterns,
or leaving video games on hold or pause, may lead to this type of damage. When taking a break,
turn the TV off until you are ready to play again.
Before using your Touchjet WAVE system with any TV, especially front and rear projection or
plasma models, be sure to review all documentation included with your TV to nd out whether
video games can be played on the TV without damaging it. If in doubt, contact the manufacturer
of the TV. Neither Touchjet nor any of Touchjet’s licensees will be liable for any damage to your
TV.
© 2018 Touchjet™ All Rights Reserved 5
Page 6
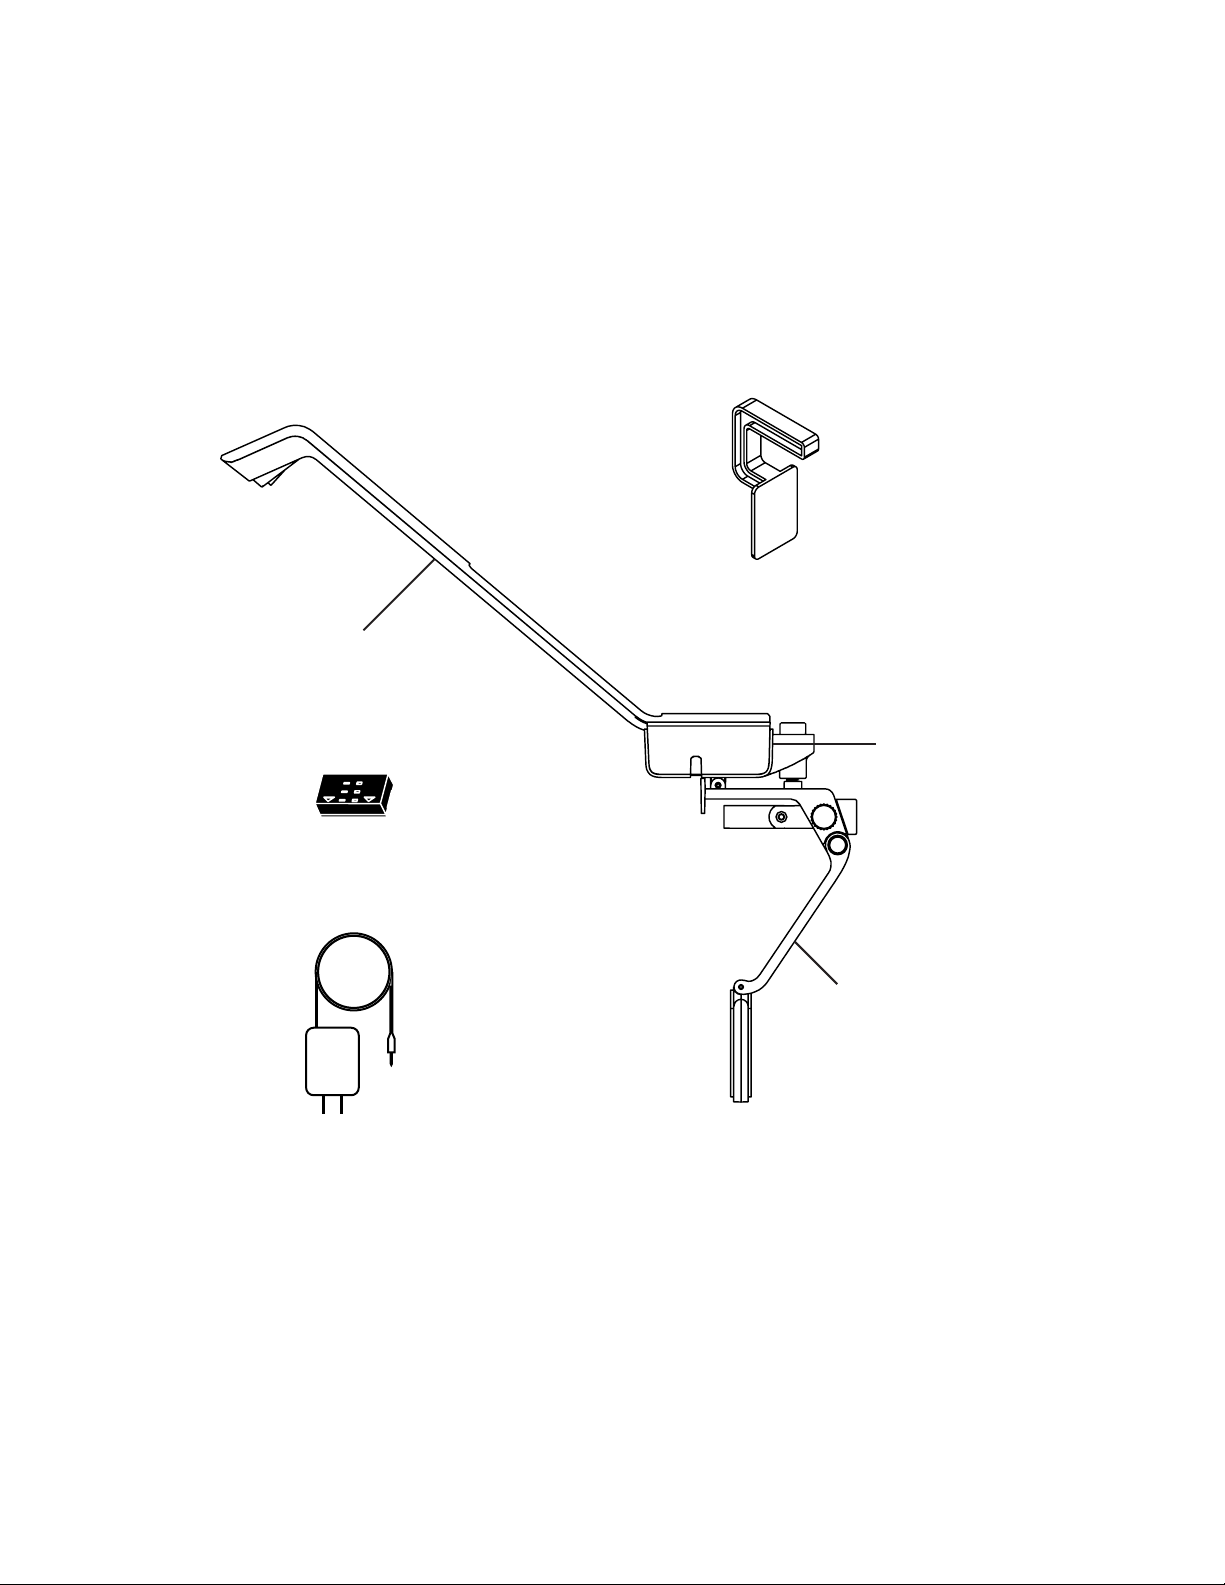
Components
Wave Arm
Alignment Tool
Android Box
Laser alignment Indicator
Stabilizing Arm
Power Adapter
Note:
HDMI cable is not included. Use any existing HDMI cable or purchase it at an electronic store.
Remote control is not included. Download the Touchjet App to your phone or tablet to use as a
smart remote.
© 2018 Touchjet™ All Rights Reserved6
Page 7
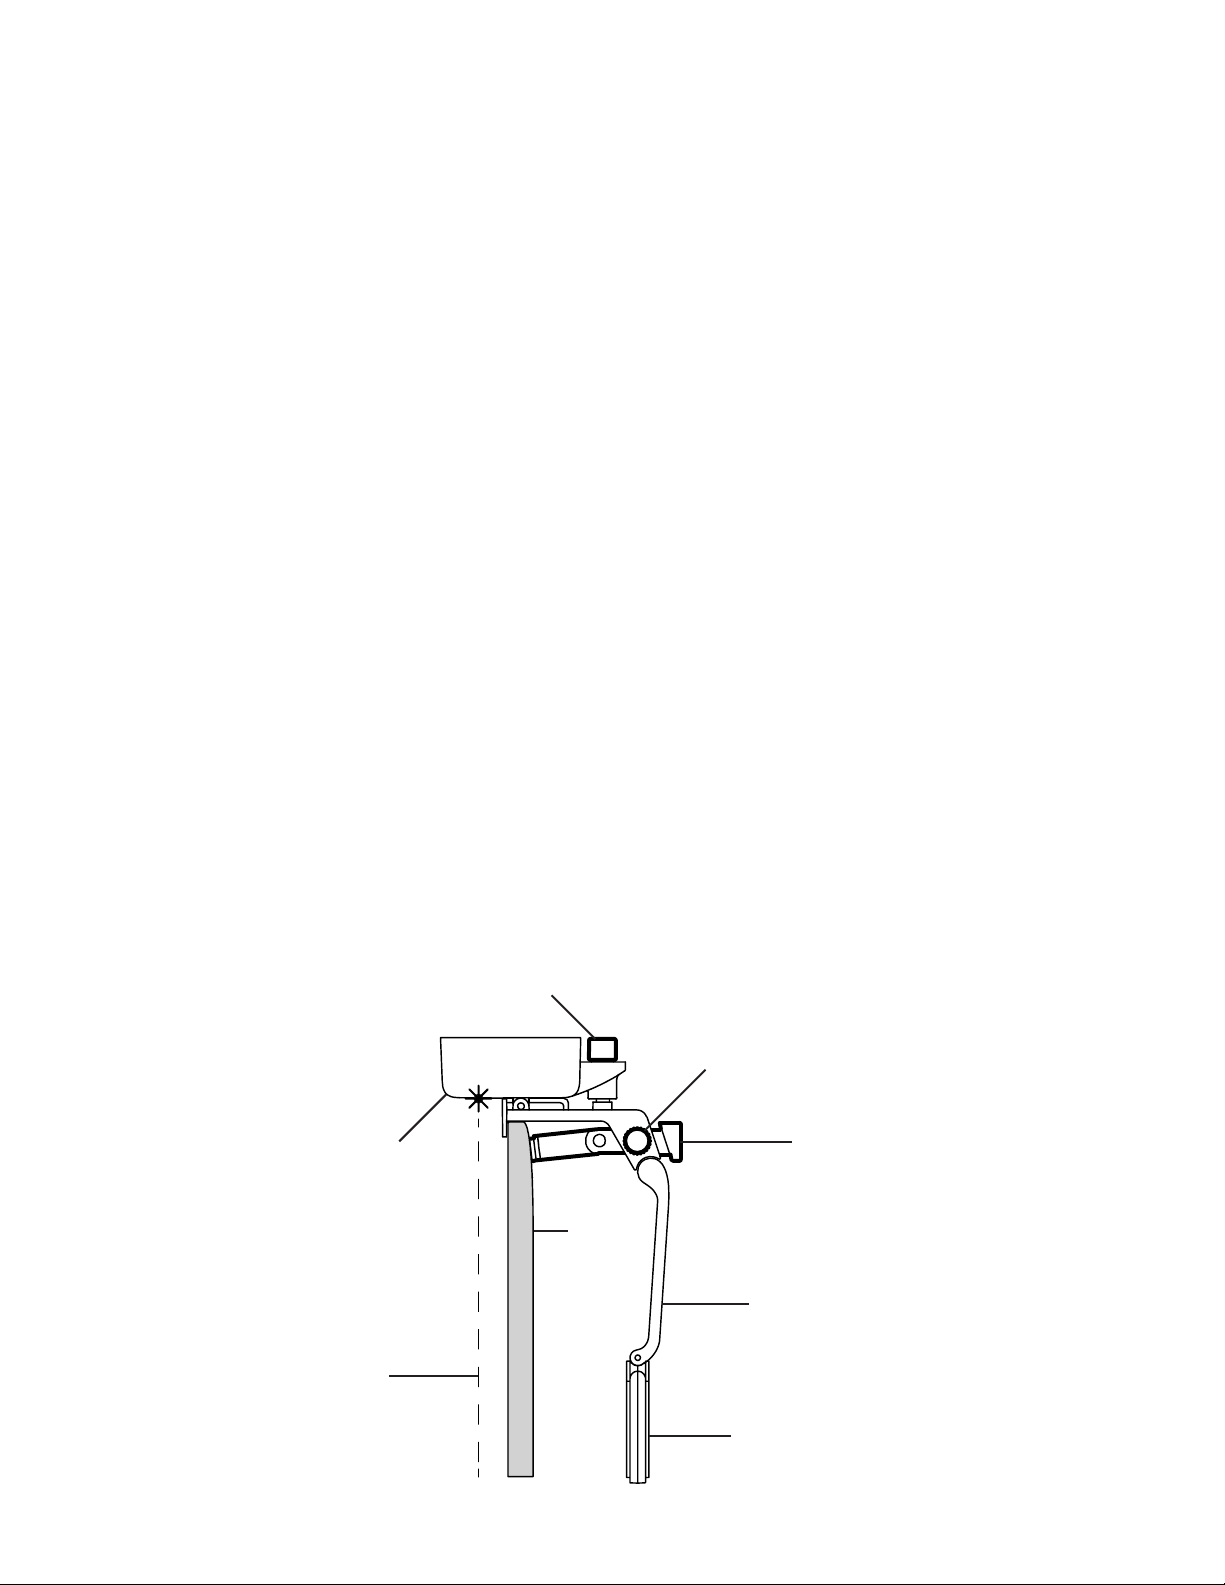
Step 1
Before you begin
The Touchjet WAVE adds a virtual touchscreen to your atscreen TV. Three lasers project a thin
wall of infrared light from the bottom of your WAVE over your TV screen. When you touch the
screen, your nger breaks the light wall, sending a reection to the infrared camera. The WAVE
sees this reection as a touch input. It’s important that the WAVE is aligned properly so that the
light wall is parallel to your TV screen.
A. Gently clean the screen, frame and back of your TV to remove any dust or dirt before installing
the WAVE.
B. Find the center of your TV. Many models have their logo centered at the top or bottom, which
you can use for reference.
C. Twist the Angle Adjustment Knob on the top of the Android Box clockwise until it
clicks, then about one-half rotation back counterclockwise.
D. Twist the Bracing Knob on the side of the Stabilizing Arm 2-3 rotations
counterclockwise so that the Bracing Rod can move freely.
E. Add the Velcro Tape to the Velcro Pad. Do not remove the Protective Film yet.
Angle Adjustment Knob
Bracing Knob
Android Box
TV
Bracing Rod
Stabilizing Arm
Laser
Velcro Pad
© 2018 Touchjet™ All Rights Reserved 7
Page 8
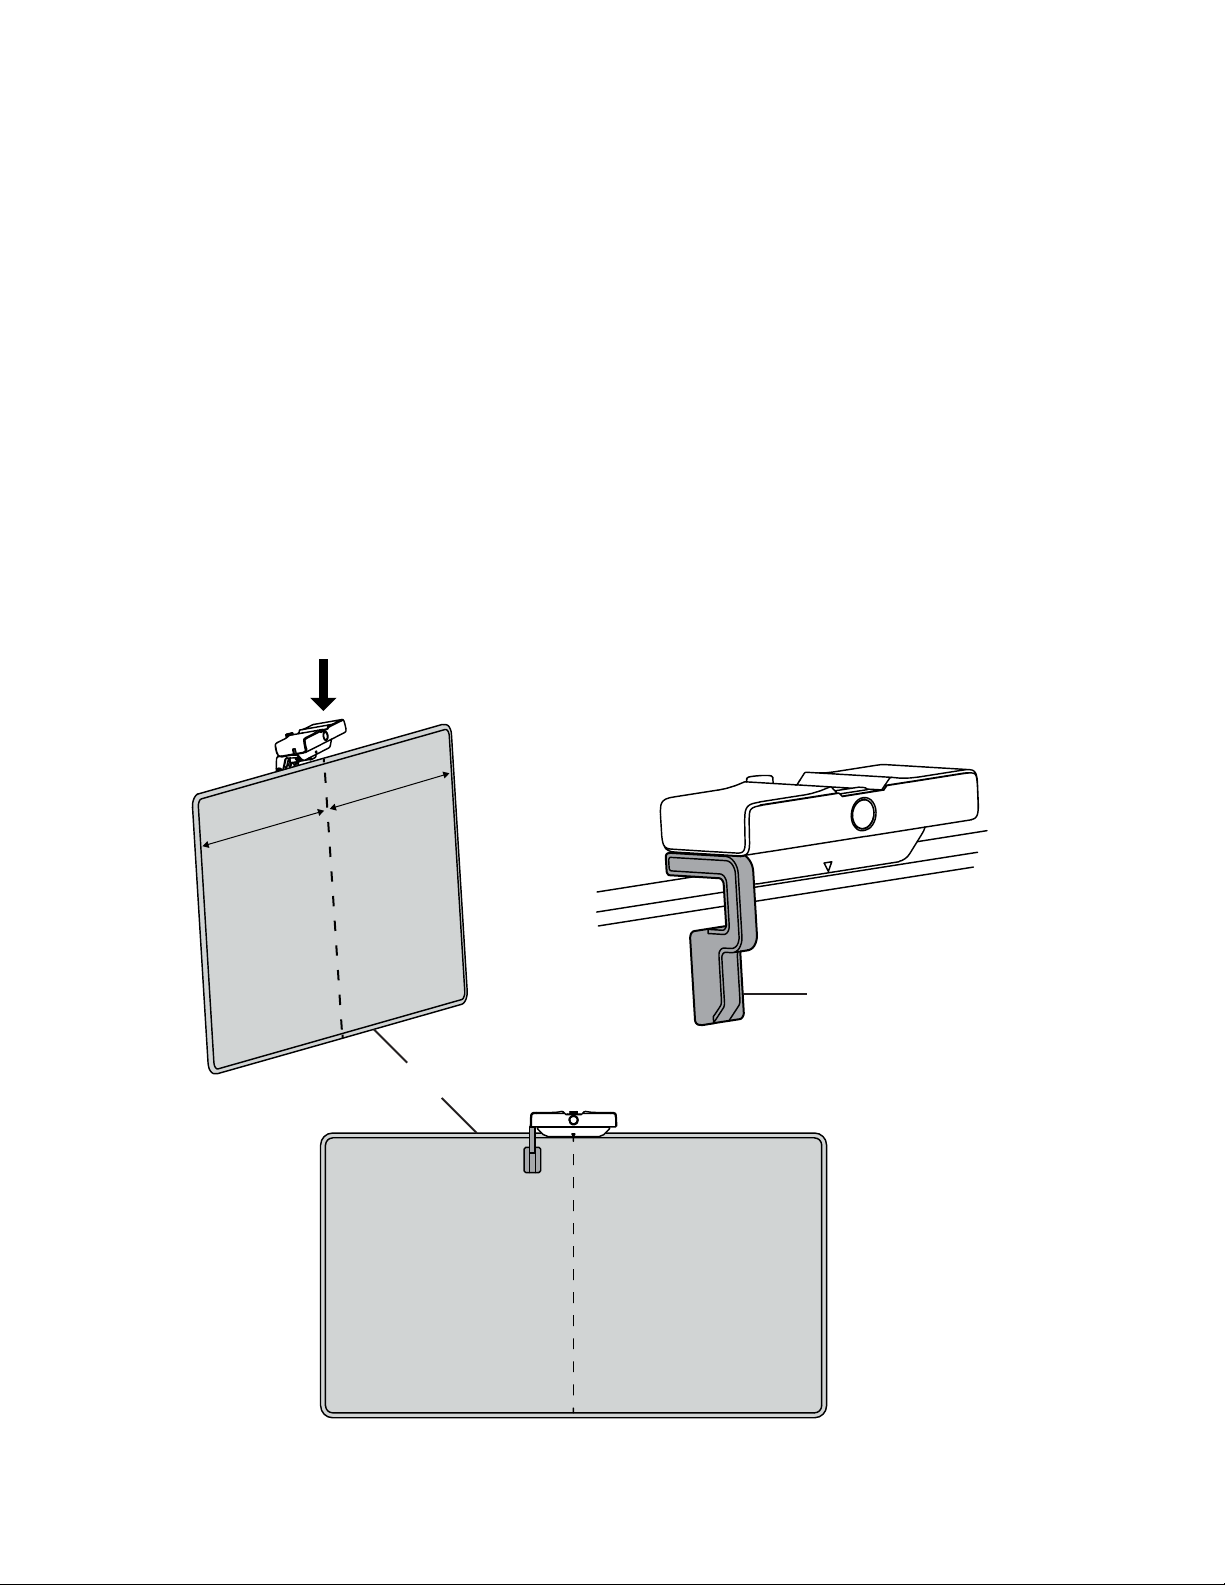
Step 2
Center and secure the Android Box
A. Align and hold the Android Box centered on top of your television. The white arrow on the
base below the box indicates the center of the unit to help with this. Press the base at against
the TV frame and hold the box in place for the next step.
B. Slide the Alignment Tool underneath one side of the Android Box with its foot at
against your screen. A snug t means that the laser projectors in the WAVE unit are correctly
aligned with the screen of your TV.
Equal
distance
Equal
distance
Alignment Tool
TV
Center
© 2018 Touchjet™ All Rights Reserved8
Page 9
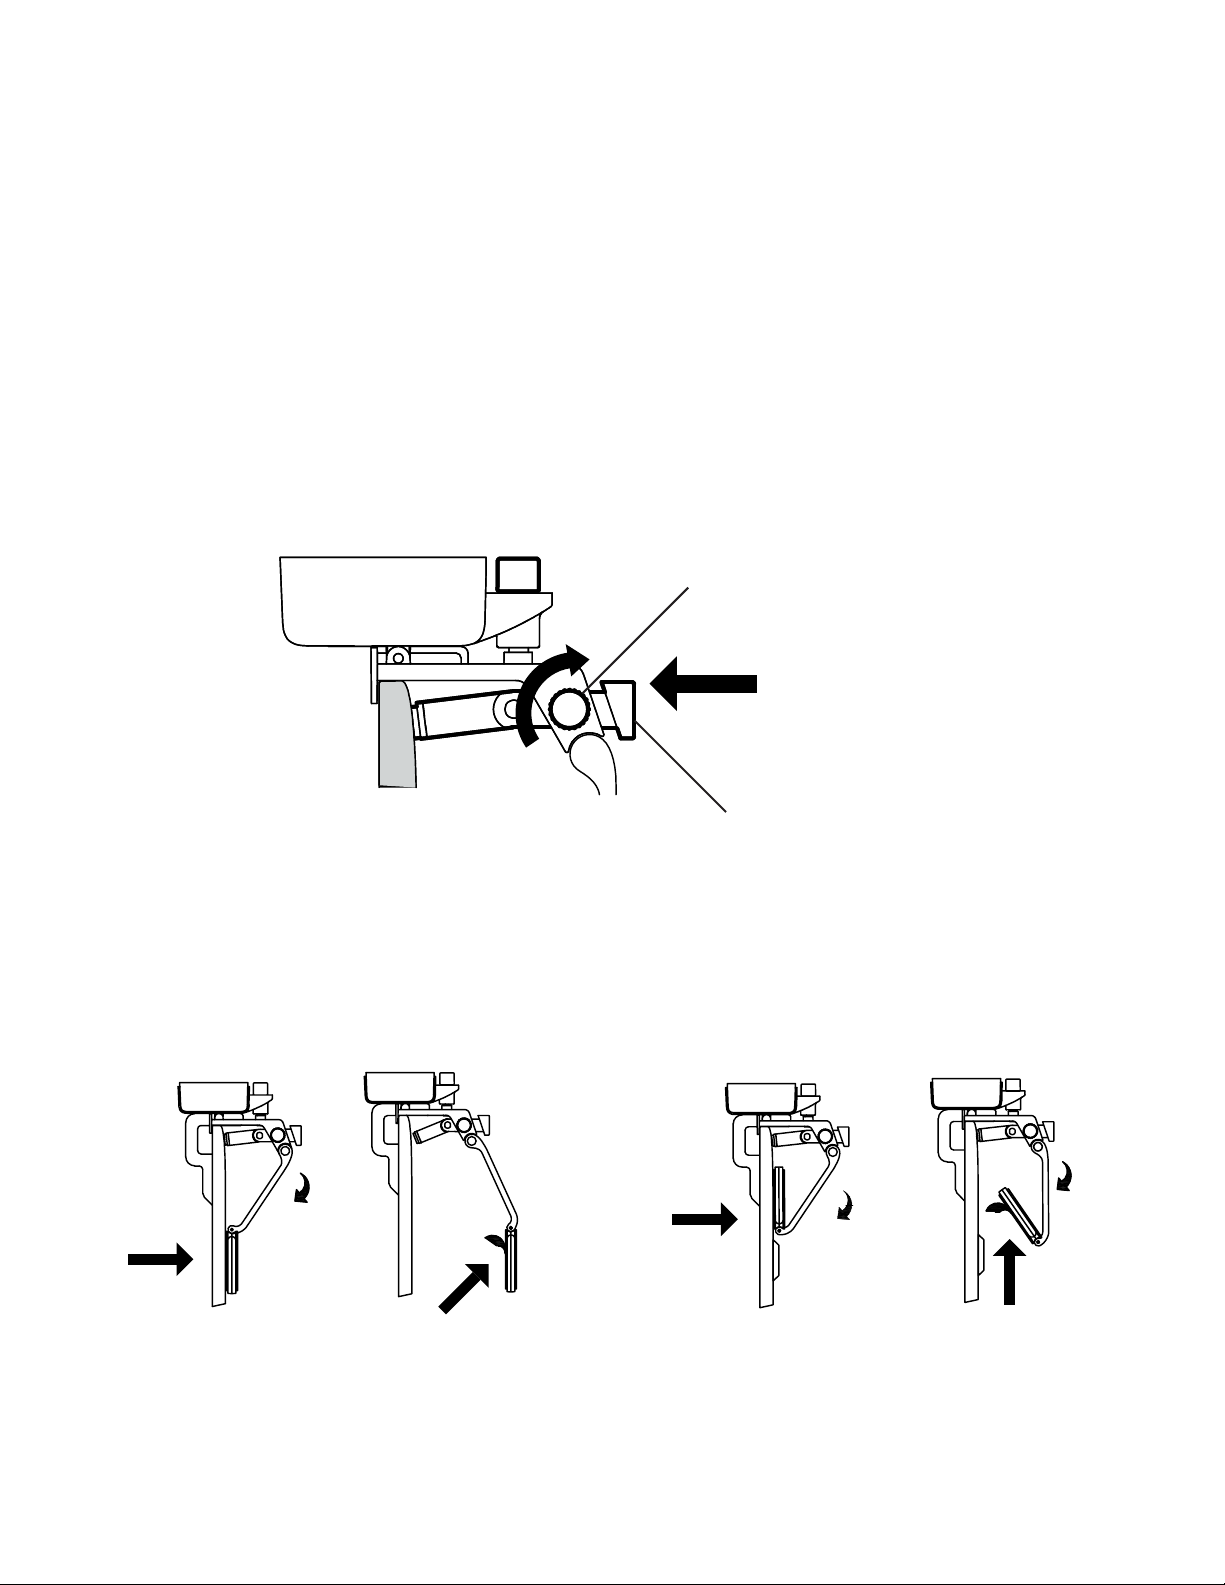
C. Press the Bracing Rod rmly onto the back of the TV. There should be no gap. Tighten the
Bracing Knob to fasten the rod in place.
Bracing Knob
Bracing Rod
D. Remove the Protective Film from the Velcro Tape attached to the Velcro Pad and
keeping the Android Box in place. Press it rmly onto the back of your TV.
E. Slide the Alignment Tool out from underneath the box to remove it.
© 2018 Touchjet™ All Rights Reserved 9
Page 10
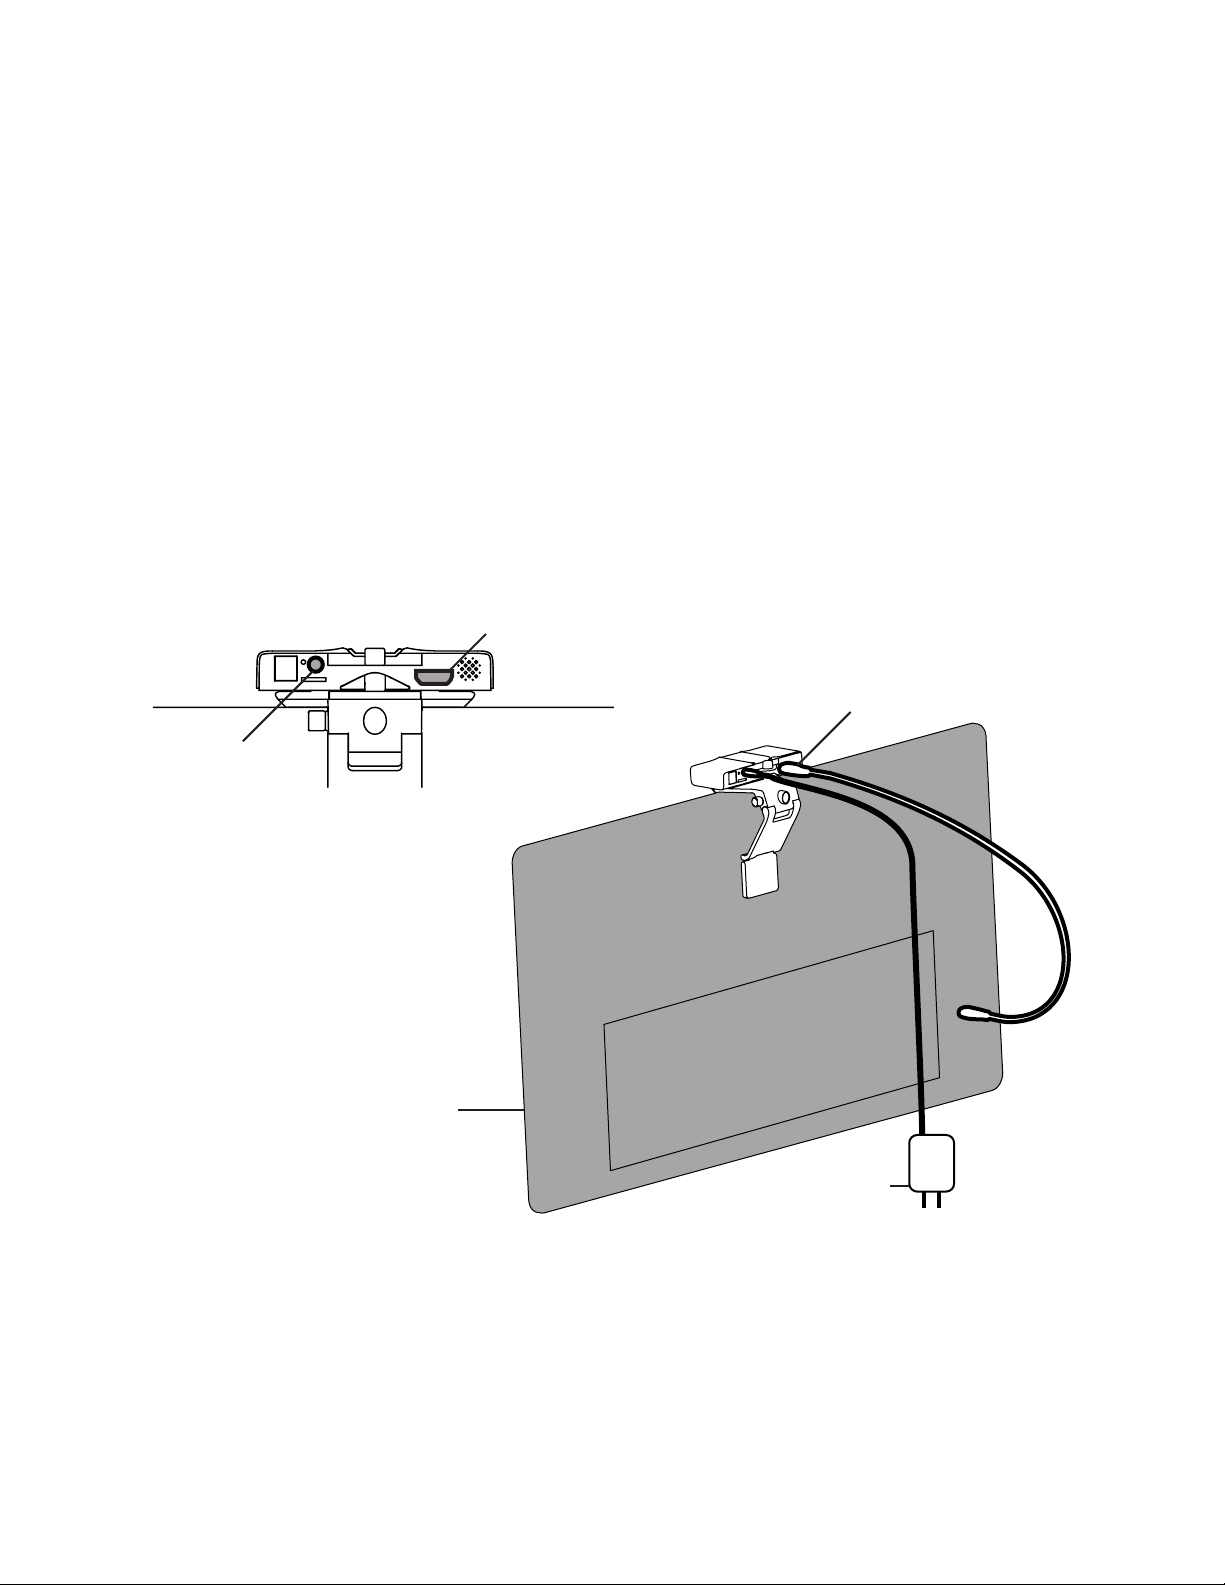
Step 3
Connect to HDMI and power
HDMI
A. Insert one end of your HDMI Cable into the HDMI Port on the back of the Android
Box, and the other into an HDMI Port on your TV. Note: the plug will not go all the way
into the box, do not try to push it in further once the red power light comes on.
HDMI Port
HDMI Cable (not included)
DC Input
Back of TV
Power Adapter
WAVE AC Adapter
B. Insert the DC plug on the WAVE AC Adapter cord into the DC Input connector on the
back of the Android Box.
C. Insert the AC plug into a 120V AC power outlet. Note: we recommend plugging your WAVE
into a power strip so that you can easily turn the device on and off.
© 2018 Touchjet™ All Rights Reserved10
Page 11
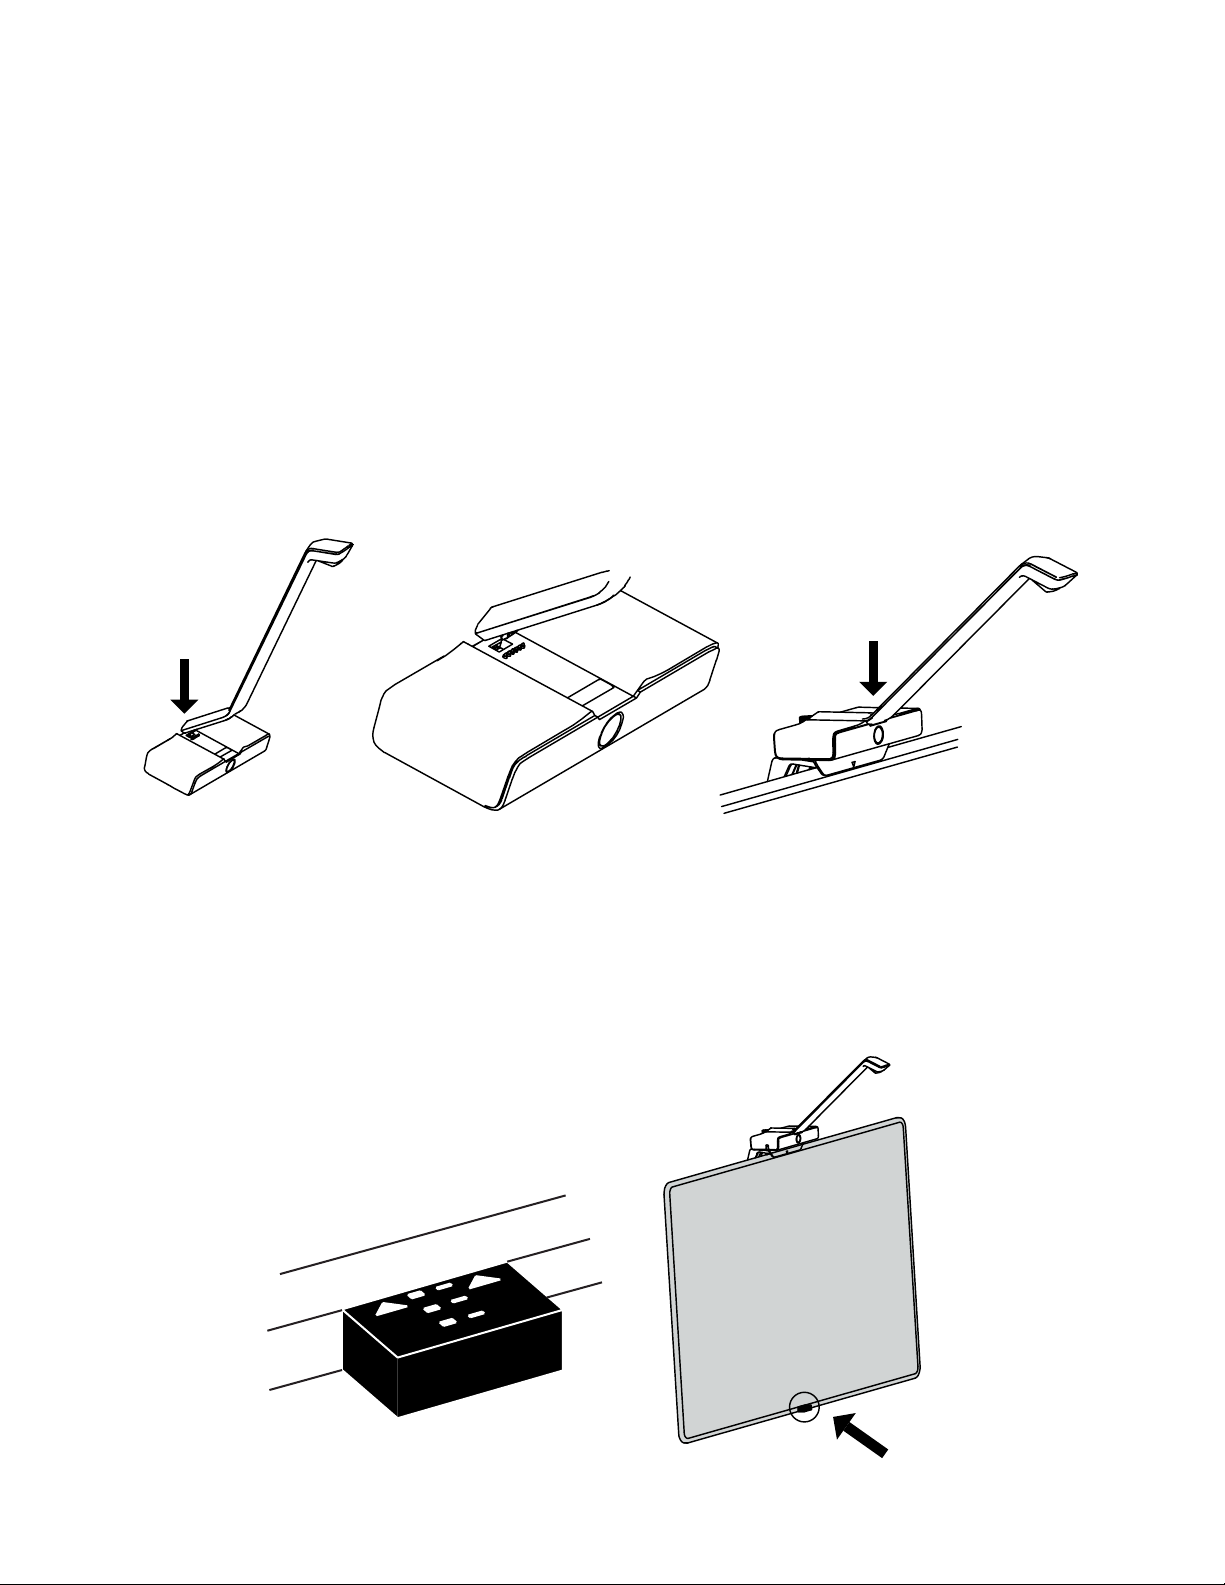
Step 4
Connect the WAVE Arm and align the infrared wall
A. Connect the WAVE Arm to the top of the Android Box by carefully place the lip at the
base of the arm into the rectangular opening atop the box. The WAVE Arm should snap into
place so that there is no gap between the arm and the box.
B. Place the Infrared Sensor at against the bottom of your TV frame. Face the sensor lights up
toward the WAVE unit and the arrows toward your screen. The colored lights of the Infrared
Sensor will indicate the angle of the infrared lasers emitting from your Android Box. Your
goal is to align them parallel to your TV screen.
© 2018 Touchjet™ All Rights Reserved 11
Page 12
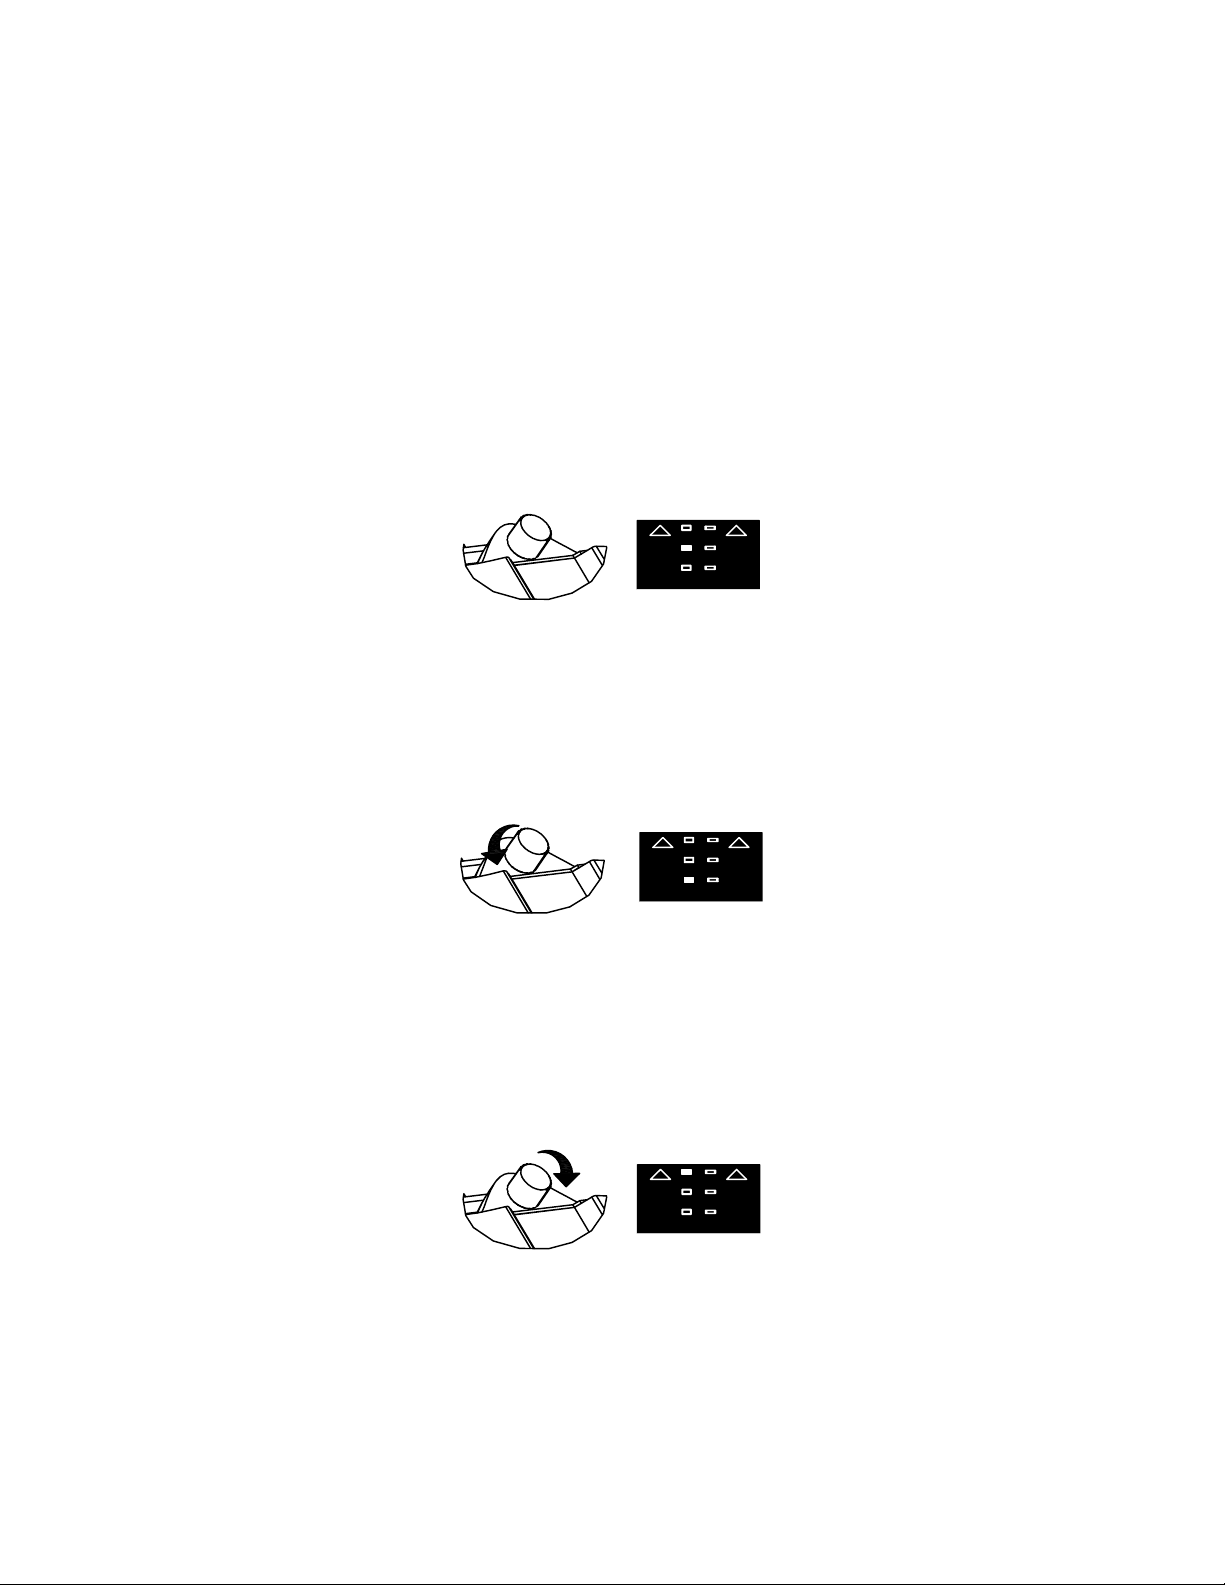
C. Green Light - indicates that the Android Box is in the correct position.
D. Red Light - slowly turn the Angle Adjustment Knob counterclockwise until the sensor
turns green.
E. Yellow Light - can indicate that you have adjusted too far. Twist the Angle Adjustment
Knob clockwise until the light turns green.
F. No Light - ensure that the WAVE arm is snapped into place tightly and that the Alignment
Tool can still t between the box and the TV.
© 2018 Touchjet™ All Rights Reserved12
Page 13
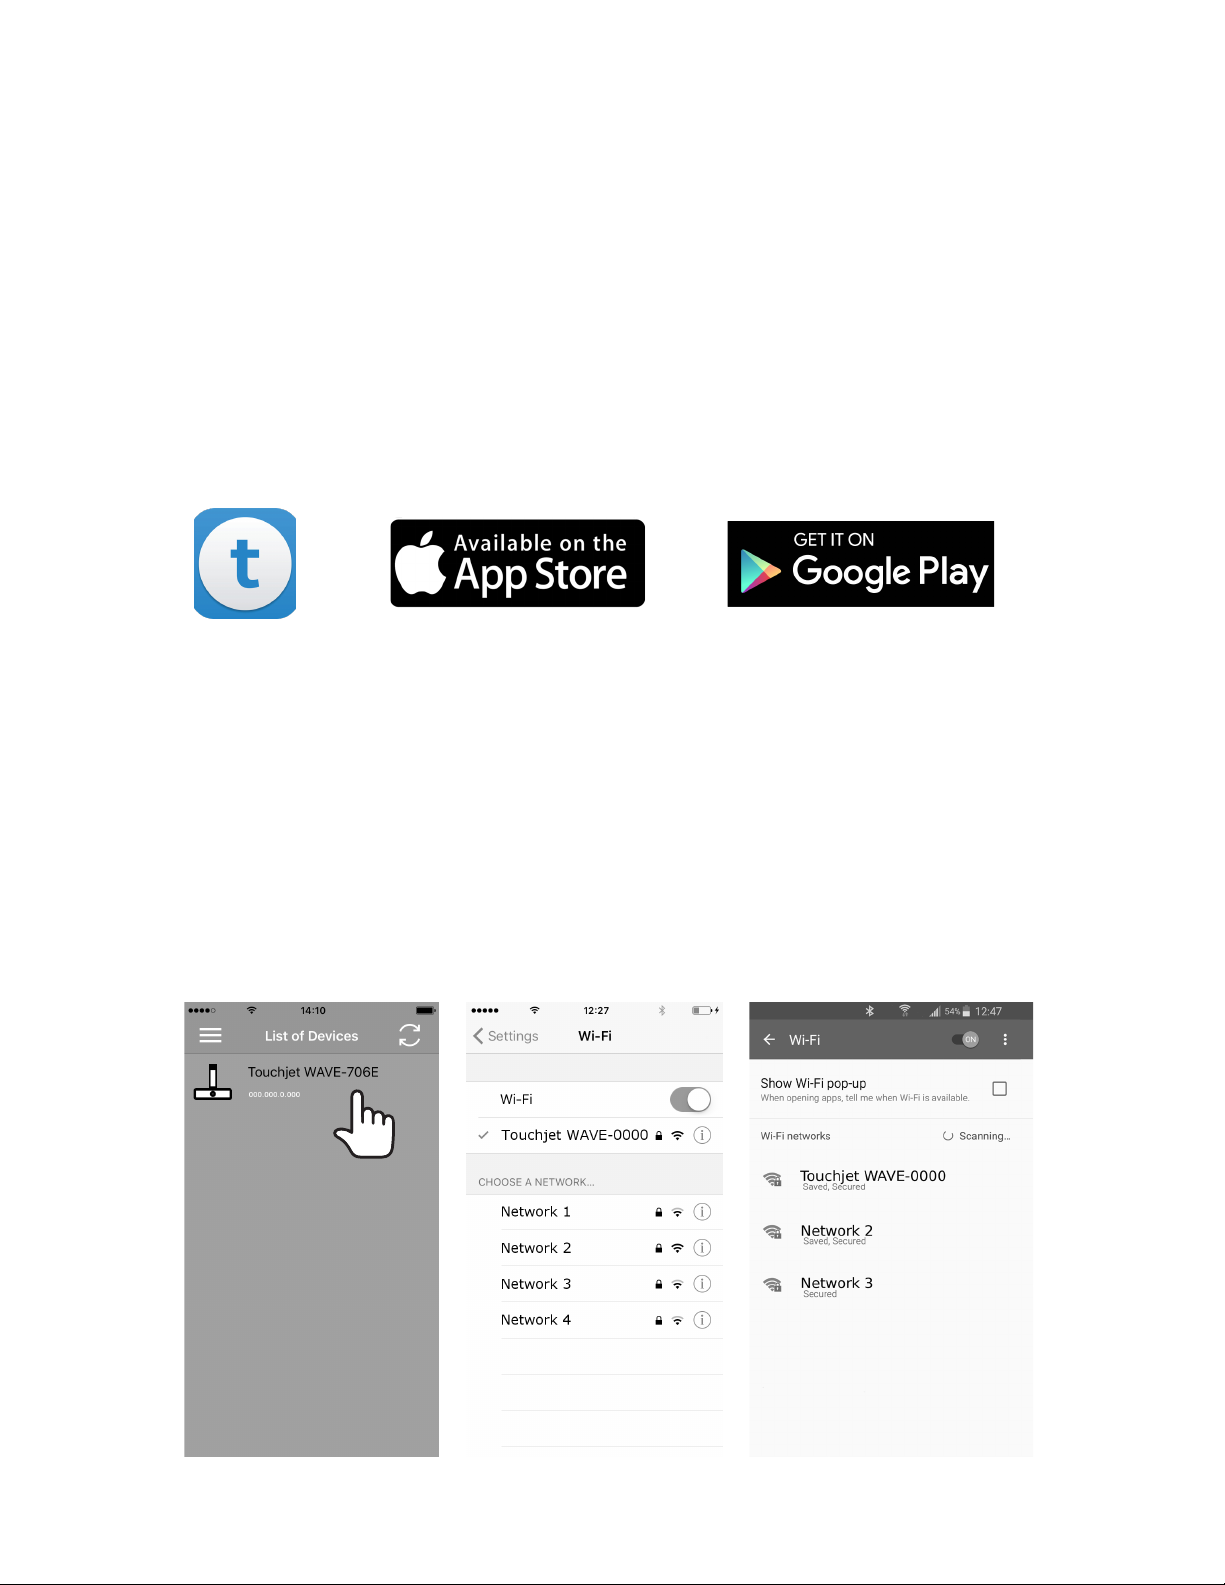
Step 5
Pairing the WAVE with your phone or tablet
A. Download the free Touchjet App using your smartphone or tablet. You will use this as a
smart remote to complete the setup process for the WAVE.
B. Turn on your TV and set its input source to the HDMI channel connected to the WAVE.
C. Go to your phone or tablet’s WiFi settings menu and connect to the WiFi hotspot broadcast by
your WAVE (see left and center images below). Note: The name of this network should also
appear in the top right corner of the WAVE screen.
D. Open the Touchjet App on your smartphone or tablet. Under Touchjet Devices, you will
see your WAVE listed. Tap Touchjet WAVE-XXXX to connect the two devices (see right
image). You may need to refresh the page using the button in the top right corner and wait a
moment for the WAVE to appear on the device list.
© 2018 Touchjet™ All Rights Reserved 13
Page 14
© 2018 Touchjet™ All Rights Reserved14
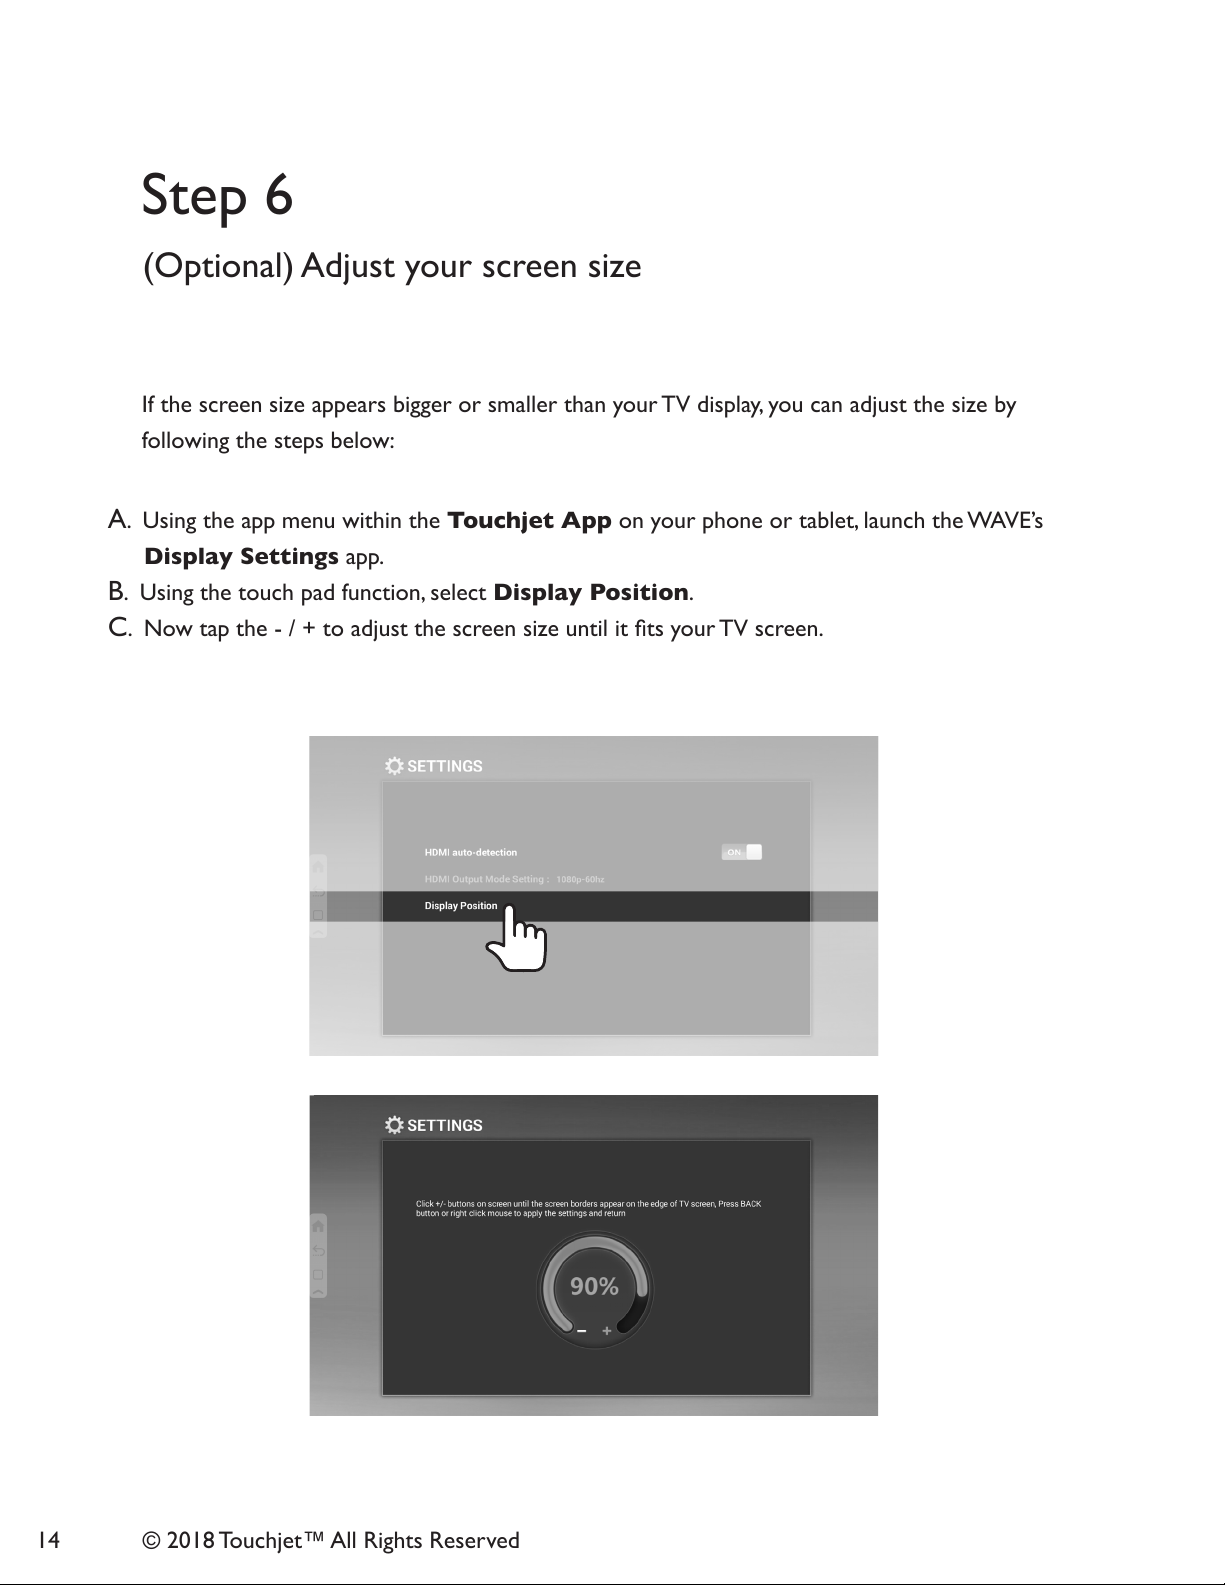
(Optional) Adjust your screen size
A. Using the app menu within the Touchjet App on your phone or tablet, launch the WAVE’s
Display Settings app.
B. Using the touch pad function, select Display Position.
C. Now tap the - / + to adjust the screen size until it ts your TV screen.
If the screen size appears bigger or smaller than your TV display, you can adjust the size by
following the steps below:
Step 6
Page 15
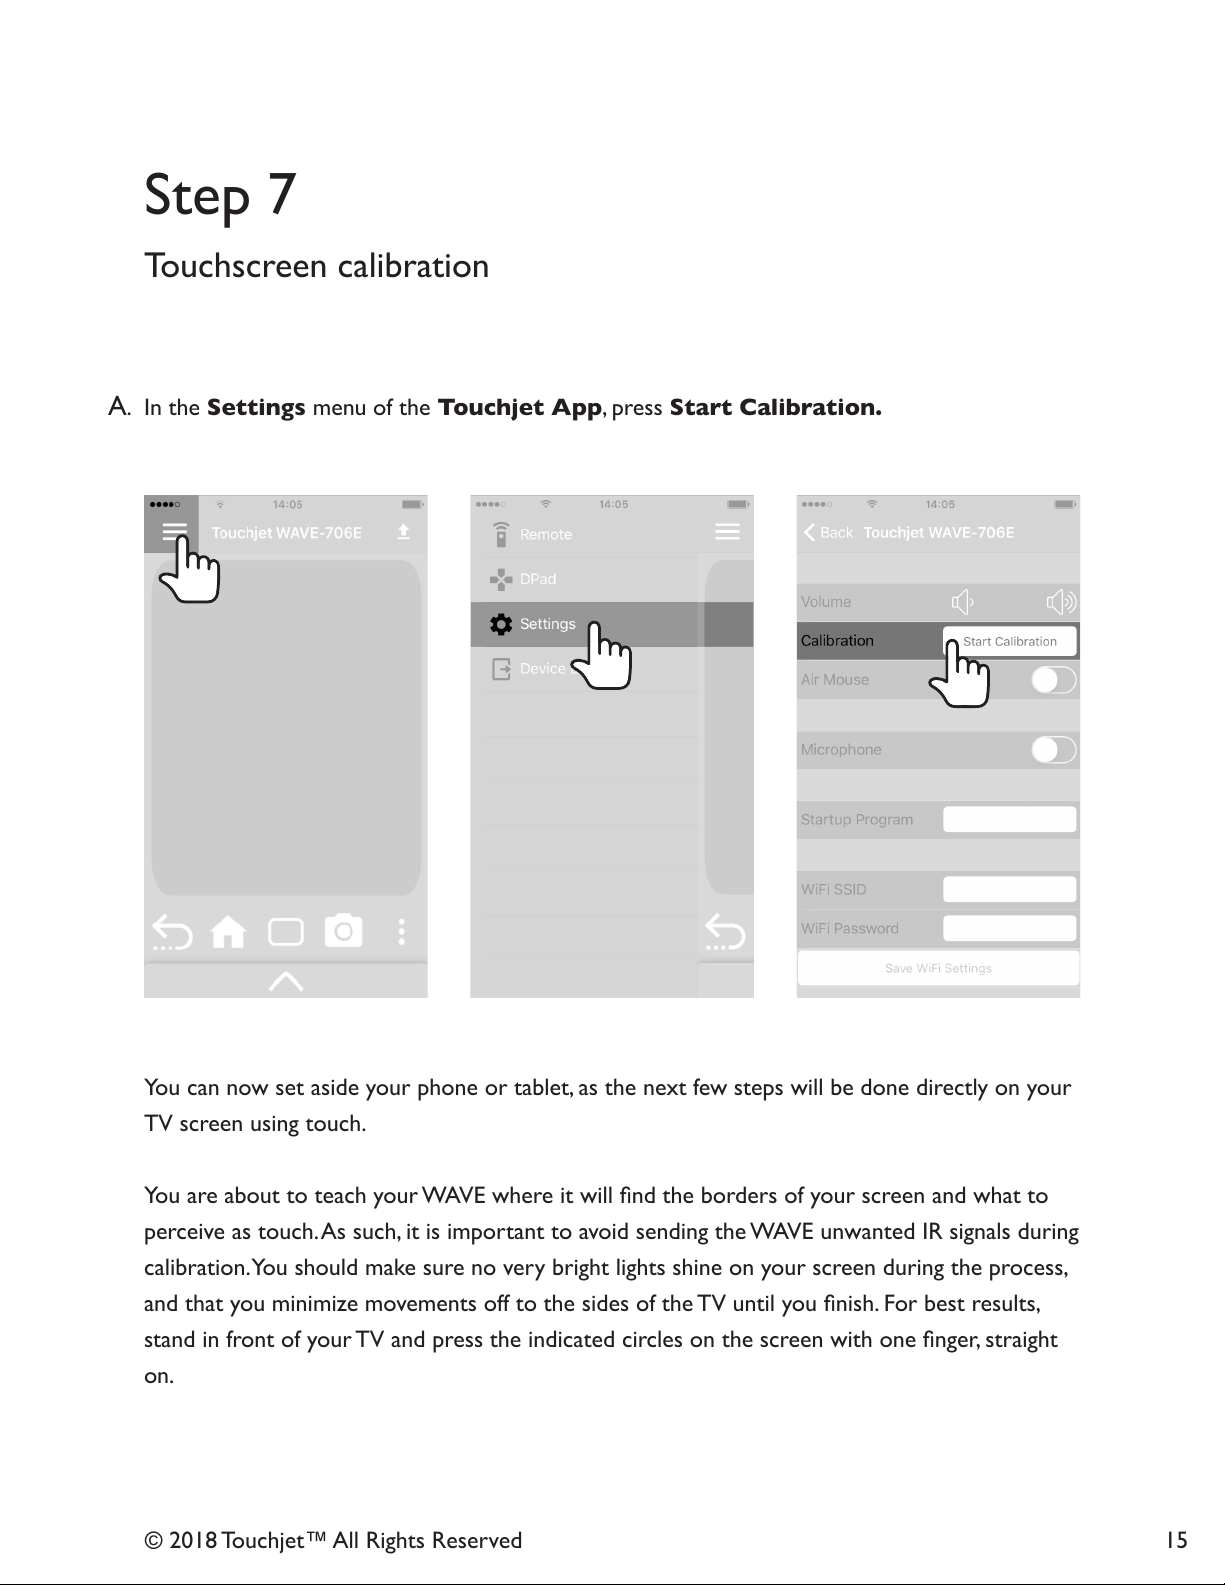
© 2018 Touchjet™ All Rights Reserved 15
Touchscreen calibration
A. In the Settings menu of the Touchjet App, press Start Calibration.
You can now set aside your phone or tablet, as the next few steps will be done directly on your
TV screen using touch.
You are about to teach your WAVE where it will nd the borders of your screen and what to
perceive as touch. As such, it is important to avoid sending the WAVE unwanted IR signals during
calibration. You should make sure no very bright lights shine on your screen during the process,
and that you minimize movements off to the sides of the TV until you nish. For best results,
stand in front of your TV and press the indicated circles on the screen with one nger, straight
on.
Step 7
Page 16
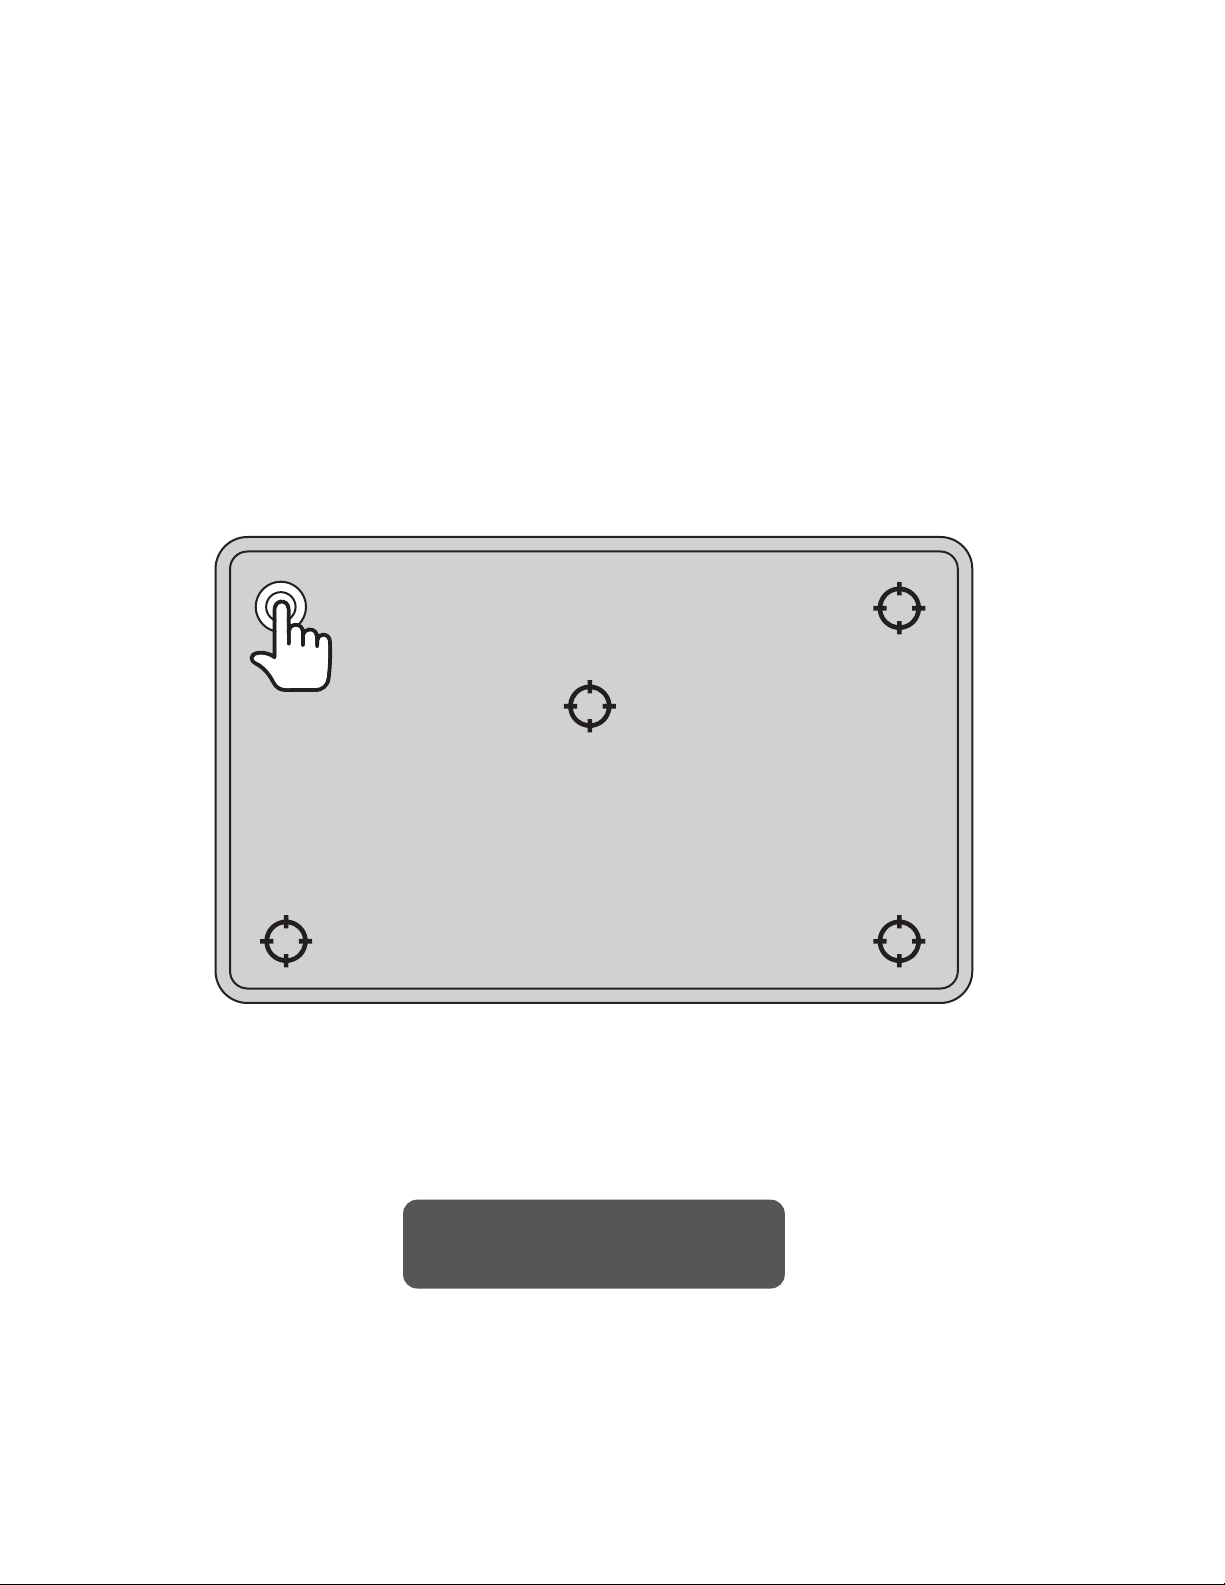
B. Touch the rst point on the screen until the dot turns from white to yellow, then lift your nger
from the screen. You should repeat this process for all ve dots that appear.
C. After the fth point turns yellow, wait for the calibration to complete and then tap the button
that reads Press to Finish to complete calibration.
Press to Finish
Once the calibration process is completed, you can fully use the touch functionality of the
WAVE, or continue to use the Touchjet App on your smartphone/tablet as a smart remote.
© 2018 Touchjet™ All Rights Reserved16
Page 17
© 2018 Touchjet™ All Rights Reserved 17
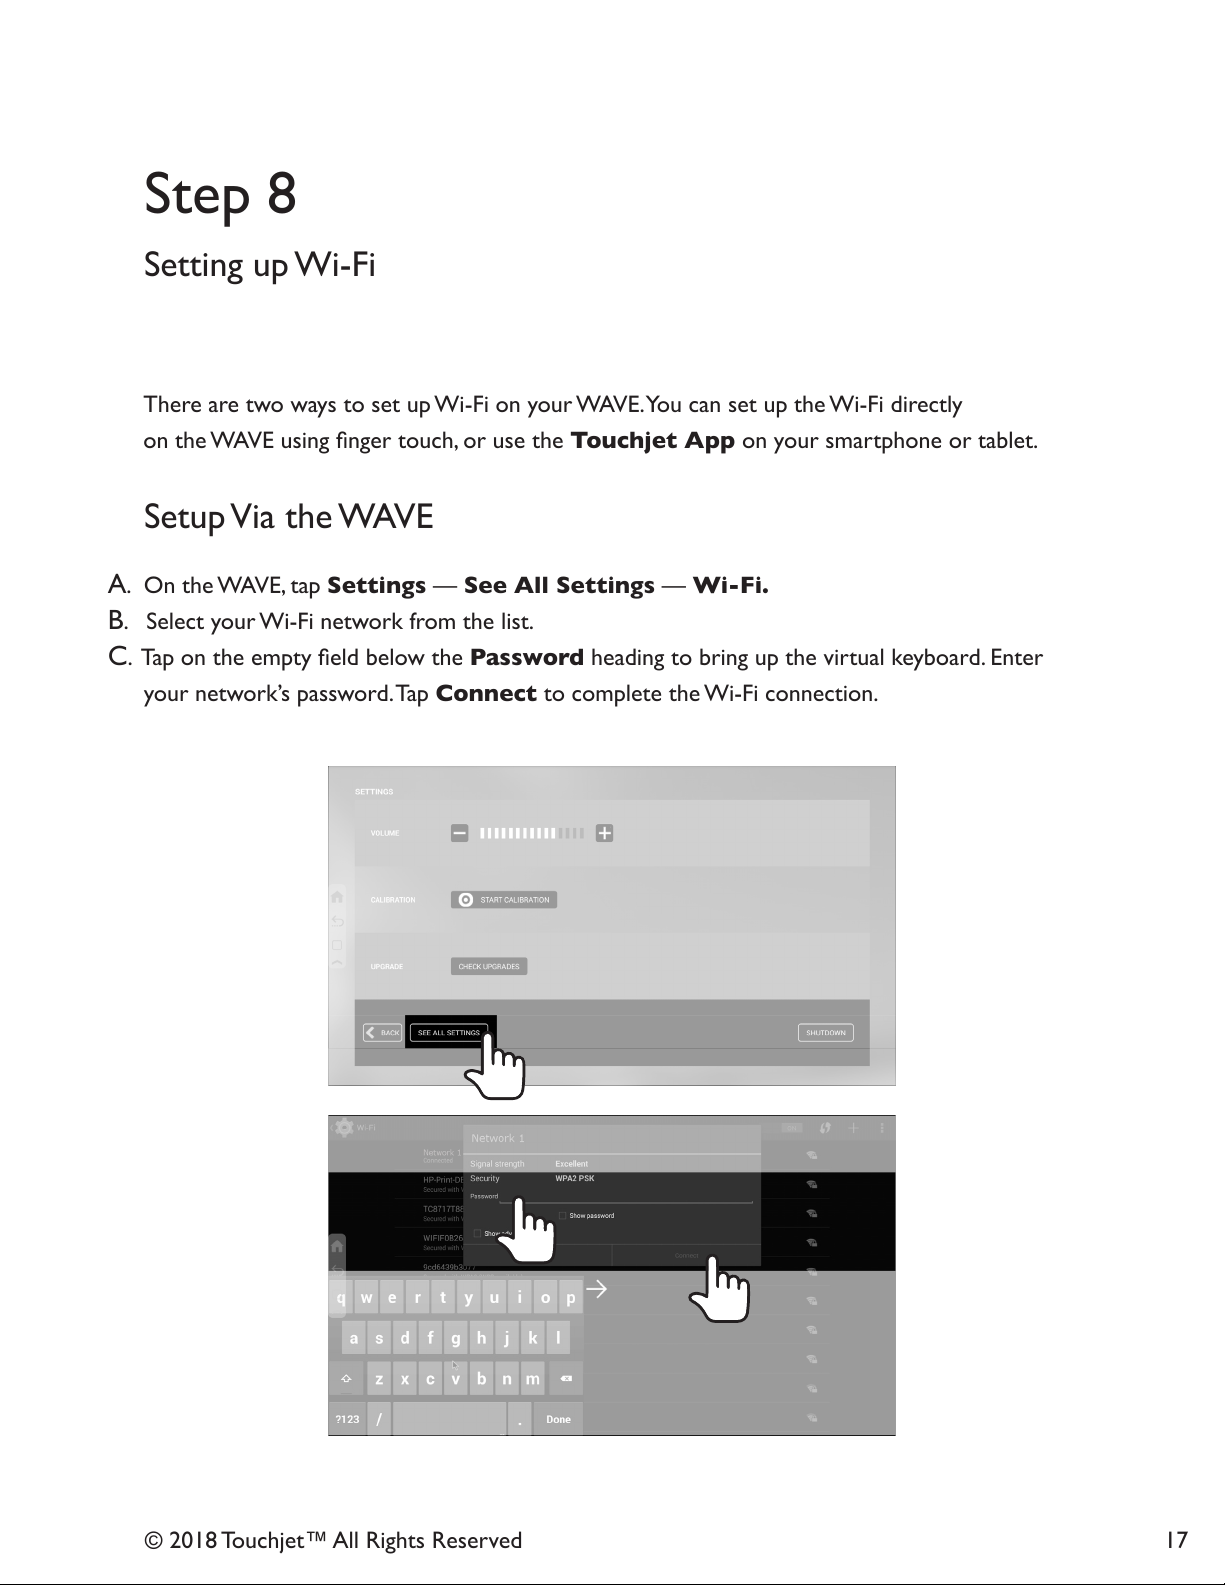
There are two ways to set up Wi-Fi on your WAVE. You can set up the Wi-Fi directly
on the WAVE using nger touch, or use the Touchjet App on your smartphone or tablet.
Setup Via the WAVE
A. On the WAVE, tap Settings — See All Settings — Wi-Fi.
B. Select your Wi-Fi network from the list.
C. Tap on the empty eld below the Password heading to bring up the virtual keyboard. Enter
your network’s password. Tap Connect to complete the Wi-Fi connection.
Setting up Wi-Fi
Step 8
Page 18
© 2018 Touchjet™ All Rights Reserved18
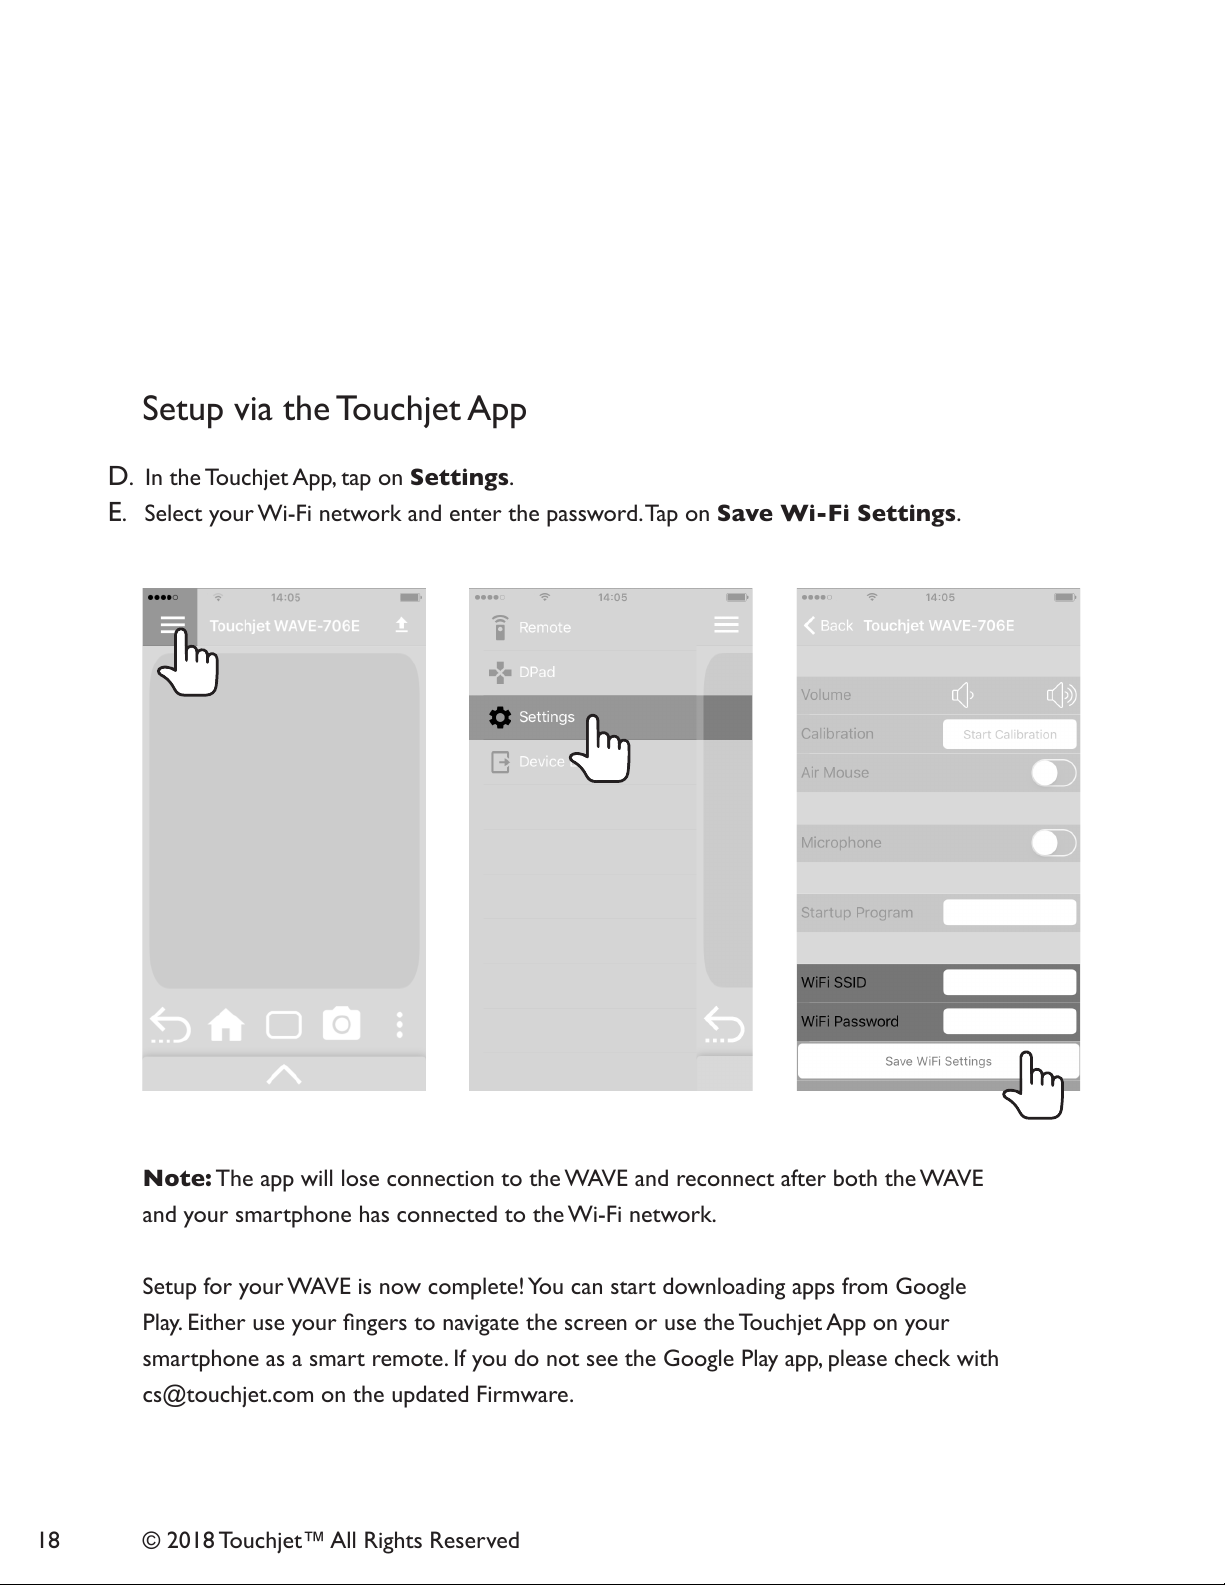
Setup via the Touchjet App
D. In the Touchjet App, tap on Settings.
E. Select your Wi-Fi network and enter the password. Tap on Save Wi-Fi Settings.
Note: The app will lose connection to the WAVE and reconnect after both the WAVE
and your smartphone has connected to the Wi-Fi network.
Setup for your WAVE is now complete! You can start downloading apps from Google
Play. Either use your ngers to navigate the screen or use the Touchjet App on your
smartphone as a smart remote. If you do not see the Google Play app, please check with
Page 19

Step 9
How to add or remove apps from the home screen
Any time you install an app for your WAVE using the Amazon App Store or Google Play,
it will be added to the All Apps menu.
You can access this by tapping the All Apps button in the bottom right hand corner of
your WAVE and swiping left or right to see more of the list. You can also see the full list
of apps within the app menu of the Touchjet App on your phone or tablet.
To change one of the apps on your favorites screen (the home menu), you will rst need
to remove an app from the grid space you wish to use. Instructions follow:
A. Press and hold your nger on the app you wish to move until it is highlighted. Two buttons will
appear at the top, prompting you to Remove or Cancel.
B. Tap Remove to clear the app from that space.
To ll the space with another app:
C. Press All Apps in the bottom right corner of the main screen.
D. Press and hold your nger on the app you wish to move to your favorites. This will take you
back to the main screen, where you will see available spaces highlighted with a white dotted
border.
E. Tap the empty space you wish to put the app in, and the process is complete.
Delete: settings — All Settings — Apps
© 2018 Touchjet™ All Rights Reserved 19
Page 20

Terms and Conditions of Use
Regulatory
Touchjet WAVE™
Touchjet USA Inc.,
1569 Solano Ave, #472
Berkeley, CA 94707 USA
+1 415.579.3399
Email: [email protected]
Touchjet warrants the Touchjet WAVE™ to be free from defects in materials and workmanship
under normal use for a period of 1 year from the date of original direct or retail purchase. You
may also have other rights that vary from state to state and country to country.
This device complies with Part 15 of the FCC Rules. Operation is subject to the following two
conditions:
(1)This device may not cause harmful interference, and (2) this device must accept any
interference received, including interference that may cause undesired operation. Caution: Any
changes or modications to the equipment not expressly approved by Touchjet could void your
authority to operate this equipment. Note: This equipment has been tested and found to
comply with the limits for a Class B digital device, pursuant to part 15 of the FCC Rules.
These limits are designed to provide reasonable protection against harmful interference
in a residential installation. This equipment generates, uses and can radiate radio frequency
energy and, if not installed and used in accordance with the instructions, may cause harmful
interference to radio communications. However, there is no guarantee that interference will not
occur in a particular installation. If this equipment does cause harmful interference to radio or
television reception, which can be determined by turning the equipment off and on, the user is
encouraged to try to correct the interference by one or more of the following measures:
• Reorient or relocate the receiving antenna.
• Increase the separation between the equipment and receiver.
• Connect the equipment into an outlet on a circuit different from that to which the
receiver is connected.
• Consult the dealer or an experienced radio/TV technician for help.
© 2018 Touchjet™ All Rights Reserved20
Page 21

One-Year Limited Warranty
Touchjet, Inc. (“Company”) offers the following commercial warranty to “you”, the rst user of
the Touchjet WAVE™ Projector (“Product”).
This warranty is in addition to any legal rights you have against the Company or any other
person.These rights vary by jurisdiction and are not affected in any way by this warranty. If you
transfer the Product to another person they will also have the benet of this warranty.
The Company warrants the Product against defects in materials and/or workmanship under
normal use for a period of ONE (1) YEAR from the date of purchase by the original purchaser
(“Warranty Period”). If a defect arises and a valid claim is received within the Warranty Period,
the Company will either, at its option:
(a) repair the defect at no charge, using new or refurbished replacement parts; or
(b) replace the Product with a new Product that is at least functionally equivalent to the original.
A replacement Product or part, including a user-installable part installed in accordance with
instructions provided by the Company, assumes the remaining Warranty Period of the original
Product. When a Product or part is exchanged, any replacement becomes your property and
the replaced item becomes the Company’s property.
Obtaining Service
To make a claim to obtain warranty service, send an email to the Company at
(a) describing the Product’s defect
(b) with a copy of the Product’s purchase receipt.
Service options, parts availability and response times will vary. If Company approves your claim,
you will be responsible for the return (and associated shipping costs) of the Product or any
defective parts to Company’s authorized service center.
© 2018 Touchjet™ All Rights Reserved 21
Page 22

Limits and Exclusions
This Limited Warranty does not cover:
(a) damage caused by failure to follow instructions relating to the Product’s use or the
installation of components, including, without limitation, in this User Guide or the Terms and
Conditions of Use;
(b) damage caused by accident, abuse, misuse, re, oods, earthquake or other external causes;
(c) damage caused by service performed by anyone who is not a representative of the Company;
(d) accessories used in conjunction with the Product, whether or not provided with the
Product;
(e) a Product or part that has been modied to alter functionality or capability;
(f) items intended to be periodically replaced by you during the normal life of the Product,
including, without limitation, batteries and light bulbs;
(g) any Product sold “as is,” including, without limitation, oor demonstration models and
refurbished items; or
(h) a Product that is used contrary to this User Guide or the Terms and Conditions of Use,
including without limitation, commercially or for a commercial purpose.
TO THE EXTENT PERMITTED BY APPLICABLE LAW, THE COMPANY DISCLAIMS ANY AND
ALL STATUTORY OR IMPLIED WARRANTIES, INCLUDING, WITHOUT LIMITATION,
WARRANTIES OF MERCHANTABILITY, FITNESS FOR A PARTICULAR PURPOSE, NON-
INFRINGEMENT AND WARRANTIES AGAINST HIDDEN OR LATENT DEFECTS.
IF THE COMPANY CANNOT LAWFULLY DISCLAIM STATUTORY OR IMPLIED
WARRANTIES, THEN TO THE EXTENT PERMITTED BY LAW, ALL SUCH WARRANTIES
SHALL BE LIMITED IN DURATION TO THE DURATION OF THIS EXPRESS LIMITED
WARRANTY.
Some jurisdictions disallow the exclusion or limitation of implied warranties, so the above
exclusions or limitations may not apply to you. This warranty gives you specic legal rights and
you may also have other rights, which vary from jurisdiction to jurisdiction.
© 2018 Touchjet™ All Rights Reserved22
Page 23

Contact Information
Customer Service: [email protected]
Address:
1569 Solano Ave, #472
Berkeley, CA 94707 USA
+1 415.579.3399
© 2018 Touchjet™ All Rights Reserved 23
 Loading...