


DT-07
User Guide for Integrators

Version 1.0 2
Revision History
Version
Date
Description
1.0
21 May 2014
Draft release

Version 1.0 3
Copyright
Copyright2014 Touch Dynamic Inc. All rights reserved.
No part of this document may be reproduced, distributed, translated, or stored in any form without
the prior written permission of Touch Dynamic Inc. All brands and product names mentioned herein
may be trademarks or registered trademarks of their respective owners. Product specifications are
subject to change without prior notice.
Disclaimer
The contents of this document are provided as is. Touch Dynamic Inc. makes no representations or
warranties with respect to the contents herein and specifically disclaims any express or implied
warranties of merchantability or fitness for any particular purpose. Touch Dynamic Inc. reserves the
right to revise this document at any time without prior notice.

Version 1.0 4
Regulatory Information
FCC Statement
This equipment complies with Part 15 of the FCC Rules. Operation is subject to the following two
conditions: (1) This device may not cause harmful interference, and (2) this device must accept any
interference received, including interference that may cause undesired operation. Changes or
modifications not expressly approved by the party responsible for compliance could void the user’s
authority to operate the equipment.
This equipment has been tested and found to comply with the limits for a Class B digital device,
pursuant to part 15 of the FCC Rules. These limits are designed to provide reasonable protection
against harmful interference in a residential installation. This equipment generates uses and can
radiate radio frequency energy and, if not installed and used in accordance with the instructions,
may cause harmful interference to radio communications. However, there is no guarantee that
interference will not occur in a particular installation. If this equipment does cause harmful
interference to radio or television reception, which can be determined by turning the equipment off
and on, the user is encouraged to try to correct the interference by one or more of the following
measures:
Reorient or relocate the receiving antenna.
Increase the separation between the equipment and receiver.
Connect the equipment into an outlet on a circuit different from that to which the receiver is
connected.
Consult the dealer or an experienced radio/TV technician for help
The FCC permits a maximum SAR value of 1.6 W/kg averaged over one gram of tissue. For body
worn operation, this device has been tested and meets the FCC RF exposure guidelines when used
with an accessory that contains no metal. The highest SAR value of this device (FCC ID: VRI-B195),
tested for typical body worn operation, is 0.495 W/kg. Use of other accessories may not ensure
compliance with FCC RF exposure guidelines.

Version 1.0 5
Safety Information
Please read the following information carefully before using the device for the first time, and keep
this User Guide in a safe place for future reference.
Always treat the device with care and keep it in a clean and dust-free environment.
Do not expose the device to extremely hot, cold or humid environment. The operation
temperature is from –10°C to 50°C.
Do not use the device in wet or rainy conditions.
Do not charge the device in extremely hot (> 40°C) or cold conditions (< 0°C).
Do not attempt to disassemble or modify the device including the charger.
Do not operate the device when your hands are wet.
Do not insert foreign objects into the openings of the device.
Use only the adaptor and battery approved for the device.
The adapter shall be installed near the device and shall be easily accessible.
Do not use the adaptor if the power cord or plug is damaged.
Install the cradle on a flat and stable surface.
Do not disassemble, crush or puncture the battery.
Do not expose the battery to high temperatures.
Do not let battery terminals touch other metal objects that could lead to short-circuit of the
battery.
Do not dispose of the battery in fire or water.
Dispose of used battery properly according to local laws and regulations.
The device shall only be connected to a USB interface of version 2.0 or higher. The connection
to so called power USB is prohibited.

Version 1.0 6
Contents
Revision History ................................................................................................................................................. 2
Copyright ........................................................................................................................................................... 3
Disclaimer .......................................................................................................................................................... 3
Regulatory Information ...................................................................................................................................... 4
Safety Information .............................................................................................................................................. 5
1. Product Specifications ............................................................................................................................... 9
2. Device Overview ...................................................................................................................................... 12
3. Getting Started ......................................................................................................................................... 14
3.1 Installing and Removing the Battery ................................................................................................ 14
3.1.1 Installing the Battery ................................................................................................................ 14
3.1.2 Removing the Battery .............................................................................................................. 14
3.2 Battery Charging .............................................................................................................................. 14
3.2.1 Charging the Device ................................................................................................................ 14
3.2.2 Charging the Spare Battery ..................................................................................................... 14
3.3 LED Status Description .................................................................................................................... 15
3.4 Powering the Device On and Off ..................................................................................................... 15
3.5 Suspending the Device .................................................................................................................... 15
3.6 Viewing Device Information ............................................................................................................. 15
4. Admin Mode and User Mode ................................................................................................................... 16
4.1 Configuring User Mode Applications ............................................................................................... 16
4.2 Configuring Auto-launch Application ................................................................................................ 17
4.3 Changing the Operating Mode ........................................................................................................ 17
4.3.1 Switching to the User Mode ......................................................................................................... 17
4.3.2 Switching the Operating Mode Temporarily ................................................................................. 17
4.4 Changing the Admin Password........................................................................................................ 17
5. Using Wi-Fi .............................................................................................................................................. 18
5.1 Turning Wi-Fi On or Off .................................................................................................................... 18
5.2 Setting Wi-Fi Boot Up State ............................................................................................................. 18
5.3 Connecting to WLAN ....................................................................................................................... 18
5.4 Unlocking/ Disconnecting WLAN ..................................................................................................... 18
5.5 Configuring Roaming Trigger Level ................................................................................................. 19
5.6 Configuring Periodic Keep-alive ...................................................................................................... 19
5.7 Configuring Auto Retry WLAN ......................................................................................................... 19
5.8 Viewing Network Information ........................................................................................................... 20
6. Using Bluetooth ....................................................................................................................................... 21
6.1 Bluetooth Profiles ............................................................................................................................. 21
6.2 Connecting to a Bluetooth Device ................................................................................................... 21
6.3 Setting Bluetooth Boot Up State ...................................................................................................... 21
6.4 Changing the Bluetooth Name ........................................................................................................ 21
6.5 Making the Device Discoverable ..................................................................................................... 22

Version 1.0 7
6.6 Modifying Bluetooth Settings in User Mode ..................................................................................... 22
6.7 Unpairing a Bluetooth Device .......................................................................................................... 22
7. Using NFC ............................................................................................................................................... 23
7.1 Turning on NFC ............................................................................................................................... 23
7.2 NFC Sample Application .................................................................................................................. 23
7.2.1 Scanning NFC tags ...................................................................................................................... 23
7.2.2 Writing NFC tags .......................................................................................................................... 23
7.2.3 Changing NFC Default Application .............................................................................................. 23
8. Configuring General Settings................................................................................................................... 24
8.1 Changing Sound Settings ................................................................................................................ 24
8.2 Changing Display Settings ............................................................................................................... 24
8.2.1 Adjusting Brightness ................................................................................................................ 24
8.2.2 Changing Wallpaper ................................................................................................................ 24
8.2.3 Enabling Auto-rotate screen .................................................................................................... 24
8.2.4 Adjusting Screen timeout ......................................................................................................... 24
8.2.5 Adjusting Font Size .................................................................................................................. 24
8.2.6 Hiding System Bar ................................................................................................................... 25
8.3 Changing Key Definition .................................................................................................................. 25
8.4 Viewing Storage Information............................................................................................................ 25
8.5 Changing Battery Charging Policy ................................................................................................... 25
8.6 Managing Applications ..................................................................................................................... 25
8.7 Changing Security Settings ............................................................................................................. 26
8.7.1 Changing Screen Lock Settings .................................................................................................. 26
8.7.2 Installing Certificates .................................................................................................................... 26
8.8 Changing Language and Input ........................................................................................................ 26
8.8.1 Changing Language .................................................................................................................... 26
8.8.2 Changing Keyboard Settings ....................................................................................................... 26
8.9 Adjusting Date & Time ..................................................................................................................... 27
9. Resetting the Device ................................................................................................................................ 27
9.1 Soft Reset ........................................................................................................................................ 27
9.2 Clean Reset ..................................................................................................................................... 27
10. Enabling Developer Options ................................................................................................................ 28
11. Performing System Backup & Restore ................................................................................................ 28
11.1 Performing System Backup ............................................................................................................. 28
11.2 Performing System Restore ............................................................................................................. 29
12. Transferring Files through USB ........................................................................................................... 29
13. Performing Firmware Upgrade ............................................................................................................ 29
14. Using Remote Assistant ....................................................................................................................... 30
14.1 Introduction ...................................................................................................................................... 30
14.2 Establishing a remote session from the tablet ................................................................................. 31
14.2.1 Connecting to the Remote Assistant Server ............................................................................ 31
14.2.2 Advanced Remote Assistant Settings ...................................................................................... 32
14.3 Establishing a Remote Session from a Computer ........................................................................... 32
14.4 Disconnecting a Remote Session .................................................................................................... 33
14.5 Using Shortcut Keys ........................................................................................................................ 34
14.6 Introducing the Remote Assistant Features ..................................................................................... 35
14.6.1 Viewing Device Information ..................................................................................................... 35

Version 1.0 8
14.6.2 Refreshing the Control Screen ................................................................................................ 35
14.6.3 Upgrading OS Software ........................................................................................................... 35
14.6.4 Updating Remote Assistant ..................................................................................................... 37
14.6.5 Changing the Controller ........................................................................................................... 39
14.6.6 File Transfer ............................................................................................................................. 40
15. MSR Expansion Module ...................................................................................................................... 41
15.1 Using the MSR ..................................................................................................................................... 41
15.2 Configuring MSR Settings ............................................................................................................... 41
16. Bundled 3rd Party Applications ............................................................................................................. 49
17. Application Development ..................................................................................................................... 50
17.1 Android SDK .................................................................................................................................... 50
17.2 Installing USB Driver ........................................................................................................................ 50
17.3 Installing Applications ...................................................................................................................... 50
17.4 Extra API Support & Sample Code .................................................................................................. 50
MSR API library ....................................................................................................................................... 51
MSR Sample Program ............................................................................................................................. 51

Version 1.0 9
1. Product Specifications
Handheld Terminal
Item
Specification
Processor
Cortex A5 1.2GHz Quad Core processor
Flash
4GB NAND Flash
RAM
1GB DDR2 RAM
LCM
7” TFT 1024 x 600 256K Colour LCD
Touch panel
Capacitive multi-touch touch panel
Hardness 7H
Memory expansion
MicroSD card slot
Support up to 32GB
WLAN
802.11b/g/n
WPAN
Bluetooth 3.0
WWAN
3.75G (Optional)
1 x SIM card slot
GPS
Assisted GPS (Optional)
NFC
Frequency: 13.56MHz
Support ISO14443A/B, MIFARE, NFC Forum tags, Felica
Sensors
Ambient light sensor
G-sensor
Proximity sensor
Hall sensor
Camera
Rear camera 5MP with LED flash
Front camera 2MP
LED Indicator
Power LED
Vibrator
Built-in vibrator
Audio
Mono speaker
Microphone
3.5mm headset jack
Keys
1 x Power Key
2 x Configurable Shortcut Key
Keys
Power key, Volume up/down key, Reset key
USB
USB2.0
Micro-USB connector
Main battery
Removable 4960mAh Lithium smart battery
Secondary battery
Lithium polymer battery for RAM backup
Battery life
Communication Time: 6 hours (Screen on. Wi-Fi data
communication every 6 seconds.)
Standby Time: 100 hours (LCD off, Wi-Fi connected, Keep alive
on)
Charging
Charging cradle with device slot and spare battery slot
Intelligent charging system
Battery charging time to 70%: 1.5 hrs
Module expansion
40-pin connector
External Module: Add-on MSR module
Dimension
210mm x 132mm x 21.4mm
Weight
570g typ.
IP Rating
IP54
Drop Test
2 cycle drops of 6 sides/ 4 corners from 1.2m onto concrete.
ESD
Contact discharge 6KV Air discharge 12KV
Operating temp.
-10 to +40 deg C

Version 1.0 10
Storage temp.
-20 to +65 deg C
Operating humidity
10% to 95%
Storage humidity
5% to 95%
Cradle
Item
Specification
Charging slot
1 x Tablet slot, 1 x spare battery slot
AC/DC adaptor
AC IN: 100-240V DC OUT: 5.9V 3A
Indicator
1 x Green LED (Cradle power status)
1 x Red/Green LED (spare battery charging status)
USB connector
USB type B connector
Dimension
106.2mm x 73.5mm x 97.2mm
Weight
450g typ.
Operating temp.
0 to +40 degree C
Storage temp
-20 to +65 degree C
Operating humidity
10% to 95%
Storage humidity
5% to 95%
Software Specification
Item
Specification
Operating system
Android OS 4.1.2
Kernel
Linux 3.4.0
File system
Ext4 flash file system for eMMC
FAT32 support for SD card
Bluetooth
Profiles supported: GAP, SPP, GOEP, OPP, A2DP, AVRCP, HID
Wi-Fi
Support WEP, WPA-PSK, WPA2-PSK, 802.1x EAP security by WPA
supplicant
Audio codecs
OGG decoders, AMR codec (for video recording)
Video codecs
MPEG4 codec only (for video recording)
Image formats
JPEG, PNG
Wi-Fi
Single SSID lock. No neighbour network appears in search list
Option to keep WiFi connected even when system is in sleep mode
WiFi keep alive mechanism in OS sleep mode to avoid access point
terminating the session after timeout
Auto/manual retry WiFi re-connection after out-of-coverage
Fast & seamless roaming
Configurable roaming trigger level
Configurable WiFi status at boot up
Configurable WiFi retry interval
Operating mode
Admin mode & User mode
Admin mode for installing programs and configuring device
User mode has limited rights for end user operations
Not able to modify WiFi connection settings
Option to disable Bluetooth pairing
Not able to modify NFC settings
Not able to install and uninstall applications
Not able to access Developer options
Launcher Config
Select applications to show or hide in Admin and User mode
Select applications for auto-launch upon booting up
Remote desktop
Bundle 3rd party remote desktop client – 2X RDP Client
Support Remote Desktop Protocol with auto-logon.
Backup / Restore
Selectable backup and restore through SD card
Backup/restore of system/application/data

Version 1.0 11
Backup option to restore backup image to the same device, or any
devices of the same model
Backup all installed programs, settings passwords, SSID, IP settings
Preserve static IP address, subnet mask, gateway and DNS settings
Remote Assistant
Remote access of device from PC over the Internet
Tablet connects to the Remote assistant server by WiFi

Version 1.0 12
2. Device Overview
No.
Item
Description
1
Power key
Press and hold to turn device on or off
If the device is on, press to suspend
2
Volume down key
Press to decrease volume
3
Volume up key
Press to increase volume
4
Earphone jack
Open the cover to access the earphone jack
5
Front camera
2MP camera
6
Ambient light sensor
Auto screen brightness control
7
Power LED
Power status indicator
8
NFC reader
Scanning area for NFC tags
9
USB connector
Open the cover to access the micro-USB connector
10
Cradle contact plates
Contact plates for charging and USB connectivity through the
cradle
11
Touch screen
LCD with capacitive touch screen
12
Microphone
Built-in microphone
13
SIM card slot
Open the cover to access the SIM card slot
14
MicroSD card slot
Open the cover to access the MicroSD card slot
15
Expansion slot cover
Remove the cover for the add-on module connection
16
Battery cover lock
Slide right to unlock the battery cover

Version 1.0 13
17
Battery cover
Remove the battery cover to access the battery
18
Rear camera
5MP camera with LED flash
19
Handstrap mounting point
To attach the handstrap
20
Speaker
Mono speaker
No.
Item
Description
1
Spare battery LED
Spare battery charging status indicator
2
Power LED
Cradle power connection indicator
3
Contact plates
Contact plates for charging and USB connectivity
4
Battery slot
To charge spare battery
5
Battery release button
Press to release the spare battery
6
DC jack
Connect AC/DC Adaptor
7
USB connector
Connect USB cable

Version 1.0 14
3. Getting Started
3.1 Installing and Removing the Battery
3.1.1 Installing the Battery
1. Slide the battery cover lock to the right until the battery cover ejects slightly.
2. Remove the battery cover.
3. Align the battery metal contacts with the contact pins inside the battery compartment.
4. Press the battery down until the battery lock clicks into place.
5. Ensure the battery cover lock is in unlock position. Align the battery cover with the battery
compartment; and push the battery cover down.
6. Slide left the battery cover lock to lock the cover.
3.1.2 Removing the Battery
Note: Always power off the device before removing the battery.
1. Slide the battery cover lock to the right until the battery cover ejects slightly.
2. Remove the battery cover.
3. Slide the battery lock down and hold it at the unlocked position.
4. Lift the battery from the battery compartment.
3.2 Battery Charging
3.2.1 Charging the Device
1. Connect the AC/DC adaptor to the DC jack of the cradle.
2. Plug the AC/DC adaptor into a suitable power socket. The cradle power LED will turn green
when power is supplied to the cradle.
3. Insert the device to the cradle slot. The device LED will indicate red while charging, and then it
will turn green when fully charged.
3.2.2 Charging the Spare Battery
1. Align the battery metal contacts with the contact plates in the battery slot.
2. Slide the battery down the battery slot until the battery clicks into place. The cradle battery LED
will turn red while charging, and then it will turn green when fully charged.
3. After charging, press the battery release button to eject the battery.

Version 1.0 15
3.3 LED Status Description
Device LED
LED color
Description
Red
Charging
Green
Fully charged / Battery level above the
user defined threshold
Flashing red
Battery low
Cradle Power LED
LED color
Description
Green
Cradle is powered on
Off
Cradle is powered off
Cradle Battery LED
LED color
Description
Red
Spare battery is charging
Green
Spare battery is fully charged
Off
Battery slot is empty
3.4 Powering the Device On and Off
Powering on the Device
Press and hold the Power key for 2 seconds to power on the device.
Note: The device can only power on when the battery cover is closed.
Powering off the Device
Press and hold the Power key for 2 seconds, and follow the screen instructions to power off the
device.
3.5 Suspending the Device
If the device is on, press the Power key once to suspend the device (i.e. entering sleep mode),
saving battery power.
To resume operation from sleep mode, press the Power key once.
3.6 Viewing Device Information
1. Select Application drawer > Settings > About tablet.
2. Scroll to view Model number, Android version, Kernel version, and Build number.
3. Click Status to view Serial number, Battery status, Battery level, IP address, Wi-Fi MAC
address, Bluetooth address, and Up time.

Version 1.0 16
4. Admin Mode and User Mode
The DT-07 can be operated in the Admin Mode or User Mode. In the Admin Mode, system
integrators will have full administrative right to configure system settings and install / un-install
applications. This operating mode is typically used in the initial setup stage and ongoing
maintenance. In contrast, the User Mode has limited access right to the system with restrictions on
certain operations. As system configurations are completely hidden in the User Mode, end users will
only be able to run designated applications.
The following table summarizes the restrictions in the User Mode.
Items
Admin Mode
User
Mode
Purpose
System setting change
Enabled
Disabled
No changes of pre-configured
environment.
No support call due to accidental
changes of settings.
Application shortcut
change
Enabled
Disabled
No changes of application
environment.
Application installation
/ un-installation
Enabled
Disabled
No installation of unauthorised
applications, e.g. games, personal
utilities.
Unable to remove pre-configured
applications.
Direct access to Files
and Local Database
Enabled
Disabled
No unauthorised access to files &
database.
No copying of device data.
USB connection
Enabled
Disabled
Prevent unauthorized data
transfer.
Prevent direct access to files and
local database.
4.1 Configuring User Mode Applications
To configure the applications for the User Mode:
1. Select Application drawer > Launcher Config.
2. Select User App.
3. Select the checkbox to enable the applications for the User Mode.
Note: The installed applications are selected automatically in both Admin App and User App..

Version 1.0 17
4.2 Configuring Auto-launch Application
To launch an application automatically at device startup in the User Mode:
1. Select Application drawer > Launcher Config.
2. Select User Launch App.
3. Select an application for auto-launch at the startup.
4.3 Changing the Operating Mode
4.3.1 Switching to the User Mode
By default, the device is configured to run in the Admin Mode. To switch the default to the User
Mode:
1. Select Application drawer > Settings > Security.
2. Select Login mode settings > Default mode.
3. Select User Mode.
4. Reboot the device.
Note: Admin password is required to switch the operating mode from User Mode to Admin Mode.
The default admin password is 1111.
4.3.2 Switching the Operating Mode Temporarily
For initial setup and ongoing maintenance, system integrators may require switching between
operating modes temporarily to check and adjust the settings without changing the default mode.
To change the operating mode temporarily:
1. Select Application drawer > Settings > Security.
2. Select Login mode settings > Current mode.
3. Select User Mode or Admin Mode.
Note: The temporary change is valid until rebooting the device. It will not change the default mode.
4.4 Changing the Admin Password
1. Select Application drawer > Settings > Security.
2. Select Login mode settings > Login password.
3. Enter the new password in New password, and re-enter the same password in Repeat
password.
4. Click OK to complete the change.

Version 1.0 18
5. Using Wi-Fi
5.1 Turning Wi-Fi On or Off
To turn Wi-Fi on or off:
1. Select Application drawer > Settings >Wi-Fi.
2. Slide the Wi-Fi On/Off switch to the ON or OFF position.
Note: The Wi-Fi feature is turned on by default.
5.2 Setting Wi-Fi Boot Up State
To change the boot up setting:
1. Select Application drawer > Settings > Wi-Fi.
2. Click Menu to show the option menu.
3. Select Turn on at Boot.
4. Select the Wi-Fi boot up option.
On: Turning on Wi-Fi after boot up.
Off: Turning off Wi-Fi after boot up.
Keep last status: Follow the last Wi-Fi status after boot up.
5.3 Connecting to WLAN
To connect to a WLAN:
1. Select Application drawer > Settings > Wi-Fi.
2. Slide the Wi-Fi On/Off switch to the ON position.
3. Select the required AP on the right pane.
4. Input the password when prompted.
5. Select Lock Single Network checkbox to lock the device to the selected network.
6. Select Show advanced options to enter static IP settings/ Proxy settings if needed.
7. Click Connect.
5.4 Unlocking/ Disconnecting WLAN
To turn off the single network lock:
1. Select Application drawer > Settings > Wi-Fi .
2. Touch and hold the connected network on the right pane until a pop up menu appears.
3. Select Modify network.
4. Uncheck Lock Single Network, and then click Save.
To disconnect from the connected network:
1. Select Application drawer > Settings > Wi-Fi .

Version 1.0 19
2. Touch and hold the connected network on the right pane until a pop up menu appears.
3. Select Forget network.
5.5 Configuring Roaming Trigger Level
For multiple AP site, it is important to perform wireless site survey to determine the best placement
of access points that provides the best signal coverage with minimum interference.
By default, the Roaming trigger level is –76dBm. When the signal is less than –76dBm, the device
will start searching for nearby APs while obeying single SSID rule. Once an AP with stronger signal
is identified (i.e. 10dBm or better), the device will roam across the APs transparent to the application
and user.
To adjust the roaming trigger level:
1. Select Application drawer > Settings > Wi-Fi
2. Click Menu to show the option menu.
3. Select Advanced > Roaming trigger level.
4. Drag the slide bar to adjust the trigger level, and then click OK.
Note:
It is suggested to set the adjacent APs to non-overlapped channels (e.g. 1, 6, 11, etc.).
It is essential to carry out site survey to ensure there are sufficient overlapped signal coverage
areas for seamless roaming between two adjacent APs.
Defining a trigger level as -60dBm may not achieve a good result as the device will need to find
an AP with -50dBm or better.
It is recommended to define the roaming trigger level as –90dBm for single AP site. This
disables the system from searching for nearby AP, and thus saving battery power.
5.6 Configuring Periodic Keep-alive
The Periodic keep alive feature prevents the session from timing-out and terminated by the AP. By
default, the keep alive period is set to 1 minute.
To change the periodic keep alive setting:
1. Select Application drawer > Settings > Wi-Fi.
2. Click Menu to show the option menu.
3. Select Advanced > Periodic keep alive.
4. Select the time interval required.
5.7 Configuring Auto Retry WLAN
When the device is out of signal range, the system will start searching for the designated network.
To preserve battery power, the Wi-Fi feature of the device will be turned off automatically if it fails to
find the network.

Version 1.0 20
The Auto Retry WLAN defines the time interval the system attempts to search and connect to the
designated network after the Wi-Fi auto off. By default, Auto Retry WLAN is set to 2 minutes.
To change the retry time interval:
1. Select Application drawer > Settings > Wi-Fi.
2. Click Menu to show the option menu.
3. Select Advanced > Auto retry WLAN.
4. Select the time interval required.
5.8 Viewing Network Information
To view WLAN information:
1. Select Application drawer > Settings > Wi-Fi.
2. Click Menu to show the option menu.
3. Select Status to view basic network information including SSID name, signal strength, AP MAC
address, WLAN channel, and IP address.
4. Click Details to view further network details.

Version 1.0 21
6. Using Bluetooth
6.1 Bluetooth Profiles
The DT-07 supports the following Bluetooth profiles:
GAP: Generic Access Profile
SPP: Serial Port Profile
GOEP: Generic Object Exchange Profile
OPP: Object Push Profile
A2DP: Advanced Audio Distribution Profile
AVRCP: Audio/ Video Remote Control Profile
HID: Human Interface Device Profile
6.2 Connecting to a Bluetooth Device
To connect to a Bluetooth device:
1. Select Application drawer > Settings > Bluetooth.
2. Slide the Bluetooth On/Off switch to the ON position.
3. Ensure the device to be paired is set to discovery mode within range.
4. Click SEARCH FOR DEVICES.
5. Select the required device under AVAILABLE DEVICES.
6. Input PIN when prompted, and then click OK.
7. Input the same PIN on the selected device if needed.
8. Upon completing the pairing, the selected device is displayed under PAIRED DEVICES.
6.3 Setting Bluetooth Boot Up State
By default, Bluetooth is set to follow the last status after booting up. To change the boot up setting:
1. Select Application drawer > Settings > Bluetooth.
2. Click Menu to show the option menu.
3. Select Turn on at Boot.
4. Select a Bluetooth boot up option.
On: Turning on Bluetooth after boot up.
Off: Turning off Bluetooth after boot up.
Keep last status: Follow the last Bluetooth status after boot up.
6.4 Changing the Bluetooth Name
To change the Bluetooth device name:
1. Select Application drawer > Settings > Bluetooth, and turn on Bluetooth.
2. Click Menu to show the option menu.
3. Select Rename tablet.
4. Enter a device name, and the click Rename.

Version 1.0 22
6.5 Making the Device Discoverable
To make DT-07 visible to all nearby Bluetooth devices:
1. Select Application drawer > Settings > Bluetooth, and turn on Bluetooth.
2. Click DT-07 on the right pane to make the device discoverable.
3. Click Menu > Visibility timeout, and select the discoverable timeout period.
6.6 Modifying Bluetooth Settings in User Mode
In the User Mode, users will only be allowed to turn Bluetooth on or off. To enable users to pair with
new devices or adjust the Bluetooth settings in the User Mode:
1. Select Application drawer > Settings > Bluetooth.
2. Click Menu to show the option menu.
3. Select User mode.
4. Select Allow modify bluetooth settings in user mode checkbox.
6.7 Unpairing a Bluetooth Device
To unpair a Bluetooth device:
1. Select Application drawer > Settings > Bluetooth.
2. Click next to the paired device.
3. Select Unpair.

Version 1.0 23
7. Using NFC
7.1 Turning on NFC
To turn on the NFC feature:
1. Select Application drawer > Settings > More.
2. Select NFC checkbox to turn on NFC.
Note: Position the tag within 2cm of the NFC scanning area to ensure successful scans.
7.2 NFC Sample Application
The NFC implementation on DT-07 is based on standard Android NFC framework. The built-in
sample application demonstrates the reading and writing of NFC tags with the use of standard
Android APIs.
7.2.1 Scanning NFC tags
1. Select Application drawer > NFC.
2. Place the NFC tag within 2cm of the NFC scanning area.
3. NFC data is displayed after scanning.
7.2.2 Writing NFC tags
1. Select Application drawer > NFC.
2. Select NFC write.
3. Enter the data to write to the tag with the soft keyboard.
4. Place the tag within 2cm of the NFC scanning area, and then click Write NDEF.
5. Prompt will appear after writing data successfully.
7.2.3 Changing NFC Default Application
The built-in NFC sample application will be launched automatically when scanning tags. To disable
the auto-run of the sample application:
1. Select Application drawer > NFC.
2. Uncheck the Autostart checkbox.

Version 1.0 24
8. Configuring General Settings
8.1 Changing Sound Settings
1. Select Application drawer > Settings > Sound.
2. Change the required sound settings including volume, notification tone, touch sounds, screen
lock sound, vibrating option, etc.
8.2 Changing Display Settings
8.2.1 Adjusting Brightness
1. Select Application drawer > Settings > Display > Brightness.
2. Drag the slide bar to adjust the backlight, or select Automatic brightness checkbox to enable
auto brightness adjustment.
8.2.2 Changing Wallpaper
1. Select Application drawer > Settings > Display > Wallpaper.
2. Select Gallery.
3. Browse to a picture, and then click OK.
8.2.3 Enabling Auto-rotate screen
1. Select Application drawer > Settings > Display.
2. Select the Auto-rotate screen checkbox.
8.2.4 Adjusting Screen timeout
Screen timeout is the idle period before the screen turns off and enters sleep mode. To change the
screen timeout period:
1. Select Application drawer > Settings > Display.
2. Select Sleep.
3. Select the required screen timeout period.
8.2.5 Adjusting Font Size
1. Select Application drawer > Settings > Display.
2. Select Font size.
3. Select the required font size.

Version 1.0 25
8.2.6 Hiding System Bar
To hide the system bar for full screen operation:
1. Select Application drawer > Settings > Display.
2. Select the Hide system bar checkbox.
Note: In full screen operation, the volume keys are re-mapped as follows if default key mapping is
used:
Key
Function
Volume up
Home
Volume down
Back
If the volume keys are re-mapped, the key functions will follow the assigned key definitions in both
normal screen and full screen operations.
8.3 Changing Key Definition
To change the key definition of volume keys:
1. Select Application drawer > Settings > Key.
3. Select Function select to change the key definition.
8.4 Viewing Storage Information
To view memory available, select Application drawer > Settings > Storage.
Note: Selecting Erase device storage will delete all data on the internal SD card permanently.
8.5 Changing Battery Charging Policy
By default, smart charging mechanism is enabled to charge the battery only when the battery level
is lower than 80%.
To adjust the charging trigger level:
1. Select Application drawer > Settings > Battery.
2. Select Smart charging >mart charging settings.
3. Drag the slide bar to adjust the charging trigger level, and then click OK.
To disable smart charging mechanism, uncheck Enable charging when battery level is lower
than ##%, and then click OK.
8.6 Managing Applications
To manage installed applications:
1. Select Application drawer > Settings > Apps.

Version 1.0 26
2. Select Manage apps.
3. Select an app to manage or remove.
To change the installation location for new applications:
1. Select Application drawer > Settings > Apps.
2. Select Preferred install location.
3. Select an install location.
8.7 Changing Security Settings
8.7.1 Changing Screen Lock Settings
The screen lock is enabled by default. To change the unlock mechanism:
1. Select Application drawer > Settings > Security.
2. Select Screen lock.
3. Select an unlock mechanism, and follow the screen instructions to complete the set up.
Note: To disable screen lock, select None.
8.7.2 Installing Certificates
To install a certificate:
1. Copy a certificate to the root directory of a MicroSD card.
2. Select Application drawer > Settings > Security.
3. Select Install from SD card.
4. Click the certificate to install.
5. Enter the certificate password when prompted, and then click OK.
6. Enter the certificate name, and then click OK.
8.8 Changing Language and Input
8.8.1 Changing Language
1. Select Application drawer > Settings > Language & input
2. Select Language.
3. Select a language.
8.8.2 Changing Keyboard Settings
To add extra keyboards for text input:
1. Select Application drawer > Settings > Language & input.
2. Select the keyboard checkbox.
To change the default keyboard:

Version 1.0 27
1. Select Application drawer > Settings > Language & input.
2. Select Default.
3. Select a keyboard as default.
8.9 Adjusting Date & Time
To set the date and time manually:
1. Select Application drawer > Settings > Date & time.
2. Adjust Set date, Select time zone, Set time, Use 24-hour format, Choose date format
accordingly.
Set date: Set the current date.
Select time zone: Select an appropriate time zone.
Set time: Set the current time.
Use 24-hour format: Select to use 24-hour format or 12-hour format.
Choose date format: Select the date display format.
9. Resetting the Device
9.1 Soft Reset
Soft reset shuts down and reboots the device. It preserves installed applications, settings, and
saved data. To perform a soft reset:
1. Remove the battery cover.
2. Press the reset button once.
3. Close the battery cover and power on the device.
9.2 Clean Reset
Clean reset restores the system to factory default by erasing all installed applications, settings and
data.
To perform a clean reset:
1. Select Application drawer > Settings > Backup & reset.
2. Select Factory data reset.
3. Select Reset tablet.
Note: Clean reset does not erase data on the internal SD card. To erase internal SD card data,
select Application drawer > Settings > Storage > Erase device Storage.

Version 1.0 28
10. Enabling Developer Options
To enable developer options for development use:
1. Select Application drawer > Settings > Developer options.
2. Slide the On/Off switch to the ON position.
3. Select the required developer option checkbox.
11. Performing System Backup & Restore
The DT-07 features a powerful backup and restore tool that minimizes the efforts on mass
deployment and ongoing customer support. It allows system integrators to clone the master image
onto a MicroSD card and replicate it on other devices.
The benefits include:
Standardised setup: Prepare one master image and restore to many devices in deployment.
Minimised on-site setup effort: The master image with applications, settings and data is
prepared in advance. Only restoring image with SD card is required for on-site installation.
Fast deployment time: Devices can be set up simultaneously with multiple SD cards.
Easy software upgrade: Software upgrade can be performed with restore process.
Minimised on-site support: The simple restore process enables end users to upgrade or
recover master image with ease; minimising interruptions to operations and the need for
on-site technical support.
11.1 Performing System Backup
To perform system backup:
1. Select Application drawer > System Backup.
2. Select the Backup button.
3. Edit the Backup path if needed. This is the folder name of the backup image.
4. Select Internal storage or SD card from the Backup Location drop down menu.
5. Select the backup data option from Backup selection drop down menu.
OS: Backup OS only.
DATA: Backup installed applications, settings, and data.
OS+DATA: Backup OS, installed applications, settings, and data.
6. To restore the back up image on current device only, select Need to match serial no.
checkbox.
7. Select Start.
Note:
Close all active programs before performing backup or restore.
The backup image will be located in the folder named backup.
The backup image folder can be re-named.
The number of files in the backup image folder will vary depending on the selected backup
option.
The backup feature is disabled in the User Mode.

Version 1.0 29
11.2 Performing System Restore
To restore a backup image:
1. Select Application drawer > System Backup.
2. Select the Restore button.
3. Select the backup image location from the Backup location drop down list.
4. Select the backup image file from Restore content menu.
5. Select Start.
Note:
Restore will overwrite all existing data in the system except the IP address assignment.
The backup image folder must be placed in the backup folder.
Restore can be performed in both Admin Mode and User Mode.
When only data is backed up, it should be restored with the same firmware version on the
device. Restoring on different firmware version might create instability or corruption.
12. Transferring Files through USB
To transfer files between the device and a PC through USB:
1. Connect the device to the USB port of a PC with the USB cable.
2. Select My Computer > DT-07 > Device storage.
3. Transfer files between the device and the PC as required.
13. Performing Firmware Upgrade
DT-07 firmware can be updated with a MicroSD card in both Admin and User mode. To update the
firmware:
1. Unzip the software update package.
2. Copy the file update.zip to the root directory of a MicroSD card.
3. Insert the MicroSD card into the card slot of DT-07.
4. Select Application drawer > Settings > About tablet > Software update.
5. Click OK to proceed software update when prompted.
6. System will reboot to home screen automatically upon completing the software update.

Version 1.0 30
14. Using Remote Assistant
14.1 Introduction
The Remote Assistant is a remote management tool that enables support technicians to access and
manage the DT-07 tablets over the Internet. Technicians will be able to perform the followings
without site visits; saving significant time and resource for ongoing customer support.
Control the tablet remotely from a computer.
Adjust tablet settings.
Transfer files.
Install applications onto the tablet.
Upgrade OS image.
View the tablet screen on multiple computers simultaneously.
System Requirements
To conduct a remote session, the minimum requirements of the computer at the service centre are:
Operating System: Windows XP or above
CPU: 800MHz or faster processor
RAM: 512MB of system RAM memory
Hard disk: 100MB available hard disk space
Internet: Broadband Internet connection
At the remote site, the tablet requires Internet access through a WiFi network.

Version 1.0 31
14.2 Establishing a remote session from the tablet
14.2.1 Connecting to the Remote Assistant Server
To establish a Remote Assistant session from the tablet:
1. Connect the tablet to a WiFi access point with Internet access.
2. Select Application drawer > Remote Assistant.
3. Select Connect.
4. Once connected to the Remote Assistant server, notify the support technician the Device S/N
and Access code.
Note: Access code is generated automatically for each session. Users may change the code
manually if needed.

Version 1.0 32
14.2.2 Advanced Remote Assistant Settings
If the remote site uses a proxy server to connect to the Internet, configure the proxy settings on the
tablet as follows:
1. Select Application drawer > Remote Assistant.
2. Click Menu to bring up the option menu, and select Settings.
3. Input Proxy host and Proxy port, and check the Proxy switch checkbox.
14.3 Establishing a Remote Session from a Computer
Support technicians will need the Remote Assistant Viewer utility to establish a remote session with
a tablet.
1. Run RemoteAssistant.exe on the computer.
2. Input the Account Name, Password, Remote Device S/N, and Access Code accordingly.
Note: Remote Device S/N, and Access Code must match the remote device to be connected.

Version 1.0 33
3. Click Connect to connect to the remote device.
Note: Click Options to input proxy server information if needed.
4. Upon successful connection, the remote device can be viewed and controlled from the
computer.
14.4 Disconnecting a Remote Session
When exiting a remote session, technicians can disconnect both the computer and tablet
connections from the server, or disconnect the computer connection only.
Click to disconnect both the computer and tablet from the server.

Version 1.0 34
Click to disconnect the computer while keeping the tablet connected to the server.
14.5 Using Shortcut Keys
The following table describes the shortcut keys for controlling the tablet remotely.
Keyboard Shortcuts
Tablet Operation
Esc key
Back
Home key
Go to Home screen
Pg Up key
Page up
Pg Dn key
Page down
End key
Menu / Turn on screen
Up
Move up
Down
Move down
Left
Move left
Right
Move right
Enter
Screen Tap
Mouse Shortcuts
Tablet Operation
Left key
Screen Tap
Right key
Back
Centre key
Scroll up/ down

Version 1.0 35
14.6 Introducing the Remote Assistant Features
14.6.1 Viewing Device Information
The control screen displays the basic device information of the tablet.
Item
Descriptions
S/N
Tablet serial number
Model No.
Tablet model number
Device Name
Tablet name
ROM Version
OS version on the tablet
SD Card Status
Indicate whether MicroSD
card is inserted into the tablet
Memory Status
RAM usage
Disk Information
Internal flash and MicroSD
card memory usage
WLAN
Information
Indicate the WLAN status of
the tablet
Viewer List
Indicate the viewer(s)
connected to the session.
14.6.2 Refreshing the Control Screen
Click Refresh to refresh the device information displaying on the control screen.
14.6.3 Upgrading OS Software
Note: Minimum 200MB is required for the internal SD card of the tablet.
1. Click Upgrade OS, and then click Yes to confirm OS upgrade on the screen prompt.
2. Select the required OS version, and click Upgrade.

Version 1.0 (Draft) 36
3. The tablet downloads the selected software to the internal SD card. Click OK on the device
screen to start the upgrade when prompted.
4. The device and control screen will be turned off temporarily during the upgrade. The Remote
Assistant Viewer will re-connect to the server automatically.

Version 1.0 (Draft) 37
5. The display will resume upon completing the upgrade.
14.6.4 Updating Remote Assistant
Updating Remote Assistant upgrades the Remote Assistant application independently on the tablet.
This is only required when the Remote Assistant version on the device is incompatible with newer
OS release.
1. Click Update Remote Assistant.

Version 1.0 (Draft) 38
2. On the left device screen, select Launcher Config.
3. Check the UpgradeRemote checkbox.

Version 1.0 (Draft) 39
4. Click Back to return to the main menu. Select UpgradeRemote, and then click OK.
14.6.5 Changing the Controller
In a remote session, only the controller will have the right to control the tablet. Other participants
connected to the session can view the shared screen only.
To pass the controller right to another viewer:
1. Select a viewer in the Viewer List.
2. Click Set As Controller.

Version 1.0 (Draft) 40
14.6.6 File Transfer
To transfer a file to the tablet:
1. Click .
2. Select the file and the destination folder with the file-browsing windows. Click to start the
transfer.

Version 1.0 (Draft) 41
15. MSR Expansion Module
15.1 Using the MSR
1. Insert the magstripe card from the side of the card slot with the magnetic stripe facing down.
2. Swipe the card through the card slot. A beep sound indicates a successful reading.
Note: The magstripe card can be swiped in either direction by default.
15.2 Configuring MSR Settings
The MSR can be configured directly on the device. To adjust the settings:
1. Select Application Drawer > MSR Settings.
2. Select the option to configure the MSR settings as required.
The following describes the available MSR settings.
Package Prefix/Suffix

Version 1.0 (Draft) 42
Add characters to the beginning and the end of a data package. Up to fifteen ASCII characters can
be defined.
Track Prefix/Suffix
Add characters to the beginning and the end of a track data. Up to six ASCII characters can be
defined.
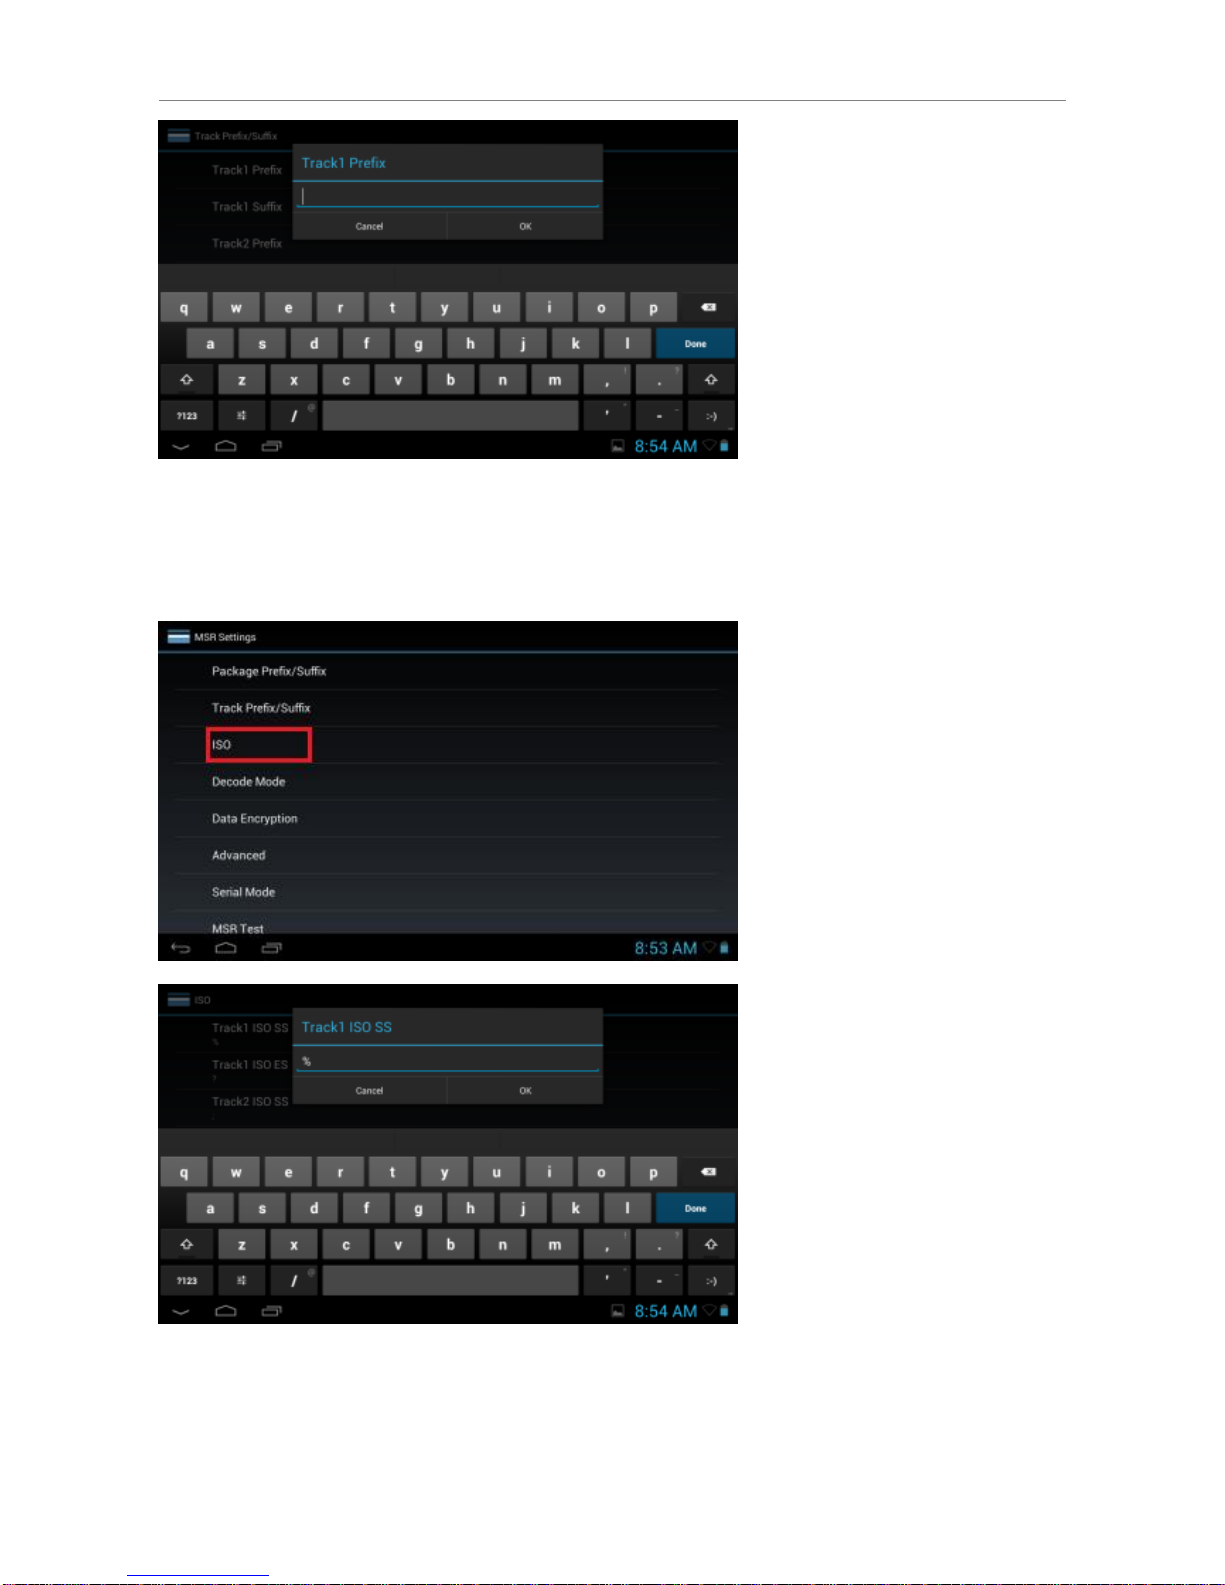
Version 1.0 (Draft) 43
ISO
Defines the Start Sentinel and End Sentinel for the track data.

Version 1.0 (Draft) 44
Decode Mode
Enable Sound: Select to play sound after swiping card.
Track Error Message: Select to display track error message for reading error.
Track Mode: Select the tracks that will be read.
Decoded Directions: Select the card reading direction.
Data Encryption

Version 1.0 (Draft) 45
Card data can be encrypted to protect from unauthorized access. Data encryption can be done by
MSR reader module hardware (hardware encryption), or at operating system level (software
encryption).
Hardware encryption
Select MSR Encryption Enable checkbox to enable hardware MSR data encryption setting. Before
encryption can be enabled, Key Serial Number (KSN) and Base Derivation Key (BDK) must be
loaded. Once encryption mode is turned on, hardware encryption is enabled. For payment cards,
encrypted data and masked clear text data are sent out.
Key management type: ‘0’: Fixed Key, ‘1’: DUKPT Key
MSR encryption mode: TDES or AES encryption
MSR KSN code: Key Serial Number (KSN)
MSR Encryption code: Encryption key, or Base Derivation Key (BDK)
There are 5 security levels:
Level 0:
This is a special case where all DUKPT keys have been used and
is set automatically when it runs out of DUKPT keys. The lifetime of
DUKPT keys is 1 million.
Level 1:
By default, the MSR module is configured to have this security
level. There is no encryption process, no key serial number
transmitted with decoded data. It functions as a non-encrypting
reader.
Level 2:
Key Serial Number and Base Derivation Key have been injected
but the encryption process is not yet activated. The reader will
send out decoded track data in default format. Setting the
encryption type to TDES and AES will change the reader to
security level 3.
Level 3:
Both Key Serial Number and Base Derivation Keys are injected
and encryption mode is turned on. For payment cards, both
encrypted data and masked clear text data are sent out. When the
encryption is turned on, level 3 is the default security level.
Level 4:
When the reader is at Security Level 4, a correctly executed
Authentication Sequence is required before the reader sends out
data for each card swipe.

Version 1.0 (Draft) 46
Note:
Once the security level is changed to level 3 or 4, it cannot go back to a lower level.
Software encryption
Select Soft Encryption Enable checkbox to enable software data encryption, and enter the data
encryption key in Software Encryption Code.
Note: Advance Encryption Standard (AES) is adopted as the encryption method for each track.
Advanced

Version 1.0 (Draft) 47
Send MSR data by key events: Select to enable MSR data to be sent as key events.
Reader status: It shows the current authentication state of the reader
PrePAN: number of leading Personal Account Number(PAN) digits to display
PostPAN number of trailing Personal Account Number(PAN) digits to display:
MaskChar: character used to mask the PAN
Session: Show current session ID
Display Expiration Data: Display expiration data as mask data(0) or clear data(1)
Reset Default Settings: Reset MSR module settings to default
Reset MSR: Re-initialize MSR module.

Version 1.0 (Draft) 48
Serial Mode
Select to control the MSR module through API programming or access MSR module directly by its
command set.
MSR Test
MSR Test is a demo application for reading magstripe cards.
Swipe a card through the card slot to read the card data. Select Clear to empty the data output field.
Software encrypted data output

Version 1.0 (Draft) 49
16. Bundled 3rd Party Applications
DT-07 is bundled with the following 3rd party applications. Visit the developer home page for product
information and user manual.
Category
Application
Version
Developer URL
Remote Desktop
2X Client for Android
11.0.1823
http://www.2x.com

Version 1.0 (Draft) 50
17. Application Development
17.1 Android SDK
The DT-07 is implemented with standard Android OS 4.1.2. To develop applications for the device,
install Android 4.1.2 (API 16) for the Android SDK.
For MSR application development, refer to section 17.4 for more details.
17.2 Installing USB Driver
It is necessary to install the DT-07 USB driver for testing applications on an actual device connected
to a Windows computer.
To install the DT-07 USB driver on Windows 7 computer:
1. Unzip the DT-07 USB driver software zip file, and copy the unzipped folder to the computer.
2. On the device, select Application drawer > Settings > Developer options. Turn on the
Developer options with the on/off switch, and check the USB debugging option.
3. Connect the DT-07 device to the computer with a USB cable.
4. Select Control Panel > System and Security > System > Device Manager.
5. Right click the device Android on the left pane, and select Update driver software.
6. Select Browse my computer for driver software.
7. Click Browse and locate the DT-07 USB driver folder. Follow the on-screen instructions to
complete the installation. Upon completion, the screen will prompt successful installation of
driver software for Android Composite ADB Interface.
17.3 Installing Applications
Applications can be installed onto the DT-07 using MicroSD card or USB connection.
To install applications by MicroSD card:
1. Copy the apk file to a MicroSD card, and insert the card into the device.
2. Select Application drawer > File Manager.
3. Browse to the /storage/sdcard1 folder.
4. Select the apk file in the SD card folder.
5. Select Install to install the installation.
To install applications by USB connection, use the adb install command in command prompt
window to complete the apk installation.
17.4 Extra API Support & Sample Code
The DT-07 supports extra APIs for the development of MSR applications. Refer to the links below to
access the document and sample in the DT-07 MSR SDK package.
MSR API Document
DT-07 MSR SDK\MSR Manager Doc\MSR-API.html

Version 1.0 (Draft) 51
MSR API library
DT-07 MSR SDK\MSR Settings\libs\MsrManager.jar
MSR Sample Program
DT-07 MSR SDK\MSR Settings
- End of Document -
 Loading...