

Page 1
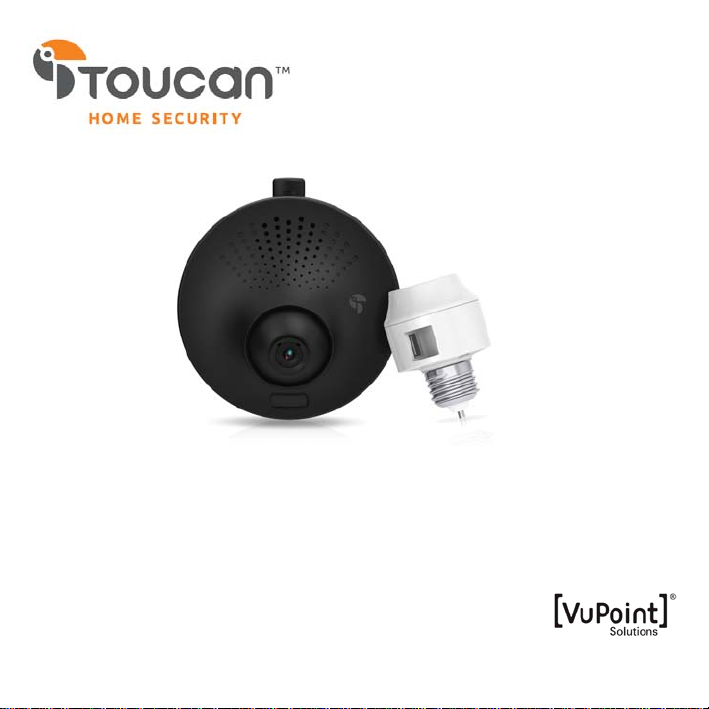
Toucan Surveillance Kit
Camera & Smart Socket
User’s Manual
Model: TSK100KU
Page 2

Table of Contents
1. Key Features.............................................................................................................................................. 3
2. What Is Included ........................................................................................................................................6
3. Toucan Camera & Socket Installation........................................................................................................ 8
4. Getting The Kuna App.............................................................................................................................. 12
5. Setting up a Light Schedule..................................................................................................................... 16
6. Setting Your Location............................................................................................................................... 17
7. Setting Motion Detection Sensitivity......................................................................................................... 18
8. Viewing & Downloading Your Recordings ...............................................................................................19
9. Setting Alerts For Individual Toucans....................................................................................................... 20
10. Share & Access From Different Devices.................................................................................................. 21
11. Specifications........................................................................................................................................... 22
12. Troubleshooting & FAQ............................................................................................................................ 23
2
Page 3
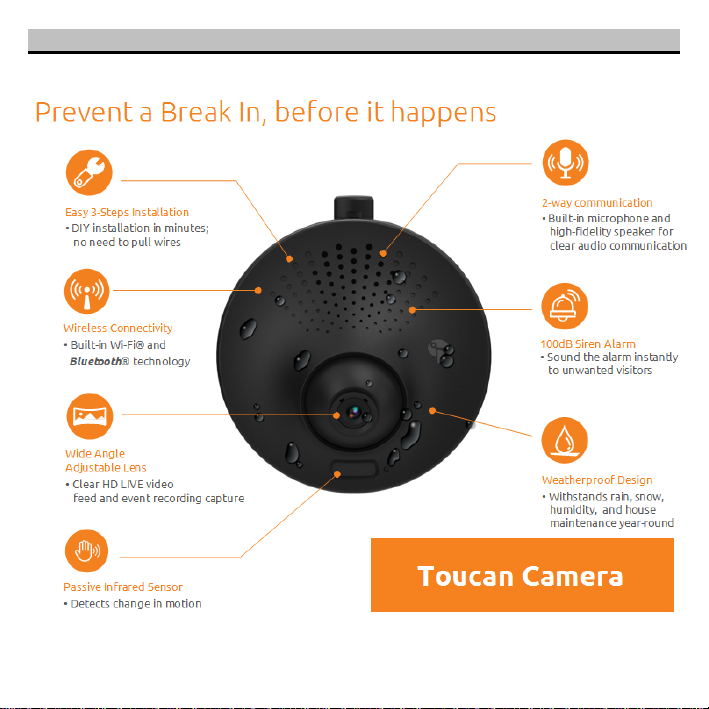
1. Key Features
3
Page 4
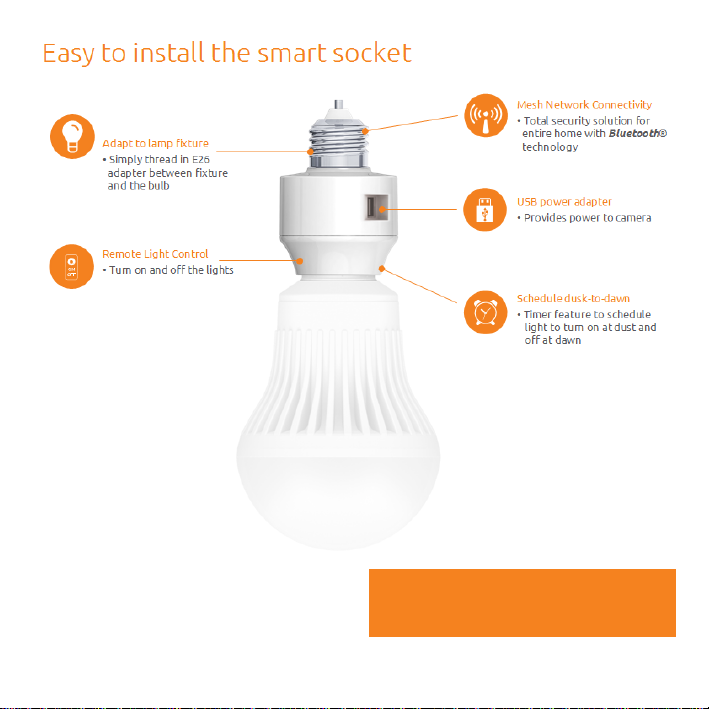
Toucan Smart Socket
4
Page 5
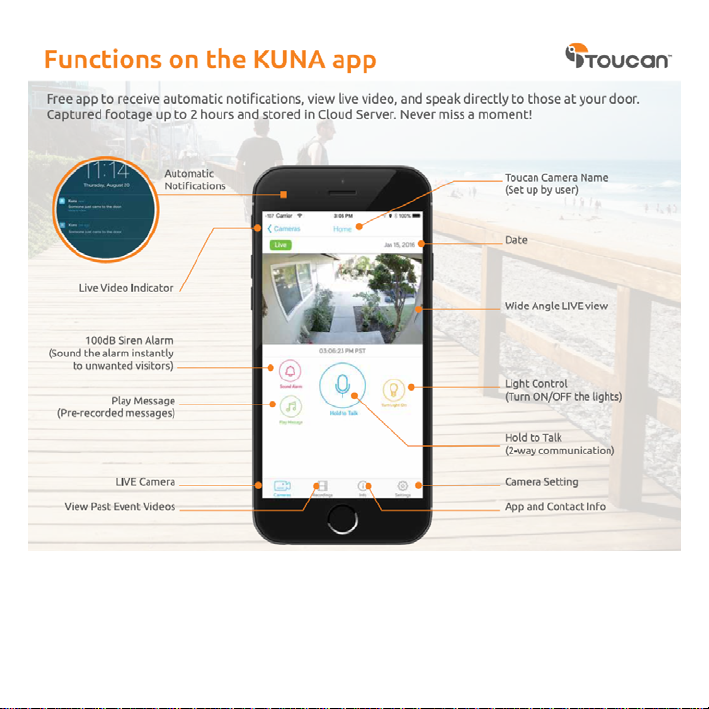
5
Page 6
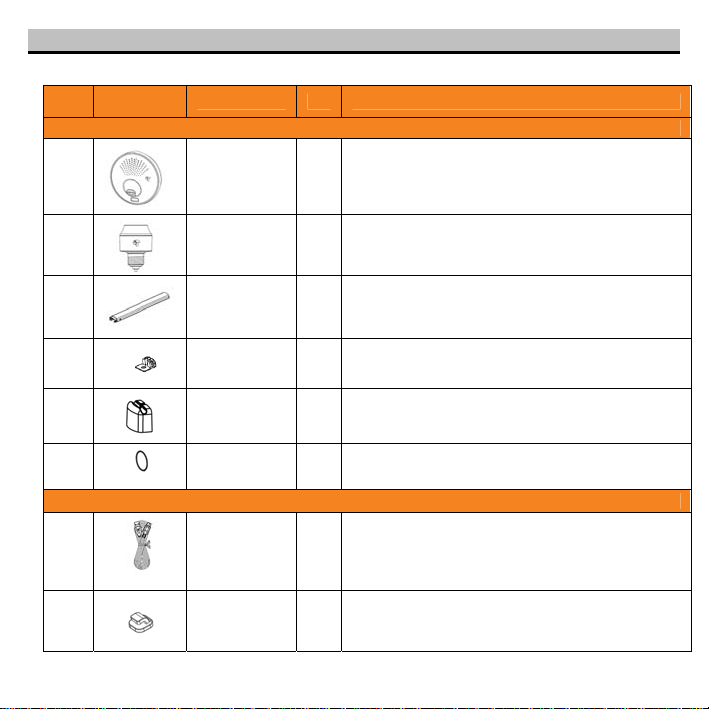
2. What Is Included
Before installing Toucan, make sure all parts are present. If any part is missing, please contact VuPoint
Solutions at [email protected]
Item Part
1
Description Qty Application
Mount Camera On Mount Plate
Toucan
Camera
1 Mount camera under light fixture
2
3
4
5
6
7
8
Smart Socket 1
Conduit 1 Manage the cable between camera and light fixture
Conduit Cover 1 Fix the cable position on conduit
Mount Plate
Cover
Positioning
Sticker
USB cable 1m
with silicon
pipe
Cable Clip 3 Manage the cable on light base plate
Thread in between light fixture and light bulb. USB port
1 Fix the cable position on mount plate
Indicate the camera location after move out the camera
1
Cable Management
Connect camera to socket to get power source. Silicon
1
pipe protects USB cable when installing lamp shade on
6
provides power to camera.
on wall
fixture
Page 7
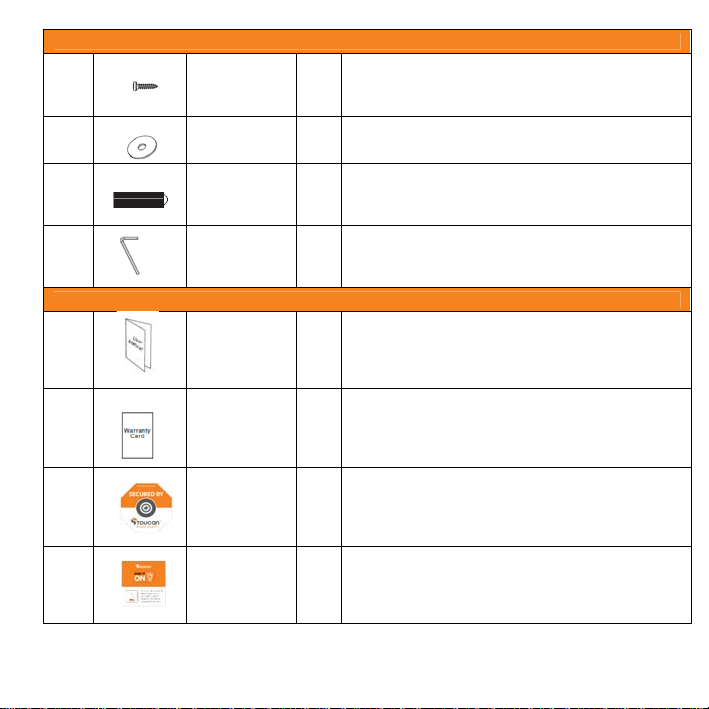
10
Mount of Wall
Mount Screws 2 Wall mount purpose
11
12
13
14
15
16
17
Washers 2 Wall mount purpose
Wall Inserts 2 Wall mount purpose
Hexagonal
Wrench
User’s Manual 1
Warranty Card 1
Secure
Stickers
Power Sticker 1 Stick on main power switch
1 Lock the camera on base plate
Manual and Labels
1 Alert intruder that home is secured by Toucan
7
Page 8
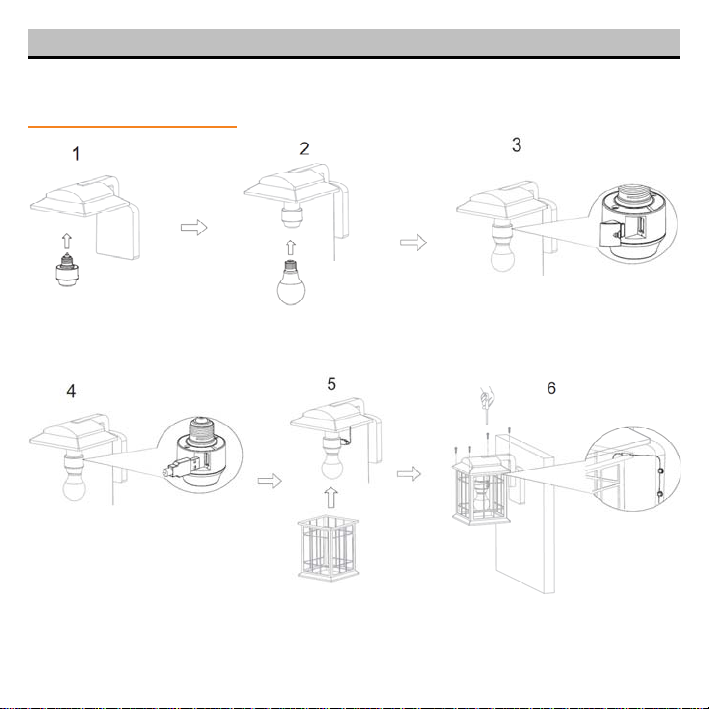
3. Toucan Camera & Socket Installation
Refer to “What Is Included” in Section 2 for part installation for the steps below:
Step 1: Socket installation
Install Smart Socket Thread in light bulb Remove USB cover
to fixture
Attach USB Cable to Reattach lamp shade Screw lamp shade back in and drag
Smart Soc
then adjust Silicon Pip from USB e
ket if necessary out USB cable through the shade
cable to protect cable
8
Page 9
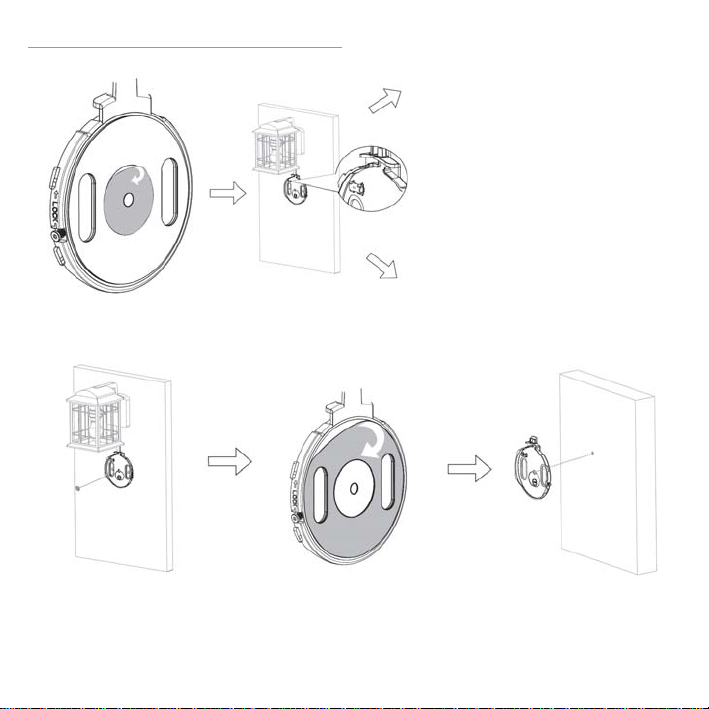
Step 2: Mounting the camera’s back plate
Re
move optional inner temporary
adhesive for camera positioning and use
leveler to align and balance back plate.
You can use a pencil or Position Sticker
(included) to mark placement before
adhering to your wall
ION 1: Mounting with adhesive
OPT
1 2 3
Refer to Option 1 to mount camera to
wall with adhesive or Option 2 to mount
camera to wall with screws
After using the leveler to adjust Remove outer adhesive from Align back plate with the
the balance of the plate, adhere back plate for a more stable Positioning Sticker on the
the Positioning Sticker to mark placement of the camera to wall to center the plate
the center of the plate the wall
9
Page 10
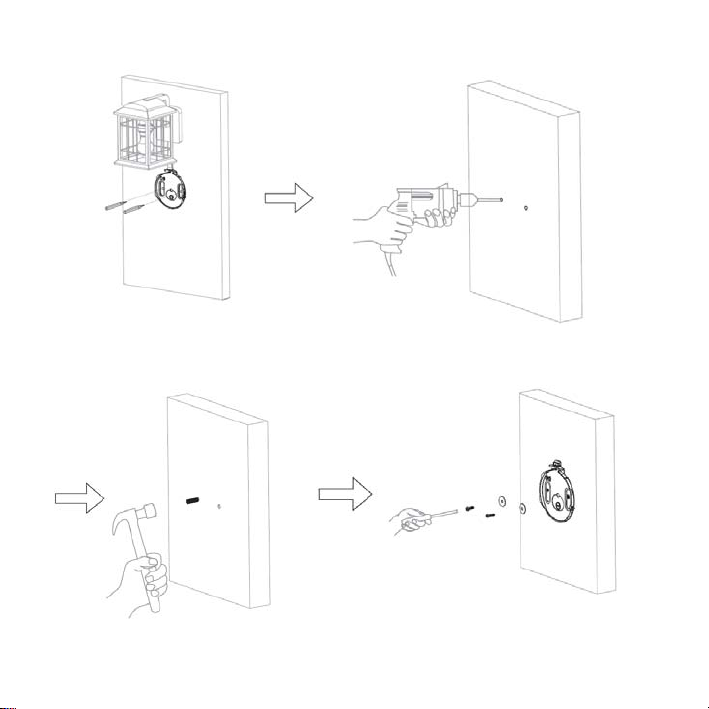
OPTION 2: Mounting with screws
1 2
After using the leveler to adjust the Drill holes for screws placement
balance of the place, you can use a pencil
mark the placement for the screws
to
3 4
Wall Inserts Mount back plate with Washers
Install
and Screws
10
Page 11
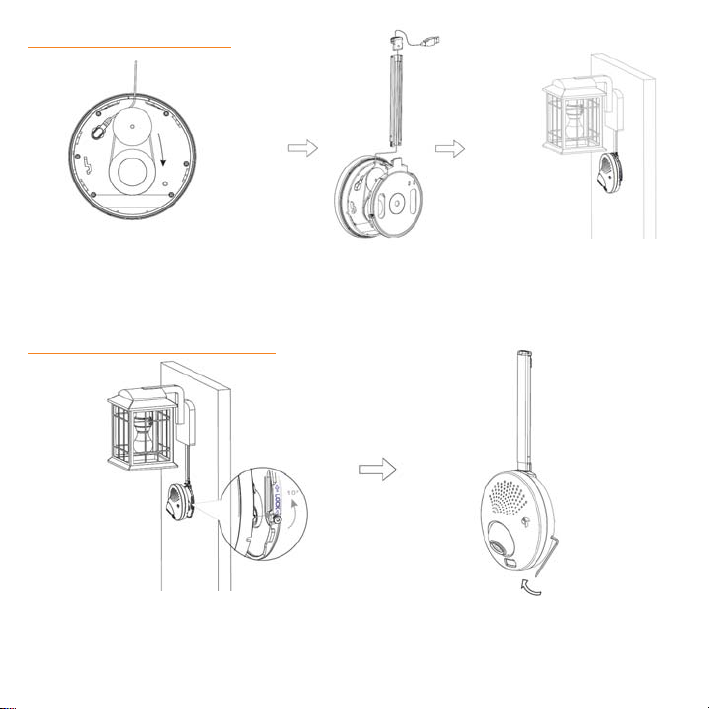
Step 3: Cable management
1 2 3
Plug USB Cable into the back of the Attach Conduit to align the Position camera and
camera and loop the cable around cable. Extend/retract conduit’s use Cable Clips to
the rings; continue looping the cable length by sliding it. Then attach manage the cable
if necessary the Conduit Cover to the top of if necessary
the conduit
Step 4: Camera body installation
1 2
Mount the camera to the back plate and align Tighten the lock with Hexagonal
the white dot to the left of the screw where Screwdriver
the white arrow starts and rotate camera 10˚
counter-clockwise to lock
11
Page 12
4. Getting The Kuna App
In order to set up your Toucan, please make sure it's successfully installed, and the status LED on the
bottom left side of your light is flashing red. This means that your Toucan is ready to be set up!
Step 1 - Download the Kuna App
First, download the free Kuna app from the Apple App Store (for iOS) or
the Google Play Store (for Android). You can also visit getkuna.com/app
from your browser or scan the QR Code for the app.
You will need to create an account specifically for the Kuna app. If you
already have one, you can skip to Step 3.
Step 2 - Create an Account
When you launch the Kuna app for the first time, it will prompt you to create an account with your
email address and password.
Click the "Create an Account" button, enter and confirm your email, and choose a password. You will
receive a confirmation email from us when your new account is active.
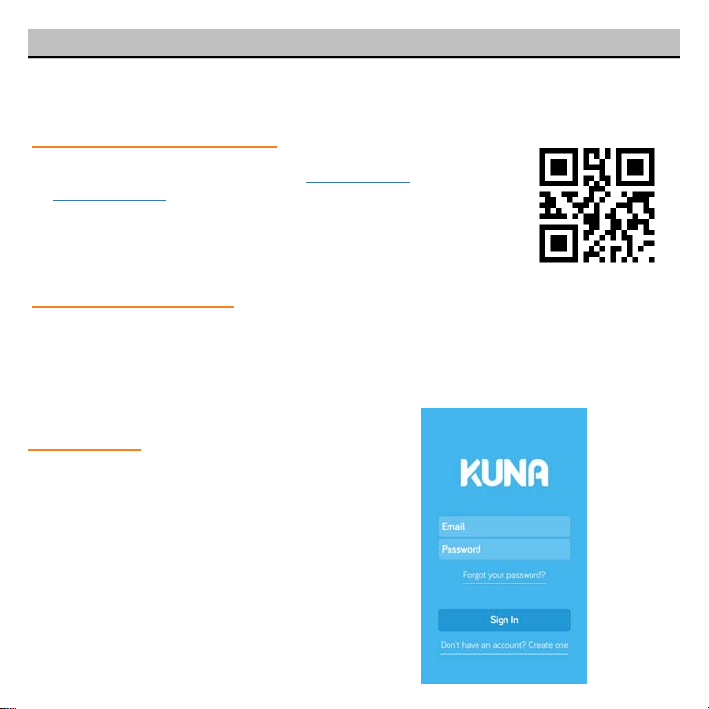
Step 3 - Sign In
Log in to the Kuna app using your email and
password.
If you don’t remember your password, click
the “Forgot you password?” link to reset it.
12
Page 13
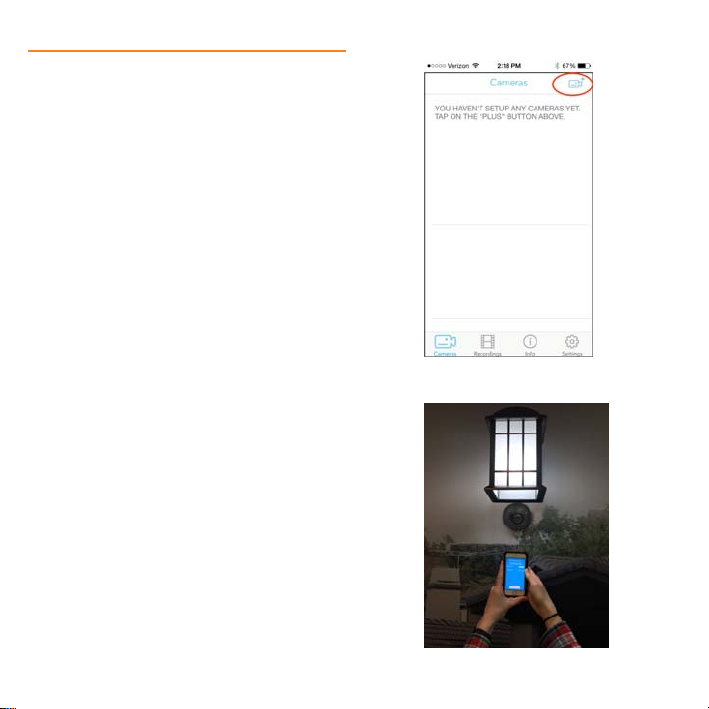
Step 4 - Add your Toucan to Your Account
Once logged in, you will see the
Cameras page. Select the Camera
Plus button in the upper right
hand corner to display your new
Toucan.
Because the set-up process uses
Bluetooth technology, you will
need to be close to your Toucan.
We recommend holding your
mobile device no more than 5
feet away.
13
Page 14
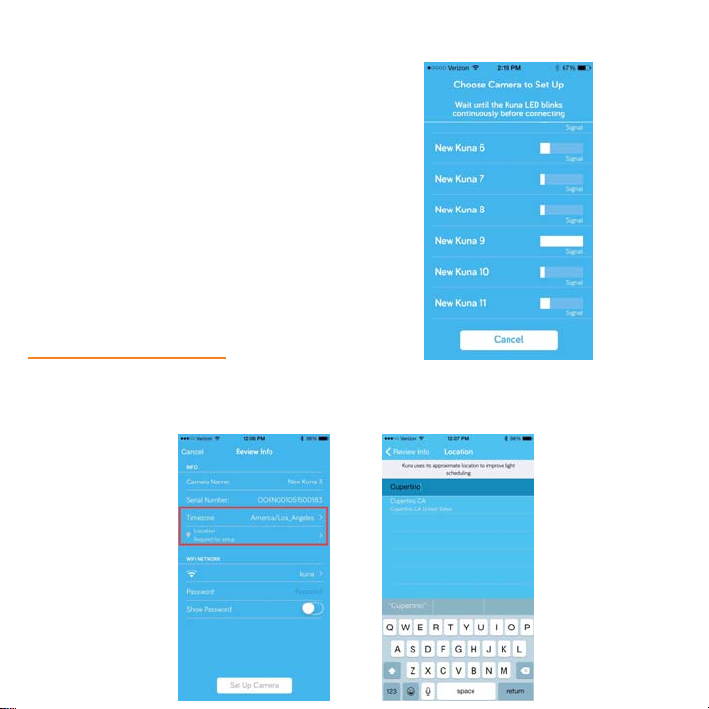
If the app displays multiple Toucans,
the one you’re setting up should
have the strongest Bluetooth
signal. Make sure you’re standing
close to it.
Plea
se note: If you are setting up
multiple Toucans, you will need to
go through this set-up process for
each new Toucan, starting at Step 4.
This allows you to set different
locations and Wi-Fi networks for
each Toucan, if you wish.
Step 5 - Set Your Location
Connecting to your Toucan can take up to a minute. Once the app connects, set your time zone and
enter your city (or a city within 100 miles or so) under location. Toucan uses your approximate location
to make your light schedule more accurate. You DO NOT need to provide your full address.
14
Page 15
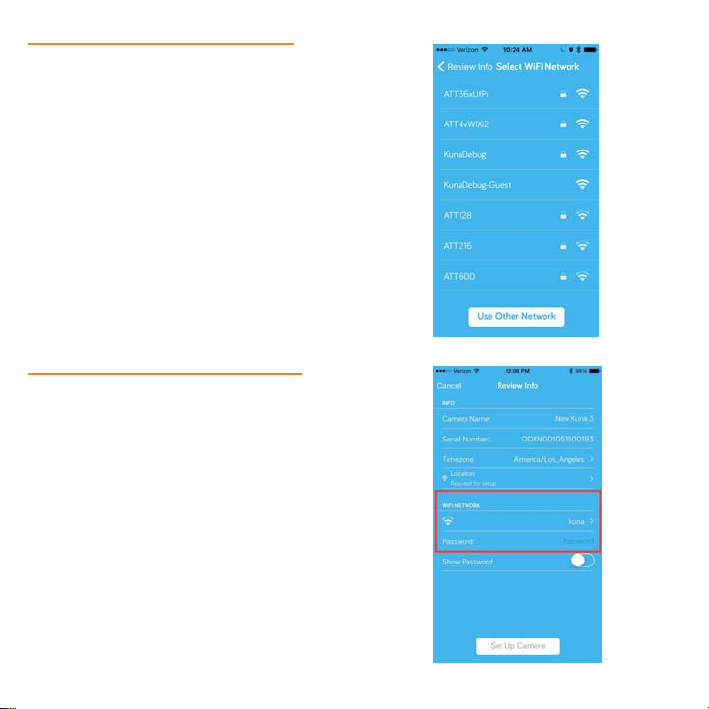
Step 6 – Select Your Wi-Fi Network
Cli
ck into “Select Wi-Fi Network” to
configure your Toucan’s Wi-Fi setup. If
you don’t see your network, or your
network is hidden, click
“Use Other Network”.
Step 7 – Connect Your Kuna to Wi-Fi
Next, enter the password for your local Wi-Fi network. Make
sure that your Toucan is able to see a strong signal (by
checking the Wi-Fi signal bars next to your network’s name).
Then, enter the password for your local Wi-Fi network. We
recommend enabling our Show Password feature for this
step, so you can make sure it’s spelled correctly.
Then, click Set Up Camera. This connection can take up to a
minute
15
Page 16
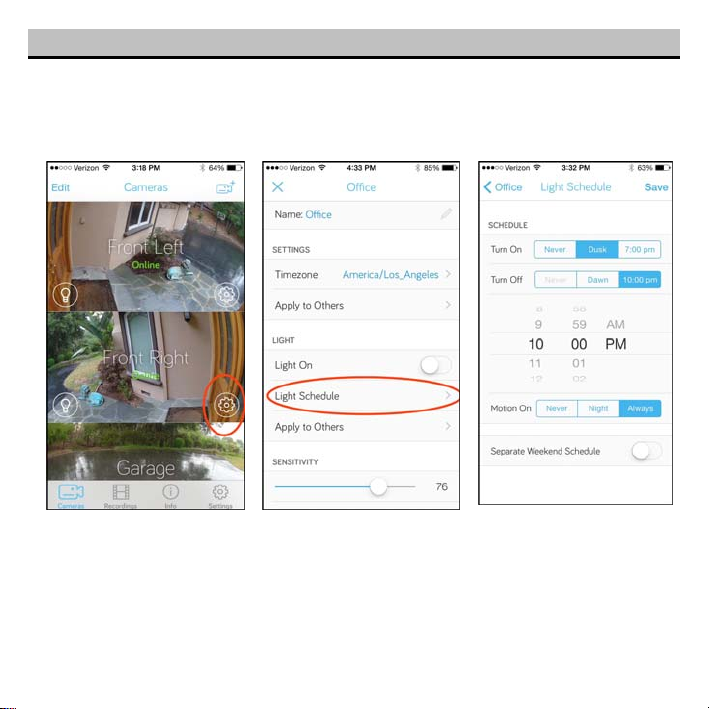
5. Setting Up A Light Schedule
You can set when your Toucan light to turn on and off with a light schedule and motion detection.
Tap the settings “gear” for the light you want to adjust in the Camera tab of the app. Then scroll down
and tap Light Schedule.
For exa
mple, if you want your light to turn on automatically in the evening, but off at night to save
energy, you can choose “dusk” for when the light comes on, “10 pm” for when the light turns off, and
have the motion sensor turn the light on at night.
Your light schedule will work best if your Toucan knows your general location. To set up or change your location,
refer to Section 6.
16
Page 17
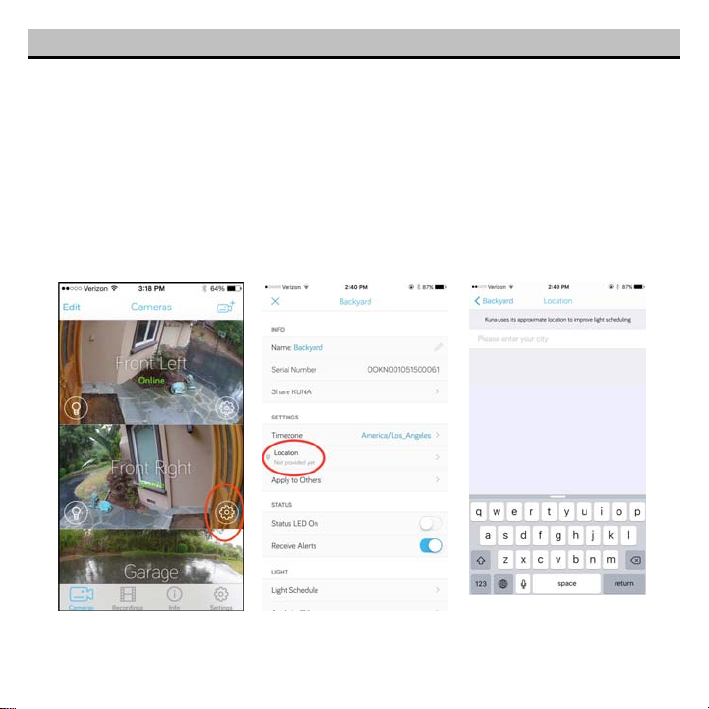
6. Setting Your Location
This feature makes the dawn/dusk setting on your light schedule more accurate.
We care about your privacy, and we don’t need your personal information for this feature to work at its
best. You can make your location as specific as your full address, or you can choose a city within about
a hundred miles.
If you have already taken your Toucan through setup and are ready to set your location, head to the
Cameras tab of your mobile app, and hit the Settings icon “gear” next to your Toucan’s name.
Then, under “Location”, and your city.
That’s it – your Toucan will now pick up dusk and dawn times by your location!
17
Page 18
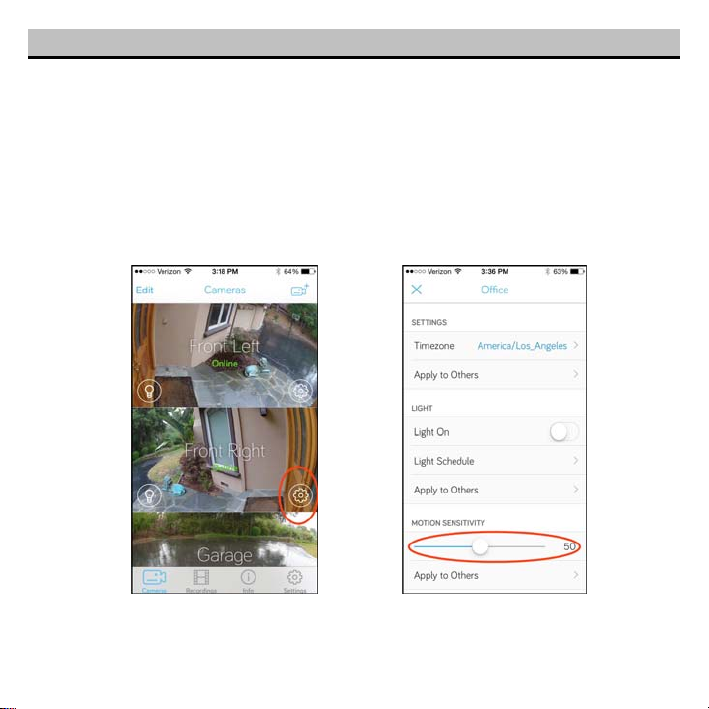
7. Setting Motion Detection Sensitivity
If your Toucan is picking up a lot of false alarms or missing you when you walk by, you can adjust the
motion detection sensitivity yourself.
Tap on the settings “gear” icon for the Toucan you wan to adjust in the “Cameras” tab.
Adjust the sensitivity slider. 0 is the least sensitive, and 100 is the most sensitive. If your Toucan faces
the street, we recommend a setting of about 50 as a good balance between prompt detection and
filtering out cars.
18
Page 19
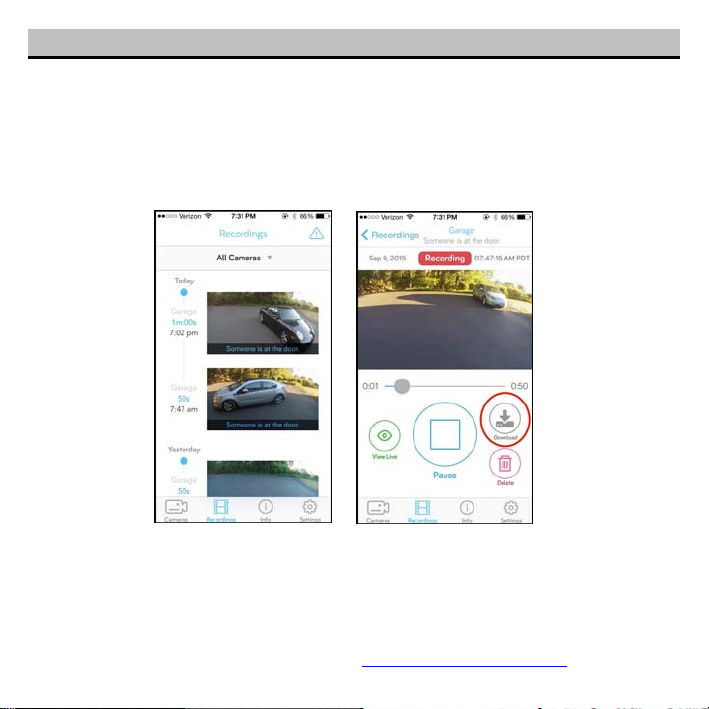
8. Viewing & Downloading Your Recordings
To view your past recordings, tap “Recordings” to view animated video thumbnails or tap into the
video of your choice.
To download a recording, simply select the recording to view it. Then tap the download button and the
recording will be saved to your phone.
You can find the recording in your film roll in iOS, and in your Downloads folder in Android. Then you
can email it, or share it!
With any premium plan, you can download as many recording as you want. Without a plan, you are
limited to three downloads per month.
T
o learn more about optional subscription plan, visit https://www.getkuna.com/plan/
19
Page 20
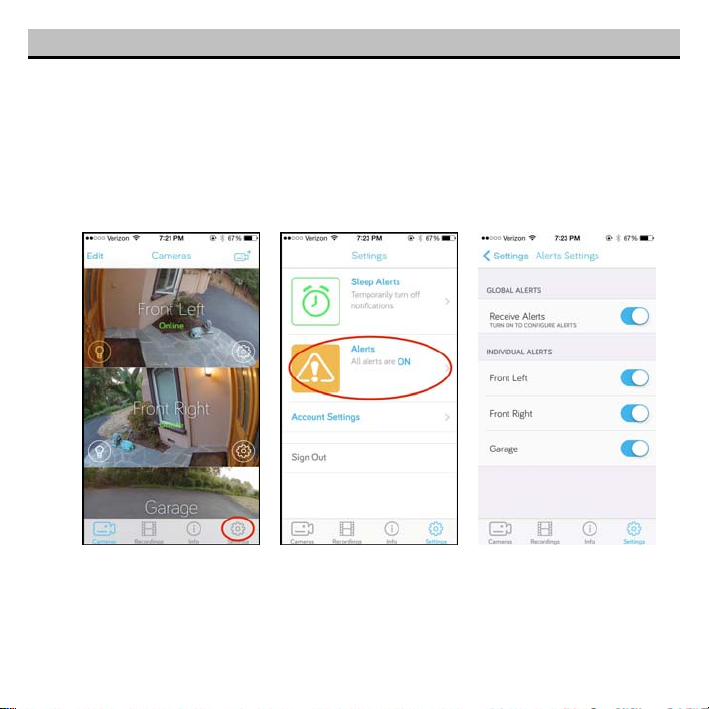
9. Setting Alerts For Individual Toucans
I want to get alerts from my front door Toucan, but I don’t want to get alerts for my garage Toucan
You can set the alerts for your Toucans in two different ways. First is to go into the global setting view,
then select the alerts.
You’ll be presented with a menu that allows you to turn on alerts globally (for all your Toucans at the
same time) or individually for each Toucan.
Note: These settings are unique to your account, so if you have shared your Toucan with another user
they can set their own alert settings. To share your Toucan to another user, refer to Section 10
20
Page 21
10. Share & Access From Difference Devices
I want my spouse or family member to use my Toucan, how do I share it with them?
You can access your Toucan from multiple logins and devices as long as you have the Kuna app
downloaded, so you can share access with your spouse or another family member.
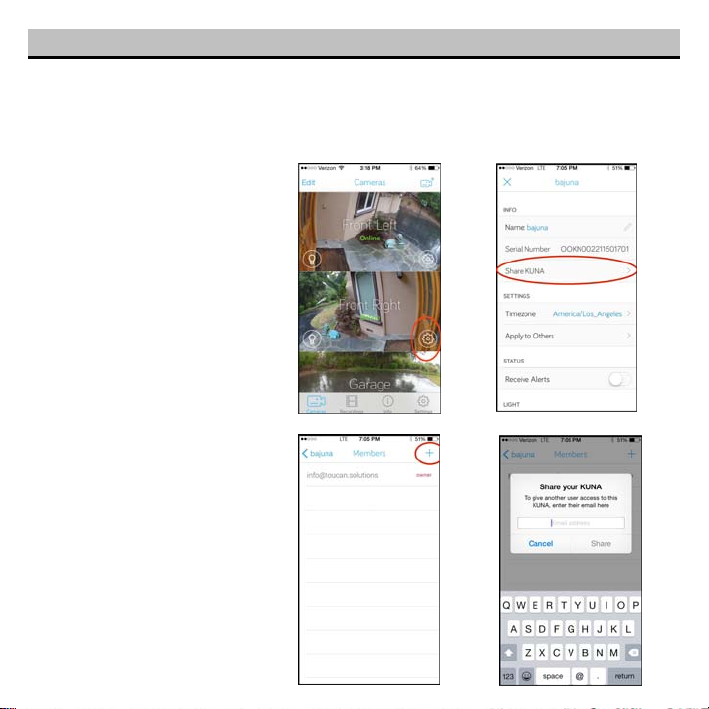
T
o share your Toucan, the easiest
way is to have the other person first
sign up for their own Kuna account.
To sign up for an account refer to
S
on 4, Step 1, 2, and 3
ecti
To share, tap on the settings “gear” for
that particular Toucan, then select
Kuna” option.
“Share
Tap the “+” button to add other users,
then enter the email address for their
account.
The other user will automatically get
access to this Toucan the next time they
lo
g in to the Kuna app.
Alert preferences are set
Note:
individually for each account. Refer
to Section 9 to manage alert settings
21
Page 22
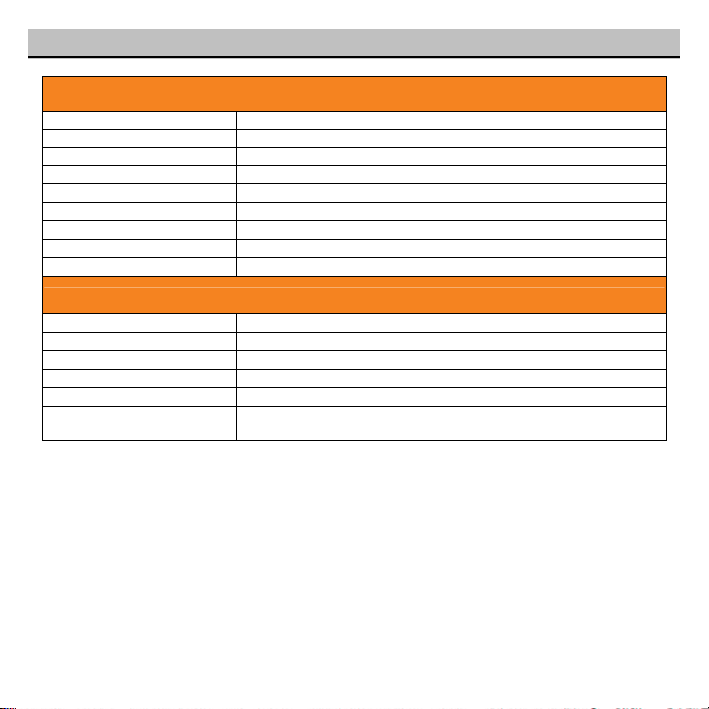
11. Specifications
Toucan Camera
Camera HD 720p resolution
Video resolution 1280x720 at 30 fps. H.264
Field of View 116 degrees (diagonal)
Wi-Fi® 2.4GHz 802.11 b/g/n
Bluetooth® Bluetooth® BLE 4.0
Siren Alarm 100 dB
Lighting Control On/Off/Scheduling with app
Weatherproof Design IP44
Dimensions (L×H×W) 4.6” x 4.6” x1.9”
Toucan Smart Socket
Lamp Base Type Socket type E26
USB Output 5V/1A
USB Input 100-240VAC, 50/60Hz
Lighting Control On/Off/Scheduling through BLE Mesh Network
Bluetooth® Bluetooth® BLE 4.0
Light bulb
Support maximum 75W standard bulb;
recommended 10W LED light bulb; not included
22
Page 23
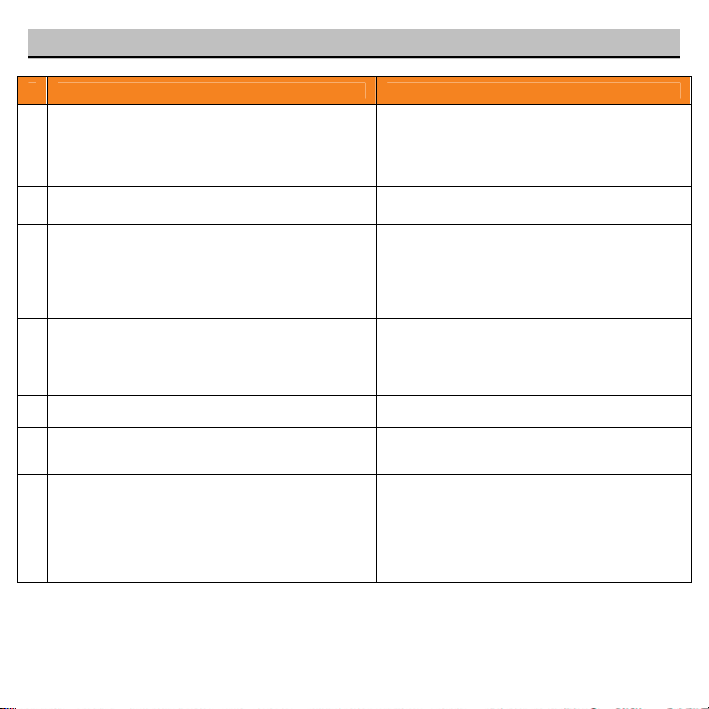
12. Troubleshooting & FAQ
Frequently Asked Questions
1 How long will my recordings be available?
2 How do I download a recording? Refer to Section 8
3 Do I have to leave my light switch on?
How many Toucan Cameras can I install at
4
home?
5 Can I use LED bulb with Toucan Yes, we recommend that you use an LED bulb.
What is the maximum light bulb wattage I can
6
use with the Smart Socket
7 I do not see any Toucan show up in setup screen
All Toucan come standard with a two-hour
download and “look back” window. With
premium subscription plans, you can “go back
in time” to access every event that your
Toucan generated for up to 30 days
Yes, Toucan uses power continuously, so you
will have to leave the light switch on. We have
provided with your Toucan a “Keep it On”
label as reminder to leave the switch on
There’s no limit. We recommend installing
Toucan at all major entry points. You can add
multiple camera to your Kuna app and
manage each camera all in one app
Smart Socket supports up to maximum 75W
Toucan uses Bluetooth® LE 4.0 for setup. You
will need to be within about 10 feet of the
Toucan and have Bluetooth enabled on your
mobile device. Try rebooting your mobile
device and launching the Kuna app again
23
Page 24
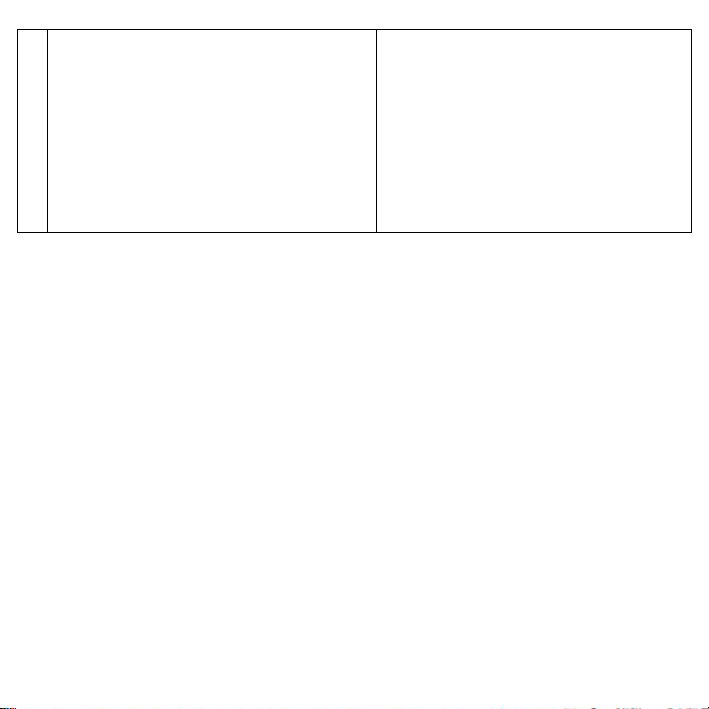
1) Reboot your Toucan: Turn off your
Toucan (using the light switch it’s
connected to) and wait at least 10
seconds. Then, turn on the light switch
back on
8 My Toucan is “offline”
2) Run Through the Set-Up Process: Refer
to Section 4
* may be caused by weak Wi-Fi signal. Improve
performance by moving your router closer to
your Toucan, or adding a Range Extender in
between
Note: Model Number and Serial Number (S/N) is located on the packaging, instruction manual, on the
product or inside the battery compartment. Please have this information ready before contacting tech
support.
24
Page 25
FCC Statement
Warning: Changes or modifications to this unit not expressly approved by the party responsible for compliance could void the
user’s authority to operate the equipment.
NOTE: This equipment has been tested and found to comply with the limits for a Class B digital device, pursuant to Part 15 of
the FCC Rules. These limits are designed to provide reasonable protection against harmful interference in a residential
installation. This equipment generates, uses and can radiate radio frequency energy and, if not installed and used in accordance
with the instructions, may cause harmful interference to radio communications.
However, there is no guarantee that interference will not occur in a particular installation. If this equipment does cause
harmful interference to radio or television reception, which can be determined by turning the equipment off and on, the user is
encouraged to try to correct the interference by one or more of the following measures:
• Reorient or relocate the receiving antenna.
• Increase the separation between the equipment and receiver.
• Connect the equipment into an outlet on a circuit different from that to which the receiver is connected.
• Consult the dealer or an experienced radio/ TV technician for help.
This device complies with Part 15 of the FCC Rules. Operation is subject to the following two conditions:
(1) This device may not cause harmful interference.
(2) This device must accept any interference received, including interference that may cause undesired operation.
Shielded cables must be used with this unit to ensure compliance with the Class B FCC limits.
SM
is a service mark of Apple Inc. Google Play™ and Android™ are registered trademarks of Google Inc. Wi-Fi® is a registered
App Stor
e
trademark of the Wi-Fi® Alliance. Kuna is a registered trademark of Kuna, Bluetooth® word mark and logo are registered trademarks owned by
Bluetooth SIG, Inc.
All trademarks are the property of their respective owner.
Patent Pending TSK100KU_Manual_16-0226
U.S.
25
 Loading...