

Totoku LV52P3, LV32P3 User Manual

LV52P3/LV32P3
High Resolution Graphics Card
User’s Manual
TOTOKU ELECTRIC CO., LTD.

LV32P3 / LV52P3
TOTOKU 2
FCC Notice
Federal Communications Commission
This equipment has been tested and found to comply with the limits for a Class A
digital device, pursuant to part 15 of the FCC Rules. These limits are designed to
provide reasonable protection against harmful interference in a residential installation.
This equipment generates, uses, and can radiate radio frequency energy and, if not
installed and used in accordance with the instruction manual, may cause harmful
interference to radio or television communications. However, there is no guarantee
that interference will not occur in a particular installation. If this equipment does
cause harmful interference to radio or television reception, which can be determined
by turning the equipment off and on, the user is encouraged to try to correct the
interference by one or more of the following measures:
• Reorient or relocate the radio or television receiving antenna.
• Move the computer or equipment away from the receiver.
• Plug the computer or equipment into an outlet on a circuit different from that which
the radio or television receiver is connected.
• Consult the dealer or an experienced radio/TV technician for help.
CE Statement
This is Class A product. In a domestic environment this product may cause radio
interface in which case the user may be required to take adequate measures.
About This Manual
Read through this manual before you install or use this product.
This manual provides detailed information on how to install and configure this
product. As for information regarding your computer display or other peripheral
devices that are not TOTOKU’s products, please refer to the respective user’s
manuals or consult their respective dealers.
Keep this manual in a safe and easily accessible place. In case of loss, contact your
dealer for another copy of this manual.
Attach this manual to the card when transferring to a third person.
This manual is subject to change without notice.

LV32P3 / LV52P3
TOTOKU 3
Contents
1. Overview···················································································4
2. Installation················································································5
2.1 Setting up DIP Switches ·························································6
2.2 Installing LV52P3/LV32P3 ······················································7
2.3 Connecting to the Display ·······················································8
3. Installing Driver Software ···························································9
4. Setting up the Display·······························································17
4.1 Display Properties································································17
4.2 Advanced Settings
4.2.1 Color/Palette ·································································22
4.2.2 Screen Update································································22
4.3 Multi Monitor Setting····························································23
4.4 Adaptor and Driver Informati o n ·············································31
4.5 Reconfiguring, Updating, and Uninstalling·······························32
5. Uninstalling Driver Software ······················································34
6. Technical Specifications
6.1 LV32P3···············································································36
6.2 LV52P3···············································································38
6.3 Display Interface ·································································40
7. Disposing of the Product ···························································40
LV32P3 / LV52P3
TOTOKU 4
1. Overview
Thank you for purchasing graphics card LV52P3 or LV32P3. TOTOKU’s high-resolution
PCI bus graphics cards are designed to deliver the highest quality visual images on 2,
3, and 5-megapixel LCD displays to meet market demands.
The following table shows the products names and their supporting displays.
Product Name Supported Displays
LV32P3
3 megapixel monochrome and color LCD displays:
・ CCL316
・ ME315L
・ ME315L plus
LV52P3 5 megapixel monochrome and color LCD Displays
For more information regarding LCD displays and/or related matters, please contact
your dealer.
This package contains the following items. Contact your dealer if any item is missing.
Graphics Card LV52P3 or LV32P3
Driver & Installer CD-ROM
User’s Manual
Note: Save the original box and packing manual to pack the product for shipping.
Damages occurred during shipping are not covered under the warranty.

LV32P3 / LV52P3
TOTOKU 5
2. Installation
This chapter explains how to install LV52P3 or LV32P3. Refer to the computer
instruction manual as necessary.
Make sure to follow the procedures as indicated below to successfully install the
graphics card and its software.
1) Set up the DIP switches
2) Install the card
3) Connect the display(s)
4) Turn on the computer
5) Install driver software
6) Set up the display properties
7) Restart the computer
Before installing …
If you do not know how to install, ask your dealer to install it.
Do not touch connectors, IC/LSI pins, and/or terminals on the card. Static
electricity could damage them.
Handle the card with clean hands. Grease on your hands could cause the product
to slip off.
Keep any parts that become unnecessary for future use.
Make sure that connectors, connector pins, and contacts are not damaged,
deformed, or stained. Dust off before use. They could cause short circuits and fire.
Handle the connectors carefully to prevent damage from dropping and keep them
clean.
Be careful not to drop any fasteners inside the computer. It could cause a short
circuit and/or an open circuit.
Do not expose the cables to heat; do not put heavy objects on the cables. They
could damage the cables and cause fire. To disconnect a cable, undo the screws on
the connector and pull straight by holding the connector.
Use this product only on supported UL-listed computers.

LV32P3 / LV52P3
2.1. Setting up DIP Switches
The DIP switches control output formats. The switches are set for EDID compatible
displays by default. Consult your dealer to find out whether or not your display is
EDID compatible.
Figure 2.1 LV52P3/LV32P3
Disabling VGA Output
To disable VGA output through the card, turn switch 3 to zero. Set up all LV52P3’s or
LV32P3’s the same way.
Figure 2.2 VGA Output Disabled
Enabling VGA Output on EDID compatible displays
To enable VGA Output on an EDID compatible display, turn switches 1 and 3 to zero
as shown in Figure. 3.3, and the card detects display information through EDID and
selects method of displaying VGA output automatically.
Note: Some EDID compatible displays do not support this setting. Contact your dealer
and find out about this in advance.
Figure 2.3 VGA Output Disabled on EDID Compatible Displays
TOTOKU 6
LV32P3 / LV52P3
2.2. Installing LV52P3/LV32P3
Follow the instructions below on how to install the card.
1. Make sure to turn off your computer and peripheral devices.
Note: Careful, the internal parts of the computer may be very hot. Wait until they
cool off before starting installation.
2. Remove the computer cover (see the computer instruction manual if necessary).
3. Insert the card in a PCI slot.
1) If the subject PCI slot has a dust cap, remove it.
2) Undo the screws of the bracket for the PCI slot. Keep the screws for later use to
secure the graphics card to the slot.
3) Insert this card to the PCI slot slowly and carefully.
4) Insert the card firmly and secure it to the slot using the screws removed at step
2. Make sure that the card is now installed properly.
Note:
・ If the card is not inserted properly, remove it once and insert it again. Do not
force to insert or remove the card, or it could damage the cables, connectors, or
the card itself.
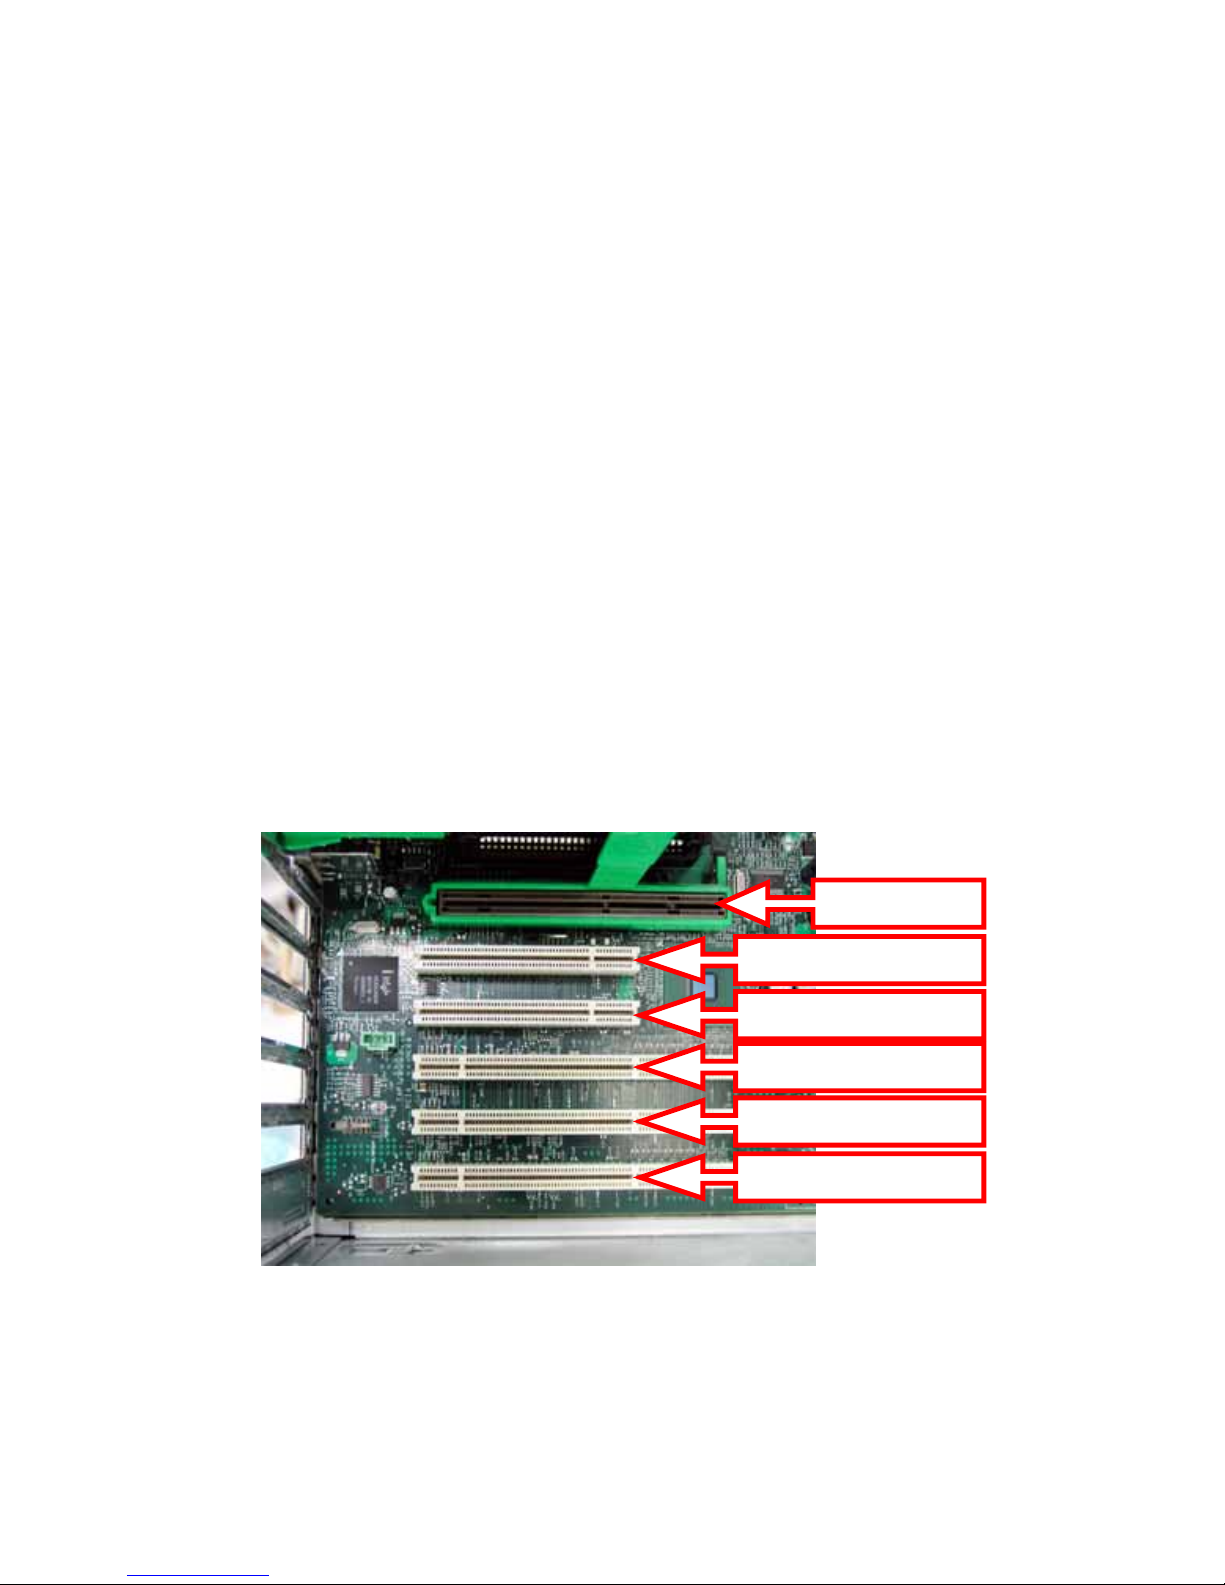
・ LV52P3/LV32P3 support the following slots: 33MHz-PCI, 66MHz-PCI bus and
PCI-X bus. However, we recommend the 66MHz-PCI bus slot for the best
performance.
33MHz PCI Bus Slot
PCI-X Bus Slot
PCI-X Bus Slot
PCI-X Bus Slot
33MHz PCI Bus Slot
AGP Bus Slot
Figure 2.4 PCI Bus Slots
In Figure 2.4, two 33MHz-PCI-bus slots and three PCI-X- bus slots are available.
Depending on the computer, the number of available slots, their order, and their types
may vary. Use any slot when using only one LV52P3 or LV32P3.
TOTOKU 7
LV32P3 / LV52P3
2.3. Connecting to the Display
Follow the instructions below on how to connect the LCD display(s) to the card. Refer
to the display instruction manual if necessary.
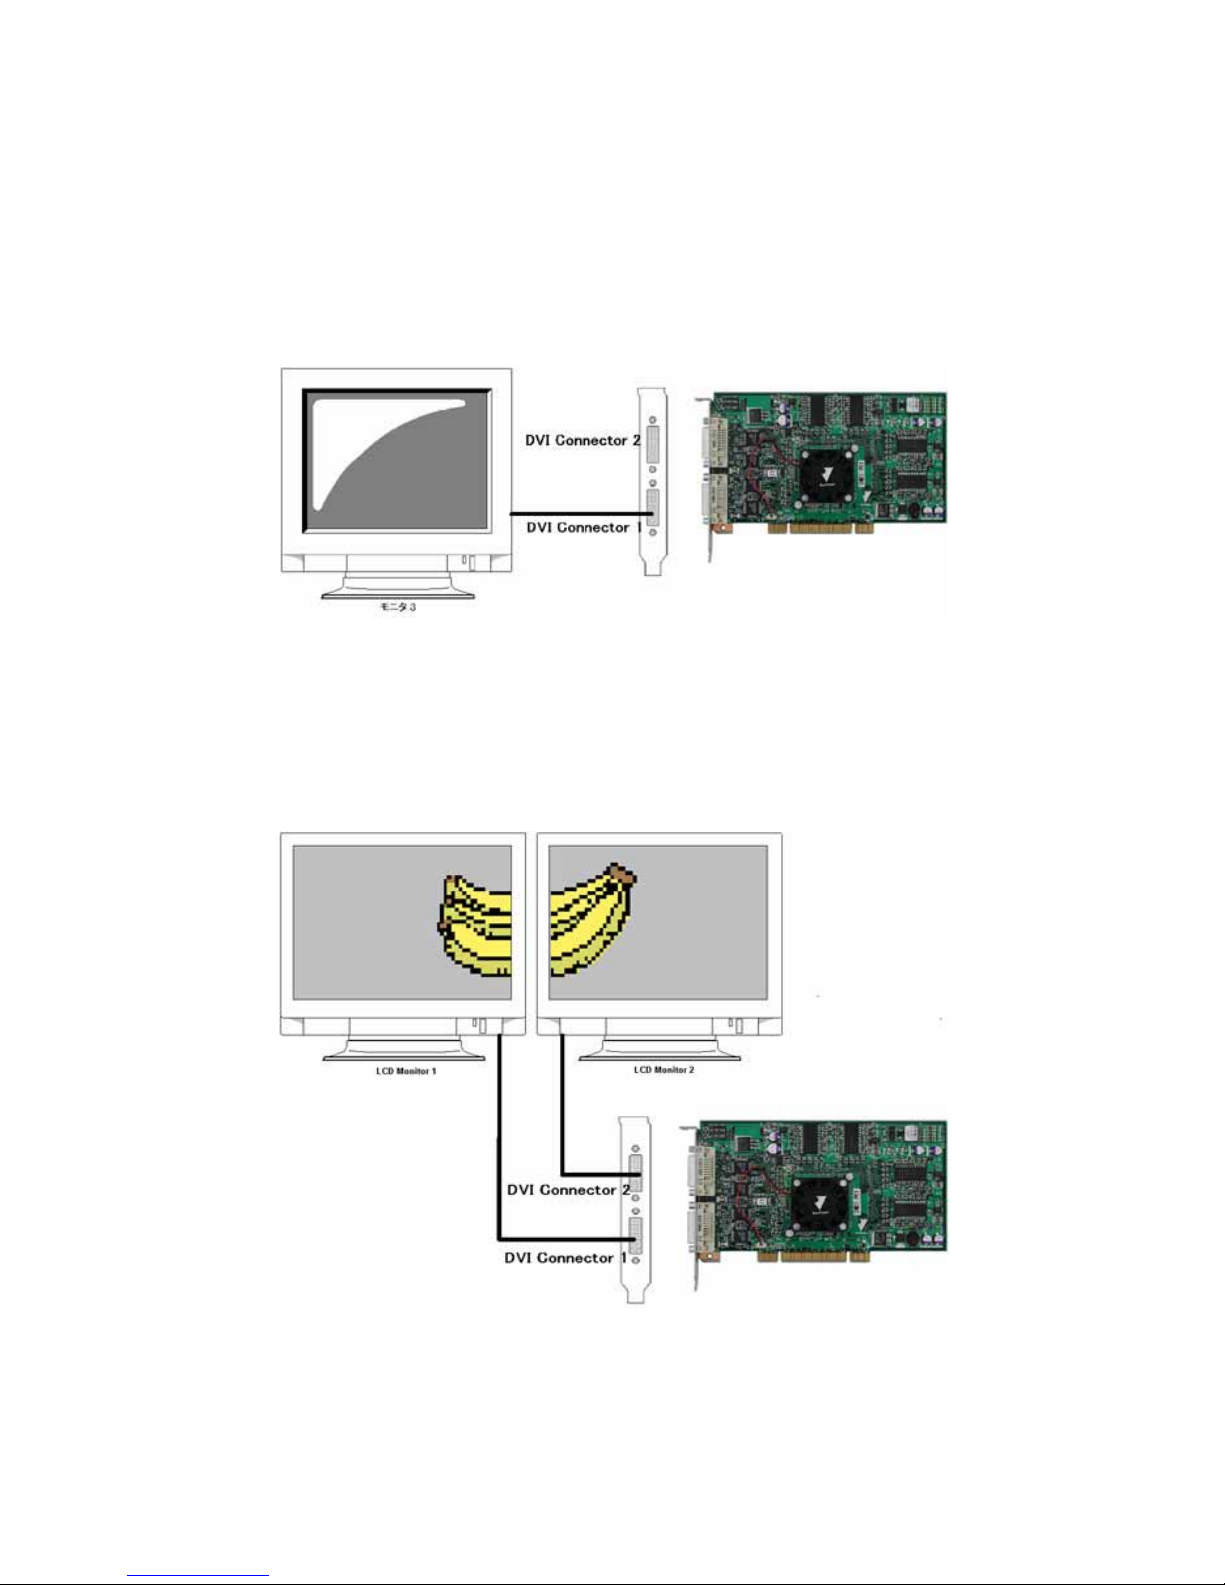
One Display on One Card
When connecting only one display, use DVI Connector 1 that is closer to the PCI bus.
DVI Connector 2 is for the secondary display.
Figure 2.5 One Display Connected to One Card
Two Displays on One Card
When connecting two displays, use DVI Connector 1 for the primary display (Display
1) and DVI Connector 2 for the secondary display (Display 2). When displays are
connected to the wrong connectors, the image will not be displayed properly.
Figure 2.6 Two displays connected to one card
TOTOKU 8
LV32P3 / LV52P3
3. Installing Driver Software
This chapter explains how to install driver software for LV52P3/LV32P3. Follow the
instructions below.
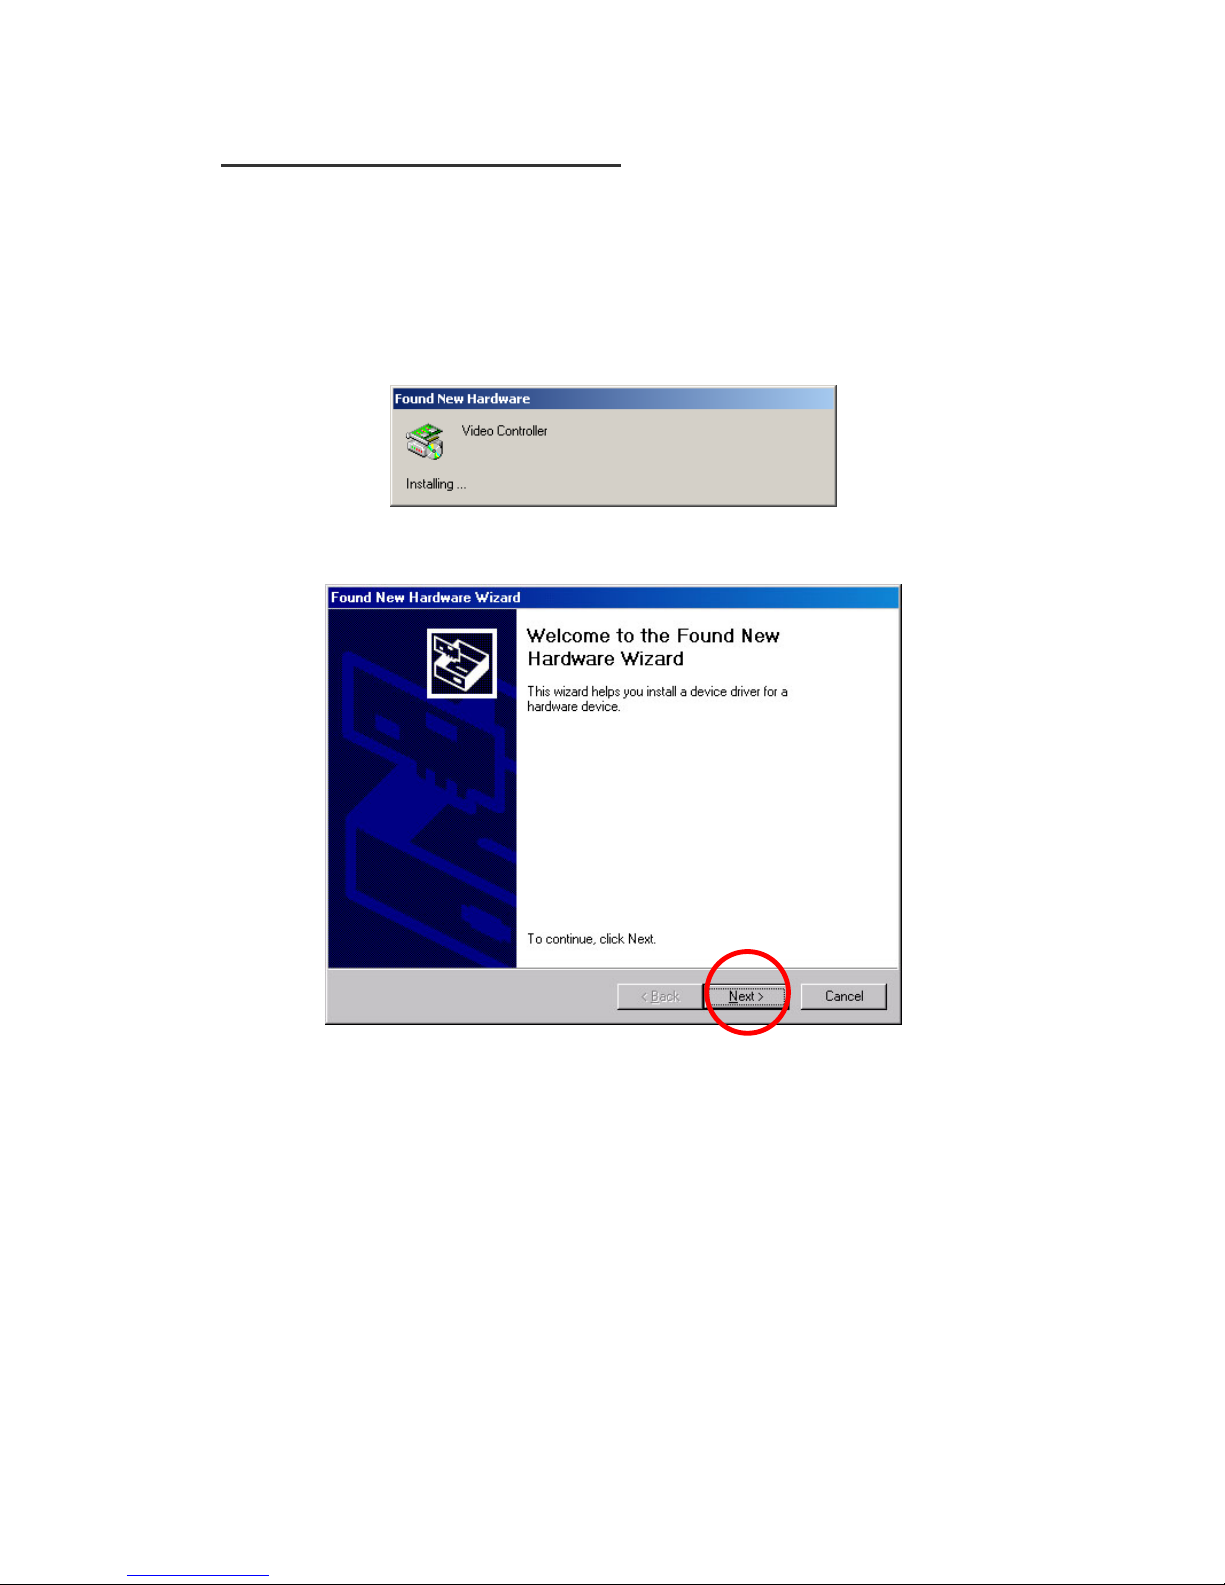
1. Turn on the computer and log into Windows as a user with administrative
privileges.
2. Click “Cancel” when the Found New Hardware Wizard starts up.
Figure 3.1 Found New Hardware
Figure 3.2 Welcome to the Found New Hardware Wizard
3. Insert the software driver CD-ROM in the CD-ROM drive, and the InstallShield
Wizard starts up automatically.
Note: If the wizard does not start automatically, run Setup.exe from the
CD-ROM.
TOTOKU 9
LV32P3 / LV52P3
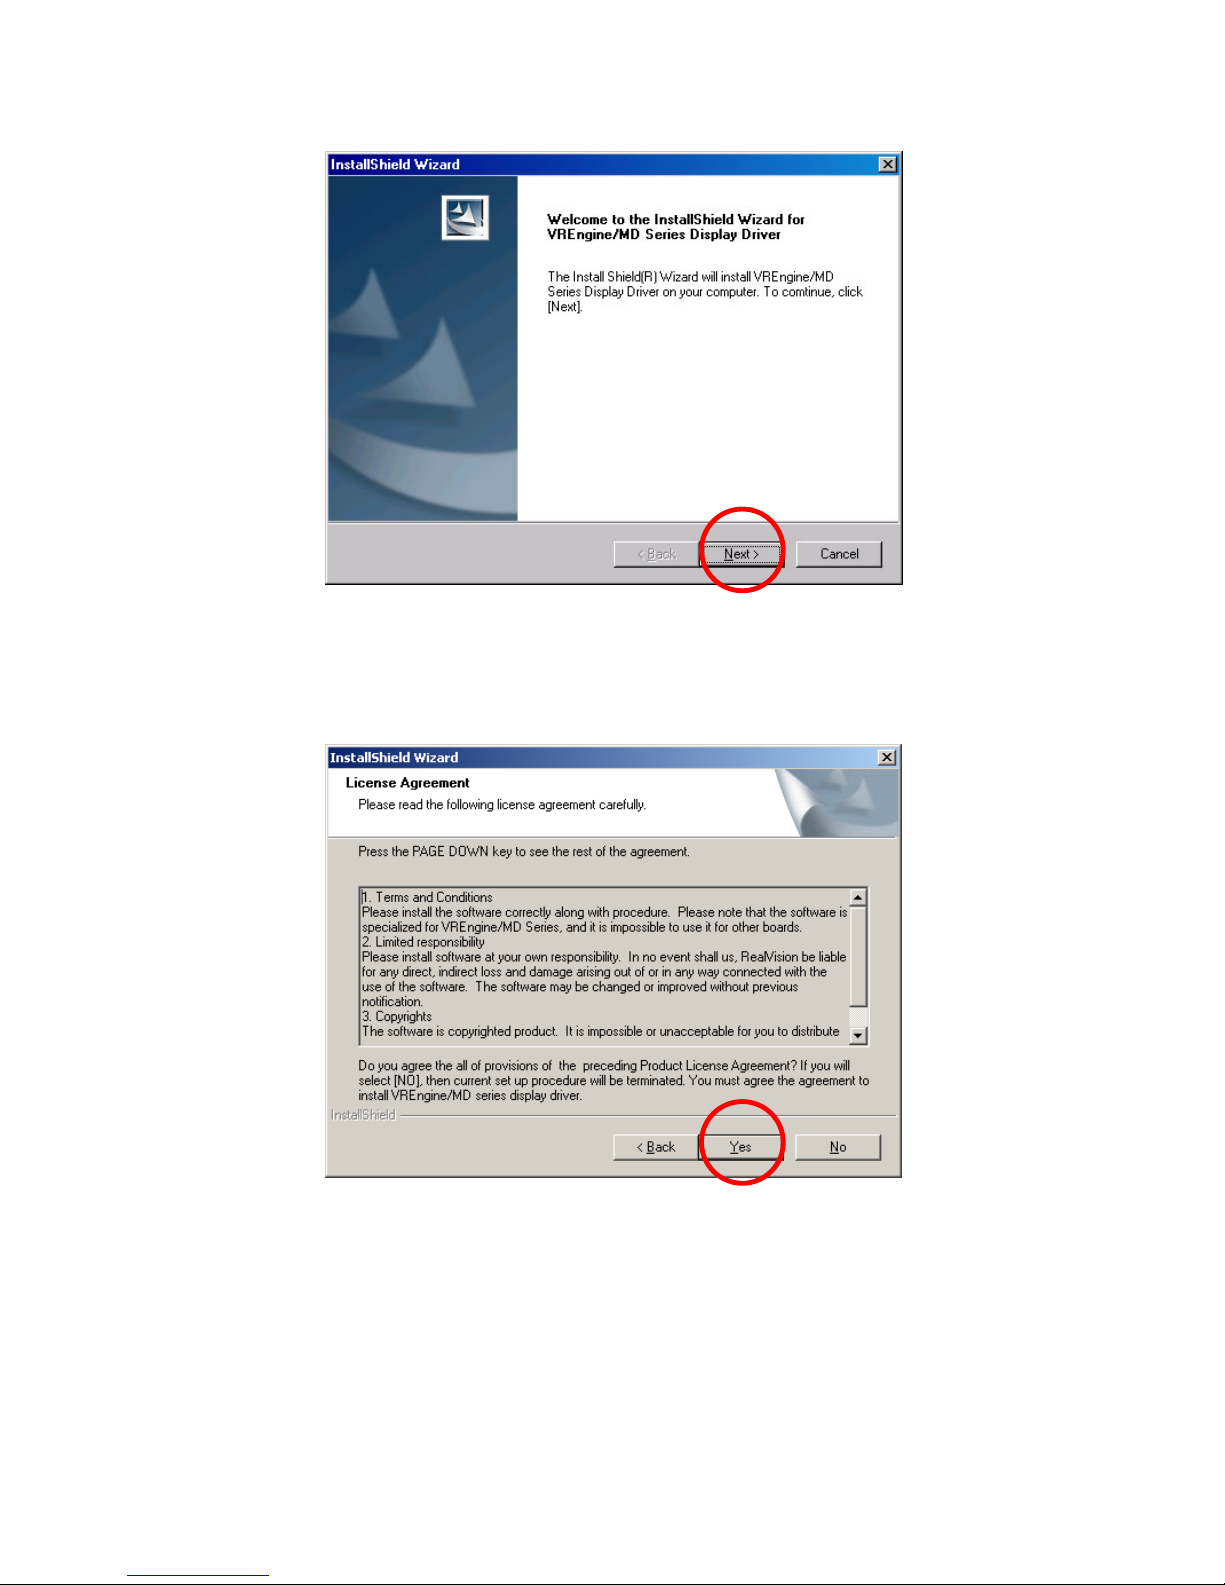
4. Click “Next” on the wizard.
Figure 3.3 InstallShield Wizard
5. The License Agreement appears. Read the terms and conditions of the Agreement.
If you accept the Agreement, click “Yes.” If you do not accept the Agreement, click
“No,” and the wizard will terminate.
Figure 3.4 License Agreement
TOTOKU 10
LV32P3 / LV52P3
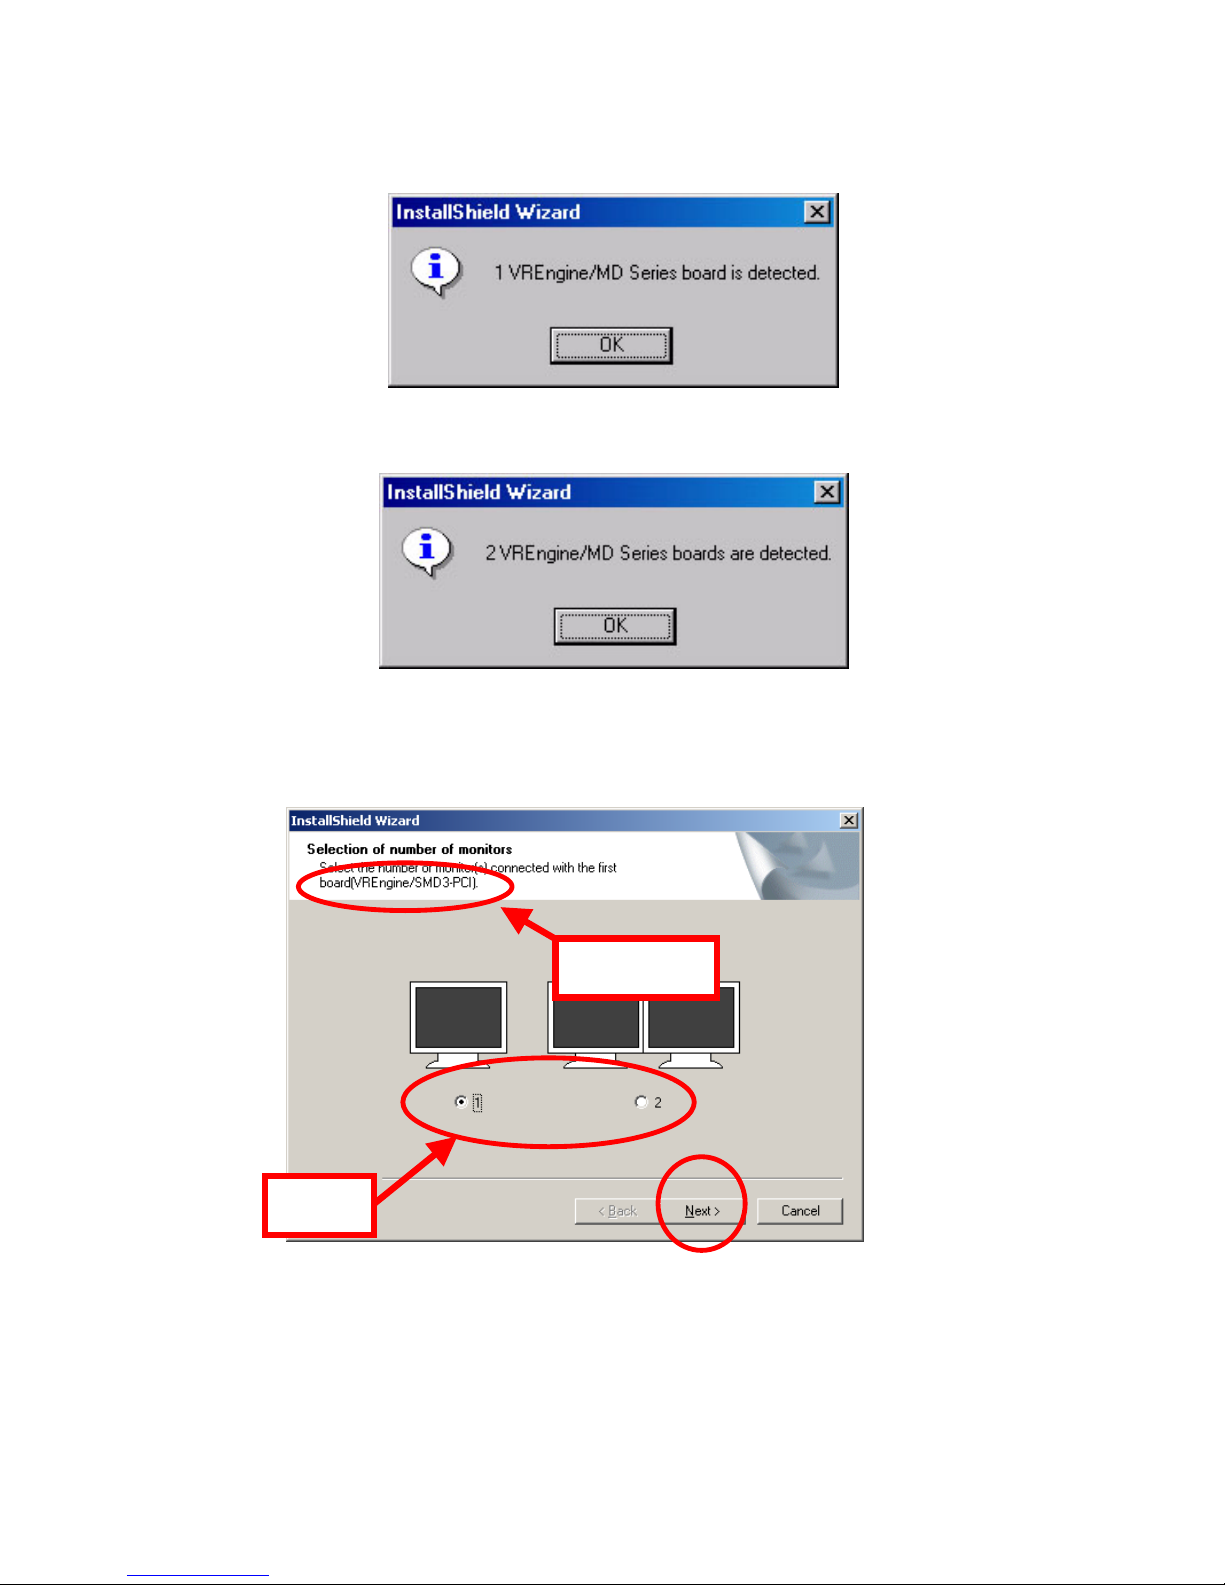
6. One of the following messages appears. Confirm the number of graphics cards
installed and click “OK.”
Figure 3.5 When a single card installed
Figure 3.6 When two cards installed
7. When the following screen appears, confirm the graphics card name and select
the number of displays connected to the card. Click “Next.”
Figure 3.7 Monitor Number Selection
Select
Confirm
TOTOKU 11
LV32P3 / LV52P3
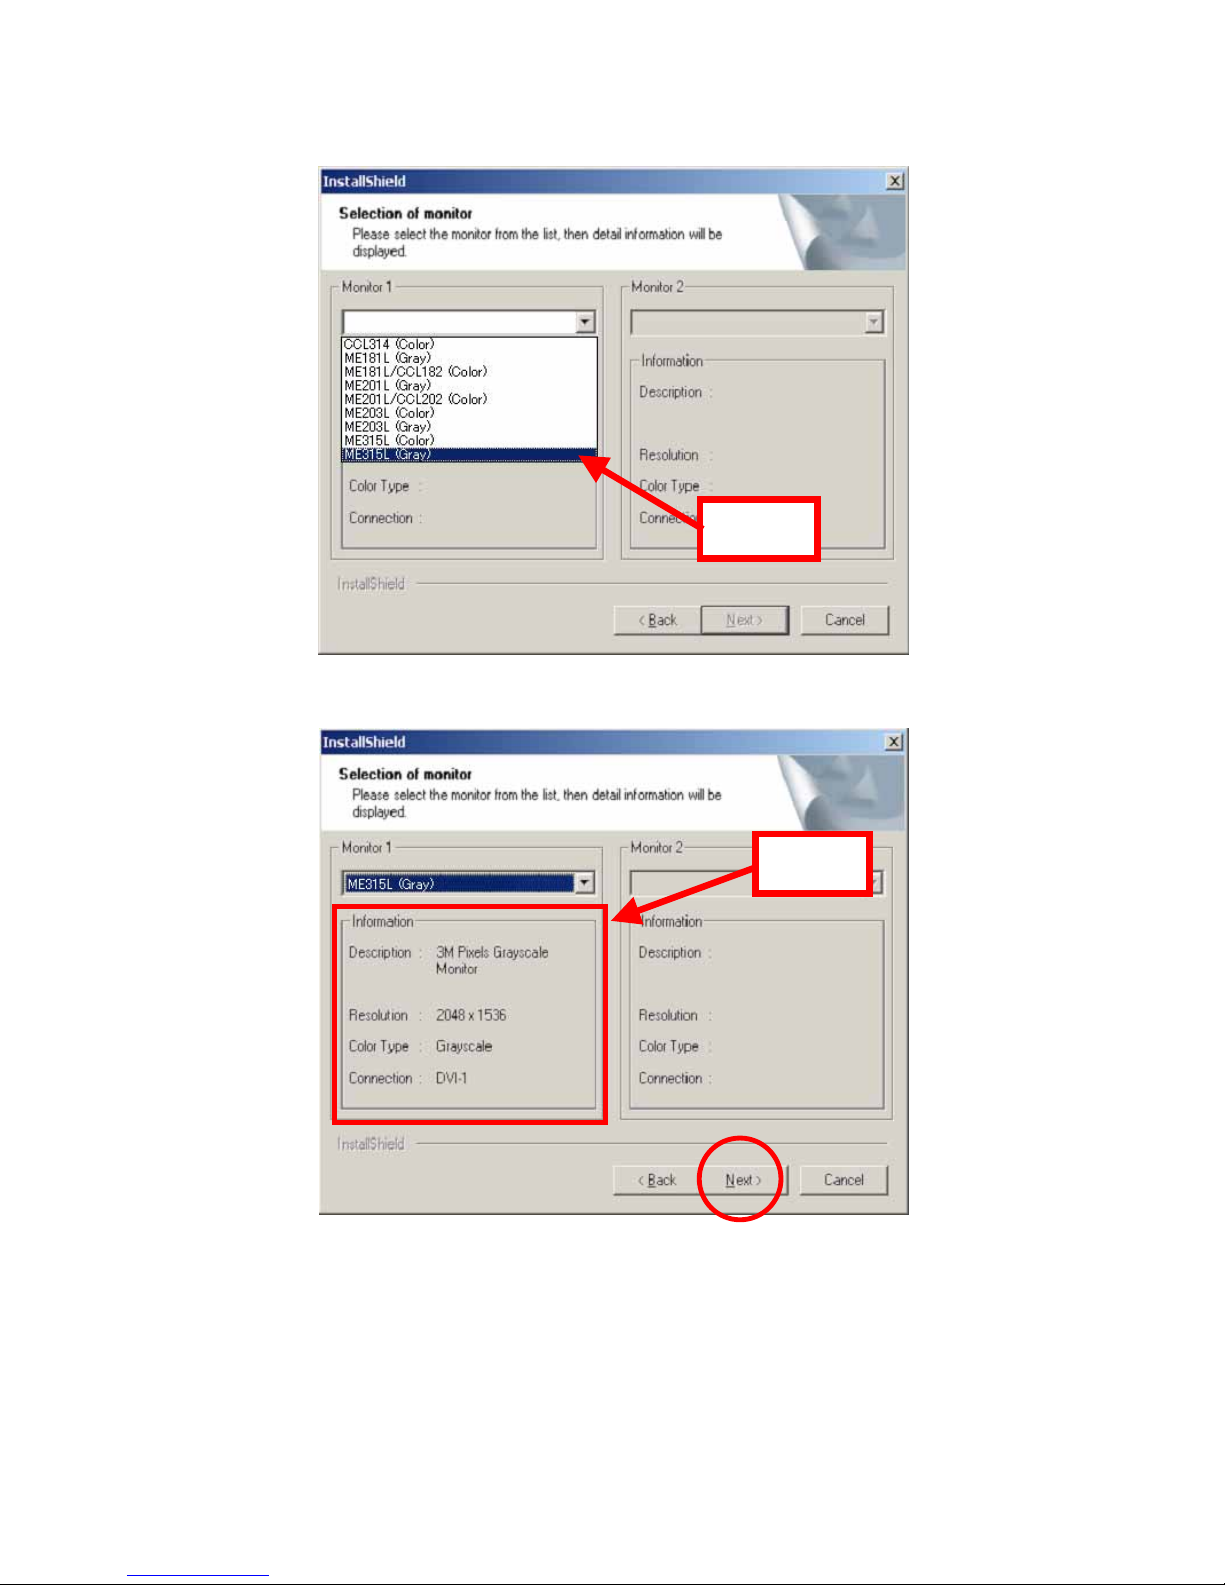
8. When the following screen appears, select a display model and click “Next.”
Select
Figure 3.8 Monitor Selection - 1
Figure 3.9 Monitor Selection - 2
Check
TOTOKU 12
LV32P3 / LV52P3
Note: When two displays are connected, select them separately.
Figure 3.10 Monitor Selection - 3
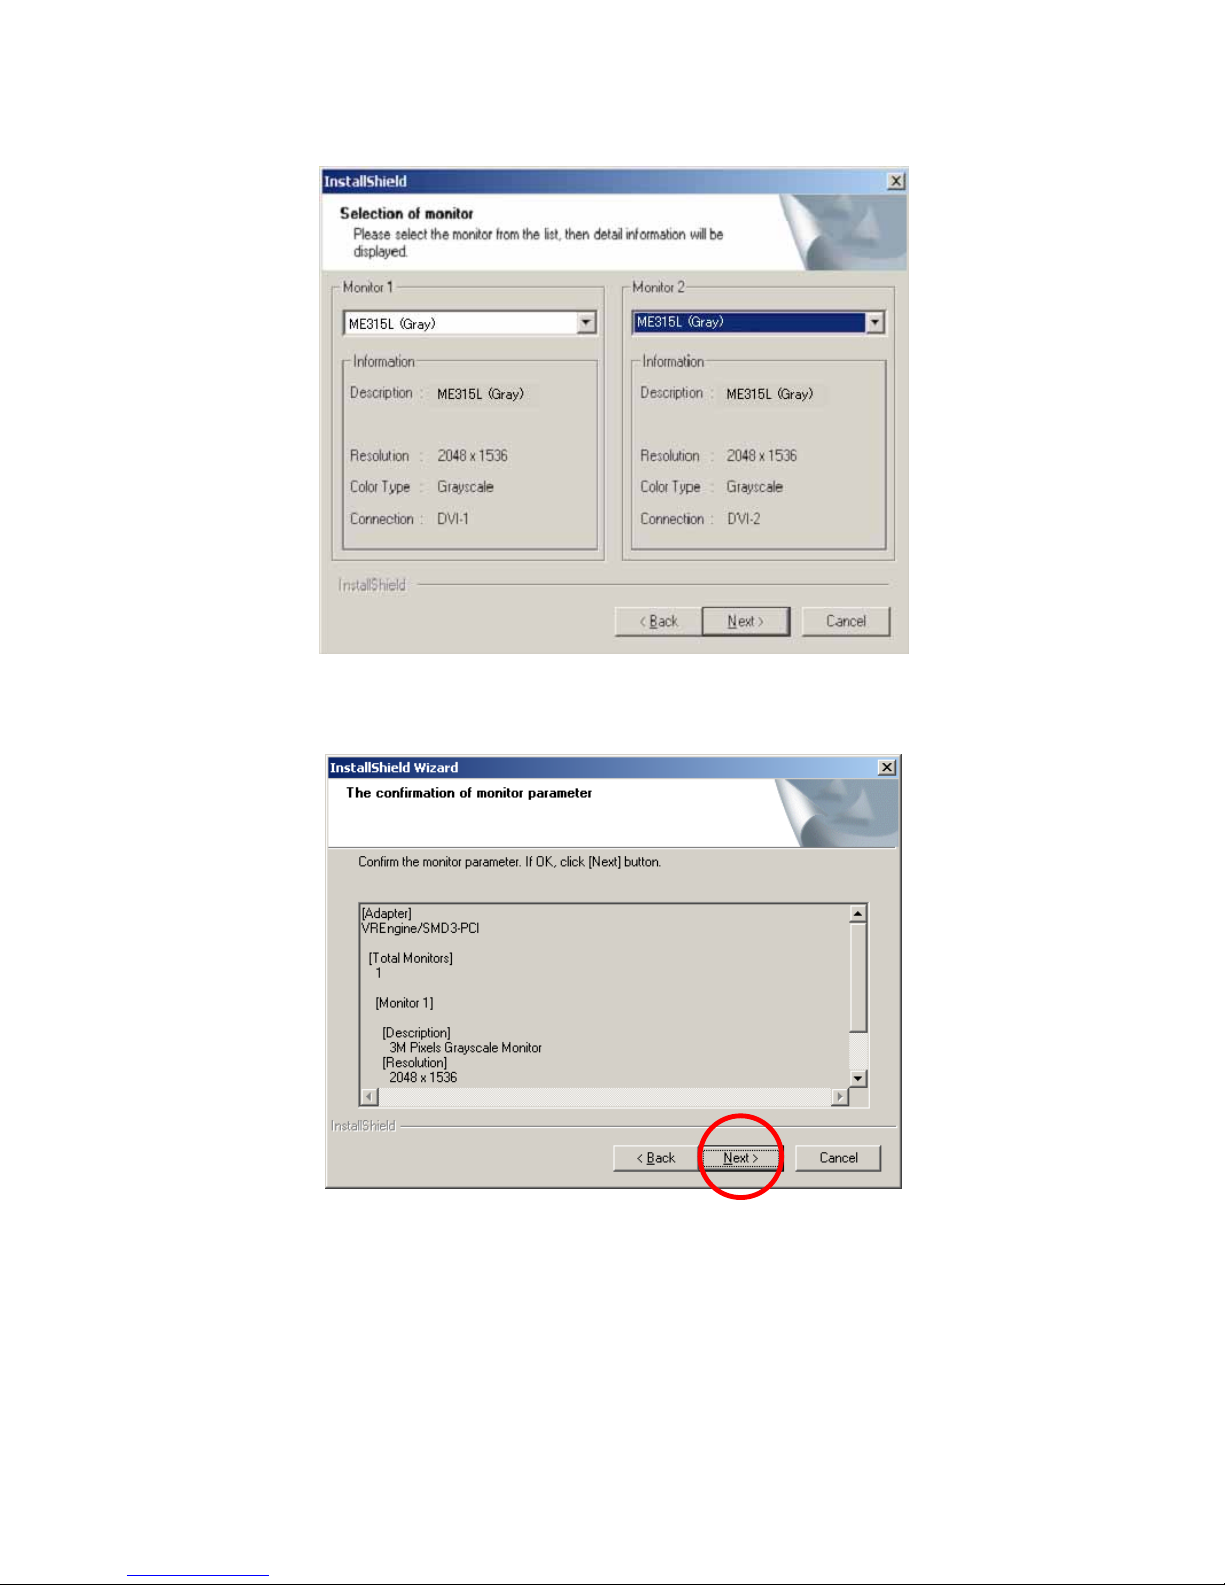
9. When the following screen appears, confirm the contents and click “Next.”
Figure 3.11 Display Parameter Confirmation
Note: When installing multiple cards, repeat steps 7 through 9 for each card.
TOTOKU 13
 Loading...