

Totoku LV33E1 User Manual

Graphics card LV33E1
User's Manual
グラフィックスカード LV33E1
取扱説明書


Graphics Card LV33E1
User's Manual
- 1 -
ENGLISH
- 2 -
ENGLISH
FCC Information
FCC (U.S. Federal Communications Commission)
This equipment has been tested and found to comply with the limits for a Class A digital
device, pursuant to part 15 of the FCC Rules. These limits are designed to provide
reasonable protection against harmful interference in a residential installation. This
equipment generates, uses, and can radiate radio frequency energy, and if not installed
and used in accordance with the instructions, may cause harmful interference to radio
communications. However, there is no guarantee that interference will not occur in a
particular installation. If this equipment does cause unacceptable interference to radio or
television reception, which can be determined by turning the equipment off and on, the
user is encouraged to try to correct the interference by one or more of the following
measures:
- Reorient or relocate the receiving antenna.
- Increase the separation between the equipment and receiver.
- Connect the equipment into an outlet on a circuit different from that to which the
receiver is connected.
- Consult your dealer or an experienced radio/TV technician for help.
FCC Warning
To assure continued FCC compliance, the user must use a grounded power supply cord
and the provided shielded video interface cable with bonded ferrite cores. Also, any
unauthorized changes or modications to this monitor would void the user's authority to
operate this device.
Responsible Party Located within the United States
Totoku North America, Inc.
1425 Greenway Dr., Ste. 565
Irving, TX 75038, U.S.A
Tel: (469)-442-0122
CE Certication
This device complies with the requirements of the EMC directive 89/336/
EEC "Electromagnetic Compatibility."
Warning
- When using at 240V in United States, supply must be from centertapped, 240V, single phase circuit.
- Concerning disposal of waste, please consult the dealer you have purchased this
device from.

Content
Introduction ............................................................................................................4
Package contents .................................................................................................4
Hardware requirements ........................................................................................4
Safety precautions ................................................................................................4
Hardware installation .............................................................................................5
Disconnecting the power cables ...........................................................................5
Inserting the graphics card....................................................................................5
Connecting the displays ........................................................................................6
Connecting the power cables................................................................................7
Software installation and setup ............................................................................8
Installing software .................................................................................................8
Conguring display settings ..................................................................................8
Q&A .......................................................................................................................11
Prior to installation ..............................................................................................11
Installation ...........................................................................................................11
Uninstallation ......................................................................................................12
Driver setup.........................................................................................................13
Miscellaneous .....................................................................................................13
Technical specication ........................................................................................14
Graphics card LV33E1 ........................................................................................14
Triple-head cable ................................................................................................15
Analog output resolution .....................................................................................15
Pin array for the analog mini D-sub 15-pin connector.........................................15
After-sale service..................................................................................................16
Repair .................................................................................................................16
Driver upgrade ....................................................................................................16
Disposing of the product .....................................................................................16
* Company names and product names are brand names or registered brand names.
- 3 -
ENGLISH

- 4 -
ENGLISH
Introduction
This manual provides step-by-step instructions on how to use the graphics card LV33E1
along with supported TOTOKU LCD's.
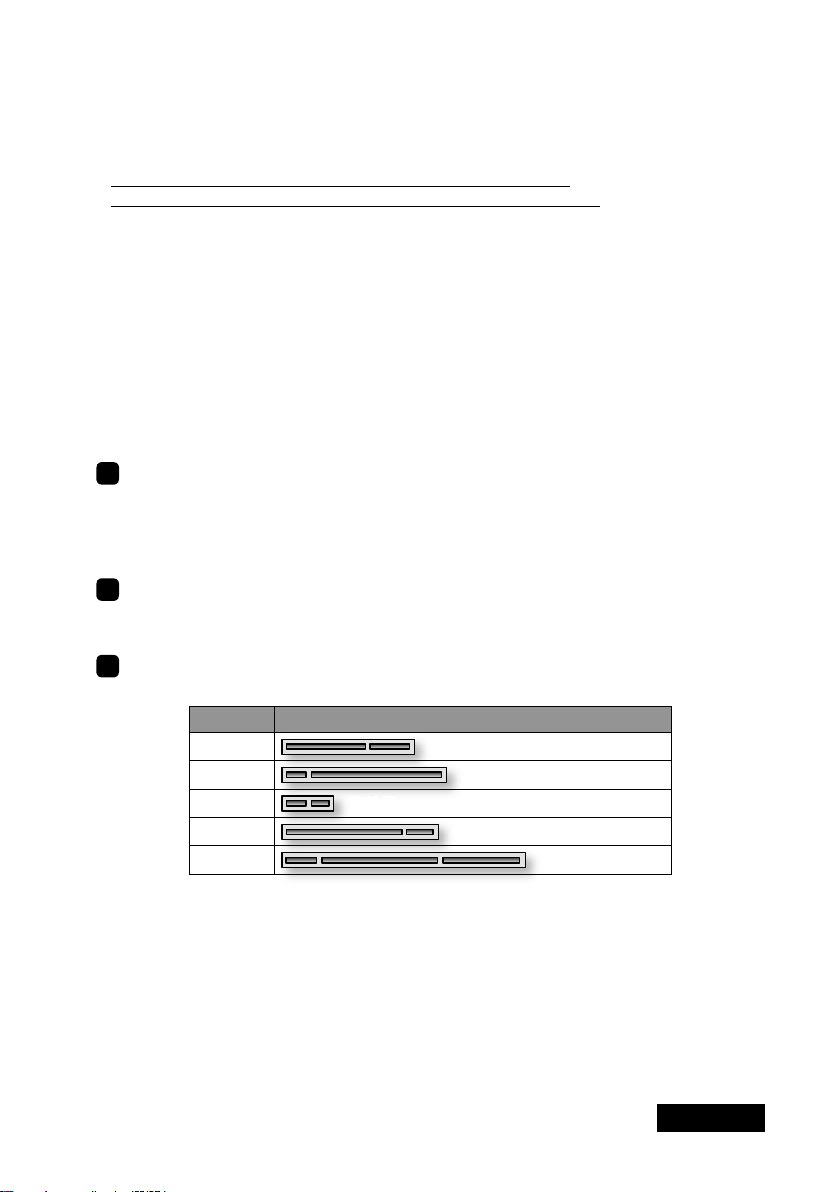
Package contents
Conrm that the package contains the following items:
Graphics card ...........................................1
Triple-head cable ......................................1
(With a DVI-Dsub adapter attached to one of the heads)
Low-prole bracket ...................................1
Washer .....................................................1
Washer securing screw ............................1
Screw driver ..............................................1
Driver CD ..................................................1
User's Manual ...........................................1
Hardware requirements
● PC/AT compatible computer with a processor equivalent to or higher than Intel Pentium
4 or AMD Athlon (This card cannot be used on a server computer.)
● PCI Express x16 compatible slot
● Microsoft Windows XP
● Minimum system memory: 256MB (Recommended: 512MB or more)
● Minimum hard disk space: 20MB
● CD-ROM Drive
● TOTOKU LCD Display(s) (ME/CCL series)
Safety precautions
Please take the following precautions for your safety in using this product:
● Do not try to repair or alter the product. It could cause re, an electric shock, and/or
other injuries.
● If any abnormality is detected, such as odor, noise, and overheat, turn off the power
and unplug it immediately. Otherwise, it could cause re and/or an electric shock.
● Do not touch the product with wet hands. It could cause an electric shock.
● This product is easily damaged by static electricity. Be careful when installing, storing,
and handling.
● Do not touch the electric terminals directly.
● Keep this product away from magnetized places and objects.
● Do not leave this product on the oor. If you accidentally step on it, you could get
injured or it could damage the product.
Hardware installation
Notices
Please read the following notices before installing the graphics card:
● Make sure that the operating system is installed properly.
● Uninstall any currently installed display drivers such as Pivot.
● Log in as a user with administrative privileges to install the driver.
● Remove all currently installed old graphics cards.
● Disable the on-board graphic controller on the computer's motherboard if any. Contact
the computer manufacturer on how to disable it.
● Proper operation of this graphics card is not guaranteed when used with other graphics
cards for multi-display. If an error occurs, see Q&A in this manual.
Disconnecting the power cables
Disconnect power cables of the computer and other peripheral devices from the wall outlet.
Inserting the graphics card
1
Remove the computer cover. (See the user manual for your computer.)
Caution: ESD (Electrostatic Discharge) Breakdown
Static electricity could damage delicate components of the computer and the graphics
card. Discharge static electricity prior to installation, for example, by touching metal
parts of the computer. Do not touch electric parts or terminals.
2
Remove any currently installed graphics card if any or remove a bracket from the slot.
Caution: Burn
Internal parts may be hot if the computer has been turned on previously.
3
Insert the graphics card in a
evenly. Make sure it does not touch any internal parts of the computer.
LV33E1 Slot Shape
Yes
PCI Express x16
AGP
PCI Express x1
slot (see the table below) rmly and
PCI Express x16
PCI 32bit
PCI 64bit
Caution: Ventilation
Ensure the proper airow for cooling the graphics card, for example, by leaving the
adjacent slot unoccupied. Keep the computer's internal cables away from the cooling
fan; keep anything that could get caught in the fan away. (E.g., labels are easy to
peel off when heated.)
Important: If the computer is used without the fan working, it could cause a failure.
- 5 -
ENGLISH
- 6 -
ENGLISH
4
Secure the bracket on LV33E1 to the computer frame.
Note: When the bracket is not properly secured, the DVI cable cannot be inserted all
the way in. If necessary, use the supplied low-prole bracket.
5
Put the cover back on the computer.
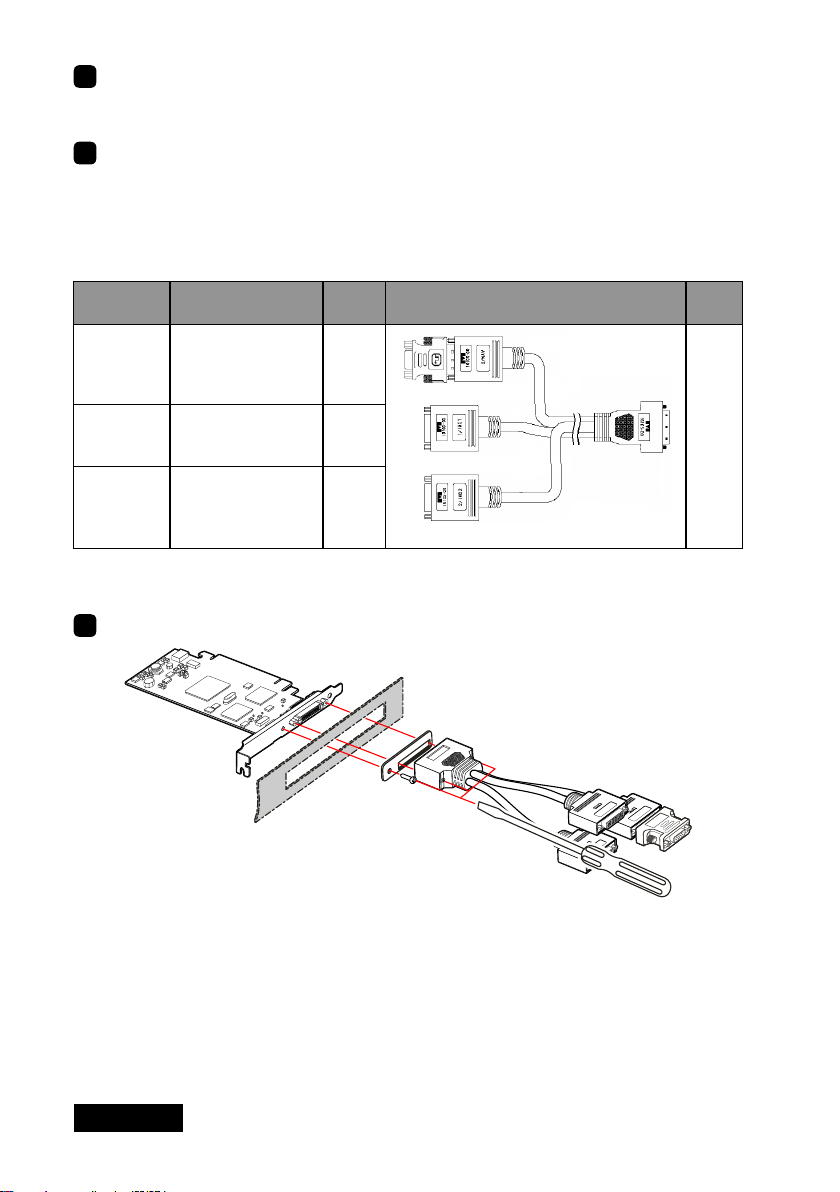
Connecting the displays
Follow the instructions below to connect LV33E1 and three displays using the supplied
triple-head cable.
Connector Destination Labeled Triple-head cable
Analog mini
D-sub
(DVI-Dsub
adapter)
Color navigation
display
3/NAV
Con-
nector
DVI 1
DVI 2
First high-resolution
display
Second highresolution display
1/IMG1
2/IMG2
KX-20
Note: The boot screen appears only on the color navigation display that is connected to
the analog mini D-sub connector.
1
Connect the KX-20 connector of the triple-head cable to LV33E1 as follows:
1. Temporarily secure the washer to the bracket on LV33E1 with the washer securing
screw using the screw driver.
2. Connect the KX-20 connector of the triple-head cable rmly to the bracket with the
washer in between.
3. Fasten the 2 screws on the KX-20 connector using the supplied screw driver.
4. Fasten the washer securing screw using the screw driver.

2
Connect the other ends of the triple-head cable to three displays as follows:
• Connect an analog cable between a color navigation display and the DVI-Dsub
adapter that is attached to one of the heads of the triple-head cable and fasten the
screws on the connectors.
• Connect DVI cables between high-resolution displays and the other two DVI heads
of the triple-head cable and fasten the screws on the connectors.
Caution
Do not connect/disconnect the analog and DVI cables while the display and the
computer are turned on. It could cause a graphics card failure.
Connecting the power cables
Plug all power cables of the computer, the displays and peripherals to the wall outlets.
- 7 -
ENGLISH
- 8 -
ENGLISH
Software installation and setup
Follow the instructions below for software installation and display setup. See Q&A if any
trouble occurs.
Installing software
1
Turn on the displays and start up the computer in VGA mode.
2
Conrm that the VGA boot screen, followed by the Windows startup screen, appears
on the navigation display.
3
Log into Windows as a user with administrative privileges.
4
When the Found New Hardware Wizard starts up, one of the following messages
appears. Cancel it properly according to the message.
• Welcome to the Found New Hardware Wizard: If this message appears, click "Cancel."
• Hardware Installation: If this message appears, click "Stop Installation" and "Finish."
5
Insert the driver CD in the CD-ROM drive on the computer.
6
Run DriverCD/Setup.exe on the CD and follow the on-screen instructions to install the
display driver. One of the following messages may appear in the course of installation:
• Digital Signature Not Found: If this message appears, click "Yes."
• Hardware Installation: If this message appears, click "Continue Anyway."
Note: The display may black out during installation. Please wait for a moment.
7
Restart the computer.
Conguring display settings
Follow the instructions below after restarting the computer.
1
Log into Windows as a user with administrative privileges.
2
Conrm that the Matrox PowerDesk icon is added to the taskbar.
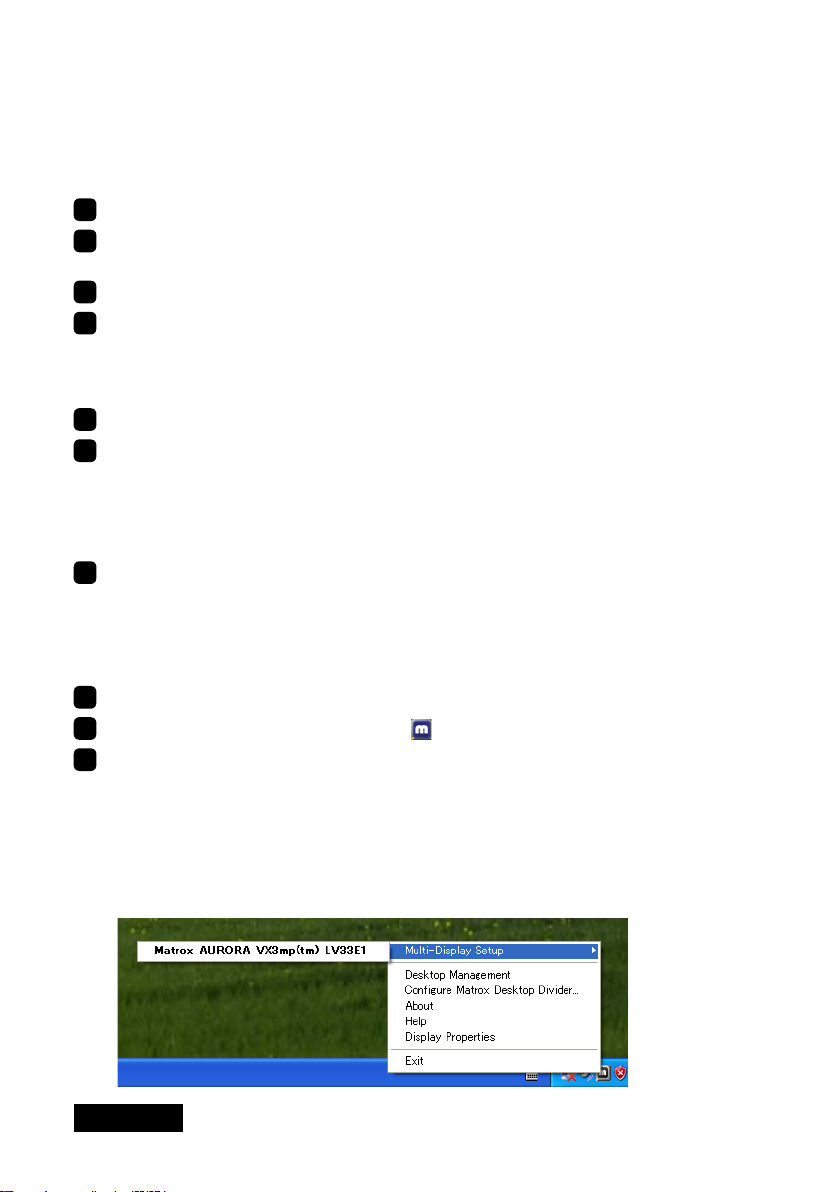
3
Set display resolution, color, and the multi-display setup by following the instructions
below.
1) Click the Matrox PowerDesk icon on the taskbar.
Note: The display driver includes a software to congure display settings.
Therefore, the Display Properties dialog box will not be used to set up LV33E1.
2) A pop-up menu appears. Select Multi-Display Setup>Matrox AURORA VX3mpTM
LV33E1
.
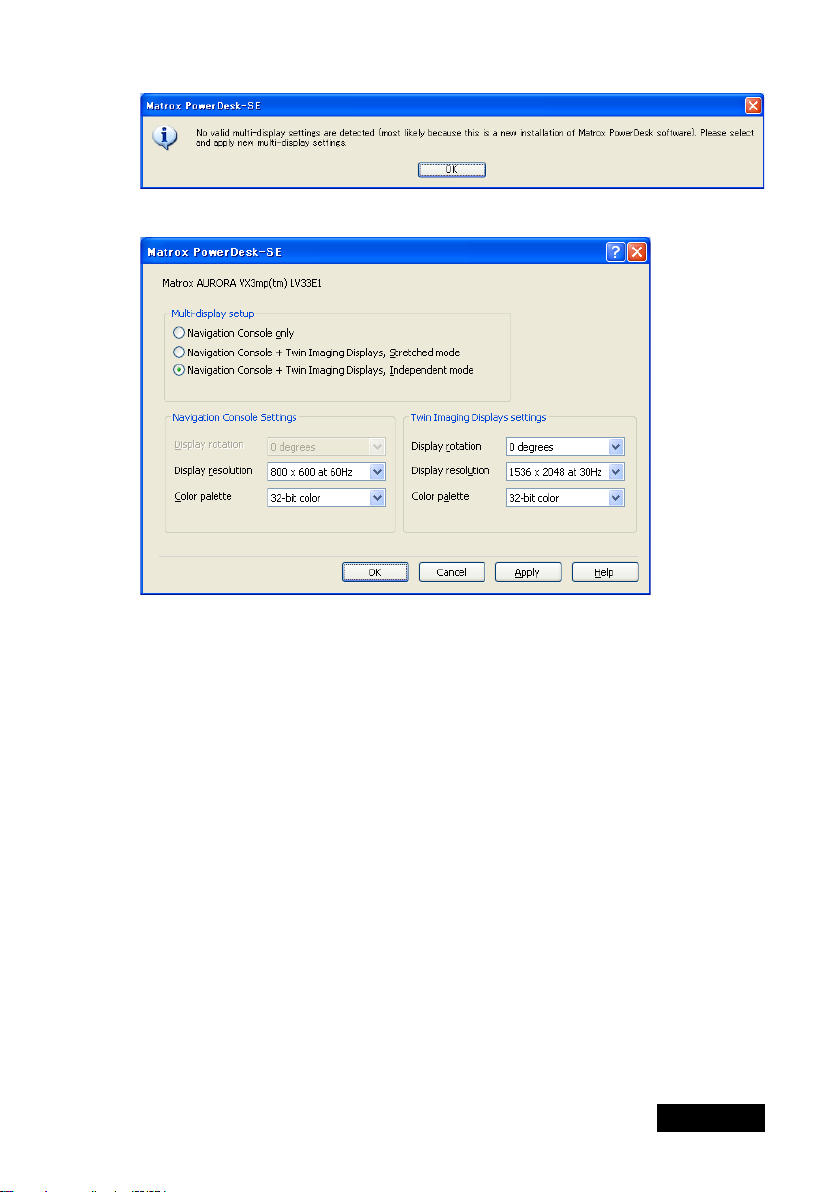
3) If the following message appears, click "OK."
4) The Matrox PowerDesk-SE dialog box appears. Set the dialog box as follows:
1. Select a multi-display setup in the Multi-display setup section.
Note:
• In stretched mode, two displays that are connected to the same are combined
into one desktop.
• In independent mode, two displays are independent of each other.
- 9 -
ENGLISH
 Loading...