

Totoku LV32P5-M User Manual

Graphics card LV32P5-M
User's Manual
グラフィックスカード LV32P5-M
取扱説明書


ENGLISH
- 1 -
Graphics Card LV32P5-M
User's Manual

- 2 -
ENGLISH
FCC Information
FCC (U.S. Federal Communications Commission)
This equipment has been tested and found to comply with the limits for a Class A digital
device, pursuant to part 15 of the FCC Rules. These limits are designed to provide
reasonable protection against harmful interference in a residential installation. This
equipment generates, uses, and can radiate radio frequency energy, and if not installed
and used in accordance with the instructions, may cause harmful interference to radio
communications. However, there is no guarantee that interference will not occur in a
particular installation. If this equipment does cause unacceptable interference to radio or
television reception, which can be determined by turning the equipment off and on, the
user is encouraged to try to correct the interference by one or more of the following
measures:
- Reorient or relocate the receiving antenna.
- Increase the separation between the equipment and receiver.
- Connect the equipment into an outlet on a circuit different from that to which the
receiver is connected.
- Consult your dealer or an experienced radio/TV technician for help.
FCC Warning
To assure continued FCC compliance, the user must use a grounded power supply cord
and the provided shielded video interface cable with bonded ferrite cores. Also, any
unauthorized changes or modications to this monitor would void the user's authority to
operate this device.
Responsible Party Located within the United States
U. S. ELECTRONICS, INC.
1324 Colorado Ave.S,
Minneapolis, MN 55416, U.S.A
Tel: (952)-285-5720
CE Certication
This device complies with the requirements of the EMC directive 89/336/
EEC "Electromagnetic Compatibility."
Warning
- When using at 240V in United States, supply must be from centertapped, 240V, single phase circuit.
- Concerning disposal of waste, please consult the dealer you have purchased this
device from.

ENGLISH
- 3 -
Content
Introduction ............................................................................................................4
Package contents .................................................................................................4
Hardware requirements ........................................................................................4
Safety precautions ................................................................................................4
Hardware installation .............................................................................................5
Disconnecting the power cables ...........................................................................5
Inserting the graphics card....................................................................................5
Connecting the displays ........................................................................................6
Connecting the power cables................................................................................7
Software installation and setup ............................................................................8
Installing software .................................................................................................8
Conguring display settings ..................................................................................8
Software uninstallation ........................................................................................11
Q&A .......................................................................................................................12
Prior to installation ..............................................................................................12
Installation ...........................................................................................................12
Uninstallation ......................................................................................................14
Driver setup.........................................................................................................14
Miscellaneous .....................................................................................................14
Technical specication ........................................................................................16
After-sale service..................................................................................................17
Repair .................................................................................................................17
Driver upgrade ....................................................................................................17
Disposing of the product .....................................................................................17
* Company names and product names are brand names or registered brand names.
- 4 -
ENGLISH
Introduction
This manual provides step-by-step instructions on how to use the graphics card
LV32P5-M along with supported TOTOKU LCD's.
Package contents
Conrm that the package contains the following items:
Graphics card ...........................................1
Triple-head cable ......................................1
Low-prole bracket ...................................1
Driver CD ..................................................1
User's Manual ...........................................1
Hardware requirements
● PC/AT compatible computer with a processor equivalent to or higher than Intel Pentium
4 or AMD Athlon (This card cannot be used on a server computer.)
● PCI slot 32bit/33MHz
● Microsoft Windows XP/Vista
● Minimum system memory: 512MB (Recommended: 1024MB or more)
● Minimum hard disk space: 40MB
● CD-ROM Drive
● TOTOKU LCD Display(s) (ME/CCL series)
Pixels Display model
2MP
ME201L, ME213L, ME251i, ME253i2, MS21i2,
CCL202, CCL204, CCL206, CCL208, CCL212, CCL250i,
CCL252i2,
3MP
ME315L plus, ME351i, ME355i2, MS31i2,
CCL350i, CCL352i2, CCL354i2
Safety precautions
Please take the following precautions for your safety in using this product:
● Do not try to repair or alter the product. It could cause re, an electric shock, and/or
other injuries.
● If any abnormality is detected, such as odor, noise, and overheat, turn off the power
and unplug it immediately. Otherwise, it could cause re and/or an electric shock.
● Do not touch the product with wet hands. It could cause an electric shock.
● This product is easily damaged by static electricity. Be careful when installing, storing,
and handling.
● Do not touch the electric terminals directly.
● Keep this product away from magnetized places and objects.
● Do not leave this product on the oor. If you accidentally step on it, you could get
injured or it could damage the product.
ENGLISH
- 5 -
Hardware installation
Notices
Please read the following notices before installing the graphics card:
● Make sure that the operating system is installed properly.
● Uninstall any currently installed display drivers such as Pivot.
● Log in as a user with administrative privileges to install the driver.
● Remove all currently installed old graphics cards.
● Disable the on-board graphic controller on the computer's motherboard if any. Contact
the computer manufacturer on how to disable it.
● Proper operation of this graphics card is not guaranteed when used with other graphics
cards for multi-display. If an error occurs, see Q&A in this manual.
Disconnecting the power cables
Disconnect power cables of the computer and other peripheral devices from the wall outlet.
Inserting the graphics card
1
Remove the computer cover. (See the user manual for your computer.)
Caution: ESD (Electrostatic Discharge) Breakdown
Static electricity could damage delicate components of the computer and the graphics
card. Discharge static electricity prior to installation, for example, by touching metal
parts of the computer. Do not touch electric parts or terminals.
2
Remove any currently installed graphics card if any or remove a bracket from the slot.
Caution: Burn
Internal parts may be hot if the computer has been turned on previously.
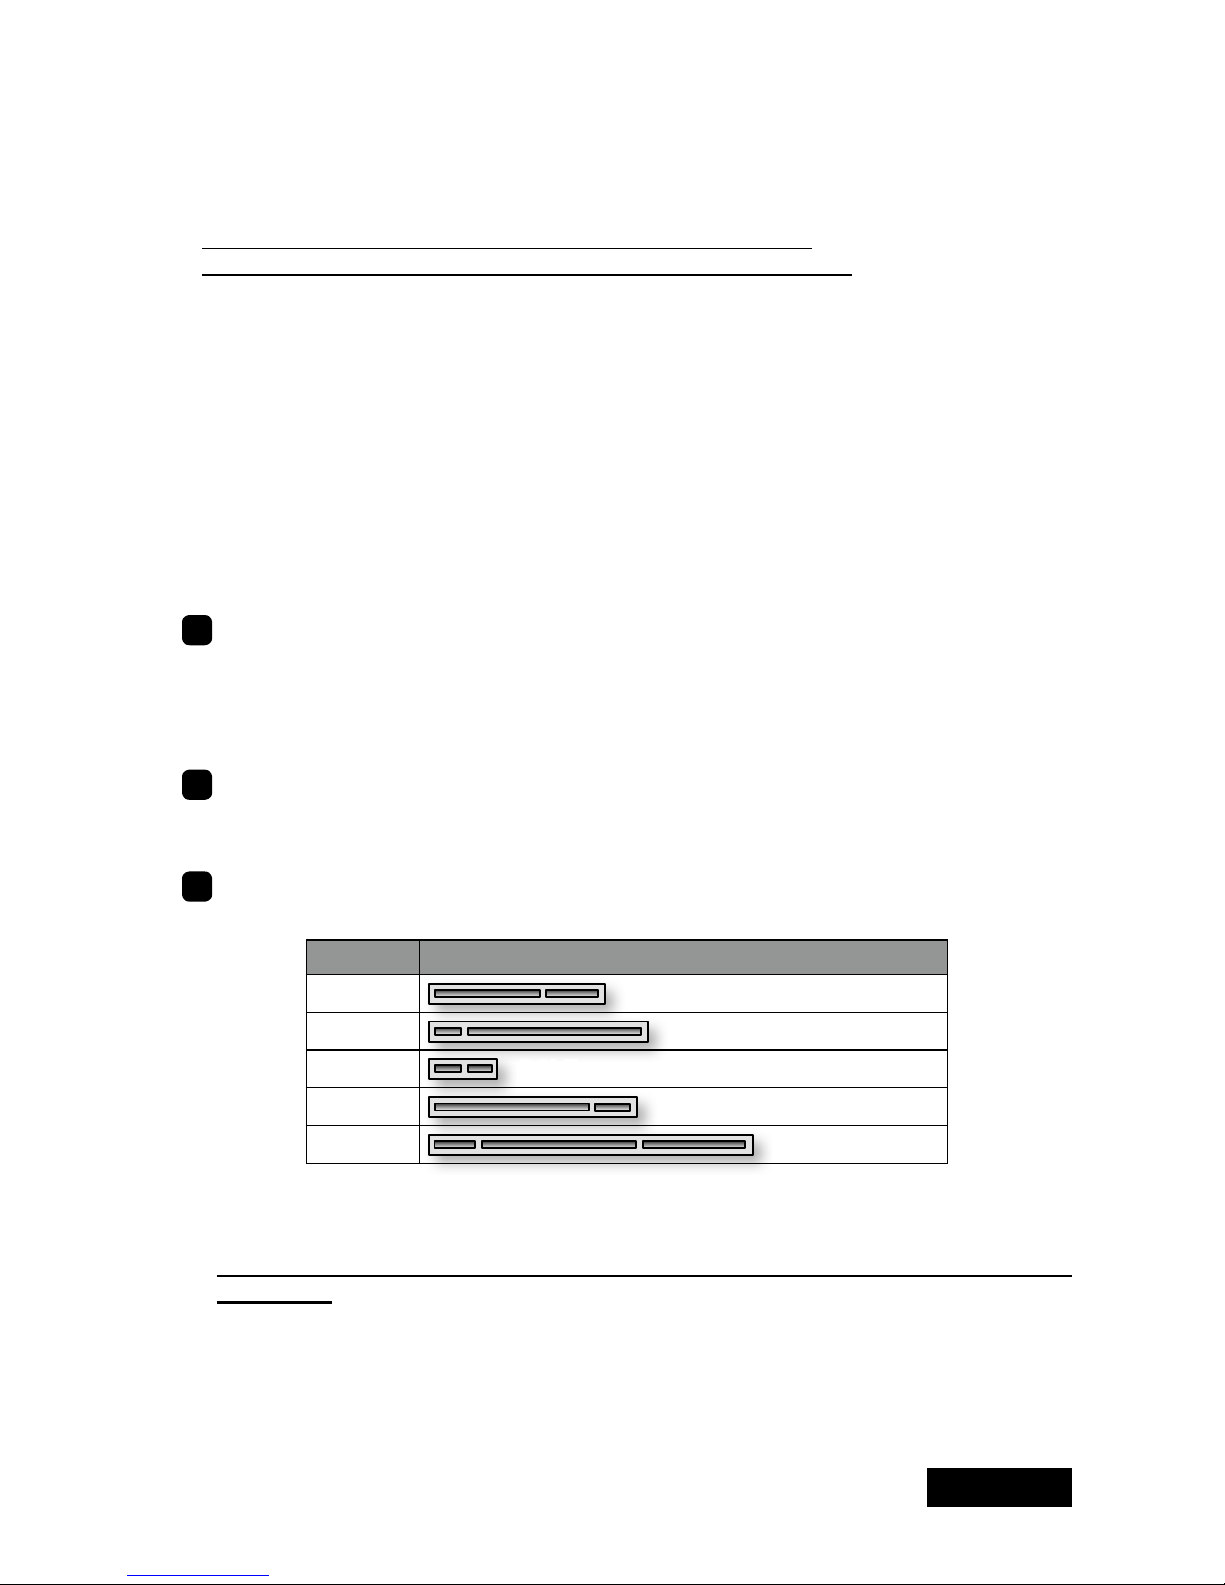
3
Insert the graphics card in a
PCI
slot (see the table below) rmly and evenly. Make
sure it does not touch any internal parts of the computer.
LV32P5-M Slot Shape
No
AGP
No
PCI Express x16
No
PCI Express x1
Yes
PCI 32bit
Yes
PCI 64bit
Caution: Ventilation
Ensure the proper airow for cooling the graphics card.
Install this graphics card in the slot where ambient temperatures are 55 degrees
C or lower.
Slot: Leave the adjacent slot or slot that is close to heat producing components unoccupied if multiple slots are available to release heat around the card sufciently.
Inadequate heat release could shorten the product lifetime or cause some troubles.
Fan: Keep the computer’s internal cables away from the cooling fan, or keep things
away that could get caught in the fan. (E.g., labels are easy to come off when

- 6 -
ENGLISH
heated.) If the computer is used without the fan working, it could cause a failure.
Dust: Dust inside the computer could restrict ventilation to cool off the card and result
in failure.
Important: Our warranty may not apply to the damages arising from those facts.
4
Secure the bracket on LV32P5-M to the computer frame.
Note: When the bracket is not properly secured, the DVI cable cannot be inserted all
the way in. If necessary, use the supplied low-prole bracket.
5
When installing two LV32P5-M cards, repeat the above steps until all cards are
installed.
Note: There is a limit to the number of the cards one computer can take, which
vary according to the types of cards, operating systems, and display drivers. Do not
exceed the number limit.
6
Put the cover back on the computer.
Connecting the displays
When using LV32P5-M on i2 model LCDs (CCLxxxi2, MExxxi2, MSxxis) ...
i2 model LCDs are loaded with two sets of Extended Display Identication Data (EDID).
EDID is a data structure stored within a display describing its own information including
supporting resolution. Both landscape and portrait display modes (resolutions) are
supported but they need to be manually switched. By default, it is set to portrait. See the
display user manual for instructions.
Check the table below to nd out in what orientation the i2 model LCDs are in the table
below.
Note
The DVI cable needs to be disconnected from the display when checking the EDID.
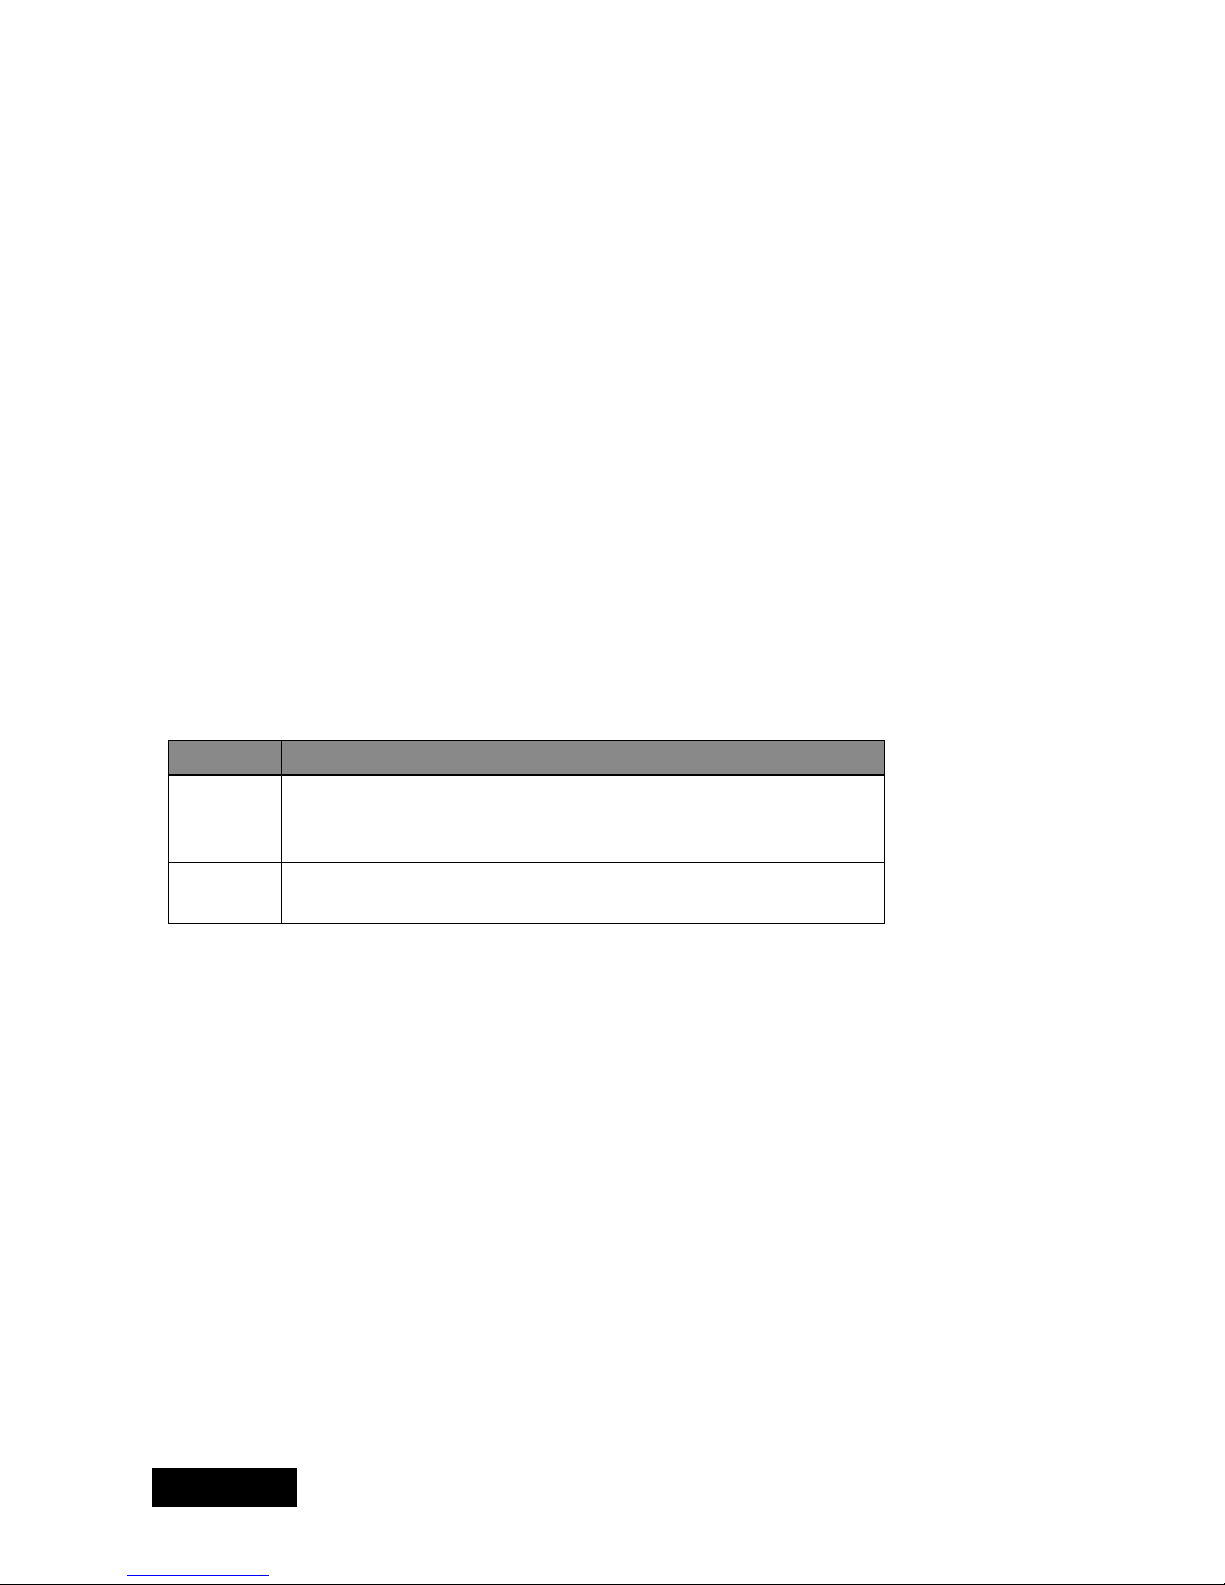
Display mode LED behavior upon turn-on
Portrait
(Default)
The LED blinks twice.
Landscape
The LED blinks three times.
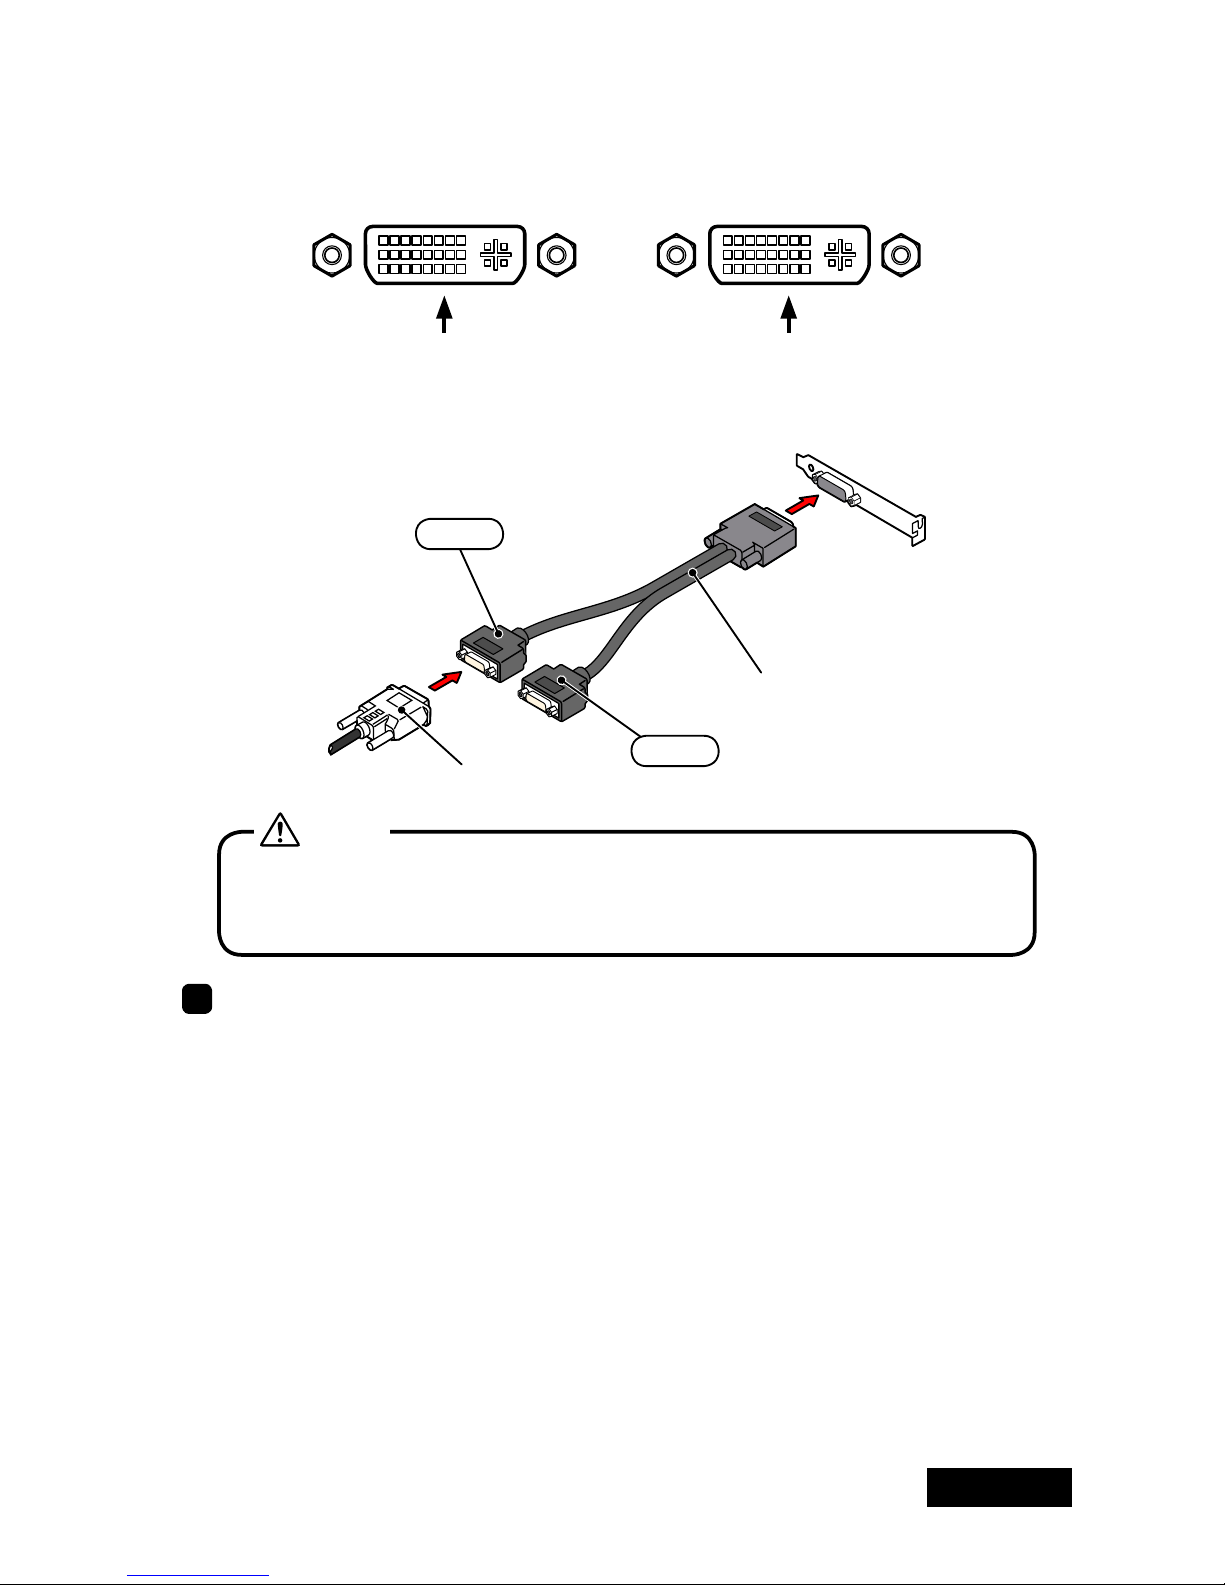
1
Connect the supplied DVI branch cable to LFH60 on the card and tighten the screws
on the connector.
Do not force the connector into the card at an angle. It could damage the
connector pins or the mold.
Caution
Connect the DVI cable supplied with the display between the branch cable's DVI
connector and the display and tighten the screws.
ENGLISH
- 7 -
Attention: This branch cable has two DVI connectors, #1 (1/3) and #2 (2/4). Make
sure to connect the rst display to "#1 (1/3)."
Graphics card connectors (female):
DVI Connector #2
Connect the second display
(on the right)
DVI Connector #1
Connect the rst display
(on the left)
DVI Branch Cable
DVI Connector of Display 1
LFH60
connector
DVI branch cable
2/4
1/3
Do not connect/disconnect the DVI cable while the display is turned on. It could
cause a graphics card failure. Connect/disconnect the DVI cables with the
display disconnected.
Caution
2
To use two displays, connect the other display as well.
Connecting the power cables
Connect all power cables to the wall outlets, including the computer, the display, and
other peripheral devices.
- 8 -
ENGLISH
Software installation and setup
Follow the instructions below for software installation and display setup. See Q&A if any
trouble occurs.
Installing software
1
Turn on the displays and start up the computer in VGA mode.
2
Log into Windows as a user with administrative privileges.
3
When the Found New Hardware Wizard starts up, one of the following messages
appears. Cancel it properly according to the message.
• Welcome to the Found New Hardware Wizard: If this message appears, click "Cancel."
• Hardware Installation: If this message appears, click "Stop Installation" and "Finish."
5
Insert the driver CD in the CD-ROM drive on the computer.
6
Double-click Setup.exe in the appropriate directory below included in the CD-ROM.
XP/Vista 32-bit: DriverCD/VISTAx32bit
XP/Vista 64-bit: DriverCD/VISTAx64bit
One of the following messages may appear in the course of installation:
• Digital Signature Not Found: If this message appears, click "Yes."
• Hardware Installation: If this message appears, click "Continue Anyway."
Note: The display may black out during installation. Please wait for a moment.
7
Restart the computer.
Conguring display settings
Follow the instructions below after restarting the computer.
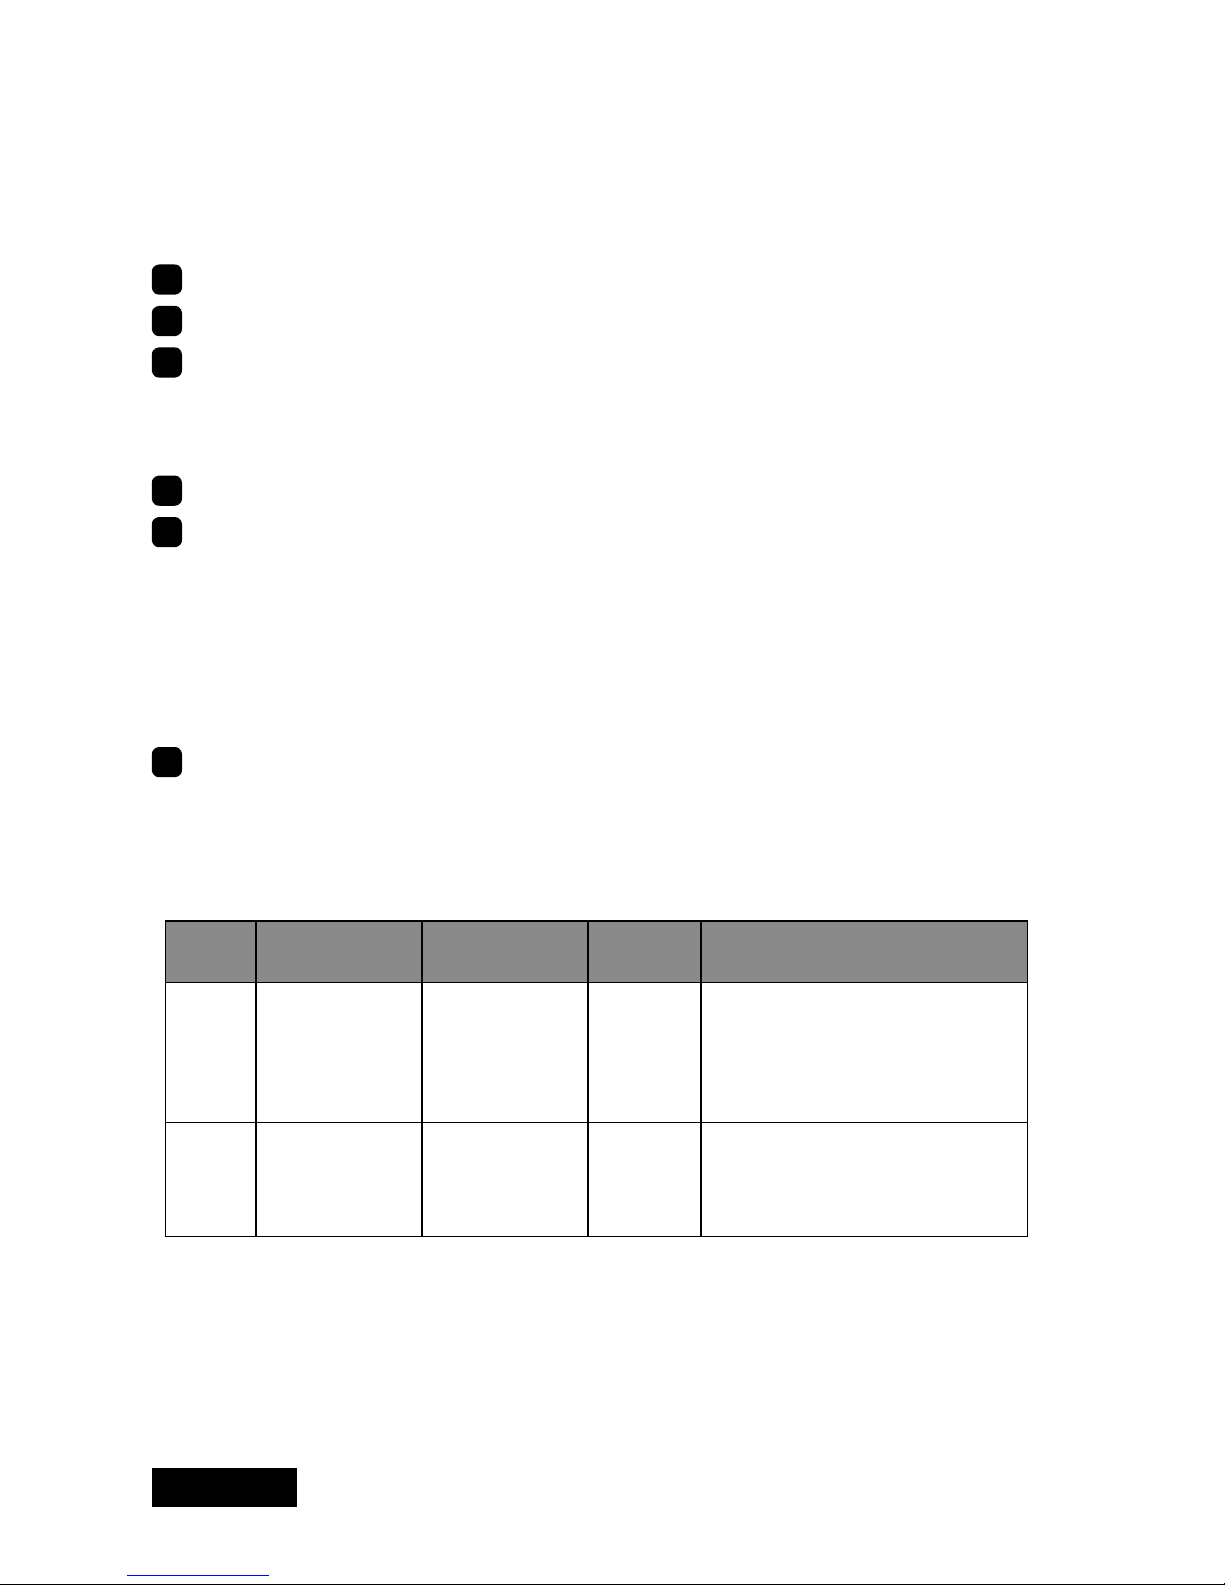
Pixel Display mode Resolution
Refresh
rate (Hz)
Display model
2MP
Landscape
Portrait
1200 x 1600
1600 x 1200
60
ME201L, ME201L/r, ME213L,
ME251i, ME253i2*, MS21i2*,
CCL202, CCL206, CCL208,
CCL212, CCL212/r, CCL250i,
CCL252i2*
3MP
Landscape
Portrait
1536 x 2048
2048 x 1536
30
ME315L plus, ME351i,
ME355i2*, MS31i2*,
CCL350i, CCL352i2*,
CCL354i2*
Note:
* Display modes for i2 models depend on the display orientation setting within the
display. See the display user manual on how to change orientation.
ENGLISH
- 9 -
1
Log into Windows as a user with administrative privileges.
2
Conrm that the Matrox PowerDesk icon is added to the taskbar.
3
Set display resolution, color, and the multi-display setup by following the instructions
below.
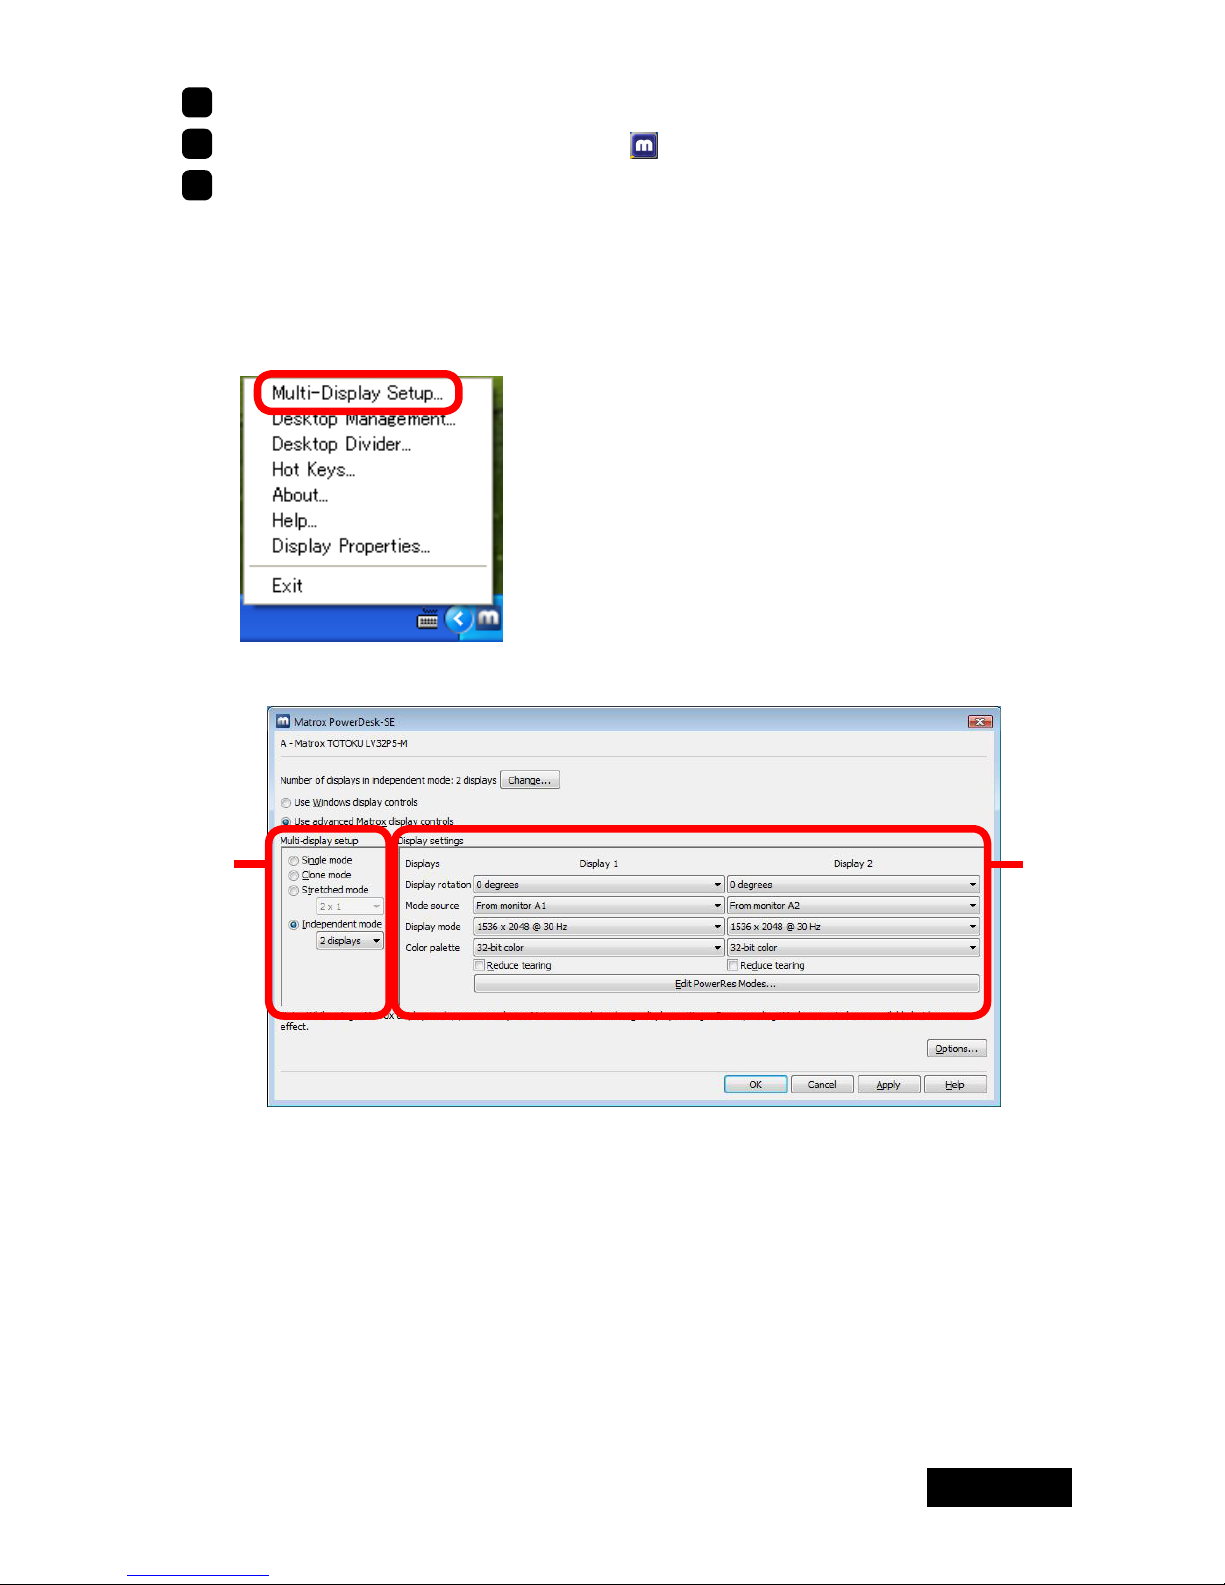
1) Click the Matrox PowerDesk icon on the taskbar.
Note: The display driver includes a software to congure display settings.
Therefore, the Display Properties dialog box will not be used to set up LV33E1.
2) A pop-up menu appears. Select Multi-Display Setup.
3) The Matrox PowerDesk-SE dialog box appears. Set the dialog box as follows:
②
①
- 10 -
ENGLISH
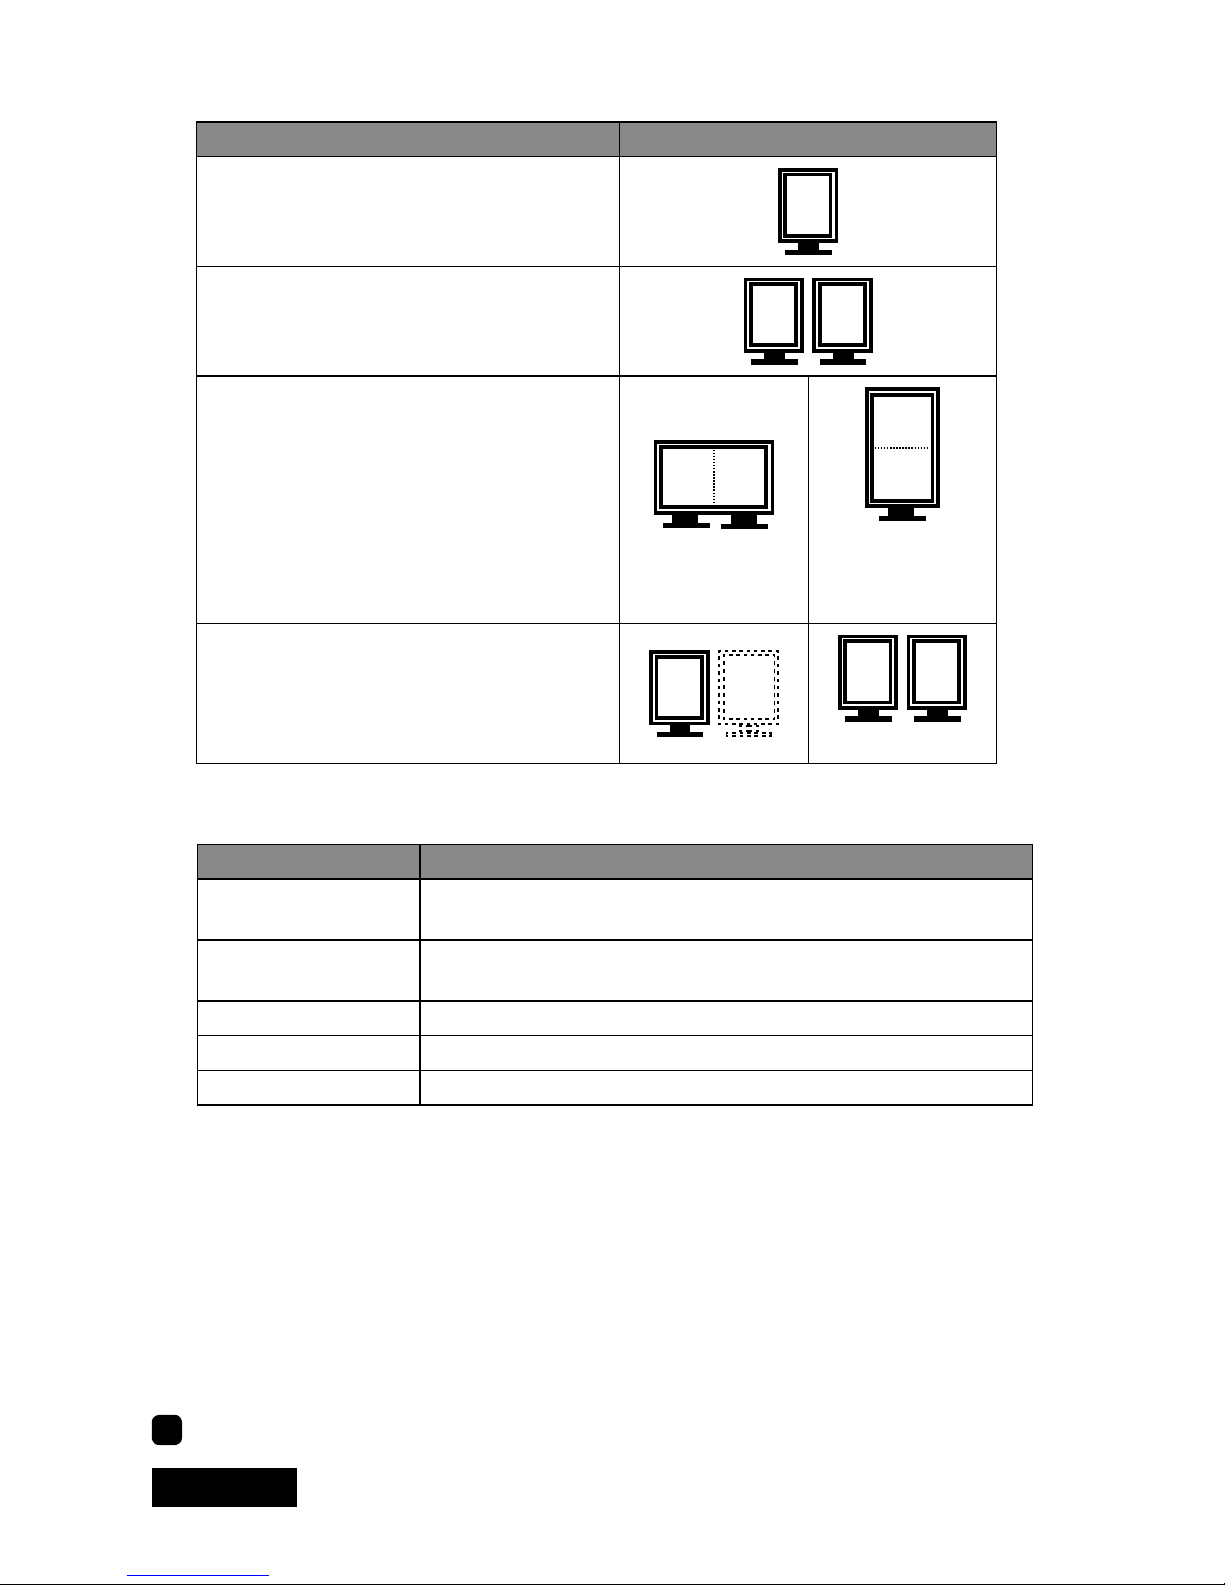
1. Select a multi-display setup in the Multi-display setup section.
Multi-display mode Display conguration
Single mode:
Single-display setup
1
Clone mode:
Two displays on the same card display
the same image respectively.
1
1
Stretched mode:
Two displays on the same card are
combined into one desktop.
1
2 x 1
1
1 x 2
*Supported by
ME213L only.
Independent mode:
Two displays on the same card are
working independently and separately
2
1
1
2
2 displays
2. Set the display rotation, resolution, and color palette for the selected Multi-display
setup (①) in the Displays Settings section (②).
Setting item Explanation
Display rotation
Rotation angle in a counterclockwise direction. Selectable
from 0 degrees, 90 degrees, 180 degrees, 270 degrees
Mode source
Primary and secondary of connected displays.
Display 1 = Primary, Display 2 = Secondary
Color mode Display resolution
Color palette Number of colors on the screen
Reduce tearing Reduction of residual image caused by tearing
Note: The two high-resolution displays cannot have different settings, regardless
of their display modes in stretched mode. Set the same resolution for both displays
in stretched mode.
3. Click "Apply" for the settings to take effect. If all three displays are properly set,
click "OK" to the conrmation message.
Note: If any of the screens go blank for a several seconds and come back on with
the original resolution settings, check if the resolutions are proper for the display by
referring to their specications.
4. Click "OK" and close the PowerDesk-SE dialog box.
4
Display settings are congured. Remove the driver CD from the CD-ROM drive.

ENGLISH
- 11 -
Software Uninstallation
Follow the instructions below to uninstall the display driver for LV32P5-M.
1
Log into Windwos as a user with administrative privileges.
2
Select Control Panel>Add/Remove Programs from the Start menu.
3
Delete “Matrox Drivers” and "Matrox PowerDesk-SE" from the Currently installed
programs list.
4
End all applications and restart the computer.
Note: To complete uninstallation, make sure to restart the computer.
- 12 -
ENGLISH
Q&A
Prior to installation
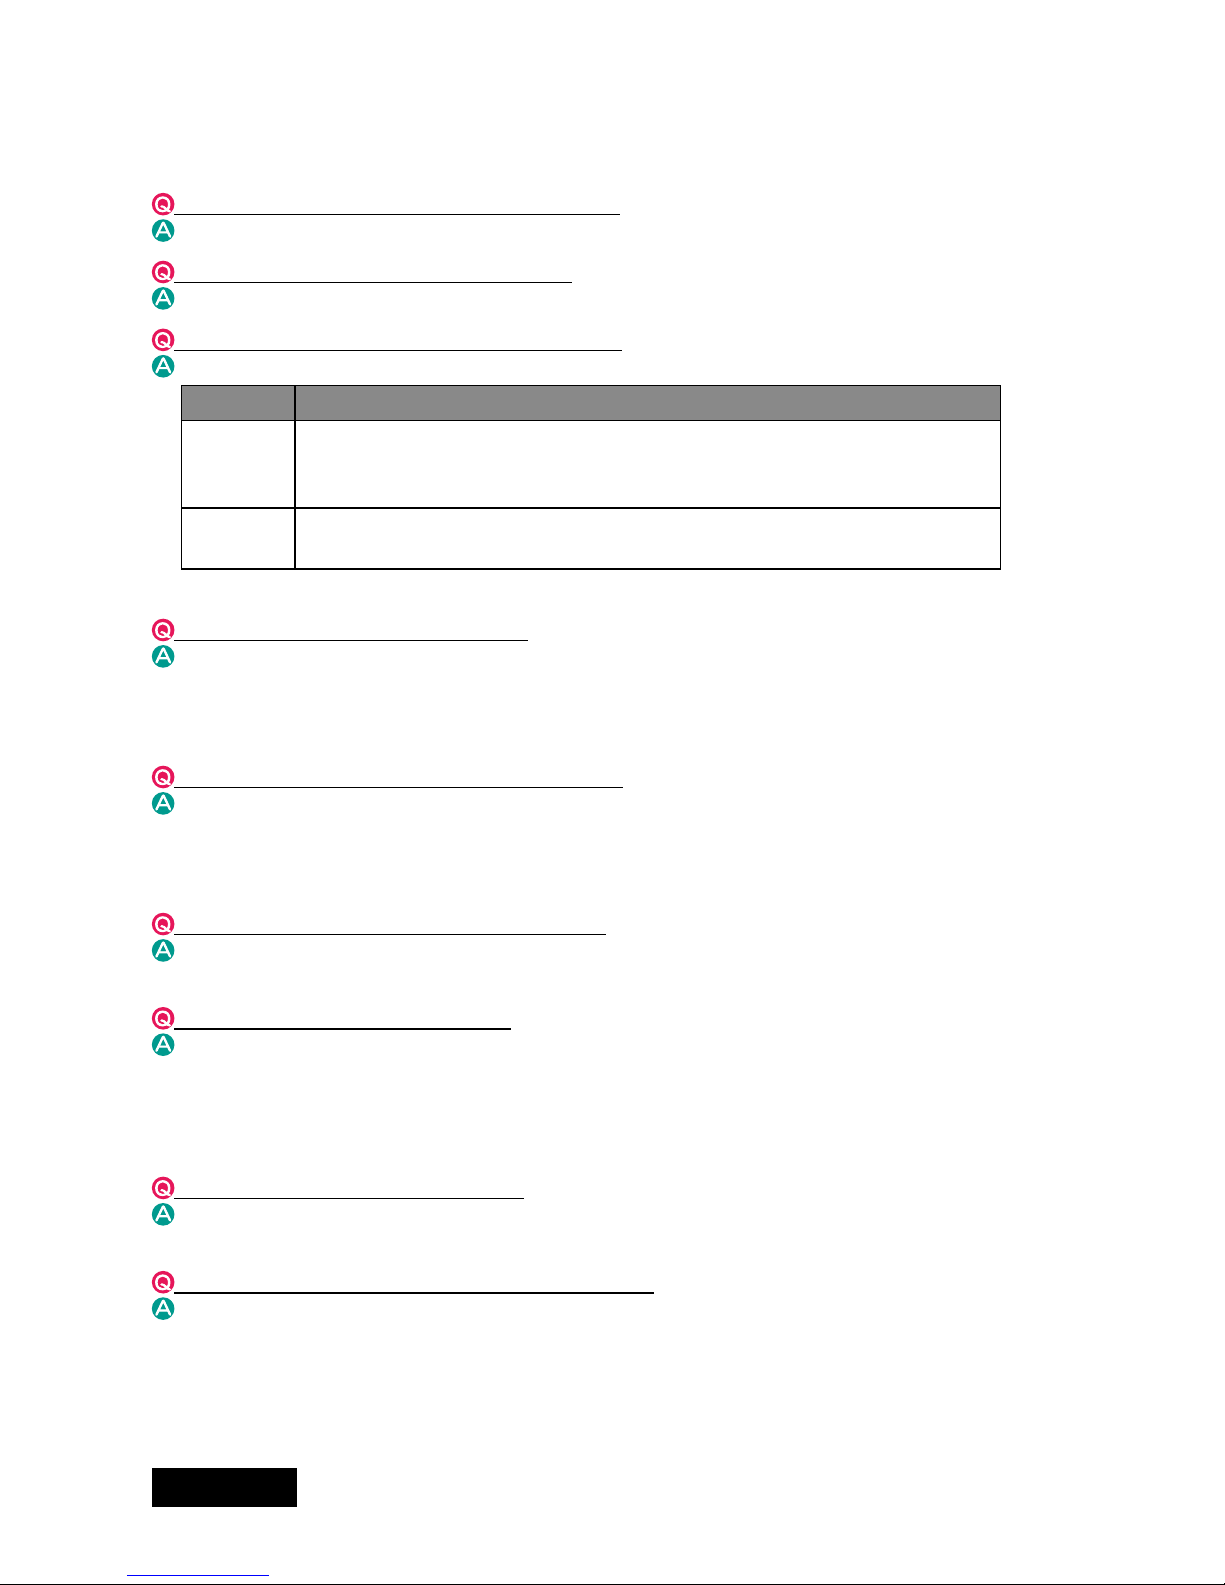
What are the supported operating systems?
Windows XP/Vista
How many displays can this card take?
2 displays per card.
What are the supporting TOTOKU displays?
See the table below:
Pixels Display model
2MP
ME201L, ME201L/r, ME213L, ME251i, ME253i2, MS21i2,
CCL202, CCL204, CCL206, CCL208, CCL212, CCL212/r, CCL250i,
CCL252i2
3MP
ME315L plus, ME351i, ME355i2, MS31i2,
CCL350i, CCL352i2, CCL354i2
Note: Displays below 2MP can also be connected.
What are the possible resolutions?
3MP x 2 screens: 1536x2048, 2048x1536
3MP x 2MP: 1536x2048, 2048x1536
2MP x 2 screens: 1200x1600, 1600x1200
(In addition, 640x480, 800x600, 1024x768 are possible.)
Is it possible to use multiple graphics cards?
Multiple graphics cards can be basically used in Windows XP. However, proper
operation is not guaranteed when combined with other graphics cards. In Windows
Vista, LV32P5-M cannot be used with non-Matrox cards. To use mulgiple cards, use
matrox cards with the same driver.
Which PCI slot should I insert this card to?
32 bit PCI and 64 bit PCI slots are useable. Also make sure that there is enough room
for the card inside the computer.
Does this card support OpenGL?
Yes, when set to 32 bit color (and 16 bit color). However, there are some restrictions.
Please check the performance on your system. OpenGL is not supported in any 8 bit mode.
Installation
Which display driver should I use?
Use the supplied driver or the designated customized driver for TOTOKU displays.
Proper operation of this card is not guaranteed when other display drivers are used.
The VGA boot screen (POST) does not appear.
Check the followings:
• The display is not turned on, or the signal cable is not connected properly.
• The display is not connected to the right card: There is output from the unplugged
on-board VGA or another card.
• Another card is conicting.
ENGLISH
- 13 -
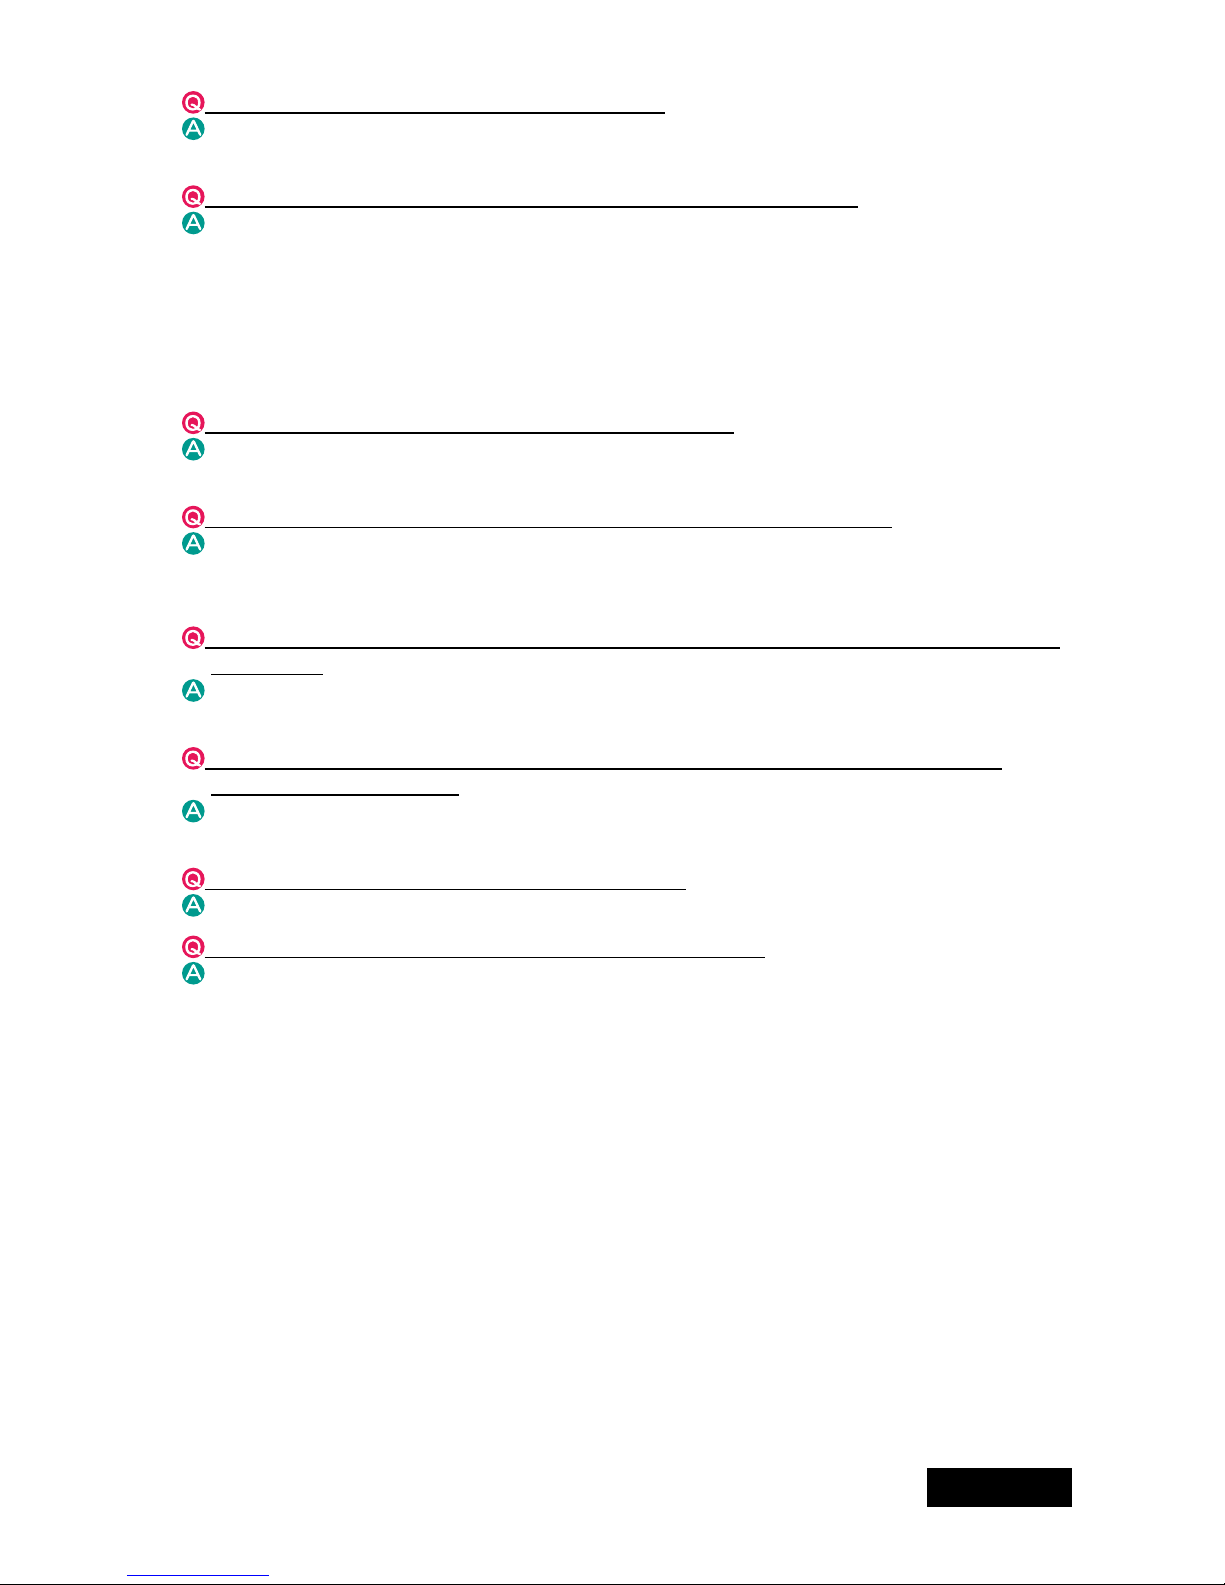
Can I install the display driver by overwriting?
No. Make sure to uninstall an existing driver before updating it or when adding/
removing cards, or changing slots, and reinstall it.
The new graphics card doesn’t get recognized as new hardware.
Check the followings:
• The graphics card is not inserted all the way in the slot.
• An older version of the display driver may have been installed. Uninstall the existing
driver before installing the latest one.
• A non-NVIDIA card may be conicting. Remove it.
• Check Device Manager. If the Other devices section shows “[!] Video Controller
(VGA compatible),” the graphics card is detected. Install it from there.
The graphics card I installed doesn’t get recognized.
Conrm that the card is inserted all the way in the slot, and a proper graphics card
and/or a display driver is installed. If another graphics card coexists, remove it.
I can’t install the display driver when another graphics card coexists.
Remove another card once, insert this card, install and setup the display driver. Now
remove this card, insert another card in another slot, install and setup a display driver.
Put this card back into the slot where it was inserted. (In Windows XP only.)
The computer freezes at the Windows startup screen when restarting after the driver
is installed.
This happens when another graphics card coexists. Reinstall cards according to the
instructions above. (In Windows XP only.)
When I add another card after setting up this card, the computer freezes at the
Windows startup screen.
Remove this card once. Insert another card in another slot, install and set up a driver,
and put this card back into the slot where it was inserted.
The display blacks out during driver installation.
Wait for a while.
Any other measures for multi-display-related problems?
Try the followings as measures.
• Use the CMOS switch if the computer has one.
• Set the system BIOS from VGA boot to PCI primary.
• Share the same IRQ with all graphics cards.
• Install cards one by one.
• Check the card for the secondary display if it can be used for a secondary display.
• Update the computer motherboard BIOS.
• Use the latest chip set driver on the computer.
• Update the driver for another graphics card.
• Disable the on-board VGA in the system BIOS settings.
• Use a different slot.
• Remove PCI cards such as sound card.
• Change the driver version.
 Loading...