

Toto WASHLET TCF802C2G, WASHLET TCF801CG Instruction Manual
Head Office TOTO Europe GmbH
Zollhof 2, 40221 Düsseldorf Germany
Tel:+49 (0)700 8686 0700
Instruction Manual
WASHLET
You are advised to record the following information to allow quick service.
Date of purchase : Name of shop :
Date : year month day
Tel :
TCF802C2G
TCF801CG
■ Thank you for your recent purchase of this product.
Please read the enclosed information to ensure the safe use of your product.
■ Be sure to read this Instruction Manual before using your product and keep it in a safe place
for future reference.
2019.7.3
D07497
Printed in China.
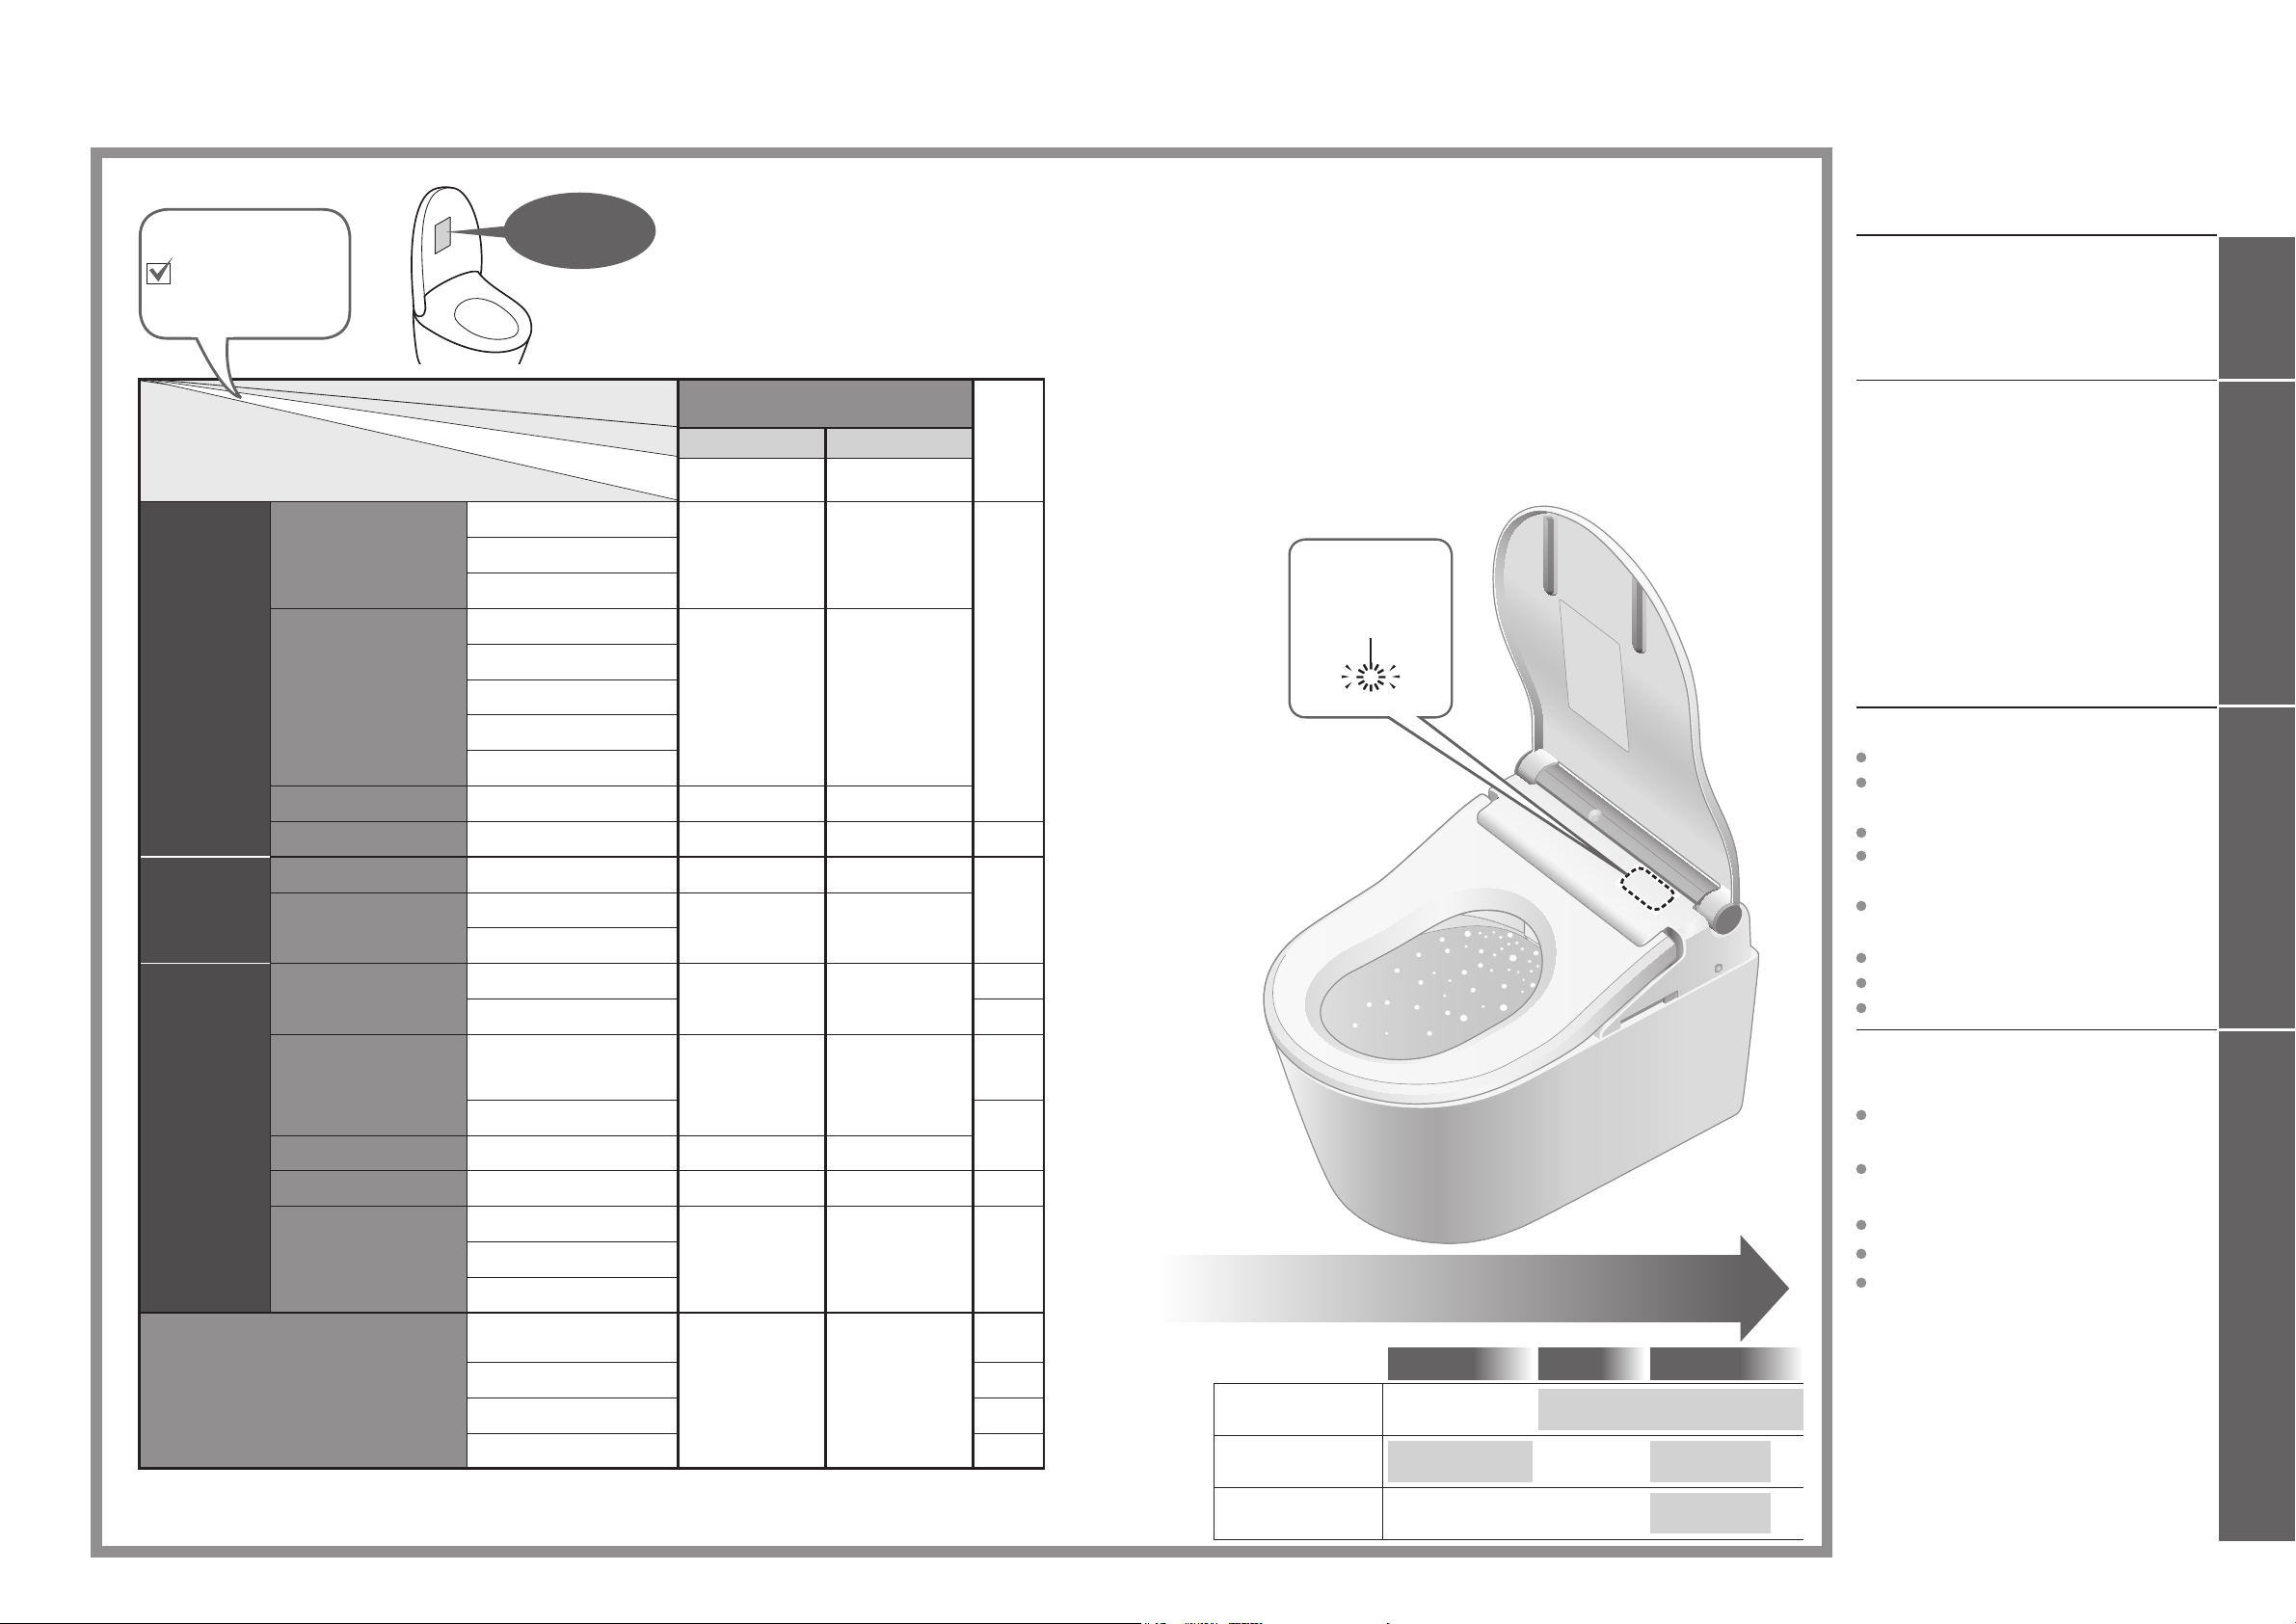
The available functions vary according to the part no.
Check your model's
part no. and write a
check mark in this
eld as needed.
Functions
Basic
Functions
Sanitary
Functions
Convenience
Functions
Maintenance
Product name,
Part No.
Product name (Model)
Your Model
Rear cleansing
Cleansing
Changing
the cleansing method
Drying Warm air drying
Changing the temperature
Removing odours Deodorizer
"ewater+" cleaning
Flushing
Opening and closing
Lighting up Soft light
Heating the toilet seat Heated seat
Save energy by
lowering the toilet seat
temperature
Rear soft cleansing
Front cleansing
Wand position adjustment
Water pressure adjustment
Oscillating cleansing
Pulsating cleansing
Personal setting
Temperature adjustment
Auto wand CLEAN
Auto bowl CLEAN
Remote control ushing
Auto ushing 20, 21
Opening and closing the
toilet seat with remote
control
Auto open / close
Auto energy saver
Timer energy saver
Main Unit One-touch
removal
Removable toilet lid 34
Wand cleaning 30
Descaling mode
Part No.
WASHLET
TCF802C2G TCF801CG
● ●
● ●
● ●
● ●
● ●
● ●
●
● ●
● ●
● ●
● ●
● ●
-
Ref.
Page
14, 15
22, 23
18, 19
14
14
20, 21
-
24, 25Auto energy saver+
32, 33
35
Keep It
Clean
Sanitary Toilet
Lights to show
that the "CLEAN"
functions are
operating.
The self-cleaning functions operate automatically.
(See pages 18,19 for details.)
As you approach As you sit As you stand up
Removing odours
inside the bowl unit
Cleans the bowl unit
with "ewater+"
Cleans the wand
with "ewater+"
Auto bowl
CLEAN
Deodorizer
Auto power
deodorizer
Auto bowl
CLEAN
Auto wand
CLEAN
Table of Contents
Safety Precautions
Operational Precautions
Parts Names
Preparation
...........................
.............................
Basic Operations
Automatic Functions
(Cleaning Features)
Deodorizer, Auto wand CLEAN, Auto bowl
CLEAN, Bowl light, CLEAN Indicator
Automatic Functions
(Convenience Features)
Auto ushing, Auto open/close, Soft light
T emperature Adjustment
(Warm Water, Toilet Seat, Drying)
Energy Saver Features
Maintenance
Main Unit
Wand
Wand cleaning
Deodorizing Filter
Gap between the Main Unit and
Bowl Unit
Gap between the Main Unit and
the Toilet Lid
Descaling mode
Water Filter Drain Valve
Spray Nozzle
.................................
......................................
.................................
............................
...........................
Changing Settings
What to Do?
If the water does not ow due to
a water service interruption
If you cannot operate with
the remote control
Freeze Damage Prevention
Long Periods of Disuse
Removal of Operation Guide
Troubleshooting
Specications
Safety Guidelines
Warranty
Important User Guidance
Information
...........................
.................................
.............................
..................
.........
...................
...............
........
..........
.......................
.....................
.......................
............
...........
........
.....................
.......
.............
.....
....................
........................
..................
..
4
9
10
12
14
18
20
22
24
28
29
30
31
32
34
35
40
41
42
62
62
62
63
64
66
67
74
75
76
78
Introduction
ReferenceMaintenanceOperation
2 3
Safety Precautions
These precautions are important for safe usage. Be sure to follow them and use the product correctly .
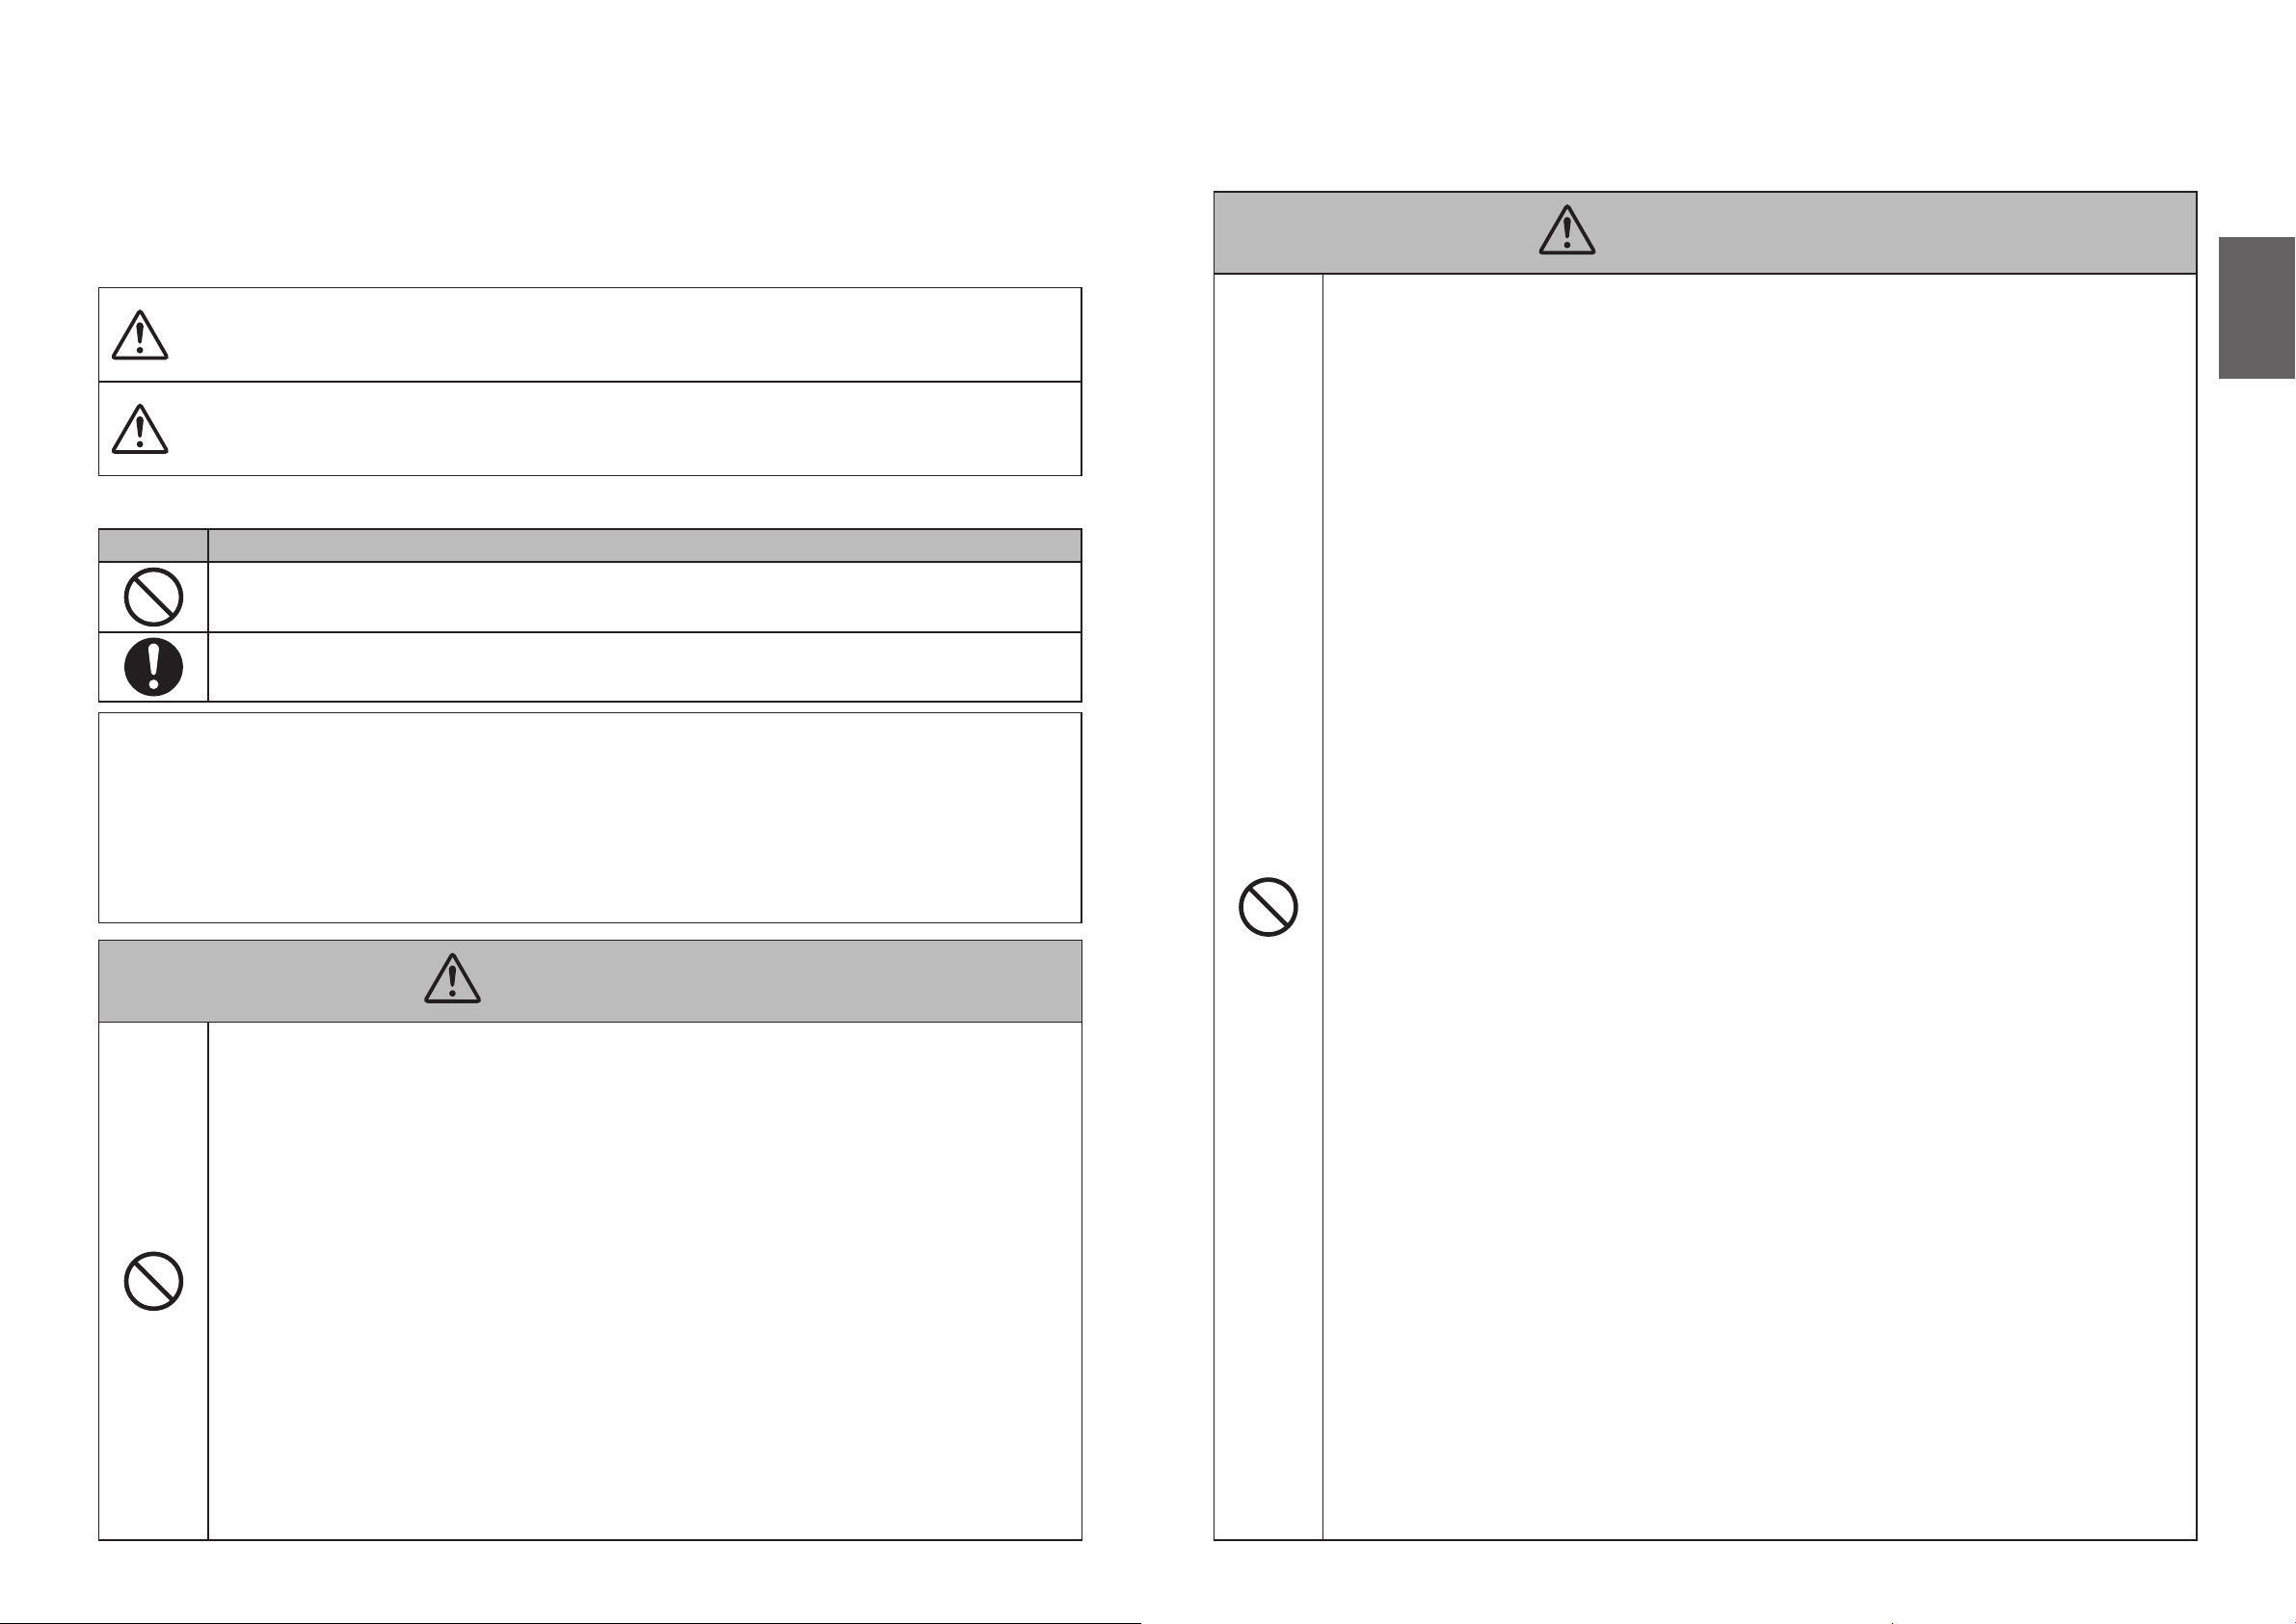
Symbols and Meanings
WARNING
CAUTION
The following symbols are used to indicate important safety instructions for the use of the product.
Symbol Meaning
This symbol indicates a prohibited use of the product.
May result in death or serious injury.
May result in injury or property damage.
WARNING
Do not use the product if a malfunction occurs.
In case of breakdown or other problems, be sure to cut off power by ipping the power switch to
OFF.
Close the water shutoff valve to stop water supply.
Possible malfunctions:
Water is leaking from a pipe or the main unit.
The product is cracked or broken.
The product makes a strange noise or emits a strange odor.
The product emits smoke.
The product is abnormally hot.
The toilet seat cushion is out of place.
Continued use after malfunction could cause a re, electric shock, heat, short circuit, injury or
water damage.
Introduction
This symbol is used to indicate a required step in the use of this product.
This product is classied as Class Ⅰ Equipment and must be grounded.
Install this equipment so that its power breaker is accessible.
This appliance is not intended for use by persons (including children) with reduced physical, sensory or
mental capabilities, or lack of experience and knowledge, unless they have been given supervision or
instruction concerning use of the appliance by a person responsible for their safety.
Children should be supervised to ensure that they do not play with the appliance.
Use the new hose set included with this equipment. Do not reuse an old hose set.
WARNING
Do not touch the connection of power cord with wet hands.
Doing so may cause electrical shock.
Do not get any water or cleaning solution on the main unit or connection of
power cord.
Doing so may cause re, electrical shock, heat or short circuit.
Doing so may cause the product to crack resulting in injury or water damage.
Never disassemble, repair or alter.
Doing so may cause re, electrical shock, overheating, short circuit or breakdown.
Do not install the product on moving vehicles such as wheeled vehicles or
boats.
Doing so may cause re, electric shock, short circuit or malfunction.
The toilet seat, toilet lid, main unit, or other parts may come loose and fall off, resulting in injury.
Do not use other water then allowed by the laws and ordinances of the
region of use. Only Use drinking water.
Do not use seawater or recycled water.
Doing so may cause irritation to the skin and malfunction.
Do not touch the connection of power cord during thunderstorms.
Doing so may cause electrical shock.
Do not allow the water supply hose to touch the connection of power cord.
Doing so may cause condensation resulting in a re, electrical shock, heat or a short.
Do not do anything that may damage the power cord.
Do not strike, yank, twist, excessively bend, damage, alter, or heat the power cords.
Also, do not place anything heavy on, bind or pinch the power cords.
Using a damaged power cord may result in a re, electrical shock, heat or short.
Do not use any power supply other than the one specied.
AC 220-240 V, 50 Hz
Doing so may cause re or excessive heat.
To reduce the danger of burns, death from electric shock, re or other
human injury:
Never operate this product if it has a damaged power cord or power connecting part, if it is not
working properly, if it has been dropped or damaged, or if it has been dropped in water. Return
the product to TOTO Europe GmbH for examination and repair.
Never block the air openings of the product or place it on a soft surface, such as a bed or a
couch,where the air openings could be blocked. Keep the air openings free of lint, hair or a
similar material.
Never use it while sleepy or drowsy.
Never drop or insert anything into any opening or hose.
Do not use it outdoors where aerosol (spray) products are being used or where oxygen is
being administered.
Do not stick a nger or anything else into the warm air outlet.
Do not place anything on the warm air outlet or drape clothes over it.
Doing so may cause burns, electrical shock or malfunction.
4 5
Safety Precautions
(Continued)
WARNING
Keep cigarettes and other open ames away from the product.
Failure to do so may cause re.
Refrain from sitting on the seat for long periods.
It may cause low-temperature burns.
To prevent the following persons from getting a moderate temperature burn during use, other
person should turn off the toilet seat heater.
Young children, the aged and other users unable to set the temperature appropriately
themselves.
The ill, physically disabled and others who do not have freedom of movement.
Those using any medicines that cause drowsiness (sleeping or cold medicine), those who have
been drinking heavily, anyone severely fatigued and anyone else liable to fall asleep.
Do not cut the string that connects the main unit and base plate.
Doing so may cause re, electrical shock, overheating, short circuit or breakdown.
To reduce the danger of burns, death from electric shock, re or other
human injury:
Close supervision is necessary when this product is used by or near children or invalids.
Use this product only for its intended use as described in this manual. Do not use accessories
not recommended by the manufacturer.
Keep the power cord away from heated surfaces.
Connect this product to a properly grounded the power supply unit (device) only.
The tank should only be lled with water.
This is an electrical product. Do not install it anywhere water is likely to get on
the product or anywhere with humidity high enough that water is likely to form
on the surface of this product. When using the product in a bathroom, install a
fan or ventilation port and ensure good air ow through the bathroom.
Failure to do so may cause re or electrical shock.
Always connect the product to the cold water supply.
Connecting to hot water supply may result in burns and equipment damage.
Check that the power cord is connected correctly.
Failure to do so may cause re, heat or short circuit.
(When installing this product, observe the local laws and regulations regarding installation.)
If the power cord is damaged, avoid danger by having the manufacturer's
repair department or equivalent specialist replace it.
Always ip the power switch to OFF before maintenance or inspection.
Failure to do so may cause electrical shock or malfunction.
Flip the power switch to "OFF" before removing the main unit.
Failure to do so may cause a re or electrical shock.
CAUTION
Do not use the product if the main unit is unstable.
Doing so may cause the main unit to come loose and fall, resulting in injury.
(If there is backlash in the main unit, consult the installer, seller, or TOTO customer service.
See contact information on the back cover.)
If the product is damaged, do not touch the damaged section.
Doing so may cause electrical shock or injury.
Replace it immediately.
Do not apply strong force, mechanical shock, step on or stand on the toilet
seat, toilet lid or main unit. Also do not place any heavy object on the toilet
seat, toilet lid or main unit.
Doing so may cause cracking or cause the main unit to come loose and fall, resulting in injury.
Doing so may damage the product and cause injury or water damage.
Do not lift up this product by the toilet seat or lid.
Do not raise the toilet seat or lid while objects are resting on top of the unit.
Doing so may cause the main unit to come loose and fall, resulting in injury.
To reduce the danger of death from electric shock:
Do not use while bathing.
Do not place or store the product where it could fall or be pulled into a tub or sink.
Do not put in or drop into water or other liquid.
Do not try to recover the product if it has fallen into water.
Switch the breaker on the distribution board to OFF.
When maintaining the plastic parts (main unit etc.) or the water supply hose,
use a neutral kitchen detergent diluted with water. Do not use any of the
following.
Toilet cleaner, household cleaner, benzene, paint thinner, powdered cleanser or nylon
scrubbing brush.
These items may damage or crack the plastic and cause injury or malfunction.
These items could damage the water supply hose and cause a water leak.
To prevent a sudden water leak, do not remove the water lter drain valve
when the shutoff valve is open.
Doing so will cause water to spurt out.
(Refer to Page 40 for instructions on cleaning the water lter drain valve.)
Do not fold or crush the water supply hose; do not damage by cutting with a
sharp object.
Doing so may cause water leaks.
Introduction
When leaking battery uid adheres to your body or clothes, wash it away
with clean water.
The uid may damage your eyes or skin.
Do not install the base plate, which is not attached.
Doing so may cause damage.
6 7
4 cm
8 cm
12 cm
Safety Precautions (Continued)
Operational Precautions
CAUTION
If a water leak should occur, always close the shutoff valve.
When the ambient temperature is likely to drop to 0 °C or lower, prevent
damage to the pipes and hoses due to freezing.
Frozen water pipes could cause the main unit and the pipes to break, resulting in a water leak.
Regulate the room temperature to prevent the pipes and hoses from freezing during cold
months.
Drain the water.
When not using the product for a long time, close the shutoff valve, drain
the water from the main unit and water supply hose, and then ip the power
switch to "OFF".
When using the product again, allow the product to rell with water rst. Otherwise, the water in
the tank might become contaminated and cause skin inammation or other problems.
(Refer to Page 65 for instructions on replenishing the water.)
Leaving the power on may cause re or heat.
When installing the water lter drain valve, make sure that it is securely
tightened in its proper position.
Failure to securely tighten it may cause a water leak.
If the bowl unit is clogged, ip the power switch to OFF and remove the
clog.
If the "Auto ushing"*1 is activated, it would make the wastewater in the bowl unit overow and
may result in water damage.
Use commercially available tools that are made for unclogging the bowl unit to remove the
clogging.
Push the main unit securely on to the base plate.
After pushing the main unit until a click sound is heard, pull it slightly toward you to make sure
that the product does not detach.
Failure to do so could cause the main unit to come loose resulting in injury.
Make sure of the plus and minus signs on the batteries before inserting
them.
Remove depleted batteries immediately.
When replacing the batteries:
Replace both batteries with new ones.
Use the same brand for both new batteries (any brand available).
Failure to do so may cause the batteries to leak uid, generate heat, rupture, or ignite.
When the product is supposed not to be used for long time, remove the
batteries from the remote control.
Failure to do so may cause the batteries to leak uid.
*1 Only applies to toilets with an "Auto ushing" function
For prevention of malfunctions
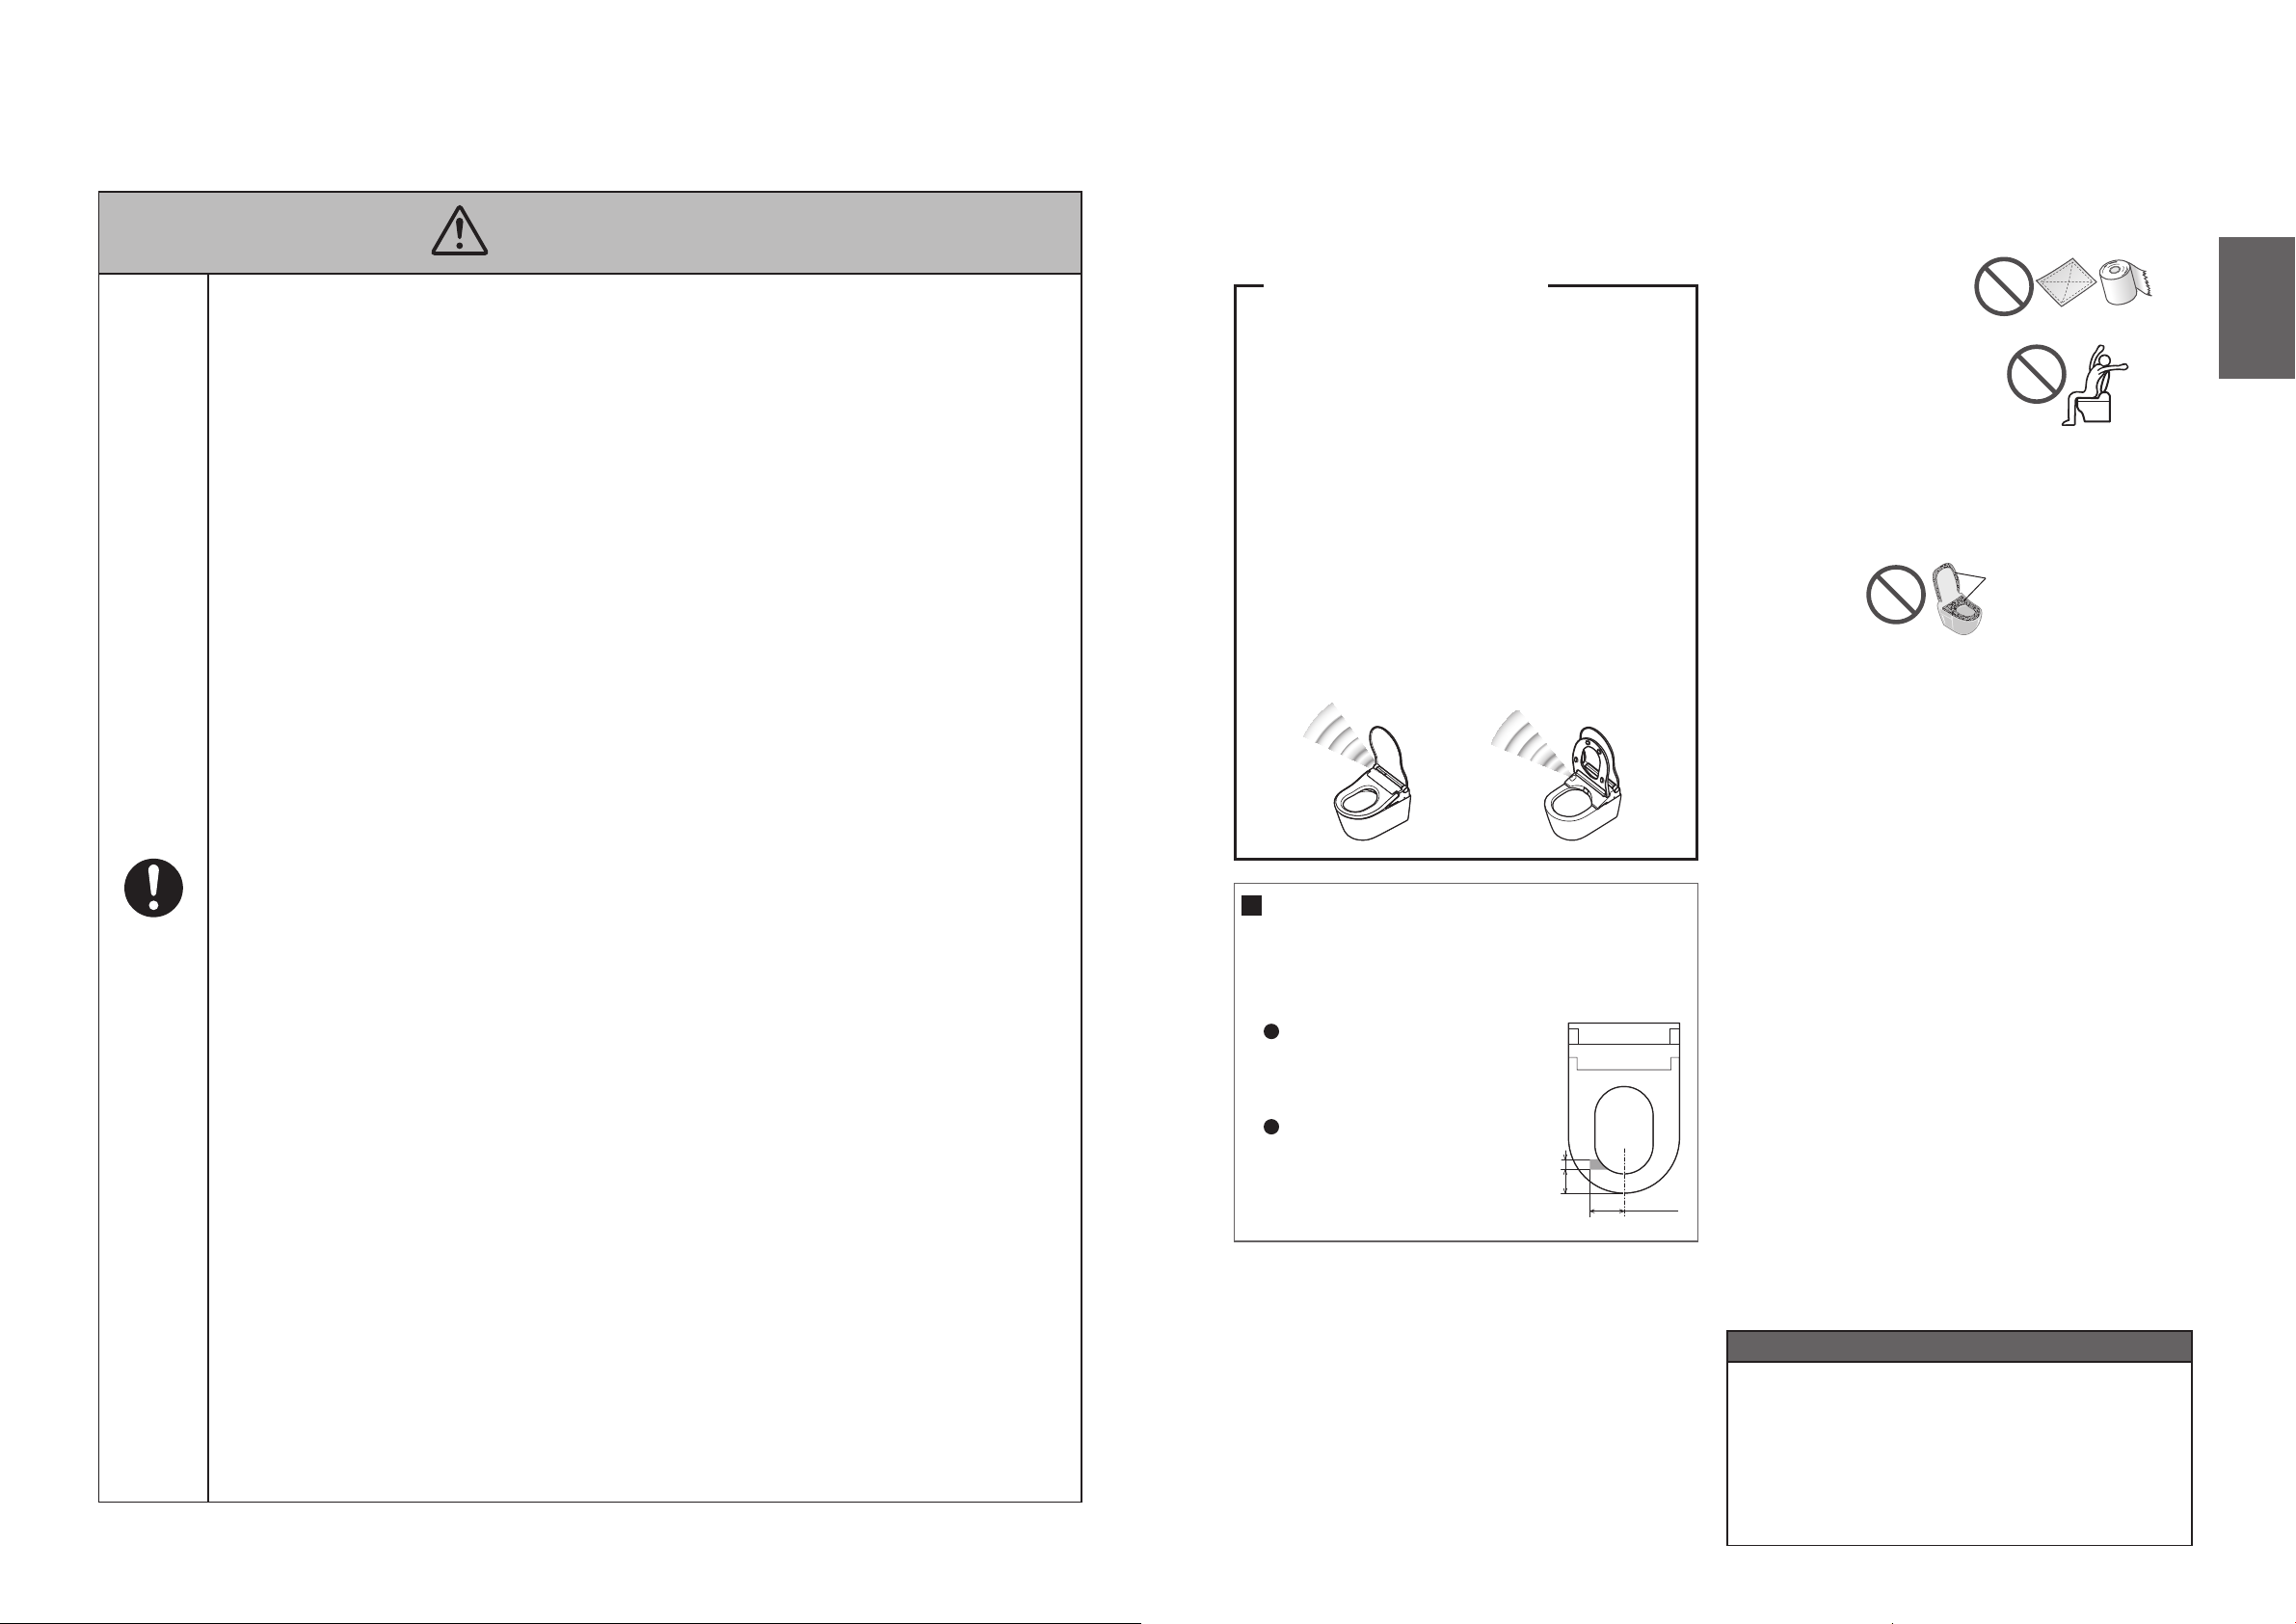
■
● Do not block the body sensor or the remote control
transmitter or receiver.
< About the body sensors >
Two types of body sensors are used.
●
Body sensor A detects changes in heat.
Detection may be difcult when the room temperature
exceeds 30 °C, such as in the summertime.
When sunlight is directly on the sensor area or a heater is
used in the bathroom, the sensor may detect incorrectly
due to the heat, resulting in the automatic operation of
functions such as auto lid opening and closing.
When the bathroom door is open, the sensor may detect
people who pass to the front or side of the toilet.
●
Body sensor B detects when someone stands in
front of the toilet bowl.
Body sensor B emits an infrared beam as shown in the
gure. When someone moves into the line of this infrared
beam, the sensor detects the person.
* Detection by the sensor may be difcult when the toilet
is used by someone small, such as a child.
Body sensor BBody sensor A
About the built-in seat sensor
When you sit on the toilet seat, the seat sensor turns ON,
enabling you to use various features.
(The deodorizer starts when the
seat sensor makes a detection.)
Sit so your skin is in direct contact
with the seat sensor. The seat
sensor may not detect properly if
there is a seat cover or clothing.
Water droplets collecting on the
seat sensor may cause the main
unit to malfunction. Be sure to
wipe off any water droplets on the
sensor.
<Detection range>
For prevention of damage
■
Wipe plastic areas
●
such as the main unit
and remote control
with a soft cloth tightly
wrung out with water.
Do not lean against
●
the toilet lid.
For prevention of malfunctions and failures
■
Flip the power switch to OFF if there is a risk of lightning.
●
A toilet seat cover or a toilet lid cover cannot be used.
●
(The seat sensors may not function properly. Additionally,
the toilet seat and lid may not open or close properly.)
Do not urinate on the main unit, toilet seat or wand.
●
(Doing so may cause a failure or discoloration.)
Do not apply strong forces to the control panel of the
●
remote control.
When using a toilet cleaner to clean the toilet, rinse it
●
off within 3 minutes and leave the toilet seat and toilet
lid open.
(If vapor from a toilet cleaner enters the main unit, it
may cause a malfunction.)
Wipe off any cleaner that remains on the bowl unit.
Do not use the product with the toilet lid removed.
●
Do not expose to direct sunlight.
●
(Doing so may cause changes in color, irregular heated
seat temperature, remote control malfunction or the
product malfunction due to the change in temperature.)
Use radios, etc. away from the product.
●
(The product could cause interference with the radio
signal.)
If you use a booster seat for infants or a soft highchair,
●
remove it after use.
(Keeping it installed may prevent some of the
functions from being used.)
Do not apply force to the remote control.
●
(May cause malfunction.)
To prevent the remote control from being dropped,
set it in the hanger when you are not using it. Be
careful not to expose it to water.
Do not place anything on top of the toilet seat.
●
Additionally, do not press it by hand.
(Doing so may activate the seat sensor, causing the
oor to get wet if buttons on the remote control are
touched and warm water comes out from the wand.)
About rear cleansing, rear soft cleansing and front cleansing
These functions wash away waste and dirt from a
localized area of your body.
Do not cleanse too much or for too long.
Doing so may wash away normal bacteria, upsetting the
balance of bacteria inside your body.
People who are receiving medical treatment or
therapy in this localized area should consult their
doctor before use.
Dry cloth or tissue
Covers
Introduction
8 9
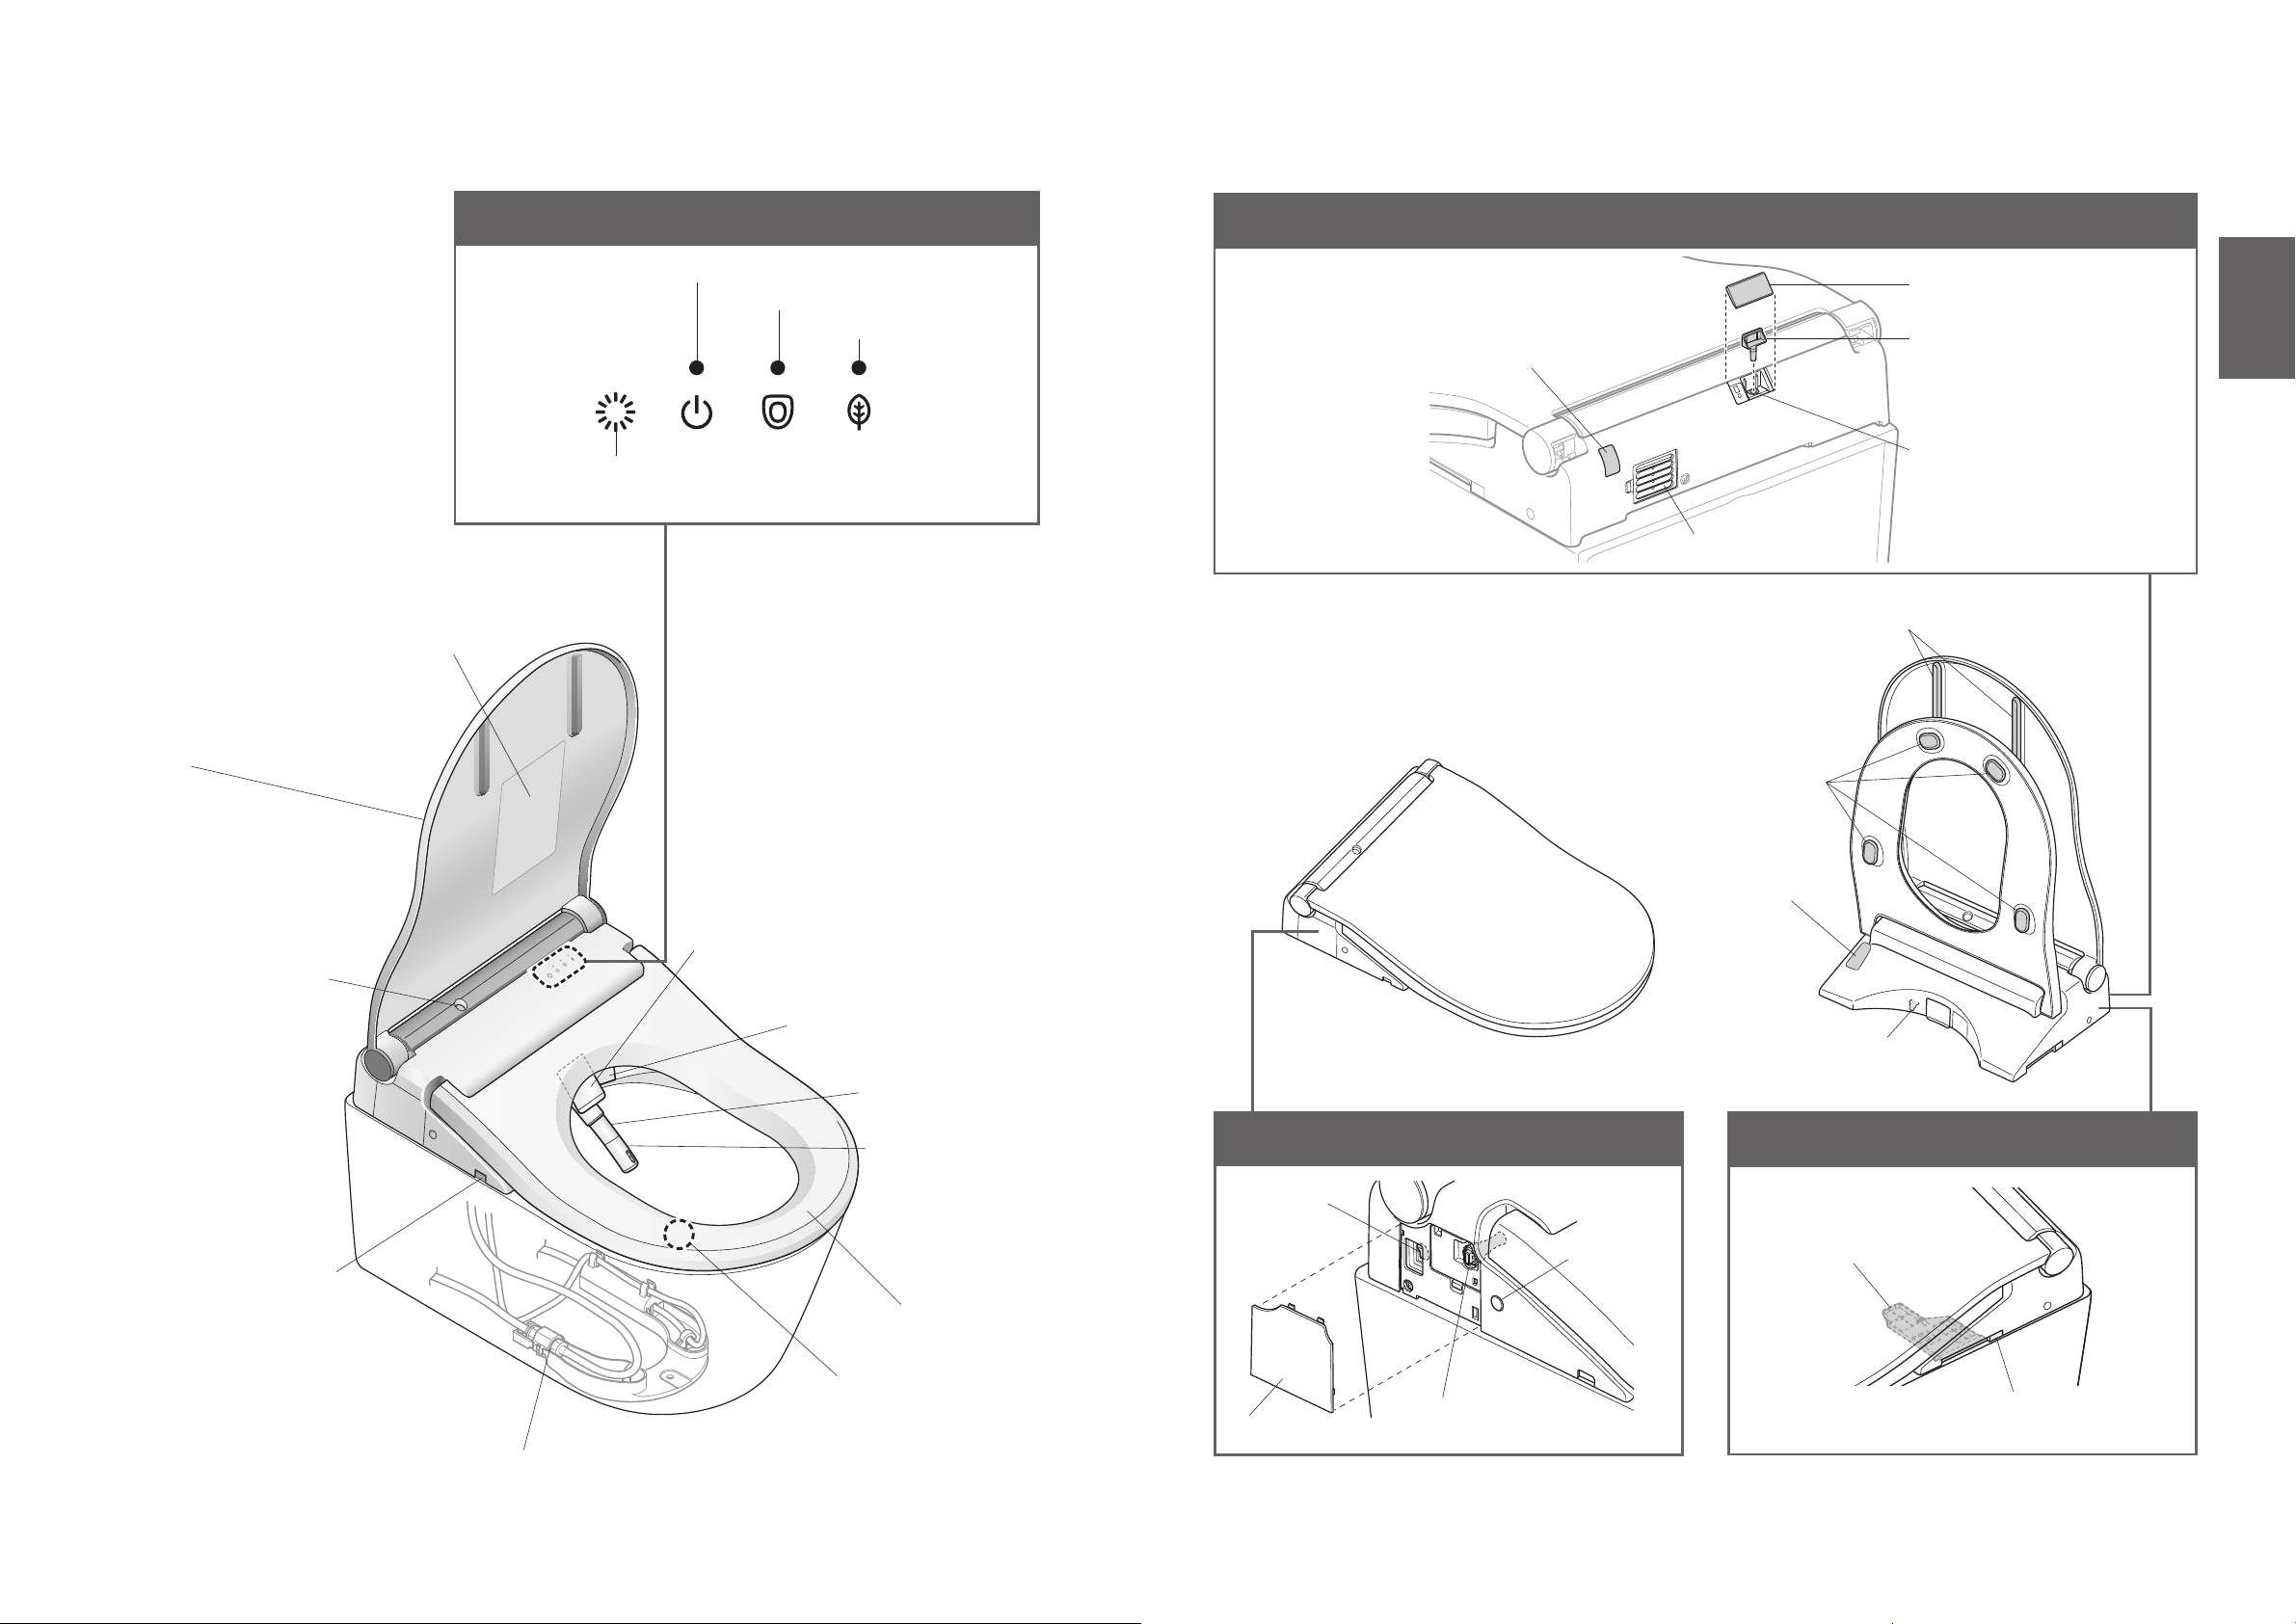
Parts Names
Product name, part no., etc.
Toilet lid
Main display
Power LED
Seat LED
Energy saver LED
CLEAN indicator
<All the CLEAN indicator and LEDs light up in the gure>
Rear side of the main unit
Remote control
receiver
Introduction
Cover
Cap
Agent port
(Page 35 - 39)
Deodorizer outlet
Toilet lid cushions
Toilet seat
cushions
Body sensor A
(Page 9)
Water drain lever
(Page 64)
Body sensor B
(Page 9)
Wand cover
Warm air outlet cover
Mist nozzle
Wand
Spray nozzle
(Page 41)
(Page 30)
Left side of the main unit
Power switch
(Page 13)
Soft light
Right side of the main unit
Deodorizing lter
(Page 31)
Heated seat
Seat sensor
(Page 9)
(built-in)
Cover
Water lter drain valve
(Page 40)
Main unit removal button
(Pages 38, 39)
Shutoff valve
(Page 13)
Descriptions in this manual are based on the illustrations of TCF802C2G.
10 11
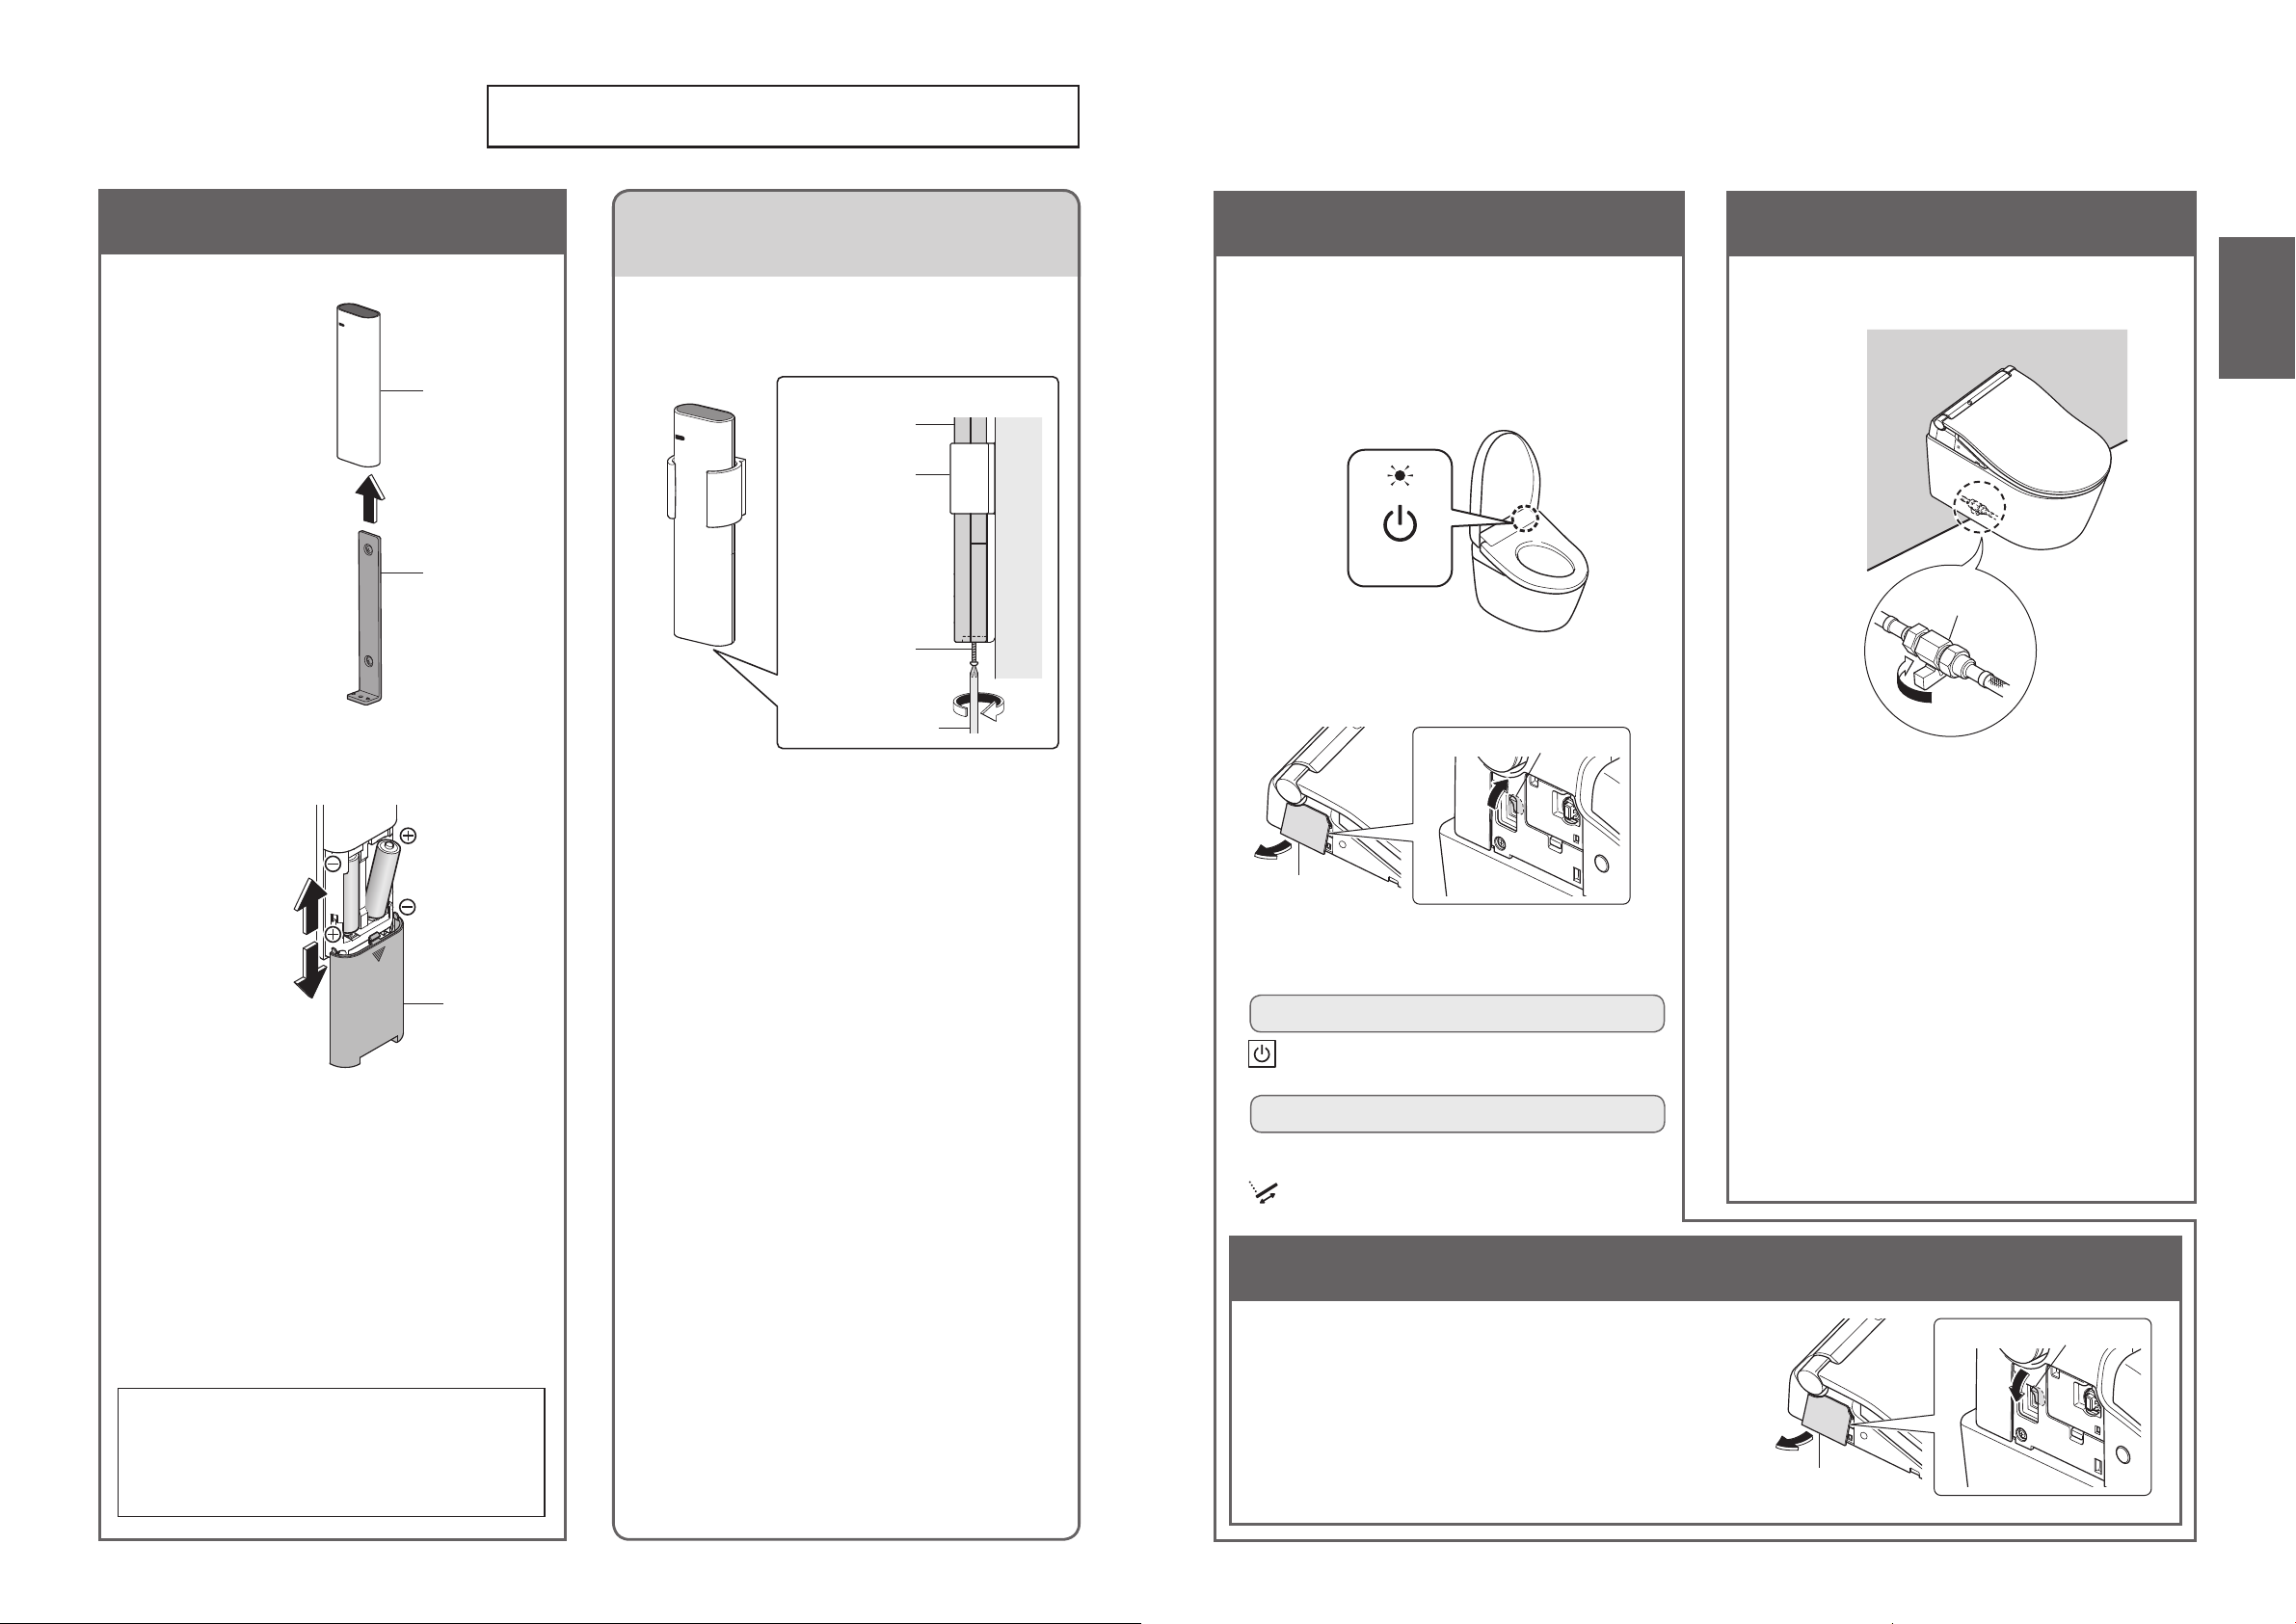
Preparation
1. Insert the battery
Remove the remote control from
1
the hanger.
Remote
control
Hanger
Using the Product for the First Time
If the remote control is secured
(for anti theft)
Remove the screw from the
1
remote control xture.
(View from side)
Remote control
Hanger
Wall
2. Turn on the power
Switch the breaker on the
distribution board to ON.
1
The wand extends and then retracts.
Check that the "Power" LED
lights up.
2
<Power>
3. Open the shutoff valve
Fully open the shutoff valve.
1
Shutoff valve
Introduction
2
Open the battery cover and
insert two AA batteries.
Close
Open
Battery cover
●
When batteries are properly inserted,
temperature levels appear on the display of
the remote control (back side).
➞
When the temperature levels are not
displayed, perform step 3 of "Language
Settings" in page 56.
●
The display goes out when no button on
the remote control is pressed for about 60
seconds or more.
2
Screw
Remove
Phillips screwdriver
Remove the remote control
from the hanger.
■ To secure the remote control again
Tighten and x the screw.
(Overtightening may cause damage to parts
such as the hanger.)
<If the light is off>
(1) Remove the cover on the left side of the main unit,
and ip the power switch to ON.
Power switch
Cover
(2) Reinstall the cover. (Page 29)
<If the light is off but, the power switch is "ON">
Switch "Power" to "ON" using the remote control.
To operate from the back of remote control
Press "Power ON/OFF" button about 3 seconds
or longer.
To operate from the front of remote control
Recommended if the remote control is secured to
prevent theft.
Press "Oscillating cleansing" button about 10
seconds or longer.
To turn the power "OFF"
Mount the remote control in
3
the hanger.
■ About the batteries
Use dry cell, alkaline batteries.
Be sure to follow "Safety Precautions" to prevent
the batteries from rupturing or leaking uid. (Pages
6, 8)
Remove the cover on the left side of the main unit,
and ip the power switch to "OFF".
The "Power" LED goes off.
Power switch
Cover
12 13
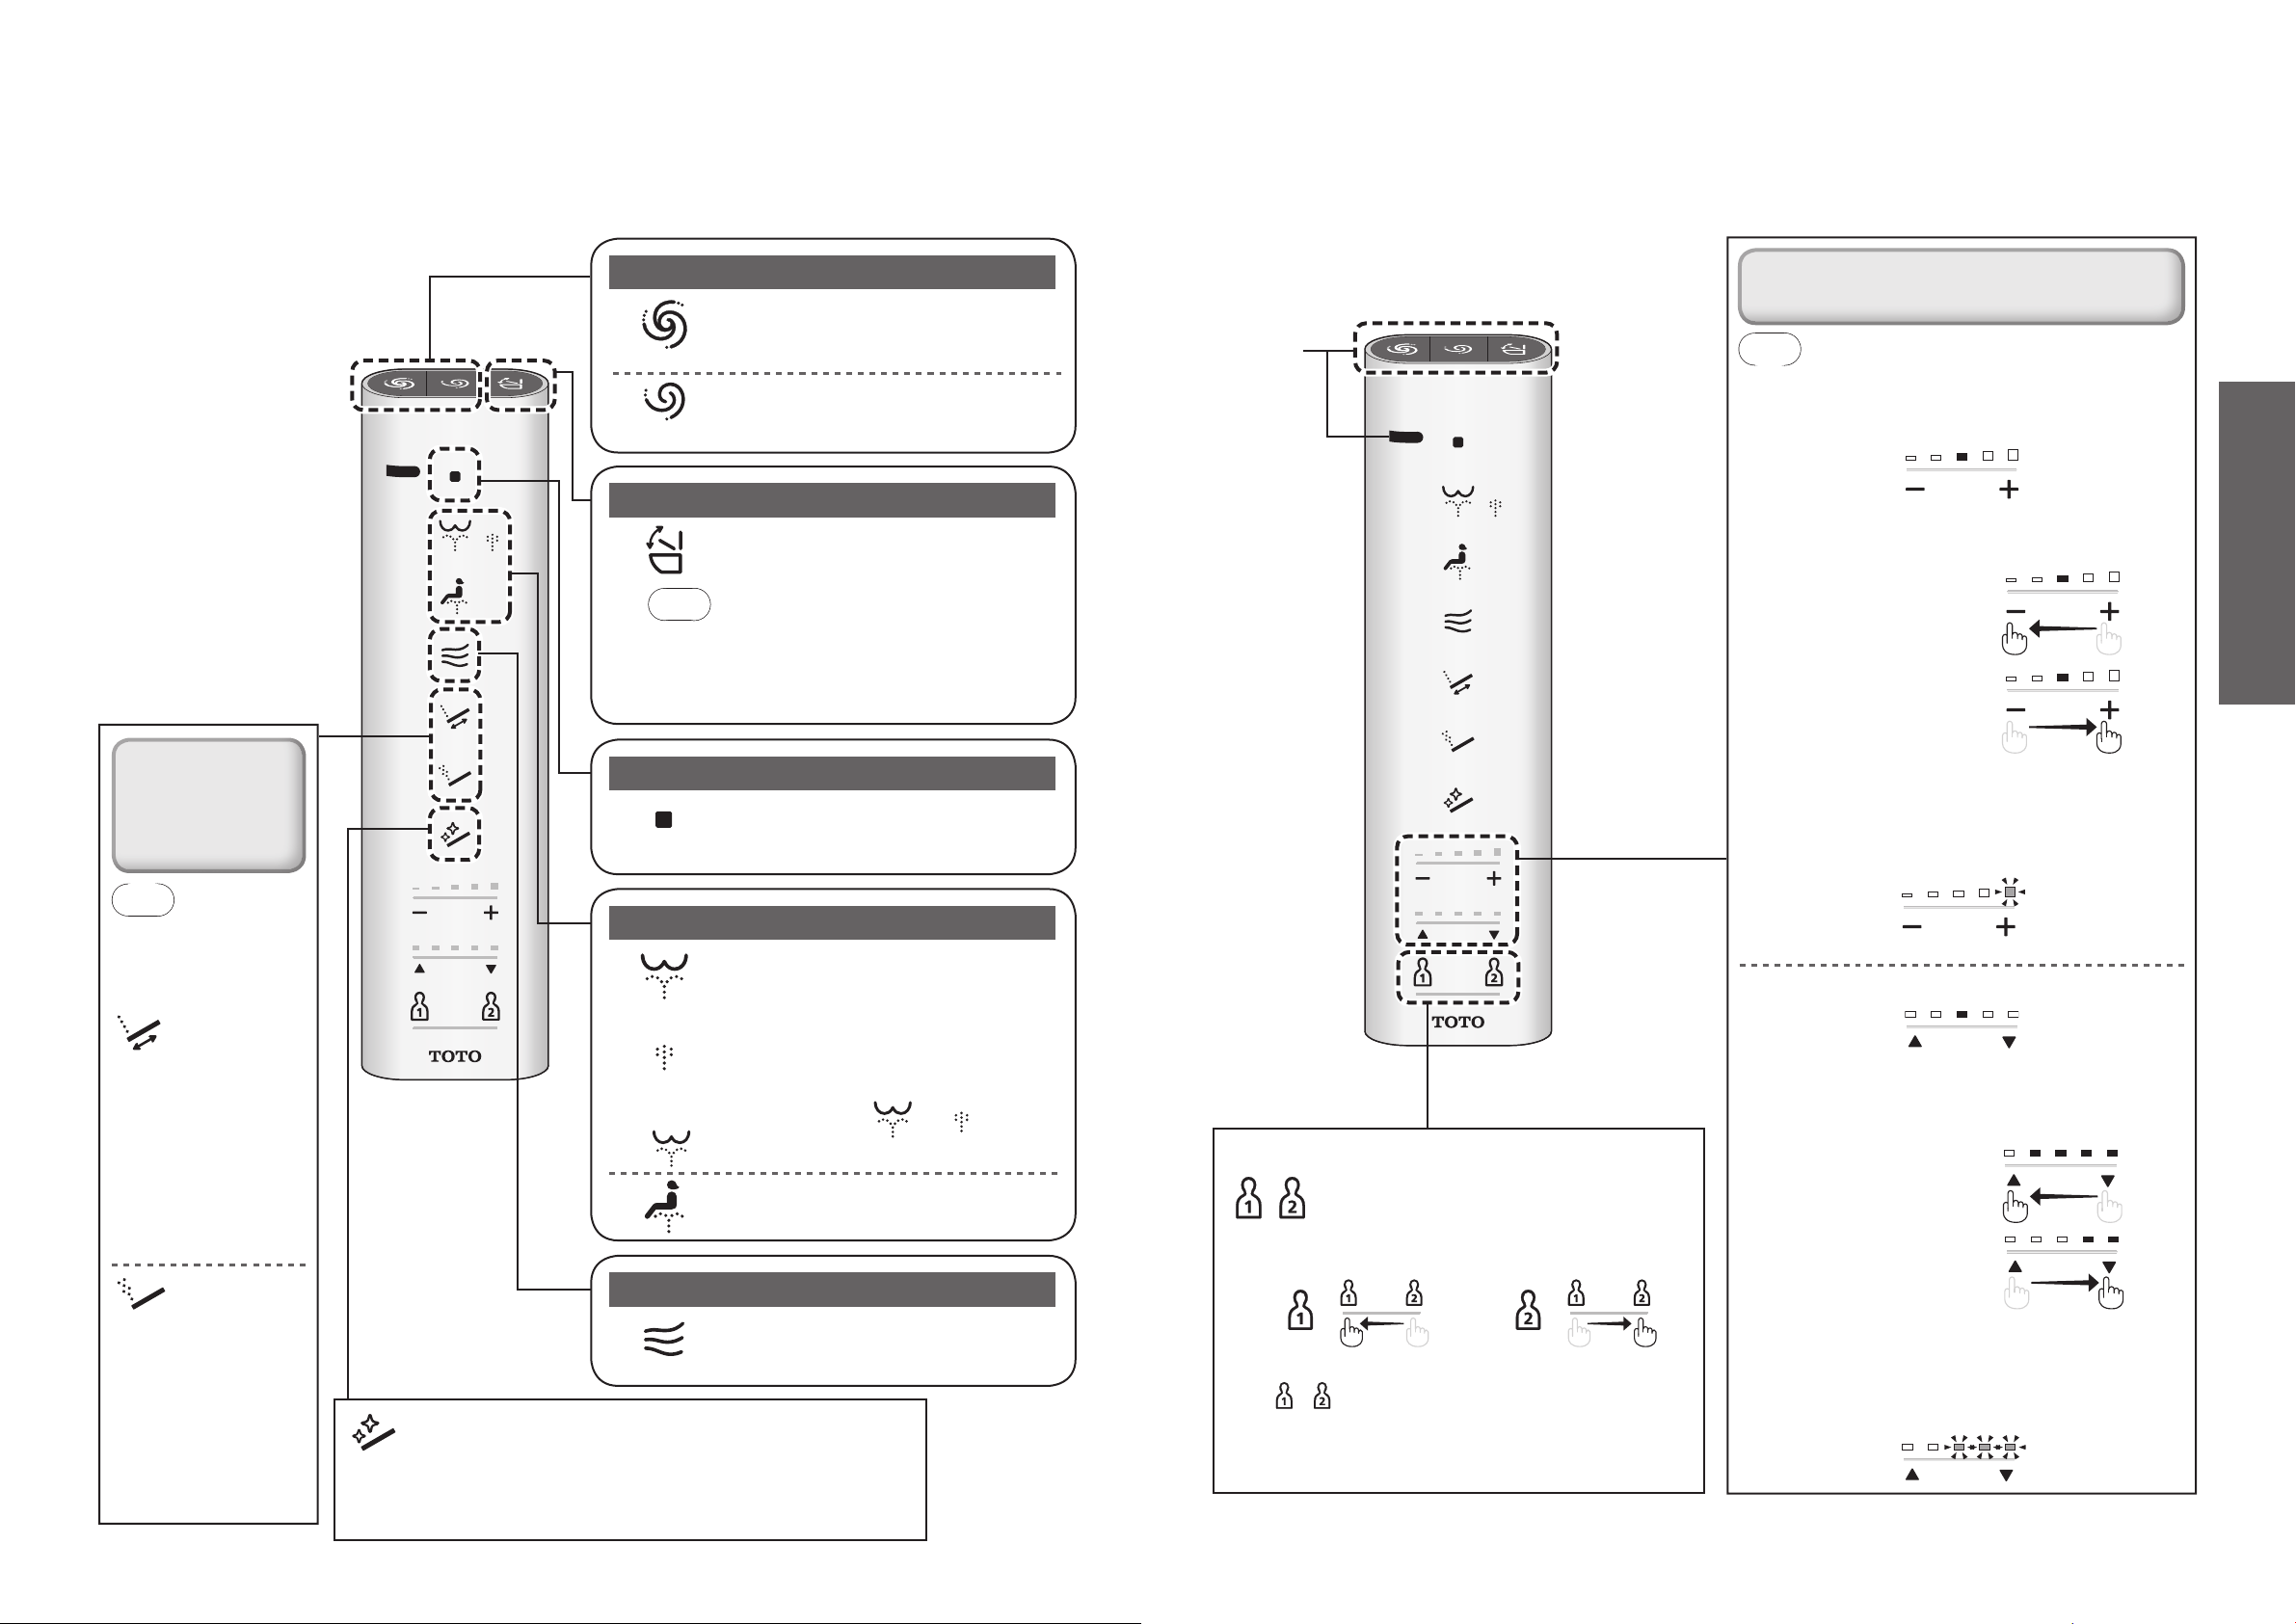
Basic Operations
Operate the controls on the remote control; a beep sounds when the main unit receives the signal.
● The "Water pressure adjustment","Wand position adjustment" and "Personal setting"
functions are swipe operated.
Flushing
*1
"Full ush"
Performs a full ush.
"Light ush"
Performs a light ush.
Opening and closing
"Opening and closing the toilet seat"
Opens and closes the toilet seat.
Note
When setting Auto open/close to "OFF".
The toilet lid opens/closes when you press the button.
Press the button for longer than 1 second to open/
close the toilet seat.
●
Functions that operate
when a button is pressed
during "Rear cleansing",
"Rear soft cleansing" or
"Front cleansing".
Stopping
"Stopping"
Stops the operation.
*2
●
Functions that operate when a button is pressed
during "Rear cleansing", "Rear soft cleansing" or
"Front cleansing".
Note
●
Sitting back on the toilet seat makes it easier to
adjust the wand position and to reduce splashing.
"Water pressure adjustment"
You can select from 5 levels of water pressure.
The setting changes by one level whenever you
swipe to the left or right.
[-] Softer
[+] Stronger
After you swipe to change the "Water pressure adjustment"
setting, the set position will light for 10 seconds.
A light will also ash for about 10 seconds to indicate the
current setting when any of the cleansing buttons (rear
cleansing, rear soft cleansing, front cleansing) are pressed.
Operation
Note
●
S
itting back on the toilet
seat makes it easier to
adjust the wand position
and to reduce splashing.
"Oscillating cleansing"
The wand moves back and
forth to cleanse your rear
thoroughly.
The setting changes
between "ON" and "OFF"
each time the button is
pressed.
"Pulsating cleansing"
Cleanses with the water
pressure pulsating between
soft and strong.
The setting changes
between "ON" and "OFF"
each time the button is
pressed.
Cleansing
"Rear cleansing"
Cleanses your rear.
"Rear soft cleansing"
Cleanses your rear with mild water
pressure.
The setting changes between and each time
the is pressed.
"Front cleansing"
Serves as a bidet for ladies.
Drying
"Warm air drying"
Dries your rear.
"Wand CLEAN"
Cleans the wand with "ewater+".
The wand can be automatically cleaned when you use the cleansing
functions (Rear cleansing , Front cleansing, etc.). (Page 18)
You can select from 5 levels of wand position
between the front and the rear.
• The setting changes by one level whenever you
swipe to the left or right.
"Personal setting"
You can store your preferred "Water pressure", "Wand
position" and "Warm water temperature" settings.
●
To store a settings → Page 60
●
To use
(Swipe left)
Select or and press the button for the cleansing you want to use.
The "Wand position" and "Water pressure" lamps will light up for
about 10 seconds in their set positions, and the "Water temperature"
display switches.
*1 Except TCF801CG
*2 Remote control transmitter (Front side, Top side)
(Swipe right)
After you swipe to change the "Wand position adjustment"
setting, the set position will light for 10 seconds.
A light will also ash for about 10 seconds to indicate the current
setting when any of the cleansing buttons (rear cleansing, rear
soft cleansing, front cleansing) are pressed.
"Wand position adjustment"
[▲] Moves to the front
[▼] Moves to the rear
14 15
Basic Operations
MEMU
1/4
MEMU
1/4
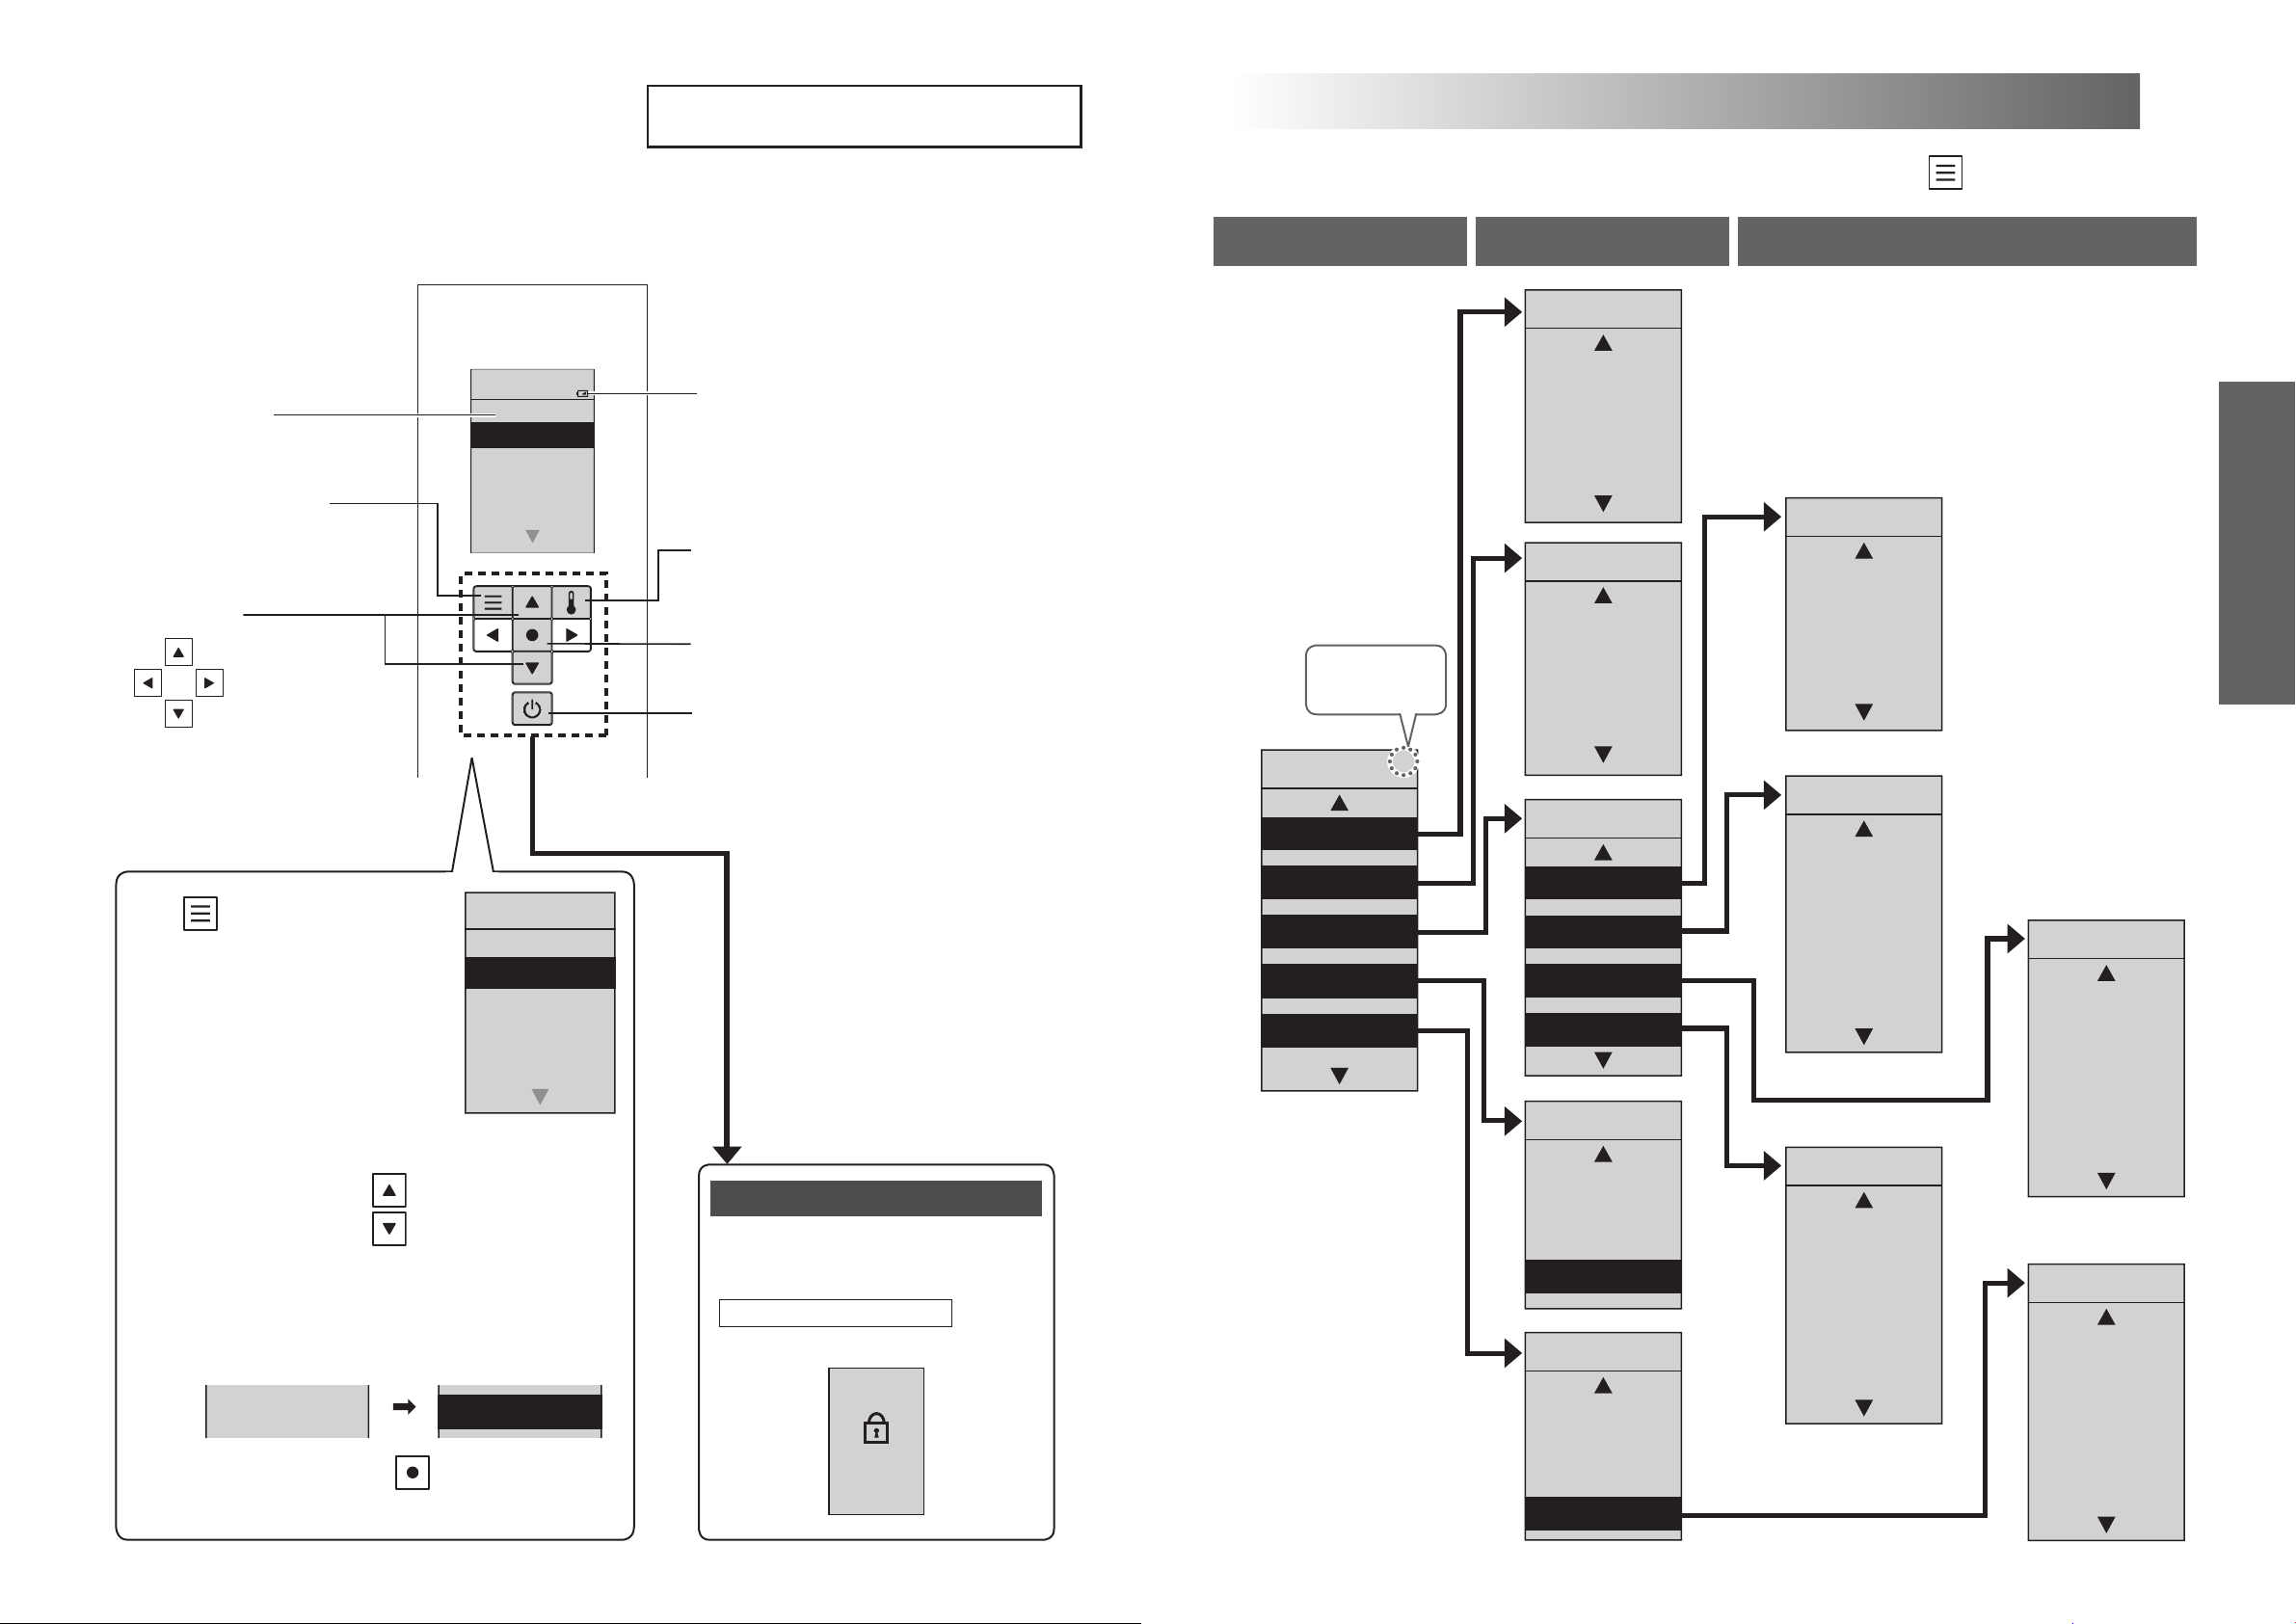
[MANUAL CLEANING]
About the Menu Screen
This section is an overview of the settings that can be congured with the remote control.
See the corresponding pages for the detailed descriptions.
Remote control back side
You can set as desired
▶
If you want to return to the previous item, press the button.
Level 1 Level 2 Level 3
Display screen
Menu, Return button
• Adjust settings
• Return to previous menu
Select keys
: Select the item
or setting
MENU
1.MANUAL
CLEANING
2.ENERGY
SAVER
3.AUTO
FUNCTION
MANUAL
CLEANING
1/5
Low battery warning mark (Page 62)
Temperature adjustment button
1.WAND CLEAN
ING ON/OF
2.MANUAL
CLEAN
3.DESCALING
MODE
ENERGY
SAVER
• Adjust temperatures (Page 22)
1.AUTO ENERGY
Enter button
Number of items
on display*
1
SAVER
2.TIMER
SAVER
Power ON/OFF button
1/3
1/2
AUTO
FLUSH
1.AUTO
FLUSH
2.AUTO FLUSH
DELAY
1/2
• Pressing it about 3 seconds
or longer turns the power on/off.
MENU
• If the remote control is secured to
1
Press.
The display screen changes.
Set the item from the display screen.
2
You can move the
buttons (Up/Down)
MENU
1.MANUAL
CLEANING
2.ENERGY
SAVER
3.AUTO
FUNCTION
prevent theft (Page 13 Step2-2)
1/5
Setting lock
1.MANUAL
CLEANING
2.ENERGY
SAVER
3.AUTO
FUNCTION
4.SPRACHE / LANGUE / LANGUAGE
5.OTHER
SETTING
You can lock the settings so that you
to select the item or setting.
The letters of the selected item will be highlighted.
When
[MANUAL CLEANING]
is not chosen
1.MANUAL
CLEANING
When
is chosen
1.MANUAL
CLEANING
When you press the button, the item is
entered.
16 17
do not mistakenly operate the rear
buttons while using the remote control.
How to Set (Page 58)
Display screen during setting lock
SETTING
LOCK
PRESS ENTER
FOR 2 SEC
TO RESET
*1 The setting items and numbers vary according to the model.
*2 Except TCF801CG
1/5
AUTO
FUNCTION
1.AUTO
*2
FLUSH
2.AUTO OPEN
/CLOSE
3.AUTO
CLEANING
4.LIGHT
SPRACHE / LANGUE/ LANGUAGE
DEUTSCH
FRANÇAIS
ENGLISH
OTHER
SETTING
1.BEEP
2.SETTING
LOCK
3.PERSONAL
SETTING
1/4
1/3
AUTO OPEN
/CLOSE
1.AUTO OPEN
/CLOSE
2.AUTO CLOSE
DELAY
3.AUTO OPEN
DELAY
4.SEAT/LID
LIGHT
1.SOFT LIGHT
2.BOWL LIGHT
3.INDICATOR
1/4
1/3
AUTO
CLEANING
1.AUTO WAND
CLEAN
2.AUTO BOWL
CLEAN
3.DEODORIZER
4.AUTO POWER
DEODORIZER
PERSONAL
SETTING
1.SETTING
2.REGISTER1
3.REGISTER2
1/4
1/3
Operation
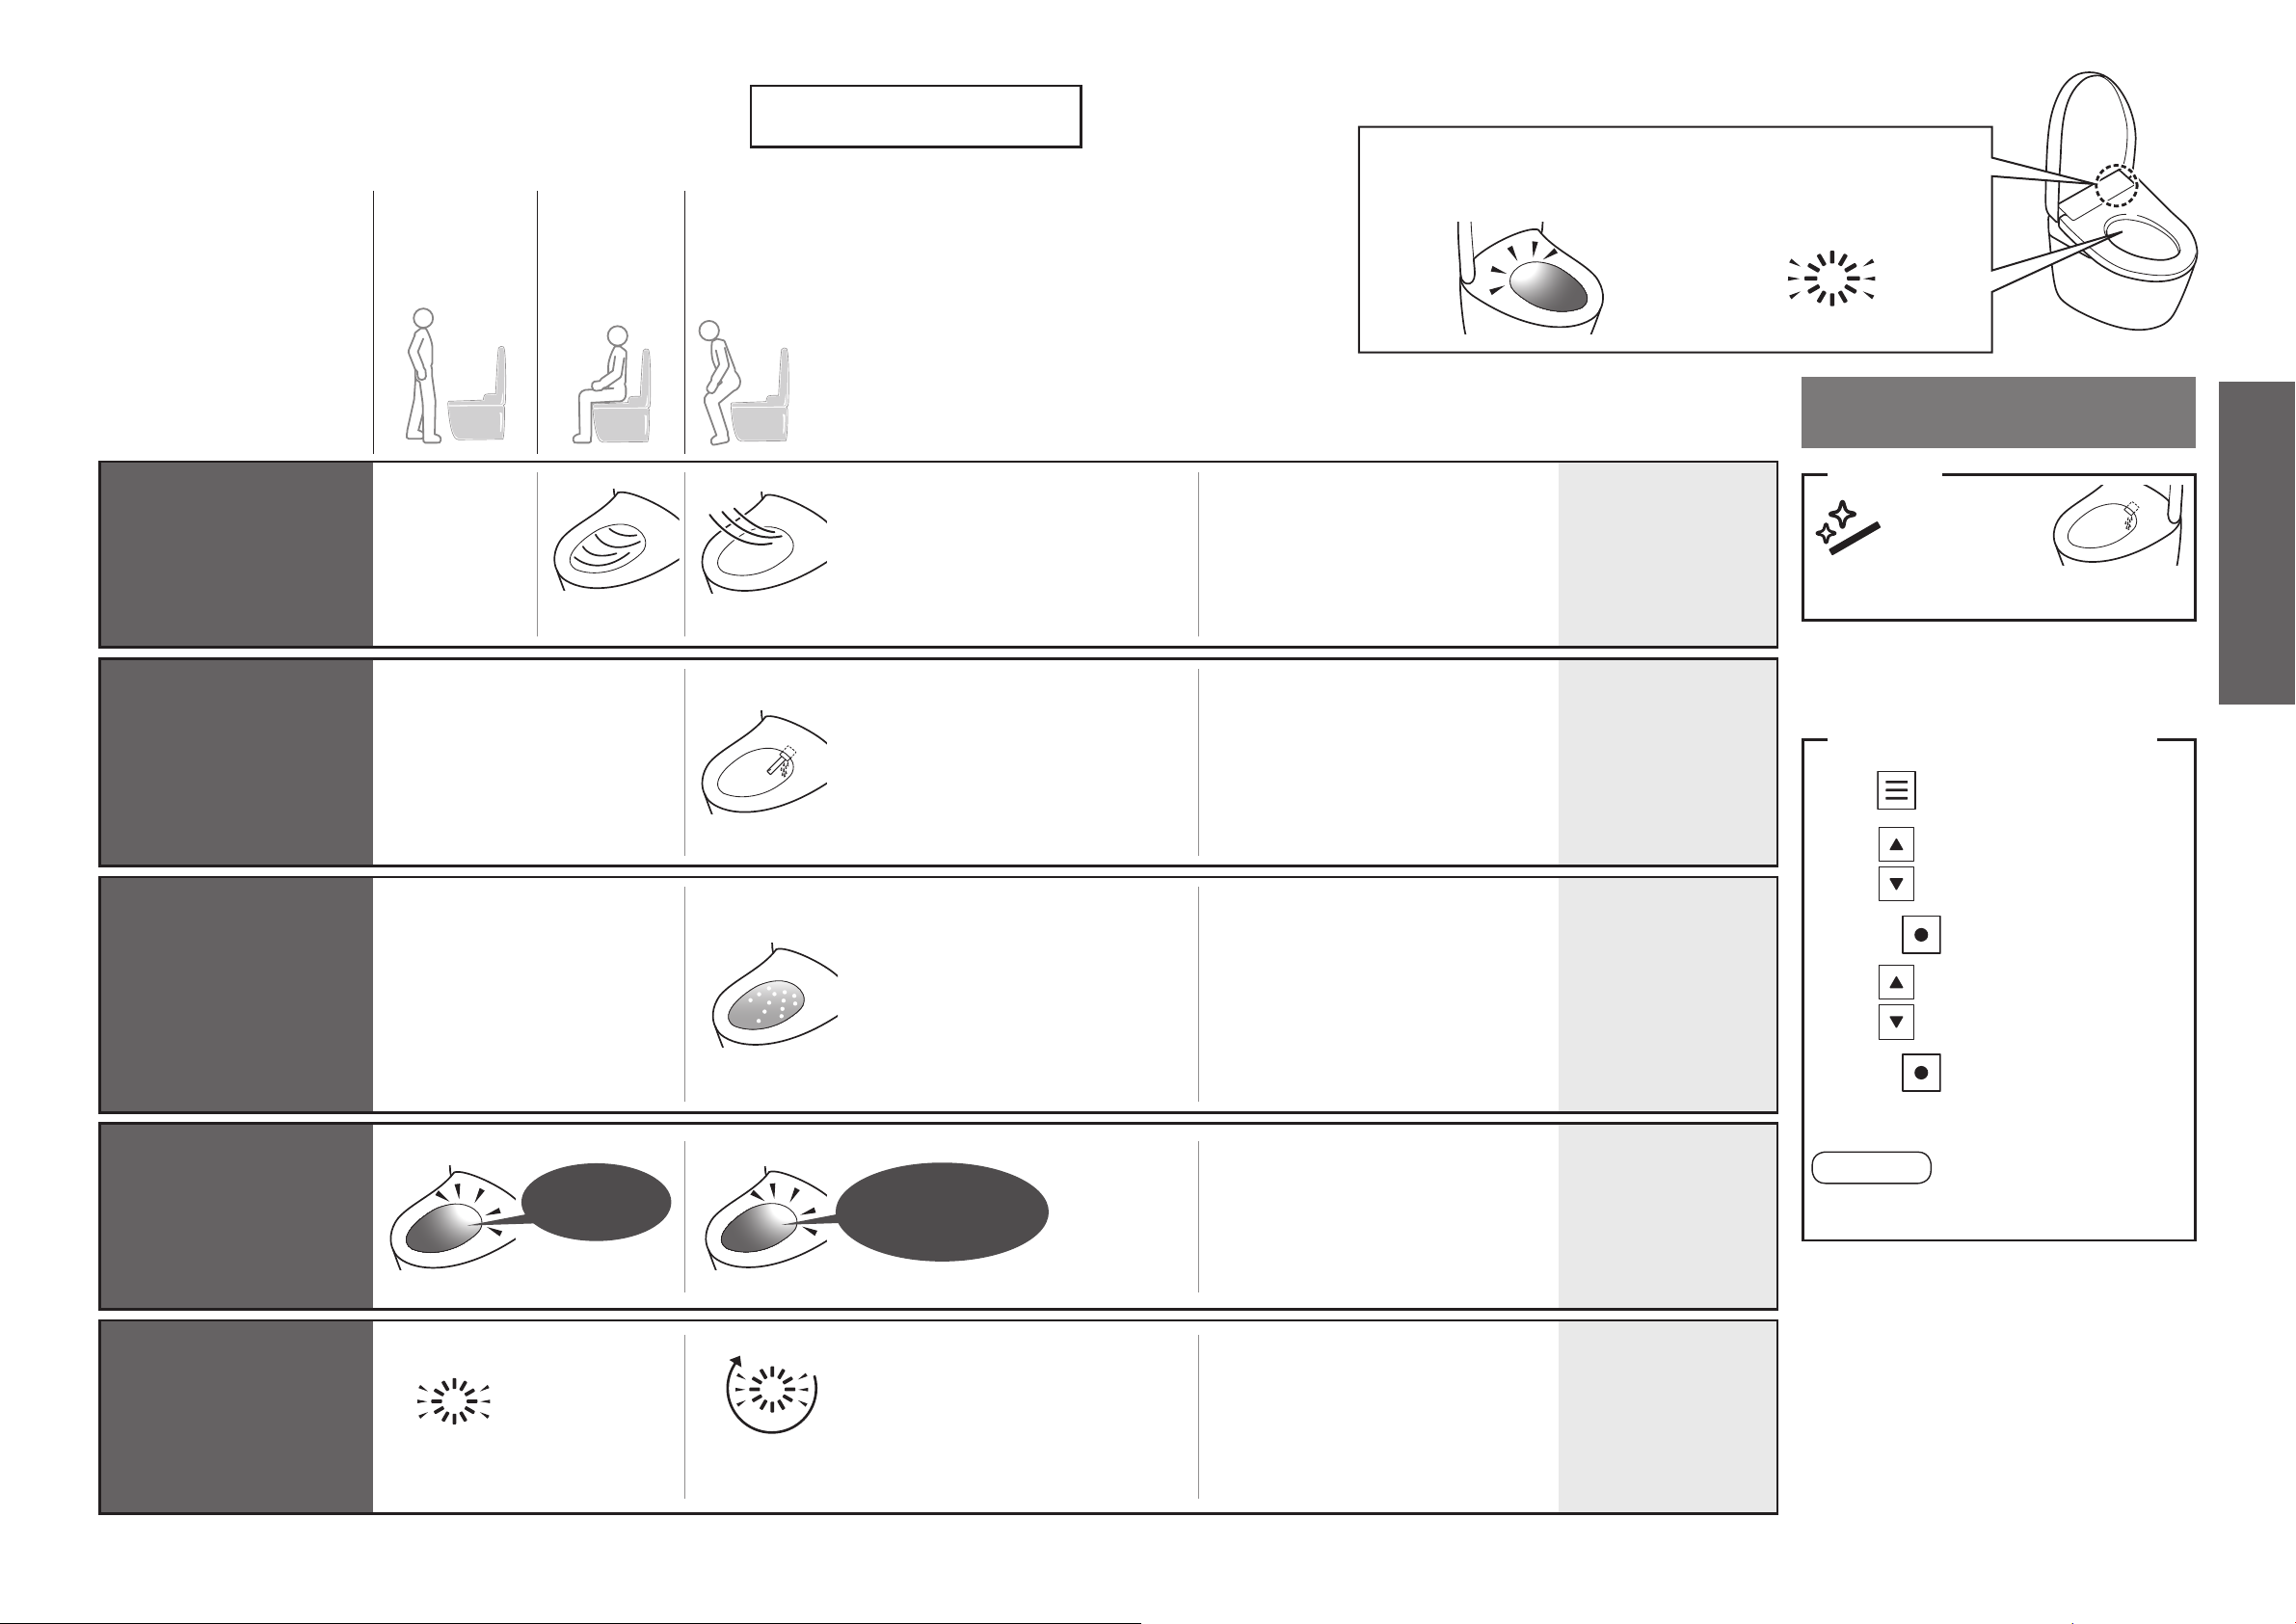
Automa ti c Functions
"ewater+"*1 is used
automatically to clean the
wand and bowl unit.
• Operation under the initial
settings is described
below.
As you
approach
As you
2
*
sit
As you
stand up
Cleaning Features
2
*
Lights to show that the "CLEAN" functions are operating.
■Bowl light
Lights to show that auto bowl CLEAN
and auto wand CLEAN are operating.
■CLEAN indicator
Lights to show that the "clean"
functions are operating.
Removing odours inside the
bowl unit
Deodorizer
Cleans the wand with
"ewater+"*
1
Auto wand
CLEAN
Cleans the bowl unit with
"ewater+"*
1
Auto bowl
CLEAN
Pre-mist
→A mist is
sprayed inside
the bowl unit to
make it more
difcult for dirt
to adhere
Starts the deodorizer
Starts the auto power
deodorizer
(After about 10 seconds)
→
It stops after about 60
seconds
Cleans the wand
automatically
(After about 25 seconds)
Only when the cleansing
functions are used.
→
The wand extends and
"ewater+" *1 comes out
from the base of the wand
After-mist
(After auto wand CLEAN)
If the cleansing functions
are not used, after-mist
starts after about 25
seconds.
→
"ewater+"*1 mist is sprayed
on the bowl unit
■Note
Deodorizing lter needs regular
maintenance. (Page 31)
When the cleansing functions (Rear
and Front cleansing etc,) have not
been used in 8 hours, the wand is
cleaned automatically.
(Water comes out from around the
wand.)
The pre-mist and after-mist are not
sprayed if the toilet seat is open.
The pre-mist does not work for about
90 seconds after the after-mist has
nished.
When the cleansing feature (Rear and
Front cleansing etc,) is not used for
about 8 hours, mist is sprayed on the
bowl unit automatically.
■ Changing
settings
"Deodorizer" ON/OFF
"Auto power deodorizer"
ON/OFF
(Page 52 for all)
"Auto wand CLEAN"
ON/OFF
(Page 50)
"Auto bowl CLEAN" ON/
OFF
(Page 50)
"ewater+" can also be used by
pressing the remote control button
For wand
Press "Wand
CLEAN" button
(After wand cleaning, water comes out
from around the wand.)
●
To clean the wand with it extended.
→"Wand cleaning" (Page 30)
For bowl unit (Manual CLEAN)
1
2
3
("ewater+" mist is sprayed on the bowl unit)
Press.
Select [MANUAL CLEANING].
→
→
Press.
Select [MANUAL CLEAN].
Press.
Operation
Note
It cannot be used when the wand is out
or when you are sitting on the toilet seat.
Bowl light
Lights up
during
pre-mist
Lights up during
auto wand CLEAN
and after-mist
"Bowl light" ON/OFF
(Page 54)
*1 What is meant by "ewater+" ?
This water containing hypochlorous acid generated
from chloride ions in tap water, is widely used
for cleaning and disinfecting items such as food,
utensils and baby bottles.
●
Well water may not deliver the required effect.
(Because the level of chloride ions is low.)
●
"ewater+" helps to minimize dirty surfaces,but
does not make cleaning unnecessary.
●
The effect and duration vary depending on the
usage environment and conditions.
*2 Water comes out from around the wand.
CLEAN
indicator
(Lights up)
(Lights up in a
cycle)
Lights up continuously or in a cycle
when "Auto wand CLEAN", "Auto bowl
CLEAN" or "Auto power deodorizer" is
operating.
(Lights only when the toilet seat is not
in-use)
"CLEAN indicator" ON/
OFF
(Page 54)
18 19
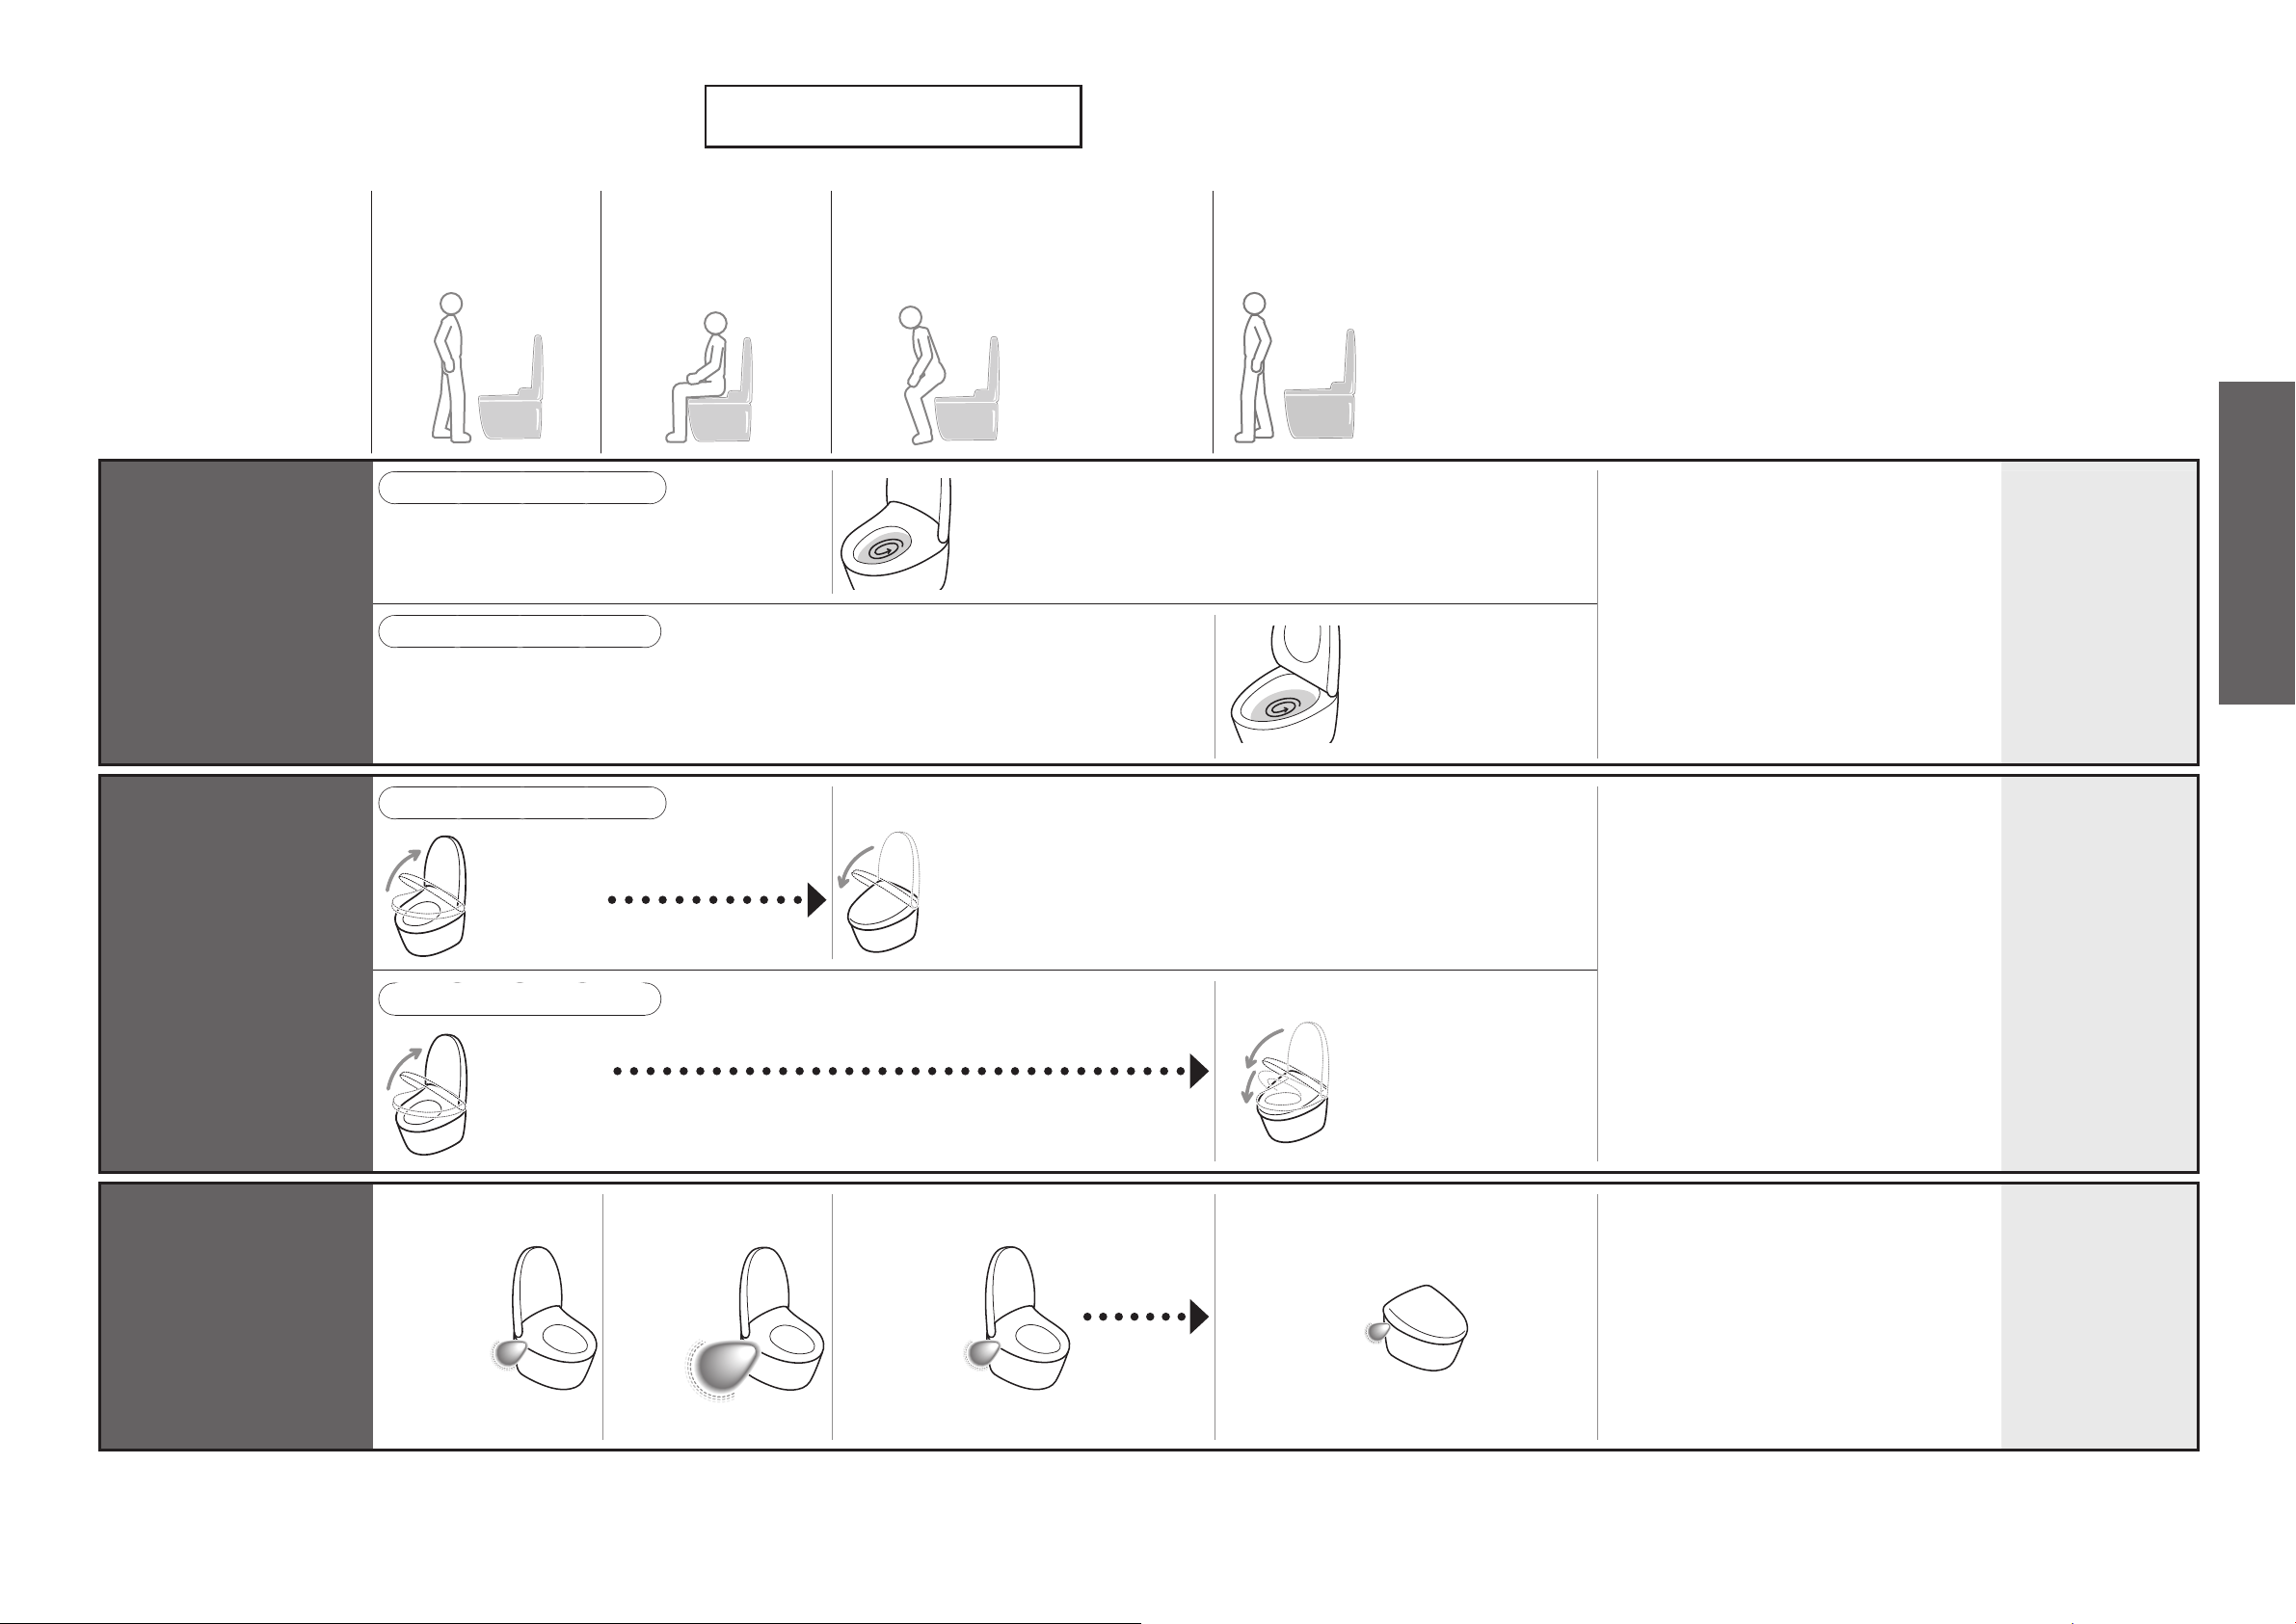
Automatic Functions
Various automatic
functions are available.
• Operation under the initial
settings is described
below.
As you
approach
As you
sit
Convenience Features
As you
stand up
As you
move away
■ Changing
Flush automatically
Auto ushing*
Opening the toilet lid
automatically
Auto open /
close
When using the toilet seat
1
When standing and using
When using the toilet seat
The toilet
lid opens
When standing and using
The toilet
lid opens
Open the toilet seat with the remote control.
The toilet
ushes.
(After about
10 seconds)
The toilet lid
closes
(After about
90 seconds)
The toilet ushes.
(Performs a "Light ush"
about 3 seconds after the
user has moved about 30
cm away from the bowl
unit)
The toilet lid and
toilet seat close
(About 90 seconds after
the user has moved
about 30 cm away from
the bowl unit.)
■Note
Auto ush is not available in the following
cases.
➝
About 60 seconds after the toilet is ushed.
(After 60 seconds have passed,
ush using the remote control.)
When the time spent sitting on the toilet
seat or standing in front of the bowl unit is
less than about 6 seconds.
(Flush with the remote control.)
The ushing varies depending on how long you
sit on the toilet seat.
About 6 to 30 seconds: "Light ush"
About 30 seconds or more: "Full ush"
When the toilet lid is closed with the
remote control or by hand, it cannot
open automatically for about 15
seconds. (Open and close manually.)
When you do not sit on the toilet seat, or
when you sit on it or stand in front of the
bowl unit briey, it takes about 5 minutes
before the lid close automatically.
settings
"Auto ushing"
ON/OFF
"Auto ush delay"
(5 seconds,
10 seconds or
15 seconds)
(Page 44 for all)
"Auto open/close"
ON/OFF
"Auto close delay"
(25 seconds or
90 seconds)
(Page 46 for all)
"Auto open delay"
(15 seconds,
30 seconds or
90 seconds)
"Seat/lid"
(Lid/Seat ∙ Lid)
(Page 48 for all)
Operation
Lighting up the inside of the
bathroom with a soft light
Soft light
*1 Except TCF801CG
Lights up
in middle
mode
Lights up
in high
mode
Lights up in
middle mode
(About 90
seconds)
Lights up in
low mode
(Goes out after
about 5 seconds.)
"Soft light"
ON/OFF
(Page 54)
20 21
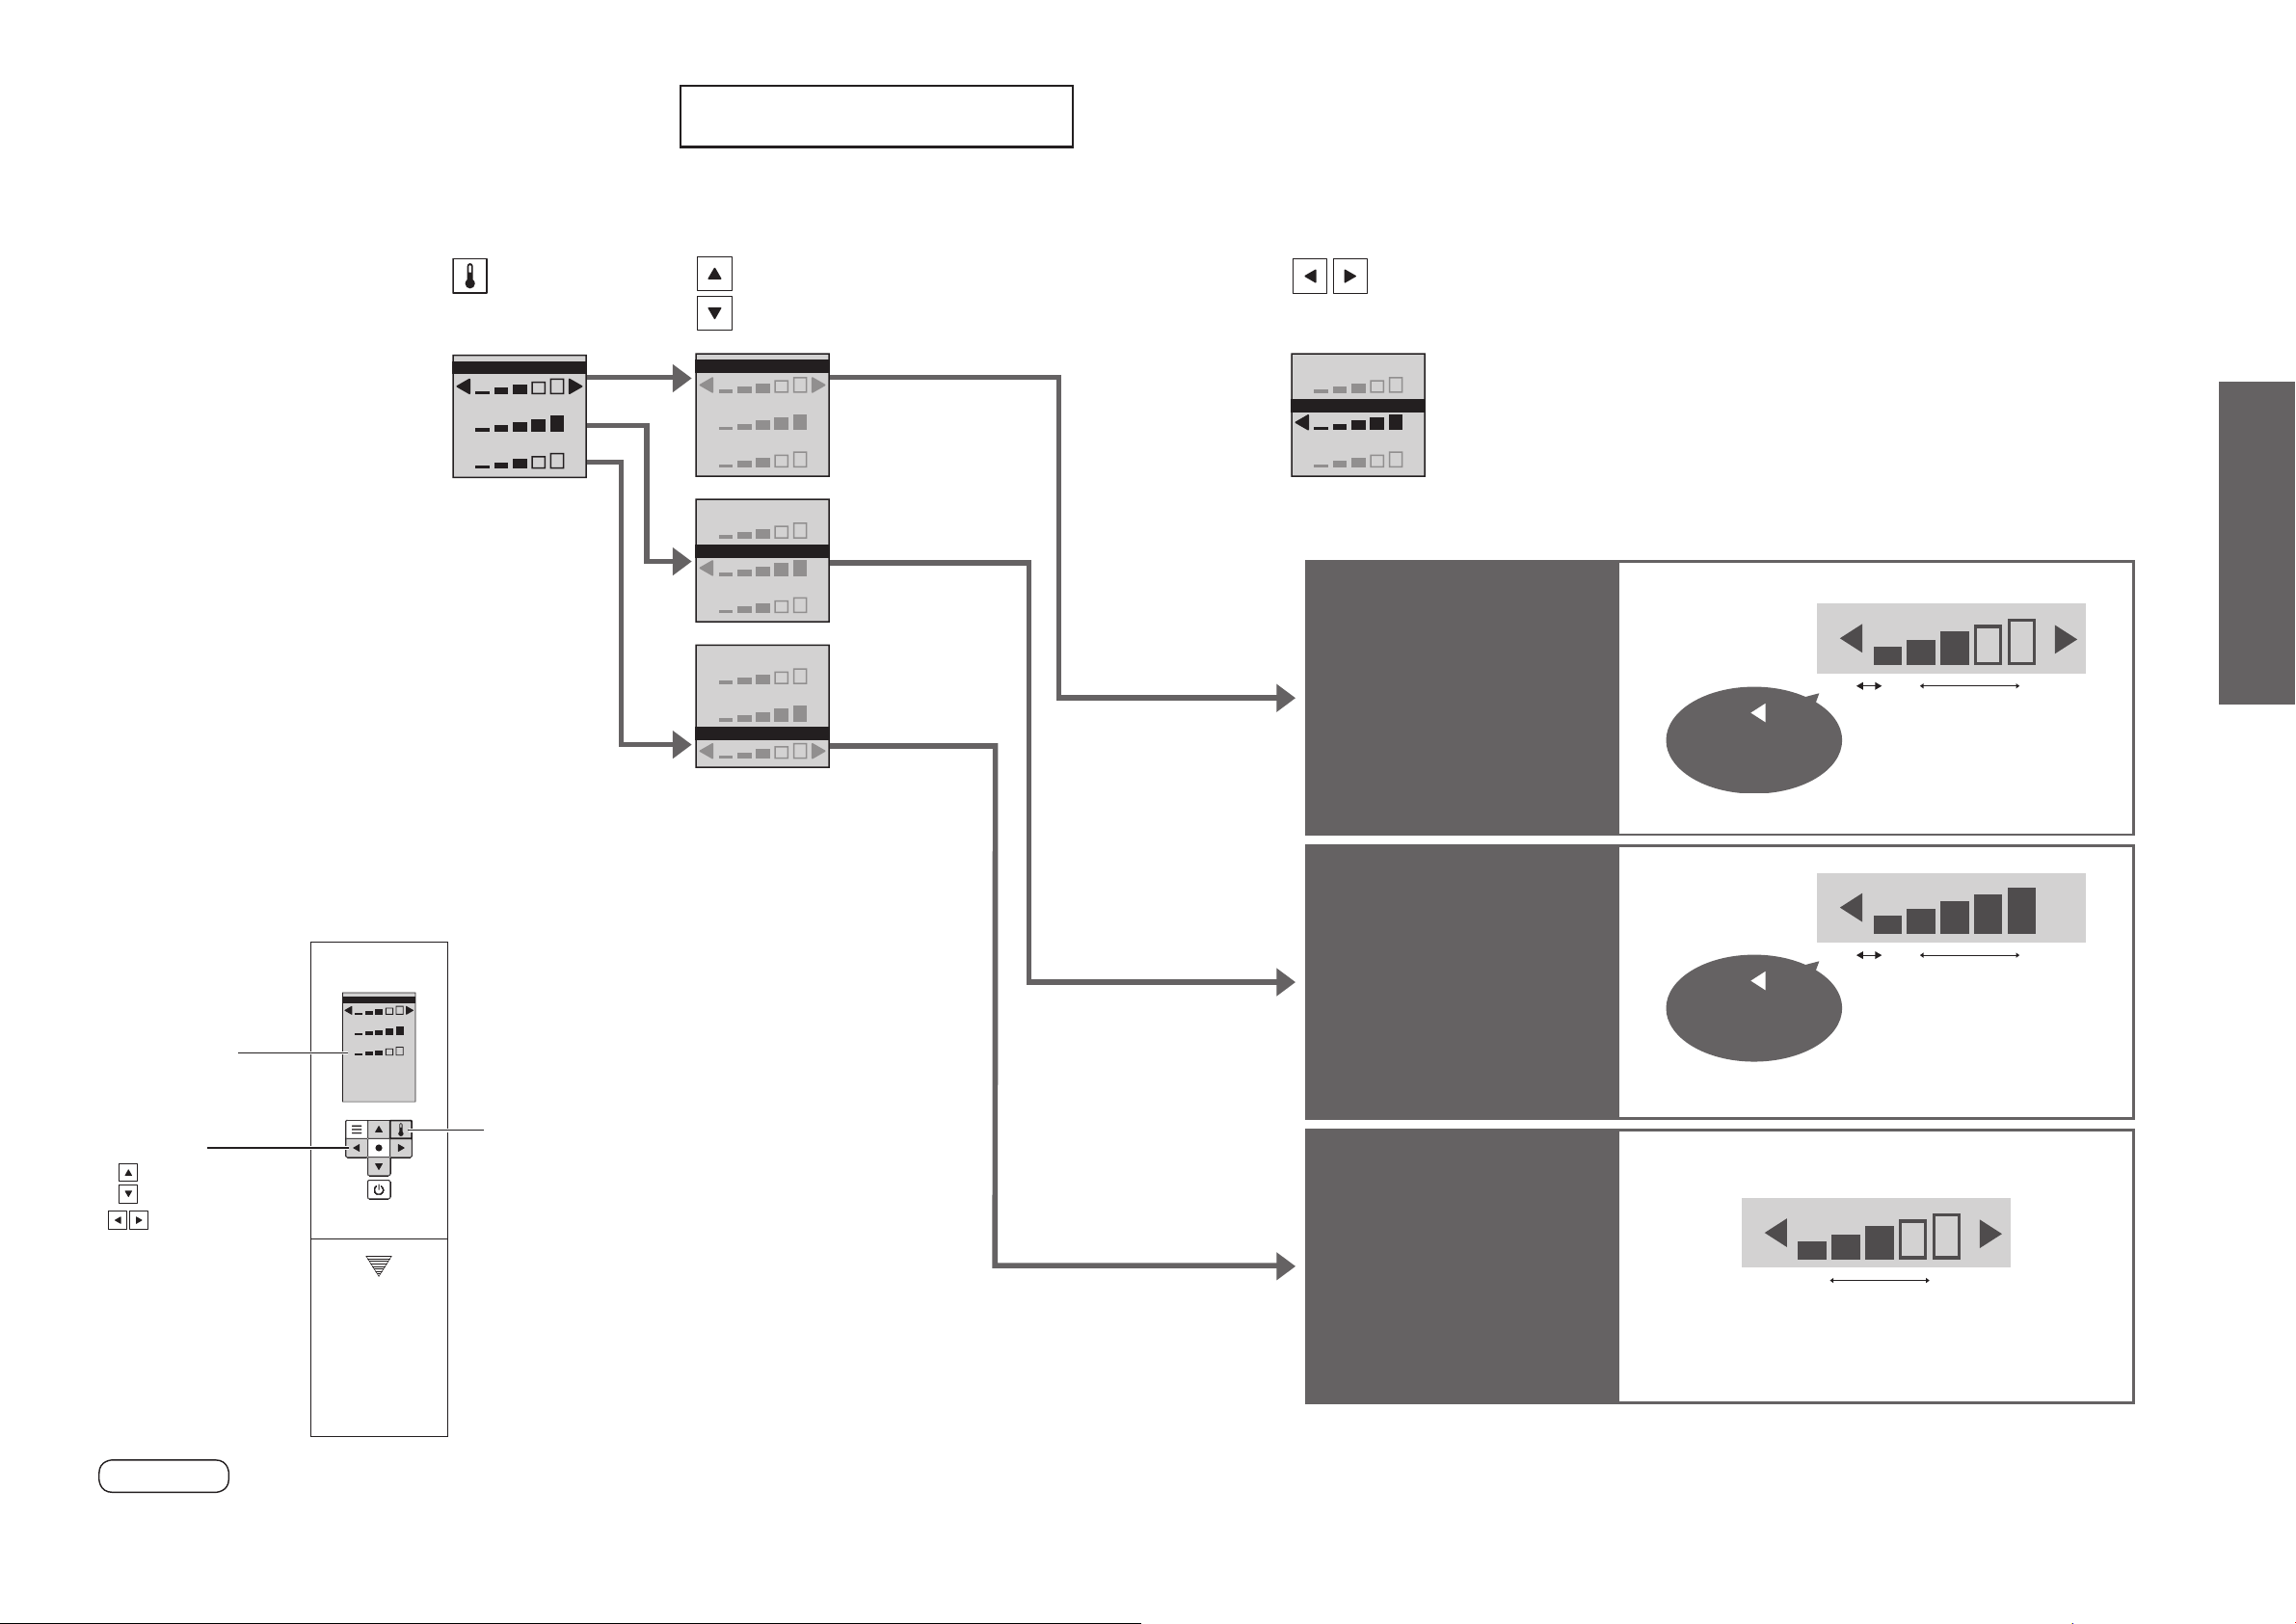
adjustment button
Display screen
Select keys
Temperature Adjustment
Warm Water, Toilet Seat, Drying
Five different temperature levels from high to low and "OFF" can be set.
1
Remove
the remote
control from
the hanger.
If the remote
control is secured
to prevent theft
(Page 12)
2
Press.
WATER TEMP
SEAT TEMP
DRYER TEMP
3
Select the item you want to set.
WATER TEMP
SEAT TEMP
DRYER TEMP
WATER TEMP
SEAT TEMP
DRYER TEMP
WATER TEMP
SEAT TEMP
DRYER TEMP
4
Select the
temperature level.
WATER TEMP
SEAT TEMP
DRYER TEMP
Warm water
temperature
<Settings
complete>
Press until
[OFF]
appears.
Mount the
5
remote control
in the hanger.
If the remote
control is secured
to prevent theft
(Page 12)
OFF Low High
*1
Operation
WATER TEMP
SEAT TEMP
DRYER TEMP
Temperature
: Select the item
: Select the
setting
CAUTION
●
During setting, the display goes out when no button is pressed within about 60 seconds.
If you fail to complete the setting, redo from the step 2.
Toilet seat
temperature
Press until
[OFF]
appears.
When "OFF" is set, the "Seat" LED on the main
display will go off.
OFF Low High
Drying air
temperature
The "Drying" cannot be turned "OFF".
*1 To prevent condensation, the water temperature does not drop below 20 °C even when set to "OFF".
●
If adjusting the temperature does not warm up the toilet seat → Is the energy saver set to "ON"?
(Page 24)
Low High
22 23
 Loading...