

Toto Washlet GL TCF891G, Washlet GL TCF891GE, Washlet GL TCF891SW Instruction Manual
Instruction Manual
Thank you very much for purchasing this Washlet. Please read ¢
this manual carefully and use the Washlet correctly.
Keep this instruction manual for future reference.
"Washlet" is a registered trademark of TOTO. ¢
Introduction Operation Cleaning Settings Troubleshooting
Cautions and warnings . .........2
Precautions for use . ............6
Efficient use . ..................7
Overview of features . ...........8
Names of parts . ................9
Before use ....................11
How to use the Washlet . ........13
Convenient functions ...........15
Adjusting the temperature ● ......15
Using the deodorizer ● ..........16
Energy Saver function ..........17
Using the Energy Saver timer ● ...17
Cleaning the Washlet . ..........19
Before cleaning ● ..............19
Daily cleaning ● ...............19
Thorough cleaning ● ............20
Cleaning the main Washlet unit, seat and lid•
..20
Cleaning between the main Washlet unit •
and the toilet ..........................22
Periodic cleaning ● .............23
Cleaning the mains plug • ................23
Cleaning the deodorizer filter• .............23
Cleaning the wand• .....................24
Cleaning the water supply filter • ...........25
Changing settings . ............27
Setting whether or not the remote ●
control makes sound ..........27
Setting automatic operation of the ●
standard deodorizer ...........27
Making the Power Deodorizer work ●
automatically
.................28
Preventing damage from freezing and
measures for long-term disuse
.....29
Troubleshooting
...................
34
Specifications . ................39
Warranty ......................40
Important User Guidance Information
. . 41
Washlet GL
TCF891G/GE/SW
2
Cautions and warnings
Always observe these warnings.
Please read these cautions and warnings carefully and use the equipment correctly.
Follow all safety precautions and warnings.
The meanings of these indications are as follows. ●
WARNING
When this appears next to a topic, this indicates that misoperation
could result in death or serious injury.
CAUTION
When this appears next to a topic, this indicates that misoperation
may result in injury or physical damage.
The following symbols are used to classify and explain instructions that must be followed. ●
Symbol example Meaning of symbol
The
symbol indicates something that is prohibited.
The
symbol indicates something that must be done.
This equipment is Class 1, so it is necessary to attach it to an earthed connection. ●
Install this equipment close to a mains socket. ●
This equipment is not to be used by any person who has reduced physical, sensory or mental abilities (including ●
children), nor is it to be used by any person who lacks sufficient experience or knowledge. However, such persons may
use the equipment when a person who takes responsibility for their safety provides supervision and direction.
Children must be supervised to make certain that they do not play with the equipment.
Use the new hose set included with this equipment. Do not reuse an old hose set. ●
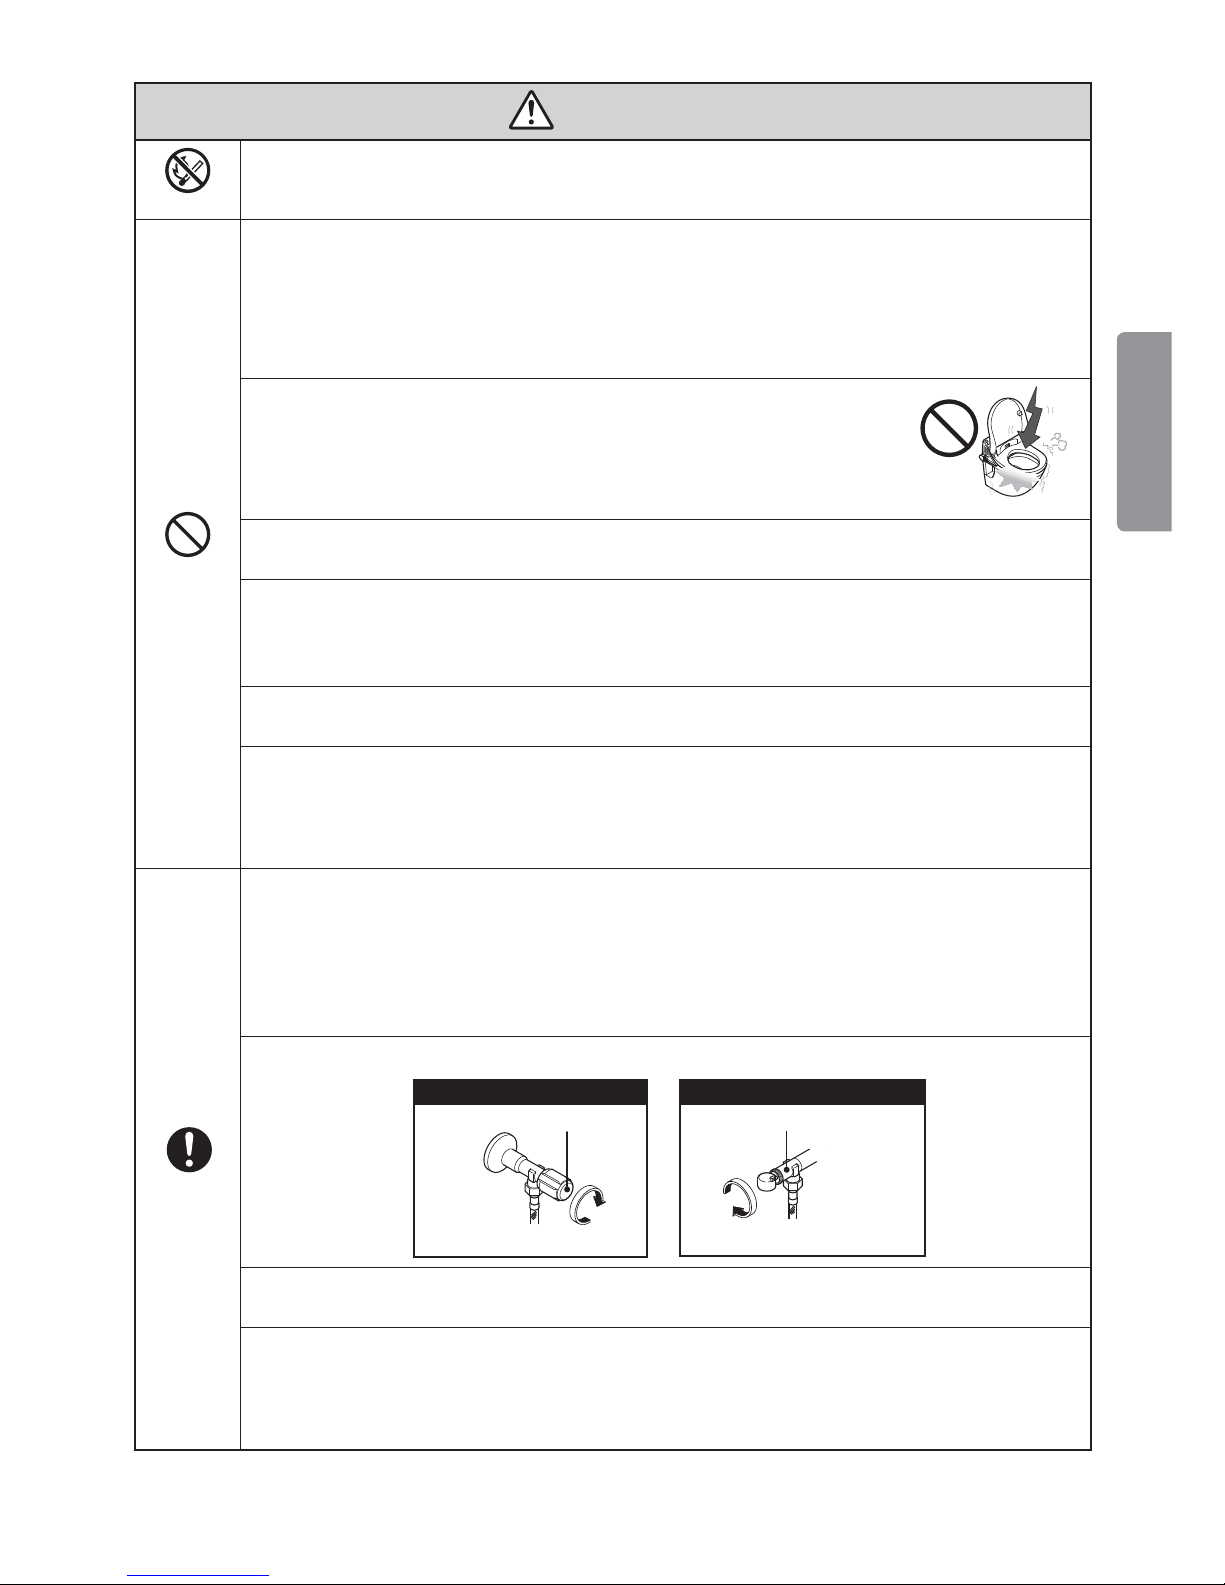
WARNING
Do not wet
Do not wet the main Washlet unit or mains plug with water or cleaning fluid.
Doing so could cause fire or electric shock. ●
Required
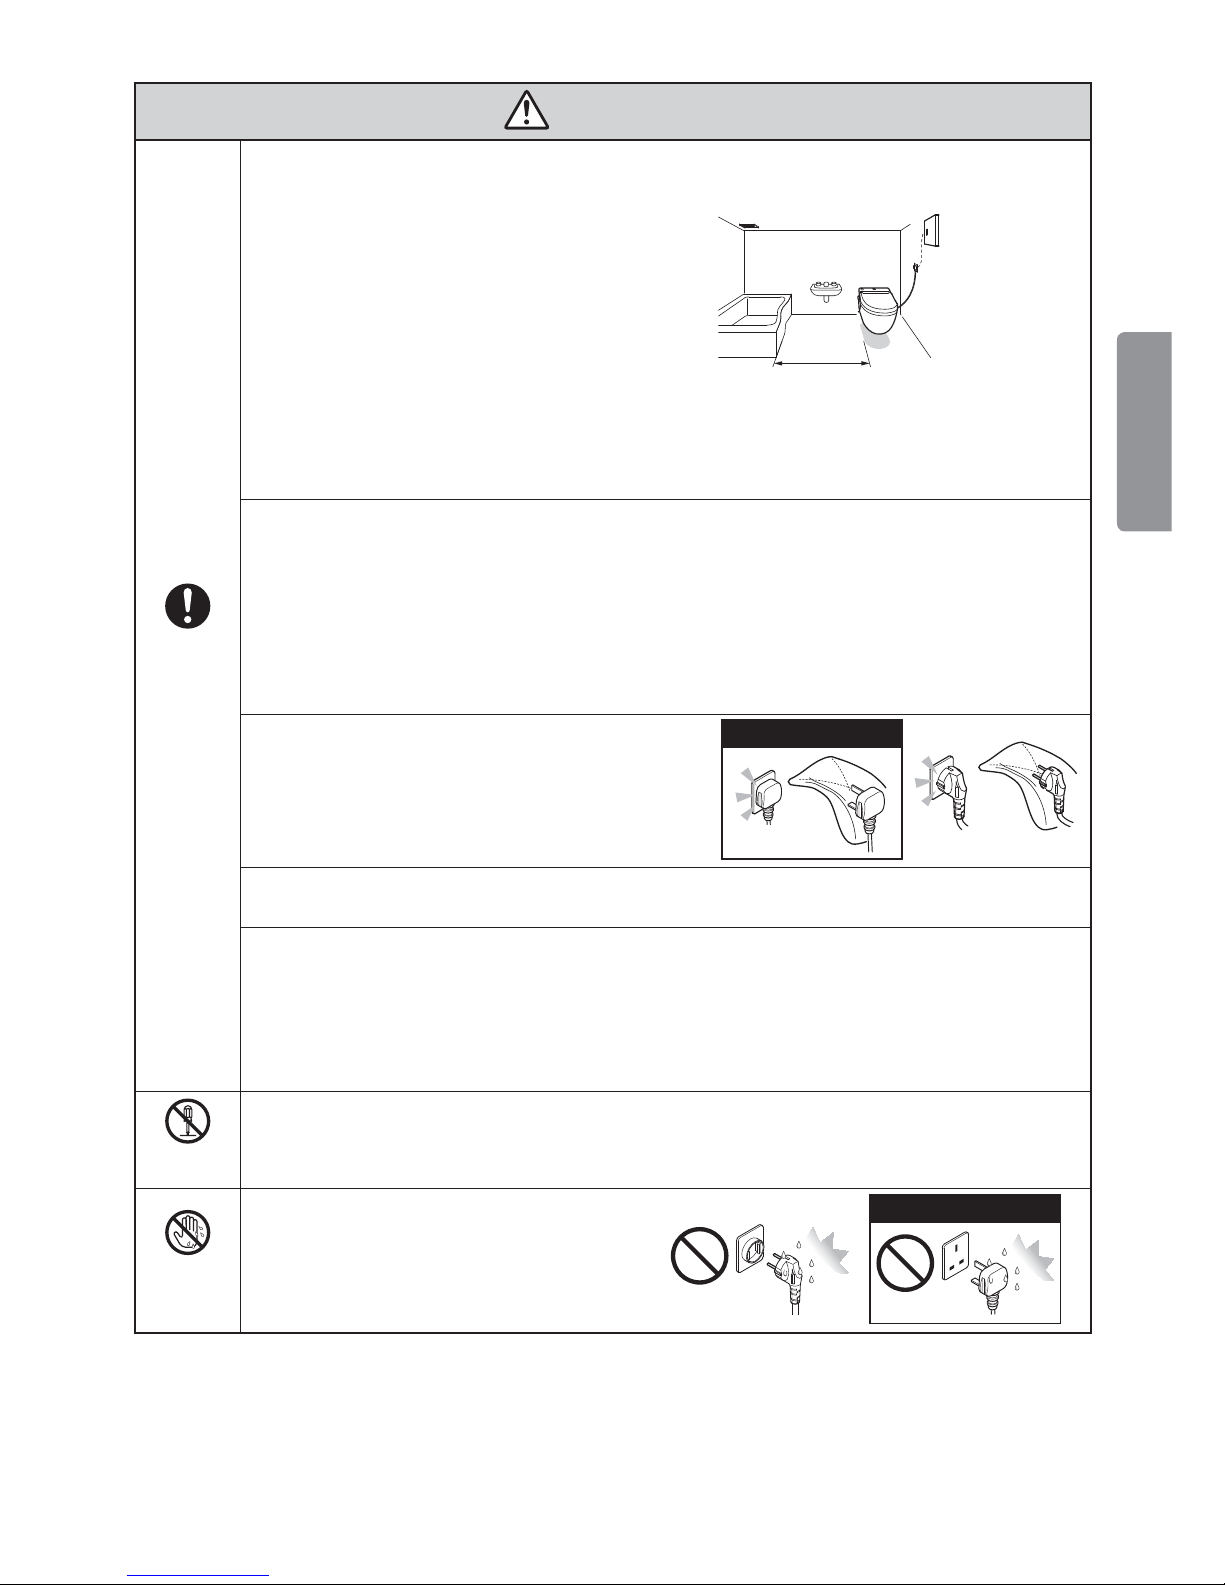
Since this is electronic equipment, do not locate it in a place where it might be
splashed or otherwise become wet. Likewise, do not locate it in a humid place
where water could drip onto the surface of the Washlet. When using it in a
bathroom, install a ventilation fan or ventilation opening, so that the bathroom
has sufficient airflow.
Install the Washlet at least 0.6 m away from any bathtub.
Failure to observe this caution may result in fire or electrical shock. ●
Prepare the socket for the electrical wiring as follows.
Failure to observe this caution may result in fire or electrical shock. ●
a. Provide electric current to the socket (device) using a differential residual electric current device
(DDR) with a released current that does not exceed 30 mA.
b. Locate the socket (device) and its wiring plug at least 0.6 m from the outside edge of a shower
chamber or bathtub.
Confirm that the wiring for items a and b above has been completed. If the wiring has not been ›
completed, request completion from the business that installed the unit.
3
Introduction
WARNING
Required
Confirm that the earth wire has been installed properly.
●
If the earth wire is not installed, electric shocks could
occur if there is a malfunction or a short circuit.
Note:
Use copper wire with a diameter of 1.6 mm or more and
with an earth resistance of 100 Ω or less.
If the earth wire has not been installed, request ›
installation from the business that installed the unit.
Always insert the electrical cord completely
into the socket (220-240 V AC, 50 Hz).
Failure to observe this caution may result in fire or ●
electrical shock.
Follow the installation requirements for the country in which the Washlet is being installed. ›
Always connect the Washlet to the cold water supply.
Failure to do so could cause burns or malfunction of the equipment. ●
Be careful to prevent low-temperature burns.
When seated on the Washlet for a long time, set the seat temperature to "off". ●
Another person should turn the seat temperature to "off" before the following types of people use the ●
Washlet.
Children, elderly and other people who cannot adjust the temperature suitably themselves.•
Sick or physically disabled people and others who might not be able to move freely. •
People who have taken medication that causes drowsiness (sleep aids, cold medicine, etc.), •
people who have drunk much alcohol, extremely fatigued people and others who might fall asleep
unintentionally.
Remove dust that has adhered to the mains
plug blades or other parts regularly and
insert it in the socket completely.
Dust could cause fire or electrical shock. Remove ●
the plug and wipe it with a dry cloth.
When removing the mains plug, always hold and pull the plug itself.
If you pull on the cord, the plug and cord could be damaged, and fire or electrical shock could result. ●
To reduce the danger of burns, death from electric shock, fire or other human injury:
Close supervision is necessary when this product is used by or near children or invalids. Use this product only for its intended use as described in this manual. Do not use accessories not recommended by the manufacturer.
Keep the cord away from heated surfaces. Connect this product to a properly earthed socket only. See the Earthing Instructions. The tank should only be filled with water. -
Do not
disassemble
Never disassemble, repair or modify the device.
This could cause fire or electric shock. ●
Do not
touch with
wet hands
Do not remove the mains plug with wet
hands.
This could cause electric shock. ●
Ventilation fan or ventilation opening
0.60 m
Earth leakage
breaker
Circuit board
For the U.K.
For the U.K.
4
WARNING
Prohibited
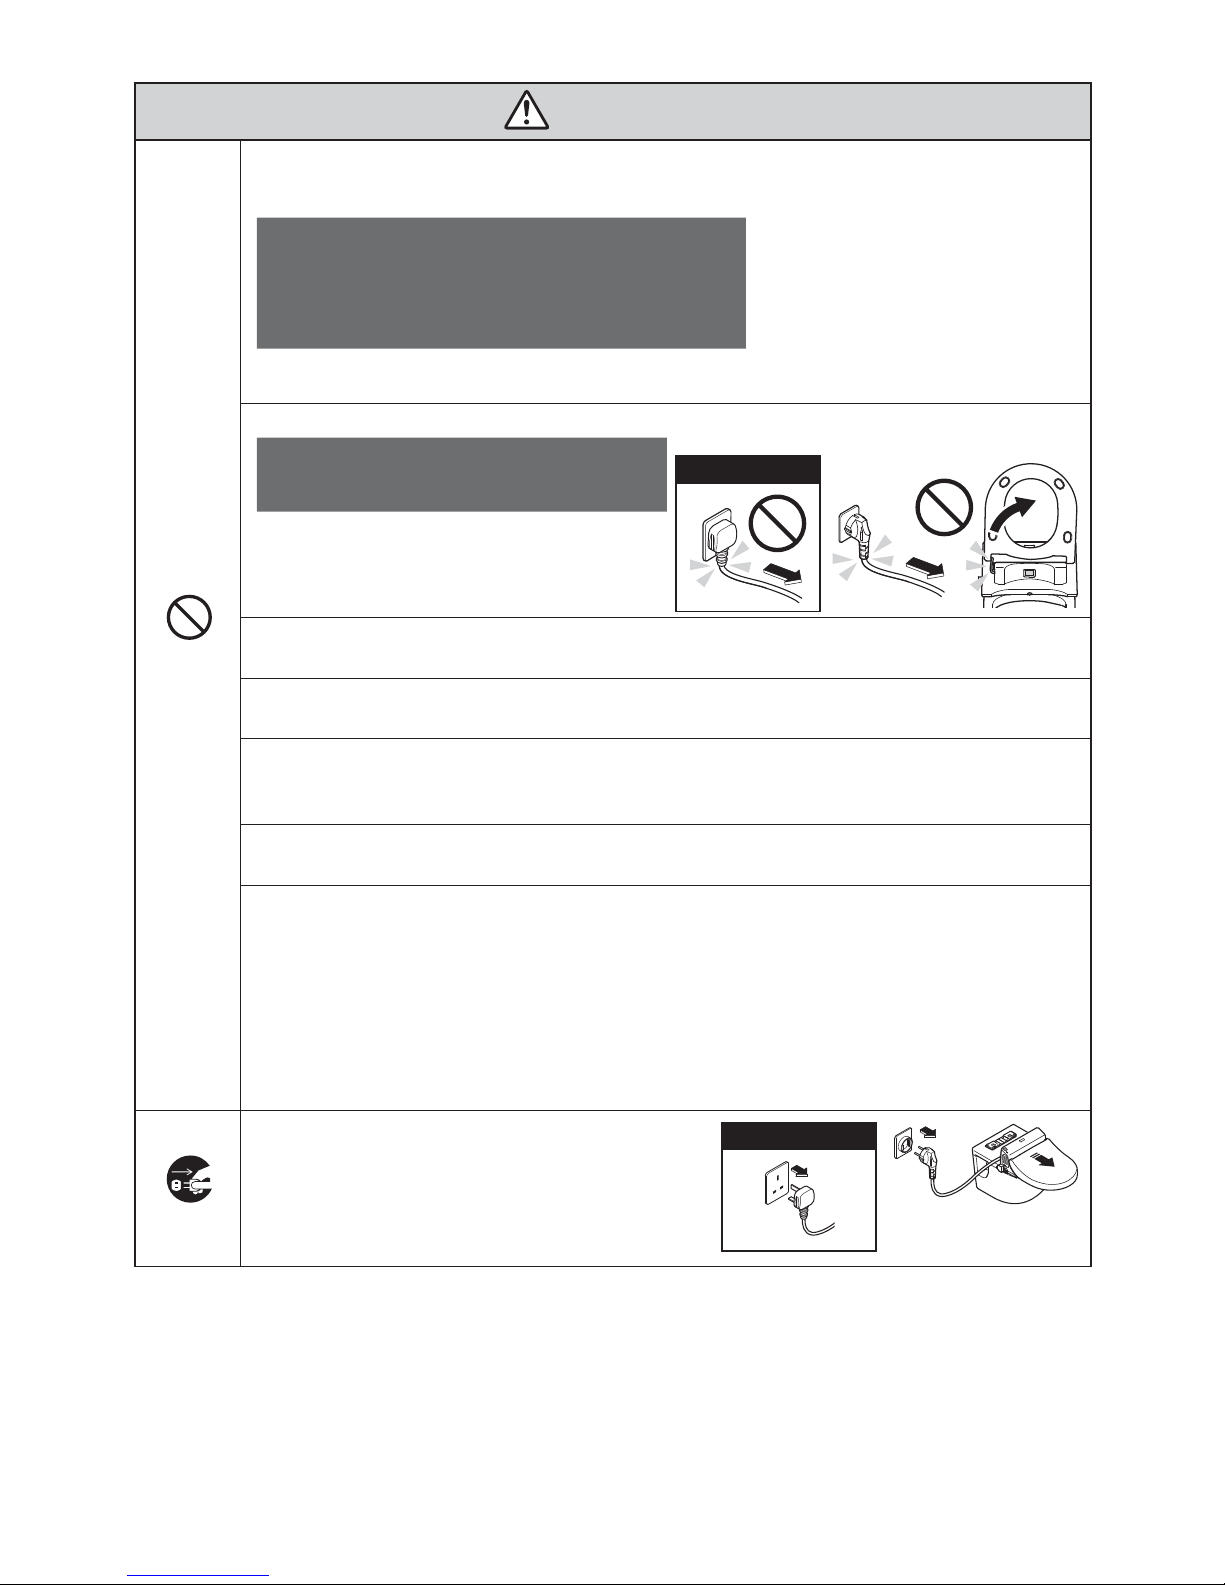
Do not continue to use Washlet that is broken or malfunctioning.
In the following situations, disconnect the mains plug and close the water shut-off valve to stop the ●
water supply.
Possible malfunctions
Water is leaking from plumbing or the main unit. ●
The Washlet has a crack or a break. ●
There is a strange sound or smell. ●
Smoke is coming from the Washlet. ●
The Washlet is unusually hot. ●
Continued use of a malfunctioning or broken unit could cause fire, electric shock, or flooding of the ●
room containing the unit.
Do not do anything that could damage the power cord or seat cord.
Do not pull, twist, excessively bend,
intentionally damage, alter or heat the cords.
Do not put heavy items on them.
Continued use of a unit with a damaged cord ●
could cause fire, electric shock, or a short circuit.
Do not use a loose mains socket.
This could cause fire or electric shock. ●
Do not use this product with any power supply other than specified (220-240 V AC, 50 Hz).
Failure to observe this caution may result in fire or electrical shock. ●
Do not use sockets or wiring equipment exceeding the rated values.
Use of multi-prong mains adapters and other actions that exceed the rated values could cause fire from ●
excess heat.
Use only tap water or potable well water (groundwater).
Use of other water could cause skin inflammation or other problems. ●
To reduce the danger of burns, death from electric shock, fire or other human injury:
Never operate this product if it has a damaged cord or plug, if it is not working properly, if it has been dropped or damaged, or if it has been dropped in water. Return the product to TOTO Europe GmbH for
examination and repair.
Never block the air openings of the product or place it on a soft surface, such as a bed or a couch, where the air openings could be blocked. Keep the air openings free of lint, hair or a similar material.
Never use it while sleepy or drowsy. Never drop or insert anything into any opening or hose. Do not use outdoors or operate where aerosol (spray) products are being used or where oxygen is being administered.
Unplug first
Always disconnect the mains plug from the
socket when cleaning.
Failure to do so could cause electric shock. ●
Use of the › "Wand Cleaning button" is an exception to
this rule.
For the U.K.
For the U.K.
5
Introduction
CAUTION
Flammable
Do not bring lit cigarettes or other burning materials near the Washlet.
Doing so could cause fire. ●
Prohibited
When cleaning plastic parts, including the main Washlet unit, use diluted (pHneutral) kitchen cleaning detergent. Do not use the following:
Toilet cleaner, household cleaner, benzine, paint thinner, cleanser powders, nylon
scrubbing pads, etc.
These could damage the plastic or cause cracks, which could lead to injury. ●
These could damage the water supply hose, resulting in water leaks. ●
Do not subject the main Washlet unit to strong force or a
sudden shock. Do not climb on the seat, the toilet lid or any
other part of the main Washlet unit. Do not put heavy objects
on it.
Injury could result if it breaks or the main Washlet unit becomes dislodged and falls. ●
Do not lift the Washlet by the seat or toilet lid.
Injury could result if the main Washlet unit becomes dislodged and falls. ●
Do not detach the drain valve with built-in water filter while the water shut-off
valve is still open.
Doing so will cause water to spill. ●
► See "Cleaning the water supply filter" on page 25
Do not bend or crush the water supply hose.
This could cause a water leak. ●
To reduce the danger of death from electric shock:
Do not use while bathing. Do not place or store the product where it could fall or be pulled into a tub or sink. Do not put in or drop into water or other liquid. Do not try to recover it if it has fallen into water. Unplug it immediately. -
Required
If the Washlet will not be used for a long time, close the water shut-off valve,
drain the water and disconnect the mains plug.
► See "Draining the water" on page 31
For safety, disconnect the mains plug. ●
Run water through the Washlet before using it again because water left in the unit may have spoiled ●
and could cause skin inflammation or other problems.
► See "Restoring the water supply after draining the Washlet" on page 33
If a water leak occurs, close the water shut-off valve and stop the water supply.
Wall-mounted toilet valve Floor-mounted toilettvalve
Water shut-off valve Water shut-off valve
Turn clockwise Turn clockwise
Thoroughly tighten the drain valve with built-in water filter.
Failure to do so could cause a water leak. ●
Prevent damage from freezing.
Freezing could cause damage to the water supply plumbing and the inside of the Washlet and result in ●
a leak.
Use a heater or otherwise keep the toilet warm. ●
► See "Preparation for freezing conditions" on page 29
6
Earthing Instructions
This product must be earthed. If an electrical short circuit occurs, earthing reduces the risk of electric shock by
providing an escape wire for the electrical current. This product is equipped with a cord that has an earth wire and an
earthing plug. The plug must be plugged into a socket that is properly installed and earthed.
Improper use of the earthing plug can result in the risk of an electric shock.
If the cord or plug requires repair or replacement, do not connect the earthing wire to either of the flat blade terminals.
The earth wire has insulation that is green on the outside and might or might not have yellow stripes.
Check with a qualified electrician or serviceman if you do not completely understand the earth wire instructions or have
a doubt about whether the product is properly earthed.
This product is equipped at the factory with a specific electrical cord and plug that allow connection to a suitable
electrical circuit. Confirm that the product is connected to a socket with the same configuration as the plug. Do not
use an adapter with this product. Do not modify the included plug. If the plug and socket are not compatible, have a
suitable socket installed by a qualified electrician. If the product must be reconnected for use with a different type of
electrical circuit, qualified service personnel must conduct the reconnection.
If it is necessary to use an extension cord, use only a three-wire extension cord that has a three-blade earthing plug
and a three-slot socket that accepts the plug on the product cord. Replace or repair a damaged cord.
Save these instructions.
Precautions for use
Please follow these instructions regarding the Washlet.
Do not wipe the main unit, seat or toilet
lid with dry cloth, toilet paper or similar
materials.
► "Cleaning the Washlet" on page 19
Do not expose to direct sunlight.
Direct exposure could cause changes in colour or ●
irregular temperature in the heated seat, as well as
malfunction of the remote control.
Avoid urinating on the
main unit and wand.
Do not cover the seat
sensor or the signal
transmission area of the
remote control.
This could cause the Washlet to ●
function incorrectly.
Do not lean against the
toilet lid.
Disconnect the
mains plug during
thunderstorms.
Use radios and similar devices at a distance from the Washlet.
The Washlet could cause interference to the radio signal. ●
For the U.K.

7
Introduction
Efficient use
Skilfully save energy to protect the global environment.
Using the timer-based Energy Saver Close the toilet lid
Once the Energy Saver is
set, the warm water and seat
heaters will turn off at the same
time every day to save energy.
The duration of the Energy
Saver can be set to 3, 6 or 9
hours.
► See page 17
By closing the toilet lid, less
warmth escapes from the seat
surface, conserving energy.
Set the temperature lower Set the Operation on/off button to "off"
when the Washlet will not be used for a
long time
To conserve energy set the
temperature just high enough so
that the seat does not feel cold.
► See page 15
When going out, for example,
set the
button to "off" to
conserve energy.
► See page 12
3-hour Energy Saver
in use
Timer-based Energy Saver in use
8
Overview of features
Washlet functions Page
Rear wash Wash the rear. ● 13
Front wash Use as a bidet for women. ● 13
Washing position adjustment Adjust the wand position forward and backward. ● 13
Water pressure adjustment Adjust the water pressure. ● 13
Oscillating wash
Moves the wand forward and backward for thorough ●
cleaning over a wide area.
13
Amenities Page
Heated seat Warms the toilet seat. ● -
Temperature adjustment Adjust the temperature of the water and the seat. ● 15
Deodorizer Eliminates odours inside the toilet. ● 16
Power Deodorizer
Eliminates odours inside the toilet with even greater ●
suction power.
16
Automatic Power Deodorizer
Automatically operates the Power Deodorizer when a ●
person leaves the seat.
16
Remote control Control the Washlet from a comfortable position. ● 10
Seat sensor
Makes various functions operate when a person sits on ●
the seat.
13
Soft closing Closes the seat and toilet lid slowly. ● -
Energy Saver functions Page
Timer-based Energy Saver
Once set, the warm water and seat heaters will turn ●
off at the same time every day to save energy. (The
duration of Energy Saver can be set to 3, 6 or 9 hours.)
17, 18
Operation on/off button
By turning this button "off", the operation of the heated ●
seat and other functions can be stopped for thorough
energy conservation.
12
Cleaning features Page
Seat and toilet lid attachment and
removal
The seat and toilet lid can be removed easily to make ●
cleaning simple.
20, 21
One-touch attachment and removal of the
main unit
The main Washlet unit can be removed with a simple ●
operation allowing easy access to the back of the toilet
for cleaning.
22
Self-cleaning
The wand tip is automatically cleaned thoroughly before ●
and after washing.
-
Wand Cleaning on/off button
The wand can be extended without emitting water for ●
easy cleaning.
24
9
Introduction
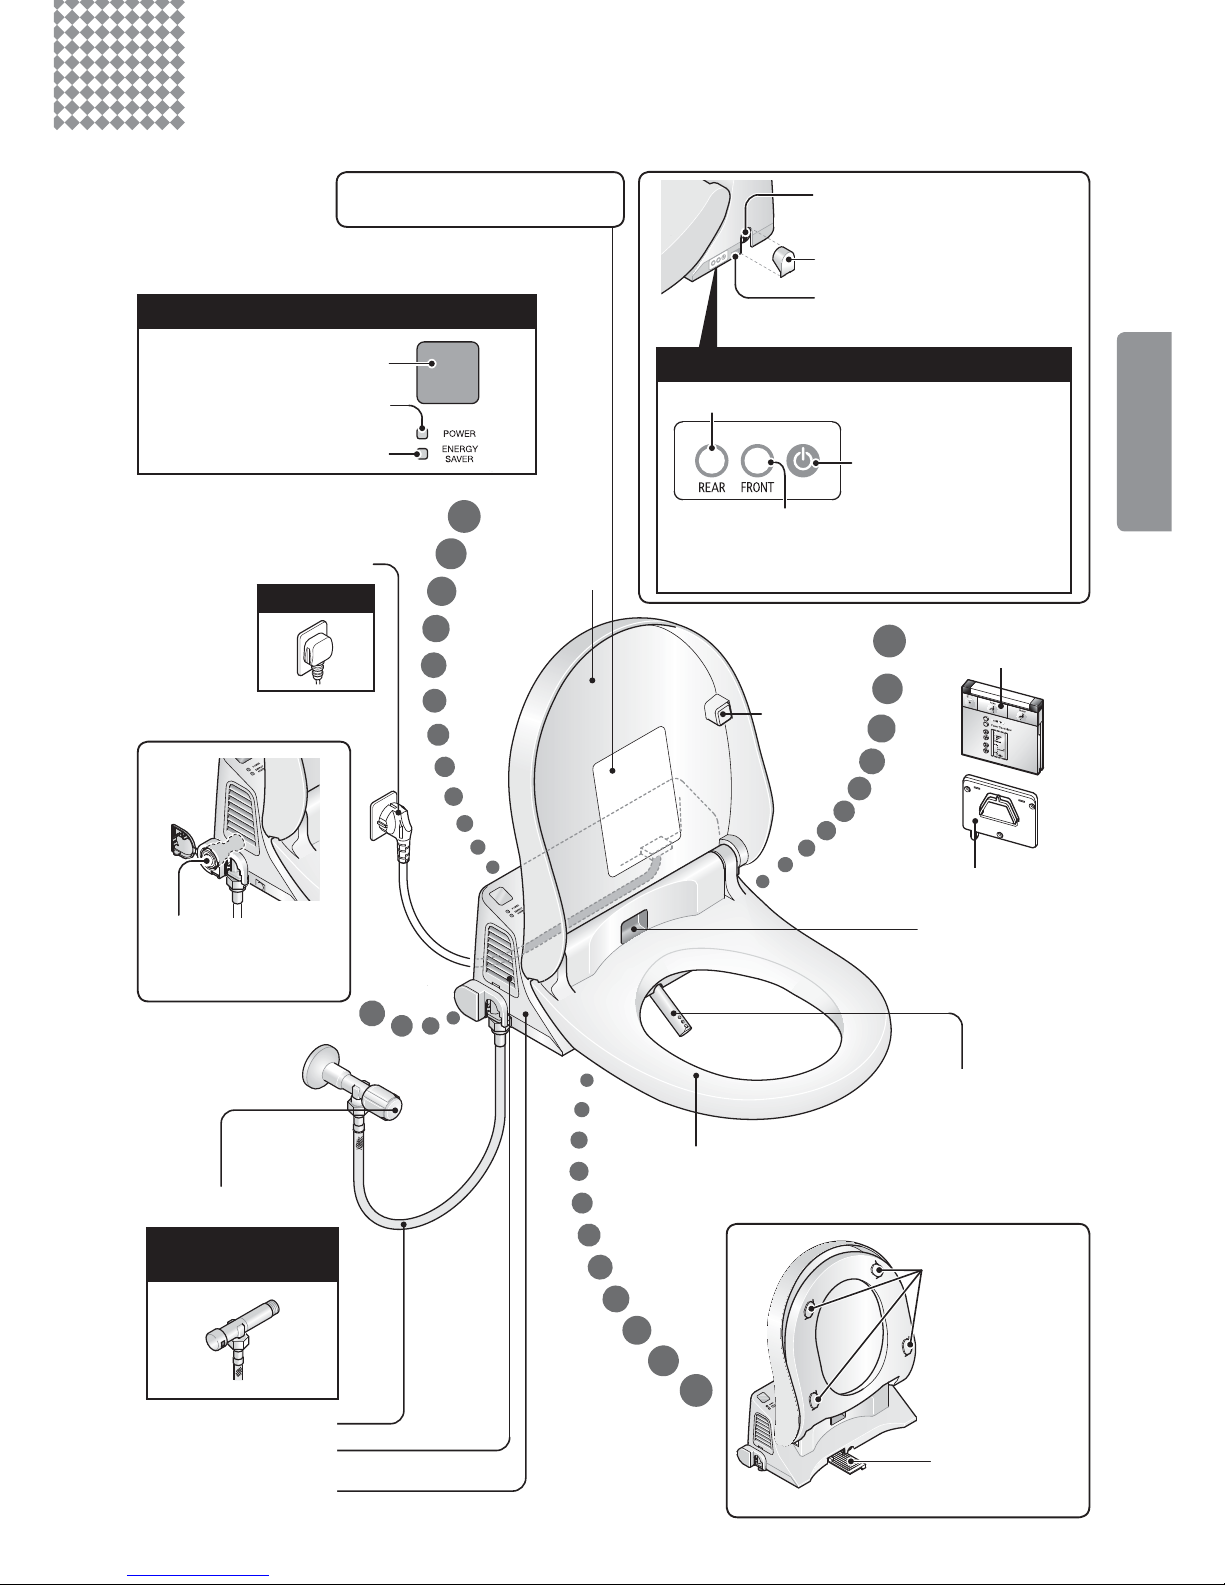
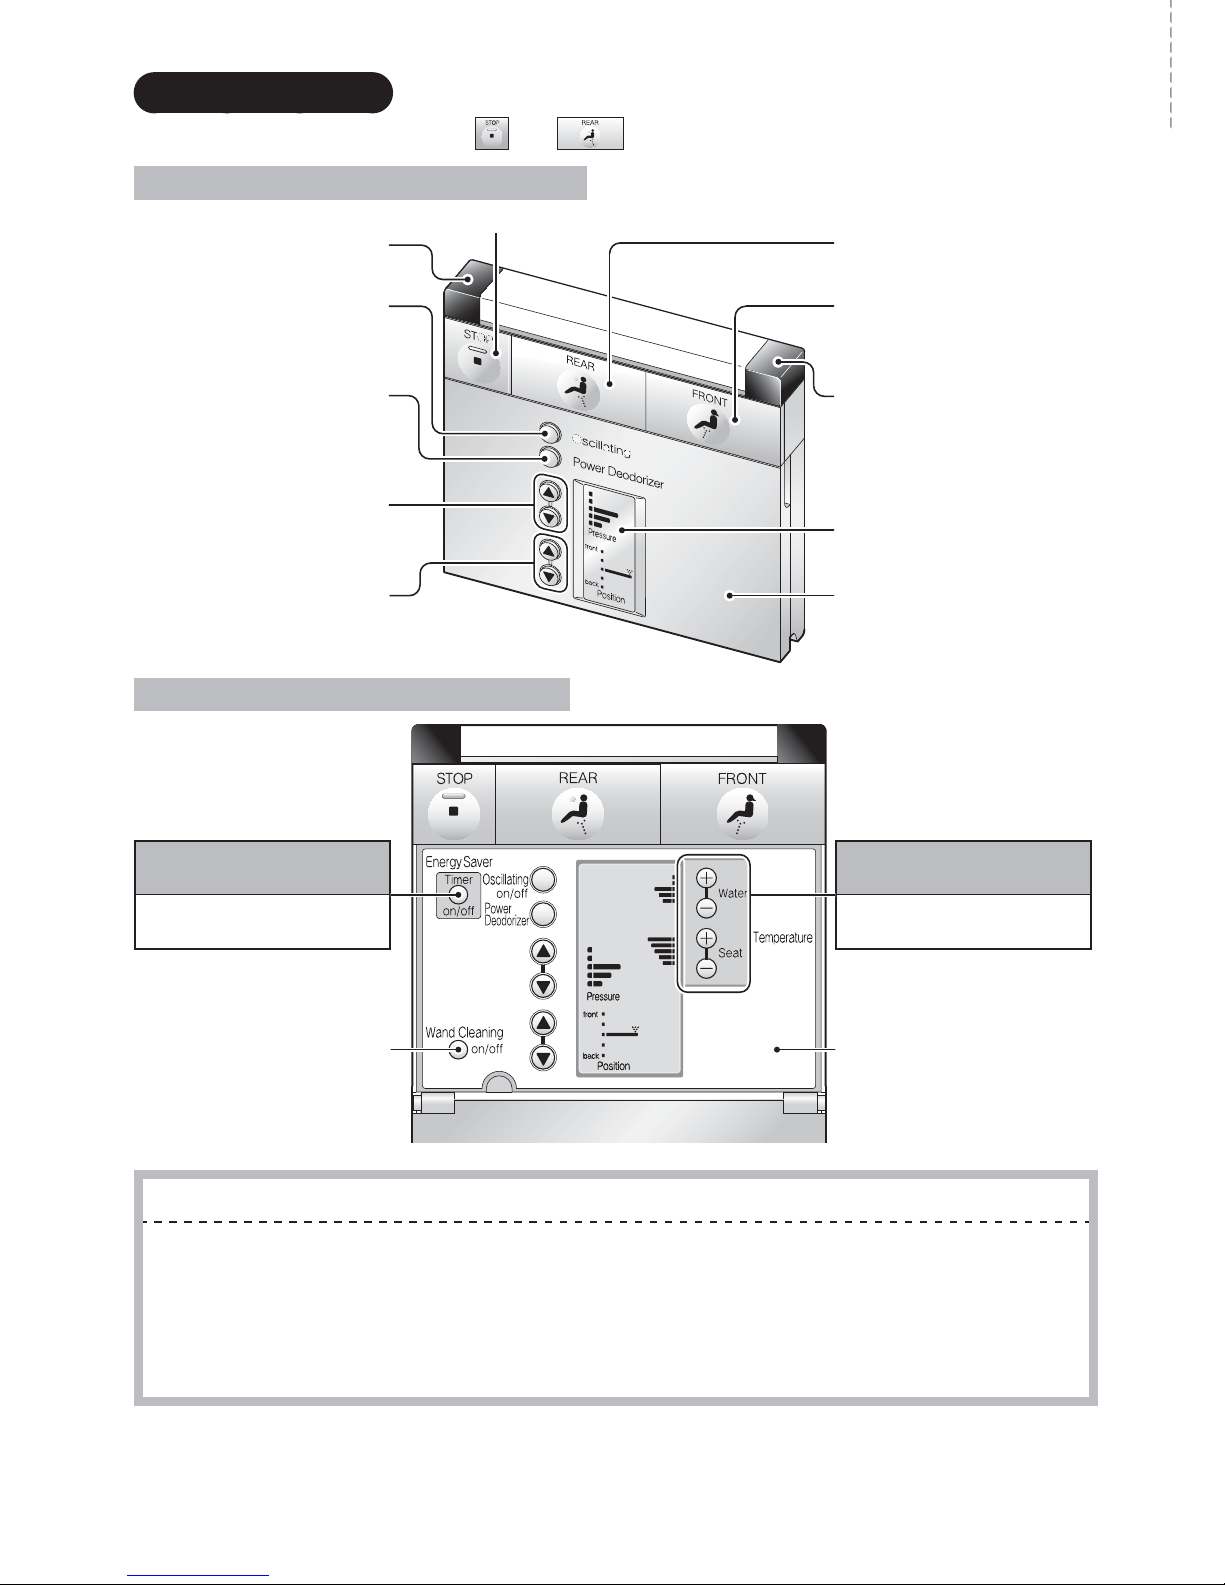
Names of parts
Washlet main display section
Remote control signal
receiver
"POWER" indicator
"ENERGY SAVER" indicator
Product stock number and type
printed here.
Toilet lid
Water drainage plug
► See pages 31 and 32
Cap
Washlet release button
► See page 22
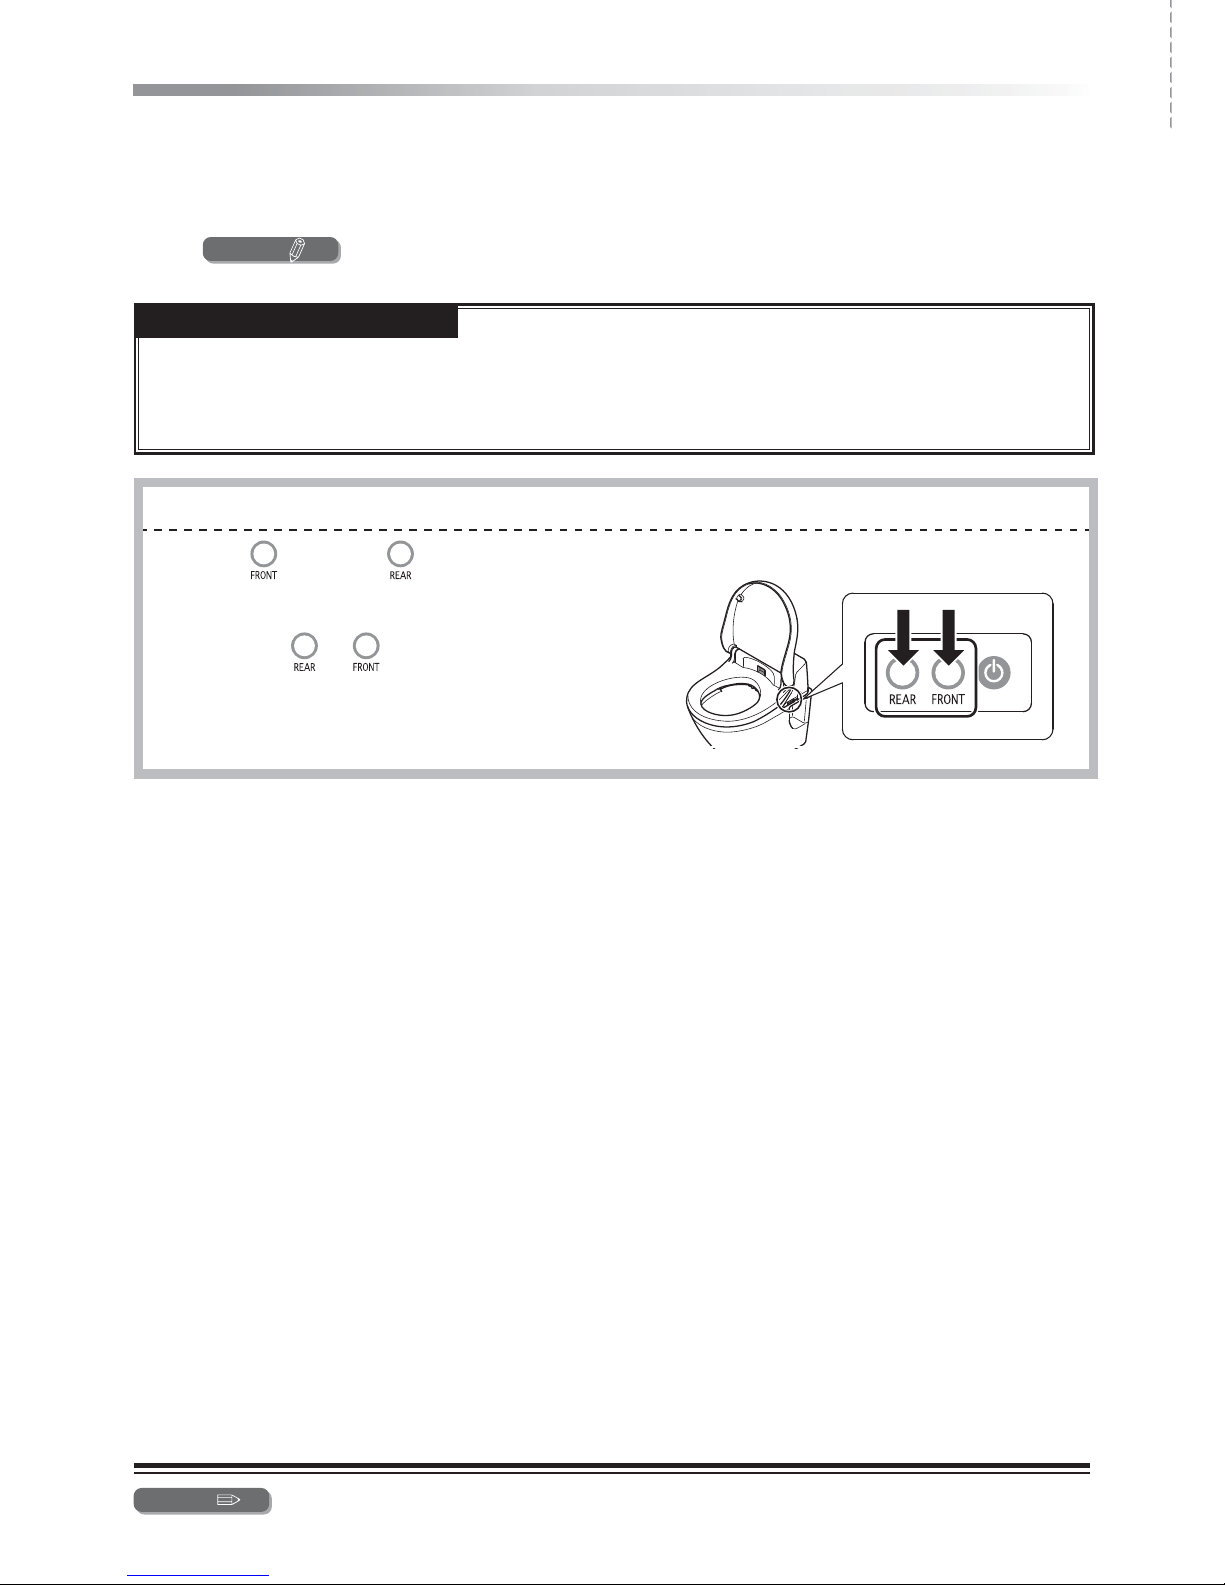
Washlet main operation section
REAR button ► See page 14
Operation on/off button
► See page 12
FRONT button ► See page 14
Use when the remote control battery is dead, ›
for example.
Drain valve with built-in
water filter
► See page 25
Mains plug
For the U.K.
Water shut-off valve
Floor-mounted toilet
valve
Water supply hose
Deodorizer cartridge
Main Washlet unit
Toilet lid
bumper
Remote control
► See page 10
Remote control
holder
Seat sensor
► See page 13
Wand (wand head)
► See page 24
Heated seat
Seat cushion
Deodorizer filter
► See page 23
(The illustration shows a wall-mounted toilet.)
10
Remote control
Raised markings are included on ●
and
for people who cannot see well.
When the remote control cover is closed
STOP button ► See page 13
Remote control signal
transmitter
REAR button
► See page 13
Oscillating button
► See page 13
FRONT button
► See page 13
Power Deodorizer button
► See page 16
Remote control signal
transmitter
Water pressure adjustment
buttons
► See page 13
Remote control display
Washing position adjustment
buttons
► See page 13
Remote control cover
When the remote control cover is open
Energy Saver setting
► See pages 17 and 18
Temperature settings
► See page 15
Timer on/off button
Water Temperature buttons
Seat Temperature buttons
Wand Cleaning on/off button
► See page 24
Inside panel
About the electronic sounds
When a remote control button is pressed and the main Washlet unit receives a signal, the unit produces an ●
electronic sound. This unit uses three types of electronic sounds.
Short beep .......Sounds when a remote control button is pressed and the main Washlet unit receives a signal.
Long beep ........Sounds when the STOP button is pressed, when any function (timer-based Energy Saver,
oscillating wash, etc.) is turned off or when the setting mode is exited.
Double beep .....Sounds when the Water or Seat Temperature is set to their "high" settings.
► See page 27 for how to turn off the remote control sound.
11
Introduction
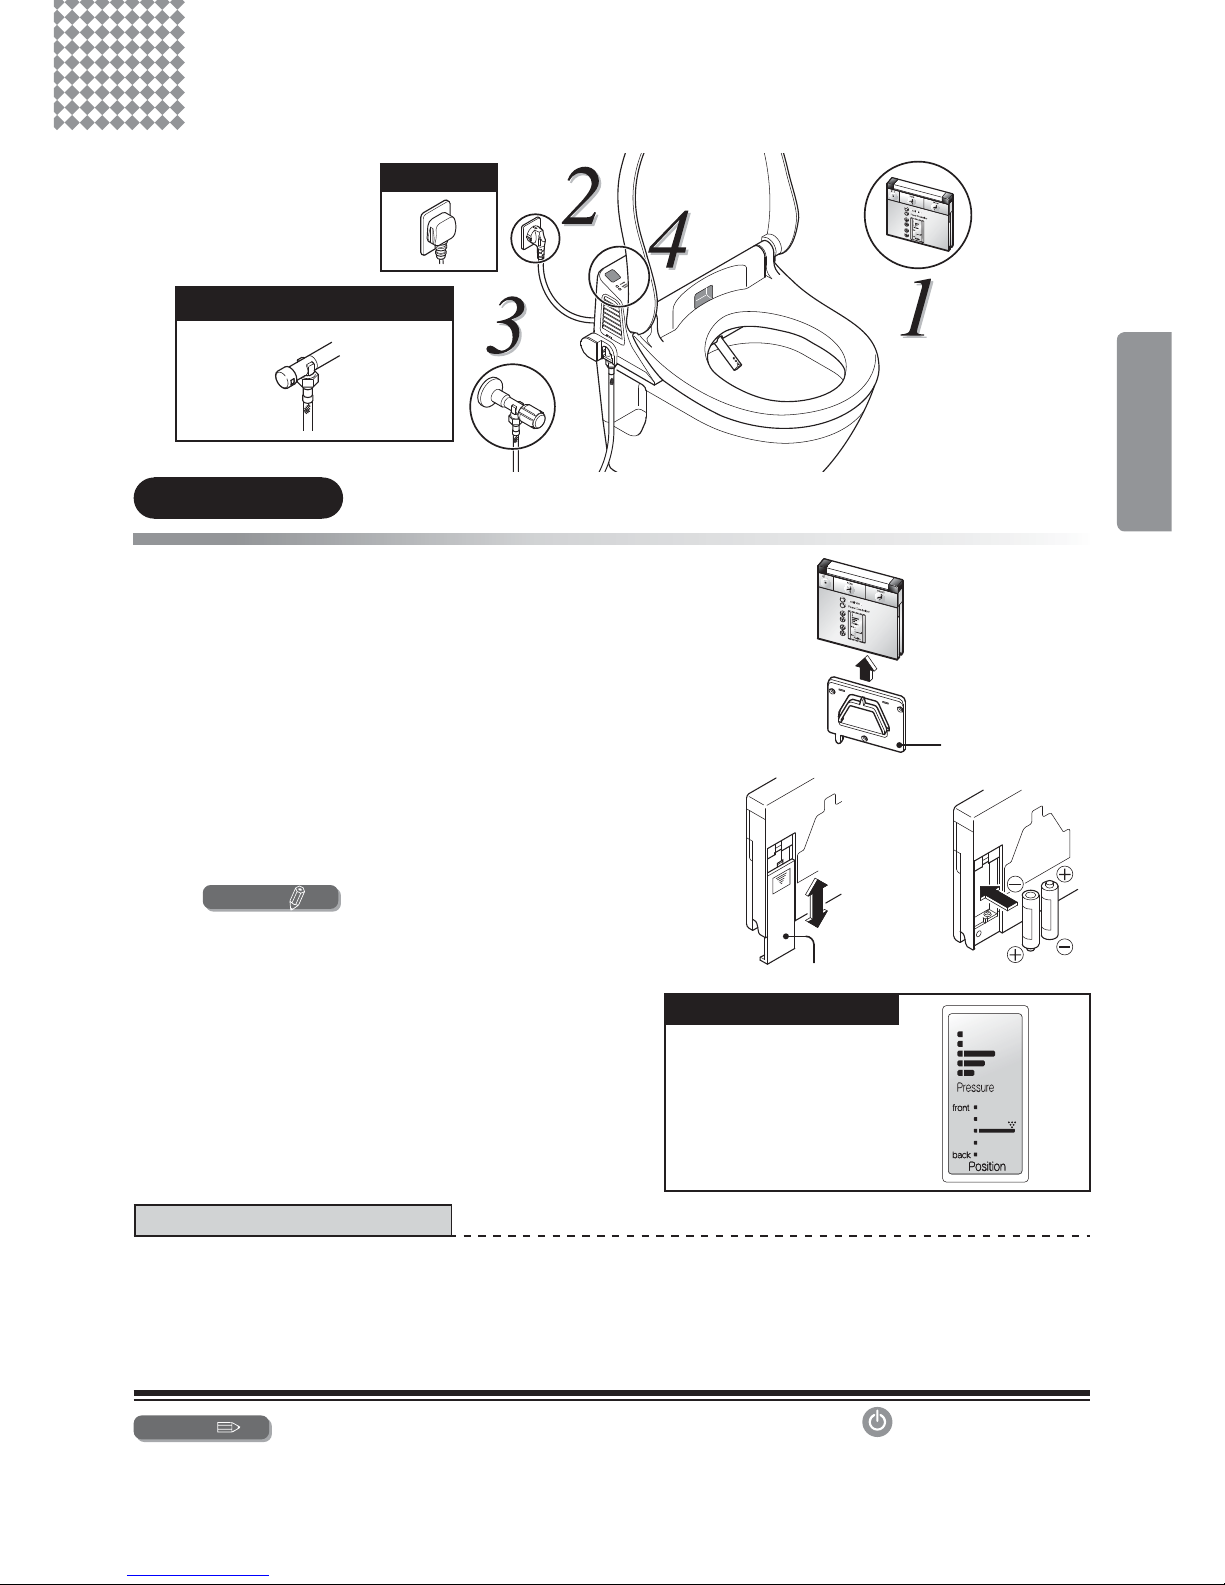
Before use
Floor-mounted toilet valve
Preparation
1
1
Put batteries in the remote control.
(1) Remove the remote control from the remote
control holder.
Grasp the sides of the remote control with both hands •
and lift straight up.
(1)
Remote control
holder
(2) Open the battery cover on the back of the remote
control.
(3) Insert two AA batteries.
(4) Close the battery cover.
Tip 1
(2)(3)(4)
Back
Close
Open
Battery cover Two AA batteries
When the batteries are correctly installed, the remote ●
control display should appear as in the illustration.
Remote control display
About the batteries
Please use alkaline batteries. ●
Observe the following precautions to keep batteries from splitting or leaking.
When replacing them, use two new batteries of the same brand. ●
Remove the batteries when not using the remote control for a long time. ●
Do not use rechargeable batteries. ●
Tip 1
When changing the batteries or cleaning the remote control, turn the ● button in the Washlet
main operation section off.
When changing the batteries, the temperature settings, timer-based Energy Saver and other ●
settings might be lost. If this should occur, please reset the settings. (For example, even though the
timer-based Energy Saver was on before, it could be off after replacing the batteries.)
For the U.K.
12
2
2
Plug the mains plug in to a socket and if there is a
switch on the socket, turn on the switch.
The ● "POWER" indicator lights automatically.
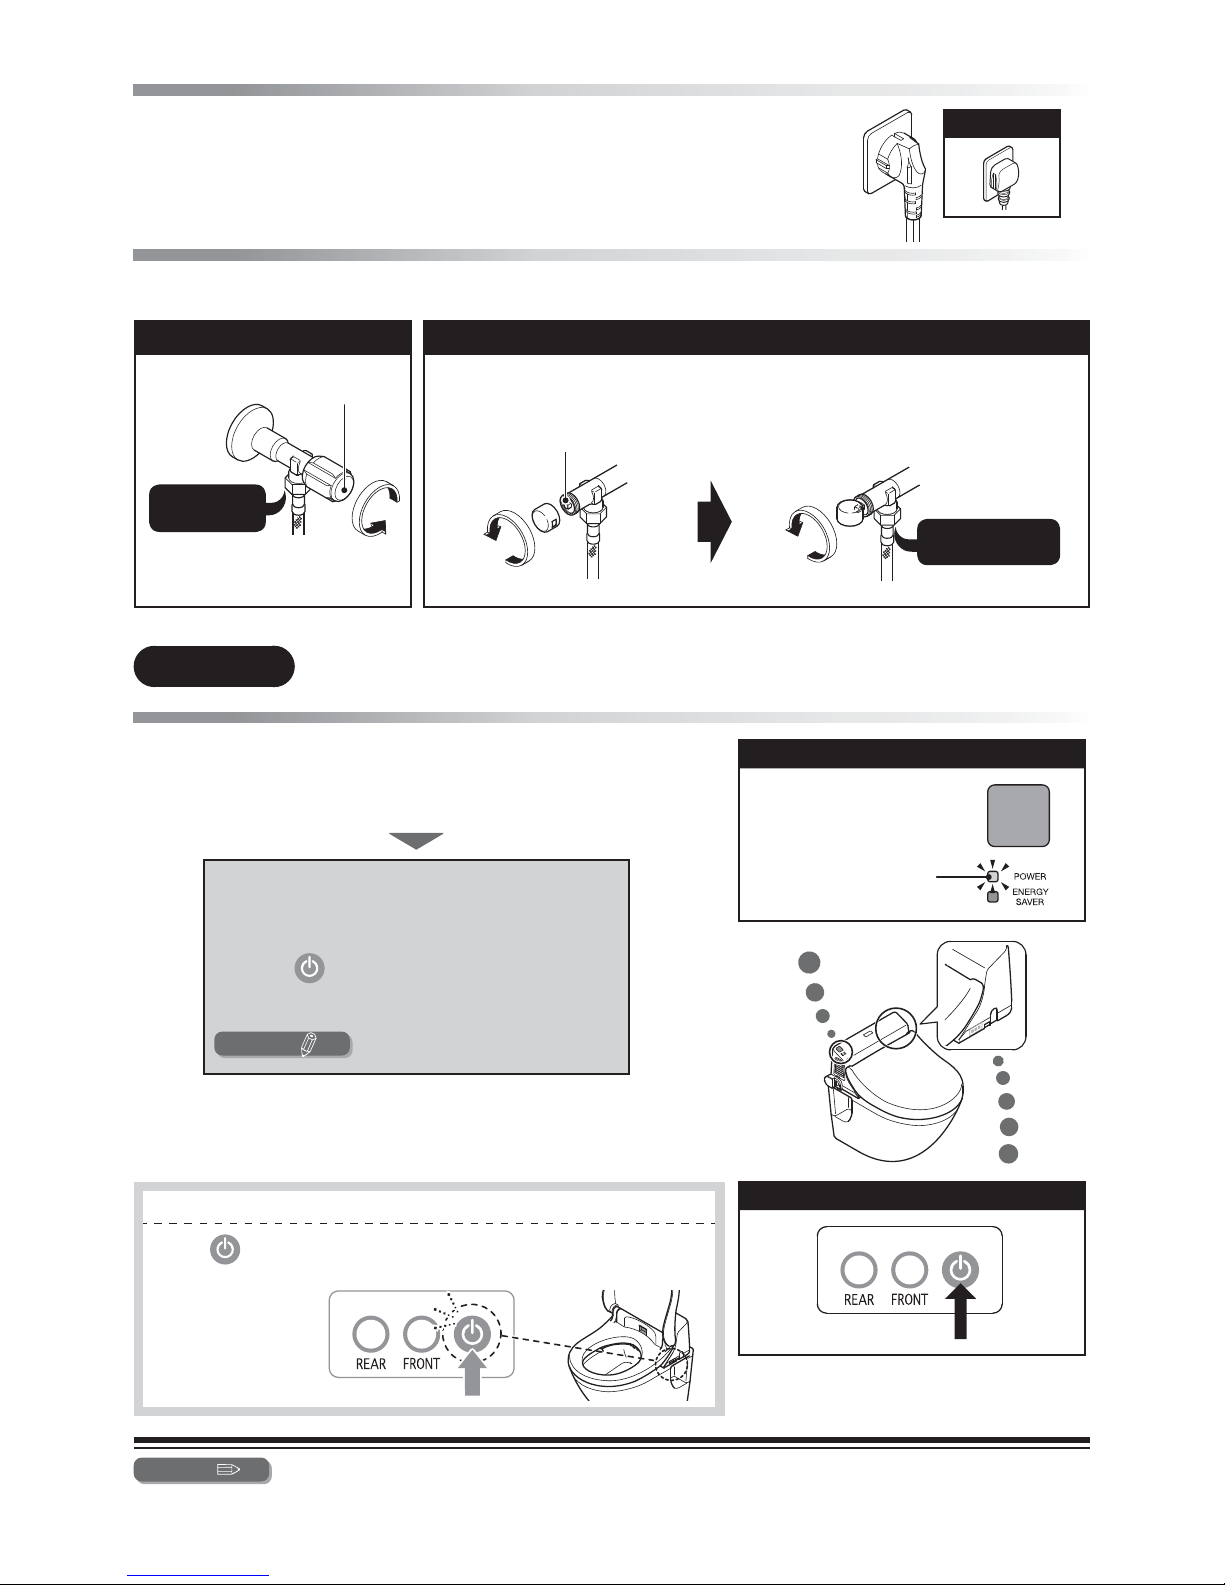
3
3
Open the water shut-off valve.
Wall-mounted toilet valve Floor-mounted toilet valve
Water shut-off valve
Turn anticlockwise
(1) Turn the water shut-off valve
cover to remove it from the
water shut-off valve.
(2) Mount the cover by the hole in its
side on the end of the spindle and
use it to open the valve.
Water shut-off valve
Turn anticlockwise Turn anticlockwise
Confirm
4
4
Check the Washlet main display
section.
Is the main display section "POWER" indicator lit? ●
If the "POWER" indicator is not lit, none of the
functions can be used.
(Excluding when Energy Saver is in use.
► See page 18)
Press the
button in the Washlet main
operation section.
(The "POWER" indicator lights.)
Tip 1
Turning off the power
Press
to turn off the power.
The "POWER" indicator goes off. ●
Tip 1
Please see "Adjusting the temperature" for instructions about turning the seat on and off and
adjusting the temperature. ► See page 15
For the U.K.
Check for
water leak
Check for
water leak
Washlet main display section
"POWER" indicator
Washlet main operation section
13
Operation
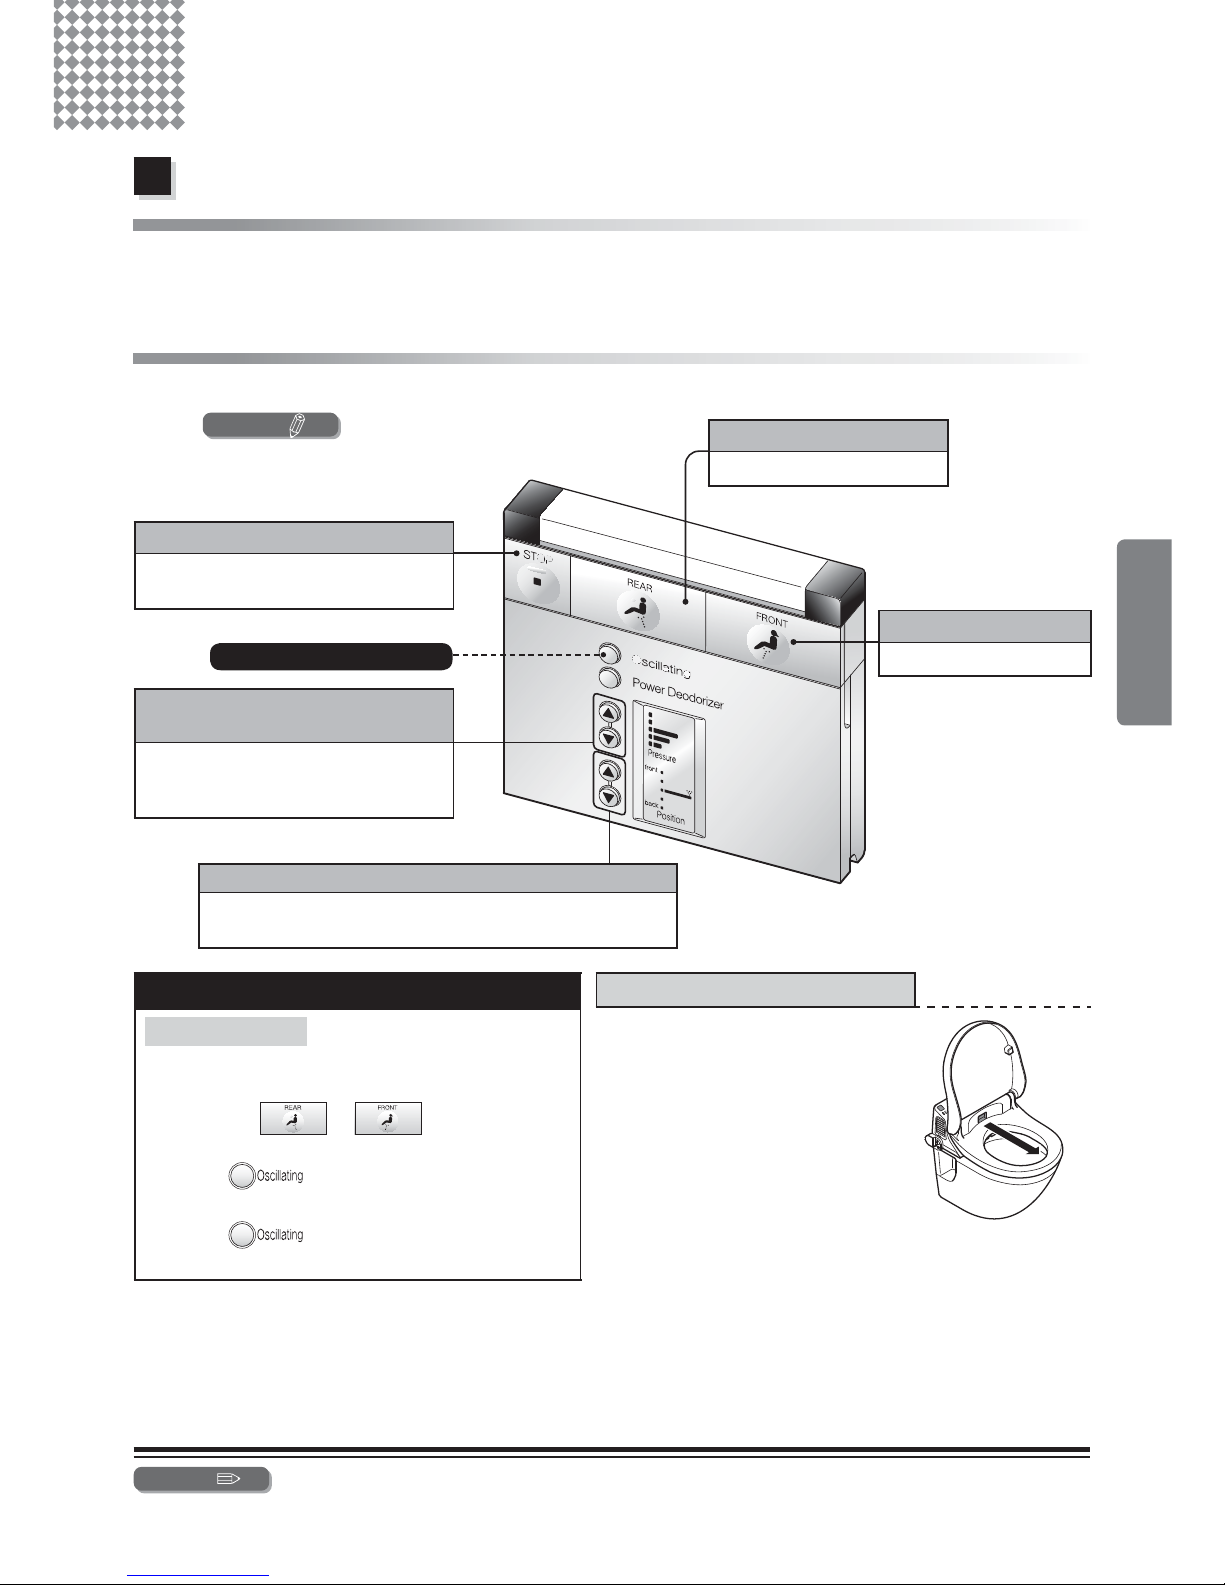
How to use the Washlet
Standard use of the Washlet
1
1
Sit on the seat.
The seat sensor detects the presence of a person and all the functions become operative.
The deodorizer starts. ●
Please test the Power Deodorizer. ► See page 16
2
2
Use and stop the washing functions.
Tip 2
Other convenient functions
About the seat sensor
The seat sensor detects when a ●
person sits down.
The seat sensor puts out Infrared ●
rays, as shown in the illustration.
The seat sensor might not work well ●
in some conditions.
► See page 34-38
Oscillating wash
This function moves the wand backward and
forward to wash thoroughly over a larger area.
(1) Press the
or
button to
select.
(2) Press
once.
This starts the oscillating wash. ●
(3) Press
again.
This stops the oscillating wash. ●
Tip 2
Please sit fully on the seat.
By doing so, the washing position will be more accurate and it is less likely that water will spray out
from the Washlet.
REAR button
Use to wash the rear.
STOP button
This button stops rear and front
washing.
Water pressure adjustment
buttons
Use these buttons to adjust the water
pressure as you like (there are five
levels).
Washing position adjustment buttons
Use these buttons to adjust the washing position as you
like (there are five positions).
FRONT button
Use as a bidet.
Oscillating wash
14
3
3
Stand up from the seat.
The Automatic Power Deodorizer starts.
It stops after about two minutes. ●
Water is emitted from around the wand into the toilet for a few seconds. ●
Water remaining in the wand is emitted so that fresh water can be used every time. ›
Tip 1
Please be aware of these points
When the Washlet is washing (when the Wand Cleaning button is used), water comes out of the left side of the ●
wand. This is necessary for proper functioning and is perfectly normal.
If water continues to come out when the Washlet is not being used for washing, something is probably wrong. ›
Close the water shut-off valve, and contact the installer or seller of this Washlet.
Water in the warm water tank expands and is sometimes emitted from the right side of the wand. ●
Using the Washlet if the remote control batteries are dead
● Press the
button or the
button in the main operation section to use the wash function.
(1) Confirm the POWER indicator in the main
display section is on.
(2) Press the
or
button to select either
rear or front washing.
(3) Press the same button again to stop
washing.
Tip 1
The Automatic Power Deodorizer might not function if the time seated is brief (40 seconds or less).
 Loading...