

Page 1

InstallatIon and owner’s Manual
Manual de InstruccIones y del ProPIetarIo
Manuel d’InstallatIon et d’utIlIsatIon
trIM only for therMostatIc MIxIng ValVe
3/4” therMostatIc MIxIng ValVe (rough ValVe only)
grIfería de la VálVula de Mezcla terMostátIca
VálVula de Mezcla terMostátIca de ¾” (19MM) (VálVula ásPera solaMente)
garnIture de la ValVe de Mélange therMostatIque
ValVe de Mélange therMostatIque de 3/4” (19MM) (corPs d’encastreMent
unIqueMent)
soIrée®
ts960t
guIneVere®
ts970t
ENGLISHESPAÑOLFRANÇAIS
tstt
Page 2

ENGLISH
TABLE OF CONTENTS
THANKS FOR CHOOSING TOTO®! ��������������������������������������������������������������������������������������������2
CARE AND CLEANING �����������������������������������������������������������������������������������������������������������������2
CAUTION ������������������������������������������������������������������������������������������������������������������������������������������2
TOOLS YOU WILL NEED ��������������������������������������������������������������������������������������������������������������3
BEFORE INSTALLATION ��������������������������������������������������������������������������������������������������������������3
INSTALLATION PROCEDURE ����������������������������������������������������������������������������������������������������4
ROUGH-IN ��������������������������������������������������������������������������������������������������������������������������������������6
TROUBLESHOOTING �������������������������������������������������������������������������������������������������������������������7
ACCESSING AND CLEANING THE VALVES �������������������������������������������������������������������������� 8
REPLACEMENT PARTS ����������������������������������������������������������������������������������������������������������������9
LIFETIME WARRANTY ��������������������������������������������������������������������������������������������������������������� 11
THANKS FOR USING TOTO® !
the MIssIon of toto® Is to ProVIde the world wIth healthy, hygIenIc and More
coMfortable lIfestyles. we desIgn eVery Product wIth the balance of forM and
functIon as a guIdIng PrIncIPle. congratulatIons on your choIce.
CARE & CLEANING
your new faucet Is desIgned for years of trouble-free PerforMance. KeeP It looKIng
new by cleanIng It PerIodIcally wIth MIld soaP, rInse thoroughly wIth warM water
and dry wIth a clean, soft cloth. do not use abrasIVe cleaners, steel wool or harsh
cheMIcals, as these wIll dull the fInIsh. faIlure to follow these InstructIons May
VoId your warranty.
CAUTION
RequiRes volume contRol valve oR positive shut off valve.
rIsK of scaldIng: thIs ValVe Must be calIbrated by the Installer (see ValVe
calIbratIon Procedure). once calIbrated, thIs ValVe has a lIMIter to PreVent the teMPerature
froM exceedIng 120°f (49°c)
If solderIng durIng InstallatIon, do not aPPly excessIVe heat to the ValVe body. excessIVe
heat May daMage the Internal seals and PlastIc coMPonents.
Please not to use If large dIfference In Pressure between the hot and cold suPPlIes.
teMPerature wIll be dIfferent when you use one shower or all showers.
suPPly hot water teMPerature should not exceed 140°f (60°c)
do not use the Product at aMbIent teMPerature below 32°f (0°c).
do not reVerse the hot and cold water Inlets
Insulate the hot water suPPly PIPe to MInIMIze heat loss.
do not use steaM for hot water suPPly
do not dIsasseMble the therMo unIt.
2
Page 3

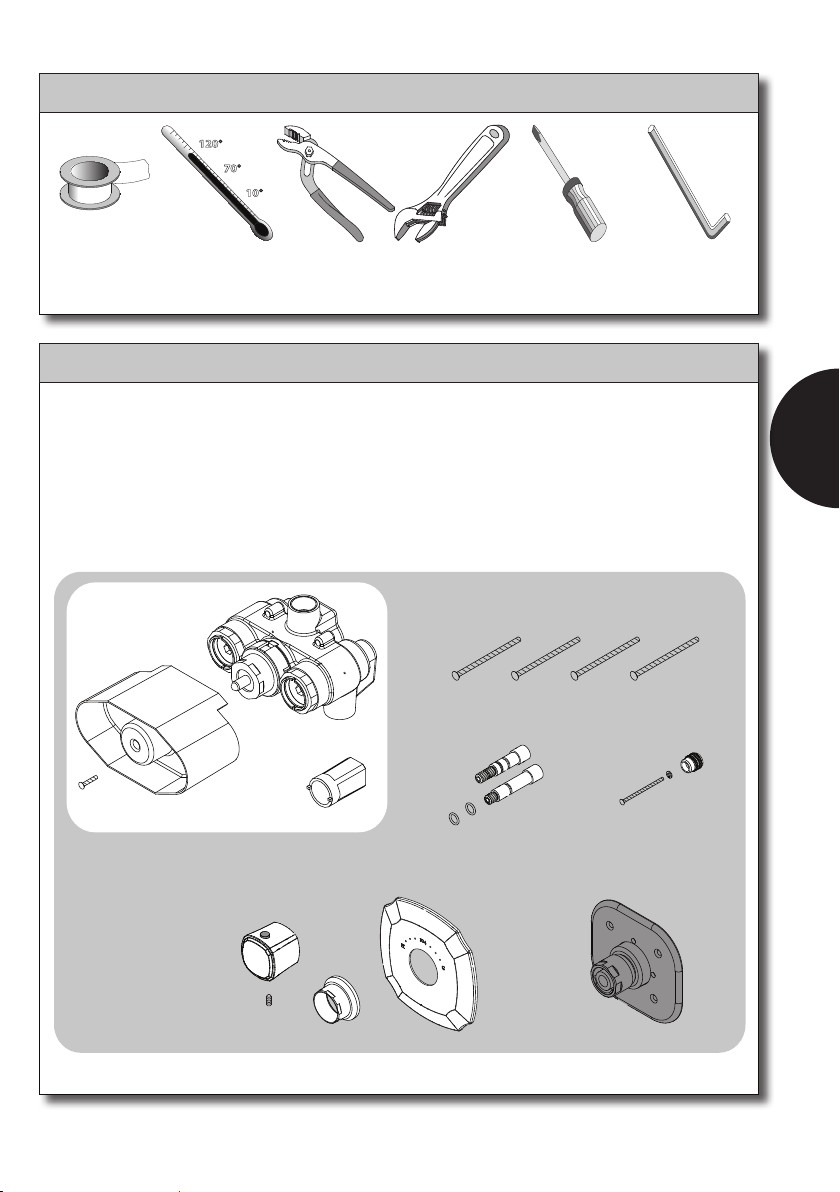
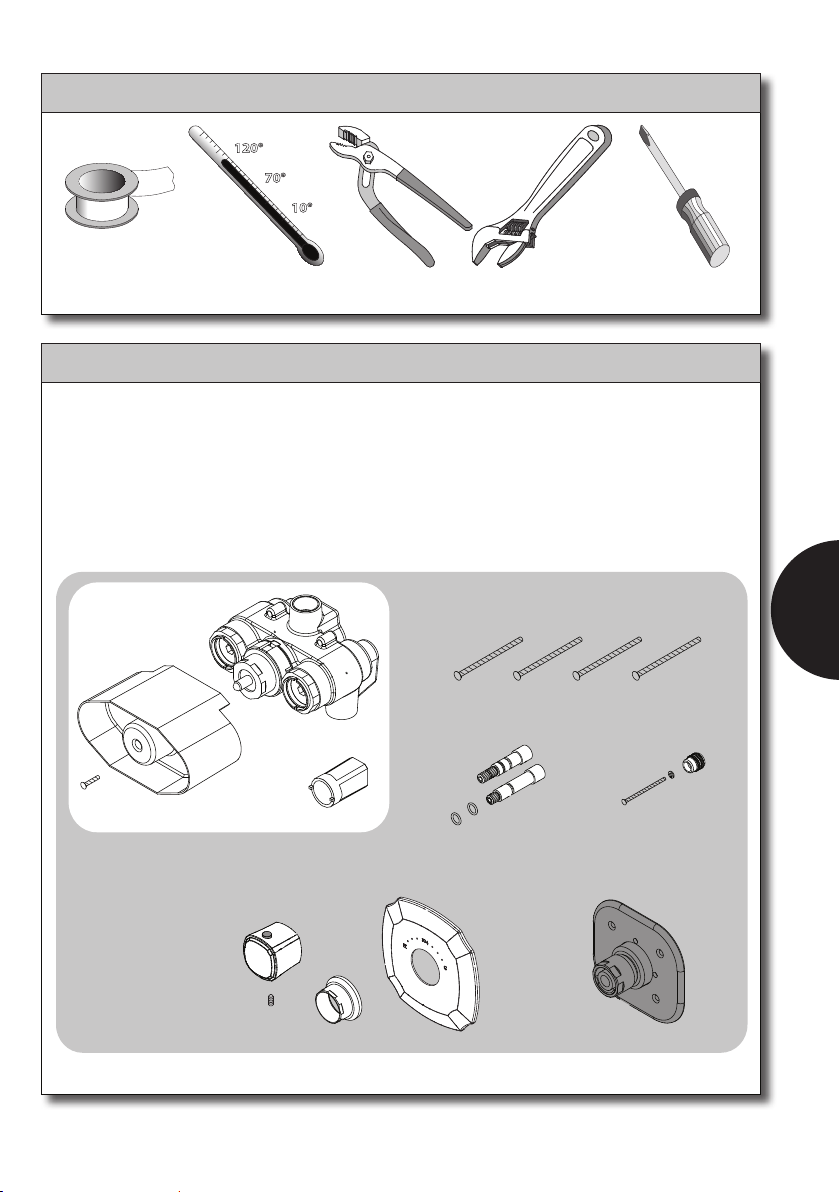
TOOLS YOU WILL NEED
10°
70°
120°
10MM
PIPe taPe therMoMeter adjustable
PlIers
adjustable
wrench
BEFORE YOU START INSTALLATION
obserVe all local PluMbIng codes
flush all PIPIng thoroughly before InstallIng the ValVe.
MaKe sure water suPPly Is shut off
read these InstructIons carefully to ensure ProPer InstallatIon
toto® reserVes the rIght to uPdate Product desIgn wIthout notIce
checK to MaKe sure you haVe the followIng Parts IndIcated below
tstt ValVe &
Plaster guard
steM adaPters &
ValVe locK-nut
tool
facePlate, escuncheon, handle
and set screw*
o-rIngs
screwdrIVer
long screws
screw, washer, &
PlastIc adaPter
MIxIng ValVe and
MountIng Plate
allen
wrench
ENGLISH
ts960t or ts970t
* these IteMs Vary In aPPearance dePendIng on Model
3
Page 4
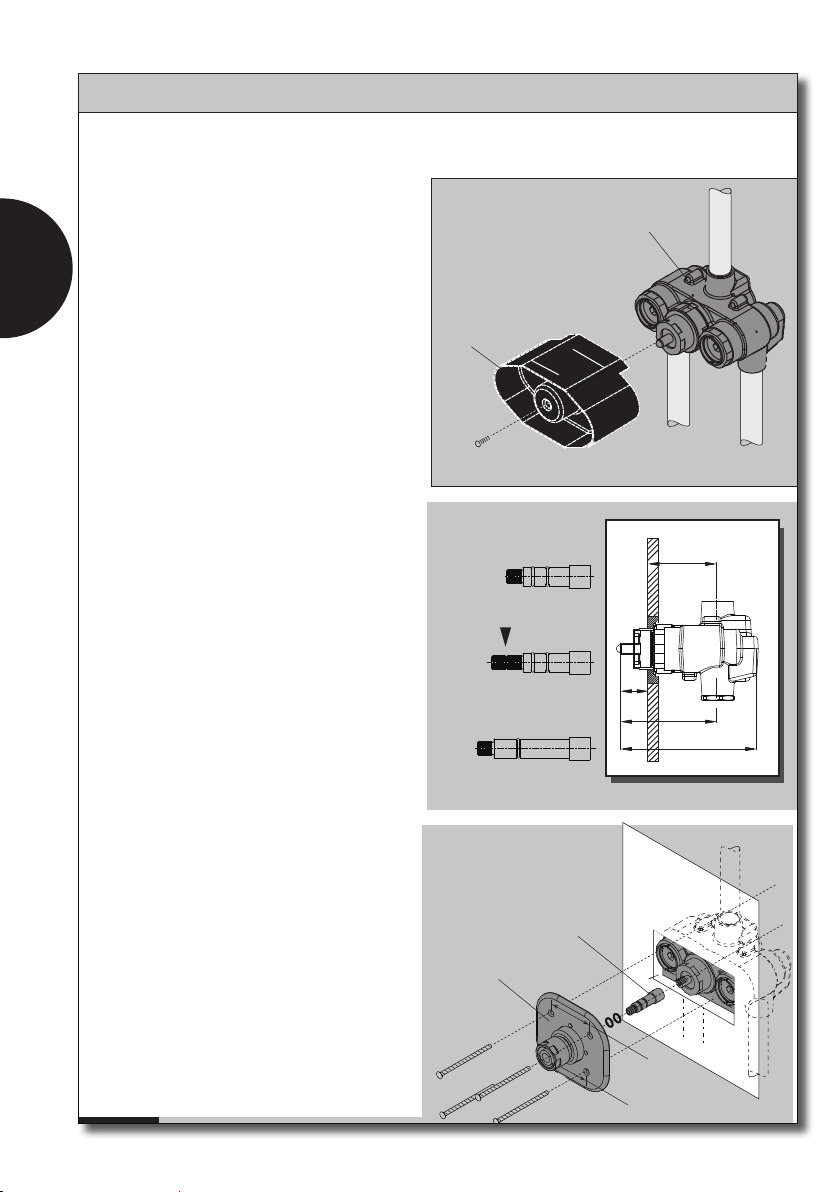
INSTALLATION PROCEDURES
cautIon: rIsK of Personal Injury. the Installer Must calIbrate thIs ValVe to MInIMIze the rIsK of
scaldIng. Max water teMP should neVer exceed 120°f (49°c)
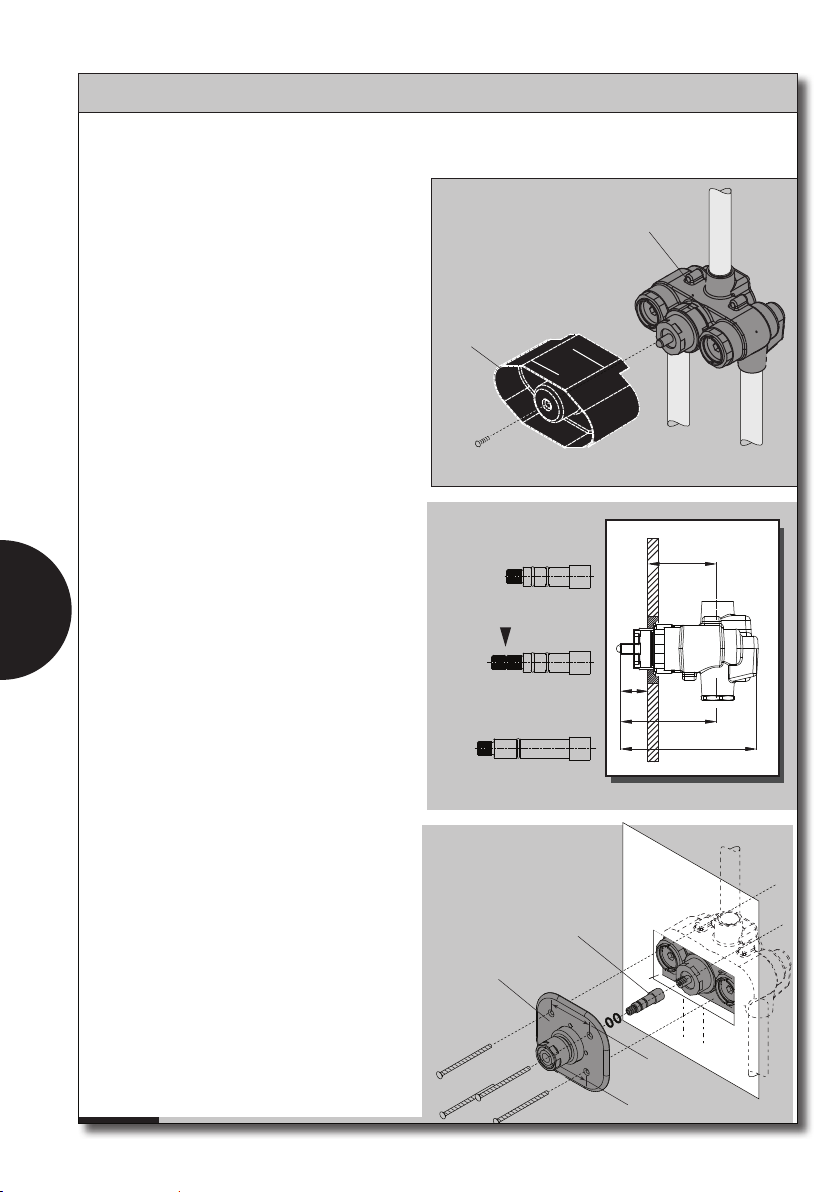
turn off MaIn water suPPly.
attach Plaster guard to ValVe. do not
reMoVe untIl Instructed to do so.
ENGLISH
Install ValVe so that “uP” MarK Is PoIntIng
uPward.
PluMb ValVe so that outsIde of fInIshed wall
lands between Max and MIn IndIcated on Plaster
guard (I.e. a=2 9/16”-3 3/4” (65-95MM) see
“a” below.
connect hot water suPPly to left Inlet
MarKed “hot” and the cold water suPPly to the
rIght Inlet MarKed “cold”
secure PIPes and ValVe to fraMe
the Plaster guard wIll requIre a rectangu-
lar hole 3 1/4” x 6 5/16” (80MM x 160MM).
fInIsh wall
Plaster guard
steM adaPter sIze
MAX
MIN
ValVe
MIxed water out
UP
hot water In
cold water In
when you are ready to contInue the Instal-
latIon: reMoVe the Plaster guard.
choose a steM adaPter based on the
dIstance “x” (see rIght)
MaKe sure o-rIngs are on the steM adaPter
and slIde It onto the ValVe steM.
note the dIstance between the holes on the
MountIng Plate. the two holes that are 2 3/4 ”
(70 MM) aPart should be on toP.
Install the MountIng Plate flush wIth the
fInIshed wall usIng the long screws.
2 5/16”
58MM
x=
cut to length
2 11/16”
68MM
x=
3 1/16”
78MM
x=
steM adaPter
MountIng Plate
13/16”-1 3/16”
20-30MM
3/8”-13/16”
10-20MM
0”-3/8”
0-10MM
X
94.8mm
f
2 3/4” (70MM)
2 5/16” (58MM)
A
3 3/4”
InIshed
5 5/16”
134.7mm
w
all
4
Page 5
INSTALLATION PROCEDURES
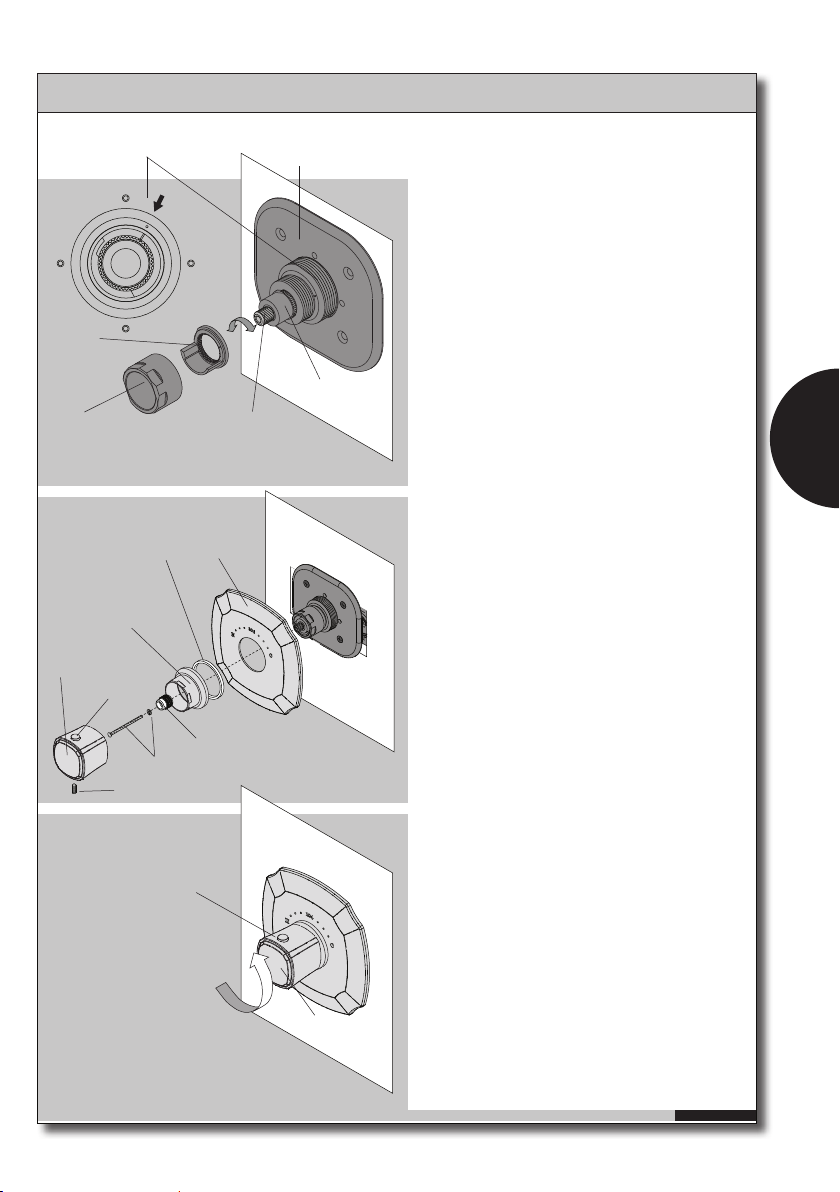
alIgnMent MarKs
lIMIter
nut
foaM
PacKIng
escuncheon
handle
button
screw and washer
set screw
104° f
40° c
facePlate
adaPter
button
MountIng Plate
steM
adaPter
MIxIng ValVe
handle
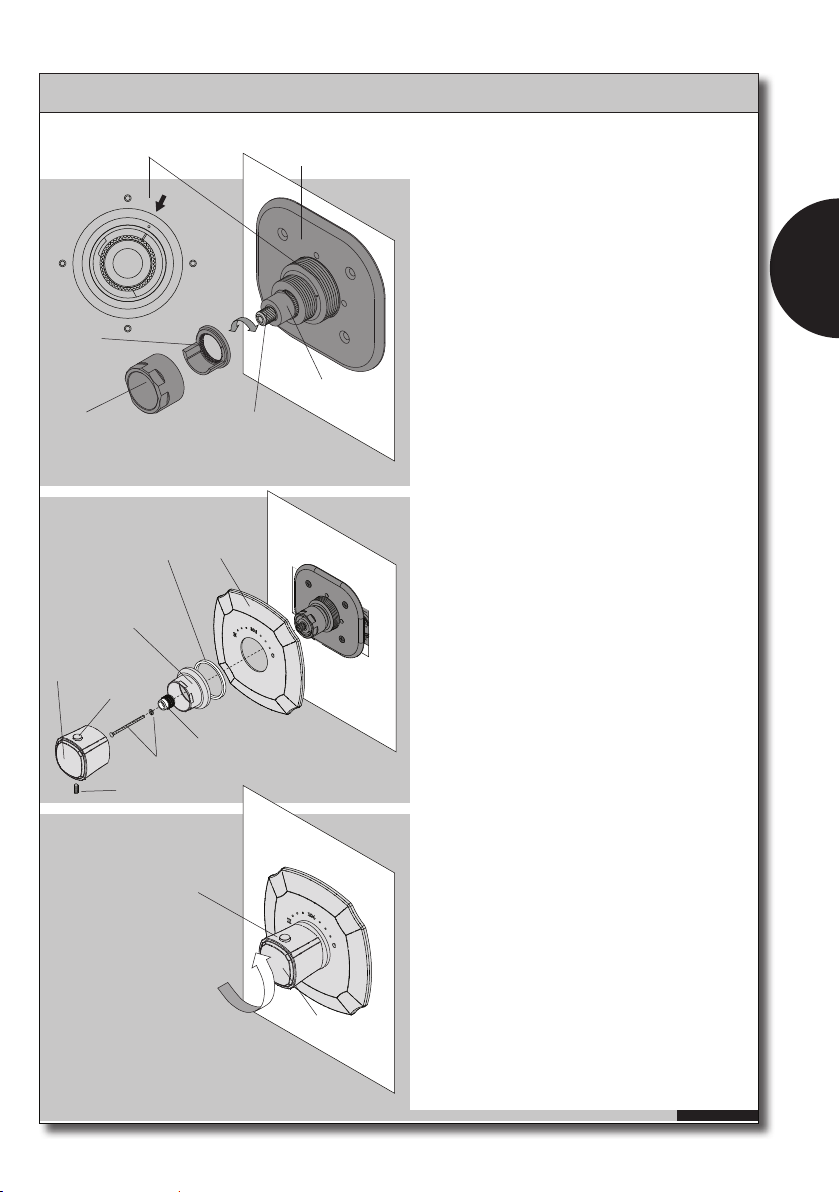
reMoVe the nut and MaKe sure that the
alIgnMent MarKs on the lIMIter and the MIxIng
ValVe are alIgned. If they are not, reMoVe the
lIMIter and rePlace It In the correct PosItIon
then rePlace the nut.
Install the facePlate flush agaInst the wall
by tIghtenIng the escutcheon.
Place the PlastIc adaPter on the end of the
steM adaPter and secure wIth the screw and
washer ProVIded.
calIbratIon Procedure
turn on the water and allow It to run for
a few MInutes.
hold a therMoMeter under the streaM and
adjust the teMPerature by rotatIng the steM
adaPter untIl the water teMPerature Is a steady
104° f (40°c)
turn off water.
Install handle wIth button at 12 o’clocK.
It should PoInt to the engraVed MarKIng on the
facePlate: 104°
secure handle wIth the set screw.
turn water on and let It run for a few
MInutes.
checK teMPerature wIth a therMoMeter. It
should read 104°f (40°c) when the button on
the handle Is In the 12 o’clocK PosItIon.
If It doesn’t, reMoVe the handle and follow
the stePs on the PreVIous Page to calIbrate It.
If the teMPerature Is correct, turn the
handle slowly wIthout PushIng the button untIl
It stoPs. the teMPerature should now be about
108°f (42°c).
If the teMPerature Is confIrMed, Press the
button and rotate counterclocKwIse untIl It
stoPs. teMPerature should not exceed 120°f
(49°c)
If eVerythIng checKs out turn the handle
bacK to 104° and checK once More.
If any of the aboVe teMPerature settIngs are
not confIrMed, rePeat the calIbratIon Process.
ENGLISH
5
Page 6
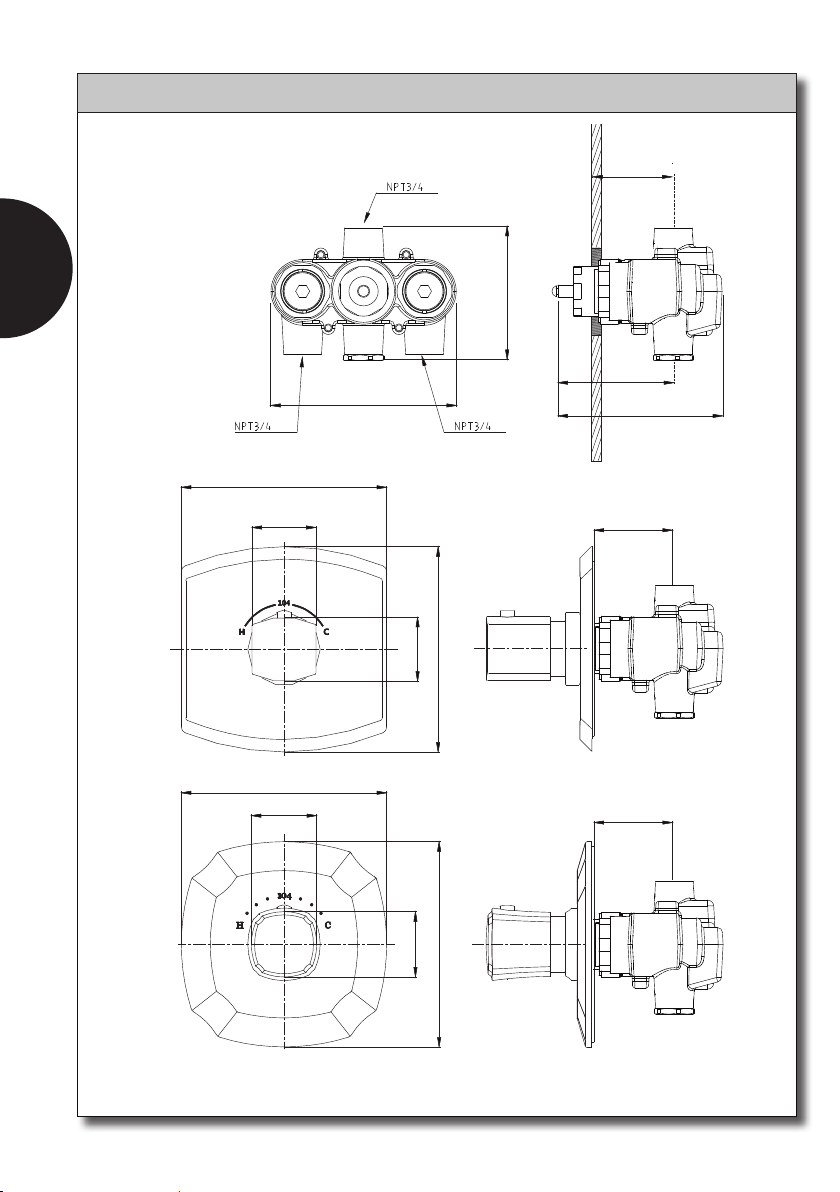
ROUGH-IN
ENGLISH
6 11/16”
170 mm
2 1/16”
53 mm
6”
152 mm
tstt
ts960t
6 11/16”
170 mm
2 1/16”
53 mm
fInIshed
wall
4 5/16”
109 mm
2 9/16” - 3 3/4”
65-95 mm
3 3/4”
94.8 mm
5 5/16”
134.7 mm
2 9/16” - 3 3/4”
65-95 mm
6 11/16”
170 mm
2 1/8”
54 mm
ts970t
6 11/16”
170 mm
2 1/8”
54 mm
6
2 9/16” - 3 3/4”
65-95 mm
Page 7
6
are the o-rIng dIrty
or daMaged?
7
Is the ValVe locK nut
ProPerly tIghtened?
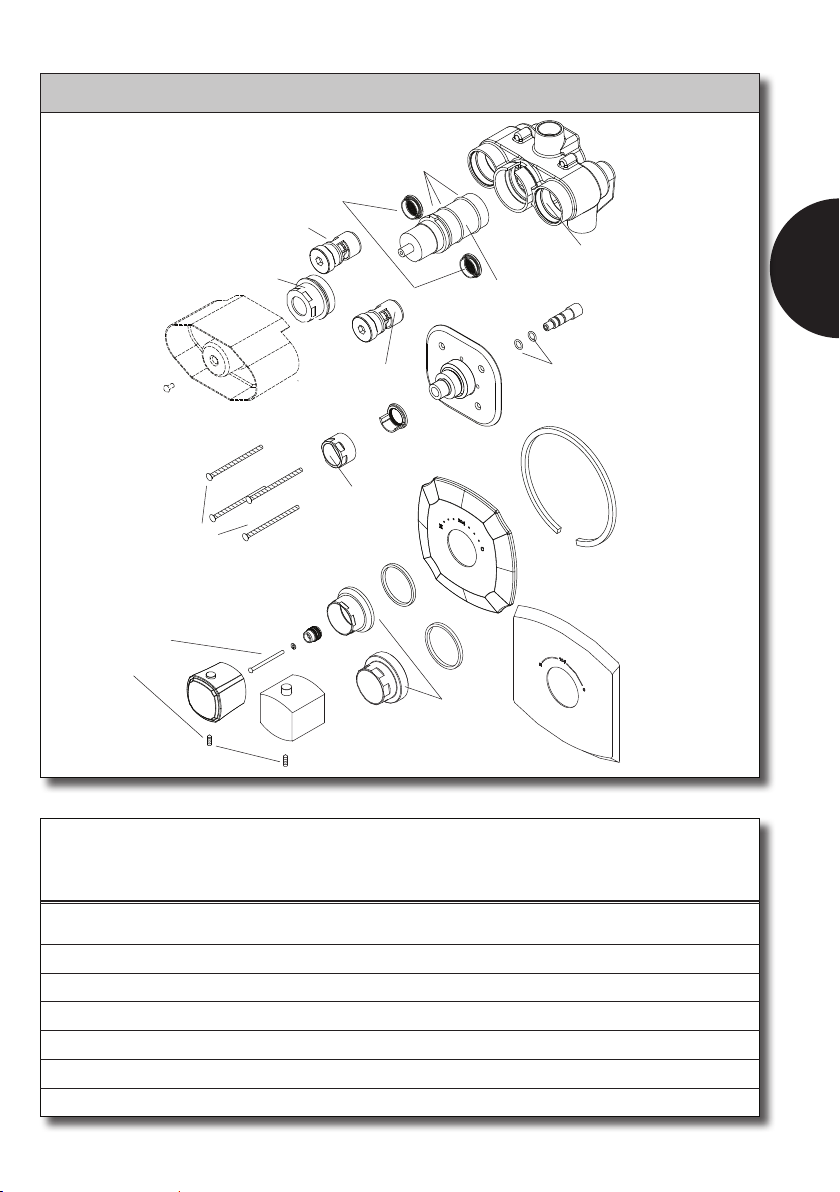
TROUBLESHOOTING
3
are the o-rIngs
dIrty or
daMaged?
4
are the fIlters
clogged?
2
Is the therMo unIt
dIrty?
1
Is the stoP ValVe
coMPletely oPened?
ENGLISH
5
are the screws
ProPerly tIghtened?
12
are the screws
ProPerly tIghtened?
10
Is the checK ValVe
caP tIghtened?
9
Is the nut ProPerly
tIghtened?
Is the escutcheon
ProPerly tIghtened?
11
are the o-rIngs dIrty
or daMaged?
ProbleM area of Interest
low flow 1, 3, 4
leaKage 3, 5, 6, 7, 8, 9
Irregular teMPerature 1, 2, 4
loose handle 12
loose facePlate 10, 11
8
7
Page 8

ACCESSING AND CLEANING THE VALVES
before you can serVIce the therMostatIc
ValVe you Must close off the hot and cold suP-
Ply ValVes usIng the ValVe locK nut tool suPPlIed
wIth the faucet.
ENGLISH
you can now access the fIlters and checK
ValVes.
use a 10MM allen wrench to reMoVe the
checK ValVe unIts, be careful not to lose the
fIlters.
rInse fIlter under water to reMoVe debrIs.
the therMo unIt can be reMoVed by reMoV-
Ing the ValVe locK nut.
Insert screwdrIVer Into slot and/or use
adjustable PlIers to reMoVe therMo unIt.
ValVe locK-nut
tool
clocKwIse to
close
fIlters
checK ValVes
ValVe
locK nut
cautIon: the therMo unIt Is a sPecIally
constructed PIece and should neVer be dIsas-
seMbled
clean usIng water and a toothbrush or
sIMIlar soft brIstled brush
do not use wIre or steel brush.
therMo
unIt
8
Page 9
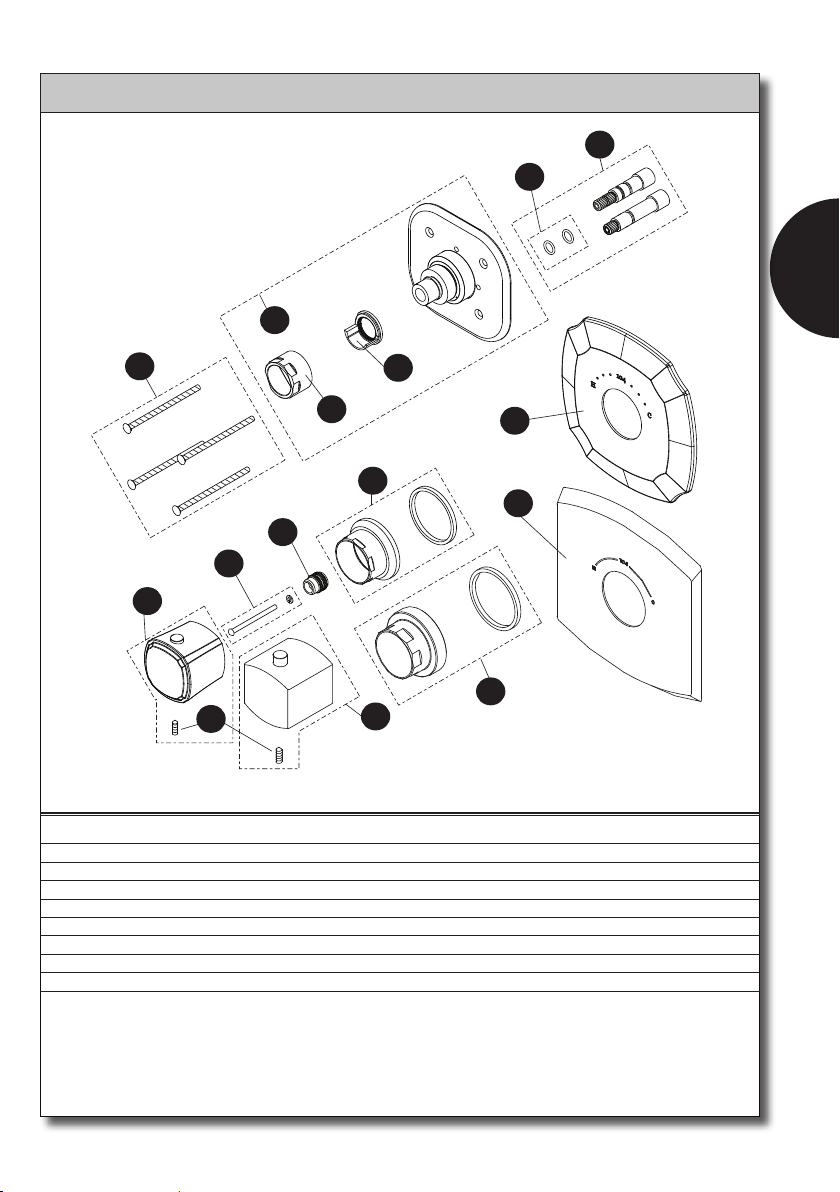
REPLACEMENT PARTS
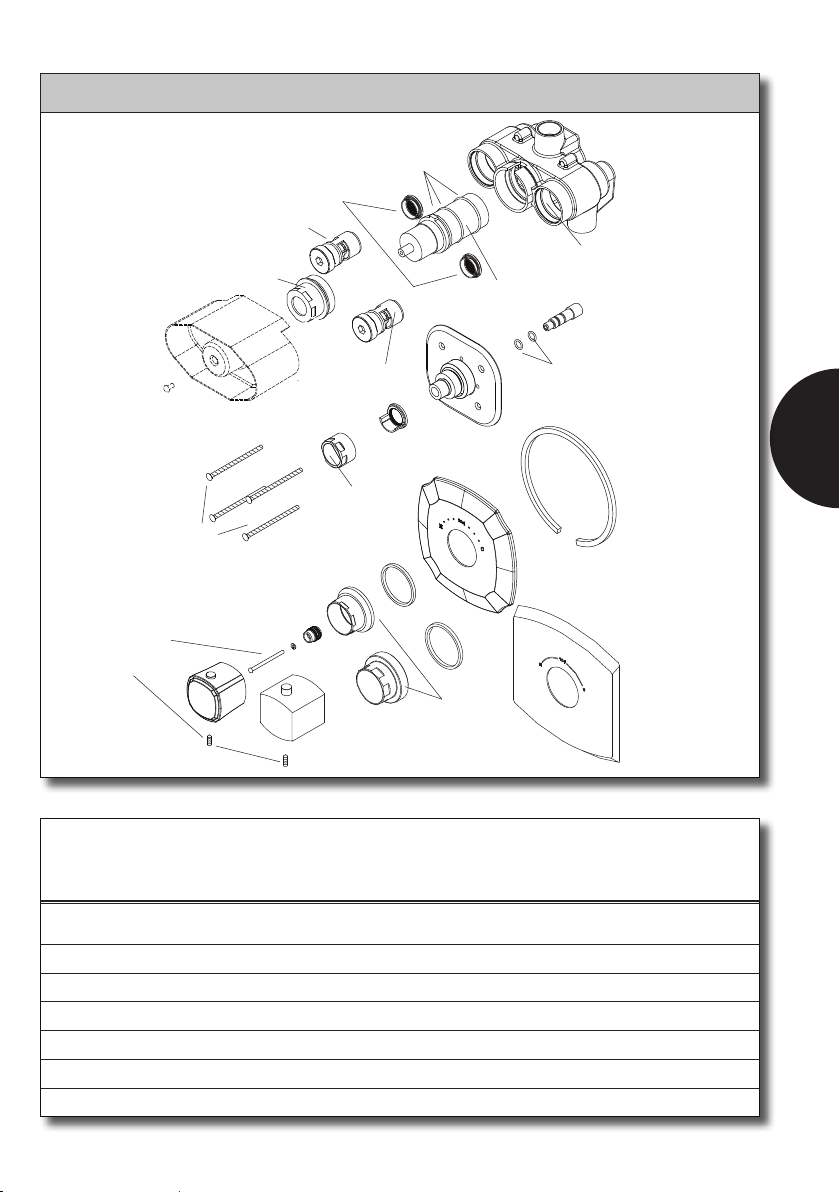
ts960t & ts970t
12
11
8
7
4
3
1a
2
IteM Product nuMber descrIPtIon
1a thP4014#$$* handle
1b thP4052#$$* handle
2 thP4051 set screw
3 thP4391 screw and washer
4 thP4392 adaPter
5a thP4394#$$* escutcheon
5b thP4393#$$* escutcheon
6a thP4396#$$* facePlate
6b thP4395#$$* facePlate
ENGLISH
10
9
6a
5a
6b
5b
1b
IteM Product nuMber descrIPtIon
7 thP4397 long screws
8 thP4398 MountIng Plate
9 1fu4200 nut
10 1fu4201 lIMIter
11 thP4400 o-rIngs
12 thP4399 steM adaPters
IteMs labeled wIth “a” are Part of the guIneVere® lIne.
IteMs labeled wIth “b” are Part of the soIrée® lIne.
*sPecIfy fInIsh when orderIng
9
Page 10
ENGLISH
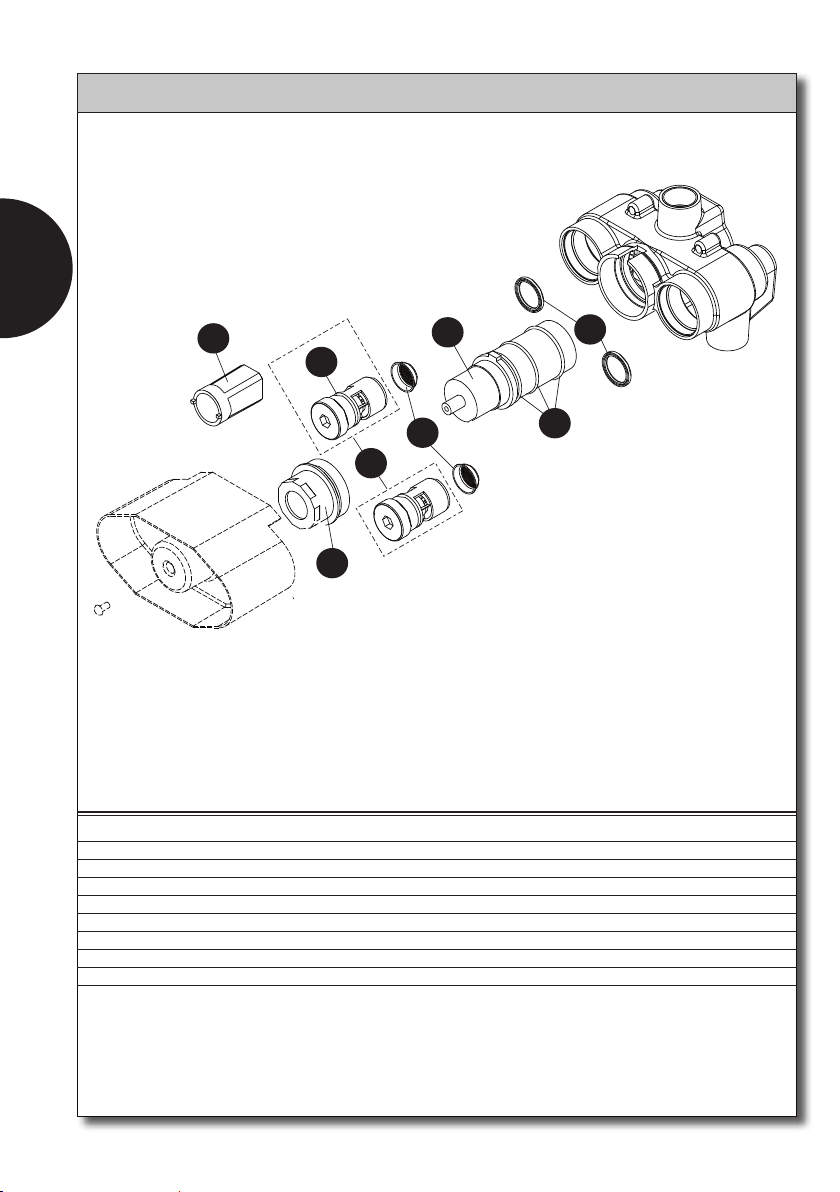
REPLACEMENT PARTS
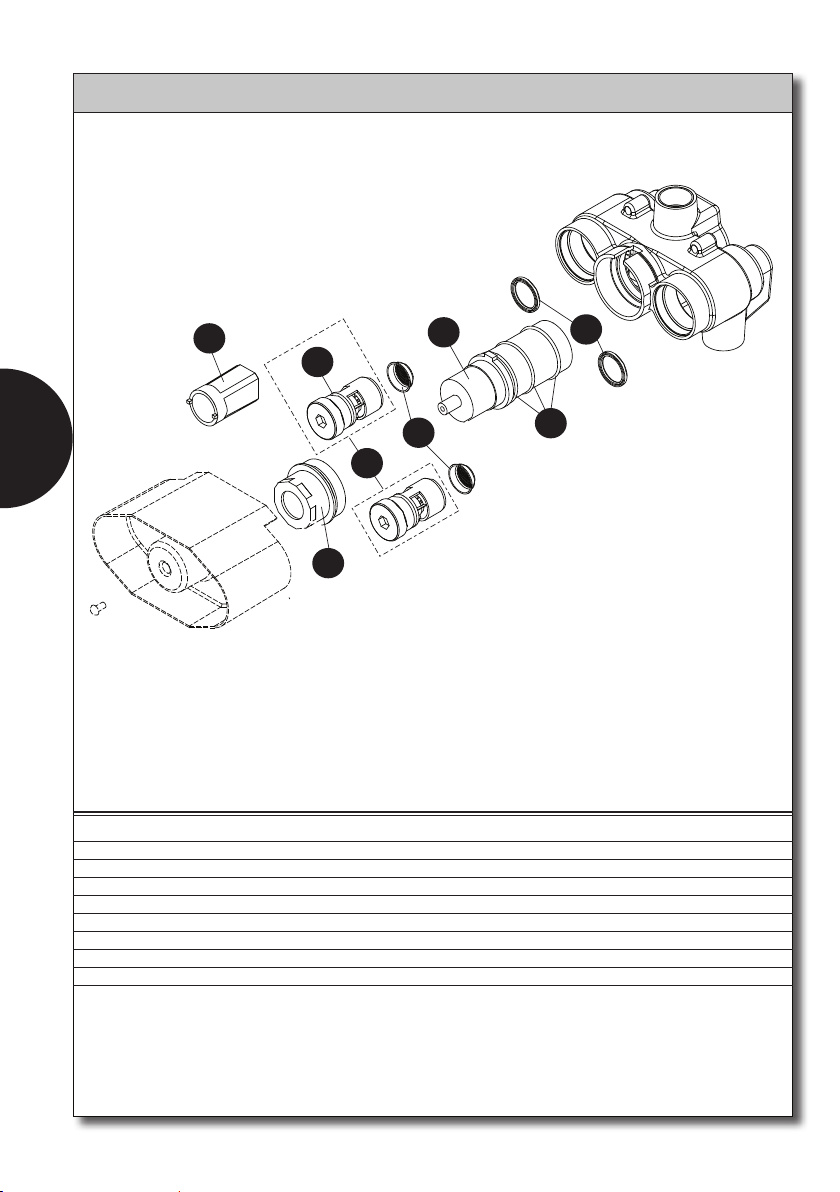
tstt
8
3
4
2
1
IteM Product nuMber descrIPtIon
1 thP4385 locK nut
2 thP4387 stoP ValVe unIt
3 thP4388 o-rIng
4 thP4389 fIlter screen
5 thP4384 3/4” therMo unIt
6 thP4390 gasKet
7 thP4386 o-rIngs
8 thP4271 ValVe locK nut tool
5
6
7
10
Page 11

WARRANTY
TOTO® U.S.A., INC. LIMITED LIFETIME WARRANTY
1.TOTO® warrants its residential faucets and bathroom accessories (“Product”) to be free from defects in
materials and workmanship during normal use when properly installed and serviced, for the lifetime of the
Product from date of purchase. This limited warranty is extended only to the ORIGINAL PURCHASER
of the Product and is not transferable to any third party, including but not limited to any subsequent
purchaser or owner of the Product. This warranty applies only to TOTO® Product purchased and
installed in North, Central and South America.
2.TOTO®’s obligations under this warranty are limited to repair, replacement or other appropriate
adjustment, at TOTO®’s option, of the Product or parts found to be defective in normal use, provided
that such Product was properly installed, used and serviced in accordance with instructions. TOTO®
reserves the right to make such inspections as may be necessary in order to determine the cause of the
defect. TOTO® will not charge for labor or parts in connection with warranty repairs or replacements.
TOTO® is not responsible for the cost of removal, return and/or reinstallation of the Product.
3.This warranty does not apply to the following items:
a.Damage or loss sustained in a natural calamity such as re, earthquake, ood, thunder, electrical
storm, etc.
b.Damage or loss resulting from any accident, unreasonable use, misuse, abuse, negligence, or
improper care, cleaning, or maintenance of the Product, including the use of an abrasive cleaning
agent or the use of any other cleaning product in a manner inconsistent with the Product instructions.
c. Damage or loss resulting from sediments or foreign matter contained in a water system.
d.Damage or loss resulting from improper installation or from installation of the Product in a harsh and/or
hazardous environment, or improper removal, repair or modication of the Product.
e.Damage or loss resulting from electrical surges or lightning strikes or other acts which are not the fault
of TOTO® or which the Product is not specied to tolerate.
f. Damage or loss resulting from normal and customary wear and tear, such as gloss reduction,
scratching or fading over time due to use, cleaning practices or water or atmospheric conditions.
4.If the Product is used commercially or is installed outside of North, Central or South America, TOTO®
warrants the Product to be free from defects in materials and workmanship during normal use for one (1)
year from the date of installation of the Product, and all other terms of this warranty shall be applicable
except the duration of the warranty.
5.THIS WARRANTY GIVES YOU SPECIFIC LEGAL RIGHTS. YOU MAY HAVE OTHER RIGHTS WHICH
VARY FROM STATE TO STATE OR PROVINCE TO PROVINCE.
6.To obtain warranty repair service under this warranty, you must take the Product or deliver it prepaid
to a TOTO® service facility together with proof of purchase (original sales receipt) and a letter stating
the problem, or contact a TOTO® distributor or products service contractor, or write directly to TOTO®
U.S.A., INC., 1155 Southern Road, Morrow, GA 30260 (888) 295 8134. If, because of the size of the
Product or nature of the defect, the Product cannot be returned to TOTO®, receipt by TOTO® of written
notice of the defect together with proof of purchase (original sales receipt) shall constitute delivery. In
such case, TOTO® may choose to repair the Product at the purchaser’s location or pay to transport the
Product to a service facility.
THIS WRITTEN WARRANTY IS THE ONLY WARRANTY MADE BY TOTO®. REPAIR, REPLACEMENT
OR OTHER APPROPRIATE ADJUSTMENT AS PROVIDED UNDER THIS WARRANTY SHALL BE
THE EXCLUSIVE REMEDY AVAILABLE TO THE ORIGINAL PURCHASER. TOTO® SHALL NOT
BE RESPONSIBLE FOR LOSS OF THE PRODUCT OR FOR OTHER INCIDENTAL, SPECIAL OR
CONSEQUENTIAL DAMAGES OR EXPENSES INCURRED BY THE ORIGINAL PURCHASER, OR FOR
LABOR OR OTHER COSTS DUE TO INSTALLATION OR REMOVAL, OR COSTS OF REPAIRS BY
OTHERS, OR FOR ANY OTHER EXPENSE NOT SPECIFICALLY STATED ABOVE. IN NO EVENT WILL
TOTO®’S RESPONSIBILITY EXCEED THE PURCHASE PRICE OF THE PRODUCT. EXCEPT TO THE
EXTENT PROHIBITED BY APPLICABLE LAW, ANY IMPLIED WARRANTIES, INCLUDING THAT OF
MERCHANTABILITY OR FITNESS FOR USE OR FOR A PARTICULAR PURPOSE, ARE EXPRESSLY
DISCLAIMED. SOME STATES DO NOT ALLOW LIMITATIONS ON HOW LONG AN IMPLIED
WARRANTY LASTS, OR THE EXCLUSION OR LIMITATION OF INCIDENTAL OR CONSEQUENTIAL
DAMAGES, SO THE ABOVE LIMITATION AND EXCLUSION MAY NOT APPLY TO YOU.
ENGLISH
11
Page 12

ESPAÑOL
ÍNDICE
¡GRACIAS POR ELEGIR TOTO®! ����������������������������������������������������������������������������������������������12
CUIDADO Y LIMPIEZA ��������������������������������������������������������������������������������������������������������������12
PRECAUCIÓN ������������������������������������������������������������������������������������������������������������������������������� 12
HERRAMIENTAS QUE NECESITA ������������������������������������������������������������������������������������������13
ANTES DE LA INSTALACIÓN �������������������������������������������������������������������������������������������������� 13
PROCEDIMIENTO DE INSTALACIÓN �����������������������������������������������������������������������������������14
BOSQUEJO ���������������������������������������������������������������������������������������������������������������������������������� 16
RESOLUCIÓN DE PROBLEMAS ��������������������������������������������������������������������������������������������� 17
ACCESO Y LIMPIEZA DE VÁLVULAS ������������������������������������������������������������������������������������ 18
PIEZAS DE REPUESTO ������������������������������������������������������������������������������������������������������������� 19
LIFETIME WARRANTY ��������������������������������������������������������������������������������������������������������������� 21
¡GRACIAS POR ELEGIR TOTO®!
la MIsIón de toto® es dar al Mundo estIlos de VIda Más saludables, hIgIénIcos y
cóModos. dIseñaMos cada Producto guIándonos Por el PrIncIPIo del equIlIbrIo entre
forMa y funcIón. felIcItacIones Por su eleccIón.
CUIDADO Y LIMPIEZA
su nueVa grIfería está dIseñada Para años de funcIonaMIento sIn ProbleMas. Manténgala
lucIendo coMo nueVa MedIante una lIMPIeza PerIódIca con jabón suaVe, enjuague
MInucIosaMente con agua tIbIa y séquela con un Paño lIMPIo y suaVe. no use lIMPIadores
abrasIVos, lana de acero nI Productos quíMIcos fuertes ya que éstos oPacarán el acabado. el
no cuMPlIr con estas InstruccIones Podría anular su garantía.
PRECAUCIÓN
Necesita válvula de coNtrol de volumeN o válvula de cierre positiva.
rIesgo de queMadura: esta VálVula debe ser calIbrada cuando se Instala (Véase
el ProcedIMIento de calIbracIón de la VálVula). una Vez calIbrada, esta VálVula lIMItará la
teMPeratura del agua a un MáxIMo de 120 °f (49 °c).
sI fuera necesarIo soldar durante la InstalacIón, no PerMIta que la VálVula se calIente
excesIVaMente. el calor excesIVo Podría dañar las juntas y los coMPonentes PlástIcos Internos.
no usar la VálVula sI hubIera una dIferencIa consIderable de PresIón entre las líneas de agua
calIente y fría.
la teMPeratura VarIará sI se usa una sola ducha o todas las duchas.
la teMPeratura de suMInIstro de agua calIente no debe ser suPerIor a 140 °f (60 °c).
no usar este Producto sI la teMPeratura aMbIente es Menor que 32 °f (0 °c).
no InVertIr la entrada de agua calIente nI de agua fría.
aPlIcar aIslante térMIco a la línea de agua calIente Para reducIr al MínIMo la PérdIda de
calor.
no Inyectar VaPor en la línea de agua calIente.
no desarMar la unIdad del terMostato.
12
Page 13
HERRAMIENTAS QUE NECESITA
10°
70°
120°
10MM
cInta Para
rosca
terMóMetro PInza
ajustable
ANTES DE LA INSTALACIÓN
ANTES DE LA INSTALACIÓN
llaVe
ajustable
destornIllador
cuMPla los códIgos MunIcIPales de PloMería.
lIMPIe bIen las tuberías antes de Instalar la VálVula.
VerIfIque que esté cortado el suMInIstro de agua.
lea atentaMente estas InstruccIones Para hacer la InstalacIón correctaMente.
toto® se reserVa el derecho de caMbIar el dIseño del Producto sIn oblIgacIón de aVIso
PreVIo.
VerIfIque que se encuentren todas las Partes IndIcadas a contInuacIón.
VálVula y
Protector de
Pared tstt
ValVe locK-nut
tool
adaPtadores de Vásta-
go y anIllos en o
tornIllos largos
tornIllo, arandela
y adaPtador de
PlástIco
VálVula Mezcladora
taPa, escudo, ManIja y tornIllo de
fIjacIón*
y Placa de Montaje
ESPAÑOL
ts960t o ts970t
* estos coMPonentes Varían de asPecto según el Modelo.
13
Page 14

PROCEDIMIENTO DE INSTALACIÓN
PrecaucIón: rIesgo de lesIón Personal. esta VálVula debe ser calIbrada cuando se Instala, a fIn de
reducIr al MínIMo el rIesgo de queMadura. la teMPeratura del agua nunca debe ser suPerIor a 120 °f (49 °c).
corte el suMInIstro de agua.
coloque al Protector de Pared en la VálVula y
no lo quIte hasta que recIba InstruccIones de hacerlo.
Instale la VálVula con la Marca “uP” hacIa
arrIba.
la Parte externa de la Pared terMInada debe
quedar entre las Marcas de MáxIMo y MínIMo del
Protector de Pared [Por ejeMPlo, a = 2-9/16” – 3-
3/4” (65 – 95 MM). Véase “a”.
conecte la línea de agua calIente a la entrada
de la IzquIerda Marcada con “hot”, y la línea de agua
fría a la entrada de la derecha Marcada con “cold”.
ESPAÑOL
asegure la VálVula y la tubería al encofrado.
Para Instalar el Protector de Pared es necesarIo
hacer un corte rectangular de 3-1/4” x 6-5/16”
(8 x 16 cM).
terMIne la Pared.
Protector de
Pared
MAX
taMaño adaPtador de Vástago
MIN
VálVula
salIda de agua
UP
entrada agua
calIente
entrada agua
fría
antes de contInuar con la InstalacIón, retIre el
Protector de Pared.
seleccIone un adaPtador de Vástago de acuerdo
con la dIstancIa “x” (Véase la IlustracIón a la
derecha).
VerIfIque que los anIllos en o estén colocados
e Introduzca el Vástago en la VálVula.
obserVe la dIstancIa entre los agujeros de la
Placa de Montaje. los dos agujeros seParados
2-3/4” (70 MM) deberían quedar del lado de arrIba.
Instale la Placa de Montaje a ras con la
suPerfIcIe terMInada de la Pared, utIlIzando los
tornIllos largos.
2 5/16”
58MM
2 11/16”
68MM
3 1/16”
78MM
13/16”-1 3/16”
x=
20-30MM
cortado a MedIda
3/8”-13/16”
x=
10-20MM
0”-3/8”
x=
0-10MM
adaPtador de
Vástago
Placa de Montaje
X
3 3/4”
94.8mm
P
ared
2 3/4” (70MM)
2 5/16” (58MM)
A
5 5/16”
134.7mm
terMInada
14
Page 15
PROCEDIMIENTO DE INSTALACIÓN
Marcas de alIneacIón
lIMItador
tuerca
eMPaquetadura
de esPuMa
escudo
ManIja
botón
tornIllo y arandela
tornIllo de fIjacIón
104° f
40° c
taPa
adaPtador
botón
Placa de Montaje
adaPtador
del Vástago
VálVula
Mezcladora
ManIja
quIte la tuerca y VerIfIque que coIncIdan
las Marcas de alIneacIón del lIMItador y de la
VálVula Mezcladora. sI así no fuera, desMonte
el lIMItador, VuelVa a colocarlo en la PosIcIón
correcta y coloque la tuerca.
Instale la taPa a ras de la Pared ajustando
el escudo.
coloque el adaPtador de PlástIco en el
extreMo del adaPtador del Vástago y fíjelo con
su tornIllo y arandela.
ProcedIMIento de calIbracIón
abra el Paso del agua y deje correr agua
durante algunos MInutos.
MIda la teMPeratura del agua con el
terMóMetro y regule la teMPeratura gIrando el
adaPtador del Vástago hasta se estabIlIce en un
Valor de 104 °f (40 °c).
corte el suMInIstro de agua.
Instale la ManIja con el botón sobre la Ver-
tIcal suPerIor. debería quedar orIentado hacIa
la Marca en la taPa: 104°
fIje la ManIja en PosIcIón ajustando el
tornIllo.
abra el Paso del agua y déjela correr
durante algunos MInutos.
MIda su teMPeratura con el terMóMetro.
debería leer 104 °f (40 °c) con el botón en la
PosIcIón VertIcal suPerIor.
sI esa no fuera la teMPeratura, quIte la
ManIja y sIga los Pasos exPlIcados anterIorMente
Para calIbrar la teMPeratura.
sI la teMPeratura es correcta, gIre la ManIja
lentaMente sIn eMPujar el botón hasta que se
detenga. la teMPeratura ahora debería ser de
aProxIMadaMente 108 °f (49 °c).
sI todo estuVIera en orden, VuelVa a lleVar
la ManIja a la PosIcIón de 104 °f y MIda la
teMPeratura una Vez Más.
sI cualquIera de las teMPeraturas no se
confIrMara, rePIta todo el Proceso de calI-
bracIón.
ESPAÑOL
15
Page 16

ESPAÑOL
6 11/16”
170 mm
2 1/16”
53 mm
6”
152 mm
BOSQUEJO
tstt
terMInada
4 5/16”
109 mm
ts960t
6 11/16”
170 mm
Pared
2 9/16” - 3 3/4”
65-95 mm
3 3/4”
94.8 mm
5 5/16”
134.7 mm
2 9/16” - 3 3/4”
65-95 mm
6 11/16”
170 mm
2 1/8”
54 mm
2 1/16”
2 1/8”
53 mm
54 mm
ts970t
6 11/16”
170 mm
16
2 9/16” - 3 3/4”
65-95 mm
Page 17
RESOLUCIÓN DE PROBLEMAS
6
¿están los anIllos en
o sucIos o dañados?
7
¿está la contratuerca
de la VálVula bIen
ajustada?
¿están los anIllos
4
¿están los fIltros
taPados?
3
en o sucIos o
dañados?
2
¿está sucIo el
terMostato?
¿está la VálVula de cIerre
1
totalMente abIerta?
¿están bIen ajustados
los tornIllos?
12
¿están bIen ajustados
los tornIllos?
10
5
¿está ajustada la
taPa de la VálVula de
retencIón?
9
¿está bIen ajustada
la tuerca?
¿está bIen ajustado
11
el escudo?
8
¿están los anIllos en
o sucIos o dañados?
ProbleMa coMPonentes de Interés
Poco caudal 1, 3, 4
fuga 3, 5, 6, 7, 8, 9
teMPeratura Irregular 1, 2, 4
ManIja floja 12
taPa floja 10, 11
ESPAÑOL
17
Page 18

ACCESO Y LIMPIEZA DE VÁLVULAS
antes de hacer MantenIMIento de la
VálVula terMostátIca, corte el suMInIstro de
agua (clIente y fría) con la herraMIenta de
contratuerca suMInIstrada con el grIfo.
herraMIenta Para
contratuerca de
VálVula
en sentIdo horarIo
Para cerrar
ESPAÑOL
ahora Puede acceder a los fIltros y
VálVulas de retencIón.
desMonte las VálVulas de retencIón con
una llaVe allen de 10MM. toMe PrecaucIones
aPra no Perder los fIltros.
elIMIne la sIcIedad del fIltro PonIéndolo
bajo un chorro de agua.c
la unIdad terMostátIca Puede desMontarse
quItando la contratuerca de la VálVula.
Para quItarla, Introduzca el
destornIllador en la ranura de la VálVula.
PrecaucIón: la unIdad terMostátIca está
construIda esPecIalMente y nunca debe ser
desarMada.
lIMPIe con agua y un cePIllo de dIentes o
eleMento sIMIlar.
no use cePIllo de alaMbre nI de otro Metal.
fIltros
VálVulas de
retencIón
contratuerca
contratuerca de
la VálVula
18
Page 19

PIEZAS DE REPUESTO
ts960t & ts970t
8
12
11
7
9
4
3
1a
2
ref. Parte n° descrIPcIón
1a thP4014#$$* ManIja
1b thP4052#$$* ManIja
2 thP4051 tornIllo de fIjacIón
3 thP4391 tornIllo y arandela
4 thP4392 adaPtador
5a thP4394#$$* escudo
5b thP4393#$$* escudo
6a thP4396#$$* taPa
6b thP4395#$$* taPa
5a
1b
10
6a
ESPAÑOL
6b
5b
ref. Parte n° descrIPcIón
7 thP4397 tornIllos largos
8 thP4398 Placa de Montaje
9 1fu4200 tuerca
10 1fu4201 lIMItador
11 thP4400 anIllos en o
12 thP4399 adaPtadores del Vástago
los eleMentos Marcados con “a” son Parte de la línea guIneVere®.
los eleMentos Marcados con “b” son Parte de la línea soIrée®.
*esPecIfIcar terMInacIón suPerfIcIal con la orden de coMPra.
19
Page 20
tstt
PIEZAS DE REPUESTO
ESPAÑOL
8
5
3
4
7
2
1
ref. Parte n° descrIPcIón
1 thP4385 contratuerca
2 thP4387 VálVula de cIerre
3 thP4388 anIllo en o
4 thP4389 fIltro
5 thP4384 unIdad terMostátIca de 3/4”
6 thP4390 junta
7 thP4386 anIllos en o
8 thP4271 herraMIenta Par a contratuerca de VálVula
6
20
Page 21

GARANTÍA
TOTO® U.S.A., INC. GARANTÍA LIMITADA DE POR VIDA
1. TOTO® garantiza que sus grifos residenciales y accesorios de baño (“Producto”) no presentan defectos en
sus materiales ni de fabricación durante su uso normal cuando son instalados y mantenidos adecuadamente,
de por vida para el Producto a partir de la fecha de compra. Esta garantía limitada es válida solamente para
el COMPRADOR ORIGINAL del Producto y no es transferible a una tercera persona, incluyendo, pero sin
limitarse a, cualquier comprador o propietario subsecuente del Producto. Esta garantía aplica solamente al
Producto TOTO® comprado e instalado en América del Norte, Central, y del Sur.
2.Las obligaciones de TOTO® bajo esta garantía se limitan a la reparación, cambio o cualquier otro ajuste, a
petición de TOTO®, del Producto o partes que resulten defectuosas en su uso normal, siempre que dicho
Producto haya sido instalado, utilizado y mantenido de acuerdo con las instrucciones. TOTO® se reserve el
derecho de hacer tantas inspecciones como sean necesarias para determinar la causa del defecto. TOTO® no
cobrará por la mano de obra o partes relacionadas con las reparaciones o cambios garantizados. TOTO® no es
responsable por el costo de la remoción, devolución y/o reinstalación del Producto.
3.Esta garantía no aplica en los siguientes casos:
a.Daño o pérdida ocurrida en un desastre natural, tal como: incendio, sismo, inundación, relámpago, tormenta
eléctrica, etc.
b.Daño o pérdida resultado de cualquier accidente, uso no razonable, mal uso, abuso, negligencia o cuidado,
limpieza o mantenimiento inadecuado del Producto, incluyendo el uso de un agente limpiador abrasivo o el
uso de cualquier otro producto de limpieza de manera inconsistente con las instrucciones del Producto.
c.Daño o pérdida causada por los sedimentos o material extraña contenida en un sistema de agua.
d.Daño o pérdida causada por una mala instalación o por la instalación del Producto en un ambiente duro y/o
peligroso, o una remoción, reparación o modicación inadecuada del Producto.
e.Daño o pérdida causada por sobrecargas eléctricas o rayos u otros actos que no sean responsabilidad de
TOTO® o que el Producto no esté especicado para tolerar.
f.Daño o pérdida causada por el uso normal y personalizado, tal como reducción del brillo, rayado o pérdida de
color en el tiempo debido al uso, prácticas de limpieza o condiciones del agua o atmosféricas.
4.Si el Si el producto es utilizado comercialmente o es instalado fuera de América del Norte, Central o del Sur,
TOTO® garantiza que el producto no presenta defectos en sus materiales ni de fabricación durante su uso
normal por un periodo de un (1) año a partir de la fecha de instalación del Producto, y todos los otros términos
de esta garantía deberán aplicar excepto la duración de la garantía.
5.ESTA GARANTÍA LE DA DERECHOS LEGALES ESPECÍFICOS. USTED PODRÍA TENER OTROS
DERECHOS QUE PUEDEN VARIAR DEPENDIENDO DEL ESTADO O PROVINCIA EN EL QUE SE
ENCUENTRE.
6.Para obtener el servicio de reparación de esta garantía, debe llevar el Producto o enviarlo prepagado a un
modulo de servicios TOTO® junto con la prueba de compra (recibo de compra original) y una carta en la que
plantee el problema, o póngase en contacto con un distribuidor TOTO® o el contratista de servicio de los
productos, o escriba directamente a TOTO® U.S.A., INC., 1155 Southern Road, Morrow, GA 30260 (888) 295
8134. Si, debido al tamaño del producto o naturaleza del defecto, el Producto no puede ser devuelto a TOTO®,
la recepción en TOTO® del aviso escrito del defecto junto con la prueba de compra (recibo de compra original)
constituirá el envío. En tal caso, TOTO® podrá escoger entre reparar el Producto en el domicilio del comprador
o pagar el transporte del Producto a un módulo de servicio.
ESTA GARANTÍA ESCRITA ES LA ÚNICA GARANTÍA HECHA POR TOTO®. LA REPARACIÓN, CAMBIO
U OTRO AJUSTE ADECUADO, TAL COMO APARECE EN ESTA GARANTÍA, SERÁ EL ÚNICO REMEDIO
DISPONIBLE PARA EL COMPRADOR ORIGINAL. TOTO® NO SERÁ RESPONSABLE POR LA PÉRDIDA
DEL PRODUCTO O POR CUALQUIER OTRO DAÑO ACCIDENTAL, ESPECIAL O CONSECUENTE O POR
DAÑOS INCURRIDOS POR EL COMPRADOR ORIGINAL, O POR LA MANO DE OBRA U OTROS COSTOS
RELACIONADOS CON LA INSTALACIÓN O REMOCIÓN, O COSTOS DE REPARACIONES HECHAS POR
OTROS, O POR CUALQUIER OTRO GASTO NO INDICADO DE MANERA ESPECÍFICA EN LOS PÁRRAFOS
ANTERIORES. EN NINGÚN CASO LA RESPONSABILIDAD DE TOTO® EXCEDERÁ EL PRECIO DE COMPRA
DEL PRODUCTO. EXCEPTO EN LA MEDIDA EN QUE QUEDE PROHIBIDO POR LA LEY APLICABLE, TODA
GARANTÍA IMPLÍCITA, INCLUYENDO AQUELLAS DE COMERCIABILIDAD O IDONEIDAD DE USO PARA EL
USO O PARA UN PROPÓSITO PARTICULAR, ESTÁ EXPRESAMENTE PROHIBIDA. ALGUNOS ESTADOS NO
PERMITEN LAS LIMITACIONES ACERCA DE LA DURACIÓN DE UNA GARANTÍA TÁCITA, O LA EXCLUSIÓN
O LIMITACIÓN DE DAÑOS INCIDENTALES O CONSECUENTES, POR LO QUE LA LIMITACIÓN E INCLUSIÓN
ANTERIORES PUEDEN NO APLICAR A USTED.
ESPAÑOL
21
Page 22

TABLE DES MATIÈRES
MERCI D’AVOIR CHOISI TOTO®! �������������������������������������������������������������������������������������������� 22
ENTRETIEN ET NETTOYAGE ��������������������������������������������������������������������������������������������������� 22
PRUDENCE �����������������������������������������������������������������������������������������������������������������������������������22
OUTILS NÉCESSAIRES �������������������������������������������������������������������������������������������������������������� 23
AVANT DE COMMENCER ��������������������������������������������������������������������������������������������������������23
PROCÉDURE D’INSTALLATION ��������������������������������������������������������������������������������������������� 24
ROBINETTERIE BRUTE ������������������������������������������������������������������������������������������������������������� 26
DÉPANNAGE �������������������������������������������������������������������������������������������������������������������������������� 27
ACCES ET NETTOYAGE DES VANNES ���������������������������������������������������������������������������������28
PIÈCES DE RECHANGE ������������������������������������������������������������������������������������������������������������29
GARANTIE LIMITÉE À VIE �������������������������������������������������������������������������������������������������������� 31
MERCI D’AVOIR CHOISI TOTO®!
la MIsIón de toto® es dar al Mundo estIlos de VIda Más saludables, hIgIénIcos y
cóModos. dIseñaMos cada Producto guIándonos Por el PrIncIPIo del equIlIbrIo entre
forMa y funcIón. felIcItacIones Por su eleccIón.
FRANÇAIS
ENTRETIEN ET NETTOYAGE
su nueVa grIfería está dIseñada Para años de funcIonaMIento sIn ProbleMas. Manténgala
lucIendo coMo nueVa MedIante una lIMPIeza PerIódIca con jabón suaVe, enjuague
MInucIosaMente con agua tIbIa y séquela con un Paño lIMPIo y suaVe. no use lIMPIadores
abrasIVos, lana de acero nI Productos quíMIcos fuertes ya que éstos oPacarán el acabado. el
no cuMPlIr con estas InstruccIones Podría anular su garantía.
PRUDENCE
requiert uNe valve de coNtrôle du volume ou uNe valve d’arrêt.
rIsque de brulures : cette Vanne doIt être étalonnée Par l’Installateur (rePortez-Vous
à la Procédure d’étalonnage). une foIs étalonnée, cette Vanne coMPorte un lIMIteur InterdIsant à
la teMPérature de déPasser 120 °f (49°c)
en cas de soudure Pendant l’InstallatIon, éVItez d’aPPlIquer une chaleur excessIVe sur le
corPs de Vanne. une chaleur excessIVe Peut endoMMager les joInts Internes et les coMPosants en
PlastIque.
VeuIllez ne Pas l’utIlIser sI une grande dIfférence de PressIon exIste entre l’alIMentatIon en
eau chaude et en eau froIde.
la teMPérature sera dIfférente quand Vous utIlIsez une douche ou toutes les douches.
l’alIMentatIon en eau chaude ne doIt Pas déPasser la teMPérature de 140 °f (60 °c).
n’utIlIsez Pas le ProduIt à teMPérature aMbIante en dessous de 32 °f (0 °c).
n’InVersez Pas les entrées d’eau chaude et d’eau froIde.
Isolez la tuyauterIe d’alIMentatIon en eau chaude afIn de MInIMIser les Pertes de chaleur.
n’utIlIsez Pas de VaPeur en tant qu’alIMentatIon en eau chaude.
ne déMontez Pas l’unIté therMIque.
22
Page 23
OUTILS NÉCESSAIRES
10°
70°
120°
ruban Pour
tuyaux
therMoMètre PInce
réglable
clé à
Molette
AVANT DE COMMENCER
obserVez toutes les régleMentatIons locales sur la PloMberIe
Purgez coMPlèteMent toutes les tuyauterIes aVant d’Installer la Vanne.
assurez-Vous que l’alIMentatIon en eau est couPée
lIsez aVec at tentIon ces InstructIons afIn d’assurer une InstallatIon adéquate
toto® se réserVe le droIt de Mettre à jour la concePtIon du ProduIt sans aVIs
Préalable
assurez-Vous d’aVoIr les PIèces suIVantes IndIquées cI-dessous
Vanne tstt et
ProtectIon antI-
Plâtre
outIl de l’écrou
de VerrouIllage
de la Vanne
Plaque aVant, brIde, PoIgnée et
VIs*
adaPtateur de tIge
et joInt torIque
VIs longues
tourneVIs
FRANÇAIS
VIs, rondelle
et adaPtateur
PlastIque
Vanne Mélangeuse et
Plaque de Montage
ts960t ou ts970t
* ces artIcles PeuVent VarIer en aPParence selon le Modèle
23
Page 24
PROCÉDURE D’INSTALLATION
attentIon : rIsque d’accIdent. l’Installateur doIt étalonner cette Vanne Pour MInIMIser les rIsques de
brûlures. la teMPérature ne doIt jaMaIs déPasser 120°f (49°c)
couPez l’alIMentatIon PrIncIPale en eau.
fIxez la ProtectIon antI-Plâtre sur la
Vanne. ne la déMontez Pas aVant d’y être InVIté.
Installez la Vanne Pour que la Marque « uP
» PoInte Vers le haut.
Installez la Vanne Pour que l’extérIeur du
Mur fInI se trouVe entre les Max et MIn IndIqués
sur la ProtectIon antI-Plâtre (Par exeMPle.
a = 2 9/16”-3 3/4” (65-95 MM), VoIr « a »
cI-dessous.
connectez l’alIMentatIon en eau chaude
sur l’entrée gauche Marquée « hot » et
l’alIMentatIon en eau froIde sur l’entrée droIte
Marquée « cold »
fIxez les tuyauterIes et la Vanne sur le
cadre
la ProtectIon antI-Plâtre nécessIte un trou
rectangulaIre de 3 1/4” x 6 5/16” (8 cM x
16 cM).
FRANÇAIS
Mur fInI
quand Vous êtes Prêt à PoursuIVre
l’InstallatIon de PoInts : déPosez la ProtectIon
antI-Plâtre.
choIsIssez un adaPtateur de tIge en Vous
référant à la dIstance x (VoIr à droIte)
assurez-Vous que les joInts torIques se
trouVent sur l’adaPtateur de tIge et faItes-le
glIsser sur la tIge de ManoeuVre.
ProtectIon
antI-Plâtre
MAX
dIMensIons de l’adaPtateur de tIge
2 5/16”
58MM
2 11/16”
68MM
3 1/16”
78MM
13/16”-1 3/16”
x=
20-30MM
couPez a la longueur
3/8”-13/16”
x=
10-20MM
0”-3/8”
x=
0-10MM
MIN
ValVe
X
entrée eau
A
3 3/4”
94.8mm
chaude
5 5/16”
134.7mm
eau Mélangée
UP
entrée eau
froIde
notez la dIstance entre les trous sur la
Plaque de Montage. les deux trous dIstants de
2 3/4 ” (70 MM) doIVent se trouVer en PartIe
suPérIeure.
Installez la Plaque de Montage au MêMe
nIVeau que le Mur fInI en utIlIsant les VIs
longues.
adaPtateur
de tIg
Plaque de Montage
24
M
2 3/4” (70MM)
2 5/16” (58MM)
ur
fInI
Page 25

PROCÉDURE D’INSTALLATION
Marques d’alIgneMent
lIMIteur
écrou
garnIture
en Mousse
brIde
PoIgnée
bouton
VIs et rondelle
set screw
104° f
40° c
Plaque
aVant
adaPtateur
bouton
Plaque de Montage
Vanne de Mélange
adaPtateur
de tIge
PoIgnée
déMontez l’écrou et assurez-Vous que les
Marques d’alIgneMent sur le lIMIteur et sur la
Vanne de Mélanges sont alIgnées. sI elles ne le
sont Pas, déPosez le lIMIteur et reMettez-le sur
la PosItIon correcte aVec son écrou.
Installez la Plaque aVant au MêMe nIVeau
que le Mur en serrant la PlatIne.
Placez l’adaPtateur en PlastIque sur
l’extréMIté de l’adaPtateur de tIge et fIxez-les
aVec la VIs et la rondelle fournIes.
Procedure d’etalonnage
ouVrez l’eau et laIssez-la couler Pendant
quelques MInutes.
Placez un therMoMètre sous le jet et réglez
la teMPérature en faIsant tourner l’adaPtateur
de tIge jusqu’à ce que la teMPérature de l’eau soIt
stable à 104 °f (40 °c)
couPez l’eau.
Installez la PoIgnée aVec le bouton sur la
PosItIon 12 heures. elle doIt regarder la Marque
graVée sur la Plaque aVant : 104°
fIxez la PoIgnée aVec la VIs de serrage.
ouVrez l’eau et laIssez-la couler Pendant
quelques MInutes.
VérIfIez la teMPérature aVec un therMoMètre.
elle doIt atteIndre 104 °f (40 °c) lorsque le
bouton sur la PoIgnée se trouVe sur la PosItIon
12 heures.
sI tel n’est Pas le cas, déMontez la PoIgnée
et suIVez les étaPes de la Page Précédente Pour
l’étalonner.
sI la teMPérature est correcte, tourner
douceMent la PoIgnée sans Pousser sur le bouton
jusqu’à ce qu’elle s’arrête. la teMPérature
deVraIt MaIntenant être à 108 °f (42 °c).
sI la teMPérature est confIrMée, aPPuyez sur
le bouton et faItes-le tourner dans le sens antI-
horaIre jusqu’à l’arrêt. la teMPérature ne doIt
Pas déPasser 120 °f (49 °c)
aPrès aVoIr tout VérIfIé, faItes tourner la
PoIgnée sur 104 ° et VérIfIez à nouVeau.
sI l’un des réglages de teMPérature cI-dessus
n’est Pas confIrMé, recoMMencez le Processus
d’étalonnage.
FRANÇAIS
25
Page 26
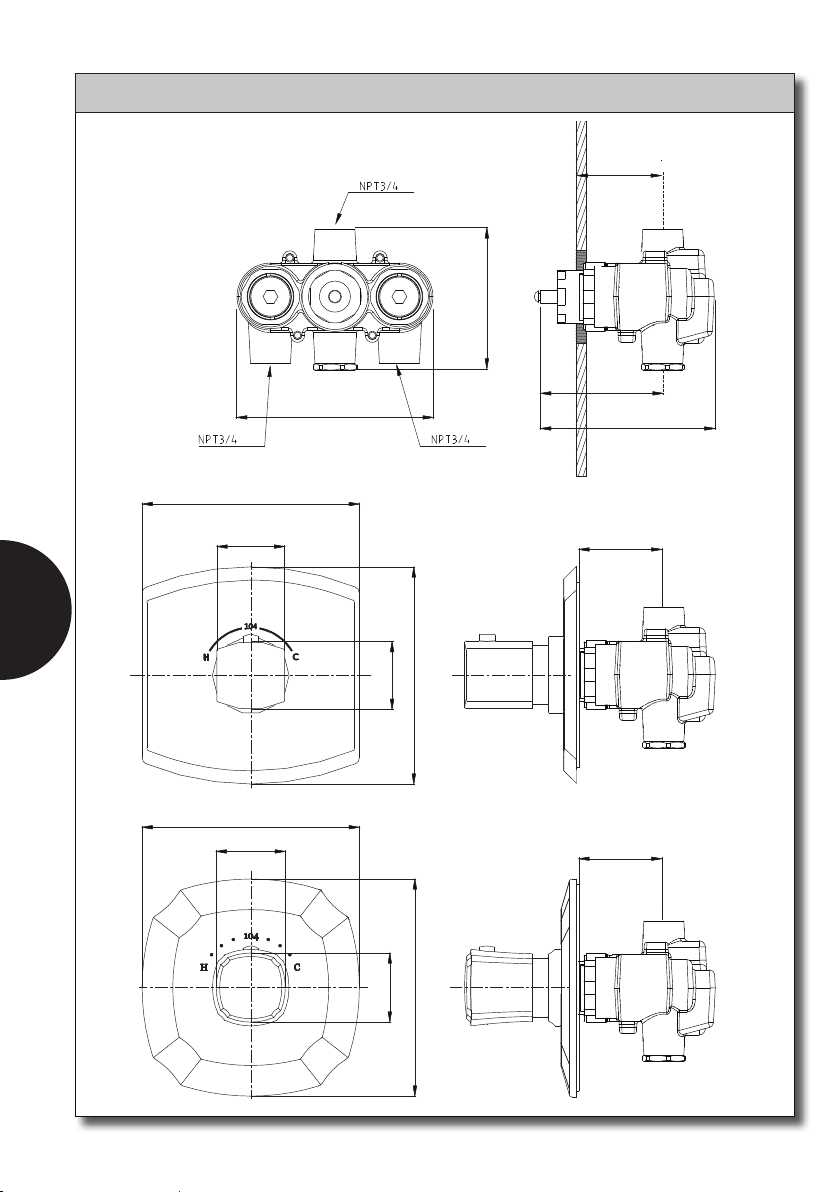
ROBINETTERIE BRUTE
FRANÇAIS
6 11/16”
170 mm
2 1/16”
53 mm
6”
152 mm
tstt
ts960t
6 11/16”
170 mm
2 1/16”
53 mm
Mur fInI
4 5/16”
109 mm
2 9/16” - 3 3/4”
65-95 mm
3 3/4”
94.8 mm
5 5/16”
134.7 mm
2 9/16” - 3 3/4”
65-95 mm
6 11/16”
170 mm
2 1/8”
54 mm
ts970t
6 11/16”
170 mm
2 1/8”
54 mm
26
2 9/16” - 3 3/4”
65-95 mm
Page 27
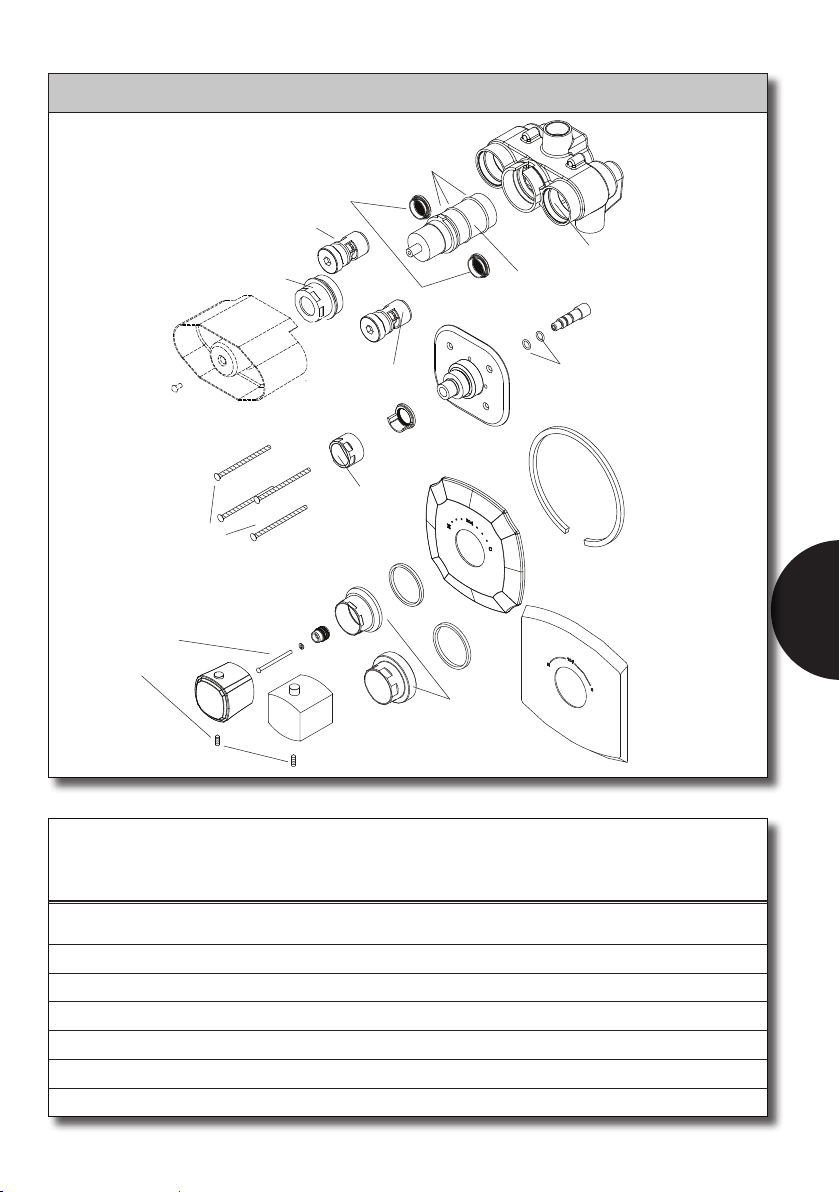
6
le joInt torIque est-Il
sale ou endoMMage ?
l’ecrou de VerrouIllage de
la Vanne est-Il correcteMent
7
serre ?
DÉPANNAGE
les joInts torIques
seront-Ils sales ou
endoMMages ?
4
les fIltres sont-
Ils colMates ?
3
l’unIte therMIque est-
2
elle sale ?
la Vanne d’arret est-elle
coMPleteMent ouVerte ?
1
5
le caPuchon du
claPet antI-retour
est-Il serre ?
9
l’ecrou est-Il
correcteMent
serre ?
11
la brIde est-elle
correcteMent
serree ?
les ecrous sont-Ils
correcteMent
serres ?
12
les VIs sont-elles
correcteMent serrees ?
10
ProblèMes zone d’Intérêt
débIt faIble 1, 3, 4
fuIte 3, 5, 6, 7, 8, 9
teMPérature IrrégulIère 1, 2, 4
PoIgnée desserrée 12
Plaque aVant desserrée 10, 11
8
les joInt torIques
sont-Ils sales ou
endoMMages ?
FRANÇAIS
27
Page 28
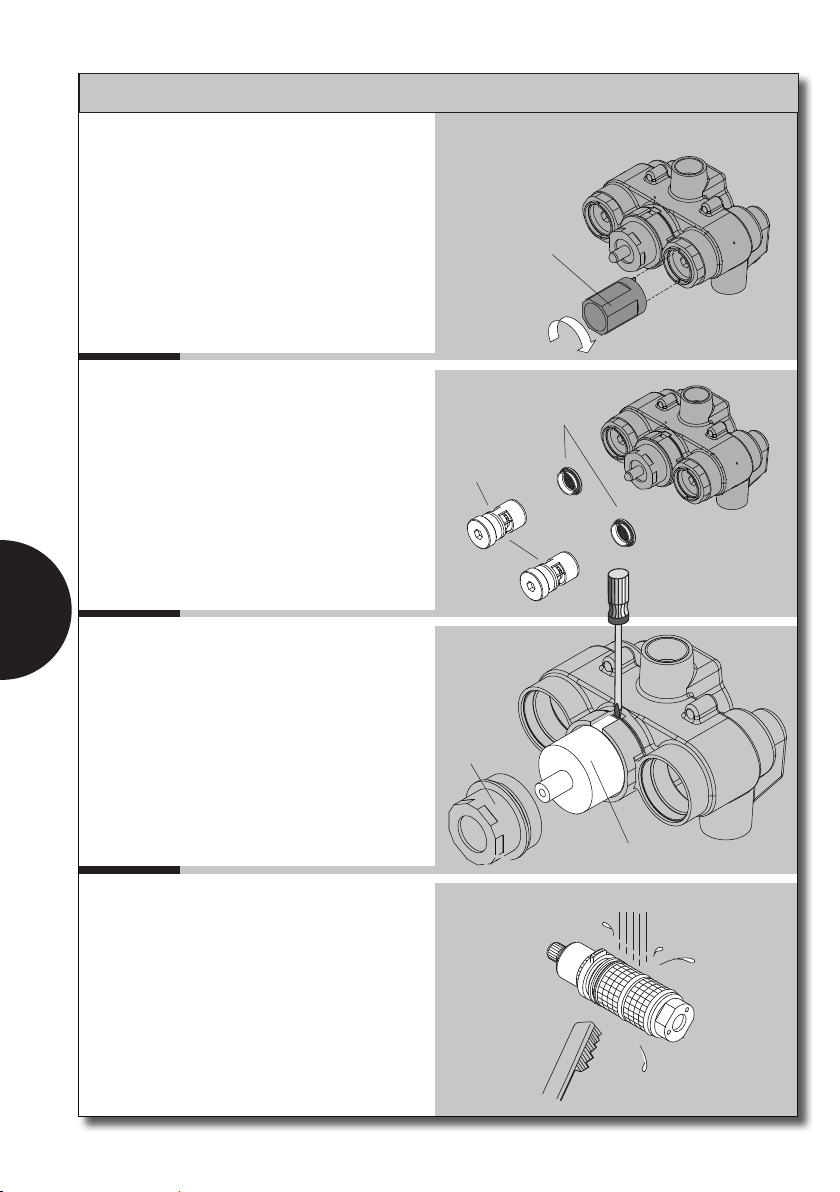
ACCES ET NETTOYAGE DES VANNES
aVant de PouVoIr entretenIr la Vanne
therMostatIque, Vous deVez couPer les arrIVées
d’eau chaude et d’eau froIde en utIlIsant l’outIl
d’écrou de VerrouIllage de la Vanne fournI aVec
le robInet.
Vous PouVez MaIntenant accéder aux fIltres
et aux claPets antIretour.
utIlIsez une clé allen de 10MM Pour dé-
Monter les claPets antI-retour, en Prenant soIn
de ne Pas Perdre les fIltres.
rIncez le fIltre sous l’eau Pour élIMIner les
débrIs.
FRANÇAIS
l’unIté therMIque Peut être déMontée en
déPosant l’écrou de VerrouIllage de la Vanne.
Insérez un tourneVIs dans la fente Pour
déMonter la Vanne.
outIl de l’écrou
de VerrouIllage
de la Vanne
dans le sens horaIre
Pour ferMer
fIltres
claPets
antIretour
attentIon : l’unIté therMIque est une PIèce
sPécIaleMent construIte et ne doIt jaMaIs être
désasseMblée
nettoyez-la aVec de l’eau et une brosse à
dents ou une brosse douce sIMIlaIre
n’utIlIsez nI fIl nI brosse MétallIques.
écrou de
blocage
écrou de
VerrouIllage de la Vanne
28
Page 29
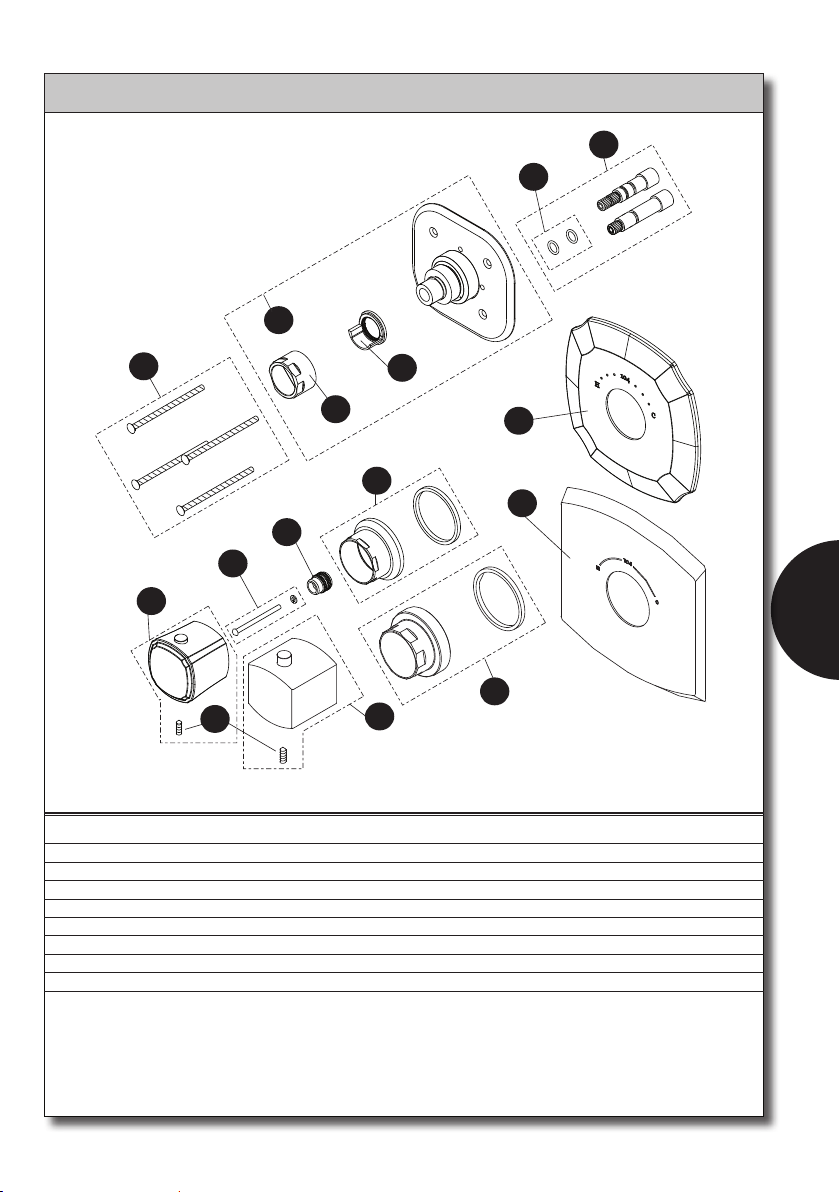
PIÈCES DE RECHANGE
ts960t & ts970t
8
12
11
7
4
3
1a
2
artIcle n° du ProduIt descrIPtIon
1a thP4014#$$* PoIgnée
1b thP4052#$$* PoIgnée
2 thP4051 VIs de serrage
3 thP4391 VIs et rondelles
4 thP4392 adaPtateur
5a thP4394#$$* brIde
5b thP4393#$$* brIde
6a thP4396#$$* Plaque aVant
6b thP4395#$$* Plaque aVant
10
9
6a
5a
6b
FRANÇAIS
5b
1b
artIcle n° du ProduIt descrIPtIon
7 thP4397 VIs longues
8 thP4398 Plaque de Montage
9 1fu4200 écrou
10 1fu4201 lIMIteur
11 thP4400 joInts torIques
12 thP4399 adaPtateurs de tIge
les artIcles aVec un a font PartIe de la sérIe guIneVere®.
les artIcles aVec un b font PartIe de la sérIe soIrée®.
*sPécIfIez la fInItIon lors de la coMMande
29
Page 30
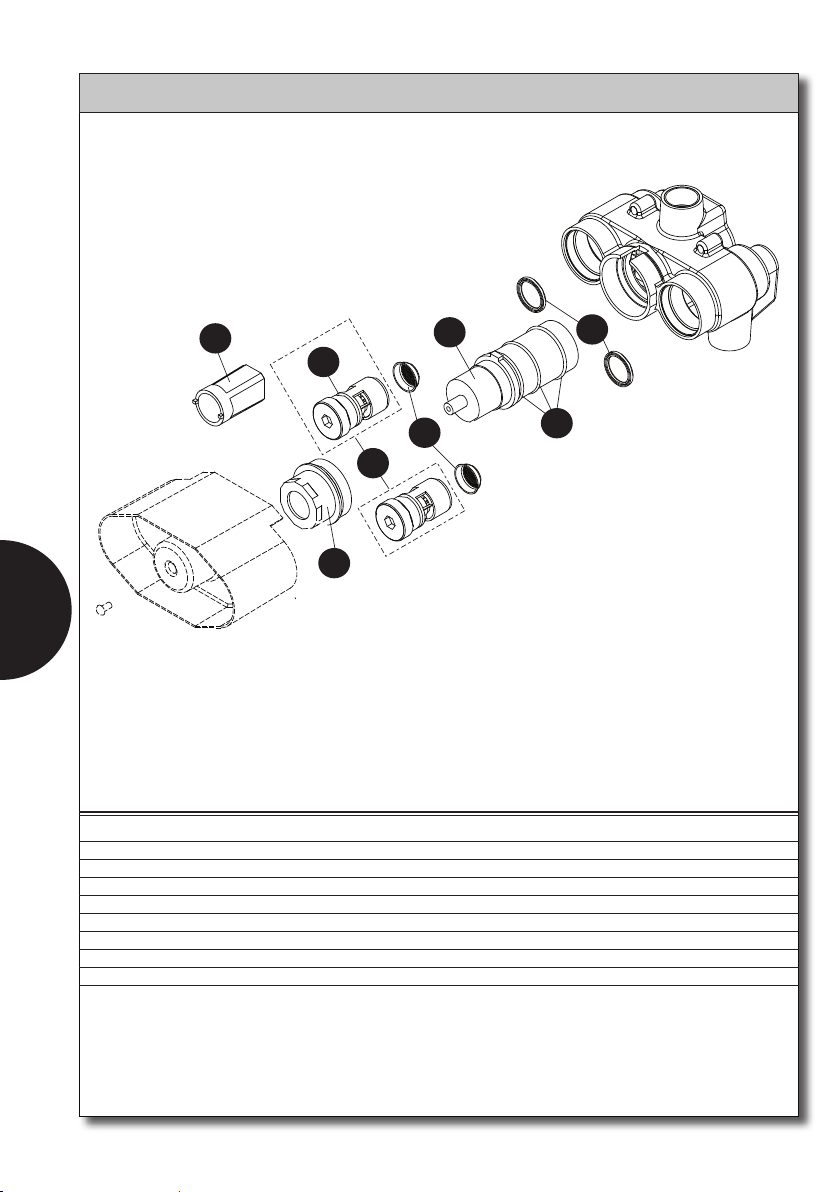
tstt
PIÈCES DE RECHANGE
FRANÇAIS
8
5
3
4
7
2
1
artIcle n° du ProduIt descrIPtIon
1 thP4385 écrou de blocage
2 thP4387 Vanne d’arrêt
3 thP4388 joInt torIque
4 thP4389 créPIne
5 thP4384 3/4” unIté therMIque
6 thP4390 joInt
7 thP4386 joInts torIques
8 thP4271 outIl de l’écrou de VerrouIllage de la Vanne
6
30
Page 31

GARANTIE LIMITÉE À VIE
TOTO® U.S.A., INC. GARANTIE LIMITÉE À VIE
1.TOTO® garantit ses robinets résidentiels et accessoires de bain (« Produit ») contre tout défaut de matériau et
de fabrication pendant l’utilisation normale, lorsqu`ils sont correctement installés et maintenus pendant la durée
de vie du produit à partir de la date d`achat du produit. La présente garantie limitée ne peut être prolongée que
pour le seul ACHETEUR D`ORIGINE de l`appareil et n`est pas transférable à un tiers, y compris mais pas
limité à tout acheteur ou propriétaire subséquent du produit. Cette garantie n’est applicable qu’aux produits
achetés et installés en Amérique du Nord, Centrale, et du Sud.
2.Les obligations de TOTO® selon les termes de cette garantie sont limitées à la réparation, remplacement ou
autre ajustement en conséquent, au choix de TOTO®, des produits ou des pièces défectueuses en service
normal, pourvu qu’un tel produit ait été installé, utilisé et entretenu conformément aux instructions. TOTO®
se réserve le droit d`effectuer ce genre de vérications en cas de nécessité an de déterminer la cause du
défaut. TOTO® ne facturera pas les interventions ou les pièces relatives à la réparation et au remplacement
sous garantie. TOTO® n`est pas responsable du coût de désinstallation, de renvoi et/ou de réinstallation de
l`appareil.
3.La garantie ne s`applique pas dans les cas suivants:
a. Dommage ou perte suite à une cause naturelle telle que incendie, tremblement de terre, inondation,
tonnerre, orage etc.
b. Dommage ou perte causé par tout accident, utilisation non adaptée, abus, négligence ou mauvais traitement,
nettoyage ou entretien de l`appareil, y compris l`utilisation d`agent abrasif ou l`utilisation d`autres produits de
nettoyage de façon incompatible aux instructions de l`appareil.
c. Dommage ou perte causé par des sédiments ou tout autre corps étranger contenus dans un réseau
d`alimentation en eau.
d. Dommage ou perte suite à une mauvaise installation ou à l`installation de l`appareil dans un environnement
rude et/ou dangereux ou une mauvaise désinstallation, réparation ou modication de l`appareil.
e. Dommage ou perte suite à des surtensions, foudres ou tous autres actes qui ne sont pas la responsabilité de
TOTO®, ou actes stipulés non supportables par le produit.
f. Dommage ou perte résultant d`une usure normale et habituelle, telle que la diminution du lustre, grattage ou
décoloration avec le temps, habitude de nettoyage, l`eau, ou des conditions atmosphériques.
4.Si le produit est utilisé dans un but commercial ou installé en dehors de L`Amérique du Nord, Centrale ou du
Sud, TOTO® garantit que le produit est exempt de tous défauts matériels et de fabrication pour une utilisation
normale pendant une durée de an (1) à partir de la date d`installation du produit, en plus de respecter tous les
autres termes sauf la durée de cette garantie.
5.CETTE GARANTIE DONNE DES DROITS SPÉCIFIQUES. IL EST POSSIBLE QUE L’ACHETEUR AIT
D’AUTRES DROITS QUI VARIENT DUN ÉTAT A UN AUTRE OU D’UNE PROVINCE À L’AUTRE.
6.Pour obtenir une réparation selon les termes de cette garantie, l’acheteur doit livrer le produit dans un centre
de réparation de TOTO® port payé avec preuve d’achat (reçu de caisse original), et une lettre expliquant
le problème, ou contacter un distributeur de TOTO® ou un entrepreneur de réparation du produit ou écrire
directement à TOTO® U.S.A., INC., Southern Road, Morrow, Géorgie 30260, (888) 295-8134. Si, à cause de
la taille du produit ou de la nature du défaut, il n’est pas possible de renvoyer le produit à TOTO®, la réception
par TOTO® d’un avis écrit du défaut avec preuve d’achat (reçu de caisse original) constitue livraison. Dans un
tel cas, TOTO® peut choisir de réparer le produit chez l’acheteur ou de payer le transport du produit à un centre
de réparation.
CETTE GARANTIE ÉCRITE EST LA SEULE GARANTIE FAITE PAR TOTO®. LA RÉPARATION, LE
REMPLACEMENT OU TOUT AUTRE AJUSTEMENT APPROPRIÉ SELON LES TERMES DE CETTE
GARANTIE EST LE SEUL RECOURS DE L’ACHETEUR INITIAL. TOTO® N’EST PAS RESPONSABLE DE
LA PERTE DU PRODUIT OU DE TOUT AUTRE DOMMAGE INDIRECT, SPÉCIAL OU SECONDAIRE OU
DES DÉPENSES ENCOURUES PAR L’ACHETEUR INITIAL NI DE LA MAIN-D’OEUVRE OU AUTRES FRAIS
ASSOCIÉS À L’INSTALLATION OU LA MANIPULATION, OU LES FRAIS DE RÉPARATION PAR DES TIERS, NI
POUR TOUS AUTRES FRAIS PAS SPÉCIFIQUEMENT MENTIONNÉS. EN AUCUN CAS, LA RESPONSABILITÉ
DE TOTO® NE PEUT DÉPASSER LE PRIX D’ACHAT DU PRODUIT. SAUF QUAND INTERDITE PAR UNE
LOI APPLICABLE, TOUTE GARANTIE SOUS-ENTENDUE, Y COMPRIS CELLE DE VENDABILITÉ OU
D’APPLICATION POUR UN USAGE PARTICULIER, EST EXPRESSÉMENT REJETÉ. CERTAINES PAYS
NE PERMETTENT PAS LA LIMITATION DE LA LONGUEUR D’UNE GARANTIE SOUS-ENTENDUE, OU
L’EXCLUSION OU LA LIMITATION DES DOMMAGES INDIRECTS OU SECONDAIRES, IL EST DONC
POSSIBLE QUE CETTE LIMITATION ET EXCLUSION NE S’APPLIQUE PAS À VOTRE CAS.
FRANÇAIS
31
Page 32

TOTO® U.S.A., Inc. 1155 Southern Road, Morrow, Georgia 30260
Tel: 888-295-8134 Fax: 800-699-4889
www.totousa.com
0GU4101
Rev 04/12
 Loading...