

Page 1
TOTO U.S.A., Inc. 1155 Southern Road Morrow, GA 30260
Phone : (770) 282-8686
Warranty Registration and Inquiry
For product warranty registration, TOTO U.S.A. Inc. recommends On-Line Warranty Registration. Please visit
our web site http://www.totousa.com. If you have questions regarding warranty policy or coverage, please
contact TOTO U.S.A. Inc.,
Customer Service Department, 1155 Southern Road, Morrow, GA 30260 (888) 295 - 8134 or (678) 466 - 1300
when calling from outside of U.S.A.
You are advised to record the following information to allow quick service.
•
Date of purchase : Name of shop :
Date : year month day
Tel : ( )
2022.3.25
D07E70
Page 2
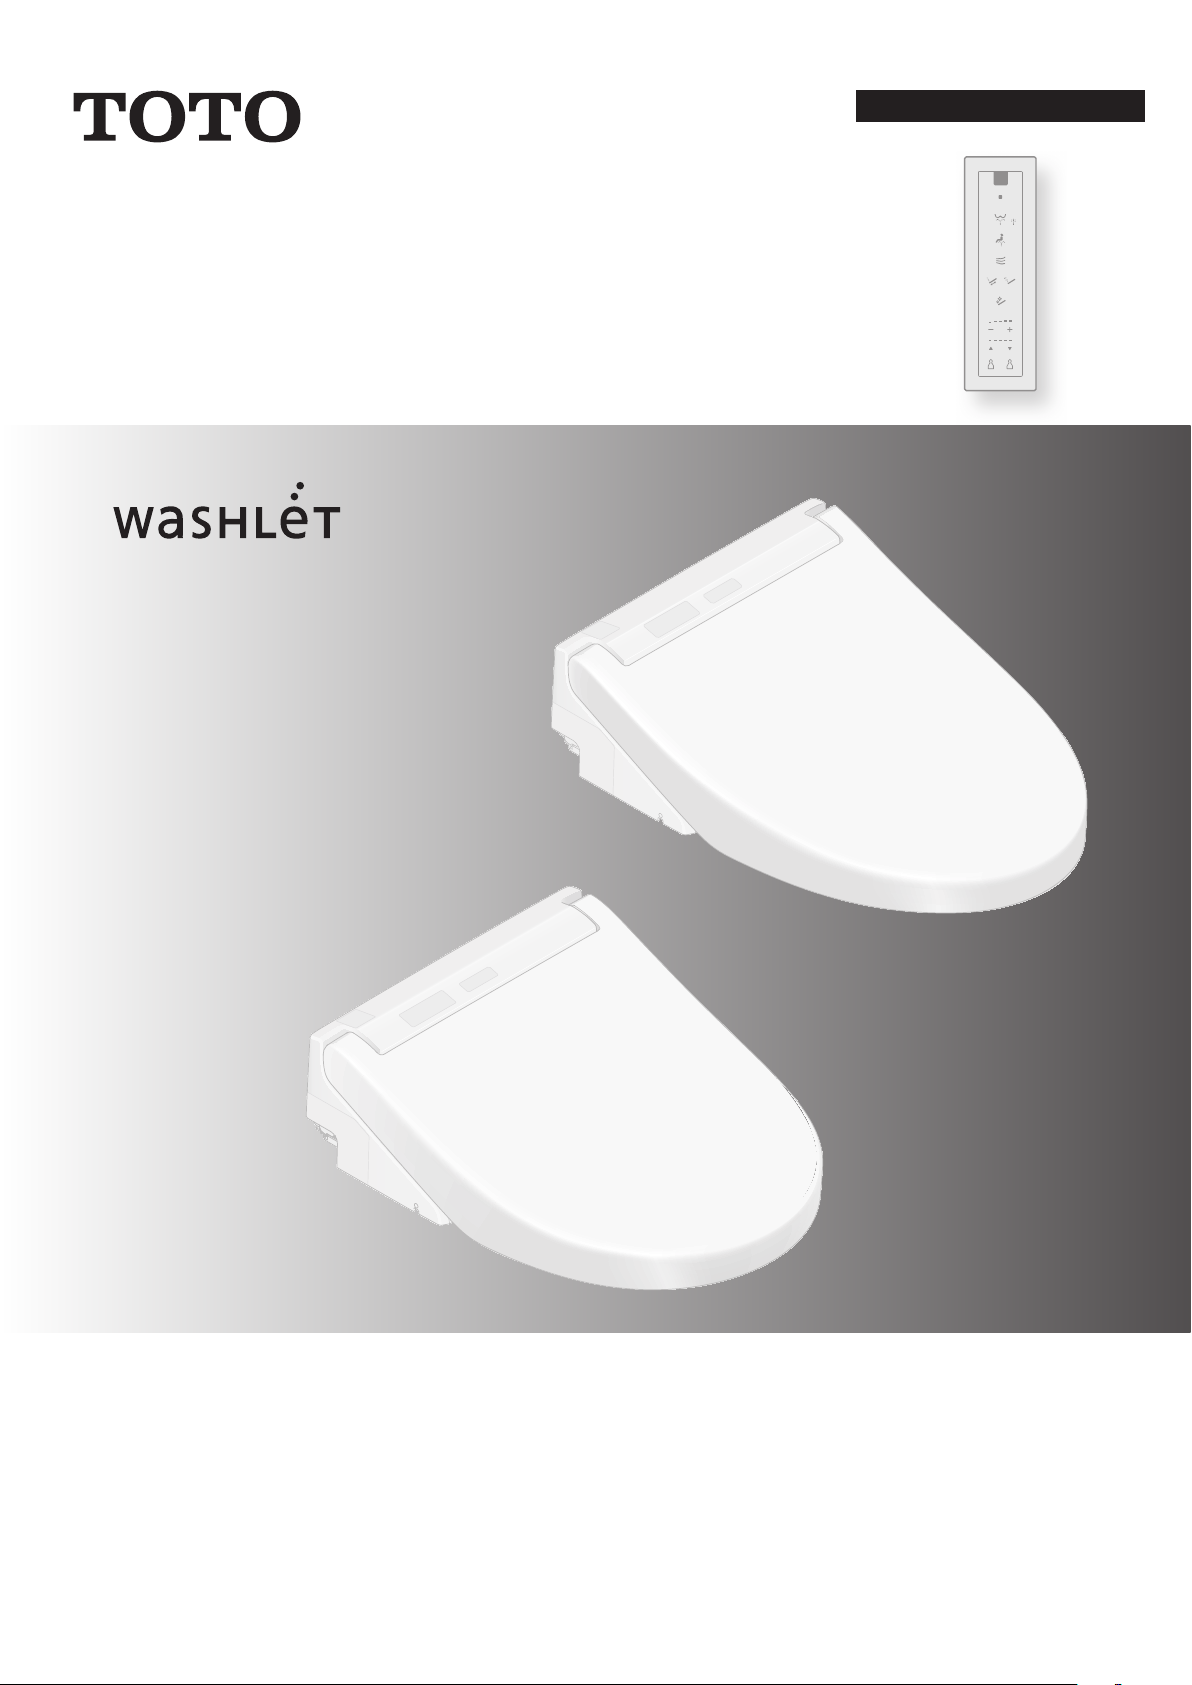
WASHLET
SW3084T40
SW3084
Instruction Manual
SW3083
■ Thank you for your recent purchase of this product.
Please read the enclosed information to ensure the safe use of your product.
■ Be sure to read this Instruction Manual before using your product and keep it in a safe place
for future reference.
Page 3
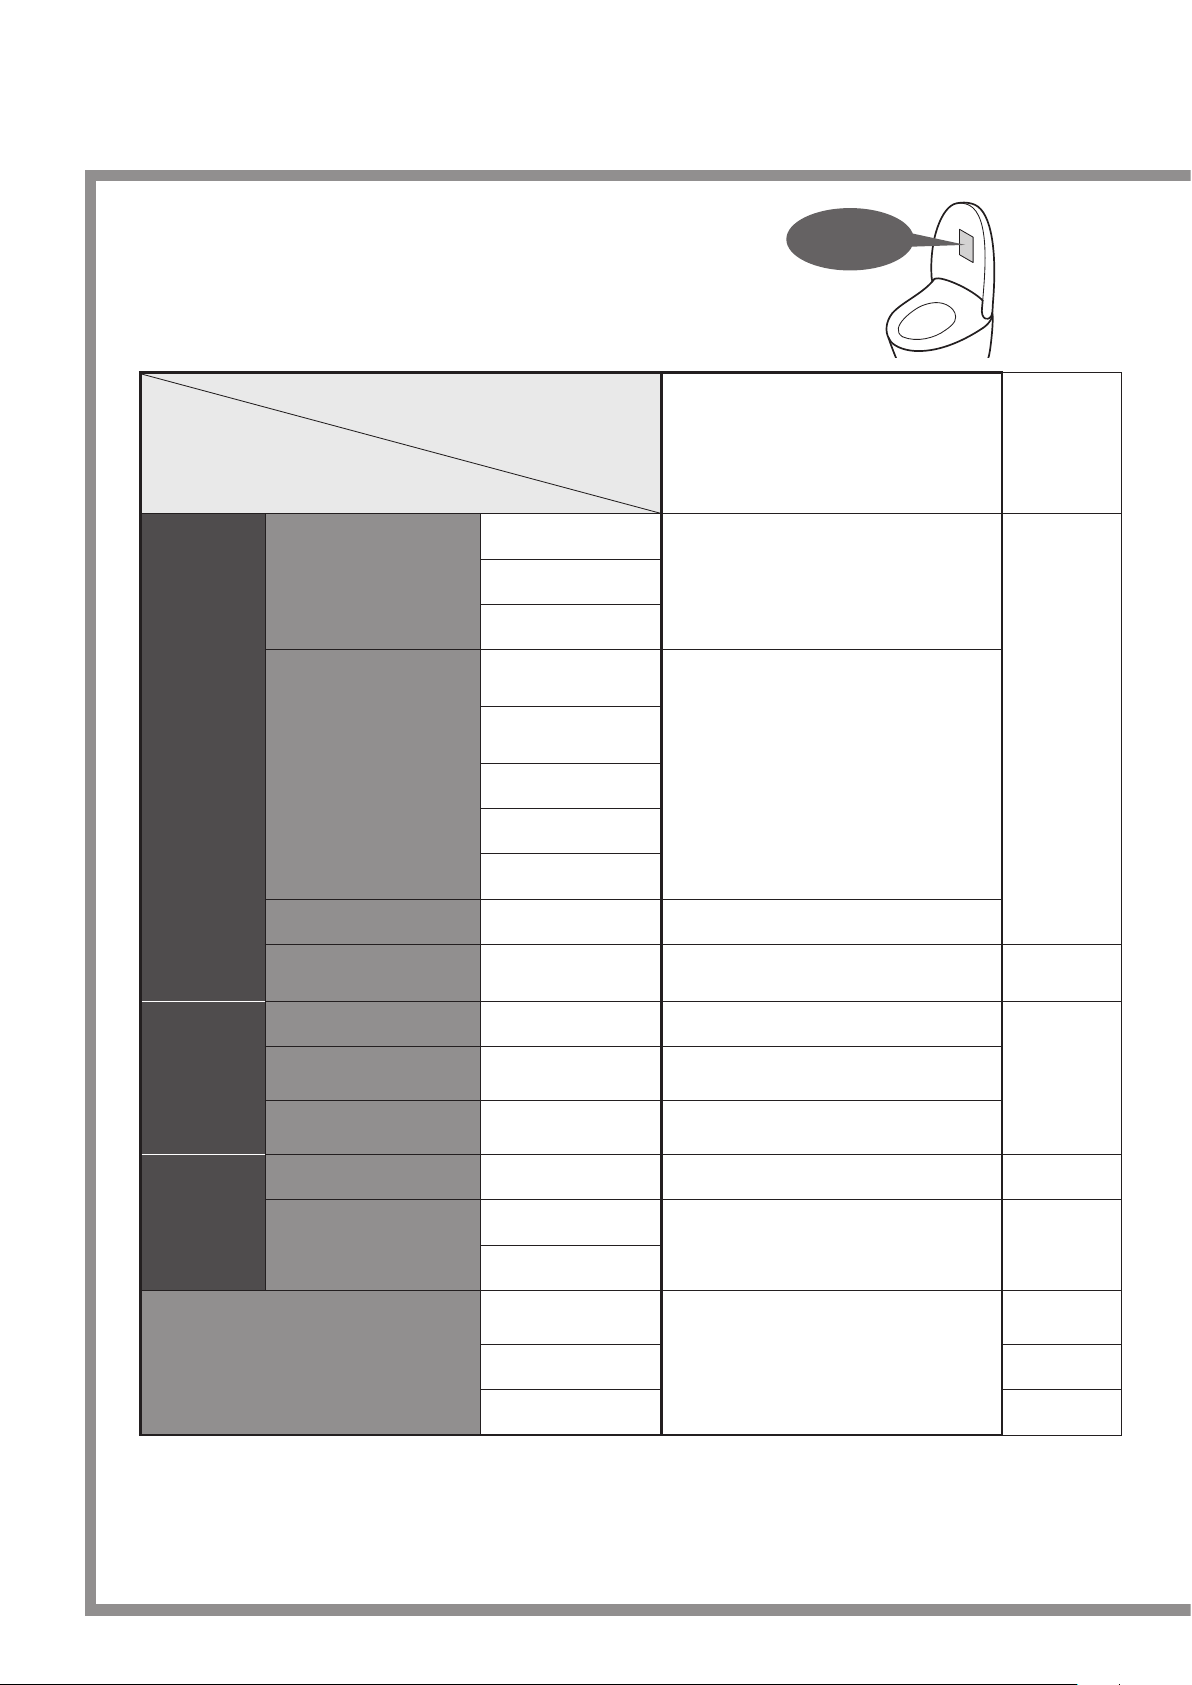
What functions are available on your product?
Model No.
Basic
Functions
Functions
Rear washing
Washing
Changing the washing
method
Drying Warm air drying
Changing
the temperature
Rear soft washing
Front washing
Wand position
adjustment
Water pressure
adjustment
Oscillating washing
Pulsating washing
Personal setting lock
Temperature
adjustment
Model No.
SW3084T40
SW3084
SW3083
●
●
●
●
Ref. Page
18
20, 21
Sanitary
Functions
Convenience
Functions
Maintenance
Removing odors
"EWATER+" cleaning Auto wand CLEAN
Bowl pre-cleaning
Heating the toilet seat
Saving energy
Deodorizer
Pre-mist
Heated seat
Auto energy saver
Timer energy saver
Main Unit One-touch
removal
Removable toilet lid 33
Wand cleaning 36
●
●
●
●
●
●
16
-
22, 23
34, 35
2
Page 4
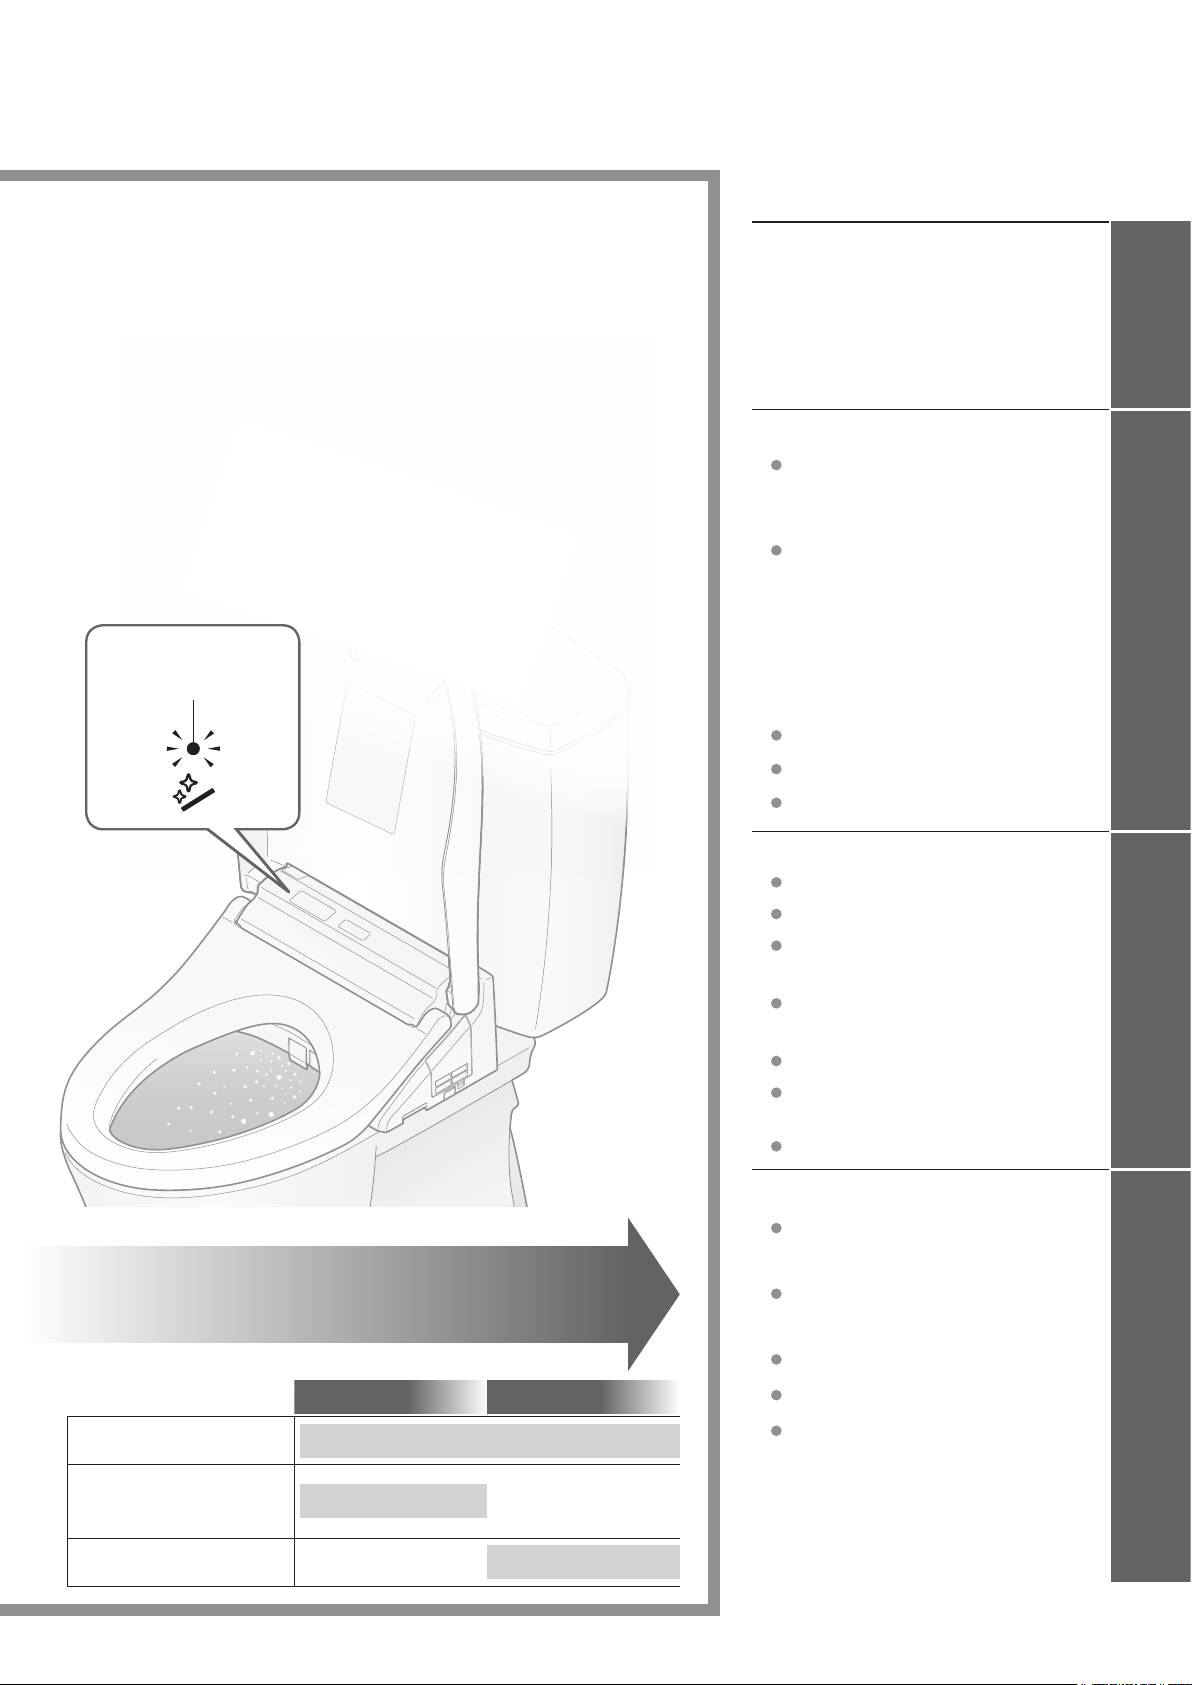
Table of Contents
Keep It
Clean
Sanitary Toilet
Lights to show that the
"CLEAN" functions are
operating.
Safety Precautions
Operational Precautions
Parts Names
Preparation
........................
..........................
Basic Operations
Mechanism of Auto Functions
Deodorizer,
Auto wand CLEAN, Pre-mist
Using the Remote Control
................
.....
.................
Temperature Adjustment
(Toilet Seat, Warm Water,
Drying)
Energy Saver Features
Various Operations
Setting List
Auto functions
Other settings
..................................
......
.............
..........................
.....................
......................
...
...
11
12
14
16
16
18
20
22
26
26
28
30
Introduction
4
The self-cleaning functions
As you sit
Removing odors inside
the bowl unit.
A mist is automatically sprayed
inside the bowl unit to make it
more di cult for dirt to adhere.
Cleans the wand with
"EWATER+"
operate automatically.
(See page 16 for details.)
As you stand up
Deodorizer Auto power deodorizer
Pre-mist
Auto wand CLEAN
Maintenance
Power Plug
Main Unit
Gap between the Main Unit
and the Toilet Lid
Gap between the Main Unit
and Bowl Unit
Deodorizing Filter
...................................
Wand
Wand cleaning
Water Filter Drain Valve
What to Do?
If the water does not ow due to
a water service interruption
If you cannot operate with
the remote control
Freeze Damage Prevention
Long Periods of Disuse
Removal of Operation Guide
Troubleshooting
Speci cations
Limited Warranty
........................
..........................
.............................
................
......................
................
......
.........................
......
................
.......
...................
......................
.................
..
...
31
31
32
33
34
36
36
37
38
38
ReferenceMaintenanceOperation
38
39
40
41
42
46
47
3
Page 5
Safety Precautions
IMPORTANT SAFEGUARDS
READ ALL INSTRUCTIONS BEFORE USING
Symbols and Meanings
WARNING
CAUTION
The following symbols are used to indicate important safety instructions for the use of the product.
Symbol Meaning
This symbol indicates a prohibited use of the product.
This symbol is used to indicate a required step in the use of this product.
Do not plug or unplug the power plug with wet hands.
Doing so may cause electrical shock.
Do not get any water or cleaning solution on the main unit or power plug.
Doing so may cause re, electrical shock, heat or short circuit.
Doing so may cause the product to crack resulting in injury or water damage.
May result in death or serious injury.
May result in injury or property damage.
WARNING
4
Never disassemble, repair or alter.
Doing so may cause re, electrical shock, overheating, short circuit or breakdown.
Do not install the product on moving vehicles such as wheeled vehicles or boats.
Doing so may cause re, electric shock, short circuit or malfunction.
The toilet seat, toilet lid, main unit, or other parts may come loose and fall o, resulting in injury.
Do not use the product if a malfunction occurs.
In case of breakdown or other problem, be sure to cut o power by means such as unplugging
the power plug.
Close the water shuto valve to stop water supply.
Possible malfunctions:
Water is leaking from a pipe or the main unit.
The product is cracked or broken.
The product makes a strange noise or emits a strange odor.
The product emits smoke.
The product is abnormally hot.
The toilet seat cushion is out of place.
Continued use after malfunction could cause a re, electric shock, heat, short circuit, injury or
water damage.
Page 6
WARNING
Do not use other water then allowed by the laws and ordinances of the
region of use. Only Use potable water.
Do not use seawater or recycled water.
Doing so may cause irritation to the skin and malfunction.
Do not touch the power plug during thunderstorms.
Doing so may cause electrical shock.
Do not allow the water supply hose to touch the power plug or outlet.
Doing so may cause condensation resulting in a re, electrical shock, heat or a short.
Do not do anything that may damage the power cord, power plug.
Do not strike, yank, twist, excessively bend, damage, alter, or heat the power cords.
Also, do not place anything heavy on, bind or pinch the power cords.
Using a damaged power cord may result in a re, electrical shock, heat or short.
Do not use a loose or faulty electrical outlet.
Doing so may cause re or short circuit.
Introduction
Do no use any outlet or wiring equipment beyond its specied rating.
Plugging too many plugs into the same outlet, for example using outlet splitters, can cause re
due to heat.
Do not use any power supply other than the one specied.
AC 120 V, 60 Hz
Doing so may cause re or excessive heat.
Do not stick a nger or anything else into the warm air outlet.
Do not place anything on the warm air outlet or drape clothes over it.
Doing so may cause burns, electrical shock or malfunction.
Keep cigarettes and other open ames away from the product.
Failure to do so may cause re.
Refrain from sitting on the seat for long periods.
It may cause low-temperature burns.
To prevent the following persons from getting a moderate temperature burn during use, other
person should turn o the toilet seat heater.
Young children, the aged and other users unable to set the temperature appropriately
themselves.
The ill, physically disabled and others who do not have freedom of movement.
Those using any medicines that cause drowsiness (sleeping or cold medicine), those who have
been drinking heavily, anyone severely fatigued and anyone else liable to fall asleep.
5
Page 7
Safety Precautions (Continued)
WARNING
This is an electrical product. Do not install it anywhere water is likely to get on
the product or anywhere with humidity high enough that water is likely to form
on the surface of this product. When using the product in a bathroom, install a
fan or ventilation port and ensure good air ow through the bathroom.
Failure to do so may cause re or electrical shock.
Always connect the product to the cold water supply.
Connecting to hot water supply may result in burns and equipment damage.
Make sure that a properly grounded (3 prong) outlet has been installed.
Failure to install a grounded outlet could cause electrical shock in the event of a malfunction or
short circuit.
Insert the power plug securely into the outlet.
Failure to do so may cause re, heat or short circuit.
To unplug, hold the power plug, not the power cord.
Do not unplug by pulling the power cord.
Pulling on the power cord may cause damage and result in re or heat.
If the power cord is damaged, avoid danger by having the manufacturer's
repair department or equivalent specialist replace it.
Always unplug the power plug from the outlet before maintenance or
inspection.
Failure to do so may cause electrical shock or malfunction.
Periodically remove dust and dirt from the power plug and make sure it is
securely plugged into the wall outlet.
Failure to do so may cause re, heat or short circuit.
Pull the power plug out from the outlet and wipe clean with a dry cloth.
Always unplug the power plug from the outlet before removing the main unit.
Failure to do so may cause re or electrical shock.
When leaking battery uid adheres to your body or clothes, wash it away
with clean water.
The uid may damage your eyes or skin.
Preliminary studies in females suggest that overuse of continuous spraying
can increase the possibility of vaginal mucosa drying and potential reduction in
desirable microbial organisms.
Although these studies have not been validated, please consult your healthcare
provider for concerns regarding whether these circumstances may apply to you.
6
More importantly, if you are an individual suering from any immune
deciency as a result of disease, chemotherapy, or other medical condition
compromising the immune system you should consult your healthcare
provider before use of this product.
Page 8
CAUTION
Do not use the product if the main unit is unstable.
Doing so may cause the main unit to come loose and fall, resulting in injury.
If the product is damaged, do not touch the damaged section.
Doing so may cause electrical shock or injury.
Replace it immediately.
Do not apply strong force, mechanical shock, step on or stand on the toilet
seat, toilet lid or main unit. Also do not place any heavy object on the toilet
seat, toilet lid or main unit.
Doing so may cause cracking or cause the main unit to come loose and fall, resulting in injury.
Doing so may damage the product and cause injury or water damage.
Do not lift up this product by the toilet seat or lid.
Do not raise the toilet seat or lid while objects are resting on top of the unit.
Doing so may cause the main unit to come loose and fall, resulting in injury.
When maintaining the plastic parts (main unit etc.) or the water supply hose,
use a pH neutral kitchen detergent diluted with water. Do not use any of the
following.
Toilet cleaner, household cleaner, benzene, paint thinner, powdered cleanser or nylon
scrubbing brush.
These items may damage or crack the plastic and cause injury or malfunction.
These items could damage the water supply hose and cause a water leak.
Introduction
To prevent a sudden water leak, do not remove the water lter drain valve
when the shuto valve is open.
Doing so will cause water to spurt out.
(Refer to Page 37 for instructions on cleaning the water lter drain valve.)
Do not fold or crush the water supply hose; do not damage by cutting with a
sharp object.
Doing so may cause water leaks.
Do not install the base plate, which is not attached.
Doing so may cause damage.
7
Page 9
Safety Precautions (Continued)
CAUTION
If a water leak should occur, always close the shuto valve.
When the ambient temperature is likely to drop to 32 °F (0 °C) or lower,
prevent damage to the pipes and hoses due to freezing.
Frozen water pipes could cause the main unit and the pipes to break, resulting in a water leak.
Regulate the room temperature to prevent the pipes and hoses from freezing during cold months.
Drain the water.
When not using the product over an extended period of time, drain the
water out of the main unit and the water supply hose after closing the water
shuto valve, and pull the power plug from the outlet.
When using the product again, allow the product to rell with water rst. Otherwise, the water in
the tank might become contaminated and cause skin inammation or other problems.
(Refer to Page 40 for instructions on replenishing the water.)
Leaving the power on may cause re or heat.
When installing the water lter drain valve, make sure that it is securely
tightened in its proper position.
Failure to securely tighten it may cause a water leak.
Push the main unit securely on to the base plate.
After pushing the main unit until a click sound is heard, pull it slightly toward you to make sure
that the product does not detach.
Doing so may cause the main unit to come loose and fall, resulting in injury.
Make sure of the plus and minus signs on the batteries before inserting them.
Remove depleted batteries immediately.
When replacing the batteries:
Replace both batteries with new ones.
Use the same brand for both new batteries (any brand available).
Failure to do so may cause the batteries to leak uid, generate heat, rupture, or ignite.
When the product is supposed not to be used for long time, remove the
batteries from the remote control.
Failure to do so may cause the batteries to leak uid.
8
Page 10
DANGER
1. Do not use while bathing.
2. Do not place or store the product where it can fall or be pulled into a tub or sink.
3. Do not place in or drop into water or other liquid.
4. Do not reach for the product when it has fallen into water. Unplug it immediately.
WARNING
1. Close supervision is necessary when this product is used by, on, or near children or
invalids.
2. Use this product only for its intended use as described in this manual. Do not use
attachments not recommended by the manufacturer.
3. Never operate this product if it has a damaged cord or plug, is not working properly, has
been dropped or damaged, or has been dropped in water. Return the product to a service
center for examination and repair.
To reduce the risk of electrocution:
To reduce the risk of burns, electrocution, re or injury to persons:
Introduction
4. Keep the cord away from heated surfaces.
5. Never block the air openings on the product or place it on a soft surface, such as a bed
or couch, where the air openings may be blocked. Keep the air openings free of lint, hair,
and other similar items.
6. Never use while sleepy or drowsy.
7. Never drop or insert any object into any opening or hose.
8. Do not use outdoors. Do not operate where aerosol (spray) products are being used or
where oxygen is being administered.
9. Connect this product to a properly grounded outlet only.
See "Grounding Instructions" in Page 10.
10. The tank should be lled with water only.
Servicing should be performed by an authorized service representative.
This product is for household use.
9
Page 11

Safety Precautions (Continued)
Grounding Instructions
This product should be grounded. In the event of an electrical short circuit, grounding
reduces the risk of electric shock by providing an escape wire for the electrical current.
This product is equipped with a cord having a grounding wire with a grounding plug.
The plug must be plugged into an outlet that is properly installed and grounded.
DANGER - Improper use of the grounding plug can result in a risk of electric shock.
If repair or replacement of the cord or plug is necessary, do not connect the grounding wire
to either at-head terminal.
Check with a qualied electrician or serviceman if the grounding wire instructions are not
completely understood, or if in doubt as to whether the product is properly grounded.
SAVE THESE INSTRUCTIONS
10
Page 12
Operational Precautions
■
■For prevention of malfunctions
● Do not block the remote control transmitter or
receiver.
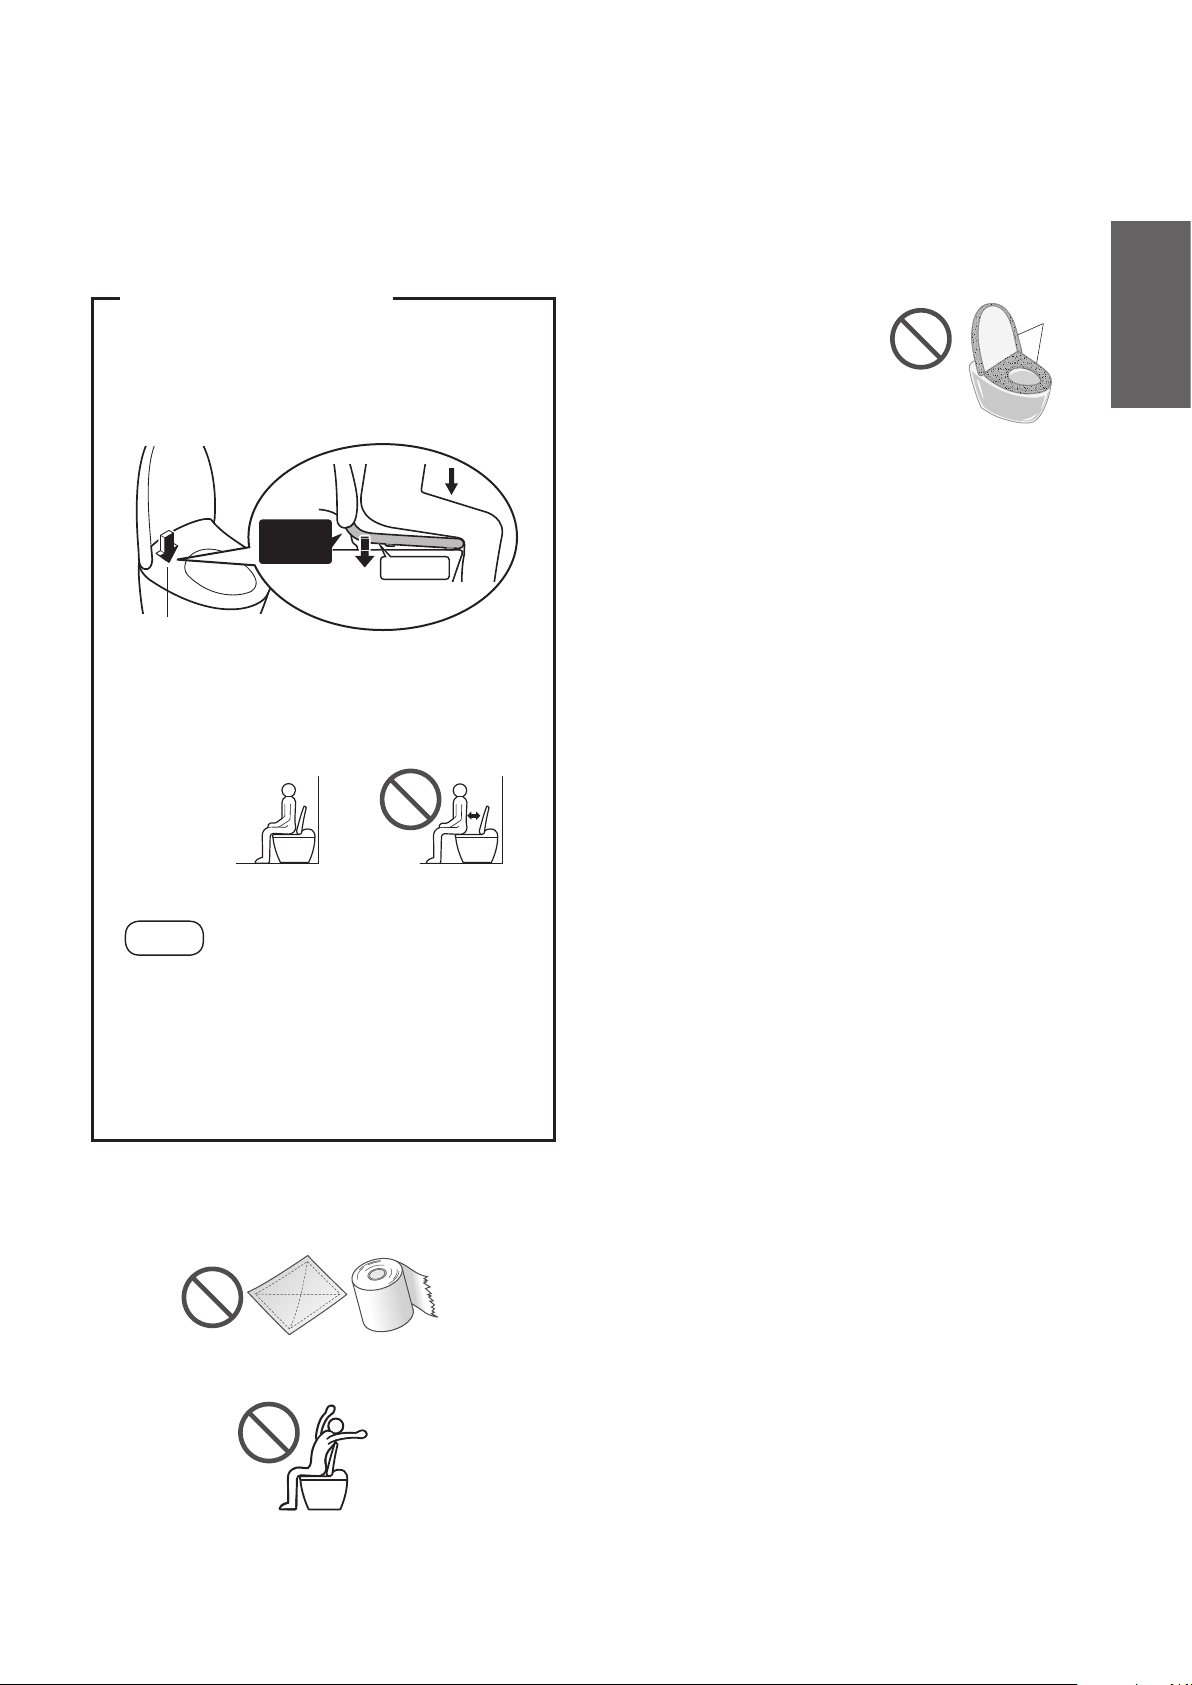
<About the seat switch>
●When you sit on the toilet seat, the seat switch
turns ON, enabling you to use various features.
(A click sound is heard when the seat switch is
ACTIVATED.)
Switch
ON
Gap
The toilet seat lowers.
Seat switch (Built-in)
●Sit back on the toilet seat.
The seat switch will not turn on unless you
sit on the seat properly.
Note
When a child uses the product, the seat
switch may not be ACTIVATED by their
light body weight.
Since the toilet seat is designed to move
up and down, a clearance is provided
between the toilet seat cushion and the
bowl unit.
■For prevention of damage
●Wipe plastic areas such as the main unit and remote
control with a soft cloth tightly wrung out with water.
For prevention of malfunctions and failures
●Disconnect the power plug if there is a risk of
lightning.
●A toilet seat cover or a toilet
lid cover cannot be used.
(The seat switch may
not function properly.
Additionally, the toilet seat
and lid may not open or
close properly.)
●Do not urinate on the main unit, toilet seat or wand.
(Doing so may cause a failure or discoloration.)
●Do not apply strong forces to the control panel of
the remote control.
●When using a toilet cleaner to clean the toilet, rinse
it o within 3 minutes and leave the toilet seat and
toilet lid open.
(If vapor from a toilet cleaner enters the main unit,
it may cause a malfunction.)
Wipe o any cleaner that remains on the bowl unit.
●Do not use the product with the toilet lid removed.
●Do not expose to direct sunlight.
(Doing so may cause changes in color, irregular
heated seat temperature, remote control
malfunction or the product malfunction due to the
change in temperature.)
●Use radios, etc. away from the product.
(The product could cause interference with the
radio signal.)
●If you use a booster seat for infants or a soft
highchair, remove it after use.
(Keeping it installed may prevent some of the
functions from being used.)
●Do not apply force to the remote control.
(This may cause a malfunction.)
To prevent the remote control from being
dropped, set it in the hanger when you are not
using it. Be careful not to expose it to water.
●Do not place anything on the toilet seat and lid,
and do not press them with hands.
(Failure to do so may turn on the seat switch,
causing the oor to get wet if buttons on the
remote control are touched and warm water
comes out from the wand.)
Introduction
Covers
Dry cloth or tissue
●Do not lean against the toilet lid.
11
Page 13
Parts Names
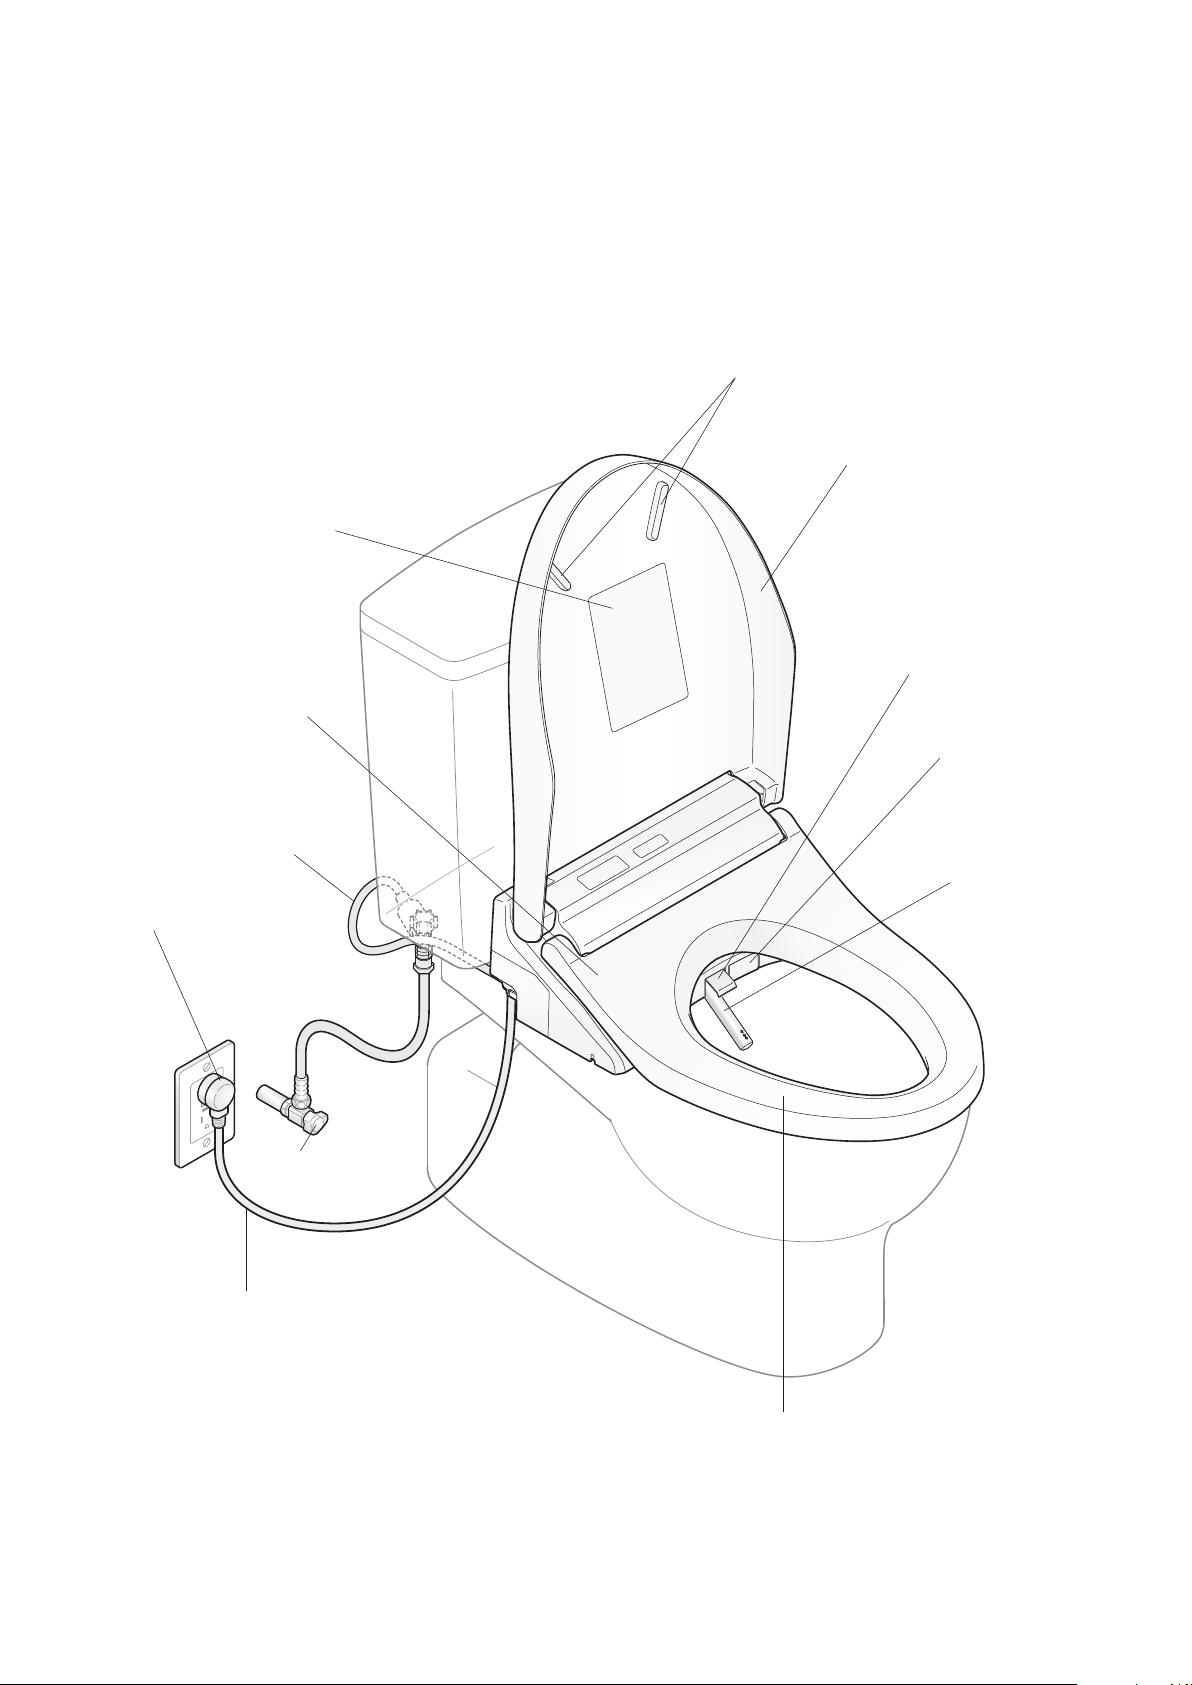
Model No., etc
Seat switch
(Built-in)
Toilet lid cushions
Toilet lid
Wand cover
Warm air outlet cover
Water supply hose
Power Plug
Shuto valve
Power cord
(Page 15)
Wand
*1
12
Heated seat
Descriptions in this manual are based on the illustrations of SW3084
The toilet seat and the toilet lid shape vary by model.
*1 The shape and location vary depending on the type of toilet bowl and tank.
Page 14
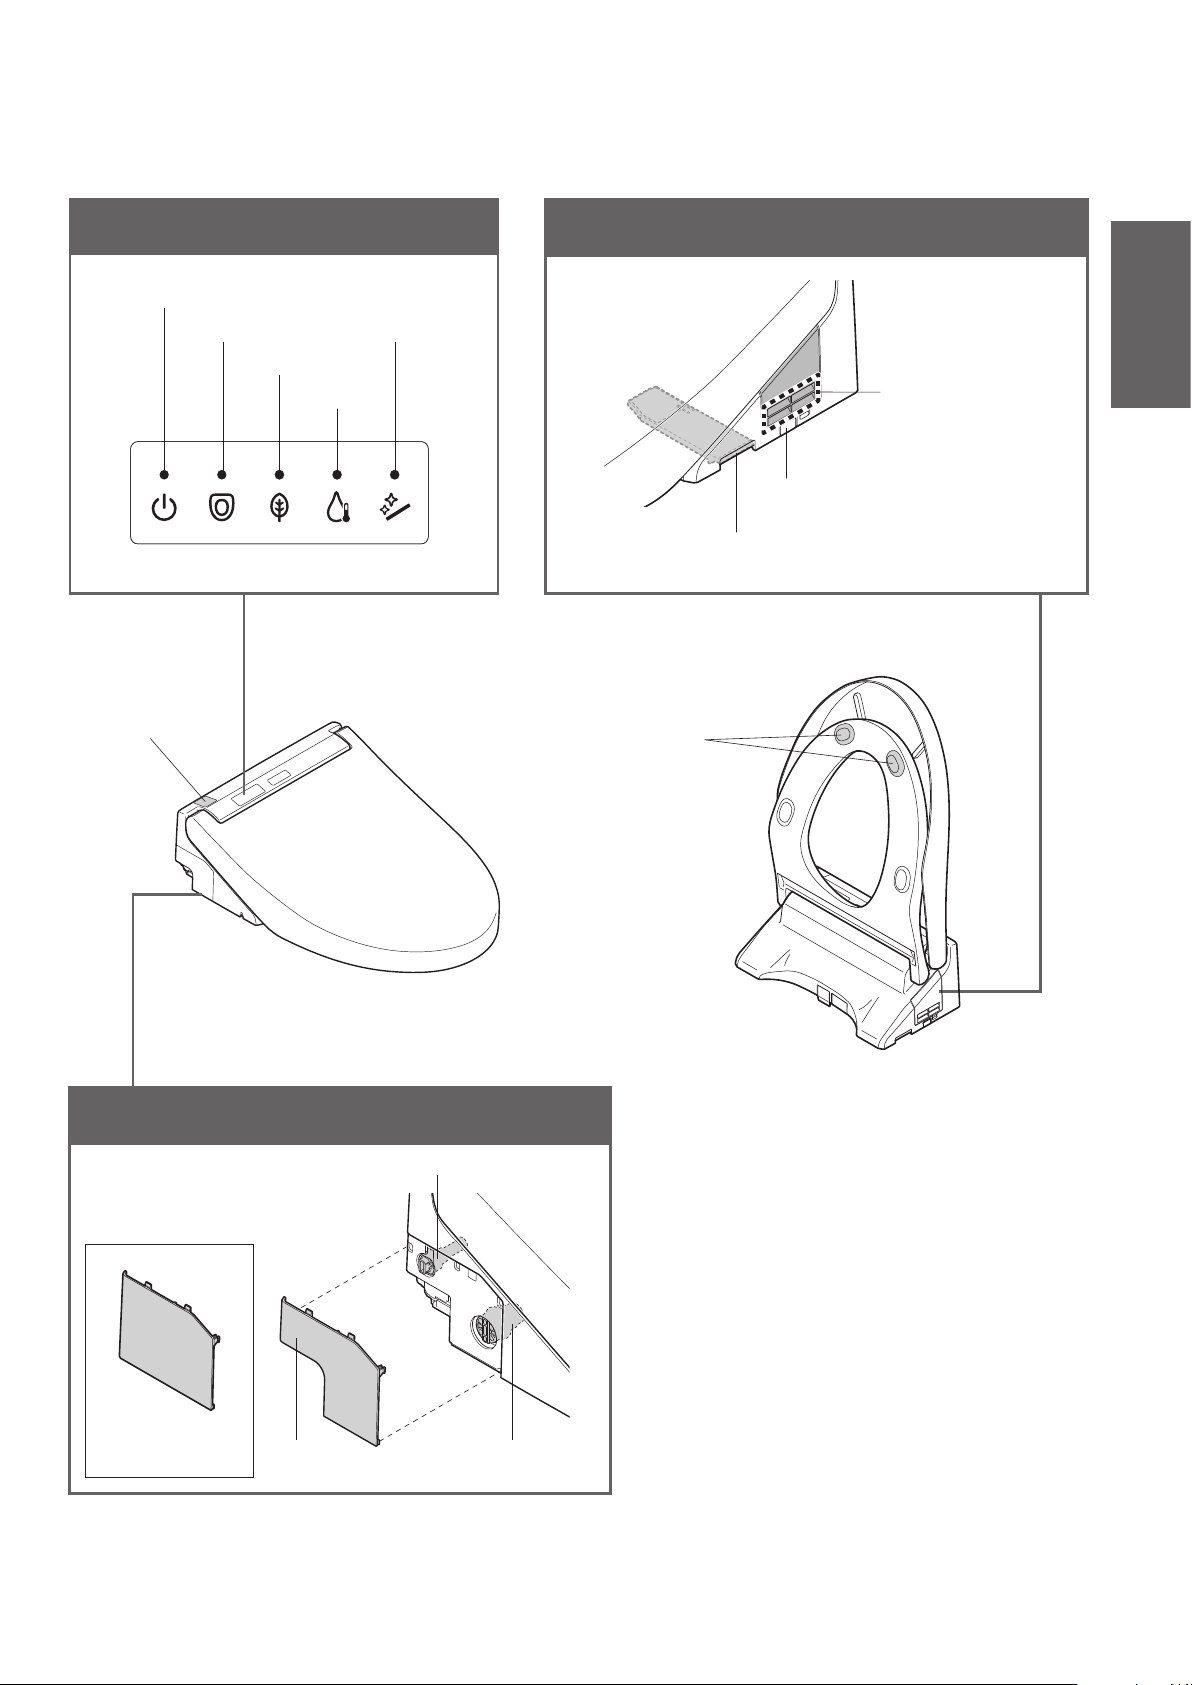
Main display
Power LED
Seat LED
<All the LEDs illuminate in the gure>
Remote control
receiver
Wand CLEAN LED
Energy saver LED
Water LED
Right side of the main unit
Main unit removal button
(Pages 34, 35)
Deodorizing lter
(Page 36)
Toilet seat
cushions
Introduction
Deodorizer outlet
Left side of the main unit
For
SW3084T40
Water lter drain valve (Page 37)
Cover Water drain plug
(Page 40)
13
Page 15
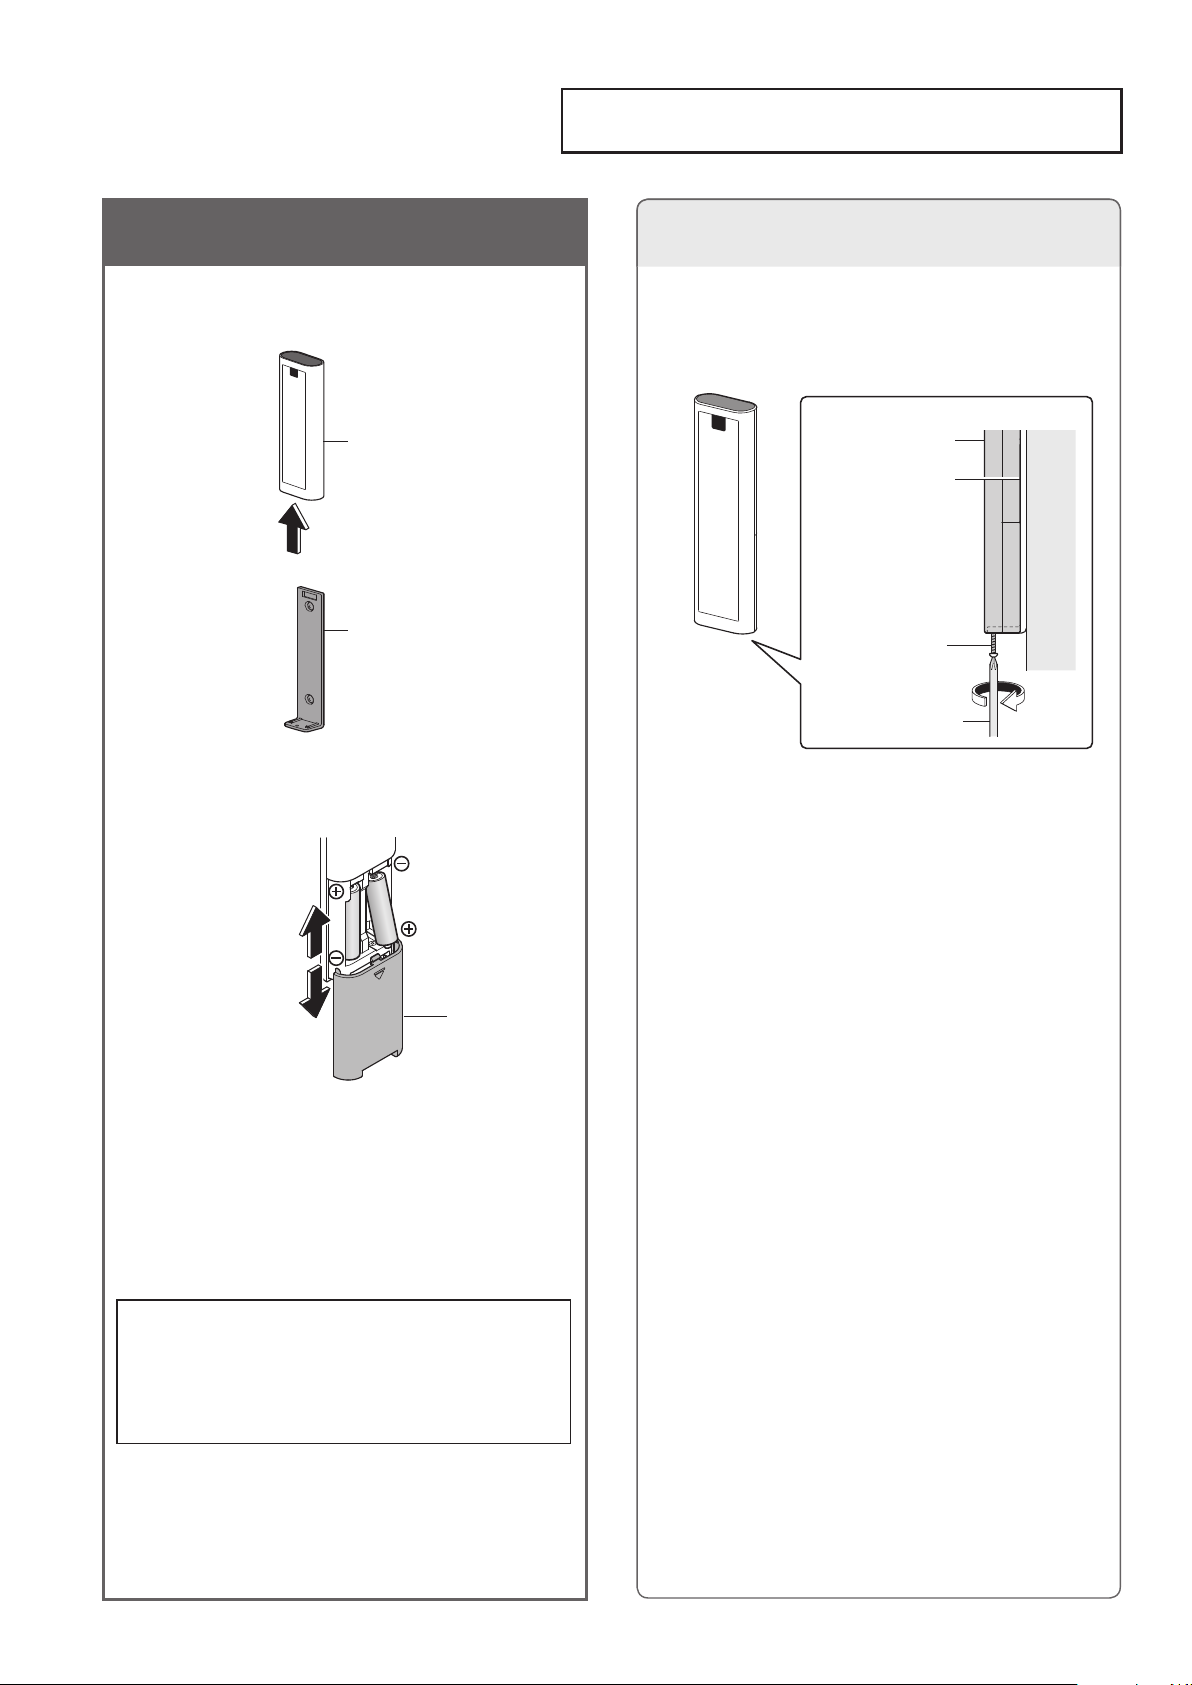
Preparation
Using the Product for the First Time
1
2
1. Insert the battery
Remove the remote control
from the hanger.
Remote control
Hanger
Open the battery cover and
insert two AA batteries.
If the remote control is secured
(for anti theft)
Remove the screw from the
1
remote control xture.
(View from side)
Remote control
Hanger
Wall
Screw
Remove
Phillips screwdriver
Remove the remote control
Close
Open
Battery cover
When batteries are properly loaded, all
the LEDs on the remote controll light up
for about 2 sec.
Mount the remote control in the
3
hanger.
■ About the batteries
Use dry cell, alkaline batteries.
Be sure to follow "Safety Precautions" to
prevent the batteries from rupturing or leaking
uid. (Pages 6, 8)
2
from the hanger.
■ To secure the remote control again
Tighten and x the screw.
(Overtightening may cause damage to parts
such as the hanger.)
14
Page 16
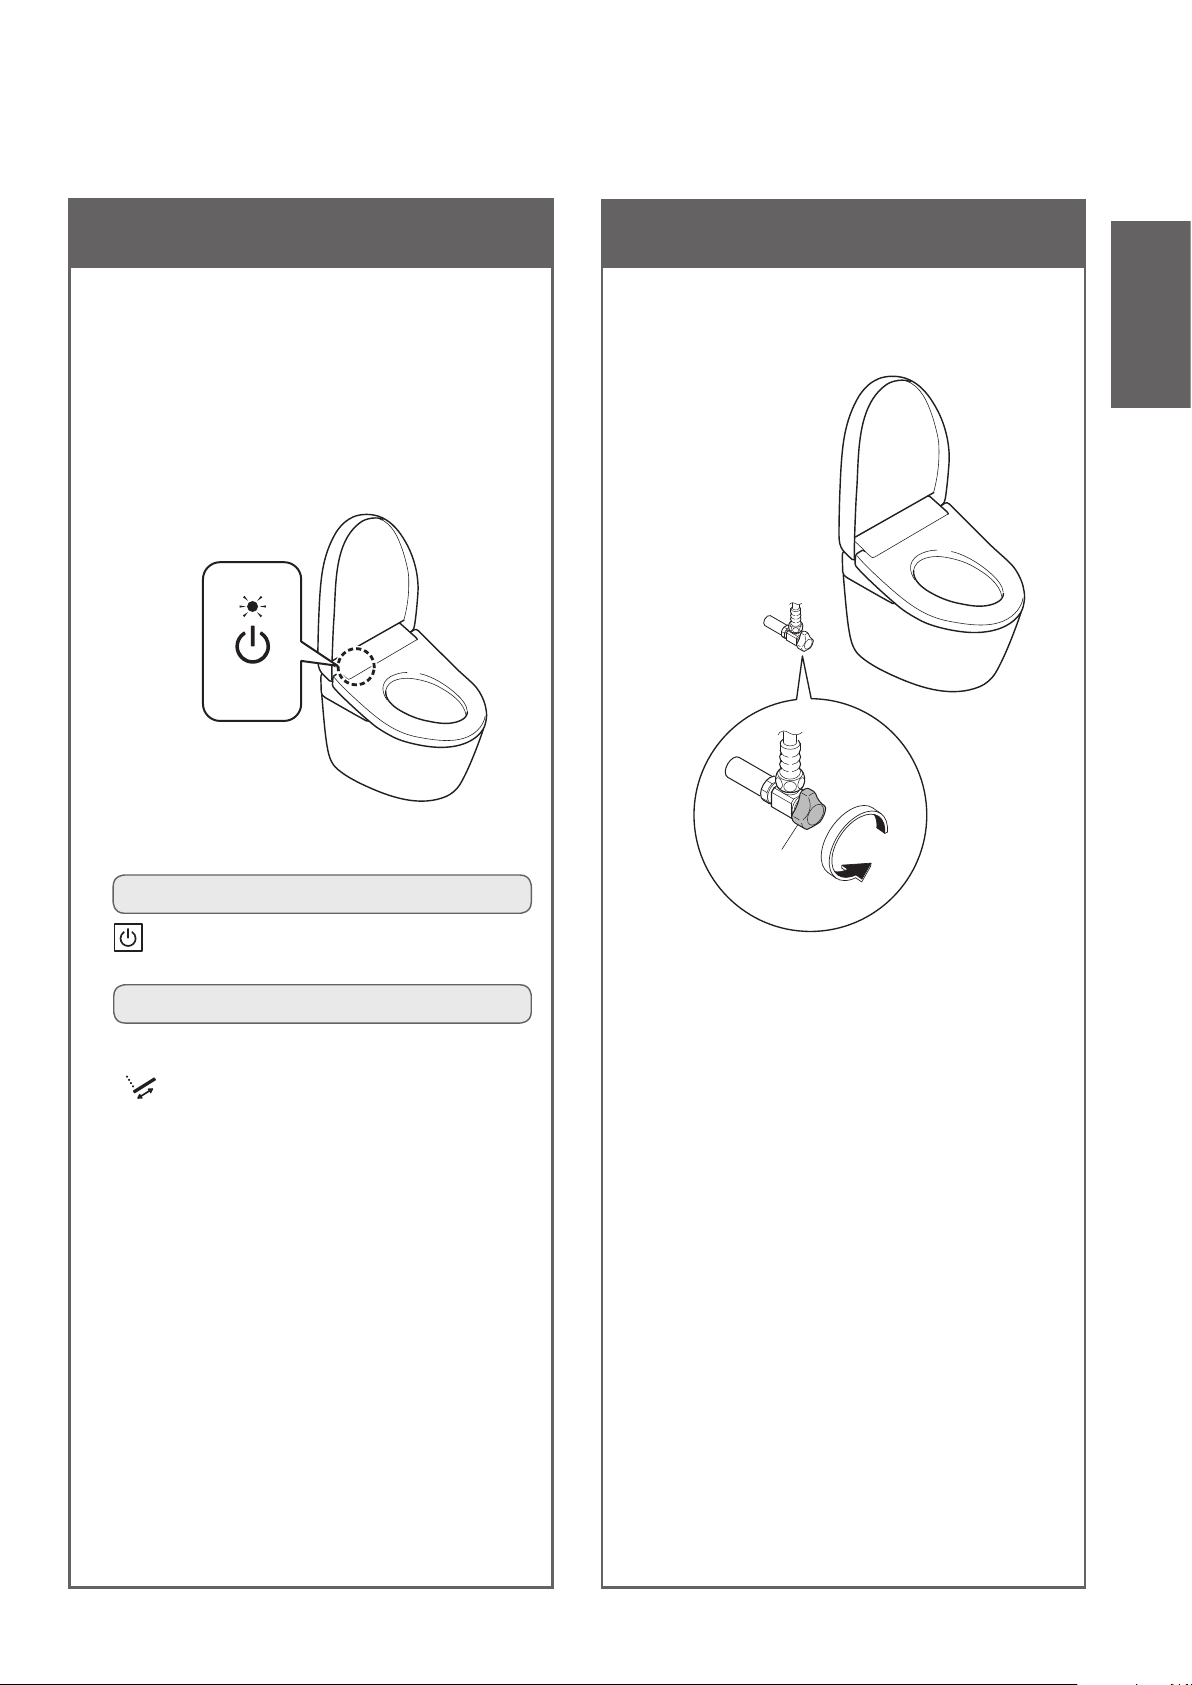
2. Turn on the power
3. Open the shuto valve
Introduction
Insert the power plug.
1
2
<If the light is o>
The wand extends and then retracts.
Check the "Power" LED
illuminates.
<Power>
Switch "Power" to "ON" using the remote control.
To operate from the back of remote control
Fully open the shuto valve.
1
Shutoff
valve
Press "Power ON/OFF" button about 3 seconds
or longer.
To operate from the front of remote control
Recommended if the remote control is secured to
prevent theft, etc.
Press "Oscillating washing" button about
10 seconds or longer.
15
Page 17
Basic Operation
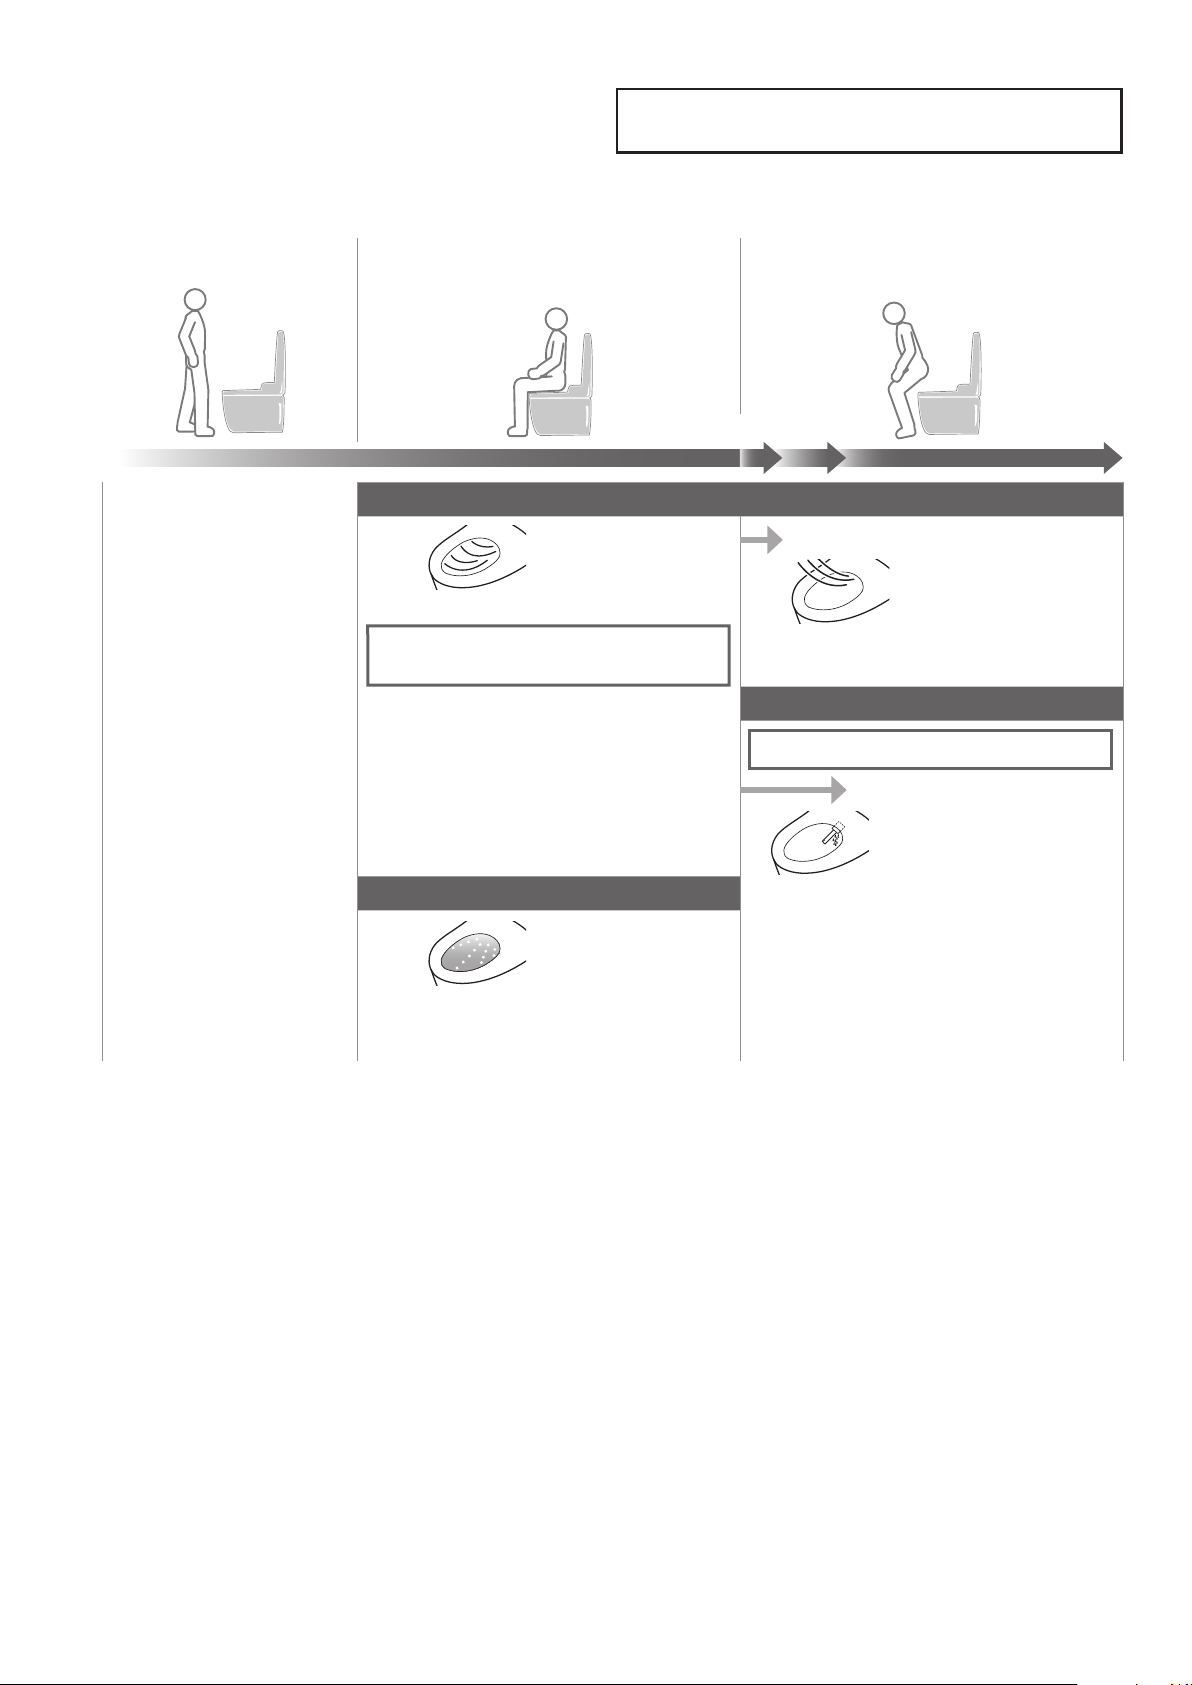
Mechanism of Auto Functions
"EWATER+" is used automatically to clean the wand.
As you approach
As you sit As you stand up
Removing odors inside the bowl unit.
● Deodorizing lter needs regular
maintenance. (Page 36)
Starts
the deodorizer
Pre-mist
0
(sec) 10 25
Deodorizer
Only when the washing functions are used.
After about 10 seconds
Starts the auto
power deodorizer
It stops after about 60 seconds.
Auto wand CLEAN
After about 25 seconds
The wand extends to clean
itself with "EWATER+" that
comes out of the base
*1
*2
Pre-mist
A mist is automatically sprayed inside the
bowl unit to make it more difcult for dirt to
adhere.
*1 To keep clean the wand every time it is used, water remaining in the wand is drained after you stand up from the toilet seat.
*2 When the washing functions (Rear washing and Front washing etc,) have not been used in 8 hours, the wand is cleaned
automatically. (Water comes out from around the wand.)
16
Page 18
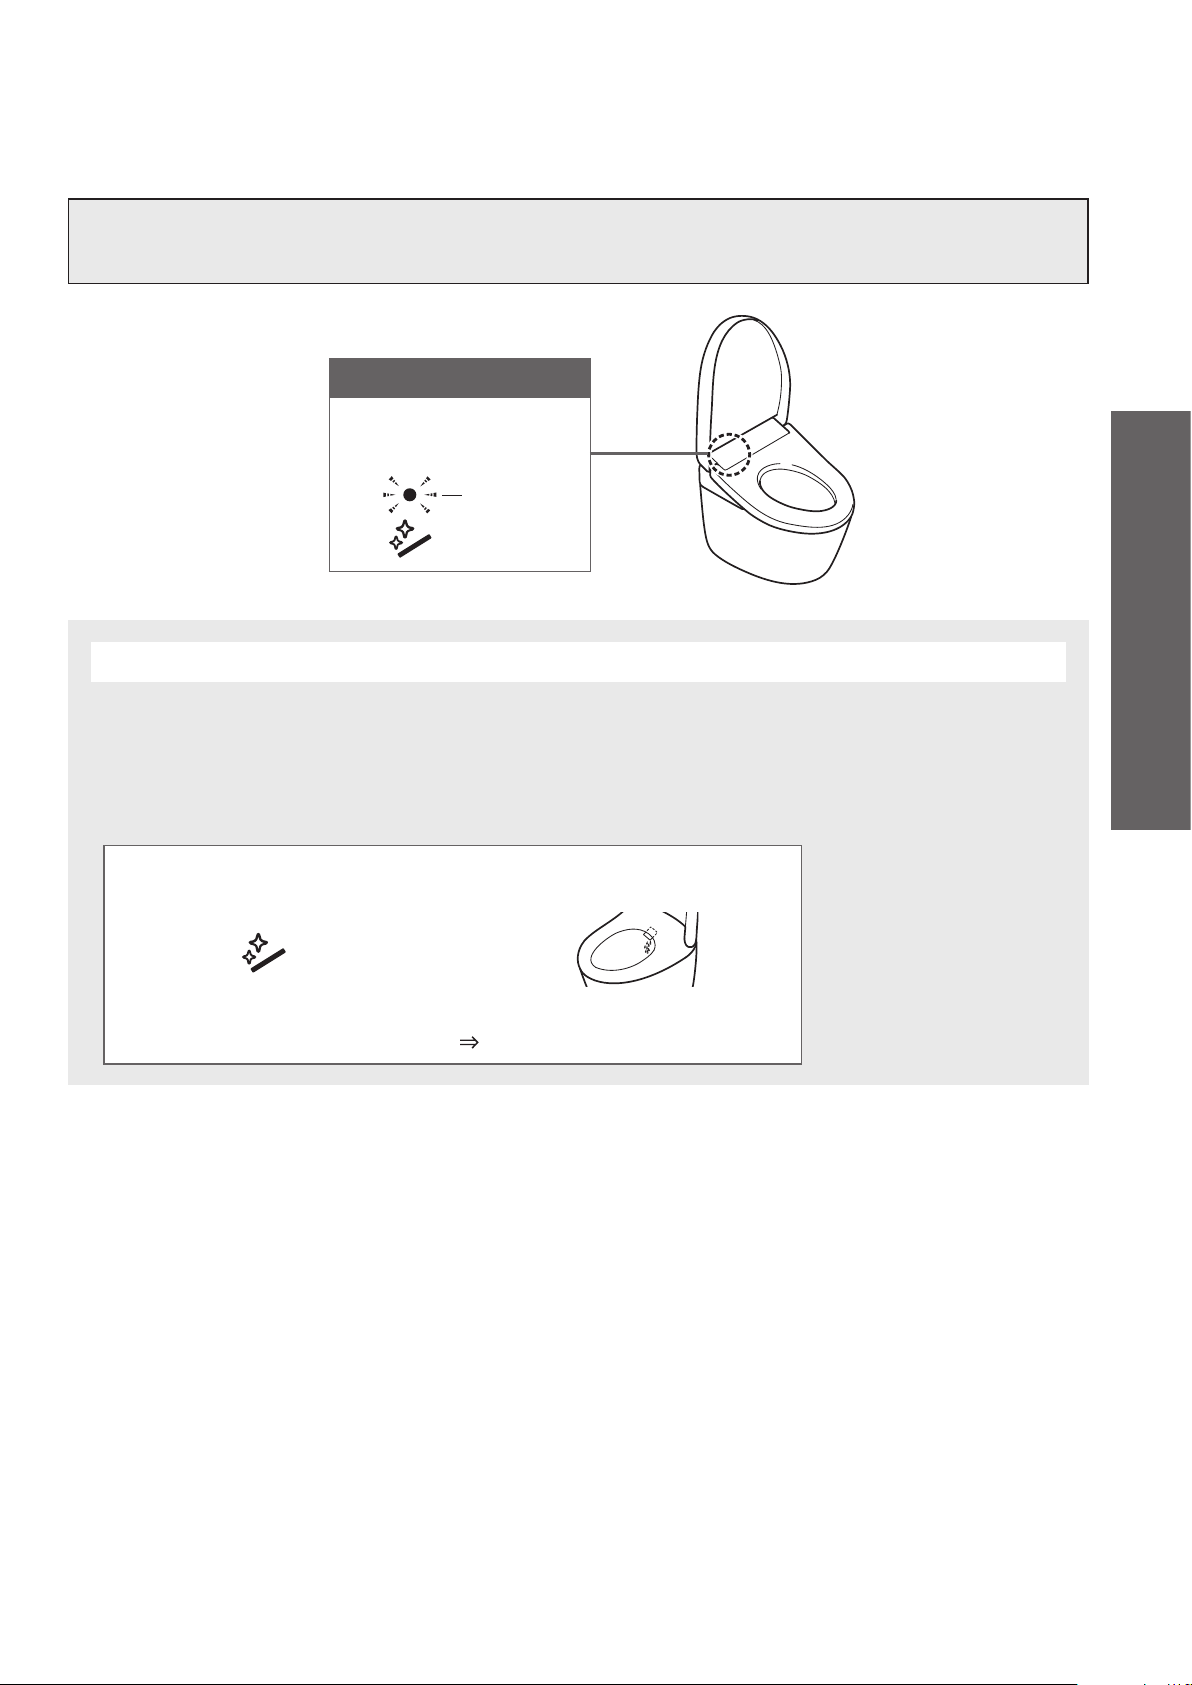
The left are default setting functions.
●These may be changed. → "Various Operations" (Pages 26-30)
Auto wand CLEAN
During "Auto wand CLEAN"
or "Wand CLEAN"
Flashes
What is meant by "EWATER+" ?
"EWATER+" helps the self-cleaning wand feature work eectively and by preventing the accumulation of
dirt that can cause stains.
• "EWATER+" is generated from chemicals already present in potable water.
• "EWATER+" helps to minimize dirty surfaces, but does not make cleaning unnecessary.
• The eect of rinsing with "EWATER+" can vary depending on the frequency of toilet use and other conditions.
Operation
"EWATER+" can also be used by pressing the remote control button.
■Wand
Press "Wand CLEAN" button
(After wand cleaning, water comes out from around the wand.)
●To clean the wand with it extended. "Wand cleaning" (Page 36)
17
Page 19
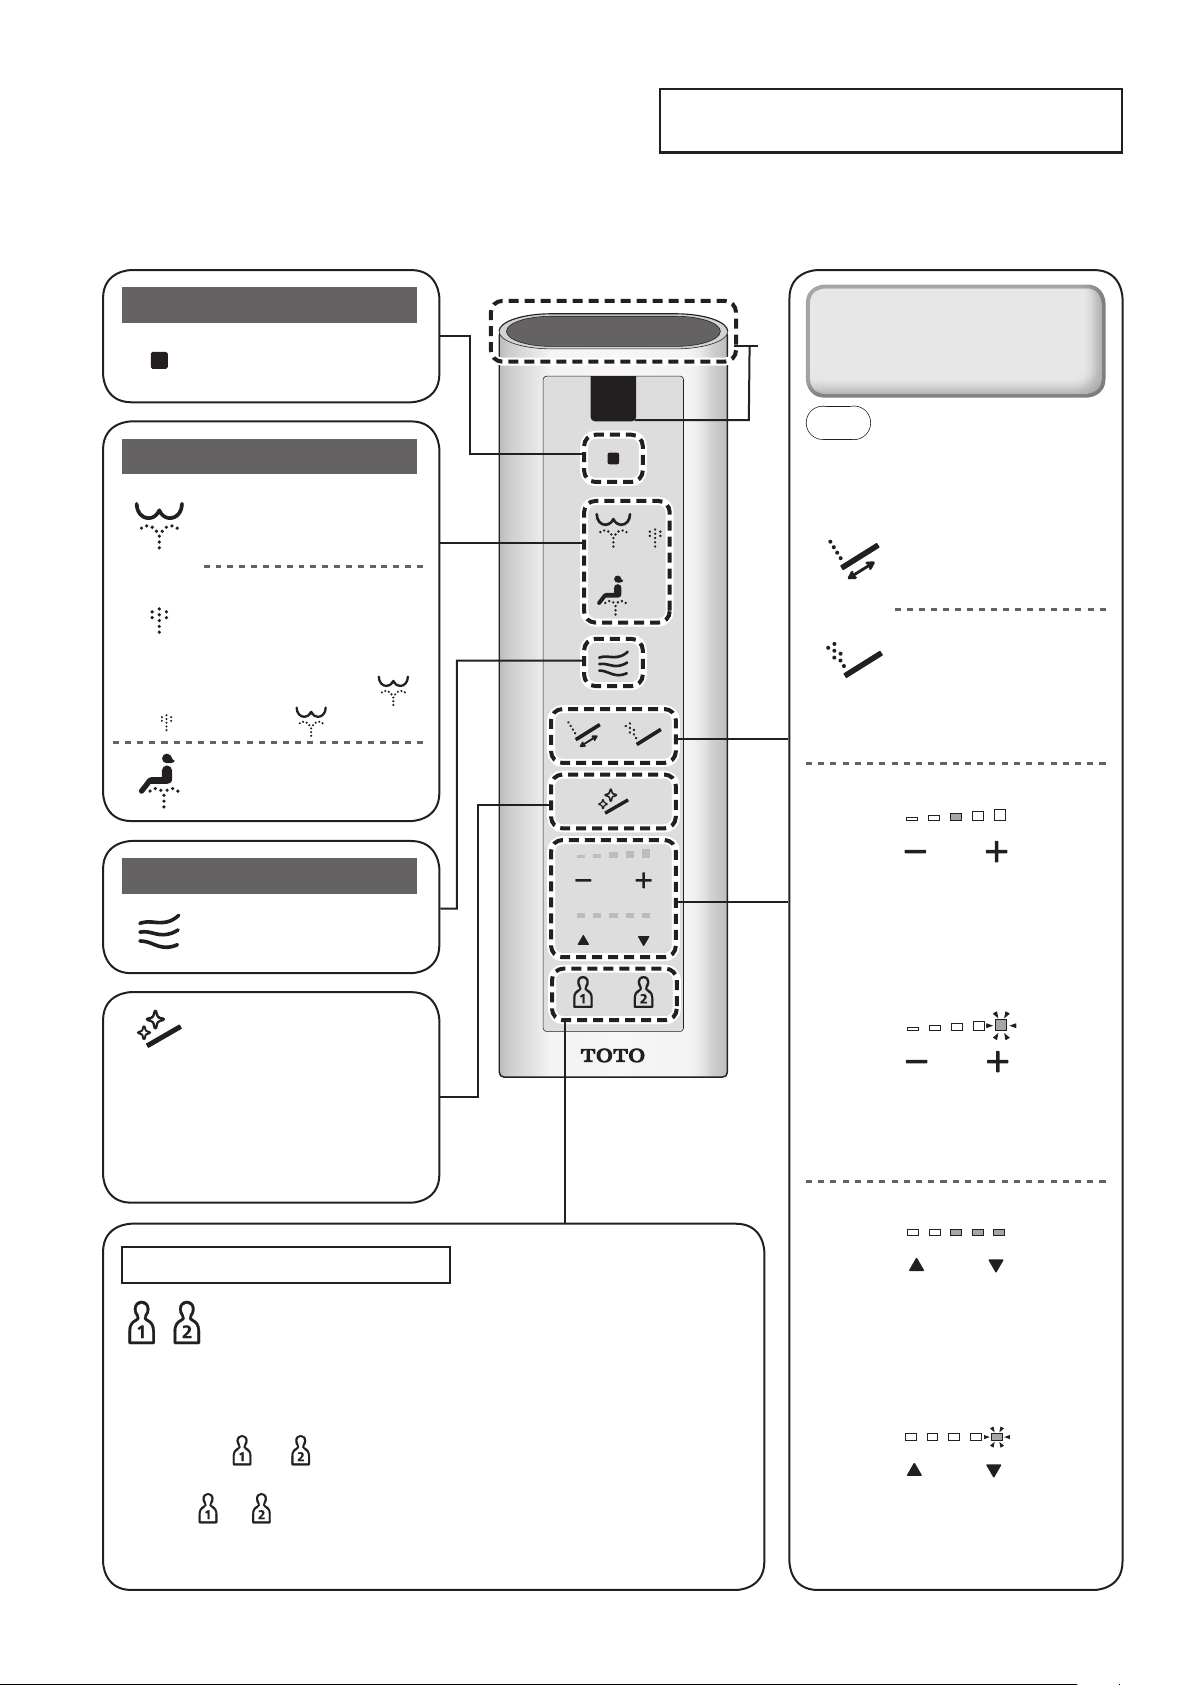
Basic Operation
Using the Remote Control
Operate the controls on the remote control; a beep sounds when the main unit
receives the signal.
Stopping
"Stop"
Stops the operation.
Washing
"Rear washing"
Washes your rear.
"Rear soft washing"
Washes your rear with
mild water pressure.
The setting changes between
each time the is pressed.
and
"Front washing"
Serves as a bidet for ladies.
Drying
"Warm air drying"
Dries your rear.
● Functions that operate when
*1
a button is pressed during
"Rear washing", "Rear soft
washing" or "Front washing".
Note
Sitting back on the toilet seat
makes it easier to adjust the wand
position and to reduce splashing.
"Oscillating washing"
The wand moves back and forth
to wash your rear thoroughly.
"Pulsating washing"
Washes with the water pressure
pulsating between soft and strong.
The setting changes between "ON" and
"OFF" each time the button is pressed.
"Water pressure adjustment"
You can adjust the water pressure
to one of ve levels.
([-] Softer, [+] Stronger)
After you press the "Water pressure
adjustment" button, the set position
will light for 10 seconds."
"Wand CLEAN"
Cleans the wand with "EWATER+".
This function will operate
automatically after using the
washing functions (Rear washing,
Front washing, etc.). (Page 16)
"Personal setting lock"
You can store your preferred "Wand position", "Water
pressure" and "Warm water temperature" settings.
●To store a setting
While washing is in progress, set your preferred "Wand position",
"Water pressure" and "Warm water temperature" and then press
and hold
●To use
Press or , and then press the button for the washing you want to use.
The "Wand position" and "Water pressure" lamps will light up for about 10
seconds in their set positions, and the "Water temperature" display switches.
*1 Remote control transmitter (Front side, Top side)
or for 2 seconds or longer.
18
Once use of the remote control is
nished, the settings will return to the
initial setting (3rd position) after a while,
not exceeding a maximum of 5 minutes.
"Wand position adjustment"
You can adjust the washing position to
5 di erent points between the front and
the rear, using the [▲] and [▼] buttons.
After you press the "Wand position
adjustment" button, the set position
will light for 10 seconds."
Once use of the remote control is
nished, the settings will return to the
initial setting (3rd position) after a while,
not exceeding a maximum of 5 minutes.
Page 20
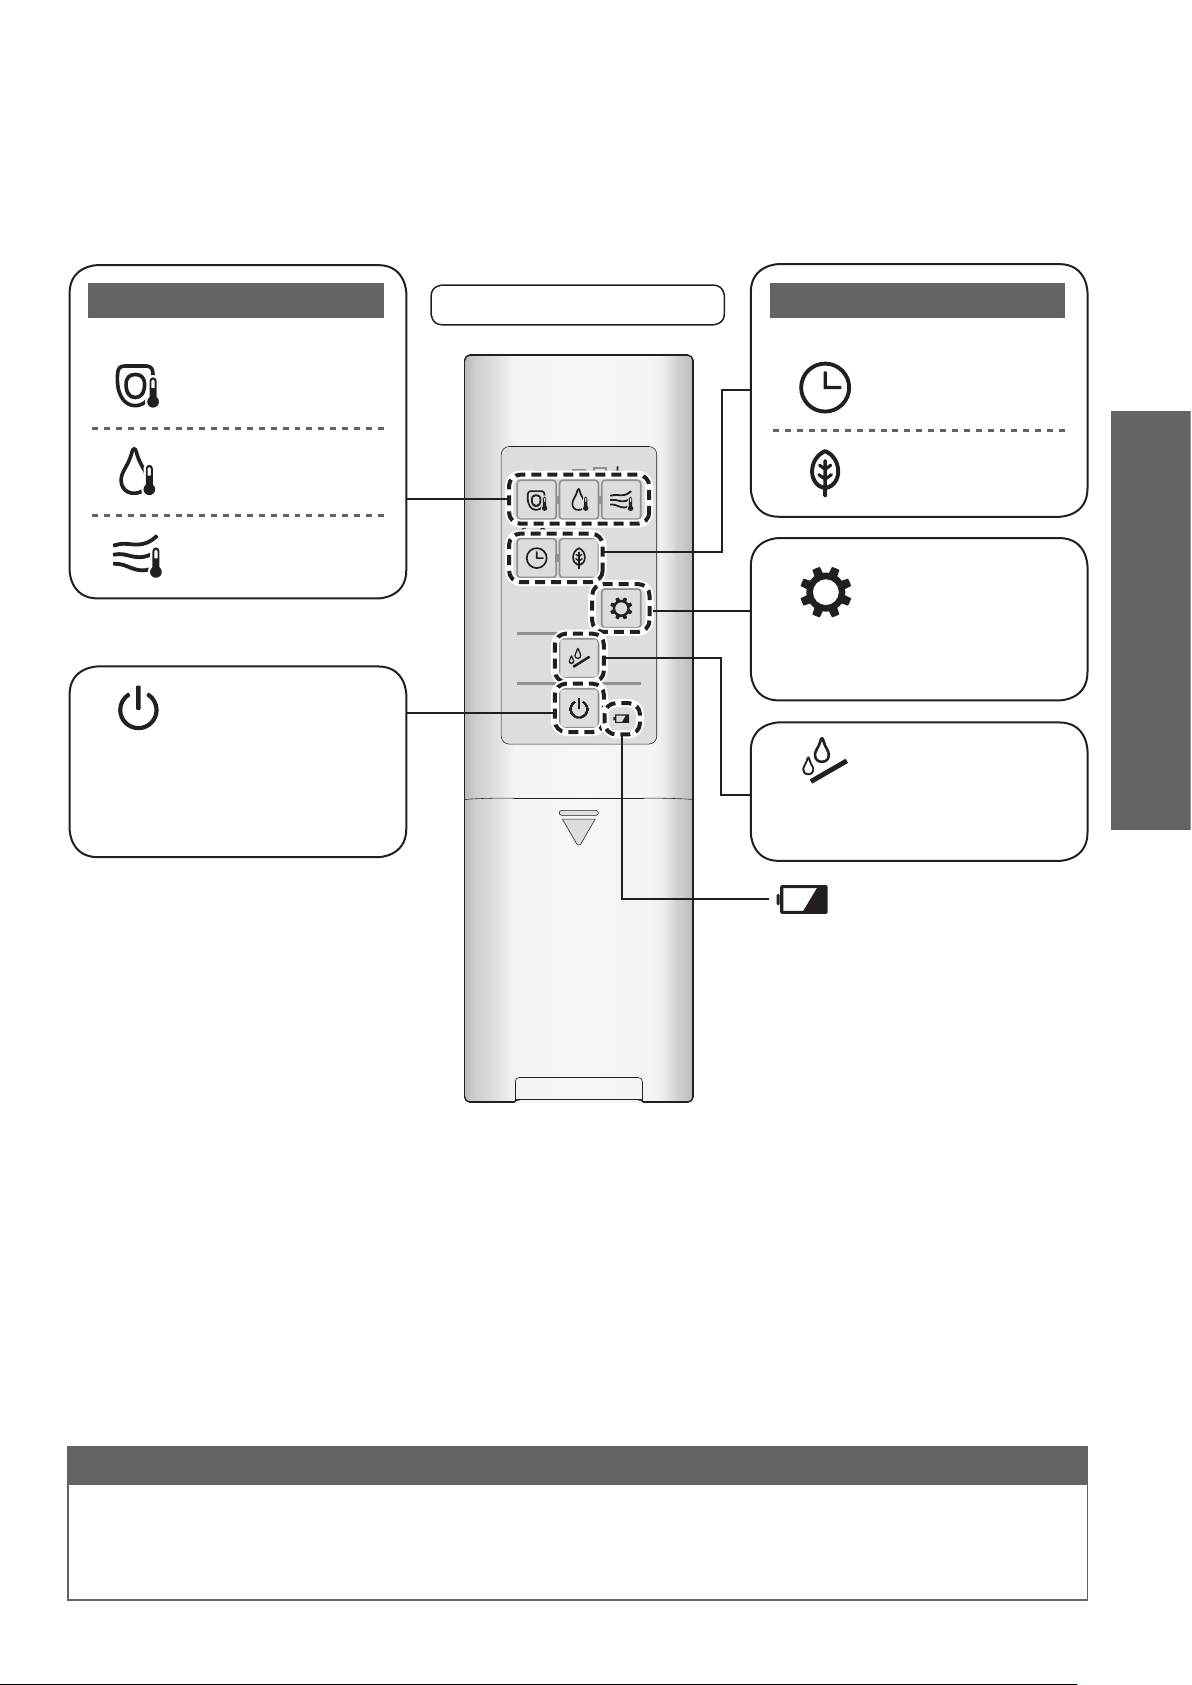
This section is an overview of the settings that can be congured with the remote control.
See the corresponding pages for the detailed descriptions.
Temperatures Energy saver
Adjust temperatures (Page 20) Saving energy (Page 24, 25)
"Toilet seat
temperature"
"Warm water
temperature"
Remote control back side
"Timer energy
saver"
"Auto energy
saver"
"Drying air
temperature"
"Setting
conrmation"
The current setting can be
discerned from the LEDs.
"Power ON/OFF"
Pressing it about 3 seconds or longer
turns the power on/o .
•
If the remote control is secured to
prevent theft (Page 15 2-2)
To clean the wand with it extended.
(Page 36)
"Wand cleaning"
Operation
For your information
Low battery warning
mark
(Page 38)
●Water may sometimes come out from around the wand when it expands in the warm water tank, but this is
normal.
●As the warm water tank of hot-water system is used, the temperature of warm water may become lower if it is
continuously consumed.
19
Page 21
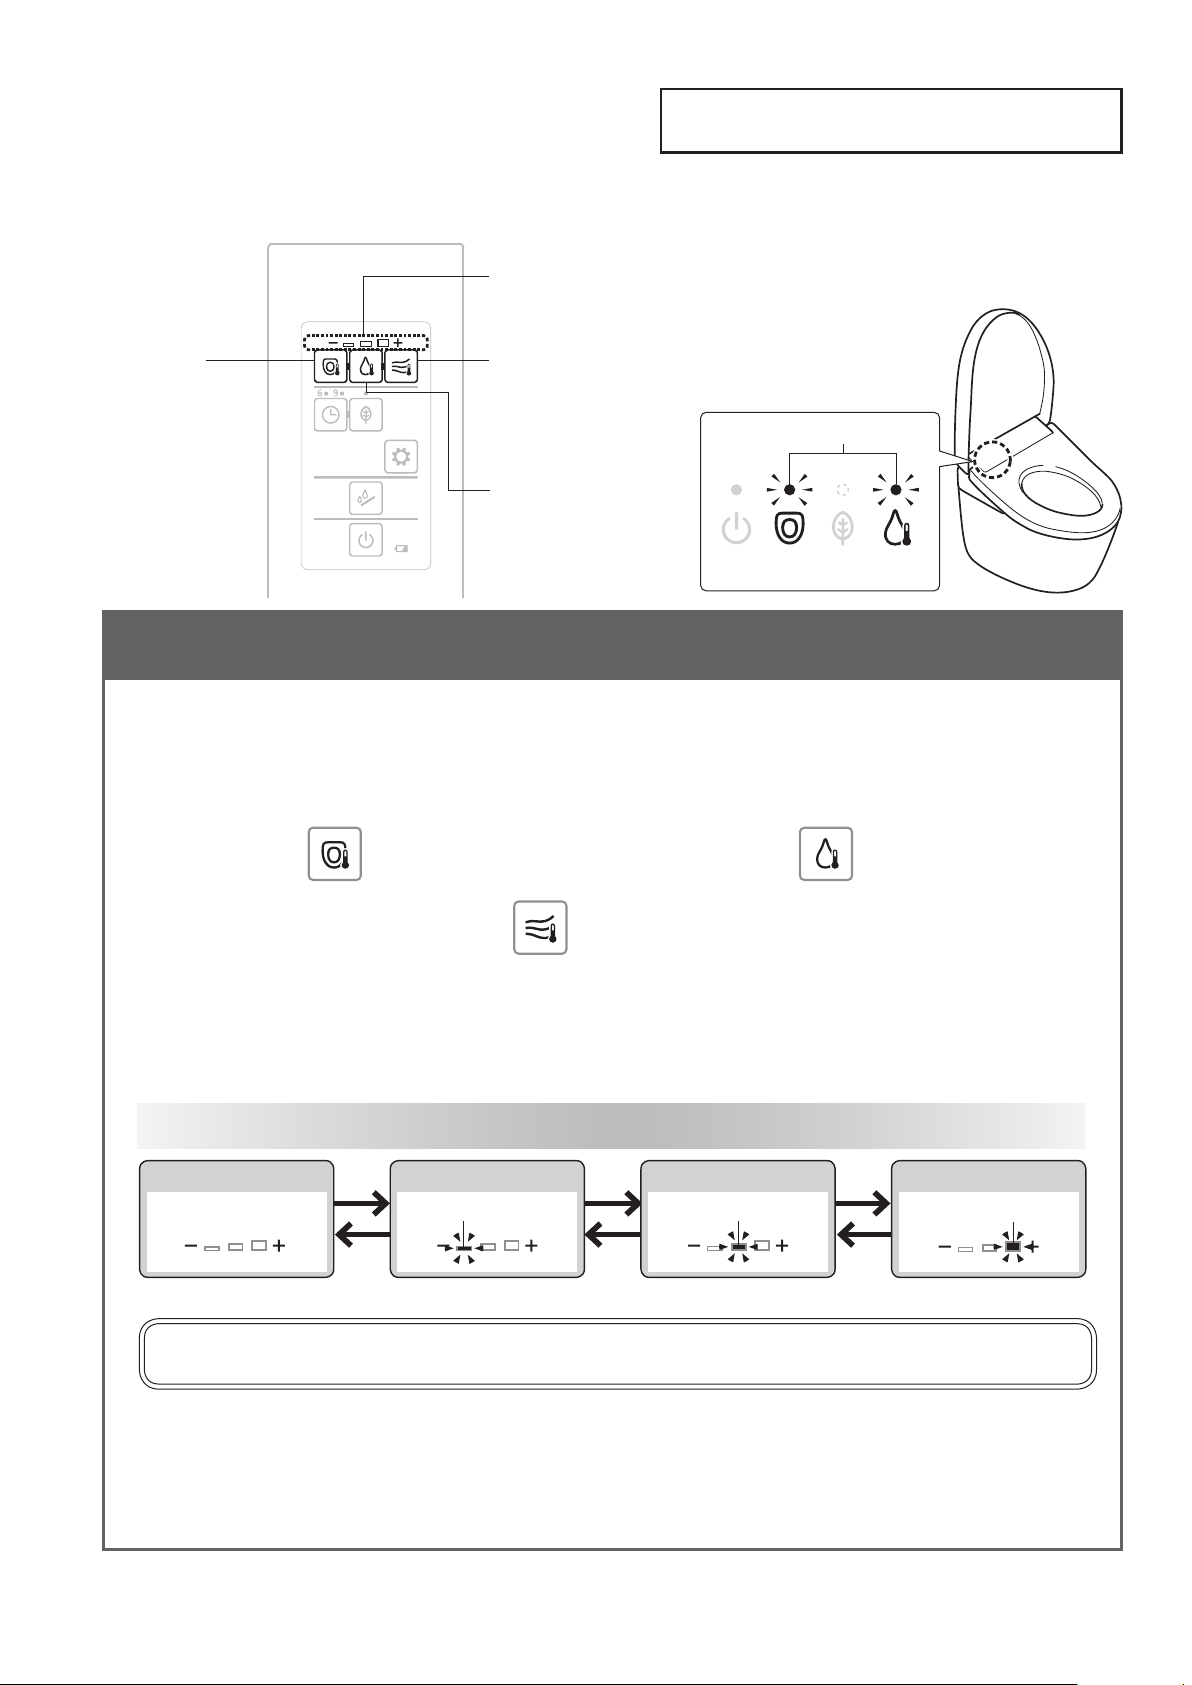
Temperature Adjustment
Three dierent temperature levels (High, Medium, Low) and "OFF" setting can be selected.
Displaying the
temperature level of
the pressed button
Toilet seat
temperature
button (When you
want to adjust
the toilet seat
temperature)
Drying air
temperature button
(When you want to
adjust the drying air
temperature)
Warm water
temperature button
(When you want
to adjust the warm
water temperature)
Toilet Seat, Warm Water, Drying
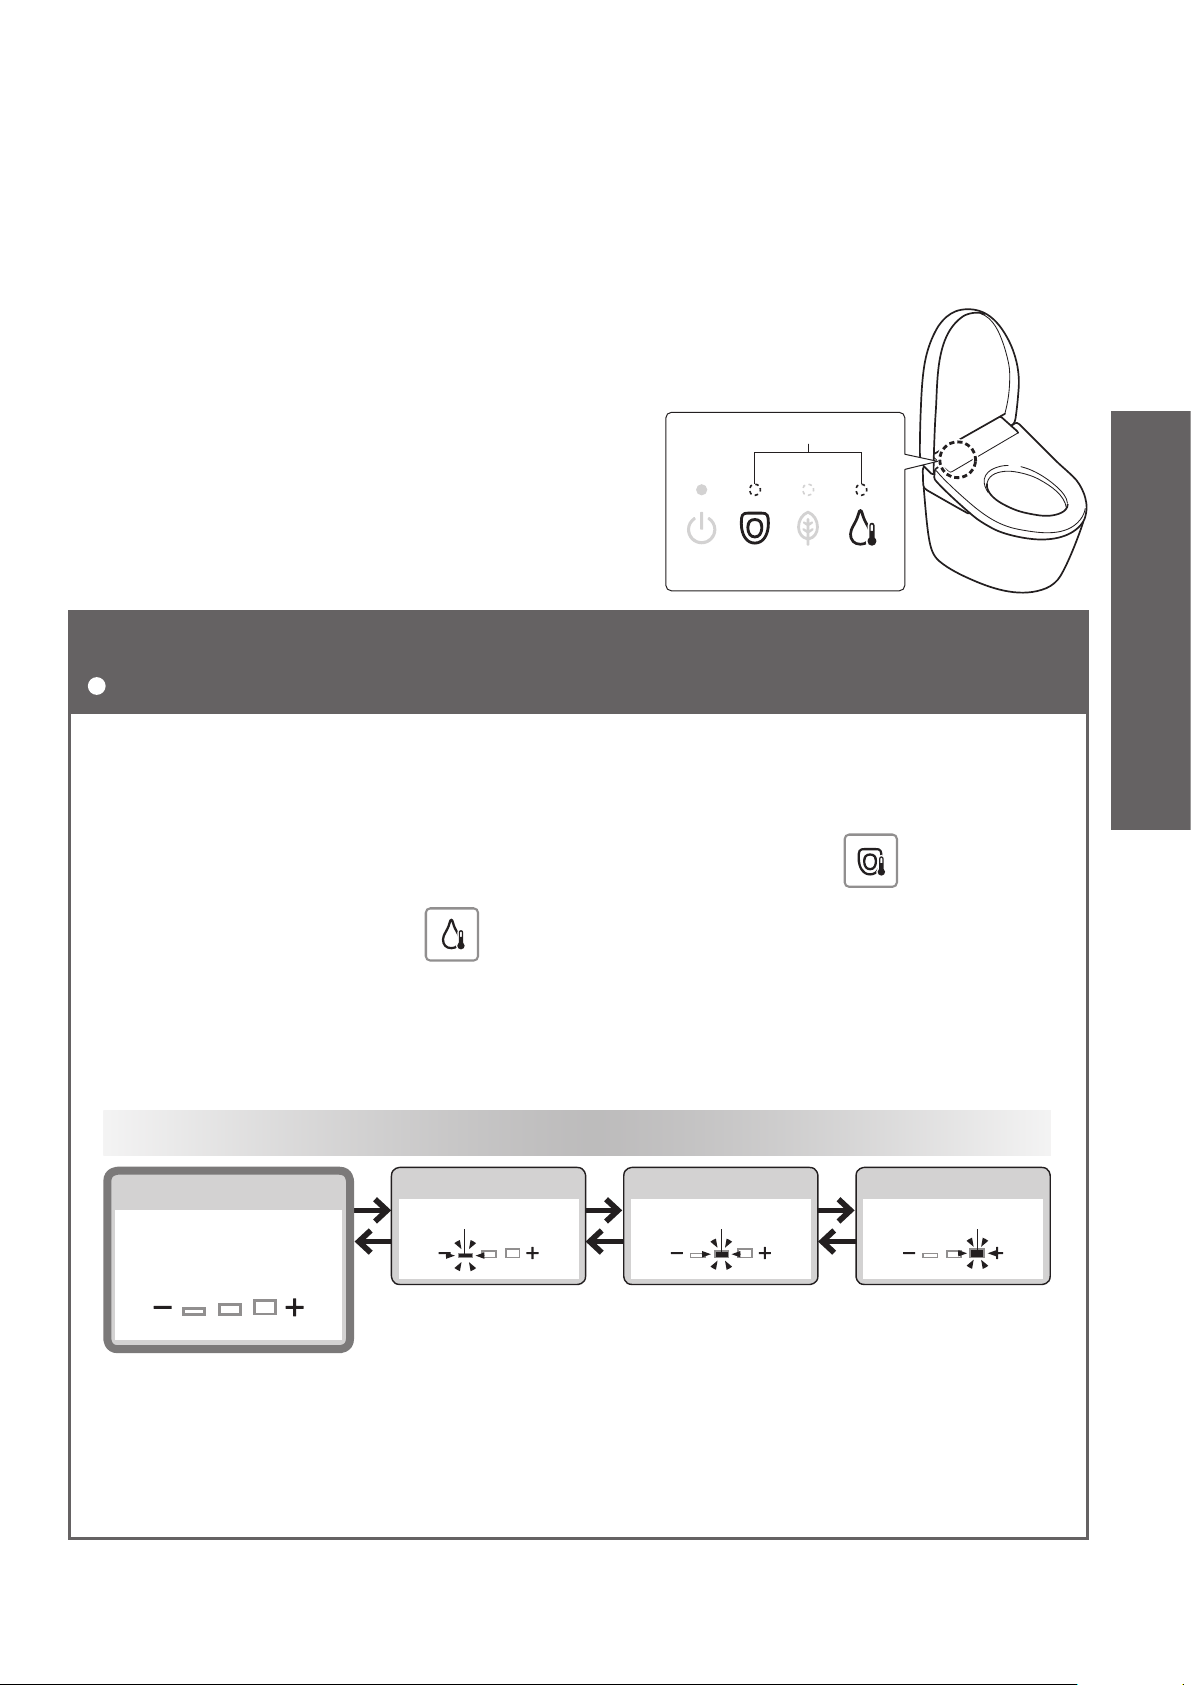
When the seat
temperature and the warm
water temperature are set
Lit
<Seat>
<Water>
Adjusting the temperature
1
2
3
Remove the remote control from the hanger.
•If the remote control is secured to prevent theft (Page 14)
Choose and press the button of the temperature that you want to set
from the
temperature" button) and
•The current temperature level appears.
Press the button selected in step 2 repeatedly until a desired
temperature level illuminates.
The setting changes each time the button is pressed once
"OFF"
OFF
("Toilet seat temperature"button), ("Warm water
("Drying air temperature" button).
"Low"
Lit
"Medium"
Lit
"High"
Lit
20
•The "Drying" cannot be turned "OFF".
If the button is not pressed for about 10 seconds, the "Temperature adjustment" LED will go o , but the setting will be retained.
If the "Temperature adjustment" LED goes out before the setting is completed, start all over again at step 2.
<Settings complete>
Mount the remote control in the hanger.
4
OWhen the toilet seat does not get warm, or when the warm water is not warm enough, even after
temperature adjustment.
•If the remote control is secured to prevent theft (Page 14)
Is the "Energy saver" set to "ON"? (Page 22, 23)
Page 22
When the seat
temperature and the warm
water temperature are
turned "OFF"
OFF
<Seat>
<Water>
Operation
To turn the warm water temperature and toilet seat temperature "OFF"
The "Drying" cannot be turned "OFF".
Remove the remote control from the hanger.
1
•If the remote control is secured to prevent theft (Page 14)
Select a temperature button you want to turn "OFF" from ("Toilet seat
2
3
temperature" button),
•The current temperature level appears.
Press the button selected in step 2 repeatedly until the temperature level
is set to "OFF".
("Warm water temperature" button) and press it.
The setting changes each time the button is pressed once
"OFF"
OFF
(All LED's)
<Settings complete>
Mount the remote control in the hanger.
4
•If the remote control is secured to prevent theft (Page 14)
"Low"
Lit
"Medium"
Lit
"High"
Lit
21
Page 23
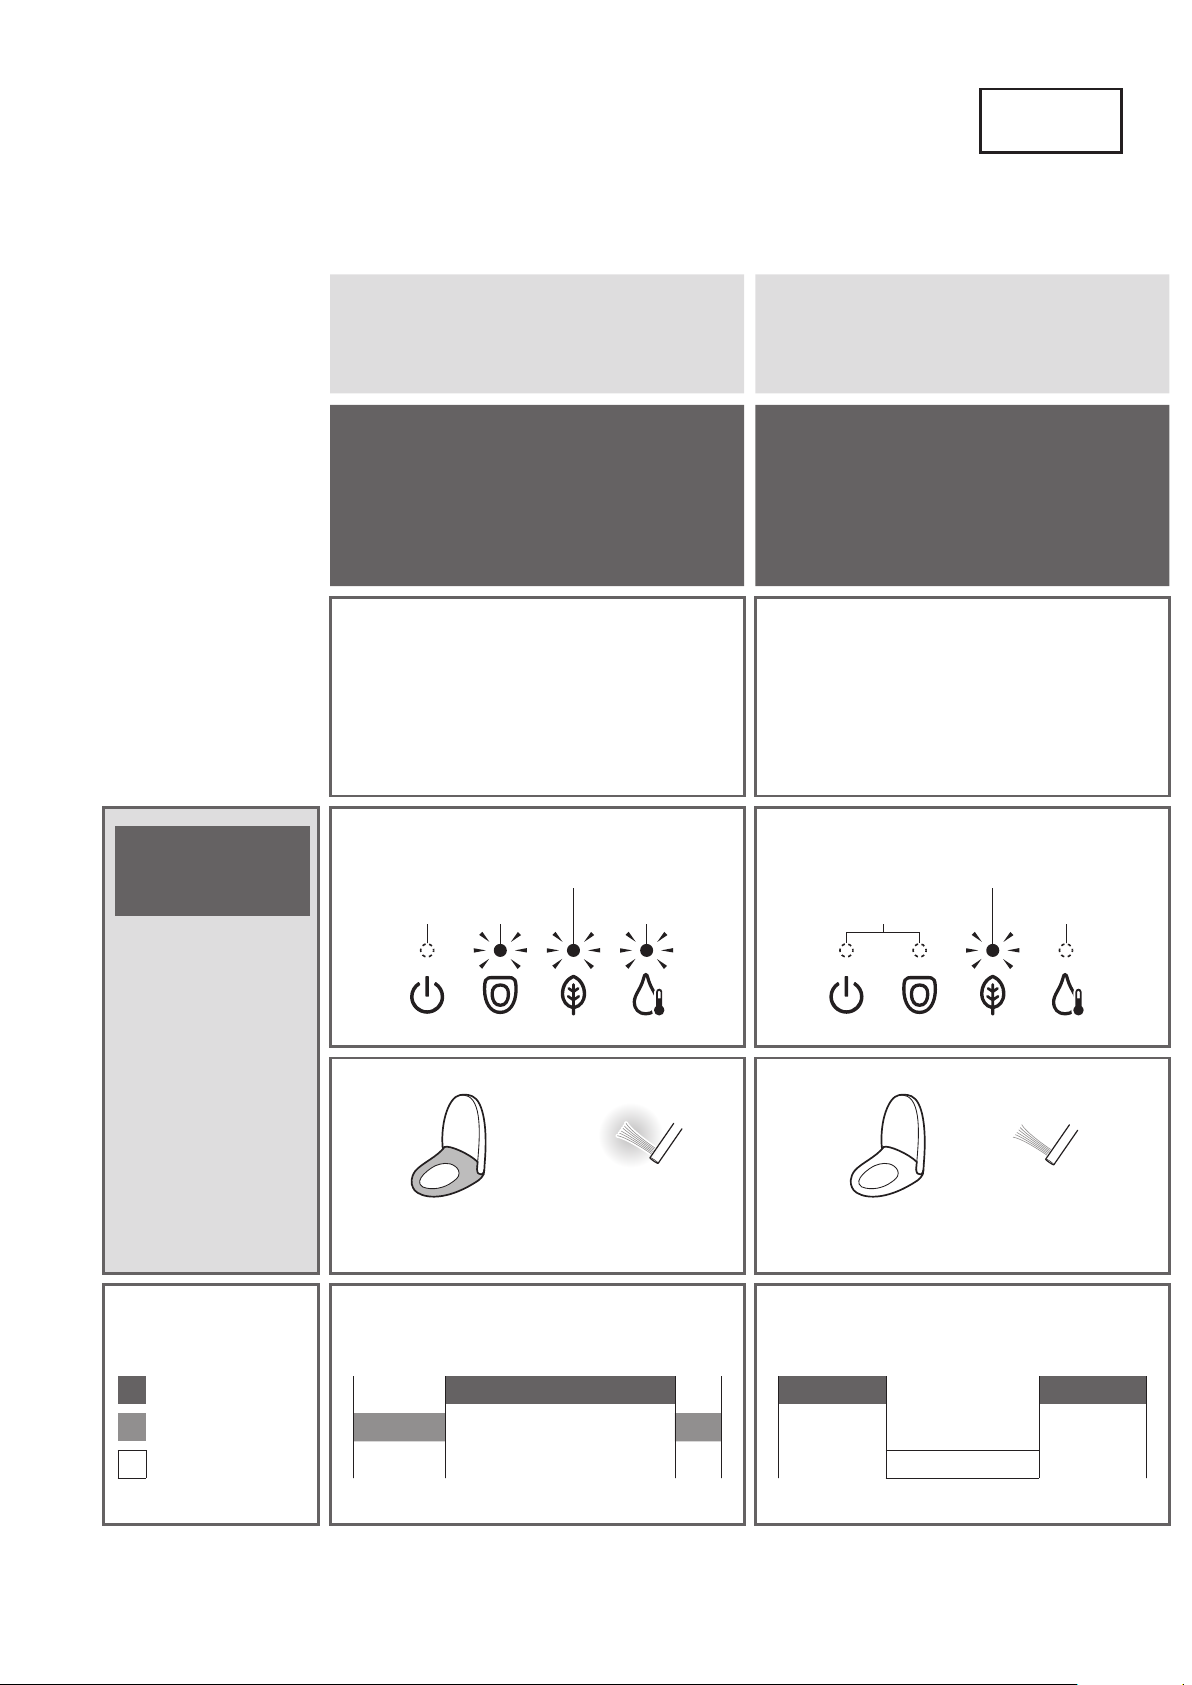
Energy Saver Features
Type
"Auto energy saver" or "Timer energy saver" can be selected.
To save energy, lower (or turn "OFF") the seat or warm water temperature.
When energy
saver is in
operation
You want the product to save
You want to save energy only
for a preset duration of time.
energy automatically.
(6 hours, 9 hours)
Auto energy saver Timer energy saver
The product detects time periods with
infrequent use and lowers the toilet seat
temperature automatically.
●
It takes about 10 days for the product
to determine the periods when it is
used relatively less frequently.
Lit
(Orange)
Lit LitOFF
Once the time is set, the toilet seat
heater and warm water heater will be
turned o automatically every day at
that same time.
Lit
(Green)
OFFOFF
■Main display
■Toilet seat heater
■Warm water heater
Example
Set temperature
Low temperature
*3
OFF
*1
*2
Set*1
Low temperature
When used infrequently from 9 pm to 6 am
6 am0 am 9 pm
temperature
OFF
OFF
When set from 8 am to 5 pm
8 am0 am 5 pm
22
Page 24
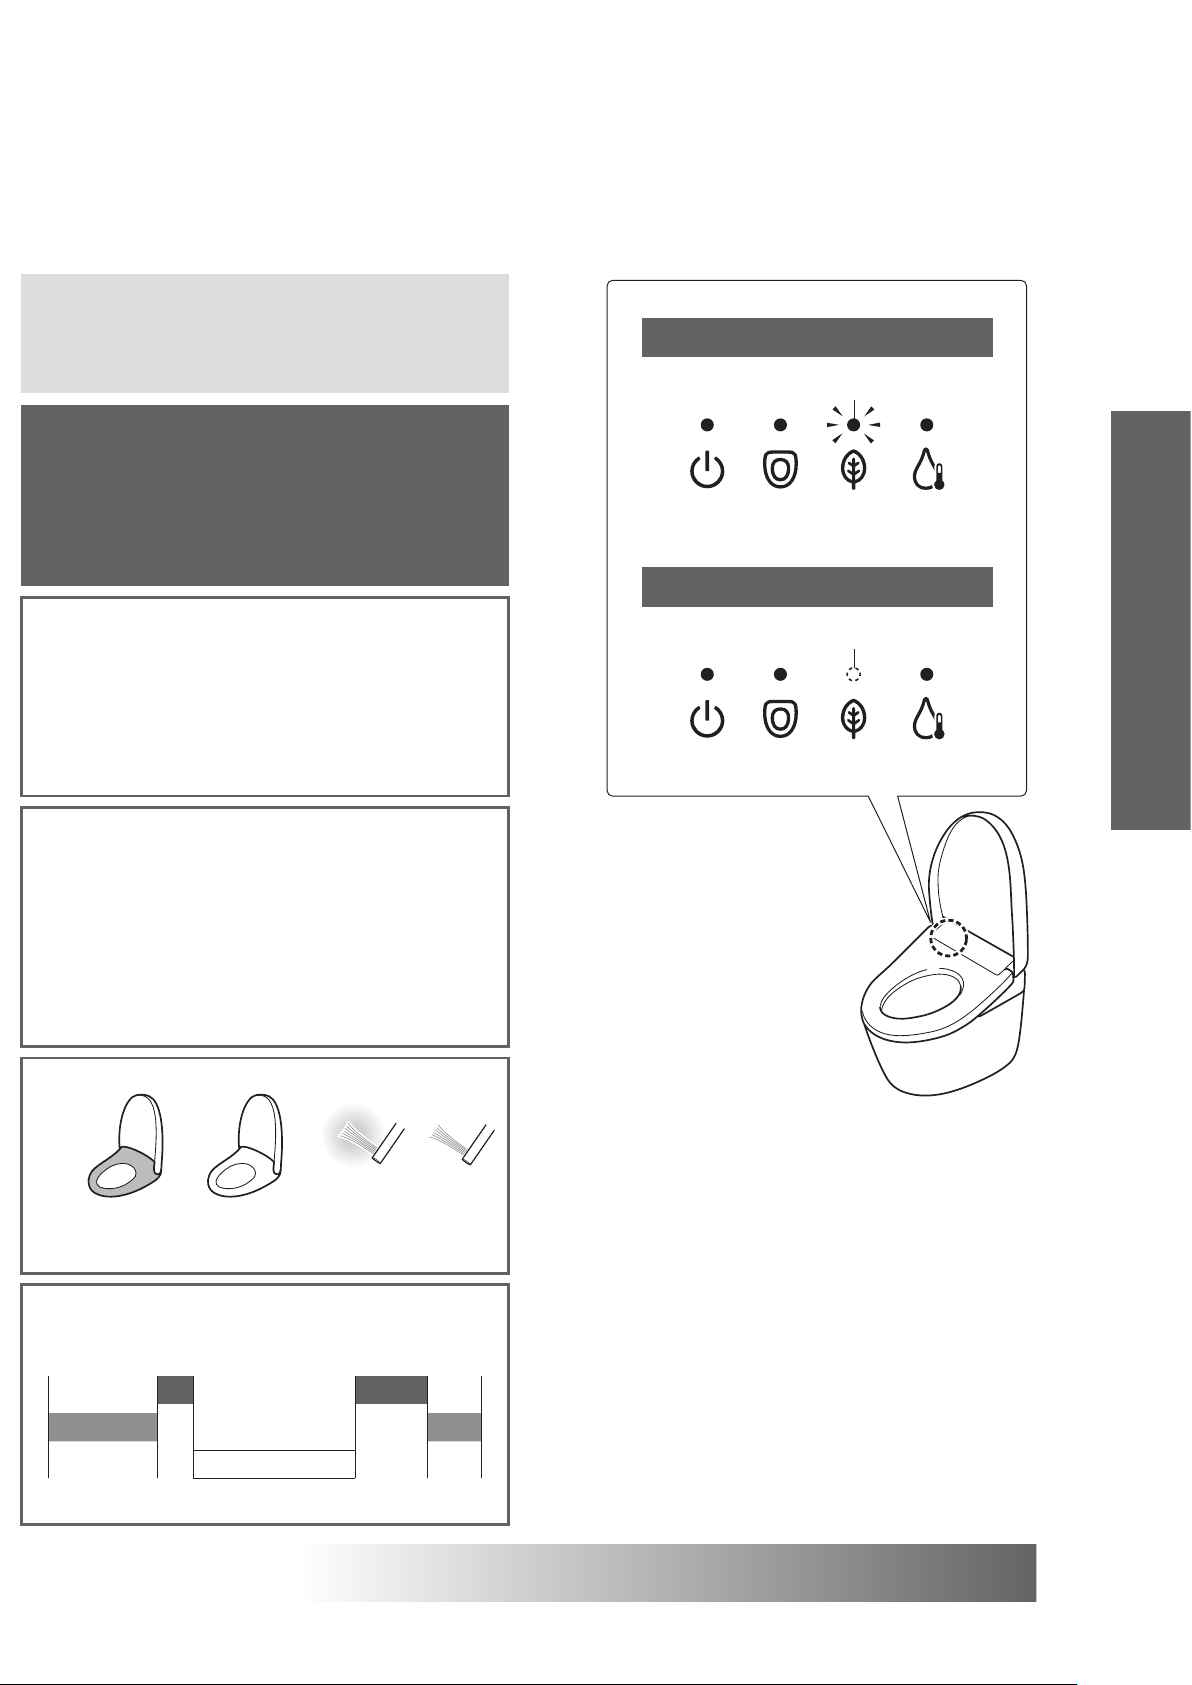
You want to save the maximum
amount of energy possible?
Timer energy saver
Energy saver is on
Lit (Green)
+
Auto energy saver
When both "Timer energy saver" and "Auto
energy saver" are set, "Auto energy saver"
operates when "Timer energy saver" is not
operating.
●During "Auto energy saver":
Same LED indication as "Auto energy saver"
●During "Timer energy saver":
Same LED indication as "Timer energy saver"
<Power> <Seat> <Energy
saver>
Energy saver is o
OFF
<Power> <Seat> <Energy
saver>
<
Water
Water
<
>
Operation
>
Set*1
Low temperature
When "Timer energy saver" and "Auto energy saver"
0 am 9 pm
6 am
OFF
are used together
8 am
temperature
5 pm
OFF
To set energy saver
●
Even if the energy saver is being activated (with the
●
toilet seat heater set to "Low" or "OFF," or with the
warm water heater set to "OFF"), the toilet seat will be
temporarily heated when you sit on it. (To reach the setting
temperature, the toilet seat takes about 15 minutes and the
warm water about 10 minutes, respectively.)
(The LED indication on the main display returns to the
state for when the energy saver is on.)
*1 The toilet seat temperature settings on pages 20, 21.
*2 The time period when the toilet seat heater is set to a "Low".
The warm water heater is "Set temperature".
*3 The time period when the toilet seat heater and warm water
heater are "OFF".
Page 24 and 25
▶
23
Page 25
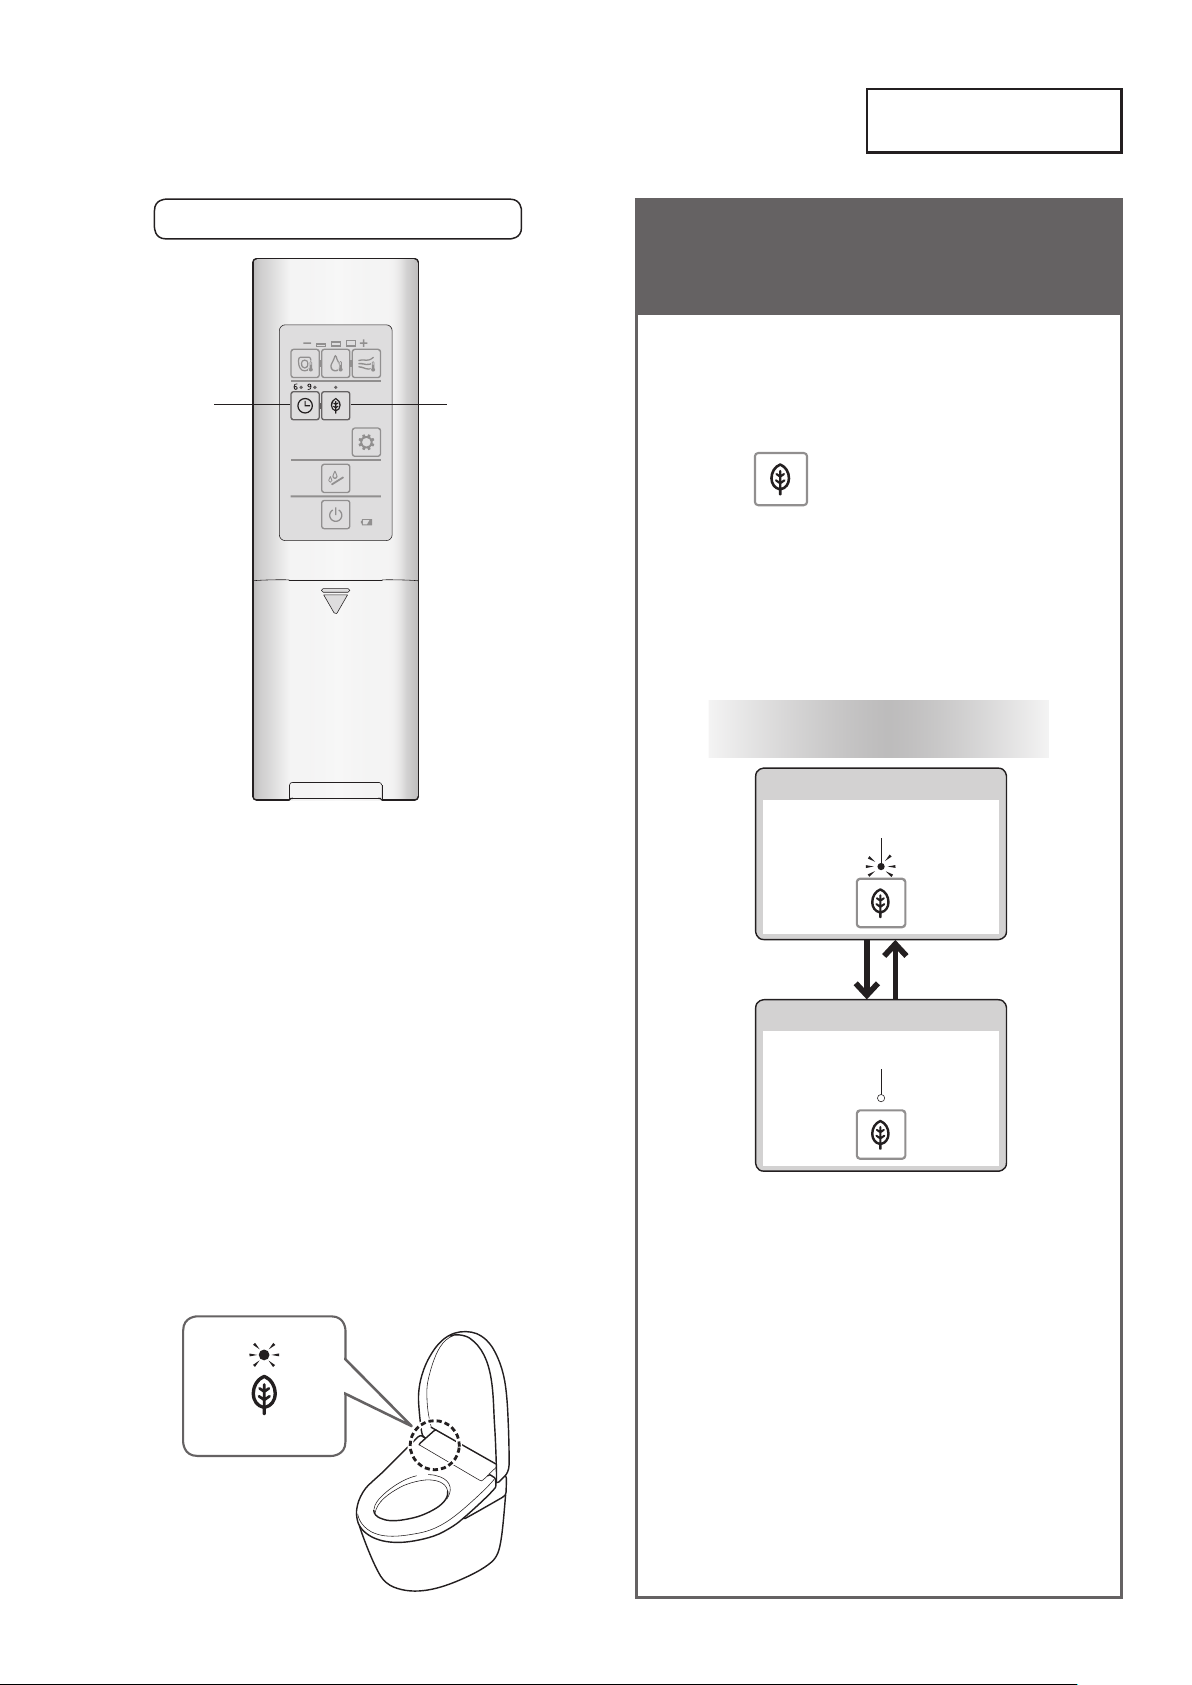
Energy Saver Features
Remote control back side
Auto energy saver Timer energy saver
How to Set
Timer energy
saver button
Auto energy saver
button
1
Press "Auto energy saver"
button.
The setting changes each time
the button is pressed once
When set to "Auto energy saver"
Lit (Green)
<Energy saver >
When energy saver is set,
the "Energy saver" LED
(green) illuminates.
When set to "OFF"
OFF
<Settings complete>
24
Page 26
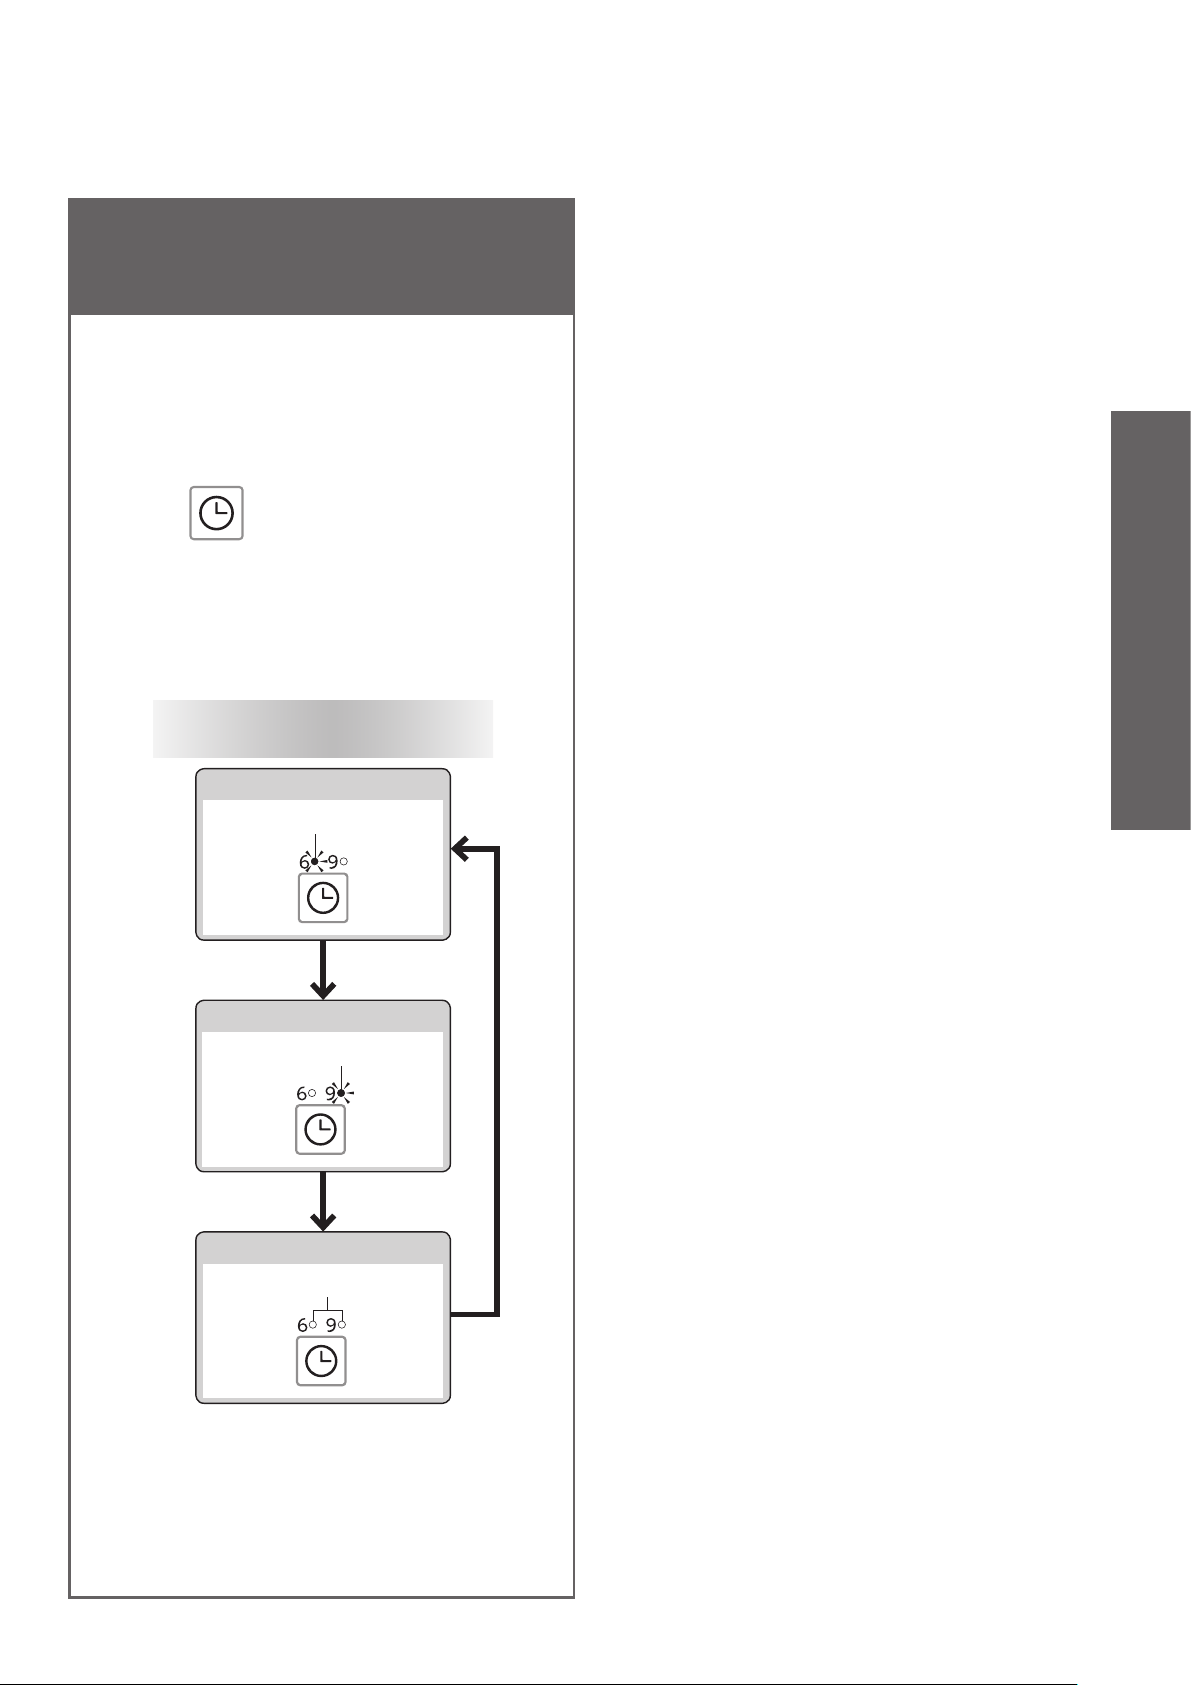
●
Set the Energy saver at the time you want to start it.
Example: To save energy from 1 am to 7 am (for 6
hours)
When the time of the day reaches
1:00 am at night,
1
Operation
Press "Timer energy saver"
button.
• Press the "Timer energy saver" button
repeatedly until the "6" LED illuminates.
The setting changes each time
the button is pressed once
For 6 hours
Lit
For 9 hours
Lit
When "OFF"
OFF
<Settings complete>
25
Page 27
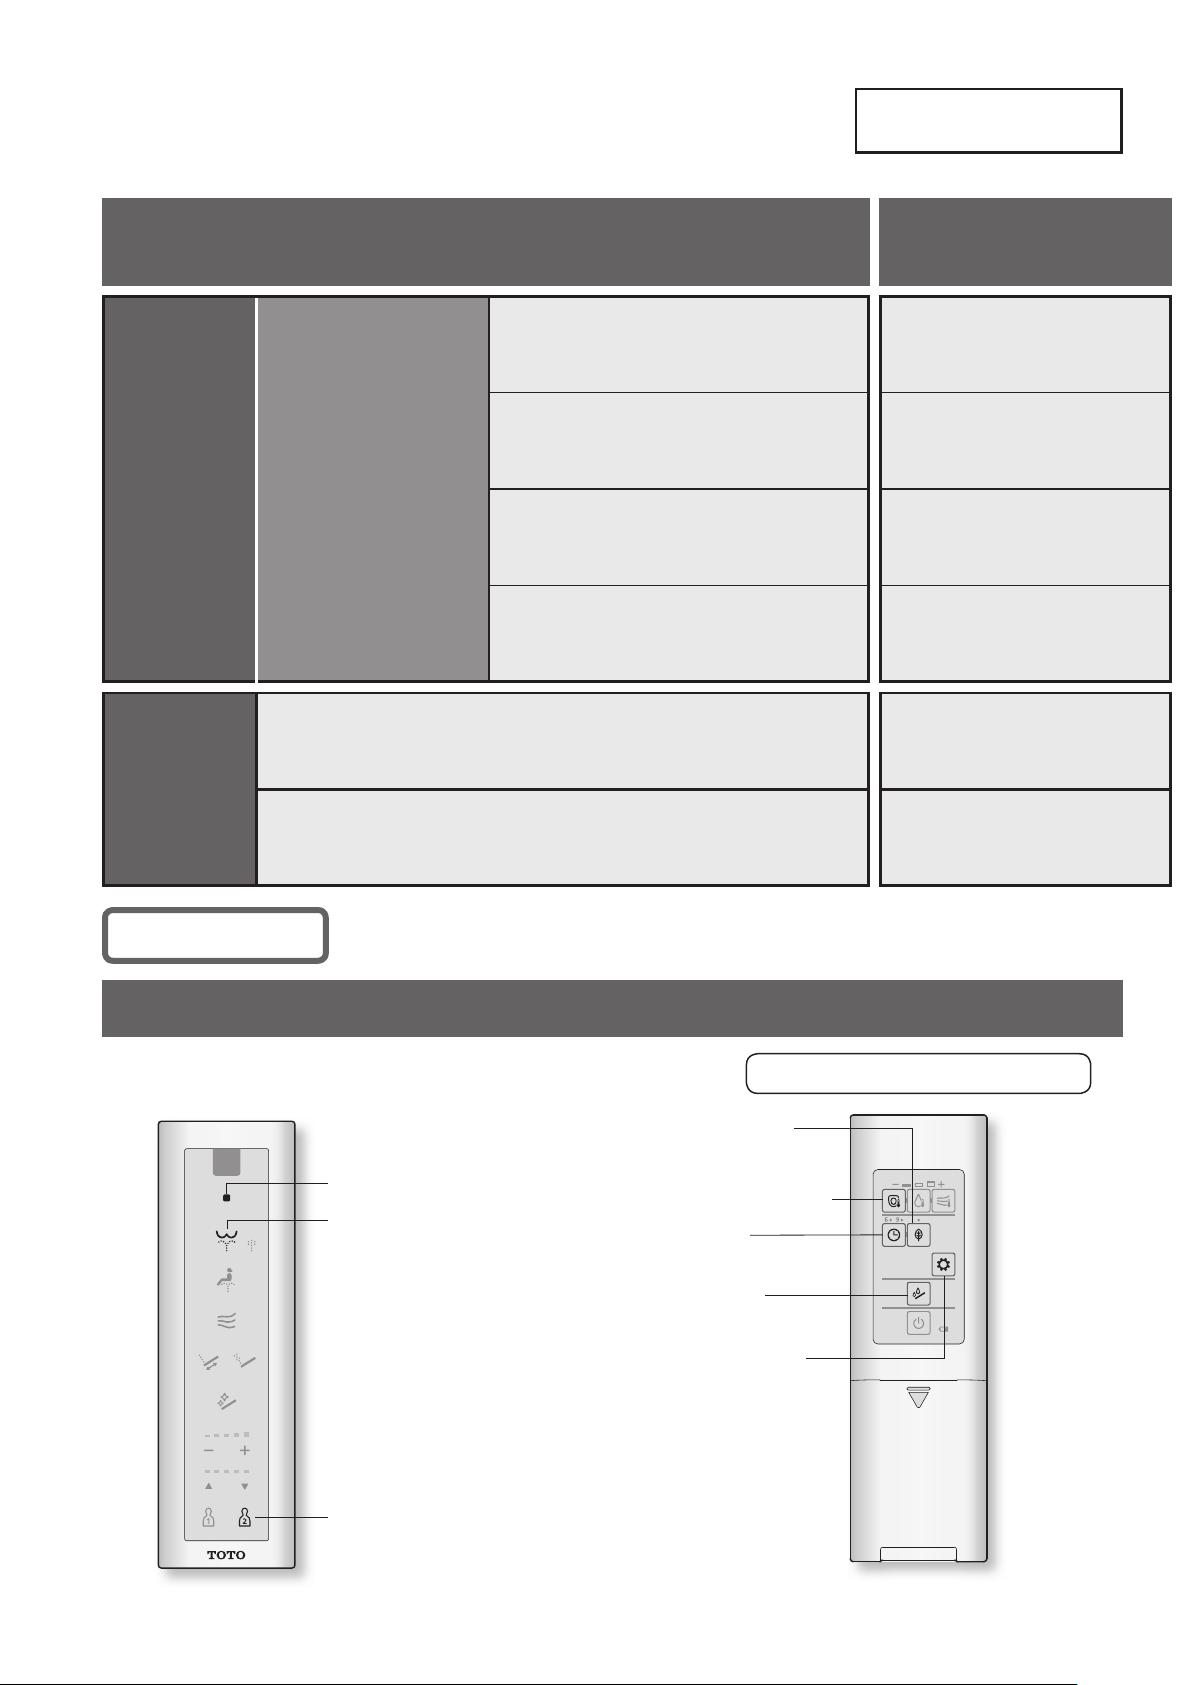
Various Operations
Setting List
Auto
functions
Other
settings
Setting Types
Auto wand CLEAN
Pre-mist
Cleaning
Features
Deodorizer
Auto power deodorizer
Beep sound
Personal setting lock
Available Settings
Bold: Initial settings
ON / OFF
ON / OFF
ON / OFF
ON / OFF
ON / OFF
ON / OFF
Check rst!
Buttons used for setting
Stop button
Rear washing button
Personal setting lock 2 button
Remote control back side
Auto energy saver button
Toilet seat temperature button
Timer energy saver
Wand cleaning button
Setting con rmation button
26
Page 28
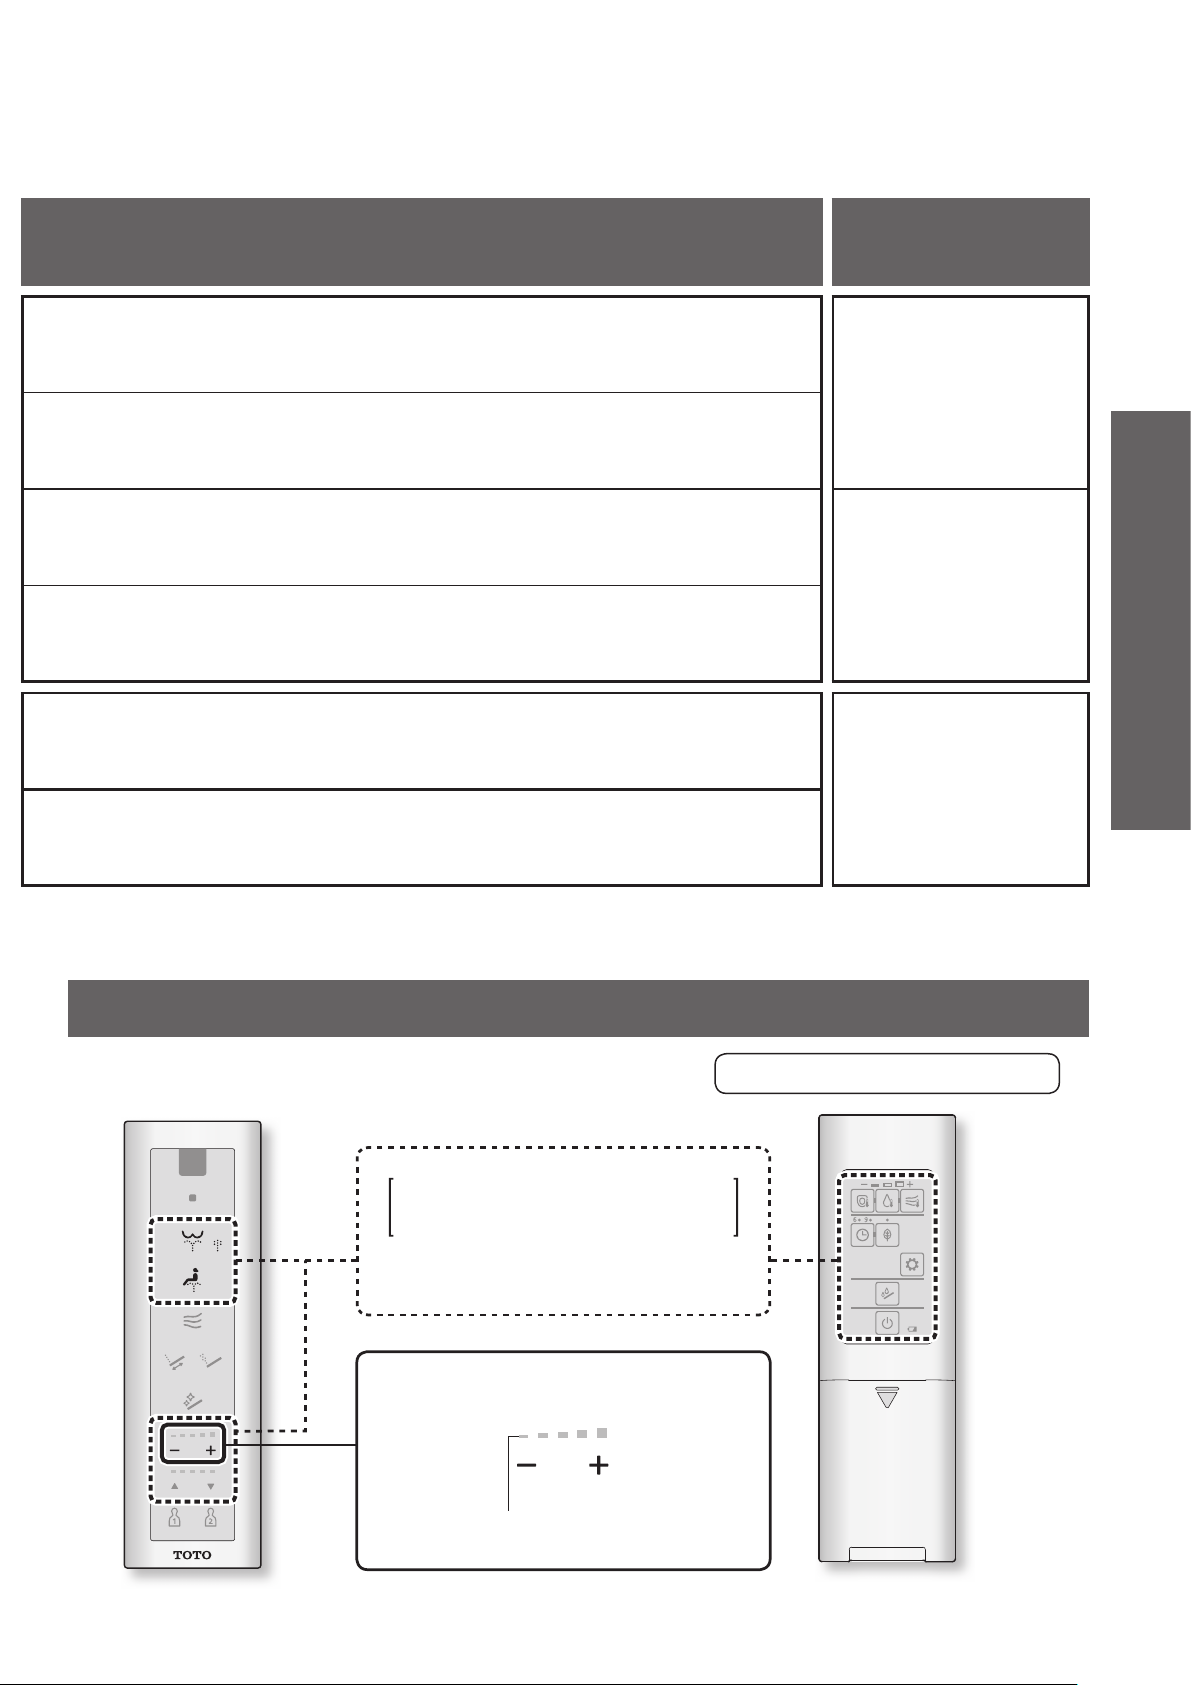
Settings
• Set whether or not to clean the wand automatically
• Set whether or not to spray mist in the bowl unit automatically
How to Set
Ref. Page
Page 28
• Set whether or not to deodorize automatically after sitting on the toilet seat
• Set whether or not to power deodorize automatically after standing up
• Set whether or not to make a beep sound
• Set whether or not to use the personal setting lock
LED indication during setting
Remote control back side
Operation
Page 29
Page 30
When the "Stop" button is
pressed for at least 10 seconds
*
All remote control LEDs flash
1
[Checking settings via LED]
"Wand position adjustment" LED
*1 During setting, if the next button is not pressed within about 60 seconds, the light will stop ashing.
If you fail to complete the setting, redo from the step 1.
27
Page 29
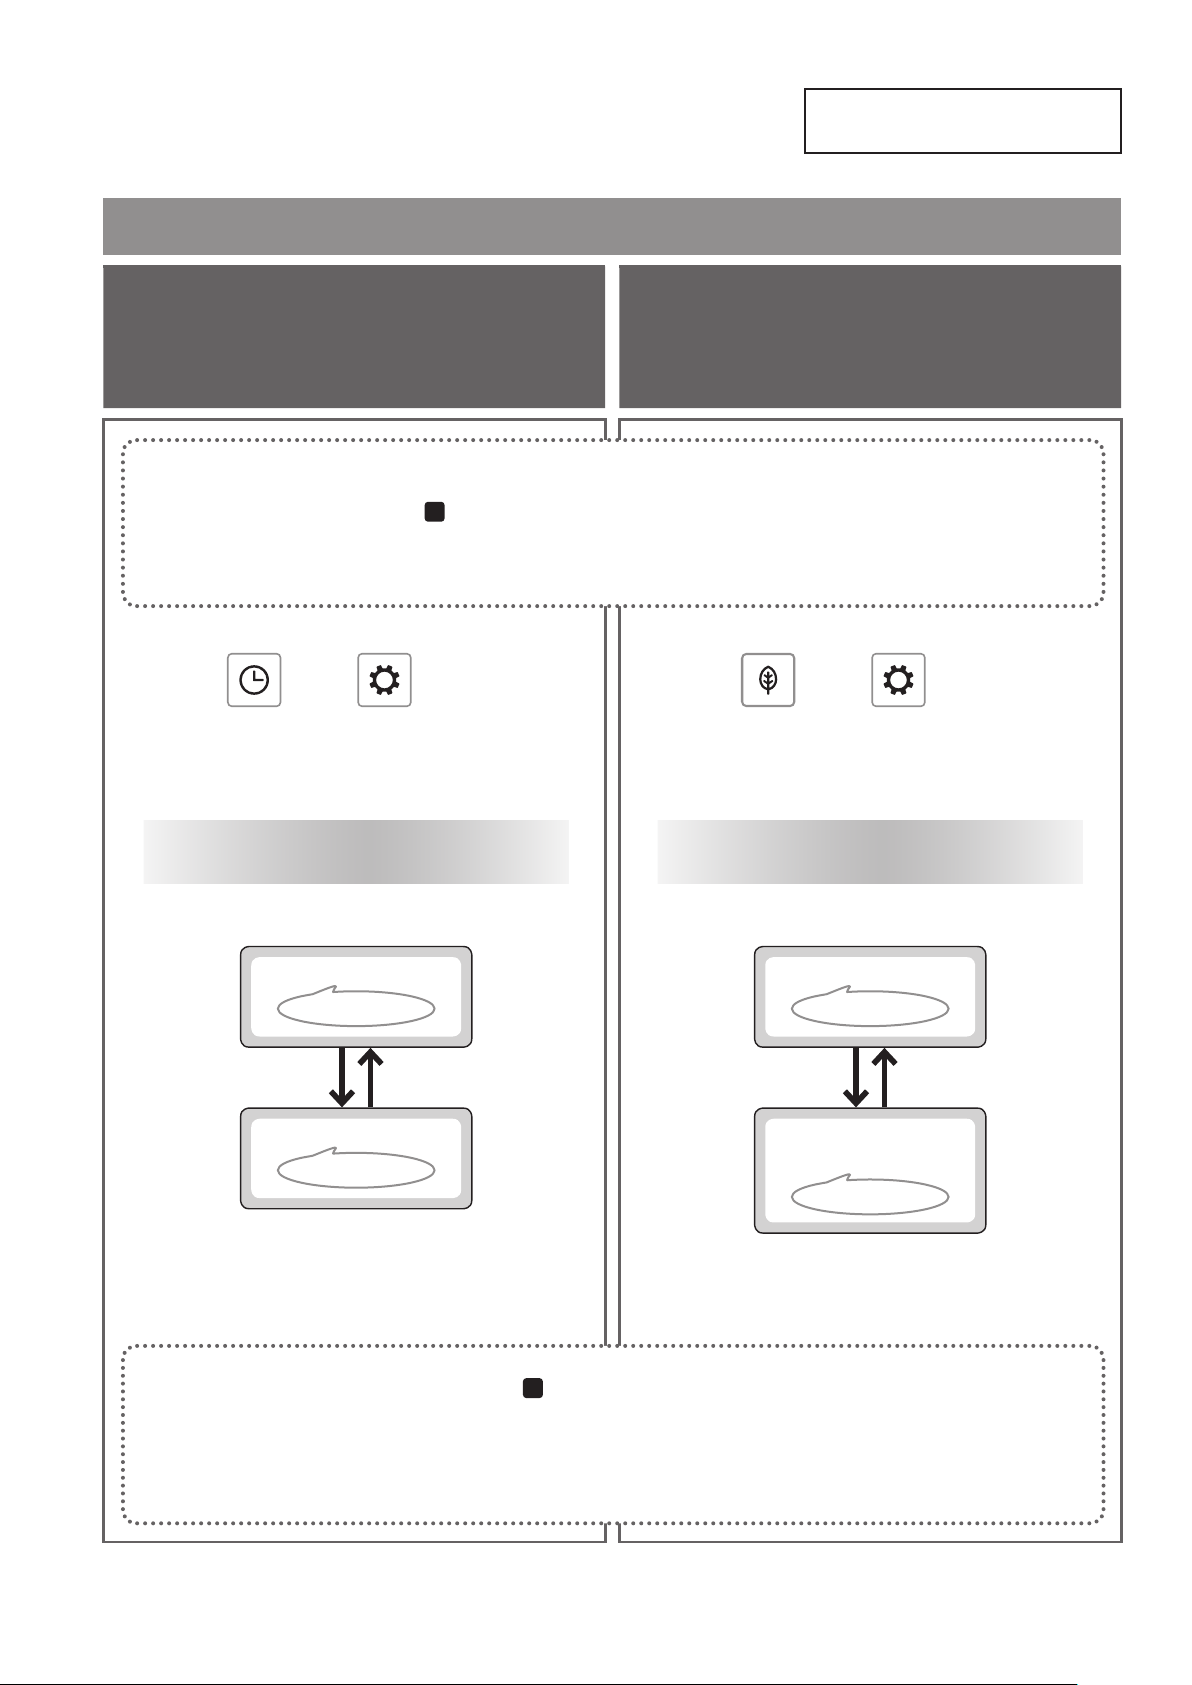
Various Operations
Cleaning Features
Auto functions
Set whether or not to clean the wand
automatically
Auto wand CLEAN
1
and
2
Press "Timer energy saver" button
and "Setting conrmation" button
at the same time.
The setting changes each time
the button is pressed once
Set whether or not to spray mist in the bowl
unit automatically
*1
Pre-mist
Press "Stop" button until all LEDs
on the remote control start ashing.
(about 10 seconds)
and
2
Press "Auto energy saver" button
and "Setting conrmation" button
at the same time.
The setting changes each time
the button is pressed once
Set whether or not to clean the wand
automatically
When set to "ON"
One short beep.
When set to "OFF"
One long beep.
*1
3
Set whether or not to spray mist in the bowl
unit automatically
When set to "spray"
One short beep.
When set to
"do not spray"
One long beep.
Press "Stop" button.
<Settings complete>
*1 When "Auto wand clean" is set to "OFF", the "Wand CLEAN" LED turns o .
28
Page 30
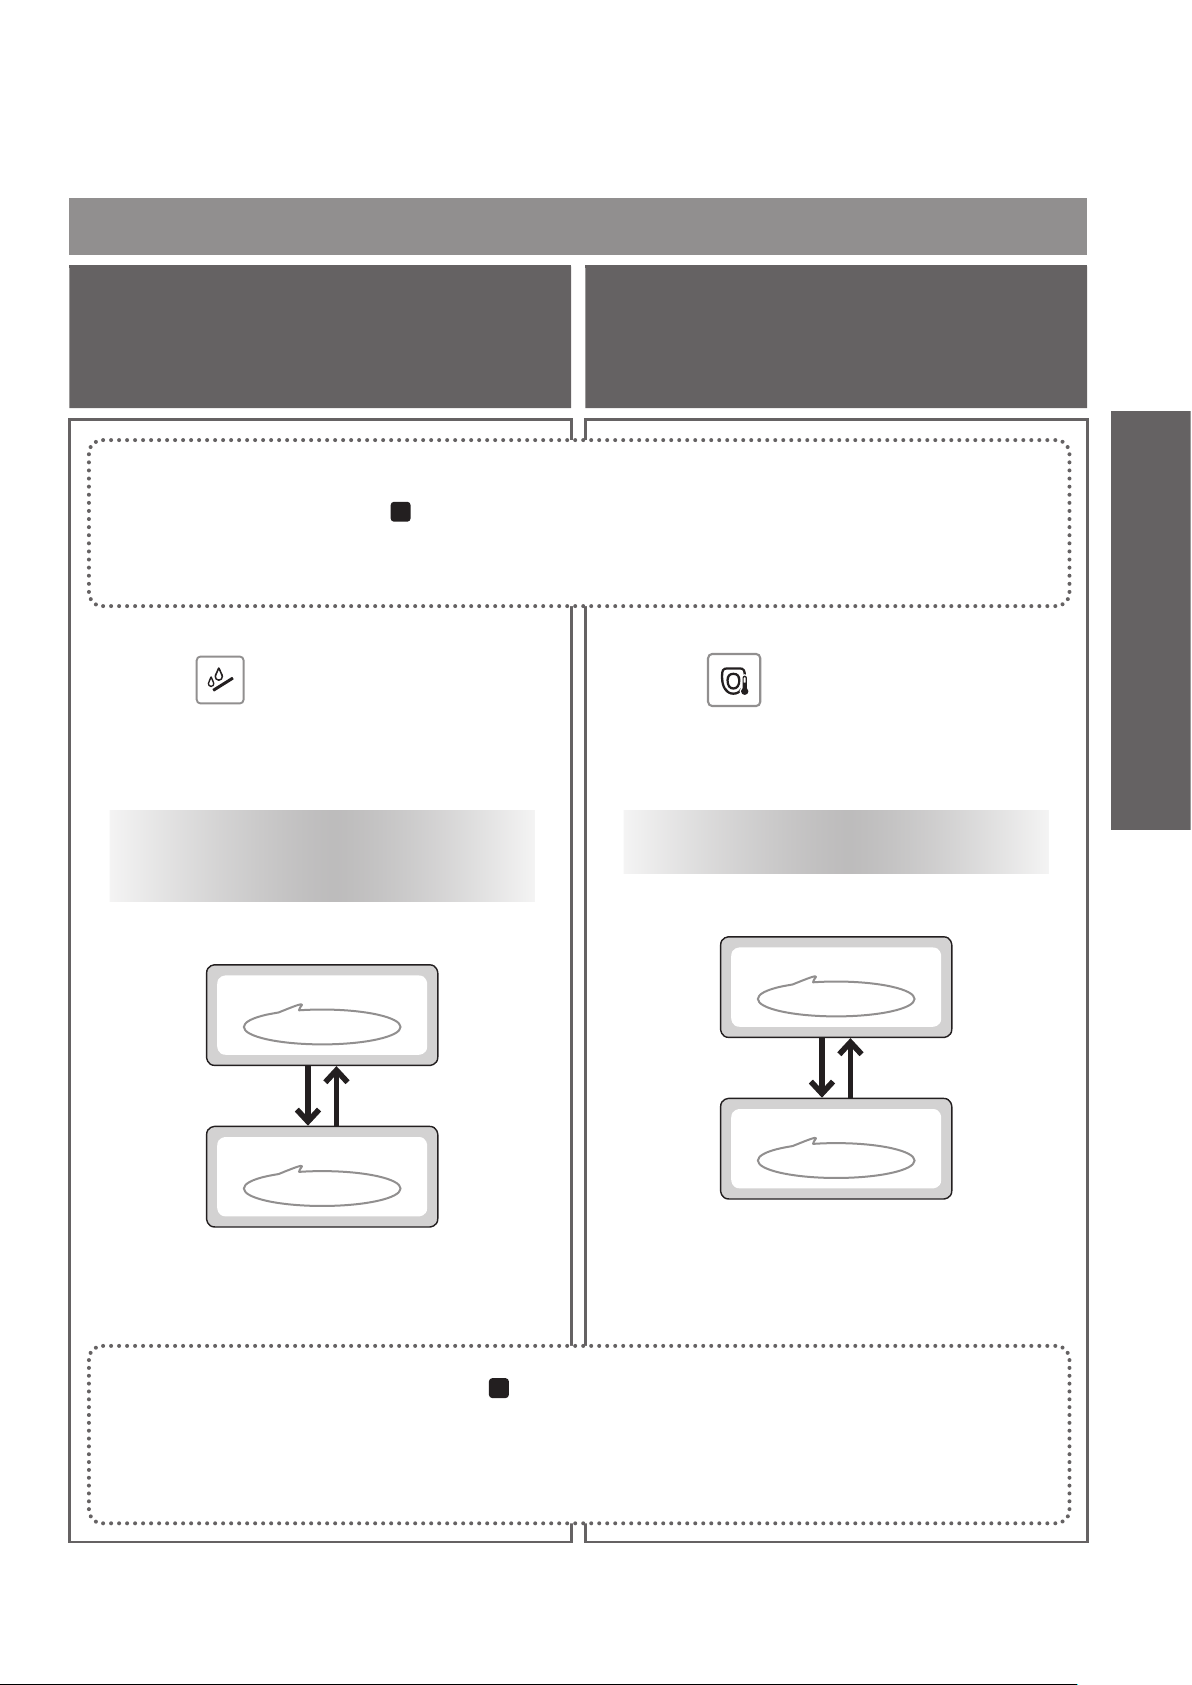
Cleaning Features
Set whether or not to deodorize automatically
after sitting on the toilet seat
Deodorizer
Press "Stop" button until all LEDs
1
2
Press "Wand cleaning" button
about 5 seconds or longer.
The setting changes each time
the button is held down
longer than 5 seconds.
Set whether or not to deodorize automatically
after sitting on the toilet seat
When set to "ON"
One short beep.
on the remote control start ashing.
(about 10 seconds)
Set whether or not to power deodorize
automatically after standing up
Auto power deodorizer
2
Press "Toilet seat temperature"
button.
The setting changes each time
the button is pressed once
Set whether or not to power deodorize
automatically after standing up
When set to "ON"
One short beep.
Operation
When set to "OFF"
One long beep.
3
When set to "OFF"
One long beep.
Press "Stop" button.
<Settings complete>
29
Page 31
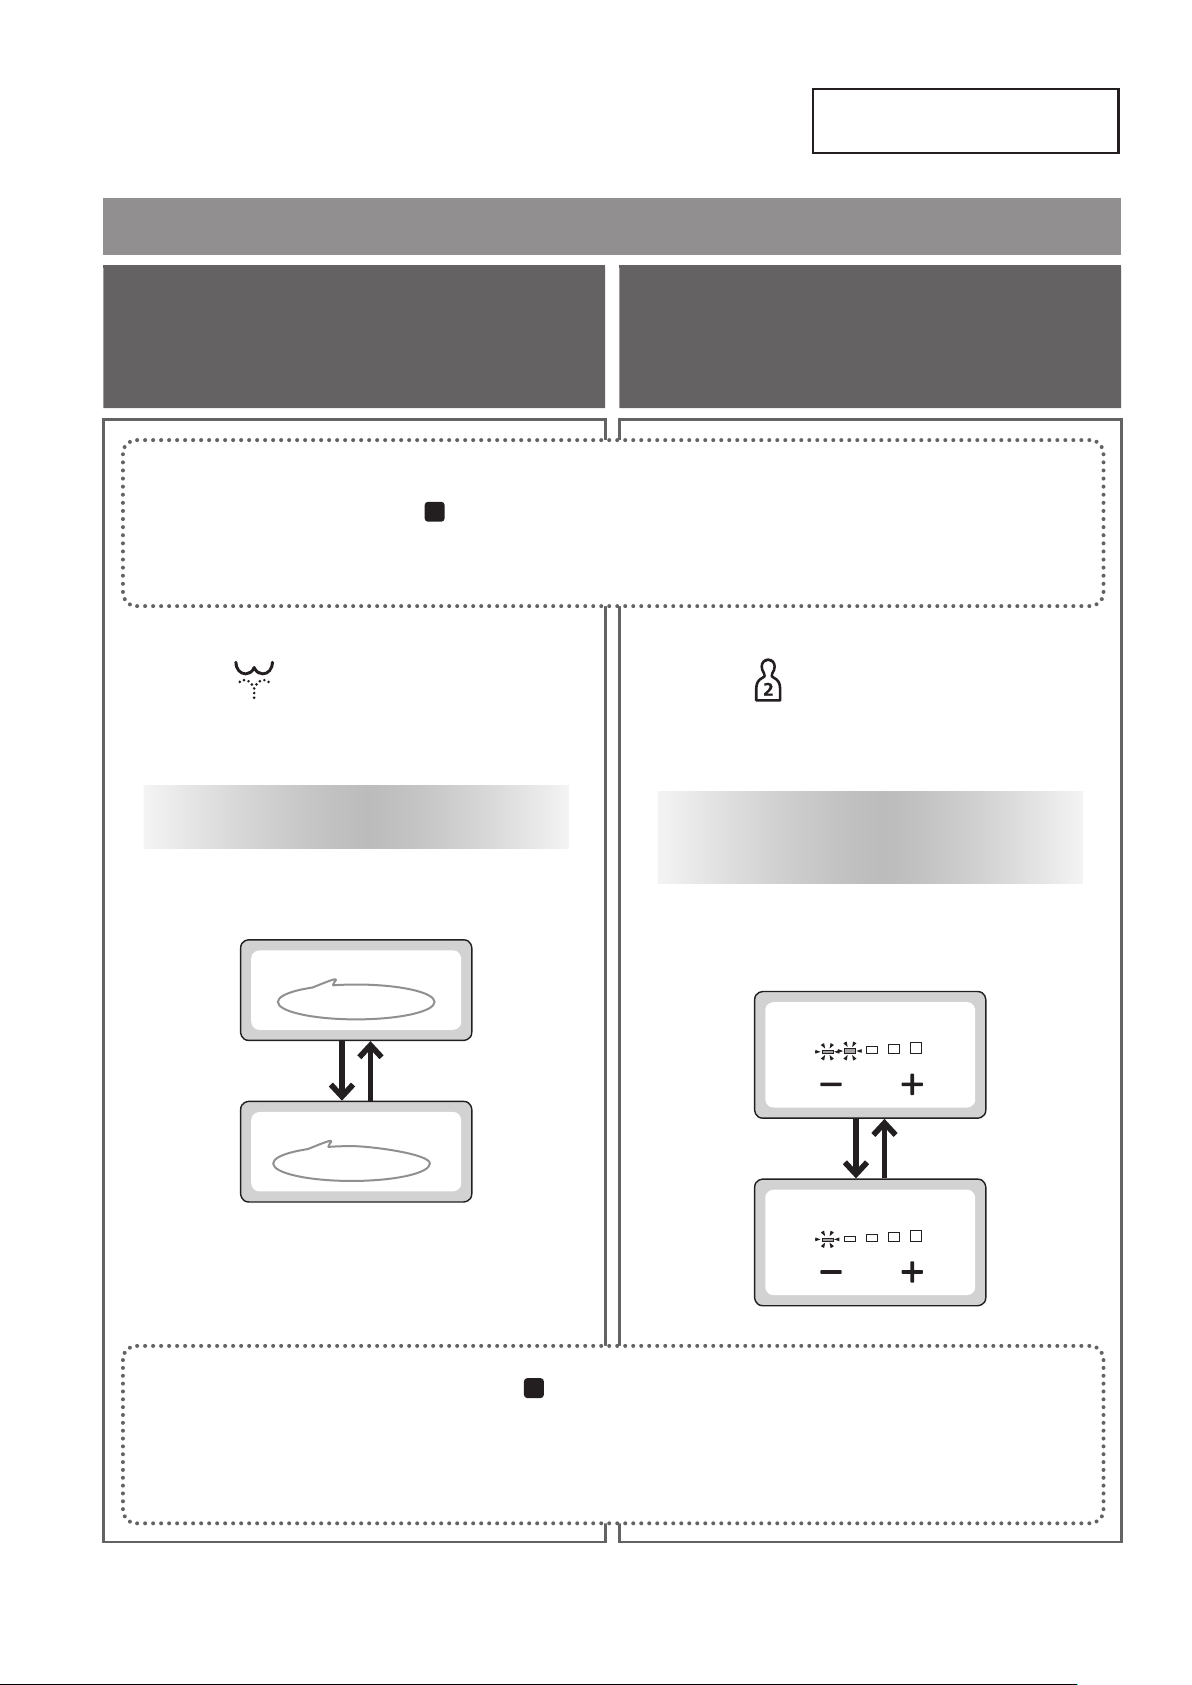
Various Operations
Other settings
Other settings
Set whether or not to make a beep sound
*1
Beep sound
Press "Stop" button until all LEDs
1
2
Press "Rear washing" button.
The setting changes each time
the button is pressed once
Set whether or not to make a beep sound
For making a beep sound
on the remote control start ashing.
(about 10 seconds)
Set whether or not to use the personal setting
lock
Personal setting lock
2
Press "Personal setting lock 2"
button for 5 seconds or longer.
The setting changes each time
the button is held down
longer than 5 seconds.
Set whether or not to use the personal
setting lock
•
Check by "Wand position adjustment" LED (Page 27)
One short beep.
For not making a beep sound
One long beep.
3
*1 When you change each of the settings, set the electronic sound to "Make a beep sound".
Press "Stop" button.
<Settings complete>
When set to "ON"
When set to "OFF"
30
Page 32
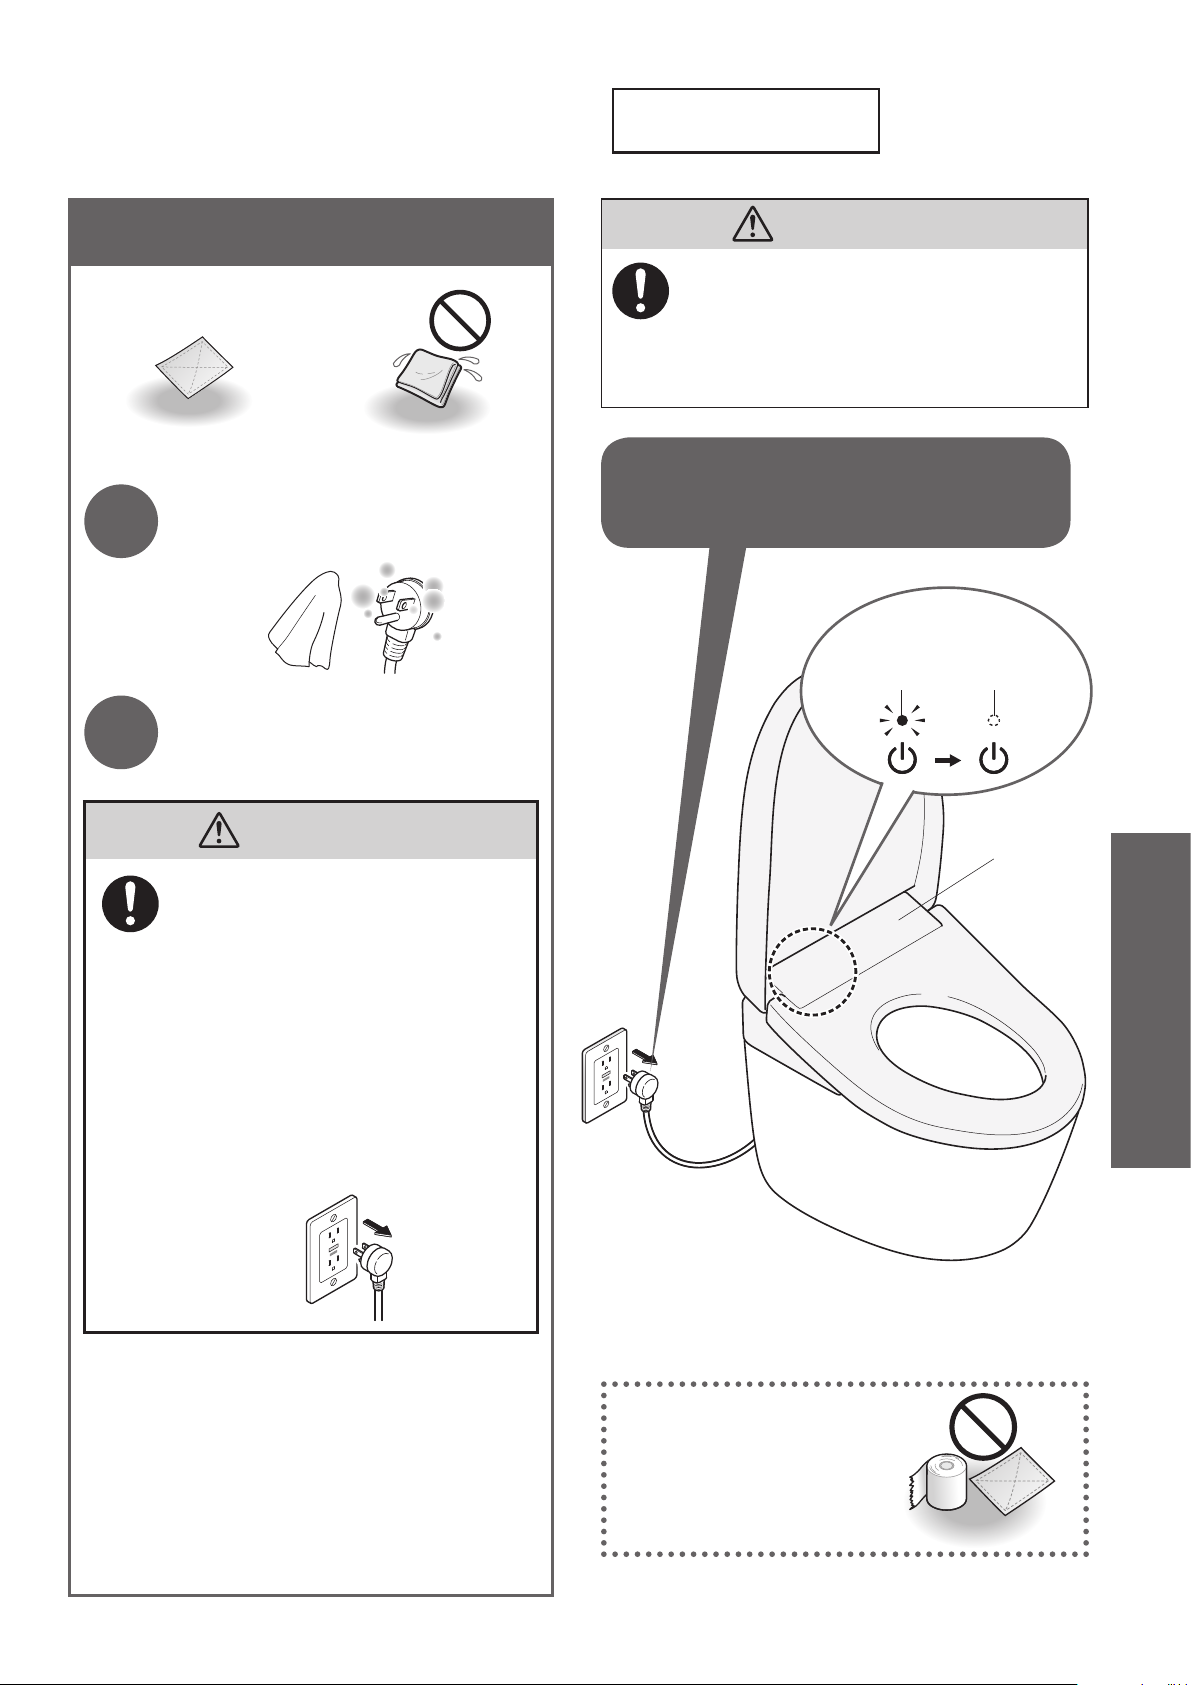
Maintenance
Power Plug
Power Plug
Dry cloth Wet cloth
(Approximately once a month)
Unplug the power plug and
1
wipe it with a dry cloth.
Insert the power plug.
2
The "Power" LED illuminates.
WARNING
Always unplug the power plug from
the outlet before maintenance or
inspection.
(Failure to do so may cause electric shock
or malfunction, resulting in a breakdown.)
For safety, unplug the power
plug before maintenance.
The "Power" LED
is unilluminated.
*2
OFFLit
WARNING
● Periodically remove dust from
the blades and other parts of the
power plug.
•
Unplug the power plug and wipe it
with a dry cloth.
● Fully insert the power plug.
● When unplugging the power plug,
hold the main body of the power
plug.
•
Pulling the power cord may
damage the power plug or power
cord.
Do not use a dry cloth
or toilet paper on plastic
parts.
(May cause damage.)
Main Unit
Maintenance
*2 Except when using "Wand cleaning".
31
Page 33
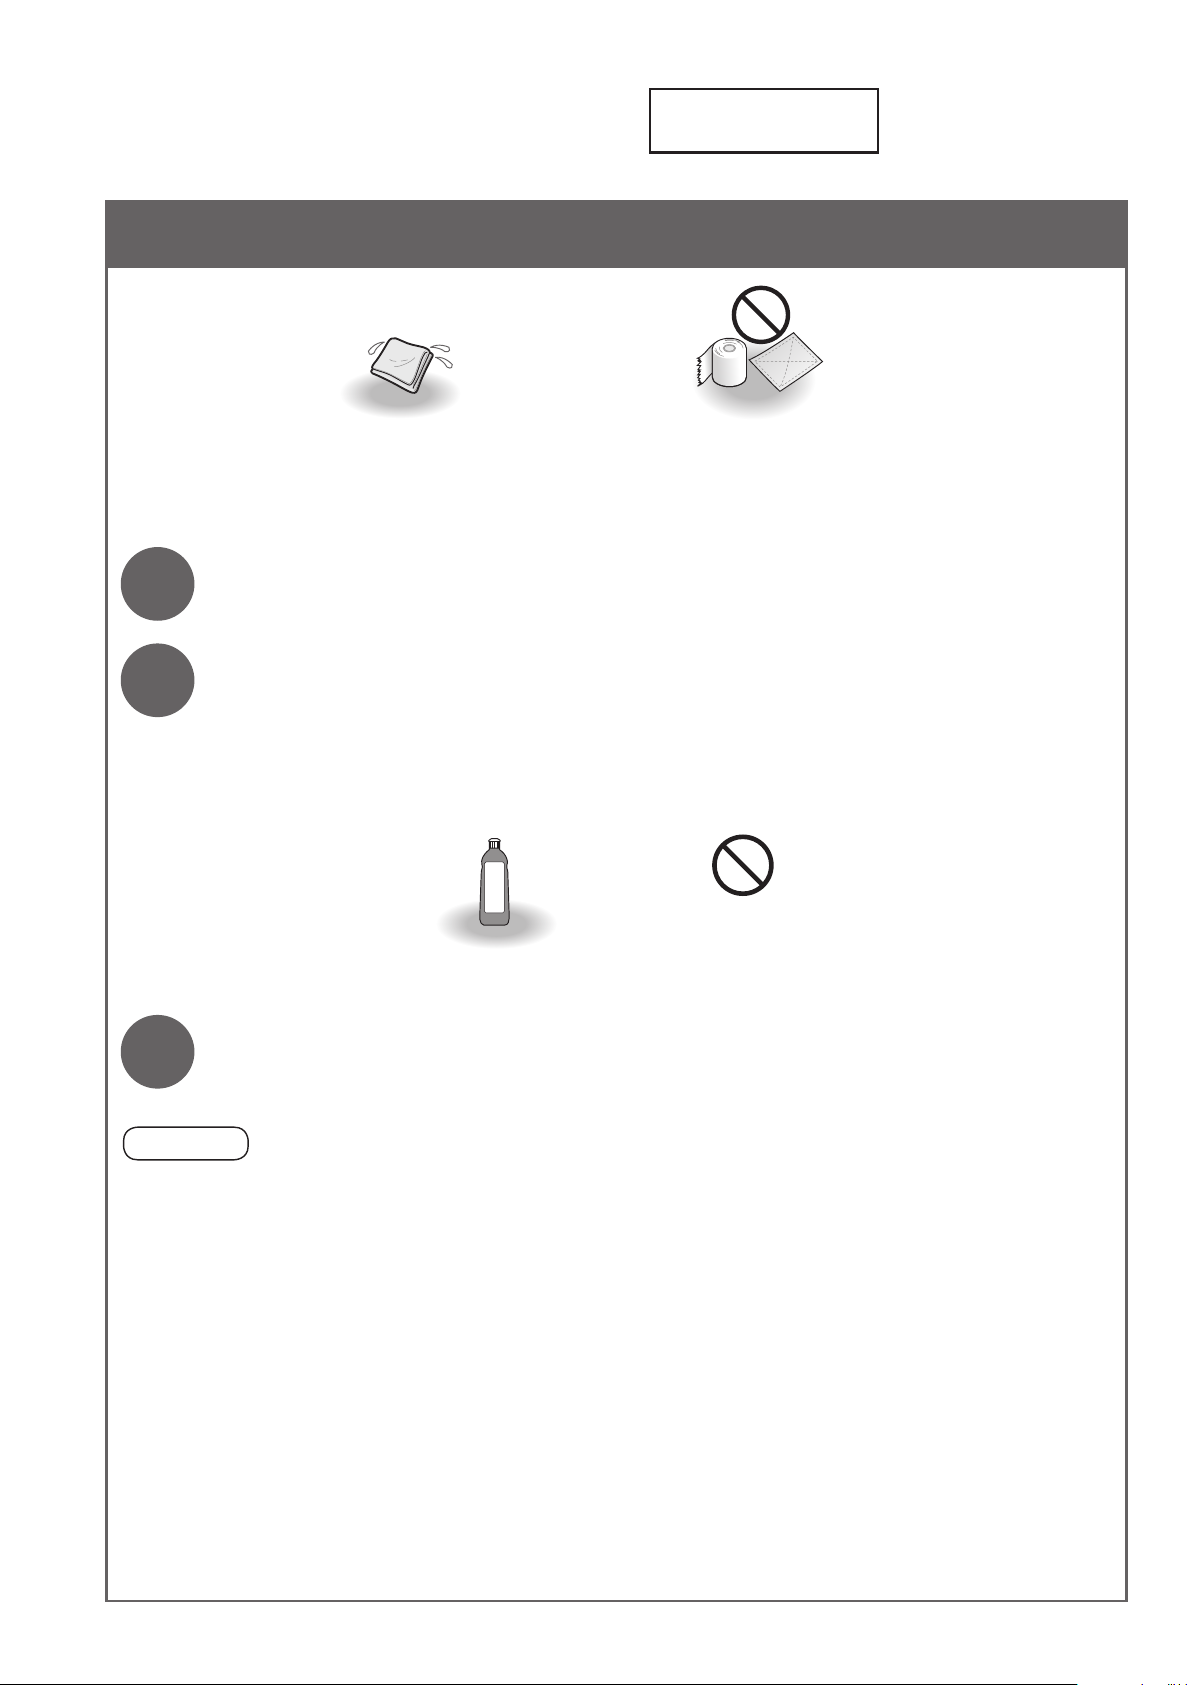
Maintenance
Main Unit
1
2
Main Unit
Soft cloth
soaked in water
(Approximately daily)
Toilet paper
•
Dry cloth
•
Nylon scrubbing brush
•
(May cause damage)
Unplug the power plug.
Wipe with a soft cloth that has been soaked in water and wrung out
thoroughly.
■For heavy dirt
• Wipe with a soft cloth soaked in diluted, pH neutral kitchen detergent, and then wipe with a soft cloth
soaked in water.
Paint thinner
•
Benzene
•
PH neutral kitchen detergent
Powdered cleanser
•
Insert the power plug.
3
Attention!
●This product is an electric appliance. Be careful not to let water seep inside or leave detergent in the gap
between the main unit and bowl unit. (May damage plastic parts or cause a malfunction.)
●When using a toilet cleaner to clean the toilet, rinse it o within 3 minutes and leave the toilet seat and toilet
lid open.
•Wipe o any cleaner that remains on the bowl unit.
(If vapor from a toilet cleaner enters the main unit, it may cause a malfunction.)
●Do not push or pull the covers around the wand with undue force.
(May cause damage or malfunction.)
●Wipe the back surface of the toilet seat and the toilet seat cushions with a soft cloth tightly wrung out with
water.
(Otherwise adhesion of dirt may result in discoloration.)
• The "Power" LED illuminates.
32
Page 34
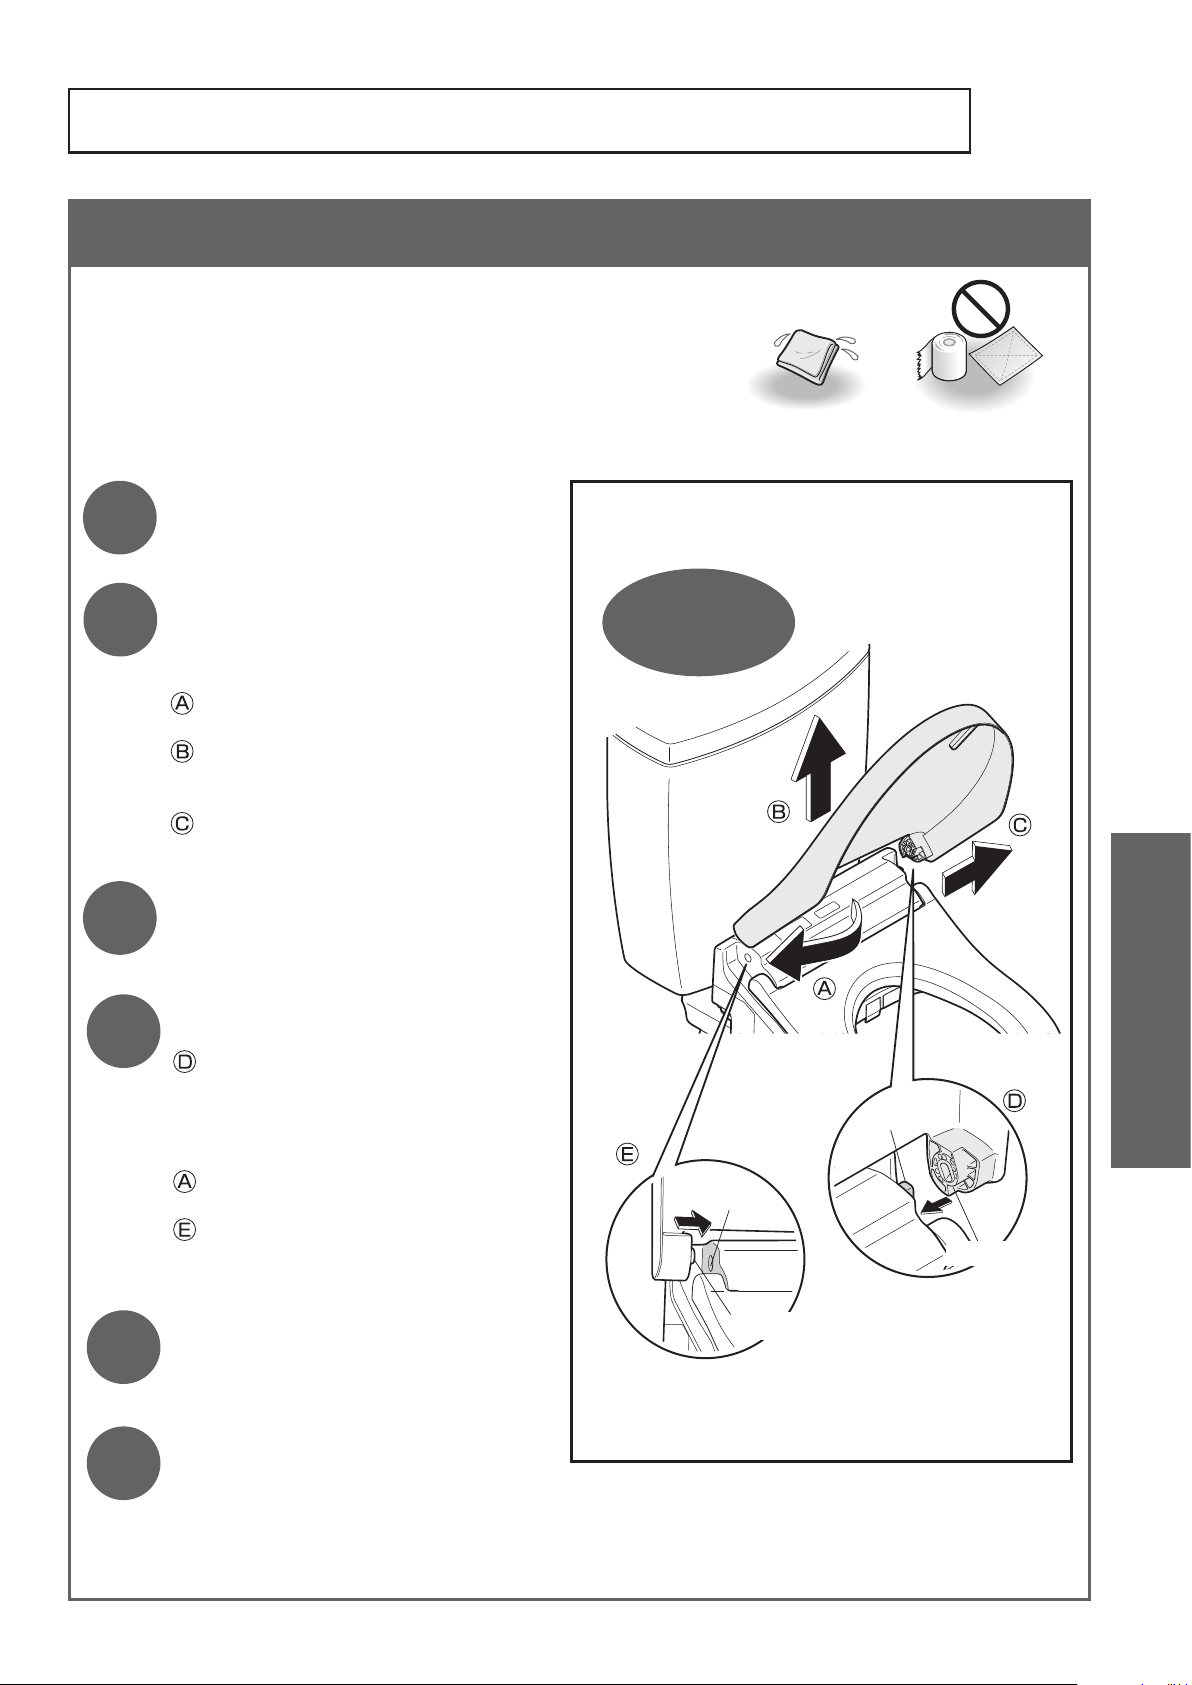
Gap between the Main Unit and the Toilet Lid
Gap between the Main Unit and the Toilet Lid
The toilet lid can be removed for
thorough cleaning.
1
2
Unplug the power plug.
Remove the toilet lid.
Slightly tilt the toilet lid to the front.
↓
: Pull the left side outward.
↓
: Disconnect the hinge from the recess
and pull up.
↓
: Disconnect the right side.
Removing and Reinstalling
Hold with
both hands
(Approximately once a month)
Soft cloth soaked
in water
Toilet paper, etc.
(May cause damage.)
3
4
5
6
Wipe with a soft cloth that
has been soaked in water
and wrung out thoroughly.
Reinstall the toilet lid.
: Join the pin and the hinge on the
right side.
↓
Slightly tilt the toilet lid to the front.
↓
: While pulling out the left side,
↓
: Mount by joining the hinge with the
recess.
* Be careful not to pinch your ngers.
Insert the power plug.
• The "Power" LED illuminates.
Open and close the toilet lid
to check the reinstallation.
Maintenance
Pin
Recess
Hinge
Hinge
33
Page 35
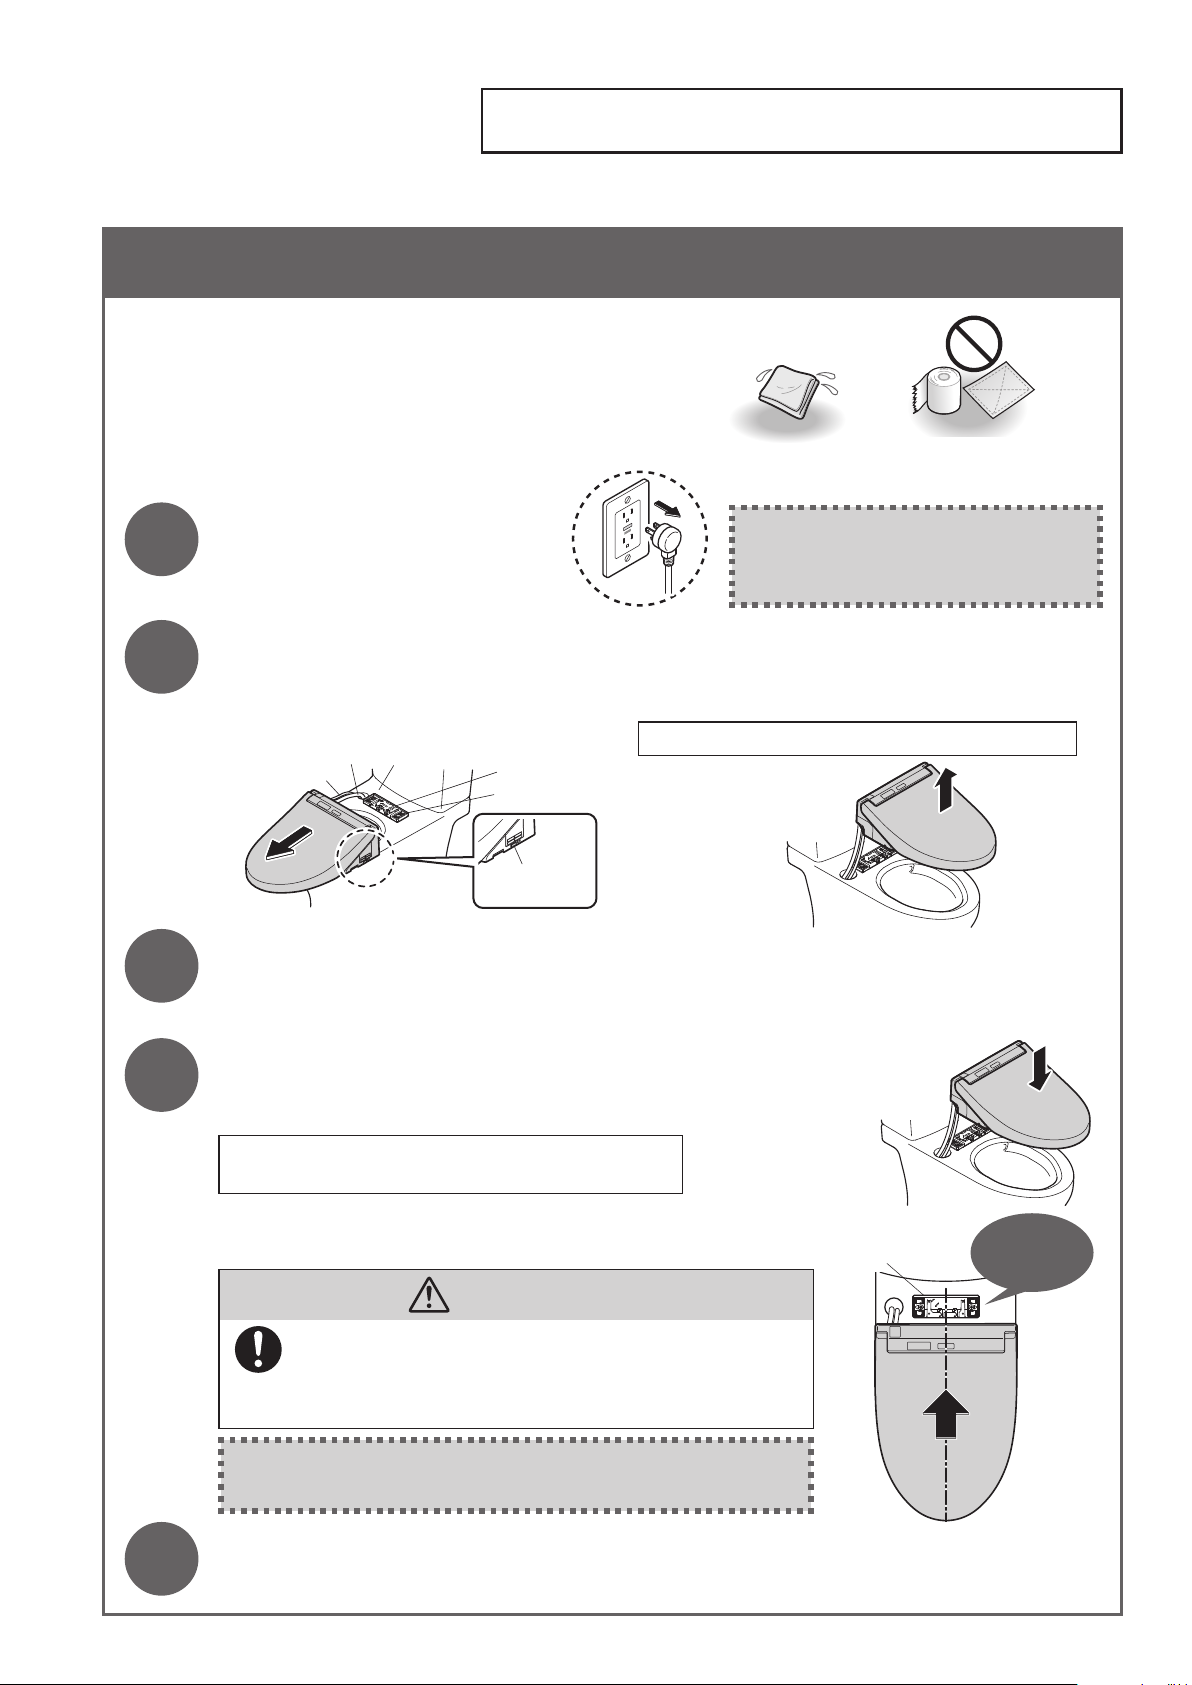
Maintenance
Gap between the Main Unit and Bowl Unit
[SW3084T40]
Gap between the Main Unit and Bowl Unit (Approximately once a month)
You can remove the main unit to clean the top
of the bowl unit and the bottom of the main unit.
1
2
3
Unplug the power plug.
Soft cloth soaked
in water
If the power is not unplugged,
the product may malfunction or
cause a failure or electric shock.
Toilet paper, etc.
(May cause damage.)
Remove the main unit.
• Do not pull the unit with undue force. (because the water supply hose and power cord are attached.)
(1) Pull the main unit toward you while pressing
the "Main unit removal button".
Top of the bowl unitWater supply hose
Power cord
Base plate
Bolt
Main unit
removal button
(2) Lift up the main unit.
• Do not excessively bend the water supply hose.
Clean the top of the bowl unit and the bottom of the main unit.
• Wipe with a soft cloth soaked in a diluted, pH neutral kitchen detergent. Then, dry the surface with
a soft cloth soaked in water so that no detergent remains.
4
5
Mount the main unit.
(1)
Lift the main unit, then lower it straight down while threading the power
cord and water supply hose into the recess on the bowl unit.
• Be careful not to pinch the power cord.
• Do not excessively bend the water supply hose
(2) Align the main unit with the center of the base plate and press it
rmly onto the base plate until a click sound is heard.
CAUTION
Push the main unit rmly on to the base plate until a
click sound is heard.
(Doing so may cause the main unit to come loose and fall,
resulting in injury.)
After mounting, check that the main unit does not
detach even when pulled.
Insert the power plug.
• The "Power" LED illuminates.
Base plate
Click
34
Page 36
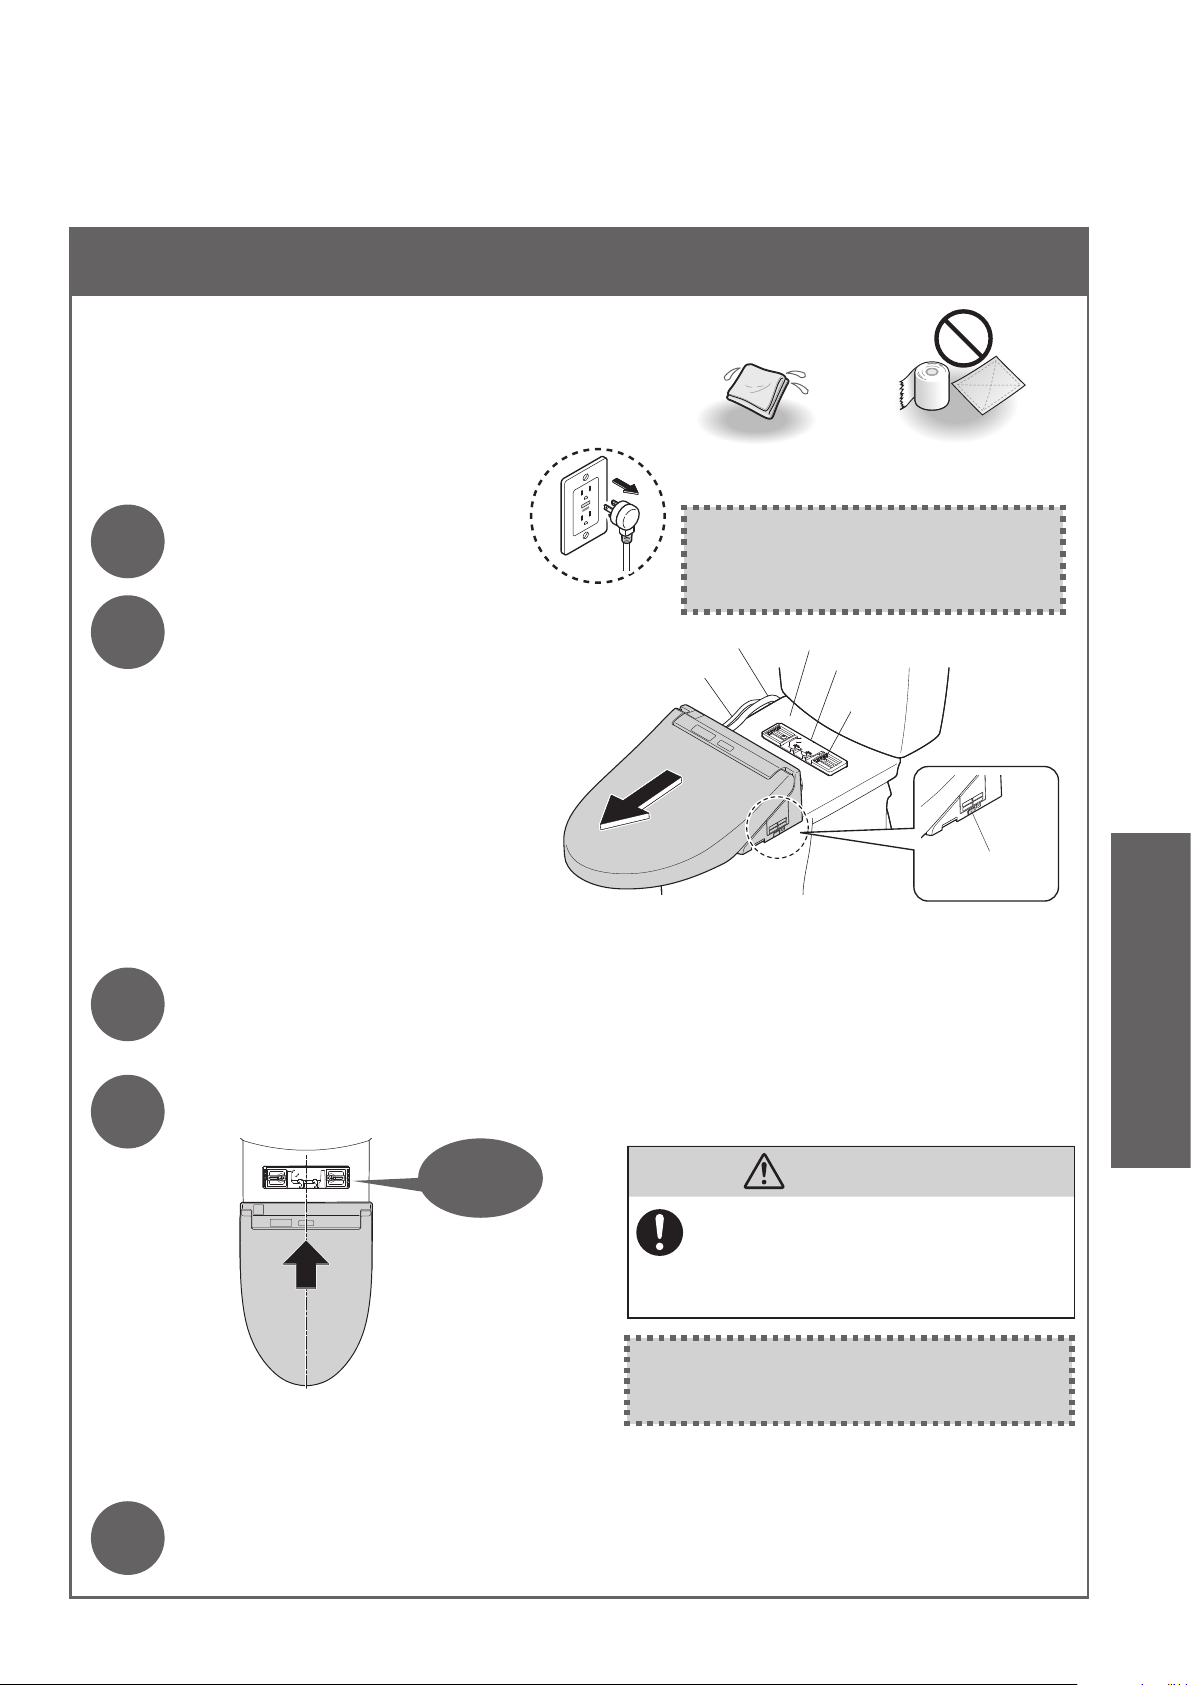
[SW3084, SW3083]
Gap between the Main Unit and Bowl Unit (Approximately once a month)
You can remove the main unit to clean the top
of the bowl unit and the bottom of the main unit.
1
2
3
Toilet paper, etc.
(May cause damage.)
Unplug the power plug.
Soft cloth soaked
in water
If the power is not unplugged,
the product may malfunction or
cause a failure or electric shock.
Remove the main unit.
• Do not pull the unit with undue force.
(because the water supply hose and
power cord are attached.)
Water supply hose
Power cord
Pull the main unit toward you while
pressing the "Main unit removal button".
Top of the bowl unit
Base plate
Bolt
Main unit
removal button
Clean the top of the bowl unit and the bottom of the main unit.
• Wipe with a soft cloth soaked in a diluted, pH neutral kitchen detergent. Then, dry the surface
with a soft cloth soaked in water so that no detergent remains.
Maintenance
4
5
Mount the main unit.
Click
Align the main unit with the center of the
base plate and press it rmly onto the base
plate until a click sound is heard.
Insert the power plug.
• The "Power" LED illuminates.
CAUTION
Push the main unit rmly on to the
base plate until a click sound is heard.
(Doing so may cause the main unit to come
loose and fall, resulting in injury.)
After mounting, check that the main
unit does not detach even when pulled.
35
Page 37
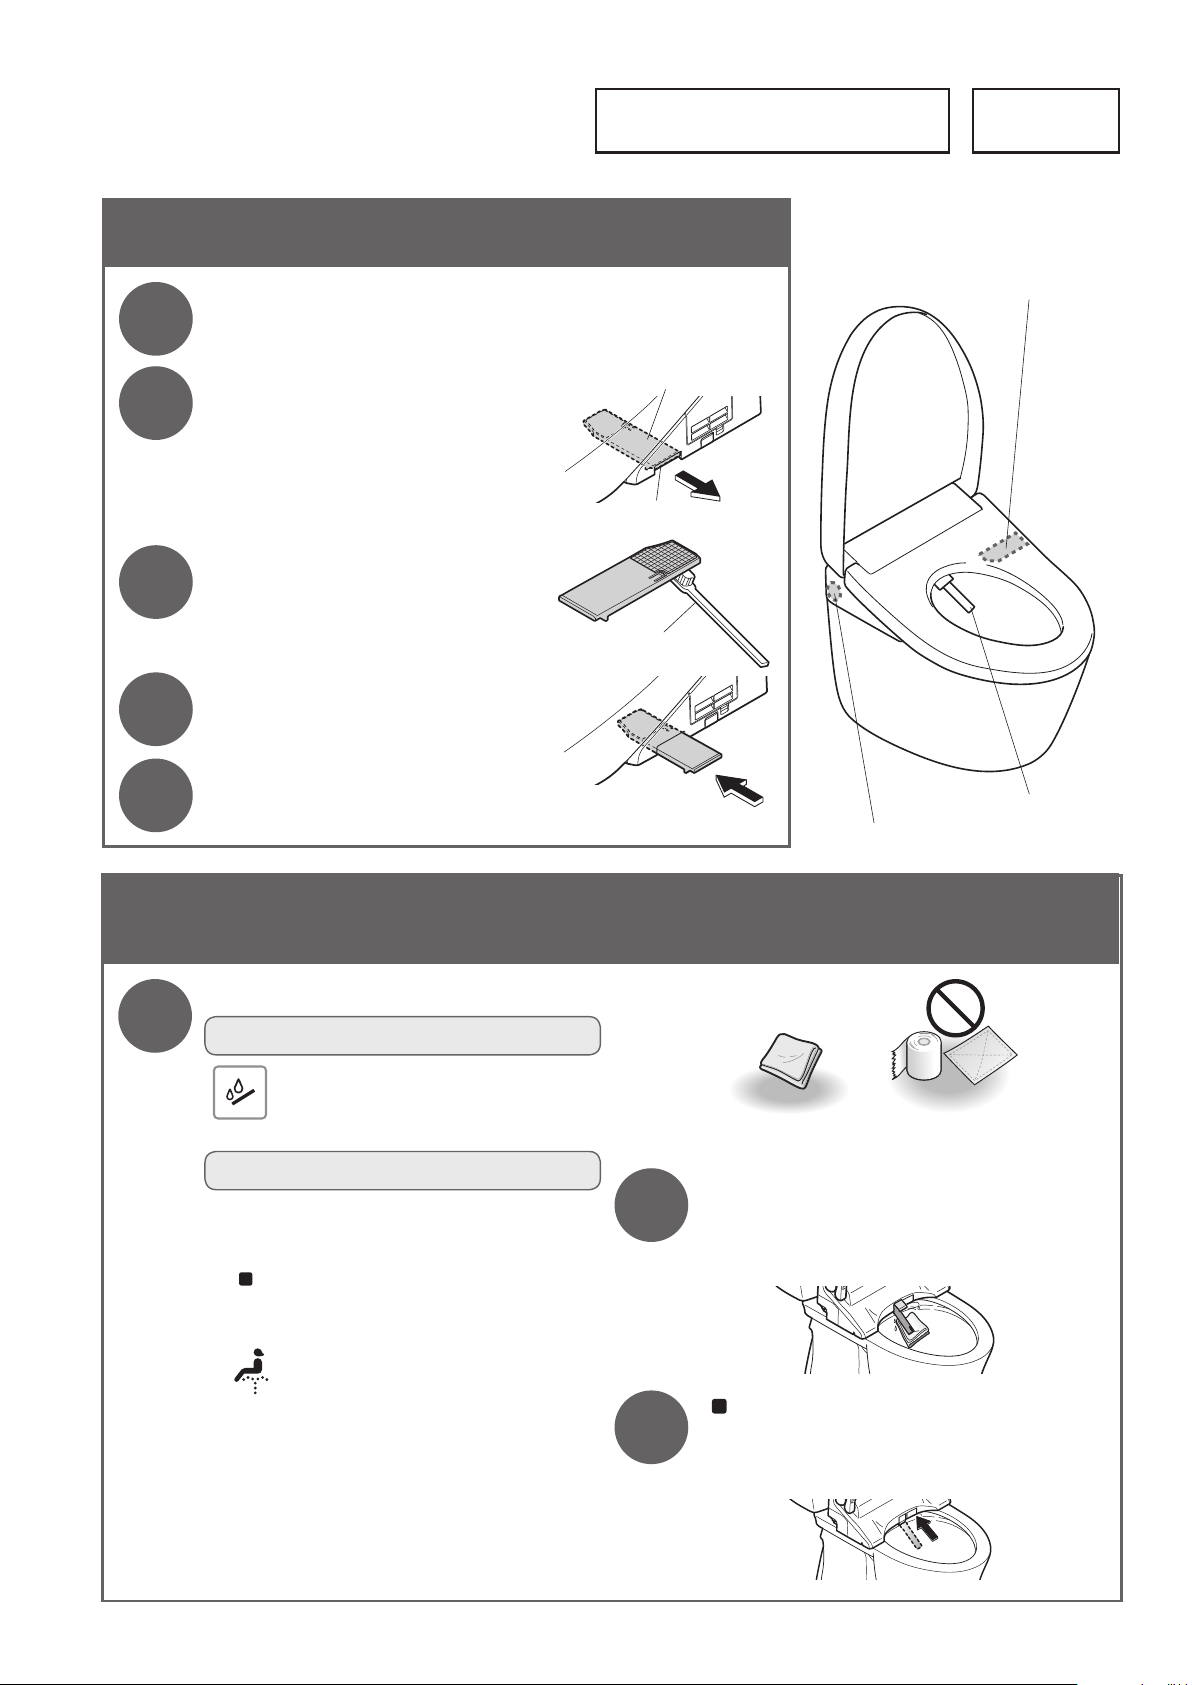
Maintenance
Deodorizing Filter Wand
Deodorizing Filter
1
2
3
4
5
Unplug the power plug.
Remove the deodorizing
lter.
• Hold the tab and pull outward.
• Do not pull with undue force.
(Doing so may cause damage or
malfunction.)
Clean with a tool such as a
toothbrush.
• When washing with water, dry o all
water before reinserting.
Reinsert the deodorizing
lter.
Insert the power plug.
• The "Power" LED illuminates.
(Approximately once a month)
Deodorizing Filter
Tab
Toothbrush, etc.
Push rmly until a
click sound is heard.
Deodorizing Filter
Wand
Water Filter Drain Valve
1
Wand
<If you notice dirt (Wand cleaning)>
Extend the wand.
To operate from the back of remote control
Press "Wand cleaning" button.
To operate from the front of remote control
Recommended if the remote control is secured
•
to prevent theft.
(1) Press "Stop" button until all LEDs on
the remote control start ashing. (about
10 seconds)
(2)
• The wand extends and water ows out for
• The wand automatically retracts after about
Press "Front washing" button about 3
seconds or longer.
cleaning.
5 minutes.
(Approximately once a month)
2
3
Soft cloth Toilet paper, etc.
(May cause damage.)
Wipe with a soft, wet cloth.
• Do not pull, push or press the wand with
excessive force.
(May cause damage or malfunction.)
Press "Stop" button on the
front side of the remote control.
• The wand retracts.
36
Page 38
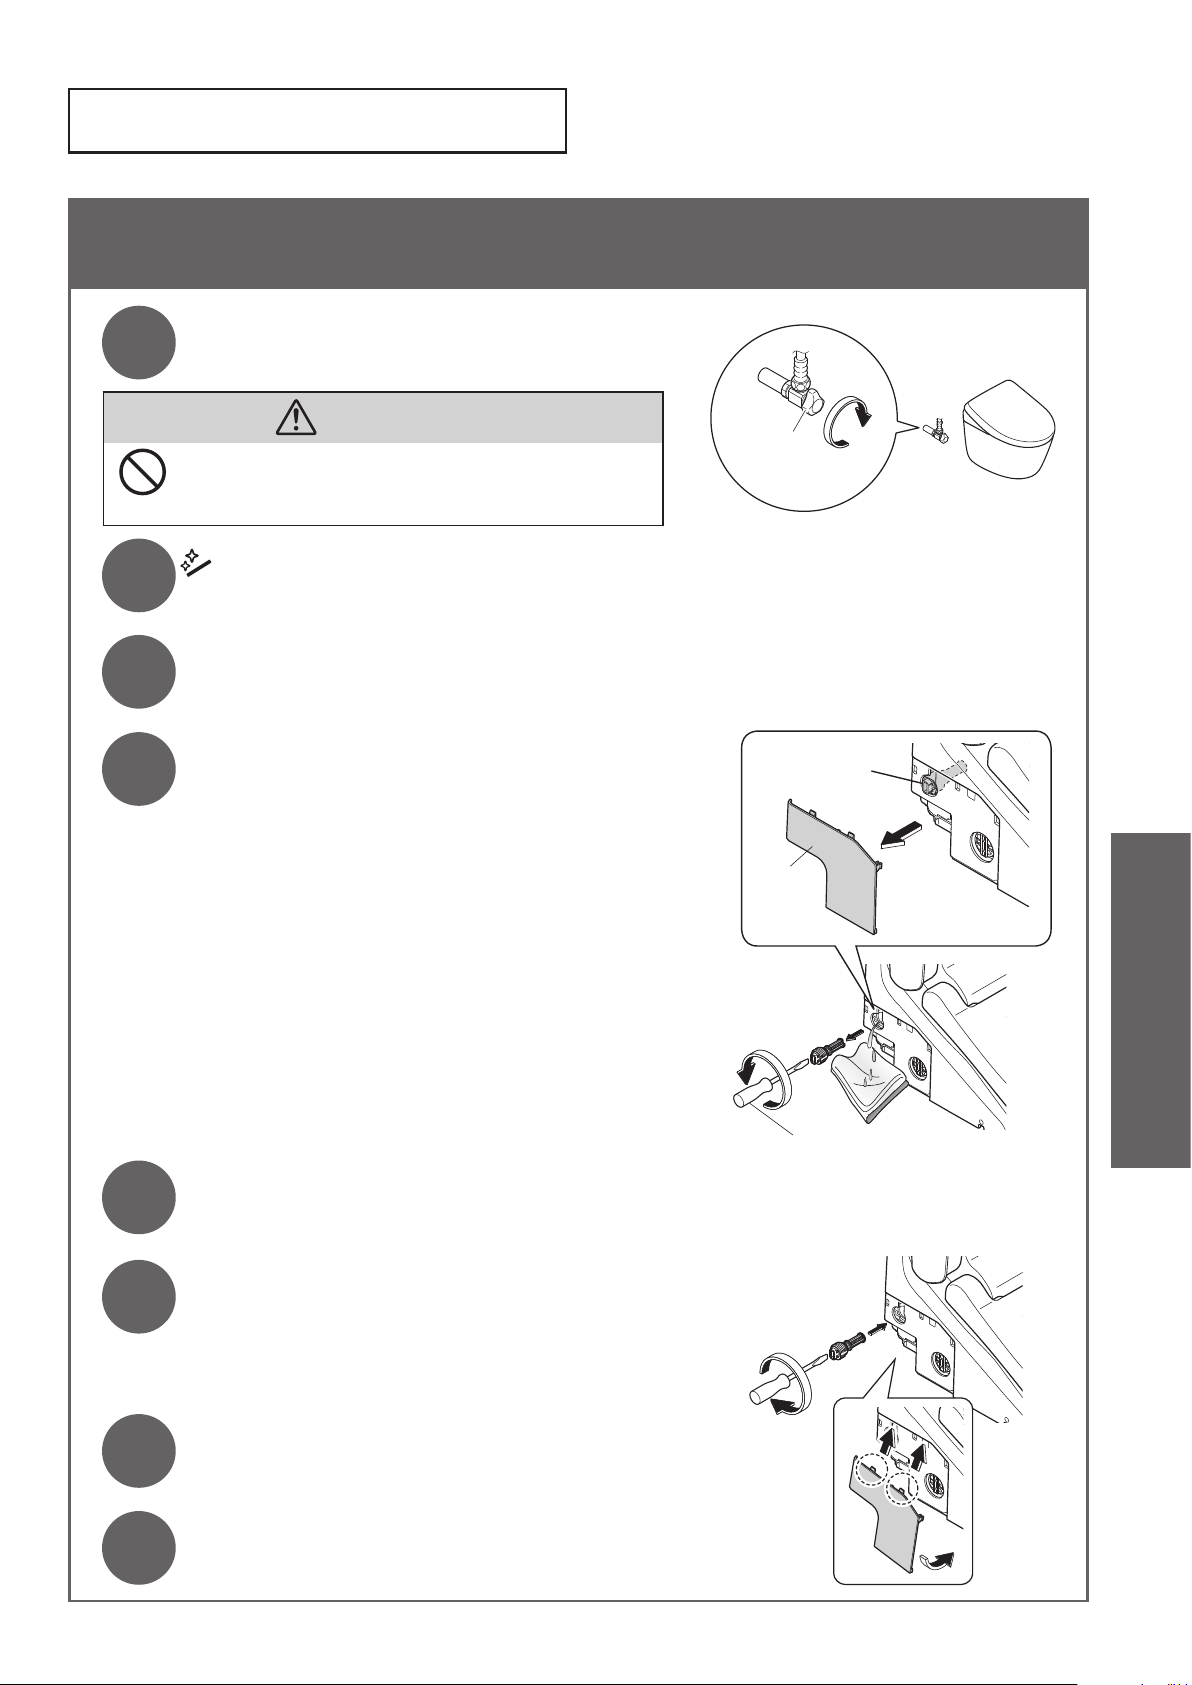
Water Filter Drain Valve
Water Filter Drain Valve
<If you think the water pressure has weakened>
Close the shuto valve.
1
2
3
4
• The water supply stops.
CAUTION
Do not remove the water lter drain valve while
the shuto valve is open.
(Otherwise, water may leak out)
Press "Wand CLEAN" button.
(Release the pressure from the water supply pipe.)
Unplug the power plug.
Remove the cover and water lter
drain valve.
• Loosen the water lter drain valve with a at-head
screwdriver and then pull it.
(Approximately once every 6 months)
Shuto
valve
Water lter drain
valve
5
6
7
Cover
Maintenance
Flat-head screwdriver
Clean with a tool such as a toothbrush.
• Also, remove any dust from inside the hole of the
water lter drain valve.
Reinstall the water lter drain valve
and cover.
• Insert the water lter drain valve and use a at-head
screwdriver to tighten it securely.
Insert the power plug.
• The "Power" LED illuminates.
8
Open the shuto valve.
(Page 15)
37
Page 39
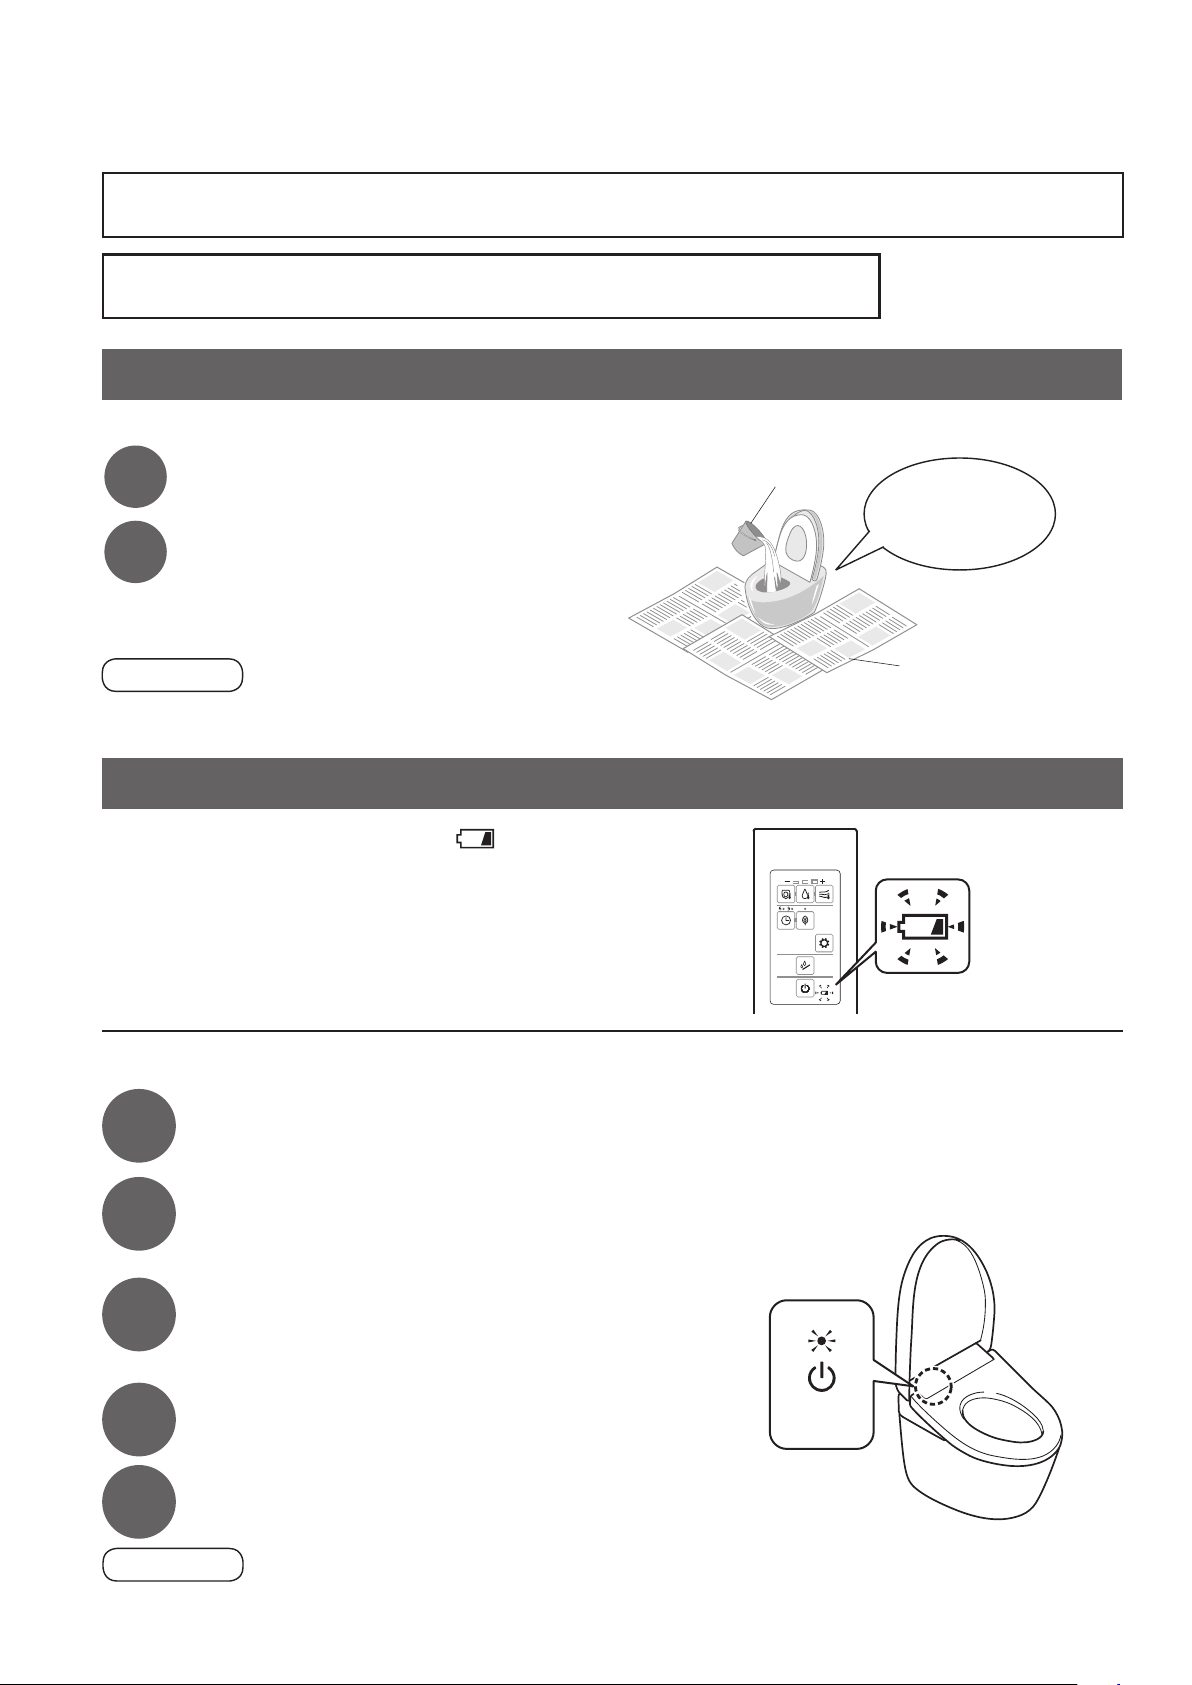
What to Do?
If the water does not ow due to a water service interruption
If you cannot operate with the remote control
If the water does not ow due to a water service interruption
Make sure to also check the instruction manual of your bowl unit.
Use a bucket to ush water.
1
If the water level is low after
2
ushing, add more water.
(Until the water level does not rise)
• Prevents odors.
Attention!
• When the water supply is restored, be sure to perform a ush.
(To prevent waste from remaining in the drain pipe.)
If you cannot operate with the remote control
If the low battery warning mark "
■
of the remote control is ashing, please replace the
batteries.
" on the back
Large bucket
Pour strongly,
aiming at the center
of the bowl unit.
Newspaper,
dust cloth, etc.
It is the time to replace
the batteries.
38
Replacing the batteries
■
1
2
3
Unplug the power plug.
Remove the remote control from the
hanger.
(Page 14)
Open the battery cover and replace two
AA batteries.
•The low battery warning mark is unilluminated.
Mount the remote control in the hanger.
(Page 14)
<Power>
4
Insert the power plug.
5
Attention!
•"ON" and "OFF" settings of the functions such as the energy saver function may be canceled when the batteries
are replaced. Set them again.
•The "Power" LED lights up.
Page 40
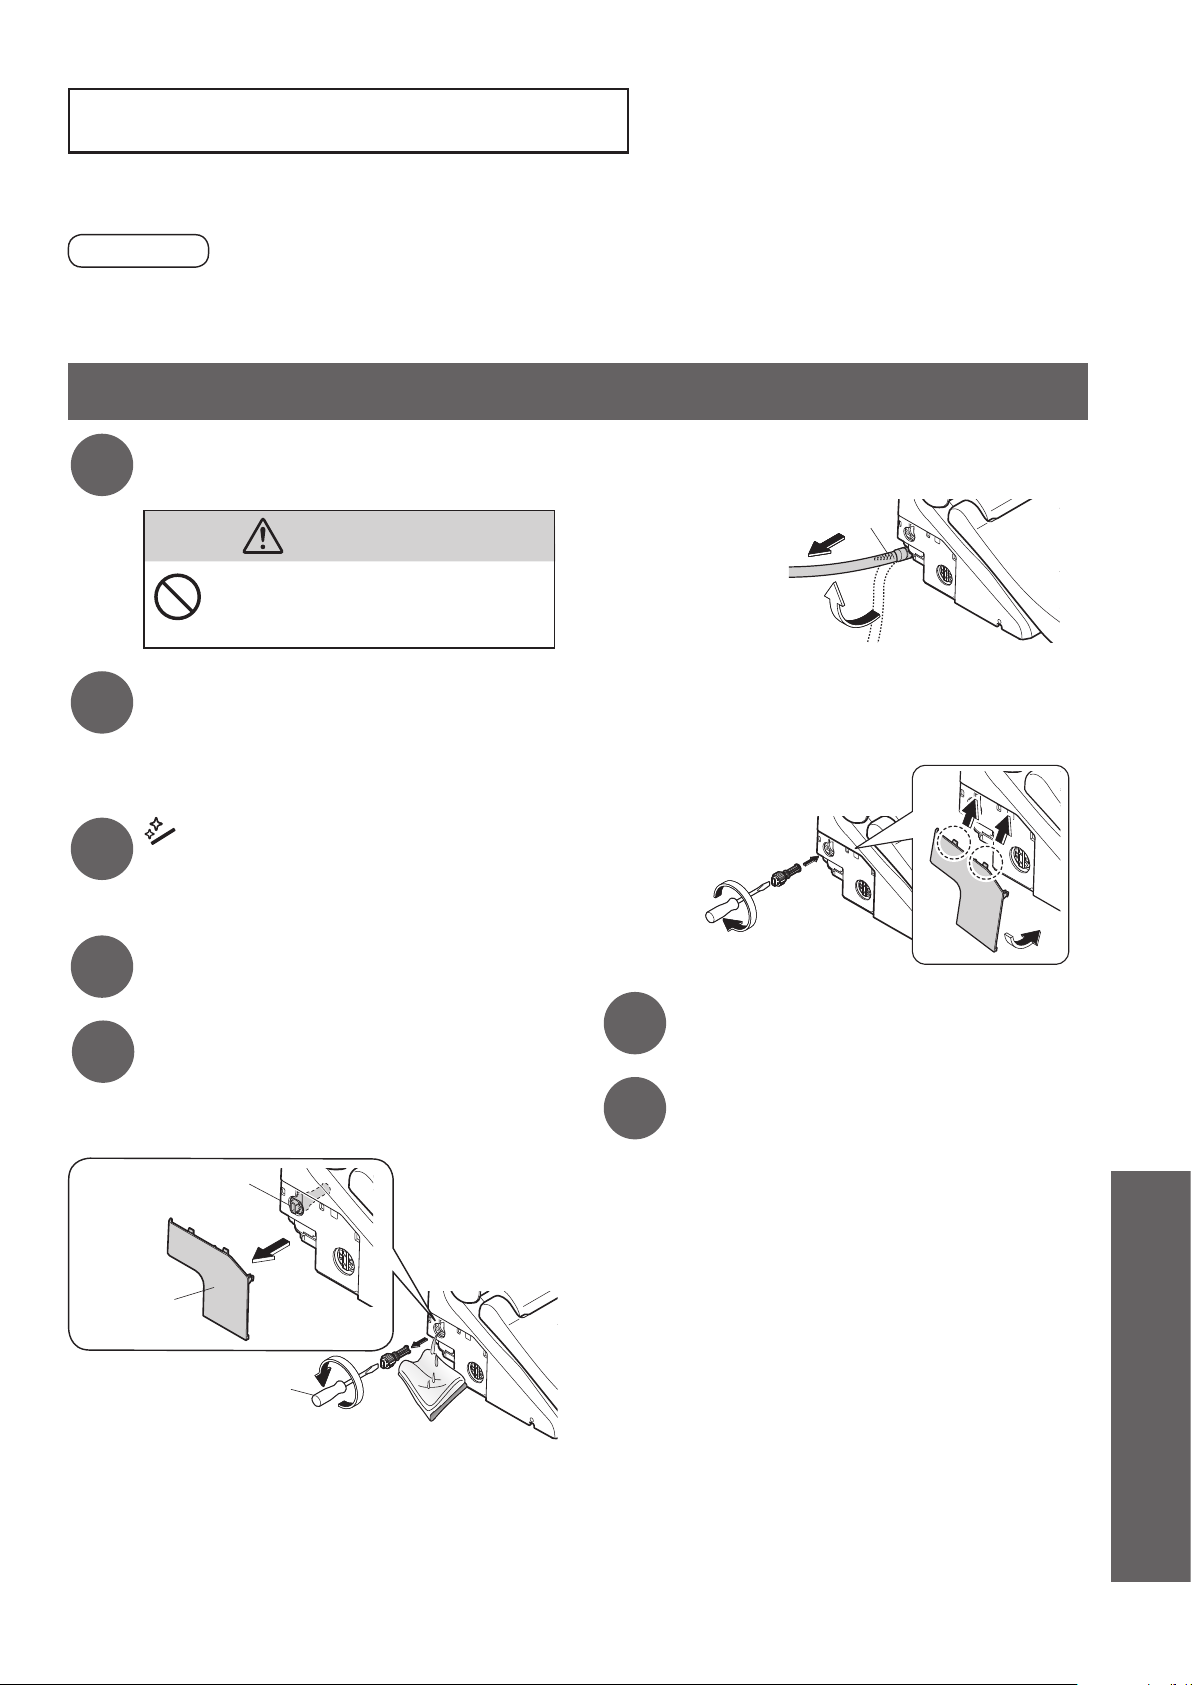
Freeze Damage Prevention
When the ambient temperature is likely to drop to 32 °F (0 °C) or lower, take measures to prevent freezing.
Attention!
• When the ambient temperature is likely to drop to 32 °F (0 °C) or lower, do not use the energy saver feature.
(May damage the product.)
• Warm the bathroom or take measures against freezing so that the ambient temperature does not drop below 32 °F (0 °C).
How to freeze damage prevention
Close the shuto valve.
1
• The water supply stops.
CAUTION
Do not remove the water lter drain valve
while the shuto valve is open.
(Otherwise, water may leak out)
Drain the water from the toilet
2
tank.
• Manipulate the lever/button/etc. until the
water stops.
Press "Wand CLEAN" button.
3
(Release the pressure from the water supply
pipe.)
Unplug the power plug.
4
Drain the pipe.
5
(1)
Remove the cover and water lter drain valve.
• Loosen the water lter drain valve with a
at-head screwdriver and then pull it.
Water lter drain
valve
(Page 37)
(2) [Applicable to SW3084, SW3083 only]
• Drain the water from the water supply hose.
Water supply hose
Horizontally
(3) When water draining is completed, reinstall
the water lter drain valve and cover.
• Insert the water lter drain valve and use a
at-head screwdriver to tighten it securely.
Insert the power plug.
6
• The "Power" LED illuminates.
Set the water and toilet seat
7
temperature to "High".
• To maintain the temperature, close the toilet seat
and toilet lid after nishing work.
■To use the product again
• The water needs to be resupplied. (Page 40)
(Page 20)
Cover
Flat-head screwdriver
Reference
39
Page 41
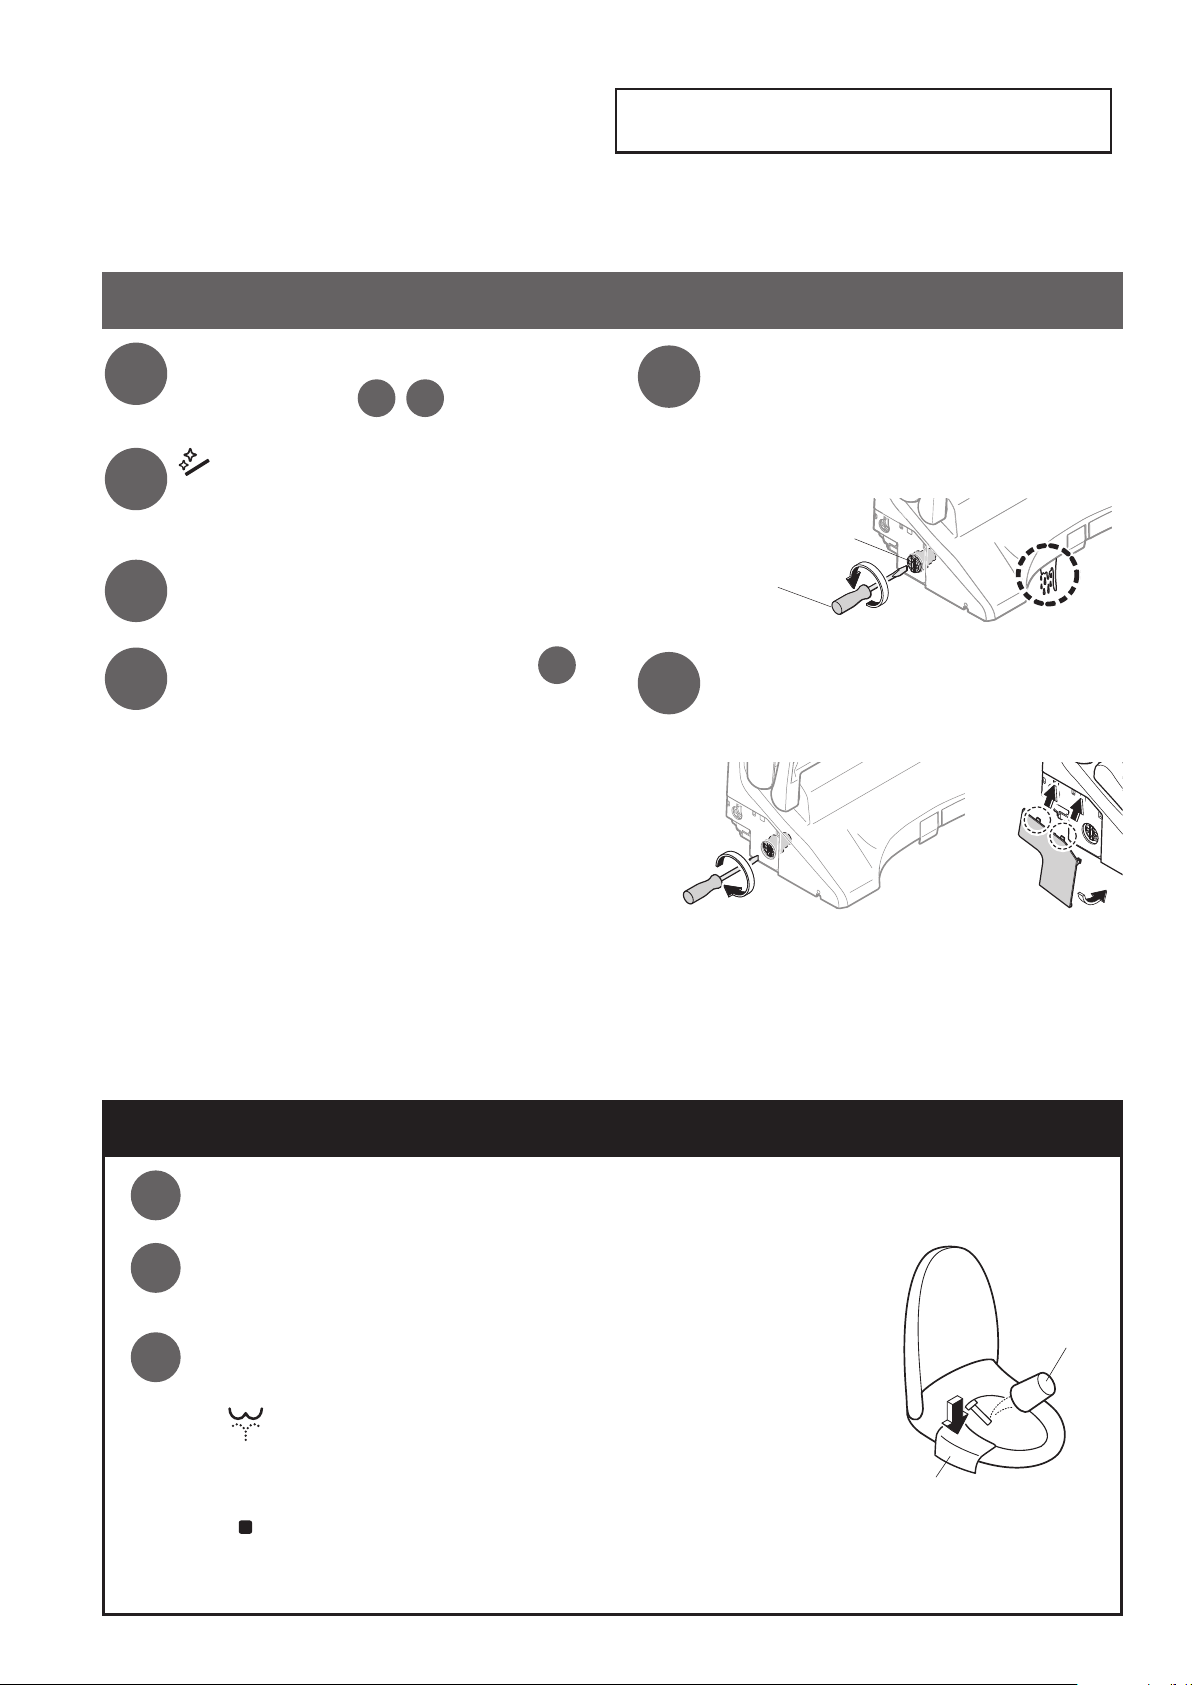
What to Do?
If the toilet is in a location you will not visit for a long time, drain the water.
(Failure to do so may cause breakdown or skin irritation due to polluted product tank water.)
Long Periods of Disuse
How to drain the water
Drain the water from the toilet tank.
1
(Page 39 Step
1 2
)
Press "Wand CLEAN" button.
2
(Release the pressure from the water supply
pipe.)
Unplug the power plug.
3
Drain the pipe. (Page 39 Step 5)
4
*After draining the water, Keep the cover
removed.
■If water may get frozen
• Add antifreeze solution to the water in the bowl to prevent freezing.
(The antifreeze solution should not be ushed out. Collect it before using the toilet and dispose of it.)
Loosen the water drain plug until water
5
comes out from around the wand.
• Water comes out from around the wand.
(It takes about 3 minutes to complete draining.)
* The water drain plug cannot be removed.
Water drain plug
Flat-head
screwdriver
Tighten the water drain plug
6
securely with a at-head screwdriver
and reinstall the cover.
■To use the product again
• The water needs to be resupplied. (See below)
Resupplying the Water
Open the shuto valve.
1
2
3
• Check that water is not leaking from a pipe or the main unit.
If the power is not on,
Insert the power plug.
• The "Power" LED illuminates.
Discharge water from the wand.
(1) Pressing down the left side of the toilet seat,
(2)
(3)
■If the remaining water has frozen and no water comes out
•
Heat the inside of the bathroom, and warm the water supply hose and shuto valve using a cloth soaked in warm water.
Press "Rear washing" button on the remote control to discharge water
from the wand for about 2 minutes.
• It takes about 1 minute maximum before water comes out.
• Catch the water in a paper cup or other receptacle.
Press the "Stop" button on the remote control.
Soft cloth soaked in water
(to prevent scratching)
Paper cup
40
Page 42
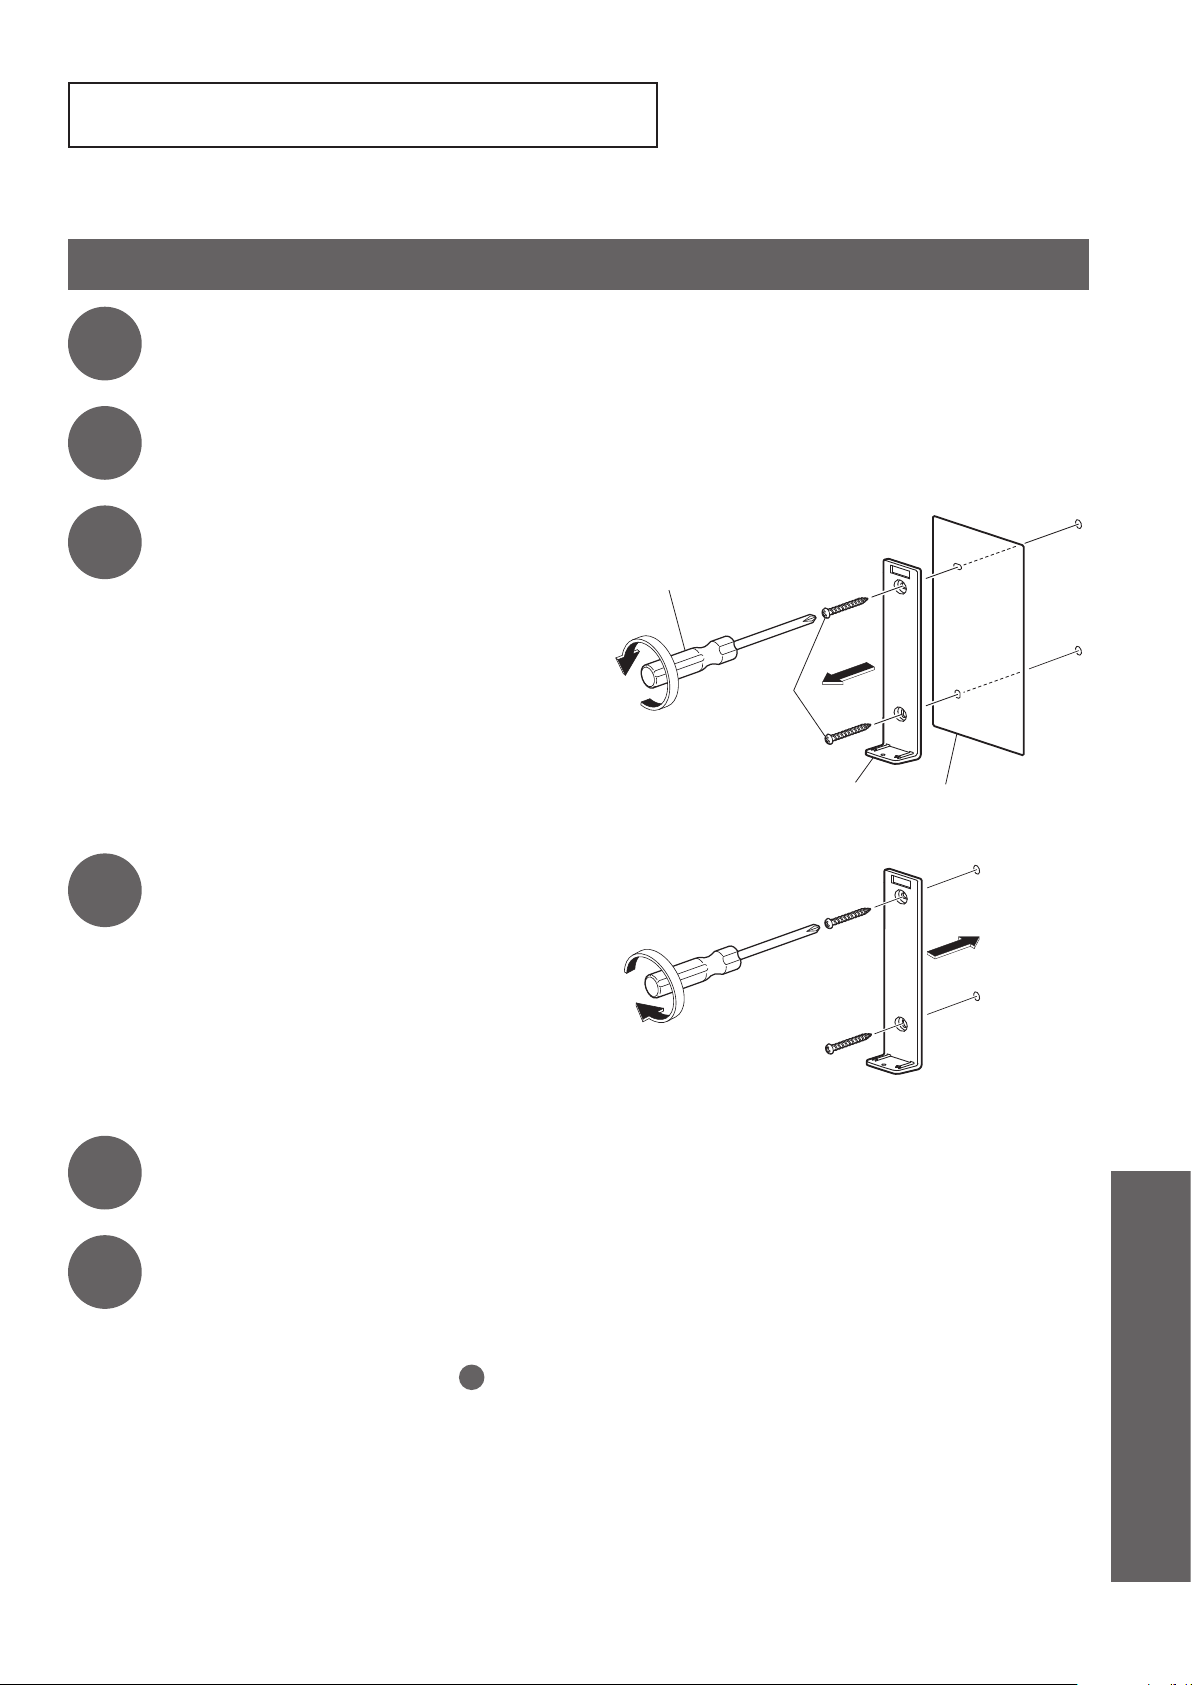
Removal of Operation Guide
Follow the procedure below.
How to remove the operation guide
1
2
3
4
Unplug the power plug.
Remove the remote control from the hanger.
(Page 14)
Remove the hanger and
operation guide.
Screw the hanger on the wall.
Phillips screwdriver
Screw
Hanger Operation guide
5
6
To install back the operation guide, follow the procedure above.
■
(Install the operation guide at step
Mount the remote control in the hanger.
Insert the power plug.
•The "Power" LED illuminates.
4
.)
Reference
41
Page 43
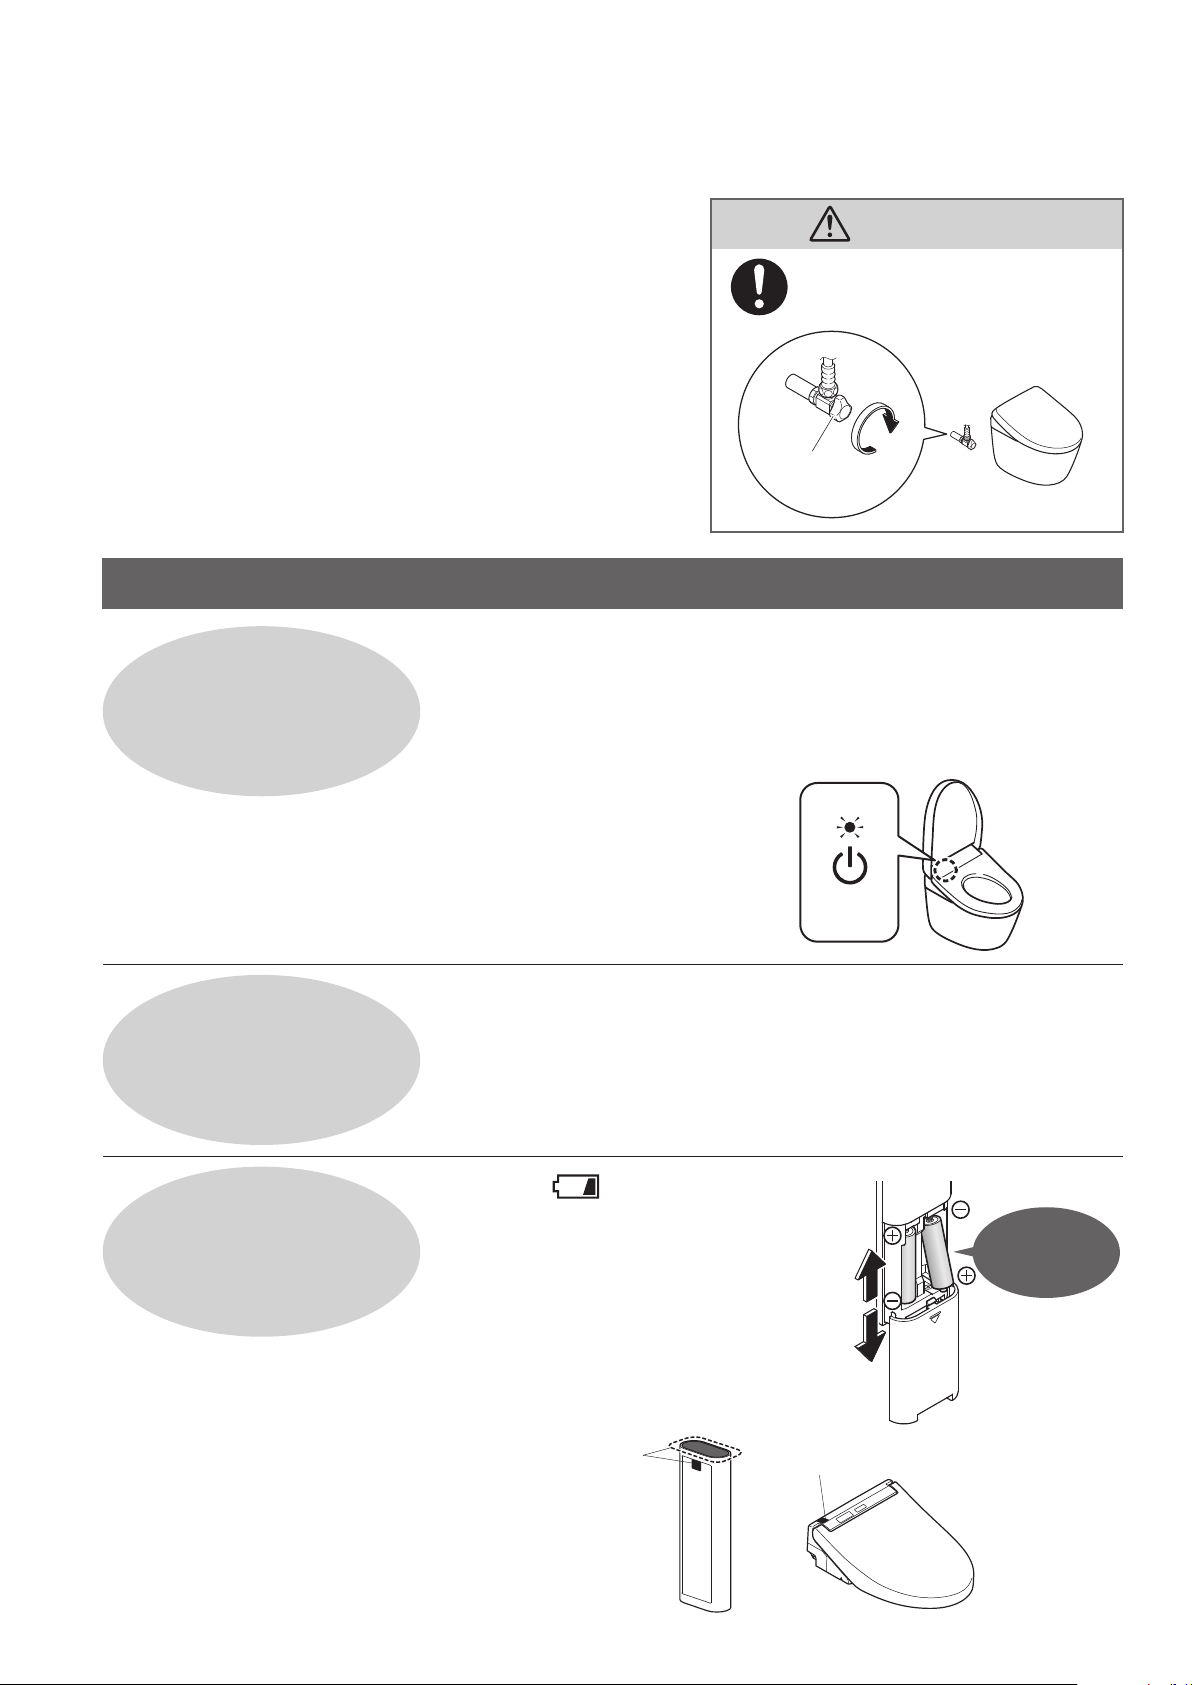
Troubleshooting
First, try the actions described on pages 42 - 45.
If the problem persists, consult the installer, seller, or
TOTO customer service.
(see contact information on the back cover.)
Please check rst
■Is the breaker on the distribution board turned on?
→ Check whether there is a power outage or the breaker has turned
Is the Power LED
illuminated?
"OFF".
■Is the "Power ON/OFF" setting "OFF"?
→ Switch it to "ON" with the remote control. (Page 15 Step2-2)
CAUTION
If a water leak occurs, close
the shuto valve.
Shuto valve
Is the Energy saver
LED illuminated?
Is the remote control
working?
■ Is the "Power" LED on the
main display ashing?
→ The main unit is not mounted
properly. Mount them correctly
again. (Pages 34, 35)
<Power>
■ While the LED is illuminated, energy saver
(Pages 22, 23)
is in operation, so the toilet seat temperature may be
reduced or the warm water heater and toilet seat heater
may be turned o.
■
Is the " " LED on the back
of the remote controller ashing?
➝ Replace the batteries. (Pages 14, 38)
The remote
control uses
batteries
Is the remote control transmitter
■
to operate.
or the remote control receiver
blocked?
➝ Remove obstructions, dirt, water
droplets or any other blockages.
42
Remote control
transmitter
Remote control receiver
Page 44
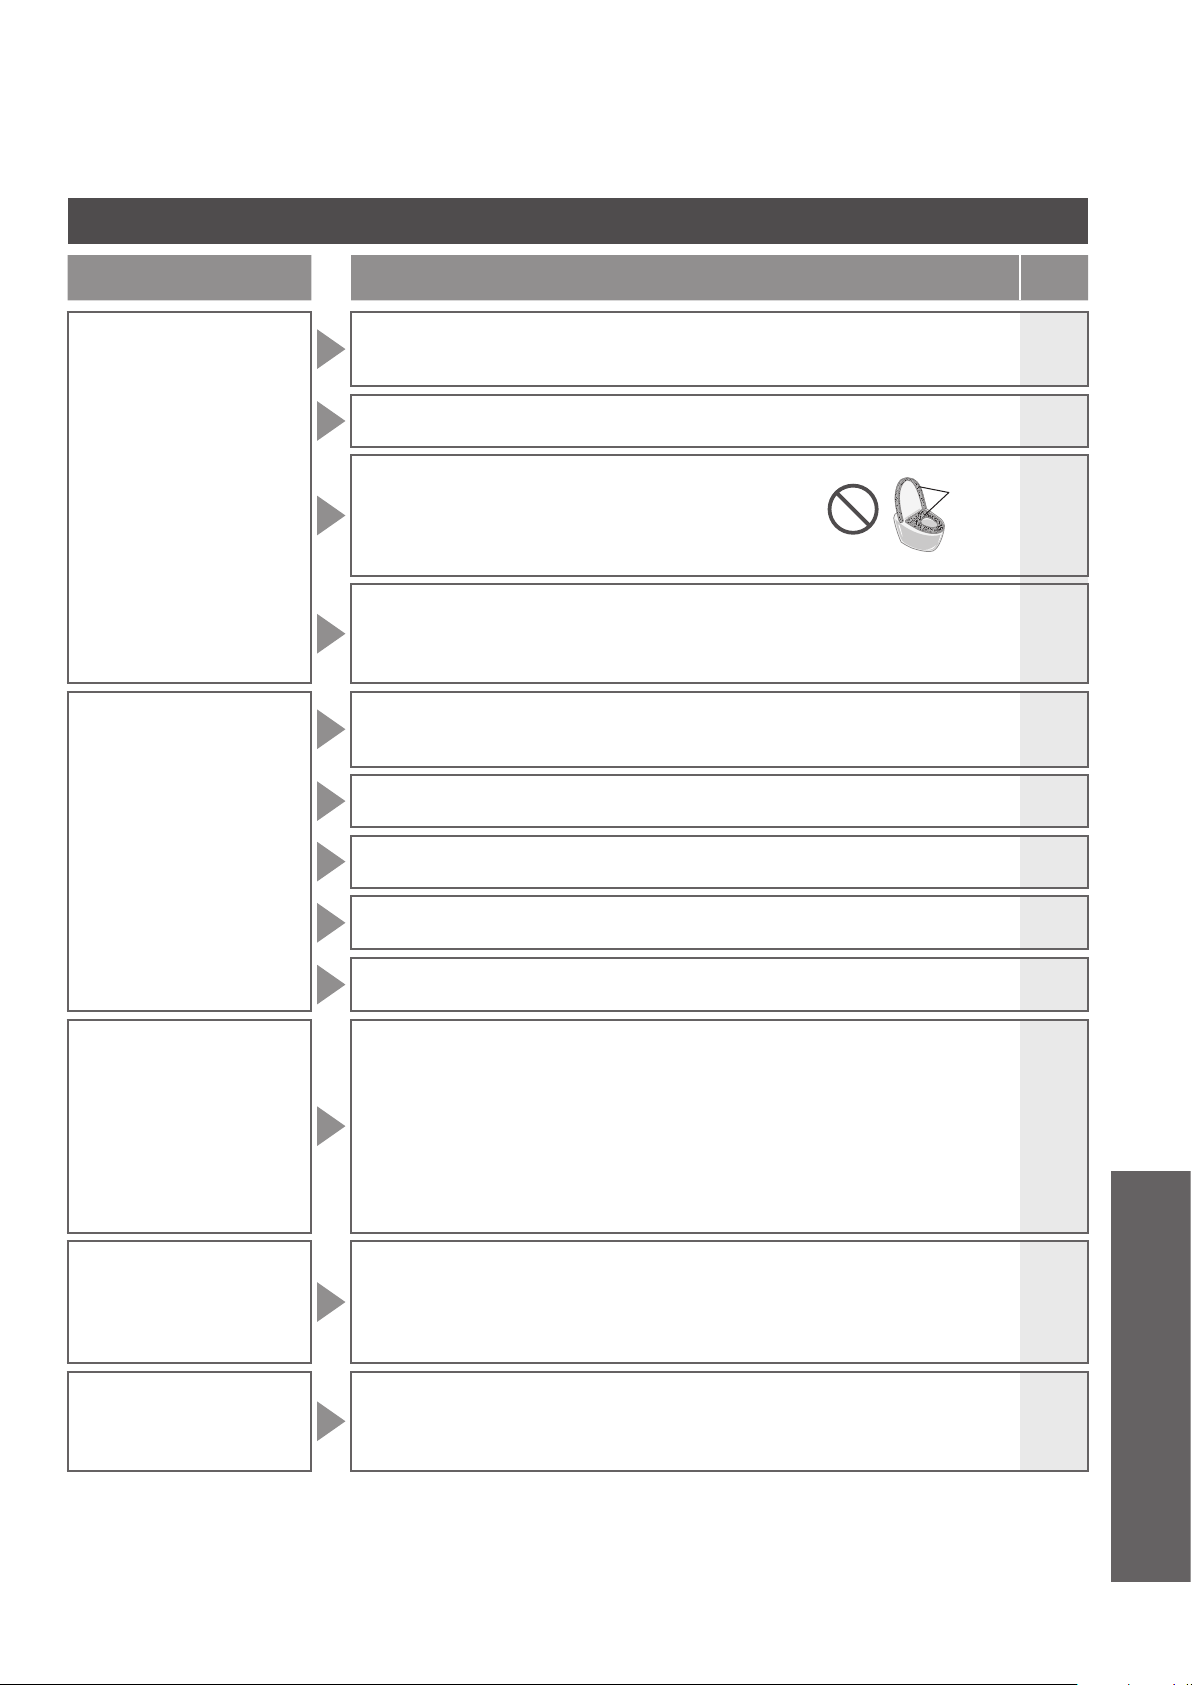
Rear washing, Rear soft washing, Front washing and Wand
Trouble Please check
The wand
(or washing water)
does not come out
The wand extends but
the washing water
does not come out /
The washing water
pressure is weak
●
Has the toilet been sat on and used continuously for 2 hours or longer? (If so,
operation is stopped for safety purposes.)
➞
Stand up from the seat and then use again.
●
The seat switch will not turn on unless you sit on the seat properly.
➞
Sit back on the toilet seat.
●
Are you using a toilet seat cover, a toilet lid cover or
a seat for infants?
➞
Remove any covers.
When using a seat for infants or a soft highchair,
remove after each use.
●
Are you pressing "Wand CLEAN" button?
• When you press "Wand CLEAN" button, "EWATER+" comes out from the
vicinity of the wand to clean the wand.
➞
To clean the wand with it extended, perform "Wand cleaning".
●
Has a water failure occurred?
➞
Press "Stop" button on the remote control and wait until water service is
restored.
●
Is the shuto valve closed?
➞
Fully open the shutoff valve.
●
Is the water lter drain valve clogged with foreign matter?
➞
Clean the filter.
●
Is the water pressure set to a low level?
Covers
Ref.
Page
-
11
11
36
-
15
37
18
The washing water is
cold
Wash functions
stop unintentionally
during use
Water comes out
unexpectedly from
the wand
●
Is the water drain plug loosened?
➞
Tighten the water drain plug securely.
●
Is the warm water temperature set to "OFF" or a low level?
●
When the temperature of the water supply or the bathroom is low, the water
temperature may be low when rst sprayed.
●
Is the timer energy saver in operation?
• The energy saver feature is on when the "Energy saver" LED is on and the
"Power" LED is off on the main display.
When you sit on the seat, the warm water heater is temporarily turned on
and water is warmed in about 10 minutes.
➞
When the timer energy saver is set to "ON", you can also turn it "OFF".
●
"Rear washing", "Rear soft washing" and "Front washing" stop automatically
after 5 minutes of continuous use.
●
Does the seat switch have diculty detecting?
➞
Sit back on the toilet seat. If you get up slightly from the seat, or sit forward on
the seat, the seating switch may temporarily stop detecting your presence.
●
Water may sometimes come out from around the wand when it expands in
the warm water tank.
●
Is the "Wand CLEAN" LED on the main display ashing?
➞
"Auto Wand CLEAN" starts and the wand is being cleaned.
40
20
-
22, 23
25
-
Reference
11
-
16
43
Page 45
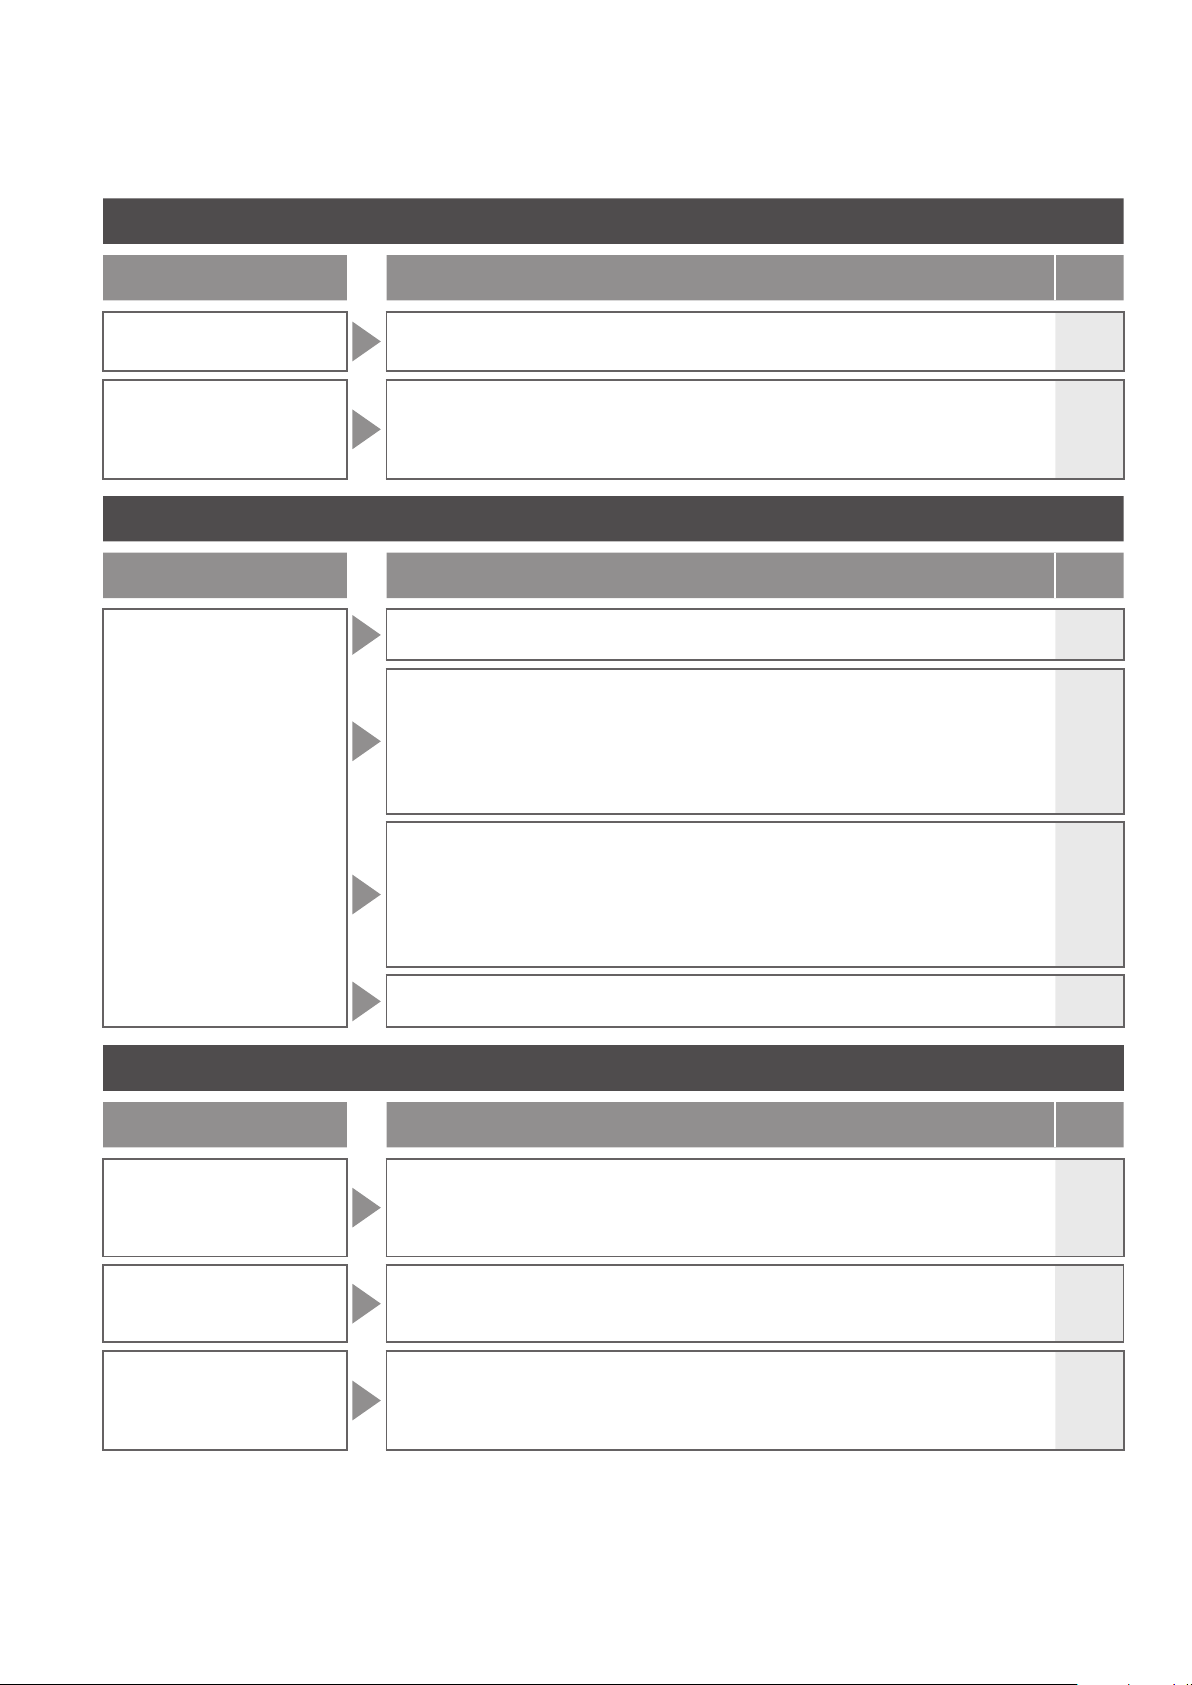
Troubleshooting
Warm air drying
Trouble Please check
The dryer
temperature is low
Stops in the middle
of use
●
Is the dryer temperature set to low level?
●
The feature stops automatically after about 10 minutes of continuous use.
●
Does the seat switch have diculty detecting?
➞
Sit back on the toilet seat. If you get up slightly from the seat, or sit forward on
the seat, the seating switch may temporarily stop detecting your presence.
Toilet Seat and Toilet Lid
Trouble Please check
●
Is the toilet seat temperature set to "OFF" or a low level?
●
Is energy saver in operation?
• The energy saver feature is on when the "Energy saver" LED is on and the
"Power" LED is off on the main display.
When you sit on the seat, the toilet seat heater is turned on temporarily and
the seat is warmed in about 15 minutes.
➞
The toilet seat is
cold
You can turn it "OFF" if the energy saver feature is "ON".
●
Have you been seated for a long time?
• After about 20 minutes of sitting, the temperature starts reducing, and after
about 1 hour, the toilet seat heater is turned "OFF".
➞
Stand up from the seat and then use again.
●
Did you put anything on the toilet seat or the toilet lid?
➞
Remove anything placed on top of the toilet seat or lid.
Ref.
Page
20
-
11
Ref.
Page
20
22, 23
24, 25
-
-
Trouble Please check
The energy saver LED
does not light up
The timer energy saver
feature is not working
The auto energy saver
feature is not working
●
Is a toilet lid or seat cover installed?
➞
Remove any covers.
Energy Saver
●
Did you unplug the power plug or was there a power outage?
The "Energy saver" LED on the main display may go o when the power is
turned on even if the energy saver feature is "ON".
(It will turn on within about 24 hours since the setting is retained.)
●
Have the batteries in the remote control been replaced?
"Timer energy saver" may be canceled when the batteries are replaced.
➞
Set the timer energy saver again at the time you want to start it.
●
Because this function takes several days learning the usage conditions
before starting energy saver, the amount of energy saving may be low,
depending on the frequency of use.
➞
Check the energy saver setting.
11
Ref.
Page
-
25
22, 23
44
Page 46
Deodorizer
Trouble Please check
The deodorizer seems
to be not working
A strange odor is
emitted
The auto power deodorizer
feature is not working
Trouble Please check
The Wand CLEAN LED
does not illuminate
●
Is "Deodorizer" set to "OFF"? ➞ Set to "ON".
●
Even after sitting down, you do not hear operation sounds.
➞
Sit back on the toilet seat.
If you hear an operation sound when you sit on the toilet seat.
➞
Clean the deodorizing filter.
●
Are you using an air freshener or deodorizer that you purchased separately?
Doing so may reduce the effectiveness of the product's deodorizer or cause strange odors.
•
➞
Remove the air freshener or deodorizer.
●
Is "Auto power deodorizer" set to "OFF"? ➞ Set to "ON".
●
It starts about 10 seconds after you stand up from the toilet seat.
Sanitary
●
If the "Wand CLEAN" LED does not illuminate, it is time to replace the
component that generates "EWATER+". Consult the installer, seller, or TOTO
customer service. (see contact information on the back cover.)
Others
Ref.
Page
29
-
36
-
29
-
Ref.
Page
-
Trouble Please check
Water is leaking from the
plumbing connections
The main unit is
unstable
The main unit makes
a sound
Ref.
Page
●
If the nut of the connecting pipe is loosened, retighten it by hand. (Do not use any tool.)
➞
If the water leak does not stop, close the shutoff valve and consult with
TOTO customer service. (see contact information on the back cover.)
●
There is clearance between the toilet seat cushion and the bowl unit for activating the seat
switch. When you sit on the toilet seat, the toilet seat subsides slightly to activate the seat switch.
●
Are the bolts that anchor the main unit loose?
➞
Remove the main unit and then firmly tighten the base plate bolts.
When sitting on the toilet seat
●
When "Pre-mist" is "ON", you hear operation sounds for preparing the pre-mist
or spraying mist in the bowl unit.
➞
You can turn it "OFF".
When moving away from the bowl unit after use
●
When "Auto power deodorizer" is "ON", operation sounds are made while the
deodorizing power increases for 60 seconds after you stand up from the toilet seat.
➞
You can turn it "OFF".
●
If "Auto wand CLEAN" is "ON" and you use the washing functions (e.g., Rear washing and
Front washing), you may hear that the wand is extended and cleaned with "EWATER+".
➞
You can turn it "OFF".
When not using the product (e.g., at night)
●
If "Auto wand CLEAN" is "ON" and you do not use the washing functions (e.g., Rear
washing and Front washing) for about 8 hours, you will hear that the wand is cleaned
with "EWATER+" and then the remaining water is drained from inside the product.
➞
You can turn it "OFF".
-
11
34, 35
16
28
29
28
28
Reference
You feel air in the bowl unit
when sitting on the toilet seat
●
A mist is sprayed inside the bowl unit to make it more dicult for dirt to adhere
when sitting on the toilet seat. You may feel air when a mist is sprayed.
➞
You can turn it "OFF".
-
28
45
Page 47
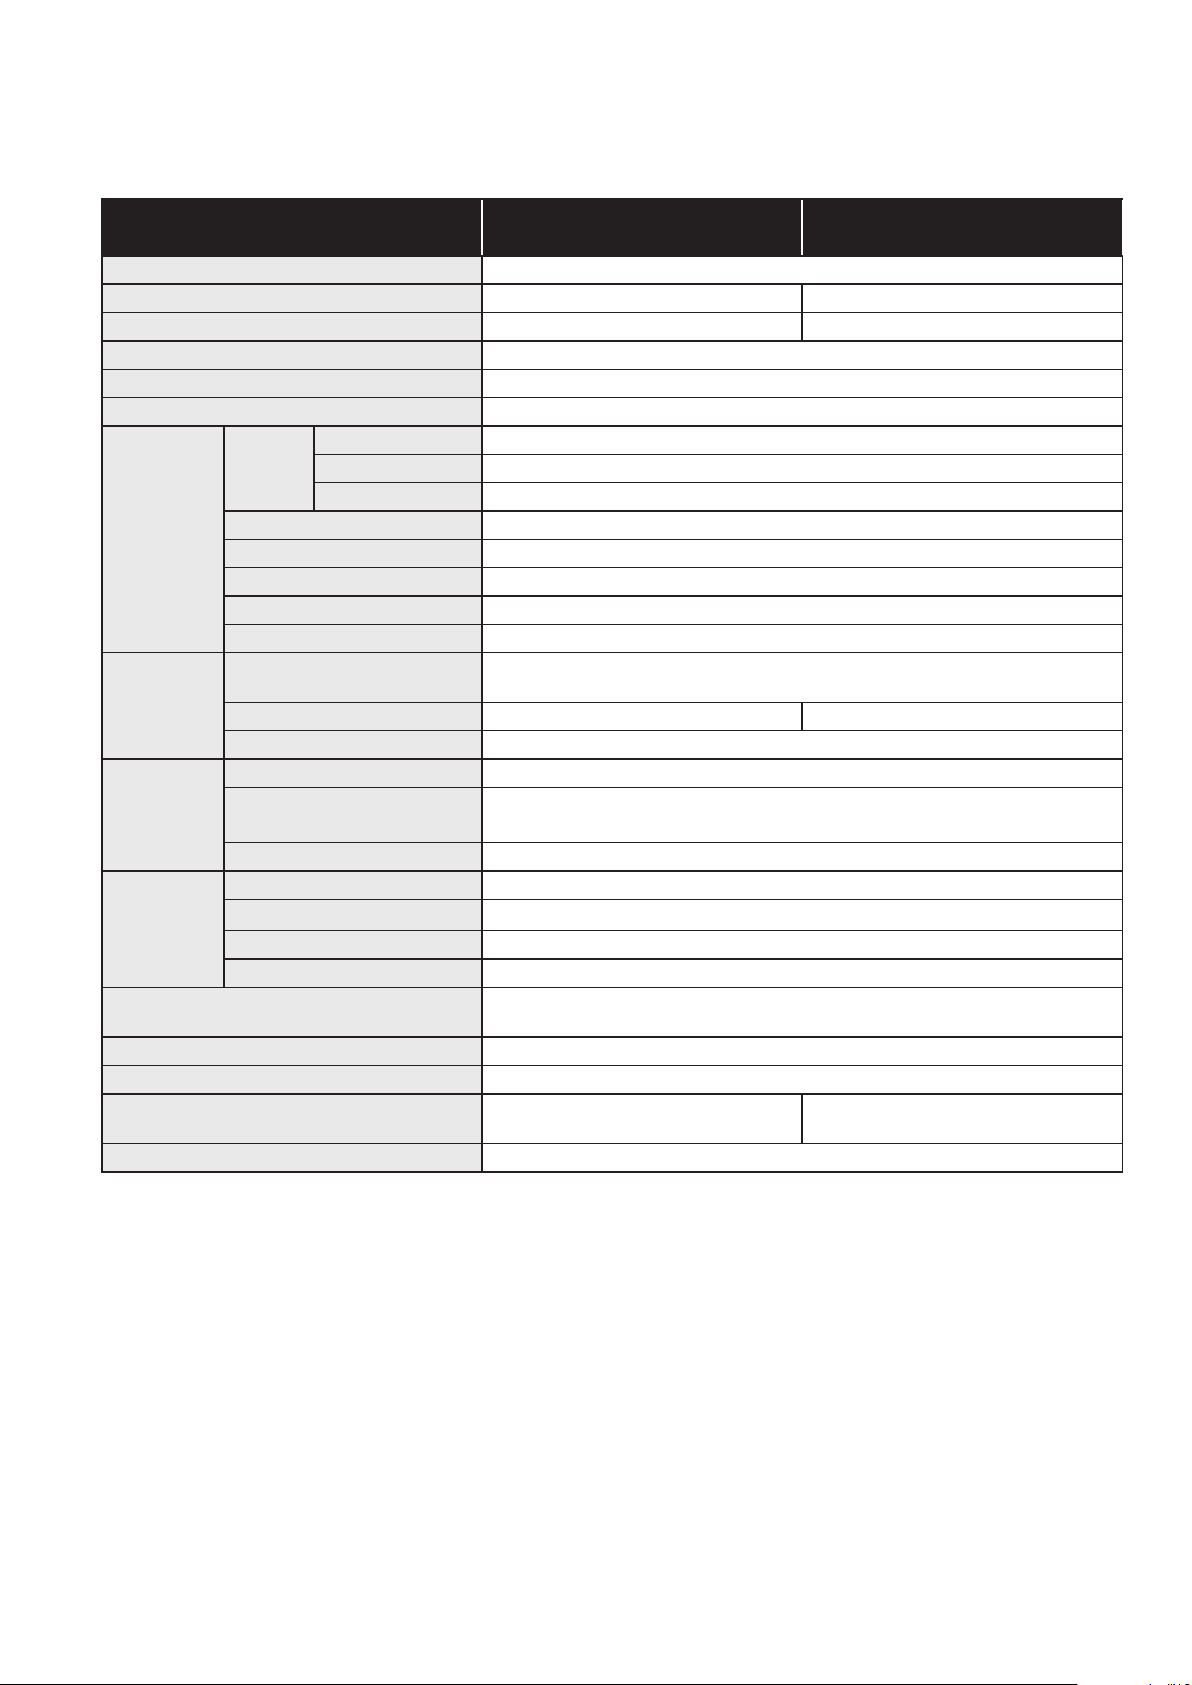
Specications
Item
Rated power supply AC 120 V, 60 Hz
Rated power consumption 403 W 409 W
Maximum power consumption
Type of water heater Tank type
Power cord length 3.9 ft (1.2 m)
Water protection level IPX4
Spray
volume
Washing
Heated
seat
Deodorizer
Warm air
dryer
Water supply pressure
Water supply temperature 32-95 °F (0-35 °C)
Working ambient temperature 32-104 °F (0-40 °C)
Dimensions
Weight About 11 lb (About 5 kg)
*1 Maximum power consumption for warm water or heated toilet seat.
*2 At 29 PSI (0.20 MPa) <dynamic> water pressure
*3 Temperature around the warm air outlet measured by TOTO.
Water temperature Adjustable temperature range : OFF, about 95-104 °F (about 35-40 °C)
Toilet tank capacity Approx. 0.13 gal (Approx. 0.49 L)
Heater capacity 225 W
Safety device Temperature fuse, anti-idling oat switch
Backow prevention device Vacuum breaker, Check valve
Surface temperature
Heater capacity 48 W 54 W
Safety device Temperature fuse
Method O
Airow volume
Power consumption Normal mode : Approx. 1.7 W, Power mode : Approx. 5.3 W
Warm air temperature
Airow volume Approx. 8.83 ft
Heater capacity 347 W
Safety device Temperature fuse
Rear washing Approx. 0.07-0.11 gal / min (Approx. 0.27-0.43 L / min)
Rear soft washing
*2
Front washing Approx. 0.08-0.11 gal / min (Approx. 0.29-0.43 L / min)
*1
Adjustable temperature range : OFF, about 82-97 °F (about 28-36 °C)
*3
Adjustable temperature range : about 95-140 °F (about 35-60 °C)
Minimum required water pressure : 7.25 PSI (0.05 MPa) <dynamic>
W 1.26 ft × D 1.74 ft × H 0.48 ft
(W 383 mm × D 530 mm× H 147 mm)
SW3084T40
SW3084
512 W 520 W
Approx. 0.07-0.11 gal / min (Approx. 0.27-0.43 L / min)
(Auto energy saver : about 79 °F (about 26 °C))
deodorization
2
Normal mode : Approx. 3.18 ft
Power mode : Approx. 5.65 ft3 / min (Approx. 0.16 m3 / min)
3
/ min (Approx. 0.25 m3 / min)
Maximum water pressure : 108.78 PSI (0.75 MPa) <static>
3
/ min (Approx. 0.09 m3 / min)
W 1.26 ft × D 1.58 ft × H 0.48 ft
(W 383 mm × D 483 mm× H 147 mm)
SW3083
46
When disposing of this product, please follow your local or state guidelines for proper disposal.
●
Page 48
Limited Warranty
1. TOTO warrants its products to be free from defects in materials and workmanship during normal use when properly installed
and serviced, for a period of one (1) year from date of purchase. This limited warranty is extended only to the ORIGINAL
PURCHASER of the product and is not transferable to any third party, including but not limited to any subsequent purchaser
or owner of the product. This warranty applies only to TOTO product is purchased and installed in USA and Canada.
2. TOTO's obligations under this warranty are limited to repair, replacement or other appropriate adjustment, at TOTO's option,
of the product or parts found to be defective in normal use, provided that such product was properly installed, used and
serviced in accordance with instructions.
TOTO reserves the right to make such inspections as may be necessary in order to determine the cause of the defect. TOTO
will not charge for labor or parts in connection with warranty repairs or replacements. TOTO is not responsible for the cost of
removal, return and/or reinstallation of the product.
3.This warranty does not apply to the following items:
a) Damage or loss sustained in a natural calamity such as fire, earthquake, flood, thunder, electrical storm, etc.
b) Damage or loss resulting from any accident, unreasonable use, misuse, abuse, negligence, improper care, or maintenance
of the product.
c) Damage or loss resulting from sediments or foreign matter contained in a water system.
d) Damage or loss resulting from the quality of water in the region where the product is used.
e) Damage or loss resulting from improper installation or from installation of the product in a harsh and/or hazardous
environment, or improper removal, repair or modification of the product. This includes locations where the water pressure
is above local codes or standards. (NOTE : Product model codes allow a maximum of 80 PSI. Check local codes or
standards for requirements).
f) Damage or loss resulting from electrical surges or lightning strikes or other acts which are not the fault of TOTO or which
the product is not specified to tolerate, including failure to use the factory equipped cord and plug or use of a loose or faulty
electrical outlet or use of a current or socket other than a 120V, 60Hz electrical current from a GFI (ground, fused) socket.
g) Damage or loss resulting from normal and customary wear and tear, such as gloss reduction, scratching or fading over
time due to use, cleaning practices or water or atmospheric conditions, including but not limited to, the use of bleach, alkali,
acid cleaners, dry (powder) cleaners or any other abrasive cleaners or the use of metal or nylon scrubbers.
4. If the Danger Label which has been placed over the seams on the back of the product’s top unit is broken or otherwise not
intact, this limited warranty is void.
5. In order for this limited warranty to be valid, proof of purchase is required. TOTO encourages warranty registration upon
purchase to create a record of product ownership at http://www.totousa.com. Product registration is completely voluntary and
failure to register will not diminish your limited warranty rights.
6. If the product is used commercially or is installed outside of USA and Canada, TOTO warrants the product to be free from
defects in materials and workmanship during normal use for one (1) year from the date of installation of the product, and all
other terms of this warranty shall be applicable except the duration of the warranty.
7. This warranty gives you specific legal rights. You may have other rights which vary from state to state, province to province or
country to country.
8. To obtain warranty repair service under this warranty, you must take the product or deliver it prepaid to a TOTO service
facility together with proof of purchase (original sales receipt) and a letter stating the problem, or contact a TOTO distributor
or products service contractor, or write directly to TOTO U.S.A., INC., 1155 Southern Road, Morrow, GA 30260 (888)
295-8134 or (678) 466-1300, if outside the U.S.A. If, because of the size of the product or nature of the defect, the product
cannot be returned to TOTO, receipt by TOTO of written notice of the defect together with proof of purchase (original sales
receipt) shall constitute delivery. In such case, TOTO
transport the product to a service facility.
WARNING! TOTO shall not be responsible or liable for any failure of, or damage to, this product caused by either
chloramines in the treatment of public water supply or cleaners containing chlorine (calcium hypochlorite).
NOTE: The use of a high concentrate chlorine or chlorine related products can seriously damage the fittings. This damage
can cause leakage and serious property damage.
THIS WRITTEN WARRANTY IS THE ONLY WARRANTY MADE BY TOTO. REPAIR, REPLACEMENT OR OTHER
APPROPRIATE ADJUSTMENT AS PROVIDED UNDER THIS WARRANTY SHALL BE THE EXCLUSIVE REMEDY
AVAILABLE TO THE ORIGINAL PURCHASER. TOTO SHALL NOT BE RESPONSIBLE FOR LOSS OF THE PRODUCT OR
FOR OTHER INCIDENTAL, SPECIAL OR CONSEQUENTIAL DAMAGES OR EXPENSES INCURRED BY THE ORIGINAL
PURCHASER, OR FOR LABOR OR OTHER COSTS DUE TO INSTALLATION OR REMOVAL, OR COSTS OF REPAIRS
BY OTHERS, OR FOR ANY OTHER EXPENSE NOT SPECIFICALLY STATED ABOVE. IN NO EVENT WILL TOTO'S
RESPONSIBILITY EXCEED THE PURCHASE PRICE OF THE PRODUCT. EXCEPT TO THE EXTENT PROHIBITED BY
APPLICABLE LAW, ANY IMPLIED WARRANTIES, INCLUDING THAT OF MERCHANTABILITY OR FITNESS FOR USE OR
FOR A PARTICULAR PURPOSE, ARE EXPRESSLY DISCLAIMED. SOME STATES DO NOT ALLOW LIMITATIONS ON
HOW LONG AN IMPLIED WARRANTY LASTS, OR THE EXCLUSION OR LIMITATION OF INCIDENTAL OR
CONSEQUENTIAL DAMAGES, SO THE ABOVE LIMITATION AND EXCLUSION MAY NOT APPLY TO YOU.
may choose to repair the product at the purchase'r s location or pay to
Reference
47
 Loading...