

Page 1
NEOREST 600
MS990CG
Instruction Manual
✲ Thank you for your recent purchase of the TOTO Neorest.
Please read the enclosed information to ensure the safe
use of your product.
Important Safety Instructions ..........
Operational Instructions ..................
Tips for Using the NEOREST 600
....
Performance Features ....................
Parts and Features .........................
Before Using the NEOREST 600....
2
5
6
7
9
11
Introduction
How to Use the NEOREST 600......
For Best Results .............................
● Adjusting the Temperature ..............
● Deodorizing .....................................
● Opening and Closing the Toilet
Seat and Lid....................................
● Flushing Water ................................
To Conserve Energy
● Using the Energy Saver Feature -
“TIMER ON/OFF”............................
● Shutting Off Energy Saver
Feature - “TIMER ON/OFF”............
● Using the Energy Saver - “AUTO
ON/OFF” .........................................
● Shutting Off the Energy Saver
Feature - “AUTO ON/OFF” .............
● If You Are Using the “TIMER
ON/OFF” and the “AUTO ON/OFF”
Features at the Same Time ............
13
15
15
16
17
20
23
24
25
27
28
Operation
Caring for your NEOREST..............
● Before Cleaning the NEOREST......
● Daily Care and Maintenance ..........
● Thorough Cleaning of the Product ..
● Other Care and Maintenance .........
29
29
30
31
34
Maintenance
Preventing Damage Due to
Frozen Water Pipes
...........................
● How to Prevent Damage (Pipe
Drain Method)
..............................
Troubleshooting .................................
Specifications .....................................
Limited Warranty ...............................
38
38
39
46
47
Troubleshooting
Page 2

2
Important Safety Instructions
When using electrical products, especially when children are present, basic safety precautions
should always be followed, including the following:
READ ALL INSTRUCTIONS BEFORE USING
To reduce the risk of electrocution:
1. Do not use while bathing.
2. Do not place or store products where it can fall or be pulled into tub or sink.
3. Do not place in or drop into water or other liquid.
4. Do not reach for a product that has fallen into water. Unplug immediately.
5. Do not wash the main unit or power plug with water or detergent.
6. Do not handle the power plug with wet hands.
7. Discontinue use of a malfunctioning product.
● If the following occurs, disconnect the power plug from the wall outlet, and turn the
water shut off valve to prevent the flow of water.
● Continued use of a malfunctioning product may result in fire or electrical shock or
cause water damage.
8. Only use tap water or drinkable well water (ground water)
● Use of water that is not safe for drinking may cause irritation or injury to the skin.
9. Do not use a loose or faulty electrical outlet.
10. This product should be used with 120V, 60Hz electrical current only.
● Use of multi-prong outlet adapters with this product may result in overheating or fire.
11. Avoid damaging the power plug or toilet seat cord.
● Do not crack, bend, twist or pull the cords. Do not treat or heat the cords or place
heavy objects on top of them.
● Use of damaged power plug may result in a short circuit, electrical shock or fire.
12. Improper use of heated toilet seats can result in a low-grade burn.
● When sitting on the heated toilet seat for extended periods of time, turn the
temperature setting to OFF.
● Make sure that the temperature setting for the heated toilet seat has been set to the
OFF position before being used by the following:
– Young children, the aged or users who cannot perform appropriate setting of the
temperature.
● Sick or disabled users who do not have freedom of movement.
● Users who are on medication that causes drowsiness.
● Users that have consumed a great deal of alcohol or who are extremely tired and may
fall asleep while using the toilet.
DANGER
Possible malfunctions:
● Water leaks from either the main
unit or the water pipes.
● The product makes a strange noise
or emits a strange odor.
● The product feels extremely hot.
● The product is cracked or broken.
● The product is smoking.
Page 3
3
To reduce the risk of burns, electrocution, fire
or injury to persons:
1.
Close supervision is necessary when this product is used by, on, or near children or invalids.
2. Use this product only for its intended use as described in this manual. Do not use
attachments not recommended by the manufacturer.
3. Never operate this product if it has a damaged cord or plug, if it is not working properly, if
it has been dropped or damaged, or dropped in water. Return the product to a service
center for examination and repair.
4. Keep cord away from heated surfaces.
5. Never block the air openings of the product or place it on a soft surface, such as a bed or
couch, where the air openings may be blocked. Keep the air openings free of lint, hair,
and the like.
6. Never use while sleepy or drowsy.
7. Never drop or insert any object into any opening or hose.
8. Do not use outdoors or operate where aerosol (spray) products are being used or where
oxygen is being administered.
9. Connect this product to a properly grounded outlet only. See Grounding Instructions.
10. Do not use this product while smoking.
11. Do not stand on or place heavy objects on top of the toilet.
● To avoid injury or damage to the toilet unit, do not stand on or place heavy objects on
top of the toilet.
12. Do not bend or crush the connection hose.
● Bending or crushing the connection hose may result in water leakage.
13. Use only a mild dish detergent diluted with water to clean your NEOREST. Do not use the
following to clean the NEOREST:
● Toilet bowl cleaner, household cleaner, benzene, paint thinner, powdered cleanser, or
nylon scrubbing pads.
● Use of any cleaning product other than diluted dish detergent may crack the plastic and
cause injury to the user or may damage the hose resulting in water leakage.
14.
To prevent sudden water leakage, do not remove the water supply filter before. Refer to
Page 34 for instructions on cleaning the water supply filter.
15. When installing the water supply filter, make sure that it is securely placed in its proper
position.
● Improper positioning of the water supply filter may
result in water leakage.
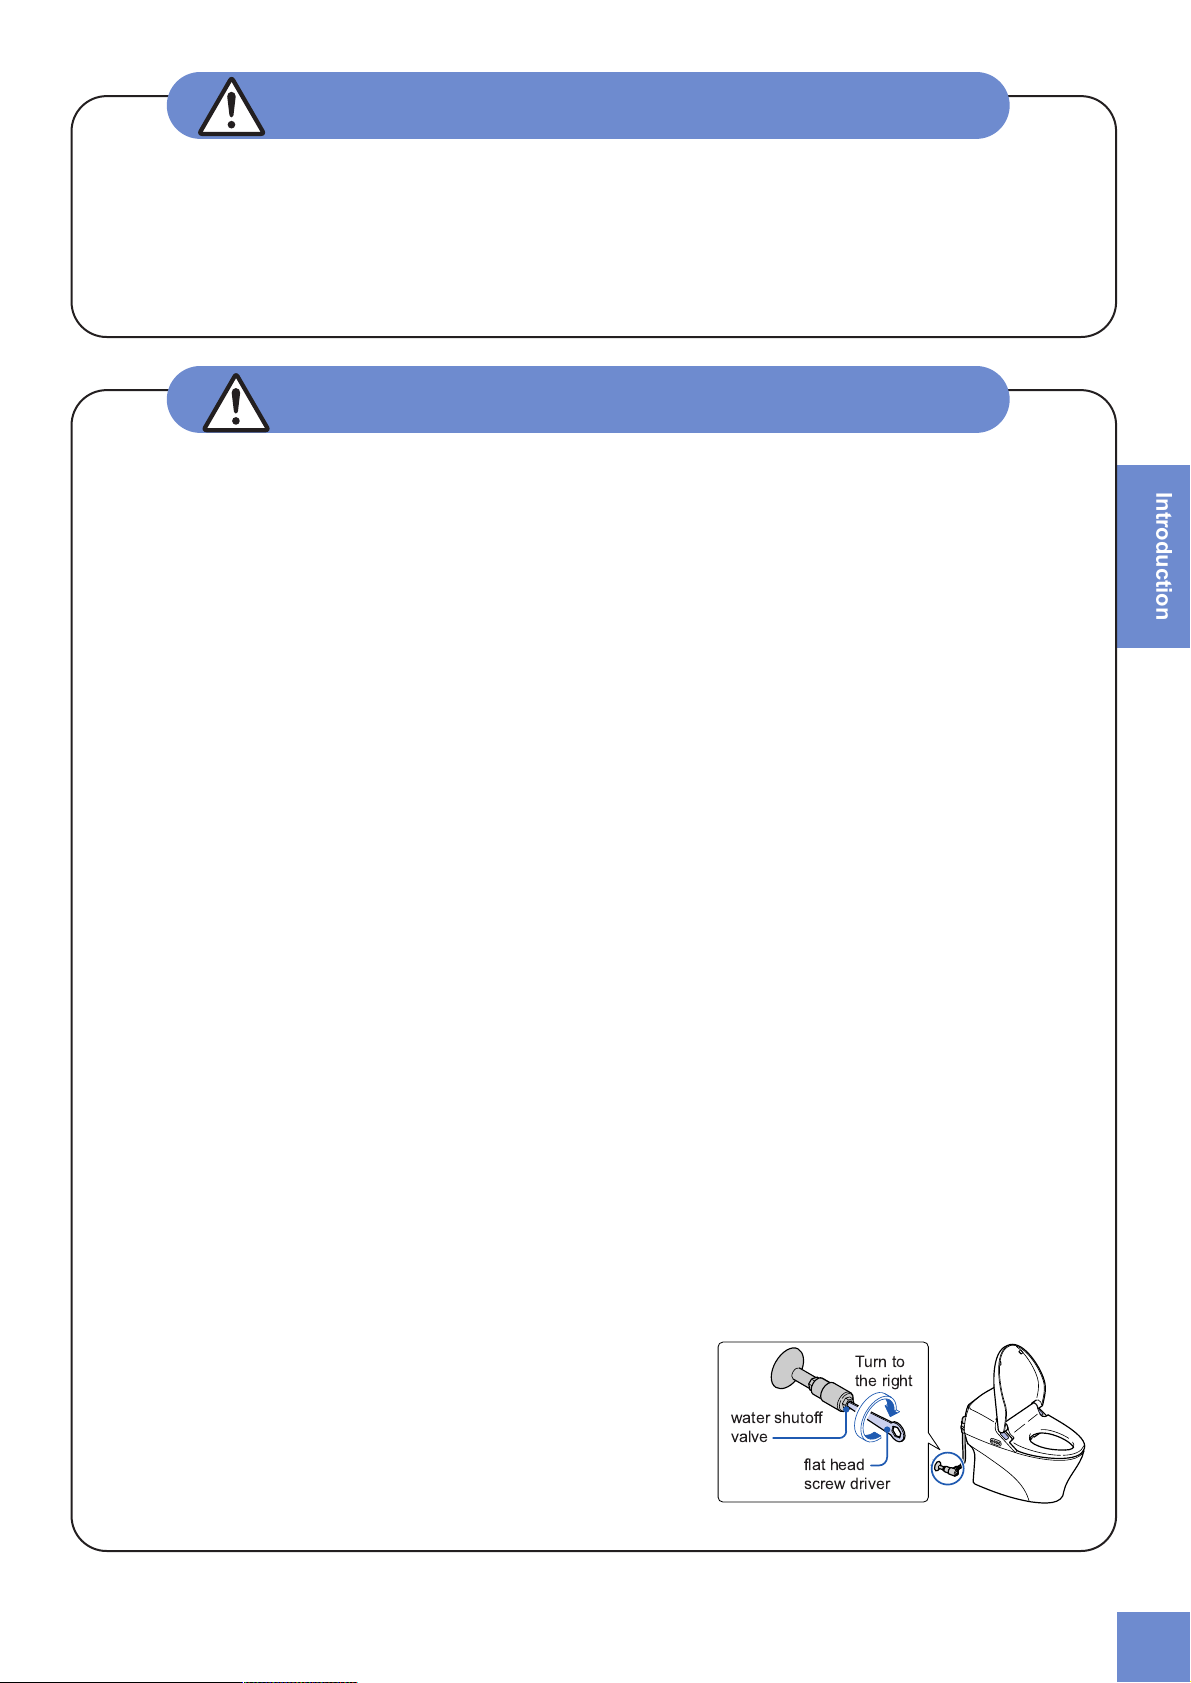
16. If water leakage should occur, always turn the water
shutoff valve and then turn off the water.
WARNING
To reduce the risk of electrocution:
13. Periodically remove dust and dirt from the power plug and make sure they are tightly
plugged into the wall outlet.
● Failure to do so may result in electrical shock or fire.
● Pull the plug out from the outlet and wipe clean with a dry cloth.
14. Do not unplug by pulling on cord. To unplug, grasp the plug, not the cord.
● Pulling on the cord may cause damage and result in electrical shock or fire.
DANGER
Turn to
the right
water shutoff
valve
flat head
screw driver
Introduction
Page 4
4
To reduce the risk of burns, electrocution, fire
or injury to persons:
17. Always use the NEOREST at a room temperature of 32°F (freezing temperature) or
above to prevent frozen pipes and hoses.
●
Frozen water pipes will cause the toilet and the pipes to break resulting in water leakage.
Refer to Page 38 for instructions on how to prevent frozen pipes.
WARNING
This product should be grounded. In the event of an electrical short circuit, grounding reduces
the risk of electric shock by providing an escape wire for the electrical current. This product is
equipped with a cord having a grounding wire with a grounding plug. The plug must be
plugged into an outlet that is properly installed and grounded.
Improper use of the grounding plug can result in a risk of electric shock.
If repair or replacement of the cord or plug is necessary, do not connect the grounding wire to
either flat blade terminal. The wire insulation having an outer surface that is green with or
without yellow stripes is the grounding wire.
Check with a qualified electrician or serviceman if the grounding wire instructions are not
completely understood, or if in doubt as to whether the product is properly grounded.
This product is factory equipped with a specific electric cord and plug to permit connection to
a proper electric circuit. Make sure that the product is connected to an outlet having the same
configuration as the plug. No adapter should be used with this product. Do not modify the
plug provided - if it will not fit in the outlet, have the proper outlet installed by a qualified
electrician. If the product must be reconnected for use on a different type of electric circuit, the
reconnection should be made by qualified service personnel.
If it is necessary to use an extension cord, use only a three wire extension cord that has a
three blade grounding plug, and a three-slot receptacle that will accept the plug on the
product. Replace or repair a damaged cord.
GROUNDING INSTRUCTIONS
DANGER
Save these instructions.
Page 5

5
Operational Instructions
Always follow these precautions to ensure the safe use of your product.
Do not wipe the toilet unit or seat
with a dry cloth or toilet paper.
● Use of a dry cloth or toilet paper to wipe
the toilet bowl, seat or lid will scratch the
surface.
Refer to Page 29 for instructions on how to
care for your Washlet.
Do not expose the NEOREST to
direct sunlight.
● Use of the product under direct sunlight
may result in discoloration of the plastic,
inconsistent temperature control of the
toilet seat or malfunction of the remote
controller.
Avoid getting urine on the main unit
or wand as this may result in
malfunction of the product.
Do not cover the seat sensor, motion
ditection sensor or remote control
transmitter.
● Covering the sensors or remote control
transmitter will prevent them from
working properly.
Do not lean back against the lid.
● Leaning against the lid may damage or
break it.
To avoid electrical damage to your
unit, be sure to unplug the power
cord during lightening storms.
Do not use the NEOREST near radios
and stereo equipment.
● Use of the NEOREST near a radio, etc.
will cause electrical interference.
When not in use over extended
periods of time, remove the power
plug from the wall outlet.
● However, when being used at a room
temperature of less than 32° F (below
freezing), be sure to keep the unit
plugged in to prevent freezing of the
pipes and hoses.
When restarting after extended disuse, let
water run for a few minutes before using.
Introduction
Page 6
6
Tips for Using the NEOREST 600
Protect the environment and reduce the use of water and electricity.
Keeping the lid
closed will help
maintain the
warmth of the
toilet seat.
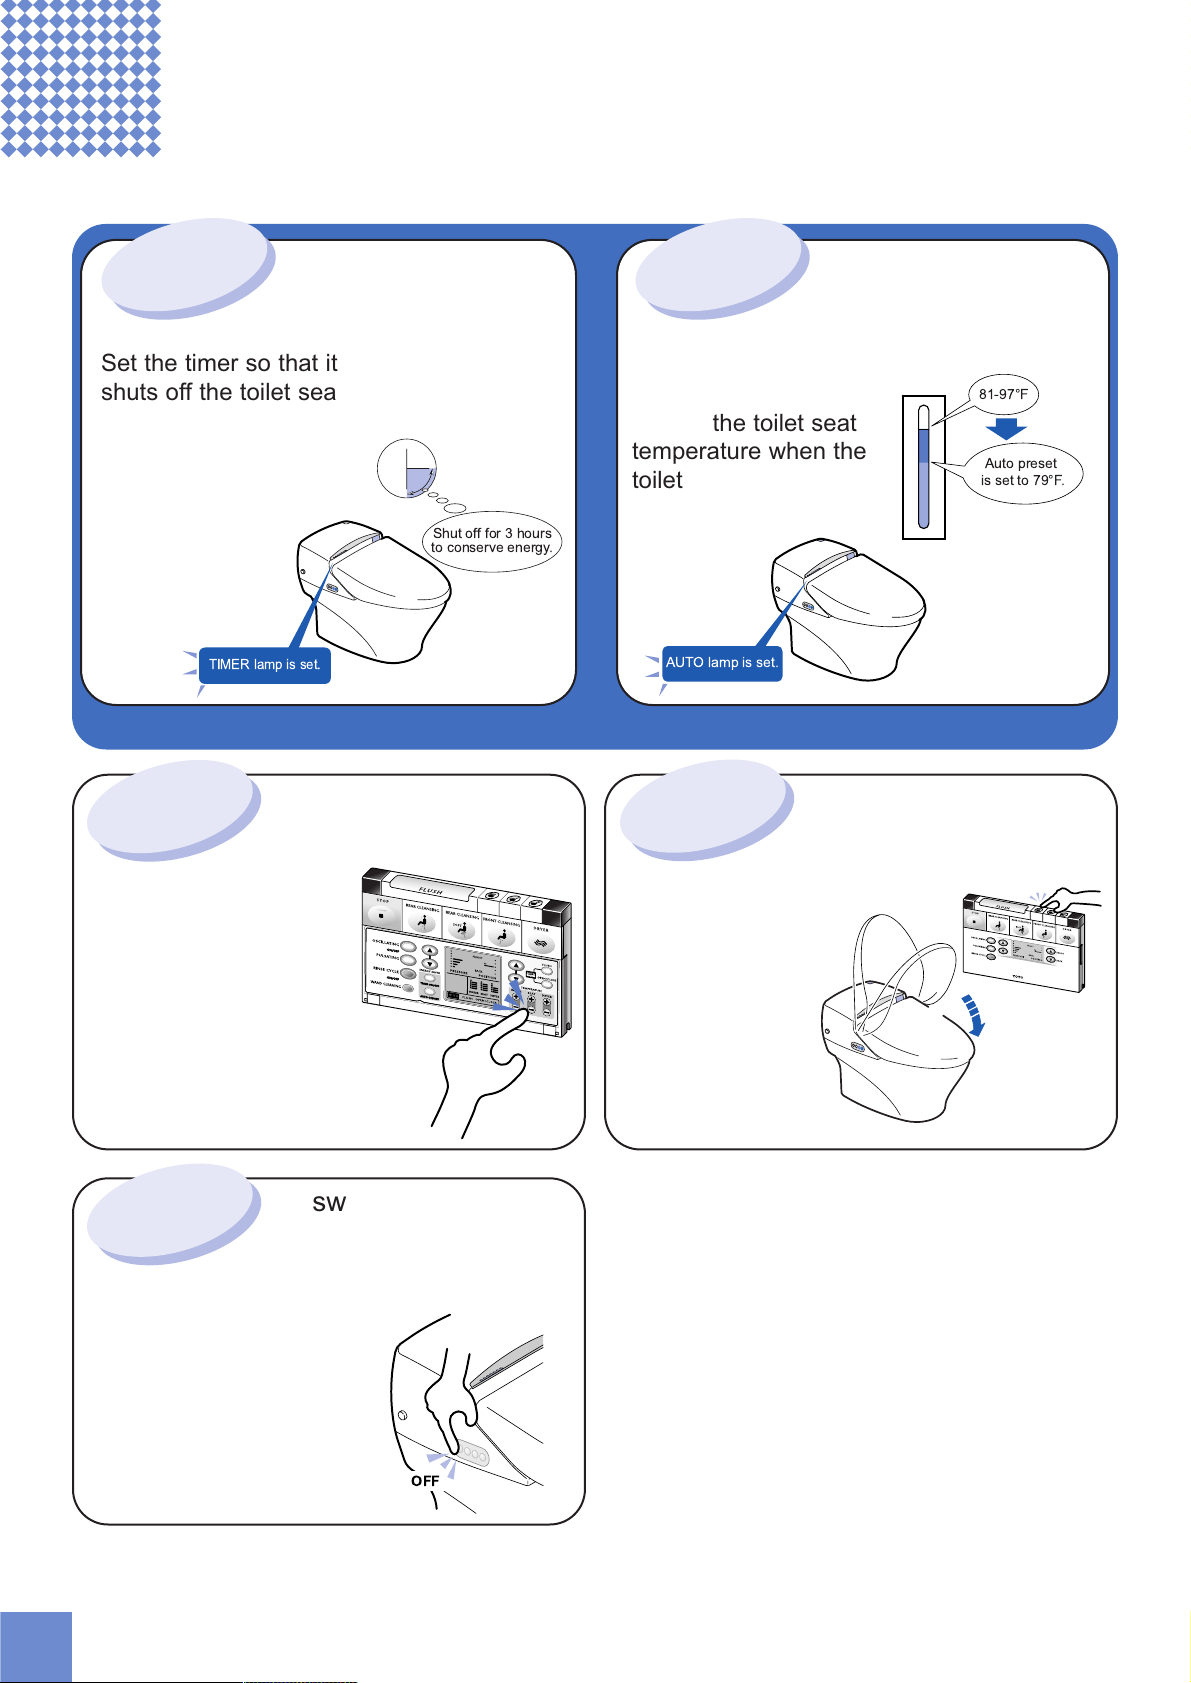
Shut off for 3 hours
to conserve energy.
TIMER lamp is set.
Set the timer so that it
shuts off the toilet seat
heater each day at the
same time to save
energy. The shutoff
time can be set for 3,
6 and 9 hours.
See page 23.
Auto preset
is set to 79¡F.
81-97¡F
AUTO lamp is set.
Use the Auto Energy
Saver to automatically
reduce the toilet seat
temperature when the
toilet is not being used.
See page 25.
Use the timer and
save energy.
Use the Auto
Energy Saver.
The "TIMER ON/OFF" and "AUTO ON/OFF" can be used together to save even more energy!
The toilet seat
temperature can be
reduced to a
comfortable setting to
save energy.
See page 15.
Reduce the temperature
setting to save energy.
Keep the lid closed to keep the toilet
seat warm and conserve energy.
OFF
Turn the power switch
off when leaving the
house to conserve
energy.
See page 12.
Turn the power switch to OFF when
the Washlet is not being used over
extended periods of time.
Page 7

7
Introduction
Performance Features
Washing Functions Page
Rear cleansing
Soft rear cleansing
Front cleansing
● The Pulsating wash alternates cycles strong and soft sprays of
water approximately 70 times per second for a very thorough
rear wash.
● The soft wash and Front features provide a soft, yet thorough,
whirling flow of water.
13
Wash position
adjustment
● The wand can be adjusted forward or backward.
13
Water pressure
adjustment
● The water pressure can be adjusted to soft or strong.
13
Oscillating wash ● The Wand moves back and forth for a wide-range, thorough
wash.
13
Pulsating wash ● A combination of soft/strong water pressure is used to wash.
13
Amenities Page
Heated toilet seat ● Warms the toilet seat.
15
Warm air drying ● Dries wet portions with warm air.
14
Temperature
adjustment
● Adjusts the temperature of the water, toilet seat and warm air
dryer.
15
Deodorizer ● Removes toilet bowl odor.
16
Remote controller ● Allows for easy operation while on the toilet seat.
10
Seat sensor ● The sensor detects when someone sits on the toilet seat and
activates all of the functions.
14
Remote controlled
toilet seat and lid
● Raises and lowers the toilet seat and lid.
17
Auto open/close ● The sensor works as a motion detector and automatically
opens/closes the lid.
17-19
Remote controlled
flush
● Flushes the toilet via remote control.
20
Automatic flush ● Automatically flushes the toilet when you get off the toilet seat.
21, 22
Page 8
8
Energy Saving Features Page
Timer ON/OFF ● Conserve energy by pre-setting the timer to turn off the toilet
seat heater for the same time period each day.(Can be set for
3, 6 or 9 hour periods of time).
23, 24
Auto ON/OFF ● The unit memorizes the time of day at which the toilet is least
used and automatically reduces the toilet seat temperature to
conserve energy.
25-27
ON/OFF Button ● Turn the button to the OFF position to stop warming the toilet
seat and conserve energy.
12
Sanitary Features Page
Removable toilet seat
and lid
● The toilet seat and lid can be removed for easy cleaning.
31, 32
Self Cleaning ● The wand tip is washed before and after each use.
—
Wand Cleaning ● The entire wand is thoroughly washed when it is extended for
use and before it is stored.
—
Wand cleaning button ● Used to switch off the water from the wand when cleaning it.
36
Rinse Cycle ● Discharges water inside the toilet bowl during cleaning.
● Automatic dual mode bowl cleaning.
37
Easy-to-clean toilet
bowl
● “SanaGloss” finish protects the toilet bowl from staining and
makes it easier to clean.
—
Protective seal ● The gap between the main unit and the toilet bowl is filled with
a seal to prevent water entering the unit.
32
Page 9
9
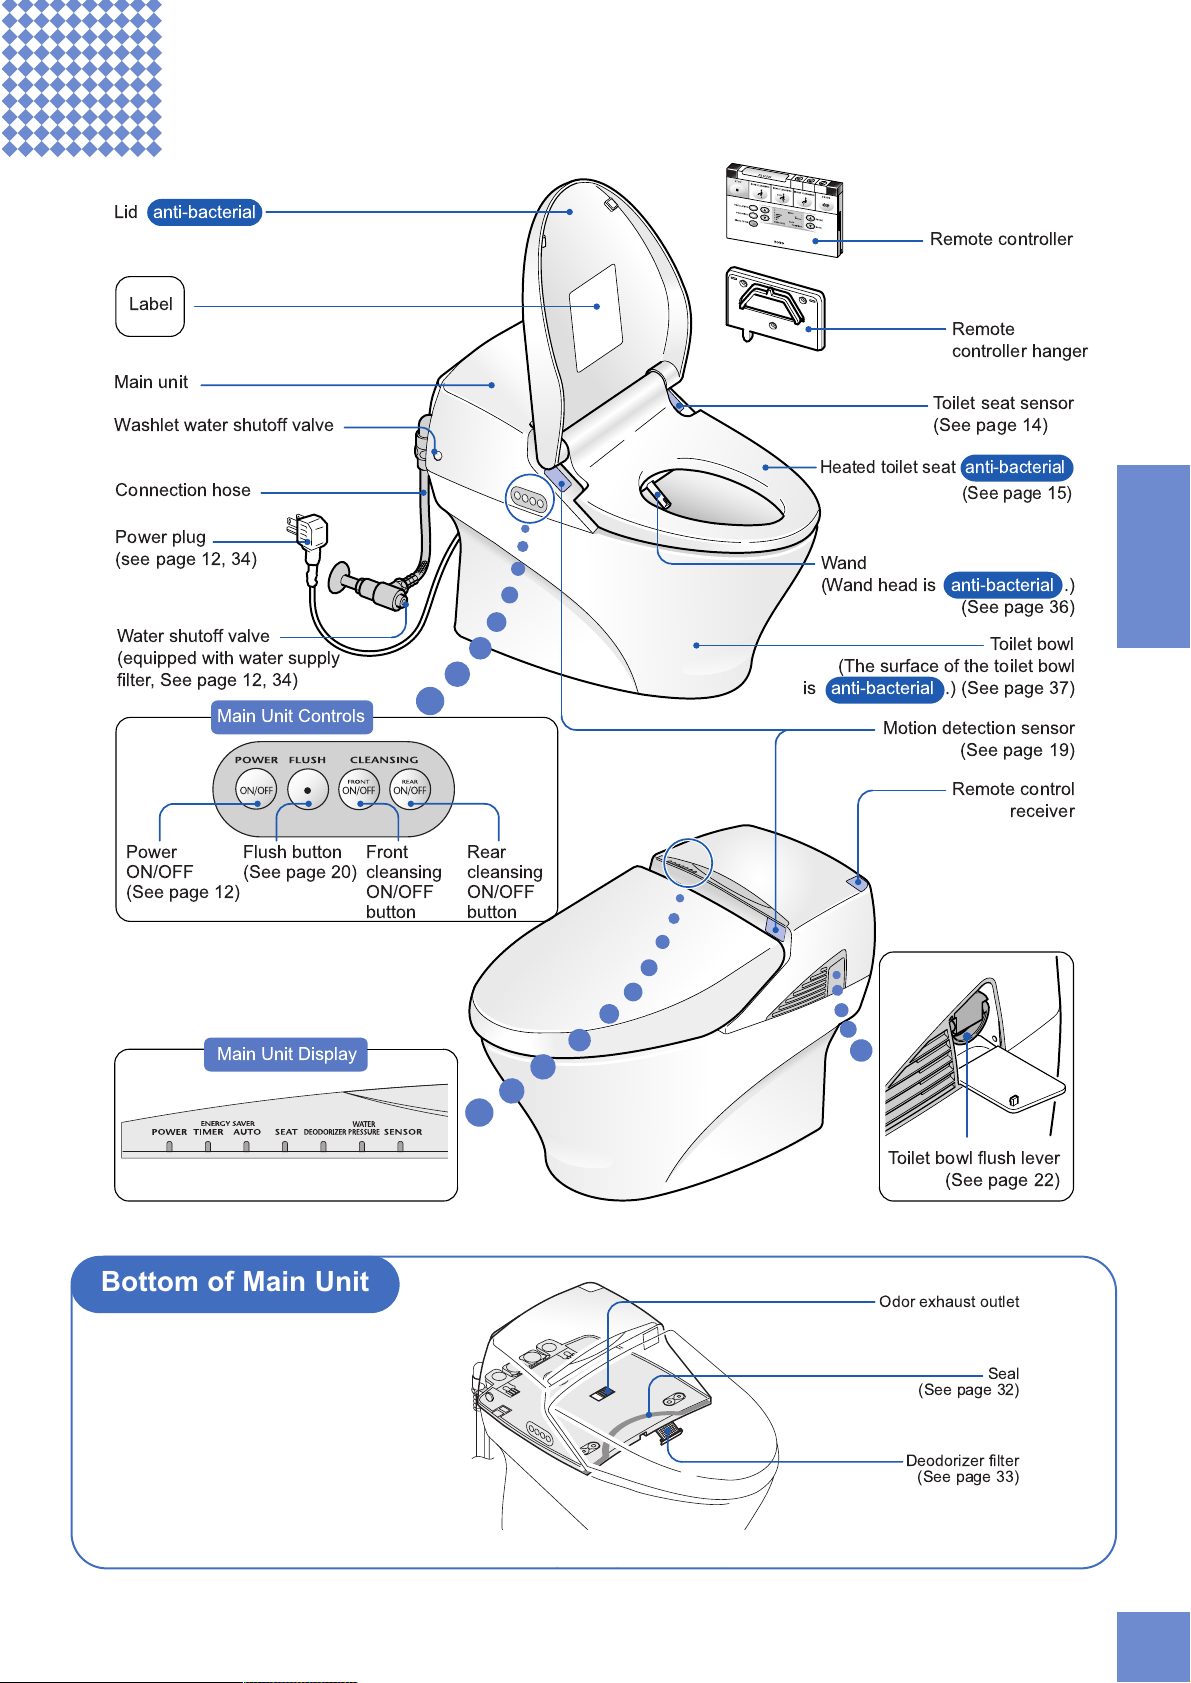
Parts and Features
Introduction
Washlet water shutoff valve
Power plug
(see page 12, 34)
Water shutoff valve
(equipped with water supply
filter, See page 12, 34)
Main Unit Controls
Power
ON/OFF
(See page 12)
Flush button
(See page 20)
Front
cleansing
ON/OFF
button
Rear
cleansing
ON/OFF
button
Main Unit Display
Wand
(Wand head is anti-bacterial .)
(See page 36)
Lid anti-bacterial
Label
Main unit
Connection hose
Remote controller
Remote
controller hanger
Toilet seat sensor
(See page 14)
Heated toilet seat anti-bacterial
(See page 15)
Toilet bowl
(The surface of the toilet bowl
is anti-bacterial .) (See page 37)
Motion detection sensor
(See page 19)
Remote control
receiver
Toilet bowl flush lever
(See page 22)
Deodorizer filter
(See page 33)
Odor exhaust outlet
Seal
(See page 32)
Bottom of Main Unit
Page 10
10
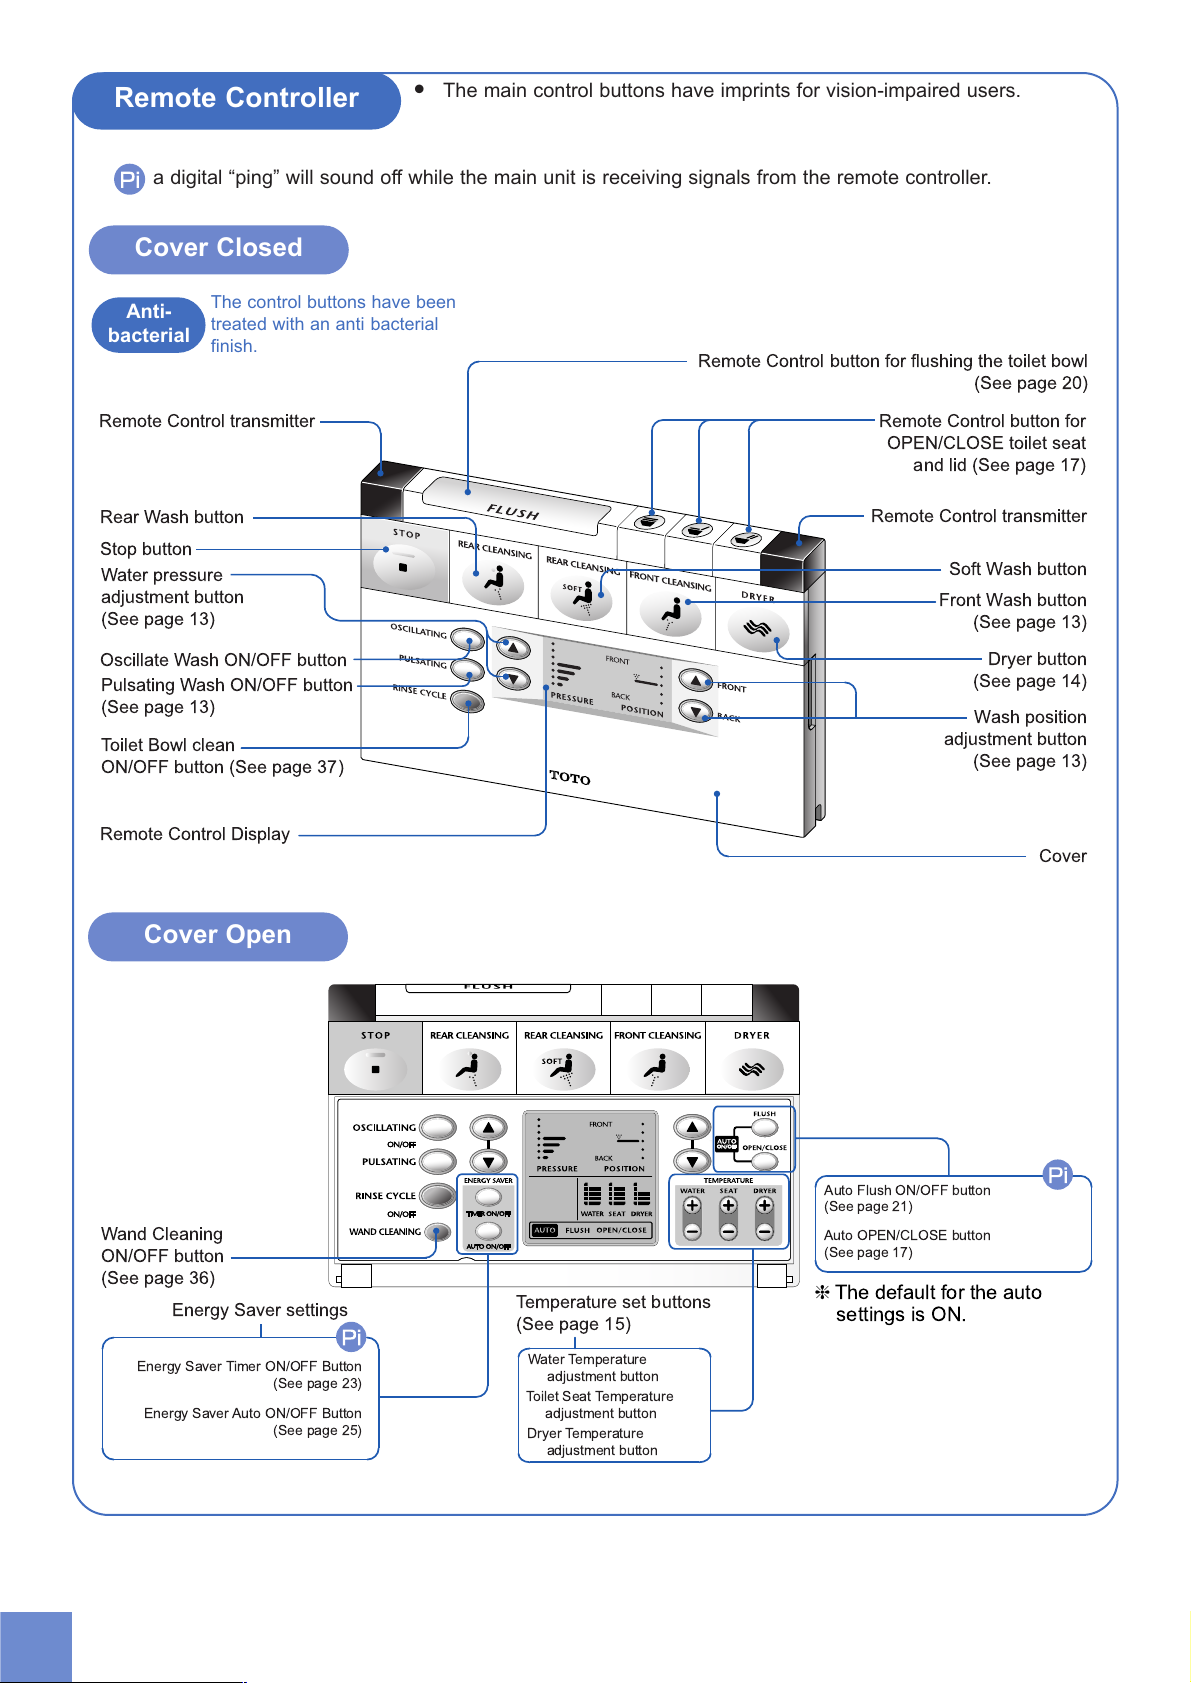
Energy Saver Timer ON/OFF Button
(See page 23)
Energy Saver Auto ON/OFF Button
(See page 25)
Wand Cleaning
ON/OFF button
(See page 36)
Temperature set buttons
(See page 15)
Toilet Seat Temperature
adjustment button
Dryer Temperature
adjustment button
Water Temperature
adjustment button
❈
The default for the auto
settings is ON.
Auto OPEN/CLOSE button
(See page 17)
Remote Control transmitter
Stop button
Rear Wash button
Water pressure
adjustment button
(See page 13)
Toilet Bowl clean
ON/OFF button (See page 37)
Remote Control Display
Oscillate Wash ON/OFF button
Pulsating Wash ON/OFF button
(See page 13)
Remote Control button for flushing the toilet bowl
(See page 20)
Remote Control button for
OPEN/CLOSE toilet seat
and lid (See page 17)
Remote Control transmitter
Front Wash button
(See page 13)
Soft Wash button
Dryer button
(See page 14)
Wash position
adjustment button
(See page 13)
Cover
Energy Saver settings
Auto Flush ON/OFF button
(See page 21)
Remote Controller
Cover Closed
●
The main control buttons have imprints for vision-impaired users.
a digital “ping” will sound off while the main unit is receiving signals from the remote controller.
The control buttons have been
treated with an anti-bacterial
finish.
Anti-
bacterial
Cover Open
Page 11

11
Before Using the NEOREST 600
Introduction
close
open
battery cover
2 AA batteries
back side
Remote Control Display
Preparation
Insert batteries into the remote controller.
➀ Remove the remote controller from its wall hanger.
●
Grasp the remote controller at each side and pull straight
up.
➁ Open the battery cover on the back of the remote
controller.
➂ Insert 2 AA batteries into the battery compartment.
➃ Close the battery cover.
1
●
If the batteries are properly inserted, the remote controller
display will appear as in the figure shown at the right.
●
Use alkaline dry cell batteries.
●
Adhere to the following precautions to prevent battery acid leakage.
●
Use the same type of batteries each time you replace batteries.
●
Remove the batteries from the battery compartment when not using the remote controller for extended periods of time.
●
Do not use rechargeable batteries.
Settings (temperature, energy saving and time) may be lost when replacing batteries. Be sure to reset the desired settings after
installing new batteries.
Regarding dry cell batteries
1
Turn the Main Unit controls to OFF when replacing the batteries or cleaning the unit to avoid
pushing other buttons and enabling unnecessary functions, such as flushing or opening and closing
the lid.
Page 12
12
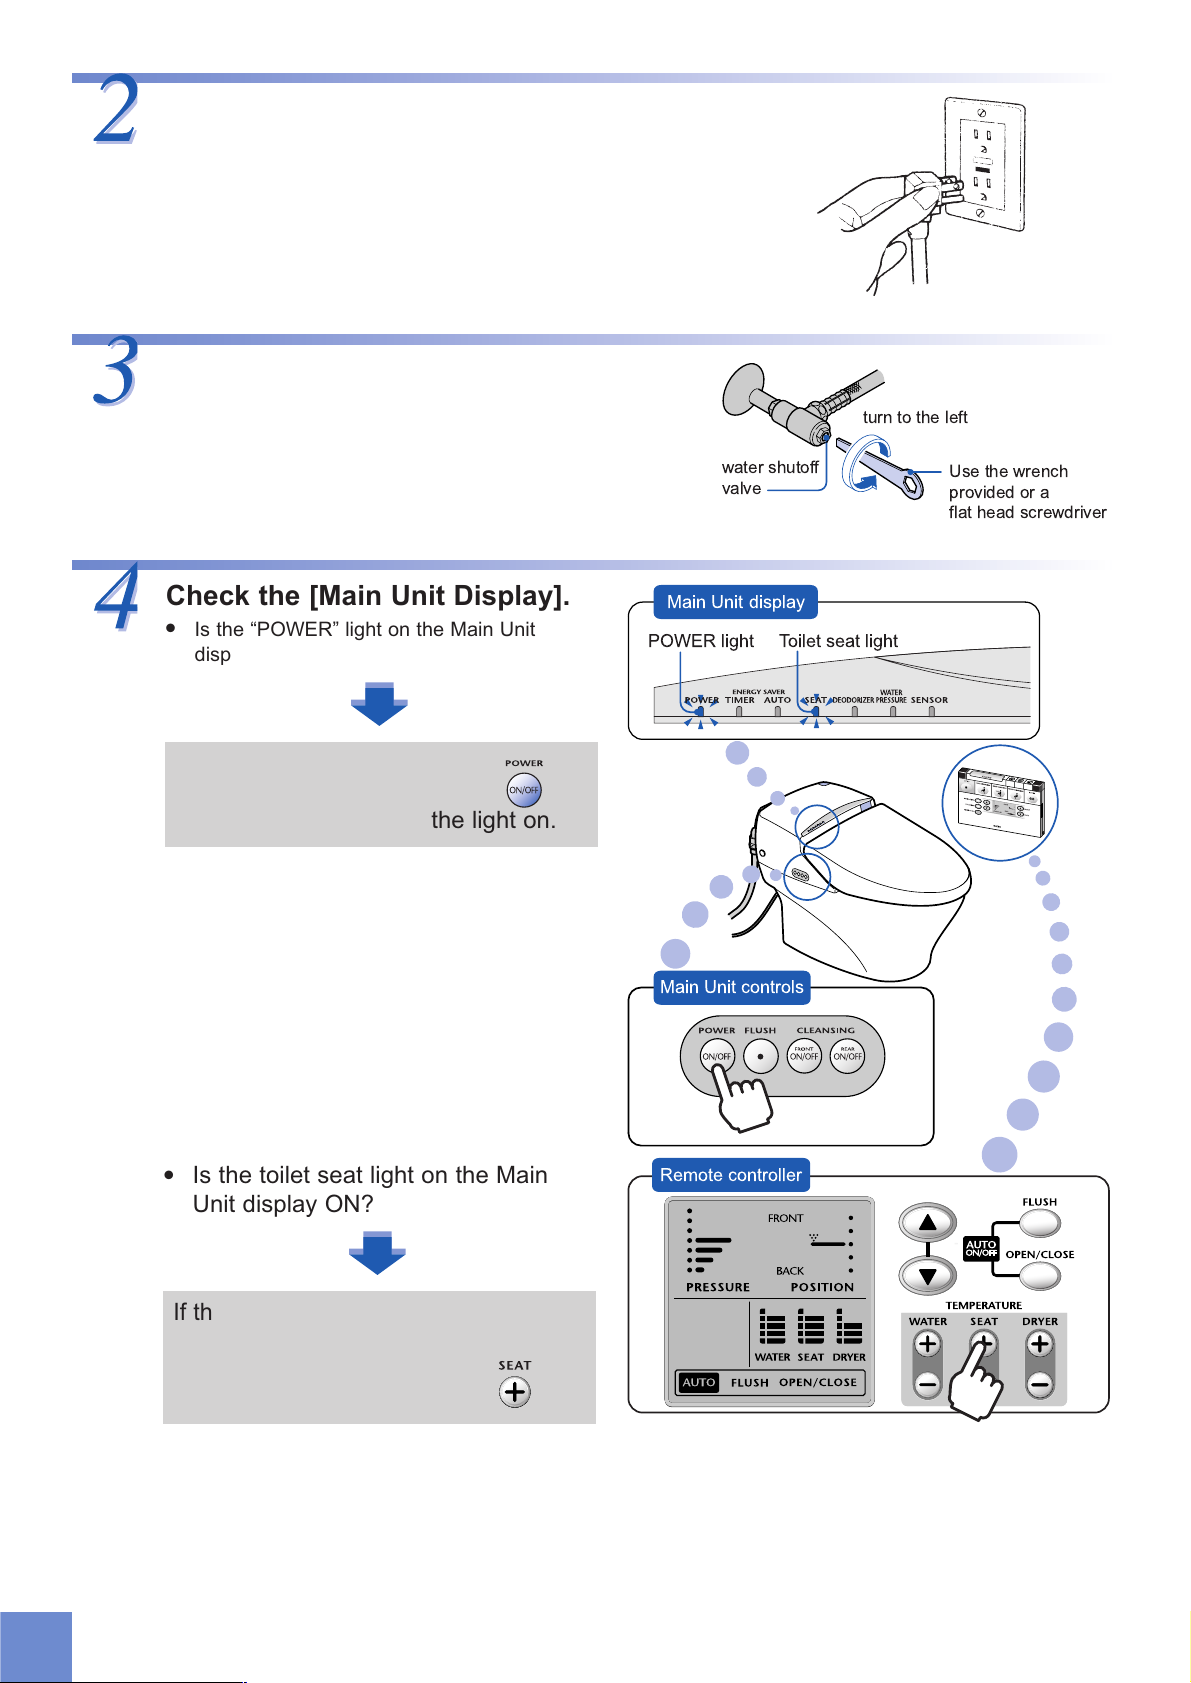
Insert the plug into the wall outlet.
●
Connect the power cord to a 120V (60 Hz) GFCI
protected power outlet.
Open the water shutoff valve.
●
Use the wrench provided or a flat head screwdriver to
open the water shutoff valve.
turn to the left
Use the wrench
provided or a
flat head screwdriver
water shutoff
valve
Check the [Main Unit Display].
●
Is the “POWER” light on the Main Unit
display ON?
Main Unit display
POWER light Toilet seat light
Main Unit controls
Remote controller
If the light is not ON,
push the “POWER” button
on the main unit to turn the light on.
●
Is the toilet seat light on the Main
Unit display ON?
If the light in not ON, open the remote
controller cover and push the toilet seat
temperature adjustment button ON
to turn the light on.
Page 13
13
How to Use the NEOREST 600
Operation
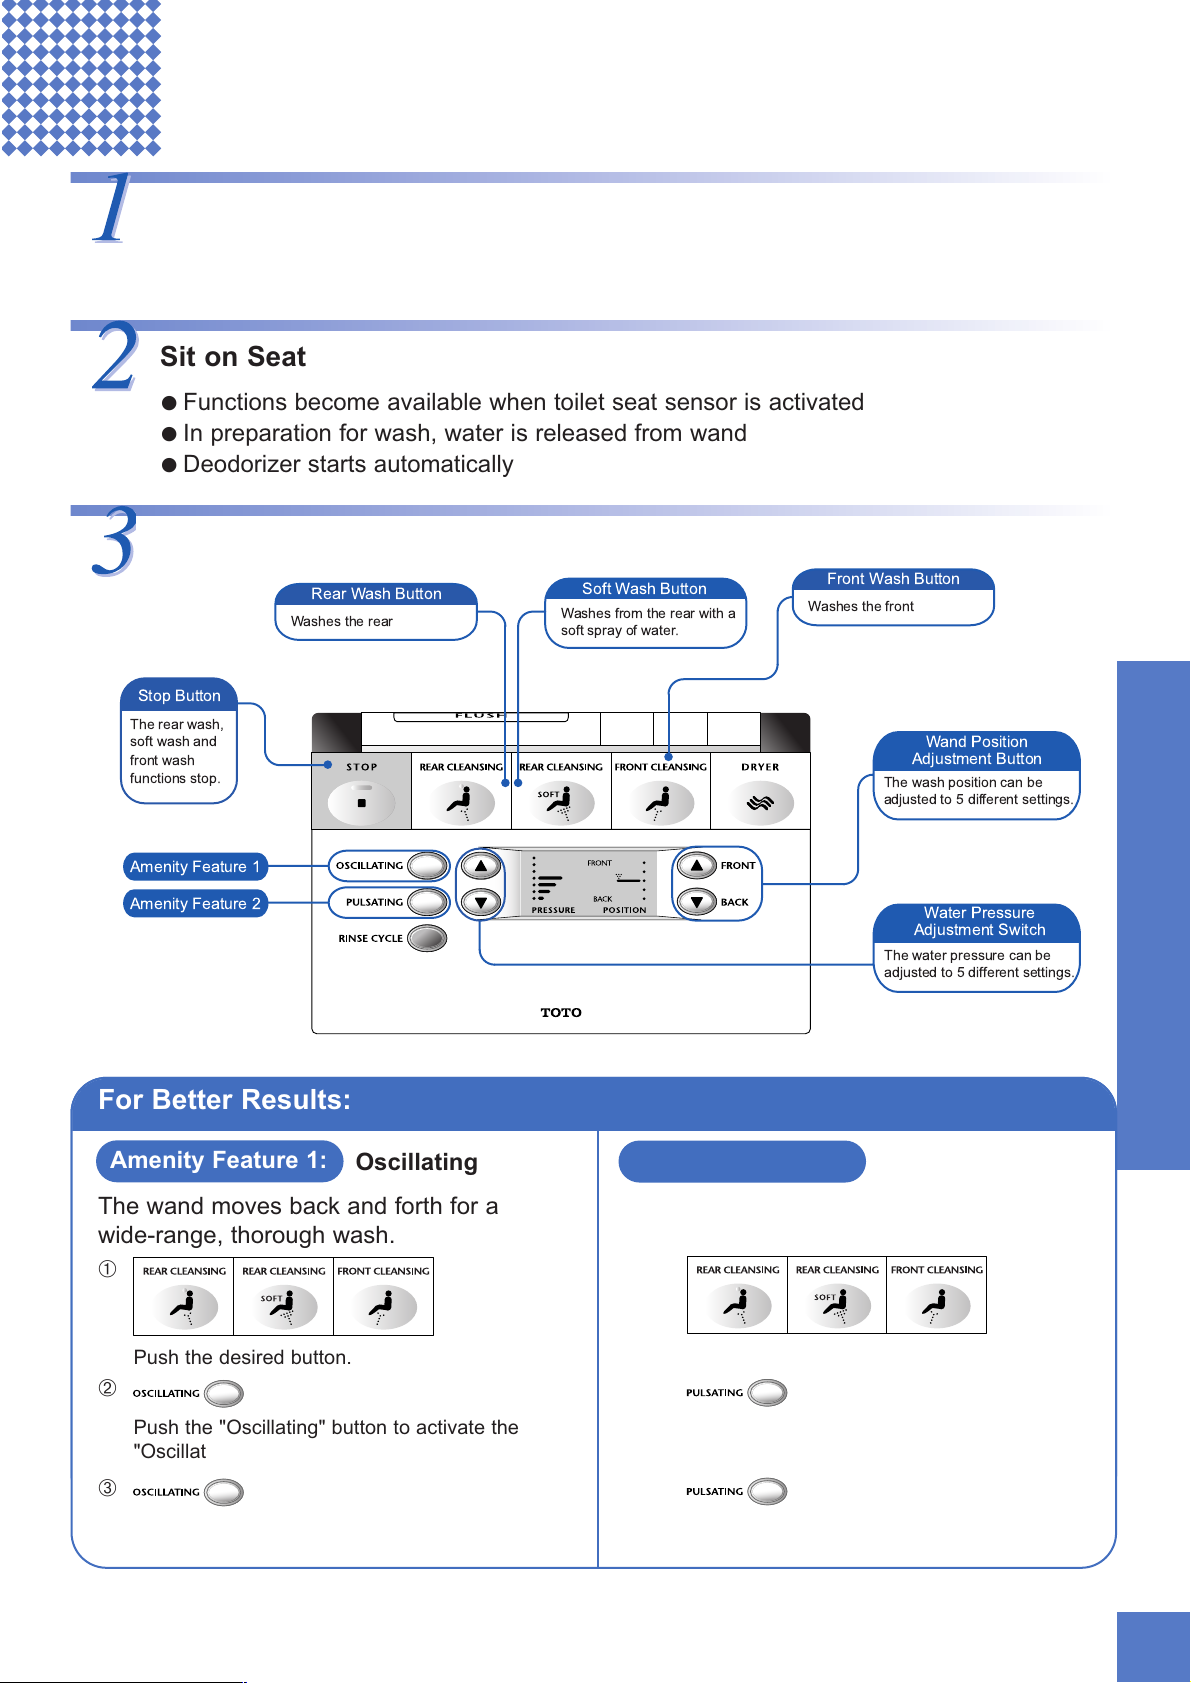
Wash
When you stand at a distance of approximately 1 foot from the front
of the toilet, the lid will automatically open.
(Auto OPEN/CLOSE, see page 17, 18)
Soft Wash Button
Rear Wash Button
Washes the rear
Front Wash Button
Washes the front
Stop Button
Amenity Feature 1
Amenity Feature 2
The rear wash,
soft wash and
front wash
functions stop.
Washes from the rear with a
soft spray of water.
Wand Position
Adjustment Button
The wash position can be
adjusted to 5 different settings.
Water Pressure
Adjustment Switch
The water pressure can be
adjusted to 5 different settings.
Sit on Seat
● Functions become available when toilet seat sensor is activated
● In preparation for wash, water is released from wand
● Deodorizer starts automatically
For Better Results:
Amenity Feature 1:
Oscillating
The wand moves back and forth for a
wide-range, thorough wash.
Push the desired button.
➀
➁
➂
Push the "Oscillating" button to activate the
"Oscillating" function.
Push the "Oscillating" button again to turn off
the "Oscillating" function.
Alternates hard and soft water pressure.
Push the desired button.
➀
➁
➂
Push the "Pulsating" button to activate the
"Pulsating" function.
Push the "Pulsating" button again to turn off
the "Pulsating" function.
Amenity Feature 2:
Pulsating
Page 14
14
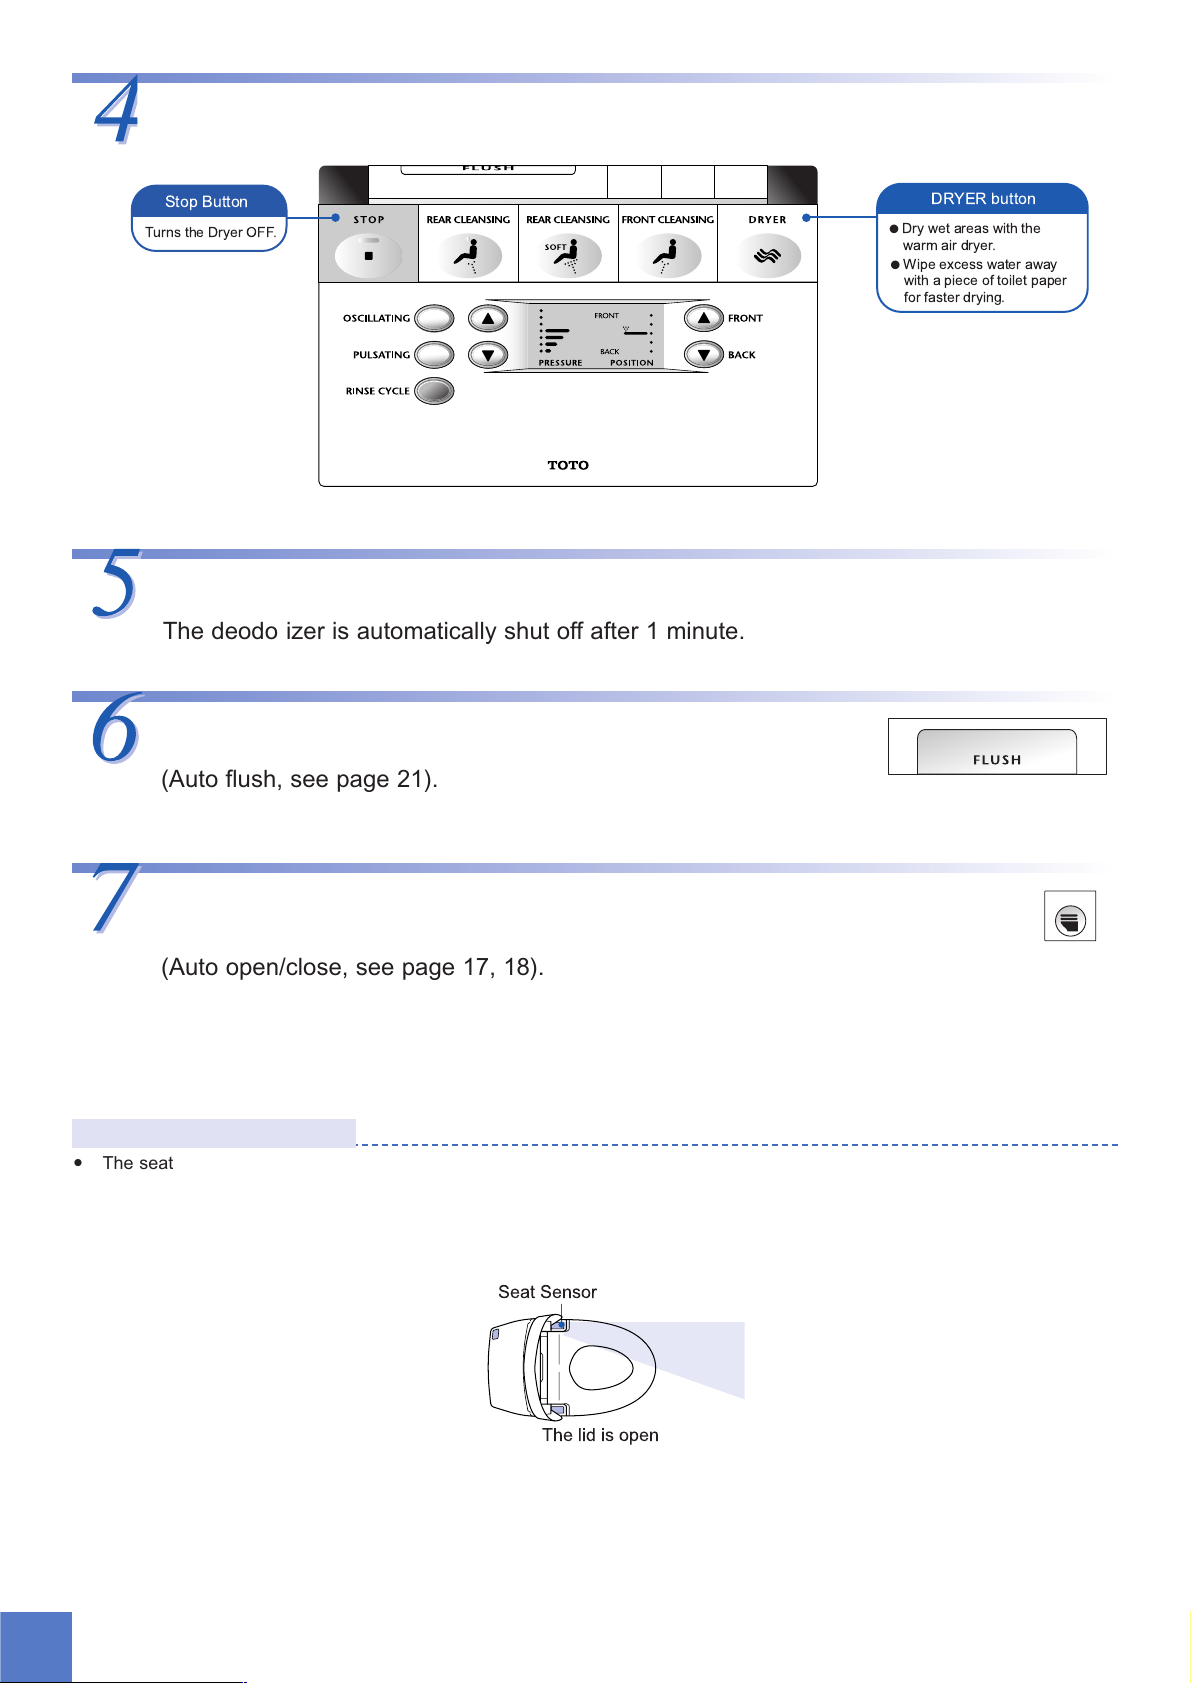
Move away from the toilet
Flush by using the flush button on the remote control.
Close the seat and lid by using the button on the remote control.
Dryer
DRYER button
●
Dry wet areas with the
Stop Button
Turns the Dryer OFF.
warm air dryer.
●
Wipe excess water away
with a piece of toilet paper
for faster drying.
The deodorizer is automatically shut off after 1 minute.
(Auto flush, see page 21).
(Auto open/close, see page 17, 18).
●
The seat sensor detects when a person sits on the seat.
●
The seat sensor projects infrared light as shown in the figure below. When a person sits in front of the beam, the sensor
detects their presence.
●
The beam may not detect a presence depending on clothing or sitting position. If this is the case, please readjust sitting
position or raise clothing.
About the Seat Sensor:
Seat Sensor
The lid is open
Page 15
15
For Best Results
Operation
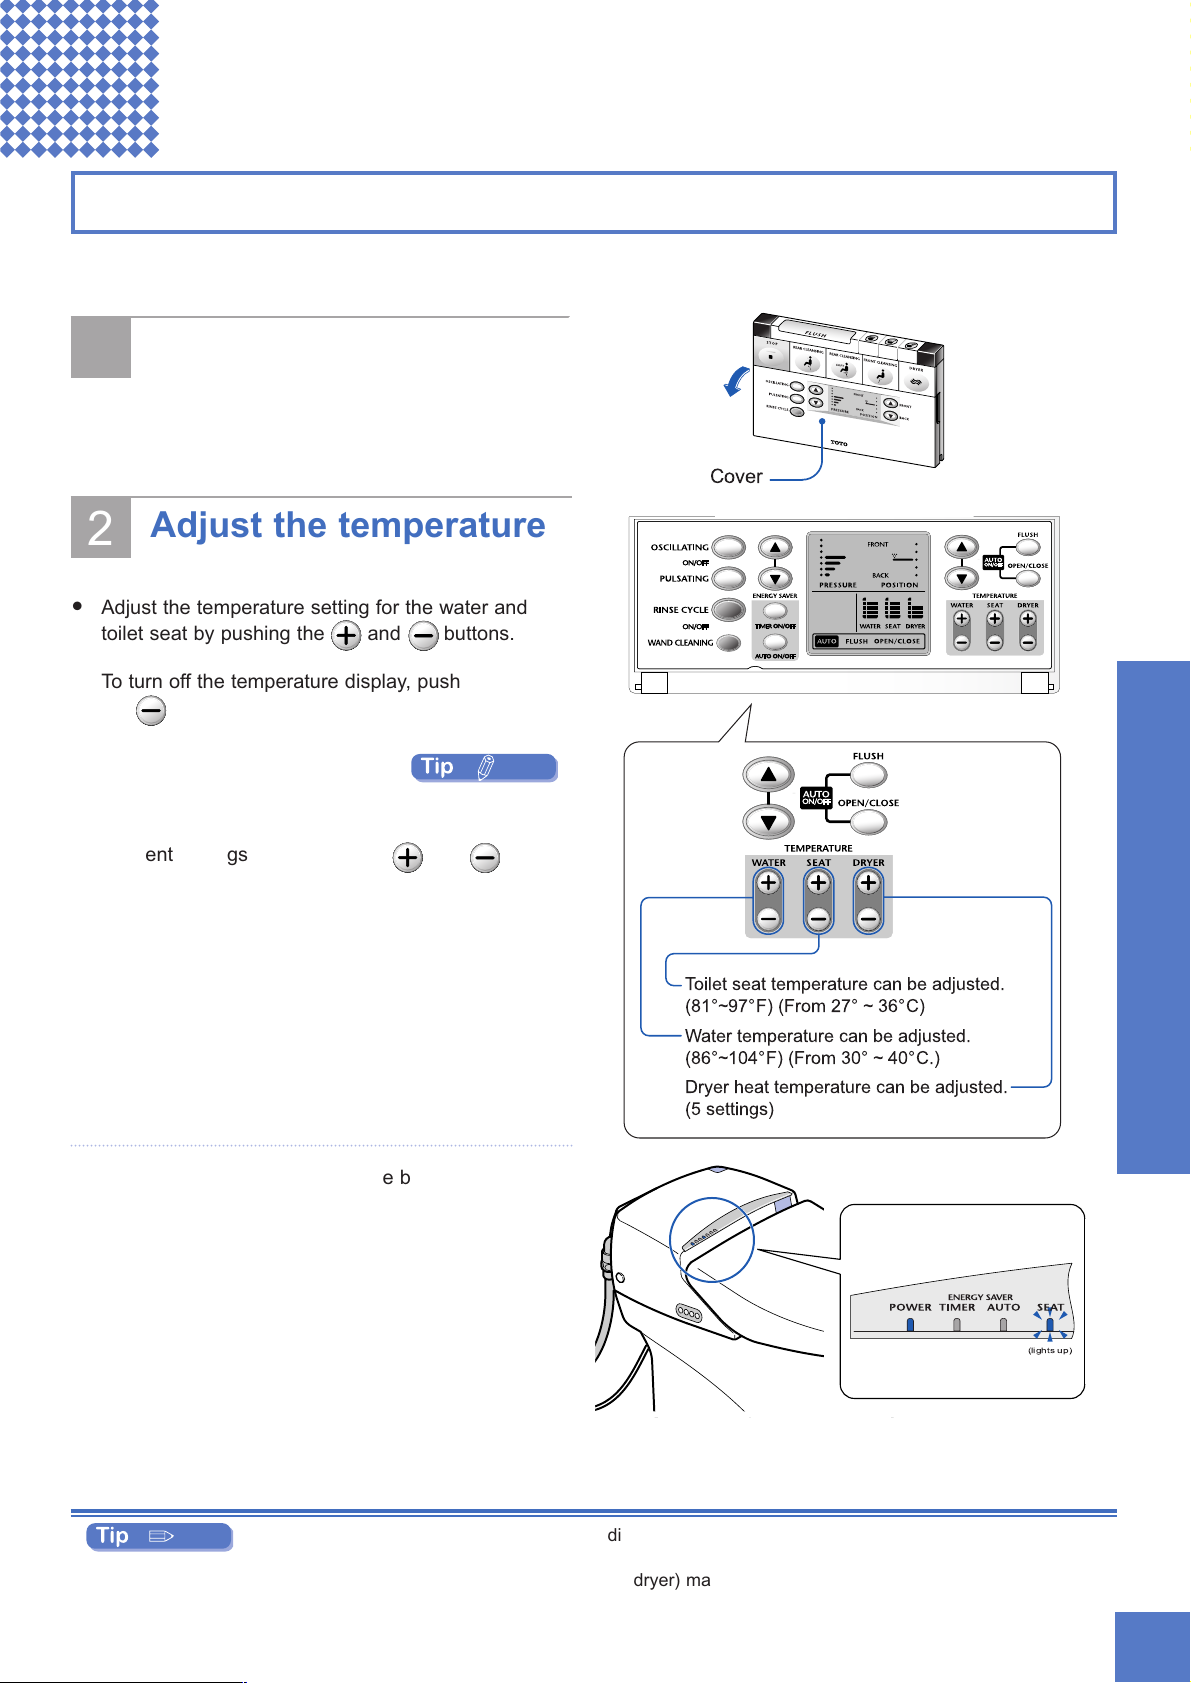
Adjusting the Temperature
●
Use the remote controller to adjust the water temperature, toilet seat temperature, or dryer
heat to the desired setting.
1
Open the Remote
Controller Cover.
Cover
Water temperature can be adjusted.
(86¡~104¡F) (From 30¡ ~ 40¡C.)
Toilet seat temperature can be adjusted.
(81¡~97¡F) (From 27¡ ~ 36¡C)
Dryer heat temperature can be adjusted.
(5 settings)
2
Adjust the temperature
●
Adjust the temperature setting for the water and
toilet seat by pushing the and buttons.
To turn off the temperature display, push down on
the button until the display goes out.
●
The dryer temperature can be adjusted to 5
different settings by pushing the and
buttons.
●
When the toilet seat temperature button is pushed,
the "Seat" light on the main unit controls will light
up.
(lights up)
1
●
The temperature setting indicated on the display is to be used as a guide and does not reflect the actual
temperature.
●
Temperature settings (water, toilet seat, and dryer) may be lost when replacing batteries. Be sure to
reset the desired settings after installing new batteries.
1
Page 16

16
Deodorizing
1
Sit on the toilet seat
(lights up)
The deodorizer funciton
automatically starts
●
The “DEODORIZER” light on the main unit display
lights up.
2
Move away from the
toilet seat
(lights goes out)
The deodorizer function
automatically stops after
1 minute.
●
The "DEODORIZER" light on the main unit display
goes out.
Page 17

17
Opening and Closing the Toilet Seat and Lid
●
The toilet seat and lid can be opened and closed by pushing the desired button on the remote
controller.
There are 2 settings for opening and closing the toilet seat and lid. The remote controlled
setting and the auto setting.
Remote Controlled Opening/Closing of Toilet Seat and Lid
Push the desired button
on the remote controller.
Both the toilet seat and lid close.
The lid opens and
the toilet seat lowers.
Both the toilet seat
and lid open.
Automatic Opening/Closing of Toilet Seat and Lid
●
When you stand in front of the toilet, the lid automatically opens, and when you move away from the
toilet, the lid automatically closes. If the lid is closed either manually or via remote control, it will not
automatically reopen for 10 seconds. (The lid is programmed so that it will not repeatedly open and
close.)
Seat and Lid "OPEN/CLOSE"
is displayed.
Auto Seat and Lid
OPEN/CLOSE button.
Confirm that the Seat and Lid "OPEN/CLOSE" function is displayed from the remote
controller display.
The toilet seat and lid will open
and close
Operation
1
In the event of a power outage or when the remote controller batteries need replacing, manually open and
close the toilet seat and lid.
1
Page 18

18
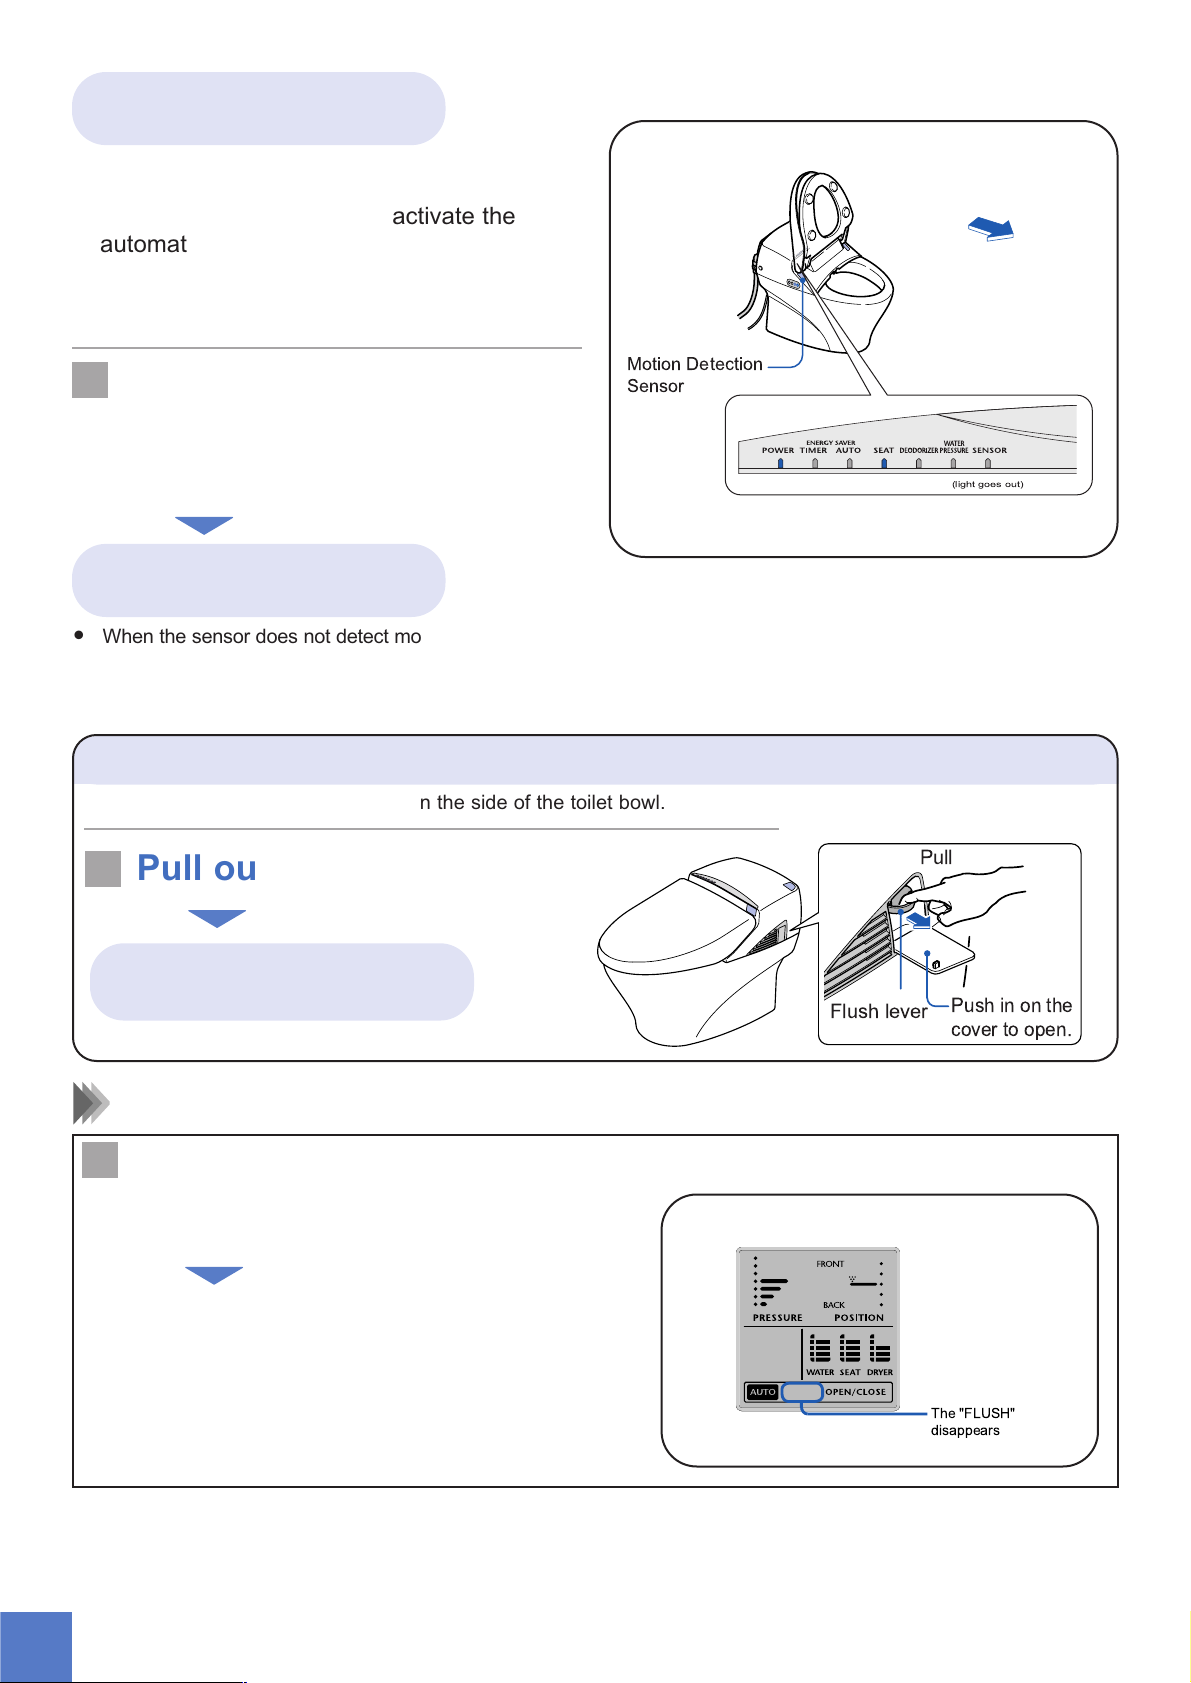
Motion Detection
Sensor
(lightgoes out)
●
When the motion detection sensor fails to detect motion,
the "sensor" light on the Main Unit Display will go out.
2
Depending upon the height and position of the user, the motion detection sensor may not be able to detect
movement. In this case, use the remote controller to push Remote Control button for OPEN/CLOSE toilet
seat and lid.
1
Stand in front of the
toilet.
Motion Detection
Sensor
(lightsup)
If the lid does not open, move at least 1 foot away from the
toilet, wait 10 seconds, and then stand in front of the toilet
again. The lid will automatically open.
●
When the motion detection sensor detects motion, the
"sensor" light on the Main Unit Display will light up.
●
The motion detection sensor detects motion and the
lid opens automatically.
1
The Lid automatically opens
1
Before cleaning the toilet, be sure to set the Auto Lid OPEN/CLOSE to OFF. This will prevent the lid from
opening/closing while cleaning is performed.
After using the toilet,
move at least 1 foot away
from the toilet.
The lid will automatically close after 90
seconds.
2
● When raised with the controller and you do not
sit on the toilet seat for at least 6 seconds,
the lid will not automatically close.
When Sitting on the Toilet Seat
Page 19

19
To turn off the Auto OPEN/CLOSE function
Push the desired button
on the remote controller
Push the Auto OPEN/CLOSE button on the
remote controller to stop the Auto
OPEN/CLOSE.
●
The Auto “OPEN/CLOSE" will disappear from the
remote control display.
●
To turn the Auto Seat and Lid “OPEN/CLOSE” on
again, repeat this operation.
●
The Motion detection sensor detects when someone stands in front of the toilet.
●
The Motion detection sensor projects an infrared light as shown in the figure below.
When someone stands in line with the infrared light, movement is detected by the sensor.
About the Motion detection sensor:
Motion detection sensor
The lid is close
Motion detection sensor
The lid is open
The Auto Seat and Lid
"OPEN/CLOSE"
disappears
Operation
●
When the motion detection sensor fails to detect motion, the "sensor" light on the Main Unit Display will go out.
●
If you do not sit or stand for more than 6 seconds, the seat and lid will close after 5 minutes.
After using the toilet,
move at least 1 foot away
from the toilet.
The toilet seat and lid will automatically
close after 90 seconds.
● Raise the toilet seat with the Remote
Controller. You must stand in front of the
toilet for at least 6 seconds or the lid will not
automatically close.
When Standing in Front of the Toilet
(light goes out)
Motion Detection
Sensor
Page 20

20
Flushing Water
●
The toilet can be flushed by pushing the flush button on the remote controller.
There are 2 settings for flushing water. The remote controlled setting and the auto setting.
Remote Controlled Flushing
1
Push the flush button on
the remote controller.
Flush
The toilet bowl is flushed.
1.6 Gallons per Flush (6 LPF)
If the remote controller batteries need replacing
Flush button
●
Use the flush button located on the main unit controls to flush the toilet.
Push the flush button on
the main unit controls.
1
The toilet bowl flush button cannot be pushed repeatedly. Wait 10 seconds before pushing the button again.
The toilet bowl is flushed.
1.6 Gallons per Flush (6 LPF)
Page 21

21
2, 3
When finished, move
away from the toilet
(more than one foot).
After 3 seconds the toilet will
automatically flush
(light goes out)
Motion
Detector
●
When the motion detection sensor does not detect
motion near the toilet, the sensor light located on the
main unit control goes out.
2
The default setting for the Auto flush is ON.
3
●
The auto flush will not function if the user sits on the toilet or stands in front of the toilet for less than 6
seconds. In this case, use the remote controller flush button to flush the toilet.
●
Depending upon the height and position of the user, the toilet may not automatically flush.
Automatic Flushing
●
The toilet will automatically flush when the user moves away from the toilet. (This function prevents the
toilet bowl from being left unflushed.)
Auto Flush
ON/OFF button
"FLUSH" is displayed
Confirm that the "Flush" function is displayed from the remote controller display.
● You must sit on the toilet seat for at least 6
seconds in order to activate the automatic
flush function.
1.6 Gallons per Flush (6 LPF)
When sitting on the toilet
seat
Operation
Page 22
22
When finished, move
away from the toilet
(more than one foot).
After 3 seconds the toilet will
automatically flush
(light goes out)
Motion Detection
Sensor
●
When the sensor does not detect motion near the toilet, the motion detection sensor light located on the main unit
control goes out.
●
Light flush only activates when sensor detects someone standing in front of unit for 6 seconds and seat and lid are
both raised.
Flushing the toilet during a power outage
Pull
Push in on the
cover to open.
Flush lever
●
Pull out the flush lever located on the side of the toilet bowl.
Pull out the flush lever
To turn off the Auto Flush function
Push the Auto Flush button on
the remote controller to
deactivate the Auto Flush
●
The "FLUSH" will disappear from the remote control
display.
●
To turn the Auto Flush on again, repeat this
operation.
The "FLUSH"
disappears
● You must stand in front of the toilet for at
least 6 seconds in order to activate the
automatic flush function.
1.2 Gallon light flush (4.5 LPF)
The toilet bowl is flushed.
1.6 Gallons per Flush (6 LPF)
When standing in front of
the toilet
Page 23

23
Operation
Using the Energy Saver Feature - “TIMER ON/OFF”
You can set your Neorest to turn off the seat heater to save energy by pressing the “TIMER ON/OFF”
button. The heater turns off for 3, 6 or 9 hours to save energy. Each day afterwards, the NEOREST
automatically goes into Energy Saver mode at the same time.
Open the remote control cover and press the “Timer” button at the time you want the
Energy Saver feature to begin operating.
●
“Timer” and “Saving Time 3 hrs.” appear in the remote control display, and a beep sounds.
●
The “Energy Saver - Timer” lamp in the main unit display lights.
●
The seat heater turns off and energy saving starts.
Push
Press the “TIMER ON/OFF” button repeatedly to set the duration.
●
Every time you press “TIMER ON/OFF”, the display changes.
●
Select the duration you want to set.
Push
●
The saving time is initially set for 3 hours.
●
When batteries for the remote control are replaced, the settings will be cleared. Reset the settings.
●
When you expect freezing temperatures, keep the room warm so that the room temperature does not fall below
freezing, and turn off the Energy Saver feature.
●
In case the power cord is disconnected or a power failure occurs, the timer may not operate as originally set
starting on the following day.
Notes
●
You can always change the energy saving duration without changing the energy saving start time.
●
If you wish to change the energy saving start time, turn off the energy saving timer and press the “Timer
ON/OFF” button again at the new time.
Notes
To Conserve Energy
Page 24

24
* Example
When you want to save energy for 6 hours between 0:00 a.m. and 6:00 a.m. (while
your family is sleeping), press the “Timer” button at midnight.
●
The energy saving starts automatically at the same time and duration on every following day.
●
When the toilet seat is occupied during energy saving mode, the seat heater temporarily turns on. At this time,
the green “Power” lamp lights.
It takes about 15 minutes for the seat to warm up.
Note
Shutting Off Energy Saver Feature - “Timer ON/OFF”
Open the remote control cover and press the “Timer ON/OFF” button until “Timer” and
“Saving Time” indicators in the remote control display go out.
●
The green “Power” lamp and the green “Seat” lamp on the main unit display light.
●
The seat heater turns on and energy saving stops.
Push No indication
Page 25

25
Operation
Using the Energy Saver - “AUTO ON/OFF”
The Neorest can be set to remember the times of day that you normally use the toilet, and will
automatically lower the temperature of the toilet seat to save energy when you do not expect to use the
toilet.
Open the remote control cover and press the “AUTO ON/OFF” button.
●
“AUTO” appears in the remote control display.
●
The “Energy Saver - Auto” lamp in the main unit display lights.
●
The main unit accepts the operation, and a beep sounds.
Push
●
The seat temperature is set to about 79°F (26°C) while in Auto energy-saving mode; the seat will begin to warm
up when someone sits on it.
Note
●
During time periods when the toilet is not used much, the orange “Energy Saver - Auto” lamp on the
main unit lights.
The Neorest begins to detect the time periods during which the toilet is not used often.
(See Note).
The temperature of the seat is automatically
lowered, and the energy-saving mode begins
operating.
Page 26

26
(Green)
(Orange)
(Green) (Green)
6:00
18:00
0:00
12:00
Not used
much
Used often
The Energy Saver will determine that
the toilet is not used often if it is used
twice per week or less at about the
same time
Precaution concerning the Energy Saver:
●
It takes the Neorest two or three days to establish during which time periods the toilet is not used often. During
that time, the energy-saving mode will go into effect gradually.
When replacing the batteries of the remote control:
●
The energy-saving settings will disappear and must be re-entered.
When the power is switched off, or if there is a power outage:
●
The Energy Saver sometimes does not operate correctly when this happens, but it will begin operating correctly
again on the following day.
●
If the three-prong plug is unplugged when the Neorest is not used for a long time, it will operate in the same
way.
Notes
Here’s one way you can save energy
Page 27

27
Shutting Off the Energy Saver Feature - “AUTO ON/OFF”
Open the cover of the remote control, and press the Energy Saver button.
●
“AUTO” disappears from the remote control display.
●
The main unit accepts the operation, and a beep sounds.
●
The green “Power” lamp on the main unit lights.
Push No indication
●
If you sit on the seat when it is in Energy Saving mode, the seat will warm up. When this occurs, the
green “Power” lamp will come on.
●
The seat will take about 5 minutes to get warm.
The Energy Saver shuts off
The NEOREST can be used even during Energy
Saving mode.
Operation
Page 28

28
If You Are Using the “TIMER ON/OFF” and the “AUTO
ON/OFF” Features at the Same Time
Open the cover of the remote control, and press the “TIMER ON/OFF” button when you
want to begin saving energy.
Note: For more details, see “TIMER ON/OFF” on page 23.
Display
Next, press the ‘AUTO ON/OFF” button. (See note.)
(Green)
(Orange) (Green)
6:00
18:00
Turn the "Timer" on
at midnight
12:00
(Green)
(Green)
"Timer
on/off"
Energy
Saver
Used oftenUsed
often
Not used much
Used oftenUsed often
Used often
Used often
18:00
●
When you are using both, the remote control display will
look as follows:
●
One of a Saving Time of 3, 6, or 9 hours will display.
Notes
Here’s one way you can save energy
●
It does not matter in which order
you push the “TIMER ON/OFF”
and “AUTO ON/OFF” buttons:
“TIMER ON/OFF” first, the “AUTO
ON/OFF” or vice-versa.
●
During the time that the “TIMER
ON/OFF” is not operating, the
“AUTO ON/OFF” operates and
helps you save energy when the
Neorest is not used often.
Page 29

29
Caring for your NEOREST 600
Before Cleaning the Neorest
Each component can be disassembled for a thorough cleaning.
Caution!
Be sure to turn off the Auto Lid OPEN/CLOSE and Auto Flush
buttons before cleaning the unit.
Water shutoff
valve
Main unit
Toilet seat,
lid
(removable,
see page 31, 32)
Deodorizer filter
(removable,
see page 33)
Toilet bowl
(See page 37.)
Wand
(Can be extended without
spraying warm water,
see page 36.)
Water supply filter
(removable, see page 34)
Power plug
(See page 34.)
Maintenance
Page 30

30
Daily Care and Maintenance
Cleaning the main unit, toilet seat and lid.
Wipe the components with a soft damp cloth.
●
Wet and wring out a soft cloth for wiping the
surface of the components.
1, 2
Cleaning very dirty components.
●
Wet a soft cloth with diluted dish detergent
and wipe down the component surfaces.
●
Then wipe off the detergent solution with a
damp cloth.
If toilet bowl cleaner gets on the plastic
components.
●
Wipe down the component surface with a wet
cloth and wipe dry.
1
●
Do not use a dry cloth or toilet tissue to wipe plastic components as this may scratch the surfaces.
●
Be careful not to get water on the electrical components. Always wipe up any excess detergent and
water that gets into crevices.
2
Always keep the toilet seat sensor, motion ditection sensor and remote control receiver free from dust and
dirt to ensure optimum operation. (See page 39-45.)
Page 31

31
Maintenance
Thorough Cleaning of the Product
Cleaning the main unit, toilet seat and lid.
Remove the lid.
●
Open the lid at a 90° angle, grasp with both
hands and lift straight up.
●
Each component can be disassembled for a thorough cleaning.
Approximately
90û
Remove the toilet seat
●
Open the toilet seat at a 90° angle, grasp with
both hands and lift straight up.
✲ The toilet seat cord cannot be removed.
✲ The toilet seat cord can only be extended about
2 inches. Do not apply force to pull the cord out.
✲ The toilet seat should only be removed at a 90°
angle. Do not apply force to pull up on the seat
as this may cause it to break.
●
After removing the toilet seat, place it on top of
the toilet bowl for cleaning.
Approximately
90û
Toilet seat cord
Approximately
2 inches
L
Clean the components
●
Refer to the "Daily Care and Maintenance" instructions on page 30.
Make certain that the toilet seat pins
are facing up. (Both right and left pins.)
●
If the toilet seat pins are not facing up, push the
button on the remote controller.
Facing up
Toilet seat
pin (left)
L
Page 32
32
Reattach the toilet seat
●
Grasp the toilet seat with both hands, making
sure to keep the blue line on the seat cord
straight.
●
Insert the toilet seat straight into the seat pins.
●
Lower the toilet seat.
✲ Be careful not to get the seat cord twisted when
installing the toilet seat.
✲ Do not install the seat at an angle or use force
when pushing down on it.
L
Approximately
90û angle
Black line:
keep this line
straight when
installing the
toilet seat.
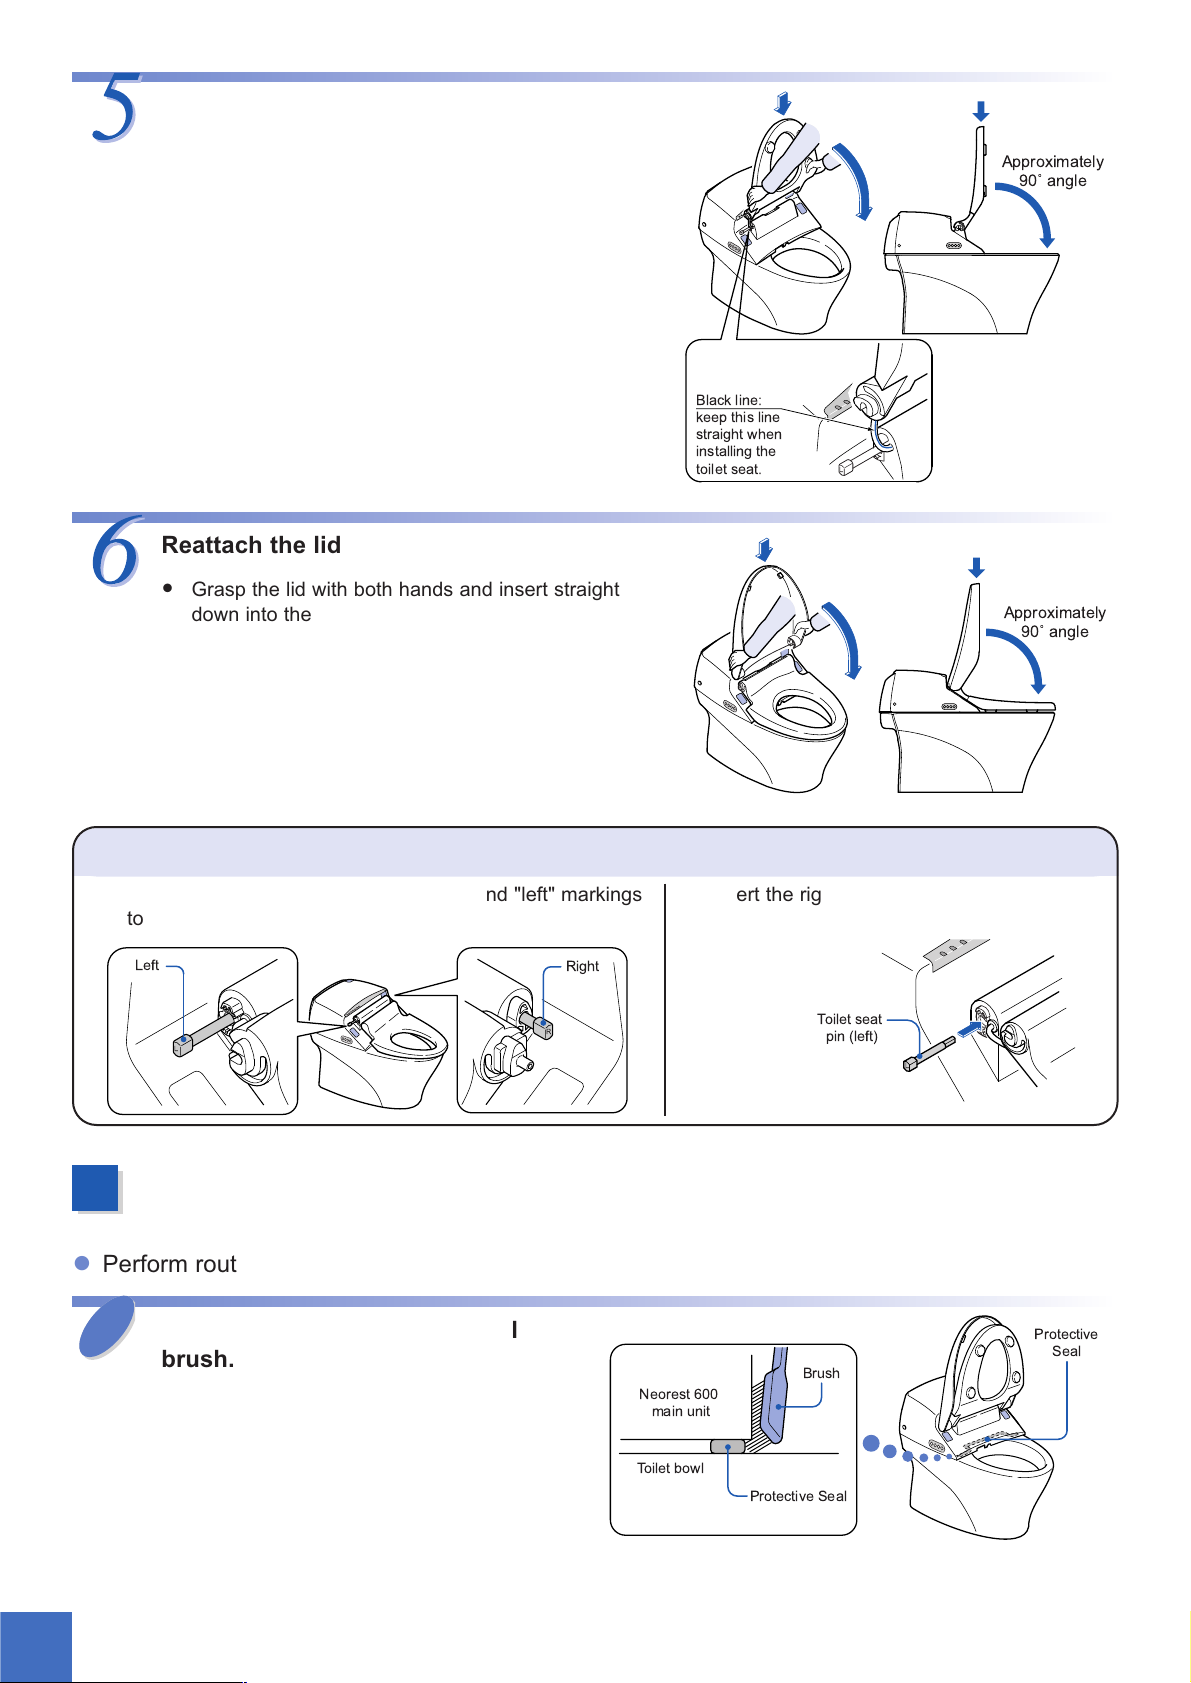
Reattach the lid
●
Grasp the lid with both hands and insert straight
down into the toilet seat pins.
●
Lower the lid.
✲ Do not install the lid at an angle or use force
when pushing down on it.
Approximately
90û angle
If the toilet seat pins come out:
Left
Right
R
L
1.
Check the toilet seat pin tips for "right" and "left" markings
to ensure proper installation.
2.
Insert the right and left pins all the way into
the respective slots.
✲ Do not apply
force when
pushing the
pins into
the slots.
Toilet seat
pin (left)
L
Cleaning crevices between the main unit and the toilet bowl.
(Perform once a week.)
Clean the crevices with a small
brush.
●
Perform routine cleaning of the crevices to prevent water and dirt from getting into the packing.
Protective
Seal
Brush
Neorest 600
main unit
Toilet bowl
Protective Seal
Page 33

33
Maintenance
Cleaning the deodorizer filter.
(Filter should be cleaned once a month.)
Remove the deodorizer filter.
●
Pull the filter (gray) forward.
●
Follow the steps below to remove dust from the filter.
Filter
Clean the deodorizer filter
●
Brush the dust off of the filter surface with a
small brush, such as a toothbrush.
Reinstall the deodorizer filter
1
1
Cleaning the filter
●
When cleaning the filter by running it under water, make sure to dry the filter thoroughly before reinstalling.
If the filter becomes extremely dirty, we recommend that you replace it with a new one.
●
Look for the "ウエ" markings on the top of the
filter.
●
Insert the filter into the unit using the two small
protrusions as a guide, as shown in the figure.
Push the filter into the slot until it clicks into
position.
✲ Never use your NEOREST without a filter as
this may cause a malfunction.
"Click"
Protrusions
ウエ
ウ
エ
Page 34

34
Other Care and Maintenance
Cleaning and inspecting the power plug.
Remove the power plug.
●
Grasp plug (never the cord) and pull straight
out.
●
Check the power plug once a month to make sure that it is in proper working condition.
Power plug
Clean the power plug
●
Remove any dirt and dust that has collected on
the plug prongs with a dry cloth.
Dry cloth
Insert the power plug
●
Insert the power supply plug all the way into the
wall outlet.
Cleaning the water supply filter.
Shut off the water valve and turn off the
water supply.
●
Shut off the water valve with the wrench provided.
●
When the water pressure gets low, it's time to clean the feed water supply filter.
Turn to the right
Wrench or flat
head screwdriver
Water shutoff
valve
Do not remove the water supply
filter with the water shutoff valve
in the OPEN position
Prohibited
Caution!
Page 35

35
Maintenance
Remove the water supply filter
●
Remove the filter cover with the wrench.
●
The filter will come out with the filter cover.
Water supply filter
Filter cover
Filter
Wrench
Turn to the left
Container to catch
the water that leaks
out when removing the filter
Water shutoff
valve unit
Clean the filter
Filter
Reinstall the water supply filter
●
Reassemble the water shutoff valve unit and
tighten the filter cover with the wrench
Filter
Filter cover
Wrench
Turn to the right
Water supply
filter
●
Remove the filter and clean the mesh by
running it under water.
✲ Use a small brush, such as a toothbrush to
remove any dirt that is lodged in the mesh.
✲ Remove any dirt that may have deposited inside
the water shutoff valve unit with a cotton swab.
1
Be sure to tighten the water
supply filter securely.
A loose filter may result in
water leakage.
Always perform
the following
Caution!
Open the water shutoff valve
●
Open the water shutoff valve with the wrench.
●
Confirm that there is no water leakage from the
water shutoff valve unit.
Water shutoff valve
Turn to the left
Wrench or flat
head screwdriver
Check for water leakage
!
1
Cleaning the filter
●
Use only plain water to clean the filter. Do not use detergent or cleaning solution.
●
Do not apply force when handling the filter to avoid bending it.
If the filter becomes extremely dirty, we recommend that you replace it with a new one.
Page 36

36
Cleaning the wand.
Extend the wand.
●
The wand can be cleaned without spraying warm water.
Wand
"Wand Cleaning"
button
Clean the wand.
●
Wipe the wand clean with a soft damp cloth.
✲ Do not apply force when pushing or pulling the
wand as this may damage the mechanism.
Store the wand.
Wand is stored
●
Push the "Wand Cleaning" button again.
The wand comes out.
●
The wand will automatically retract after 5 minutes.
1
The wand is stored and
automatically washed
1
Some water will spray from the base of the wand when cleaning it
●
Push the “Wand Cleaning” button on the remote controller.
Page 37

37
Maintenance
Cleaning the toilet bowl.
●
The toilet bowl can easily be cleaned while flushing with water. Perform routine cleaning of the toilet bowl.
✲ Be careful not to get toilet bowl cleaner on the plastic components.
Clean the toilet bowl with toilet bowl cleaner before pushing the
"Rinse Cycle" button.
●
After using toilet bowl cleaner or disinfectant to clean the toilet bowl, flush the bowl
right away (within 3 minutes) and leave the toilet seat and seat cover open. Wipe away any cleaner that spills
onto the toilet seat. (To prevent evaporated gas from the toilet bowl cleaner from getting into the main unit of
the Washlet.)
If you want to stop the Rinse Cycle:
●
Push the "Rinse Cycle" button, the unit will flush once and then refill.
During the Rinse Cycle, pushing the button again
will move to the next step of the cycle before 30
seconds is up.
2
3
Flush the toilet bowl.
Rinse Cycle
ON/OFF button
Clean the toilet bowl.
●
Clean the toilet bowl while the water is being
sprayed into the bowl.
●
Water swirls to wash the bowl for 30 seconds.
Toilet automatically switches to Flush mode
●
Flush mode lasts for 30 seconds.
●
Clean bottom of bowl (trap-way).
Water swirls into the toilet bowl
The water in the toilet
bowl gets flushed.
2
Cleaning the toilet bowl
●
Cleaning solution can be used to wash the toilet bowl, but be sure to
flush out the toilet bowl immediately after use to prevent it from staining
the toilet bowl.
3
Pushing the "Rinse Cycle" button again at any time will interrupt the cycle,
stop the water flow and refills the water automatically.
●
Push Rinse Cycle button
Automatically refills bowl
Page 38

38
Preventing Damage Due to Frozen Water
Pipes
How to Prevent Damage (Pipe Drain Method)
Caution!
Before performing the pipe drain method turn OFF the "Auto OPEN/CLOSE"
button and the "Auto Flush" buttons and keep the toilet bowl seat and cover in
the lowered position.
During cold months, or when there is a risk of frozen water pipes, follow the steps below to
prevent the pipes and hoses from freezing, which could cause damage to the components and
result in water leakage.
●
The water in the toilet bowl and Washlet unit are automatically drained at fixed intervals to
prevent the pipes and hose from freezing.
Push the "Rear Cleansing" button on the
main controls for 10 seconds or longer.
1
Begins the pipe drain method.
●
The "POWER" light on the main unit flashes on and off.
●
Warm water sprays from the stored wand at 5 minute intervals.
●
The water in the toilet bowl flushes at 10 minute intervals.
For best results:
●
Set the water temperature and the toilet seat temperature
settings on the remote controller to the maximum setting.
●
Keep the toilet seat and lid closed.
To Stop the Pipe Drain Function.
Push the "Rear Cleansing" button on the
main controls for 10 seconds or longer.
Stops the pipe drain method.
●
The "Power" light on the main unit stops flashing.
1
When there is a risk of frozen pipes:
●
Refrain from using the energy saving functions to avoid a greater risk of frozen pipes.
To turn off the Energy Saving Timer ON/OFF, see page 24.
To turn off the Auto ON/OFF, see page 27.
●
Even when not using the unit over extended periods of time, be sure to keep the power supply plug
plugged into the wall outlet and the "POWER" button ON.
"Rear Cleansing" ON/OFF button
"Power" button (flashes)
button (stops flashing)
Page 39

39
Troubleshooting
Troubleshooting
Turn to the right
Wrench or flat head
screw driver
Water shutoff
valve
WARNING
If water leakage occurs,
close the water shutoff
valve and turn off the
water.
Always perform
the following
Please check the following before calling for service.
Performance
Completely fails to
operate
Is there a power outage or is the circuit breaker
out?
Is the "Power" light on the main unit OFF?
Wait until the power is restored. Turn
the circuit breaker back ON.
Push the "Power" button on the main
controls.See page 12.
Problem Possible Cause Solution
Rear Wash · Front Wash
Has water stopped flowing from the main
supply?
Is the water shutoff valve closed?
Is the toilet seat sensor working properly?
Is the water pressure setting set too low?
Is the water supply filter dirty?
Push the stop button and wait until the
main water supply is restored.
Open the water shutoff valve.
(See page 12.)
Refer to the toilet seat sensor
instructions on page 44.
Push the water pressure adjustment
button on the remote controller.
Clean the water supply filter.
(See page 34.)
Problem Possible Cause Solution
Water will not spray.
The water pressure is
low.
Page 40

40
Rear Wash · Front Wash (Continued)
Is the water temperature setting button OFF or
set too low?
If the "Rear Wash", "Soft Wash" or "Front wash"
button are pushed, the water spray automatically
stops after 5 minutes.
Is the toilet seat sensor working properly?
When the toilet seat sensor is enabled, a small
amount of water is discharged before warm
water is sprayed from the wand. Also, changing
your position while seated on the toilet will cause
the toilet seat sensor to turn ON or OFF and a
small amount of water may discharge from the
wand area. This is not due to a malfunction.
Adjust the water temperature by
pushing the + or - buttons on the
remote controller. (See page 15.)
Push the "Rear Wash", "Soft Wash" or
"Front wash" button again.
(See page 13.)
Refer to the toilet seat sensor
instructions on page 44.
—
Problem Possible Cause Solution
The wash water is too
cold
The wash water stops
spraying while the
unit is in use
Water sprays into the
toilet bowl from the
wand for a few
seconds when sitting
on the toilet seat
Heated Toilet Seat
Problem Possible Cause Solution
Adjust the seat temperature by
pushing the + or - buttons on the
remote controller. (See page 15.)
It takes 15 minutes for the toilet seat
to get warm after sitting on it.
It takes 5 minutes for the toilet seat to
get warm after sitting on it.
—
The toilet seat does
not get warm.
The toilet seat is too
cold.
Is the toilet seat temperature setting turned OFF
or set too low?
Is the timer on "Energy Saving" mode?
Is the Auto Temperature Preset turned ON?
In case of continued sitting, the seat will shut off
after 1 hour. Seat heater will restart after person
gets up.
Warm Air Drying
Problem Possible Cause Solution
Adjust the dryer temperature by
pushing the + or - buttons on the
remote controller. (See page 15.)
Push the "dry" button again to restart
the warm air dryer.
Refer to the toilet seat sensor
instructions on page 44.
Refer to the toilet seat sensor
instructions on page 44.
The warm air dryer
does not get warm.
Is the warm air dryer temperature set too low?
If the "dry" button is pushed, the warm air dryer
automatically stops after 10 minutes.
Is the toilet seat sensor working properly?
Is the toilet seat sensor working properly?
The warm air dryer
stops working while
in use.
The warm air dryer
completely fails to
operate.
Page 41

41
Troubleshooting
Deodorizer
Problem Possible Cause Solution
Refer to the toilet seat sensor
instructions on page 44.
Clean the deodorizer filter.
(See page 33.)
—
The deodorizer is not
working.
Is the toilet seat sensor working properly?
Is the deodorizer filter dirty?
In the following situations, the toilet seat sensor
detects motion and activates the deodorizer:
● when standing in front of the toilet seat;
● when closing/opening the toilet seat and lid;
● when cleaning the toilet;
● when using the toilet bowl wash lever.
Odors are sometimes
not eliminated
thoroughly.
The deodorizer turns
on by itself.
Energy Saving Functions
Problem Possible Cause Solution
—
—
Energy Saving will not work correctly
on that day. The feature will begin
working on the next day.
User settings may be changed. Please
reset preferred settings.
(See page 23 or 25.)
The Auto ON/OFF
does not work even
after pushing the
button.
It may take 2~3 days to determine the correct
time frame for when the toilet is not used
frequently.
If the toilet is used at the same time 3 times a
week or more, the energy saving function may
not work. The time will not be considered an
energy save time.
In case of power failure or power cord
disconnect.
When batteries in remote controller are replaced.
The Energy Saving
functions fail to
operate.
Page 42

42
Auto OPEN/CLOSE
Problem Possible Cause Solution
Push the "Auto" function of the seat and
lid OPEN/CLOSE on the remote controller
to turn it ON. (See page 17, 18.)
Stand facing the toilet.
(See page 17, 18.)
Make sure that the sensors are not
covered as this will prevent the
infrared light from projecting.
Remove any dust or water drops that
may have settled on the sensors.
Do not hang any decorations or
fixtures directly in fron of the unit.
Move away 1 foot and wait ten
seconds, then try again. (See page 17.)
—
—
Move away from the toilet and wait for
approximately 90 seconds.
(See page 18.)
Change your position on the toilet seat
or the position in which you are
standing or raise the clothing you are
wearing to allow the sensor to detect
bare skin.
Make sure that the sensors are not
covered, as this will prevent the
infrared light from projecting.
The lid will not
automatically open
and close.
Is the Auto OPEN/CLOSE function OFF? When
it is OFF, the Auto OPEN/CLOSE will not be
display.
Is the sensor light on the main control display
ON?Are you facing the toilet when standing in
front of it?
Is the toilet seat sensor or motion detection
sensor covered with something?
Is the toilet seat sensor or motion detection
sensor dusty or wet?
Are there any wall hangings or fixtures located
directly in front of the toilet?
Was the lid manually closed or closed by remote.
The lid will not reopen for 10 seconds.
When lid is opened, but the seat is not sat on for
more than 6 seconds, then the lid will not close
for 5 minutes.
When both seat and lid are opened, but it is not
stood in front of for more than 6 seconds, then
the lid will not close for 5 minutes.
Is the sensor light located on the main unit
display OFF?
If the light is OFF and the user stands facing the
toilet, the lid will not automatically close.
The sensors in the toilet seat sensor and motion
detection sensor may not work properly
depending upon the way in which the user sits
on the toilet seat, or stands in front of it, or the
color of the clothing or type of fabric worn.
Is the toilet seat sensor or motion detection
sensor covered up by your clothing? Are the
sensors covered with dust or water?
The lid closes by
itself.
Page 43

43
Troubleshooting
Remote Controller
Problem Possible Cause Solution
Replace the batteries (See page 11.)
Reinsert the batteries in the correct
position.(See page 11.)
Remove any objects that may be
covering the transmitter.
Remove any dirt or water that may
have settled on the transmitter.
Refer to the toilet seat sensor
instructions on page 44.
Replace the batteries.(See page 11.)
The remote controller
does not work.
Do the batteries need replacing?
Are the batteries inserted in the correct position
(+/-)?
Is the remote controller transmitter covered with
something?
Is the remote controller transmitter dirty or wet?
Is the toilet seat sensor working properly?
Does the remote controller display momentarily
go out when the buttons are pushed?This is an
indication that the batteries are worn.
Remote Controlled Flushing
Problem Possible Cause Solution
Replace the batteries. (See page 11.)
The remote control buttons for flushing
the toilet bowl cannot be pushed
repeatedly. Wait 10 seconds before
pushing the buttons again.
Remove any dirt or water that may
have settled on the transmitter.
Nothing happens
when the remote
control button for
flushing the toilet
bowl is pushed.
Do the batteries need replacing?
Has the button been pushed repeatedly?
Is the remote controller transmitter dirty or wet?
Remote Controlled Toilet Seat/Lid OPEN/CLOSE
Problem Possible Cause Solution
Replace the batteries. (See page 11.)
Remove any dirt or water that may
have settled on the transmitter.
Nothing happens
when the remote
control button for
opening/closing the
toilet seat/lid is
pushed.
Do the remote control batteries need replacing?
Is the remote controller transmitter dirty or wet?
Page 44

44
Toilet Seat Sensor
Problem Possible Cause Solution
Make sure that the sensors are not
covered, as this will prevent the
infrared light from projecting.
(See page 14.)
Remove any dirt or water that is on the
toilet seat sensor.
Change your position on the toilet seat
or raise the clothing you are wearing
to allow the sensor to detect bare skin.
Make sure that the sensors are not
covered, as this will prevent the
infrared light from projecting.
Even when not seated
on the toilet seat, the
"Rear Wash", "Air
deodorizer" and
"Warm Air Dryer"
functions turn on
when the buttons are
pushed.
Is the toilet seat sensor covered with something?
Is the toilet seat sensor dirty or wet?
The sensors in the toilet seat sensor may not
work properly depending upon the way in which
the user sits on the toilet seat, or stands in front
of it, or the color of the clothing or type of fabric
worn.
Is the toilet seat sensor covered up by your
clothing? Are the sensors covered with dust or
water?
Even when seated on
the toilet seat, the
"Rear Wash", "Air
deodorizer" and
"Warm Air Dryer"
functions do not turn
on when the buttons
are pushed.
Auto Flush
Problem Possible Cause Solution
Push the Auto Flush on the remote
controller to turn it ON.
(See page 21~22.)
Use the "Flush" button on the remote
controller to flush the toilet.
Make sure that the sensors are not
covered, as this will prevent the
infrared light from projecting.
—
Remove any dirt or water that is on the
toilet seat sensor or motion detection
sensor.
Do not hang any decorations or
fixtures directly in front of the unit.
Sit for more than 6 seconds. See page
21.
Stand in front for more than 6
seconds. See page 22.
The toilet bowl flush
function does not
automatically turn on.
Is the Auto Flush function OFF? When it is OFF,
the "Flush" light on the remote controller display
will not be lit up.
Once the Auto Flush button has been pushed,
the Auto Flush function will not operate again
until 60 seconds have passed.
Is the toilet seat sensor or motion detection
sensor covered with something?
When the remote controller is used to flush the
toilet, the Auto Flush function will not
operate.However, if the motion detection sensor
continues to detect motion for more than 60
seconds, the Auto Flush function will operate.
Is the toilet seat sensor or motion detection
sensor dirty or wet?
Are there any wall hangings or fixtures located
directly in front of the toilet?
In case of sitting for less than 6 seconds, the
automatic flush will not activate.
When both seat and lid are opened, but it is not
stood in front of for more than 6 seconds, the
automatic flush will not activate.
Page 45

45
Troubleshooting
Other
Problem Possible Cause Solution
Make sure that the water shutoff valve
is open enough to allow proper flow of
water.
Clean the water supply filter. (See
page 34.)
—
Make sure that the water shutoff valve
is open enough to allow proper flow of
water.
Wait until the water supply is restored.
—
—
Tighten the bolts with a monkey
wrench.
The toilet does not
flush properly (the
"water pressure" light
is flashing).
Is the water shutoff valve open?
Is the water supply filter dirty?
Is water being used in other areas of the
household or building? (The "water pressure"
light flashes if the water pressure is too low for
the toilet to flush properly.)
Is the water shutoff valve closed?
Has the water supply to the house been cut off?
In the following situations, the toilet seat sensor
may become activated: ● when standing in front
of the toilet seat; ● when closing/opening the
toilet seat and lid; ● when cleaning the toilet; ●
when using the toilet bowl flush lever
If the temperature inside the toilet unit is too
cold, the Washlet automatically drains itself of
water to prevent frozen pipes. When this
happens, you will hear water draining for
approximately 10 seconds, but this is not a
malfunction.
Are the bolts loose?
Water does not spray
when the toilet is
flushed.
Auto Flush (Continued)
Problem Possible Cause Solution
Move away from the toilet and wait for
3 seconds. (See page 21~22.)
Change your position on the toilet seat
or the position in which you are
standing or raise the clothing you are
wearing to allow the sensor to detect
bare skin.
Make sure that the sensors are not
covered, as this will prevent the
infrared light from projecting.
The toilet bowl flush
function does not
automatically turn on.
Is the "sensor" light on the main unit display
OFF? When it is OFF, standing in front of the
toilet will not activate the Auto Flush function.
The sensors in the toilet seat sensor and motion
detection sensor may not work properly
depending upon the way in which the user sits
on the toilet seat, or stands in front of it, or the
color of the clothing or type of fabric worn.
Is the toilet seat sensor or motion detection
sensor covered up by your clothing? Are the
sensors covered with dust or water?
The toilet flushes by
itself.
Water sprays from
the area near the
wand even though no
one is seated on the
toilet seat.
Water leaks from the
pipe fittings.
Page 46

46
Specifications
Item Contents
Power 120 V AC, 60 Hz
Power Usage 1288 W
Average Power Consumption per Hour 20 Wh
Flush Volume 1.6 Gallons per Flush (6.0 LPF) with alternate
1.2 Gallon light flush (4.5 LPF)
Cord Length 3 feet
Flush Type "Cyclone" Siphon jet
Bowl Style Elongated
Washlet Rear 9-14.5 oz/m (270-430 mL/min) (29 PSI max pressure)
Wand Flow Rate Soft 9-14.5 oz/m (270-430 mL/min) (29 PSI max pressure)
Front 9.5-14.5 oz/m (290-430 mL/min) (29 PSI max pressure)
Water Temp 86-104°F (30-40°C)
Heater Power Consumption 1200 W
Features Oscillate, Pulsate, change positions
Safety Temperature Fuse, Bi-metal sensor (auto reset),
and Float switch (prevent boil)
Backflow Prevention Vacuum Breaker, Check Valve, Duckbill
Dryer Temperature 104-138°F (40-59°C)
Air Volume 10.5 feet3/min (0.3 m3/min)
Heater power 350 W
Safety Temperature Fuse
Heated Seat Temperature 81 - 97°F (27-36°C)
Heater Power 50 W
Safety Temperature Fuse
Deodorizer Catalyst Activated Oxygen
Air Volume 5.5 feet3/min (0.16 m3/min)
Remote Power 2 AA batteries (3 Volt)
Water Supply Pressure 20-80 PSI, Static (Use a minimum water supply pressure of 10 PSI
(0.07MPa) flowing)
Water Supply Temperature 32 - 96°F (0-35°C)
Ambient Temperature 32 - 104°F (0-40°C)
Size 17" x 32.2" x 22.2" (436 x 820 x 564 mm)
Weight 108 lbs (49 kg) (28.6 lbs (13 kg) top, 79.4 lbs (36 kg) bowl )
Page 47

Three Year Limited Warranty
1) TOTO USA, Inc (“TOTO”) warrants its products to be free from manufacturing defects under normal use and
service for a period of three (3) years from the date of purchase. This warranty is extended only to the ORIGINAL
PURCHASER.
TOTO’s obligations under this warranty are limited to repair or replacement, at TOTO’s option, of products or parts
found to be defective, provided that such products were properly installed and used in accordance with instructions.
TOTO reserves the right to make such inspections as may be necessary in order to determine the cause of the
defect. TOTO will not charge for labor or parts in connection with warranty repairs or replacements. TOTO is not
responsible for the cost of removal, return and/or reinstallation of products.
2) This warranty does not apply to the following items:
a. Damage or loss sustained in a natural calamity such as fire, earthquake, flood, thunder and/ or electrical storm,
etc.
b. Damage or loss resulting from any unreasonable use, misuse, abuse, negligence, or improper maintenance of
the product.
c. Damage or loss resulting from removal, improper repair, or modification of the product.
d. Damage or loss resulting from sediments or foreign matter contained in a water system.
e. Damage or loss resulting from improper installation or from installation of a Washlet in a harsh and/or
hazardous environment.
This includes locations where the water pressure exceeds the maximum allowed by local codes.
Note:model codes allow a maximum of 80 PSI. Check local code for requirement.
3) This warranty applies only to the Washlet, and not to any other items such as the toilet bowl,etc.
4) To obtain warranty repair service under this warranty, you must take the defective product or deliver it prepaid
(shipping and handling) to an authorized TOTO USA, INC. service center. To find the closest authorized dealer,
please call 1-800-350-TOTO (8686).
5) In order for this limited warranty to be valid, TOTO USA, INC. must receive the completed attached warranty
registration card and your proof of purchase within 30 days of the original purchase date.
6) If the danger label which has been placed over the seams on the back of the Washlet’s main unit is broken or
otherwise not intact, this limited warranty is void.
This written warranty is the only warranty made by TOTO. Repair or replacement as provided under this warranty
shall be the exclusive remedy available to the purchaser. TOTO shall not be responsible for loss of the product or for
other incidental, special or consequential damages or expenses incurred by the purchaser, or for labor or other costs
due to installation or removal, or costs of repairs by others, or for any other expense not specifically stated above.
TO THE EXTENT PERMITTED BY LAW, TOTO DISCLAIMS ALL OTHER IMPLIED WARRANTIES INCLUDING
THAT OF MERCHANTABILITY AND FITNESS FOR A PARTICULAR PURPOSE. TOTO ALSO DISCLAIMS ANY
LIABILITY FOR SPECIAL, INCIDENTAL, OR CONSEQUENTIAL DAMAGES. Some states do not allow limitations of
how long an implied warranty lasts or the exclusion or limitation of special, incidental or consequential damages, so
these limitations and exclusions may not apply to you. This warranty gives the consumer specific legal rights. You
may also have other rights that vary from state to state. This warranty is to the original purchaser only, and excludes
product damage due to installation error, product abuse, or product misuse, whether performed by a contractor,
service company, or the consumer.
Warning! TOTO shall not be responsible or liable for any failure of, or damage to, this plumbing product or product
component caused by either chloramines in the treatment of public water supply or cleaners containing chlorine
(calcium hypochlorite).
Note: The use of a high concentrate of chlorine or chlorine related products can seriously damage the fittings. This
damage can cause leakage and serious property damage.
THIS IS OUR EXCLUSIVE WRITTEN WARRANTY.
47
Limited Warranty
Page 48

1155 Southern Road
Morrow, GA 30260
(770) 282 8686
For your safety, be sure to inspect your Neorest 600 occasionally.
● Is the power plug abnormally hot?
● Is the power plug covered with dust?
● Is the outlet loose?
● Is your Neorest 600 operating differently than usual?
* In case anything is abnormal, contact TOTO USA to prevent a fire or an electrical shock.
©2003 TOTO USA, Inc. 0GU9001
2003.8.27
D06696-1
 Loading...