

Page 1

Graphics Card LVU2E1
User's Manual
ࠣࡈࠖ࠶ࠢࠬࠞ࠼
৾ե୰ྶ
LVU2E1
Page 2

Page 3

Graphics Card LVU2E1
User's Manual
Page 4

FCC Information
FCC (U.S. Federal Com mu ni ca tions Com mis sion)
This equipment has been tested and found to comply with the limits for a Class A digital
device, pursuant to part 15 of the FCC Rules. These limits are designed to provide
rea son able protection against harmful in ter fer ence in a res i den tial in stal la tion. This
equipment generates, uses, and can radiate radio frequency energy, and if not installed
and used in accordance with the in struc tions, may cause harmful interference to radio
com mu ni ca tions. However, there is no guar an tee that in ter fer ence will not occur in a
particular installation. If this equip ment does cause unacceptable in ter fer ence to radio or
television reception, which can be de ter mined by turning the equipment off and on, the
user is en cour aged to try to correct the in ter fer ence by one or more of the following
measures:
• Reorient or relocate the receiving antenna.
• Increase the separation between the equipment and receiver.
• Connect the equipment into an outlet on a circuit different from that to which the
receiver is connected.
• Consult your dealer or an ex pe ri enced radio/TV tech ni cian for help.
FCC Warning
To assure continued FCC com pli ance, the user must use a grounded power supply cord
and the provided shielded video interface cable with bonded ferrite cores. Also, any
un au tho rized changes or mod i fi ca tions to this monitor would void the user's au thor i ty to
operate this device.
Responsible party located within the United States
TOTOKU North America, Inc.
1425 Greenway Dr., Ste. 565
Irving, TX 75038, U.S.A
Tel: (469) 442-0122
CE Certifi cation
This device complies with the re quire ments of the EMC di rec tive 89/336/EEC
"Electromagnetic Compatibility."
Warning
• When using at 240V in the United States, supply must be from centertapped, 240V, single phase circuit.
• Concerning disposal of waste, please consult the dealer you have
purchased this device from.
ENGLISH
- 2 -
Page 5

Contents
1. Introduction ........................................................................................................4
Package contents ................................................................................................4
Hardware requirements .......................................................................................4
Safety precautions ...............................................................................................4
2. Hardware Installation ........................................................................................5
Disconnecting power cables ................................................................................5
Installing the graphics card ..................................................................................5
Connecting the display ........................................................................................5
Connecting the power cables ..............................................................................7
3. Software Installation and Setup ......................................................................8
Installing the display driver software ...................................................................8
Setting up display settings .................................................................................10
For multi-display environments on Windows 2000 ....................................... 11
All users ........................................................................................................11
Portrait orientation on ME201L/ME251i/CCL202/CCL212/CCL250i ............13
4. Software Uninstallation ...................................................................................14
5. Multi-Display Modes ........................................................................................14
Changing Multi-Display modes ..........................................................................15
6. Q&A ...................................................................................................................16
Prior to installation .............................................................................................16
Installation .........................................................................................................16
Driver setup .......................................................................................................19
Miscellaneous ....................................................................................................21
7. Technical Specifi cation ...................................................................................22
* Company and product names mentioned herein may be the trademarks of their
respective owners.
- 3 -
ENGLISH
Page 6
1. Introduction
This manual explains how to use this graphics card along with TOTOKU LCD displays.
Package contents
Confi rm that the package contains the following items.
Graphics card LVU2E1 ...........1
Driver CD ................................1
User’s Manual ........................1
Hardware requirements
• DOS/V PC or a workstation with an Intel Pentium4- or Athlon64-equivalent processor
or higher
• PCI Express x16 compliant slot (x1)
• Microsoft Windows 2000/XP
• System memory: 128MB or more (Recommended: 256MB or more)
•
Hard disk space: 140MB or more
• CD-ROM drive (for installation of the supplied display driver)
• Power supply above 350W
• Supported displays:
Pixels Display model
2MP ME201L, ME213L, ME251i, CCL202, CCL212, CCL250i
3MP ME315L, ME351i, CCL316, CCL350i
5MP ME511L, ME551i2 s, ME551i2*
* Only ME551i2 supports dual-link DVI. ME551i2 s supports single-link only.
Safety precautions
Please take the following precautions for your safety in using this graphics card.
• Do not try to repair or alter the product. It could cause fi re, an electric shock, and/or
other injuries.
• If any abnormalities are detected such as odor, sound, and overheat, turn off the power
and disconnect it immediately. Otherwise, it could cause fi re and or an electric shock.
• Do not touch the product with wet hands. It could cause an electric shock.
• This product is easily damaged by static electricity. Be careful when installing, storing,
and handling.
• Do not touch the electric terminals directly.
• Keep this product away from magnetized places and objects.
• Do not leave this product on the fl oor. If you accidentally step on it, you could get
injured or it could damage the product.
ENGLISH
- 4 -
Page 7

2. Hardware Installation
Notices
Please read the following notices before installing the graphics card.
● Make sure that your operating system is installed properly.
● Uninstall all previously installed drivers and display-related software such as Pivot.
● Log in as a user with administrative privileges to install the driver.
● Remove all currently installed old graphics card.
● Proper operation of this graphics card is not guaranteed when used with other graphics
cards for a multi-display setup. If an error occurs, see Q&A in this manual.
Disconnecting power cables
Disconnect power cables of the computer and other peripheral devices.
Installing the graphics card
1
Remove the cover of the computer. (See the computer instruction manual.)
Caution: ESD (Electrostatic Discharge) Breakdown
Static electricity could damage delicate components of the computer and the graphics
card. Discharge static electricity by touching metal parts of the computer prior to
installation. Do not touch electric parts or terminals.
2
Remove the old card or a bracket from an appropriate slot.
Caution: Burn
Internal parts may be hot if the computer has been turned on previously.
3
Install the graphics card in the slot fi rmly. Make sure it does not touch any part of the
computer.
Caution: Ventilation
Ensure the proper airfl ow for cooling the graphics card: leave the adjacent slot open,
keep the computer's internal cables away from the cooling fan, or keep things away
that could get caught in the fan. (E.g., labels are easy to come off when heated.)
Important: If the computer is used without the fan working, it could cause a failure.
4
Secure the bracket to the chassis of the computer.
5
Put the cover back on the computer.
Connecting the display
When using LVU2E1 on 5MP monochrome LCD ME551i2 ...
ME551i2 supports landscape and portrait orientations. However, the EDID (Extended
Display Information Data) within the display controls the display orientation and its
orientation settings need to be manually switched. By default, it is set to portrait. See the
display user manual for instructions.
Please note that, in setting up LVU2E1 in Display Properties, only choices available
for the currently used display orientation will be listed. For instance, when ME551i2
is in portrait orientation, landscape resolutions do not appear in the drop-down menu.
Therefore, it is recommended that the display orientation be determined before starting
the following procedures.
- 5 -
ENGLISH
Page 8
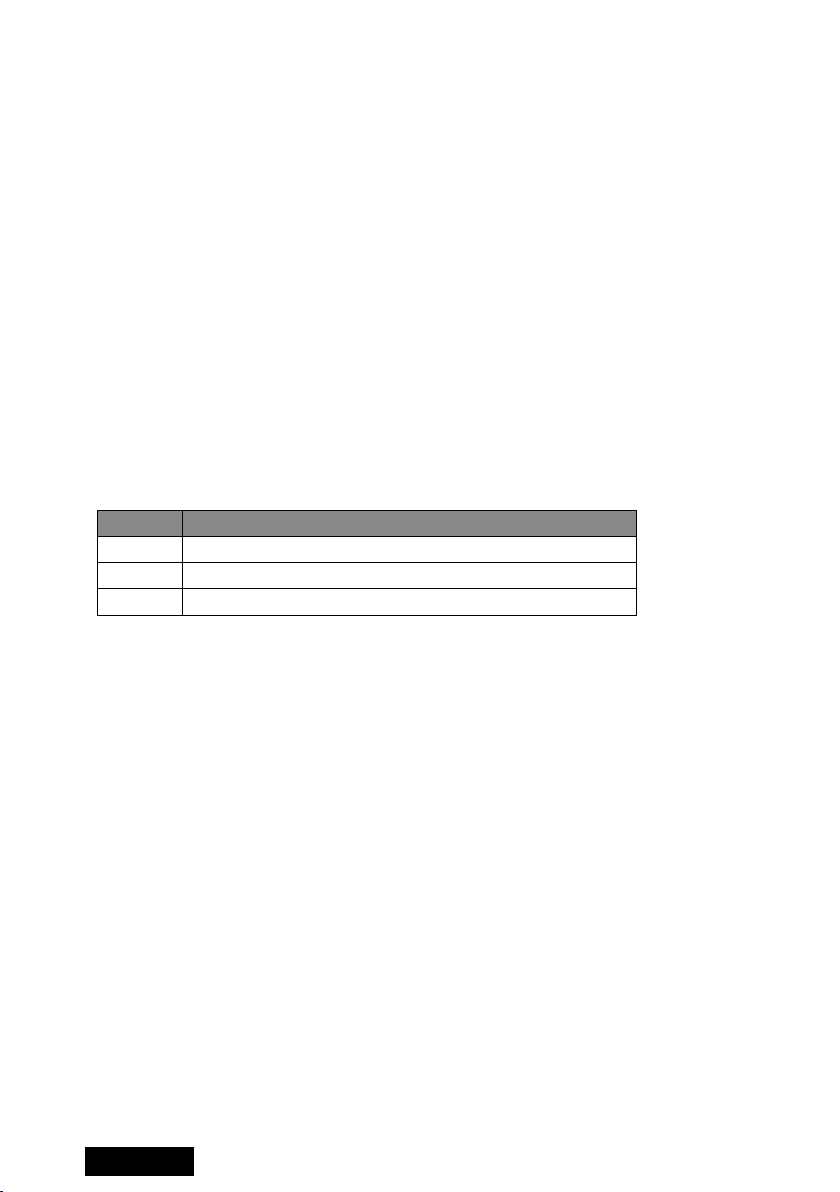
See the table below to check in what orientation ME551i2 is.
Display mode LED behavior upon turn-on
The LED blinks just once.
Portrait (default)
The LED blinks twice.
Landscape
1
Connect one end of the DVI cable supplied with the display to LVU2E1 and the other
end to the display and tighten the screws on the connectors.
Caution
Careful not to break the connector pins by trying to insert the DVI connector at
an angle.
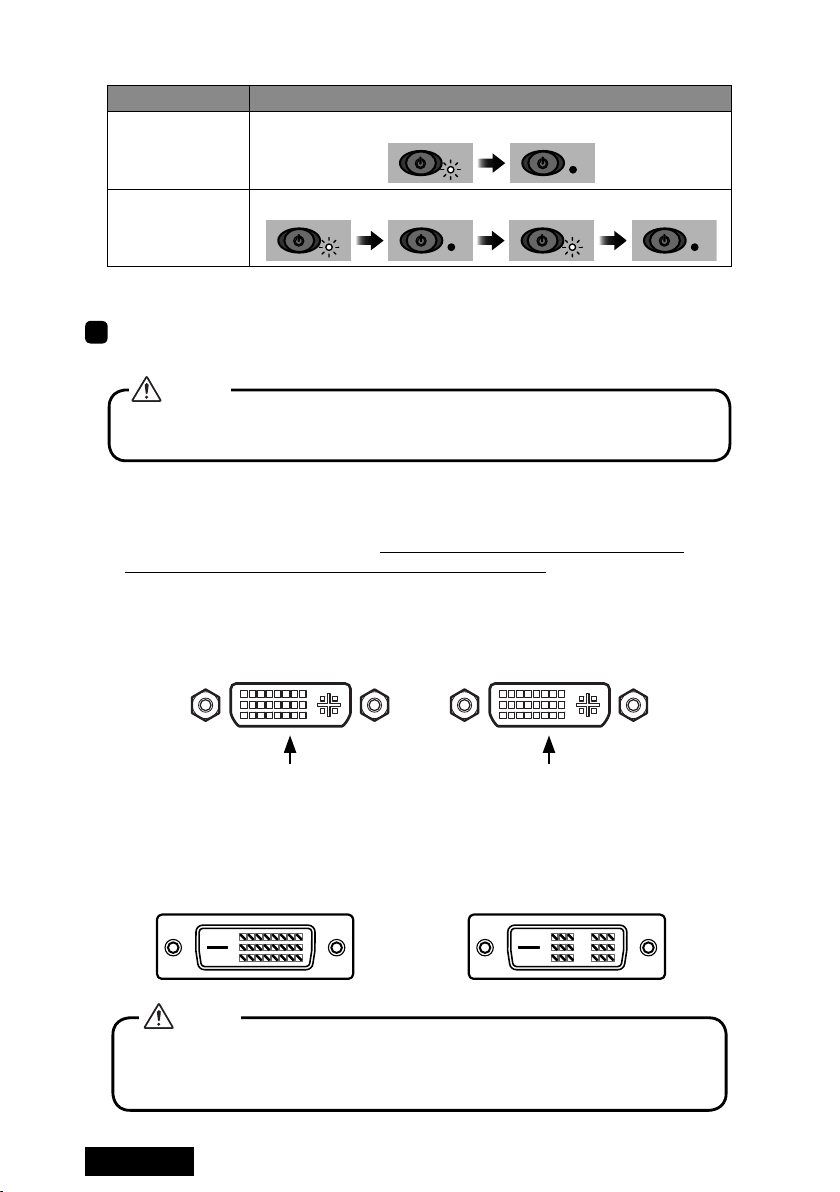
Graphics card connectors (female):
Note:
• LVU2E1 has two DVI connectors. Make sure to connect the fi rst display to
Connector 1 on the left when the card is placed face up.
• LVU2E1 has two dual-link DVI connectors. To use LVU2E1 in dual-link mode, a
display and a DVI cable that support dual-link are required. Use the DVI cable
supplied with the dual-link display.
DVI Connector 1
Connect the fi rst display
(on the left)
DVI Connector 2
Connect the second
display (on the right)
DVI cable connector (male):
Dual- and single-link support Single-link only
Caution
Do not connect/disconnect the DVI cable while the display is turned on. It could
cause a graphics card failure. Connect/disconnect the DVI cables with the
display disconnected.
ENGLISH
- 6 -
Page 9

2
To use two displays, connect the other display as well.
Connecting the power cables
Connect all power cables to the wall outlets, including the computer, the display, and
other peripheral devices.
- 7 -
ENGLISH
Page 10
3. Software Installation and Setup
Follow the instructions below to install the software (display driver) and set it up using the
setup program included in the accompanying CD-ROM. See Q&A if any problem occurs.
Installing the display driver software
1
Turn on the display and start up the computer.
2
Confi rm that the VGA boot screen appears followed by the Windows startup screen.
3
Log into Windows as a user with administrative privileges.
4
Select Control Panel>Add/Remove Programs from the Start menu, and verify that
NVIDIA programs are not installed previously. If programs such as "NVIDIA Display
Driver" or "NVIDIA Windows 2000/XP Display Drivers" are listed, remove them and
restart the computer (see Q&A: Uninstallation).
5
Install the driver using the setup program included in the accompanying CD-ROM.
Note: If installation fails, follow the instructions in Q&A (pages 17 and 18) on
reinstallation.
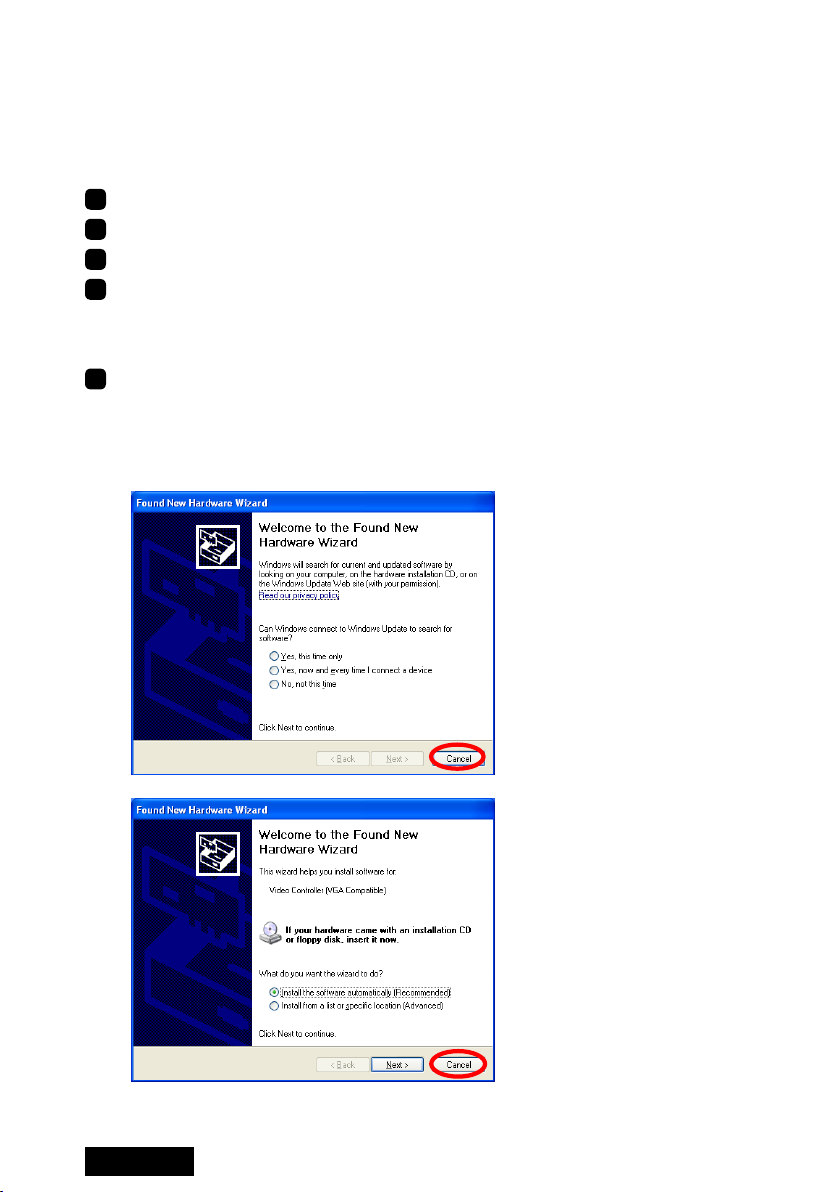
1) The Welcome to the Found New Hardware Wizard appears by itself. Whichever
screen appears, click "Cencel."
ENGLISH
- 8 -
Page 11
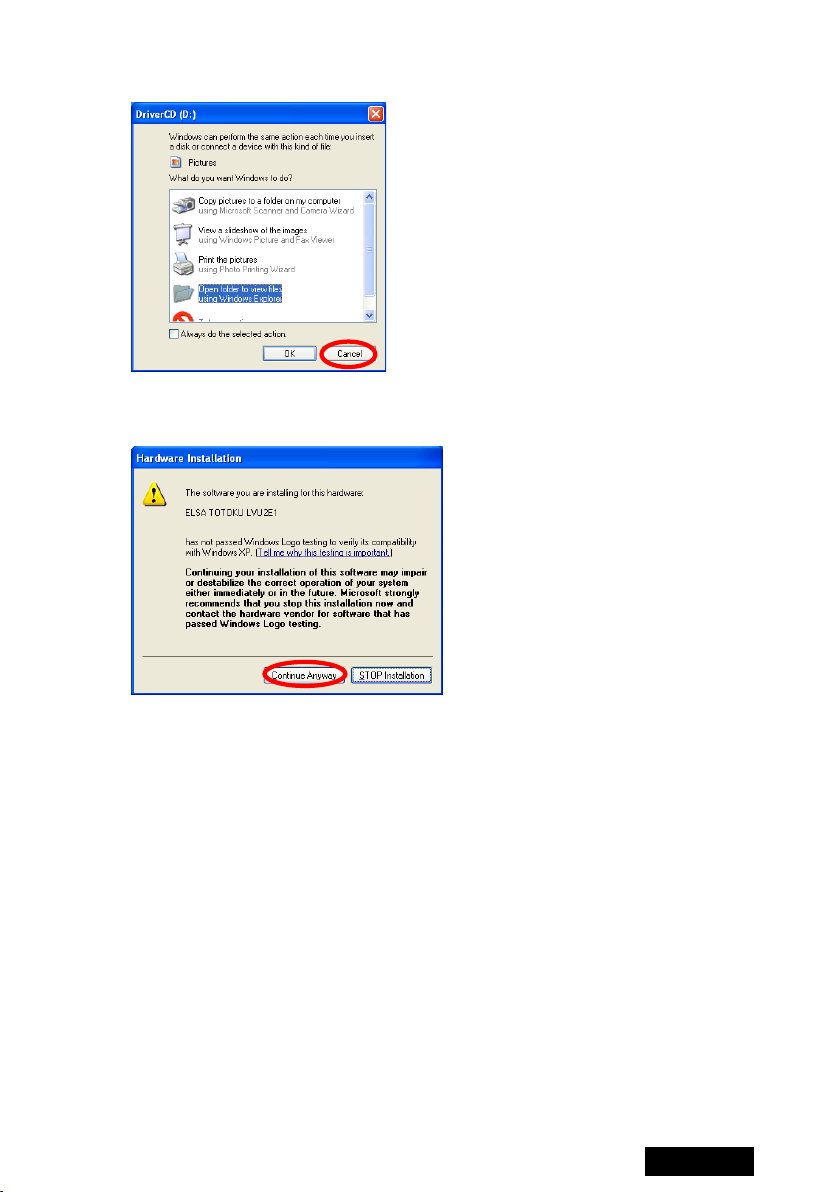
2) Insert the driver CD in the CD-ROM drive. If the following screen appears, click
"Cancel."
3) Double-click Setup.exe in DriverCD/XP2K directory included in the CD-ROM.
4) If the Hardware Installation screen appears, click "Continue Anyway."
5) When the InstallShield Wizard starts up, click "Next."
- 9 -
ENGLISH
Page 12
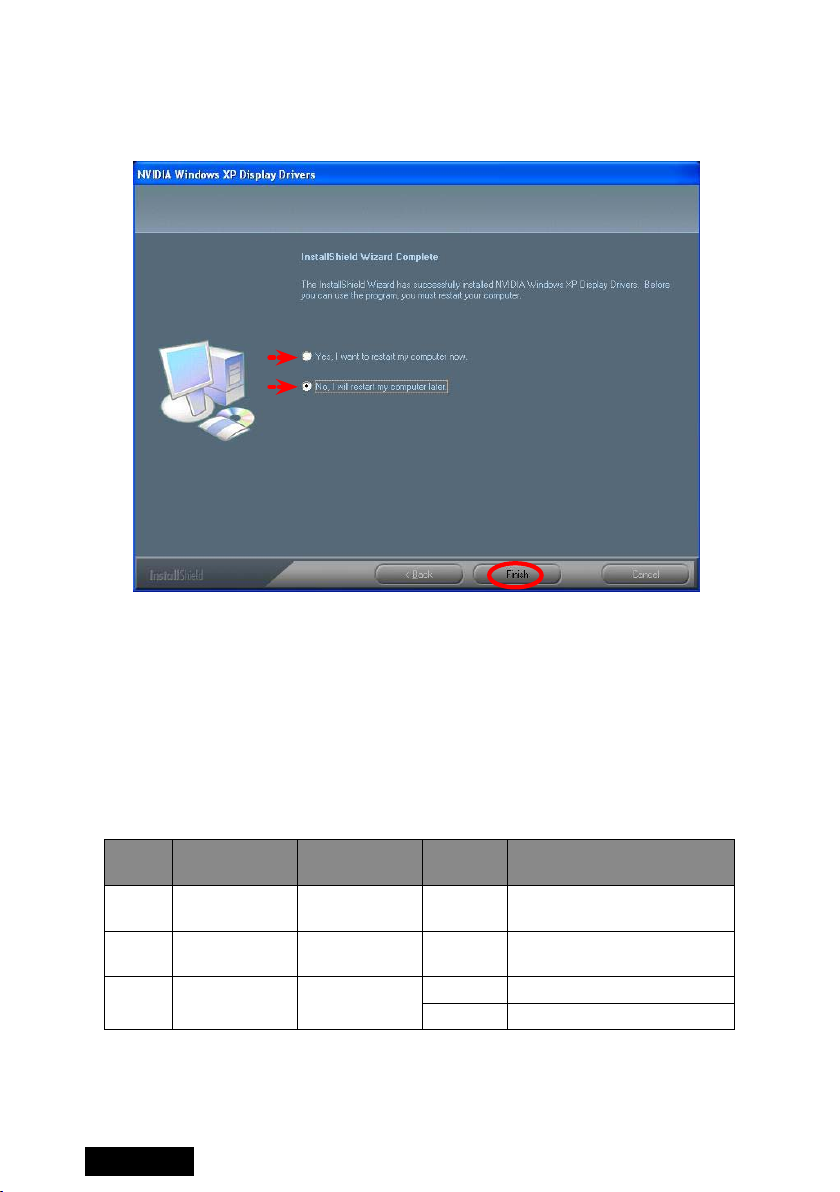
6) At the end of installation, the InstallShield Wizard Complete screen appears. For
those using two displays on Windows 2000, select "No, I will restart my computer
later" and click "Finish;" for those using a single display on Windows 2000 and
all Windows XP users, select "Yes, I want to restart my computer now" and click
"Finish."
Windows 2000 (single-display) & Windows XP
Windows 2000 (multi-displays)
Setting up the display settings
For those who are using two displays on Windows 2000, start from 2K-1 below and move
on to All users; for those using a single display on Windows 2000 and all Windows XP
users, start from All users.
For those who are using ME201L, ME251i, CCL202, CCL212, or CCL250i and wish to
use the display in portrait orientation, follow the instructions on page 13.
See the table below for supported displays and their resolutions and refresh rates.
Pixel Display mode Resolution
2MP
3MP
5MP
Note:
• Display modes for ME551i2 s and ME551i2 depend on the display orientation setting
within the display. See the display user manual on how to change orientation.
• As for ME551i2, 50Hz refresh rate is recommended unless otherwise required.
Landscape
Portrait
Landscape
Portrait
Landscape
Portrait
1200 x 1600
1600 x 1200
1536 x 2048
2048 x 1536
2048 x 2560
2560 x 2048
ENGLISH
Refresh
rate (Hz)
60
30
25 ME511L, ME551i2 s*
25/50 ME551i2*
- 10 -
Display model
ME201L, ME213L, ME251i,
CCL202, CCL212, CCL250i
ME315L, ME351i,
CCL316, CCL350i
Page 13
For multi-display environments on Windows 2000:
2K-1: Access the Display Properties dialog box and click the Settings tab.
2K-2: Select "Ture Color (32bit)" from the Colors drop-dowm menu.
2K-3: Set a resolution using the Screen Area slider.
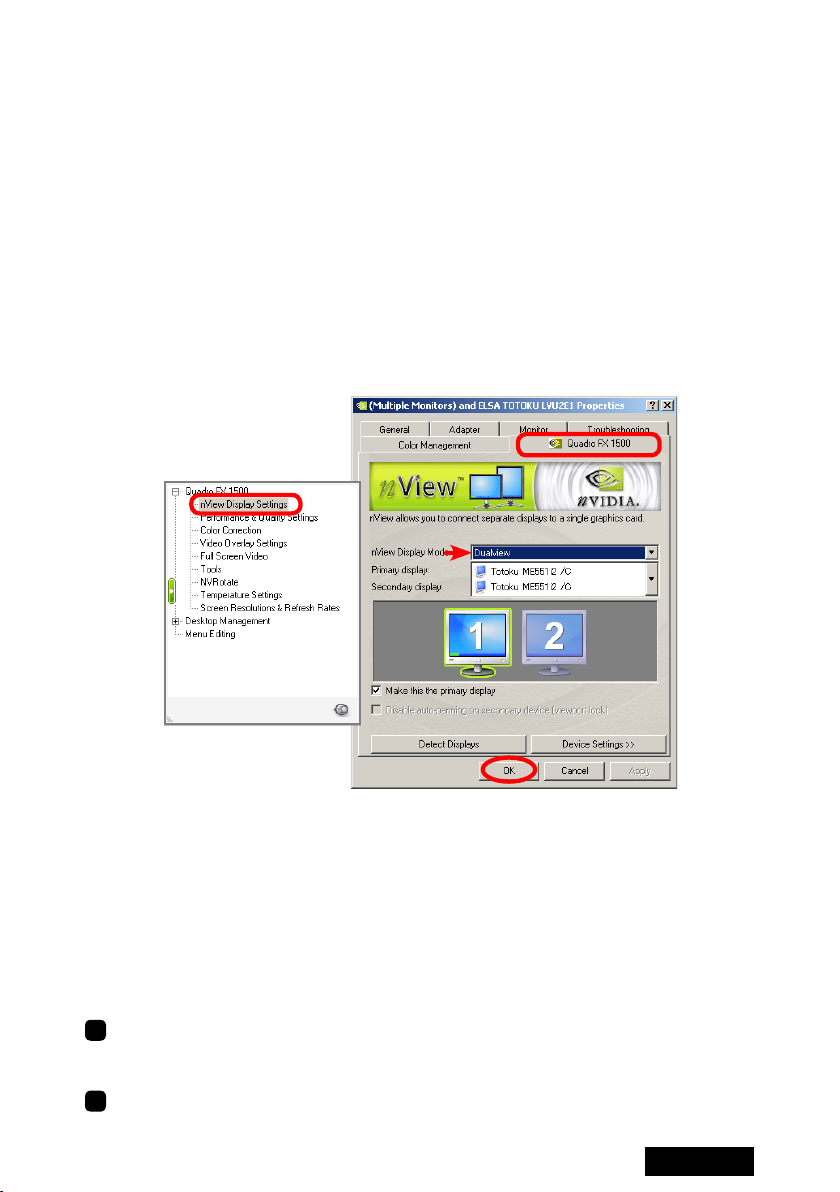
2K-4: Click "Advanced" on the Settings tab, and another dialog box appears.
2K-5: Select the Quadro FX 1500 tab, and a popup menu appears to the side.
Note: When another graphics card coexists, the Quadro FX 1500 tab will not appear.
In that case, a display on another card needs to be detached for now. Right-click
the subject display icon on the Settings tab and uncheck "Attached" on the rightclick menu, or uncheck "Extend my Windows desktop onto this monitor."
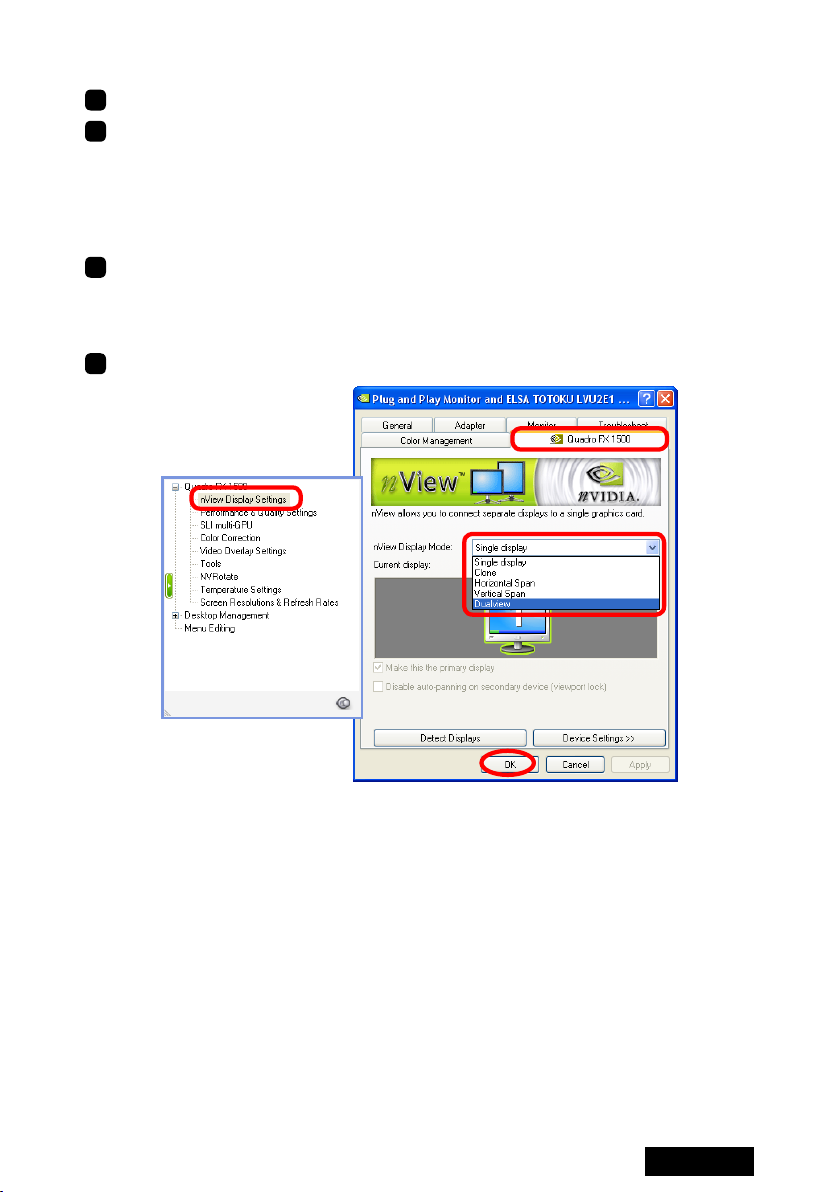
2K-6: Select "nView Display Settings" from the menu and "Dualview" from the nView
Display Mode drop-down menu on the Qadro FX 1500 tab and click "OK."
Note: See Chapter 4 for detailed information on multi-display modes.
2K-7: When a message prompting restart of the computer appears, click "Restart now."
2K-8: After restarting the computer, click "Finish" on the NVIDIA Dualview installation
completion message.
2K-9: A message prompting restart of the computer appears again. Restart the computer.
(Go on to All users below or Portrait orientation on ME201L/ME251i/CCL202/
CCL212/CCL250i on page 13.)
All users:
1
Select Display Properties>Settings(tab).
Select a display icon, and if the Display section says "Plug and Play monitor on Elza
TOTOKU LVU2E1," the corresponding display is connected to LVU2E1.
2
In a multi-display setup, select the icon for the fi rst display on this card and verify
"Extend my Windows desktop onto this monitor" is checked.
- 11 -
ENGLISH
Page 14
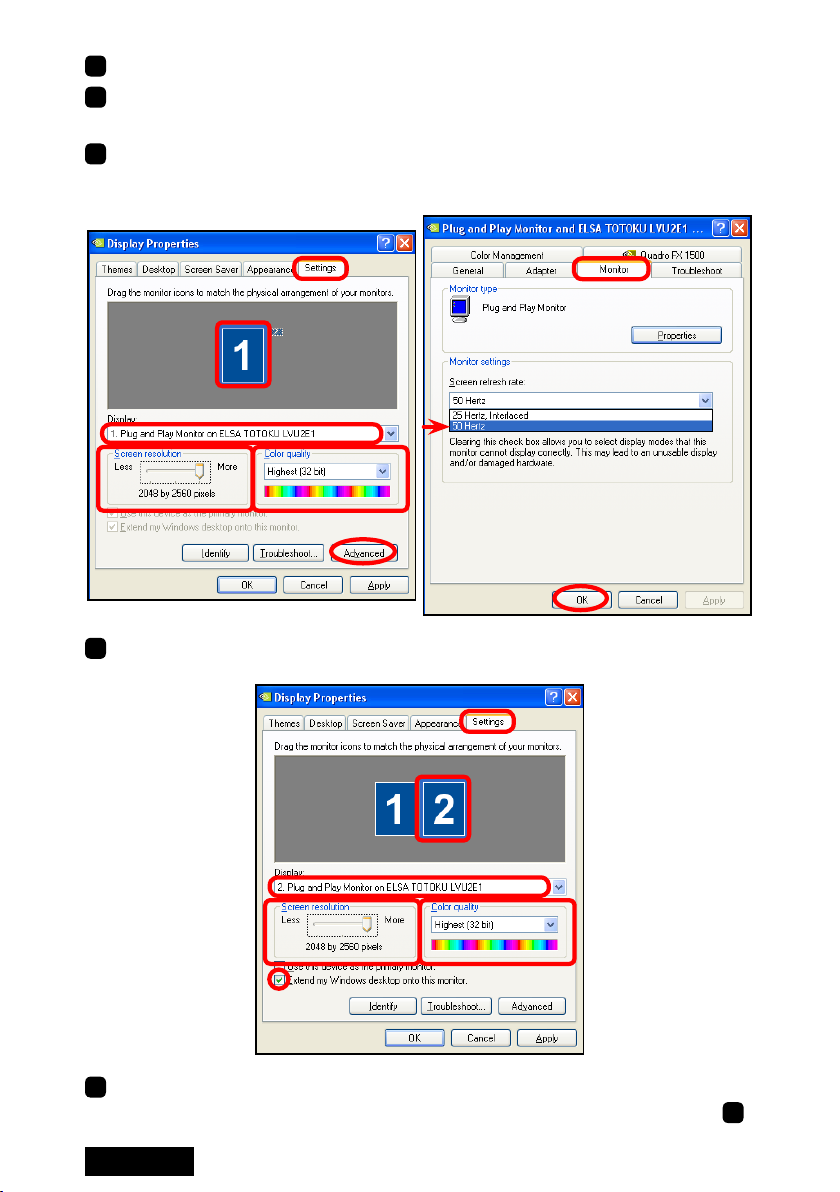
3
Set a resolution using the Screen resolution slider.
4
Select 32 bit color from the Color quality drop-down menu.
Note: "True Color (32bit)" on Windows 2000, "High (32bit)"
5
Click "Advanced," select the Monitor tab, and check the refresh rate (see the table
on the previous page). If necessary, select an appropriate refresh rate and click "OK."
Note: As for ME551i2, 50Hz refresh rate is recommended unless otherwise required.
on Windows XP
6
(Windows XP users) When two displays are connected, repeat Steps 2 to 5 for the
second display by selecting the second display's icon instead.
7
If necessary, change multi-display modes (see Chapter 4 for detailed information).
(Go to Step 8.)
ENGLISH
- 12 -
Page 15
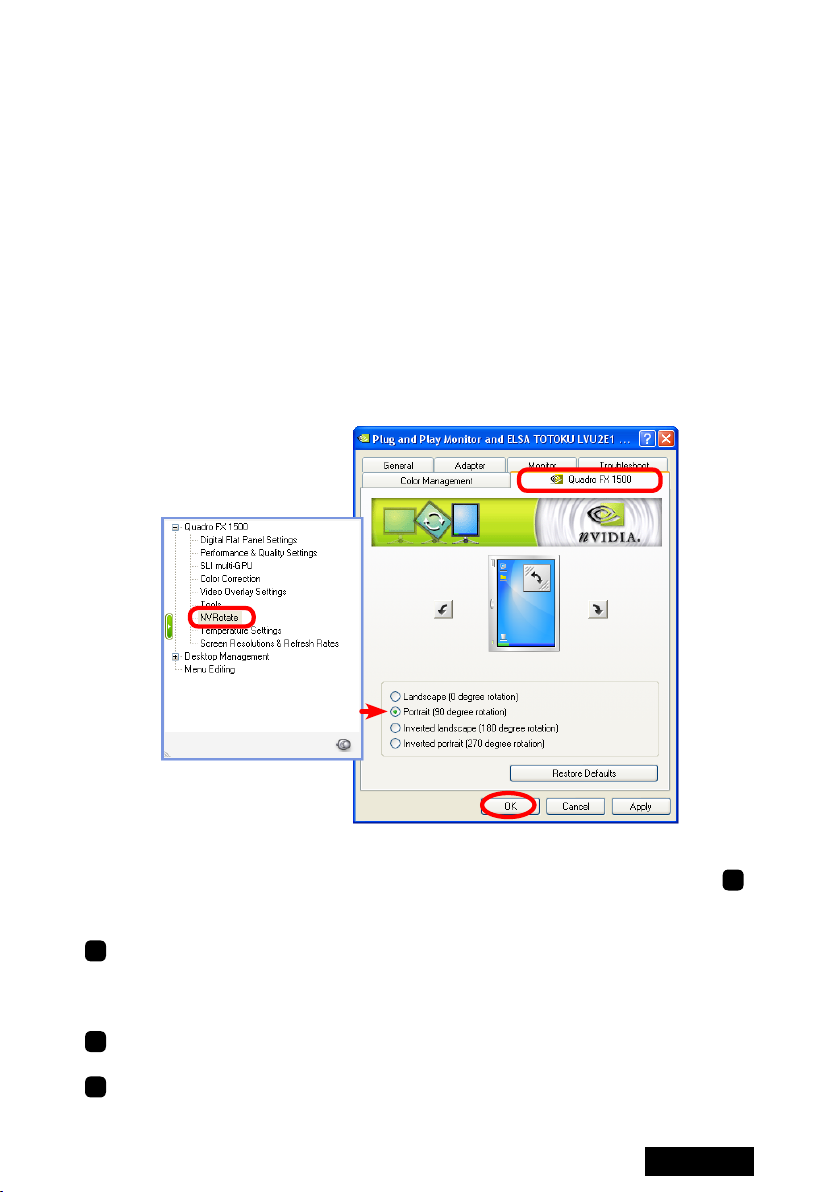
Portrait orientation on ME201L/ME251i/CCL202/CCL212/CCL250i:
To use ME201L, ME251i, CCL202, CCL212, and CCL250i in portrait orientation, follow
the instructions below.
Note: In a multi-display setup, horizontal span mode is not available (see Chapater 4 for
detailed information on multi-display modes).
1) Select Display Properties>Settings(tab).
2) Select a display icon and click "Advanced."
3) Select the Quadro FX 1500 tab, and a popup menu appears to the side.
Note: When another graphics card coexists, the Quadro FX 1500 tab will not appear.
In that case, a display on another card needs to be detached for now. Right-click the
subject display icon on the Settings tab and uncheck "Attached" from the right-click
menu, or uncheck "Extend my Windows desktop onto this monitor."
4) Select "NVRotate" from the popup menu and "Portrait (90 degree roration)" on the
Quadro FX 1500 tab, and click "OK."
5) When two displays are connected, repeat steps 2 to 4 for the other display.
(Go on to Step
8
In a multi-display setup, check the display arrangement by clicking "Identify" on
the Settings tab. The same number as the selected display icon
corresponding display. If necessary, rearrange the icons by dragging them to match
the actual display arrangement.
9
In a multi-display setup, determine a primary display, select the corresponding display
icon, check "Use this device as the primary monitor."
Click "OK," and remove the driver CD from the CD-ROM drive.
10
- 13 -
's appears on the
ENGLISH
8
.)
Page 16
4. Software Uninstallation
Follow the instructions below to uninstall the display driver for LVU2E1.
1
Log into Windwos as a user with administrative privileges.
2
Select Control Panel>Add/Remove Programs from the Start menu.
3
Delete "NVIDIA drivers" from the Currently installed programs list.
Note: If a program named "NVIDIA Windows 2000/XP Display Drivers" exists,
uninstall it as well.
4
End all applications and restart the computer.
Note: To complete uninstallation, make sure to restart the computer.
5. Multi-Display Modes
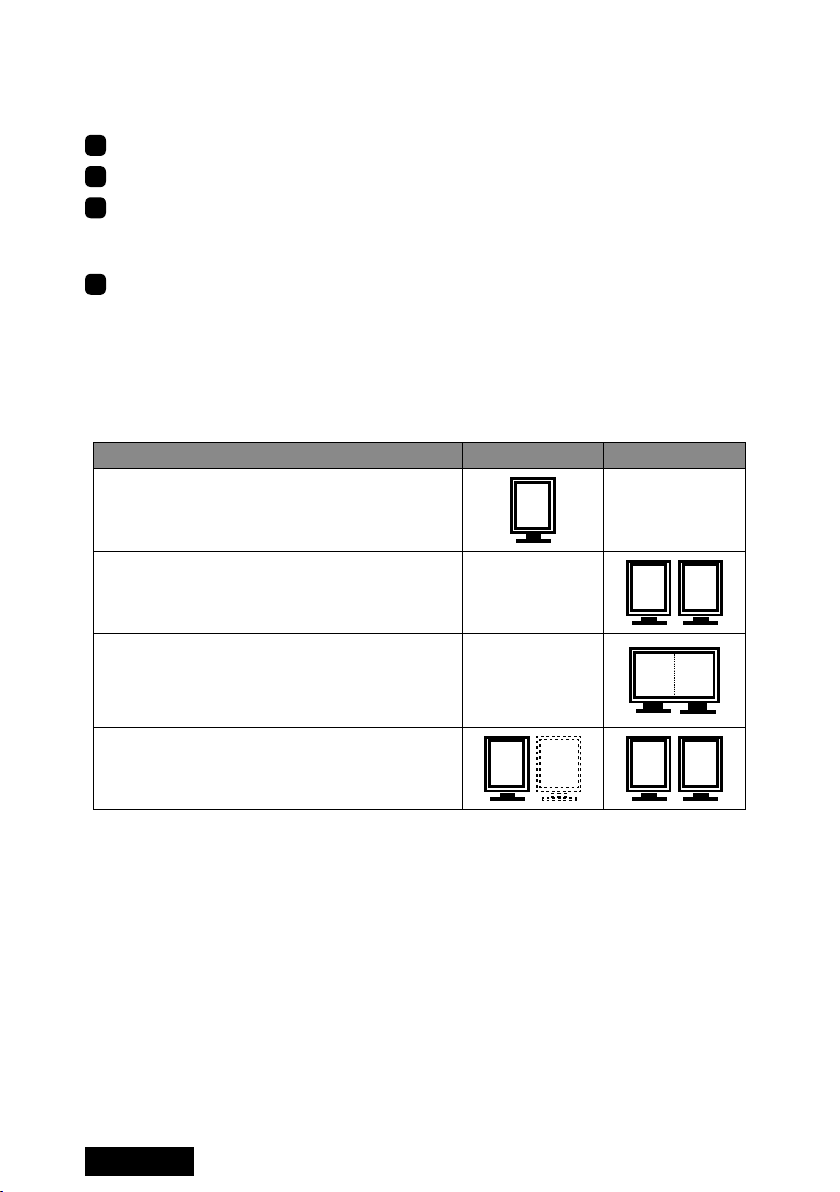
There are the following four multi-display modes are available:
Multi-display mode 1 Display/card 2 Displays/card
Single display:
Single-display setup
Clone:
Two displays on the same card display the
same image respectively.
Horizontal*/vertical span:
Two displays on the same card are combined
into one desktop (side-by-side or one above the
other).
Dualview:
Two displays on the same card are working
independently and separately
Note: In portrait orientation, horizontal span mode is only supported by ME213L.
1
1
2
1
1
1
1
2
ENGLISH
- 14 -
Page 17
Changing multi-display modes
1
Select Display Properties>Settings(tab) and select a subject display's icon.
2
Select Advanced>Quadro FX 1500(tab) and select "nView Display Settings" from the
popup menu.
Note: When another graphics card coexists, the Quadro FX 1500 tab will not appear.
In that case, a display on another card needs to be detached for now. Right-click the
subject display icon on the Settings tab and uncheck "Attached" on the right-click
menu, or uncheck "Extend my Windows desktop onto this monitor."
3
Select a desired multi-display mode from the nView Display Mode drop-down menu
and click "OK."
Note: The nView Display Mode drop-down menu offers only "Single display" when
there is only one display connected to LVU2E1.
4
Follow the on-screen prompts and instructions to complete the setup.
- 15 -
ENGLISH
Page 18
6. Q&A
Prior to installation
What are the supported operating systems?
Windows 2000/XP
How many displays can this card take?
2 displays per card.
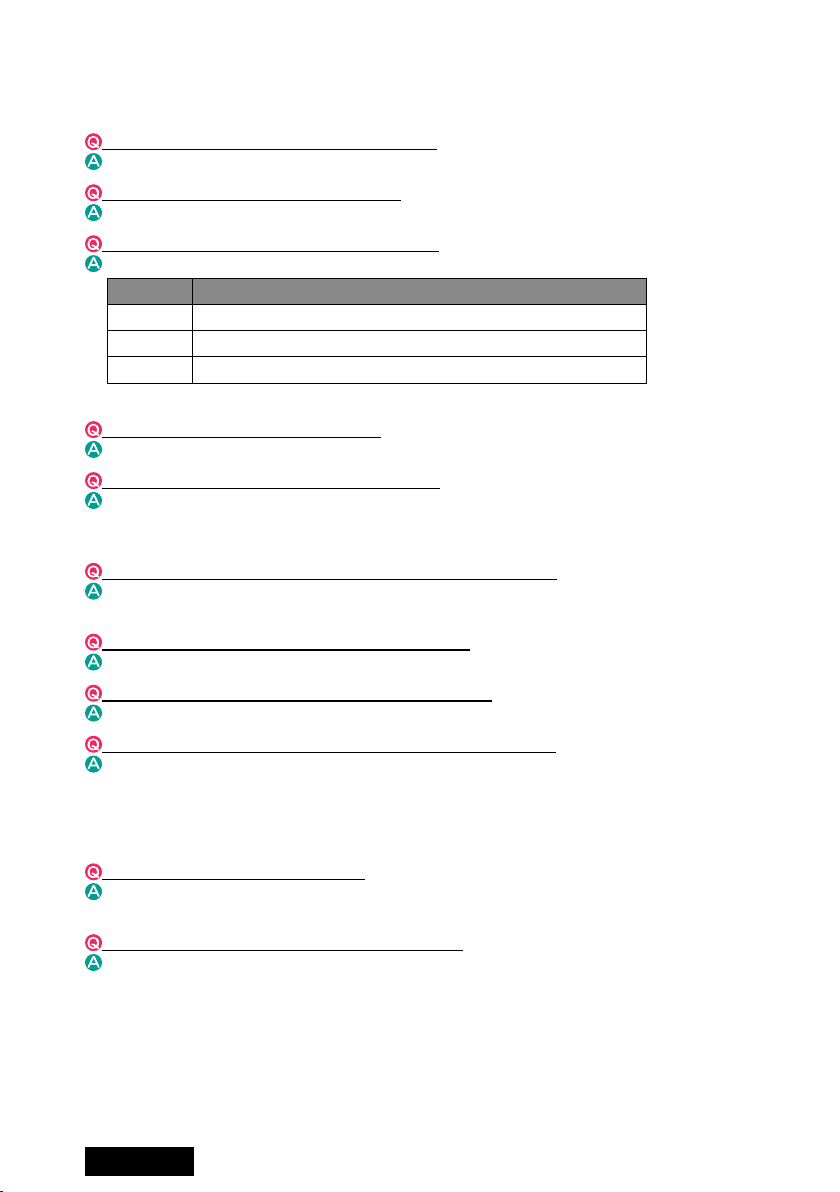
What are the supporting TOTOKU displays?
See the table below:
Pixels Display model
2MP ME201L, ME213L, ME251i, CCL202, CCL212, CCL250i
3MP ME315L, ME351i, CCL316, CCL350i
5MP ME511L, ME551i2, ME551i2 s
Note: Displays below 2MP can also be connected.
What are the supported resolutions?
See the table on page 9.
Is it possible to use multiple graphics cards?
Yes. This graphics card occupies one PCIExpress x16 slot. Graphics cards that fi t
in the remaining unoccupied slots can be used. However, proper operation is not
guaranteed when combined with other graphics cards.
What card do you recommend if another card is necessary?
NVIDIA-based cards. Proper operation of this card is not guaranteed when used with
non-NVIDIA cards.
Is this card compatible with DirectX or OpenGL?
It is compatible with DirectX 9 and OpenGL 2.0.
How many dual-link DVI ports does this card have?
2
Is there any special setup required for dual-link connection?
Only ME551i2 (not ME551i2 s) supports dual-link. Use the DVI cable supplied with
the display and set its refresh rate to 50Hz (see All users on pages 11-12).
Installation
Which display driver should I use?
Use the supplied driver or the designated customized driver for TOTOKU displays.
Proper operation of this card is not guaranteed when other display drivers are used.
The VGA boot screen (POST) does not appear.
Check the followings:
• The display is not turned on, or the signal cable is not connected properly.
• The graphics card is not inserted all the way in the slot.
• The display is not connected to the right card: There is output from the unplugged
on-board VGA or another card.
• Another card is confl icting.
ENGLISH
- 16 -
Page 19

Can I install the display driver by overwriting?
No. Make sure to uninstall an existing driver before updating it or when adding/
removing cards, or changing slots, and reinstall it.
The new graphics card doesn't get recognized as new hardware.
Check the followings:
• The graphics card is not inserted all the way in the slot.
• An older version of the display driver may have been installed. Uninstall the existing
driver before installing the latest one.
• A non-NVIDIA card may be confl icting. Remove it.
• Check Device Manager. If the Other devices section shows "[!] Video Controller
(VGA compatible)," the graphics card is detected. Install it from there.
I can't install the display driver for this card when a non-NVIDIA card is installed.
Remove the non-NVIDIA card once, insert LVU2E1, install and set up the display
driver for it. Now remove it, insert the other card in another slot, install and set up a
display driver for it. Put LVU2E1 back into the slot where it was inserted.
My computer freezes at Windows Startup when restarting after driver installation.
It can happen when a non-NVIDIA card coexists. Remove it once, insert LVU2E1,
install and set up the display driver for it. Now remove it, insert the other card in
another slot, install and set up a display driver for it. Put LVU2E1 back into the slot
where it was inserted.
The screen blacks out at Windows Startup when restarting after the driver is installed.
Check if the video signal is output from another graphics card.
My computer freezes at Windows Startup when I try to add another card after setting
up this card.
Remove LVU2E1 once. Insert the other card in another slot, install and set up a driver
for it, and put this card back into the slot where it was inserted.
Do I execute Setup.exe to install the driver?
Yes. Try Setup.exe fi rst. If it fails, follow the instructions below to reinstall the driver.
1) Uninstall the driver (see Uninstallation of this chapter.)
2) Restart the computer.
3) Insert the driver CD in the CD-ROM drive on the computer.
4) If the following screen appears, click "Cancel."
- 17 -
ENGLISH
Page 20

5) If the following screen appears, select "No, not this time" and click "Next."
6) When the Hardware Installation screen appears, click "Continue Anyway."
7) On the following screen, select "Install from a list or specifi c location (Advanced)"
and click "Next."
8) Click "Browse" and point to DriverCD/XP2K directory, and click "OK."
9) Click "Finish." In a multi-display setups, the follwoing steps repeat as many times
as the number of displays connected.
10) If the same screen as in step 3 appears, select "No, not this time" and click "Next."
11) On the Welcome to the Found New Hardware screen, select "Install the software
automatically (Recommended)" this time and click "Next."
12) Click "Finish."
Another NVIDIA-based card does not work after the driver is installed.
Check Device Manager. If the Other devices section shows "[!] Video Controller (VGA
compatible)," the graphics card is detected. Reinstall it from there. Or reinstall it using
the Found New Hardware Wizard.
Would it be a problem to use another driver for a coexisting NVIDIA-based card?
Yes, use the same driver for it as for LVU2E1. If the other card does not work, contact
your dealer.
ENGLISH
- 18 -
Page 21

Another driver fi le of different version exists.
It can happen when the driver is installed by overwriting the old one. Uninstall the old
driver completely before installing the new one.
Any other measures for multi-display-related problems?
Try the followings as preventive measures:
• Use the CMOS switch on HP/Compaq computers.
• Set the system BIOS's primary video setting to PCIExpress.
• Install cards one by one.
• Check the card for the secondary display(s) if it can be used for secondary displays.
• Update the computer motherboard BIOS.
• Update the chip set driver on the computer.
• Update the driver for a non-NVIDIA card.
• Use a different slot.
• Change the driver version.
Display setup
I can't select the predetermined resolution.
Check the followings:
• Was the display connected when the computer was turned on? Start up the
computer with the display being connected.
• Isn't "Hide modes that this display cannot display" unchecked? Select Display Prope
rties>Settings(tab), select the subject display's icon, click Advanced>Monitor(tab),
and uncheck "Hide modes that this display cannot display."
• Isn't the old driver active? Uninstall the driver fi rst and then install the new driver.
• Is there a display icon that has ! mark in Device Manager? If so, delete the display.
I can't uncheck "Hide modes that this display cannot display."
Log in as a user with administrative privileges.
Is it possible to have both portrait and landscape orientations or two different
resolution settings in a multi-display setup at the same time?
Yes, in independet mode.
Is there any other way to change the display settings?
Click the NVIDIA Settings icon in the task bar. If the icon is missing, restart the computer.
There is an inactive display icon in Display Properties>Settings on Windows XP.
It is a virtual display that appears when set to a mode other than the independent
mode. There is no problem with it.
Do I set the color mode to 256 colors (8bit) for a monochrome display?
No. Set 32-bit color for monochrome displays. (High Color (16bit) does not display
256 shades of gray.)
Note: This card does not support the fi xed linear gray palette. When set to 256 colors
(8bit), it only displays 236 shades of gray due to Windows restrictions.
Tell me about the multi-display mode settings.
See Chapter 4.
Nothing comes up on one of two displays connected to this card.
Check if the display's multi-display setting is not in "Single display" and if the display is
"Attached" by right-clicking the display icon in Display Properties. Check "Attached"
if not.
- 19 -
ENGLISH
Page 22

Images are displayed upside-down.
Check the NVRotate setting. Do not use NVRotate on ME213L/ME315L/ME351i/
ME511L/ME551i2 s/ME551i2/CCL316/CCL350i. Set NVRotate to "Landscape (0
degree rotation)."
On the supported 5MP and 3MP displays and ME213L, two methods are available
to turn the display in portrait orientation: by selecting a vertical timing in Display
Properties and via NVRotate function. Which method should I use?
For better image quality, setting the vertical timing in Display Properties is
recommended.
The Quadro FX 1500 tab is missing.
When A non-NVIDIA card coexists, the tab will not appear. In this case, detach
displays (right-click and uncheck "Attached")
I can't open the Monitor tab in Display Properties>Settings>Advanced.
Open Device Manager, delete the display icon with ! mark, if any.
Is it possible to have the portrait orientation using the NVRotate function and by
setting a portrait resolution in Display Properties simultaneously
Yes. However, if a non-NVIDIA card coexists, a Control Panel error may occur.
The Quadro FX 1500 is missing but I have a tab labeled "desk.cpl error" instead,
It can happen on a DELL computer installed with an old NVIDIA driver. In this case,
uninstall the old driver and reinstall the new driver.
When another NVIDIA-based card is used, the icon for the second display in Dualview
mode on LVU2E1 isn't displayed in Display Properties>Settings.
Select "Dualview" from the nView Display Modes drop-down menu in Display
Properties>Settings>Advanced>Quadro FX
problem remains, reinstall the driver or the display(s) on another card may need to be
set to "Dualview" as well.
On DELL computers with an add-on NVIDIA-based card, problems such as that the
NVRotate function doesn't work occurr.
It happens due to confl icts between NVIDIA drivers. DELL computers (e.g. Precision,
OptiPlex, PowerEdge series, and etc.) with Windows 2000 or XP preinstalled, have
the cap
ability to automatically install drivers designated for the add-on graphics cards.
In this case, disable the automatic installation capability, uninstall the previously used
NVIDIA driver, and install the designated driver. To do so, follow the instructions below:
1. Move the "C:\DRIVERS" folder located in Local Disk (C:) onto the desktop for now.
Note: Make sure it is C:\DRIVERS, not C:\Dell\Drivers.
2. Uninstall the following existing NVIDIA driver(s) by going to "Add/Remove
programs" and restart the computer.
• NVIDIA Display Driver (Unifi ed NVIDIA driver)
• NVIDIA Windows 2000/XP Display Drivers (DELL custom driver)
3. Install the designated driver.
4. Move the C:\DRIVERS folder back to Local Disk (C:).
Even if I rotate the orientation using NVRotate, the display icon in Display
Properties>Settings doesn't rotate.
Close Display Properties once and open it up. The icon should be rotated.
What are the display types that may be listed in the Display drop-down menu in
Display Properties>Settings?
Plug and Play Monitor, Multiple Monitors, and Default Monitor depening on the system
confi guration
on the card for now.
?
1500 and restart the computer. If the
ENGLISH
- 20 -
Page 23

Miscellaneous
Gray shades are not displayed properly (discontinuity, non-smoothness).
Check the display color setting. Set it to 32 bit color for full 256 shades of gray.
Lightning-like noise occurs during switching to portrait orientation using NVRotate.
It occurs due to the high-speed drawing by NVRotate. It is not a failure.
Can I use any commercially available DVI cable?
No, use the DVI cable supplied with the TOTOKU display.
What is the display driver version?
The latest version as of July 2006 is 84.26.
Note:
• Drivers will be updated for improvement. Use the latest version.
• Setup methods may vary from version to version. Please follow the instructions.
• Make sure to uninstall the old version before installing the new version.
Driver upgrade history:
Version Release Changes
84.26 Jul/06 (First
What are the restrictions for display settings when calibrating displays?
• When a primary display is set to 8 bit color, a secondary monochorme display cannot
be calibrated properly. In this case, set the primary display to 32 bit color or set the
monochrome display as primary.
• If gamma correction is working on the system, disable it.
• Calibration software for ME201L supports 32 bit color.
• Calibration software for ME213L/ME251i/ME315L/ME351i/ME511L/ME551i2 s/
ME551i2 support 32 bit color and fi xed gray palette.
• Calibration software for CCL202/CCL212/CCL250i/CCL316/CCL350i support 32 bit
color. Do not calibrate displays in 8/16
version)
bit color mode.
- 21 -
ENGLISH
Page 24

7. Technical Specifi cation
Graphics card LVU2E1
GPU NVIDIA Quadro FX 1500
Video memory 256MB 256-bit DDR3 SDRAM
Card type PCI Express x16 full-height
Bus PCI Express x16
Operating system Windows 2000/XP
Max. # of cards 1 (maybe 2 depending on computers)
# of output connectors Two dual-link DVI-I connectors
Dimensions 198 x 111 mm (w/o bracket)
Max. power consumption 65W
Digital DVI output:
• 640x480, 800x600, 1024x768
• 1200x1600/1600x1200 at 60Hz: ME201L, ME213L,
Resolutions
Color modes Color 8-, 16-, 32-bit/pixel
Multi-display modes Single, Clone, Horizontal/Vertical spans, Dualview
ME251i, CCL202, CCL212, CCL250i
• 1536x2048/2048x1536 at 30Hz: ME315L, ME351i,
CCL316, CCL350i
• 2048x2560/2560x2048 at 25Hz: ME511L, ME551i2 s
• 2048x2560/2560x2048 at 25/50Hz: ME551i2
198 mm
ENGLISH
111 m m
- 22 -
Page 25

TOTOKU
Graphics Card LVU2E1 User's Manual
August 2006 Edition PZZ11-1367
Notes for this user's manual
• No part of this manual, whether partly or wholly, may be reproduced or copied without authorization.
• The content of this manual is subject to change without notice.
• Although this manual has been prepared carefully, please let us know if you fi nd any errors,
omissions, or ambiguous explanations.
- 23 -
ENGLISH
Page 26

TOTOKU ELECTRIC CO., LTD.
1-3-21 OKUBO, SHINJUKU-KU,
TOKYO 169-8543 JAPAN
TEL: +81-3-5273-2005
FAX: +81-3-5273-2091
URL: http://www.totoku.com/display/
ENGLISH
- 24 -
Page 27

日本語
- 1 -
グラフィックスカード LVU2E1
取扱説明書
Page 28

- 2 -
日本語
もくじ
はじめに ..................................................................................................................................................................................3
安全上の注意 ...................................................................................................................................................................5
パッケージ内容 .................................................................................................................................................................6
必要システム構成 .........................................................................................................................................................6
ハードウェアのインストールとディスプレイの接続 ............................................................................. 7
1. 電源コードの取り外し ........................................................................................................................................................ 7
2. グラフィックスカードの取り付け ................................................................................................................................. 7
3. ディスプレイの接続 ..............................................................................................................................................................8
4. 電源コードの接続 .................................................................................................................................................................. 9
ソフトウェアのインストールと表示設定 .................................................................................................10
1. ソフトウェアのインストール .........................................................................................................................................10
2. 表示設定 ...................................................................................................................................................................................12
3. マルチディスプレイモードの確認とセットアップの完了 ......................................................................15
ソフトウェアのアンインストール ....................................................................................................................16
マルチディスプレイモード ......................................................................................................................................17
1. 選択可能なモード ...............................................................................................................................................................17
2. マルチディスプレイモードの変更方法 ...............................................................................................................18
Q & A .................................................................................................................................................................................19
1. 導入前 .........................................................................................................................................................................................19
2. ソフトウェアのインストール .........................................................................................................................................19
3. 表示設定 ...................................................................................................................................................................................22
4. その他 ..........................................................................................................................................................................................24
技術仕様 ............................................................................................................................................................................26
保証とアフターサービス ........................................................................................................................................28
保証期間 .........................................................................................................................................................................................28
修理を依頼されるときは ...................................................................................................................................................28
サポートを依頼されるときは ..........................................................................................................................................28
ドライバのアップグレードについて ...............................................................................................................................28
廃棄について ................................................................................................................................................................................28
アフターサービスのお問い合わせ窓口 ....................................................................................................................29
* 記載されている会社名および商品名は各社の登録商標または商標です。
Page 29

日本語
- 3 -
はじめに
このたびは、 弊社のグラフィックスカードをお買い上げいただき、 誠にありがとうございます。
本書は、 グラフィックスカードを弊社の液晶ディスプレイと組み合わせてお使いいただくための取扱説明書
です。 本書をよくお読みになり、 正しくお使いいただくようお願いいたします。
安全にお使いいただくために
本書には、 本製品をお使いいただくための重要な情報が記載されています。
本製品をお使いになる前に、 「安全上の注意」 をよくお読みになり、 ご理解された上で正しくお使いくだ
さい。
また、 本書は、 本製品の使用中にいつでも参照できるように大切に保管してください。
保証書について
保証書は内容をよくお読みの上、 必要事項を記入して大切に保管してください。
修理をするときには、 必ず保証書をご用意ください。
責任制限
● 火災、 地震、 第三者による行為、 その他の事故、 使用者の故意または過失、 誤用、 その他異常な
条件下での使用により生じた損害に関して、 当社は一切責任を負いません。
● 本製品の使用または使用不能から生ずる付随的な損害 (事業利益の損失、 事業の中断、 記憶内
容の変化、 消失など) に関して、 当社は一切責任を負いません。
● 取扱説明書で説明された以外の使い方によって生じた損害に対して、 当社は一切責任を負いません。
● 接続機器との組み合わせによる誤動作などから生じた損害に対して、 当社は一切責任を負いません。
● 本製品の使用のため弊社より供給されたソフトウェアの使用により発生したいかなる損害 (期限にか
かわるもの、 ビジネス上の、 利益の減少および遅延や情報にかかわるもの、 その他、 金銭上の不利
益) が、 たとえその発生が当方において予想されたとしても、 弊社は一切責任を負いません。
注意
この製品は、 情報処理装置等電波障害自主規制協議会 (VCCI) の基準に基づく
クラスA情報処理装置です。
この装置を家庭環境で使用すると電波妨害を引き起こすことがあります。
この場合には使用者が適切な対策を講ずるよう要求されることがあります。
Page 30

- 4 -
日本語
安全にお使いいただくための絵記号について
ここでは、 お客様や他の人々への危害、 財産への損害を未然に防ぎ、 本製品を安全に正しくお使いい
ただくための注意事項を記載しています。
その表示と意味は次のようになっています。
■絵表示について
警告
この表示を無視して誤った取り扱いをすると、 人が死亡または
重傷を負う可能性が想定される内容を示しています。
注意
この表示を無視して誤った取り扱いをすると、 人が障害を負う
可能性が想定される内容、 および物的損害のみの発生が想定
される内容を示しています。
■絵記号の意味
で示した記号は警告、 注意を促す事項があることを告げるものです。
記号の中には、 具体的な警告内容が描かれています。
例) 「感電注意」 を表す絵記号
で示した記号は、 してはいけない行為 (禁止行為) です。
記号の中には、 具体的な禁止内容が描かれています。
例) 「分解禁止」 を表す絵記号
で示した記号は、必ずしたがっていただく内容であることを告げるものです。
記号の中には、 具体的な指示内容が描かれています。
例) 「電源プラグをコンセントから抜いてください」 を表す絵記号
本文中の記号について
使用前に必ず読んでいただきたい内容を記述しています。
お使いになるときに注意していただきたいことや、 してはいけないことを記述しています。
操作や用語に関することを記述しています。 必要に応じてお読みください。
本書内の参照ページを記述しています。
Page 31

日本語
- 5 -
安全上の注意
グラフィックスカードを安全にお使いいただくために、 下記の項目を守って正しくお使いください。
警告
分解禁止
本製品を分解 ・ 修理 ・ 改造はしないでください。
火災、 感電、 けが、 故障の原因となります。
修理 ・ 点検は、 お買い求めの販売店に依頼してください。
分解や改造をした場合、 修理をお断りしたり、 保証期間であっても有償修理となる
場合があります。
火災
故障した状態や異常のまま使用しないでください。
そのまま使用を続けると火災や感電の原因になります。
ぬれ手禁止
濡れた手で本製品を取り扱わないでください。
感電や本製品の故障の原因になります。
電源プラグを
抜く
煙が出たり変な臭いや音がしたら、 すぐにコンピュータの電源スイッチを切り、 電
源プラグをコンセントから抜いてください。
そのまま使用を続けると火災や感電の原因となります。
お買い求めの販売店にご相談ください。
注意
禁止
本製品を床などに放置しないでください。
踏みつけて壊したり、 けがの原因になります。
禁止
次のような場所に設置しないでください。
・ 強い磁界の発生する場所 ・ 振動の発生する場所
・ 腐食性のガスが発生する場所 ・ 静電気の発生する場所
故障の原因となります。
接触禁止
端子部分には指などで直接触れないでください。
故障の原因となります。
厳守
静電気による破壊を防止するため、 本製品を設置 ・ 保管 ・ 運搬する場合には十
分注意してください。
取り扱いの際は、 身体に溜まった静電気を放電 ( 逃がす ) するなどしてください。
Page 32

- 6 -
日本語
パッケージ内容
パッケージに下記のものがすべて含まれていることを確認してください。
グラフィックスカード 1 枚
ドライバ CD 1 枚
取扱説明書 1 冊 (本書)
日本語保証書 1 枚
必要システム構成
・ Intel Pentium 4 もしくは Athlon 64 クラス以上の DOS/V PC およびワークステーション
・ PCI Express x16 に対応した空きスロット 1 つ
・ Microsoft Windows 2000、 Windows XP
・ 128MB 以上のシステムメモリ (推奨 : 256MB 以上)
・ 140MB 以上のハードディスク空き容量
・ CD-ROM ドライブ ( 付属ドライバのインストール時に使用 )
・ 350W 以上の電源
・ 弊社製の液晶ディスプレイ (ME/CCL シリーズ)
画素数 対象ディスプレイ
2MP
ME201L, ME213L, ME251i
CCL202, CCL212, CCL250i
3MP
ME315L, ME315L plus, ME351i
CCL316, CCL350i
5MP
ME511L, ME551i2 s
*1
ME551i2
*2
* 1 : 「ME551i2 s」 は Single Link のみの対応製品です。
* 2 : 「ME551i2」 は Single Link と Dual Link の両方に対応している製品です。
Page 33

日本語
- 7 -
ハードウェアのインストールとディスプレイの接続
新しいグラフィックスカードをインストールする前に、 以下の項目を確認してください。
● OS (Windows) が正しくインストールされていることを確認してください。
● 過去に使用していたディスプレイドライバやディスプレイ関連のソフトウェア (Pivot Software など)
は、 すべて削除しておいてください。
● ドライバをインストールする際は、 アドミニストレータとしてログオンしてください。
● 古いグラフィックスカードが実装されている場合は、 それを取り外してください。
● マルチディスプレイ表示のために、 他の種類のグラフィックスカードと混在してお使いになる場合、
あらゆる組み合わせでの動作を保証するものではありません。 インストールが正常に行えないなど
の問題が発生した場合は、 Q&A の内容を参考にしてください。
1. 電源コードの取り外し
コンピュータ本体や周辺機器の電源コードをコンセントから抜き、 電源が入っていないことを確認し
てください。
2. グラフィックスカードの取り付け
1
コンピュータのカバーを取り外してください。
(カバーの取り外し方は、 コンピュータの取扱説明書を参照してください。)
静電気破壊
静電気によりコンピュータやグラフィックスカード上のデリケートなコンポーネント類に損
傷を与える可能性があります。 コンピュータの金属部分に触れるなどして静電気を放
電させてから作業を行ってください。 電気部品や端子部分に触れないようにしてくださ
い。
2
新しくグラフィックスカードを取り付ける際は、 古いグラフィックスカードを取り外すか、 スロッ
トから補助ブラケットを取り外します。
やけど
直前にコンピュータを起動していた場合、 内部の部品が熱くなっていることがあります。
3
グラフィックスカードをコンピュータ内の該当するスロットに差し込み、 グラフィックスカードが
コンピュータ内の他の部品に当たらないこととスロットに完全に差し込まれていることを確認
します。
通風
グラフィックスカードの放熱をよくするために、 冷却のための通風にご留意ください。
コンピュータ内の冷却ファンに内部ケーブルなどが接触していないことと、 ファンに巻き
込まれる恐れのあるもの (熱ではがれやすいラベルなど) がファンの近くにないことを
確認してください。
ファンが回らない状態で使用すると、 故障の原因となります。
部品破損
本カード上の部品には無理な力を加えないでください。 特に放熱器や実装部品に力を
加えてのグラフィックスカードの挿抜は避けてください。 故障の原因となります。
Page 34

- 8 -
日本語
4
グラフィックスカードのブラケット部分をコンピュータの筐体に固定します。
5
コンピュータにカバーを取り付けます。
3. ディスプレイの接続
5 メガピクセルモノクロームディスプレイ ME551i2 を表示する場合の注意
ME 551i2 は、 ポートレイト ( 以降 縦長表示 とする ) とランドスケープ ( 以降 横長表示 とする )
の両方の表示モードをサポートしていますが、 表示モードの切替は手動で行う必要があります。
デフォルト ( 工場出荷設定 ) では、 縦長表示に設定されています。
ME 551i2 を
横長表示で使用する場合は、 必ず表示モードの切替を行ってください。
表示モードの切替方法については、 ディスプレイの取扱説明書をご覧ください。
表示モードの設定状態は、 ディスプレイから DVI ケーブルを外した状態でパワースイッチ
を ON にしたときのLEDインジケータの点滅状態で確認することができます。
表示モード パワースイッチを ON にしたときの LED インジケータの点滅状態
縦長表示
(工場出荷設定)
LED インジケータが緑色に 1 回点滅します
横長表示
LED インジケータが緑色に 2 回点滅します
1
本カードのDVIコネクタとディスプレイ間を、 ディスプレイに付属のDVIケーブルで接続し、
ネジ止めロックします。
コネクタ破損
DVIコネクタは乱暴に斜めに接続すると、 コネクタのピンが折れ曲がることがありますの
で、 まっすぐ丁寧に接続してください。
注意 : 2 つのDVIコネクタ
本カードには 2 つのDVIコネクタ (#1 と #2) があります。
コネクタ #1 に 1 台目のディスプレイを接続してください。
2 台目 ( 右側 ) の
ディスプレイを接続
1 台目 ( 左側 ) の
ディスプレイを接続
DVIコネクタ 1
DVIコネクタ 2
Page 35

日本語
- 9 -
本カードを Dual Link でご使用になる場合は、 Dual Link に対応したディスプレイと
Dual Link 用 DVI ケーブルが必要になります。
DVI コネクタ端子の種類 (ケーブル側 ・ オスピン)
Dual Link/Single Link 用 Single Link 用
電源が入った状態でDVIケーブルを接続すると、 グラフィックスカード故障の
原因となります。
DVIケーブルの接続は、 必ず電源コードを抜いた状態で行ってください。
注意
2
複数台のディスプレイを使用する場合は、 すべてのディスプレイを接続してください。
4. 電源コードの接続
コンピュータやディスプレイ、 周辺機器の電源コードを、 すべてコンセントに差し込みます。
Page 36

- 10 -
日本語
ソフトウェアのインストールと表示設定
OSにより手順が異なりますので、 ご使用のOSに合わせてお読みいただき、 ソフトウェアのインストー
ルと表示設定を行ってください。 ソフトウェア (ドライバ) は同梱のドライバ CD (もしくは指定のもの)
を使用してください。 もしもトラブルが発生した場合は、 Q&A の章を参照してください。
1. ソフトウェアのインストール
1
接続したディスプレイの電源を入れ、 コンピュータを起動します。
2
VGA ブート画面、 続いて Windows 起動画面がディスプレイに表示されることを確認します。
3
アドミニストレータとして Windows にログオンします。
4
古い NVIDIA 系ディスプレイドライバがインストールされていないことを確認します。
コントロールパネルの 「アプリケーション (プログラム) の追加と削除」 を開き、 もし 「NVIDIA
Display Driver」 や 「NVIDIA Windows 2000/XP Display Drivers」 といったプログラムがある場合は、
それを削除して再起動します。
■インストール
[ 新しいハードウェアの検索ウィザードの開始 ] セットアッププログラムによるインストール
1
ドライバ CD を CD-ROM ドライブに挿入します。
2
CD 用のメニューが現れたら、 [ キャンセル ] をクリックします。
CD 用のメニューは OS Service
Pack の状態により表示されな
いものもあります。
3
下図のような [新しいハードウェアの検索ウィザードの開始] が表示されたらで [ キャンセル ]
ボタンをクリックします。
4
CD 内の DriverCD/XP2K フォルダにある Setup.exe を実行してください。
画面の指示にしたがい、インストールを行います。 インストール中次のような画面が現れたら、
[ 続行 ] をクリックします。
Page 37

日本語
- 11 -
5
インストールの完了表示が出たら、 次のようにします。
・ OSがWindows XPの場合は[Yes, I want to restart my computer now.]を選択し、[Finish]
ボタンをクリックして再起動します。
・ OS が Windows 2000 でディスプレイが 1 台の場合は [Yes, I want to restart my
computer now.] を選択し、 [Finish] ボタンをクリックして再起動します。
・ OS が Windows 2000 でディスプレイが 2 台の場合は [No, I will restart my computer
later.] を選択し、 [Finish] ボタンをクリックします。
Windows XP
の場合 および
Windows 2000
でディスプレイが 1 台の場合
Windows 2000
でディスプレイが 2 台の場合
インストールが正常に行えないなどの問題が発生した場合は、 Q&A の内容を
参考にしてください。
インストール後は 「表示設定」 を行います。
Page 38

- 12 -
日本語
2. 表示設定
< 確認事項 >
ご使用のディスプレイにより、 表示できる解像度が異なります。
表示設定を行う前に、 下記内容を確認してください。
画素数 表示方向 解像度 リフレッシュレート 対象ディスプレイ
2MP
縦長表示
横長表示
1200 × 1600
1600 × 1200
60 Hz
ME201L, ME213L, ME251i
CCL202, CCL212, CCL250i
3MP
縦長表示
横長表示
1536 × 2048
2048 × 1536
30 Hz
ME315L, ME315L plus, ME351i
CCL316, CCL350i
5MP
縦長表示
横長表示
2048 × 2560
2560 × 2048
25 Hz ME511L, ME551i2 s
*1
25 Hz / 50 Hz
(50 Hz 推奨)
ME551i2
*1
各対象ディスプレイの解像度とリフレッシュレートの対応表
* 1 : ME551i2, ME551i2 s の表示方向はディスプレイの表示モードに依存します。
ディスプレイの表示モードの切替方法は、ME 551i2 に付属の取扱説明書を参照してください。
次の 2MP ディスプレイを縦長表示で使用する場合は、 「ポートレイト ( 縦長 ) 表示で使用する場合」
( P15) を参照の上、 表示設定をしてください。
対象ディスプレイ
■■■■■■■■■■■■■■■■■■■■■■■■■■■■■■
2MP ME251i, CCL250i, CCL212, CCL202, ME201L
■■■■■■■■■■■■■■■■■■■■■■■■■■■■■■
Page 39

日本語
- 13 -
< 表示設定 >
表示設定は Windows XP、 Windows 2000 の各 OS、 ディスプレイ数により手順が異なります。
お使いのシステム状況に合わせて表示設定を行います。
Windows XP の場合
および
Windows 2000 でディスプレイが 1 台の場合
XP
-1
[ 画面のプロパティ / 設定 ] を表示します。
XP
-2
識別番号 1 のモニタアイコンをクリックします。
[ ディスプレイ ] 欄に次のように表記されます。
1. ELSA TOTOKU LVU2E1 上のプラグアンドプレイモニタ
XP
-3
画面の解像度をスライダバーで設定を行います。
XP
-4
画面の色を 32 ビットに設定します。
XP
-5
詳細設定ボタンをクリックし、 [ モニタ ] タブ内のリフレッシュレートを確認します。
リフレッシュレートは [ 各対象ディスプレイの解像度とリフレッシュレートの対応表 ]
(
P12) を参照してください。 [OK] ボタンを押します。
※ ME551i2 の場合リフレッシュレートは
50 Hz を推奨します。
XP
-6
ディスプレイを 2 台で使用する場合は、 識別番号 2 のモニタアイコンをクリックし、
「Windows デスクトップをこのモニタ上で移動できるようにする」 のボックスにチェックを
入れます。
XP
-7
識別番号 2 のディスプレイに対しても
XP
-3
~
XP
-5
を行います。
XP
-8
[OK] ボタンを押して設定を適用します。
Page 40

- 14 -
日本語
Windows 2000 でディスプレイが 2 台の場合
2K
-1
[ 画面のプロパティ / 設定 ] を表示します。
2K
-2
画面の色を 32 ビットに設定します。
2K
-3
画面の領域をスライダーバーで目的の解像度に設定します。
2K
-4
[ 適用 ] ボタンをクリックします。 画面の指示にしたがい、 目的の解像度に設定します。
2K
-5
[ 詳細 ] ボタンをクリックし、 Quadro FX 1500 タブを選択します。
他のグラフィックスカードが混在していると上記のタブが表示されません。
このようなときは、 他のグラフィックスカード上のモニタアイコンをいったん
非接続にする必要があります。
2K
-6
nView ディスプレイ設定 (又は nView Display Settings) を選択し、 n View (又は
nView Display Mode) 欄から デュアルビュー (又は Install Dualview [Advanced]) を
選択します。 [ OK ] ボタンをクリックします。
2K
-7
再起動メッセージ中の再起動 (又は Restart now) ボタンをクリックします (再起動)。
2K
-8
NVIDIA Dualview に対するソフトウエアのインストールが終了したら [ 完了 ] ボタンを
クリックします。
2K
-9
コンピュータを再起動します。
2K
-10
再起動したら
XP
-1
~
XP
-6
、
XP
-8
を行います。
Page 41

日本語
- 15 -
■ 2MP ディスプレイ (ME213L を除く ) をポートレイト ( 縦長 ) 表示で
使用する場合
ディスプレイを縦長表示で使用する場合は次の手順で表示設定を行ってください。
対象となるディスプレイは 「対象ディスプレイ」 ( P12) を参照してください。
1
[ 画面のプロパティ / 設定 ] を表示します。
2
対象モニタアイコンをクリックし、 [ 詳細設定 ] ボタンをクリックして、 FX1500 タブを
クリックします。
他のグラフィックスカードが混在していると上記のタブが表示されません。
このようなときは、 他のグラフィックスカード上のモニタアイコンをいったん
非接続にする必要があります。
3
縦長表示する場合は、 Quadro FX1500 のメニューからパンコントロール (又は NVRotate)
を選択します。
4
縦 90 度回転 (又は Portrait 90 degree rotation) を選択し、 [ OK ] ボタンを押して設定を
適用します。
5
ディスプレイ毎に 2 ~ 4 を繰り返します。
3. マルチディスプレイモードの確認とセットアップの完了
1
必要であれば、 マルチディスプレイモードを変更します。
「マルチディスプレイモード」 の章をご参照ください。
2
マルチディスプレイの場合、 ディスプレイの配置を確認します。
[ 画面のプロパティ / 設定 ] の [ 識別 ] をクリックしてディスプレイの番号と配置を確認し、 モニタアイコ
ンをドラッグして実際のディスプレイの配置と合わせ、 [ 適用 ] をクリックします。
3
マルチディスプレイの場合、 プライマリモニタを確認します。
[ 画面のプロパティ / 設定 ] でプライマリにしたいモニタアイコンをクリックし、 「このデバイスをプライマ
リモニタとして使用する」 にチェックをして 「OK」 ボタンをクリックします。
4
ドライバ CD を CD-ROM ドライブから取り出し、 セットアップは完了です。
Page 42

- 16 -
日本語
ソフトウェアのアンインストール
本グラフィックスカードのソフトウェアをアンインストールする場合は、 以下の手順で行ってください。
1
アドミニストレータとして Windows にログオンします。
2
タスクバーのスタートメニューから [設定] → [コントロールパネル] を選択します。
3
[コントロールパネル] が表示されたら [アプリケーション (プログラム) の追加と削除] をダブル
クリックします。
4
現在インストールされているプログラムの一覧より [NVIDIA Drivers] を削除します。
もしも、 上記以外に 「NVIDIA Windows 2000/XP Display Drivers」 というプログラムがある
場合は、 このプログラムも同様に削除してください。
5
すべてのアプリケーションを終了し、 コンピュータを再起動します。
再起動を行わないとアンインストールは終了しません。
Page 43

日本語
- 17 -
マルチディスプレイモード
1. 選択可能なモード
以下のモードが選択可能です。
・ 独立表示モード (デュアルビュー) : 2 台のディスプレイを独立して表示
・ 連結表示モード
*
(水平/垂直スパン) : 2 台のディスプレイを連結して表示
・ 単独表示モード (1 つのディスプレイ) : 1 台目のディスプレイのみ表示
・ 複製表示モード (クローン) : 2 台のディスプレイに同じ画像を表示
モード
1 カード
1 ディスプレイ
1 カード
2 ディスプレイ
独立表示モード
連結表示モード
*
単独表示モード
複製表示モード
2
1
1
1 2
1
1 1
* : ディスプレイの連結モードにおいて、 縦長表示の連結をサポートしているのは ME213L
のみです。
Page 44

- 18 -
日本語
2. マルチディスプレイモードの変更方法
1
「Quadro FX1500」 メニューを表示します。
2
[nView ディスプレイ設定 ] を選択します。
3
nView 内のリストから目的のモードを選択し、 [OK] または [ 適用 ] をクリックします。
[ 画面のプロパティ / 設定 ] で対象となるモニタアイコンを選択し、 [ 詳細 ] → [Quadro
FX1500] タブをクリックします。
他のグラフィックスカードが混在していると上記のタブが表示されません。
このようなときは、 他のグラフィックスカード上のモニタアイコンをいったん
非接続にする必要があります。
また、 ディスプレイが 1 台しか接続されていない場合は、 選択できません。
4
連結表示モードで表示する場合 : [ 水平スパン ] を選択します。
独立表示モードで表示する場合 : [ デュアルビュー (DualView)] を選択します。
単独表示モードで表示する場合 : [ 1 つのディスプレイ ] を選択します。
複製表示モードで表示する場合 : [ クローン ] を選択します。
その後は画面の指示に従います。
Page 45

日本語
- 19 -
Q & A
1. 導入前
対応する OS は何ですか ?
Windows 2000/XP に対応します。
ディスプレイを何台表示できますか ?
本カード 1 枚で 2 台のディスプレイが表示可能です。
TOTOKU のどの液晶ディスプレイと組み合わせて使用できますか ?
以下のモデルと組み合わせて使用できます。
ME201L, ME213L, ME251i, CCL202, CCL212, CCL250i,
ME315L, ME315L plus, ME351i, CCL316, CCL350i
ME511L, ME551i2 s, ME551i2
上記以外に 2M 以下の解像度のモデルとの組み合わせでも使用できます。
どのような解像度を表示できますか ?
本カードで表示できる解像度は 「各対象ディスプレイの解像度とリフレッシュレートの対応表」 P12 を
参照してください。
複数枚のグラフィックスカードを混在して使用できますか ?
基本的には使用できます。
本カードは PCIExpress X16 バスを 1 つ占有しますが、 お使いのコンピュータの空きスロットに対応した
グラフィックスカードとの混在使用ができます。 他のグラフィックスカードと混在してお使いになる場合
は、 あらゆる組み合わせでの動作を保証しておりません。
他のカードと混在する必要がある場合、 どのカードがお薦めですか ?
本カードの場合は、 NVIDIA 系カードを推奨します。
ただし、 基本的には他種カードとの混在動作は保証しておりません。
DirectX や OpenGL に対応しますか ?
DirectX 9 や Open GL2.0 がサポートされています。
デュアルリンク出力は何系統ですか ?
2 系統のデュアルリンクをサポートしています。
デュアルリンクで出力するための設定は何かありますか ?
デュアルリンクに対応しているモデルは ME551i2 です。 ディスプレイのリフレッシュレートを 50Hz に
設定してください。 (リフレッシュレートを 25Hz に設定するとシングルリンクで出力します。)
2. ソフトウェアのインストール
ディスプレイドライバは、 どのドライバを使用すればよいですか ?
同梱または指定の TOTOKU 液晶ディスプレイ用カスタムドライバを用いてください。
それ以外のディスプレイドライバでの動作は保証されません。
コンピュータ起動時の POST 画面 (VGA ブート画面) が表示されません。
以下のような理由が考えられますので、 ご確認ください。
Page 46

- 20 -
日本語
・ ディスプレイの電源が入っていない、 または信号ケーブルが確実に接続されていない。
・ グラフィックスカードがスロットに確実に挿入されていない。
・ ディスプレイ未接続のオンボード VGA アダプタや他のグラフィックスカードから出力されている。
・ 他のグラフィックスカードの影響を受けている。
ディスプレイドライバを上書きインストールしてもよいですか ?
いいえ。 ドライバの更新やカードの追加、 取り外しおよび使用しているスロットの変更を行う場合には、
必ずいったんディスプレイドライバをアンインストールした上で、 再度ドライバをインストールしてくださ
い。
新しいグラフィックスカードを取り付けても、 新しいハードウェアとして検出されません。
以下のような理由が考えられますので、 ご確認ください。
・ グラフィックスカードがスロットに確実に挿入されていない可能性があります。
・ ディスプレイドライバが既にインストールされていた可能性があります。 古いバージョンのドライバが
インストールされていた場合、 そのドライバをアンインストールしてから最新ディスプレイドライバを
インストールしてください。
・ 混在して実装された他種グラフィックスカードの影響を受けている場合があります。
他種グラフィックスカードを取り外してみてください。
・ 検出されないようでも、 実際はデバイスマネージャの 「その他のデバイス」 に 「 ビデオコント
ローラ (VGA 互換)」 として認識されている場合があります。 そのままディスプレイドライバをインス
トールしてください。
他種グラフィックスカードと混在させると、 ディスプレイドライバがうまくインストールできません。
いったん他種グラフィックスカードを取り外し、 本カードのみ取り付けてディスプレイドライバのインス
トールと画面設定を行います。 次に本グラフィックスカードを取り外して、 他種グラフィックスカードの
みを取り付けてディスプレイドライバのインストールと画面設定を行った後、 本カードを元のスロットに
取り付けてみてください。
ドライバをインストールし再起動したら Windows 起動画面でフリーズしてしまいます。
他種グラフィックスカードが混在実装されている場合に起こることがあります。 いったん他種カードを
取り外し、 本カードのみでセットアップを行い、 次に本カードを取り外して他種カードのみを取り付けて
セットアップを行った後、 本カードを元のスロットに取り付けてみてください。
ドライバをインストールし再起動したら Windows 起動画面でブラックアウトしてしまいます。
他のグラフィックスカードからビデオ信号が出力されていないか確認してください。
本カード設定後に他種グラフィックスカードを追加したら、 Windows 起動画面でフリーズします。
いったん本カードを取り外し、 他種グラフィックスカードだけでインストールと設定を行った後に、
再び本カードを元のスロットに取り付けてみてください。
ドライバのインストールはドライバの Setup.exe を実行する方法でよいですか ?
はい、 Setup.exe によりインストールすることを推奨します。 「新しいハードウェアの検出ウィザード」 に
よるインストールは、 Setup.exe によるインストールで、 カードが認識されない等、 正しくインストール
できないときに行ってください。
以下に [ 新しいハードウェアの検索ウィザード ] でのインストール手順を示します。
Page 47

日本語
- 21 -
[ 新しいハードウェアの検索ウィザードの開始 ] - ハードウェアの検索ウィザードによるインストール
(1) [ 新しいハードウェアの検索ウィザードの開始 ] が表示されたら [ 次へ ] をクリックします。
(2) 「ソフトウエア検索のため、 Windows Update に接続しますか ?」 のメッセージが表示されたら
「いいえ、 今回は接続しません」 を選択して、 [ 次へ ] をクリックします。
[ ハードウェアのインストール (ELSA TOTOKU LVU2E1) ]
注) もしも 「ハードウェアのインストール」 画面にならない場合は、
「一覧または特定の場所からインストールする (詳細)」 を選択して [ 次へ ] をクリックします。
デバイス検索方法で 「最適なドライバを検索する」 を選択し、 CD ドライブを参照して、
ドライバの場所 (DriverCD/XP2K) を指定してください。
(3) [ 次へ ] をクリックします。
「nv4_disp.inf」 が選択され、 インストールが行われます。
[ 新しいハードウェアの検索ウィザードの完了 (ELSA TOTOKU LVU2E1) ]
(4) [ 完了 ] をクリックします。
[ 新しいハードウェアの検索ウィザードの開始 (プラグアンドプレイモニタ) ]
(5) 「ソフトウエア検索のため、 Windows Update に接続しますか?」 のメッセージが表示されたら
「いいえ、 今回は接続しません」 を選択して、 [ 次へ ] をクリックします。
(6) 「ソフトウェアを自動的にインストールする (推奨)」 のチェックを確認し、[ 次へ ] をクリックします。
[ 新しいハードウェアの検索ウィザードの完了 (プラグアンドプレイモニタ) ]
(7) [ 完了 ] をクリックします。
注) ディスプレイの数だけ (1) ~ (7) を繰り返します。
ドライバをインストールしたら他の NVIDIA 系カードが動作しません。
デバイスマネージャを開いて 「 Video Controller (VGA Compatible)」 となっている場合、 そこから
ドライバを更新してください。
または、 ドライバのインストールを 「新しいハードウェアの検出ウィザード」 により行ってください。
混在する他の NVIDIA 系カード用に他のドライバを用いると問題がありますか ?
はい。 異なる NVIDIA 系ドライバを混在させると正常に動作しないことがあります。
混在する他の NVIDIA 系カードにも本ドライバを用いてください。
ただし、 最新 NVIDIA 系カードには対応できない場合があります。 混在する他の NVIDIA 系カードに本
ドライバを用いても正常に動作しない場合は、 弊社サポートデスクにご相談ください。
異なったバージョンのドライバファイルが存在します。
新しい指定ドライバを上書きインストールすると起こりえます。
以前の NVIDIA 系ドライバを完全に削除した後に指定ドライバをインストールしてください。
マルチディスプレイ表示でのトラブル対策として、 他に何か参考として考えられますか。
以下の事項を行うことでトラブル対策となることがあります。
・ CMOS スイッチのある HP/Compaq 製コンピュータでは、 CMOS スイッチを利用する。
・ システム BIOS で VGA Video Primary を PCI Express 優先 (プライマリ) に設定する。
・ カードを 1 枚ずつインストールする。
・ セカンダリモニタ用には、 セカンダリとして使用できるカードか確認する。
・ コンピュータのマザーボードの BIOS を最新のものにしてみる。
・ コンピュータのチップセットのドライバを最新のものにしてみる。
Page 48

- 22 -
日本語
・ 他種グラフィックスカードのドライバを最新のものにしてみる。
・ カードを挿入するスロットを変えてみる。
・ ドライバのバージョンを変える。
3. 表示設定
所定の解像度に設定できません。
以下のような理由が考えられますので、 ご確認ください。
・ コンピュータの電源を入れたときに所定のディスプレイが接続されていましたか ?
→ 所定のディスプレイが接続された状態でコンピュータを起動してください。
・ 「このモニタでは表示できないモードを隠す」 のチェックが外れていますか ?
→ [ 画面のプロパティ / 設定 ] で解像度が設定できないモニタアイコンを選択し、 [ 詳細 / モニ
タ ] で 「このモニタでは表示できないモードを隠す」 のチェックを外してください。
・ 古いディスプレイドライバが有効になっていませんか ?
→ そのドライバを削除した後に、 新しいドライバを再インストールしてください。
・ デバイスマネージャ上で [ ] マークのついたモニタアイコンがありますか ?
→ その [ ] マークのついたモニタアイコンを削除してください。
「このモニタでは表示できないモードを隠す」 のチェックが外せません。
アドミニストレータとして Windows にログオンし、 操作してください。
本カードの 2 つの DVI 出力で、 縦長表示と横長表示あるいは他の解像度を混在表示できますか ?
はい。 Windows 2000/XP の独立表示モードにおいて可能です。
本カードのリフレッシュレートやパンコントロールなどの機能を設定する他の方法はありますか ?
タスクバー上の [NVIDIA 設定 ] アイコンから本カードの機能を設定することもできます。
(インストール後に上記アイコンが表示されていないときは、 いったん再起動すると表示されるように
なります。)
Windows XP で、 [ 画面のプロパティ / 設定 ] に無効なモニタアイコンがあります。
独立表示モード以外のモードに設定した場合に表示される仮想モニタです。 そのままご使用ください。
モノクロームディスプレイでは、 カラーパレットを 256 色 (8 bit) に設定すれば良いですか ?
モノクロームで使用する場合でも、 True Color (32 bit) に設定してください。
(本グラフィックッスカードはリニアグレイ固定パレット対応していませんので、 256 色 (8 bit) に設定
すると、 Windows の制約で 256 階調グレースケールが表示できず、 236 階調までの表示となります。
なお、 High Color (16 bit) に設定すると、 256 階調グレースケールを表示できません。)
マルチディスプレイモードの設定について教えてください。
「マルチディスプレイモード」 の章をご参照ください。
本カード上の 2 台のディスプレイのうち 1 台が表示できません。
マルチディスプレイモードが 「単独表示モード」 に設定されていないか確認してください。
本カード上のディスプレイが接続されているか [ 画面のプロパティ / 設定 ] を確認してください。
画像の表示方向が上下逆になってしまいます。
パンコントロールの設定を見直してください。
Page 49

日本語
- 23 -
なお ME213L/ME315L, ME315L plus/CCL316/ME351i/CCL350i/ME511L/ME551i2 s/ME551i2 で
縦長タイミングによるディスプレイ側回転機能を利用する場合は、パンコントロールを 「横 (0 度回転)」
に戻して無効にしてください。
ME213L/ME315L/ME315L plus/ME351i/CCL316/CCL350i/ME511L/ME551i2 s/
ME551i2 では、 2 つの縦長表示方法 ( 画面のプロパティで画面解像度を変える方法と
Quadro FX1500 のメニューからパンコントロールで行う方法 ) が選べますが、 どちらが
良いでしょうか ?
高品位の描画が行える 「画面のプロパティで画面解像度を変える縦長表示方法」 を推奨します。
日本語版 Windows XP で [Quadro FX1500] タブの内容が英語で表示されてしまいます。
日本語版 Windows XP で 「新しいハードウェアの検出ウィザード」 によるインストールを行うと
起こる場合があります。 英語のままご使用いただいても問題はありませんが、 日本語で表示させるに
は、 いったん再起動を行ってください。
[Quadro FX1500] タブが表示されません。
オンボード VGA や NVIDIA 社以外の GPU を搭載したグラフィックスカードが混在していると、
[Quadro FX1500] タブが表示されません。 タブを表示させるには他のカード上のモニタアイコンを
いったん非接続にしてから設定してください。
[ 画面のプロパティ / 設定 / 詳細 ] の [ モニタ ] タブが開けません。
デバイスマネージャを開き [ ] マークのついたモニタアイコンがある場合、 それを削除してみて
ください。
パンコントールによる縦長表示と縦長タイミングによる縦長表示を混在できますか ?
混在可能です。 ただし他種グラフィックスカードが存在する場合は、 コントロールパネルエラーが発生
することがあります。
タブ名が [Quadro FX1500] でなく、 desk.cpl エラーが発生します。
DELL 製コンピュータなどで以前の NVIDIA ドライバが残っている場合に起こることがあります。
ドライバを完全にアンインストールしてから新しいドライバを再インストールしてください。
他の NVIDIA 系カード混在時に 2 台目 (Dualview 側) のモニタアイコンが表示されません。
[ 画面のプロパティ / 設定 / 詳細 /Quadro FX1500/nView Display 設定 ] の nView Modes で
Dualview を選択し再起動してください。 それでも表示されない場合は、 ドライバをインストール
し直すか、 他の NVIDIA 系カードも Dualview モードに設定する必要があるかもしれません。
NVIDIA 系カードがアドオンされた DELL 製コンピュータで、 パンコントロールができないなどの
問題が発生します。
Windows 2000 あるいは Windows XP がプリインストールされた DELL 製コンピュータには、 アドオン
されたグラフィックスカード専用のドライバを自動的にインストールする機能があります。
(Precision や OptiPlex、 PowerEdge シリーズなど)
DELL 製コンピュータにアドオンされた NVIDIA 系カードを使用する場合、 NVIDIA 系ドライバどうし
のコンフリクトによって問題が起こりえます。 この問題を回避するには、 その自動インストール機能を
一時的に止めてから以前の NVIDIA 系ドライバをアンインストールし、 その後に指定のドライバをイン
ストールしてください。
具体的には、
1. 「ローカルディスク (C:)」 直下の 「DRIVERS」 フォルダを一時的に 「デスクトップ」 に移動します。
Page 50

- 24 -
日本語
注 : 対象は 「C:\DRIVERS」 です。 「C:\Dell\Drivers」 は関係ありません。
2. 以前の NVIDIA 系ドライバをアンインストールして、 再起動します。
「アプリケーション (プログラム) の追加と削除」 で以下のプログラムを削除
「NVIDIA Display Driver」 ← NVIDIA の統合ドライバ
「NVIDIA Windows 2000/XP Display Drivers」 ← DELL のカスタムドライバ
3. 指定ドライバをインストールします。
4. 「DRIVERS」 フォルダを 「デスクトップ」 から元の 「ローカルディスク (C:)」 直下に戻します。
パンコントロールで画像を回転しても、 [ 画面のプロパティ / 設定 ] のモニタアイコンが回転しない
ことがあります。
[ 画面のプロパティ / 設定 ] をいったん閉じてから、 再度開くと正常に表示されます。
[ 画面のプロパティ ] で示される 「モニタの種類」 は何ですか ?
システムの構成によって 「プラグアンドプレイモニタ」、 「マルチモニタ」、 「既定のモニタ」 の 3 つの
タイプのいずれかが表示されます。
4. その他
グレースケールの階調が階調落ちなどして正常に表示されません。
色の設定が、 カラーモードの 8 ビットカラーあるいは 16 ビットカラーに設定されていないか確認して
ください。 32 ビットカラーでないと、 256 階調のグレースケールが表示できません。
パンコントロールによる縦長表示で、 画像が変わる瞬間に稲妻状のノイズが画面に現れます。
これはパンコントロールによる高速描画のための現象で、 異常ではありません。
指定外の DVI ケーブルを使用してもよいですか ?
いいえ。 性能を確保するために弊社ディスプレイに付属の DVI ケーブルを使用してください。
ディスプレイドライバのバージョンについて教えてください。
本書作成時のバージョンは、 Ver. 84.26 です。
注) ドライバは改善のため更新されます。 最新のドライバをご使用ください。
なおバージョンによって設定方法などが変更される場合がありますのでご注意ください。
また古いバージョンのドライバが既にインストールされている場合は、 必ずそれをアンインストー
ルした後に、 最新ドライバをインストールしてください。
ドライバ更新履歴 :
Windows 2000/XP 用
バージョン リリース 主な更新内容
Ver. 84.26 2006.07 (初版)
ディスプレイのキャリブレーションを行うときの表示設定上の制約はありますか ?
以下の点にご注意ください。
・ モノクロームディスプレイのキャリブレーションを行うときに、 プライマリモニタとして他のカラーディス
プレイを混在して使用している場合、 プライマリモニタが 8 ビットカラーモードに設定されているとキ
ャリブレーションが正常に行えません。 その場合、 プライマリモニタを 32 ビットカラーモードにするか、
キャリブレーションの対象となるモノクロームディスプレイをプライマリモニタにしてください。
・ Windows 上でのガンマ補正がかかっている場合は、 その機能をオフにしてください。
Page 51

日本語
- 25 -
・ ME201L 用のキャリブレーションソフトウェアは、 32 ビットカラーモード対応です。
・ ME213L/ME251i/ME315L, ME315L plus/ME351i/ME511L/ME551i2 s/ME551i2 用のキャリブレー
ションソフトウェアは、 32 ビットカラーモードおよびグレー固定パレットに対応しています。
・ CCL202/CCL212/CCL250i/CCL316/CCL350i 用のキャリブレーションソフトウェアは、 32 ビット
カラーモード対応です。
8 /16 ビットカラーモードでキャリブレーションを行わないでください。
Page 52

- 26 -
日本語
技術仕様
LVU2E1 グラフィックスカード
項 目 仕 様
GPU NVIDIA Quadro FX 1500
ビデオメモリ 256MB 256bit DDR3 SDRAM
カードタイプ PCI Express x16 フルハイト
対応バス PCI Express x16
対応 OS Windows 2000, Windows XP
最大混在枚数 1 枚 (コンピュータの仕様によって 2 枚混在可能な場合があります。)
出力コネクタ 2 系統の DVI-I Dual Link コネクタ
寸法 198 mm × 111 mm
最大消費電力 65 W
出力解像度
解 像 度 対応ディスプレイ
640 × 480
800 × 600
1024 × 768
ME201L, ME213L, ME251i
CCL202, CCL212, CCL250i
ME315L, ME315L plus, ME351i
CCL316, CCL350i
ME511L, ME551i2 s, ME551i2
1200 × 1600 (60 Hz)
1600 × 1200 (60 Hz)
ME201L, ME213L, ME251i
CCL202, CCL212, CCL250i
1536 × 2048 (30 Hz)
2048 × 1536 (30 Hz)
ME315L, ME315L plus, ME351i
CCL316, CCL350i
2048 × 2560 (25 Hz)
2560 × 2048 (25 Hz) ME511L, ME551i2 s
2048 × 2560 (25 Hz/ 50 Hz)
2560 × 2048 (25 Hz/ 50 Hz) ME551i2
カラーモード カラーモード (8, 16, 32 bit /pixel)
マルチディスプレイモード 独立表示、 連結表示*、 単独表示、 複製表示
* : 連結表示モードでの縦長表示は、 ME213L でのみ可能
Page 53

日本語
- 27 -
198 mm
111 mm
Page 54

- 28 -
日本語
保証とアフターサービス (この内容は日本国内に限られます。)
保証期間
保証期間はお買い上げの日から 3 年間です。
修理を依頼されるときは
① 本書をよくお読みの上、 もう一度お調べください。
② それでも異常があるときは、 使用をやめて電源コードをコンセントから抜き、 TOTOKU フィールド
サービスセンターにお問い合わせください。
ご自分での修理はしないでください。 大変危険です。
③ 保証期間中の修理は…
故障内容や使用状況により無料修理いたします。
④ 保証期間後の修理は…
TOTOKU フィールドサービスセンターにご相談ください。
修理によって機能が維持できる場合は、 ご要望により有料修理いたします。
⑤ 修理依頼での輸送は、 製品の梱包箱および梱包材をご使用ください。
サポートを依頼されるときは
トラブルのお問い合わせの際は、 必ず下記の情報をご連絡ください。
● グラフィックスカード : モデル名、 使用枚数、 他のグラフィックスカードやオンボードVGAの有無
● ディスプレイ : モデル名、 使用台数、 他のモニタの有無
● コンピュータ : メーカー、 モデル名、 メモリサイズ、 CPU、 チップセットなど
● OS : バージョン (サービスパック含む)
● アプリケーション : 使用アプリケーション (ビューア)
● 画面の設定 : 使用解像度と色数 (グレースケール、 カラー)
● トラブル内容 : トラブルの詳細と再現方法
ドライバのアップグレードについて
ドライバのアップグレードについては販売店にお問い合わせください。
廃棄について
本製品の廃棄については、 各自治体の廃棄ルールにしたがってください。
詳しくは、 各自治体へお問い合わせください。
Page 55

日本語
- 29 -
アフターサービスのお問い合わせ窓口
アフターサービスのお問い合わせは、 下記サービスセンターにご相談ください。
[修理に対するお問い合わせ]
〒940-0006東特長岡株式会社
新潟県長岡市東高見 1-2-1
東特長岡株式会社
TOTOKU フィールドサービスセンター
0120-24-7911 FAX.0258-24-6700
受付時間 9 : 00 ~ 12 : 00
13 : 00 ~ 17 : 00
(土、 日、 祝祭日および東特長岡休日は除く)
[サポートに対するお問い合わせ]
〒940-0006東特長岡株式会社
新潟県長岡市東高見 1-2-1
東特長岡株式会社
サポートデスク
0120-24-2061 FAX.0258-24-6700
受付時間 9 : 00 ~ 12 : 00
13 : 00 ~ 17 : 00
(土、 日、 祝祭日および東特長岡休日は除く)
[製品に関する営業窓口]
〒169-8543
東京都新宿区大久保 1-3-21
東京特殊電線株式会社
情報機器カンパニー 営業部
TEL.03-5273-2005 FAX.03-5273-2091
受付時間 9 : 00 ~ 12 : 00
13 : 00 ~ 17 : 00
(土、 日、 祝祭日および当社休日は除く)
◆製品に関する詳しい内容は、 当社インターネットホームページをご覧ください。
www.totoku.co.jp/display/
[年間保守契約に対するご相談]
各営業 窓口
情報機器カンパニー 営業部
TEL.03-5273-2005 FAX.03-5273-2091
大阪支店
TEL.06-6352-3541 FAX.06-6354-0828
名古屋支店
TEL.052-771-1161 FAX.052-776-0643
信越支店
TEL.0268-34-5285 FAX.0268-34-5497
受付時間 9 : 00 ~ 12 : 00
13 : 00 ~ 17 : 00
(土、 日、 祝祭日および当社休日は除く)
Page 56

- 30 -
日本語
Memo
Page 57

日本語
- 31 -
TOTOKU
グラフィックスカード LVU2E1 取扱説明書
2006 年 8 月版 PZZ11-1367
・ 本書の内容の一部又は全部を無断転記することは禁止されています。
・ 本書の内容について将来予告なしに変更することがあります。
・ 本書は内容について万全を期して作成いたしましたが、 万一ご不明な点や誤り、 記載もれなどお気づきの
ことがありましたらご連絡ください。
取扱説明書に関するご注意
Page 58

- 32 -
日本語
東京特殊電線株式会社
〒 169-8543 東京都新宿区大久保 1-3-21
TEL.03-5273-2005 FAX.03-5273-2091
http://w ww.totoku.co.jp/display/
Page 59

Page 60

Printed in Japan (Recycled Paper)
PZZ11-1367
LVU2E1/R
060808
 Loading...