

Page 1
Installation and Owner’s Manual
Manual de instrucciones y del propietario
Manuel d’installation et d’utilisation
Dual-flush Toilet
Inodoro de doble descarga
Toilettes à double chasse d’eau
CST646F
Warranty Registration and Inquiry
For product warranty registration, TOTO U.S.A. Inc. recommends online warranty registration. Please visit
our web site http://www.totousa.com. If you have questions regarding warranty policy or coverage, please
contact TOTO U.S.A. Inc., Customer Service Department, 1155 Southern Road, Morrow, GA 30260
(888) 295-8134 or (678) 466-1300 when calling from outside of U.S.A.
Page 2
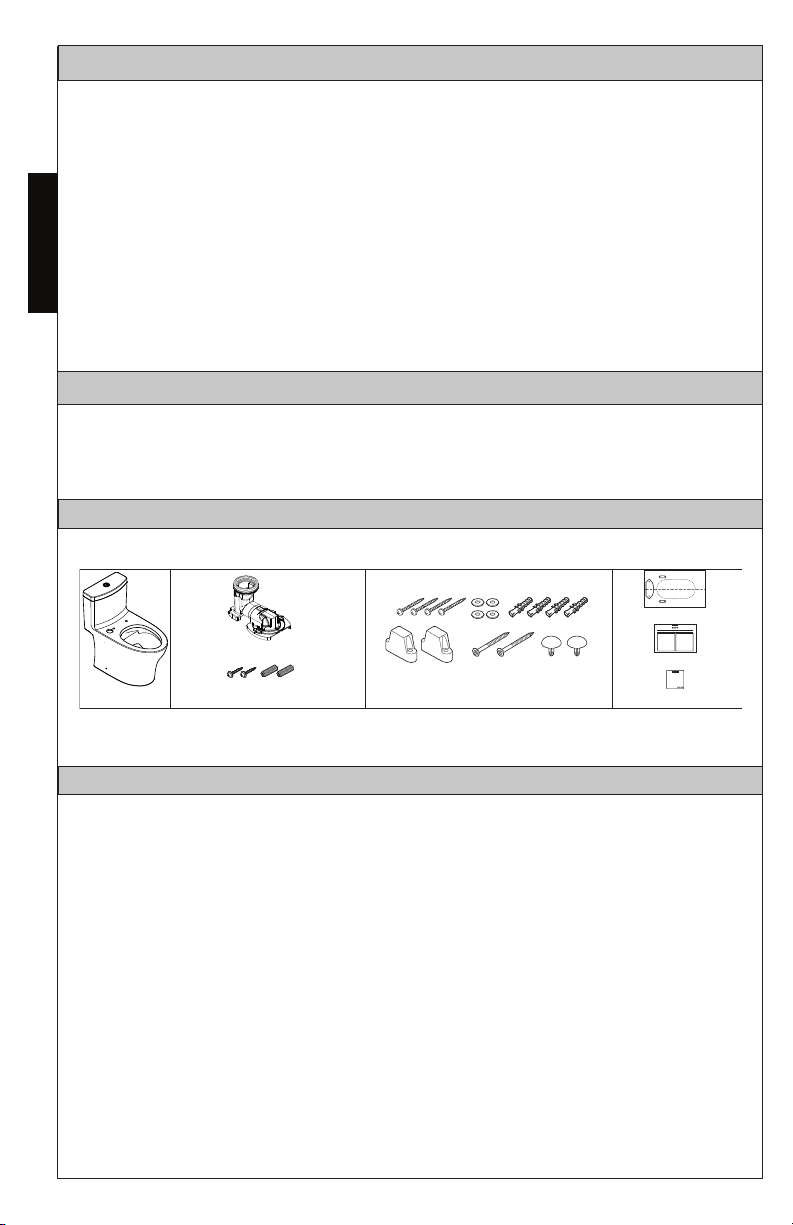
TABLE OF CONTENTS
Thanks for Choosing TOTO! ..............................................................................2
Included Parts ......................................................................................................2
Common Tools Needed ......................................................................................2
Before Installation ................................................................................................3
ENGLISH
Installation Procedure ..........................................................................................4
Care and Cleaning ...............................................................................................7
Replacing the Fill Valve .......................................................................................8
Adjusting the Water Level ...................................................................................8
Servicing Fill Valve ...............................................................................................9
Servicing Flush Valve .........................................................................................10
Warranty..............................................................................................................11
THANKS FOR CHOOSING TOTO!
The mission of TOTO is to provide the world with healthy, hygienic and more
comfortable lifestyles. We design every product with the balance of form and
function as a guiding principle. Congratulations on your choice.
INCLUDED PARTS
Check to make sure you have the following parts included in your package*:
Template
Rough-in
Toilet
Rough-in Mounting Hardware
Bowl Mounting hardware
* Actual parts may appear different from drawing according to the model.
Manual
Unifit Rough-in Instruction
COMMON TOOLS NEEDED
10” adjustable wrench
Carpenters’ level
Hacksaw
Tape measure
Hand pliers
Flat head screwdriver
Phillips screwdriver
Pencil
Putty knife
Drill
Drill bits (mounting block)
For wood floor installation:
- ⁄” drill bit
For concrete/tile installation:
- ⁄” drill bit
MATERIALS REQUIRED:
(Not Included)
Flexible supply hose
Angle stop valve
Wax ring
2
Page 3
BEFORE INSTALLATION
” (90mm) MAX
Read these instructions thoroughly before beginning work.
Please leave instructions for customers. These instructions contain
maintenance and warranty information.
If necessary, remove the existing toilet and if new construction, purge the
supply line.
NOTICE
Due to the powerful performance of our Tornado, G-Max, E-Max and Power
Gravity flushing systems, they are not specified for back-to-back installations.
The only means of installing these toilets in a back-to-back situation is when
the toilet drain connections incorporate a WYE fitting. Please contact your
builder or contractor prior to this installation.
ENGLISH
Double Combination WYE / 1/8 Bend
YES
Double Sanitary Tee / Sanitary Cross
NO
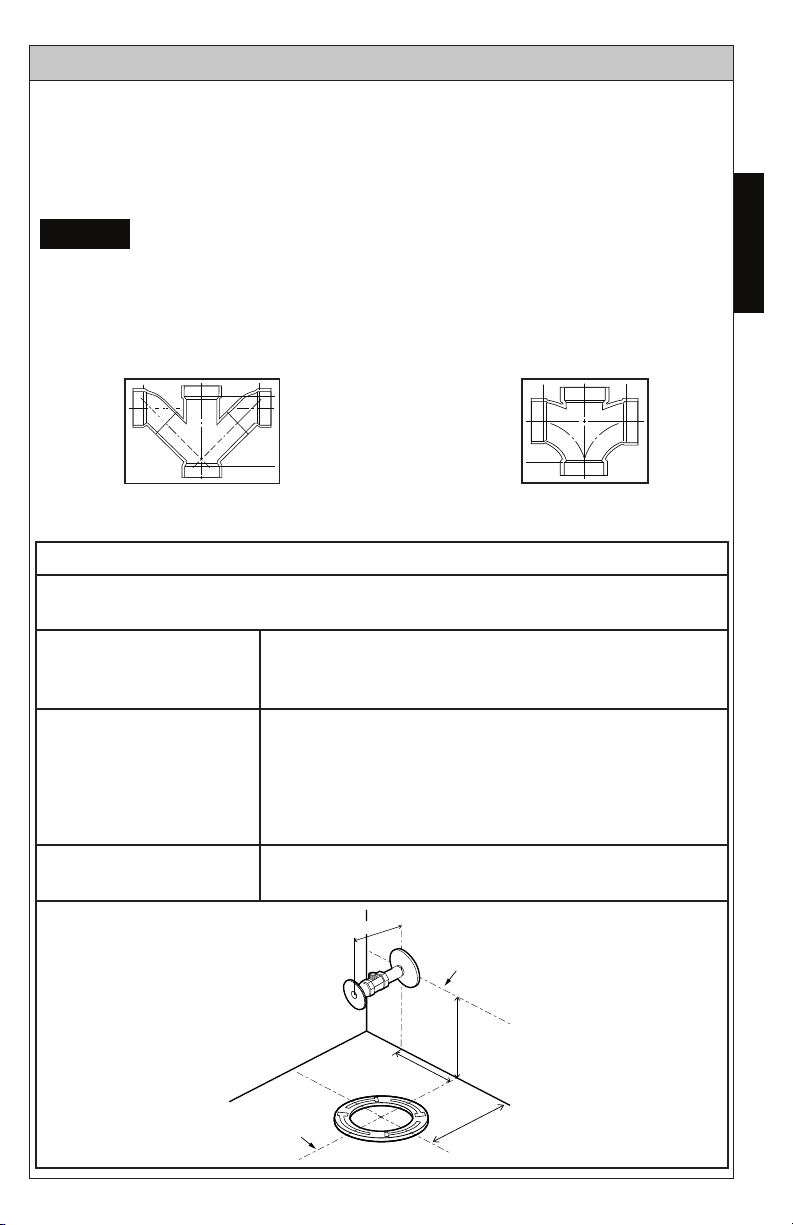
Water supply shut-off valve installation recommendations
Follow these recommendations to ensure an optimal and trouble-free
installation with a neat and professional appearance.
Location
(From floor and left of
center of floor flange)
Valve type
Maximum length
4-3/4” x 4-3/4” (120mm x 120mm)
Angle stop type valve with supply connection
facing upward, inward, or downward
NOTE: Straight stop type valve, or valve with
supply connection on front of angle stop, is not
recommended
Angle stop must protrude less than 3-1/2” (90mm)
from wall
4¾”
(120mm)
Finished wall
Centerline of
Stop valve
4¾”
(120mm)
3½
Centerline of
Flange
“RI”
3
Page 4
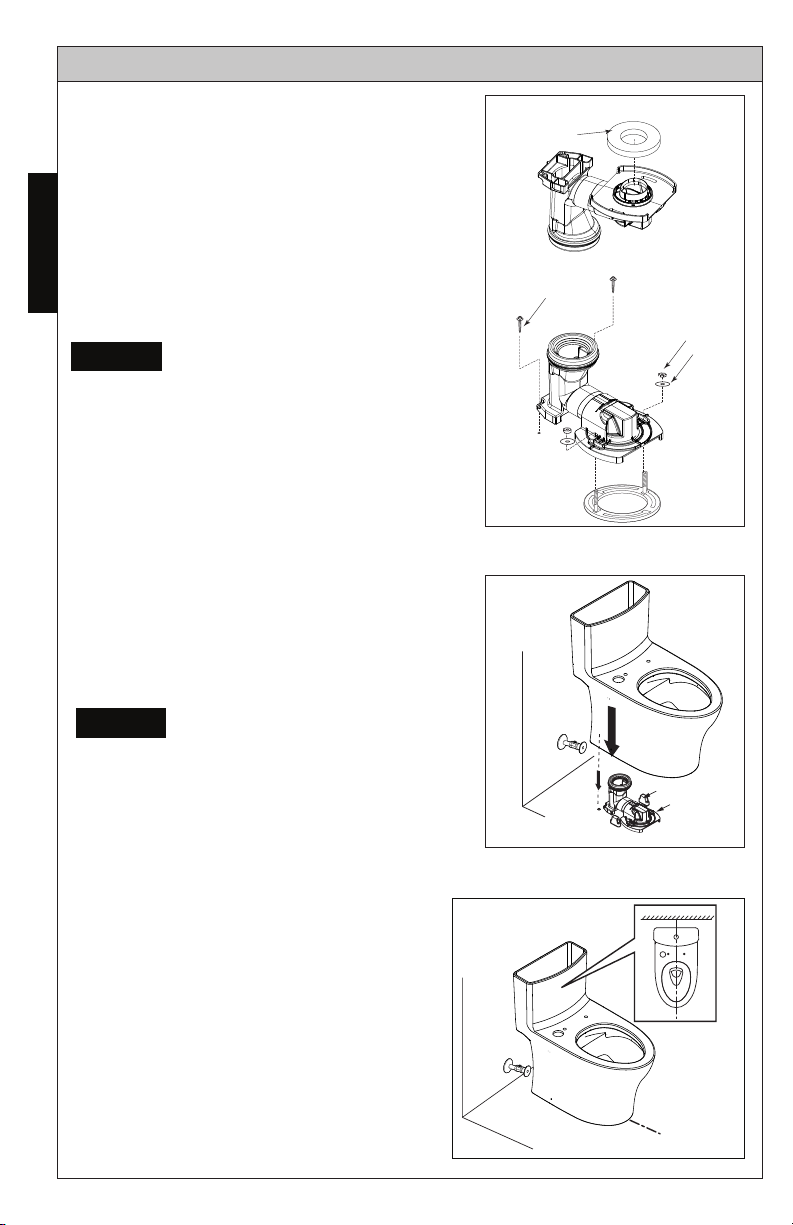
INSTALLATION PROCEDURE
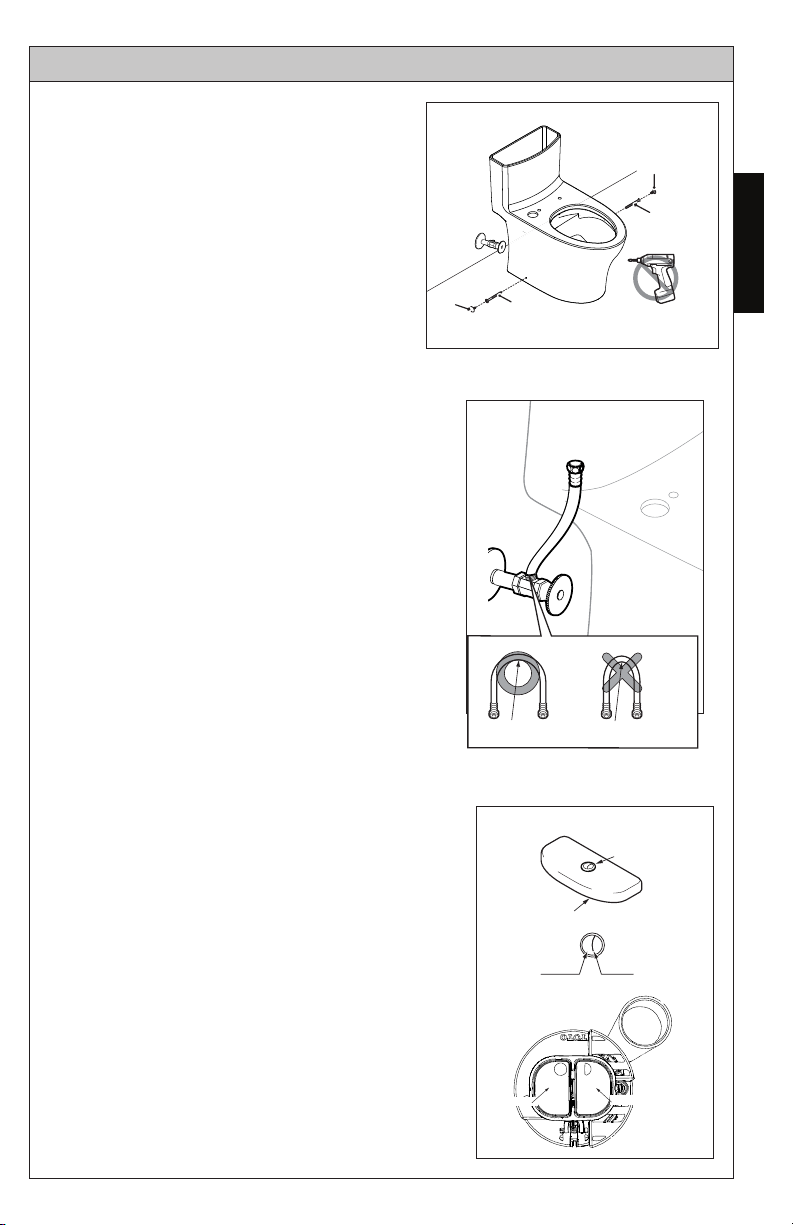
1. Open the Unifit Rough-In packaging.
Follow the Unifit Rough-In
Installation instruction to complete
ENGLISH
the rough-in installation (ill. 1).
2. Place the template into position and
follow its instructions to prepare for
installing the toilet.
NOTICE
Do not move the Unifit RoughIn on the Floor Flange after
wax seal is set. If this notice is
disregarded, discard the wax ring
and replace with new wax ring.
3. Place the toilet over the Unifit RoughIn and the two mounting blocks, by
aligning the toilet outlet with the Unifit
Rough-In opening (ill. 2).
ill.2
ill.1
Wax seal
Screw
Nut
Washer
NOTICE
Insert the toilet all the way
into position. If this notice is
disregarded, leakage may result.
4. Align the toilet perpendicular to the
back wall and parallel to side walls;
it should not sit crooked or diagonal
(ill. 3).
4
ill. 3
Mounting block
Unit
Page 5
INSTALLATION PROCEDURE
Left
5. Install the side screws to the
mounting blocks. Cover the
screw head with the provided
screw caps (ill. 4).
6. Connect the water supply hose (not
provided) to the fill valve (ill. 5).
7. Install the flexible water supply hose to
the angle stop (ill. 5). Make sure that
the hose is free of kinks.
ill. 4
Cap
Side-screw
ill. 5
50mmradiusminimumMakesuretherearenokinks
Cap
Side-screw
ENGLISH
8. Carefully place the lid on top of the
tank, making sure that the full flush push
button is on the left side (ill. 6).
9. If necessary, adjust the length of the push
button rods. They are factory set to the
correct length, so only follow these steps if
applicable to your situation.
ill. 6
Push buttons
Tank lid
Left Right
Full
Flush
Full ush
5
Partial
Partial ush
Flush valve
Flush
Right
Page 6
INSTALLATION PROCEDURE
10. If the push button rods are too short, the
push buttons will not sit properly. If the
ENGLISH
push button rods are too long, the push
button may continuously activate the flush
valve. Correct with the following steps (see
ill. 7):
1. Loosen the lock nuts counter-clockwise.
2. Turn the rods clockwise to shorten,
counter-clockwise to lengthen (each full
turn is 1mm).
3. Place the lid on the tank to check the
adjustment.
4. When the adjustment is completed,
tighten the lock nut to secure.
11. Turn on the water supply at the angle
stop. Check ALL connections for leaks.
Fix as needed.
12. The toilet seat is installed with the
seat top mounting hardware. Refer
to the seat installation instruction.
ill. 7
Locknut
Push button assembly
Clip
Lid
Flush valve
Clockwise/
counter-clockwise
CARE AND CLEANING
Use a detergent or non-abrasive toilet cleaner and a soft bristled
plastic brush to clean your toilet. To remove hard water stains, use
vinegar or lime dissolving cleaner and a non-scratch scour pad
made for porcelain. Allow a little contact time to allow the cleaner
to dissolve the buildup.
Do not spray cleaner directly onto the button, instead wipe it using
a dampened soft cloth with diluted dishwashing detergent and
dry it with another soft cloth. Do not use bleach or products that
include acid or alkaline detergents in their ingredients. Do not use
metal scrub brushes or steel wool.
NOTICE
DO NOT USE IN-TANK BOWL CLEANERS.
The use of high concentration of chlorine or chlorine-related products can
seriously damage fittings in the tank. This damage can cause leakage and
property damage. TOTO shall not be responsible or liable for any tank fitting
failure or damage caused by the use of in-tank bowl cleaners.
6
Page 7

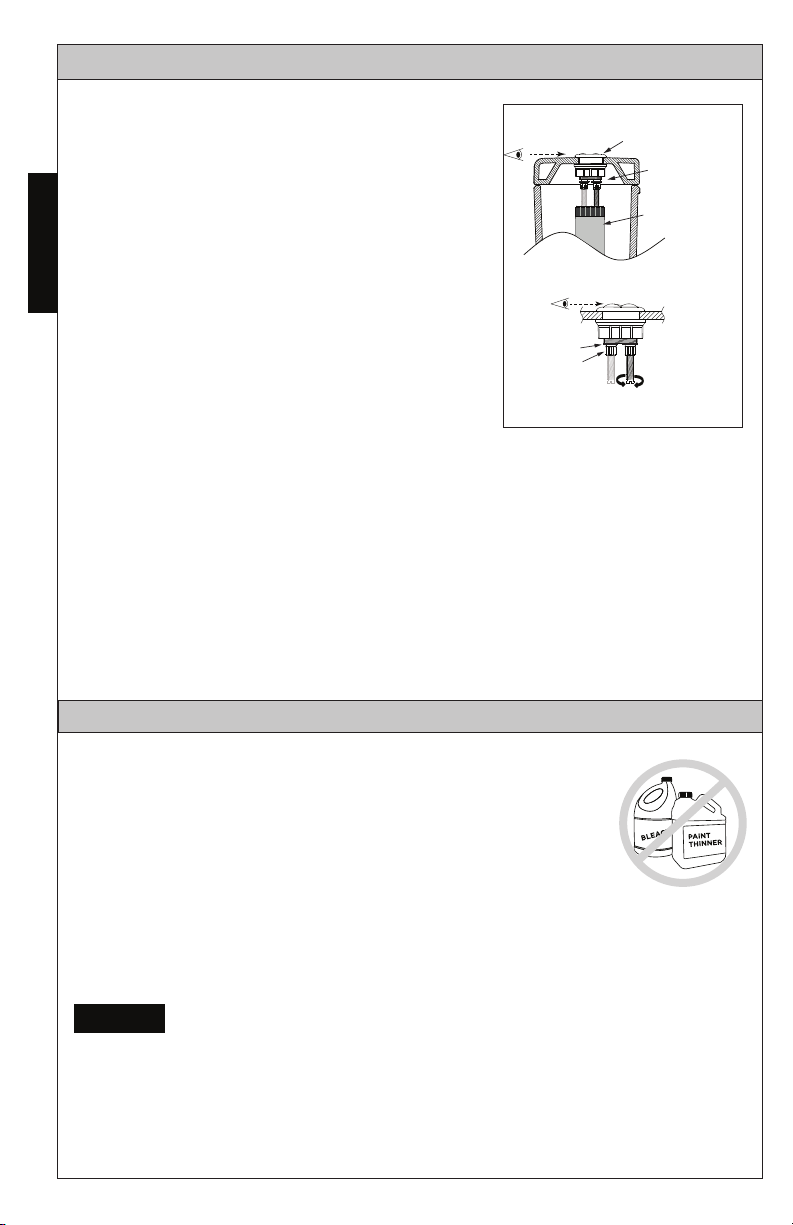
REPLACING THE FILL VALVE
Flexible hose
Coupling nut
Nut
Washer
1. Shut off the water supply. Flush the toilet
and remove any remaining water from the
tank. Reverse the tank installation instructions to remove it from the bowl. Remove
the old fill valve.
2. Install new fill valve by sliding the threaded portion of the shaft through the hole
in the bottom of tank.
3. Thread mounting nut onto exposed shaft
under the tank and tighten nut.
Do not over-tighten.
؍CAUTION
4. Connect the water supply (see Ill. 1). Pipe
dope is not recommended. Attach the
refill tube to the valve and clip the other
end to the overflow pipe.
Ill. 1
Cone seal
ENGLISH
ADJUSTING THE WATER LEVEL
Refer to the water level line stamp inside the
tank.
1. The water level adjustment is located
in the top end of the fill valve. Use
a flathead screwdriver to make
adjustments:
t To raise the water level: turn the
screwdriver clockwise, or towards
the ‘+’ indicator.
t To lower the water level: turn the
screwdriver counter-clockwise, or
towards the ‘-’ indicator.
2. Flush after each adjustment to check
the water level. When satisfied with the
water level, flush once more to verify.
7
Ill. 1
water level adjuster
Page 8
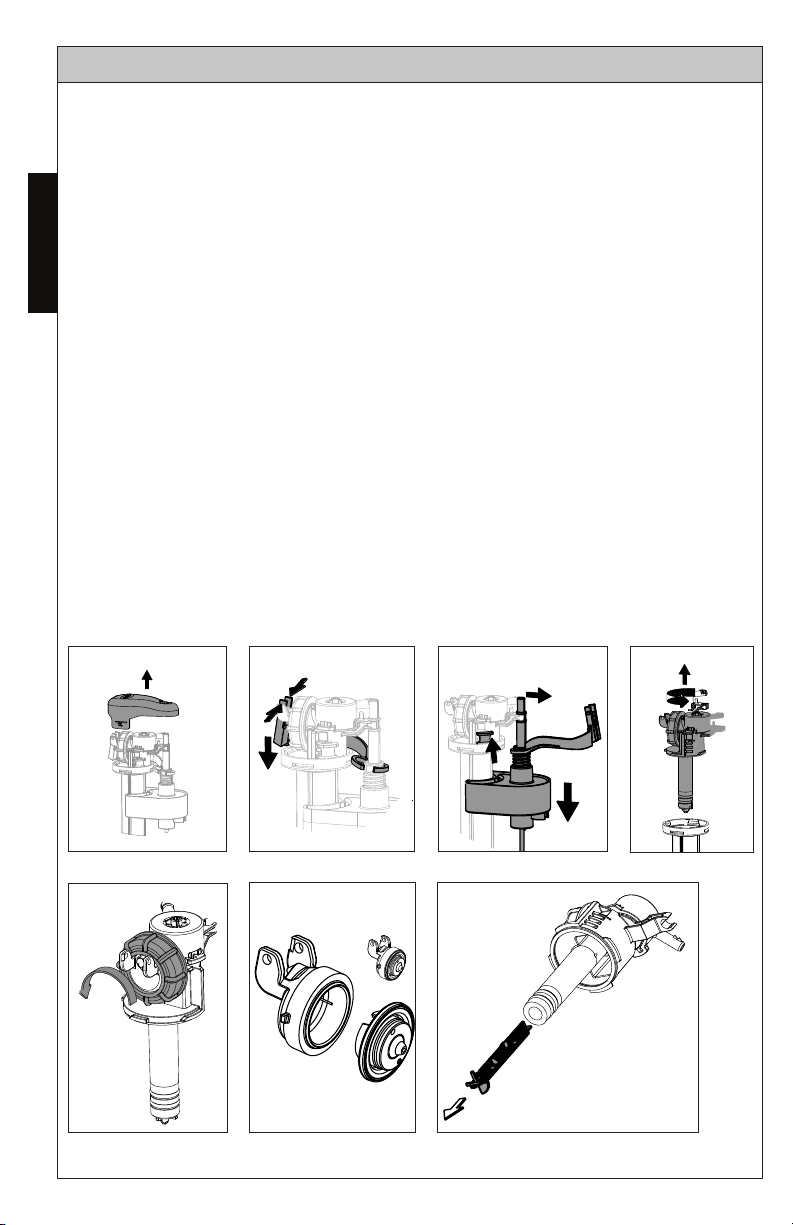
SERVICING THE FILL VALVE
NOTE: Due to water conditions in your area, the strainer may require periodic cleaning. An indication that the strainer requires service can be seen in a delayed fill cycle,
intermittent fill cycle, or inadequate amount of water flow from the refill tube.
1. Snap off the top cover by pulling from under the tab (see ill. 1).
ENGLISH
2. Pinch the tabs of the lever arm to allow its removal (see ill. 2).
3. Snap off the adjustable rod from the bracket (1) allowing the unit to
slide to the bottom and remove the retainer tab by pulling as the arrow
indicates (3) (see ill. 3).
4. Grab hold of the valve unit, twist 1/4 turn counterclockwise and pull the
unit out (see ill. 4).
5. Unscrew nut of the diaphragm housing (see ill. 5).
6. Remove the diaphragm from its housing by carefully pulling the edge
of the diaphragm (see ill. 6). Note the position of the diaphragm while
removing.
7. Remove the strainer from the tube with needle nose pliers (see ill. 7).
Use twisting motion while pulling to help with removal.
8. Rinse all parts under running water to clear any debris, residues or films.
Reinstall all parts in reverse order. Turn the water ON and check for leaks
and operation.
Ill. 1 Ill. 2 Ill. 3
1
2
Ill. 5
Ill. 6
Ill. 7
8
Ill. 4
1
3
2
2
1
Page 9

SERVICING THE FLUSH VALVE
1. Turn off water supply and flush the toilet.
2. Remove the tank lid and place it upside down on a clean surface.
3. Note the orientation of the flush valve for reassembly.
4. Turn the upper half of flush valve counter-clockwise and pull it up to
remove it (see Ill. 1).
5. Remove the rubber seal gasket and rinse under running water to clean
(see Ill. 2).
6. Place the gasket back on the flush valve (see Ill. 3).
7. Install the flush valve back on the base.
8. Rotate the flush valve so that the partial flush button is on the right and
the full flush button is on the left.
9. Carefully, install the tank lid back on the tank.
10. Flush the toilet several times using each push button to verify proper
operation. Check for leakage.
ENGLISH
Ill. 1
Ill. 2
Ill. 3
9
Page 10
WARRANTY
1. TOTO warrants its vitreous china products (“Product”) to be free from defects in materials and workmanship during normal use when properly installed and serviced, for a period of one (1) year from date
of purchase. This limited warranty is extended only to the ORIGINAL PURCHASER of the Product and
is not transferable to any third party, including but not limited to any subsequent purchaser or owner
of the Product. This warranty applies only to TOTO Product purchased and installed in North, Central
and South America.
ENGLISH
2. TOTO’s obligations under this warranty are limited to repair, replacement or other appropriate adjustment, at TOTO’s option, of the Product or parts found to be defective in normal use, provided that
such Product was properly installed, used and serviced in accordance with instructions. TOTO reserves
the right to make such inspections as may be necessary in order to determine the cause of the defect.
TOTO will not charge for labor or parts in connection with warranty repairs or replacements. TOTO is
not responsible for the cost of removal, return and/or reinstallation of the Product.
3. This warranty does not apply to the following items:
a. Damage or loss sustained in a natural calamity such as fire, earthquake, flood, thunder, electrical
storm, etc.
b. Damage or loss resulting from any accident, unreasonable use, misuse, abuse, negligence, or
improper care, cleaning, or maintenance of the Product.
c. Damage or loss resulting from sediments or foreign matter contained in a water system.
d. Damage or loss resulting from improper installation or from installation of the Product in a harsh
and/or hazardous environment, or improper removal, repair or modification of the Product.
(NOTE: Product model codes allow a maximum of 80 PSI. Check local codes or standards for
requirements).
e. Damage or loss resulting from electrical surges or lightning strikes or other acts which are not the
fault of TOTO or which the Product is not specified to tolerate.
f. Damage or loss resulting from normal and customary wear and tear, such as gloss reduction,
scratching or fading over time due to use, cleaning practices or water or atmospheric conditions.
g. Tank flushing mechanisms of plastic or rubber moving parts.
h. Toilet seats of plastic, wood or metal.
4. In order for this limited warranty to be valid, proof of purchase is required. TOTO encourages warranty
registration upon purchase to create a record of Product ownership at http://www.totousa.com. Product
registration is completely voluntary and failure to register will not diminish your limited warranty rights.
5. THIS WARRANTY GIVES YOU SPECIFIC LEGAL RIGHTS. YOU MAY HAVE OTHER RIGHTS WHICH
VARY FROM STATE TO STATE, PROVINCE TO PROVINCE OR COUNTRY TO COUNTRY.
6. To obtain warranty repair service under this warranty, you must take the Product or deliver it prepaid to
a TOTO service facility together with proof of purchase (original sales receipt) and a letter stating the
problem, or contact a TOTO distributor or products service contractor, or write directly to TOTO U.S.A.,
INC., 1155 Southern Road, Morrow, GA 30260 (678) 466-1300 or (888) 295-8134, if outside the U.S.A. If,
because of the size of the Product or nature of the defect, the Product cannot be returned to TOTO,
receipt by TOTO of written notice of the defect together with proof of purchase (original sales receipt)
shall constitute delivery. In such case, TOTO may choose to repair the Product at the purchaser’s location or pay to transport the Product to a service facility.
WARNING! TOTO shall not be responsible or liable for any failure of, or damage to, this Product caused
by either chloramines in the treatment of public water supply or cleaners containing chlorine (calcium
hypochlorite). NOTE: The use of a high concentrate chlorine or chlorine related products can seriously
damage the fittings. This damage can cause leakage and serious property damage.
THIS WRITTEN WARRANTY IS THE ONLY WARRANTY MADE BY TOTO. REPAIR, REPLACEMENT OR
OTHER APPROPRIATE ADJUSTMENT AS PROVIDED UNDER THIS WARRANTY SHALL BE THE EXCLUSIVE REMEDY AVAILABLE TO THE ORIGINAL PURCHASER. TOTO SHALL NOT BE RESPONSIBLE FOR
LOSS OF THE PRODUCT OR FOR OTHER INCIDENTAL, SPECIAL OR CONSEQUENTIAL DAMAGES OR
EXPENSES INCURRED BY THE ORIGINAL PURCHASER, OR FOR LABOR OR OTHER COSTS DUE TO
INSTALLATION OR REMOVAL, OR COSTS OF REPAIRS BY OTHERS, OR FOR ANY OTHER EXPENSE NOT
SPECIFICALLY STATED ABOVE. IN NO EVENT WILL TOTO’S RESPONSIBILITY EXCEED THE PURCHASE
PRICE OF THE PRODUCT. EXCEPT TO THE EXTENT PROHIBITED BY APPLICABLE LAW, ANY IMPLIED
WARRANTIES, INCLUDING THAT OF MERCHANTABILITY OR FITNESS FOR USE OR FOR A PARTICULAR PURPOSE, ARE EXPRESSLY DISCLAIMED. SOME STATES DO NOT ALLOW LIMITATIONS ON HOW
LONG AN IMPLIED WARRANTY LASTS, OR THE EXCLUSION OR LIMITATION OF INCIDENTAL OR CONSEQUENTIAL DAMAGES, SO THE ABOVE LIMITATION AND EXCLUSION MAY NOT APPLY TO YOU.
10
Page 11

ÍNDICE
¡Gracias por elegir TOTO! ................................................................................11
Partes incluidas ..................................................................................................11
Herramientas comunes necesarias ...................................................................11
Antes de la instalación ......................................................................................12
Procedimiento de instalación ...........................................................................13
Cuidado y limpieza ............................................................................................15
Reemplazo de la válvula de llenado .................................................................16
Ajuste del nivel de agua ....................................................................................16
Mantenimiento de la válvula de llenado..........................................................17
Mantenimiento de la válvula de descarga .......................................................18
Garantía ..............................................................................................................19
¡GRACIAS POR ELEGIR TOTO!
La misión de TOTO es brindarle al mundo estilos de vida sanos, higiénicos y
más cómodos. Diseñamos cada producto con el balance de forma y función
como un principio rector. Felicidades por su elección.
PARTES INCLUIDAS
Revise para asegurar que tenga todas estas partes en el empaque*:
Plantilla
Unifit
Instrucciones de instalación
Inodoro
Piezas de montaje por Unifit
* El producto real puede variar en apariencia dependiendo del modelo.
Piezas de montaje por taza de inodoro
Instrucciones de Unifit
ESPAÑOL
HERRAMIENTAS COMUNES NECESARIAS
Llave ajustable de 10”
Nivel de carpintero
Serrucho de costilla
Cinta métrica
Pinzas
Destornillador plano
Destornillador Phillips
Lapiz
MATERIALES NECESARIOS:
Manguera flexible de suministro de agua
Llave de paso ángulo
Anillo de cera
Espátula
Taladro
Brocas de taladro (bloque de montaje)
Para instalación en piso de madera:
- Brocas de ⁄”
Para instalación en concreto/azulejo:
- Brocas de ⁄”
(no incluida)
11
Page 12

ANTES DE LA INSTALACIÓN
Lea detenidamente estas instrucciones antes de comenzar a trabajar.
Proporcione las instrucciones a los usuarios. Estas instrucciones
contienen información acerca del mantenimiento y de la garantía.
Si es necesario, retire el inodoro existente y si construcción nueva, purgar
la línea de suministro.
AVISO
Debido al potente rendimiento de nuestros sistemas de descarga Tornado,
G-Max, E-Max y Power Gravity, no están especificados para las instalaciones
respaldo con respaldo. La única forma de instalar estos inodoros de una
manera respaldo a respaldo es cuando el desagüe del inodoro incorpora un
ESPAÑOL
accesorio WYE. Póngase en contacto con su constructor o contratista antes
de la instalación.
WYE de doble combinación / doblado de 1/8
SÍ
T sanitaria doble / cruz sanitaria
NO
Recomendaciones por instalación de llave de paso
Sigue estas recomendaciones asegurar instalación sin problemas con una
apariencia ordenada y profesional.
Ubicación
(de piso y izquierda de
centro brida de piso)
Tipo de llave de paso
Longitude maxima
4-3/4” x 4-3/4” (120mm x 120mm)
Llave de paso ángulo con conexión a suministro
hacia arriba, adentro, o abajo.
NOTA: Llave de paso código o llave de paso con
conexión hacia al frente, no se recomienda.
Llave de paso debe sobresalir a menos de 3-1/2”
(90mm) de la pared.
4¾”
(120mm)
Pared acabada
C/L* Llave de paso
4¾”
(120mm)
3½” (90mm) MAX
C/L* Brida
“RI”
* C/L es Línea de centro
12
Page 13

PROCEDIMIENTO DE INSTALACIÓN
Bloque de montaje
1. Abre el embalaje de Unifit. Sigue sus
instrucciones de instalación completar
la instalación del Unifit (il. 1).
2. Coloque la plantilla en posición y sigue sus
instrucciones a preparar para instalación la
taza de inodoro.
AVISO
No mueva el Unifit despues de
el anillo de cera haya asentado.
Si no se tiene en cuenta este
aviso, deseche el anillo de cera y
reemplace con el anillo de cera
nuevo.
3. Coloque la taza del inodoro sobre la
Unifit y los bloques de montaje, con la
salida de taza y la abertura de Unifit en
alineación (il. 2)
il. 1
Sello de cera
Tornillo
il. 2
Tuerca
Arandela
ESPAÑOL
AVISO
Inserte el inodoro en posición
completamente. Si no se tiene
en cuenta este aviso, fuga puede
resultar.
4. Alinee el inodoro perpendicular
a la pared trasera y paralelo a las
pareds laterals; no debe ser torcido o
diagonal (il. 3).
Unit
il. 3
13
Page 14

PROCEDIMIENTO DE INSTALACIÓN
Tornillo de lado
Asegurarsequelamanguera
notienelascurvasexcesivas.
il. 4
5. Instale los tornillos laterales en los
bloques de montaje. Cubra las
cabezas del tornillos con las tapas
suministrado (il. 4)
ESPAÑOL
6. Conecte la manguera de suministro
de agua (no proveído) a la válvula de
llenado (il. 5).
7. Instale la manguera de suministro
de agua a el llave de paso (il. 9).
Asegurarse que la manguera no tiene
las curvas excesivas.
Tapa
Tornillo
de lado
Tapa
il. 5
؍PRECAUCIÓN
Radiomínimo50mm
8. Coloque con cuidado la tapa encima
del inodoro, asegurarse que el boton
de descarga completa es en el lado
izquierdo (il. 10).
9. Si necessario, ajuste los pulsadores. Las
varillas de pulsadors están configuradas
de fábrica a la longitud correcta, por lo
que sólo debe seguir estos pasos si es
aplicable a su situación.
14
il. 6
Tapa de tanque
Izquierda Derecho
Descarga
completa
Izquierda
Descarga
completa
Pulsadors
Descarga
parcial
Derecho
Descarga
parcial
Válvula de descarga
Page 15

Montaje de pulsadors
PROCEDIMIENTO DE INSTALACIÓN
10. Si las varillas del botón son demasiado
cortas, los botones no se colocarán
correctamente. Si las varillas del botón son
demasiado largas, el botón pulsador puede
activar continuamente la válvula de descarga.
ill. 7
Tapa
Válvula de
descarga
Corrija con los siguientes pasos (ver ill. 7):
1. Afloje las contratuercas en sentido
contrario a las agujas del reloj.
2. Gire las barras en el sentido de las
agujas del reloj para acortar, en
Pinza
Contratuerca
Sentido horario/
anti-horario
sentido antihorario para alargar (cada
vuelta completa es de 1 mm).
3. Coloque la tapa en el tanque para
verificar el ajuste.
4. Cuando se complete el toilet, apriete
la contratuerca para asegurarla.
11. Abra el suministro de agua en el tope angular. Verifique TODAS las
conexiones para ver si hay fugas. Repare según sea necesario.
12. El asiento del inodoro está instalado con el equipo de montaje
superior del asiento. Consulte las instrucciones de instalación del
asiento.
ESPAÑOL
CUIDADO Y LIMPIEZA
Use un detergente o un limpiador de tocador no abrasivo y un
cepillo de plástico de cerdas suaves para limpiar el inodoro. Para
eliminar las manchas de agua dura, utilice vinagre o detergente que
disuelva la cal y un estropajo no raspado hecho para porcelana.
Permita un poco de tiempo de contacto para permitir que el
limpiador disuelva la acumulación.
No rocíe el limpiador directamente sobre el botón, en su lugar,
límpielo con un paño suave humedecido con detergente para
lavavajillas diluido y séquelo con otro paño suave. No use cloro ni
productos que contengan detergentes ácidos o alcalinos en sus
ingredientes. No use cepillos metálicos ni lana de acero.
AVISO
NO UTILICE LIMPIADORES EN EL RECIPIENTE DEL TANQUE
El uso de cloro en alta concentración o productos derivados del cloro puede dañar
seriamente los accesorios en el tanque. Este daño puede ocasionar fugas y daños en
la propiedad. TOTO no se hará responsable por fallas o daños en los accesorios del
tanque causados por el uso de limpiadores en el taza del tanque.
15
Page 16

REEMPLAZO LA VÁLVULA DE LLENADO
Tubo exible
Tuerca de
acoplamiento
Tuerca
Arandela
1. Cierre el suministro de agua. Descargar
el inodoro y elimine el agua restante de la
tanque. Siga las instrucciones de instalación
del tanque al revés para extraerlo de la taza.
Retire la válvula de llenado existente.
2. Instale la válvula de llenado nuevo
deslizando la parte roscada del eje aunque
el orificio en el parte inferior del tanque.
3. Enrosque la tuerca de montaje en el eje
ESPAÑOL
expuesto bajo el tanque y apriete la tuerca.
No apriete demasiado.
؍PRECAUCIÓN
4. Conecte el suministro de agua (ver Il. 1). No
se recomienda el grasa para tuberías. Fije
el tubo de llenado a la válvula sujete el otro
extremo al tubo de desbordamiento.
Il. 1
Sello de cono
AJUSTE DEL NIVEL DEL AGUA
Consulte la marca que indica el nivel de agua
dentro del tanque.
1. El ajuste del nivel del agua se encuentra en
el extremo superior de la válvula de llenado.
Use un destornillador plano para realizar
ajustes:
t Para elevar el nivel del agua: gire el
destornillador en el sentido de las
agujas del reloj o hacia el indicador ‘+’.
t Para bajar el nivel del agua: gire el
destornillador en el sentido contrario a
las agujas del reloj o hacia el indicador
‘-’.
2. Descarge el inodoro déspues de cada
ajuste vérifier el nivel de agua. Cuando esté
satisfecho con el nivel del agua, vuelva a
descargar el inodoro para verificarlo.
16
Il. 1
Ajustador del nivel
del agua
Page 17

MANTENIMIENTO DE LA VÁLVULA DE LLENADO
NOTA: Debido a las condiciones del agua en su área, el colador puede requerir una
limpieza periódica. Los indicadores de que el filtro requiere servicio incluyen un ciclo
de llenado retardado, ciclo de llenado intermitente o cantidad inadecuada de flujo de
agua del tubo de llenado.
1. Desprenda la cubierta superior tirando de debajo de la pestaña
(ver il. 1).
2. Presione las pestañas del brazo de palanca para permitir su extracción.
(ver il. 2).
3. Desprenda la barra ajustable del soporte (1) permitiendo que la unidad
se deslice hacia la parte inferior y retire la pestaña del retén tirando como
indica la flecha (3) (ver il. 3).
4. Mientras sostiene la válvula con una mano, gire la tapa 1/4 de vuelta en
sentido contrario a las manecillas del reloj y retírela (ver il. 4).
5. Destornille la tuerca de la cubierta del diafragma (ver il. 5).
6. Retire la diafragma desde la cubierta tirando con cuidado del borde del
diafragma (ver il. 6). Tenga en cuenta la posición del diafragma mientras lo
extrae.
7. Retire el colador desde el tubo con pinzas de punto (ver il. 7). Use el
movimiento giratorio mientras tira para ayudar con la extracción.
8. Enjuague todas las partes con agua corriente para eliminar cualquier
residuo o película. Vuelva a instalar todas las piezas en orden inverso. Abra
el suministro de agua y verifique si hay fugas y si funciona.
ESPAÑOL
Il. 1 Il. 2 Il. 3
1
2
Il. 5
Il. 6
Il. 7
17
Il. 4
1
3
2
2
1
Page 18

MANTENIMIENTO DE LA VÁLVULA DE DESCARGA
1. Cierre el suministro de agua y descarge el inodoro.
2. Retire la tapa del tanque y colóquela en forma invertida sobre una
superficie limpia.
3. Observe la posición de los botones de la válvula de descarga para
cuando deba volver a ensamblarla.
4. Gire la mitad superior de la válvula en sentido contrario a las manecillas del reloj y extraiga la válvula (ver Ill. 1).
5. Retire la junta de sello de goma y enjuáguela con agua corriente para
ESPAÑOL
limpiarla (ver Ill. 2).
6. Vuelva a colocar la junta en la válvula de descarga (ver Ill. 3).
7. Instale la válvula nuevamente sobre la base.
8. Gire la válvula según sea necesario de manera que el botón de descarga parcial (is on the right) y el botón de descarga complete (is on
the left).
9. Vuelva a colocar cuidadosamente la tapa del tanque sobre el mismo.
10. Descarge el inodoro varias veces con cada botón para comprobar la
operación correcta. Verifique que no haya fugas de agua.
Il. 1
NOTICE
Il. 2
Il. 3
18
Page 19

GARANTÍA
1. TOTO® garantiza que su vitreos china producto no presenta defectos en sus materiales ni de fabricación
durante su uso normal cuando es instalado y mantenido adecuadamente, por un periodo de uno (1) año(s)
a partir de la fecha de compra. Esta garantía limitada es válida solamente para el COMPRADOR ORIGINAL
del Producto y no es transferible a una tercera persona, incluyendo, pero sin limitarse a, cualquier comprador o propietario subsecuente del Producto. Esta garantía aplica solamente al Producto TOTO comprado
e instalado en América del Norte, Central, Latina y del Sur.
2. Las obligaciones de TOTO bajo esta garantía se limitan a la reparación, cambio o cualquier otro ajuste, a
petición de TOTO, del Producto o partes que resulten defectuosas en su uso normal, siempre que dicho
Producto haya sido instalado, utilizado y mantenido de acuerdo con las instrucciones. TOTO se reserve el
derecho de hacer tantas inspecciones como sean necesarias para determinar la causa del defecto. TOTO
no cobrará por la mano de obra o partes relacionadas con las reparaciones o cambios garantizados. TOTO
no es responsable por el costo de la remoción, devolución y/o reinstalación del Producto.
3. Esta garantía no aplica en los siguientes casos:
a) Daño o pérdida ocurrida en un desastre natural, tal como: incendio, sismo, inundación, relámpago,
tormenta eléctrica, etc.
b) Daño o pérdida resultado de cualquier accidente, uso inaceptable, mal uso, abuso, negligencia o
cuidado, limpieza o mantenimiento inadecuado del Producto.
c) Daño o pérdida causada por los sedimentos o material extraña contenida en un sistema de agua.
d) Daño o pérdida causada por una mala instalación o por la instalación del Producto en un ambiente
duro y/o peligroso, o una remoción, reparación o modificación inadecuada del Producto. (NOTA:
Los códigos de modelo del producto permiten un máximo de 80 PSI. Revise los códigos locales o las
normas de requisitos.)
e) Daño o pérdida causada por sobrecargas eléctricas o rayos u otros actos que no sea responsabilidad
de TOTO o que el Producto no esté especificado para tolerar.
f) Daño o pérdida causada por el uso normal y personalizado, tal como reducción del brillo, rayado o
pérdida de color en el tiempo debido al uso, prácticas de limpieza o condiciones del agua o atmos-
féricas.
4. Para que esta garantía limitada sea válida, prueba de compra es necesaria. TOTO anima el registro de la
garantía sobre compra para cree un archivo de la propiedad del producto en http://www.totousa.com. El
registro del producto es totalmente voluntario y la falta a registrar no disminuirá sus derechas de garantía
limitada.
5. ESTA GARANTÍA LE DA DERECHOS LEGALES ESPECÍFICOS. USTED PODRÍATENER OTROS DERECHOS
QUE PUEDEN VARIAR DEPENDIENDO DEL ESTADO O PROVINCIA EN EL QUE SE ENCUENTRE.
6. Para obtener el servicio de reparación de esta garantía, debe llevar el Producto o enviarlo prepagado a
un modulo de servicios TOTO junto con la prueba de compra (recibo de compra original) y una carta en
la que plantee el problema, o póngase en contacto con un distribuidor TOTO o el contratista de servicio
de los productos, o escriba directamente a TOTO U.S.A., INC., 1155 Southern Road, Morrow, GA 30260
(678) 466-1300 o 888) 295-8134, si fuera de los E.E.U.U. Si, debido al tamaño del producto o naturaleza del
defecto, el Producto no puede ser devuelto a TOTO, la recepción en TOTO del aviso escrito del defecto
junto con la prueba de compra (recibo de compra original) constituirá el envío. En tal caso, TOTO podrá
escoger entre reparar el Producto en el domicilio del comprador o pagar el transporte del Producto a un
módulo de servicio.
ESTA GARANTÍA ESCRITA ES LA ÚNICA GARANTÍA HECHA POR TOTO. LA REPARACIÓN, CAMBIO U OTRO
AJUSTE ADECUADO, TAL COMO APARECE EN ESTA GARANTÍA, SERÁ EL ÚNICO REMEDIO DISPONIBLE
PARA EL COMPRADOR ORIGINAL. TOTO NO SERÁ RESPONSABLE POR LA PÉRDIDA DEL PRODUCTO
O POR CUALQUIER OTRO DAÑO ACCIDENTAL, ESPECIAL O CONSECUENTE O POR DAÑOS INCURRIDOS POR EL COMPRADOR ORIGINAL, O POR LA MANO DE OBRA U OTROS COSTOS RELACIONADOS
CON LA INSTALACIÓN O REMOCIÓN, O COSTOS DE REPARACIONES HECHAS POR OTROS, O POR CUALQUIER OTRO GASTO NO INDICADO DE MANERA ESPECÍFICA EN LOS PÁRRAFOS ANTERIORES. EN
NINGÚN CASO LA RESPONSABILIDAD DE TOTO EXCEDERÁ EL PRECIO DE COMPRA DEL PRODUCTO.
EXCEPTO EN LA MEDIDA EN QUE QUEDE PROHIBIDO POR LA LEYAPLICABLE, TODA GARANTÍA IMPLÍCITA, INCLUYENDO AQUELLAS DE COMERCIABILIDAD O IDONEIDAD DE USO PARA EL USO O PARA UN
PROPÓSITO PARTICULAR, ESTÁ EXPRESAMENTE PROHIBIDA. ALGUNOS ESTADOS NO PERMITEN LAS
LIMITACIONES ACERCA DE LA DURACIÓN DE UNA GARANTÍATÁCITA, O LA EXCLUSIÓN O LIMITACIÓN
DE DAÑOS INCIDENTALES O CONSECUENTES, POR LO QUE LA LIMITACIÓN E INCLUSIÓN ANTERIORES
PUEDEN NO APLICAR A USTED.
AVISO TOTO no será responsable de fallas o daños ocasionados en este producto de plomería o componente
del producto causados por cloraminas en el tratamiento del suministro de agua público o en los limpiadores
en el recipiente del tanque que contengan cloro (hipoclorito de calcio). Nota: el uso de cloro en alta concentración o productos derivados del cloro puede dañar seriamente los accesorios. Este daño puede ocasionar
fugas y daños graves en la propiedad. Para obtener más información, llámenos al (888) 295-8134.
ESPAÑOL
19
Page 20

TABLE DES MATIÈRES
Merci d’avoir choisi TOTO! ...............................................................................20
Pièces incluses ...................................................................................................20
Outils nécessaires ..............................................................................................20
Avant l’installation ..............................................................................................21
Procédure d’installation ....................................................................................22
Entretien et nettoyage ......................................................................................24
Remplacement de la valve de remplissage .....................................................25
Réglage du niveau d’eau ..................................................................................25
Instructions d’entretien de valve de remplissage ...........................................26
Instructions d’entretien de valve de chasse ....................................................27
Garantie ..............................................................................................................28
MERCI D’AVOIR CHOISI TOTO!
La mission de TOTO est d’offrir au monde entier un style de vie sain,
hygiénique et plus confortable. Comme principe de base, nous concevons
chaque produit avec un équilibre entre la forme et la fonction. Félicitations
pour votre choix.
FRANÇAIS
PIÈCES INCLUSES
Assurez-vous que vous avez toutes ces pièces dans l’paquet* :
Unifit
Toilette
Pièces de montage de Unifit
Pièces de montage de cuvette des toilletes
* Le produit réel peut varier en apparence en fonction du modèle.
OUTILS NÉCESSAIRES
10” clé ajustable
Niveau de charpentier
Scie à métaux
Mètre à ruban
Pinces manuelles
Tournevis plat
Tournevis Phillips
MATERIAUX REQUIS :
Tuyau flexible
Valve d’arrêt d’angle
Anneau de cire
Crayon
Couteau à mastiquer
Perceuse
Mèche (bloc de montage)
Pour l’installation de plancher en bois :
- ⁄” mèche
Pour l’installation de béton / carreaux :
- ⁄” mèche
(non inclus)
d’alimentation
Gabarit
Manuel
Instructions de Unifit
20
Page 21

AVANT L’INSTALLATION
Lisez attentivement ces instructions avant toute installation.
Veuillez mettre ces instructions à la disposition des clients. Ces instructions
contiennent des information relatives à l’entretien et à la garantie.
Si nécessaire, retirez l’ancient WC et si construction nouvelle, purgez la
conduite d’alimentation.
AVIS
En raison de la performance de nos puissants Tornado, G-Max, E-Max et la
puissance de pesanteur des chasses d’eau, ils ne sont pas spécifiés pour les
installations consécutives. Le seul moyen d’installer ces toilettes de manière
consécutives est lorsque les connexions du drain de toilette ont un raccord
WYE. Veuillez contacter votre constructeur ou l’entrepreneur avant cette
installation.
Combinaison Double WYE / 1/8 Coude
OUI
Double Sanitaires T / Croix Sanitaire-
NON
Valve d’arrêt alimentation d’eau recommandations d’installation
Suivez ces recommandations pour assurer une installation optimale et sans
problème avec un aspect soigné et professionnel.
Emplacement
(Du plancher et à
gauche du centre de la
bride de plancher)
Type de valve
Longueur maximale
4-3/4” x 4-3/4” (120mm x 120mm)
Valve d’arrêt d’angle avec raccord d’alimentation
orienté vers le haut, vers l’intérieur ou vers le bas
AVIS : Une valve d’arrêt d’droit ou une valve avec
raccord d’alimentation à l’avant de la valve d’arrêt
n’est pas recommandée.
Valve d’arrêt doit dépasser de moins de 3 1/2 po
(90 mm) du mur
4¾”
(120mm)
Mur ni
C/L* valve d'arrêt
4¾”
(120mm)
3½” (90mm) MAX
FRANÇAIS
C/L* Bride
“RI”
* C/L est ligne centrale
21
Page 22

PROCÉDURE D’INSTALLATION
1. Ouvrir le paquet de Unifit. Suivez ses
instructions d’installation pour terminer
l’installation de l’Unifit (ill. 1).
2. Placez le modèle en place et suivez ses
instructions pour préparer l’installation
de la cuvette des toilettes.
AVIS
Ne pas bouger la cuvette après
avoir fixé le joint en caoutchouc.
Si cet avis n’est pas pris en
compte, alors jetez le anneau
FRANÇAIS
de cire et la remplacer par une
nouvelle anneau de cire.
3. Placez la cuvette des toilettes sur l’Unifit
et les deux blocs de montage afin que
la sortie des cuvette des toilettes et
l’ouverture de l’Unifit soient alignées.
(ill.2).
ill .1
Anneau de
cire
ill.2
Vis
Écrou
Rondelle
AVIS
Insérez complètement la
cuvette des toilettes. Si cet
avis n’est pas pris en compte,
alors, il peut y avoir des fuites.
4. Alignez les toilettes perpendiculairement à la mur arrière et parallèlement
aux murs latérales; il ne doit pas être
tordu ou diagonal (ill. 3).
22
Bloc de montage
ill. 3
Page 23

PROCÉDURE D’INSTALLATION
Gauche
ill. 4
5. Installez les vis latérales à les blocs de
montage. Couvrir les têtes de vis avec
les bouchons fournis (ill. 4).
6. Installez les pièces de montage de
réservoir-á-cuvette á la réservoir (ill. 5).
7. Installez le flexible d’alimentation
en eau sur la butée d’angle (ill.5).
Assurez-vous que le tuyau est
exempt de plis.
Bouchon
ill. 9
Bouchon
Vis latérale
Vis latérale
FRANÇAIS
8. Placez délicatement le couvercle sur le
dessus du réservoir en vous assurant que le
bouton de rinçage complet est sur le côté
gauche (ill 6).
9. Si nécessaire, ajustez la longueur des tiges
du bouton-poussoir. Ils sont réglés en usine
à la longueur correcte, donc suivez ces
étapes uniquement si cela s’applique à votre
situation.
23
Rayonminimum50mm Asserez-vousquelatuyau
ill. 10
Couvercle du réservoir
Chasse
complet
chasse
complète
Gauche
Boutons poussoirs
Droit
Chasse
partielle
chasse
partielle
Valve de chasse
Droit
Page 24

PROCÉDURE D’INSTALLATION
Montage de poussiers
1. Si les tiges du bouton-poussoir sont
trop courtes, les boutons-poussoirs ne
ill. 7
s’installent pas correctement. Si les tiges
du bouton-poussoir sont trop longues, le
bouton-poussoir peut activer en continu la
vanne de rinçage. Corriger avec les étapes
suivantes (voir ill.7):
1. Desserrez les contre-écrous dans le sens
inverse des aiguilles d’une montre.
2. Tournez les tiges dans le sens des
aiguilles d’une montre pour raccourcir,
dans le sens contraire des aiguilles d’une
montre pour allonger (chaque tour
Clip
Contre-écrou
Dans le sens horaire/
Dans le sens antihoraire
complet est de 1mm).
3. Placez le couvercle sur le réservoir pour
vérifier le réglage.
FRANÇAIS
4. Lorsque le réglage est terminé, serrez le
contre-écrou pour le fixer.
2. Activez l’alimentation en eau à l’arrêt d’angle. Vérifiez TOUTES les
connexions pour les fuites. Corrigez au besoin.
3. Le siège de toilette est installé avec le matériel de montage du siège.
Reportez-vous aux instructions d’installation du siège.
Couvercle
Valve de chasse
ENTRETIEN ET NETTOYAGE
Utilisez un détergent ou un nettoyant pour toilettes non abrasif et
une brosse en plastique à poils doux pour nettoyer les toilettes.
Pour enlever les taches d’eau dure, utiliser un nettoyant dissolvant
au vinaigre ou à la chaux et un tampon à récurer non abrasif pour
la porcelaine. Laisser un peu de temps de contact pour permettre
au nettoyant de dissoudre l’accumulation.
Ne vaporisez pas le nettoyant directement sur le bouton, mais essuyez-le avec un
chiffon doux humidifié avec un détergent à vaisselle dilué et séchez-le avec un autre
chiffon doux. N’utilisez pas d’eau de Javel ou de produits contenant des détergents
acides ou alcalins dans leurs ingrédients. N’utilisez pas de brosses à récurer en métal
ni de laine d’acier.
AVIS
NE PAS UTILISER DE NETTOYANT DE CUVETTE DANS LE RESERVOIR.
L’utilisation de concentration élevée de chlore ou de produits à base de chlore peut
sérieusement endommager les raccords dans le réservoir. Ces dommages peuvent
causer des fuites et des dommages matériels. TOTO ne peut être tenu responsible ou
redevable pour toute défaillance des raccords du réservoir ou tout dommages causés
par l’utilisation de nettoyants de cuvettes dans le réservoir.
24
Page 25

REMPLACEMENT DE LA VALVE DE REMPLISSAGE
Tuyau exible
Écrou de raccord
Écrou
Rondelle
1. Fermez l’alimentation en eau. Chassez
les toilettes et retirez toute l’eau restante du réservoir. Inversez les instructions
d’installation du réservoir pour l’enlever du
bol. Retirez le vieux valve de remplissage.
2. Installez la nouvelle valve de remplissage en
faisant glisser la partie filetée de l’arbre à
travers le trou dans le fond du réservoir.
3. Visser l’écrou de montage sur l’arbre exposé
sous le réservoir et serrer l’écrou.
؍PRUDENCE
Ne pas trop serrer.
4. Raccordez l’alimentation en eau (see Ill. 1
or Ill. 2). Pâte lubrifiante n’est pas recommandé. Fixez le tube de recharge à la valve
et attachez l’autre extrémité au tuyau de
trop-plein.
RÉGLAGE DE NIVEAU D’EAU
Ill. 1
Joint de cône
FRANÇAIS
Reportez-vous à la marque indiquant le niveau
d’eau à l’intérieur du réservoir.
1. Le réglage du niveau d’eau est situé à
l’extrémité supérieure de la valve de
remplissage. Utilisez un tournevis plat
pour effectuer les réglages.
t Pour augmenter le niveau d’eau:
tournez le tournevis dans le sens
des aiguilles d’une montre, ou vers
l’indicateur «+».
t Pour abaisser le niveau d’eau:
tournez le tournevis dans le sens
contraire des aiguilles d’une montre
ou vers le repère «-».
2. Chasser les toilettes après chaque réglage
pour vérifier le niveau d’eau. Lorsque vous
êtes satisfait du niveau d’eau, rincez une
fois de plus pour vérifier.
25
Ill. 1
Ajusteur du
niveau d'eau
Page 26

INSTRUCTIONS D’ENTRETIEN DE VALVE DE REMPLISSAGE
REMARQUE : En raison des conditions d’eau dans votre région, le filtre peut
nécessiter un nettoyage périodique. Les indicateurs indiquant que le filtre nécessite
un entretien comprennent un cycle de remplissage retardé, un cycle de remplissage
intermittent ou une quantité d’eau insuffisante provenant du tube de remplissage.
1. Décrochez le couvercle supérieur en tirant sous l’onglet (voir ill. 1).
2. Pincez les onglets du bras de levier pour permettre son retrait (voir ill. 2).
3. Décrochez la tige réglable du support (1) en laissant glisser l’appareil
vers le bas et retirez la languette de retenue en tirant comme indiqué par
la flèche (3) (voir ill. 3).
4. En tenant le valve avec une main, tourner le couvercle d’1/4 de tour dans
le sens inverse des aiguilles d’une montre et l’enlever (voir ill. 4).
5. Dévissez l’écrou du logement du diaphragme (voir ill. 5).
6. Retirez le diaphragme tirant délicatement le bord du diaphragme (voir ill.
6). Notez la position du diaphragme pendant le retrait.
7. Retirez le filtre avec des pinces à bec effilé (voir ill. 7). Utilisez le
FRANÇAIS
mouvement de torsion tout en tirant pour aider à l’enlèvement.
8. Rincez toutes les pièces à l’eau courante pour éliminer les débris, les
résidus ou les films. Réinstallez toutes les pièces dans l’ordre inverse.
Allumez l’eau et vérifiez les fuites et le fonctionnement.
Ill. 1 Ill. 2 Ill. 3
1
2
Ill. 5
Ill. 6
Ill. 7
26
Ill. 4
1
3
2
2
1
Page 27

INSTRUCTIONS D’ENTRETIEN DE VALVULA DE CHASSE
1. Arrêtez l’alimentation d’eau et déchargez les toilettes.
2. Déposez le couvercle du réservoir et posez-le à l’envers sur une surface propre.
3. Notez l’orientation de la valve de chasse pour le remontage.
4. Tournez la moitié supérieure de la valve de chasse dans le sens antihoraire et tirez vers le haut pour la retirer (voir Ill. 1).
5. Déposez le joint d’étanchéité en caoutchouc et rincez à l’eau courante
pour nettoyer. (voir Ill.2)
6. Replacez le joint sur le valve de chasse (voir Ill. 3).
7. Réinstallez le valve de chasse sur sa base.
8. Tournez le valvula de chasse de sorte que le bouton de chasse partielle soit à droite et que le bouton de chasse soit à gauche.
9. Reposez avec précaution le couvercle du réservoir sur le réservoir.
10. Déchargez les toilettes d’eau plusieurs fois pour vous assurer que le
levier de déclenchement fonctionne normalement. Assurez-vous qu’il
n’y a pas de fuites.
Ill. 1 Ill. 2 Ill. 3
FRANÇAIS
27
Page 28

GARANTIE
1. TOTO® garantit sa vitreous china produits contre tout défaut de matériau et de fabrication pendant
l’utilisation normale, lorsqu`elle est correctement installée et maintenue pour une période de une (1)
ans à dater de l`achat. La présente garantie limitée ne peut être prolongée que pour le seul ACHETEUR
D`ORIGINE de l`appareil et n`est pas transférable à un tiers, y compris mais pas limité à tout acheteur ou
propriétaire subséquent du produit. Cette garantie n’est applicable qu’aux produits achetés et installés en
Amérique du Nord, Centrale, Latine, et du Sud.
2. Les obligations de TOTO selon les termes de cette garantie sont limitées à la réparation, remplacement ou
autre ajustement en conséquent, au choix de TOTO, des produits ou des pièces défectueuses en service
normal, pourvu qu’un tel produit ait été installé, utilisé et entretenu conformément aux instructions. TOTO
se réserve le droit d`effectuer ce genre de vérifications en cas de nécessité afin de déterminer la cause du
défaut. TOTO ne facturera pas les interventions ou les pièces relatives à la réparation et au remplacement
sous garantie. TOTO n`est pas responsable du coût de désinstallation, de renvoi et/ou de réinstallation de
l`appareil.
3. La garantie ne s`applique pas dans les cas suivants:
a) Dommage ou perte suite à une cause naturelle telle que incendie, tremblement de terre, inondation,
tonnerre, orage etc.
b) Dommage ou perte causés par tout accident, utilisation non adaptée, un abus, une négligence ou un
mauvais traitement, nettoyage ou entretien de l`appareil.
c) Dommage ou perte causé par des sédiments ou tout autre corps étranger contenus dans un réseau
d`alimentation en eau.
d) Dommage ou perte suite à une mauvaise installation ou à l`installation de l`appareil dans un envi-
ronnement rude et/ou dangereux ou une mauvaise désinstallation, réparation ou modification du
produit. (REMARQUE : Les codes de modèle du produit permet un maximum de 80 PSI. Vérifiez les
codes locaux ou des normes pour les besoins).
e) Dommage ou perte suite à des surtensions, foudres ou tous autres actes qui ne sont pas la respon-
FRANÇAIS
sabilité de TOTO, ou actes stipulés non supportables par le produit.
f) Dommage ou perte résultant d`une usure normale et habituelle, telle que la diminution du lustre, grat-
tage ou décoloration avec le temps, habitude de nettoyage, l`eau, ou des conditions atmosphériques.
4. Pour que la garantie limitée soit valable, la preuve d’achat est exigée. TOTO vous encourage à enregistrer
votre produit après l’achat pour créer un record du propriété, cela peut être fait au site http://www.totousa.
com. L’enregistrement du produit est complètement volontaire et à défaut de l’enregistrement ne va pas
limiter votre droit au garantie limitée.
5. CETTE GARANTIE DONNE DES DROITS SPÉCIFIQUES. IL EST POSSIBLE QUE L’ACHETEUR AIT D’AUTRES
DROITS QUI VARIENT DUN ÉTAT A UN AUTRE OU D’UNE PROVINCE À L’AUTRE.
6. Pour obtenir une réparation selon les termes de cette garantie, l’acheteur doit livrer à un centre de réparation de TOTO port payé avec preuve d’achat (reçu de caisse original), et une lettre expliquant le problème,
ou contacter un distributeur de TOTO ou un entrepreneur de réparation du produit ou écrire directement à
TOTO U.S.A., INC., Southern Road, Morrow, Géorgie 30260, (678) 466-1300 ou appelé (888) 295-8134, si en
dehors de L’Etat Unis. Si, à cause de la taille du produit ou de la nature du défaut, il n’est pas possible de
renvoyer le produit à TOTO, la réception par TOTO d’un avis écrit du défaut avec preuve d’achat (reçu de
caisse original) constitue livraison. Dans un tel cas, TOTO peut choisir de réparer le produit chez l’acheteur
ou de payer le transport du produit à un centre de réparation.
CETTE GARANTIE ÉCRITE EST LA SEULE GARANTIE FAITE PAR TOTO. LA RÉPARATION, LE REMPLACEMENT OU TOUT AUTRE AJUSTEMENT APPROPRIÉ SELON LES TERMES DE CETTE GARANTIE EST LE SEUL
RECOURS DE L’ACHETEUR INITIAL. TOTO N’EST PAS RESPONSABLE DE LA PERTE DU PRODUIT OU DE
TOUT AUTRE DOMMAGE INDIRECT, SPÉCIAL OU SECONDAIRE OU DES DÉPENSES ENCOURUES PAR
L’ACHETEUR INITIAL NI DE LA MAIN-D’OEUVRE OU AUTRES FRAIS ASSOCIÉS À L’INSTALLATION OU LA
MANIPULATION, OU LES FRAIS DE RÉPARATION PAR DES TIERS, NI POUR TOUS AUTRES FRAIS PAS SPÉCIFIQUEMENT MENTIONNÉS. EN AUCUN CAS, LA RESPONSABILITÉ DE TOTO NE PEUT DÉPASSER LE PRIX
D’ACHAT DU PRODUIT. SAUF QUAND INTERDITE PAR UNE LOI APPLICABLE, TOUTE GARANTIE SOUSENTENDUE, Y COMPRIS CELLE DE VENDABILITÉ OU D’APPLICATION POUR UN USAGE PARTICULIER,
EST EXPRESSÉMENT REJETÉ. CERTAINES PAYS NE PERMETTENT PAS LA LIMITATION DE LA LONGUEUR
D’UNE GARANTIE SOUS-ENTENDUE, OU L’EXCLUSION OU LA LIMITATION DES DOMMAGES INDIRECTS
OU SECONDAIRES, IL EST DONC POSSIBLE QUE CETTE LIMITATION ET EXCLUSION NE S’APPLIQUE PAS
À VOTRE CAS.
ATTENTION ! TOTO décline toute responsabilité quant aux panes ou aux dommages causés sur ce produit de
plomberie ou composant du produit par la chloramine contenue dans le traitement de l’alimentation en eau
publique ou dans les produits d’entretien pour réservoirs des toilettes contenant du chlore (hypochlorite de
calcium). Remarque : l’utilisation d’une forte concentration de chlore ou de produits à base de chlore risque
d’endommager sérieusement la tuyauterie. Ces dommages peuvent provoquer des fuites et des dégâts des
eaux. Pour plus d’informations, contactez-nous au (888) 295-8134.
28
Page 29

MEMO
FRANÇAIS
29
Page 30

MEMO
FRANÇAIS
29
30
Page 31

MEMO
FRANÇAIS
31
29
Page 32

TOTO U.S.A., Inc. 1155 Southern Road,
Morrow, Georgia 30260
Tel: 888-295-8134 Fax: 800-699-4889
www.totousa.com
0GU180
Rev Date: 03/2018
Warranty Registration and Inquiry
For product warranty registration, TOTO U.S.A. Inc. recommends online warranty registration. Please visit
our web site http://www.totousa.com. If you have questions regarding warranty policy or coverage, please
contact TOTO U.S.A. Inc., Customer Service Department, 1155 Southern Road, Morrow, GA 30260
(888) 295-8134 or (678) 466-1300 when calling from outside of U.S.A.
 Loading...