

Page 1
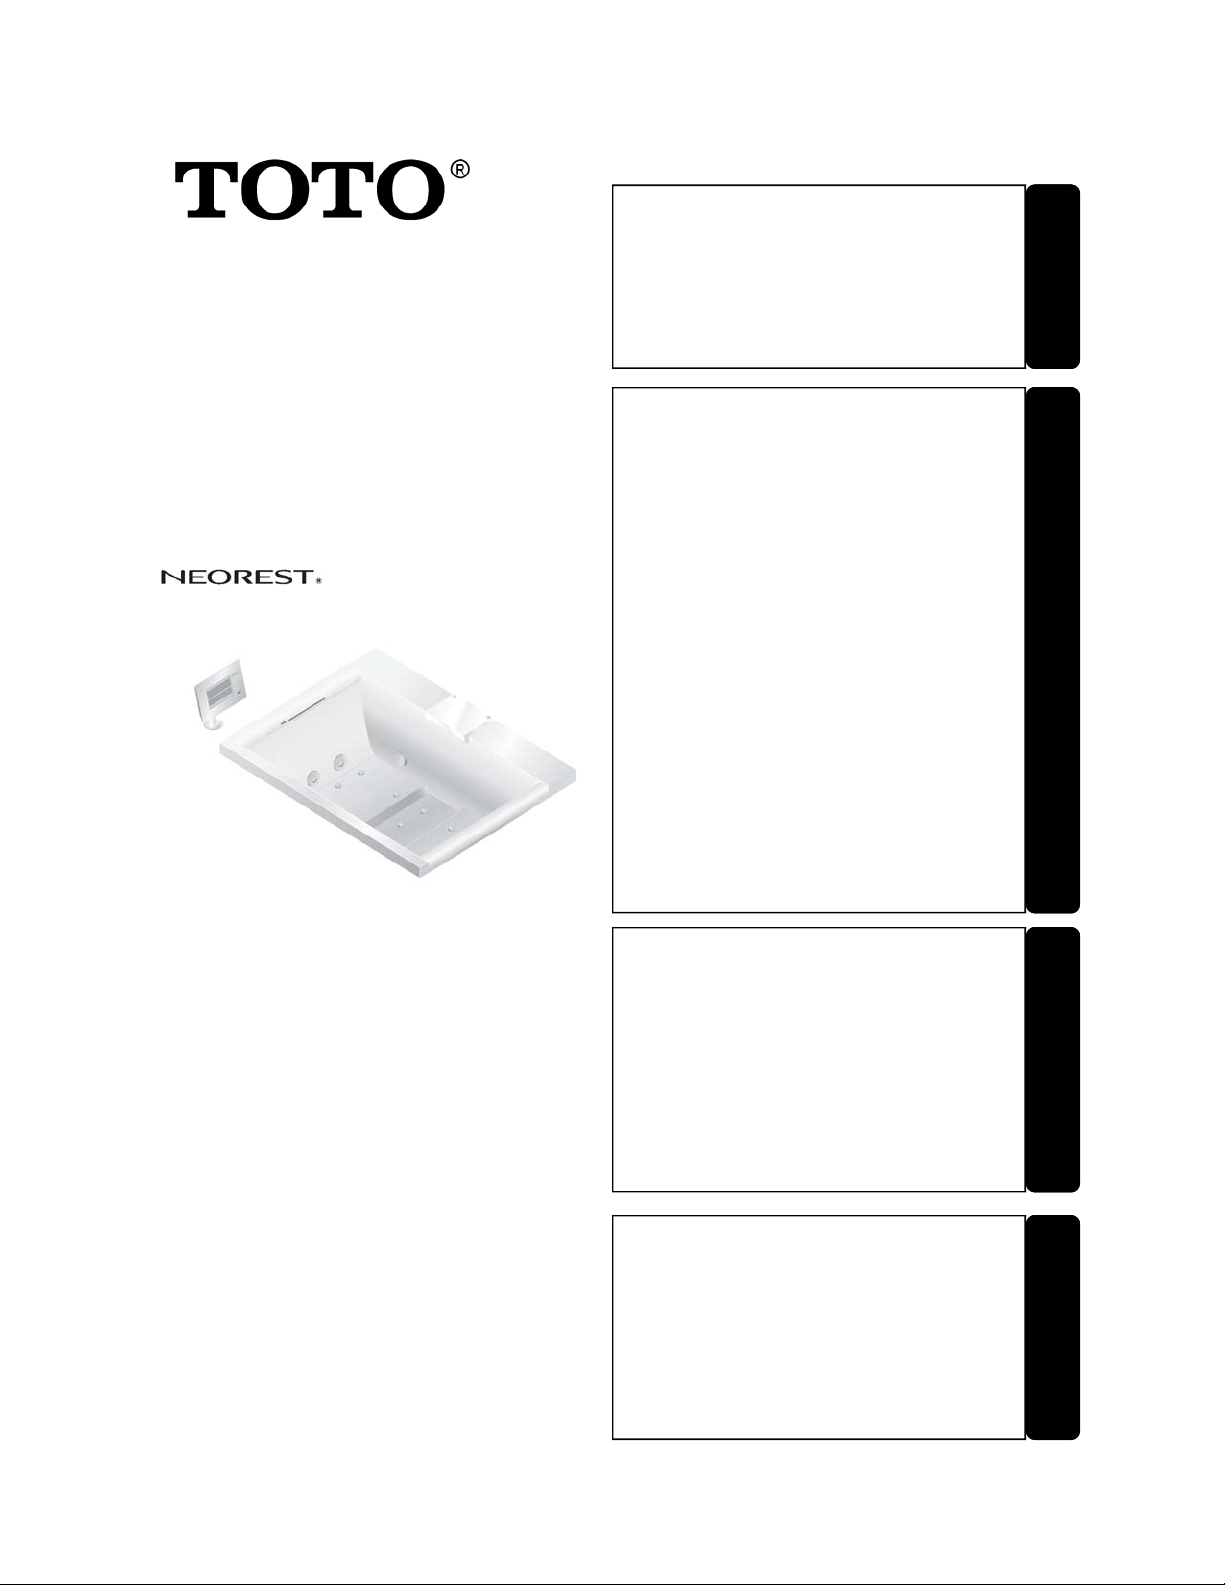
NEOREST SE
AIR BATH
Cautions and warnings……….…2
Precautions for use……………...7
The controller……………………..8
Names of parts…………….…….10
Before using it the first time…..13
Introduction
■ Thank you very much for purchasing
the NEOREST. Please read this manual
carefully and use the NEOREST correctly. Keep this instruction manual for
future reference.
■”NEOREST” is a registered trademark
of TOTO.
Operation…………………..……..15
●Drain plug……………………....15
●Controller stand………………..16
●Filling the tub with hot water….17
●Air blower operation…………...18
●Using Hydro Hands and
Shoulder-warmer water……….19
●Using the underwater
Lighting………………………….20
●Lowering the bath temperature
(Cooling water)………………....21
●Raising the bath temperature
(Heating water)…………………22
●Adding more water
(Add water)……………………...23
●Using the preference
Buttons………………………….25
●Changing the settings………….28
Cleaning the NEOREST…..…….30
●Cleaning the tub...……………..30
●Care and cleaning………….….31
●Purging/draining the tub….…...33
●Air jet cap………..……………...35
●Lighting Modules………...……..36
●Controller………………………..36
●Pillows…..……………………….37
●Function module……………..…38
Long periods of disuse…..…….41
Troubleshooting………………...43
Specifications……………………49
Operation
Cleaning
Troubleshooting
0GU5082, V.01
Page 2
Cautions and warnings
Always observe these warning.
Please read these cautions and warnings carefully and use the equipment correctly.
Follow all safety precautions and warnings.
● The meanings of these indications are as follows.
WARNING
!
CAUTION
!
When this appears next to a topic, this indicates that misoperation could result in death or serious injury.
When this appears next to a topic, this indicates that misoperation may result in death or serious injury.
● The following symbols are used to classify and explain instructions that must be followed.
Meaning of symbol Symbol example
The symbol indicates something that is prohibited.
!
WARNING
Do not, under any circumstances, disassemble, repair or modify.
Otherwise, abnormal operation, injury, fire or electric shock could result.
Do not
disassemble
Prohibited
Additionally, leaking water could contaminate or ruin household property.
Do not use the bathtub while under the influence of drugs or strong pharmaceuticals.
● Otherwise there is a risk of drowning.
Ensure that no electrical appliances are plugged in near the bathtub.
● Keep electrical appliances away from the bathtub. Otherwise there is a risk of injury, fire or
electric shock due to abnormal operation of the electrical appliance.
Do not drain the tub while bathing.
● Otherwise your hands, legs or hair might be drawn into the drain, with the possibility of injury or drowning.
The symbol indicates something that must be done.
!
!
2
Do not stand on the edge of the tub.
● Otherwise, you may slip and hurt yourself.
Do not submerge yourself or thrash about in the tub.
● Otherwise, injury or drowning may result.
Page 3
WARNING
Do not use flammable substances around the function module.
● Otherwise, a fire could result.
!
Do not bend, handle the power cords roughly or place heavy objects on them.
● Otherwise, a fire or electric shock could result.
Do not look directly into the lighting element of the underwater lights.
● Otherwise, eye injury might result.
Do not grasp the headrest when entering the tub.
● There is a chance that the headrest will come off and injury or drowning will result.
Do not supply water with a temperature any higher than 158°F (70°C) to the equipment.
● Otherwise, there is a chance of reduced equipment life, damage, scalding or leakage that
could wet and cause damage to household property.
When using high-temperature hot water, do not touch the spout or the shower hose
directly.
● A hot spout or shower hose could cause a burn.
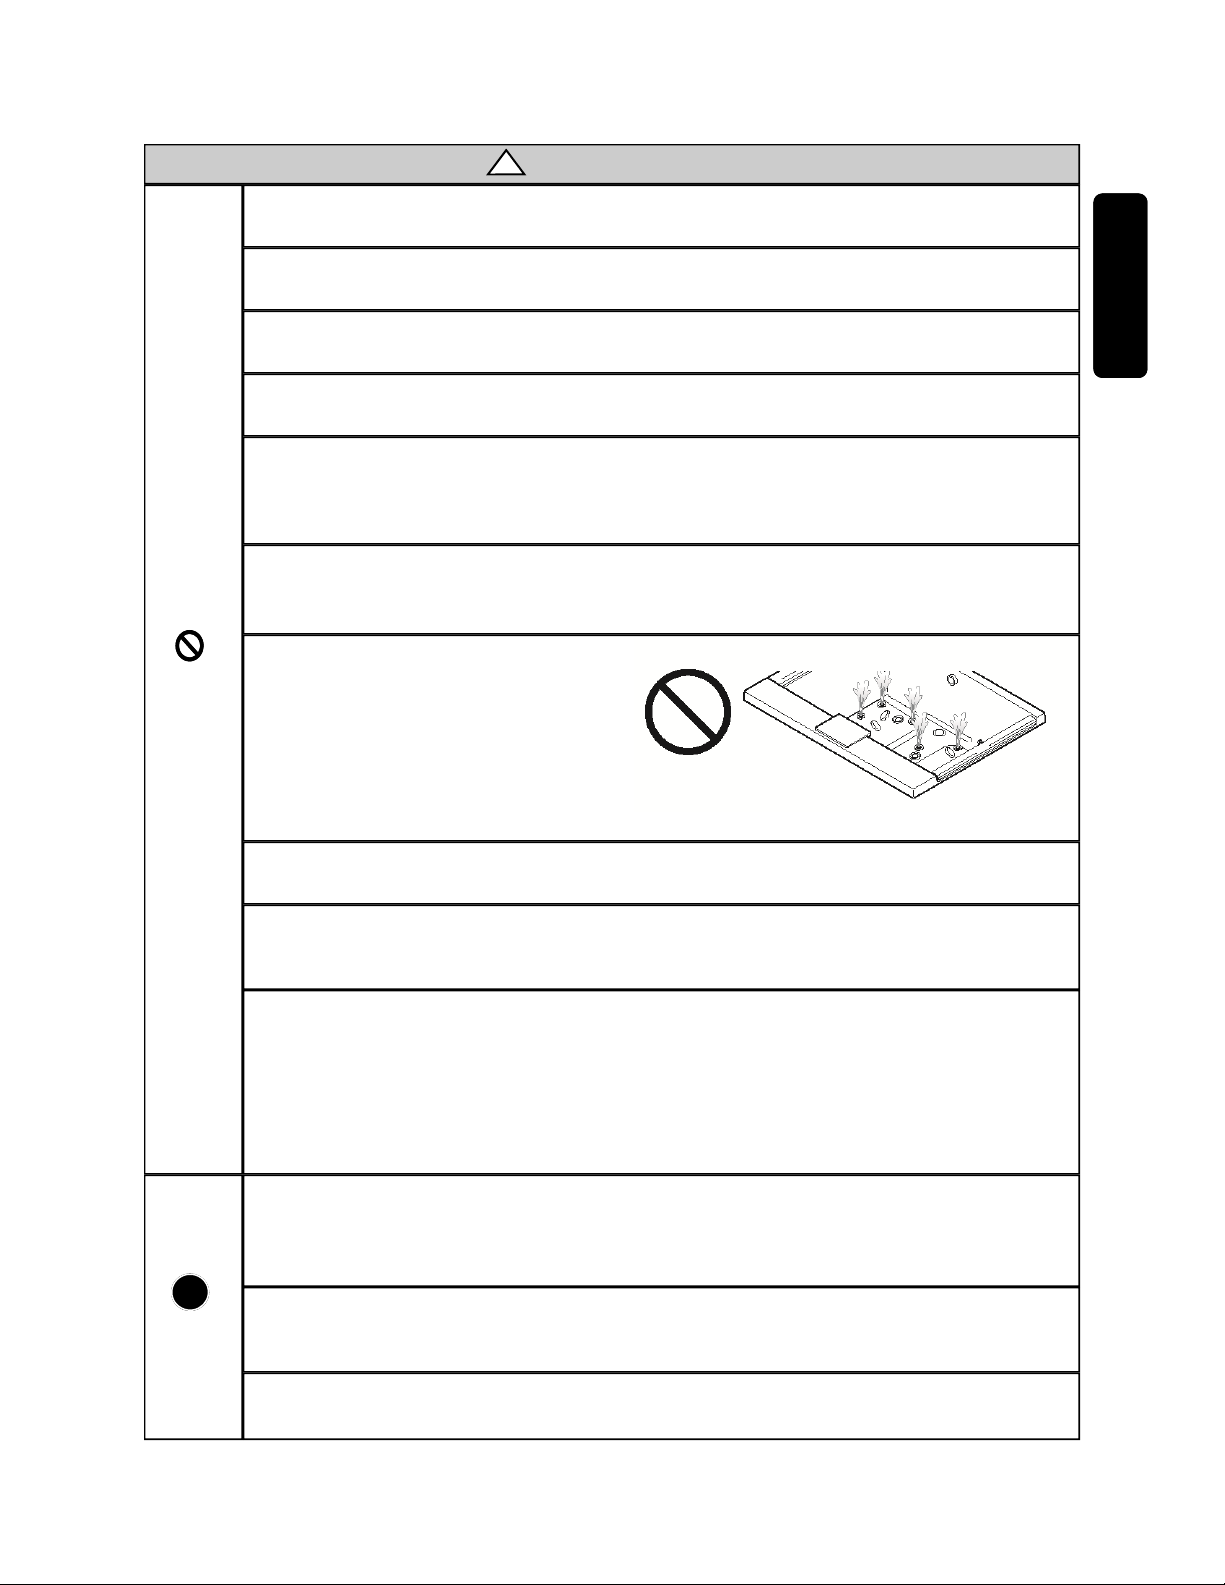
Prohibited
Do not run the NEOREST with the air
jet caps removed.
● Water remaining in the pipes could
splash up into the eyes or mouth, risking
injury, when draining the tub or if the tub is
run while empty. Please replace the air jet
caps properly before operating the NEOREST.
Introduction
!
Required
Do not handle the power plug with wet hands, or pull on the cable.
● Electric shock of malfunction could result.
The power inlet must be connected to the permanently installed power outlet (cable).
● To prevent the occurrence of electric shocks and device failures, the relocation of the
power outlet is prohibited.
The electronic components must be installed out of the reach of users in the bathroom.
●To prevent the occurrence of electric shocks and device failures, the installation of electronic components in the bathroom is prohibited.
*However, this rule is not applied to ultralow voltage supply components at 12 V or less,
such as remote controllers.
*The function modules must not be installed in the bathroom.
Ask your retailer, contractor or specialist about installing or moving the product.
● If you try to install or move it yourself and something has not been done properly, fire or
electric shock could result. Additionally, leaking water could contaminate or ruin household
property.
Be sure to supervise anyone (including children) with limited physical, sensory or
mental abilities at all times while they are taking a bath.
● Otherwise there is a risk of drowning.
To avoid injury, exercise care when entering or exiting the tub.
● Otherwise, you may slip and hurt yourself.
3
Page 4
WARNING
Step in and out of the bathtub carefully.
● Do not jump into the bathtub as there is a danger of slipping.
!
When using the shower, check the temperature of the water before showering.
● Special care is needed when using the shower for a second time after very hot water has
previously been used; there is a risk of scalding.
Check the temperature of the water before entering the tub.
● There is a risk of scalding.
Check that the suction guards are fitted over the suctions.
● If the suction guards are not in place during use, parts of the body, hair, etc. may be
sucked in, leading to drowning or injury.
Do not block the suctions.
● Otherwise, hands, feet, hair, etc. may be sucked in, causing an unforeseen accident.
Do not use the bathtub if the filter or suction guards are damaged.
!
Required
● Doing so may lead to the hair being sucked in, or other injury.
When using the shower, always turn on the cold water first and then slowly turn on
the hot water, adjusting to your preferred temperature.
● Otherwise, there is a risk of scalding from very hot water if the hot water is turned on first
or quickly.
When turning off the shower, be sure to turn the hot water off first.
● Otherwise, there is a risk of scalding the next time the shower is used from hot water remaining in the pipes.
Let the cold water run for a while after using high-temperature hot water in the
shower.
● Otherwise, there is a risk of scalding the next time the shower is used from hot water remaining in the pipes.
To ensure safety, replace the check valve in the function module regularly.
● If the check valve is not functioning properly, in some circumstances there is a risk that
water that has once been discharged from the water faucet may flow backwards. A poorlyfunctioning check valve may also lead to unknown accidents such as leakage.
Be sure to clean the bathtub before it is used for the first time.
Clean the bathtub regularly.
Ensure that there is adequate ventilation during and after bathing.
● Otherwise, mildew may form.
The electronic components must be fixed so that they will not fall into the bathtub.
If the fixing status is inadequate, the electronic components must not be used.
●Otherwise, an electric shock, device failure, or injury could result.
*The function modules must not be installed in the bathroom.
4
Page 5
CAUTION
Do not aim the air bubbles directly at the eyes, nose or ears.
● Doing so could lead to an infection.
!
Do not hit or drop the plated parts.
● Doing so could crack the plated surfaces, leading to injury. If the plated surface should
ever crack, please replace the cracked part immediately with a new part.
Do not sit on or climb onto the function module, shower lid, pillow, or controller stand.
● Doing so could cause a fall or injury. Components may deform and/or break.
Do not apply force to the suction guards or filter.
● Doing so may cause damage to the suction guards or filter, causing the pump to stop, or
causing an unforeseen accident such as the hair being sucked in.
Do not put your ears near the controller.
● It sometimes produces loud noises and could contribute to hearing damage.
Do not apply grease to the hinge part of the shower lid.
● It can affect the open/close function of the lid. It can get heavier or lighter, close suddenly
and catch your finger.
Prohibited
Operate the controller gently.
● Use of excessive force could cause malfunction.
Do not drop things into the tub. Do not bump, or impose undue force on the tub.
● Doing so could cause cracking and leaks.
Introduction
Do not let hot water splash outside the tub.
● Water splashing out of the tub could cause flooding outside the bathing area and problems
in other rooms (mold, peeling wallpaper, flooring damage, etc.)
Do not pour paint thinner, other solvents or chemicals down the drain.
● Doing so could damage the pipes, leading to leaks.
Do not use bath oils. Do not use bath salts containing sulfur, salts, or acids.
● Doing so could discolor or deteriorate the bathtub or damage the pipes, leading to leaks.
Do not use foaming, chlorine-based or anti-mold cleansers.
● The gases that are produced in reactions with water or moisture can corrode or degrade
the stainless steel or other metals.
Keep sources of heat at a distance.
● Do not put candles or nightlights on the rim of the bathtub. Do not smoke. Otherwise there
is a risk of deformation, discoloration or deterioration of the bathtub.
Do not leave items out that rust easily.
● Leaving hairpins, razors or other items that rust easily in the bathtub could leave rust
marks on the surface.
Avoid powerful forces and impacts.
● Damage could lead to leaks, which could lead to water damage of household property.
Do not use inorganic drain cleaners / granulates for removing blockages.
● They may damage the pipes as well as the surface and they are dangerous to health when
wrongly used. At most, use a biological drain cleaner, if a plunger is insufficient.
5
Page 6
CAUTION
Do not dispose of any chemicals or objects likely to block the drain pipe in the bathtub.
● Observe the current environmental regulations of each country.
!
When cleaning, do not use the following cleansers or tools.
Doing so could cause product problems or an adverse reaction in people, depending upon
Prohibited
how they are used.
●Cleansers labeled “acidic”
These could cause discoloration, deterioration or staining of the surface.
●Cleansers labeled “alkaline”
These could cause discoloration, deterioration or staining of the surface.
●Paint thinner, acetone or other solvents
These could cause discoloration, deterioration or staining of the surface. Additionally, there
is also a chance of damaging the drain path and subsequent leakage.
●Chemicals
These could cause discoloration, deterioration or staining of the surface. Additionally, there
is also a chance of damaging the drain path and subsequent leakage.
●Cleansers containing chlorine
These could cause discoloration, deterioration or staining of the surface.
●Metal scrubbers
These will damage the surface of the bathtub.
●Cleansing or polishing powders
These will cause scratching
●Nylon scrubbers
These will damage the surface of the bathtub.
!
Required
Rinse the bathtub well immediately after using cleanser.
● Otherwise there is a risk of discoloration, deterioration or cracking of the bathtub.
If cosmetics or similar substances get on the product, wash it with water immediately.
● Leaving cleansing lotions, hair treatment, hair coloring, baldness remedy, permanent wave
solution or similar agents on the surface could cause discoloration, deterioration or cracks.
Operate the shower handle slowly.
● Turning it off rapidly can cause a loud “boom” (water hammer), which will have an impact
on the plumbing fixtures and which could lead to leaks and water damage to household
property. Water hammer arrestors are recommended to be installed in the plumbing system
to minimize water hammer.
6
Page 7
Precautions for use
Please follow these instructions regarding the NEOREST.
Introduction
Do not allow an excess of water in the shower box.
● There is a drainage tray inside, but an overflow can
cause water leaks.
Use only genuine parts with this product.
● Otherwise, an unforeseen accident could result.
Clean out the suction filter carefully.
● This is to prevent pump damage.
Do not cover the suction with a towel or washcloth. Do not put things in the suction.
● This can cause damage to the equipment.
Do not apply pressure inside the jet or run water
through it.
● Water could get inside the air pump and break it.
Be careful of the shower lid when it’s open.
● The corner of the lid can cause injury.
Keep the NEOREST neat and clean.
● If there is bath water residue, trace amounts of copper ions in the water could react with the fatty acids in
the soap, causing a bluish tinge.
Do not intentionally pour water over the controller.
● It is water resistant, but large amounts of water can
cause damage.
Do not block the air jet caps.
● Doing so could cause problems.
Do not pour hot water over the controller or subject
it to impact.
● Doing so could break it.
Air jet cap
Jet
Do not pour hot water over the suction or other
fittings or subject them to impact.
Direct contact between the bathtub surface and
hot water in excess of 140°F (60°C) can damage
the surface.
Dropping or striking the tub with makeup bottles
or other hard objects can cause scratches.
7
Do not use emulsive-type bath additives.
While powder may remain inside the pump or
plumbing fittings, causing cloudy water to spray out
when using the air blower or Hydro Hands / shoulder-warmer.
For other types of bath additives, please read the
instructions carefully and use them properly.
When using bath bubbles, do not run the air blower
or Hydro Hands / shoulder-warmer.
● Doing so will generate a large amount of bubbles and
the bubbles could remain in the pump or in the plumbing fittings.
Page 8
The controller
The controller can be set to the following languages. ► See page 28.
Setting the language
Pushing the buttons
Please press the buttons lightly with a finger near the center (the small raised area).
Good Example
Each button may have its own feel, but this is normal.
The buttons may not work if they are not pressed near the center.
It will not work to press two or more buttons at the same time.
The buttons may not work when pressed while wearing gloves.
* Please do not place objects near the controller or cover it with towels. It may stop working.
● English (US) (Initial Setting)
● Chinese (Simplified)
● Chinese (Traditional)
● Spanish
● French
Bad Example
Audio guide functions
Audio description of operations.
* When the speaker is emitting sound, there
may be some noise (sounds like rushing air),
but this is normal. If the sound bothers you,
turn down the volume or turn off the audio
guide. ► See page 28.
8
Page 9
Button status
Buttons displaying a ■ or a □ indicate their operating mode or the fact that they are on or off.
There are three states. The left edge
(■) indicates the selected mode. The
display changes each time a button is
pressed.
■□□→□■□→□□■
ON (■)
When the lower four buttons are on, the backlighting looks orange.
OFF (□)
The backlighting looks blue.
Turning off the display
If a specific amount of time passes without any controller operations after all operations have stopped, then the
screen will go out by itself. Pressing a button (with no display) will turn the screen on and make operation possible.
Turn the on/off button to off. Or
after around 30 minutes, if the
equipment has not been running or
if no buttons have been pressed.
The backlighting will go dark after about 10
seconds, when nothing is running.
Introduction
Or after around 10 minutes, if the
equipment has not been running or
If any button is pressed.
(Any button at all)
The screen is lit and the control will work.
if no buttons have been pressed.
The screen will be dark.
Other
There may be times when the display flashes or when there are streaks of color or brightness in the backlighting,
but these are not things that will affect the operation of the controller. Please be aware of that in advance. There
may be times when the controller will stop working in close proximity (around 50 cm) to an incandescent light or in
direct sunlight. Please adjust the angle of the controller stand or darken the surroundings before continuing.
9
Page 10
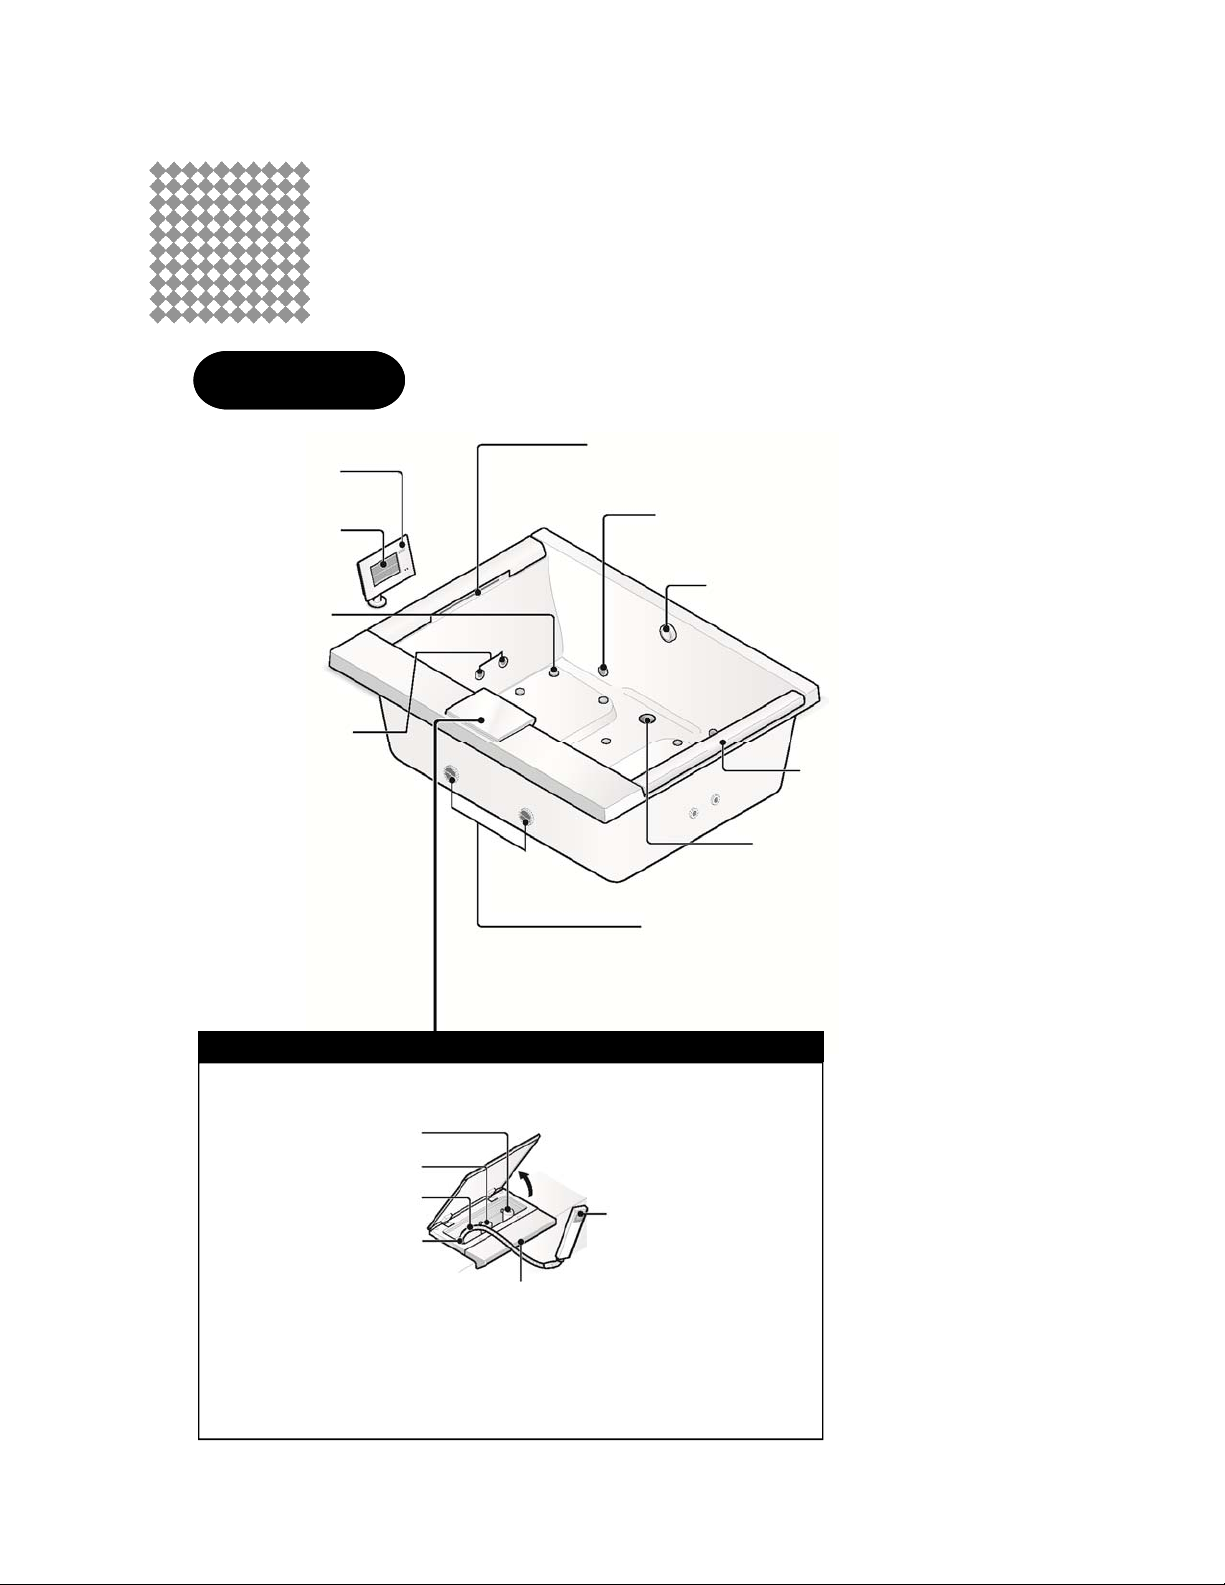
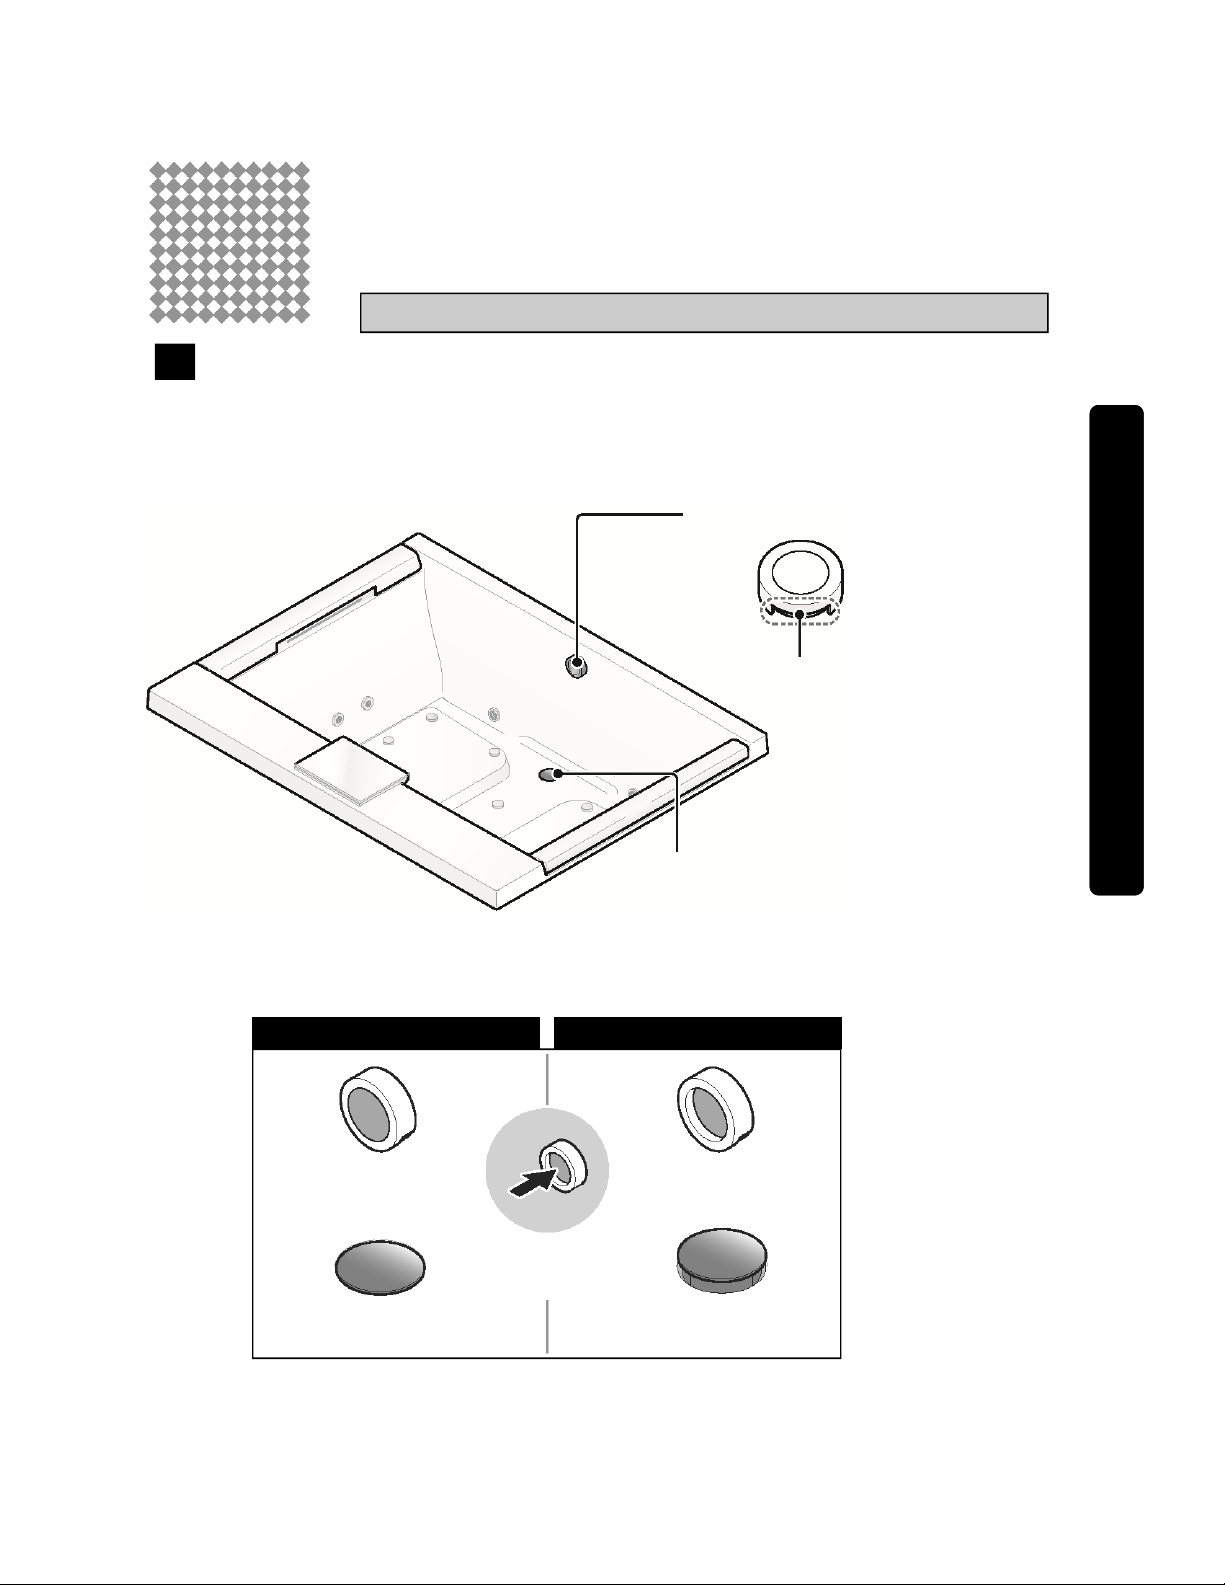
Names of parts
Bathtub
Controller Stand
Controller
Air Jet Cap (15)
(for the air blower)
Ejection nozzle (4)
(for Hydro Hands)
Shoulder-warmer water outlets (2)
Recirculates bath water in through the
suction and through this outlet
Chromatherapy module (2)
(for underwater lighting)
One-touch drain
(with overflow)
Pillow (2)
Drain plug
Suction (2)
(for Hydro Hands/shoulder-warmer water)
10
Cold water knob
Hot water knob
Shower hose
Hose port
Shower
Lid opens
upward
Shower head
Tub fill outlet
Hot water flows out after the temperature
has been adjusted in the function module,
filling the tub with hot water
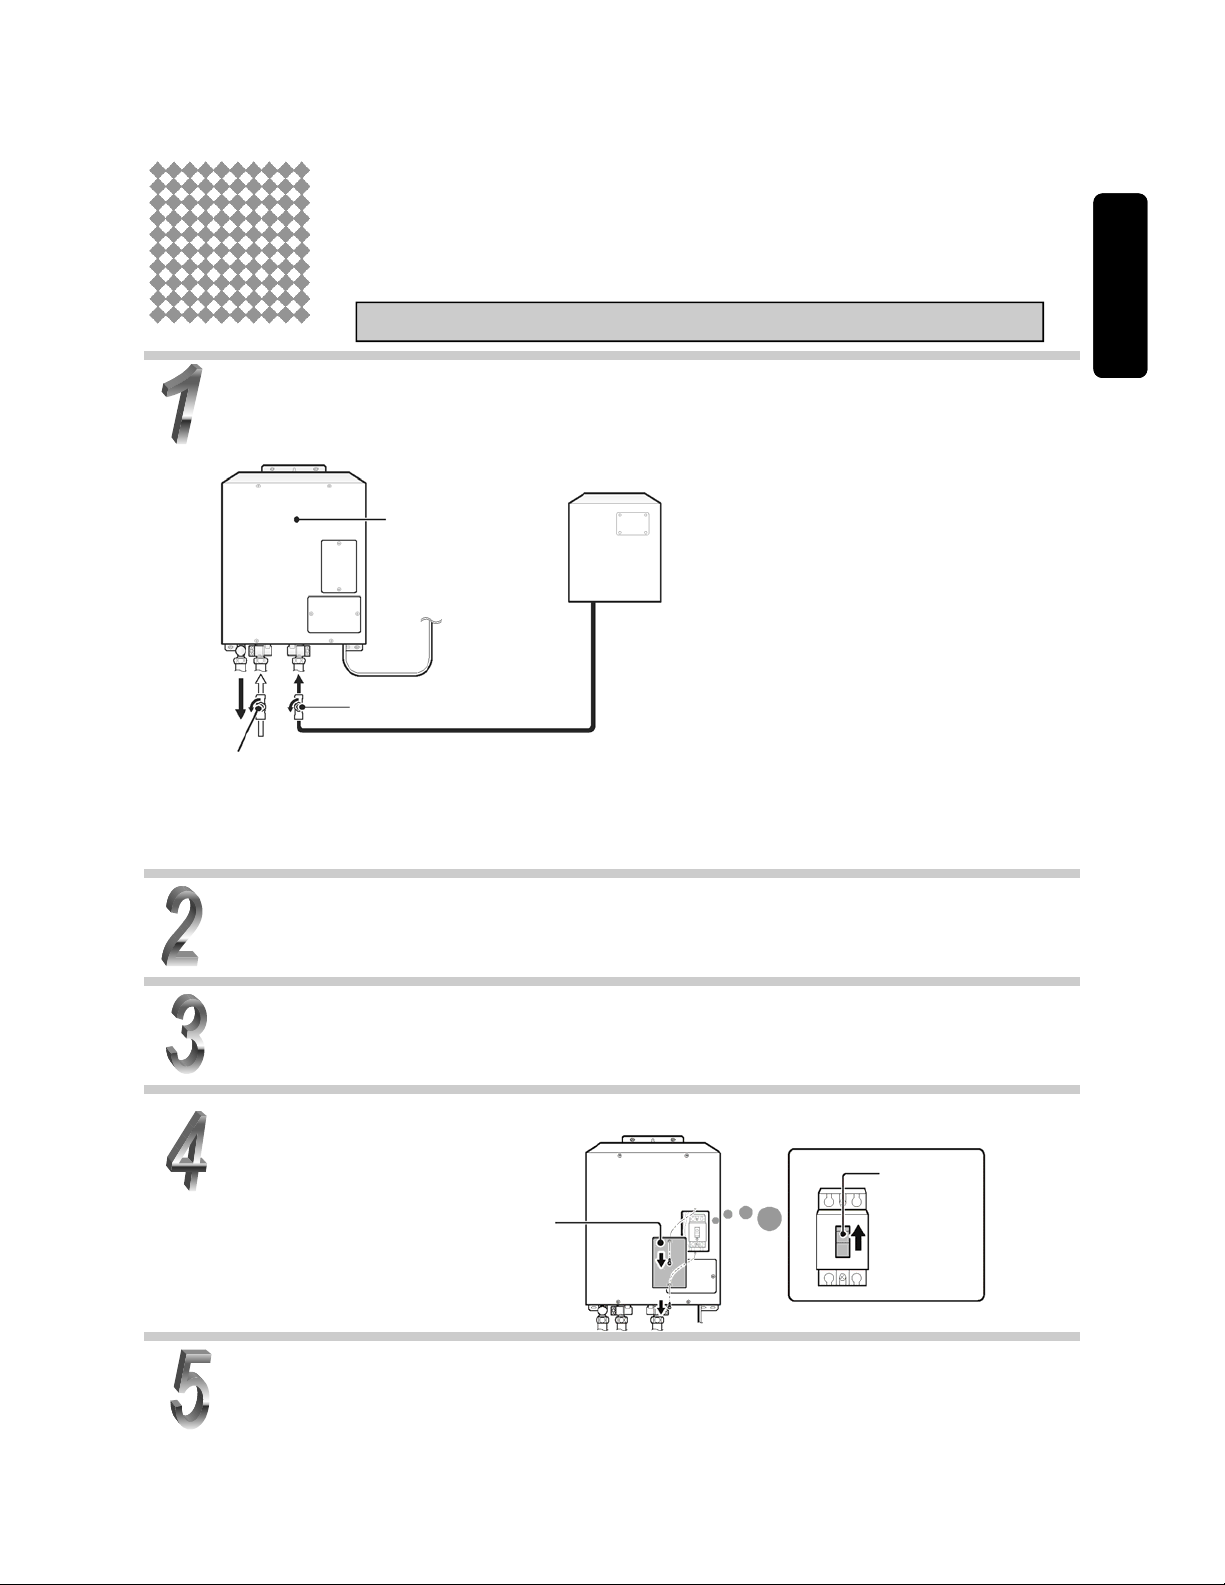
Page 11
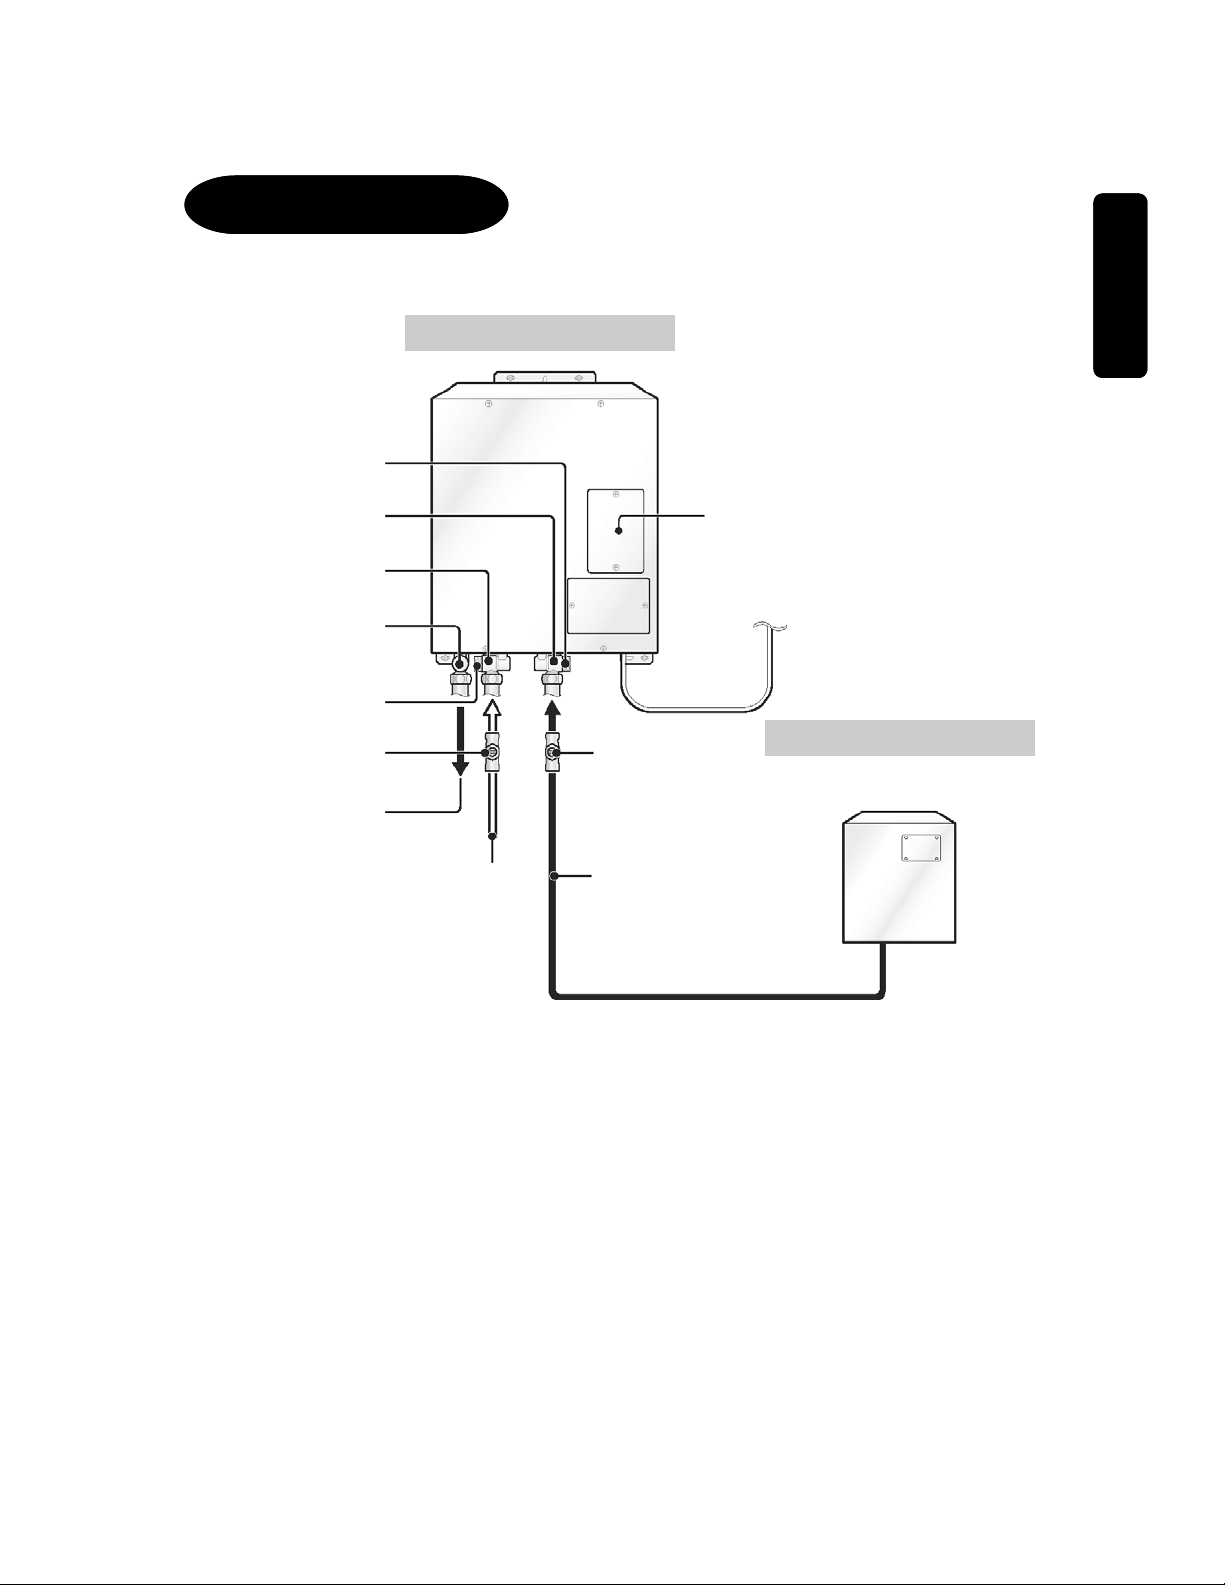
Function module
● The diagram shows a sample installation.
Water drain lug
(with filter)
Connection for hot water
Introduction
Function module
Supplementary
Protector cover
Connection for cold water
Connection for tub
hot heater spout
Water drain lug (with filter)
Cold water shut off valve
To hot water tub spout
Cold water supply
To circuit breaker
Hot water
shut off valve
Hot water supply
Water heater
(Not included with this product)
11
Page 12
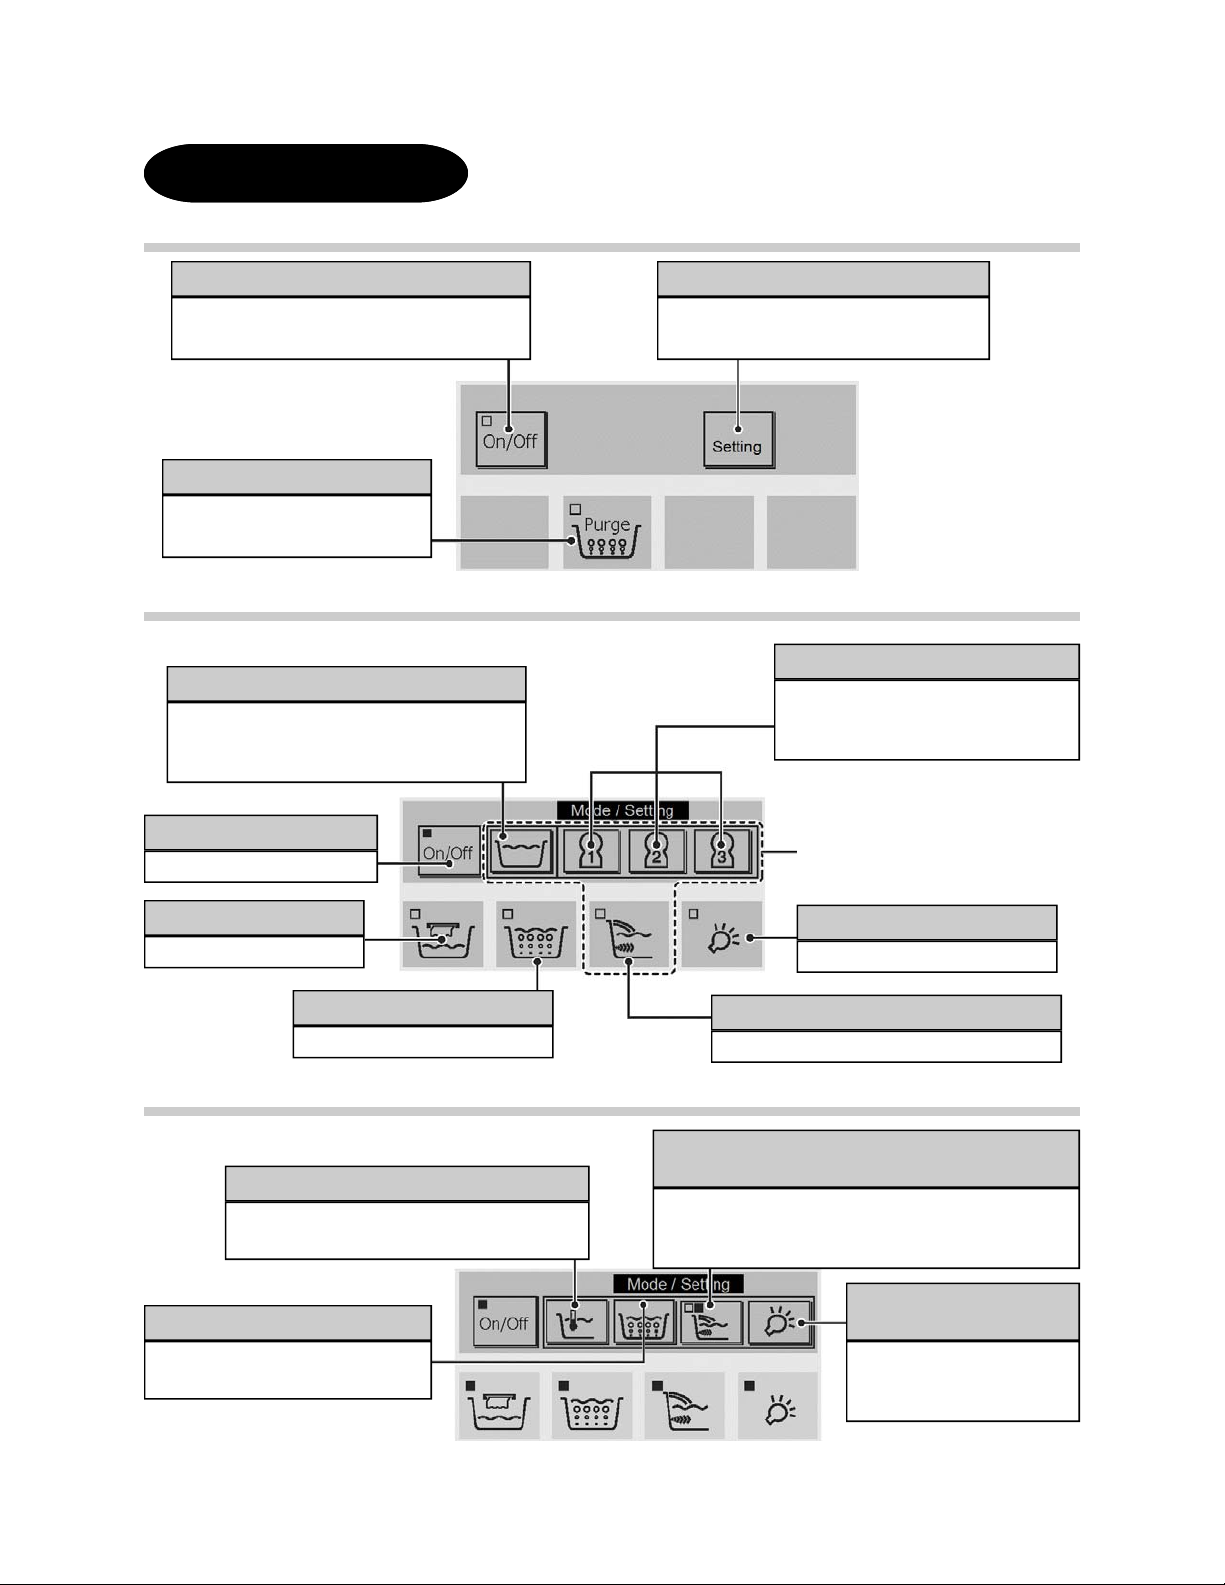
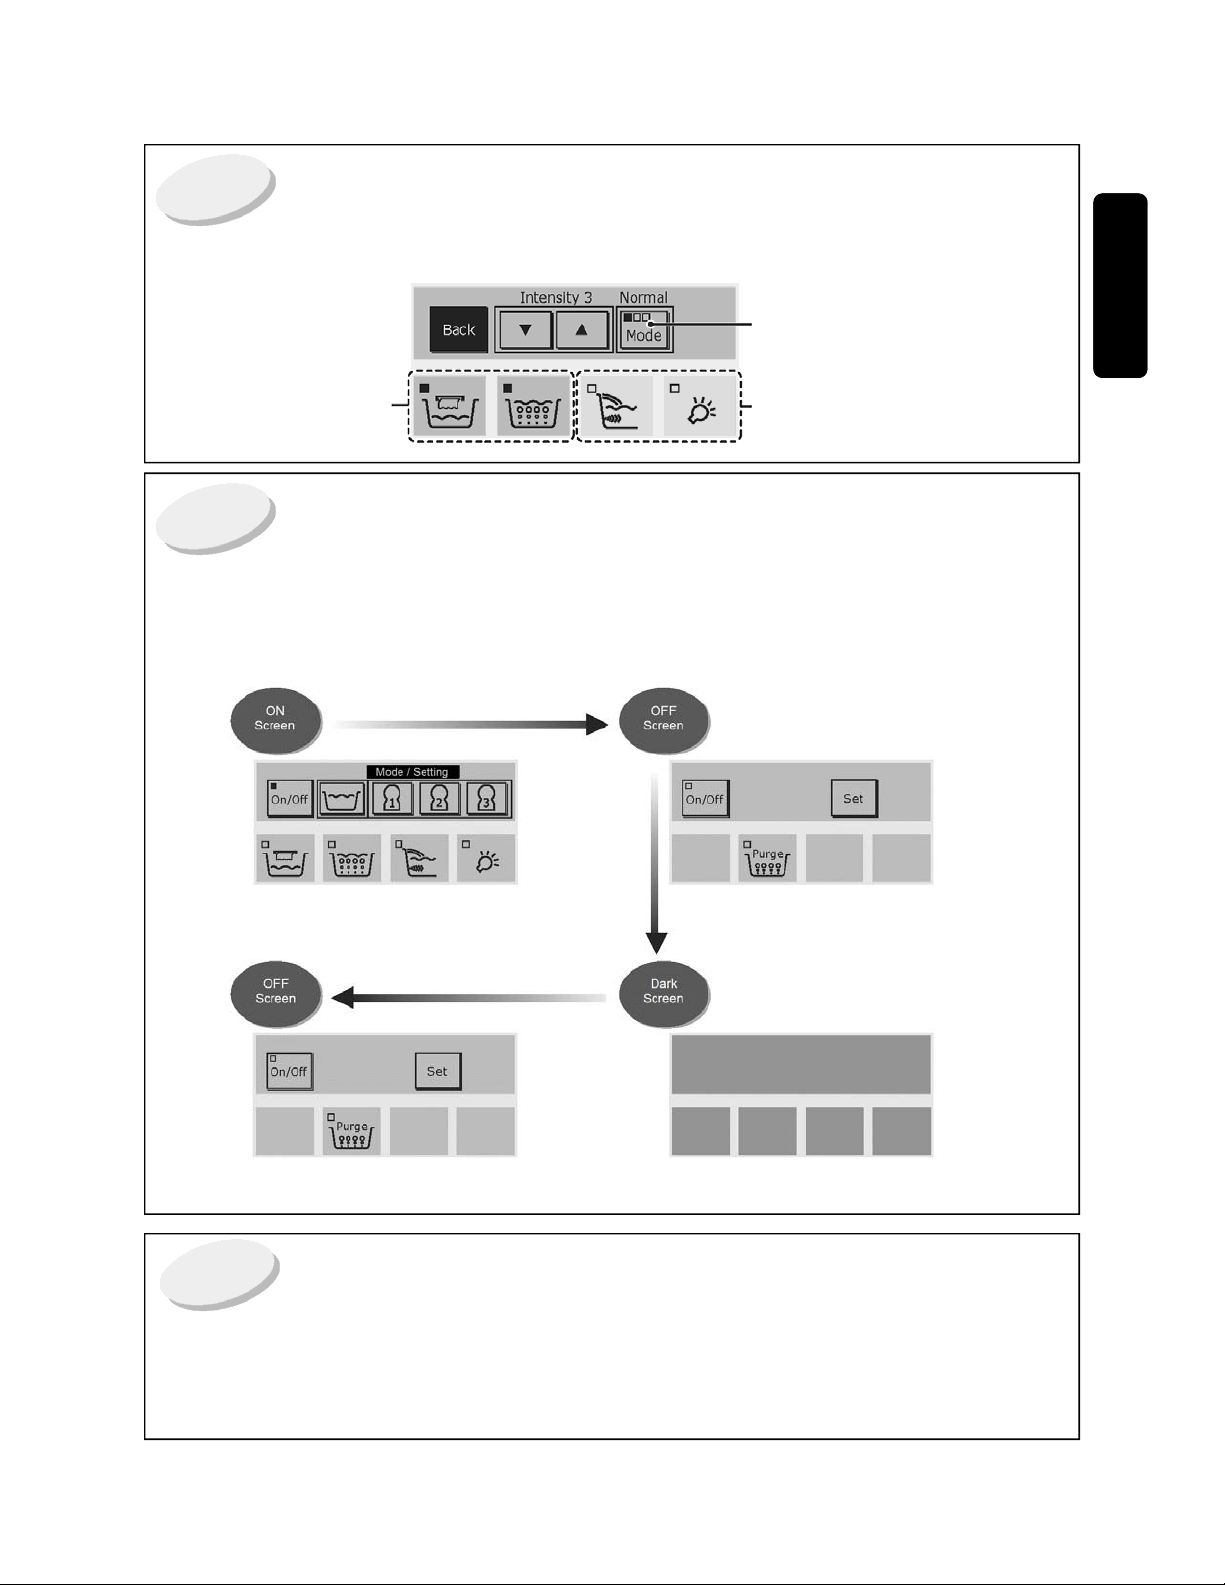
Controller Screen
OFF Screen
On/Off button
Setting button
Activates the ON screen.
(The Purge button is off.)
Purge button
Drains remaining water from
the pipes. ► See page 33.
ON Screen
ӿ Example: When the four lower buttons are all off.
Hot/cold water buttons
To adjust the temperature of the bath water
while bathing.
► See pages 21 and 22.
On/Off button
Activates the OFF screen.
To change volume and other settings
► See page 28.
Preference buttons
To start operating at your preferred
settings.
► See page 25.
ӿ These will not work if
there is no water in the tub.
Please run at least 133/8” (34 cm) into the tub.
Fill tub button
► See page 17.
Air Blower button
► See page 18.
ON Screen
ӿ Example: When the four lower buttons are all on.
Water temperature/level button
Displays when the fill tub button is on.
► See page 17.
Air blower mode setting button
Displays when the air blower button is on. ► See page 18.
12
Underwater lighting button
► See page 20.
HydroHands/shoulder-warmer button
► See page 19.
HydroHands/shoulder-warmer mode settings
button
Displays when the HydroHands/shoulder-warmer
button is on.
► See page 19.
Underwater lighting
mode settings button
Displays when the underwater lighting button is on.
► See page 20.
Page 13
Before using it for the first time
Procedure for first-time use
Introduction
valve
Turn on the hot and cold water valves connected to the function module.
ӿ The position of the shut off valves will vary depending upon site.
Please turn the shut off valves on and supply hot and cold water to the function module.
Function module
To circuit breaker
Hot water
Hot water valve
Cold water Cold water
Cold water pressure
29-108.75 psi (0.2-0.75MPa) flowing
Hot water
Supply temperature 140-158°F (60-70°C)
Water pressure 29-108.75 psi (0.2-0.75MPa)
flowing
Water heater
(Not included with product)
Turn on the circuit breaker.
13
Remove the Supplementary Protector cover.
Turn on the power lever on the Supplementary Protector.
Power lever
Supplementary
Protector cover
ON
OFF
Replace the Supplementary Protector cover.
ӿ When there is no hot and cold water from the shower for cleaning the tub, open the inspection port (installed on site) that is located near the shower and check the water shut off valve.
Page 14
Precautions for first-time bathing
The temperature of the hot water into the function module must be at least 140°F (60°C) and 158°
F (70°C) or less.
● If the temperature of the hot water supply is low, it won’t be possible to fill the tub with water at the
temperature set using the controller. The function module mixes the hot and cold water, releasing it
from the outlet to fill the tub with warm water. The temperature of the water coming from the outlet is
always lower than that of the hot water supply.
Please keep about 13-3/8” (34 cm) of water in the tub while bathing.
● If the water level is low then there may be some functions that don’t work, like the shoulder warmer.
The tub has foot rests for your feet for maintaining
Pillow
a proper bathing position in the tub.
● Please avoid sliding into the tub by keeping your
hands on the rim of the tub or your feet on the foot
rests.
ӿ Please do not grasp the pillows. They could
come out and injury or drowning could result.
Foot rest
For a pleasant bathing experience, please change the water
in the tub daily.
We also recommend draining the water out of the tub soon
after bathing.
When draining the tub, run the water draining function to
remove the residual water from the pipes. ► See page 33.
● If the water is frequently left in the tub until the next day or if the
tub is drained but the residual water is not removed then residue
could build up in the pipes. This could cause an offensive odor.
Rim of tub
Pillow
Nice and clean
14
Page 15
Operation
Drain plug
One-touch drain
This is a drain plug that can be opened and closed with the single touch of a button.
ӿ Please press the button slowly. If it is pressed too quickly then it could pop the drain plug out of place.
One-touch drain button
The bottom is an overflow valve.
Operation
Drain plug
Filling the tub Draining the tub
Button is flat
Opens or closes
with each push
Drain plug is closed Drain plug is open
Button is recessed
15
Page 16
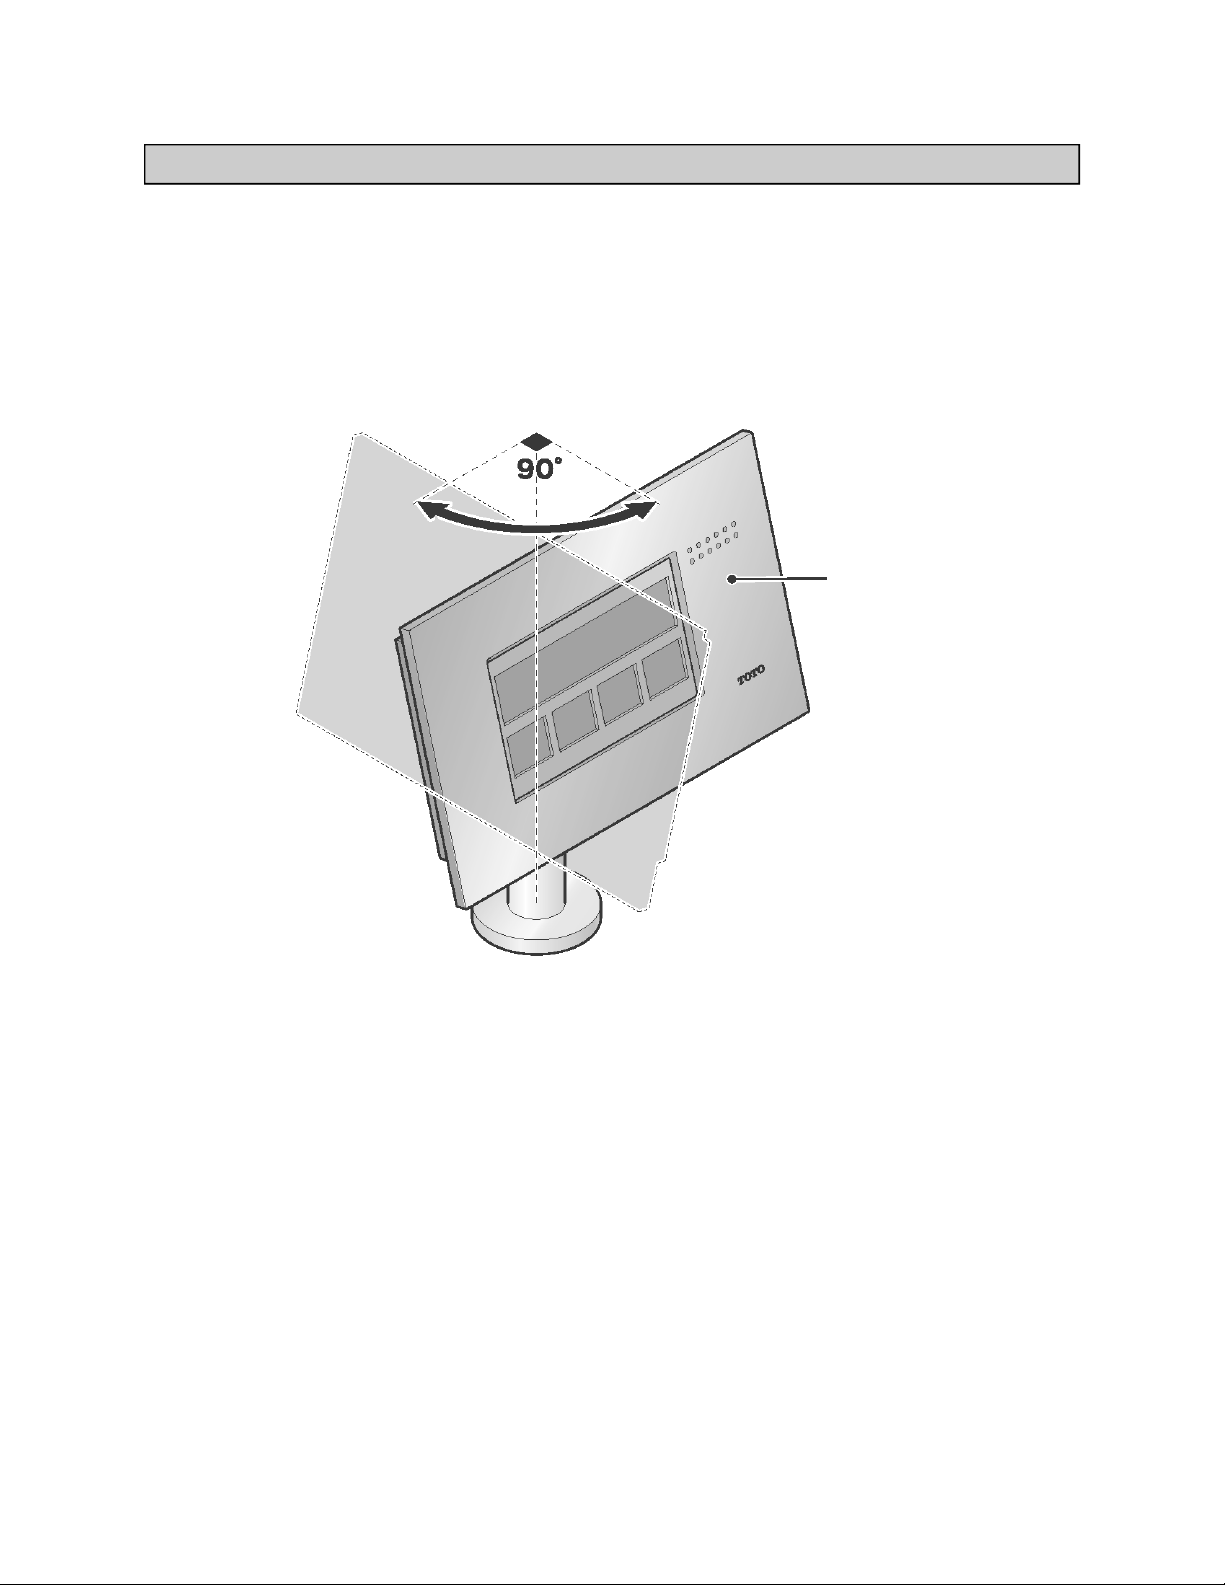
Controller Stand
The controller stand rotates 90°.
Please rotate it so that it is easy to use.
ӿ Please do not apply too much force. Otherwise it could break.
ӿ The controller stand may seem harder to rotate after it has been used for a while compared with when it
was new. This is because the inner parts adjust with use and become more settled. The controller is not
broken.
ӿ The room temperature must be under 122°F (50°C). Otherwise, damage may result.
Controller stand
16
Page 17
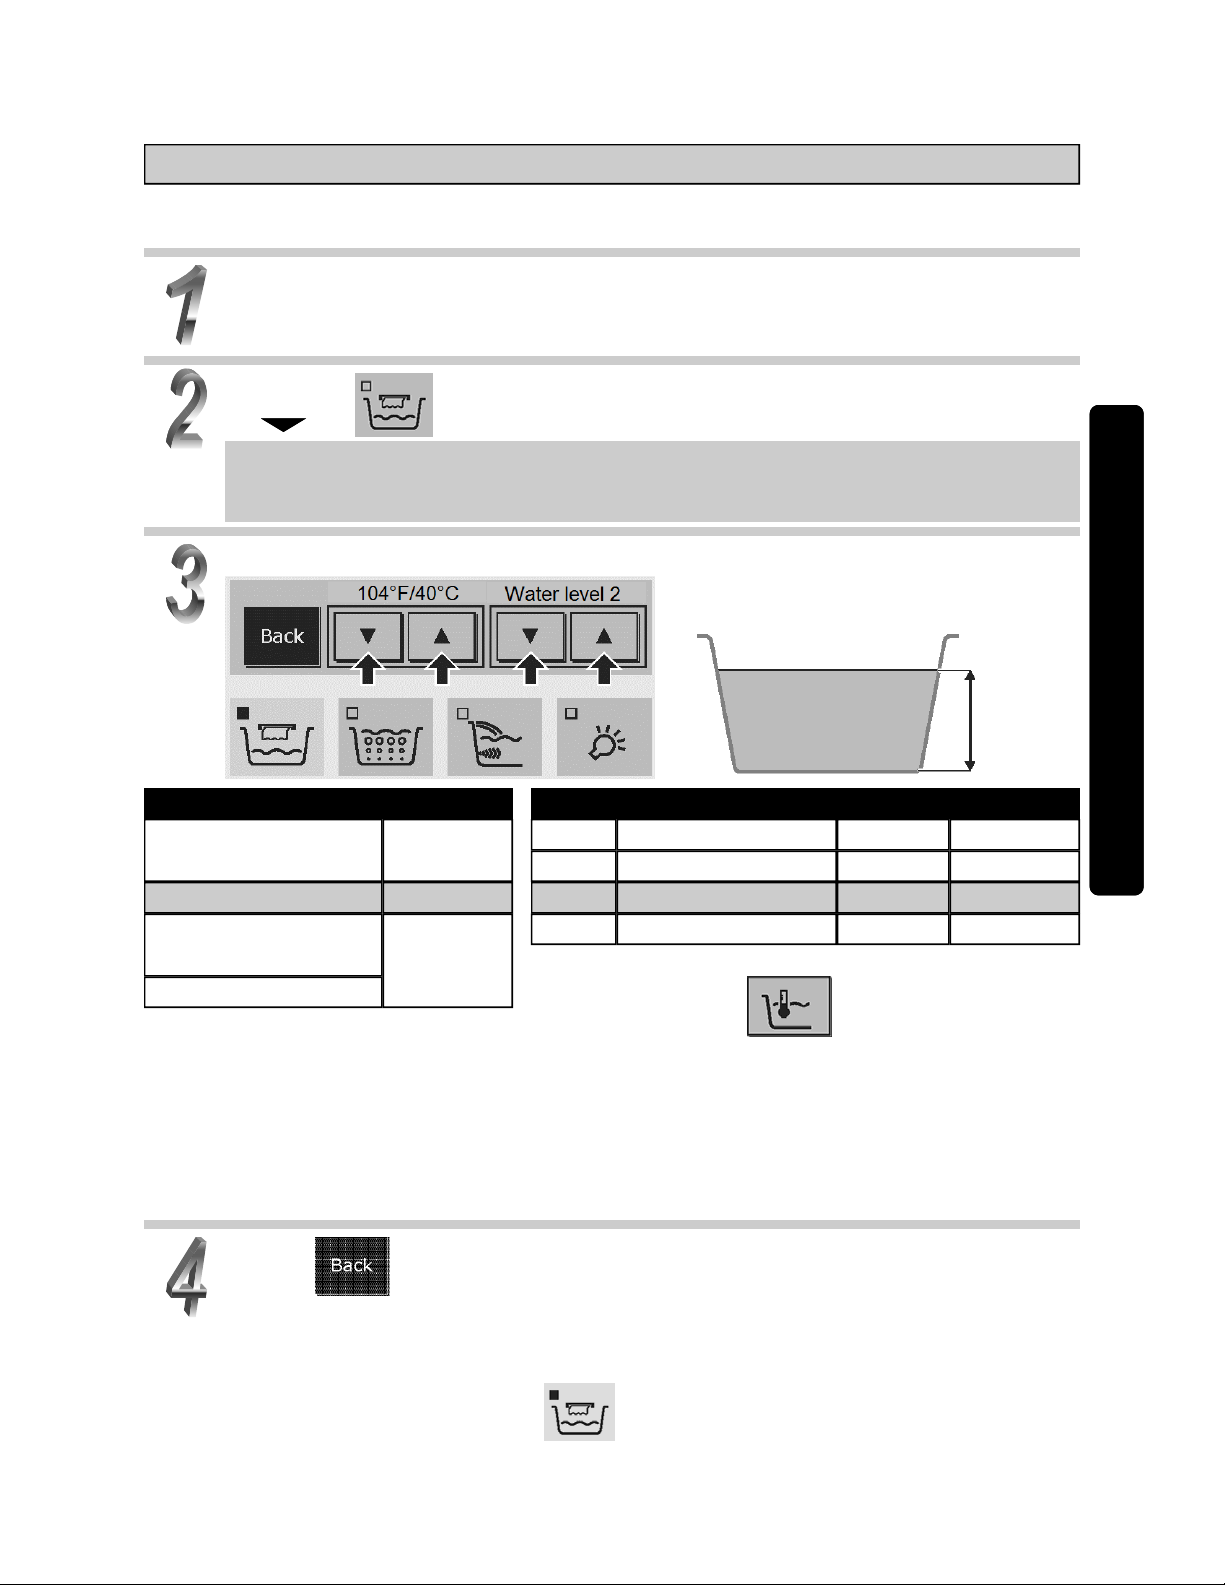
Filling the tub with hot water
The tub is filled with water at a preset temperature. The process stops automatically when the preset
water level is reached.
Close the drain plug and turn the On/Off button to on.
Press the to on.
After around 10 seconds (but at most 20 seconds) warm water will begin
to flow from the outlet.
Setting the tub water temperature and level.
Water
level
Water Level Temperature (Guide)
106°F (41°C)
104°F (40°C)
102°F (39°C)
95°F (35°C)
Low (cold)
113°F (45°C)
Initial Setting
Setting
Capacity Level
3
Approx. 144 gal (545 L)
2
Approx. 133 gal (505 L)
1
Approx. 123 gal (465 L)
17” (43 cm)
16” (40 cm)
15” (37 cm)
Initial Setting
When the controller screen is not the display shown, please press the
The temperature of the water coming from the outlet that fills the tub and the temperature settings will not
necessarily match due to such factors as ambient temperature and water pipe length. Please use these as a
guide.
The water level is a guide for filling the tub when empty. If there is water still in the tub, the water level will vary.
►See page 23.
When running very hot water into the bath, beware of scalding.
● The set temperature and water level are retained in memory.
Operation
Press .
ӿ If the controller is not used, the system returns to auto after around one minute.
When the tub has filled, a melody will be played and then stop.
When you want to stop filling a tub, turn the
17
to off. (The water flow will stop after about 10 seconds.)
Page 18
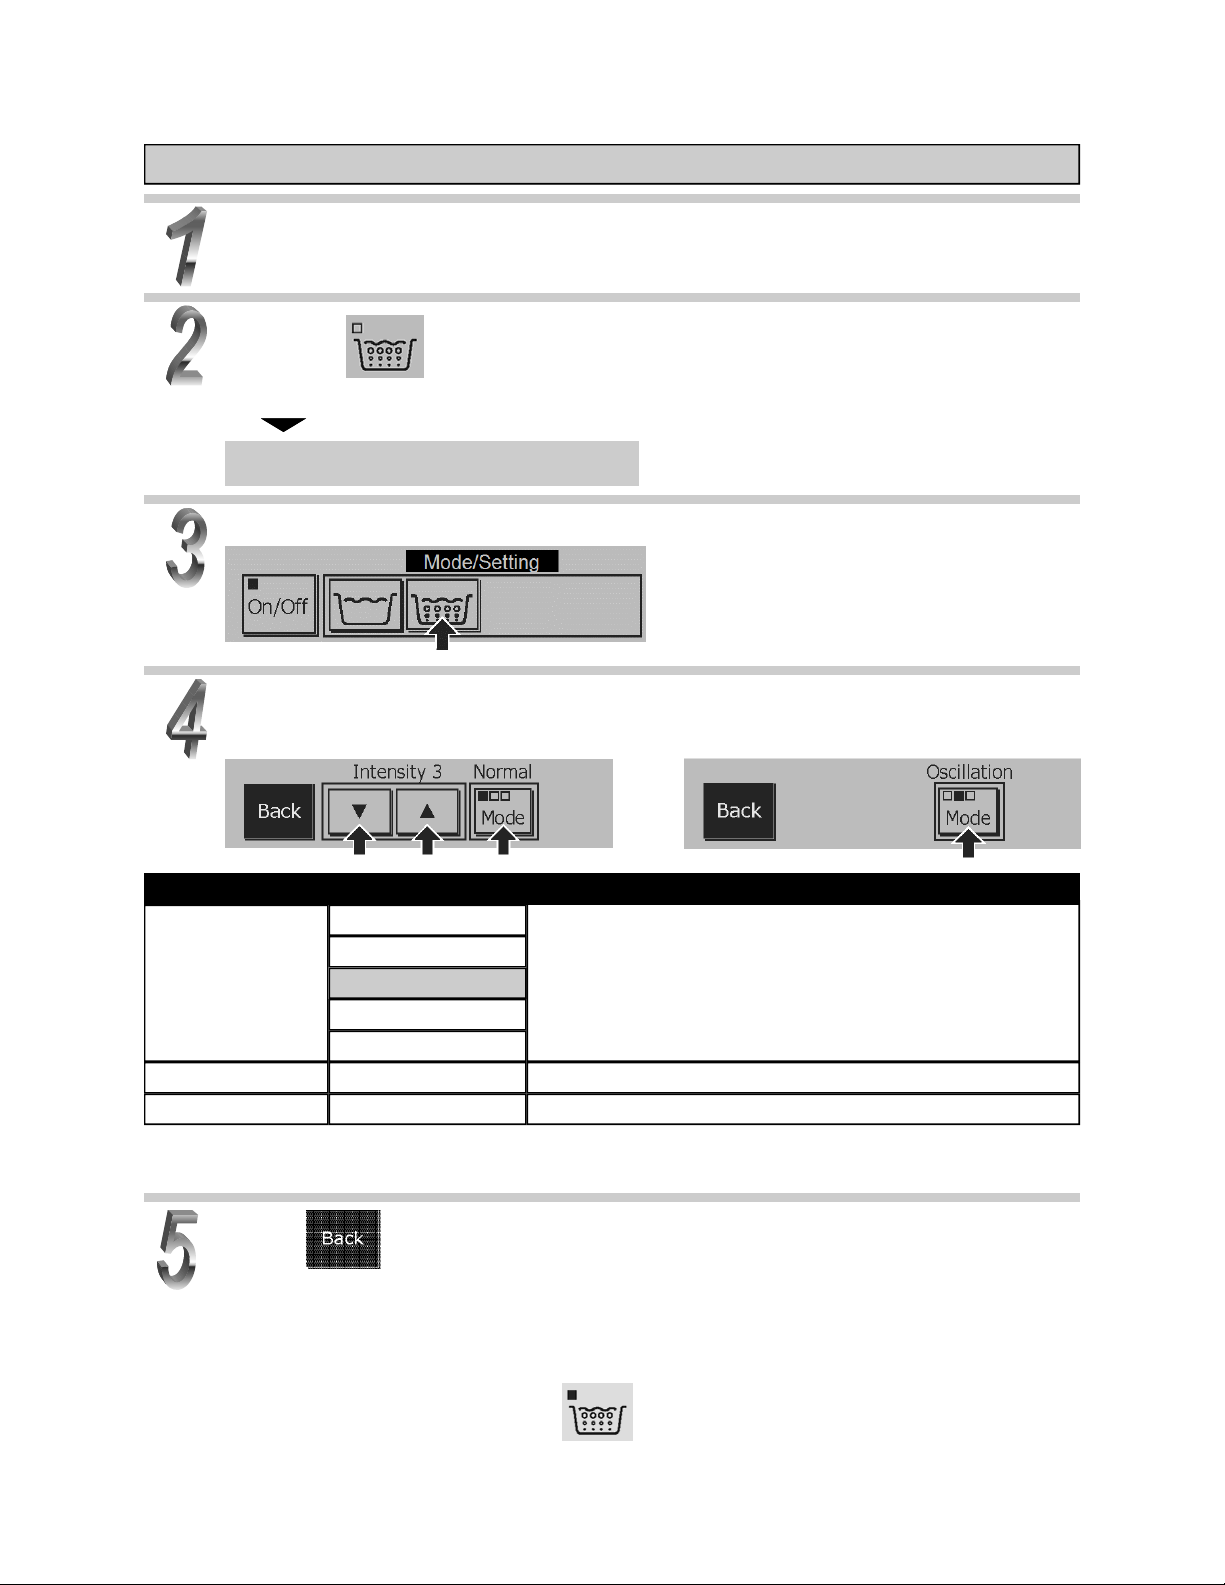
Air blower operation
Fill the tub with water.
►See page 17.
Press the to on.
● Please operate with the On/Off button set to on.
Air will come out of the air jet cap.
Change the screen.
Set the operating mode and bubble intensity.
Normal operation
Bubble Intensity
Normal
Oscillating
5
4
3 (Initial setting)
2
1
Cannot be set
Cannot be set Pulsating
Runs at the bubble instensity settings.
The bubble intensity changes as follows: 5→4...→1→2...→5...
The bubble intensity changes as follows: 5→1→5→1→...
Other operation
Description of operation Mode
● The operating mode and bubble intensity settings are stored in memory.
Press .
ӿ If the controller is not used, the system returns to auto after around one minute.
After starting operations 2 or 4, the system will automatically stop after approximately 15 minutes has expired.
The time settings on the timer can be set to approximately 30 minutes. ► See page 28.
When you want to stop the air blower, turn the
18
to off.
Page 19
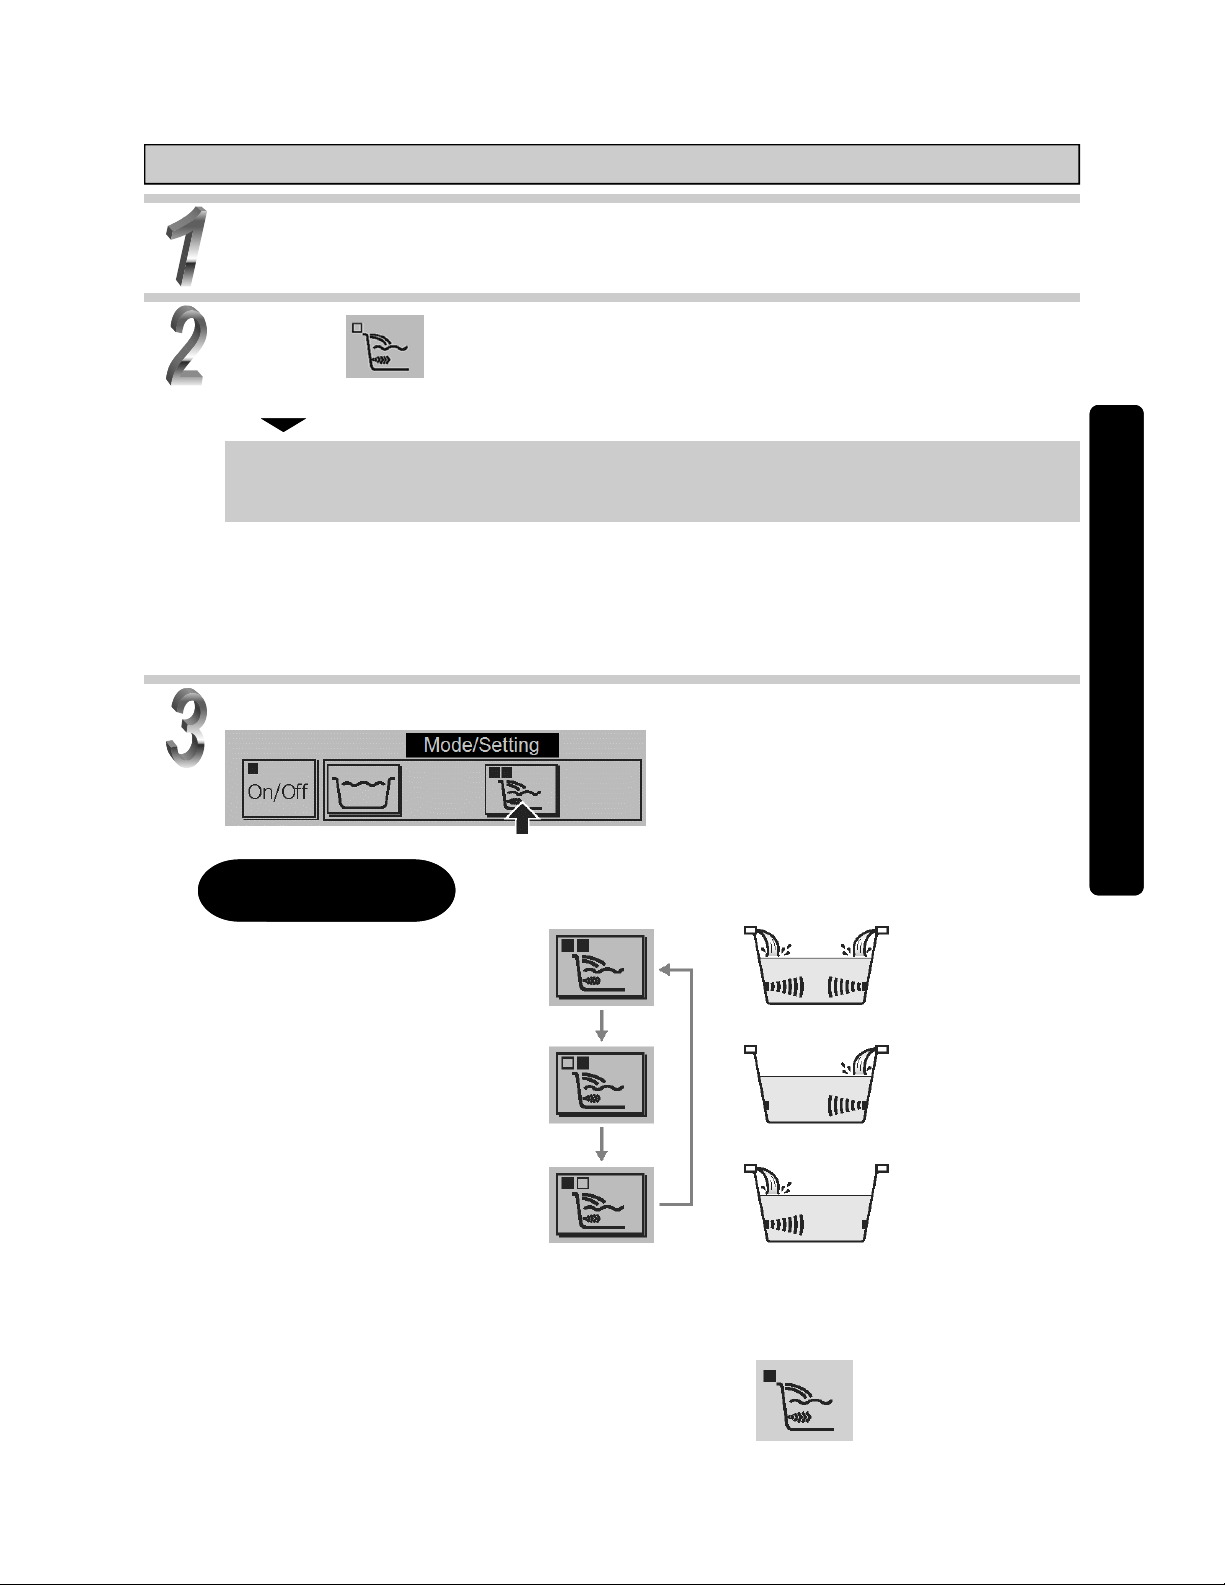
Using HydroHands and shoulder-warmer water
Fill the tub with water.
►See page 17.
Press the to on.
● Please operate with the On/Off button set to on.
HydroHands and shoulder-warmer water come out from the ejection nozzle and the shoulder-warmer water outlets, respectively.
The bathtub won’t function unless it has water in it. Fill the bathtub with hot water to Level 1 or more.
HydroHands and shoulder-warmer are operated at the same time. These functions cannot be
operated individually.
As lukewarm water in the piping comes out when the operation is started, it may feel cool at first. It is
also possible to set HydroHands/shoulder-warmer warm-up operation. ► See page 28.
Operation
Set the operating mode (ejection/outlet nozzle).
Operating Mode
Two-sided ejection/outlet
(Initial setting)
One-sided ejection/outlet
One-sided ejection/outlet
After starting operations 2 or 3, the system will automatically stop after approximately 15 minutes has
expired.
The time settings on the timer can be set to approximately 30 minutes. ► See page 28.
When you want to stop HydroHands/shoulder-warmer water, press the
19
to off.
Page 20
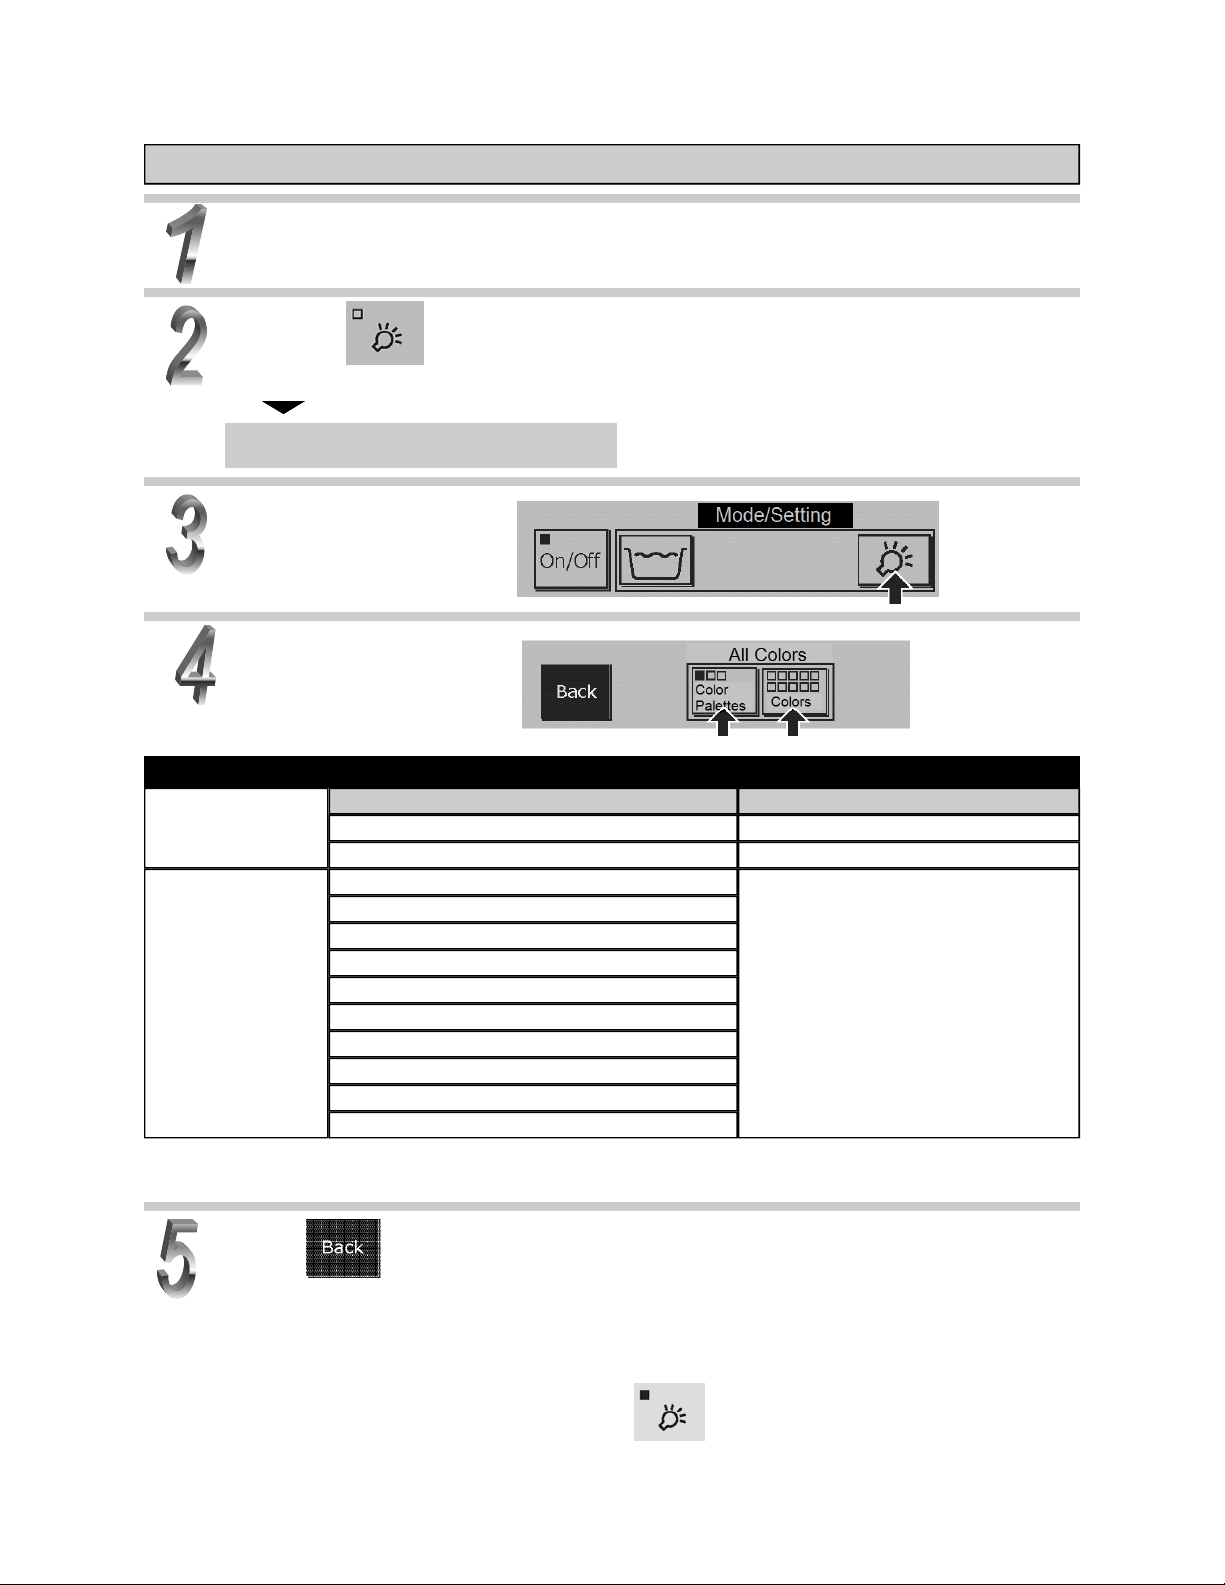
Using the underwater lighting
Color Palette
Fill the tub with water.
►See page 17.
Press the to on.
● Please operate with the On/Off button set to on.
The underwater lights will go on.
Change the screen.
Set the operating mode.
All colors in turn (Initial Settings)
Cool colors in turn
Warm colors in turn
Colors
Light Blue
Blue
Blue Green
Light Green
Green
Orange
Red
Pink
Purple
White
Description of Operation Operating Mode
All colors go on in order.
The cool colors go on in order.
The warm colors go on in order.
The specified color goes on.
● The operating mode setting is stored.
Press .
ӿ If the controller is not used, the system returns to auto after around one minute.
After starting operations 2 or 4, the system will automatically stop after approximately 15 minutes has expired.
The time settings on the timer can be set to approximately 30 minutes. ► See page 28.
When you want to stop the underwater lighting, turn the
20
to off.
Page 21
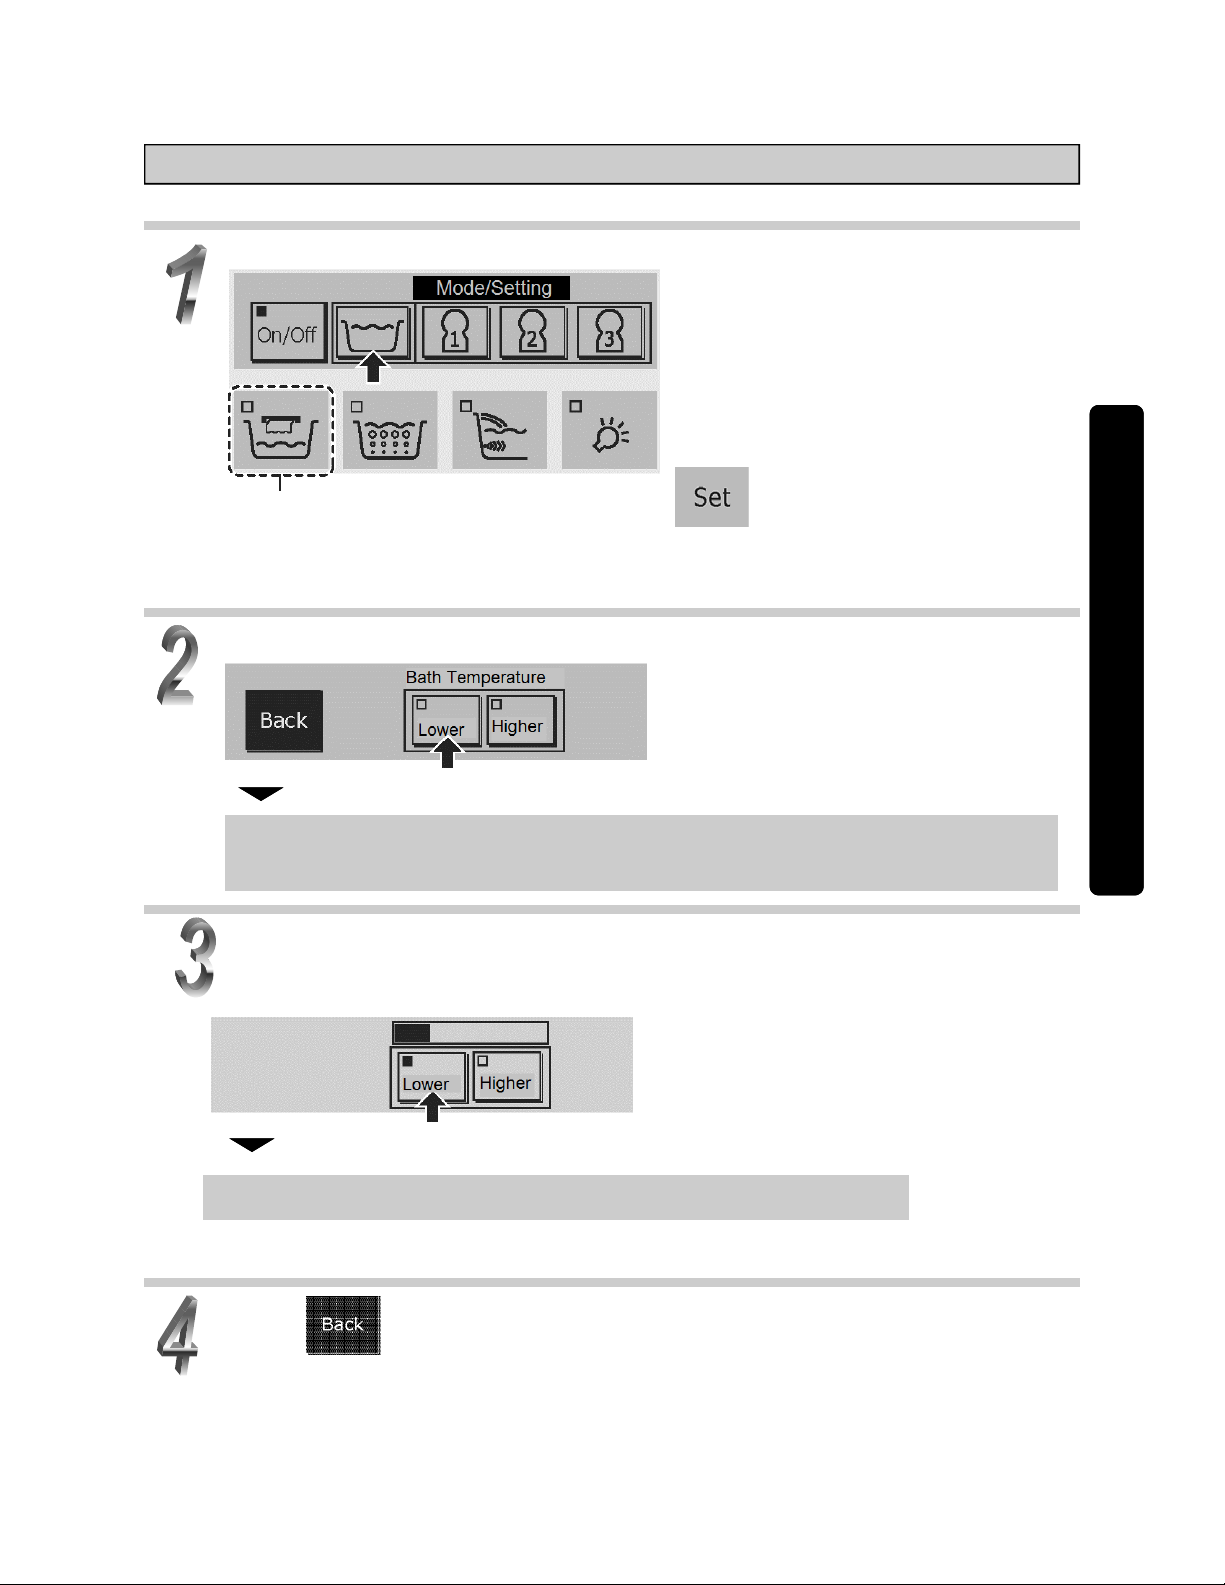
Lowering the bath temperature (Cooling water)
This adds cold water to lower the temperature of the bath water.
Please operate with the On/Off button set to on.
This won’t work unless there is water in the tub. Put water in the tub. ► See page 17.
Switch screens.
ӿ Turn this button off or check to see that it is
Turn the Lower button to on.
Operation
After about 10 seconds (but at most 20 seconds), cold water will flow
from the Fill-Tub outlet.
When the bath water has reached the desired temperature, turn off the
Lower button.
The water flow will stop after about 10 seconds.
ӿ When the horizontal gauge (about 26 gallons or about 100 L) on the screen reaches the end, it will
stop automatically.
Press .
This won’t work if the Lower button or the Higher button is on.
21
Page 22
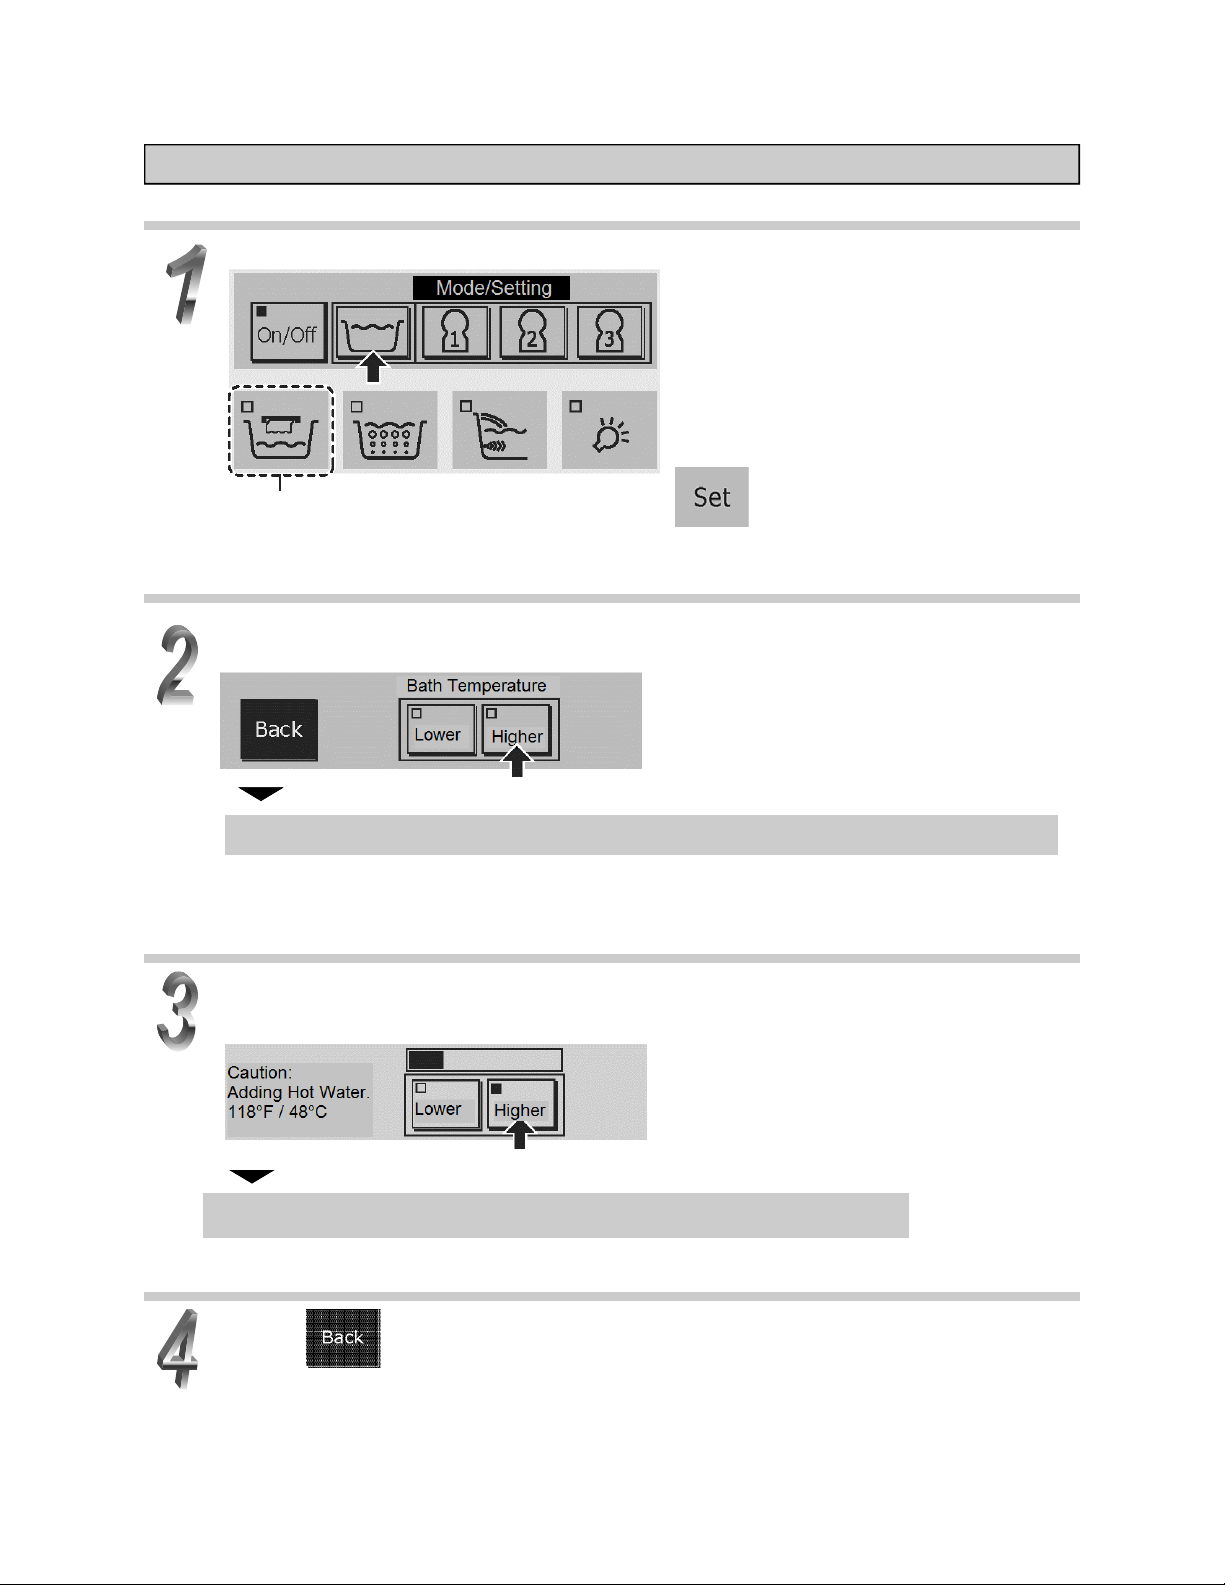
Raising the bath temperature (Heating water)
This adds hot water to raise the temperature of the bath water.
Please operate with the On/Off button set to on.
This won’t work unless there is water in the tub. Put water in the tub. ► See page 17.
Switch screens.
ӿ Turn this button off or check to see that it is
Turn the Higher button to on.
Please press for one second.
The water will flow after about 10 seconds (but at most 20 seconds).
Water that is 118°F/48°C will flow from the Fill-Tub outlet. Please be care-
ful of the high temperature.
When the bath water has reached the desired temperature, turn off the
Higher button.
The water flow will stop after about 10 seconds.
ӿ When the horizontal gauge (about 26 gallons or about 100 L) on the screen reaches the end, it will
stop automatically.
Press .
This won’t work if the Lower button or the Higher button is on.
22
Page 23
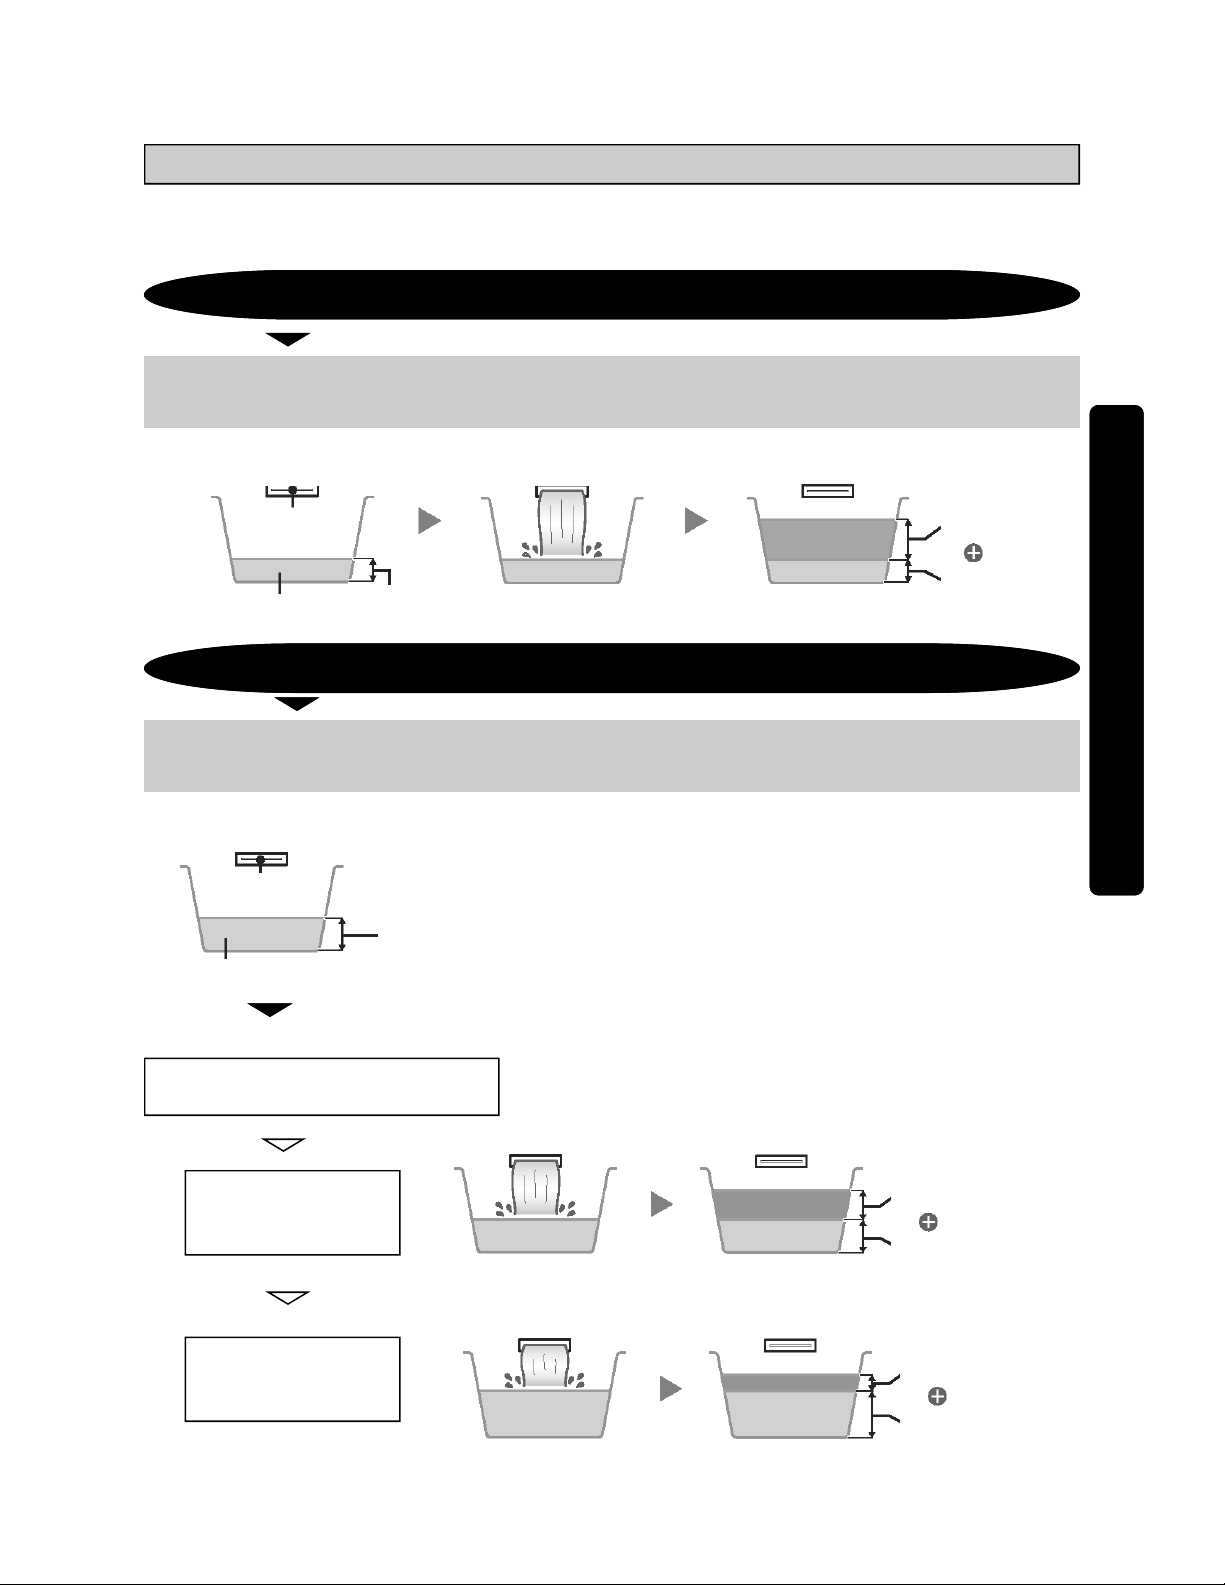
Adding more water (Add water)
●The method is the same as for filling the bathtub. (► See page 17) Water at the preset temperature
will be added to the bathtub.
The amount of water in the tub after using the Fill-Tub feature will vary with the amount of starting water.
When starting with less than 5-1/2” (14 cm) of water in the tub.
The ending water level will be above the selected water level by the amount of
starting water.
Less than 5-1/2” (14 cm)
of water in the bathtub
Tub filler
Starting water
Less than 5-1/2”
(14 cm)
Water added by the normal
amount of the selected level
Fill-tub feature ends
Normal amount
Starting water
When starting with at least 5-1/2” (14 cm) of water in the tub.
The amount of water needed to reach the selected water level is calculated and
that amount of water is added to the bathtub.
ӿ 26 gallons (100L) of water will be added to the bathtub when the amount of water to be added is calculated
at less than 26 gallons (100L).
Tub filler
At least 5-1/2”
(14 cm)
Starting water
ӿ
Operation
The amount of water needed to reach
the selected water level is calculated.
Case 1: The calculated
amount of water is at
least 26 gallons (100L).
Case 2: The calculated
amount of water is less
than 26 gallons (100L).
23
►
►
Fill-tub feature ends
Calculated amount
Starting water
Fill-tub feature ends
26 gallons (100L)
Starting water
Page 24
Adding more water (Add water) continued
Press the to on.
Please operate with the On/Off button set to on.
After about 10 seconds (but at most 20 seconds), water will flow from
the fill-tub outlet.
If changing the Fill-Tub temperature or water level, please do so.
Put water in the tub. ► See page 17.
Press .
ӿ The controller will automatically go back after about one minute without operation.
When the desired water level has been reached turn the off.
The water flow will stop after about 10 seconds.
ӿ When the selected water level has been reached there will be music and the filling will stop automatically.
24
Page 25
Using the preference buttons
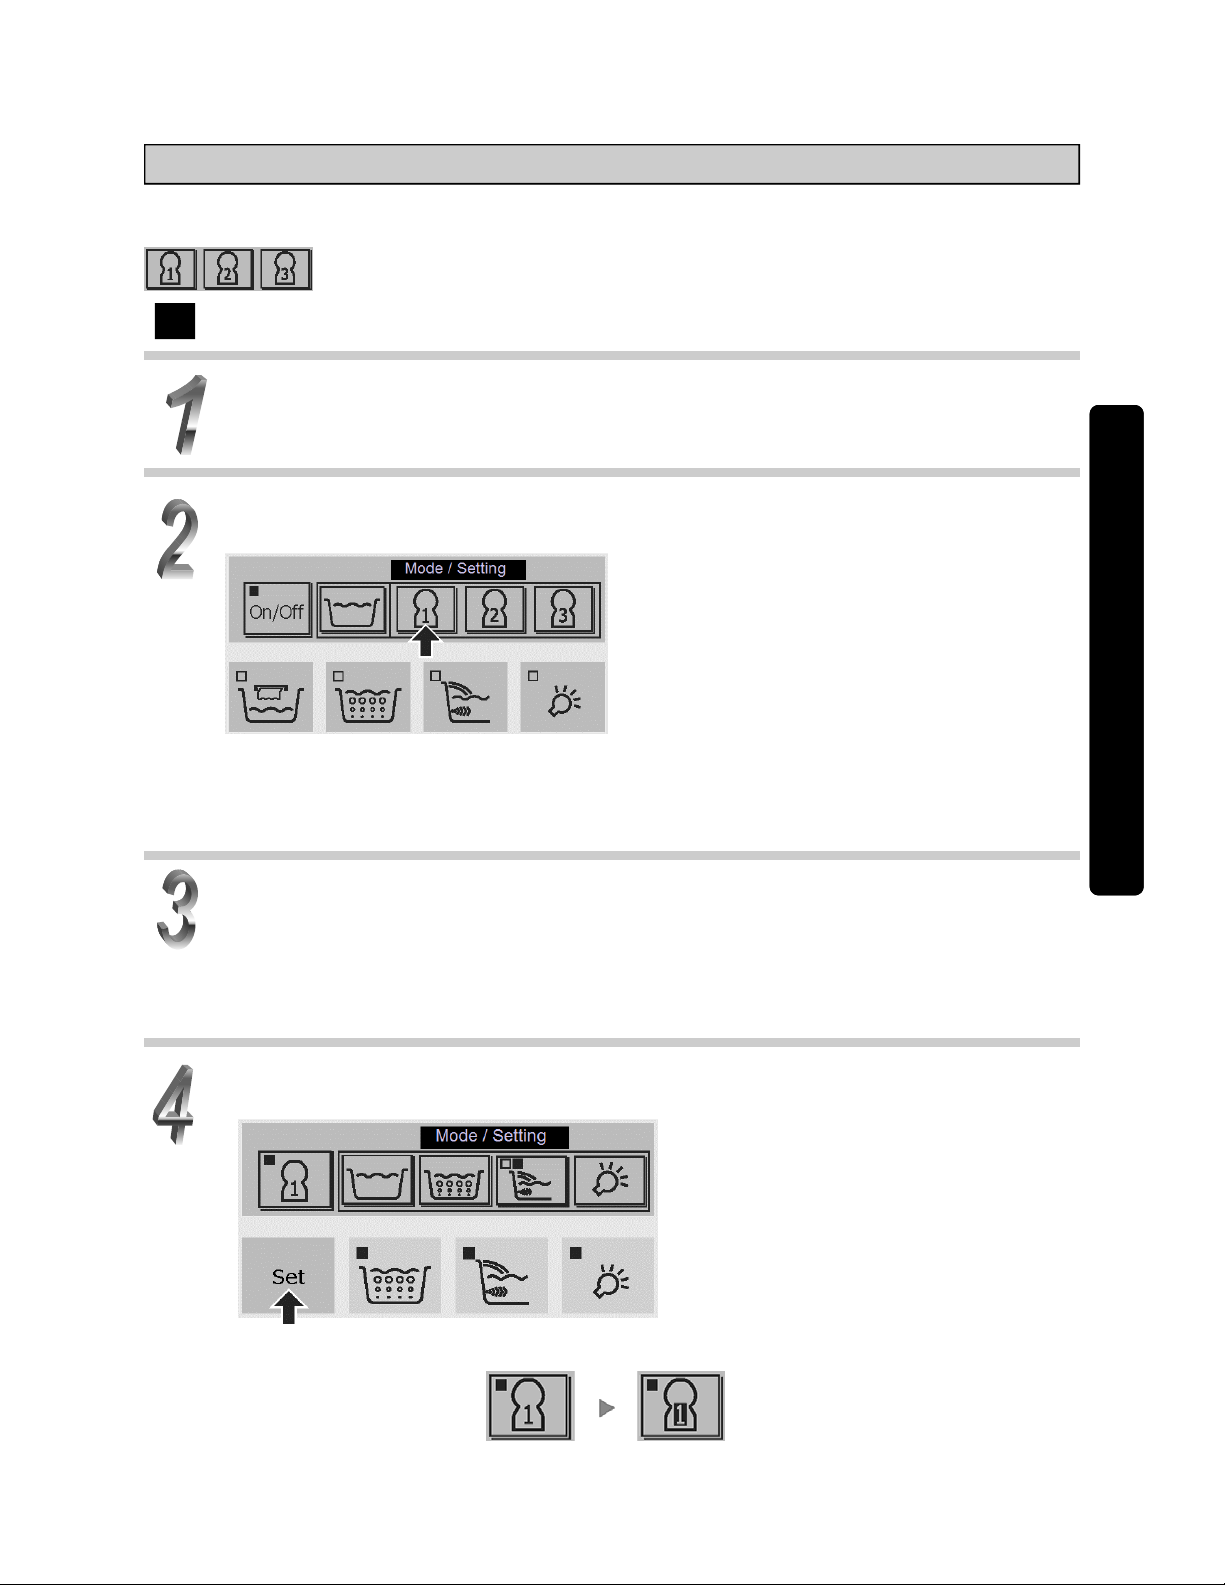
This preference buttons can be set to your preferred operations (air blower, Hydro Hands / shoulderwarmer water, underwater lighting). Up to three patterns can be set using the preference buttons.
Configuring the settings
Put water in the bathtub.
► See page 17.
With water in the bathtub, press one of the three preference buttons.
In this example we press preference button 1.
Operation
Please operate with the On/Off button set to on.
This won’t work unless there is water in the bathtub. Please have at least 13-3/8” (34 cm) of water in
the bathtub.
When the preference button does not display, please set all four of the lower buttons to off.
Operating the air blower, Hydro Hands / shoulder-warmer water, or underwater lighting at your preference settings.
25
Operating the air blower ► See page 18.
Operating Hydro Hands / shoulder-warmer water ► See page 19.
Operating the underwater lighting ► See page 20.
When you have configured your preferred settings, press the Set button
and the settings will be complete.
ӿ When the settings have been configured, the display colors of the numeral on the preference
button will be reversed.
Settings are stored.
Page 26
Using the preference buttons (continued)
Configuring the settings (continued)
To end operation with the preference button, press the again.
Operation using the preference buttons
Put water in the bathtub.
► See page 17.
Press one of the three configured (numeral display colors reversed) preference buttons (1~3) and begin operation.
In this example we press preference button 1.
26
Please operate with the On/Off button set to on.
This won’t work unless there is water in the bathtub. Please have at least 13-3/8” (34 cm) of water in
the bathtub.
When the preference button does not display, please set all four of the lower buttons to off.
To end operation with the preference button press the .
After approximately 15 minutes the air blower, Hydro Hands / shoulder-warmer water or underwater
lighting will turn off automatically.
To restart, please turn one of the on.
The timer can be set for up to about 30 minutes. ► See page 28.
Changing or deleting the settings
Put water in the bathtub.
► See page 17.
Page 27
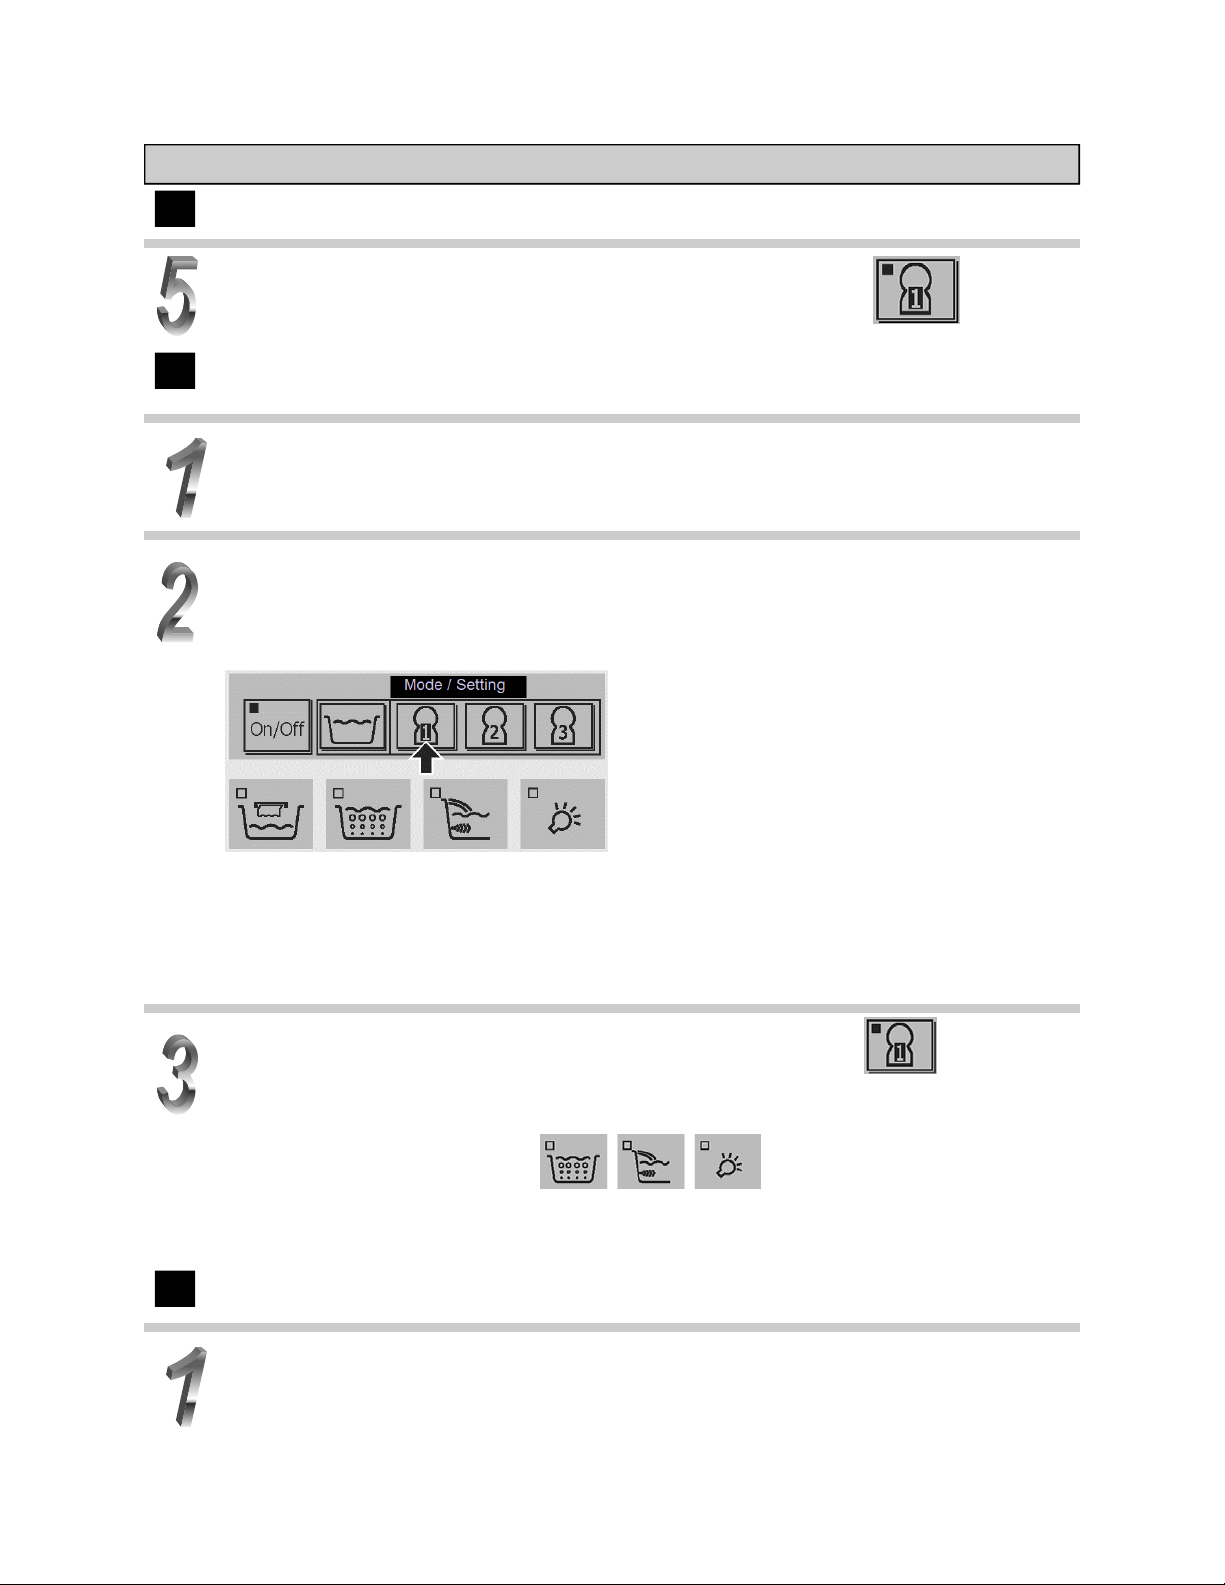
Using the preference buttons (continued)
Changing or deleting the settings (continued)
Press one of the three configured (numeral display colors reversed) preference buttons (1~3) and begin operation.
In this example we press preference button 1.
Please operate with the On/Off button set to on.
This won’t work unless there is water in the bathtub. Please have at least 13-3/8” (34 cm) of water in
the bathtub.
When the preference button does not display, please set all four of the lower buttons to off.
Operating the air blower, Hydro Hands / shoulder-warmer water or un-
Operation
derwater lighting at your preferred settings.
The three lower buttons are turned off when these settings are cancelled.
Operating the air blower ► See page 18.
Operating Hydro Hands / shoulder-warmer water ► See page 19.
Operating the underwater lighting ► See page 20.
When you have configured your preferred settings, press the Set button
and the settings will be complete.
ӿ When the settings have been configured, the display colors of the numeral on the preference
button will be reversed.
Settings are stored.
To end operation with the preference button, press the or
for operation.
27
Page 28
Changing the settings
Set the On/Off button to off.
Press the
.
Select the menu using the Menu
button and the up/down buttons
to change the settings.
Settings
Language
Volume
Volume
Voice Guide
English (USA)
Chinese (simplified)
Chinese (traditional)
Spanish
French
3
2
1
1
Off
Comments Menu
On
ӿ1 Timer settings for the air blower, Hydro Hands / shoulder-warmer water and the underwater lighting.
ӿ2 Setting of Hydro Hands / shoulder-warmer warm-up operation.
This is a function for rotating the water in a bathtub in the piping of Hydro Hands / shoulder-warmer water before
bathing because lukewarm water in the piping of Hydro Hands / shoulder-warmer water comes out when Hydro
Hands / shoulder-warmer operation is started.
Hydro Hands / shoulder-warmer warm-up operation automatically starts when the bathtub has been filled with hot
water. When the operation is started, it is terminated by turning OFF the Hydro Hands / shoulder-warmer button or
automatically terminated in approximately 3 minutes.
Contrast
Timer
5
4
3
2
1
15 min.
Off
: Initial setting
30 min.
ӿ1
On
ӿ2
28
Page 29

Changing the settings (continued)
Press .
ӿ The controller will automatically go back after about one minute without operation.
Operation
29
Page 30
Cleaning the NEOREST
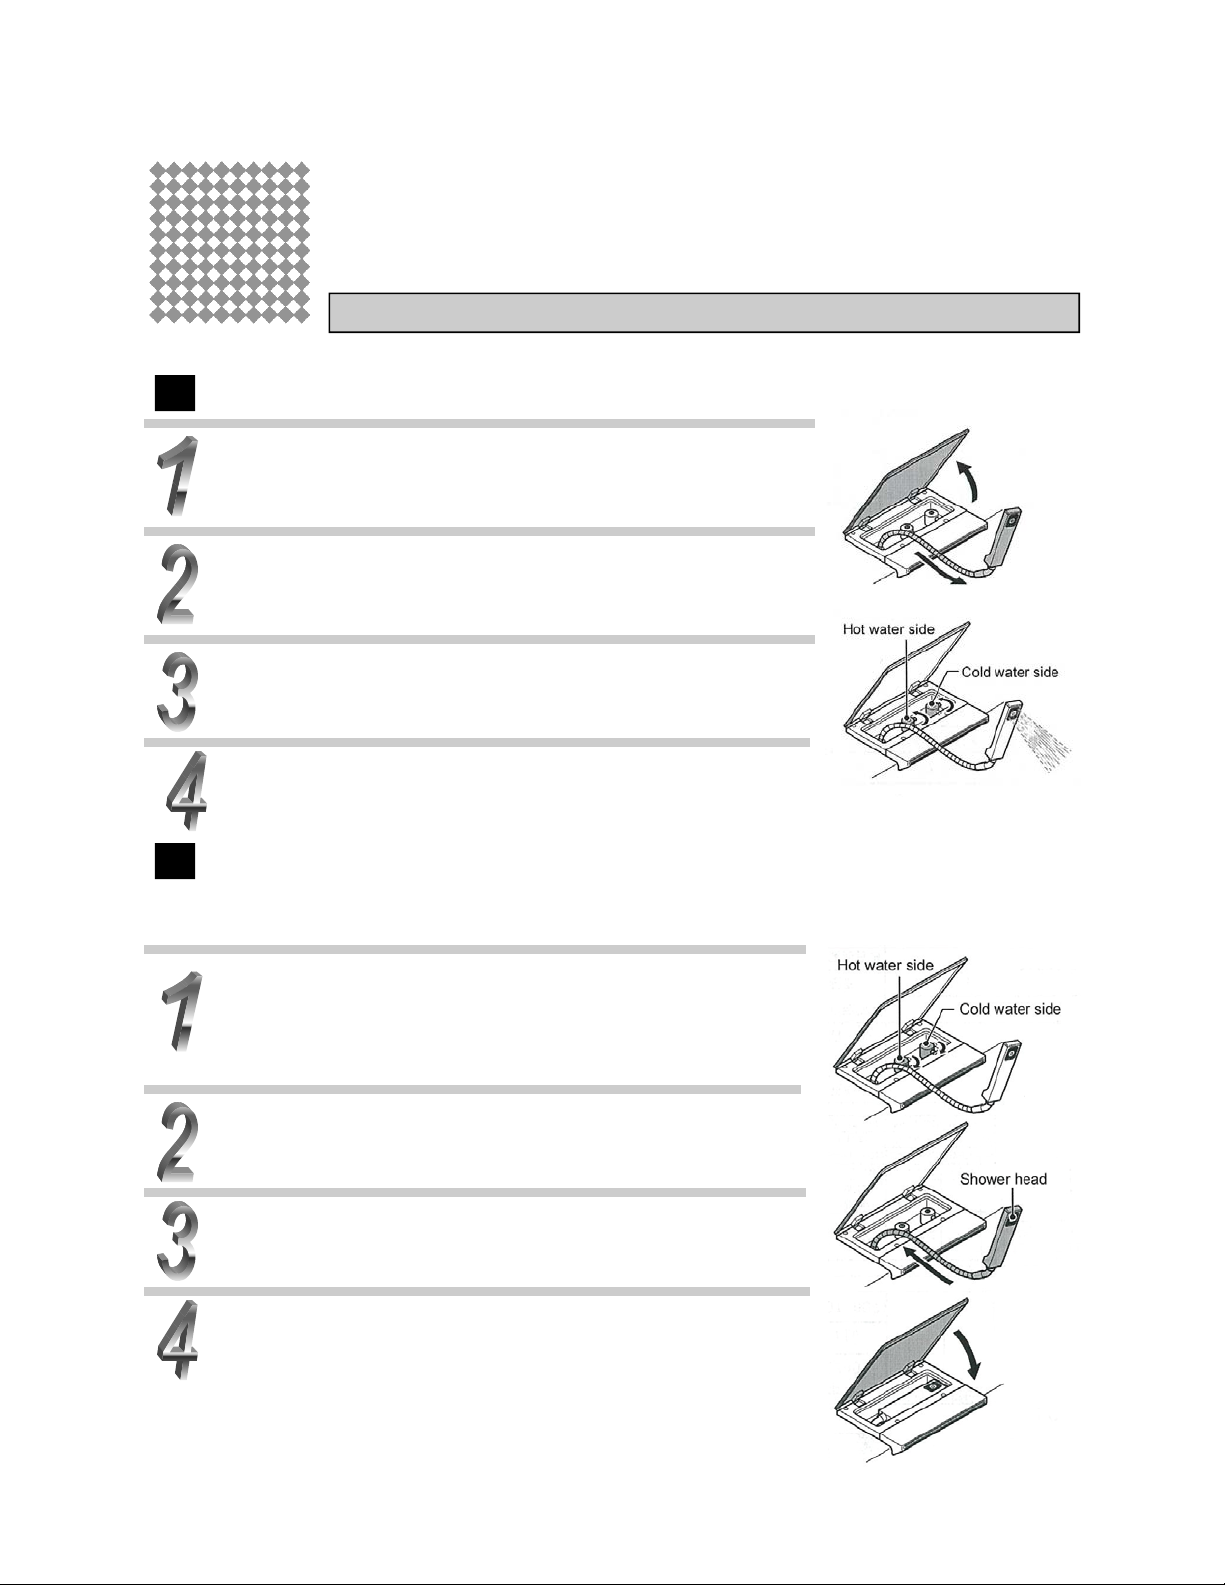
Cleaning the tub
The shower is stored in the outlet module that fills the tub.
Running the water
Open the lid on top of the tub filling outlet.
Pull out the shower hose.
●Please do not use undue force. Otherwise, leaks or damage could
result.
Turn the cold water side knob counterclockwise.
●Starting with the hot water will result in only hot water coming out,
which could cause scalding.
Turn the hot water knob counterclockwise and adjust the water flow and temperature.
Turning off the shower
ӿ Please turn the knob slowly. Turning it off rapidly can cause a loud “boom” (water hammer),
which will impact the plumbing fixtures and could lead to leaks and water damage.
Be sure to start with the hot water and turn the
knob clockwise.
ӿ Starting with the cold water would leave just the hot water running, which could cause scalding.
●After cleaning the tub, please press the Purge button on the controller and drain
the water. ► See page 33.
30
Turn the cold water knob clockwise.
Reinsert the shower hose.
ӿ Caution: Do not insert the shower head downward. It may be
damaged.
Close the lid.
ӿ Please be careful not to pinch your fingers.
Page 31

Care and cleaning
Cleaning the various parts
Cleaning the plated parts
To remove dirt and debris, please soak a
soft cloth in warm or cold water and wring it
well. When badly soiled, please use the
same cleaning methods as for the bathtub.
Cleaning the Hydro Hands / shoulder-warmer water pipes
If the Hydro Hands / shoulder-warmer water has gone
without cleaning for a long time, flakes of dirt (residue)
deposited in the pipes may be released into the bathtub. To avoid the build-up of residue, the pipes should
be cleaned out about once a month using a commercially available pipe cleanser.
Cleaning the controller
► See page 36.
Cleaning the lighting module
► See page 36.
Cleaning the bathtub
Dirt gets harder to remove the longer it stays in
one place. Cleaning the tub after bathing while the
tub is still wet makes cleaning up
easy. To keep the tub fresh and
clean at all times, please be good
about cleaning. Apply a pH neutral
bathtub detergent with a sponge or
cloth, wash, rinse with water within 5
minutes and then wipe dry.
Cleaning the pillow
► See page 37.
ӿ Dirt and debris on the
water outlet may cause disorder in the water fall.
Clean the water outlet using
the cleaning spatula provided for the shoulderwarmer outlet to remove
foreign matter around it.
Water outlet
Cleaning spatula for shoulder
-warmer water outlet
ӿ After cleaning the bathtub, please press the Purge button on the controller and purge the bathtub.
► See page 33.
Cleaning the suction
If hair or residue blocks the suction, the Hydro Hands / shoulder-warmer will have less force and won’t function fully. It
could also cause the pump to break down.
Please clean it at least once a week.
WARNING
!
Do not remove the suction.
● Hands, feet or hair might become drawn in,
Prohibited
causing injury or drowning.
Cleaning the air jet cap
► See page 35.
31
Cleaning
Page 32

Care and cleaning (continued)
Care and cleaning precautions
CAUTION
Do not use the following sorts of detergent or tools when cleaning.
● There is a chance that doing so could cause problems with the product or affect someone
physically.
Detergents with “acidic” in the label.
● These can discolor or stain the surface.
Detergents with “alkaline” in the label.
● These can discolor or stain the surface.
Detergents with “chlorine” in the label.
Prohibited
● These can discolor or stain the surface. Also, they can corrode the plating on the plug and
elsewhere.
Chemicals
● These can discolor or stain the surface. Also, they can damage the drain and lead to
leaks.
Solvents like paint thinner or acetones
● These can discolor or stain the surface. Also, they can damage the drain and lead to
leaks.
!
!
Required
Sponges with non-woven fabric, sponges with aluminum, sponges with netting,
sponges containing polish, metal scrubbers, Nylon scrubbers
● These can leave scratches and cause damage to the surface.
Cleansers and polishing powders
● These can cause scratching.
Rinse the bathtub well immediately after using cleanser.
● Otherwise there is a risk of discoloration, deterioration or cracking of the bathtub.
32
Page 33

Purging/draining the tub
Please purge the bathtub after draining or cleaning it and remove residual water from inside the pipes.
There are two types of purge operations: automatic and manual.
Even when the bathtub has been emptied,
there may be some remaining water.
Residual water
Purging the bathtub removes
residual water from inside the pipes.
Automatic purge operation
When there is at least 13-3/8” (34 cm) of water remaining in the bathtub, the purge operation will take
place automatically when the water is drained from the bathtub.
Set the On/Off button to off and open the drain plug.
●When there is not at least 13-3/8” (34 cm) of water standing in the tub, please run the purge operation
manually. ► See page 34.
Drain the bathtub
At least 13-3/8” (34 cm)
of water
When the bathtub has been drained to less than about 11” (28 cm) of water, the purge operation will go into standby.
●Please operate with the On/Off button set to off.
Less than about 11” (28
cm) of water
ӿ When the On/Off button and the Set button are pressed, the standby time will revert to 15 minutes.
ӿ Setting the Purge button to on will start the purge operation in Step 3.
●Please leave the drain plug open and empty the bathtub.
33
Cleaning
Page 34

Purging/draining the tub (continued)
After fifteen minutes of standby, the system will automatically run the
purge operation for two minutes.
●The purge operation will end automatically after about two minutes.
●When you want to stop a purge operation, set the to off.
Manual purge operation
After cleaning the bathtub with the shower or when there is less than 13-3/8” (34 cm) of water remaining
in the bathtub, the purge operation is carried out manually.
Set the On/Off button to off, open the drain plug and empty the bathtub.
●The purge operation will end automatically after around two minutes.
● When you want to stop a purge operation, set the to off.
Set the purge button to on.
●Please operate with the On/Off button set to off.
●Leave the drain plug open and allow the bathtub to empty.
34
Page 35

Air jet cap
When the residue clogs the air jet cap, the air blower will have less power and will not be able to function
sufficiently. If you find that the air blower has less power, please clean it.
CAUTION
Prohibited
Drain all of the water out of the bathtub.
Remove the air jet cap.
Remove the air jet cap.
●Please use a smooth plastic tool or similar object to remove the
air jet cap. (Using your finger to remove it could hurt your finger
or fingernail.
Remove any debris or residue on the back.
Return the air jet cap to where it was.
!
Do not operate the bathtub with the air jet caps removed.
● Operation of the bathtub when it is empty will cause water remaining in the pipes to shoot upward and could be
dangerous if it gets in the eyes or mouth. Please keep the
air jet caps properly attached during operation.
Click!
35
Cleaning
Page 36

Lighting Modules
Normally, you need only wipe dirt away with a dry cloth.
If the lighting modules are badly soiled, use a suitable amount of diluted, neutral pH detergent on a cloth
or sponge to wipe them clean.
Cleaning the lighting module covers
When the space between the lighting module covers and the bathtub is badly soiled, remove the cover
with your hand and use a suitable amount of diluted, neutral pH detergent on a cloth or sponge to wipe it
clean.
Turn
counterclockwise
●To reattach the lighting modules please follow the process in reverse.
CAUTION
Do not use any tools when removing the lighting
Prohibited
module covers.
It might cause damage or leaks.
Never remove any parts other than the lighting
module covers.
● It might cause leaks.
!
Controller
Please use a soft, slightly damp cloth to wipe the unit.
If it is badly soiled, use a suitable amount of diluted, neutral deter-
gent on a cloth or sponge to wipe it clean.
When cleaning, if the buttons react, please press on one button
and wipe the other sections. The buttons are designed not to react
if two or more are pressed.
ӿ The product is made of plastic, so please do not wipe it with a dry cloth
or sponge. Doing so could cause scratches.
36
Page 37

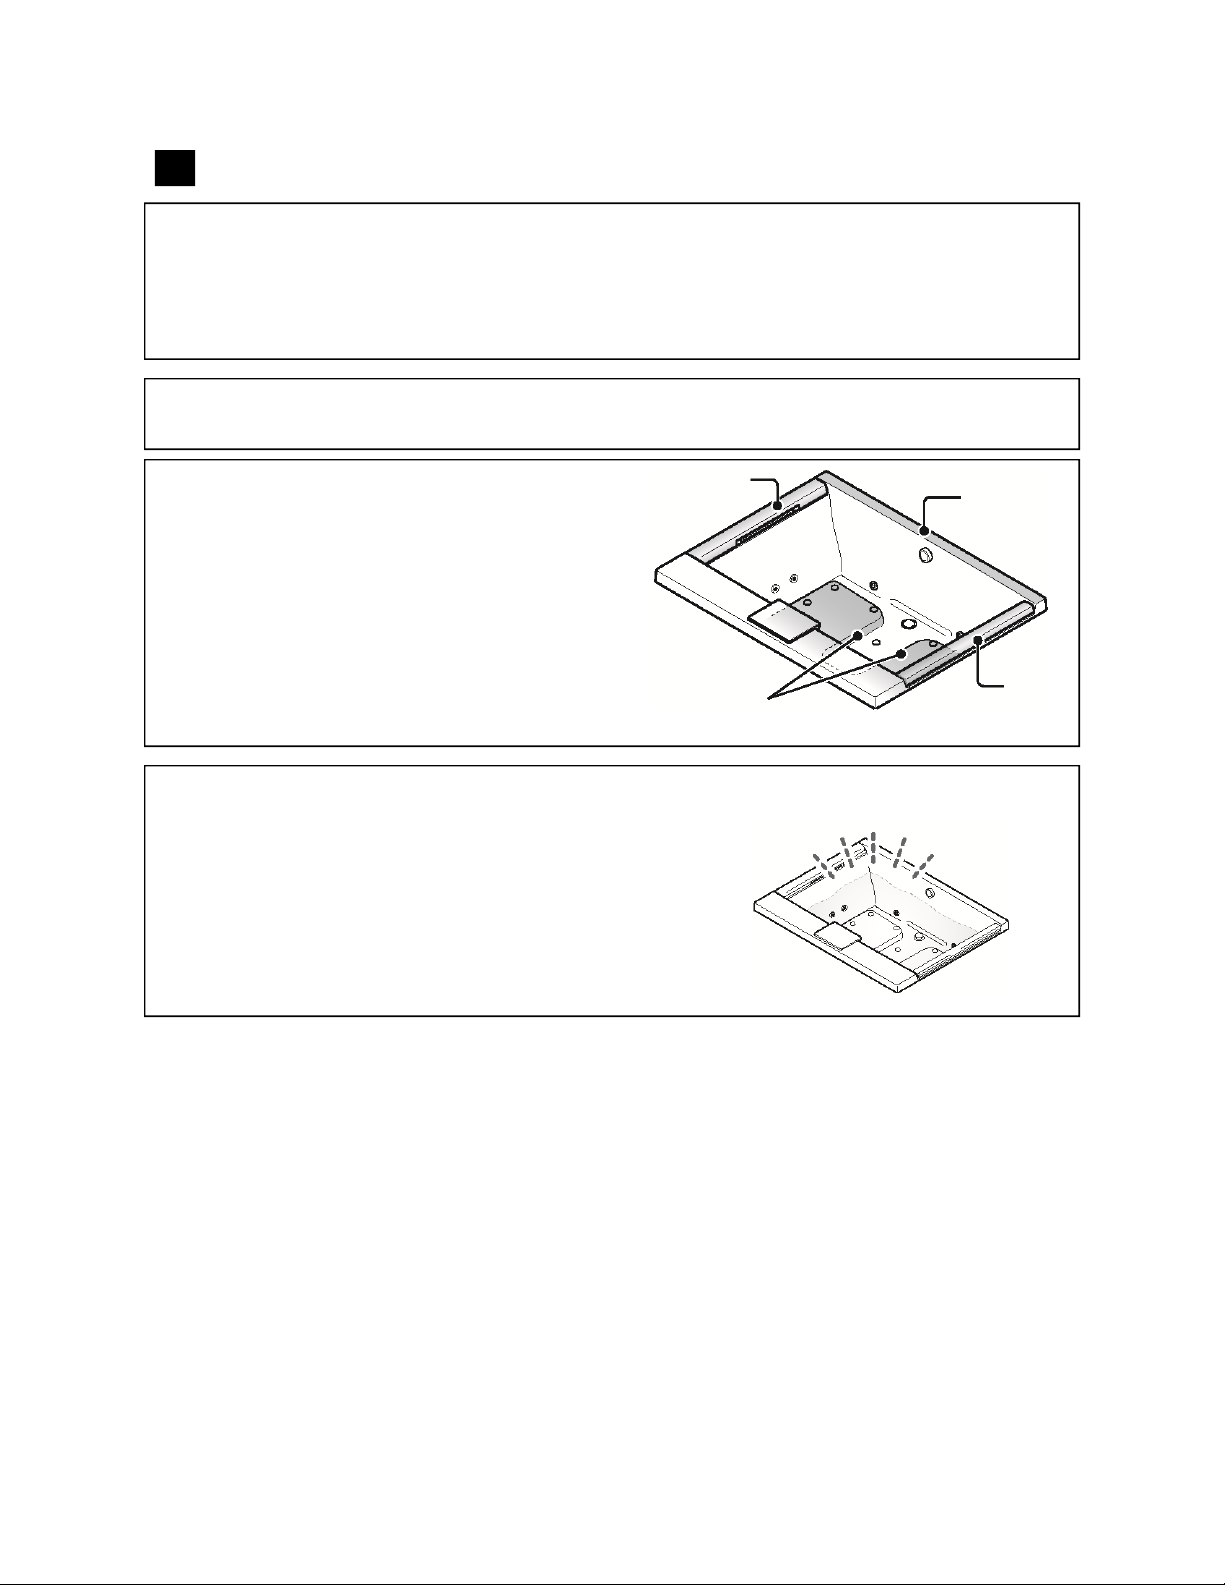
Pillows
Clean the pillows twice a month or more, depending upon usage. Use mild soap and water on a clean,
soft cloth for routing cleaning. To clean stubborn stains, remove the pillow and the base plate. After
removal, clean each of the parts and the shoulder-warmer outlet as well. When badly soiled, put some
high-quality cleaner recommended for vinyl on a soft cloth or sponge, wash the area, rinse with water
within five minutes and then buff dry.
Remove the pillow.
Remove the two screws holding
the base plate.
Remove the base plate.
37
Cleaning
Clean here.
●After cleaning, please reattach the pieces as
they were.
Page 38

Function module
Outside enclosure
Please wipe dirt off the function module enclosure with a damp cloth and then buff dry. When badly
soiled, please use a natural detergent.
Supplementary Protector
Please check the function of the Supplementary Protector two to three times a year. You risk electric
shock if you use the function module while the Supplementary Protector is broken.
Supplementary
Protector cover
Check to see that power is being supplied.
●Power is being supplied if you can operate the controller.
Remove the Supplementary Protector cover.
Push the test button on the Supplementary Protector.
●It is functioning normally if the power lever goes from on to off.
Power lever
Test button
38
After the inspection, turn the power lever back on.
Reattach the Supplementary Protector cover as it was.
Page 39

Function module (continued)
Water drain plug (with filter)
When debris and other things block the filters in the water drain plugs, the following will happen, so
please keep them clean.
The volume of water flowing out will fall and it will take a long time to fill the bathtub.
The water will not flow out like a waterfall.
The temperature of the water will be unsatisfactory.
ӿ After hot water has been run into the bathtub from the fill-tub spout, the water remaining in the function
module will be very hot. To prevent scalds, please wait until after the equipment has cooled.
ӿ Since hot and cold water will come out of the water drain valve, please place a bucket or other container
below the function module to catch any water.
Turn off the hot and cold water shut-off valves connected to the connecting port.
●The positioning of the shut-off valves will vary by site.
Hot water connection
Cold water connection
Close
Cold water valve
Set the on the controller to on and wait for about 20 seconds.
●Please operate with the On/Off button set to on.
Close
Hot water valve
Cleaning
Check to see that water is not flowing from the Fill-Tub outlet and then
set the On/Off button to off.
ӿ If the water continues to flow, set the On/Off button to off once again and then start at Step 1.
●Occasionally, the controller will display error code 572. This is a water shut-off notice. After resetting
the error (►See page 43), please set the On/Off button to off and proceed to Step 4.
39
Remove the water drain plugs.
●Please be aware that water in the function module will flow out when removing the water drain plugs.
●If you are unable to turn the water drain plugs and remove them manually, please insert a screwdriver or
similar tool into the hole in the water drain plug and turn it with the tool.
Cold water connection Hot water connection
Water drain plug
(with filter)
Water drain plug
(with filter)
Page 40

Function module (continued)
Water drain lug (with filter) continued
Use a toothbrush or similar tool to rinse the filter with water.
●Please keep from scratching or letting debris get on the packing.
Otherwise, leaks could develop or debris could get inside the function module and cause problems.
Reattach the water drain plugs to the hot and cold water connections as
they were.
Turn on the hot and cold water drain plugs and check to see that no water
leaks from around the plugs.
Hot water connection
Cold water connection
Filter
Packing
Water drain plug
Toothbrush
Packing
40
Open
Cold water valve
Open
Hot water valve
Page 41

Long periods of disuse
When the product will not be used for a long period of time, remove the water from
the function module and shut off the power.
ӿ After hot water has been run into the bathtub from the fill-tub spout, the water remaining in the function
module will be very hot. To prevent scalds, please wait until after the equipment has cooled.
ӿ Since hot and cold water will come out of the water drain valve, please place a bucket or other container
below the function module to catch any water.
Drain the water out of the bathtub and empty it.
●Please leave the water drain open.
Turn off the hot and cold water shut-off valves connected to the connecting port.
●The positioning of the shut-off valves will vary by site.
Hot water connection
Cold water connection
Close
Cold water valve
Set the on the controller to on and wait for about 20 seconds.
●Please operate with the On/Off button set to on.
Close
Hot water valve
41
Check to see that water is not flowing from the Fill-Tub outlet and then
set the On/Off button to off.
ӿ If the water continues to flow, set the On/Off button to off once again and then start at Step 2.
●Occasionally, the controller will display error code 572. This is a water shut-off notice. After resetting
the error (►See page 43), please set the On/Off button to off and proceed to Step 5.
Remove the three water drain plugs.
●Please be aware that water in the function module will flow out when removing the water drain plugs.
●If you are unable to turn the water drain plugs and remove them manually, please insert a screwdriver or
similar tool into the hole in the water drain plug and turn it with the tool.
Water drain plug
(with filter)
Water drain plug (with filter) Water drain plug
Troubleshooting
Page 42

After removing the water, reattach the water drain plugs to the three
places where they were.
●Please keep from scratching or letting debris to get on the packing. Otherwise, leaks could develop or
debris could get inside the function module and cause problems.
●Please attach the water drain plug without a filter to the connection port on the far left.
Water drain plug
Turn the on the controller to on and wait until the water draining
operation ends.
●Please operate with the On/Off button set to off.
●After around two minutes, the water draining operation will end.
Remove the Supplementary Protector cover and turn the power lever to
off.
Supplementary
Protector cover
Packing
Water drain plug
(with filter)
Packing
Power lever
Filter
Packing
ON
OFF
42
Reattach the Supplementary Protector cover as it was.
Turn off the circuit breaker.
●Please open the inspection door for the shower, which is located near the shower (built on site) and turn
off the water shut-off valves.
●Please follow the procedure in “Before using it for the first time” (►See page 13) when you want to use it
again.
Page 43

Troubleshooting
Please read this section to troubleshoot any problem before requesting repairs.
When error codes are displayed
032
079
152
165
572
B01
B02
Other
Cause
Open bathtub drain
No hot water
Abnormal incoming water temperature
Unusual temperature
when filling
No water
Abnormality in the Hydro Hands / shoulderwarmer pump circuit
—-
Procedure Error Code
Is the bathtub drain closed?
Empty the tub, and then re-try filling.
Is there enough hot water coming from the water heater?
-Please check the temperature and operating settings on the
water heater
Is hot water being supplied to the function module’s cold water
connection?
-Please check the plumbing connections to the water heater.
-It could be that high-temperature hot water is flowing through, so
please stop using the equipment.
Are the main valve and stop valve open?
Is the filter of the water connection clean?
-Please clean it? ► See page 39.
Is there ample water supply pressure? ► See page 13.
Is the water main or shut off valve turned off?
Has the water company turned off the water?
Could the plumbing be frozen?
Stop using the equipment and request a service call.
Please try it again, after resetting the error.
Error reset methods
You can reset errors by pressing the button that has displayed an error code.
43
Troubleshooting
Page 44

Shower
The water won’t turn off.
Are the hot and cold water knobs turned completely off?
Water dripping from the shower can be from residual water flowing inside the shower head. It is not
broken.
The hot/cold water doesn’t work. There isn’t enough flow.
Are the water main and shut off valves turned on far enough?
Are the knobs turned on far enough?
Has the water been shut off or could it be frozen?
The water’s always cold.
Does the water heater produce enough hot water?
→ Please check the temperature and operating settings on the water heater.
Is the hot water knob turned on?
The water’s always hot.
Is the cold water knob turned on?
Filling the bathtub
There isn’t enough water flowing out.
Is there debris trapped in the filters in the hot or cold water connections in the function module?
→ Please clean them. ► See page 39.
Is there enough hot water from the water heater?
→ Please check the temperature and operating settings on the water heater.
→ Please set the hot water supply temperature to 140-158°F (60-70°C)
Are the water main and shut-off valves turned on?
Is there water pressure? ► See page 13.
The water is lukewarm.
Is the temperature setting on the controller low? → Please increase the setting. ► See page 17.
Is it adding cold water?
Is there enough hot water coming from the water heater?
→ Please check the temperature and operating settings on the water heater.
→ Please set the hot water supply temperature to 140-158°F (60-70°C)
Is there debris trapped in the filters in the hot water connections in the function module?
→ Please clean them. ► See page 39.
Is there water pressure? ► See page 13.
The water is too hot.
Is the Fill-Tub temperature setting too high? → Please lower the setting. ► See page 17.
Is it adding hot water? → Hot water is added at 118°F (48°C)
Is there debris trapped in the filters in the cold water connections in the function module?
→ Please clean them. ► See page 39.
Is there water pressure? ► See page 13.
44
Page 45

Filling the bathtub (continued)
It stops filling.
It stops filling automatically when the set volume of water, about 26 gallons (100L), has been added
to the bathtub or reached the set water level. ► See page 23.
The water level varies.
When the bathtub is filled and there is already water in the bathtub, the water level
will vary by the amount of water that was in the bathtub. ► See page 23.
Please empty the bathtub and then try refilling.
Is there debris or residue trapped in the air jet cap (for water level detec-
tion) on the inside surface of the bathtub? → Please clean them out referring to the cleaning method for air jet caps. ► See page 35.
Air jet cap
(water level
detector)
Adding cooling water
I can’t add cooling water.
Is the Fill tub button set to on? → Cooling water cannot be added while filling the bathtub.
Is the water level in the bathtub low? → It won’t work if the water level is low. Please fill the bathtub
at least 13-3/8” (34 cm).
This feature shuts off on its own.
It stops filling automatically when the selected volume of water, 26 gallons (100L), has been added
to the bathtub. ► See page 21.
Adding warming water
I can’t add warming water.
Did you press the button for at least 1 second? → As a safety feature, the button must be pressed
for at least 1 second. Please press the button for at least 1 second.
Is the Fill tub button set to on? → Heating water cannot be added while filling the bathtub.
Is the water level in the bathtub low? → It won’t work if the water level is low. Please fill the bathtub
at least 13-3/8” (34 cm).
The water is lukewarm.
Is there enough hot water coming from the water heater?
→ Please check the temperature and operating settings on the water heater.
→ Please set the hot water supply temperature to 140-158°F (60-70°C).
→ Because the function module blends the incoming hot and cold water, the temperature of the wa-
ter flowing out is lower than that of the hot water supply.
Is there debris trapped in the filters in the hot or cold water connections in the function module?
→ Please clean them. ► See page 39.
Is there water pressure? ► See page 13.
The feature shuts off on its own.
Troubleshooting
It stops filling automatically when the selected volume of water, 26 gallons (about 100L) has been
added to the bathtub. ► See page 22.
45
Page 46

Air Blower
No air bubbles come out of the air jets.
Is there debris or residue trapped in the air jet caps? → Please clean the air jet caps. ► See page
35.
One of the air jet caps on the side (not the bottom) of the bathtub is for detecting the water level. It
doesn’t produce air bubbles.
A safety device will turn off the air pump when the temperature rises. Please wait for a while and try
again.
This feature shuts off on its own.
It stops automatically after the time on the timer has elapsed. ► See page 18.
This feature starts up on its own.
Is the automatic draining operation running to drain the bathtub? ► See page 33.
Cold water or cold air bubbles come out of the caps.
Right after the feature starts, cold water that had been in the pipes might come out.
The air bubbles near the air jet caps on the bottom of the bathtub feel cool. Please adjust your
bathing position.
The water in the bathtub goes cold sooner than expected.
When using the air blower, the water in the bathtub cools off quicker than when not using the air
blower.
Purging feature
The automatic purging feature doesn’t work, even when I let the water out of the bathtub.
Is the water level at least 13-3/8” (34 cm) when draining the bathtub? → When the bathtub is
drained and the water level is low, the automatic purging feature won’t work. Please press the
Purge button to purge the bathtub.
Is the On/Off button set to off? → The automatic purge feature won’t work if it is on. Please set it to
off.
Please run the purging feature with the Purge button after the bathtub is empty. → Please check the
automatic purging feature the next time you drain the bathtub.
Hydro Hands and shoulder-warmer feature
It doesn’t work.
Is the water level in the bathtub low? → It won’t work if the water level is low. Please keep at least
13-3/8” (34 cm) of water in the bathtub.
This feature shuts off on its own.
It shuts off automatically when the time on the timer has elapsed. ► See page 19.
Operation may stop when the water level is low. → Please add water and increase the water level in
the bathtub.
46
Page 47

Hydro Hands and shoulder-warmer feature (continued)
When filling the bathtub, the Hydro Hands / shoulder-warmer feature turns itself on.
Is the Hydro Hands / shoulder-warmer warm-up feature set to on? ► See page 28.
The display for the Hydro Hands / shoulder-warmer feature went out.
When interference or noise keeps the detector from sensing the water level in the bathtub, the but-
ton display may go out. → Please wait for a while.
There isn’t much water flow volume.
Is the suction blocked? → Please clean it. ► See page 30.
Underwater lighting
This feature turns itself off.
It shuts off automatically when the time on the timer has elapsed. ► See page 20.
Controller
The lights on the controller don’t work.
Is the circuit breaker for the power supply turned off?
Has there been a power outage?
Is the Supplementary Protector inside the function module turned off? ► See page 13.
Have the display lights been turned off? ► See page 9. → Pressing the buttons will turn lights on.
There seem to be black holes in the button display modules.
This is normal. They are the button sensors.
The display or backlighting have streaks of color or flash.
This is normal.
→ There may be times when the color streaks or flashes.
→ When sound comes out of the speaker, the backlighting may flash.
There is background noise when the voice guide or sound is on.
This is normal. → When noise is a problem, please turn down the volume or shut off the voice
guide. ► See page 28.
The screen display or backlighting went out at some point.
Has the screen been turned off? ► See page 9. → It will go on when the buttons are pressed.
Troubleshooting
47
Page 48

Controller (continued)
The buttons won’t work.
Please refer to button pressing methods. ► See page 8.
Are you pressing them slowly or adding too much force after you touch them? → Press the buttons
lightly in the center to make them work.
Are you pressing the button along the edge or in a corner? → Please press near the little raised
symbol.
If you press more than one button at a time, they won’t respond.
→ For example, when you are pushing a button with your index finger and your little finger is near
another button, the button might not respond.
Are you leaving your finger down, pressing the buttons continuously? → Please lift your finger off of
the button for a moment, even if you are pressing the same button more than once.
The buttons may not respond if you are wearing gloves.
Is there dirt or debris on the button? Is there something nearby, a towel for example that is interfer-
ing with the operation?
→ Please clean the buttons.
→ When the buttons won’t work, even after moving objects out of the way. Please wait another two
minutes before trying again.
Is there too much surrounding light such as direct sunlight?
→ The buttons sometimes won’t operate in direct sunlight or near incandescent light, 20” (50 cm) or
so.
→ Please change the angle of the controller or darken the room.
Please turn the Supplementary Protector in the function module off once, back on and then try
again.
I can’t operate the preference buttons.
Is the water level in the bathtub low? → The product won’t run if the water level is low. Please keep
at least 13-3/8” (34 cm) of water in the bathtub.
The preference buttons won’t display.
Is equipment, like the air blower or underwater lighting, running? → The preference buttons won’t
display while the equipment is running. Please turn off the equipment.
When interference or noise keeps the detector from sensing the water level in the bathtub the but-
ton display may go out. → Please wait for a while.
48
Page 49

Specifications
Bathtub
Dimensions 70-7/8” x 55-1/8” x 30-1/8”
(1800mm x 1400mm x 765mm)
Includes the frame that supports the bathtub
Weight 397 pounds (180 kg)
Capacity 151 gallons (570 L) to overflow line
Material Acrylic synthetic marble
Bathtub filling
Air Blower
Shoulder
Warmer
(cascade)
HydroHands
Outflow ports
Bathtub filling flow rate
Number of jets
Volume of air
Intake ports
Outflow ports
Flow rate
Intake ports
Outflow ports
Flow rate
One
Max. 9.2 gpm (35 Lpm) (controlled by function
module)
15 on the bottom of the bathtub
Max. 148 gpm (560 Lpm) (15 total, controlled by
function module)
Two
Two
Max. 10 gpm (38 Lpm) (2 Total)
Two
Four
Max. 40 gpm (150 Lpm) (4 Total)
49
Underwater
lighting
Shower
(Two knobs)
Bathtub filling connection dia. threads
Lighting modules
Colors
Uses Cleaning the bathtub
Water
pressure
perature
Connection diameter threads
Min. required
water pressure (when
flowing)
Max. water
pressure
(when not
Hot Inlet water tem-
Cold
Hot
Cold
Two
Three pattern types, 10 individual colors
11.6 psi (0.08 MPa)
108.75 psi (0.75 MPa)
Controlled by tempering valve (supplied)
32 to 86°F (0 to 30°C) no freezing
NPT 1/2
NPT 1/2
NPT 3/4
Troubleshooting
Page 50

Specifications
Controller
Stand
Function
Module
Dimensions 9-11/16” x 4-7/16” x 10-1/16”
(246mm x 113mm x 255mm)
Weight 6 pounds (2.8 kg) including the controller
Adjustable arc 90°
Dimensions 16-5/8” x 7-1/16” x 18-3/4”
(422mm x 180mm x 476mm)
External height excludes the connection ports.
Weight 31 pounds (14 kg)
Rated voltage 120 VAC
Rated frequency 60 Hz
Rated current 14.3 A
Rated power consumption 1490 W
Standby power consumption 7.0 W
Installation location Indoors (location without condensation, damp-
ness or freezing: not the bathroom)
Water pressure
Min. required water pressure (when flowing)
Max. water pressure (when
not flowing)
29 psi (0.20 MPa)
108.75 psi (0.75 MPa)
50
Hot
Inlet water temperature
Cold
Hot Connection diameter
threads
Cold
Fill bathtub NPT 3/4
Safety device Continuous operation prevention device, over
140 to 158°F (60 to 70°C)
32 to 86°F (0 to 30°C) no freezing
NPT 3/4
NPT 3/4
current protection device, ground-fault circuit
interrupter (GFCI)
Page 51

NEOREST SE
BAÑERA
Precauciones y advertencias……2
Precauciones de uso……………...7
El controlador………..……………..8
Nombres de las piezas…….…….10
Antes del primer uso…………….13
Introducción
■Muchas gracias por su compra de NEOREST.Lea este manual con atención y
utilice la bañera NEOREST corrctamente.Conserve este manual de instrucciones para su uso en el futuro.
■"NEOREST" es una marca registrada
de TOTO.
Funcionamiento…….……..……..…....15
●Tapón de drenaje…………..………....15
●Soporte del controlador……...…….....16
●Cómo llenar la bañera con
agua caliente………………………....….17
●Funcionamiento del soplador
de aire……………………………..…..….18
●Cómo usar las funciones de
HydroHands y Calentador de
hombros………………………………..….19
●Cómo usar la iluminación
bajo el agua…………………………….....20
●Cómo bajar la temperatura del
baño (con agua fría)………………….......21
●Cómo aumentar la temperatura
del baño (calentar el agua)………..……..22
●Cómo agregar más agua
(agregar agua)…………………..……...23
●Cómo utilizar los botones de
preferencia………………………………....25
●Cómo cambiar las configuraciones…….28
Cómo limpiar la NEOREST…..…….30
●Cómo limpiar la bañera...……….…..30
●Cuidado y limpieza……………….….31
●Cómo purgar/drenar la bañera….….33
●Tapa surtidora de aire…….…..….....35
●Módulos de iluminación………..…...36
●El controlador………………….……..36
●Apoyos…..………………………...….37
●Módulo de función………….….....…38
Largos períodos sin usar…..…….41
Resolución de problemas………...43
Especificaciones……………………49
Funcionamiento
Limpieza
Resolución de problemas
0GU5082, V.01
Page 52

Precauciones y
advertencias
Cumpla siempre con esta advertencia.
Lea atentamente estas precauciones y advertencias y use el equipo correctamente.
Siga todas las precauciones y advertencias de seguridad.
● El significado de estas indicaciones es el siguiente.
ADVERTENCIA
!
PRECAUCIÓN
!
● Los siguientes símbolos se utilizan para clasificar y explicar las instrucciones que se deben
seguir.
Cuando esto aparece junto a un tema, indica que el uso incorrecto podría provocar la muerte o lesiones graves.
Cuando esto aparece junto a un tema, indica que el uso incorrecto puede provocar la muerte o lesiones graves.
Significado del símbolo Ejemplo de símbolo
El símbolo indica algo que está prohibido.
!
ADVERTENCIA
No desarme, repare ni modifique el producto bajo ninguna circunstancia.
De lo contrario, podría producirse un funcionamiento anormal, lesiones, incendios o des-
No
desarmar
Prohibido
cargas eléctricas.
Además, las fugas de agua podrían contaminar o arruinar lo que hay en la casa.
No utilice la bañera bajo la influencia de drogas o fármacos fuertes.
● De lo contrario, corre el riesgo de ahogarse.
Asegúrese de que no haya aparatos eléctricos enchufados cerca de la bañera.
● Mantenga los aparatos eléctricos alejados de la bañera. De lo contrario, hay riesgo de
lesiones, incendios o descargas eléctricas debido al funcionamiento anormal del aparato
eléctrico.
No drene la bañera mientras se baña.
● Si lo hace, se pueden atascar las manos, los pies o el cabello y usted podría lesionarse o
ahogarse.
El símbolo indica algo que se debe hacer.
!
!
2
No se pare sobre el borde de la bañera.
● Si lo hace, puede resbalarse y lastimarse.
No se sumerja ni se revuelque en la bañera.
● Si lo hace, puede lesionarse o ahogarse.
Page 53

ADVERTENCIA
No utilice sustancias inflamables alrededor del módulo de función.
● De lo contrario, podría producirse un incendio.
No doble ni manipule bruscamente los cables de alimentación ni coloque objetos
pesados sobre ellos. ● Si lo hace, podría producirse un incendio o una descarga eléctrica.
No mire directamente el elemento de iluminación de las luces bajo el agua.
● Si lo hace, podría sufrir lesiones en los ojos.
No se agarre del apoyacabezas cuando entre en la bañera.
● Existe la posibilidad de que el apoyacabezas se salga y usted podría lesionarse o
ahogarse.
No suministre agua al equipo con una temperatura superior a 158 °F (70 °C).
● Si lo hace, existe la posibilidad de que se reduzca la vida útil del equipo o se produzcan
daños, quemaduras o fugas que podrían mojar y dañar lo que hay en la casa.
Cuando use agua caliente a temperatura alta, no toque el caño ni la manguera de la
ducha directamente.
● El caño o la manguera de la ducha caliente pueden causar quemaduras.
Prohibido
No haga funcionar su NEOREST sin las tapas
surtidoras de aire.
● Cuando drene la bañera o si se pone la bañera
en funcionamiento cuando está vacía, el agua
que queda en las tuberías podría salpicarle en los
ojos o la boca y provocar lesiones. Vuelva a colocar correctamente las tapas surtidoras de aire
antes de poner su NEOREST en funcionamiento.
!
Introducción
!
Necesario
3
No manipule el enchufe de alimentación con las manos mojadas ni tire del cable.
● Se podría producir una descarga eléctrica debido al funcionamiento incorrecto.
La entrada de energía eléctrica debe conectarse a la salida de energía eléctrica instalada en forma permanente (cable).
● Para evitar descargas eléctricas y fallas en el dispositivo, se prohíbe la reubicación de la
salida de energía.
Los componentes electrónicos deben instalarse fuera del alcance de los usuarios en
el cuarto de baño.
●Para evitar descargas eléctricas y fallas en el dispositivo, se prohíbe la instalación de componentes eléctricos en el cuarto de baño.
*Sin embargo, esta regla no se aplica a componentes de suministro de voltaje ultrabajo de
12 V o menos, como controladores remotos.
*Los módulos de función no deben instalarse en el cuarto de baño.
Consulte a su minorista, contratista o especialista acerca de la instalación o el traslado del producto.
● Si intenta instalarlo o trasladarlo y hace algo incorrecto, se puede producir un incendio o
una descarga eléctrica. Además, las fugas de agua podrían contaminar o arruinar lo que
hay en la casa.
Asegúrese de supervisar a cualquier persona (incluidos los niños) con capacidades
físicas, sensoriales o mentales limitadas en todo momento mientras se bañan.
● Si no lo hace, alguien podría ahogarse.
Para evitar lesiones, tenga cuidado al entrar a la bañera o salir de ella.
● De lo contrario, puede resbalarse y lastimarse.
Page 54

ADVERTENCIA
Entre a la bañera y salga de ella con cuidado.
● No salte dentro de la bañera, ya que corre peligro de resbalarse.
Cuando utilice la ducha, verifique la temperatura del agua antes de ducharse.
● Debe tener especial cuidado cuando utilice la ducha por segunda vez después de haber
usado agua muy caliente; hay riesgo de quemaduras.
Verifique la temperatura del agua antes de entrar en la bañera.
● Hay peligro de quemaduras.
Verifique que haya protectores de succión colocados sobre las succiones.
● Si los protectores de succión no están en su lugar durante el uso, es posible que se succionen partes del cuerpo, cabello, etc. y usted podría lesionarse o ahogarse.
No bloquee las succiones.
● Si lo hace, es posible que se succionen las manos, los pies, el cabello, etc. y se provoque
un accidente imprevisto.
!
Necesario
No utilice la bañera si el filtro o los protectores de succión están dañados.
● Si lo hace, se puede provocar la succión del cabello u otras lesiones.
Cuando utilice la ducha, siempre abra primero el agua fría y luego abra lentamente el
agua caliente, para ajustar a la temperatura deseada.
● De lo contrario, hay riesgo de quemaduras por el agua muy caliente si se abre primero el
agua caliente o si se abre muy rápidamente.
!
Cuando apague la ducha, asegúrese de cerrar primero el agua caliente.
● De lo contrario, existe el riesgo de quemaduras la próxima vez que se use la ducha si
queda agua caliente en las tuberías.
Deje correr el agua fría por un tiempo después de usar agua caliente de alta temperatura en la ducha.
● De lo contrario, existe el riesgo de quemaduras la próxima vez que se use la ducha si
queda agua caliente en las tuberías.
Para garantizar la seguridad, reemplace periódicamente la válvula de cierre en el
módulo de función.
● Si la válvula de cierre no funciona correctamente, en algunas circunstancias existe el riesgo de que el agua que se ha descargado de la canilla de agua pueda fluir hacia atrás.
Una válvula de cierre que funciona incorrectamente también puede provocar accidentes
desconocidos, tales como fugas.
Asegúrese de limpiar la bañera antes de usarla por primera vez.
Limpie la bañera periódicamente.
Asegúrese de que haya ventilación adecuada durante el baño y después.
● De lo contrario, puede formarse moho.
Los componentes electrónicos deben colocarse de manera tal que no caigan en la
bañera.
Si el estado de fijación es inadecuado, no se deben usar los componentes electrónicos.
●De lo contrario, se puede producir una descarga eléctrica, una falla en el dispositivo o lesiones.
*Los módulos de función no deben instalarse en el cuarto de baño.
4
Page 55

PRECAUCIÓN
No apunte las burbujas de aire directamente a los ojos, la nariz ni las orejas.
● Esto puede provocar infecciones.
No golpee ni deje caer las piezas metalizadas.
● Esto podría hacer que se agrieten las superficies metalizadas y se produzcan lesiones. Si
la superficie metalizada se agrieta alguna vez, reemplace inmediatamente la pieza agrietada
con una pieza nueva.
No se siente ni se trepe sobre el módulo de función, la tapa de la ducha, el apoyo ni el
soporte del controlador.
● Esto podría causar caídas o lesiones. Los componentes pueden deformarse o romperse.
No aplique fuerza a los protectores de succión ni al filtro.
● Esto podría dañar los protectores de succión o el filtro y hacer que la bomba se detenga, o
provocar un accidente imprevisto, tal como la succión del cabello.
No coloque las orejas cerca del controlador.
● A veces, produce ruidos fuertes y podría provocar daños en la audición.
No aplique grasa a la bisagra de la tapa de la ducha.
Prohibido
● Puede afectar la función de apertura y cierre de la tapa. Puede volverse más pesada o
más liviana, cerrarse de golpe y dejar su dedo atrapado.
Abra el controlador con cuidado.
● El uso de fuerza excesiva podría causar un funcionamiento incorrecto.
!
Introducción
No deje caer objetos dentro de la bañera. No golpee la bañera ni le aplique demasiada
fuerza. ● Esto podría causar grietas y fugas.
No permita que se salpique agua caliente fuera de la bañera.
● Las salpicaduras de agua de la bañera podrían causar inundaciones fuera del área de
baño y problemas en otras habitaciones (moho, papel de empapelar despegado, daño en el
piso, etc.)
No vierta disolvente de pintura, otros solventes o productos químicos por el drenaje.
● Esto podría dañar las tuberías y provocar fugas.
No utilice aceites para baño. No utilice sales para baño que contengan azufre, sales o
ácidos.
● Esto podría decolorar o deteriorar la bañera o dañar las tuberías y provocar fugas.
No utilice limpiadores con espuma, cloro o antimoho.
● Los gases que se producen en reacciones con agua o humedad pueden corroer o degradar el acero inoxidable u otros metales.
Mantenga alejadas las fuentes de calor.
● No coloque velas ni luces de noche en el borde de la bañera. No fume. Si lo hace, existe
el riesgo de deformación, decoloración o deterioro de la bañera.
No deje afuera elementos que se oxiden fácilmente.
● Si deja en la bañera horquillas, rasuradoras u otros objetos que se oxidan fácilmente podrían quedar marcas de óxido en la superficie.
Evite fuerzas e impactos poderosos.
● Los daños podrían causar fugas que podrían mojar y dañar lo que hay en la casa.
5
Page 56

PRECAUCIÓN
No utilice limpiadores ni granulados inorgánicos para drenaje para eliminar las obstrucciones.
● Pueden dañar las tuberías y la superficie y son peligrosos para la salud cuando se usan
incorrectamente. Como mucho, utilice un limpiador biológico para drenaje, en caso de que
un desatascador no sea suficiente.
No deseche productos químicos ni objetos que puedan bloquear las tuberías de
Prohibido
drenaje de la bañera.
● Cumpla con las reglamentaciones ambientales vigentes de cada país.
Al limpiar, no utilice los siguientes limpiadores o herramientas.
De usarlos, podría haber problemas en el producto o una reacción adversa en las personas,
según cómo se usen.
●Limpiadores con la palabra “acídico” (acidic) en la etiqueta:
Pueden causar decoloración, deterioro o manchas en la superficie.
●Limpiadores con la palabra “alcalino” (alkaline) en la etiqueta:
Pueden causar decoloración, deterioro o manchas en la superficie.
●Disolventes de pintura, acetona u otros solventes:
Pueden causar decoloración, deterioro o manchas en la superficie. Además, existe la posibilidad de que se dañe el circuito de drenaje y se produzcan fugas.
●Sustancias químicas:
Pueden causar decoloración, deterioro o manchas en la superficie. Además, existe la posibilidad de que se dañe el circuito de drenaje y se produzcan fugas.
●Limpiadores que contengan cloro:
Pueden causar decoloración, deterioro o manchas en la superficie.
●Esponjas de metal:
Dañan la superficie de la bañera.
●Polvos de limpieza o para pulir:
Dejan rayas.
●Esponjas de nylon:
Dañan la superficie de la bañera.
!
!
Necesario
6
Enjuague bien la bañera inmediatamente después de usar un producto de limpieza.
● De lo contrario, existe riesgo de decoloración, deterioro o grietas de la bañera.
Si caen productos cosméticos o sustancias similares sobre el producto, lávelo con
agua inmediatamente.
● Si deja lociones de limpieza, tratamientos para el cabello, soluciones para coloración del
cabello, remedios para la calvicie, soluciones para ondas permanentes o agentes similares
en la superficie, se puede producir decoloración, deterioro o grietas.
Haga funcionar el mango de la ducha lentamente.
● Si lo apaga demasiado rápido, se puede provocar un fuerte “ruido” (golpe de ariete), que
tendrá un impacto en los accesorios de fontanería y podría causar fugas y daños a lo que
hay en la casa. Se recomienda la instalación de frenos de golpes de ariete en el sistema de
fontanería para minimizar el golpe de ariete.
Page 57

Precauciones de uso
Siga estas instrucciones con respecto a su NEOREST.
Introducción
No deje exceso de agua en la ducha.
● Adentro hay una bandeja de drenaje, pero un desborde puede causar fugas de agua.
Utilice solamente piezas genuinas con este producto.
● De lo contrario, podría producirse un accidente imprevisto.
Limpie cuidadosamente el filtro de succión.
● Esto impide que se dañe la bomba.
No cubra la succión con una toalla ni un trapo. No
coloque objetos en la succión.
● Esto puede causar daño al equipo.
No aplique presión dentro del surtidor ni haga
correr agua a través de él.
● Podría entrar agua dentro
de la
bomba de
aire y
romperla.
Tapa surtidora de
Surtidor
Tenga cuidado con la tapa de la ducha cuando esté
abierta.
● La esquina de la tapa puede causar lesiones.
Mantenga su NEOREST limpia y ordenada.
● Si hay residuos de agua en la bañera, las cantidades
de rastros de iones de cobre en el agua podrían reaccionar con los ácidos grasos del jabón y causar un tinte
azulado.
No derrame agua de manera intencional sobre el controlador.
● Es resistente al agua, pero grandes cantidades de agua
pueden causar daños.
No bloquee las tapas surtidoras de aire.
● Si lo hace, puede causar problemas.
No derrame agua caliente sobre el controlador ni lo
someta a impactos.
● Esto podría romperlo.
No derrame agua caliente sobre la succión ni
otros accesorios ni los someta a impactos.
El contacto directo entre la superficie de la
bañera y el agua caliente superior a 140 °F (60 °
C) puede dañar la superficie.
Dejar caer o golpear la bañera con frascos de
maquillaje u otros objetos duros puede causar
rayones.
7
No utilice aditivos para baño, tipo emulsiones.
Puede quedar polvo dentro de la bomba o los ac-
cesorios de fontanería, lo cual puede generar rocío
de agua turbia cuando utilice el soplador de aire, el
hidromasaje o el calentador de hombros.
En el caso de otros tipos de aditivos para baño, lea
Cuando utilice burbujas para baño, no haga funcionar el soplador de aire, el Hydro Hands ni el calentador de hombros.
● Si lo hace, se generará gran cantidad de burbujas que
pueden quedar en la bomba o en los accesorios de fontanería.
Page 58

El controlador
El controlador puede configurarse en los siguientes idiomas. ► Consulte la página
Cómo configurar el
idioma
Cómo presionar los botones
Presione ligeramente con un dedo cerca del centro de los botones (la pequeña área elevada).
Ejemplo correcto
Cada botón puede tener su propia sensibilidad, pero esto es normal.
Es posible que los botones no funcionen si no se presionan cerca del centro.
No funcionará presionar dos o más botones a la vez.
Es posible que los botones no funcionen si se presionan con guantes puestos.
* No coloque objetos cerca del controlador ni lo cubra con toallas. Puede dejar de funcionar.
28.
● Inglés (EE. UU.) (configuración inicial)
● Chino (simplificado)
● Chino (tradicional)
● Español
● Francés
Ejemplo incorrecto
Funciones de la guía auditiva
Descripción auditiva de las funciones.
* Cuando el altavoz emite sonidos, puede
haber algún ruido (como una ráfaga de aire),
pero esto es normal. Si el sonido le molesta,
baje el volumen o apague la guía auditiva.
► Consulte la página 28.
8
Page 59

Estado del botón
Los botones que muestran ■ o □ indican su modo de funcionamiento o si están encendidos o apagados.
Existen tres estados. El (■) del ex-
tremo izquierdo indica el modo seleccionado. La pantalla cambia cada
vez que se presiona un botón.
ENCENDIDO (■)
Cuando los cuatro botones
inferiores están encendidos, la
luz de fondo se ve anaranjada.
■□□→□■□→□□■
APAGADO (□)
La luz de fondo se ve azul.
Cómo apagar la pantalla
Si pasa una cantidad específica de tiempo sin que funcione el controlador después de que todas las funciones se
hayan detenido, entonces la pantalla se apagará sola. Si presiona un botón (sin que se encienda), se encenderá
la pantalla y se permitirá el funcionamiento.
Coloque el botón de encendido/apagado en
modo apagado. O después de aproximadamente 30 minutos, si el equipo no ha estado
funcionando o si no se presionó ningún botón.
La luz de fondo se oscurecerá después de 10
segundos aproximadamente, cuando nada funcione.
Introducción
O después de aproximadamente 10
minutos, si el equipo no ha estado fun-
Si se presiona algún botón.
(Cualquier botón).
La pantalla está iluminada y el control funcionará.
cionando o si no se presionó ningún botón.
La pantalla estará oscura.
Otra información
Es posible que, en algunas ocasiones, la imagen se vuelva intermitente o que haya vetas de color o brillo en la luz
de fondo, pero esto no afectará el funcionamiento del controlador. Tenga en cuenta eso de antemano. Es posible
que, por momentos, el funcionamiento del controlador se detenga cuando se encuentre cerca (aproximadamente a
50 cm) de una luz incandescente o cuando esté bajo la luz solar directa. Ajuste el ángulo del soporte del controlador u oscurezca los alrededores antes de continuar.
9
Page 60

Bañera
Soporte del
controlador
Controlador
Tapa surtidora
de aire (15)
(para el soplador
de aire)
Boquilla de
eyección (4)
(para el Hydro
Hands)
Nombres de las piezas
Salida de agua para el calentador de hombros (2)
Recircula el agua de la bañera a través de la succión y
de esta salida.
Módulo de cromaterapia (2)
(para iluminación bajo el agua)
Drenaje de un solo toque
(con rebosadero)
Apoyo (2)
Perilla de agua fría
Perilla de agua caliente
Manguera de la ducha
Conector de
la manguera
Tapón de
Succión (2)
(para el agua del Hydro Hands y del calentador de hombros)
Ducha
La tapa se abre
hacia arriba
Cabezal de la ducha
Salida de llenado de la bañera
El agua caliente fluye hacia afuera después
de ajustar la temperatura en el módulo de
función y llena la bañera con agua caliente.
10
Page 61

Módulo de función
● El diagrama muestra una instalación de ejemplo.
Módulo de función
Orejeta de
drenaje de agua
(con filtro)
Introducción
Conexión para
agua caliente
Conexión para agua fría
Conexión para el pico de
salida del calentador de
la bañera
Orejeta de drenaje de
agua (con filtro)
Válvula de cierre
del agua fría
Al pico de salida de agua
caliente de la bañera
Suministro de
agua fría
Tapa del protector
complementario
Al interruptor
Válvula de cierre
del agua caliente
Suministro de
agua caliente
Calentador de agua
(No se incluye con este producto)
11
Page 62

Pantalla del controlador
Pantalla de APAGADO
Botón de encendido/apagado (On/Off)
Botón de configuración (Setting)
Activa la pantalla de ENCENDIDO.
(El botón de purga (Purge) está apagado).
Botón de purga (Purge)
Drena el agua que queda de
las tuberías. ► Consulte la
página 33.
Para cambiar el volumen y otras configuraciones ► Consulte la página 28.
Pantalla de ENCENDIDO
ӿ Ejemplo: Cuando los cuatro botones inferiores están apagados.
Botones de agua caliente/fría
Para ajustar la temperatura del agua mientras uno se baña.
► Consulte las páginas 21 y 22.
Botón de encendido/
apagado (On/Off)
Activa la pantalla de APAGADO.
Botón de llenado de la
bañera
► Consulte la página 17.
Botones de preferencia
Para que funcione según sus preferencias de configuración.
► Consulte la página 25.
ӿ No funcionarán si no hay
agua en la bañera. Hágalos
funcionar con al menos 13,
3/8” (34 cm) de agua en la
bañera.
Botón de iluminación bajo el agua
► Consulte la página 20.
Botón de soplador de aire
► Consulte la página 18. ► Consulte la página 19.
Pantalla de ENCENDIDO
ӿ Ejemplo: Cuando los cuatro botones inferiores están
encendidos.
Botón de temperatura/nivel del agua
Se ilumina cuando el botón de llenado de la
bañera está encendido.
► Consulte la página 17.
Botón de configuración del
modo en soplador de aire
Se ilumina cuando el botón de
soplador de aire está encendido.
► Consulte la página 18.
12
Botón de HydroHands/calentador de hombros
Botón de configuración en modo HydroHands/
calentador de hombros
Se ilumina cuando el botón HydroHands/calentador
de hombros está encendido.
► Consulte la página 19.
Botón de configuración en
modo iluminación bajo el
agua
Se ilumina cuando el botón
de iluminación bajo el agua
está encendido.
► Consulte la página 20.
Page 63

Antes del primer uso
Procedimiento para el primer uso
Introducción
agua
fría
Encienda las válvulas de agua caliente y fría conectadas al módulo de
función.
ӿ La posición de las válvulas de cierre variarán según la instalación de fábrica.
Abra las válvulas de cierre y suministre agua caliente y fría al módulo de función.
Módulo de función
Al interruptor
Agua caliente
Agua caliente
Válvula del agua caliente
Agua fría Válvula del
Presión del flujo de agua fría
de 29 a 108,75 psi (de 0,2 a 0,75 MPa)
Calentador de agua
(No se incluye con este producto)
Temperatura del agua de 140 a 158 °F (de 60 a 70 °C)
Presión del flujo de agua de 29 a 108,75 psi (de 0,2 a
0,75 MPa)
Encienda el interruptor.
13
Quite la tapa del protector complementario.
Encienda la palanca de energía en el protector complementario.
Palanca de
energía
Tapa del protector
complementario
ENCENDIDO
APAGADO
Vuelva a colocar la tapa del protector complementario.
ӿ Cuando no hay agua caliente ni fría de la ducha para limpiar la bañera, abra el puerto de inspección (instalado de fábrica) que está ubicado cerca de la ducha y controle la válvula de cierre del agua.
Page 64

Precauciones para el primer baño
La temperatura del agua caliente en el módulo de función debe ser de por lo menos 140 °F (60 °
C) y 158 °F (70 °C) o menos.
● Si la temperatura del suministro de agua caliente es baja, no será posible llenar la bañera con agua a
la temperatura configurada con el controlador. El módulo de función mezcla el agua caliente y el agua
fría y luego la libera desde la salida para llenar la bañera con agua tibia. La temperatura del agua que
proviene de la salida siempre es más baja que la temperatura del suministro de agua caliente.
Llene la bañera con aproximadamente 13 3/8” (34 cm) de agua mientras se baña.
● Si el nivel de agua es bajo, es posible que no puedan utilizarse algunas funciones, como el calentador de hombros.
La bañera tiene un apoyapiés para mantener la
Apoyo
posición correcta en la bañera durante el baño.
● Evite deslizarse dentro de la bañera sosteniéndose
con las manos de las ranuras de la bañera o manteniendo los pies en el apoyapiés.
ӿ No se agarre de los apoyos. Podrían salirse de su
lugar y usted podría lesionarse o ahogarse.
Apoyapiés
Para tener una experiencia placentera de baño, cambie el
agua de la bañera a diario.
También recomendamos drenar el agua de la bañera
después de bañarse.
Al drenar la bañera, inicie la función de drenaje de agua para
eliminar el agua residual de las tuberías. ► Consulte la
página 33.
● Si deja con frecuencia el agua en la bañera hasta el otro día o
si la bañera se drena pero no se elimina el agua residual, podrían
acumularse residuos en las tuberías. Esto podría ocasionar mal
olor.
Ranura de
la bañera
Apoyo
Bien limpio
14
Page 65

Funcionamiento
Tapón de drenaje
Drenaje de un solo toque
Este es un tapón de drenaje que puede abrirse y cerrarse simplemente tocando un botón.
ӿ Presione el botón lentamente. Si lo presiona muy rápidamente, es posible que el tapón de drenaje se
salga de lugar.
Botón de drenaje de un solo toque
La parte inferior es una válvula
de rebose.
Funcionamiento
Tapón de drenaje
Llenar la bañera Drenar la bañera
El botón está
plano
Se abre y se cierra cada
vez que se presiona
El tapón de drenaje
está cerrado
El botón está
hundido
El tapón de drenaje
está abierto
15
Page 66

Soporte del controlador
El soporte del controlador rota 90º.
Rótelo para que sea más fácil de usar.
ӿ No aplique demasiada fuerza. De lo contrario, el soporte puede romperse.
ӿ Es posible que la rotación del soporte del controlador sea más difícil después de usarlo durante un
tiempo en comparación con su uso cuando es nuevo. Esto es así porque las piezas internas se ajustan con
el uso y se asientan más. El controlador no está averiado.
ӿ La temperatura ambiente debe ser inferior a 122 °F (50 °C). De lo contrario, el soporte puede dañarse.
Soporte del controlador
16
Page 67

Cómo llenar la bañera con agua caliente
La bañera se llena con agua a una temperatura preprogramada. El proceso se detiene automáticamente cuando se alcanza el nivel de agua preprogramado.
Cierre el tapón de drenaje y encienda el botón de encendido/apagado.
Presione el botón para encender.
Después de aproximadamente 10 segundos (pero como máximo
20 segundos), el agua tibia comenzará a fluir desde la salida.
Cómo configurar la temperatura y el nivel del agua de la bañera.
Nivel
de
agua
Nivel de agua Temperatura (guía)
113 °F (45 °C)
106 °F (41 °C)
104 °F (40°C)
102 °F (39°C)
95 °F (35°C)
Baja (fría)
Configuración
inicial
Configu-
ración
Cuando la pantalla del controlador no sea la imagen que se ilumina,
Capacidad Nivel
3
Aprox. 144 gal (545 l)
2
Aprox. 133 gal (505 l)
1
Aprox. 123 gal (465 l)
17” (43 cm)
16” (40 cm)
15” (37 cm)
presione el botón .
Configuración
inicial
La temperatura del agua que proviene de la salida y llena la bañera y las configuraciones de temperatura no
coincidirán necesariamente debido a factores como la temperatura ambiente y la longitud de la tubería de agua.
Use esto como guía.
El nivel de agua es una guía para llenar la bañera cuando está vacía. Si todavía hay agua en la bañera, el
nivel de agua variará. ►Consulte la página 23.
Al verter agua muy caliente en la bañera, tenga precaución de no quemarse.
● La temperatura y el nivel de agua configurados se guardan en la memoria.
Funcionamiento
Presione .
ӿ Si no se usa el controlador, el sistema regresa a modo automático después de aproximadamente
un minuto.
Cuando se haya llenado la bañera, sonará una melodía y luego se detendrá.
Cuando desee detener el llenado de la bañera, apague el botón
(El flujo de agua se detendrá después de aproximadamente 10 segundos).
17
Page 68

Funcionamiento del soplador de aire
Llene la bañera con agua.
►Consulte la página 17.
Presione el botón para encender.
● Opere con el botón de encendido/apagado (On/Off) en modo encendido.
El aire saldrá de la tapa surtidora de aire.
Cambie la pantalla.
Configure el modo de funcionamiento y la intensidad de las burbujas.
Funcionamiento normal
Intensidad de las burbujas
Normal
Oscilante
5
4
3 (Configuración inicial)
2
1
No se puede configurar
Funciona según la configuración de intensidad de las burbujas.
La intensidad de las burbujas cambia de la siguiente
manera: 5→4...→1→2...→5...
Otro funcionamiento
Descripción del funcionamiento Modo
No se puede configurar Pulsátil
● La configuración del modo de funcionamiento y de la intensidad de las burbujas se guarda en la memoria.
La intensidad de las burbujas cambia de la siguiente
manera: 5→1→5→1→...
Presione .
ӿ Si no se usa el controlador, el sistema regresa a modo
automático después de aproximadamente un minuto.
Después de iniciar las operaciones 2 y 4, el sistema se detendrá automáticamente una vez que hayan pasado
aproximadamente 15 minutos.
La configuración del tiempo en el temporizador puede establecerse en aproximadamente 30 minutos. ► Con-
sulte la página 28.
Cuando desee detener el soplador de aire, apague el botón
18
Page 69

Cómo usar las funciones de HydroHands y calentador de hombros
Llene la bañera con agua.
►Consulte la página 17.
Presione el botón para encender.
● Opere con el botón de encendido/apagado (On/Off) en modo encendido.
El agua de las funciones de HydroHands y calentador de hombros proviene de la
boquilla de eyección y de las salidas de agua del calentador de hombros, respectivamente.
La bañera no funcionará a menos que tenga agua. Llene la bañera con agua caliente al Nivel 1 o más.
Las funciones de HydroHands y calentador de hombros funcionan al mismo tiempo. No pueden funcionar indi-
vidualmente.
Al iniciar el funcionamiento, es posible que el agua tibia que sale de las tuberías esté fría al principio. También
es posible configurar la función de calentamiento con el HydroHands/calentador de hombros. ► Consulte la
página 28.
Configure el modo de funcionamiento (boquilla de eyección/salida).
Funcionamiento
Modo de funcionamiento
Eyección/salida por dos lados
(Configuración inicial)
Eyección/salida por un lado
Eyección/salida por un lado
Después de iniciar las operaciones 2 ó 3, el sistema se detendrá automáticamente una vez que ha-
yan pasado aproximadamente 15 minutos.
La configuración del tiempo en el temporizador puede establecerse en aproximadamente 30 minutos.
► Consulte la página 28.
Cuando desee detener el agua del HydroHands/calentador de hombros, presione el botón
para apagar las funciones.
19
Page 70

Cómo usar la iluminación bajo el agua
Llene la bañera con agua.
►Consulte la página 17.
Presione el botón para encender.
● Opere con el botón de encendido/apagado (On/Off) en modo encendido.
Las luces bajo el agua se encenderán.
Gama de colores
Cambie la pantalla.
Configure el modo de funcionamiento.
Colores
Todos los colores en orden
(Configuración inicial)
Colores fríos en orden
Colores cálidos en orden
Celeste
Azul
Verde azulado
Verde claro
Verde
Anaranjano
Rojo
Rosa
Violeta
Blanco
Descripción del funcionamiento Modo de funcionamiento
Todos los colores se muestran en orden.
Los colores fríos se muestran en orden.
Los colores cálidos se muestran en orden.
Se muestra el color especificado.
● Se guarda la configuración del modo de funcionamiento.
Presione .
ӿ Si no se usa el controlador, el sistema regresa a modo automático después de aproximadamente
un minuto.
Después de iniciar las operaciones 2 y 4, el sistema se detendrá automáticamente una vez que hayan pasado
aproximadamente 15 minutos.
La configuración del tiempo en el temporizador puede establecerse en aproximadamente 30 minutos. ► Con-
sulte la página 28.
Cuando desee detener la iluminación bajo el agua, apague el botón
20
Page 71

Cómo bajar la temperatura del baño (con agua fría)
Agrega agua fría para bajar la temperatura del agua de la bañera.
Opere con el botón de encendido/apagado (On/Off) en modo encendido.
Esto no funcionará a menos que haya agua en la bañera. Coloque agua en la bañera. ► Consulte la página
Cambie de pantalla.
ӿ Apague este botón o revise que esté apagado:
17.
Encienda el botón inferior (Lower).
Funcionamiento
Después de aproximadamente 10 segundos (pero como máximo,
20 segundos), el agua fría fluirá desde la salida para llenar la bañera.
Cuando el agua de la bañera haya llegado a la temperatura deseada,
apague el botón inferior (Lower).
El flujo de agua se detendrá después de aproximadamente 10 segundos.
ӿ Cuando el medidor horizontal (aproximadamente 26 galones ó 100 l) en la pantalla llegue al final,
se detendrá automáticamente.
Presione .
Esto no funcionará si el botón inferior (Lower) o el botón superior (Higher) están encendidos.
21
Page 72

Cómo aumentar la temperatura del baño (calentar el agua)
Agrega agua caliente para aumentar la temperatura del agua de la bañera.
Opere con el botón de encendido/apagado (On/Off) en modo encendido.
Esto no funcionará a menos que haya agua en la bañera. Coloque agua en la bañera. ► Consulte la página
Cambie de pantalla.
ӿ Apague este botón o controle que esté apagado:
17.
Encienda el botón superior (Higher).
Presione durante un segundo.
El agua fluirá después de aproximadamente 10 segundos (pero como
máximo, 20 segundos).
Fluirá agua a 118 °F/48 °C desde la salida para llenar la bañera. Tenga
cuidado con las altas temperaturas.
Cuando el agua de la bañera haya llegado a la temperatura deseada,
apague el botón superior (Higher).
El flujo de agua se detendrá después de aproximadamente 10 segundos.
ӿ Cuando el medidor horizontal (aproximadamente 26 galones ó 100 l) en la pantalla llegue al final,
se detendrá automáticamente.
Presione .
Esto no funcionará si el botón inferior (Lower) o el botón superior (Higher) están encendidos.
22
Page 73

Cómo agregar más agua (agregar agua)
●El método es el mismo que para llenar la bañera. (► Consulte la página 17) Se agregará agua a la
bañera a la temperatura preprogramada.
La cantidad de agua en la bañera después de usar la función de llenado de la bañera variará según la
cantidad de agua inicial.
Cuando la cantidad inicial de agua en la bañera es menos de 5 1/2” (14 cm).
El nivel final de agua estará por encima del nivel de agua seleccionado debido a
la cantidad de agua inicial.
Menos de 5 1/2” (14 cm)
de agua en la bañera
Llenador de bañera
Cantidad de
agua inicial
Menos de 5 1/2”
(14 cm)
Agua agregada en la cantidad
normal del nivel seleccionado
Se detiene la función de
llenado de la bañera
Cantidad
normal
Cantidad de
agua inicial
Cuando la cantidad inicial de agua en la bañera es por lo menos 5 1/2” (14 cm).
Se calcula la cantidad de agua necesaria para alcanzar el nivel de agua seleccionado y esa cantidad de agua se agrega a la bañera.
ӿ Se agregarán 26 galones (100 l) a la bañera cuando la cantidad de agua a agregar se calcule en menos de
26 galones (100 l).
Llenador de bañera
Por lo menos 5 1/2”
(14 cm)
Cantidad de agua inicial
ӿ
Funcionamiento
Se calcula la cantidad de agua necesaria para
alcanzar el nivel de agua seleccionado.
Caso 1: La cantidad de
agua calculada es por lo
menos 26 galones (100 l).
Caso 2: La cantidad de
agua calculada es menos
de 26 galones (100 l).
►
►
23
Se detiene la función
de llenado de la
bañera
Se detiene la función
Cantidad calculada
Cantidad de
agua inicial
26 galones (100 l)
Cantidad de
agua inicial
Page 74

Cómo agregar más agua (agregar agua) - continuación
Presione el botón para encender.
Opere con el botón de encendido/apagado (On/Off) en modo encendido.
Después de aproximadamente 10 segundos (pero como máximo, 20 segundos), el agua fluirá desde la salida para llenar la bañera.
Si cambiará la temperatura o el nivel de agua de llenado de la bañera,
hágalo.
Coloque agua en la bañera. ► Consulte la página 17.
Presione
ӿ El controlador regresará automáticamente a la posición atrás después de casi un minuto sin funcionar.
.
Cuando se haya alcanzado el nivel deseado de agua, apague el botón
24
El flujo de agua se detendrá después de aproximadamente 10 segundos.
ӿ Cuando se haya alcanzado el nivel de agua seleccionado, se escuchará una música y el llenado
se detendrá automáticamente.
Page 75

Cómo utilizar los botones de preferencia
Estos botones de preferencia pueden configurarse según sus preferencias de funcionamiento (soplador
de aire, agua de Hydro Hands/calentador de hombros, iluminación bajo el agua). Pueden configurarse
hasta tres patrones con los botones de preferencia.
Cómo establecer las configuraciones
Coloque agua en la bañera.
► Consulte la página 17.
Con agua en la bañera, presione uno de los tres botones de preferencia.
En este ejemplo, presionamos el botón de preferencia 1.
Opere con el botón de encendido/apagado (On/Off) en modo encendido.
Esto no funcionará a menos que haya agua en la bañera. La bañera debe tener por lo menos 13
3/8” (34 cm) de agua.
Cuando el botón de preferencia no se ilumine, apague todos los cuatro botones inferiores.
Cómo hacer que el soplador de aire, el agua de Hydro Hands/calentador
Funcionamiento
de hombros o la iluminación bajo el agua funcionen según sus preferencias de configuración.
25
Cómo operar el soplador de aire ► Consulte la página 18.
Cómo operar el agua de hidromasaje/calentador de hombros ► Consulte la página 19.
Cómo operar la iluminación bajo el agua ► Consulte la página 20.
Cuando haya establecido sus preferencias de configuración, presione el
botón de configuración y se completarán las configuraciones.
ӿ Cuando se hayan establecido las configuraciones, se revertirán los colores de los números
que se muestran en el botón de preferencias.
Se guardan las configuraciones.
Page 76

Cómo utilizar los botones de preferencia (continuación)
Cómo establecer las configuraciones (continuación)
Para finalizar el funcionamiento del botón de preferencia,
presione el botón nuevamente.
Funcionamiento con los botones de preferencia
Coloque agua en la bañera.
► Consulte la página 17.
Presione uno de los tres botones (del 1 al 3) de preferencia configurados
(colores de números revertidos) y comenzará a funcionar.
En este ejemplo, presionamos el botón de preferencia 1.
26
Opere con el botón de encendido/apagado (On/Off) en modo encendido.
Esto no funcionará a menos que haya agua en la bañera. La bañera debe tener por lo menos 13
3/8” (34 cm) de agua.
Cuando el botón de preferencia no se ilumine, apague los cuatro botones inferiores.
Para finalizar el funcionamiento del botón de preferencia,
presione el botón
Después de aproximadamente 15 minutos, el soplador de aire, el agua de Hydro Hands/calentador
de hombros o la iluminación bajo el agua se apagarán automáticamente.
Para reiniciar, encienda uno de los botones
El temporizador puede programarse en alrededor de 30 minutos. ► Consulte la página 28.
Cambiar o borrar las configuraciones
Coloque agua en la bañera.
► Consulte la página 17.
Page 77

Cómo utilizar los botones de preferencia (continuación)
Cambiar o borrar las configuraciones (continuación)
Presione uno de los tres botones (del 1 al 3) de preferencia configurados
(colores de números revertidos) y comenzará a funcionar.
En este ejemplo, presionamos el botón de preferencia 1.
Opere con el botón de encendido/apagado (On/Off) en modo encendido.
Esto no funcionará a menos que haya agua en la bañera. La bañera debe tener por lo menos 13
3/8” (34 cm) de agua.
Cuando el botón de preferencia no se ilumine, apague todos los cuatro botones inferiores.
Funcionamiento
Cómo hacer que el soplador de aire, el agua de Hydro Hands/calentador
de hombros o la iluminación bajo el agua funcionen según sus preferencias de configuración.
Los tres botones inferiores están apagados cuando se cancelan estas configuraciones.
Cómo operar el soplador de aire ► Consulte la página 18.
Cómo operar el agua de Hydro Hands/calentador de hombros ► Consulte la página 19.
Cómo operar la iluminación bajo el agua ► Consulte la página 20.
Cuando haya establecido sus preferencias de configuración, presione el
botón de configuración y se completarán las configuraciones.
ӿ Cuando se hayan establecido las configuraciones, se revertirán los colores de los números
que se muestran en el botón de preferencias.
Se guardan las configuraciones.
Para finalizar el funcionamiento del botón de preferencia,
presione o presione para que funcione.
27
Page 78

Cómo cambiar las configuraciones
Apague el botón de encendido/
apagado (On/Off).
Presione
.
Seleccione el menú con el botón
menú (Menu) y use los botones
arriba/abajo para cambiar las configuraciones.
Configuraciones
Idioma
Volumen
Volumen
Guía por voz
Inglés (EE. UU.)
Chino (simplificado)
Chino (tradicional)
Español
Francés
3
2
1
1
Encendido
Apagado
Comentarios Menú
Contraste
Temporizador
ӿ1 Configuración del temporizador para el soplador de aire, el agua de Hydro Hands/calentador de hombros o la iluminación bajo el agua.
ӿ2 Configuración de la función de calentamiento con el Hydro Hands/calentador de hombros.
Esta es una función para rotar el agua de una bañera en las tuberías del Hydro Hands/calentador de hombros antes del baño debido a que el agua tibia de las tuberías del Hydro Hands/calentador de hombros sale cuando se
inicia la función hidromasaje/calentador de hombros.
La función de Hydro Hands/calentador de hombros se inicia automáticamente cuando se ha llenado la bañera con
agua caliente. Cuando la operación está iniciada, se finaliza al APAGAR el botón de Hydro Hands/calentador de
hombros o se finaliza automáticamente en casi 3 minutos.
5
4
3
2
1
30 min.
15 min.
Encendido
Apagado
: Configu-
ӿ1
ӿ2
28
Page 79

Cómo cambiar las configuraciones (continuación)
Presione .
ӿ El controlador regresará automáticamente a la posición atrás después de casi un minuto sin
funcionar.
Funcionamiento
29
Page 80

Cómo limpiar la NEOREST
Cómo limpiar la bañera
La ducha se guarda en el módulo de salida de agua que llena la bañera.
Cómo hacer correr el agua
Abra la tapa de la parte superior de la salida de
agua para llenar la bañera.
Saque la manguera de la ducha.
●No aplique demasiada fuerza. De lo contrario, se podrían ocasionar
fugas de agua o daños.
Gire la perilla del agua fría en sentido contrario a
las agujas del reloj.
●Comenzar con el agua caliente hará que salga solamente agua caliente, lo que podría ocasionar quemaduras.
Gire la perilla del agua caliente en sentido contrario a las agujas del reloj y ajuste el flujo de
agua y la temperatura.
Cómo cerrar la ducha
ӿ Gire la perilla lentamente. Cerrarla rápidamente puede ocasionar un fuerte “ruido” (golpe de ariete), lo
que puede impactar en las uniones de las tuberías y puede ocasionar fugas de agua y daños.
Asegúrese de comenzar con el agua caliente y
girar la perilla en el sentido de las agujas del reloj.
30
ӿ Comenzar a cerrar la ducha con el agua fría dejaría corriendo
únicamente el agua caliente, lo que podría ocasionar quemaduras.
Cierre la perilla de agua fría en el sentido de
las agujas del reloj.
Vuelva a guardar la manguera de la ducha.
ӿ Precaución: No guarde la ducha con el cabezal hacia abajo.
Puede dañarse.
Cierre la tapa.
ӿ Tenga cuidado de no apretarse los dedos.
●Después de limpiar la bañera, presione el botón de purga (Purge) en el
controlador y drene el agua. ► Consulte la página 33.
Page 81

Cuidado y limpieza
Cómo limpiar las diferentes piezas
Cómo limpiar las piezas metalizadas
Para eliminar la suciedad y los residuos, moje un trapo
suave en agua tibia o fría y escúrralo bien.
Cuando estén muy manchadas, use el mismo
método de limpieza que para la bañera.
Cómo limpiar el módulo de iluminación
► Consulte la página 36.
Cómo limpiar las tuberías de agua del Hydro Hands/
calentador de hombros
Si agua del Hydro Hands/calentador de hombros pasó
mucho tiempo sin que se limpiara, es posible que las
escamas de suciedad (residuos) depositadas en las
tuberías se liberen en la bañera. Para evitar la acumulación de residuos, las tuberías deben limpiarse una vez
al mes con un producto de limpieza para tuberías disponible en comercios.
Cómo limpiar el controlador
► Consulte la página 36.
Cómo limpiar la bañera
Mientras más tiempo permanece la suciedad en un
lugar, más difícil se torna removerla. Limpiar la
bañera después del baño mientras
la bañera aún está húmeda facilita
la limpieza. Para mantener la
bañera fresca y limpia en todo momento, cumpla con la limpieza. Aplique un detergente para bañeras de
pH neutro con una esponja o un
trapo, lave, enjuague con agua dentro de los
5 minutos y luego seque.
ӿ La suciedad y los residuos
en la salida de agua pueden
intervenir en la caída del agua.
Limpie la salida de agua con la
espátula de limpieza y elimine
las materias extrañas alrededor de la salida del calentador
de hombros.
Salida
de agua
Espátula de limpieza para salida de
agua del calentador de hombros
31
ӿ Después de limpiar la bañera, presione el botón de purga en el controlador y purgue la bañera.
►Consulte la página 33.
Cómo limpiar el apoyo
► Consulte la página 37.
Cómo limpiar la tapa surtidora de
► Consulte la página 35.
Cómo limpiar la succión
Si la succión está bloqueada con cabellos o residuos, el Hydro
Hands/calentador de hombros tendrá menos fuerza y no funcionará
plenamente. También podría provocar la rotura de la bomba.
Límpiela por lo menos una vez a la semana.
ADVERTENCIA
!
No quite la succión.
● Se pueden atascar las manos, los pies o el
Prohibido
cabello y usted podría lesionarse o ahogarse.
Limpieza
Page 82

Cuidado y limpieza (continuación)
Precauciones sobre el cuidado y la limpieza
PRECAUCIÓN
No utilice los siguientes tipos de detergentes o herramientas al limpiar:
● Es posible que utilizarlos ocasione problemas con el producto o afecte físicamente a alguien.
Detergentes con la palabra “acídico” (acidic) en la etiqueta:
● Pueden decolorar o manchar la superficie.
Detergentes con la palabra “alcalino” (alkaline) en la etiqueta:
● Pueden decolorar o manchar la superficie.
Detergentes con la palabra “clorado” (chlorine) en la etiqueta:
Prohibido
● Pueden decolorar o manchar la superficie. También pueden corroer el metalizado del
tapón y en otras piezas.
Sustancias químicas:
● Pueden decolorar o manchar la superficie. Además, pueden dañar el drenaje y ocasionar
fugas de agua.
Solventes, como el diluyente de pintura o las acetonas:
● Pueden decolorar o manchar la superficie. Además, pueden dañar el drenaje y ocasionar
fugas de agua.
Esponjas con telas no tejidas, esponjas con aluminio, esponjas con redes, esponjas
que tienen barniz, esponjas de metal, esponjas de nylon:
● Pueden rayar y provocar daño a la superficie.
!
!
Necesario
Productos de limpieza y polvos para pulir:
● Pueden dejar rayas.
Enjuague bien la bañera inmediatamente después de usar un producto de limpieza.
● De lo contrario, existe riesgo de decoloración, deterioro o grietas de la bañera.
32
Page 83

Cómo purgar/drenar la bañera
Purgue la bañera después de drenarla o limpiarla y elimine toda el agua residual del interior de las tuberías. Existen dos tipos de funciones de purga: automática y manual.
Incluso cuando se haya vaciado la bañera,
es posible que quede agua en la bañera.
Agua residual
Purgar la bañera eliminar el agua
residual del interior de las tuberías.
Función de purga automática
Cuando haya por lo menos 13 3/8” (34 cm) de agua en la bañera, la función de purga se iniciará
automáticamente cuando se drene el agua de la bañera.
Apague el botón de encendido/apagado (On/Off) y abra el tapón de
drenaje.
●Cuando no haya por lo menos 13 3/8” (34 cm) de agua en la bañera, inicie la función de purga de
manera manual. ► Consulte la página 34.
Drenar la bañera
Por lo menos 13
3/8” (34 cm) de agua
Cuando la bañera haya sido drenada a menos de 11” (28 cm) de agua, la
función de purga se pondrá en espera.
●Opere con el botón de encendido/apagado (On/Off) en modo apagado.
Menos de 11” (28 cm) de
agua
ӿ Cuando presione el botón de encendido/apagado (On/Off) y el botón de configuración (Set), el tiempo de
espera se revertirá a 15 minutos.
ӿ Encender el botón de purga (Purge) iniciará la función de purga que se indica en el Paso 3.
●Deje el tapón de drenaje abierto y vacíe la bañera.
33
Limpieza
Page 84

Cómo purgar/drenar la bañera (continuación)
Después de quince minutos de espera, el sistema automáticamente iniciará la función de purga durante dos minutos.
●La función de purga finalizará automáticamente después de unos dos minutos.
●Cuando desee detener la función de purga, apague el botón .
Función de purga manual
Después de limpiar la bañera con la ducha o cuando haya menos de 13 3/8” (34 cm) de agua en la
bañera, la función de purga debe iniciarse manualmente.
Apague el botón de encendido/apagado (On/Off), abra el tapón de drenaje
y vacíe la bañera.
●La función de purga finalizará automáticamente después de unos dos minutos.
● Cuando desee detener la función de purga, apague el botón .
Encienda el botón de purga.
●Opere con el botón de encendido/apagado (On/Off) en modo apagado.
●Deje el tapón de drenaje abierto y deje que la bañera se vacíe.
34
Page 85

Tapa surtidora de aire
Cuando los residuos obstruyan la tapa surtidora de aire, el soplador tendrá menos potencia y no podrá
funcionar eficientemente. Si nota que el soplador de aire tiene menos potencia, límpielo.
Drene toda el agua de la bañera.
Retire la tapa surtidora de aire.
Retire la tapa surtidora de aire.
●Utilice una herramienta de plástico blanda o un objeto similar
para retirar la tapa surtidora de aire. (Si usa los dedos para quitarla, podría lastimarse los dedos o las uñas).
Elimine los residuos en la parte trasera.
Vuelva a colocar la tapa surtidora de aire
donde estaba.
PRECAUCIÓN
No haga funcionar la bañera sin la tapa surtidora de
Prohibido
aire en su lugar.
● Si la bañera funciona mientras está vacía, el agua remanente en las tuberías se disparará hacia arriba y esto podría ser peligroso si cae en los ojos o la boca. Mantenga
las tapas surtidoras de aire debidamente colocadas mientras la bañera está en funcionamiento.
!
¡Clic!
Limpieza
35
Page 86

Módulos de iluminación
Normalmente, solo debe limpiar la suciedad con un trapo seco.
Si los módulos de iluminación están muy manchados, utilice un trapo o una esponja con una cantidad
adecuada de detergente diluido de pH neutro.
Cómo limpiar las tapas del módulo de iluminación
Cuando el espacio entre las tapas del módulo de iluminación y la bañera esté muy sucio, quite la tapa
con la mano y utilice un trapo o una esponja con una cantidad adecuada de detergente diluido con pH
neutro para limpiarlo.
Girar en sentido
contrario a las
agujas del reloj
●Para volver a colocar los módulos de iluminación, siga los pasos de manera inversa.
PRECAUCIÓN
No use herramientas para quitar las tapas del
Prohibido
módulo de iluminación.
Podría ocasionar daños o fugas.
Nunca quite otra pieza que no sea las tapas del
módulo de iluminación.
● Esto podría ocasionar fugas.
!
Controlador
Utilice un trapo suave levemente húmedo para limpiar la unidad.
Si está muy sucia, utilice un trapo o una esponja con una cantidad
adecuada de detergente diluido de pH neutro.
Si, al limpiar la unidad, los botones reaccionan, presione un botón
y limpie las otras secciones. Los botones están diseñados para no
reaccionar si hay más de uno presionado.
ӿ El producto está hecho de plástico; por eso, no lo limpie con un trapo
ni una esponja secos. Si lo hace, rayará el producto.
36
Page 87

Apoyos
Limpie los apoyos dos veces al mes o más, según el uso. Utilice un trapo limpio y suave con jabón
suave para la limpieza habitual. Para limpiar manchas difíciles de quitar, retire los apoyos y la base
metálica. Después de quitarlos, limpie cada pieza y la salida de agua del calentador de hombros.
Cuando haya mucha suciedad, aplique un producto de limpieza de alta calidad recomendado para vinilo
con un trapo o una esponja suave, lave el área, enjuáguela con agua dentro de los cinco minutos y
luego séquela.
Retire el apoyo.
Quite los dos tornillos que
sostienen la base de metal.
Retire la base de metal.
37
Limpieza
Limpiar aquí.
●Después de limpiar, vuelva a colocar las piezas
tal como estaban.
Page 88

Módulo de función
Recinto exterior
Limpie la suciedad del recinto del módulo de función con un trapo húmedo y luego séquelo. Cuando
esté muy sucio, utilice un detergente natural.
Protector complementario
Revise la función del protector complementario dos o tres veces al año. Si utiliza el módulo de función
mientras el protector complementario está averiado, corre riesgo de recibir una descarga eléctrica.
Tapa del protector
complementario
Revise que se esté suministrando energía.
●Si puede manejar el controlador, esto significa que se está suministrando energía.
Quite la tapa del protector complementario.
Presione el botón de prueba del protector complementario.
●Si la palanca de energía se mueve de encendido a apagado, significa que está funcionando normalmente.
Palanca de
energía
Botón de
prueba
38
Después de la inspección, encienda nuevamente la palanca de energía.
Vuelva a colocar la tapa del protector complementario.
Page 89

Módulo de función (continuación)
Tapón de drenaje de agua (con filtro)
Cuando los residuos y otros elementos bloquean los filtros de los tapones de drenaje ocurrirá lo
siguiente. Por lo tanto, manténgalos limpios.
Disminuirá el volumen de agua que sale y llevará más tiempo llenar la bañera.
El agua no fluirá como una cascada.
La temperatura del agua será insatisfactoria.
ӿ Después de que el agua caliente ingrese a la bañera desde el pico de salida de llenado de la bañera, el
agua que quede en el módulo de función estará muy caliente. Para prevenir quemaduras, espere hasta que
el equipo se haya enfriado.
ӿ Debido a que el agua caliente y el agua fría saldrán por la válvula de drenaje de agua, coloque un balde u
otro recipiente debajo del módulo de función para atrapar el agua que se derrame.
Cierre las válvulas de cierre de agua fría y caliente conectadas al puerto
de conexión.
● La posición de las válvulas de cierre variará según la instalación de fábrica.
Conexión para agua caliente
Conexión para agua fría
Cerrar
Válvula del agua fría
Encienda el botón en el controlador y espere unos 20 segundos.
●Opere con el botón de encendido/apagado (On/Off) en modo encendido.
Revise que no salga agua por la salida de llenado de la bañera y luego
Cerrar
Válvula del agua caliente
Limpieza
apague el botón de encendido/apagado (On/Off) .
ӿ Si el agua sigue fluyendo, apague el botón de encendido/apagado (On/Off) una vez más y
comience con el Paso 1.
●Ocasionalmente, el controlador mostrará el código de error 572. Este es un aviso de interrupción del
agua. Después de solucionar el error (►consulte la página 43), apague el botón de encendido/apagado
(On/Off) y siga con el Paso 4.
Conexión para agua fría Conexión para agua caliente
Quite los tapones de drenaje de agua.
●Tenga en cuenta que el agua en el módulo de función saldrá al quitar los tapones de drenaje de agua.
●Si no puede girar los tapones de drenaje de agua y quitarlos manualmente, inserte un destornillador o
una herramienta similar dentro del agujero en el tapón de drenaje de agua y gírelo con la herramienta.
Tapón de drenaje
de agua (con filtro)
Tapón de drenaje
de agua (con filtro)
39
Page 90

Módulo de función (continuación)
Orejeta de drenaje de agua (con filtro), continuación
Utilice un cepillo de dientes o una herramienta similar para enjuagar el
filtro con agua.
●Evite que la empaquetadura se raye o que le ingresen residuos.
De lo contrario, podrían generarse fugas o los residuos podrían ingresar al módulo de función y ocasionar problemas.
Empaquetadura
Tapón de drenaje de agua
Vuelva a colocar los tapones de drenaje de agua en las conexiones para
el agua caliente y el agua fría tal como estaban.
Gire los tapones de drenaje de agua fría y caliente y controle que no haya
fugas de agua alrededor de los tapones.
Conexión para
agua caliente
Conexión para agua fría
Filtro
Cepillo de dientes
Empaquetadura
40
Abrir
Válvula del agua fría
Abrir
Válvula del agua caliente
Page 91

Largos períodos sin usar
Cuando el producto no se utilizará durante un largo período de tiempo, quite el
agua del módulo de función y desconecte la energía.
ӿ Después de que el agua caliente ingrese a la bañera desde el pico de salida de llenado de la bañera, el
agua que quede en el módulo de función estará muy caliente. Para prevenir quemaduras, espere hasta que
el equipo se haya enfriado.
ӿ Debido a que el agua caliente y el agua fría saldrán por la válvula de drenaje de agua, coloque un balde u
otro recipiente debajo del módulo de función para atrapar el agua que se derrame.
Drene el agua de la bañera y vacíela.
●Deje el drenaje de agua abierto.
Cierre las válvulas de cierre de agua fría y caliente conectadas al puerto
de conexión.
Conexión para agua caliente
Conexión para agua fría
Encienda el botón en el controlador y espere unos 20 segundos.
●Opere con el botón de encendido/apagado (On/Off) en modo encendido.
Revise que no salga agua por la salida de llenado de la bañera y luego
apague el botón de encendido/apagado.
ӿ Si el agua sigue fluyendo, apague el botón de encendido/apagado (On/Off) una vez más y
comience con el Paso 2.
●Ocasionalmente, el controlador mostrará el código de error 572. Este es un aviso de interrupción del
agua. Después de solucionar el error (►consulte la página 43), apague el botón de encendido/apagado
(On/Off) y siga con el Paso 5.
● La posición de las válvulas de cierre variará según la instalación de fábrica.
Cerrar
Válvula del agua fría
Cerrar
Válvula del agua caliente
Resolución de problemas
41
Quite los tres tapones de drenaje de agua.
●Tenga en cuenta que el agua en el módulo de función saldrá al quitar los tapones de drenaje de agua.
●Si no puede girar los tapones de drenaje de agua y quitarlos manualmente, inserte un destornillador o
una herramienta similar dentro del agujero en el tapón de drenaje de agua y gírelo con la herramienta.
Tapón de
drenaje de agua
(con filtro)
Tapón de
drenaje de agua
Tapón de drenaje de agua (con filtro)
Page 92

Después de sacar el agua, vuelva a colocar los tapones de drenaje de
agua en los tres lugares donde estaban.
●Evite que la empaquetadura se raye o que le ingresen residuos. De lo contrario, podrían generarse fugas o los residuos podrían ingresar al módulo de función y ocasionar problemas.
●Coloque el tapón de drenaje de agua sin filtro en el puerto de conexión en el extremo izquierdo.
Encienda el botón en el controlador hasta que la función de
drenaje de agua finalice.
●Opere con el botón de encendido/apagado (On/Off) en modo apagado.
●Después de unos dos minutos, finalizará la función de drenaje de agua.
Quite la tapa del protector complementario y apague la palanca de energía.
Tapa del protector
complementario
Tapón de
drenaje de agua
Empaquetadura
Empaquetadura
Tapón de drenaje de
agua (con filtro)
Palanca de
energía
Filtro
Empaquetadura
ENCENDIDO
APAGADO
42
Vuelva a colocar la tapa del protector complementario.
Apague el interruptor.
●Abra la puerta de inspección de la ducha, que está ubicada cerca de la ducha (construida de fábrica) y
cierre las válvulas de cierre de agua.
●Siga el procedimiento que figura en la sección “Antes del primer uso” (►consulte la página 13) cuando
desee usarla nuevamente.
Page 93

Resolución de problemas
Lea esta sección para solucionar problemas antes de solicitar reparaciones.
Cuando se muestran
códigos de error
error
032
079
152
165
572
B01
B02
Otro
Causa
Drenaje de la bañera
abierto
No hay agua caliente
Temperatura de entrada
de agua anormal
Temperatura inusual al
llenarse
No sale agua
Anormalidad en el circuito de la bomba de
Hydro Hands/calentador
de hombros
—-
Procedimiento Código de
¿El drenaje de la bañera está cerrado?
Vacíe la bañera y luego vuelva a intentar llenarla.
¿Es suficiente el agua caliente que proviene del calentador?
-Revise la temperatura y las configuraciones de funcionamiento
del calentador de agua.
¿Se está suministrando agua caliente a la conexión de agua fría
del módulo de función?
-Revise las conexiones de tuberías al calentador de agua.
-Es posible que esté circulando agua caliente a alta temperatura;
por lo tanto, deje de utilizar el equipo.
¿La válvula principal y la válvula de cierre están abiertas?
¿El filtro de la conexión de agua está limpio?
-Límpielo. ► Consulte la página 39.
¿Hay presión suficiente de suministro de agua? ► Consulte la
página 13.
¿La válvula principal o de cierre de agua está apagada?
¿La compañía de agua cortó el agua?
¿Podrían estar congeladas las tuberías?
Deje de usar el equipo y solicite una llamada de servicio.
Resolución de problemas
Inténtelo nuevamente después de resolver este error.
Métodos de resolución de errores
Puede resolver errores presionando el botón
que mostró un código de error.
43
Page 94

Ducha
El agua no se cierra.
¿Las perillas de agua caliente y agua fría están completamente cerradas?
El agua que gotea de la ducha puede provenir del agua residual que fluye desde adentro del ca-
bezal de la ducha. No está averiada.
El agua caliente/fría no funciona. No hay suficiente flujo.
¿Las válvulas principal y de cierre de agua están lo suficientemente abiertas?
¿Las perillas están lo suficientemente abiertas?
¿El suministro de agua ha sido cerrado o el agua puede estar congelada?
El agua siempre está fría.
¿El calentador de agua produce suficiente agua caliente?
→ Revise la temperatura y las configuraciones de funcionamiento del calentador de agua.
¿La perilla de agua caliente está abierta?
El agua siempre está caliente.
¿La perilla de agua fría está abierta?
Llenar la bañera
No hay suficiente flujo de agua.
¿Hay residuos atascados en los filtros de las conexiones agua caliente y agua fría en el módulo de
función? → Límpielos. ► Consulte la página 39.
¿Es suficiente el agua caliente que proviene del calentador?
→ Revise la temperatura y las configuraciones de funcionamiento del calentador de agua.
→ Configure la temperatura del suministro de agua caliente entre 140 y 158 °F (entre 60 y 70 °C).
¿Las válvulas principal y de cierre de agua están abiertas?
¿Hay presión de agua? ► Consulte la página 13.
El agua está tibia.
¿La configuración de la temperatura en el controlador está baja? → Aumente la configuración. ►
Consulte la página 17.
¿Se agrega agua fría?
¿Es suficiente el agua caliente que proviene del calentador?
→ Revise la temperatura y las configuraciones de funcionamiento del calentador de agua.
→ Configure la temperatura del suministro de agua caliente entre 140 y 158 °F (entre 60 y 70 °C).
¿Hay residuos atascados en los filtros de las conexiones agua caliente en el módulo de función?
→ Límpielos. ► Consulte la página 39.
¿Hay presión de agua? ► Consulte la página 13.
El agua está muy caliente.
¿La configuración de temperatura de llenado de la bañera es muy alta? → Disminuya la configu-
ración. ► Consulte la página 17.
¿Se agrega agua caliente? → El agua caliente se agrega a 118 °F (48 °C).
¿Hay residuos atascados en los filtros de las conexiones agua fría en el módulo de función?
→ Límpielos. ► Consulte la página 39.
¿Hay presión de agua? ► Consulte la página 13.
44
Page 95

Llenar la bañera (continuación)
Deja de llenarse.
Deja de llenarse automáticamente cuando el volumen de agua configurado, alrededor de
26 galones (100 l), se haya agregado a la bañera o cuando se haya llegado al nivel de agua configurado. ► Consulte la página 23.
El nivel de agua varía.
Cuando se llena la bañera y ya había agua, el nivel del agua variará según la canti-
dad de agua que había en la bañera. ► Consulte la página 23.
Vacíe la bañera y luego intente volver a llenarla.
¿Hay residuos atascados en la tapa surtidora de aire (para detección de
nivel de agua) que se encuentra en la superficie interior de la bañera? →
Consulte el método de limpieza correspondiente a las tapas surtidoras de
aire y límpielos. ► Consulte la página 35.
Tapa surtidora de aire
(detector de
nivel de agua)
Agregar agua para enfriar
No se puede agregar agua para enfriar.
¿El botón para llenar la bañera está encendido? → No se puede agregar agua fría mientras se
llena la bañera.
¿El nivel de agua de la bañera está bajo? → No funcionará si el nivel de agua está bajo. Llene la
bañera con al menos 13 3/8” (34 cm) de agua.
Esta función se detiene automáticamente.
Deja de llenarse automáticamente cuando el volumen de agua seleccionado, 26 galones (100 l), se
haya agregado a la bañera. ► Consulte la página 21.
Agregar agua para calentar
No se puede agregar agua para calentar.
¿Presionó el botón durante al menos 1 segundo? → Como función de seguridad, el botón debe
presionarse por al menos 1 segundo. Presione el botón durante al menos 1 segundo.
¿El botón para llenar la bañera está encendido? → No se puede agregar agua para calentar mien-
tras se llena la bañera.
¿El nivel de agua de la bañera está bajo? → No funcionará si el nivel de agua está bajo. Llene la
bañera con al menos 13 3/8” (34 cm) de agua.
El agua está tibia.
¿Es suficiente el agua caliente que proviene del calentador?
→ Revise la temperatura y las configuraciones de funcionamiento del calentador de agua.
→ Configure la temperatura del suministro de agua caliente entre 140 y 158 °F (entre 60 y 70 °C).
→ Debido a que el módulo de función mezcla el agua entrante caliente y fría, la temperatura del
agua que sale es menor que la del suministro del agua caliente.
¿Hay residuos atascados en los filtros de las conexiones agua caliente y agua fría en el módulo de
función? → Límpielos. ► Consulte la página 39.
¿Hay presión de agua? ► Consulte la página 13.
Resolución de problemas
Esta función se detiene automáticamente.
Deja de llenarse automáticamente cuando el volumen de agua seleccionado, 26 galones (100 l), se
haya agregado a la bañera. ► Consulte la página 22.
45
Page 96

Soplador de aire
No salen burbujas de aire de las tapas surtidoras de aire.
¿Hay residuos atascados en las tapas surtidoras de aire? → Limpie las tapas surtidoras de aire. ►
Consulte la página 35.
Una de las tapas surtidoras de aire en la parte lateral (no en la parte inferior) de la bañera tiene
como fin detectar el nivel del agua. No produce burbujas de aire.
Un dispositivo de seguridad apagará la bomba de aire cuando se eleve la temperatura. Espere un
momento e inténtelo nuevamente.
Esta función se detiene automáticamente.
Se detiene automáticamente después de que haya pasado el tiempo que indica el temporizador. ►
Esta función se inicia automáticamente.
¿Funciona la función de drenaje automático para drenar la bañera? ► Consulte la página 33.
Sale agua fría o burbujas de aire frías de las tapas.
Justo después de que se inicia, es posible que salga el agua fría que estaba en las tuberías.
Las burbujas de aire cercanas a la parte inferior de la bañera se sienten frías. Ajuste su posición de
baño.
El agua de la bañera se enfría antes de lo esperado.
Al utilizar el soplador de aire, el agua de la bañera se enfría más rápidamente que cuando no se
utiliza el soplador de aire.
Función de purga
La función de purga automática no funciona, incluso cuando dejo salir el agua de la bañera.
¿El nivel del agua es por lo menos 13 3/8” (34 cm) al drenar la bañera? → Cuando se drena la
bañera y el nivel del agua es bajo, la función de purga automática no funciona. Presione el botón
de purga (Purge) para purgar la bañera.
¿El botón de encendido/apagado (On/Off) está apagado? → La función de purga automática no
funcionará si está encendido. Apáguelo.
Active la función de purga con el botón de purga (Purge) después de que se vacíe la bañera. →
Controle la función de purga automática la próxima vez que drene la bañera.
Función de Hydro Hands y calentador de hombros
No funciona.
¿El nivel de agua de la bañera está bajo? → No funcionará si el nivel de agua está bajo. La bañera
debe tener por lo menos 13 3/8” (34 cm) de agua.
Esta función se detiene automáticamente.
Se detiene automáticamente cuando pasa el tiempo que indica el temporizador. ► Consulte la
página 19.
Es posible que la función se detenga si el nivel del agua es bajo. → Agregue agua y aumente el
nivel del agua en la bañera.
46
Page 97

Función de hidromasaje y calentador de hombros
(continuación)
Al llenar la bañera, la función de hidromasaje/calentador de hombros se enciende automáticamente.
¿La función de calentamiento con el hidromasaje/calentador de hombros está encendida? ► Con-
sulte la página 28.
Se encendió el botón de la función de hidromasaje/calentador de hombros.
Cuando, debido a ruidos o interferencias, el detector no puede detectar el nivel de agua en la
bañera, es posible que se apague el botón. → Espere un momento.
No hay mucho volumen de flujo de agua.
¿La succión está bloqueada? → Límpiela. ► Consulte la página 30.
No hay mucho volumen de flujo de agua.
¿La succión está bloqueada? → Límpiela. ► Consulte la página 30.
Iluminación bajo el agua
Esta función se apaga automáticamente.
Se detiene automáticamente cuando pasa el tiempo que indica el temporizador. ► Consulte la
página 20.
Controlador
Las luces del controlador no funcionan.
¿El interruptor del suministro de energía está apagado?
¿Ha habido un corte de energía?
¿Está apagado el protector complementario de adentro del módulo de función? ► Consulte la
página 13.
¿Se han apagado las luces de la pantalla? ► Consulte la página 9. → Si presiona los botones, se
encenderán las luces.
Aparentemente, hay agujeros negros en los módulos de pantalla de los botones.
Esto es normal. Son sensores de botones.
La pantalla o la luz de fondo tienen vetas de colores o titilan.
Esto es normal.
→ Es posible que a veces el color parpadee o titile.
→ Cuando salga sonido del altavoz, la luz de fondo puede titilar.
Hay un ruido de fondo cuando la guía por voz o los sonidos están encendidos.
Esto es normal. → Cuando los ruidos molestan, baje el volumen o apague la guía por voz. ► Con-
sulte la página 28.
La pantalla o la luz de fondo se apagaron en algún momento.
¿Se ha apagado la pantalla? ► Consulte la página 9. → Se encenderá cuando se presionen los
botones.
Resolución de problemas
47
Page 98

Controlador (continuación)
Los botones no funcionan.
Consulte los métodos de presión de botones. ► Consulte la página 8.
¿Los presiona lentamente o aplica demasiada fuerza después de tocarlos? → Presione suave-
mente los botones en el centro para que funcionen.
¿Está presionando el botón por el borde o en una esquina? → Presione cerca del pequeño símbolo
elevado.
Si presiona más de un botón a la vez, no repsonderán. → Por
ejemplo, si presiona un botón con el dedo índice y el dedo meñique está cerca de otro botón, es
posible que el botón no responda.
¿Deja apoyado el dedo y presiona los botones de manera continua? → Levante el dedo del botón
por un momento, incluso si está presionando el mismo botón más de una vez.
Es posible que los botones no respondan si está usando guantes.
¿Hay suciedad o residuos sobre el botón? ¿Hay algo cerca, como una toalla, que interfiera con el
funcionamiento? →
Limpie los botones. →
Cuando los botones no funcionen, incluso después de quitar los elementos. Espere otros dos
minutos antes de intentarlo nuevamente.
¿Hay mucha luz alrededor; por ejemplo, luz solar directa?
→ Los botones a veces no funcionan bajo la luz solar directa ni cerca de luces incandescente, a
20” (50 cm), aproximadamente.
→ Cambie el ángulo del controlador u oscurezca la habitación.
Apague una vez el protector complementario del módulo de función, luego vuelva a encenderlo e
inténtelo nuevamente.
No puedo hacer funcionar los botones de preferencia.
¿El nivel de agua de la bañera está bajo? → El producto no funcionará si el nivel del agua está bajo.
La bañera debe tener por lo menos 13 3/8” (34 cm) de agua.
Los botones de preferencia no se iluminan.
¿El equipo está funcionando; por ejemplo, el soplador de aire o la iluminación bajo el agua? → Los
botones de preferencia no se iluminarán mientras el equipo esté funcionando. Apague el equipo.
Cuando, debido a ruidos o interferencias, el detector no puede detectar el nivel de agua en la
bañera, es posible que se apague el botón. → Espere un momento.
48
Page 99

Especificaciones
Bañera
Dimensiones 70 7/8” x 55 1/8” x 30 1/8”
(1800 mm x 1400 mm x 765 mm)
Incluye el marco sobre el que se apoya la bañera.
Peso 397 libras (180 kg)
Capacidad 151 galones (570 l) hasta la línea de rebose
Material Mármol sintético de acrílico
Llenado de la
bañera
Soplador de aire
Calentador de
hombros
(cascada)
HydroHands
Puertos de salida
Tasa de flujo de llenado
de la bañera
Cantidad de surtidores
Volumen de aire
Puertos de entrada
Puertos de salida
Tasa de flujo
Puertos de entrada
Puertos de salida
Tasa de flujo
Uno
Máx. 9,2 gpm (35 lpm) (controlado por el
módulo de función)
15 en la parte inferior de la bañera
Máx. 148 gpm (560 lpm) (15 en total, controlado por el módulo de función)
Dos
Dos
Máx. 10 gpm (38 lpm) (2 en total)
Dos
Cuatro
Máx. 40 gpm (150 lpm) (4 en total)
49
Iluminación
bajo el agua
Ducha
(dos perillas)
Diámetro de rosca de las conexiones para llenar la bañera
Módulos de iluminación
Colores
Usos Limpieza de la bañera
Presión
de
agua
entrada de agua
Diámetro de rosca
de las conexiones
Presión de agua
mínima requerida
(en el flujo)
Presión de agua
máxima (cuando no
fluye)
Caliente Temperatura de
Fría
Caliente
Fría
Dos
Tres tipos de patrones, 10 colores individuales
11,6 psi (0,08 MPa)
108,75 psi (0,75 MPa)
Controlado por la válvula de templado (incluida)
De 32 a 86 °F (de 0 a 30 °C) sin congelamiento
Resolución de problemas
NPT 1/2
NPT 1/2
NPT 3/4
Page 100

Especificaciones
Soporte
del controlador
Módulo
de función
Dimensiones 9 11/16” x 4 7/16” x 10 1/16”
(246 mm x 113 mm x 255 mm)
Peso 6 libras (2,8 kg) incluido el controlador
Arco ajustable 90°
Dimensiones 16 5/8” x 7 1/16” x 18 3/4”
(422 mm x 180 mm x 476 mm)
La altura externa no incluye los puertos de conexión.
Peso 31 libras (14 kg)
Tensión nominal 120 V CA
Frecuencia nominal 60 Hz
Corriente nominal 14,3 A
Consumo de energía nominal 1490 W
Consumo de energía de reserva 7,0 W
Lugar de instalación Interior (lugar sin condensación, humedad ni
congelamiento: no en el baño)
50
Presión de
agua
trada de agua
las conexiones
Dispositivo de seguridad Dispositivo de prevención de funcionamiento
Presión de agua mínima
requerida (en el flujo)
Presión de agua máxima
(cuando no fluye)
Caliente Temperatura de en-
Fría
Caliente Diámetro de rosca de
Fría
Llenado de la
bañera
29 psi (0,20 MPa)
108,75 psi (0,75 MPa)
De 140 a 158 °F (de 60 a 70 °C)
De 32 a 86 °F (de 0 a 30 °C) sin congelamiento
NPT 3/4
NPT 3/4
NPT 3/4
continuo, dispositivo de protección contra sobrecorriente, interruptor de circuito de falla a
tierra (ground-fault circuit interrupter, GFCI)
 Loading...