

Page 1

Page 2
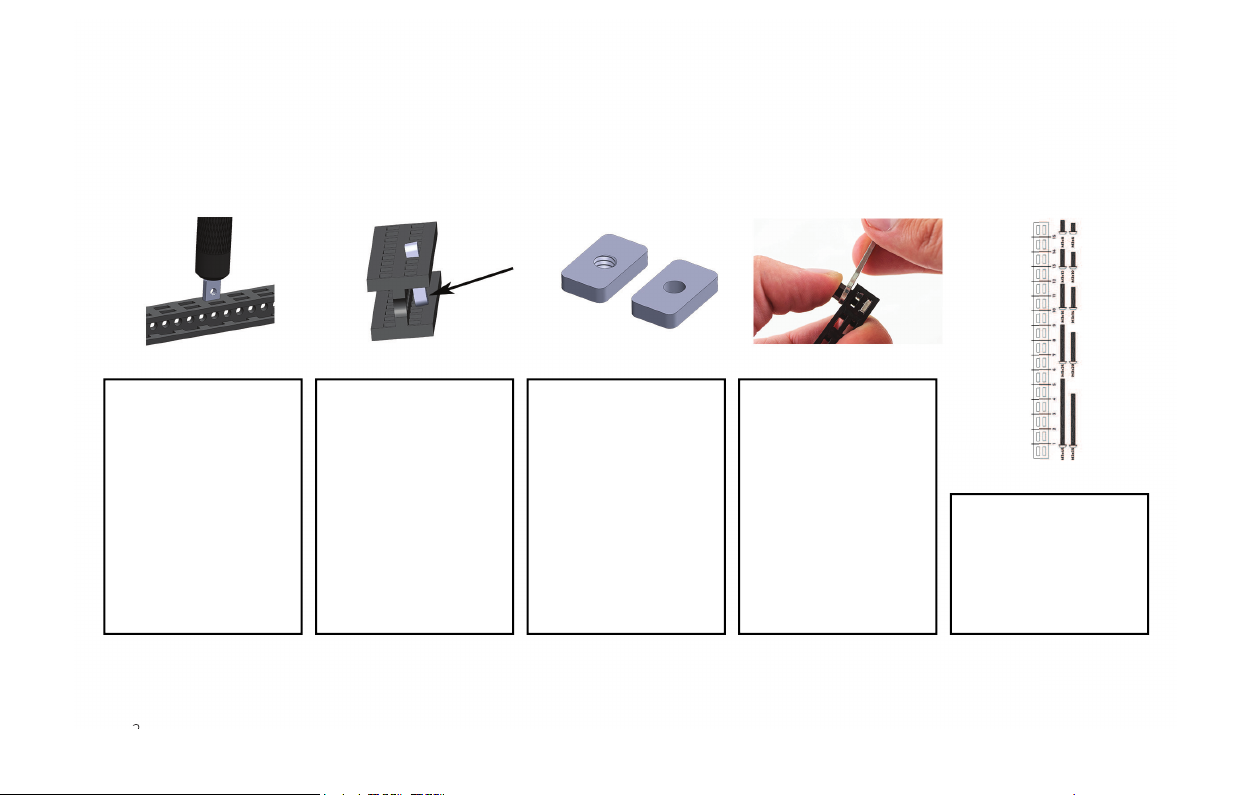
STARTING TIPS
Inserting nuts (1) Inserting nuts (2) Faulty threads Tightening
standoff s
It is a good idea to
start every step inserting nuts into
beams (if the step
requires).
Use the back of the
screwdriver to push
in the nuts.
After entering the
fi rst slot, nuts tend
to tilt. Use your
thumb to push it
back straight, and
then again use the
screwdriver to in-
sert the nut all the
way in.
For more tips, please visit the link below:
Some of the nuts
are missing threads.
This is a manufacturing issue and we
are working on it. In
the mean time, we
add few extra nuts.
We apologize for
the inconvenience.
Push Nylon
Standoff with your
thumb while tight-
ening it with the
wrench.
https://totemmaker.net/blog/totem-mechanics-for-beginners/
2
Ruler
Use Beam/Bolt
ruler to determine
the length of beams
and bolts.
Page 3
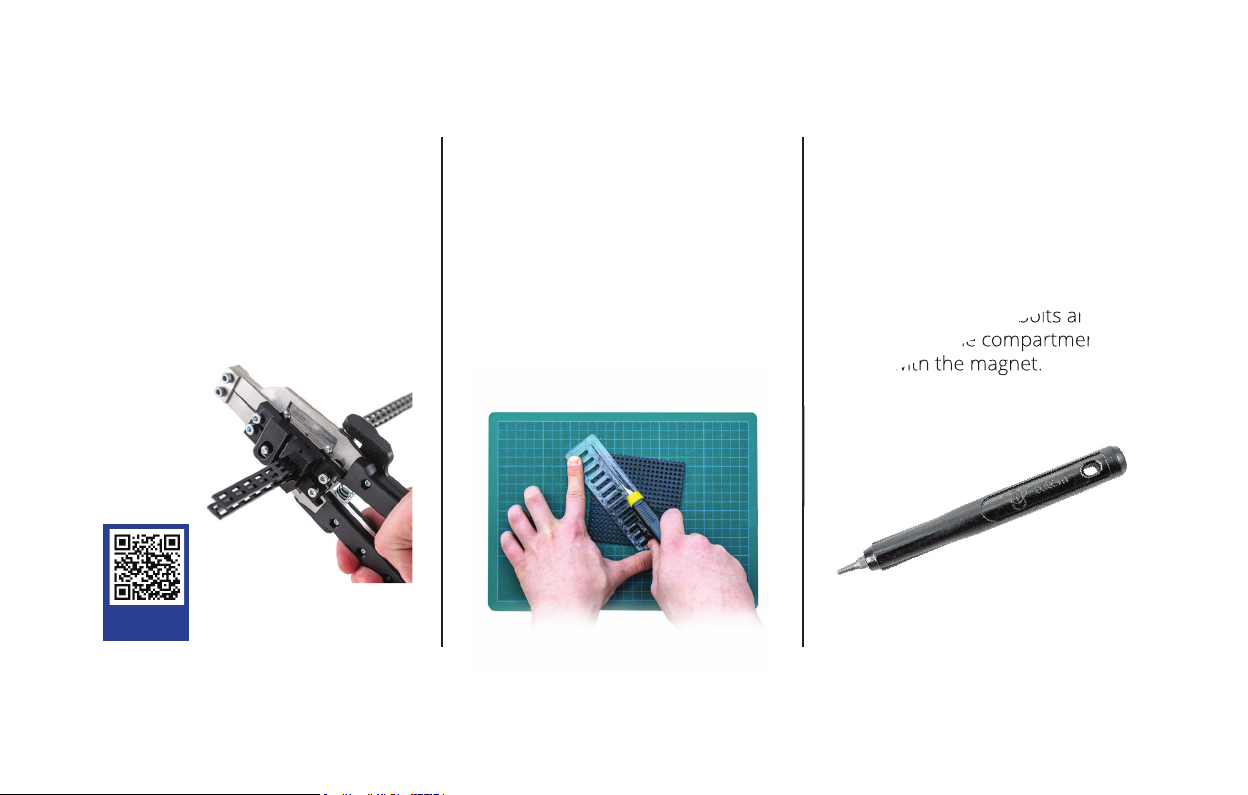
Totem Tools
Beam Pro-Cutter Board Cutter Magnetic Screwdriver
• Totem Beam Pro-Cutter cuts
the beam in a blink, just like
the scissors.
• Simple but super smart tool
for cutting Totem Boards.
Ruler pins fi ts into the grid of
• Super strong magnetic grip -
bolt fi rmly stays on screwdriver
even when shaking it.
the board.
• Cut Beams to the lengths you
need - a ruler allows for consistent sizes to be cut.
• Easily cut the boards in
straight or 45° angled cuts –
depends on the side of the
• Makes things easier -
conveniently grab bolts and
nuts from the compartment
box with the magnet.
ruler.
More
information
TOOLS CAUTION: cut hazard. Sharp blade. Contact may result in injury. Always keep blades away from fi ngers and body. Handle with care.
Keep out of reach of children!
3
Page 4
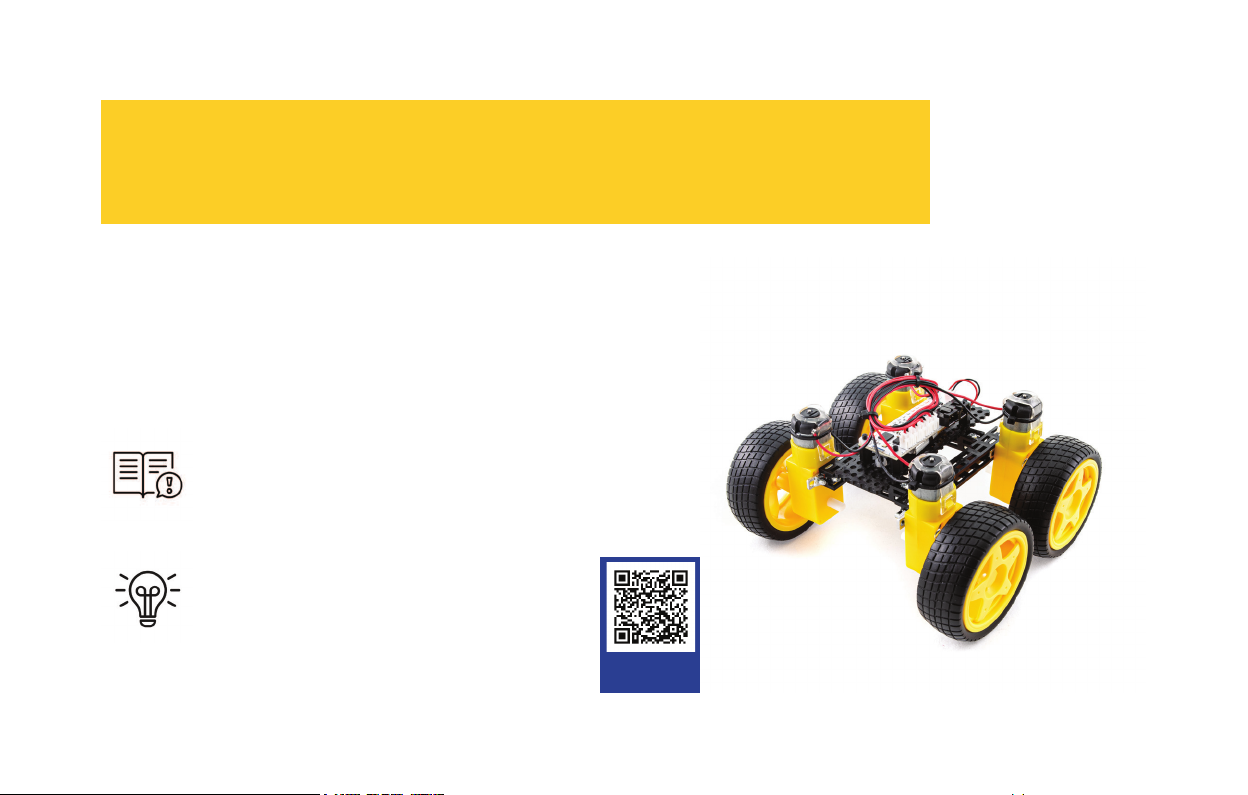
In this 7-in-1 Robotics Kit there are 7 already made models that you can
build, upgrade or recreate.
We encourage you to use your imagination’s full potential but here are
some ideas that you can use for the starting point:
4WD
Robotic car with independent wheel control.
Turns in all directions by the wheels friction force.
Diff erent methods for propulsion
and steering.
The same kind of wheel-system is
used in small loader machines.
Assembly
instructions
4
Page 5
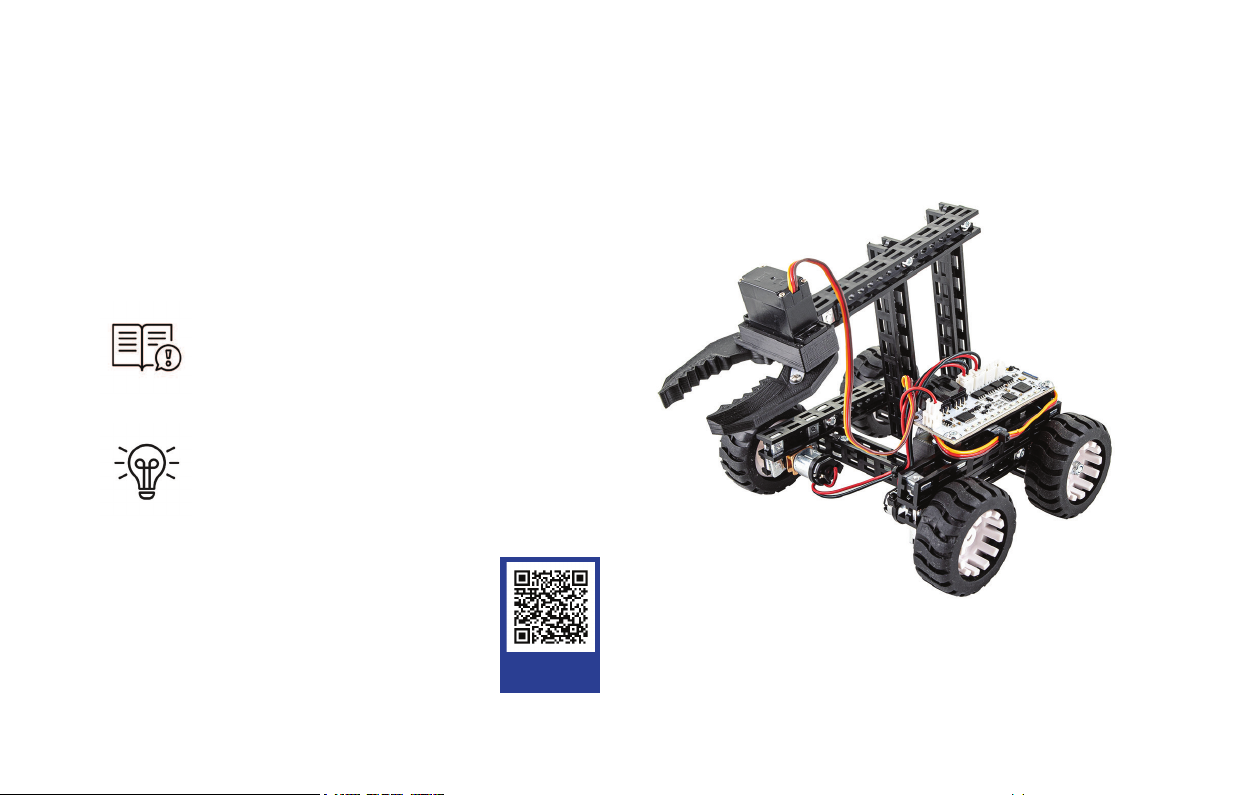
Gripper Bot
Car with a controllable gripper arm. Use
servo motors for rotation and applied force.
Learn diff erences between
motors and their use. Make forward
motion from rotating action.
Grippers with robotic arm are used in
assembly lines in many factories.
Assembly
instructions
5
Page 6
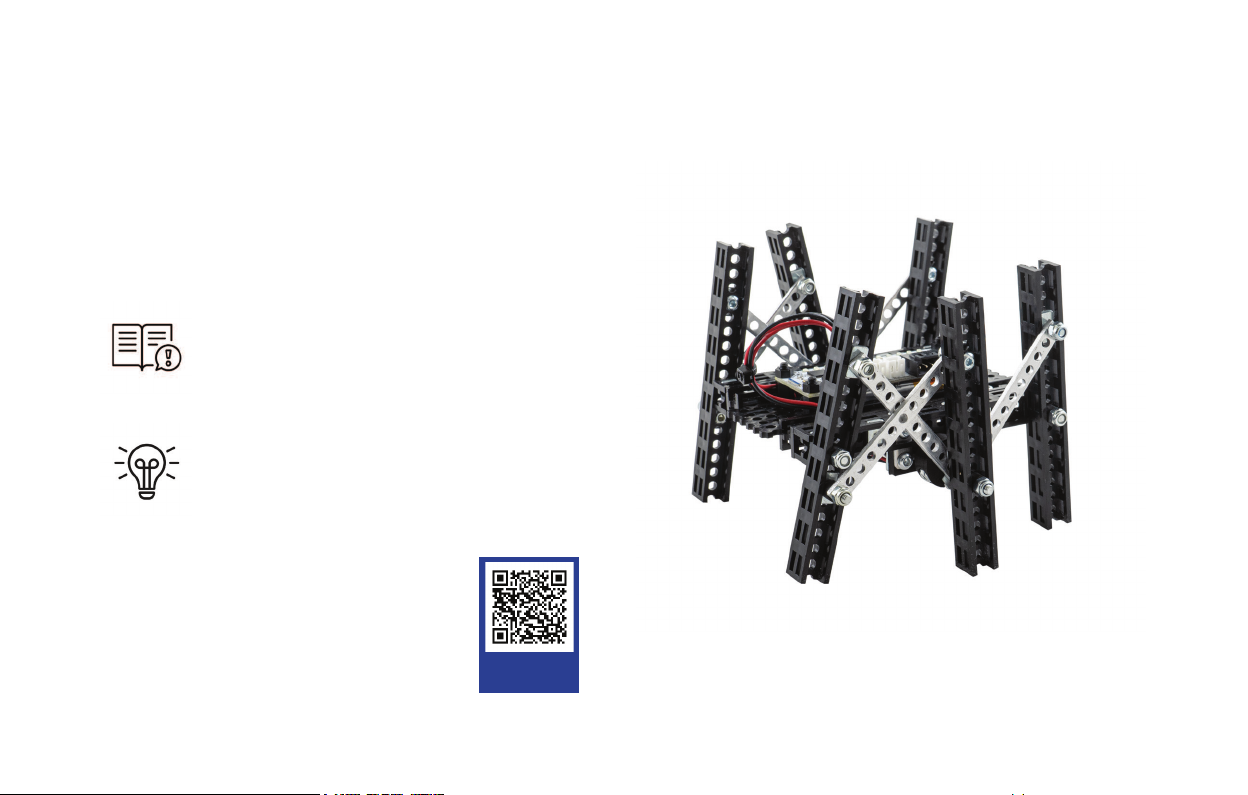
Mini Spider
Mimic a walking animal from a rotating
force.
Teaches how a rotating motor can
drive walking legs.
Similar mechanisms are used in steam
locomotives, piston movement in the
internal combustion engine, stamping
press, many heavy
machinery where
rotary movement is
converted to linear.
Assembly
instructions
6
Page 7
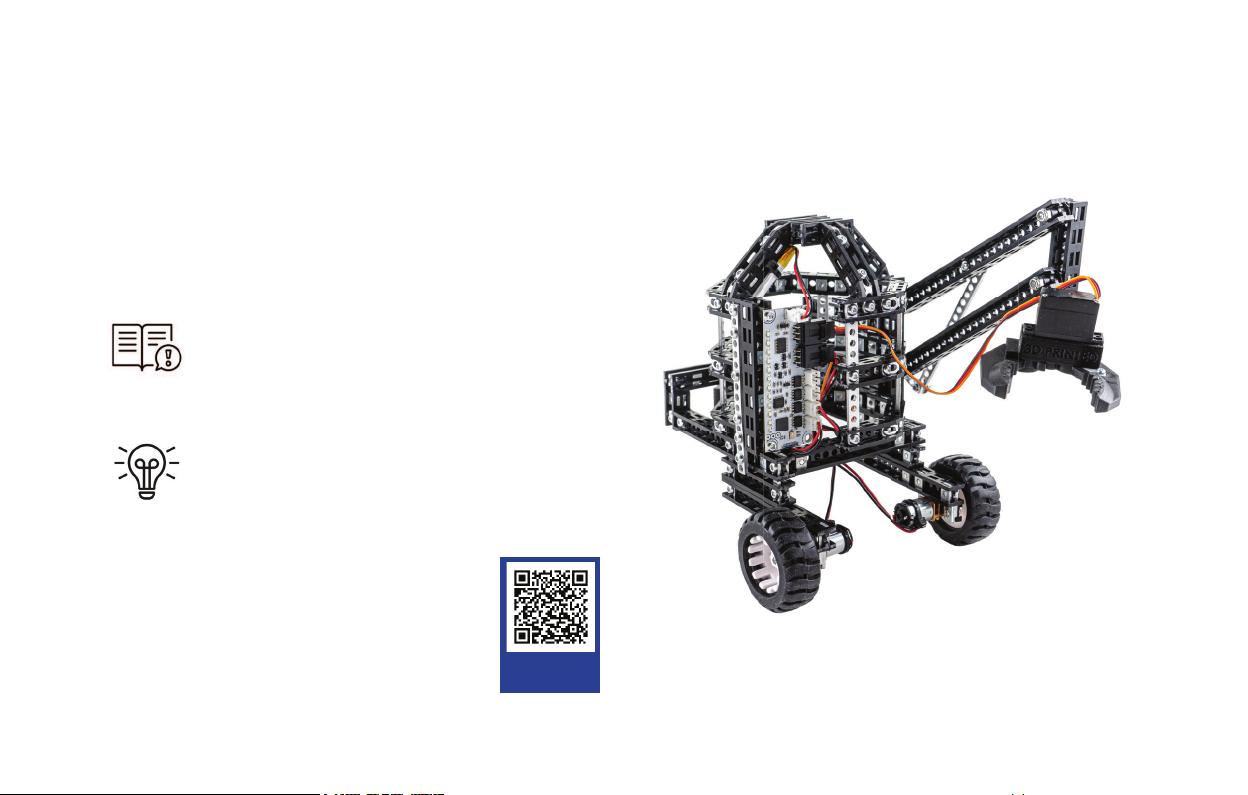
Lucas Robot
Caster Wheel based robot, inspired by sci-fi
movies. A true little robot, turns 360 , grips
and lifts.
Learn Caster Wheel mechanical
principle, advanced building
techniques.
Mars rovers and demining robots are
very similar robots with gripper and
wheels.
See page no. 30 in the Robotics Kit Handbook
for Caster Wheel instructions
Assembly
instructions
7
Page 8
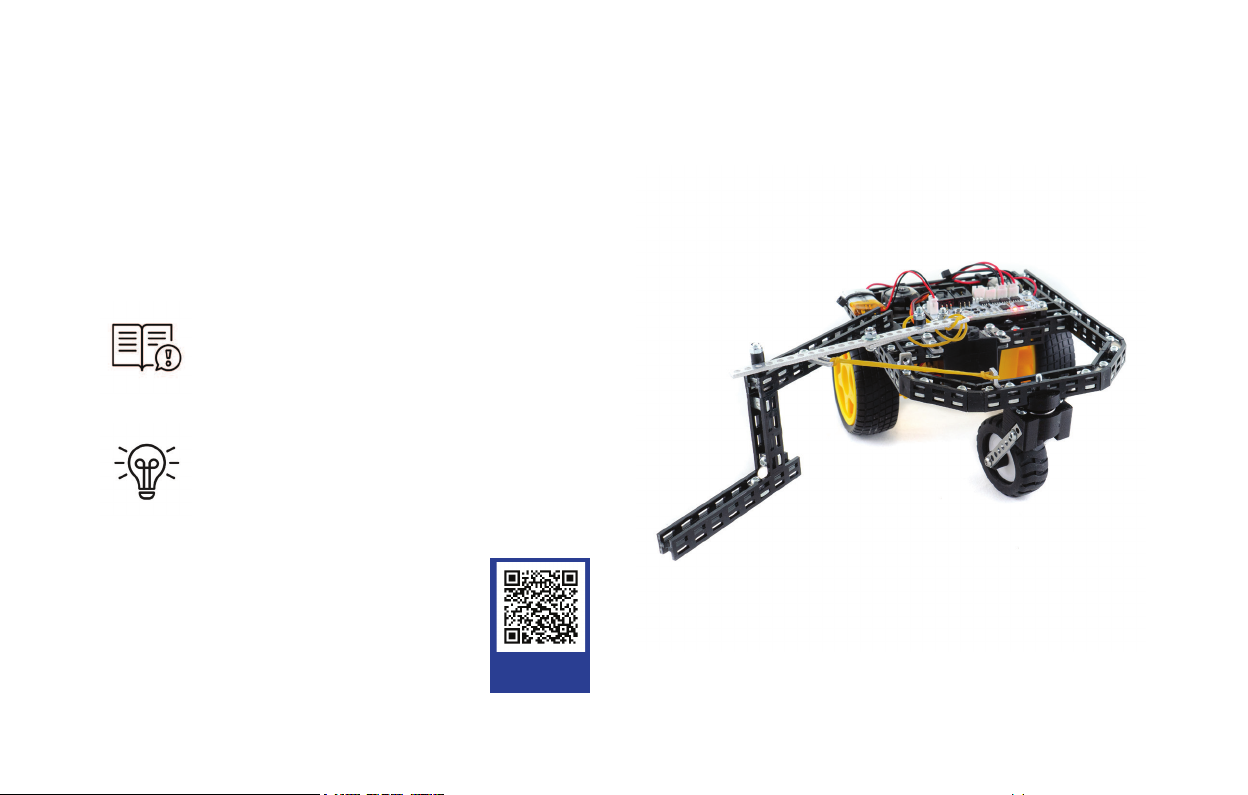
Hockey Bot
Car with a retractable swinging arm that
accumulates and later releases the energy
by swinging the arm to kick the ball.
Demonstates how to store potential
energy and convert it to kinetic energy.
Similar idea is used in bows and crossbows, mouse traps.
See page no. 30 in the Robotics Kit Handbook
for Caster Wheel instructions
8
Assembly
instructions
Page 9
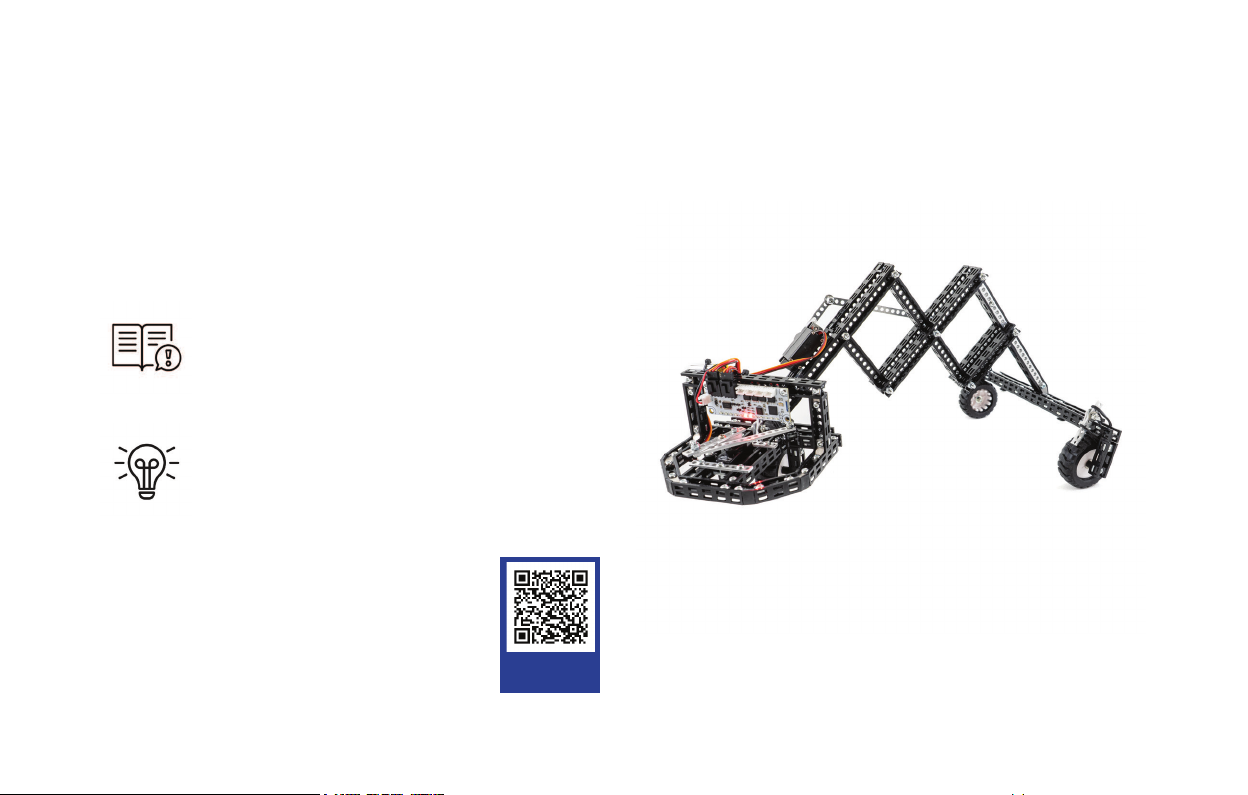
Larva Mobile
Inspired by the nature, inch-worm, this
robot uses scissors principle shape shifting
for movement.
This robot teaches using shape shifting
for movement. Learn about applying
braking mechanisms and their use.
Similar mechanism is used in scissor
lift. Wheels can only rotate to one
direction and it is a similar design to a
ratchet tool.
Assembly
instructions
9
Page 10
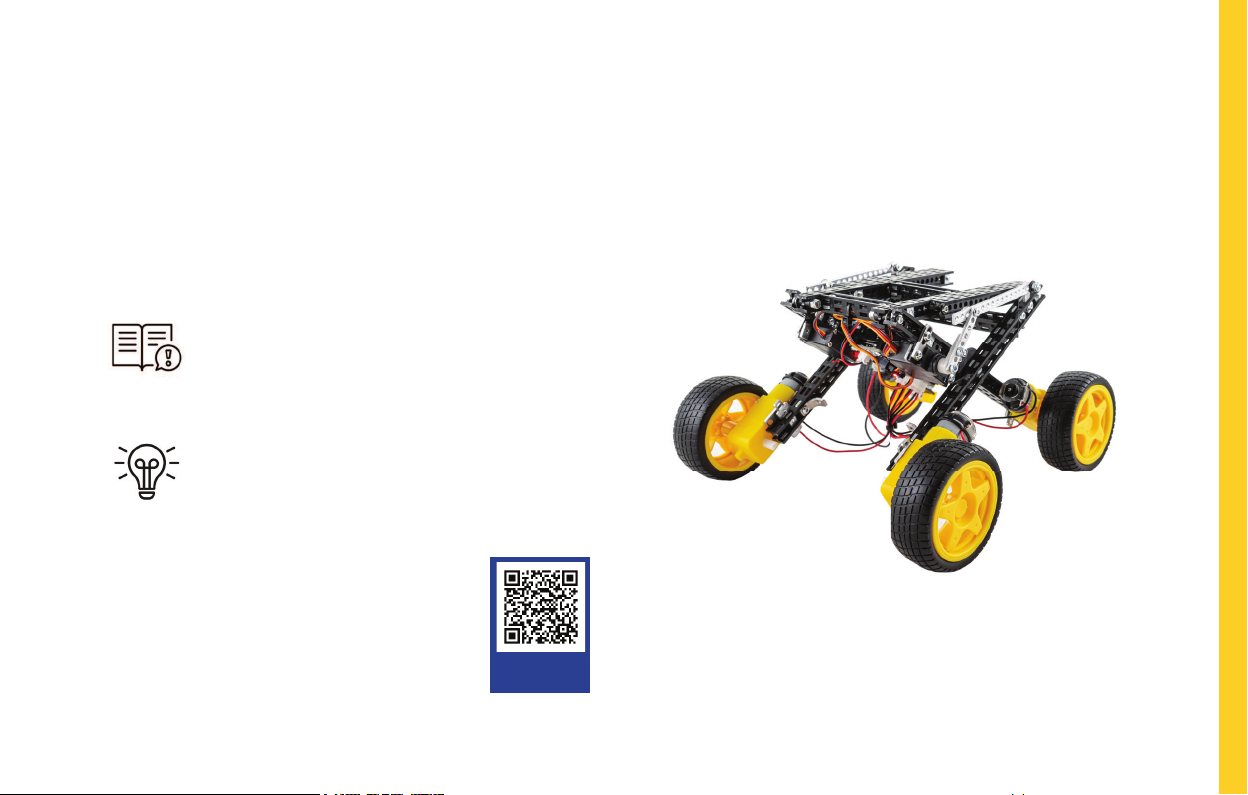
Lift Mobile
Uses scissor mechanism in a robotic lifting
platform.
Learn how to construct a lift that always has the platform level.
Simple version of scissor lift which are
used in real life to reach high places.
Assembly
instructions
10
Page 11
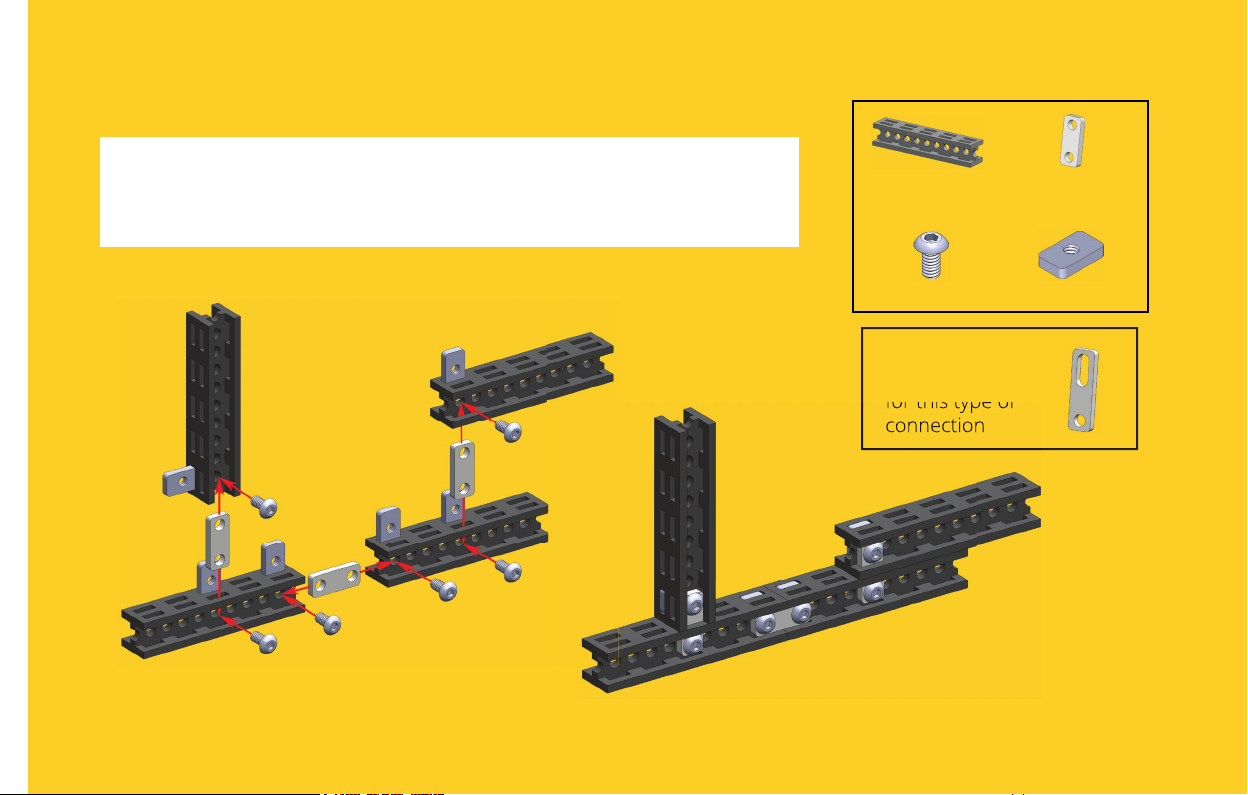
Totem building techniques
The following are examples how to use the Robotics Kit
parts to build your projects. Please note that there are many
other ways to use Totem parts. Set your imagination free!
2-Hole Simple Bracket
NOTE: there are many other ways to use this bracket.
4x Beam 50 mm
6x Bolt M3x6 6x Nut M3 6x10
3x 2-Hole Simple
Bracket
2-Hole Bracket
can also be used
for this type of
connection
11
Page 12
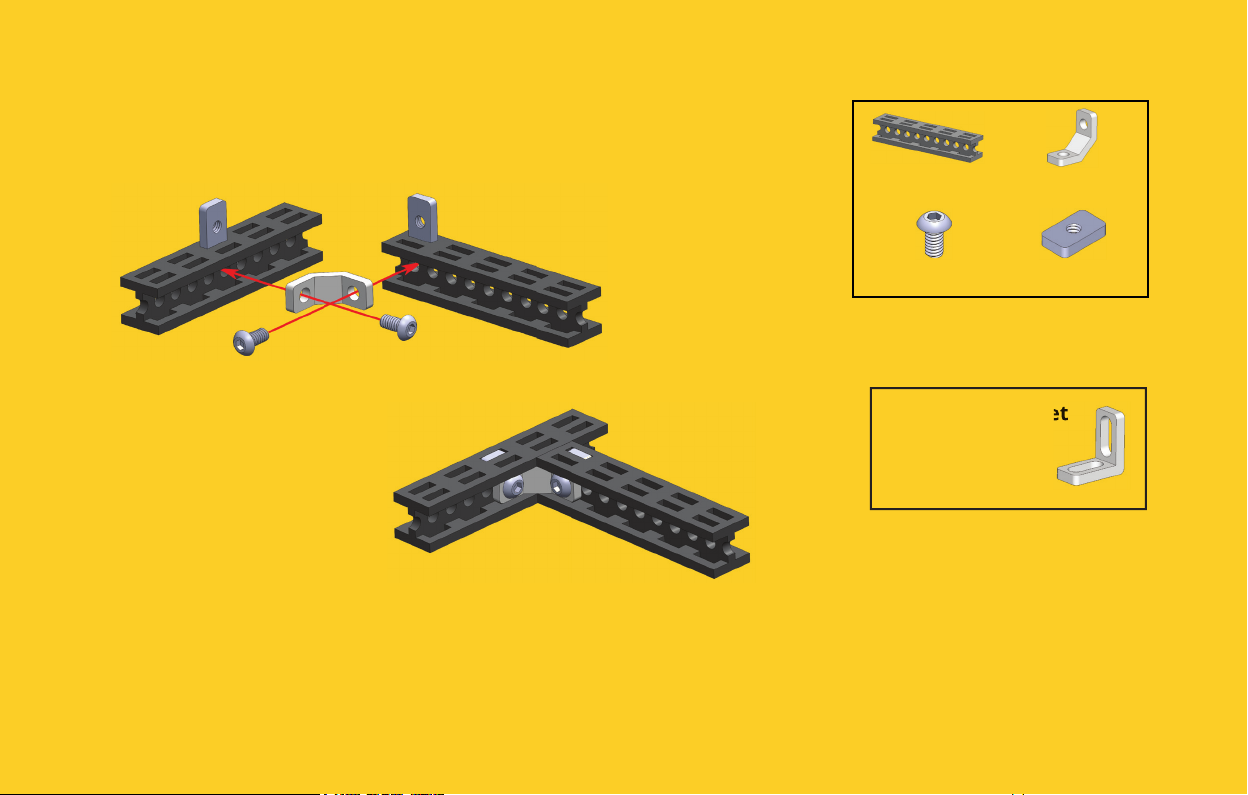
C-Bracket
NOTE: there are many other ways to use this bracket.
2x Beam 50 mm 1x C-Bracket
2x Bolt M3x6 2x Nut M3 6x10
2-Hole 90 Bracket
can also be used
for this type of
connection
12
Page 13
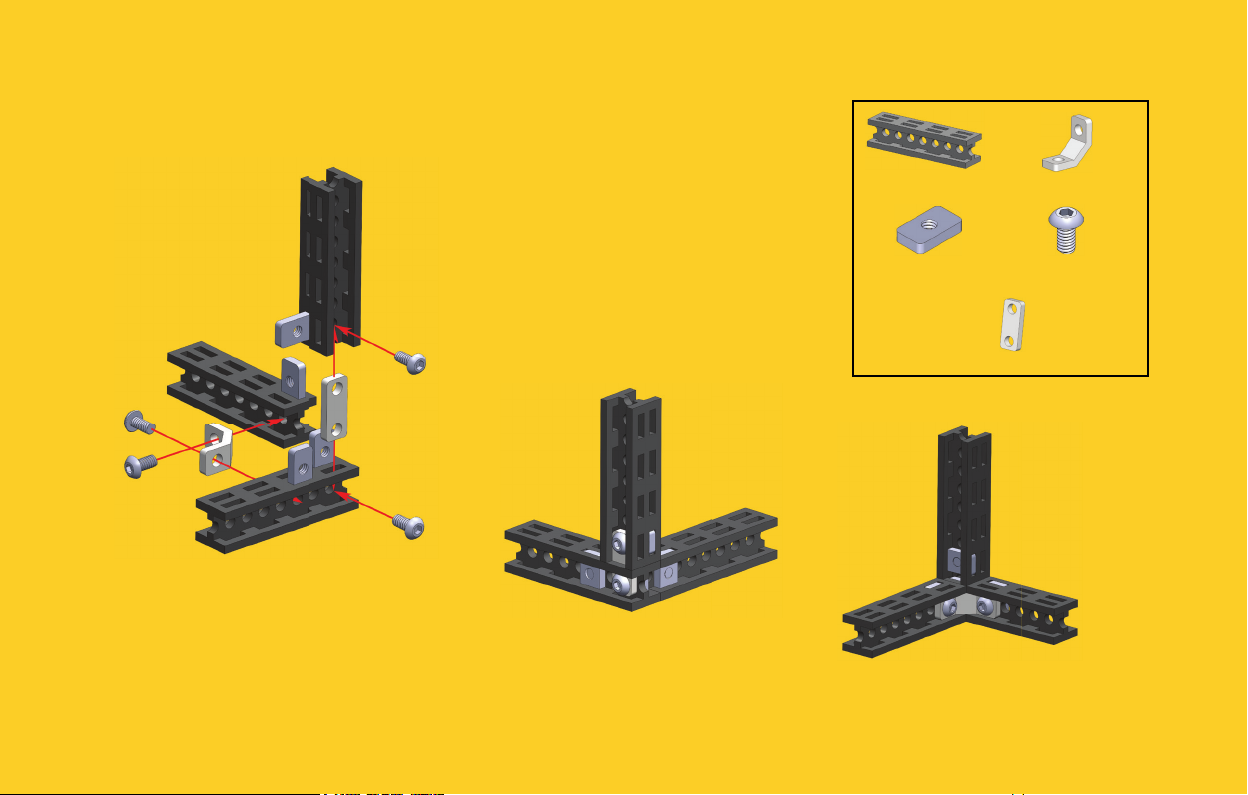
Typical C-Bracket Corner
NOTE: there are many other ways to use this bracket.
3x Beam 40 mm 1x C-Bracket
4x Nut M3 6x10 4x Bolt M3x6
1x 2-Hole Simple Bracket
13
Page 14
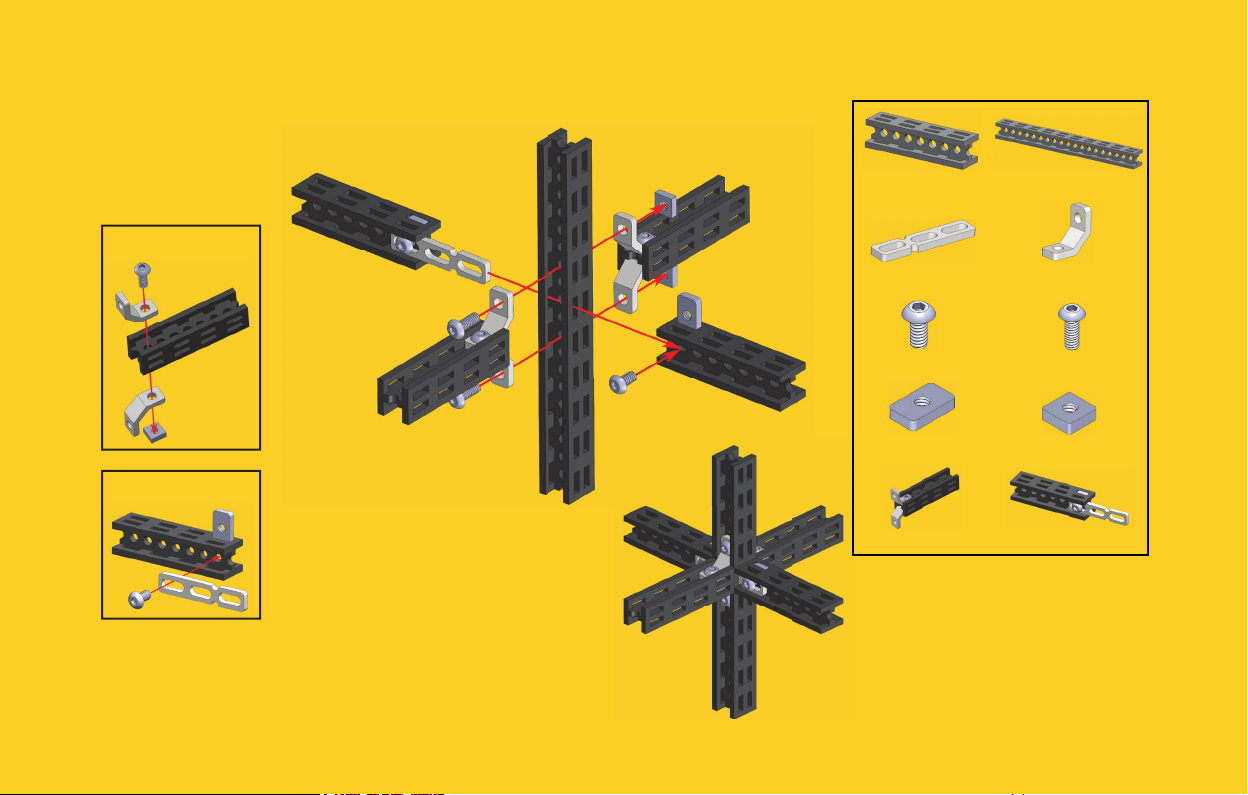
C-Bracket and 3-Hole Bracket
2x Subassembly
1x Subassembly
NOTE: there are many other ways to use this bracket.
4x Beam 40 mm 1x Beam 100 mm
1x 3-Hole Bracket 4x C-Bracket
2x Bolt M3x6 4x Bolt M3x8
4x Nut M3 6x10 4x Nut M3 5.5x5.5
1x Subassembly 1 1x Subassembly 2
14
Page 15
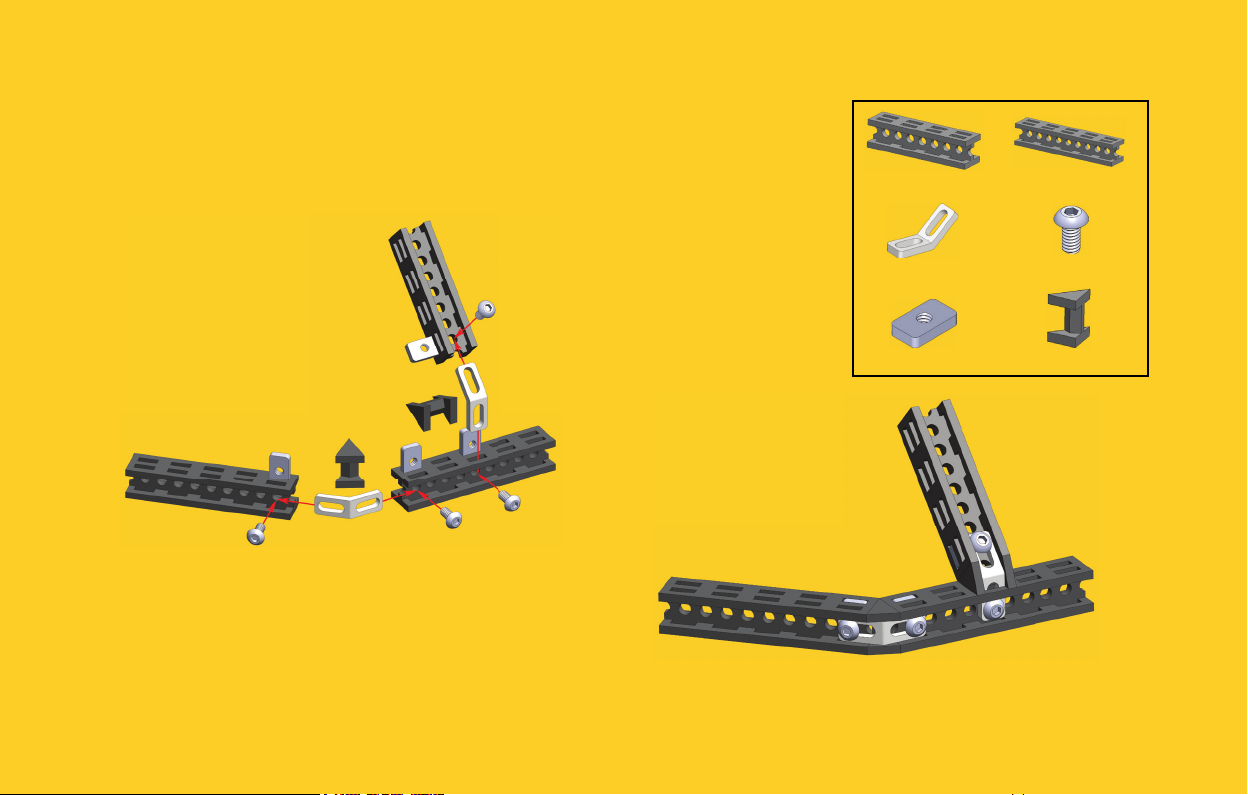
2-Hole 45 Bracket
NOTE: there are many other ways to use this bracket.
1x Beam 40 mm 1x Beam 50 mm
2x 2-Hole 45 Bracket 4x Bolt M3x6
4x Nut M3 6x10 2x Double Side Filler
15
Page 16
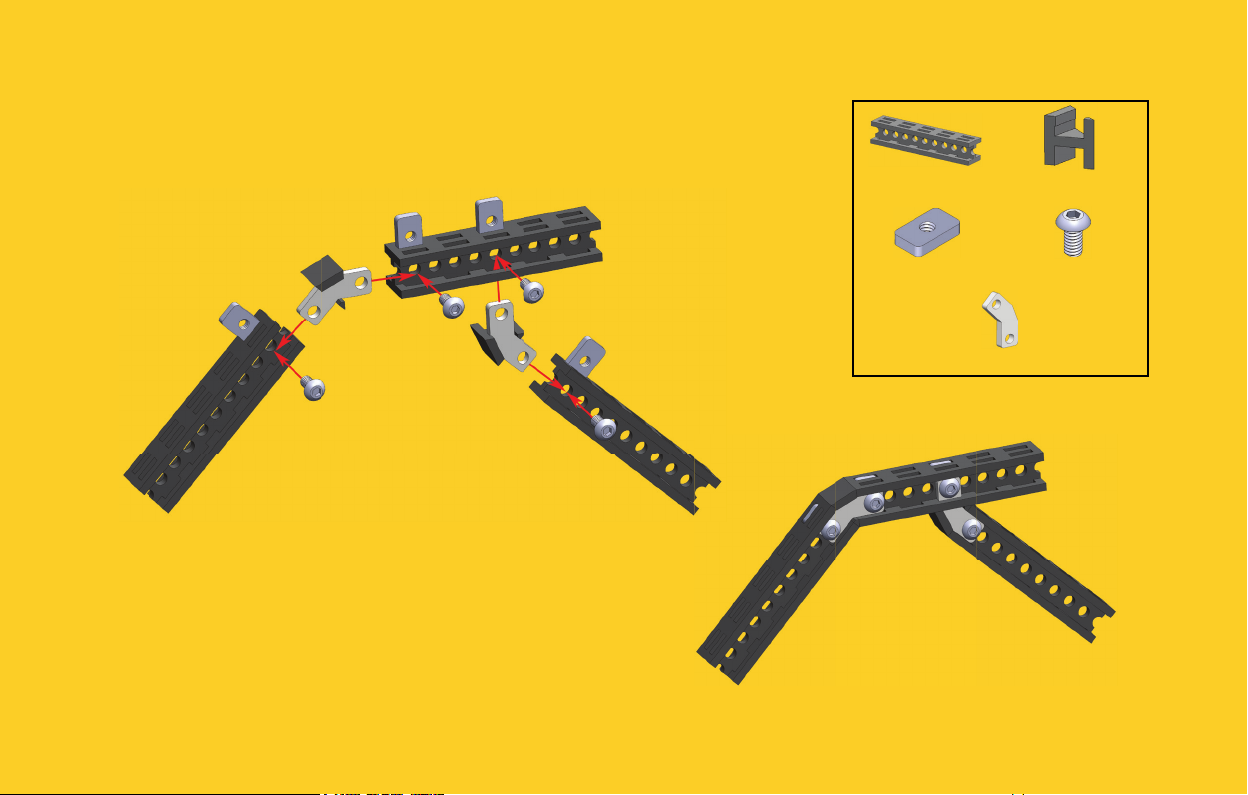
2-Hole 45 Simple Bracket
NOTE: there are many other ways to use this bracket.
3x Beam 50 mm 2x Single Side Filler
4x Nut M3 6x10 4x Bolt M3x6
2x 2-Hole 45 Simple Bracket
16
Page 17
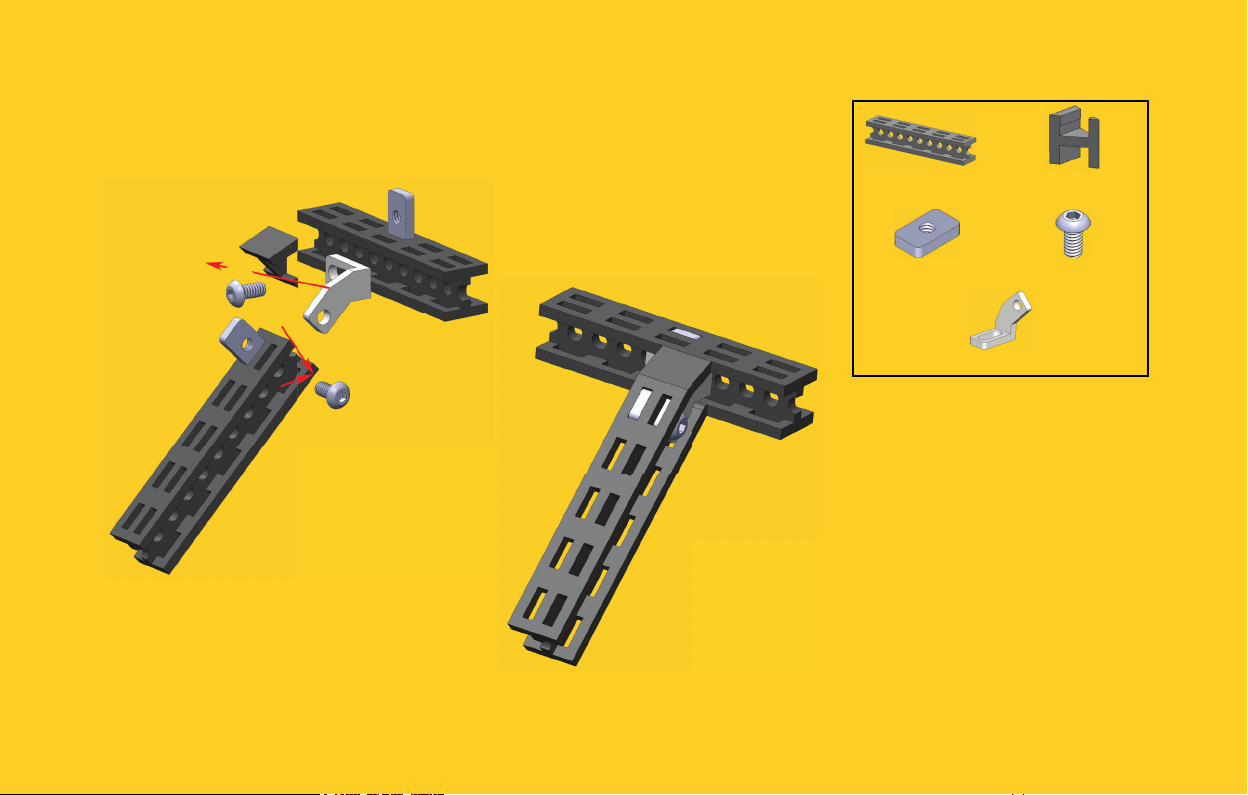
45x90 Bracket
NOTE: there are many other ways to use this bracket.
Tip: mirroring brackets are used the same way
2x Beam 50 mm 1x Single Side Filler
2x Nut M3 6x10 2x Bolt M3x6
1x 45x90 Bracket
17
Page 18
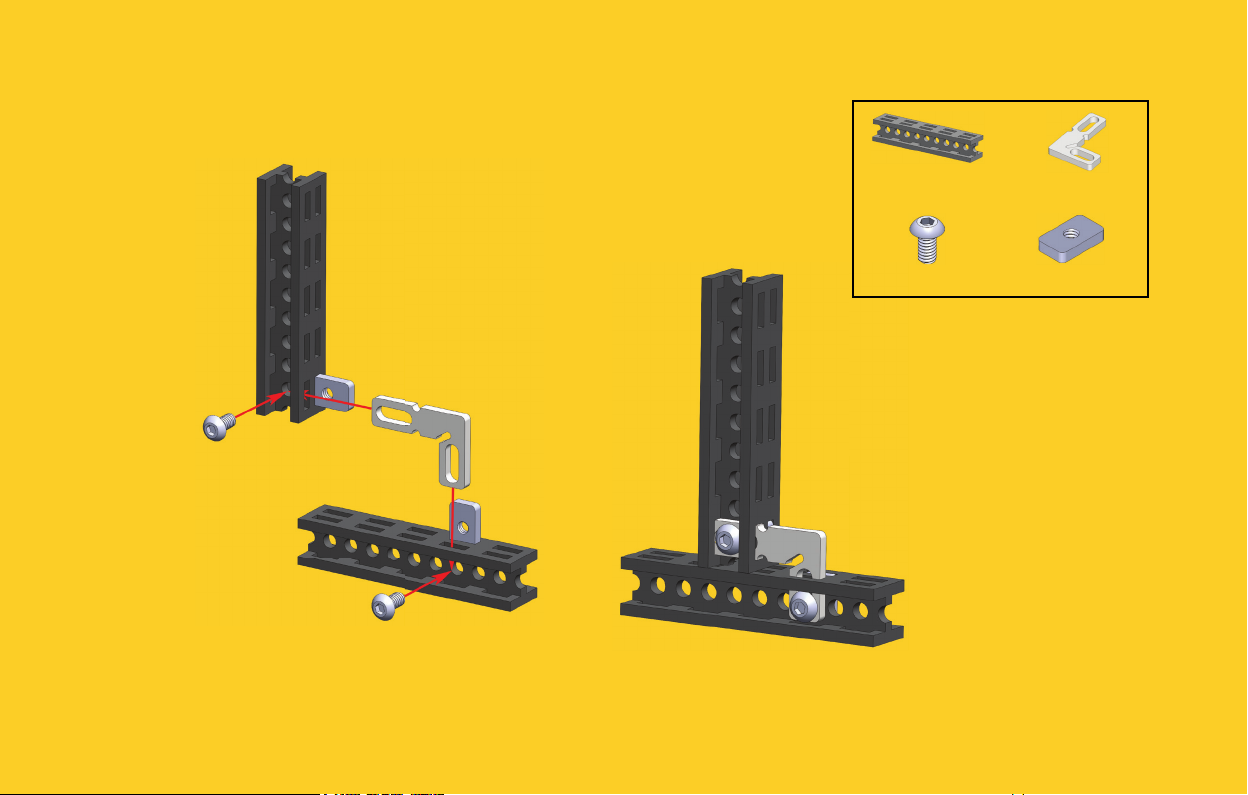
L-Bracket
NOTE: there are many other ways to use this bracket.
2x Beam 50 mm 1x L-Bracket
2x Bolt M3x6 2x Nut M3 6x10
18
Page 19
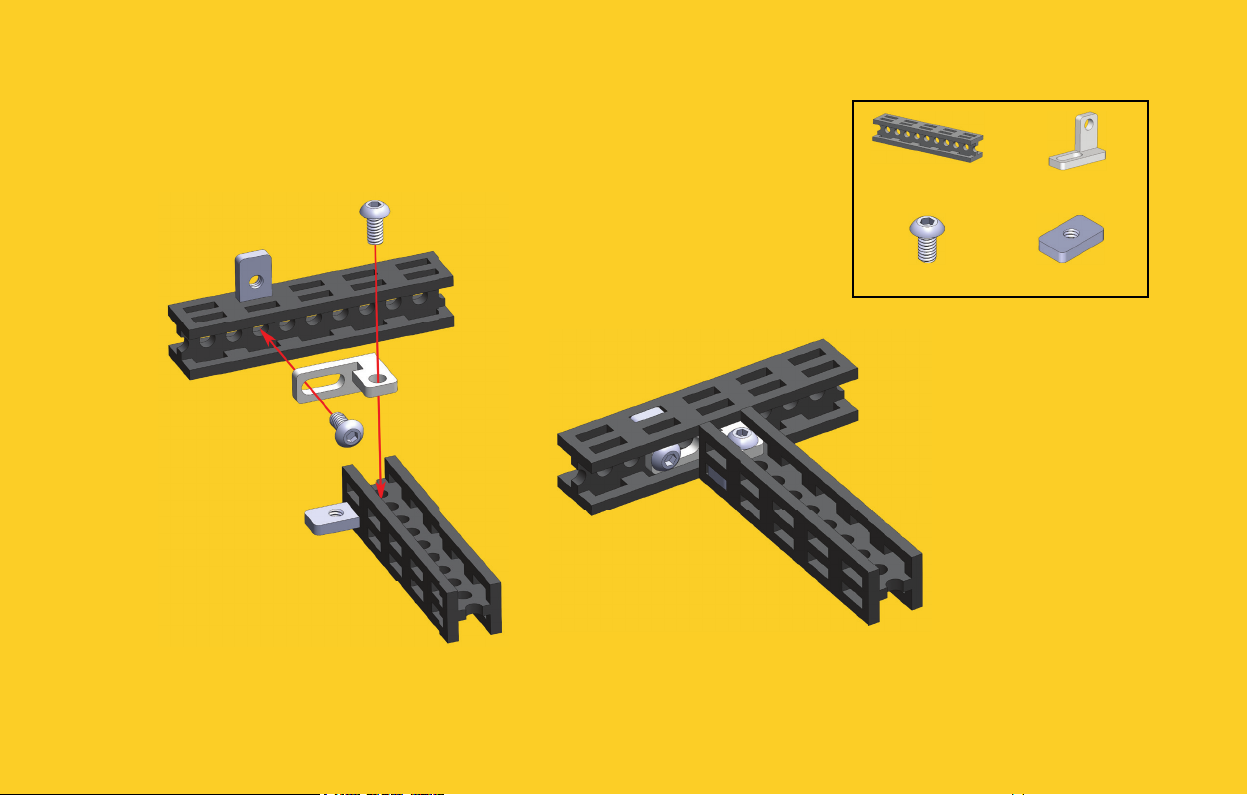
L-Twisted Bracket
NOTE: there are many other ways to use this bracket.
2x Beam 50 mm 1x L-Twisted Bracket
2x Bolt M3x6 2x Nut M3 6x10
19
Page 20
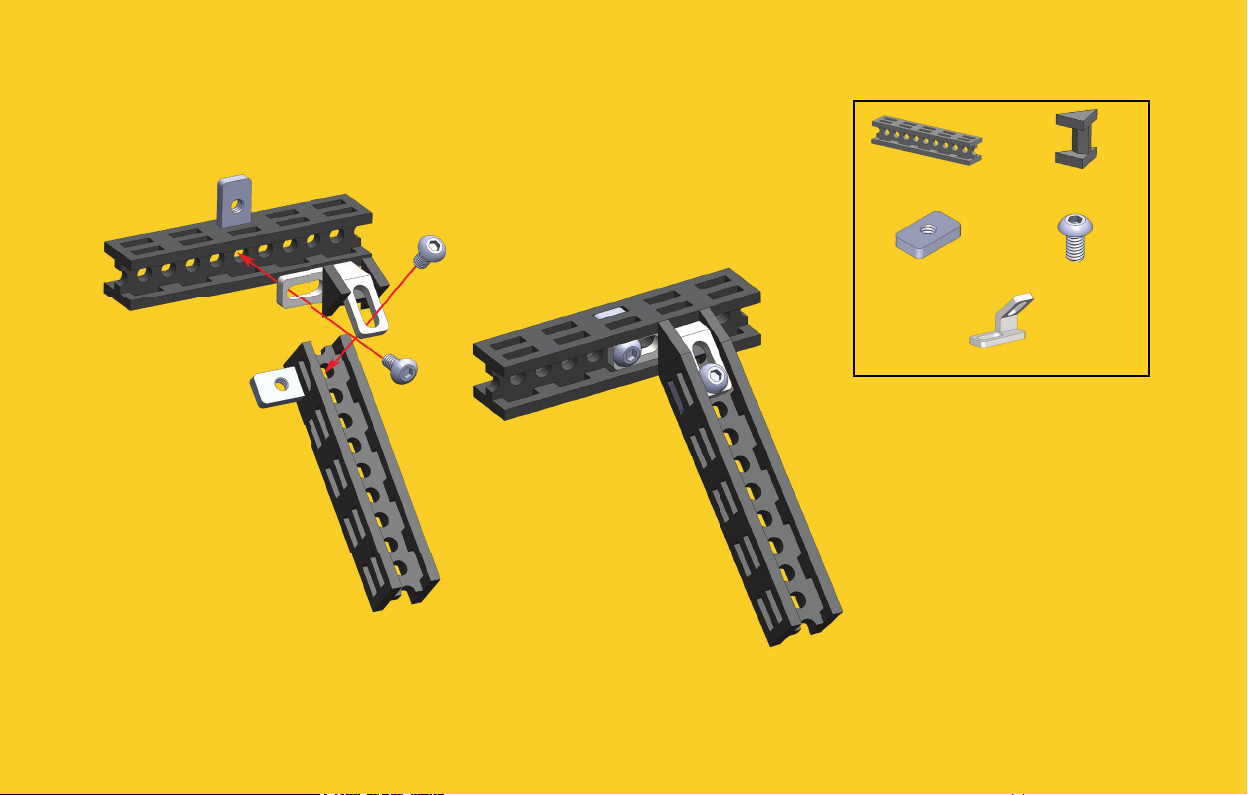
Swan 90x45 Bracket
2x Beam 50 mm 1x Double Side Filler
2x Nut M3 6x10 2x Bolt M3x6
1x Swan 90x45 Bracket
NOTE: there are many other ways to use this bracket.
20
Tip: mirroring brackets are used the same way
Page 21
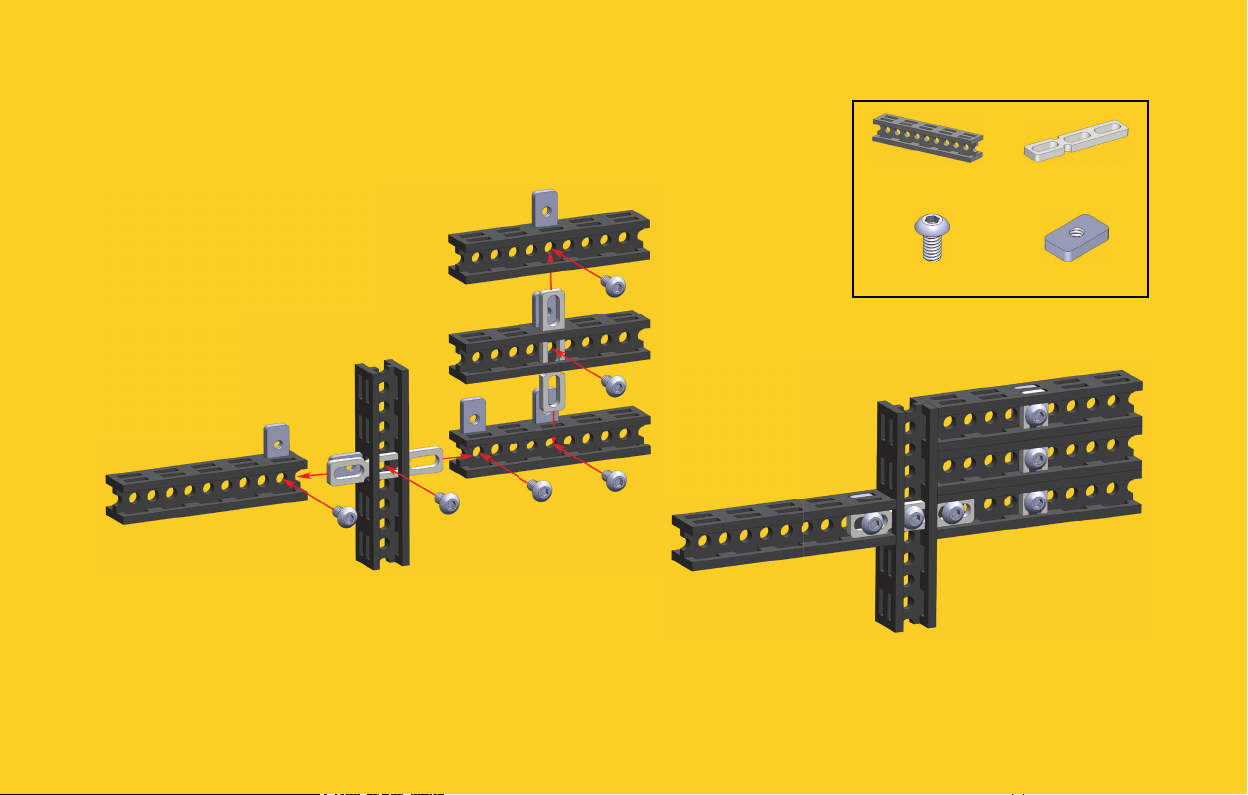
3-Hole Bracket
NOTE: there are many other ways to use this bracket.
5x Beam 50 mm 2x 3-Hole Bracket
6x Bolt M3x6 6x Nut M3 6x10
21
Page 22
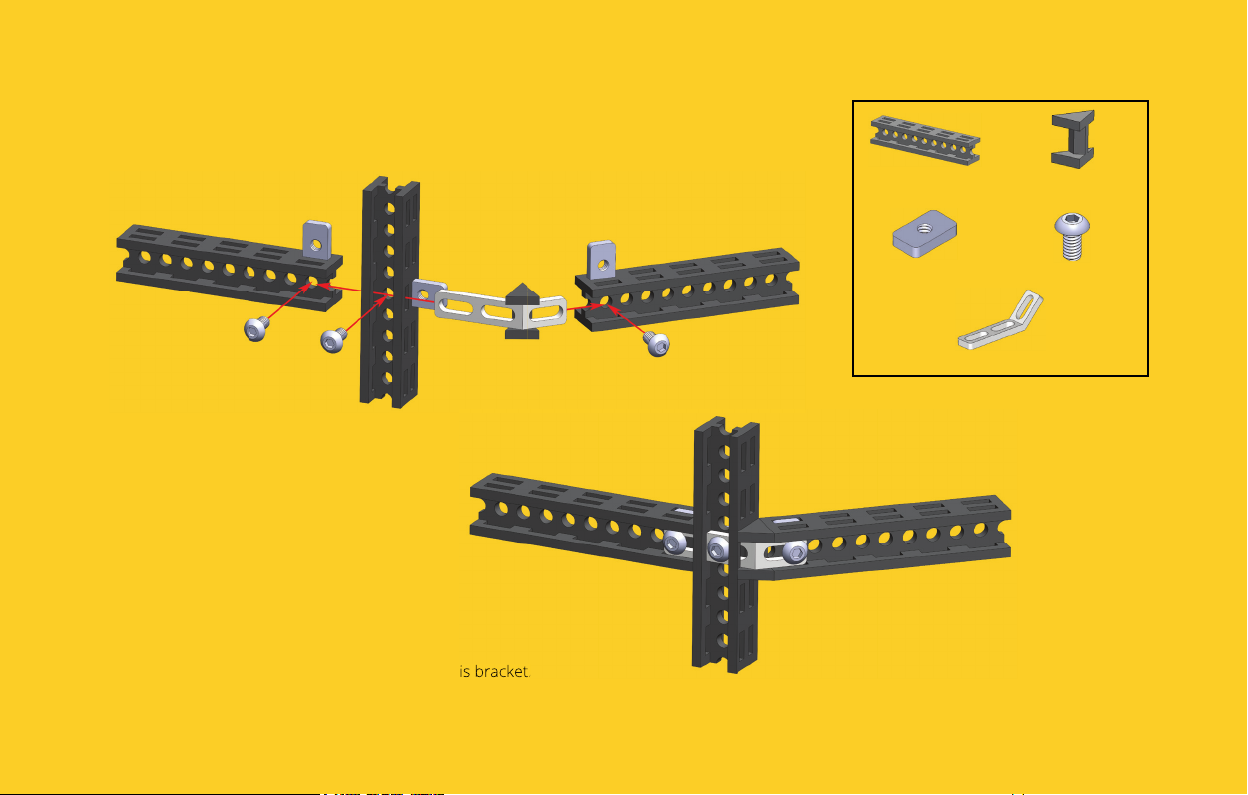
3-Hole 45 Bracket
NOTE: there are many other ways to use this bracket.
3x Beam 50 mm 1x Double Side Filler
3x Nut M3 6x10 3x Bolt M3x6
1x 3-Hole 45 Bracket
22
Page 23
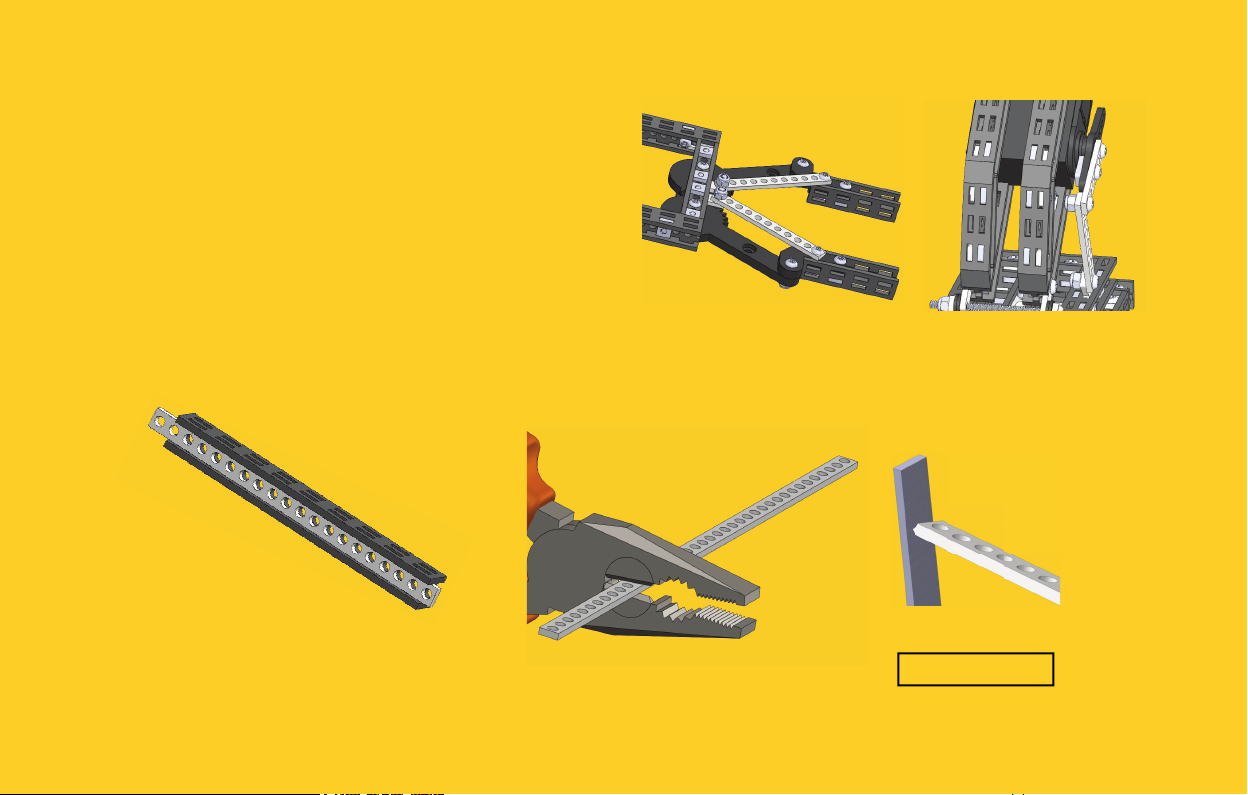
Using Strip Brackets
• Perfect when building robotics (pictures 1 and 2).
• Can be cut into any required length.
• Hole diameter: 3 mm.
• Holes can be drilled for 4 mm hardware.
• Strengthen the Beam: Strip Bracket perfectly fi ts
into the track of beam and makes it even more
sturdy (picture 3).
• Easy to cut using pliers or hacksaw (picture 4).
Picture 1 Picture 2
Picture 3 Picture 4
Use fi le for fi nishing.
23
Page 24
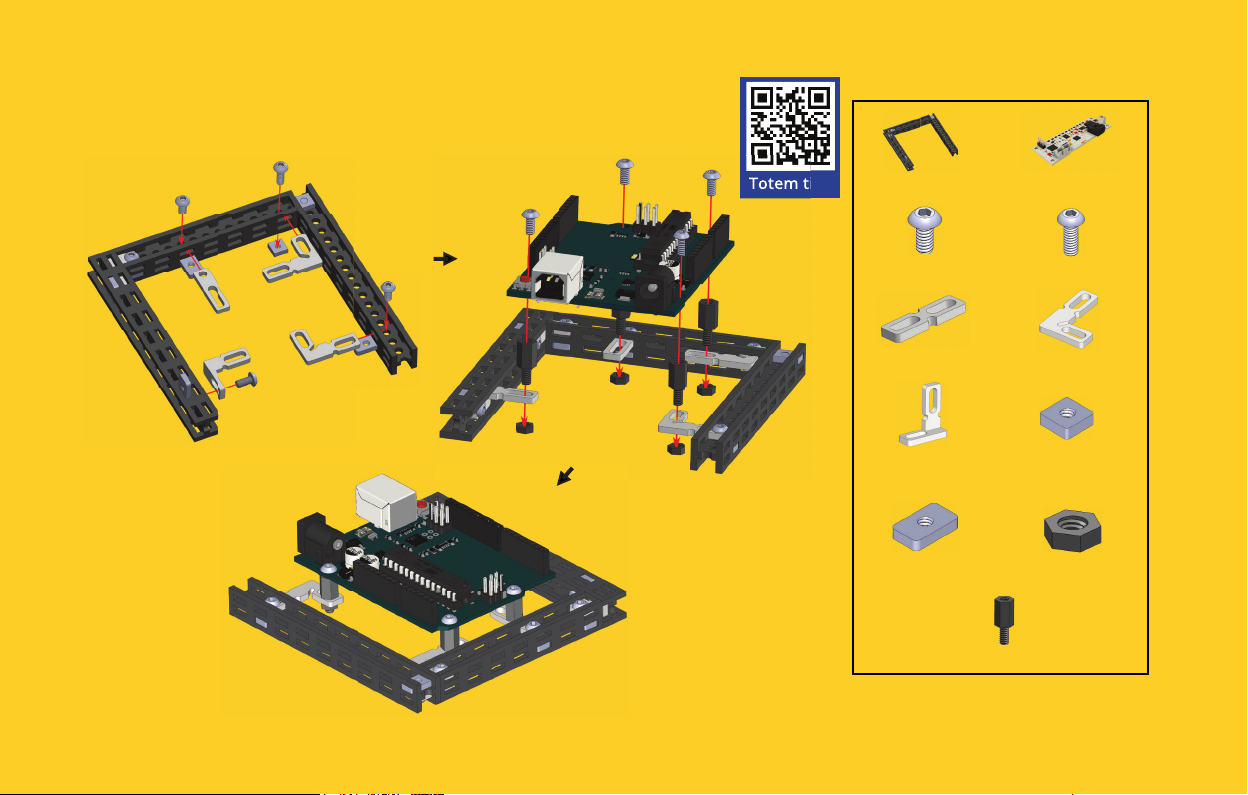
Using Nylon Standoff s to Mount Electronics
1. Do not tighten
bolts too much,
since you will adjust
position a little in
the next step.
24
Totem tips
2. Adjust position
of the brackets and
standoff s to fi t holes
in the electronics
board. Then tighten
nuts and bolts.
1x Structure of Beam 1x Electronics Board
7x Bolt M3x6 1x Bolt M3x8
1x 2-Hole Bracket 2x L-Bracket
1x L-Twisted
Adjustable Bracket
3x Nut M3 6x10 4x Nylon Nut M3
4x Nylon Standoff M3x8 mm
1x Nut M3 5.5x5.5
Page 25
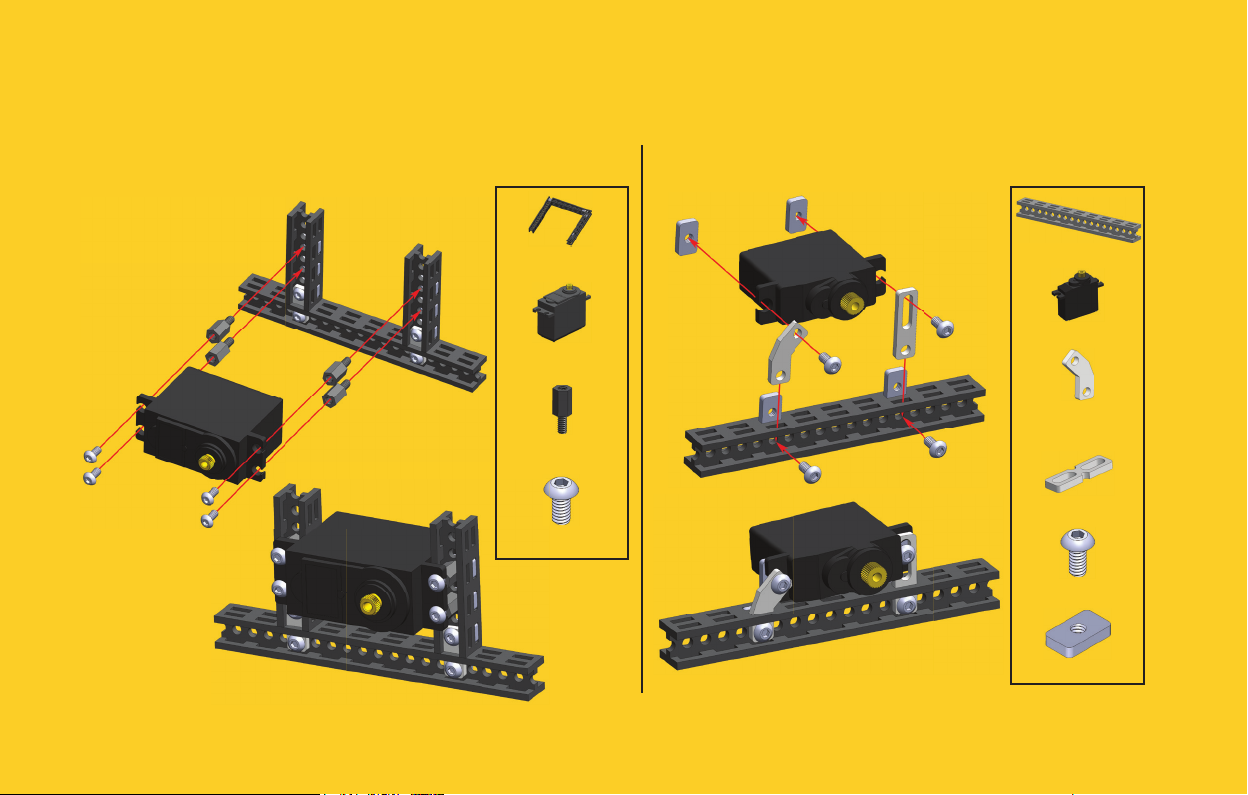
Tips for Mounting Motors
Standard Servo Motors: Using Standoff s Mini Servo Motors: Using Brackets
1x Structure
of Beams
1x Standard
Servo Motor
4x Nylon Standoff
M3x8 mm
4x Bolt M3x6
1x Beam 90 mm
1x Mini Servo motor
1x 2-Hole 45
Simple Bracket
1x 2-Hole Bracket
4x Bolt M3x6
4x Nut M3 6x10
Standard Servo can also be mounted on beams using brackets.
25
Page 26
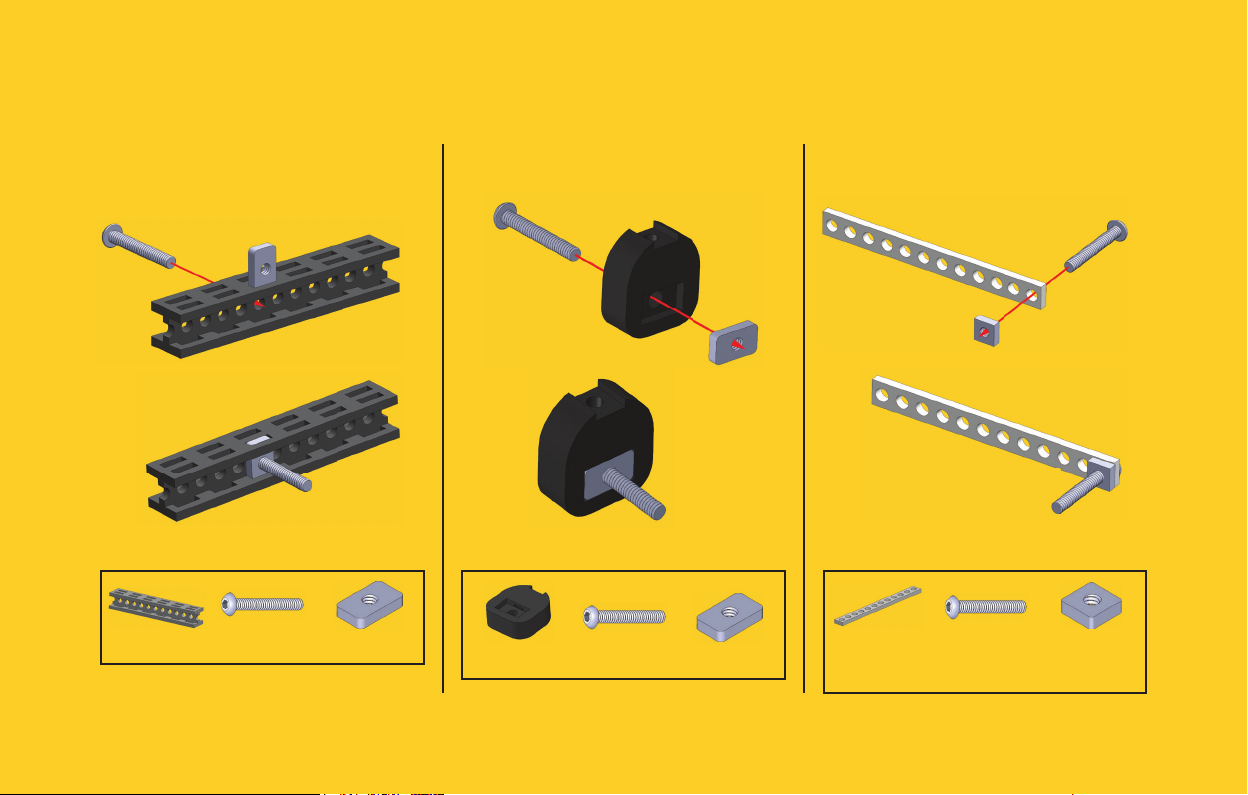
Axles
Beam Axle Motor Hub Axle Strip Bracket Axle
26
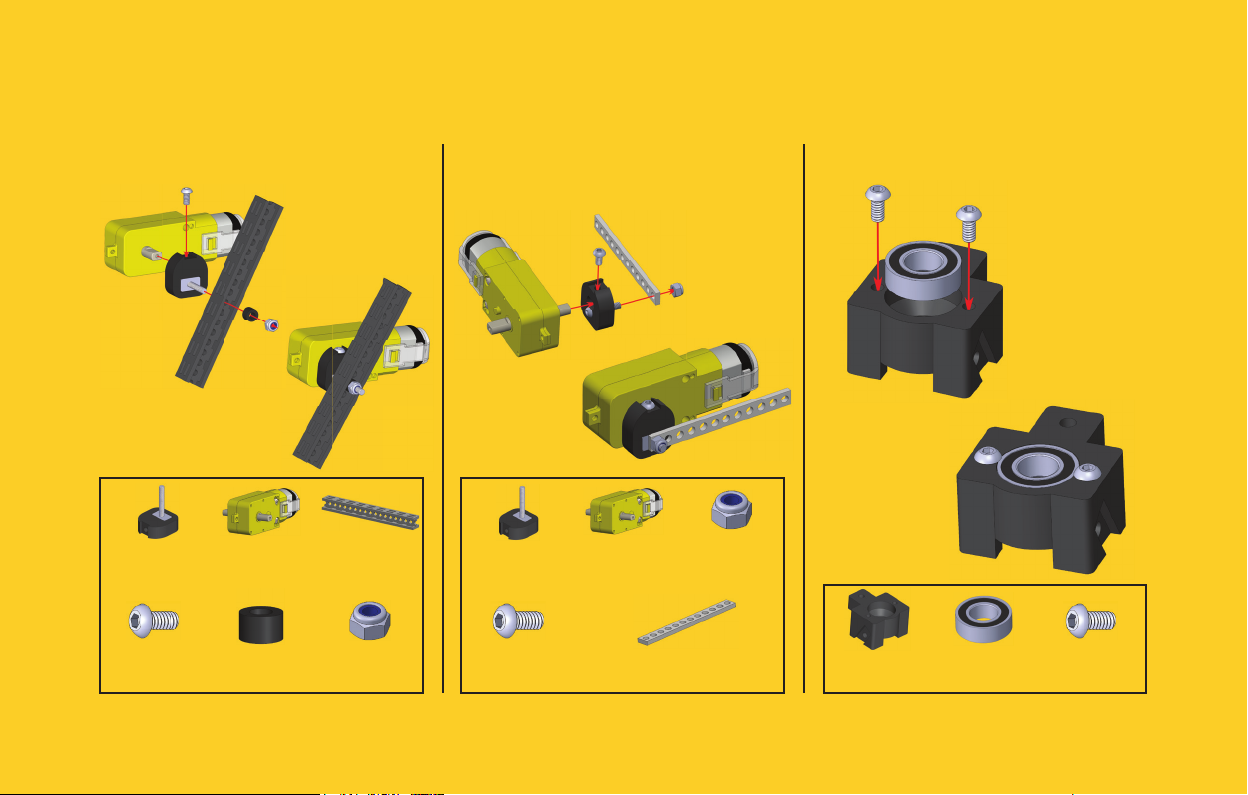
1x Yellow DC
Motor Hub
1x Bolt M3x20 1x Nut M3 6x101x Beam 60 mm 1x Bolt M3x20 1x Nut M3 6x10
1x Strip Bracket
60 mm (12
holes)
1x Bolt M3x20 1x Nut M3
5.5x5.5
Page 27
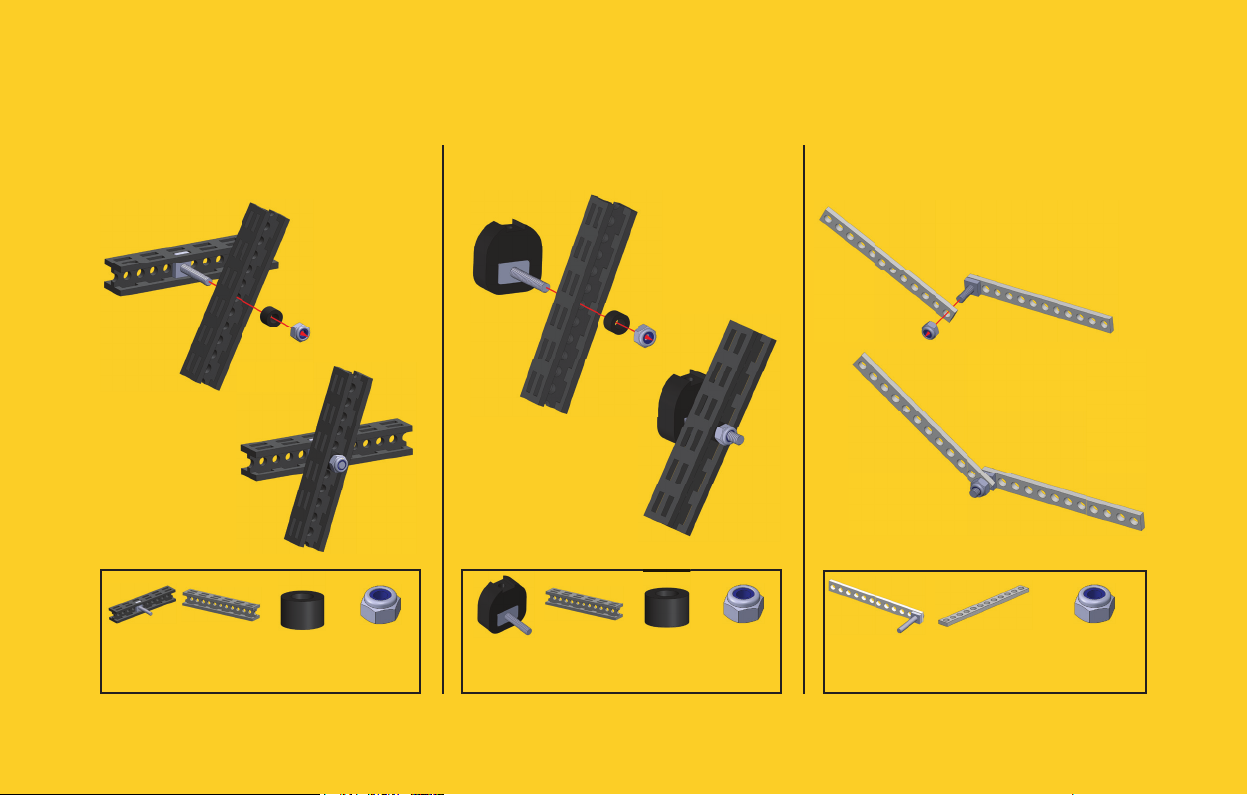
Lock Nuts
Lock Nut + Beam Axle Lock Nut + Motor Hub Axle Lock Nut + Strip Bracket Axle
1x Beam
Axle
1x Beam
60 mm
1x Nylon
Spacer 4
mm
1x Lock
Nut M3
1x Motor
Hub Axle
1x Beam
60 mm
1x Nylon
Spacer 4
mm
1x Lock
Nut M3
1x Strip Bracket
Axle
1x Strip Bracket
60 mm (12
holes)
1x Lock Nut M3
27
Page 28
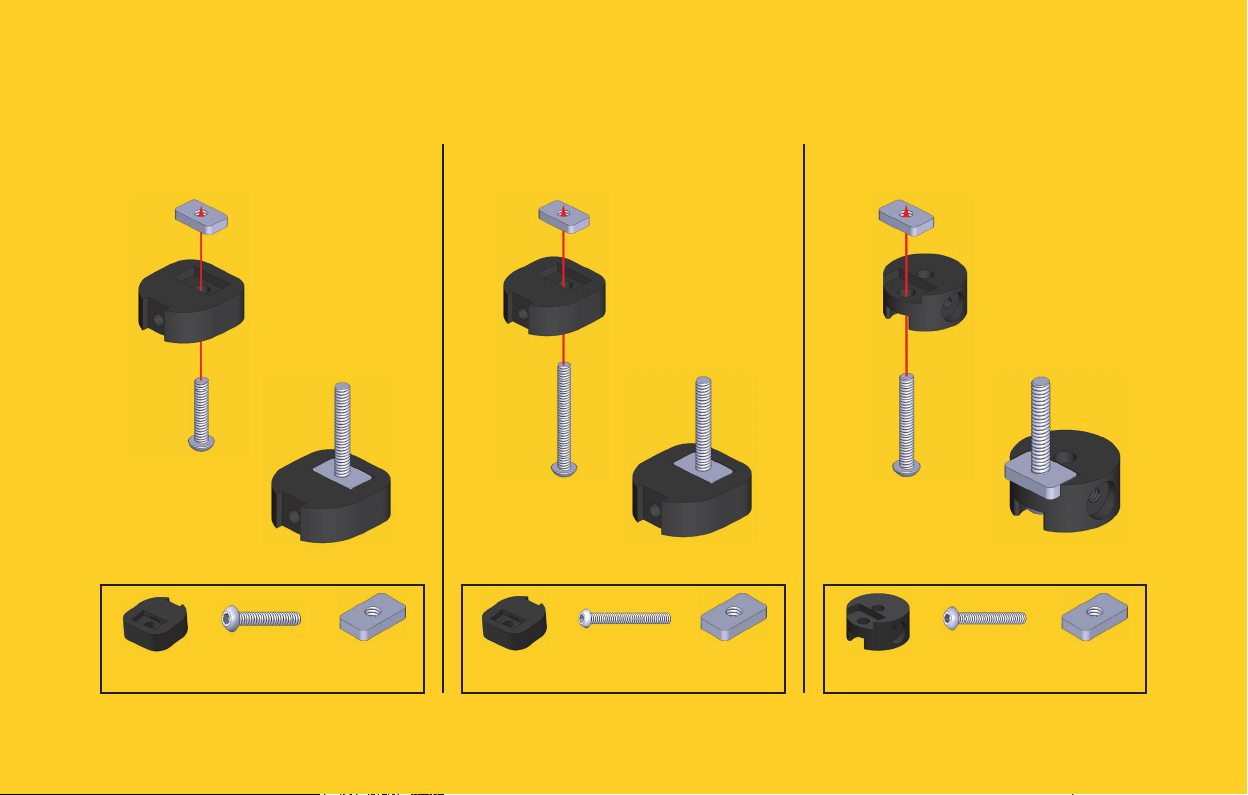
Loco Motion
Loco Motion Prep 1 Loco Motion Prep 2 Loco Motion Prep 3
1x Yellow DC
Motor Hub
28
1x Bolt M3x14 1x Nut M3 6x10 1x Yellow DC
Motor Hub
1x Bolt M3x25 1x Nut M3 6x10 1x N20 Motor
Hub
1x Bolt M3x20 1x Nut M3 6x10
Page 29
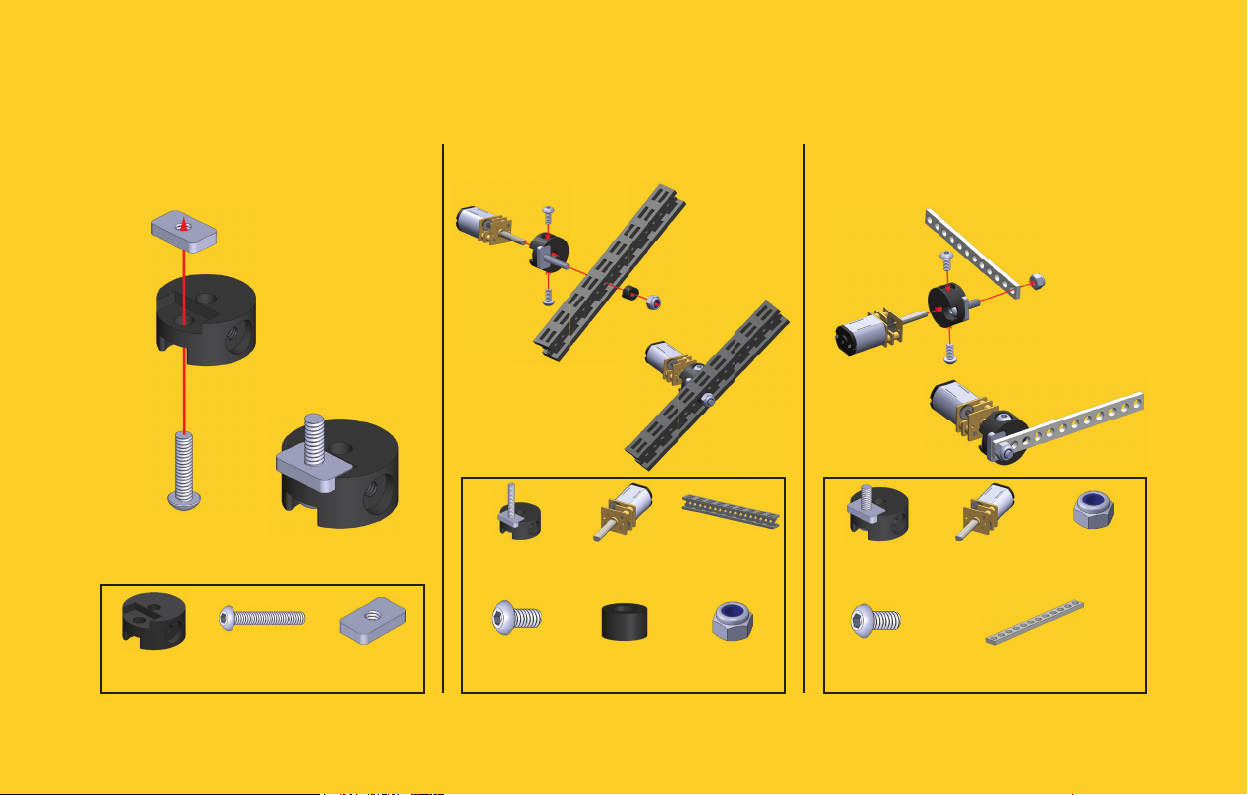
Loco Motion
Loco Motion Prep 4 Loco Motion N20 with Beam Loco Motion N20
with Strip Bracket
1x N20 Motor
Hub
1x Bolt M3x20 1x Nut M3 6x10
1x Loco Motion
Prep 3
1x Bolt M3x6 1x Nylon Spacer
1x N20 Motor 1x Beam 90 mm
4 mm
1x Lock Nut M3
1x Loco Motion
Prep 4
1x Bolt M3x6 1x Strip Bracket 60 mm (12 holes)
1x N20 Motor 1x Lock Nut M3
29
Page 30
Loco Motion Caster Wheel
Loco Motion with Beam Loco Motion with
Strip Bracket
1x Loco Motion
Prep 2
1x Bolt M3x6 1x Nylon Spacer
30
1x Yellow DC
Motor
4 mm
1x Beam 90 mm
1x Lock Nut M3
1x Loco Motion
Prep 1
1x Bolt M3x6 1x Strip Bracket 60 mm (12 holes)
1x Yellow DC
Motor
1x Lock Nut M3
Caster Wheel Set Step 1
1x Caster Wheel
Body
1x Bearing
8x16x5
1x Bolt M3x6
Page 31
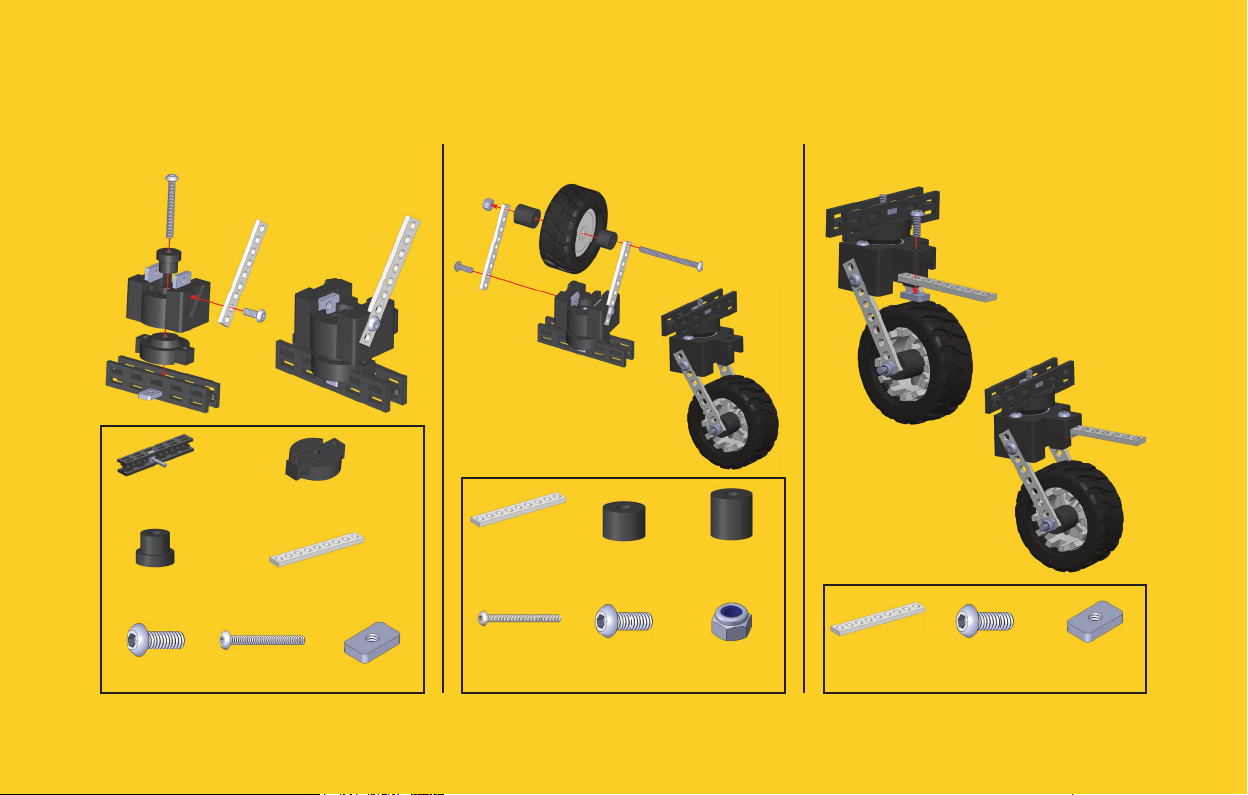
Caster Wheel
Caster Wheel Set Step 2 Caster Wheel Set Step 3 Caster Wheel Set Step 4
1x Structure of
Beam
1x Caster Wheel
Axle
1x Bolt M3x8 1x Bolt M3x25 1x Nut M3 6x10
1x Caster Wheel Mounting Bracket
1x Strip Bracket 45 mm (9 holes)
1x Strip Bracket
45 mm (9 holes)
1x Bolt M3x35 1x Bolt M3x8 1x Lock Nut M3
1x Caster Wheel
Spacer 1
1x Caster Wheel
Spacer 2
1x Strip Bracket
45 mm (9 holes)
1x Bolt M3x8 1x Nut M3 6x10
31
Page 32
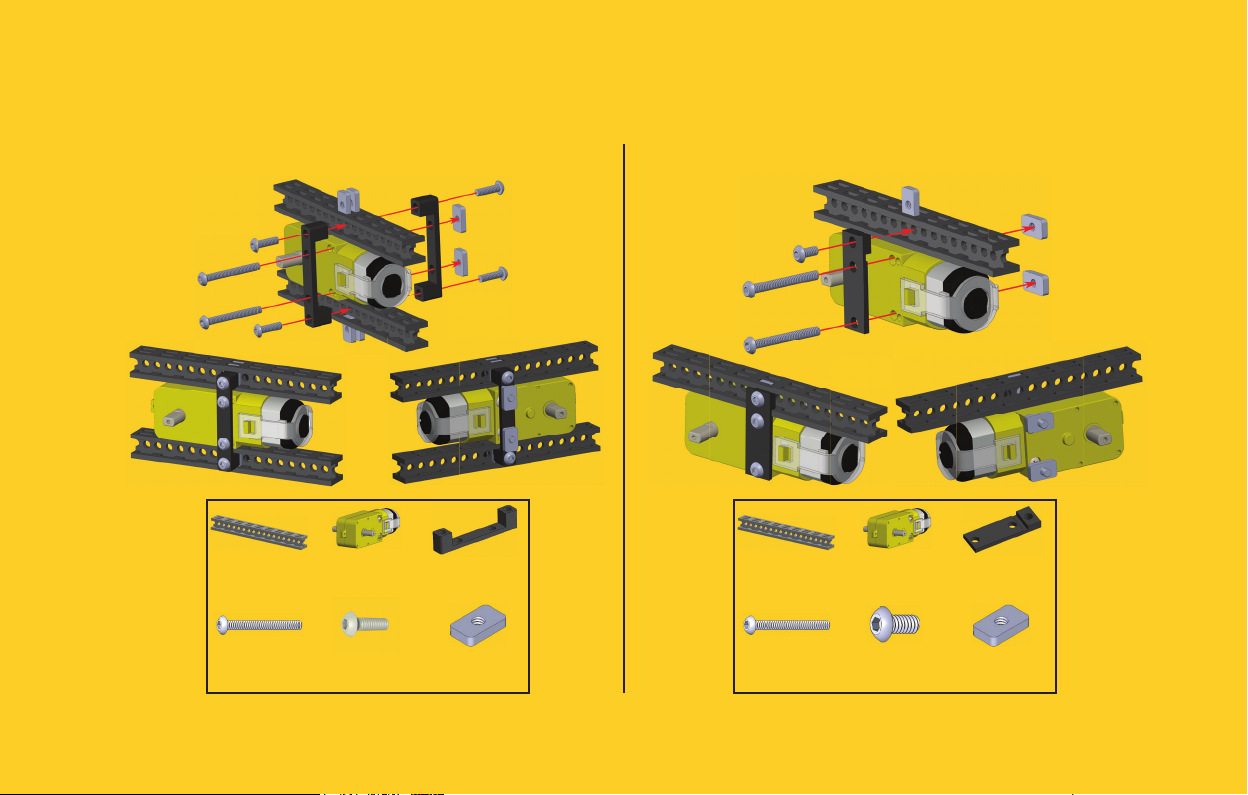
Mounting Yellow DC Motor
3D Printed Bracket for Yellow DC Motor 1 3D Printed Bracket for Yellow DC Motor 2
32
2x Beam 90 mm 1x Yellow DC
2x Bolt M3x25 4x Bolt M3x10 4x Nut M3 6x10
Motor
2x Yellow DC
Motor Bracket 1
1x Beam 90 mm 1x Yellow DC
2x Bolt M3x25 1x Bolt M3x6 3x Nut M3 6x10
Motor
1x Yellow DC
Motor Bracket 2
Page 33
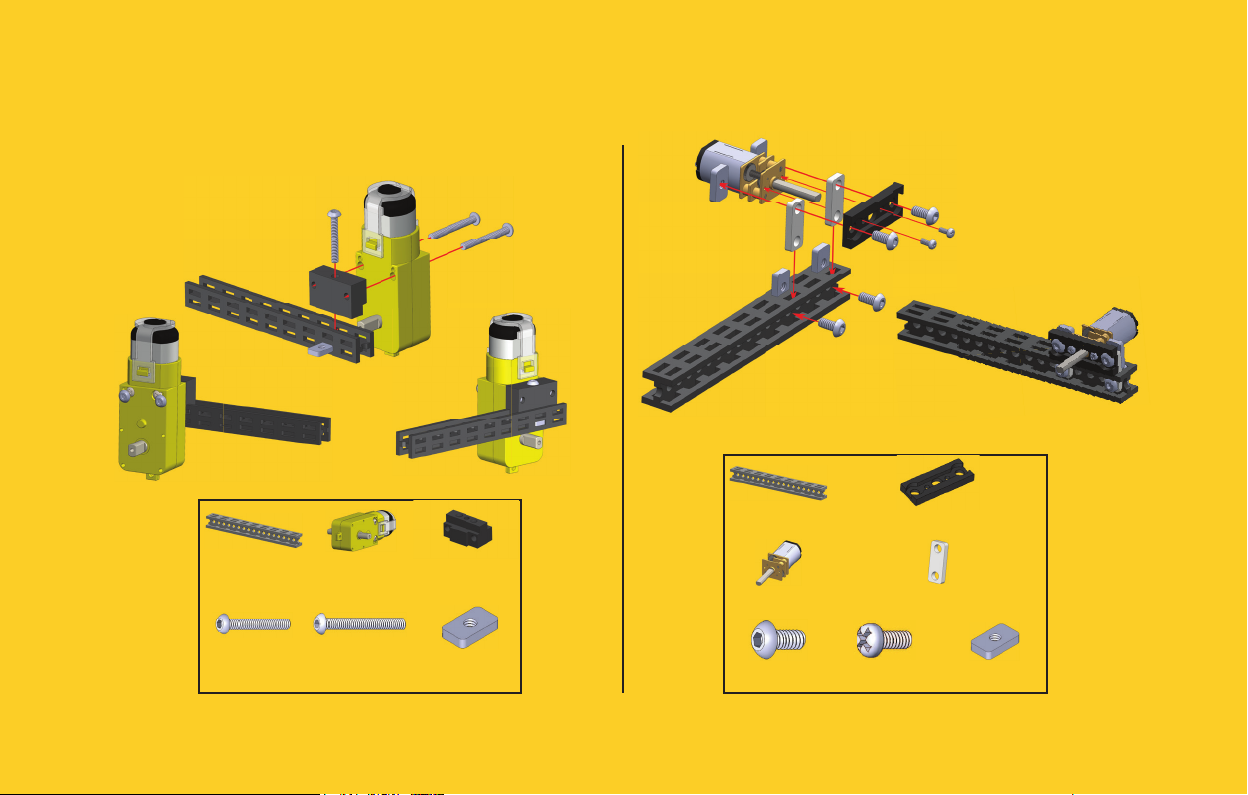
3D Printed Bracket for Yellow DC Motor 3
Mounting N20 MotorMounting Yellow DC Motor
1x Beam 90 mm 1x N20 Motor Bracket 2 v.3
1x Beam 90 mm 1x Yellow DC
1x Bolt M3x20 2x Bolt M3x25 1x Nut M3 6x10
Motor
1x Yellow DC
Motor Bracket 3
1x N20 Motor 2x 2-Hole Simple Bracket
4x Bolt M3x6 2x Bolt M1.6x3 4x Nut M3 6x10
33
Page 34

MINI CONTROL BOARD X3 TROUBLESHOOT
Can’t connect to the Mini Controller Board X3 with Totem mobile application.
• Check if Mini Trooper PCB is powered on (LEDs should blink).
• Only one device can be connected to the PCB at a time. Reconnect the battery to
reset the PCB or disconnect with another device.
• Check if your device is running the latest version of Totem mobile application.
• Ensure that your device has Bluetooth functionality and location service (GPS)
enabled and Totem mobile application has the location permission.
• Close Totem mobile application and run it again (restart).
Servo motor doesn’t spin.
Servo motor connector may be plugged in upside down. Flip it over.
LEDs are fl ashing when battery is not connected and motors are spined
manually.
This is a normal behaviour and doesn’t indicate any malfunction.
None of the LEDs are fl ashing when battery is connected.
Battery voltage is low. Charge the battery.
First LED of light bar is fl ashing when battery is connected.
Battery voltage is low. Charge the battery.
DC motors are twitching or decelerates while driving.
Battery voltage is low. Charge the battery.
DC motor spin direction is incorrect.
• Check instruction manual if motors are plugged to
appropriate DC motor sockets.
• Connect to Mini Trooper using Totem mobile application. Go to “Settings”
and switch “DC motor pins” to “Inverted”. Write changes by clicking “Save”.
• A button confi guration may be wrong. Reinstall Totem mobile application
in order to reset all the settings.
PRECAUTIONS:
ELECTRONICALLY OPERATED PRODUCT
Do not give this product to children because of sharp cutting tools. As with all electronic products, precautions should be observed during handling and use to
prevent electric chock. Adult supervision required.
SAFETY WARNINGS:
• Do not pick up model while in motion.
• Keep fi ngers, hair, and loose clothing away from rotating wheels and/or other moving parts to avoid the injury.
• If you stopped operating the model, remember to unplug the battery, to avoid accidental operation.
• If the model is dirty, please clean it with dry and soft cloth. Do not clean electronics.
• Do not expose the model to high temperature, high humidity, or direct sunlight.
• Indoor use only. Do not put this product in water to avoid damaging its electronic components.
• The product is made of complex electronic circuit and electronic components, do not disassemble, or modify the circuit board.
34
Page 35
BATTERY SAFETY INFORMATION:
• Do not expose battery to high temperature, high humidity, or direct sunlight.
• There is a risk of fi re and personal injury if battery is punctured, damaged or misused.
• Do not disassemble or damage the battery pack.
• Use only the supplied 250 mAh 3.7V LiPo battery battery. Using any other battery may damage the model.
• Use only the included USB charging cable to charge the battery.
• Please check on a regular basis the wire, plug, battery, charger, and other electronic parts. If any damage is found, please stop using the product immediately.
• Stop charging if battery becomes hot, smells, smokes or gives off strong odour.
• Never throw batteries into fi re to avoid explosion or leakage.
• Check the batteries on regular basis to avoid leakage.
• Recycle or dispose of batteries according to local laws and guidelines.
TOOLS SAFETY INFORMATION:
Cut hazard: sharp blade. Contact may result in injury. Always keep blades away from fi ngers and body. Handle with care. Keep out of reach of children.
BATTERY CHARGING:
Rechargeable battery must be charged by adult only.
• The new battery pack needs to be charged before use.
3.7v 250 mAh
• Connect the USB charging cable to 5V USB power source, such as laptop.
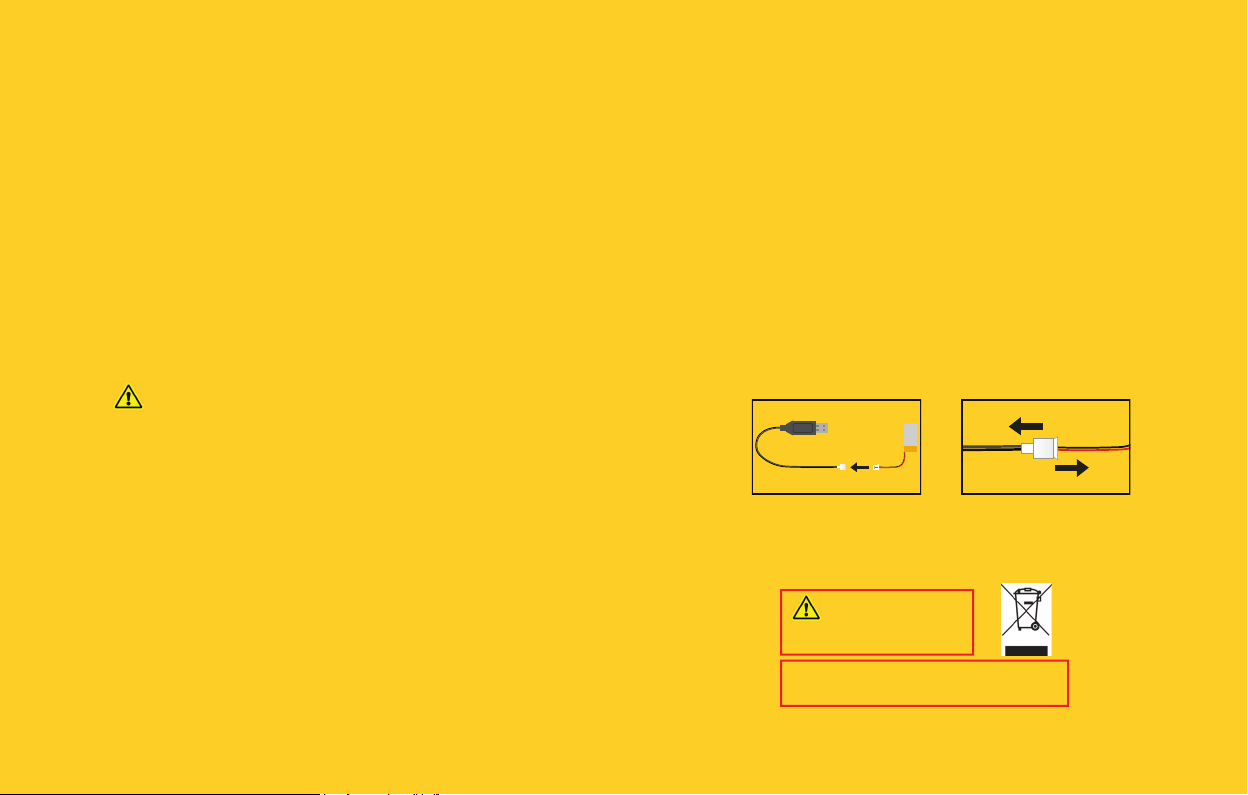
• Connect the battery to the charger (see picture 1). The charger will show a red LED light
when charging the battery. When the battery is fully charged, the red LED light turns off .
• To disconnect cables, hold the connectors of both cables and pull apart (see picture 2).
• Do not attempt to overcharge the battery.
Picture 1 Picture 2
KEEP THIS INTRUCTION MANUAL AND THE PRODUCT BOX AS IT CONTAIN IMPORTANT INFORMATION FOR FUTURE REFERENCE.
Due to the continuous product improvement, the pictures on this manual may diff er slightly from the actual product. Please adhere to actual product instead.
Totem Maker names and logos are registered trademarks. All rights reserved.
www.totemmaker.net
Totem Technology, UAB
Sauletekio al. 15-709, Vilnius, 10224, Lithuania
For customer support please contact: [email protected]
WARNING:
CHOKING HAZARD - Small parts.
Not for children under 3 years.
Caution: this is not a toy and is intended for
use by or under the supervision of adult.
35
Page 36
36
 Loading...