

Page 1

Page 2
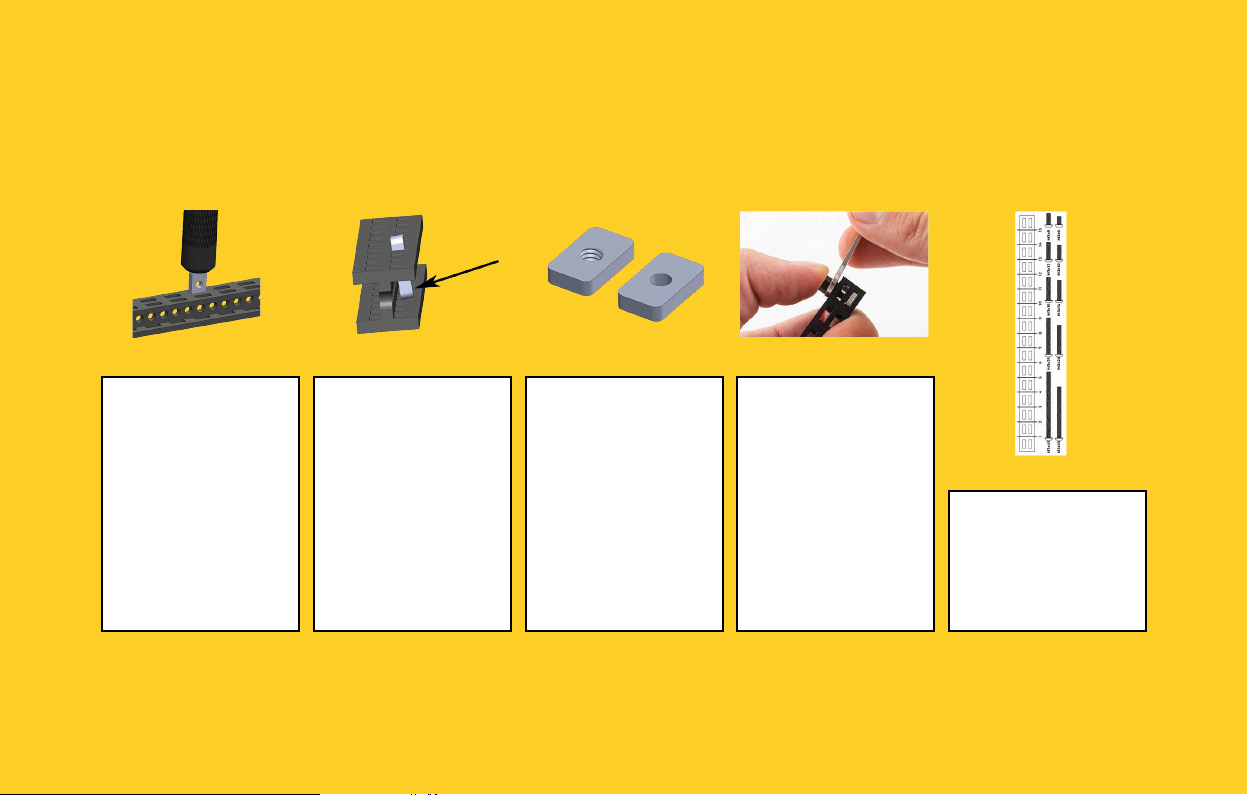
STARTING TIPS
Inserting nuts (1) Inserting nuts (2) Faulty threads Tightening
standos
It is a good idea to
start every step inserting nuts into
beams (if the step
requires).
Use the back of the
screwdriver to push
in the nuts.
After entering the
rst slot, nuts tend
to tilt. Use your
thumb to push it
back straight, and
then again use the
screwdriver to in-
sert the nut all the
way in.
For more tips, please visit the link below:
Some of the nuts
are missing threads.
This is a manufacturing issue and we
are working on it. In
the mean time, we
add few extra nuts.
We apologize for
the inconvenience.
Push Nylon
Stando with your
thumb while tight-
ening it with the
wrench.
https://totemmaker.net/blog/totem-mechanics-for-beginners/
Ruler
Use Beam/Bolt
ruler to determine
the length of beams
and bolts.
Page 3

PART LIST
7x Beam 90 mm 4x Beam 40 mm 10x Bolt M3x6 1x Bolt M3x8 8x Bolt M3x10 6x Bolt M3x25
2x Bolt M3x35 4x Lock Nut M3 25x Nut M3 6x10 2x 2-Hole 45 Bracket 1x 2-Hole 45 Simple Bracket 2x 2-Hole Simple Bracket
2x C-Bracket 4x Strip Bracket 75 mm 6x Nylon Spacer 4 mm 2x Nylon Spacer 8 mm 4x Nylon Stando M3x8 2x DC Motor Hub
2x DC Motor Bracket 1x Battery Case with Switch 1x DC Motor 1x Totem Screwdriver 1x Totem Wrench
Page 4
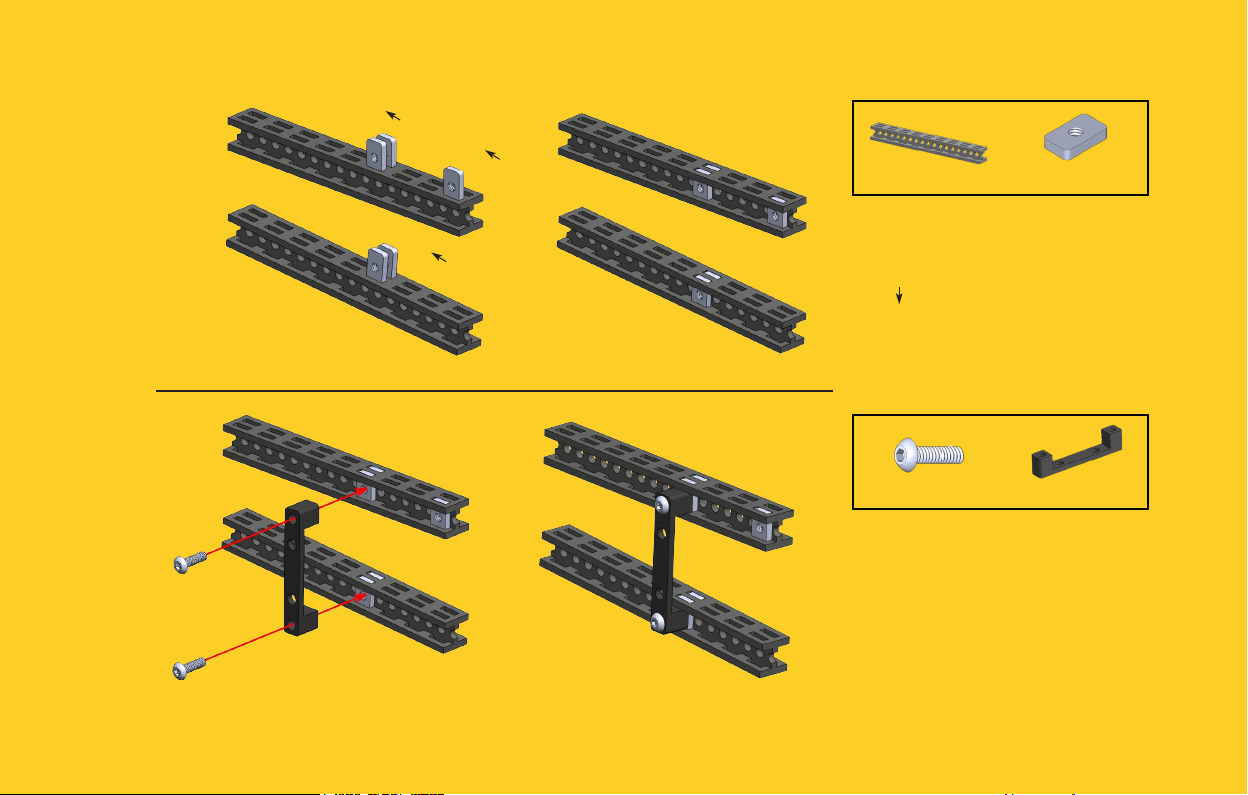
1
2
#4
#4
#1
2x Beam 90 mm 5x Nut M3 6x10
# indicates number
of circular hole.
indicates counting
direction.
2x Bolt M3x10 1x DC Motor Bracket
Page 5
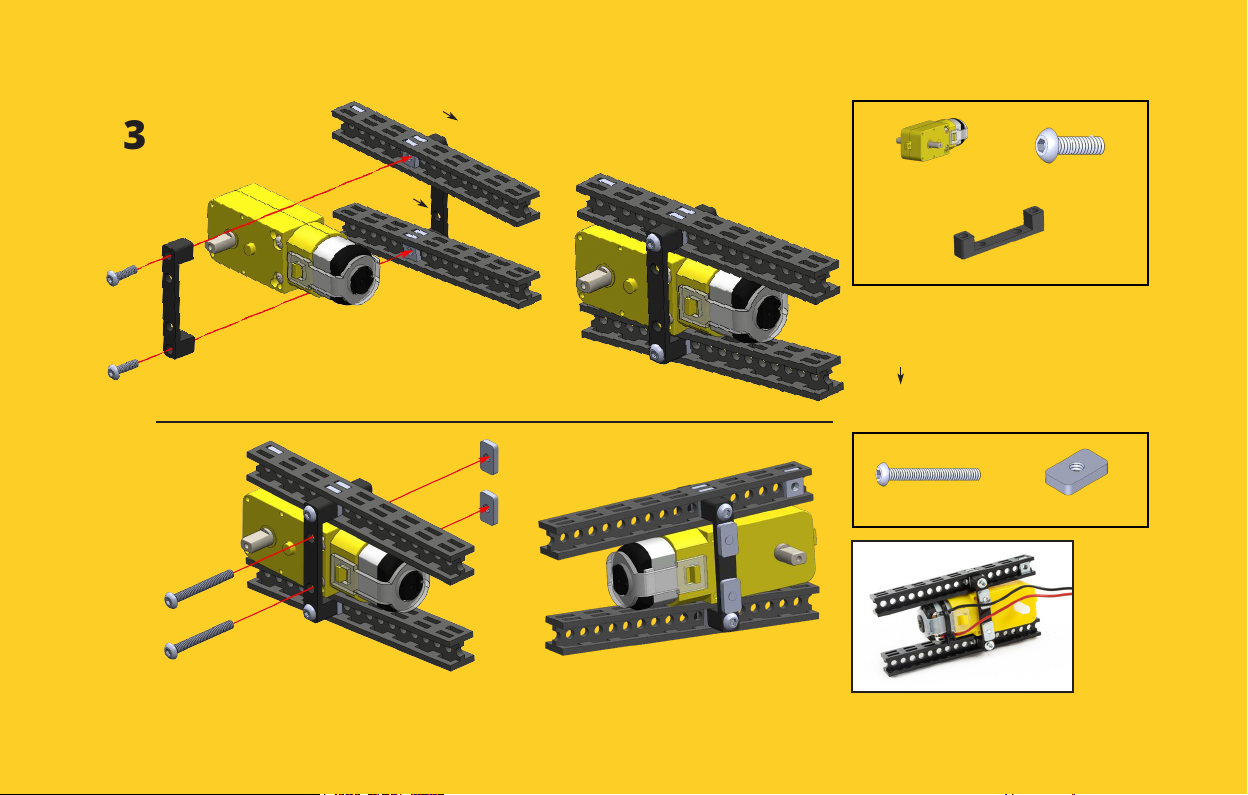
3
4
#4
1x DC Motor 2x Bolt M3x10
#4
1x DC Motor Bracket
# indicates number
of circular hole.
indicates counting
direction.
2x Bolt M3x25 2x Nut M3 6x10
Page 6
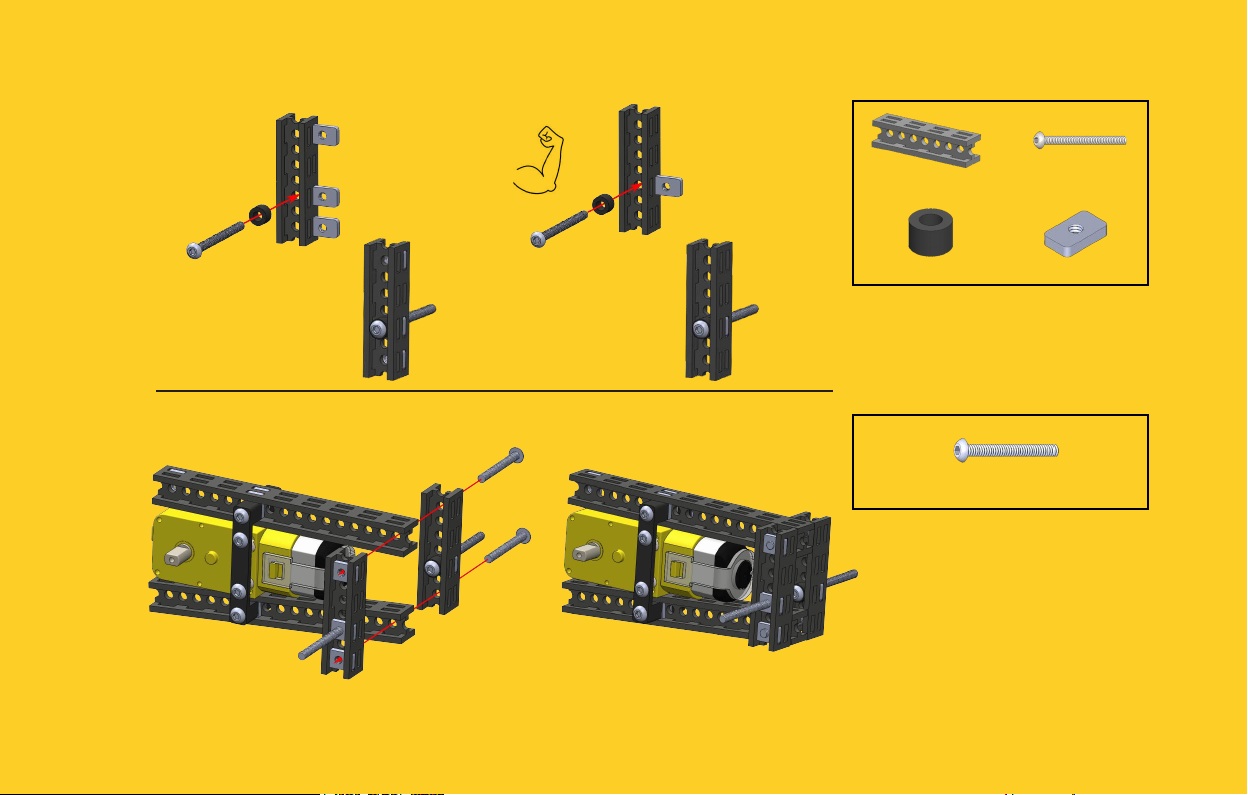
5
6
Tighten the
bolts rmly.
2x Beam 40 mm 2x Bolt M3x35
2x Nylon Spacer 4 mm 4x Nut M3 6x10
2x Bolt M3x25
6
Page 7
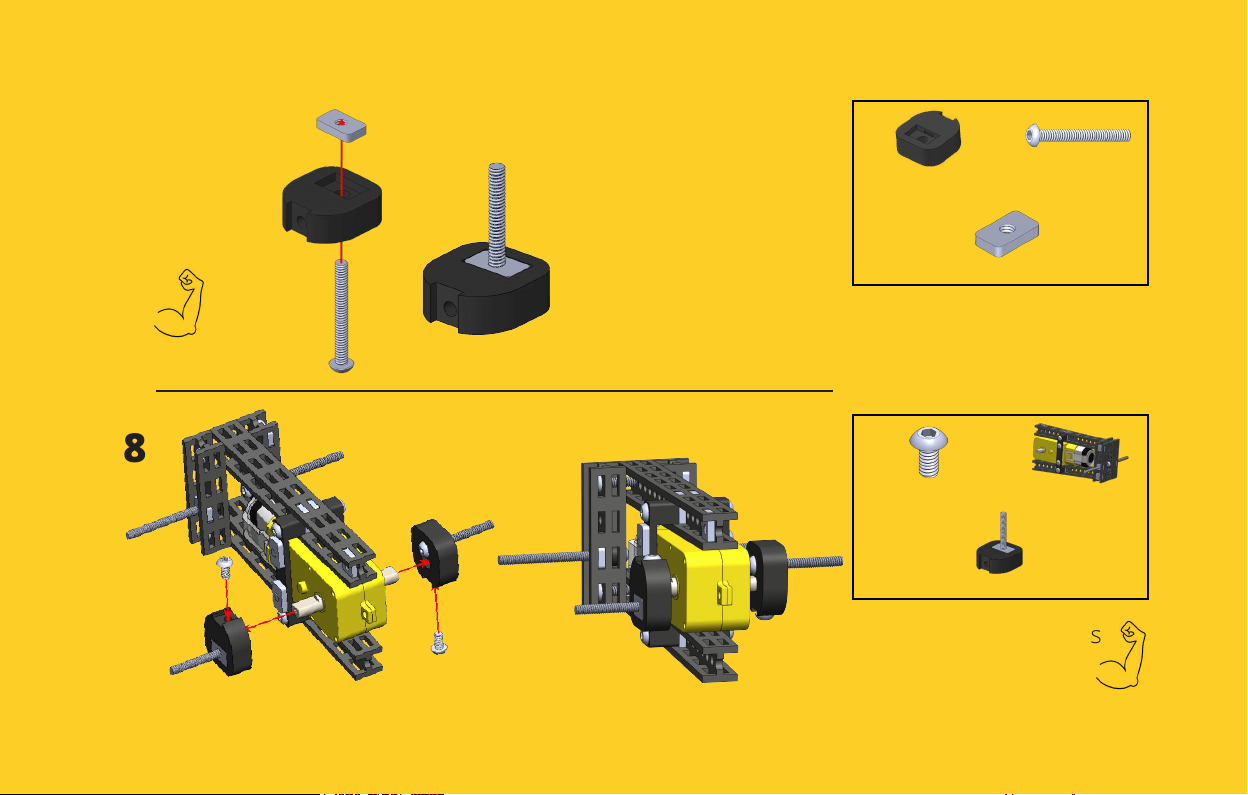
7
2x DC Motor Hub 2x Bolt M3x25
Tighten the
bolt rmly.
8
Repeat this step twice.
2x
Screw bolt with strength as
the hub’s hole is tight t.
2x Nut M3 6x10
2x Bolt M3x6 1x Step 6 Assembly
1x Step 7 Assembly
Page 8
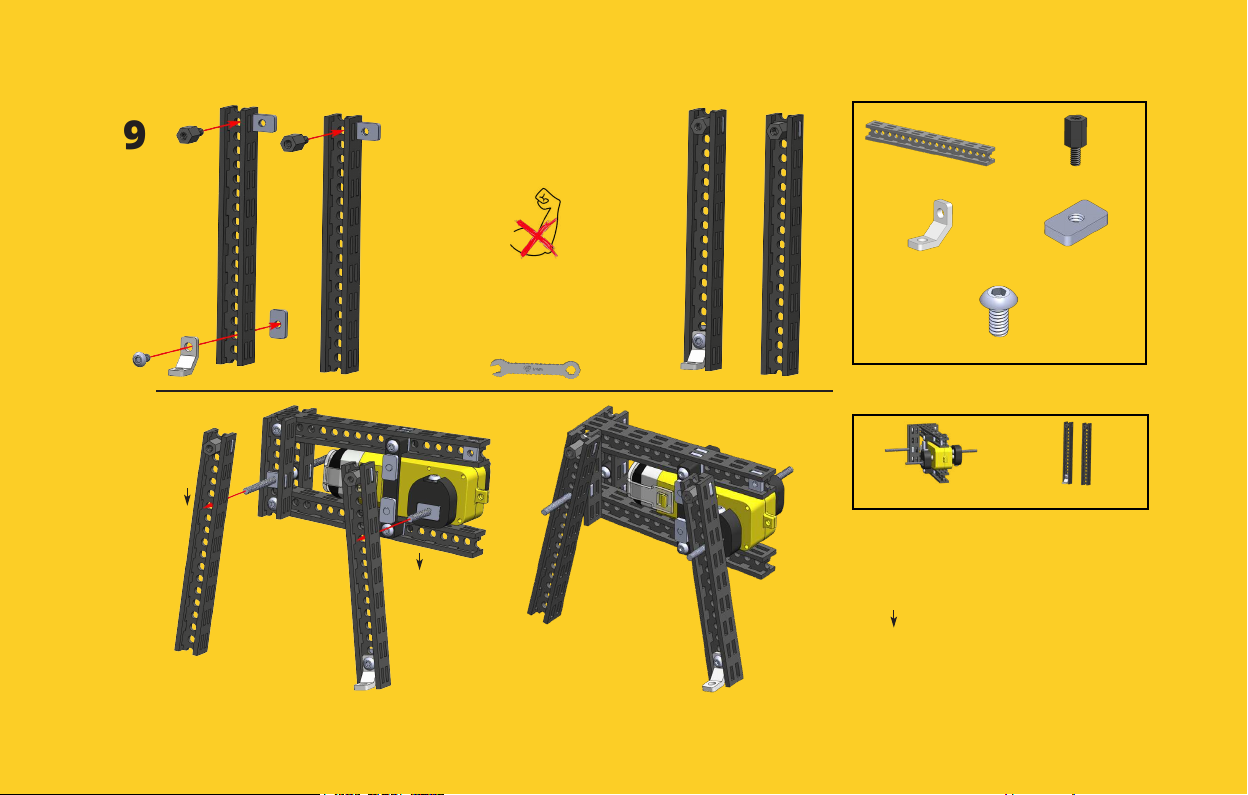
9
10
Do not use much
force when tightening
Nylon Standos.
Use wrench for
Nylon Standos.
2x Beam 90 mm 2x Nylon Stando
1x C-Bracket 3x Nut M3 6x10
1x Bolt M3x6
#6
#6
1x Step 8 Assembly 1x Step 9 Assembly
# indicates number
of circular hole.
indicates counting
direction.
Page 9
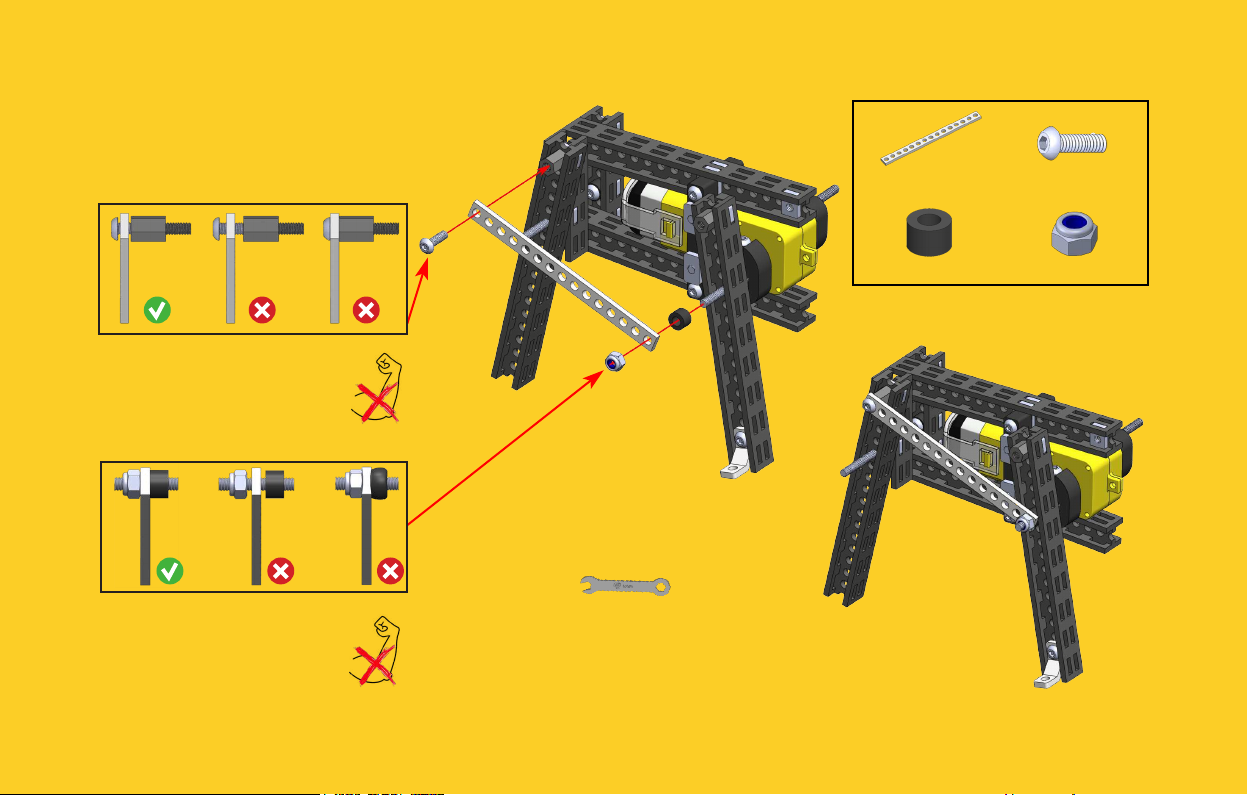
11
Do not use much
force when tightening
Bolt into Stando.
Do not over-tighten
Strip Bracket. Bracket
must be slightly loose.
1x Strip Bracket 1x Bolt M3x10
1x Nylon Spacer 4 mm 1x Lock Nut M3
Use wrench for
Lock Nut.
Page 10
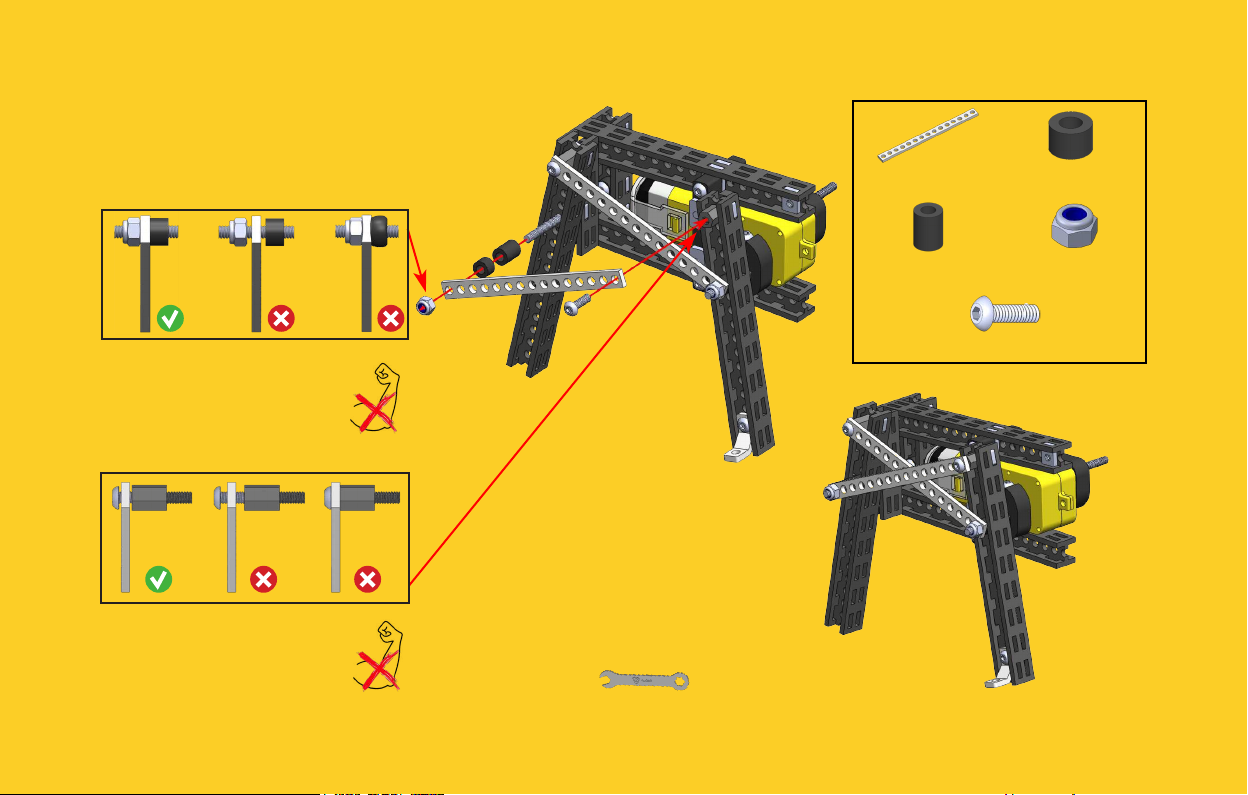
12
1x Strip Bracket 1x Nylon Spacer 4 mm
1x Nylon Spacer 8 mm 1x Lock Nut M3
Do not over-tighten
Strip Bracket. Bracket
must be slightly loose.
Do not use much
force when tightening
Bolt into Stando.
1x Bolt M3x10
Use wrench for
Lock Nut.
Page 11
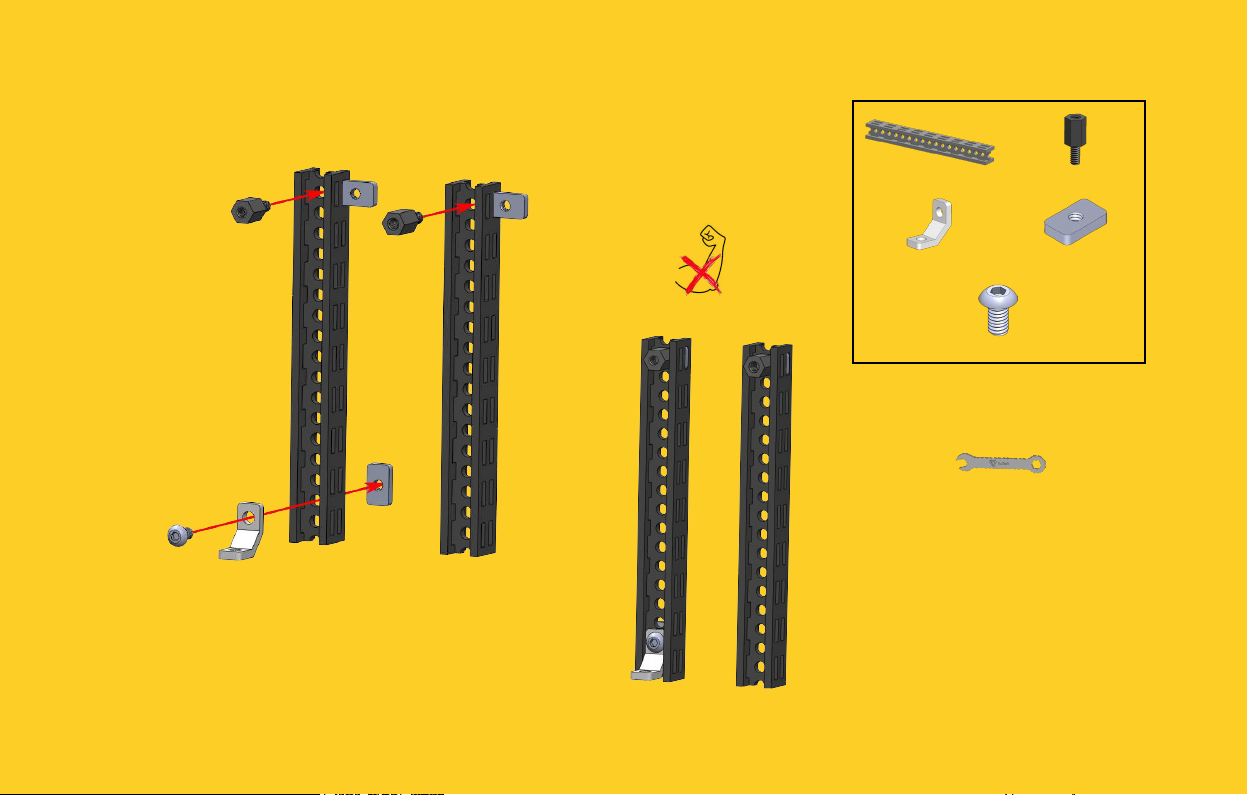
13
Do not use much
force when tightening
Nylon Standos.
2x Beam 90 mm 2x Nylon Stando
1x C-Bracket 3x Nut M3 6x10
1x Bolt M3x6
Use wrench for
Nylon Standos.
Page 12
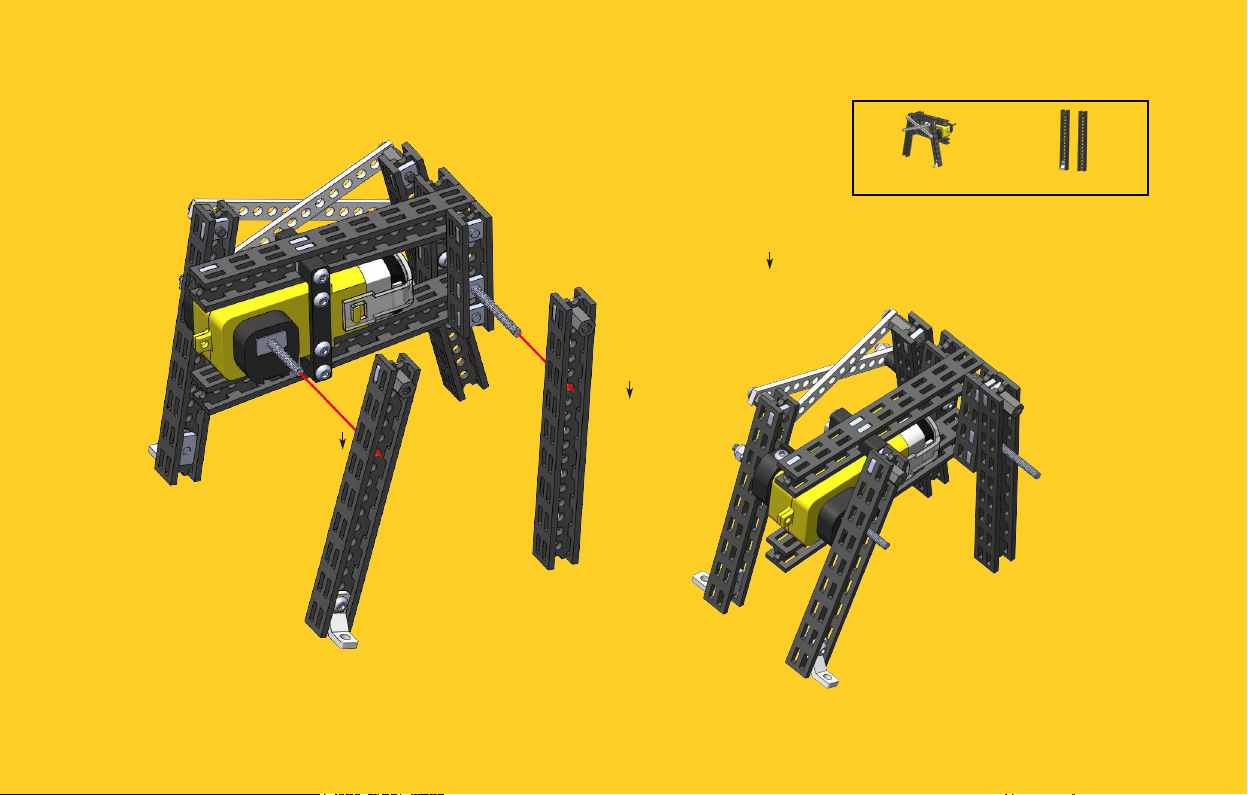
14
1x Step 12 Assembly 1x Step 13 Assembly
# indicates number of circular hole.
indicates counting direction.
#6
#6
Page 13
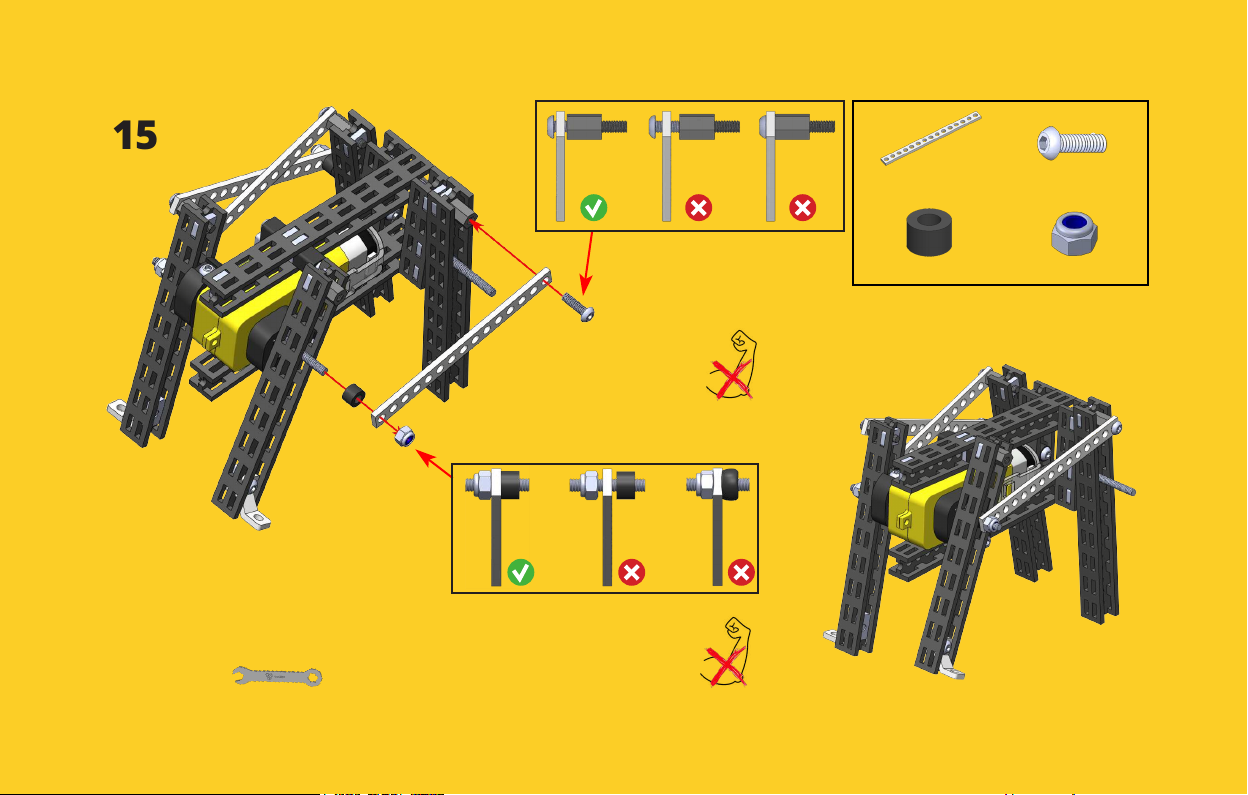
15
1x Strip Bracket 1x Bolt M3x10
Use wrench for
Lock Nut.
Do not use much
force when tightening
Bolt into Stando.
Do not over-tighten
Strip Bracket. Bracket
must be slightly loose.
1x Nylon Spacer 4 mm 1x Lock Nut M3
Page 14
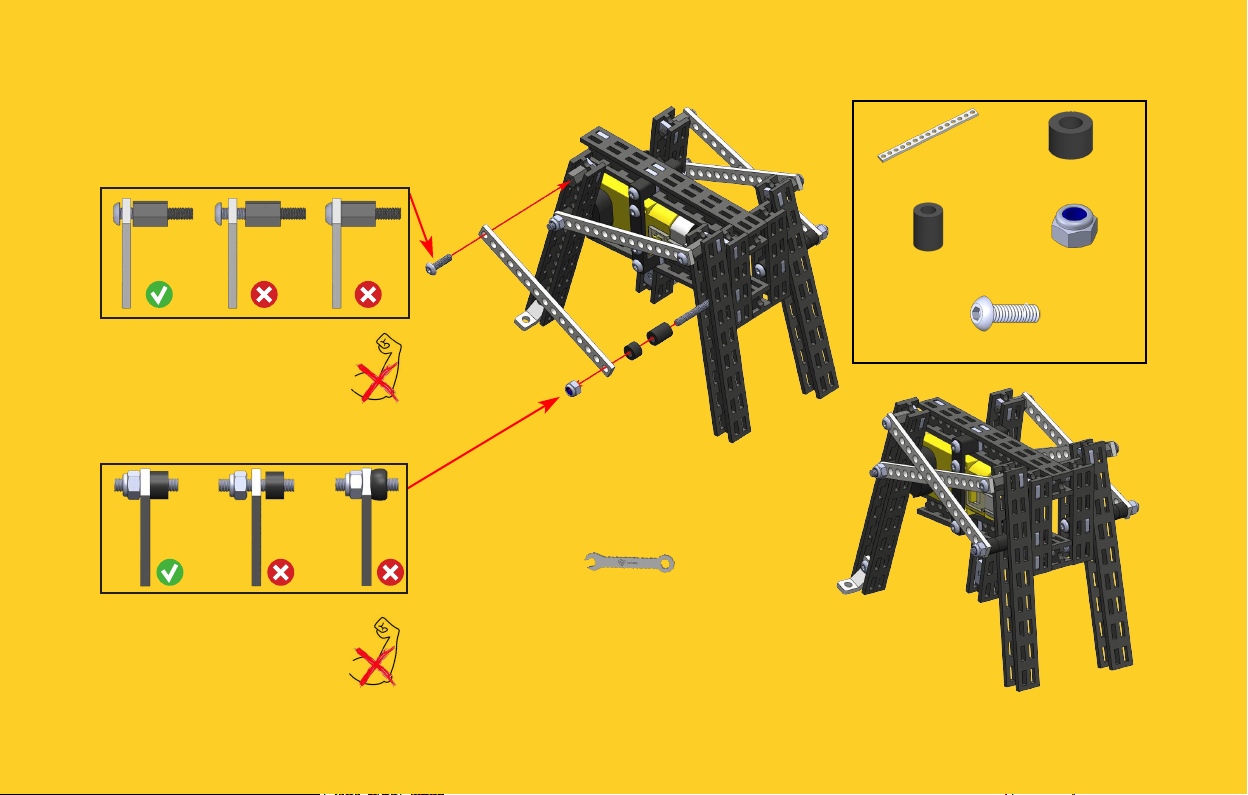
16
1x Strip Bracket 1x Nylon Spacer 4 mm
1x Nylon Spacer 8 mm 1x Lock Nut M3
Do not use much
force when tightening
Bolt into Stando.
Do not over-tighten
Strip Bracket. Bracket
must be slightly loose.
1x Bolt M3x10
Use wrench for
Lock Nut.
Page 15
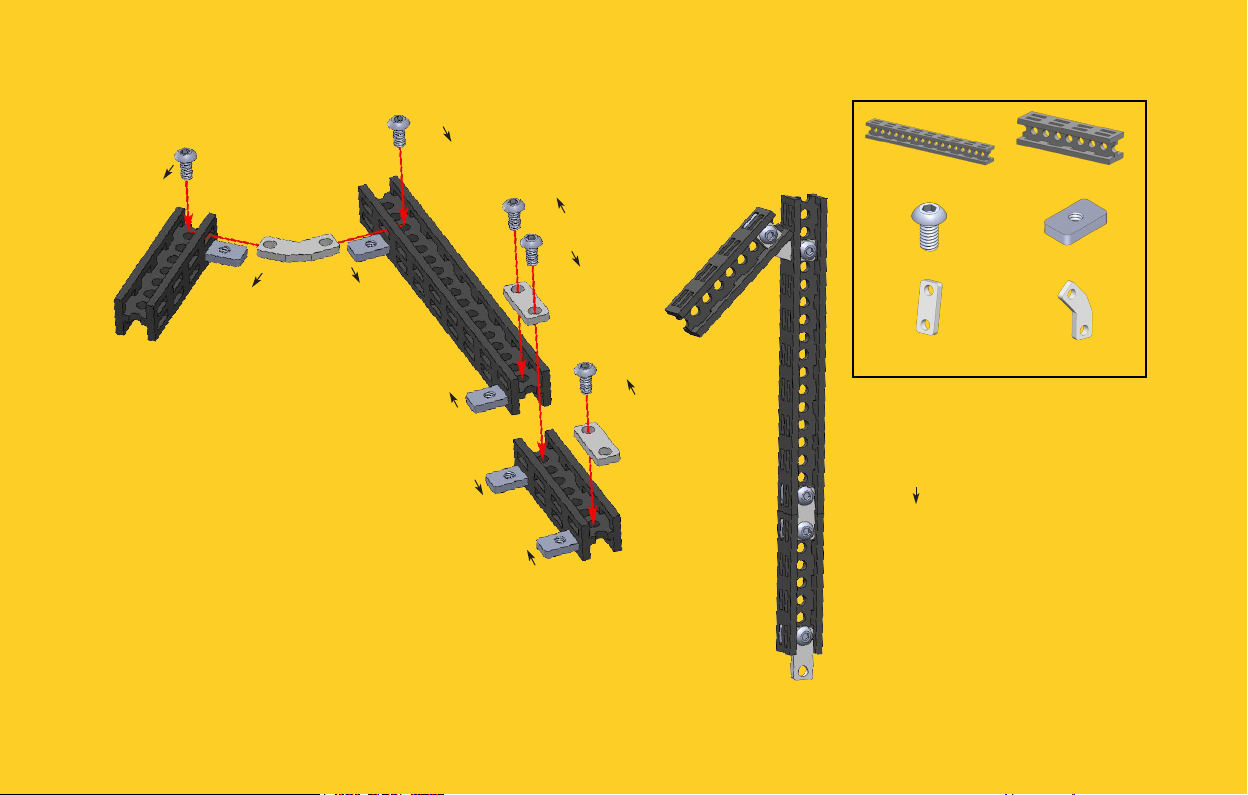
17
#1
#3
1x Beam 90 mm 2x Beam 40 mm
#1
#1
#2
#1
#1
#1
#1
#1
5x Bolt M3x6 5x Nut M3 6x10
2x 2-Hole Simple
Bracket
1x 2-Hole 45 Simple
Bracket
# indicates number
of circular hole.
indicates counting
direction.
Page 16
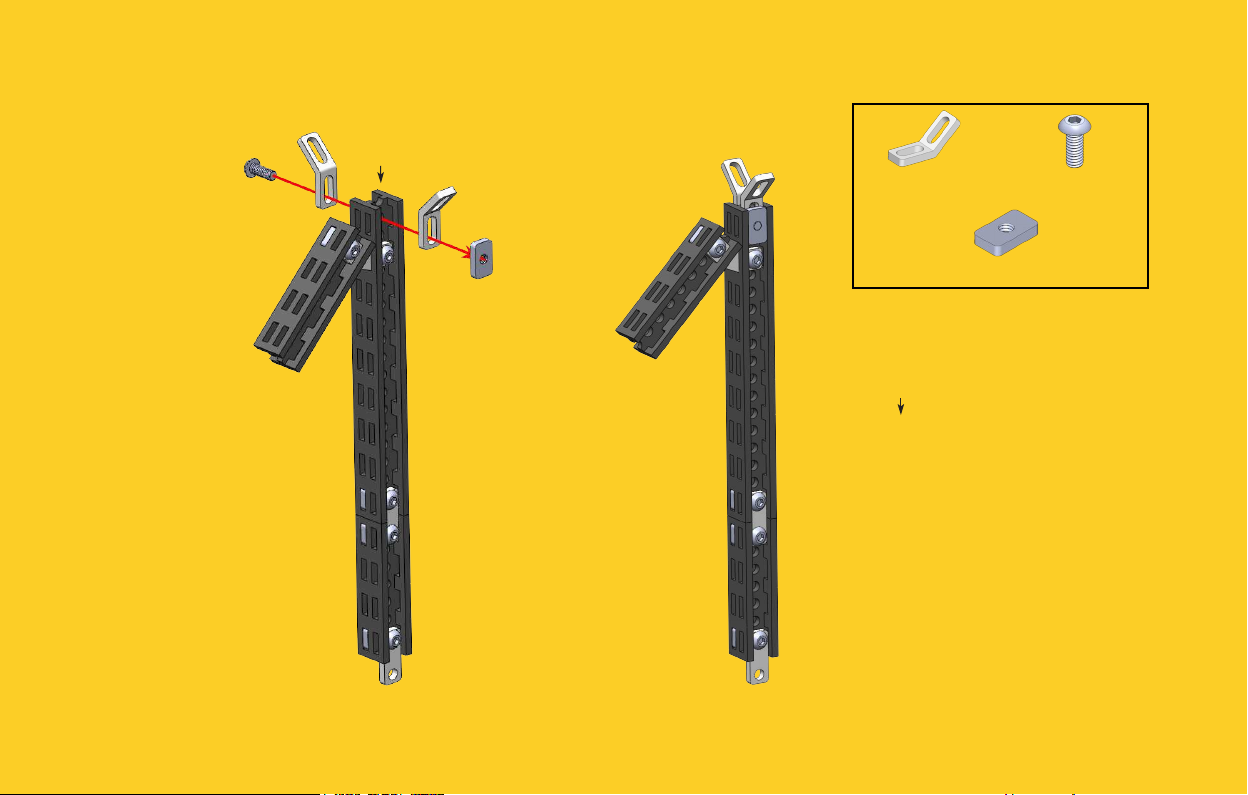
18
#1
2x 2-Hole 45 Bracket 1x Bolt M3x8
1x Nut M3 6x10
# indicates number
of circular hole.
indicates counting
direction.
Page 17
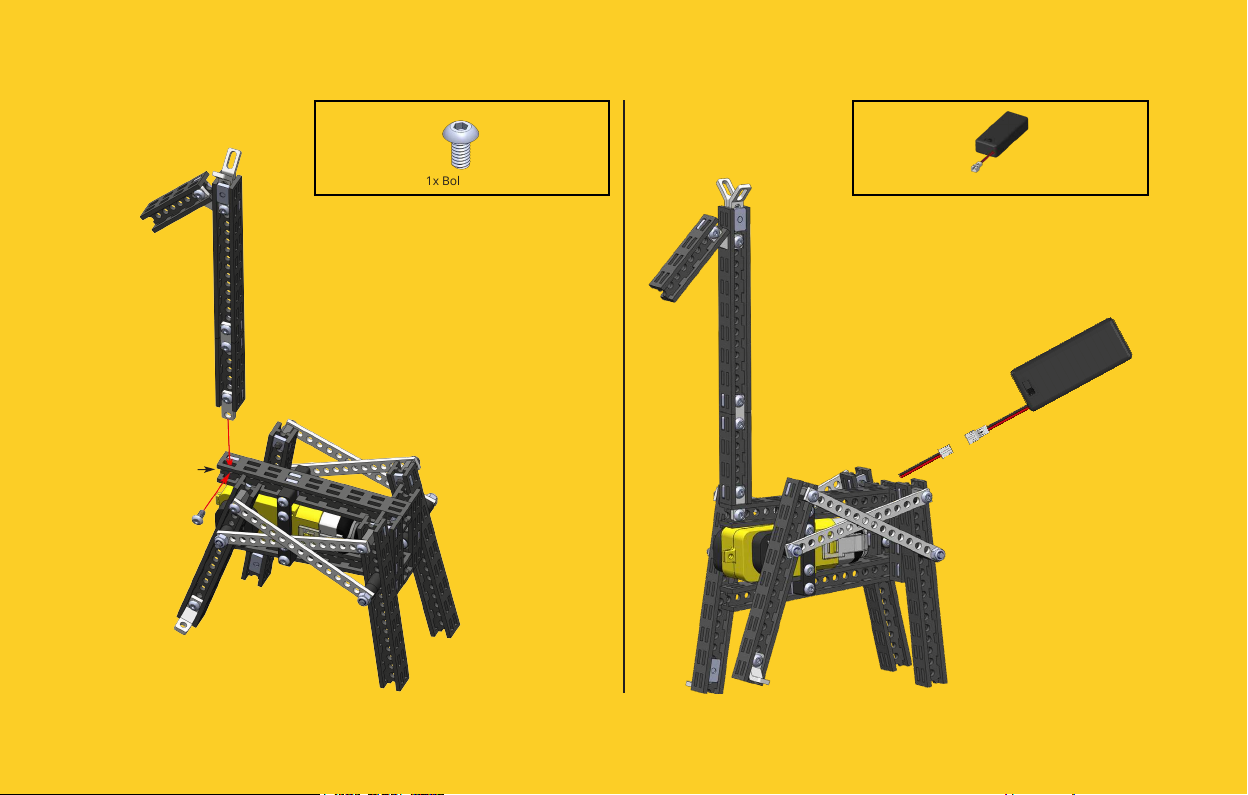
19
20
#1
1x Bolt M3x6
1x Battery Case with Switch
Connect motor
with battery switch.
Page 18
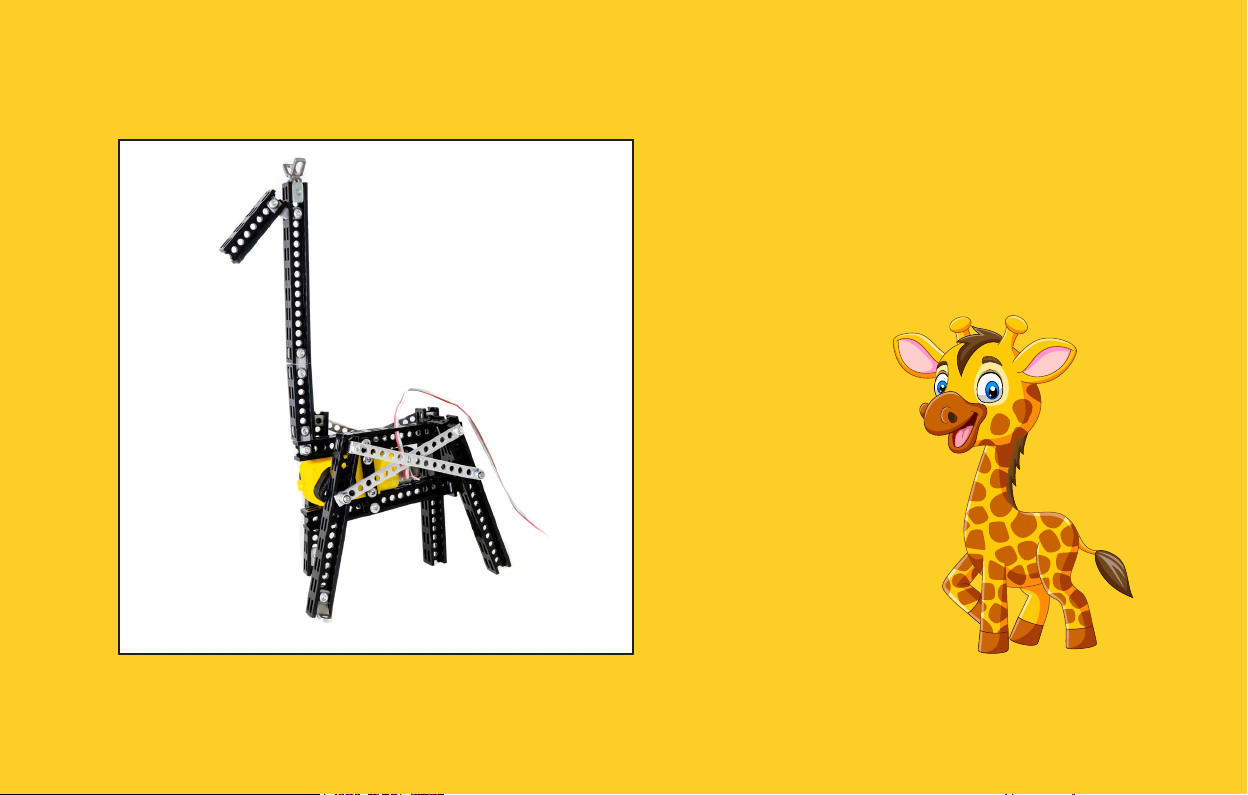
Loosen Lock Nuts (if needed, on both
sides) if motor cannot move legs.
Tighten Lock Nuts (if needed, on both
sides) if legs are too wobbly.
Woohoo!
Your Girae is
now alive and
ready to play.
Page 19

Do not give this product to children aged 3 or below. As with all electronic products, precautions should be observed during handling and use.
Adult supervision required.
Note to adults: to ensure that the child’s play is both safe and fun, please review all operating instructions and safety rules with your child.
SAFETY WARNINGS:
• Do not pick up toy while in motion.
• Keep ngers, hair, and loose clothing away from moving parts, to avoid the injury.
• If the toy is dirty, please clean it with dry and soft cloth.
• Do not expose the vehicle to high temperature, high humidity, or direct sunlight.
• Indoor use only. Functions best on hard, at surface.
• Do not put this product in water,
• Do not disassemble or modify the motor.
TO AVOID BATTERY LEAKAGE:
• Do Always follow the instrutions carefully. Use only batteries specied and be sure to insert them correctly by matching the + and – polarity markings.
• Do not mix old batteries and new batteries or standard (carbon-zinc) with alkaline batteries.
• Remove exhausted or dead batteries from the product.
• Remove batteries if product is not to be played with for a long time.
• Do not short-circuit the supply terminals.
• RECHARGEABLE batteries: Do not mix these with any other type of batteries. Always remove from the product before recharging. Recharge batteries under
adult supervision. DO NOT RECHARGE OTHER TYPES OF BATERIES.
• Should this product cause, or be aected by local electrical interference, move it away from other electrical equipment.
KEEP THIS INTRUCTION MANUAL AND THE PRODUCT BOX AS IT CONTAIN IMPORTANT INFORMATION FOR FUTURE REFERENCE.
Due to the continuous product improvement, the pictures on this manual may dier slightly from the actual product. Please adhere to actual product instead.
Totem Maker names and logos are registered trademarks. All rights reserved.
www.totemmaker.net
Aldrea lalas Totem, UAB
Sauletekio al. 15-709, Vilnius, 10224, Lithuania
For customer support please contact: [email protected]
WARNING:
CHOKING HAZARD - Small parts.
Not for children under 3 years.
BATTERY INFORMATION:
• 2x 1.5V AA batteries required (not included).
• To insert batteries, use cross head screwdriver
(not included).
Page 20

 Loading...