

Page 1
ITEM # UVC9
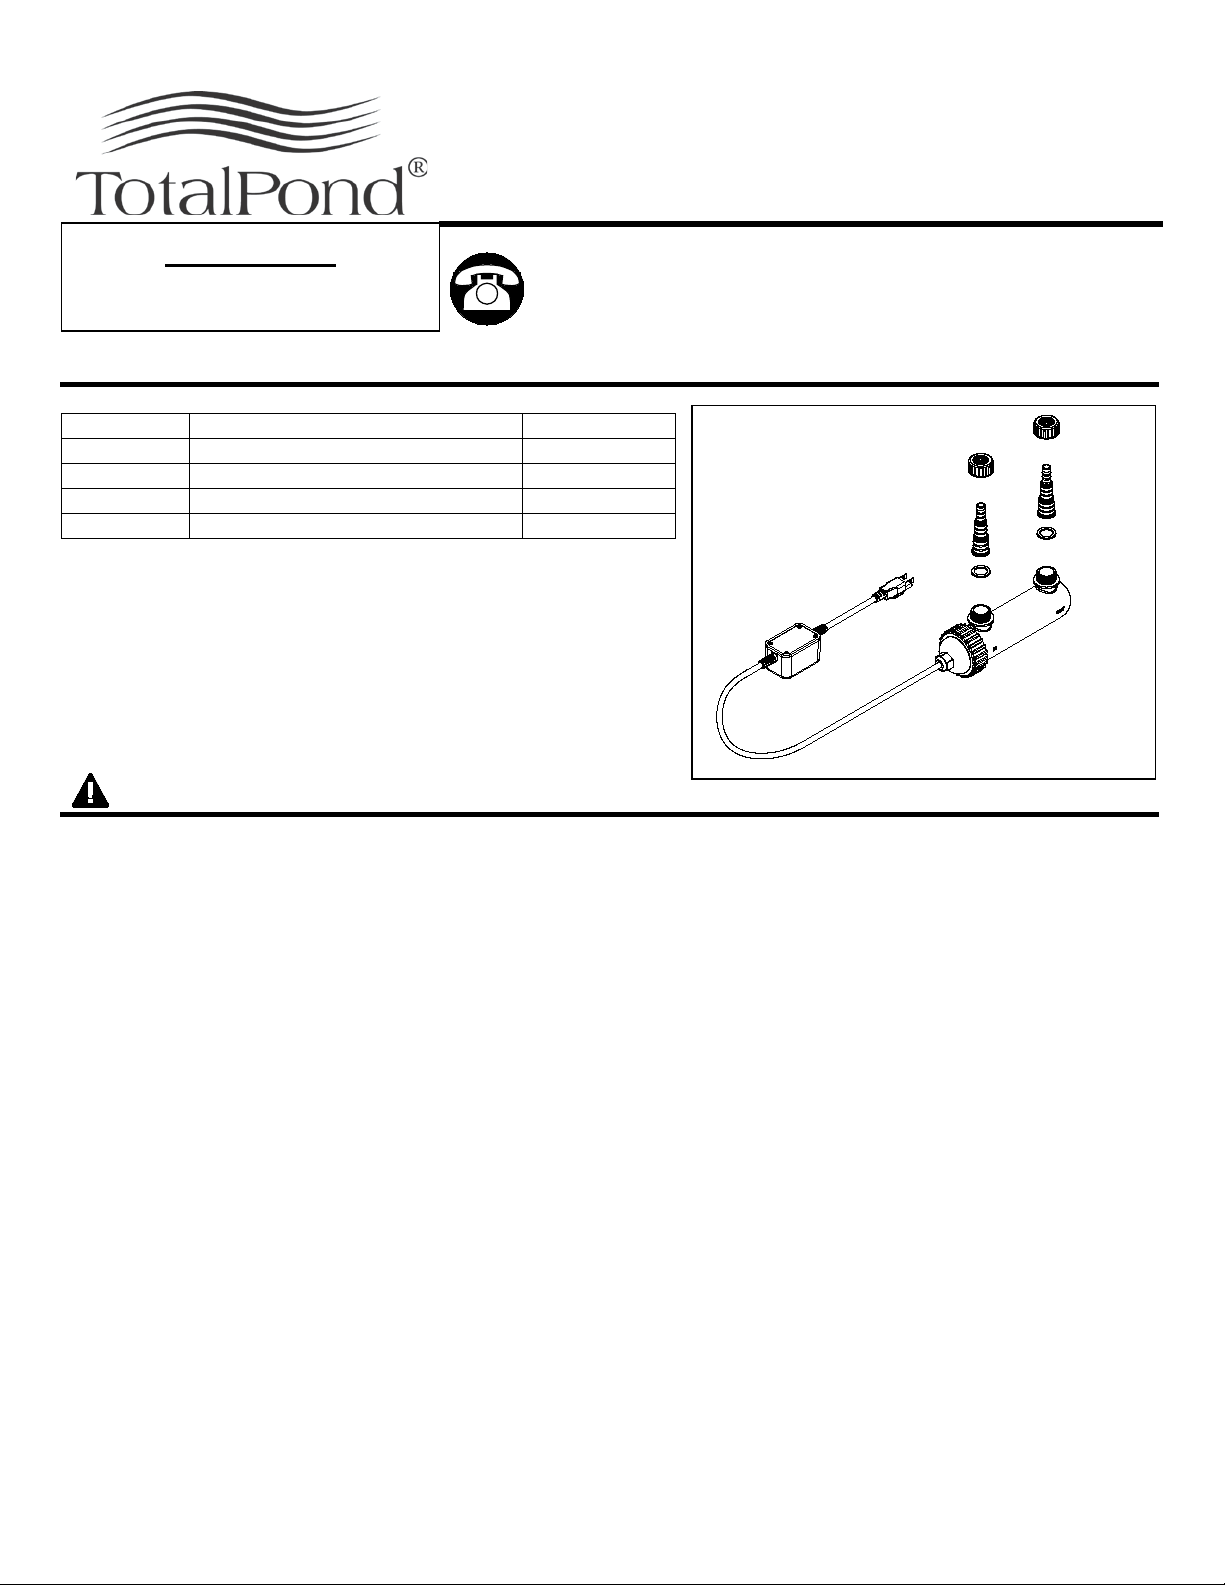
PACKAG E CONTENTS
WARNINGS AND CAUTIONS
Part
Description
Quantity A UV light
1
B
Adapter gasket
2
C
Adapter
2
D
Adapter nut
2
B C D
A
Questions, problems, missing parts? Before returning
REMINDER
BEFORE RETURNING TO STORE.
Ultraviolet Water Cl ari fier
CALL 1-888-412-6001
WARNING
• WARNING – Improper connection of the appliance-grounding conductor can result in a risk of e lect ric
shock. Check with a qualified e lect r i cian or service representat ive if you are in doubt whether t he
appliance is properly grounded. Do not modify the plug provided with the appliance; i f it w ill not f it t he
outlet, have a proper outlet inst al led by a qualified technician.
• Do not operate any applianc e i f it has a damaged cord or plug, or if it is malfunctioning or if it is
damaged in any manner.
• Always unplug the applian ce from the outlet before putting on or taking off parts, before cleaning or
when not in use.
• Connect only to a circuit that is protected by a ground-fault circuit-interrupter (GFCI).
• Risk of Electric Shock: Do not use the UV filter if the quartz tubing arou nd the lamp is broken.
Immediately unplug and s eek an authorized repair service or discard the unit.
• GROUNDING INSTRUCTIONS – This appliance must be grounded. In t he event of a malfunction or
break down, grounding w il l reduce the risk of electric shock by providing a path of least resistance for
electric current. This appl i ance is equipped with a cord having a n appliance-grounding c onductor and a
grounding plug. The plug mu st be plugged into an appropriate outlet that is installed and grou nded in
accordance with all local codes and ordinances.
CAUTION
• UV light may cause irritati on t o t he skin and/or eyes. Avoid expos ure.
• DANGER – U L TRAVIOLET RADIATION – disconnect power before replacing lamp.
• Prolonged or repeated exposure to UV light may have adverse physical effects inc luding, severe
• Keep the cord away from hig h t em per at ures or other heat sources.
• Do not lift the light or the transformer by its power cord.
• This light assembly has n ot been investigated for use in swimming pools or hot tubs.
damage to your skin and eyes. Seek immediate medical attention for overexposure to UV radiation.
to your retailer, call our cust om er ser vice department at
1-888-412-6001, 8 a.m.-6 p.m., EST, Monday-Friday, or
email us at customercare@geoglobalpartners.com. Or
visit our website www. t ot alpond. com.
1
Page 2
PREPARATION
Before beginning assem bl y of product, make sure all part s ar e pr esent. Compare parts with package
IMPORTA NT NOTES
ASSEMBLY INSTRUCTIONS
Lamp Voltage
60V
Lamp Current
0.2A
Lamp Power
9 W
Rated Frequency
60 Hz
UV Irradiance
35 µW/cm2
Bulb Life
8000 hours
Bulb Model Number
UVRB
UV Wave Length
UV(C) · 254 nm
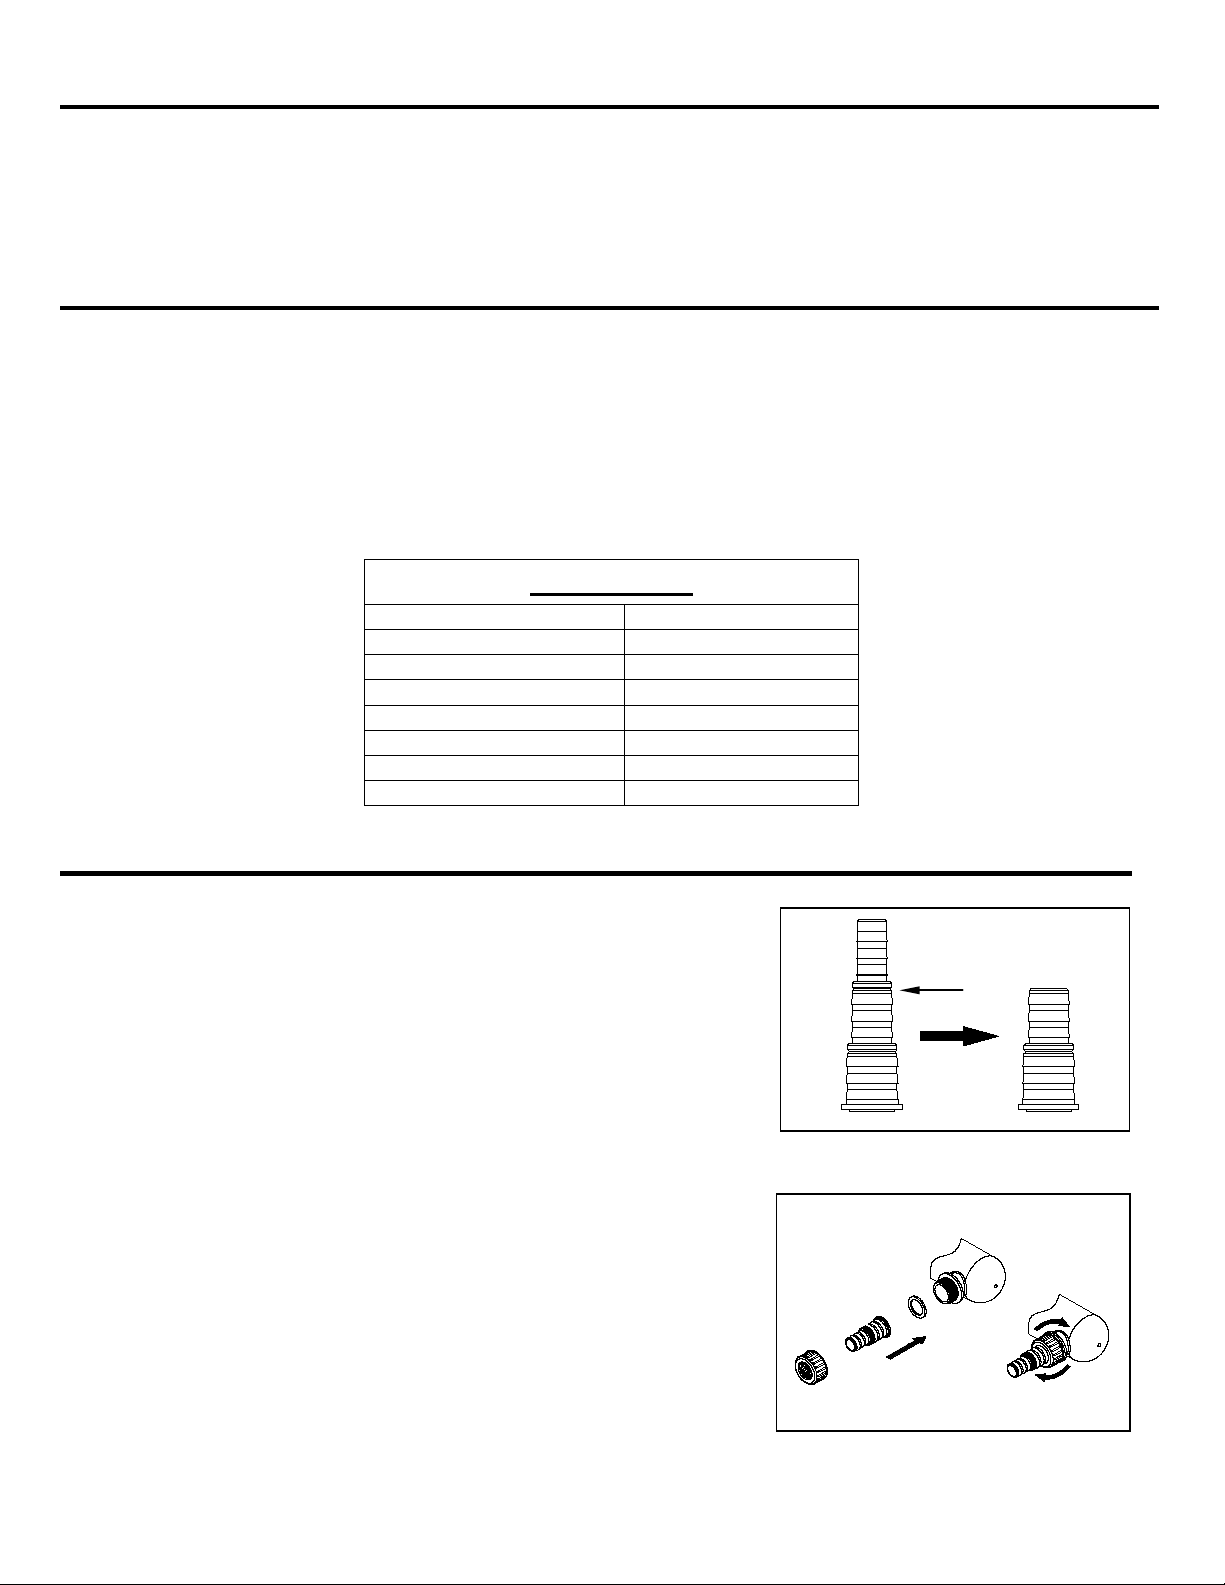
Gasket
Adapter
Locking nut
Cut ring
contents list and diagra m above. If any part is missing or damaged, do not attempt to assemble, install or
operate the product. Contact customer service for replacement parts.
• Estimated Assembly Ti me: 30 minutes
• No Tools Required for Assembly
• This product will not operate unless it is fully assembled with the lamp base screw ed completely into
the housing.
• UV rays are harmful to your eyes and skin. The indicator portal will remove the harmful e f fects of the
UV light but still allow you to see t he bulb operating.
• Do not attempt to operate this product unless the lamp is com pl etely assembled within the light
housing.
• This product conforms to the C ode of Federal Regulations ( CF R) r equirements including, Title 21,
Chapter 1, Subchapter J, Ra diological Health.
Specifications
1. The adapters included can connect to 1/2-in., 3/4-in. or 1-in.
tubing. Note that 3/4-in. tubing is r ecommended for optimu m
performance. If using 1/2 in. ID t ubi ng, proceed to step 2. If
using 3/4 in. ID tubing, cut t he adapt er as shown using a
hacksaw. Fig. 1
Fig. 1
2. Install the adapter gasket , adapt er , and adapter locking nut
onto the inlet and outlet of t he la mp ho using. Fig.2
NOTE: For a proper seal, the par t s m ust be installed in this
specific order.
Fig. 2
2
Page 3
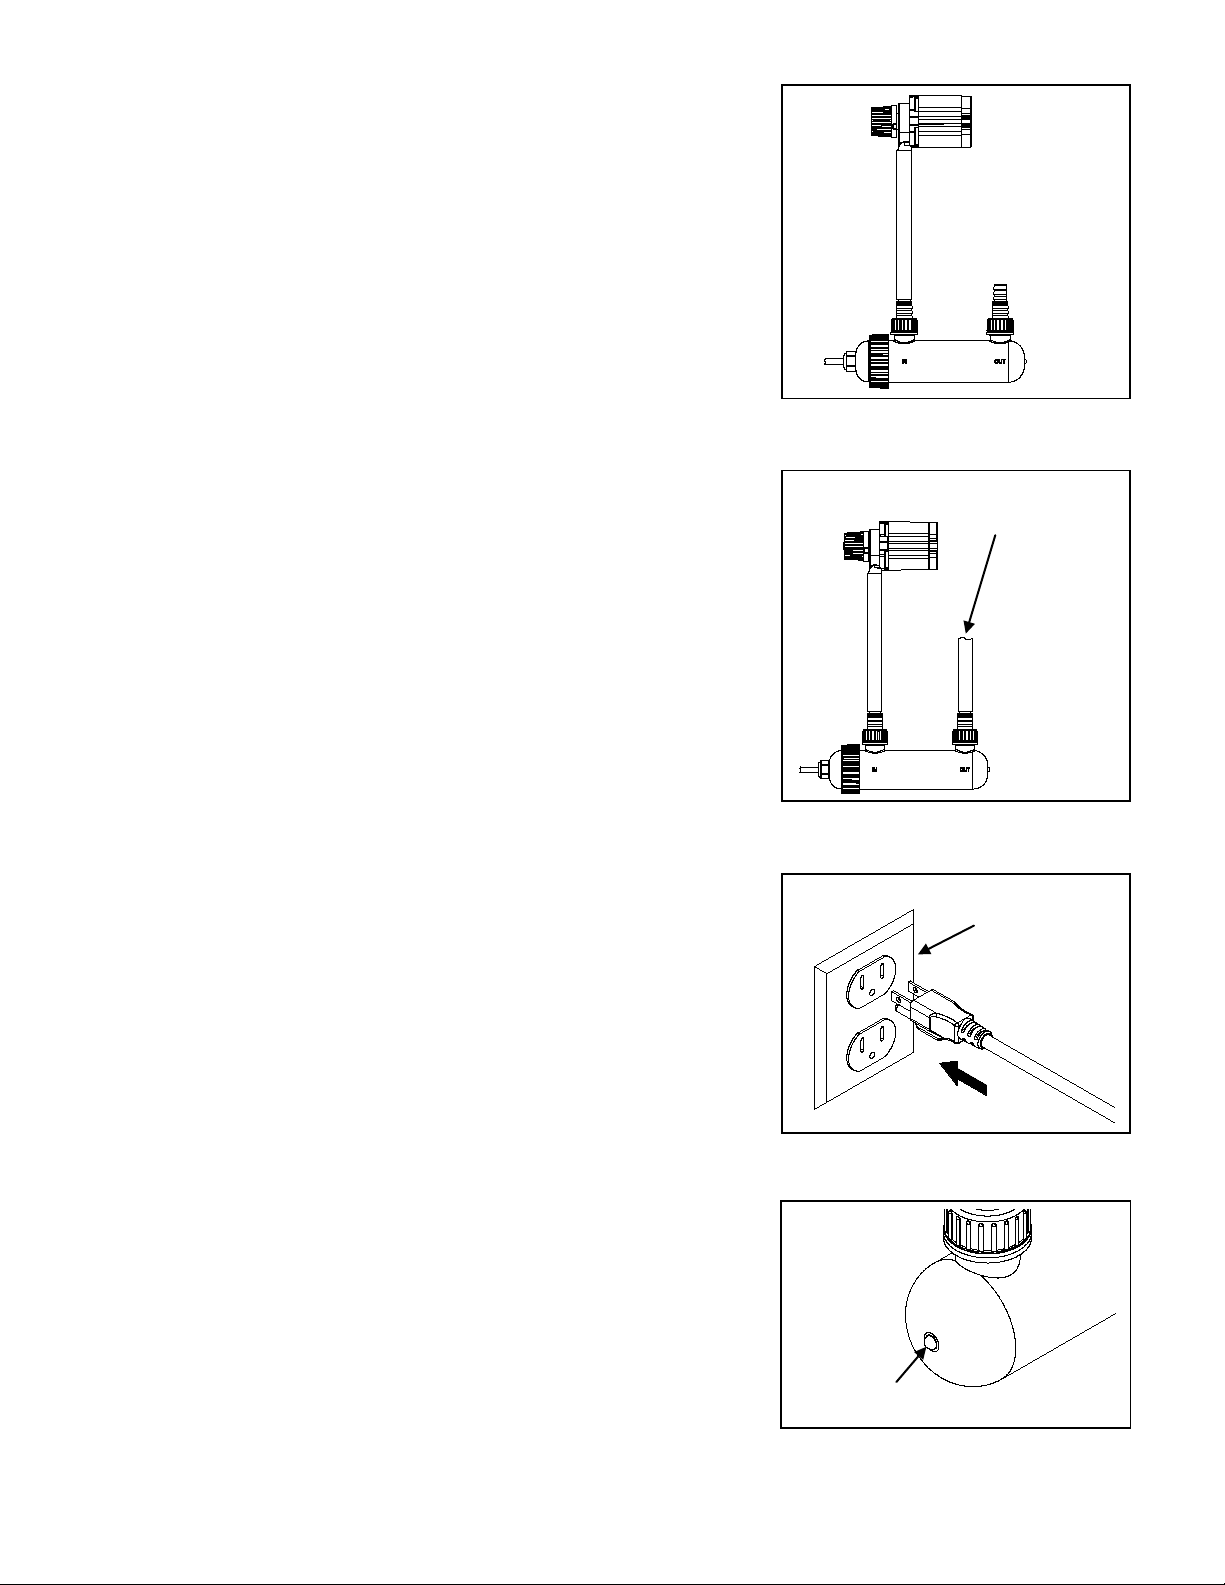
3. Connect tubing from the out let of y our pump to the inlet of the
Pump
(not included)
Tubing
(not included)
PCUV9
PCUV9
Connect this
feature.
Submersible
pump in water
GFCI
Indicator light
PCUV9. Fig. 3
NOTE: The inlet is marke d “ I N” on t he lamp housing.
Fig. 3
4. Connect tubing to the outl et of t he P CUV9. The other end
can be connected to a spitter , waterfall, or any other wat er
feature for your pond. Fig. 4
NOTE: The outlet is mark ed “OUT” on the lamp housing.
Fig. 4
5. Plug the PCUV9 into a properly grounded electrical outlet.
Fig. 5
Fig. 5
6. Wait several seconds for the li ght t o t ur n on then check the
indicator light to verify if the light is f unctioning correctly .
Fig. 6
NOTE: This clarifier has a safety featur e t hat only allows the
UV light to turn on if the lamp holder is fully seated
into the lamp housing.
Fig. 6
end to a
water
3
Page 4

REPLACING THE B UL B
Locking
Old bulb
New bulb
Locking
Lamp
holder
Lamp
holder
Lamp
holder
Lamp
housing
Lamp
housing
1. Disconnect the UV light fr om the outlet. Be sure to allow
sufficient time for the light to cool before disassembli ng t he
Fig. 7
light.
Fig. 7
2. Rotate the locking ring counterclockwise to r emove the lamp
holder. Fig. 8
Ring
Fig. 8
3. Carefully remove the old bulb by firmly pulling on the base.
Carefully install the new b ulb. Fig. 9
Fig. 9
4. Reinstall the lamp holder and locking ring. Fig. 10
NOTE: This clarifier has a safety feature that only allows the
UV light to turn on if the lamp holder is fully seated
into the lamp housing.
Ring
Fig. 10
4
Page 5

5. Connect the PCUV9 plug i nto a properly grounded electr ica l
CARE AND MA INT ENANCE
TROUBLESHOOTING
GFCI
Indicator light
outlet. Fig. 11
Fig. 11
6. Wait several seconds for the light to turn on then check the
indicator light to verify if the light is f unctioning correctly .
Fig. 12
NOTE: This clarifier has a safety feature that only allows t he
UV light to turn on if the lamp holder is fully seated
into the lamp housing.
Fig. 12
To maximize the performance of the UVC9, periodically disassemble the unit t o clean dirt and debris from
the exterior of the glass tube.
IMPORTA NT NOTE:
Be sure that the entire unit is completely dry and gaskets are properly seated when reassembling
the UVC9.
Failure to do so will result in w at er le akage, which can cause damage t o t he l ight unit.
1. Disconnect the UV light fr om the outlet. Be sure to allow su ff ic ient t i me for t he light to cool before
disassembling the light.
2. Unscrew the locking ring, and pull out the light unit.
3. Carefully pull out the glass tube holder by twisting and then pull out.
4. Use warm, soapy water t o c lea n t he glass tube. Be sure to use biodegr able soap.
5. Reassemble the UVC9, and be sure that all gaskets and o-rings are seated properly .
If the light fails to operate:
• Check to make sure the power c ord is plugged in and the light is gett i ng power.
• Check to make sure that the lamp holder is screwe d completely into the body . ( This product will not
operate unless it is fully assembled with the lamp holder screwed completely into the body.)
• Check bulb to make sure t hat it has not burned out. Replace t he bulb as necessary or after every
season. Bulbs are availab le by calling the customer ser vice department or TotalPond item #UVRB.
5
Page 6

REPLACEMENT PARTS LIST
Part
Description
B
Adapter gasket
C
Adapter
D
Adapter nut
E
Lamp holder
F
Lamp holder gasket
G
Bulb holder
H
Glass tube holder
I
O-ring 1
J
Glass tube gasket
K
Glass tube
L
Glass tube locking nut
M
O-ring 2
N
Lamp housing
TotalPond replacement UV bulbs can be purchased at Home Depot, Item #UVRB.
F
E J H M K G B
N C D
L
I
Printed in China
6
Page 7

LIMITED WARRANTY
All pumps and electrical products are warranted to t he user against defective mater ial and workmanship,
under normal working con ditions. This warranty period begins on the date of purchase by the original
purchaser.
All TotalPond® electrical products are warranted to the user against defectiv e material and workmanship,
under normal working con ditions for 1 year from the date of p ur chase. All TotalPond® liners are warranted
to the user against defecti ve workmanship, under normal w orking conditions for 20 years from the date of
purchase. All other TotalPon d® pr oduct is warranted to the user against defective mater ial and
workmanship, under normal working conditions f or 90 days.
Application
Warranty covers only properly installed and maint ain ed units. Pump warranty is limited to applications
pumping fresh water in a pond or fountain only. Other liquid ap pl ications or extreme temper at ure uses
must be approved in writin g by the manufacturer. Rece ipt and pr oduct date code are required f or w ar r ant y
claims.
Warranty Claim
Warranty claims must be made by calling customer serv i ce ( at 1-888-412-6001). If the item is
determined to be defective, you will be given authorization to r et ur n t he defective part(s), freight pre-paid,
along with proof of purchas e.
Disposition
The manufacturer will make a good faith effort for prompt disposition regarding all war r ant y claims.
Returned product will be i nspected to determine cause o f fail ur e before warranty is appl ied. Warranty does
not cover any costs associated with the shipping, handling, installation or removal of products or parts
subject to this warranty. For produc t s damaged in transit, a claim should be filed with the carrier .
Disclaimer
Any oral statements mad e about the product by the sel ler, t he m anufacturer, the represent atives, or any
other parties do not constitute warranties, should no t be r elied upon by the user, and are not part of the
contract for sale. The seller’s and manufacturer’s only obligation, and buyer’s only r em edy shall be for the
manufacturer to either rep lace and/or repair at the m anufacturer’s sole discret i on, the product as described
above. Neither seller nor the ma nufacturer shall be liable for inj ury, loss or damages for lost profits, lost
sales, injury to person or propert y, or any other incidental or consequential loss arising from any cause
whatsoever, no matter w het her based upon warranty , cont r act, negligence or other misuse, and the buyer
and user agree that no other remedy shall be available to them. Before using, the buy er and user shall
determine the suitabil ity of the product for the intended use, and assume all ris k and liability whatsoever i n
connection therewith. The warranty and remedy des cr ib ed in this limited warranty is an exclusive warranty
and remedy in lieu of any other w ar r anty or remedy expressed or implied. All other warranties and
remedies are hereby expr ess ly excluded, including but not li m ited to any implied warranty of
merchantability of fitness for any particular purpose. This warranty gives the buyer and user specific legal
rights, and buyer and user may als o have other rights which vary from stat e to state. Some states do not
allow exclusions or limitations of incidental or cons equential damages, so the above limitations or
exclusions may not apply t o you.
REMINDER
CALL 1-888-412-6001
BEFORE RETURNING TO STORE.
7
 Loading...