

Page 1
USER MANUAL / BEDIENUNGSANLEITUNG
Page 2

2
Congratulations on purchasing your
Totally Wicked aio Slider Hellre Electronic Cigarette Kit.
The Totally Wicked AIO Slider Hellfire is an all-in-one device that combines
optimum ease of use with exceptional vapour production. This is made possible
by the combination of HW atomizer heads and a considerable maximum power
output of up 50 Watts. 2 x 0.2ohm HW1 single cylinder, dual coil atomizer heads
are supplied. HW2 0.3ohm dual cylinder quad coil, HW3 0.2ohm triple cylinder
sextuple coil and HW4 0.2ohm quad cylinder octuple coil atomizer heads are
available separately as optional atomizer heads. The slide to fill mechanism
incorporated into the top cap of the device, single button functionality, and direct
voltage output ensure that the device is extremely simple to use, whilst providing
a satisfying vape at a moment’s notice. In addition, a substantial 3000mAh battery
is integrated into the surprisingly compact device housing, which is sure to supply
power for plenty of time between recharges.
Page 3
3
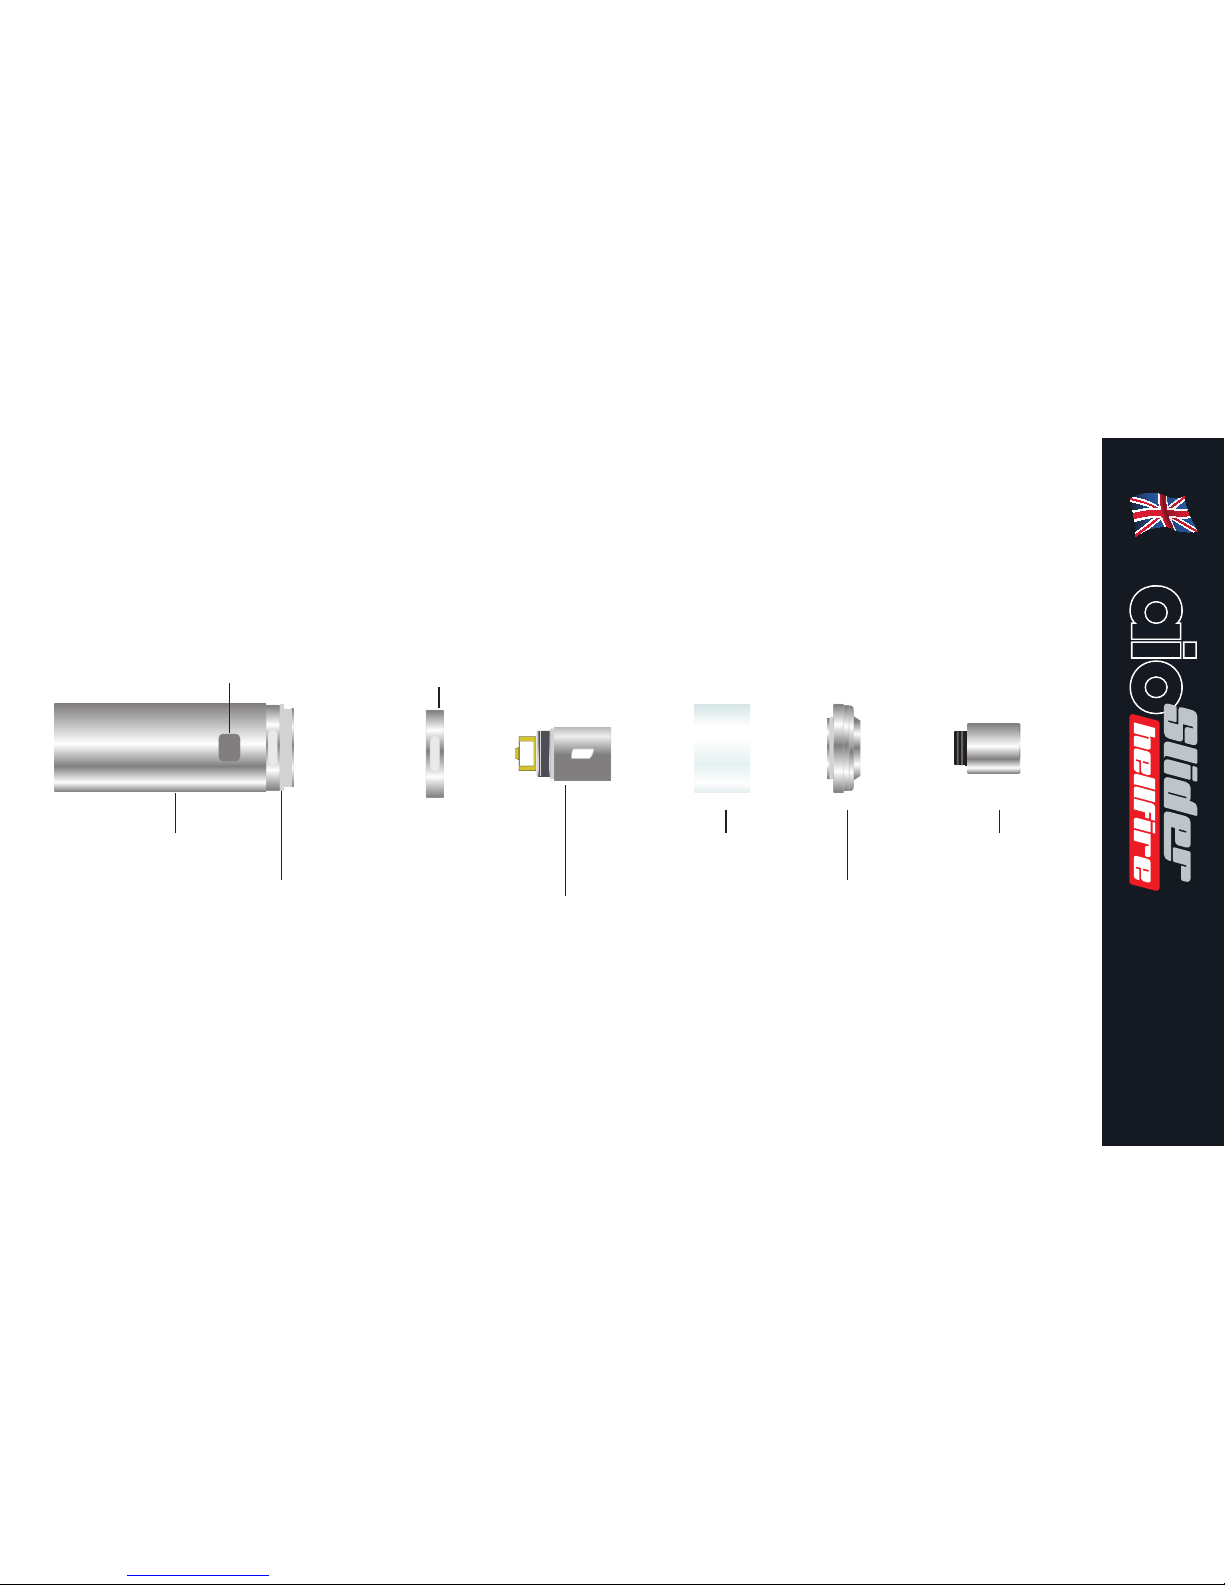
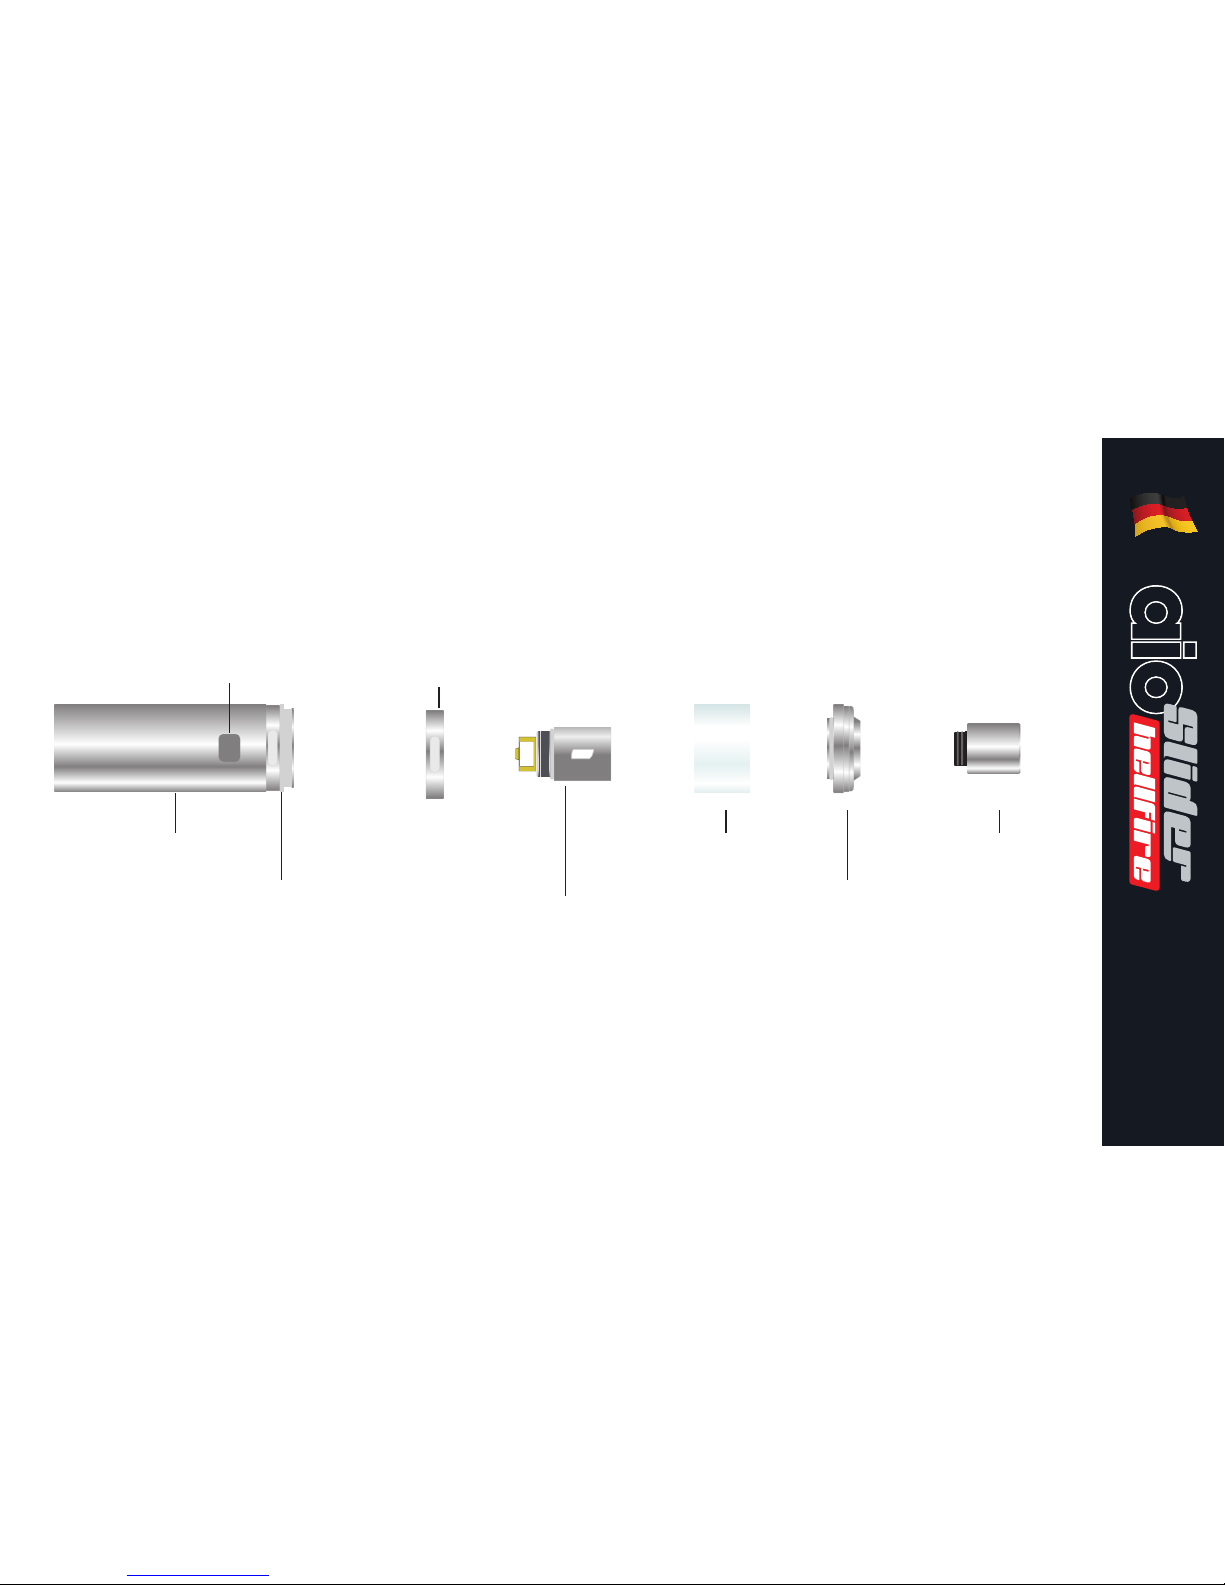
Power Button
Battery
Atomizer Base
Airflow Ring
HW Coil
Glass Tube
Top Cap
Mouthpiece
Page 4

4
Using your aio Slider Hellre
Power On and Off:
To switch the AIO Slider Hellfire on,
quickly press the power button 5
times, the power button LED will
illuminate to indicate that the device
has been switched on. Similarly,
when the device is powered on,
quickly press the power button 5
times to switch the device off.
Vaping:
Simply press the power button as
you inhale, the power buttons LED
will illuminate while the device is
powered.
Charging the Battery:
The AIO Slider Hellfire can be
charged via the USB cable when
connected to a powered USB port
or suitable wall adapter. The USB
port LED will illuminate in red to
indicate that the battery is charging
successfully, the light will turn off
once fully charged.
Page 5
5
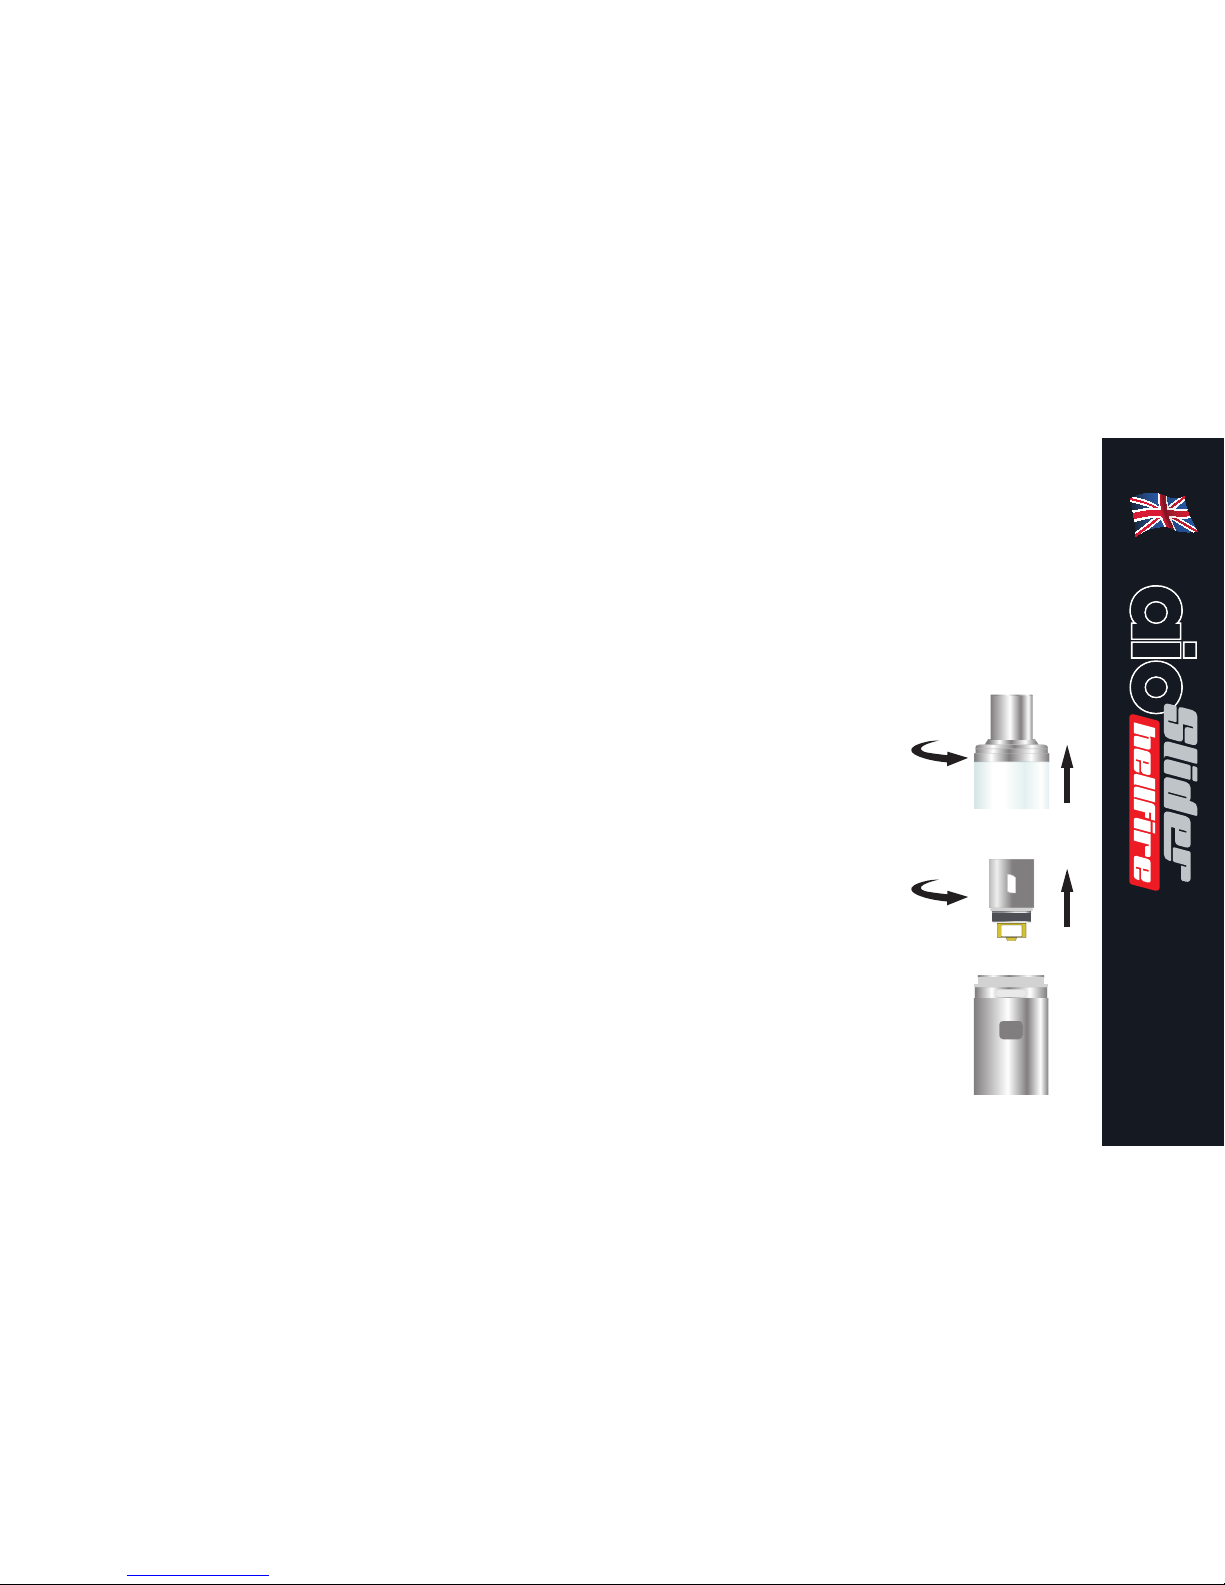
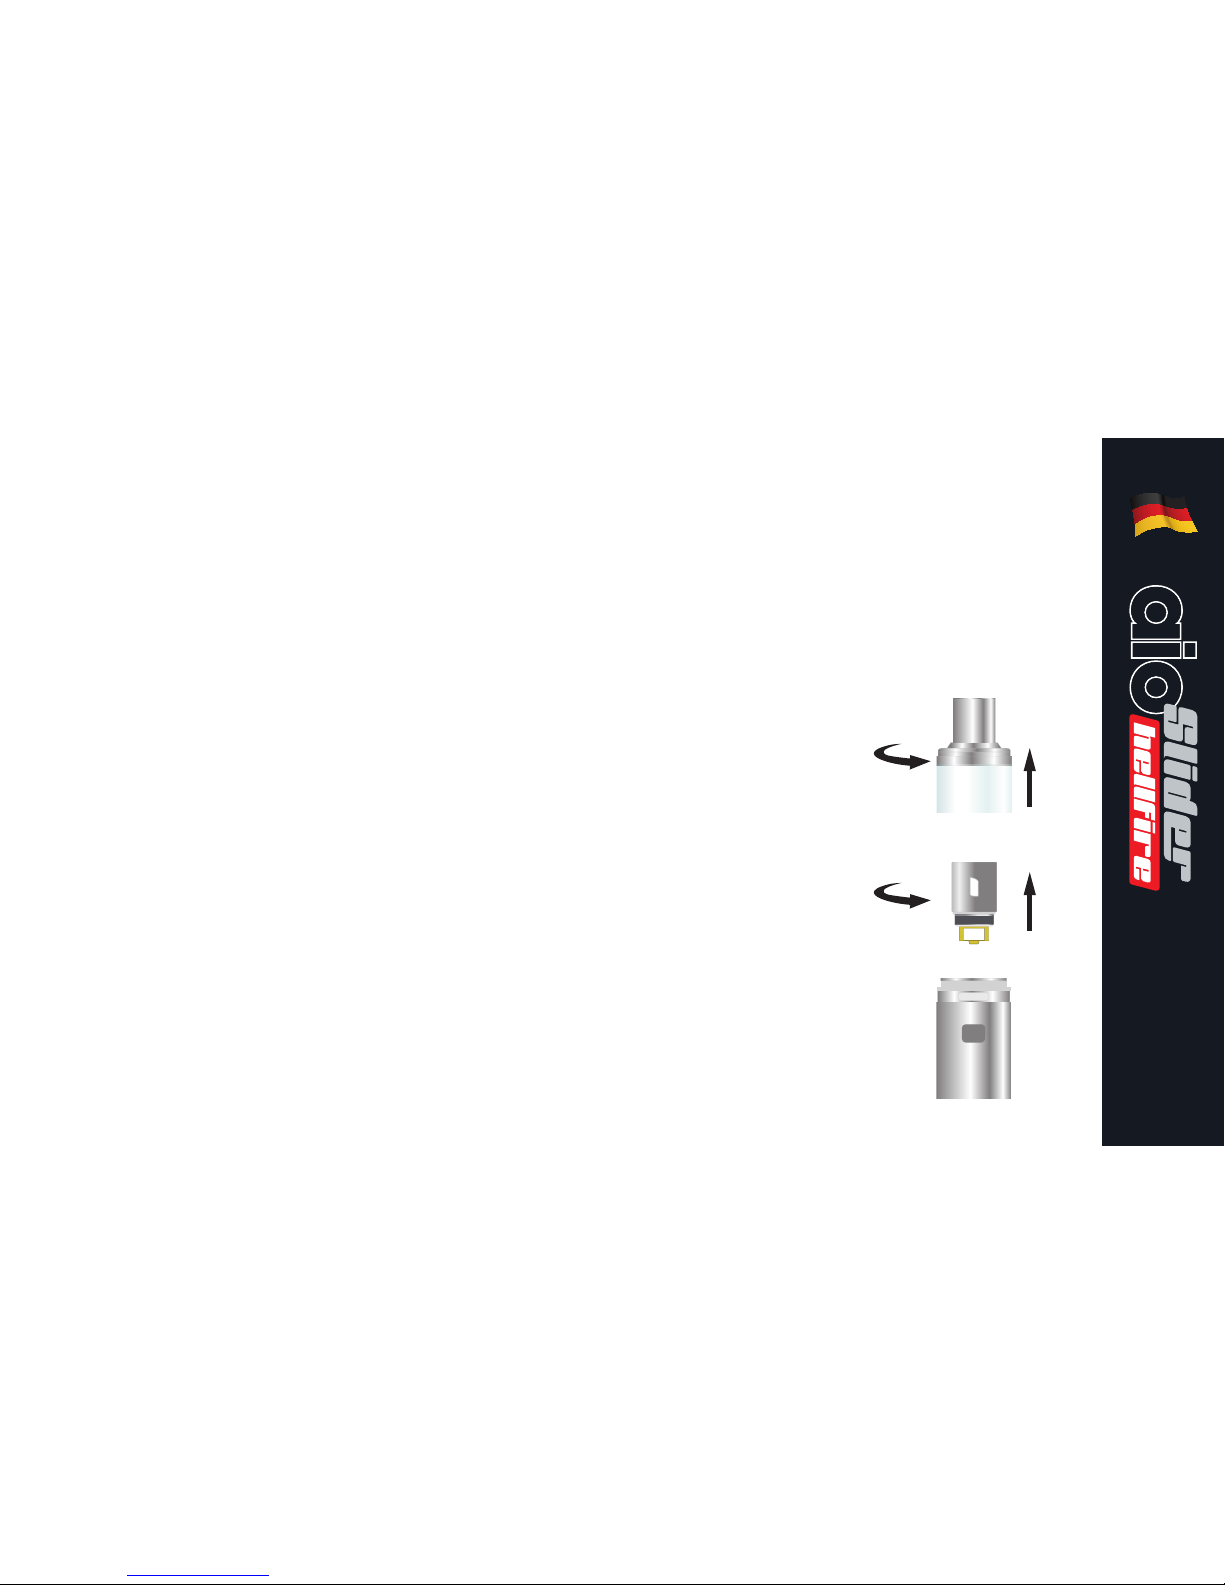
Installing/Replacing an Atomizer
Head:
Firstly, ensure the tank is completely
empty of e-liquid to prevent e-liquid
leakage. To replace the atomizer
head, unscrew the top cap from the
atomizer by turning it anti-clockwise
until the top cap fully detaches,
then the glass must be removed
by carefully pulling it upwards.
Remove the existing atomizer head
by unscrewing it in an anti-clockwise
direction until it fully detaches. The
new atomizer head can now be fitted
into the atomizer base by screwing
it in a clockwise direction until firmly
sealed. Refit the glass and replace
the top cap by screwing it in a
clockwise direction,
ensuring they are
firmly sealed before
filling.
Using your aio Slider Hellre
Note: Be sure to
drip a few drops
of e-liquid into the
atomizer head before
the first usage to
ensure maximum
performance.
Page 6
6
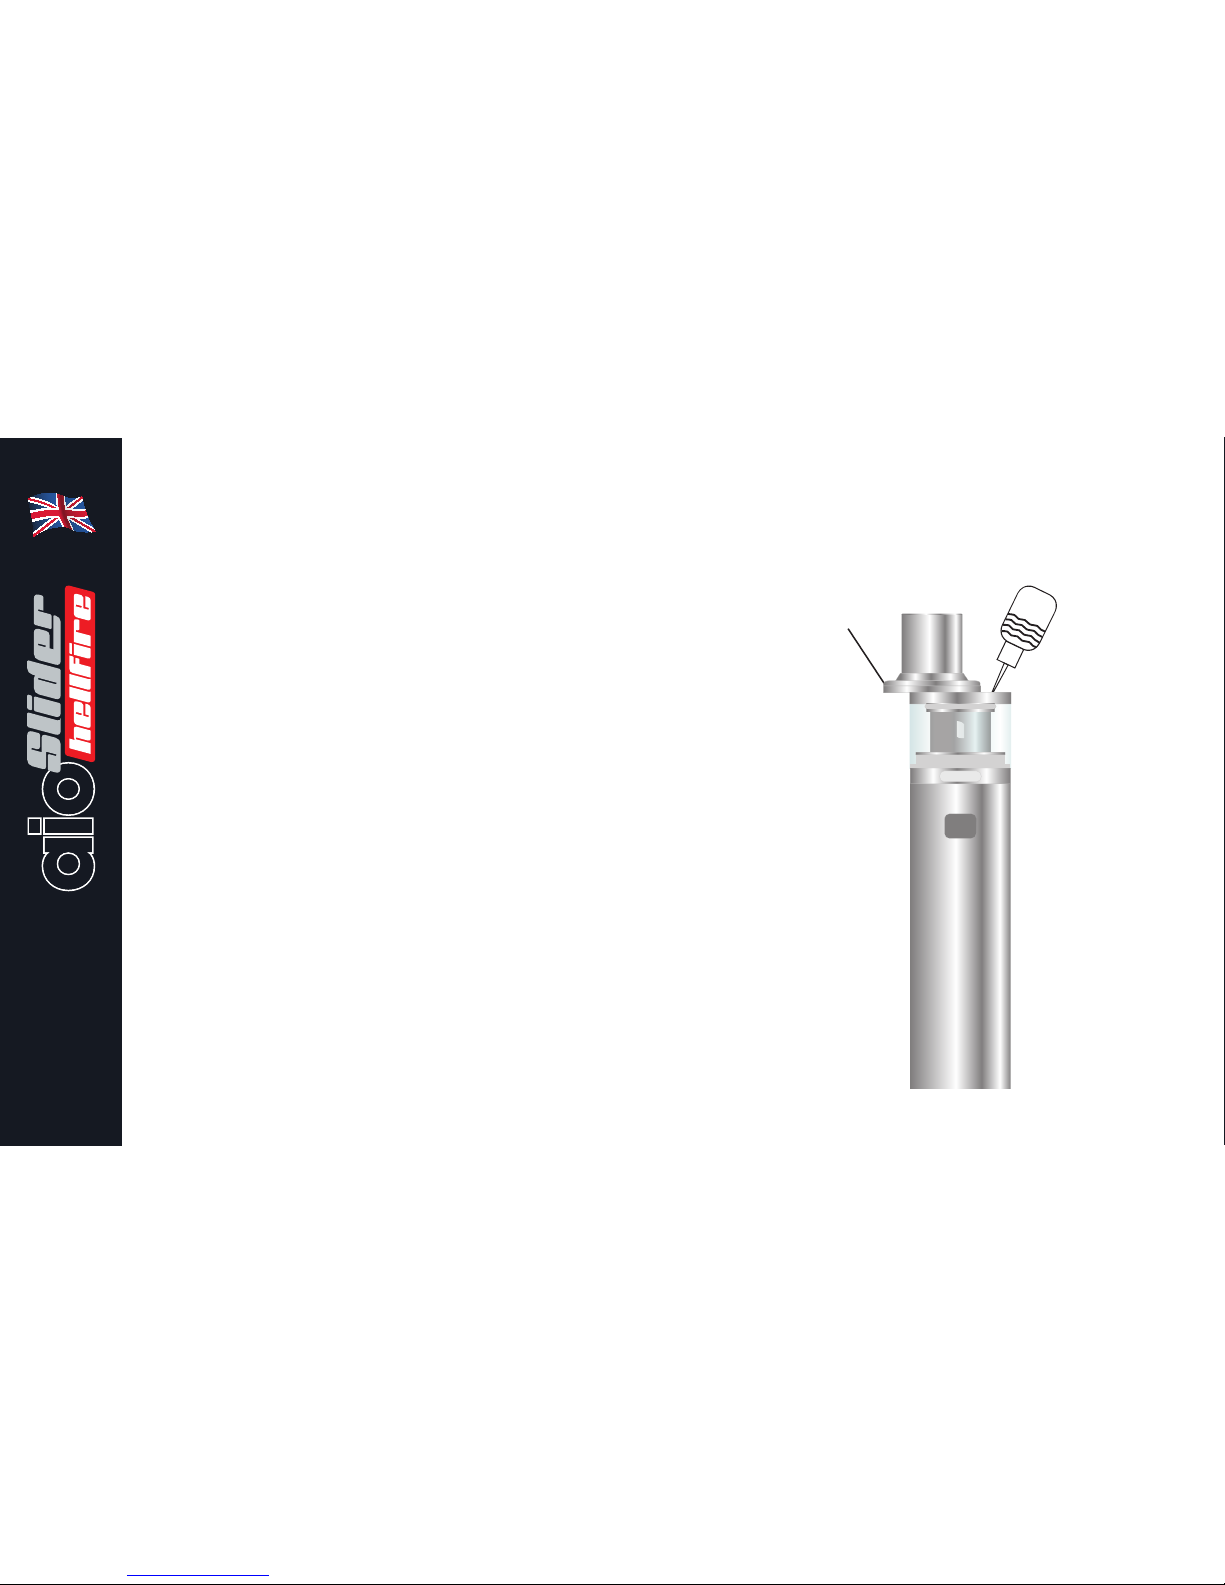
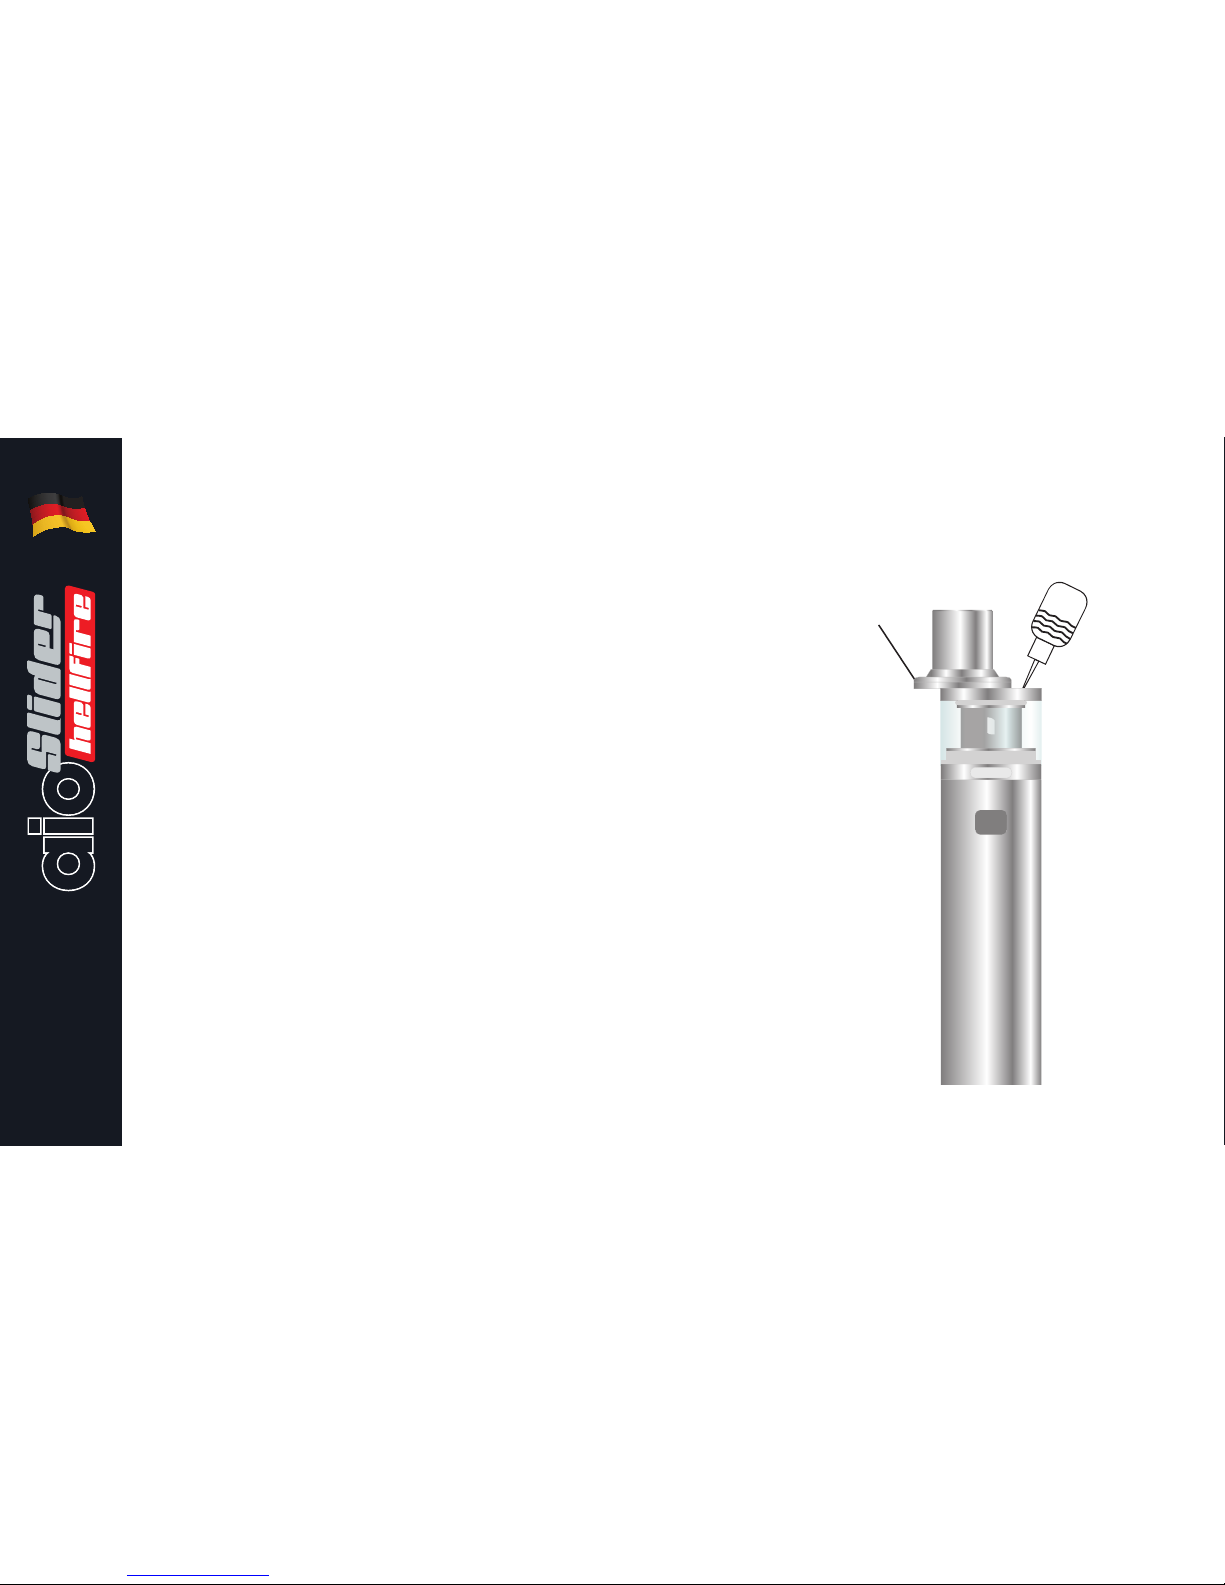
Filling with E-liquid:
To fill the device, slide the upper
section of the top cap to the side
by pushing firmly sideways, this will
expose the filling hole. The correct
sliding direction is clearly indicated.
Insert the e-liquid filling nozzle into
the fill hole and slowly fill the tank
with e-liquid, being careful not to
overfill.
Note: When filling, ensure that the
tank is not entirely filled and an
air gap of 2mm remains above the
e-liquid to ensure proper e-liquid
supply to the wick.
Using your aio Slider Hellre
Sliding Cap
Page 7
7
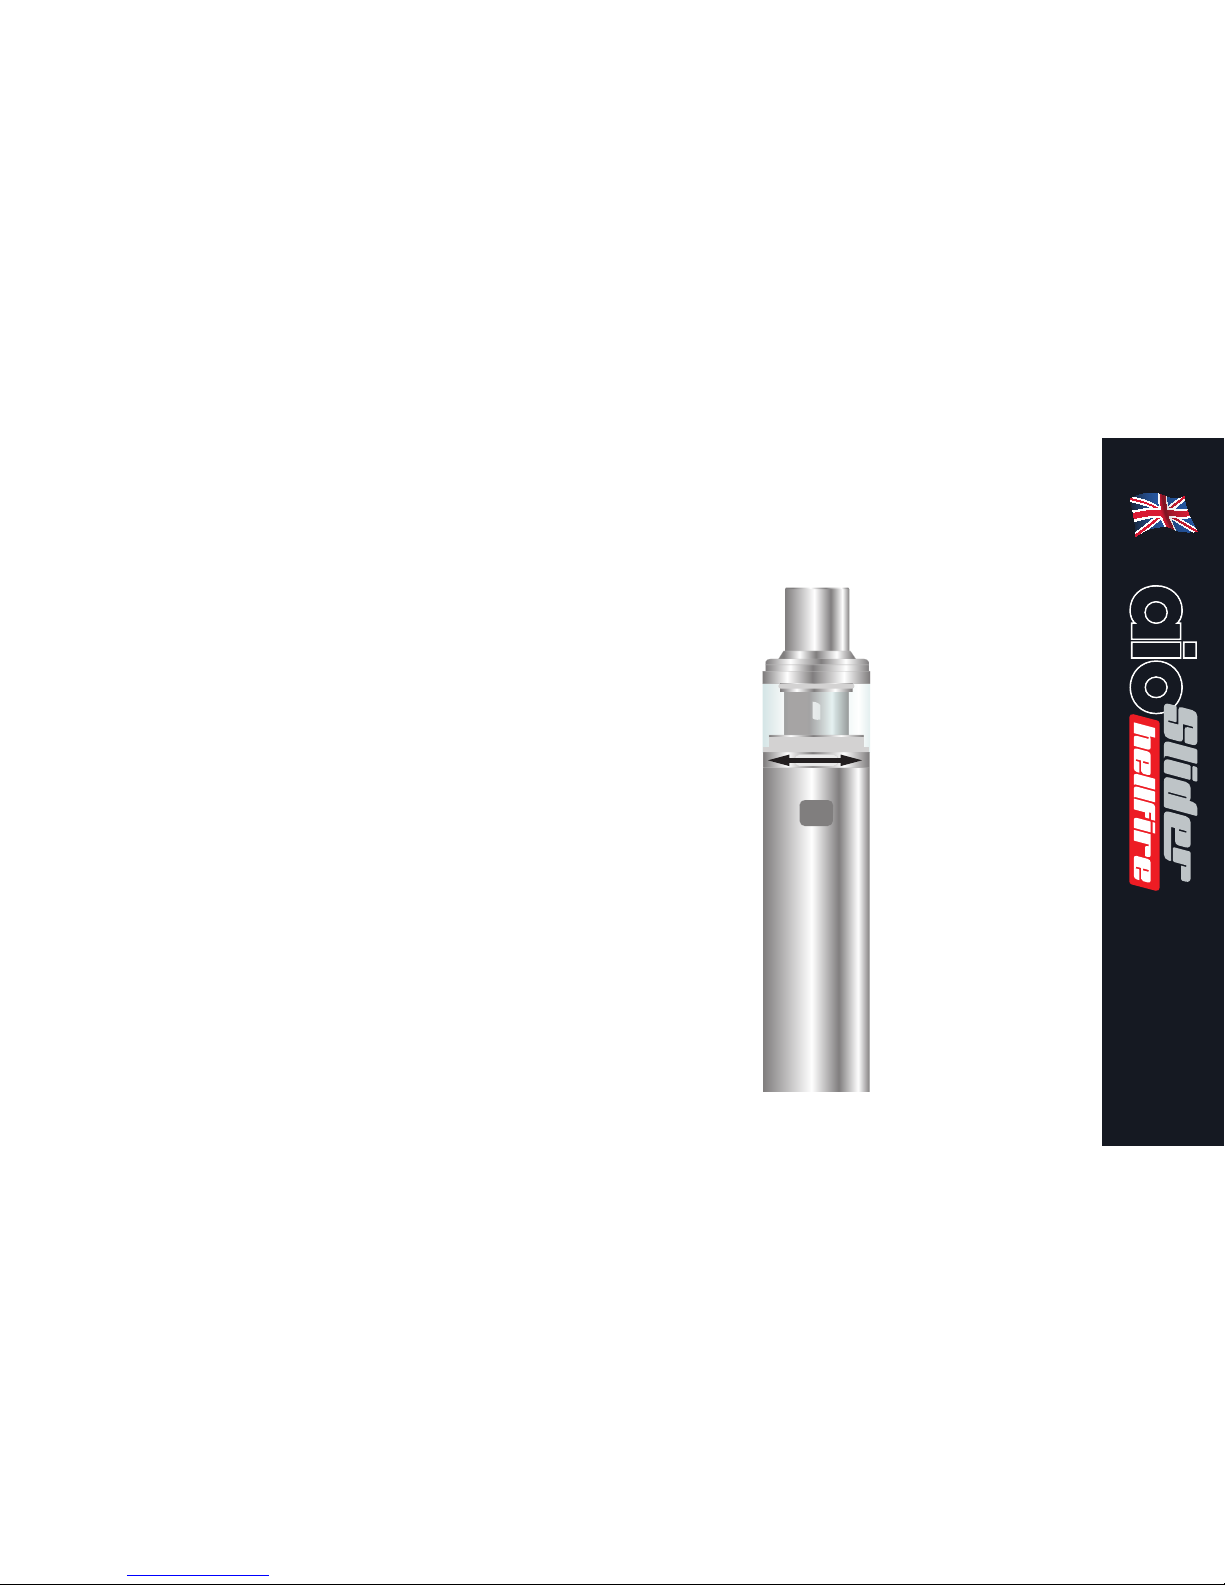
Adjustment of Airflow:
To adjust the airflow through the
atomizer, simply turn the airflow ring
on the atomizer base to expose the
desired area of the airflow slot.
Using your aio Slider Hellre
Page 8
8
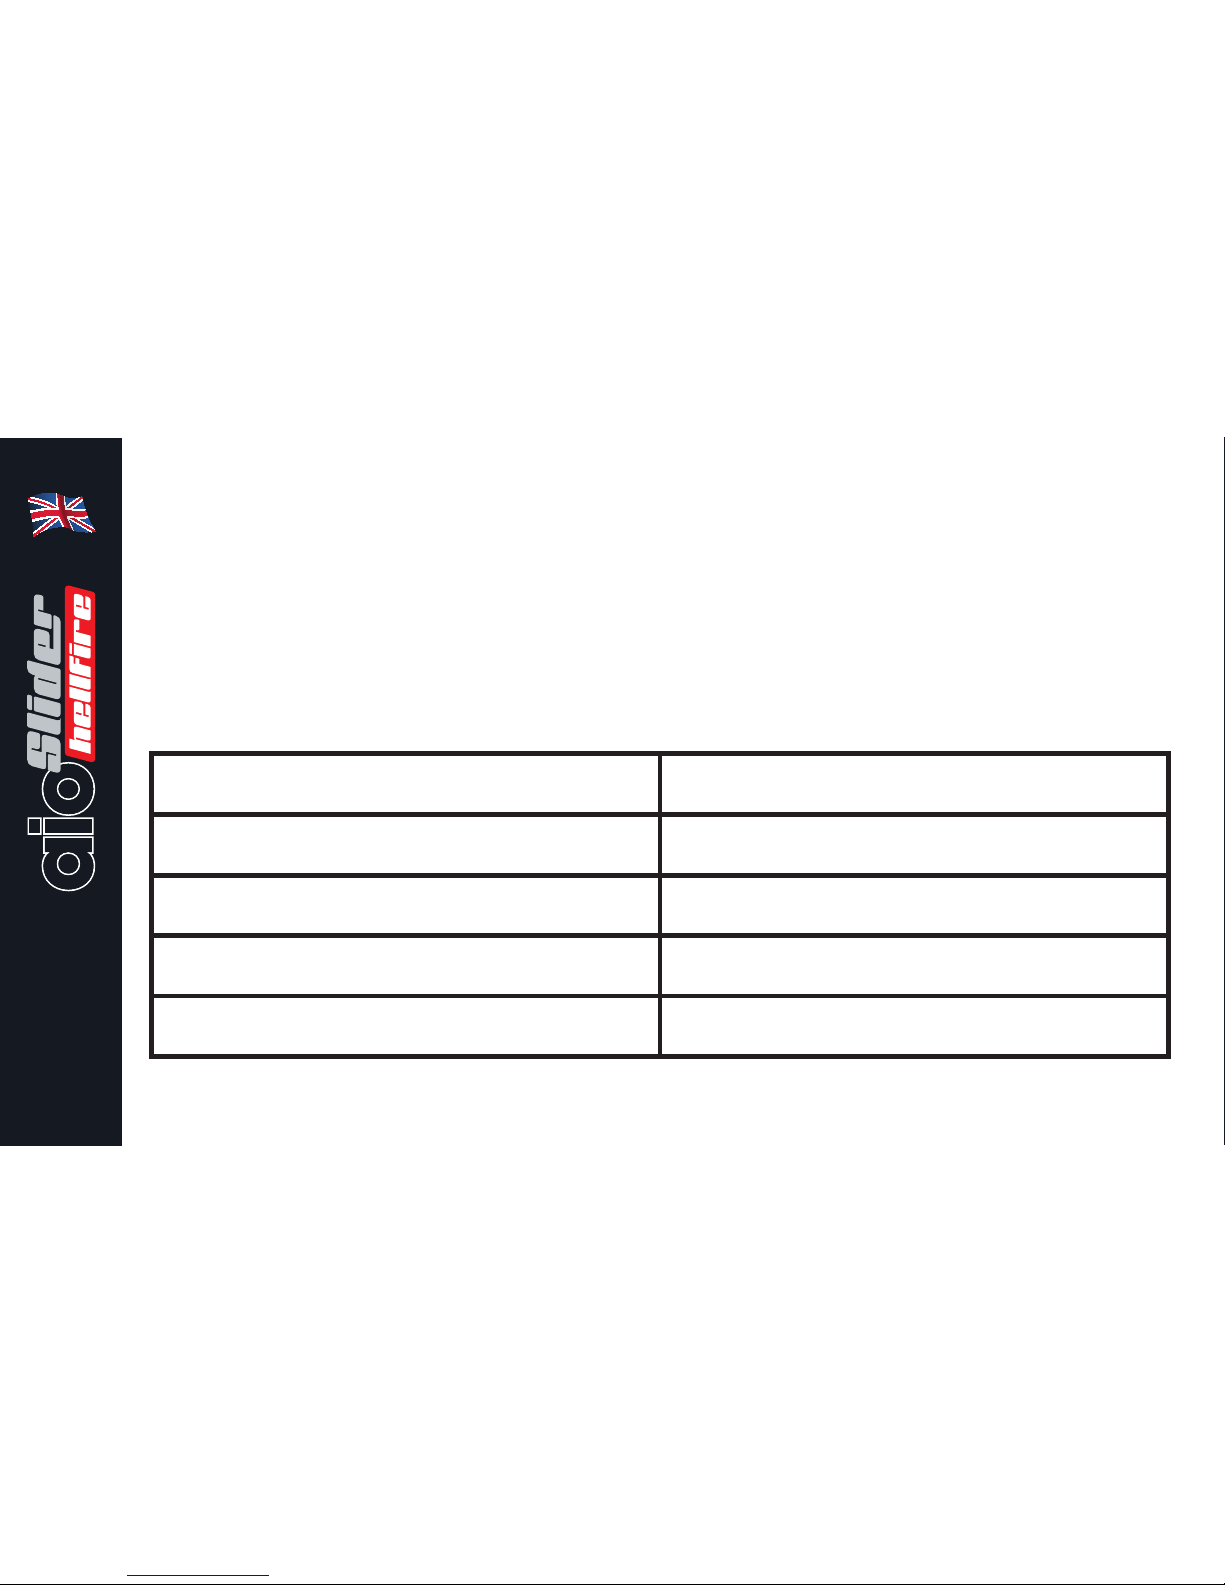
Battery Life Indication:
As the level of charge changes the
LED will change colour. The table
below can be used as a reference.
Using your aio Slider Hellre
Battery Charge Level Light Colour
60 – 100% Green
30 – 59% Orange
10 – 29% Blue
0 – 9% Red
Page 9
9
Using your aio Slider Hellre
Short Circuit Protection:
If a short circuit occurs before
the power button is pressed, the
power buttons LED will flash 5
times consecutively. If a short circuit
occurs while the power button is
pressed, the power buttons LED will
flash 3 times consecutively.
Atomizer Protection:
If the power button is held down for
longer than 15 seconds, the device
will stop producing any vapour and
the power buttons LED will flash
10 times.
Low Voltage Protection:
When the battery voltage drops
below 3.3V, the power buttons LED
will flash 40 times and the device
will power off. Charge the device via
USB to power it back on.
Page 10

10
Kit Contents
1 x AIO Slider Hellfire
2 x 0.2ohm HW1 Single Cylinder, Dual Coil Atomizer Heads (1 Fitted, 1 Spare)
1 x Mouthpiece
1 x Sealing Rings
1 x USB Cable
1 x User Manual
Page 11
11
Specications
Dimensions: 24.5mm (diameter) x 123.5mm (length)
Battery: 3000mAh Integrated Battery
Tank Capacity: 2ml
Atomizer Type: HW
Atomizer Resistance Capability: 0.15ohm – 3.0ohm
Voltage Output: 3.3 – 4.2V (Direct)
Battery Voltage: 3.7 (Nominal)
Power Output: Maximum output of up to 50 watts
Maximum Filling Nozzle Diameter: 4.4mm
Page 12

12
Additional product information
There are no reported medical side effects with this product. If you believe you
experience a side effect, please contact the manufacturer.
Warranty
The aio Slider Hellfire components have a 28-day parts warranty, with the
exception of Atomizer Heads, which are consumable items and covered by
“dead on arrival” warranty only. The USB cable supplied has a 12-month
warranty. If any parts are found to be faulty within this time please contact our
customer service team, whose details are on the back page of this booklet and
we will arrange for a replacement. We may require the goods to be returned for
further investigation.
Page 13
13
Product Storage and Battery Precautions
• Store the AIO Slider Hellfire and its accessories away from children when not
in use.
• Ensure the AIO Slider Hellfire is powered off when not in use.
• Avoid accidentally pressing the aio Slider Hellfire power button when not in
use.
• Please only use the charging cable provided.
• Please dispose of dead batteries in accordance with your country’s
appropriate legislation.
• Do not charge the batteries in a damp environment.
• Do not use the device when temperatures are outside the range -10 - 60°0C.
• Do not charge the battery when temperatures are outside the range 0 - 45°C.
• Do not attempt to repair a faulty aio Slider Hellfire as these are sealed units
with no serviceable parts. Attempted repairs will void the warranty.
Page 14

14
Glückwunsch zum Kauf Ihres
Totally Wicked aio Slider Hellre E-Zig Kits.
Die Totally Wicked AIO Slider Hellfire ist ein All-in-One Gerät, das optimale
Bedienerfreundlichkeit mit außergewöhnlicher Dampfproduktion kombiniert. Dies
wird mittels HW-Verdampferköpfen und einer beachtlichen Leistung von bis zu
50 Watt erreicht. 2 x 0.2 Ohm HW1 Single Cylinder Dual Coil Verdampferköpfe
sind im Kit inbegriffen. HW2 0.3 Ohm Dual Cylinder Quad, HW3 0.2 Ohm Triple
Cylinder Sextuple und HW4 0.2 Ohm Quad Cylinder Octuple Verdampferköpfe
sind separat im Zubehör erhältlich. Der Schiebe-Füllmechanismus und die EinKnopf-Bedienung sowie die Gleichspannung sorgen dafür, dass das Gerät äußerst
einfach zu bedienen ist und zugleich ein äußerst befriedigendes Dampferlebnis
bietet. Darüber hinaus sind die 3000mAh Akkuzellen in das überraschend
kompakte Gerätegehäuse integriert, die ausreichend Power zwischen den
Ladevorgängen bereithalten.
Page 15
15
Powertaster
Akku
Verdampferbasis
Luftzugring
HW Verdampferkopf
Tank-Glas
Top-Cap
Mundstück
Page 16

16
Bedienung - aio Slider Hellre
Power Ein/Aus:
Die aio Slider Hellfire hat eine 5-Klick
Ein/Aus-Funktion. Drücken Sie zum
Einschalten den Powertaster 5-mal
zügig in Folge. Die Taster-LED blinkt
5-Mal auf und signalisiert, dass
das Gerät eingeschaltet und für die
Nutzung bereit ist. Zum Ausschalten
Powertaster ebenfalls 5-Mal zügig in
Folge drücken.
Dampfen:
Powertaster drücken und inhalieren.
Wenn der Taster gedrückt wird,
leuchtet die Taster-LED auf.
Akku aufladen:
Die aio Slider Hellfire kann
über das USB-Kabel an einem
geeigneten USB-Port oder USBNetzstecker aufgeladen werden.
Die Powertaster LED leuchtet
hierbei rot und signalisiert, dass
der Akku aufgeladen wird. Die LED
erlischt sobald der Akku vollständig
aufgeladen wurde.
Page 17
17
Verdampferkopf installieren/
wechseln:
Schrauben Sie den Top-Cap gegen
den Uhrzeigersinn ab und ziehen
Sie vorsichtig das Tank-Glas aus der
Akku-Verdampferbasis. Schrauben
Sie als Nächstes (falls installiert)
den alten Verdampferkopf aus der
Verdampferbasis und ersetzen Sie
diesen durch einen Neuen. Setzen
Sie anschließend alle Komponenten
in umgekehrter Reihenfolge wieder
zusammen.
Hinweis: Träufeln Sie vor der
ersten Benutzung etwas E-Liquid
direkt in den Verdampferkopf
Bedienung - aio Slider Hellre
– hierdurch
werden präventiv
Trockenzüge
vermieden und
eine bessere
Langlebigkeit
des Verdampfers
erreicht.
Page 18
18
Tank befüllen:
Schieben Sie die Kappe zur Seite,
um die Befüll-Öffnung freizulegen.
Füllen Sie den Tank mit E-Liquid und
achten Sie darauf nicht zu überfüllen
(2mm nach oben freilassen).
Schieben Sie anschließend die
Kappe wieder in Position, um den
Tank zu verschließen.
Schiebe-Kappe
Bedienung - aio Slider Hellre
Page 19
19
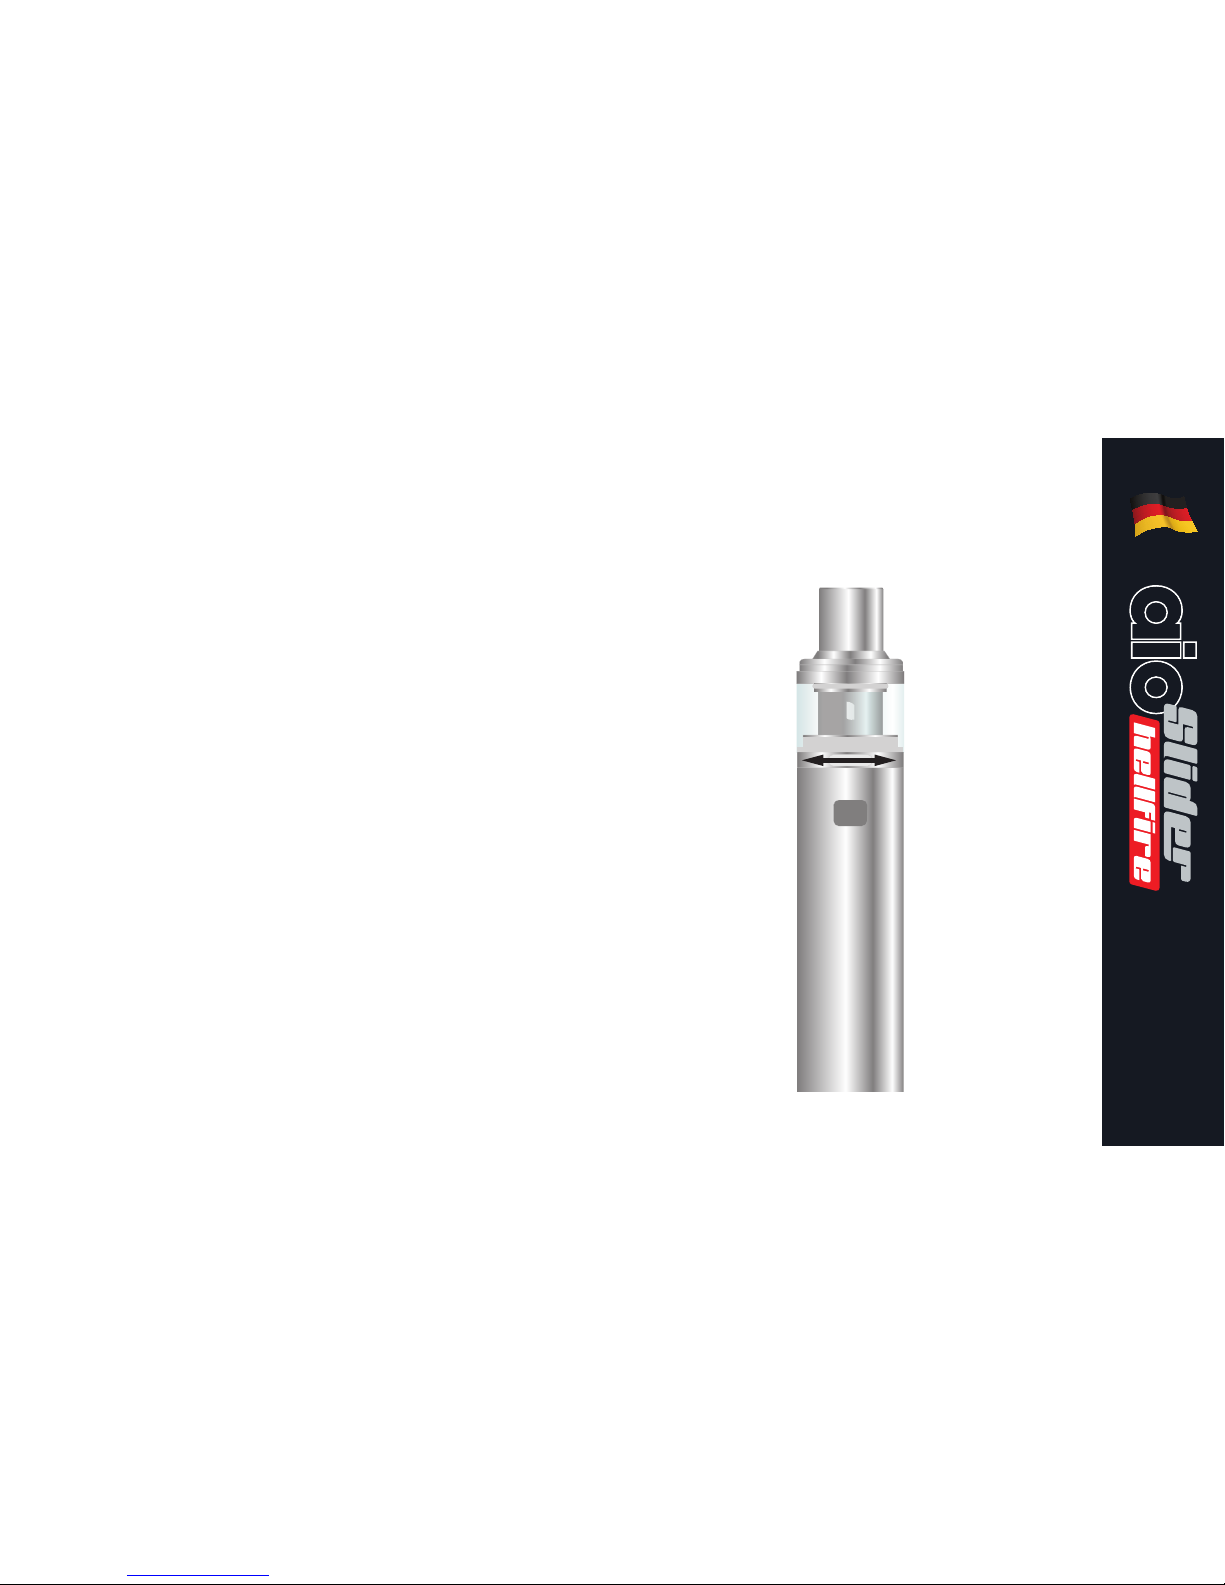
Luftzug einstellen:
Durch Drehen des Luftzugringes
an der Verdampferbasis variiert die
Öffnungsgröße des Lufteinlasses
und somit die Menge an Luft, die
zum Verdampferkopf angesaugt
wird – dies erlaubt eine perfekte
Abstimmung des Zugwiderstandes.
Bedienung - aio Slider Hellre
Page 20
20
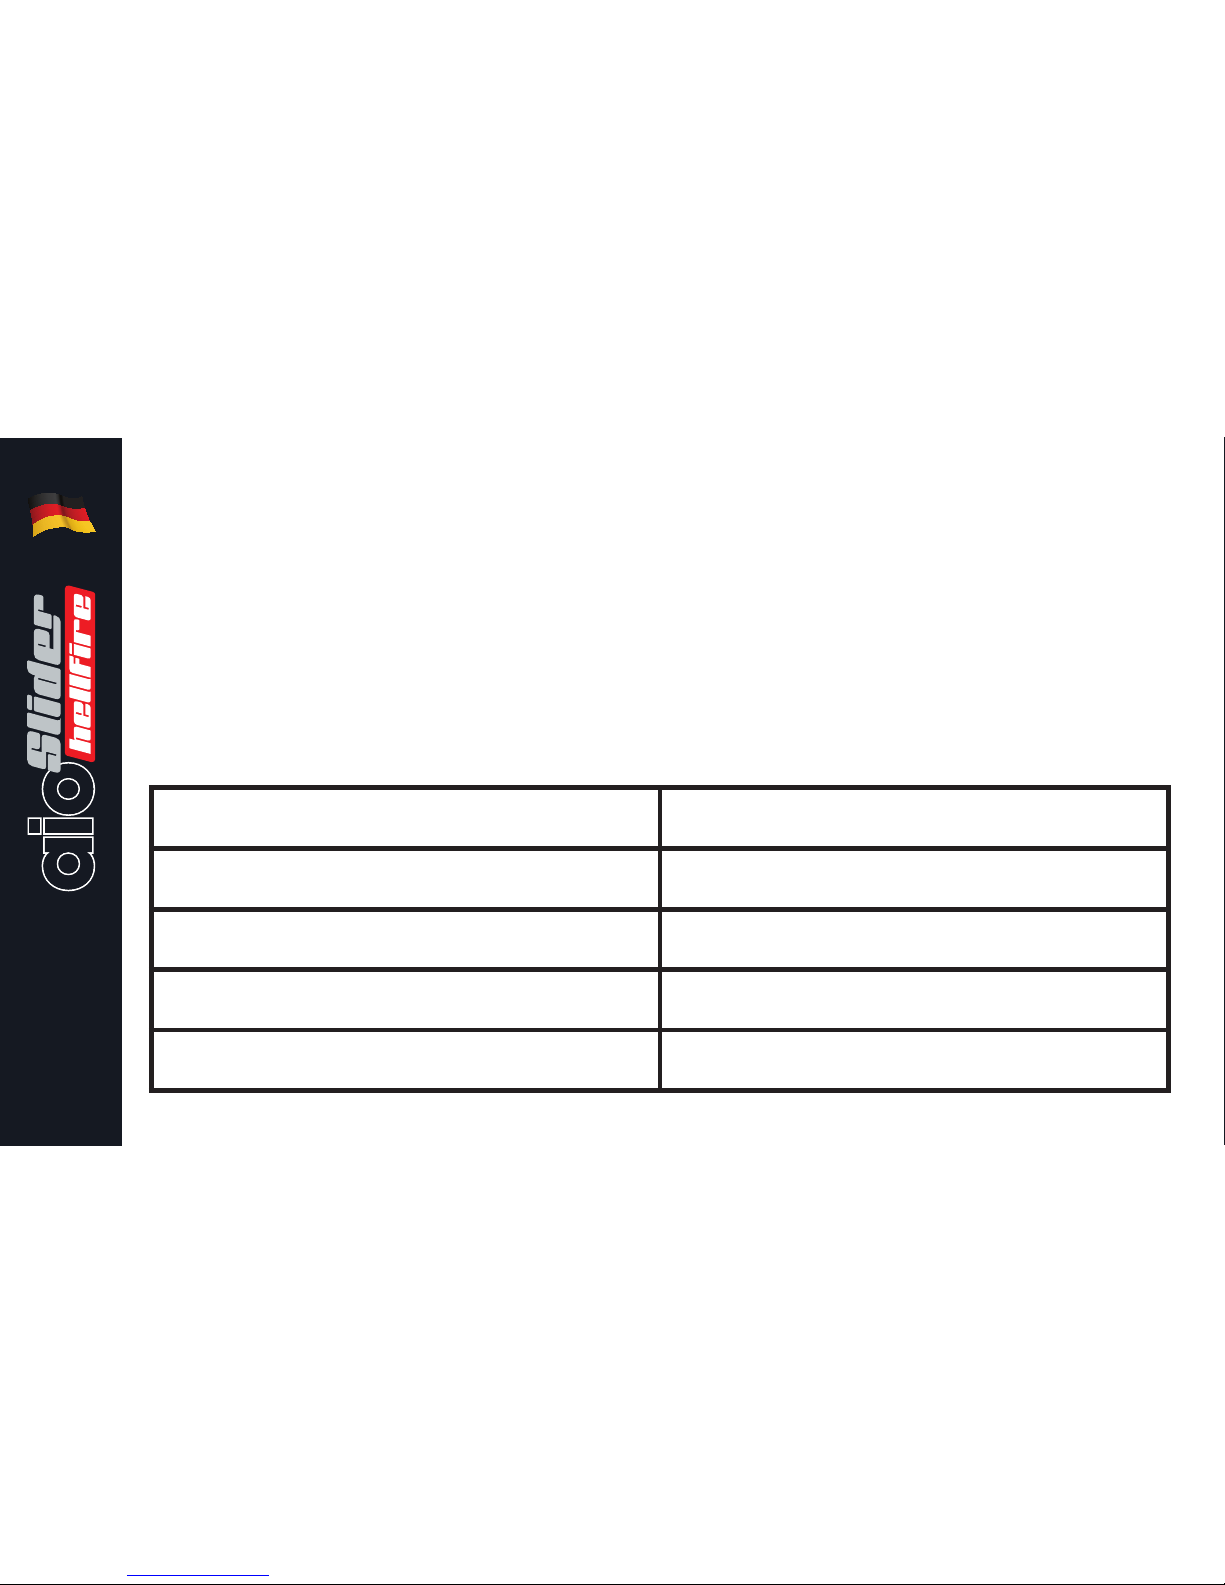
Akku-Ladestandanzeige:
Der Ladestand des Akkus ist
jederzeit über die LED-Farbe
ersichtlich – siehe nachfolgende
Tabelle.
Akkuladestand LED-Farbe
60 – 100% Grün
30 – 59% Orange
10 – 29% Blau
0 – 9% Rot
Bedienung - aio Slider Hellre
Page 21
21
Kurzschluss-Schutzfunktion:
Wird ein Kurzschluss (bevor der
Powertaster gedrückt wird) vom
Gerät erkannt, blinkt die LED 5-Mal
auf. Sollte ein Kurzschluss beim
Drücken des Powertasters erkannt
werden, blinkt die LED 3-mal auf.
Verdampfer-Schutzfunktion:
Wird der Powertaster länger als 15
Sekunden gedrückt, blinkt die LED
10-mal auf - die Stromzufuhr zum
Verdampfer wird unterbrochen.
Niederspannungsschutz:
Fällt die Akku-Spannung auf unter
3.3V, blinkt die LED 40-mal auf
und das Gerät schaltet sich ab –
Ladevorgang erforderlich.
Bedienung - aio Slider Hellre
Page 22

22
Kit Inhalt
1 x aio Slider Hellfire
2 x 0.2 Ohm HW1 Single Cylinder Dual Coil Verdampferkopf
(1 eingesetzt, 1 extra)
1 x Mundstück
1 x Dichtungsring
1 x USB Kabel
1 x Bedienungsanleitung
Page 23
23
Technische Daten
Abmessungen: 24,5mm (Durchmesser) x 123,5mm (Länge)
Akku: 3000mAh integrierte Zellen
Tankkapazität: 2ml
Verdampferkopf Typ: HW
Akzeptierte Verdampferkopf-Widerstände: 0.15 Ohm – 3.0 Ohm
Betriebsspannung: 4.2V – 3.3V (ungeregelt)
Akkuspannung: 3.7 (nominal)
Maximaler Durchmesser für Einfüllstutzen: 4,4mm
Page 24

24
Ergänzende Produktinformation
Es bestehen keine Erkenntnisse über medizinische Nebenwirkungen mit
diesem Produkt. Sollten Sie glauben eine Nebenwirkung zu verspüren, kontaktieren Sie bitte den Hersteller.
Garantie
Die aio Slider Hellfire Komponenten haben eine 28-tägige Garantie.
Verdampferköpfe sind als Verschleißteil von der Garantie ausgeschlossen und
durch eine DOA-Regulierung abgedeckt. Das mitgelieferte USB-Kabel hat eine
12-monatige Garantie. Sollte eine Komponente fehlerhaft sein, bitten wir Sie
Ihren Händler oder den Totally Wicked Kundenservice zu kontaktieren.
Page 25
25
Aufbewahrungshinweise und
Akku-Sicherheitsinformationen
• Die aio Slider Hellfire und das Zubehör außerhalb der Reichweite von Kindern
und Tieren aufbewahren.
• Schalten Sie die aio Slider Hellfire aus, wenn nicht in Gebrauch.
• Vermeiden Sie versehentliches Drücken des Powertasters, wenn die aio
Slider Hellfire nicht in Gebrauch ist.
• Verwenden Sie nur das beigefügte USB-Ladekabel.
• Alte oder defekte Akkus nach den gesetzlichen Bestimmungen entsorgen.
• Akku nicht in feuchter Umgebung aufladen.
• Bei Außentemperaturen unter -10°C und über 60°C Gerät nicht nutzen.
• Akku nicht bei Temperaturen unter 0°C oder über 45°C aufladen.
• Versuchen Sie nicht eine defekte aio Slider Hellfire zu reparieren. Beim
Reparaturversuch erlischt die Garantie.
Page 26
Manufactured in China
under the authority
of Pillbox38 UK Ltd,
Stancliffe Street,
Blackburn, Lancashire,
BB2 2QR.
Tel 01254 692244
www.totallywicked.co.uk
Tel 1(888) 761-9425
www.totallywicked.com
Tel 0941-78447082
www.totallywicked.de
 Loading...