

Page 1
USER MANUAL
Page 2
3
THE TOTALLY WICKED ACTIVE
TOTALLY WICKED
ACTIVE
ELECTRONIC
CIGARETTE KIT
CONGRATULATIONS
ON PURCHASING YOUR
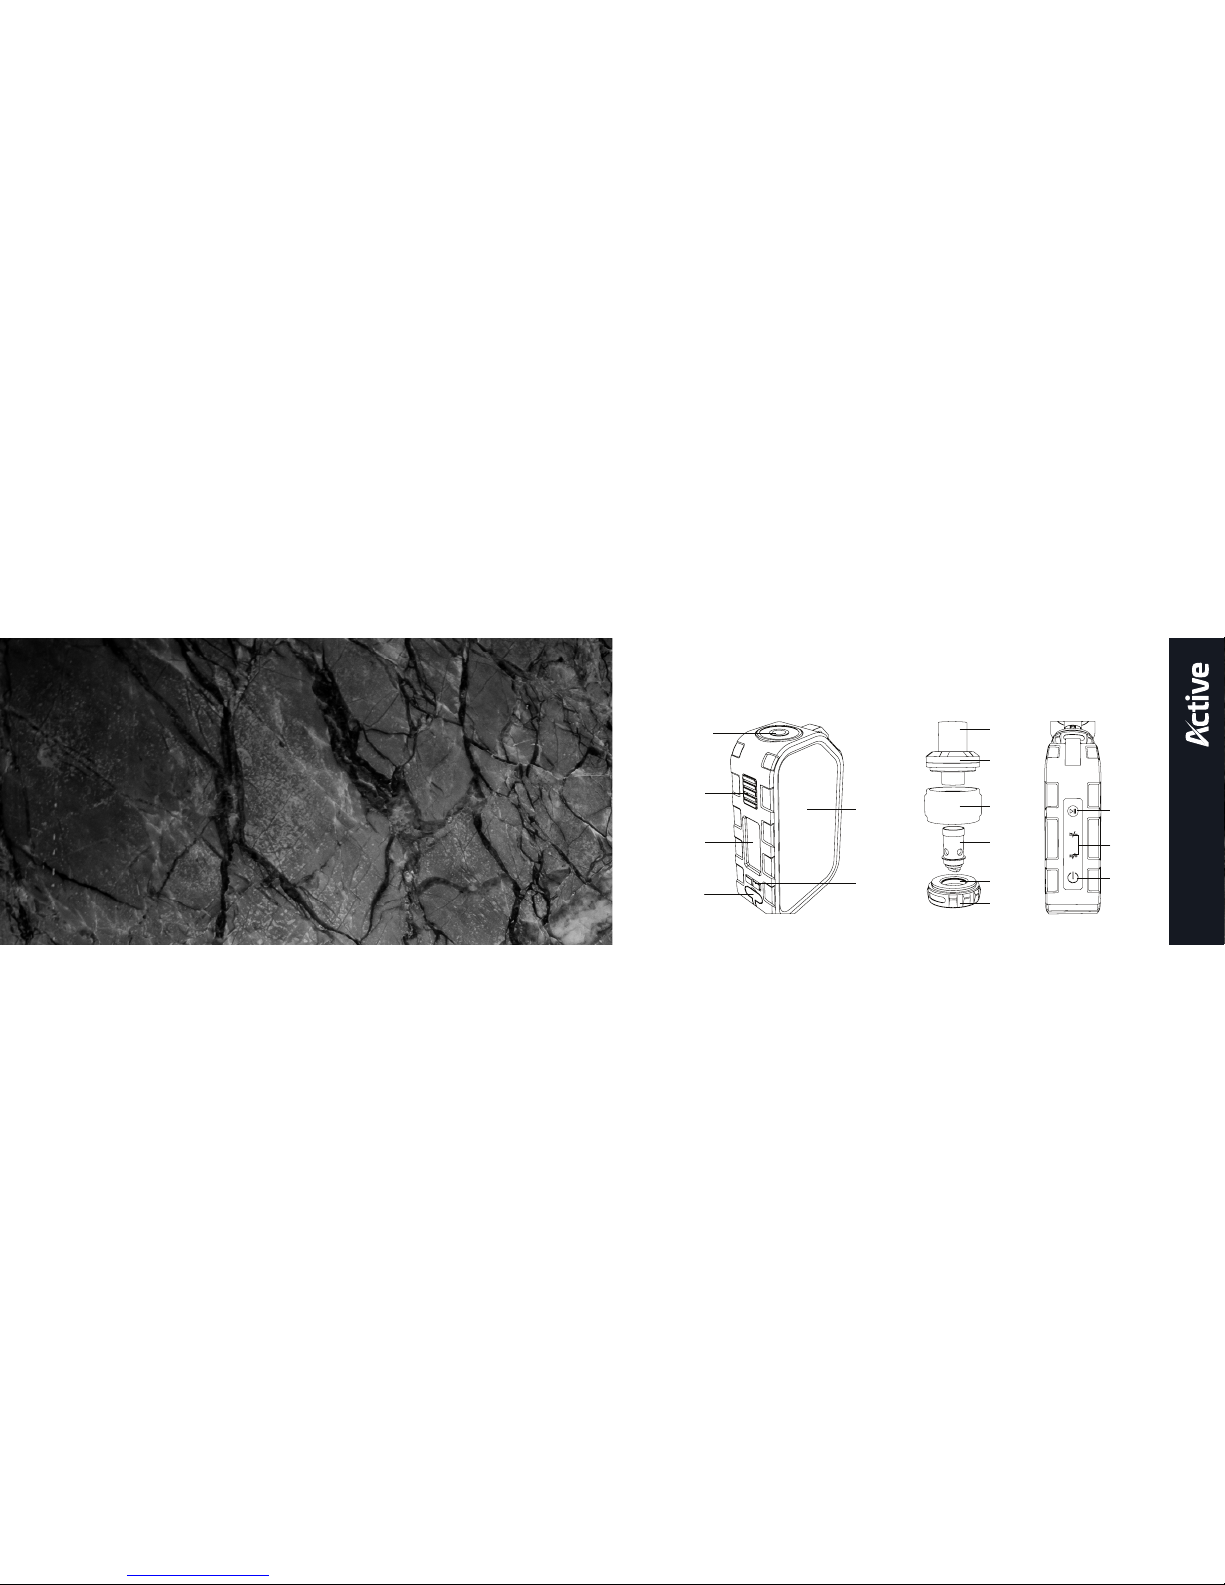
Charging
Port
Display Screen
Power
Button
Tank Connection
Adjustment
Buttons
Speaker
Pause/Play
Button
Speaker
Power Button
Volume/Music
Control Buttons
Mouthpiece
Top Cap
Atomizer
Head
Airflow
Control
Ring
Acrylic
Sleeve
Tank Base
Page 3

4 5
For those familiar with Wireless speakers, the steps below can be followed to allow
the device to be used in the shortest possible time:
• Press the speaker power button – the device will begin scanning for Wireless
devices
• Turn on the Wireless connection on your selected device and pair with the
“ACTIVE”
• Select the music you wish to play on your selected device
• Charge the battery (it may not have been shipped with a full charge)
Detailed descriptions of these steps and more are given in the full user guide.
For those familiar with e-cigarettes, the steps below can be followed to allow the
device to be used in the shortest possible time:
• Prime the atomizer head
• Fill the tank
• Switch the Active on
• Set the Active to wattage mode
• Check the power setting (we suggest 15 watts with the 1.3ohm atomizer head)
• Press the power button and inhale
• Charge the battery (it may not have been shipped with a full charge)
QUICK START GUIDE QUICK START GUIDE (WIRELESS SPEAKER)
Page 4
6 7
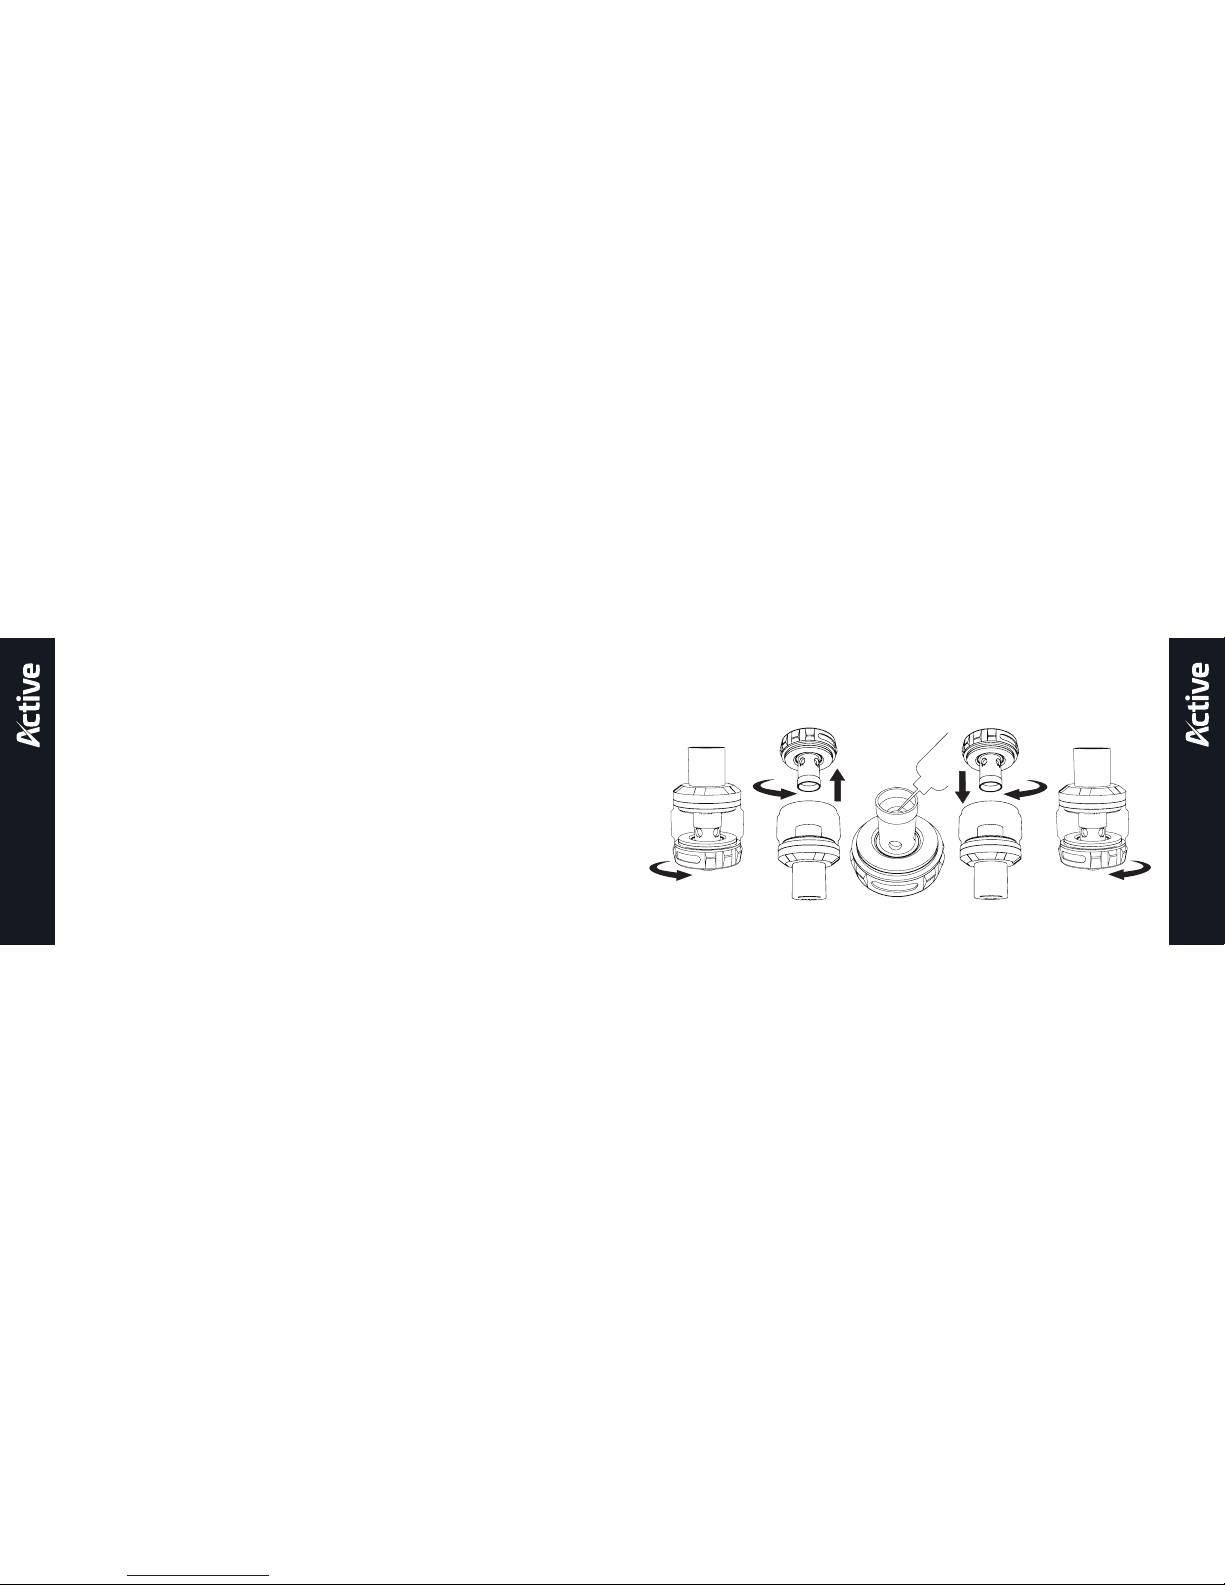
Note: It is important to “prime” a new
atomizer head before first use. Failure
to do so can cause the atomizer coil to
overheat, leading to an unpleasant taste
and sometimes irreversible damage
to the atomizer head requiring early
replacement.
Remove the tank from the battery.
Turn the Active tank upside down and
unscrew the atomizer base from the
clear acrylic section of the tank.
Prime the fitted atomizer head by
slowly dripping e-liquid onto the cotton,
avoiding dripping e-liquid directly
down the centre of the atomizer head.
Continue to slowly drip e-liquid onto the
cotton until the cotton visible through
the sides of the atomizer head appears
to be saturated. Refit the atomizer base
onto the clear acrylic section of the tank
then screw the assembled tank back
onto the Active battery. Fill the tank.
PRIMING THE ATOMIZER HEAD PRIMING THE ATOMIZER HEAD
Page 5
8 9
E-liquid Level
To avoid the atomizer head becoming
dry and burning prematurely, ensure
the e-liquid level does not drop below
half way down the acrylic section of
the tank.
Atomizer Head Lifespan
Atomizer heads do not last forever and
need to be periodically replaced. The
lifespan of an atomizer head can vary
from several days up to several weeks.
Factors affecting lifespan include
wattage, vaping style, flavour and type
of e-liquid. Indicators that the atomizer
head may require replacement include
a slight burnt taste, general loss of
vapour production or a reduction in
flavour intensity.
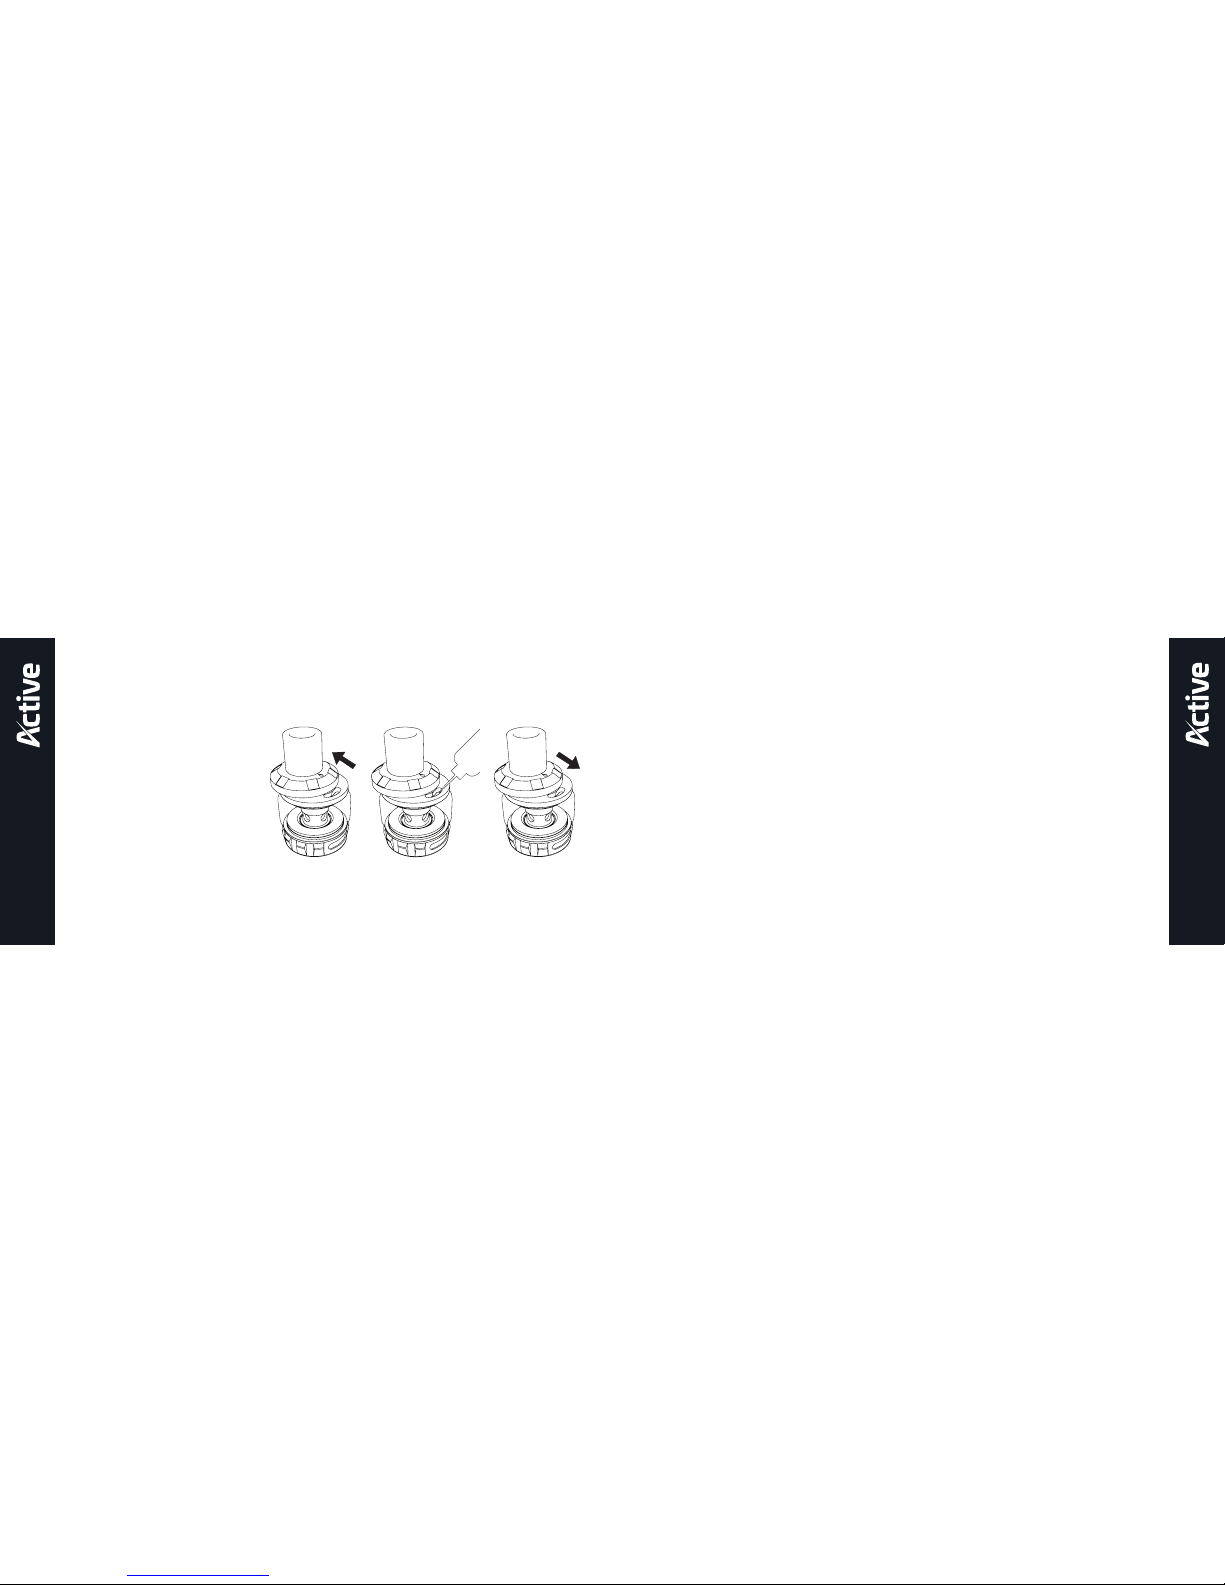
Slide the top cap open by
pushing firmly in the direction
indicated by the arrow on the
top cap to expose the fill hole.
Insert the filling nozzle into the
fill hole and fill the tank, being
careful to leave an air gap of
approximately 2mm. Slide the
top cap shut after filling.
FILLING THE TANK USING YOUR ACTIVE KIT
Page 6

10 11
wattage settings will give a cooler and
less dense vapour than higher power
settings, higher power settings will
produce larger clouds of vapour but too
much power can lead to poor flavour,
or even a burnt taste in the vapour.
Experiment to find your preference.
Tip: Long pressing either of the
adjustment buttons allows quicker
changes to the wattage.
Vaping
Press and hold the power button as you
inhale the vapour.
Atomizer Head Protection
If the power button is held down for
longer than 10 seconds while vaping
the screen will display “Over 10s
protection” and the Active will refuse to
power or produce any vapour. Release
the power button to allow normal
operation to return.
Powering On and Off
To switch the Active on, quickly press
the power button 5 times. The screen
will activate indicating that the device
is powered on. To turn the Active off,
quickly press the power button 5 times.
Setting the Mode and Wattage
The atomizer heads supplied with the
Active are compatible with wattage
mode only, and will not work in
temperature control modes. To set the
Active to wattage mode, quickly press
the power button 3 times to enter the
mode selection menu, the screen will
display your current mode. Press either
adjustment button until you have found
“Wattage”, press the power button
once to confirm your selection. Lower
USING YOUR ACTIVE KIT USING YOUR ACTIVE KIT
Page 7
12 13
Weak Battery Alert
If the battery cannot supply your desired
wattage the screen will display “WEAK
BATTERY” and the wattage will be
adjusted automatically to the maximum
which can be supplied. Charge the
Active using the steps outlined in
Charging the Battery below to allow
normal operation to resume.
Battery Low
Once the Active battery completely
depletes, the indicator on the screen
will begin to flash. If the Active is used
while the battery indicator is flashing,
the screen will state “BATTERY LOW”
pressing the button again will result in
the screen displaying “BATTERY LOW
LOCK!” Charge the Active using the
steps outlined in Charging the Battery
below to allow normal operation to
resume.
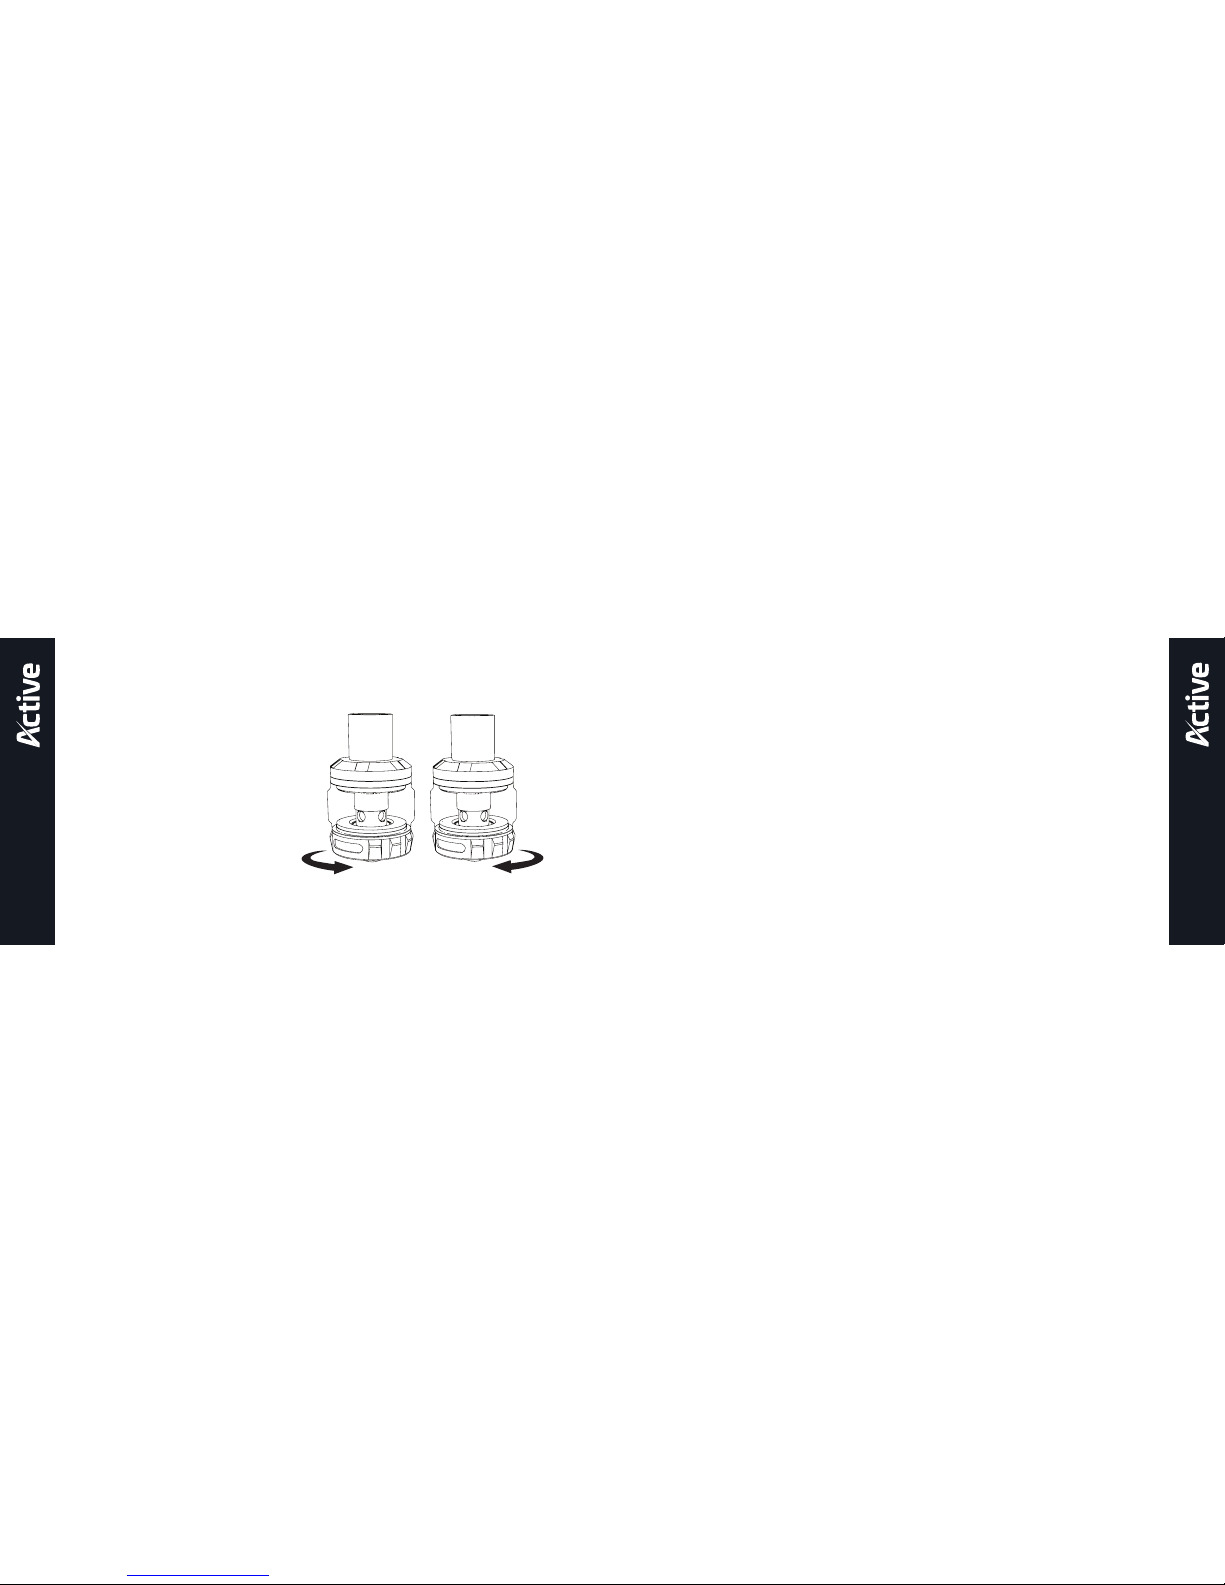
Adjusting the Airflow
If you find the airflow too airy or
too restrictive while vaping, it can
be adjusted by rotating the airflow
control ring located on the atomizer
base. Experiment to find your
preferred setting.
USING YOUR ACTIVE KIT USING YOUR ACTIVE KIT
Page 8

14 15
Stealth Mode
If stealth mode is enabled, the display
will not activate while pressing the
power button to vape. The display will
still activate whenever the adjustment
buttons are pressed to make changes
to wattage or change modes, or if the
power button is pressed briefly. To
enable or disable stealth mode, ensure
the Active is powered on, then press
and hold the power button and left
adjustment button at the same time.
The screen will display “STEALTH
ON” if enabled and “STEALTH OFF” if
disabled.
Key Lock Mode
Key lock mode prevents accidental
changes to the wattage or temperature
settings. To enable or disable key lock
mode, ensure the Active is powered on,
then press and hold both adjustment
buttons at the same time to enable or
disable key lock mode. The screen will
Charging the Battery
The Active is charged by connecting
the charge port located beneath the
adjustment buttons to a USB port or
suitable wall adaptor with the charging
lead supplied. The silicone plug
covering the charge port will need to
be flipped down before connecting
a charger. The battery indicator will
display a lightning bolt while charging,
and after a few minutes the screen will
display an icon showing a battery being
charged.
Replacing the Atomizer Head
To replace the atomizer head, remove
the Active tank from the Active battery
by unscrewing at the atomizer base.
Turn the tank upside down, then
unscrew the atomizer base from the
acrylic section of the tank. Unscrew
the atomizer head from the atomizer
base and replace. After following the
instructions in “Priming the Atomizer
Head”, reassemble the tank and screw
the assembled tank back onto the
Active battery.
USING YOUR ACTIVE KIT SETTINGS
Page 9

16 17
Bypass Mode:
Bypass mode provides an effectively
direct connection between the device’s
battery and the atomizer. As the battery
depletes, the device supplies less
power to the tank. To enter bypass
mode, ensure the Active is turned on
and quickly press the power button 3
times. Use either adjustment button to
scroll until “Bypass” is displayed and
press the power button to confirm.
Rotating the Display:
To rotate the display by 180°, turn the
Active off then press and hold both
adjustment buttons at the same time.
Turn the Active back on.
display “KEY LOCK” when enabled
and “KEY UNLOCK” when disabled. If
key lock mode is enabled the screen
will display “KEY LOCK” when the
adjustment buttons are pressed.
Adjustments cannot be made until the
key lock has been disabled.
Switch between Current,
Puff Counter or Total Time
Vaping Displayed
Ensure the Active is powered on, press
and hold the power button and the right
adjustment button. The bottom icon will
begin to flash, use either adjustment
button to find the icon wanted and
press the power button to confirm your
selection.
Note: you can reset the puff counter
and total time vaping to zero by holding
down both adjustment buttons while the
respective icon is flashing.
SETTINGS SETTINGS
Page 10

18 19
Note: The atomizer heads supplied
with the Active kit are compatible with
wattage mode only, and will not work in
temperature control mode.
Adjusting Wattage in
Temperature Control/TCR Modes
The maximum wattage that is applied
in Temperature Control or TCR modes
can be adjusted. Higher wattages allow
the target temperature to be reached
quicker, while lower wattages increase
the time taken to reach the target
temperature. Setting the wattage too
low may prevent the target temperature
from being reached at all. To adjust
the maximum wattage, quickly press
the power button 4 times to enter the
wattage adjustment screen. Increase or
decrease the wattage until the desired
wattage is reached, press the power
button once to confirm the selection.
Switching to Temperature
Control Vaping Modes
Temperature Control vaping modes
can be used only when specific coil
materials have been used for atomizer
head manufacture, generally nickel (Ni),
titanium (Ti) or stainless steel (SS).
To select the appropriate temperature
control mode, quickly press the power
button 3 times to enter the mode
selection menu; Then press either
adjustment button to cycle between the
modes of wattage, bypass, temperature
(Ni, Ti, SS) or temperature (M1, M2,
M3). Press the power button once to
confirm the selection.
Only atomizer heads with coils made
from nickel, titanium or “316” stainless
steel are compatible with temperature
control mode. Select the appropriate
mode to match your atomizer type.
TEMPERATURE CONTROL SETTINGS TEMPERATURE CONTROL SETTINGS
Page 11

20 21
Celsius mode, or Celsius if previously
in Fahrenheit mode. The same can be
achieved by pressing and holding the
left adjustment button.
New Temperature Control Atomizer
Head Installation
Follow the steps outlined in “Replacing
the Atomizer Head” above to replace
and prime the atomizer head. After
replacing an atomizer head in
temperature control mode, the screen
may display the message “NEW COIL
RIGHT, SAME COIL LEFT”. Press
the right adjustment button once to
confirm a new atomizer head has been
fitted, or the left adjustment button if
the previously used atomizer head
has been replaced. Confirmation of a
newly fitted atomizer head with the right
adjustment button should only be made
when the atomizer head is at room
temperature. If the atomizer head has
recently been used and is still warm,
Temperature Adjustment:
When in temperature control or TCR
mode, use the left or right adjustment
buttons to adjust the temperature from
100°C – 315°C (200°F – 600°F). Lower
temperature settings give a cooler and
less dense vapour. Higher temperature
settings produce hotter vapour and
larger clouds of vapour, but can lead
to poor flavour or even a burnt taste.
Experiment to find your own favourite
setting.
Note: The screen displaying “TEMP
PROTECT” is not an error or fault; it
means the atomizer head has reached
or exceeded the set target temperature.
Switching between °C and °F
Press and hold the right adjustment
button to increase the maximum
temperature to 315°C or 600°F , then
press the right adjustment button
once more. The unit of measure will
switch to Fahrenheit if previously in
TEMPERATURE CONTROL SETTINGS TEMPERATURE CONTROL SETTINGS
Page 12

22 23
Note: The “New Coil Right, Same Coil
Left” message will be displayed if the
Active detects a significant change
in the atomizer head resistance after
removing and refitting the tank without
locking the atomizer head resistance
first.
Setting the TCR
TCR (temperature coefficient of
resistance) settings allow atomizer
heads made from coil materials other
than those available in the standard
temperature mode to be used with
effective temperature control. The Active
allows 3 different coil materials to be
pre-set as M1, M2 and M3. To set the
temperature coefficient of resistance to
match a particular coil material, switch
the Active off by quickly pressing the
the Active will not properly control
atomizer temperature. Allow any newly
fitted atomizer head or tank to cool to
room temperature before confirming a
new coil.
Reminder: Do not forget to prime your
new atomizer head before first use.
Atomizer Head Resistance Lock
Locking an atomizer head’s resistance
prevents the “NEW COIL RIGHT, SAME
COIL LEFT” message from being
displayed if the tank is removed and
refitted to the Active battery. When
in temperature control mode, press
and hold the power button and right
adjustment button, a padlock icon
should appear next to the atomizer
resistance.
TEMPERATURE CONTROL SETTINGS TEMPERATURE CONTROL SETTINGS
Page 13
24 25
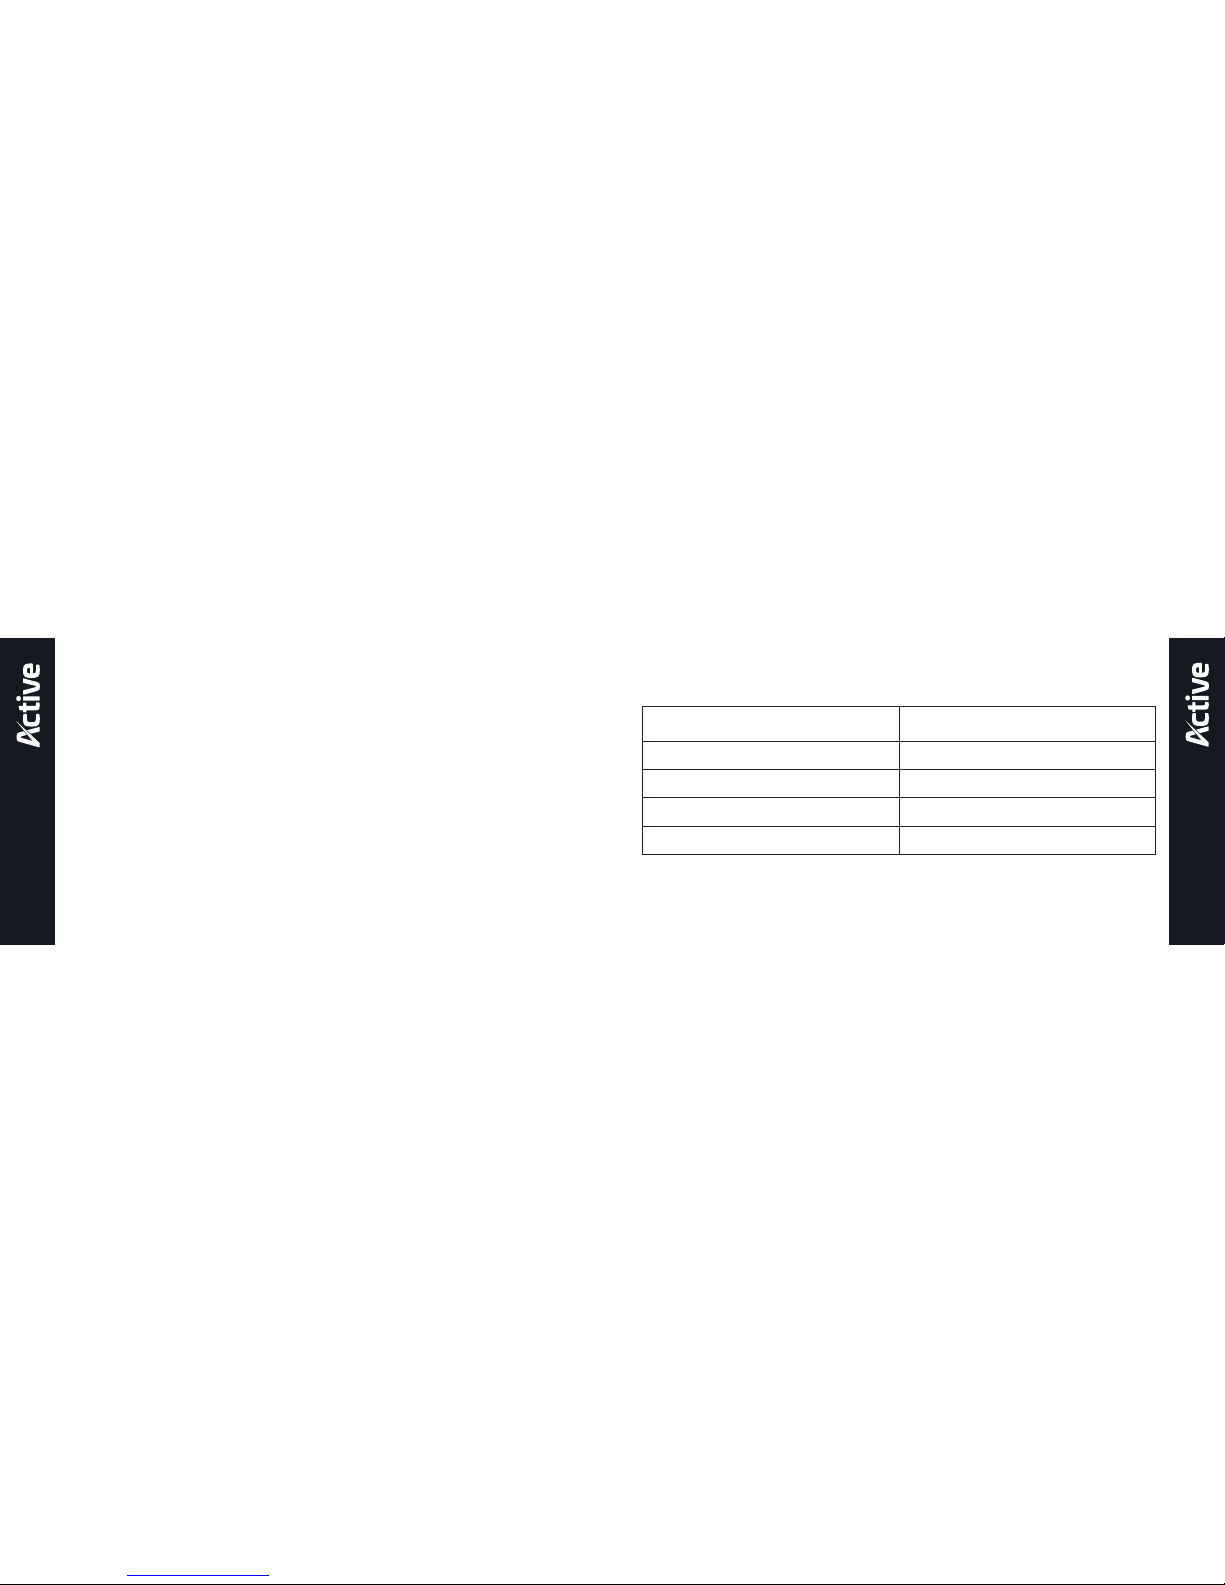
Note: The TCR value displayed is 105 (100,000) times greater than the actual TCR
value in standard units of K-1.
power button 5 times. Then press and
hold the power and right adjustment
buttons at the same time to enter the
menu. Press the power button to cycle
between M1, M2 and M3. When a
specific TCR mode is selected, use
the left or right adjustment buttons
to increase or decrease it. Leave the
Active idle for 5 seconds to confirm your
selection, then turn the Active back on.
Note: TCR settings are not generally
required for standard coil material. If
using standard nickel, titanium or
316 stainless steel coils, TCR settings
will not have any advantage over the
standard temperature control settings.
Material TCR Value Range
Nickel 600 - 700
NiFe 300 - 400
Titanium 300 - 400
SS (303, 304, 316, 317) 80 - 200
TEMPERATURE CONTROL SETTINGS TEMPERATURE CONTROL SETTINGS
Page 14

26 27
outlined in “Replacing the Atomizer
Head” above.
Atomizer Head Resistance
If the resistance of the atomizer head
is lower than 0.05ohm, the screen will
display “ATOMIZER LOW” and the
Active will refuse to power or produce
any vapour. Replace the atomizer head
with one of a compatible resistance to
allow normal operation to resume.
Resetting the Active Battery
If the Active freezes during a firmware
update, there is a reset button next to
the USB port. To reset the Active, use
a pin to press the reset button, this will
reset the device and normal operation
can resume.
Cleaning and Maintenance
The Active battery and tank connection
can be cleaned by wiping down with
tissue or a dry cloth. The tank can be
Short Circuit Protection
If an atomizer short circuit occurs, the
screen will display “ATOMIZER SHORT”
and the Active will refuse to power or
produce any vapour. Replacing the
atomizer head should allow normal
operation to resume. Follow the steps
outlined in “Replacing the Atomizer
Head” above to allow normal operation
to resume.
No Atomizer Detected
If no atomizer head is detected, the
screen will display “NO ATOMIZER
FOUND”, and the Active will refuse to
power or produce any vapour. If the
“NO ATOMIZER FOUND” message is
displayed, ensure the atomizer head is
fully screwed down into the atomizer
base. If the “NO ATOMIZER FOUND”
message continues, replacing the
atomizer head should allow normal
operation to resume, follow the steps
PROTECTIONS PROTECTIONS
Page 15

28 29
Pairing with Selected Device
To pair with your smartphone, follow the
steps found in “Turning On/Off”.
Once the Active speaker is turned on,
after a few seconds it will say “wireless
connecting, please wait”. Keep the
speaker no more than 1 metre from
your smartphone and turn on your
smartphone’s wireless connection.
It will now search for active wireless
devices (for instructions on how to
pair with devices please see your
smartphone manual).
Select the “ACTIVE” from the list of
available devices, and the device will
confirm successful connection. The
speaker is now ready for use.
cleaned by removing it from the battery,
unscrewing the atomizer head from the
atomizer base; then the entire tank and
atomizer base can be cleaned under
hot running water. Allow the tank to fully
dry before refitting the atomizer head
into the atomizer base. Reassemble
the tank.
Note: Do not attempt to clean the
atomizer head with water.
Turning On/Off
To turn on the wireless speaker, press
the speaker power button located at
the rear of the Active for 3 seconds, the
Active will beep and state that it is now
in “Wireless Mode”. To turn the speaker
off, press the same power button for 3
seconds, you will hear a slightly quieter
beep, the wireless speaker is now off.
USING YOUR ACTIVE’S WIRELESS SPEAKERPROTECTIONS
USING YOUR ACTIVE’S
WIRELESS SPEAKER
Page 16
30 31
Active Battery
Dimensions: 94.5mm (length) x
55.6mm (width) x 26.6mm (depth)
Weight: 166.4g
Battery capacity: 2100mAh integrated
battery.
Output modes: VW/Bypass/TC-Ni/TCTi/TC-SS/TCR mode
Max charging current: 2.0A
Max output current: 50A
Max output voltage: 9V
Wattage range: 1-80W
Voltage range: 0.5-9V
Temperature range: 100-315°C/200-
600°F
Screen size: 0.91 inch
Tank/Battery connection: 510
connection
Maximum tank diameter: 27mm
Atomizer head resistance
compatibility (Power/Bypass): 0.05
– 3.5ohm
Atomizer head resistance
compatibility (TC/TCR): 0.05 – 1.5ohm
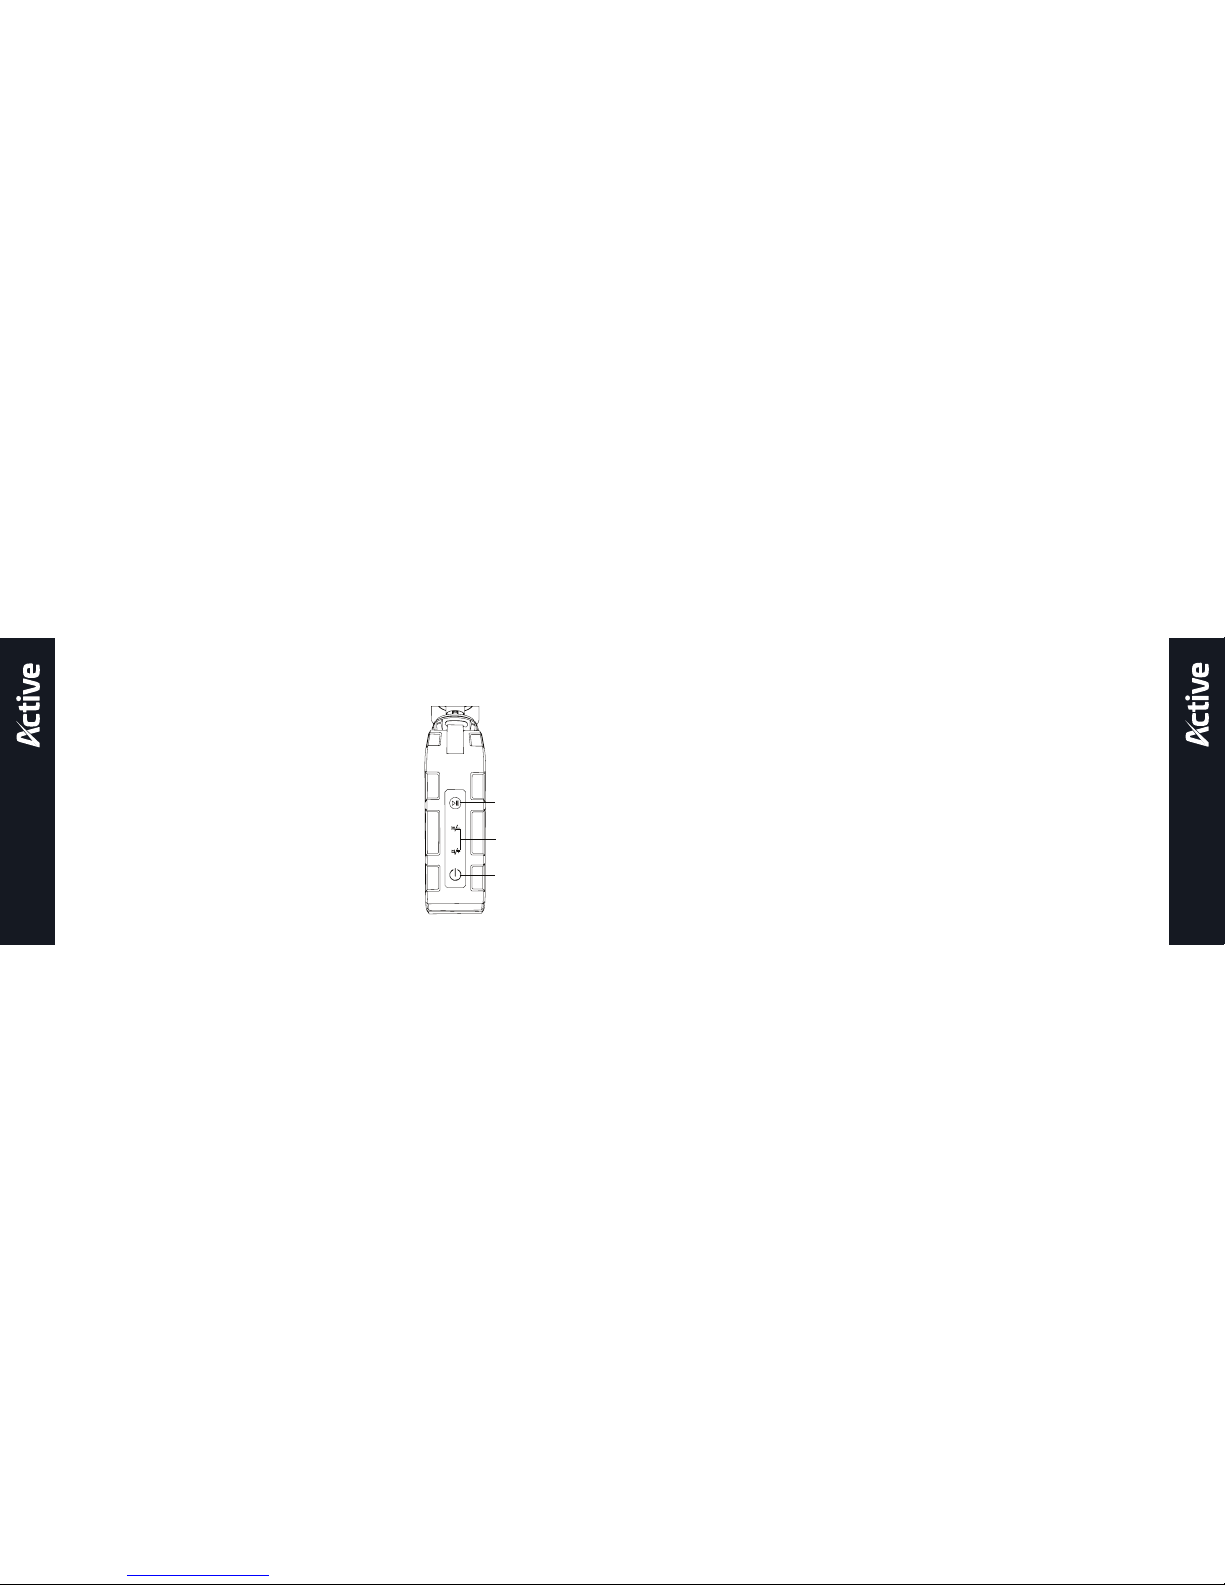
Operation of the Speaker
1) To play or pause music, press the button
2) To turn the volume up, press and hold
the /+ button
3) To turn the volume down, press and hold
the /- button
4) To skip to the next song, quickly press
the /+ button 3 times
5) To skip to the previous song, quickly press
the /- button 3 times
SPECIFICATIONSUSING YOUR ACTIVE’S WIRELESS SPEAKER
Pause/Play
Button
Speaker
Power Button
Volume/Music
Control Buttons
Page 17

32 33
• Store the Active e-cigarette and its accessories away from children
whilst not in use.
• Please only use the charging cable provided.
• Please dispose of dead batteries in accordance with your country’s
appropriate legislation.
• Do not charge the battery in a damp environment, or in temperatures
under 0°C or above 45°C.
• Do not use the device in temperatures under -10°C or above 60°C.
• Do not carry batteries in a pocket or bag with other metallic objects.
• Do not attempt to repair a faulty Active battery as these are sealed units
with no serviceable parts. Attempted repairs will void the warranty.
Active Tank
Dimensions: 27.0mm (diameter) x
47mm (height)
Weight: 48g
Atomizer type: WS atomizer heads
Tank capacity: 2ml
Filling method: Sliding top fill
Airflow type: Bottom adjustable
1 x Totally Wicked Active
1 x Active tank black
1 x WS04 1.3ohm atomizer head fitted
1 x WS01 0.2ohm atomizer head spare
1 x Hook
1 x QC USB cable
1 x User manual
Spare parts
PRODUCT STORAGE AND BATTERY PRECAUTIONSSPECIFICATIONS KIT CONTENTS
Page 18

34 35
Totally Wicked Active components have a 28 day parts warranty with the exception of
atomizer heads which are consumable items and are covered by our ‘Dead on Arrival’
warranty only. The USB cable supplied has a 12-month warranty. If any parts are
found to be faulty within this time please contact our customer service team, whose
details are on the back page of this booklet and we will arrange for a replacement. We
may require the goods to be returned for further investigation.
There are no reported medical side effects with this product. If you believe you
experience a side effect, please contact the manufacturer.
ADDITIONAL PRODUCT INFORMATION WARRANTY
Page 19

Manufactured in China
under the authority
of Pillbox38 UK Ltd,
Stancliffe Street,
Blackburn, Lancashire,
BB2 2QR.
Tel 01254 692244
www.totallywicked.co.uk
Tel 1(888) 761-9425
www.totallywicked.com
Tel 0941-78447082
www.totallywicked.de
 Loading...