

TOTALINE TST-EGND06413SCS09, TST-EGND06413SCS10, TST-EGND06423SCS09, TST-EGND06423SCS10 User Manual
NON-PROGRAMMABLE
r
DIGITAL THERMOSTAT
TST-EGND06413SCS09 / TST-EGND06413SCS10
TST-EGND06423SCS09 / TST-EGND06423SCS10
-Cool, Heat and Ventilation
-Large, Easy To Read Display
-Blue Backlight
-Fahrenheit or Centigrade
-Auto Recovery
-2-pipe or 4-pipe Selection
-DA or DB Type Selection
-Key Card Function
Cool mode Heat mode
Room temperature
Set temperature
On/Off Button
Mode Button
Invalid Fan Button Down Button Up Button
Specification
Set-Point Range: 5℃-35℃(41℉-95℉)
Operating difference: ± 1℃
Switch current rating: < 2A
Sensing element : NTC
Display: LCD
Power supply:
TST-EGND 06413SCS09: AC85V~260V 50Hz/60Hz
TST-EGND 06413SCS10: AC85V~260V 50Hz/60Hz
TST-EGND 06423SCS09: AC24V ±10% 50Hz/60Hz
TST-EGND 06423SCS10: AC24V ±10% 50Hz/60Hz
Dimensions: 86 × 86 × 29.5 mm (W×H×D)
Housing: ABS Flame Retardant
Basic Operation
Power ON/OFF
" To turn the thermostat on, press “ ”. Mode symbol ( , or ),
“RT”, and room temperature will be displayed.
" To turn the thermostat off, press “ ” again. There is no any display
on LCD and no any output.
Select Mode
" Cool Setting: Press “M”, until the “ ” is displayed, it will be
confirmed automatically after 6 seconds.
" Heat Setting: Press “M”, until the “ ” is displayed, it will be
confirmed automatically after 6 seconds.
" Ventilation Setting: Press “M”, until the “ ” is displayed, it will be
confirmed automatically after 6 seconds.
Fan Setting
" Fan speed select: press the fan button to select “ (Hi), (Med),
(Low), (Auto)”. In mode “ (Auto)”, the fan-speed changed
automatically. Auto LOW-speed When the difference between
room-temperature and setting-temperature exceed 1℃(2℉), Auto
MED-speed When exceed 2℃(4℉), Auto HI-speed When exceed 3
℃(6℉).
Setting Temperature
" To enter the configuration mode: press ”5” or ”6” button s , The “ ”
and “SET” will appear on the display.
" Press”5” or ”6” to adjust the Cool Temperature.
" Press ”M” button once. The “ ” and “SET” will appear on the
display.
" Press ”5” or ”6” to adjust the Heat Temperature.
Ventilation
Shows room temperature,
desired temperature, and
other feature information
as required.
Fan indicato
Key Card Function
TST-EGND06413SCS09 / TST-EGND06423SCS09:
" If the card was removed, The thermostats will set to 26℃ automatically
in Cooling Mode and 18℃ in Heating Mo de; Fan will run in speed of low
under all of the modes.
TST-EGND06413SCS10 / TST-EGND06423SCS10:
" If the card was removed, The thermostats will switch OFF
Error Codes
E1 — If the thermostat cannot properly read room temperature, and it
needs to be adjusted, E1 will be displayed.
Set Thermostat Configuration
Configuration options are intended to be selected at installation and
normally should not be modified by the home owner. These options are
not discussed in the Homeowner ’s Guide and therefore must be made as
part of the installation. A special procedure allows entry in to the
configuration mode. The thermostat will automatically exit this if no button
is pressed for 90 seconds.
An explanation for each of these and how to enter the configuration mode
follows.
To enter the configuration mode:
Turn off the thermostat hold the fan button down for approximately 15
seconds. After 15 the second periof, Option”01” will appear in the display.
OPTION 01–LOW TEMPERATURE PROTECTION (FROST PROTECTION )
In the low temperature protection mode, When the thermostat is off , and
the room temperature is lower than 5℃, it will be turned on automatically
and in heating mode; When t he roo m temper atur e is higher t han 7℃, it w ill
be turned off automatically.
TO ADJUST :
Enter configuration mode (if not already there).
Use “5” and “6” buttons to display Option 01.The SET icon should be of f.
Press ”M” button once. The SET icon will be come on. The display now
shows Option 01 setting.
Use “5” and “6” buttons to move between the available Option 01
choices of 00(disable) or 01(enable). Factory default is 00.
Press ”M” button again to return to Option 01. The SET icon will now be
off.
Use “5” and “6” buttons to select another Option, or press”
to exit configuration mode.
OPTION 02 –FAHRENHEIT/CELSIUS SELECTION
This option selects Fahrenhe it or Celsius operation.
TO ADJUST :
Enter configuration mode (if not already there).
Use “5” and “6” buttons to display Option 02.The SET icon should be of f.
Press ”M”button once. The SET icon will be come on. The display now
shows Option 02 setting.
Use “5” and “6” buttons to move between the available Option 02
choices of F (Fahrenheit) or C (Celsius). Factory default is C.
Press ”M” button again to return to Option 02. The SET icon will now be
off.
Use “5” and “6” buttons to select another Option, or press “ “ button to
exit configuration mode.
OPTION 03-ROOM TEMPERATURE OFFSET
This option allows calibration (or deliberate miscalibration) of room
temperature sensor. There are various reasons why the home owners
want to adjust the displayed temperature. The selected number is the
number of degrees, plus or minus, which will be added to the actual
temperature. The number can ran ge b etw een - 5 an d + 5. F actory de fault i s
0. This adjusted value will be used as actual temperature for both display
and control action. For example, if 2 is selected, 72F actual will read 74F.
If setpoint is 72, the room will control to an act ua l value of 70 which will be
displayed and acted upon as if it were 72. The effect is that a positive
number selection will make the room temperature lower and vice versa.
This thermostat is factory calibrated within an accuracy of plus or minus
1F, so this adjustment will provide the best accuracy when set to 0.
TO ADJUST :
Enter configuration mode(if not already there).
Use “5” and “6” buttons to display Option 03.The SET icon should be of f.
Press ”M” button once. The SET icon will be come on. The display now
shows Option 03 setting.
Use “5” and “6” buttons to move between the available Option 01
choices of -5 through +5 in 1 step. Factory default is 0.
Press ”M ”button again to return to Option 03. The SET icon will now be
off.
Use “5” and “6” buttons to select another Option, or press “ “ button to
exit configuration mode.
OPTION 04 –AUTO RECOVERY
Auto recovery feature means the thermostat will retain the previous status
when power is back. This option can be used to choose whether auto
“button
recovery feature is enabled.
TO ADJUST :
Enter configuration mode (if not already there).
Use “5” and “6” buttons to display Op tion 04.The SET icon should be
off.
Press ”M” button once. The SET icon will be come on. The display now
shows Option 04 setting.
Use “5” and “6” buttons to move between the available Option 04
choices of 00(disable) or 01(enable). Factory default is 01.
Press ”M” button again to return to Option 04. The SET icon will now be
off.
Use “5” and “6” buttons to select another Option, or press “
exit configuration mode.
OPTION 06 –DA/DB TYPE SELECTION
This option selects DA type or DB type operation. DA means that when
temperature reaches the set point, valve will close, fan will keep running;
DB means that when temperature reaches the set point, Valve and fan
will close together.
TO ADJUST :
Enter configuration mode (if not already there).
Use “5” and “6” buttons to display Op tion 06.The SET icon should be
off.
Press ”M” button once. The SET icon will be come on. The display now
shows Option 06 setting.
Use “5” and “6” buttons to move between the available Option 06
choices of 00 (disable) or 01(enable). Factory default is 01.
Press ”M” button again to return to Option 06. The SET icon will now be
off.
Use “5” and “6” buttons to select another Option, or press “
to exit configuration mode.
OPTION 07 –2-PIPE/4-PIPE SELECTION
This option selects 2-pipe or 4-pipe operation.
TO ADJUST :
Enter configuration mode (if not already there).
Use “5” and “6” buttons to display Op tion 07.The SET icon should be
off.
Press ”M” button once. The SET icon will be come on. The display now
shows Option 07 setting.
Use “5” and “6” buttons to move between the available Option 07
choices of 2 (2-pipe) or 4(4-pipe). Factory default is 2.
Press ”M” button again to return to Option 07. The SET icon will now be
off.
Use “5” and “6” buttons to select another Option, or press “ “ button
to exit configuration mode.
OPTION 08 –TYPE OF KEY CARD CONTACT
This option selects the type of key card contact..
TO ADJUST:
Enter configuration mode (if not already there).
Use “5” and “6” buttons to display Option 08.The SET icon should be
off.
Press” M ” button once. The SET icon will come on. The display now
shows Option 08 setting.
Use “5” and “6” buttons to move between the available Option 08
choices of 00(When key card is inserted, the contact of S1 and S2 is
open) or 01(When key card is inserted, the contact of S1 and S2 is
closed). Factory default is 00.
Press ” M” button again to return to Option 08. The SET icon will now be
off.
Use “5” and “6” buttons to select another Option, or press “ “button
to exit configuration mode.
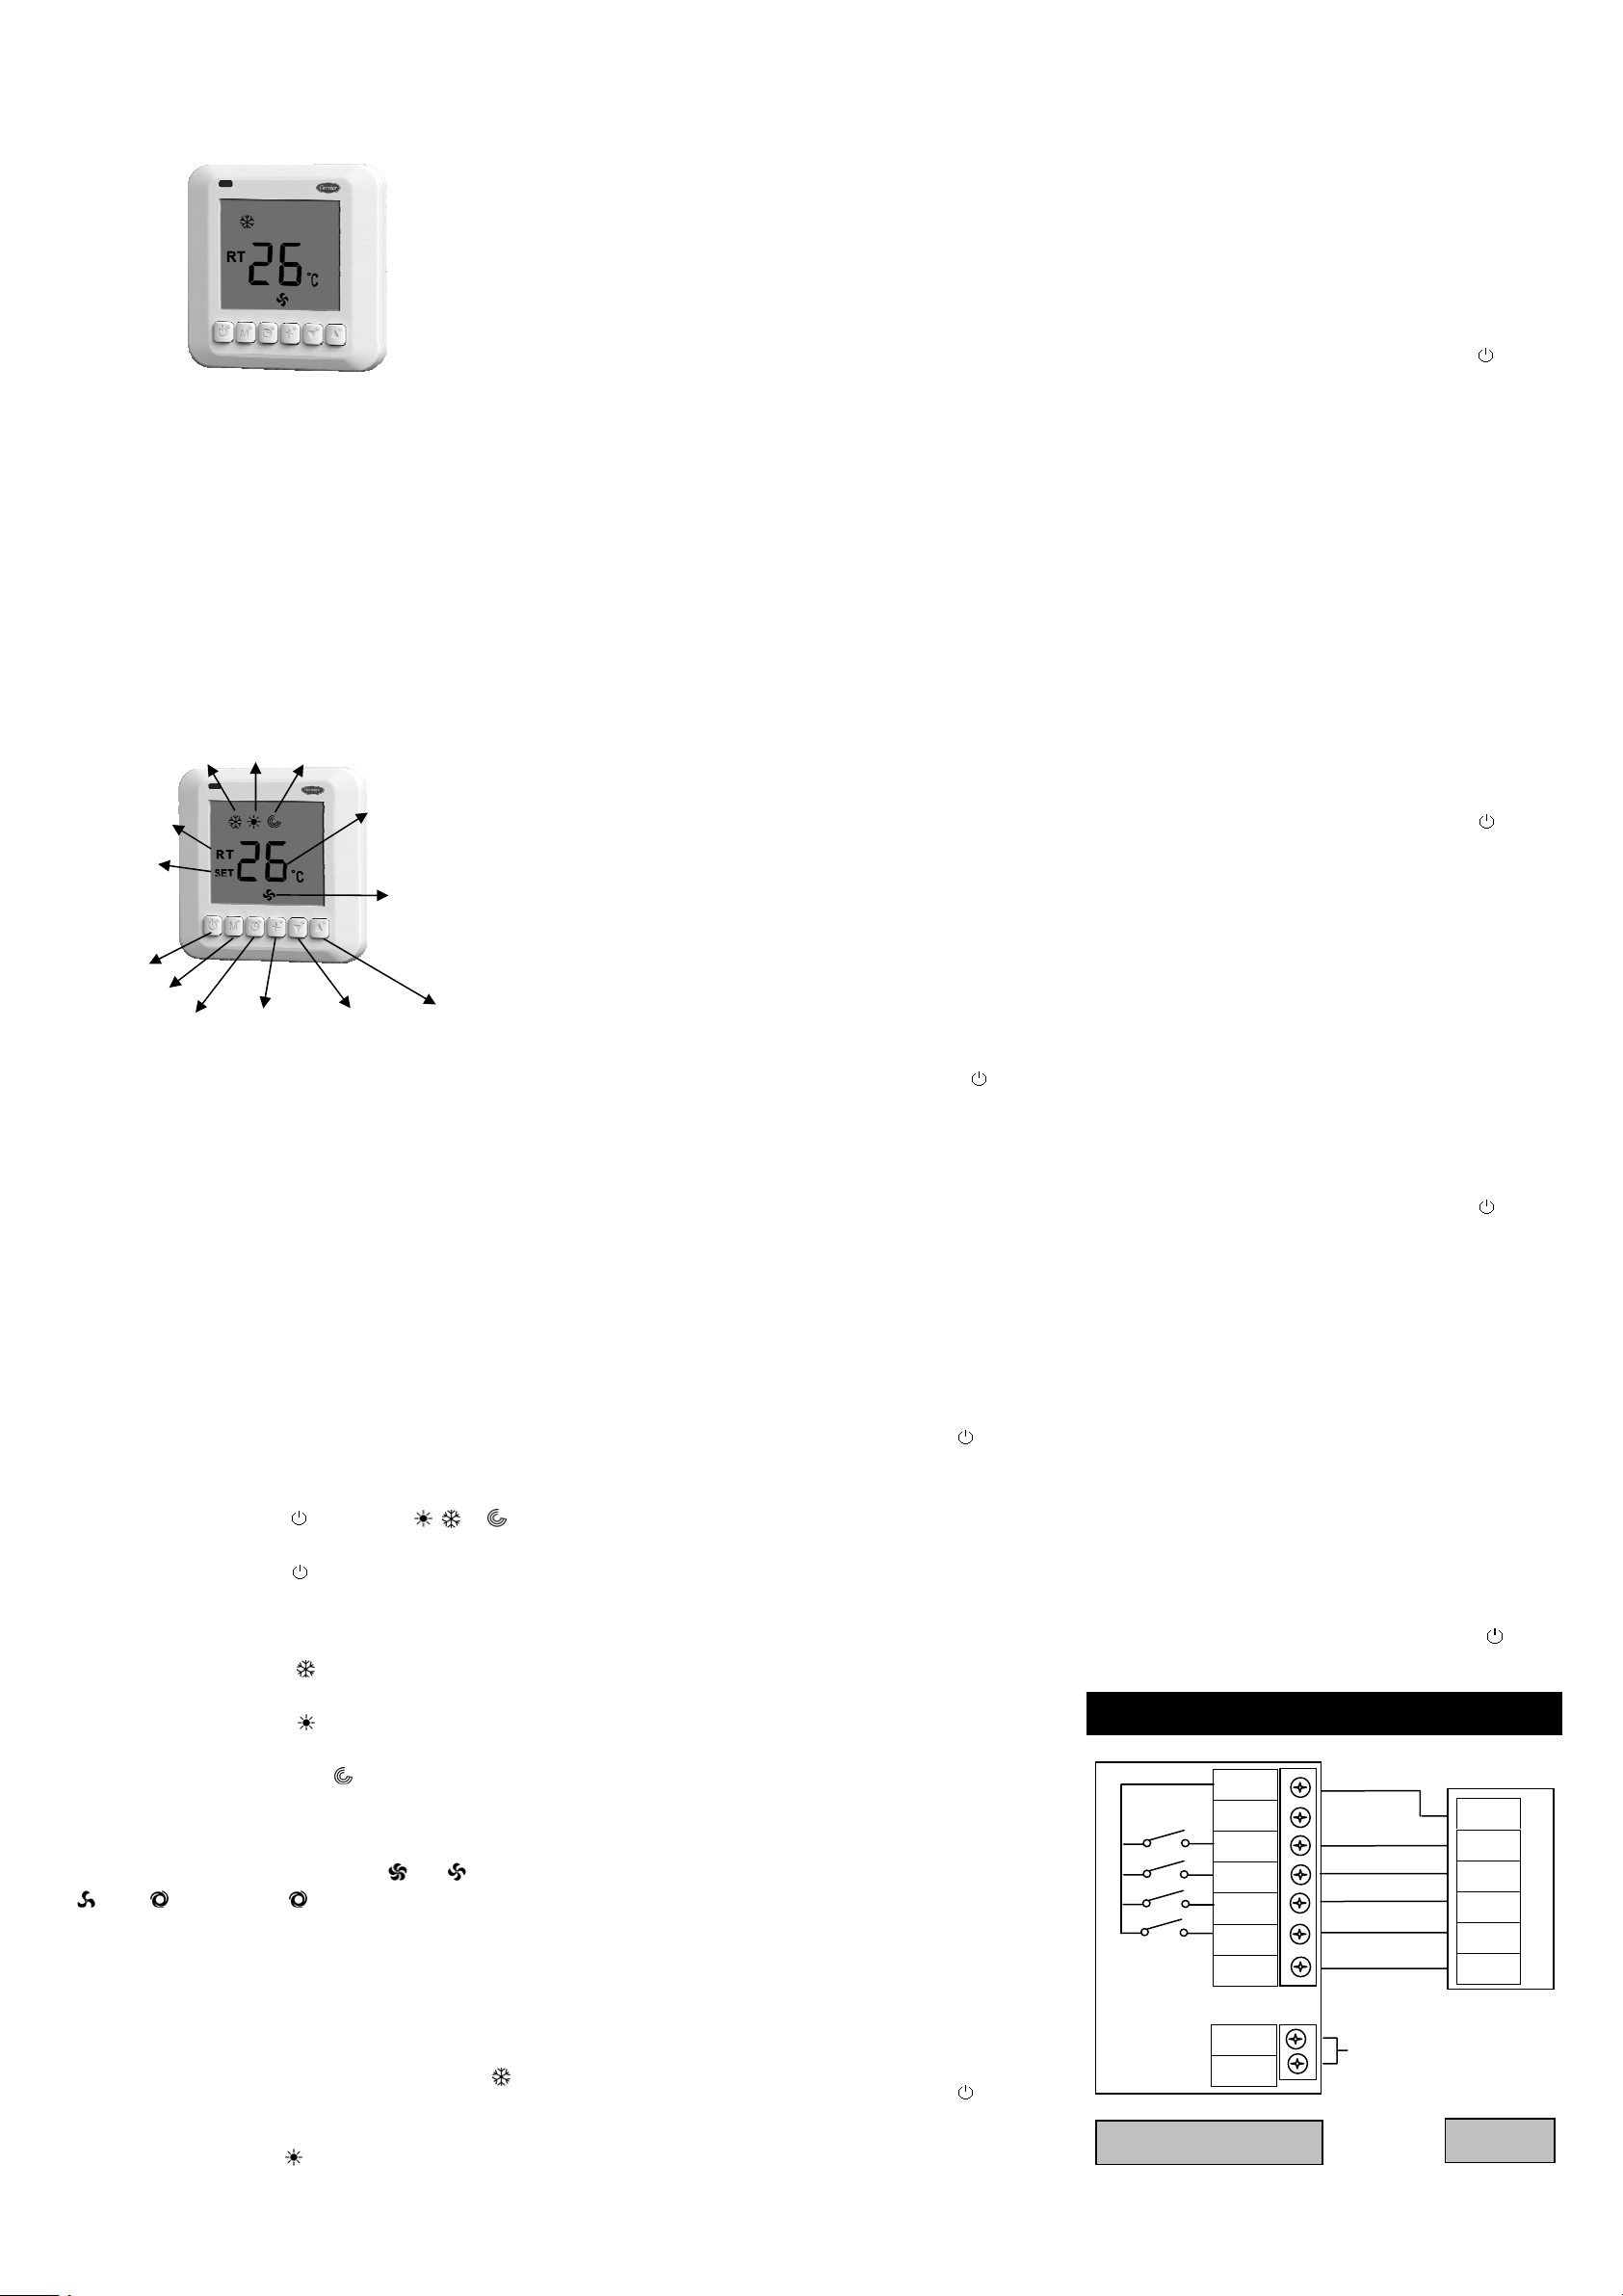
Wire Diagram
L(R)
Val2
Val1
Low
Med
Hi
N(C)
L(R)
Val
Low
Med
Hi
N(C)
S1
S2
Thermostat
2-pipe
KEY CARD
CONTACT
Fan coil
“ button to
“ button
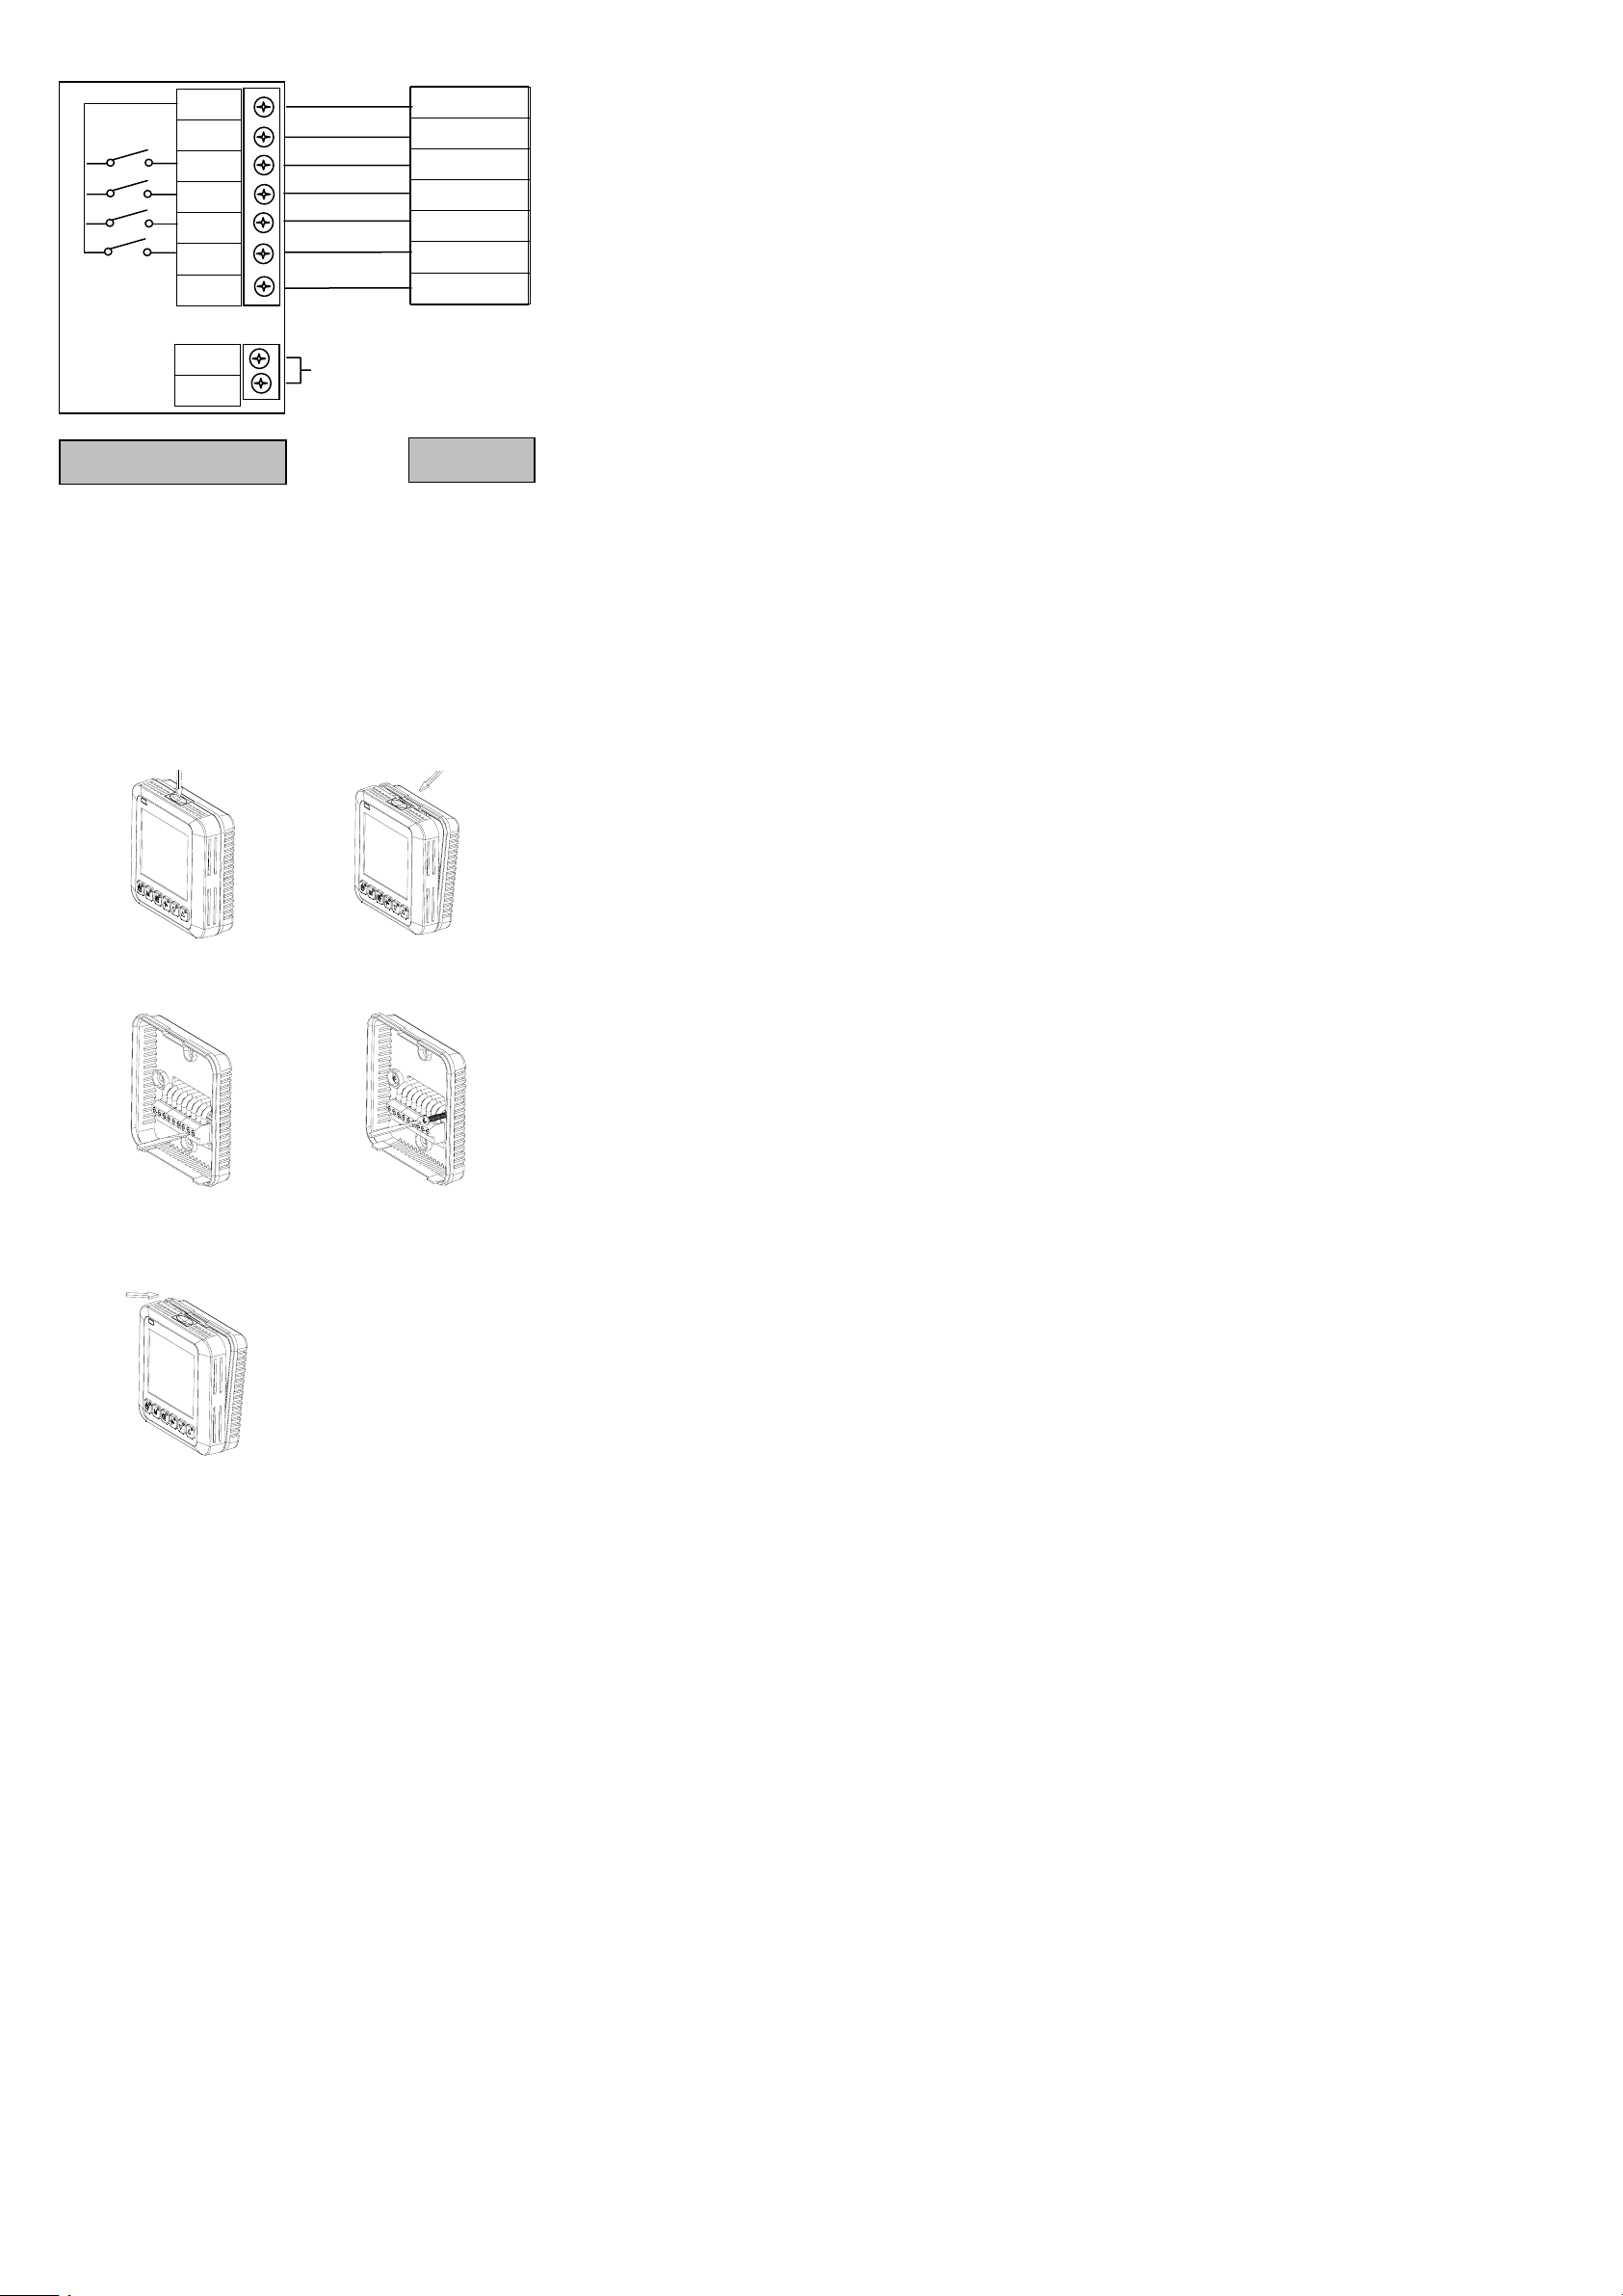
L(R)
Val2
Val1
Low
Med
Hi
N(C)
L(R)
Heating Val
Cooling Val
Low
Med
Hi
N(C)
S1
S2
KEY CARD
CONTACT
Thermostat
4-pipe
Fan coil
Installation
Thermostat Location
Thermostat should be mounted:
• Approximately 5 ft (1.5m) from floor.
• Close to or in a frequently used room, preferably on an inside
partitioning wall.
• On a section of wall without pipes or duct work.
1. Cut off the power, the mark of wire should be clear.
2. Take the main control panel
apart.
3.Push up by force, open the
clip.
4. As per wiring drawing,
connect with terminals, fix it by
crewdriver.
5. Fix by the two screws in the
packing box.
6. Push the downside by force,
lock the up panel, and finish the
installation.
 Loading...