

Page 1
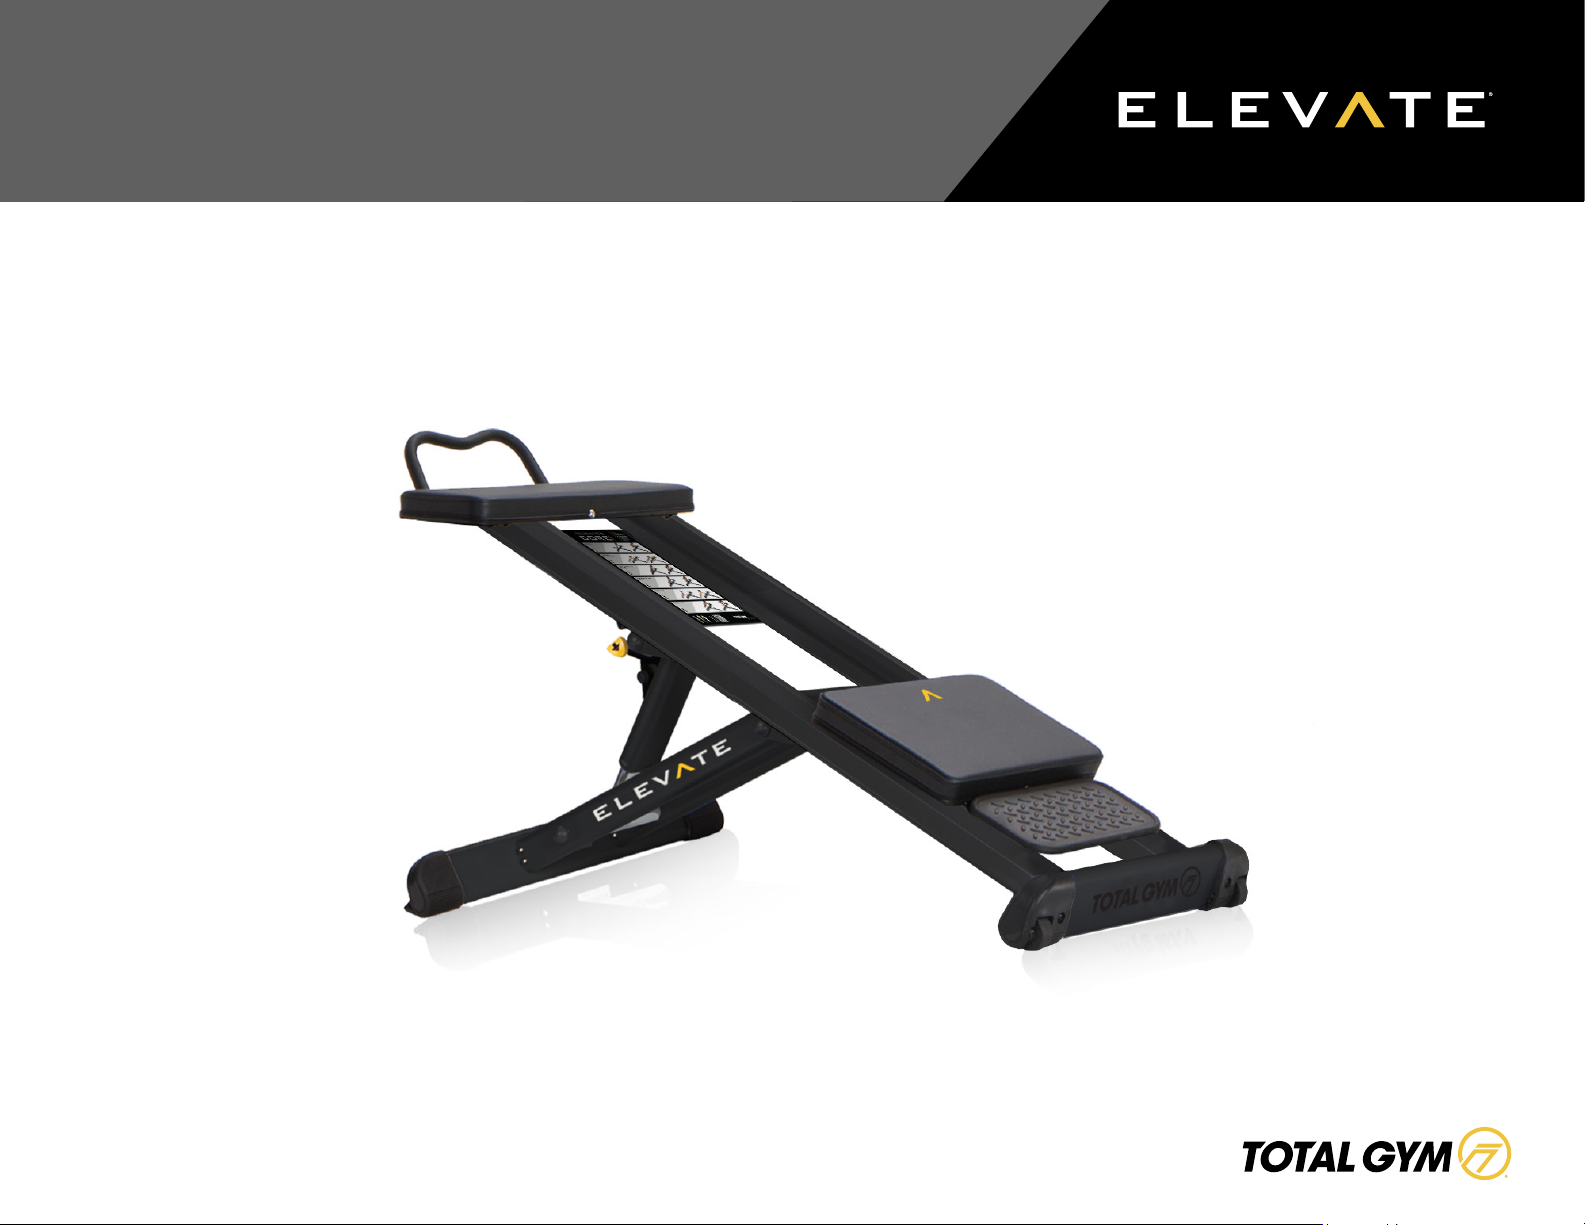
ELEVATE® CORE ADJ
TM
OWNER’S GUIDE
Page 2
CONGRATS / TOC
ELEVATE® CORE ADJTM OWNER’S GUIDE
TABLE OF CONTENTSCONGRATULATIONS
Thank you for choosing Total Gym® products and services.
2
Safety Precautions ...................................................................... 3
As with all of our products, we trust that your ELEVATE Core ADJ™ will
provide you with unsurpassed service and versatility year after year in
Specications and Limitations ...................................................... 4
the clinical and/or commercial setting.
Parts Identier ............................................................................ 5
Your Total Gym product arrives with assembly required. Simply follow
the directions for assembly and set-up your ELEVATE Core ADJ to be
Assembly Instructions ............................................................... 6-7
operational.
In this Owner’s Guide, you will nd information about your ELEVATE
Seat or Foot Platform: Roller Removal & Assembly ........................ 8
Core ADJ and its component parts, operation, maintenance and care.
Additionally, you will nd usage and safety tips, as well as safety
Pad Replacement......................................................................... 8
precautions and warranty information. Please save this guide and refer
to it in the future. You can also download a copy from our website for
Getting Started ............................................................................ 9
your convenience at totalgym.com/presstrainer.
We value you as a customer and your feedback is important to
Maintenance and Care .................................................................. 9
Maintenance Schedule ...................................................................................9
us. If you have any questions or need further information about
your ELEVATE Core ADJ, please contact our customer experience
Exercise Instructions ................................................................. 10
department at (858) 586-6080 or email [email protected].
Warranty Information .................................................................. 11
USA Warranty ................................................................................................ 11
Yours in health,
Limited Warranty...........................................................................................11
Warranty Claims ............................................................................................11
Jesse Campanaro
CEO
Page 3
SAFETY PRECAUTIONS
SAFETY PRECAUTIONS
ELEVATE® CORE ADJTM OWNER’S GUIDE
Before starting this or any exercise program, consult your physician, who
can assist in planning a program that is age and ability specic. Certain
exercise programs or types of equipment may not be appropriate for all
people. Ensure that your clients are able to participate in an exercise
program on this equipment without injury.
• Do not overexert, or allow your clients to overexert using this equipment or
performing any exercise program on this equipment. If any pain or tightness in
the chest occurs, an irregular heartbeat, shortness of breath, faintness, nausea or
dizziness is experienced by you or your client stop the exercise session immediately
and ensure that a physician is consulted before resuming any exercise program.
(Clinicians and trainers should follow these recommendations if these symptoms are
observed in clients.)
• This product is designed and intended for commercial use. Clinicians and trainers
should inform clients of and monitor their adherence to all safety precautions. Use
only as instructed.
• Children should only use the ELEVATE Core ADJ when closely attended and
supervised by an adult. Do not leave children or clinical patients unattended on Total
Gym equipment.
• Parents and others in charge of children should responsibly monitor children whose
natural play instinct and fondness of experimenting can lead to situations and
behavior for which the training equipment is not intended.
• If children are allowed to use the equipment, their mental and physical development
and above all their temperament should be taken into account. They should be
controlled and instructed in the correct use of the equipment.
• The equipment is under no circumstances suitable as a children’s toy.
• Keep ngers, loose clothing and hair away from moving parts. Wear appropriate
exercise attire and tie long hair back.
• Inspect your Total Gym ELEVATE Core ADJ before each use to ensure proper
operation. Check all parts for wear before each use. Do not use your Total Gym
ELEVATE Core ADJ if it is not completely assembled or if it has been damaged in any
manner. Contact Total Gym Customer Service for replacement parts or repairs.
• Before transporting, raise rails to top level. Always lift from the rear base when
moving the unit.
• Follow instructions in this Owner’s Guide for using the unit. Improper use could result
in severe or fatal injury. Your Total Gym ELEVATE Core ADJ must be bolted to the
floor on a flat, solid surface with nonskid material underneath. Keep the area around
it free from obstructions. The Total Gym ELEVATE Core ADJ is rated at a maximum
user weight capacity of 400 lbs [181 kg].
WARNING
READ ALL INSTRUCTIONS BEFORE USING TOTAL GYM ELEVATE CORE ADJ.
1. Inspect your Total Gym ELEVATE Core ADJ unit before each use to ensure proper
operation. Do not use this equipment unless all moving parts are working properly.
Follow all maintenance and care instructions found in this Owner’s Guide and on
the equipment labels.
2. Close supervision is necessary when the Total Gym ELEVATE Core ADJ is used by
or near children, disabled or injured persons.
3. Care should be taken at all times when getting on and off your Total Gym ELEVATE
Core ADJ or any exercise equipment. Falling on or off the product could result in
injury, or possibly death. Follow the “Getting Started” instructions for using the unit
found in this Owner’s Guide.
4. Use your Total Gym ELEVATE Core ADJ only for its intended use.
5. Keep ngers, loose clothing and hair away from all moving parts.
3
Page 4
SPECS & LIMITATIONS
ELEVATE® CORE ADJTM OWNER’S GUIDE
SPECIFICATIONS & LIMITATIONS
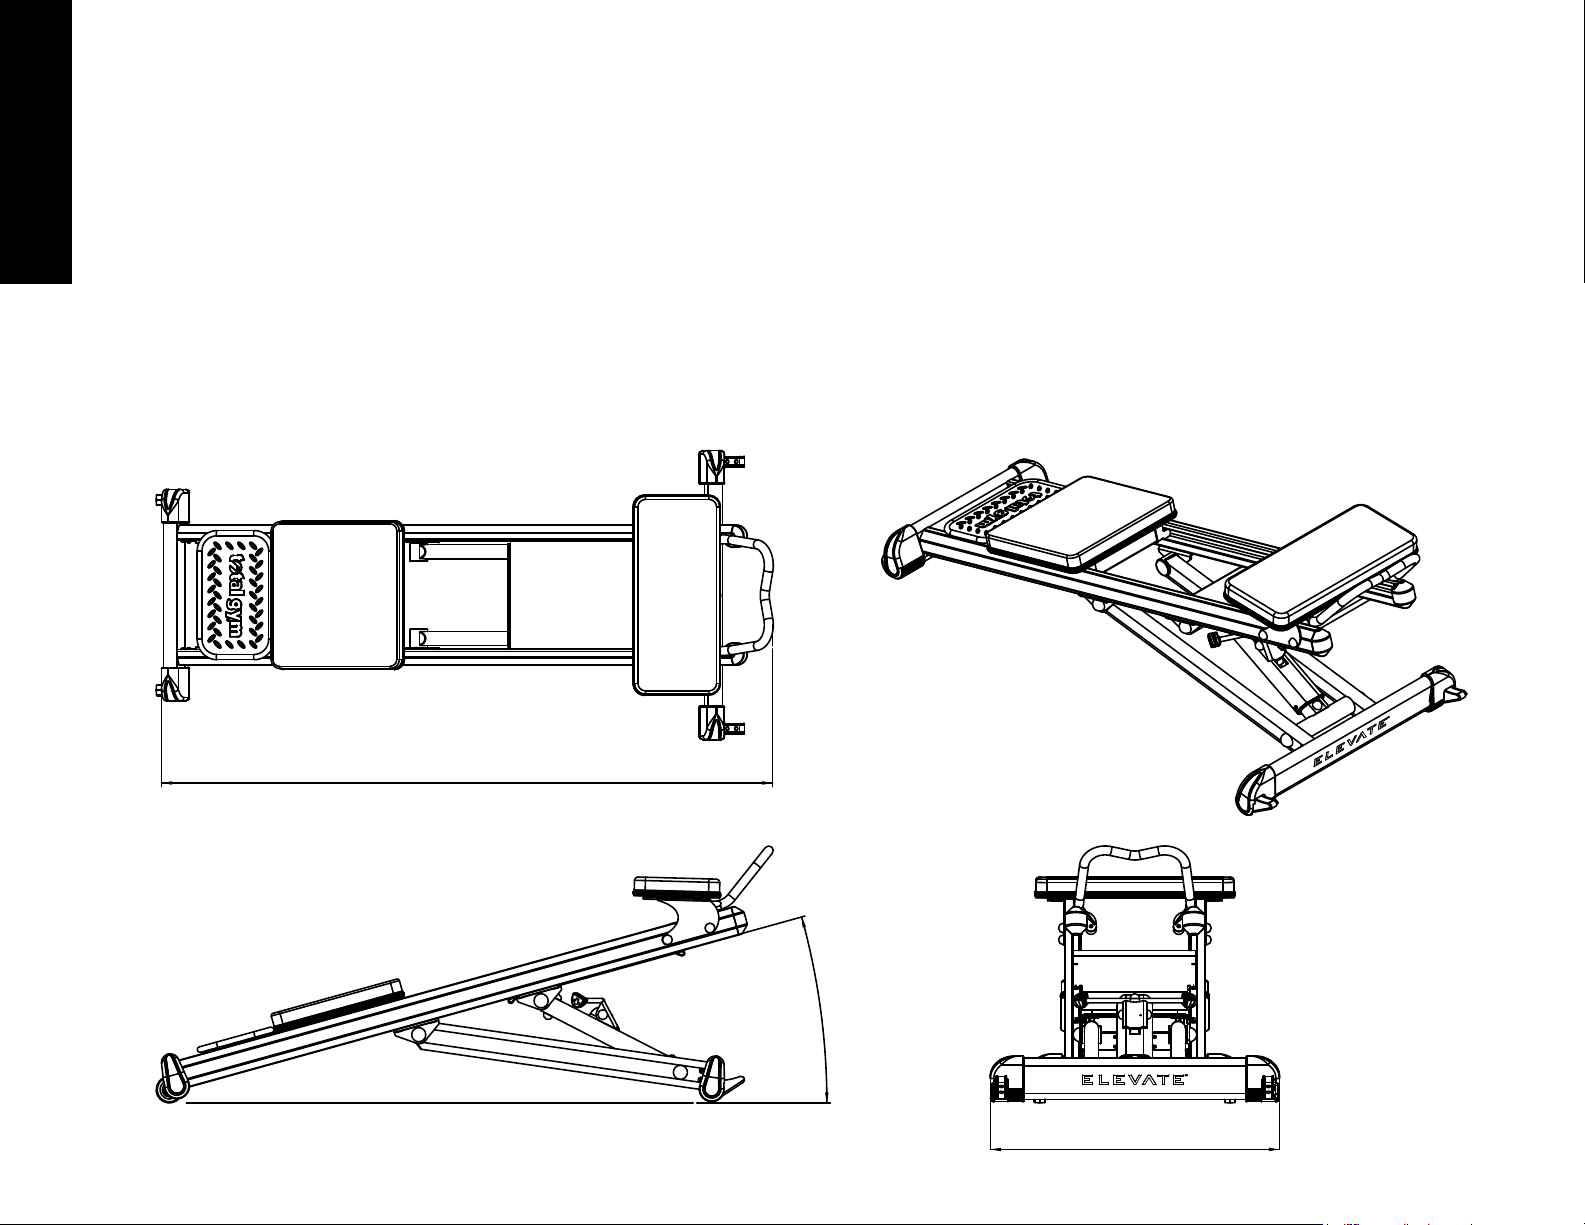
• Glideboard Range of Motion: 31 inches [787 mm]
4
• Weight Capacity: Maximum user weight capacity of 400 lbs [181 kg]
• In Use: 72” x 33” x 51” (L/W/H) [1.8 m x .83 m x 1.29 m]
• Unit Weight: 88 lbs [40 kg]
68.2” [1.73m]
• Freight Weight: 150 lbs [68 kg]
• Freight Dimensions: 71” x 26” x 13” (L/W/H) [181 x 66 x 33 cm]
• Floor Space Required: 12 square feet [1.1 square meters]
• Construction: Steel with steel reinforced extruded aluminum rails
• Keep side areas clear 1.96’ [0.6 m] or more.
15.5°
32.3” [0.82m]
Page 5
PARTS IDENTIFIER
PARTS IDENTIFIER
ELEVATE® CORE ADJTM OWNER’S GUIDE
5
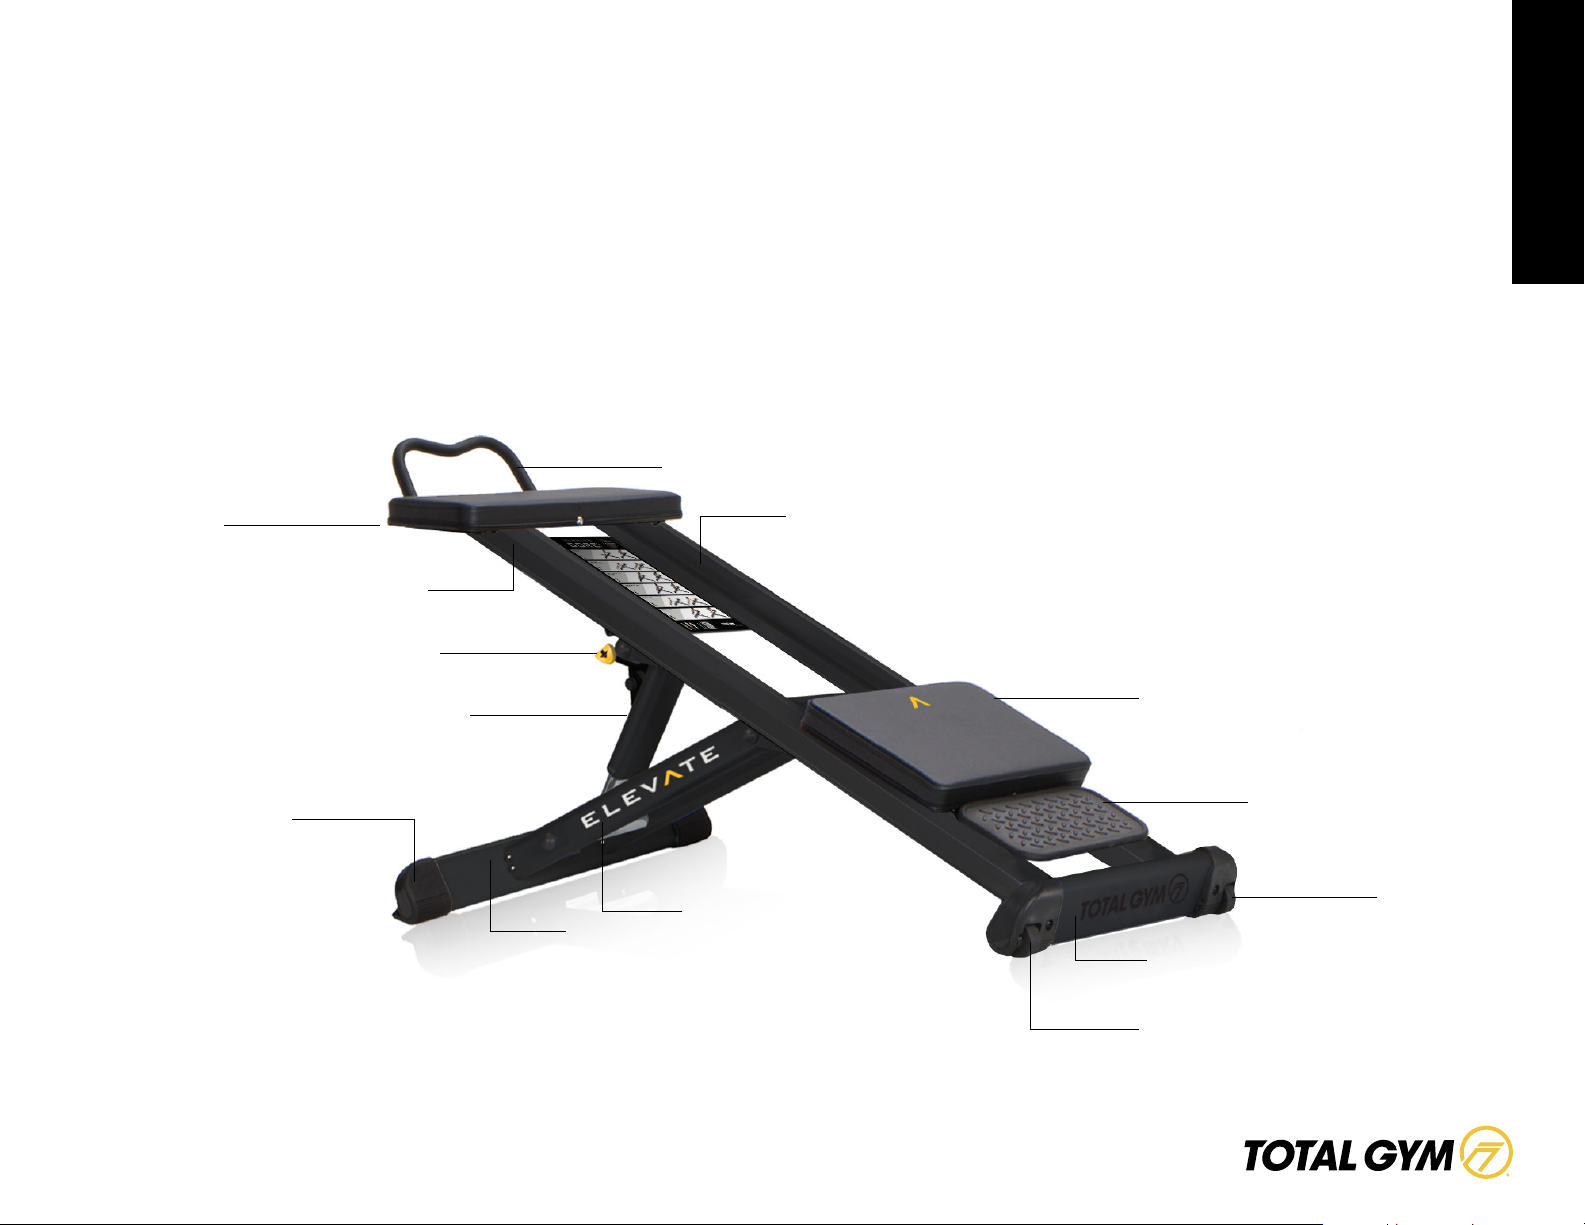
Handle Base
SCRUNCH Pad
Anchor Foot
Left Rail
Incline Release Lever
Incline Strut
Rear Base
Rear Struts
Right Rail
Glideboard
Rubber Foot Plate
Transport Wheel
Rail Base
Transport Wheel
Page 6
ASSEMBLY & INSTALL
ELEVATE® CORE ADJTM OWNER’S GUIDE
ASSEMBLY & INSTALLATION
TWO-PERSON ASSEMBLY REQUIRED
6
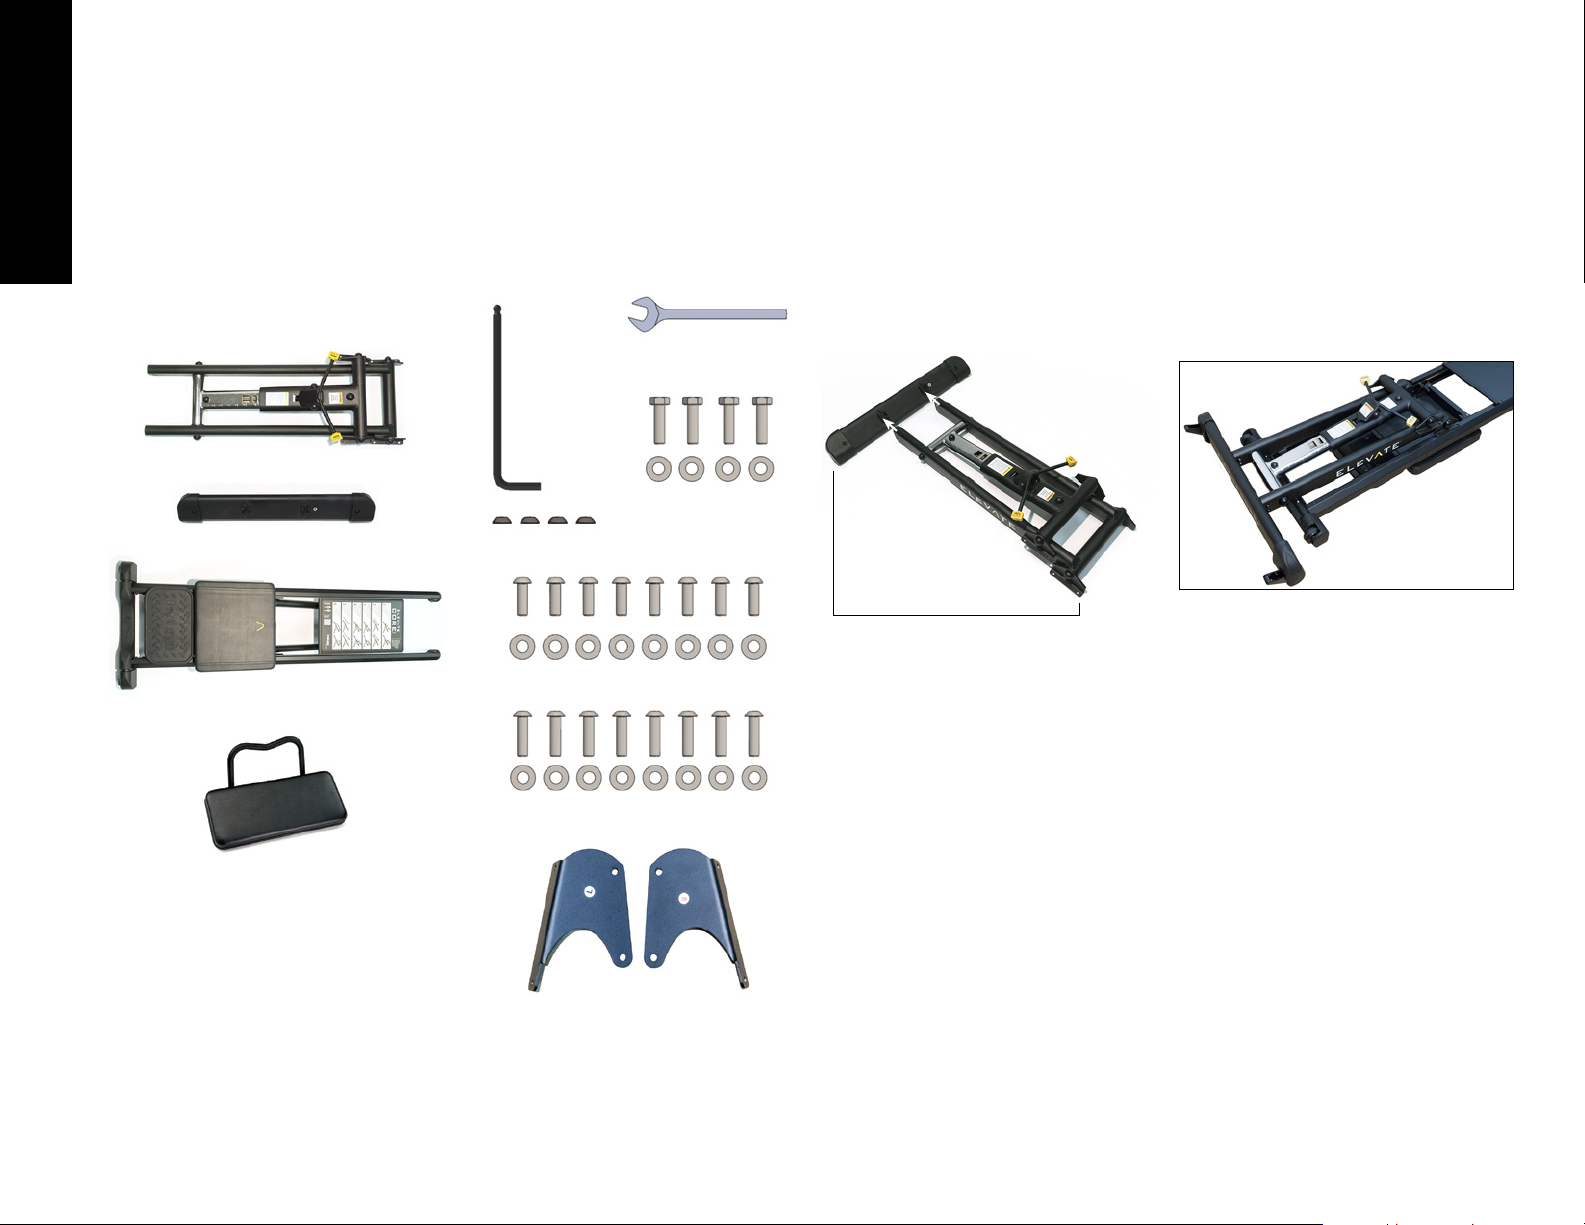
STEP 1. Carefully unpack all the parts and
the Information & Hardware box at the
installation site if possible.
STEP 2. Open the Information & Hardware
box. Inside there will be:
13 mm
Open End Wrench
5 mm
Hex Wrench
STEP 3. Attach B to A as shown. Using
the 5 mm Hex Wrench install all eight
Short M8 screws with washers. Do not
tighten completely until all eight screws
have been installed.
B
STEP 4. Now that you have assembled
A and B to create D as shown in STEP
3, you will need to take D and lay it over
the top of C. Be sure to place a cloth or
packing material between the surfaces.
A Rear Struts & Incline Strut
A
M8 Hex Head Screws
B Rear Base
Black Screw Caps (4)
& Washers (4)
D
Using the 5 mm Hex Wrench, attach
+ B creates D
C Rail Assembly
A
Short M8 Button Head Screws & Washers (8)
the hinges on to C with four Long M8
screws and washers. Do not tighten
any completely until all four screws are
installed.
Long M8 Button Head Screws & Washers (8)
SCRUNCH Pad
SCRUNCH Brackets (Left and Right)
Page 7
ELEVATE® CORE ADJTM OWNER’S GUIDE
ASSEMBLY / BAND
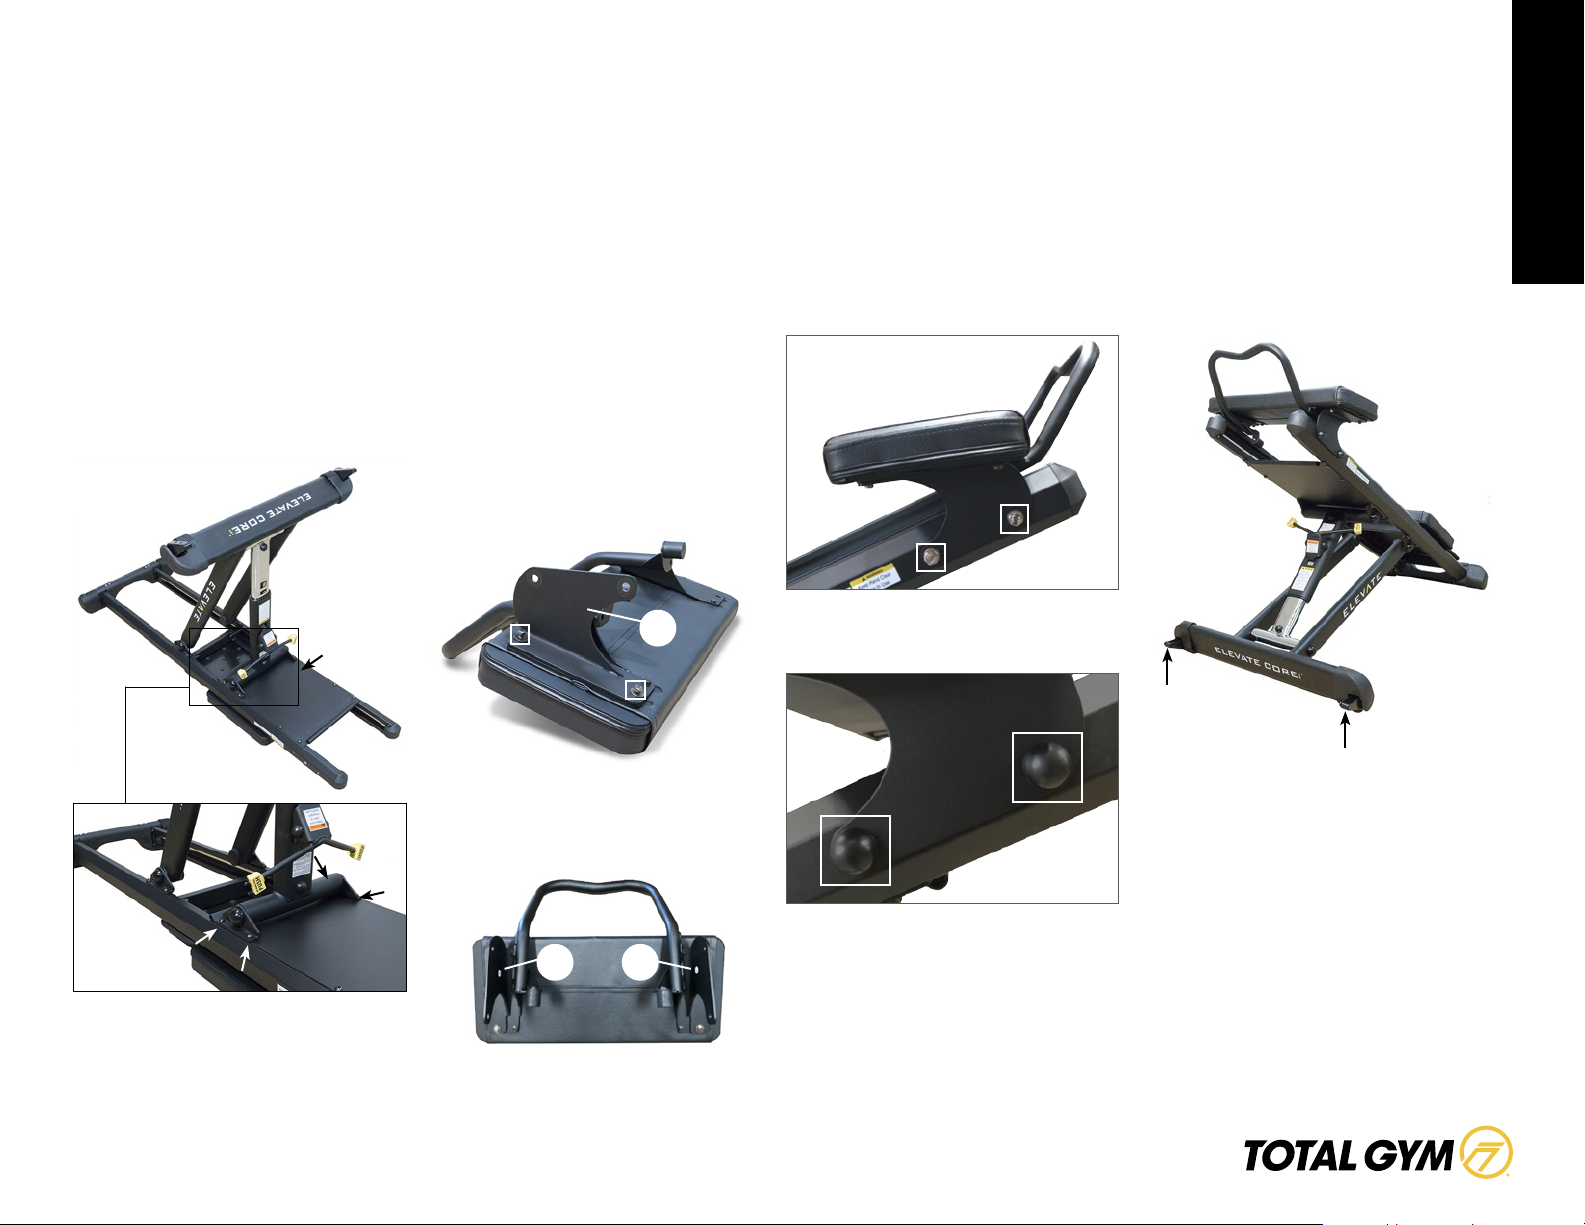
STEP 5. While one person holds the
Incline Strut up as shown, the other
person aligns the hinges on it to the set of
holes in the rails near the Placard Plate.
Using the 5 mm Hex Wrench attach the
hinges on to the C with four Long M8
Button Head Screws and Washers. Do
not tighten any completely until all four
screws are installed.
Placard
Plate
STEP 6. Locate the SCRUNCH Pad and lay
it upside down. NOTE: It is best to place
the SCRUNCH Pad on a soft surface (i.e.,
carpet) to avoid scratching the SCRUNCH
Pad bar.
Inside your Hardware and Information
Box, locate the two SCRUNCH Pad
brackets marked R (right) and L (left).
Install the right bracket on the SCRUNCH
Pad with 2 M6 Screws and Washers;
repeat the process for the left bracket.
R
NOTE: the L and R will seem reversed
as the SCRUNCH pad is upside down for
bracket installation.
STEP 8. Attach the SCRUNCH Pad to the
left and right rails using the 4 M8 Hex
Screws. Do not tighten the Hex Screws
until all Hex Screws are installed.
After tightening Hex Screws, install the 4
Black Screw Caps
STEP 10. Position your ELEVATE Core
ADJ in a permanent location then bolt to
floor through the Anchor Feet. Bolts not
included.
Anchor
Foot
Anchor
Foot
7
Carefully turn the ELEVATE Core ADJ unit
over.
R L
Page 8
COMPUTER / ROLLERS
ELEVATE® CORE ADJTM OWNER’S GUIDE
SEAT OR FOOT PLATFORM:
ROLLER REMOVAL & ASSEMBLY
8
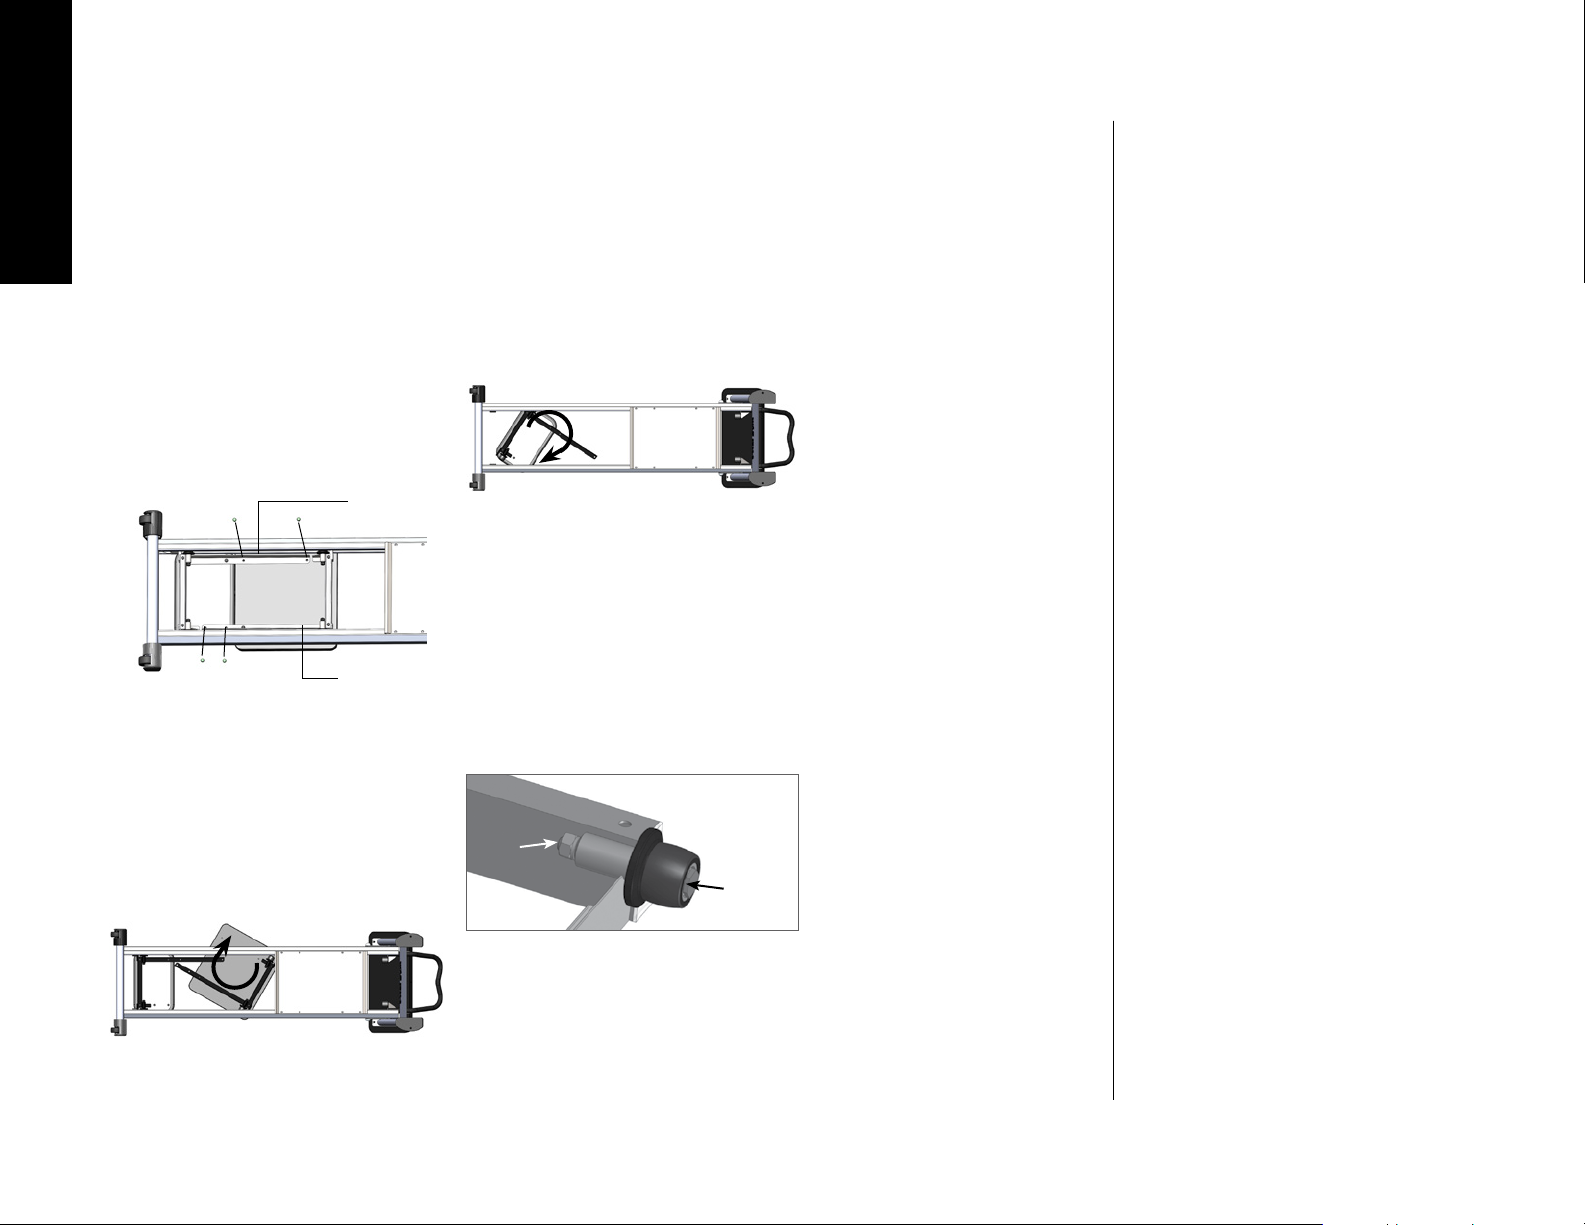
STEP 1. Lie on your back and slide under
the rails to disconnect the Upper L-Frame
and glideboard from the Lower L-Frame
and rubber foot plate. You will need a 10
mm open end wrench to unscrew the four
screws from the Upper L-frame and Lower
L-frame.
Lower L Frame
Screw #3
Screw #1
Roll the glideboard up,then lower the
glideboard and unscrew Screws #3 and
#4 from the glideboard.
Screw #2
Screw #4
Upper L Frame
STEP 3. Rotate the rubber foot plate and
Lower L-frame until a roller comes out of
the rail; then tilt it and lift it off of the rail
assembly.
STEP 4. To remove the wheels: Use a
13 mm socket wrench and a 13 mm openend wrench.
Insert socket wrench over the bolt on the
outside of the roller as you engage the
open-end wrench on the nut on the inside
of the frame; turn to unscrew.
NOTE: Socket wrench and open-end
wrench not included.
STEP 5. Replace the rollers as
needed and reinstall the bolt and
nut. Tighten just enough so that
the wheel can roll but does not
slide lengthwise on the axle. DO
NOT OVER TIGHTEN.
STEP 6. To reinstall the
glideboard and rubber foot plate,
rst slightly angle the rubber
footplate and lower until it is
sitting on the rails. Rotate the
rubber foot plate until the rollers
slide into rail grooves. Repeat this
process with the glideboard.
STEP 7. Using a 10 mm open end
wrench, lie on your back and slide
under the rails to re-install all four
screws.
PAD
REPLACEMENT
The pad on the glideboard and the SCRUNCH®
assembly can be replaced by the method
below.
TO CHANGE THE GLIDEBOARD PAD:
STEP 1: First, follow the procedure to
remove the glideboard.
STEP 2: Unscrew and remove the (second)
lower L-frame from the glideboard pad.
STEP 3: Replace the old pad with the new
pad.
STEP 6: Screw on the lower L-frame
and follow instructions to reinstall the
glideboard.
TO CHANGE THE SCRUNCH PAD:
STEP 1: Using the 10 mm open-end
wrench, remove the four bolts that hold the
SCRUNCH Pad to the strut frame.
STEP 2. Rotate the glideboard and Upper
L-frame until a roller comes out of the rail;
then tilt and lift it out of the rail assembly.
Nut
Bolt
STEP 2: Remove the four bolts (using 10 mm
open-end wrench) that hold the handle bar
to the SCRUNCH Pad.
STEP 3: Replace the old pad with the new
pad.
STEP 4: Re-attach the handle bar to the
SCRUNCH Pad with the same four bolts.
STEP 5: Follow instructions for attaching
SCRUNCH assembly to the strut frame.
Page 9
ELEVATE® CORE ADJTM OWNER’S GUIDE
MAINTENANCE / START
GETTING STARTED
As a facility offering the use of a ELEVATE Core ADJ to customers, or as a personal user
of the product, you – the owner of the product – assumes the responsibility to become
familiar with the guidelines relative to safe use of the product and to convey these
guidelines to all users. Read all safety, warnings and usage instructions before using the
ELEVATE Core ADJ. Care and maintenance for this product are included to promote safe,
enjoyable and prolonged use of this equipment.
When using your ELEVATE Core ADJ, wear athletic shoes and comfortable lightweight
clothing. Before you begin, check to ensure that all parts are in place and working
properly. Remember to control the glideboard at all times, particularly when getting on or
off your ELEVATE Core ADJ.
WARNING
Always control the glideboard while using your Total Gym
ELEVATE Core ADJ. ELEVATE Core ADJ is rated
at a maximum user weight capacity of 400 lbs [181 kg].
MAINTENANCE & CARE
Your Total Gym ELEVATE Core ADJ will
offer you or your facility and your clientele
years of easy operation if you follow these
simple tips for maintenance and care.
With periodic cleaning, moving parts and
rolling surfaces will maintain their smooth
function. The ELEVATE Core ADJ is not
safe to use if it is not maintained regularly
as follows. Clean rail surfaces on a regular
basis with a noncorrosive cleaner like
soap and water or waterless cleaner or
just wipe clean with a dry towel. Some
black powder residue is normal on the
inside of the rails. All other parts can be
cleaned the same way or antibacterial
wipes may be used. If your ELEVATE Core
ADJ is damaged, please discontinue use
until defective components are repaired.
Please pay special attention to the
following wear items: rollers, cables and
handle grips.
CAUTION! DO NOT USE ANY LUBRICANTS
OR SILICONE-BASED PRODUCTS on the
rails or wheels. This will cause the wheels
to slide rather than roll and will damage
the wheels. You can clean the glideboard
material with a non oil-based window
cleaner. DO NOT USE ARMOR ALL® OR
LIKE SUBSTANCES. These will make
the glideboard slippery. Wipe down your
ELEVATE Core ADJ with a clean cloth.
MAINTENANCE SCHEDULE
DAILY
1. Wipe down all padded surfaces
with antibacterial cleanser after
each use.
2. Move the glideboard up and down
rails to ensure smooth rolling. If
glideboard does not roll smoothly,
clean rails and wheels thoroughly.
WEEKLY
1. Wipe down rails with a noncorrosive, no alkaline, no alcohol
cleanser.
2. Clean all surface areas for
aesthetics.
3. Check all screws and fasteners to
ensure they are installed correctly
and tightened.
4. Check all pads, fabric or foam for
punctures or wear and replace as
needed.
MONTHLY
1. Visually inspect the rollers. Clean
any debris accumulated on the
roller.
2. Inspect rubber stoppers, bungee
and computer.
9
Page 10
EXERCISES
ELEVATE® CORE ADJTM OWNER’S GUIDE
EXERCISES
10
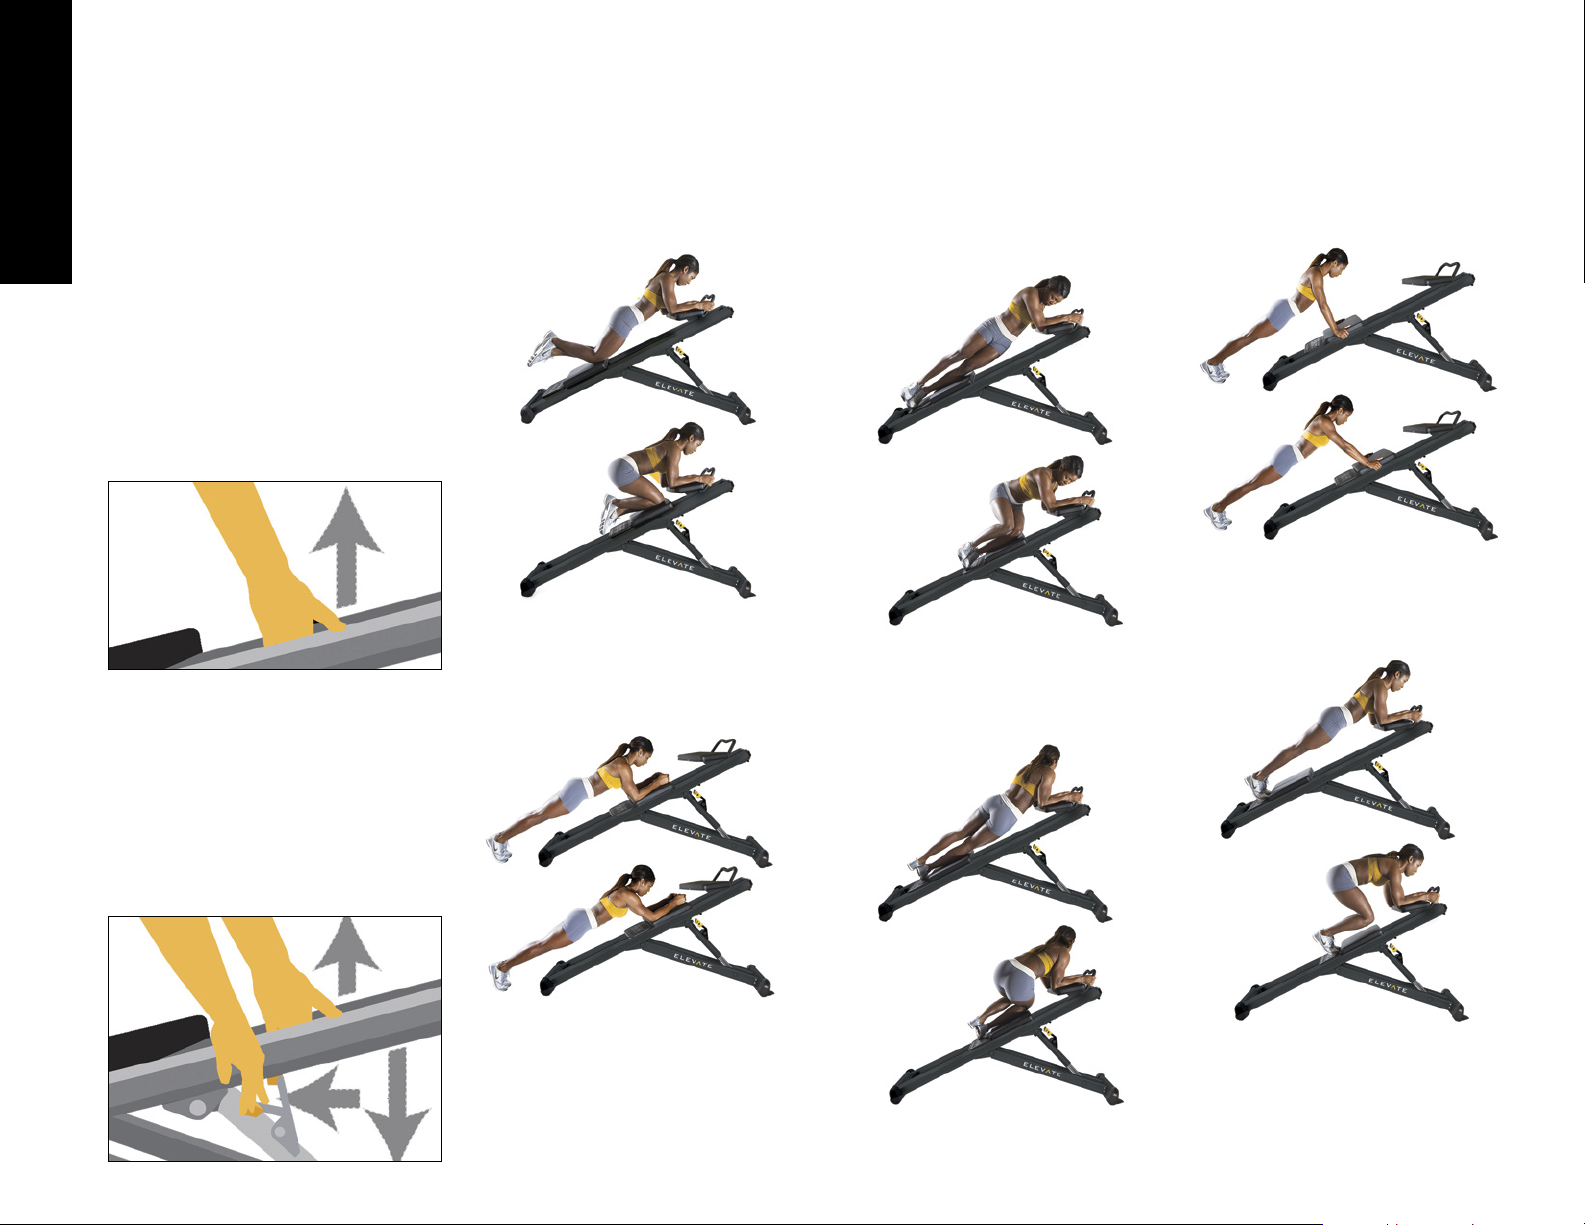
Follow the instructions on the placard as
illustrated by doing the desired number
of sets and repetitions appropriate for
the skill and level of difculty. Additional
exercises are provided on TotalGym.com/
coretrainerexercises.
INCREASE RESISTANCE
To increase resistance, raise rails to
desired level.
DECREASE RESISTANCE
To decrease resistance, lower rails to
desired level.
BASIC SCRUNCH
DYNAMIC PLANK
Option: Elbows on Board
OBLIQUE SCRUNCH WITH KNEES
Right Side
OBLIQUE SCRUNCH WITH KNEES
Left Side
INTERMEDIATE PLANK
INTERMEDIATE SCRUNCH
1. Lift rails slightly
2. Push lever down
3. Lower to desired level
1
2
3
Page 11

WARRANTY INFORMATION
WARRANTY INFO
ELEVATE® CORE ADJTM OWNER’S GUIDE
US WARRANTY
Warranties outside the US may vary. Contact your local authorized distributor for
details.
Commercial Warranty:
• Frame – 5 years
• Parts – 1 year
• Rubber – 1 year
LIMITED WARRANTY
IMPROPER USE OF ELEVATE CORE ADJ: Defects or damages that result from
improper use are excluded from coverage.
UNAUTHORIZED SERVICE OR MODIFICATION: Defects or damages that result from
service, maintenance, repairs, adjustment, installation or alteration conducted by
anyone other than Total Gym or its authorized representatives are excluded from
coverage.
WARRANTY CLAIMS
Total Gym treats warranty claims as a priority. To process these quickly, a Return
Merchandise Authorization (RMA) number is required to properly link your merchandise
with your claim. Total Gym does not accept returned merchandise without an
accompanying RMA number. Contact Total Gym Customer Service Department at
858-586-6080 if you are making a warranty claim. A representative will issue you an
RMA number and instructions for proper packaging of the equipment for shipping.
IMPORTAN T: Save your invoice. Please retain packaging instructions. US Customer
Service Center: 858-586-6080. Shipping Damage: FOB origin, unless otherwise specied.
Total Gym accepts no responsibility for damage in shipping. Total Gym does, however,
make every effort to facilitate the satisfactory resolution of claims made against
delivery agents for damage during shipping. If the package appears to have sustained
damage in shipping, or if the ELEVATE Core ADJ appears to have shifted in delivery but
no damage is evident, retain the shipping boxes until the ELEVATE Core ADJ has been
fully assembled to ensure there is no functional damage that is not initially visible. In
the event of damage during shipping, retaining the shipping boxes helps to facilitate
your claim against the shipper. Take photographs of damaged boxes or contents before
opening.
PURCHASE RECORD. RETAIN THIS COPY FOR YOUR RECORDS.
Date Purchased ______________________________________________________________________
Purchased From ______________________________________________________________________
Model Name: ELEVATE Core ADJ, Part # 6000-B1
Serial Number ________________________________________________________________________
TotalGym.com
Customer Service:
858.586.6080
5225 Avenida Encinas Suite C
Carlsbad CA 92008
11
Page 12

TotalGym.com
Customer Service: (858) 586-6080
5225 Avenida Encinas Suite C, Carlsbad CA 92008
©2017 Total Gym Global Corp. All rights reserved. Total Gym and ELEVATE are registered trademarks of TGG Global Corp. Unauthorized duplication of this booklet is punishable by law.
Covered by one or more of U.S. Pat. Nos. D574,901, 7,775,950, 8,075,457, 7,938,763, 8,834,332, D493,853, 6,921,355, 7,503,880, 7,270,628, D694347, 7,892,159, 8,702,575, 5,967,955, D734,409, D741,960, 361898, D741,420: 5,967,955; 6,921,355;
7,766,801; Australia Des. Pat. No. 154471; European Des. Pat. Nos. 000068788-0001 to 0006; New Zealand Des. Pat. No. 403803; Japan Des. Pat. No. 1203066; Russia Des. Pat. No. 56172, Taiwan Des. Pat. No. D100334; and other patents pending.
 Loading...