

TOSO DUAL 100 Instruction Manual
Sales Division For General Construction
No.3 Kinpai Bldg. 6F, 1-14-5 Shinkawa, Chuo-ku, Tokyo 104-0033 Japan
Sales Division For General Construction
No.3 Kinpai Bldg. 6F, 1-14-5 Shinkawa, Chuo-ku, Tokyo 104-0033 Japan
TEL : +81- (0) 3-3552-4471 HP : http://www.toso.co.jp
Free Repair Policy
Thank you for purchasing our product.
This product was delivered after a thorough quality inspection. However, if something wrong should
happen to the product during the warranty period, it will be repaired under our Free Repair Policy.
1. Repair will be provided for free if the product goes wrong during the warranty period while conforming to
normal usage described on the instruction manual/unit caution labels/tags. To ask for free repair, see
the maintenance sticker and contact your original retail shop.
2. You will be charged for repair under the following circumstances, even within the warranty period.
(a) If this certificate is not shown.
(b) Breakage or damage caused by transportation or due to dropping of the product after purchase.
(c) Misuse, alterations to the product or usage of non-genuine parts.
(d) Breakage or damage arising from external factors such as fires, earthquakes, lightening, storms, floods,
or other natural disasters.
(e) Exposure to unusual conditions (excess moisture, smoke, chemical gases, pollution).
(f) Breakage or damage due to moving the product from its original place after purchase.
3. This certificate is only valid in Japan.
Product Warranty Certificate
Warranty period: One year from the date of purchase
Vertical Blind
DUAL 100
No.V−08101001
Guide for Distributors and Installation Contractors
This manual contains information for a user to safely operate this product.
Please provide this manual to a customer.
Instruction Manual
Thank you for purchasing TOSO products. To ensure safe use of this product,
please read the following thoroughly and keep this manual stored.
INDEX
Cautions ...............................................................................................................2
Product View and Part Names ...........................................................................4
Installation and Detaching.................................................................................. 5
Operation Methods ........................................................................................... 11
Maintenance Sticker......................................................................................... 13
Cleaning ............................................................................................................. 13
Product Warranty Certificate............................................................................ 14
P. 2
CAUTIONS
This manual contains cautions and instructions for safe use of the product.
Please read it carefully before using to ensure appropriate use.
This document illustrates the dangers of using this product without taking necessary
precautions. Please refer to the symbols below for different types of safety points.
This document illustrates safety points to be followed using the symbols below.
Illustrates that if this product is misused, there are dangers of serious
injuries or possible fatal accidents.
Illustrates that if this product is misused, there are dangers of
casualties or possible physical damage of the product.
Illustrates specific actions which are prohibited.
Illustrates specific guidelines which must be followed.
Screws provided are for xylem only. Do not use on materials other than xylem.
Check the foundation base and strength of the material before installing this product. If
not installed properly to the foundation base, there are dangers of it falling.
Install this product as instructed with the necessary quantity of brackets. Otherwise the
product may fall.
Warning
Caution
This product is intended for indoor use. Please do not use it for outdoor purposes.
Locations subject to high temperatures and high humidity, or areas where
water may leak, should be avoided.
Make sure to install this product horizontally.
Precautions upon installing the product (Please read before installation.)
Warning
Caution
Caution
Warning
Japan Blind Industry
Association
P. 3
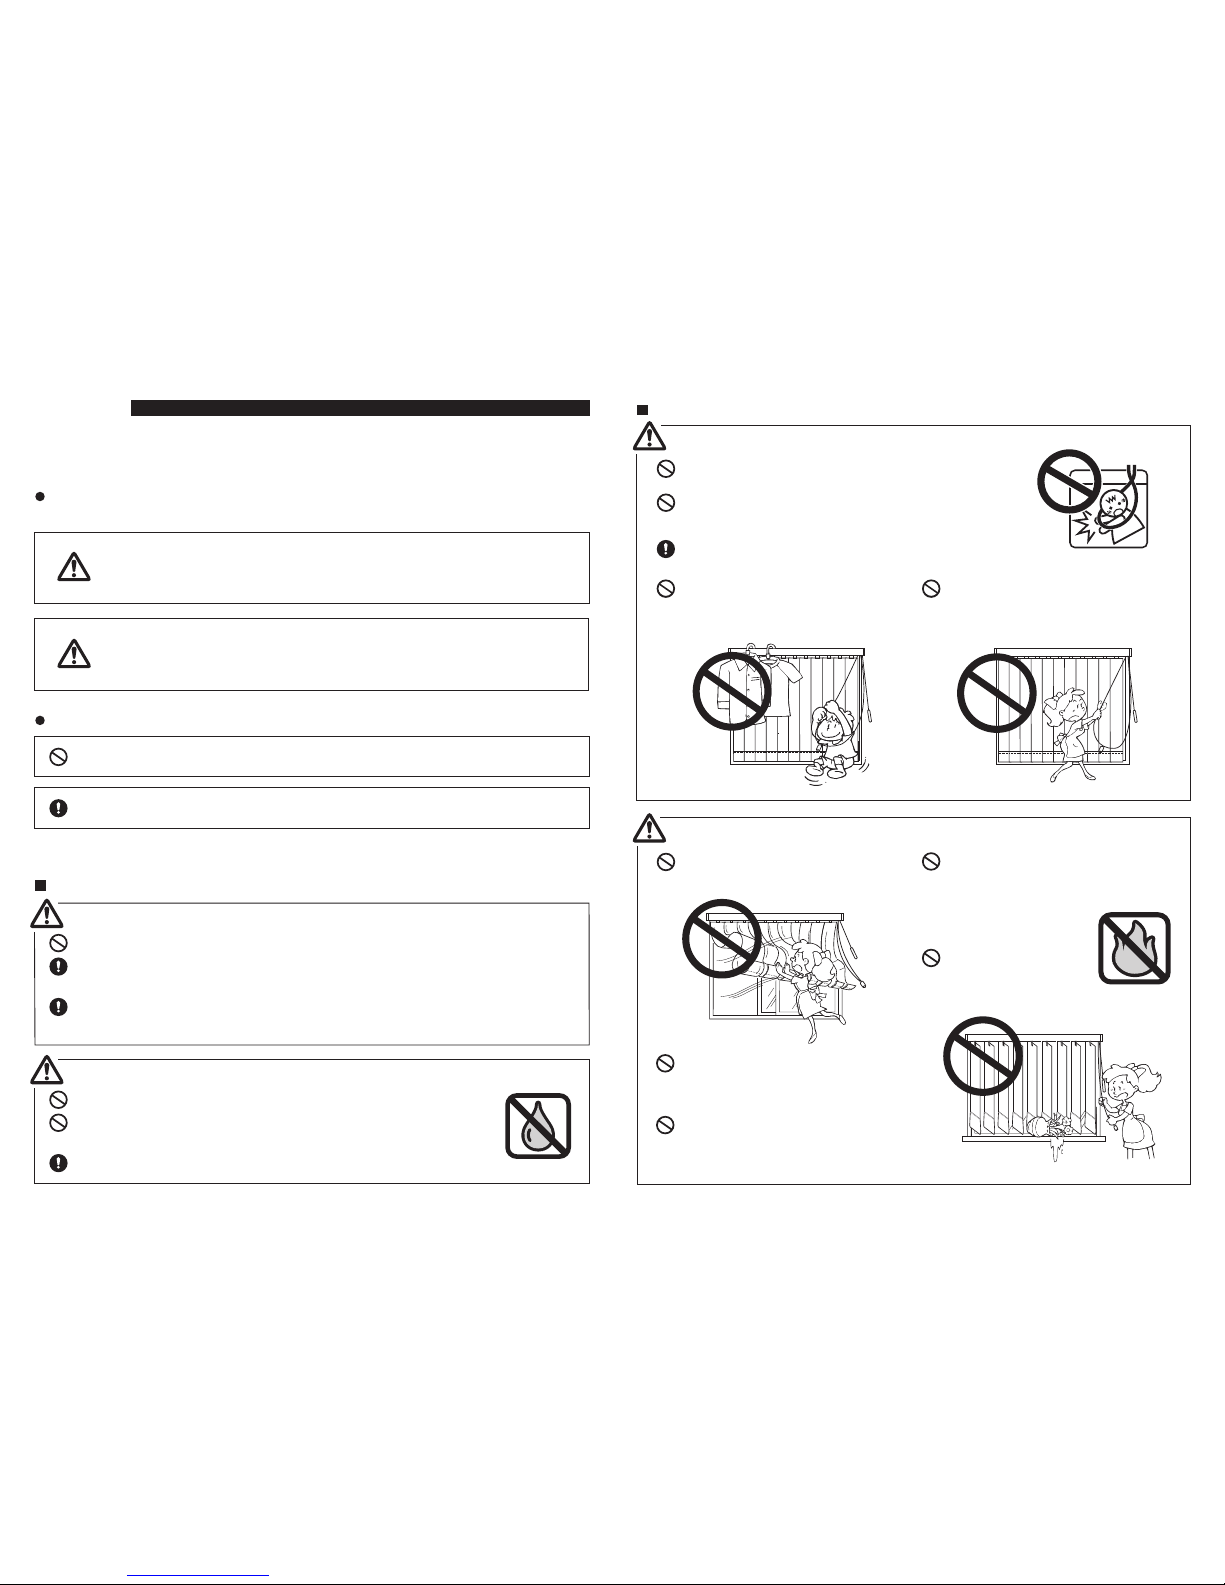
Safety During Use (Please read thoroughly)
Please keep the cord or the chain where children cannot
reach.
Please avoid actions which may result in the cord or the chain
entangling the body or becoming hooked onto something.
This may cause an accident.
When not in use, please take the cord and put away the
handling cord by wrapping it around the safety hook.
Please do not hang from or pull on
this product. This may damage the
product or cause it to fall down.
Please do not operate the product with
sudden or forceful motion. This may
damage the product or cause it to fall
down.
When there is strong wind, please
either close the window or have the
louver completely opened up.
Please remember to always use the drive
cord or Operation Wand when operating this
product. Please do not attempt to move the
louver directly.
Please do not place any fragile objects or
objects that may interfere with operation
near the Louver.
Please do not dismantle the
mechanical assembly or lubricate the
moving parts of this product.
Physical damage or
malfunction of the
product will occur.
Please do not use this
product around open
flames.
P. 4
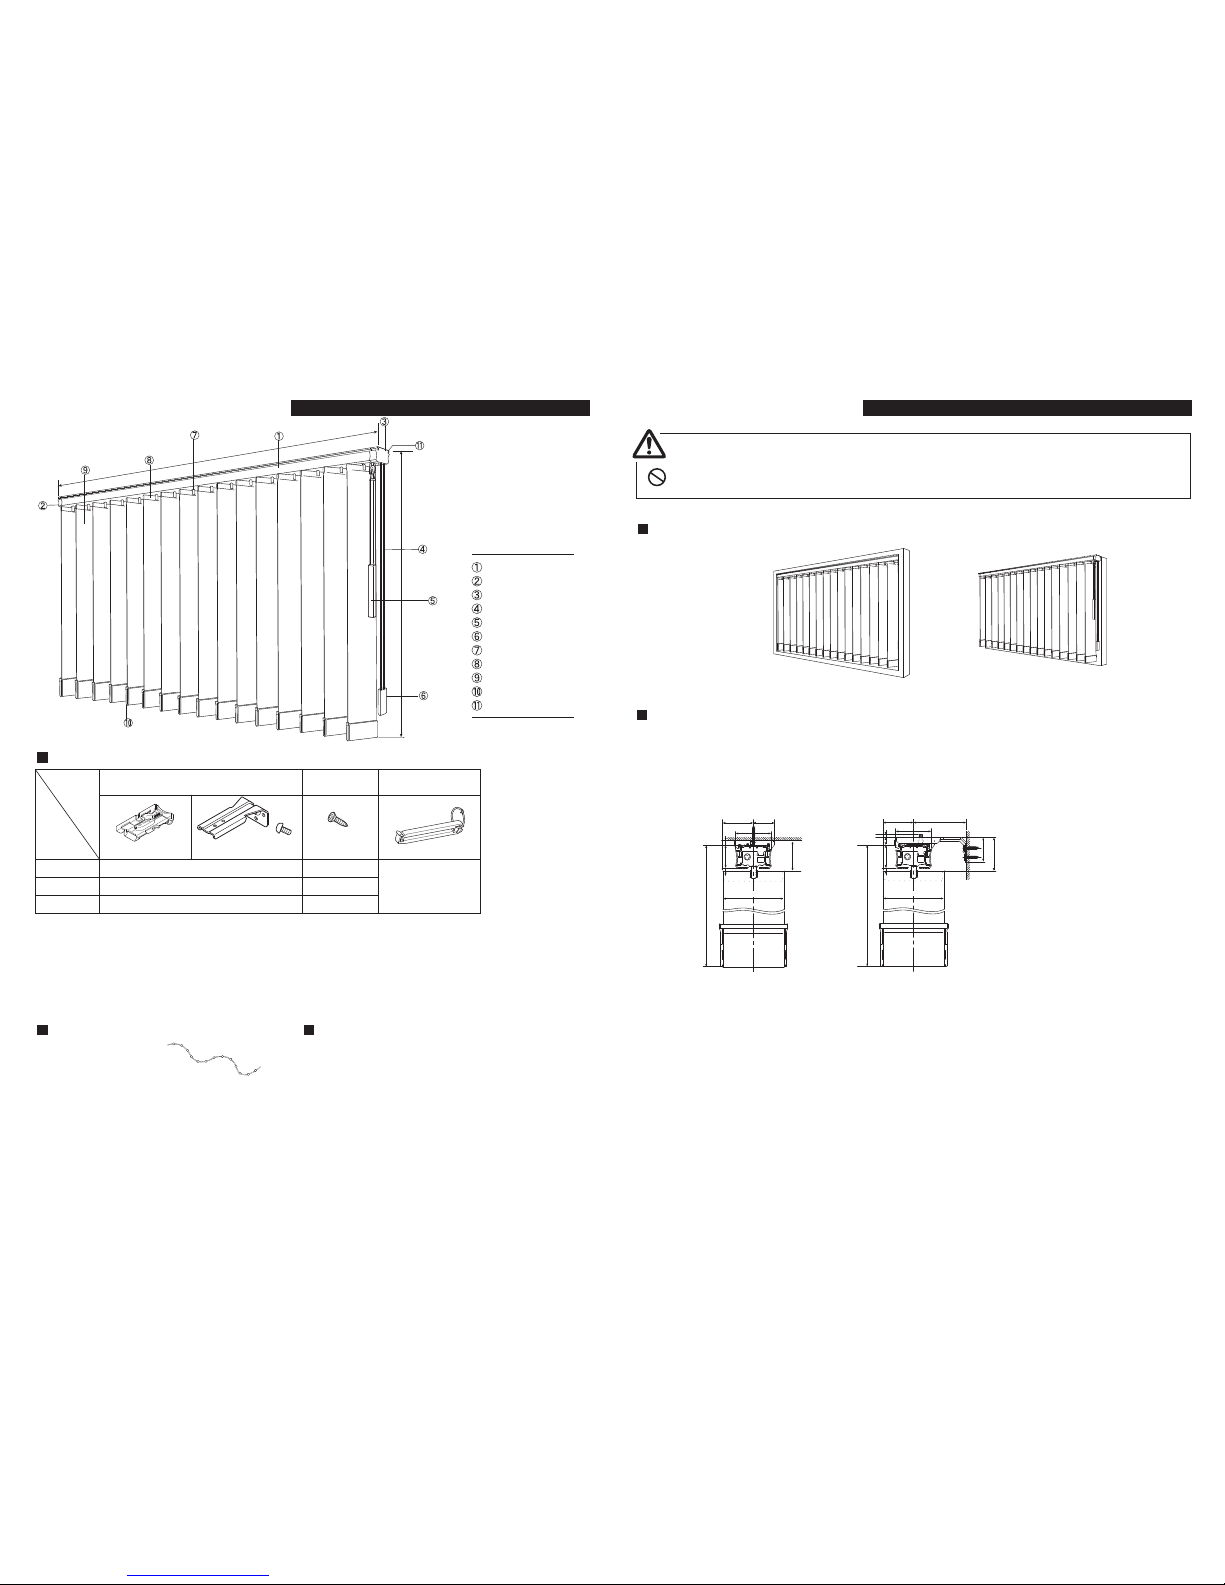
Product View and Part Names
Product height (H)
Product Name
Head Rail
Side Cap
Cord side Cap
Drive Cord (outside)
Operation Wand (inside)
Tension Weight
Roller Hook
Hanger
Louver
Balance Weight
Maintenance Sticker
The number in parentheses is for installation type of Front Attachment.
The bracket attachment details vary depending on the specifications for the requested product.
For Ceiling Attachment products, Ceiling Bracket are included. For Front Attachment, Ceiling
Bracket and L-Shape Bracket (for Front Attachment) + attachment screws are included. For
installing methods, see "Installing the Brackets" on P.6.
Components Parts
Option components Product Weight
300−1200
1210−2400
2410−4000
2
3
4
2 (6)
3 (9)
4 (12)
1
Product Width
(mm)
Components
Name
Bracket () Fixing Screw ()
Safety Tassel
Fixing Screw
(round head Ø3.5 x 20)
Ceiling Bracket
L-Shape Bracket + Screw
(for Front Attachment)
Bottom Cord
3.9kg
(Product Width 2,000 mm x Product Height
2,000 mm)
Product width (W)
P. 5
Installation and Detaching
Installation Method
<Ceiling Attachment>
<Front Attachment>
Installation Dimension (mm)
Ceiling Attachment
(with Ceiling Bracket)
41
47
27
7
30
4
/2Louver width
Louver width
47
32
44
70 (84)
4
10
30
4
40
Louver width
Front Attachment
(with L-Shape Bracket)
Product height (H)
Product height (H)
Screws provided are for xylem only. Do not use on materials other than xylem.
Caution
Product Height: From the attaching surface of the Head Rail to the bottom end of the Louver
(not included the thickness of Bracket)
 Loading...