

Page 1
X-Pilot
X-Pilot
autopilot for bait boats
Quick Start Guide V1.1
www.toslon.com
Page 2
X-Pilot
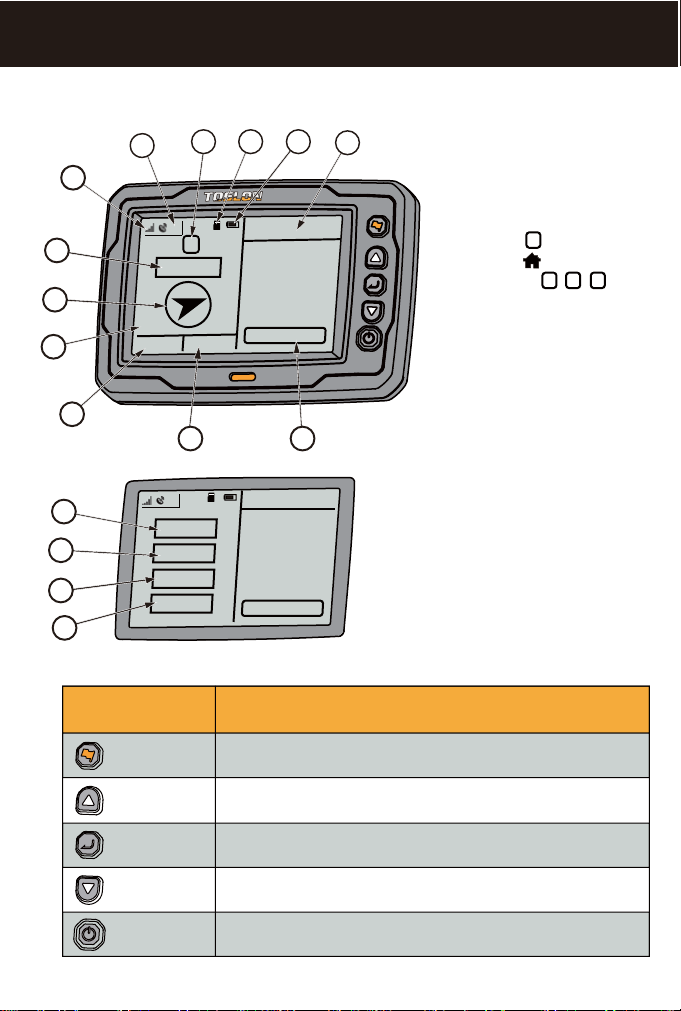
1. What’s on the display & Keypad instruction
5
4
6
10
7
2
86.5m
8
12.1V
4 deg
9
1.1 m/s
3
X-Pilot
Waypoints
0427-161201
H
0615-161004
2
0930-160842
3
XXXX - XXXX
4
XXXX - XXXX
5
Home
2
1
1) Waypoint list
2) Strength of display battery
3) SD card is ready
4) Instruction icon of autopilot
condition ( means North
N
direction; means backing to
HOME point; , , means
1 2 3
the Quick Reach Target which
the boat is running toward)
5) Number of GPS Satellites
6) Strength of radio signal
7) Distance to target (or HOME
10
11
12
Point)
8) Boat heading
9) Voltage of X-Pilot CCU
10) Speed of the boat
11) Angle between boad heading
13
14
15
10
275.2
1.2
m/s
18
deg
11.6
m
v
16
Waypoints
H 0427-161201
2 0615-161004
3 0618-150904
4 0618-152206
5 0930-160842
Home
direction and the north
12) Home position
13) The distance to Target (or
HOME Point)
14) Speed of the boat
15) Angle between boad heading
direction and the north
16) Voltage of X-Pilot CCU
Key Function
[Autopilot]
[Up]
[Menu / Enter]
[Down]
[Power / Exit]
1) Start / Stop autopilot mode
2) Switch between pages in the waypoints list
1) Shortcut to enter waypoints list
2) Move up menu or increase value of an option
1) Confirm a setting / selection
2) Enter the menu settings
1) Shortcut to mark current pisition as Home point
2) Move down menu or decrease value of an option
1) Power on / off the unit
2) Exit the selection or menu
Page 3
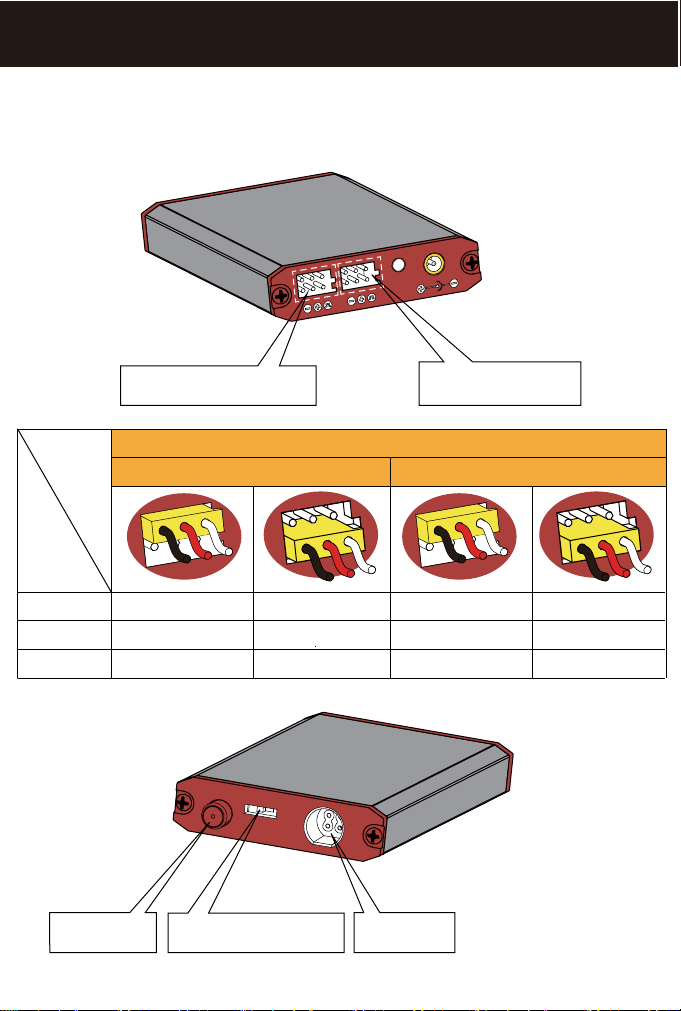
2.1 Connections of CCU
The following figures instruct how to connect the CCU box of X-Pilot with your bait boat.
The system could control most 2 engineers or 1 engine (with rudder) boat with proper settings.
Port A is connected to Speed
Contorller(ESC) or Servo
Transmitter connection & function
Port A
Xboat mode ESC of Right Mot or ESC of Left Moto r
2 Engines ESC of Right Motor ESC of Left Moto r
1 Engine ESC
Connector to
Antenna
Switch (Mode set between
X-Pilot and TF640 Gen2 )
Servo
Port B is connected to
Reciver of the remote
Port B
channel-3 channel-1
channel of right Motor channel of left Motor
channel of ESC
Socket to
GPS receiver
channel of servo
Page 4
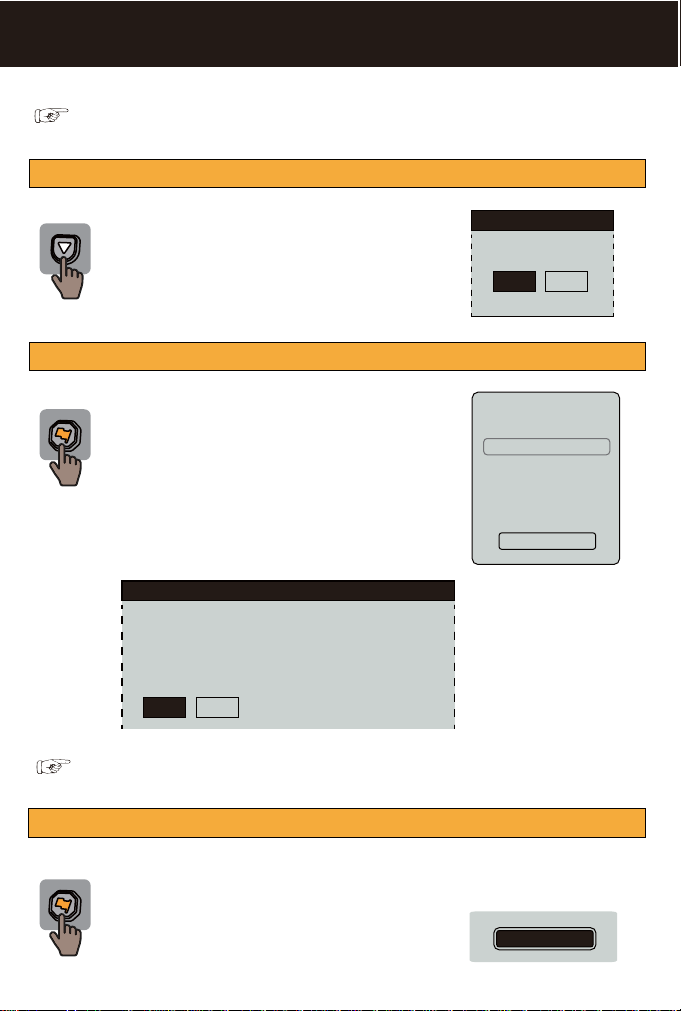
2.2 Start Autopilot & Back to Home
0427-161201
0615-161004
0930-160842
XXXX - XXXX
XXXX - XXXX
Home
H
2
3
4
5
Home
NOTE: after connecting the X-Pilot to the boat, please refer the [Wiring Test] in
charpter 3.1 and confirm the wiring before start autopilot model.
1) set a HOME point, which is generally the point where you start the autopilot
1) Push the [Down] key, then appears an
message-box to confirm if you would like to set
the current location as HOME point.
2) Select [Yes] to confirm.
2) load an prestored target point to start the autopilot
1) Push the [Autopilot] key, the cursor would
blink and point to the target.
2) Move the [Up ] / [Down] key to select an
Quick Reach Target then push [Autopilot] or
[Enter] key to confirm the selction. An
message-box appears to remind if you will start
the autopilot.
3) Select [Yes] to start the autopilot.
Messages
From: 0° 0.0000′ / 0° 0.0000′
To: 32° 15.7354′ / 118° 42.0948′
Distance is 224.6m
Start Autopilot?
Yes No
NOTE: during the autopilot, push & pull the joystick of your remote to MAX / MIN
position could stop the autopilot mode.
Messages
SET AS HOME?
Yes No
3) back to Home
After the boat arrived the target, autopilot will be finished automaticly. Then
you could choose guiding the boat back to HOME point.
Like the operation in step 2, please chose Home
as the target and start the autopilot. The boat will
run back to the HOME accordingly.
Page 5
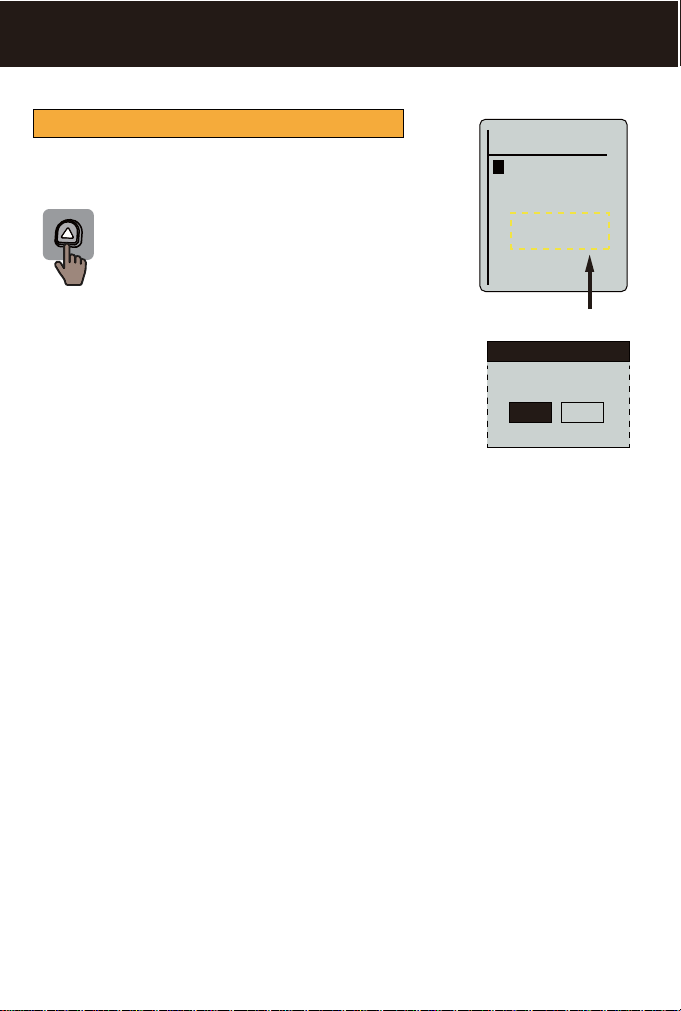
2.3 Save a waypoint
0427-161201
0615-161004
0930-160842
Waypoint 1/100
Lat.: xxx xxxx
Lon.: xx xxxx
XXXX-XXXXXX
XXXX-XXXXXX
H
2
3
4
5
How to save a waypoint?
X-Pilot could save up to 500 waypionts in the memory.
1) Push the [Up] key to enter into the waypoint
interface.
2) Move the [Up] or [Down] key to select an
slot to save to.
3) Push [Enter] key. An message-box appears
remind if you will save the waypoint.
4) Select [Yes] to comfirm.
Blank position
Messages
Save to Slot?
Yes
No
Page 6
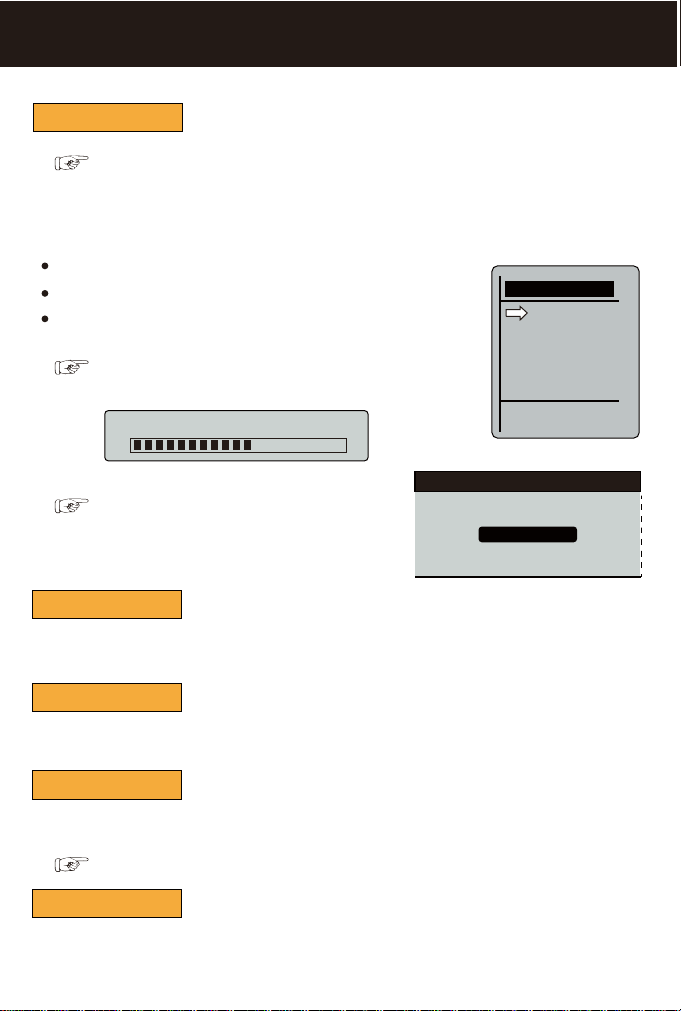
Wiring Test
RF Channel
Steering sens.
Compass Cali.
Compass Test
X-Pilot Setting
3.1 X-Pilot Setting
Wiring Test
NOTE: before making the test, please check [Boat Option] in Chapter 3.2 and
choose the relative boat option according to the type of your boat.
After you finished all the connections between X-Pilot and your boat, please use the [Wiring
Test] to test the motor (or rudder) to sure the sytem could control the boat properly.
Go Forward: test if the boat can go forward correctly
Turn Left: test if the boat can turn left correctly.
Turn Right: test if the boat can turn right correctly .
NOTE: after one test option was confirmed with [Enter]
key, a message-box will appear:
Ready to Test ...
NOTE: if you find the motor (or rudder) does
not run at the correct way, please enter
[Advanced Set.] / [CH Reverse] menu to
reverse the relative channel.
Go Forward
Turn Left
Turn Right
RF Channel
Wiring Test
When more than one user operate the X-Pilot at the same time, it is necessary to choose a
different channel for each user to avoid the possible radio interferance.
Steering sens.
Used to set the sensitivity of boat to keep it steering in a straight way when using with the device.
If boat is light and flexible, sent the senvivity in a low value. Otherwise, set it in a higher value.
Compass Cali.
Used to make the calibration of compass. After install X-Pilot to a new boat or move to
an new enviroment, strongly recommend to re-calibarate the compass.
Used to check if compass working normal or not
NOTE: DO NOT calibirate the compass in a house or car!
Compass Test
Page 7
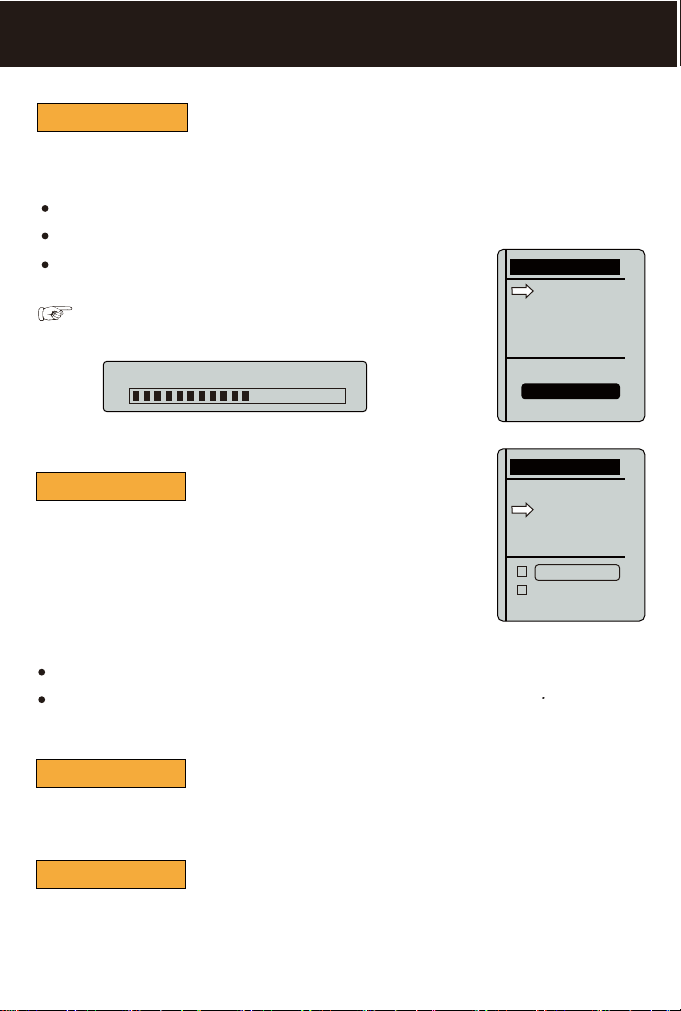
3.2 Advanced Set.
Boat Option
CH Reverse
Channel Limit
Dev. Mode
Advanced Set.
X-Boat
1 Engine
2 Engines
Boat Option
CH Reverse
Channel Limit
Dev. Mode
Advanced Set.
CH1 Reverse
CH2 Reverse
Boat Option
X-Pilot can work with most kinds of bait boats( with 2 engines or 1engine & rudder) . So, before
you start the operation, please select the corresponding boat type.
X-Boat: specially for Toslon X-Boat.
1 Engine: for the boat designed with 1 engine (and rudder).
2 Engines: for the boat designed with 2 engines.
NOTE: after you changed and confirmed a new boat option, a
message-box will appear:
Mode Setting...
CH Reverse
During you made [wiring test], [CH Reverse] is used to correct the
running direction of motor (or rudder) after you found them did not
run the correct direction as expected.
For example, if your boat are with 2 engines, and you found the motor
was running the counter direction when you push [Go Forwarder] in
the [wiring test], then please enter into [CH Reverse] and select
CH2 Reverse.
CH1 Reverse: to correct the running direction of rudder.
CH2 Reverse: to correct the running direction of motor.
Channel Limit
Used to limit the Max speed which your boat can get when it work with X-Pilot.
Dev. Mode
Used to enter developing mode for engineer testing.
Page 8
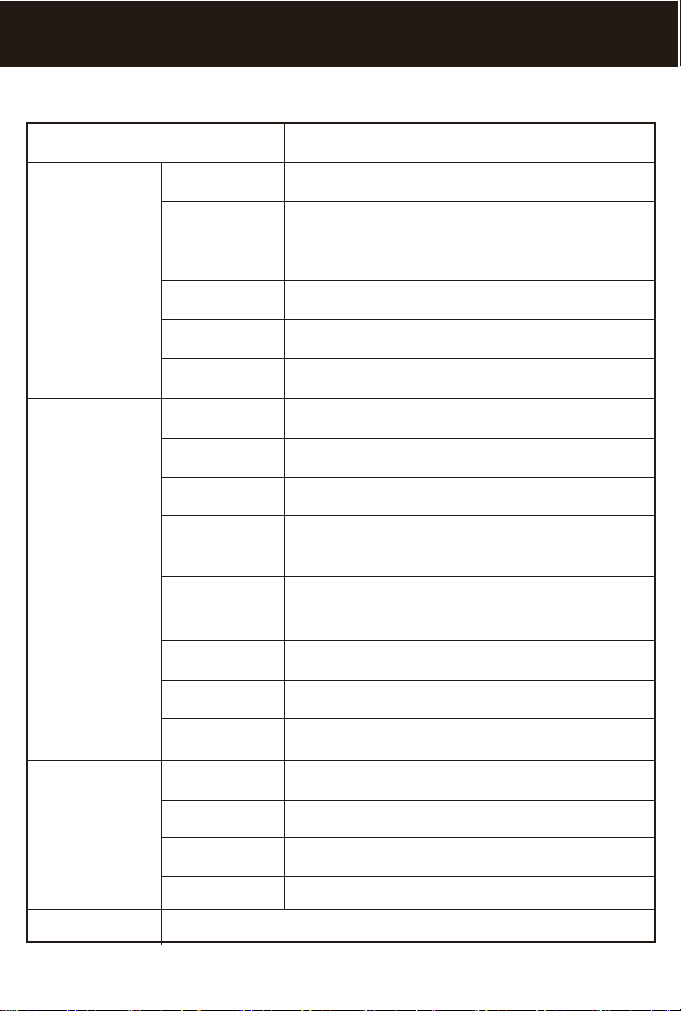
3.3 Menu List
Waypoints
X-Pilot Setting
System Setting
Wiring Test
RF Channel
Steering sens.
Compass Cali
Compass Test
Beeper
Backlight
Contrast
Boat Voltage
Dsp. Voltage
Time Zone
Language
List of stored waypoints
Test if the X-Pilot could control the boat properly
Set different RF channel to allow more than one users
operating the device in the same region without any
radio interference
Set the sensitivity of boat steering
Used for calibration of compass
Used to check if compass working normal or not
Set if the unit sound a tone or not when a key is pressed
Allow the unit to be used at night
To get a suitable display when operate the unit
Sounds when the input battery voltage of transmitter is
equal to or less than the setting
Set if the display sounds with warning message when
the input battery voltage of display is low enough
Selects time zone for using in different countries
Select the display language for menus
Advanced Set.
System Info.
Load Default
Boat Option
CH Reverse
Channel Limit
Dev. Mode
Used to restore original factory setting
Select boat type to match X-Pilot setting
To correct the running direction of motor (or rudder)
Limite the max speed of boat (with X-Pilot built in)
Developing Mode for engineer test
Show system information of device
Page 9
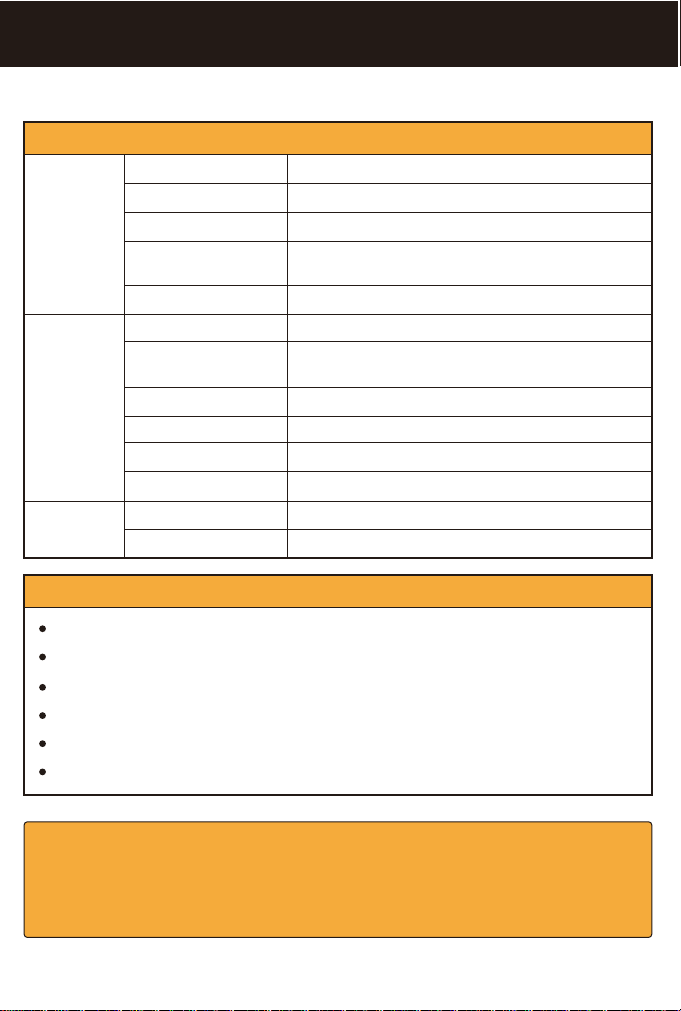
4. Specifications & Features
Specifications
Display
GPS & R/F
Power
Features
Display size:
Display resolution:
Language:
Failing-safe:
SD card storage:
Radio frequency:
Radio Power:
Waypoints Number:
Quick Reach Targets:
GPS Receiver Type:
Compass Update Rage:
Power for X-Pilot CCU:
Power for the display:
4.3" FSTN, Black & white
240x160 Pixels,Visible under sunlight
English (future update: German / French / Russian)
YES (the X-Pilot would alarm when lost the remot
signal)
YES
433Mhz / 2GFSK
20dBm (Max 800ft RC distance , depending on weather
and environmental conditions)
500
4 ( include the Home position)
50 Channels
10Hz
DC 6~16V
Li battery (BL-5C)
One-button pushing to quickly start autopiloting
Quickly saving Home point
Automatically steer straight ahead
Easy operation with quick saving / loading waypoints
Easy program upgrading with SD card
Quickly fixed to remote with special metal bracket (optional)
For the details of product, please visit TOSLON website and download the manual :
http://www.toslon.com
Features and specifications listed are the most recent available at the time of printing and are subject to change
without notice. Yachting Electronic Co., Ltd reserves the right to change or improvements in its products without
incurring the obligation to install such changes or improvements on equipment of items previously manufactured.
Page 10
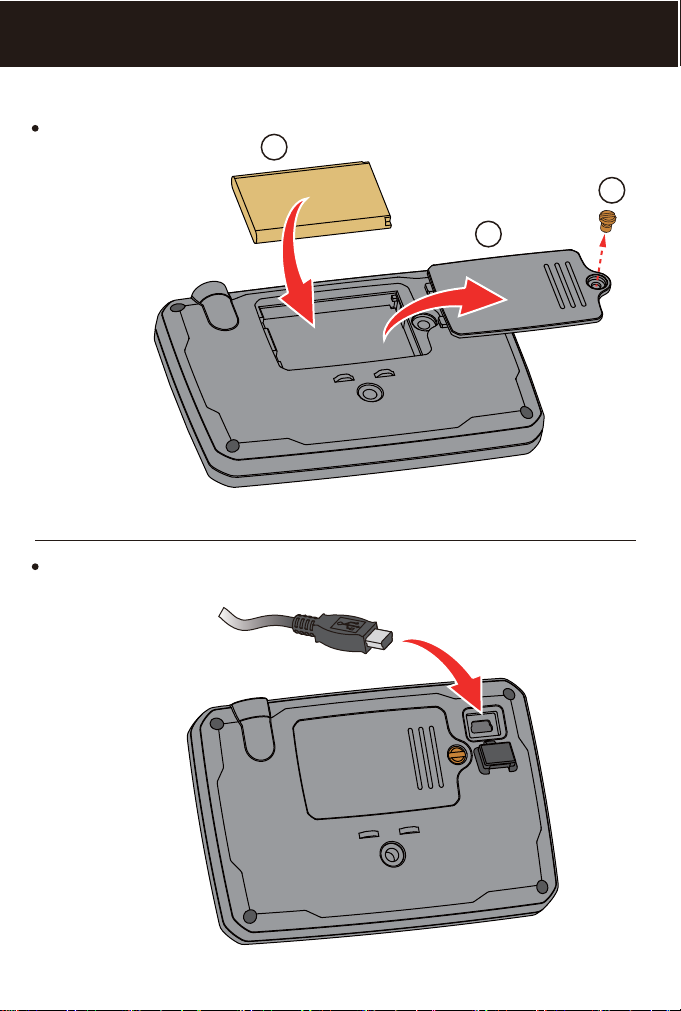
5. Battery installation & Charging
Battery Installation
Battery Charging
3
1
2
Page 11

YACHTING ELECTRONIC CO., LTD
Building 29, No. 2 Qiancheng Road,
Liuhe District, Nanjing City, China 211500
Email: [email protected]
www.toslon.com
Facebook: Toslon Marine
 Loading...