

Toshiba XD-E500KU, XD-E500, XDE500VPK Owner's Manual
TOSHIBA
!M>
v
IDE
Upconverting
Extended Detail
[Q]D~~
O·
IDIGITAL
vlDeol
1080p
lillCOMPACT
DIGIQ~~
DVD
XD-E500KU
[I]DOLB'l
DIGITAL I
Homl™
HIGH DEFINITION MULTIMEDIA INTERFACE
~db
Digital
Out
.Xi
C>E:
Player
B"le
Ad",,,,
playb",
playb,,'
I
I
© 2008 Toshiba Corporation
Owner's
The model numberand serial number are onthe back
your DVD Player. Record these numbersinthe spaces
below. Refer to these numbers whenever you communicate
with your Toshiba dealerabout this DVD Player.
Model number:
Serial number:
Record
I
~========
IL-
of
_
SAFETYPRECAUTIONS
The
IIDillIIDmIII
RISKOFELECTRIC
DO
NOT
CAUTION:
OPEN.
WARNING:TOREDUCE
SHOCK,DONOT
NO
SERVICINGTOQUALIFIED
VISIBLE
DO
NOT
LASER
STARE
INTO
RISQUEDECHOC
AVIS
THE
REMOVE
USER-SERVICEABLE
SHOCK
OPEN
RADIATION
BEAM.
PASOUVRIR
RISKOFELECTRIC
COVER
PARTS
SERVICE
WHEN
ELECTRIQUE
(OR
BACK).
INSIDE.
PERSONNEL.
NE
REFER
equilateraltriangle, is intended
of
uninsulated
enclosure
risk
Theexclamationpointwithin theequilateral triangle is intended
to alert the
maintenance(servicing) instructionsin this
The symbol for ClassII(Double Insulation)
lightning flash with an
"dangerous
that
maybeof
of
electric
user
shock
to the
to persons.
presenceofimportant
arrowhead
toalert
voltage"
sufficient
symbol, within the
the
userto
the presence
within the product's
magnitude
to constitutea
operating and
owner's
manual.
WARNING:
CAUTION:
WARNING: The apparatus shall not
CAUTION: This Digital Video Disc Player employs a Laser System.
FCC NOTICE: This equipment has been tested and found to comply with the limits for a Class B digital device, pursuant
WARNING: Changes or modifications to this unit not expressly approved by Toshiba, or parties authorized
Warnings: • The main plug is used as disconnect device and it should remain readily operable during intended used.
TO
REDUCE THE RISK
OR
MOISTURE. DANGEROUS
OPEN
THE CABINET. REFER SERVICINGTOQUALIFIED PERSONNEL
TO
PREVENT ELECTRIC
THEN
FULLY
INSERT.
vases, shall
To
ensure proper useofthis product, please read this owner's manual carefully and retain for future
reference. Should the unit require maintenance, contact an authorized service location.
Use of controls or adjustments or performance of procedures other than those specified herein may result
in
hazardous radiation exposure.
To
prevent direct exposure to laser beam, do not try to open the enclosure.
Visible and invisible laser radiation when open and interlocks defeated.
DO
NOT STARE INTO BEAM.
to part 15 of the FCC Rules. These limits are designed to provide reasonable protection against harmful
interference
energy and, if not installed and used in accordance with the instructions, may cause harmful interference
to radio communications. However, there is no guarantee that interference will not occur
installation. If this equipment does cause harmful interference to radio or television reception, which can
be
determinedbyturning the equipment off and on, the user is encouraged to try to correct the interference
by
one or moreofthe following measures:
- Reorient or relocate the receiving antenna.
- Increase the separation between the equipment and receiver.
- Connect the equipment into
- Consult the dealer or
could void the user authority to operate the equipment.
In
order to disconnect the apparatus from the mains completely, the main plug shouldbedisconnected
from the mains socket outlet completely.
• Minimum
• The ventilation should not be impeded
table-cloths, curtains, etc.
• No naked flame sources such as lighted candles should
The use ofapparatus in moderate climates.
be
placedonthe apparatus.
in
a residential installation. This equipment generates, uses, and can radiate radio frequency
10cm(4
OF
FIREORELECTRIC SHOCK,DONOT
HIGH
VOLTAGES
SHOCK,
be
an
inches) distances around the apparatus for sufficient ventilations.
MATCHWIDE
exposed to dripping or splashing and thatnoobjects filled with liquid, such as
an
outlet on a circuit different from that to which the receiver is connected.
experienced radiolTV technician for help.
by
covering the ventilation openings with items suchasnewspaper,
ARE
PRESENT INSIDE
BLADEOFPLUG
be
EXPOSETHIS
TOWIDE SLOT OFACPOWER
placedonthe apparatus.
THE
ENCLOSURE.
ONLY.
APPLIANCE
in
TO
RAIN
DO
NOT
OUTLET,
a particular
by
Toshiba,
CLASS 1
LASER PRODUCT
This Class B digital apparatus complies with Canadian
ICES-003.
IMPORTANTSAFETY INSTRUCTIONS
1.
Read these instructions.
2.
Keep these instructions.
3.
Heed all warnings.
4.
Follow all instructions.
5.
Do not use this apparatus near water.
6.
Clean only with a dry cloth.
7.
Do not block any of the ventilation openings. Installinaccordance with the manufacturer's instructions.
8.
Do not install near any heat sources such as radiators, heat registers, stoves, or other apparatus (including amplifiers)
that produce heat.
9.
Do not defeat the safety purpose ofthe polarized or grounding-type plug. A polarized plug has two blades with one wider
than the other. A grounding type plug has two blades and a third grounding prong. The wide blade or the third prong
provided for your safety. If the provided plug does not fit into your outlet, consult an electrician for replacement of the
obsolete outlet.
10.
Protect the power cord from being walked on or pinched particularlyatplugs, convenience receptacles, and the point
where they exit from the apparatus.
11. Only use attachments/accessories specified by the manufacturer.
12.
Use only with the cart, stand, tripod, bracket, or table specifiedbythe manufacturer, or
sold with the apparatus. When acart
combination to avoid injury from tip-over. .
13.
Unplug this apparatus during lightning storms or when unused for long periods of time. Portable Cart Warnmg
14.
Refer all servicing to qualified service personnel. Servicing is required when the apparatus has been damagedinany
way,
such as the power-supply cord or plug is damaged, liquid has been spilled or objects have fallen into the apparatus,
the apparatus has been exposed to rain or moisture, does not operate normally, or has been dropped.
is
used, use caution when moving the cart/apparatus
<I
..
,
...
~.!
I
is
ADDITIONALSAFETYINSTRUCTIONS
15.
Do
not overload wall outlets; extension cords, or integral convenience receptacles as this can resultina risk of fire or
electric shock.
16. Never expose the apparatus to dripping or splashing or place items such as vases, aquariums, any other item filled with
liquid, or candles on top
17.
Keep your fingers well clear of the disc tray as itisclosing. Neglecting to do so may cause serious personal injury.
18.
Do not place anything on top of this unit.
19.
Do not place the apparatusonamplifiers or equipment that may produce heat.
20.
Never block or cover the slots or openingsinthe unit.
Never place the unit:
• on a bed, sofa, rug or similar surface;
• too close to drapes, curtains, or walls; or
•ina confined space such as a bookcase, built-in cabinet, orany other place with poor ventilation.
The slots and openings are provided to protect the unit from overheating and to help maintain reliable operation.
21.
Do not use a cracked, deformed, or repaired disc. These discs are easily broken and may cause serious personal injury
and apparatus malfunction.
22.
If the apparatus should emit smoke oranunusual odor, immediately disconnect the power cord from the wall outlet. Wait
until the smoke or smell stops, then ask your dealer for a check and repair. Neglecting to do so may cause fire.
23.
During thunderstorms, do not touch the connecting cables or the apparatus.
24. Warning: To prevent spread
Location
(\f
the required label
of
the unit.
of
fire, keep candles or other open flames away from this product at all times.
The rating plate and the safety caution are
on
the rearofthe unit.
ecautions
• When shipping the
carton
maximum protection, repack the unitasit
packed at the factory. Take care not to give it a shock
or shake when carrying.
• Do not use volatile liquids, such as insect spray, near
the
in
leave marks on the finish.
• The top and rear panels ofthe
warm
malfunction.
• When the
the disc and turn off the power.
• If you do not use the
unit may not function properly
and use the
Notes
• Place the
on
table or inclined stand. The loaded disc may come off
the proper position and cause damage to the
player.
• When
VCR, the playback picture may become poor and the
sound may
player away from the
and packing materials come in handy. For
DVD
player. Do not leaverubber or plastic products
contact with the
afteralong
DVD
DVD
on
DVD
a shaky or unstable surface suchasa wobbling
you
place this
be
DVD
player, the original shipping
was originally
DVD
player for a long time. They will
DVD
player may become
periodofuse.
playerisnotinuse,besure to remove
DVD
player for a long period, the
player occasionally.
Thisisnot
in
the future. Turn
locating
playerona level surface. Do not use it
DVD
DVD
player near a
distorted.Inthis case, place the
TV,
radio, or VCR.
TV,
radio, or
DVD
on
Moisture condensation damages the DVD player. Please
read the following carefully.
Moisture condensation occurs, for example, when
a cold drink into a glassona warm
form
on
the outsideof the glass.Inthe same
may condense on the optical pick-up lens inside this unit,
one of the most crucial internal partsofthe
~~ample
a
• Moisture condensation occurs during the following
cases.
• When you bring the
place to a warm place.
• When you use the
just turned on the heater, or a place where the cold
wind from the air conditioner directly hits the unit.
•
In
summer, when you use the
humid place just after you move the unit from an air
conditioned room.
• When you use the
o .
o
of
ondensation'
C
DVD
player directly from a cold
DVD
playerina room where you
DVD
playerina humid place.
mOisture
DVD
day.
Drops of water
way,
DVD
playerina hot and
you
pour
moisture
player.
Notes on cleaning
Use a soft, dry cloth for cleaning.
• For stubborn dirt, soak the cloth
solution, wring well and wipe. Use a dry cloth to wipe it
dry.
Do
not use any typeofsolvent, such as thinners and
benzene, as they may damage the surface ofthe
player.
• Ifyou use a chemical saturated cloth to clean the unit,
follow that product's instructions.
in
a weak detergent
DVD
[ Inspection and Maintenance
This DVD playerisa high technology, precision device. If
the optical pick-up lens and disc drive parts become dirty
be
or worn down, the picture quality may
avoid reductioninpicture quality, itisrecommended that
regular inspection and maintenance (cleaning or parts
replacement) beperformed every 1,000 hours of use. For
further details, contact your nearest consumerelectronics
dealer.
reduced.
To
•
Do
not use the
may occur.
you
use the
If
damage discs and internal parts. Remove the disc,
connect the power cord of the
outlet, turn
three hours. After two or three hours, the
will havewarmed up and evaporated anymoisture. Keep
the DVD player connected to the wall
moisture condensation will seldom occur.
on
DVD
playerwhen moisture condensation
DVD
playerinsuch a situation, it may
DVD
playertothe wall
the
DVD
player, and leave it for two or
DVD
outlet
player
and
.
tes
On
handling
on
Discs
discs
• Do not touch the playback sideofthe disc.
o
'---
• Do not attach paper or tape to discs.
[
On
cleaning discs
• Fingerprints and dustonthe disc cause picture and
sound deterioration. Wipe the disc from the center
outwards with a soft cloth. Always keep the disc clean.
Playback
side
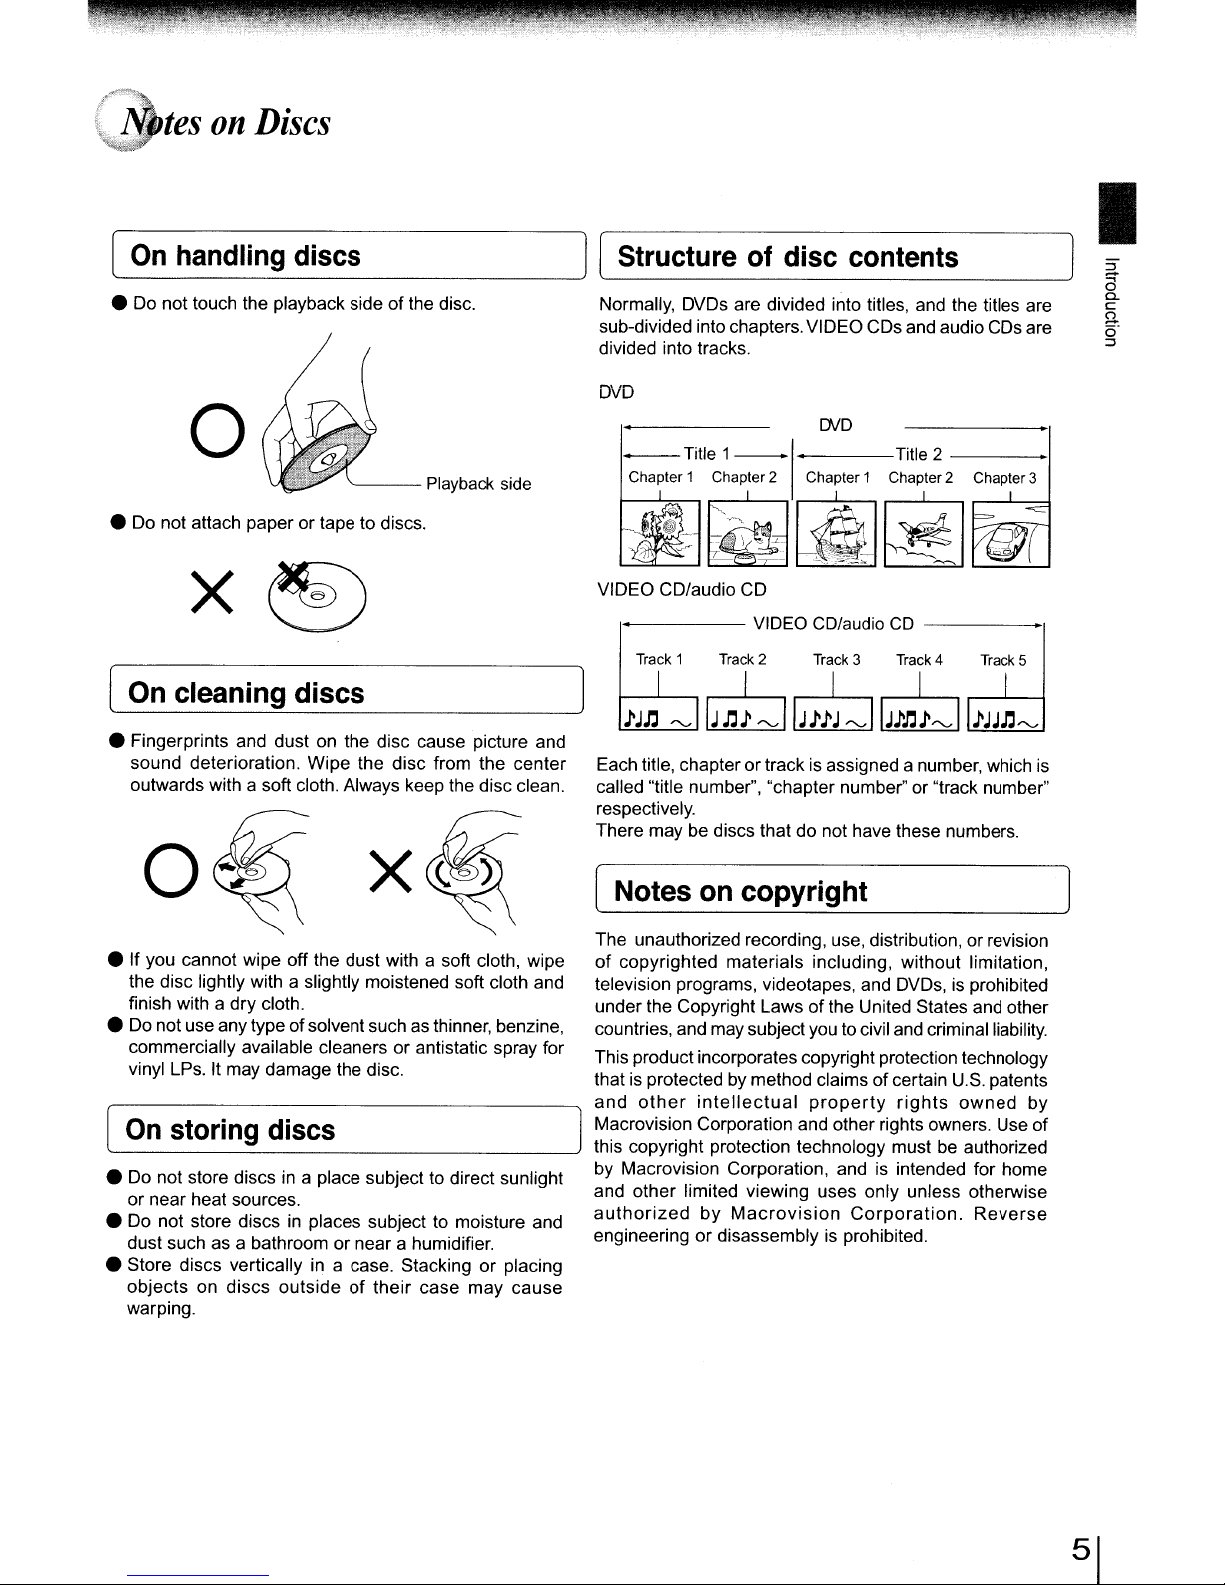
Normally, DVDs are divided into titles,
sub-divided into chapters.VIDEO CDsand audio CDs are
divided into tracks.
DVD
[NO
--
Title 1
------+
Chapter 1 Chapter 2 Chapter 1 Chapter2 Chapter3
~~
VIDEO CD/audio CD
1------
Each title, chapter or track is assigned anumber, which is
called "title number", "chapter number"or "track number"
respectively.
There may be discs that do not have these numbers.
~
~
Track 1 Track 2 Track 3
iJn
~
IJn~
I'
bjj
VIDEO CD/audioCD-----..,
~IIJii~
~IIJin~~1
and
Title 2
~
Track
the titles are
L----:=7-I
4
Track
5
iJJn~
x
• If you cannot wipe off the dust with a soft cloth, wipe
the disc lightly with a slightly moistened soft cloth and
finish with a dry cloth.
•
Do
not use anytype ofsolvent such as thinner, benzine,
commercially available cleaners or antistatic spray for
It
vinyl LPs.
On
• Do not store discsina place subject to direct sunlight
or near heat sources.
• Do not store discs
dust such as a bathroom or near a humidifier.
• Store discs vertically
objects on discs outside
warping.
may damage the disc.
storing
discs
in
places subject to moisture and
in
a case. Stacking or placing
of
their case may cause
[ Notes
The unauthorized recording, use, distribution, or revision
of
copyrighted materials including, without limitation,
television programs, videotapes, and DVDs, is prohibited
under the Copyright Laws
countries, and may subjectyou
This productincorporates copyrightprotection technology
that is protected
and
other
Macrovision Corporation and other rights owners. Use of
this copyright protection technology must be authorized
by Macrovision Corporation, and
and other limited viewing uses only unless otherwise
authorized
engineering or disassemblyisprohibited.
on
copyright
of
by
method claimsofcertain
intellectual
by
Macrovision
property
the United States and other
to
civil and criminal liability.
U.S.
patents
rights
is
intended for home
Corporation.
owned
Reverse
by
E-1.r:,·~'tf~:~
\~§)tes
on
Discs
(continued)
[ About this owner's manual ]
the
of
by
playable
This owner's manual explainsthe basic instructions
Some
DVD player.
allows specific
such, the DVD player
DVDs are producedina manner that
or
limited operation during playback. As
may
not respond to all operating
commands. This is not a defect in the DVD player. Refer
of
to instruction notes
"(9" may
..
(9
A
appear
" means that the operation is not permitted
discs.
on the TV screen during operation.
DVD player or the disc.
About
The
C@)<::@:>C]!D
C@)<::@:>CfQ::>
iconsonthe
heading bar show
discs for the function described under that heading.
C@>
:
You
<::@:>
C]!D
can use this function with
:
You
can use this function with Video
:
You
can use this function with Audio CDs/CD-R/RW
DVD
discs.
CDs.
CDs.
['--_p_la_y_a_b_le_d_is_C_S
this This DVD player can play the following discs.
Disc
_---
Scm
playback time
Approx.4
(single
Approx.8
(double
-------
,
Approx.80minutes
(single
Approx.
(double
Approx.74minutes
, -
-----------_._--_.
Approx.20minutes
Size
12cm
+
--~-
8cm
12cm
+
~-_
..
the
DVDs
VIDEO
CDs
Disc Mark
Dl'2
VI
DE
WD§~,
IDIGITAL
0
VIDEOI
Contents
Audio
video
(moving
pictures)
Audio
video
(moving
:
pictures)
Maximum
hours
sided
--_
..
_---
..._..
hours
sided
sided
_...
160
minutes
sided
disc)
--_.
disc)
disc)
.....
disc)
__
._-
~
Notes on region numbers
The
region
numberofthis DVD
player
is 1.Ifregion
numbers, which stand for their playable area, are printed
your
on
DVD and you
do
not
find
~
or
~,diSC
playback will not be allowed by the player. (In this case,
the DVD player will display a message on-screen).
[ On VIDEO CDs
This DVD player supports VIDEO CDs equipped with the
PBC (Version 2.0) function. (PBC is the abbreviation
Playback Control.)
depending on types
• VIDEO CD not equipped with PBC function (Version 1.1)
Sound and movie can be played
the same way as an audio
• VIDEOCDequipped with PBC function (Version 2.0)
In addition to operation
with
the
interactive software with search function by using the
menu displayed on the
of
Some
the functions described in this owner's manual
may notwork with
PBC
You
can enjoy two playback variations
of
discs.
on
this DVD player in
CD.
function,
some
ofaVIDEO
you
TV
screen (Menu Playback).
discs.
can
CD
enjoy
not
equipped
playback
of
Audio
CDs
SUPER
VIDEO
CDs
DivX®
12em:
!
illJD~@,
I
DIGITAL
AUDIO '
I
illJCOMPACT,
o
O§@:
ISUPER VIDEOI '
I
I@I~
Audio
Audio
vi;eo i
(moving
i
pictures)
Audio
video
(moving
pictures)
i
single)
12
:
8cm
:
12cm
+
Scm
i
Scm
(CD
em
.
--_
Approx.74minutes
,
.
Approx.20minutes
..
_----.
It
dependsonDivX®
The following discs are also available.
•
DVD:±R/:±RW
• CD-RlCD-RW discs of CD-DA, Video
and
DVD-ROM discs of
DVD
format
CD,
MP3, WMA or
JPEG format
.Official
• Plays
Some ofthese discs may
of
•
You
•
You
etc.,
• This
play
DivX®
Certified product
all
standard playback of
versions of
DivX®
video (including
DivX®
be
media files
DivX®6)with
incompatible.
cannot play discs otherthan those listed above.
cannot play DVD-RAM discs or non-standardized discs,
even
if they maybelabeled as above.
DVD
player uses the NTSC color system, and cannot
[NDs
recordedinany other color system
etc.).
Because of problems and errors that can occur during the
creation
DVD
will
If
or
of
DVD
andCDsoftware and/or the manufacture of
andCDdiscs, Toshiba cannotassure thatthis
successfully play every disc bearing the
you
happentoexperience any difficulty playing a
CD
disconthis
DVD
player,
please contactToshiba Customer
DVD
Service.
~
is
atrademark of
DVD
Format/Logo Licensing Corporation.
~-
-
------
35
min.
10
min.
quality
(PAL,
SECAM,
DVD
player
andCDlogos.
DVD
and/
" "
hie
of
Contents
Introduction
• SAFETY PRECAUTIONS 2
• IMPORTANT
SAFETY INSTRUCTIONS 3
• Precautions 4
• Notes on Discs 5
Notes on region numbers ".................. 6
• Table of Contents 7
.Identification
Front panel " "
Rearpanel 8
DVD
display 8
Remote control 9
Loading batteries
Operating with the remote control
of Controls.. 8
".
10
10
Connections
• Connecting to a TV
Connecting to aTV
Connecting to aTV (Using the component video
jacks)
Connectingtoa
.Connecting
Connecting
Dolby®
Connecting
Dolby Surround Pro Logic..............................
Connecting
DTS®
decoder..................................................
Connecting to an amplifier equipped withanMPEG2
audio decoder
Connecting
digital audio input........................................... 15
display
(Using
to Optional Equipment
to
an
amplifier
Digital decoder
to
an
amplifier
to
an
amplifier
to an
amplifier
a
HDMITM
equipped
equipped
equipped
cable)
equipped
11
12
13
with
14
with
14
with a
15
15
with
Basic playback
• Playing a Disc 16
Basic playback............................
• Variable Speed Playback 17
Playing
directions
Playing frame by frame
Playinginslow-motion...................................... 17
Resuming playbackfrom the same location.....
in
fast
reverse
or
fast
• Locating a Desired Section 18
Locating atitle using the top menu
Locating aspecific chapter ortrack..
16
forward
17
17
17
18
18
Advanced playback
•
AccessingaSpecific
Locating aspecific title/chapter/time
Location
Directly
• Repeating a Specific Segment
Repeating aspecific segment
• Playingina Varied Order
Playing
order 20
• Playingina Favorite Order
8
Setting
order
.Zooming
Zooming a picture 22
.Selecting
titles.
titles.
chaptersortracks
chapters
or tracks in a
in a
a Picture 22
the
Sound
Enhancement
(E.A.M.) 22
Selecting the sound enhancement.. 22
.Selecting
11
Selecting the picture mode
the Picture Mode 23
• Selecting Subtitles 23
11
Selecting a subtitle language
• Selecting the Camera Angle
Changing the camera angle
a
• Selecting a Language
Selecting a playbackaudio setting 24
• On-screen Display Operation 25
On-screen display operation
• Playing MP3IWMA Files 26
Playing MP3IWMAfiles
• Viewing JPEG Files
a
Viewing JPEG files
Viewing athumbnail view
• Playing DivX®/MPEG·4 Files 28
Playing DivX®/MPEG-4 files
Function setup
• Customizing the Function Settings 29
Setting procedure
Setting details
Others
• Table of Languages 35
• Before Calling Service Personnel 36
• Specifications 37
• Limited Warranty
19
19
20
20
20
varied
21
favorite
21
23
23
24
24
24
25
26
27
27
27
28
29
29
38
I
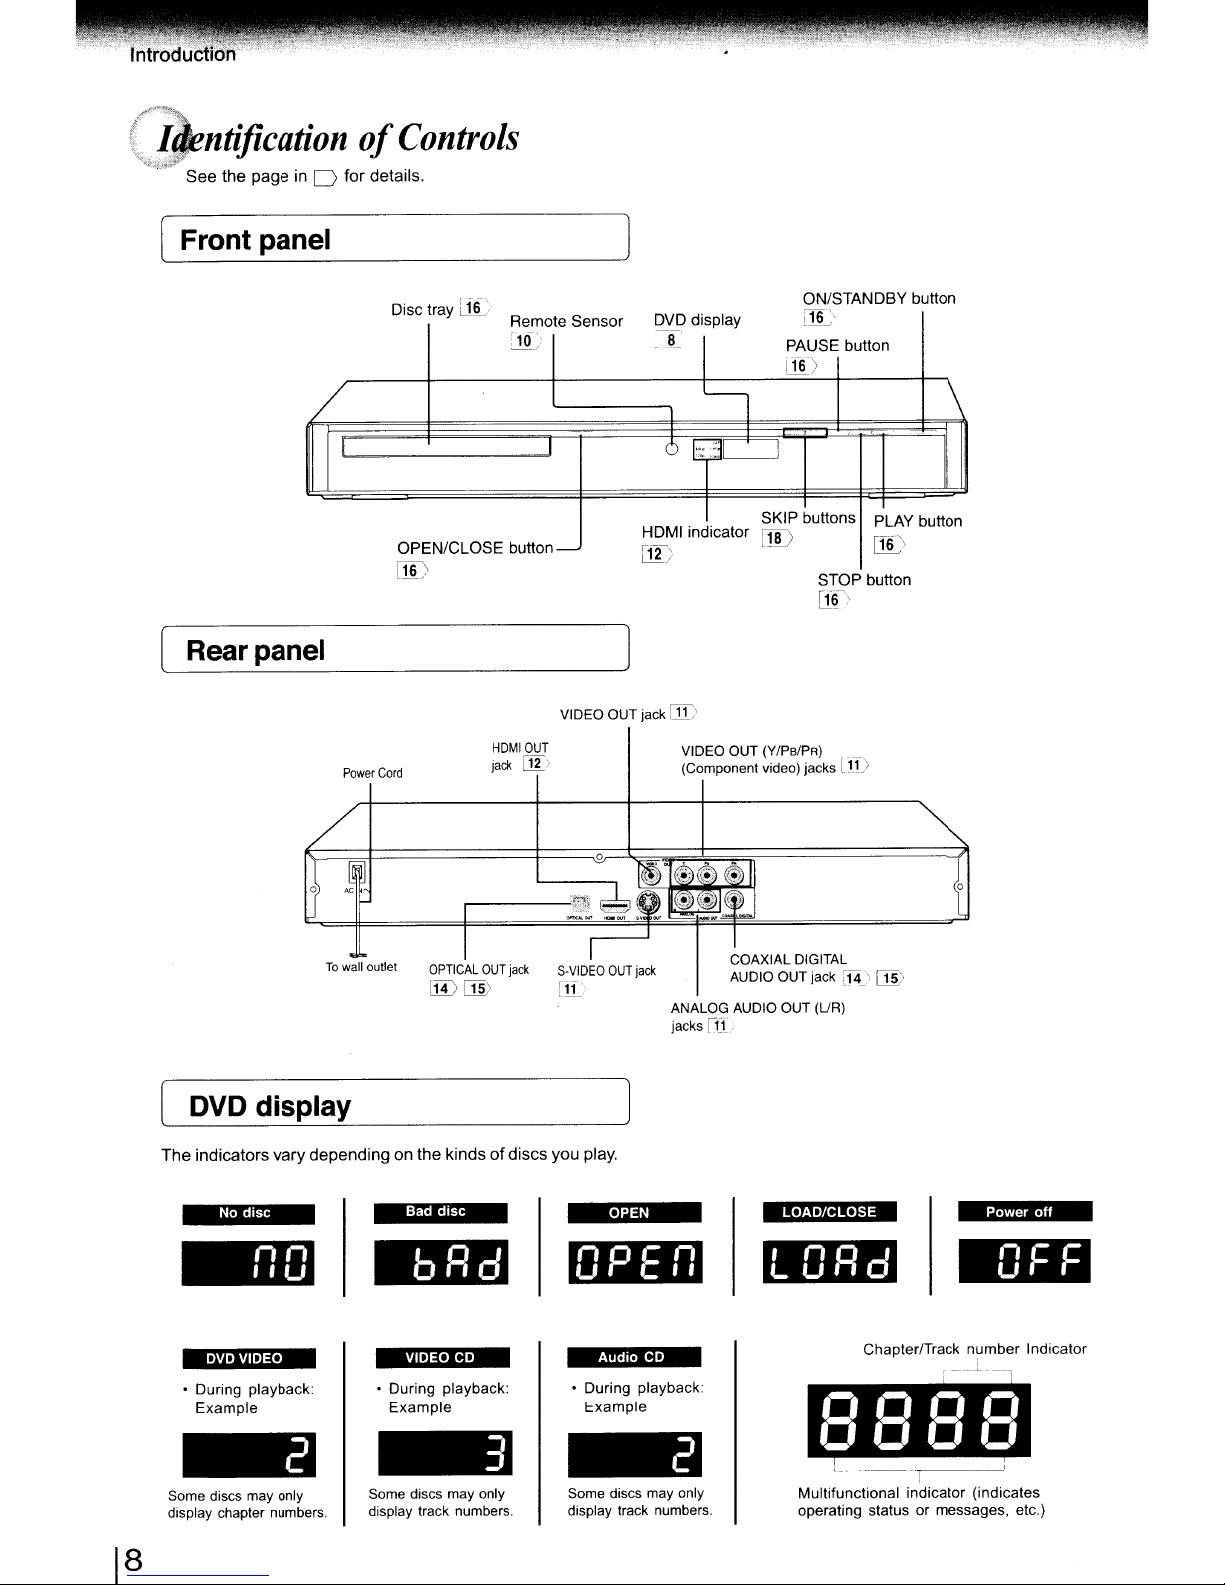
(identification
",•.t,
....
See
the page in 0
Front panel
for
of
details.
Controls
Rear
panel
/
0)
Disc tray [iii'.
-
/
I I
OPEN/CLOSE
i1i:\
Power
Cord
~
I
~
~
To
wall
outlet
I
OPTICAL
lIDlli>
OUT
Remote Sensor
:1(1)
button-
VIDEO OUT jack
HDMIOUT
jack
l:!1->
~~
jack
S-VIDEO
[jj-
HOM
C!l~\
0
~~.
-'~'
=~
I
OUT
jack
DVD
display
-a
I
6
I:;:.~'il
I indicator
ITD
VIDEO OUT
(Component video) jacks
:\~..~~
".--
®:®~
~«;
~
~
ANALOG AUDIO OUT
jacks ilL
~"
-~
COAXIAL DIGITAL
AUDIO OUT jack
ON/STANDBY button
l.1L'
PAUSE button-
ill)
-,
.~
I
SKIP buttons
lID
STOP button
f16-'
(Y/PBlPR)_
llJ)
["14\
(UR)
PLAY
[T6)
[TI:;,
button
~
(0
DVD display
The indicators
DVDVIDEO
During
•
Example
Some discs may only
display chapter numbers.
8
1
No
vary
disc
nn
, , u
playback:
depending on the kindsofdiscs you play.
Bad
VIDEO CD
•
During
Example
Some discs may only
display track numbers.
disc
playback:
OPEN
npE- n
U
Audio
During
•
Example
Some discs may only
display track numbers.
II
CD
playback:
LOAD/CLOSE
LORd
ChapterfTrack
.-, .-,
.-,
., .,
- - - -
----T-----..J
Multifunctional
operating
statusormessages,
number
I
"-~----'-----I
.-, .-,
.,
indicator
(indicates
Power
Ii
L' ,
off
C F
Indicator
etc.)
lRemote control
I
The instructionsinthis manual describethe functionsonthe remote control. See the page
POWER
I/Ol---H--
POWER button
OPEN/CLOSE button
o:D
---11--1
OPEN/CLOSE
~
CD
CD
Number buttons
E.A.M. button
PIC
MODE
ANGLE button
PAUSE/STEP button
SKIP button
REV button
IJD
00
button
00
[ID-----tt--+
DD
IJI)
----ti~
-----*--+
IJI)
G)
.~~~~~~~
T /
SLOW buttons
SUBTITLE button
AUDIO button
PLAY button
STOP button
SKIP button
FWD button
ENTER button
in
0 for details.
SEARCH
button
IJI)
[ID
o:D
00
[ill
IJI)
[ill
o:D
IJD
[ID
Direction buttons
(iJ../T/<4
TOP MENU button
PLAY MODE button
CLEAR button
MEMORY button
SETUP button
PROGRESSIVE button
* RETURN button
Return to menu display for VCD (2.0) discs with
menu.
/~)
[ill
IJD
[]I)
00
DD
00
-----1+-H
---t4:;;:;:;:-::::::::-:::-7.=--=:;~T-Il
IJD
--fH-t-=-=-=-=-'~_~==::Jrtt-
DISPLAY button
MENU button *
NAVI button
RETURN button"'00
PBC button
A-B RPT button
ZOOM button
HDMI
button
* MENU button
Use the MENU button to display the menu included
many DVDs.Tooperate a menu, follow the instructions
in
"Locating a title using the top menu."
ill)
00
[ID
00
00
00
IJD
Iill
on
91
[_Lo_a_d_i_n_g_b_a_t_te_r_ie_s
1Open the cover.
2 Insert batteries (R03/AAA size).
~]
[Operating
with
the
remote
control
Point the remote control at the remote
sensor and press the buttons.
Within
about
7 m (23 feet)
,
I
,
~o~~'
:=;Cl-::i
aoe·
1
c::c>c...
.
(,00']
~
I
Make
sure to match the + and - on the batteries
marks
to the
Caution
o Never throw batteries into a fire.
Notes
o
Be
sure to use R03/AAA size batteries.
o Dispose of batteries in a designated disposal area.
o Attention should be drawn to the environmental aspects of
battery disposal.
o Do not mix different batterytypes orcombine used batteries
with new ones.
o If the remote control does not operate correctly, or if the
operating range becomes reduced, replace both batteries
with new ones.
o Ifthe batteries are dead or if
control for a long time, remove the batteries to prevent
battery acid from leaking into the battery compartment.
inside the
battery
you
compartment.
will notbeusing the remote
Distance:
Angle:
* Do
to a strong light source such as direct sunlight
other
to operate the DVD player via the remote control.
Notes on the remote control
• Direct the remote control at the remote sensor of the DVD
player.
o When using the remote control, press the buttonsat intervals
of about 1 second to ensure the correct mode ofoperation.
o
Do
not drop or give the remote control a shock.
•
Do
humid place.
Do
not spill wateror put anything wetonthe remote control.
•
• Do not open the remote control.
o If the remote control
time, remove the battery to avoid damage caused by
battery leakage corrosion.
CAUTIONS:
•
Dangerofexplosionifbatteryisincorrectly
Replace only with the same or equivalent type.
o Batteries shall not
sunshine, fire or the like.
o
Do
• When discarding batteries, environmental problemsmust be
considered and local rules or laws governing the disposal
these batteries mustbestrictly followed.
About
7 m (23 feet) from
remote
About
the remote sensor
not
expose the remote
illumination.Ifyoudoso, you
not leave the remote control near an extremely hot or
not disposeofbatteryinfire; battery may explode or leak.
sensor
30° in each directionofthe
sensorofthe DVD player
is
not going to be used for a long
be
exposed to excessive heat such
the
frontofthe
may
not be able
front
of
or
replaced.
as
of
10
nnecting
Connect
the DVD playerto
toaTV
your
TV.
Connectingtoa
Normal TV
Notes
• Refer to the owner's manualofthe connected TV as well.
you
• When
connections.
• Ifyour television set has one audioinput, connectthe leftand rightaudio outputs of the
then connect toyour
• Connectthe
picture may be distortedas DVDs are copy protected.
• Analog audio out will not have sound if DTS playback is selected.
connect the
TV.
DVD
player directly to your
TV
W
Signal
Flow
To
wall
oullet
S-Video cable (not supplied)
If
theTVhasa S-videoinput, connectthe DVD player
with an
S-video
do
not connect the yellowvideo cable and component
video cables (Y/Ps/PR).
AudiolVideo cable (supplied)
DVD
player to your
cable.
When
using an S-video cable,
TV,besure to turn offthe power and unplug both units from the wall outlet before making any
TV.
Ifyou connect the
DVD
playerto a VCR,
o
To
2ch
AUDIO
(R:
DVD
playerto aY cable adapter (not supplied) and
TVNCR
OUT
red,L:white)
•
Make
the
following
On-screen display
"Digital
Output"
"Video
Output"
combination or video selector, the playback
"PCM"
"Bitstream"
Component
S-VIDEO
setting.
Select:
"Off',
P-Scan
HOMI
I
()
o
:::J
:::J
CD
g..
o
:::J
(Jl
Page
@
or
!.ill
[ ConnectingtoaTV
Interlaced
Some TVs or monitors are equipped with component video inputs.
Connecting to these inputs allows you to enjoy higher quality
picture playback.
Actual labels for component video inputs may vary depending
the TV manufacturer. (ex.Y,R-Y,
In
some TVs or monitors, the color levels of the playback picture
may be reduced slightly or the tint may change.
adjust the TV or monitor for optimum performance.
outputs
ToYvideo
(ColorStream®)
r-:=====~
input
fO~~;;=;:7(
To
audiO
B-Y orY,
Input
i
(Using
CB,
CR)
To
iii
wall
the
In
DUlle'
component
on
such a case,
~--I-
..,.
Audio cable (not supplied)
Component video cables (not supplied)
video jacks)
Progressive
Some TVs or monitors are equipped with component video inputs
that are capableofreproducing a progressively scanned video
signal. Connecting to these inputs allows you to view the highest
quality pictures with less flicker.
Consumers should note that not all high definition television sets
are fully compatible with this product
be
displayed in the picture.Incase of 480 progressive scan picture
problems, itisrecommended that the user switch the connection to
the "standard definition" output. Ifthere are questions regarding our
TV set compatibility with this model480p
our CustomerService Center.
~EJO
To
2Cl1
AUDIO
(R:
red,L:wMe)
OUT
outputs
~
-
...
_T
~
(ColorStream
Signal Flow
ToPRTo
PB
VIDEO
"VIDEO"t,VIDEO
OUT
'OUT
Pro®)
and
may cause artifacts to
DVD
player, please contact
To
Y
-=
OUT
•
Switching
using
You
can temporarily switch the output signal for betterpicture quality.
Press PROGRESSIVE button repeatedly on the remote control to
select Video Output to P-Scan modeduring stop.
IfyourTV does notsupportthe progressive scan format, the picture
will appear scrambled orblank.
PROGRESSIVEbutton repeatedlyto turn off progressive mode.
Notes inputjacks which support the progressive scan.
• Refer to the owner's manual
• When you connect the
before makingany connections.
• Ifyou place the
the tuner and radio.
• The output sound
Otherwise, high volumesound maydamage your hearing as well as the speakers.
• Turn off the amplifier before you connectordisconnectthe
be damaged.
• Analog audio out will nothave sound ifOTS playback is selected.
• ColorStream®and ColorStream
the
the
output
remote
DVO
of
signal (interlaced I progressive)
• Make the following setting.
control
On-screen display
"Digital Output"
To
return to normal picture, press
of
the connected equipmentaswell.
OVO
player to otherequipment, be suretoturn off the power and unplug all ofthe equipmentfrom the wall outlet
player neara tuner or radio, the radio broadcast sound mightbedistorted.Inthis case, placethe DVD playeraway from
the
OVO
player has a wide dynamic range.Besuretoadjust the receiver's volume to a moderate listening level.
OVO
player's power cord. If you leave the amplifierpower on, the speakersmay
Pro®
are registered trademarks ofToshiba America Cousumer Products L.L.C.
"Video Output"
• Only for TV equipped with component video
Select:
"PCM" or
"Bitstream"
Component
'P-Scan
(Progressive)
Page
~
In>
Connecting to a display (Using a
W
To
wall outlet
Available output signals arebelow:
Auto
480p (progressive)
720p (progressive)
1080i (interlaced)
1080p (progressive)
1080p/24F (progressive)
•
Switching
buttononthe
Press HOMI button on the remote control to receive a suitable
video quality
yourTV having HOMI feature and suitable quality. Please also check
your TV owner's manual. Press this button to change the output
signals
output signal.
rl
Press
480p, 720p, 1080i,1080pand 1080p/24F are signals created with
this
OVO
picture may not be increasedeven ifthey are selected.
480pand 720pcannot be selected when the picture modeis sharp,
color
the
video
quality
remotecontrol.
in
STOP mode. The video qualityisrequired to match
as
below. See the HOMI indicator and select the appropriate
HDMI
indicator
illuminates"
illuminates" 1080p'
I
I
I
I
illuminates
Player from original 480i signal. The resolutionofthe
or
contrast
1080p,
Press
Press
illuminates"1080i"
Press
illuminates
illuminates
"720p"
Press
"480p"
Press
"480p,
1080i,10BOp"
@.
24F"
nop,
Signal
Flow
(HOMI mode)
Video outputsignal
1080pl24F
10BOp
(progressive)
1
08Di
(interlaced)
~
nop
(progressive)
~
480p (progressive)
..
Auto
o
To
HOMI
Output
using
(progressive)
HDMI™
cable)
®~~
CW~CW
HOMI
Cable
(notsupplied)
HOMI
D
c::::::J~c::::::::J
HDMI-compatible
• Makethefollowing setting.
On-screen display
"Digital Output"
"Video Output"
display
Select:
"PCM"
HOMI
I
About
HOMI
HDMI (High Definition
I
and
audioona single digital
set-top
OTV,
I
to
provide
Protection
one
I
I
I
specification.
transmitted
displays.
HOMI has the capabilitytosupport standard, enhanced, or highdefinition video plus standard to multi-channel surround-sound
audio. HOMI features included
bandwidth
connector
communication between the AV source and AV devices such as
OTVs.
HDMI, the HDMI logo and High-Definition Multimedia Interface are
trademarks
boxes,
the
(HDCP)aswellasDigital
and
of
up to 2.2 gigabytes per second (with HOTV) signals, one
(insteadofseveral
or
Multimedia
and
technologiesofHigh
registered trademarksofHDMI licensing LLC.
otherAVdevices.
HDCPisusedtoprotect
received by
Interface)
connection
DVI-compliantorHDMI-compliant
uncompressed
cables
supports
for
use
HDMI
Bandwidth
Visual
and
with
Interface (DVI) in
connectors),
Page
~
@!)
both
video
OVO
players,
was
developed
Digital
Content
digital
content
digital video, a
and
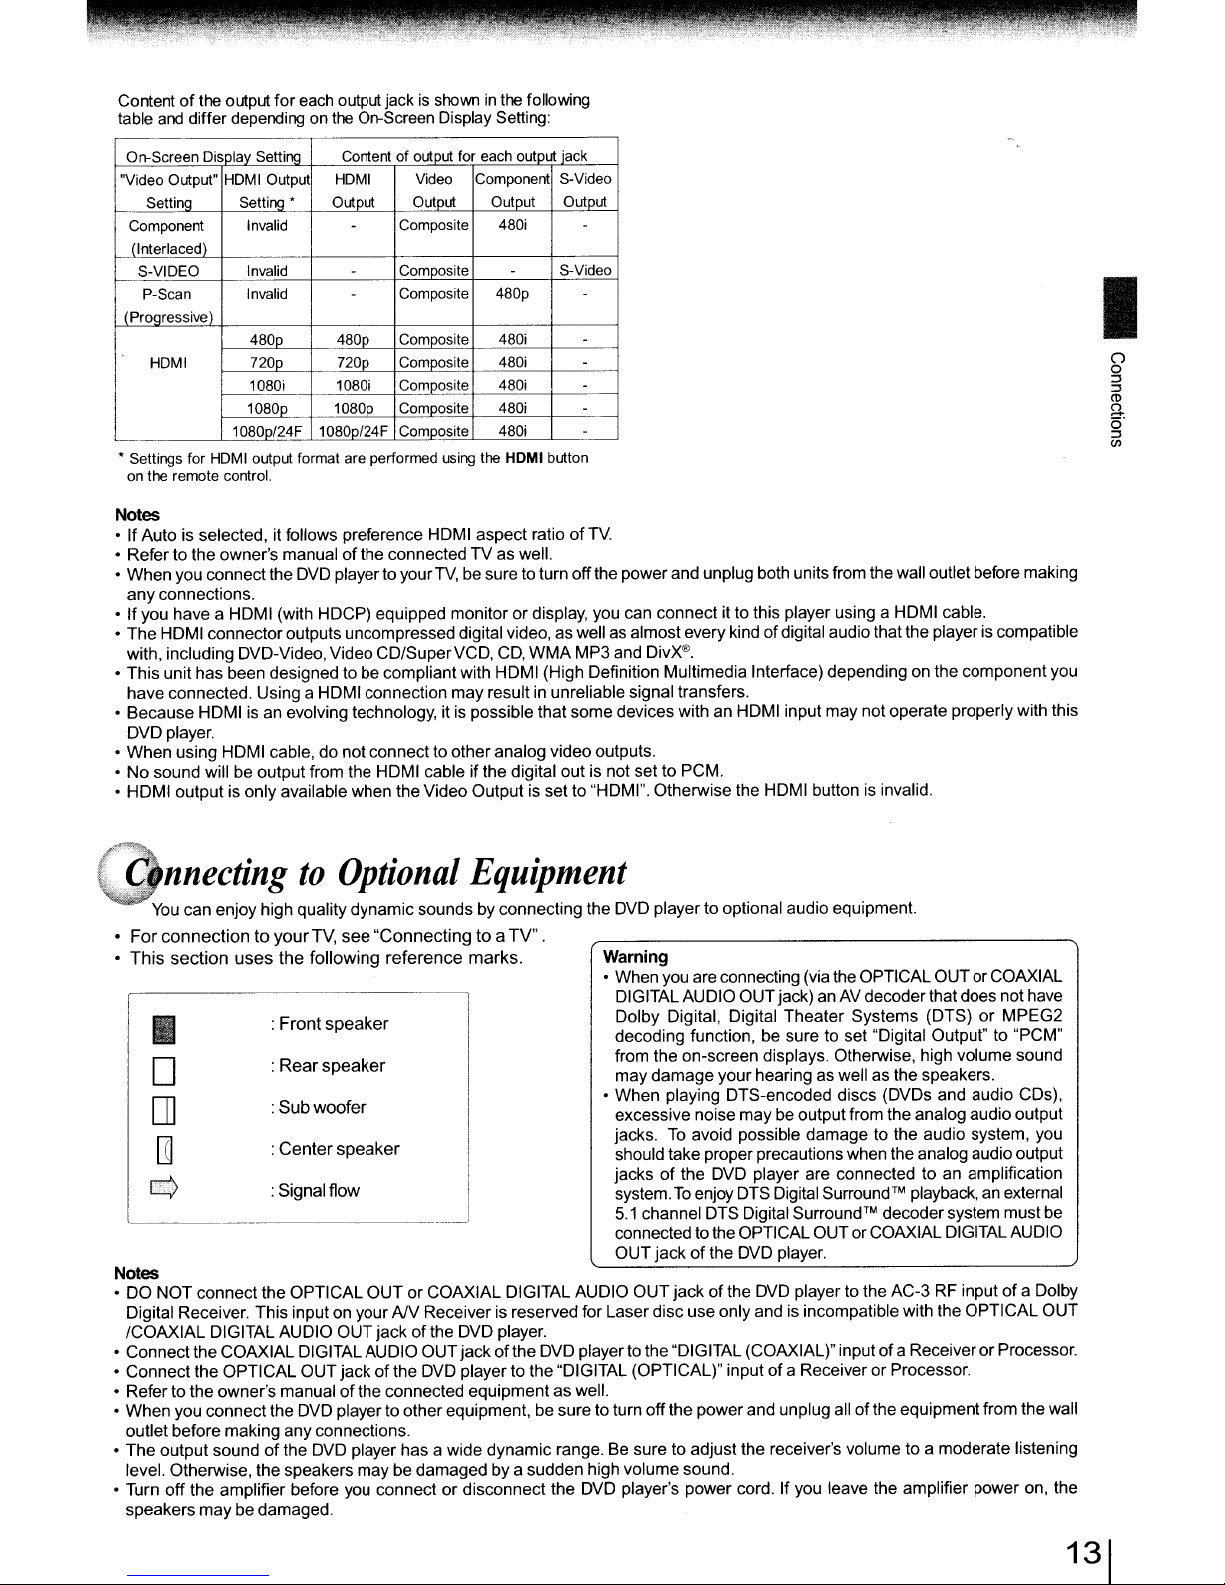
Contentofthe output
table
and
differ depending on
for
each output jack is showninthe following
the
On-Screen Display Setting:
On-Screen
"Video
Component
(Interlaced)
S-VIOEO
(Proqressive)
•
Settings
on
Output"
Setting
P-Scan
HOMI
the
remote
Display
Setlirl!j
HOMIOutpu
Setting
Invalid
Invalid
Invalid
480p 480p
720p 720p
1080i
1080p
1080p/24F 1080p/24F
for
HDMIoutput
control.
"
format
Contentofoutput
HOMI
Output
-
-
-
1080i
1080p
are
Video
Output
Composite
Comoosite
Composite
Comoosite
Composite
Composite
Composite
Composite
performed
for
using
each
output
Component
Output
480i
-
480p
480i
480i
480i
480i
480i
the
HOMI
jack
S-Video
Output
-
S-Video
-
-
-
-
-
-
button
Notes
• If Auto is selected, it follows preference HDMI aspect ratioofTV.
• Refer to the owner's manualofthe connectedTVas well.
When
you connect the DVD player to your
•
any
connections.
If
you have a HDMI (with HDCP) equipped monitorordisplay, you can connect it to this player using a HDMI cable.
•
The
HDMI connectoroutputs uncompressed digital video,aswell as almostevery kindofdigital audiothat the playeris compatible
•
with, including DVD-Video, Video
• This unit has been designed to be compliantwith HDMI (High Definition Multimedia Interface) depending on the componentyou
have
connected. Using a HDMI connection
•
Because
DVD player.
•
When
No
•
• HDMI outputis only available when the Video Output is set to "HOM
HDMI is an evolving technology, it is possible that
using HOM I cable, do not connectto
sound will be output from the HOMI cableifthe digital out is not set to PCM.
TV,
be sure to turnoffthe power and unplug both units from the wall outletbefore making
CD/SuperVCD,
may
other
CD,
WMA
MP3 and DivX®.
result in unreliablesignal transfers.
analog video outputs.
some
devices with an HDMI input
I".
Otherwise the HDMI button is invalid.
may
notoperate properlywith this
I
o
o
::J
::J
<D
g..
o
::J
(fl
'ifl\i
..
,-(:"nnectingtoOptional
You
can enjoy high quality
For
connectiontoyour
•
•
This
section
I
D
[]
[TI
u::>
uses
:
:
:
:
: Signalflow
the
Front
Rear
Sub
Center
dynamic
TV,
see
following
speaker
speaker
woofer
speaker
"Connectingtoa
reference
Notes
•DONOT
Digital Receiver. This input on your
ICOAXIAL
• Connectthe COAXIALDIGITAL AUDIO
Connect
•
• Refer to the owner's manual
•
When
outlet before making any connections.
•
The
level. Otherwise, thespeakers
• Turn
speakers
connect the
DIGITAL AUDIO
the
OPTICAL
you connect the DVD playerto other equipment, besure to turn
output
soundofthe DVD player has a wide
off
the
amplifier before you connectordisconnect
may
OPTICAL
OUT
be damaged.
OUTorCOAXIAL DIGITAL AUDIO
AN
OUT
jackofthe
jackofthe DVD playerto the "DIGITAL (OPTICAL)" inputofa Receiver or Processor.
of
the connected equipmentas well.
may
be damaged by a sudden high volume sound.
Equipment
sounds by connecting the DVD playertooptional audio equipment.
TV".
marks.
Receiveris reservedfor Laser disc
DVD player.
OUT
jackofthe DVD player to the "DIGITAL (COAXIAL)" inputofa ReceiverorProcessor.
dynamic
Warning
• Whenyou areconnecting (via the OPTICAL
DIGITALAUDIO
Dolby Digital, Digital
decoding function, be sure to set "Digital Output" to "PCM"
from the on-screen displays. Otherwise, high volume sound
may
damage
• When playing DTS-encoded discs (DVDs and audio CDs),
excessive noise
jacks. To avoid possible
should take proper precautions when the analog audio output
jacks
of
system.
To
5.1
channel DTS DigitalSurround™ decoder system
connected tothe OPTICAL OUT
OUT
jackofthe DVD player.
OUT
jackofthe DVD player to the
off
the
range. Be sure to adjust the receiver's volume to a moderate listening
the
DVD player's power cord. If you leave the amplifier power on,
OUT
jack) an AV decoder that does
Theater
your
hearing as well as the speakers.
may
be outputfrom theanalog audio
the DVD player are connected to an amplification
enjoy DTS Digital
use
only
and is incompatiblewith the
powerand unplug allofthe equipmentfrom thewall
Systems
damage
Surround™
or
COAXIAL DIGITAL AUDIO
OUT
or COAXIAL
(DTS)orMPEG2
to the audio system, you
playback, an external
AC-3
RF inputofa Dolby
OPTICAL
not
output
must
have
be
OUT
the
C
nnecting
to
Optional
Equipment
(Continued)
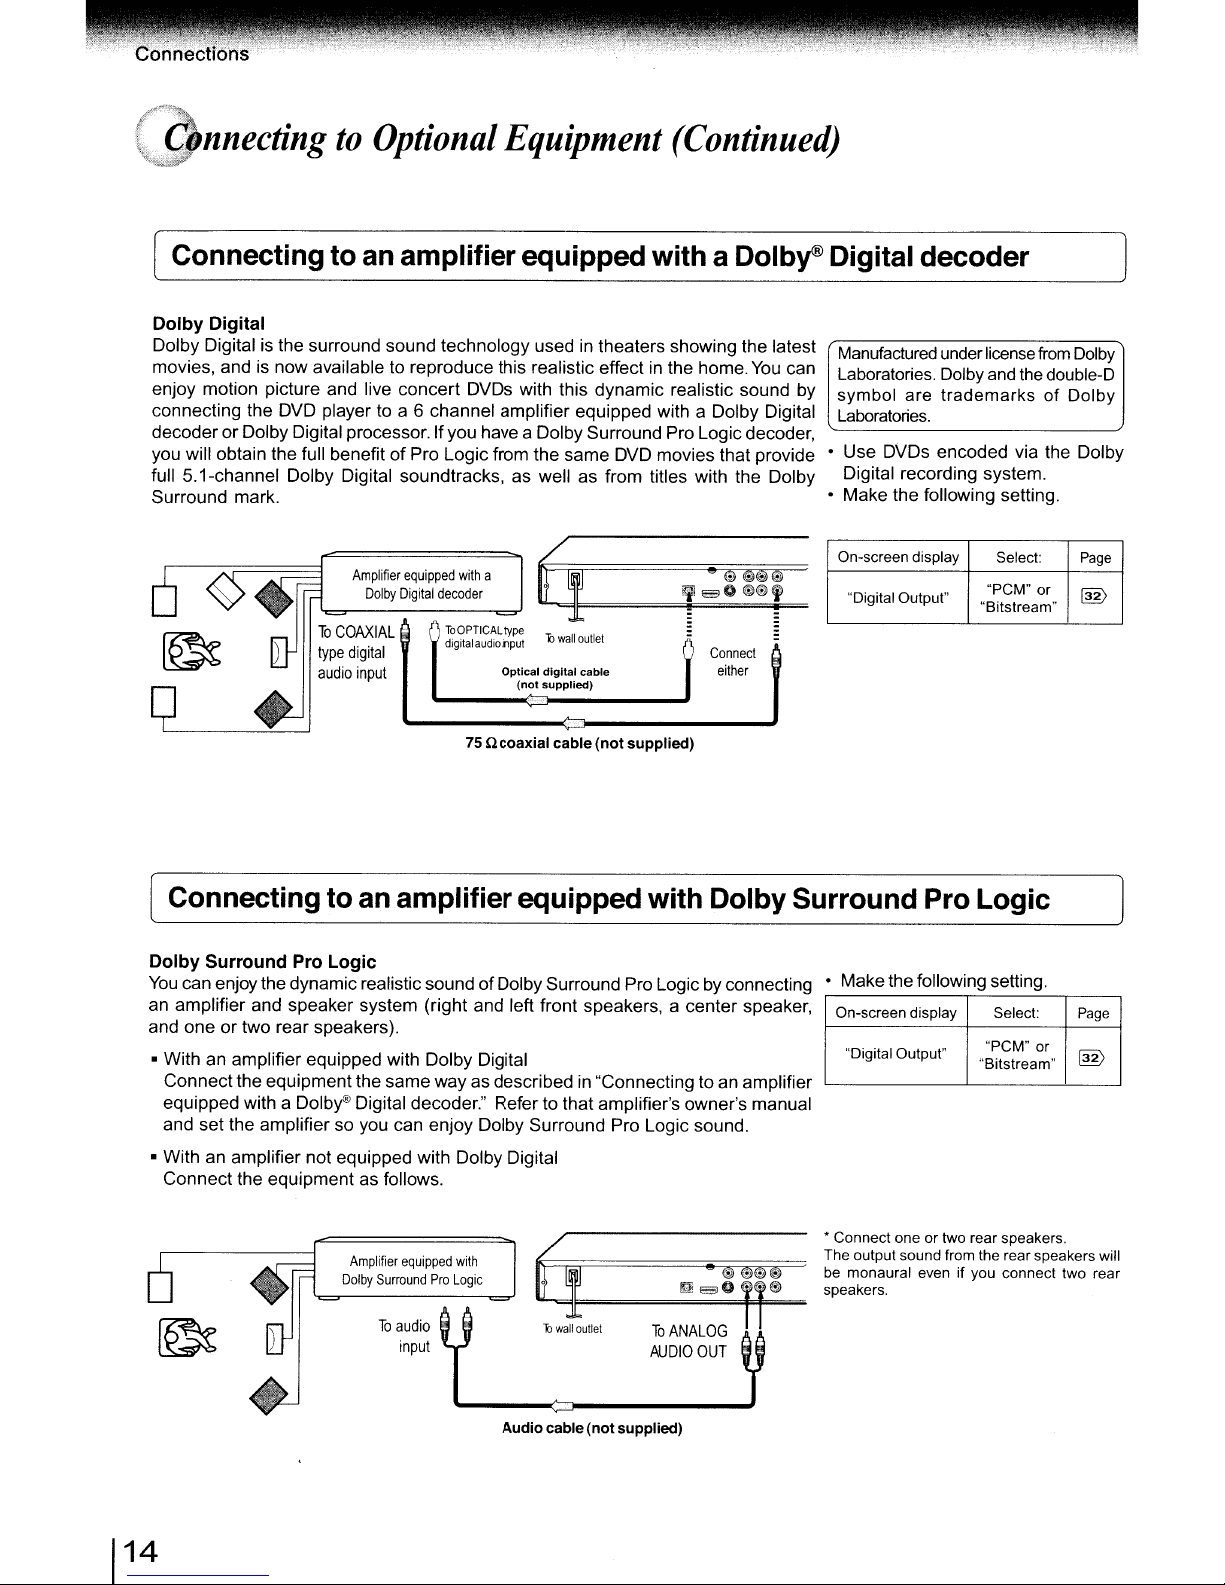
[ Connecting to an amplifierequipped with a Dolby® Digital
Dolby Digital
Dolby Digital is the surround sound technology used in theaters showing the latest
movies, and is now available to reproduce this realistic effect in the home.
enjoy motion picture and live concert DVDs with this dynamic realistic sound
connecting the DVD player to a 6 channel amplifier equipped with a Dolby Digital
decoder or Dolby Digital processor. Ifyou have a Dolby Surround Pro Logicdecoder,
of
you will obtain the full benefit
full 5.1-channel Dolby Digital soundtracks, as well as from titles with the Dolby
Surround mark.
Pro Logicfrom the same DVD movies that provide
Amplifier
equipped
with
a
Dolby
Digital
decoder
()
ToOPTICAL
dignal
audio
75
f:I
4====l1f=E3=o=@=@~,
type
bwallouUel
input
Optical
digital
supplied)
cable
cable
(not
supplied)
(not
ncoaxial
You
e e
@0~
i_F-'
Connect
either
Manufactured
can
Laboratories. Dolby
by
symbol are trademarksofDolby
Laboratories.
• Use DVDs encoded via the Dolby
Digital recording system.
• Make the following setting.
On-screen display
"Digital Output"
=
decoder
under
license
and
Select:
"PCM"
"Bitslream"
from
the
or
Dolby
double-D
Page
lID
[ Connecting to an amplifier equippedwith Dolby Surround Pro Logic
Dolby Surround Pro Logic
You
can enjoy thedynamicrealistic soundofDolby Surround ProLogicbyconnecting • Make the following setting.
an amplifier and speaker system (right and left front speakers, a center speaker,
and one or two rear speakers).
• With an amplifier equipped with Dolby Digital
Connectthe equipment the same way as described in "Connectingto an amplifier
Dolby®
equipped with a
and set the amplifier so you can enjoy Dolby Surround Pro Logic sound.
• With an amplifier not equipped with Dolby Digital
Connect the equipment as follows.
Digital decoder." Refer to that amplifier's owner's manual
~
E30'
·0
'$ff!=
To
audio
input
bwallouUet
Audiocable (notsupplied)
To
AUDIO
ANALOG
OUT
On-screen display Select: Page
"Digital Output"
• Connect
The output sound from the rear speakers will
be
speakers.
oneortwo rearspeakers.
monaural
evenifyou connect two rear
"PCM"
"Bitstream"
or
lB>
 Loading...