

OWNER’S MANUAL
TWIN TUB WASHING MACHINE
(Home use
)
VH-B1100WE
VH-B1100WM
VH-B1000ME
VH-B900GE
VH-B900GS
VH-B900GM
VH-B800LE
Model
Thank you for purchasing this TOSHIBA Twin Tub Washing Machine.
Please read this manual carefully in order to operate the machine properly and safely.
After reading, keep this manual handy for your future reference.
131030c1VH-B1100WBAsia.indd1 13/10/3015:25
2
Safety Precautions
Do not put your hand in the spin tub before it stops
completely.
(Even at slow rotation, the laundry could wrap around your
hand, resulting in injury.)
Make sure to set the spin cap properly for the spin cycle.
(If the laundry is sticking out, parts may get damaged or fly
out, resulting in injury.)
Spin cap
Set
properly!
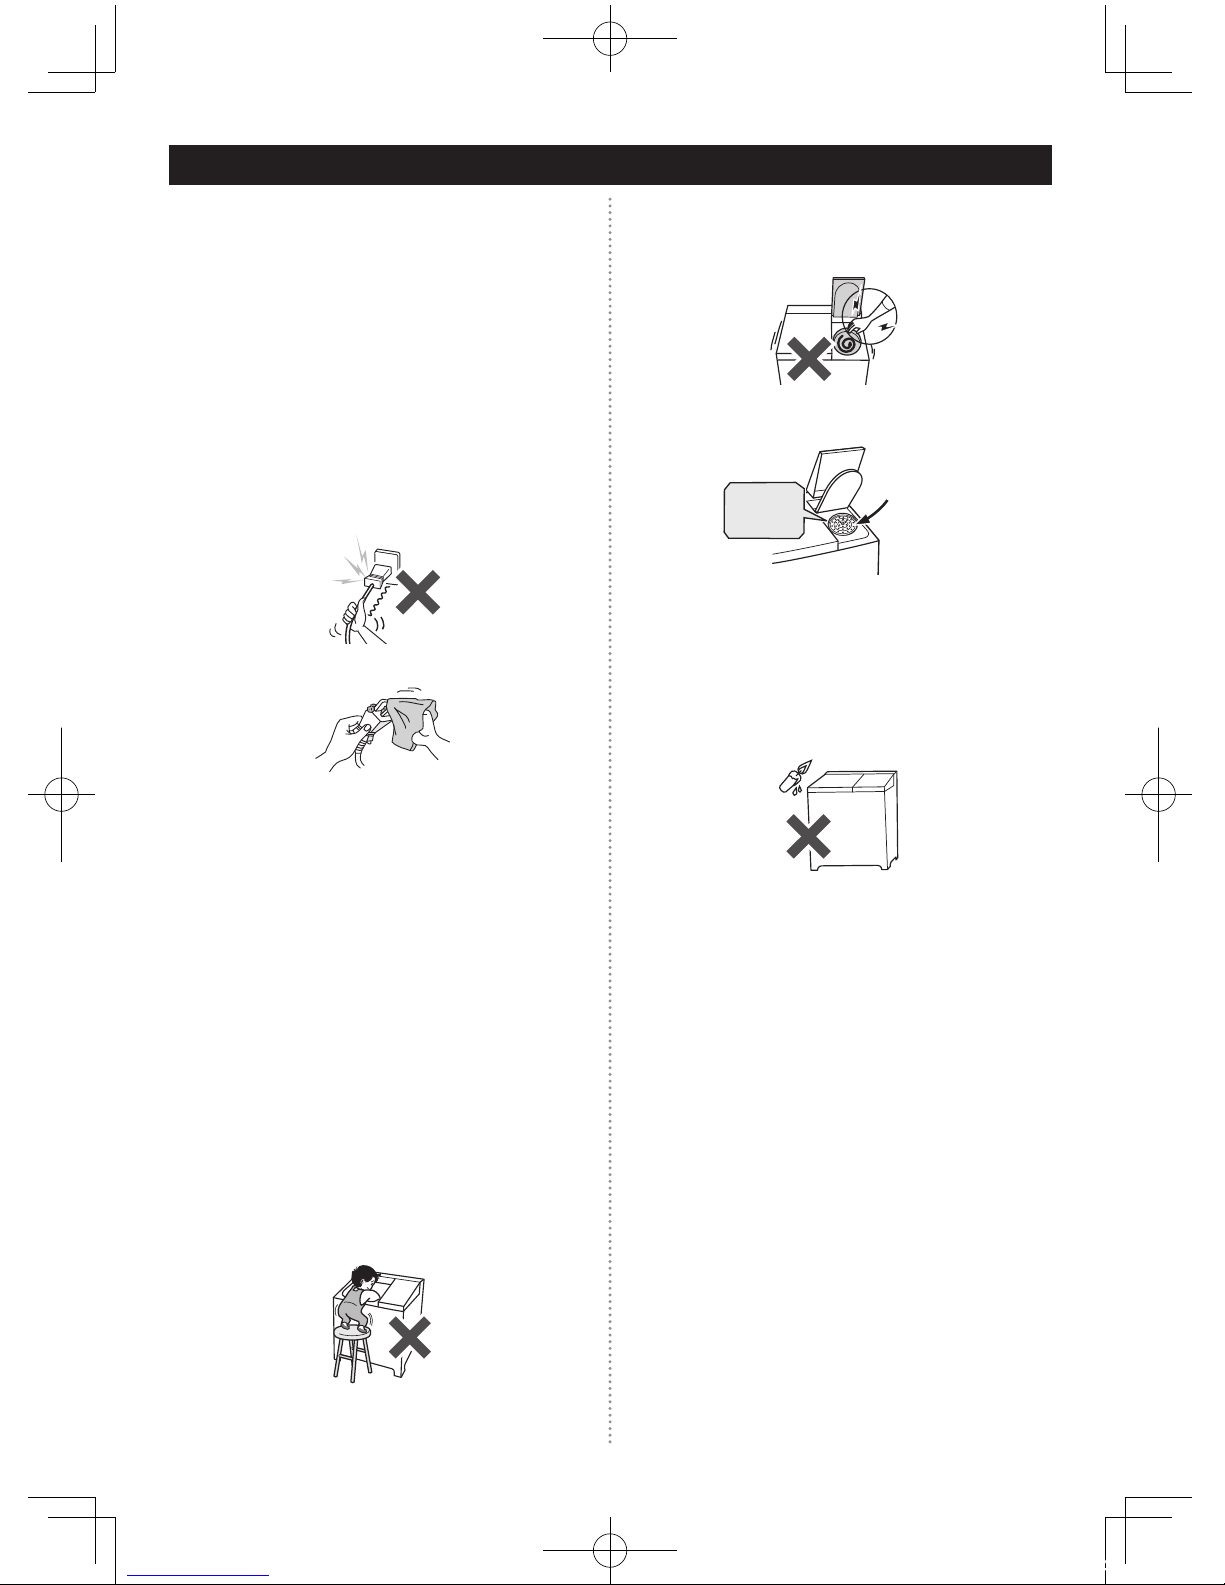
Do not climb on the washing machine, or do not put
objects on it.
(It may cause deformation, breakage or injury.)
Do not spill water or detergent on the main unit parts.
(It may cause fire, electric shock or breakage.)
Do not put it near open flame.
(It may cause fire.)
Mosquito coils, cigarettes, candles, etc.
Do not use hot water (50°C or higher).
(It can deform the plastic parts, resulting in electric leakage
and electric shock.)
■ For emergency case
Stop using the washing machine immediately and
unplug the power plug in case of abnormality or
failure.
(It may cause fire, burn injury, electric shock or injury.)
Contact the qualified repair shop.
Examples of abnormalities and failures
• The power plug and power cord are extremely hot.
• The washing machine does not start though power is
supplied.
• There is an unusual noise or a burnt smell during the
operation.
• The spin tub does not stop within 15 seconds after
opening the spin tub lid during the spin cycle.
■ Laundry
Do not wash and spin a rain coat, sleeping bag, wet
suit and other waterproof materials.
(If the laundry is sticking out or there is an abnormal
vibration during the spin cycle, it may cause the main unit
and house to break and the laundry to damage.)
Do not wash a mat or any other thick and hard
materials.
(An abnormal vibration may cause the main unit and
house to break and the laundry to damage.)
Do not wash it even if the label indicates it is washable.
This section explains the precautions that should be taken to
prevent users from being hurt or assets from being damaged.
■ Power plug and cord
You must make sure the following:
(Otherwise, it may cause fire, electric shock or injury)
• Be sure to use an outlet with the rated voltage and use
it for washing machine alone. Do not use the extended
cord or overload the electrical circuit by using a power
strip.
• Do not damage the power cord, force to bend it, or put a
heavy load on it.
If the power cord has been damaged, request the
qualified repair shop to replace it with genuine parts
specified by the manufacturer.
• Do not plug/unplug the power plug with wet hands.
• Insert the power plug into the wall outlet completely.
• Do not unplug the power plug by pulling the power cord.
• Use a dry cloth to wipe off dirt on the mounting surfaces
between blades of the power plug on a regular basis.
Make sure to unplug the power plug when you do not
use the washing machine for a long time.
(Otherwise, the insulation can deteriorate, resulting in
electric leakage and electric shock.)
■ For use
If gasoline, kerosene, benzene alcohol or other
flammable solutions are spilled on the laundry, do not
put the laundry in or closer to the wash tub and spin tub.
(Otherwise, the volatile gas may catch fire, resulting in
explosion or fire.)
Do not allow to use by persons (including children)
with reduced physical, sensory or mental capabilities,
or lack of experience and knowledge, unless they
have been given supervision or instruction concerning
use of the appliance by a person responsible for their
safety.
Children should be supervised to ensure that they do
not play with the appliance.
Do not put a stand near washing machine or do not let
children play around it.
Do not let children look into the wash tub and spin tub.
(They may fall into the wash tub and spin tub, resulting in injury.)
Drain the water after doing laundry.
Do not disassemble, repair or modify.
(Otherwise, it may cause fire, electric shock or injury)
Consult with the qualified repair shop for repair services.
131030c1VH-B1100WBAsia.indd2 13/10/3015:25
3
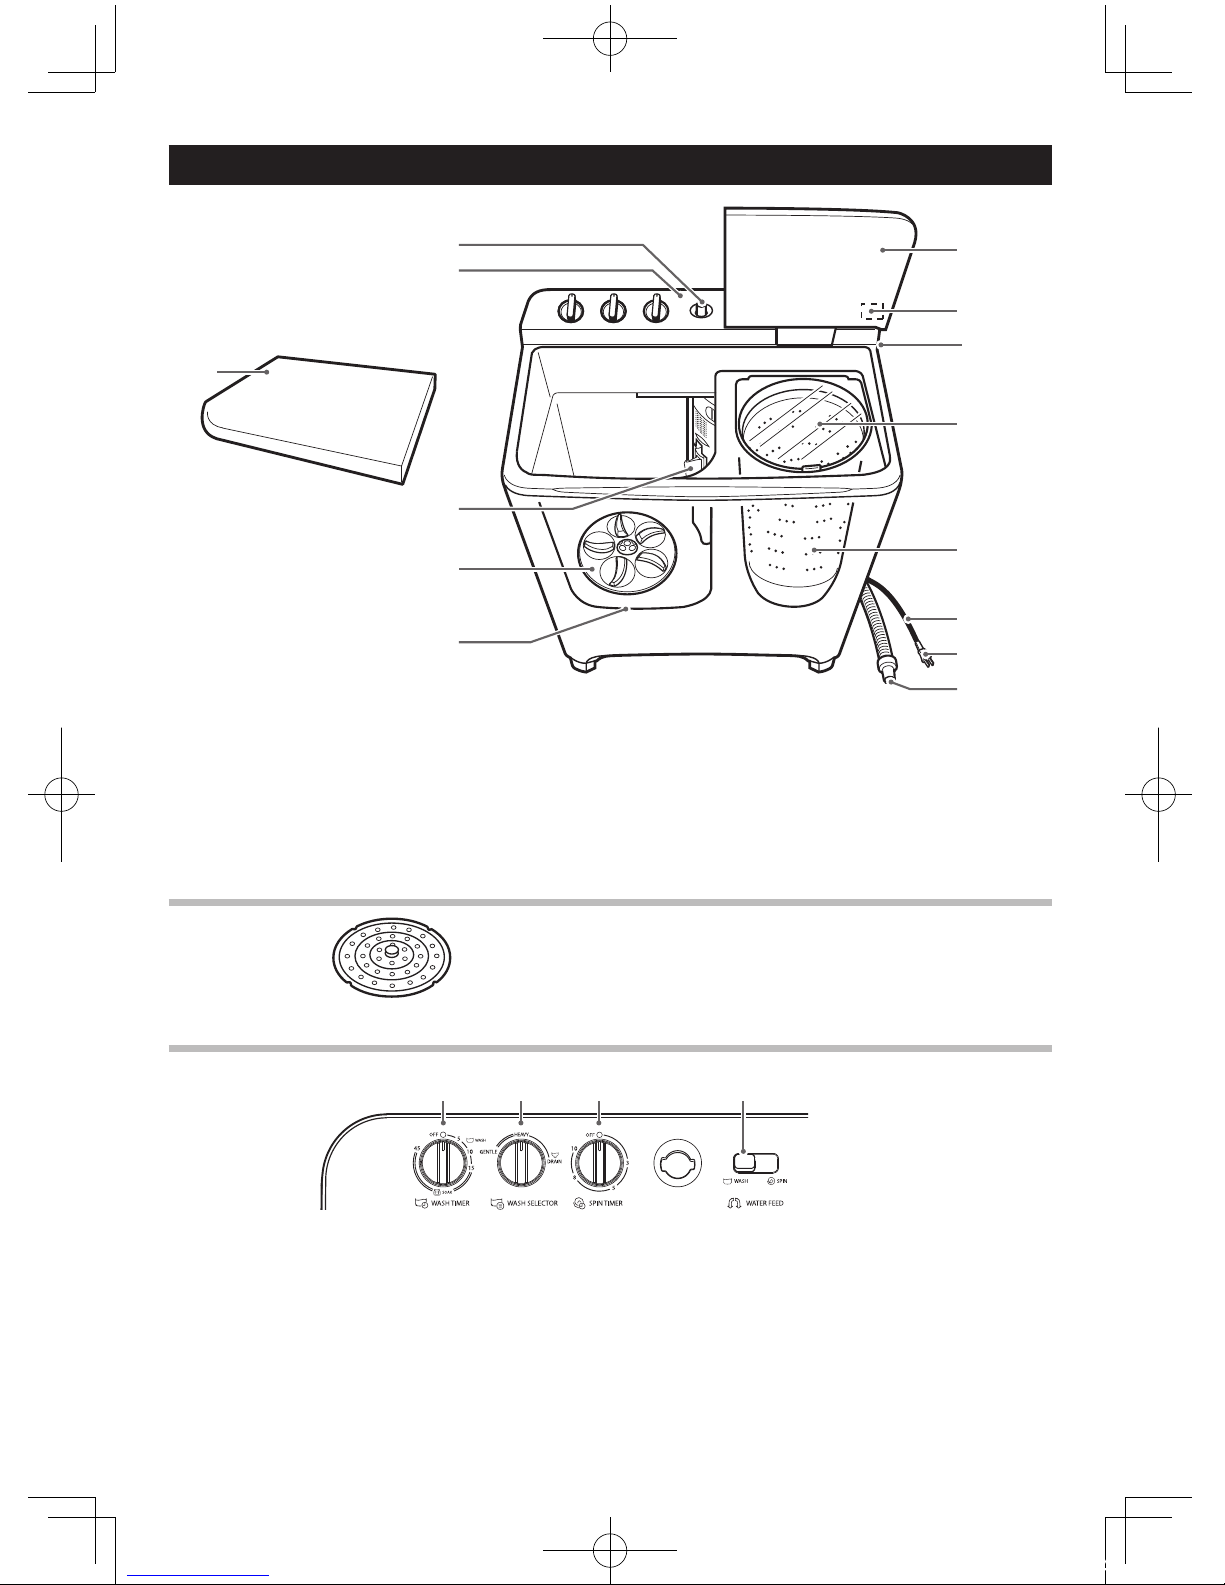
Name of Parts
Accessories
Spin cap
1 piece
1 Control panel
2 Water inlet
3 Spin tub lid
4 Safety precaution label
5 Hose hook
6 Inner lid
7 Spin tub
8 Power cord
9 Power plug
10 Drain hose
11 Wash tub
12 Pulsator
13 Lint filter
14 Wash tub lid
2
1
14
13
12
11
3
4
5
6
7
8
9
10
Control panel
1 WASH TIMER knob
This sets time for the soak wash, wash and rinse cycles. (Please refer to page 8 for the settable time.)
2 WASH SELECTOR knob
This selects the water flow from 2 types, “HEAVY” and “GENTLE”. Set the WASH SELECTOR knob to the “DRAIN”
position for draining water.
3 SPIN TIMER knob
This sets the spin time. (Please refer to page 8 for the settable time.)
4 WATER FEED selector
This selects whether water is fed into the wash tub or spin tub.
2 3 41
131030c1VH-B1100WBAsia.indd3 13/10/3015:25

4
Installation Before Using
●
Do not place the washing machine in the porch or
yard where it can be exposed to water and in the
bath room where humidity is high.
This may cause fire and electric shock due to the electric
leakage.
●
Place the washing machine on the stable and leveled
floor.
Do not place the washing machine on the blocks, bricks
and other unstable surfaces.
This may cause the vibration and noise to increase.
Correct Incorrect Incorrect
●
Do not install in direct sunlight
The plastic part may be discolored or deformed.
●
Place the washing machine where water can be
drained properly.
This may cause fire and electric shock due to the electric
leakage caused by poor drainage.
●
Leave space of 5 cm or more between the wall and
the washing machine (distance from the back and
the left and right sides). Leave space of 5 cm or
more from the faucet.
This may cause an abnormal vibration and noise.
●
If you install the washing machine on the carpet,
make sure the holes in the bottom of the washing
machine are not blocked.
This may cause malfunction.
Install the water supply hose.
Insert the water supply hose into the water inlet
securely.
Lay the drain hose to allow for drainage.
Place the drain hose at no higher than 15 cm from the
floor.
15cm
* The drain hose can be extended up to 3 m on the flat
surface.
Insert the power plug into the wall outlet.
1
2
3
131030c1VH-B1100WBAsia.indd4 13/10/3015:25

5
How to Use
Wash method (WASH TIMER)
Set the WASH SELECTOR knob to the “HEAVY” or
“GENTLE” position depending on the laundry type.
Place the WATER FEED selector to the “WASH”
side.
Feed water to 2 to 3 cm below the water level “L”,
and put the detergent.
Set the WASH TIMER to 2 to 3 minutes, and
dissolve the detergent thoroughly.
Put laundry in and feed water to the level
appropriate for the load of laundry.
Set the WASH TIMER.
If you do not continue to wash after finishing the wash
cycle, set the WASH SELECTOR knob to the “DRAIN”
position to drain water.
Laundry type Wash time
Synthetics or thin clothes 2 to 5 min.
Cotton or linen 7 to 10 min.
Very soiled cotton, linen, or work
clothes
10 to 15 min.
●
When you wash the synthetics with the weight of less
than 2 kg, set the WASH SELECTOR knob to the
“GENTLE” position.
■ SOAK wash
Set the WASH TIMER knob in the “45” position.
When the knob is placed in the “15” position, wash
cycle starts.
Soak wash (30 min.)
Wash
Stir
Pause
Stir
Pause
Stir
Pause
5 min. 7 min. 2 min. 7 min. 2 min. 7 min.
15 min.
45 min.
1
2
3
4
5
6
1
Checking the Laundry
●
Separate the color clothes from the white.
●
Check the care label of the clothes.
Put fragile clothes in a laundry net bag to prevent the
clothes from being damaged or deformed.
●
Remove things from pockets before washing laundry.
Coins, screws, hair pins, nails, sands may clog inside
of the main unit and drainage path, resulting in water
leakage and malfunction.
●
Tie strings and close fasteners to prevent the
clothes and fasteners from being damaged.
Weight of laundry
Remember the weight of clothes roughly to prevent the
washing machine from overloading.
It is overloaded if the movement of laundry in the
washing machine is small.
Brief
[
approx. 50 g
]
Undershirt
[approx. 130 g]
Shirt
[
approx. 200 g
]
Sheet
[
approx. 500 g
]
Socks
[
approx. 50 g
]
Pajamas (top
and bottom)
[approx. 500 g]
Blouse
[
approx. 200 g
]
Bath towel
[
approx. 300 g
]
The above weights are rough indications.
1 24, 6
131030c1VH-B1100WBAsia.indd5 13/10/3015:25

6
How to Use (continued)
A. Shower spin and Overflow rinse
●
This rinse method can shorten the last shower rinse time
by feeding water to the spin tub and spinning it again
after the first spin cycle.
●
Make sure the amount of laundry is less than about 80
percent of the spin tub.
Up to here
Place the WATER FEED selector to the “SPIN”
side.
Open the spin tub lid. Make sure the spin tub is
stopped, and open the faucet to feed water for one
and half minutes.
After closing the faucet, close the spin tub lid to let
the washer spin for 2 to 3 minutes.
Transfer laundry to wash tub, feed water and rinse*
for 3 to 4 minutes. (*: See “B. Overflow rinse”.)
Attention!
• If the tap water contains high levels of ferric iron (red
water), do not operate the shower spin. This may cause
the laundry to turn yellowish.
B. Overflow rinse
●
This is a method to rinse while running water.
Transfer laundry to wash tub after spinning.
Set the WASH SELECTOR knob to the “HEAVY” or
“GENTLE” position.
Place the WATER FEED selector to the “WASH”
side.
Feed water to the level appropriate for the load of
laundry, set the WASH TIMER, and keep feeding
water.
Attention!
• Make sure to operate with the wash tub lid closed
otherwise water may splash depending on the laundry.
C. Rinse
●
This is a method to rinse after a certain level of water is
filled.
Transfer laundry to wash tub after spinning.
Set the WASH SELECTOR knob to the “HEAVY” or
“GENTLE” position.
Place the WATER FEED selector to the “WASH”
side.
Feed water to the level appropriate for the load of
laundry.
Set the WASH TIMER.
1
2
3
4
1
2
3
4
1
2
3
4
5
Spin method (SPIN TIMER)
Loosening the laundry while transferring it into
the spin tub, and flatten it by pressing with your
hands.
Fit in the spin cap horizontally.
Fit the spin cap into the top part even when the amount
of laundry is small.
Correct Incorrect
Close the inner lid, spin tub lid, and set the SPIN
TIMER.
Laundry type Spin time
Thin clothes (synthetics or mixed
fabric)
1 min.
Sweater (synthetics) 1 to 2 min.
Underwear (cotton) 2 to 4 min.
Sheet (cotton) 5 min.
Attention!
• Do not operate the spin cycle during the drain or the
overflow rinse. It may cause improper drainage from the
spin tub.
• If there is an abnormal vibration or noise, set the SPIN
TIMER knob to the “0” position, and place the laundry
evenly again after the spin tub has been stopped.
Rinse method
There are following three types of rinse methods. Please
select the desired method.
1
2
3
A.
Shower spin
and Overflow
rinse
B.
Overflow
rinse
C. Rinse
Spin
2 to 3 min.
Feed water to
spin tub
1.5 min.
Spin
2 to 3 min.
Supply water (to
wash tub)
Overflow rinse
3 to 4 min.
Spin
2 to 3 min.
Supply water
(to wash tub)
Overflow rinse
6 to 8 min.
Spin
2 to 5 min.
Supply water
(to wash tub)
Rinse
2 to 10 min.
* Optional : Repeat
this process once or
twice up to rinsing
status.
131030c1VH-B1100WBAsia.indd6 13/10/3015:25

7
Maintenance
Make sure to unplug the power plug before maintenance.
■ Lint filter
●
Remove lint from the lint filter net every time you do laundry.
Insert your finger deep into the concave portion of the lint filter, and press it down to remove.
Place the filter in the original position after cleaning it.
■ Main unit
●
Wipe off the main unit with a soft cloth if it is dirty.
If it is excessively dirty, wipe it off using a cloth soaked with kitchen detergent.
Attention!
• Do not spill detergent on the lid or control panel. Do not wipe it off with benzene, thinner, cleanser, detergents for house
and home furniture, bleach, or spray it with insecticide.
The plastic parts and control panel may get damaged or the letters of the control panel may be faded.
1
Concave portion
Troubleshooting
Symptom Items to be checked
Washing machine
does not work
• Make sure the power plug is plugged into the wall outlet.
• Make sure the WASH TIMER knob and SPIN TIMER knob are not placed in the “0” position.
• Make sure it is not in the middle of soak wash cycle.
• Make sure the spin tub lid is closed.
Water is not supplied
to washing machine
• Make sure the faucet is open.
• Make sure the WATER FEED selector is placed in the “WASH” side.
Water in the washing
machine does not
drain
• Make sure the drain hose is laid.
• Make sure the WASH SELECTOR knob is placed in the “DRAIN” position.
131030c1VH-B1100WBAsia.indd7 13/10/3015:25

8
MANUFACTURED BY
PT. TOSHIBA CONSUMER PRODUCTS INDONESIA
L127008701
Model name
VH-B1100WE
VH-B1100WM
VH-B1000ME
VH-B900GE
VH-B900GS
VH-B900GM
VH-B800LE
Power supply 230-240V 50Hz
Power
consumption
(for WASH)
330 W 320 W 300 W 290 W
Power
consumption
(for SPIN)
150 W 140 W
Maximum power
consumption
480 W 460 W 440 W 430 W
External
dimension
W884×D552×H1065 mm W794×D506×H993 mm
Product weight 29 kg 24 kg
Rated capacity
(for WASH/RINSE)
10 kg 9 kg 8 kg 7 kg
Rated capacity
(for SPIN)
6.5 kg 5.5 kg
Water level
H2: 87L (~10kg) H1: 79L (~8kg)
M: 70L (~6kg) L: 61L (~4kg)
H1: 57L (~8kg)
M: 51L (~4kg) L: 43L (~2kg)
Wash time / soak 15 minutes / 45 minutes (with soak wash)
Spin time 10 minutes 5 minutes
Inlet water
pressure
0.03 ~ 1 MPa
IP Number IPX 4
Washing system Vortex system
Kind of washing
machine
Manual electric washing machine
Class of appliance Class
II
Country of origin Made in Indonesia
Specifications
131030c1VH-B1100WBAsia.indd8 13/10/3015:25
 Loading...