

Page 1

TABLE OF CONTENTS
Warranty and Safety ............................................................................... 4
After Sales Service ................................................................................... 4
Safety Guidelines ..................................................................................... 4
General ..................................................................................................... 4
Operating Environment ............................................................................ 5
Electronic Devices .................................................................................... 5
Battery Safety ........................................................................................... 6
SOS Soft Key ........................................................................................... 6
Care and Maintenance ............................................................................. 7
FCC Notice ............................................................................................... 8
European RF Exposure Information ......................................................... 8
FCC RF Exposure Information ................................................................. 9
Licences ................................................................................................. 11
Declaration of Conformity of Toshiba ..................................................... 12
Setting up the Phone ........................................................................... 13
Battery .................................................................................................... 13
Inserting or Changing the Battery ....................................................... 13
Charging the Battery ........................................................................... 15
Charging Indicator .............................................................................. 16
SIM Card ................................................................................................ 17
Inserting / Removing the SIM Card .................................................... 17
Personal Identification Numbers (PINs) .................................................19
Memory slot ............................................................................................ 19
General Information .............................................................................22
Parts and Functions ...............................................................................22
Keys .................................................................................................... 23
The 4-Way Key ................................................................................... 24
Quick keys .......................................................................................... 25
Soft Keys ............................................................................................ 26
Main menu .......................................................................................... 27
Icons ................................................................................................... 30
i
Page 2

Basic Phone Use ....................................................................................31
Making an Emergency Call .................................................................31
Making/Ending a Call ..........................................................................31
Receiving/Rejecting a Call ..................................................................32
Holding a Call ......................................................................................32
Making/Receiving a Second Call ........................................................33
Making a Conference Call ...................................................................33
Receiving a Third Call .........................................................................33
Text Entry ...............................................................................................34
Changing Entry Mode .........................................................................34
T9 Language .......................................................................................34
Character Table ..................................................................................36
Settings ..................................................................................................37
General ...................................................................................................37
Language ............................................................................................37
Time & date .........................................................................................37
Security ...............................................................................................38
Voice control .......................................................................................40
Auto keypad lock .................................................................................41
Shortcuts .............................................................................................41
Default storage ....................................................................................41
Flight mode .........................................................................................42
Profiles ................................................................................................42
Default settings ...................................................................................42
Display ....................................................................................................43
Wallpaper ............................................................................................43
Themes ...............................................................................................43
Backlight level .....................................................................................43
Backlight duration ...............................................................................43
Greeting ..............................................................................................44
Sounds ....................................................................................................44
Alert type .............................................................................................44
Ringtones ............................................................................................44
Ring volume ........................................................................................44
Key sound ...........................................................................................45
Shutter sound ......................................................................................45
ii
Page 3

Connectivity ............................................................................................ 45
Call options ......................................................................................... 45
Message settings ................................................................................ 49
Network .............................................................................................. 49
Browser .............................................................................................. 51
Connections ........................................................................................ 51
Bluetooth ............................................................................................ 51
USB features ...................................................................................... 52
Memory card ....................................................................................... 53
Browser ................................................................................................. 54
WAP setup .............................................................................................54
WAP Page Connection ....................................................................... 55
WAP push setting ................................................................................... 55
Tools ...................................................................................................... 56
Scheduler ............................................................................................... 56
Alarm ...................................................................................................... 57
Appointments ......................................................................................... 57
Tasks ...................................................................................................... 58
Notes ...................................................................................................... 58
Calculator ............................................................................................... 59
Calculation keys ................................................................................. 59
Unit converter ......................................................................................... 59
Countdown ............................................................................................. 60
STK (SIM Tool Kit) ................................................................................. 60
Camera .................................................................................................. 61
Camera mode ......................................................................................... 61
Video mode ............................................................................................ 62
Messages .............................................................................................. 64
Text Messages ....................................................................................... 65
Multimedia Messages ............................................................................. 67
E-mail ..................................................................................................... 68
Templates ............................................................................................... 70
Cell info .................................................................................................. 70
Memory status ........................................................................................ 71
Voice mail ............................................................................................... 71
Entertainment ....................................................................................... 72
Games .................................................................................................... 72
iii
Page 4

Composer ...............................................................................................72
Contacts ................................................................................................73
Create/View Contacts/SIM contact or PhoneBook .................................73
View groups ............................................................................................74
Special numbers .....................................................................................75
Quick call ................................................................................................75
Advanced ................................................................................................76
Memory status ........................................................................................76
My player ...............................................................................................77
FM Radio ................................................................................................77
Tracks .....................................................................................................78
Last played .............................................................................................78
Playlists ...................................................................................................79
Voice memo ............................................................................................79
Background MP3 ....................................................................................80
My data ..................................................................................................81
Managing files .........................................................................................81
Phone memory .......................................................................................81
Memory card ...........................................................................................81
Calls .......................................................................................................82
Call history ..............................................................................................82
Clear history ............................................................................................83
Call settings ............................................................................................83
Index ......................................................................................................88
iv
Page 5

TOSHIBA CORPORATION
IMPORTANT NOTE: PLEASE READ BEFORE USING YOUR MOBILE
PHONE
BY ATTEMPTING TO USE ANY SOFTWARE ON THE SUPPLIED
HANDSET THIS CONSTITUTES YOUR ACCEPTANCE OF THESE
EULA TERMS. IF YOU REJECT OR DO NOT AGREE WITH ALL THE
TERMS OF THIS EULA, PLEASE DO NOT ATTEMPT TO ACCESS OR
USE THE SUPPLIED SOFTWARE.
End User Licence Agreement
This End User Licence Agreement (“EULA”) is a legal agreement between
you (as the user) and TOSHIBA CORPORATION (“Toshiba”) with regard
to the copyrighted software as installed in a Toshiba 2.5G mobile phone
handset supplied to you (the “Handset”).
Use or disposal of any software installed in the Handset and related
documentations (the “Software”) will constitute your acceptance of these
terms, unless separate terms are provided by the Software supplier on the
Handset, in which case certain additional or different terms may apply. If
you do not agree with the terms of this EULA, do not use or dispose the
Software.
1. Licence Grant. Toshiba grants to you a personal, non-transferable
and non-exclusive right to use the Software as set out in this EULA.
Modifying, adapting, translating, renting, copying, making available,
transferring or assigning all or part of the Software, or any rights
granted hereunder, to any other persons and removing any
proprietary notices, labels or marks from the Software is strictly
prohibited, except as expressly permitted in this EULA. Furthermore,
you hereby agree not to create derivative works based on the
Software.
2. Copyright. The Software is licenced, not sold. You acknowledge that
no title to the intellectual property in the Software is or will be
transferred to you. You further acknowledge that title and full
ownership rights to the Software will remain the exclusive property of
Toshiba, Toshiba's affiliates, and/or their suppliers, and you will not
acquire any rights to the Software, except as expressly set out in this
EULA. You may keep a back-up copy of the Software only so far as
necessary for its lawful use. All copies of the Software must contain
the same proprietary notices as contained in or on the Software and
are subject to the terms of this EULA. All rights not expressly granted
1
Page 6

under this EULA are reserved to Toshiba, Toshiba's affiliates and/or
their suppliers.
3. Reverse Engineering. You agree that you will not attempt, and if you
are a business organisation, you will use your best efforts to prevent
your employees, servants and contractors from attempting to reverse
engineer, decompile, modify, translate or disassemble the Software
in whole or in part except to the extent that such actions cannot be
excluded by mandatory applicable law and only if those actions are
taken in accordance with such applicable law. Any failure to comply
with the above or any other terms and conditions contained herein
will result in the automatic termination of this licence and the
reversion of the rights granted hereunder to Toshiba.
4. LIMITED WARRANTY. Only during the warranty period for the
Handset, Toshiba, Toshiba's affiliate, its suppliers or its authorised
service company will repair or replace, at Toshiba's sole discretion,
defective Software unless such defect results from acts or
phenomenon beyond the reasonable control of Toshiba. EXCEPT AS
PROVIDED IN THIS EULA: (A) TOSHIBA, TOSHIBA'S AFFILIATES,
AND THEIR SUPPLIERS DISCLAIM ALL WARRANTIES,
CONDITIONS OR OTHER TERMS (WHETHER EXPRESS OR
IMPLIED), INCLUDING BUT NOT LIMITED TO WARRANTIES,
CONDITIONS AND TERMS OF SATISFACTORY QUALITY,
MERCHANTABILITY, FITNESS FOR A PARTICULAR PURPOSE
AND NON-INFRINGEMENT OF THIRD-PARTY RIGHTS; AND (B)
THE ENTIRE RISK AS TO THE QUALITY AND PERFORMANCE
OF THE SOFTWARE IS WITH YOU. YOU ACCEPT THAT
SOFTWARE MAY NOT MEET YOUR REQUIREMENTS AND NO
WARRANTY CAN BE GIVEN THAT OPERATION OF THE
SOFTWARE WILL BE UNINTERRUPTED OR ERROR-FREE.
5. 5. LIMITATION OF LIABILITY. TO THE FULLEST EXTENT
LEGALLY PERMITTED, IN NO EVENT SHALL TOSHIBA,
TOSHIBA'S AFFILIATES OR THEIR SUPPLIERS BE LIABLE TO
YOU FOR ANY DAMAGES FOR (A) LOST BUSINESS OR
REVENUE, BUSINESS INTERRUPTION, LOSS OF BUSINESS
DATA; OR (B) CONSEQUENTIAL, SPECIAL, INCIDENTAL OR
INDIRECT DAMAGES OF ANY KIND (WHETHER UNDER
CONTRACT, TORT OR OTHERWISE) ARISING OUT OF: (I) THE
USE OR INABILITY TO USE THE SOFTWARE, EVEN IF TOSHIBA,
TOSHIBA'S AFFILIATES OR THEIR SUPPLIER HAS BEEN
ADVISED OF THE POSSIBILITY OF SUCH DAMAGES; OR (II) ANY
2
Page 7

CLAIM BY A THIRD PARTY. SAVE AS SET OUT IN THIS
SECTION, TOSHIBA'S ENTIRE LIABILITY UNDER THIS EULA
SHALL NOT EXCEED THE PRICE PAID FOR THE SOFTWARE, IF
ANY.
THE ABOVE DISCLAIMER AND LIMITATION DOES NOT
EXCLUDE OR LIMIT (A) LIABILITY FOR DEATH OR PERSONAL
INJURY CAUSED BY NEGLIGENCE OR (B) ANY MANDATORY
LEGAL RIGHT OR LIABILTY TO THE EXTENT THAT IT CANNOT
BE LAWFULLY EXCLUDED OR LIMITED UNDER APPLICABLE
LAW.
PLEASE MAKE AND RETAIN A COPY OF ALL DATA YOU HAVE
INSERTED INTO YOUR PRODUCT, FOR EXAMPLE NAMES,
ADDRESSES, PHONE NUMBERS, PICTURES, RINGTONES ETC,
BEFORE SUBMITTING YOUR PRODUCT FOR A WARRANTY
SERVICE, AS SUCH DATA MAY BE DELETED OR ERASED AS
PART OF THE REPAIR OR SERVICE PROCESS.
6. Laws. This EULA will be governed by the laws of England and Wales.
All disputes arising out of this EULA shall be subject to the exclusive
jurisdiction of the English Court.
7. Export Laws. Any use, duplication or disposal of the Software
involves products and/or technical data that may be controlled under
the export laws of applicable countries or region and may be subject
to the approval of the applicable governmental authorities prior to
export. Any export, directly or indirectly, in contravention of the export
laws of applicable countries or region is prohibited.
8. Third Party Beneficiary. You agree that certain suppliers of the
Software to Toshiba have a right as a third party beneficiary to
enforce the terms of this EULA against you as a user.
9. Transfers. The Software may be transferred only as installed on the
Handset to a lawful third party user, where that party accepts the
terms of this EULA which will continue to apply.
10. IF YOU ARE DEALING AS A CONSUMER IN THE UK & THE
SOFTWARE QUALIFIES AS 'GOODS' YOUR STATUTORY
RIGHTS UNDER APPLICABLE LAW ARE NOT AFFECTED.
3
Page 8

Warranty and Safety
This section addresses important warranty and safety issues. You should
read and thoroughly familiarise yourself with this section before using your
phone.
After Sales Service
Your Toshiba mobile telephone contains no user serviceable parts. For
further information on service, please contact your retailer or service
provider.
Safety Guidelines
Follow the guidelines below to use your phone in a safe and legal manner.
General
• Use your phone in the intended manner, for example, hold it to your
ear. Incorrect usage may affect its performance.
• Use only compatible batteries and accessories. Using incompatible
items may permanently damage the phone.
• Do not connect the phone to any other device without reading the
provided documentation. The other device may be incompatible.
• When making emergency calls from your phone, ensure that the
phone is switched on and in service.
• Interference may affect your phone's performance. Once you move
away from the source of interference, the phone should function as
usual.
• When using ear buds or other headphones, be careful not to listen at
excessive volume. Listening to very loud sound levels may lead to
hearing loss. Also, listening through the ear buds or headphones for
prolonged periods of time, even at normal sound levels, may lead to
hearing loss. You should consult your doctor for more information on
proper use of ear buds or headphones.
4
Page 9

Operating Environment
• Do not use the phone hand-held while driving or otherwise operating
machinery. If using the phone hand-held, park the vehicle before
conversing. If using an integrated hands-free device, make sure the
phone is securely in its holder.
• Switch your phone off when entering a hospital or other such
institutions. Medical equipment may be effected by the phone so you
should observe any building regulation governing phone usage.
• Switch your phone off when on an aircraft. The aircraft's systems
may be affected by the phone signal. You are legally obliged to
comply with this recommendation.
• Switch your phone off in any facility where posted notices so require.
• Do not use your phone when refuelling. You should keep your phone
away from fuel and chemicals.
• Switch your phone off when blasting is in progress. Observe any
provided guidelines or regulations.
• Switch your phone off when in an area of a potentially explosive
atmosphere (for example fuel storage areas, spray paint facilities
etc.).
• Only qualified personnel should install the device in a vehicle. Faulty
installation or service may be dangerous and may invalidate any
warranty. For more information, check with the manufacturer, or its
representative for your vehicle.
Electronic Devices
• If you wear a pacemaker, or are in the company of someone who
does, you should be aware that there is a small risk of your phone
interfering with the operation of the pacemaker. Only certain types of
pacemakers are affected and only if the mobile phone is placed
directly next to one. You should consult your doctor or the pacemaker
manufacturer for more information.
• Your phone may interfere with some hearing aids. If this happens you
should contact your service provider or doctor.
• Your phone may interfere with the functionality of inadequately
shielded medical devices. Consult a physician or the device
manufacturer to ensure safe practice.
5
Page 10

• Your phone may interfere with the functionality of any inadequately
shielded electronic system in a motor vehicle. Examples include airbags and fuel injection systems. You should contact the vehicle
manufacturer to ensure proper shielding.
Battery Safety
Your device is powered by a rechargeable battery. The full performance of
a new battery is achieved only after two or three complete charge and
discharge cycles. The battery can be charged and discharged hundreds of
times but it will eventually wear out. When the talk and standby times are
noticeably shorter than normal, buy a new battery.
• A new battery or one that has not been used for a long time could
have reduced capacity the first few times it is used. The battery can
only be charged in temperatures between 0 °C (+32 °F) and +45 °C
(+113 °F).
• Only use batteries approved by Toshiba and only recharge the
battery with the recommended charger supplied by Toshiba.
• When the charger is not in use disconnect it from the power source.
• Do not leave the battery connected to the charger and power source
for longer then necessary as overcharging it will shorten its life.
• Do not short-circuit the battery. Accidental short-circuiting can occur
when a metallic object causes a direct connection between the + and
- terminals of the battery.
• Do not expose the battery to extreme temperatures, for example, a
fridge or a car exposed to direct sunlight, as this will affect its
performance.
• Do not dispose of the battery in a fire.
• Do not dispose of the battery in an ordinary bin. The battery contains
toxic chemicals and must be disposed of in the correct manner.
Contact your local authority for more information.
SOS Soft Key
The SOS soft key enables you to call the emergency services without
entering your PIN, inserting your SIM card or when your phone is blocked.
The SOS soft key is only active prior to the PIN being entered. To use it
simply press and confirm with the Yes soft key.
6
Page 11

Care and Maintenance
If you maintain your phone and all other parts and accessories supplied
with the original box, (“phone”), in good condition, the quality of your phone
usage as well as the phone life span will be greatly enhanced. If you follow
the suggestions below, this will also help you fulfil warranty obligations.
• Keep the phone and all the parts and accessories out of the reach of
small children.
• Keep the phone dry as moisture of any kind can contain minerals that
will corrode the electronic circuits.
• Do not use or store the phone in dusty or dirty locations as the
movable parts of the phone can be damaged.
• Do not use or store the phone in excessively hot places. High
temperatures will shorten the life-span of the phone, damage the
battery or warp/melt the plastic used in the phone's manufacture.
• Do not store the phone in excessively cold places. When there is a
difference in temperature between the room and the phone,
condensation can form inside the phone, causing damage to the
electronic circuits.
• Do not open the phone unless absolutely necessary, for example, to
install the battery or SIM card. We recommend that you go to your
dealer when problems arise with either of these items and allow their
experts to handle the phone instead.
• Do not mishandle or abuse the phone. Dropping, knocking or shaking
it can damage the internal circuits.
• Do not use harsh chemicals, strong detergents, or cleaning solvents
to clean the phone. If you must clean it, then use a soft, clean and dry
lint-free cloth.
• Do not apply paint or other such substances to the phone. This could
clog the phone's movable parts.
• If the phone or any of the accessories are not working as they should,
please consult your dealer who can provide you with the expert
assistance required.
• Electrical interference may affect your phone's performance. This is
perfectly normal and once you move away from the source of
interference, the phone should function as usual.
• Do not attempt to disassemble your product, including accessories.
Only Toshiba authorised personnel should perform the service.
7
Page 12

The following information is for EU member states
only:
The use of this symbol indicates that this product may not
be treated as household waste. By ensuring the correct
disposal of this product, you will help prevent potential
negative consequences to the environment and human
health, which could otherwise be caused by inappropriate
waste handling of this product. For more detailed
information about recycling this product, please contact
your local city council, your household waste disposal service or the shop
from where you purchased the product.
FCC Notice
This device complies with Part 15 of the FCC rules. Operation is subject to
the following two conditions: (1) This device may not cause harmful
interference, and (2) This device must accept any interference received,
including interference that may cause undesired operation.
European RF Exposure Information
Your mobile device is a radio transmitter and receiver. It is designed not to
exceed the limits for exposure to radio waves recommended by
international guidelines. These guidelines were developed by the
independent scientific organisation ICNIRP and include safety margins
designed to assure the protection of all persons, regardless of age and
health.
The guidelines use a unit of measurement known as the Specific
Absorption Rate, or SAR. The SAR limit for mobile devices is 2 W/kg and
the highest SAR value for this device when tested at the ear was
0.567 W/kg*. As mobile devices offer a range of functions, they can be
used in other positions, such as on the body as described in this user
guide**. In this case, the highest tested SAR value is 0.788 W/kg
As SAR is measured utilising the devices highest transmitting power the
actual SAR of this device while operating is typically below that indicated
above. This is due to automatic changes to the power level of the device
to ensure it only uses the minimum level required to reach the network.
8
Page 13

The World Health Organisation has stated that present scientific
information does not indicate the need for any special precautions for the
use of mobile devices. They note that if you want to reduce your exposure
then you can do so by limiting the length of calls or using a 'hands-free'
device to keep the mobile phone away from the head and body. Additional
information can be found on the websites of the World Health
Organisation (http://www.who.int/emf).
* The tests are carried out in accordance with international guidelines
for testing.
** Please refer to the <FCC RF Exposure Information> section about
body worn operation.
FCC RF Exposure Information
In August 1996 the Federal Communication (FCC) of the United States
with its action in Report and Order FCC 96-326 adopted an updated
safety standard for human exposure to radio frequency (RF)
electromagnetic energy emitted by FCC regulated transmitters. Those
guidelines are consistent with the safety standard previously set by both
U.S. and international standards bodies. The design of this phone
complies with the FCC guidelines and these international standards. Use
only the supplied or an approved internal antenna. Unauthorised
antennas, modifications, or attachments could impair call quality, damage
the phone, or result in violation of FCC regulations.
Your handset is a radio transmitter and receiver. It is designed and
manufactured not to exceed the emission limits for exposure to radio
frequency (RF) energy set by the Federal Communications Commission
of the U.S. Government.
The guidelines are based on standards that were developed by
independent scientific organisations through periodic and thorough
evaluation of scientific studies. The standards include a substantial safety
margin designed to assure the safety of all persons, regardless of age and
health.
9
Page 14

The exposure standard for wireless handsets employs a unit of
measurement known as the Specific Absorption Rate, or SAR. The SAR
limit set by the FCC is 1.6 W/kg. The tests are performed in positions and
locations (e.g., at the ear and worn on the body) as required by the FCC
for each model. The highest SAR value for this model handset when
tested for use at the ear is 0.487 W/kg and when worn on the body, as
described in this user guide, is 0.393 W/kg. Body-worn Operation; This
device was tested for typical body-worn operations with the back of the
handset kept 1.5 cm from the body. To maintain compliance with FCC RF
exposure requirements, use accessories that maintain a 1.5 cm
separation distance between the user's body and the back of the handset.
The use of belt clips, holsters and similar accessories should not contain
metallic components in its assembly. The use of accessories that do not
satisfy these requirements may not comply with FCC RF exposure
requirements, and should be avoided.
The FCC has granted an Equipment Authorisation for this model handset
with all reported SAR levels evaluated as in compliance with the FCC RF
emission guidelines. SAR information on this model handset is on file with
the FCC and can be found under the Display Grant section of
http:// www.fcc.gov/oet/fccfid after searching on FCC ID HFS-SD3-E01.
Additional information on Specific Absorption Rates (SAR) can be found
on the Cellular Telecommunications & Internet Association (CTIA) website
at http://www.phonefacts.net.
10
Page 15
Licences
• T9® Text Input and the T9® logo are registered
trademarks of Tegic Communication. “T9 Text Input is
licenced under one or more of the following:
U.S. Pat. Nos. 5,187,480, 5,818,437, 5,945,928,
5,953,541, 6,011,554, 6,286,064, 6,307,548,
6,307,549, and 6,636,162, 6,646,573; Australian Pat. Nos. 727539,
746674, and 747901; Canadian Pat. Nos. 1,331,057, 2,302,595, and
2,227,904; Japan Pat. No. 3532780, 3492981; United Kingdom Pat.
No. 2238414B; Hong Kong Standard Pat. No. HK1010924; Republic
of Singapore Pat. No. 51383, 66959, and 71979; European. Pat.
Nos. 0 842 463 (96927260.8), 1 010 057 (98903671.0), 1 018 069
(98950708.2); Republic of Korea Pat. Nos. KR201211B1 and
KR226206B1. People's Republic of China Pat. Application Nos.
98802801.8, 98809472.X and 96196739.0; Mexico Pat. No. 208141;
Russian Federation Pat. No. 2206118; and additional patents are
pending worldwide”
• This product contains Openwave Systems Inc.'s Openwave internet
browser software.
Copyright © 2000-2005 Openwave Systems Inc.
Openwave
Systems Inc. in Japan and selected countries worldwide. It is certified
with Master browser licence agreement No. 000336.
•
• Bluetooth™ is a trademark of Bluetooth SIG, Inc. USA.
®
is a registered trademark or trademark of Openwave
11
Page 16
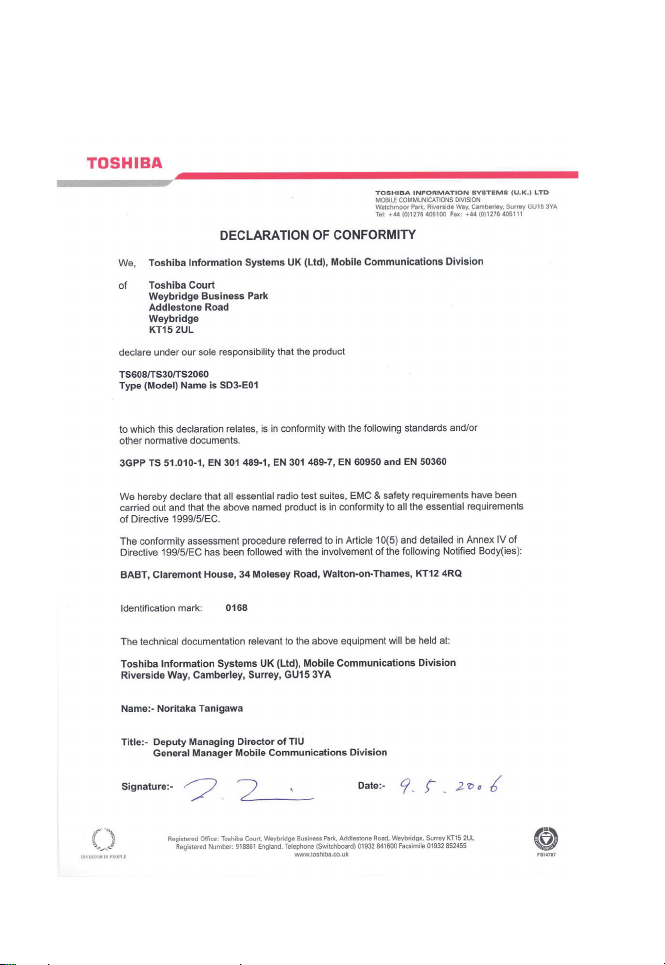
Declaration of Conformity of Toshiba
12
Page 17
Setting up the Phone
This section describes basic operations such as inserting your SIM card,
charging the battery, and entering your PIN.
The following must be completed before you begin using the phone:
• Ensure that the battery is inserted
• Ensure that the SIM card is inserted
• Charge the phone's battery
Battery
The battery included with your phone is not charged. Before you can
switch on your phone for the first time, you need to insert the phone's
battery and charge it.
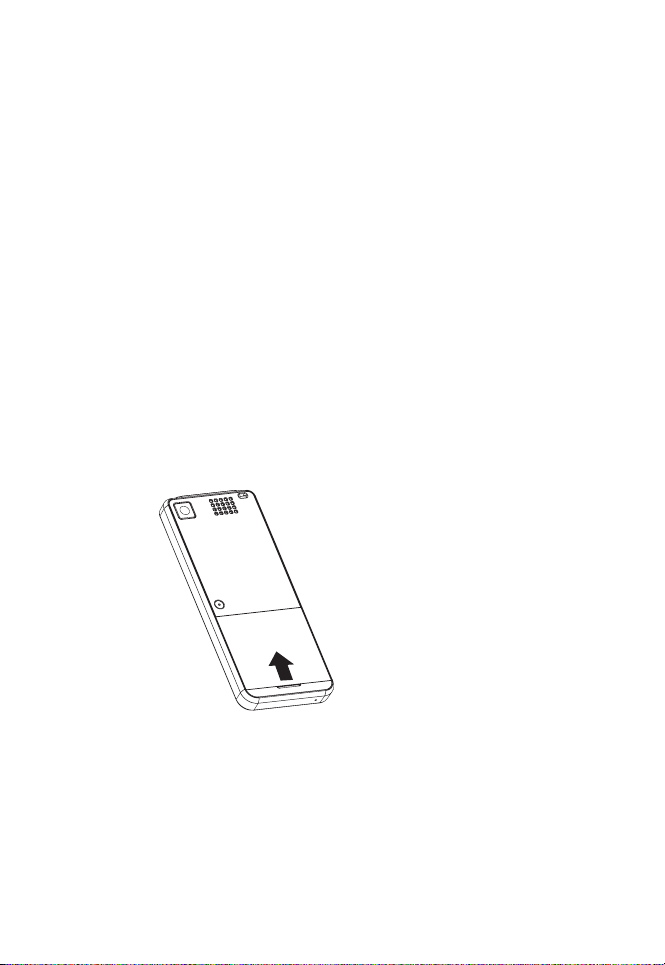
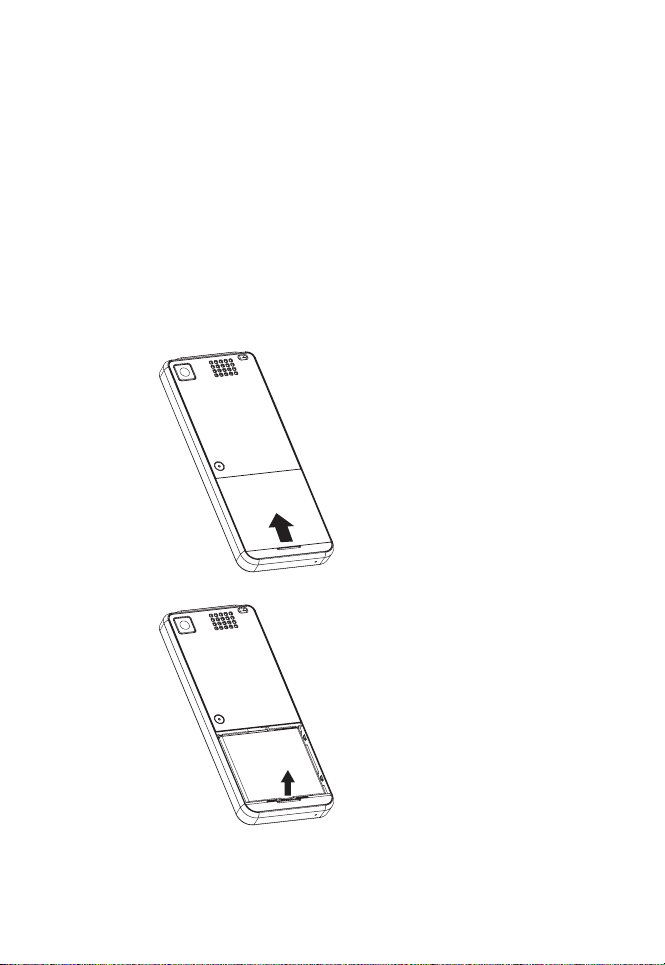
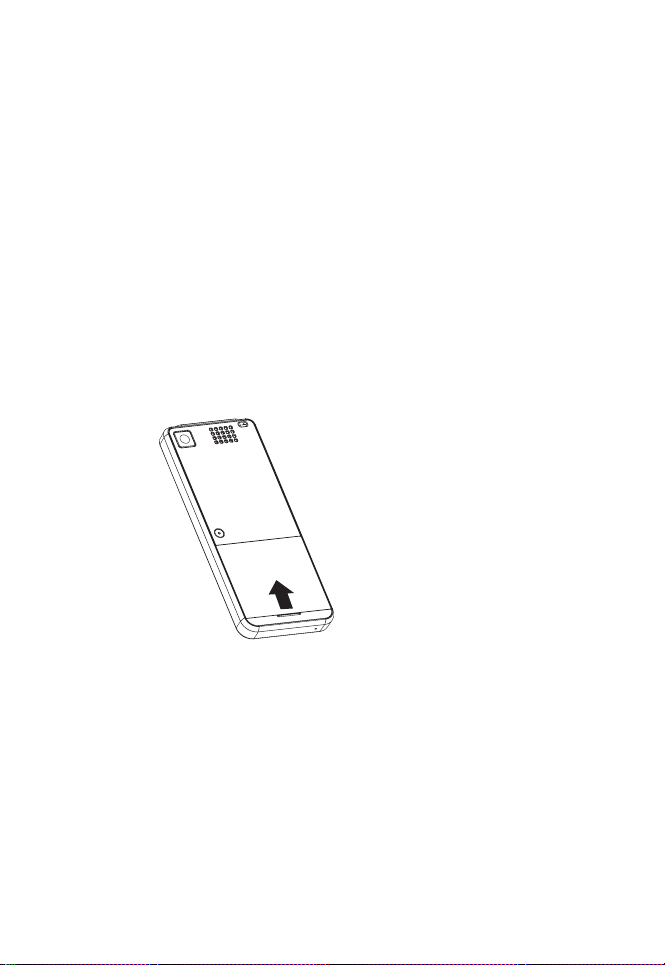
Inserting or Changing the Battery
To insert or change the battery:
Step 1:
Flip the battery cover up
to remove it.
13
Page 18
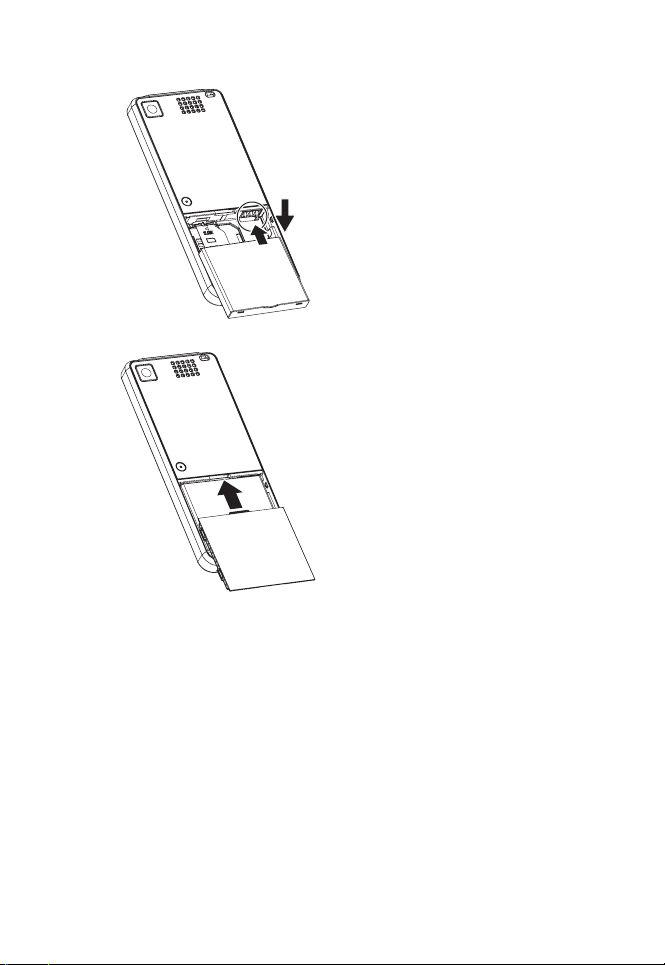
Step 2:
Insert your battery with
the metallic part in contact
with the phone's and
gently press it down.
Step 3:
Replace the battery cover.
14
Page 19
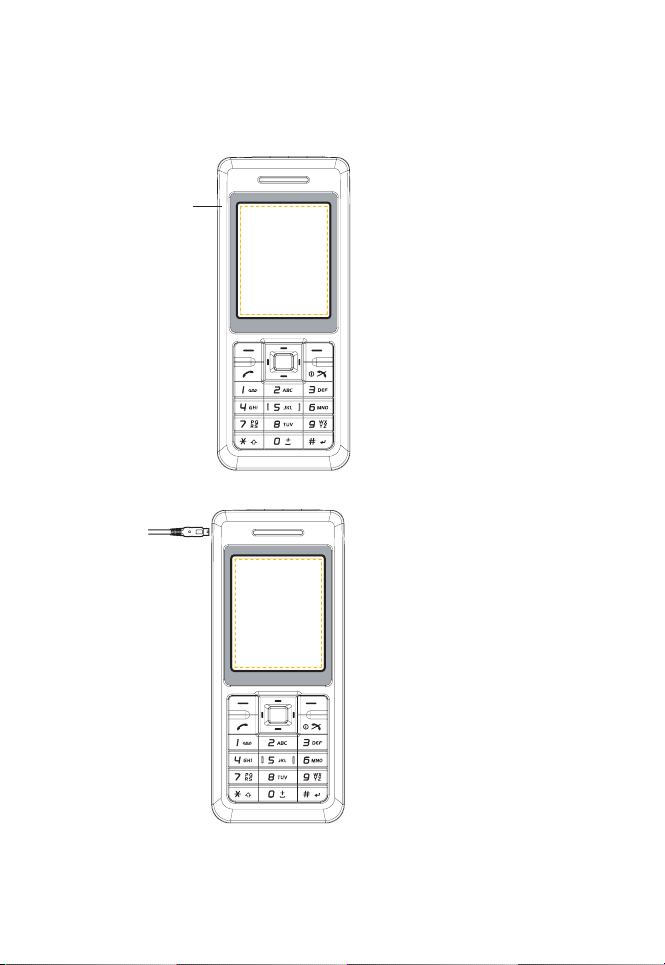
Charging the Battery
To charge a battery:
Charger
Charger
connector
connector
Step 1:
Locate your charger
connector on the left of
your phone.
Step 2:
Connect the charger to
the phone. Plug the
charger into a power
socket. The charger
connection screen will be
displayed.
15
Page 20
During charging there is a possibility that the charging
indicator may not appear. Please keep the phone charged
for a while before you disconnect the charger.
Disconnecting the charger
To disconnect the charger, grip it tightly and pull. You should disconnect
the charger from the power outlet before disconnecting the charger from
the phone.
Charging Indicator
The first time you charge your battery, you should leave it charging for 8
hours. The battery only achieves optimum performance after two or three
complete charges.
When the battery power is low, the phone starts beeping and Battery
empty! will be displayed every 30 seconds and will be automatically
power off within three minutes.
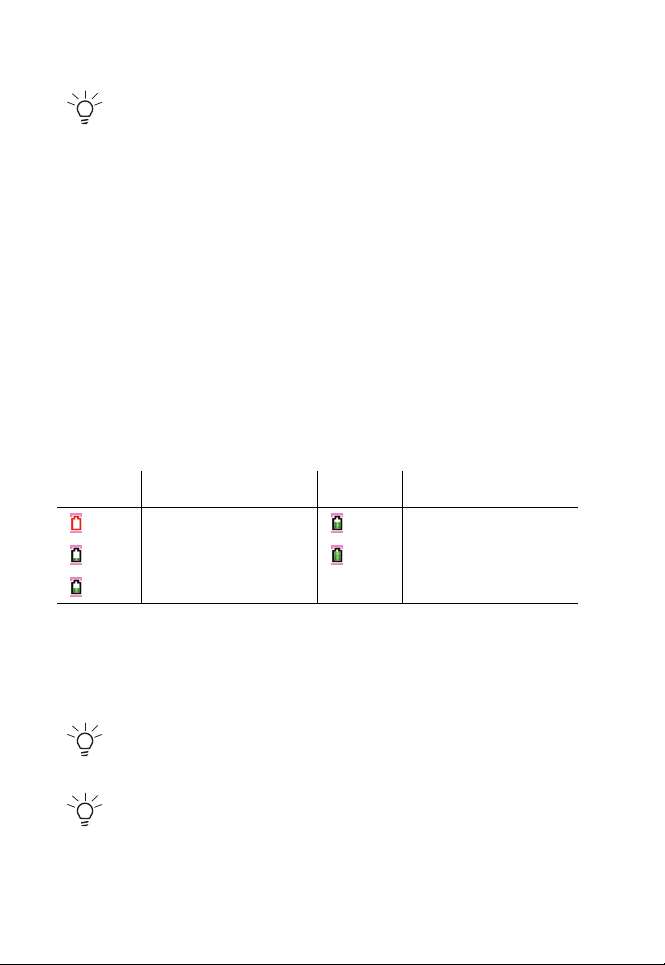
When in use and during charging, the indicator shows the following icons:
Icon Description Icon Description
Battery empty Battery nearly full
Battery nearly empty Battery full
Battery half full
When the battery is fully discharged, the charging indicator is not
displayed and will not appear after the phone has recharged sufficiently.
For safety information regarding the battery, refer to ”Battery Safety” on
page 6.
Always turn off the phone before removing the battery.
Please note that if the battery is empty and is not used for a
couple of days there is the possibility that the charging indicator
may not be displayed until after a maximum time of 30 minutes
after the phone is charged again.
16
Page 21
SIM Card
Your SIM card identifies your phone on the network and stores your
details, including your PIN, call history, and subscription information. It
can also be used to store some phone book data. For more information,
refer to ”Contacts” on page 74.
You should only remove your SIM card when absolutely necessary. If it is
lost or damaged, the information stored on it cannot be retrieved.
Inserting / Removing the SIM Card
Turn to the back of your phone to locate your battery cover. To insert or
remove the SIM card (Steps 1-5):
Step 1:
Flip the battery cover up
to remove it.
Step 2:
Remove the battery.
17
Page 22
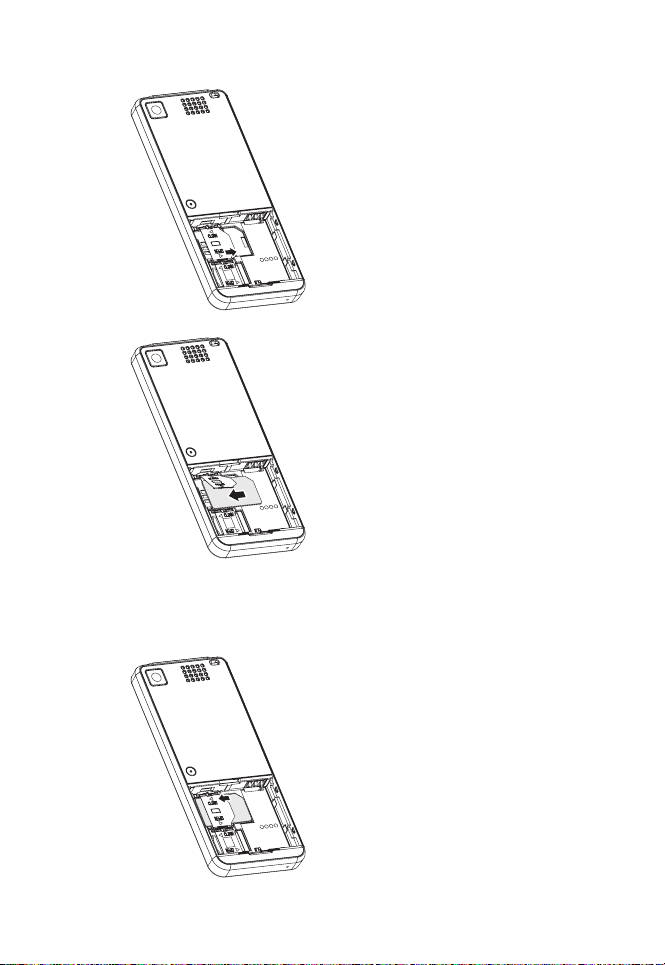
Step 3:
Push the SIM locker to the
right to unlock and lift it
up.
Step 4:
Insert your SIM card into
the SIM card holder with
the card's metallic
connector in contact with
the phone's and the
notched corner on the
right.
(To remove your SIM
card, simply lift it off the
SIM card holder.)
Step 5:
Gently press down the
SIM locker and push it to
the left to lock.
18
Page 23
Personal Identification Numbers (PINs)
When you switch on your phone, you may be requested to enter your PIN
or phone code if your phone requires you to do so. This number should be
in the documentation supplied by your service provider.
If you enter the wrong PIN three times in a row your phone will become
blocked. You will then require your PUK number to unblock it. For more
information about your PIN and PUK number, refer to ”Security” on
page 38.
Memory slot
Your phone supports a Micro SD Flash memory card of up to 512 MB. The
Memory card slot is located under the battery. The battery cover is located
on the rear of the phone.
To insert or remove the Memory card (Steps 1-5):
Step 1:
Flip the battery cover up
to remove it.
19
Page 24
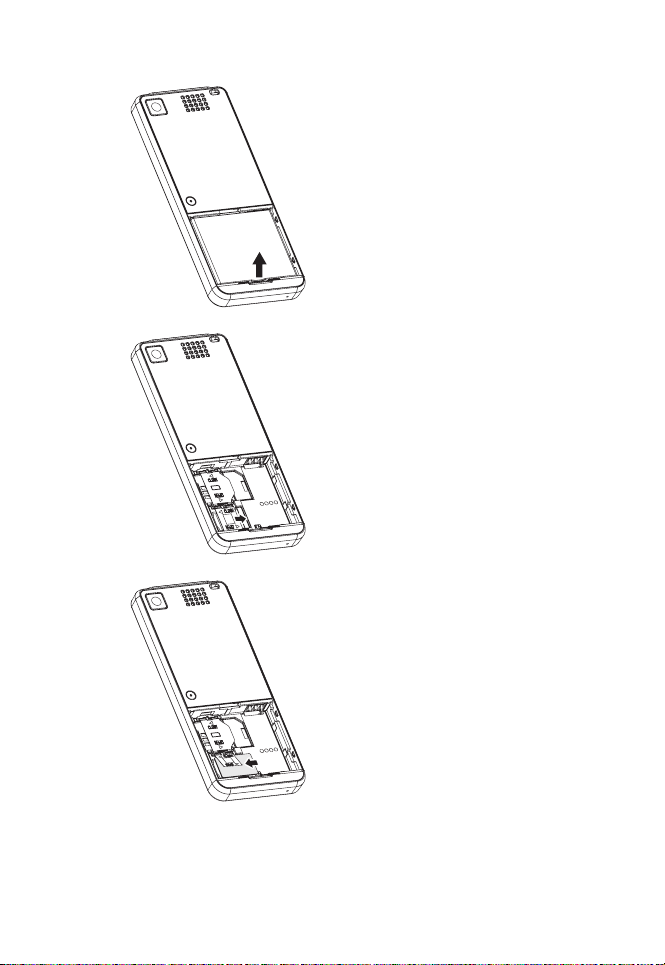
Step 2:
Remove the battery.
Step 3:
Push the memory card
locker to the right to
unlock and lift it up.
Step 4:
Insert your memory card
into the memory card
holder with the card's
metallic connector in
contact with the phone's
and the notched corner on
the right.
(To remove your memory
card, simply lift it off the
memory card holder.)
20
Page 25
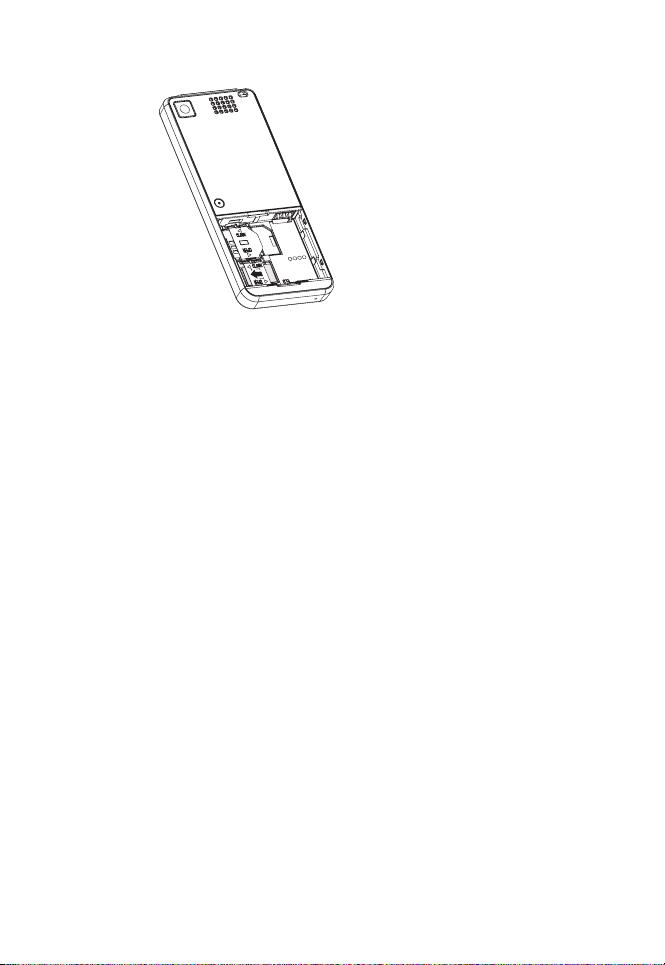
Step 5:
Gently press down the
memory locker and push it
to the left to lock.
21
Page 26
General Information
A
This section explains the features of your phone. Please familiarise
yourself with the phone before you start using it.
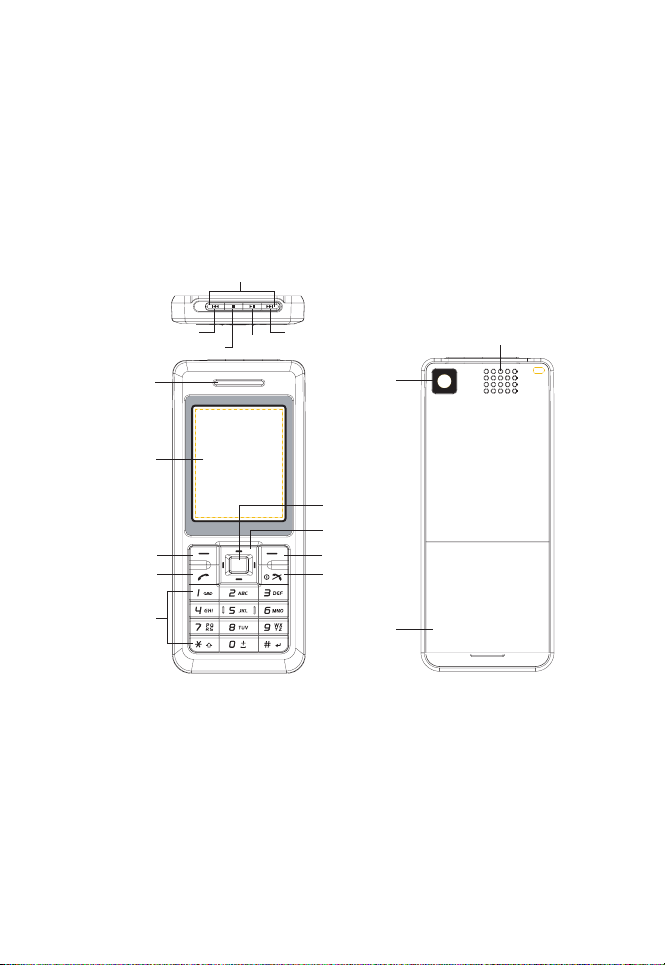
Parts and Functions
MP3 Key
MP3 Key
Backward
Backward Forward
Stop
Stop
Earpiece
Earpiece
LCD Screen
LCD Screen
Left Soft Key
Left Soft Key Right Soft Key
Call Key
Call Key
Alphanumeric
lphanumeric
Keys
Keys
Play
Play
Forward
Camera
Camera
Centre/
Centre/
Camera Key
Camera Key
4-Way
4-Way
Navigation Key
Navigation Key
Right Soft Key
Power/End Key
Power/End Key
Battery
Battery cover
cover
Speaker
Speaker
22
Page 27
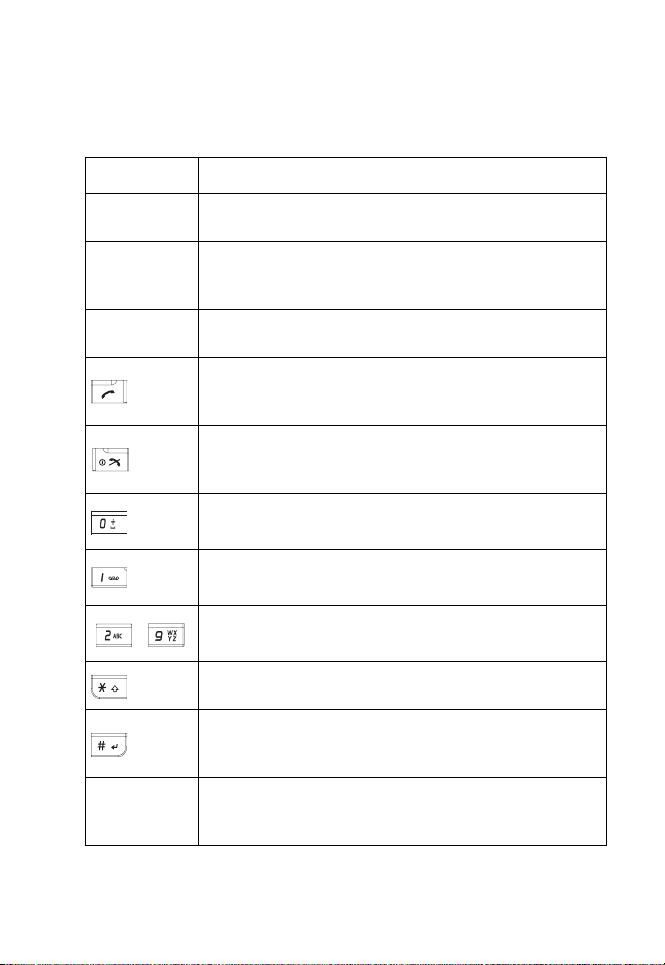
Keys
Each of the keys on your phone has one or more functions, as explained
in the table below.
Key Function(s)
4-way key
Centre key
Soft keys
To navigate the phone's menu system. For more
information, refer to ”The 4-Way Key” on page 24.
To enter the selected menu, confirm the selection,
submit an entered number or piece of text. For more
information, refer to ”The 4-Way Key” on page 24.
Press to access the functions available for the soft keys.
For more information, refer to ”Soft Keys” on page 26.
To dial a number or accept an incoming call; also from
the idle screen, press once to display the Dialled calls
list, and press twice to redial the last number called.
To turn on/off the phone, reject an incoming call, end a
call, cancel a selection, return to the idle screen from
any phone menu.
From the idle screen, press and hold to enter “+” and
display the “+List (for international codes).”
From the idle screen, press and hold to access Voice
mail.
-
MP3 keys
Press and hold to access shortcut functions. For more
information, refer to ”Shortcuts” on page 41.
From the idle screen, press and hold to lock the keypad.
During text editing, press to switch entry method.
During text editing, press to access to the symbol chart.
In idle screen, press and hold to bring up the Profiles
menu. And it also can be personalised in "Shortcuts".
From the top of the phone, you may access the MP3
keys from the left to right, they are Previous, Stop, Play
and Next.
23
Page 28
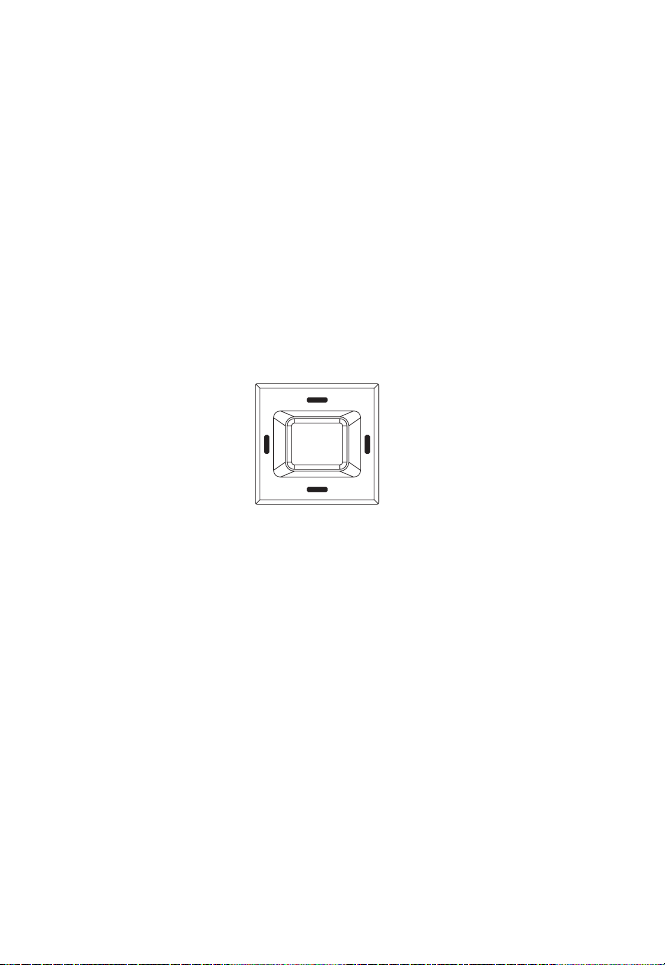
The 4-Way Key
Your phone has an easy-to-use menu system that you can navigate using
the 4-way key.
S Up
• To scroll up lists or
move the cursor
upwards.
• To access Scheduler
menu from the idle
screen.
• To increase the
brightness level in
camera preview mode.
W Left
• To scroll left or move
the cursor to the left of
the screen.
• Press and hold to
access My Player from
the idle screen.
• To select camera mode
under the video mode.
• To decrease volume
during a call.
24
• To scroll down or move
the cursor downwards.
• To access Phonebook/
SIM contacts from the
idle screen.
• To reduce the
brightness level in
camera preview mode.
Down T
Right X
• To scroll right or move
the cursor to the right of
the screen.
• To access My data
from the idle screen.
• To select Video mode
under the camera
mode.
• To increase volume
during a call.
Centre key
• To confirm the function.
• To access the Main
Menu from the idle
screen.
• To toggle a desired
function on/off in a
menu screen.
• To take a picture/shoot
a video in camera/video
mode.
Page 29
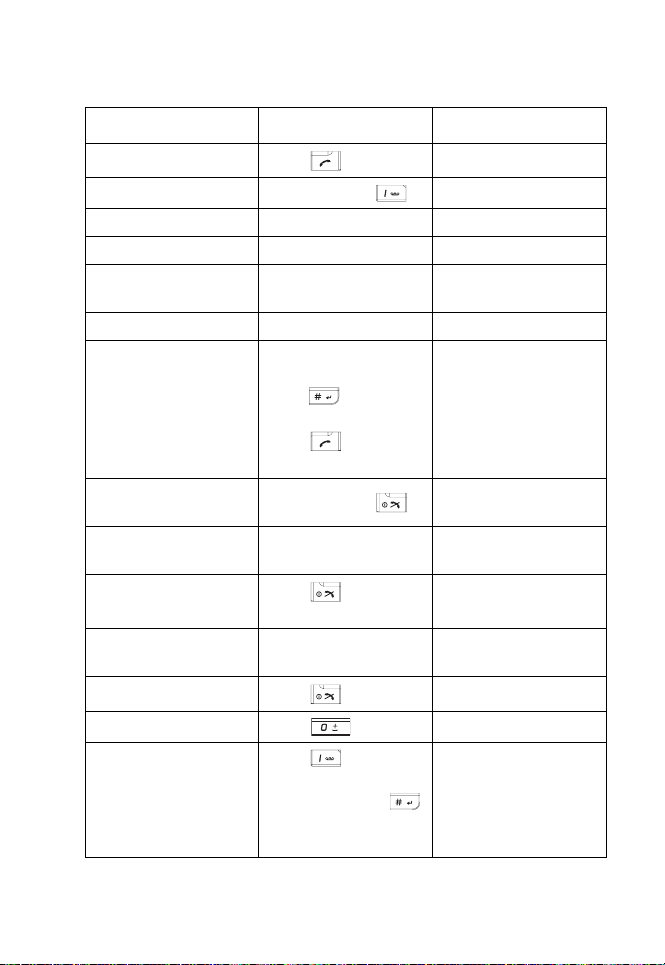
Quick keys
To Key Sequence Mode
View recent calls
Call voice mail
Access My Player Press W key Standby
Access My data Press X key Standby
Access Phonebook /
SIM contacts
Access Scheduler Press S key Standby
Quick dial a
phonebook number
Switch on/off the
phone
Select a menu item
Exit a menu
Put a call on hold or
retrieve a call on hold
Reject/end a call
Enter a space
Enter a symbol
Press once
Press and hold
Press T key Standby
Enter the number of
Position in SIM and
press to display
the number quickly.
Press to dial the
number.
Press and hold
Press Centre key or
Left Softkey
Press or Right
Softkey
Press Hold or
Retrieve soft keys.
Press
Press
Press until the
desired symbol
appears or press
to display the symbol
chart
Standby
Standby
Standby
Standby
In the menu
In the menu
During a call
Receiving/during a call
Entering text
Entering text
25
Page 30
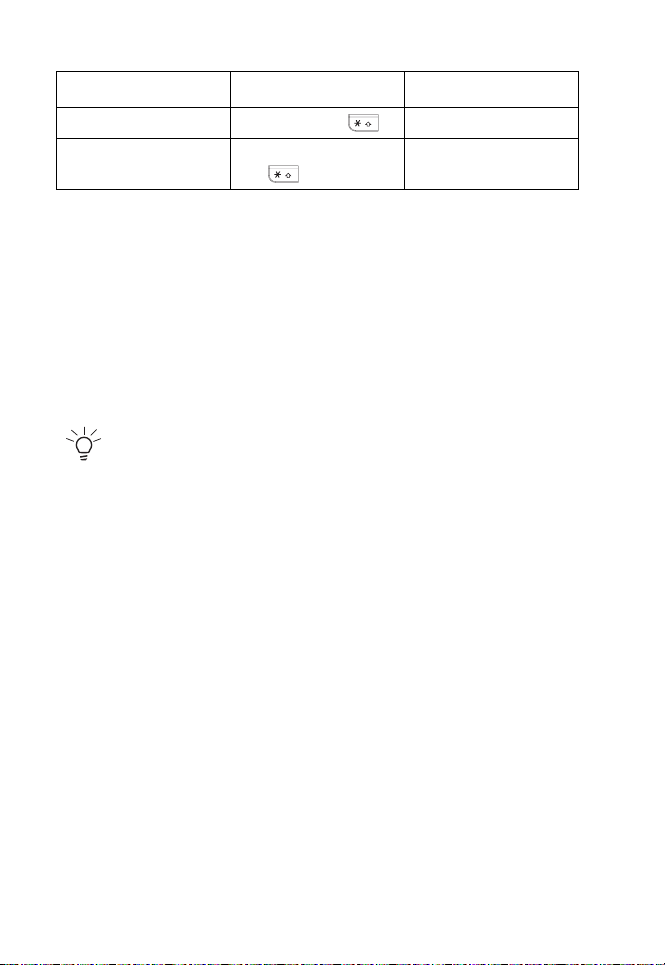
To Key Sequence Mode
Lock keypad
Unlock keypad
Press and hold
Press Right Softkey
and
Standby
Standby
Soft Keys
Your phone has two keys called “Soft keys.” The function of these keys
depends on the menu being displayed at the time. The available function
is displayed above the soft keys, as shown below.
The default soft keys (i.e. the ones displayed in stand-by mode) are
Message and Homepage. Pressing the soft keys will take you
directly to the functions. However, you can redefine the Softkey functions.
For more information, refer to ”Shortcuts” on page 41.
If PIN entry is required when you turn on your phone, the SOS
soft key will be available before you enter the PIN. For more
information, refer to ”SOS Soft Key” on page 6.
26
Page 31
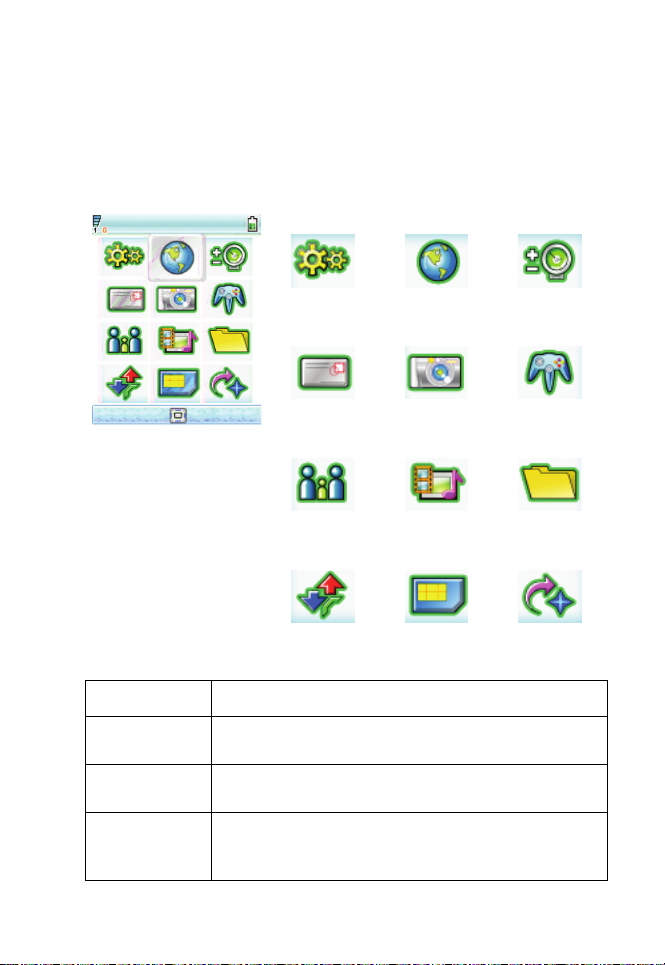
Main menu
Your phone's menu structure starts with the 12 Main menu icons in a grid
view. Press the Centre key to access the Main Menu from the idle screen.
Navigate to the desired menu by using the 4-way navigation key, then
press the Centre key or Select to access the sub-menu.
Browser
Messages Camera Entertainment
Select
Back
Menu Description
Settings
Browser
Includes a variety of phone settings. For more
information, refer to ”Settings” on page 37.
Provides access to the Internet. For more information,
refer to ”Browser” on page 54.
Provides extra features such as Scheduler, Alarm,
Tools
Appointments, Tasks, and Calculator. For more
information, refer to ”Tools” on page 56.
Settings Browser Tools
Contacts My player My data
Calls STK Shortcuts
27
Page 32
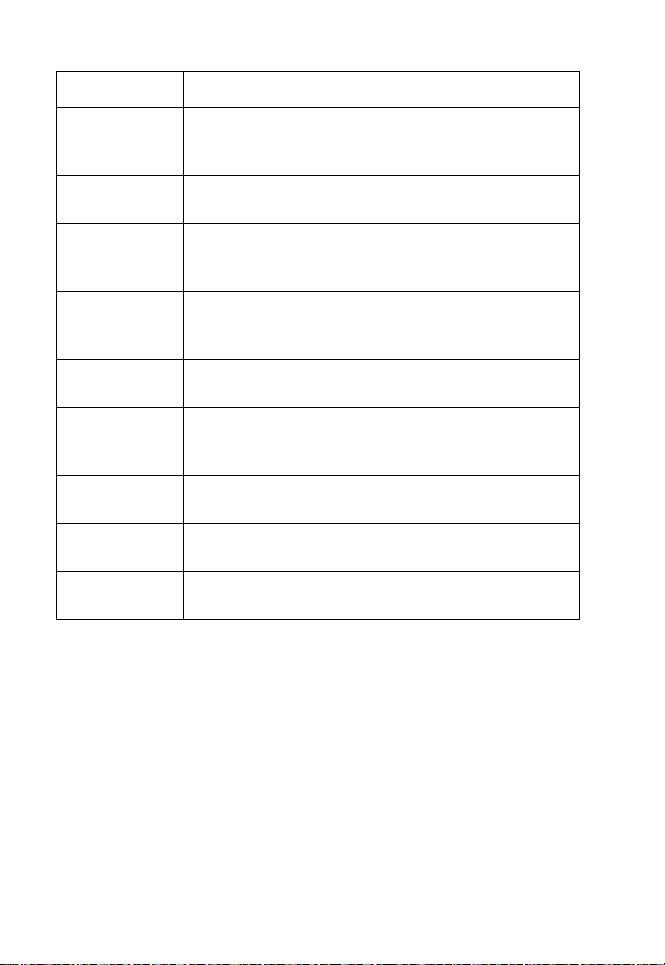
Menu Description
Allows you to take a picture/shoot a video by using the
Camera
display as a view finder. For more information, refer to
”Camera” on page 61.
Messages
Provides SMS/MMS/E-mail functions. For more
information, refer to ”Messages” on page 64.
Provides some entertaining features: Default Games,
Entertainment
Java Games and Composer. For more information,
refer to ”Entertainment” on page 72.
Stores a list of phone contacts and shows memory
Contacts
status. For more information, refer to ”Contacts” on
page 74.
My player
Allows you to listen to music on your phone. For more
information, refer to ”My player” on page 78.
Accesses all the files on your phone and allows you to
My data
manage your files. For more information, refer to ”My
data” on page 82.
Calls
STK
Shortcuts
Records a call history list. For more information, refer
to ”Calls” on page 83.
Provides SIM related functions (depending on your
SIM card).
Allows you to access some features quickly. For more
information, refer to ”Shortcuts” on page 41.
28
Page 33
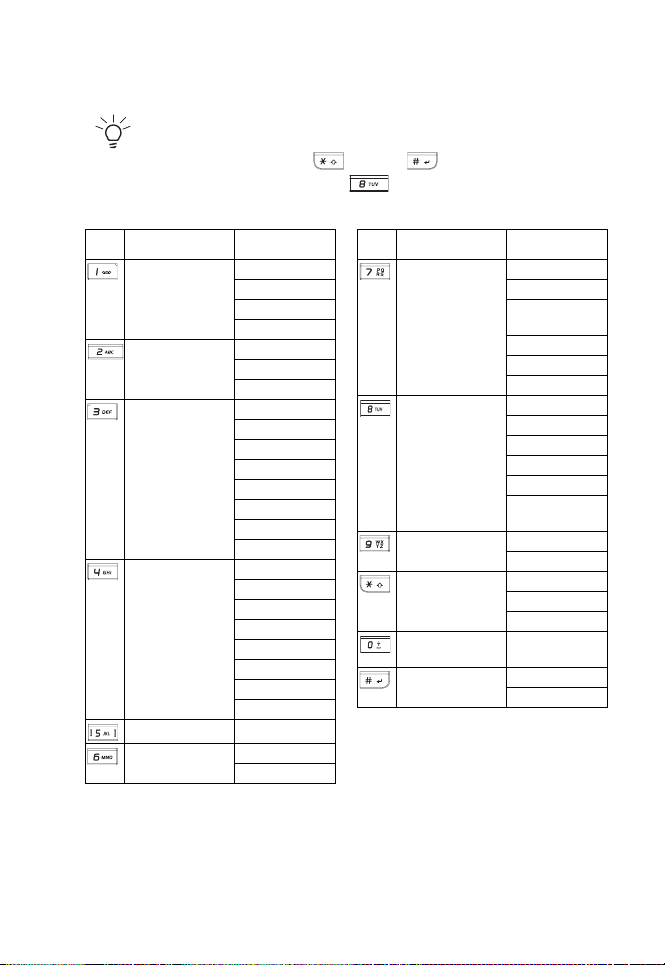
Menu Structure
Note: On the Main Menu screen, you can press the 4-way key
to scroll to the desired option. Alternatively, you can press the
number keys (0-9), the and the to access any menu
directly. For example, press to access My player.
Key Main Menu 2nd Level
Settings General
Display
Sounds
Connectivity
Browser Homepage
Favourites
Settings
Tools Scheduler
Alarm
Appointments
Tasks
Notes
Calculator
Unit converter
Countdown
Messages Create
Inbox
Outbox
Drafts
Templates
Cell info
Memory Status
Settings
Camera <View Finder>
Entertainment Games
Composer
Key Main Menu 2nd Level
Contacts View Contacts
View groups
Special
numbers
Quick call
Advanced
My player FM radio
My data My data
Calls Call history
STK*
Shortcuts Fast keys
Memory status
Tracks
Last Played
Playlists
Voice memo
Background
MP3
Memory card
Clear history
Call Settings
SIM related
functions
Hot keys
* The feature is subscription dependent. Please contact your service
provider.
29
Page 34
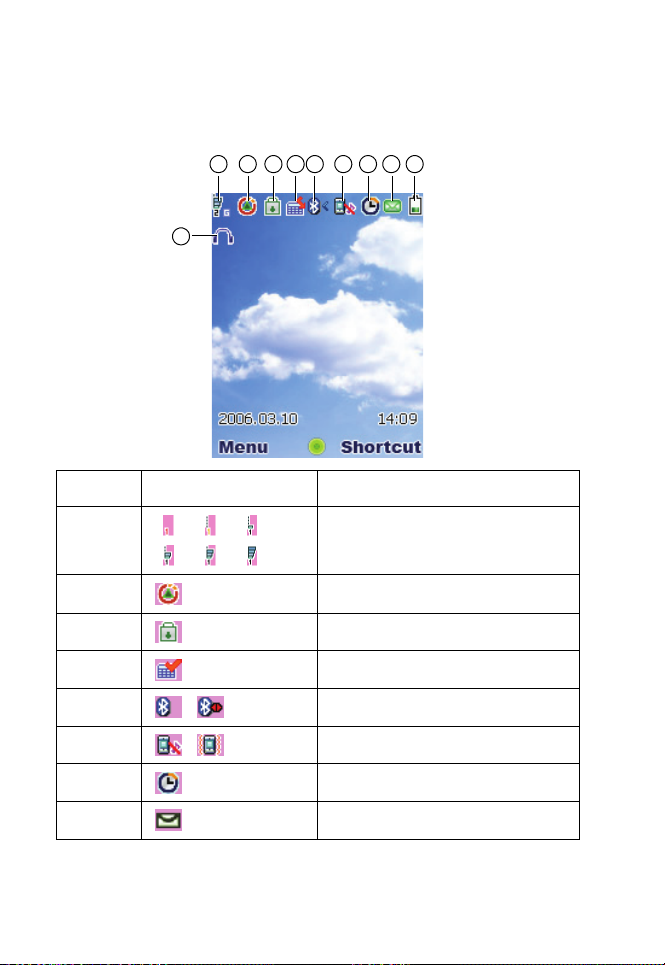
Icons
Your phone has a 262,000-colour LCD screen. The icons displayed on the
screen are explained below.
1 2 3 4 5 6 7 8 9
10
No. Icon Description
1 Signal strength (low to high)
2 Roaming
3 Keypad lock
4 Appointments
5 Bluetooth (active/ connecting)
6 Phone set to mute/Vibrate
/
/
7Alarm set
8 Message indicator
30
Page 35
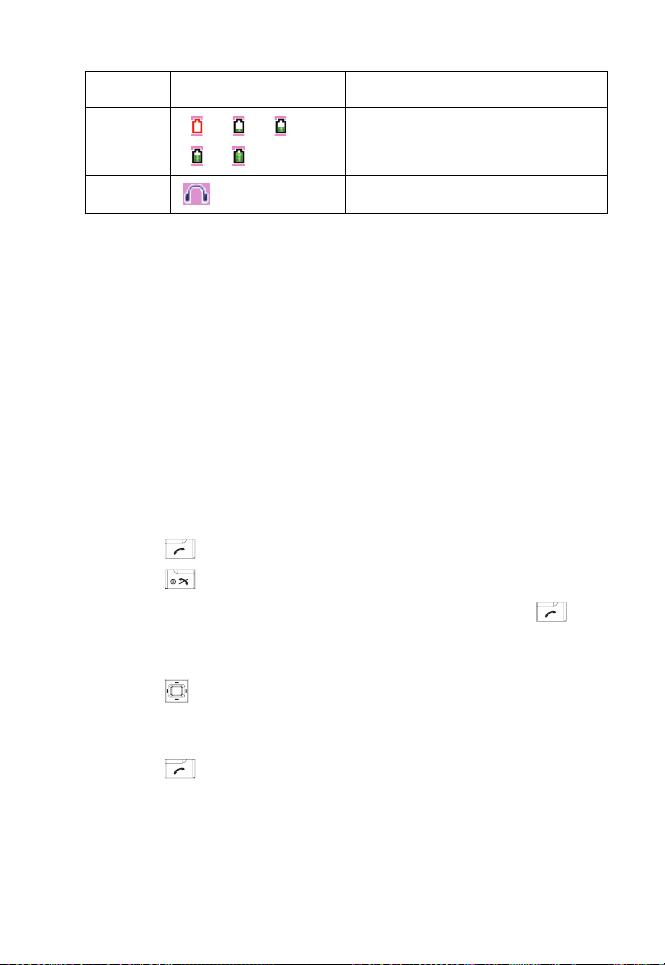
No. Icon Description
9 Battery level (empty to full)
10 Headset
Basic Phone Use
Making an Emergency Call
Emergency calls can be made without credit on your phone and in some
cases without a SIM card inserted. To make an emergency call, dial the
local emergency number or, if available, press SOS, followed by Yes.
Making/Ending a Call
Before you can make a call, you need to insert your SIM card and make
sure your phone is switched on.
To make/end a call (Steps 1-3):
1. Enter a phone number (including area codes if necessary) using the
keypad keys.
2. Press to dial the number.
3. Press to terminate the call.
Alternatively, you can select a contact from Contacts and press to
dial the number:
To make a call from Contacts (Steps 1-3):
1. Press > Contacts > View Contacts. Alternatively, press T from
the idle screen to view contacts.
2. Scroll to the desired entry.
3. Press .
31
Page 36

When there are more than one phone entries in a contact, you may set
one of the numbers as Default number. Therefore, you can view/call it
whenever you bring up the contact's detail.
1. Press > Contacts > View Contacts > Select SIM contacts or
Phonebook.
2. Scroll to the desired entry.
3. Press Options > Default number
When you enter a new entry in your contacts, the phone assigns a
Position in SIM number. Using this, you can speed dial a number.
To speed dial a number (Steps 1-3):
1. Enter a Position in SIM number by using the keypad keys.
2. Press to request the phone number from the contacts.
3. Press .
To dial a number from the Call history lists (Steps 1-4):
1. Press from the idle screen.
2. Press W/X to scroll to the desired call list.
3. Press S/T to scroll to the desired number.
4. Press .
Receiving/Rejecting a Call
When there is an incoming call, the phone rings/vibrates (depending on
your Profile) and the screen displays the name (if recorded in the
Contacts) or phone number of the caller (this feature is network
dependent).
To receive a call, press or Options > Accept call.
To reject a call, press to Reject or press Options > Reject call.
Holding a Call
A call may be put on hold.
To place a call on hold:
During a call, press Hold. Alternatively, press Options and select Hold.
32
Page 37

Making/Receiving a Second Call
Your first call is put automatically on hold by your phone when you receive
or dial a second call.
To make a second call (Steps 1-3):
1. During a call, press the keypad keys to enter a number.
2. Press Options and select Dial number.
When you make the second call, the first call will automatically
be put on hold.
3. Press Swap to switch between two calls.
Making a Conference Call
When you have one active call and another one on hold, you can connect
the two calls for a conference call.
To make a conference call (Steps 1-2):
1. Press Options > Conference to connect the two calls.
2. Press Options > End Call to disconnect the two calls.
To make a second call (Steps 1-2):
1. During an active call or during a call on hold, enter a phone number
by pressing the keypad keys.
2. Press .
This feature is subscription dependent.
Receiving a Third Call
If you have a third call coming in while you have one call on hold and
another active, answering the third call will end the active call and replace
it with the newly received one. Alternatively, you can receive a third call
when you have the first two calls connected (using the Conference Call
feature).
33
Page 38

Text Entry
Changing Entry Mode
This section describes how to enter text by using your keypad keys.
In an edit screen, an indicator displays the currently applied entry mode.
When creating a new SMS or MMS, there is a word counter above the
indicator, telling you how many characters you can still enter.
To turn T9 predictive text input on/off, press and hold in an edit
screen.
To change entry method, press to switch between the following
modes:
T9 Entry Method Normal Entry Method
T9 abc abc
T9 Abc Abc
T9 ABC ABC
123 123
T9 Language
Your phone supports T9 predictive text input in a number of languages.
To select a T9 language (Steps 1-3):
1. Press > Settings > Language > T9 language > T9 language.
2. Scroll to the desired language.
3. Press Select.
Setting the T9 language to Automatic allows the phone to
select a language for you.
T9 Preferred
The T9 preferred setting displays the preferred T9 language when you edit
SMS or MMS messages. If the setting is off, T9 entry will be switched off
when you edit messages.
To disable T9 preferred (Steps 1-2):
34
Page 39
1. Press > Settings > Language > T9 Language > T9 preferred.
2. Press Change.
T9 English Entry Method
T9 predictive text offers possible word combinations by searching the T9
dictionary. Below is an example of how this is done.
To enter “Cat” in your edit screen (Steps 1-4):
1. Press using the keypad keys. “Act” appears on
the screen.
2. Press Left soft key to go to the next possible combination such as
Cat, Bat, Abu, Cau, etc.
3. Stop pressing Left soft key when “Cat” appears on the screen.
4. Press to add the word and press to enter a space after the
word.
Other key functions:
1. : Enters the word and adds a space after it.
2. Right soft key: Deletes the letter on the left of the cursor.
3. Left soft key: Opens Options menu or goes to the next possible T9
word combination.
4. : Press to switch between entry modes (upper or lower case).
5. : Press once to open the symbols chart; press and hold to turn
T9 entry on/off.
Normal Entry Method
To enter “Act” in your edit screen (Steps 1-3):
1. Press once to enter “A”.
2. Press three times for the display to jump to “c”.
3. Press once for “t”.
Numeric Entry Method
Press the numeric key to enter the number.
35
Page 40
Character Table
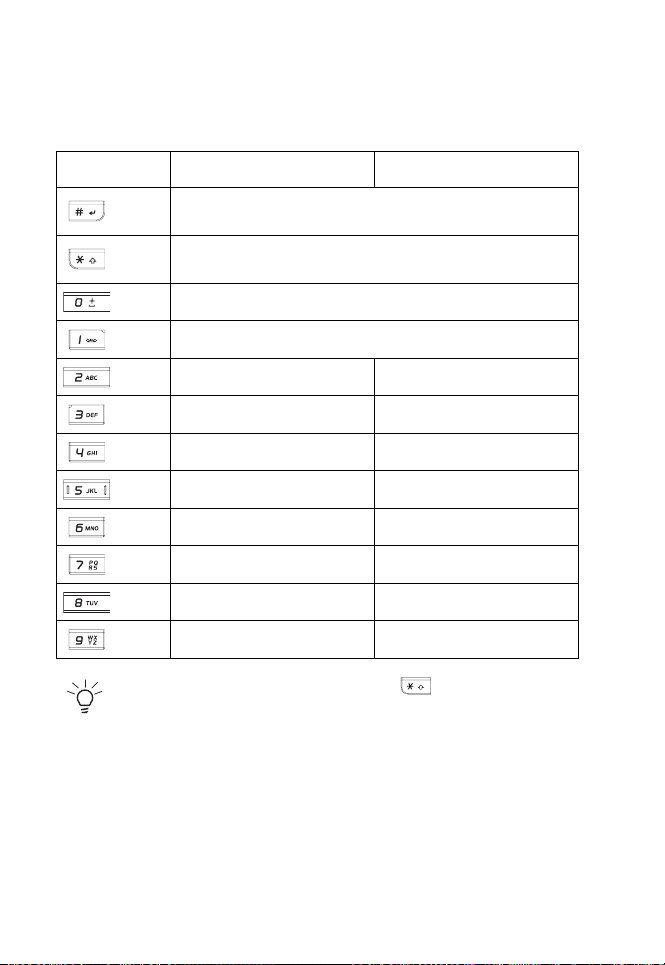
Numeric keys have different functions under different entry methods.
Please refer to the following table for details
Lower case Upper case
Press once to bring up the symbol chart; press and hold
to select T9 language.
Press once to switch between different entry methods:
ABC, Abc, abc or 123.
Space 0
.,@?!:'/";1
abc2 ABC2
def3 DEF3
ghi4 GHI4
jkl5 JKL5
mno6 MNO6
pqrs7 PQRS7
tuv8 TUV8
wxyz9 WXYZ9
To change upper/lower case, press the to switch between
different entry modes (for example: abc or ABC).
36
Page 41

Settings
You can customise your phone by changing the following options in the
Settings menu: General, Display, Sounds and Connectivity. After
entering the Settings menu, you can press W/X key to scroll to the
desired submenu.
General
Under the General submenu, you can define the following settings:
Language, Time & date, Security, Voice control, Auto keypad lock,
Shortcuts, Default storage, Flight mode, Profiles and Default
settings.
Language
This menu allows you to select a text entry language (T9 language) and
phone language (Display language). For details about T9 language, refer
to ”Text Entry” on page 34.
To set a phone language (Steps 1-3):
1. Press > Settings > General > Language > Display language.
2. Scroll S/T to select a desired language.
3. Press Select or to confirm.
If you set the Display language to Automatic, the phone will
automatically select a language for you.
Time & date
This feature allows you to set the time and date.
To set the time display on/off (Steps 1-2):
1. Press > Settings > General > Time & date > Display time.
2. Press Change to turn it on/off.
37
Page 42

To set the Time zone (Steps 1-5):
1. Press > Settings > General > Time & date > Time zone.
2. Press W/X to scroll to the desired time zone.
3. Press Select or to confirm.
4. Select Yes/No to use Daylight saving mode.
To set the time & date (Steps 1-5):
1. Press > Settings > General > Time & date > Set time & date
2. Select Time and enter the time by using the keypad keys.
3. Press Ok to confirm and go back to the previous menu.
4. Select Date and enter the date by using the keypad keys.
5. Press Ok to confirm.
To set the Time format (Steps 1-2):
1. Press > Settings > General > Time & date > Time format.
2. Press Change to switch between 12 hours and 24 hours.
To set the Date format (Steps 1-2):
1. Press Settings > General > Time & date > Date format.
2. Press Select or to choose a format (DD/MM/YYYY, MM/DD/
YYYY, YYYY/MM/DD, YYYY.MM.DD, DD.MM.YYYY, YYYY-MMDD, DD-MM-YYYY).
To set the Power-on/Power-off time (Steps 1-4):
1. Press > Settings > General > Time & date > Power-on time or
Power-off time.
2. Press Change and W/Xto turn the feature on/off.
3. When the Power-on time/Power-off time feature is turned on, you
need to specify an exact time by using the keypad keys.
4. Press Save.
Security
The Security menu provides settings that prevent unauthorised use of
your phone. Before you can change any security settings, you will be
asked to enter the following codes:
• PIN code request (a SIM protection feature)
38
Page 43

• PIN code (a protection code if your SIM is stolen. It is provided by
your network)
• PIN2 code (a protection code for charging information and FDN
service)
• PUK/PUK 2 code (unblocking codes in case you forget your PIN/
PIN2 codes)
• Phone lock (provided by the phone)
PIN code request
This setting allows you to enable the SIM PIN feature, protecting your SIM
card from unauthorised use. Please contact your service provider for your
SIM PIN code.
To set your PIN code request (Steps 1-3):
1. Press > Settings > General > Security > PIN code request.
2. Press Select to turn PIN code request on/off.
3. To turn on PIN code request, the phone asks you to Enter PIN
code.
If you enter the wrong PIN code three times, the SIM card will be
locked.
Changing PIN/PIN2
You will be requested to enter your PIN when the phone is switched on.
However, this feature can be turned off, which leaves your phone at risk of
unauthorised use if it is stolen or lost. You can only change PIN codes
when they are active.
To activate PIN (Steps 1-3):
1. Press > Settings > General > Security > Change PIN.
2. Enter your PIN.
3. Press Ok.
To change PIN/PIN2/lock code (Steps 1-5):
1. Press > Settings > General > Security > Change PIN/PIN2/
lock code.
2. Key in the current code.
3. Key in the new code.
39
Page 44

4. Enter the new code again.
5. Press Ok.
Phone Lock
This setting allows you to enable the phone lock feature, preventing
unauthorised use. Note that the default phone lock code is 123456#.
To turn on your phone lock (Steps 1-2):
1. Press > Settings > General > Security > Phone lock > On.
2. When the phone lock is set to On, enter the default phone lock code
to unlock your phone.
Voice control
By pre-recording voice tags on your phone, you can call up an option or a
contact's phone number by saying the recorded voice tag to your phone.
For example, if you have recorded Calculator in your phone, you can call
up the feature later by saying Calculator.
Voice command
Voice command allows you to record a voice tag for the options you would
like to activate by voice command later.
To create a Voice command (Steps 1-5):
1. Press > Settings > General > Voice control > Voice
command.
2. Scroll S/T to the desired feature and press Record.
3. Press Yes to create Recording for: the desired feature.
4. You can record the voice tag up to three times.
5. Press Save.
Quick call
Quick call allows you to record a voice tag for the contact's name.
To create a voice tag (Steps 1-5):
1. Press > Settings > General > Voice control > Quick call.
2. Scroll S/T to the desired feature and press Record.
3. Press Yes to create Recording for: the desired contact's name.
4. You can record the voice tag up to three times.
40
Page 45

5. Press Save.
Auto keypad lock
This feature allows you to lock the phone keypad automatically or after a
desired period of time.
To set the Auto keypad lock (Steps 1-2):
1. Press > Settings > General > Auto keypad lock.
2. Press Select to choose from the following settings: Off, After 1
minute, After 2 minutes and After 5 minutes.
Shortcuts
Shortcuts allow you to access phone functions quickly by pressing (and
holding) keypad keys-including numeric keys and 4-way navigation key.
To set shortcut functions for numeric keys (Steps 1-4):
1. Press > Settings > General > Shortcuts.
2. Press W/X key to select 123 submenu.
3. Scroll S/T to a desired numeric key number and press Options
> Personalise.
4. Scroll S/T to select a desired shortcut function for the key and press
Select > Ok.
To set shortcut functions for 4-way navigation key (Steps 1-4):
1. Press > Settings > General > Shortcuts.
2. Press W/X key to select 4-way navigation key icon.
3. Scroll S/T to a desired key icon and press Options > Personalise.
4. Scroll S/T to select a desired shortcut function for the key and press
Select > Ok.
Default storage
This feature allows you to check the memory space on your phone and in
your memory card.
To check the Phone memory or Memory card:
Press > Settings > General > Default storage > Phone memory or
Memory card.
41
Page 46

Flight mode
When you are in aircraft to disable celluler functionality, your phone is not
allowed to be turned on. This feature allows you quickly to disable cellular
functionality so you can have your phone on for listening to music, playing
games and so on. The FM radio is disabled in Flight mode.
To turn the Flight mode On/Off (Steps 1-2):
1. Press > Settings > General > Flight mode.
2. Scroll S/T to set the feature On/Off and press Select.
Profiles
Your phone has five sound profiles-Normal, Outdoors, Headset,
Meeting and USB cable. For different situations, you can set your phone
to sound differently. For example, you can set your phone to Meeting
mode when you are in a meeting, where muting your phone may be
necessary. But for USB cable profile, you can select Ringtones only from
Phone memory; do not support from External memory. For more details,
please refer to Sounds on page 44.
To customise a profile (Steps 1-7):
1. Press > Settings > General > Profiles.
2. Select a profile and press Options > Personalise.
3. Define an alert type: Ring only, Vibrate only, Ring & Vibrate,
Vibrate then ring or None.
4. Set the Key sound On/Off by pressing Select.
5. Select Ringtones for a specific event.
6. Set the Ring Volume.
7. Press Back when you have finished.
Default settings
This feature allows you to restore default values for your phone.
To restore Default settings (Steps 1-2):
1. Press > Settings > General > Default settings.
2. Select Yes and enter the phone lock code, as described on page 40,
to confirm you want to Restore default setting.
42
Page 47

Display
Under the Display submenu, you can define settings such as Wallpaper,
Themes, Backlight level, Backlight duration and Greeting.
Wallpaper
You can select an image from the folders and set it as the background
image to the idle screen.
To set the wallpaper (Steps 1-4):
1. Press > Settings > Display > Wallpaper.
2. Select On to go to a desired folder.
3. Scroll S/T to go to the desired image and press Select.
4. Set the Display wallpaper to Stretch or Centre.
Themes
To set a different colour style for your phone (Steps 1-3):
1. Press > Settings > Display > Themes.
2. Scroll S/T to select a theme from Theme 1, Theme 2 and Theme 3.
3. Press Select.
Backlight level
To set the phone's backlight level (Steps 1-3):
1. Press > Settings > Display > Backlight level.
2. Scroll S/T to select from Maximum, High, Medium and Low.
3. Press Select.
Backlight duration
To set the duration of the phone's backlight (Steps 1-3):
1. Press > Settings > Display > Backlight duration.
2. Scroll S/T to select from 1 minute, 30 seconds and 15 seconds.
3. Press Select.
43
Page 48

Greeting
This feature provides a text greeting when the phone is switched on.
When the text greeting is on, the animation is disabled.
To set a text greeting (Steps 1-3):
1. Press > Settings > Display > Greeting.
2. Select On to open the text edit screen.
3. Enter the text and press Ok.
Sounds
Use the Sounds menu to set Alert type, Ringtones, Ring Volume, Key
sound and Shutter sound for your phone. For details about customising
a sound profile, refer to Profiles on page 42.
Alert type
To specify an Alert type (Steps 1-3):
1. Press > Settings > Sounds > Alert type.
2. Scroll S/T to go to the desired alert type: Ring only, Vibrate only,
Ring & Vibrate, Vibrate then ring or None.
3. Press Select.
Ringtones
To set a ring tone for a specific event (Steps 1-4):
1. Press > Settings > Sounds > Ringtones.
2. Press S/T key to scroll to the desired event (All contacts calls, All
calls, Alarm, Appointments, Messages, Cell info or Group 1-10).
3. Press Select and choose a Ringtones source: Phone memory or
Memory card.
4. Scroll S/T to select a sound file and press Select > Ok.
Ring volume
To adjust the Ring Volume (Steps 1-3):
1. Press > Settings > Sounds > Ring Volume.
2. Press W/X key to decrease/increase the volume.
3. Press or Ok to confirm.
44
Page 49

Key sound
To set Key sound (Steps 1-2):
1. Press > Settings > Sounds > Key sound.
2. Press Select to turn the Key sound On/Off.
Shutter sound
To set Shutter sound (Steps 1-2):
1. Press > Settings > Sounds > Shutter sound.
2. Press Select to turn the Shutter sound Off or select Shutter sound
1/2.
Connectivity
In addition to the network and phone connection settings, the
Connectivity submenu also provides Call options, Message settings,
Bluetooth, USB features and Memory card features.
Call options
Call Options include the following settings: Auto Answer, Any key
answer, Second reminder, Call services, Call divert, Bar calls, Fixed
dialling and Closed user group.
Auto Answer
To turn Auto Answer On/Off (Steps 1-2):
1. Press > Settings > Connectivity > Call options
> Auto Answer.
2. Press Change to turn the Auto Answer On/Off.
Any key answer
To turn Any key answer On/Off (Steps 1-2):
1. Press > Settings > Connectivity > Call options
> Any key answer.
2. Press Change to turn the Any key answer On/Off.
Seconds reminder
To turn Seconds reminder On/Off (Steps 1-4):
45
Page 50

1. Press > Settings > Connectivity > Call options
> Seconds reminder.
2. Press Change and W/X key to turn the Auto Answer On/Off.
3. When the feature is set to On, you need to specify the Start time by
using the keypad keys.
4. Press Save.
Call services
Call services provides the following settings: Time & cost, Call waiting,
Hide ID, Caller ID and Cost Settings.
To check/reset Last call/Total incoming/Total outgoing/Cost left/All
voice calls:
1. Press > Settings > Connectivity > Call options > Call
services > Time & cost > Last call/Total incoming/Total
outgoing/Cost left/All voice calls
2. Press Ok to return to the previous screen or Reset to clean the
history record.
Call waiting
To Activate/Cancel Call waiting:
1. Press > Settings > Connectivity > Call options
> Call services > Call waiting
2. Scroll S
/T to select Activate/Cancel and press Select.
To check status, press > Settings > Connectivity > Call options
> Call services > Call waiting > Check status.
Caller ID
To Hide ID (Steps 1-2):
1. Press > Settings > Connectivity > Call options > Call
services > Hide ID.
2. Press Yes to Hide ID for all calls or Hide ID for next call.
To check Caller ID status, press > Settings > Connectivity > Call
options > Call services > Caller ID.
46
Page 51

Cost Settings
To set Currency, press > Settings > Connectivity > Call options
> Call services > Cost Settings > Currency.
To set Cost/unit (Steps 1-2):
1. Press > Settings > Connectivity > Call options
> Call services > Cost Settings > Cost/unit.
2. Enter the rate Per unit and Per minute.
To set Maximum cost (Steps 1-2):
1. Press > Settings > Connectivity > Call options
> Call services > Cost Settings > Maximum cost.
2. Press Edit to turn Display credit On/Off and specify the Maximum
cost by using the keypad keys.
To set Auto display (Step 1-2):
1. Press > Settings > Connectivity > Call options
> Call services > Cost Settings > Auto display.
2. Set the Auto display to be Off or show Cost/Duration/Both.
Call divert
You can select call diversion when you are unable to pick up a phone call
in the following conditions:
• Divert for all calls (diverts all incoming calls to the number you
assigned).
All un-answer (diverts an incoming call when it is not answered).
•
• Not reachable (diverts all incoming calls to the number you assigned
when the phone is turned off or out of signal range).
• When no reply (diverts an incoming call when it is not answered for
a period of time determined by your network).
• Busy (diverts the incoming call when the line is busy).
• Divert all data calls active (diverts the incoming call when the
phone is receiving data).
To set Call divert (Steps 1-2):
1. Press > Settings > Connectivity > Call options > Call divert.
47
Page 52

2. Select Call divert condition: Divert for all calls, All un-answer, Not
reachable, When no reply, Busy, Divert all data calls active or
Cancel all.
To check Call divert status, press > Settings > Connectivity
> Call options > Call divert > Check status.
Bar calls
This feature allows you to bar different types of calls made or received on
your phone. Ask your service provider for a 4-digit password if you want to
activate the feature. There are five types of calls that can be barred:
1. All outgoing (except emergency calls)
2. Outgoing international (only calls within the home country can be
dialled)
3. Only here & home (international calls to your home network are
allowed, but all other international calls are barred)
4. All incoming (bars all incoming calls)
5. When roaming (bars incoming calls when you are out of your home
network range)
To set Bar calls (Steps1-2):
1. Press > Settings > Connectivity > Call options > Bar calls.
2. Select a barred call type: All outgoing, Outgoing international,
Only here & home, All incoming, When roaming or Cancel all.
To check Bar calls status, press > Settings > Connectivity
> Call options > Bar calls > Check status.
Fixed dialling
Fixed dialling allows you to dial only certain predefined numbers.
To turn on Fixed dialling (Steps 1-3):
1. Press > Settings
> Connectivity > Call options
> Fixed dialling.
2. Enter PIN2 code. An activating/deactivating message will be
displayed on the screen.
3. Press Ok.
48
Page 53

Closed user group
Closed user group is a network service that specifies the group of people
whom you can call and who can call you. For more information, contact
your network operator or service provider.
To turn Closed user group On/Off, press > Settings > Connectivity
> Call options > Closed user group > Closed user group.
To select a group, press > Settings > Connectivity > Call options
> Closed user group > Select group.
To turn Outgo. access On/Off, press > Settings > Connectivity
> Call options > Closed user group > Outgo. access.
To turn Preferred group On/Off, press > Settings > Connectivity
> Call options > Closed user group > Preferred group.
Message settings
This menu includes setting options for Text message, Multimedia
message, E-mail and Voice mail. For detailed Message settings, refer to
”Messages” on page 64.
Network
The Network menu provides the following settings.
Select network
This feature allows you to search for the network automatically.
To select the network automatically (Steps 1-2):
1. Press > Settings > Connectivity > Network > Select network.
2. Press Yes to search for available networks.
Search mode
To select a network search mode (Steps 1-3):
1. Press > Settings > Connectivity > Network > Search mode.
2. Press Change to select a mode from Manual or Auto.
Preferred Networks
This feature gives a list of available networks. You can view, edit and
delete a network from the list.
49
Page 54

To create a Preferred network (Steps 1-5):
1. Press > Settings > Connectivity > Network > Preferred
networks.
2. Press List.
3. Press Options > Insert/Add to end.
4. Press Select to select a network.
5. Press Ok.
To delete a Preferred network (Steps 1-4):
1. Press > Settings > Connectivity > Network > Preferred
networks.
2. Press List.
3. Press Options > Delete.
4. Press Ok.
Select band
To select a network band (Steps 1-3):
1. Press > Settings > Connectivity > Network > Select band.
2. Scroll to the desired band (900, 1800, 1900, 900/1800, 900/
1900 MHz).
3. Press Select. The radio button will be marked when it is activated.
Select line
To select a phone line (Steps 1-3):
1. Press > Settings > Connectivity > Network > Line > Select
line.
2. Select a line from Line 1 and Line 2.
3. Press Select.
To protect the line, press > Settings > Connectivity > Network
> Line > Protected and select
On/Off.
This feature is only available depending on the region or
country.
50
Page 55

Browser
This menu includes browser setup options and Push messages. For
detailed Browser settings, refer to ”Browser” on page 54.
Connections
This menu includes settings for CSD profile, GPRS profile and GPRS
info.
To create a CSD profile (Steps 1-4):
1. Press > Settings > Connectivity > Connections > CSD
profiles.
2. Scroll S/T to go to a profile and press Select.
3. Enter information such as Name, Call type (ISDN or Analogue),
Dial number, Login and Password.
4. Press Save.
To create a GPRS profile (Steps 1-4):
1. Press > Settings > Connectivity > Connections > GPRS
profiles.
2. Scroll S/T to go to a profile and press Select.
3. Enter information such as Name, APN, Login, Password and
Authentication (On/Off).
4. Press Save.
To view GPRS info (Steps 1-3):
1. Press > Settings > Connectivity > Connections > GPRS info.
2. Check
3. Press Ok.
GPRS info (Received data and Total time of GPRS service)
Bluetooth
Your phone features Bluetooth wireless technology. With Bluetooth, you
can connect your phone to a Bluetooth-compatible device within 10
metres. The connection can be affected by any obstruction such as a wall
or other electronic devices. Your phone memory can support up to 350k.
51
Page 56

Ensure that the other device supports Bluetooth features so that you can
build a successful Bluetooth connection. Contact the device's
manufacturer or refer to the accompanying documentation to see if other
devices support Bluetooth.
Your phone allows you to receive a VCard from other phone via Bluetooth.
A notification is given when you receive a VCard, which will then be
automatically saved in My data > Others. The VCard details appear after
you unpack the VCard. The maximum number of VCard via Bluetooth is 9.
To create a Bluetooth connection (Steps 1-3):
1. Press > Settings > Connectivity > Bluetooth.
2. Select Activate > Search for devices.
3. When the list of detected devices appears, select one to connect to.
If you do not intend to use Bluetooth for an extended period of
time, deactivate it to save your phone's power.
The Bluetooth menu options include:
• Activate: Turn the Bluetooth feature on/off.
• Search for devices: Select to search for external devices that you
would like to connect to your phone.
• My devices: Select to connect to devices that you prefer.
• Preferences: Select to change your Preferences settings, including
Phone name, Visible (On/Off) and Services supported (Dial-up,
File transfer, Handsfree, Headset, Imaging, Object push, and
Serial port).
USB features
This menu allows you to connect your phone to a USB-compatible device.
To make a USB connection (Steps 1-3):
1. Press > Settings > Connectivity > USB features.
2. Scroll through USB drive.
3. Press Select to connect to the desired device.
52
Page 57

Memory card
Your phone features a Micro SD memory card slot in order to increase the
phone's memory. Your phone supports a Micro SD card up to 512MB with
guaranteed performance and quality.
To format your memory card (Steps 1-2):
1. Press > Settings > Connectivity > Memory card > Format.
2. Press Ok.
53
Page 58

Browser
Your phone provides WAP service, enabling you to get up to date
information, content and downloads. The use of WAP service depends on
your service provider and the WAP settings in your phone.
When you are connected to the WAP browser, the predefined browser
homepage will be displayed. The available menu options depend on the
page you connect to. Hold down the to terminate the WAP
connection.
WAP setup
To select WAP connection profiles (Steps 1-3):
1. Press > Browser > Settings > WAP profiles. Alternatively, press
> Settings > Connectivity > Browser > WAP profiles.
2. Scroll to a desired network service provider.
3. Press Options > Go to.
Profile settings include the following items:
• Name: Enter the name of the service provider.
• IP address: Enter the IP address.
• Port: Enter the port number.
• Homepage: Enter the address of the homepage.
• Linger time: If the connection is not used for the preset linger time,
the connection will cease.
• Connection mode: Select from Auto, CSD and GPRS.
• CSD profiles: Select a CSD profile from Profile 1-10.
• GPRS profiles: Select a GPRS profile from Profile 1-10.
54
Page 59

WAP Page Connection
You can connect to a WAP page in the following two ways. Connect to
your Homepage by pressing > Browser > Homepage. Or connect to
a previously saved Web page by pressing > Browser > Favourites
> the desired bookmark.
WAP push setting
This feature allows you to select your preferences for messages sent from
your service provider.
To set WAP push settings (Steps 1-3):
1. Press > Browser > Settings > Push messages. Alternatively,
press > Settings > Connectivity > Browser > Push messages.
2. Select a mode from: Always accept, Never accept and Only from
address.
3. Press Select.
55
Page 60

Tools
The Tools menu provides a variety of personal features to help you get the
most out of your phone.
Press > Tools to access this menu, which allows you to utilise the
following features:
• Scheduler, Appointments, Tasks and Notes
• Alarm and Countdown
• Calculator and Unit converter
Scheduler
To view the calendar in day/week format (Step 1-2):
1. Press > Tools > Scheduler.
2. Select Options > View day/ View week.
To schedule a new meeting (Steps 1-4):
1. Press > Tools > Scheduler.
2. Select Options > New meeting.
3. On the New entry screen, enter the meeting details: Subject,
Location, Start date, Start time, End date, End time, Reminder
(At event time, 5 mn before, 15 mn before, 1 hour before, 1 day
before, Other, No reminder), and Repetition (Once, Daily,
Weekly, Monthly, Annually).
4. Press Save.
To go to a specific date (Steps 1-2):
1. Press > Tools > Scheduler.
2. Select Options > Go to date.
To clear events (Steps 1-2):
1. Press > Tools > Scheduler.
2. Select Options > Advanced > Clear all (All events, One day old
One week old).
and
56
Page 61

Alarm
When an alarm is set, it will ring even if the phone is turned off.
To set Simple alarm (Steps 1-3):
1. Press > Tools > Alarm > Simple alarm.
2. Press Select to turn the feature On/Off.
3. When Alarm is set to On, you need to specify the alarm time.
To set Recurrent alarm (Steps 1-5):
1. Press > Tools > Alarm > Recurrent alarm.
2. Press Select to turn the feature On/Off.
3. When Alarm is set to On, you need to specify the alarm time.
4. Scroll to week day indicators and press Change to select alarm
frequency.
5. Press Save.
To set an Alarm tone (Steps 1-3):
1. Press > Tools > Alarm > Alarm tone.
2. Select Ring tones from Phone memory or Memory card.
3. Press Select.
Appointments
This feature allows you to create an appointment and to set a reminder.
Note that the phone will switch on automatically if the appointment alarm
is set to a specific time.
To create an appointment (Steps 1-4):
1. Press > Tools > Appointments.
2. Select New events or press Add.
3. On the New entry screen, enter the Appointments details: Subject,
Location, Start date, Start time, End date, End time, Reminder
(At event time, 5 mn before, 15 mn before, 1 hour before, 1 day
before, Other, No reminder) and Repetition (Once, Daily, Weekly,
Monthly, Annually).
4. Press Save.
57
Page 62

Tasks
Tasks remind you of a task that is scheduled to be done at a specific time.
To create a Tasks (Steps 1-4):
1. Press > Tools > Tasks.
2. Select New events or press Add.
3. On the New entry screen, enter the Tasks details: Subject, Status
(Pending and Done), Priority (High, Normal and Low), Set date
(Yes or No), Due date, Due time, and Reminder (At event time, 5
mn before, 15 mn before, 1 hour before, 1 day before, Other, No
reminder).
4. Press Save.
Notes
This feature allows you to write down some text for later reference.
To create Notes (Steps 1-4):
1. Press > Tools > Notes.
2. Select <New Notes> or press Add.
3. Write down information.
4. Press Save.
Options for Notes include:
• View: View the content of the notes.
• Edit: Edit the note.
• New entry: Create a new entry.
• Delete: Delete a note.
• Delete all: Delete all notes.
• Send: Sends the note.
• Capacity: Check the maximum and free memory space.
58
Page 63

Calculator
You can perform calculations as if using a calculator. A maximum of 8
digits can be entered into this calculator, which will display a 9 digit or 6
decimal result. If the result exceeds 9 digits, the screen will display an
Over range message.
Calculation keys
1. S: Addition
2. X: Division
3. W: Multiplication
4. T: Subtraction
5. Centre key: Equals (=)
6. Right soft key: Clear
7. Left soft key: Options
8. : Decimal point (.)
9. : Negative (-)
To perform a calculation (Step 1-3):
1. Press > Tools > Calculator.
2. Enter the digits with numeric keys and other calculation keys (listed
above).
3. Press to return to the idle screen.
Unit converter
This function allows you to enter a unit/ currency exchange rate and
convert from one unit/currency to another.
To set an exchange rate (Steps 1-3):
1. Press > Tools > Unit converter
2. Press W/X to scroll to a desired unit (Velocity, Mass, Area, Volume,
Power, Time, Pressure, Length, Temperature, Currency or
Energy).
3. Enter a number and press Change.
59
Page 64

Countdown
To start a Countdown (Steps 1-4):
1. Press > Tools > Countdown.
2. Select Options > Change.
3. Press W/X key to set the countdown time.
4. Press Ok > Options > Start.
STK (SIM Tool Kit)
This option depends on your service provider.
60
Page 65

Camera
Your phone has an integrated camera that allows you to take pictures or
shoot video clips and send them as MMS messages/attachments. The
pictures are taken and saved in JPEG format, which can be viewed by
most picture viewing programms.
Do not apply force to your camera lens, it might get damaged.
Camera mode
To take a picture (Steps 1-4):
1. Press > Camera to launch the Camera.
2. Press Centre key to take a picture.
3. The picture is saved automatically.
4. Press Back to go back to the camera's view finder screen.
Options for the saved image include:
• Send: Send the saved image Via multimedia msg, Via Bluetooth
or Via e-mail.
• Take new picture: Select this option to go back to the camera's view
finder screen.
• As contact ID: Set the image as the contact ID.
• As wallpaper: Set the image as the wallpaper.
• Delete: Delete the image.
Options for the view finder screen include:
• Preview screen: Set the size of the Preview screen to be Large
screen or Small screen (1280 x 1024 resolution does not support
Large screen).
• Picture resolution: Set the image resolution: 1280 x 1024,
800 x 600, 640 x 480, 320 x 240 or 160 x 120.
• Picture quality: Set the image quality to be SuperFine, Fine or
Normal.
61
Page 66

• View pictures: View the saved images in the Photos file.
• Mode: Set the Night mode and Multishot to be On/Off or turn On/
Off the Self-timer.
• Effects: Select the Colour effects: Off, B&W, Sepia, Blue,
Negative.
• Advanced: Enter the Default name for the image to be saved; Reset
settings under Camera menu; Set the Anti-flicker value (50Hz or
60Hz).
On the camera's view finder screen, you can press the 4-way navigation
keys to adjust the following two functions:
• Zoom: Press and hold S to zoom in; press and hold T to zoom out.
The function is only available for image size 640 x 480, 320 x 240
and 160 x 120.
• Brightness: Press S or T to adjust the level of brightness on the
camera's view finder screen.
Video mode
To shoot a video (Steps 1-4):
1. Press > Camera to launch the Camera. Then, press the right
navigation key to launch video mode.
2. Press Centre key to start recording a video clip and press again to
stop.
3. The video is saved automatically.
4. Press Back to go back.
Options for the saved video clips include:
• Play: Play the recorded video clip.
• Send: Send the saved image Via multimedia msg, Via Bluetooth
or Via e-mail.
• Record new video: Select this option to go back and shoot a new
video.
During recording, if the user exceeds the maximum file size
allowance, an envelope icon will appear with a red line drawn
through it symbolising that this video clip cannot be sent via MMS.
• Delete: Delete the video clip.
62
Page 67

Options for the view finder screen include:
• Video length: Set the Video length to be MMS length or Maximum
length.
• Video resolution: Set the video resolution: 160 or 176X144.
• Video quality: Set the video quality to be Fine or Normal.
• View videos: View the saved video clips in the Videos file.
• Colour effects: Select the Colour effects: Off, B&W or Sepia.
• Advanced: Enter the Default name for the image to be saved; Reset
settings under Camera menu.
Before you start shooting a video clip, you can press the 4-way navigation
keys to adjust the following two functions:
• Zoom: Press and hold S or T to zoom in/out. The function is only
available for image size 176 X 144.
• Brightness: Press S or T to adjust the level of brightness.
63
Page 68

Messages
Messages offer a variety of messaging functions, including text
messages, multimedia messages and E-mail. This chapter guides you
through each messaging function and setting options.
The messages you receive and create are saved in three folders: Inbox
(the received messages), Outbox (the sent messages) and Drafts (the
messages that haven't been finalised and are to be sent later).
When you navigate through the list of messages in Inbox, press Options
to access the following features:
1. View: Displays message contents.
2. Reply: Sends a message to the sender.
3. Forward: Forwards the message to others.
4. Delete: Deletes the selected message.
5. Delete all: Deletes all messages in the current folder.
6. Details: Displays message details, including Date, Delivery time
and sender information.
7. Call back: Calls the person who sent you the message.
8. Select multiple: Deletes multiple messages selected individually or
by selecting all.
When you navigate through the list of messages in Outbox, press
Options to access the following features:
1. View: Displays message contents.
2. Forward: Forwards the message to others.
3. Delete: Deletes the selected message.
4. Delete all: Deletes all messages in the current folder.
5. Details: Displays message details, including Date, Delivery time
and sender information.
6. Call: Calls the person who sent you the message.
When you navigate through the list of messages in Drafts, press Options
to access the following features:
1. View: Displays message contents.
2. Edit: Edits the message.
64
Page 69

3. Delete: Deletes the selected message.
4. Delete all: Deletes all messages in the current folder.
5. Details: Displays message details, including Date, Delivery time
and the number of the sender.
6. Select multiple: Deletes multiple messages selected individually or
by selecting all.
Text Messages
You can send a text message of up to 160 characters, including
punctuation marks and spaces.
Creating/Sending/Saving Text Messages
To create a new Text message (Steps 1-4):
1. Press > Messages > Create > Text message.
2. Input your message.
3. When done, press and add phone number(s) from the Contacts
or manually. Alternatively, press Options > Continue.
4. Or press Options > Save as draft.
For more information on entry methods, refer to ”Text Entry” on page 34.
Options for Text Message editing include:
1. Continue: Continues to send the messages by selecting recipients
from Contacts or by entering phone number(s) manually.
2. Add symbol: Displays the symbol chart for selection.
3. Insert object: Inserts objects from Predefined sounds, Predefined
animations, Own animations, Own pictures, Own sounds, Text
template, Contact number and Bookmark.
4. Spell word: Spells a word and add it to the message content.
5. T9 language: Selects T9 language. For more information, refer to
”Text Entry” on page 34.
6. T9 dictionary: Turns T9 dictionary on/off.
7. Save as draft: Saves the message in the draft box.
8. Text format: Selects the Font style and Font colour for the
message.
65
Page 70

Text Message Settings:
To select a text message account (Steps 1-3):
1. Press > Messages > Settings > Text message.
2. Scroll S or T to select Account 1 or Account 2.
3. Press Options > Activate or > Activate to confirm your
selection.
To personalise your text message account:
1. Press > Messages > Settings > Text message.
2. Scroll S or T to select Account 1 or Account 2.
3. Press Options > Personalise.
The personalise settings include the following:
• Message centre: Enters your text Message centre number.
• Protocol: Select your message type from Standard text/Fax/X.400/
Paging/ERMES/E-mail.
• Validity period: Select the period from 1 hour/12 hours/1 day/
1 week/Maximum. This determines the length of times the SMS
message is stored at the SMS centre. The radio button for the
selection will be marked.
• Delivery report: This feature allows you to get a receipt when the
SMS message is successfully delivered. Press Select to activate/
inactivate the feature. This feature is network dependent.
• SMS via GPRS: This feature allows you to send your SMS via GRPS
rather than CSD. Press Select to activate/inactivate the feature.
• Direct reply: If this feature is enabled and available from your service
provider, you may pay for the message sent back to you. Press
Select to activate/inactivate the feature.
66
Page 71

Multimedia Messages
You can send a multimedia message, which includes multimedia files and
texts.
Creating/Sending/Saving Multimedia Messages
To create a new Multimedia message (Steps 1-4):
1. Press > Messages > Create > Multimedia message.
2. Insert multimedia objects by pressing Options > Insert object or
Insert new.
3. When this has been done, add the recipients phone number(s) from
the Contacts or manually. Alternatively, press Options > Continue.
4. Or alternatively press Options > Save as draft.
Options on the message editing screen include:
• Continue: Continues to send the messages by selecting recipients
from Contacts or entering phone number(s) manually.
• Insert object: Inserts objects from Pictures, Photos, Videos,
Sounds and Page.
• Insert new: Inserts objects by creating files from Digital camera,
Video camera and Sound recorder.
• Attachment: Attach a Business card (of a contact's information) or
an Appointment entry.
• Preview message: Selects to preview the whole multimedia
message content or page by page.
• Timing: Sets the Slide duration.
• Page list: Displays a page list. Scroll to the desired page and access
it directly.
• Save: Saves the message.
Multimedia Message Settings:
To edit MMS profiles (Step 1-3):
1. Press > Messages > Settings > Multimedia message
> Profiles.
2. Scroll S or T to select a profile.
3. Press Options > Edit.
67
Page 72

To customise MMS options (Steps 1-2):
1. Press > Messages > Settings > Multimedia message
> MMS options.
2. Scroll S or T to go to the desired option and press Select to change
the setting.
The Sending options include the following settings:
• Sender visibility: This feature indicates whether to hide or show the
sender's ID by turning it on/off.
• Priority: Defines the message priority to be Low, Normal or High.
• Delivery report: This feature allows you to get a receipt when the
message is successfully delivered. Press Select to activate/
inactivate the feature. This feature is network dependent.
• Read report: This feature allows you to get a report when the
message is read. Press Select to activate/inactivate the feature. This
feature is network dependent.
• Expiry time: When the expiry time is due, the message will be
deleted. Set the Expiry time: 1 hour, 3 hours, 6 hours, 12 hours,
1 day, 1 week or Maximum.
• Retrieval: Sets the Retrieval mode--Automatic, Deferred or Auto.
homenet.
• Advertisements: Sets the Spam filter to be on/off to reject/receive
junk messages.
E-mail
Creating/Sending/Saving E-mail
To compose E-mail (Steps 1-4):
1. Press > Messages > Create > E-mail.
2. Enter the text.
3. When done, press and add phone number(s) from the Contacts
or manually. Alternatively, press Options > Continue.
4. Or press Options > Save.
68
Page 73

Options for the E-mail editing screen include:
• Continue: Continues to send the messages by selecting recipients
from Contacts or entering phone number(s) manually.
• Save: Saves the input content.
• New line: Moves the cursor back to the starting place of the
message.
• Clear all: Delete all the input text in the edit screen.
• Back: Exits the E-mail edit screen and go back to the Create menu
screen.
E-mail Settings
Before you start composing an E-mail, you need to set up an E-mail
account. Under the E-mail settings, you can define the E-mail server and
your E-mail account.
Server
To create an E-mail Server (Steps 1-3):
1. Press > Messages > Settings > E-mail > Server.
2. Scroll S or T to select a server.
3. Press Options > Edit.
The Server details include the following information:
• Connection: Defines settings such as Connect using, CSD only
and GPRS only.
• Incoming server: Specify the name of the Server, Port,
Authentication (General and Security), Account, Password and
Download (All and Header only).
• Outgoing server: Specify the name of the Server, Port,
Authentication (None, General and Security
), Account and
Password.
Account
To create an account (Steps 1-3):
1. Press > Messages > Settings > E-mail > Account.
2. Edit the details.
3. Press Save.
69
Page 74

The Account includes the following details:
• User name: Enters a user name.
• Address: Enters the E-mail address.
• Signature: Creates your own signature and send it with E-mails.
Templates
The Templates menu provides a list of predefined text for you to add into
your text/multimedia messages.
To add a template (Steps 1-3):
1. Press > Messages > Templates > Text template.
2. Select <New template> or press Add.
3. Enter the text and press Options > Templates.
4. Scroll S/T to select a predefined text.
5. Press Options > Save.
Cell info
This feature is network dependent. You need to register with your service
provider. To access this feature, press > Messages > Cell info. From
the menu, you can set up the following options:
• Auto display: This feature allows cell broadcast messages to be
displayed automatically in standby mode. Press Select to activate/
inactivate the feature.
• Broadcast: Sets this feature on/off to read any new cell broadcast
messages.
• Message inbox: Displays a list of received cell broadcast messages.
• Topic list: To select the received message type, select Add new
from My topics to enter favourite topics or select an existing topic
from the Active topics list to change or delete.
• CB languages: This feature allows you to specify the language in
which your cell broadcast message is displayed.
70
Page 75

Memory status
To check the phone memory (Steps 1-2):
1. Press > Messages > Memory status.
2. Scroll S/T to see the memory space of Text msgs in phone, Text
msgs in SIM, Multimedia msgs and E-mail.
Voice mail
To set up your voice mailbox (Steps 1-3):
1. Press > Messages > Settings > Voice mail.
2. Enter the Voice mail number.
3. Press Save.
71
Page 76

Entertainment
Your phone provides various entertaining features: Games that include
default games and Java games and Composer that allows you to create
your personal music.
Games
Default games
Your phone has a number of pre-installed games.
To play a game (Steps 1-3):
1. Press > Entertainment > Games > Default games.
2. Scroll to the game you would like to play.
3. Press Select > Options > New.
Options for a game include:
• New: Select to start a new game.
• Level: Choose the game’s difficulty.
• Top score: See the best score record.
• Instructions: Information about how to play a game.
Java Games
Your phone has a number of pre-installed Java games.
To play Java game (Steps 1-3):
1. Press > Entertainment > Games > Java Games.
2. Scroll to the game you would like to play.
3. Press
Your phone supports Java. With this feature, you can run Java-compatible
applications such as downloaded games. You can create folders to
manage the games that you have downloaded from the network.
72
Page 77

Composer
Your phone features a composer that allows you to create your own
personal music.
To create sounds (Steps 1-4):
1. Press > Entertainment > Composer.
2. Scroll S/T to a desired sound file.
3. Press Options > Edit and select from Main track, Sub track 1/
Sub track 2/Sub track 3.
4. Press
Options
to
Play
the music, set
Tempo, Instruments
, or press
Save
.
73
Page 78

Contacts
The Contacts menu is where you can record names, phone numbers and
other personal details. There are two storage areas: SIM card and phone
memory. Contacts saved in the phone memory allow you to store more
information (E-mail, Web page, Street, Postal code, City and Country).
The space available for these on the SIM card may vary according to the
manufacturer.
To access phonebook lists, press > Contacts > View contacts.
Alternatively, press T from the idle screen.
Create/View Contacts/SIM contact or PhoneBook
To create a SIM/Phone contact (Steps 1-4):
1. Press > Contacts > View contacts > SIM contact or
PhoneBook.
2. Select Add contact.
3. Enter details.
4. Press Save.
Options for new SIM card entry include:
• Name: Enter the contact's name.
• Home: Enter the contact's home number.
• Location: Select where to save the entry: SIM, Protected SIM.
• Position in SIM: The phone will assign a number to the contact
automatically; or you can enter one yourself.
To switch between SIM contacts and Phonebook contacts,
press > Contacts > Advanced > Select address book.
Options for new phone contact entry include the following:
• First name/Last name:
• Mobile/Home/Work/Fax numbers
• E-mail/Webpage
74
Page 79

• Picture/Ringtone/Voice command
•Groups
• Postal code/State/Province/City/Street/Country
• Additional info
Make sure you provide at least a phone number so that you can create a
contact. Not all of the fields require information.
Options for View contacts include:
• View: View the contact's detailed information.
• Send message: Send a Text message or Multimedia message to
the selected contact.
• Call: Call the selected contact.
• Delete: Delete the contact.
• Default number: The user can choose which phone number is used
to default number such as mobile, Home, work or Fax.
• Send contact: Send the contact's information via Bluetooth.
• Copy contact: Select to copy the contact to phone/SIM.
• Move contact: Move the contact to phone/SIM.
• Add picture: Assign a picture for contacts.
• Select multiple: Select to add multiple contacts, individually or as a
group, to Move to phone/SIM, Copy to phone/SIM, Delete, and
Send contact.
View groups
This feature allows you to manage your contacts by assigning images
and/or ringtones to a group of contacts and sending messages to the
group.
To view group contacts (Steps 1-3):
1. Press > Contacts > View groups.
2. Scroll S/T to a desired group.
3. Press Options > View.
75
Page 80

Options for View groups include:
• View: Display the group members.
• Set ringtone: Select a ringtone that will sound when a member of the
group calls.
• Rename: Rename the group.
• Remove entries: Remove the selected contact from the group.
• Add picture: Add a picture to the group.
• Send SMS: Send an SMS to members of the group.
Special numbers
This feature allows you to keep a list of useful numbers such as My
numbers, Service numbers, Voice mail and Emergency numbers.
To enter a special number (Steps 1-5):
1. Press > Contacts > Special numbers > My numbers/Service
numbers/Voice mail or Emergency.
2. Select <Empty>.
3. Press Options > Edit.
4. Enter details.
5. Press Save.
Options for My numbers include View, Edit and Delete.
Quick call
You can edit a list of quick calls (Steps 1-5):
1. Press > Contacts > Quick call.
2. Scroll to a desired image.
3. Press Add to go to the Contacts list.
4. Select a contact.
5. Press Done.
76
Page 81

Advanced
This menu provides a list of options so that you can view and edit your
contacts.
Options for the Advanced menu include:
• Select address book: Switch between contacts recorded on the SIM
card and Phonebook.
• Sort names: Find a contact by searching for his/her First name or
Last name or Position.
• Picture in contacts: Turn the display of the caller's ID on/off.
• Copy to SIM: Copy all the contacts to SIM card.
• Copy to phone: Copy all the contacts to phone memory.
• Move to SIM: Move all the contacts to SIM card.
• Move to phone: Move all the contacts to phone memory.
• Delete all entries: Delete all contacts.
Memory status
This feature allows you to check your phone memory space.
To check Memory status, press > Contacts > Memory status. You
may see the following details: SIM, Protected SIM and Phone.
77
Page 82

My player
Your phone allows you to listen to the music from the network, save the
music files, edit the Playlist and play the music. Your phone will
automatically stop playing the music when there is an incoming call. The
supported music format includes MP3, AAC and AAC+.
FM Radio
You can listen to FM Radio on your phone. You can locate a channel by
setting the frequency or set the channel ID, name and frequency for easy
selection later.
To turn FM Radio On/Off (Steps 1-2):
1. Press > My player > FM Radio > Options > Switch On/Switch
Off.
2. Press Select to turn FM Radio On/Off.
This feature can be turned on only when the headset is plugged
into the phone's headset connector.
Options for FM Radio include:
• Switch On/Switch Off: Turn FM Radio on/off.
• LoudSpeaker: Turn the loud speaker on/off.
• Volume: Press W/X key to decrease/increase the volume.
• Set Frequency: Set the frequency by using the keypad keys.
• Save Channel: Enter Channel ID (from Ch0-Ch9), Channel Name
and Frequency. Press and hold alphanumeric key to launch the
channel ID.
• Erase Channel: Enter the Channel ID to erase the channel.
• AutoSwitchOff radio: Select AutoSwitchOff on/off. When on, you
must define the Linger time.
• Display RDS: RDS stands for Radio Data System. You can turn
Display RDS on/off.
• Backlight Mode: Set the Backlight Mode to be Automatic or On.
78
Page 83

Tracks
You can play the downloaded music from Phone memory or Memory card.
For example, to play tracks from a memory card (Steps 1-3):
1. Press > Music > Tracks > Memory card.
2. Scroll S/T to the desired track.
3. Press Options > Play or .
Options for the tracks list screen include:
• Play: Play the selected track.
• Play mode: Set the mode to be Off, Repeat, Shuffle or Shuffle &
repeat.
• Add to playlist: Add the selected track to the Playlist.
• Details: Show the detailed information of the selected track: Name,
Size, Time, Type and Duration.
• Delete: Delete the selected track.
Last played
You can access this feature to see a list of songs that you previously
played. The song list is arranged chronologically.
Options for the Last played tracks include:
• Play: Play the selected track.
• Play mode: Set the mode to be Off, Repeat, Shuffle or Shuffle &
repeat.
• Add to playlist: Add the selected track to the Playlist.
• Delete: Delete the selected track.
79
Page 84

Playlists
With Playlists, you can edit your favourite songs list.
To add a playlist (Steps 1-3):
1. Press > My player > Playlists.
2. Select <New playlist>.
3. Press Add or .
To edit the Playlists (Steps 1-3):
1. Press > Music > Playlists.
2. Select a Playlist and press Options.
3. Scroll to a desired option and press Select.
Options for Playlists include:
• Open: Open the selected playlist.
• Play: Play the track in the selected playlist.
• Delete: Delete the selected playlist.
• Rename: Rename the selected playlist.
• Help: Help information about playlists.
Voice memo
This function allows you to record a voice clip (of up to 36 seconds) using
your phone's microphone. You can send the recorded voice clip as an
MMS message attachment.
To record a voice clip (Steps 1-5):
1. Press > My player > Voice memo.
2. Press Record or to start recording.
3. Press Stop/Pause to cease/hold the recording.
4. When you press Stop, the recorded voice is saved.
5. Select Play to hear the recorded voice or Back to return.
80
Page 85

Background MP3
This feature allows you to define MP3 data source and customise font
colour.
To select memory source (Step 1-3) :
1. Press > My player > Background MP3 > Data.
2. Scroll S/T to select data source from Auto, Memory card, Phone
memory, and Playlists.
3. Press Select to confirm.
To customise the phone's font colour (Steps 1-3) :
1. Press > My player > Background MP3 > Font colour.
2. Scroll S/T to select font colour from Dark green, Dark cyan, Dark
blue, Dark magenta, Grey and White.
3. Press Select to confirm.
81
Page 86

My data
My data allows you to manage the files in your phone by separating them
into different folders. In addition you can check the Phone memory or
Memory card to see the memory capacity of your phone.
Managing files
Generally, My data in the Phone memory are separated into four folders:
Photos, Pictures, Videos, Sounds and Others.
For example, to create a new folder under My data in Phone memory
(Steps 1-5):
1. Press > My data.
2. Scroll W/X to select the Phone memory.
3. Scroll S/T to select a folder and press Select.
4. Select New Folder and enter a name for the folder.
5. Press Ok.
Options for Folder list include:
• New folder: Create a new folder.
• Change view: Select the folder display type: List view or Grid view.
Phone memory
To check Phone memory (Steps 1-4):
1. Press > My data.
2. Scroll W/X to select Phone memory.
3. Scroll S/T to the Memory status.
4. The displayed information includes
Free memory, Used
and
Total size
.
Memory card
To see all the files saved in the Memory card (Steps 1-3):
1. Press > My data.
2. Scroll W/X to select Memory card.
3. Scroll S/T through the files that are saved in external cards.
82
Page 87

Calls
Features under the Calls menu are mostly operator and/or subscription
dependent and require either a PIN2 code or a phone code. For more
information about PIN codes, refer to ”Security” on page 38.
Call history
Call history keeps a record of your dialled, received and missed calls.
To see a call history (Steps 1-3):
1. Press > Calls.
2. Scroll W/X to switch between four Call history lists: All calls,
Missed calls, Answered calls and Outgoing calls.
3. Scroll S/T to select a call history.
Options for a known number include:
• Delete: Delete the record from the call history.
• Call: Call the selected number.
• Delete all: Delete all the numbers from the call history list.
• Text message: Send a SMS to the selected number.
• Multimedia message: Send a MMS to the selected number.
• Edit: Edit the entry's details. For more information, refer to ”Contacts”
on page 74.
Options for an unknown number include:
• Save number: Save the number in the phonebook.
• Delete: Delete the selected number.
• Call: Call the selected number.
• Delete all: Delete all the numbers from the call history list.
• Text message: Send a SMS to the selected number.
• Multimedia message: Send a MMS to the selected number.
83
Page 88

Clear history
This menu allows you to clear a call history record. You can select Clear
outgoing, Clear answered, Clear missed, or Clear all.
To clear a call history (Steps 1-3):
1. Press > Calls > Clear history.
2. Scroll S/T to a desired option.
3. Press Select > Yes.
Call settings
Call settings include the following Call options: Auto Answer, Any key
answer, Second reminder, Call services, Call divert, Bar calls, Fixed
dialling and Closed user group.
Auto Answer
To turn Auto Answer on/off (Steps 1-2):
1. Press > Calls > Call settings > Auto Answer.
2. Press Change to turn the Auto Answer On/Off.
Any key answer
To turn Any key answer on/off (Steps 1-2):
1. Press > Calls > Call settings > Any key answer.
2. Press Change to turn the Any key answer On/Off.
Seconds reminder
To turn Seconds Reminder on/off (Steps 1-4):
1. Press > Calls > Call settings > Seconds Reminder.
2. Press Change and W/X key to turn the Auto Answer On/Off.
3. When the feature is set to On, you need to specify the Start time by
using the keypad keys.
4. Press Save.
84
Page 89

Call Services
Call services provides the following settings: Time & cost, Call waiting,
Hide ID, Caller ID and Cost Settings.
To check/reset Last call/Total incoming/Total outgoing/Cost left/All
voice calls (Steps 1-2):
1. Press > Calls > Call settings > Call services > Time & cost
> Call duration/Total incoming/Total outgoing/Cost left/All voice
calls
2. Press Ok to return to the previous screen or Reset to clean the
history record.
Call Waiting
To Activate/Cancel Call waiting (Steps 1-2):
1. Press > Calls > Call settings > Call services > Call waiting
2. Scroll S/T to select Activate/Cancel and press Select.
To check status, press > Settings > Connectivity > Call options
> Call services > Call waiting > Check status.
Caller ID
To Hide ID (Steps 1-2):
1. Press > Calls > Call settings
> Call services > Hide ID.
2. Press Yes to Hide ID for all calls or Hide ID for next call.
To check Caller ID status, press > Calls > Call settings > Call
services > Caller ID.
Cost Settings
To set Currency, press > Calls > Call settings > Call services
> Cost Settings > Currency.
To set Cost/unit (Steps 1-2):
1. Press > Calls > Call settings > Call services > Cost Settings
> Cost/unit.
2. Enter the rate Per unit and Per minute.
85
Page 90

To set Maximum cost (Steps 1-2):
1. Press > Calls > Call settings > Call services > Cost Settings
> Maximum cost.
2. Press Edit to turn Display credit On/Off and specify the Maximum
cost by using the keypad keys.
To set Auto display (Steps 1-2):
1. Press > Calls > Call settings > Call services > Cost Settings
> Auto display.
2. Set the Auto display to be Off or show Cost/Duration/Both.
Call divert
You can select call diversion when you are unable to pick up a phone call
in the following conditions:
• Divert for all calls (diverts all incoming calls to the number you
assigned).
• All un-answer (diverts an incoming call when it is not answered)
• Not reachable (diverts all incoming calls to the number you assigned
when the phone is turned off or out of signal range).
• When no reply (diverts an incoming call when it is not answered for
a period of time determined by your network).
• Busy (diverts the incoming call when the line is busy).
• Divert all data calls active (diverts the incoming call when the
phone is receiving data).
To set Call divert (Steps 1-2):
1. Press > Calls > Call settings > Call divert.
2. Select Call divert condition: Divert for all calls, All un-answer, Not
reachable, When no reply, Busy,
Divert all data calls active or
Cancel all.
To check Call divert status, press > Calls > Call settings
> Call divert > Check status.
86
Page 91

Bar calls
This feature allows you to bar different types of calls made or received on
your phone. Ask your service provider for a 4-digit password if you want to
activate the feature. There are four types of calls that can be barred
• All outgoing (except emergency calls)
• Outgoing international (only calls within the home country can be
dialled)
• Only here & home (international calls to your home network are
allowed, but all other international calls are barred.)
• All incoming (bars all incoming calls)
• When roaming (bars incoming calls when you are out of your home
network range)
To set Bar calls (Steps 1-2):
1. Press > Calls > Call settings > Bar calls.
2. Select a barred call type: All outgoing, Outgoing international,
Only here & home, All incoming, When roaming and Cancel all.
To check Bar calls status, press > Calls > Call settings > Bar calls
> Check status.
Fixed dialling
Fixed dialling allows you to dial only certain predefined numbers.
To turn on Fixed dialling (Steps 1-3):
1. Press > Calls > Call settings > Fixed dialling.
2. Enter PIN2 code. An activating/deactivating message will be
displayed on the screen.
3. Press Ok.
87
Page 92

Closed user group
Closed user group is a network service that specifies the group of people
whom you can call and who can call you. For more information, contact
your network operator or service provider.
To turn Closed user group On/Off, press > Calls > Call settings
> Closed user group > Closed user group.
To select a group, press > Calls > Call settings > Closed user
group > Select group.
To turn Outgo. access On/Off, press > Calls > Call settings
> Closed user group > Outgo. access.
To turn Preferred group On/Off, press > Calls > Call settings
> Closed user group > Preferred group.
88
Page 93

INDEX
A
Alarm 57
Alert type 44
Any key answer 45, 84
Appointments 57
Auto Answer 45, 84
Auto keypad lock 41
B
Background MP3 81
Backlight duration 43
Backlight level 43
Bar calls 48, 87
Battery 13
Bluetooth 51
Browser 51, 54
C
Calculator 59
Call divert 47, 86
Call history 83
Call options 45
Call Services 46, 85
Call settings 84
Call Waiting 46, 85
Caller ID 46, 85
Camera 61
Camera mode 61
Cell info 70
Clear history 83
Closed user group 49, 88
Composer 73
Connections 51
Connectivity 45
Contacts 74
Cost Settings 47, 85
Countdown 60
D
Default settings 42
Default storage 41
E
E-mail 68
Entertainment 72
F
Fixed dialling 48, 86
Flight mode 42
FM Radio 78
G
Games 72
Greeting 44
H
Holding a Call 32
K
Key sound 45
L
Language 37
Last played 79
M
Main menu 27
Making a Conference Call 33
Making an Emergency Call 31
Making/Ending a Call 31
Making/Receiving a Second Call
33
Memory card 53, 82
Memory slot 19
Memory status 71, 77
89
Page 94

Message settings 49
Messages 64
MP3 keys 23
Multimedia Messages 67
My Data 82
My player 78
N
Network 49
Notes 58
P
Personal Identification Numbers
(PINs) 19
Phone Lock 40
Phone memory 82
PIN 39
Playlists 80
Preferred Networks 49
Profiles 42
Q
Quick call 40, 76
Quick keys 25
R
Receiving a Third Call 33
Receiving/Rejecting a Call 32
Ring volume 44
Ringtones 44
S
Scheduler 56
Search mode 49
Seconds reminder 45, 84
Security 38
Select band 50
Select line 50
Shortcuts 41
Shutter sound 45
SIM Card 17
Soft Keys 26
SOS Soft Key 6
Special numbers 76
STK (SIM Tool Kit) 60
T
T9 Language 34
Tasks 58
Templates 70
Text Entry 34
Text Messages 65
The 4-Way Keys 24
Themes 43
Time & date 37
Tools 56
Tracks 79
U
Unit converter 59
USB features 52
V
Video mode 62
View groups 75
Voice command 40
Voice control 40
Voice mail 71
Voice memo 80
W
Wallpaper 43
WAP setup 54
90
 Loading...