

Page 1
Page 2

Security Software Installation Manual
TRANSMEMORY™ USB TNU FLASH DRIVE
Table of Contents
Chapter 1: Introduction. ..................................................................................... 2
Chapter 2: Required System Configuration ..................................................... 4
Chapter 3: How to Download the Security Software ....................................... 5
1. Connect the TransMemory™ USB TNU Flash Drive ............................. 5
1.1 Downloading the TransMemory™ Secure Software ......................... 5
Chapter 4: How to Use the Security Software .................................................. 7
1. Connect the TransMemoryTM USB 2.0 Flash Drive .................................. 7
1.1 Setting up the security software - adaptability .................................. 7
1.2 Setti ng up the security soft wa re ....................................................... 9
1.3 Formatting using the security software........................................... 11
2. Changing the Security Software Password and Log In/Log Out ............ 18
2.1 Changing the password using the security software ...................... 18
2.2 Logging into the Privacy Zone using the security software. ........... 20
2.3 Logging out of the Privacy Zone using the security software ......... 22
1
v.1.0
Page 3

Security Software Installation Manual
TRANSMEMORY™ USB TNU FLASH DRIVE
Chapter 1: Introduction
Thank you for purchasing a TransMemoryTM USB TNU Flash Drive (“TransMemoryTM” or
“TransMemory
• This TransMemory
a removable disk for a personal computer.
• Toshiba T ransMemory
saved data.
• The TransMemory
adapter.
Important Note: Please comply with all applicable laws regarding the treatment of copyrighted
material. Any copyrighted data saved on this device must be used only in accordance with
applicable copyright laws.
This document describes how to install and use the TransMemory
installing or using this Software, please read this manual thoroughly to ensure correct use.
• The TransMemoryTM Secure Software w orks only when connected t o one per sonal computer
• Do not activate IEEE1667 password protectio n and the TransMemory
simultaneously
• When formatting TransMemory
shaking/impact, turn off the power to your computer, r est ar t your computer, or put it into the
Standby or Hibernate mo de. If one of the above operations has been performed, plea se
reformat the TransMemory
•
The Tr a nsM e mo ry ™ Fl as h Driv e m ay st op fu nct io ni ng pro p erly if you r co m put er is res t art ed or
resumed from Standby or Hibernate mode while the TransMemory™ Secure Software is enabled
and the Privac y Zon e is in us e. If one of thes e op er at io ns has bee n perf or m e d, disconnect the
Tran s Mem or y ™ F las h Dr ive from your computer, reconnect it, and log back into the Privacy Zone.
•
If you are using the W ind o ws V i st a® or Windows 7® operating system and have enabled
ReadyBoost™ to use the Public Zone, you may find at times that you are unable to log into the
Privacy Zo ne. If this hap pe ns, di s abl e Rea d yB oost
from your computer, reconnect it, and log back into the Privacy Zone.
•
If you are using the W ind o ws V ista ® operating system, do not enable ReadyBoostTM to use the
Privacy Z one.
•
The images depicted in this manual may differ from the actual product.
•
The design, specificat i ons, product manual, a nd related informatio n are subjec t t o c hange without
notice.
TM
Flash Drive”). The device has the following features:
TM
Flash Drive, featuring Toshiba’s NAND flash memory, can be used as
TM
Secure Software is available to allow password protection of
TM
Flash Drive is bus-powered, eliminating the need for an AC power
.
TM
Flash Drive using the Secure Softwar e, do not subject it to
TM
Flash Drive using the TransMemoryTM Secure Software.
TM
, disconnect the TransMemory™ Flash Drive
TM
Secure Software. Before
TM
Secure Software
2
v.1.0
Page 4

Security Software Installation Manual
TRANSMEMORY™ USB TNU FLASH DRIVE
■ Trademarks
• Microsoft®, Windows®, Windows Vista® and ReadyBoostTM are trademarks, registered in
the United States and other countries, of Microsoft Corporation of the U.S.
• Intel® and Pentium® are trademarks or registered trademarks of Intel Corporation in
various nations.
• Other c ompanies and products mentioned herein are trademarks or registered trademarks
of their respective owners.
3
v.1.0
Page 5

Security Software Installation Manual
TRANSMEMORY™ USB TNU FLASH DRIVE
Chapter 2: Required System Configuration
The following are required to properly operate this product:
■ Required hardware
• CPU: Intel Pentium II 266MHz or higher
• Available hard disk space of at least 800 KB
• USB Specification-compliant USB port (Operation on self-built or modified personal
computers cannot be guaranteed.)
■ Required operating systems
• Microsoft® Windows® XP Professional Service Pack 2 or greater
• Microsoft® Windows® XP Home Edition Service Pack 2 or greater
• Microsoft® Windows Vista® Ultimate
• Microsoft® Windows Vista® Enterprise
• Microsoft® Windows Vista® Business
• Microsoft® Windows Vista® Home Premium
• Microsoft® Windows Vista® Home Basic
• Microsoft® Windows® 7 Ultimate
• Microsoft® Windows® 7 Enterprise
• Microsoft® Windows® 7 Professional
• Microsoft® Windows® 7 Home Premium
• Microsoft® Windows® 7 Home Basic
• Microsoft® Windows® 7 Starter
For Microsoft Windows XP be sure to first log in as a user belonging to the Administrator’s
group. If attempting to log in as a User, an error may result.
TM
Note: The TransMemory
Microsoft
Windows systems listed above.
Secure Software does not work with any operating system other than
4
v.1.0
Page 6
Security Software Installation Manual
TRANSMEMORY™ USB TNU FLASH DRIVE
Chapter 3: How to Download the Security Software
Please follow the instructions below to download the TransMemoryTM Secure Software.
■ 1. Connect the TransMemory™ TNU Flash Drive
Before downloading the security software, connect the TransMemoryTM Flash Drive to the
computer. Close all other applications.
■ 1.1 Downloading TransMemory
1) Access www.digitalmedia.toshiba.com.
TM
Secure Software
2) Click on the “TransMemoryTM USB TNU Secure Software and Installation Manual” link.
TM
3) Then click on the “TransMemory
TNU Secure Software v305” link.
4) Read and agree to the End User Software License Agreement and click the Download
button.
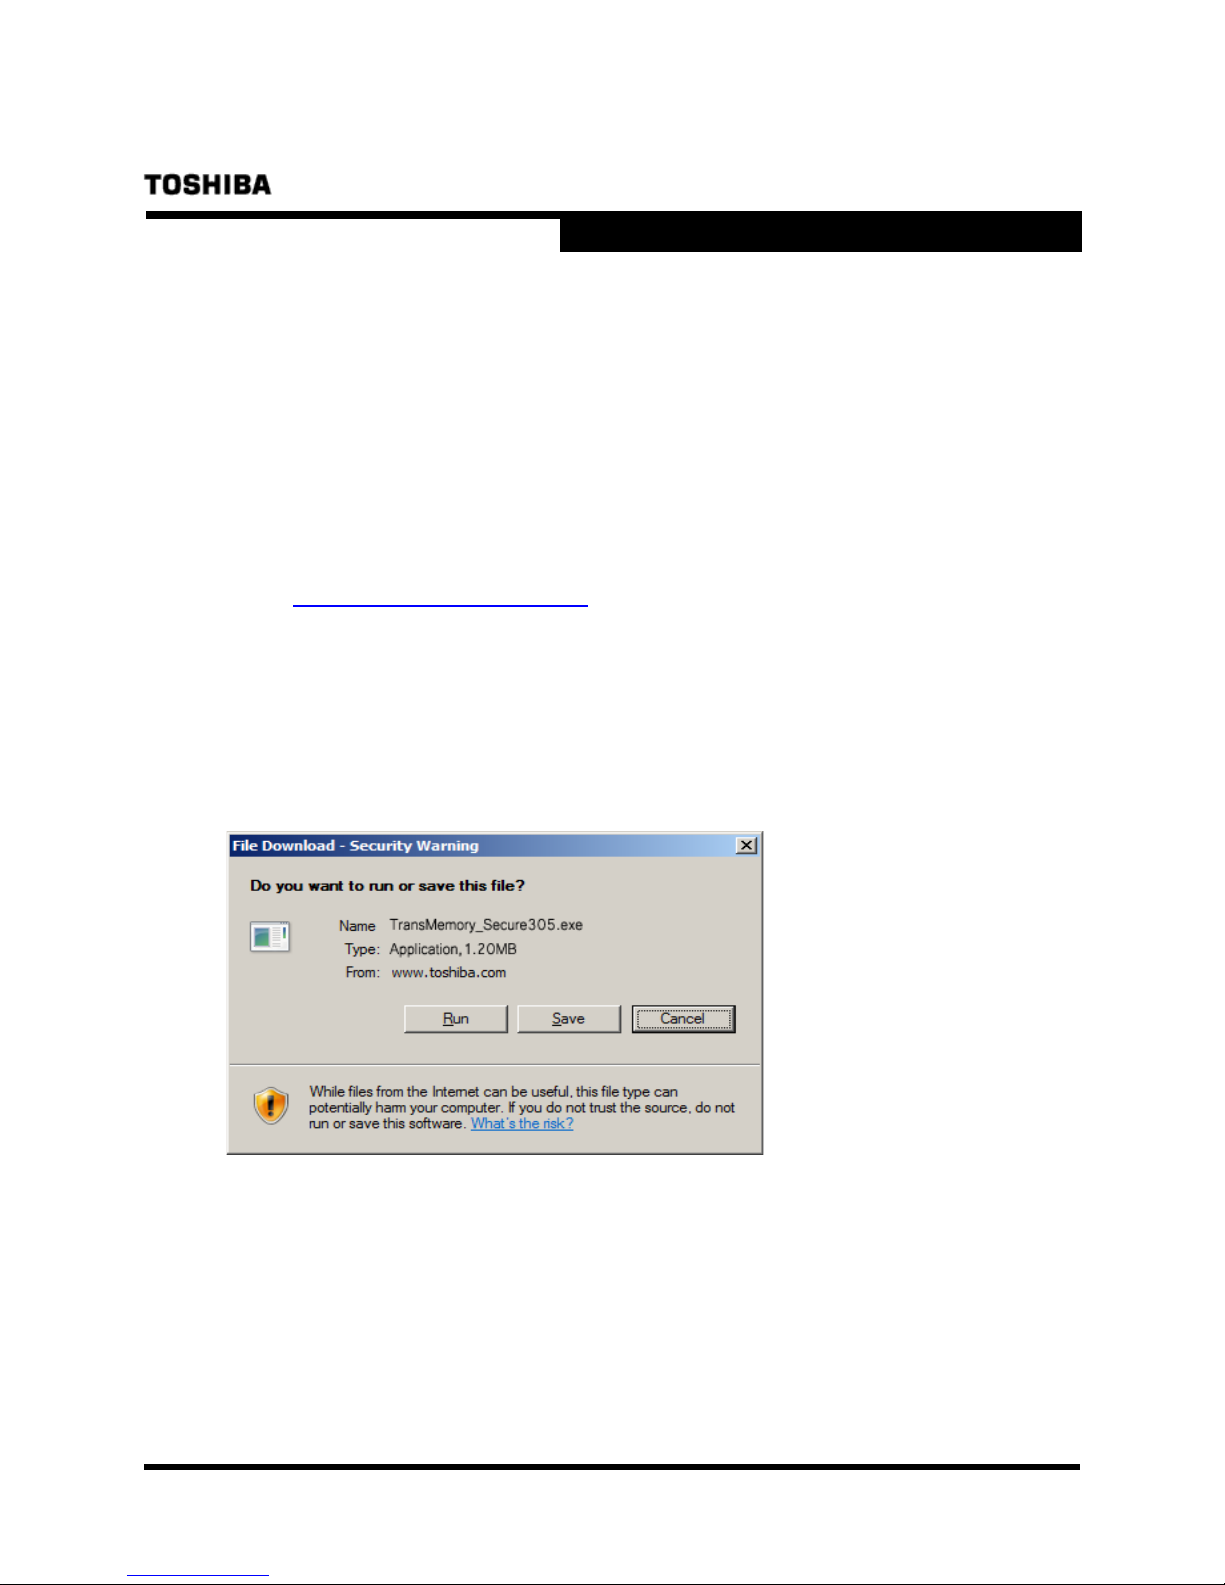
5) Click on “Save” in the dialog box, as shown below
5
v.1.0
Page 7
Security Software Installation Manual
TRANSMEMORY™ USB TNU FLASH DRIVE
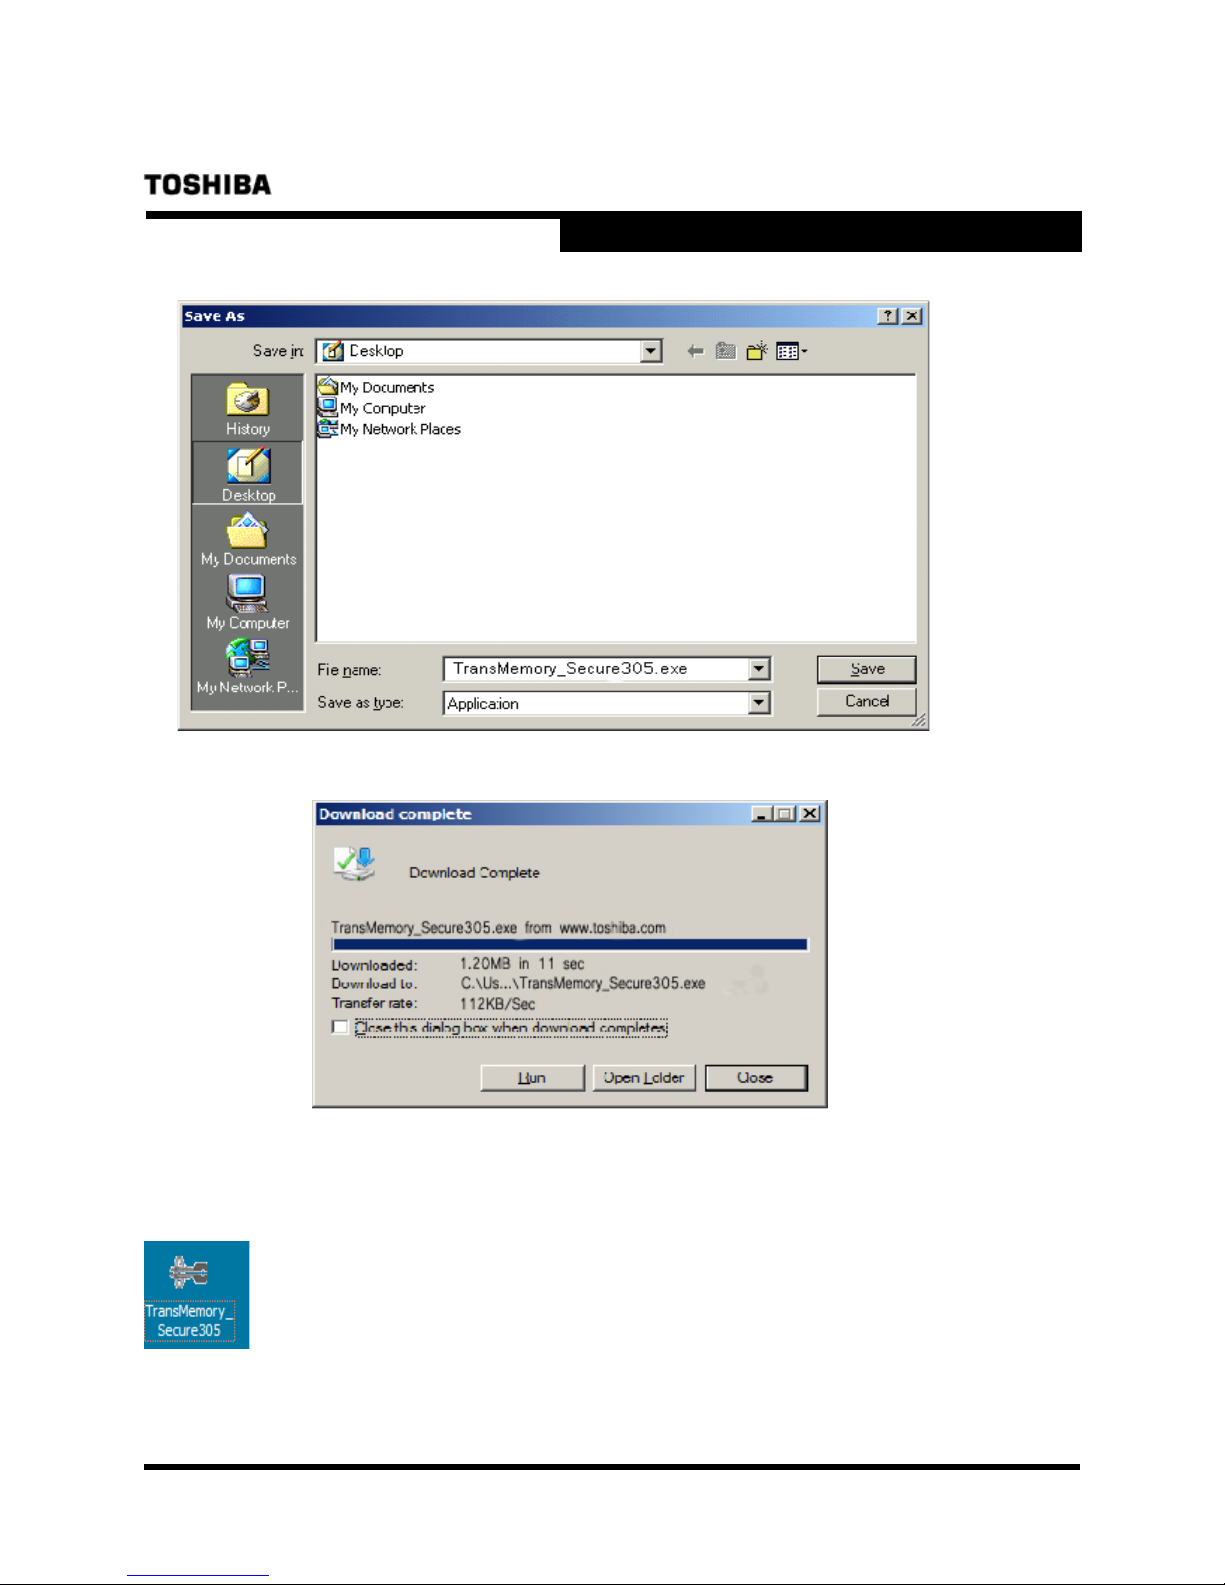
6) A dialog box asking where the software is to be saved appears. Select on “Desktop”.
7) When the download is complete, the following dialog box appears. Click on “Close”.
8) On the desktop, the downloaded software named “TransMemory_Secure305.exe” appears
as a new executable file.
6
v.1.0
Page 8
Security Software Installation Manual
TRANSMEMORY™ USB TNU FLASH DRIVE
Chapter 4: How to Use the Security Software
This chapter describes how to use the TransMemory
TM
Secure Software. Be sure to follow the
instructions for correct installation.
Important Note: Before following the instructions below, please back up any data stored in the
TransMemory
TransMemoryTM for the Privacy Zone. Toshiba assumes no liability for destruction or loss of data
stored on TransMemory
TM
Flash Drive that you wish to save. All data may be lost when formatting
TM
for any reason.
■ 1. Connect the TransMemory USB TNU Flash Drive
Please connect the TransMemory
TransMemory
TM
Secure Software.
TM
Flash Drive to your computer before executing the
■ 1.1 Setting up the Security Software – Adaptability Check
1) Double click on the “TransMemory_Secure305.exe” security software icon to start up the
security software.
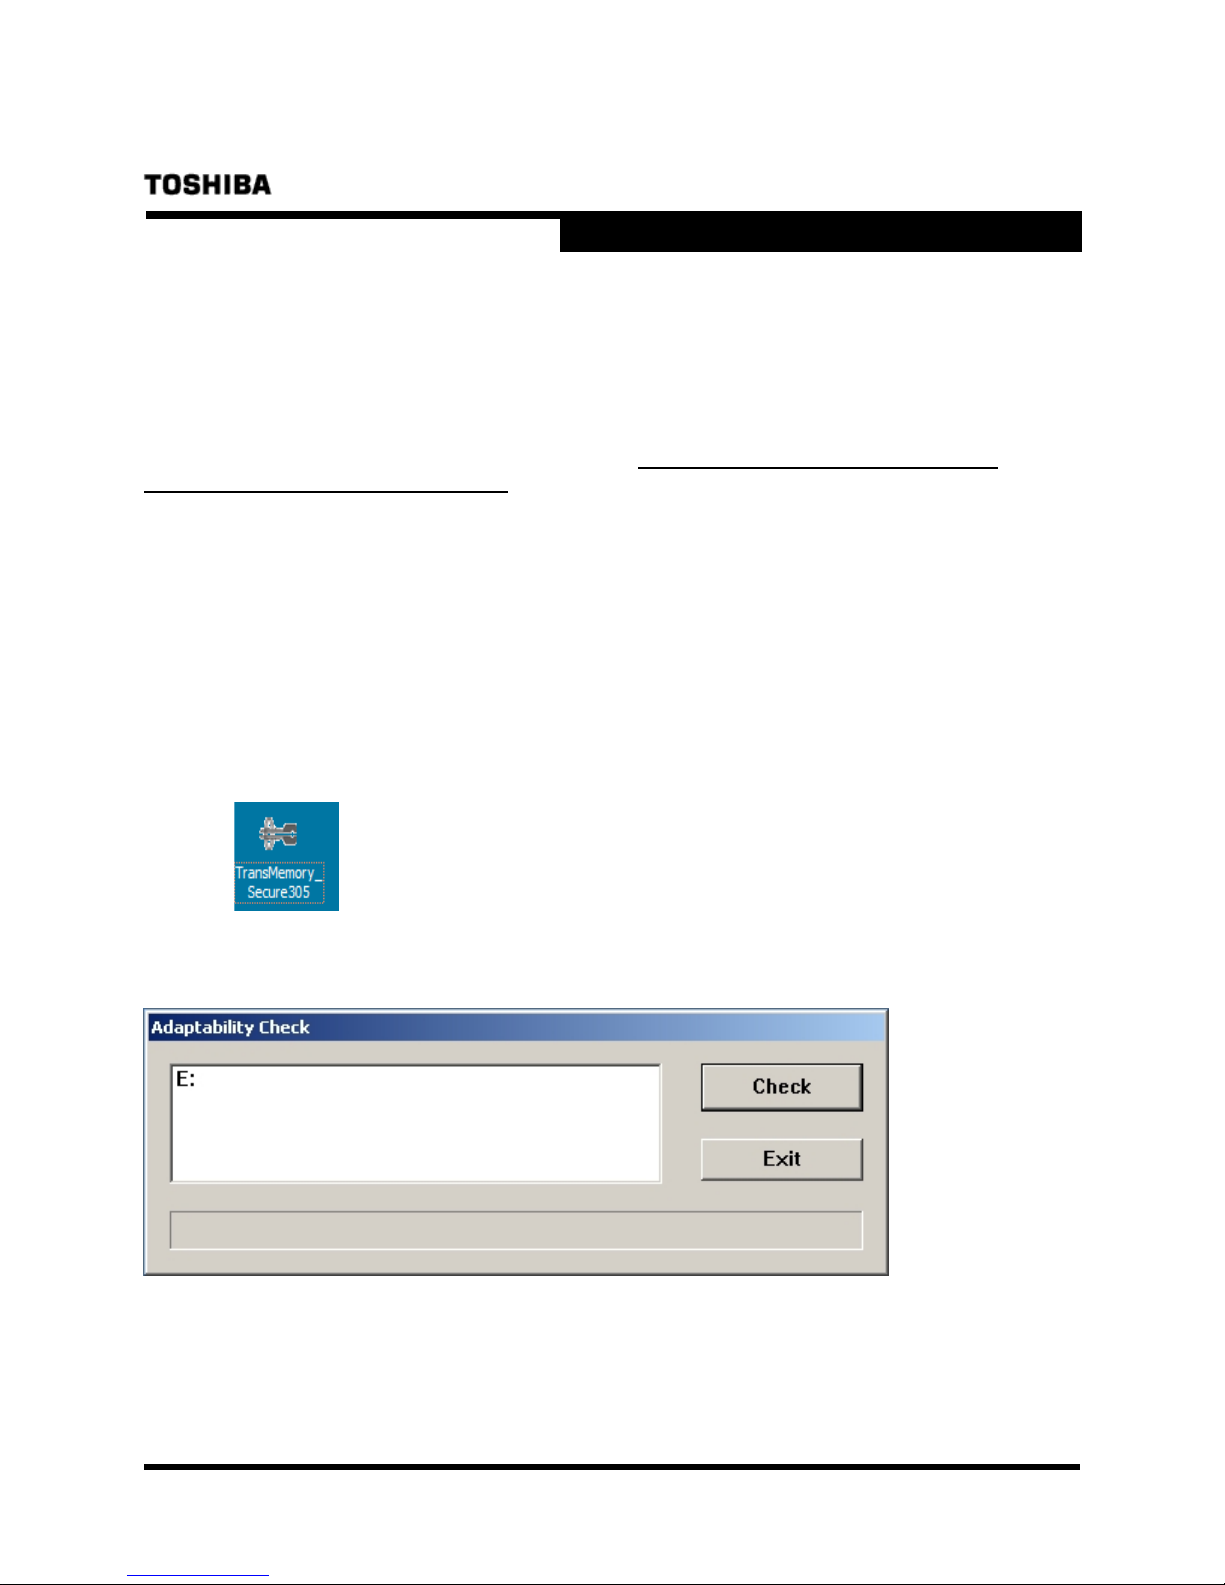
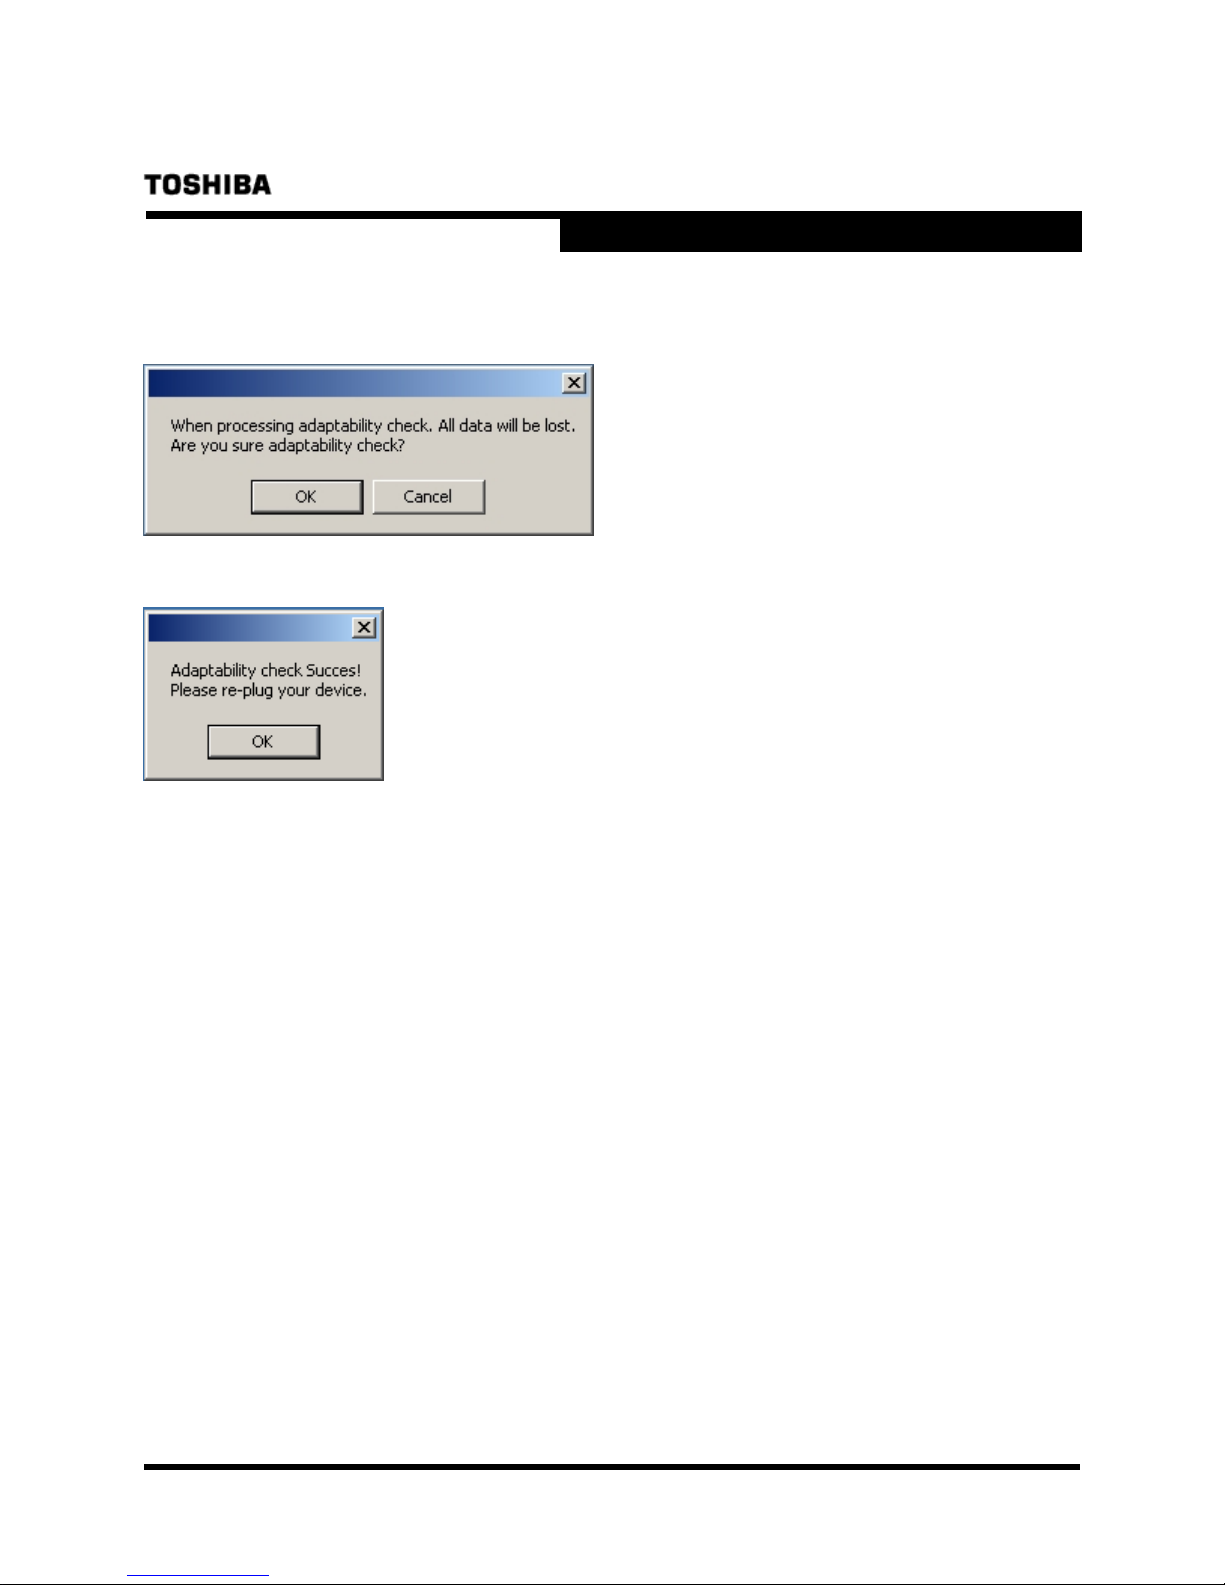
2) Some types of TransMemory
Click “Check” when below dialogue box appears.
TM
USB Flash Drives will show the dialogue boxes below.
7
v.1.0
Page 9
Security Software Installation Manual
TRANSMEMORY™ USB TNU FLASH DRIVE
Click “OK” on the dialogue box below.
Click “OK” on the dialogue box below.
Disconnect the TransMemory™ from the PC. These dialogues boxes will not appear once this
protocol is completed.
8
v.1.0
Page 10
Security Software Installation Manual
TRANSMEMORY™ USB TNU FLASH DRIVE
1.2 Setting up the Security Software
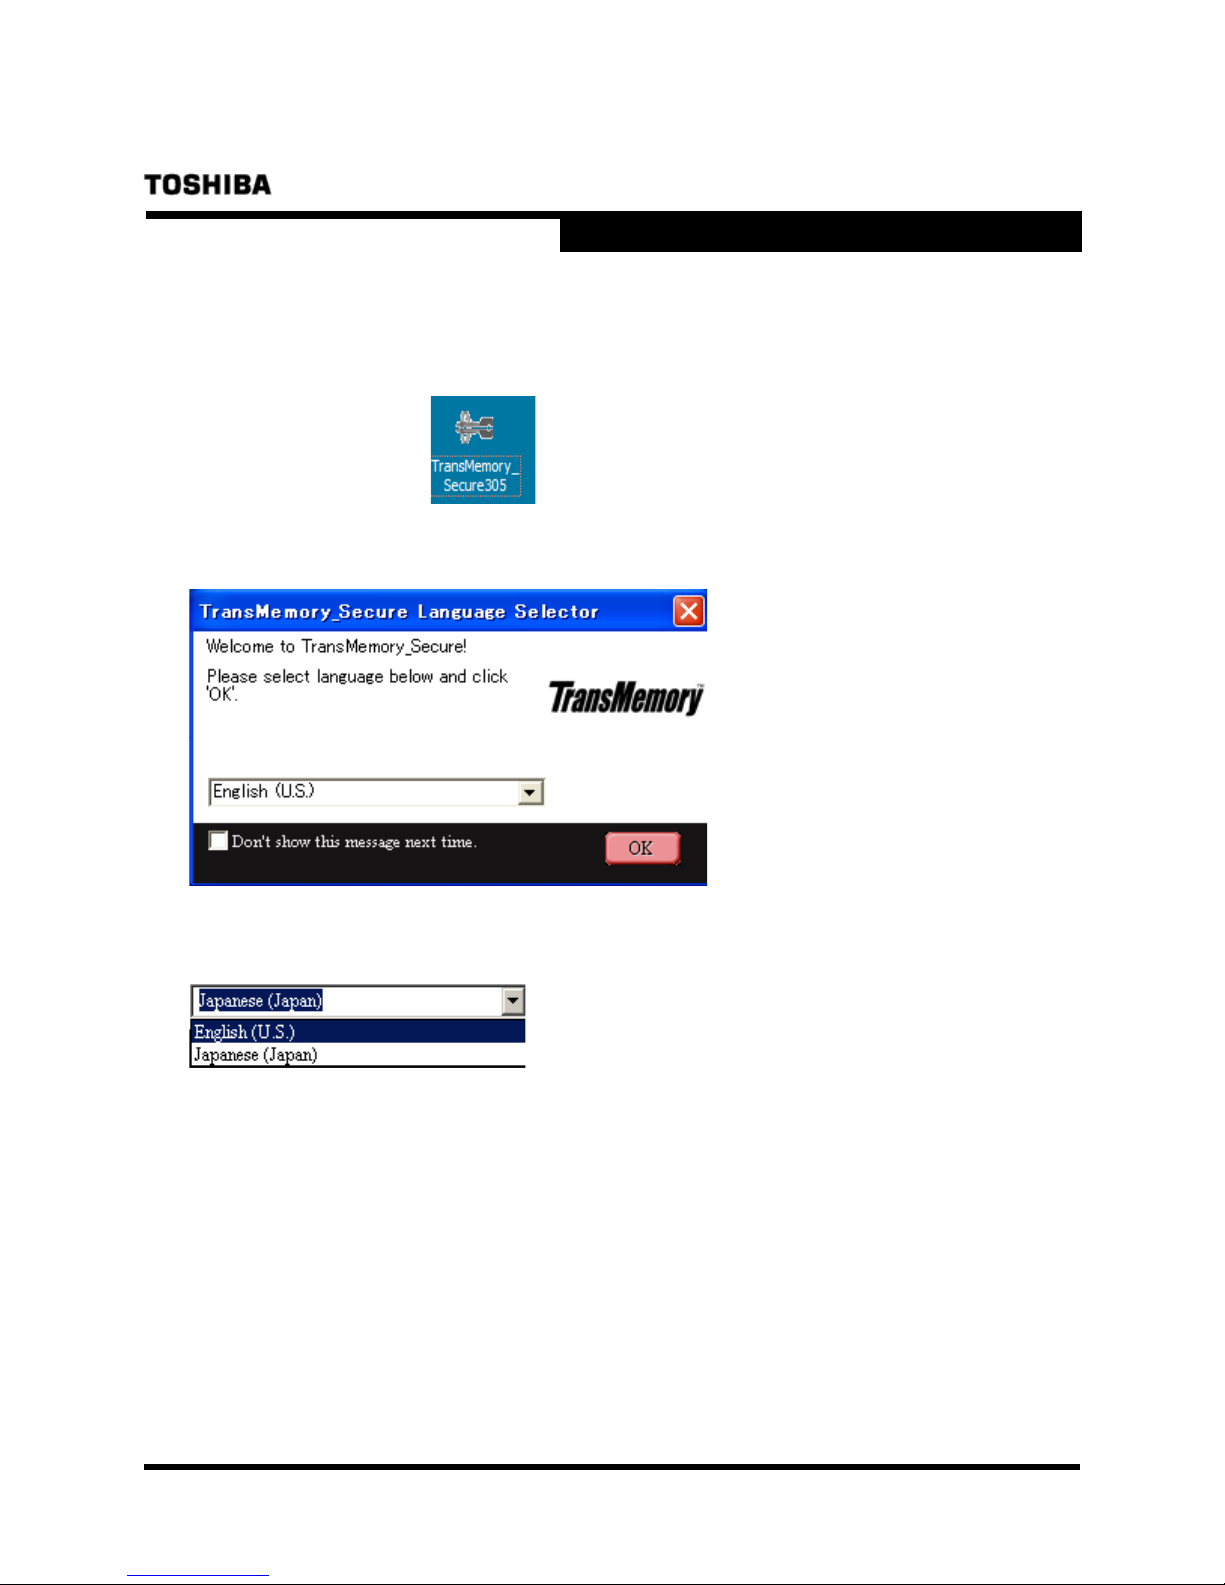
1) Double click on the “TransMemory_Secure305.exe” security software icon to start up the
security software.
2) When the following dialog box appears, click on “OK”.
If English is not selected, click on the downward-pointing arrow and select English.
9
v.1.0
Page 11
Security Software Installation Manual
TRANSMEMORY™ USB TNU FLASH DRIVE
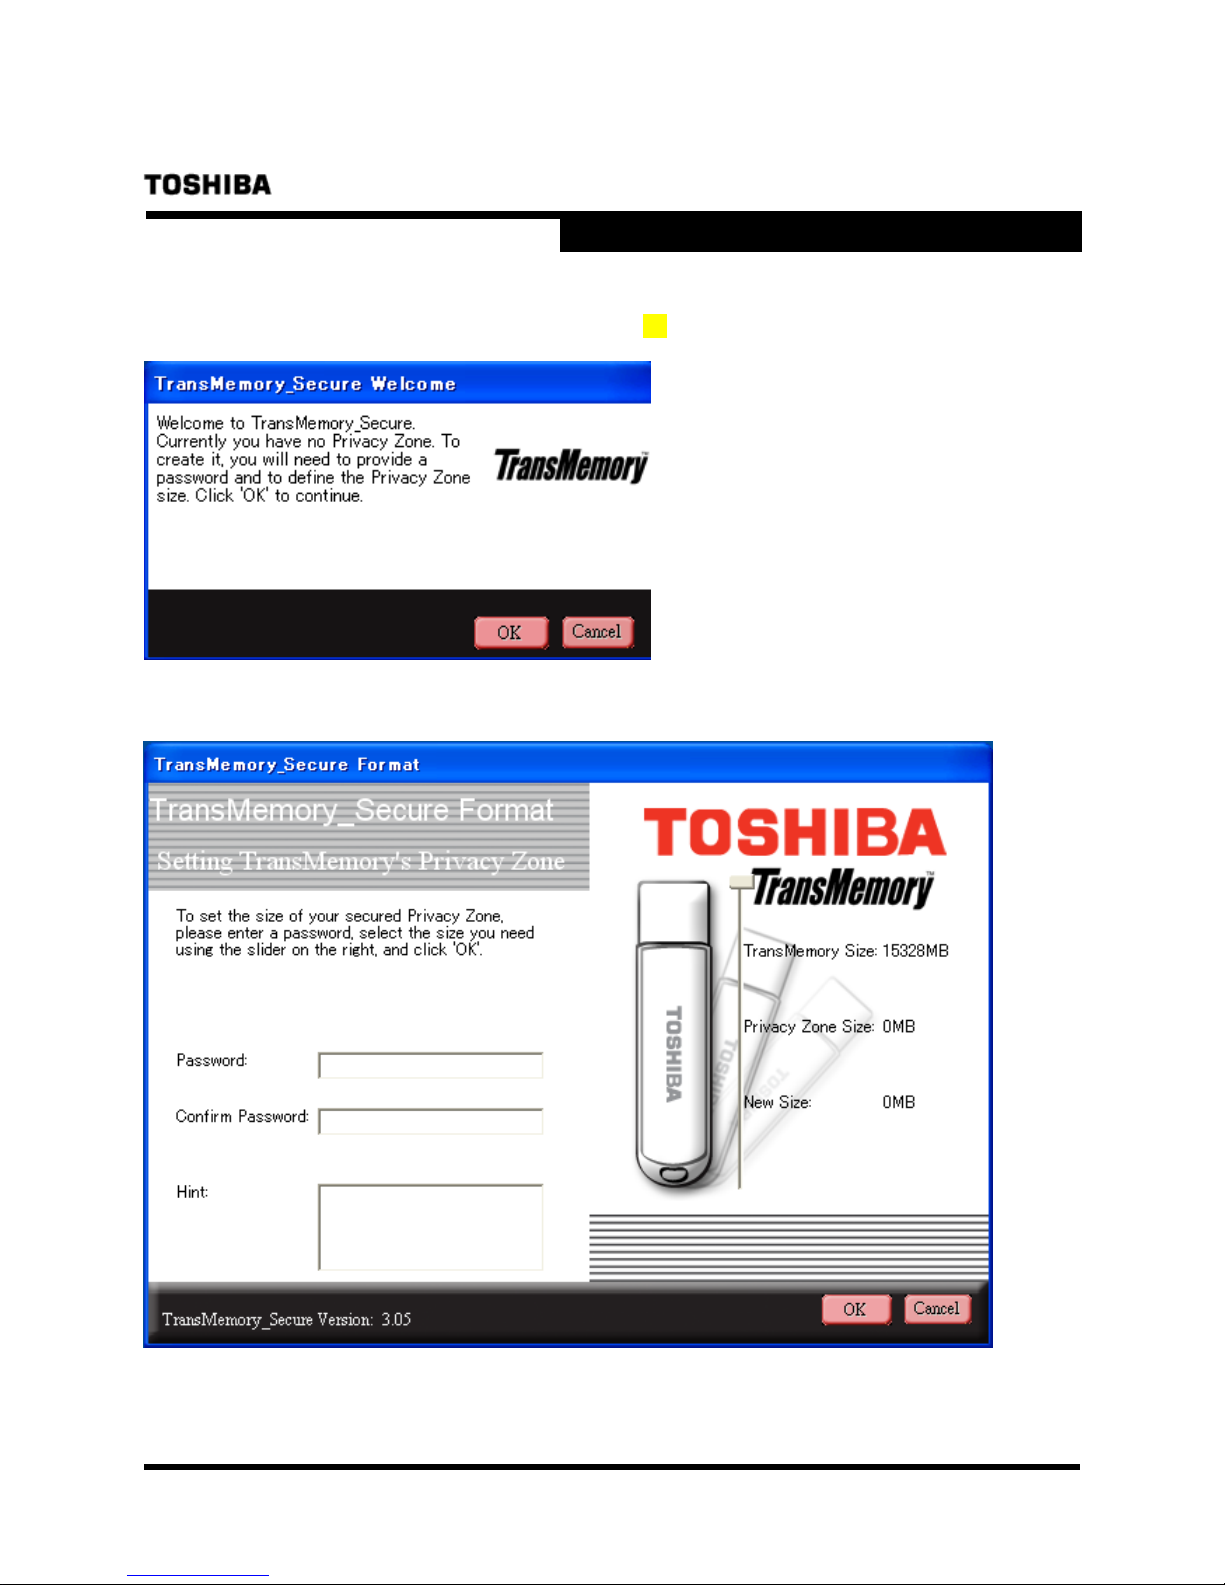
3) When the following dialog box appears, confirm and click on “OK” if you ha ve not established
a Privacy Zone. The step 7) dialo g box on p age 13 appears when a Privacy Zone has already
been established.
The following dialog box appears.
10
v.1.0
Page 12
Security Software Installation Manual
TRANSMEMORY™ USB TNU FLASH DRIVE
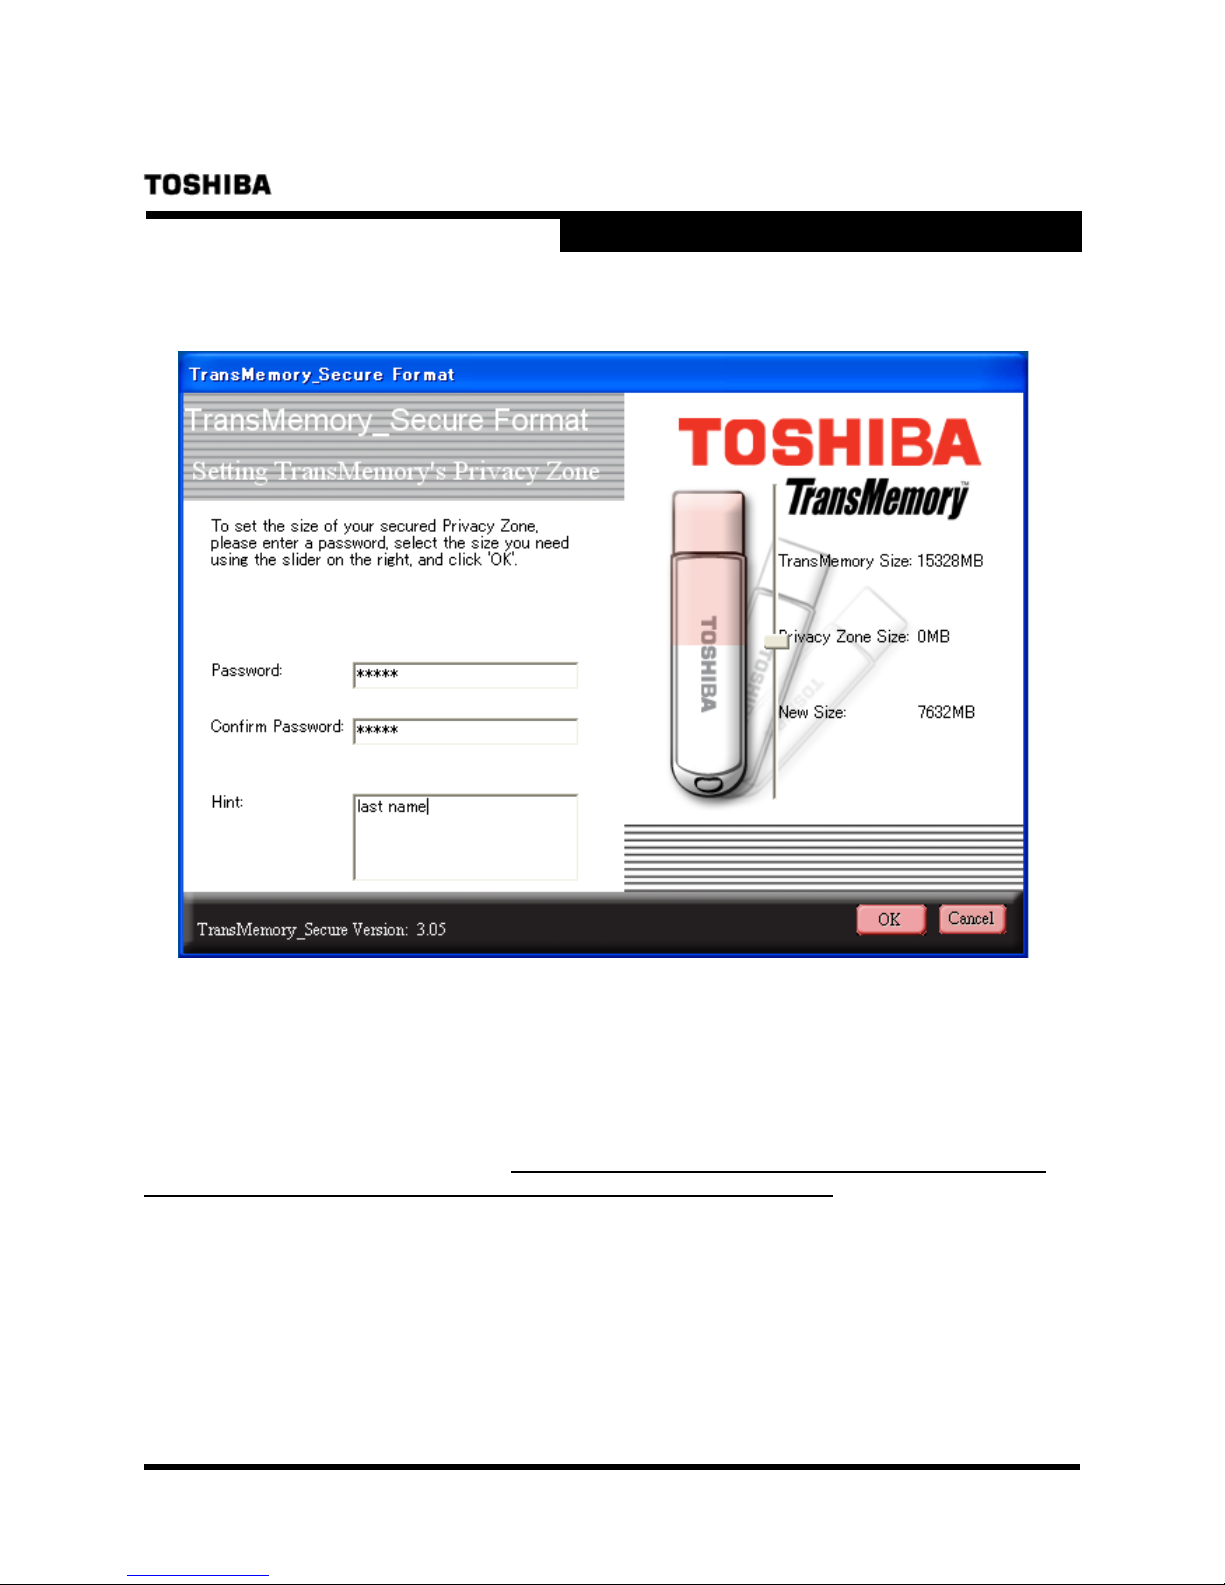
4) Slide the partition to determine the size of the Privacy Zone. Enter the password, reenter
the password in the “Confirm Password” box, enter a “Hint” to yoursel f, and click on “ OK ” .
Note: You may choose a password of up to 16 characters using half-width alphanumerics (case
sensitive). Please choose a password and hint that is easy for you to remember but difficult for
others to guess.
Note: If you forget your password, you will not be able to access any data you have saved in the
Privacy Zone. In that case, follow the instructions in Section 1.2 to reformat the TransMemory
Flash Drive and set a new password. All data stored in both the Privacy Zone and the Public
Zone may be lost when the TransMemoryTM Flash Drive is reformatted. When formatting using
your computer’s format command, only the Public Zone will be formatted, but not the Privacy
Zone.
Note: The size of the Privacy Zone is limited to a maximum of 90% of the available memory
(user area). The pink area denotes the Privacy Zone.
TM
11
v.1.0
Page 13
Security Software Installation Manual
TRANSMEMORY™ USB TNU FLASH DRIVE
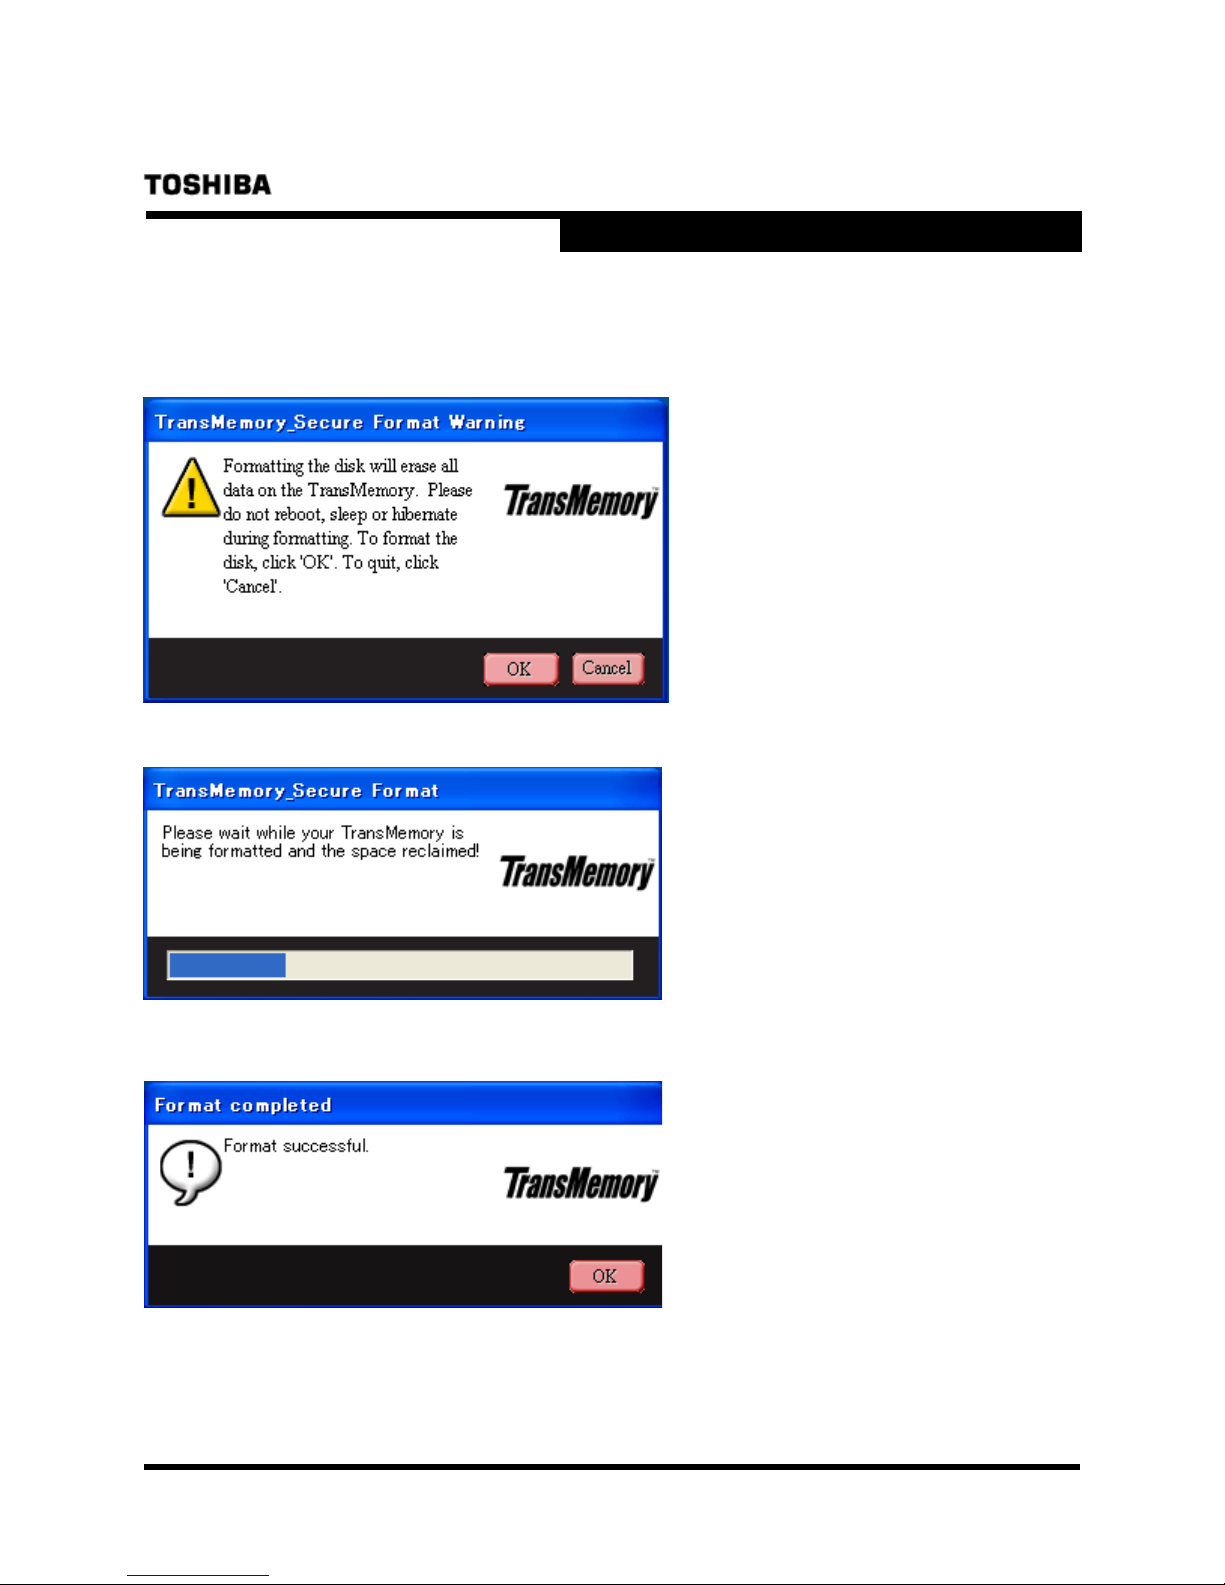
5) When the following dialog box appears, confirm that you have backed up all data on the
TransMemory
TM
Flash Drive that you wish to keep, and then click on “OK”.
The following dialog box appears, then automatically disappears.
6) When the following dialog box appears, confirm and click on “OK”.
12
v.1.0
Page 14
Security Software Installation Manual
TRANSMEMORY™ USB TNU FLASH DRIVE
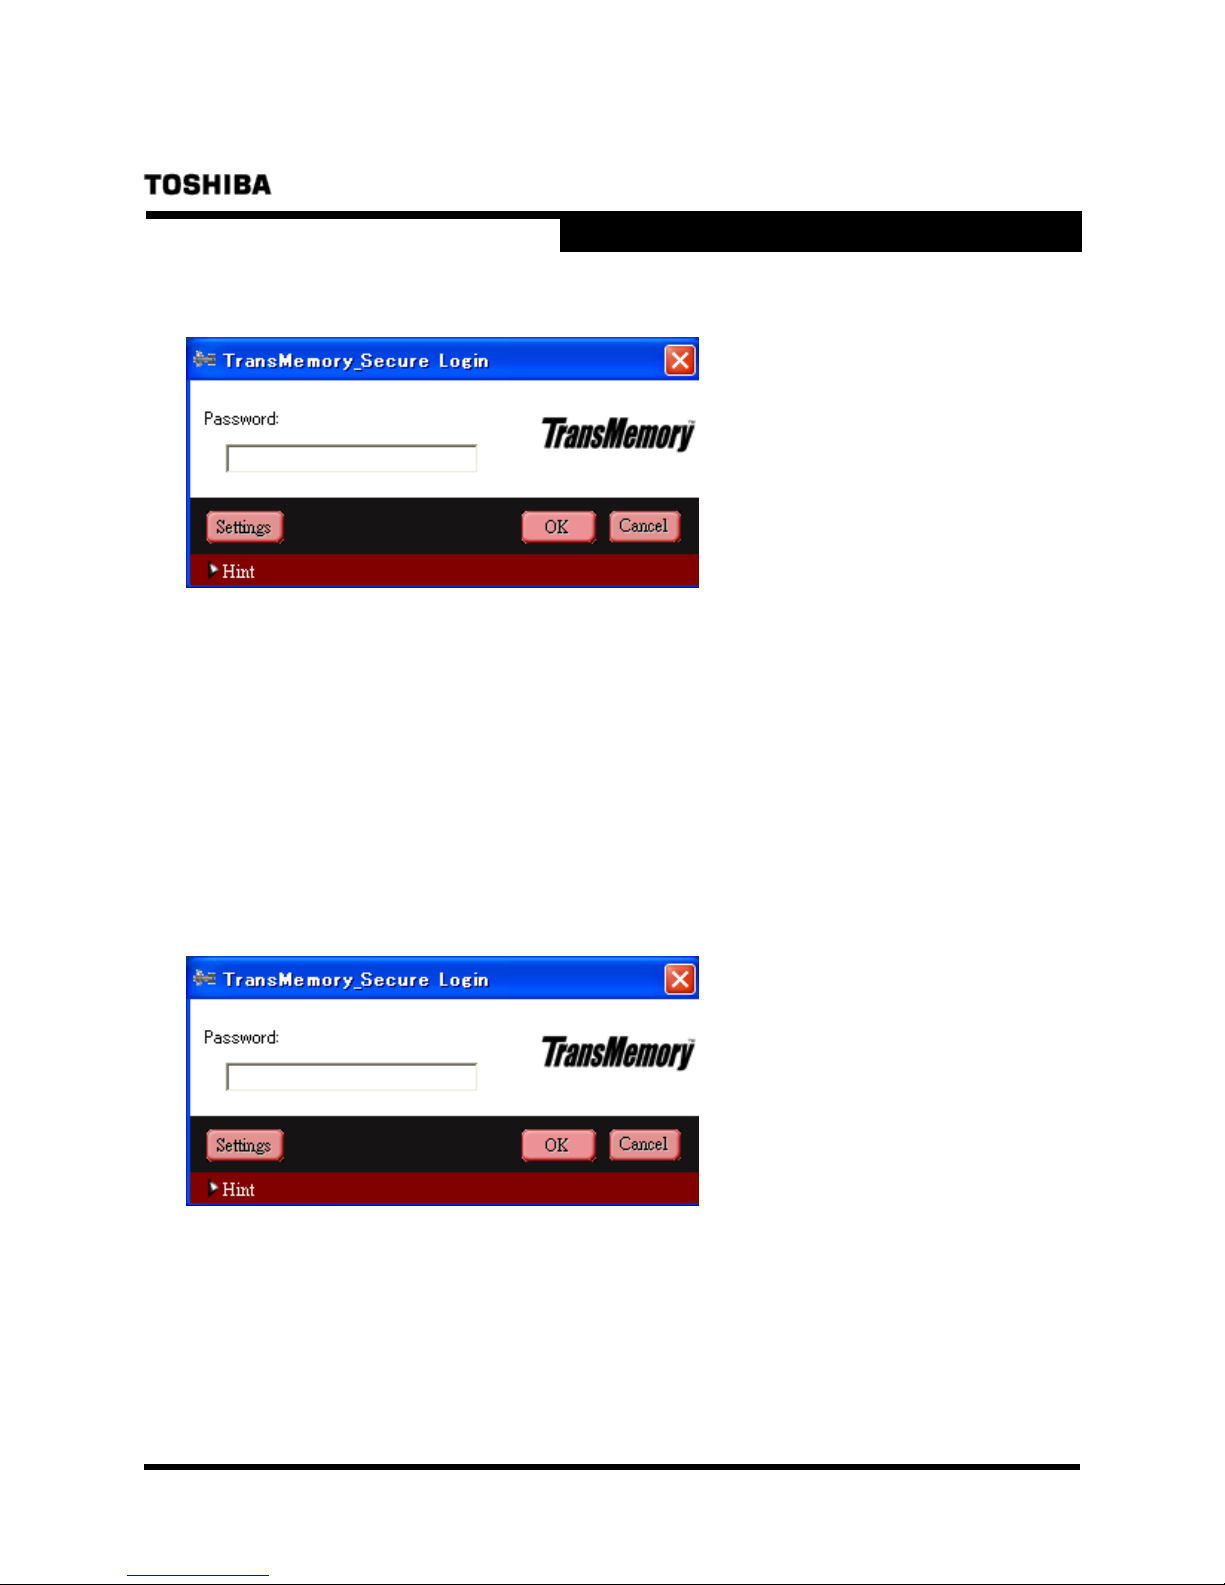
7) The following dialog box appears. The set-up is now complete.
■ 1.3 Formatting using the Security software
Important Note: Reformatting the TransMemory
completely remove all data and/or data may be recoverable from the TransMemory
transferring or destroying the TransMemory
functionality to completely remove sensitive saved data, such as software for deleting data
available from third-party vendors, is recommended.
1) When the following dialog box appears, click on “Settings”.
TM
Flash Drive or deleting data may not
TM
Flash Drive, the use of a product with the
TM
. Before
13
v.1.0
Page 15
Security Software Installation Manual
TRANSMEMORY™ USB TNU FLASH DRIVE
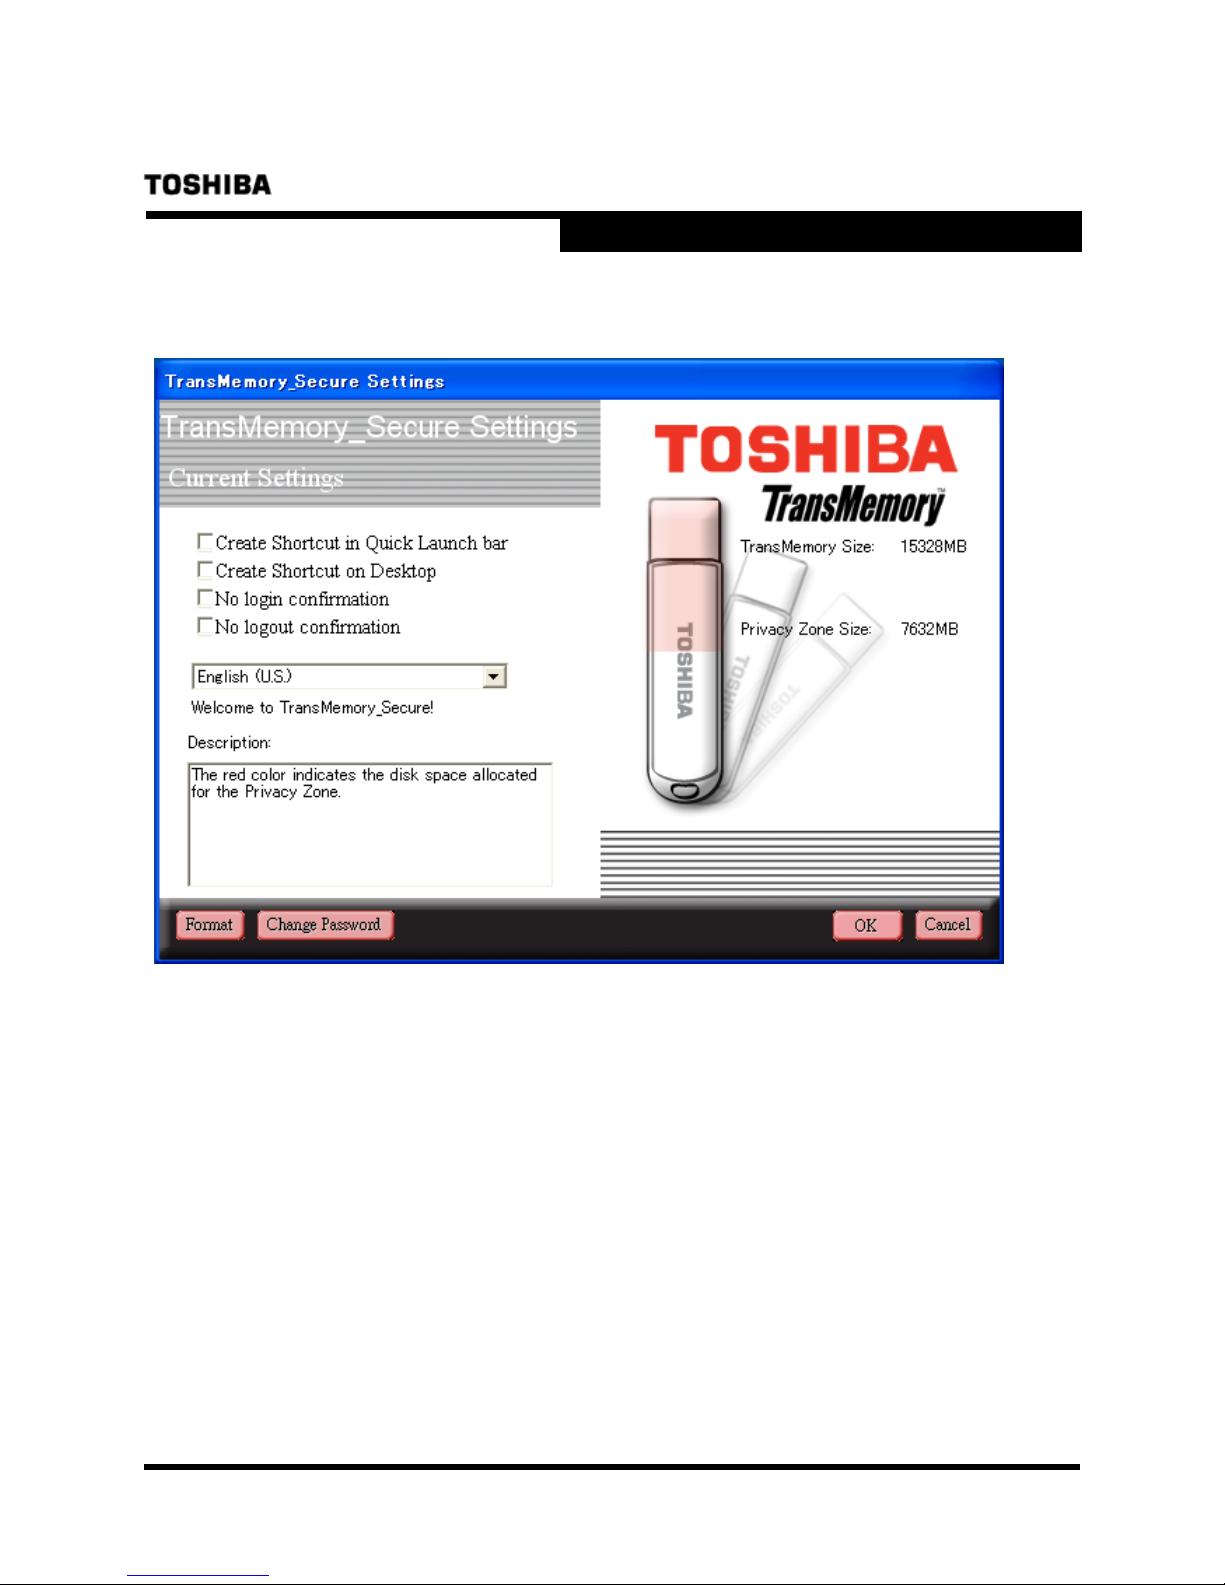
2) When the following dialog box appears, click on “Format”.
14
v.1.0
Page 16
Security Software Installation Manual
TRANSMEMORY™ USB TNU FLASH DRIVE
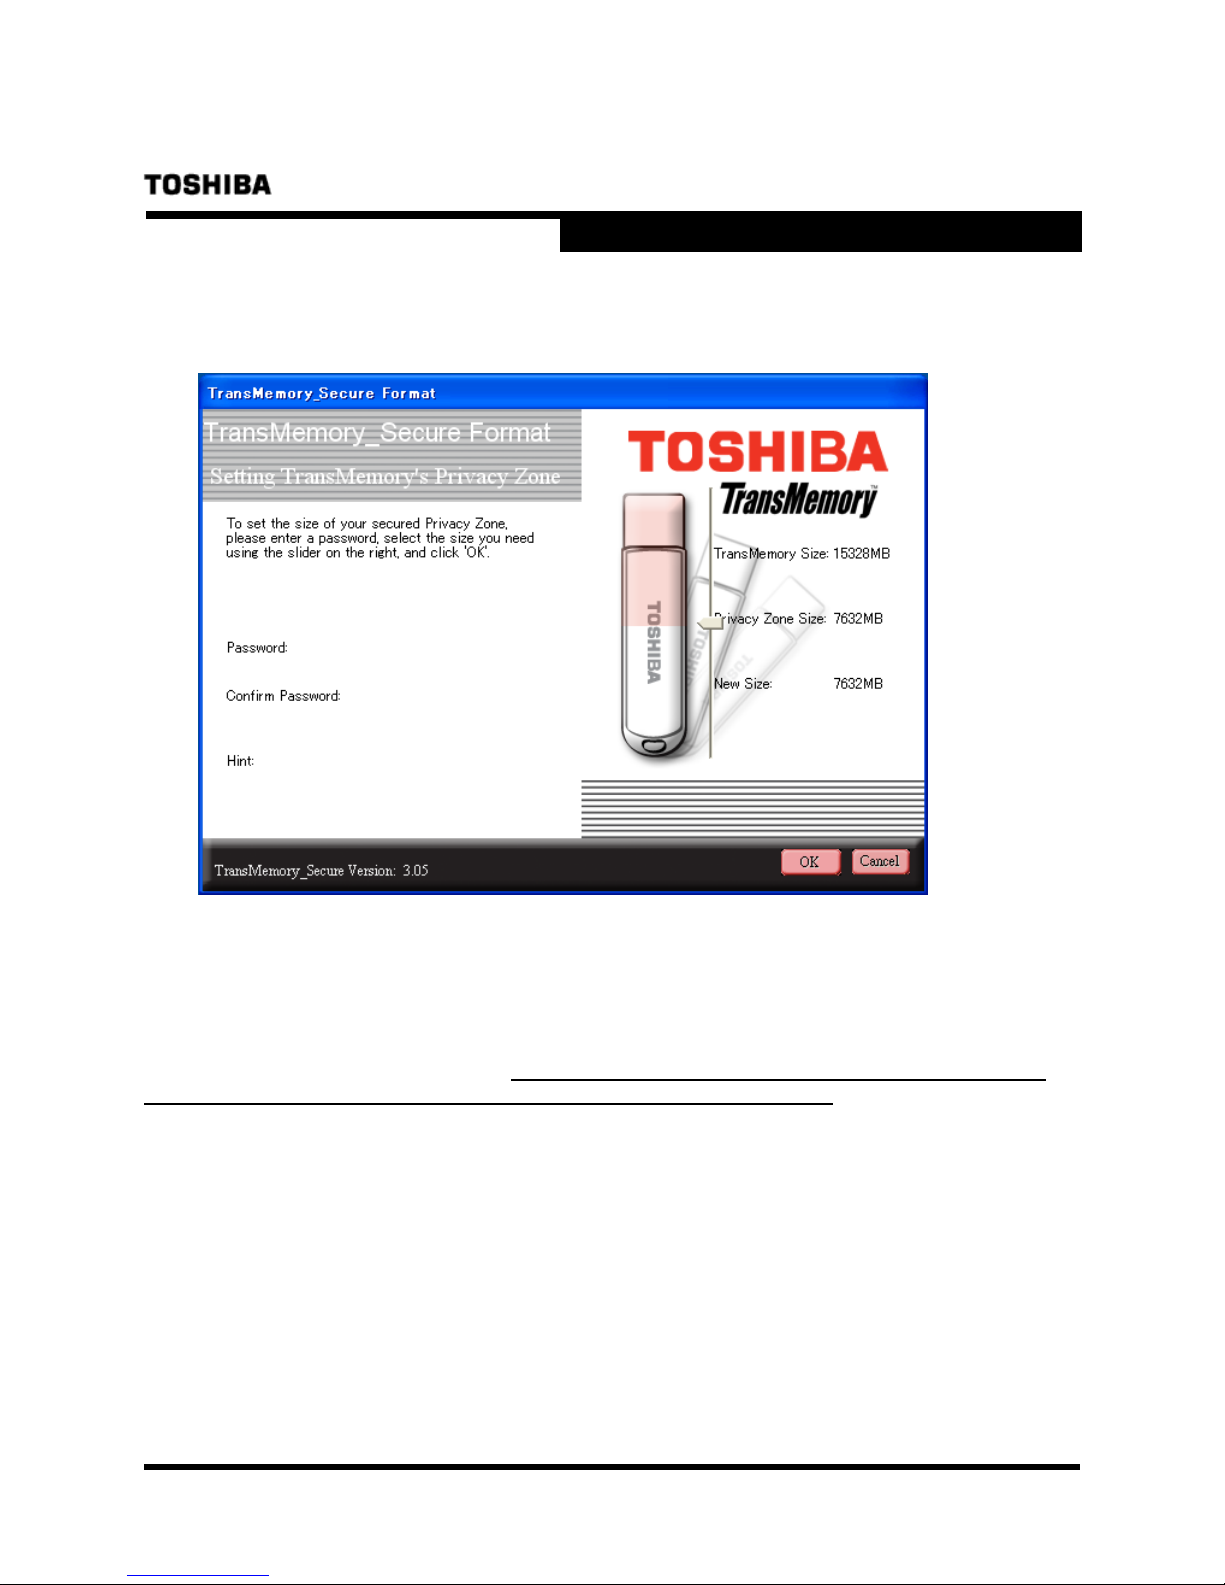
3) When the following dialog box appears, slide the partition to determine the size of the
Privacy Zone. Choose a password, reenter the password in the “Confirm Password” box,
enter a “Hint” to yourself, and click on “OK”.
Note: You may choose a password of up to 16 characters using half-width alphanumerics (case
sensitive). Please choose a password and hint that is easy for you to remember but difficult for
others to guess.
Note: If you forget your password, you will not be able to access any data you have saved in the
Privacy Zone. In that case, follow the instructions in Section 1.2 to reformat the TransMemory
TM
Flash Drive and set a new password. All data stored in both the Privacy Zone and the Public
Zone may be lost when the TransMemoryTM Flash Drive is reformatted. When formatting using
your computer’s format command, only the Public Zone will be formatted, but not the Privacy
Zone.
Note: The size of the Privacy Zone is limited to a maximum of 90% of the available memory
(user area). The pink area denotes the Privacy Zone
15
v.1.0
Page 17
Security Software Installation Manual
TRANSMEMORY™ USB TNU FLASH DRIVE
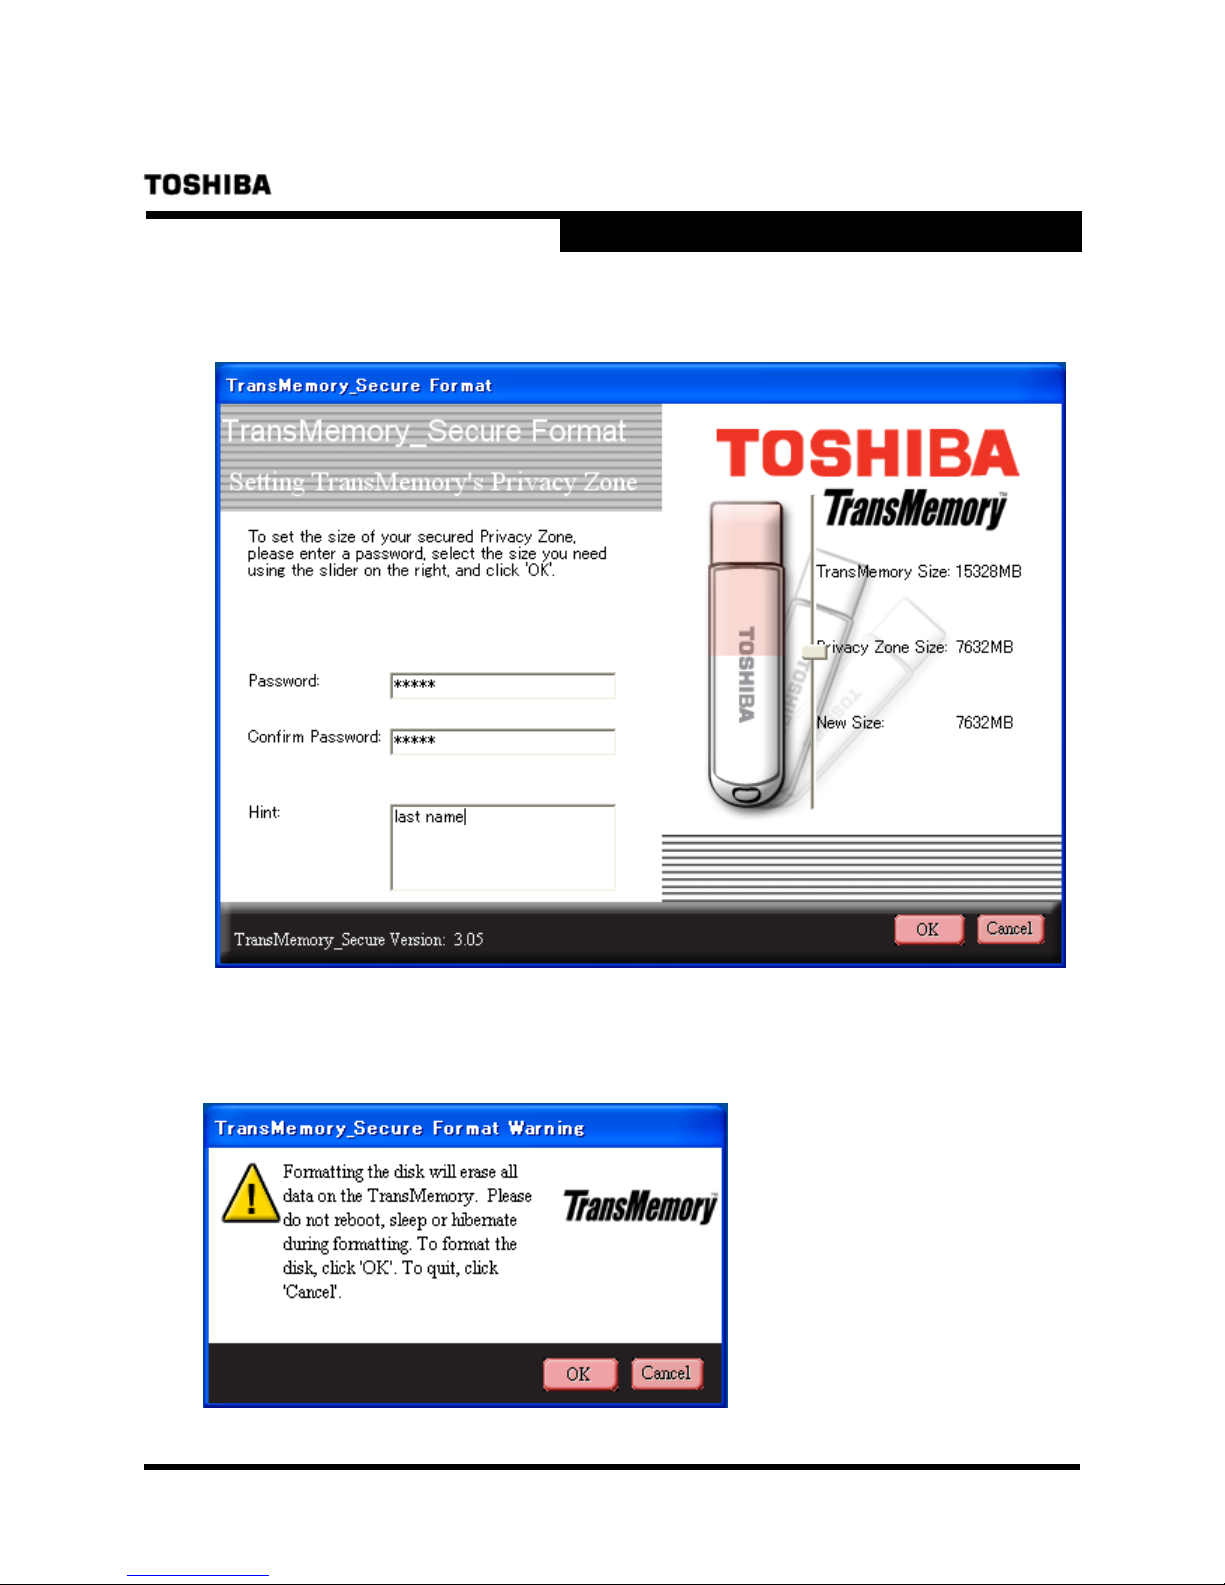
4) Determine the size of the Privacy Zone. Enter the “Password”, re-enter the “Confirm
Password”, then a “Hint”, and click on “OK”.
5) When the following dialog box appears, confirm that you have backed up all data on the
TransMemory
TM
USB that you wish to keep, and click on “OK”.
16
v.1.0
Page 18
Security Software Installation Manual
TRANSMEMORY™ USB TNU FLASH DRIVE
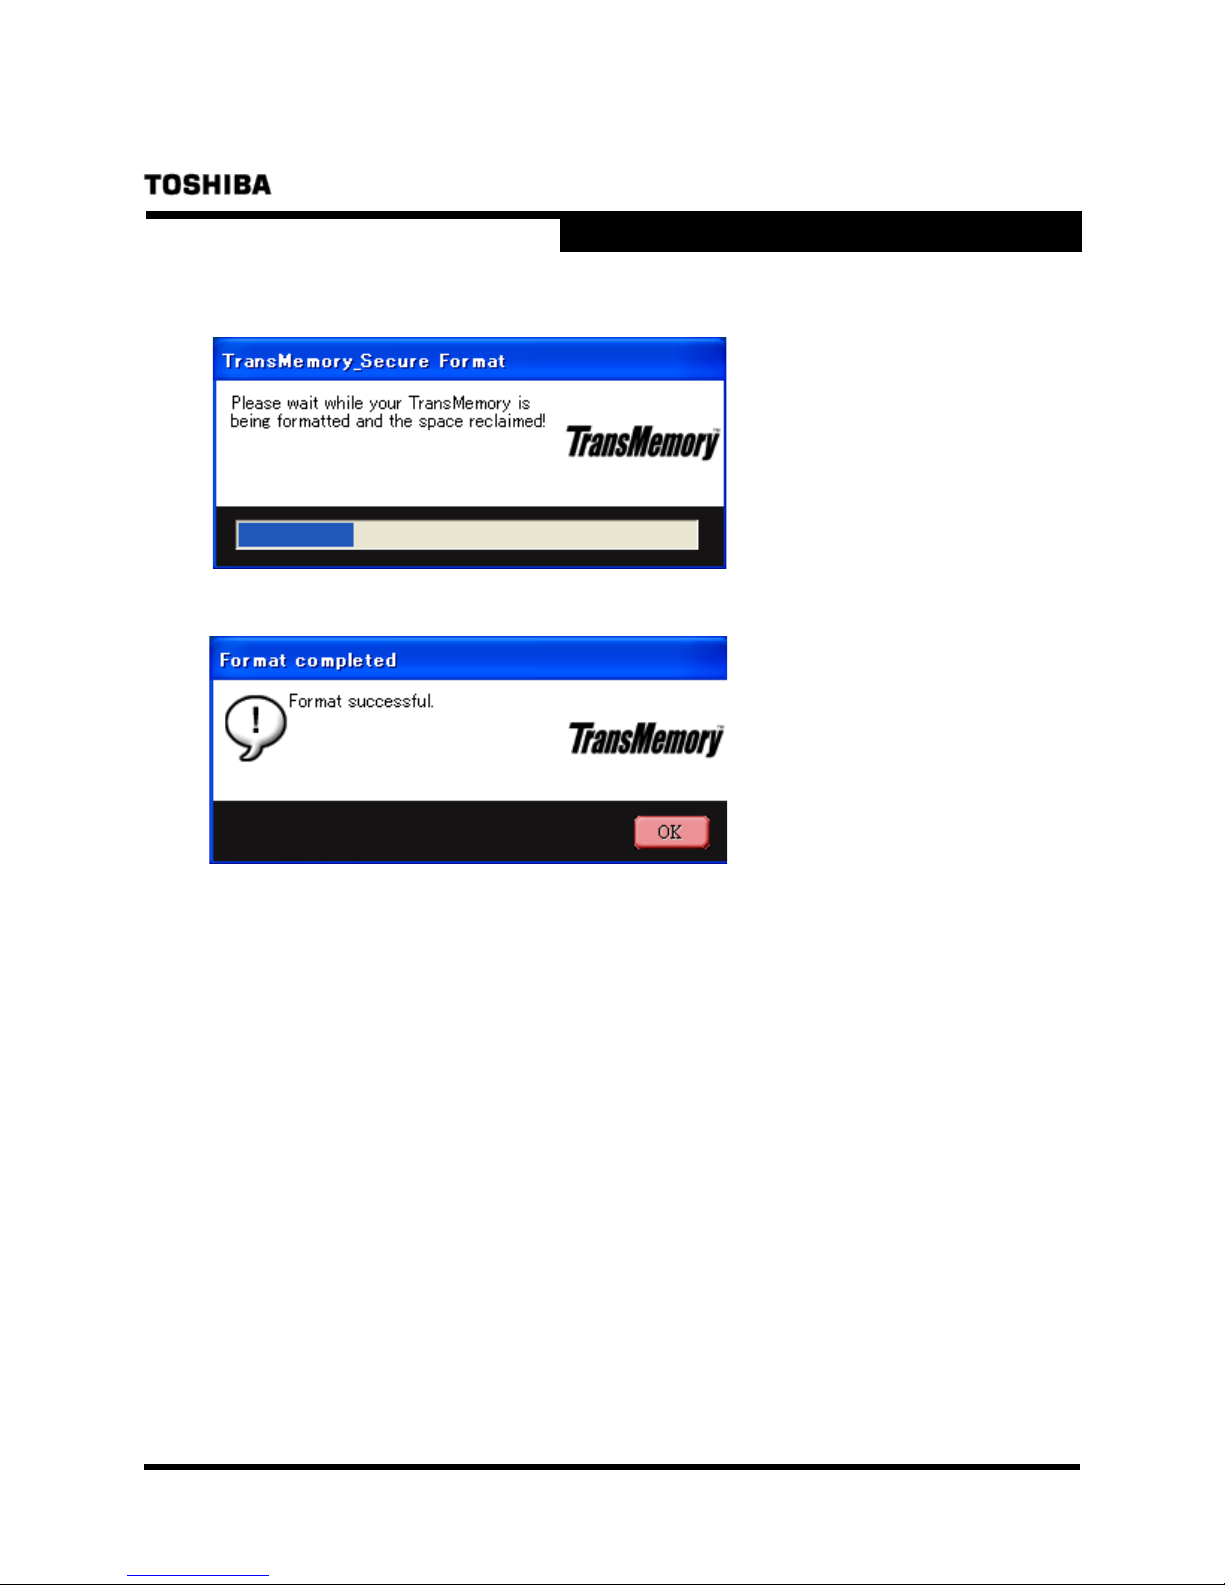
6) The following dialog box appears, then automatically disappears.
7) When the following dialog box appears, confirm and click on “OK” to complete formatting.
17
v.1.0
Page 19
Security Software Installation Manual
TRANSMEMORY™ USB TNU FLASH DRIVE
■ 2. Changing the Security Software Password and Log In/Log Out
Be sure to connect the TransMemory
security software password changes and before logging in and out of the Privacy Zone.
TM
Flash Drive to your computer before making
■ 2.1 Changing the password using the Security Software
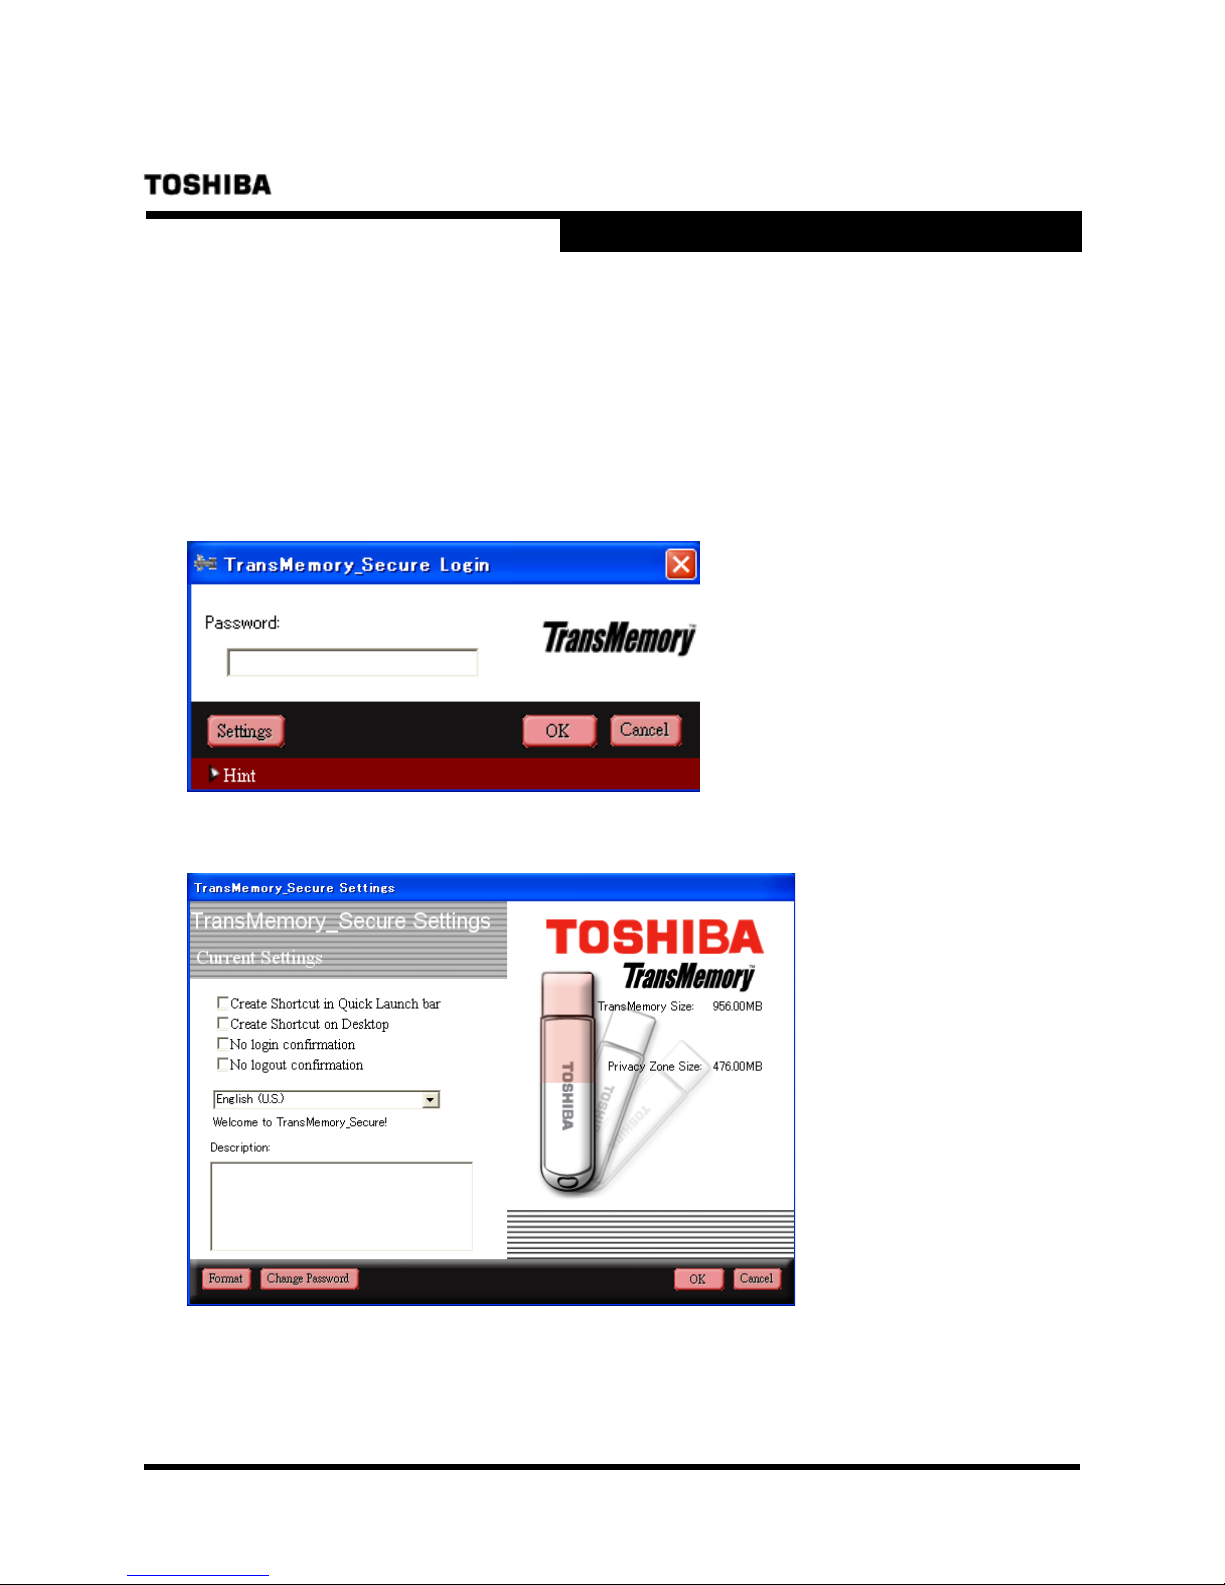
1) When the following dialog box appears, click on “Settings”.
2) When the following dialog box appears, click on “Change Password”.
18
v.1.0
Page 20
Security Software Installation Manual
TRANSMEMORY™ USB TNU FLASH DRIVE
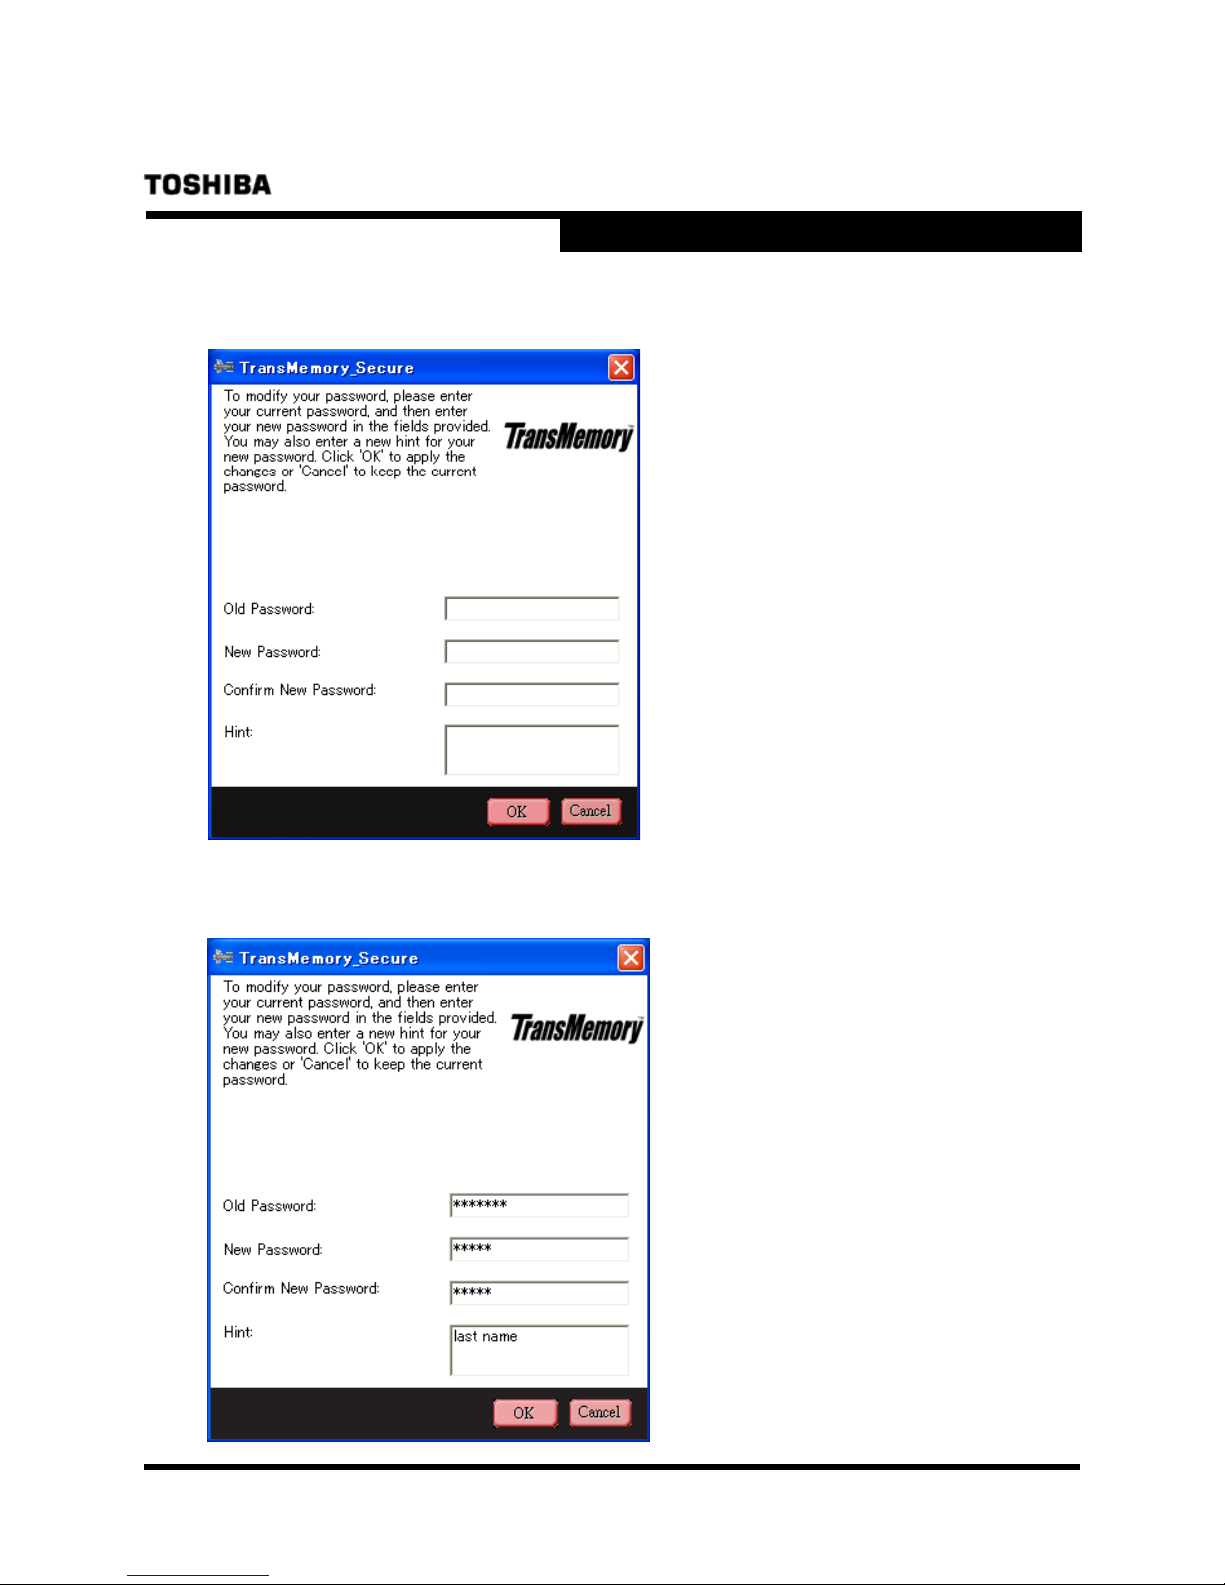
3) When the following dialog box appears, enter the “Old Password”, then the “New
Password”, reenter the “Confirm New Password”, then a “Hint”.
4) When the “Old Password”, “New Password”, “Confirm New Password”, and “Hint” have
been entered, click on “OK”.
19
v.1.0
Page 21
Security Software Installation Manual
TRANSMEMORY™ USB TNU FLASH DRIVE
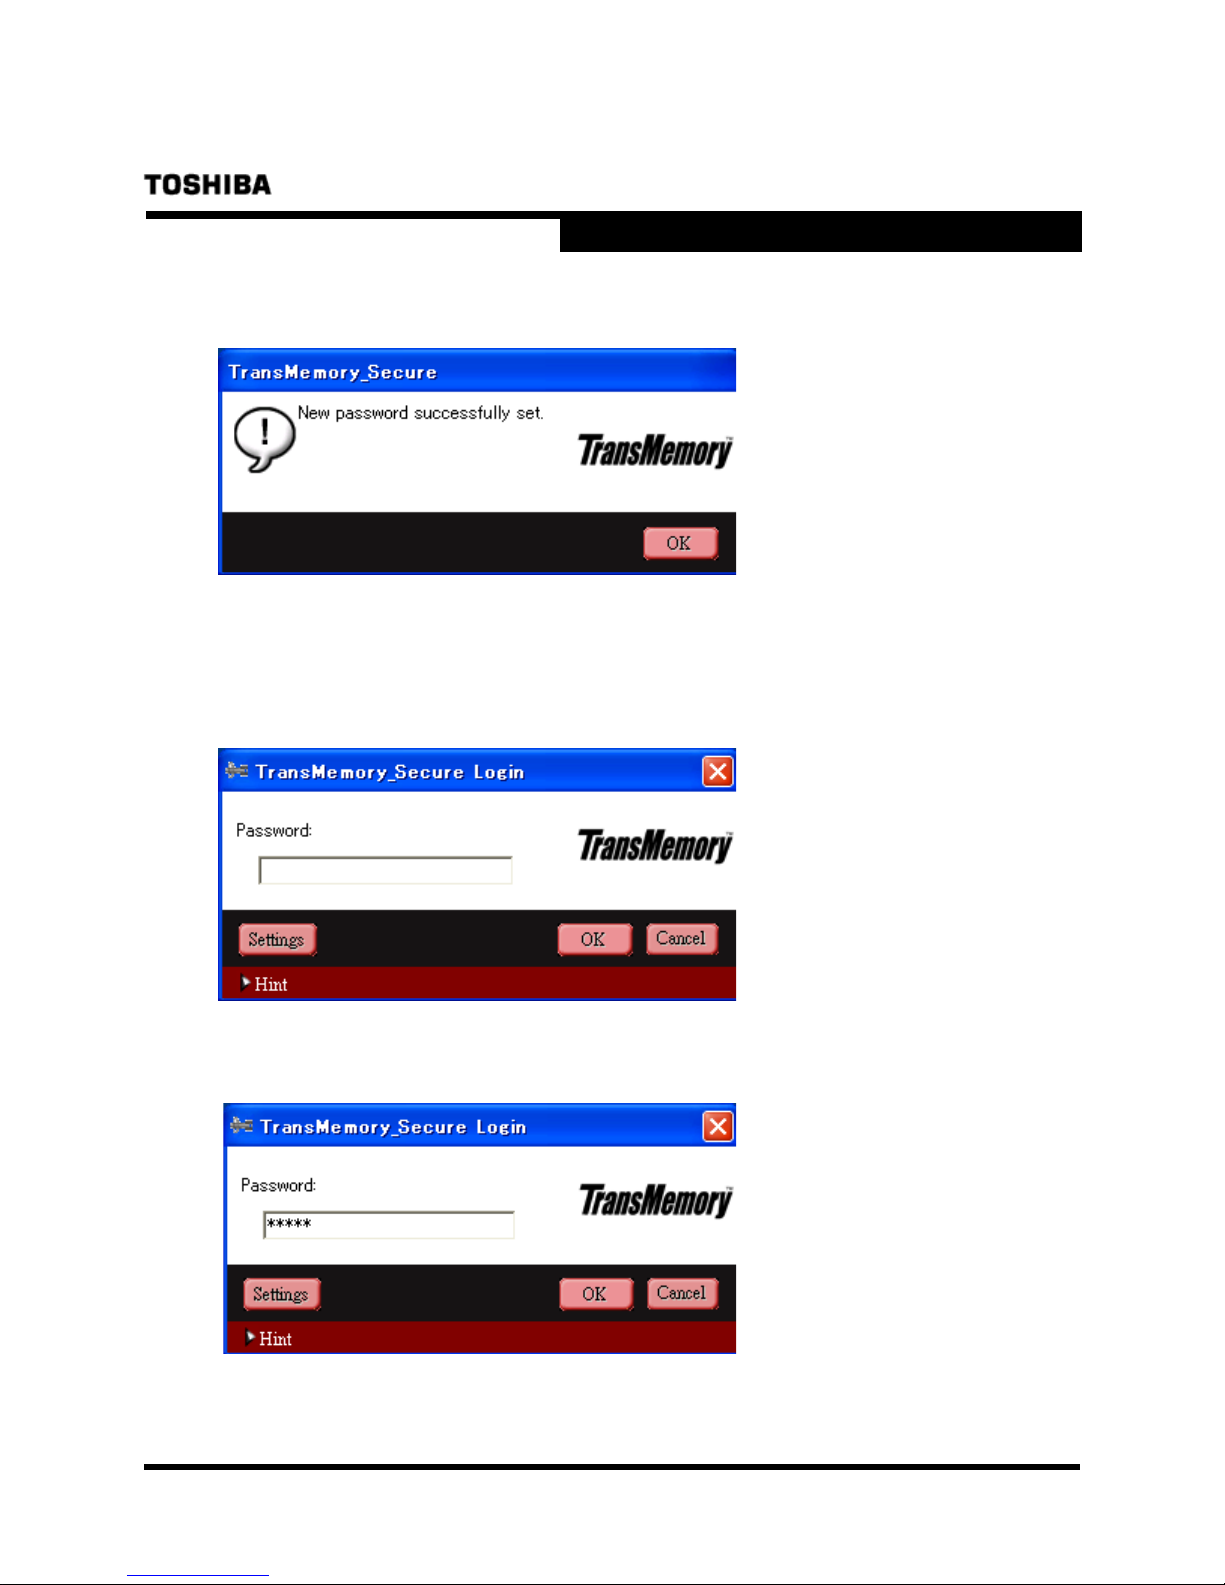
5) When the following dialog box appears, confirm and click on “OK”.
2.2 Logging into the Privacy Zone using the Security Software
■
1) When the following dialog box appears, enter the “Password”.
2) When the “Password” has been entered, click on “OK”.
20
v.1.0
Page 22
Security Software Installation Manual
TRANSMEMORY™ USB TNU FLASH DRIVE
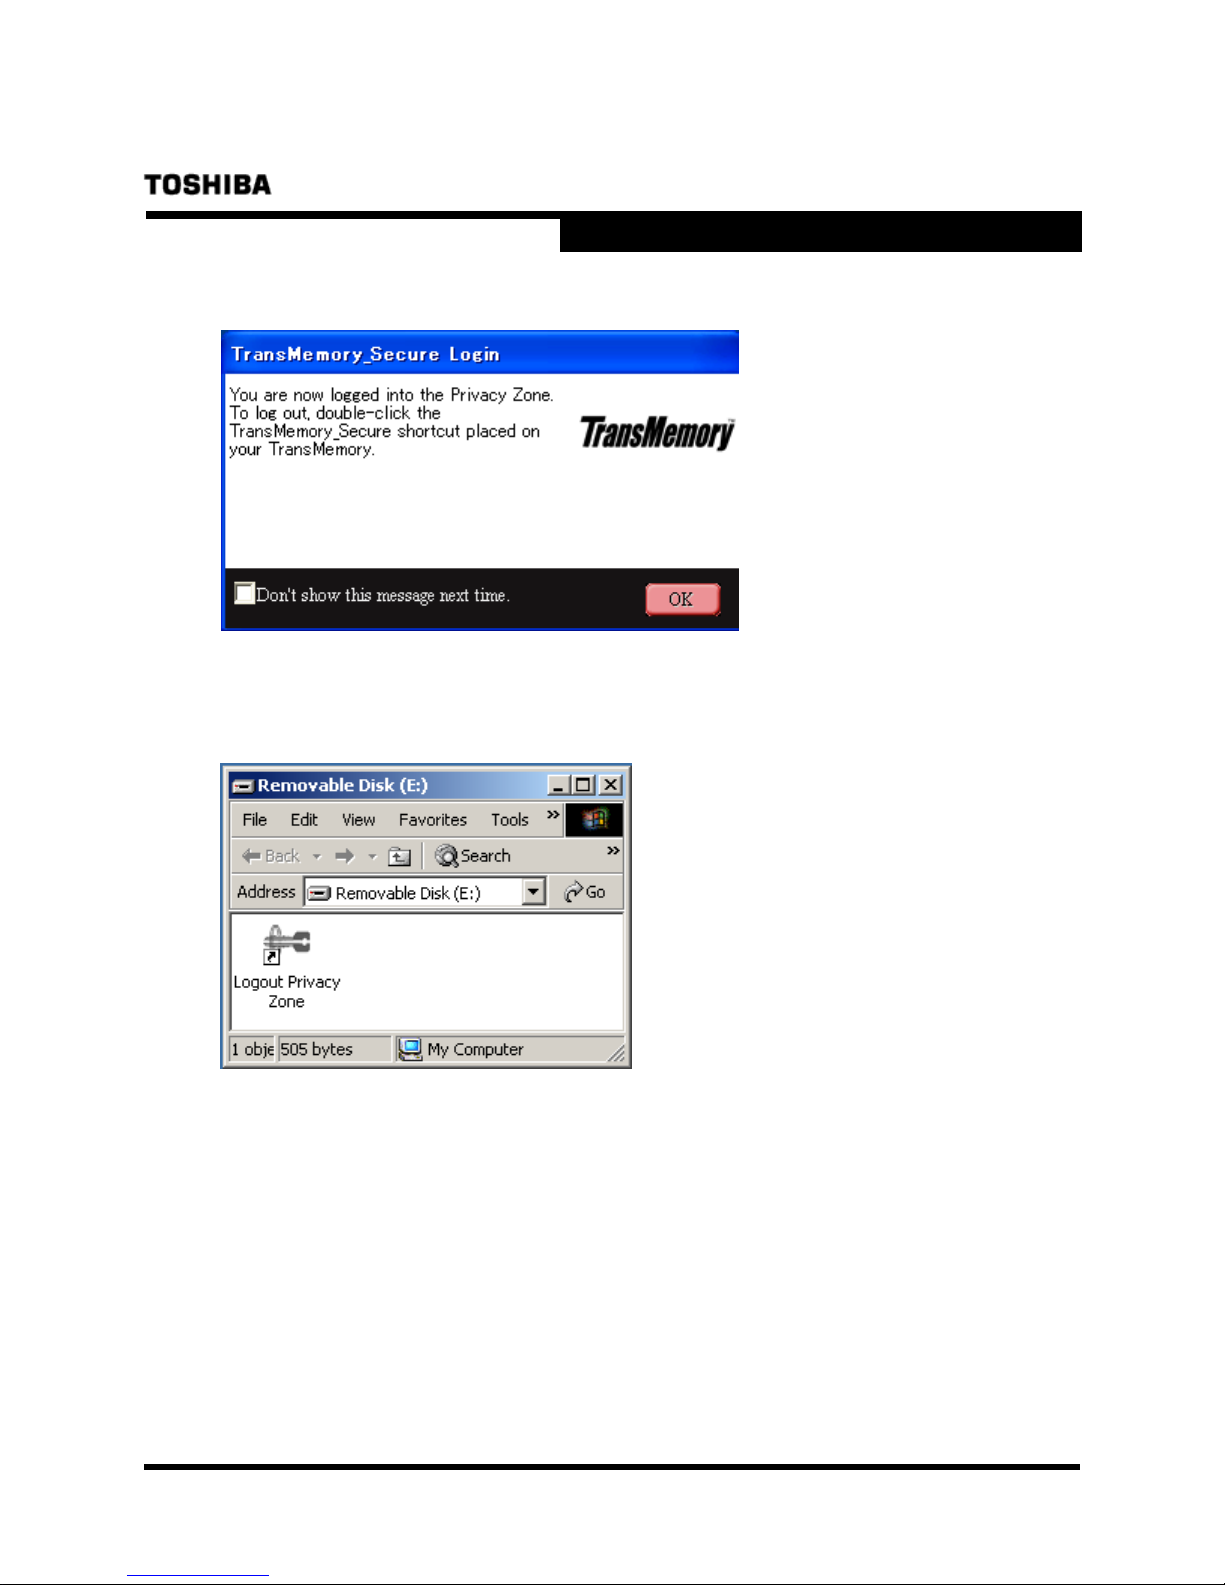
3) When the following dialog box appears, confirm and click on “OK”.
4) When the following dialog box appears, logging into the Privacy Zone is complete.
21
v.1.0
Page 23
Security Software Installation Manual
TRANSMEMORY™ USB TNU FLASH DRIVE
■ 2.3 Logging out of the Privacy Zone using the Security Software
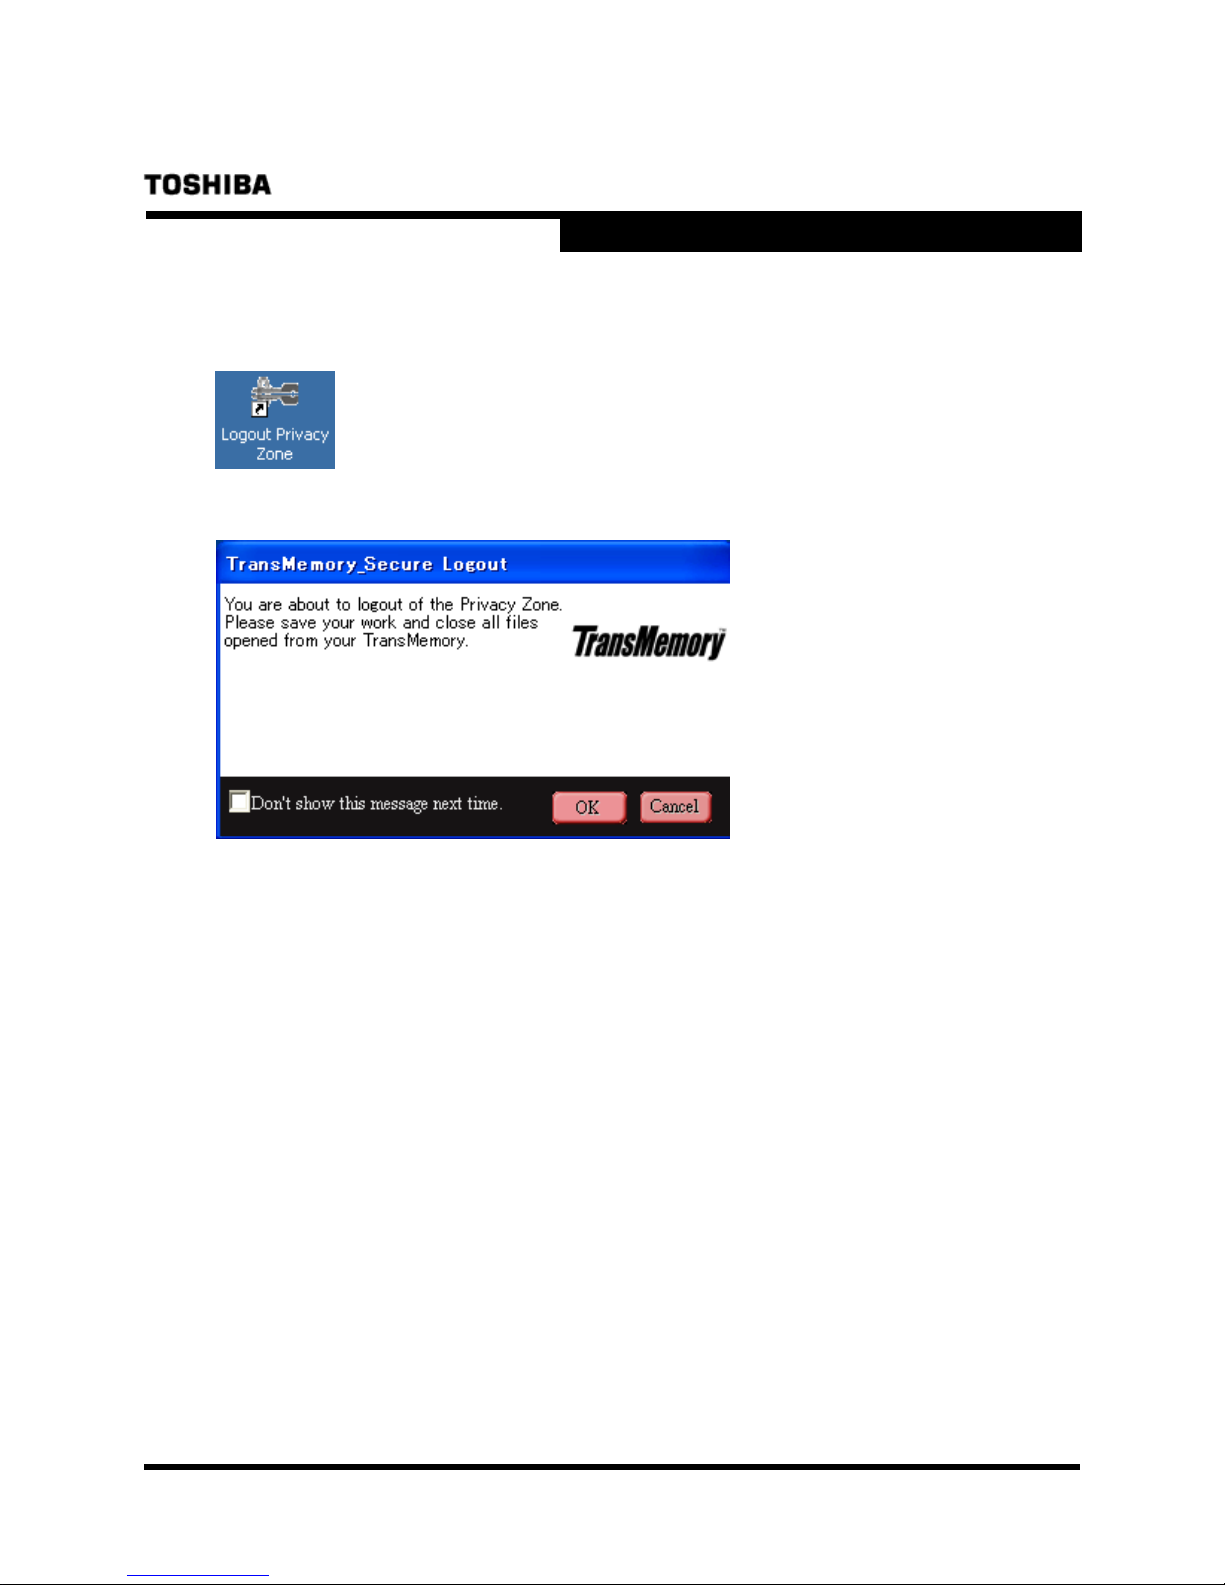
1) Double click on “Logout Privacy Zone” to log out.
2) When the following dialog box appears, click on “OK”.
22
v.1.0
 Loading...