

Toshiba Tecra 500CS, Tecra 500CDT User Manual

000-book.bk : 01-find.fm5 Page 0 Wednesday, May 15, 1996 3:50 PM
Chapter 1
Make Sure You Have Everything . . . . . . . . . . . . . . . . . . . . . . . . . . . . 1
Select a Place To Work . . . . . . . . . . . . . . . . . . . . . . . . . . . . . . . . . . . . . 2
Find Out Where Everything's Located . . . . . . . . . . . . . . . . . . . . . . . . . 6

000-book.bk : 01-find.fm5 Page 1 Wednesday, May 15, 1996 3:50 PM
Finding Your
Way around
the System
You’ve bought your computer and taken everything out of the
box. You may be asking yourself, “Now, what do I do?” Well, this
chapter explains how to set up your computer, gives you tips on
working comfortably and takes you on a tour of the computer’s
features.
Make Sure You Have Everything
Your computer comes with everything you need to get up and running quickly. However, before you do anything else, it's a good
idea to make sure you received everything you were supposed to.
This information is listed on the Quick Start Card at the top of the
box.
If any items are missing or damaged, notify your dealer immediately. For additional help, contact Toshiba as described in “If You
Need Further Assistance” on page 357.
11
000-book.bk : 01-find.fm5 Page 2 Wednesday, May 15, 1996 3:50 PM
Finding Your Way around the System
2
Select a Place To Work
Select a Place To Work
Your computer is portable, designed to be used in a variety of
circumstances and locations. However, by giving some thought to
your work environment, you can protect the computer and work in
comfort.
Keep the Computer Comfortable
Use a flat surface which is large enough for the computer and any
items you need to refer to while your work. Allow sufficient space
behind the computer for adjusting the display panel. If you're planning to use a printer or other external device, make sure there's
enough room for it as well.
Leave enough space around the computer and any other devices to
give adequate ventilation. Otherwise they may overheat.
If you are going to use a power outlet, make sure it is nearby and
easily accessible.
To keep your computer in prime operating condition, make sure
your work area is free from:
❖ dust, moisture and direct sunlight.
❖ corrosive chemicals.
❖ sources of water or other liquids that could spill into the
computer.
If you spill a liquid into the computer. If you spill a liquid into
the keyboard, turn the computer off, unplug it from the AC
power source, and let it dry out completely before turning it
on again.
If the computer does not operate correctly after you turn it
back on, contact a Toshiba authorized service provider.
❖ equipment that generates a strong electromagnetic field, such
as stereo speakers or speakerphones.
Part I: Getting To Know Your Computer
000-book.bk : 01-find.fm5 Page 3 Wednesday, May 15, 1996 3:50 PM
Finding Your Way around the System
Select a Place To Work
❖ rapid changes in temperature or humidity. Keep the computer
away from sources of temperature change such as air conditioner vents or heaters.
❖ extreme heat, cold or humidity. Operate the computer within a
temperature range of 40 to 95 degrees Fahrenheit (5 to 35
degrees Celsius) and a relative humidity of 20 to 80 percent.
Keep Yourself Comfortable
Strain and stress injuries are becoming more common as people
spend more time using their computers. However, if you use your
computer properly, you can work comfortably all day.
When you cannot place your computer in the best position for
working (on a journey for example) be careful to use it for short
periods only.
3
Using the computer keyboard incorrectly can result in discomfort and possible injury. If your hands, wrists, and/or
arms bother you while typing, discontinue using the computer and rest. If the discomfort persists, consult a physician.
In addition to the hints provided in the following sections, there
are a number of books available on ergonomics, repetitive strain
injury, and repetitive stress syndrome.
Placement of the Computer
Proper placement of the computer and external devices is important to avoid stress-related injuries:
❖ Place the computer on a flat surface, directly in front of you, at
a comfortable height and distance. When you use the keyboard, your arms and hands should be in a relaxed position
with your forearms parallel to the floor. You should be able to
type without twisting your body or neck, and look at the screen
without slouching.
Part I: Getting To Know Your Computer

000-book.bk : 01-find.fm5 Page 4 Wednesday, May 15, 1996 3:50 PM
Finding Your Way around the System
4
Select a Place To Work
❖ If you plan to use an external monitor, the top of the screen
should be no higher than eye level.
❖ Adjust the screen to avoid reflections and glare.
❖ If you use a paper holder, set it at the same distance as the
screen. If possible, adjust the holder so that the paper is at the
same height as the screen.
Seating and Posture
When using your computer, sit comfortably and maintain good
posture with your weight evenly distributed.
Proper seating is one of the primary factors in reducing work
strain. Some people find a backless chair more comfortable than a
conventional chair. Whichever type you choose, refer to the following guidelines to adjust your chair for maximum computing
comfort.
Below eye level
Foot rest
Correct posture and positioning of the computer
❖ Position your chair so that the keyboard is at or slightly below
the level of your elbow. You should be able to type comfortably with your shoulders relaxed.
Part I: Getting To Know Your Computer
Approximately 90
degree angles

000-book.bk : 01-find.fm5 Page 5 Wednesday, May 15, 1996 3:50 PM
Finding Your Way around the System
Select a Place To Work
If you are using a conventional chair:
❖ Your knees should be slightly higher than your hips. If neces-
sary, use a foot rest to raise the level of your knees and ease the
pressure on the back of your thighs.
❖ Adjust the back of your chair so it supports the lower curve of
your spine. If necessary, use a cushion to provide extra back
support. Lower back support cushions are available at many
office supply stores.
❖ Sit with your back straight so that your knees, hips and elbows
form approximately 90 degree angles when you work. Do not
slump forward or lean back too far.
Lighting
5
Proper lighting can improve the legibility of the display and
reduce eye strain.
❖ Position the display panel (or external monitor) so that sunlight
or bright indoor lighting does not reflect off the screen. Use
tinted windows or shades to reduce glare.
❖ Avoid placing your computer in front of a bright light that
could shine directly in your eyes.
❖ If possible, use soft, indirect lighting in your computer work
area.
Arms and Wrists
❖ Avoid bending, arching, or twisting your wrists. Keep them in
a relaxed, neutral position while typing.
❖ Exercise your hands, wrists and arms several times during the
day to improve circulation.
Part I: Getting To Know Your Computer

000-book.bk : 01-find.fm5 Page 6 Wednesday, May 15, 1996 3:50 PM
Finding Your Way around the System
6
Find Out Where Everything's Located
Work Habits
The key to avoiding discomfort or injury from repetitive strain is
to vary your activities. If possible, schedule a variety of tasks into
your working day. Finding ways to break up the routine can
reduce stress and improve your efficiency.
❖ Take frequent short breaks to change position, stretch your
muscles, and relieve your eyes. A break of two or three minutes every half hour is more effective than one long break after
several hours.
❖ Avoid performing repetitive activities for prolonged periods of
time. Plan your work so that you intersperse such activities
with other tasks.
❖ Focusing your eyes on your computer screen for long periods
of time can cause eye strain. Look away from the computer
frequently, say every 15 minutes, and focus your eyes on a distant object for 30 seconds or so.
Find Out Where Everything's Located
If you've never used a notebook computer before, you're probably
wondering how an entire computer can fit into so small a case.
The next few pages take you on a guided tour of the computer and
its components.
Rather than reading through this section, you may prefer to use it
as a reference as you move through the remainder of the manual
and need to locate specific parts of the computer. This information
is also available in the electronic form of this manual, described in
“Using The Electronic Guide” on page 303.
Don't worry if you don't know what some parts of the computer
do. Some items in this tour are for more advanced computing
functions that you may want to use as your computing needs and
skills increase.
Part I: Getting To Know Your Computer
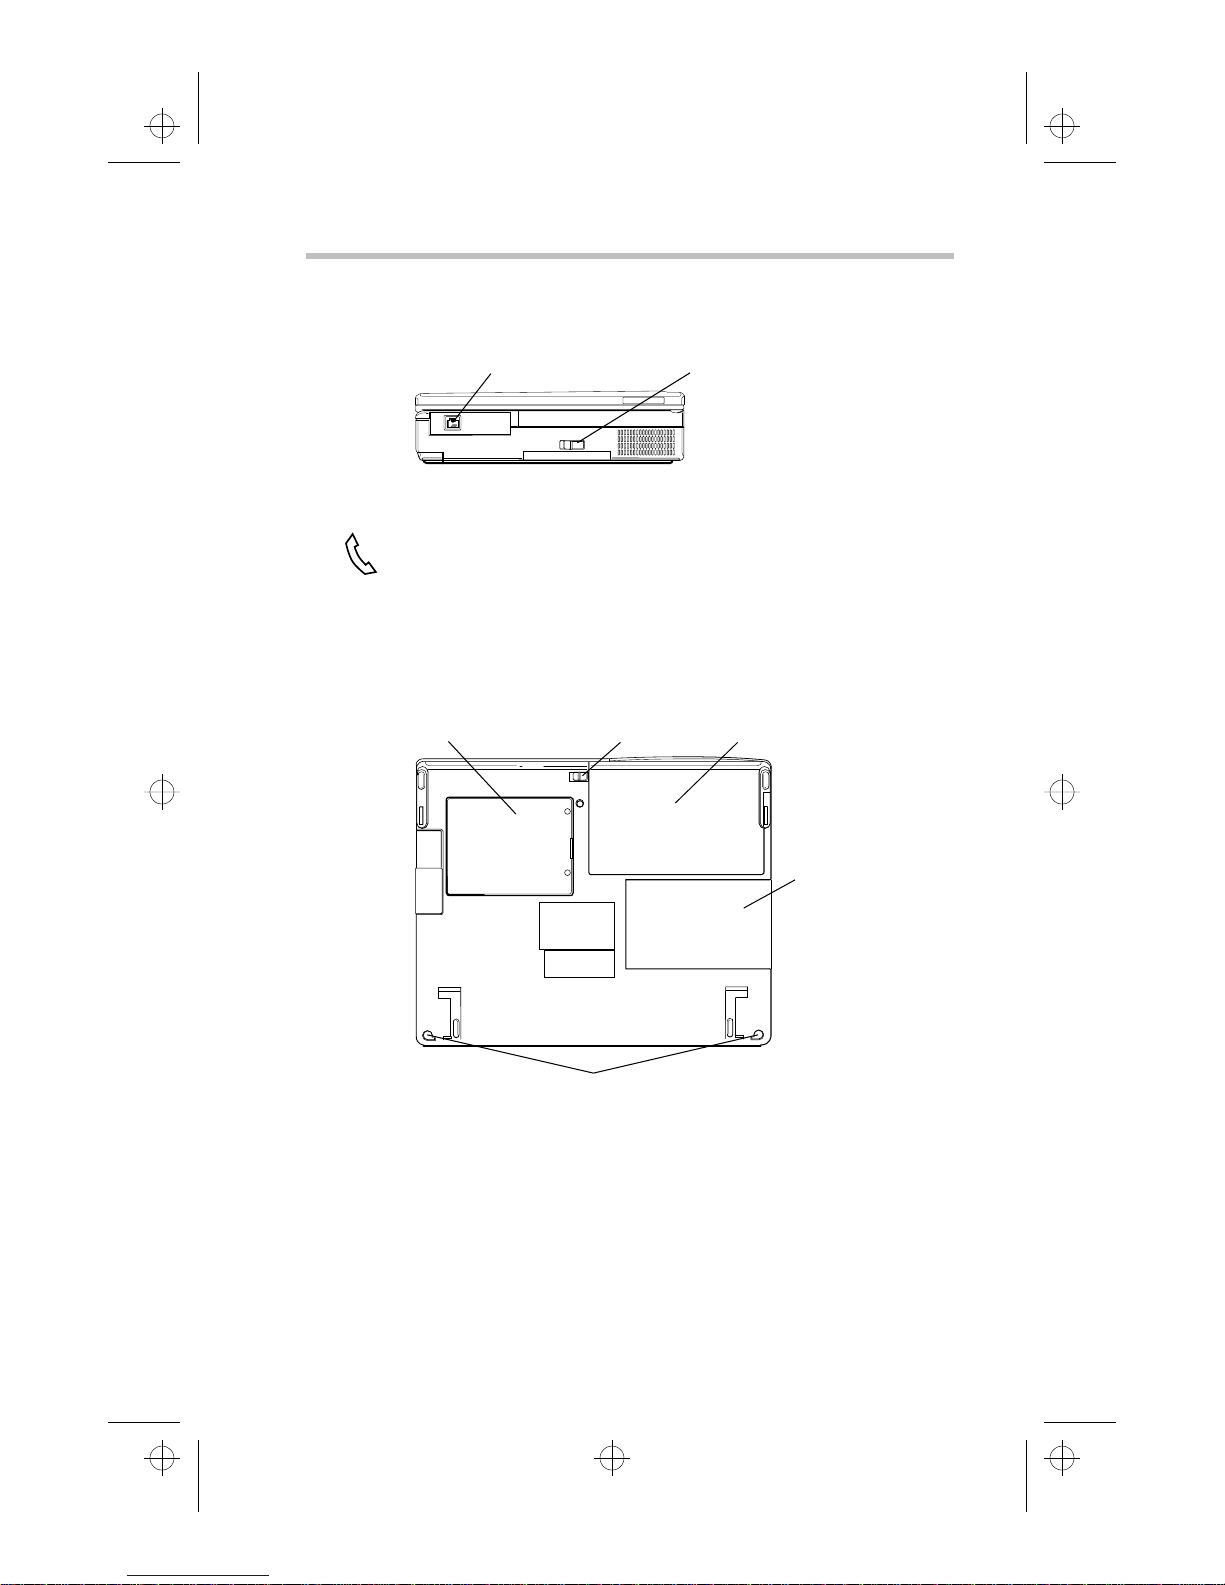
System indicator panelSelectBay lock
Infrared port
Display latch
SelectBay with diskette drive module
000-book.bk : 01-find.fm5 Page 7 Wednesday, May 15, 1996 3:50 PM
Finding Your Way around the System
Find Out Where Everything's Located
The Front with the Display Closed
The front with the display closed
™
The SelectBay
a diskette drive module. You can also use it to hold a second hard
module. An external drive chassis holds the diskette drive module
when you install another module in the SelectBay, so the diskette
drive is always available. For more information about the SelectBay, see “Swapping Drives in the SelectBay” on page 115.
usually holds either a CD-ROM drive module or
7
IR
The SelectBay lock prevents the SelectBay module from being
removed accidentally.
Pressing the display latch lets you open the computer's display
panel. For more information, see “Open the Display” on page 28.
The serial infrared port allows wireless communication with a
computer or other device, such as a printer, that has an infrared
port. There is another infrared port on the back of the computer.
The lights on the system indicator panel provide information
about various system functions. See “The System Indicator Panel”
on page 14 for a description of the panel lights.
Part I: Getting To Know Your Computer

Reset buttonSecurity lock slot Power button
SelectBay eject leverCooling fan
External diskette drive port cover
Volume control dial PC Card slot
000-book.bk : 01-find.fm5 Page 8 Wednesday, May 15, 1996 3:50 PM
Finding Your Way around the System
8
Find Out Where Everything's Located
The Left Side
The left side
The SelectBay eject lever lets you remove the module installed in
the SelectBay.
The volume control dial lets you adjust the loudness of the
system speakers.
On
Attaching a special cable to the security lock slot lets you anchor
your computer to your desk or other large, heavy object. For more
information, see “Applying Physical Restraints” on page 270.
The cooling fan provides extra cooling when necessary to help
keep the computer’s Pentium processor from overheating. This
lets the processor keep performing at its maximum speed.
To prevent possible overheating of the Pentium processor,
make sure you don’t block the fan vent.
Pressing the power button turns the computer on and off. For
more information, see “Turn the Computer On” on page 30.
The PC Card slot lets you install up to two Type I or Type II
PCMCIA-compatible PC Cards, or one Type III PC Card. For
more information, see “Little Cards that Do Big Things” on
page 193.
Pressing the reset button restarts the computer when it does not
respond to the keyboard. Restarting the system in this way overrides Suspend and Resume modes, which enable you to continue
Part I: Getting To Know Your Computer
000-book.bk : 01-find.fm5 Page 9 Wednesday, May 15, 1996 3:50 PM
Finding Your Way around the System
Find Out Where Everything's Located
working from where you left off. So use this button only if all
other attempts at restarting the computer have failed.
Don’t use a pencil to press the reset button. Pencil lead can
break off inside the computer and damage it. Instead, use a
slender object such as a straightened paper clip.
The external diskette drive port cover protects the external diskette drive port. You use this port to connect the external 3 1/2
inch diskette drive when the CD-ROM drive module is installed in
the computer’s SelectBay.
The Back
9
Display hinge
Monitor port
Serial port
Expansion port
The back
The display hinges attach the display panel to the computer.
The power socket is where you plug in the power cable. For more
information, see “Connect to a Power Source” on page 17.
The expansion port allows you to connect the optional
NoteDock II or Desk Station V Plus docking station. These
devices provide additional expansion capability. For more information, see “The Desk Station V Plus” on page 233 and “The
NoteDock II” on page 237.
PS/2 mouse/keyboard port
Parallel portPower socket Infrared port
Headphone jack
Microphone jack
Line-in jack Line-out jack
Keep foreign objects away from this port. Pins and other
small objects can slip inside the port and damage computer
circuitry.
Part I: Getting To Know Your Computer
000-book.bk : 01-find.fm5 Page 10 Wednesday, May 15, 1996 3:50 PM
Finding Your Way around the System
10
Find Out Where Everything's Located
The monitor port allows you to connect an external monitor. For
more information, see “Using an External Monitor” on page 225.
The serial port lets you connect a serial mouse, printer or other
serial device.
The PS/2
PS/2 compatible mouse or keyboard. For more information, see
“Using a PS/2 Mouse” on page 230 or “Using an External Keyboard” on page 228.
®
mouse/keyboard port lets you connect an optional
IR
The serial infrared port provides a cable free connection for
transferring data between the computer and another device, such
as a printer, that has a compatible infrared port. There is another
infrared port on the front of the computer.
The parallel port lets you connect a parallel printer or other
parallel device. For more information, see “Connecting a Parallel
Printer” on page 27.
The 3.5 mm microphone jack lets you connect an external
monaural microphone or other audio input device. Connecting a
microphone or other device to this jack disables the internal
microphone automatically.
The 3.5 mm headphone jack lets you connect stereo headphones
or other audio output devices. Connecting headphones or other
devices to this jack automatically disables the internal speaker.
The 3.5 mm mini line-in jack lets you connect an external stereo
device for audio input.
The 3.5 mm mini line-out jack lets you connect an external stereo
device for audio output.
Part I: Getting To Know Your Computer
000-book.bk : 01-find.fm5 Page 11 Wednesday, May 15, 1996 3:50 PM
Finding Your Way around the System
Find Out Where Everything's Located
11
The Right Side
Modem/fax (RJ-11) jack
The right side
The modem/fax (RJ-11) jack lets you connect the computer’s
internal modem directly to a telephone line.
The hard disk drive cover latch prevents the hard disk drive
from being removed accidentally.
The Underside
Memory slot cover Battery cover latch Battery cover
Hard disk drive cover latch
Hard disk drive cover
Part I: Getting To Know Your Computer
Guides
The underside
The memory slot cover protects a slot for adding extra memory
to your computer. For more information, see “Adding Memory
(Optional)” on page 19.
The battery cover latch prevents the battery from being removed
accidentally.
000-book.bk : 01-find.fm5 Page 12 Wednesday, May 15, 1996 3:50 PM
Finding Your Way around the System
12
Find Out Where Everything's Located
The battery cover protects the computer’s Lithium ion battery,
which provides power to the computer when you are not using an
AC power outlet. For more information, see “Replacing Batteries”
on page 153.
The hard disk drive cover protects the computer’s removable
hard disk drive.
The guides help align the optional Desk Station V Plus or
NoteDock II. For more information, see “The Desk Station V
Plus” on page 233 and “The NoteDock II” on page 237.
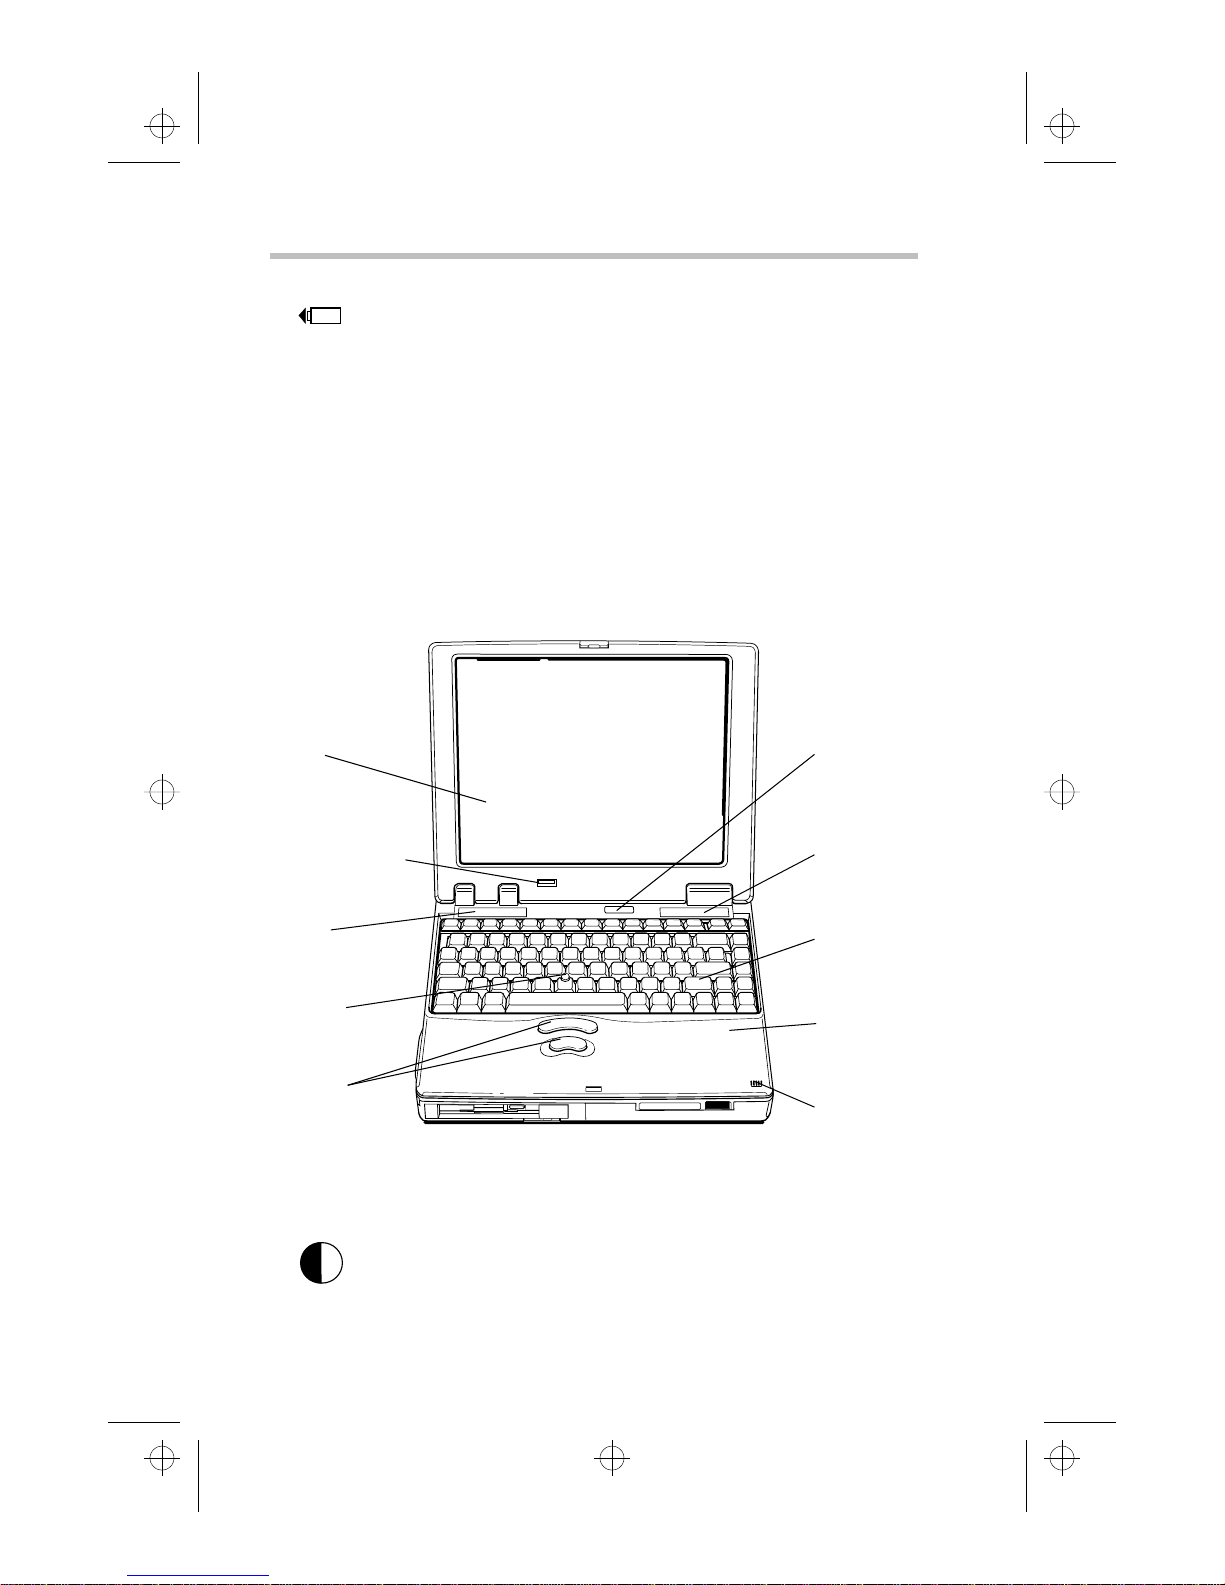
The Front with the Display Open
Screen
Contrast control dial
(Tecra 500CS only)
Speaker
AccuPoint
AccuPoint
buttons
The front with the display open
The computer's screen is a liquid crystal display (LCD) that
provides clear, sharp images.
The contrast control dial ( Tecra 500CS only) adjusts the contrast
of the display.
Keyboard
indicator panel
Speaker
Keyboard
Palm rest
Microphone
Part I: Getting To Know Your Computer

000-book.bk : 01-find.fm5 Page 13 Wednesday, May 15, 1996 3:50 PM
Finding Your Way around the System
Find Out Where Everything's Located
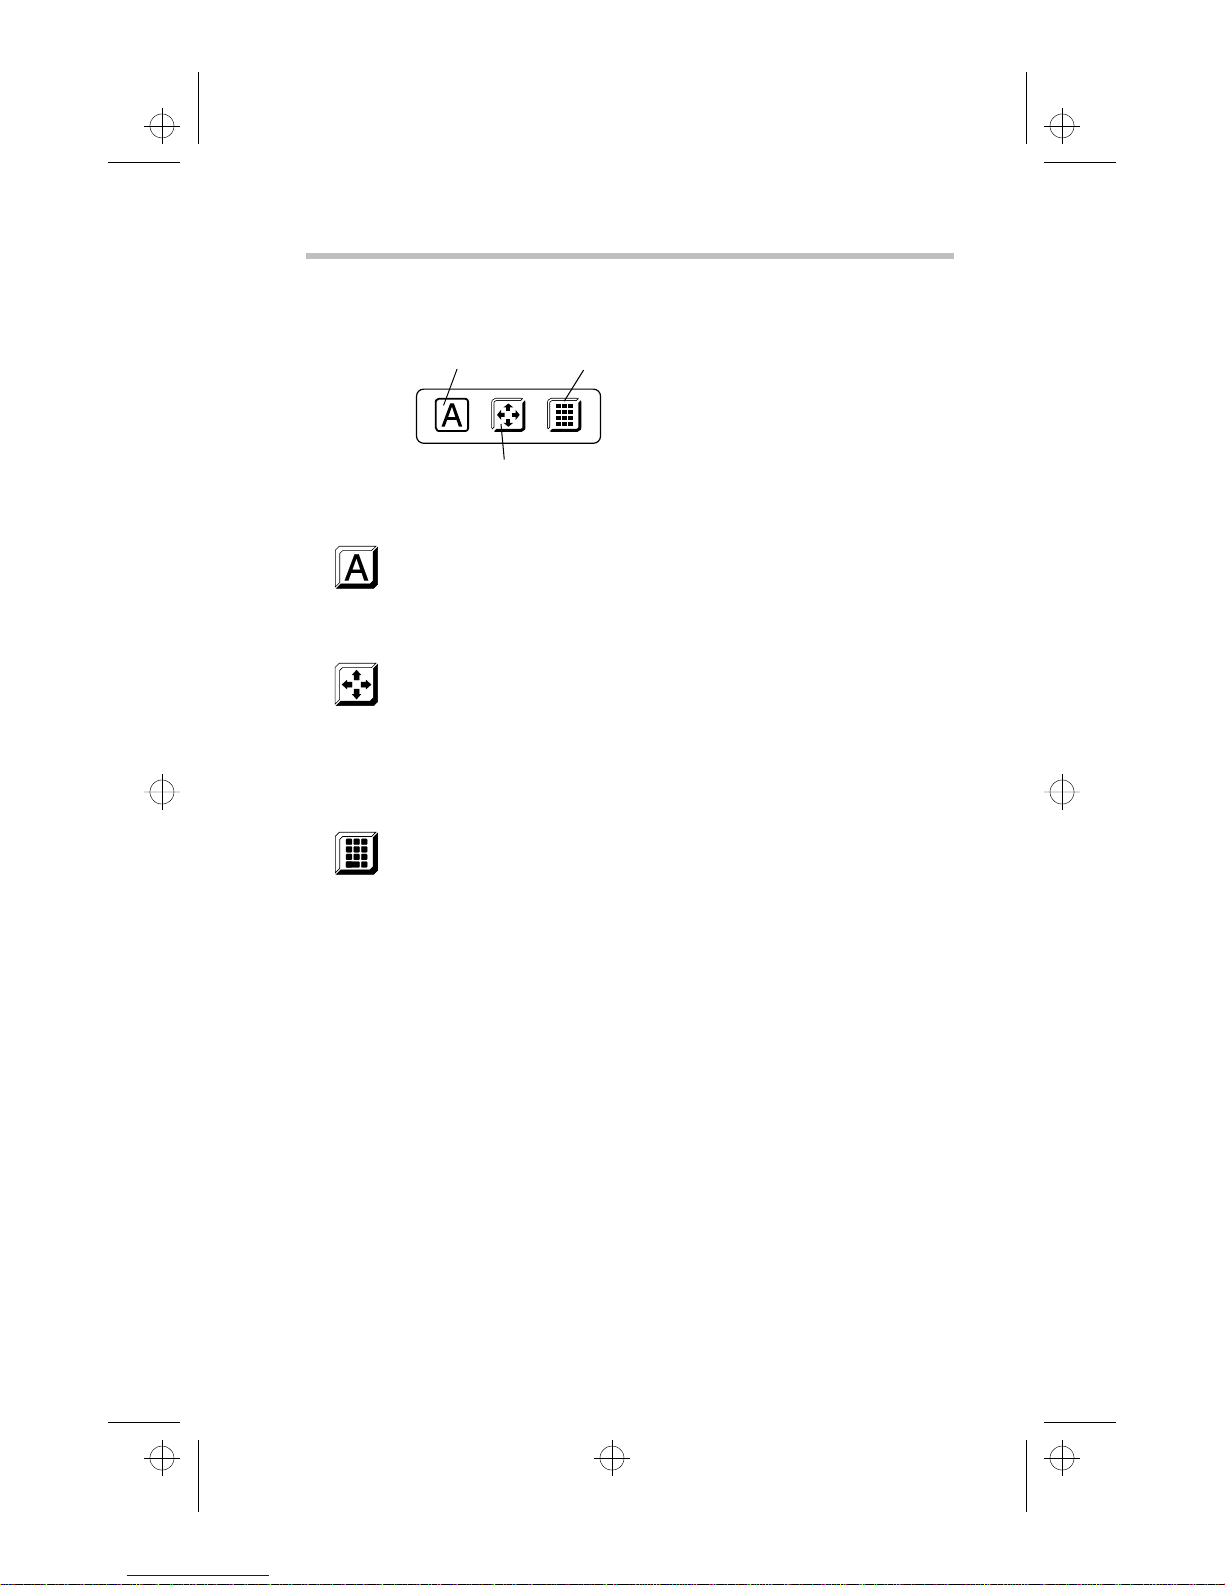
The AccuPoint pointing device combines the function of a mouse
with the convenience of never having to remove your hands from
the keyboard. For more information, see “Using the AccuPoint
Pointing Device” on page 31.
The AccuPoint buttons work with the AccuPoint. The larger (primary) button acts as the left button on a mouse. The smaller (secondary) button acts as the right mouse button. For more
information, see “Using the AccuPoint Pointing Device” on
page 31.
The lights on the keyboard indicator panel provide information
about various system functions. See “The Keyboard Indicator
Panel” on page 15 for a description of the panel lights.
The speakers let you hear system alarms and sounds associated
with your software. For more information.
13
The 82-key keyboard provides all the functionality of a full-sized
101-key keyboard. For more information, see “How to Use the
Keyboard” on page 93.
The palm rest makes typing more comfortable.
The built-in microphone lets you record sounds and speak
through the telephony modem.
Part I: Getting To Know Your Computer
000-book.bk : 01-find.fm5 Page 14 Wednesday, May 15, 1996 3:50 PM
Finding Your Way around the System
14
Find Out Where Everything's Located
The Indicator Panels
Two panels of lights display the current state of your system. This
section describes the two indicator panels.
The System Indicator Panel
This panel is located on the front of the computer.
On
AC power light
The system indicator panel
The AC power light glows when the computer is connected to an
external power source. For more information, see “Connect to a
Power Source” on page 17.
The on/off light glows when the computer is on and shows the
speed at which the computer is processing information. Green
indicates high speed and orange indicates low speed.
The SelectBay light indicates the device in the SelectBay—the
hard disk, diskette drive module, or CD-ROM drive module—is
currently in use.
The disk light glows when the main hard disk drive or the diskette
drive are in use.
SelectBay light
On/off light
Disk light
Battery light
Do not turn the computer off if the SelectBay light or the hard
disk light is on.
The battery light indicates the current battery charge. For more
information, see “Monitoring Battery Power” on page 144.
Part I: Getting To Know Your Computer
Caps lock light
Cursor control mode light
Numeric mode light
000-book.bk : 01-find.fm5 Page 15 Wednesday, May 15, 1996 3:50 PM
Finding Your Way around the System
Find Out Where Everything's Located
15
The Keyboard Indicator Panel
The keyboard indicator panel
The caps lock light glows when you press the
When this light is on, pressing a letter key on the keyboard produces an upper-case (capital) letter. For more information, see
“The Character Keys” on page 93.
The cursor control mode light glows when the cursor control
overlay is on. When the overlay is on, pressing an overlay key
moves the cursor as shown by the white arrow printed on the left
front of the key instead of the letter printed on the top of the key.
For more information, see “The Cursor Control Overlay” on
page 296.
The numeric mode light glows when the numeric overlay is on.
When the overlay is on, pressing an overlay key produces the
white number printed on the right front of the key instead of the
letter printed on the top of the key. For more information, see
“Typing Numbers” on page 94.
Caps Lock key.
Part I: Getting To Know Your Computer

000-book.bk : 02-start.fm5 Page 16 Wednesday, May 15, 1996 3:50 PM
Chapter 2
Connect to a Power Source . . . . . . . . . . . . . . . . . . . . . . . . . . . . . . . . . 17
Adding Memory (Optional) . . . . . . . . . . . . . . . . . . . . . . . . . . . . . . . . 19
Connect the External Diskette Drive . . . . . . . . . . . . . . . . . . . . . . . . . 24
Connecting a Parallel Printer . . . . . . . . . . . . . . . . . . . . . . . . . . . . . . . . 27
Open the Display . . . . . . . . . . . . . . . . . . . . . . . . . . . . . . . . . . . . . . . . . . 28
Fill In Your Registration Card and Mail It . . . . . . . . . . . . . . . . . . . . . 29
Turn the Computer On . . . . . . . . . . . . . . . . . . . . . . . . . . . . . . . . . . . . . 30
Using the AccuPoint Pointing Device . . . . . . . . . . . . . . . . . . . . . . . . 31
When You Turn the Computer on the First Time… . . . . . . . . . . . . 32
Create Master Diskettes or Purchase the CD-ROM . . . . . . . . . . . . . 38

000-book.bk : 02-start.fm5 Page 17 Wednesday, May 15, 1996 3:50 PM
Let's Start
at the Very
Beginning…
Now that you know where everything is, it’s time to get to work. If
you’re new to computers or have never used a notebook computer
before, this chapter provides easy-to-follow steps for getting the
computer up and running.
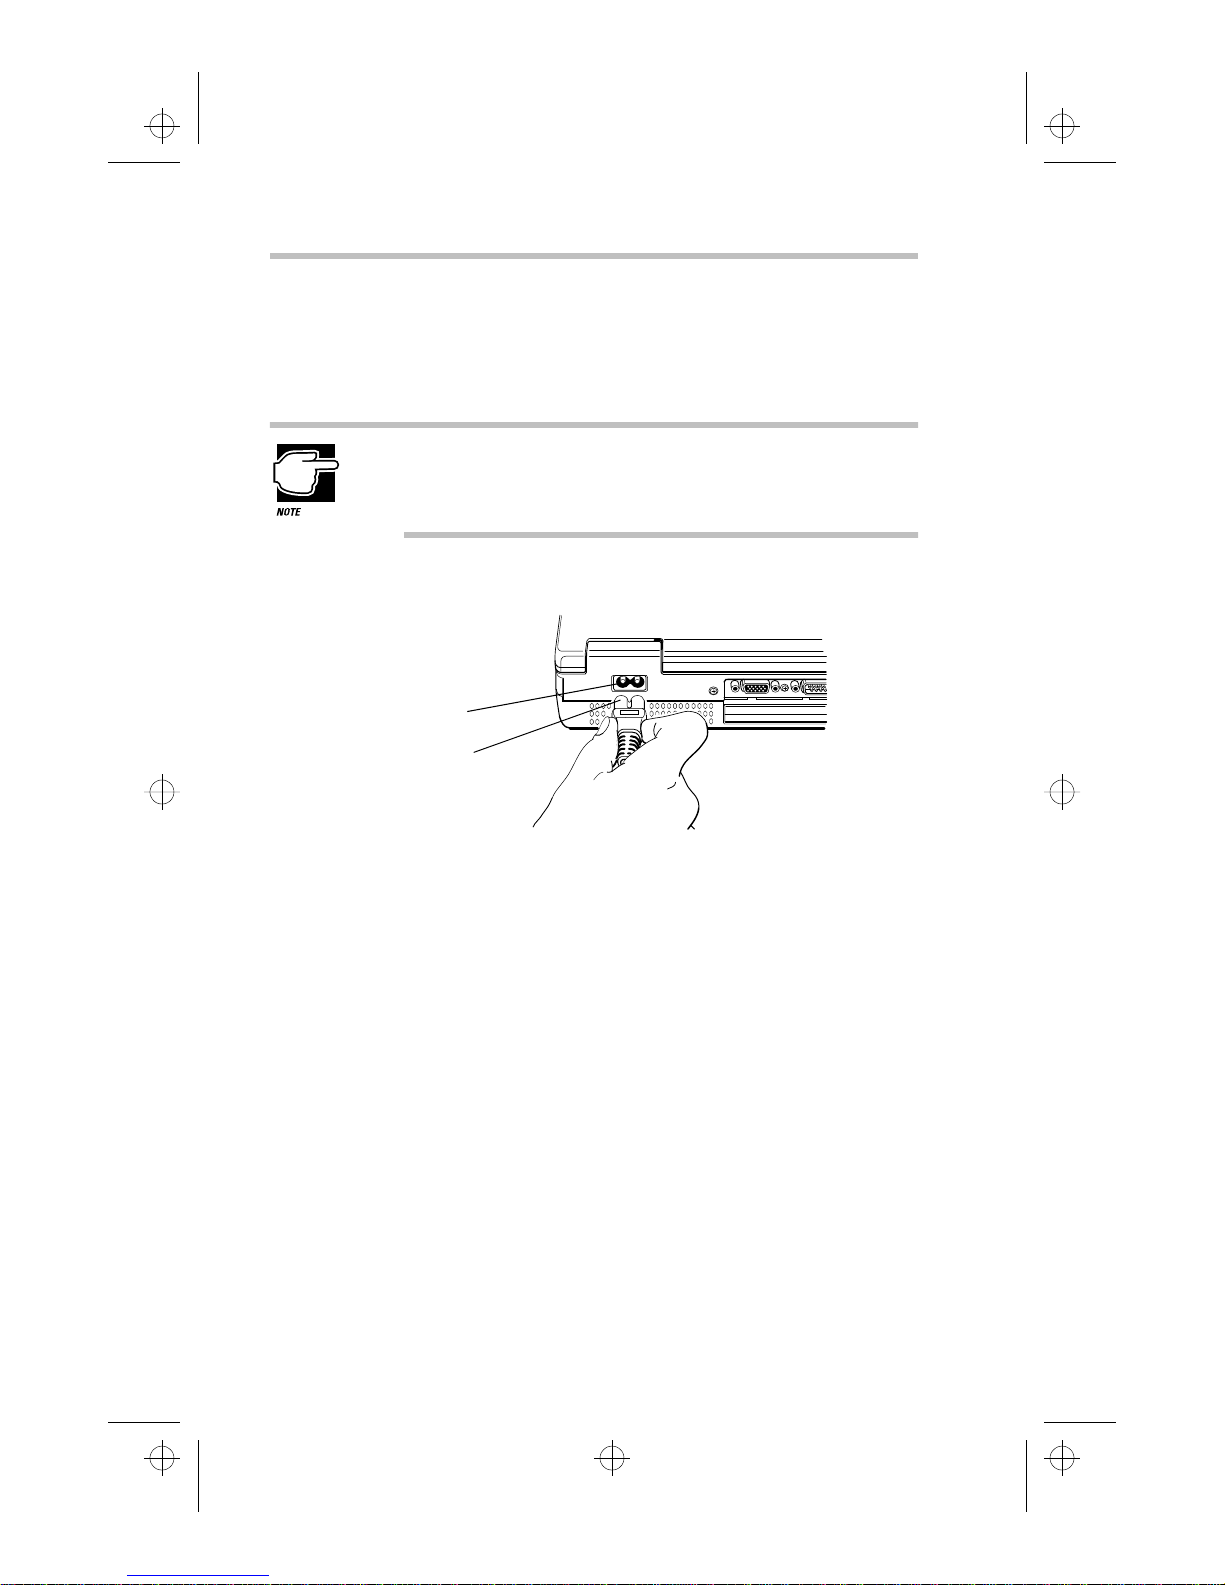
Connect to a Power Source
Your computer requires power to operate. By connecting the computer to a power source you can provide power to run the computer and charge the battery. With the computer’s built-in power
supply, providing power to your computer requires only a power
cable. Just plug the cable into the computer and a live power
outlet.
1717
000-book.bk : 02-start.fm5 Page 18 Wednesday, May 15, 1996 3:50 PM
Let's Start at the Very Beginning…
18
Connect to a Power Source
Before you can use the battery to power the computer, you must
charge it. Leave the computer plugged in for at least two and a half
hours with the computer turned off. Then the battery will be ready
to power the computer.
Once the battery is charged for the first time, don’t leave the
computer plugged in and turned off for more than a few hours
at a time. Overcharging the battery shortens its life.
To connect your computer to a power source, follow these steps:
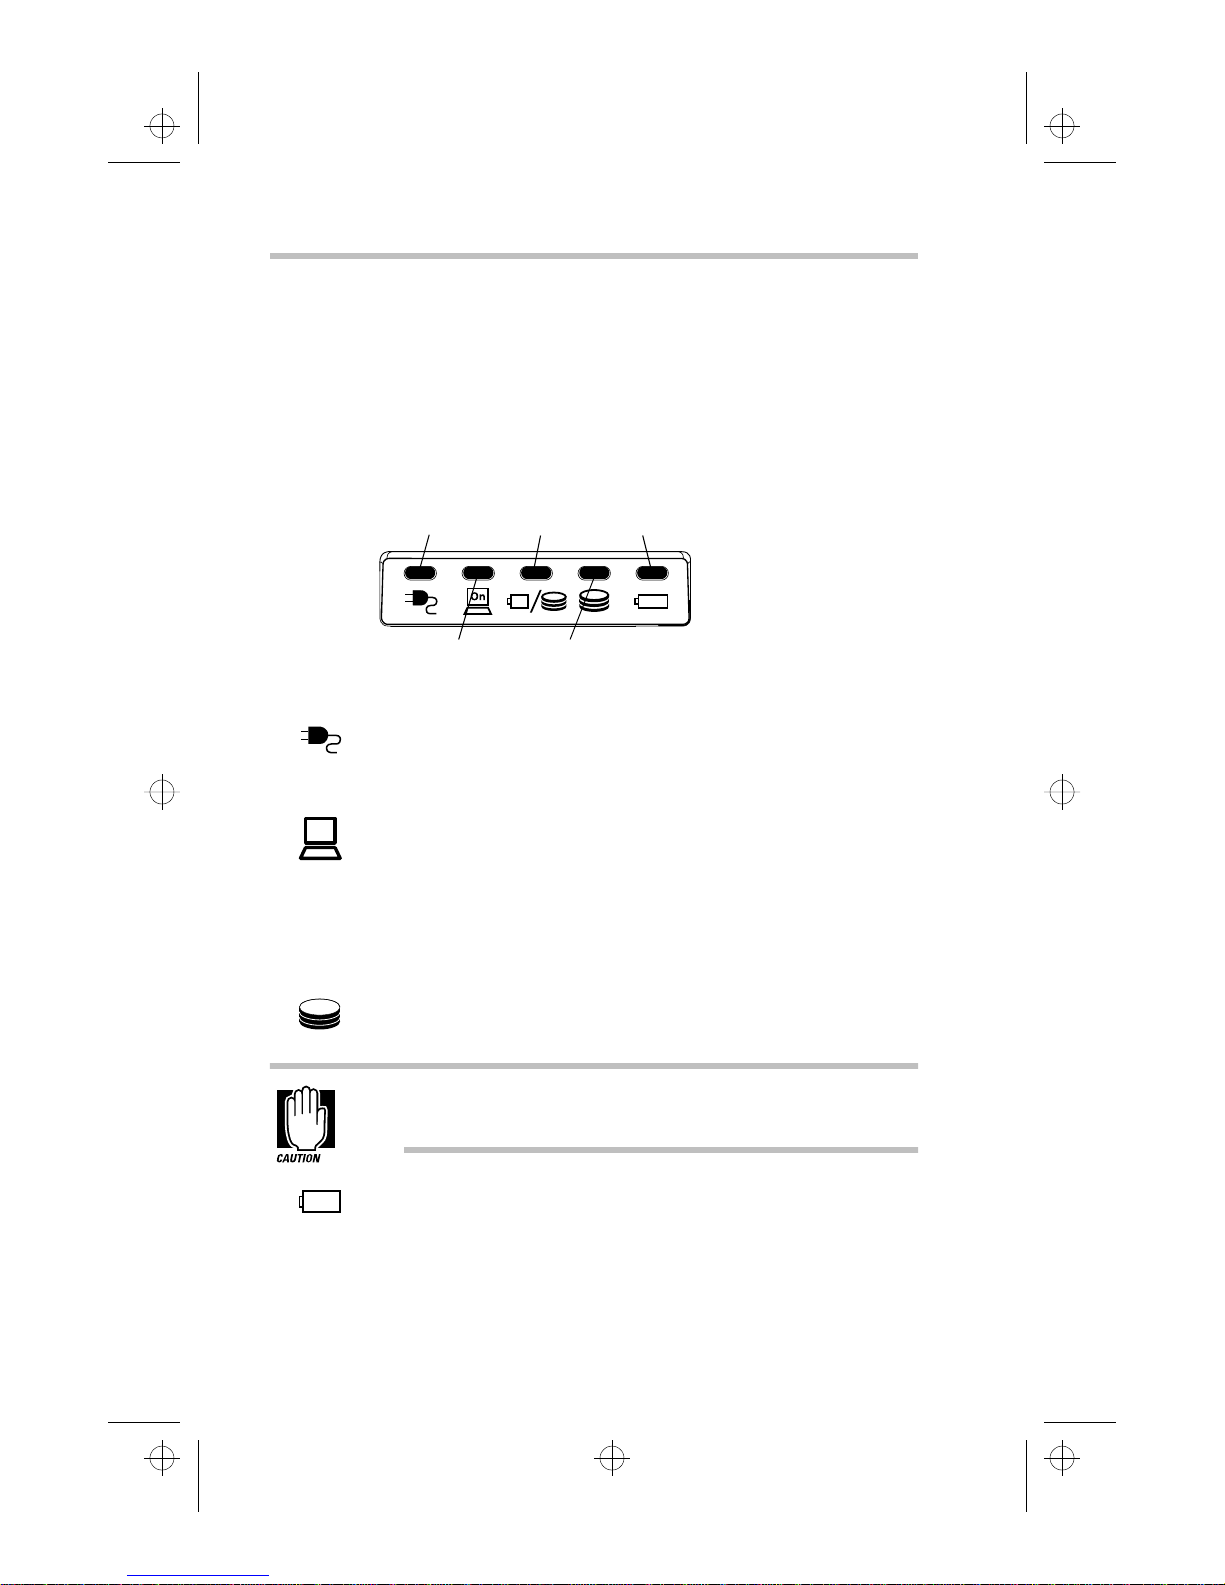
Power socket
Power cable
Connecting the power cable to the power socket
1 Connect the power cable to the power socket on the back of
the computer.
2 Connect the other end of the power cable to a live wall
outlet.
The AC power light on the front of the computer glows green.
Part I: Getting To Know Your Computer

000-book.bk : 02-start.fm5 Page 19 Wednesday, May 15, 1996 3:50 PM
Let's Start at the Very Beginning…
Adding Memory (Optional)
19
Adding Memory (Optional)
Your computer comes with enough memory to run most of today's
popular applications. However, you may want to increase the
computer's memory. With additional memory, the computer:
❖ can run more programs and open more documents at the
same time.
❖ runs Windows 95 and Windows applications faster.
By installing extra memory now, you’ll be able to operate your
computer at its maximum capacity from the start. Of course, you
can always come back to this section if you decide to add memory
at a later time.
Sizes of Memory Modules
Additional memory is easy to install. Memory modules, available
from your dealer, come in the following sizes:
Memory Module Size Total Memory Installed
No module installed 16MB
8MB card installed 24MB
16MB card installed 32MB
32MB card installed 48MB
64MB card installed 80MB
128MB card installed 144MB
Part I: Getting To Know Your Computer
000-book.bk : 02-start.fm5 Page 20 Wednesday, May 15, 1996 3:50 PM
Let's Start at the Very Beginning…
20
Adding Memory (Optional)
Install the Memory Module
The memory module installs into the memory expansion slot on
the bottom of the computer. You’ll need a small Phillips screwdriver for this procedure.
1 Turn the computer off and unplug it.
Installing a memory module with the computer's power on
may damage the computer, the module or both.
2 Close the display.
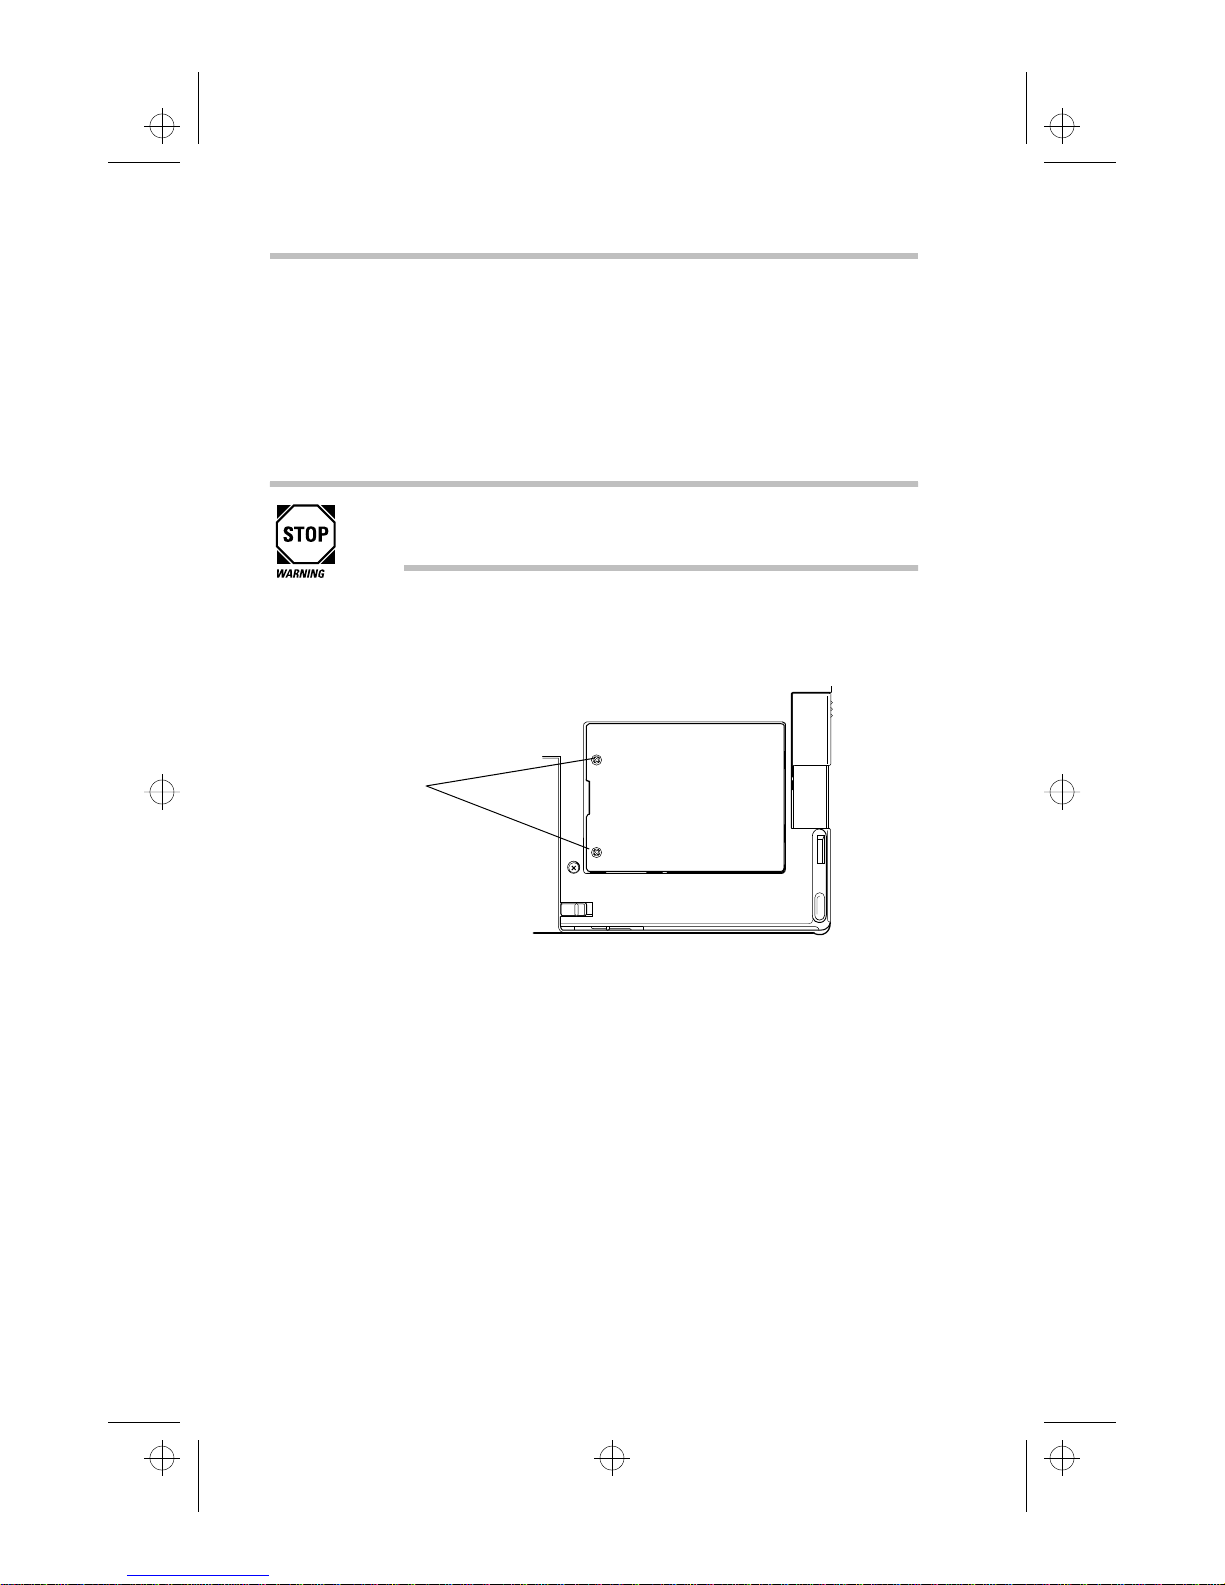
3 Turn the computer upside down.
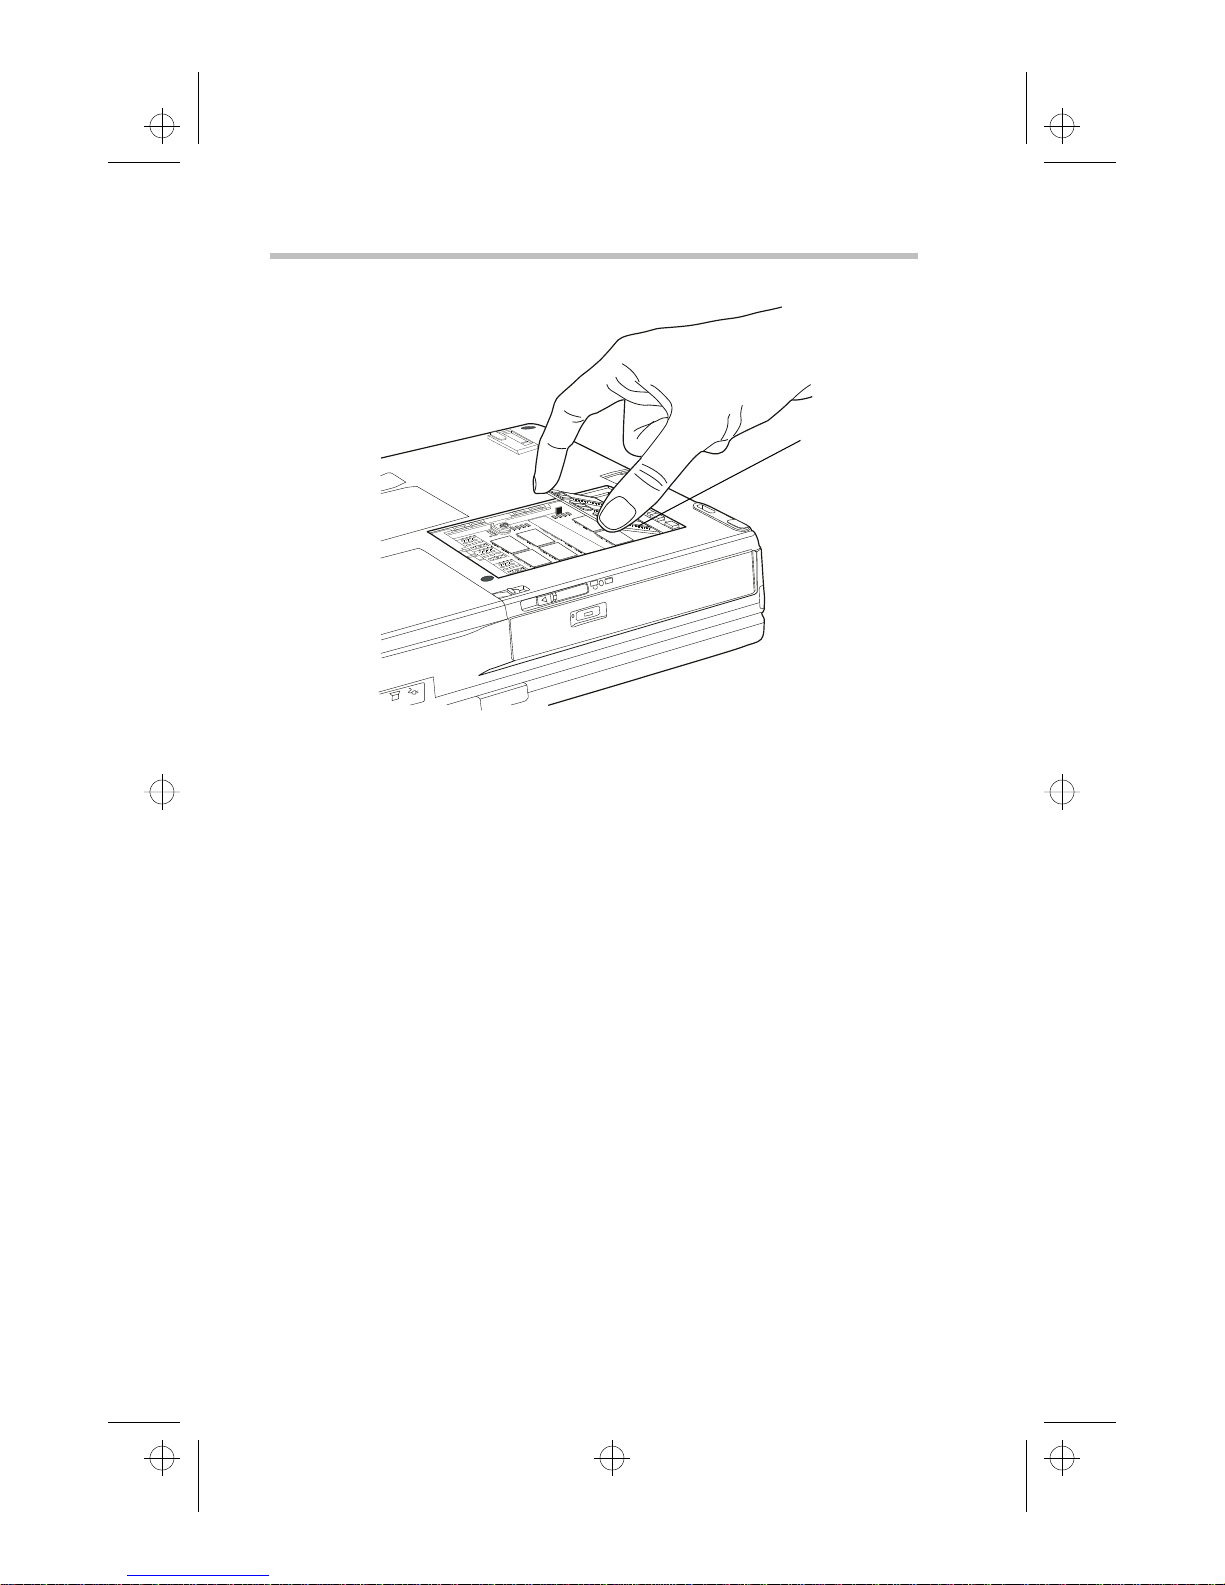
Screws
Locating the screws
4 Use a small Phillips screwdriver to remove the two screws
that secure the memory slot cover.
Part I: Getting To Know Your Computer
000-book.bk : 02-start.fm5 Page 21 Wednesday, May 15, 1996 3:50 PM
Let's Start at the Very Beginning…
Adding Memory (Optional)
5 Remove the memory slot cover.
Static electricity can damage the memory module. Before you
handle the module, touch a grounded metal surface to discharge any static electricity you may have built up.
To avoid damaging the memory module, be careful not to
touch its pin connector (on the side you insert into the
computer).
21
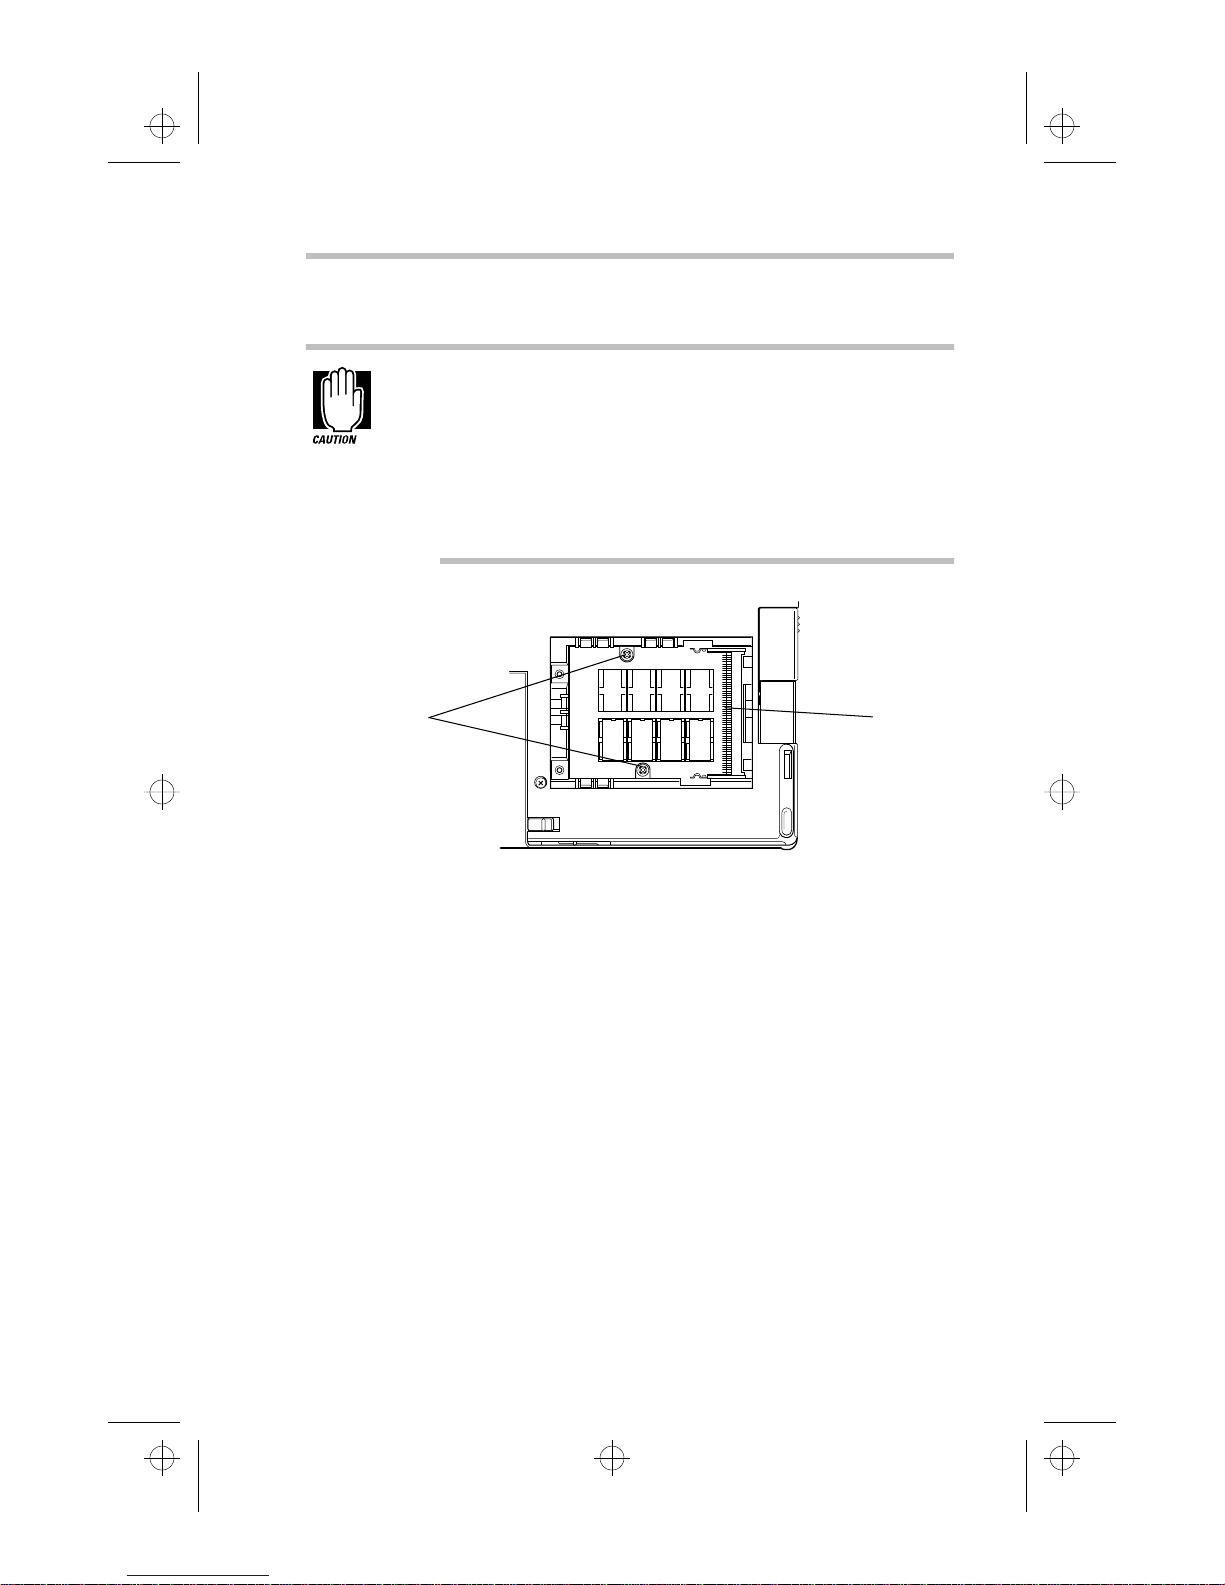
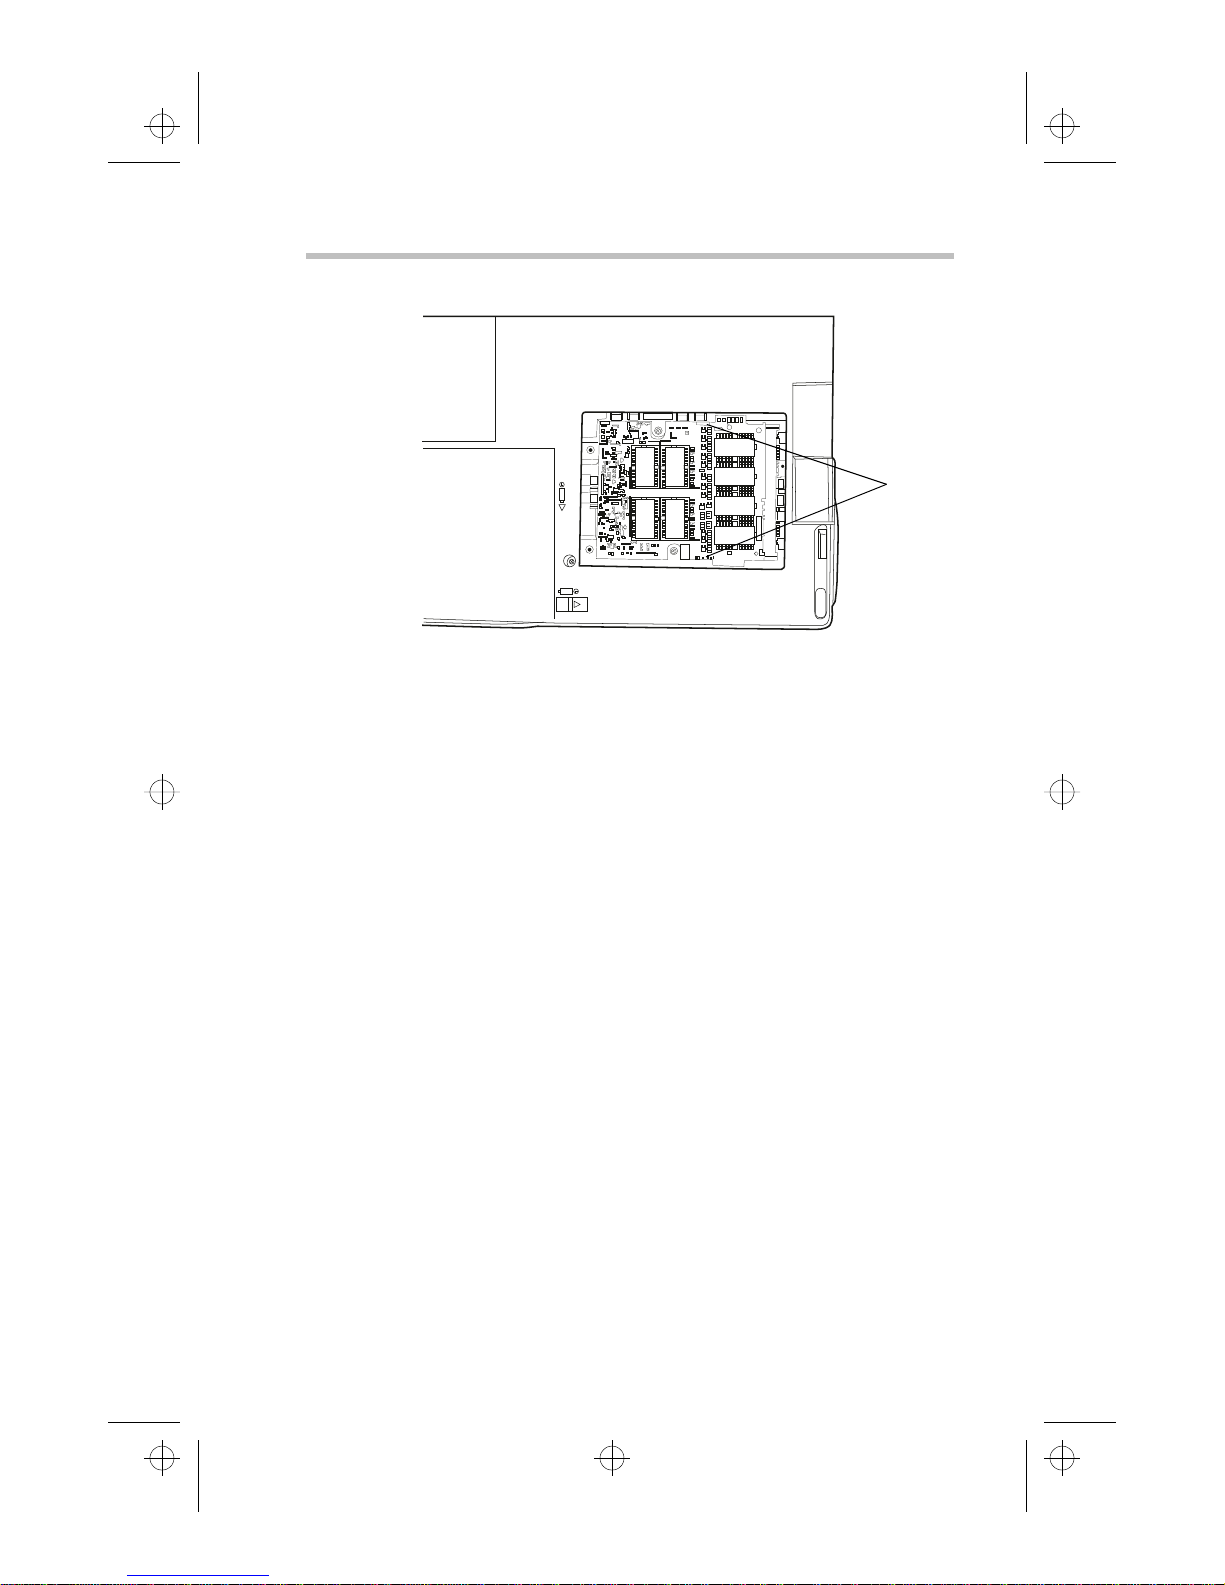
Screws
Removing the screws from the brace
6 If you are installing a full-sized memory module (one that
will fill the entire memory slot), remove the two screws
from the brace at the center of the slot.
Connector
Part I: Getting To Know Your Computer
000-book.bk : 02-start.fm5 Page 22 Wednesday, May 15, 1996 3:50 PM
Let's Start at the Very Beginning…
22
Adding Memory (Optional)
Module
Inserting a half-sized memory module
7 Place the module in the memory slot at a 45° angle, aligning
the memory module’s connector with the connector in the
slot.
The memory module fits only one way.
8 Press the memory module firmly into the slot’s connector.
Part I: Getting To Know Your Computer
000-book.bk : 02-start.fm5 Page 23 Wednesday, May 15, 1996 3:50 PM
Let's Start at the Very Beginning…
Adding Memory (Optional)
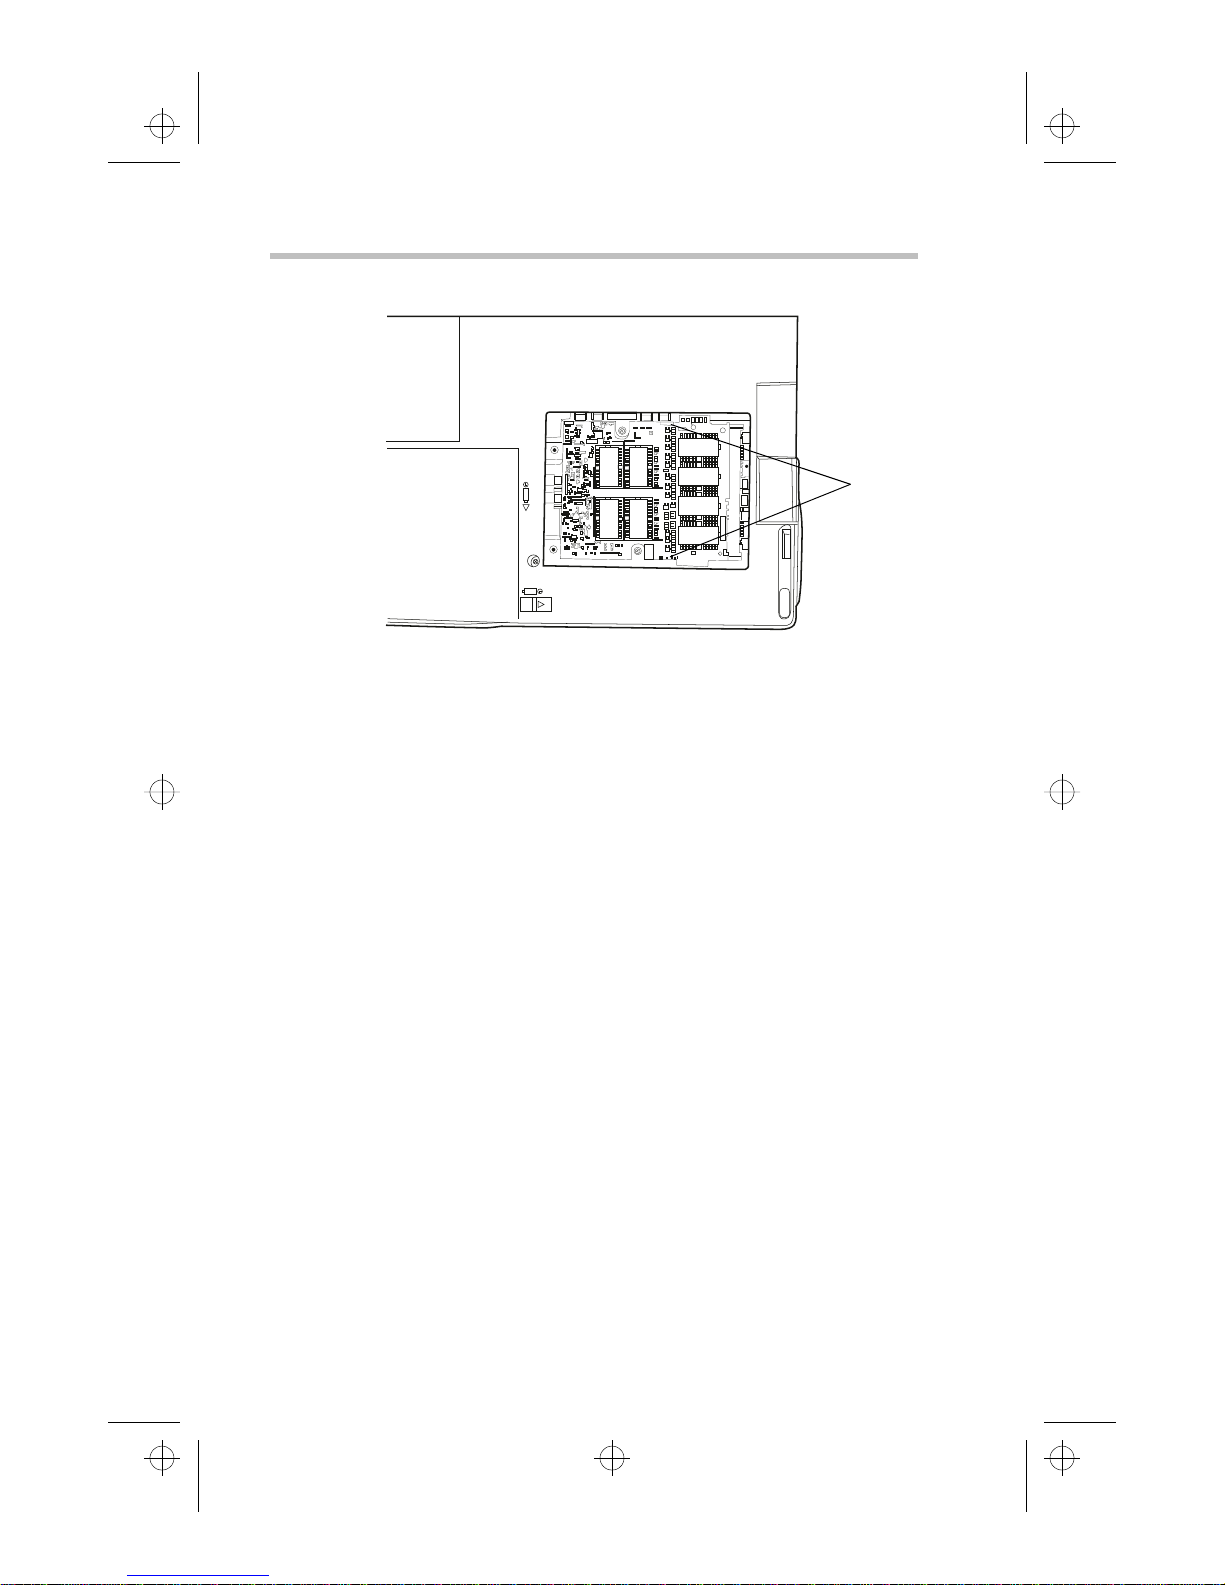
A half-sized memory module inserted correctly
23
Clips
9 Press the free edge of the memory module into the slot
until the clips snap into place, securing the memory
module.
10 If you’ve installed a full-sized memory module, secure the
module by replacing the two screws you removed in step 6.
11 Replace the memory slot cover.
12 Replace the screws you removed in step 4.
13 Turn the computer over.
When you turn your computer on, it recognizes the additional
memory automatically.
Removing a Memory Module
To remove a memory module, follow these steps:
1 Remove the memory slot cover, following steps 1 through
6 in the previous section, “Install the Memory Module.”
Part I: Getting To Know Your Computer
000-book.bk : 02-start.fm5 Page 24 Wednesday, May 15, 1996 3:50 PM
Let's Start at the Very Beginning…
24
Connect the External Diskette Drive
Clips
Removing a memory module
2 Pull the clips away from the memory module.
The memory module pops partially out of the slot.
3 Carefully remove the module from the slot.
4 Replace the memory slot cover, following steps 10 through
13 in the previous section.
Connect the External Diskette Drive
The computer’s external 3 1/2” diskette drive is useful for installing programs on the hard disk, exchanging information with other
systems, and making backup copies of the files stored on your
hard disk.
If you prefer, you can remove the CD-ROM drive (optional in the
Tecra 500 CS) and install the diskette drive into the SelectBay.
Part I: Getting To Know Your Computer
External diskette drive port cover
000-book.bk : 02-start.fm5 Page 25 Wednesday, May 15, 1996 3:50 PM
Let's Start at the Very Beginning…
Connect the External Diskette Drive
See “Swapping Drives in the SelectBay” on page 115 for more
information.
The external chassis (optional with the Tecra 500 CS) works
with the diskette drive only. The CD-ROM drive and the sec-
ond hard drive only work when installed in the SelectBay.
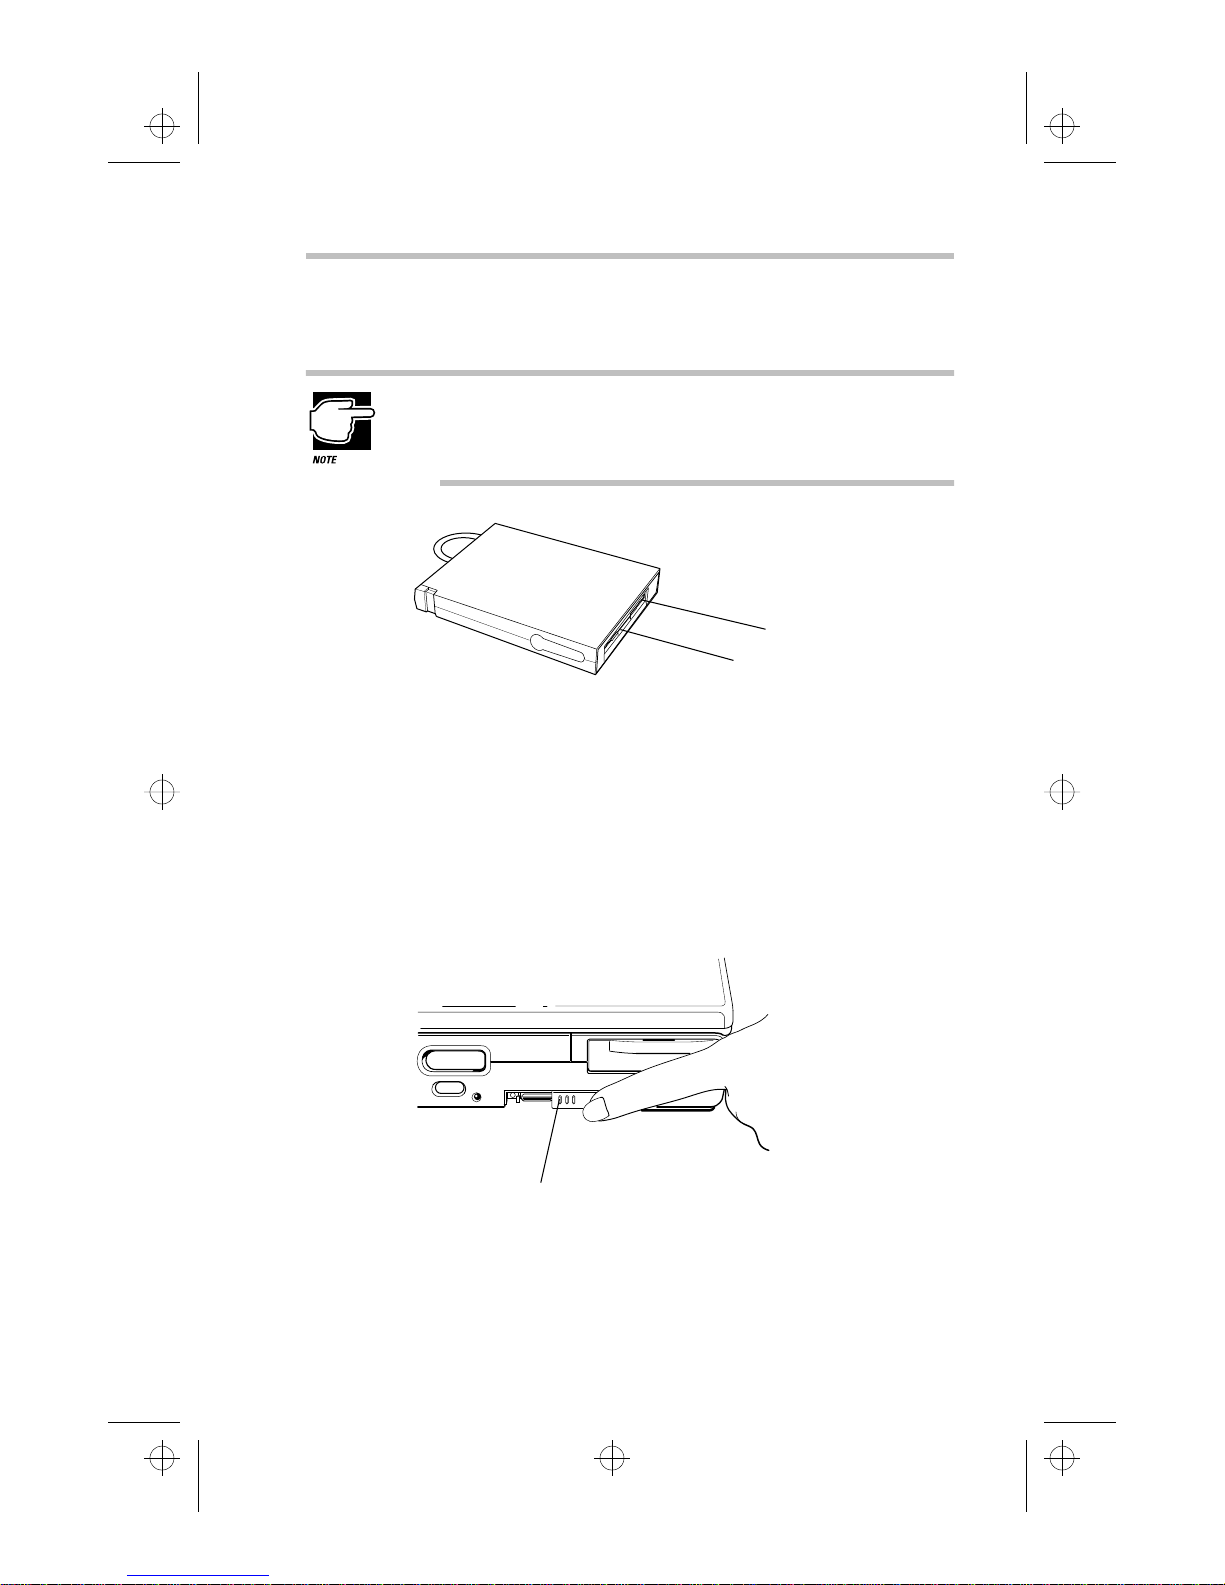
Disk eject button
Insertion slot
25
The external diskette drive
A protective flap inside the disk insertion slot automatically
retracts when you insert a diskette. Push the disk eject button
when you want to remove a diskette from the drive.
Attaching the External Diskette Drive
To attach the external diskette drive to the computer, follow these
steps:
The external diskette drive port cover
Part I: Getting To Know Your Computer
1 Slide open the external diskette drive port cover, located on
the left side of the computer.

000-book.bk : 02-start.fm5 Page 26 Wednesday, May 15, 1996 3:50 PM
Let's Start at the Very Beginning…
26
Connect the External Diskette Drive
External diskette drive portCable
Attaching the external diskette drive
2 Attach the cable from the external diskette drive to the
external diskette drive port.
You may attach the external diskette drive with the computer
on or off. If you attempt to use the diskette drive and it is not
attached to the computer, the computer displays an error
message.
The computer automatically recognizes the external diskette drive
and calls it the A drive.
Locating the cable connector buttons
To detach the external diskette drive from the computer, press the
cable connector buttons (on each side of the cable connector)
Part I: Getting To Know Your Computer
Cable connector buttons

000-book.bk : 02-start.fm5 Page 27 Wednesday, May 15, 1996 3:50 PM
Let's Start at the Very Beginning…
Connecting a Parallel Printer
and gently pull the connector out of the external diskette drive
port.
If you try to access a diskette in the external diskette drive
after disconnecting the drive, you will get a disk error
message.
27
Connecting a Parallel Printer
If you've already purchased a printer, now is a great time to connect it to the computer. If you don't have printer or don’t wish to
connect it yet, don't worry. You can always connect one later.
The most common type of printer connection is through a parallel
printer cable. You may have received this cable when you purchased your printer. Otherwise, printer cables are available from
your dealer and at most computer and electronics stores.
If your printer is ECP compatible and you wish to take advan-
tage of high speed printing, you’ll need to connect the printer
to the computer using an IEEE 1284 printer cable.
To connect the printer to the computer, follow these steps:
1 Turn the computer’s power off.
2 Identify the two ends of the printer cable.
One end connects to the computer. The other end connects to
the printer.
To the computer To the printer
Identifying the ends of the printer cable
Part I: Getting To Know Your Computer
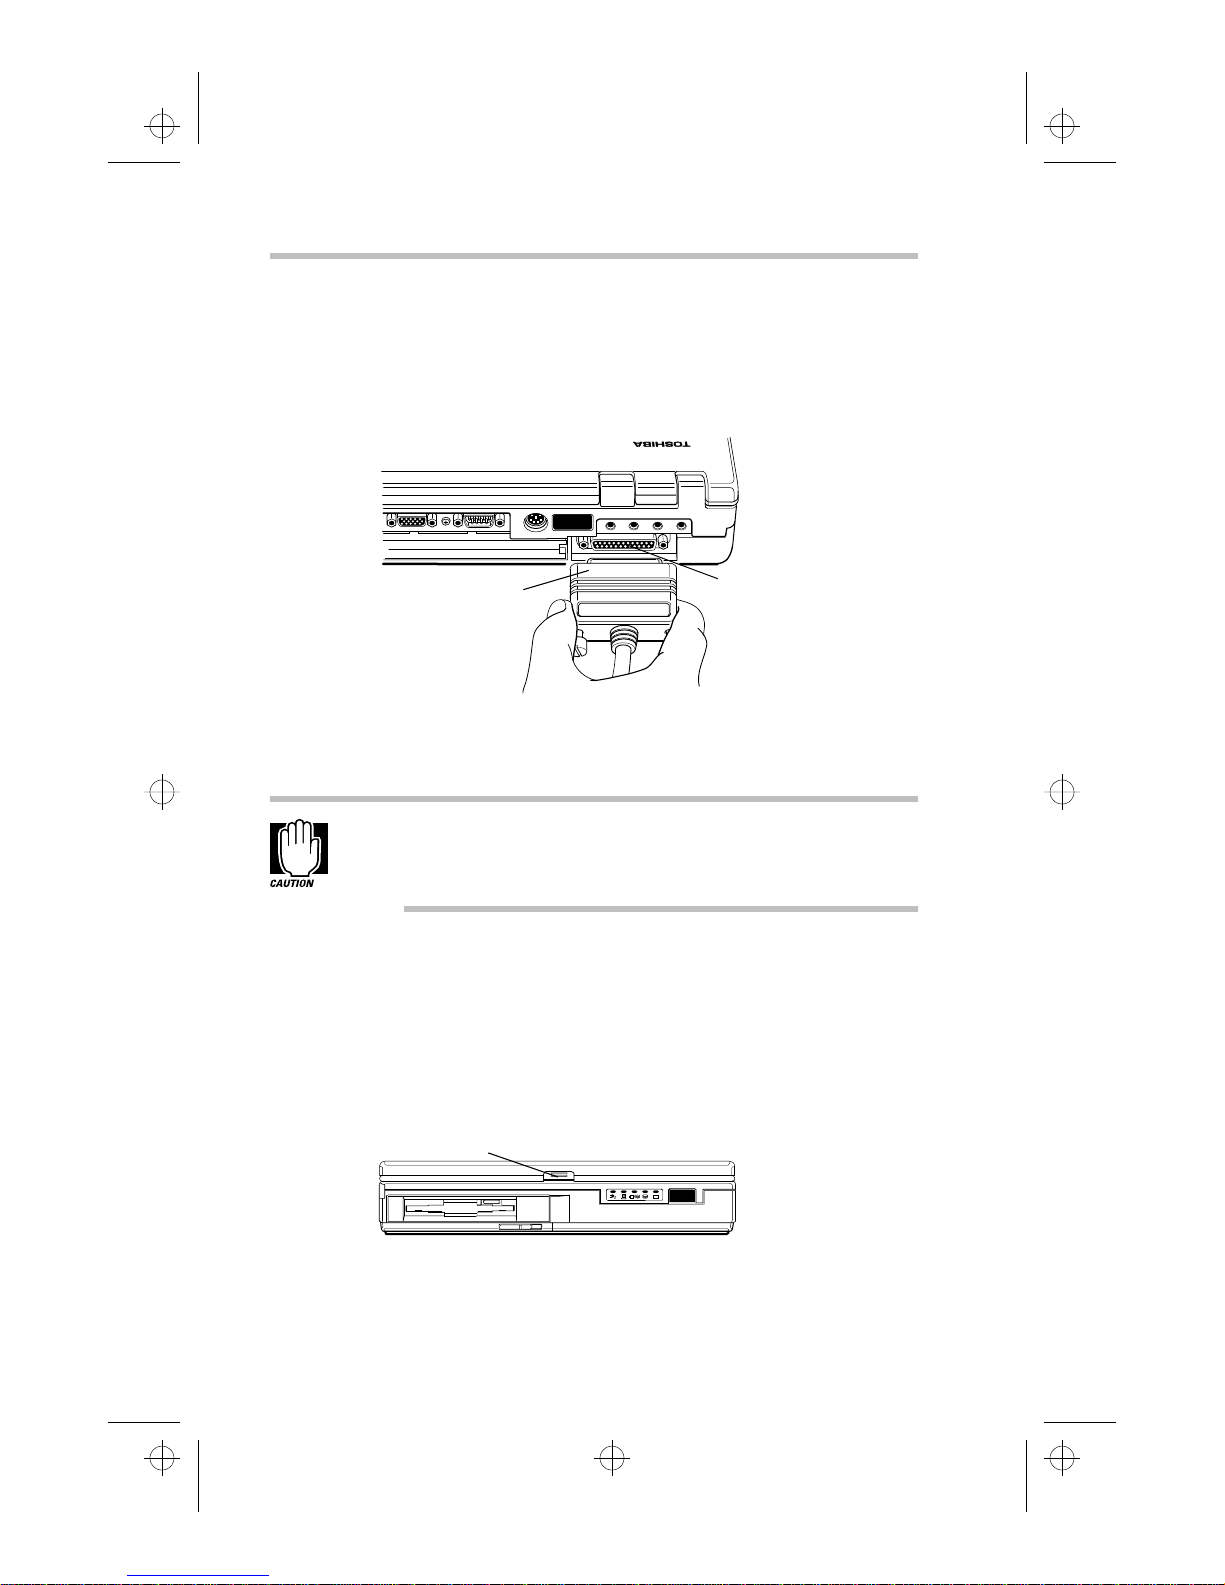
000-book.bk : 02-start.fm5 Page 28 Wednesday, May 15, 1996 3:50 PM
Let's Start at the Very Beginning…
28
Open the Display
3 With the printer off, connect the printer cable to your
printer.
If you’re unsure how to do this, your printer’s documentation
will tell you.
Printer cable
Connecting the printer cable to the parallel port
4 Connect the printer cable to the computer's parallel port.
Don’t connect the printer cable if the computer’s power is on.
Doing so may cause damage to the printer, the computer or
both.
5 Plug the printer's power cable into a live AC outlet.
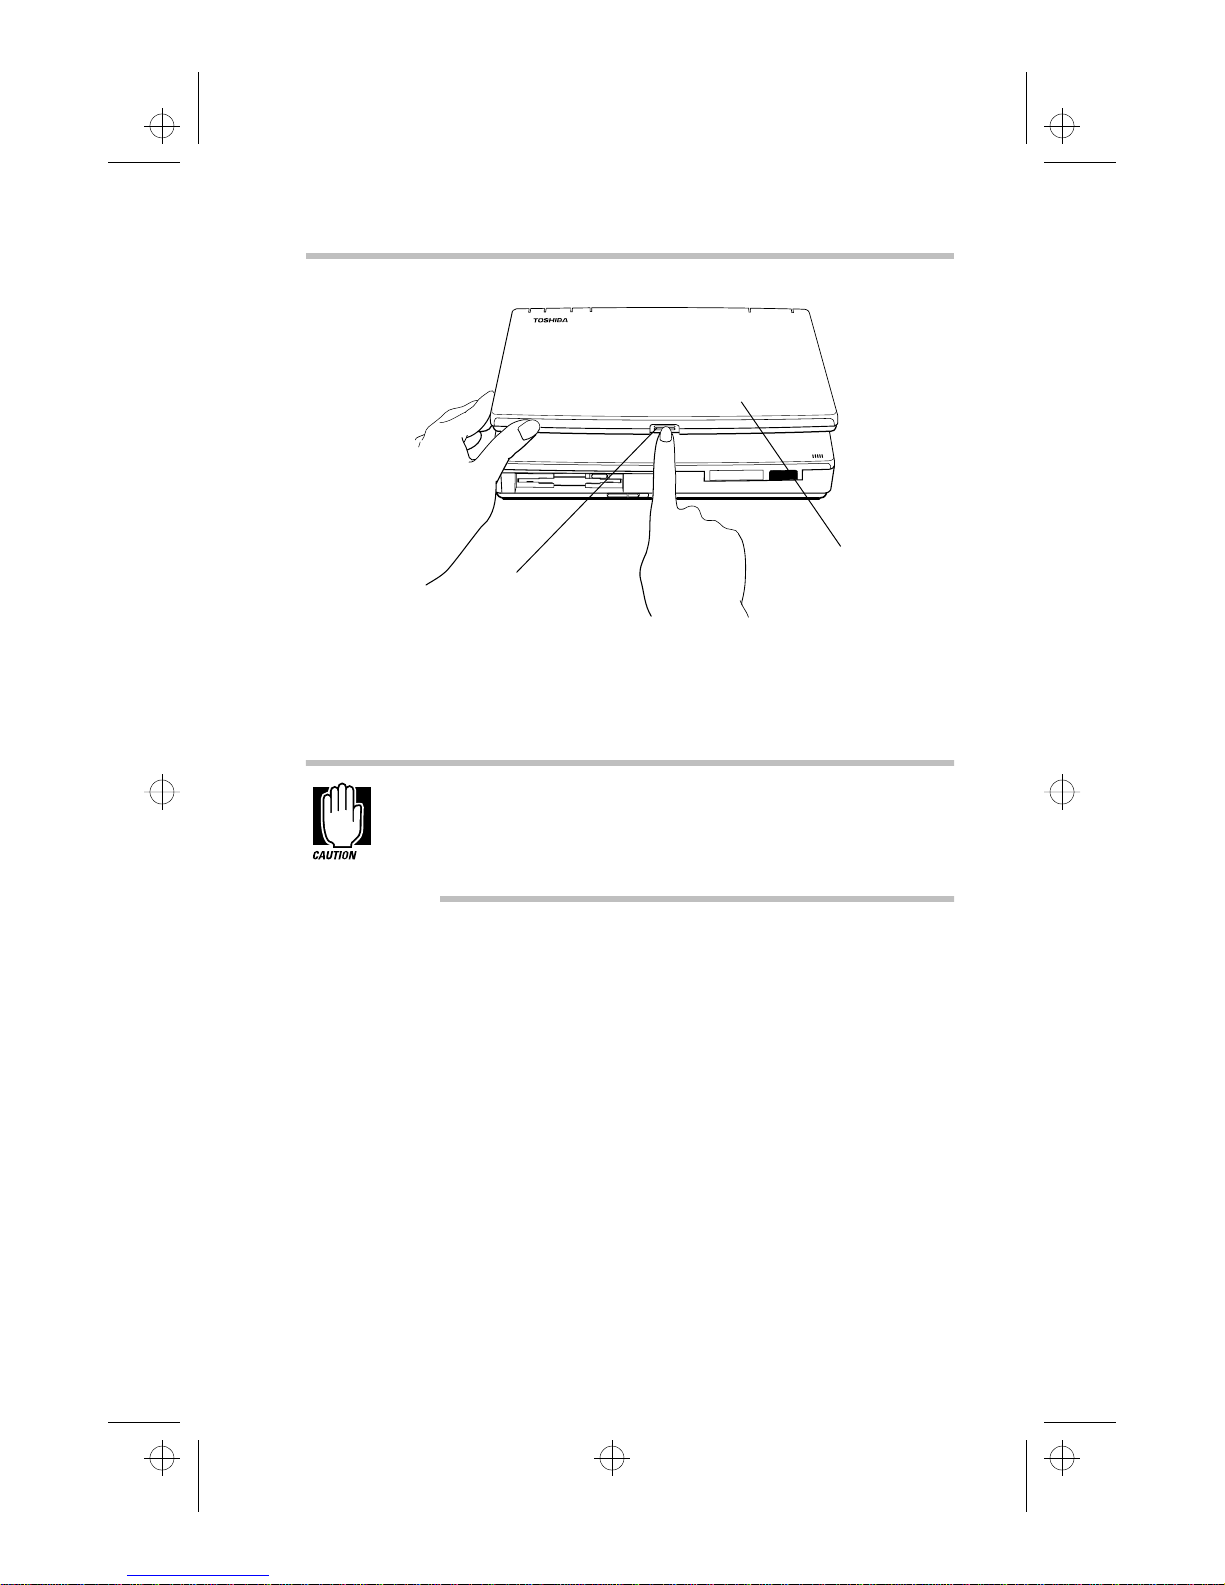
Open the Display
The final step before you turn your computer on is to open the
display.
Display latch
Parallel port
The display latch on the front of the computer
1 Locate the display latch on the front of the display panel.
Part I: Getting To Know Your Computer
000-book.bk : 02-start.fm5 Page 29 Wednesday, May 15, 1996 3:50 PM
Let's Start at the Very Beginning…
Fill In Your Registration Card and Mail It
Display latch
Opening the display
2 Press the display latch and lift the display panel.
29
Display panel
3 Adjust the display panel to a comfortable viewing angle.
To avoid damaging the display panel, be careful when open-
ing and closing the panel. Do not force it beyond where it
moves easily, and never lift the computer by the display
panel.
Fill In Your Registration Card and Mail It
Take a few minutes now to fill in and mail your product registration card. The card was on the keyboard of your computer when
you first opened the display panel. Sending in your product registration card lets Toshiba keep you up to date with information
about new products and upgrades.
Part I: Getting To Know Your Computer
 Loading...