


INSTRUCTION MANUAL
To ensure that you use the Toshiba Sora-T10 (PDR -
T10) Digital Still Camera safely and correctly, read
this lnstruction Manual carefully before you start us-
ing the camera. Once you have finished reading this
lnstruction Manual, keep it handy at all times.

Attention
For customers in the U.S.A.
DIGITAL STILL CAMERA PDR-T10
Tested To Comply
With FCC Standards
FOR HOME OR OFFICE USE
FCC Statement
This device complies with Part 15 of the FCC Rules. Operation is subject to the following
two conditions:
(1) This device may not cause harmful interference, and
(2) This device must accept any interference received, including interference that may
cause undesired operation.
NOTE
This equipment has been tested and found to comply with the limits for a Class B digital
device, pursuant to Part 15 of the FCC Rules. These limits are designed to provide
reasonable protection against harmful interference in a residential installation.
This equipment generates, uses and can radiate radio frequency energy and, if not
installed and used in accordance with the instructions, may cause harmful interference to
radio communications. However, there is no guarantee that interference will not occur in a
particular installation. If this equipment does cause harmful interference to radio or
television reception, which can be determined by turning the equipment off and on, the
user is encouraged to try to correct the interference by one or more of the following
measures:
• Change the direction of the radio or TV antenna.
Move the equipment or the radio or TV. For example, if the equipment is to the right
of the TV, move it to the left of the TV.
Or, move the equipment farther away from the radio or TV.
• Plug the equipment into a different outlet. Don’t plug your radio or TV into the same
circuit as your equipment.
• Ensure that all expansion slots (on the back or side of the equipment) are covered.
Also, ensure that all metal retaining brackets are tightly attached to the equipment.
• If these suggestions don’t help, consult your equipment dealer or experienced radio/
TV technician for help.
Getting Ready
Photography
Basic
Erasing Images
Playing/
Connecting to
the PC
Applications
Other
Information
Additional
1

Attention (continued)
CAUTION
If you modify the camera in any way, without getting approval from Toshiba Corporation,
your camera may violate FCC regulations. Violation of FCC regulations may cause the
FCC to void your right to use the modified camera.
TOSHIBA AMERICA INFORMATION SYSTEMS, INC.
Imaging Systems Division
Getting Ready
9740 Irvine Boulevard,
Irvine, California 92618-1697
Phone Number: (800)288-1354
For customers in Canada
CAUTION
Basic
This Class B digital apparatus complies with Canadian ICES-003.
Photography
Playing/
Erasing Images
the PC
Connecting to
Other
Applications
Additional
Information
2

Before Reading This Manual
Thank you for purchasing the Toshiba PDR-T10 Digital Still Camera.
To ensure that you use this camera safely and correctly, read this Instruction Manual
carefully before you start using the camera. Once you have finished reading this
Instruction Manual, keep it handy at all times.
Every effort has been made in assuring the quality of this product, however if for any
reason the product has been damaged during production, it will be replaced free of
charge. For all other non conformities or damages other than the above, Toshiba
corporation will not be held liable whatsoever.
The Design, Specifications, Software and Contents of instruction Manual are subject to
change without prior notice for improvement.
TRADEMARK INFORMATION
• MS-DOS, Windows, Windows 98, Windows 2000, Windows ME and Windows XP are
registered trademarks of the Microsoft Corporation of the U.S. registered in the USA
and other countries.
Windows is an abbreviated term referring to the Microsoft Windows Operating
System.
• Macintosh is a registered trademark of Apple Computer, Inc.
• SD is a trademark.
• Image Expert is a registered trademark of Sierra Imaging, Inc.
• Other companies or product names are trademarks or registered trademarks of the
respective companies.
NOTES ON COPYRIGHT
Images taken with digital still cameras are for personal enjoyment only and should not be
used, indicated, distributed or exhibited, etc. otherwise without the permission of the
copyright holder as per copyright laws.
Note that photographing some performances, exhibitions, etc., is restricted, even when
photographs are taken for personal enjoyment. In addition, the transfer of memory cards
(SD memory cards, etc.) containing copyrighted images and files is limited to purposes
within the range permitted by copyright laws.
NOTES ON SOFTWARE AND INSTRUCTION MANUAL
• Copying or duplication of the software and Instruction Manual packaged with this
Software Application in part or in whole is not allowed without the prior permission of
Toshiba Corporation.
• Use of the software and Instruction Manual packaged with this Software Application
is allowed only on one personal computer.
• Toshiba Corporation is not liable whatsoever for any damages to the user or a third
party as a result of use of a device by the software and Instruction Manual packaged
with this Software Application.
• The personal computer screens shown in this Instruction Manual are examples, and
may differ from actual screens. Toshiba Corporation is not liable whatsoever for any
compensation arising from errors in descriptions in this Instruction Manual.
Getting Ready
Photography
Basic
Erasing Images
Playing/
Connecting to
the PC
Applications
Other
Information
Additional
3

Notes on Software
This Instruction Manual describes how to install the supplied software and a brief
explanation of how to use the Software Application. See the help file of Software
Application for detailed explanation.
This manual has been written assuming that you basically understand how to use your
personal computer. For basic details on your personal computer, refer to the Instruction
Manual of your personal computer or the operating system.
Getting Ready
Notes on the Supplied Software
The supplied CD-ROM includes the following software applications.
• Image viewing software “Image Expert”
Basic
Playing/
Connecting to
Other
This program allows you to view images you have taken with the camera on a
computer and also to process and modify them. For detailed operating instructions,
refer to the help file.
Photography
☞ Installing the image viewing software ➲ page 42.
• USB driver (for Windows 98 only)
Install this to connect the camera to a computer using the supplied USB cable. This
driver is exclusively used for Windows 98. If you use a Macintosh computer or
Windows 2000, ME or XP, use the standard driver for that operating system.
☞ Installing the USB Driver ➲ page 43.
• Service and Support file
Erasing Images
This includes information on service and support. We recommend storing this file into
your computer in case you lose this manual.
☞ After-sales service ➲ page 56.
• Software version upgrade
For better use, the firmware of the camera may be upgraded after shipment. The
the PC
methods of version upgrade are available in our homepage.
Homepage URL: http://www2.toshiba.co.jp/mobileav/camera
Abbreviations Used in This Manual
Windows 98
This refers to the Microsoft® Windows® 98 operating system.
Windows 2000
This refers to the Microsoft
Applications
Windows ME
This refers to the Microsoft® Windows® ME operating system.
Windows XP
This refers to the Microsoft® Windows® XP operating system.
®
Windows® 2000 operating system.
Additional
Information
4
Safety Precautions
Read these safety precautions carefully before using the Sora-T10. These instructions
contain valuable information on safe and proper use that will prevent harm and damage to
the operator and other persons. Make sure that you fully understand the following details
(indications) before proceeding to the main descriptions in this manual.
Indication Definitions and Graphic Symbol Definitions
Indication Meaning
DANGER
WARNING
CAUTION
*1 “Catastrophic bodily injury” means loss of eyesight, burns (high and low
temperatured), shock, fracture, poisoning, etc. which leaves a sequela and require
hospitalization or prolonged treatment.
*2 “Bodily injury” means injuries, burns, and shock which does not require hospitaliza-
tion or prolonged treatment.
*3 “Property damage” means extended harm to home, household effects, domesti-
cated animals, and pets.
Graphic symbol
This indicates the existence of an imminent hazard that death or
catastrophic bodily injury*
This indicates the existence of a hazard that death or
catastrophic bodily injury*
This indicates the existence of a hazard that bodily injury*2 or
property damage*
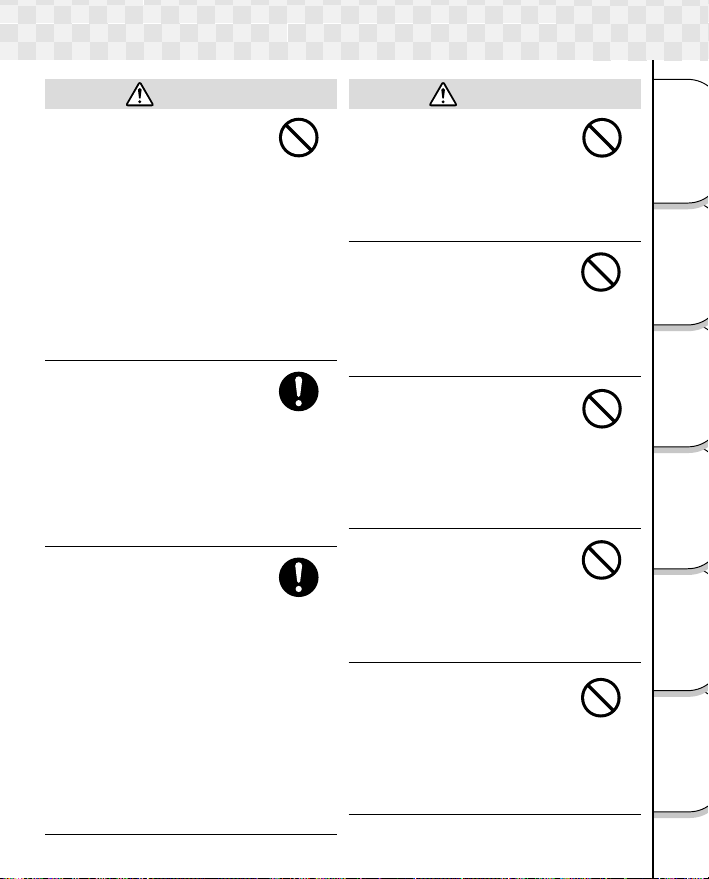
Indicates a prohibited action that must not be carried out.
The actual prohibited action is indicated in the symbol or nearby
graphically or described in text.
Indicates a necessary action that must be carried out.
The actual necessary action is indicated in the symbol or nearby
graphically or described in text.
1
may result from improper use.
1
may result from improper use.
3
may result from improper use.
Meaning
Exemption Clauses
• Toshiba Corporation bears no responsibility for any damages or losses arising from
earthquakes, fire or any other act of God, acts by third parties, misuse by the user or
use under extreme operating conditions.
• Toshiba Corporation bears no responsibility for incidental damages (lost profit,
suspension of business activities, corruption or loss of the memory contents, etc.)
arising from the use of or the inability to use this unit.
• Toshiba Corporation accepts no liability whatsoever for any damages arising from the
incorrect use not in compliance with instructions in this instruction manual.
• Toshiba Corporation accepts no liability whatsoever for any damages arising from
malfunctions arising from combination with equipment or software that is not related
to Toshiba Corporation.
• Toshiba Corporation accepts no liability whatsoever for any damages arising from
repair or modifications made by the user or cause to be made by the user and carried
out by an unauthorized third party.
• Notwithstanding the foregoing, Toshiba’s liabilities shall not, in any circumstances,
exceed the purchase price of the product.
Getting Ready
Photography
Basic
Erasing Images
Playing/
Connecting to
the PC
Applications
Other
Information
Additional
5
Safety Precautions (continued)
Do not heat, disassemble
or throw the batteries into
fire or water.
Doing this might cause it to
Getting Ready
rupture, ignite or heat up,
resulting in fire or major
injury.
Do not strike the batteries
Basic
with a hammer, or step on,
drop, or subject the battery
Photography
to strong impact.
Doing so might cause it to
rupture, ignite or heat up,
resulting in fire or major
injury.
Playing/
Erasing Images
Should you ever notice
smoke, a strange odor or
excessive heat coming
from the camera,
the PC
immediately turn OFF the
Connecting to
power and remove the
batteries and AC adapter.
Continued use in this state
might cause fire, electric
shock or burns. For details on
Other
repair, consult the store of
purchase, or please contact
Applications
the technical support number.
Additional
Information
WARNING
DANGER
WARNING
If foreign objects or water
have entered the camera,
immediately turn the power
OFF and remove the
batteries and AC adapter.
Continued use in this state
might cause fire or electric
shock. For details on repair,
consult the store of purchase,
or please contact the
technical support number.
If the camera has fallen or
its case is damaged,
immediately turn the power
OFF and remove the
batteries and AC adapter.
Continued use in this state
might cause fire or electric
shock. For details on repair,
consult the store of purchase,
or please contact the
technical support number.
Do not use in areas near
water.
This might cause fire or
electric shock. Take special
care during rain, snow, on the
beach or near the shore.
Do not use the camera in
the bath or shower.
This might cause a fire or
electric shock.
Do not place the camera on
inclined or unstable
surfaces.
This might cause the camera
to fall or tilt over.
6
Safety Precautions (continued)
WARNING
Do not allow metallic
objects or other flammable
foreign matter inside the
camera.
This might cause a fire or
electric shock. Do not open
the battery cover, and insert
or allow such objects to fall
inside.
Do not disassemble,
change or repair the
camera.
This might cause fire or
electric shock. For details on
repair and internal inspection,
consult the store of purchase,
or please contact the
technical support number.
Do not touch power cords
during a thunderstorm.
This might cause electric
shock.
Do not use the camera
while you are walking,
driving or riding a
motorcycle.
This might cause you to fall
over or result in a traffic
accident.
Use only the specified
batteries or the specified
AC adapter.
Use of a battery or AC
adapter other than specified,
might cause fire, defects or
malfunctions.
WARNING
Keep the batteries out of
the reach of children.
If a child swallows a battery,
this might result in poisoning.
If a child swallows a battery,
immediately consult a
physician.
If battery fluid enters the
eyes, immediately rinse
with fresh water and
consult a physician to
receive treatment.
If left untreated, damage to
the eye could be permanent.
Use the AC adapter only
with the indicated power
supply voltage (USA: 100 to
120V, Europe: 230V AC).
Use with any other power
supply voltage might cause
fire or electric shock.
CAUTION
If you want to use the
camera in an airplane,
consult with the airline and
follow their instructions.
Use of this camera is
sometimes restricted due to
potential radio interference.
Do not use the camera in
humid, steamy, smoky or
dusty places.
This might cause fire or
electric shock.
Getting Ready
Photography
Basic
Erasing Images
Playing/
Connecting to
the PC
Applications
Other
Information
Additional
7
Safety Precautions (continued)
Do not leave the camera in
places where the
temperature may rise
significantly, such as inside
Getting Ready
a car.
This might adversely affect
the case or the parts inside,
resulting in fire.
Do not place or wrap the
Basic
camera in cloth or blankets.
Photography
This might cause heat to build
up and deform the case,
resulting in fire. Use the
camera in a well-ventilated
place.
Playing/
Before you move the
camera, disconnect cords
Erasing Images
and cables.
Failure to do this might
damage cords and cables,
resulting in fire or electric
shock.
the PC
Do not drop or subject the
Connecting to
camera to strong impact.
This might cause fire, electric
shock or malfunctions.
Before you carry out
Other
maintenance on the
camera, remove the
Applications
batteries and AC adapter.
Leaving these attached might
cause electric shock.
Remove the batteries and
AC adapter if you plan not
to use the camera for a
Additional
Information
long time.
This might cause fire.
8
CAUTION
CAUTION
Insert the batteries paying
careful attention to the
polarity (+ or –) of the
terminals.
Inserting the batteries with
polarities inverted might
cause fire and injury, or
damage the surrounding
areas.
Do not fire the flash near
the eyes.
This might cause temporary
damage to the eyesight.
Do not walk around with
the camera swinging from
the strap.
The camera might come into
contact to other people and
cause injury or damage to the
camera or other objects.
Before you store or dispose
the used batteries, tape the
(+) and (–) terminals with
insulating tape.
If stored or disposed without
doing this, the batteries may
make contact with metal
objects, resulting in fire or
injury due to leaking of
battery fluid, overheating or
bursting of the battery.
Do not play the supplied
CD-ROM with a regular CD
player.
This might damage the
headphone or speaker and
may injure your ears.
Safety Precautions (continued)
CAUTION
Do not subject the LCD
monitor to impact.
If the LCD monitor is
impacted, the glass on the
screen may be broken and
internal fluid may leak.
If the internal fluid enters your
eyes or comes into contact
with your body or clothes,
immediately rinse with fresh
water. If the internal fluid
enters your eyes, immediately
consult a physician to receive
treatment.
Consult your dealer
regarding the internal
cleaning of the camera
once every two years.
If dust is allowed to
accumulate inside the camera
for a long time, this might
result in fire or defects.
Consult your dealer regarding
the cleaning costs.
When changing batteries,
replace both with new
batteries.
Failure to do this might cause
them to rupture, ignite or heat
up, resulting in fire, major
injury or damaging the
camera.
“New batteries” refers either
to recently purchased, never
used Nickel or Lithium
batteries or to Nickel Metal
Hydrogen (NiMh) or Nickel
Cadmium batteries that have
recently been charged
simultaneously.
CAUTION
Do not use different types
of batteries together, or mix
old and new batteries.
Doing so might cause them to
rupture, ignite or heat up,
resulting in fire, major injury
or damaging the camera.
Do not remove batteries
immediately after using the
camera for a long period of
time.
The batteries are heated up,
they might resulting in fire
injury.
Do not leave dead or
exhausted batteries in the
camera.
Neglecting the above may
cause the battery to rupture,
ignite or heat up, resulting in
fire, major injury or damaging
the camera.
Do not press the touch
panel with force or operate
the touch panel with
fingernails or hard or
pointed objects.
Doing so may damage the
touch panel.
Do not place magnetic
cards such as credit cards
or the like near the front
side of the camera.
The data of the credit card
may be damaged (erased)
due to the magnet in the front
side of the camera.
Getting Ready
Photography
Basic
Erasing Images
Playing/
Connecting to
the PC
Applications
Other
Information
Additional
9

Contents
■ Attention ............................................... 2
■ Before Reading This Manual ................ 3
■ Notes on Software ................................ 4
■ Safety Precautions ............................... 5
Getting Ready
■ Contents ............................................. 10
■ Notes on Handling Your Camera ........ 11
■ Notes on Batteries .............................. 12
■ Notes on the AC Adapter ................... 13
■ Notes on SD card ............................... 14
■ Notes on Touch Panel ........................ 15
Basic
Photography
■ Names of the Parts ............................. 16
■ Replacing the Face Pad ..................... 17
■ Inserting and Removing the Batteries 18
■ Using the Power Outlet....................... 19
■ Loading and Removing the SD card .. 20
Playing/
■ Turning the Power On/Off ................... 21
Erasing Images
■ Setting the Date and Time .................. 22
■ Switching the Mode (Photography mode
■ Taking Photographs ............................ 24
the PC
■ Setting the Scene Mode ..................... 26
Connecting to
■ Setting the Flash ................................ 28
■ Self-timer Photography ....................... 30
■ Digital Zoom Photography .................. 31
■ Changing the Preset Conditions of
Other
Applications
Additional
Information
■ Playing ................................................ 34
■ Displaying a List of Images (Thumbnail
10
Preface
Getting Ready
<--> Play Mode) .................................. 23
Basic Photography
Recording menu ................................. 32
•Color ................................................ 32
•ISO Sensitivity ................................. 32
•Exposure Compensation ................. 32
•White Balance .................................. 33
•Image Quality ................................... 33
•Preview ............................................ 33
•LCD Monitor Brightness .................. 33
Playing/Erasing Images
Display) ............................................... 35
■ Erasing Images .................................. 36
■ Zoom Play .......................................... 37
■ Changing Settings of Play Menu ........ 38
•LCD Monitor Brightness .................. 38
•DPOF (Digital Print Order Format) .. 38
•Display switching ............................. 39
•Slide Show ....................................... 39
•Protect ............................................. 39
■ Setting DPOF ..................................... 40
Connecting to the PC
■ Connecting PC ................................... 41
■ Installing the Image Viewing
Software ............................................. 42
■ Installing the USB driver ..................... 43
■ Transferring the Camera’s Images
to the Computer ................................. 44
Other Applications
■ Changing the Basic Settings of the
Camera ............................................... 46
•Reset ............................................... 46
•Language ......................................... 46
•Auto Mode Switch ............................ 46
•Time and Date ................................. 47
•Sound .............................................. 47
•Touch Sensor ................................... 47
•Auto Power Off ................................. 47
•Version Information .......................... 47
•Format ............................................. 47
■ Formatting the SD card ...................... 48
Additional Information
■ Specifications ..................................... 49
■ Separately Sold Accessories .............. 50
■ List of Warning Messages .................. 51
■ FAQ .................................................... 52
■ Troubleshooting .................................. 54
■ Global Contacts .................................. 56
■ Index ................................................... 57

Notes On Handling Your Camera
When you use your camera, carefully read and strictly observe the Safety Precautions
from page 5 onwards and the notes described below.
Avoid using or storing the camera in the following places:
• Places subject to humidity, dust and dirt
• Places subject to direct sunlight
• Places subject to high or low temperature
• Places filled with highly flammable gas
• Places near gasoline, benzene or paint thinner
• Places subject to strong vibrations
• Places subject to smoke or steam
• Places subject to strong magnetic fields (such as electric motors, transformers or
magnets)
• Places contacting chemicals such as pesticides or next to rubber or vinyl products
for long periods
Do not expose the camera to sand or dust.
• The PDR-T10 is particularly sensitive to sand and dust. If the camera comes into
contact with sand or dust, not only will the camera become damaged, it will also no
longer be repairable.
Pay special attention when using the camera at the beach or where sand or dust is
likely to be present.
Notes On Condensation
• Due to a sudden change in temperature, such as when you move the camera from
a cold location to a warm one, water droplets (condensation) may form on the
inside of the camera or on the lens. When this occurs, switch the camera OFF, and
wait an hour before using the camera. Condensation may also form on the SD
card. If this happens, remove the SD card, wipe off any condensation and wait a
short time before using it again.
Carrying Out Maintenance on Your Camera
• To prevent the lens, surface of the LCD monitor from being scratched, blow off any
dust from these parts with a blower brush and lightly wipe with a soft dry cloth.
• Clean the body of the camera with a soft dry cloth. Do not use volatile liquids such
as paint thinner, benzene or insecticide, as these may react with the camera body
and cause deformation or remove the coating.
Getting Ready
Photography
Basic
Erasing Images
Playing/
Connecting to
the PC
Applications
Other
Information
Additional
11

Notes on Batteries
Batteries
To extend the use of the camera, we strongly recommend that you only use the following
types of batteries:
• AA Nickel battery (not rechargeable) : ZR6G (Toshiba “Giga Energy”)
• AA Nickel Metal Hydride (NiMh) battery (Rechargeable) : TH-3 (Toshiba)
Getting Ready
• AA Lithium battery (Not Rechargeable)
• New model Lithium battery (Not Rechargeable) : CR-V3
Use Toshiba “Giga Energy” AA Nickel batteries.
“GigaEnergy” batteries are next generation batteries which are optimum for use in digital
still cameras. They offer far better performance than conventional Alkaline batteries and
can be used at low temperatures as well.
Basic
Photography
Batteries Possible for Usage
Nickel Cadmium batteries can also be used in this camera. Due to their negative effect on
the environment, however, when using second generation (rechargeable) batteries, we
suggest using Nickel Metal Hydride (NiMh) batteries.
AA Manganese batteries cannot be used in this camera. Also, the AA Alkaline batteries
can be used in case of urgent need, but they cannot be used in low temperatures. Please
Playing/
be careful to purchase the correct batteries.
Erasing Images
Number of Frames
The number of pictures taken may vary depending on individual brand of the battery,
length of storage since manufacture, temperature and operating condition of the digital
camera, such as flash. Moreover, if the polarities of the batteries (+ or –) and the terminal
of the camera that come in contact with the electrodes are contaminated, electricity will
the PC
not flow properly and as a result may decrease the number of photographs that can be
taken. When removing and loading the batteries, be careful not to touch these parts. If the
Connecting to
parts are contaminated, clean with a dry cloth.
When using the supplied Nickel batteries, the number of photographs that can be taken
are shown as below.
Conditions: Flash use rate 100%
Photography interval: 1 frame every 0 seconds
Other
Number of frames: 00 frames
Applications
The number of frames shown above is a reference value.
Method of Extending Battery Life
Even if the switch of the camera is turned off, the battery power is slightly consumed. We
strongly recommend to remove the batteries when the camera is not in use for an
extended period of time. However, the time and date settings may return to the initial
settings, so reset them before using. Low temperatures can also affect the performance of
Additional
Information
the battery so keep the camera and battery warm by placing in clothes to protect against
the cold.
Furthermore, battery performance affected by low temperature restores its functions
when batteries return to the adequate temperature.
12

Notes on Handling the AC Adapter
Be sure to use only the specified AC adapter (sold separately). Using a different AC
adapter might cause the camera to malfunction.
When you use the AC adapter, carefully read and strictly observe the Safety Precautions
from page 5 onwards and the notes described below.
• Use the AC adapter with the rating of the country/region where the camera is used.
Be sure that you do not allow the AC adapter to contact any other metal object as this
might cause a short circuit.
• To connect the AC adapter, firmly insert the plug on the end of the cable into the DC
IN 5V terminal. Do not insert the plug into other terminals. This might cause the
camera to malfunction.
• Before you disconnect the connector cable, turn the camera OFF and then disconnect the cable holding it by its plug. Do not disconnect the connector cable by pulling
the actual cable.
• Do not drop the AC adapter or subject it to strong impacts.
• Do not use the AC adapter in very hot and humid locations.
• Do not plug in the AC adapter while you are using the battery. Switch the camera
OFF first.
• The AC adapter is for indoor use only.
• Use only the specified AC adapter. Do not use other AC adapters.
• The AC adapter may sometimes become warm during use. This is normal and not a
malfunction.
• Buzzing or whirring noises may come from inside the camera. This is normal and not
a malfunction.
• Do not use the AC adapter near a radio as it could interfere with radio signal
reception.
• If you remove the battery or AC adapter while the camera is in operation, the date
may be lost from the memory. If this happens, reset the date.
Specifications
AC Adapter (PDR-AC20)
Power supply: AC 100 to 240V 50/60Hz
Rated Input Capacity: AC 100V 33VA
Rated Output: DC 5V 3A
Operating temperature: 0°C to +40°C
Storage temperature: -20°C to +65°C
Dimensions: 94.2 x 40 x 30.5mm (W x D x H)
Weight: Approx 150g
Connector Cable Length: Approx 1.5m
Accessories: Instruction Manual
AC cord
Getting Ready
Photography
Basic
Erasing Images
Playing/
Connecting to
the PC
Applications
Other
Information
Additional
13
Notes on SD card
In this camera, the SD memory card is used for the storage medium.
In this instruction manual, the SD memory card is called “SD card”.
Pay attention to the following notes on handling the supplied SD card.
Cautions
• SD card includes a non-volatile semiconductor memory (NAND Flash EEP-ROM).
Getting Ready
Under normal use data stored on SD cards cannot be destroyed (lost). If used
improperly, however, the data may be destroyed (lost). Please note that Toshiba will
accept no responsibility whatsoever for destroyed (lost) data, regardless of the type
or cause of the problem or damage.
• SD card uses part of the memory as the system area based on the SD card, so the
Basic
Playing/
Connecting to
Other
actually usable memory capacity is lower than the indicated capacity.
• SD card is already formatted and can be used as such. If you should want to reformat
Photography
a card in order to delete images or folders, however, be sure to do so on the camera.
Formatting the SD memory card on other devices on which the SD logo mark is not
indicated (computers, etc.) may result in problems such as the inability to read or
write data.
• It is recommended that you make backups of important data.
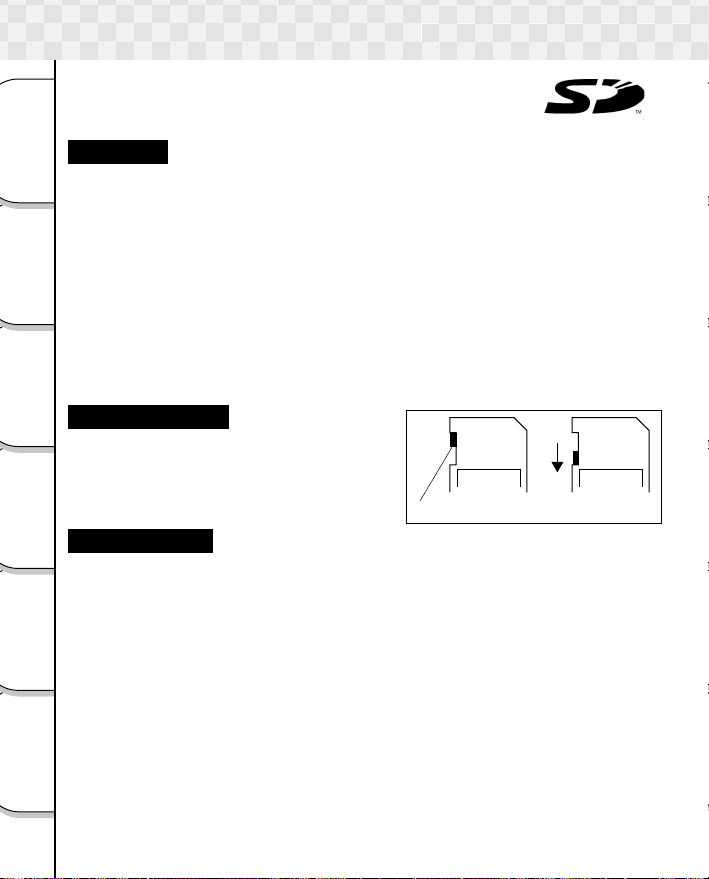
Write Protection
Erasing Images
To prevent valuable data from being erased,
switch the write protect tab at the side of the card
to “LOCK”. Data can no longer be overwritten
(Lock status). To write, edit or erase data from
the SD card, release the write-protection state.
the PC
Specifications
Type of memory: NAND Flash memory
Temperature for operation: 0°C to 55°C
Temperature for storage: -20°C to 65°C
Operating/Storage humidity: 30% to 80% (no condensation)
Dimensions: 24.0 x 32.0 x 2.1 (W x D x H)
Weight: Approx. 2g
Applications
LOCK LOCK
Write-protect tab
Write protection state
Additional
Information
14
Notes on Touch Panel
In this camera, all input operations other than operations of the POWER switch and
shutter button are performed on the touch panel.
The use of a touch panel reduces the number of key operations, thereby improving
operability, and also results in a neater design thanks to the absence of buttons.
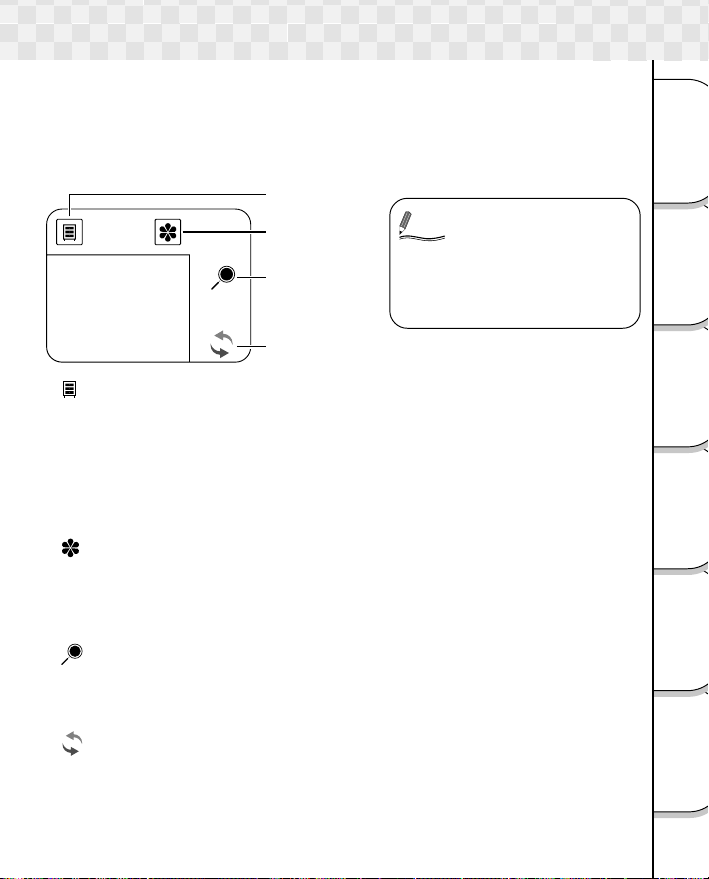
In this camera, special functions are assigned to four key icons. Read the referred pages
below carefully for a description of the different functions.
Menu key
• The touch panel can be
Display key
Zoom key
Memo
operated with the finger,
but the use of the stylus
pen will reduce the
number of operational
mistakes.
Mode key
[ ] Menu key ( ➲ P. 32, 38, 46)
Displays the Recording menu, Play menu and Setup menu.
Recording menu: Color, ISO sensitivity, Exposure compensation, White balance,
Play menu: LCD monitor Brightness, DPOF, Display switch, Slide show,
Setup menu: Reset, Language, Auto mode switch, Date and time, Sound,
Image quality, Preview, LCD monitor brightness.
Protect.
Touch sensor, Auto power off, Version information, Format.
[ ] Display key (➲ P. 25, 34)
Switches the characters and icons on the screen to display/not to display. Also, the
settings below can be activated when the icon is displayed.
During photography mode: Scene mode, Flash, Self-timer
During play mode: Thumbnail display, Erase images
[ ] Zoom key (➲ P. 31, 37)
Performs the zoom operation.
During photography mode: Digital zoom photography
During play Mode: Zoom play
[ ] Mode key (➲ P. 23)
Switches between the photography mode and play mode.
During photography mode: Switches to play mode.
During play mode: Switches to photography mode.
Getting Ready
Photography
Basic
Erasing Images
Playing/
Connecting to
the PC
Applications
Other
Information
Additional
15
/
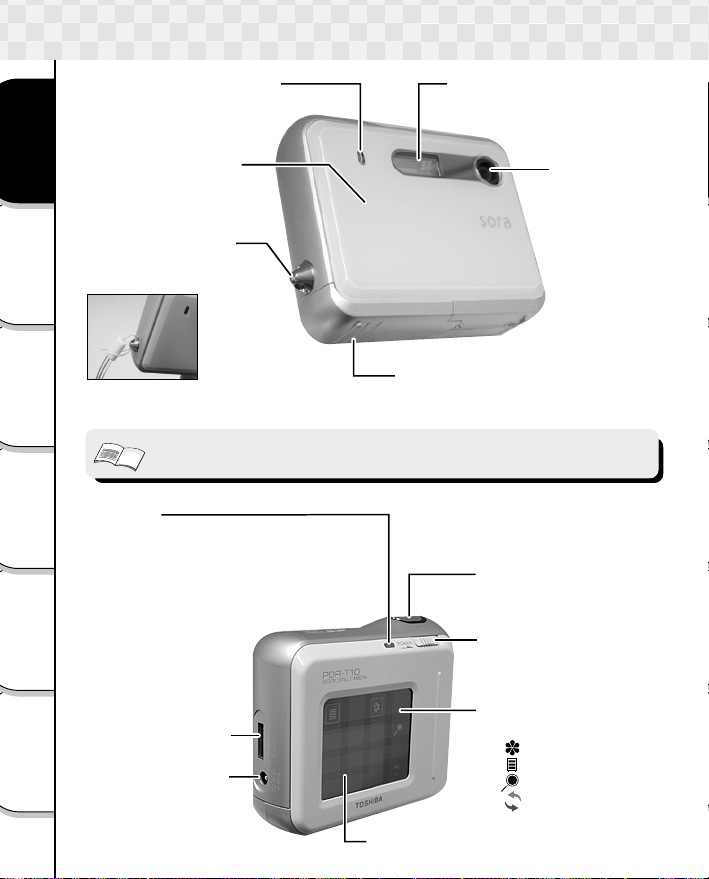
Names of Parts
Self-timer Lamp
➲ P. 30
Face pad
Getting Ready
➲ P. 17
Strap attachment
Attach the strap as
shown on the illustration.
Basic
Photography
Playing/
Erasing Images
Important
Indicator
the PC
Lit red: Loading, termination, recording,
Connecting to
Blinks red: Auto focus error, flash charging in progress
Lit green: Auto focus normal lock
Blinks green: Self-timer operating in progress
Other
Applications
• Magnet is used on the front side of the camera. Be careful not to place
magnetic cards such as credit cards or the like near the front side of camera.
reading in progress
Flash
➲ P. 28
Battery/SD card
Battery ➲ P. 18
SD card ➲ P. 20
Shutter button
Touch sensor
➲ P. 23, 24
Power switch
➲ P. 21
Lens
Additional
Information
16
Digital terminal
➲ P. 43
DC IN 5V
terminal
➲ P. 19
Touch panel
➲ P.15
[ ] Menu key
[ ] Display Key
[ ] Zoom Key
[ ] Mode Key
LCD monitor
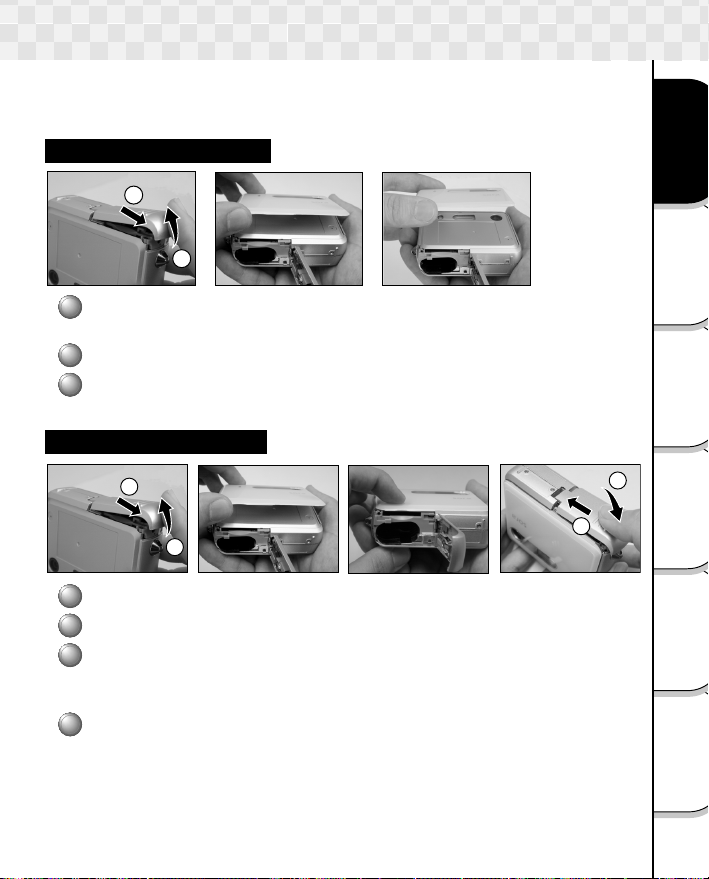
Replacing the Face Pad
With the camera, the face pad can be replaced as desired. Various types of face pads are
available for purchase.
Be careful not to drop the camera when replacing the face pad.
Detaching the Face Pad
1
1
2
3
1
Open the battery/SD card cover.
Slide the battery/SD card cover 1, and open it 2.
Remove from the bottom of the face pad.
Detach the hook on the top of the face pad from the
2
2
3
camera.
Attaching the Face Pad
1
1
2
3
1
Open the battery/SD card cover.
Hook the top of the face pad to the camera.
Press the bottom of the face pad onto the camera until a
2
2
3
4
1
2
click is heard and the face pad is securely attached.
Check that there is no gap between the face pad and the camera.
4
Close the battery/SD card cover.
Close the battery/SD card cover 1, and slide it 2.
Make sure that the battery cover is firmly closed.
Getting Ready
Photography
Basic
Erasing Images
Playing/
Connecting to
the PC
Applications
Other
Information
Additional
17

Loading and Removing the Batteries
This camera uses two size AA batteries. Manganese batteries cannot be used.
Before loading the batteries, be sure to read “Notes on Batteries” on page 12.
Loading the Batteries
Getting Ready
Basic
1
Photography
Important
• When an AC adapter is connected, check that the power is OFF.
• If batteries are loaded when the termination is not operated correctly, the
camera may not start up properly. Turn on the power again to resume
operation.
1
2
3
2
1
Playing/
Erasing Images
Open the battery/SD card cover.
Slide the battery/SD card cover 1, and open it 2.
2
Load the batteries in the correct direction as shown in
the figure 2 above.
3
Close the battery/SD card cover.
the PC
Connecting to
Other
Applications
Additional
Information
Close the battery/SD card cover 1, and slide it 2.
Make sure that the battery cover is firmly closed.
Removing the Batteries
Important
• Before you remove the batteries, be sure to turn the camera OFF. If the
battery is removed with the power ON, it may cause malfunction and damage
important data.
Battery Wear
When the power is ON, the remaining battery power is displayed on the LCD monitor.
Display
Definition
Memo
Sufficient battery
power
• When you use the camera for the first time or if you have left the camera for a
long time without the battery loaded, set the date and time (➲ page 22).
Batteries
partially used
Battery power
nearing exhaustion
18
1
2
Batteries completely
exhausted

Using the Power Outlet
If you use the AC adapter (sold separately) in a room with a power outlet, you can take
photographs for an extended period of time. This also prevents unsuccessful photography
or failed transfer of data to a PC due to battery wear. For details on handling the AC
adapter, be sure to read page 13.
Important
1
• Before you connect or disconnect the AC adapter, be sure to turn the camera
OFF. If the AC adapter is connected or disconnected with the power ON, it
may cause malfunction and damage important data.
• If the AC adapter is used when the termination is not properly operated, the
camera may not startup properly. Turn on the power again to resume
operation.
• You cannot use this camera to charge the batteries. To charge the batteries
such like Nickel Metal Hydride batteries, use the charger sold on the market.
Insert the AC adapter connector plug into the DC IN 5V
terminal of the camera.
2
Insert the AC adapter power plug into the power outlet.
Getting Ready
Photography
Basic
Erasing Images
Playing/
Connecting to
the PC
Applications
Other
Information
Additional
19

1
2
Inserting and Removing the SD card
Important
Getting Ready
Inserting SD card
1
Basic
Photography
1
Make sure that the camera power is turned OFF.
If the power is ON, turn it OFF.
☞ Turning the power OFF ➲ page 21
2
Playing/
Erasing Images
the PC
Connecting to
Other
Applications
Additional
Information
Open the battery/SD card cover.
Slide the battery/SD card cover 1, and open it 2.
3
Make sure that the SD card is inserted in the correct
direction as shown in the figure 3 above.
Make sure that the card is inserted as far as it can go.
4
Close the battery/SD card cover.
Close the battery/SD card cover 1, and slide it 2.
Make sure that the battery cover is firmly closed.
Removing SD card
1
Make sure that the camera power is turned OFF.
If the power is ON, turn it OFF.
☞ Turning the power OFF ➲ page 21
2
Open the battery/SD card cover, remove the SD card.
If you push SD card once in as far as it go, it will protrude slightly.
Important
• For details on handling the SD card, be sure to read page 14.
• Before you insert or remove the SD card, be sure to turn the camera off. If the
SD card is inserted or removed with the power ON, it may cause malfunction
and damage important data.
2
• Never open the battery/SD card cover or remove the batteries or the SD card
while data is being recorded to the SD card (indicator is lit). This might
damage the SD card or important data in the SD card.
1
3
2
4
20

Turning the Power ON/OFF
Turning the Power ON
1
1
Load the batteries and insert the SD card.
2
☞ Loading batteries ➲ page 18
☞ Inserting SD card ➲ page 20
2
Slide the POWER switch in the direction of the arrow.
The indicator is lit, and the photography mode starts up.
If no operation is performed for a fix period of time, Auto power off is activated. Auto
power off is a function that turns the power OFF to preserve battery life. To return to the
normal state, slide the POWER switch.
The default setting of auto power off is 1 minute.
☞ Auto power off ➲ page 47
Important
• After the power is turned ON, it may take a few seconds to charge the flash.
The indicator blinks red and the monitor turns OFF while the flash charging is
in progress. Photography is not possible while the charging is in progress.
Wait until the charging is completed.
Turning the Power OFF
1
Slide the POWER switch.
Getting Ready
Photography
Basic
Erasing Images
Playing/
Connecting to
the PC
Applications
Other
Important
• The indicator is lit red until the power is turned OFF properly. Never open the
battery/SD card cover or remove the SD card and batteries while the
indicator is lit.
Information
Additional
21

Reset
Date & time set
2002
01 01
00 00
2002
02 26
14 30
Date & time set
Setting the Date and Time
When you use the camera for the first time or if you have left the camera for a long time
without the batteries loaded, set the date and time.
1
Touch the menu key [ ].
Getting Ready
2
Touch the setup Icon
Basic
Photography
Playing/
Erasing Images
the PC
Connecting to
2002
Other
Applications
Reset
Date & time set
01 01
00 00
[ ] .
3
Select the date and time
setting screen with icon
[ ] or [ ].
4
Touch [SET] at the center
of the screen.
5
Select and touch the
item you wish to
change, and change
with [+] and [–].
Additional
Information
22
2002
02 26
14 30
6
After changing to the
present date and time,
touch [OK].
The current date and time are set,
and the camera returns to the date
and time setting screen.

Switching the Mode (Photography Mode <--> Play Mode)
There are two methods of switching between photograpy mode and play mode.
Using the Mode Key
Whenever the mode key is touched, photography mode and play
mode switches.
Using Touch Sensor / Auto Mode Switch Function
This camera is equipped with a touch sensor/auto mode switch function to improve
convenience.
Here we describe the touch sensor function and auto mode switch function.
• When you touch the shutter button ... (Touch sensor
function)
When you touch the shutter button to take a photo during the play mode, the
mode automatically switches to the photography mode. This is called the “Touch
sensor function”. The shutter button senses that a human finger has touched it.
• The touch sensor function can be turned on and off.
Memo
☞ Touch sensor ➲ page 47
• For some people and under certain weather
conditions the touch sensor function may not work
well.
• When you take a photo ... (Auto mode
switch function)
When a specific period of time elapses after you take a photo and release your
finger from the shutter button, the mode switches to the play mode. This is called
the auto mode switch function. The time after which the mode switches can be set
to anywhere between 2 and 30 seconds. (The auto mode switch function can also
be turned off.)
☞ Auto mode switch ➲ page 46
Set the “Touch sensor function” and “Auto mode switch” function according to you
preference.
Getting Ready
Photography
Basic
Erasing Images
Playing/
Connecting to
the PC
Applications
Other
Information
Additional
23

Taking Photographs
1
Load the batteries and insert the SD card into the
camera, and turn the power ON.
The photography mode is launched.
☞ Loading the batteries ➲ page 18
Getting Ready
Basic
Photography
Playing/
Erasing Images
the PC
Connecting to
Other
Applications
☞ Inserting SD card ➲ page 20
☞ Turning the power ON ➲ page 21
2
Determine the composition while looking at the LCD
monitor.
If the monitor is too dark, adjust its brightness.
☞ LCD monitor brightness ➲ page 33
3
Press the shutter button down half way.
When the shutter button is half-pressed, auto focus
adjustment and auto exposure control are activated.
The exposure is a combination of aperture (light
quantity adjustment function) and shutter speed.
When the focus and exposure are locked to
appropriate values while the shutter button is halfpressed, a high-pitched tone is produced and the
indicator lights green. If the focus or exposure could
not be set to a proper value, a low-pitched tone is
produced and the indicator flashes red. In this case,
the focus is locked to infinity (1.5 meters when using
the flash) and the exposure is locked to the closest
value.
4
From the half-pressed position,
press the shutter button further in.
The photo is taken.
If the shutter button is fully pressed at once without pausing at the half-pressed
position, the photograph is not taken until the focus and exposure are locked. We
recommend using the half-press function so as not to miss photo opportunities.
Important
• The indicator lights red when data is recorded to the SD card. Never open the
Battery/SD card cover or remove the battery/SD card while the light is lit. This
might damage the SD card or important data in the SD card.
1
2
Additional
Information
24
• If the auto mode switch is set, and some period of time elapses after you take
Memo
a photo and release your finger from the shutter button, photography mode
automatically switches to play mode. If you wish to continue photograping,
switch to photography mode.
☞ Switching the mode (Recording <--> Play) ➲ page 23
☞ Auto mode switch ➲ page 46

Taking Photographs (continued)
Display the Photograph Information
The photograph information can be displayed to check the camera’s status in the
photography mode. Also, display the photograph information before changing the scene
mode, flash and self timer settings.
☞ Setting the scene mode ➲ page 26
☞ Setting the flash ➲ page 28
☞ Self timer photography ➲ page 30
In the photography mode...
☞ Switching the mode ➲ page 23
1
Touch the display key
[ ].
The photograph information is
Recording mode icon
Zoom(2x, 4x)
➲ P.31
displayed.
If you press the display key [
again, photograph information is
not displayed.
Battery wear display
➲ P.18
]
Scene mode icon
➲ P.26
Flash icon
➲ P.28
Self-timer icon
➲ P.30
Getting Ready
Photography
Basic
Erasing Images
Playing/
Connecting to
the PC
Applications
Other
Possible number of shots
• The LCD monitor sometimes displays bright, dark or colored spots at all
Memo
times. This is not a malfunction. These spots do not appear in the photographed image.
Information
Additional
25

Setting the Scene Mode
When the photograph conditions in accordance with the scene mode are selected, the
camera makes the optimum settings automatically. The scene mode is initially set to the
] mode.
auto [
In the photography mode...
Getting Ready
Basic
Photography
Playing/
Erasing Images
the PC
Connecting to
☞ Switching the mode ➲ page 23
1
Touch the display key
[ ]
The photograph information is
displayed. If the information is
already displayed, proceed to the
next step.
2
Touch the scene mode
icon [ ].
A list of scene mode selection icons
are displayed.
3
Select the optimum
scene mode for the
photograph conditions
and touch the
corresponding icon.
The selected scene mode icon is
displayed.
For descriptions of the individual scene modes, see the following page.
Other
Applications
Additional
Information
• The scene mode settings are not canceled even if the power is turned OFF or
Memo
the Auto Power OFF function is activated. If the batteries are removed or the
AC adapter is disconnected, the settings will return to their defaults
] Auto).
([
26

Setting the Scene Mode (continued)
About Scene Mode
The scene mode has the following 6 options.
[ ] Auto
Default setting. No special setting is necessary.
Available flash: All
[ ] Landscape
Select this option to take photographs of distant scenery or
landscapes.
Available flash: [
] Suppressed Flash
[ ] Sports
Select this option to take photographs of fast-moving subjects.
Available flash: [
] Suppressed Flash
[ ] Portrait
Select this option to take photographs of people.
Available flash: [
] Auto Red-Eye Reduction, [ ] Red-
Eye Forced Flash
[ ] Macro
Select this option to take photographs in a distance of 20cm to
40cm.
Available flash: [
] Suppressed Flash, [ ] Force Flash
Getting Ready
Photography
Basic
Erasing Images
Playing/
Connecting to
the PC
Applications
Other
[ ] Night
Select this option to take photographs of people against a dusk
or night-time background.
Available flash: [ ] Slow Synchro
Information
Additional
27

Setting the Flash
You can take a photo with the flash set.
In the default setting, the flash will be automatically set [
The flash firing mode can be set to suit the conditions of photography.
The effective firing distance of the flash is approximately OOm to OOm.
In the photography mode...
Getting Ready
Basic
Photography
Playing/
Erasing Images
the PC
Connecting to
Other
Applications
Additional
Information
☞ Switching the mode ➲ page 23
1
Touch the display key
[ ]
The photograph information is
displayed. If the information is
already displayed, simply proceed to
the next step.
2
Touch the scene mode
icon[ ]
A list of scene mode selection icons
are displayed.
3
Select the optimum scene
mode for the photograph
conditions and touch the
corresponding icon.
The selected scene mode icon is
displayed.
For descriptions of each flash setting, see the following page.
• If you take a photo in the [ ] Slow Synchro mode at a place with a dark
Memo
background or in the [
shutter speed slows down. To prevent hand shake, we recommend you to
place the camera on a stable surface.
• It may take a few seconds to charge the flash. The indicator blinks red and the
monitor turns OFF while the flash charging is in progress. Photography by
using the flash is not possible while the charging is in progress. Wait until the
charging is completed.
• The flash settings are not canceled even if the power is turned OFF or the
Auto Power OFF function is activated. If the batteries are removed or the AC
adapter is disconnected, the settings will return to their defaults ([
] Suppressed Flash mode at a dark place, the
] to function in dark places.
] Auto).
28

Setting the Flash (continued)
About Flash
The flash has the following 6 options.
[ ] Auto
A default setting. The flash fires automatically according to the photography conditions.
[ ] Forced Flash
In this mode, the flash always fires. Use the Forced Flash mode when the subject is
backlit, or in artificial light (fluorescent lighting, etc.).
[ ] Suppressed Flash
The flash does not fire. Use the Suppressed Flash mode when you are taking pictures
in indoor lighting at distances too great for the flash to have any effect, such as theater
performances or indoor sporting events.
[ ] Auto Red-Eye Reduction
“Red-eye” (when the eyes of people in photographs are red) happens when people are
photographed in dark places using a flash, and is caused by the light of the flash
reflecting the eyes. When the auto red-eye reduction mode is set, the flash is emitted
automatically according to the conditions and red-eye is reduced.
Red-eye reduction is most effective when the people being photographed are looking
into the camera, and when you photograph from as close as possible.
[ ] Red-Eye Forced Flash
The flash always fires. Red-eye is reduced more effectively.
[ ] Slow Synchro
The flash is fired at a slower shutter speed.
This flash mode is effective when taking pictures so that not only the subject but also
the background are both clearly reproduced in artificial light (backlighting, fluorescent
lighting, etc.) or with people against the night as a background scene.
Getting Ready
Photography
Basic
Erasing Images
Playing/
Connecting to
the PC
Applications
Other
Information
Additional
29

Self-timer Photography
When the self-timer is used, the camera automatically takes a picture after the preset
time. (Possible to change the set time)
In the photography mode...
☞ Switching the mode ➲ page 23
Getting Ready
Basic
Photography
Playing/
Erasing Images
the PC
Connecting to
For descriptions of each self timer settings, see the following.
[ ] : Takes a photo after 10 seconds.
[ ] : Takes a photo after 2 seconds.
Other
[ ] : Self-timer is set to OFF.
Applications
• The self-timer settings are canceled if a photograph is taken with the self-
Memo
timer, the power is turned OFF or the Auto Power OFF function is activated.
1
Touch the display key
[ ].
The photograph information is
displayed. If the information is
already displayed, proceed to the
next step.
2
Touch the self timer icon
[ ].
A list of self timer selection icons are
displayed.
4
Select the optimum self
timer for the photograph
conditions and touch the
corresponding icon.
The selected flash icon is displayed.
Additional
Information
30

Digital Zoom Photography
This function enlarges the center of the screen and takes photographs in the digital zoom
mode with an increased focal distance.
In the photography mode...
☞ Switching the mode ➲ page 23
1
Touch the zoom key
[ ].
A [ x2 ] icon is displayed on the
LCD monitor and the center of the
screen is enlarged to twice the
original size.
When you press the zoom key [ ], the following screens are displayed in order of 2 times
--> 4 times --> no zoom on the LCD monitor.
• The digital zoom is canceled if the power is turned OFF or the Auto Power
Memo
OFF function is activated.
Getting Ready
Photography
Basic
Erasing Images
Playing/
Connecting to
the PC
Applications
Other
Information
Additional
31

Color
Color
ISO Sensitivity
Exposure
Changing the Preset Conditions of Recording menu
Establish the photography settings. The settings for recording menu are not canceled
even if the power is turned OFF or the Auto Power OFF function is activated. If the
batteries are removed or the AC adapter is disconnected, the settings will return to their
defaults.
1
Touch the menu key
Getting Ready
[ ].
The menu icons are displayed.
Basic
Photography
Touch [
Playing/
The items on the recording menu are as follows:
Erasing Images
Set the color of the image to be photographed.
the PC
Connecting to
The higher the ISO sensitivity value, the greater the sensitivity (the
brighter photographs can be taken with less light), but the greater the
noise as well.
Other
Applications
] or [ ] to scroll through the items and to display one at a time.
Color
[
] : Photographs are taken with a color image (Default)
[ ] : Photographs are taken with a black and white image
[ ] : Photographs are taken with a sepia image.
ISO Sensitivity
[ ] : Photographs are taken with a sensitivity corresponding to ISO 100.
(Default)
] : Photographs are taken with a sensitivity corresponding to ISO 200.
[
[ ] : Photographs are taken with a sensitivity corresponding to ISO 400.
2
Touch the recording
menu [ ].
The recording menu is displayed.
Exposure Compensation
In this camera, the exposure (a combination of the aperture and
shutter speed) is determined automatically and the brightness of the
image is adjusted accordingly. If there are extremely bright or dark
parts in the frame, the desired subject may be too dark or too light in
the resulting photo.
Additional
Information
The exposure compensation function adjusts for this.
Touch [ + ] or [ – ] to increase or decrease the compensation value in steps of 1. The maximum
compenstion value is +3, the minimum is -1.5. The default setting is 0. The types of subject for
effective function and the effective setting values are as shown below.
32

LCD Brightness
Preview
White balance
Picture quality
Changing the Preset Conditions of Recording menu (continued)
Positive (+) Compensation
• Copying of printed text (black characters
on white paper)
• Backlit portraits
• Very bright scenes (such as snowfields)
and highly reflective subjects
• Shots made up predominantly of sky
Negative (–) Compensation
• Spotlit subjects, particularly against dark
backgrounds
• Copying of printed text (white characters
on black paper)
• Scenes with low reflectivity, such as
shots of green or dark foliage
White Balance
The human eye adapts to changes in light so that white objects
still appear white even when the light changes. With cameras,
however, the color balance must be adjusted according to the
colors of the light surrounding the subject. This color adjustment
is called the “white balance adjustment”. This setting allows you to
set the white balance when taking photographs under specific
lighting conditions.
Select and set the appropriate white balance using [
[
] : Automatic adjustment (Default)
[ ] : photograpy outdoors in sunny day
[
] : photograpy in cool white flourescent light
[ ] : Photography in standard flourescent light
[ ] : photograpy in incandescent light
[ ] : Photography out doors in cloudy weather
] and [ ].
Picture Quality
Set the quality of picture.
] : Photographs are taken with high quality (1600 X 1200).
[
[ ] :
Photographs are taken with normal quality (
(Default)
[ ] : Photographs are taken with low quality (800 X 600).
1600 X 1200
).
Preview
Set the preview display to ON/OFF after a photograph is taken
[ ] : Sets the preview display to ON (Default)
[ ] : Sets the preview display to OFF
LCD Monitor Brightness
Set the brightness of the LCD monitor.
] : The brightness of the LCD monitor is set somewhat on
[
the dark side.
] :
The LCD monitor is set to the normal brightness. (Default)
[
[ ] : The brightness of the LCD monitor is set somewhat on
the light side.
Getting Ready
Photography
Basic
Erasing Images
Playing/
Connecting to
the PC
Applications
Other
Information
Additional
33

Playing
1
Load the batteries and insert the SD card into the
camera, and turn the power ON.
The photography mode is launched.
2
Switch to play mode.
Getting Ready
Basic
Photography
Playing/
Erasing Images
the PC
Connecting to
Other
Applications
Touch the mode key [ ].
☞ Switching the mode ➲ page 23
The last recorded image appears.
You can play the previous/next image one frame at a time with [ ] and [ ].
Display the Play Information
The play information screen displays details on the image. In addition, a list of images
(thumbnails) can be displayed, images can be erased after displaying the play information.
☞ Displaying a list of images (thumbnails) ➲ page 35
☞ Erasing images ➲ page 36
In the play mode...
Switching the mode ➲ page 23
☞
1
Touch the display key
[ ].
Play mode icon
➲ P. 38
The play information is displayed. If
you press the display key [
again, the play information will not
be displayed.
Battery wear display
➲ P. 18
]
Thumbnail icon
➲ P. 35
Erase icon
➲ P. 36
Additional
Information
34
Folder No.
➲ P. 22
• Touching [ ] at the last image displays the first image, and touching [ ] at
Memo
the first image displays the last image.
• If the play information is not displayed, the previous and next image can be
displayed by touching the right-end and the left-end of the image.
Frame No.
➲ P. 22

Displaying a List of Images (Thumbnail Display)
Six images are shown on one screen. This is called the thumbnail display. Use the
thumbnail display to find the desired images quickly from many images.
In the play mode...
Switching the mode ➲ page 23
☞
1
Touch the display key
[ ].
The play information screen is
displayed. If the information is
already displayed, proceed to the
next step.
2
Touch the thumbnail
display icon [ ].
Images are displayed in a list of
images (Thumbnail Display)
When an image is touched, it is selected. When the image is touched again it is displayed
over the entire screen.
If there are more than 7 images, touch [
other images.
Touch [
] to erase the selected image.
☞ Erasing images ➲ page 36
] or [ ] to scroll the screen and display the
Getting Ready
Photography
Basic
Erasing Images
Playing/
Connecting to
the PC
Applications
Other
Information
Additional
35

Erasing Images
You can erase the photographed images.
In the play mode...
Switching the mode ➲ page 23
☞
1
Getting Ready
Basic
Photography
Playing/
[ ] : Erasing one image
Erasing Images
the PC
Connecting to
Other
Applications
Erases the currently displayed image. When the icon is
touched, “Erase image” is displayed at the center of the
screen.
To erase the image, touch [
To cancel the erasure, touch [ ].
[ ] : Erasing all images
Erases all the images and folders. When the icon is
touched “Erase all Image?” is displayed at the center of
the screen.
To erase images, touch [ ].
To cancel the erasure, touch [ ]. To display the
reconfirmation screen, touch [
A confirmation screen appears when erasing images or folders. Touch the “Yes” icon if you
wish to erase the image/folder or the “No” icon if not.
Touch the display key
[ ].
The play information screen is
displayed. If the information is
already displayed, proceed to the
next step.
2
Touch the erase icon
[ ].
].
].
Additional
Information
36
Important
• Protected images (prevents images from being erased accidentally) cannot
be erased.
☞ Protect ➲ page 39
• Images cannot be erased when the SD card lock is activated.
☞ SD card ➲ page 14

Zoom Play
Images are played enlarged.
In the play mode...
Switching the mode ➲ page 23
☞
1
Touch the [ ] or [ ] to
select the image you
want to display enlarged.
The play information screen is
display enlarged.
2
Touch the zoom key icon
[ ].
The screen on the upper left corner indicates the area currently displayed on the LCD
monitor.
Touch [
When you press the zoom key [
times --> 4 times --> no zoom on the LCD monitor.
],[ ] , [ ] or [ ] to move the section of the image displayed on the screen.
] , the following screens are displayed in order of 2
Getting Ready
Photography
Basic
Erasing Images
Playing/
Connecting to
the PC
Applications
Other
Information
Additional
37

LCD Brightness
LCD Brightness
Changing Settings of Play Menu
Establish the Play settings. The settings for play menu are not canceled even if the power
is turned OFF or the Auto Power OFF function is activated. If the batteries are removed
or the AC adapter is disconnected, the settings will return to their defaults.
1
Touch the menu key [ ]
Getting Ready
The menu icon is displayed.
Basic
Photography
Playing/
Touch [ ] or [ ] to scroll through the items and to display one at a time.
Erasing Images
The items on the play menu are as follows:
2
Touch the play menu icon
[ ]
Play menu is displayed.
LCD Monitor Brightness
Set the brightness of the LCD monitor.
[ ] : The brightness of the LCD monitor is set somewhat on
the PC
Connecting to
Other
Applications
the dark side.
] : The LCD monitor is set to the normal brightness.
[
(Default)
] : The brightness of the LCD monitor is set somewhat on
[
the light side.
DPOF (Digital Print Order Format)
“DPOF” is a standard for directly writing print information to the
SD cards and other media. For details on DPOF, please refer to
the explanations on the 40 page.
☞ Setting DPOF ➲ page 40
Additional
Information
38

Changing Settings of Play Menu (continued)
Display change
Slide show
Protect
Display Switch
You can switch the information displayed at the bottom of the play
menu.
] : Displays the date and time of the photograph taken.
[
[ ] : Displays the number of folder and file. (Default)
[ ] : Displays the image quality.
Slide Show
Use this function to display the images in the SD card in order.
[ ] : The images are displayed in order at 3-second intervals.
[ ] : The images are displayed in order at 10-second intervals.
The slide show is canceled if the touch panel is touched during
the slide show.
The auto power off function does not work during the slide show.
Protect
Use this function to protect images against accidental erasure.
Touch the [SET] icon at the center of the screen, the setting
screen is displayed.
Select the image and touch [
The protect icon [
is protected. Take note that protected images will be erased after
formatting the SD card.
To release the protect, select the protected image and
touch [ ].
] is displayed on the screen when the image
] to protect the image.
☞ Formatting the SD card ➲ page 48
Getting Ready
Photography
Basic
Erasing Images
Playing/
Connecting to
the PC
Applications
Other
Information
Additional
39

Setting DPOF (Digital Print Order Format)
CLEAR
CLEAR
ALL
DPOF (Digital Print Order Format)
“DPOF” is a standard for recording information for printing directly on SD cards and other
media. Files compatible with the DPOF format can easily be printed on printers compatible with the DPOF format or laboratory printing services.
Getting Ready
Basic
Photography
1
Touch the [SET] icon at
the center of the screen.
The images in the SD card will be
displayed as thumbnails. The
number of prints are displayed in
each image.
2
Select by touching the
image.
Playing/
Erasing Images
CLEAR
3
Decide the number of
prints with - and +.
the PC
Connecting to
Other
Applications
Additional
Information
40
CLEAR
When one image is selected, [ ] is displayed at the bottom of the screen.
Touch [ ] to set the number of prints for the selected image to 0.
Touch the selected image again to deselect it.
[
] is displayed at the bottom of the screen when no image is selected. Touch [ ]
to select all the images.
Once the number of prints is specified for all the images you wish to print, touch the menu
key [
].
• The number of prints for each image can be set in the range of 0 to 99.
Memo
However, the total number of prints is limited to 999.
• This camera conforms with the Print Image Matching. Print Image Matching
stand for the use of the assorted compatible printer, with a system that simply
acutualizes a clear print.

3.5 inch FD (A:)
CD-ROM (D:)
Removable Disk (E:)
DCIM
100TOSHI
101TOSHI
Desktop
(C:)
My document
My computer
Connecting PC
To install the software contained in the supplied CD-ROM, your personal computer must
conform to the system requirements in the table below. Check the following items before
you install the software.
Minimum System Requirements
Windows Macintosh
CPU
OS
Memory
Free space on hard disk
Color monitor
Device
Pentium higher processor
Windows 98/2000/ME/XP
Pre-installed PC
256 or more colors (800 X 600 dot min)
32000 or more colors recommended
CD-ROM drive/USB port standard equipment
Power PC G3 processor
226MHz or higher
Mac OS 9.0 or higher
64MB or higher
20MB or higher
File Structure
Images are stored in the “XXXTOSHI” folders shown at the right. (The illustration on the
right is an example.)
(“XXX” is a number from 100 to 999.)
The files are given the names “PDR_XXXX.jpg”.
(“XXXX” is a number from 0001 to 9999.)
The extension “.jpg” indicates that the file is in JPEG
format.
“JPEG” is a file format for storing color images in
compressed form. The compression rate can be
selected. The higher the compression rate, the greater
the reduction in image quality. On this camera, the
compression rate is determined by the image quality
setting.
JPEG is a file format commonly used for computer
image programs and on the Internet.
Images taken on the camera are stored in Exif format.
“Exif” is the abbreviation of “Exchangeable Image File
Format”, a color still image format for digital still
cameras approved by the JEIDA (Japan Electronics Industry Development Association,
Present JEITA: Japan Electronics and Information Technology Industries Association).
Exif consists of JPEG data and also includes thumbnail image and shooting mode
settings. The Exif format is compatible with TIFF (another image format) and JPEG
formats, and can be used with ordinary computer image processing programs.
Getting Ready
Photography
Basic
Erasing Images
Playing/
Connecting to
the PC
Applications
Other
Information
Additional
41

Installing the Image Viewing Software
Install the “Image Expert” software into your personal computer to view images.
<For Windows>
Applicable OS : Windows 98/2000/ME/XP
1
Getting Ready
Basic
Photography
Playing/
Erasing Images
the PC
Connecting to
Other
Applications
Insert the supplied CD-ROM into the CD-ROM drive.
Display language selection screen appears.
2
Click “English”.
3
Click “Install Image Expert”.
Follow the on-screen instructions and install Image
Expert.
<For Macintosh>
Applicable OS : Mac OS 9.0 or higher
1
Insert the supplied CD-ROM into the
CD-ROM drive.
2
Double-click [ ].
Display language selection screen appears.
Additional
Information
42
3
Select “English” and click [OK]

Installing the USB driver
The USB driver must be installed when connecting the supplied USB cable to the
personal computer for the first time. Pay attention to the direction of the terminal when
connecting the USB cable.
<For Windows>
Applicable OS : Windows98/2000/Me/XP.
Install the USB driver contained in the supplied CD-ROM for windows 98. Install the
standard driver of each OS for windows 2000/Me/XP.
<For Windows 98>
1
Insert the supplied CD-ROM into
the CD-ROM drive.
Display language selection screen appears.
2
Click “English”.
3
Click “Install driver”.
Follow the on-screen instructions and install the
driver.
After completing the installation, restart your
personal computer.
<For Windows ME/2000/XP>
1
Start up the camera and PC.
2
Connect the computer and camera with
the supplied USB cable.
Connect the USB cable to the USB port of the personal
computer and digital terminal of the camera.
3
Follow the on-screen instructions and
install the USB driver.
<For Macintosh>
Applicable OS : Mac OS 9.0 or higher
This camera conforms to the USB Mass Storage Class. Drivers conforming to the USB
Mass Storage Class are pre-installed in Mac OS 9.0 or higher, so it is not necessary to
install the USB driver.
Getting Ready
Photography
Basic
Erasing Images
Playing/
Connecting to
the PC
Applications
Other
Information
Additional
43

Transferring the Camera’s Images to the Computer
Launch the image viewing software “Image Expert” and transfer the camera’s images to
the computer.
Important
Getting Ready
<For Windows>
Basic
If Image Expert and the USB driver are not yet installed, first install them.
Photography
☞ Installing image viewing software ➲ page 42
☞ Installing the USB driver ➲ page 43
1
Playing/
Erasing Images
2
3
the PC
Connecting to
4
Other
5
Applications
• The data may be damaged if the camera’s power is terminated while image
data is being transferred. We recommend the use of the AC adapter (sold
seperately) when connecting the camera to the PC.
• The auto power Off does not operate when the camera is connected to the
PC.
• When removing the USB cable or the SD card from the camera after data is
transferred, be sure to remove in accordance with the OS you are using.
Connect the computer and camera with the USB cable.
When the USB cable is connected with both the computer and camera started up,
the computer automatically detects the camera. Pay attention to the direction of
the terminal when connecting the USB cable.
Launch Image Expert.
Click [ Start ] - [ Programs ] - [ Image
Expert ] on the Windows task bar.
Click “Camera” in the menu
bar then click
“Connection”.
Select Connect Via to
“USB” and click “OK”.
Click [ ] on the tool bar.
In the “Select Album” screen, either select an album, or enter a new album name
and click Open, all images are downloaded to the selected album.
Additional
Information
44
• Refer to the help file for details on Image Expert.
Memo

Transferring the Camera’s Images to the Computer (continued)
<For Macintosh>
If Image Expert is not yet installed, first install it.
☞ Installing image viewing software ➲ page 42
1
Connect the computer and camera with the USB cable
When the USB cable is connected with both the computer and camera started up,
the computer automatically detects the camera. Pay attention to the direction of
the terminal when connecting the USB cable.
2
Launch Image Expert.
Open the “Image Expert” folder, and double click “Image Expert” icon.
3
Click “Camera” on the menu bar, then click
“Connection”.
4
Select Connect Via to “USB” and click “OK”.
Important
5
• The SD card in the camera may not be
mounted on the desktop if another USB
driver is being used at the same time. In
this case, use with only the camera
connected.
Click “Camera” on the menu
bar, then click “View image”.
6
Click the images you wish to install into the personal
computer while pressing the [OPTION] key.
7
Click [ ].
In the “Select Album” screen, either select an album, or enter a new album name
and click Open, all images are downloaded to the selected album.
8
Click [SELECT].
• Refer to the help file for details on Image Expert.
Memo
Getting Ready
Photography
Basic
Erasing Images
Playing/
Connecting to
the PC
Applications
Other
Information
Additional
45

Changing the Basic Settings of the Camera
Reset
Auto mode change
Reset
This feature allows you to change the settings for images as well as the settings for the camera.
The settings for set-up menu are not canceled even if the power is turned OFF or the
Auto Power OFF function is activated. If the batteries are removed or the AC adapter is
disconnected, the settings other then the LANGUAGE, Date and time will return to their
defaults.
Getting Ready
Basic
Photography
Playing/
Touch [ ] or [ ] to scroll through the items and to display one at a time.
Erasing Images
The items on the setup menu are as follows:
Reset
Set whether or not to return the settings to their default settings
(original factory settings). except for the language and date & time
the PC
setting.
Connecting to
Language
Set the display language for menus displayed on the LCD
monitor.
Other
Select the language with [ ] or [ ] .
Applications
1
Touch the menu key
[ ] .
Menu icon is displayed.
2
Touch the setup [ ].
Auto Mode Switch
If some period of time elapses after you take a photo and release
your finger from the shutter button, the mode switches to play
mode. This is called the “Auto Mode Switch function”.
Additional
Information
Set the switch over duration for the play mode. You can set the
time within 2 to 30 seconds, or set it to OFF (Default).
Set the time with [
] or [ ] according to your preference.
46

Change the Basic Settings of the Camera (continued)
Sound
Auto power off
Version info.
Touch sensor
Date & time set
Date & Time
Set the time and date.
For Date & Time , see “Setting the date and time” on page 22.
Sound
When you touch the key or icon, set whether or not to sound
the beep tone.
[ ] : Sounds the beep tone. (Default)
[ ] : Does not sound the beep tone.
Touch Sensor
When you touch the shutter button to take a photograph during
the play mode, the mode automatically switches to the photography mode. This is called the “Touch sensor function”.
[ ] : Touch sensor is set to ON
[ ] : Touch sensor is set to OFF (Default)
Auto Power OFF
If no operation is carried out for a fixed period of time, the
power is automatically turned OFF to prevent battery wear.
This is called Auto power off. To return to the normal state,
slide the POWER switch.
] : If no operation is carried out for 1 minute, Auto power
[
off is activated. (Default)
] : If no operation is carried out for 2 minute, Auto power off is activated.
[
[ ] : If no operation is carried out for 3 minute, Auto power off is activated.
Version Information
Display the version of firmware.
“Firmware” refers to the software that controls the camera’s
operation. The firmware is pre-installed in the camera.
When the touch panel is touched while the version information is
displayed, the screen returns to the setup menu.
Format
Format (Initialize) the SD card.
For details on Format, see the following page.
☞ Formatting the SD card ➲ page 48
Getting Ready
Photography
Basic
Erasing Images
Playing/
Connecting to
the PC
Applications
Other
Information
Additional
47

Formatting the SD card
Format
Format
Format
Format
Format
Formatting (Initializing) the SD card.
In the setup menu...
☞
Changing the basic settings of the Camera ➲ page 46.
1
Getting Ready
Reset
Display the format
selection screen by
touching [ ] or [ ].
Basic
Photography
Playing/
Erasing Images
the PC
Connecting to
Other
Applications
Additional
Information
48
Format
Format
Format
Format
Important
2
Touch [Format SD card?]
at the center of the
screen.
[Format SD card?] is displayed at
the center of the screen.
3
Touch [Yes].
If you do not wish to format, touch
[ YES ].
If you touch [ YES ], [Are you sure?]
is displayed at the center of the
screen.
4
Touch [YES].
To cancel formatting, touch [NO].
If you touch [YES], [Reset frame
nomber?] is displayed at the center
of the screen.
5
Touch [YES] or [NO].
If you touch [YES], the frame No. of
image the next time you photograph
will start from 0001.
• Note that even protected images will be erased when the SD card is
formatted.
• SD card cannot be formatted when the SD card is set to write-protect.
☞ Notes on SD card ➲ page 14.

Specifications
Model name PDR-T10
Pickup elements 1/2.7” CCD sensor (total number of pixels: approx. 2.01million)
Sensitivity Equivalent to ISO 100/200/400
Lens Single focus lens F3.1/F8
Focal length f=5.96mm (equivalent to 35mm on a 38mm camera)
Auto-focus TTL system. AF, focus adjusting range: approxi. 20cm to infinity
Metering system TTL metering by Pickup system
Exposure control system Program Automatic exposure (Exposure compensation possible)
Shutter speed 1 to 1/500sec.
White balance
Detection system: Contrast detection system.
Auto/switch possible (outdoor(clear), cool white flourescent
light, standard flourescent light, incandescent light,
outdoor(cloudy))
Focal range Standard: Approx. 40cm to infinity. Macro: Approx. 20cm to infinity
Self-Timer 2 seconds/10 seconds selectable
Flash Auto/Auto Red-eye Reduction/Red-eye Forced Flash/Forced
Date/Time Simultaneously recorded to image data (Exif file format)
Automatic calendar function
LCD monitor 1.6" low-temperature polysilicon TFT (61,380 pixels)
I/O terminal
Power supply 2 x AA (Nickel, Nickel Metal Hydride or Lithium) battery or AC
Recording medium SD Memory Card 8/16/32/64/128/256MB compatible
Compressing system JPEG-compliant
Image file format Exif ver.2.1-compliant
Conversion rules DCF ver.1.0-compliant
Operating conditions Operating temperature: +5°C (+41°F) to +40°C (+104°F), Storage
Camera dimensions 85.5 mm (W) x 72 mm (H) x 27.9 mm (D) (excluding protrusions)
Weight Approx. 120g (excluding accessories, battery and SD card)
Flash/Suppressed Flash/Slow Synchro
Flash Adjusting Method/ Automatic Adjustment
Effective range: Approx. 0.4m to 2.5m
Automatically adjusted until the year 2037
DC IN 5V terminal: DC 5 V, DIGITAL terminal: USB cable connections.
adapter (sold separately) (PDR-AC20)
temperature: –20°C (–4°F) to +60°C (+140°F), Humidity: 30 to 80%
no condensation
Number of frame
QUALITY MODE
FINE
NORMAL
BASIC
The recorded data amount is not fixed due to the subject, so the number of frames does
not necessarily follow the table.
8MB 32MB16MB 64MB 128MB 256MB
Getting Ready
Photography
Basic
Erasing Images
Playing/
Connecting to
the PC
Applications
Other
Information
Additional
49

Separately Sold Accessories
The AC adapter and the face pad are available as separately sold accessories.
The use of the separately sold accessories will increase your convinience and enjoyment
when using the camera. Take a look at Toshiba’s homepage when purchasing the
separately sold accessories.
AC adapter
Getting Ready
PDR-AC20
This can be used with the household electric outlet.
Before use, please read “Notes on the AC Adapter” (
page 19).
(
➲
For further details, see the instruction manual of the AC adapter.
Basic
Face pad
Photography
PDR-KFPI (4 face pads)
PDR-KFPI (4 face pads)
For the method of replacing the face pad, read “Replacing the Face Pad”. (
For the color pattern or type of the face pad, confirm at Toshiba’s homepage.
Playing/
Toshiba’s homepage:
Erasing Images
http://www2.toshiba.co.jp/mobileav/camera
the PC
Connecting to
page 13), “Using the Power Oulet”
➲
page 17)
➲
Other
Applications
Additional
Information
50

List of Warning Messages
The following warning messages are displayed on the LCD monitor.
<During Photography mode>
Message
NO CARD
CARD FULL
CARD ERROR
CARD PROTECTED
NOT FORMATTED
FULL
FOLDER ERROR
Batteries power is below half.
Battery power is nearing exhaustion.
Batteries are completely exhausted.
No SD card is inserted.
No more space in the SD card. Recording is not possible.
The SD card is damaged.
The SD card format is incorrect.
The SD card is locked. Recording is not possible.
The SD card is not formatted (Initialized).
(Switches to the format execution screen.)
Folder No. and file has reached its maximum value.
Folder with the same number exists
Meaning
<During Play Mode>
Message
NO CARD
CARD FULL
CARD ERROR
NOT FORMATTED
INCONFORM DATA
FOLDER ERROR
NO IMAGE
IMAGE IS PROTECTED
CARD IS PROTECTED
DPOF ERROR
Batteries power is below half.
Battery power is nearing exhaustion.
Batteries are completely exhausted.
No SD card is inserted.
No more space in the SD card. Recording is not possible.
The SD card is damaged.
The SD card format is incorrect.
The SD card is not formatted (Initialized).
(Switches to the format execution screen.)
Playing back an image shot with another device other than
this camera.
Folder with the same number exists.
There is no Image in SD card.
Trying to erase an image that is protected.
SD card is locked.
DPOF information is abnormal.
Meaning
Getting Ready
Photography
Basic
Erasing Images
Playing/
Connecting to
the PC
Applications
Other
Information
Additional
51

FAQ
The following are some frequently asked questions.
Q: When I press the shutter button, the picture is not taken immedi-
ately. Why is this?
A: Are you using the “half-shutter” function (half-pressing the shutter button)?
Getting Ready
Basic
Photography
Playing/
Erasing Images
the PC
Connecting to
Other
Applications
Additional
Information
52
With the camera, the focus and exposure are adjusted when the shutter button
is half-pressed. If you press the shutter button all the way in without halfpressing first, the camera first adjusts the focus and exposure and the photo is
only taken once the focus and exposure have been adjusted properly, resulting
in a time lag between the time when the shutter button is pressed and when
the photo is actually taken.
We recommended using the “half-shutter” function so as not to miss photo
opportunities. For instructions on using the “half-shutter” function, see “Taking
photographs” on page 24.
Q: I can’t focus properly. What could the problem be?
A: The camera uses a precise auto focus mechanism, but under the conditions
and with the subjects described below the auto focus function may not work
well.
• Subjects moving at high speed
• Very shiny subjects such as a mirror or car body
• Extremely low contrast subjects (such as subjects dressed in the same
color as the background, etc.)
• When there are objects in front of or behind the subject (such as an animal
in a cage or a person in front of a tree)
• Subjects with little reflection, such as hair or fur
• Subjects with no solidity, such as smoke or flames
• Subjects viewed through glass
In addition, the focus is set on the center of the frame, so if the subject is not
at the center (when shooting two people standing side by side, for example),
the focus is adjusted on the background and the desired subject (the two
people) may be out of focus. In such cases, do the following:
1) Point the camera so that one of the persons is at the center of the
viewfinder.
2) Half-press the shutter button. (The focus is locked on the person.)
3) Holding the shutter button in the half-pressed position, reposition the
camera to achieve the desired composition.
4) Take the photo.
If the focus cannot be adjusted, it is locked to infinity (1.5 meters when using
the flash).

FAQ (continued)
Q: I want to send at photo as an e-mail attachment. How can I
reduce its size?
A: When sending photos as e-mail attachments, the image (file) size should not
be too large. Use the included image viewing program called Image Expert to
save photos in reduced size. For instructions on installing Image Expert, see
“Installing the image viewing program” on page 42.
1) Launch Image Expert.
2) Choose “Open Image” from the “File” menu.
3) Specify the image you want to reduce, then click “Open”.
If the camera is connected using the USB cable, it is displayed as a removable
disc. Images on the camera can be opened directly by specifying the removable disc.
4) Click on “Change Size” in the “Image” menu.
5) Input values at “Width” and “Height”, then click “OK”. If “Keep Aspect Ratio”
is checked, the size is changed without changing the image’s
vertical:horizontal ratio.
6) The image is displayed at its new size.
7) Click on “Save As” in the “File” menu to save the image with the new size.
Q: I am having trouble retouching the image. What is the problem?
A: You have likely had the experience of taking a photo and seeing afterwards
that it is brighter or darker than you expected or does not have the desired
colors. With digital still cameras you can retouch the photos after taking them,
but this is often difficult at first. Image Expert, the included image viewing
program, includes an auto retouch function that makes it easy to retouch
photos.
1) Launch Image Expert.
2) Open the image you want to retouch.
3) Click on “Auto Retouch” in the “Image” menu.
4) Save the retouched image.
Getting Ready
Photography
Basic
Erasing Images
Playing/
Connecting to
the PC
Applications
Other
Information
Additional
53

Troubleshooting
First check the warning displayed on the LCD monitor (➲ page 51) and the Indicator (➲
page 16). Then check the following items.
Problem
No power supply
Getting Ready
No power supply
during operation.
The battery runs
Basic
out quickly.
Photography
No photograph is
Playing/
taken when the
shutter button is
Erasing Images
pressed.
the PC
Connecting to
Other
Applications
Causes
The batteries are
exhausted.
The AC adapter plug is
diconnected from the
power outlet.
The batteries are
exhausted.
You are using the camera
in extremely cold
conditions.
The terminals are dirty.
The battery are
exhausted.
No SD card is inserted.
The SD card is inserted
incorrectly.
Not enough space in the
SD card.
The SD card is writeprotected.
The SD card is not
formatted.
The SD card is damaged.
The Auto Power OFF
function is activated.
Replace with new batteries.
Plug the adapter back in.
Replace with new batteries.
Put the battery in your pocket or
another warm place to heat it and
then load it into the camera just
before you take a picture.
Wipe the battery terminals with a
clean, dry cloth.
Replace with new batteries.
Insert an SD card.
Insert the SD card correctly.
Insert a new SD card.
Erase photographed images or
change the size and quality to
increase space on the SD card.
Remove the write-protection or
replace with a new SD card.
Format the SD card.
Insert a new SD card.
Turn the power on again.
Remedy
See page
18
19
18
12
_
18
20
20
20
36
14
20
48
20
47
Additional
Information
54

Troubleshooting (continued)
Problem
I cannot use the
flash to take
pictures.
I cannot set the
flash.
The play image is
too dark even
though I used the
flash.
The play image is
blurred.
I cannot format the
SD card.
I cannot erase one
frame.
The set date and
time disappears.
Causes
The flash is set to
Suppressed Flash mode.
You pressed the shutter
button while the flash was
charging.
The scene mode is set.
The subject is too far
away.
The lens is not clean.
The image is out of focus.
The SD card is
write-protected.
The frame is protected.
The SD card is
write-protected
Left the camera for a long
time with the batteries
removed.
Remedy
Set the flash other than suppressed
Flash mode.
Wait until charging is completed
before pressing the shutter button.
The scene mode is set to auto or the
like.
Move closer to the subject.
Clean the lens.
Set the Macro photography
according to the distance up to the
subject.
Remove the write-protection.
Remove the write-protection.
Cancel the DPOF setting.
Remove the write-protection.
Load the batteries and set the data
and time.
See page
28
28
26
28
11
27
14
39
14
22
Getting Ready
Photography
Basic
Erasing Images
Playing/
Connecting to
the PC
Applications
Other
Information
Additional
55

Global Contacts
Country/Region
Canada
China Hong
Kong
Getting Ready
France
Germany
Italy
Basic
Singapore
Photography
Switzerland
United
Kingdom
Playing/
United
States
Erasing Images
Company name
Toshiba America
Information
Systems, Inc.
Toshiba Hong
Kong Ltd.
Toshiba Systems
(France)
Toshiba Europe
Gmbh
Toshiba Consumer
Products (Italia)
Toshiba
Singapore Pte.
Toshiba Europe
Gmbh Swiss
Branch
Toshiba (UK) Ltd.
Toshiba America
Information
Systems, Inc.
Phone number
(800) 829-8318
2956-0222
01 47 28 28 50
(02131) 158 01
(039) 6099342
270-7776
01-946 07 77
(01932) 828828
(800) 829-8318
e-mail
dsc.support@tais.toshiba.com
NA
consommateur@toshiba-tsf.com
consumer@toshiba-teg.com
toshiba.italia@toshibatuk.com
NA
info@toshiba.ch
enquiries@toshibatuk.com
dsc.support@tais.toshiba.com
www.toshiba.com/taisisd
www.toshiba.com.hk
www.toshiba.fr/produits/
video/index.htm
www.toshiba.de/consumer
www.toshiba.it/
www.cp.toshiba.com.sg
www.toshiba.ch/
www.toshiba.co.uk
www.toshiba.com/taisisd
For customers in the United States and Canada
Register your product On-Line
the PC
There are many advantages to being a member of the Toshiba Digital Camera community.
Toshiba provides free firmware upgrades for applicable models, allowing you to get the
Connecting to
latest technology and enhancement for your camera direct from the web site. There are
links, updates and notices for special options available at the Toshiba Digital Community,
like special adapter mounts for Tele-photo, Wide-angle, and other filters and lenses
designed specifically for your digital camera. There are frequent discounts and promotions
on printing services, carrying cases, service plans, and digital camera accessories. To
Other
find out more, visit the Toshiba Digital Community at www.toshiba.com/taisisd
Applications
Website
Additional
Information
56

Index
AC Adapter ....................................... 13, 19
Alphabetic order
Auto Focus ............................................. 24
Auto Mode Switch ............................. 23,46
Auto Power OFF ..................................... 47
Battery ............................................... 12,18
Brightness of LCD Monitor ................ 33,38
Color ...................................................... 32
Connecting to PC ....................... 41, 44, 45
DCF ........................................................ 49
DC IN 5V Terminal ................................. 19
Digital Terminal........................... 43, 44, 45
Digital Zoom Photography...................... 31
Display Key ............................................ 15
DPOF ..................................................... 40
Erase ...................................................... 36
Exposure Compensation ........................ 32
Face Pad ................................................ 17
File Structure .......................................... 41
Flash ................................................ 28, 29
Format .................................................... 48
Image Quality ......................................... 33
Image Viewing Software ......................... 42
Indicator ................................................. 16
ISO Sensitivity ........................................ 32
JPEG ..................................................... 41
Photography Information ........................ 25
Recording Menu (Rec. Menu) ................ 32
Photography mode ................................. 23
Play Information ..................................... 34
Play Menu .............................................. 38
Play Mode .............................................. 23
Preview .................................................. 33
Protect .................................................... 39
Red-eye Reduction Auto ........................ 29
Red-eye Reduction Forced Flash........... 29
Remaining Battery Display ..................... 18
Reset ...................................................... 46
Scene Mode ..................................... 26, 27
SD card ............................................ 14, 20
Self Timer ............................................... 30
Setting the Time & Date ......................... 22
Shutter Button .................................. 23, 24
Slide Show ............................................. 39
Slow Synchro... ...................................... 29
Sound ..................................................... 47
Strap....................................................... 16
Thumbnail Display.................................. 35
Touch Panel ........................................... 15
Touch Sensor ................................... 23, 47
Turning the Power ON/OFF .................... 21
USB Driver ............................................. 43
Version Information ................................ 47
Getting Ready
Photography
Basic
Erasing Images
Playing/
Connecting to
the PC
Applications
Other
Language ............................................... 46
LCD Monitor ..................................... 25, 34
List of Warning Message........................ 51
Macro ..................................................... 27
Menu Key ............................................... 15
Mode Key ............................................... 15
Mode Switch .......................................... 23
White Balance ........................................ 33
Zoom Key ............................................... 15
Information
Additional
57

TOSHIBA DIGITAL STILL CAMERA
PDR-T10
Pour la clientèle en France
Site Web pour appareils photo: www.toshiba.fr/
Vous pouvez obtenir de I'assistance technique,en-ligne,
9:30 du matin à 6:00 du soir. Du lundi au vendredi sauf jours fériés,
ou en envoyant E-mail au : consommateur@toshiba-tsf.com
7, Rue, Ampére B.P.131, 92804 Puteaux Cedex, France
For customers in the U.S.A., Canada and Mexico
Register your product on -line at www.toshiba.com/taisisd
Technical support is available on-line, or by calling (800) 829-8318.
8:00 a.m. to 5:00 p.m. EST, Monday to Friday except holidays,
or e-mail us at: dsc.support@tais.toshiba.com
Toshiba America Information Systems, Inc.
Imaging Systems Division
9740 Irvine Boulevard, lrvine, California 92618-1697
For customers in the U.K.
Website for digital cameras: www.toshiba.co.uk
Technical support is available on-line, or by calling (0115)9766958.
9:00 a.m. to 5:00 p.m. Monday to Friday except bank holidays,
or e-mail us at: enquiries@toshiba-tuk.com
Toshiba European Service Center
Units 6&7 Admiralty Way, Camerley, Surret, GU15 3DT, U.K
Pour la clientèle aux Ètats-Unis et au Canada
Pour I'assistance technique, veuillez contacter:
8:00 du matin à 5:00 du soir. Du lundi au vendredi sauf jours fériés,
ou envoyer E-mail au: dsc.support@tais.toshiba.com
Toshiba America Information Systems, Inc.
9740 Irvine Boulevard, Irvine, California 92618-1697
* L'adresse et le numéro de téléphone peuvent étre modifiés sans
avis préalable.
* Pour la clientéle en dehors de la France, des États-Unis et du
Canada se reporter aux "Contacts mondiaux" de la page
antérieure et contactez la compagnie Toshiba la plus proche
pour obtenir assistance.
Für Kunden in Deutschland
Para clientes en U.S.A., Canada y Mexico
Registre su producto en-linea al:www.toshiba.com/taisisd
Soporto tecnico es disponible en-linea o llamando (800) 829 8318
De 8:00 AM a 5:00 PM tiempo de EST, de Lunes a Viernes,
O contactenos por e-mail al: dsc.support@tais.toshiba.com
Toshiba America Information Systems, Ins.
Imaging Systems Division
9740 Irvine Blvd., Irvine, California 92618-1697
* Address and telephone number are subject to change without notice.
* For customers outside of Canada, U.K. and the U.S.A., please refer
to the "Global Contacts" before this page and contact the nearest
Toshba company for assistance.
Website für Digitalkamera: www.toshiba.de/consumer
Technische Unterstützung ist vorhanden online oder telefonisch
8.00 bis 17.00 Montag bis Freitag, Feiertage ausgenommen.
oder E-mail: consumer@toshiba-teg.com
Hammfelddamn 8, D-41460 Neuss, Germany
* Änderungen bei Adresse und Telefonnummer bleiben ohne
vorherige Ankündigung vorbehalten.
* Für Kunden, die außerhalb Deutschlands leben, sehen Sie die
Tabele
"Globale Kontakte" vor dieser Seite und kontaktieren Sie uns bitte
bei der Ihnen am nächsten gelegenen Landesvertretung.
ou en contactant 01 47 28 28 50.
Toshiba Systèmes (France) S.A.
(800) 829-8318
Imaging Systems Division
(02131) 158 01
Toshiba Europe GmbH
T10-0201
 Loading...