

Page 1
.
eI’nti4’
b
I
I
UN-auuw
TELEPHONE
w..”
I
USER GUIDE
.-
Page 2
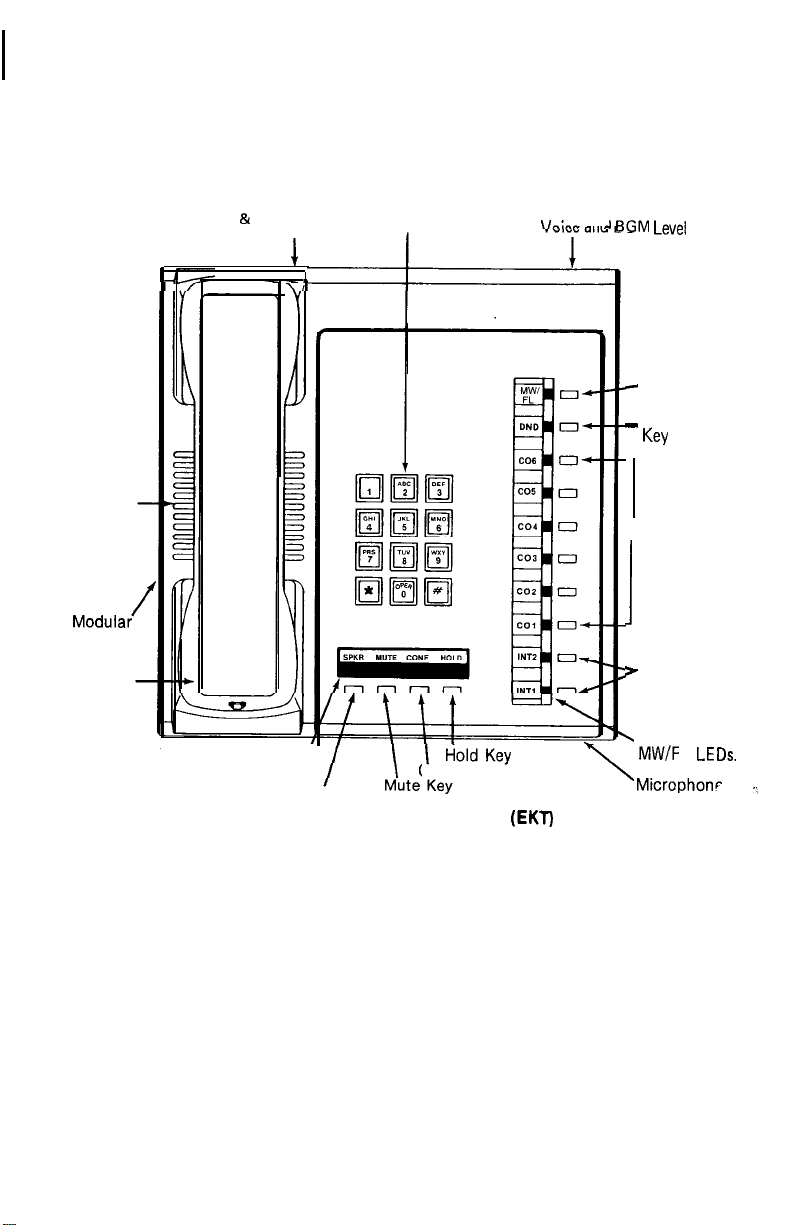
Speaker.
Speaker Volume
Ring Tone & Intercom
Voice Level
,
-
1
Dial Pad.
Speaker Volume Dial Tone,
\I^:^..
. .
..A DPM Leve,
Message Waiting/
-
Flash Key
_
Do Not Disturb
Key
Outside Line Access
Keys
Modula;
Cord Outlet.
Handset.
Speaker On/Off LED.
Speaker On/ Off Key
ELECTRONIC KEY TELEPHONE
Conference Key
(EKT)
I
r
intercom Access
Keys
Intercom, Outside
Line, DND and
MW/F
\
Microphonr
L
LEDs.
.,,
Page 3
TABLE OF CONTENTS
Key E+unctions
Volume Controls
Message Waiting
Outside Calls
Intercom Calls
Call Holding
Call Transfer
Night Transfer
Speakerphone
Conference Calls
Background Music
Automatic Dialing
Telephone Number Storage
Paging
Override
Do Not Disturb
Tone Signalling
Busy Lamp Field
2
3
3
3
4
4
5
5
5-G
7-8
9
9-10
IO-I I
12
12
I2
13
I3
OCopyrighf
Executive Telephone
Phone Directory
1983 Toshiba
T&corn
13-16
Back Cover
1
Page 4
TOSHIBA
KEY FUNCTIONS
Your
STRATA VI EKT
and a push-button dial pad. The following is a
general description of each key.
has 14 line and feature keys
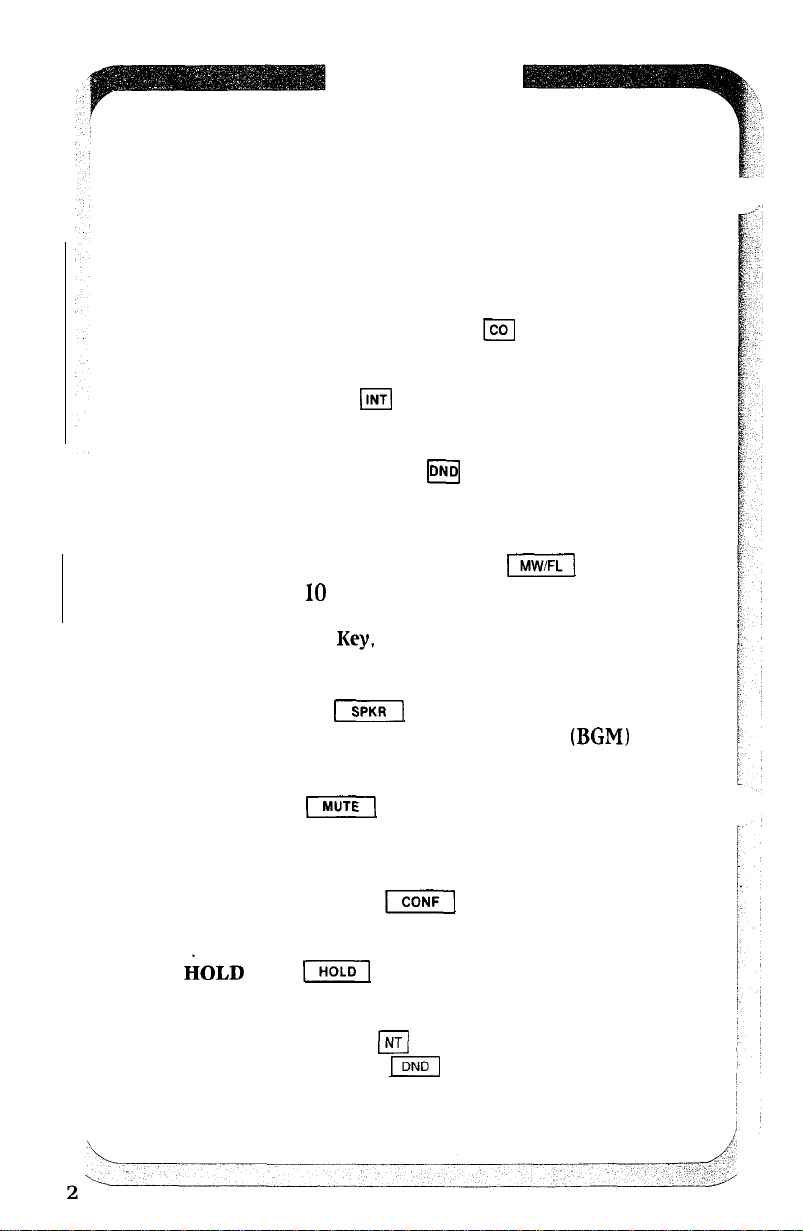
CENTRAL OFFICE LINE KEY
m
To access an outside line.
INTERCOM KEY
m
To access an intercom line.
DO NOT DISTURB KEY
m
Places the individual telephone in a Do Not
Disturb mode.
MESSAGE WAITING/FLASH KEY
i==-l
Used by ext. 10 or 11 (operator) to indicate when a
message is waiting for any other extension. When
used as a Flash
Key,
it disconnects and recalls dial
tone on a CO line, or is used to access PBX features.
SPEAKER KEY
1-t
Turns the Speaker and Background Music (BGM)
ON/OFF.
MUTE KEY
j-=-j
Cuts off the Speakerphone’s microphone for
private conversation.
CONFERENCE KEY
-1
Sets up conference calls.
IiOLD
KEY
[--==-I
Places an outside call on hold.
NIGHT TRANSFER
Takes the place of the
(NT(
m
key on the operator’s
station, and automatically transfers incoming calls.
Page 5
VOICE AND RING TONE VOLUME
You may control the volume levels on your
STRATA
located on the rear of your telephone. The control on
the right side adjusts speaker volume for dial tone,
voice and BGM level; the left side control adjusts
ring tone and intercom voice-announcement
volume.
VI telephone with the two volume controls
MESSAGE
PROGRAMMABLE OPTION
a
Message Waiting Center calls station on intercom.
If no answer, depress
Waiting telephone. This causes the
the called station to illuminate.
0
Called station user lifts handset and calls Message
Waiting Center on intercom. After receiving the
message(s), hang up.
@
To clear the
depress an INT or CO line key) and depress
the
/MW/FL
WNTING
I[
LED, lift the handset (do not
key.
Ihnw/FLI
key on the Message
mMW/FL
OUTSIDE CALLS
TO MAKE AN OUTSIDE CALL
Q
Lift the handset.
@
Depress an available m line key.
=S
Listen for a dial tone.
@
The CO line LED will flash at a steady-double
flash rate
e
Dial the desired telephone number.
@
Hang up when the call is completed.
(“I’‘-use).
LED on
TO RECEIVE AN INCOMING CALL
e
You will hear a continuous ringing tone.
0
The CO line LED will be flashing at a medium
on/off rate.
0
Lift the handset.
Q
The CO line LED will flash at a steady-double
flash rate (“I’‘-use).
Page 6
TO MARE AN INTERCOM CALL
0
Lift the handset.
0
Depress an available
m
key, and you
will hear a continuous INT dial tone.
c
The INT LED will flash at a
double flash rate ( ’ ‘I’
=
Dial the desired extension number, and
‘-use).
steady-
you will hear a single ring tone.
5
Speak when the ring tone ends.
0
Hang up when the call is completed.
Tone signaling can be
dialing
intercom
station.
TO RECEIVE AN INTERCOM CALL
0
/YJ
after the extension number. An
caZl
may be answered at any
You will hear a single long tone, followed
accompLished
by
by the caller’s voice.
0
The INT LED will flash at a medium pulsating
on/off rate
0
Lift the handset.
0
The INT LED will flash at a steady-double flash
(“I”-called).
rate (“I”-use).
Q
Hang up when the call is completed.
CALL HOLDING
TO HOLD A CALL
0
While connected to an outside call, depress
the
j-1
0
The CO line LED will flash at a fast rate
(“I”-hold).
On-hoM
pre-determined time.
released if the other party hangs up. When a CO
line is placed on hold it may be picked up at any
station.
key.
reminder tone
will
be heard within a
Hol’d will
be
automaticab’y
Page 7

TOSHIBA
SFER
TO TRANSFER A CALL
8
While connected to an outside call, depress
the
I[
0
The CO line LED will flash at a fast rate
(“I”-hold).
Q
Depress an available m key; you will hear
a continuous INT tone.
e
The INT LED will flash at a steady-double flash
rate
0
Dial the desired extension to which the call is
to be transferred.
d
Voice-announce the call.
key.
(“I”-use).
NIGHT TRANSFER
PROGRAMMABLE OPTION
Extension 10 (operator) may automatically
transfer all incoming call ringing to selected
stations by depressing the
m
key.
1
i
,, -.
i
j
/
/ ~
I
:
1
SPEAKERPHONE
TO MARE AN OUTSIDE CALL WITH
PHONE (On-hook
@
Leave the handset on-hook.
@
Depress any available a line key.
8
Listen for dial tone.
@
Dial the desired telephone number.
@
The CO line LED will flash at a
double flash rate ( * ‘I’ ‘-use).
Q
Speak at a normal voice level in the direction of
telephone.
0
Depress the
~0
RECEIVE AN INCOMING CALL
e
You will hear a ringing tone.
0
Leave the handset on-hook.
0
Depress the m line key that is flashing at a
medium on/off rate.
m
Ditiing)
key when the call is completed.
SPEARER-
steady-
(HANDSFREE)
(continued)
b
Page 8

TOSHIBA
SI?EAI.ERPHONE (continued)
0
The CO line LED will flash at a steady-double
flash rate ( ’ ‘I’ ‘-use).
o
Speak at a normal voice level in the direction of
telephone.
0
Depress the
pleted.
TO MARE AN INTERCOM CALL WITH
SPEAKERPHONE (On-hook Dialing
0
Leave the handset on-hook.
Q
Depress any available
0
Listen for INT dial tone.
@
Dial the desired intercom extension.
e
The INT LED will flash at a steady-double flash
rate ( ’ ‘I”-use) and you will hear a single ring
tone.
e
Speak at a normal voice level in the direction of
telephone.
@
Depress the
pleted.
-1
I]
key when the call is com-
1
(INTI
key.
key when the call is com-
TO RECEIVE AN INTERCOM CALL
0
You will hear a single long tone, followed by the
(HANDSFREE)
caller’s voice.
e
Leave the handset on-hook.
@
To assure a private conversation, depress
the m key opposite the LED flashing at medium
pulsating on/off rate ( ’ ’ I ’ ’ -called).
e
The INT LED will flash at a steady-double flash
rate (“I”-use).
@
Speak at a normal voice level in direction of
telephone.
0
Depress the
I]
key when the call is com-
pleted.
To change from Speakerphone to handset.
L&t
handset
To change from handset to Speakerphone.
Depress and hold
Retuvn handset to on-book
Release
-1
m
key
key
Page 9

TOSHIBA
CONFERENCE CALLS
TO CONFERENCE ONE STATION
AND TWO CO LINES
B
Lift the handset.
B
Depress an available m line key.
@
Dial the desired telephone number.
a
Depress
B
Depress a second available
e
Dial the second party’s telephone number.
e
Depress the
answers.
*
Depress original m line key.
e
Station is now connected to both m lines.
(P
Hang up when conference call is completed.
TO CONFERENCE TWO OR THREE STATIONS
AND TWO CO LINES
e
Lift handset.
B
Depress an available m line key.
@
Dial the desired telephone number.
@
Depress the
B
Depress a second available m line key.
e
Dial the second party’s telephone number.
B
Depress the
@
Depress an available m key, and call the
to be included in the conference call.
@
Advise the station(s) of the number of the second CO
line and tell them to depress that m key when its
LED begins the distinctive conference flash.
@
Depress the second m line key.
0
Depress the
conference flash
*
The LED will then change from conference flash to
“I”-use indication when the other station enters the
conference.
e
Depress the
enter the conference call.
0
After station(s) has entered, depress the
and then the first m line key.
8
Hang up when the conference call is completed.
-1
key after the party answers.
(COI
line key.
-1
key after the second party
-1
key after the party answers.
IHOLD)
key after the party answers.
-1
key (CO line LED changes to
1.
-1
key again if a third station is to
station(s)
IFj
key,
Page 10

CONFERENCE CALLS
TO CONFERENCE UP TO FOUR STATIONS
AND ONE CO LINE
CB
Lift handset.
0
Depress an available a line key.
Q
Dial the desired telephone number.
0
Depress the
0
Depress an available m key, and call the station(s)
to be included in the conference call.
0
Advise the station(s) of the number of the CO line and
tell them to depress that m key when its LED begins
the distinctive conference flash.
e
Depress the m line key.
a
Depress the
conference flash).
Q
The LED will then change from conference flash to
“I”-use indication when the other station enters the
conference.
*
Depress the
enter the conference call.
@
Repeat for a fourth station, if necessary.
@
Hang up when the conference call is completed.
TO CONFERENCE THREE OR FOUR STATIONS
AND ONE INTERCOM LINE
@
Using the intercom, advise the third and fourth
parties of the conference. Tell them to depress the
appropriate m key when its LED begins the
distinctive conference flash.
0
Using the intercom, call party
8
Depress the
conference flash at all stations.
@
The LED will then change from conference flash to
”
I “-use indication when the third station enters the
conference.
@
Depress the
to enter.
@
Hang up when the conference call is complete.
-1
-1
key after the party answers.
El
key
(CO
line LED changes to
-1
key again if a third station is to
key - LED will change to
-1
key again to allow a fourth party
#2.
(contimed)
Page 11

You may listen to background music via the station’s
speaker if music-on-hold is available on your system
by depressing the
-1
key. Control the volume
level with the control on the right side of your
,
I
/
j
f ~
I
telephone.
TO AUTOMATICALLY DIAL A FREQUENTLY
CALLED NUMBER
3
Lift the handset.
0
Depress an available
@
Listen for dial tone.
@
Dial the
@
Dial the two-digit number that corresponds
q
key.
m
line key.
to the desired telephone number.
@
STRATA VI will automatically dial the number
for you.
@
Hang up when the call is completed.
TO AUTOMATICALLY REDIAL THE LAST
NUMBER CALLED
e
Depress an available
e
Listen for a dial tone.
@
Depress the
Q
STRATA VI will automatically redial the last
q
key.
m
line key.
telephone number you dialed.
a
Hang up when the call is completed.
TO CHAIN DIAL AUTOMATICALLY
:
I
Automaticab) dials
during one call.
3
Lift the handset.
3
Depress an available
0
Listen for a dial tone.
0
Depress the
z
Dial the two-digit number that corresponds
two or more sets of numbers
m
line key.
q
key.
I
/
to the first telephone number to be dialed.
(continued)
Page 12

AUTOMATIC DIALING
e
Depress the
s
Dial the two-digit number that corresponds to the
second telephone number to be dialed.
Q
Repeat the above steps for each subsequent
number to be dialed.
8
STRATA VI will automatically dial the number
for you.
e
Hang up when the call is completed.
the first sets of numbers
multz$le
q
key.
dial’ed
during the
dial will be repeated by the automatic
(continuedl
redial.
TO OUTPUT
When the special’
for
computer input service or other use), they may be
dialed
by disabling the Automatic Dialing feature.
permit
manual
8
Press an available
numbers desired utilizing the Automatic Dialing
feature in the usual manner.
e
To disable the Automatic Dialing feature and per-
mit the special q and q tones to be manually
output, first press the
Manual’ dialing
tones
of
will be output as dialed. The Automatic Dialing feature
wil/
be restored when the telephone is hung up,
or placed on
q
b!il
AND
q
dialing
wi2
and H, as we/l’ as digits “O-9
ho/d.
q
or
q
of
the special
m
q
be
unrest&ted
TONES
tones must be output
q
line key. Dial any
key and then the
and the special
and
q
”
TELEPHONE NUMBER
STORAGE
TO STORE A TELEPHONE NUMBER IN SYSTEM
MEMORY (Standard Feature)
Telephone numbers can be stored in the system memory
by station 10
on[y.
tones.
q
To
key.
(continued)
Page 13

TOSHIBA
:
TELEPHONE NUMBER
(continued)
STORAGE
Q
Remove the handset from its hook
tivate a
c
Dial the q and q keys, respectively.
0
Dial a Z-digit address code. Codes run
[col
or
llNTl
line)
consecutively from GO through 83
through 99 if optional card is installed).
0
Dial the telephone number to be stored.
after the trunk access code to allow for dial tone delay.
Press the
@
Dial the fl key to record the number in memory.
@
Repeat the above steps with every number
the standard
0
Return the handset to on-hook.
@
Write down the address codes and telephone
-1
key after entering the PBX access code.
24)
to be stored.
numbers for future reference.
Repeat this procedure to replace the stored telephone
numbers with new telephone numbers.
TO STORE A TELEPHONE NUMBER IN STATION
MEMORY (Optional Feature)
Telephone numbers can 6e stored by each station.
0
Lift the handset
(do
not activate a B or
line).
@
Dial the q and q keys, respectively.
@
Dial a Z-digit address code (codes run con-
secutively from 10 through
@
Dial the telephone number to be stored.
BEHIND PBX: It is necessary to insert a pause
after the trunk access code to
tine delay.
entering the PBX access code.
a
Dial the H key to record the number in memory.
’
Repeat the above steps with every number to be
stored
f,
Return the handset to on-hook.
0
Write down the address codes and telephone.
Press the
(up
to
40).
a/low
-1
key
numbers for future reference.
Repeat this procedure to replace the stored telephone
numbers with new ones.
49).
for dial
after
(do
not ac-
(GO
(up
@I
to
Page 14

TOSHIBA
PAGING
TO PAGE
Q
Lift the handset
0
Depress an available
one of the following:
w EKT
speakers only.
m
key and dial
q External speakers only.
q Both
0
Make your announcement in a normal
voice level and repeat it.
0
Hang
~:p
when you have completed your
announcement.
EKT
and external speakers.
OVERRIDE
TO MARE A BUSY OVERRIDE CALL
@
After reaching a busy station, you may signal that
station that a call is waiting by dialing
@
A tone signal will be heard at the busy station.
12).
TO MARE A DND OVERRIDE CALL
Programmable Option
9
After reaching a
may signal that station that a call is waiting by
dialing
q
@
A tone signal will be heard at the
DND
station fast busy signal, you
.
DND
station.
DO NOT DISTURB
PROGRAMMABLE OPTION
TO ENGAGE THE DO NOT DISTURB MODE
O
Depress the
@
DND LED will light steady.
TO RELEASE THE DO NOT DISTURB MODE
’
Depress the
0
DND LED will be off.
(DNDI
m
key.
key.
Page 15

TONE SIGNALLING
PROGRAMMABLE OPTION
TONE SIGNALLING
c
You will hear a ringing tone as the
primary method of intercom call signalling .
c
Handsfree answerback is inoperative.
2
Voice call can be accomplished by dialing q
.LA-
_-___
--.---~-.---
BUSY LAMP FIELD (BLF)
OPTIONAL TELEPHONE
‘C
Automatically indicates which stations are in use.
EXECUTIVE TELEPHONE
.-~---.
: L’..,/
/
(continued)
/
Page 16

TOSHIBA
EXECUTIVE TELEPHONE (continued)
KEY FUNCTIONS
The optional executive telephone
provides, via ten additional feature keys; seven
button automatic-dialing (AD
@O-key EKT)
I-7)
telephone numbers,
one-
automatic-redial, pause and automatic-dialing access.
The optional
EKT
has 24 line and feature keys and a
push-button dial pad. The following is a general
description of each additional key.
AUTOMATIC-DIALING
KEYS j-i6?l
One-key automatic-dialing for seven different
telephone numbers after accessing a CO line.
REDIAL
KEY m
Will automatically redial the last telephone number
dialed after accessing a CO line. (Serves the same
function as the H key on the standard
REPERTORY
KEY m
EKT.)
Provides access to automatic-dialing address codes.
(Serves the same function as the
standard
PAUSE
EXT. )
KEY (pAuI
q
key on the
Applies a pause after the CO line access code in
automatic-dialing telephone numbers behind a
The
@Kj
key will not perform this function on this
PBX.
unit. It is used to store a timed flash.
The remaining function keys retain the same functions as
their counterparts on the standard EKT.
(continued)
Page 17

TOSHIBA
EXECUTIVE TELEPHONE
AUTOMXTIC
TO AUTOMATICALLY DIAL A FREQUENTLY CALLED
NUMBER
Telephone numbers can be accessed by each of the AD
through 7 keys or one of the 2-d&t access codes in the usual
STRATA VI manner.
B
Lift the handset.
a
Depress an available m line key.
s
Listen for dial tone.
GJ
Depress the
IAD
DIALING
key (or depress the
(continued)
/REP(
key and dial
1
the Z-digit number) that corresponds to the desired
telephone number.
@
STRATA VI will automatically dial the number for
you.
TO AUTOMATICALLY REDIAL THE LAST NUMBER
CALLED
e
Depress an available m line key.
0
Listen for a dial tone.
4
Depress the
o
STRATA VI will automatically dial the last telephone
(RDLI
key.
number dialed.
0
Hang up when the call is completed.
A
TO OUTPUT
The
aand
on the standard EKT; they are now free to
access.
e
Press an available m line key. Dial any desired
q
q
AND
q
TONES
k
eys
will not have the functions they perform
rise
for
computer
number in the usual manner.
o
Depress either the
*
tones to be output.
q
or
q
key, permitting the # and
(continued)
Page 18

r
EXECUTIVE TELEPHONE (continued)
TELEPHONE NUMBER
STORAGE
TO STORE TELEPHONE NUMBERS
e
Lift the handset (do not activate a CO or INT line).
e
Depress the m and m keys, respectively.
o
Depress one of the m keys or dial a Z-digit address
code (codes run consecutively from IO through 49:
AD numbers reside at
*
Dial telephone number to be stored.
It is necessary to insert a pause after the trunk access code
to allow for dial tone delay. Depress the m key after
entering the PBX access code. If a PBX feature access code
is being stored, a timed flash may be stored by depressing
the
(KJ
key.
e
Depress the m key to record number in memory.
e
Repeat the above steps with every number to be
stored (up to
e
Return the handset to on-hook.
e
Write down the address codes and telephone
numbers for future reference.
Repeat this procedure to replace stored telephone numbers
with new ones.
401.
43-491.
Page 19

Address Code
11
13
14
15
21
22
26
27
Phone Number
36
37
38
39
41
44
45
47
48
49
 Loading...