

Page 1

Toshiba
®
Magnia
SG30
Appliance Server
User’s Guide
For the latest information, please visit:
www.toshiba-tro.de
www.computers.toshiba-europe.com
Page 2

2
Model: Toshiba Magnia SG30 Appliance Server
EU-Declaration of Conformity
Toshiba declares that the product: Toshiba Magnia SG30 Appliance Server
conforms to the following standards:
Toshiba erklärt, daß das Produkt: Toshiba Magnia SG30 Appliance Server
folgenden Normen entspricht:
Toshiba déclare que le produit cité ci-dessous: Toshiba Magnia SG30 Appliance Server
est conformé aux normes suivantes:
Toshiba declara que el producto: Toshiba Magnia SG30 Appliance Server
cumple los siguientes estándares:
Toshiba dichiara, che il prodotto: Toshiba Magnia SG30 Appliance Server
è conforme alle seguenti norme:
Toshiba intygar att produkten: Toshiba Magnia SG30 Appliance Server
överensstämmer med följande normer:
Supplementary
Information:
Weitere Informationen: Das Produkt entspr icht den Anforderungen der Niederspa nnungs-Richtlinie
Informations
complémentaires:
Información
complementaria:
Ulteriori informazioni: Il prodotto é conforme ai requisiti della direttiva sulla bassa tensione 73/23/
Ytterligare
information:
The product complies with the requirements of the Low Voltage Directive
73/23/EEC and the EMC Directive 89/336/EEC.
73/23/EG und der EMC-Richtlinie 89/336/EG.
Ce produit est conforme aux exigences de la directive sur les basses
tensions 73/23/CEE et de la directive EMC 89/336/CEE.
El Producto cumple los requisitos de baja tensión de la Directiva 73/23/
CEE y la Directiva EMC 89/336/CEE.
EG e la direttiva EMC 89/336/EG.
Produkten uppfyller kraven enligt lägspänningsdirektiver 73/23/EEC och
EMC-direktiv 89/336/EEC.
This product is carrying the CE-Mark in accordance with the related
European Directives. Responsible for CE-Marking is Toshiba Europe,
Hammfeldamm 8, 41460 Neuss, Germany.
Page 3

Copyrights
This guide is copyrighted by Toshiba Corporation. with all rights reserved.
Under the copyright laws, this guide cannot be reproduced in any form
without the prior written permission of Toshiba. No patent liability is assumed,
however, with respect to the use of the information contained herein.
©2003 by Toshiba Corporation. All rights reserved.
Additional copyright information may be found in “Open Source License
Information” on page 289.
Caution
Danger of explosion if battery is incorrectly replaced.
Replace only with the same or equivalent type recommended by the
manufacturer. Dispose of used batteries according to the manufacturer’s
instruction.
Toshiba Battery Co. Ltd. model CR2032
Sony Electric Corp. model CR2032
Hitachi Maxell Ltd. model CR2032
Matsushita Electric Corp. model CR2032
Important Safety Instructions
When using your telephone equipment, basic safety precautions should
always be followed to reduce the risk of fire, electric shock and injury to
persons, including the following:
1 Do not use this product near water, for example, near a bath tub, wash
bowl or kitchen sink or laundry tub, in a wet basement or near a
swimming pool.
2 Avoid using a telephone (other than a cordless type) during an
electrical storm. There may be a remote risk of electric shock from
lightning.
3 Do not use the telephone to report a gas leak in the vicinity of the leak.
4 Use only the power cord and batteries indicated in this manual. Do not
dispose of batteries in a fire. They may explode. Check with local
codes for possible special disposal instructions. SAVE THESE
INSTRUCTIONS.
3
Page 4

4
Disclaimer
The information contained in this manual, including but not limited to any
instructions, descriptions and product specifications, is subject to change
without notice.
TOSHIBA CORPORATION (TOSHIBA) PROVIDES NO
WARRANTY WITH REGARD TO THIS MANUAL OR ANY
OTHER INFORMATION CONTAINED HEREIN AND HEREBY
EXPRESSLY DISCLAIMS ANY IMPLIED WARRANTIES OF
MERCHANTABILITY OR FITNESS FOR ANY PARTICULAR
PURPOSE WITH REGARD TO ANY OF THE FOREGOING.
TOSHIBA ASSUMES NO LIABILITY FOR ANY DAMAGES
INCURRED DIRECTLY OR INDIRECTLY FROM ANY
TECHNICAL OR TYPOGRAPHICAL ERRORS OR OMISSIONS
CONTAINED HEREIN. IN NO EVENT SHALL TOSHIBA BE
LIABLE FOR ANY INCIDENTAL, CONSEQUENTIAL, SPECIAL,
OR EXEMPLARY DAMAGES, WHETHER BASED ON TORT,
CONTRACT OR OTHERWISE, ARISING OUT OF OR IN
CONNECTION WITH THIS MANUAL OR ANY OTHER
INFORMATION CONTAINED HEREIN OR THE USE THEREOF.
SG30 Software License Information
Copies of the binary software packages or the source for these packages can be
obtained from the FTP site: ftp://ftp.redhat.com.
Further information about these packages can be obtained from the Web site at
http://www.redhat.com.
The software installed on the Toshiba Magnia SG30 is a modular operating
system made up of hundreds of individual software components, each of which
was written and copyrighted individually. Each component has its own
applicable end user license agreement (“EULA”). Most of the software programs
are licensed pursuant to a EULA that permits you to copy, modify, and
redistribute the software in both source and binary code forms. All of the
software and documentation developed or created by or for Toshiba Corporation
are proprietary products of Toshiba Corporation and are protected by copyright
laws, international treaty provisions, and other applicable laws.
The following EULAs are provided in accordance with their terms. The full text
of the documents can be found at the Web sites that are listed here for ease of
reference.
Apache
Copyright ©2000 The Apache Software Foundation. All rights reserved.
http:// www.apache.org/LICENSE.txt
Page 5

5
The BSD License
Copyright ©1991, 1992, 1993, 1994 The Regents of the University of California.
All rights reserved.
http://www.xfree86.org/3.3.6/COPYRIGHT2.html#6
The DES License
Copyright ©1995-1997 Eric Young (eay@cryptsoft.com) All rights reserved.
See Appendix in the user guide.
GNU Lesser General Public License
http://www.gnu.org/copyleft/lesser.html
GNU Library General Public License
http://www.gnu.org/copyleft/library.html#SEC3
GNU General Public License
http://www.gnu.org/copyleft/gpl.html
MIT License
Copyright ©1985-2001 Massachusetts Institute of Technology. All rights
reserved.
http://www.opensource.org/licenses/mit-license.html
Open Content License
http://www.opensource.org/licenses/cpl.html
Open LDAP
Copyright ©1998-2001 the Open LDAP Foundation and portions Copyright
©1992-1996 Regents of the University of Michigan. All rights reserved.
http://www.OpenLDAP.org/license.html
Open SSL
Copyright ©1998-2000 The Open SSL Project. All rights reserved. See
Appendix in the user guide.
http://www.openssl.org
Open SS Leay
Copyright ©1995-1998 Eric Young (eay@cryptsoft.com). All rights reserved.
See Appendix in user guide.
The Q Public License
http://opensource.org/licenses/qtpl.html
Page 6

6
W3C IPR Software Notice
Copyright © 1994-2001 World Wide Web Consortium, (Massachusetts Institute
of Technology, Institut National de Recherche en Informatique et en
Automatique, Keio University). All Rights Reserved.
http://www.w3.org/Consortium/Legal/copyright-software-19980720
Xfree86
Copyright © 1994-2001, The Xfree86 Project, Inc. All Rights Reserved.
http://www.xfree86.org/
This product includes software developed by: the Apache Group for use in the
Apache HTTP server project and the Apache Software Foundation (http://
www.apache.org/); the University of California, Berkeley and its contributors; the
Open SSL Project for use in the Open SSL Toolkit (http://www.openssl.org/);
Eric Young (eay@cryptsoft.com).
THE SOFTWARE PROGRAMS THAT ARE INSTALLED OR ANY OTHER
SOFTWARE DISTRIBUTED TO YOU AT ANY TIME IN CONNECTION
WITH THE MAGNIA SG30 (COLLECTIVELY THE “SOFTWARE”), AND
THIS MANUAL AND ANY OTHER DOCUMENTATION DISTRIBUTED
TO YOU AT ANY TIME IN CONNECTION WITH THE MAGNIA SG30
AND ALL INFORMATION CONTAINED THEREIN (COLLECTIVELY
“DOCUMENTATION”) ARE PROVIDED BY TOSHIBA “AS IS”
WITHOUT WARRANTY OF ANY KIND, EITHER EXPRESSED OR
IMPLIED, INCLUDING BUT NOT LIMITED TO, THE IMPLIED
WARRANTIES OF MERCHANTABILITY, NON-INFRINGEMENT, AND
FITNESS FOR A PARTICULAR PURPOSE. THE ENTIRE RISK AS TO
THE QUALITY AND PERFORMANCE OF THE SOFTWARE, AND AS TO
THE ACCURACY AND COMPLETENESS OF THE DOCUMENTATION,
IS WITH YOU.
IN NO EVENT WILL TOSHIBA BE LIABLE TO YOU FOR DAMAGES,
INCLUDING ANY GENERAL, SPECIAL, INCIDENTAL OR
CONSEQUENTIAL DAMAGES ARISING OUT OF OR IN CONNECTION
WITH THE DOCUMENTATION OR ANY INFORMATION CONTAINED
THEREIN OR THE USE THEREOF, OR ARISING OUT OF THE USE OR
INABILITY TO USE THE SOFTWARE (INCLUDING BUT NOT LIMITED
TO LOSS OF DATA OR DATA BEING RENDERED INACCURATE OR
LOSSES SUSTAINED BY YOU OR THIRD PARTIES OR A FAILURE OF
THE SOFTWARE TO OPERATE WITH ANY OTHER PROGRAMS),
EVEN IF TOSHIBA HAS BEEN ADVISED OF THE POSSIBILITY OF
SUCH DAMAGES.
Page 7

If you would like to receive a copy of the source code for software licensed
pursuant to an end user license agreement that requires that a distribution of the
object code shall be accompanied by an offer to provide the source code, please
contact Toshiba product support.
Magnia is a trademark of Toshiba Corporation.
Ethernet is a registered trademark of Xerox, Inc.
Microsoft, Windows, and Windows NT are registered trademarks of Microsoft
Corporation.
Red Hat is a registered trademark of Red Hat, Inc.
Other product names and trademarks belong to the individual companies
concerned.
Trademarks
Magnia is a registered trademark and InTouch is a service mark of Toshiba
Corporation.
Apple and Macintosh are registered trademarks of Apple Computer, Inc.
Ethernet is a registered trademark of Xerox, Inc.
Microsoft, Outlook, Windows, and Windows NT are registered trademarks
of Microsoft Corporation.
RealNetworks and RealPlayer are trademarks of RealNetworks, Inc.
Red Hat is a registered trademark of Red Hat, Inc.
Intel is a registered trademark and Celeron is a trademark of the Intel
Corporation.
WinZip is a registered trademark of WinZip computing, Inc.
Wi-Fi is a registered trademark of the Wireless Capability Ethernet
Alliance.
Other product names and trademarks belong to the individual companies
concerned.
7
Page 8

Contents
Introduction ................................................................................ 17
About this guide ..................................................................... 17
Other documentation .............................................................. 18
Safety icons ............................................................................ 18
Other icons used................................................................ 19
Service options....................................................................... 20
Maintenance contracts............................................................ 20
Chapter 1: Getting Started .......................................................... 21
What is the Toshiba Magnia SG30 Appliance Server?............. 21
Quick start procedure ............................................................. 22
Unpacking the Magnia SG30 .................................................. 24
You will also need................................................................... 24
Finding your way around ........................................................ 25
Front of the Magnia SG30.................................................. 25
Back of the Magnia SG30 ................................................. 26
Turning on the Magnia SG30 .................................................. 28
Connecting the first client computer using the seven
LAN ports .......................................................................... 29
Connecting a printer to the Magnia SG30 (optional) ............... 30
Connecting to the Internet ...................................................... 31
Before You Begin .................................................................... 32
Configuring the first client computer ...................................... 34
Configuring the Magnia SG30................................................. 36
Configuring wireless access ................................................... 45
9
Page 9

10
Determining if wireless access point is installed ................ 45
Configuring wireless features ............................................. 46
Configuring Wired Equivalent Privacy (WEP) keys............. 48
Configuring access control................................................. 49
Using SSL .......................................................................... 51
Advanced wireless configuration........................................ 52
Connecting and configuring other client computers using the
seven LAN ports ................................................................. 55
Ways to use the Magnia SG30................................................. 57
Features................................................................................... 58
What to read next .................................................................... 59
Chapter 2: Using the Network..................................................... 61
Logging in to the network........................................................ 62
Types of users......................................................................... 63
Notes for systems with Windows NT, Windows 2000 and
Windows XP operating systems ................................. 63
Placing files on the network .................................................... 65
Storing files on the server .................................................. 66
Sharing files ............................................................................ 67
Mapping drives using the Windows 95 and Windows 98
operating system ........................................................ 68
Mapping drives using the Windows Me operating system . 69
Mapping drives using the Windows NT operating system.. 69
Mapping drives using the Windows 2000
operating system ........................................................ 70
Technical information on file sharing.................................. 71
Sharing a printer...................................................................... 72
Connecting the printer to the Magnia SG30........................ 73
Connecting a client computer to the network printer .......... 73
Deleting print jobs from the print queue............................. 76
Dial-in access .......................................................................... 77
Exploring your intranet site ..................................................... 77
Chapter 3: Setting Up Your Local Area Network ......................... 79
Planning your network ............................................................ 79
Network topologies ............................................................ 81
Wireless networking........................................................... 83
Physical considerations...................................................... 84
More about connecting client computers ................................ 86
Page 10

11
Dial-in access .................................................................... 86
Communicating with the Magnia SG30................................... 88
Accessing the Administration Web site.............................. 88
Exploring the Administration Web site............................... 89
Turning on the Magnia SG30 ............................................. 90
Shutting down the Magnia SG30 ....................................... 90
Viewing LCD information................................................... 92
Viewing general system information and status ................ 93
Viewing health information ................................................ 94
Connecting to an existing corporate network.......................... 96
Chapter 4: Establishing an Internet Connection.......................... 99
Connecting the Magnia SG30 to the Internet .......................... 99
Shared Internet access ...................................................... 99
Types of Internet connections.......................................... 100
Configuring for phone-based Internet service ................. 101
Configuring for ISDN-based Internet service ................... 104
Configuring for cable-based Internet service ................... 107
Configuring for DSL-based Internet service..................... 109
Client configuration to access the Internet............................ 113
Dial-out modem usage .................................................... 113
Internet performance enhancements ............................... 117
Internet content filtering .................................................. 118
Internet security and the firewall........................................... 120
How the firewall works .................................................... 120
Changing the firewall settings.......................................... 122
Advanced firewall usage .................................................. 122
Adding your own firewall rules ........................................ 124
Chapter 5: Setting up Email Services........................................ 131
Types of email services supported........................................ 132
Local email ...................................................................... 132
ISP Only........................................................................... 133
Internet email (mirrored host) ......................................... 134
Using Internet email ........................................................ 135
Setting up the Magnia SG30 for local email .......................... 136
Setting up the Microsoft® Outlook® application ........... 137
How to modify your existing Outlook® Express client .... 138
Setting up the Magnia SG30 for Internet email ..................... 140
Domain hosted email (email mirroring)........................... 140
Enabling Internet email for users ..................................... 141
Page 11

12
Summary of email user accounts .................................... 141
Sending email through an ISP .......................................... 142
Client email setup............................................................. 143
Advanced topics .................................................................... 145
Setting up automated email retrieval ................................ 145
Direct email delivery......................................................... 145
Domain hosts and SMTP.................................................. 146
When Internet email is checked........................................ 147
Chapter 6: Managing the Server ............................................... 149
Managing user accounts ....................................................... 149
Predefined accounts......................................................... 149
System security modes ......................................................... 151
User security levels .......................................................... 152
Creating user accounts..................................................... 153
Changing user accounts ................................................... 154
Deleting user accounts ..................................................... 155
Backing up your data............................................................. 157
Types of backup ............................................................... 158
Performing a manual backup ........................................... 158
Selecting backup location................................................. 163
Selecting Internet backup ................................................. 164
Starting a manual backup................................................. 164
Scheduling an automatic backup...................................... 165
Canceling automatic backups ........................................... 166
Viewing backup status...................................................... 167
Encrypting backups .......................................................... 167
Restoring files from a backup................................................ 169
Selecting an archive ......................................................... 169
Selecting files to restore................................................... 170
Starting the restore .......................................................... 171
Extracting Files Under Windows....................................... 172
Using the second disk drive .................................................. 174
Primary disk drive usage .................................................. 174
Secondary disk drive usage.............................................. 174
Installing a second disk drive ........................................... 175
Secondary disk drive usage.............................................. 177
Using an External USB Hard Disk .......................................... 183
Connecting a USB HDD to the Magnia SG30 .................... 183
Disconnecting the USB HDD ............................................ 185
Page 12

13
Formatting the USB HDD ................................................. 186
Checking the USB Drive................................................... 188
Configuring a Shared Printer ................................................ 189
Viewing server status ........................................................... 190
Viewing server health status ................................................. 192
Hard drive status ............................................................. 193
Fan status ........................................................................ 193
Temperature status.......................................................... 194
Voltage status.................................................................. 195
Software upgrades................................................................ 196
Viewing available upgrades.............................................. 196
Selecting an upgrade to install......................................... 197
Viewing installed upgrades .............................................. 197
Manual software upgrades .............................................. 197
Software upgrades auto-check ........................................ 198
Chapter 7: Exploring Toshiba’s Built-In Services ...................... 201
Upgrading your appliance ..................................................... 201
Chapter 8: Advanced Networking Features ............................... 203
Changing the Appliance / Workgroup Name .................... 204
Turning off Workgroup Master Browser .......................... 207
Changing the Local IP Addresses .................................... 207
Turning off Network Address Translation......................... 209
SNMP Support................................................................. 214
Chapter 9: Using Your Preinstalled Intranet Site....................... 223
Managing the intranet site .................................................... 225
Adding your company logo.............................................. 226
Choosing a style and color scheme ................................. 227
Adding a welcome message ............................................ 229
Managing news items...................................................... 230
Managing events ............................................................. 232
Managing documents and forms ..................................... 233
Adding a document or form............................................. 233
Managing company links ................................................. 236
Acquiring useful software applications ............................ 237
Acquiring office supplies ................................................. 238
Developing an intranet from scratch................................ 238
Page 13

14
Chapter 10: If Something Goes Wrong..................................... 239
Problems when you turn on the Magnia SG30 ...................... 239
Problems when you turn on a client computer...................... 241
Internet problems.................................................................. 243
Other system problems ......................................................... 245
Email problems ................................................................ 247
If you need further assistance ............................................... 249
Remote monitoring and maintenance............................... 249
Toshiba Support Web site................................................. 249
Appendix A: Specifications ....................................................... 251
Basic overview ...................................................................... 252
Operating systems supported................................................ 254
Linux components............................................................ 254
Appendix B: Manually Configuring Clients for the
Magnia SG30............................................................................ 255
Manually configuring clients using the Windows 95, 98 and
Windows Me operating system ........................................ 256
Determining if your system has a network interface card
(NIC) ......................................................................... 256
Configuring the PCMCIA socket ....................................... 259
Installing the network card using Windows 95 or 98
operating systems .................................................... 260
Installing the NIC using the Windows Me
operating system ...................................................... 261
Operating system networking settings ............................. 261
Configuring Internet Explorer to connect to the
Magnia SG30 ............................................................ 265
User accounts .................................................................. 266
Adding links to the desktop .............................................. 269
Manually configuring clients with
Windows NT 4.0, Windows 2000 and Windows XP
operating systems............................................................ 271
Determining if your system has a network interface
card (NIC) ................................................................. 272
Networking settings ......................................................... 275
Configuring Internet Explorer to connect to the
Magnia SG30 ............................................................ 278
User accounts .................................................................. 279
Adding links to the desktop .............................................. 282
Page 14

15
Appendix C: Configuring a Macintosh as a Client ..................... 285
Configuring a Macintosh client ............................................. 285
Network settings.............................................................. 285
User Accounts ................................................................. 286
Appendix D: Open Source License Information ........................ 289
GNU GENERAL PUBLIC LICENSE ......................................... 289
Preamble ......................................................................... 289
TERMS AND CONDITIONS FOR COPYING, DISTRIBUTION
AND MODIFICATION ................................................ 290
NO WARRANTY ............................................................... 294
END OF TERMS AND CONDITIONS ................................. 295
DES / SSL Library LICENSE .................................................. 296
OpenSSL Library LICENSE ................................................... 297
Appendix E: System Recovery CD ............................................ 299
Index ........................................................................................ 301
Page 15

Introduction
Thank you for purchasing the Toshiba Magnia SG30 Appliance
Server. With this device you’ll be able to quickly and easily install
your own network.
About this guide
This guide introduces the features of the Magnia SG30 and
explains how to set up, configure, and maintain your network.
Most of this information is intended for the person who will be
responsible for the Magnia SG30 and who will act as the network
administrator.
Information for users of the network is in “Using the Network” on
page 61.
17
Page 16

Introduction
18
Other documentation
Other documentation
In addition to this user’s guide, Toshiba provides:
❖ Getting Started Booklet
❖ Addendum Sheet
❖ Software License Agreement
❖ Safety Instruction Manual
❖ Warranty and Service material
Safety icons
Read all safety instructions carefully. Make sure you understand
them before using the Toshiba Magnia SG30 Appliance Server.
This guide contains the safety instructions that must be observed
in order to avoid personal injury or damage to your Magnia SG30.
The safety instructions have been classified according to the
seriousness of the risk, and the following icons highlight these
instructions:
DANGER: This icon indicates the existence of a hazard that could
result in death or serious bodily injury if the safety instruction is
not observed.
CAUTION: This icon indicates the existence of a hazard that could
result in damage to equipment or property if the safety instruction
is not observed.
Page 17
WARNING: This icon indicates the existence of a hazard that could
result in bodily injury if the safety instruction is not observed.
NOTE: This icon indicates information that relates to the safe
operation of the equipment or related items.
It is extremely important that basic safety practices are followed
when installing and maintaining the system.
Other icons used
Additional icons highlight other helpful or educational
information:
TECHNICAL NOTE: This icon highlights technical information
about the Toshiba Magnia SG30 Appliance Server.
Introduction
Safety icons
19
HINT: This icon denotes helpful hints and tips.
DEFINITION: This icon indicates the definition of a term used in
the text.
Page 18

Introduction
20
Service options
Service options
Toshiba offers a full line of warranty options and service
programs. Refer to the warranty and service material included
with the Magnia SG30 .
Toshiba also offers accessories to enhance server performance.
These range from extra cables to more complex items like an
optional hard disk drive or a wireless device.
Maintenance contracts
Periodic maintenance and inspection is essential to keeping the
Magnia SG30 fully operational. Toshiba recommends taking out a
maintenance contract for support of the Toshiba Magnia SG30
Appliance Server.
Page 19

Chapter 1
Getting Started
This chapter provides a written quick start procedure. In addition
to explaining how to connect the Toshiba Magnia SG30
Appliance Server
unit’s features, and identifies each component.
What is the Toshiba Magnia SG30 Appliance
and insta
ll the software, it introduces the
Server?
The Toshiba Magnia SG30 Appliance Server is a device that
allows you to quickly connect computers to form a single
system through a built-in wired or wireless network. It
provides all the basic networking capability you need to
support small groups, a home office, or small business,
including: file sharing, printer sharing, Internet gateway, and
local intranet.
The Magnia SG30 is:
❖ Simple to use and setup
❖ Dedicated to a limited, but specific purpose
❖ Extremely reliable
21
Page 20

Getting Started
22
Quick start procedure
Quick start procedure
If you have already planned your network and are an
experienced computer user, this section should provide all the
information you need. Otherwise, read “Planning your
network” on page 79 before installing the Magnia SG30, and
begin the installation process with “Unpacking the Magnia
SG30” on page 24.
The basic steps for installing the Magnia SG30 are:
1 Unpack all components.
2 Assemble the additional components you will need:
network cables or wireless network card for client
computers, printer cable (if you’re connecting a network
printer), and telephone cable or Ethernet
connecting to the Internet).
3 Locate and identify all ports.
For more information, see “Finding your way around” on
page 25.
®
cable (for
4 Turn on the Magnia SG30.
5 Connect the first client computer.
6 Connect a printer to the USB port on the Magnia SG30
(optional).
7 Connect the Magnia SG30 to your Internet connection
(such as phone line to the modem, Ethernet connection
from cable or DSL modems to the public Ethernet port).
8 Run the Client Setup Wizard on the client computer.
(Insert the Toshiba Magnia SG30 "Client Setup- and
Documentation CD". The CD program runs
automatically after the Client Setup Wizard has finished
and when you have activated the "Autostart Option" on
your PC.) Select the option Connect this PC to your
Magnia SG30.
Page 21

Getting Started
Quick start procedure
9 Configure the Magnia SG30. (When you configure the
first client computer, the Server Setup Wizard runs
automatically after the Client Setup Wizard has finished.)
10 Connect the rest of the client computers and run the
Client Setup Wizard on each.
If you’re an experienced user, see “Features” on page 58.
The rest of this chapter explains each of these steps in more
detail.
23
Page 22

Getting Started
24
Unpacking the Magnia SG30
Unpacking the Magnia SG30
1 Unpack the Toshiba Magnia SG30 Appliance Server kit.
In addition to this guide, you should have:
❖ Toshiba Magnia SG30 Appliance Server
❖ Toshiba Magnia SG30 Appliance Server “Client
Setup- and Documentation CD”
❖ Power cable (black)
❖ Ethernet network cable
❖ Getting Started Booklet
❖ Addendum Sheet
❖ Safety Instruction Guide
❖ Software License Agreement Booklet
❖ Warranty booklet
If any items are missing or damaged, notify your dealer
immediately.
For a detailed description of each component, see “Finding
your way around” on page 25.
You will also need
❖ Network cables or wireless devices for connecting client
computers to the Magnia SG30, and for connecting the
Magnia SG30 to the Internet.
❖ USB cables if you are connecting USB devices such as a
printer of external storage devices.
Page 23

Finding your way around
Finding your way around
This section explains the physical connections and screen
displays of the Magnia SG30.
Front of the Magnia SG30
LCD display
Status scroll button
Power/Shutdown button
Locating the LCD display, status and power buttons
❖ The LCD display indicates that the Magnia SG30 is on,
provides access to the public and private network IP
addresses, and displays warnings if any of the hardware
is at the point of failure.
Getting Started
25
You can configure the display to provide information
about the status of your Magnia SG30 such as: modem
status, the date and time the last backup was performed,
the availability of software upgrades, and so on.
❖ The Status scroll button allows you to scroll through the
information displayed on the LCD display.
❖ The Power/Shutdown button turns the Magnia SG30 on
and off. When you turn off the Magnia SG30, a message
prompts you to press the button again as confirmation.
Page 24
Getting Started
26
Finding your way around
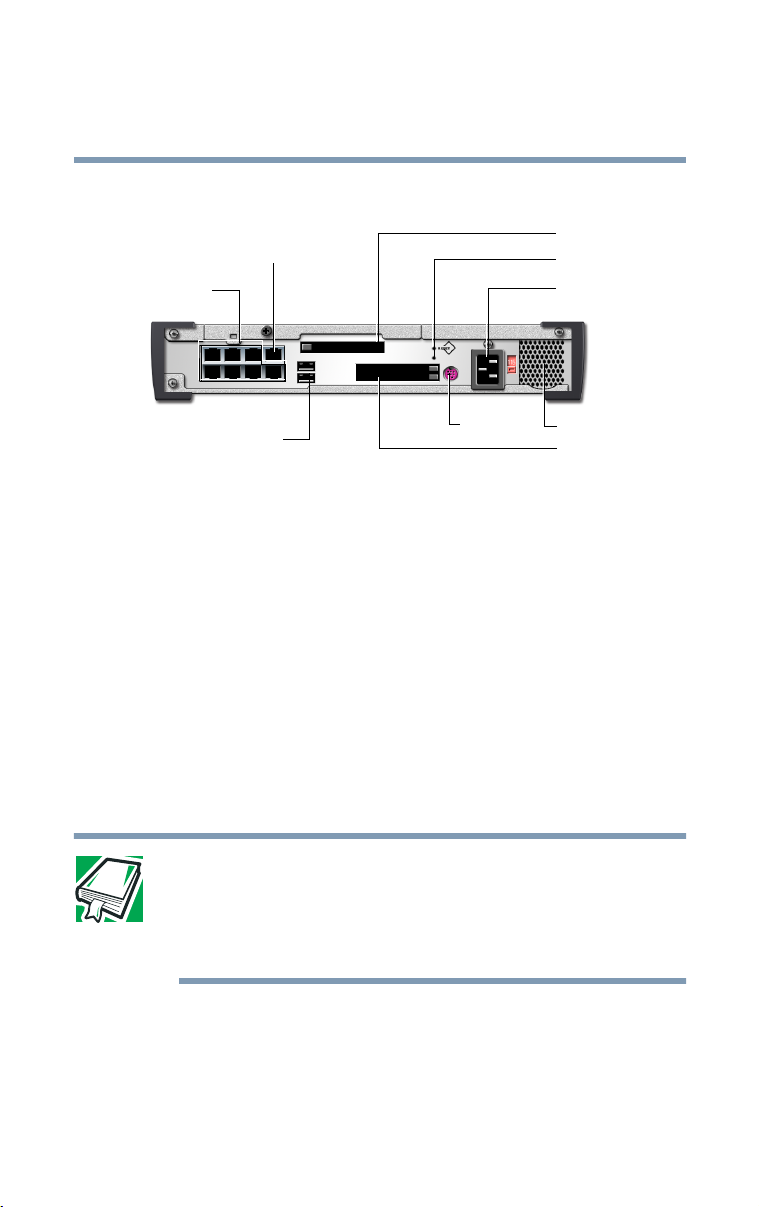
Back of the Magnia SG30
Public Ethernet port
LAN ports
PMCIA card slot
Reset
AC socket
USB ports
Serial port
Fan
PMCIA card slot
Magnia SG30 ports
❖ The public Ethernet port connects the network to the
Internet via a cable modem, DSL modem or an existing
local area network (LAN). For more information about
connecting the Magnia SG30 to a corporate network, see
“Corporate environment” on page 83.
❖ The LAN ports provide a built-in switch for connecting
the individual client computers. For more information
about adding a computer to the network, see
“Configuring the first client computer” on page 34. (All
local LAN ports are auto-sensing for uplink connection,
and can be used to connect hubs or switches for
additional client connections).
DEFINITION: The Toshiba Magnia SG30 Appliance Server is a
computer through which your local area network (LAN) connects
to the Internet.
Each computer connected to the Magnia SG30 is called a client.
❖ An optional modem PCMCIA card allows the
Magnia SG30 to dial out to the Internet, and a client
computer to dial into the Magnia SG30. For more
Page 25

Getting Started
Finding your way around
information about using the Magnia SG30 modem, see
“Stand-alone with modem connection” on page 81.
❖ Installing an 802.11B/Wi-Fi
Card into a PCMCIA slot enables the Magnia SG30 to
provide access to client computers that have
802.11B/Wi-Fi networking capability.
❖ The reset button resets the Magnia SG30 CPU and
restarts the system. For information, see “Problems when
you turn on the Magnia SG30” on page 239.
❖ The AC socket connects the Magnia SG30 to AC power
(230 volt, 50 Hz line).
❖ The fan provides cooling to the power supply.
❖ The USB port connects a printer to the Magnia SG30.
For more information about adding a printer to the
network, see “Connecting a printer to the Magnia SG30
(optional)” on page 30.
TM
wireless LAN PCMCIA
27
Page 26
Getting Started
28
Turning on the Magnia SG30
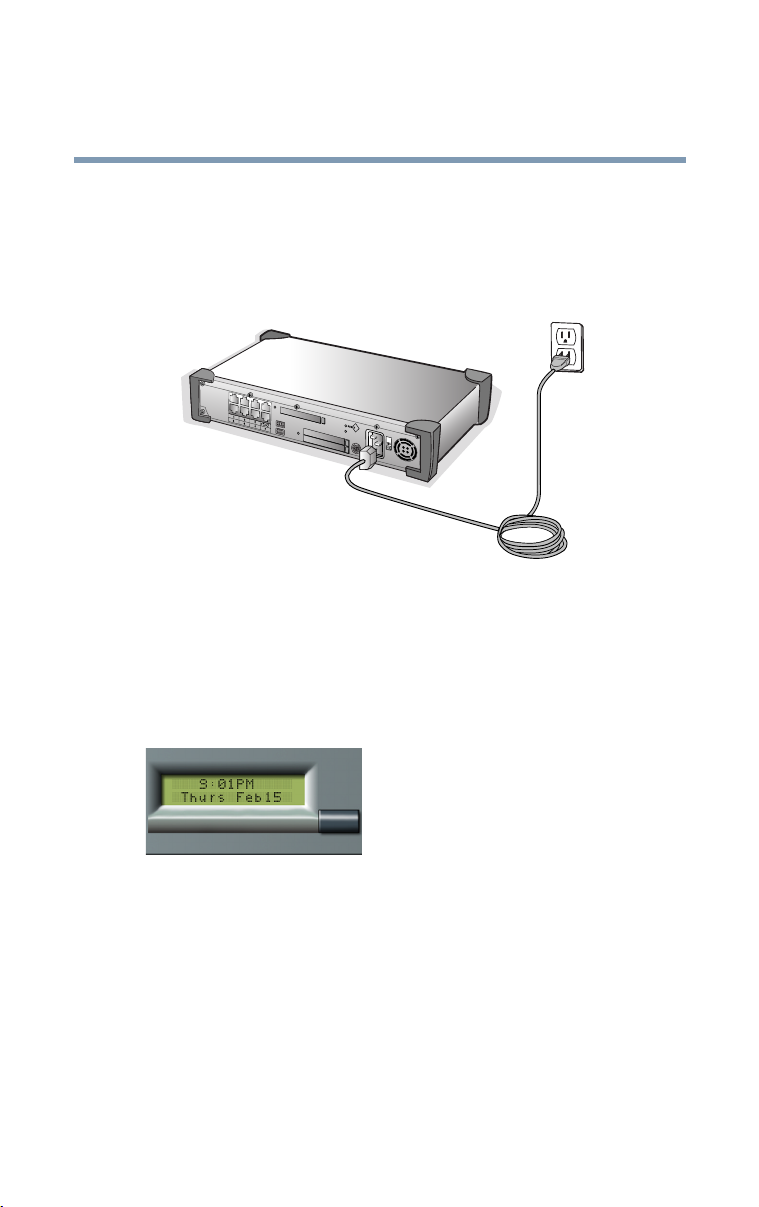
Turning on the Magnia SG30
Place the Magnia SG30 where you can easily access the back
panel. Connect the black power cable to the socket on the
back of the Magnia SG30 and then to a wall outlet.
Connecting the power cable
The Magnia SG30 powers up in a few moments.
During the startup process, the Magnia SG30’s LCD displays
a “warming up” message. When the startup process is
complete, the LCD displays a date and time message.
Magnia SG30 system date and time message
The Magnia SG30 is ready for you to connect the first client
computer.
Page 27

Getting Started
Connecting the first client computer using the seven
LAN ports
29
Connecting the first client computer using the seven LAN ports
The first step in setting up your Magnia SG30 is to connect a
client computer and configure the computer to access the
server.
Using the network cable, connect a desktop or notebook
computer to one of the seven LAN ports of the built-in switch
on the back of the unit.
LAN ports
A client connected to the Magnia SG30
Page 28
Getting Started
30
Connecting a printer to the Magnia SG30 (optional)
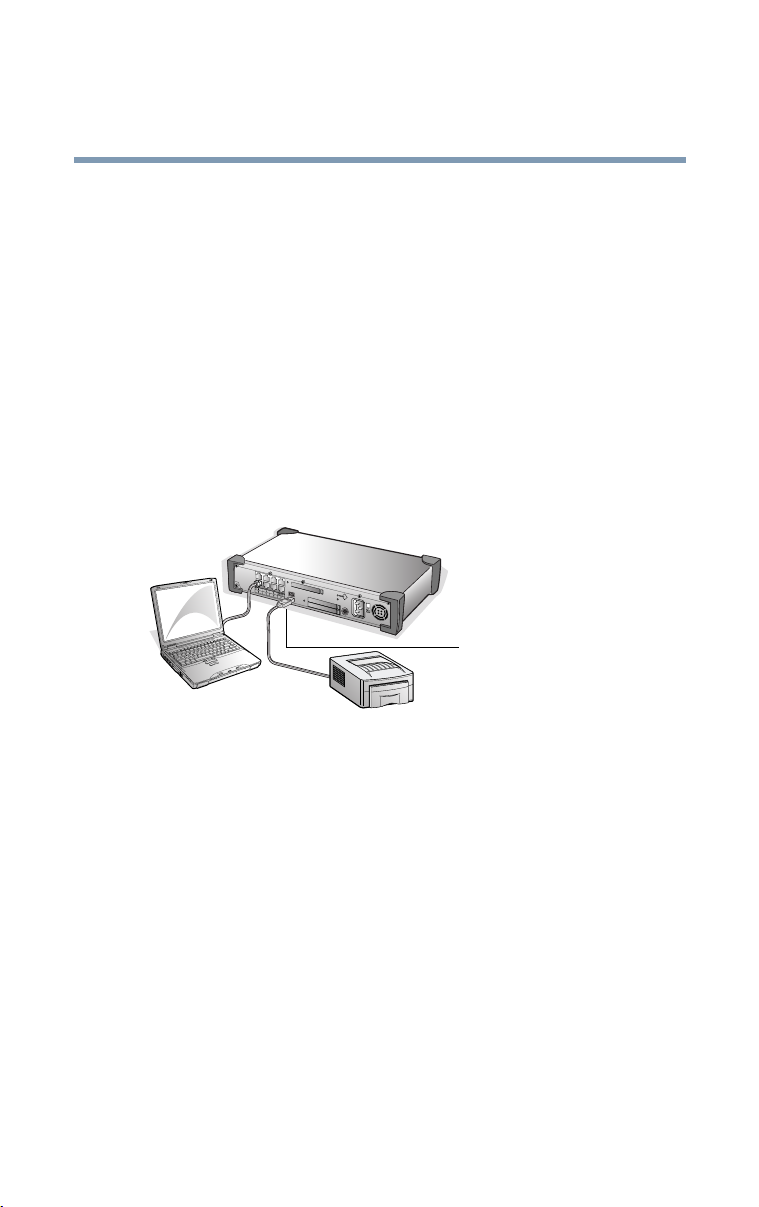
Connecting a printer to the Magnia SG30
(optional)
An important feature of the Magnia SG30 is that it allows all
users on the network to share the same printer, rather than
having a printer connected to each individual computer. Each
user can submit print jobs, which will be queued on the
Magnia SG30 to be printed in the order received.
Connect the printer’s data cable to the Magnia SG30’s USB
printer port. (If your printer uses a parallel cable instead of
USB, a USB to parallel converting cable is required to
connect with the Magnia SG30).
USB port
A printer connected to the USB port
The Magnia SG30 supports both the direct connect USB
printer connection, or a network printer connection. If you
have a network printer, you can configure the Magnia SG30
to send print jobs to this network printer instead of
connecting it directly to the server. If you are connecting a
printer directly to the Magnia SG30’s USB printer port, you
don’t need to configure the printer on the Magnia SG30. If
the printer is a network printer, connected to a local network
connection, you will have to configure the Magnia SG30 to
redirect print jobs to the printer. See “Configuring a Shared
Printer” on page 189.
Page 29

Connecting to the Internet
Whether you have a network printer or a USB printer,
Magnia SG30, you will have to install the printer on each of
the client computers using the Add Printer Wizard. See
“Connecting a printer to the Magnia SG30 (optional)” on
page 30.
Connecting to the Internet
You have several options for connecting the Magnia SG30 to
the Internet.
Optional Modem card
Public Ethernet port
Getting Started
31
Options for connecting to the Internet
❖ Use the public Ethernet port for a broadband connection
(such as cable or DSL) or a corporate LAN. See
“Broadband connection” on page 40 for detailed
instructions.
❖ If broadband access is not available, you may connect the
server to a phone line and use a dial-up phone- or
ISDN-based ISP line (Internet Service Provider).This
requires that either the optional PCMCIA modem card or
PCMCIA ISDN card be installed in the server. See
Page 30

Getting Started
32
Before You Begin
“Dial-up connection” on page 44 for detailed
instructions.
NOTE: If you do not already have access to the Internet in some
way, you will need to obtain an account with an Internet Service
Provider.
Before You Begin
❖ The Magnia SG30 comes with three accounts already
created and defined on the server. These accounts are
defined for specific purposes. The first two of these
accounts come from the factory with a default password
of “toshiba.” However, both accounts will have their
password changed to the first account’s password when
the system is first set up
NOTE: It is important that you remember the password of the first
account you create using the Magnia SG30 "Client Setup- and
Documentation CD" or Administration Web site, because this
password will be used to access these predefined accounts.
applianceadmin— Because this account cannot be deleted,
it can be used to gain access to the Administration Web site if
other accounts have been deleted. It is a predefined level 3
account, meaning that it has full access to all administrative
functions. While all other accounts are restricted to viewing
files and directories belonging to that account, the
applianceadmin account can view and access any file or
directory belonging to any account on the server. The
applianceadmin account cannot send or receive email.
telnetuser
internal Linux interface directly, without going through the
Administration Web site. Only experienced Linux users
should attempt this method of accessing the server. For
— Telnet is a method of accessing the Magnia SG30
Page 31

Getting Started
Before You Begin
security reasons, the only account allowed to log in via telnet
is the telnetuser account (it serves no other purpose).
❖ To set your home page for Internet Explorer to the
Magnia SG30 intranet, select the General tab from the
Tools menu and type http://myserver.loc in the box
labeled Home Page.
NOTE: The address http://192.168.1.1 may also be used to access
the Intranet.
❖ To access the Administrative web site, type in the
address http://myserver.loc:8282.
NOTE: The address http://192.168.1.1:8282 may also be used .
33
Page 32

Getting Started
34
Configuring the first client computer
Configuring the first client computer
The Magnia SG30 "Client Setup- and Documentation CD"
automatically sets up your client computer to access the
Magnia SG30. Specifically, it:
❖ Sets up the network configuration
❖ Creates a user account on your PC and the server
❖ Maps drive G: on the PC to your personal directory on
the Magnia SG30
❖ Maps drive H: on your PC to the public directory on the
Magnia SG30
❖ Adds icons to the desktop on your PC for accessing the
built-in intranet and Digital Central Intranet
Follow these steps:
1 If it’s not on already, turn on the client computer. If it is
on, close all other applications to avoid a potential loss of
data.
2 Insert the Magnia SG30 "Client Setup- and
Documentation CD" into the CD-ROM drive on the
client computer.
The Magnia SG30 "Client Setup- and Documentation
CD" menu appears.
3 Select Connect this PC to your Magnia SG30.
The setup wizard runs automatically and displays the
Welcome screen. This wizard automatically configures
your computer for access to the Magnia SG30.
N
OTE: The Client Setup- and Documentation CD will automatically
change your client computer’s networking configuration. If you do
not want to have your configuration modified by the “Client Setupand Documentation CD", click Cancel.
Page 33

Getting Started
Configuring the first client computer
4 Click Next.
The setup wizard examines the system and briefly
displays a setup screen.
Then the setup wizard displays the User account
information screen.
5 Enter your personal information.
The logon name is the name you will type every day to
log in to your PC and to the network. Pick a name that is
easy to remember. If you already have a user account set
up on your client computer, you can use this account.
Logon names are conventionally flastname where “f” is
the first initial of the first name, and “lastname” is the
last name of the user. However, you may use any
combination of letters and numbers you wish.
Your password can be any combination of letters and
numbers. Make sure it’s a name you will be able to
remember, but not something like your birthday or
nickname that others can easily guess.
35
NOTE: The Administration password changes to match the first
user’s password.
After you’ve entered the personal information, the
Configure Now screen appears.
6 Click Next to continue answering the questions about
configuring the Magnia SG30’s Internet connection.
Your system may restart, after which the setup wizard
automatically completes the network setup of your
computer.
After restarting, the setup wizard displays the Client
Setup Wizard screen, and the configuration process will
complete without further interaction.
Page 34

Getting Started
36
Configuring the Magnia SG30
Configuring the Magnia SG30
The first time you run the Client Setup Wizard, it
automatically continues with the Server Setup Wizard
Welcome screen. The Server Setup Wizard performs the
initial configuration of your server. Configuration choices
you make during this server setup process can always be
changed later through the server’s Administration Web
interface.
If you need to run the Server Setup Wizard manually, simply
use your web browser on a client connected to the
Magnia SG30 local network, and use the following URL:
http://192.169.1.1:8282/wizard.
The setup wizard will ask you to set these options:
❖ Security mode (“Ease-of-Use” or “High Security”)
❖ System date and time (Locale)
❖ Internet connection (Cable, DSL or telephone)
Click Next and follow the instructions on the screen to
prepare the Magnia SG30.
Security modes
The Magnia SG30 supports two security modes:
❖ Ease-of-Use mode allows you to create user accounts on
the Magnia SG30 at any time by running the Client Setup
Wizard. All user accounts have access to basic server
management (administrative) functions using the
Administration Web site.
Page 35

Getting Started
Configuring the Magnia SG30
DEFINITION: Each person who uses the network must have a user
account set up for them. User accounts determine access to
personal files, data, and server administration.
User accounts are level 1, 2 or 3.
Level 1 users have no special account privileges,
level 2 users can access basic server management functions, and
level 3 users have access to all network features.
❖ High Security mode requires you to set up new user
accounts before you run the setup wizard on the client
computer.
With High Security mode, you must assign access
privileges (level 1, 2 or 3) for each user.
You may always change the server’s security mode after your
network computers are set up.
37
Page 36

38
Getting Started
Configuring the Magnia SG30
Magnia SG30 locale
The wizard automatically sets its date and time to that of the
client computer you’re using to set up the server.
If these values are incorrect, enter the proper date, time, and
time zone for the Magnia SG30.
Sample Date and Time screen
You also have the opportunity to set the system language,
which is the local language you wish to use on the LCD
screen. Select this from the list of available languages in the
drop-down box.
Internet connection information
You can configure your Magnia SG30 to access the Internet
through your broadband or modem or ISDN connection.
To configure your Magnia SG30 to access the Internet
through your broadband or dial-up connection, select Ye s. If
you do not wish to set up the system for Internet access at this
time, select No and click Next. (You can always configure
your Internet access using the Administration Web interface
at a later time.) If you select No, your server setup is
complete.
To configure Internet access:
Page 37

Getting Started
Configuring the Magnia SG30
1 Enter the Internet connection information such as:
❖ Server name
❖ Primary and secondary DNS
❖ User ID and password
If you’re unsure how to configure your Internet
connection, ask your Internet Service Provider (ISP) to
help you.
NOTE: The setup wizard automatically takes you through setting
up the Toshiba Magnia SG30 Appliance Server only once.
To change the configuration, use the Administration Web site. To
access the site, click the Admin icon on your desktop.
If you selected Yes, the Internet connection choice screen
appears. Note that the ISDN or modem option will not
appear if the optional PCMCIA card is not installed.
39
Sample Internet Connection choice screen
2 Select what type of Internet access you will be using.
Broadband access support includes:
❖ Cable modem or corporate network connection
Page 38

40
Getting Started
Configuring the Magnia SG30
❖ DSL with Ethernet modem (DSL modems connected
with USB are not supported)
For broadband connections, continue to “Broadband
connection” on page 40. Alternatively, you can select
phone- based access to the Internet using the modem
port. Continue at “Dial-up connection” on page 44.
Broadband connection
For a broadband connection, the following screen appears.
Sample ISP address type screen
1 Select ISP address type.
Determine whether your ISP uses a fixed IP address
(provided by your ISP) or is set up to assign the addresses
whenever your computer connects. If you don’t know, try
the DHCP option or call your ISP for assistance.
If you select Static IP, you will be asked to enter your IP
address and subnet mask. These are sets of numbers
joined with periods, like 192.168.123.12, and
255.255.255.0. You will also need to enter the primary
DNS, which is an IP address like the above examples.
Page 39

Getting Started
Configuring the Magnia SG30
Sample ISP Static IP address screen
2 Enter the secondary DNS and Gateway addresses, if your
ISP provides them. Otherwise, leave these fields blank.
Click Next to continue.
If you selected DHCP on the ISP address type screen, the
computer name screen appears. This screen assigns the
Magnia SG30 a specific computer name that is used only
when communicating with your ISP’s DHCP server.
41
Sample computer name screen
3 If your ISP has provided a specific computer name, type
the name in the computer name field. Otherwise, leave
the field empty.
If you leave the computer name field empty, the server
automatically assigns a computer name.
Page 40

42
Getting Started
Configuring the Magnia SG30
When configuring broadband using DSL, you can also
enter a username and password. This is used if your ISP
uses PPPoE for its connection protocol.
Sample username and password screen
DSL configuration also allows you to select the idle
connect timeout value. Don’t change the idle connect
timeout value from the default “Never” unless you pay
for DSL connect time by the minute.
4 Click Next to continue.
Page 41

Getting Started
Configuring the Magnia SG30
A verification screen appears.
Sample verification screen
5 If all entries are correct, click Next to save your settings.
6 Click Finish to end the server setup process.
43
Page 42

44
Getting Started
Configuring the Magnia SG30
Dial-up connection
NOTE: Some phone-based ISPs require special software to access
their networks. These ISPs include America Online
ISP that requires advertisements to be downloaded and displayed
on your client computer while connected. These ISPs cannot be
used with the Magnia SG30.
If you purchased the Magnia SG30 with the optional modem,
you can configure the system for modem- or ISDN card
based Internet access.
1 The setup wizard requests information specific to
phone-based access. Enter this information, including the
phone number you use to connect to your ISP and the
account name and password used to validate access.
2 When you have completed your dial-up entries, a
verification screen appears. If everything is correct, click
Next.
®
, and any free
Page 43

Getting Started
Configuring wireless access
Configuring wireless access
The Magnia SG30 offers a built-in wireless access point
option. This option enables you to use the server as a wireless
access point for your local network. With this option, you can
provide both wireless 11-Mbit and wired 100-Mbit local
network access.
Wireless clients can easily access your network, with all of
the same features and capabilities as clients directly wired to
the seven internal LAN ports. Using the wireless access point
option provides immediate, easy and fast expansion of your
network with unparalleled flexibility.
If you purchased your Magnia SG30 without the wireless
access point option, you can purchase it as a
customer-installable feature from Toshiba.
Determining if wireless access point is installed
To determine if the wireless access point option has been
installed on your Magnia SG30, open the Administration
Web interface, and click the Network tab. If wireless access
point is not installed, a status screen showing the option is not
present.
45
Sample Wireless Access Point not installed screen
If wireless access point is installed, a configuration page
appears that enables you to configure the wireless features.
Page 44

Getting Started
46
Configuring wireless access
Configuring wireless features
When the wireless access point option is installed in the
Magnia SG30, wireless access should be possible using the
configured defaults. However, it is recommended that you
review the wireless configuration and modify it as necessary.
1 Open the Administration Web site, click the Network
tab, then select Wireless.
The wireless configuration screen appears.
Sample Wireless configuration screen
2 Select the Enable Wireless Access Point check box to
enable wireless access. Clear the check box to disable
wireless access.
3 In the Network Name box, enter your network name
(sometimes known as the ESSID).
Each wireless client is configured using the same
network name. If there is more than one wireless access
point, the network name determines which access point
each wireless client uses.
4 In the Channel box, select which radio frequency to use
for wireless communications.
Page 45

Getting Started
Configuring wireless access
This same frequency must also be specified in each
wireless client’s configuration.
5 Select the Enable Data Encryption check box to
encrypt information sent between wireless clients and the
Magnia SG30. Clear the check box to disable encryption.
This feature is known as Wired Equivalent Privacy
(WEP).
6 If you enabled data encryption in step 5, click the
Configure hyperlink next to the Enable Data
Encryption check box to set up or modify the required
encryption keys (passwords).
See “Configuring Wired Equivalent Privacy (WEP) keys”
on page 48 for further instructions.
7 Select the Enable Access Control check box to specify
the wireless clients that can access your network, using
each client’s unique network card MAC address.
This security feature allows only the specified clients to
access the network through the wireless access point. See
“Configuring access control” on page 49 for further
instructions.
47
8 Select the Enable SSL (Secure Sockets Layer) check box
to use HTTPS (Secure Hyper Text Transfer Protocol) to
encrypt your usage of the Administration Web Site and
the Digital Central Web Site.
The primary purpose of this feature is to add another
layer of security to help prevent an unauthorized user on
your wireless network from changing settings in the
Administration Web Site or Digital Central Web Site.
There are additional advanced wireless configuration options.
To view and modify these options, click the Advanced
Settings hyperlink next to the Enable Wireless Access Point
check box.
Page 46

Getting Started
48
Configuring wireless access
Configuring Wired Equivalent Privacy (WEP) keys
Encryption keys are passwords that are used to ensure
privacy when transferring wireless data. To use WEP
encryption in your wireless network, all wireless client
computers must have the encryption feature installed and
enabled, and they must use the same encryption key as the
Magnia SG30.
This feature enables you to configure up to four keys, then
select which key to enable. This makes it convenient to
change the key periodically, without disrupting service while
configuring new keys.
1 Open the Administration Web site, click the Network
tab, then the Wireless tab, then click the Configuration
link next to the Enable Data Encryption box.
The following screen appears.
Sample Configure Wired Equivalent Privacy encryption keys
screen
2 Select either 13-digit Alphanumeric Value or 26-digit
Hexadecimal Value format for the encryption keys.
The default is alphanumeric. Typically, there is no reason
to change this setting.
Page 47

Getting Started
Configuring wireless access
3 Enter up to four encryption keys in the Key fields as
follows.
❖ When your wireless interface supports 64-bit
encryption and you selected alphanumeric format in
step 2, enter a five-digit alphanumeric value using
letters a through z and numbers 0 through 9 (for
example, SECU1).
❖ When your wireless interface supports 64-bit
encryption and you selected hexadecimal format in
step 2, enter a ten-digit hexadecimal value.
❖ When your wireless interface supports 128-bit RC4
encryption and you selected alphanumeric format in
step 2, enter a 13-digit alphanumeric value using
letters a through z and numbers 0 through 9 (for
example, SECURITY12345).
❖ When your wireless interface supports 128-bit RC4
encryption and you selected hexadecimal format in
step 2, enter a 26-digit hexadecimal value.
49
4 Select the key you wish to enable at this time.
5 Click Apply to save the changes.
Configuring access control
You can control wireless access to your network by
specifying each wireless client’s MAC address. MAC
addresses are 16-digit hexadecimal identification numbers
assigned to networking devices, such as adapters, at the
factory. Each adapter has a unique MAC address that cannot
be changed. The MAC address is usually printed on a label
on the back of the adapter.
Limiting network access to specific MAC addresses provides
additional security and improves network performance by
filtering extraneous traffic.
1 Open the Administration Web site, click the Network
tab, then select Wireless.
Page 48

50
Getting Started
Configuring wireless access
2 Make sure the Enable Access Control check box is
selected, then click the Configuration link next to it.
The MAC address configuration screen appears.
Sample MAC Address Configuration screen
3 To add a new MAC address to the list, enter the 16-digit
value in the New MAC Address field, then click Add.
4 To delete a MAC address from the list, click the address
you wish to delete, then click Delete.
5 Click Apply to save the changes, otherwise click Cancel.
Page 49

Using SSL
By enabling SSL (Secured Sockets Layer), the main URLs
for the Administration Web Site and the Digital Central Web
site will be redirected to an HTTPS (Secure HTTP) Web site.
HTTPS will encrypt your connections to these sites, thus
making your communication more secure. In particular, your
user name and password, which you enter to access certain
sensitive settings, will be encrypted. This adds one more
layer of wireless security should an unauthorized user access
your wireless network.
The next time you request either Web site once SSL is
enabled, you will be redirected to the corresponding HTTPS
Web site. The Administration Web Site,
http://myserver:8282/, will redirect to https://myserver:8383/.
The Digital Central Web Site, http://myserver/digital/, will
redirect to https://myserver/digital/.
Whenever you access a secured Web site, you might see the
following Security Alert message box. You can simply click
OK to proceed to the Web site.
Getting Started
Configuring wireless access
51
Security Alert - Entering a secured Web site
Page 50

52
Getting Started
Configuring wireless access
You will also be presented with a second security alert which
indicates that the Magnia SG30 is not on your list of trusted
certificate authorities.
Security Alert - your Magnia SG30 is not on your trusted list
You can simply click Yes to proceed to the Web site.
However, to avoid this alert in the future, the Microsoft
Internet Explorer browser will allow you to click View
Certificate, and then click Install Certificate... and follow
the wizard instructions from there. See your browser’s
documentation or help text for help with this on your
browser.
Advanced wireless configuration
The wireless access point feature provides several advanced
configuration options. These options should not typically be
modified. However, if you are an experienced wireless
network administrator managing a multiple access point
environment, you may wish to modify these settings.
1 Open the Administration Web interface, click the
Network tab, select Wireless, then click the Advanced
Settings link.
Page 51

Getting Started
Configuring wireless access
The Advanced Configuration screen appears.
Sample Advanced Configuration screen
Select the Reject clients using the network name ANY box
to reject connections from wireless clients with a network
name (ESSID) of “ANY.” If you clear this check box, the
Magnia SG30 accepts connections from wireless clients with
a network name of “ANY,” in addition to wireless clients
with a network name that matches the configured local
network name. (See “Configuring wireless features” on
page 46 for information on configuring the local network
name.)
53
The Distance between access points option prevents overlap
of access point service regions when multiple access points
are used. This value should not be changed unless the
Magnia SG30 is part of a network of wireless access points.
The Multicast Rate option applies to multicast
environments, which exist in some corporate networks that
have multiple access points. Typically, this value should not
be changed, as the default multicast rate of 2 Mbit/s is
supported by all wireless network interfaces. However, you
may want to use higher multicast rates when all of the
following conditions exist:
❖ Your network environment includes wireless Turbo PC
Cards only.
Page 52

54
Getting Started
Configuring wireless access
❖ The physical placement of access points was based on the
objective of creating a high-performance wireless
infrastructure with maximum data throughput, regardless
of the total number of access points required to build
such a network.
❖ All locations where wireless devices are operated have
been verified with the Client Manager tool to provide a
communications quality that is rated “Excellent” or
“Good”.
Page 53

Getting Started
Connecting and configuring other client computers
using the seven LAN ports
Connecting and configuring other client computers using the seven LAN ports
When you’ve finished configuring the Magnia SG30:
1 Connect the other client computers, each to one of the
LAN ports on the Magnia SG30.
LAN ports
55
An example of a typical local network
The client computers connected to the Magnia SG30 can
use different versions of the Windows
You can also connect Macintosh computers to the
Magnia SG30.
2 For PCs, use the Magnia SG30 "Client Setup- and
Documentation CD" to configure each additional client
computer.
To configure a PC manually, see “Manually Configuring
Clients for the Magnia SG30” on page 255 for more
information.
To configure a Macintosh, see “Configuring a Macintosh
as a Client” on page 285 for more information.
®
operating system.
Page 54

56
Getting Started
Connecting and configuring other client computers using the
seven LAN ports
Once setup is complete, the client computer starts your Web
browser and displays the Administration Web site if you are
the first user, or it displays the preinstalled intranet site if you
are a subsequent user.
Sample Intranet home page
This intranet site is fully customizable via the Administration
Web site. For more information, see “Using Your
Preinstalled Intranet Site” on page 223.
The Magnia SG30 maintains an internal intranet for the
exclusive use of the computers connected to the
Magnia SG30. The intranet is not available to outside
systems.
HINT: Before using the Magnia SG30 or accessing any external
Internet services, Toshiba recommends that you purchase a virus
detection program. Viruses have become a danger to all operating
systems and can lurk anywhere. They can range from small
annoyances to truly destructive events.
A virus detection program on your client computers automatically
check the files you download from the Internet. You’ll need to
periodically update this program, but as long as you’ve got the
latest version, your clients should be virus-free.
Page 55

Getting Started
Ways to use the Magnia SG30
For more information about setting up client computers and
user accounts, see “Managing user accounts” on page 149.
Ways to use the Magnia SG30
The Toshiba Magnia SG30 Appliance Server provides the
following networking features:
❖ File sharing: You can store files on the server’s hard disk
drives instead of on your local computer. These files are
available to any other computer connected to the
network. Files stored in your personal directory are
accessible to your client computer only when you are
logged on with your user account. Files can also be
stored in a public directory that is accessible to all users.
❖ Print sharing: The same printer can serve all computers
connected to the network.
❖ Internet gateway: All network computers can access the
Internet through the Magnia SG30. You can surf the
World Wide Web, send and receive email, and use other
Internet services.
57
❖ Wireless networking: The optional internal wireless
access point in the Magnia SG30 establishes a fast,
secure wireless network for all your clients. Mobile
systems such as notebook computers can be used
anywhere, and even desktop computers become easier to
manage and move because a wired networking
infrastructure is no longer required.
❖ Intranet service: You can customize the content of your
preinstalled intranet Web pages, which are stored in the
Magnia SG30. The pages include: Welcome page (a good
place for your mission statement), Company News (your
own electronic newsletter), Upcoming Events (an
electronic bulletin board), Docs and Forms (special
procedures), and Company Links (your favorite Web
links).
Page 56

58
❖ Scheduled Internet data backups: The Magnia SG30
Features
In addition to being easy to set up and administer, your
Toshiba Magnia SG30 Appliance Server provides:
❖ Firewall service: You don’t have to worry about
❖ Scheduled data backup: You can schedule automatic
Getting Started
Features
provides a feature allowing you to back up your data on
an external FTP site of your choosing on a scheduled
basis.
someone accessing your computers illegally over the
Internet. The Magnia SG30 comes with a built-in firewall
to protect your data.
backups of your important data on a scheduled time
frame of your choosing. It’s a good idea to back up
regularly, especially if the Magnia SG30’s hard disk
drives contain important information.
❖ Data redundancy: You can use your second hard disk
drive to back up the the primary drive. You can take a
snapshot of your main hard disk every night, so that if
anything goes wrong you can simply switch drives.
❖ Software upgrades: As software upgrades or new
features become available, you can download and install
them from the Internet quickly and easily.
❖ Email: The Magnia SG30 comes with local email
services. Every user added to the system can exchange
email with other local network users. You can also
establish Internet email services, and have your domain’s
email retrieved to the Magnia SG30, or clients can access
an external email service directly through your server’s
Internet gateway.
Page 57

What to read next
Every LAN has someone who configures the network
equipment, assigns email addresses, and sets up network
users. This person is the network administrator.
If you are the network administrator, refer to “Setting Up
Your Local Area Network” on page 79 to continue setting up
your system.
If you are a network user, the only chapter in this book you
will need is “Using the Network” on page 61.
Getting Started
What to read next
59
Page 58

Chapter 2
Using the Network
A network is a group of computers connected together so that
they can share services such as printers, files, disk space and
backup. Your Toshiba Magnia SG30 Appliance Server
provides networking services to all the computers connected
through the private Ethernet
through the optional built-in wireless network. These
computers are called “clients.”
®
LAN ports on its back panel, or
After your client computer has been connected to the
Magnia SG30, it needs to be configured with the
Magnia SG30 "Client Setup- and Documentation CD". Your
network administrator may do this for you. Then each time
you start your computer you can automatically connect to the
Magnia SG30. The process of connecting to the server is
called “Logging in.”
61
Page 59

Using the Network
62
Logging in to the network
Logging in to the network
When you start your computer, you will be asked for a user
name and password to connect to the server. Both your client
computer and the Magnia SG30 check your user name and
password entries to make sure that you are an authorized user
of the system. Therefore, the user name and password for
your client computer must match the user name and password
registered with the Magnia SG30 exactly.
Sample login screen
®
The various Microsoft
manage user names differently.
The Microsoft
Windows
names in separate files on the computer’s hard disk. They do
not have elaborate security, and therefore allow you to cancel
the login process by clicking Cancel or pressing the
key on the keyboard. If you cancel the login process on the
Windows
access to the client computer only, you will not be logged in
to the Magnia SG30 and, therefore, will not have use of its
resources.
The Windows NT
operating systems have sophisticated security and user
management features. They will not allow you to access the
client computer without entering a user name and password.
®
Windows® 95, Windows® 98, and
®
Me operating systems each maintain their user
®
95, 98, or Me operating system, you will have
Windows® operating systems
®
, Windows® 2000 and Windows® XP
Escape
Page 60

Types of users
Your Magnia SG30 categorizes user accounts by different
types of administrative access permissions, identified by their
access (or security) level.
❖ Level 1 users cannot use the Administration Web site to
configure the Magnia SG30. This access level is only
used if your Magnia SG30 is configured in High Security
mode.
❖ Level 2 users have limited access to the Administration
Web site but lack security clearance to change sensitive
settings. The Magnia SG30 is preset to Ease-of-Use
mode, in which Level 2 is the default security level.
❖ Level 3 users have full access to all functions on the
Administration Web site. The network administrator is a
level 3 user, and is automatically assigned to the first user
that is set up on the Magnia SG30.
Using the Network
Types of users
63
Notes for systems with Windows NT, Windows 2000 and Windows XP operating systems
TECHNICAL NOTE: If you have a pre-existing network setup, you
should consider manually configuring clients.
See “Manually Configuring Clients for the Magnia SG30” on
page 255 rather than using the "Client Setup- and Documentation
CD".
The Windows NT, Windows
systems also have different types of users. This is important
because, when you log in to your client computer, you are
actually logging in to the Magnia SG30 as well. Furthermore,
your user name has a user type associated with it on both the
client computer and the Magnia SG30.
2000 and Windows XP operating
Page 61

64
Using the Network
Types of users
Both operating systems have a default user name called
“administrator” that has been granted administrator rights and
can change sensitive settings.
The Magnia SG30 "Client Setup- and Documentation CD"
can only be run by a user name that has administrator rights.
On Windows 2000 and Windows XP, it creates a user account
with administrative rights. On Windows NT, the account
created does not have administrative rights.
As a result your user name and password on your client
computer may have administrator rights in the
Windows NT/Windows
systems, but the same user name and password on the
Magnia SG30 may not.
Equally, your user name and password may lack
administrator rights on your client computer, but have level 3
access rights on the Magnia SG30.
2000/Windows XP operating
Page 62

Using the Network
Placing files on the network
Placing files on the network
When you store data on your local computer, this information
is usually stored in files on the computer’s hard disk. Later,
when you want to work on the information again, you open
these files and can modify, print, or use the data. Information
stored on your local computer is normally accessible only
when you are using your computer.
The Magnia SG30 can act as a central file server, allowing
you to save files on the Magnia SG30 instead of your local
computer. Saving files on your server can have several
advantages:
❖ Extra Storage: If the hard disk on your local computer is
almost full, you can save information to the
Magnia SG30. The Magnia SG30’s hard disk becomes an
extension of your computer, providing extra storage
when needed.
❖ Data Backup: Because the information on your
Magnia SG30 is centrally located, copies of everyone’s
work can be copied to a remote location, such as the
Internet. This type of data backup provides an extra sense
of security. If something happens to your disk or a file is
accidentally deleted, you can retrieve the file from the
backup copy. The Magnia SG30 can even act as a backup
device itself.
65
❖ File Sharing: A public area is provided on the
Magnia SG30’s hard disk where you can place files that
need to be shared with other computers on the network.
This “scratch pad” area makes it easy to transfer
information between network users.
Each user account created on the Magnia SG30 has its
own folder in which to place files. This folder is private,
and cannot be viewed by other users (except for the
network administrator, who can view any files, including
those in private account folders). These folders are
named after the user account. For example, the account
“jsmith” would have a private folder named “jsmith.”
Page 63

66
Using the Network
Placing files on the network
An additional public folder is provided on the server.
Anyone can create, modify, or delete files in this folder.
When your client computer is configured for access to the
network, the setup wizard automatically creates your
account’s private folder as a special mapped disk drive. It also
maps the second hard disk drive to the public folder on the
Magnia SG30. These drives look just like the C: drive on
your computer, but have a different letter.
You can access these drives from your computer using My
Computer, Windows Explorer or by browsing any file
selection dialog in an application.
If your computer has not been set up using the Magnia SG30
"Client Setup- and Documentation CD", you can still access
the files on the Magnia SG30 using Network Neighborhood
(or My Network Places). By browsing using this utility, you
can see the Magnia SG30 (named “Myserver” as the default
name).
Double-click the Myserver icon to show the folders available
for access, including your private folder and the public folder.
Storing files on the server
Storing files on the server is easy. Simply copy files from the
folder in your local client computer to the Magnia SG30. You
can also access these files directly with applications such as
word processors, spreadsheets, database applications, and
other programs, by simply specifying that the files reside on
the private or public drive.
To gain access to the files on the Magnia SG30, you must be
logged in to your local client computer, and your login
account must match the account established on the
Magnia SG30. If you used the setup wizard, these accounts
were established automatically. However, if you have
multiple user accounts on your client computer, the account
you use when you log in determines which files you see on
the Magnia SG30.
Page 64

Sharing files
A basic use of the Magnia SG30 is for file sharing. Each
client computer connected to the Magnia SG30 can access
not only its own hard disk drive(s), but also two special areas
on the Magnia SG30’s hard disk drive. The two areas are:
❖ \public, which is used to store shared files and documents
to which all network users have access
❖ \personal, which is used to store personal files and
documents to which only the individual client computer
has access
To view these areas:
1 Open the Windows
My Network Places folder).
2 Select the Magnia SG30.
Using the Network
Sharing files
®
Network Neighborhood folder (or
67
Sample Network Neighborhood screen
The default name for the Magnia SG30 is “Myserver.”
3 Locate the \personal and \public drive in your local My
Computer folder.
Page 65

68
Using the Network
Sharing files
These folders are mapped drives that point to an area on
the Magnia SG30.
Sample My Computer screen
To map drives to these areas without using the Magnia SG30
"Client Setup- and Documentation CD", follow the
instructions based on your operating system.
Mapping drives using the Windows 95 and Windows 98 operating system
1 Double-click the Network Neighborhood icon on the
Desktop.
2 In the Network Neighborhood window, double-click the
Magnia SG30 icon (usually labeled “Myserver”).
3 Click the folder labeled Personal.
4 From the File menu, select Map Network Drive….
5 Select from the drop-down list the drive letter you wish to
map to your personal folder on the Magnia SG30, select
the Reconnect at logon check box, and click OK.
6 Repeat steps 3-5 to map the folder labeled Public.
Page 66

Using the Network
Sharing files
69
Mapping drives using the Windows Me operating system
1 Double-click the My Network Places icon on the
Windows Desktop.
2 The Network Places window appears.
3 From the Tools menu, select Map Network Drive….
4 In the box labeled Drive, select from the drop-down list
the letter you wish to map to your personal folder on the
Magnia SG30.
5 In the box labeled Path, type
If the name of your Magnia SG30 has been changed from
the default “Myserver,” substitute the new name.
6 Check the Reconnect at logon check box, and click OK.
7 Repeat steps 1-6 to map the public drive. For the path
name type
\\Myserver\public.
\\Myserver\personal.
Mapping drives using the Windows NT operating system
1 Double-click the Network Neighborhood icon on the
Desktop.
2 In the Network Neighborhood window, double-click the
Magnia SG30 icon (usually labeled “Myserver”).
3 Click the folder labeled Personal.
4 From the File menu, select Map Network Drive… .
5 Select from the drop-down list the drive letter you wish to
map to the personal folder on the Magnia SG30, check
the Reconnect at logon check box, and click OK.
6 Repeat steps 1-5 for the folder labeled Public.
Page 67

Using the Network
70
Sharing files
Mapping drives using the Windows 2000 operating system
1 Double-click the My Network Places icon on the
Desktop.
The Network Places window appears.
2 From the Tools menu, select Map Network Drive… .
3 In the box labeled Drive, select from the drop-down list
the letter you wish to map to the personal folder on the
Magnia SG30.
4 In the box labeled Path, type
If the name of your Magnia SG30 has been changed from
the default “Myserver,” substitute the new name.
5 Check the Reconnect at logon check box, and click OK.
6 Repeat steps 1-5 to map the public drive. For the path
name type
\\Myserver\public.
\\Myserver\personal.
Mapping drives using the Windows XP operating system
1 Click Start.
2 Select My Computer.
3 From the Tools menu, select Map Network Drive… .
4 In the box labeled Drive, select from the drop-down list
the letter you wish to map to the personal folder on the
Magnia SG30.
5 In the box labeled Path, type
If the name of your Magnia SG30 has been changed from
the default “Myserver,” substitute the new name.
6 Check the Reconnect at logon check box, and click OK.
7 Repeat steps 1-5 to map the public drive. For the path
name type
\\Myserver\public.
\\Myserver\personal.
Page 68

Using the Network
Technical information on file sharing
The Magnia SG30 uses the Server Message Block (SMB) file
sharing protocol for file sharing services. This protocol is
supported by the Windows 95/98 and Windows Me operating
systems, as well as by the Windows NT, Windows 2000 and
Windows XP operating systems. If you are using an Apple
Macintosh
Magnia SG30 using AppleTalk or use a commercial product,
such as “Dave” to obtain SMB access. For more information
about configuring a Macintosh, see “Configuring a
Macintosh as a Client” on page 285.
The network administrator can set limits on how much disk
space a single account can use.
If your Magnia SG30 has a second hard disk drive, your
network administrator can make its disk available for general
public storage in addition to the private folders established
with all accounts. For more information, see “Using the
second disk drive” on page 174.
®
, you can either configure it to access the
Sharing files
71
®
Page 69

Using the Network
72
Sharing a printer
Sharing a printer
Another important feature of the Magnia SG30 is that it
allows all users to share a single network printer. In some
cases, the network printer can replace individual printers. In
other cases, the network printer is an additional higher-speed
and higher-resolution device.
Print jobs sent to this single network printer are stored in a
queue on the Magnia SG30 and are processed on a first-come
first-served basis. You can even send print jobs to the shared
network printer from a remote location when you are
connected to the local network through a dial-in or VPN
connection.
The Magnia SG30 supports a printer connected directly to its
USB printer port, or a network enabled printer connected to
your local LAN (connected to the 7 port built-in switch).
Page 70

Using the Network
Sharing a printer
Connecting the printer to the Magnia SG30
If you plan to use a printer with a USB connection, the printer
must be connected to the printer port on the back of the
Magnia SG30. If the printer is a network printer supporting a
LAN network connection, it should be plugged in to the
internal switch. Normally your network administrator does
this when setting up the LAN.
73
Internal switch
Magnia SG30 printer port
NOTE: Make sure the power for the printer is turned on before you
attempt to configure the network to use it.
USB ports
Connecting a client computer to the network printer
Although the screen displays vary slightly between the
different Microsoft Windows operating systems, the way you
configure the network printer is much the same. You will
probably need the device driver diskette or CD that came with
the printer, as well as your original Microsoft Windows Setup
Disk.
Page 71

74
Using the Network
Sharing a printer
General Windows procedure
Follow these steps to connect your client computer to the
Magnia SG30 printer.
1 From the Windows Start menu, select Settings, then
Printers.
The Printers folder appears on your desktop.
2 Double-click the Add Printer icon. It should be the first
icon displayed.
3 When the Add Printer Wizard appears set these options:
❖ For Is the printer attached to your computer?
select the setting Network printer.
❖ For Network path or queue name, type
\\Myserver\printer.
If the name of your Magnia SG30 has been changed
from the default “Myserver,” substitute the new
name.
Sample Add Printer Wizard screen
Page 72

Using the Network
Sharing a printer
❖ For Manufacturer and Printer, select from the lists
provided.
To use your device driver diskette, click Have Disk,
and follow the directions on screen.
4 Print a test page to verify that the printer is configured
correctly.
75
Procedures for the Windows 98 operating system
This example uses the Windows 98 operating system. The
process is very similar on other Windows operating systems.
1 Click Start, Settings, then Control Panel.
The Control Panel window opens.
2 Double-click Printers.
The Printers window opens, listing the network printer
and any local printer connected to your computer.
3 Double-click the Add Printer icon, and select the
Network printer option.
4 Type the name of your Magnia SG30 (the default is
“Myserver”) or use Browse to find the server and printer.
The name of the shared network printer on the
Magnia SG30 is “printer.”
The Windows Add Printer Wizard continues with the
printer driver installation process.
5 Install the driver on your client computer as you would
for any printer connected locally.
Once your client computer has been configured for the
printer, you may use the network printer just like any printer
connected directly to your computer.
Page 73

Using the Network
76
Sharing a printer
Deleting print jobs from the print queue
Should you send a print job to the network printer by mistake,
you can cancel the print job by using the Administration Web
site (provided you are a level 2 or 3 user).
1 Click the Admin icon on your desktop.
The Administration Web site opens.
2 Click the System tab and the Printer page.
The Administration Web site displays the printer
information.
3 Select the print job(s) to delete, and click Delete Selected
Jobs.
The selected print job(s) are removed from the printer
queue.
Page 74

Dial-in access
The Magnia SG30 has an optional modem or an ISDN card
that allows you to log in to the network from remote locations
(such as your home) over a phone line —provided your
network administrator has enabled this option and granted
your user name Dial-In Access privileges.
All the other user name and password rules apply to the
remote client computer. This means that the computer you are
dialing in from must have the same user name and password
as your account on the Magnia SG30.
Once connected by modem or ISDN, you can do anything
that you are able to do when connected locally including
accessing public and personal files, printing to the network
printer, and making backup copies of your files to the
Magnia SG30.
Exploring your intranet site
Using the Network
Dial-in access
77
The Magnia SG30 maintains an internal intranet for the
exclusive use of the systems in the local area network. It is
not available to outside systems.
To access the Magnia SG30’s intranet, click the Intranet
icon.
The intranet home page opens in your Web browser.
Your company may customize and use the intranet site for
whatever purpose it wishes. For more information, see
“Using Your Preinstalled Intranet Site” on page 223.
Page 75

Chapter 3
Setting Up Your Local Area Network
This chapter describes the basic configuration options for
setting up your Local Area Network (LAN) and connecting to
the Internet. This chapter is for the network administrator.
Additional configuration options for technically minded users
are described in “Managing the Server” on page 149.
Planning your network
This section describes how to set up your Toshiba Magnia SG30
Appliance Server
DEFINITION: A server is the central computer to which other
computers connect so that they can share services, such as
printing, hard disk space, and the Internet.
In a network, the individual computers connected to the server are
called client computers, or clients.
for the first time.
79
Page 76

80
Setting Up Your Local Area Network
Planning your network
Before you can actually connect your network, you need to:
❖ Plan what equipment to use, including any wireless
accessories that may be needed
❖ Select appropriate locations for the Magnia SG30 and
client computers
❖ Plan and route cabling to the locations of each client
device. (Ethernet cable length and path is key to planning
the physical location)
❖ Plan and execute wireless area coverage (optional).
❖ Ensure that adequate power is available to run the
equipment
❖ Consider making standby power available for the
Magnia SG30 (optional)
❖ Take into consideration the location of connections to the
telephone or cable system for access to the Internet
If wireless is used, consider distances of the Magnia SG30 to
wireless clients. Wireless access may be usable up to 300
feet, though the usable distance can be greatly reduced by
walls and other interference caused by machinery or other
electronic devices. For best results, the Magnia SG30 should
be located in a central position as close to wireless client
computers as practical.
NOTE: Wireless security should be taken seriously. The Magnia SG30
supports WEP as well as MAC address filtering. You should also
consider enabling SSL for the Administration Web site and Digital
Central. For more information, refer to “Configuring wireless
access” on page 45.
A single Magnia SG30 supports up to seven client computers
directly connected to its internal LAN ports. Additional client
computers can be connected using an additional hub
accessory or through the wireless option.
Page 77

Connecting to the Internet requires that you subscribe to an
Up t
Internet Service Provider (ISP). There are many service
providers to choose from.
Network topologies
DEFINITION: A topology is the physical layout of the network,
including how the devices are connected.
The Magnia SG30 supports several network topologies,
including:
❖ Stand-alone with modem connection
❖ Stand-alone with broadband connection
❖ Corporate environment
Stand-alone with modem connection
Setting Up Your Local Area Network
Planning your network
81
This is a widely used topology. It has these characteristics:
o seven client computers
Modem port
Modem connection
❖ The Magnia SG30 is used as the sole (stand-alone) server
within the network.
❖ The modem port allows dialing out to the Internet.
Wireless access to additional clients
Firewall
Page 78

82
Setting Up Your Local Area Network
Planning your network
❖ The firewall is automatically on, but can be turned off.
DEFINITION: Firewall is a term for the security procedures used to
prohibit unauthorized users from gaining access to the resources
on the network.
For more information about firewalls, see “Internet security and
the firewall” on page 120.
For this topology, connect a standard telephone cable to the
modem port and to the RJ11 port on the telephone or wall
jack.
Once you have configured the Magnia SG30 with your
Internet Service Provider’s dial-up settings, any client
computer can request Internet content, such as a Web page or
email, and the Magnia SG30 will automatically dial out to the
Internet.
Stand-alone with broadband connection
Up to seven computers
Cable modem / DSL connection
Broadband connection
The Magnia SG30 can connect to broadband communications
through the public Ethernet port.
Using an RJ45 cable, connect the Magnia SG30’s public
Ethernet port to a cable modem or Digital Subscriber Line
(DSL) modem.
Page 79

Setting Up Your Local Area Network
Planning your network
83
Corporate environment
In this topology, the Magnia SG30’s public Ethernet port is
connected to a corporate LAN.
Direct connection to a LAN
Direct connection to the corporate LAN is via DHCP client
or static IP address.
DEFINITION: DHCP (Dynamic Host Configuration Protocol) is a
TCP/IP protocol that enables PCs and client computers to get
temporary IP addresses from centrally-administered servers.
You perform the initial setup through the private
(Magnia SG30) network. Assuming the corporate LAN can
be considered a trusted and secure environment, you can turn
off the Magnia SG30 firewall. This way, the preinstalled
intranet and Administration Web site can be accessed from
clients connecting via the corporate LAN.
Wireless networking
Wireless communications provide the ability to connect client
computers to the Magnia SG30 and the network to the
Internet without using cables.
The Magnia SG30 can be purchased with a built-in wireless
capability, so that the server acts as the wireless access point
for your wireless network. If the Magnia SG30 contains the
wireless access point option, simply configure it for use (see
“Configuring wireless access” on page 45). Make sure clients
systems that are to be part of the wireless network have a
wireless 802.11b PC Card or PCI card installed.
Page 80

Setting Up Your Local Area Network
84
Planning your network
Physical considerations
Locate your Magnia SG30 in a safe place, away from work
and recreation areas.
Environment
❖ Place the server in a clean, dust-free, and well-ventilated
place
❖ Place the server on a level and steady surface
❖ Operate the Magnia SG30 under the following
temperature and humidity conditions:
Ambient temperature: 50° F to 95° F (10º C to 35º C)
Relative humidity: 30% to 80% Rh (no condensation)
CAUTION: Avoid exposing the Magnia SG30 to condensation
during use and storage. Condensation can corrode components
and short-circuit electrical circuits if the unit is on.
To avoid damage from condensation when the room temperature
is too high or too low, wait about an hour to allow the Magnia
SG30 to adjust to the ambient conditions of the room before
turning it on.
Other considerations
Never place the Magnia SG30 upside down or in any of the
following places:
❖ Where it will be exposed to direct sunlight
❖ Where it will be exposed to vibration or shock
❖ Near any devices that generate a strong magnetic field or
produce radio frequency noise—such as a radio, TV,
large motor, or loudspeaker
❖ Where the temperature and humidity change constantly,
near an air-conditioning vent, fan, or heat source
Page 81

Setting Up Your Local Area Network
Planning your network
❖ Near liquids or corrosive chemicals
CAUTION: If debris or liquid gets in the Magnia SG30, shut it
down, set the Power/Shutdown button to Off, and unplug the
power cable from the AC outlet.
Do not turn the unit back on. Contact an authorized Toshiba
service provider immediately.
85
Power requirements
Before plugging the power cable into a wall outlet, make sure
the AC power source and the over-current protector (circuit
breaker current rating) are sufficient to handle the
requirements of the Magnia SG30.
To ensure a continuous supply of power, Toshiba recommends
the use of an Uninterruptable Power Supply (UPS).
WARNING: To ensure proper grounding of the Magnia SG30 and
avoid a possible fire hazard, only use the power cable provided.
Set the power supply setting on the back of the Magnia SG30
to match your local voltage requirement.
Power supply setting
Power supply setting
Page 82

Setting Up Your Local Area Network
86
More about connecting client computers
More about connecting client computers
The “Quick start procedure” on page 22 explains the basics
of connecting and configuring client computers for the local
network if you have already set it up.
You can connect clients to the Magnia SG30 and configure
them quickly and easily using the Magnia SG30 "Client
Setup- and Documentation CD". This is the recommended
method of setting up client computers for your private
network.
The "Client Setup- and Documentation CD" will modify your
client computer’s network configuration to match that of the
Magnia SG30. If your client computer is already configured
for use with another network (such as a corporate LAN), you
may wish to manually configure your client for Magnia SG30
access.
If you need to set up client computers without using the
"Client Setup- and Documentation CD", see “Manually
Configuring Clients for the Magnia SG30” on page 255. To
configure a Macintosh, see “Configuring a Macintosh as a
Client” on page 285.
Dial-in access
The Magnia SG30 has an optional modem or an ISDN card
that allow users to log in to the network from remote
locations (such as their homes) over a phone line. If you
would like to allow users to connect via modem or ISDN, you
must first connect the Magnia SG30 to a working phone line.
1 Connect a telephone cable from the modem (or ISDN)
port to the telephone jack.
2 At the remote location, connect the computer to the
telephone or ISDN line.
Page 83

Setting Up Your Local Area Network
More about connecting client computers
87
Configuring the Magnia SG30
To perform this procedure, you must be logged in with a user
name that has level 3 access. To enable Dial-In access:
1 Click the Admin icon on the client computer’s desktop to
access the Administration Web site.
2 Click the Network tab.
3 In the Network section of the tab, select I want to:
Enable Dial-In.
4 Click Enable/Disable Users.
The dial-in screen appears.
5 Select the Dial-In Enabled check box next to a user
account to enable dial-in access for that user. To disable
access, clear the check box.
6 Click Apply to save your changes. Otherwise, click
Cancel.
Configuring the client computer
Even with the Dial-In service enabled, you must grant dial-in
access to each user name individually. By default no users
can dial in. To allow a user to dial in to the Magnia SG30:
1 Click the Admin icon on the client computer’s desktop to
access the Administration Web site.
2 In the Users section of the System page, check the
Dial-In Access option on that user’s account
configuration page
To perform this procedure, you must be logged in with a user
name that has level 3 access.
After the user name has had “Dial-In Access” privileges
granted, all other user name and password rules still apply to
the client computer. This means that both the client computer
that the user is dialing in from and the Magnia SG30 must
have the same user name and password.
Page 84

Setting Up Your Local Area Network
88
Communicating with the Magnia SG30
Once connected to the Magnia SG30 by modem or ISDN,
users can do anything that they were able to do when
connected locally including access public and personal files,
make backup copies, and print to the network printer.
Communicating with the Magnia SG30
The Toshiba Magnia SG30 Appliance Server is a highly
reliable and simple to use device. It does not have
connections for a monitor or keyboard and cannot be
significantly altered by adding options or additional
hardware. All management of the Magnia SG30 is performed
through the Administration Web site.
Accessing the Administration Web site
The Magnia SG30 doesn’t support the connection of a
monitor or keyboard. Instead, you use your Web browser on
one of the client computers to access both the built-in intranet
Web site and the Administration Web site, which stored on
the Magnia SG30’s hard disk drive.
If you used the Magnia SG30 "Client Setup- and
Documentation CD" to set up the client computer, an icon on
the desktop labeled “Admin” provides access to the
Administration Web site.
To access the Administration Web site, click the Admin
icon on the client computer’s desktop. If the client computer
does not have this icon, direct your browser to the
following URL: http://myserver:8282 (you can also use
http://192.168.1.1:8282).
Be patient when accessing the Administration Web site. Like
any other Web site, it may take a few seconds to load.
Access to the Administration Web site is restricted to level 2
and 3 user accounts. When the Magnia SG30 is set up in
Ease-of-Use mode (default), all accounts are at least Level 2.
Some areas of the Administration Web site are restricted to
Level 3 users. If you attempt to enter these areas, you will be
Page 85

Setting Up Your Local Area Network
Communicating with the Magnia SG30
prompted for a login password. Once you have logged in, you
will be able to access all areas of the Administration Web site.
If your server is set for High Security mode, user accounts are
created as Level 1 accounts by default. Most user accounts
will not be able to access the Administration Web site.
Exploring the Administration Web site
The Administration Web site has five tabs, which link to
additional Web pages, allowing you to manage a variety of
areas for your server. Click each tab to view its page. The
Quick Help Box explains how to use each page.
❖ Reports: This tab provides current information about
several features of the network and Magnia SG30: overall
status, software upgrades, users, Internet access and
configuration, system health, email, and backup.
❖ System: This tab lets you configure a variety of system
related areas: print queues, adding, deleting and changing
user accounts, setting up and configuring local or Internet
email services, configuring or performing backups,
restoring files from previous backups, changing the
server’s Date/Time, configuring what messages appear
on the LCD panel, configuring the second disk, and
shutting down the system.
89
❖ Network: This tab provides access to pages for
configuring network-related parameters including: local
network, Firewall, wireless networking, modem
configuration, dial-in configuration and Internet
connection.
❖ Intranet: This tab lets you configure the preestablished
company intranet functions: company news, upcoming
events, common documents for download, and favorite
links. You can also use this tab to adjust the look and feel
of the intranet.
❖ Services: This tab presents additional services available
for the Magnia SG30.
Page 86

Setting Up Your Local Area Network
90
Communicating with the Magnia SG30
Turning on the Magnia SG30
Press the Power/Shutdown button on the front of the
Magnia SG30 to turn on the unit. This process takes from 45
to 60 seconds. During this time, the LCD panel displays the
message, “Magnia SG30” with an asterisk moving back and
forth. When the system has finished loading, the LCD panel
reverts to its Date/Time display, indicating it is ready for use.
Now you can access the Administration Web site, file and
printer sharing, Internet gateway and other services.
If the Magnia SG30 is shut down incorrectly, it may take
several minutes to warm up. To avoid this delay, always make
sure it is properly shut down.
Shutting down the Magnia SG30
As a general rule, you can leave the Magnia SG30 running at
all times. If you plan to unplug the unit, make sure the system
is shut down properly. Always use the Power/Shutdown
button at the front of the unit, or the shutdown command in
the Administration Web Site to turn off the Magnia SG30.
Power/Shutdown button
Shutting down the Magnia SG30
To shut down the Magnia SG30 using the Power/Shutdown
button:
1 Press the Power/Shutdown button.
The LCD panel displays a confirmation message.
2 Press the Power/Shutdown button again within five
seconds to confirm shutdown.
The LCD panel light turns off.
Page 87

Setting Up Your Local Area Network
Communicating with the Magnia SG30
The appliance is now off and safe to unplug.
NOTE: When the Magnia SG30 is shut down, a small amount of power
may still be supplied within the unit. This power preserves the last
message on the LCD panel, “System Off, Push Power to Start.”
To shut down the system using the Administration Web Site:
1 From a client computer, click the Admin icon to start the
Administration Web site.
2 Select the System tab, and click the Shutdown tab. Then
select either:
❖ Shutdown the Appliance
The system shuts down and turns itself off.
❖ Reboot the Appliance
The system shuts down, then restarts itself.
91
When the startup process is complete, the LCD panel
displays the date and time.
Magnia SG30 system date and time message
The method of shutting the system off described above (and
shutting it down using the Administrative Web interface) is a
“soft “shutdown, assuring the system software writes all data
to disk before turning the power off. You can also shut the
system down by pressing the front panel power button and
holding it down for 5 seconds. This causes an immediate
power off. This method is not recommended, as it turns
power off without allowing the software to write all data to
Page 88

Setting Up Your Local Area Network
92
Communicating with the Magnia SG30
disk. As a result, data may be lost, and the system could even
become inoperable.
Viewing LCD information
The LCD panel can display a variety of information about
your Magnia SG30. The default display shows the date and
time. Several messages may be displayed simultaneously, in
which case some messages appear only when you scroll
through the list of messages.
You can press the Status scroll button on the front of the
appliance to view the Internet IP address and other current
status information.
Urgent messages will display on the LCD panel immediately:
they don’t require use of the scroll button.
To set the LCD to display the status of certain system
conditions:
1 From the Administration Web site, select the System tab,
and click the LCD Panel tab.
The LCD options screen appears.
2 Select which options you want to display on the LCD and
click Apply.
Some of the information on the LCD panel is always displayed
and cannot be turned off. This information includes:
❖ Private address: This private TCP/IP address is set for
the local network Ethernet interface (7 port hub).
❖ Public address: This public TCP/IP address is set for the
public (Internet) Ethernet port.
❖ Time of day: This default display is frequently used to
show the system is ready.
Other information can be displayed on the LCD panel. This
optional information includes:
❖
Firewall status
operation.
: This displays the status of firewall
Page 89

Setting Up Your Local Area Network
Communicating with the Magnia SG30
❖ Software upgrades indicator: Information displays
when a new software upgrade is available for
downloading.
❖ Software upgrades status indicator: Information
displays showing whether a software upgrade installation
was successful.
❖ Backup status: This indicates whether the last backup
was successful, and the time at which the last backup was
performed.
❖ Backup image status: This shows the last time the
second hard disk was used to take a snapshot of the
primary hard drive.
❖ Restore status: Information displays on the progress of a
restore operation from a previous backup.
❖ Modem status: Information displays on the status and
settings of the modem or ISDN modem.
93
Viewing general system information and status
General system information regarding the operation and
status of the Magnia SG30 is available in the Administration
Web site, on the Status screen.
To view the status of the Magnia SG30, select the Reports
tab.
The system status screen appears. Items on this screen
include:
❖ Overall appliance health: The Magnia SG30 monitors
internal information on system operation and health.
❖ Number of print jobs queued: This function reports the
number of print jobs currently waiting in the Magnia
SG30’s print queue.
❖ Backup last performed: This reports the last time a
successful backup was performed. It does not cover
snapshots made to the second hard disk drive. The status
Page 90

Setting Up Your Local Area Network
94
Communicating with the Magnia SG30
will initially be “yellow” and will not change until a
backup is performed.
❖ Firewall is on/off: This indicates whether the firewall is
on, protecting the local network and server from Internet
attacks.
❖ Hard disk usage: This reports on the amount of disk
space used on the primary and secondary hard drives (if
configured).
❖ Current system time: This shows the system time at
which this page was displayed.
❖ Wireless Access Point: This reports on the current status
of the internal wireless access point.
More information about the options in the System status
report can be viewed by clicking on the given hyperlinks
(underlined words).
Viewing health information
The Magnia SG30 monitors hardware health indicators to
identify potential problems. This important health
information is available for you to view.
To view the “health” (current operational status) of the
Magnia SG30, select the Reports tab, and click the Health
tab.
The system health window appears.
The green bullet to the left of each item indicates that the
appliance is operating without a problem. If a problem is
detected, the bullet will turn yellow. Click each item for
further information.
Two types of hard disk drive information are monitored.
SMART drive status is an internal drive feature that allows
the drive to monitor itself and predict if a problem will occur.
Total available hard drive space is reported.
Fans are also monitored for health. If a fan fails or begins to
run too slowly, the health monitor reports this.
Page 91

Setting Up Your Local Area Network
Communicating with the Magnia SG30
The internal temperature of the Magnia SG30 is monitored at
two different locations. If the temperature exceeds the normal
limit, the health monitoring screen will indicate this. The
LCD panel will also indicate this problem.
NOTE: High internal temperatures in the Magnia SG30 can usually
be corrected by ensuring the unit is in a well-ventilated area and
the fan openings are not blocked.
Internal voltages are monitored to assure sufficient power
supply. If the voltage exceeds normal limits, it will be
indicated here.
95
Page 92

Setting Up Your Local Area Network
96
Connecting to an existing corporate network
Connecting to an existing corporate network
Instead of connecting the Magnia SG30 to the Internet, you
can connect it to another local network. This is useful if the
other network has Internet access, or if you need to transfer
files between the Magnia SG30 and the corporate LAN.
Using a suitable cable, connect the corporate LAN to the
Magnia SG30’s public Ethernet port.
Connect the corporate LAN to this port
Locating the Ethernet ports on the Magnia SG30
NOTE: Do not connect the LAN to any of the private ports. This
action may affect LAN performance. Use only the “public” port for
LAN connection.
Configure the Magnia SG30 to the corporate LAN option. If
you do this when setting the server up for the first time, you
can select this option through the Server Setup Wizard.
If you have already set up your system, use the
Administration Web site to configure the Magnia SG30.
1 Click the Network tab. Make sure the Internet menu has
been selected.
2 A screen appears confirming your Internet connection
type and configuration. Select the Internet Connection
Configure option.
3 Select the Corporate LAN or Cable Modem option.
Click Next.
Page 93

Setting Up Your Local Area Network
Connecting to an existing corporate network
4 Enter your specific network information: specify either
DHCP or Static IP address.
Once you have set up access for the corporate LAN, all
client computers attached to the Magnia SG30 will be
able to use the LAN’s Internet access.
To grant access to the Magnia SG30’s files and shared printer
to client computers on the corporate LAN, you must turn off
the appliance firewall.
To do this:
1 From a client computer, click the Admin icon to open the
Administration Web site.
2 Click the Network tab.
3 Select the Firewall menu.
4 Select Firewall off, then click Apply.
Computer systems on the corporate LAN can now access
the Magnia SG30 as long as the users have corresponding
accounts on the Magnia SG30.
97
Page 94

Chapter 4
Establishing an Internet Connection
This chapter describes the configuration options for
connecting your Toshiba Magnia SG30 Appliance Server to
the Internet.
Connecting the Magnia SG30 to the Internet
Shared Internet access
The Magnia SG30 supports phone- or ISDN-based access to
the Internet through its optional modem card or ISDN port (if
you have the SG30 ISDN version),
through its built-in public Ethernet port. When the Magnia SG30
is connected to the Internet,
can also access the Internet. This shared Internet access
allows all the client computers on your local network to use a
single Internet access line. While you may have several client
computers accessing the Internet, it appears to your ISP as if
there is only one computer connected. The Magnia SG30
or broadband access
all client computers connected to it
99
Page 95

Establishing an Internet Connection
100
Local computers
Connecting the Magnia SG30 to the Internet
takes care of routing Internet traffic to the correct client
computer.
Internet data routing
Types of Internet connections
Internet
Magnia SG30
The Magnia SG30 can connect to the Internet in several
ways:
❖ Through a phone line (at modem speeds of up to 56,000
baud)
❖ Through a cable modem
❖ Using a DSL (Digital Subscriber Line)
❖ Using ISDN
Each method has its advantages, such as speed or economy,
although the final consideration will be what your Internet
Service Provider (ISP) offers, and what kind of wiring is
available and cost effective in your locale.
When you have decided on the connection to use, contact
your local Internet Service Provider and open an account.
Page 96

Establishing an Internet Connection
Connecting the Magnia SG30 to the Internet
Once your ISP has supplied you with your account
information and the appropriate connection hardware, you
may proceed with connecting the Magnia SG30.
See “Connecting to the Internet” on page 31 for instructions
on how to connect the various Internet access options.
When you set up your first client computer, the Server Setup
Wizard gave you the option of configuring your Internet
connection based on the information you provided. You can
change this configuration using the Network tab in the
Administration Web site. If you did not set up your Internet
configuration at that time, you can do it now using the
Administration Web site. For more information, see “Internet
connection information” on page 38.
WARNING: Changing networking options and configurations will
restart the networking connections to all clients connected to the
Magnia SG30. Ongoing work may be interrupted, and data could
be lost. To avoid this, reconfigure networking options only when
the Magnia SG30 is not being actively used by client computers or
for other system operations, such as backups.
101
Configuring for phone-based Internet service
Many businesses start with a traditional phone-based
connection to the Internet. If you purchased a Magnia SG 30
with the modem option, you can connect the Magnia SG30 to
a phone line using the port on the PCMCIA card. When
configuring your Magnia SG30 for a phone-based Internet
connection, you will need information such as:
❖ Phone number (if using a dial-up ISP connection)
❖ Account number or name
❖ Password
Page 97

102
Establishing an Internet Connection
Connecting the Magnia SG30 to the Internet
❖ Primary and Secondary DNS (optional, depending on
whether the ISP requires this. Some do not).
NOTE: Some phone-based ISPs require special software to access
their networks. These ISPs include America Online, and any free
ISP that requires advertisements to be downloaded and displayed
on your client computer while connected. These ISPs cannot be
used with the Magnia SG30.
To configure your system for phone-based or ISDN-based
access to the Internet:
1 Connect your phone line to the modem port at the back of
the Magnia SG30.
2 From a client computer, click the Admin icon to start the
Administration Web site. Select the Network tab.
A screen describing your current configuration appears.
3 Click the Configure hyperlink next to the Internet
Connection section.
This takes you to the screen where you can select the type
of Internet connection to use.
4 Select the Phone Modem option and click Next.
Page 98

Establishing an Internet Connection
Connecting the Magnia SG30 to the Internet
The ISP information screen appears.
Sample ISP information screen
5 Type in your ISP’s phone number, account, and
password.
The optional setting section allows you to enter your
ISP’s DNS server information. This is not usually
required, because most phone-based ISPs provide this
information to your server automatically when it
connects. However, if your ISP gives you this
information, type it here. The check box to log in to
network is used only in rare circumstances.
103
6 When you have finished entering the information, click
Next.
A confirmation screen showing your current settings
appears.
7 If these settings are correct, click Finish.
NOTE: Your configuration changes are not made permanent until
you click Finish.
Page 99

Establishing an Internet Connection
104
Connecting the Magnia SG30 to the Internet
Once configured for dial-up phone access, the Magnia SG30
will dial your ISP and connect to the Internet whenever any
client computer connected to it (and properly configured)
attempts to access the Internet. This can happen when a client
computer accesses a Web site, checks email, accesses an FTP
site, or runs a program that attempts to access the Internet
(such as RealNetworks™ RealPlayer™).
Once the Magnia SG30 connects to the Internet using a
dial-up service, it will typically remain connected for 20
minutes after the last Internet access. If you wish to
disconnect the phone sooner than this, you can do so
manually. For more information, see “Hanging up or
disabling the modem” on page 115.
Configuring for ISDN-based Internet service
If you purchased an Magnia SG30 with the ISDN option, you
can connect the Magnia SG30 to an ISDN line using it’s
ISDN port on the PCMCIA card. When configuring your
Magnia SG30 for a phone- or ISDN-based Internet
connection, you will need information such as:
❖ Phone number (if using a dial-up ISP connection)
❖ Account number or name
❖ Password
❖ Primary and Secondary DNS (optional, depending on
whether the ISP requires this. Some do not).
NOTE: Some phone-based ISPs require special software to access
their networks. These ISPs include America Online, and any free
ISP that requires advertisements to be downloaded and displayed
on your client computer while connected. These ISPs cannot be
used with the Magnia SG30.
To configure your system for ISDN based access to the
Internet:
Page 100

Establishing an Internet Connection
Connecting the Magnia SG30 to the Internet
1 Connect your phone line to the modem card at the back
of the Magnia SG30.
2 From a client computer, click the Admin icon to start the
Administration Web site. Select the Network tab. A
screen describing your current configuration appears.
3 Click the Configure hyperlink next to the Internet
Connection section. This takes you to the screen where
you can select the type of Internet connection to use.
4 Select the Phone Modem option and click Next.
The ISP information screen appears.
105
Sample ISP information screen
5 Type in your ISP's phone number, account, and password.
The optional setting section allows you to enter your
ISP's DNS server information. This is not usually
required, because most phone-based ISPs provide this
information to your server automatically when it
connects. However, if your ISP gives you this
information, type it here. The check box to log in to
network is used only in rare circumstances.
 Loading...