

Page 1
2005 Toshiba Corporation
DVD VIDEO PLAYER
SD-6980SU
OWNER’S MANUAL
C
00839A-SD-6980SU-Cover 6/29/05 8:58 AM Page 3
Page 2
ENG-2
Safety Precautions
TO REDUCE THE RISK OF ELECTRIC SHOCK, DO NOT
REMOVE THE COVER(OR BACK).
NO USER-SERVICEABLE PARTS ARE INSIDE. REFER
SERVICING TO QUALIFIED SERVICE PERSONNEL.
This lightning flash with arrowhead
symbol within an equilateral triangle is
intended to alert the user to the presence
of uninsulated dangerous voltage within
the product’s enclosure that may be of
sufficient magnitude to constitute a risk of
electric shock to persons.
The exclamation point within an
equilateral triangle is intended to alert the
user to the presence of important
operating and maintenance (servicing)
instructions in the literature
accompanying the product.
WARNING : Do not install this equipment in a confined space such as a bookcase or similar unit.
WARNING : TO REDUCE THE RISK OF FIRE OR ELECTRIC SHOCK, DO NOT EXPOSE THIS
APPARATUS TO RAIN OR MOISTURE.
CAUTION : DVD PLAYERS USE AN INVISIBLE LASER BEAM WHICH CAN CAUSE
HAZARDOUS RADIATION EXPOSURE IF DIRECTED.
BE SURE TO OPERATE PLAYER CORRECTLY AS INSTRUCTED.
CAUTIONS
Caution: To prevent electric shock, match wide blade of plug to wide slot, fully insert.
Attention: Pour éviter les chocs électriques, introduíre la lame la plus large de la fiche dans la borne
correspondante de la prise et pousser jusqu au fond.
CAUTION
: This DVD player employs a Laser System. To ensure proper use of this product, please
read this owner’s manual carefully and retain for future reference. Should the unit require
maintenance, contact an authorized Service location.Use of controls, adjustments, or the
performance of procedures other than those specified herein may result in hazardous
radiation exposure.
To prevent direct exposure to laser beam, do not try to open the enclosure. Visible laser
radiation when open. DO NOT STARE INTO BEAM.
CAUTION: The apparatus should not be exposed to water (dripping or splashing) and no objects
filled with liquids, such as vases, should be placed on the apparatus.
SERIAL NUMBER: The serial number is found on the back of this unit. This number is unique to this
unit and not available to others. You should record requested information here
and retain this guide as a permanent record of your purchase.
Model No. ___________________________________
Serial No. ___________________________________
CLASS 1 LASER PRODUCT
KLASSE 1 LASER PRODUKT
LUOKAN 1 LASER LAITE
KLASS 1 LASER APPARAT
PRODUCTO LÁSER CLASE 1
CAUTION
RISK OF ELECTRIC SHOCK
DO NOT OPEN
Introduction
00839A-SD-6980SU-1 6/29/05 9:12 AM Page 2
Page 3

ENG-3
Introduction
Important Safety Instructions
1) Read these instructions.
2) Keep these instructions.
3) Heed all warnings.
4) Follow all instructions.
5) Do not use this apparatus near water.
6) Clean only with dry cloth.
7) Do not block any ventilation openings, Install in accordance with the manufacturer's instructions.
8) Do not install near any heat sources such as radiators, heat registers, or other apparatus (including
amplifiers) that produce heat.
9) Do not defeat the safety purpose of the polarized or grounding- type plug. A polarized plug has two blades
with one wider than the other. A grounding type plug has two blades and a third grounding prong.
The wide blade or the third prong are provided for your safety. If the provided plug does not fit into your
outlet, consult an electrician for replacement of the obsolete outlet.
10) Protect the power cord from being walked on or pinched particularly at plugs, convenience receptacles,
and the point where they exit from the apparatus.
11) Only use attachments/accessories specified by the manufacturer.
12) Use only with the cart, stand, tripod, bracket, or table specified by the
manufacturer, or sold with the apparatus. When a cart is used, use caution
when moving the cart/apparatus combination to avoid injury from tip-over.
13) Unplug this apparatus during lightning storms or when unused for long periods of
time.
14) Refer all servicing to qualified service personnel. Servicing is required when the apparatus has been
damaged in any way, such as power-supply cord or plug is damaged, liquid has been spilled or objects
have fallen into the apparatus the apparatus has been exposed to rain or moisture, does not operate
normally, or has been dropped.
15) When you use headphones on the amplifier, keep the volume at a moderate level.
If you use the headphones continuously with high volume sound, it may cause hearing damage.
16) Do not overload wall outlets; extension cords, or integral convenience receptacles as this can result in a
risk of fire or electric shock.
17) Never insert objects of any kind into this apparatus through openings as they may touch dangerous
voltage points or short-out parts that could result in a fire or electric shock. Never spill liquid of any kind on
the apparatus.
18) Keep your fingers well clear of the disc tray as it is closing. Neglecting to do so may cause serious
personal injury.
19) Do not place a heavy object on or step on the apparatus. The object may fall, causing serious personal
injury and serious damage to the apparatus.
20) Do not use a cracked, deformed, or repaired disc. These discs are easily broken and may cause serious
personal injury and apparatus malfunction.
00839A-SD-6980SU-1 6/29/05 9:12 AM Page 3
Page 4

ENG-4
Introduction
FCC WARNING: This equipment may generate or use radio frequency energy. Changes or modifications to
this equipment may cause harmful interference unless the modifications are expressly
approved in the instruction manual. The user could lose the authority to operate this
equipment if an unauthorized change or modification is made.
REGULATORY INFORMATION: FCC Part 15
This equipment has been tested and found to comply with the limits for a Class B digital device, pursuant to
Part 15 of the FCC Rules. These limits are designed to provide reasonable protection against harmful
interference when the product is operated in a residential installation. This product generates, uses, and can
radiate radio frequency energy and, if not installed and used in accordance with the instruction manual, may
cause harmful interference to radio communications. However, there is no guarantee that interference will
not occur in a particular installation. If this product does cause harmful interference to radio or television
reception, which can be determined by turning the product off and on, the user is encouraged to try to correct
the interference by one or more of the following measures:
• Reorient or relocate the receiving antenna.
• Increase the separation between the product and receiver.
• Connect the product into an outlet on a circuit different from that to which the receiver is connected.
• Consult the dealer or an experienced radio/TV technician for help.
Note:
• This unit can be used only where the power supply is AC 120V, 60Hz. It cannot be used elsewhere.
Regional code
This DVD player is designed and manufactured
for playback of region “1”encoded DVD software.
This unit can play only DVD discs labeled “1” or “ALL”.
Notes on Regional Codes
• Most DVD discs have a globe with one or more numbers in it clearly visible on the cover.
This number must match your DVD player’s regional code or the disc cannot play.
• If you try to play a DVD with a different region code from your player, the message “Check Regional
Code” appears on the TV screen.
Notes on DVDs and Video CDs
Because of problems and errors that can occur during the creation of DVD and CD software
and/or the manufacture of DVD and CD discs, Toshiba cannot guarantee that this DVD player
will play every feature of every DVD bearing the DVD logo and/or every CD bearing the CD
logo. As one of the creators of DVD technology, Toshiba DVD players are manufactured using
the highest standards of quality, and as a result, such incompatibilities are rare. If you happen to
experience any difficulty playing a DVD or a CD on this DVD player, please feel free to contact
us via the method listed in the “How to Obtain Warranty Services” section on page 74.
Notes on copyright
The unauthorized recording, use, distribution, or revision of television programs, videotapes,
DVDs and other materials, is prohibited under the Copyright Laws of the United States and other
countries, and may subject you to civil and/or criminal liability.
This product incorporates copyright protection technology that is protected by method claims of
certain U.S. patents and other intellectual property rights owned by Macrovision Corporation and
other rights owners. Use of this copyright protection technology must be authorized by Macrovision
Corporation, and is intended for home and other limited viewing uses only unless otherwise
authorized by Macrovision Corporation. Reverse engineering or disassembly is prohibited.
00839A-SD-6980SU-1 6/29/05 9:12 AM Page 4
Page 5

ENG-5
Introduction
• The product unit accompanying this user manual is licensed under certain intellectual property rights
of certain third parties. In particular, this product is licensed under the following US patents:
5,991,715, 5,740,317, 4,972,484, 5,214,678, 5,323,396, 5,539,829, 5,606,618, 5,530,655,
5,777,992, 6,289,308, 5,610,985, 5,481,643, 5,544,247, 5,960,037, 6,023,490, 5,878,080, and
under US Published Patent Application No. 2001-44713-A1.
This license is limited to private non-commercial use by end-user consumers for licensed contents.
No rights are granted for commercial use. The license does not cover any product unit other than this
product unit and the license does not extend to any unlicensed product unit or process conforming to
ISO/IEC 11172-3 or ISO/IEC 13818-3 used or sold in combination with this product unit.
The license only covers the use of this product unit to encode and/or decode audio files conforming
to the ISO/IEC 11172-3 or ISO/IEC 13818-3. No rights are granted under this license for product
features or functions that do not conform to the ISO/IEC 11172-3 or ISO/IEC 13818-3.
HANDLING CAUTIONS
• Before connecting other components to this player, be sure to turn them all off.
• Do not move the player while a disc is being played, or the disc may be scratched or broken, and the player’s
internal parts may be damaged.
• Do not put a flower vase filled with water or any small metal objects on the player.
• Be careful not to put your hand into the disc tray.
• Do not place anything other than the disc in the disc tray.
• Exterior interference such as lightning and static electricity can affect normal operation of this player.
If this occurs, turn the player off and on again with the POWER button, or disconnect and then reconnect the
AC power cord to the AC power outlet. The player will operate normally.
• Be sure to remove the disc and turn off the player after use.
• Disconnect the AC power cord from the AC outlet when you don’t intend to use the player for long
periods of time.
• Clean the disc by wiping in a straight line from the inside to the outside of the disc.
NOTES ON LOCATING
Place the DVD video player on a level surface. Do not use it on a shaky or unstable surface such as a
wobbling table or inclined stand. The loaded disc may become disaligned and damage the DVD video player.
When you place this DVD video player near a TV, radio, or VCR, the playback picture may become poor and
the sound may be distorted. In this case, place the DVD video player away from the TV, radio, or VCR.
STORING DISCS
Do not store discs in a place subject to direct sunlight or near heat sources.
Do not store discs in places subject to moisture and dust such as a bathroom or near a humidifier.
Store discs vertically in a case. Stacking or placing objects on discs outside of their case may cause warping.
MAINTENANCE OF CABINET
For safety reasons, be sure to disconnect the AC power cord from the AC outlet.
• Do not use benzene, thinner, or other solvents for cleaning.
• Wipe the cabinet with a soft cloth.
Introduction
00839A-SD-6980SU-1 6/29/05 9:12 AM Page 5
Page 6
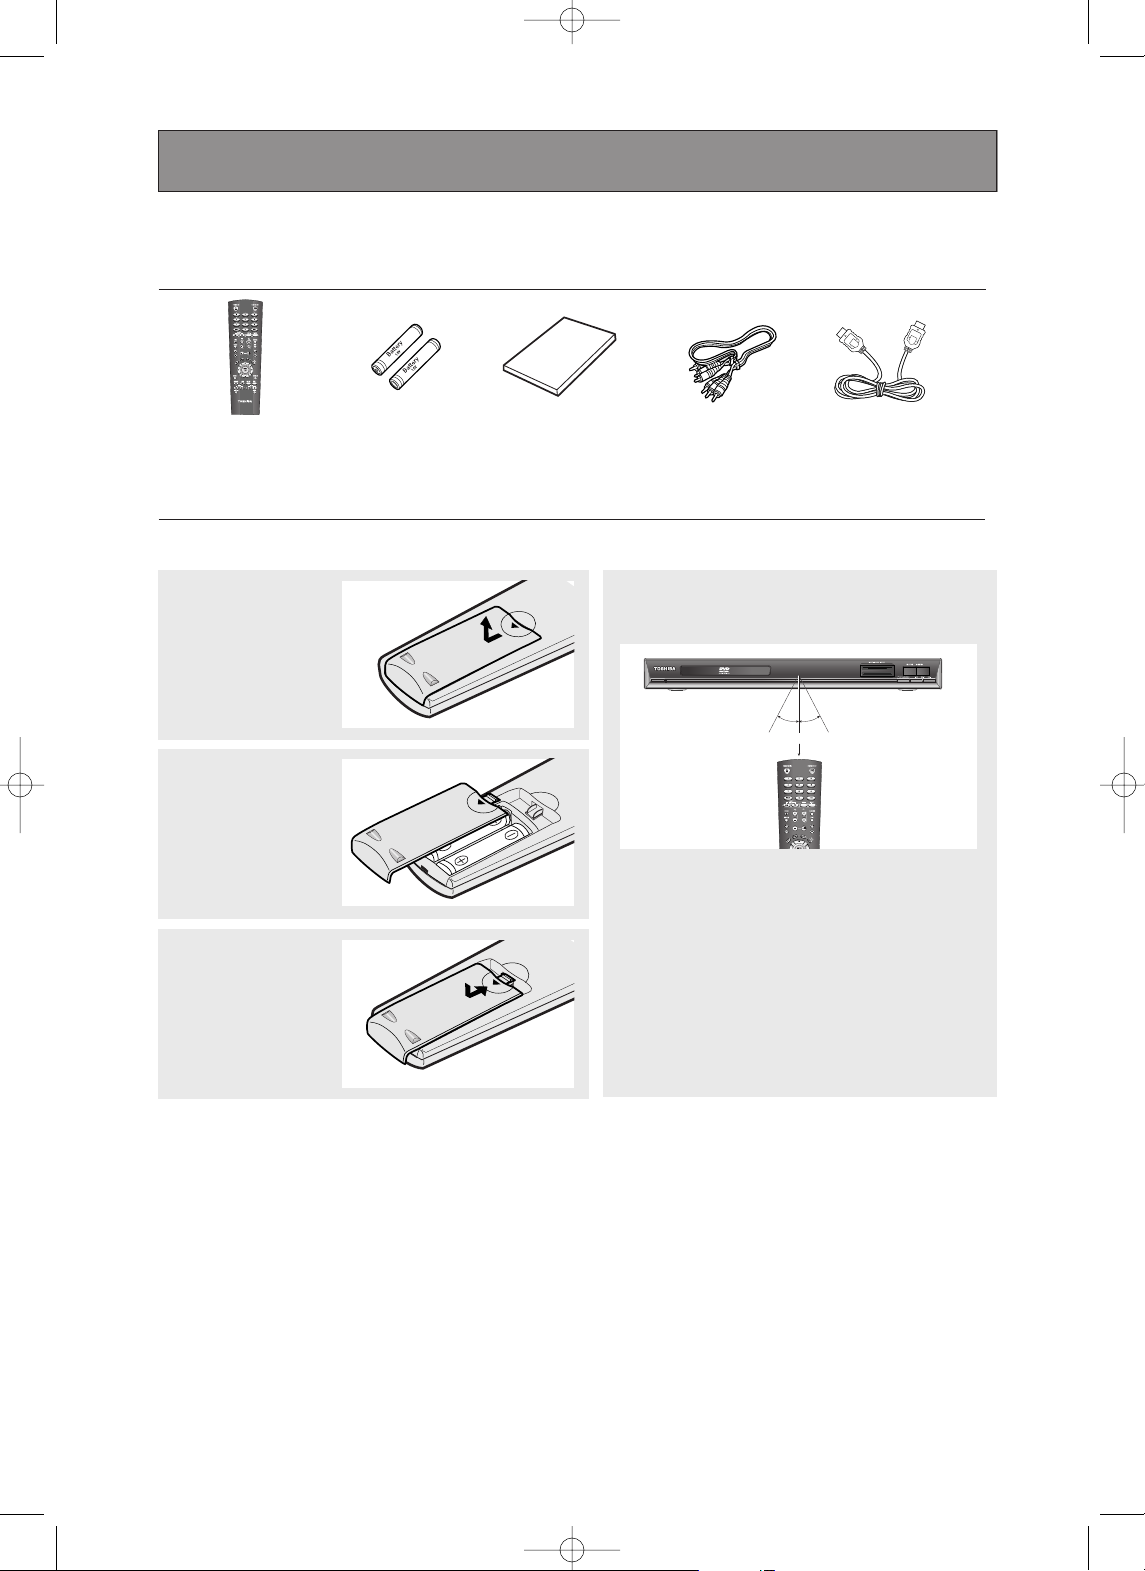
Install Batteries in the Remote control
1
Open the battery
cover on the back of
the remote control.
Operating with the remote control
Point the remote control at the remote sensor and
press the buttons.
Distance : Approx. 7m(23 feet) from the front of the
remote sensor.
Angle : Approx. 30º in each direction of the front of the
remote sensor.
• Do not expose the remote sendor of the DVD video
player to a strong light source such as direct sunlight
or other illumination. If you do so, you may not be
able to opearate the DVD video player via the
remote control.
2
Insert two AA batteries.
Make sure that the
polarities (+ and -) are
aligned correctly.
3
Replace the battery
cover.
If the remote control doesn’t operate
properly:
- Check the polarity + - of the batteries (Dry-Cell).
- Check if the batteries are drained.
- Check if remote control sensor is blocked by
obstacles.
- Check if there is any fluorescent lighting nearby.
Caution:
Never throw batteries into a fire.
Notes:
• Be sure to use AA size batteries.
• Dispose of batteries in a designated disposal area.
• Batteries should always be disposed of with the
environment in mind. Always dispose of batteries in
accordance with applicable laws and regulations.
• If the remote control does not operate correctly, or if
the operating range becomes reduced, replace
batteries with new ones.
• When necessary to replace batteries in the remote
control, always replace both batteries with new
ones. Never mix battery types or use new and used
batteries in combination.
• Always remove batteries from remote control if they
are dead or if the remote control is not to be used
for an extended period of time. This will prevent
battery acid from leaking into the battery
compartment.
Before you start
Accessories
Remote
Control
(AK59-00028H)
Batteries for
Remote Control
(AA Size)
(AC43-12002H)
User’s Manual
(AK68-00839A)
Video/Audio
Cable
(AC39-42001R)
HDMI-HDMI
Cable
(MF39-00299A)
ENG-6
Within approx. 7m(23 feet)
30º 30º
Introduction
00839A-SD-6980SU-1 6/29/05 9:12 AM Page 6
Page 7

ENG-7
Table of Contents
Introduction
Safety Precautions. . . . . . . . . . . . . . . . . . . . . . . . . . . . . . . . . . . . . . . . . . . . . . . . . . . . 2
Important Safety Instructions . . . . . . . . . . . . . . . . . . . . . . . . . . . . . . . . . . . . . . . . . . . . 3
Before you start . . . . . . . . . . . . . . . . . . . . . . . . . . . . . . . . . . . . . . . . . . . . . . . . . . . . . 6
Table of Contents. . . . . . . . . . . . . . . . . . . . . . . . . . . . . . . . . . . . . . . . . . . . . . . . . . . . . 7
General Features . . . . . . . . . . . . . . . . . . . . . . . . . . . . . . . . . . . . . . . . . . . . . . . . . . . . 8
Type of Playable Discs . . . . . . . . . . . . . . . . . . . . . . . . . . . . . . . . . . . . . . . . . . . . . . . 10
Front Panel. . . . . . . . . . . . . . . . . . . . . . . . . . . . . . . . . . . . . . . . . . . . . . . . . . . . . . . . . 11
Front Panel Display . . . . . . . . . . . . . . . . . . . . . . . . . . . . . . . . . . . . . . . . . . . . . . . . . . 11
Rear Panel. . . . . . . . . . . . . . . . . . . . . . . . . . . . . . . . . . . . . . . . . . . . . . . . . . . . . . . . . 12
Remote Control . . . . . . . . . . . . . . . . . . . . . . . . . . . . . . . . . . . . . . . . . . . . . . . . . . . . . 13
Connections
Choosing a Connection . . . . . . . . . . . . . . . . . . . . . . . . . . . . . . . . . . . . . . . . . . . . . . 14
Basic Functions
Playing a Disc . . . . . . . . . . . . . . . . . . . . . . . . . . . . . . . . . . . . . . . . . . . . . . . . . . . . . . 23
Using the Search and Skip Functions . . . . . . . . . . . . . . . . . . . . . . . . . . . . . . . . . . . . 25
Using the Display Function . . . . . . . . . . . . . . . . . . . . . . . . . . . . . . . . . . . . . . . . . . . . 26
Using the Disc and Title Menu . . . . . . . . . . . . . . . . . . . . . . . . . . . . . . . . . . . . . . . . . 28
Using the Function Menu . . . . . . . . . . . . . . . . . . . . . . . . . . . . . . . . . . . . . . . . . . . . . 29
Repeat Play . . . . . . . . . . . . . . . . . . . . . . . . . . . . . . . . . . . . . . . . . . . . . . . . . . . . . . . 30
Slow Repeat Play . . . . . . . . . . . . . . . . . . . . . . . . . . . . . . . . . . . . . . . . . . . . . . . . . . . 31
Program Play & Random Play . . . . . . . . . . . . . . . . . . . . . . . . . . . . . . . . . . . . . . . . . 32
Advanced Functions
Selecting the Audio Language. . . . . . . . . . . . . . . . . . . . . . . . . . . . . . . . . . . . . . . . . . 33
Selecting the Subtitle Language . . . . . . . . . . . . . . . . . . . . . . . . . . . . . . . . . . . . . . . . 34
Changing the Camera Angle . . . . . . . . . . . . . . . . . . . . . . . . . . . . . . . . . . . . . . . . . . . 35
Using the Instant Replay/Skip Function. . . . . . . . . . . . . . . . . . . . . . . . . . . . . . . . . . . 36
Using the Marker Function. . . . . . . . . . . . . . . . . . . . . . . . . . . . . . . . . . . . . . . . . . . . . 37
Using the Zoom Function. . . . . . . . . . . . . . . . . . . . . . . . . . . . . . . . . . . . . . . . . . . . . . 39
How to Insert a Memory Card . . . . . . . . . . . . . . . . . . . . . . . . . . . . . . . . . . . . . . . . . . 40
DVD AUDIO Playback . . . . . . . . . . . . . . . . . . . . . . . . . . . . . . . . . . . . . . . . . . . . . . . . 41
Super Audio CD Playback . . . . . . . . . . . . . . . . . . . . . . . . . . . . . . . . . . . . . . . . . . . . . 44
Clips Menu for MP3/WMA/JPEG/MPEG4 . . . . . . . . . . . . . . . . . . . . . . . . . . . . . . . . . 47
Folder Selection. . . . . . . . . . . . . . . . . . . . . . . . . . . . . . . . . . . . . . . . . . . . . . . . . . . . . 47
MP3/WMA Playback . . . . . . . . . . . . . . . . . . . . . . . . . . . . . . . . . . . . . . . . . . . . . . . . . 48
MPEG4 Playback. . . . . . . . . . . . . . . . . . . . . . . . . . . . . . . . . . . . . . . . . . . . . . . . . . . . 50
Picture CD Playback . . . . . . . . . . . . . . . . . . . . . . . . . . . . . . . . . . . . . . . . . . . . . . . . . 52
Picture CD Playback for HD-JPEG . . . . . . . . . . . . . . . . . . . . . . . . . . . . . . . . . . . . . . 53
Changing Setup Menu
Using the Setup Menu . . . . . . . . . . . . . . . . . . . . . . . . . . . . . . . . . . . . . . . . . . . . . . . . 55
Setting Up the Language Features . . . . . . . . . . . . . . . . . . . . . . . . . . . . . . . . . . . . . . 56
Setting Up the Audio Options. . . . . . . . . . . . . . . . . . . . . . . . . . . . . . . . . . . . . . . . . . . 60
Setting Up the Display Options . . . . . . . . . . . . . . . . . . . . . . . . . . . . . . . . . . . . . . . . . 64
Setting Up the Parental Control . . . . . . . . . . . . . . . . . . . . . . . . . . . . . . . . . . . . . . . . . 67
Reference
Controlling a TV with the Remote Control . . . . . . . . . . . . . . . . . . . . . . . . . . . . . . . . . 70
Troubleshooting . . . . . . . . . . . . . . . . . . . . . . . . . . . . . . . . . . . . . . . . . . . . . . . . . . . . . 71
Specifications. . . . . . . . . . . . . . . . . . . . . . . . . . . . . . . . . . . . . . . . . . . . . . . . . . . . . . . 73
Introduction
00839A-SD-6980SU-1 6/29/05 9:12 AM Page 7
Page 8

ENG-8
General Features
Excellent Sound
Dolby Digital, a technology developed by Dolby
Laboratories, provides crystal clear sound reproduction.
Screen
Both regular and widescreen(16:9) pictures can be
viewed.
Slow Motion
An important scene can be viewed in slow motion.
Program Play (CD)
You can program tracks to play in desired order.
Parental Control (DVD)
The parental control allows users to set the level
necessary to prohibit children from viewing harmful
movies such as those with violence, adult subject
matter, etc.
Various On-Screen Menu Functions
You can select various languages (Audio/Subtitle)
and screen angles while enjoying movies.
Progressive Scan
Progressive scanning creates an improved picture
with double the scan lines of a conventional
interlaced picture.
Digital Photo Viewer (JPEG)
You can view Digital Photos on your TV.
Repeat
You can repeat a song or movie simply by pressing
the REPEAT button.
MP3/WMA
This unit can play discs created from MP3/WMA files.
Instant Replay (DVD)
This function is used to replay the previous 10
seconds of a movie from the current position.
Instant Skip (DVD)
This function skips playback ahead 10 seconds.
Super Audio CD
Super Audio CD is a high quality audio format with
higher sampling rates and fuller, richer sound as
compared to regular CD.
DVD AUDIO
DVD AUDIO is a format specifically designed to
provide the highest possible audio fidelity capable on
DVD.
MPEG4
This unit can play MPEG4 formats within an avi file.
HDMI (High Definition Multimedia
Interface)
HDMI reduces picture noise by allowing a pure
digital video/audio signal path from the player to
your TV.
Note
- Discs which cannot be played with this
player.
• DVD-ROM • DVD-RAM
• CD-ROM • CDV
• CDI • CVD
• CDGs play audio only, not graphics.
- Ability to play back may depend on recording
conditions.
• DVD-R
• CD-RW
• DVD-RW (V mode)
- The unit may not play certain CD-R, CD-RW
and DVD-R due to the disc type or recording
conditions.
PROGRESSIVE SCAN OUTPUTS (525p)
CONSUMERS SHOULD NOTE THAT NOT ALL HIGH
DEFINITION TELEVISION SETS ARE FULLY
COMPATIBLE WITH THIS PRODUCT AND MAY
CAUSE ARTIFACTS TO BE DISPLAYED IN THE
PICTURE, IF 525 PROGRESSIVE SCAN PICTURE
PROBLEMS OCCUR, IT IS RECOMMENDED THAT
THE USER SWITCH THE CONNECTION TO THE
‘STANDARD DEFINITION’ OUTPUT. IF THERE ARE
QUESTIONS REGARDING YOUR TV SET
COMPATIBILITY WITH THIS MODEL 525p DVD
PLAYER, PLEASE CONTACT OURS’ CUSTOMER
SERVICE CENTER.
Introduction
00839A-SD-6980SU-1 6/29/05 9:12 AM Page 8
Page 9

ENG-9
Introduction
Introduction
To ensure proper use of this product, please read this
owner’s manual carefully and retain for future
reference.
This manual provides information on the operation
and maintenance of your DVD Home Theater
System.
Should the unit require service, contact an authorized
service location.
Symbol Used in this Manual
The lightning flash symbol alerts you to
the presence of dangerous voltage within
the product enclosure that may constitute
a risk of electric shock.
The exclamation point alerts you to the
presence of important operating and
maintenance / servicing instructions.
Indicates hazards likely to cause harm to
the unit itself or other material damage.
About the Symbol Display
“ ” may appear on your TV display during
operation and indicates that the function explained in
this owner’s manual is not available on that specific
DVD video disc.
Notes on Discs
HANDLING DISCS
Do not touch the playback side of the disc. Hold the
disc by the edges so that fingerprints do not get on
the surface. Never stick paper or tape on the disc.
STORING DISCS
After playing, store the disc in its case. Do not
expose the disc to direct sunlight or sources of heat
and never leave it in a parked car exposed to direct
sunlight.
CLEANING DISCS
Fingerprints and dust on the disc can cause poor
picture quality and sound distortion. Before playing,
clean the disc with a clean cloth. Wipe the disc from
the center out.
Do not use strong solvents such as alcohol, benzine,
thinner, commercially available cleaners, or anti-static
spray intended for older vinyl records.
00839A-SD-6980SU-1 6/29/05 9:12 AM Page 9
Page 10
ENG-10
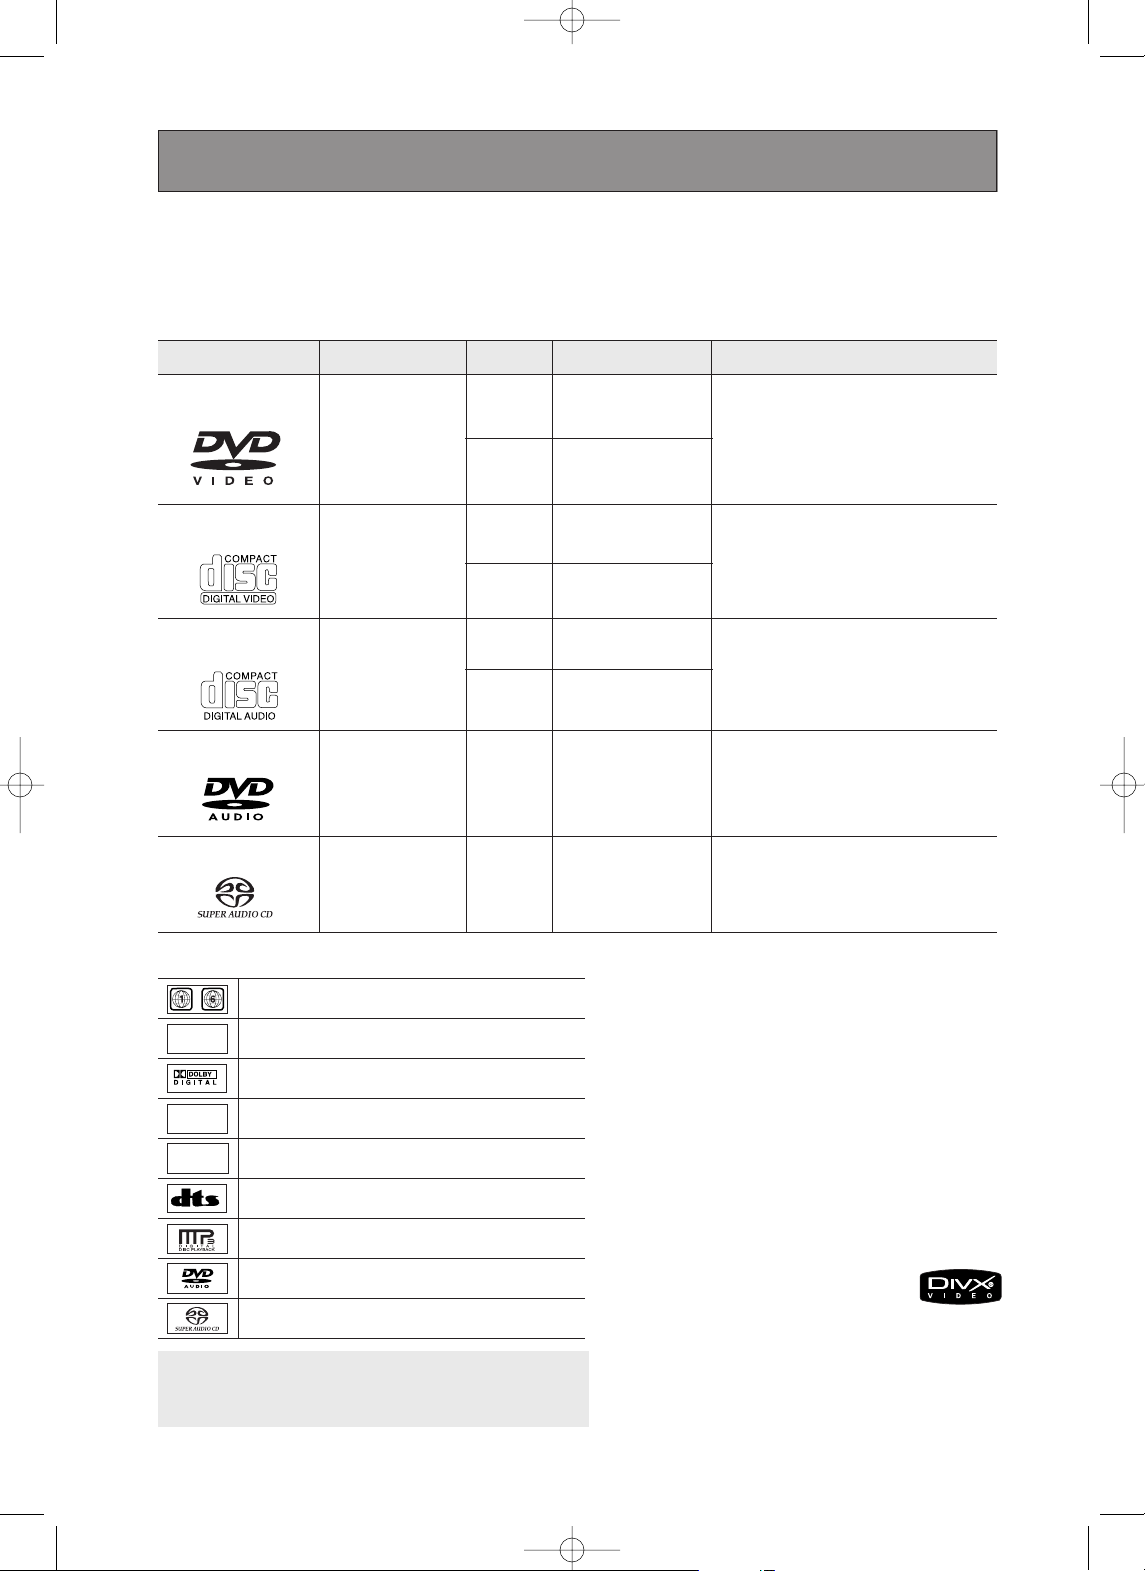
Type of Playable Discs
This DVD player is capable of playing the following types of discs with the corresponding logos:
Disc Markings Region Number
Both the DVD player and the discs are
coded by region. These regional
codes must match in order for the disc
to play. If the codes do not match, the
disc will not play.
The Region Number for this player
is printed on the rear panel of the
player.
~
DIGITAL
SOUND
STEREO
NTSC
Play Region Number
NTSC broadcast system in U.S.A, Canada, Korea,
Japan, etc.
Dolby Digital disc
Stereo disc
Digital Audio disc
DTS disc
MP3 disc
DVD AUDIO disc
Super Audio CD disc
You must only insert one DVD disc at a time.
Inserting two or more discs will not allow playback
and may cause damage to the DVD player.
5"
31/2"
Single-sided 240 min.
Double-sided 480 min.
Single-sided 80 min.
Double-sided 160 min.
Audio
+
Video
- DVD contains excellent sound and
video due to Dolby Digital and
MPEG-2 system.
- Various screen and audio functions
can be easily selected through the
on-screen menu.
Disc Types (Logos)
Recording Types Disc Size Max. Playing Time Characteristics
DVD-VIDEO
5"
31/2"
74 min.
20 min.
Audio
+
Video
- Video with CD sound, VHS quality &
MPEG-1 compression technology.
VIDEO-CD
5"
31/2"
74 min.
20 min.
Audio
- CD is recorded as a Digital Signal with
better audio quality, less distortion and
less deterioration of audio quality over
time.
AUDIO-CD
5"
400 min.
Audio
+
Video
- DVD AUDIO is a format specifically
designed to provide the highest
possible audio fidelity capable on
DVD.
DVD-AUDIO
5"
74 min.
Audio
- Super Audio CD is a high quality audio
format with higher sampling rates and
fuller, richer sound as compared to
regular CD.
Super Audio CD
Introduction
DivX Certification
DivX, DivX Certified, and
associated logos are
trademarks of DivX, Inc and
are used under license.
00839A-SD-6980SU-1 6/29/05 9:12 AM Page 10
Page 11
ENG-11
Introduction
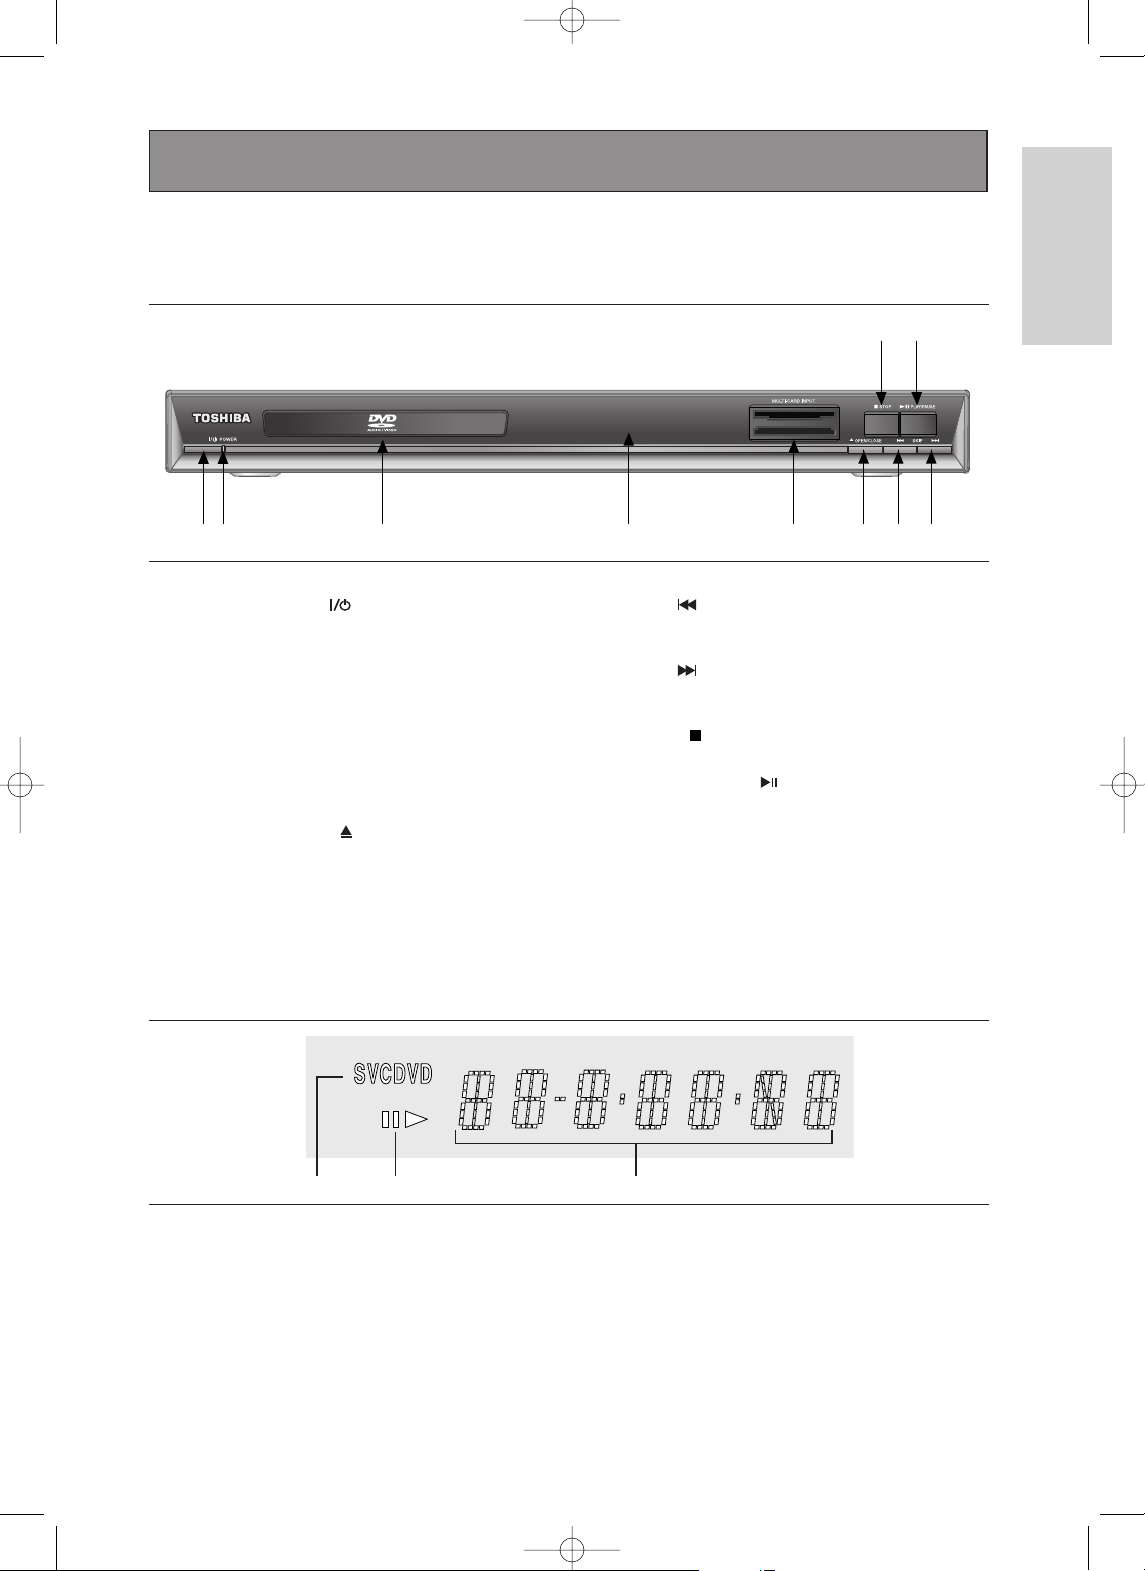
Front Panel
Front Panel Display
1. ON/STANDBY( )
Use to turn your player on and off (standby).
2. POWER Indicator
This indicator will lights up when the power is on.
3. DISC TRAY
Place the disc here.
4. DISPLAY
Operation indicators are displayed here.
5. MULTI- CARD INPUT
Insert a Memory Card.
6. OPEN/CLOSE ( )
Press to open and close the disc tray.
7. SKIP ( ) / SEARCH
- Use to reverse skip a scene or music.
- Press and hold to search backward.
8. SKIP ( ) / SEARCH
- Use to forward skip a scene or music.
- Press and hold to search forward.
9. STOP ( )
Stops disc play.
10. PLAY/PAUSE ( )
Begin or pause disc play.
1
9
10
23 4 5678
Introduction
1. Disc type indicators
2. Play / Pause
3. Displays various messages
concerning operations such as PLAY,
STOP, LOAD ...
no DISC: No disc loaded.
OPEN: The disc tray is open.
LOAD: Player is loading disc information.
12 3
00839A-SD-6980SU-1 6/29/05 9:12 AM Page 11
Page 12
ENG-12
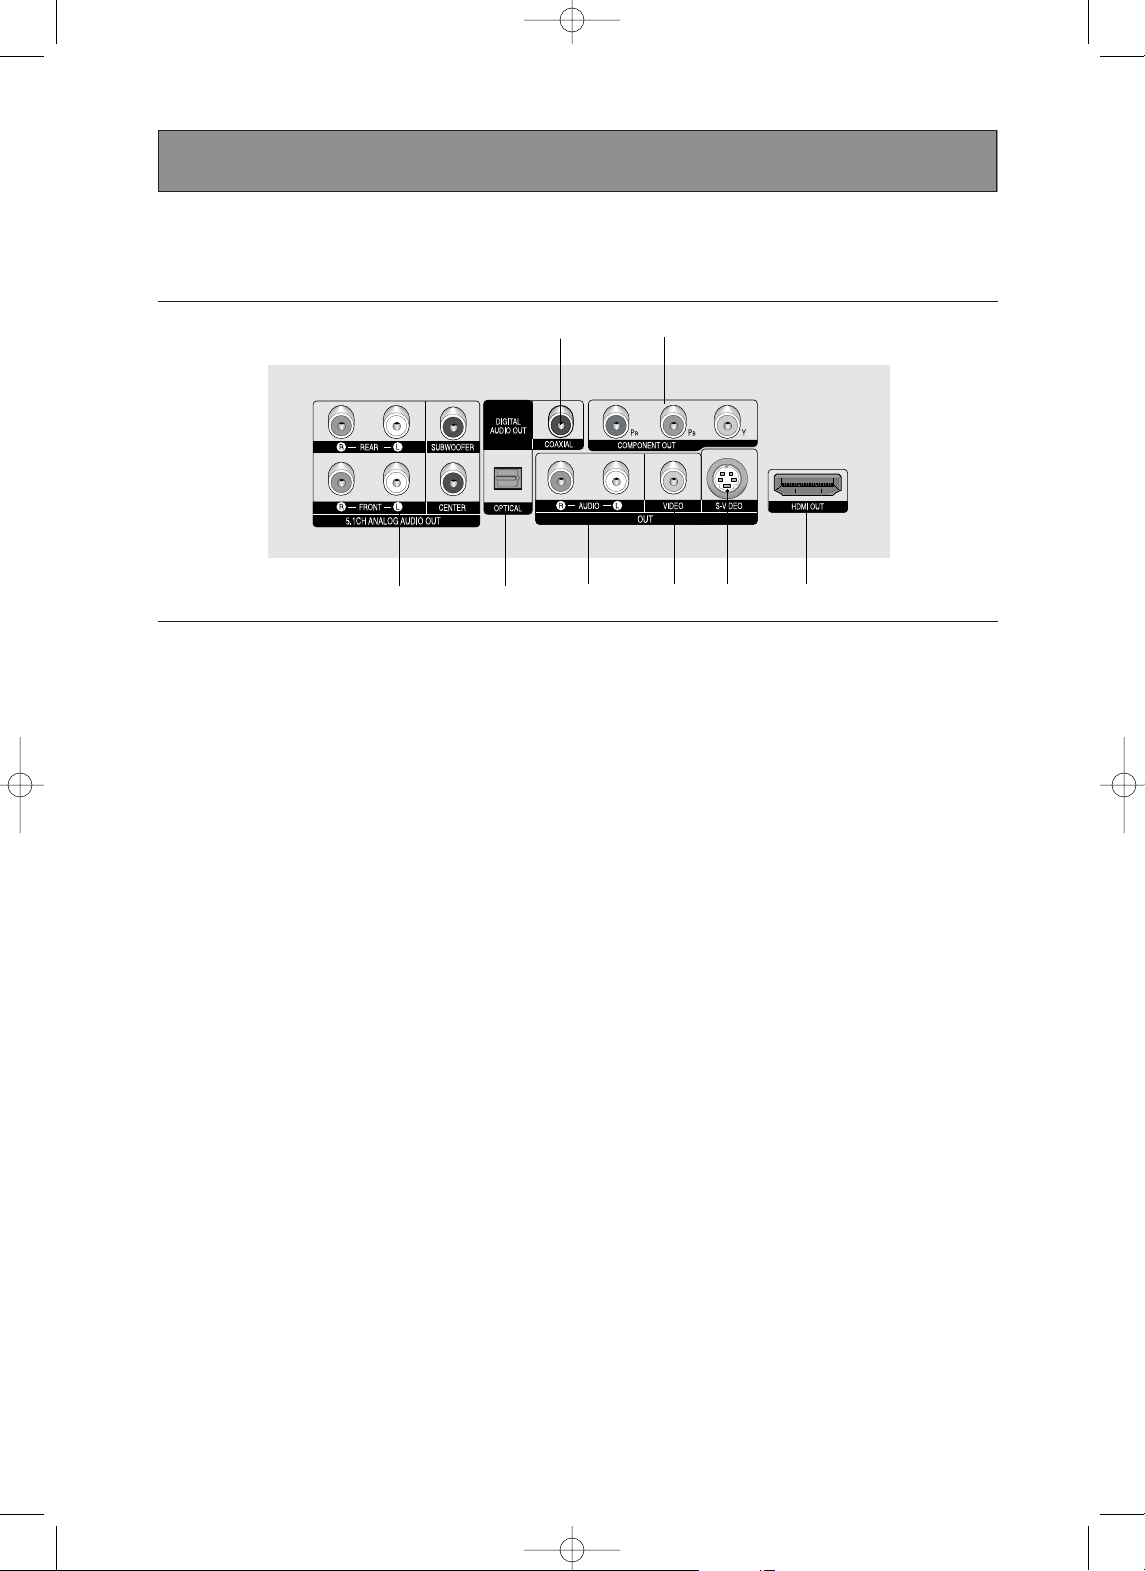
Rear Panel
1. 5.1CH ANALOG AUDIO OUT JACKS
- Connect to an amplifier with 5.1ch analog input jacks.
2. DIGITAL AUDIO OUT JACKS
- Use either an optical or coaxial digital cable to connect
to a compatible Dolby Digital receiver.
- Use either an optical or coaxial digital cable to connect
to an A/V Amplifier that contains a Dolby Digital,
MPEG2 or DTS decoder.
3. AUDIO OUT JACKS
Connect to the Audio input jacks of your television or
audio/video receiver.
4. VIDEO OUT JACK
- Use a video cable to connect to the Video input jack on
your television.
- The Video Output in Setup Menu must be set to
COMPONENT(I-SCAN) or COMPOSITE/S-VIDEO.
5. S-VIDEO OUT JACK
- Use the S-Video cable to connect this jack to the
S-Video jack on your television for higher picture
quality.
- The Video Output in Setup Menu must be set to
COMPOSITE/S-VIDEO.
6. HDMI OUT JACK
- Use the HDMI cable to connect this jack to the HDMI
jack on your television for the best quality picture.
- If an HDMI cable is connected to an HDMI-compatible
TV, HDMI will be output automatically a maximum of 10
seconds later.
- If you want to use a Video, S-Video or Component
Output, unplug HDMI cable.
7. COMPONENT VIDEO OUT JACKS
- Use these jacks if you have a TV with Component
Video in jacks. These jacks provide PR, PBand Y video.
- If HDMI/COMPONENT(P-SCAN) Video Output is
selected in Setup Menu, progressive scan mode will
work.
- If COMPONENT(I-SCAN) Video Output is selected in
Setup Menu, interlaced scan mode will work.
Note
-
Consult your TV User’s Manual to find out if your TV supports Progressive Scan (P-SCAN).
If Progressive Scan is supported, follow the TV User’s Manual regarding Progressive Scan settings in the
TV’s menu system.
- If HDMI/COMPONENT(P-SCAN) Video Output is selected in Setup Menu, Video and S-Video Outputs do
not work.
- There may be no image output if the DVD player is connected to a TV or display that is not compatible with
the above format.
- Refer to the TV's instruction manual for detailed information regarding the HDMI terminal.
- See pages 64 ~ 65 to get more information on how to use the setup menu.
2
123456
7
Introduction
00839A-SD-6980SU-1 6/29/05 9:12 AM Page 12
Page 13
ENG-13
Introduction
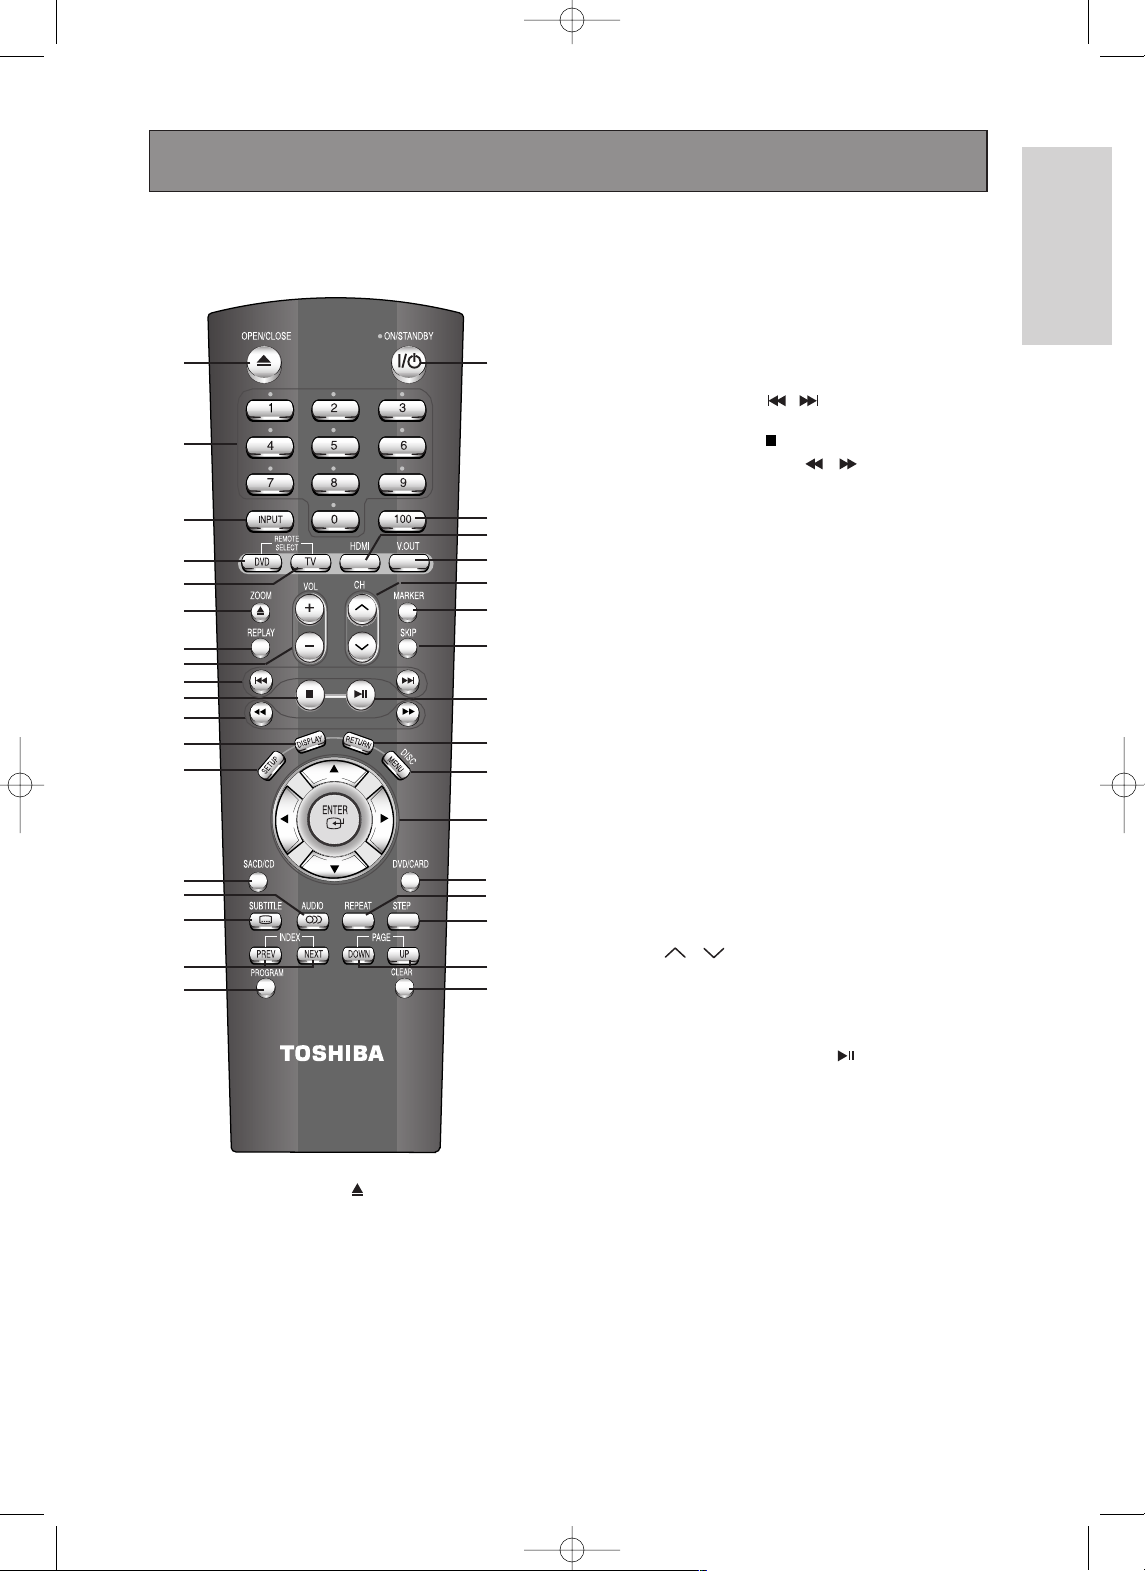
Remote Control
1. OPEN/CLOSE ( ) Button
To open and close the disc tray.
2. NUMBER Buttons
3. INPUT Button
Selects Video input connection in TV mode.
4. DVD Button
Press this to operate DVD Player.
5. TV Button
Press this to operate TV. (Go to TV mode.)
6. ZOOM Button
Enlarges DVD picture.
7. REPLAY Button
This function is used to replay the previous 10 seconds
of a movie from the current position.
8. VOL (+, -) Buttons
Control volume in TV mode.
9. SKIP Buttons ( / )
Use to skip the title, chapter or track.
10. STOP Button ( )
11. SEARCH Buttons ( / )
Allow you to search forward/backward through a disc.
12. DISPLAY Button
Displays the current disc mode.
13. SETUP Button
Brings up the Setup menu.
14. SACD/CD Button
Selects Super Audio CD or CD playback mode.
15. AUDIO Button
Use this button to access various audio functions on a disc.
16. SUBTITLE Button
17. INDEX Buttons
Use to skip the INDEX in DVD Audio disc.
18. PROGRAM Button
Allows you to program a specific order.
19. ON/STANDBY Button
Turns the power on or off.
20. 100 Button
Press to select channel over 100. For example, to select
channel 121, press ‘100’, then press ‘2’ and ‘1’.
21. HDMI Button
HDMI Output resolution setup.
22. V.OUT Button
Select Video output format.
23. CH ( , ) Buttons
Channel selection in TV mode.
24. MARKER Button
25. SKIP Button
This function skips playback ahead 10 seconds.
26. PLAY/PAUSE Button ( )
Begin/Pause disc play.
27. RETURN Button
Returns to a previous menu.
28. MENU/DISC Button
Brings up the DVD player’s menu.
Brings up the Disc menu.
29. ENTER/
……††œœ√√
Buttons
This button functions as a toggle switch.
30. DVD/CARD Button
Use to operate DVD/CARD.
31. REPEAT Button
Allows you to repeat play a title, chapter, track, or disc.
32. STEP Button
Advances play one frame at a time.
33. PAGE Buttons
Use to skip the PAGE in DVD Audio disc.
34. CLEAR Button
Use to remove menus or status displays from the screen.
1
2
3
4
5
6
7
8
9
10
11
12
13
15
16
14
17
18
19
20
21
22
23
27
24
25
26
28
29
30
31
32
33
34
Introduction
00839A-SD-6980SU-1 6/29/05 9:12 AM Page 13
Page 14

ENG-14
Choosing a Connection
The following shows examples of connections commonly used to connect the DVD player with a TV
and other components.
Before Connecting the DVD Player
- Always turn off the DVD player, TV, and other components before you connect or disconnect any
cables.
- Refer to the user’s manual of the additional components (such as a TV) you are connecting for
more information on those particular components.
Connection to a TV (Video)
1
Using video/audio cables, connect the VIDEO (yellow)/AUDIO
(red and white) OUT terminals on the rear of the DVD player to
the VIDEO (yellow)/AUDIO (red and white) IN terminals of
your TV.
2
Turn on the DVD player and TV.
3
Press the input selector on your TV remote control until the
Video signal from the DVD player appears on the TV screen.
Note
- Noise may be generated if the audio cable placed too close to the power cable.
- If you want to connect to an Amplifier, please refer to the Amplifier connection page. (See pages 20 to 22)
- The number and position of terminals may vary depending on your TV set. Please refer to the user's manual
of your TV.
- If there is one audio input terminal on the TV, connect it to the [AUDIO OUT][left] (white) terminal of the DVD
player.
- If you press the V.OUT button when DVD Player is in stop mode or no disc is inserted, the Video Output
mode changes in the following sequence: (
COMPOSITE/S-VIDEO ➝ COMPONENT(I-SCAN) ➝
HDMI/COMPONENT(P-SCAN)
)
If HDMI/COMPONENT(P-SCAN) mode is selected and your TV does not support HDMI or progressive scan,
you cannot see any picture. Press the
V.OUT button untill the picture can be seen on the screen.
- When the Video Output in Setup menu is set to HDMI/COMPONENT(P-SCAN), the Video and S-Video
Outputs do not work.
RED
WHITE YELLOW
RED WHITE YELLOW
Audio Cable
Video Cable
Connections
00839A-SD-6980SU-1 6/29/05 9:12 AM Page 14
Page 15
ENG-15
Connections
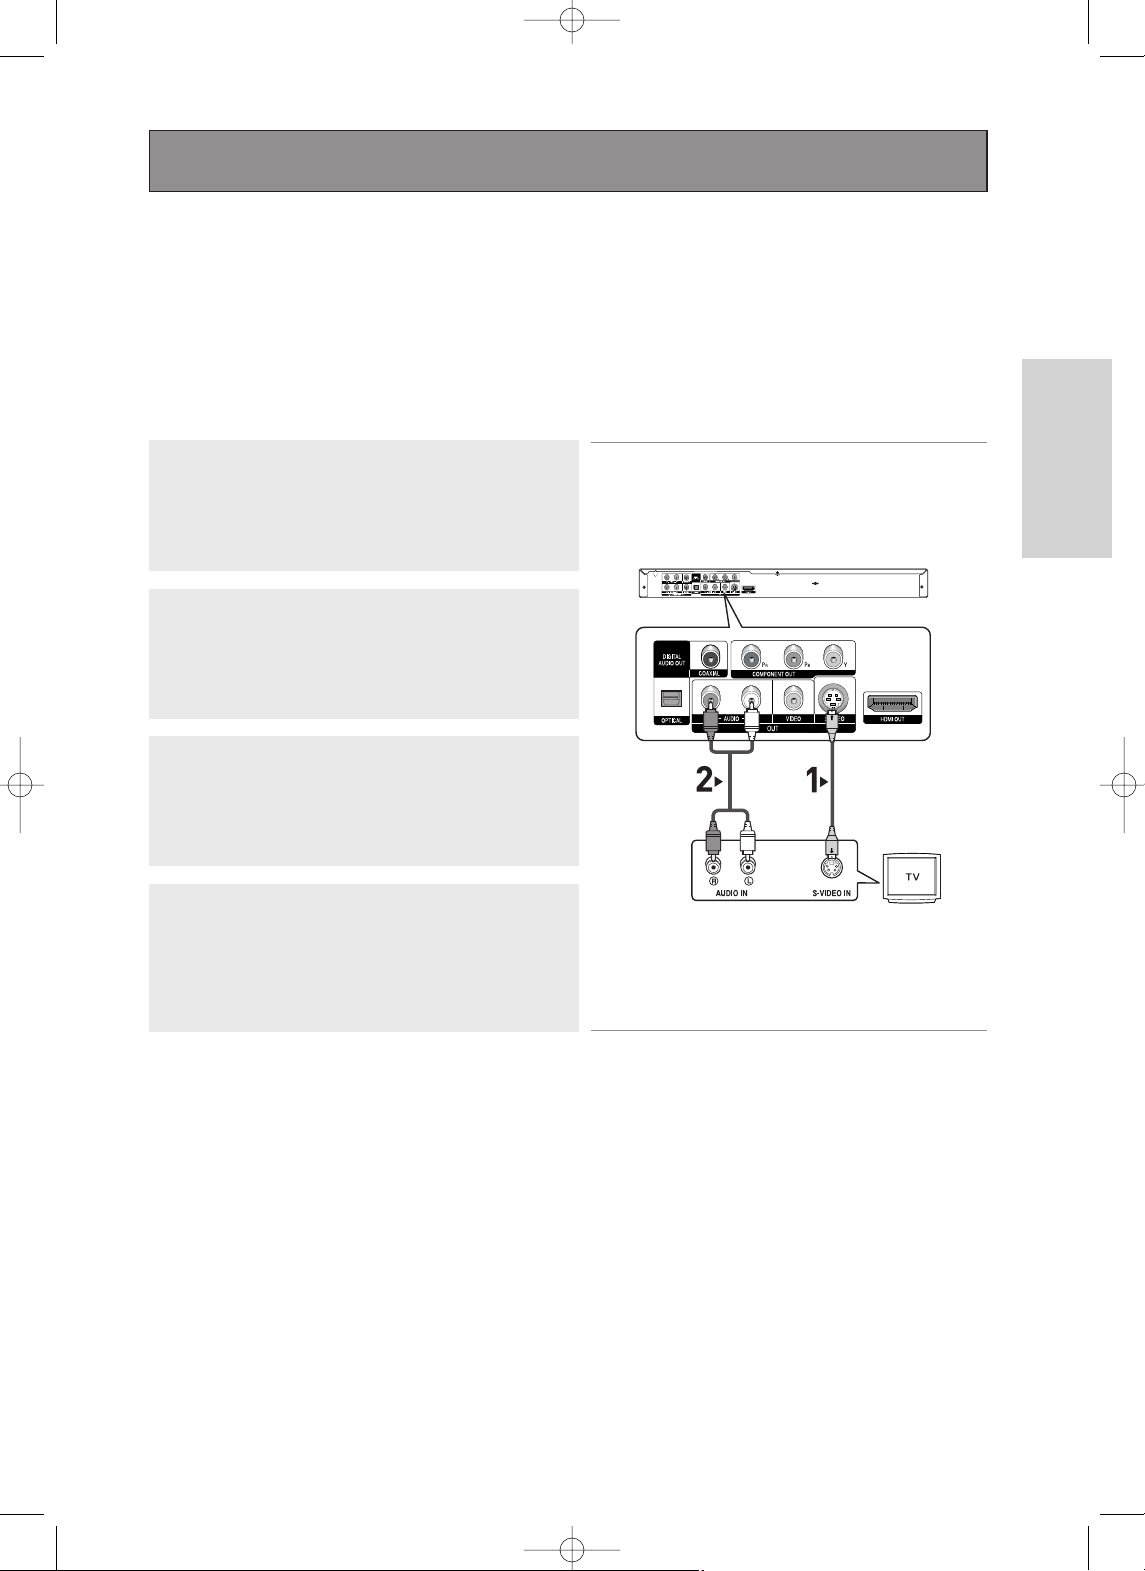
Connection to a TV (S-Video)
- Connecting to your TV using an S-Video cable.
- You will enjoy high quality images. S-Video separates the picture element into black and white(Y)
and color(C) signals to present clearer images than regular video input mode.
(Audio signals are delivered through the audio output.)
Note
- If you want to connect to an Amplifier, please refer to the Amplifier connection page. (See pages 20 to 22)
- The number and position of terminals may vary depending on the TV set.
Please refer to the user's manual of your TV.
1
Using an S-Video cable (not supplied), connect the S-VIDEO
OUT terminal on the rear of the DVD player to the
S-VIDEO IN terminal of your TV.
2
Using the audio cables, connect the AUDIO (red and white)
OUT terminals on the rear of the DVD player to the AUDIO (red
and white) IN terminals of your TV.
Turn on the DVD player and TV.
3
Press the input selector on your TV remote control until the
S-Video signal from the DVD player appears on your TV
screen.
4
Set the Video Output to COMPOSITE/S-VIDEO in the Display
Setup menu. (See pages 64 to 65)
You can use the V.OUT button to change the Video Output
mode. (See page 14)
RED
WHITE
RED
WHITE
Audio Cable
S-Video Cable
(not supplied)
Connections
00839A-SD-6980SU-1 6/29/05 9:13 AM Page 15
Page 16
ENG-16
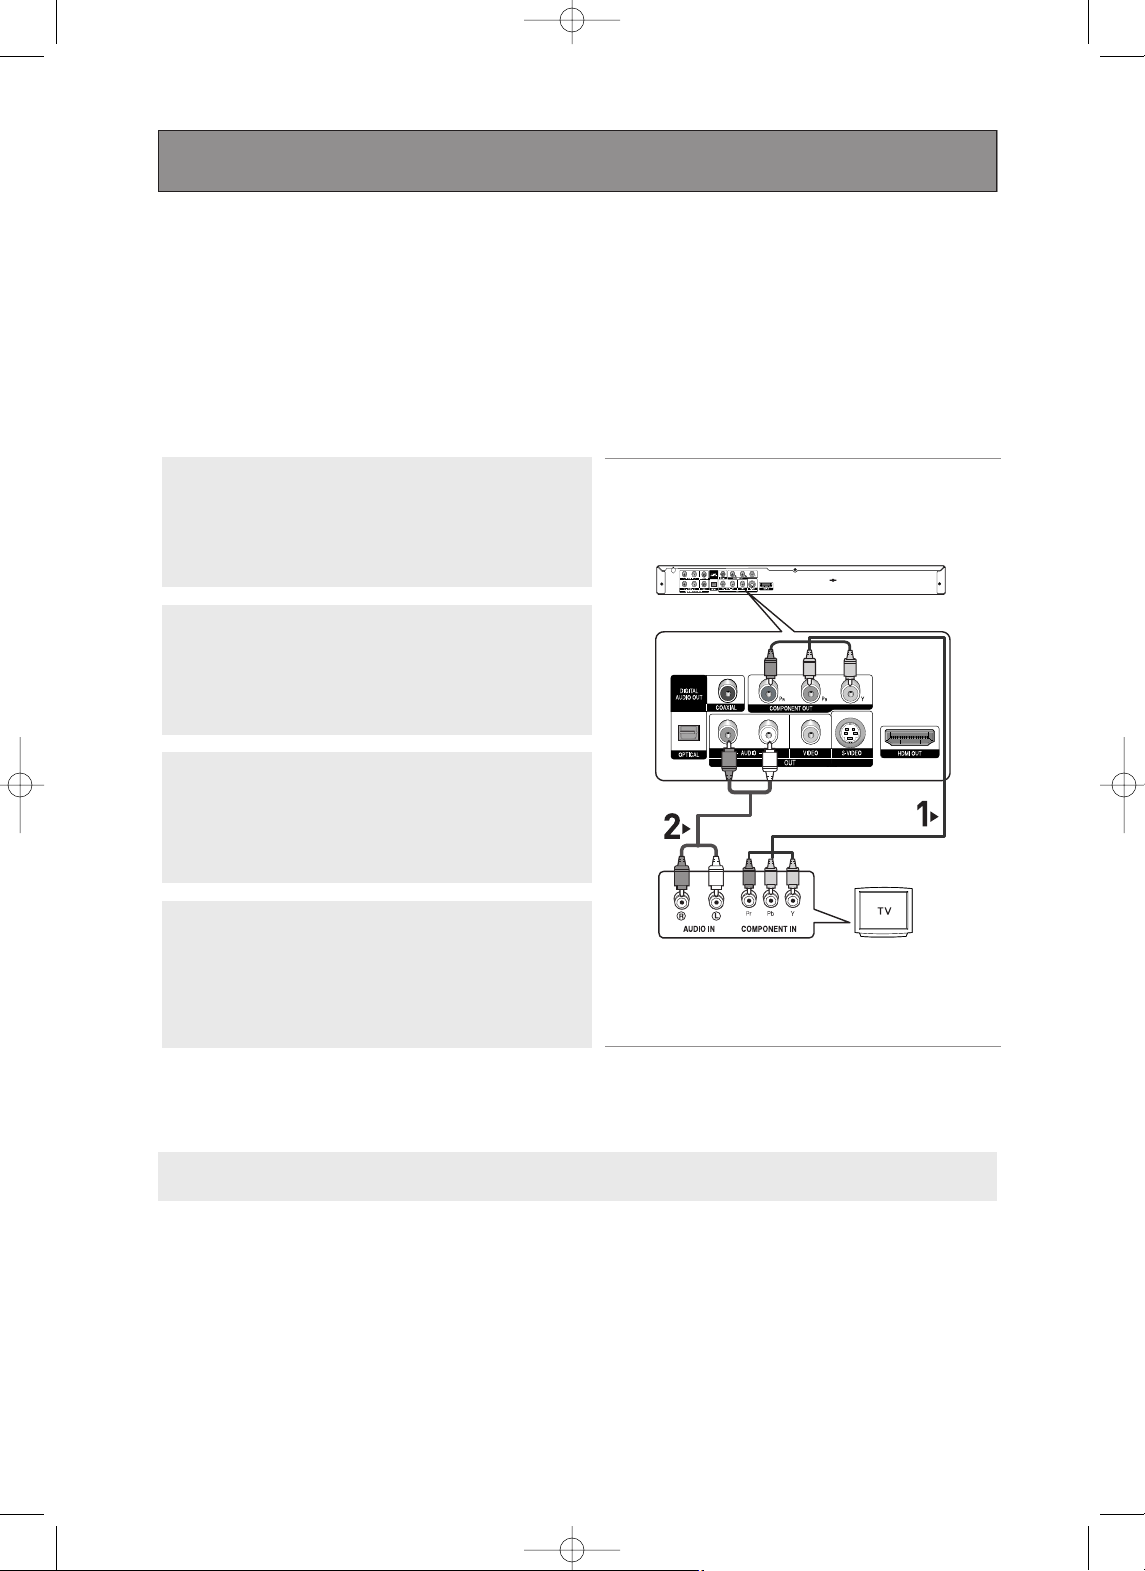
Connection to a TV (Interlace)
- Connecting to your TV using Component video cables.
- You will enjoy high quality and accurate color reproduction images. Component video separates
the picture element into black and white(Y), blue(PB), red(PR) signals to present clear and clean
images. (Audio signals are delivered through the audio output.)
Note
- If Video output is incorrectly set to COMPOSITE/S-VIDEO with the Component cables connected, the
screen will turn red.
- If you want to connect to an Amplifier, please refer to the Amplifier connection page. (See pages 20 to 22)
- The component terminal of your TV may be marked “R-Y, B-Y, Y” or “Cr, Cb, Y” instead of “P
R
, PB, Y”
depending on the manufacturer. The number and position of terminals may vary depending on the TV set.
Please refer to the user's manual of your TV.
1
Using component video cables (not supplied), connect the
COMPONENT VIDEO OUT terminals on the rear of the DVD
player to the COMPONENT IN terminals of your TV.
2
Using the audio cables, connect the AUDIO (red and white)
OUT terminals on the rear of the DVD player to the AUDIO (red
and white) IN terminals of your TV.
Turn on the DVD player and TV.
3
Press the input selector on your TV remote control until the
Component signal from the DVD player appears on the TV
screen.
4
Set the Video Output to COMPONENT(I-SCAN) in the Display
Setup menu. (See pages 64 to 65)
You can use the V.OUT button to change the Video Output
mode. (See page 14)
RED WHITE
RED WHITE
RED
BLUE
GREEN
RED
BLUE
GREEN
Audio Cable
Component cable
(not supplied)
Connections
00839A-SD-6980SU-1 6/29/05 9:13 AM Page 16
Page 17
ENG-17
Connections
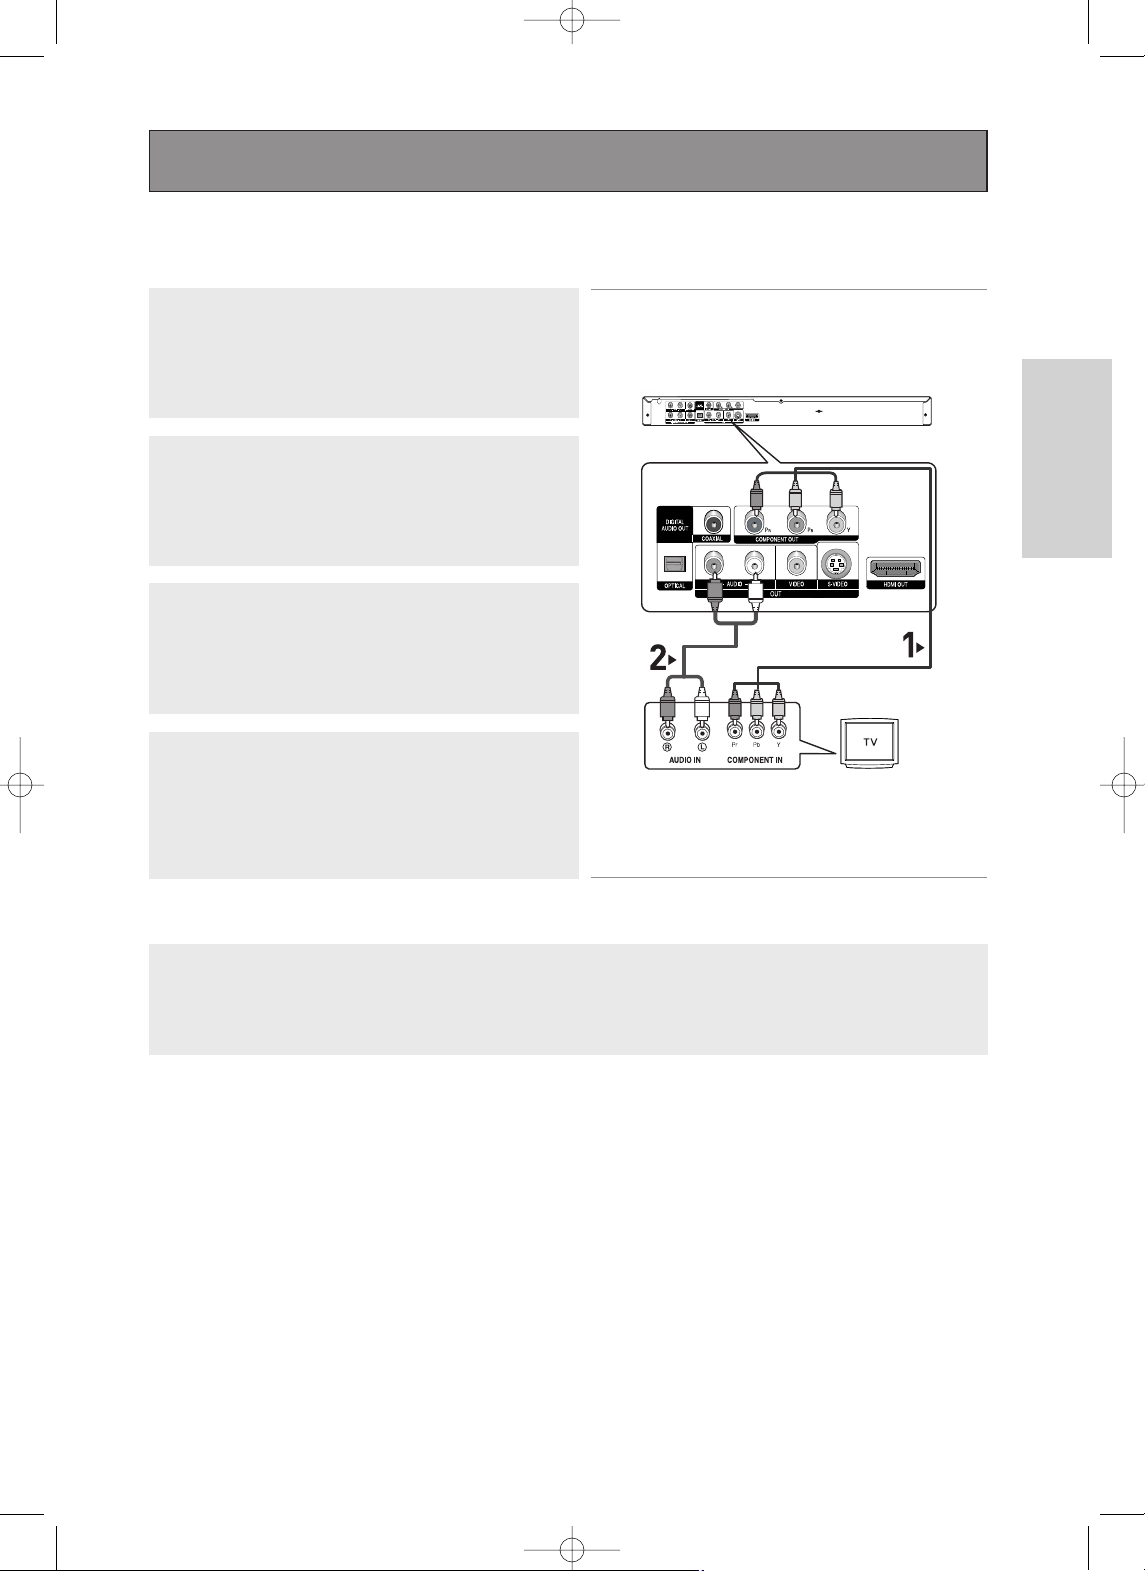
Connection to a TV (Progressive)
Note
- What is "Progressive Scan"?
Progressive scan has twice as many scanning lines as the interlace output method.
Progressive scanning method provides better and clearer picture quality.
1
Using component video cables (not supplied), connect the
COMPONENT VIDEO OUT terminals on the rear of the DVD
player to the COMPONENT IN terminals of your TV.
To see the progressive video output,
- Consult your TV User’s Manual to find out if your TV supports Progressive Scan.
If Progressive Scan is supported, follow the TV User’s Manual regarding Progressive Scan settings
in the TV’s menu system.
- Depending on your TV, the connection method may differ from the illustration above.
2
Using the audio cables, connect the AUDIO (red and white)
OUT terminals on the rear of the DVD player to the AUDIO (red
and white) IN terminals of your TV.
Turn on the DVD player and TV.
3
Press the input selector on your TV remote control until the
Component signal from the DVD player appears on the TV
screen.
4
Set the Video Output to HDMI/COMPONENT(P-SCAN) in the
Display Setup menu. (See pages 64 to 65)
You can use the V.OUT button to change the Video Output
mode. (See page 14)
RED WHITE
RED WHITE
RED
BLUE
GREEN
RED
BLUE
GREEN
Audio Cable
Component cable
(not supplied)
Connections
00839A-SD-6980SU-1 6/29/05 9:13 AM Page 17
Page 18

ENG-18
Connecting to a TV with HDMI Jack
1
Using the HDMI cable, connect the HDMI OUT terminal on the
rear of the DVD player to the HDMI IN terminal of your TV.
2
Press the input selector on your TV remote control until the
HDMI signal from the DVD player appears on your TV screen.
HDMI VIDEO Specifications
When you press the HDMI button, 480p, 720p and 1080i are selected in order.
The first press of the
HDMI button brings up the current resolution.
The second press allows you to change the HDMI output resolution.
- Depending on your TV, certain HDMI output resolutions may not work.
Because HDMI is an evolving technology, it is possible that some devices with an HDMI input may not operate
properly with this DVD player.
- Please refer to the user's manual of your TV.
- If HDMI cable is plugged into TV, the DVD player’s output is set to HDMI within 10 seconds.
- If you set the HDMI output resolution 720p or 1080i, HDMI output provides better picture quality.
HDMI cable
Connections
00839A-SD-6980SU-1 6/29/05 9:13 AM Page 18
Page 19

ENG-19
Connections
• HDMI (High Definition Multimedia Interface)
HDMI is an interface to enable the digital transmission of video and audio data with just a single connector.
Using HDMI, the DVD player transmits a digital video and audio signal and displays a vivid picture on a TV
having an HDMI input jack.
• HDMI, the HDMI logo and High-Definition Multimedia Interface are trademarks or registered
trademarks of HDMI Licensing LLC.
• HDMI connection description
HDMI connector - Both uncompressed video data and digital audio data (LPCM or Bit Stream data).
- Though the player uses a HDMI cable, the player outputs only a pure digital signal to the TV.
- If TV does not support HDCP (High-bandwidth Digital content protection), snow noise appears on the
screen.
• Why does Toshiba use HDMI?
Analog TVs require an analog video/audio signal. However, when playing a DVD, the data transmitted to a
TV is digital. Therefore either a digital-to-analog converter (in the DVD player) or an analog-to-digital
converter (in the TV) is required. During this conversion, the picture quality is degraded due to noise and
signal loss. HDMI technology is superior because it requires no D/A conversion and is a pure digital signal
from the player to your TV.
• What is the HDCP?
HDCP (High-bandwidth Digital Content Protection) is a system for protecting DVD content output via
HDMI from being copied. It provides a secure digital link between a video source (PC, DVD, etc.) and a
display device (TV, Projector, etc.). Content is encrypted at the source device to prevent unauthorized
copies from being made.
Connections
00839A-SD-6980SU-1 6/29/05 9:13 AM Page 19
Page 20
ENG-20
Note
- Please turn the volume down when you turn on the Amplifier.
Sudden loud sound may cause damage to the speakers and your ears.
- Please set the audio in the menu screen according to the Amplifier. (See pages 60 to 61)
- The position of terminals may vary depending on the Amplifier.
Please refer to the user's manual of the Amplifier.
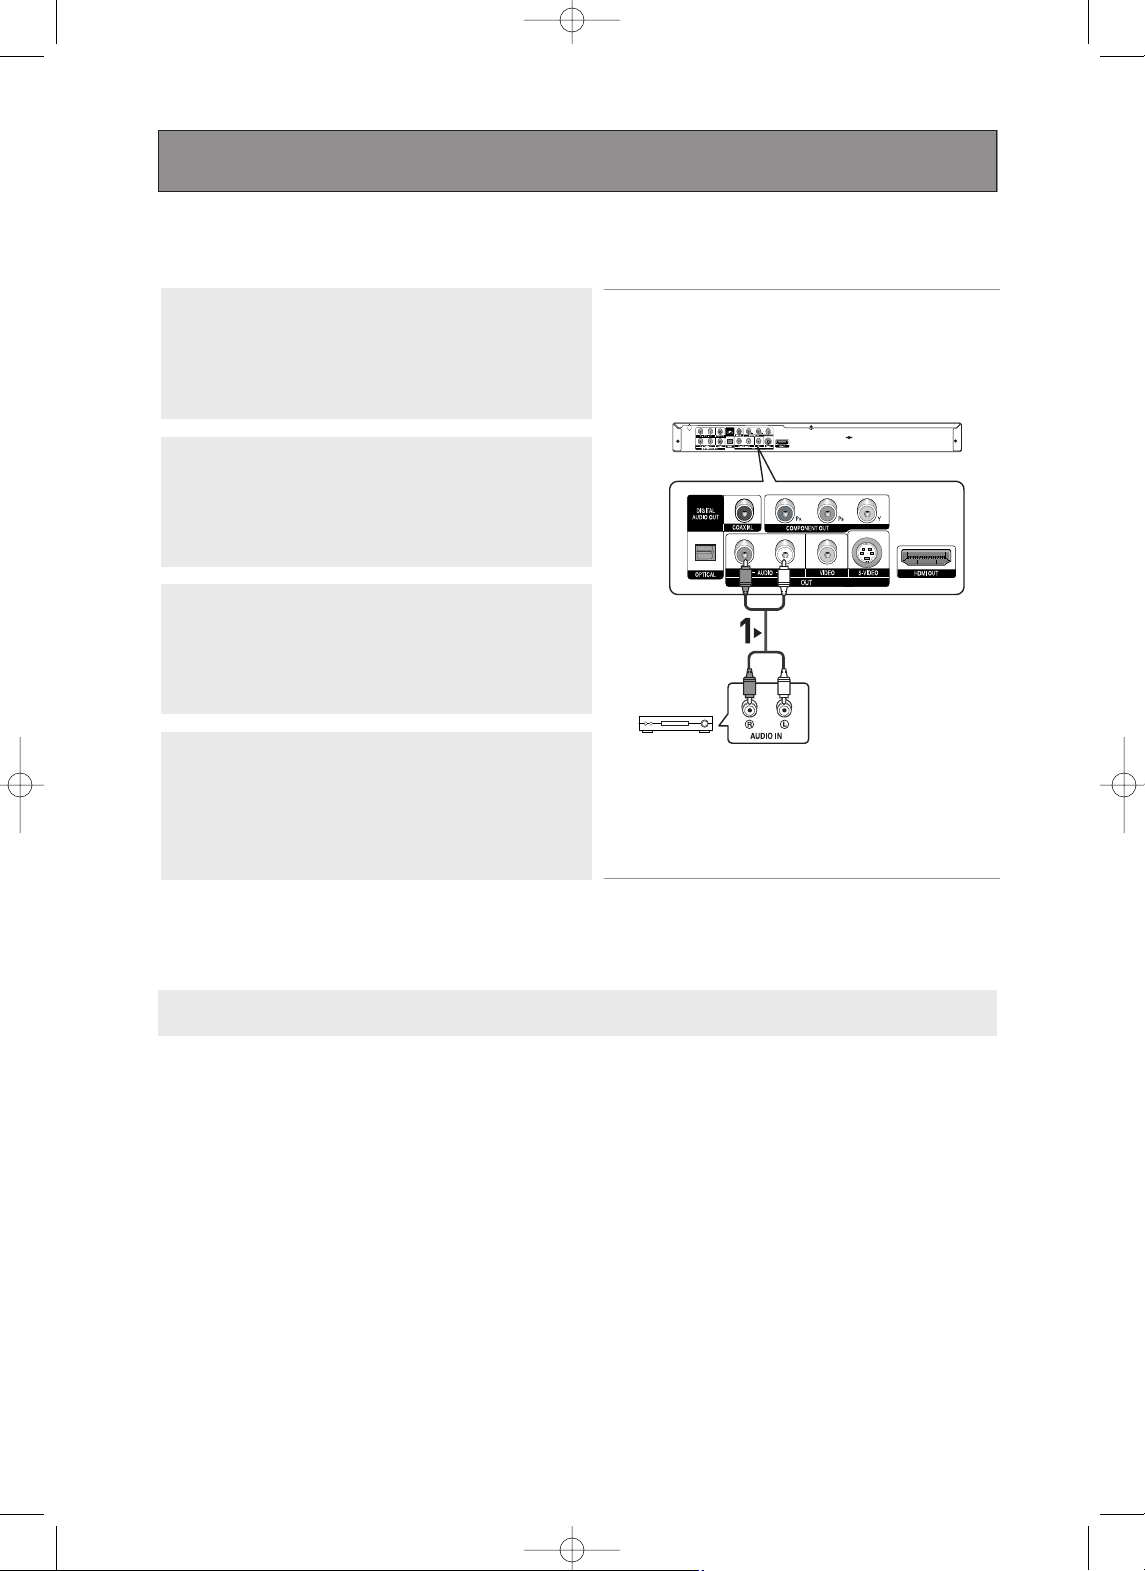
Connection to an Audio System (2 Channel Amplifier)
1
Using the audio cables, connect the AUDIO (red and white)
OUT terminals on the rear of the DVD player to the AUDIO (red
and white) IN terminals of the Amplifier.
2
Using the video signal cable(s), connect the VIDEO, S-VIDEO,
COMPONENT or HDMI OUT terminals on the rear of the DVD
player to the VIDEO, S-VIDEO, COMPONENT or HDMI IN
terminal of your TV as described on pages 14 to 18.
3
Turn on the DVD player, TV, and Amplifier.
4
Press the input select button of the Amplifier to select external
input in order to hear sound from the DVD player.
Refer to your Amplifier's user manual to set the Amplifier's
audio input.
RED
WHITE
RED WHITE
2-Channel stereo amp
Audio Cable
Connections
00839A-SD-6980SU-1 6/29/05 9:13 AM Page 20
Page 21

ENG-21
Connections
Note
- Please turn the volume down when you turn on the Amplifier.
Sudden loud sound may cause damage to the speakers and your ears.
- Please set the audio in the menu screen according to the Amplifier. (See pages 60 to 61)
- The position of terminals may vary depending on the Amplifier.
Please refer to the user's manual of the Amplifier.
- Please remove the dust cover before using the optical cable (not included) and put the cover on the cable
again when it's not used.
- DVD-AUDIO only plays back two channel audio through the Digital Audio out.
Multi-channel DVD-Audio discs are output through the Analog outputs.
- SACD plays back only through the Analog outputs. (See pages 60 to 61)
Connection to an Audio System (Dolby Digital or DTS Amplifier)
1
If using an optical cable (not supplied), connect the DIGITAL
AUDIO OUT (OPTICAL) terminal on the rear of the DVD player
to the DIGITAL AUDIO IN (OPTICAL) terminal of the Amplifier.
If using a coaxial cable (not supplied), connect the DIGITAL
AUDIO OUT (COAXIAL) terminal on the rear of the DVD player
to the DIGITAL AUDIO IN (COAXIAL) terminal of the Amplifier.
2
Using the video signal cable(s), connect the VIDEO, S-VIDEO,
COMPONENT or HDMI OUT terminals on the rear of the DVD
player to the VIDEO, S-VIDEO, COMPONENT or HDMI IN
terminals of your TV as described on pages 14 to 18.
3
Turn on the DVD player, TV, and Amplifier.
4
Press the input select button of the Amplifier to select external
input in order to hear sound from the DVD player.
Refer to your Amplifier's user manual to set the Amplifier's
audio input.
Optical Cable
(not supplied)
Coaxial Cable
(not supplied)
or
Dolby Digital or
DTS amp
Connections
00839A-SD-6980SU-1 6/29/05 9:13 AM Page 21
Page 22
ENG-22
Note
- Please turn the volume down when you turn on the Amplifier.
Sudden loud sound may cause damage to the speakers and your ears.
- Please set the audio in the menu screen according to the Amplifier. (See pages 60 to 61)
- The position of terminals may vary depending on the Amplifier.
Please refer to the user's manual of the Amplifier.
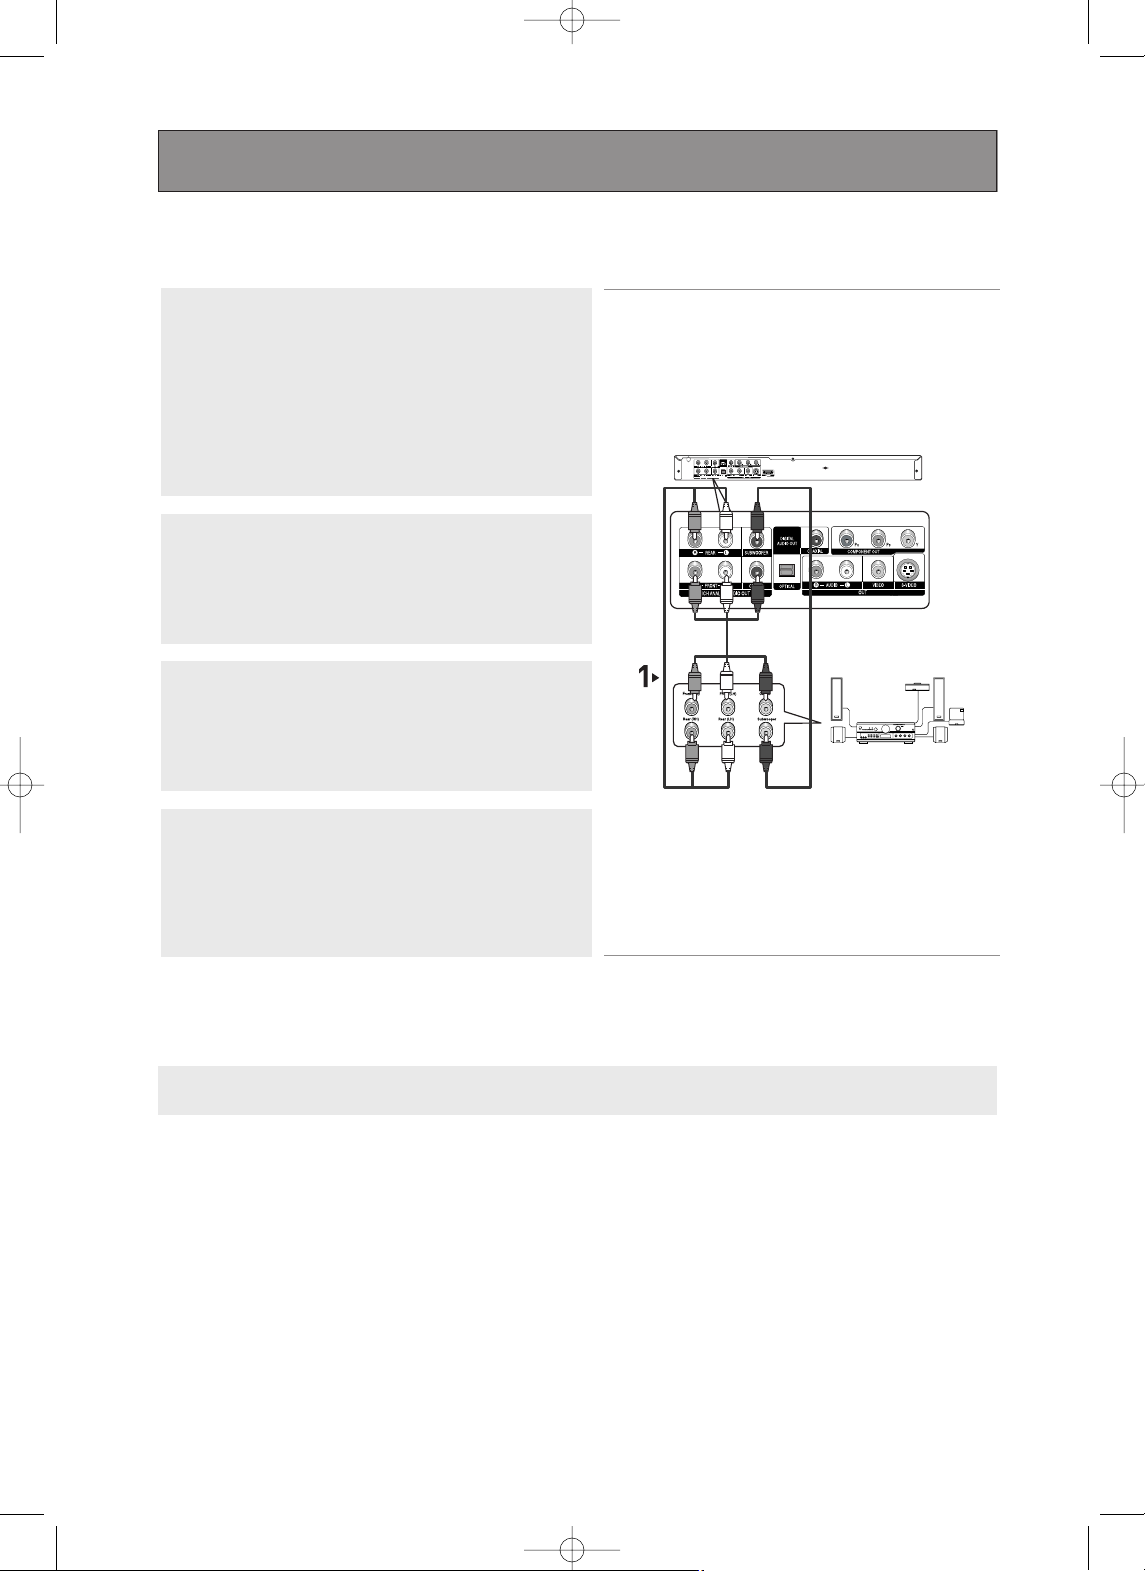
Connection to a 5.1CH Analog Amplifier
1
If using audio cables for 5.1 CH Analog Amplifier (not supplied)
connect the 5.1CH ANALOG AUDIO OUT terminals on the rear
of the DVD player to the 5.1CH ANALOG AUDIO IN terminals
of the 5.1CH Analog Amplifier.
2
Using the video signal cable(s), connect the VIDEO, S-VIDEO,
COMPONENT or HDMI OUT terminals on the rear of the DVD
player to the VIDEO, S-VIDEO, COMPONENT or HDMI IN
terminals of your TV as described on pages 14 to 18.
3
Turn on the DVD player, TV, and Amplifier.
4
Press the input select button of the Amplifier to select external
input in order to hear sound from the DVD player.
Refer to your Amplifier's user manual to set the Amplifier's
audio input.
WHITE
BLACK
GREEN
WHITE
BLACK
GREEN
5.1ch Analog
Amplifier
Connections
00839A-SD-6980SU-1 6/29/05 9:13 AM Page 22
Page 23
ENG-23
Basic Functions
Playing a Disc
Before Play
- Turn on your TV and set it to the correct Video Input on the TV's remote control.
-
If you connected an external Audio System, turn on your Audio System and set it to the correct Audio Input.
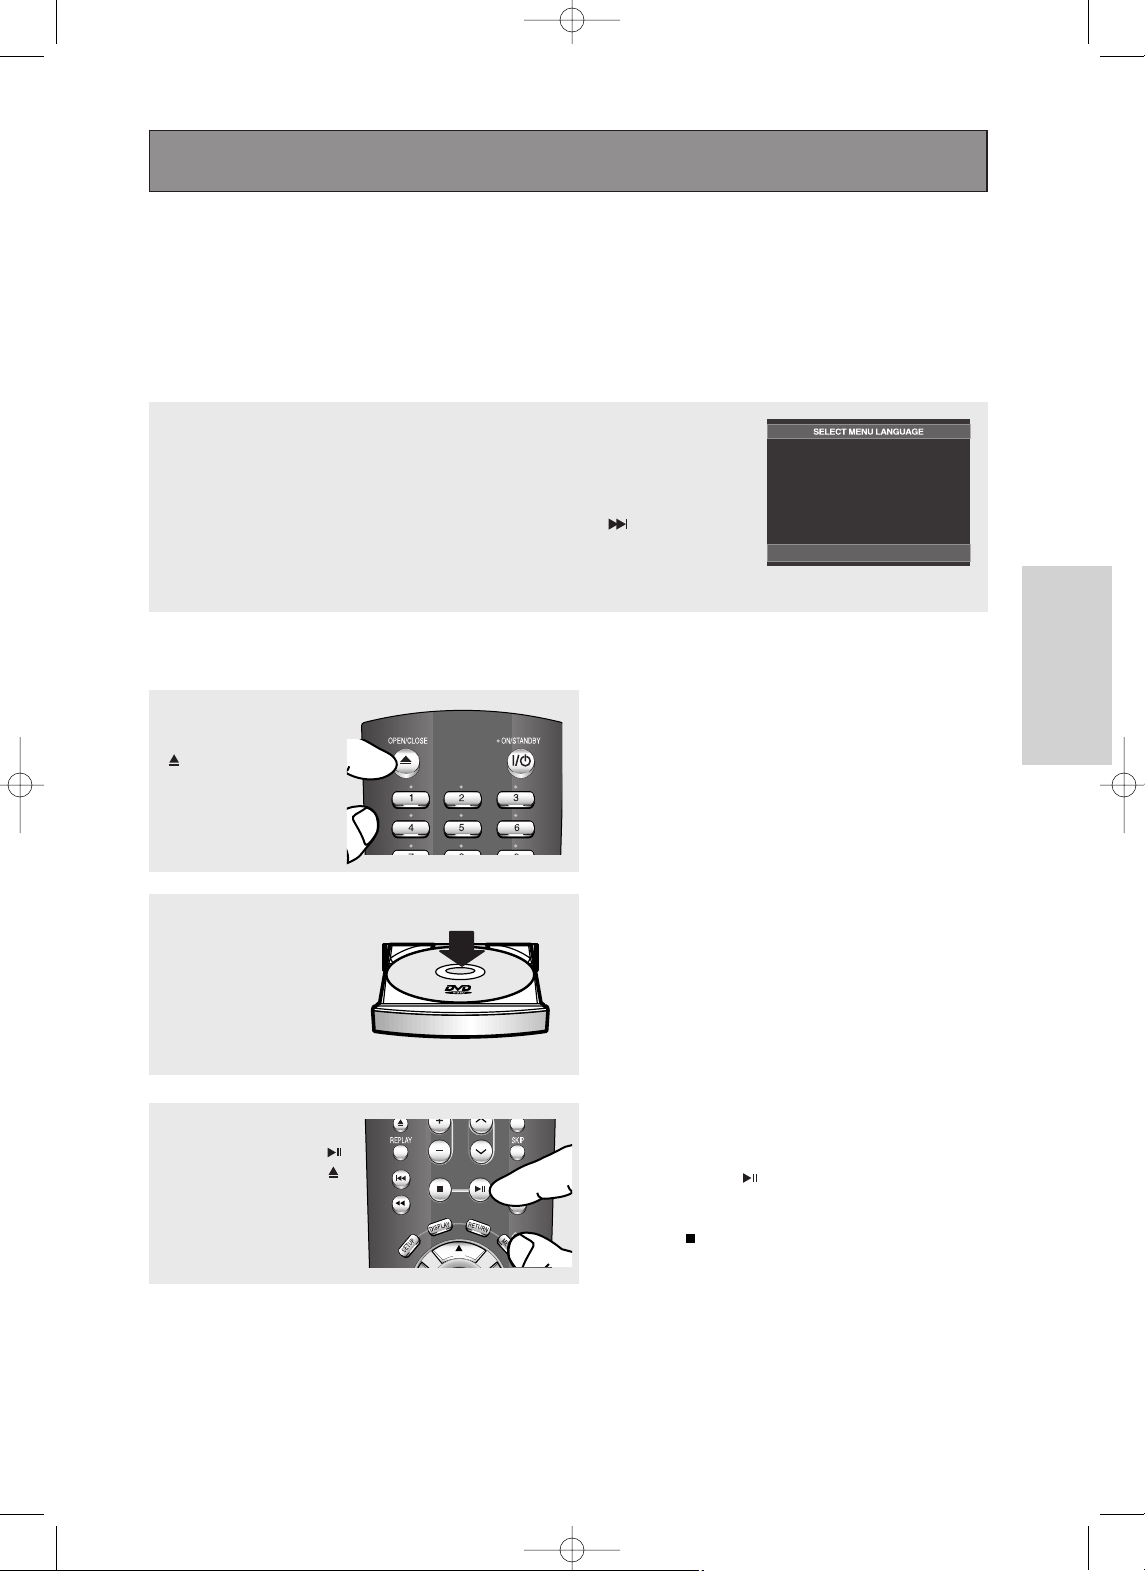
After plugging in the player, the first time you press the DVD POWER button, this
screen comes up: If you want to select a language, press a NUMBER button.
(This screen will only appear when you plug in the player for the first time.) If the
language for the startup screen is not set, the settings may change whenever you turn
the power on or off. Therefore, make sure that you select the language you want to use.
Once you select a menu language, you can change it by pressing the button on the
front panel of the unit for more than 5 seconds with no disc in the unit.
Then the SELECT MENU LANGUAGE window appears again where you can reset
your preferred language.
Playback
1
Press the OPEN/CLOSE
()button.
The STANDBY indicator
light goes out and the tray
opens.
2
Place a disc gently into the
tray with the disc’s label
facing up.
3
Press the PLAY/PAUSE ( )
button or OPEN/CLOSE ( )
button to close the disc tray.
▼
RESUME function
When you stop disc play, the player remembers
where you stopped, so when you press
PLAY/PAUSE ( ) button again, it will pick up
where you left off. (unless the disc is removed
or the player is unplugged, or if you press the
STOP ( ) button twice.)
Press 1 for English
Touche 2 pour Français
Drücken Sie 3 für Deutsch
Pulse 4 para Español
Premere 5 per Italiano
Druk op 6 voor Nederlands
Basic Functions
00839A-SD-6980SU-1 6/29/05 9:13 AM Page 23
Page 24

ENG-24
6
Pausing Play
Press the PLAY/PAUSE
()or STEP button on the
remote control during play.
▼
Screen stops, no sound.
To resume, press the PLAY/PAUSE ( ) button
once again.
Note
If the player is left for about 5 minutes in pause
mode, it will stop.
7
Step Motion Play (Except
CD)
Press the STEP button on
the remote control during play.
▼
Each time the button is pressed, a new frame
will appear.
No sound is heard during STEP mode.
Press the PLAY/PAUSE ( ) button to resume
normal play.
You can only perform step motion play in the
forward direction.
5
Removing Disc
Press the OPEN/CLOSE
()button.
8
Slow Motion Play (Except
CD)
Press the SEARCH ( )
button to choose the play
speed between 1/8, 1/4 and
1/2 of normal during PAUSE
or STEP mode.
Note
This ( ) icon indicates an invalid button press.
4
Stopping Play
Press the STOP ( ) button
during play.
Note
- If the player is left in the stop mode for more than
one minute without any user interaction, a screen
saver will be activated. Press the PLAY/PAUSE
( ) button to resume normal play.
- If the player is left in the stop mode for more than
30 minutes, the power will automatically turn off.
(Automatic Power-Off Function)
▼
No sound is heard during slow mode.
Press the PLAY/PAUSE ( ) button to resume
normal play.
Reverse slow motion play will not work.
Basic Functions
00839A-SD-6980SU-1 6/29/05 9:13 AM Page 24
Page 25

ENG-25
Basic Functions
Using the Search and Skip Functions
During play, you can search quickly through a chapter or track, and use the skip function to jump to
the next selection.
Searching through a Chapter or Track
During play, press the
SEARCH (or )
button on the remote
control for more than 1
second.
▼
During play, press the
SEARCH ( or )
button
and press again to search at a faster speed.
Note
- The speed marked in this function may be
different from the actual playback speed.
- No sound is heard during search mode
(Except CD).
DVD
VCD
CD/SACD/DVD-AUDIO
2X, 4X, 8X, 32X, 128X
4X, 8X
2X, 4X, 8X
Skipping Tracks
- When playing a DVD, if you press the SKIP ( )
button, it moves to the next chapter. If you press
the SKIP ( ) button, it moves to the beginning
of the chapter. One more press makes it move to
the beginning of the previous chapter.
- When playing a VCD 2.0 in Menu Off mode, or a
VCD 1.1 or a CD, if you press the SKIP ( )
button, it moves to the next track. If you press
the SKIP ( ) button, it moves to the beginning
of the track. One more press makes it move to
the beginning of the previous track.
- If a track exceeds 15 minutes when playing a
VCD and you press the button, it moves
forward 5 minutes. If you press the button,
it moves backward 5 minutes.
During play, press the SKIP
( or ) button.
Note
When VCD 2.0 is in Menu Off mode only, this
function works. Select Menu Off by pressing the
DISC MENU button.
Basic Functions
00839A-SD-6980SU-1 6/29/05 9:13 AM Page 25
Page 26

ENG-26
Using the Display Function
When Playing a DVD/VCD/CD/MPEG4
1
During play, press the
DISPLAY button on the
remote control.
▼
You can select Info in the function menu by
pressing the MENU button.
2
Press the …/† buttons to
select the desired item.
DVD
VCD
CD
▼
When VCD2.0 is in Menu Off mode only, this
function works. Select Menu Off by pressing the
DISC MENU buton.
01
02
0:00:13
ENG 5.1CH
Off
01
0:00:43
01
0:00:48
Basic Functions
MPEG4
01
0:00:13
MP3 1/8
No
640x272
00839A-SD-6980SU-1 6/29/05 9:13 AM Page 26
Page 27

ENG-27
Basic Functions
4
To make the screen
disappear, press the
DISPLAY button again.
Note
To access the desired title when there is more than one in the disc.
For example, if there is more than one movie on a DVD, each movie will be identified.
Most DVD discs are recorded in chapters so that you can quickly find a specific passage (similar to
tracks on an audio CD).
Allows playback of the film from a desired time. You must enter the starting time as a reference.
The time search function does not operate on some discs.
Refers to the film's soundtrack language.
In the example, the soundtrack is played in English 5.1CH.
A DVD disc can have up to eight different soundtracks.
The MP3, AC3 and WMA are supported.(DivX)
Refers to the subtitle languages available in the disc.
You will be able to choose the subtitle languages or, if you prefer, turn them off from the screen.
A DVD disc can have up to 32 different subtitles.
(DivX)
File Size has a relationship with resolution of a title.
The larger file size is, the higher resolution is displayed.
If the file resolution is small, it scales up automatically. So you can see the larger screen.
3
Press the œ/√ buttons to
make the desired setup and
then press the ENTER
button.
▼
You may use the number buttons of the remote
control to directly access a title, chapter or to
start the playback from a desired time.
Basic Functions
00839A-SD-6980SU-1 6/29/05 9:13 AM Page 27
Page 28

ENG-28
Using the Disc and Title Menu
Using the Disc Menu (DVD)
1
During the playback of a
DVD disc, press the SETUP
button on the remote
control.
2
Press the …/† buttons to
select Disc Menu, then
press the √ or ENTER
button.
Note
- Depending on a disc, the Disc Menu may not
work.
- You can also use the Disc Menu, using the DISC
MENU button on the remote control.
- In VCD 2.0 the DISC MENU button is used to
select Menu On or Menu Off mode.
Using the Title Menu (DVD)
1
During the playback of a
DVD disc, press the SETUP
button on the remote
control.
2
Press the …/† buttons to
select
Title Menu, then
press the
√ or ENTER
button.
Note
- Depending on a disc, the Title Menu may not
work.
- Title Menu will only be displayed if there are at
least two titles in the disc.
Press ENTER key
for Disc Menu
Press ENTER key
for Title Menu
Basic Functions
00839A-SD-6980SU-1 6/29/05 9:13 AM Page 28
Page 29

ENG-29
Basic Functions
Using the Function Menu
Using the Function Menu (DVD/VCD)
1
Press the SETUP button
during playback.
2
Press the …/† buttons to
select Function, then press
the √ or ENTER button.
- Info (See pages 26 to 27)
- Zoom (See page 39)
- Marker
(See pages 37 to 38)
- Repeat (See pages 30 to 31)
- Angle (See page 35)
- Front Display
For Front display, you can
select the brightness of the
display to 3 different modes :
Auto, Bright, Dim.
▼
You can also directly select these functions
using their respective buttons on the remote
control.
Note
- When VCD2.0 is in Menu Off mode only, this
function works. Select Menu Off by pressing the
DISC MENU buton.
3
Press the …/† buttons to
select one of the six
functions. Then press the
√ or ENTER button to
access the function.
Info
Zoom
Bookmark
Repeat
Angle
Front Display : Bright
Basic Functions
00839A-SD-6980SU-1 6/29/05 9:13 AM Page 29
Page 30

ENG-30
Repeat Play
Repeat the current track, chapter, title, a chosen section (A-B), or all of the disc.
When playing a DVD/VCD/CD
1
Press the REPEAT button
on the remote control.
Repeat screen appears.
2
Press the œ/√ buttons to
select Chapter, Title or A-B,
then press the ENTER
button.
▼
DVD repeats play by chapter or title, CD and
VCD repeat play by disc or track.
Chapter ( ): repeats the chapter that is
playing.
Title ( ): repeats the title that is playing.
Disc ( ): repeats the disc that is playing.
Track ( ): repeats the track that is playing.
A-B: repeats a segment of the disc that you
select.
Using the A-B Repeat function
1. Press the REPEAT button on the remote control.
2. Press the œ/√ buttons to Select A-B.
3. Press the ENTER button at the point where you want repeat play to start (A).
B is automatically highlighted.
4. Press the ENTER button at the point where you want the repeat play to stop (B).
- To return to normal play, press the CLEAR button.
Note
A-B REPEAT does not allow you to set point (B) until at least 5 seconds of playback time has
elapsed after point (A) has been set.
3
To return to normal play,
press
REPEAT button
again, then press the œ/√
buttons to select Off and
press ENTER button.
Note
- Depending on a disc, the Repeat function may
not work.
- When VCD2.0 is in Menu Off mode only, this
function works. Select Menu Off by pressing the
DISC MENU buton.
DVD
VCD/CD
DVD
VCD/CD
Off 01 01 A-B
Off 01 01 A-B
Off 01 01 A-B
Off 01 01 A-B
Basic Functions
00839A-SD-6980SU-1 6/29/05 9:13 AM Page 30
REPEAT
REPEAT
ENTER
ENTER
T
T
D
REPEAT
T
ENTER
REPEAT
T
D
ENTER
Page 31

ENG-31
Basic Functions
Slow Repeat Play
This feature allows you slowly to repeat scenes containing sports, dancing, musical instruments
being played etc., so you can study them more closely.
When playing a DVD/VCD
1
During play, press the
PLAY/PAUSE ( ) button.
2
Press the SEARCH ( )
button to choose the play
speed between 1/8, 1/4 and
1/2 of normal during PAUSE
or STEP mode.
3
Press the REPEAT button
on the remote control.
Press the œ/√ buttons to
select A-B.
▼
The disc will play from A to B repeatedly at the
speed you chose.
Note
When VCD2.0 is in Menu Off mode only, this
function works. Select Menu Off by pressing the
DISC MENU buton.
▼
To set A-B REPEAT, set (A) first, then set (B)
after the following slow play time has elapsed:
1/8x: wait 40 seconds, then press B
1/4x: wait 20 seconds, then press B
1/2x: wait 10 seconds, then press B
4
Press the ENTER button at
the point where you want
repeat play to start (A).
B is automatically
highlighted. Press the
ENTER button at the point
where you want the repeat
play to stop (B).
5
To return to normal play,
press the CLEAR button and
then press the PLAY/PAUSE
() button.
Basic Functions
00839A-SD-6980SU-1 6/29/05 9:13 AM Page 31
Page 32

ENG-32
Program Play & Random Play
Program Play (CD)
Program Play allows you to select the order in which you want tracks to play.
1
During play, press the
PROGRAM button.
Random Play (CD)
Random Play plays a disc's tracks in random order.
1
Press the PROGRAM
button.
2
Press the œ/√ buttons to
select RANDOM.
Press the ENTER button.
2
Press the œ/√ buttons to
select PROGRAM.
Press the ENTER button.
3
Press the …/†/œ/√ buttons
to select the first track to
add to the program.
Press the ENTER button.
The selection numbers
appear in the Program
Order box.
▼
- To return to the previous menu screen, press
the RETURN button.
- To cancel the selected program order, press
the CLEAR button.
- This unit can support a maximum of 20
programmed tracks.
Note
- Depending on a disc, the Program and Random
Play functions may not work.
- While in playback mode, press the CLEAR button
on the remote control to cancel Program Play or
Random Play.
4
Press the PLAY/PAUSE
()button.
The disc will be played in
programmed order.
PROGRAM 01
Track Program Order
PROGRAM
œœ √√
RANDOM
PROGRAM
œœ √√
RANDOM
Basic Functions
00839A-SD-6980SU-1 6/29/05 9:13 AM Page 32
01 02 03 04
05 06 07 08
09 10 11 12
13 14 15 16
- - - - - - - -
- - - - - - - -
- - - - - - - -
- - - - - - - -
- - - - - - - -
Page 33

ENG-33
Advanced
Functions
Selecting the Audio Language
You can select a desired audio language quickly and easily with the AUDIO button.
Using the AUDIO button (DVD/VCD/CD)
1
Press the AUDIO button.
The Audio changes when
the button is pressed
repeatedly.
- The audio languages
are represented by
abbreviations.
2
To remove the AUDIO
icon, press the CLEAR or
RETURN button.
DVD
When playing a VCD or CD,
you can select among
Stereo, Right or Left.
VCD/CD
Note
- This function depends on audio languages are
encoded on the disc and may not work.
- A DVD disc can contain up to 8 audio
languages.
- To have the same audio language come up
whenever you play a DVD; Refer to “Using the
Audio Language” on page 58.
Stereo
Advanced Functions
00839A-SD-6980SU-1 6/29/05 9:13 AM Page 33
ENG
DOLBY DIGITAL 5.1CH
AUDIO
AUDIO
Page 34

ENG-34
Selecting the Subtitle Language
You can select a desired subtitle quickly and easily with the SUBTITLE button.
Using the SUBTITLE button (DVD/MPEG4)
1
Press the SUBTITLE
button.
The subtitle changes when
the button is pressed
repeatedly.
The subtitle languages are
represented by
abbreviations.
2
To remove the SUBTITLE
icon, press the CLEAR or
RETURN button.
Note
- Depending on DVDs, you can change desired
subtitle in the Disc Menu. Press the DISC MENU
button.
- This function depends on what subtitles are
encoded on the disc and may not work on all
DVDs.
- A DVD disc can contain up to 32 subtitle
languages.
- To have the same subtitle language come up
whenever you play a DVD;
Refer to “Using the Subtitle Language” on page
59.
DVD
Off
Advanced Functions
Press the œœ/√√buttons to
select the desired subtitle
language on a MPEG4 then
press the ENTER .
MPEG4
NONE
00839A-SD-6980SU-2 6/29/05 9:02 AM Page 34
SUBTITLE
Page 35

ENG-35
Advanced
Functions
Changing the Camera Angle
When a DVD contains multiple angles of a particular scene, you can use the ANGLE
function.
Using the Angle Function (DVD)
If the disc contains multiple angles, the ANGLE appears on the screen.
1
During play or pause
mode, press the SETUP
button on the remote
control.
4
Press the
œ/√
button
repeatedly to select the
desired angle. To remove
the ANGLE icon, press the
CLEAR or RETURN
button.
Note
If the disc has only one angle, this feature won’t
work. Currently, very few discs have this
feature.
2
Press the ……/††buttons to
select Function, then
press the √or ENTER
button.
Info
Zoom
Bookmark
Repeat
Angle
Front Display : Bright
3
Press the ……/††buttons to
select Angle, then press
the √or ENTER button.
Info
Zoom
Bookmark
Repeat
Angle
Front Display : Bright
Advanced Functions
00839A-SD-6980SU-2 6/29/05 9:02 AM Page 35
ANGLE
4/6
Page 36

ENG-36
Using the Instant Replay/Skip Function
Using the Instant Replay function (DVD)
If you miss a scene, you can see it again using this function.
Press the REPLAY button.
- The current scene
moves backward about
10 seconds, and plays
back.
Using the Instant Skip function (DVD)
Use this function to skip playback about 10 seconds ahead of the current scene.
Press the SKIP button.
- Playback will skip ahead
10 seconds.
Note
Depending on the disc, these functions may not
work.
Advanced Functions
00839A-SD-6980SU-2 6/29/05 9:02 AM Page 36
Page 37

ENG-37
Advanced
Functions
Using the Marker Function
This feature lets you bookmark sections of a DVD or VCD (Menu Off mode) so you can quickly find
them at a later time.
Using the Marker Function (DVD/VCD)
1
During play, press the
MARKER button on the
remote control.
Using the SETUP button.
During play, press the SETUP
button on the remote control.
Press the ……/††buttons to
select Bookmark, then
press the √or ENTER
button.
2
When you reach the
scene you want to mark,
press the ENTER button.
Up to three scenes may
be marked at a time.
Note
- When VCD2.0 is in Menu Off mode only, this
function works. Select Menu Off by pressing the
DISC MENU buton.
- Depending on a disc, the Bookmark function may
not work.
Press the ……/††buttons to
select Function, then
press the √or ENTER
button.
Info
Zoom
Bookmark
Repeat
Angle
Front Display : Bright
Info
Zoom
Bookmark
Repeat
Angle
Front Display : Bright
Advanced Functions
00839A-SD-6980SU-2 6/29/05 9:02 AM Page 37
Page 38

ENG-38
Recalling a Marked Scene
1
During play, press the
MARKER button on the
remote control.
3
Press the PLAY/PAUSE
( ) button to skip to
the marked scene.
2
Press the
œ/√
buttons to
select a marked scene.
Clearing a Marker
1
During play, press the
MARKER button on the
remote control.
3
Press the CLEAR button
to delete a bookmark
number.
2
Press the
œ/√
buttons to
select the bookmark
number you want to delete.
Advanced Functions
00839A-SD-6980SU-2 6/29/05 9:02 AM Page 38
Page 39

ENG-39
Advanced
Functions
Using the Zoom Function
Using the Zoom Function (DVD/VCD)
1
During play, press the ZOOM
button on the remote control.
Using the SETUP button.
During play or pause mode,
press the SETUP button on
the remote control.
Press the
……/††
buttons to
select Zoom, then press
the √or ENTER button.
2
Press the ……/††or
œ/√
buttons to select the part
of the screen you want to
zoom in on.
Press the ENTER button.
▼
During DVD play, press ENTER to zoom in
2X/4X/2X/Normal in order.
During VCD play, press ENTER to zoom in
2X/Normal in order.
Press the ……/††buttons to
select Function, then
press the √or ENTER
button.
Note
When VCD2.0 is in Menu Off mode only, this
function works. Select Menu Off by pressing the
DISC MENU buton.
Info
Zoom
Bookmark
Repeat
Angle
Front Display : Bright
Info
Zoom
Bookmark
Repeat
Angle
Front Display : Bright
Advanced Functions
00839A-SD-6980SU-2 6/29/05 9:02 AM Page 39
Page 40

ENG-40
3
Depending on the file type stored on the Memory card,
audio files will be played the same way as MP3/WMA files
and picture files will be played the same way as Picture
CD’s files. (See pages 48 to 54)
1
Insert a Memory Card.
2
Press the DVD/CARD
button on the remote
control.
How to insert a Memory Card
This unit accepts 11 different types of Memory Cards
Insert the Memory Card correctly with the label facing up, otherwise it may not work.
Multi card slot to support 11 types of memory cards: Memory Stick, Memory Stick-Pro, Memory Stick Duo,
SD, Mini SD Card and xD-Picture Card, MMC, RS-MMC, Smart Media Card, Compact Flash, Micro Drive.
When cards are inserted in two slots, the card which is inserted first has a priority on playback.
Toshiba is an authorized licensee of the Compact Flash® registered trademark. SD is a trademark of SD
Card Association. MMC and MultiMedia Card are trademarks of Infineon Technologies AG and licensed to
MMCA (MultiMediaCard Association). Memory Stick is a trademark of Sony Corporation.
xD-Picture Card is a trademark of Fuji Photo Film Co., Ltd.
SmartMedia is a trademark of Toshiba Corp.
Micro Drive is a trademark of Hitachi Global Storage Technologies Netherlands B.V.
Note
-
This device supports xD M series card.
-
This unit is able to recognize up to a maximum of 1,450 files per card.
-
If it is not fully inserted, the “Memory Card” will not work. Some memory cards may not be perfomed correctly.
- If you remove the “Memory Card” during Memory Card operation, the recorded data may become
corrupted. It is better to remove it after pressing DVD/CARD button to return to DVD/CD Mode.
- Memory Stick Duo, Mini SD, and RS-MMC must be inserted into a slot using adapter.
But some Memory cards may not be performed correctly depending on the adapter condition.
- DVD/CD cannot be played in the Memory Card mode. If you press the DVD/CARD or OPEN/CLOSE
button in M.CARD mode, the system will automatically enter the DVD/CD mode.
-
When pressing the DVD/CARD button to play the disc again, the player doesn’t remember where you stopped.
-
It takes the longer time to load files according to Memory Card Maker, file size and the number of files.
When playing a Memory Card
Advanced Functions
Card Mark Contents
SD(Secure DigitalTM)
memory card
MMC
(MultiMediaCard
TM
)
xD-Picture card
Memory Stick
TM
Memory StickTM(Pro)
CompactFlash
®
memory card (Type 1)
CompactFlash
®
memory card (Type 2)
Playable card
capacity
32 MB1 GB
8 MB1 GB
16 MB1 GB
MP3/
WMA/
JPEG
files
16 MB128 MB
128 MB2 GB
8 MB4 GB
8 MB4 GB
00839A-SD-6980SU-2 6/29/05 9:02 AM Page 40
Page 41

ENG-41
Advanced
Functions
5
To make the screen
disappear, press the
DISPLAY button again.
DVD AUDIO Playback
1
Open the disc tray.
Place the DVD AUDIO disc on the tray.
- Place the DVD AUDIO disc with the labeled side up.
Close the tray.
- The tray closes and disc plays.
2
During play, press the
DISPLAY button on the
remote control.
▼
You can select Info in the function menu by
pressing the MENU button.
4
Press the œ/√ buttons to
make the desired setup and
then press the ENTER
button.
▼
You may use the number buttons of the remote
control to directly access a Group, Track, Page
or to start the playback from the desired time.
▼
Some DVD-AUDIO discs don’t down-mix audio.
These discs always output 5.1ch analog audio
regardless of audio setup.
3
Press the …/† buttons to
select the desired item.
DVD-AUDIO
01
01
01
0:00:13
Advanced Functions
00839A-SD-6980SU-2 6/29/05 9:02 AM Page 41
Page 42

ENG-42
Note
Most DVD AUDIO discs are recorded in Groups you can change Groups with this Function.
Bonus Group playback.
Some DVD AUDIO discs have Bonus groups. If you want to play a Bonus group, you must enter the
Bonus Group code. The code is usually on the DVD AUDIO disc case.
To access the desired Track when there is more than one on the DVD AUDIO disc.
If pages are included with the DVD-AUDIO disc, you can see this icon.
To access the desired page, you can use this Function.
If a slide show is included with the DVD-AUDIO disc, you can see this icon.
In this case, you cannot use PAGE DOWN/UP buttons.
If a video zone is included with the DVD-AUDIO disc, you can see this icon.
In this case you cannot use PAGE DOWN/UP buttons.
Allows playback of music from a desired time by using the number buttons.
Slide
V-zone
Page, Index Function
1
Use PAGE DOWN/UP
buttons to Skip the Page
when there is more than one
in a group.
- Some DVD-AUDIO discs
include a slide show. In the
slide show mode, this
function can not be used.
- PAGE is still images.
You can see the still
images when a DVDAUDIO disc is played back.
2
Use INDEX PREV/NEXT
buttons to Skip the Index
when there is more than one
in a track.
Note
Depending on a disc, this function may not work.
Advanced Functions
00839A-SD-6980SU-2 6/29/05 9:02 AM Page 42
Page 43

ENG-43
Advanced
Functions
REPEAT Play
1
Press the REPEAT button
on the remote control.
Repeat screen appears.
2
Press the œ/√ buttons to
select Track, Group, then
press the ENTER button.
▼
Track ( ): repeats the title that is playing.
Group ( ): repeats the group that is playing.
DVD-AUDIO
Off 01 01
AUDIO Format Display
1
During DVD AUDIO
playback, press the AUDIO
button to see AUDIO Format
information.
- LPCM : Linear Pulse Code Modulation.
Not compressed Audio data format.
- PPCM : Packet Pulse Code Modulation.
Lossless compressed Audio data
format.
▼
Note
Some DVD-AUDIO discs don’t allow audio
down-mixing.
DVD-AUDIO
PPCM 5.1CH
Advanced Functions
00839A-SD-6980SU-2 6/29/05 9:02 AM Page 43
Page 44

ENG-44
Super Audio CD Playback
1
Open the disc tray.
Place the Super Audio CD
disc on the tray.
- Place the Super Audio CD
disc with the labeled side up.
Close the tray.
- The tray closes and you
should get a screen.
Super Audio CD Clips Menu On Play Function
1
Use the …/† buttons to
select a music title.
2
Press the ENTER button to
begin playback of the music
title.
- If you want to use the
Repeat Function, press
the REPEAT button to
change the mode, such as
Off, Track, Disc.
* Off : Normal Playback
* Track : Repeats the current
music title.
* Disc : Repeats the music
titles in the Super Audio
CD.
Off
▼
If you want to see information about the Disc
title and Artist, press the DISPLAY button.
If you want to convert to regular CD mode,
press the SACD/CD button.
During play or stop mode, you can change the
2CH or MULTI mode by using LEFT/RIGHT
buttons. (You can use this function when Super
Audio CD disc includes both multi channel and
2 channel audio format.)
Advanced Functions
00839A-SD-6980SU-2 6/29/05 9:02 AM Page 44
Page 45

ENG-45
Advanced
Functions
5
To make the screen
disappear, press the
DISPLAY button again.
Super Audio CD Clips Menu Off Play Function
1
In Stop mode, press the
DISC MENU button until the
Clips menu is off.
2
During play, press the
DISPLAY button on the
remote control.
▼
You can select Info in the function menu by
pressing the SETUP button.
4
Press the œ/√ buttons to
make the desired setup and
then press the ENTER
button.
▼
You may use the number buttons of the remote
control to directly access a track and to start the
playback from the desired time.
3
Press the …/† buttons to
select the desired item.
SACD
01
0:00:13
MULTI
Advanced Functions
00839A-SD-6980SU-2 6/29/05 9:02 AM Page 45
SACD
Page 46

ENG-46
Note
(SACD)
To access the desired Track when there is more than one in the disc.
(SACD)
Allows playback from a desired time by using the number buttons.
(SACD)
If you want to change the 2 channel or multi channel mode in play or stop mode, press AUDIO
button.
- You can use this function when the Super Audio CD disc includes multi channel and 2 channel
audio format.
• 2CH : L, R
• MULTI : F/L, F/R, R/L, R/R, C/T, S/W
(CD)
To access the desired Track when there is more than one in the disc.
(CD)
Allows playback from a desired time. You must enter the starting time as a reference.
CD Layer Play Function
1
During Super Audio CD
playback, press the
SACD/CD button to playback
the CD layer of a dual layer
Super Audio CD disc.
(Refer to the page 26 for
setting CD playback
Function).
Note
- Some Super Audio CD discs do not include a CD
layer.
- Depending on a disc, this function may not work.
- Super Audio CD, SA-CD and their logos are
trademaks of Sony and Philips.
01
0:00:13
Advanced Functions
00839A-SD-6980SU-2 6/29/05 9:02 AM Page 46
Page 47

ENG-47
Advanced
Functions
Clips Menu for MP3/WMA/JPEG/MPEG4
Discs with MP3/WMA/JPEG/MPEG4 contain individual songs and/or pictures that
can be organized into folders as shown below. They are similar to how you use your
computer to put files into different folders.
Open the disc tray.
Place the disc on the tray.
Close the tray.
The tray closes and this
screen displays.
Parent Folder, Current Folder
and Peer Folders
Folders and Files in
Current Folder
- : Name of currently playing file.
- : Current Playback Time.
- : Current Playback Mode : There are four
modes. They can be selected in order by
pressing the REPEAT button.
- Off: Normal Playback
- Track: Repeats the current track.
- Folder: Repeats the current folder.
- Random: Files in the disc will be played
in random order.
- : MP3 file icon.
- : WMA file icon.
- : JPEG file icon.
- : AVI file icon.
- : Folder icon.
- : Current Folder icon.
- To select the Parent Folder
Press the RETURN button to go to the parent folder,
or press the ……/††buttons to select “..” and
press ENTER to go to the parent folder.
- To select the Peer Folder
Press the
œ/√
buttons to highlight the left window.
Press the
……/††
buttons to select the desired folder,
then press ENTER.
- To select the Sub-Folder
Press the
œ/√
buttons to highlight the right window.
Press the ……/
††
buttons to select the desired folder,
then press ENTER.
Folder Selection
The folder can only be selected in the Stop mode.
Parent Folder
Current Folder
Sub-Folders
Peer Folders
Off
Advanced Functions
00839A-SD-6980SU-2 6/29/05 9:02 AM Page 47
ROOT
ROOT
WMA
JPEG
MP3
MPEG4
Root
WMA
JPEG
MP3
MUSIC
SONG FILE 1
SONG FILE 2
SONG FILE 3
1st
2nd
Page 48

ENG-48
MP3/WMA Playback
1
Open the disc tray.
Place the disc on the tray.
Close the tray.
▼
When a disc that contains both MP3 and
WMA files, only one type will play, not
both.
2
Press the ……/††or
œ/√
buttons to select a song
file.
Press ENTER to begin
playback of the song file.
Repeat/Random playback
1
Press the REPEAT button
to change the playback
mode. There are four
modes; Off, Track, Folder
and Random.
- Off: Normal Playback
- Track: Repeats the current song file.
- Folder: Repeats the song files which have the same extension
in the current folder.
- Random: Song files which have the same extension will be
played in random order.
To resume normal play, press the CLEAR button.
Note
- Depending on the recording method, some MP3 CD-Rs may not be played.
- It is impossible to write MP3 or JPEG files to a Memory Card in this unit as it is read only.
- Only MP3/WMA Format files with the “ .mp3 and .wma” extensions can be played.
Off
OffOff
Advanced Functions
00839A-SD-6980SU-2 6/29/05 9:02 AM Page 48
ROOT
ROOT
ROOT
ROOT
WMA
WMA
JPEG
JPEG
MP3
MP3
MPEG4
MPEG4
00:00:23 Because You
ROOT
ROOT
WMA
JPEG
MP3
MPEG4
ROOT
..
Because You
WMA
Cactus
JPEG
Sad Dayu
MP3
Wonderful
MPEG4
Page 49

ENG-49
Advanced
Functions
MP3/WMA file
When you record MP3 or WMA files on CD-R/Memory Card, please refer to the following.
- Your MP3 or WMA files should be ISO 9660 or JOLIET
format.
ISO 9660 format and Joliet MP3 or WMA files are
compatible with Microsoft's DOS and Windows, and with
Apple's Mac. This format is the most widely used. Memory
Card over 4GB use FAT32, which may not be compatible
with this unit.
- When naming your MP3 or WMA files, do not exceed 8
characters, and enter “.mp3, .wma” as the file
extension.
General name format : Title.mp3. or Title.wma. When
composing your title, make sure that you use 8 characters
or less, have no spaces in the name, and avoid the use of
special characters including: (.,/,\,=,+).
- Use a decompression transfer rate of at least 128 Kbps
when recording MP3 files.
Sound quality with MP3 files basically depends on the rate
of compression/decompression you choose. Getting CD
audio sound requires an analog/digital sampling rate, that is
conversion to MP3 format, of at least 128 Kbps and up to
160 Kbps. However, choosing higher rates, like 192
Kbps or more, only rarely give better sound quality.
Conversely, files with decompression rates below 128 Kbps
will not be played properly.
- Use a decompression transfer rate of at least 64Kbps
when recording WMA files.
Sound quality with WMA files basically depends on the rate
of compression/decompression you choose.
Getting CD audio sound requires an analog/digital sampling
rate, that is conversion to WMA format, of at least 64Kbps
and up to 192Kbps.
Conversely, files with decompression rates below 64Kbps
or over 192Kbps will not be played properly.
For example, a cusor is jumping next file, and play a file but
no sound.
- Use a sampling rate of at least 32Khz and up to 48Khz.
Conversely, files will not be played properly, and may
be skipped.
- Do not try recording copyright protected MP3 files.
Certain "secured" files are encrypted and code protected to
prevent illegal copying. These files are of the following
types: Windows MediaTM(registered trade mark of Microsoft
Inc) and SDMITM(registered trade mark of The SDMI
Foundation). You cannot copy such files.
- Important:
The above recommendations cannot be taken as a
guarantee that the DVD player will play MP3 recordings, or
as an assurance of sound quality. You should note that
certain technologies and methods for MP3 file recording on
CD-Rs prevent optimal playback of these files on your DVD
player (degraded sound quality and in some cases, inability
of the player to read the files).
- This unit can play a maximum of 3000 files and 300 folders
per disc.
- This DVD player requires discs/recordings to meet certain
technical standards in order to achieve optimal playback
quality. Pre-recorded DVDs are automatically set to these
standards. There are many different types of recordable
disc formats (including CD-R containing MP3/WMA files).
Because this area of technology is still evolving, Toshiba
cannot guarantee that all recordable discs will produce
optimal playback quality. The technical criteria set forth in
this owner's manual are meant only as a guide.
- Please be advised that you must obtain permission from
the applicable copyright owners to download copyrighted
content, including music files, in any format, including the
MP3 and WMA formats, prior to the downloading thereof.
Toshiba has no right to grant and does not grant permission
top download any copyrighted content.
Advanced Functions
00839A-SD-6980SU-2 6/29/05 9:02 AM Page 49
Page 50

ENG-50
MPEG4 Playback
MPEG4 Play Function
AVI files are used to contain the audio and video data. Only AVI format files with the
“.avi” extensions can be played.
1
Open the disc tray.
Place the disc on the tray.
Close the tray.
2
Press the ……/††or
œ/√
buttons to select an avi file
(DivX/XviD), then press the
ENTER button.
Repeat Playback
1
Press the REPEAT button
to change playback mode.
There are 4 modes, such
as Off, Folder, Title and
A-B (a distance between
two points appointed by
user).
- Folder : Repeats the AVI files which have the same extension
in the current folder.
- Title : repeats the title that is playing.
- A-B : repeats a segment of the file that you select.
Off
Off
Advanced Functions
00839A-SD-6980SU-2 6/29/05 9:02 AM Page 50
ROOT
ROOT
ROOT
WMA
JPEG
MP3
MPEG4
ROOT
ROOT
WMA
WMA
JPEG
JPEG
MP3
MP3
MPEG4
MPEG4
ROOT
..ROOT
WMA
JPEG
MP3
MPEG4
Page 51

ENG-51
Advanced
Functions
Note
- Some MPEG4 files created on a personal computer may not be play back.
That is why Codec Type, Version and Higher resolution over specification is not supported.
- This unit supports CD-R/RW written in MPEG4 in accordance with the “ISO9660 format”.
MPEG4 Function Description
- These functions may not work depending on MPEG4 file.
CD-R AVI file
This unit can play the following video compression formats
within the AVI file format:
- DivX 3.11 contents
- DivX 4 contents (Based on MPEG4 Simple Profile)
- DivX 5 contents (MPEG4 simple profile plus additional
features such as bi-directional frames. Qpel and GMC are
also supported.)
This unit supports all resolutions up to maximum below.
Function Description Reference page
Skip
( or )
Search
( or )
Slow Motion
Play
Step Motion
Play
ZOOM
During play, press the or
button, it moves forward
or backward 5 minutes.
During play, press the SEARCH
( or ) button and press
again to search at a faster
speed.
Allows you to search
at a faster speed in an AVI
file. (2X, 4X, 8X)
Allows you to search at a
slower speed in an AVI file.
(1/8X, 1/4X, 1/2X)
Each time the STEP button
is pressed, a new frame will
appear.
2X/4X/2X/Normal in order
-
-
P24
P24
P39
DivX3.11 & DivX4 & XviD DivX5
Bitrate may fluctuate:
Device may skip decoding
the high bitrate portions
and begin decoding again
when Bitrate returns to
normal.
720 x 480 @30fps
720 x 576 @25fps
: Maximum bitrate : 4Mbps
Advanced Functions
00839A-SD-6980SU-2 6/29/05 9:02 AM Page 51
Page 52

ENG-52
Picture CD Playback
1
Select the desired folder.
Note
- If no buttons on the remote control are pressed
for 10 seconds, the menu will disappear.
- Press the STOP button to return to the clips
menu.
- When playing a Kodak Picture CD, the unit
displays the Photo directly, not the clips menu.
2
Press the ……/††buttons to
select a Picture file in the
clips menu and then press
the ENTER button.
3
Press the DISPLAY button
to display the menu.
Press the œ/√ buttons to
select the menu you want
to view, then press the
ENTER button.
Album Screen
• : Returns to the Album Screen.
• To see the next six pictures, press the button.
• To see the previous six pictures, press the button.
Rotation
: Each time the ENTER button is pressed, the
picture rotates 90 degrees clockwise.
Zoom
: Press the ……/††or
œ/√
buttons to select the
part of the screen you want to zoom in on.
Press the ENTER button. Each time the ENTER
button is pressed, the picture is enlarged up
to 4X. (2X ➝ 4X ➝ 2X ➝ Normal)
Slide Show
• : The unit enters slide show mode.
• Before beginning the Slide Show, the picture interval must be
set. Press the œ/√ buttons to select a desired icon, then
press the ENTER button.
• : The pictures change automatically with about a 6
second interval.
• : The pictures change automatically with
about a 12 second interval.
• : The pictures change automatically with
about a 18 second interval.
ENTER
RETURN
Note
- Depending on a file size, the amount of time between each picture may be different from the set interval
time.
- If you don’t press any button, the slide show will start automatically in about 10 seconds by default.
Off
Off
TIMER:
Advanced Functions
00839A-SD-6980SU-2 6/29/05 9:02 AM Page 52
ROOT
ROOT
WMA
JPEG
MP3
MPEG4
ROOT
WMA
JPEG
MP3
MPEG4
..
1
2
3
ENTER RETURN
Page 53

ENG-53
Advanced
Functions
Picture CD Playback for HD-JPEG
Must connect to HDMI. Resolution should be 720p or 1080i, and HD-JPEG should
be in HD mode. (See page 64)
2
Select the desired folder.
1
Set the HD-JPEG to HD from
Setup menu. (See page 64)
3
Press the ……/††buttons to
select a Picture file in the
clips menu and then press
the ENTER button.
Off
Off
▼
Press the STOP ( ) button to return to the
clips menu.
When playing a Kodak Picture CD, the unit
displays the Photo directly, not the clips menu.
Note
- Depending on a file size, the amount of time
between each picture may be different from the set
interval time.
- Album Screen, Zoom, and Info functions are not
available when displaying images in HD-JPEG
mode.
- OSD (On Screen Display) messages are not
displayed when displaying images in HD-JPEG
mode.
- The image may be displayed at a smaller size
depending on the picture size when displaying
images in HD-JPEG mode.
Note
- Only available in HDMI/COMPONENT(P-SCAN)
output.
HDMI SETUP
▼
To exit the setup menu, press the SETUP
button.
Slide Show
Press the the
PLAY/PAUSE()
button to start SLIDE
function.
Press the the
PLAY/PAUSE()
button again at this time
to stop SLIDE function.
Skip Picture
Press the or
button to select previous
or next picture.
Advanced Functions
Resolution setting : Auto
Resolution : 1080i
Format : RGB-Normal
HD-JPEG : SD
00839A-SD-6980SU-2 6/29/05 9:02 AM Page 53
ROOT
WMA
JPEG
MP3
MPEG4
..
1
2
3
ROOT
ROOT
WMA
JPEG
MP3
MPEG4
Page 54

ENG-54
JPEG Discs
When playing a CD-R/Memory Card/Picture CD
- Only files with the “.jpg” and “.JPG” extensions can be played.
- If the disc is not closed, it will take longer to start playing and not all of the recorded files may be played.
- Only CD-R discs with JPEG files in ISO 9660 or Joliet format can be played.
- Some memory cards may not be perfomed correctly.
- The name of the JPEG file may not be longer than 8 characters and should contain no blank spaces or special characters
(. / = +).
- Only a consecutively written multi-session disc can be played. If there is a blank segment in the multi-session disc, the disc can
be played only up to the blank segment.
- A maximum of 3000 images can be stored on a single CD.
- Kodak Picture CDs are recommended.
- When playing a Kodak Picture CD, only the JPEG files in the pictures folder can be played.
- Kodak Picture CD: The JPEG files in the pictures folder can be played automatically.
- Konica Picture CD: If you want to see the Picture, select the JPEG files in the clips menu.
- Fuji Picture CD: If you want to see the Picture, select the JPEG files in the clips menu.
- QSS Picture CD: The unit may not play QSS Picture CD.
- If the number of files in 1 Disc is over 3000, only 3000 JPEG files can be played.
- If the number of folders in 1 Disc is over 300, only JPEG files in 300 folders can be played.
Advanced Functions
00839A-SD-6980SU-2 6/29/05 9:02 AM Page 54
Page 55

ENG-55
Changing
Setup Menu
Using the Setup Menu
The Setup menu lets you customize your DVD player by allowing you to select various language
preferences, set up a parental level, even adjust the player to the type of television screen you
have.
Œ
Language Setup : Setup of the Language.
´
Audio Setup : Setup of the Audio Options.
ˇ
Display Setup : Setup of the Display Options. Use to select which type of screen you want to
watch and several display options.
¨
Parental Setup : Setup of the Parental Level. Allows users to set the level necessary to prevent
children from viewing unsuitable movies such as those with violence, adult
subject matter, etc.
ˆ
DivX(R) Registration : Please use the Registration code to register this player with the DivX(R)
Video On Demand format. To learn more go to www.divx.com/vod.
1
With the unit in Stop
mode, press the SETUP
button on the remote
control.
Press the ……/††buttons to
select Setup, then press
the √or ENTER button.
2
Press the ……/††buttons to
access the different
features. Press the √or
ENTER button to access
the sub features.
3
To make the setup screen
disappear after setting up,
press the SETUP button
again.
Note
- Depending on the disc, some Setup menu
selections may not work.
Setup
Language Setup
√√
Audio Setup
√√
Display Setup
√√
Parental Setup :
√√
DivX(R) Registration
√√
Changing Setup Menu
00839A-SD-6980SU-2 6/29/05 9:02 AM Page 55
Page 56

ENG-56
Setting Up the Language Features
If you set the player menu, disc menu, audio and subtitle language in advance, they will come up
automatically every time you watch a movie.
Using the Player Menu Language
1
With the unit in Stop
mode, press the SETUP
button.
3
Press the ……/††buttons to
select Language Setup,
then press the √or
ENTER button.
4
Press the ……/††buttons to
select Player Menu, then
press the √or ENTER
button.
5
Press the ……/††buttons to
select the desired
language, then press the
√
or ENTER button.
▼
- The language is selected and the screen
returns to Language Setup menu.
- To exit the setup menu, press the SETUP
button.
Player Menu : English
√√
Disc Menu : English
√√
Audio : English
√√
Subtitle : Automatic
√√
LANGUAGE SETUP
Player Menu English
Français
Deutsch
Español
Italiano
Nederlands
PLAYER MENU LANGUAGE
Setup
Language Setup
√√
Audio Setup
√√
Display Setup
√√
Parental Setup :
√√
DivX(R) Registration
√√
2
Press the ……/††buttons to
select Setup, then press
the √or ENTER button.
Setup
Language Setup
√√
Audio Setup
√√
Display Setup
√√
Parental Setup :
√√
DivX(R) Registration
√√
Changing Setup Menu
00839A-SD-6980SU-2 6/29/05 9:02 AM Page 56
Page 57

ENG-57
Changing
Setup Menu
Using the Disc Menu Language
This function changes the text language only on the disc menu screens.
4
Press the ……/††buttons to
select Disc Menu, then
press the √or ENTER
button.
5
Press the ……/††buttons to
select the desired
language, then press the
√
or ENTER button.
▼
- Select “Others” if the language you want is
not listed.
- If the selected language is not recorded on
the disc, the original pre-recorded language is
selected.
- The language is selected and the screen
returns to Language Setup menu.
- To exit the setup menu, press the SETUP
button.
1
With the unit in Stop
mode, press the SETUP
button.
3
Press the ……/††buttons to
select Language Setup,
then press the √or
ENTER button.
Player Menu : English
√√
Disc Menu : English
√√
Audio : English
√√
Subtitle : Automatic
√√
LANGUAGE SETUP
English
Disc Menu Français
Deutsch
Español
Italiano
Nederlands
Others
DISC MENU LANGUAGE
Setup
Language Setup
√√
Audio Setup
√√
Display Setup
√√
Parental Setup :
√√
DivX(R) Registration
√√
2
Press the ……/††buttons to
select Setup, then press
the √or ENTER button.
Setup
Language Setup
√√
Audio Setup
√√
Display Setup
√√
Parental Setup :
√√
DivX(R) Registration
√√
Changing Setup Menu
00839A-SD-6980SU-2 6/29/05 9:02 AM Page 57
Page 58

ENG-58
Using the Audio Language
4
Press the ……/††buttons to
select Audio, then press
the √or ENTER button.
5
Press the ……/††buttons to
select the desired
language, then press the
√
or ENTER button.
▼
- Select “Original” if you want the default
soundtrack language to be the original
language the disc is recorded in.
- Select “Others” if the language you want is
not listed.
- If the selected language is not recorded on
the disc, the original pre-recorded language is
selected.
- The language is selected and the screen
returns to Language Setup menu.
- To exit the setup menu, press the SETUP
button.
1
With the unit in Stop
mode, press the SETUP
button.
3
Press the ……/††buttons to
select Language Setup,
then press the √or
ENTER button.
Player Menu : English
√√
Disc Menu : English
√√
Audio : English
√√
Subtitle : Automatic
√√
LANGUAGE SETUP
English
Français
Audio Deutsch
Español
Italiano
Nederlands
Original
Others
AUDIO LANGUAGE
Setup
Language Setup
√√
Audio Setup
√√
Display Setup
√√
Parental Setup :
√√
DivX(R) Registration
√√
2
Press the ……/††buttons to
select Setup, then press
the √or ENTER button.
Setup
Language Setup
√√
Audio Setup
√√
Display Setup
√√
Parental Setup :
√√
DivX(R) Registration
√√
Changing Setup Menu
00839A-SD-6980SU-2 6/29/05 9:02 AM Page 58
Page 59

ENG-59
Changing
Setup Menu
Using the Subtitle Language
4
Press the ……/††buttons to
select Subtitle, then press
the √or ENTER button.
5
Press the ……/††buttons to
select the desired
language, then press the
√
or ENTER button.
▼
- Select “Automatic” if you want the subtitle
language to be the same as the language
selected as the audio language.
- Select “Others” if the language you want is
not listed. Some discs may not contain the
language you select as your initial language;
in that case the disc will use its original
language setting.
- The language is selected and the screen
returns to setup menu.
- To exit the setup menu, press the SETUP
button.
1
With the unit in Stop
mode, press the SETUP
button.
3
Press the ……/††buttons to
select Language Setup,
then press the √or
ENTER button.
Player Menu : English
√√
Disc Menu : English
√√
Audio : English
√√
Subtitle : Automatic
√√
LANGUAGE SETUP
Automatic
English
Français
Subtitle Deutsch
Español
Italiano
Nederlands
Others
SUBTITLE LANGUAGE
Setup
Language Setup
√√
Audio Setup
√√
Display Setup
√√
Parental Setup :
√√
DivX(R) Registration
√√
2
Press the ……/††buttons to
select Setup, then press
the √or ENTER button.
Setup
Language Setup
√√
Audio Setup
√√
Display Setup
√√
Parental Setup :
√√
DivX(R) Registration
√√
Changing Setup Menu
00839A-SD-6980SU-2 6/29/05 9:02 AM Page 59
Page 60

ENG-60
Setting Up the Audio Options
Audio Options allows you to setup the audio device and sound status settings
depending on the audio system in use.
3
Press the ……/††buttons to
select Audio Setup, then
press the √or ENTER
button.
4
Press the ……/††buttons to
select the desired item,
then press the √or
ENTER button.
1
With the unit in Stop
mode, press the SETUP
button.
▼
To exit the setup menu, press the SETUP
button.
Setup
Language Setup
√√
Audio Setup
√√
Display Setup
√√
Parental Setup :
√√
DivX(R) Registration
√√
Dolby/DTS Digital Out : PCM
Dynamic Compression : On
PCM Down Sampling : On
Speaker Setup
√√
AUDIO SETUP
2
Press the ……/††buttons to
select Setup, then press
the √or ENTER button.
Setup
Language Setup
√√
Audio Setup
√√
Display Setup
√√
Parental Setup :
√√
DivX(R) Registration
√√
Changing Setup Menu
00839A-SD-6980SU-2 6/29/05 9:02 AM Page 60
Page 61

ENG-61
Changing
Setup Menu
Note
• To exit the setup menu, press the SETUP button.
• DVD-AUDIO
- Outputs 2 channel digital audio only.
- Some DVD-AUDIO discs do not downmix, so they will not output 2 channel digital audio.
- MULTI channel DVD-AUDIO discs play back through the analog outputs.
• Super Audio CD
- Outputs analog signals only.
- Super Audio CD audio is only available through the analog outputs.
It is not possible to output Super Audio CD audio via the HDMI output or Digital Audio Output.
Manufactured under license from Dolby Laboratories. “Dolby” and the double-D symbol are
trademarks of Dolby Laboratories.
“DTS” and “DTS Digital Out” are trademarks of Digital Theater Systems, Inc.
HDMI
- If your TV is not compatible with compressed multi-channel formats (Dolby Digital, DTS),
you should set Digital Audio to PCM.
- If your TV is not compatible with LPCM sampling rates over 48kHz, you should set PCM
Down sampling to On.
- SACD audio is only available through the analog outputs. It is not possible to output
SACD audio via the HDMI output or Digital Audio Output.
Œ
Dolby/DTS Digital Out
- PCM : Converts to PCM(2CH) audio.
- Bitstream : Outputs Dolby Digital or DTS Bitstream via digital output.
Select Bitstream when connecting to a Dolby Digital and DTS Decoder.
´
Dynamic Compression
- On : To select dynamic compression.
- Off : To select the standard range.
ˇ
PCM Down Sampling
- On : Select this when the Amplifier connected to the player is not 96KHz compatible.
In this case, the 96KHz signals will be down converted to 48KHZ.
- Off : Select this when the Amplifier connected to the player is 96KHz compatible.
In this case, all signals will be output without any changes.
Note
Even when PCM Down sampling is Off
• Some discs will only output down sampled audio through the digital outputs.
¨
Speaker Setup (See pages 62~63)
Changing Setup Menu
00839A-SD-6980SU-2 6/29/05 9:02 AM Page 61
Page 62

ENG-62
Surround Sound Speaker Setup
3
Press the ……/††buttons to
select Audio Setup, then
press the √or ENTER
button.
4
Press the ……/††buttons to
select Speaker Setup,
then press the √or
ENTER button.
1
With the unit in Stop
mode, press the SETUP
button.
▼
To exit the setup menu, press the SETUP
button.
Setup
Language Setup
√√
Audio Setup
√√
Display Setup
√√
Parental Setup :
√√
DivX(R) Registration
√√
AUDIO SETUP
5
Press the
…/†/œ/√
buttons to select the
desired item, then press
the ENTER button to set
the speaker.
SPEAKER SETUP
Small Small
User
Test
Small
Small Small
On
Dolby/DTS Digital Out : PCM
Dynamic Compression : On
PCM Down Sampling : On
Speaker Setup
√√
2
Press the ……/††buttons to
select Setup, then press
the √or ENTER button.
Setup
Language Setup
√√
Audio Setup
√√
Display Setup
√√
Parental Setup :
√√
DivX(R) Registration
√√
Changing Setup Menu
00839A-SD-6980SU-2 6/29/05 9:02 AM Page 62
C
LFE
SR
L
SL
R
Page 63

ENG-63
Changing
Setup Menu
The default settings : FRONT L, R (Small), CENTER (Small), SURROUND (Small).
Select the size of the speakers to be connected.
Œ
Front (FL, FR)
- Large: Normally select this.
- Small: When the sound distorts or the surround sound effects are difficult to hear, select this.
This activates the Dolby Digital bass redirection circuitry and outputs the bass
frequencies of the speaker from the subwoofer.
´
Center
- None: If you do not connect a center speaker, select this.
- Large: Normally select this.
- Small: When the sound distorts, select this.
This activates the Dolby Digital bass redirection circuitry and outputs the bass
frequencies of the center speaker from other speakers.
ˇ
Surround (SL, SR)
- None: If you do not connect a center speaker, select this.
- Large (Rear/Side): Normally select either of these according to the rear speaker’s position.
- Small (Rear/Side): When the sound distorts or the surround sound effects are difficult to hear,
select either of these according to the rear speaker’s position.
This activates the Dolby Digital bass redirection circuitry and outputs the
bass frequencies of the rear speaker from other speakers.
Setting up Test
The test output signals come clockwise starting from the Front Speaker(L).
Adjust Channel Balance so that speakers output equally in your room.
FRONT(L) ➝ CENTER ➝ SUBWOOFER ➝ FRONT(R) ➝ SURROUND(R) ➝ SURROUND(L)
Note
To make the Setup menu disappear or return to menu screen during set up, press RETURN or
œ
button.
• The subwoofer test output signal is lower than the other speakers.
• The MPEG Multichannel logo is a trademark registered by PHILIPS Corporation.
• If you set Front (L, R) “Small”, LFE (Subwoofer) is set “On” automatically.
Changing Setup Menu
00839A-SD-6980SU-2 6/29/05 9:02 AM Page 63
Page 64

ENG-64
Setting Up the Display Options
Display options enable you to set various video functions of the player.
3
Press the ……/††buttons to
select Display Setup,
then press the √or
ENTER button.
4
Press the ……/††buttons to
select the desired item,
then press the √or
ENTER button.
1
With the unit in Stop
mode, press the SETUP
button.
▼
To exit the setup menu, press the SETUP
button.
TV Aspect : Wide
√√
Still Mode : Auto
Screen Messages : On
Black Level : On
Video Output :
COMPOSIT/S-VID
√√
HDMI : 480p
√√
DISPLAY SETUP
Setup
Language Setup
√√
Audio Setup
√√
Display Setup
√√
Parental Setup :
√√
DivX(R) Registration
√√
2
Press the ……/††buttons to
select Setup, then press
the √or ENTER button.
Setup
Language Setup
√√
Audio Setup
√√
Display Setup
√√
Parental Setup :
√√
DivX(R) Registration
√√
Changing Setup Menu
00839A-SD-6980SU-2 6/29/05 9:02 AM Page 64
Page 65

ENG-65
Changing
Setup Menu
ΠTV Aspect
Depending on the type of television you
have, you may want to adjust the screen
setting (aspect ratio).
- 4:3 Letter Box : Select when you want to
see the total 16:9 ratio screen DVD
supplies, even though you have a TV with a
4:3 ratio screen. Black bars will appear at
the top and bottom of the screen.
- 4:3 Pan & Scan : Select this for
conventional size TVs when you want to
see the central portion of the 16:9 screen.
(Extreme left and right side of movie picture
will be cut off.)
- 16:9 Wide : You can view the full 16:9
picture on your wide screen TV.
´ Still Mode
These options will help prevent picture shake
in still mode and display small text clearer.
- Auto : When selecting Auto, Field/Frame
mode will be automatically converted.
- Field : Select this feature when the screen
shakes in the Auto mode.
- Frame : Select this feature when you want
to see small letters more clearly in the Auto
mode.
ˇ Screen Messages
Use to turn on-screen messages On or Off.
¨ Black Level
Adjusts the brightness of the screen.(On or
Off) It does not function in Progressive mode.
ˆ Video Output
Select Video Output.
- COMPOSITE/S-VIDEO : Select when you
want to use Video and S-Video Out.
- COMPONENT(I-SCAN) : Select when you
want to use Video and Component
525i(Interlace) Out.
- HDMI/COMPONENT(P-SCAN) : Select
when you want to use Component
525p(Progressive) Out or HDMI.
• If the Yes/No selection in the Display
Setup sub Menu is not made within 10
seconds, the screen returns to the
previous menu.
• Video Output mode can also be changed
in the following sequence in no disc mode
by pressing the V.OUT button.
COMPOSITE/S-VIDEO ➝ COMPONENT(I-SCAN)
HDMI/COMPONENT(P-SCAN)
If HDMI/COMPONENT(P-SCAN) mode is
selected and your TV does not support
HDMI or progressive scan, you cannot see
any picture. Press the V.OUT button untill
the picture can be seen on the screen.
TV ASPECT
4:3 Letter Box
4:3 Pan&Scan
16:9 Wide
DISPLAY SETUP
DISPLAY SETUP
COMPOSITE/S-VIDEO
COMPONENT(I-SCAN)
HDMI/COMPONENT(P-SCAN)
Changing Setup Menu
TV Aspect : Wide
√√
Still Mode : Auto
Screen Messages : On
Black Level : On
Video Output :
COMPOSIT/S-VID
√√
HDMI : 480p
√√
00839A-SD-6980SU-2 6/29/05 9:02 AM Page 65
Page 66

ENG-66
Ø HDMI
This setting is used when the unit is
connected by HDMI to Display devices (TV,
Projector, etc.).
- Resolution setting
•
Auto : Resolution setting automatically
•
Manual : Resolution setting manually
- Resolution
•
480p : 720 x 480
•
720p : 1280 x 720
•
1080i : 1920 x 1080
- Format
You can use this function to set HDMI
output's digital data RGB range.
•
RGB-Normal : HDMI Limited range RGB
data output.
•
RGB-Expand : HDMI Full range RGB data
output.
•
YCbCr-(4:4:4) : HDMI Limited range
YCbCr-(4:4:4) output.
•
YCbCr-(4:2:2) : HDMI Limited range
YCbCr-(4:2:2) output.
Limited range - Black/White and color level
displayed within Limited data range.
ex) When the bit depth is 8 bits
- Y : 16~235 - levels of brightness
- CbCr : 16~240 - levels of color
Full range - Black/White and color level are
expressed within full data range.
ex) When the bit depth is 8 bits
- Y : 0~255 - levels of brightness
- CbCr : 0~255 - levels of color
- HD-JPEG
•
HD : High Definition image source
- Available when resolution is 720p or
1080i in HDMI enabled.
•
SD : Standard Definition image source
• Consult your TV User’s Manual to find
out if your TV supports Progressive Scan.
If Progressive Scan is supported, follow
the TV User’s Manual regarding
Progressive Scan settings in the TV’s
menu system.
• If Video Output is set incorrectly, the
screen may be blocked.
• The resolutions available for HDMI output
depend on the connected TV or projector.
For details, see the user’s manual of your
TV or projector.
• When the resolution is changed during
playback, it may take a few seconds for a
normal image to appear.
• If you set the HDMI output resolution 720p
or 1080i, HDMI output provides better
picture quality.
• No sound will be output from the HDMI
cable if the Dolby/DTS Digital Out is not
set to PCM.
Changing Setup Menu
Resolution Setting : Auto
Resolution : 1080i
Format : RGB-Normal
HD-JPEG : SD
HDMI SETUP
00839A-SD-6980SU-2 6/29/05 9:02 AM Page 66
Page 67

ENG-67
Changing
Setup Menu
Setting Up the Parental Control
The Parental Control function works in conjunction with DVDs that have been assigned a rating,
which helps you control the types of DVDs that your family watches.
There are up to 8 rating levels on a disc.
3
Press the ……/††buttons to
select Parental Setup,
then press the √or
ENTER button.
4
Press the √or ENTER
button to select Yes if you
want to use a password.
The Enter Password
screen appears.
5
Enter your password.
The Re-enter Password
screen appears to confirm
the password. Enter your
password again.
The player is locked ( ).
1
With the unit in Stop
mode, press the SETUP
button.
Use Password : No
PARENTALSETUP
CREATE PASSWORD
Enter Password
- - - -
CREATE PASSWORD
Re-enter Password
- - - -
▼
To exit the setup menu, press the SETUP
button.
Setup
Language Setup
√√
Audio Setup
√√
Display Setup
√√
Parental Setup :
√√
DivX(R) Registration
√√
2
Press the ……/††buttons to
select Setup, then press
the √or ENTER button.
Setup
Language Setup
√√
Audio Setup
√√
Display Setup
√√
Parental Setup :
√√
DivX(R) Registration
√√
Changing Setup Menu
00839A-SD-6980SU-2 6/29/05 9:02 AM Page 67
Page 68

ENG-68
Setting Up the Rating Level
2
Press the ……/††buttons to
select Parental Setup,
then press the √or
ENTER button.
3
Enter your password.
4
Press the ……/††buttons to
select Rating Level, then
press the √or ENTER
button.
▼
To exit the setup menu, press the SETUP
button.
For example, if you select up to Level 6, discs
that contain Level 7, 8 will not play.
▼
If the DVD disc has been designed to
temporarily cancel the Rating Level, the screen
which follows the “PLAY” screen will change
depending on which disc is played.
If you select “Yes” with the ENTER button,
‘Enter Password” screen then appear.
Input the 4-digit password as you have set at
step 4 page 67 and playback will start.
If “No” is selected, press the OPEN/CLOSE to
remove the disc.
5
Press the ……/††buttons to
select the Rating Level
you want, then press the
√
or ENTER button.
e.g.) Setting up in Level 6.
1
With the unit in Stop
mode, press the SETUP
button.
Press the ……/††buttons to
select Setup, then press
the √or ENTER button.
Use Password : Yes
Rating Level : 8
√√
Change Password
√√
PARENTALSETUP
RATING LEVEL
PASSWORD CHECK
Enter Password
- - - -
Level 8 Adult
Level 7
Level 6
Level 5
Level 4
Level 3
Level 2
Level 1 Kids Safe
6
Press the OPEN/CLOSE
to activate Parental
control setting.
Setup
Language Setup
√√
Audio Setup
√√
Display Setup
√√
Parental Setup :
√√
DivX(R) Registration
√√
Changing Setup Menu
00839A-SD-6980SU-2 6/29/05 9:02 AM Page 68
Page 69

ENG-69
Changing
Setup Menu
Changing the Password
3
Press the ……/††buttons to
select Parental Setup,
then press the √or
ENTER button.
The Enter Password
screen appears.
Enter your password.
4
Press the ……/††button to
select
Change Password,
then press the √or
ENTER button.
Enter your new password.
Re-enter the new
password again.
1
With the unit in Stop
mode, press the SETUP
button.
CHANGE PASSWORD
Enter New Password
- - - -
CHANGE PASSWORD
Re-enter Password
- - - -
Use Password : Yes
Rating Level : 8
√√
Change Password
√√
PARENTALSETUP
Note
If you have forgotten your password, see
“Forgot Password” in the Troubleshooting Guide
on page 71.
▼
To exit the setup menu, press the SETUP
button.
Setup
Language Setup
√√
Audio Setup
√√
Display Setup
√√
Parental Setup :
√√
DivX(R) Registration
√√
2
Press the ……/††buttons to
select Setup, then press
the √or ENTER button.
Setup
Language Setup
√√
Audio Setup
√√
Display Setup
√√
Parental Setup :
√√
DivX(R) Registration
√√
Changing Setup Menu
00839A-SD-6980SU-2 6/29/05 9:02 AM Page 69
Page 70

ENG-70
Reference
Setting Control Codes
1. Press TV to set the remote control operating
your TV.
2. While holding down PROGRAM button enter
the two diglts of your TV’s brand code (listed
right) using number buttons.
3. Release PROGRAM.
4. Point the remote control at your TV and use
each button listed below to make sure your
TV is operated correctly.
TV POWER
To turn the TV on or off.
CH
To select TV channels in the upper or lower
direction.
TV VOL.
To adjust the sound level.
INPUT
To select an external source such as a VCR.
Number buttons
To select TV channels. When selecting
channels 1 to 9, first enter 0 and then the
desired number.
100
To substitute for 100 channel key.
DISPLAY
To turn on or off TV’s screen display.
ENTER
To use for the TV’s ENTER key.
Table of Brand Codes
Note
• Some TV’s may not respond to all the operations
above, or may not be operated at all with this
remote control. In this case, operate your TV with its
own remote control.
• For some brands, several control codes (brand
codes) are allocated. Try each of them until the
buttons work on your TV.
• If you replace the remote control’s batteries, set the
brand code again.
Controlling a TV with the Remote Control
The remote control can be compatible with various brands of TV by setting their
control codes. The TOSHIBA code has initially been set to control TOSHIBA TVs.
BRAND CODE
TOSHIBA PROGRAM + 01
RCA/GE PROGRAM + 02
SONY PROGRAM + 03
MITSUBISHI PROGRAM + 04
JVC PROGRAM + 05
HITACHI PROGRAM + 06
PANASONIC A PROGRAM + 07
SHARP NEW PROGRAM + 08
SANYO PROGRAM + 09
MAGNAVOX PROGRAM + 10
GOLDSTAR NEW PROGRAM + 11
SAMSUNG PROGRAM + 12
SHARP OLD PROGRAM + 13
ZENITH PROGRAM + 14
PANASONIC B PROGRAM + 15
PIONEER PROGRAM + 16
00839A-SD-6980SU-2 6/29/05 9:02 AM Page 70
Page 71

ENG-71
Reference
Reference
Troubleshooting
Before requesting service (troubleshooting), please check the following.
No operations can be
performed with the
remote control.
The screen ratio
cannot be changed.
No audio.
Play mode differs from
the Setup Menu
selection.
Disc Menu doesn’t appear.
The icon appears
on screen.
Forgot password
The screen is blocked
If you experience other
problems.
5.1 channel sound is
not being reproduced.
Disc does not play.
• Check the batteries in the remote control.
They may need replacing.
• Operate the remote control at a distance of no more than 20 feet.
• Remove batteries and hold down one or more buttons for several minutes to
drain the microprocessor inside the remote control to reset it. Reinstall
batteries and try to operate the remote control again.
• Ensure that the disc is installed with the label side facing up.
• Check the region number of the DVD.
• 5.1 channel sound is reproduced only when the following conditions are met. :
1) The DVD player is connected with the proper Amplifier
2) The disc is recorded with 5.1 channel sound.
• Check whether the disc being played has the “5.1 ch” mark on the outside.
• Check if your audio system is connected and working properly.
• In a SETUP Menu, is the Audio Output set to Bitstream?
• The features or action cannot be completed at this time because:
1. The DVD’s software restricts it.
2. The DVD’s software doesn’t support the feature (e.g., angles).
3. The feature is not available at the moment.
4. You’ve requested a title or chapter number or search time that is out of range.
• Check if the disc has a Menu.
• Some of the functions selected in the Setup Menu may not work properly if the
disc is not encoded with the corresponding function.
• The Screen Ratio is fixed on your DVDs.
• Make sure you have selected the correct Digital Output in the Audio Options
Menu.
• Press the button for more than 5 seconds under no disc inside.
All settings will revert to the factory settings.
• Press the button for more than 5 seconds under no disc inside.
All settings including the password will revert to the factory settings.
Don't use this unless absolutely necessary.
• Go to the contents and find the section of the instruction book that contains
the explanations regarding the current problem, and follow the procedure once
again.
• If the problem still cannot be solved, please contact your nearest authorized
service center.
• Make sure that the disc is not dirty or scratched.
• Clean the disc.
• Make sure the correct video output setting is selected in this unit.
• Make sure the video outputs are connected correctly.
Action
Problem Page
The picture is noisy or
distorted.
No picture or abnormal
color (pinkish,
greenish etc,)
P7
P10
P22
P60~61
P55~69
P64~65
P60~63
P23, 66
P67~69
P5
P65
P14~18
00839A-SD-6980SU-2 6/29/05 9:02 AM Page 71
Page 72

ENG-72
Reference
No HDMI output.
HDMI output jitter
No Component video
outputs in JPEG
playback.
Abnormal HDMI output
screen.
• Check the Video output is HDMI enabled.
• Check the connection between the TV and the HDMI jack of DVD player.
• See if the TV supports this 480p/720p/1080i DVD player.
• If snow noise appears on the screen, it means that TV does not support
HDCP (High-bandwidth Digital Content Protection).
• Check your TV system setup.
• The screen jitter phenomenon may occur when frame rate is converted from
50Hz to 60Hz for 720P/1080i HDMI (High Definition Multimedia Interface)
Output.
• Please refer to the user’s manual of your TV.
• Select SD in HDMI menu if you need to view both HDMI and component out in
parallel.
Action
Problem Page
P18~19, P66
P18~19
P64~66
P66
00839A-SD-6980SU-2 6/29/05 9:02 AM Page 72
Page 73

ENG-73
Reference
Reference
Specifications
Power Requirements
Power Consumption
Weight
Dimensions
Operating Temperature Range
Operating Humidity Range
DVD
(DIGITAL VERSATILE DISC)
CD :
31/2"
(COMPACT DISC)
CD : 8Cm
(COMPACT DISC)
VCD :
3
1/2"
Composite Video
Component Video
S-Video
HDMI
2 Channel
5.1 Channel
Digital Audio Output
*Frequency Response
*S/N Ratio
*Dynamic Range
*Total Harmonic Distortion
AC 120 V, 60 Hz
14 W
5.1 lbs
16.9 (W) x 9.8 (D) x 1.9 (H) inches
+41°F to +95°F
10 % to 75 %
Reading Speed : 3.49 ~ 4.06 m/sec.
Approx. Play Time
(Single Sided, Single Layer Disc) : 135 min.
Reading Speed : 4.8 ~ 5.6 m/sec.
Maximum Play Time : 74 min.
Reading Speed : 4.8 ~ 5.6 m/sec.
Maximum Play Time : 20 min.
Reading Speed : 4.8 ~ 5.6 m/sec.
Maximum Play Time : 74 min. (Video + Audio)
1 channel : 1.0 Vp-p (75
Ω
load)
Y : 1.0 Vp-p (75
Ω
load)
Pr : 0.70 Vp-p (75
Ω
load)
Pb : 0.70 Vp-p (75
Ω
load)
Luminance Signal : 1.0 Vp-p (75
Ω
load)
Chrominance Signal : 0.3 Vp-p (75
Ω
load)
480p, 720p, 1080i
L(1/L), R(2/R)
F/L, F/R, R/L, R/R, C/T, S/W
Optical/Coaxial
48 kHz Sampling : 4 Hz to 22 kHz
96 kHz Sampling : 4 Hz to 44 kHz
110 dB
100 dB
0.004 %
General
Disc
Video
Output
Audio
Output
*: Nominal specification
- Designs and specifications are subject to change without notice.
- This model complies with the above specifications.
- This model may not be compatible with features and/or specifications that may be
added in the future.
00839A-SD-6980SU-2 6/29/05 9:02 AM Page 73
Page 74

ENG-74
Toshiba America Consumer Products, L.L.C. ("TACP") makes the following limited warranties to original consumers in
the United States. THESE LIMITED WARRANTIES EXTEND TO THE ORIGINAL CONSUMER PURCHASER OR
ANY PERSON RECEIVING THIS DAV PRODUCT AS A GIFT FROM THE ORIGINAL CONSUMER PURCHASER
AND TO NO OTHER PURCHASER OR TRANSFEREE.
DAV PRODUCTS PURCHASED IN THE U.S.A. AND USED ANYWHERE OUTSIDE OF THE U.S.A., INCLUDING,
WITHOUT LIMITATION, CANADAAND MEXICO, ARE NOT COVERED BY THESE WARRANTIES.
DAV PRODUCTS PURCHASED ANYWHERE OUTSIDE OF THE U.S.A., INCLUDING, WITHOUT LIMITATION,
CANADA AND MEXICO, AND USED IN THE U.S.A., ARE NOT COVERED BY THESE WARRANTIES.
Limited Warranty
TACP warrants this DAV Product and its parts against defects in materials or workmanship for a period of ninety (90)
days after the date of original retail purchase. DURING THIS PERIOD, TACP WILL EXCHANGE A DEFECTIVE
DAV PRODUCT WITH A NEW OR REFURBISHED DAV PRODUCT WITHOUT CHARGE TO YOU. DURING THE
PERIOD THAT COMMENCES ON THE DATE THAT IS NINETY ONE (91) DAYS AFTER THE DATE OF ORIGINAL
RETAIL PURCHASE AND ENDS ON THE DATE THAT IS THREE HUNDRED SIXTY FIVE (365) DAYS AFTER
THE DATE OF ORIGINAL RETAIL PURCHASE, TACP WILL EXCHANGE A DEFECTIVE DAV PRODUCT WITH A
NEW OR REFURBISHED DAV PRODUCT FOR A FEE.
Rental Units
The warranty for DAV Product rental units begins on the date of the first rental or thirty (30) days after the date of
shipment to the rental firm, whichever comes first.
Commercial Units
DAV Products sold and used for commercial purposes have a limited warranty for all parts and labor, which warranty
begins on the date of original retail purchase and ends on the date that is ninety (90) days thereafter.
Owner's Manual and Product Registration Card
Read this owner’s manual thoroughly before operating this DAV Product.
Complete and mail the enclosed product registration card or register your DAV Product on-line at
www.tacp.toshiba.com/service as soon as possible. By registering your DAV Product you will enable TACP to bring
you new products specifically designed to meet your needs and help us to contact you in the unlikely event a safety
notification is required under the U.S. Consumer Product Safety Act. Failure to complete and return the product
registration card does not diminish your warranty rights.
Your Responsibility
THE ABOVE WARRANTIES ARE SUBJECT TO THE FOLLOWING CONDITIONS:
(1) You must retain your bill of sale or provide other proof of purchase.
(2) All warranty servicing of this DAV Product must be made pursuant to the TACP DAV Product Warranty Exchange
Program.
(3) The warranties from TACP are effective only if the DAV Product is purchased and operated in the Continental
U.S.A. or Puerto Rico.
(4) Labor service charges for set installation, setup, adjustment of customer controls, and installation or repair of
antenna systems are not covered by this warranty. Reception problems caused by inadequate antenna systems
are your responsibility.
Limited United States Warranty
Digital Audio Video ("DAV") Product - Exchange Warranty
00839A-SD-6980SU-2 6/29/05 9:02 AM Page 74
Page 75

ENG-75
Reference
(5) Warranties extend only to defects in materials or workmanship as limited above, and do not extend to any DAV
Product or parts that have been lost or discarded by you or to damage to the DAV Product or parts caused by
fires, misuse, accident, Acts of God (such as lightning or fluctuations in electric power), improper installation,
improper maintenance, or use in violation of instructions furnished by TACP; use or malfunction through
simultaneous use of this DAV Product and connected equipment; or to units that have been modified or had the
serial number removed, altered, defaced, or rendered illegible.
How to Obtain Warranty Services
If, after following all of the operating instructions in this manual and checking the section "Troubleshooting," you find
that service is needed:
(1) For instructions on how to obtain warranty service for your DAV Product under the TACP DAV Product Warranty
Exchange Program, contact TACP's Consumer Solutions Center toll free at 1-800-631-3811.
(2) You must include the original bill of sale (or a copy of the original bill of sale) or other proof of purchase along with
the entire DAV Product when sending the DAV Product to the TACP Warranty Exchange Center specified by
TACP's Consumer Solutions Center. You are responsible for all inbound transportation and insurance charges for
the DAV Product to the TACP Warranty Exchange Center.
For additional information, visit TACP's website:
www.tacp.toshiba.com
ALL WARRANTIES IMPLIED BY THE LAW OF ANY STATE OF THE U.S.A., INCLUDING THE IMPLIED
WARRANTIES OF MERCHANTABILITY AND FITNESS FOR A PARTICULAR PURPOSE, ARE EXPRESSLY
LIMITED TO THE DURATION OF THE LIMITED WARRANTIES SET FORTH ABOVE. WITH THE EXCEPTION OF
ANY WARRANTIES IMPLIED BY THE LAW OF ANY STATE OF THE U.S.A. AS HEREBY LIMITED, THE
FOREGOING WARRANTY IS EXCLUSIVE AND IN LIEU OF ALL OTHER WARRANTIES, GUARANTEES,
AGREEMENTS, AND SIMILAR OBLIGATIONS OF TACP WITH RESPECT TO THE REPAIR OR REPLACEMENT
OF ANY PARTS. IN NO EVENT SHALL TACP BE LIABLE FOR CONSEQUENTIAL OR INCIDENTAL DAMAGES
(INCLUDING, BUT NOT LIMITED TO, LOST PROFITS, BUSINESS INTERRUPTION, OR MODIFICATION OR
ERASURE OF RECORDED DATA CAUSED BY USE, MISUSE OR INABILITY TO USE THIS DAV PRODUCT).
No person, agent, distributor, dealer, or company is authorized to change, modify, or extend the terms of these
warranties in any manner whatsoever. The time within which an action must be commenced to enforce any obligation
of TACP arising under the warranty or under any statute or law of the United States or any state thereof is hereby
limited to ninety (90) days from the date you discover, or should have discovered, the defect. This limitation does not
apply to implied warranties arising under state law.
THIS WARRANTY GIVES YOU SPECIFIC LEGAL RIGHTS AND YOU MAYALSO HAVE OTHER RIGHTS WHICH
MAY VARY FROM STATE TO STATE IN THE U.S.A. SOME STATES OF THE U.S.A. DO NOT ALLOW
LIMITATIONS ON HOW LONG AN IMPLIED WARRANTY LASTS, WHEN AN ACTION MAY BE BROUGHT, OR
THE EXCLUSION OR LIMITATION OF INCIDENTAL OR CONSEQUENTIAL DAMAGES, SO THE ABOVE
PROVISIONS MAY NOT APPLY TO YOU UNDER SUCH CIRCUMSTANCES.
00839A-SD-6980SU-2 6/29/05 9:02 AM Page 75
Page 76

AK68-00839A-00
SmartMedia is a trademark of Toshiba Corp.
Toshiba is an authorized licensee of the Compact Flash® registered
trademark.
SD is a trademark of SD Card Association.
MMC and MultiMedia Card are trademarks of Infineon Technologies
AG and licensed to MMCA (MultiMediaCard Association).
Memory Stick is a trademark of Sony Corporation.
00839A-SD-6980SU-Cover 6/29/05 8:58 AM Page 2
 Loading...