

Page 1
TEC Software Solution
SCALE VIEW V4
Owner’s Manual
Original Oct, 2004
(Revised )
TEC
Document No. OM-SW4
TOSHIBA TEC AMERICA RETAIL INFORMATION SYSTEMS, INC.
Page 2

TOSHIBA TEC AMERICA RETAIL INFOMATION SYSTEMS, INC. provides this publication as is without
warranty of any kind, either expressed or implied. This publication could include
technical inaccuracies or typographical errors. Changes are periodically made to the
information herein; these changes will be incorporated in new editions of the publication.
TOSHIBA TEC AMERICA RETAIL INFOMATION SYSTEMS, INC. may make improvements and/or changes in
the product(s) and/or program(s) described in this publication at any time.
Last Revised October 15, 2004
Page 3

Table of Contents
Getting Started
Creating the Databases ........................................................................................................1
PLU Maintenance Form ........................................................................................................2
Data Maintenance
PLU Maintenance
Add New PLU..................................................................................................................3
Saving PLU’s...................................................................................................................4
Editing PLU’s...................................................................................................................4
Delete a PLU ...................................................................................................................5
Ingredient Maintenance
Add/Enter Ingredients......................................................................................................6
Search Function...............................................................................................................8
Maximum Characters per Line.........................................................................................9
Insert Function.................................................................................................................9
Copy Current SL9000 Ingredient to SL5300 Ingredient Number ...................................10
Add New SL5300 Ingredient Number ............................................................................10
Import Ingredient Message............................................................................................10
Saving Ingredients.........................................................................................................11
Deleting Ingredients.......................................................................................................11
Nutrition Maintenance
Edit SL9000 Nutrition Message .....................................................................................12
Edit SL5300 Nutrition Message .....................................................................................13
Nutrition Templates........................................................................................................14
Search Nutrition Numbers..............................................................................................14
Add Nutrition Numbers................................................................................................... 14
Import Nutrition Numbers...............................................................................................14
Saving Nutrition Messages............................................................................................15
Deleting Nutrition Messages..........................................................................................15
Scheduled Batches
Send All Batches................................................................................................................. 16
Delete an Individual PLU.....................................................................................................16
Delete Multiple PLU’s..........................................................................................................17
Delete an Individual Ingredient Number (SL5300 Only)......................................................18
Delete a Range of Ingredient Numbers (SL5300 Only).......................................................18
Delete an Individual Nutrition Number (SL5300 Only).........................................................19
Delete a Range of Nutrition Numbers (SL5300 Only) .........................................................19
i
Page 4

Table of Contents
Main Menu
Sort/Search Database.........................................................................................................20
Sending Batches.................................................................................................................20
Set Back Function...............................................................................................................21
View ....................................................................................................................................22
Log......................................................................................................................................22
Reports
PLU Price Report...........................................................................................................23
PLU Detail Report..........................................................................................................23
PLU SPrice Report ........................................................................................................24
SL9000 Reports
PLU/Nutri Batch Report .................................................................................................24
SL9000 Ing Report.........................................................................................................25
SL9000 Nutr Report.......................................................................................................25
SL9000 Ing Batch Report...............................................................................................26
SL5300 Reports
SL5300 Ing Report.........................................................................................................26
SL5300 Nutr Report.......................................................................................................27
SL5300 Ing Batch Report...............................................................................................27
SL5300 Nutr Batch Report.............................................................................................28
SL5300 PLU Ingr No Report..........................................................................................28
SL5300 Nutr No Report .................................................................................................29
Error Messages.......................................................................................................................31
ii
Page 5
Scale View V4.0 Owner’s Manual
Getting Started
Getting Started
Creating the Databases
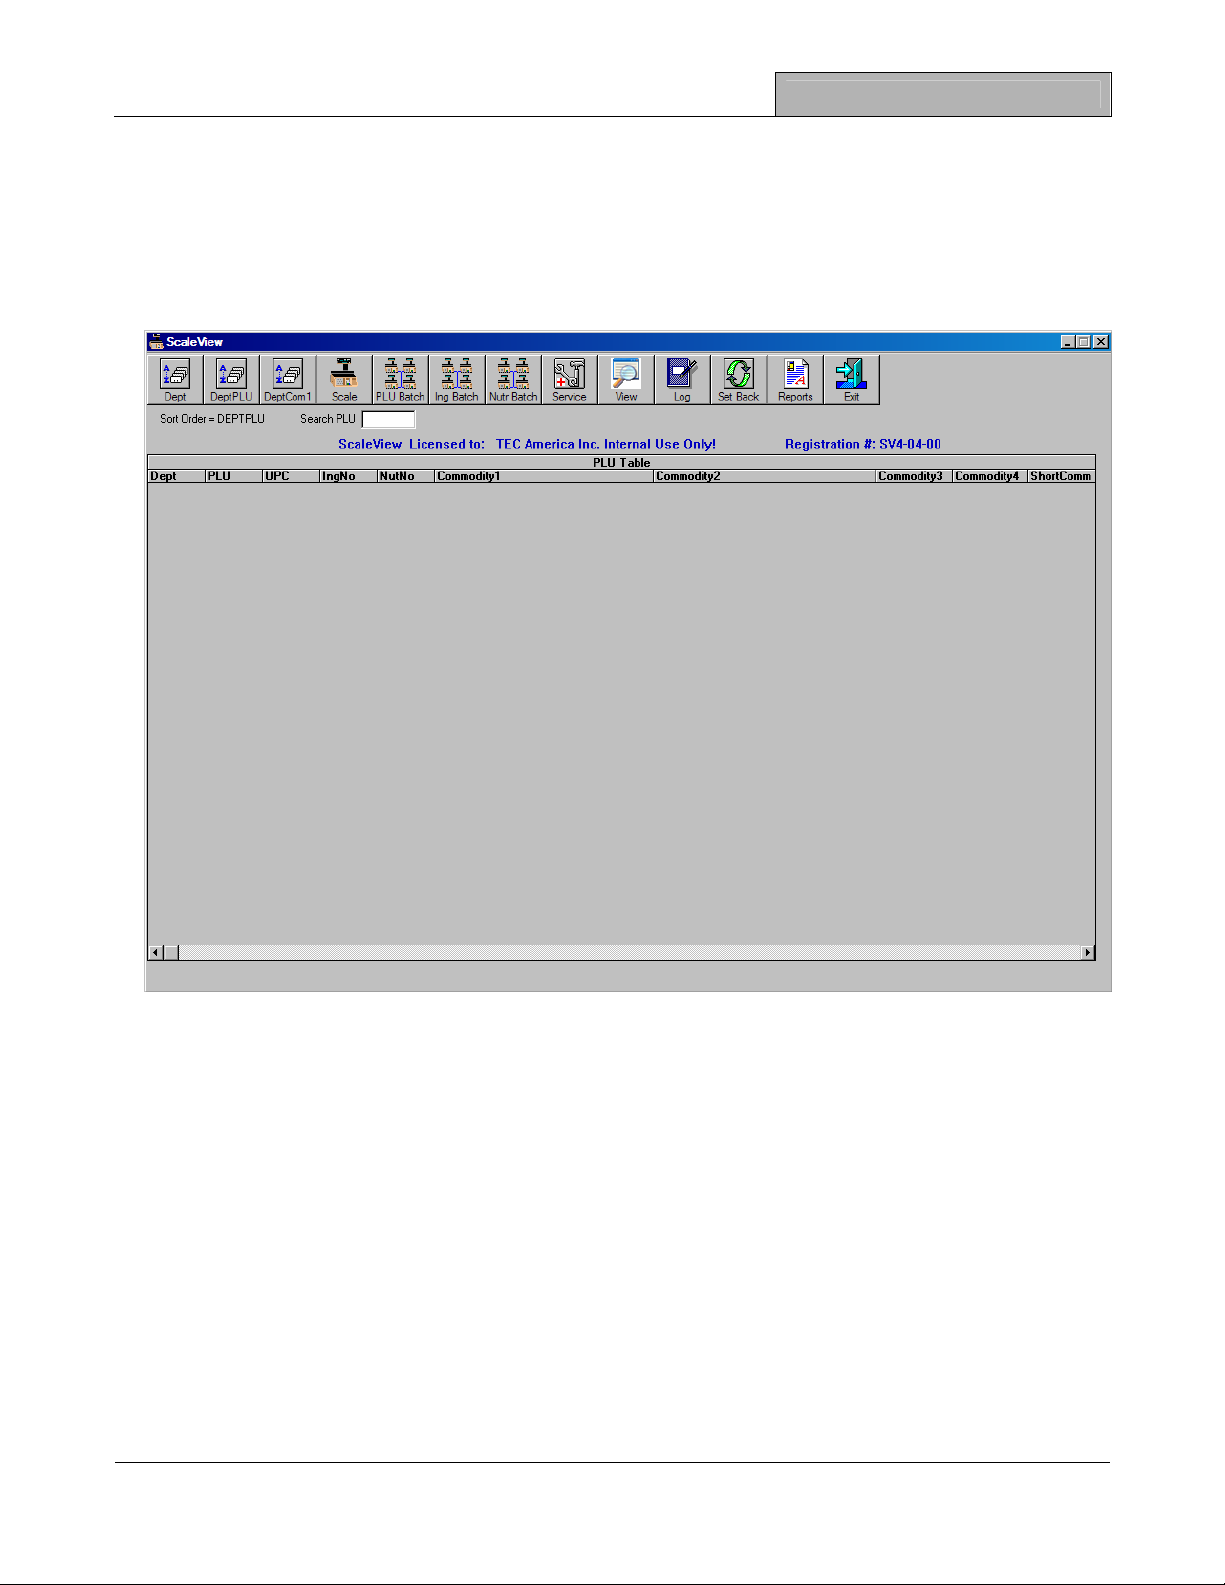
When Scale View is installed the PLU, Ingredient and Nutrition databases are empty. The
screen below shows an empty PLU database.
The PLU, Ingredient or Nutrition databases can be created by either of the following methods:
1.) Uploading and then Importing the information from one scale or any number of
scales.
Note: This method should only be performed by the installing TEC Dealer.
2.) Manually inputting the information using the appropriate data maintenance form
The Upload and Import method is usually used during the initial installation and setup of the
software. If you have had your software installed and the databases are not populated and you
wish to use the Upload and Import method to populate them, please contact your authorized
TEC Dealer.
If you simply wish to add or change information in your existing database or build the database
from scratch, you should use the appropriate PLU, Ingredient or Nutrition data maintenance
form and input that information manually. To start to build your database from scratch you would
simply “double-click” anywhere below the title PLU Table in the screen above.
18-Oct-04 Page 1
Page 6
Getting Started
Scale View V4.0 Owner’s Manual
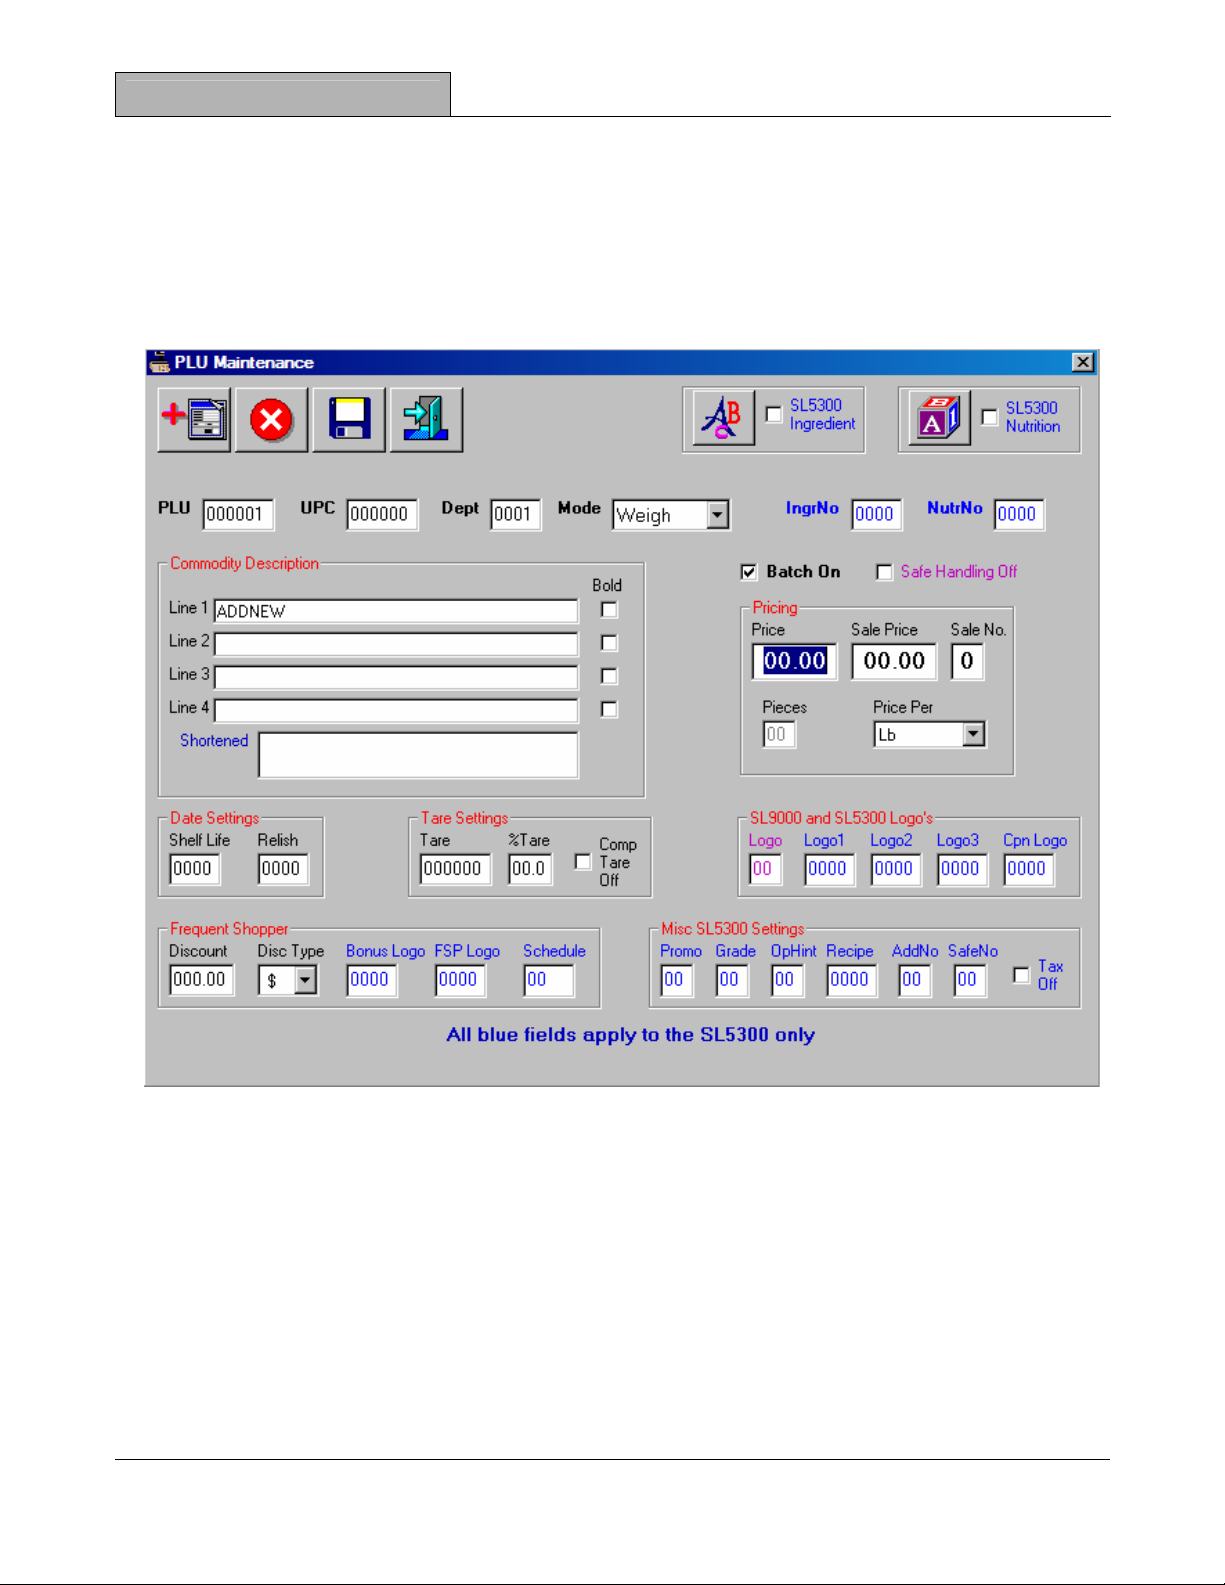
PLU Maintenance Form
You should see the PLU Maintenance Form shown below. For those of you familiar with other
versions of Scale View you will notice that the PLU Maintenance Form contains some changes.
A lot of these changes have been incorporated to support the new SL5300 Series Scale along
with the SL9000 Series Scales that were previously supported.
You will notice several blue fields. These blue fields are only used by the SL5300 Series Scale.
The fields that are titled in magenta are used only in the SL9000 Series. The fields that are titled
in black are used for both the SL5300 and SL9000 Series Scales. Since you can have both
types of scales, an SL9000 and SL5300 in the same department you may use a combination of
these different colored fields when programming a PLU. Scale View will send the appropriate
information down to the scale based on the scale type.
Also notice that when you place your cursor over a text box you will get a pop up box that gives
you the acceptable format and limitations for that particular field.
Page 2 18-Oct-04
Page 7

Scale View V4.0 Owner’s Manual
Data Maintenance
Data Maintenance
Add New PLU
The Add New PLU button allows you to add a new PLU number to the database.
The status of your PLU database will determine what happens when you press the
Add New PLU button. For example, if your PLU database is empty and you have
just “double-clicked” on the PLU Table screen you will see the PLU Maintenance
Form with PLU Number 000001 with a Commodity Descriptor of ADDNEW and a department
number of 000001. If you depress the Add New PLU button at this moment you will get a pop-up
warning telling you that the PLU has not been saved and asking you if you want to save it. If you
answer YES, the PLU Number 000001 ADDNEW will be saved to the database in department
number 000001. If you answer NO, the PLU Number field will be blanked and the cursor will be
placed in the PLU Number field so you may add a new PLU number to department 000001. If
you “double-click” on the PLU Table screen and you already have PLU’s in your database, you
will be adding a new PLU to the department number of the PLU you “double-clicked” on. If you
press the Add New PLU button at this point, the PLU Number field will blank and the cursor will
be placed there for you to add a new PLU number. Please keep in mind that if you do not want
this new PLU to be in the current department you must change the department number prior to
saving this PLU.
After you have entered a PLU Number enter all the other appropriate information for this PLU.
You may move to the other fields by depressing the TAB key or moving the mouse pointer to
the desired field and clicking there. Notice that some fields have an explanation or limitation
statement at the bottom of the PLU Maintenance Form.
Miscellaneous Field Requirements:
Field Requirement
PLU Price, Sale Price
or Frequent Shopper
Discount Price
These price fields do not require you to enter a decimal point.
They will automatically format the number that is entered to 2
decimal places.
Commodity Line 1 This field must have at least 1 character space entered due to
database sort index requirements. If you attempt to save a
PLU without at least 1 character space entered you will get a
pop up window reminding you of the requirement.
Tare Weight The tare weight field entry must follow the minimum
incremental weighing capacity setup of the scale. For
example, if the scale is setup to weigh 0 – 15 lb in 0.005 lb
increments then the tare weight field must be entered in
increments of 5. If the scale is setup to weigh in 0.01lb
increments then the tare weight should be entered in
increments of 1. Failure to use the correct tare weight
increments will not result in an error during downloading but
will result in a PLU DATA ERROR when recalling the PLU.
Note: If scale types are mixed in a department all scales
must be set to weigh in the same minimum increments.
Ingredient or Nutrition Ingredient or Nutrition information can only be entered if the
PLU has been saved
18-Oct-04 Page 3
Page 8
Data Maintenance
Scale View V4.0 Owner’s Manual
Field Requirement
Unit Price When the unit price of a Weigh Mode PLU is set to $00.00 you
must set the Price Per field to Lb Open. When the unit price of
a By Count Mode PLU is set to $00.00 you must set the
Pieces field to “0” and the Price Per field to Lb Open. Failure
to do this will result in PLU DATA ERROR when recalling
those PLU’s.
Sale Price If the Sale Price field is set to any number larger than $00.00
when downloading the entire PLU file or a PLU Batch to the
scale the Sale Price field will be sent as the unit price. If the
Sale Price is set to $00.00 then the unit price field entry will be
sent to the scale.
Sale Number The software allows for up to 9 different Sale Batches for the
entire PLU database. This feature will be discussed in the Set
Back section of this manual.
Shortened
Commodity Name
This box is only used for the SFKC name on the SL5300. It
has a limit of 24 characters and spaces maximum. It may also
be multiple lines. Keep in mind that a carriage return is
counted as a character.
Batch On/Off Box This box indicates the status of a PLU’s Batch flag. If it is
checked it means the PLU is part of a pending batch. If it is
not checked then the PLU is not part of a pending batch.
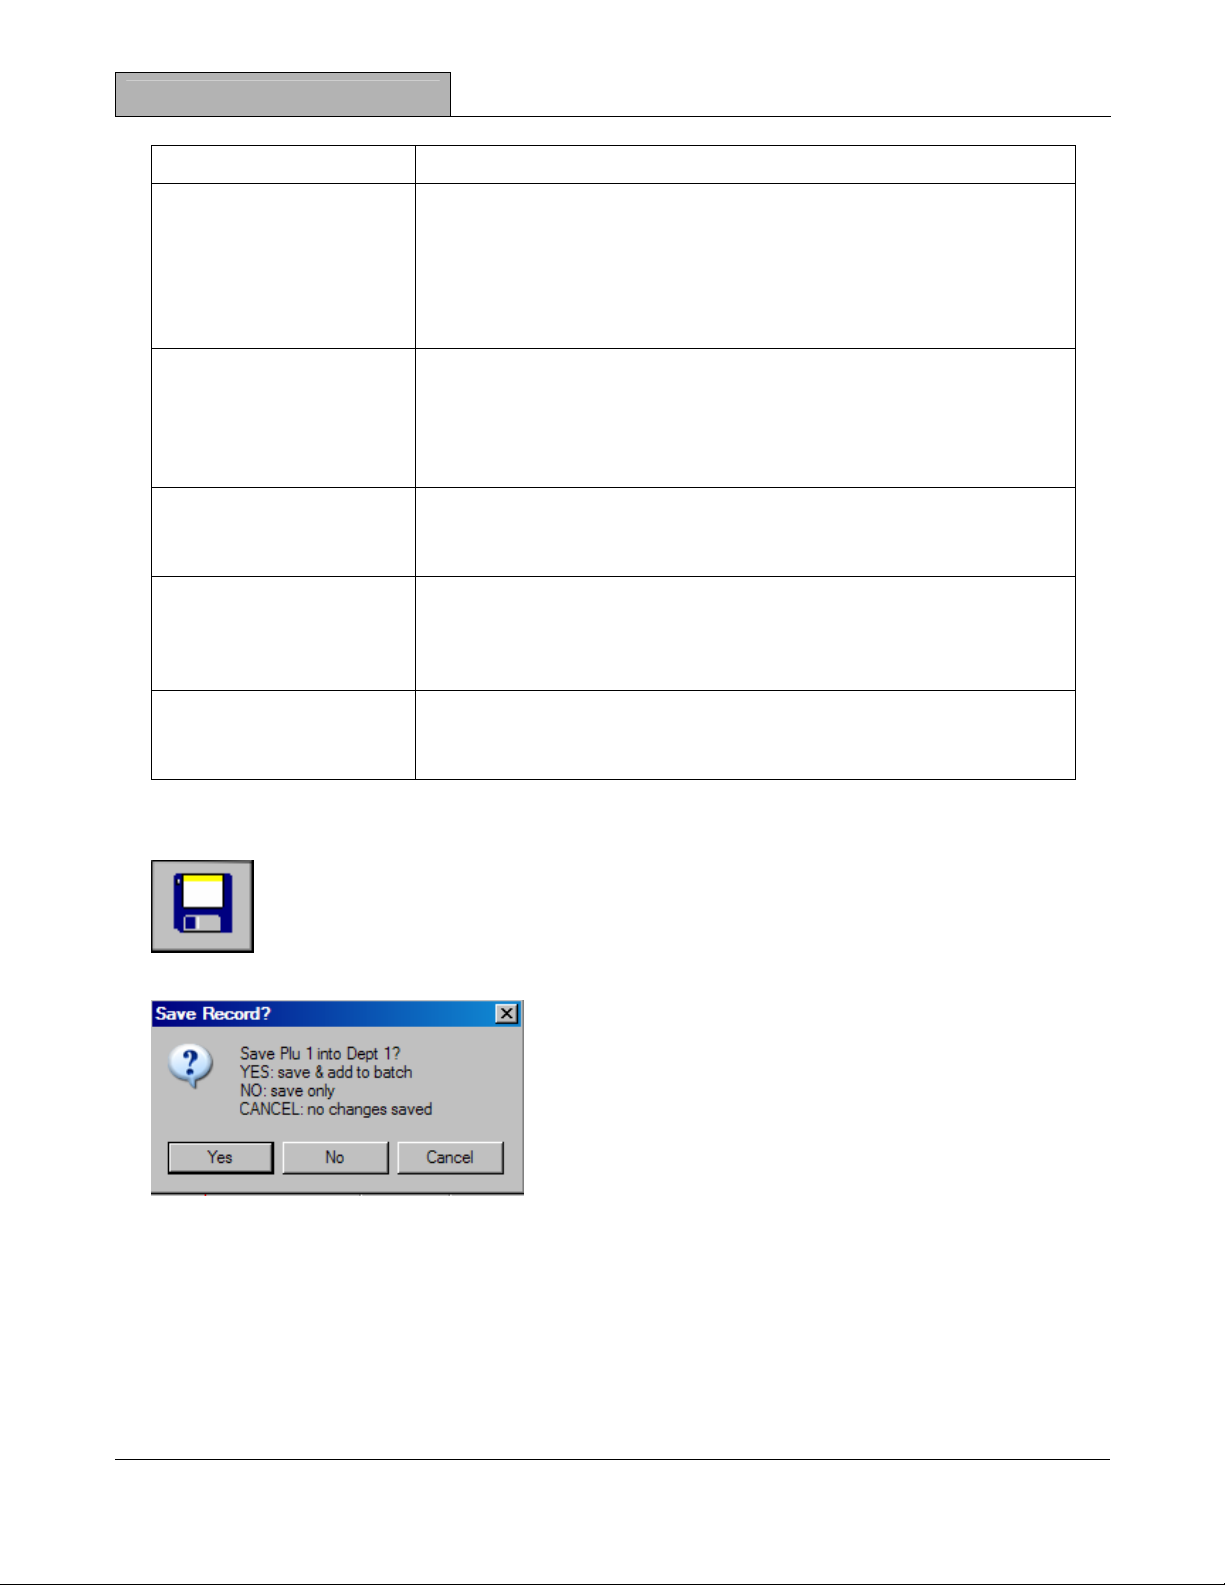
Saving PLU’s
After you have entered all of the appropriate information for a PLU you will need to
save it to the database. This is done by depressing the Save button at the top of
the PLU Maintenance Form. Once you have depressed the Save button you will be
prompted with three options.
If you answer YES, the PLU will be saved to the
database and added to a PLU batch.
If you answer NO, the PLU will be saved to the
database but will not be added to a PLU batch.
If you answer CANCEL then the information you have
programmed will be discarded and the PLU will not be
added to the database.
Editing PLU’s
To edit a PLU, simply “double-click” on the desired PLU in the database. Make the necessary
changes and then click the Save button. When editing the PLU you may change any information
except the PLU number. If the PLU belongs in another department, change the department
number and depress the Save button. You should then delete the original PLU.
Page 4 18-Oct-04
Page 9

Scale View V4.0 Owner’s Manual
Data Maintenance
Keep in mind that you can take advantage of the special features in a scale by using the same
techniques when editing PLU’s in Scale View. For example, if you only place information on
Commodity Line 1 and Commodity Line 3 in a PLU and the total number of characters on each
line is less than 25, the printed Commodity Name will be in large letters.
Delete PLU
PLU’s are deleted individually and not by batches when using the Delete PLU
button. To delete a PLU “double-click” on it in the database and the PLU
Maintenance Form will appear. Click on the Delete PLU button and a message box
will appear.
Before you click on YES make sure that the correct PLU has been selected for deletion. The
selected PLU, and its associated Ingredients and Nutrition information (if applicable) will be
deleted from all scales in the department. If communications is successful to all scales in the
department, the PLU and its associated Ingredients and Nutrition information will be deleted
from the database.
If there is any error at any scale with the exception of
“PLU DOES NOT EXIST” the PLU and its associated
Ingredients and Nutrition information will remain in the
database.
Hint: To delete a PLU when there is no scale connected, do not have a scale assigned in the
Scale Table to the same department of the PLU to be deleted.
Ingredient Maintenance
Ingredient Maintenance is performed based on the scale model. The
Edit Ingredient button has a check box on it. If the check box is left
unchecked when you click on it you will be editing an Ingredient
Message for the SL5300 Scale. The SL5300 stores Ingredients
separate from the PLU information and uses Ingredient Numbers (INGRNO). These Ingredient
Numbers may be linked to an Individual PLU or the same Ingredient Number may be linked to
several different PLU’s. There are other unique ingredient maintenance features available that
we will discuss later.
18-Oct-04 Page 5
Page 10

Data Maintenance
Scale View V4.0 Owner’s Manual
If you click on the check box and then click on the Edit Ingredient
button you will be editing an Ingredient Message for the SL9000 Scale.
An ingredient message that is programmed for a PLU in the SL9000
is automatically attached to the PLU record. The SL9000 does not
use Ingredient Numbers like the SL5300.
Add/Edit Ingredient Messages
The status of the check box next to the Ingredient Edit button will determine the Ingredient Edit
Screen that will appear when the button is depressed. Since there are differences in the
methods of how each scale manages its Ingredient Messages there will also be differences in
these Ingredient Edit screens.
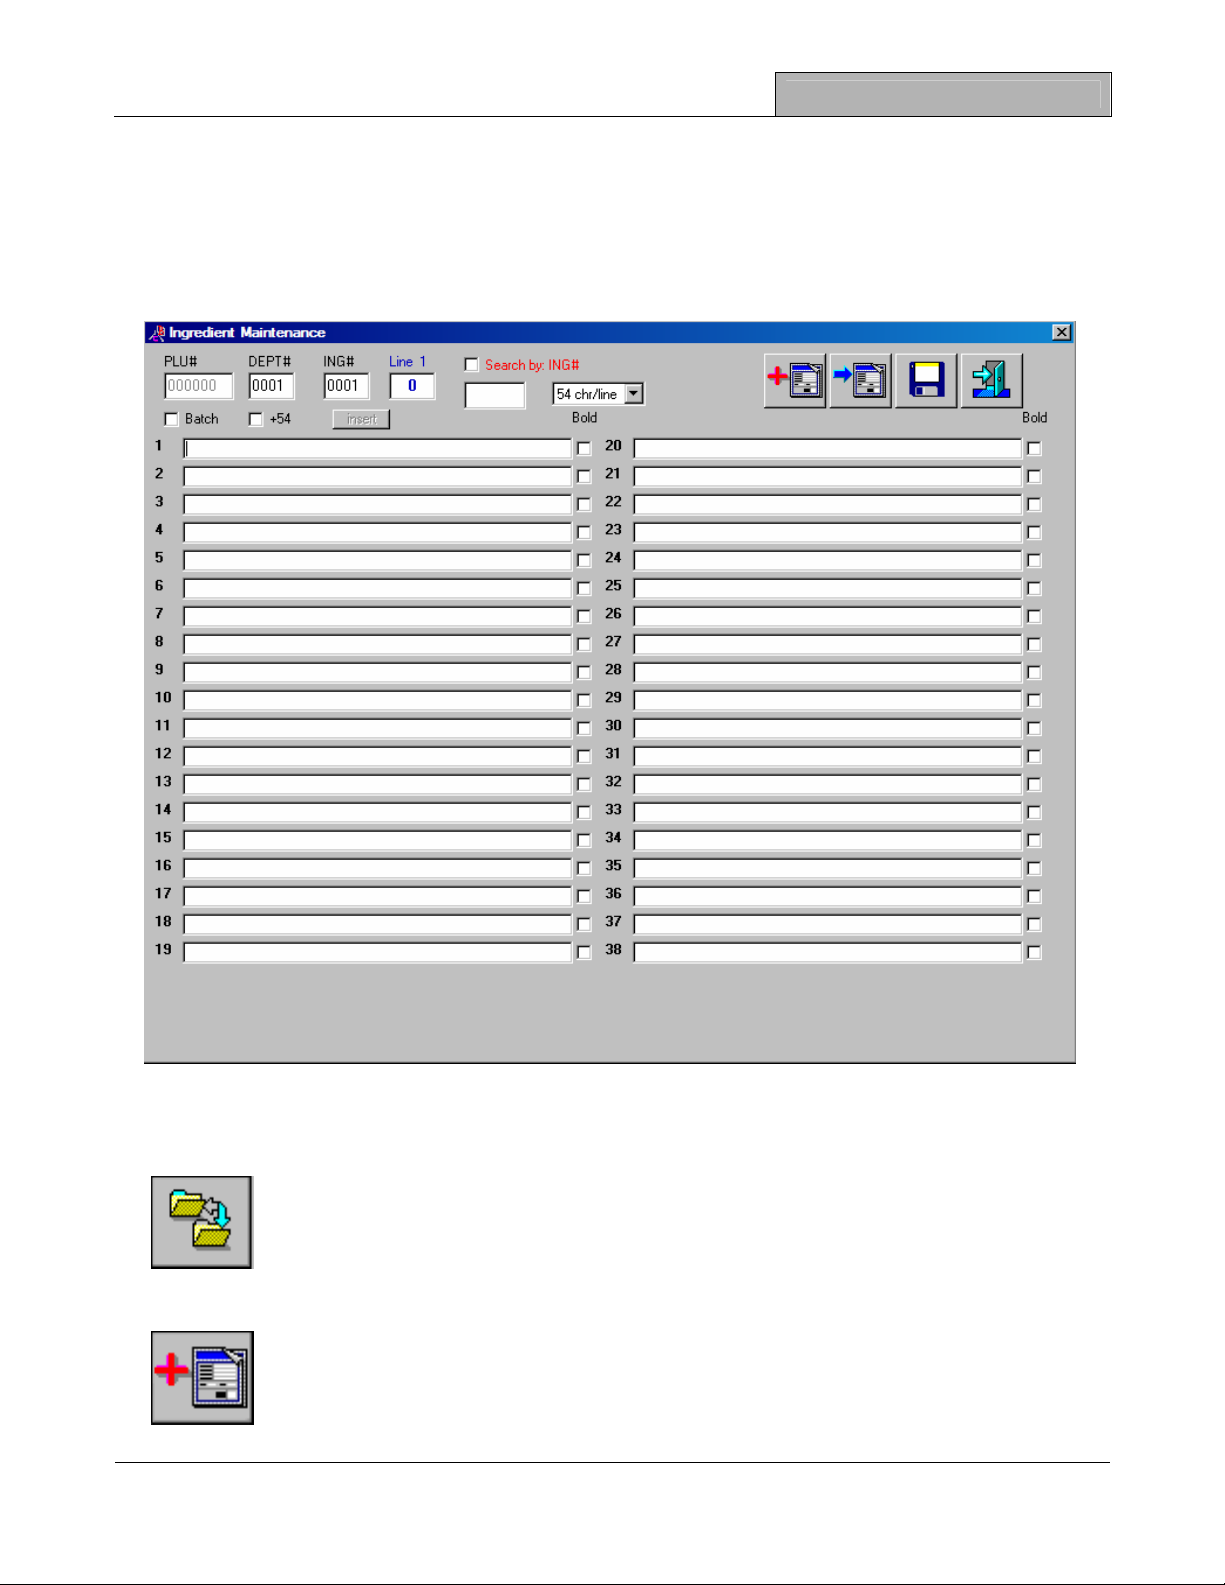
In the SL9000 Ingredient Edit screen shown below you will notice that the Ingredient Number
field is grayed out but the PLU Number and Department Number fields are highlighted.
Remember, in the SL9000 we do not use Ingredient Numbers; the PLU record contains the
Ingredient Message information.
Page 6 18-Oct-04
Page 11
Scale View V4.0 Owner’s Manual
Data Maintenance
Note that in the SL5300 Ingredient Edit screen the PLU Number is grayed out and the
Department Number and Ingredient Number fields are highlighted. This is because the SL5300
uses the Ingredient Number when storing Ingredient Messages. This Ingredient Number is used
to provide a link in the PLU to the Ingredient Message stored in the Ingredient memory area in
the scale.
The other differences in the Ingredient Edit screens of the SL9000 and the SL5300 are:
Copy Current SL9000 Ingredient Message to Selected Ingredient Number button
This button allows you to copy the SL9000 Ingredient Message that is currently
displayed to an Ingredient Number that will be used in the SL5300. This function
provides an easy way to create Ingredient Messages for the SL5300 from existing
SL9000 Ingredient Messages.
Add New SL5300 Ingredient Number button
This button allows you to create a new SL5300 Ingredient Number. This may be
done without having to assign the message to a PLU number. These functions will
be explained in more detail in the paragraphs to follow.
18-Oct-04 Page 7
Page 12
Data Maintenance
Scale View V4.0 Owner’s Manual
With the exception of the two items mentioned previously, the Ingredient Message Edit Screen
functions are the same for both the SL5300 and the SL9000 model scales. There are some new
features in the Ingredient Message Edit function that make creating and editing Ingredient
Messages much easier. Please keep in mind that even though these new features may be
available for both scale models in Scale View they may not necessarily provide any true
functionality in a particular scale.
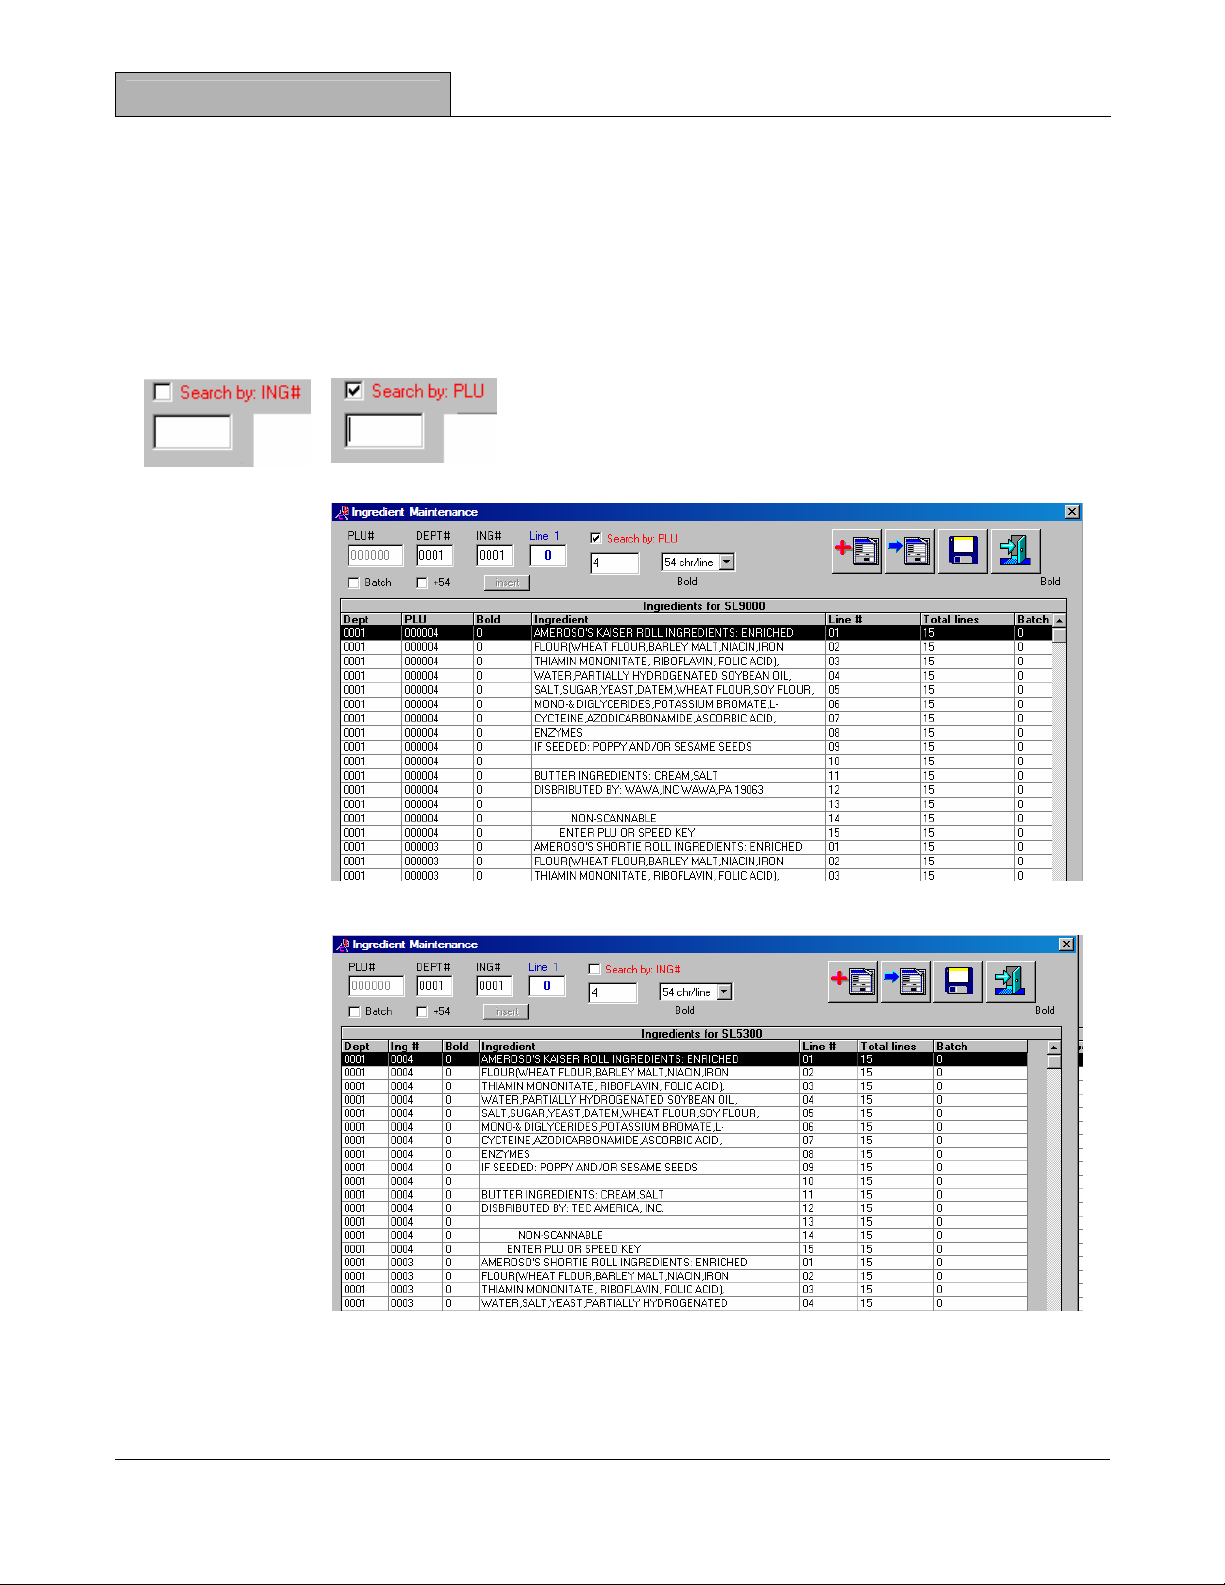
Search Function
By using the search function you can navigate to different
Ingredient Messages. This allows you to edit or view the
entire Ingredient Message database. You can select
Search by PLU for SL9000 Ingredient Messages or
Search by Ingredient # for the SL5300 by checking or unchecking the check box. In the text box
you can enter
either the
number (PLU for
SL9000 or
Ingredient for
SL5300) or [A]
for all
departments or
[D] for the
current
department and
the Ingredient
table will appear.
When the PLU
or Ingredient
number has
been entered, the Ingredient table will show that Ingredient Message and the three previous
Ingredient
Messages in the
file. You may
scroll to the
desired PLU or
Ingredient
number and
“double-click” on
any Ingredient
line for that
number and the
Ingredient table
will disappear
and the selected
Ingredient
Message is now
ready to edit. You may also adjust the column widths in the Ingredient table and the widths will
be saved permanently when you exit the maintenance screen.
Page 8 18-Oct-04
Page 13

Scale View V4.0 Owner’s Manual
Data Maintenance
Maximum Characters per Line
Another feature that is available in the Ingredient Message Edit function is the
ability to set the maximum number of characters allowed for each line in the
Ingredient Message. This feature can be used to ensure that Ingredient
Messages contain the correct number of characters that can be printed on a
certain label width. For example, if the label width that is being used in a
particular department is always the same then the maximum number of characters capable of
being printed on that size label can be set in the Ingredient Message maintenance screen. This
can help prevent missing or truncated information. The SL9000 and the SL5300 have the
capability of using 48mm or 57mm label widths. The 48mm label has a maximum printable
character width of 45 and the 57mm label has a maximum printable character width of 54.
The SL5300 can also use an 80mm label. By using the 36 character per line setting, the 80mm
label is capable of having both the Ingredient Message and Nutrition Information printed side by
side on the same label.
Note: This setting remains after closing the Ingredient Maintenance screen. If an
Ingredient is selected for editing that has more characters per line than the character per
line setting those lines will be truncated. To make use of this function you should set the
characters per line to the desired setting, exit the Ingredient Maintenance screen and then
re-enter the Ingredient Maintenance screen. After editing the shortened character per line
Ingredient Messages you should reset the character per line setting to the maximum
characters per line needed for other Ingredient Messages in the database. This will
prevent inadvertent truncating of Ingredient Messages.
Insert Function
The need may arise to insert words, characters or spaces into an
ingredient line once they have been created. This need may occur
even if the ingredient line already contains the maximum number of
characters allowed. To accomplish the inserting of words, characters or spaces into lines of an
existing Ingredient message click the +54 box. (This could also be +45 or +36 depending on the
current character per line setting) After checking this box the Insert button will be enabled and
all Ingredient lines will accept any number of characters that are entered. When editing is
complete simply click on the Insert button. Any Ingredient line that contains more than the
maximum allowable characters will have those characters wrapped onto the next line. Any
subsequent lines that receive “overflow” characters will automatically be adjusted until line 38 is
reached. Any “overflow” from line 38 will simply be discarded.
You may perform this Insert function one line at a time or you may edit multiple lines and then
press the Insert button. If the end of the line of “overflow” contains a dash, the dash will be
removed. If the end of the “overflow” does not contain a space a dash is added. Confirm that all
Ingredient lines are correct and click the Save button. If any Ingredient lines are not acceptable
simply exit and all changes will be removed.
The Insert function may also be used in conjunction with the maximum characters per line
function to convert larger number of characters per line to smaller ones. For example, a 54
characters per line Ingredient Message can be converted to a 36 characters per line message
by selecting the 36 characters per line and then clicking on the +36 checkbox. Now click on the
Insert button. The Ingredient Message will be converted to 36 characters per line. (Remember
to set the characters per line setting back to the largest size required by your database.)
18-Oct-04 Page 9
Page 14

Data Maintenance
Scale View V4.0 Owner’s Manual
When both the SL9000 and the SL5300 are programmed in the same department and contain
Ingredients, a set of Ingredients will be required for each scale. This is necessary because of
the differences in memory management in each scale. There is a special feature in Scale View
that allows you to maintain these separate Ingredient databases very easily.
Copy Current SL9000 Ingredient Message to Selected Ingredient Number button
This button will only appear if the Ingredient Message you are adding or editing is
an SL9000 type. This feature will allow you to copy an existing SL9000 Ingredient
Message to any Ingredient Number in the SL5300 Ingredient database. To do this
you will need to program the SL9000 Ingredient Message and click Save. Then go
back into the Ingredient Maintenance screen and select that Ingredient Message. Click on the
Copy Current Ingredient Message to Selected Ingredient Number button and enter the desired
SL5300 Ingredient Number. Click OK. The Ingredient Message has been copied to the SL5300
Ingredient database under the Ingredient Number you entered.
Note: If the SL5300 Ingredient Number that you enter already exists in the SL5300
Ingredient database the existing SL5300 Ingredient Number will be overwritten without
any warning. Therefore, unless you wish to overwrite an existing Ingredient message in
the database please ensure that it does not already exist.
Add New SL5300 Ingredient Number button
This button will only appear if the Ingredient Message you are adding or editing is
an SL5300 type. Since the Ingredient Numbers in the SL5300 do not require a PLU
number to already exist before they can be programmed, they may be added at
anytime using this button. Click on the button and then enter an Ingredient Number.
Enter Ingredient lines as necessary and then click Save. If the Ingredient Number you have
chosen already exists a warning message will appear. Decide if you wish to overwrite the
existing Ingredient Number or not. If you select No, then the entered information will be
discarded and you will be returned to the PLU Maintenance screen.
Import Ingredient from Existing PLU or Ingredient Number
This button allows you to Import an existing SL9000 Ingredient Message or an
existing SL5300 Ingredient Number into the current Ingredient Message being
edited.
Enter the SL5300 INGNO and Department
Number of the Ingredient Message that you want
to import and press the Import button. That
INGNO message will now be displayed in the
Ingredient Message Maintenance screen and can
be edited.
If you wish to import an SL9000 Ingredient
Message you would enter the PLU Number and
Department Number and press the Import button.
Make sure that you enter the desired Department
Number of the Ingredient Message you are trying
to import or you may not get the correct
Ingredient Message.
Page 10 18-Oct-04
Page 15

Scale View V4.0 Owner’s Manual
Data Maintenance
Saving Ingredients
After you have entered all the necessary lines of your Ingredient Message you will
need to save the information to the appropriate database. To do this simply press
the Save button at the top of the Ingredient Message maintenance form. You will
be prompted with three choices.
If you answer YES the Ingredient Message will be
saved to the database and added to a batch.
If you answer NO the Ingredient Message will be
saved to the database only.
If you answer CANCEL all changes will be discarded.
Deleting Ingredients
To delete an SL9000 Ingredient Message but not delete the PLU you must first delete all of the
currently programmed Ingredient Lines for that PLU. Then insert one space on Line 1 of that
PLU’s Ingredient Message. Save the Ingredient Message by selecting the YES option. This will
save the Ingredient Message to the database and add that Ingredient Message to an Ingredient
Batch for that department. Send the Ingredient Batch to the Scale and the Ingredient Message
for that PLU will be removed.
In the SL5300 Deleting an Ingredient Number is quite different. Since the Ingredient Number is
not part of the PLU record it may be deleted without affecting any PLU or PLU’s to which it has
been linked. In Scale View to delete an SL5300 Ingredient Number you can use the Scheduled
Batch function or if you have a password you can use the SL5300 Delete function under the
Service Menu. (This is explained in detail in the Scale View Dealer’s Manual)
Nutrition Maintenance
Nutrition Information editing is based on the scale model. The Edit
Nutrition button has a check box on it. If the check box is left
unchecked when you click on it you will be editing a Nutrition
Message for the SL5300. The SL5300 stores Nutrition Information
separate from the PLU information and uses Nutrition Information Numbers (NutrNo). These
Nutrition Numbers may be linked to an individual PLU or the same Nutrition Number may be
linked to several different PLU numbers. The SL5300 has some special Nutrition editing
features that will be discussed later in this document.
If you click on the check box and then click on the Edit Nutrition button
you will be editing an SL9000 Nutrition Message. The SL9000
Nutrition Messages are different from the SL5300 Nutrition Messages
and therefore are maintained by different maintenance screens and
stored in a separate database.
18-Oct-04 Page 11
Page 16

Data Maintenance
Scale View V4.0 Owner’s Manual
Add/Edit Nutrition
There are separate databases for the SL9000 Nutrition Information and the SL5300 Nutrition
Information because the SL5300 has multiple Nutrition Information templates available.(See
SL5300 Owner’s Manual). Also the databases are separate because the SL9000 Nutrition
Information is stored with the PLU record and the SL5300 stores Nutrition Information in a
separate area of memory.
Editing SL9000 Nutrition Information
The SL9000 Nutrition Information Maintenance screen allows for only one type of Nutrition
template. This Nutrition Information is stored with the PLU and is attached to a department.
The TAB key is used to
navigate from one field to
another. To go in reverse press
and hold the SHIFT key while
pressing the TAB key.
Nutrition Information may be
imported from an existing PLU
by depressing the Import button
once. Then input the desired
Department and PLU Number.
Depress the Import button
again to Import the information
or you may press the Close
button to abort the Import.
To save the Nutrition
Information press the Save
button. The Nutrition Save
function is the same as the PLU
or Ingredient Save function.
Keep in mind that the Nutrition
Message will be saved with the
PLU number in the department.
Field Limitations
Field Requirements
Serving Size Field limited to 30 characters and spaces including
field title characters. Template allows for 18
characters which when added to the 12 characters
for the field title equals 30.
Page 12 18-Oct-04
Page 17

Scale View V4.0 Owner’s Manual
Data Maintenance
Field Requirements
Servings per Container Field limited to 30 characters and spaces including
field title characters. Template allows for 18 but only
the first 8 will be accepted and printed due to the
length of the title field characters (22).
Calories, Calories from Fat Field limited to 4 characters.
Total Fat, Saturated Fat, Cholesterol,
Sodium, Total Carbs, Fiber, Sugars,
Field limited to 5 characters. May include one
decimal point as one of 5 characters.
Protein
Vitamin A, Vitamin C, Calcium, Iron Field limited to 4 characters. No decimal point.
Editing SL5300 Nutrition Information
The SL5300 Nutrition Edit Maintenance screen provides support for the SL5300’s enhanced
Nutrition Information Templates. Nutrition Information stored in the database may be linked to
an individual PLU or to multiple PLU’s by the use of Nutrition Information numbers.
The TAB key is used to navigate
from one field to another. To go in
reverse press and hold the SHIFT
key while pressing the TAB key.
Field Limitations
Field Requirements
Serving Size Field limited to 32 characters and spaces including
field title characters. Template allows for 20
characters which when added to the 12 characters
for the field title equals 32.
18-Oct-04 Page 13
Page 18

Data Maintenance
Scale View V4.0 Owner’s Manual
Field Requirements
Servings per Container Field limited to 32 characters and spaces including
field title characters. Template allows for 20 but only
the first 10 will be accepted and printed due to the
length of the title field characters (22).
Calories, Calories from Fat Field limited to 4 characters. May include one
decimal point as one of 4 characters.
Total Fat, Saturated Fat, Cholesterol,
Sodium, Total Carbs, Fiber, Sugars,
Field limited to 5 characters. May include one
decimal point as one of 5 characters.
Protein
Vitamin A, Vitamin C, Calcium, Iron Field limited to 4 characters. May include one
decimal point as one of 4 characters.
Nutrition Templates
The SL5300 supports multiple Nutrition Templates. The Nutrition
Template may be selected for different reasons. One reason may be
size or layout style so it will fit on a particular label. This functionality
means that the Nutrition Information numbers can only be used in the
SL5300. For examples of each of the different templates refer to the
SL5300 Owner’s Manual.
Search Nutrition Number
The Search Nutrition Number function works like the Ingredient Number
search function. The only difference is that the Search Nutrition Number
will only return Nutrition Information stored in the SL5300 Nutrition
database. This results from the differences in the available templates for the SL5300 as
opposed to the SL9000 scale.
Add New Nutrition Number
The Add New Nutrition Number button allows us to add Nutrition Information
numbers without having a PLU programmed first. This is possible due to the way
the SL5300 stores information. Determine the desired Department you want to add
the new Nutrition Information to and enter it in the Department Number field.
Depress the Add New Nutrition button and enter the desired NutrNo. Enter the appropriate
Nutritional Information and depress the Save button.
Import Nutrition Number
The Import Nutrition Number function will only allow you to import other SL5300
Nutrition Information. Depress the Import Nutrition Number button and then enter
the desired Department number and the desired NutrNo. Depress the Import
button again.
Page 14 18-Oct-04
Page 19

Scale View V4.0 Owner’s Manual
Data Maintenance
Saving Nutrition
After you have entered all appropriate Nutrition Information press the Save button.
You will be prompted with three options just like the PLU and Ingredient save
functions.
If you answer YES the Nutrition Information will be
saved to the database and added to a batch.
If you answer NO the Nutrition Information will only
be saved to the database.
If you answer CANCEL the Nutrition Information will
be discarded.
Delete Nutrition
Deleting Nutrition Information for an SL9000 scale can not be done through Scale View unless
the entire PLU is deleted. To delete just the Nutrition Information and not the PLU on an SL9000
you must perform the delete Nutrition operation at the scale.
In the SL5300 Deleting a Nutrition Number is quite different. Since the Nutrition Number is not
part of the PLU record it may be deleted without affecting any PLU or PLU’s to which it has
been linked. In Scale View to delete an SL5300 Nutrition Number you can use the Scheduled
Batch function or if you have a password you can use the SL5300 Delete function under the
Service Menu. (This is explained in detail in the Scale View Dealer’s Manual.)
18-Oct-04 Page 15
Page 20

Scheduled Batches
Scale View V4.0 Owner’s Manual
Scheduled Batches
Sending Batches using the Windows
Scheduled batches can be performed using the Windows
appropriate version Windows
®
Manual or the Help Menu for scheduled task setup procedures.
Each department will require separate scheduled tasks. Scheduled tasks will not execute
correctly if Scale View is in operation. To verify the correct execution of scheduled tasks use the
Log button on the Scale View Main Menu.
Send All Batches
To send all pending PLU, Ingredient and Nutrition batches for a department follow the Windows
Task Scheduler instructions for adding a task and add the command line switch as shown.
Where 1 represents the department number. There is a space after the “ mark and before the
word batch.
This will result in all pending batches for department 1 to be sent at the time entered in the
scheduled task. If you want to send batches for multiple departments you would need to create
separate scheduled tasks for each department and substitute the appropriate department
number in the command line switch. (i.e., batch,2; batch,3; etc.) Keep in mind that each
scheduled task may take some time depending on the number of items in a batch and the
number of batch types. Therefore, you should allow enough time between scheduled tasks to
ensure each task can be performed.
Delete an Individual PLU
To delete an individual PLU for a department follow the Windows
for adding a task and add the command line switch as shown.
Where 1 represents the department number and 8001 represents the PLU number in that
department to be deleted. There is a space between the “ mark and delplu.
This will result in PLU number 8001 in department 1 being deleted from the database and the
scales in department 1 if there are no problems with communications. (i.e., scale turned off,
scale disconnected from the network, etc.) If there are any problems with communications to
any scale in the department the PLU will not be deleted from the database. It will be deleted
from any scale that had successful communications.
®
Task Scheduler
®
Task Scheduler. Please refer to the
batch,1
®
Task Scheduler instructions
delplu,1,8001
®
Page 16 18-Oct-04
Page 21

Scale View V4.0 Owner’s Manual
Scheduled Batches
Delete Multiple PLU’s
To delete multiple PLU’s for a department follow the Windows
adding a task and add the command line switch as shown.
The 1 is fixed. (department information is included in the “delete.txt” file.) There is a space
between the “ mark and delete.
To delete multiple PLU’s in the department you will need to create a file named “delete.txt”. The
“delete.txt” file can be created using Windows
®
Notepad. The PLU’s you want to delete should
be added to the file by entering the department number, PLU number then pressing the enter
key.
Ex.)
1,1001
1,1002
1,3010
1,5005
1,6000
At the end of each PLU number the enter key was depressed. After all the PLU’s you wish to
delete are entered save the file as “delete.txt” in C:\Program Files\ScaleView\FTP.
Note: The path shown is the location if you used the default directory during the Scale
View installation procedure. If you did not use the default directory when installing Scale
View you will need to save the “delete.txt” file in the FTP folder located in the path where
you installed Scale View. If the “delete.txt” file is not located in the correct folder it will not
be executed and the PLU’s you wanted to delete will not be deleted.
Executing this command will result in all PLU numbers included in the “delete.txt” file being
deleted from the database and all departmental scales if there are not any communications
problems. (i.e., scale turned off, scale disconnected from the network, etc.) If there are any
problems with communications to any scale in the department the PLU’s will not be deleted from
the database. The PLU’s will be deleted from any scale that had successful communications.
®
Task Scheduler instructions for
delete,1
18-Oct-04 Page 17
Page 22

Scheduled Batches
Scale View V4.0 Owner’s Manual
Delete Ingredient Numbers (SL5300 Only)
In the SL5300 scales you can delete Ingredient Numbers without deleting PLU’s because they
are stored in separate areas of memory. This is not the case in the SL9000 scales, to delete an
Ingredient Message in the SL9000 you will need to delete the PLU.
We also have the capability in the SL5300 to delete either a single Ingredient Number in a
department or a range of Ingredient Numbers in the department. Each option is explained below.
Delete a Single Ingredient Number (SL5300 Only)
To delete a single Ingredient Number in a department follow the Windows
instructions for adding a task and add the command line switch as shown.
deling,1,5,5
Where 1 is the department number; 5 is the starting Ingredient Number and 5 is also the ending
Ingredient Number. There is a space between the “ mark and the word deling.
This will result in Ingredient Number 5 being deleted in the database and all departmental
scales if there are no communications problems. (i.e., scale turned off, scale disconnected from
the network, etc.) If there are problems with communications to any scale in the department the
Ingredient Number will not be deleted from the database. The Ingredient Number will be deleted
from any scale that had successful communications.
Deleting a Range of Ingredient Numbers (SL5300 Only)
To delete a range of Ingredient Numbers in a department follow the Windows
instructions for adding a task and add the command line switch as shown.
deling,1,10,100
Where 1 is the department number; 10 is the starting Ingredient Number and 100 is the ending
Ingredient Number. There is a space between the “ mark and the word deling.
This will result in Ingredient Numbers in the range between 10 and 100 being deleted in the
database and all departmental scales. This includes Ingredient Numbers 10 and 100. If there
are communications problems with any scale in the department the Ingredient Numbers will not
be deleted from the database. The Ingredient Numbers will be deleted from any scale that had
successful communications.
®
Task Scheduler
®
Task Scheduler
Page 18 18-Oct-04
Page 23

Scale View V4.0 Owner’s Manual
Scheduled Batches
Delete Nutrition Numbers (SL5300 Only)
In the SL5300 scales you can delete Nutrition Numbers without deleting PLU’s because they
are stored in separate areas of memory. This is not the case in the SL9000 scales, to delete a
Nutrition Message in the SL9000 you will need to delete the PLU.
We also have the capability in the SL5300 to delete either a single Nutrition Number in a
department or a range of Nutrition Numbers in the department. Each option is explained below.
Delete a Single Nutrition Number (SL5300 Only)
To delete a single Nutrition Number in a department follow the Windows
instructions for adding a task and add the command line switch as shown.
delnutr,1,5,5
Where 1 is the department number; 5 is the starting Nutrition Number and 5 is also the ending
Nutrition Number. There is a space between the “ mark and the word delnutr.
This will result in Nutrition Number 5 being deleted in the database and all departmental scales
if there are no communications problems. (i.e., scale turned off, scale disconnected from the
network, etc.) If there are problems with communications to any scale in the department the
Nutrition Number will not be deleted from the database. The Nutrition Number will be deleted
from any scale that had successful communications.
Deleting a Range of Nutrition Numbers (SL5300 Only)
To delete a range of Nutrition Numbers in a department follow the Windows
instructions for adding a task and add the command line switch as shown.
delnutr,1,10,100
Where 1 is the department number; 10 is the starting Nutrition Number and 100 is the ending
Nutrition Number. There is a space between the “ mark and the word delnutr.
This will result in Nutrition Numbers in the range between 10 and 100 being deleted in the
database and all departmental scales. This includes Nutrition Numbers 10 and 100. If there are
communications problems with any scale in the department the Nutrition Numbers will not be
deleted from the database. The Nutrition Numbers will be deleted from any scale that had
successful communications.
®
Task Scheduler
®
Task Scheduler
18-Oct-04 Page 19
Page 24

Main Menu
Scale View V4.0 Owner’s Manual
Main Menu
Sort/Search Database
There are six ways to sort the database; the default sort order is
DEPTPLU. Anytime Scale View is opened, the database will be
sorted and displayed by DEPTPLU. The first button sorts by either
Department Number or PLU Number. When sorting by Dept, the
PLU numbers might not be listed in numerical order and when
sorting by PLU the Department numbers might not be in
numerical order. The second button sorts the database by either
DEPTPLU or DEPTUPC. The DEPTPLU sorts the database by
the Department number first and then by PLU number within that Department. The DEPTUPC
sorts the database by the Department number first and then the UPC number within that
Department. The third button sorts the database by either DEPTCOM1 or DEPTBATCH. The
DEPTCOM1 will sort the database by the Department number first and then alphabetically sorts
that Department by the first line of the PLU’s commodity name. The DEPTBATCH sorts the
database by the Department number and then by the PLU Batch flag.
There is a status description located below these sort buttons that
displays the current sort method selection. As different sort
options are selected this description will change accordingly.
To search the database for a specific PLU, enter the PLU Number in the
text box (no enter key required). The database will be searched after
every number entered. The PLU number that is less than or equal to the number entered will be
highlighted. Valid number entries in this search field are 1 through 999999.
Sending Batches
In Scale View the term “batch” refers to any record in the
database that has its “batch” checkbox checked. There are
“batch” checkboxes for PLU’s, Ingredients and Nutrition
Information. Anytime you press the Save button when you Add or
Edit a PLU, Ingredient or Nutrition item you are given the option of saving the item to the
database and adding it to an appropriate “batch” type for that item. If you select the YES option
when saving an item it will have its “batch” flag set and will be added to that department’s
current batch for that type of item. There is another option to set the “batch” flag for an item.
This option is available in the maintenance screen for all the item types. You can check the
“batch” checkbox in the maintenance screen for an item and then select the NO option when
you are saving that item and it will have its “batch” flag set. (The normal procedure when adding
or editing an item would be to save it and select the YES option which would automatically set
the “batch” flag but if the only change desired is to add the item to a batch you could use this
method.) In the PLU table the “batch” status of a PLU will show a “1” in the “batch” column.
There are no indications for the status of an Ingredient batch or Nutrition type batch in the PLU
table. The only method of determining and viewing Ingredient and Nutrition batches is by using
the Report function.
Page 20 18-Oct-04
Page 25

Scale View V4.0 Owner’s Manual
Main Menu
When one of the Batch buttons is depressed a window
will open asking you to select the department to which
you want to send all pending batches. Select the
appropriate department and press the yes button. If
there are any pending batches of any type that have not
been sent to the scales in that department they will be
sent now. After batches have been sent successfully to
all scales in the department, the “batch” flags for the
items in those batches will be reset. This will only
happen if communications to all scales in that
department were successful. If there was a communication failure to any scale in the selected
department the “batch” flags for those departmental items will not be reset. The communication
problem should be corrected and the batches for that department resent.
If there are no pending batches of any type for a department that is selected there will be no
attempted communications with that department’s scales.
Note: If the PLU batch includes any new PLU’s for a department be sure to download the
PLU batch first and then any Ingredient and Nutrition batches.
Set Back Function
The Set Back function is used in conjunction with the PLU Sale Price and Sale
Number fields in the PLU Maintenance screen. It provides a method of resetting all
PLU items that have been placed on sale by the Sale Number.
When performing PLU maintenance enter a Sale Price and a
Sale Number (1 – 9) for the desired PLU. If the PLU is saved
to the database using the YES option it will have its “batch”
flag set. The next time a PLU Batch Download or a Complete
File Download (Service Menu) is executed for this department
the Sale Price that was entered for the PLU will be downloaded to the scales in that department.
Note: If there is a Sale Price entered for a PLU it will be downloaded during a batch
download for the department or a complete file download for a scale instead of the current
price entry. To use the current price field during a download make sure the Sale Price field
is set to all zeroes.
When the Sale Price is over and the original prices
need to be restored simply press the Set Back button
and select the desired Sale Number.
Note: This will set all Sale Price field entries for this
Sale Number back to all zeroes. This affects all
PLU’s associated with this Sale Number regardless
of the department to which they are assigned.
18-Oct-04 Page 21
Page 26

Main Menu
Scale View V4.0 Owner’s Manual
After selecting the desired Sale Number press the YES button. A confirmation screen will
appear; press the YES button and all of the PLU’s associated with this Sale Number will have
their Sale Price and Sale Number fields set back to all zeroes.
Selecting YES will also set the “batch” flag for the PLU’s that had a Sale Price. To send the
updated prices to a scale, click on the PLU Batch Download button and select the appropriate
department number. Keep in mind that you must execute the PLU Batch Download for each
department that had PLU’s with this Sale Number associated with them.
View
The View button expands the PLU table to show all programmed fields for PLU’s. If
it is depressed again it will truncate the programmed fields view. Please note that
the columns used in the PLU table are manually adjustable. Once they are
adjusted there widths will be permanently saved.
Log
All communications attempts whether they are successful or unsuccessful will be
recorded into the Log file (tmcc.log). This recording includes both uploads and
downloads from a scale. To view the Log file simply click on the Log button. The
Log file will open showing all communications records to and from scales in the
system. Some errors may not be the result of a communication problem. For
example, “DATA ERROR…Dept 1 PLU 1” means that there is a conflict between the
programmed PLU data and a scale setting (usually tare or price per field).
After closing the Log file the Log button will change to the Clear Log button. At this
point you should decide if you want to clear the Log file or not. Depress the Clear
Log button and you will get a decision screen.
If you don’t want to clear the log file at this time depress the NO
button and the Clear Log button will revert back to the Log button
and the Log file will remain intact.
If you want to clear the Log file then depress the YES button and
the Log file will be cleared.
The Log file should be cleared on a regular basis. If the size of
the Log file exceeds 40Kbytes a warning message will be displayed. Every time Scale View is
started a copy of the Log file is saved in a file named tmcc.sav. If the Log file is cleared by
mistake, exit Scale View; rename the tmcc.sav file to tmcc.log and re-start Scale View. If you
are not sure how to accomplish this you should call your authorized TEC dealer representative.
Page 22 18-Oct-04
Page 27

Scale View V4.0 Owner’s Manual
Main Menu
Reports
There are several reports available in Scale View. These reports can be displayed
on the screen, printed to a connected printer or exported in various file formats.
There are reports that can be performed on both scale models and some only used
for the SL5300. All reports available are programmed data only, there are no
financial report capabilities in Scale View V4.0.0.
PLU Reports
PLU Price Report provides the department number and all PLU‘s with their current programmed price. It also displays Commodity Line 1 and 3 of the PLU descriptor.
PLU Detail Report provides all programmed information for a PLU. The PLU’s are listed numerically by PLU and include all data except the Ingredient and Nutrition Information.
18-Oct-04 Page 23
Page 28

Main Menu
Scale View V4.0 Owner’s Manual
PLU SPrice Report provides a list of all items by department number then PLU number. It includes the current price field and the Sale Price field with the Sale Number. It also shows Commodity Line 1 of the PLU’s descriptor.
SL9000 Reports
PLU/NUTRI Batch Report displays a list of all PLU’s by department and their PLU “batch” and Nutrition “batch” flag status.
Page 24 18-Oct-04
Page 29

Scale View V4.0 Owner’s Manual
Main Menu
SL9000 Ing Report shows a list by department of all SL9000 PLU’s in the database and their Ingredient Message.
SL9000 Nutr Report displays a list by department of all SL9000 PLU’s in the database and the Nutrition Information programmed for those PLU’s.
18-Oct-04 Page 25
Page 30

Main Menu
Scale View V4.0 Owner’s Manual
SL9000 Ing Batch Report provides a listing of all SL9000 PLU’s in the database that have an Ingredient “batch” flag turned on. The department number, PLU number, first line of the Ingredient Message and the “batch” flag status are displayed.
SL5300 Reports
SL5300 Ing Report provides a list by department of all SL5300 Ingredient Numbers that are in the database.
Page 26 18-Oct-04
Page 31

Scale View V4.0 Owner’s Manual
Main Menu
SL5300 Nutr Report displays a list by department of all SL5300 Nutrition Numbers stored in the database. All programmed Nutrition Information for the Nutrition Number is shown.
SL5300 Ing Batch Report provides a list by department of all Ingredient Numbers with their Ingredient Number “batch” flags turned on.
18-Oct-04 Page 27
Page 32

Main Menu
Scale View V4.0 Owner’s Manual
SL5300 Nutr Batch Report displays a list by department of all Nutrition Numbers in the database with their Nutrition Information “batch” flags turned on.
SL5300 PLU Ingr No Report uses the PLU Detail report to display the SL5300 PLU programmed data including the Ingredient Number programmed for each PLU.
Page 28 18-Oct-04
Page 33

Scale View V4.0 Owner’s Manual
Main Menu
SL5300 PLU Nutr No Report uses the PLU Detail report to display the SL5300 PLU programmed data including the Nutrition Number programmed for each PLU.
Choosing a Report
To select a specific report press the Report button on the Main Menu. The Report Selection
screen will appear. Depending on the report type select you will have the option of selecting the
report to run in an individual department or all departments. If you are attempting to run the PLU
Sale Price report you will be allowed to choose from an Individual Sale Number, a range of Sale
Numbers or all Sale Numbers. This is different due to Sale Numbers having the ability to be
programmed on PLU’s in different departments.
18-Oct-04 Page 29
Page 34

Main Menu
Scale View V4.0 Owner’s Manual
Reports may be viewed on the screen in different magnifications or printed to any attached
printer. They also may be exported in several different formats. These functions are
accomplished by clicking on the appropriate buttons on the bottom of the report screen.
Export Options
Viewing Size
Export Report
Print Report
Page 30 18-Oct-04
Page 35

Scale View V4.0 Owner’s Manual
Error Messages
Error Message Explanation
Error Messages
Mismatch Data Length
SL9000DRV.EXE is not
found
Terminal Busy
Invalid Port Number
Cannot Open Port
TMCC text file format is incorrect – check Scale
Table file format version against setting in scale
(Initial set 9 bit 7: 1 = Version 2.3; 2 = Version 2.8).
Refer to Scale Table settings and Initial Set
Information.
This is the TMCC driver (SL9000DRV.EXE). This
error may display when running the Scale View for
the first time. Start Windows Explorer, go to
“c:\program files\scaleview\” and double click on the
driver icon. A new window will open, click on File in
new window and then on Exit. This registers the
driver in Windows. This error may occur with Demo
CD and some Windows versions, like Windows XP.
The master scale is in the middle of LON command
or in the middle of reset. If this is not the case, status
clear scale in question.
The COM port selected for the PC in the Scale Table
doesn’t exist. Select another COM port.
The COM port selected for the PC in the Scale Table
is malfunctioning or is currently being used by
another program. Try re-booting or select another
COM port.
Error Closing Port
Select Failed in
Command Sequence
Poll Failed in Get Data
Sequence
Poll Failed in
Command Sequence
Expected Ack: Send
Command
Expected Ack: Send
Message
The COM port selected for the PC in the Scale Table
is malfunctioning or is currently being used by
another program. Select another COM port.
The selected scale is not responding - check scales
Initial sets and “Online” status, Scale View Scale
Table configuration, cabling or Level Converter.
Selected scale stopped communicating. Check
cabling, Level Converter, scales Initial sets, and
Scale View Scale Table configuration.
PC stopped communicating with scale. Check
cabling, Level Converter, scales Initial sets, and
Scale View Scale Table configuration.
Check cabling, Level Converter, scales Initial Sets,
and Scale View Scale Table Configuration. May see
this error with USB to RS-232 adapter, which is not
supported
Check cabling, Level Converter, scales Initial Sets,
and Scale View Scale Table configuration.
18-Oct-04 Page 31
Page 36

Error Messages
Scale View V4.0 Owner’s Manual
“Run Time error 76”
when trying to access
TMCC log
An error occurs when
requesting a report
Scale Not
Communicating
The file “notepad.exe” is not found in the default
directory. The default directory for Scale View for
“notepad.exe” is “C:\Windows”. This error usually
occurs with Windows NT, Windows NT WS and
Windows NT 2000.
To correct this first confirm that there is not a
“Windows” subdirectory. If there is no “Windows”
subdirectory you must create one and copy the file
“notepad.exe” into it. This should take care of this
error.
“Unable to connect, incorrect session parameters.”
Or Microsoft Access opens and requests a
password.
These problems occur because of a conflict between
different versions of Crystal Reports installed by
other programs.
Contact your TEC Representative for assistance.
In Scale View V4.0 this error indicates that there is a
problem with a Scale’s IP address. This problem
could be that it isn’t programmed in the scale or in
Scale View’s Scale Table correctly. Check the Scale
View Scale Table configuration and the Scale’s IP
address.
Page 32 18-Oct-04
Page 37

Page 38

TOSHIBA TEC AMERICA RETAIL INFORMATION SYSTEMS, INC.
4401-A Bankers Circle
Atlanta, GA 30360
PRINTED IN USA
E
OM-SV4
 Loading...