

Toshiba SBM1W User Manual

User’s Manual
MINI 3D SOUND BAR
& SUBWOOFER
This manual is for three models below:
1) Mini 3D Sound Bar + Subwoofer (SBM1W)
2) Mini 3D Sound Bar (SBM10)
3) Subwoofer for Toshiba Mini 3D Sound Bar (SBW10)
EN
CZ
DE
DK
ES
FI
FR
GR
HR
HU
IT
NL
NO
PL
PT
RS
SE
SK
SL
TR
User’s Manual
MINI 3D SOUND BAR
& SUBWOOFER
This manual is for three models below:
1) Mini 3D Sound Bar + Subwoofer (SBM1W)
2) Mini 3D Sound Bar (SBM10)
3) Subwoofer for Toshiba Mini 3D Sound Bar (SBW10)

EN-1 User’s Manual
MINI 3D SOUND BAR & SUBWOOFER
User’s Manual
Contents
Introduction..................................................................................................2
Package Content.........................................................................................2
Safety Instructions.......................................................................................2
Quick Tour...................................................................................................3
Mini 3D Sound Bar ................................................................................4
Subwoofer .............................................................................................6
Remote control ......................................................................................6
Getting Started ............................................................................................8
Connecting the power adaptor ..............................................................8
Connecting the subwoofer.....................................................................9
Using the remote control .......................................................................9
Mini 3D Sound Bar and subwoofer placement ....................................10
Connecting to the audio device ...........................................................11
3D Sound ..................................................................................................14
Playback via Bluetooth
®
-enabled devices .................................................14
Frequently Asked Questions (FAQ) ..........................................................15
Specifications ............................................................................................16
Trademarks ...............................................................................................17
TOSHIBA Support.....................................................................................17
Regulatory Information..............................................................................18
REACH......................................................................................................19
Following information is only valid for EU-member States:.......................19
Additional Information................................................................................20
User’s Manual EN-2
MINI 3D SOUND BAR & SUBWOOFER
Introduction
Welcome and thank you for choosing a TOSHIBA product.
We recommend to reading this manual carefully and keep it with your
product documentation for future reference.
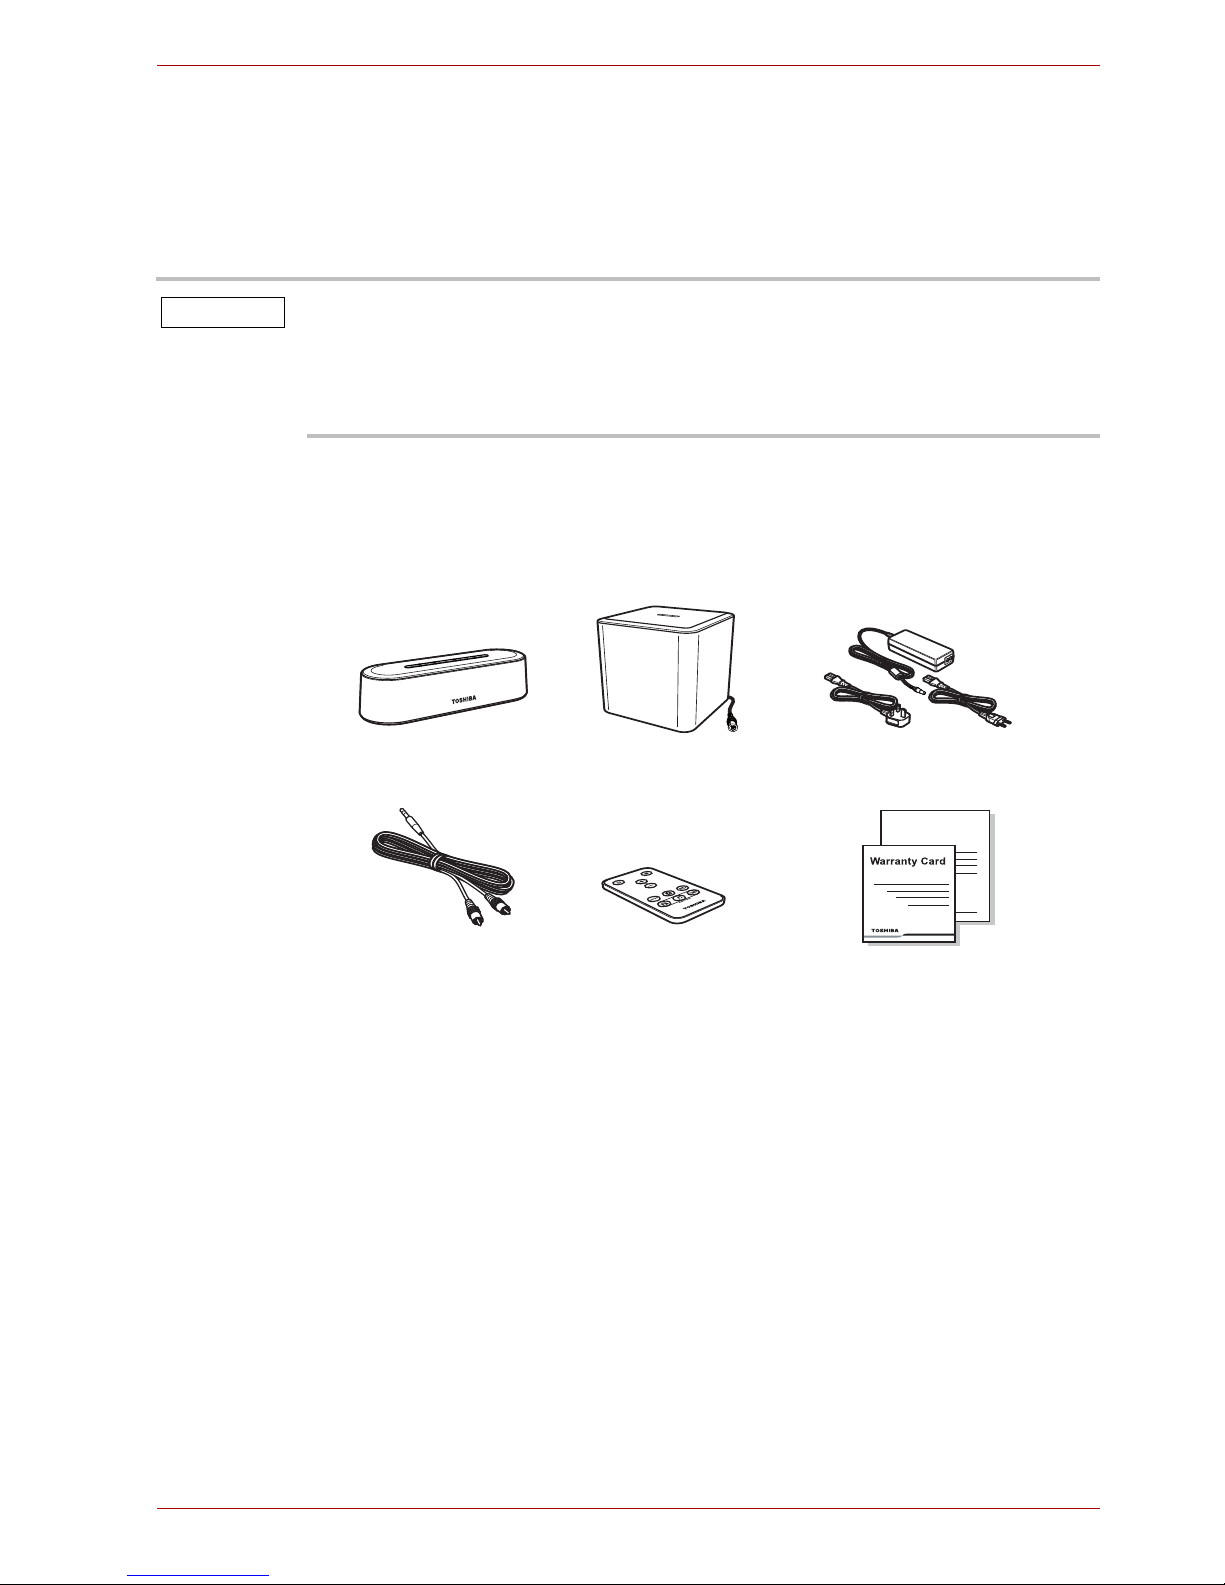
Package Content
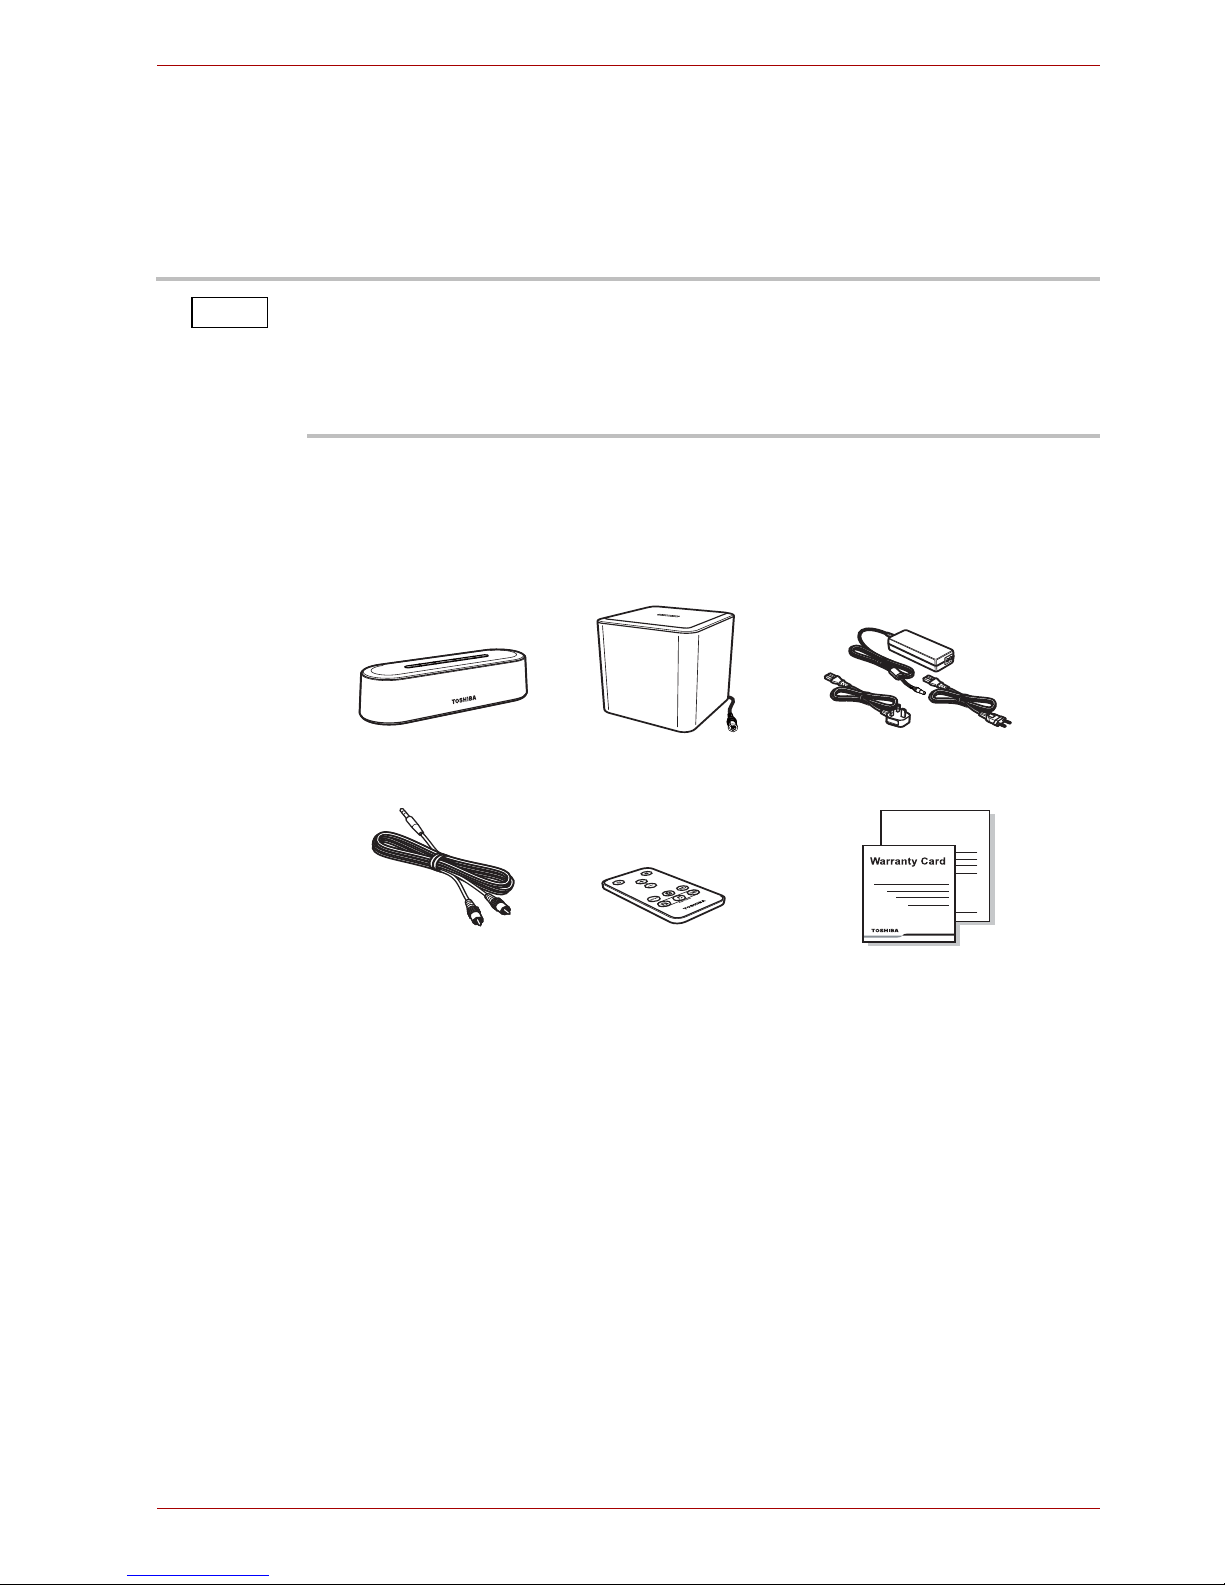
Check to make sure you have all of the following items:
Safety Instructions
In order to avoid malfunction or damage of the product, please carefully
follow the precautions listed below.
■ Do not
■ open the enclosure or product
■ disassemble the product or parts of it
■ place liquids near or on the product, as it may damage the product,
cause personal injury or may result in an electrical shock or fire
■ bump, drop or jar the product
■ move the product while operating, as data damage may happen
This manual covers both of the using of the Mini 3D Sound Bar and the
subwoofer. You can purchase the Mini 3D Sound Bar and the subwoofer
as a set, or any one of them separately as you like.
In this manual, the word “sound bar” refers to the Mini 3D Sound Bar for
short.
NOTE
User’s Manual
Mini 3D Sound Bar
Subwoofer
(if applicable)
AC adaptor
3.5mm - RCA audio cable
Remote control
with battery
User’s Manual &
Warranty Leaflet

EN-3 User’s Manual
MINI 3D SOUND BAR & SUBWOOFER
■ use other AC/DC adaptors than the one bundled with your device,
as otherwise your device may be damaged
■ disconnect cables while operating
■ expose the product to temperatures outside the range of 5°C - 35°C
while operating, and temperatures of -20°C - 60°C while switched
off
■ expose the product to wet or damp conditions
■ cover the product during operation, as it may become overheated
■ place the product close to hot appliances
■ throw the battery of the remote control (provided with the Mini 3D
Sound Bar) into a fire, as it may cause the battery to explode
■ leave the battery of the remote control within the reach of children,
as the button cell battery could be ingested by children
■ Immediately disconnect the product if
■ smoke or an unusual smell is coming from the product enclosure
■ water has entered the product enclosure or if it becomes wet
■ an object has entered the product enclosure
■ the cable has been damaged (in such case replace the cable with a
new one)
■ The Mini 3D Sound Bar contains magnets for the loudspeakers.
Magnets can erase data from magnetic storage media such as video
tapes, hard drives and credit cards. Therefore, keep the sound bar
away from those products.
If the product behaves not as expected or you have doubts about the
electrical safety, please contact immediately the TOSHIBA hotline or an
authorized reseller!
Quick Tour
This section identifies the various components of the Mini 3D Sound Bar
and the subwoofer. For a description of each component, please refer to
the table beneath each illustration.
Depending on your purchase, you may not have both of the Mini 3D Sound
Bar and the subwoofer.
NOTE
User’s Manual EN-4
MINI 3D SOUND BAR & SUBWOOFER
Mini 3D Sound Bar
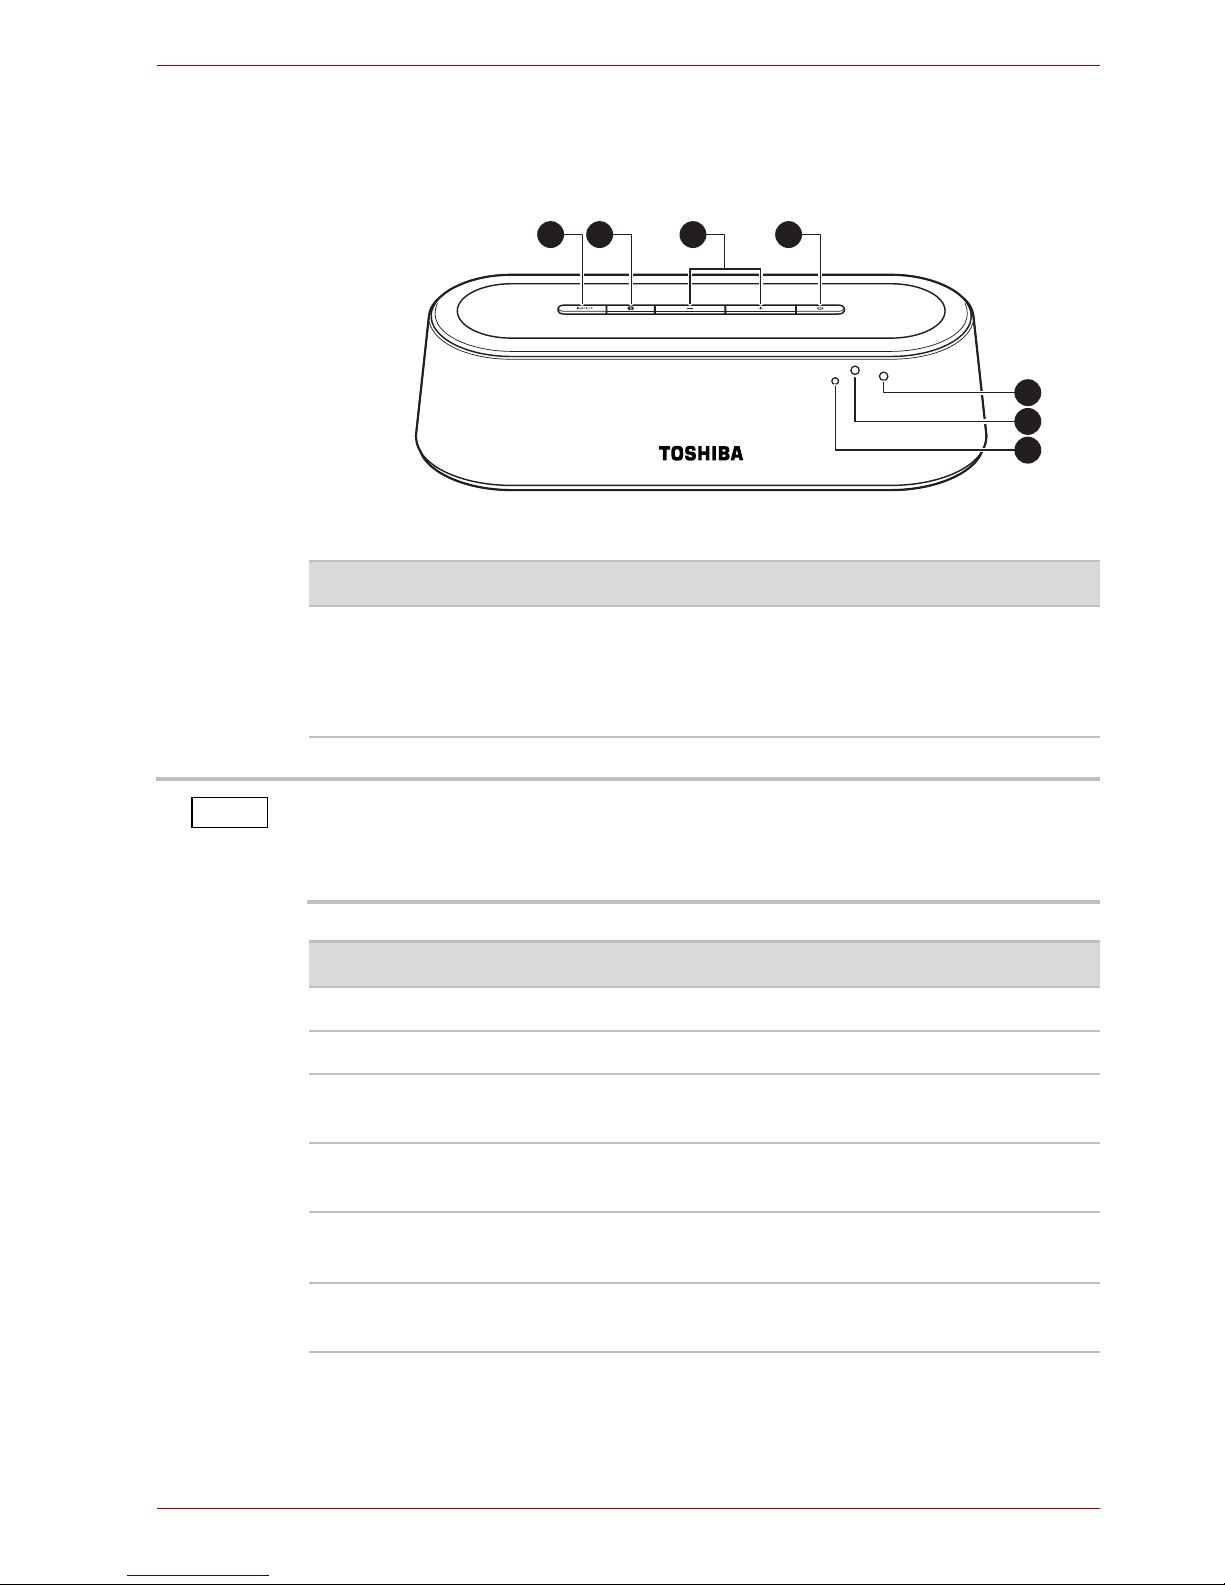
Front view
(Sample Illustration) The front view of the Mini 3D Sound Bar
Item Component Description
1 INPUT Selects the source (in the sequence of Aux-in,
Line-in, Optical, Coaxial and then back to
Aux-in).
The sound bar is set to Aux-in mode by default.
1 2 4
7
6
5
3
The sound bar will restore from your last selected input when it is back
from the standby mode with the AC adaptor connected. But if you
disconnect the AC adaptor and connect it again, the sound bar will start
with Aux-in input by default.
NOTE
Item Component Description
2
Bluetooth
®
Selects Bluetooth® mode.
3 Volume +/- Increases/decreases the volume.
4 Power Turns the sound bar on or puts it into the
standby mode.
5 Remote
sensor
Receives the remote control’s signals.
6
Bluetooth
®
indicator
Glows blue while the sound bar is paired and
flashes blue while pairing.
7Power
indicator
Glows green while the sound bar is ON and red
while it is OFF or in the standby mode

EN-5 User’s Manual
MINI 3D SOUND BAR & SUBWOOFER
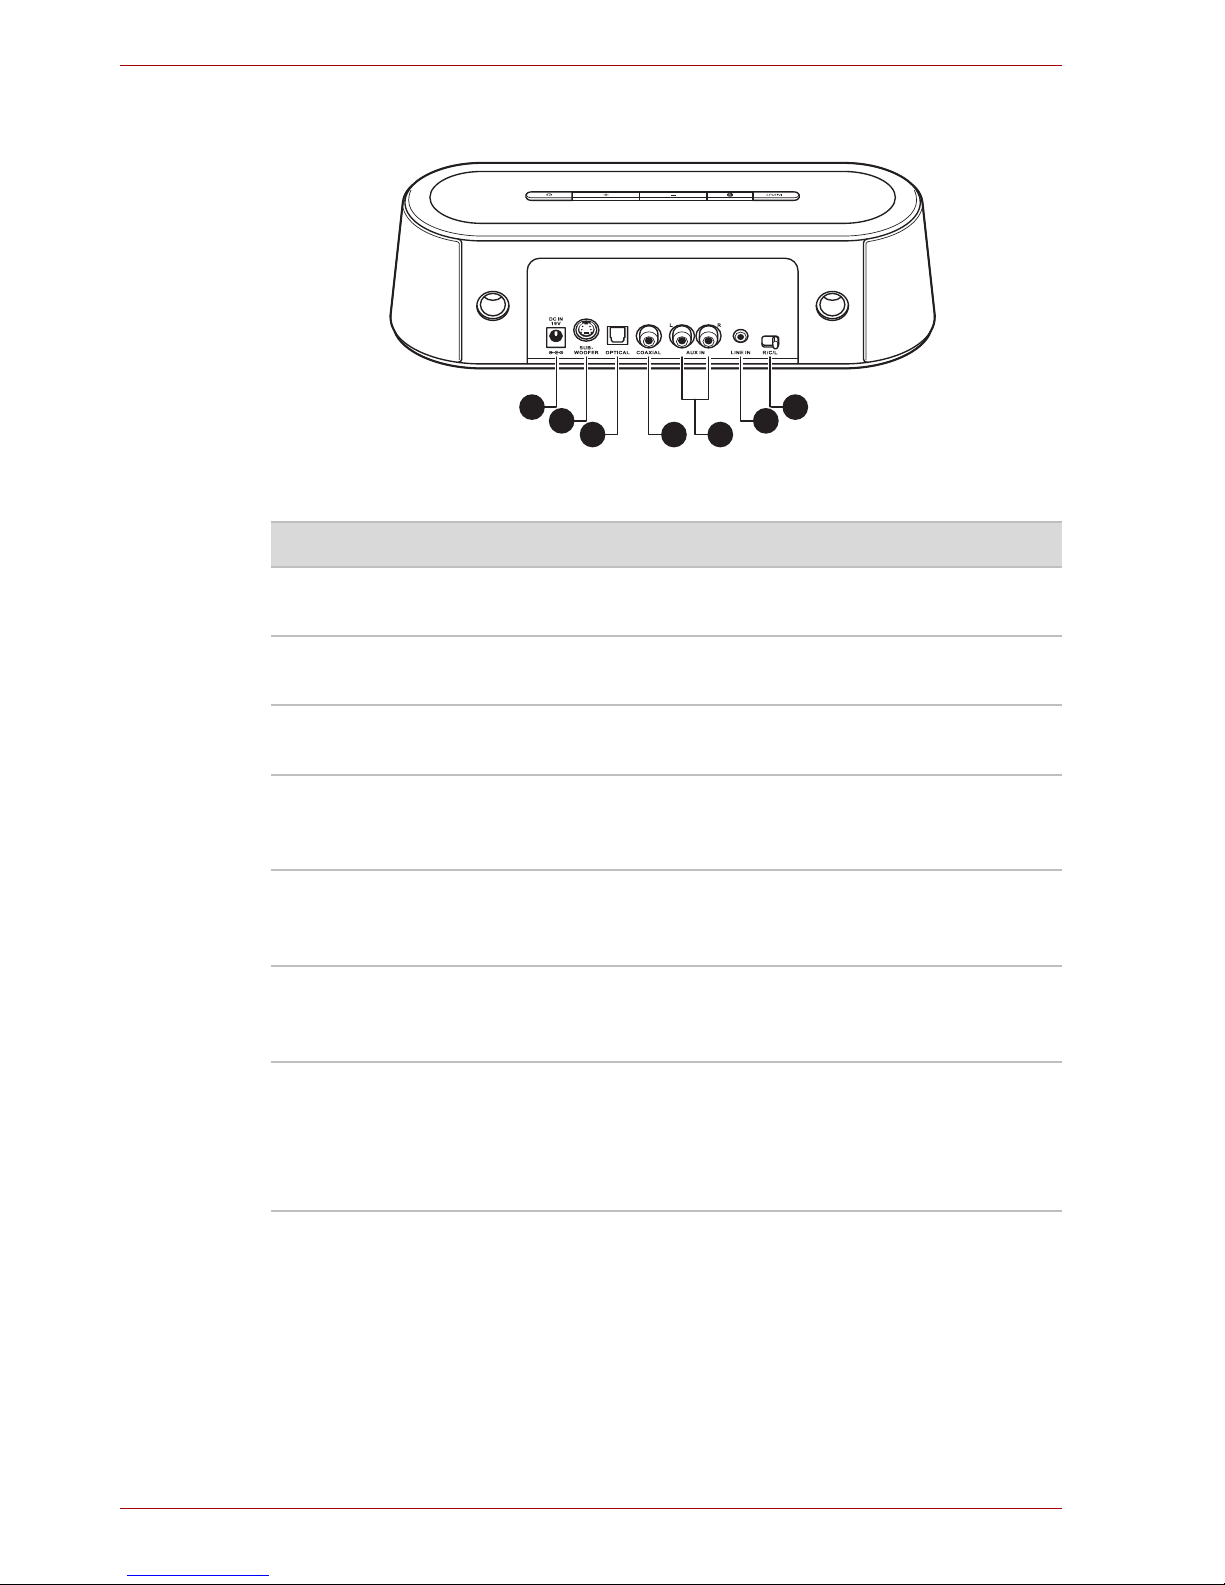
Rear view
(Sample Illustration) The back view of the Mini 3D Sound Bar
Item Component Description
1 DC IN jack Connection for the provided AC adaptor
(provided with the Mini 3D Sound Bar).
2SUBWOOFER
jack
Connection for the subwoofer.
3 OPTICAL jack Connection for an optical audio output device
using an optical audio cable (not provided).
4 COAXIAL jack Connection for a coaxial audio output device
using a coaxial digital audio cable (not
provided).
5 AUX IN jacks Connection for an audio output device using a
3.5mm - RCA audio cable (provided with the
Mini 3D Sound Bar).
6 LINE IN jack Connection for an audio output device using a
3.5mm - RCA audio cable (provided with the
Mini 3D Sound Bar).
7 R/C/L balance
slide switch
Selects the audio channel (right/center/left).
Adjusts the sound to center when the sound bar
is placed to the right/left side of the audio/video
device.
1
2
3
7
6
54
User’s Manual EN-6
MINI 3D SOUND BAR & SUBWOOFER
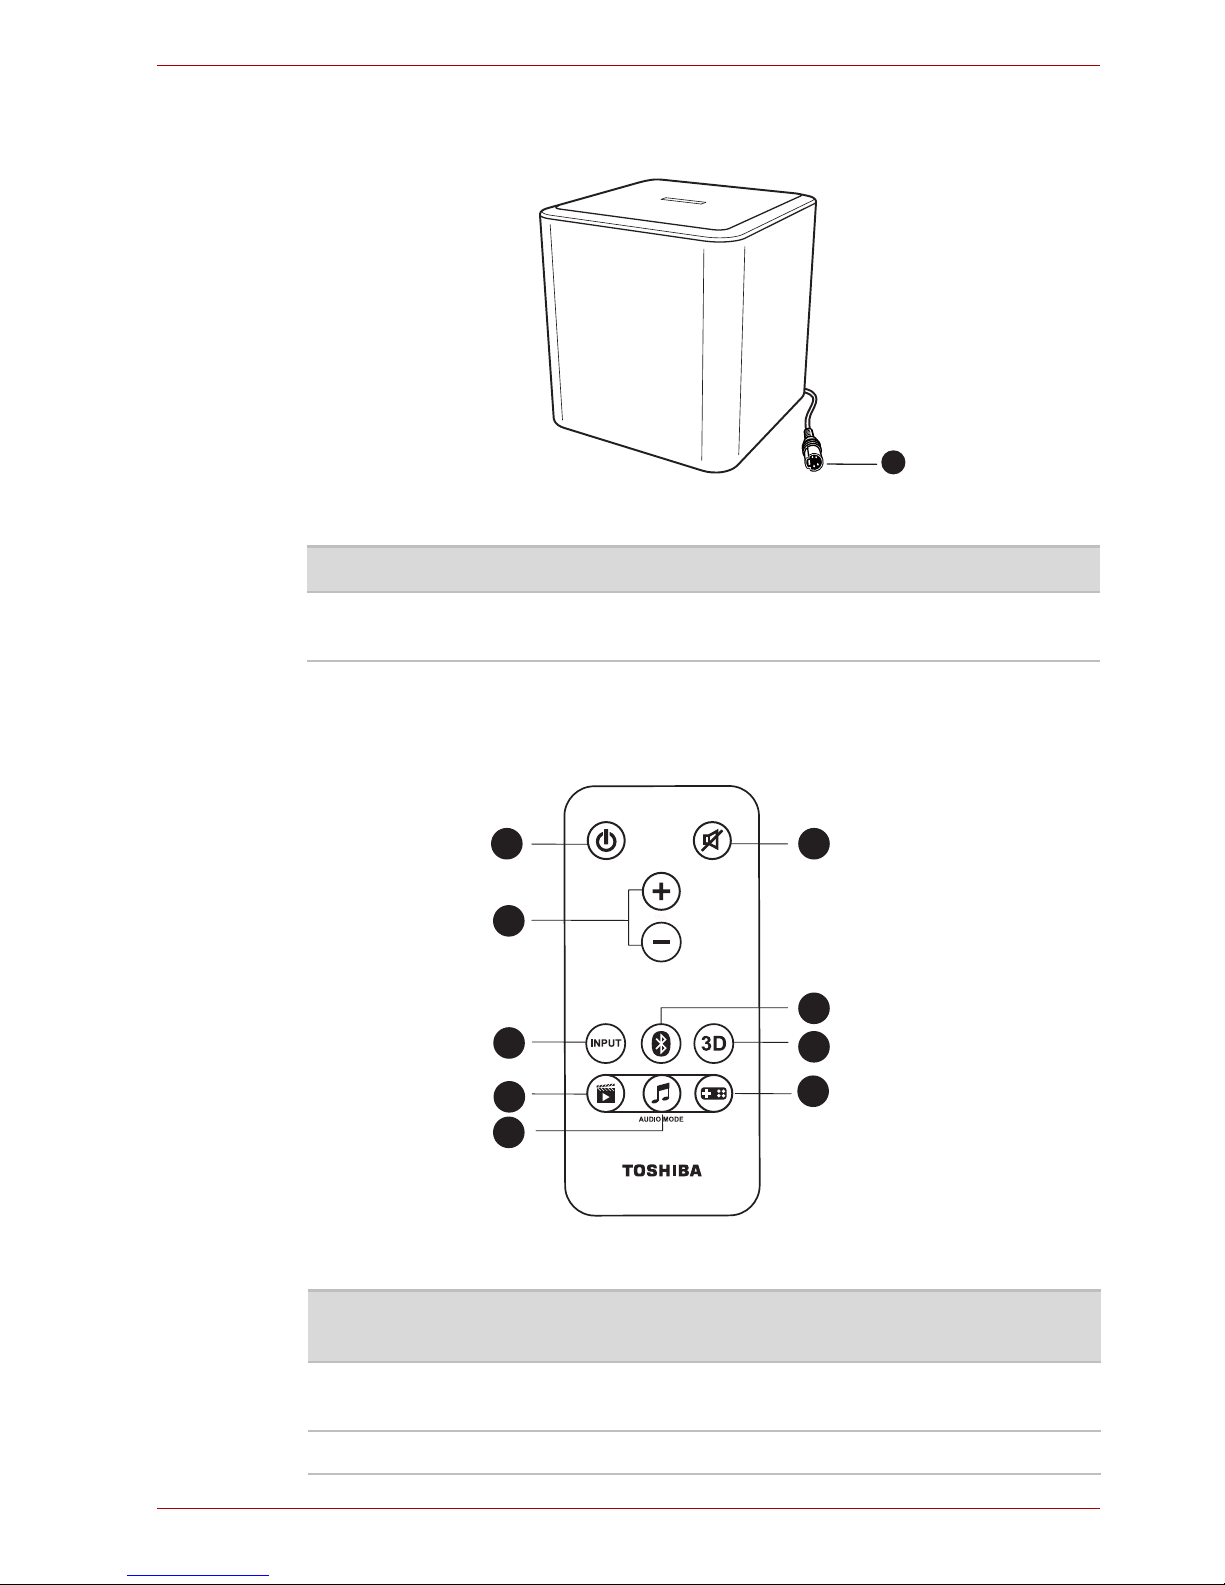
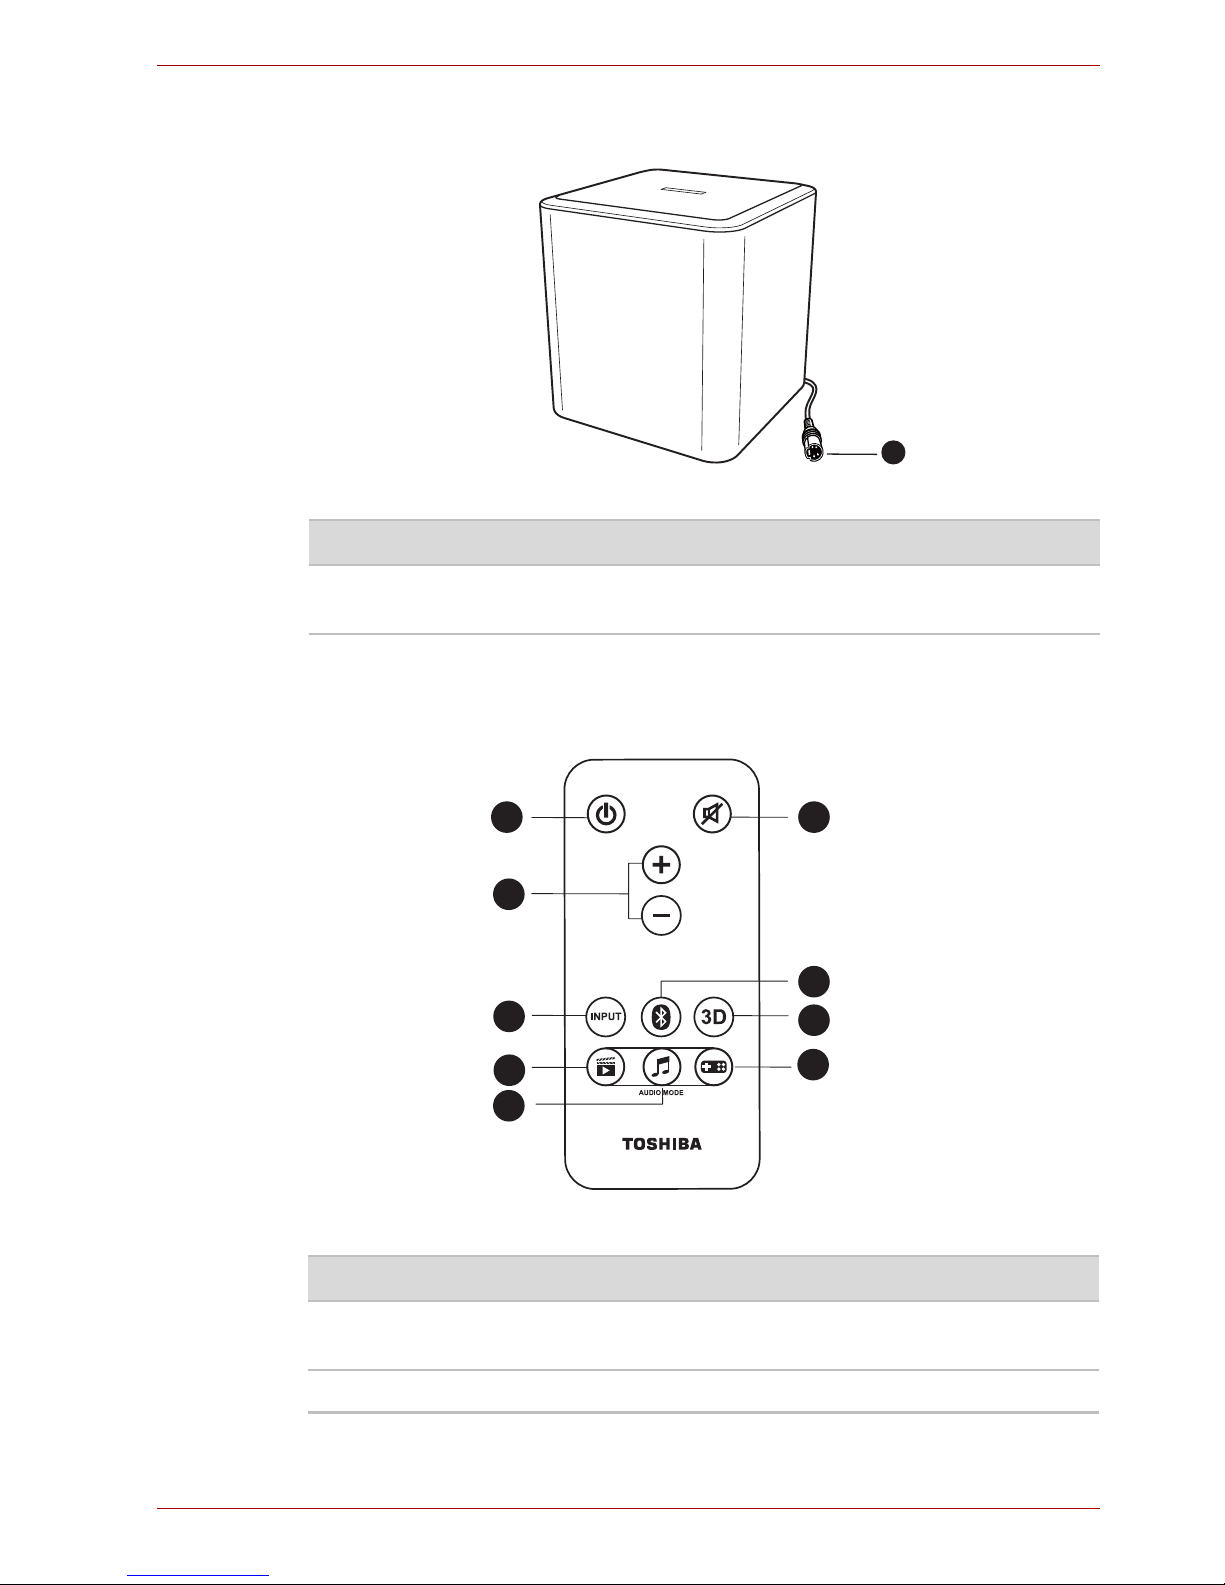
Subwoofer
(Sample Illustration) The subwoofer view
Remote control
The Mini 3D Sound Bar is provided with a remote control.
(Sample Illustration) The remote control
Item Component Description
1 Subwoofer
plug
Connection to the SUBWOOFER jack.
1
Item Button
name
Function
1 POWER Press to turn the sound bar ON or put it into the
standby mode.
2 MUTE Press to turn the sound on/off.
1 2
3
4
5
6
7
9
8

EN-7 User’s Manual
MINI 3D SOUND BAR & SUBWOOFER
3 VOLUME +/- Press to increase/decrease the volume.
4 INPUT Press to select the source (in the sequence of
Aux-in, Line-in, Optical, Coaxial and then back to
Aux-in).
The sound bar is set to Aux-in mode by default.
5
Bluetooth
®
Press to select Bluetooth® mode. It functions the
same as the Bluetooth® button on the sound bar.
6 3D Press to toggle 3D mode ON/OFF. The 3D mode
is set to enable by default.
The 3D sound feature creates an immersive
listening experience by adding depth and
spaciousness to the sounds when using the 3D
sound button.
Please refer to the “3D Sound” section for more
details.
7 MOVIE Press to select the MOVIE audio mode (the
default mode).
The Movie mode has been optimized for the
vocal frequency bands by increasing the impact
of clearness in speech while brightening the
overall sound. The vocals become more precise,
crisp, and well-defined, accentuated by
outstanding sound clarity.
8 MUSIC Press to select the MUSIC audio mode.
The Music mode has been optimized for creating
a balanced, yet wide ambient soundscape to
enrich the musical composition.
9 GAME Press to select the GAME audio mode.
The Game mode has been optimized to deliver
an immersive listening experience with an
increase of bass and treble for impactful effects
that give a sense of movement of sound
surrounding the listeners.
Item Button
name
Function
The sound bar will restore from your last selected audio mode when it is
back from the standby mode with the AC adaptor connected. But if you
disconnect the AC adaptor and connect it again, the sound bar will start
with movie audio mode by default.
NOTE
User’s Manual EN-8
MINI 3D SOUND BAR & SUBWOOFER
Getting Started
Check the illustrations below to setup your device properly.
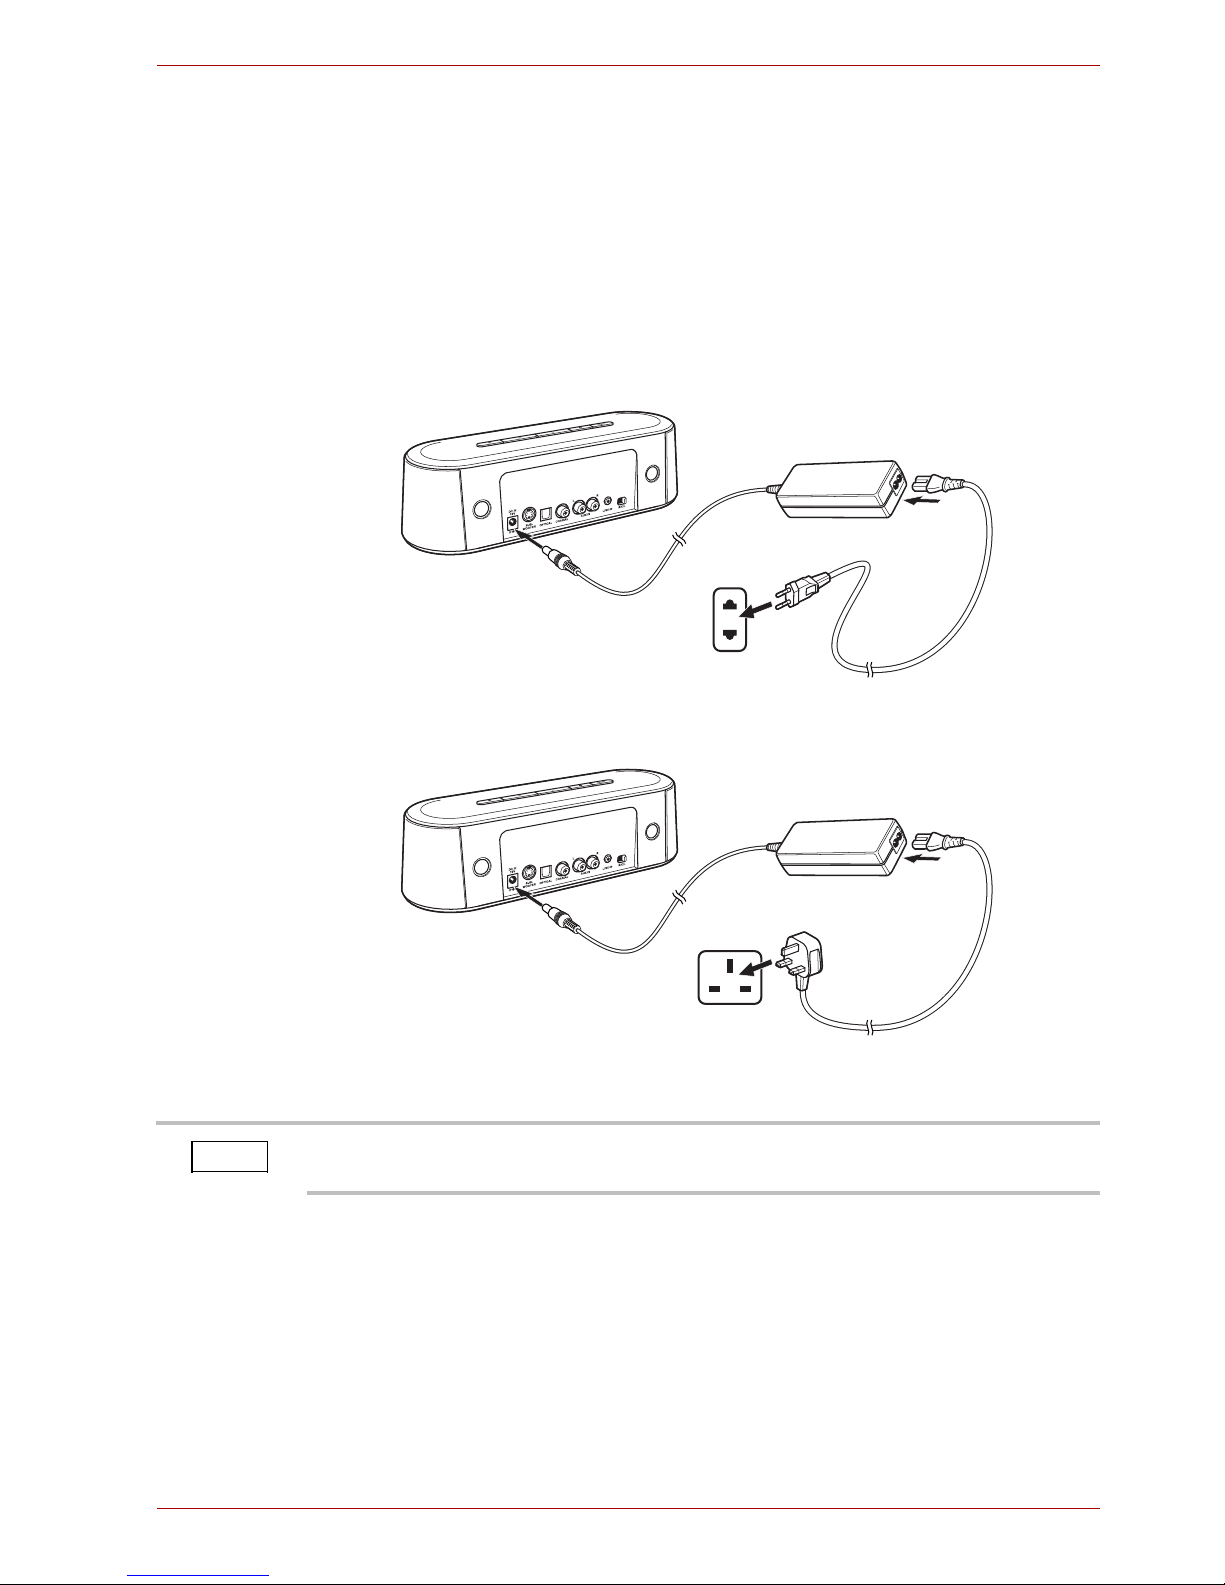
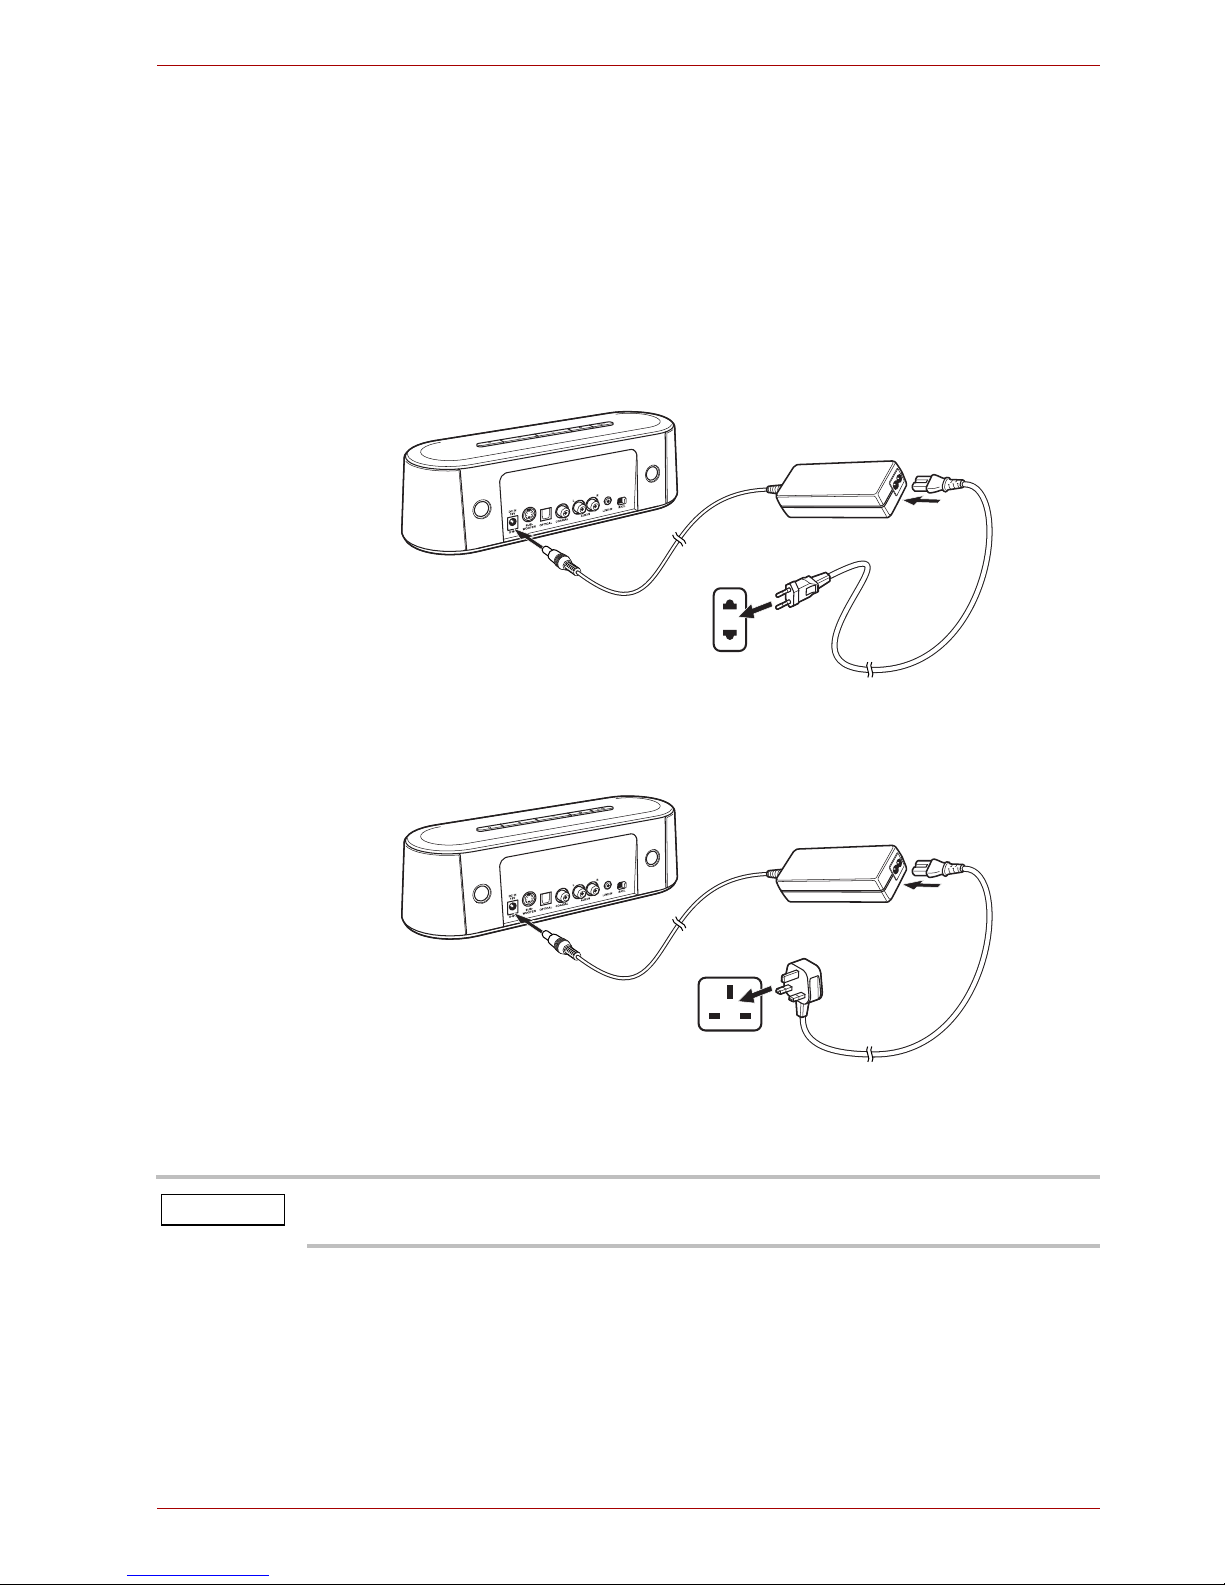
Connecting the power adaptor
Choose the proper plug to attach to an AC adaptor. Plug one end of the AC
adaptor cord/cable into the DC IN jack on the back of the sound bar, and
the other end to a live electrical outlet. The power indicator on the front
panel glows green when the sound bar is powered on.
(Sample Illustration) Connecting the power cord to the AC adaptor (2-pin plug)
(Sample Illustration) Connecting the power cord to the AC adaptor (3-pin plug)
AC Adaptor
AC Adaptor
The sound bar will automatically go to the standby mode in 10 minutes if
no audio output.
NOTE
EN-9 User’s Manual
MINI 3D SOUND BAR & SUBWOOFER
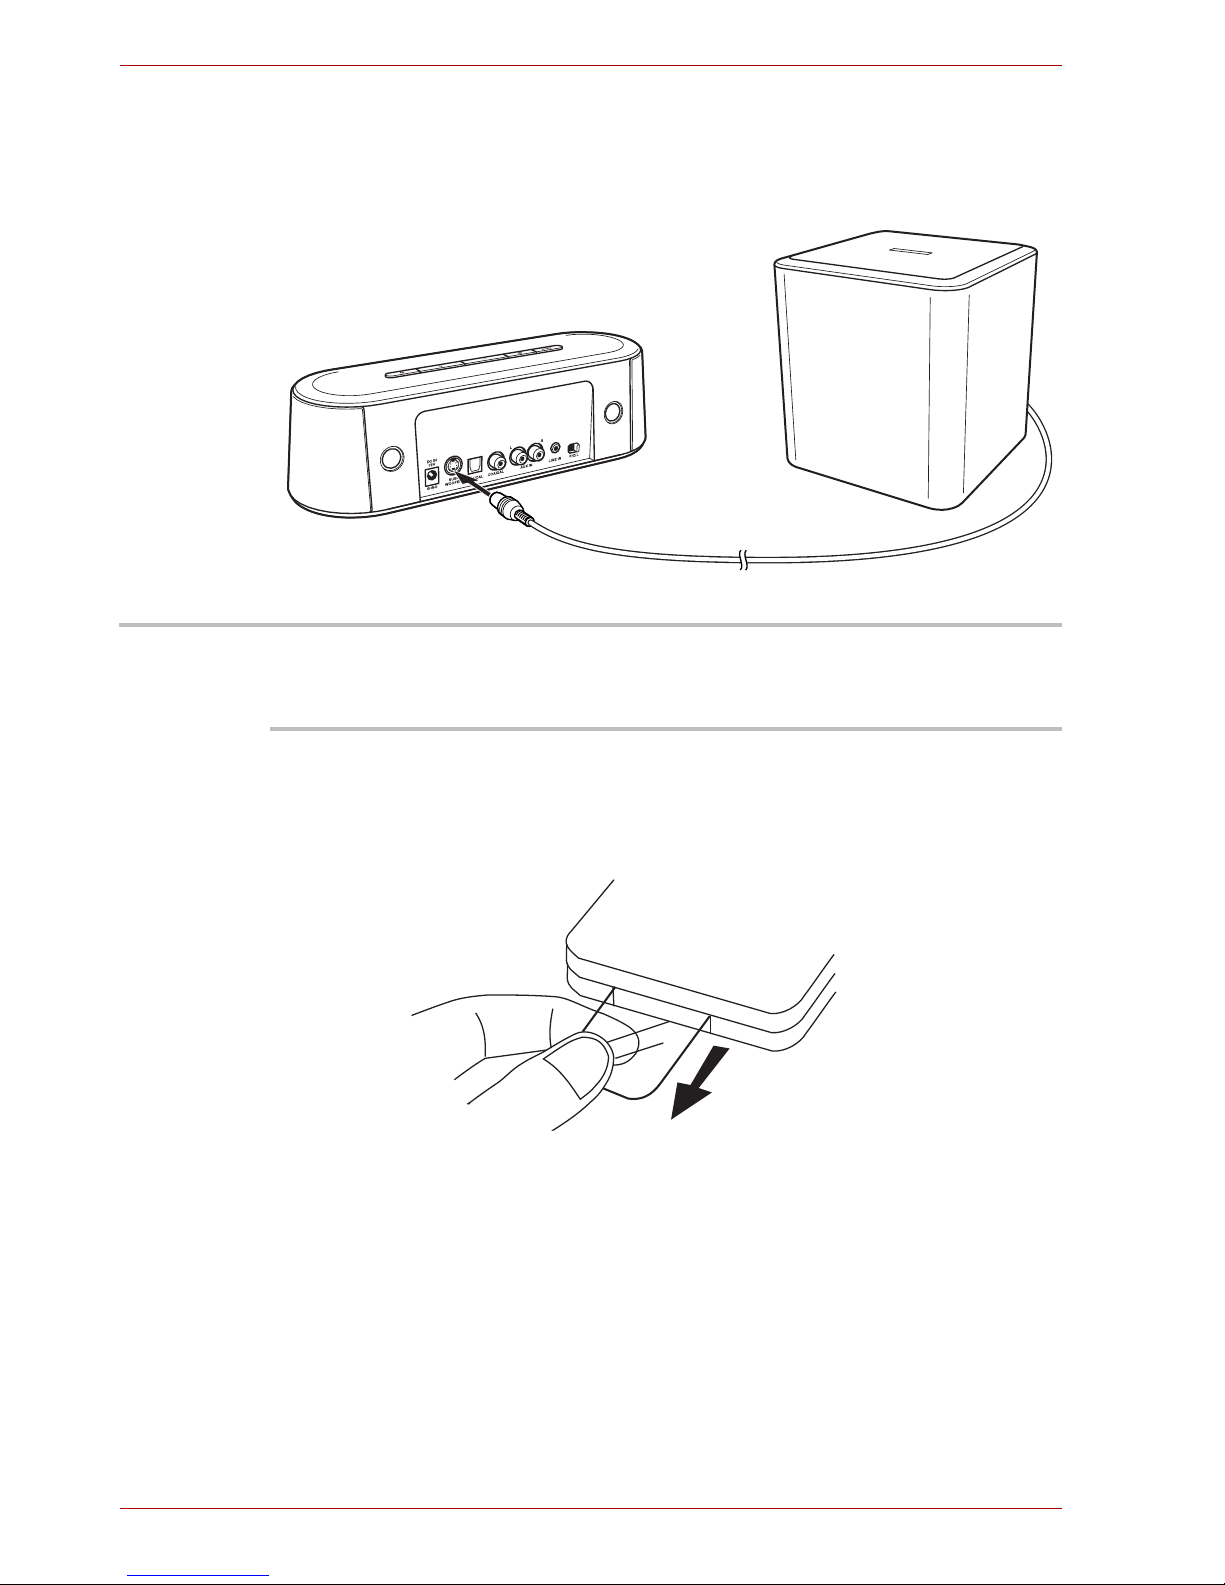
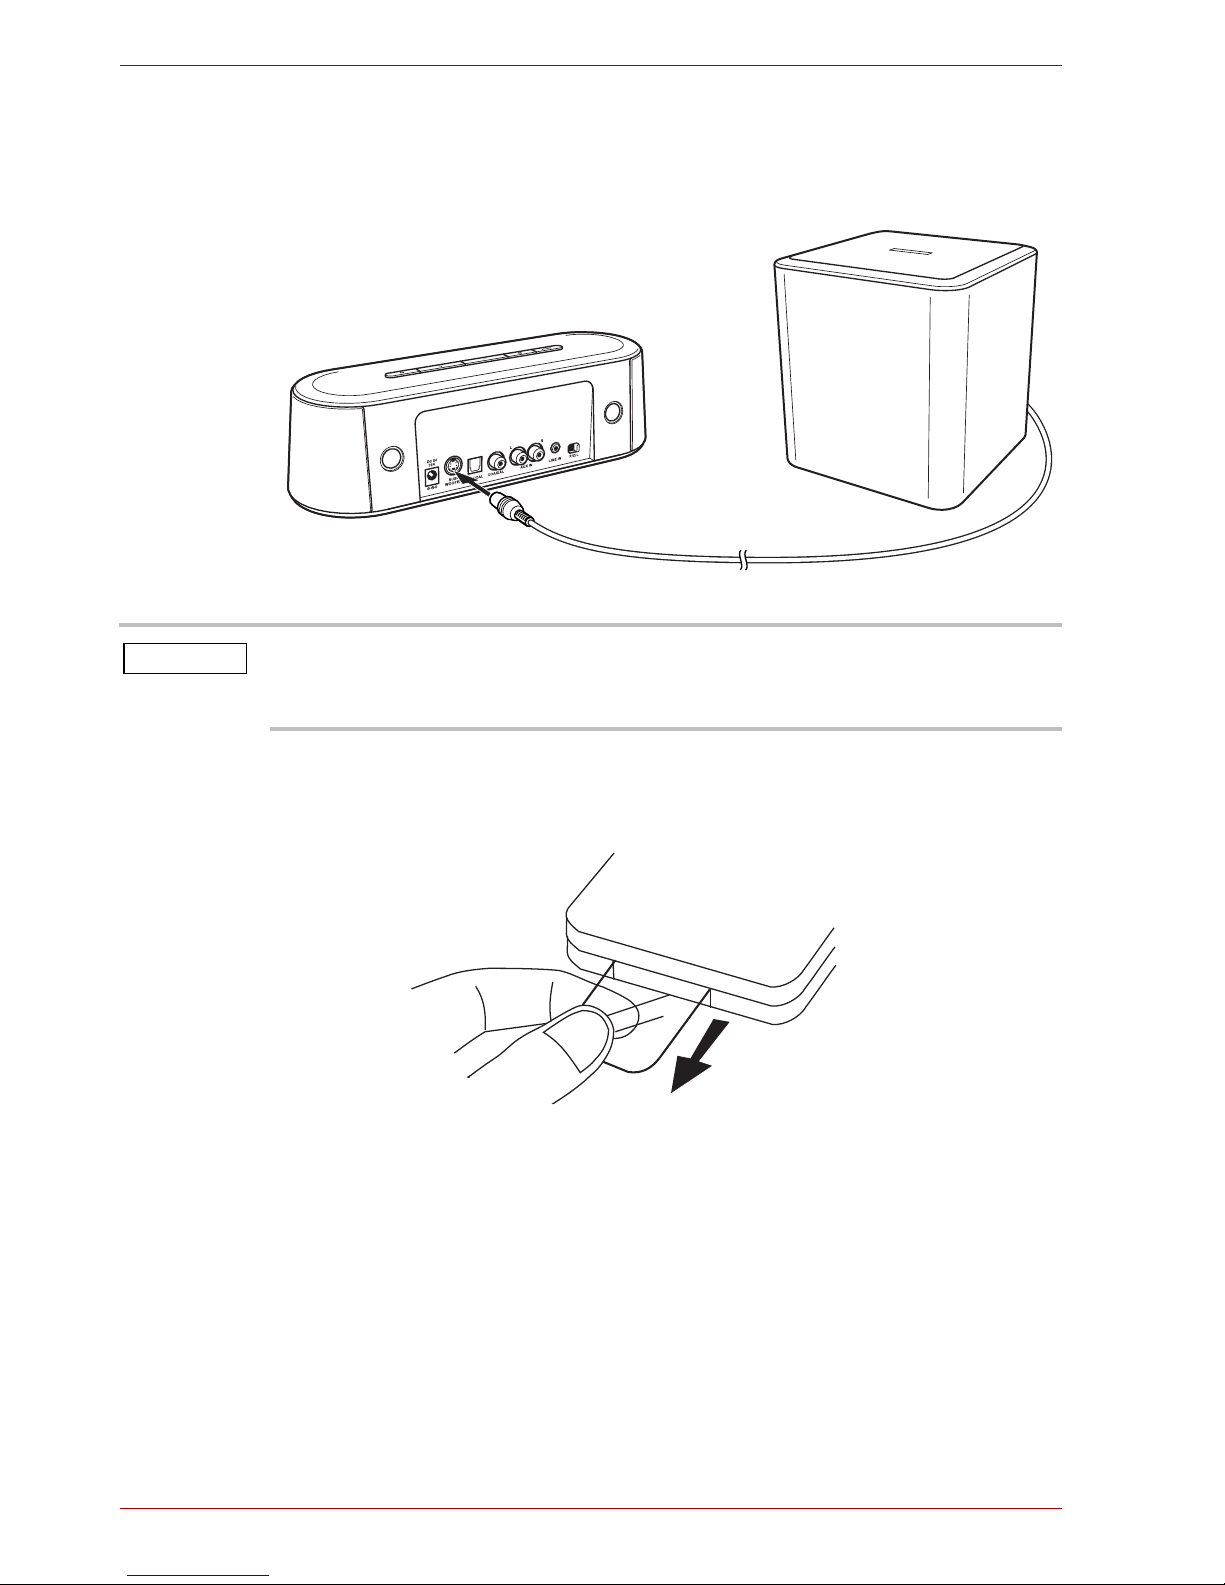
Connecting the subwoofer
Connect the subwoofer to the SUBWOOFER jack (if applicable) on the
back of the sound bar.
(Sample Illustration) Connecting the subwoofer
Using the remote control
Remove the plastic sheet before operating the remote control for the first
time.
(Sample Illustration) Remove the plastic sheet before operating the remote
control
While using the remote control, please follow the instructions below:
■ Point the remote control at the remote sensor and press the buttons.
■ Distance: Approximately 5m from the front of the remote sensor.
■ Angle: About 30° in each direction from the front of the remote sensor.
Subwoofer
Please do not connect or disconnect the subwoofer when the sound bar is
powered up.
This subwoofer is compatible with Toshiba Mini 3D Sound Bar only.
NOTE
User’s Manual EN-10
MINI 3D SOUND BAR & SUBWOOFER
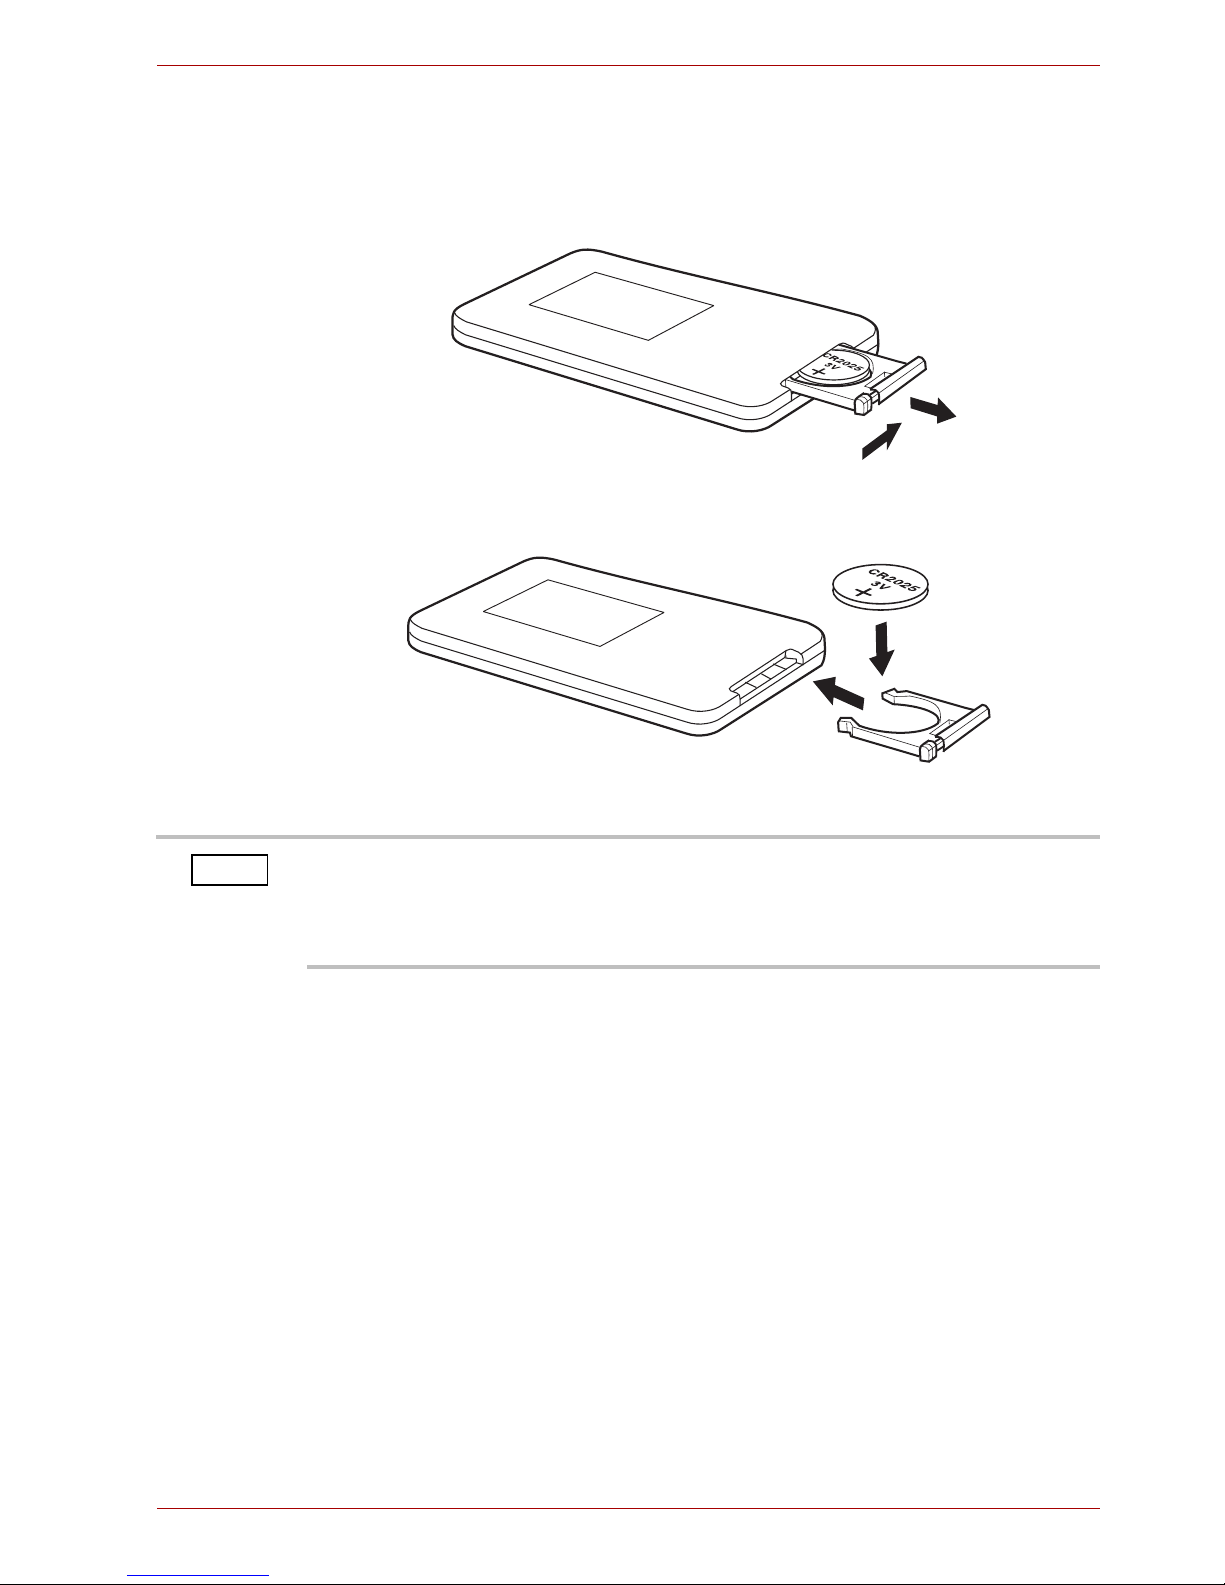
Replacing the battery
The remote control is provided with one CR2025 (3V) battery. To replace
the battery, please follow the instructions below.
1. Open the battery door.
(Sample Illustration) Open the battery door
2. Remove the exhausted battery and insert the new battery.
(Sample Illustration) Insert the new battery
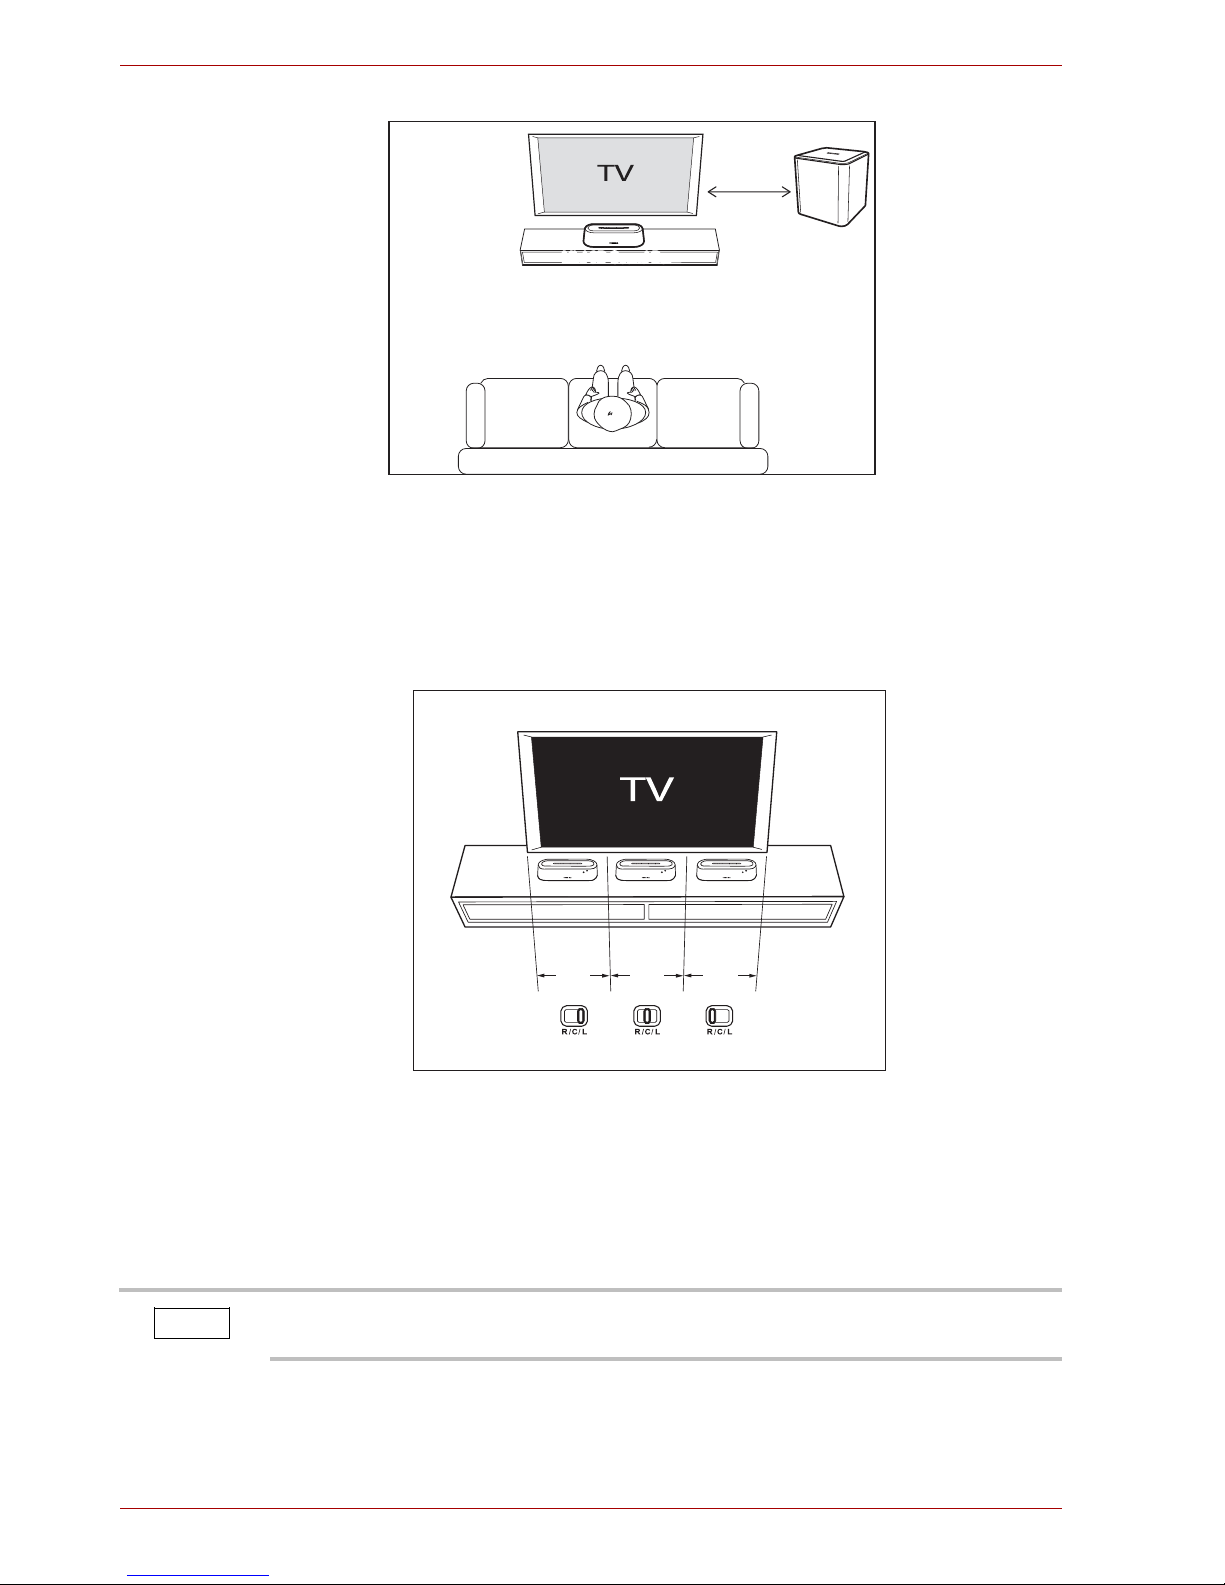
Mini 3D Sound Bar and subwoofer placement
The sound bar can be placed freestanding on a table with at least 30cm
away from the TV. For the best surround sound experience, it is
recommend to place your subwoofer directly below the sound bar, or at the
corner of the room (with 5~10cm away from the wall).
If the remote control does not operate correctly, or if the operating range is
reduced, replace the battery with a new one.
Press the remote control buttons at intervals of approximately one second
to ensure correct operation.
NOTE
EN-11 User’s Manual
MINI 3D SOUND BAR & SUBWOOFER
(Sample Illustration) Mini 3D Sound Bar and subwoofer placement
Using the R/C/L balance slide switch
If the sound bar is placed to the right (left) side of the TV or other device,
you can slide the R/C/L balance switch on the back of the sound bar to
offset the sound to the center.
(Sample Illustration) Using the R/C/L balance slide switch
Connecting to the audio device
Follow these instructions to route external audio signals from devices such
as a TV to the sound bar via the AUX IN, LINE IN, OPTICAL and COAXIAL
jacks.
Mini 3D Sound Bar
30cm
Subwoofer
Left
15.75 in.
(40 cm)
Center
15.75 in.
(40 cm)
Right
15.75 in.
(40 cm)
For best performance with a TV, we recommend using with a digital optical
cable (available separately).
NOTE
User’s Manual EN-12
MINI 3D SOUND BAR & SUBWOOFER
Using the AUX IN jacks
1. Connect a 3.5mm - RCA audio cable (provided with the sound bar) from
the L/R AUX IN jacks on the sound bar to the AUDIO OUT jacks on a
TV, DVD or other audio device.
(Sample Illustration) Analog audio cable connection
2 Press the INPUT button on the sound bar or the remote control to
switch to the AUX IN input.
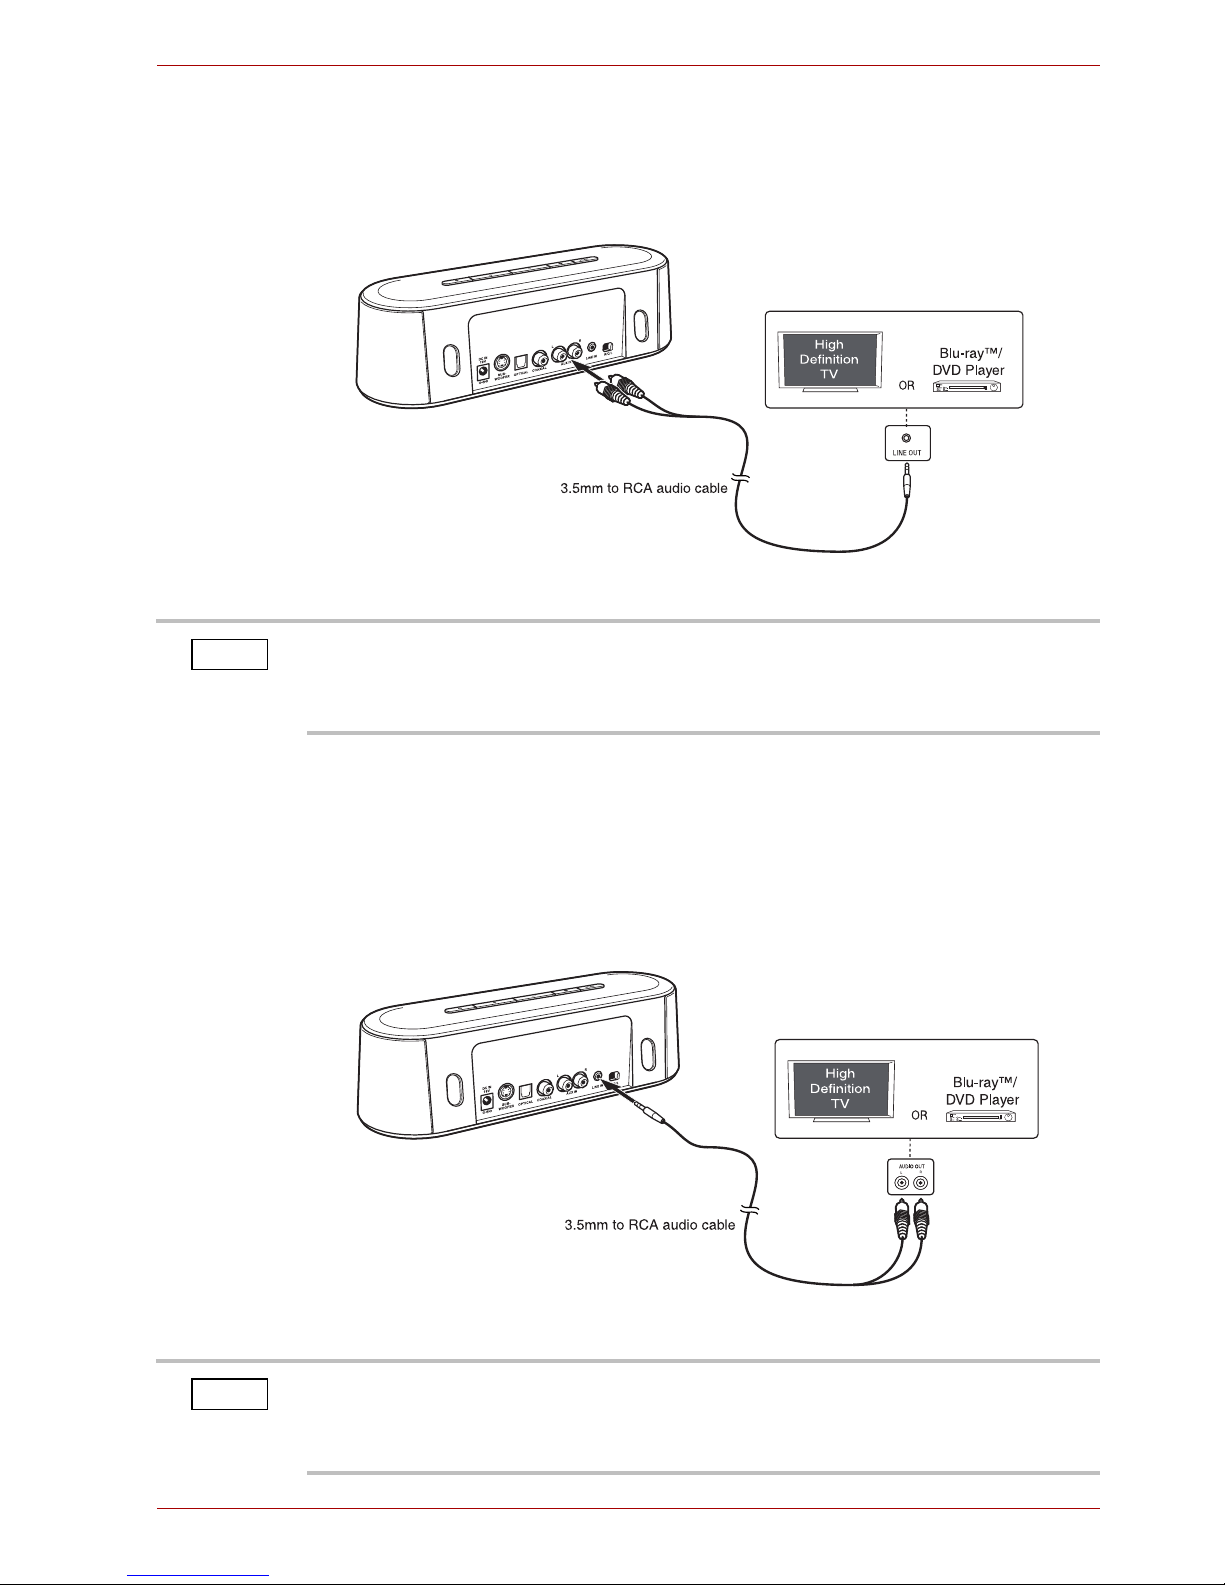
Using the LINE IN jack
1. Connect a 3.5mm - RCA audio cable (provided with the sound bar) from
the LINE IN jack on the sound bar to the LINE OUT jack on an audio
device.
(Sample Illustration) 3.5mm audio cable connection
You can connect to the TV by using one of the cables below:
■ 3.5mm - RCA audio cable (provided with the sound bar)
■ RCA - RCA cable (not provided)
NOTE
You can connect to the TV by using one of the cables below:
■ 3.5mm - RCA audio cable (provided with the sound bar)
■ 3.5mm - 3.5mm audio cable (not provided)
NOTE
EN-13 User’s Manual
MINI 3D SOUND BAR & SUBWOOFER
2 Press the INPUT button on the sound bar or the remote control to
switch to the LINE IN input.
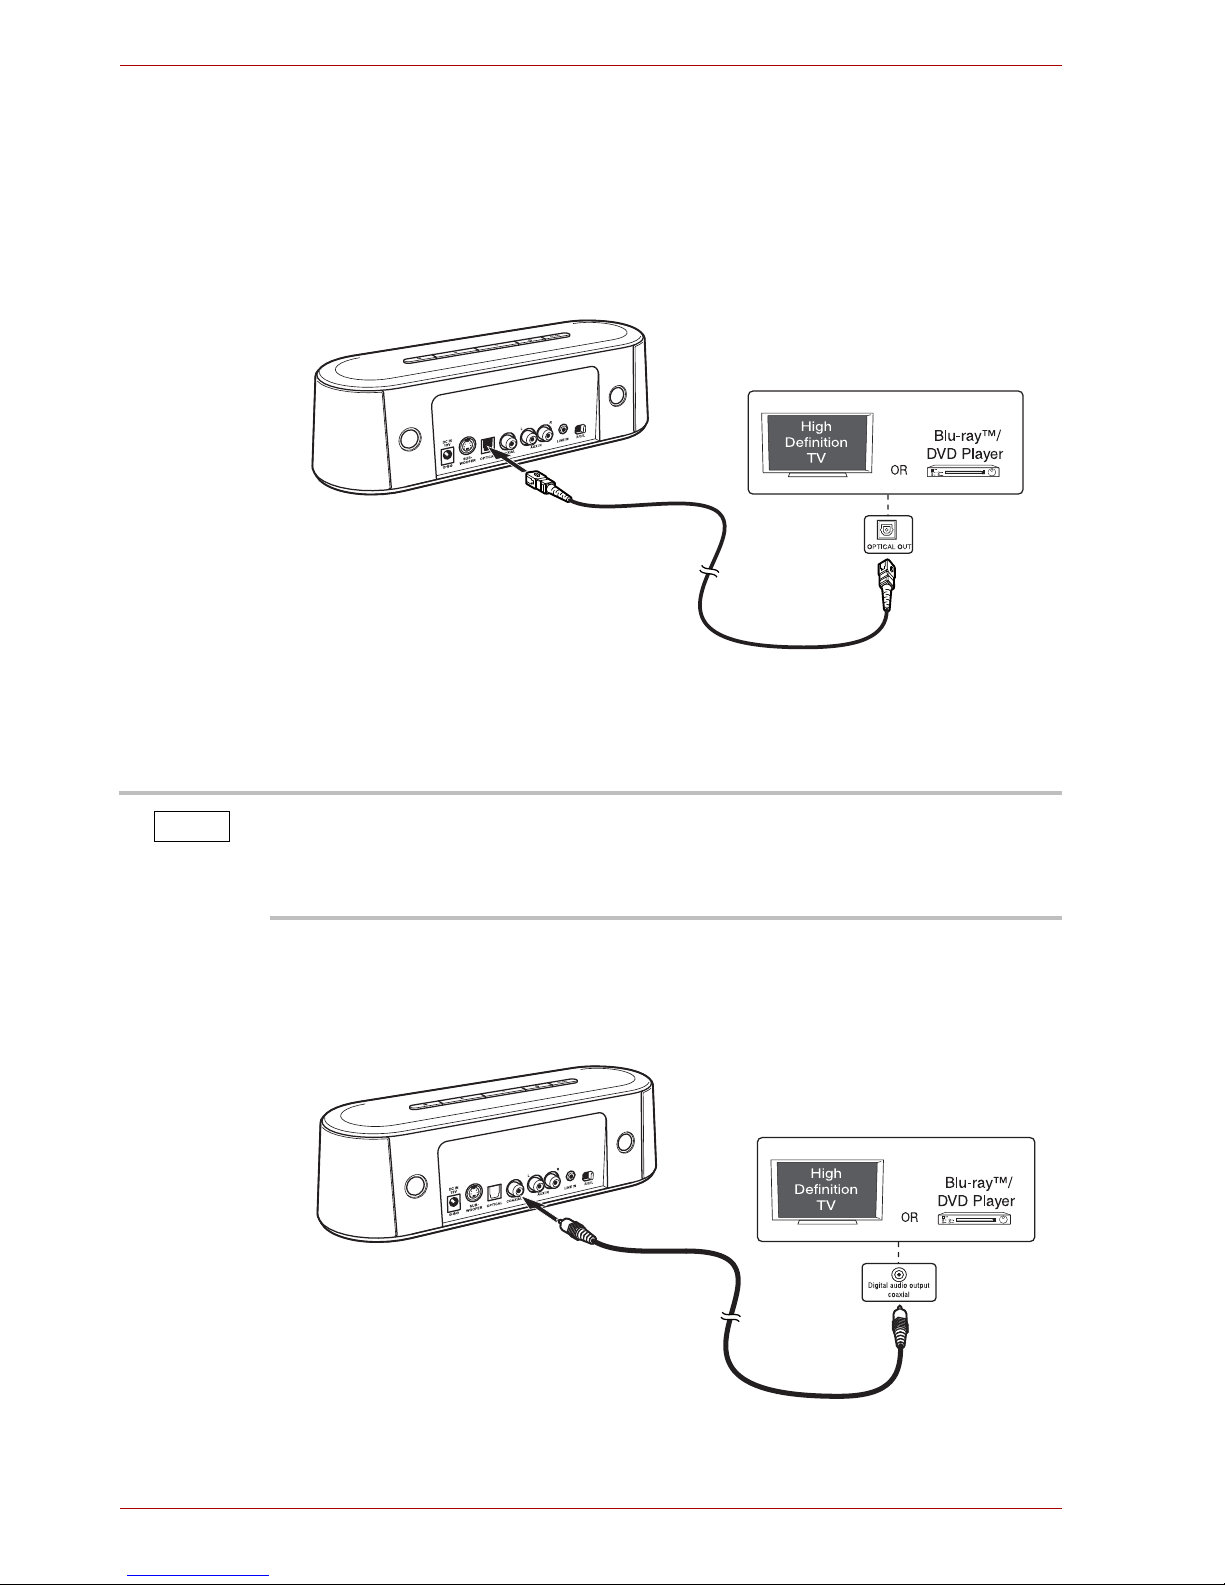
Using the OPTICAL jack
1. Connect an optical cable (not provided) from the OPTICAL jack on the
sound bar to the OPTICAL OUT jack on a TV, DVD or other audio
device.
(Sample Illustration) Optical cable connection
2 Press the INPUT button on the sound bar or the remote control to
switch to the OPTICAL input.
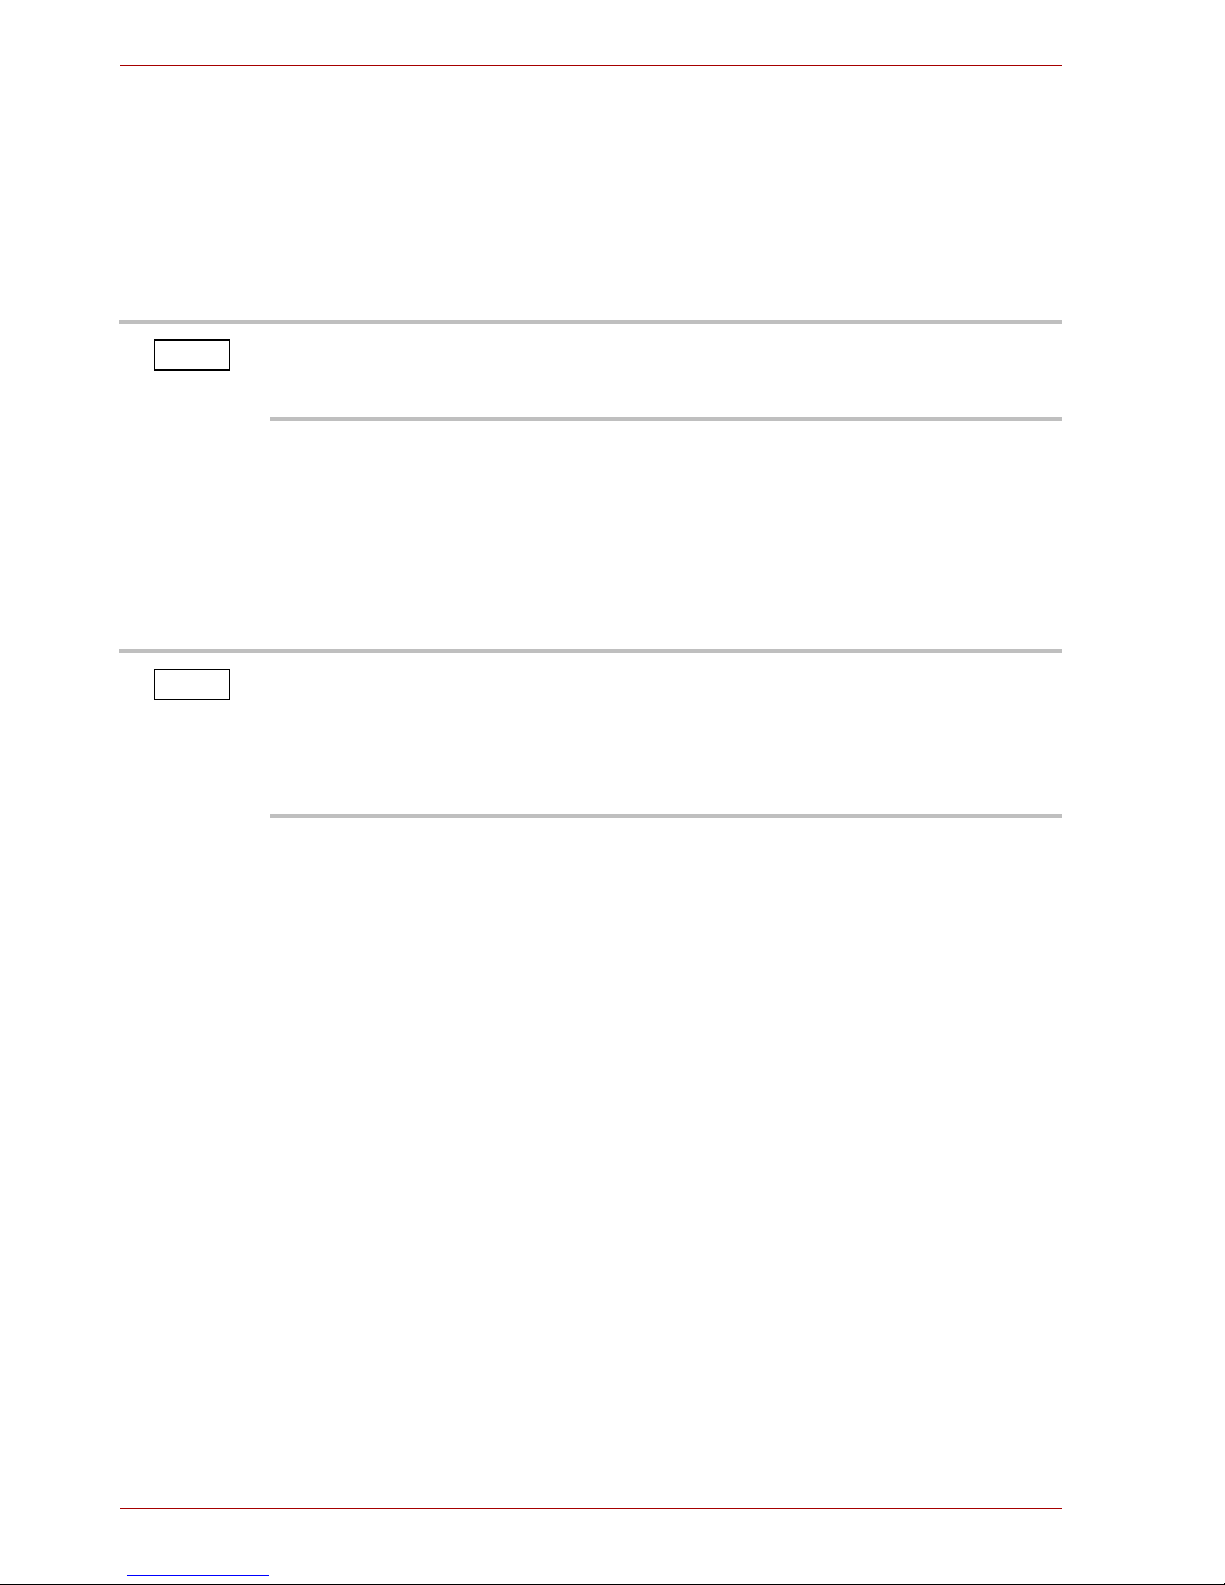
Using the COAXIAL jack
1. Connect a digital audio coaxial cable (not provided) from the COAXIAL
jack on the sound bar to the COAXIAL OUT jack on a TV, DVD or other
audio device.
(Sample Illustration) Digital audio coaxial cable connection
Digital optical cable
The sound bar is designed to support PCM (Pulse-code modulation) digital
signal only. To set the audio signal from external sources (e.g. Blu-ray
TM
and DVD player), please do not select “DTS” or “Dolby Digital”. Otherwise,
there will be no sound from the sound bar.
NOTE
Digital audio coaxial cable

User’s Manual EN-14
MINI 3D SOUND BAR & SUBWOOFER
2 Press the INPUT button on the sound bar or the remote control to
switch to the COAXIAL input.
3D Sound
The sound bar features Sonic Emotion® Absolute 3D sound technology that
delivers the ultimate listening experience from a single compact device,
without the clutter of additional cabling. Its plug and play device creates a
multi-use capability which attributes to the high-quality sound.
You can select from three different sound modes (Movie, Music, or Game),
depending on the type of sources you want to experience. Select a Sound
Mode based on the source material and your personal taste.
About Sonic Emotion® 3D Sound
Sonic Emotion® Absolute 3D is the listening experience. Absolute 3D uses
sound field control to transform the listener’s room to a virtually created
natural sound field.
With wave field synthesis being the foundation of sound field control, sound
waves are produced and dispersed throughout the entire listening area
ensuring all listeners to be amazed in an all enveloping room filled with high
quality sounds regardless of the listeners’ position. Exactly as in a natural
environment, sounds are heard from all around regardless of the device
location.
Playback via Bluetooth®-enabled devices
To play files via Bluetooth®-enabled devices:
1. Turn on the sound bar.
2. Press the Bluetooth
®
button on the sound bar to enable Bluetooth
mode.
The blue indicator will be flashing, meaning that it is searching for
available Bluetooth
®
-enabled devices.
3. Turn on the Bluetooth
®
mode of your other Bluetooth®-enabled device.
Your other device will search the available Bluetooth arround it.
If your device does not automatically start searching, you may have to
enable the search feature on your device.
4. Once the sound bar is detected, select “Toshiba Mini 3D Sound Bar” on
your device for pairing.
The sound bar is designed to support PCM (Pulse-code modulation) digital
signal only. To set the audio signal from external sources (e.g. Blu-ray
TM
and DVD player), please do not select “DTS” or “Dolby Digital”. Otherwise,
there will be no sound from the sound bar.
NOTE
EN-15 User’s Manual
MINI 3D SOUND BAR & SUBWOOFER
5. Once the two devices are paired successfully, “connected” will be
shown on your device and the blue indicator on the sound bar will stop
flashing.
6. Then the devices have been paired, you can play music/video files on
your other device and enjoy the sound from the sound bar.
Once disconnected, you need to repeat the above steps 4~6 for reconnection.
Pairing the sound bar with another Bluetooth® device
1. Disconnect your Bluetooth® device from the sound bar.
2. Press the Bluetooth
®
button on the sound bar until the blue indicator
flashes.
3. Turn on the Bluetooth® mode of your other device, and select “Toshiba
Mini 3D Sound Bar” on it for pairing.
Frequently Asked Questions (FAQ)
Question 1:
The sound bar cannot be turned on.
Answer:
Make sure that the AC adapter is connected to the sound bar, and that it is
plugged into a wall socket correctly.
Press the power button on the top of the sound bar and check whether the
power indicator is glowing green.
Question 2:
There is no sound from the sound bar.
Answer:
This problem may have several causes. Check the following items:
■ Press the Volume +/- buttons of the sound bar.
■ Make sure that the source you have selected is sending audio. If you
are connected to your TV, please make sure that your TV is configured
to output audio.
■ Make sure that there are no loose audio connections.
When pairing a new Bluetooth
®
enabled device, use the Bluetooth® button
on the sound bar speaker and not on the remote control. The remote
control can only be used to reconnect a previously paired device.
NOTE
For details, please refer to the user’s manual of your Bluetooth® device.
The sound bar can only be paired with one Bluetooth
®
device at a time. If
the sound bar is already paired with one Bluetooth
®
device, you will not be
able to pair it with another Bluetooth
®
device, even though it may display
the name “Toshiba Mini 3D Sound Bar”.
NOTE

User’s Manual EN-16
MINI 3D SOUND BAR & SUBWOOFER
■ Make sure that you have selected the correct source (input).
■ Press the MUTE button on the remote control to make sure that the
sound bar is not muted.
Question 3:
There is no sound from the subwoofer.
Answer:
Make sure that the subwoofer is connected properly.
Question 4:
The remote control does not work properly.
Answer:
This problem may have several causes. Check the following items:
■ Make sure that the plastic sheet is removed before operating the
remote control.
■ The remote control is pointed directly at the remote sensor of the
sound bar.
■ The remote control is not being used from too far a distance from
sound bar.
■ Nothing is obstructing the remote sensor (located in the front of the
sound bar).
Others
Accessories of this series of products may vary depending on the model.
Please refer to the packaging, packing list or contact your agent for
information.
Please understand no advance notice for further product improvement,
appearance design and specification update.
The illustration may be a little different from the real product.
Specifications
Mini 3D Sound Bar
General Information Description
Power requirements 19V DC, 3.42A
Power output 10 watts x 4 (per channel at 4ohms, 1 KHz /
THD 10%)
Power consumption 40W
Impedance 4 ohms
Dimension (width x
height x depth)
11.4" x 2.8" x 3.9" (290 x 72 x 100mm)
EN-17 User’s Manual
MINI 3D SOUND BAR & SUBWOOFER
Subwoofer
Trademarks
The Bluetooth word mark and logos are registered trademarks owned by
Bluetooth SIG, Inc, and any use of such marks by TOSHIBA Corporation is
under license.
Sonic Emotion is a registered trademark of sonic emotion ag.
Other trademarks and registered trademarks not listed above may be used
in this manual.
TOSHIBA Support
Need help?
For the latest driver updates, User’s Manuals & FAQs please have a look at
the TOSHIBA options & services support page:
http://computers.toshiba.eu/options-support
Please see http://computers.toshiba.eu/options-warranty for the TOSHIBA
hotline numbers.
Weight About 1.87 lbs (0.85kg)
Frequency Response 95Hz – 19kHz
Distortion <10%
General Information Description
General Information Description
Power output 20 watts at 8 ohms, 100Hz / THD 10%
Impedance 8 ohms
Dimension (width x
height x depth)
8.6" x 9.6" x 8.6" (220 x 246 x 220mm)
Weight About 6.24 lbs (2.83kg)
Frequency Response 38Hz – 19kHz (Mini 3D Sound Bar and
Subwoofer)
Appearance and specification may vary and can be changed without
notice.
NOTE

User’s Manual EN-18
MINI 3D SOUND BAR & SUBWOOFER
Regulatory Information
CE compliance
This product is CE marked in compliance with the essential requirements
and other relevant provisions of Directive 1999/5/EC. Responsible for CE
marking is Toshiba Europe GmbH, Hammfelddamm 8, 41460 Neuss,
Germany. A copy of the official Declaration of Conformity can be obtained
from following website:
http://epps.toshiba-teg.com
.
This product and the original options are designed to observe the related
EMC (Electromagnetic Compatibility) and safety standards. However,
TOSHIBA cannot guarantee that this product still observes these EMC
standards if other units or cables not produced by TOSHIBA are connected.
In this case the persons who have connected those other units/cables have
to provide assurance that the system (sound bar plus options/cables) still
fulfills the required standards. To avoid general EMC problems, the
following guidance should be noted:
■ Only CE marked options should be connected/implemented
■ Only best shielded cables should be connected
Working Environment
The Electromagnetic Compliance (EMC) of this product has been verified
typically for this product category. Your product is not intended for industrial
use, but for personal use only. Any other working environment has not been
verified by TOSHIBA and the use of this product in these working
environments is maybe restricted or cannot be recommended. Possible
consequences of the use of this product in non verified working
environments can be:
Disturbances of other products or of this product in the nearby surrounding
area with temporarily malfunction or data loss/corruption as result.
Example of non verified working environments and related advices:
Industrial environment (e.g. where 3-phase 380V mains is being used
mainly): Danger of disturbances of this product due to possible strong
electromagnetic fields especially near to big machinery or power units.
Medical environment: The compliance to the Medical Product Directive has
not been verified by Toshiba, therefore this product cannot be used as a
medical product without further verification. The use in usual office
environments e.g. in hospitals should be no problem if there is no restriction
by the responsible administration.

EN-19 User’s Manual
MINI 3D SOUND BAR & SUBWOOFER
REACH
Following information is only valid for EU-member States: REACH Compliance Statement
The new European Union (EU) chemical regulation, REACH (Registration,
Evaluation, Authorization and Restriction of Chemicals), entered into force
on 1 June 2007.
Toshiba will meet all REACH requirements and is committed to provide our
customers with information about the chemical substances in our products
according to REACH regulation.
Please consult the following website
www.toshiba-europe.com/computers/info/reach for information about the
presence in our articles of substances included on the candidate list
according to article 59(1) of Regulation (EC) No 1907/2006 (“REACH”) in a
concentration above 0.1 % weight by weight.
Following information is only valid for EU-member
States:
Disposal of products
The crossed out wheeled dust bin symbol indicates that products must be
collected and disposed of separately from household waste. Integrated
batteries and accumulators can be disposed of with the product. They will
be separated at the recycling centres.
The black bar indicates that the product was placed on the market after
August 13, 2005.
By participating in separate collection of products and batteries, you will
help to assure the proper disposal of products and batteries and thus help
to prevent potential negative consequences for the environment and
human health.
For more detailed information about the collection and recycling
programmes available in your country, please visit our website
(http://eu.computers.toshiba-europe.com
) or contact your local city office or
the shop where you purchased the product.
Disposal of batteries and/or accumulators
The crossed out wheeled dust bin symbol indicates that batteries and/or
accumulators must be collected and disposed of separately from
household waste.
If the battery or accumulator contains more than the specified values of
lead (Pb), mercury (Hg), and/or cadmium (Cd) defined in the Battery
Directive (2006/66/EC), then the chemical symbols for lead (Pb), mercury
(Hg) and/or cadmium (Cd) will appear below the crossed out wheeled dust
bin symbol.

User’s Manual EN-20
MINI 3D SOUND BAR & SUBWOOFER
By participating in separate collection of batteries, you will help to assure
the proper disposal of products and batteries and thus help to prevent
potential negative consequences for the environment and human health.
For more detailed information about the collection and recycling
programmes available in your country, please visit our website
(http://eu.computers.toshiba-europe.com
) or contact your local city office or
the shop where you purchased the product.
Additional Information
© 2012 TOSHIBA Europe GmbH. All rights reserved.
TOSHIBA reserves the right to make technical changes. TOSHIBA
assumes no liability for damages incurred directly or indirectly from errors,
omissions or discrepancies between this product and the documentation.

CZ-1 Uživatelská příručka
MINI 3D SOUND BAR a SUBWOOFER
Uživatelská příručka
Obsah
Úvod............................................................................................................2
Obsah balení...............................................................................................2
Bezpečnostní pokyny ..................................................................................2
Rychlé seznámení.......................................................................................3
Mini 3D Sound Bar ................................................................................4
Subwoofer .............................................................................................6
Dálkové ovládání ...................................................................................6
Začínáme ....................................................................................................8
Připojení napájecího adaptéru...............................................................8
Připojení subwooferu.............................................................................9
Používání dálkového ovládání...............................................................9
Umístění zvukové lišty Mini 3D Sound Bar a subwooferu ...................10
Připojení k audio zařízení ....................................................................11
3D zvuk .....................................................................................................14
Přehrávání pomocí zařízení s funkcí Bluetooth
®
.......................................14
Často kladené dotazy (FAQ).....................................................................15
Specifikace................................................................................................16
Obchodní známky .....................................................................................17
Podpora TOSHIBA....................................................................................17
Informace o předpisech.............................................................................18
REACH......................................................................................................19
Následující informace jsou určeny pouze pro členské státy EU:...............19
Doplňující informace..................................................................................20
Tato příručka je určena pro tři modely uvedené níže:
1) Mini 3D Sound Bar + Subwoofer (SBM1W)
2) Mini 3D Sound Bar (SBM10)
3) Subwoofer pro Toshiba Mini 3D Sound Bar (SBW10)
Uživatelská příručka CZ-2
MINI 3D SOUND BAR a SUBWOOFER
Úvod
Vítejte a děkujeme, že jste si vybrali tento produkt TOSHIBA.
Doporučujeme pečlivé přečtení této příručky a její uschování spolu
s dokumentací produktu pro budoucí využití.
Obsah balení
Přesvědčte se, zda máte všechny následující položky:
Bezpečnostní pokyny
Aby nedošlo k závadě nebo poškození produktu, je potřeba důsledně
dodržovat pokyny uvedené níže.
■ Nikdy
■ neotevírejte kryt nebo jednotku
■ nerozebírejte jednotku nebo její součásti
■ neumisťujte kapaliny vedle produktu nebo na něj, protože mohou
poškodit produkt, způsobit poranění, úraz elektrickým proudem
nebo požár
■ nevystavujte produkt nárazům, otřesům nebo pádům
■ nehýbejte s produktem za provozu, aby nedošlo k poškození dat
Tato příručka se zabývá používáním zvukové lišty Mini 3D Sound Bar
a subwooferu. Mini 3D Sound Bar a subwoofer je možné zakoupit v sadě
nebo samostatně.
Označení „zvuková lišta“ v této příručce znamená zařízení Mini 3D
Sound Bar.
POZNÁMKA
User’s Manual
Mini 3D Sound Bar
Subwoofer
(je-li součástí)
AC adaptér
3,5mm - RCA audio kabel
Dálkové ovládání
s baterií
Uživatelská příručka
a záruční leták

CZ-3 Uživatelská příručka
MINI 3D SOUND BAR a SUBWOOFER
■ nepoužívejte jiné AC/DC adaptéry, než je adaptér přibalený u
zařízení, aby nedošlo k poškození zařízení
■ neodpojujte kabely za provozu
■ nevystavujte produkt teplotám mimo rozsah 5°C – 35°C za provozu
a -20°C – 60°C ve vypnutém stavu
■ nevystavujte produkt mokru a vlhkosti
■ nepřikrývejte produkt za provozu, protože by mohlo dojít k jeho
přehřátí
■ nepokládejte produkt v blízkosti tepelných zdrojů
■ neodhazujte baterie z dálkového ovládání (které je součástí
zvukové lišty Mini 3D Sound Bar) do ohně, aby nedošlo k jejich
explozi
■ nenechávejte baterie z dálkového ovládání v dosahu dětí, aby je
nespolkly
■ Okamžitě odpojte produkt v těchto případech
■ z krytu produktu vychází kouř nebo neobvyklý zápach
■ do krytu produktu se dostala voda nebo je produkt mokrý
■ do krytu produktu pronikl cizí předmět
■ došlo k poškození kabelu (v takovém případě nahraďte kabel
novým)
■ Zvuková lišta Mini 3D Sound Bar má v reproduktorech magnety.
Magnety mají schopnost smazat data z magnetických úložných médií,
například z video pásků, pevných disků a z kreditních karet. Z tohoto
důvodu udržujte zvukovou lištu mimo dosah takových produktů.
Jestliže se produkt chová nečekaným způsobem nebo máte pochybnosti o
elektrické bezpečnosti, okamžitě se obrať
te na horkou linku TOSHIBA
nebo na autorizovaného prodejce!
Rychlé seznámení
V této části jsou popsány různé komponenty zvukové lišty Mini 3D Sound
Bar a subwooferu. Popis každé součásti je uveden v tabulce pod každou
ilustrací.
Podle rozsahu vašeho nákupu nemusíte mít obě zařízení, zvukovou lištu
Mini 3D Sound Bar i subwoofer.
POZNÁMKA

Uživatelská příručka CZ-4
MINI 3D SOUND BAR a SUBWOOFER
Mini 3D Sound Bar
Pohled zepředu
(Ukázková ilustrace) Přední pohled na zvukovou lištu Mini 3D Sound Bar
Položka Komponenta Popis
1 VSTUP Slouží k výběru zdroje (v pořadí Aux-in,
Line-in, Optický, Koaxiální a znovu Aux-in).
Ve výchozím stavu je zvuková lišta
nastavena na režim Aux-in.
1 2 4
7
6
5
3
Při návratu z pohotovostního režimu a při zapnutém AC adaptéru zvuková
lišta obnoví svůj poslední vybraný vstup. Pokud však AC adaptér odpojíte
a znovu připojíte, zvuková lišta bude opět nastavena na vstup Aux-in.
POZNÁMKA
Položka Komponenta Popis
2
Bluetooth
®
Vyberte režim Bluetooth®.
3 Hlasitost +/- Zvýší/sníží hlasitost.
4 Napájení Zapne zvukovou lištu nebo ji uvede do
pohotovostního režimu.
5 Dálkový
snímač
Slouží k přijímání signálů z dálkového
ovládání.
6 Indikátor
Bluetooth
®
Svítí bíle, když je zvuková lišta spárovaná a
bliká bíle v průběhu párování.
7 Indikátor
napájení
Svítí zeleně, když je zvuková lišta zapnutá a
svítí červeně, když je vypnutá nebo v
pohotovostním režimu.
CZ-5 Uživatelská příručka
MINI 3D SOUND BAR a SUBWOOFER
Pohled zezadu
(Ukázková ilustrace) Zadní pohled na zvukovou lištu Mini 3D Sound Bar
Položka Komponenta Popis
1 Konektor
DC IN
Připojení pro AC adaptér (dodán společně
se zvukovou lištou Mini 3D Sound Bar).
2 Konektor pro
SUBWOOFER
Připojení pro subwoofer.
3 OPTICKÝ
konektor
Připojení pro optické audio výstupní zařízení
pomocí optického kabelu (není přiložen).
4 KOAXIÁLNÍ
konektor
Připojení pro koaxiální audio výstupní
zařízení pomocí koaxiálního digitálního
audio kabelu (není přiložen).
5 Konektory
AUX IN
Připojení pro audio výstupní zařízení pomocí
3,5mm - RCA audio kabelu (dodává se se
zvukovou lištou Mini 3D Sound Bar).
6 Konektor
LINE IN
Připojení pro audio výstupní zařízení pomocí
3,5mm - RCA audio kabelu (dodává se se
zvukovou lištou Mini 3D Sound Bar).
7 Posuvný
spínač pro
nastavení
rovnováhy
P/C/L
Vybere audio kanál (pravý/centr/levý).
Nastaví zvuk do středu, pokud je zvuková
lišta umístěna doprava/doleva vzhledem
k audio/video zařízení.
1
2
3
7
6
54
Uživatelská příručka CZ-6
MINI 3D SOUND BAR a SUBWOOFER
Subwoofer
(Ukázková ilustrace) Pohled na subwoofer
Dálkové ovládání
Zvuková lišta Mini 3D Sound Bar je vybavena dálkovým ovládáním.
(Ukázková ilustrace) Dálkové ovládání
Položka Komponenta Popis
1 Zásuvka pro
subwoofer
Připojení konektoru pro SUBWOOFER.
1
Položka Název tlačítka Funkce
1 NAPÁJENÍ Stiskem se zvuková lišta zapne nebo se
uvede do pohotovostního režimu.
2 MUTE Stiskem se zapne nebo vypne zvuk.
1 2
3
4
5
6
7
9
8

CZ-7 Uživatelská příručka
MINI 3D SOUND BAR a SUBWOOFER
3 HLASITOST +/- Stiskem se zvýší nebo sníží hlasitost.
4 VSTUP Stiskem se vybere zdroj (v pořadí Aux-in,
Line-in, Optický, Koaxiální a znovu Aux-in).
Ve výchozím stavu je zvuková lišta
nastavena na režim Aux-in.
5
Bluetooth
®
Stiskem se vybere režim Bluetooth®.
Funguje stejně jako tlačítko Bluetooth
®
na
zvukové liště.
6 3D Stiskem se zapíná/vypíná 3D režim.
3D režim je nastaven jako výchozí.
Funkce 3D zvuku umožňuje poutavý
posluchačský zážitek díky hloubce a
prostoru zvuku při použití tlačítka 3D zvuku.
Viz část „3D zvuk“, kde najdete další detaily.
7 VIDEO Stiskem se vybere audio režim VIDEO
(výchozí režim).
Filmový režim je optimalizován pro hlasová
frekvenční pásma díky zvýšení
srozumitelnosti řeči a projasnění celkového
zvuku. Hlasy jsou přesnější, ostré a dobře
definované, s důrazem na vynikající
hlasovou čistotu.
8 HUDBA Stiskem se vybere audio režim HUDBA.
Hudební režim je optimalizován pro
dosažení vyváženého a širokého
prostorového zvukového obrazu, který
obohacuje hudební kompozice.
9 HRY Stiskem se vybere audio režim HRY.
Herní režim je optimalizován pro poutavý
poslechový zážitek s využitím
zdůrazněných basů a výšek v nárazových
efektech, které naznačují pohyb zvuku
obklopujícího posluchače.
Položka Název tlačítka Funkce
Při návratu z pohotovostního režimu a při zapnutém AC adaptéru zvuková
lišta obnoví svůj poslední vybraný zvukový režim. Pokud však AC adaptér
odpojíte a znovu připojíte, zvuková lišta bude opět nastavena na filmový
zvukový režim.
POZNÁMKA
Uživatelská příručka CZ-8
MINI 3D SOUND BAR a SUBWOOFER
Začínáme
Podle ilustrací dole zapojte správně svoje zařízení.
Připojení napájecího adaptéru
Vyberte správnou zástrčku pro AC adaptér. Zapojte jeden konec kabelu AC
adaptéru do konektoru DC IN na zadní straně zvukové lišty a druhý konec
do funkční elektrické zásuvky. Je-li zvuková lišta zapnutá, indikátor
napájení na přední straně svítí zeleně.
(Ukázková ilustrace) Připojení napájecího kabelu k AC adaptéru
(2pinová zástrčka)
(Ukázková ilustrace) Připojení napájecího kabelu k AC adaptéru
(3pinová zástrčka)
AC Adaptor
AC Adaptor
Po 10 minutách, kdy není k dispozici žádný zvukový vstup, zvuková lišta
přejde do pohotovostního režimu.
POZNÁMKA
CZ-9 Uživatelská příručka
MINI 3D SOUND BAR a SUBWOOFER
Připojení subwooferu
Připojte subwoofer ke konektoru SUBWOOFER (pokud máte subwoofer)
na zadní straně zvukové lišty.
(Ukázková ilustrace) Připojení subwooferu
Používání dálkového ovládání
Před prvním použitím odstraňte z dálkového ovládání plastovou fólii.
(Ukázková ilustrace) Sejmutí plastové fólie před prvním použitím dálkového
ovládání
Při používání dálkového ovládání se řiďte těmito pokyny:
■ Namiřte dálkové ovládání na vzdálený snímač a stiskněte tlačítko.
■ Vzdálenost: přibližně 5 m od přední části vzdáleného snímače.
■ Úhel: přibližně 30° v každém směru od přední části vzdáleného
snímače.
Subwoofer
Nepřipojujte nebo neodpojujte subwoofer při zapnuté zvukové liště.
Tento subwoofer je kompatibilní pouze se zvukovou lištou Toshiba Mini 3D
Sound Bar.
POZNÁMKA
 Loading...