

Page 1
TOSHIBA
Satellite
4000CDT/XCDT
For
models:
4030CDT
4060CDT
4080XCDT
4085XCDT
GUIDE
series
Page 2

Page 3
We
want
to
hear
from
you!
Toshiba
Please
Thisismy
Thisismy
Asacomputer
□
3
□
□
□
I
used
□
I
found
□
Overall,IfoundmySatellite®
up and
D
welcomes
valuable
Satellite®
check
very
first
completely
not
very
familiar
familiar
somewhat
very
yes
strongly
strongly
with
experienced
the
Quick
the
Quick
agree□agree□neutral□disagree□strongly
begin
using
agree□agree3neutralZldisagree□strongly
your
information
4000CDT7XCDT
one
choice
first
computer.
notebook
userIam:
newtocomputers
with
computers
experienced
and
Start
Card
□
no
Start
Card
evaluation of
which
will
for
eachofthe
computer.LJyes
computers
but
newtonotebooks,
and
can
technically
that
came
very
helpfulinsettingupmy
4000CDT/XCDT
this
manual.
helpusimprove
Series
Your
our
User's
following:
□
yes
comfortably
knowledgeable
withmycomputer
Series
□
_)
batteries
loadmyown
computer
comments
provide
documentation.
Guide
no
no
and
such
software
computer
disagree
easytoset
disagree
This
manual
3
strongly
I
was
abletofind
□
strongly
The
technical
LJ
strongly
Overall,Iwould
_]
excellent□very
Have
you
was
installedonyour
Did
you
□
very
Do
you
access?
LJ
Yes
was
agreeLJagree3neutral3disagree3strongly
agree□agree3neutralPdisagree3strongly
terms
agreeLIagreePneutral3disagree□strongly
used
the
find
this
easy
prefer
LJ
having
easytoread
the
information
were
well
rate
this
manual
good
Satellite®
online
somewhat
the
□
4000CDT/XCDT
computer?
manual
easy
manual
No
and
understand
I
needed
explainedinlanguageIcould
easytouse?
installedonthe
quite
J
good
Series online
3
somewhat
LJ
Not
easily
understand
□
needs
manual
□
yes
difficult□difficult
computer
sure
for
disagree
disagree
disagree
improvement
which
_]
no
easy
Page 4
ieqiuso±
6uaoaias
joj
noA
>fueu±
:(3|qissodseo^pads
jajndujoo
Jjagi
6uijen|eA8u;eqigsoi
Toshiba
Attn:
America
Documentation
Computer
PO
Box
10580
Santa
Ana,CA92711-9860
se aq
aseaid)
Information
Systems
suoijsa66ns
)s|sse01Bumijmaqp|noM|1sga
jo/pue
ajnirti
Systems,
s;ueiuuioo
au,} uj
:ssejppe
~
Inc.
s|bu3jblu
:Auediuoo
Manager
Division
r
jaajjs
Page 5
Satellite'
4000CDT/XCDT
Series
For
Models:
4030CDT,
4080XCDT,
4060CDT,
User's
4085XCDT
Guide
Page 6
Satellite
and
4085XCDT
Models:
4030CDT,
4060CDT,
4080XCDT
FCC
Notice
"Declaration
Information"
This
equipment
digital
device,
provide
lation.
This
equipment
installed
ferencetoradio
ence
will
harmful
turning
ferencebyoneormoreofthe
♦J*
Reorient or
<• Increase
♦2*
Connect
the receiverisconnected.
♦•♦
Consult
NO
attached
peripherals
to
radio
nal
external
Changesormodifications
by
to
operate
has
been
tested
pursuanttoPart15of
reasonable
and
not
interference
the
TE:
devices
protection
generates,
usedinaccordance
communications.
occurina
to
equipment
relocate
the
separation
the
equipment
the
dealeroran
Only
peripherals
to
this
computer. Operation
not
recommended
andTVreception.
and
the
disk
drive
against
uses
particular
radioortelevision
off
and
on, the
following
the
receiving
between
toanoutletona
experienced
complying
Shielded
computer's
port,
USB
madetothis
Toshibaorparties
the
authorized
equipment
of
Conformity
and
foundtocomply
the
FCC
harmful
and
can
radiate
with
the
instructions,
However,
installation.
reception,
userisencouragedtotrytocorrect
measures:
with
the
limits
rules.
These
limits
interference
radio
thereisno
If
this
inaresidential
frequency
equipment
which
energy
it
may
cause
guarantee
can be
foraClass
are
designed
instal
and,ifnot
harmful
inter
that interfer
does
cause
determined
the
inter
antenna.
the
equipment
radio/TV
with
with
by
Toshibaislikelytoresultininterference
cables
serial
port,
port,
PS/2
port
equipment
by
Toshiba
and
receiver.
circuit
different
from
thattowhich
technician
the
FCC
ClassBlimits
non-compliant
mustbeused
parallel
port,
and
microphone
not
could
void
for
help.
may
peripherals
between
monitor
expressly
the
user's
or
the
port,
jack.
approved
authority
be
exter
B
to
by
This
device
complies
following
♦
♦J*
two
This
device
This
device
may
cause
conditions:
with
Part15of
may
not
cause
must
accept
any
undesired
operation.
the
FCC
Rules.
Operationissubjecttothe
harmful
interference.
interference received,
including
interference
that
Page 7
Contact:
Toshiba
FCC
Requirements
America
9740
Irvine
Irvine,CA92618-1697
949-583-3000
The
following
internal
modems.
information
Blvd.
information
Installation
When
you
are
readytoinstalloruse
pany
and
give
them
♦
The
Type
of
telephone
♦
The
FCC
*t*
The
ringer
The
modem
USOC
RJ11C.
Service
numberofthe
registration
equivalence
connectstothe
Systems,
is
pursuanttoFCC
the
following
numberofthe
number
telephone
Inc.
CFR
47,
the
modem,
call
your
information:
linetowhich
you
will
modem.
(REN)ofthe
linebymeans
modem,
of a
Part68and
local
connect
refers
telephone
the
modem.
whichis0.5B.
standard
jack
to
com
called
the
Your
modemisdesignedtobe
tiontotelephone
systems)isprohibited.
If
you
have
equipment
mation
upon
Telephone
Company
The
goalofthe
In
ordertodo
their
equipment,
viceorthe
notice,inwriting,toallow
terrupted
service.
usedonstandard-device
company-provided
Connectiontoparty
any
questions
you
can
request.
about
your
connecttoit,
the
Procedures
telephone
this,itmay
operations or
operationofyour
companyisto
occasionally
procedures.
equipment,
youtomake
PartI:GettingToKnow
coin
service
(central
lines
serviceissubjecttoState
telephone
telephone
be
line,
suchashow
company
provide
you
necessary
If
the
any
for
these
changes
telephone
changes
necessarytomaintain
telephone
will
with
themtomake
company
lines.
office
implemented
many
provide
the
best
might
affect
will
Your
Connec
tariffs.
pieces
of
this
infor
serviceitcan.
changes
in
your
ser
give
you
unin
Computer
Page 8
If
Problems
Arise
If
anyofyour
diately
network.
continue
nection.Ifadvance
When
and
informedofyour
are
ever
tionoran
telephone
removeitfrom
If
the
telephone
service.
When
noticeisnot
you
are
notified,
neededonyour
authorized
representative
righttofileacomplaint
your
you
Disconnection
If
you
should
ever
decidetopermanently
present
line,
please
call
the
Fax
Branding
The
Telephone
computerorother
machine
each
transmitted
is
sent
message
other
entityorindividual.
In
ordertoprogram
the
setup
Consumer
electronic
unless
such
message
pageoron
andanidentification
and
the
telephone
this
for
your
fax
software
equipmentisnot
telephone
company
practical,
feasible,
willbegiven
modem,
telephone
Protection
devicetosend
clearly
the
first
of
the business,
numberofthe
information
before
operating
line,asit
notesaproblem,
they
will
notify
you
the
they
shouldbeperformedbyToshiba
of
Toshiba
disconnect
company
Actof1991
any
containsina
pageofthe
other
sending
into
your
sendingamessage.
properly,
may
youinadvanceofthis
willbenotifiedassoonaspossible.
opportunity
with
the
Corporation.
and
let
makesitunlawfultouse a
message
marginatthe
transmission,
entityorindividual
machineorsuch
fax
modem,
you
cause
harmtothe
they
may
temporarily
to
correct the
FCC.Inthe
your
modem
them
knowofthis
via
a telephone
the
you
should
imme
telephone
dis
discon
problem
event
repairs
Corpora
from
its
change.
fax
toporbottom
date
sending
business,
should
of
and
time
it
the
complete
Industry
CD-ROM
PartI:GettingToKnow
Canada
This
ClassBdigital
Cet
appareil
nume"rique
Canada.
Safety
The
CD-ROM
product,
reference.
service
drive
please
Should
location.
Your
Requirement
apparatus
complies
delaclasseBest
with
conforme"
Canadian
ICES-003.
alanorme
Instruction
employsalaser
read
this
instruction
the
unit
ever
Computer
system.Toensure
manual
carefully
require
maintenance,
proper
and
contactanauthorized
NMB-003
use of
this
retain
for
future
du
Page 9

Useofcontrols,
specified
To
prevent
adjustments
may
resultinhazardous
direct
exposuretothis
or
the
performance
radiation
laser
exposure.
beam,donot
of
procedures
trytoopen
other
the
than
those
enclosure.
Location
of
the
required
j
t
CAUTIONS:
1
LASER
carefully
model, please
direct
CLASS1LASER
LASER
PRODUCT]
KLASSE
1
Useofcontrols
those
exposure.
label
.
N^
s.
i
This
appliance
PRODUCT."
and
exposure
specified
To
use
keepitfor
your
contact
your
to
the
laser
or
adjustments
in
the
owner's
Productiscertifiedbythe
comply
with
chapter
J appl
manufacluit;.
MANUFACTURED:
Toshiba
Corporation
1-1,
Shibaura
Minato-Ku,
CLASS1LASER
LASER
contains
a
laser
system
this
model
properly,
future
reference.
nearest
"AUTHORIZED
beam,donot
trytoopen
or
performance
manual
may
manufacturer
DHHS
rules21CFR
icableatthe
1-Chome
Tokyo
105-0061,
date
of
Japan
sub-
PRODUCT
KLASSE
In
resultinhazardous
1
andisclassified
read
the
caseofany
service
the
enclosure.
of
procedures
asa"CLASS
instruction
station."
manual
trouble
with
this
Toprevent
other
than
radiation
to
Copyright
This
guideiscopyrighted
the
copyright
written
respecttothe
©1998byToshiba
laws,
permissionofToshiba.Nopatent
useofthe
Corporation.
by
Toshiba
this
guide
cannot be reproducedinany
information
All
PartI:GettingToKnow
Corporation
contained
rights
with
liability
is
assumed,
herein.
reserved.
all
rights
form
however,
reserved.
without
Your
Under
the
with
Computer
prior
Page 10

Export
Administration
This
document
Export
Administration
U.S.
DepartmentofCommerce
in
contravention
Notice
The
information
uct
specifications,
TOSHIBA
INFORMATION
WARRANTY
INFORMATION CONTAINED
DISCLAIMS
MERCHANTABILITYORFITNESS
PURPOSE
TOSHIBA
INCURRED
OR
TYPOGRAPHICAL
HEREINORFOR
THE
MANUAL.INNO
ANY
INCIDENTAL,
DAMAGES,
OTHERWISE,
MANUAL OR
OR
THE
Regulation
contains
technical
Regulations,
of
the
U.S.
containedinthis
is
subjecttochange
CORPORATION
SYSTEMS,
WITH
REGARDTOTHIS
ANY
IMPLIED
WITH
REGARDTOANY
ASSUMESNOLIABILITY
DIRECTLYORINDIRECTLY
DISCREPANCIES
CONSEQUENTIAL,
WHETHER
ARISING
ANY
OTHER
USE
THEREOF.
data
that
maybecontrolled
and
maybesubjecttothe
priortoexport.
Export
Administration Regulations
manual,
including
without
AND
TOSHIBA
INC.
(TOSHIBA)
HEREIN
WARRANTIES
FOR
OF THE
ERRORSOROMISSIONS
BETWEEN
EVENT
SHALL
BASEDONTORT,
OUTOFORINCONNECTION
INFORMATION
under
the
U.S.
approvalofthe
Any
export,
directlyorindirectly,
is
prohibited.
but not
limitedtoany
notice.
AMERICA
PROVIDES
MANUALORANY
AND
HEREBY
OF
ANY
PARTICULAR
FOREGOING.
FOR
ANY
DAMAGES
FROM
THE
TOSHIBABELIABLE
SPECIAL,OREXEMPLARY
CONTRACT
CONTAINED
NO
OTHER
EXPRESSLY
ANY
TECHNICAL
CONTAINED
PRODUCT
FOR
OR
WITH
THIS
HEREIN
prod
AND
Trademarks
Satellite
isaregistered
trademarksofToshiba
Celeronisa
of
Intel
ESS
LapLinkisa
MS-DOS,
Microsoft
PS/2isa
RingCentral
PartI:GettingToKnow
trademark,
Corporation.
Audio
Driveisa
Microsoft,
Corporation.
trademarkofInternational
isatrademarkofRing Zero
registered
registered
Microsoft
Your
Computer
trademark,
America
and
trademarkofTraveling Software,
and
Noteworthy,
Information
Intel,
Pentium
and
trademarkofESS
Press,
and
Windows
Business
Systems,
AccuPoint,
Systems,
Inc.
MMX
are
registered
Technologies,
Inc.
are
registered
Machines
Corporation.
Inc.
and
Fn-esse
are
trademarks
Inc.
trademarks
of
Page 11

Page 12

Page 13

Contents
Part
Chapter
Chapter
I:
Getting
1:
Finding
Front
Leftside
Back
Right
Underside
Front
Display
Keyboard
2:
Getting
Making
Selecting
Creating
Keeping
Settingupyour
Connecting
Charging
To
Know
Your
Way
with
the
display
side
with
the
display
panel
panel
Started
sure
you
have
a
placetowork
a
computer-friendly
yourself
computer
theACadapter
the
battery
Your
Computer
Around
closed
panel
open
everything
environment
comfortable
Page 14
Connecting
Adding
Installing
Removing
Connecting
Connecting
Connecting
Using
the
Opening
Turningonthe
Using
Setting
Registering
Changing
a
printer
memory
the
(optional)
a
memory
a
memory
a
mouse
a
serial
a
PS/2
computer
the
for
display
power
AccuPoint
up
your
software
your
computer
the
desktop
module
module
mouse
mouse
the
first
time
panel
pointing
device
online
Chapter
3:
Learning
Precautions
Computing
Using
Character
Ctrl,
Overlay
Starting
Starting
Starting
Using
Saving
Printing
Starting
Using
Using
Hibernation
Using
Inserting
Caring
Using
Inserting
the
Basics
tips
the
keyboard
keys
Fn,
and
Alt
keys
keys
a
program
a
program fromanicon
a
program from
the
Run
dialog
boxtostartaprogram
your
work
your
work
again
where
you
the
Standbycommand
Resume
Mode
mode
diskettes
and
removing
for
diskettes
compact
discs
compact
discs
Explorer
left
off
diskettes
into
the
CD-ROM
drive..
PartI:GettingToKnow
Your
Computer
Page 15
Removing
Caring
Backingupyour
Copyingtoa
Using
aCDfrom
for
compact
files
diskette
the
Backup
the
discs
Wizard
UsingPCCards
PC
Card
supporting
Inserting
PC
Cards
software
RemovingPCCards
Hot
swapping
Using
your
computer
Exchanging
Setting
Using
Connecting
Connecting
Communications
File
Sending
Toshiba's
Turning
Caring
Cleaning
Moving
data
up
for
communications
the
internal
your
directly
transfer
afax
online
off
the
for
your
the
the
computer
at
the
with
another
modem
computertoa
toaremote
parameters
protocols
resources
computer
computer
computer
drive
office
computer.
network
computer
Chapter
4:
Mobile
Toshiba's
Running
Battery
Monitoring
Monitoring
Whattodo
Changing
Removing
Inserting
Disposing
Conserving
Computing
energy-saver
the
computer on
safety
the
battery
when
the
battery
the
a charged
of
used
battery
design
battery
precautions
battery
battery
charge
power
you
hearabattery
battery
batteries
power
safely
PartI:GettingToKnow
power
alarm.
Your
Computer
Page 16
Maximizing
Traveling
Usingacomputer
battery
tips
life
lock
.
Chapter
5:
Getting
Lesson1:Exploring the
Finding
Using
Choosing
Using
Lesson2:Using
Lesson3:Creating
Lesson4:Creating
Lesson5:Starting
Lesson6:Resizing
Using
Maximizing
Resizing
Lesson7:Closing
Lesson8:Creating
Creating
Creating
Lesson9:Displaying
Lesson
Lesson
Lesson
Lesson
Windows98Help
Troubleshooters
Using
to
Know
your
the
toolbars
the
and
a
a
10:
Changing
11:
Setting
12:
Removing
13:IfIamlost—what
the
Windows
desktop
way
around
active
desktop
a
desktop
the
AccuPoint
a
a
programs
and
taskbar
and
minimizing
moving
your
shortcuts
shortcut
shortcut
the
online
tutorial
the
style
new
document
new
folder
repositioning
windows
programs
to
the
Calculator
to
the
Character
Web
content
the
wallpaper
date
and
objects
98
desktop
pointing
the
active
and
in
individual
time
from
the
doIdo?
device
windows
window
files
Map
windows
desktop
71
72
7
74
75
79
81
83
85
86
88
88
89
90
90
91
91
92
93
98
99
100
102
102
103
104
Part
Chapter
PartI:GettingToKnow
II:
Technical
6:
Exploring
Setting
Exploring
up
audio
UsingCDPlayer
Reference
Your
Options
Windows98to
features.
Your
Computer
work
with
your
printer
109
109
112
112
Page 17
Using
external
Makingarecording
Emulating
Determining
Using
MS-DOS
speakers
a
full-size
the
keyboard
COM
Port
programs
or
headphones
Chapter
7:
Toshiba
Fn-esse
Starting
Assigning
Viewing
Changing
Hardware
Accessing
Hardware
TSETUP
Toshiba
Accessing
Toshiba
Chapter
8:
If
Something
Problems
Problems
Windows98is
Using
Windows98can
Resolving
A
Resolving
Fixing
Fixing
Memory
Power
Keyboard
AccuPoint
Display
Disk
Utilities
Fn-esse
a
keytoa
existing
or
removing
Setup
Hardware
Setup
Power
Extensions
Toshiba
Power
Goes
that
are
when
not
Start-up
a
hardware
planofaction
hardware
a
problem
device-related
card
and
the
problems
problems
problems
drive
problems
programordocument
key
assignments
existing
Setup
window
Power
Extensions
Extensions
window
Wrong
easytofix
you
turnonthe
working
options
problems
batteries
to
fix
problems
help
you
conflict
conflicts
with
Device
problems.
key
assignments.
computer
on
your
own
Manager
Parti:
GettingToKnow
Your
Computer
Page 18

CD-ROM
Sound
PC
Printer
Modem
If
you
Before
Contacting
Toshiba's
drive
problems
system
Card
problems
need
you
worldwide
problems
problems
problems
further
assistance
call
Toshiba
offices.
Part
Appendix
Appendix
Appendix
Appendix
III:
Appendices
A:
Hot
Keys
B:
Features
C:
Power
D:
Video
Glossary
Index
and
Specifications.
Cable
Connectors
Modes
PartI:GettingToKnow
Your
Computer
Page 19

Page 20

Page 21
Introduction
Welcometothe
Toshiba
ever
The
sor
anda13.3
ingupto65thousand
The
processor,
(measured
colorsat1024 x
The
Mobile
anda14.1
ingupto65thousandat1024 x
power
In
V.90
online
Satellite
you
Satellite
with
MMX®
Satellite
Satellite
Pentium®IIprocessor,
you'll
addition,
modem
services.
worldofportable
computer,
go.
4030CDT
technology,
inch
screen
4060CDT
a
4.3
billion
diagonally)
768
4080XCDT
inch
screen
need.
each
computerisequipped
that
provides
your
hasa300
(measured
colorsat1024 x
hasa333
byte
hard
capableofdisplaying
resolution.
and
(measured
for
computing.
work
MHz
a
4.3
billion
diagonally)
MHz
disk
drive,
4085XCDT
a
6.4
billion
diagonally)
768
resolution,
fast
accesstothe
With
can
accompany
Intel®
byte
capableofdisplay
768
resolution.
IntelMobile
anda13.3
upto65
havea366
byte
capableofdisplay
withanintegrated
your
new
you
wher
Celeron™
hard
proces
disk
drive,
Pentium®
inch
screen
thousand
MHz
Intel
hard
disk
drive,
giving
you
all
the
56K
Internet
and
other
II
Page 22
XVIII
Microsoft®
offering
face
with
notebook
pointing
This
Safety
guide
This
guide
♦
Readitright
♦
Skim
♦
Use
information.
If
you
puter
before,
familiarize
to
turniton.
cautions
Windows®98comes
you
exciting
the
Internet.
computer,
device
introduces
through
the
tableofcontents
are
newtocomputers,
read
yourself
After
new
features
And,ifyou
you
will
eliminates
through.
and
through
that,
the
the
computer's
stop
whenatopic
and
or
the
with
the
components
seek
out
preinstalled
that
have
find
that
Toshiba's
needtocarryamouse.
features.
the
indextofind
have
not
first
coupleofchapters
whatever
on
your
provide
never
a
smoother
usedaToshiba
AccuPoint™
You
can:
interests
usedanotebook
of
you.
specific
to
the
computer
interests
you
computer,
inter
com
and
how
most.
Parti:
GettingToKnow
This guide
ordertoavoid
riesordamage
classified
ing
could
observed.
contains
potential
your
according
icons
highlight
DANGER:
couid
result
instruction
WARNING:
result
Your
these
This
icon
in
deathorserious
is
not
This
icon
in
bodily
Computer
safety
instructions
hazards
equipment.
to
the
seriousness
instructions
indicates
the
that
that
could
The
safety
of
as follows:
existence
bodily
observed.
indicates
injury
the
existence
if
the
safety
mustbeobserved
result in
instructions
the
injury,
instruction
personal
have
risk,
and
the
follow
ofahazard
if
ofahazard
that
the
safety
is
not
that
inju
been
in
Page 23
CAUTION:
could
instruction
NOTE:
operation
This
icon
result
in
damagetoequipment
is
not
observed.
This
icon
indicates
of
the
equipment
indicates
the
existence
information
or
related
ofahazard
or
property,
that
items.
if
relates
to
that
the
safety
the
safe
Other
icons
Additional
information:
Other
documentation
Your
♦
used
icons
highlight
TECHNICAL
about
HINT:
DEFINITION:
in
the
NOTE:
the
unit.
This
icon
This
text.
This
denotes
icon
and
Satellite
The
how
tronic
the
puter,
supplied
computer
User's
Guide
contains
the
computer
User's
electronic
you
can
with
works.Your
Guide
User's
install
your
other
helpfuloreducational
icon
provides
helpful
indicates
technical
hints
and
tips.
the
definition
software
comes
with:
the
technical
computer
preinstalled
Guide
it
using
system.
withanicononthe
was
not
the
Configuration
information
comes
preinstalled
information
of
a term
used
about
withanelec
desktop.
on
your
Builder
If
com
CD
PartI:GettingToKnow
Your
Computer
Page 24

♦
The
Toshiba
PC
Cards
explains
♦
Windows98documentation
Microsoft
♦
The
Toshiba
the
Toshiba
on
the
♦
Additional
documentation
on
your
Accessories
and
other
howtoorder
Catalog
accessories
them.
that
Windows98operating
Companion
Companion
diskette
that
software
for
computer.
Diskette
Diskette
are
not discussed
including
other
a
Configuration
software
available
lists
PCMCIA-compatible
from
Toshiba,
explains
system.
Guide
and
that
the
features
explains
howtouse
in
this
guide.
BuilderCDand
may
come
and
of
the
whentouse
the
programs
preinstalled
Service
options
Toshiba
ranty
with
If
thing
offers
programs.
your
you
haveaproblemorneedtocontact
Goes
a
full
lineofservice
See
the
warranty
computer
Wrong"onpage
for
registration
options
and
built
service
information.
Toshiba,
131.
around
material
its
war
included
see
"If
Some
PartI:GettingToKnow
Your
Computer
Page 25

Page 26

Page 27

Part
I
Getting
Computer
What
This
partisdesignedtogiveaquick
additional
hesitatetoskip
details
and
all
around.
technical
To
Know
is
in
Part
overviewofyour
information
canbefoundinPart
Your
I
Satellite
computer.
II.Donot
Many
Page 28
Front
Left
with
side
the
display
Back
Right
side
Underside
Front
with
the
display
closed
panel
open
1
2
3
4
5
6
Page 29
Finding
Your
Way
This
including
servesasa
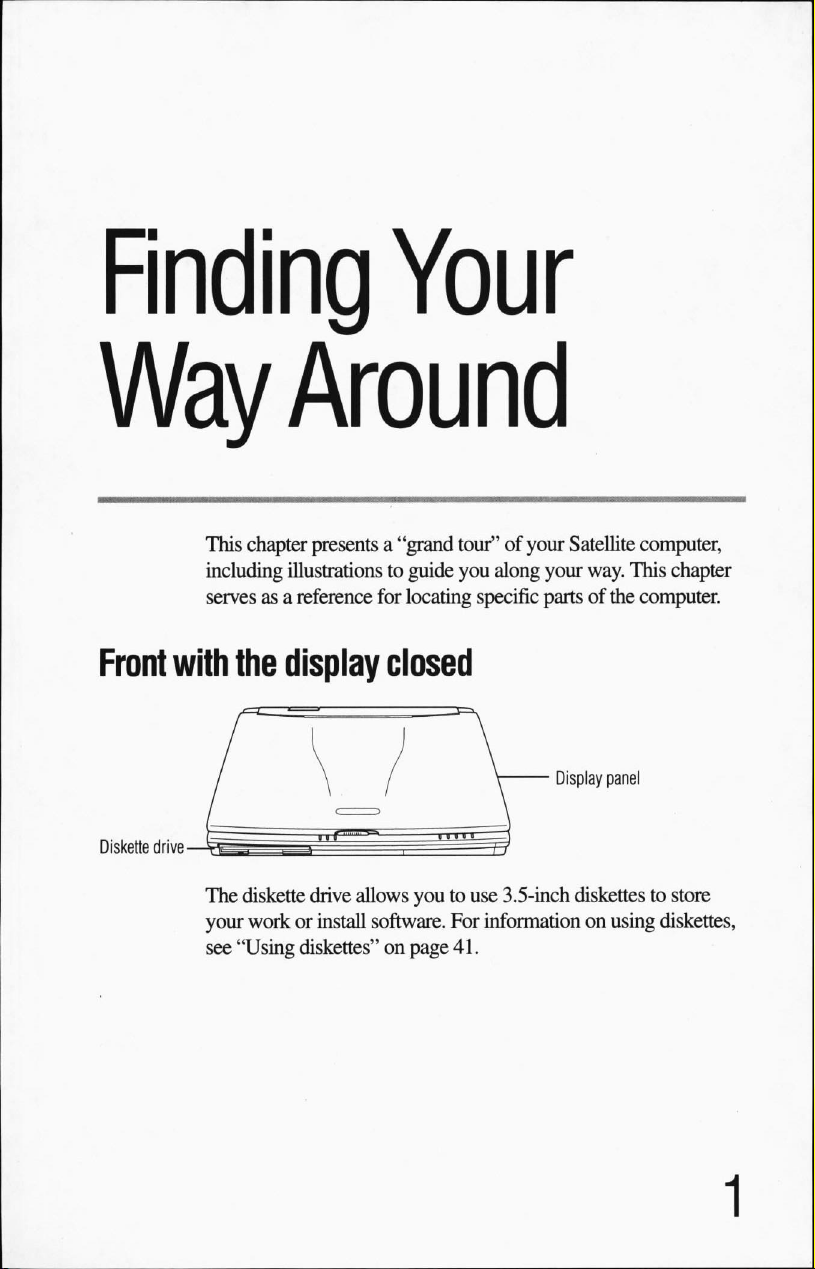
Front
Diskette
with
drive
The
your
see
Around
chapter
the
diskette
workorinstall
"Using
presents
illustrations
reference
display
drive
diskettes"
a
"grand
to
for
tour"ofyour
guide
you
locating
closed
allows
youtouse
software.
on
For
page
41.
Satellite
along
your
way. This
specific
partsofthe
Display
panel
3.5-inch
information
diskettes to store
on
using
computer,
chapter
computer.
diskettes,
Page 30
Finding
Leftside
Your
Way
The
display
contains
the
Around
panelisthe
screen
pivoting
and
the
upper
display
latch.
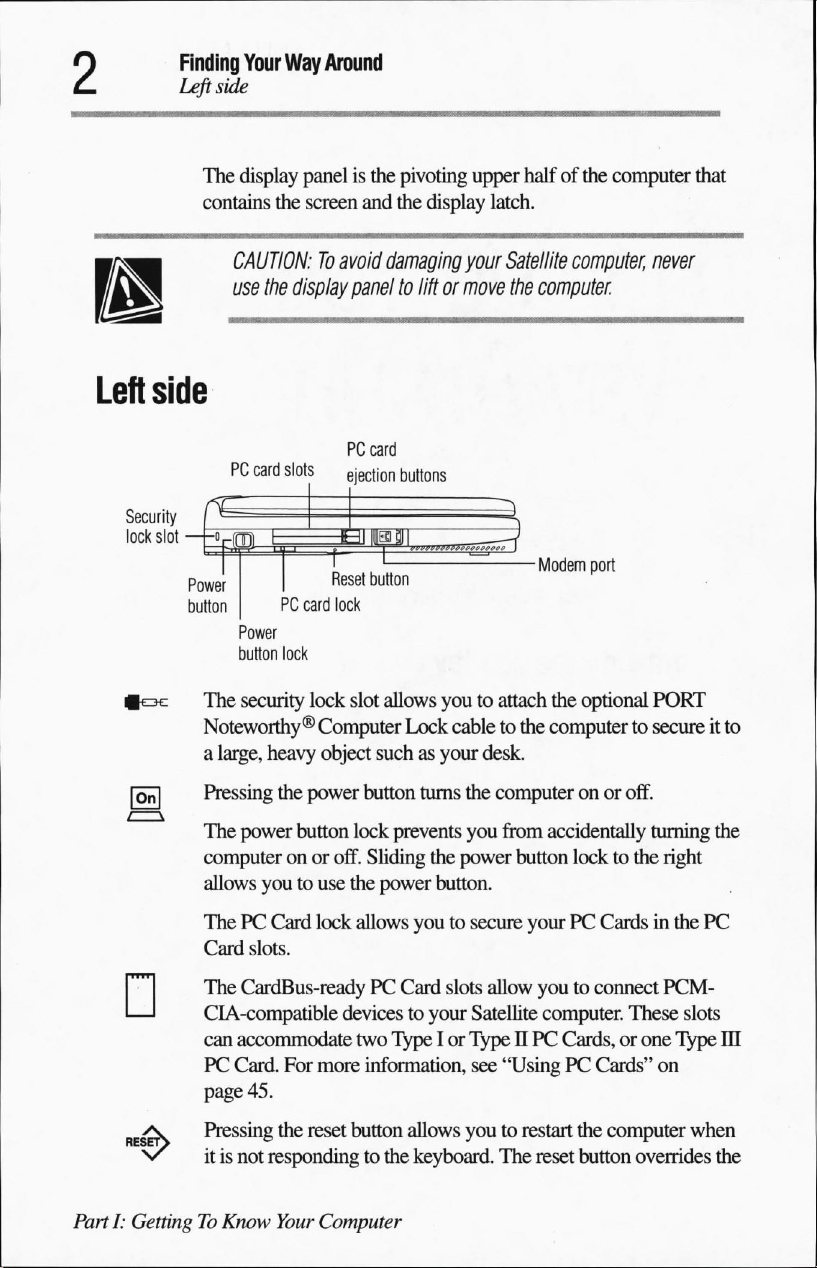
halfofthe
computer
that
Left
side
Security
lock
slot
power
buttonPCcard
|oc
[ojn
*—v
CAUTION:Toavoid
use
the
display
paneltoliftormove
PC
card
PC
card
slots
Power
button
lock
The
security
Noteworthy®
a
large,
heavy
Pressing
The
computeronor
allows
the
power
youtouse
ejection
Reset
button
lock
lock
slot
Computer
object
suchasyour
power
button
button
lock
off.
Sliding
the
power
damaging
your
Satellite
buttons
allows
youtoattach
Lock
cabletothe
desk.
turns
the
computeronor
prevents
you
from
the
power
button.
computer,
the
computer
Modem
port
the
optional
computer
accidentally
button
to
off.
locktothe
never
PORT
secureitto
turning
the
right
ThePCCard
Card
slots.
:The
>V
v
PartI:GettingToKnow
CardBus-readyPCCard
CIA-compatible
can
accommodate
PC
Card.
page
45.
Pressing
itisnot
responding
lock
devicestoyour
For
more
the
reset
Your
Computer
allows
youtosecure
slots
allow
Satellite
two TypeIor
information,
button allows
to
the
TypeIIPC
see
"UsingPCCards"
youtorestart
keyboard.
The
yourPCCardsinthe
youtoconnect
computer.
Cards,orone
reset
These
the
computer
button
overrides
PC
PCM
slots
Type
on
when
III
the
Page 31
Finding
Your
Way
Around
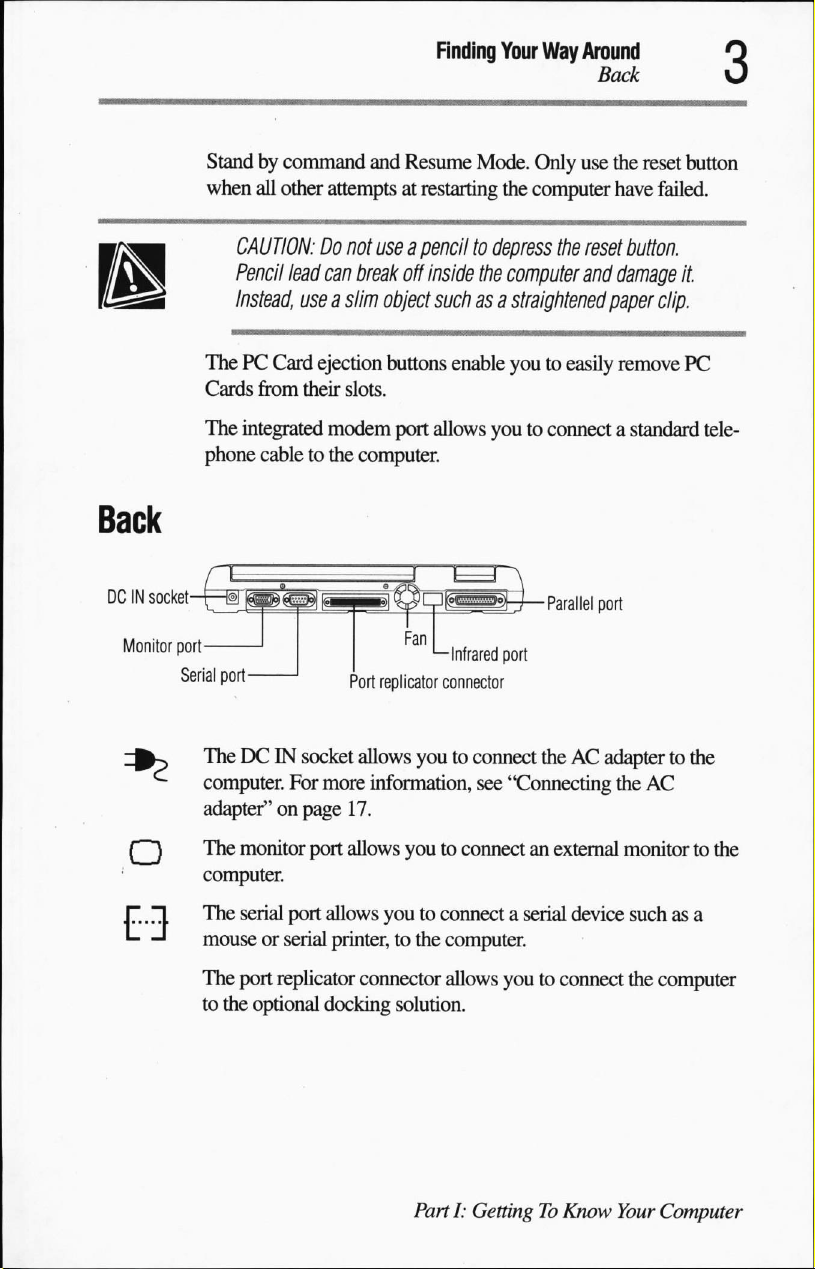
Back
Monitor
port
Serial
Standbycommand
when
all
other
CAUTION:Donot
Pencil
lead
Instead,
useaslim
ThePCCard
Cards
from
their
The
integrated
phone
cabletothe
port
-
and
attempts
useapenciltodepress
can
break
ejection
slots.
modem
computer.
Port
replicator
Resume
at
off
object
buttons
port
Mode.
restarting
inside
the
suchasa
enable
allows
youtoconnectastandard
■Infrared
connector
Only
use
the
reset
button
the
computer
computer
straightened
youtoeasily
■Parallel
port
the
reset
and
port
have
failed.
button.
damage
paper
remove
it.
clip.
PC
tele
TheDCIN
computer.
adapter"onpage
The
monitor
computer.
The
serial
mouseorserial
The
port
to
the
socket
For
more
17.
port
allows
port
allows
printer,tothe
replicator
optional
docking
allows
youtoconnect
information,
see
theACadaptertothe
"Connecting
youtoconnectanexternal
youtoconnectaserial
computer.
connector
allows
youtoconnect
solution.
PartI:GettingToKnow
device
the
AC
monitortothe
suchasa
the
computer
Your
Computer
Page 32
Finding
Right
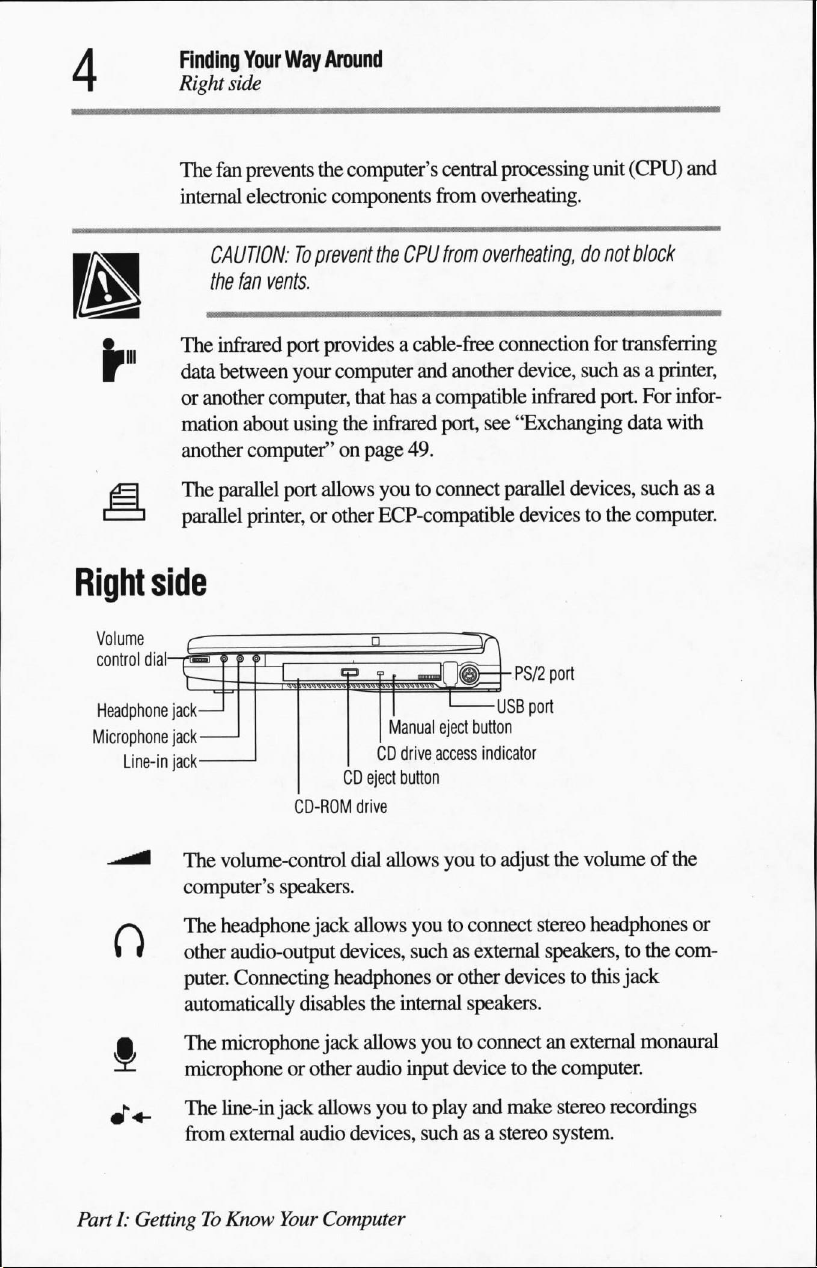
The
internal
Your
Way
side
fan
prevents
electronic
Around
the
computer's
central
components from
processing
unit
(CPU)
overheating.
and
CAUTION:Toprevent
the fan
The
data
or
another
mation
another
The
parallel
Volume
control
i
dial
)
Headphone
Microphone
jack-
jack-
Line-in
jack-
vents.
infrared
between
port
provides
your
computer
computer,
about
using
the
that
computer"onpage
parallel
port
allows
printer,
or other
CD
CD-ROM
the
CPU
from
overheating,
a
cable-free
and
hasacompatible
infrared
connection
another
port,
device,
see
"Exchanging
infrared
49.
youtoconnect
ECP-compatible
Manual
eject
CD
drive
access
eject
button
drive
parallel
devicestothe
■
PS/2
-USB
port
button
indicator
do
not
block
for
transferring
suchasa
port.
data
devices,
port
suchasa
computer.
printer,
For
infor
with
The
volume-control
computer's
.
The
headphone
»
other
audio-output
puter.
Connecting
automatically
The
microphone
microphone
j-
-
The
line-in
from
extemal
PartI:GettingToKnow
dial
allows
speakers.
jack
allows
devices,
headphones
disables
or other
jack
audio
Your
the
internal
jack
allows
audio
allows
youtoplay
devices,
Computer
youtoadjust
youtoconnect
such
as external
or other
speakers.
youtoconnectanexternal
input
devicetothe
and
suchasa
the
volumeofthe
stereo
headphones
speakers,
devicestothis
computer.
make
stereo
stereo
system.
to
jack
recordings
the
monaural
or
com
Page 33
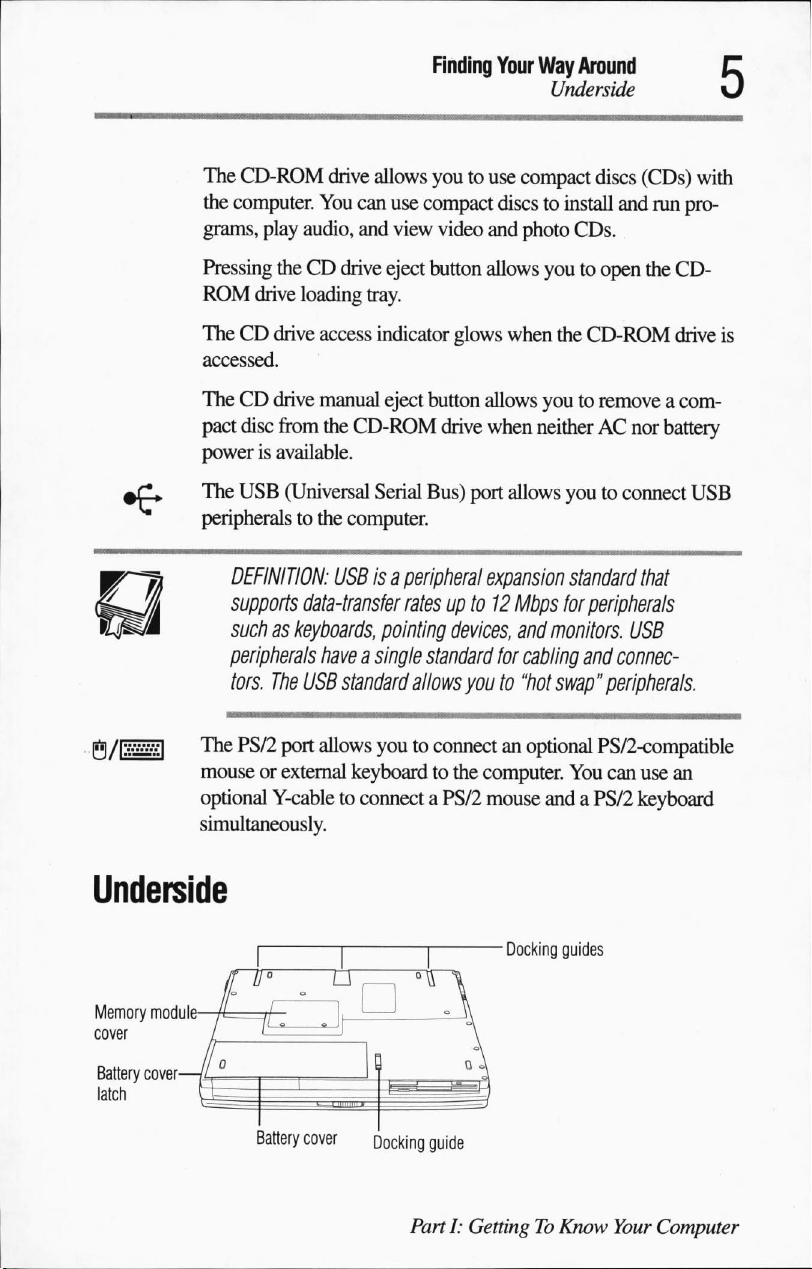
The
CD-ROM
the
computer.
grams,
play
audio,
drive
allows
You
can
and
Finding
youtouse
use
compact
view
video
Your
Way
Around
Underside
compact
discstoinstall
and
photo
discs
and
CDs.
(CDs)
with
run pro
Pressing
ROM
TheCDdrive
accessed.
TheCDdrive
pact
powerisavailable.
The
peripherals
The
mouseorexternal
optional
simultaneously.
theCDdrive
drive
loading
access
manual
disc
from
USB
(Universal
to
the
DEFINITION:
supports
data-transfer
suchaskeyboards,
peripherals
tors.
PS/2
haveasingle
The
USB
port
allows
Y-cabletoconnectaPS/2
eject
tray.
indicator
eject
the
CD-ROM
Serial
computer.
USBisa
peripheral
ratesupto12Mbps
pointing
standard
keyboardtothe
allows
youtoconnectanoptional
button
allows
youtoopen
glows
when
the
button allows
drive
Bus)
port
youtoremoveacom
when
neitherACnor
allows
expansion
devices,
standard
and
monitors.
for
cabling
youto"hot
computer.
mouse
swap"
andaPS/2
the
CD-
CD-ROM
youtoconnect
standard
for
peripherals
drive
battery
USB
that
is
USB
and
connec
peripherals.
PS/2-compatible
You
can
use
an
keyboard
Underside
Memory
module
cover
Battery
cover
latch
Battery
cover
Docking
Docking
guide
PartI:GettingToKnow
guides
Your
Computer
Page 34
Finding
Front
The
memory
ory
The
tery
computer
"Changing
The
ing
Your
Way
with
the
display
memory
module,
battery
cover
docking
the
module
expansion
see
cover
hasanintegrated
case.
the
guides
computerinthe
Around
panel
open
cover
provides
module.
"Installing
houses
For
information
battery"onpage
assist
For
information
a
memory
and
protects
latch
that
on
63.
youinaligning,
optional
docking
accesstothe
module"onpage
the
main
secures
replacing
positioning
solution.
computer's
on
inserting
battery.
the
batterytothe
the
battery,
a
20.
The
see
and
mem
bat
secur
Front
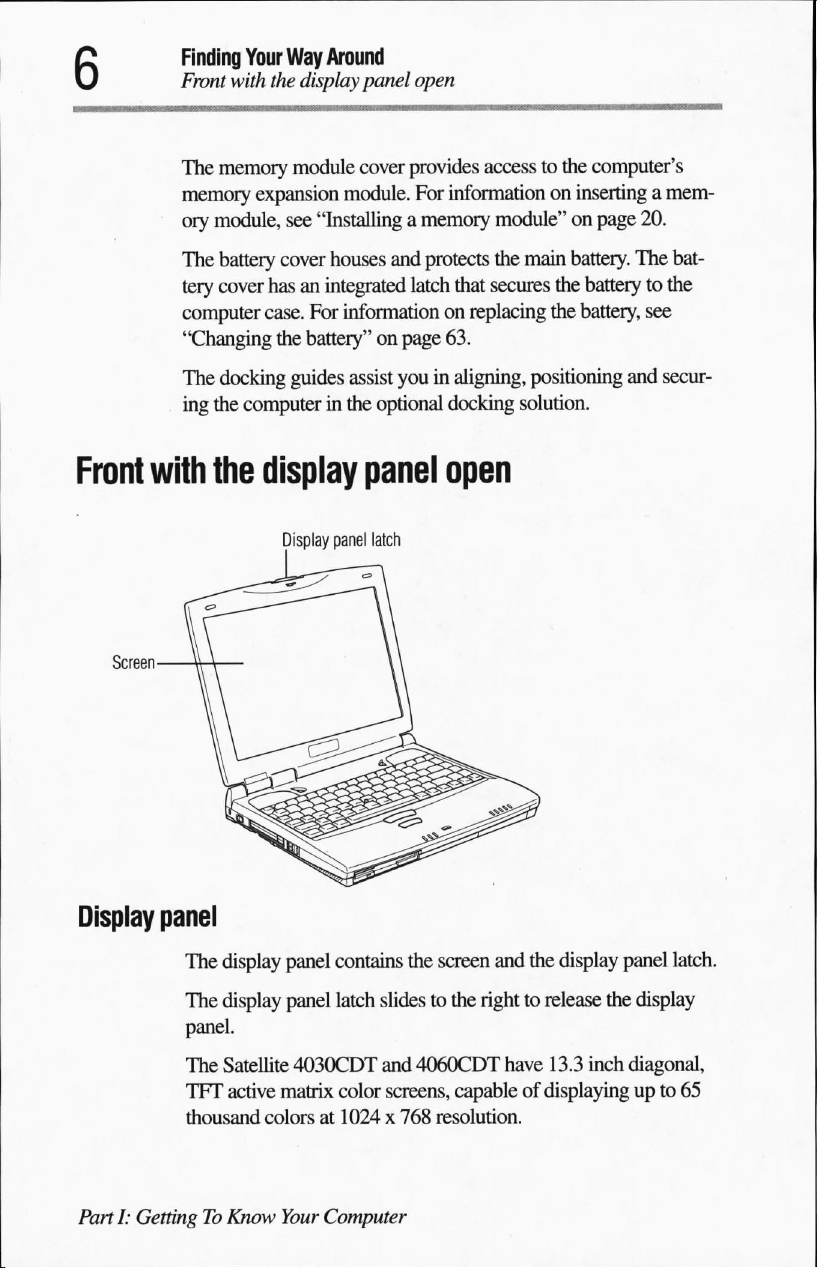
Display
with
panel
The
The
panel.
the
display
Display
panel
display
display
panel
contains
panel
latch
panel
latch
slides to
open
the
screen
the
righttorelease
and
the
display
panel
latch.
the
display
The
Satellite
TFT
active
thousand
PartI:GettingToKnow
colorsat1024 x
4030CDT
matrix
color
Your
Computer
and
4060CDT
screens,
capableofdisplaying
768
resolution.
have
13.3
inch
diagonal,
upto65
Page 35
The
Satellite
nal,
TFT
active
65
thousand
Finding
Front
with
the
4080XCDT
matrix
colorsat1024x768
and
4085XCDT
color
screens,
Your
Way
Around
display
panel
open
have
14.1
inch
diago
capableofdisplaying
up
resolution.
to
Keyboard
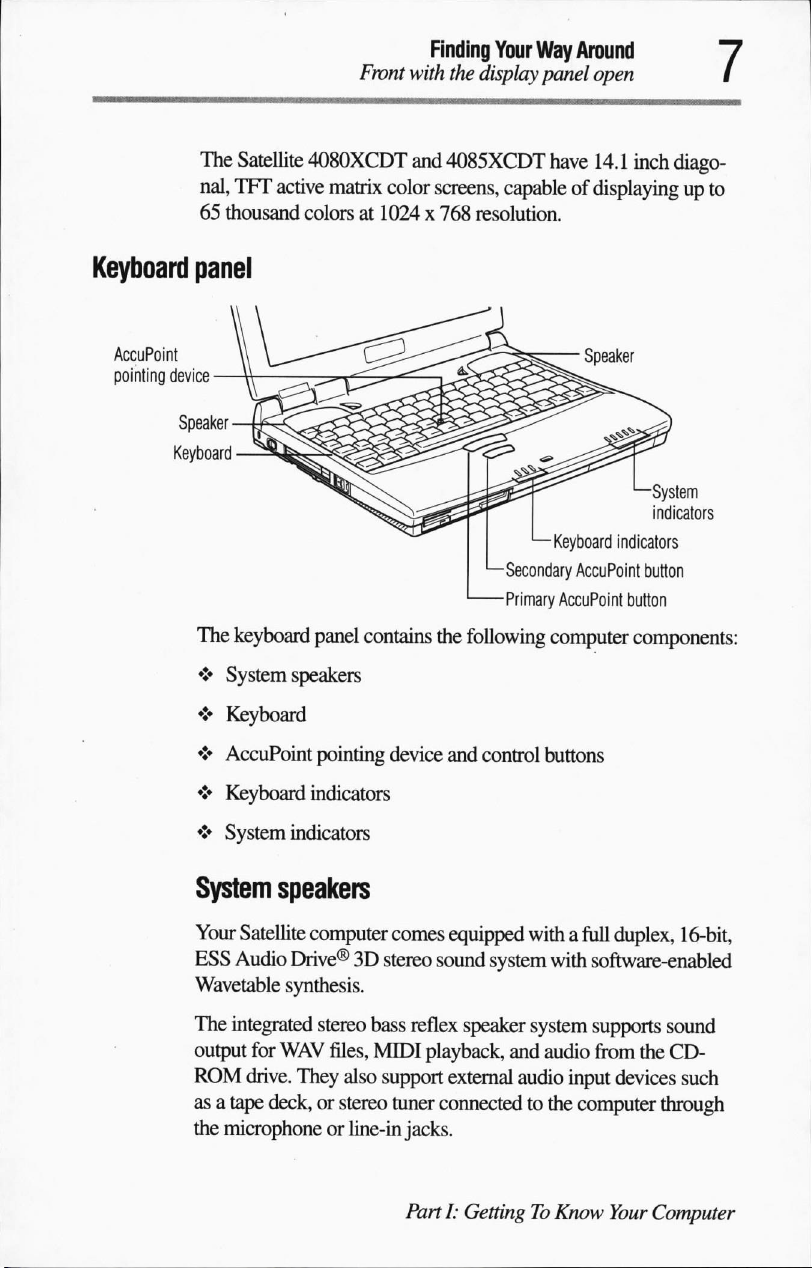
AccuPoint
pointing
panel
device
-
Speaker
-
Keyboard
The
keyboard
♦
System
♦
Keyboard
♦
AccuPoint
♦
Keyboard
♦
System
panel
contains
speakers
pointing
indicators
the
device
indicators
Keyboard
Secondary
Primary
AccuPoint
following
and
control
computer
buttons
Speaker
System
indicators
indicators
AccuPoint
button
button
components:
System
Your
ESS
Wavetable
The
output
ROM
asatape
the
speakers
Satellite
Audio
integrated
drive.
microphoneorline-in
computer
Drive®3Dstereo
synthesis.
stereo
bass
for
WAV
files,
MIDI
They
also
support
deck,orstereo
comes
equipped
sound
reflex
speaker
playback,
external
tuner
connectedtothe
jacks.
Parti:
GettingToKnow
withafull
system
with
system
and
audio
audio
input
computer
duplex,
16-bit,
software-enabled
supports
from
sound
the
CD-
devices
Your
such
through
Computer
Page 36
Finding
Front
Your
with
the
Way
Around
display
panel
Keyboard
The
84-key
keyboard
keyboard.
when
tionsonand
For
keyboard"onpage
The
pressedincombination
off.
more
information
provides
keyboard
has
on
33.
open
all
the
twelve
built-in
with
theFnkey,
howtouse
the
functionality
hot-key
keyboard,
of a
full-size
functions
turn
system
see
"Using
that,
func
the
AccuPoint®
The
AccuPoint
pointing
AccuPoint
The
mouse
from
The
device.
respondstothe
The
ing
and
For
on
Keyboard
The
functions
device,
AccuPoint
with
the
primary
The
secondary
device.
corresponds
more
page
26.
keyboard
pointing
comprises
the
button.
pointing
the
convenience
keyboard.
AccuPoint
primary
primary
AccuPoint
The
secondary
to
the
information,
device
three
primary
device
button
AccuPoint
mouse
button
AccuPoint
secondary
see
"Using
indicators
indicators
are
enabled.
provide
and
control
components—the
Accupoint
combines
of
never
works
buttonisthe
button.
button
the
havingtomove
with
the
works
with
buttonisthe
mouse
information
button.
the
AccuPoint
buttons
AccuPoint
and
secondary
functionality
AccuPoint
larger
button
the
AccuPoint
smaller
pointing
on
which
of a
your
hands
pointing
and
cor
point
button
device"
keyboard
PartI:GettingToKnow
Your
Computer
Page 37
Front
The
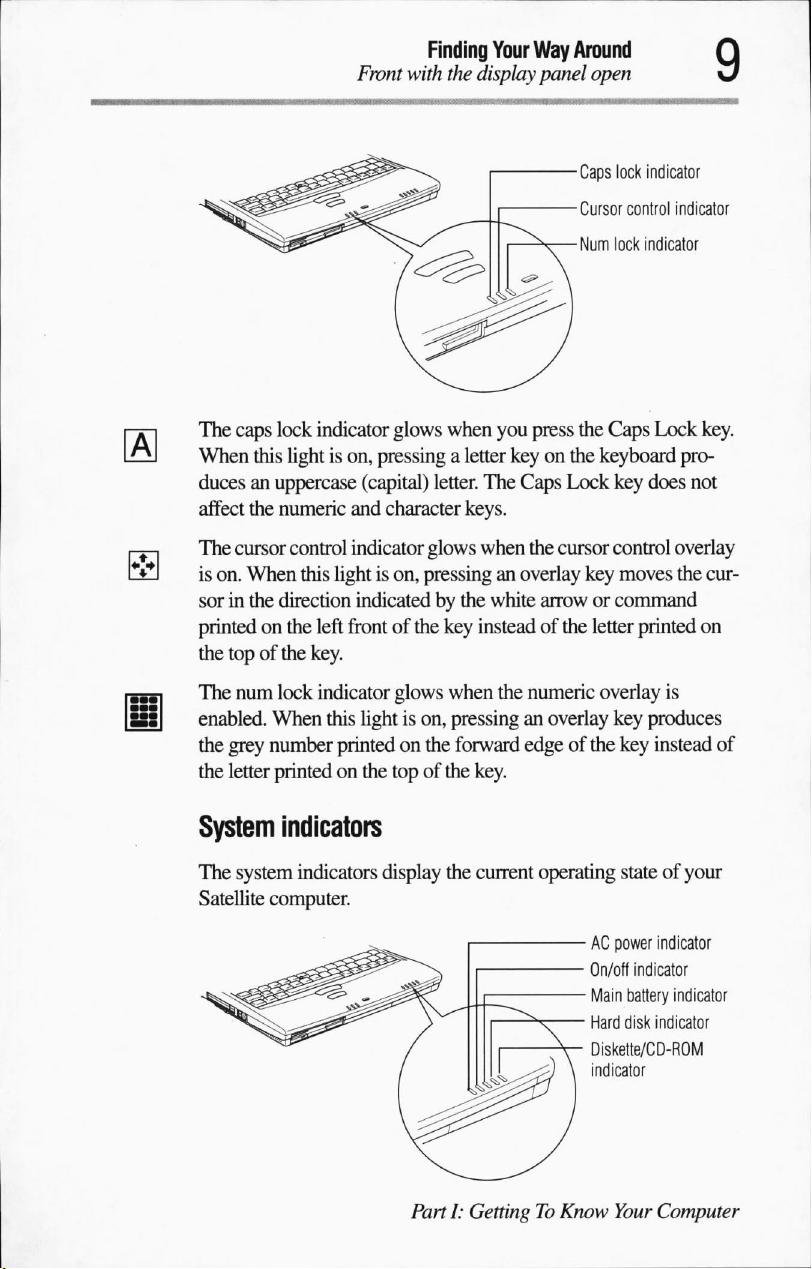
caps
lock
indicator
When
this
lightison,
ducesanuppercase
affect
the
numeric
The
cursor
control
is
on.
When
this
sorinthe direction
printedonthe
the
topofthe
left
key.
glows
pressing a
(capital)
and
character
indicator
lightison,
indicatedbythe
frontofthe
Finding
with
glows
pressinganoverlay
Your
the
display
when
you
letter
keyonthe
letter.
The
Caps
keys.
when
white
key
insteadofthe
Way
Around
panel
Caps
■Cursor
■Num
press
the
Lock
the
cursor
arroworcommand
open
lock
indicator
control
indicator
lock
indicator
Caps
Lock
keyboard
key
does
control
key
letter
overlay
moves
the
printed
key.
pro
not
cur
on
The
num
lock
indicator
enabled.
the
the
System
The
Satellite
When
grey
number
letter
printedonthe
indicators
system
indicators
computer.
glows
this
lightison,
printedonthe
topofthe
display
/
PartI:GettingToKnow
when
the
numeric
pressinganoverlay
forward
the
edgeofthe
key.
current
111^)\
overlay
key
key
operating
stateofyour
-ACpower
-
On/off
-
Main
battery
-
Hard
disk
■
Diskette/CD-ROM
indicator
Your
is
produces
instead
indicator
indicator
of
indicator
indicator
Computer
Page 38
Finding
Front
Your
with
the
Way
Around
display
panel
open
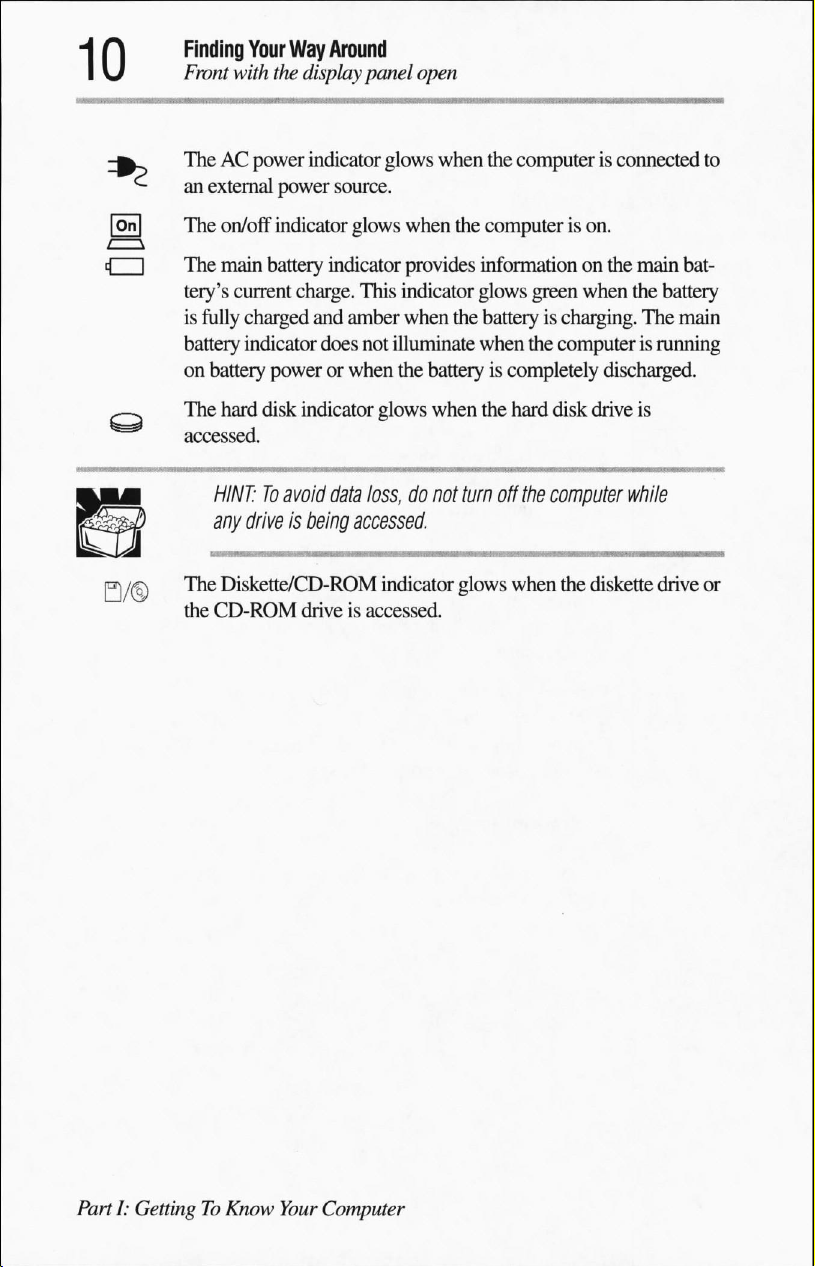
TheACpower
an
external
The
on/off
The
main
tery's
current
is
fully
charged
battery
on
The
accessed.
indicator
battery
hard
HINT:Toavoid
any
driveisbeing
The
Diskette/CD-ROM
the
CD-ROM
indicator
power
source.
indicator
battery
powerorwhen
disk
glows
indicator
charge.
This
and
amber
does
not
indicator
data
accessed
driveisaccessed.
glows
when
when
the
provides
indicator
when
the
illuminate
the
batteryiscompletely
glows
when
loss,donot
indicator
turn
glows
the
computerisconnected
computerison.
information
glows
batteryischarging.
when
the
hard
off
the
when
on
the
main
green
when
the
battery
The
the
computerisrunning
discharged.
disk
drive
is
computer
the
while
diskette
drive
to
bat
main
or
PartI:GettingToKnow
Your
Computer
Page 39

Page 40
Making
Selecting
Settingupyour
Adding
Connecting
Using
Changing
Registering
sure
you
a
placetowork
computer
memory
a
mouse
the
computer
the
desktop
your
have
(optional)
computer
everything
for
the
first
time
online
13
13
17
20
23
25
29
29
Page 41

Getting Started
This
chapter
in
whichtouse
describes
whattodo
provides
howtoconnect
the
tipsoncreating
your
Satellite
the
first
time
you
a
comfortable
computer.
computer's
use
the
This
chapter
components
computer.
environment
also
and
explains
Making
Selecting
sure
Before
the
components.
If
ately.
page
Your
tions
a
you
have
doing
anything
topofthe
any
items
For
156.
a
place
Satellite
and
comfortable
computer
are
additional
to
computerisdesignedtobe usedina
situations.
computing
everything
else,
read
the
Quick
box)tomake
missingordamaged,
help,
see
"If
sure
notify
you
need
work
This
section
provides
environment.
Start
card
(packed
there
arenomissing
your
dealer
immedi
further
assistance"
varietyofloca
guidelines
for
setting
at
on
up
Page 42

Getting Started
Selecting
a
placetowork
Creating
a
computer-friendly
Place
the
the
computer
printer.
menttoallow
To
keep your
work
area
♦
Dust,
♦
Liquids
CAUTION:
unplugitfrom
pletely
If
the
back
♦
Equipment
as
stereo
ers),orspeakerphones.
computerona
and
any
Leave
enough
adequate
computerinprime
from:
moisture
and
and
corrosive
If
you
spill
theACpower
before
turning
computer
on,
does
contact
a
Toshiba-authorized
that
generates
speakers
environment
flat
surface
other
devices
space
around
ventilation
direct sunlight.
chemicals.
liquid
itonagain.
not
operate
(other
than
thatislarge
you
plantouse,
the
computer
and
prevent
operating
into
the
computer,
source
and
properly
service
a
strong
electromagnetic
the
computer's
enoughtohold
overheating.
condition,
turnitoff,
letitdry
after
you
provider.
suchasa
and
other
equip
protect
out
com
turn
internal
your
it
field,
such
speak
♦
Rapid
changesintemperature
computer
♦
Extreme
temperature
degrees
humidity.
Keeping
PartI;GettingToKnow
yourself
Strain
spend
and
throughout
This
For
strain injury,
comfortable
and
more
proper
section
more
information,
or
near
heatingorair
heat,
cold,orhumidity.
range
of 41to95
Celsius)
stress
time
useofthe
the
provides
and
Your
and20to80percent
injuries
using
day.
repetitive-stress
Computer
are
their
equipment,
hintsonavoiding
consult
conditioning
degrees
becoming
computers.
you
booksonergonomics,
syndrome.
humidity.
Operate
more
can
Don't
place
vents.
the
computer
Fahrenheit
non-condensing
commonaspeople
However,
work
strain
(5 to
withalittle
comfortably
and
stress
repetitive-
the
within
a
35
care
injuries.
Page 43
Getting
Selecting
a
placetowork
Started
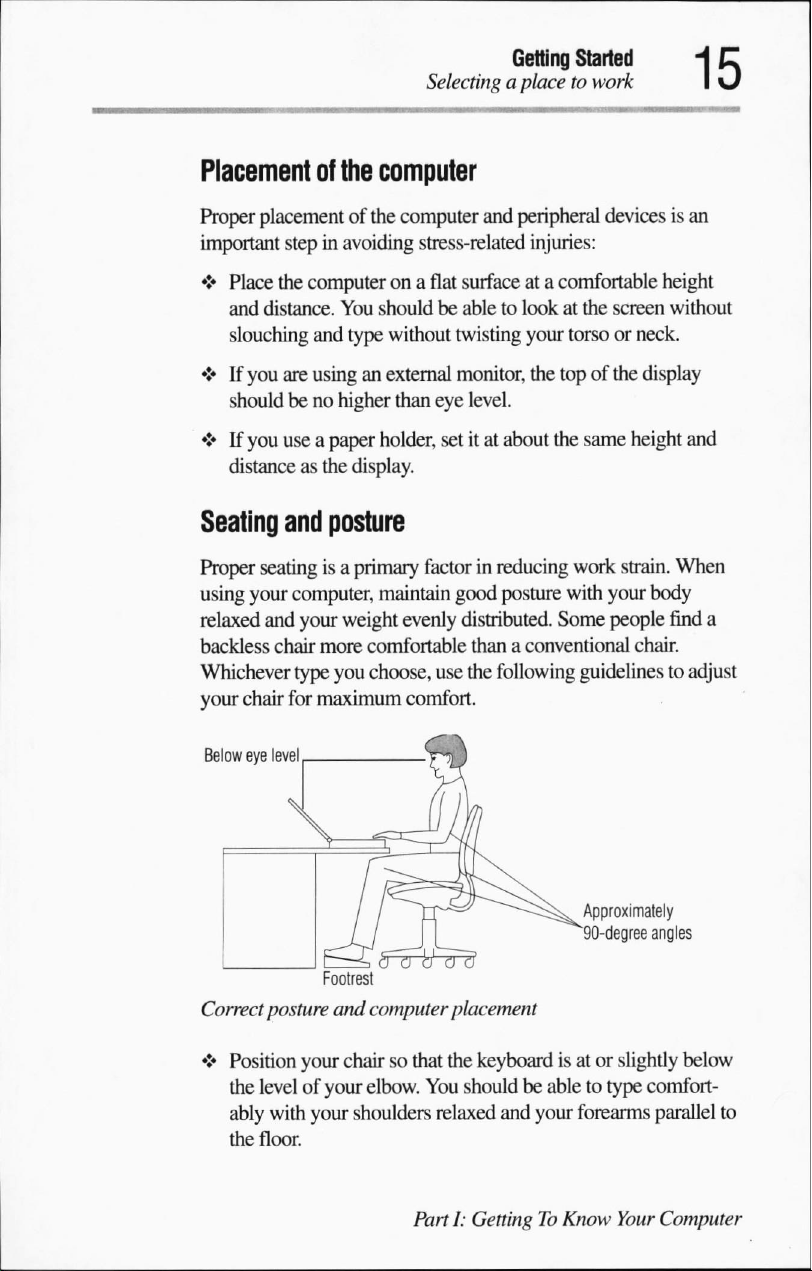
Placement
Proper
important
♦
Place
and
slouching
♦Ifyou
shouldbeno
♦Ifyou
distanceasthe
Seating
Proper
using
your
relaxed
backless
Whichever
your
chair
Below
eye
of
the
computer
placementofthe
stepinavoiding
the
computerona
distance.
seatingisa
and
chair
level
You
shouldbeabletolookatthe
and
type
are
usinganexternal
higher than
useapaper
and
computer,
your
type
for
maximum
holder,
display.
posture
primary
maintain
weight
more
comfortable
you
choose,
computer
stress-related
without
factorinreducing
evenly
and
peripheral
injuries:
flat
surfaceata
twisting
monitor,
eye
level.
setitat
good
distributed.
comfortable
your
the
topofthe
about
the
posture
Some
thanaconventional
use
the
following
comfort.
devicesisan
height
screen
without
torso
or neck.
display
same
height
and
work
strain.
When
with
your
body
people
find
chair.
guidelines
to
adjust
a
Correct
•>
posture
Position
the
levelofyour
ably
with
the
floor.
I
I
Footrest
and
computer
your
chairsothat
elbow.
your
shoulders
Approximately
"90-degree
J
placement
the
keyboardisatorslightly
You
shouldbeabletotype
relaxed
PartI:GettingToKnow
and
your
forearms
angles
below
comfort
parallel
Your
Computer
to
Page 44

Getting
Selecting
♦
Started
a
placetowork
Your
knees
shouldbeslightly
sary,
useafootrest
pressureonthe
to
raise
the
backofyour
thighs.
higher
than
your
levelofyour
knees
hips.Ifneces
and
ease
the
♦Ifyou
♦
are
usingaconventional
chairsothatitsupports
to
cushion
cushions
Sit
with
form
slump
provide
are available
your
approximately
forwardorlean
extra
back
straightsothat
90-degree
Lighting
Proper
lighting
eyestrain.
♦
Position
or
bright
tinted
♦
Avoid
could
♦Ifpossible,
Arms
and
can
improve
the
display
indoor
windowsorshadestoreduce
placing
shine
directlyinyour
use
panelorexternal
lighting
your
computerinfront
soft,
indirect
wrists
chair,
your
lower
back
support.
at
many
office
your
angles
back
too
far.
the
visibility
does
not
reflect
eyes.
lighting
adjust the
back.Ifnecessary,
Lower-back-support
supply
knees,
when
of
the
monitorsothat
glare.
of a
in
your
backofyour
stores.
hips,
you
work.Donot
display
off the
screen.
bright
light
computer
use a
and
elbows
and
reduce
sunlight
Use
that
work
♦
Avoid
bending,
a
relaxed,
♦
While
armstoimprove
WARNING:
resultindiscomfort
and/or
arms
and
restIfthe
PartI:GettingToKnow
arching,ortwisting
neutral
working,
position
occasionally
circulation.
Using
the
computer
and
bother
you
discomfort
Your
Computer
your
while
typing.
exercise
keyboard
possible
while
injury.
typing,
stop
persists,
consult
wrists.
Keep
them
your
hands,
wrists
and
incorrectly
If
your
using
a
physician.
can
hands,
wrists,
the
computer
in
Page 45

Getting
Settingupyour
computer
Started
Work
The
your
work
and
Setting
up
This
computer.
habits
keytoavoiding
activities.
day.
improve your
♦
Take
frequent
and
relieve
hourismore
♦
Avoid
Intersperse
♦
Focusing
can
cause
puter
seconds.
your
section
discomfortorinjury
If
possible,
Finding
performing
and
waystobreakupthe
efficiency.
breakstochange
your
effective
such
your
eyesonyour
eyestrain.
focus
your
scheduleavarietyoftasks
eyes.Atwoorthree
thanalong
repetitive
activities
Occasionally,
eyesona
activities
with
computer
computer
provides
instructions
from
strainisto
routine
position,
break
other
look
distant
on whattodotostart
can
stretch
minute
for
tasks.
break
after
several
long
screen
for
away
from
object
foratleast thirty
periodsoftime.
vary
into
your
reduce
your
muscles,
every
hours.
long
periods
the
using
stress
half
com
your
Connecting
the
AC
adapter
TheACadapter
nalACpower
Power
cable
Power
cable
allows
youtopower
source
andtocharge
andACadapter
PartI:GettingToKnow
the
computer
the
computer's
fromanexter
batteries.
AC
adapter
Your
Computer
Page 46

Getting Started
Settingupyour computer
To
connectACpowertothe
1
Connect
computer.
2
Connect
other
theACadaptertotheDCIN
one
endofthe
endtoanACoutlet.
power
computer:
socketatthe
cabletotheACadapter
backofthe
and
the
TheACpower
charged.Ifnot,itilluminates
Charging
the
battery
Your
computer
charged
1
Connect
ing
2
Allow
computer
When
completely
TECHNICAL
toACpower
With
the
sumes.
indicator
containsarechargeable
before
you
can
the
computertoanACpower
theACadapter"onpage17for
the
batterytocharge
turned
off.
the
battery
charged
NOTE:
causes
the
computer
battery
dependsonhow
illuminates
amber.
useitfor
indicator
and
Using
the
on,
the
the
first
for
twotothree
illuminates
readytopower
the
computer
battery
to
chargeata
amountoftime
much
power
greenifthe
battery
detailed
batteryisfully
pack
that
time.
source.
See "Connect
steps.
hours
with
green, the
the
whileitis
required
the
battery
computer.
connected
slower
rate.
to
charge
computer
must
the
con
be
is
Connecting
PartI:GettingToKnow
a
printer
Before
you
a
serialora
If
you
can
configure
setitup
for
can
connectaprinter,
parallel
parallel
Your
interface.
the
operation.
Computer
Check
printeraseitheraserialorparallel
you
the
must
determineifit
printer's
documentation.
requires
device,
Page 47

Settingupyour computer
You
also
needasuitable
been
provided
a
computerorelectronics
with
printer
your
printer.
store.
Getting
cable.Aprinter
If
not,
you
can
Started
cable
purchase
may
one
have
from
TECHNICAL
make
Parallel
today.
To
1
printers
These
connect
Turn
power
NOTE:Ifyour
sure
your
printer
are the
instructions
the
printer:
off the
computer.Ifthe
source,
disconnect
CAUTION:Donot
puterison.
or
both.
2
Connect
to
the
To
the
computer
Identifying
Doingsomay
one
endofthe
parallel
portatthe
the
ends ofaparallel
printer
cableisan
most
common
assume you
computerisconnectedtoan
theACpower
connect
the
printer
damage
printer
backofthe
To
the
printer
printer
is
ECP-orIEEE-compliant,
IEEE 1284
typeofprintersinuse
haveaparallel
the
cabletothe
cable.
printer.
adapter.
cable
while
the
printer,
the
computer,
printer
and
computer.
cable
com
the
AC
other
3
Plug
the
4
Refertoyour
tion
information,
your
printer'on
printer's
power
printer
documentation
or
see
page
109.
PartI:GettingToKnow
cable
intoanAC
"SettingupWindows98to
outlet.
for
additional
Your
configura
work
with
Computer
Page 48

Getting
Adding
Started
memory
(optional)
Adding
Installing
memory
Your
Satellite
enough
However,
use
You
memoryisavailable
modules.
computer.
a
The
tor
small
1
2
memorytorun
you
memory-intensive
can
expand
You
memory
memory
that
you
Phillips
Open
the
Windows98displays
Select
Shut
Windows98shuts
(optional)
computer
may
the
can
module
module
access
screwdriver
Start
down,
comes
with64MBofRAM.
mostoftoday's
wanttoincrease
the
softwareorprocess
computer's
in32MB,64MB
only
install
installs
from
the
menu
then
off
RAMto192
one
memory
into
the
memory
undersideofthe
to
remove
and
click
the
Shut
clickOKto
the
computer.
the
Shut
down
popular
computer's
large
and
memory
Down.
Windows
shut
This
is
applications.
memoryifyou
amountsofdata.
MB.
Additional
128MBmemory
moduleinyour
expansion
computer.
module
down
connec
You
need
cover.
dialog
box.
the
computer.
a
3Ifyou
are
adapter
CAUTION:
connected
the
memory
4
Close
the
the
computer.
5
Turn
the
6
Locate
"Underside"onpage
PartI:GettingToKnow
running
from
Installing
toanAC
the
computeronAC
theACoutlet.
a
memory
power
moduleorboth.
display
computer
the
Your
panel
upside
memory
module
5.
Computer
module
source
can
damage
and
disconnect
down.
cover.Ifyou
power,
while
the
the
all
cables
need
unplug
computer
the
AC
is
computer,
connected
help,
see
to
Page 49
7
Remove
the
two
Adding
screws
securing
Getting
memory
(optional)
the
memory
Started
module
cover.
Removing
8
9
10
the
memory
Remove
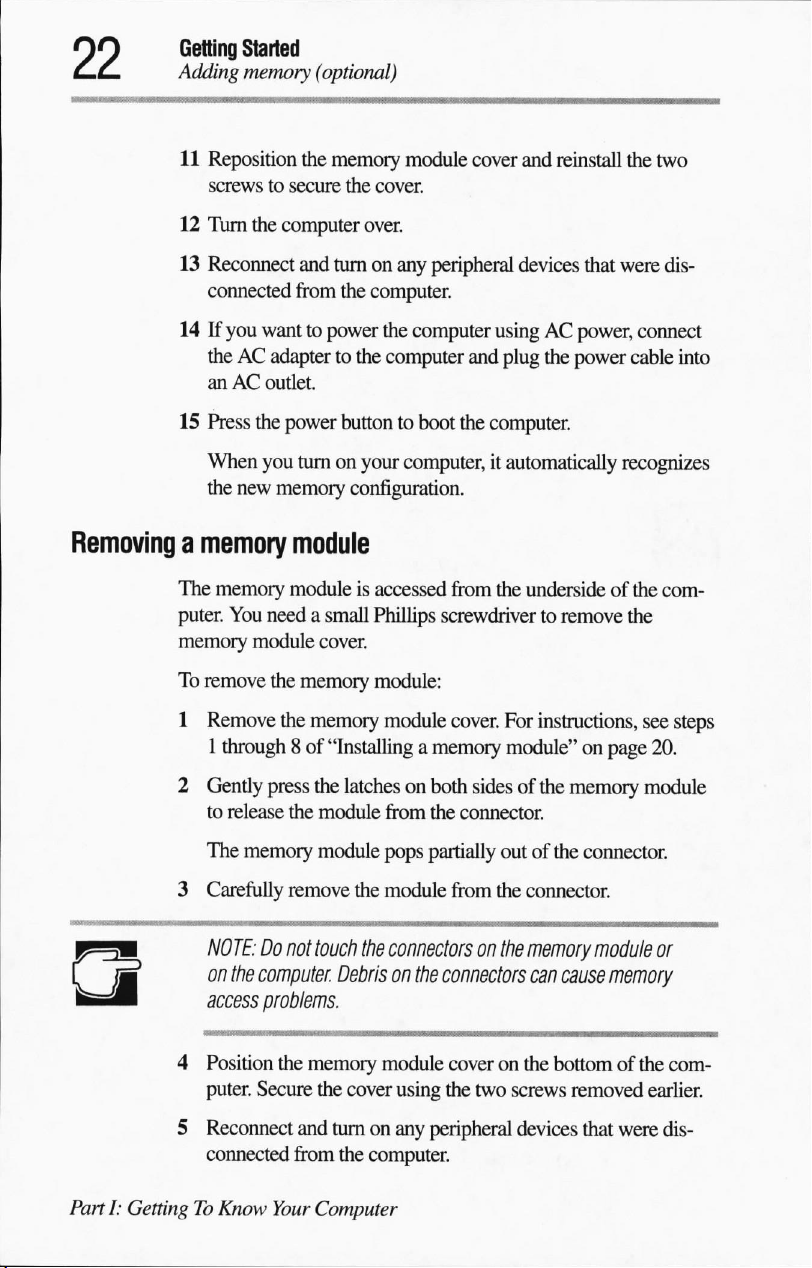
CAUTIONS:
ule.
surface
up.
Do
computer.
access
Place
ata45-degree
with
HINT:
Gently
nector
place.
the
Static
Before
you
to
discharge
not touch
Debrisonthe
problems.
the
memory
the
memory
The
memory
press
until
the
module
memory
electricity
handle
any
the
connectors
cover
module
cover
can
the
module,
static
electricity
on
the
connectors
moduleinthe
angle,
aligning
expansion
module
the
free
edgeofthe
latches
the
connector.
only
snap,
securing
and
setitaside.
damage
fits
the
memory
touchagrounded
you
may
memory
memory
memory
memory
can
cause
one
way.
the
moduleoron
expansion
module's
module
memory
mod
metal
have
memory
into
module
built
the
connector
connector
the
con
into
Placing
the
memory
module
into
the
Parti:
GettingToKnow
memory
expansion
connector
Your
Computer
Page 50
Getting Started
Adding
11
memory
Reposition
screwstosecure
(optional)
the
memory
the
module
cover.
cover
and
reinstall
the
two
12 Turn
13 Reconnect and
connected
14Ifyou
theACadaptertothe
anACoutlet.
15
Press
When
the
Removing
a
memory
The
memory
puter.
You
memory
To
remove
1
Remove
1
through 8of"Installing
2
Gently
to
release
the
computer
over.
turnonany
from
the
computer.
wanttopower
the
power
you
turnonyour
new
memory
the
buttontoboot
configuration.
module
moduleisaccessed
needasmall
module
the
memory
the
memory
press
the
the
Phillips
cover.
module:
latchesonboth
module
peripheral
computer
computer
computer,
module
a
memory
usingACpower,
and
the
computer.
it
from
the
screwdriver
cover.
sidesofthe
from
the
connector.
devices
that
were
dis
connect
plug
the
power
cable
into
automatically
underside
to
remove
For
instructions,
module"onpage
recognizes
of
the
com
the
see
20.
memory
module
steps
The
memory
3
Carefully
NOTE:Donot
on
the
computer.
access
problems.
4
Position
puter.
Secure
5
Reconnect
connected
PartI:GettingToKnow
module
remove
touch
Debrisonthe
the
memory
the
and
turnonany
from
the
Your
Computer
pops
partially
the
module
the
connectors
from
connectors
module
cover
computer.
coveronthe
using
the
peripheral
outofthe
the
connector.
on
the
memory
can
cause
bottomofthe
two
screws
devices
connector.
module
or
memory
com
removed
that
earlier.
were
dis
Page 51
6
Connect
cable
7
Press
When
the
new
theACadaptertothe
intoanAC
the
power
you
memory
outlet.
buttontoboot
turnonyour
computer,itautomatically
configuration.
Getting
Connecting
computer
the
computer.
Started
a
mouse
and
plug
the
power
recognizes
Connecting
Connecting
11"Jportatthe
Connecting
a
mouse
You
can
connectamousetothe
built-in
serial
To
readytouse.
Refertoyour
AccuPoint.
mouseorPS/2-compatible
TECHNICAL
WithaPS/2
activeatthe
a
serial
connect a
a
PS/2
CAUTION:
the
mouse.
poweroncan
NOTE:Aserial
mouse,
same
mouse
serial
backofthe
mouse
mouse
Make
Connecting
damage
computer
Your
Satellite
you
time.
mouse,
computer.
documentation
sure
the
a
the
computer
mouse.
mouse
disables
can
choosetohave
connect
computer
PS/2
mouse,
the
mouse
Once
connected,
for
configuration
is
off
mouse
with
the
computer,
insteadofusing
can
support
the
AccuPoint.
the
AccuPoint
cabletothe
the
before
you
the
computer's
or
the
either
serial
mouse
information.
attach
both.
a
is
To
connect a
1
Open
Windows98displays
PS/2
the
Start
mouse:
menu
and
click
Shut
Down.
the
Shut
down
Windows
PartI:GettingToKnow
dialog box.
Your
Computer
Page 52
Getting
Started
Connecting
2
Select
a
mouse
Shut
down,
then
clickOKto
shut
down
the
computer.
Windows98shuts
3
Attach
the
PS/2
of
the
computer.
HINT:
You can
an
optional
a
PS/2
Refer
your
Setting
Connecting
mouse,
work
with
1
Click
Windows98displays
2
Click
3
Select
Y-cable
keyboard
mouse
up
a PS/2
a
PS/2
the
AccuPoint,orboth.Toconfigure
the
AccuPoint:
Start,
the
Hardware
the
Hardware
off
mouse
only
connect
allows
to
your
documentation
mouse
mousetoyour
Settings,
the
computer.
cabletothe
one
PS/2
PS/2
deviceata
youtoconnect
computer
then
the
Setup
Options
simultaneously.
for
configuration
computer,
Control
control
Panel.
panel
icon.
tab.
portonthe
time.
a
PS/2
mouse
information.
allows
youtouse
the
PS/2
mouse
screen.
right
side
Using
and
the
to
4
Select
the
5
Under
♦
Auto-selected
Auto-selected
connectedatpower
Auto-selected
♦
Simultaneous
Simultaneous
mousetowork
reboot
PartI:GettingToKnow
Pointing
Pointing
the
computer
Your
Devices
Devices
configures
on,orthe
is
the
configures
with
Computer
tab.
Options,
the
default option.
both
the
computer,atthe
for the
select
PS/2
mousetowork
AccuPointtowork
the
AccuPoint
settingstotake
oneofthe
same
following:
whenitis
otherwise.
mouse
time.
effect.
and
You
PS/2
must
Page 53

>
HINT:
The
nectitafter
6
Click
OK,
Using
the
computer
computer
booting
then
cannot
the
computer.
click
Exit
Getting Started
for
the
detect
a
PS/2
first
time
mouseifyou
con-
Using
Opening
Turning
the
computer
This
computer
the
display
1
2
on
the
To
1
2Ifa
for
the
section
provides
for
the
information
first
time.
panel
Slide
the
display
panel.
Lift
the
display
CAUTION:Toavoid
it
open
beyond
Never
liftormove
panel
panel.
damaging
the
point
the
computer
power
tunonthe
Make
on
computer:
sure
the
diskette
printerorother
the
device.
deviceisconnectedtoyour
first
time
on whattodo
latchtothe
whereitmoves
driveisempty.
righttorelease
the
display
panel,donot
easily
using
the
display
when
using
the
display
force
panel.
computer,
the
turn
3
Press
and
hold
the
glows.
TheACpower
nectedtoanACpower
indicator
power
button
until
the
only
glowsifthe
source.
PartI:GettingToKnow
on/off
indicator
computeriscon
Your
Computer
Page 54
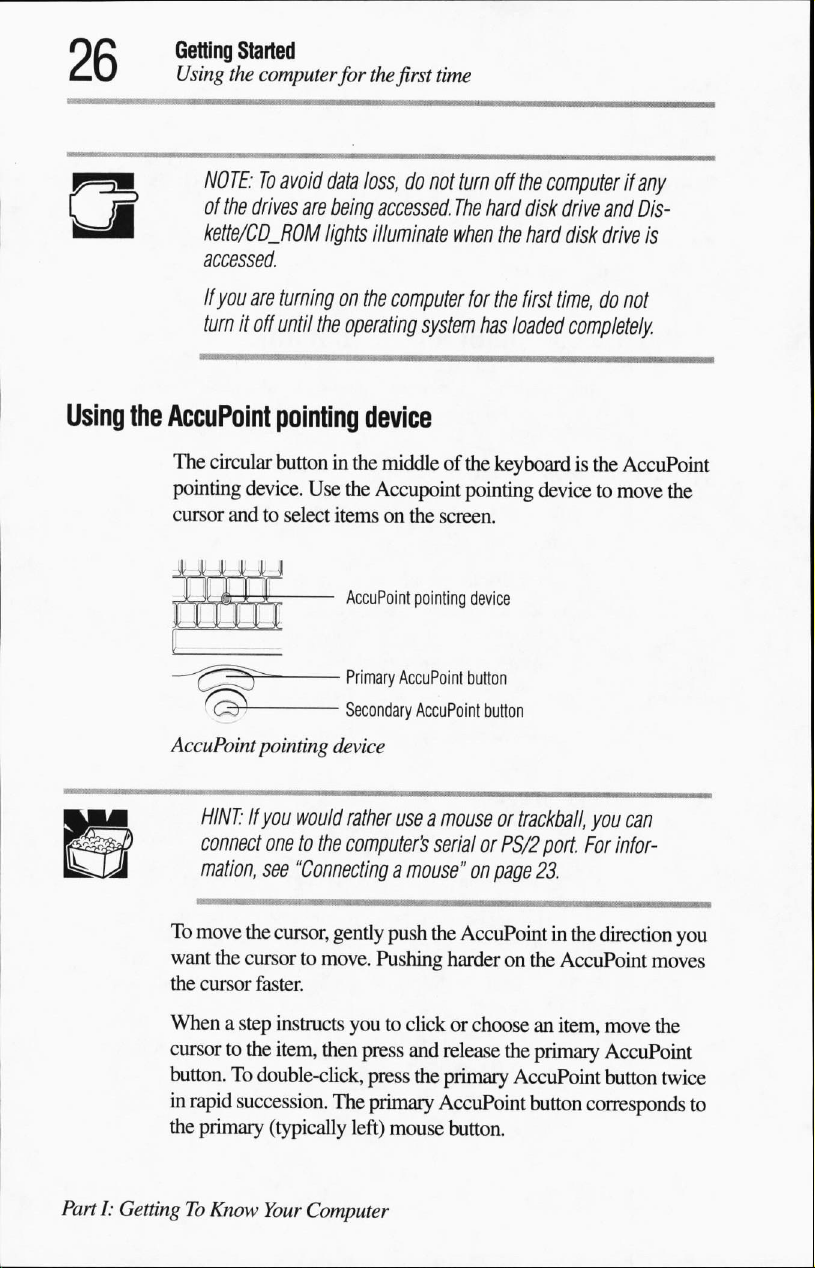
Getting
Using
Started
the
computer
for
the
first
time
Using
the
AccuPoint
NOTE:Toavoid
of
the drives
kette/CD_ROM
accessed.
If
you
are
turnitoff
data
are
being
lights
turning
until
on
the
operating
pointing
The
circular
pointing
cursor
buttoninthe
device.
andtoselect
Use
;
the
itemsonthe
AccuPoint
;
-
Primary
■
Secondary
AccuPoint
pointing
device
loss,donot
accessed.
illuminate
the
computer
turn
off
The
hard
when
the
for
the
system
has
loaded
the
disk
hard
first
device
middleofthe
Accupoint
pointing
AccuPoint
AccuPoint
keyboardisthe
pointing
screen.
device
button
button
computer
drive
if
and
disk
drive
any
Dis-
is
time,donot
completely.
AccuPoint
devicetomove
the
HINT:Ifyou
connect
mation,
To
move
the
want
the
cursortomove.
the
cursor
faster.
Whenastep
cursortothe
button.Todouble-click,
in
rapid
succession.
the
primary
PartI:GettingToKnow
would
rather
useamouseortrackball,
onetothe
see
cursor,
instructs
item,
(typically
Your
computer's
"Connecting
then
The
Computer
a
mouse"onpage
gently
push
Pushing
youtoclickorchooseanitem,
press
press
primary
left)
mouse
serial
or
PS/2
the
AccuPoint
harderonthe
and
release
the
primary
AccuPoint
the
AccuPoint
button.
you
can
port.
For
infor
23.
in
the
direction
AccuPoint
move
primary
button
AccuPoint
button
corresponds
you
moves
the
twice
to
Page 55
The
function
program
right)
determine
of
you
are
mouse
button.
whetherituses
Getting
Using
the
computer
the
secondary
using.Itcorresponds
Check
your
the
for
the
first
AccuPoint
program's
right
button
to
the
mouse
button.
documentation
Started
time
dependsonthe
secondary
(typically
to
Setting
up
your
The
the
ishing
To
setupyour
1
2Inthe
3
4Inthe
5
Setting
To
software
first
time
you
turnonthe
devicesitdetectsonyour
Setup
screen.
software:
Click
Finishtorestart
User
Information
in
the
appropriate
Read
the
license
the
agreement,
Certificate
the
certificate
with
your
computer,
Click
Finish.
Setup
displays
dateAime
set
the
current
boxes,
agreement,
then
of
affixed
the
Date/Time
properties
date
computer,
system.
the
computer.
screen,
then
click
Next.
Authenticity
to the
then
click
and
time:
Windows
Setup
type
your
click
Next.
click
the
button
screen,
Windows98manual
Next.
Properties
Setup
then
displays
name
and
labeled
type
the
number
that
dialog
box.
installs
the
Fin
company
I
accept
from
came
1Atthe
Time
tab.
2
Set
the
3
Click
the
4
Select
your
5
Click
Close.
Setup
displays
Date/Time
correct
Time
Properties
date
and
Zone
tab.
time
zonebyclicking
the
Add
PartI:GettingToKnow
dialog
box,
time,
as necessary.
theupand
Printer
Wizard.
click
the
down
Your
Date
and
arrow
keys.
Computer
Page 56
Getting
Using
Started
the
computer
for
the
first
time
Setting
To
1
2
3
4
5
up
your
use
the
Add
printer
When
the
system
Next
and
follow
If
you
plantoinstall
Select
your
printer
dialog
box
and
If
the
driver for
into
the
diskette
From
Disk
dialog
Select
the
porttowhich
cally,aparallel
settoCOM1.(If
have,
check
your
Enter
the
printer
If
you
want
setuptoprintatest
Finish.
printer
Wizardtosetupyour
prompts
the
manufacturer
click
your
drive,
box,
printerissettoport
you
printer
name.
youtosetupyour
on-screen
a
printer
instructions.
later,
click
and
Next.
printerison
click
click
you
are
not
manual.)
diskette, insert
Have
Disk,
OK.
wanttoconnect
LPT1
sure
which
page,
printer:
printer,
Cancel.
model
from
theninthe
the
andaserial
typeofprinter
click
Yes,
click
the
the
diskette
Install
printer.
then
click
Printers
Typi
printer
is
you
Completing
Setup
displays
displays
♦
♦
♦
♦
When
on
PartI:GettingToKnow
the
Register
Windows98with
Connecttothe
Wizard
Discover
98
essentials,
introduction,
Maintain
in
Windows
you
the
WelcometoWindows98screen.
the
initial
the
WelcometoWindows98screen.
following
Now-Allows
and
Windows98-
your
are
readytostart
Your
options:
Microsoft
Internet
connects
new
see
98.
Computer
youtothe
features,
"GettingtoKnow
Computer-Launches
start-up
youtoregister
-
Launches
Provides
Windows
procedure
your
copy
online.
the
Internet
Internet.
a
brief
overviewofWindows
andatutorial.
Foramore
Windows
the
Maintenance
98,
click
the
This
screen
of
Connection
complete
98"onpage
Close
71.
Wizard
button
Page 57
Getting
Changing
the
Started
desktop
Registering
Changing
your
computer
The
first
time
you
registration
To
register
icon
instructions.
Registering
with
extends
the
registration
warranty
the
Setupyour
like
To
change
1
Clickablank
Point
card or
your
providedonthe
your
information
your
Toshiba
options
desktop
computertosuit
the colorsorthe
the
desktop:
button.
online
use
your
computer,
register
computer
computer
about
card
available
areaofthe
your
with
desktop
allows
new
products
warranty
and
warranty
from
your
fontsonthe
desktop with
either
fillinand
computer
Toshiba
and
follow
Toshibatokeep
worldwide
information
Toshiba.
tastes
screen,
with
online,
the
on-screen
and
upgrades,
atnochargetoyou.
for
and
needs.Ifyoudonot
you
can
the
secondary
mail
the
Toshiba
double-click
online.
the
youupto
and
also
date
See
details
about
the
change
them.
Accu-
2
Click
Properties.
Windows98opens
3
Select
the
Appearance
Use
the
Appearance
wanttoseeonthe
the
Display
tab.
tabtochoose
screen.
PartI:GettingToKnow
Properties
the colors
dialog
box.
and
the
font
Your
Computer
you
Page 58

Precautions
Computing
Using
Starting
Saving
Printing
Starting
Using
Using
Backingupyour
tips
the
keyboard
a
program
your
work
your
work
again
where
diskettes
compact
discs
files
UsingPCCards
Using
Exchanging
Settingupfor
Connecting
Sendingafax
Toshiba's
Turning
Caring
your
computeratthe
data
with
communications
directly toaremote
online
off the
for
resources
computer
your
computer
you
left
off
office
another
computer
computer
31
32
33
35
37
38
39
41
42
43
45
48
49
50
52
53
54
54
55
Page 59
Learning
This
chapter
viding
♦
Don't
gets
ble
♦
Don't
ing off
storage
drive,orboth.
covers
precautions
important
spill
into
and
turn
information
liquidsonthe
the
keyboard,
allowitto
the
computer
device
dry
off the
computerifa
can
the
and
computing
about
basic
features.
keyboard.
turn
off the
overnight
whileitis
resultindamagetothe
If
youdospillaliquid
computerassoonaspossi
before
usingitagain.
driveisbeing
reading
fromorwritingtoa
storage
tipsaswellaspro
that
accessed.
Turn
media,
the
♦
Keep
the
computer
erate
strong
magnetic
Placingamagnet
♦
Scan
all
new
files
important
for
and
too
closetoa
for
viruses.
files
you
diskettes
fields,
receive
away
suchaslarge
diskette
Scanning
via
diskette,
from
devices
stereo
can
erase
for
virusesisespecially
email,ordownload
that
gen
speakers.
the
files.
Page 60

Learning
Computing
the
Basics
tips
from
the
Internet.
fromasupplier
Occasionally,
may
containacomputer
even
new
programs
virus.
you
buy
Computing
tips
If
you
any
harm.
♦
Save
your
Your
you
saveitto
you
last
down
battery
HINT:
you
can
at
preset
follow
work
work
staysinthe
saved
and
you
runs
out
Some
programs
turn
on.
intervals.
details.
Backupyour
regular
a
Itiseasytoput
if
unless
basis.
safe
place.
your
hard
you
disk
haveaseparate
directions,
frequently.
the
if,
for
must
of charge
you
are
computer's
disk.
You
will
example,
restart
your
while
unlikely
temporary
lose
all
the
network
computertoreconnect,
you
are
haveanautomatic
This
feature
saves
your
See
your
software
files
to diskettes (or
Label
the
backup
off
backingupbecauseittakes
suddenly
fails,
backup
documentation
other
copies
clearly
you
will
copy.
todoyour
the
work
you
working.
save
feature
filetothe
computer
memory
done
are
using
which
hard
disk
for
removable
lose
media)ona
and
store
time.
all
the
However,
dataonit
until
since
goes
or
your
them
in
Use
ScanDisk,
ard
regularly
performatits
mentation
Take
frequent
eyestrain.
Unless
downorStandbycommandtoturn
"Saving
Mode.
PartI:GettingToKnow
Disk
to
conserve
optimal
for
more
breakstoavoid
Resume
your
Your
Modeison,
work"onpage 37
Computer
Defragmenter,
disk
level.
Consult
information
and
the
space
and
help
your
Windows98docu
on
these
and
repetitive-motion
always
use
the
off
the
for
information
Maintenance
your
other
injuries
Wiz
computer
utilities.
and
Windows98Shut
computer.
See
about
Resume
Page 61
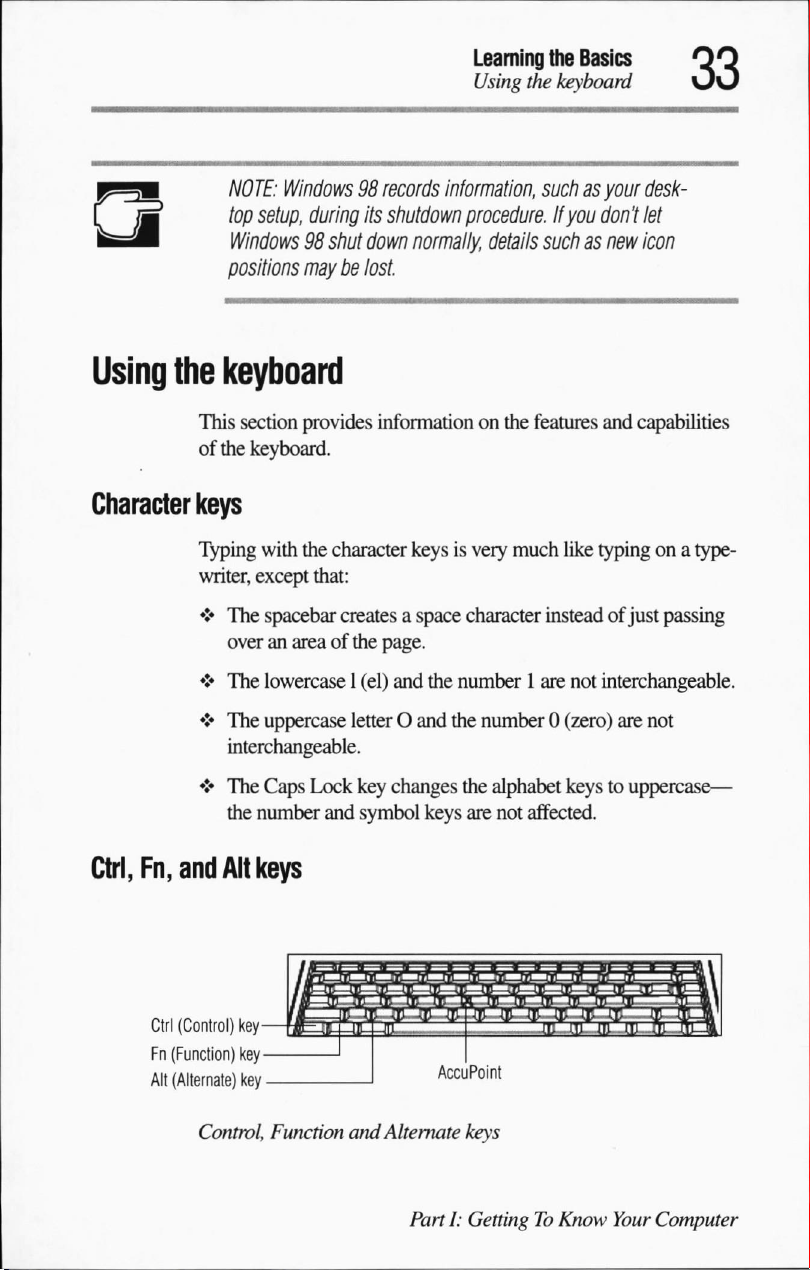
NOTE:
Windows98records
top
setup,
during
its
Windows98shut
positions
maybelost.
down
Learning
Using
inform3tion,
shutdown
procedure,
normally,
details
the
Basics
the
keyboard
suchasyour
if
you
don't
suchasnew
desk
let
icon
Using
Character
Ctrl,
the
Fn,
and
keyboard
This
section
of
the
keyboard.
keys
Typing
writer,
♦
♦
♦
♦
with
except
The
spacebar
overanareaofthe
The
lowercase
The
uppercase
interchangeable.
The
Caps
the
number
Alt
keys
provides
the
that:
Lock
information
character
createsaspace
page.
1
(el)
and
letterOand
key
changes
and
symbol
on
the
keysisvery
the
the
keys
much
character
number1are
number0(zero)
the
alphabet
are
not
features
affected.
and
capabilities
like
typingona
insteadofjust
not
interchangeable.
keystouppercase—
passing
are
not
type
Ctrl
(Control)
key-
Fn
(Function)
Alt
(Alternate)
key
key
■
Control,
Function
and
Alternate
PartI:GettingToKnow
Accu
Point
keys
Your
Computer
Page 62

Learning
Using
The
program
the
Basics
the
keyboard
functionofthe
you
are
Ctrl,
Fn,
using.
See
and
Alt
your
program
keys
varies,
dependingonthe
documentation.
Function
Fl through
grammed
Fn
key,
computer.
Windows
The
Windows:
functionasthe
Overlay
keys
The
form
numeric
keypadona
Using
To
turn
neously.
overlayison.
keys
F1-F12
F12
are
functions
keys
marked
keys
keyboard
keys
the
provides
one
activates
secondary
with grey
numeric
data or
the
the
The
and
control
full-size
overlay
numeric
num
called
function
when
pressed,
with
icons
execute
two
keys
the
Start
AccuPoint
numbers
keyboard.
overlayonand
lock
and
cursor
overlay.
the
cursorasyou
to
type
numeric
indicator
keys
because
Usedinconjunction
specific
that
have
menu
and
(or
right
symbolsonthe
This
they
functioninthe
special
functions
the
other
mouse)
frontofthem
overlay
would
lets
using
execute
with
has
the
button.
you
enter
the
ten-key
data
off,
pressFnand
illuminates
when
F11,
simulta
the
numeric
pro
the
in
same
To
type
alphabetic characters
♦
For
lowercase
the
letters.
♦
For
uppercase
you
while
Using
To
simultaneously.
cursor
PartI:GettingToKnow
the
turn
the
control
letters,
press
letters,
press
type
the
letters.
overlay
cursor
overlayison.
Your
for
cursor
control
The
Computer
overlayonand
cursor
while
the
and
hold
and
hold
control
control
indicator
overlayison:
theFnkey
both
off,
while
theFnand
pressFnand
illuminates
you
type
Shift
keys
F10,
when
the
Page 63

To
type
alphabetic
♦
For
lowercase
the
letters.
♦
For
uppercase
you
while
To
use
the
numeric
on,
press
and
returntothe
cursor
characters
letters,
press
letters,
press
type
the
letters.
overlay
hold
the
Shift
control
Learning
Starting
while
the
overlayison:
and
hold
theFnkey
and
hold
both
keys
when
the
key
while
you
overlay,
release
the
Basics
a
program
while
theFnand
cursor
control
use
the
overlay
the
Shift
you
Shift
overlay
keys.
key.
type
keys
is
To
Starting
Starting
a
program
In
Windows98there
icon,
Windows
a
program
To
startaprogram
these
example.
1
Click
Windows98displays
grams
2
Windows98displays
3
Click
Windows98opens
down
That's
at
the
from an
steps,
which
Start,
and
Step3,otherwise,
Pointtothe
the
program
word
all
thereisto
upper-right
are
three
waystostartaprogram—from
Explorer,
and
using
icon
that
hasaniconinthe
use
the
Windows98Wordpad
then
pointtoPrograms.
the
Programs
program
program
processor
groups.Ifyour
continue
(Wordpadinthis
Wordpad,
it.Toclose
cornerofthe
with Step
group
(Accessories
the
Accessories
without
the
window.
the
run
dialog
box.
Programs
programasan
menu.
This
programislisted,goto
2.
in
this
menu.
example).
whichisa
the
program,
text
editor—a
frills.
click the
an
menu,
follow
menu
lists
pro
example).
scaled-
close
button
PartI:GettingToKnow
Your
Computer
Page 64
Learning
Startingaprogram
the
Basics
Starting
a
program
Ifaprogramisnot
from
Windows
Explorer,
program.
The
following
its
filename
To
startaprogram
1
Click
2
Click
3Inthe
the
Explorer
right
folders
4
Click
Explorer
right
from
Explorer
listedinthe
Explorer.
you
must
example,
WORDPAD.EXE.
Start,
then
the
Windows
left
panelofthe
folder
containing
shows
sideofthe
containedinthe
Accessories.
shows
sideofthe
To
know
the
like
from
Explorer:
pointtoPrograms.
Explorer
screen,
the
the
contentsofthe
screen.
the
contentsofthe
screen.
Programs
startaprogram
filename
the
one
icon.
under
program,inthis
The
left
Program
menu,
and
locationofthe
above,
opens
theC:icon,
Program
sideofthe
Files
folder.
Accessories
you
can
from
Windows
Wordpad,
double-click
case
Program
Files
screen
folderonthe
start
it
using
Files.
folderonthe
shows
all
the
Using
Parti:
the
GettingToKnow
5
Double-click
Windows98opens
Run
dialog
You
can
startaprogram
know
its
name.
PBRUSH.EXE.
1
Click
2Inthe
Wordpad.
box
This
Start
then
dialog
box:
Your
Computer
Wordpad.
to
startaprogram
using
the
Run
dialog
example
click
opens
Run.
Paintbrush,
box
provided
using
the
you
filename
Page 65
Learning
Saving
the
Basics
your
work
♦Ifyou
If
you
the
pbrush.exe)
found
The
Paintbrush.
Saving
your
Before
or a
diskette.
You
can
NOTE:
Modeorthe
charges
know
the
program's
line.
For
example,toaccess
C:\Windows\pbrush.exe.
then
click
OK.
don't
know
the
program's
Browse
specified
the
file,
dialog
box,
and
select
click
Open.
program
the
opens.Inthis
location,
Paintbrush,
location,
enter
the
filename
drivetosearch.
case,
work
you
turn
off
the
computer,
Thisisoneofthe
never
save
your
files
Save
your
data
even
Standbycommand,incase
before
you
returntowork.
save
most
important
too
often.
when
you
your
are
using
the
type
the
command
type
click
Browse...
(for
example
When
Windows
Windows
worktothe
rulesofcomputing.
In
has
opens
hard
disk
Resume
battery
dis
Many
programs
intervals,
tion
that
came
To
saveafile,dooneofthe
♦Ifyou
♦ifyou
Save
As.
HINT:Tomake
ing
with,
fileadifferent
offerafeature
for instance,
with
your
are
updating
are
creating
Typeaname
another
choose
SaveAsfrom
name.
that
saves
documentsatregular
every15minutes.
program
following:
the
file,
open
a
new
file,
open
for the
copyofthe
the
PartI:GettingToKnow
Refertothe
for
details.
the
File
the
File
file,
then
click
file
you
are
File
menu
menu
and
documenta
and
click
Save.
menu
and
click
OK.
currently
give
the
Your
work
new
Computer
Page 66
Learning
Printing
the
Basics
your
work
Naming
Windows
characters.
board
+,
-,;,
If
you
pre-Windows95versionofWindows,
a
more
acter
Most
ingaparticular
with a
Printing
your
Ensure
"SettingupWindows98to
your
98,
You
plus
the
and\The
plantoshare
than
eight
extension.AnMS-DOS
programs
.doc
extension.
work
that
Windows98is
HINT:
You
connect
printers,
it.Ifyou
you
additional
files
like
Windows
may
use
following
names
your
characters
assignanextension
format.
only
needtosetupthe
use
will
needtosetupWindows98to
printer(s).
95,
supports
all
the
letters
characters:
can
include
files
withacomputer
followedbya
filename
For
example,
setupfor
work
with
printer
more
than
one
filenames
and
numbersonthe
_,A$,~,!,#,%,&,{,},0,@,[,],
spaces.
the
period
cannot
that
identifies
Microsoft
your
printerasdescribed
your
the
printer
ofupto
using
MS-DOS
filename
andathree-char
contain
the
Word
printer"onpage
first
time
or
are
changing
run
with
255
key
mustbeno
spaces.
fileashav
saves
files
in
109.
you
the
or
To
printafile:
1Ifyour
2
Open
the
Print.
The
program
PartI:GettingToKnow
printerisnot
File
Your
on,
menuofyour
displays
Computer
turniton
Windows
a
Print
now.
program
dialog
box.
and
click
Page 67
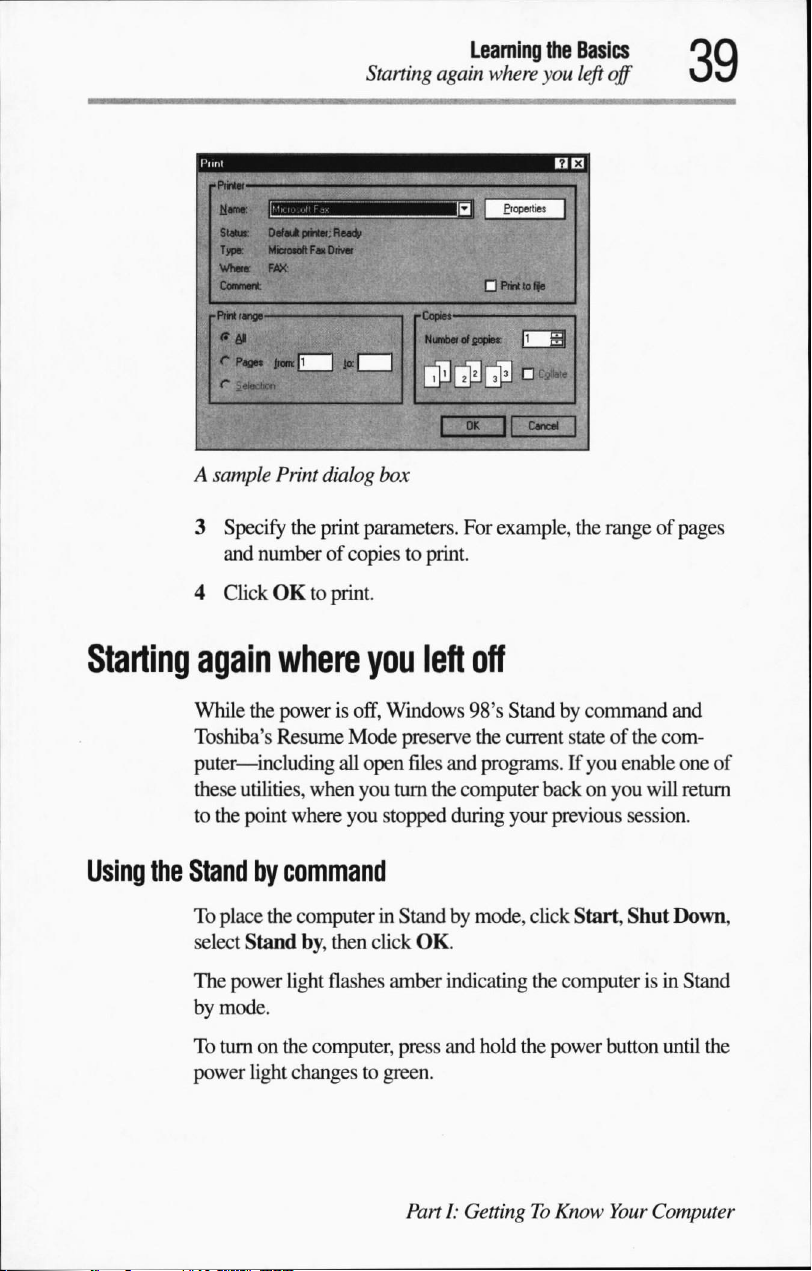
A
sample
3
Specify
and
numberofcopiestoprint.
4
ClickOKto
Print
dialog
the
print
print.
Learning
Starting
parameters.
box
again
where
For
example,
the
Basics
you
left
the
off
rangeofpages
Starling
Using
again
While
Toshiba's
puter—including
these
to
the
the
Stand by
To
select
The
by
To
power
where
the
powerisoff,
Resume
utilities,
point
where
command
place
the
computerinStandbymode,
Stand
power
light
mode.
turnonthe
light
changestogreen.
you
Windows
Mode
preserve
all
open
files
when
you
turn
you
stopped
by,
then
click
OK.
flashes
computer,
amber
press
PartI:GettingToKnow
left
off
98's
Standbycommand
the
current
and
programs.Ifyou
the
computer
during
your
click
indicating
and
hold
the
the
stateofthe
enable
backonyou
previous
computerisin
power
session.
Start,
Shut
button
Your
and
com
one
of
will
return
Down,
Stand
until
the
Computer
Page 68
Learning
Starting
the
Basics
again
where
you
left
off
Using
Resume
Mode
Resume
mand.
♦
♦
To
1 PressFnandF3simultaneously
2
3
When
your
before
decidetocontinue
turning
Mode
provides
With
Resume
Automatically
display
TYirn
foraset
enable
pop-up
While
indicates
Release
You
computer
using
screen
panel.
off
automatically
amountoftime.
Resume
window.
holding
Stand
theFnkey.
are
nowinStandbymode.
using
the
power
settings.
using
either
files
and
make
you
turn
off the
the
computeronagain.
more
Mode
stand
by/resume
Mode:
Fn,
press
by.
the
power
switch
Resume
sure
thatnostorage
computer.Ifyou
working
options
you
when
and
than
can
configure
when
you
have
to
display
releaseF3until
When
switch
and
again,
you
will
Modeorthe
after
all,
waitafew
does
you
not
you
then
returntothe
Standbycommand,
deviceisbeing
change
the
Standbycom
your
system
closeoropen
used
your
system
the
Resume
the
pop-up
turn
turnitback
your
seconds
Mode
window
off the
previous
accessed
mind
before
to:
the
on
save
and
The
next
time
working
Hibernation
Hibernation
Hibernation
Your
Hibernation
1
2
PartI:GettingToKnow
from
mode
isaWindows
saves
Satellite
Open
Select the
computerisconfigured
is
the
Control
Hibernation
Your
you
turnonthe
where
you
left
function.
your
datatothe
disabled
and
Panel
Computer
power,
you'llbeabletocontinue
off.
Unlike
hard
you
wanttoenable
and
double-click
tab.
ResumeorStand
drive.
with
Hibernation
it:
the
enabled.
Power
icon.
by,
If
Page 69
3
Set
your
default
Learning
the
Using
options,asneeded.
Basics
diskettes
Using
Inserting
Caring
diskettes
This
section
ing
for
your
and
removing
To
insertadisketteinthe
1
Hold
toward
2
Insert
When
To
removeadiskette
for
diskettes
♦
Store
them
♦
Don't
♦
Don't
can
prevent
provides
diskettes.
information
diskettes
the
diskettesothat
the
drive.
the
diskette
the
disketteisin
your
and
keep
slide
touch
into
from
diskettes
them
back
the
the
magnetic
the
drive
on
inserting,
computer's
the
the
place,
the
in
their
clean.
protective
surfaceofa
from
diskette
arrowonits
drive.
the
eject
drive,
push
boxes
or other
metal
reading
the
removing
drive:
upper
surface
button
pops
out.
the
eject
button.
containers
cover.
diskette.
data
Fingerprints
storedona
and
car
points
to
protect
disk.
♦
Don't
twistorbendadiskette.
♦
Keep
diskettesatroom
direct sunlight.
♦
Don't
place
heavy
♦
Don't
eat,
smoke,oruse
cles
can
damage
♦
Keep
diskettes
speakers
♦Ifthe
in
and
diskette
water.
Don't
radios,
caseisdirty,
temperature
Otherwise,
objectsonyour
the
away
use
cleaning
data
maybelost.
erasers
diskette's
from
since
PartI:GettingToKnow
surface.
sourcesofmagnetism,
these
cleanitwithasoft
fluids.
and
don't
expose
diskettes.
near
diskettes.
can
destroy
data.
cloth
them
Foreign
Your
parti
such
as
moistened
Computer
to
Page 70
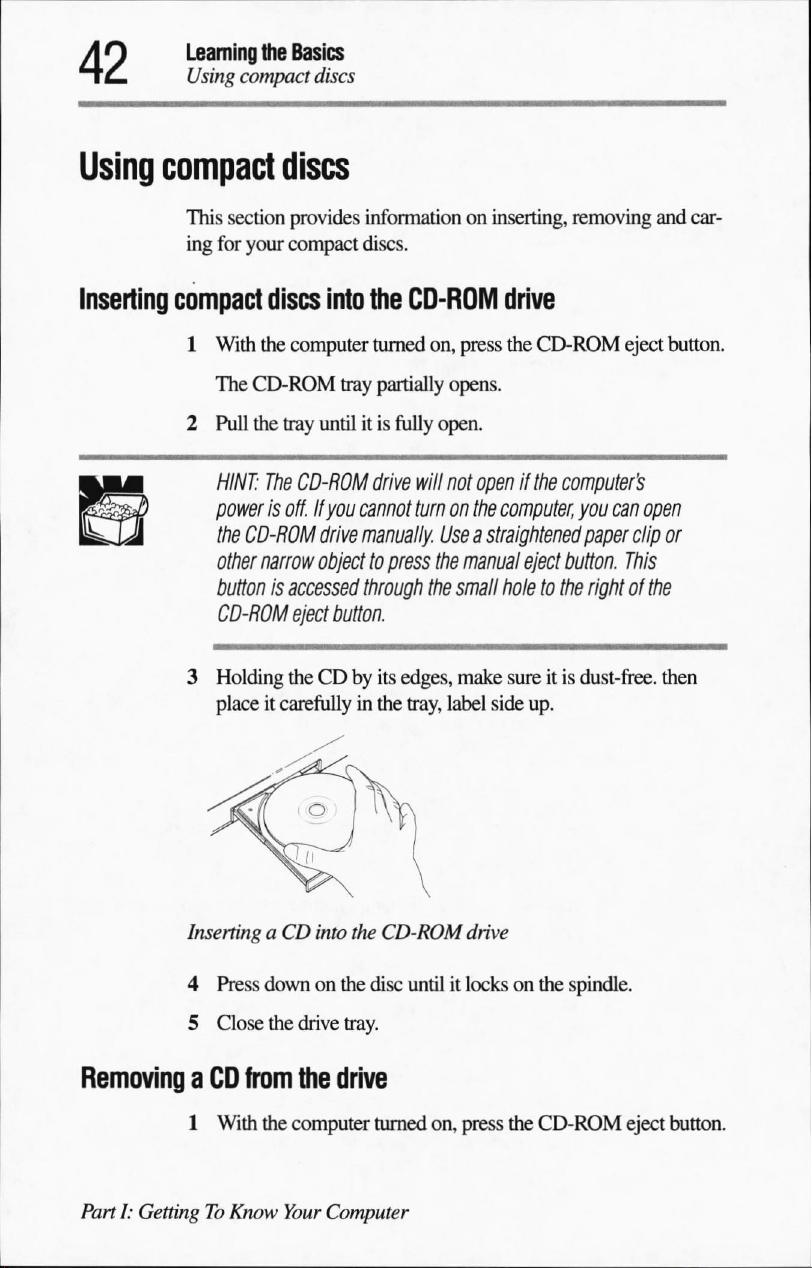
Learning
Using
the
Basics
compact
discs
Using
Inserting
compact
This
section
ing
for
your
compact
1
With
the
The
CD-ROM
2
Pull
the
HINT:
)
power
the
CD-ROM
other
narrow
buttonisaccessed
CD-ROM
3
Holding
placeitcarefully
discs
provides
compact
discs
computer
tray
The
CD-ROM
is
off.
eject
theCDby
information
discs.
into
the
tray
untilitis
If
you
cannot
drive
manually.
objecttopress
through
button.
in
on
inserting,
CD-ROM
turned
on,
press
partially
drive
its
the
opens.
fully
open.
will
not
openifthe
turn
on
the
Useastraightened
the
manual
the
small
edges,
make
tray,
label
side
removing
and
drive
the
CD-ROM
computer's
computer,
eject
button.
holetothe
sureitis
up.
eject
button.
you
can
open
paper
clip
or
This
rightofthe
dust-free,
then
car
Inserting
4
5
Removing
PartI:GettingToKnow
a
1
aCDinto
Press
downonthe
Close
the
CD
from
With
the
the
CD-ROM
disc
drive
tray.
the
drive
computer
Your
turned
Computer
drive
untilitlocksonthe
on,
press
the
spindle.
CD-ROM
eject
button.
Page 71
2
Pull
the
its
protective
3
Close
the
tray
untilitis
case.
drive
fully
tray.
Learning
Backingupyour
open,
the
remove
theCDand
Basics
files
placeitin
Caring
Backing
for
compact
♦
Store
from
scratches
♦
Don't
♦
Don't
♦
HoldaCDbyits
CD
can
♦
Don't
♦
Keep
the
center
necessary,
(not
benzineorrubbing
before
up
your
Backing up
disketteorcopying
device,
suchasa tape
discs
your
CDsintheir
and keep
bendaCDorplace
applyalabeltoor
prevent
expose
your
inserting
the
CDstodirect
CDs
clean.Toclean aCDthatisdirty,
outwards
moisten
itinthe
original
them
heavy
otherwise
outside
edge.
drive
from
(notina
the
cloth
alcohol).
drive.
files
your
files
simply
entire
drive.
means
sectionsofyour
containers
clean.
objectsontopofit.
mar
Fingerprints
reading
sunlightorextreme
circle)
with waterora
Let
copying
to
protect
the
surface
on
the
the
data
properly.
heatorcold.
wipeitfrom
withaclean,
theCDdry
hard
dry
neutral
completely
individual
disktoanother
them
of a
CD.
surface
of a
cloth.
If
cleaner
filestoa
Copying
toadiskette
To
backupyour
1
2
3
filestoa
Insertaformatted
On
the
Windows
Double-click
the
diskette:
diskette
desktop,
drive
that
PartI:GettingToKnow
into
the
diskette
double-click
contains
drive.
theMyComputer
the
file
you
Your
wanttocopy.
Computer
Page 72

Learning
Backing
4
5
6
the
Basics
up your
Double-click
you
wanttocopy.
HINT:
Click
Click
HINT:
file
(or
then
pointing
files
the
Use
the
Ctrl
File,
then
the
icon
You
can
also
files)
you
to
folder
that
contains
and
Shift
keystoselect
click
Send
To.
for the
diskette
backupa
drive
filetoa
wanttobackupwith
SendToand
clicking
the
file,
then
click
more
than
one
file.
(typically,
diskette
the
3
1/2
drive
A:).
by
clicking
secondary
Floppy
the
button,
(A:).
the
file
Using
the
Backup
Using
and
1
2
Backup
Wizard
the
Windows98Backup
the
typeofbackup
Connect
manufacturer's
Click
then
The
the
backup
Start,
pointtoPrograms,
click
Backup.
Backup
Wizard
You
can
can
back up
continue.
«•■
BackupMi1
[Backupagfles
f~
Ba*upifitectedffe*,foldeisanddriYos
(Click
Wizard
instructions.
eSh«
Wizard
you
wanttoperform.
devicetoyour
dialog
box
bockupevwylhinflmjkh*
specific
drivw.
IqMom.
and
Computer
and
toMe«
yg)1
Nextlanfect
fles.
fokfets
you
can choose
computerasshowninthe
Accessories,
System
appears.
&
fles.
I
bed'
and
driv_
the
files
Tools,
PartI:GettingToKnow
Your
Computer
Page 73
3
Follow
the
Backup
Learning
UsingPCCards
Wizard's
instructions.
the
Basics
Using
PC
Cards
PC
notebook
chasePCCards
cards,
PCMCIA
ciation)
Your
ports
*>
♦
When
you
Cards
are the
"keys"toexpanding
computer
from
combine
standard.
Satellite
three
TypeIand
are
used
cards,
in
each
TypeIDcards
removable
a
larger card.
PC
Card
computer.
you buyaPC
are
buying.
several
(Personal
computer
typesofPC
TypeIIcards
for
modems,
and
more.
slot.
are
hard
disks
TypeIDPC
slot.
You
and
connectingtoa
your
dealer.
SomePCCards,
functions.
Computer
has
Cards:
fax/modems,
You
can
much
and
can
only
Card,
MostPCCards
Memory
two
stackedPCCard
are
thinner
installupto
thicker
other
hardware
cards
install
check
the
the
capabilities
network.
Card
International
than
Type
memory
twoofthese
and
are typically
functions
mustbeinserted
one
Type
package
for
of
your
You
can pur
suchassound
conformtothe
slots
and
III
cards.
storage,
IIIPCcardinyour
the
network
cards,
used
that
into
the
typeofcard
Asso
sup
They
one
for
require
lower
PC
Card
HINT:
For
PCMCIA-compatible
to
make
sure
they
conformtothe
later).
Other
cards
may
likely
tobemuch
supporting
PC
Cards
programs
computer.
(switching
software
require
that actsasa
Card
cards
more
Card
and
Socket
while
PC
Cards,
check
PCMCIA
work
with
your
difficult
and
translator
the
to
setupand
Socket
Services
between
Services
computerison)
PartI:GettingToKnow
software
2.1
computer,
thePCCard
possible.
the
package
standard
but
they
(or
are
use.
software—a
makes
set
and
hot
swapping
Your
Computer
of
the
Page 74
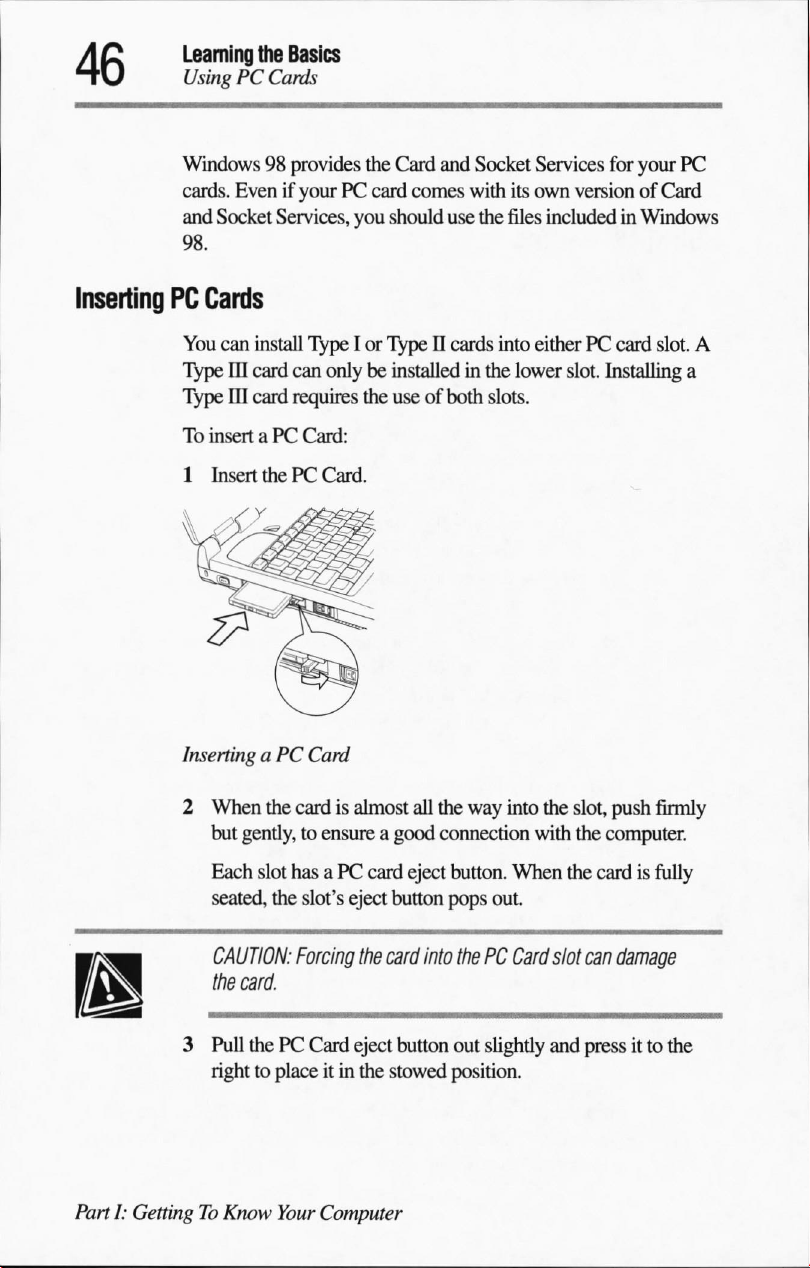
Learning
UsingPCCards
the
Basics
Windows98provides
cards.
EvenifyourPCcard
and
Socket
98.
Inserting
PC
Cards
You
can
Type
III
Type
III
To
insertaPC
1
Insert
install
card
card
the
Services,
can
requires
you
TypeIor
onlybeinstalled
the
Card:
thePCCard.
Card
and
Socket
comes
with
should
use
the
files
TypeIIcards
use of both
into eitherPCcard
in
the
slots.
Services
its
own
includedinWindows
lower
for
your
versionofCard
slot.
slot.
Installing
PC
A
a
Inserting
2
aPCCard
When
the
but
gently,toensureagood
Each
slot
seated,
CAUTION:
the
card.
3
Pull
thePCCard
righttoplaceitin
PartI:GettingToKnow
cardisalmost
hasaPC
the
slot's
Forcing
card
eject
the
card
eject
the
Your
Computer
all
the
way
connection
eject
button.
button
pops
into
thePCCard
button
out
stowed
position.
into
the
slot,
with
the
When
the
cardisfully
out.
slot
can
slightly
and
pressitto
push
firmly
computer.
damage
the
Page 75

To
lock
4
left.
Noteworthy
computer
yourPCcardsinthe
You
can
also
secure
the
Cable
Lock.
lock"onpage
67.
Learning
lfo>ig
slots,
slide
computer
For
more
information,
the
BasicsA/
PC
Cards
thePCCard
usinganoptional
see
HI
locktothe
PORT
"Using
a
Removing
PC
Cards
1
Click
Click
2
Windows98displays
remove
If
the
3
card
ittoeject
HINT:
)
tom
thePCCard
Stop
xxxf
where
the
card.
eject
button
that
installed
The
buttontothe
is
stowed,
thePCcard.
top
button
lower
buttononthe
xxxxisthe
a
message
corresponds
rotate
corresponds
taskbar.
identifier
indicating
to
the
slotinwhich
the
button90degrees,
to
the
upper
slot.
for
yourPCcard.
that
you
may
your
then
slot,
the
bot
safely
PC
press
RemovingaPC
4
Hot
swapping
Oneofthe
PC
swapping."
Grasp
the
great
card
with
Card
edgesofthePCcard
things
aboutPCcardsisthat
another
while
PartI:GettingToKnow
and
the
computerison.
slideitoutofthe
you
Thisiscalled
slot.
can
replace
Your
Computer
one
"hot
Page 76
Learning
Using
Hot
the
Basics
your
computeratthe
swapping
office
precautions
Although
removeacard
able
For
♦
♦
♦
♦>
you
can
whileitisinuse.
information.
example:
Don't
remove
the
card.
Don't
removeanetwork
network.
Don't
removeaSCSI
operating.
DEFINITION:
tems
Interface.
several
your
computer.
Before
Card
SCSIisan
A
SCSI
devices,
removingaPC
(PCMCIA)
insertaPC
a hard
disk
cardifthe
acronym
single
SCSIPCCard
such
card,
icononthe
cardatany
Otherwise,
card
card
while
as a
scannerordigital
shutitdownbyclicking
taskbar.
time,
while
the
you
SCSI
device
for
Small
enables
remember
you
could
systemisaccessing
are
connectedtoa
connectedtoit
Computer
youtoconnect
camera
not
lose
valu
Sys
to
the
to
is
PC
Using
[rti
/[■.•.•.•■•.•.•.■I
PartI:GettingToKnow
your
r~~)
T...TIAserial
computer
By
connectinganexternal
mouse,
office
An
A"
to
to
you
can
computer.
external
external
the
the
monitor
PS/2-compatible
PS/2
port.Anoptional
port.
mouse
Your
at
work
connectstothe
connects
Computer
the
office
monitor,
with
your notebookasifitwereastandard
to
the
full-size
monitor
keyboard
Y-cable
serial
or a
lets
you
port.
keyboard,
port.
PS/2
connect
and
mouse
connects
both
devices
a
Page 77
Exchanging
data
with
Learning
another
the
Basics
computer
Exchanging
data
To
transfer
can
use
tion
program
♦Totransfer
cable.
♦Totransfer
parallel
♦Totransfer
withacompatible
essary
(4Mbps)
To
transfer
1
Do
♦Ifyou
♦Ifyou
with
a
large
amountofinformation
the
Windows98Briefcaseora
and
the
files
files
cable.
files
software.
support
files:
oneofthe
cable.
red
following:
are
usingaserialorparallel
are
usinganinfrared
portsofthe
another
computer's
using
the
using
the
using
the
internalorexternal
Windows98provides
for
IrDA-compliant
two
devices
computer
between
specialized
serial,
parallel,
serial
port,
useanull
parallel
infrared
port,
use a
port,
use
infrared
Fast
devices.
connection,
connection,
within
data
computers,
synchroniza
or
infrared
modem
LapLink®-type
another
port
and
Infrared port
connect
position
transfer
you
ports.
serial
computer
the
nec
the
the
infra
range.
)
HINT:Toestablish
two
devices
other,
withnovisible
2
Load
the
transfer
3
Set
any
specific
4
Start
the
transfer.
5
When
you
on
both
computers.
the
must
be
programonboth
options.
have
finished
connection,
within
the
infrared
three
feet
(one
portsofthe
meter)
obstructions.
computers.
transferring
PartI:GettingToKnow
files,
close
of
each
the
programs
Your
Computer
Page 78
Learning
Settingupfor
For
1
the
Basics
communications
detailed
Click
information
Start,
then
Help.
on
ways
to transfer
files:
2 Choose
3Inthe
4
Follow
Setting
Using
up
for
To
connecttothe
across
the
comes
equipped
In additiontothe
♦Atelephone
♦ A
browserorcommunications
♦
An
Internet
plantouse
the
internal
Before
voice-grade,
you
the
Index
tab.
dialog
box,
type
communicating.
the
online
instructions.
communications
Internet,
telephone
withanintegrated
modem,
line
Service
the
Internet
modem
can
use
telephone
useanonline
lines
with
you
Provider
the
modem
line.
service,orcommunicate
another
need
you
computer,
56K
V.90
modem.
the
following:
program
(ISP)orOnline
must
connectittoastandard,
your
computer
Serviceifyou
NOTE:Ifyou
Call
Waiting
Waiting
1
Open
the
CAUTION:Toavoid
don't
force
angletothe
PartI:GettingToKnow
are
using
the
telephone
before
you
connect
interrupts
modem
data
transmission.
port
covertoaccess
damaging
the
cover
open.
When
sideofthe
Your
Computer
computer,
lineathome,
through
the
the
the
phone
jack
the
coverisata45-degree
itisfully
disable
modem.
RJ-11
phone
access
open.
Call
cover,
jack.
Page 79
2
Attach
port.
one
end
Settingupfor
of a
standard
Learning
telephone
the
Basics
communications
cabletothe
modem
Connecting
3
Attach
the
jack.
Connecting
your
computer
To
accessanetwork:
♦Atthe
♦
office,
For
specific
consult
While
tion.
of
your
you
Ask
the
network.
Installing
1
Open
the
grams
2
Select
3
Select
and
Communications
Dial-Up
the
internal
other
modem
endofthe
telephone
cabletoa
toanetwork
install
a
network
information
network
areathomeortraveling,
your
Dial-Up
Control
click
administrator.
network
Networking
Panel,
the
Windows
Networking
cardinoneofthePCCard
about
connectingtoa
you
administrator
double-click
and
and
for
Setup
tab.
click
Details.
follow
modular
LANorWAN,
needadial-up
the
telephone
Add/Remove
the
instructions
phone
connec
number
Pro
on
slots.
the
PartI:GettingToKnow
Your
Computer
Page 80
Learning
Connecting
the
Basics
directly
toaremote
computer
Setting
To
1
2
upadial-up
setupthe
Click
cations.
Click
NOTE:
connection,
Start,
then
Dial-Up
When
Networking.
you
Windows98StandBycommandorToshiba's
These
utilities
when you
Connecting
directly toaremote
To
connect
vice
(BBS),
program.Inaddition,
know:
♦
The
communications
may
turnonthe
directly
you
needageneral-purpose
networking connection
use
the
Dial-Up
pointtoPrograms,
are
connected
toanetwork,
Networking
Accessories,
don'tusethe
Resume
cause
youtolose
computer
accesstothe
again.
network
computer
toaremote
to
connecttoanother
computerora
communications
parameters
bulletin
computer
Wizard:
Communi
Mode.
board
ser
you
must
♦
The
file
transfer
uploading
The
following
parameters
Communications
There
tobeconcerned:
♦
Modem
mation.
manual
♦
Data
usually
PartI:GettingToKnow
and
parameters
are
four
speedisthe
Speeds
documents
bitsisthe
sevenoreight.
Your
protocol (onlyifyou
files)
sections
file
transfer
communications
are
numberofbits in
Computer
are
provide
speedatwhich
measuredinbits
the
information
protocols.
parameters
the
per
speedofyour
modem.
one
character.
downloading
on
communications
with
which
modem
transfers
second.
This
you
Your
modem
number
or
need
infor
is
Page 81
♦
♦
These
viated
data
two
You
gram.
Otherwise,
File
transfer
File
transfer
determine
any,
Stop
bits
indicate
oneortwo.
Parityisan
or
none.
parameters,
and
combined.
bits
and one
stop
bits).
set
eachofthese
Each
parameter
the
the
endofa
error-checking
except
Common
stop
bit)
parameters
mustbeset
two
devices
protocols
transfer
occur
protocols
files
between
what
typeoferror
during
transfer.
are
modems
Learning
character.
method
for the
modem
examples
and
E72
(even
in
the
will
notbeabletoconnect.
standards
the
Basics
Sendingafax
This
and
willbesettoeven,
speed,
are
N81
parity,
your
communications
sameonboth
that
govern
overatelephone
checking
and
data
numberisusually
odd,
are
usually
(no
seven
computers.
how
line.
compression,
abbre
parity,
eight
data
bits
and
pro
computers
Protocols
if
You
don't
make
sure
which
you
protocols
Sending
a
fax
Faxingadocumentisalmostassimpleasprinting
To
faxadocument:
1Onthe
on
the
RingCentral®
The
RingCentral
2
Select
needtoknow
you
are
are
communicating.
are
described
desktop,
desktop,
Next
and
anything
using
the
in
any
click
the
click
Start,
folder
and
Setup
Wizard
follow
the
PartI:GettingToKnow
same
bookontelecommunications.
RingCentral
click
about
specific
protocols
If
you
would
then
pointtoPrograms.Goto
RingCentral.
appears.
on-screen
protocols—just
as
the
computer
liketoknow
it.
icon.Ifthe
instructions.
Your
with
more,
iconisnot
the
Computer
Page 82
Learning
Toshiba's
the
Basics
online
resources
Toshiba's
online
Toshiba
nect.
These
provide
about
future
To
access
♦
On
go
toshiba
♦
Toshiba's
files
access
(949)
foundin"If
♦
Toshiba's
resources
maintains
sites
help
with
upgrades.
Toshiba
CompuServe®,
24-hour
and
computing
Toshiba's
837-4408.
Something
home
http://www.toshiba.com
http://computers.toshiba.com
mationinthe
http://pcsupport.toshiba.com
http://www.toshiba.ca
http://www.toshiba-Europe.com
http://www.toshiba.co.jp
a
numberofonline
provide
information
technical
online
More
pagesonthe
questions
resources:
type:
BBSisa
information
BBS,
good
set
your
information
Goes
Wrong"onpage
World
(worldwide
(marketing
USA)
(product
(Canada)
(Japan)
sitestowhich
about
Toshiba
and keep
source
for
suchastechnical
modemtoN81
on
Toshiba's
Wide
Toshiba
supportinthe
(Europe)
you
can
products,
youupto
Toshiba
Web
date
utilities
bulletins.
and
call
BBS
can
131.
are:
corporate
and
product
infor
USA)
con
To
be
site)
♦
You
can
engineatwww.snap.com,
Toshiba.
Turning
Part1:GettingToKnow
off
the
Itisa
good
it
forawhile.
♦Ifyou
have
the
Windows98StandbycommandorToshiba's
Modetosave
the
computer
also
reach
Toshiba's
Web
then
performing
computer
ideatoturn
workinprogress
Your
off
your
your
system
again,
you
automatically
Computer
computer
and
expecttoresume
settings
site
through
when
so
that
returntowhere
the
a
search
you
when
Snap
search
on
are
not
using
shortly,
Resume
you
turn
on
you
use
left
Page 83
Learning
Caring
for
the
your
computer
Basics
off.Toleave
the
♦
Don't
so
drive.
♦Ifyou
Panel
Caring
Cleaning
for
your
This
section
information
"Running
the
computer
CAUTION:
computer's
Never
harshorcaustic
the
computer
Windows98Shut
turn
the
power
may
damage
close
the
Close
Alarm
Down
offifa
your
hard
display
beeps
computer
gives
tipsoncleaning
about
taking
careofyour
the
computeronbattery
Keep
liquids,
keyboard,
spray
cleaner
speaker
directly
chemical
turned
off foralonger
command.
disk-in-use
disk,
diskette
panel
while
loudly.
and
power"onpage
including
cleaning
grille,
onto
the
products
indicator
driveorCD-ROM
the
computerison, the
moving
computer's
fluid,
and
other
computer.
to
clean
the
period,
your
computer.
battery,
60.
is
on.
Doing
see
use
For
outofthe
openings.
Never
use
computer.
To
exterior
dealer
Moving
the
Before
1
2Ifa
3IfaCDisinthe
4
keep your
computer
case
withalightly
for
suggestions
computer
moving
Make
stop
glowing).
disketteisin
drive
Shut
your
sure
all
disk
CD-ROM
trayissecurely
down
Windows98and
clean,
gently
wipe
dampened
for
appropriate
computer,
activity
the
has
diskette
closed.
PartI:GettingToKnow
cloth.
cleaning
even
across
ended
drive,
remove
drive,
removeitand
turn
off
the
display
Ask
your
products.
the
room:
(the
drive
indicator
it.
make
the
computer.
Your
panel
and
Toshiba
lights
sure
the
Computer
Page 84
Learning
Caring for
5
6
7
the
Basics
your computer
Disconnect
Close
Close
all
the
display
all
port
cables.
panel.
covers.
CAUTION:
by
the
back
Although
shock
You
through
your notebook
and
vibration,
can
purchase a
the
Toshiba
Don't
pickupthe
(where
the
ports
computerisbuilttowithstand
transport
carrying
Accessories
computer
are
itina
case
by
its
located).
carrying
from
your
Catalog.
display
panel
reasonable
case
for
long
Toshiba
dealer
or
trips.
or
Part1:GettingToKnow
Your
Computer
Page 85

Page 86
Toshiba's
Running
Changing
Conserving
Traveling
Maximizing
Usingacomputer
energy-saver
the
computeronbattery
the
battery
battery
tips
battery
power
life
lock
design
power
59
60
63
65
67
66
67
Page 87
Computing
This
chapter
traveling.
covers
all
aspectsofusing
your
computer
while
Toshiba's
energy-saver
Toshibaisa
(EPA)
the
Energy
Your
being
process.
efficiency.
Manyofthese
We
recommend
computertooperateatits
useitfor
partnerinthe
Energy
computer
used,
Star
Star
entersalow-power
thereby
It
hasanumberofother
energy-saving
longer
design
Environmental
Program
guidelines
conserving
you
periods
and
has
for
energy
energy
features
features
leave these
while
features
maximum
traveling.
Protection
designed
efficiency.
stand-by
energy
state
and
saving
that
have
been
active,
efficiency
Agency's
this
producttomeet
whenitis
moneyinthe
enhance
setbyToshiba.
allowing
not
its
energy
your
so
you
can
Page 88
Mobile
Running
Computing
the
computeronbattery
power
Running
Battery
the
computer
The
computer
pack
that
onACpower.
safety
precautions
Adheretothe
battery:
♦
Never
♦
Don't
object.
terytooverheat
the
computer.
♦
Never
ittoexplode
♦Ifa
batteryisleaking or
protective
♦
Replace
on
battery
contains a
provides
You
following
trytodisassemble
touch
the
Short-circuiting
incinerate
and
gloves
the
main
removable
powertothe
can
recharge
metal
and
may
a
used
release
when
battery
computer
safety
precautions
a
battery
terminals
the
battery
permanently
battery.
toxic
damaged,
handlingadamaged
withanidentical
Lithium
the
battery
of
Burning
materials.
power
Ion
(Li-Ion)
whenitis
many
times.
when
handling
pack.
the
battery
terminals
damage
replaceitimmediately.
withametal
will
the
battery
battery.
battery.
battery
not
running
cause
the
battery
will
the
the bat
or
cause
Use
Monitoring
1
PartI:GettingToKnow
the
battery
Charge
charge
putertoanACpower
of
computerison.
Use
1
♦>
♦
The
which
the
the
battery
seven
hours.
the
battery
The
indicator
The
indicator
battery
you
can
charge
battery
before
you
whileitisinyour
source
The
battery
indicator
is
is
can
alsobecharged
also
Your
Computer
to
amber
green
when
purchase
useitto
and
takes
monitor
while
from
power
computer,
leaveitturned
much
longertocharge
battery
the
the
batteryisfully
usinganoptional
your
status:
battery
is
dealer.
the
computer.
connect
off foraminimum
To
the
com
when
the
charging.
charged.
battery
charger,
Page 89
The
battery
♦
The
To
it
to26degrees
♦
The
Leave
ing
NOTE:
you
pack
and
may
batteryisextremely
ensure
reaches
batteryisalmost
the
afterafew
Onceabattery
operate
discharges
helps
Running
that
room
power
the
computeronbattery
not
start
charging
hotorcold.
the
battery
temperature
Celsius).
connected
minutes.
chargestoits
completely
packisfully
your
computer
completely.
ensure
accurate
monitoring
Mobile
Computing
immediately
full
(50to80
and
on
battery
Doing
degrees
discharged.
the
battery
charged,
we
power
this
extends
of
battery
power
if:
capacity,
should
wait
until
Fahrenheit,
begin
10
charg
recommend
until
the
battery
battery
life
capacity.
Using
If
puter
battery
and
additional
you
spendalotoftime
using
packs
continue
CAUTIONS:
more
thanaweekata
chargeofthe
Use
only
book
computer.
through
Monitoring
tl
battery
I
The
computer's
battery's
♦
Green
current charge.
battery
traveling
the
battery,
with
working.
Don't
battery
the
Toshiba
power
indicates
you
you.
You
leave
time.
battery
chargers
You can
Accessories
battery
indicator
a
full
charge.
packs
and needtopower
may
wanttocarry
can
then
replace
batteries
in
the
Doingsomay
designed
to
orderaToshiba
Catalog.
gives
PartI:GettingToKnow
additional
a
discharged
battery
charger
reduce
the
work
with
your
battery
charger
youanindication
the
com
charged
battery
for
potential
note
of
the
Your
Computer
Page 90

Mobile
Computing
Running
♦
♦
To
1
2
the
computeronbattery
Amber
Flashing
see
HINT:
before
computer
capacity
Click
Double-click
In
ofaseriesofboxes
longer
show
indicates
amber
how
much
battery
Waitatleast16seconds
trying
to
monitor
needs
and
perform
Start,
then
Power
the
Power
Meter
the
bar,
the
the
remaining
power
the
batteryischarging.
indicates
this
pointtoSettings,
that
the
chargeisrunning
power you
the
timetocheck
its
calculations.
Management.
sectionofthe
indicates
more
power
powerasa
have
left:
after
turning
remaining
battery
the
battery's
and
click
dialog
remaining
you
percentage.
battery
have
low.
on
the
computer
power.
The
remaining
Control
box,abar
left.
You
Panel.
composed
power.
can
also
The
TECHNICAL
battery
use
and
The
computer
tures.
Check
ingintemperatures
What
to
do
The
warning
when
you
computer
before
HINT:IfHibernation
alarm.
Instead
cally
goes
PartI:GettingToKnow
NOTE:
The
charge
basedonthe
other
factors
suchasthe
drains
the
your
remaining
below50degrees
hear a
has
battery
two
alarms
your
battery
is
enabled,
ofasecond
into
Hibernation
Your
Computer
computer
calculates
computer's
current
ageofthe
battery
power
faster
charge
frequently
Fahrenheit.
alarm
designed
becomes
alarm,
mode.
to
give
fully
discharged.
your
computer
your
computer
the
remaining
rateofpower
battery.
at
low
tempera
if
you're
work
you
sufficient
sounds
one
automati
Page 91

To
set
the
alarm
levels:
1
Click
Start,
pointtoSettings,
2
Double-click
3
Select
You
can
you
wanttoreceive
You
can
both,ornone.
StandbymodeorShut
the
Alarm
set
eachofthe
also
Power
set
how
You
Mobile
Changing
and
Management.
tab.
levelstothe
the
Low
Battery
the
warnings
can
also
configure
down
during
Computing
the
battery
click
Control
time
remainingatwhich
Critical
occur—alarm
the
computertogo
the
alarm
Panel.
Battery
warnings.
sounds,
warning.
text,
into
Changing
the
When
the
♦IfAC
while
the
batterytorecharge.
♦Ifyou
battery
battery
powerisavailable,
the
have
CAUTION:
to
the
casing.
Also,becareful
Removing
the
battery
1
Save
your
2
Shut
down
to
the
instructions
page
39.
3
Remove
all
runs
outofpower:
run
the
computer
battery
charges,orshut
charged
Handle
a spare
battery
Avoid
dropping
packs
nottoshort-circuit
work.
the
computerorputitin
in
"Using
cables
connectedtothe
down
battery,
change
carefully
the
battery
the
Standbymode
the
Standbycommand"
computer.
from
theACsource
the
computer
the
to
prevent
or
mishandling
battery
terminals.
and
battery.
damage
it.
according
on
allow
4
Close
the
underside
display
panel
faces
up.
and
turn
the
computer
PartI:GettingToKnow
oversothe
Your
Computer
Page 92

Mobile
Changing
5
Computing
the
Carefully
computer.
battery
slide
the
battery
release
panel
toward
the
frontofthe
Removing
6
Slide
3/4
inch).
7
Lift
the
WARNING:Ifthe
protective
the
advicein"Disposing
Inserting
a
charged
1
Wipe
clothtoensureagood
2
Place
tery's
nals
facing
3
Slide
4
Without
compartment.
the
battery
the
battery
battery
away
module
battery
gloves.
Discard
battery
the
battery
the
charged
label
the
battery release
using
terminalsofthe
battery
facing
the
insideofthe
the
open
endofthe
force,
place
from
the
computer
and
removeitfrom
is
leaking
or
the
battery
of
used
batteries
charged
connection.
into
the
battery
cover.
panelinthe
the
battery
untilitstops
its
caseiscracked,
immediately, following
safely"
battery
cover
battery
cover
unlocked
and
coverinthe
(about
the
computer.
wear
on page
with
with
the
and
its
65.
a clean
bat
termi
position.
battery
HINT:
When
the
bottomofthe
PartI:GettingToKnow
properly
computer.
Your
Computer
seated,
the
battery
coverisflush
with
Page 93

Mobile
Conserving
Computing
battery
power
5 Using
battery
6
Slide
the
CAUTION:
resultinthe
7
Turn
the
8
Reconnect
9
Turnonthe
Disposing
of
used
You
can
recharge
years.
When
flashes
amber
You
must
WARNING:
disposed
irresponsible,
light
pressure,
compartment
battery release
Failure
battery
computer
any
computer.
batteries
the
battery
shortly
also
discardabattery
The
of.
Putting
slide
the
and
holdinplace.
paneltothe
to
lock
the
battery
dislodging
right
side
up.
cables.
safely
a
battery
battery
it
may
pack
many
pack
needs
after
you
have
packifit
can
explode
spent
batteries
alsobeillegal.
battery
from
toward
locked
cover
the
times,soit
replacing,
fully
if
not
in
the
the
position.
into
position
computer.
the
recharged
becomes
properly
trashisnot
contactsinthe
can
should
battery
last
for
light
the
battery.
damaged.
handled
or
only
Disposeofthe
ulations.
battery
Use
only
replacements.
The
materials
regarding
government
batteries.
Conserving
battery
How
longafully
the
computer
♦
How
that
the
disposalofbatteries.
for
information
power
charged
dependsona
the
computerisconfigured.
as
required
batteries
came
recommended
with
your
on
wheretorecycleofdisposeofold
battery
numberoffactors,
Part1:GettingToKnow
by
local
ordinances
by
Toshiba
computer
If
not,
pack
may
check
lasts
when
such
or
reg
as
includeaninsert
with
your
local
you
are
using
as:
Your
Computer
Page 94
Mobile
Computing
Maximizing
♦
How
♦
Whether
supplies
♦
Where
temperatures.
battery
much
you
you
use
power.
you
are
life
use
the
hard
disk
any
optional
working,
since
and
other
drives.
devicestowhich
operating
the
time
decreases
battery
at
low
Toshiba's
you
Toshiba
modes:
♦
♦
♦
To
1
2
Maximizing
A
main
it
will
main
power-saving
can
use
the
computer
has
combined
Home/Office
desk
Portable/Laptop
Always
selectapower-usage
on
PressFnandF2simultaneously
up
window.
While
continuing
desired
You
shown
power-usage
are
nowinthe
withinasquare,
battery
battery
lose
its
battery:
life
canberecharged
abilitytoholdacharge.Tomaximize
options
these
mode:
to
press
mode.
selected
greatly
before
you
options
Fn,
pressF2until
Then
mode.
with
the
many
increase
needtorecharge
into
three
to
display
release
The
nameofthe
times.
the
length
preset
power-usage
the
power-usage
you
select
theFnkey.
selected
mode
modetothe
Gradually
the
of time
the
battery.
pop
the
will
be
right.
over
time
lifeofyour
♦
Don't
leave
a
few
hours.
life.
♦Ifyou
♦
PartI:GettingToKnow
are
time,
remove
Alternate
the
computer
Overcharging
not
goingtouse
the
battery
between
Your
battery
Computer
pluggedinand
the
main
battery
the
computer
pack.
packsifyou
haveaspare.
unused
for
may
shorten
for
a long
more
than
its
period
of
Page 95
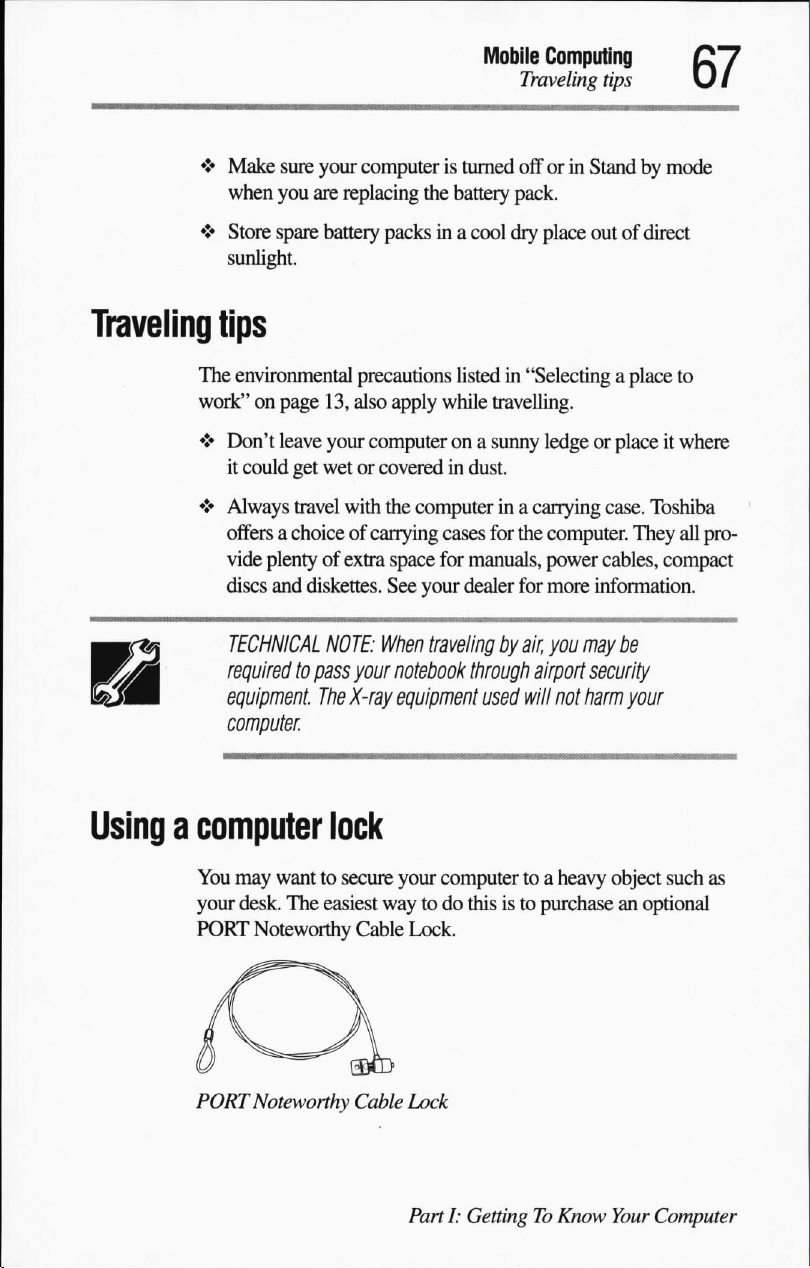
♦
Make
sure
when
you
♦
Store
spare
sunlight.
your
computeristurned
are
replacing
battery
the
packsina
Mobile
battery
cool
Computing
Traveling
offorin
pack.
dry
place
tips
Standbymode
outofdirect
Traveling
Usingacomputer
tips
The
environmental
work"onpage
♦
Don't
leave
it
could
get
♦
Always
offersachoiceofcarrying cases
vide
discs
travel
plentyofextra
and
TECHNICAL
required
equipment.
computer.
precautions
13,
also
apply while
your
computerona
wetorcoveredindust.
with
the
space
diskettes.
NOTE:
to
pass
The
See your
When
your
notebook
X-ray
equipment
lock
You
may
wanttosecure
your
desk.
PORT
Noteworthy
The
easiest
your
waytodo
Cable
listed in
computerina
for
dealer
traveling
"Selecting
travelling.
sunny
for
the
manuals,
for
by
air,
through
used
will
computertoa
thisisto
Lock.
a
place
to
ledgeorplaceitwhere
carrying
power
airport
purchaseanoptional
case.
Toshiba
computer.
more
you
They
cables,
information.
may
compact
be
security
not
harm
your
heavy
object
such
all
pro
as
PORT
Noteworthy Cable
Lock
PartI:GettingToKnow
Your
Computer
Page 96
Mobile
Computing
Usingacomputer
To
secure
the
1
Loop
the
Make
sure
off
the
object.
2
Pass
the
lock
computer:
cable
throughoraround
thereisno
locking
end
some
way
forapotential
through
the
loop.
part
of a
heavy
thieftoslip
object.
the
cable
3IfaPCCardisinstalled,
secure
the
cardinthePCCard
4
Insert
the
cable's
computer,
The
computerisnow
give
the
locking
slide
thePCCard
slot.
end
into
keyaquarter
secured.
turn
locktothe
the
security
and
remove
lock
slotonthe
it.
right
to
PartI:GettingToKnow
Your
Computer
Page 97

Page 98
Lesson1:Exploring
Lesson2:Using
Lesson3:Creating
Lesson4:Creatinganew
Lesson5:Starting
Lesson6:Resizing
Lesson7:Closing
Lesson8:Creating
Lesson9:Displaying
Lesson
Lesson
Lesson
Lesson
10:
Changing
11:
Setting
12:
Removing
13:IfIamlost—whatdoI
the
desktop
the
AccuPoint
a
new
document
folder
programs
and
repositioning
your
programs
shortcuts
Web
contentinindividual
the
wallpaper
the
date
and
objects
pointing
device
windows
and
files
time
from
the
desktop
do?
windows
..
Page 99
Getting
to
Know
Windows
This
chapter
few
basic
can
expecttosee
Windows
If
you've
you
gain
going
or
Macintosh,
dows
HINT:Ifyou've
discusses
tion-and-answer
menu
screen
text
Windows98from
introduces
tasks.Italso
when
98.
never
used
will
more
through
98,
these
you
since
the
a
numberofthe
and
select
appears,
box,
theninthe
Windows
shows
you
Windows98before,
than
offset
lessons.
will
already
operating
been
using
format.
Help.
When
select
the
topics
Windows
98
98 by
guiding
you
someofthe
open
basic
the
short
However,ifyou've
have
some
systems
Windows
major
To
start
Index
list
31."
are
3.1,
differences
online
the
Help
tab.
Type
double-click
new
applications
the
skill
amountoftime
familiarity
similar.
Windows98Help
inaneasy
help,
open
Topics:
Windows
"upgrading"
"Upgrading
you
through
screens
and
used
the
you
of
confidence
you
spend
Windows
with
Win
ques-
Start
Help
in
the
to
a
95
As
you
gain
there
are
experience
often
many
waysofaccomplishing
with
Windows
98,
you
will
a
particular
discover
that
task.
Page 100
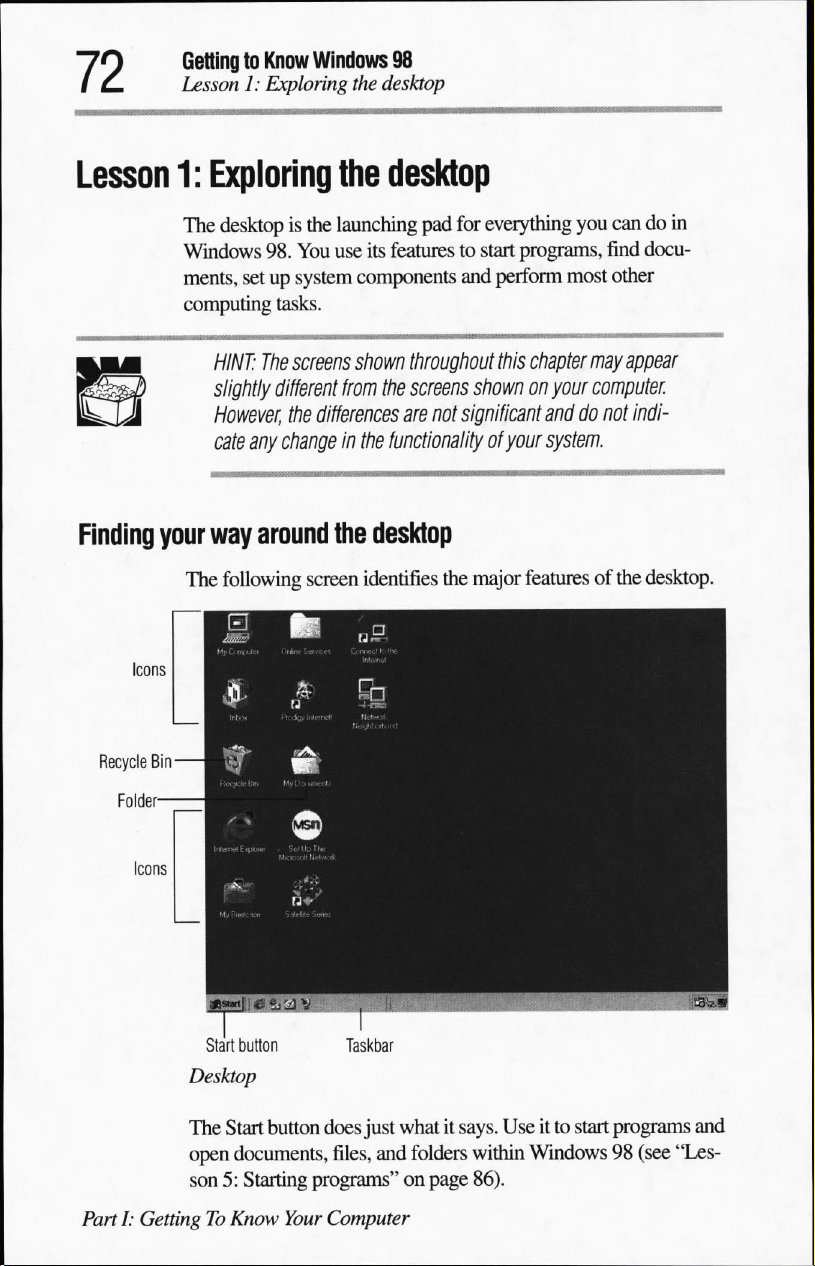
GettingtoKnow
Lesson1:Exploring
Windows
98
the
desktop
Lesson
1:
Exploring the
The
desktopisthe
Windows
ments,
computing
HINT:
slightly
However,
cate
Finding
your
way
The
following
launching
98.
You
use
its
setupsystem
tasks.
The
screens
different
the
any
changeinthe
around
components
shown
from
differences
the
desktop
screen
identifies
desktop
pad
for
everything
featurestostart
and
perform
throughout
the
screens
are
not
functionality
this
shownonyour
significant
of
your
the
major
you
programs,
most
chapter
anddonot
system.
features
candoin
find
docu
other
may
appear
computer.
indi
of
the
desktop.
Recycle
Bin
Start
button
Desktop
The
Start
button
open
documents,
son5:Starting
PartI:GettingToKnow
Taskbar
does
just
whatitsays.
files,
and
folders
programs"onpage
Your
Computer
Useitto
within
Windows98(see
86).
start
programs
and
"Les
 Loading...