

Toshiba Satellite 2800-S202, Satellite 2805-S301, Satellite 2805-S201, Satellite 2805-S202, Satellite 2805-S302 User Manual
...
User’s Guide
®
Satellite
Tips for viewing PDFs:
For more information, select Help > Reader Guide from the Adobe Acrobat
window.
2800/2805 Series
T o use bookmarks, click the Bookmarks tab, then click the plus sign (+)
next to the bookmark icon to display topics in that chapter. Click the
minus (-) sign to collapse again.
T o use thumbnails, click the Thumbnails tab, and double-click on the
page number you want to view. (The page will appear on the right side of
your screen.)
T o print, specify a range of pages in the Acrobat Print dialog box, or
specify noncontiguous pages or a particular page before opening the
dialog box. Click the Print button or choose File > Print.
If you need assistance:
For more information, see Chapter 9 on page 198 in this
guide.
C493-0800M1
www.pcsupport.toshiba.com
InTouchsmCenter
Calling within the United States (800) 457-7777
Calling from outside the United States (949) 859-4273
choose freedom
TOSHIBA
™

Model: Satellite 2800/2805 Series
FCC Notice “Declaration of Conformity
Information”
This equipment has beentested and found to comply with the limits for a
Class B digital device, pursuant to Part 15 of the FCC rules. These limits
are designed to provide reasonable protection against harmful
interference in a residential installation.
This equipment generates, uses and can radiate radio frequency energy
and, if not installed and used in accordance with the instructions, it may
cause harmful interference to radio communications. There is no
guarantee that interference will not occur in aparticular installation. Ifthis
equipment does cause harmful interference to radio or television
reception,whichcan be determinedbyturning theequipmen toff and on,
the useris encouraged to try tocorrect the interference byone ormore of
the following measures:
Reorient or relocate the receiving antenna.
Increasethe separation between the equipmentand recei v e r.
Connect the equipment to an outlet on a circuit different from that to
which the receiver is connected.
Consult the dealer or an experienced radio/TV technician for help.
2
NOTE: Only peripherals complying with the FCC Class B limits may be
attached to this computer. Operation with non-compliant peri pherals or
peripherals not recommended by Toshiba is likely to result in interference
to radio and TV reception. Shielded cables must be used between the
external devices and the computer's serial port, parallel port, monitor port,
USB port, PS/2™ port and mi crophone jack. Changes or modific ations
made to this equipment not expressly approved by Toshiba or parties
authorized by Toshiba could void the user
equipment.
This devicecomplies with Part 15 of the FCC Rules. Operation issubject
to the follo wi ngtwo conditions:
This device may notcause harmful interf eren ce .
’s autho rit y to operate the

This device must accept any interference received, including
interference that maycause undesired operation.
Contact:
ToshibaAmericaInformationSystems,Inc.
9740 Irvine Blvd.
Irvine, CA 92618-1697
(949) 583-3000
Industry Canada Requirement
This Class B digital apparatus complies with Canadian ICES-003.
Cet appareil numérique de la classe B est conformé àla norme NMB-
003 du Canada.
FCC Requirements
The following information is pursuant to FCC CFR 47, Part 68 and refers
to internal modems.
3
Installation
When you areready toinstall or use the modem, call your localtelephone
company and give them the following information:
The modem connects to the telephone line by means of a standard jack
called the USOC RJ11C.
The telephone number ofthe line to which youwill connect the
modem.
The FCC registration number of the modem.
The ringer equivalence number (REN) of the modem, which is 0.5B.

T ype of service
Your modem is designed to be used on standard-device telephone lines.
Connection to telephone company-provided coin service (central office
implemented systems) is prohibited. Connection to party lines service is
subject to State tariffs. If you have any questions about your telephone
line, such as how many pieces of equipment you can connect toit, the
telephone company will provide this information upon request.
T elephone Company Procedures
The goal ofthe telephone company is toprovide youwith the best service
it can. In order to do this, it may occasionally be necessary for them to
make changes in their equipment, operations or procedures. If these
changesmightaffectyour service ortheoperationofyourequipment,the
telephone company will giveyou notice, in writing, to allow you to make
anychanges necessary to maintain uninterrupted service .
If Problems Arise
If any of your telephone equipment is not operating properly,you should
immediately remove it from your telephone line, as it may cause harm to
the telephone network. If the telephone company notes aproblem, they
may temporarily discontinue service. When practical, they will notify you
in advance of this disconnection. Ifadvance notice isnot feasible,you will
be notified as soon as possible. When you are notified, you will be given
the opportunity to correct the problem and informed of your right to file a
complaint with the FCC.In the eventrepairs are ever needed on your
modem,theyshouldbeperformedbyToshibaAmericaInformation
Systems, Inc. or an authorized representative of Toshiba America
Information Systems, Inc.
4

Disconnection
If you should ever decide to permanently disconnect your modem from its
present line,please callthe telephone companyand letthem knowof this
change.
Fax Branding
The Telephone Consumer Protection Act of 1991 makesit unlawful to
use a computer or other electronic device tosend any message via a
telephone faxmachine unless such message clearly contains in a margin
at the top or bottom of each transmitted page or on the first page of the
transmission, the date and time it is sent and an identification of the
business, other entity or individual sending the message and the
telephone number of the sending machine orsuch business, other entity
or individual.
In order to program this information into your fax modem, you should
complete the setup foryour fax software before sending a message.
Instructions for IC CS-03 certified equipment
5
1 NOTICE: The Industry Canada label identifies certified equipment.
This certification means that the equipment meets certain
telecommu nic ati onsnetworkprotective,operationa land saf e ty
requirements as prescribed in the appropriate Terminal Equipment
Technical Requirements document(s). The Department does not
guarantee the equipment will operate to the user’s satisfaction.
Befor einstallingthis equi pment ,users should ensurethat it is
permissible to be connected to the facilities of the local
telecommunications company.The equipment must also be
installed using an acceptable method of connection. The customer
should be aware that compliance with the aboveconditions may not
prevent degradation of service in some situations.
Repairsto certifiedequipment should becoordinatedby a
representative designated by the supplier.Any repairs or alterations
made bythe user to this equipment, or equipment malfunctions,
may give the telecommunications company cause torequest the
user to disconnect the equipment.
Users should ensure for their own protection that the electrical
ground connections of the power utility,telephone lines andinternal

metallic water pipe system, if present, are connected together.This
precaution may be particularly important in rural areas.
Caution:Users should notattempt to makesuch conn ect io ns
themselves, but should contact the appropriate electric inspection
authority, or electrician, as appropriate.
2 The user manual of analog equipment mustcontain the equipment’s
Ringer Equivalence Number (REN) and an explanation notice
similar to the following:
The Ringer Equivalence Number (REN) of this device is 0.2.
NOTICE: The Ringer Equivalence Number (REN) assigned to each
terminal device provides an indication of the maximum number of
terminalsallowedto be connected to a telep hon einterface .The
terminationon aninterfacemayconsist of any combinationof
devices subject only to the requirement that the sum of the Ringer
Equivalence Numbers of all the devices does not exceed 5.
3 The standard connecting arrangement (telephone jack type) for this
equipment is jack type(s): USOC RJ11C.
CD-ROM/DVD-ROM Safety Instructions
6
The CD-R OM/DVD-ROM drive employs a laser system. T o ensure
proper use of this product, please read this instruction manual
carefully and retain forfuture reference. Should the unit everrequire
maintenance, contact an authorized service location.
Use of controls, adjustments or the performance of procedures other
than those specified mayresult in hazardous radiation exposure.
To prevent direct exposure to the laser beam, do not try to open the
enclosure.
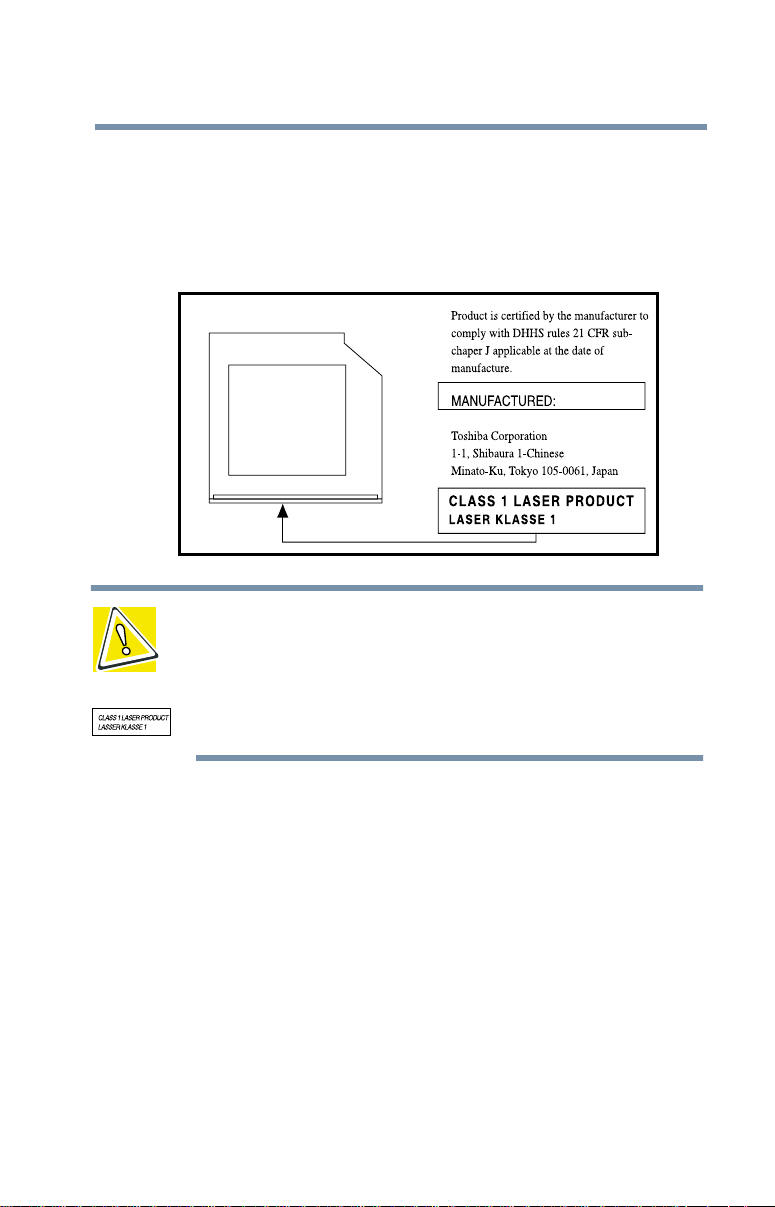
Location of the required label
(The following is a sample. Location of the label and manufacturing
information may vary.)
CAUTIONS: This appliance contains a laser system and is classified as a
“CLASS 1 LASER PRODUCT .” To use this model properly, read the instruction
manual carefully and keep it for your future reference. In case of any trouble with
this model, please contact your nearest “AUTHORIZED service st ation.” To
prevent direct exposure to the laser beam, do not t ry to open the enclosure.
Use of controls or adjustments or performance of procedures other than those
specified in the owner’s manual may result in hazardous radiation exposure.
7
Copyright
This guide is copyrighted byToshibaAmerica Information Systems, Inc.
with all rights reserved. Under the copyright laws,this guide cannot be
reproduced in any form without the prior written permission of Toshiba.
No patent liability is assumed, howev er ,with respect to the use of the
information contained herein.
©2000by Tosh ibaAmericaInformationSystems,Inc. All rightsreserved.

Export Administration Regulation
This document contains technical data that may be controlled under the
U.S. Export Administration Regulations, and may be subject to the
approval of the U.S. Department of Commerce prior to export. Any
export, directly or indirectly,in contravention of the U.S. Export
Administr ati onRegulationsis prohibi ted .
Notice
The information contained in this manual, including but not limited to any
product specifications, is subject to change without notice.
TOSHIBACORPORATION AND TOSHIBA AMERICA
INFORMATION SYSTEMS, INC. (TOSHIBA) PROVIDES NO
WARRANTY WITH REGARD TO THIS MANUAL OR ANY OTHER
INFORMATION CONTAINED HEREIN AND HEREBY
EXPRESSLY DISCLAIMS ANY IMPLIED WARRANTIES OF
MERCHANTABILITY OR FITNESS FOR ANY PARTICULAR
PURPOSE WITH REGARD TO ANY OF THE FOREGOING.
TOSHIBA ASSUMES NO LIABILITY FOR ANY DAMAGES
INCURRED DIRECTLYOR INDIRECTLY FROMANY TECHNICAL
OR TYPOGRAPHICAL ERRORS OR OMISSIONS CONTAINED
HEREIN OR FOR DISCREPANCIES BETWEEN THE PRODUCT
AND THE MANUAL. IN NO EVENT SHALL TOSHIBA BE LIABLE
FOR ANY INCIDENTAL, CONSEQUENTIAL, SPECIAL, OR
EXEMPLARY DAMAGES, WHETHER BASED ON TORT,
CONTRACT OR OTHERWISE, ARISING OUT OF OR IN
CONNECTION WITH THIS MANUALOR ANY OTHER
INFORMATION CONTAINED HEREIN OR THE USE THEREOF.
8
T rademarks
Satellite, Noteworthy ,Fn-esse, and AccuPointare registered trademarks,
SecureSleep, SelectServ,Active Menu,Ask IRIS Online, and VirtualTech
are trademarks, and InTouch is aservice mark of Toshiba America
Information Systems, Inc. and/or Toshiba Corporation.
CompuServe and America Online are registered trademarks of America
Online, Inc.

D VDEx pre ssis atrademark of Mediamatics ,Inc., a National
Semiconductor Company.
Mediamatics is a registered trademark of Mediamatics, Inc.
Manufactured underlicense from Dolby Laboratories, Dolby ,DolbyDigital
Surround, and Dolby Digital are trademarks of Dolby Laboratories.
LapLink is a registered trademark of Traveling Software, Inc.
Wakeon LAN and OS/2 are registered trademarks and PS/2 is a
trademark of IBM Corporation.
Macrovision is aregistered trademark of Macrovision Corporation.
Microsoft, Windows, Windows Media Player,NetMeeting, MSN, Outlook,
Microsoft Press, DirectSound, Direct3DSound, DirectShow, DirectMusic,
and DirectX are registered trademarks, and Active Desktop is a
trademark of Microsoft Corporation.
SoundBlaster is a registered trademark of Creative Technology ,Ltd.
Intel, Celeron, and Pentiumare registered trademarks, andSpeedStep is
a trademark of Intel Corporation.
WorldNetis a registered trademark of AT&T, Inc.
Yahoo! and My Yahoo!are registered trademarks of Yahoo!, Inc.
Energy Star is a registered trademark of the U .S. Environmental
ProtectionAgency.
All other brandand produ ctnames are trademarksor registered
trademarks of their respective companies.
9
Energy Star Compliance
As an Energy Star®partner,Toshiba has determinedthat thisproductis
Energy Star compliant.

Introduction
Welcome to the world of powerful, portable, multimedia
computing. Your Satellite computer offers enhanced
multimedia and easy Internet access. With your new
Toshiba notebookcomputer ,your work canaccompanyyou
whereveryougo.
Your Satellite computer’soperating system is Microsoft
Windows®Millennium Edition, which offers exciting new
features, enhanced home networking, and easy Internet
access.
This guide
This guide introduces the computer’sfeatures. You can:
Read the entire guide from beginning to end.
Skim through and stop when a topic interests you.
Use the table of contents and the index to find specific
information.
®
10
Safety icons
If you are new to computers, or have not used a notebook
computer before ,read through thefirstcouple ofchaptersto
familiarizeyourselfwiththe components of the computer
and how to turn it on. After that, seek out whateverinterests
you most.
Safety icons
This manual contains safety instructions that must be
observed in order to avoid potential hazards that could
result in personal injuries, damage your equipment, or loss
of data. The safety cautions havebeen classified according
to the seriousness of the risk, and the icons highlight these
instructions as follows:
DANGER: This icon indicates the existence of a hazard that
could result in death or serious bodily injury if the safety
instruction is not observed.
11
WARNING: This icon indicates the existence of a hazard that
could result in bodily injury if t he safety instruction is not
observed.
CAUTION: This icon indicates the existence of a hazard that
could result in da mage t o e quipme nt or prop er ty if t he sa fe ty
instruction is not observed.
NOTE: This icon indi cate s infor matio n that relat es to the safe
operation of the equipment or related items.
Other documentation
Other icons used
Additional icons highlight other helpful or educational
information:
TECHNICAL NOTE: This icon highlights technical
information about the computer .
HINT: This icon denotes helpful hints and tips.
DEFINITION: Thi s icon i ndicat es the def inition of a t erm used
in the text.
12
Other documentation
Your computer comes with the following documentation, in
addition to this user’s guide:
An electronic version of the user’s guide. Look for the
user’sguideicon on your desktop or install it from your
Configuration Builder CD provided with your computer.
Guides for other programs that may come preinstalled
on your computer and for additional programs on your
Configuration Builder CD.
The
Toshiba Accessories Catalog,
accessories availablefrom Toshiba and explainshowto
order them.
The Microsoft Windows Millennium Edition
documentation which explains the features of the
operating system.
which lists

Service options
Service options
Toshiba offers a full line of service options built around its
SelectServ™ warranty programs. See the warranty and
service material included with yourcomputer for registration
information.
If you havea problem or need to contact T oshiba,see If
Something Goes Wrong on page 199.
13

PART I
GETTING TO KNOW Y OUR
COMPUTER
What is in Part I
This part explains the components of your Satellite computer and
how to use them. Many details and technical information can be
foundin Part III. Do nothesitateto skip around. Guides,suchas this
one, are not meant to be read from cover to cover .

Chapter 1

Finding Your Way Around
This chapter presents a “grand tour” of your Satellite
computer.It serves as a reference when youneedtolocate
specific parts of the computer.
Making sure you have everything
Before doing anything else, consult the Quick Start card
provided with your system to make sure you received
everything.If any items are missingordamaged, notify your
dealer immediately. For additional help, see If you need
further assistance on page 240.
16
Finding Your Way Around
Front with the display closed
Front with the display closed
Bass speakers
Display latch
The display latch keeps the display panel closed and
locked. To open the display panel, press the display latch
and raise the panel.
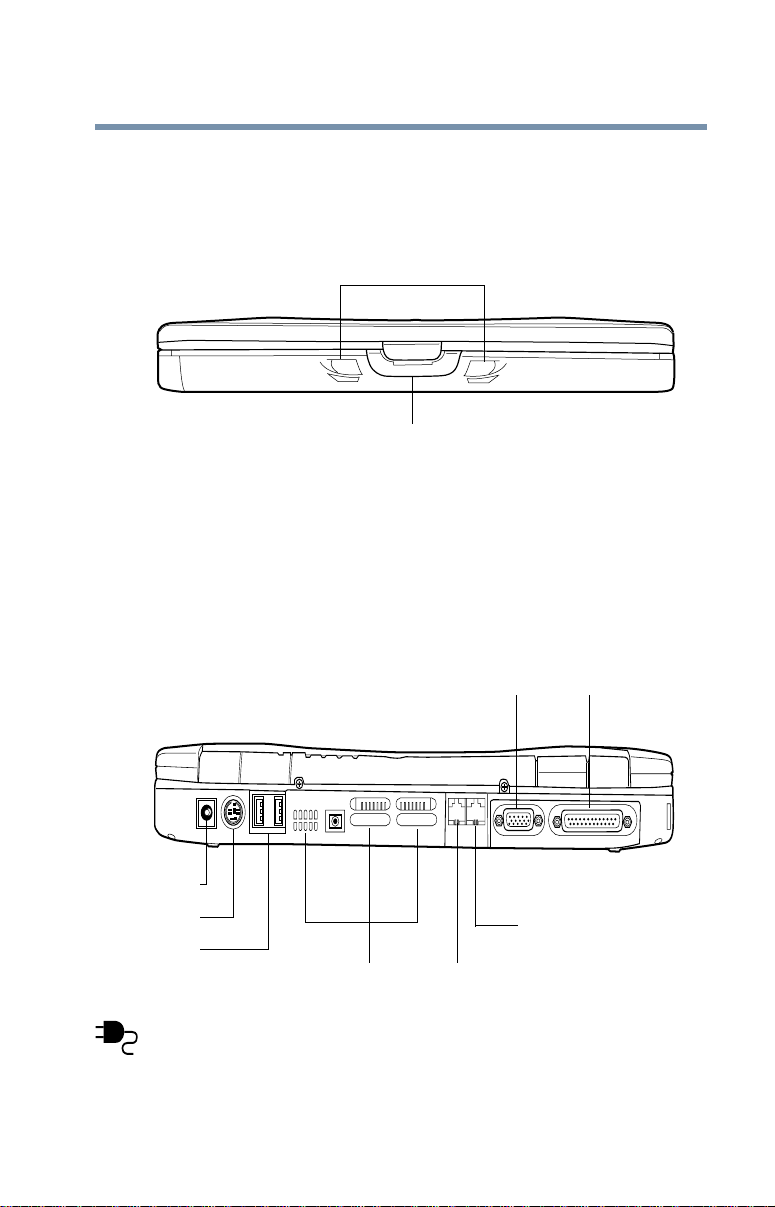
Back
17
Parallel port
Parallel port
LAN port
DC-IN jack
DC-IN jack
PS/2 port
PS/2 port
USB ports
USB ports
Monitor port
Monitor port
Cooling ve nt s Modem port
Cooling ve nt s Modem port
The DC-IN jack is where you plug in the AC adapter.
Part I: Getting to Know Y ourComputer
Finding Your Way Around
Back
The PS/2™port allows you to connect an optional PS/2compatible mouse or external keyboard. Alternatively, you
can connect an optional Y -cab lethat allows youto use a
PS/2 mouse and a PS/2 keyboardsimultaneously.
The USB (UniversalSerial Bus)ports allowsyouto connect
USB peripherals to your computer.
DEFINITION: USB is a peripheral expansion standard th at
supports a data-transfer rate of up to 12 Mbps for
peripherals su ch as keyboards, pointing devices, and
monitors. USB peri pherals have a single standard for
cabling and conne ctors. The USB standard allows hot
swapping of peripherals.
The cooling vents prevent the computer’s central
processing unit (CPU) from overheating so that it can
continue to perform at its maximum speed.
18
CAUTION: T o pre vent possib le overheatin g of the CPU, make
sure you don’t block the cooling vents.
The modem port lets you use a modular cable to connect
the modem directly to a standard telephone line. For more
information, see Using the modem on page 81.
The LAN port lets you connect the computer to a local area
network using a 10/100 Ethernet link.
The parallel port lets you connect a parallel printer or other
parallel device,includingECP-compatibledevices .
The monitor port allows you to connect an external monitor.
Part I: Getting to Know Y ourComputer
Finding Your Way Around
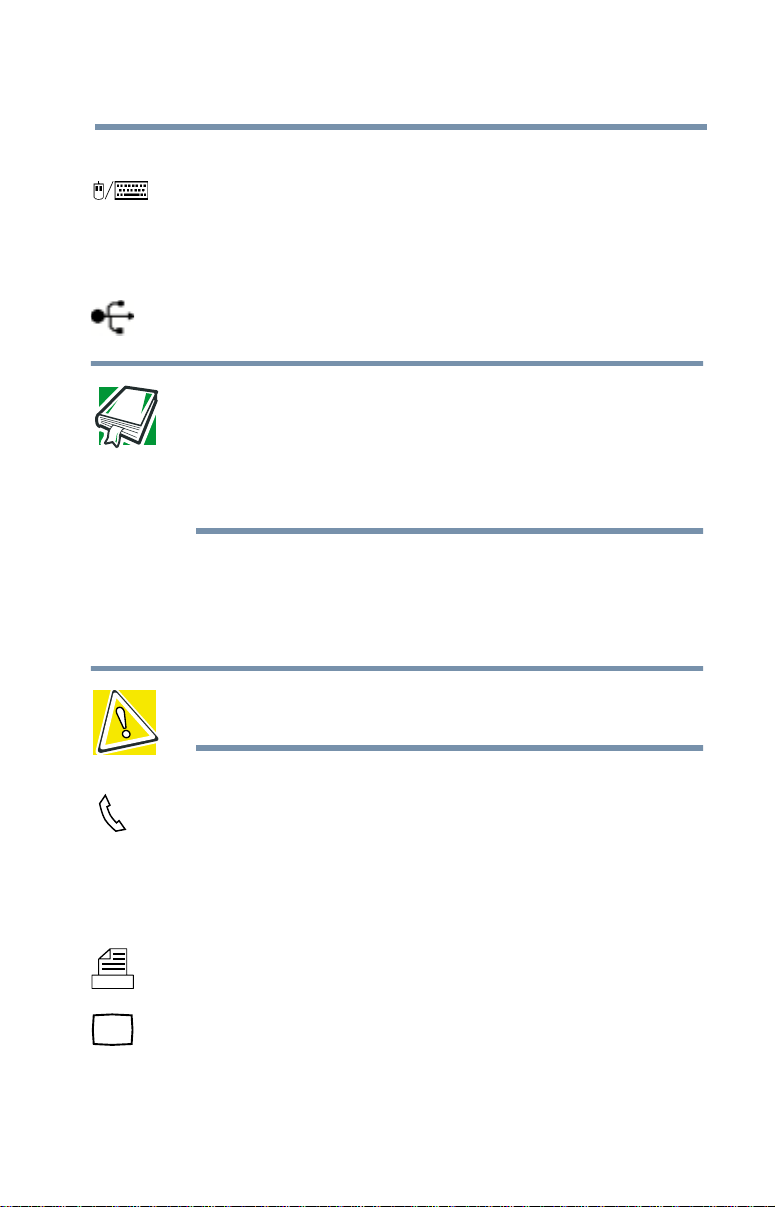
Right side
Right side
19
DVD-ROM
manual eject
button
Video/audio out jack
Microphone jack
Headphone jack
Volume control dial
DVD-ROM
eject button
DVD-ROM drive
The volume control dial lets you adjust the loudness of the
system speakers.
The 3.5 mm headphone jack lets you connect stereo
headphones or other audio-output devices, such as
external speakers. Connecting headphones or other
devices to this jack automatically disables the internal
speakers.
The 3.5 mm microphone jack lets you connect an external
monaural microphone or other audio input device.
The 3.5 mm video/audio out jack allows you to play D VD
audio and video on a projector or TV that accepts audio/
video inputs.
The DVD-R OM drive enables youto playhigh-resolution,
full-screen videos at up to 30 frames per second. Y oucan
also use it to install and run programs from application CDROMs, and to play music CDs.
Part I: Getting to Know Y ourComputer
Finding Your Way Around
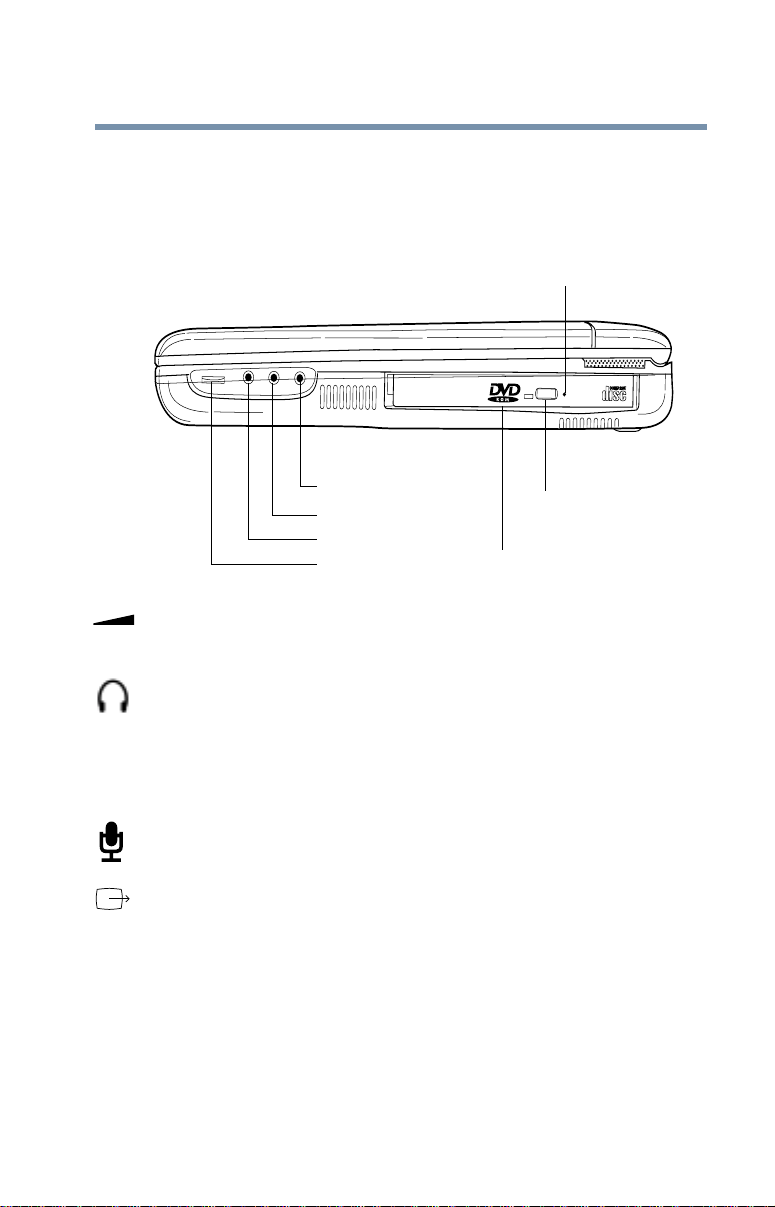
Left side
The DVD-R OM eject button opens the DVD-ROMtray .
The DVD-R OM manual eject button enables you to open
the D VD-ROMtra ywhen the computer is turned off.
Left side
PC Card eject buttons
Security
lock slot
PC Card lock
PC Card slots
20
Diskette drive
Diskette drive release button
Reset button
The security lock slot allows you to attach an optional
®
PORT- Noteworthy
computer lock cable to your computer
to secure it to a large, heavy object such as your desk.
The PC Card lock holds the PC Cards in place once they
are installed.
The two stacked PC Card slots support up to two T ypeI or
Type II PC Cards, or one Type III PC Card. See Using PC
Cards on page 170 for more information.
Part I: Getting to Know Y ourComputer

Finding Your Way Around
Left side
Pressing the Reset button restarts the computer when it is
not responding to the keyboard. This ov errides the Standby
command, which enables you to continue working from
where youleft off.Use this button onlyif all other attemptsat
restarting the computer have failed.
CAUTION: Never use a pencil to press the Reset button.
Pencil lead c an b reak of f in side th e c ompu ter and da mage i t.
Instead, use a slim object such as a straightened paper clip.
The diskette drive release button opens the diskette drive.
The diskette drive allows you to use either high-density or
double-density3.5-inch diskettes.Formoreinformation, see
Using diskettes on page 67.
The PC Card eject buttons release PC Cards from the
corresponding slots.
21
Part I: Getting to Know Y ourComputer
Finding Your Way Around
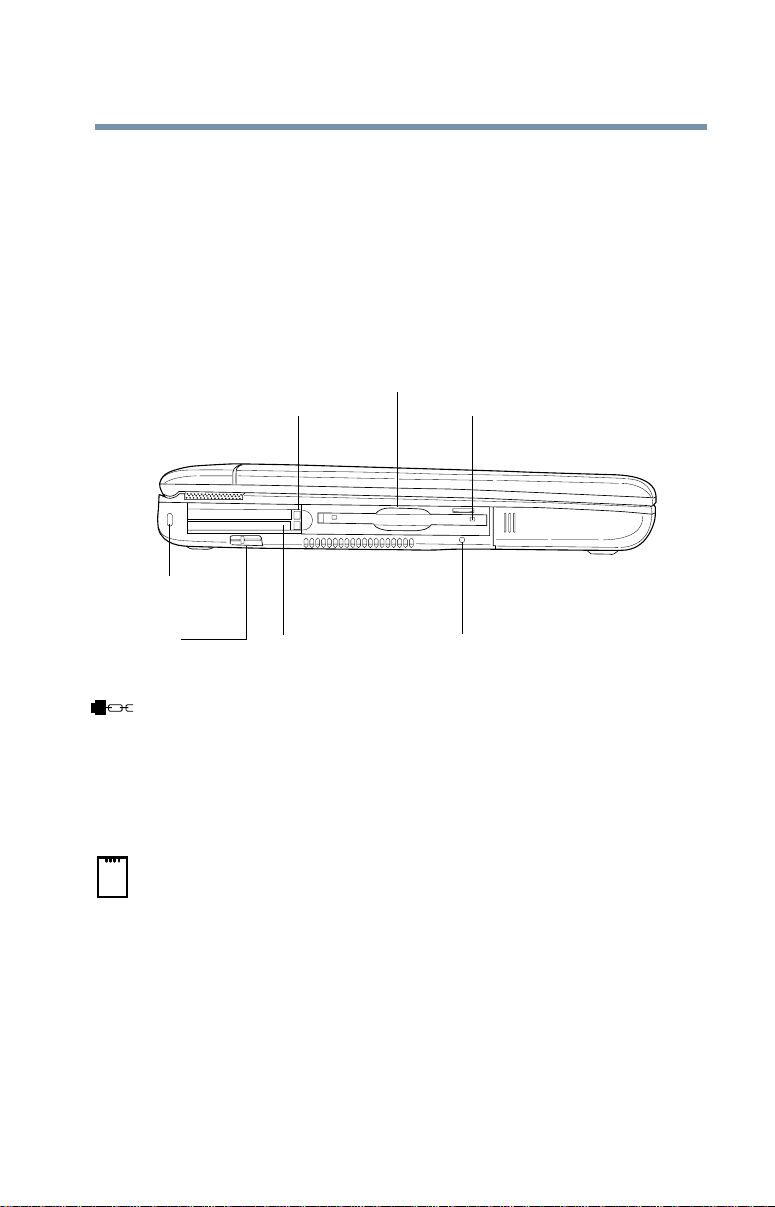
Front with the display open
Front with the display open
22
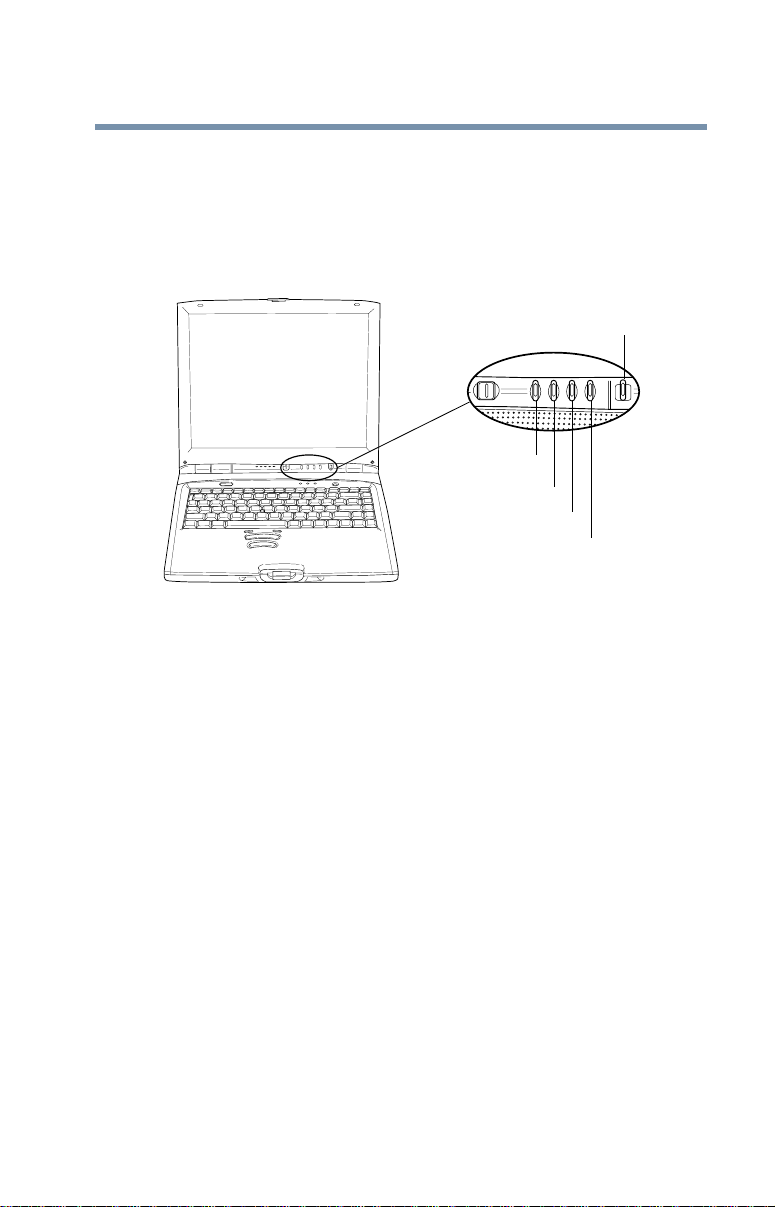
CD/DVD control buttons
Keyboard
indicator panel
CD/DVD/Media Player
switch
System indicator panel
Power button
Function
keys
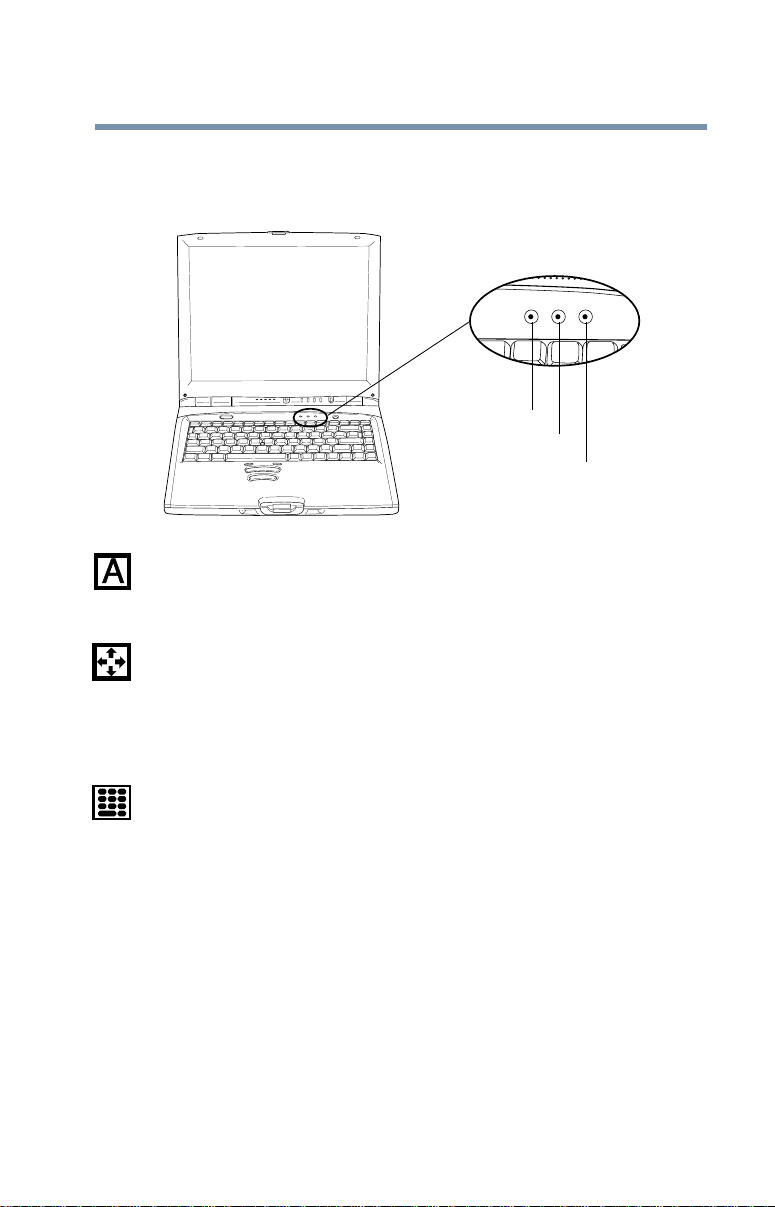
AccuPo int II
control
buttons
The CD/DVDcontrol buttonsallowyouto play audio CDs
when thedisplay panelisclosed and thecomputeris turned
off. You can also use them to play CDs and D VDs with the
display panel open and the computer turned on. For a
description of these controls, see CD/DVDcontrol buttons
on page 26.
Screen
Speakers
Internet butto n
Pointing device
Keyboard
Palm rest
The lights on the keyboard indicator panel provide
information about various keyboard functions. For details,
see Keyboard indicator panel on page 24.
The CD/D VD/MediaPlayer switchsets the computer to turn
on the CD/DVDpla yerautomatically if there is a disc in the
D VD-ROMdrive when the computer is turned off, or to
power up and launch Windows Media Player.
Part I: Getting to Know Y ourComputer

Finding Your Way Around
Front with the display open
The lightsonthe system indicator panel provideinf ormation
about various system functions. For a description of these
lights, see System indicator panel on page 25.
23
On
The power button turns the computer on and off.
The function keys, when used with the
Fn key, activate
sever aldifferentsystem functions. For more information,
see Hot Keys on page 248.
®
The AccuPoint
II control buttons work with the pointing
device.Thelarger buttonacts as the primary button on a
mouse. The smaller button acts as the secondary mouse
button. The two small buttons above the primary button are
up and down scroll buttons. For more information, see
Using the AccuPoint II pointing device on page 46.
The front panel provides a palm rest to assist you in
maintaining proper posture while using the computer.
The 85-key keyboardprovidesall the functionality of a fullsize keyboard.Formore information, see Using the
keyboard on page 60.
The AccuPoint IIpointing devicecombines the function of a
mousewiththe convenienceof neverhaving toremoveyour
hands from the keyboard.
The Internet button turns on the computer and launches
your defaultInternet browser.If youhav en’t established an
®
Internet protocol, the button launches MSN
Internet
Access.
The stereo speakers and subwoofer option let you hear
sounds, such as system alarms associated with your
software,and music from D VD-ROMsand audio CDs.
The computer’sscreen is a liquid crystal display (LCD) that
provides clear,sharp images. For more information on your
viewing options, see Satellite video modes on page 267, or
see Display modes on page 251.
Part I: Getting to Know Y ourComputer
Finding Your Way Around
Front with the display open
Keyboard indicator panel
The caps lock light glows when you press the Caps Lock key .
When this light is on, pressing a letter key on the keyboard
produces an uppercase (capital) letter .
The cursorcontrolmodelightglows when thecursor control
overlayis on. When this light is on, pressing an overlay key
moves the cursor in the direction of the white arrow printed
on the front of the key instead of typing the letter printed on
the top of the key .
24
Caps lock light
Cursor control mode light
Numeric mode light
The numeric mode light glows when the numeric overlay is
on. When this light is on, pressing an overlay key types the
white number printed on the front of the key instead of
typing the letter printed on the top of the key.
Part I: Getting to Know Y ourComputer

Finding Your Way Around
Front with the display open
System indicator panel
The AC power light glows green when the computer is
connected to an external power source.
25
AC power light
On/off light
Battery light
Hard disk drive light
Disk activity light
On
The on/off light glows green when the computer is on. The
light glows amber when the computer is in Standby mode.
Thebattery lightindicates the mainbattery’s currentcharge .
It glows green when the battery is fully charged. It glows
amber while the battery is being charged. It does not glowif
thee xternalpowersource isdisconnectedor if thebattery is
completely discharged.
The hard disk drive light flashes green while the hard disk
drive is being accessed.
The disk activity light flashes green when the diskette drive
or the DVD-ROMdriveisbeing accessed.
CAUTION: Never turn off the computer while any of the
drives are in use. Doing so may damage the disk and result
in a loss of data.
Part I: Getting to Know Y ourComputer
Finding Your Way Around
Front with the display open
CD/DVD control buttons
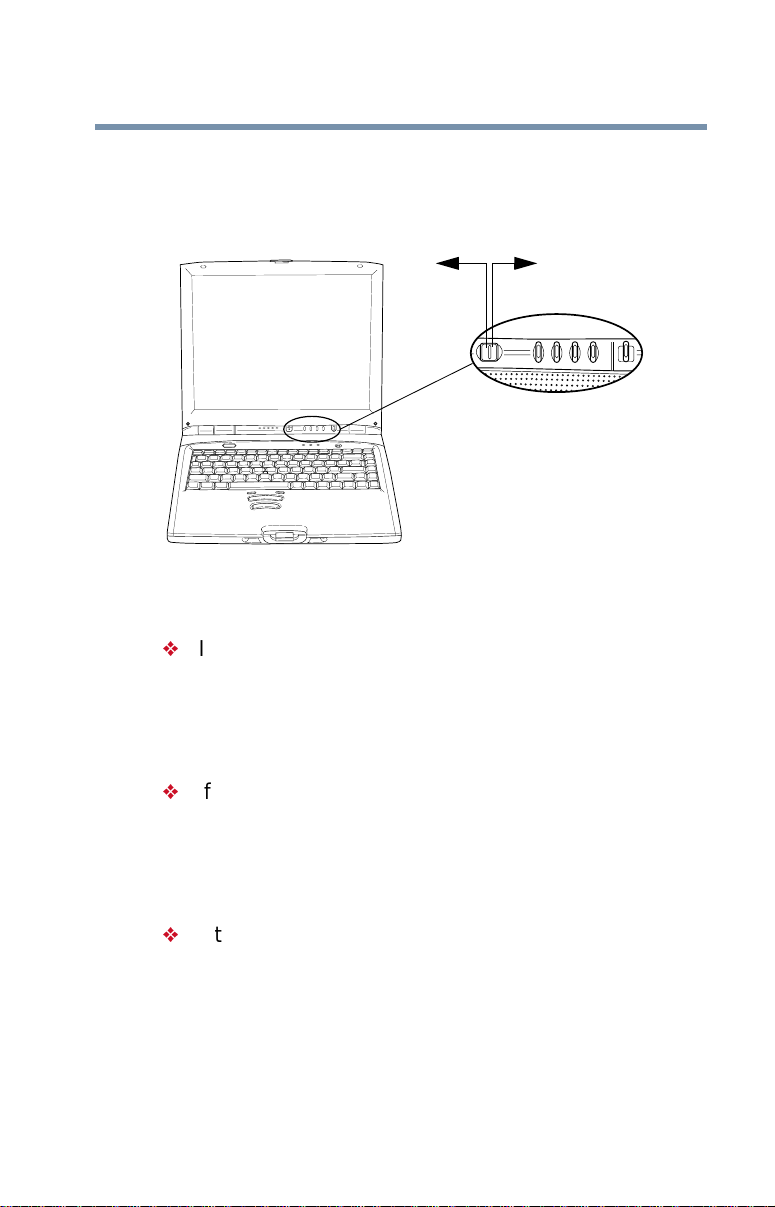
The control buttons on the top of the computer are for
playing CDs and DVDs .
The previous track buttonreturns to the preceding track on
the disc.
26
Bass button
Previous track
Play/pause
Stop/eject
Next track
The play/pausebutton starts playing the disc,or pauses the
disc if it is currently playing.
Thestopbuttonstopsadiscthatiscurrentlyplaying.Press
thebuttonagaintoejectthedisc.
Thene x ttrack bu tt onskips tothefollowi ngtrackonthe disc.
The bass button turns the subwoofer speaker on and off.
Part I: Getting to Know Y ourComputer
Finding Your Way Around
Front with the display open
CD/DVD/Media Player power switch
When the computer is turned off and the display panel is
closed:
If there is a DVD in the drive when the CD/DVD/Media
Players witchis move d to the left side (CD/DVD),the
system will power up and launch D VD Express. For
D VDs,you must open the display panel in order to view
the video.
27
Media PlayerCD/DVD
If there is a music CD in the drive when the CD/D VD/
MediaPlayerswitchismovedtotheleftside(CD/DVD),
the soundsystemstarts and theCD plays.You can play
audio CDs with the display open or closed and the
computer turned on or off.
If theCD/DVD/Media Playerswitch is movedto the right
side (Media Player),the system will power up and
launch Windows Media Player .
Formoreinformation, see Playinga CD or DVD on page 70.
Part I: Getting to Know Y ourComputer
Finding Your Way Around
Bottom
Bottom
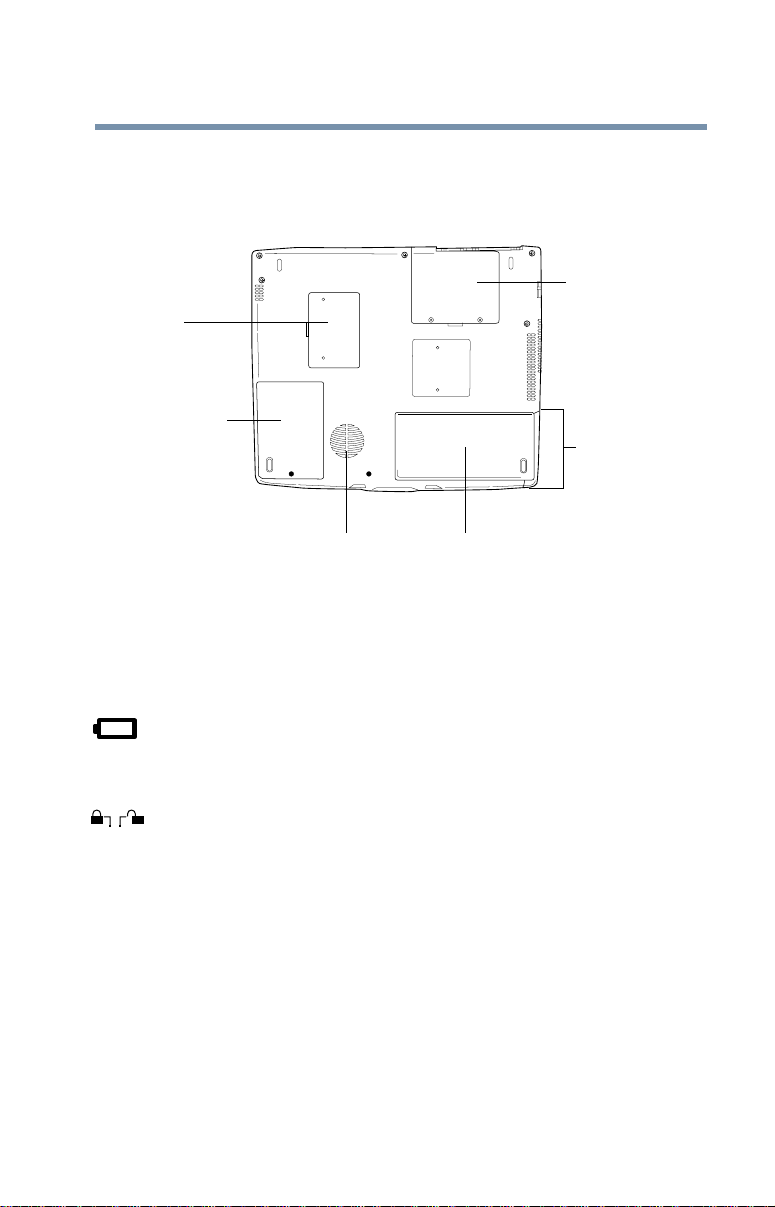
28
Expansio n m e m ory sl ot
cover
Hard disk drive cover
Thee xpansionmemory slotcover protectsthe space where
you insert additional memory.See Installing additional
memory (optional) on page 36 for detailed information.
The hard disk drive cover protects the computer’shard disk.
Thebatterycov erprotects thebattery .Forinformation about
replacing the battery,see Changing the main battery on
page 101.
The battery cover latch (which is the entire molded panel in
front of the battery cover) secures the battery coverto the
computer,preventing the cover from dislodging from the
computer case.
Bass speaker
Modem/LAN cover
Battery cover latch
Battery cover
The modem/LAN cover protects the PCI Card which
facilitateseither amodem connection, orbotha modemand
a LAN connection.
Part I: Getting to Know Y ourComputer

Chapter 2

Getting Started
This chapter provides tips for working comfortably ,
describes how to connect components, and explains what
to do the first time you use your notebook computer.
Selecting a place to work
Your computer is portable and designed to be used in a
variety of circumstances and locations.
Creating a computer-friendly environment
Place the computer on a flat surface which is large enough
forthe computer and any other items you need touse,such
as a printer.Leave enough space around the computer and
other equipment to provide adequate ventilation and
prevento verheating.
30

Getting Started
Selecting a plac e to work
To keepy ourcomputerin prime operating condition, protect
your work area from:
Dust, moisture, and direct sunlight.
Liquids and corrosive chemicals.
CAUTION: If you spill liquid into the co mputer, turn it off,
unplug it from the AC power source, and let it dry out
completely bef or e tu rn in g it on aga in .
If the computer does not operate correctly after you t urn it
back on, contact a Toshiba authorized service provider.
Equipment that generates a strong electromagnetic
field, suchasstereospeakers (other than speakers that
are connected to the computer) or speakerphones.
Rapid changes in temperature or humidity and sources
of temperature change such as air conditioner vents or
heaters.
31
Extreme heat, cold, or humidity. Operate the computer
within atemperaturerangeof 41 degrees to95degrees
F and 20 percent to 80 percent non-condensing
humidity.
Keeping yourself comfortable
Strain and stress injuries are becoming more common as
people spend more time using their computers. With a little
care and proper use of the equipment, you can work
comfortably throughout the day .
This section provides hints on avoiding strain and stress
injuries. For more information, consult books on
ergonomics, repetitive-straininjury, and repetitive-stress
syndrome.
Part I: Getting to Know Y ourComputer

Getting Started
Selecting a plac e to work
Placement of the computer
Proper placement of the computer and external devices is
important to avoidstress-relatedinjuries.
Place the computer on a flat surface at a comfortable
height and distance. You should be able to type without
twisting your torso or neck, and look at the screen
without slouching.
If you are using an external monitor, the top of the
display should be no higher than eye level.
Ifyouuse a paperholder,setit at aboutthesame height
and distance as the screen.
Seating and posture
When using your computer, maintain good posture with
your body relaxed and your weight distributed evenly.
Proper seating is a primary factor in reducing work strain.
Some people finda backless chair more comfortablethana
conventionalchair .
32
Below eye level
Footrest
Correctposture and positioningof the computer
Part I: Getting to Know Y ourComputer
Approximately
90-degree angles

Getting Started
Selecting a plac e to work
Whichevertype you choose, use the following guidelines to
adjust your chair for maximum computing comfort.
Positionyour chair so that the keyboard is at or slightly
belowthe levelof yourelbow. You should beable to type
comfortably with your shoulders relaxed and your
forearms parallel to the floor.
If you are using a conventional chair:
Your knees should be slightly higher than your hips. If
necessary ,use a footrestto raise thelev elof yourknees
and ease the pressure on the back of your thighs.
Adjust the back of your chair so that it supports the
lowercurve ofyourspine. Ifnecessary, use acushionto
provide extrabacksupport. Lower-back-support
cushions are availableatmany office supply stores.
Sit with your back straight so that your knees, hips, and
elbowsf ormapproximately90-degree angles when you
work. Do not slump forwardor lean back too far .
33
Lighting
Proper lighting can improve the visibility of the display and
reduce eyestrain.
Positionthe display panel or external monitor so that
sunlight or bright indoor lighting does not reflect off the
screen. Use tinted windows or shades to reduce glare.
Av oidplacing your computer in front of a bright light that
could shine directly in your eyes.
If possible, use soft, indirect lighting in your computer
work area.
Part I: Getting to Know Y ourComputer

Getting Started
Selecting a plac e to work
Arms and wrists
Av oid bending, arching, or twisting your wrists. Keep
them in a relaxed, neutral position while typing.
Exercise your hands, wrists, and arms to improve
circulation.
WARNING: Using the computer keyboard incorrectly may
result in disco mfort and possible injury. If your hands,
wrists, and/or arms bother you while typing, stop using the
computer and rest. If the discomfort persists, consult a
physician.
Work habits
The ke yto avoidingdiscomfort orinjuryfromstrain is to vary
your activities. If possible,schedule a variety of tasks into
your working day. Finding ways to break up the routine can
reduce stress and improve your efficiency.
34
Take frequent breaks to change position, stretch your
muscles, and relieveyour eyes. A break of two or three
minutes every half hour is more effective than a long
break after severalhours.
Av oidperformingrepetitiveactivities for long periods.
Intersperse such activities with other tasks.
Focusing your eyeson your computer screen for long
periods can cause eyestrain. Look away from the
computer frequently and focus your eyes on a distant
object for at least 30 seconds.
Part I: Getting to Know Y ourComputer

Getting Started
Setting up your computer
Precautions
Your computer is designed to provide optimum safety and
easeofuse, and towithstand the rigorsoftravel.Y oushould
observe certain precautions to further reduce the risk of
personal injury or damage to the computer.
CAUTION: Never apply heavy pressure to the computer or
subject it to sharp imp acts. Excess ive pressur e or impact can
damage computer components or otherwise cause your
computer to malfunction.
Some PC Cards can become hot with prolonged use. If two
cards are installed, both can become hot even if only one i s
being used. Ove rheating of a PC Card can resul t in errors or
instability in its operation.
Be careful when you remove a PC Card that has been used
for a long period.
35
Setting up your computer
Your computer contains a rechargeable high-capacity
battery that needs to be charged beforeyou can use it the
first time.
Setting up your computer may include:
Upgrading your computer by installing more memory
Connecting a printer
Connecting a mouse
Connecting the AC adapter
HINT : To create a compl ete des ktop environ ment, see Using
your computer at the office on page 159.
Part I: Getting to Know Y ourComputer

Getting Started
Setting up your computer
Installing additional memory (optional)
Your computer comes with enough memory to run most of
today’s popular applications. You may want to increase the
computer’s memory if youuse complex softwareor process
large amounts of data.
Additional memory comes in 64 MB, 128 MB, and 256 MB
modules. You can only install one module in your
computer’s expansion memory slot, located on the bottom
of your computer.
You need a small Phillips screwdriver to install a memory
module. If youare adding memory after you have started to
use the computer, begin at step 1, otherwise skip to step 2.
1 If the computer is on, click Start, Shut Down, select
Shut down, then click OK.
Windows Millennium Edition turns off the computer.
36
2 Unplug and remove any cables connected to the
computer.
3 Turn your computer upside down and locate the
expansion memory slot cover .
Expansion memory
slot cover
Bottom of the Satellite 2800/2805 Series computer
Part I: Getting to Know Y ourComputer

Getting Started
Setting up your computer
4 Using the small Phillips screwdriver ,unscrew the two
screwsthatsecurethe memory slot cover ,then remove
the memory slot cover .
Removing the memory slot cover scre ws
5 Put the screwsand the cover inasafeplace so that you
can retrieve them later.
37
CAUTION: Static electricity can damage the memory module.
Before you handle the module, touch a grounded metal
surface to di scharge any static electri city you may have built
up.
To avoid damaging the memory module, be careful not to
touch its gold connector bar (on the side you insert into the
computer).
6 Remove the memory module from its antistatic
packaging.
7 Holding the memory module by its edges so that the
gold connector bar faces the slot, fit the module into the
socket.
Part I: Getting to Know Y ourComputer

Getting Started
Setting up your computer
8 Gently press down on the memory module connector
until the clips snap into place.
Do not force the module into position. The memory
module should be level when secured in place.
Inserting the memory module
38
CAUTION: Avoid touching the connectors on the memory
module or on the computer. Grease or dust on the
connectors may cause memory access problems.
9 Replace the memory slot cover .
10 Replace the screws and tighten them.
11 Turn the computer over and reconnect any cables you
removed.
When you turn on your computer, it automatically
recognizestheadditional memory. If the computerdoes
not recognize the memory, shut down the computer,
remove the memory slot cover, and make sure the
memory module isseated properly ,as described instep
7.
Part I: Getting to Know Y ourComputer

Getting Started
Setting up your computer
Removing a memory module
1 Followsteps 1 through 5 in Installingadditional memory
(optional) on page 36.
2 Gently pull up on the module to disconnect it, then
gently pull it out of the slot.
3 Complete the procedure by following steps 9 through
11.
Connecting a mouse
You may want to use a mouse instead of the computer’s
built-in pointing device. A USB mousedisab lesthe
AccuPoint II pointing device .With a PS/2 mouse, you can
choose to have the
AccuPointII pointing device active at the same time.
Connecting a USB mouse
39
To connect a USB mouse,plug the mouse cableinto one of
the USB ports.
Connecting a PS/2 mouse
CAUTION: The computer must be turned off. Connecting a
PS/2 mouse with the computer’s power on may damage the
mouse, the computer, or both.
To connect a PS/2 mouse, plug the mouse cable into the
PS/2 port.
By default, the system configures the PS/2 mouse to work
when it is connected at power on, or the AccuPoint II
pointing device to work otherwise.
Part I: Getting to Know Y ourComputer

Getting Started
Setting up your computer
To use both the PS/2 mouse and the AccuPoint II pointing
device simultaneously, see UsingaPS/2mousewiththe
AccuPointII on page 52.
TECHNICAL NOTE: You can only connect one P S/2 devic e at
a time, unless you pu rchase an option al Y- ca bl e. Using a Ycable allows you to connect a PS/2 mouse and a PS/2
keyboard simultaneously.
Connecting a printer
Before connecting a printer, you need to know whether it
uses a serial or a parallel interface. Check the printer’s
documentation. If the printer can be switched between
serial and parallel mode,chooseparallelbecause it is faster.
Youalsoneedasuitableprintercable,whichmaycomewith
your printer.Otherwise, youcan purchase one from a
computer or electronics store.
40
NOTE: If your printer is ECP- or IEEE-compliant, make sure
your printer cable is an IEEE 1284 cable.
To connect a parallel printer:
1 Turn off the computer.
2 Connect the printer cable to the printer and to the
computer’s parallel port.
T o the computer
Identifying the ends of a parallel printer cable
To the printer
Part I: Getting to Know Y ourComputer

Getting Started
Setting up your computer
3 Plug the printer’spowercableintoaliveACoutlet.
See your printer documentation for additional configuration
steps, or see Settingupaprinteron page 49.
Connecting the AC adapter
The AC adapter enables you to power the computer from
an AC outlet and to charge the computer’sbatteries. The
AC powerlight on the computer glows when the device is
plugged in.
Power cable
41
AC adapter
P owercable and AC adapter
To connect AC power to the computer:
1 Connect the power cable to the AC adapter.
Connecting the power cable to the AC adapter
Part I: Getting to Know Y ourComputer

Getting Started
Setting up your computer
2 Plug the AC adapter into the DC-IN jack on the back of
the computer.
Connecting the adapter to the computer
3 Connect the power cable to a live electrical outlet.
The AC power and battery indicator lights glow .
42
DANGER: Damaged power cab les can cause fire or electric
shock. Never modify, forcibly b end, place heavy objects on
top of, or apply heat to the power cable.
If the power cable becomes damaged or the plug overheats,
discontinue use. There is a risk of electric shock.
Never remove the po wer pl ug from t he ou tlet wi th we t hands.
Doing so may cause an electric shock.
CAUTION: Using the wro ng AC adapter could damage your
computer. Toshiba assumes no liability for any damage in
such cases. The cu rrent rating for the co m p uter is 3.0
amperes.
Never pull directly on the power cable to unplug it. Hold the
power plug when removi ng the cable from the outlet.
Part I: Getting to Know Y ourComputer

Getting Started
Charging the battery
Charging the battery
Before you can use the battery to power the computer, you
must charge it. Connect the computer to a live power outlet
using the AC adapter and power cable. The on/off light
glows green and the battery light glows amber.
Once the computer is connected to a power outlet, you can
chargethebattery withthecomputer turned off oron.When
the computer is turned off, the battery charges in two to
three hours.
When thecomputeris turned on,thebattery charges in four
to ten hours, if the computer is not consuming full power.
For more information on battery use, see Running the
computer on battery power on page 94.
CAUTION: Once the battery is charged for the first time,
avoid leaving the computer plugged in and turned off for
more than a few hours at a t ime.
43
Part I: Getting to Know Y ourComputer

Getting Started
Using the computer for the first time
Using the computer for the first time
Opening the display panel
Press the display latch and lift the display panel.
Lift
Push
Opening the displaypanel
44
CAUTION: To avoid damaging the display panel, don’t force
it beyond the point where it moves easily.
Never lift or move the computer using the display panel.
Part I: Getting to Know Y ourComputer

Getting Started
Using the computer for the first time
T urning on the power
1 Check that all the drives are empty.
2 If you havea printer connected to your computer, turn
on the printer and wait untiltheprinterindicatesthatitis
ready (on line).
45
On
3 Turn on the computer by pressing the power button
located on the top of the keyboard.
Pressingthe power button
NOTE: When you turn on the computer for the first time,
don’t turn off the power again until the operating system has
loaded comple tel y.
The AC power light glows when the computer is
connected to an external power source.
Part I: Getting to Know Y ourComputer

Getting Started
Using the computer for the first time
The battery light:
Glows amber while the battery is being charged.
Glows green when the battery is fully charged.
Is unlit when the computer is not connected to an
external power source.
The harddiskdrivelight flashes to indicatethatthe hard
disk drive is currently in use.
CAUTION: Never turn off the computer while any of the
drives are in use.
Using the AccuPoint II pointing device
The round button in the middle of the keyboard is the
AccuPointII pointing device. It enables you to movethe
cursor and to select items on the screen. (If you would
rather use a mouse or trackball,youcan connect one to the
computer’s USB port or PS/2 port. See Connecting a
mouse on page 39 for more information.)
46
Up scroll button
Primary button
AccuP oi nt II control buttonsand pointing device
Part I: Getting to Know Y ourComputer
Pointing device
Down scroll button
Secondary button

Getting Started
Using the computer for the first time
To move the cursor,gently push the pointing device in the
direction you want the cursor to move. Pushing harder on
the pointing device moves the cursor faster .
When a step instructs you to click or choose an item, move
the cursor to the item, then press and release the primary
button. To double-click,pressthe primary button twice in
rapid succession. The primary button usually corresponds
to the left mouse button.
The function of the secondary button depends on the
program you are using. It usually corresponds to the right
mouse button. Check yourprogram’s documentation to find
whether it uses the right mouse button.
Press the up or down scroll buttons to scroll through the
document you are viewing.
Setting up your software
47
The first time you turn on your computer, Windows
Millennium Edition guides you through several essential
steps to set up your computer.
Select Time Zone—Select one of the timezoneslisted
by clicking the up and down arrow keys to highlight the
appropriate time zone, then click Next to change the
setting.
End User License Agreement — Youwillbeprompted
to complete information for Microsoft’soperating
system.
Part I: Getting to Know Y ourComputer

Getting Started
Using the computer for the first time
Register Online — Enables you to register your
computer withT oshibaonline.T oregister yourcomputer
at a later time, select No, I do not want to register at
this time. You can click on the registration icon on your
desktop or complete and mail the registration card that
came with your computer.
Registering your computer lets T oshiba keep youup-todate with information about new products and
upgrades, and also extends your Toshiba warranty
worldwide at no charge to you.
NOTE: To perform online operations, your computer’s
modem must be connected to a voice-grade telephone line,
or you must be connected to a local area network.
WarrantyExtensions and Upgrades — Provides
important information from Microsoft.
48
Internet Access — Guides you through signing up for a
new Internet account with AT&T WorldNet
®
Service,or
assists you in setting up your computer to work with
your existingInternet account. If you choose to sign up
for Internet access with A T&TWorldNet, youwill not be
charged for the call.
®
Toshiba and Yahoo!
have joined together to offer
you a free account on Yahoo!. In order to sign up for
Yahoo!, you must have an Internet access account.
Completing installation
Upon completion, you will be prompted to click Finish to
restart your computer.
Part I: Getting to Know Y ourComputer

Getting Started
Using the computer for the first time
Setting up a printer
If you started your computer with a printer connected and
turned on, it may havebeen detected automatically (Plug
and Play). If this is not the case, then you must install the
printer driver for the model of printer that is connected to
your computer.You install the printer driver either by
followingthe instructions indicatedinyour printer manual,or
by using the Windows Millennium Edition Add Printer
Wizard.
Ifyouplantosetupaprinterlater,clickCancel.
Using the Add Printer Wizard
To set up a printer with the Add Printer Wizard:
1 Click the Start button, then point to Settings, and click
Printers.
The Printers window appears.
49
Printers window
Part I: Getting to Know Y ourComputer

Getting Started
Using the computer for the first time
2 Double-click AddPrinter.
The Add Printer Wizard starts.
Add Printer Wizard
50
3 Click Next.
The Add Printer Wizard asks you to select your printer.
TECHNICAL NOTE: If your prin ter is Plug and Play, Windows
Millennium Edition recognizes it automatically. You can
ignore the remainder of this section. See your printer
manual.
4 Iftheprinteryouaresettingup:
Is not connected to a network, select Local printer.
Is connected to a network, select Network printer.
5 Click Next.
Part I: Getting to Know Y ourComputer

Getting Started
Using the computer for the first time
TheAddPrinterWizardpromptsyoutoselectyour
printer.
6 Fromthe list of manufacturersand printers, select your
printer,then click Nex t.
7 Select the port settings according to the instructions in
your printer’s documentation and the port to which your
printer is connected, then click Next.
The Add Printer Wizard prompts you to enter a
“friendly”printer name.
8 Enter a name for your printer.
HINT: If you are using more than one printer, make sure t he
name is descriptive enough to help you tell the difference.
9 To set up the printer to be:
51
The default printer for Windows Millennium Edition,
click Yes.
Av ailab lewhen specifically requested, click No.
10 Click Next.
Windows Millennium Edition prompts you to print a test
page.
11 If your printer is connected and turned on, click Finish
to print a test page.
To complete the setup procedure without printing a test
page, click No,then clickFinish.
You are now ready to print.
12 If you requested a test page, click OK to print.
Depending on your program, you may see various
messages indicating the status of your print job.
Part I: Getting to Know Y ourComputer

Getting Started
Using the computer for the first time
Using a PS/2 mouse with the AccuPoint II
To set up a PS/2 mouse to work simultaneously with the
AccuPointII pointing device:
1 Click Start,pointtoSettings, then clickControl Panel.
2 Double-click Toshiba HWSetup, then select the
Pointing Devices tab.
3 Under Pointing Devices , select Simultaneous.
This option configures both the AccuPointII pointing
device and the PS/2 mouse to work at the same time.
You must restart the computer for the setting to take
effect.
TECHNICAL NOTE: The system cannot detect a PS/2 mouse
if you connect it after you start the computer.
52
4 Click OK, then click Yes to restart the computer.
Part I: Getting to Know Y ourComputer

Getting Started
Shutting down the computer
Shutting down the computer
It is very important that you let the operating system shut
downyourcomputer .As itshuts down,Windows Millennium
Edition performs a number of tasks that ensure that
everything is in place the next time you turn on the
computer.To shut down Windows Millennium Edition and
turn off your computer:
1 Click Start, then click Shut Down.
Windows Millennium Edition displays the Shut Down
Windows dialog box.
53
Shut Down W indowsdialog box
2 Select Shut down,thenclickOK.
Windows Millennium Edition displays a message that it
is shutting down and turns off the computer.
Forotherwa ysto shut down yourcomputer ,seeTurning off
the computer on page 84.
Part I: Getting to Know Y ourComputer

Getting Started
Caring for your computer
Caring for your computer
This section gives tips on cleaning and moving your
computer,lists some basic precautions and explains howto
fit anantitheftlock. Forinformationabouttaking care of your
computer’s battery ,see Running the computer on battery
power on page 94.
Cleaning the computer
To keep your computer clean, gently wipe the display panel
and exterior case with a lightly dampened cloth. Ask your
Toshiba dealer for suggestions for appropriate cleaning
products.
CAUTION: Keep liquid, including cleaning fluid, out of the
computer’s keyboard, speaker grille, and other openings.
Never spray cleaner directly ont o th e co m p uter. N e v er use
harsh or caustic chemical products to clean the computer.
54
Part I: Getting to Know Y ourComputer

Getting Started
Caring for your computer
Moving the computer
Beforemovingyour computer, evenacross the room, make
sure all disk activity has ended (the drive activity lights stop
glowing) and all external peripheral cables are
disconnected.
CAUTION: Never pick up the computer by its display panel
or by the back (where the ports are located).
Although your notebook computer is built to withstand
reasonable shock and vibration, transport it in a carrying
case for long trips. You can purchase a carrying case from
your Toshiba dealer or through the
Catalog.
Other precautions
55
Toshiba Accessories
Do not spill liquids into the computer’sk eyboard.
If youdo spill a liquidthat gets into theke yboard,turn off
the computer immediately .Leav ethe computer turned
off overnight to let it dry out before you use it again.
Neverturn off the computer if a disk activity light
indicates that a drive is being accessed.
Turning off the computer while it is reading from or
writingtoadiskmaydamagethedisk,thedrive,or
both.
Keep the computer and diskettes awayfromobjects
that generate strong magnetic fields, such as large
stereo speakers.
Information on diskettes is stored magnetically. Placing
a magnet too close to a diskette can erase important
files.
Part I: Getting to Know Y ourComputer

Getting Started
Caring for your computer
Scan all new files for viruses.
This precaution is especially important for files you
receive via diskett e ,email, or downl oadfrom the
Internet. Occasionally ,ev ennew programs you buy
from a supplier may contain a computer virus. Your
computer comes with a virus-scan program.
Using a computer lock
You may want to secure your computer to a heavy object
suchasyour desk. Theeasiestwaytodo this istopurchase
an optional PORT-Noteworthy computer lock cable.
56
PORT -Note worthy computer lock cable
To secure the computer:
1 Loop the cable through or around some part of a heavy
object.
Make sure there isnowa yfor a potential thief to slip the
cable off the object.
2 Passthe locking end through the loop.
Part I: Getting to Know Y ourComputer

Getting Started
Caring for your computer
3 Insert the cable’slockingend into the security lock slot
located on the left side of the computer,then rotate the
keya quarter turn and remove it.
The computer is now securely locked.
Locking the computer
57
Part I: Getting to Know Y ourComputer

Chapter 3

Learning the Basics
This chapter lists some computing tips and provides
important information about basic features.
Computing tips
Saveyourwork frequently.
Your work sta ysin the compute r’s temporary memory
untilyousaveittothedisk.Youwillloseallthework
done since you last saved, if,forexample, a system
error occurs and you must restart your computer, or
your battery runs out of charge while you are working.
HINT: Some programs have an automatic save feature which
you can turn on. Th is feature saves your file to the ha rd disk
at preset intervals. See your software documentation for
details.
59

Learning the Basics
Using the keyboard
Back up your files to diskettes (or other removable
storage media) on a regular basis. Label the backup
copies clearly and store them in a safe place.
It is easy to put off backing up because it takes time. If
your hard disk suddenly fails, you maylose all the data
on it unless you have a separate backup copy.
Use ScanDisk, Disk Defragmenter, and the
Maintenance Wizard regularly to conserve disk space
and help your computer perform at its optimal level.
Consult your Windows Millennium Edition
documentation for more information on these and other
utilities.
Before turning off the computer, always use the Shut
down command (unless you want to use Standby or
Hibernation mode as described in T urning off the
computer on page 84).
60
CAUTION: Windows Millen nium Edition records
information, such as your desktop setup, during its
shutdown procedu re. If you don’t let Windows Millennium
Edition shut down normally, details such as new icon
positions may be lost .
Using the keyboard
Ke yboar d
Part I: Getting to Know Y ourComputer

Learning the Basics
Using the keyboard
Character keys
Typing with the character keys is very much like typing on a
typewriter,except that:
The spacebar creates a space character instead of just
passing over an area of the page.
The lowercase l (el) and the number 1 are not
interchangeable.
The uppercase letter O and the number 0 are not
interchangeable.
The Caps Lock keychanges only the alphabet keys to
upper case — the number and symbol keys are not
affected.The caps lock light on the keyboard indicator
panel illuminates when you press the
Ctrl, Fn, and Alt keys
61
Caps Lock key .
Alt
Fn
Ctrl
Ctrl, Fn andAlt keys
The
Ctrl,Fn, and Alt keysdo differentthingsdepending on the
program you are using. For more information, see your
program documentation.
Part I: Getting to Know Y ourComputer
.

Learning the Basics
Using the keyboard
Function keys
The function keys (not to be confused with the Fn key) are
the 12 keys at the top of the keyboard.
F1 F2 F3 F4 F5 F6 F7 F8 F9 F10 F11 F12
Function keys
F1 through F12 are called function keys because they run
programmed functions when you press them. Used in
combinationwiththe
run specific functions on the computer.
Windows special keys
62
Fn key, function ke ysmarked withicons
Application key
Windows logo key
Windowsspecial keys
The keyboardprovides two keysthathav especial functions
in Windows Millennium Edition:
The Windows logo key opens the Start menu.
The Application key has the same function as the
secondary button of the AccuPoint II pointing device(or
the right mouse button).
Part I: Getting to Know Y ourComputer

Learning the Basics
Using the keyboard
Overlay keys
F1 F2 F3 F4 F5 F6 F7 F8 F9 F10
Esc
!
£
"
2
1345790
QW RTYUI OP
E
ASDFGHJK L
Caps
Lock
Shift
Alt
Ctrl
Fn
Ke yboar doverlay keys
The keys with graynumbers and symbols on the front of
them form the numeric and cursor overlay. This overlaylets
you enter numeric data or control the cursor as you would
using the ten-key keypadon a desktop computer’s
keyboard.
()&
∗
8
790
Home PgUp
78 9
UIOP
456
JKL
End PgDn
123
M
Ins Del
$%
^
68
Home PgUp
78 9
\
0
()&
∗
.
456
End PgDn
123
<
MNVCXZB
,
Ins Del
0
¬
Alt
Gr
`
∗
>
.
F11 F12
∗
-
>
.
|
-
:
;
.
_
-
{}
[]
:
;
+
?
/
.
Ins
63
+
?
/
/
Prt Sc
Pause
Break
Sys Req
+
BkSp
Home
=
~
PgUp
#
@
Enter
PgDn
´
/
Del
EndShift
Using the numeric keypad overlay
To turn on the numeric keypad overlay, press Fn and F11
simultaneously. The numeric mode light on the keyboard
indicator panel glows when the numeric overlay is on.
You can still use the overlay keysto type alphabetic
characters while the numeric overlay is on. To do so:
For lowercaseletters , hold down Fn while you type the
letters.
For uppercase letters, hold down both Fn and Shift while
youtypetheletters.
Part I: Getting to Know Y ourComputer

Learning the Basics
Using the keyboard
To use the cursor control overlay when the numeric overlay
is on, press and hold down
control keys.To return to the numeric overlay, release
64
Shift while you use the cursor
Shift.
To turn offthenumeric keypadoverlay, holddownthe
and press
F11 again. The numeric mode light on the
Fn key
keyboardindicatorpanel goes out.
Using the cursor control overlay
To turn on the cursor control overlay, press Fn and F10
simultaneously. The cursor control mode light on the
keyboardindicatorpanel glows when the cursor control
overlayis on.
To type alphabetic characters while the overlayis on:
For lowercaseletters , hold down Fn while you type the
letters.
For uppercase letters, hold down both Fn and Shift while
youtypetheletters.
To use the numeric keypad overlay when the cursor control
overlayis on, hold down
overlaykeys. To return to the cursor control overlay, release
Shift.
To turn off the cursor control overlay, hold down the
and press
F10 again. The cursor control mode light on the
keyboardindicatorpanel goes out.
Shift while you use the numeric
Fn key
Part I: Getting to Know Y ourComputer

Learning the Basics
Starting a program
Starting a program
The easiest way to start a program is to click the name of
the filethatcontains the information youwantto work on. To
find the file, use My Computer or Windows Explorer.
Ifyoupreferto open theprogramfirst, youhavef ouroptions.
You can:
Double-clickthe icon for the program on your desktop
Use the Start menu
Use Windows Explorer or My Computer to locate the
program file
UsetheRundialogbox
The Windows Millennium Edition tutorial chapter givesstepby-step instructions for starting a program from the Start
menu,ExplorerandRun dialog box.SeeLesson6: Starting
programs on page 126.
65
Saving your work
Beforeyou turn off thecomputer ,saveyourwork to thehard
disk drive or a diskette. This is one of the most important
rules of computing.
NOTE: Save your data even when you are using the Standby
command, in case the battery discharges before you return
to work.
Many programs offer a featurethat savesdocuments at
regular intervals, such as every 15 minutes. Check your
programs’documentation to see whether they have an
automatic save feature .
Part I: Getting to Know Y ourComputer

Learning the Basics
Printing your work
To save:
A file you are updating, open the File menu of your
Windows program and click Save.
A new file, choose Save As from the File menu, typea
name for the file, and click OK.
HINT: To make another copy of the f ile you are currently
working with, choose Save As from the File menu and give
the new file a different name.
For information on how to name a file, see Windows
Millennium Edition file system on page 115.
Printing your work
V erifythat Windows Millennium Edition is set up for your
printer as described in Settingupaprinteron page 49.
66
TECHNICAL NOTE: You only need to set up the prin ter the
first time you connect it. If you use more than one printer or
are changing printers, you will need to set up Windows
Millennium Edition to run with the additional printer(s).
To print a file:
1 If your printer is not on, turn it on now .
2 In the File menu of your Windows program, click Print.
The program displays a Print dialog box.
Part I: Getting to Know Y ourComputer

Learning the Basics
Using diskettes
Using diskettes
The 3.5-inch diskette drive lets you use either doubledensity (720 KB) or high-density (1.44 MB) diskettes for
data transfer and storage.
Diskette drive
The diskette activity light glows while the drive is being
accessed. You will find that the disk activity light on the
system indicator panel is easier to see while you are
working.
Inserting and removing diskettes
67
Eject buttonDiskette activity light
1 Hold the diskette so that the arrow on its upper surface
points toward the drive.
2 Pushthediskettegentlyintothedriveslotontheleft
sideofthecomputer.Whenthedisketteisinplace,the
eject button pops out.
To release a diskette from the drive,push the eject button.
CAUTION: Never press the eject button or turn off the
computer while the l ight is glowing. Doing so could destr oy
data and damage the diskette or the drive.
Part I: Getting to Know Y ourComputer

Learning the Basics
Backing up your files
Caring for diskettes
Store your diskettes properly to protect them and keep
them clean.
Ifadiskette isdirty ,clean it withasoft cloth moistenedin
water. Do
Neverslide backthe protective metal cover .
Nevertouch the magnetic surface of a diskette.
Fingerprints can preventthe drivefromreading the data
storedon a diskette .
Nevertwistor bend a diskette.
Keepdiskettes atroom temperatureandavoide xposing
them to direct sunlight. Otherwise data may be lost.
Neverplace heavyobjects on your diskettes.
Nevereat,smoke,or use erasers near your diskettes.
Foreign particles can damage the diskette’ssurface.
not
use cleaning fluids.
68
Keep your diskettesaw a yfrom sources of magnetism,
such as speakers and radios, since these can destroy
data.
Backing up your files
Backing up your files means copying individual files to a
diskette or copying entire sections of your hard disk to
another device, such as a tape drive.
Part I: Getting to Know Y ourComputer

Learning the Basics
Backing up your files
Copying to a diskette
To back up your files to a diskette:
1 Insert a formatted diskette into the diskette drive.
2 Double-clickthe My Computer icon on the Windows
desktop.
3 Double-clickthe drive that contains the file you want to
copy.
4 Double-clickthe folderthatcontains the file,then click
the file you want to copy .
HINT: You can use th e Ctrl or Shift keys to select more than
one file.
5 Click File, then click Send To.
69
6 Click the icon for the diskette drive (3 1/2 floppy [A:]).
HINT: You can al so back up a file to a disk ette by click ing t he
file (or files) you want to backup with the secondary button,
then pointing to Send To and clicking 3 1/ 2 Floppy (A:).
Part I: Getting to Know Y ourComputer

Learning the Basics
Playing a CD or DVD
Playing a CD or DVD
Yourcomputerhas a ToshibaDVD-ROM drivethat can read
both DVD-R OMand CD-ROM discs.
Digital V ersati leDiscs(DVDs) provide a significant increase
in data storage and support features that are not available
on any other video platform. These features include widescreen movies, multiple language tracks, digital surround
sound, multiple camera angles, and interactive menus.The
computercanplayhigh-resolutionvideoatupto30frames
per second.
You use CD-ROMs to load and run software, and to access
reference material such as catalogs.
A special feature allows you to play audio CDs evenwhen
the computer is turned off and the display panel is closed.
Drive components and control buttons
70
The DVD-R OM drive is on the right side of the computer.
The CD/DVDcontrol buttonsare located on top of the
keyboardand they canbe accessed when thedisplaypanel
is either closed or open.
Components
Vent
Eject button Manual eject button
DVD-ROM drive
Part I: Getting to Know Y ourComputer

Learning the Basics
Playing a CD or DVD
Use the eject button to release the disc tray. This button
requires power to operate.
CAUTION: Never press the eject button or turn off the
computer while the activity light is glowing. Doing so could
damage the disc or the drive.
The manual eject button allows you to manually open the
disc tray when power to the computer and the drive is off.
To open the disc tray manually, insert a straightened paper
cliporother narrow object throughthemanual eject button’s
access hole.
The vent, located at the lower right-hand side of the drive,
cools the DVD-R OM drive’s internal mechanisms. Do not
block this vent.
71
HINT: When the computer is off and the DVD- ROM drive is
on, press the stop /eject control button on the top of t he
computer to eject a di sc.
Part I: Getting to Know Y ourComputer

Learning the Basics
Playing a CD or DVD
CD/DVD control buttons
The control buttons on the top of the computer enable you
to play audio CDs when the computer is off. You can also
use them to play CDs and DVDs when the computer is on.
Play/pause
72
Stop/eject
Next track
CD/DVD/Media Player switch
Previous track
Bass button
CD/DVD control buttonson the top of the computer
TheCD/DVD/MediaPlayerswitch:
IfthereisaDVD-ROMinthedrivewhenyouslidethe
CD/D VD/Media Play ers witch to the CD/D VD side (the
left),thesystem will powerup and launch DVD Express.
If there is a music CD in the drive when you slide the
CD/D VD/Media Play ers witch to the CD/D VD side (the
left), the sound system will start and play the music CD.
To turn off the music CD player, slide the switch to the
left and hold it for 2 seconds.
Sliding the CD/DVD/MediaPla yerswitch to the right
side turns on the system and launches WindowsMedia
Playeronce the displayis open.
The previous track buttonreturns to the preceding track on
the disc.
Part I: Getting to Know Y ourComputer

Learning the Basics
Playing a CD or DVD
Thepla y/pausebutton starts playingthe disc orpauses it ifit
is currently playing.
The stop/eject button stops a disc that is currently playing
and ejects the disc.
You can eject a disc by pressing the stop/eject button twice.
Use thismethod to eject adisc whenthecomputer is turned
off and the eject button on the front of the drive is
unavailab le .
Thene x ttrack bu tt onskips tothefollowi ngtrackonthe disc.
The bassbutton turns thesubwooferspeakerson and off.
Inserting a disc
WARNING: Before playing an audio CD, turn the volume
down. Playing the comp act disc at maximum volume could
damage your ears. To turn the volume down, use the V olume
Control dial or access the Volum e Control program (click
Start, Programs, Accessories, Entertainment, Volume
Control).
73
1 If the computer is turned on, press the eject button on
the DVD-ROM drive.
To play an audio CD when the computer is turned off,
slide the CD/DVD/MediaPlayerswitch to the left to turn
the D VD-ROMdriveon,and press the CD/DVDcontrol
stop/eject button twice to release the disc tray .
Part I: Getting to Know Y ourComputer

Learning the Basics
Playing a CD or DVD
Pressingthe stop/eject button
The disc tray partially opens.
CAUTION: To avoid damaging a disc or losi ng data, check
that the disc activity light is off before opening the disc tray.
2 Grasp the disc tray and pull it fully open.
3 Hold the disc by its edges and check that it is clean and
free of dust.
74
CAUTION: Handle discs carefully. Do not touch the surface
of the disc. Gras p it by its center hole and edge. If you
handle the disc incorrectly, you could lose data.
4 Carefully place the disc in the empty tray with its label
facing up.
Part I: Getting to Know Y ourComputer

Learning the Basics
Playing a CD or DVD
Inserting a disc
CAUTION: Be careful not to touch the drive’s lens (located
underneath the dr ive’s spindle) or the area around it. Doing
so could cause the drive to malfunction.
5 Gently press the center of the disc onto the center
spindle until it locks into place.
75
Spindle
Disc
Correct position
Incorrect position
Incorrect position
P osi tioning the disc on the spindle
CAUTION: Make sure the disc is properly positioned on the
spindle. If you position the disc incorrectly, it can jam the
disc tray.
Part I: Getting to Know Y ourComputer

Learning the Basics
Playing a CD or DVD
6 Close the disc tray by pressing gently on the center of
the trayuntil it clicksindicating that it is locked.
Playing an audio CD
Insert an audioCDand close thedisctray. Ifthe computer is
turned off, use the CD/DVD/Media Players witchand the
control buttons on the top of the computer.Slide the CD/
D VD/MediaPlay erswitch to the left to turn on the CD/DVD
player, then press the play/pause buttontwice.The CD will
begin to play.
If the computer is turned on, Windows Media Playeropens
and the CD begins to play. You can use either the CD
control buttons or the Windows Media Player program to
control the CD.
To access the Windows Media Player,youcan open it
through the Start menu or activate it from the taskbar.
76
Stop buttonPlay/pause button
WindowsMedia Player screen
Part I: Getting to Know Y ourComputer

Learning the Basics
Playing a CD or DVD
The CD Player control panel works much like an ordinary
compact disc player:
To stop the compact disc, click the Stop button.
To playtheCDor topause,clickthe Play/pause button
on the CD Player control panel.
Playing a DVD
A DVDautomatically starts playing when you insert it and
close the disc tray.
When you play a DVD, a Mediamatics
box mayadvise you that video and audio playback
performance is dependent upon processor speed (MHz)
and system configuration.
®
DVDPlayer dialog
77
V ideoand audio playback performance warning
The CD/DVDcontrol buttonson the top of the computer do
not work with DVDs if the computer is off. To view a DVD
video, youmustopen the display panel and turn the
computer on.
Part I: Getting to Know Y ourComputer

Learning the Basics
Playing a CD or DVD
You can open the DVD Playerthrough the Start menu
before you insert the DVD or once the DVD is playing.To
displaythe D VDPlayer, double-click the primary button.
Mediamatics D VDExpr essDVD player
While your DVDcontent plays , youhav eaccess to all
D VDExpress
description of these features, see Status display window on
page 190.
78
Display W i ndow
™ functions and features. For a detailed
NOTE: DVDExpress does not support audio compact disc
formats. Use CD Player instead.
Playing specific DVD files
1 On the DVDExpress control panel, click the Open File
button.
The Openfile dialog boxappears, allowing youto select
the desired file by browsing.
2 Locate, then double-clickthe file you want to play.
The selected file begins to play.
To play the same file again, you must reselect the file.
Part I: Getting to Know Y ourComputer

Learning the Basics
Playing a CD or DVD
Viewing the contents of a CD or DVD
CDs and DVDs contain files just like diskettes and the hard
disk.CDsare often used to installsoftw areor store files that
require lots of space, such as photographs and large
presentation files. You can use Explorer or My Computer to
view the contents of any CD or D VD.
For each installed audio CD title, the hard disk stores a
small program that displays the CD’s icon. It does not store
the CD’s content. To view the contents of an audio CD:
1 Placethedisc in the DVD-ROM drive.
2 Click Start, then point to Programs.
3 Locate the folder that contains the compact disc icon
and title.
4 Click the icon.
Ifyouclicktheiconwithouthavingthecompactdiscinthe
drive, Windows prompts you to insert the disc.
79
Removing a disc with the computer on
CAUTION: Never press the ej ect button whil e the computer is
accessing the drive. Wait for the disk activity light on the
system indicator panel to turn off before opening the disc
tray.
1 Locate and press the eject button.
The disc tray partially opens.
2 Grasp the sides of the disc tray and pull it fully open.
Part I: Getting to Know Y ourComputer

Learning the Basics
Playing a CD or DVD
3 Remove the disc from the disc tray and place it in its
protective cover.
CAUTION: If the di sc is sp in ning when you ope n th e disc
tray, wait for the disc to stop before removing it.
4 Close the disc tray by pressing gently on the center of
the trayuntil it clicksindicating that it is locked.
Removing a disc with the computer off
1 Insert a slender object, such as a straightened paper
clip,into the manual eject button access hole.
CAUTION: Never use a pencil to press the manual eject
button. Pencil lead can break off inside the computer and
damage it.
80
2 Pull the tray fully open, remove the disc and place it in
its protective cover.
3 Pushthetrayintoclosethedrive.
Caring for CDs and DVDs
Store your discs in their original containers to protect
them from scratches and keep them clean.
Neverbend a disc or place heavy objects on top of it.
Hold a disc by its outside edge. Fingerprints on the
surface of a compact disc can prevent the drive from
reading the data properly.
Av oidexposingdiscs to direct sunlight or extreme heat
or cold.
Part I: Getting to Know Y ourComputer

Learning the Basics
Using the modem
To clean a disc, wipe it from the center outwards (not in
a circle) with a clean, dry cloth. If necessary ,moisten
the cloth with water or a neutral cleaner (not benzine or
rubbing alcohol). Let the disc dry completely before
inserting it in the drive.
Using the modem
The Satellite 2800/2805 Series computers come with a
built-inV.90 56K fax/modem and a built-in 10/100 Ethernet
LAN connection. To use the modem, you must connect it to
a standard voice-grade RJ11 telephone line.
TECHNICAL NOTE: Disabl e Ca ll W a it ing bef ore y ou c onn ect
through the modem. Call Waiting interrupts data
transmission.
81
1 Attach one end of a standard RJ11 telephone cable to
the modem port.
Connecting the internal modem
2 Plug the other end of the RJ11 telephone cable into the
modular jack of a standard voice-grade telephone line.
Part I: Getting to Know Y ourComputer

Learning the Basics
Using the modem
Connecting your computer to a network
You can connect your computer to a network locally or
remotely:
Locally, using the 10/100 Ethernet LAN connection by
connecting it to a standard RJ45 LAN line.
Remotely, using the modem and a dial-up connection.
For specific information about connecting to the LAN or
WAN,consultyournetwork administrator .
To use a dial-up connection, have your network
administrator configure your computer for the network and
supply you with the telephone number for the dial-up
connection. To set up the network connection, use the DialUp Networking Wizard:
1 Click Start and point to Programs.
2 Point to Accessories,thentoCommunications,and
click Dial-Up Networking.
82
3 Enter the phone number of your network connection
and let the program dial the number.
The computer connects with the network.
Part I: Getting to Know Y ourComputer

Learning the Basics
Setting up for communications
Setting up for communications
To communicate across the telephone lines with another
computer,youneed:
A modem (a 56Kflex modem comes with your
computer)
A telephone line
A communications program
In essence, the telephone line is just a very long data cable
that connects to another computer.Y ouuse a
communications program to converse with the other
computer or network. For the simplest of connections, you
can use a terminal emulator program such as Microsoft’s
HyperTerminal. Connecting to America Online
specialized communications program supplied by AOL to
you at no charge. To connect to the Internet, you need a
Web browser ,such as Microsoft’s Internet Explorer.
®
requires a
83
To connect your computer to a network, you need either:
A network card (to connect to the network’s
communication system)
A modem (to connect to the network through a dial-up
connection)
For specific information about connecting to the LAN or
WAN,consultyournetwork administrator .
To usea dial-up connection, see Connectingyourcomputer
toanetworkon page 82.
Part I: Getting to Know Y ourComputer

Learning the Basics
T ur ning o ff th e compu ter
T urning off the computer
When you power down the computer, you have three
options to choose from: Shut down, Standby, and
Hibernation. Each method has its advantages.
Shut down command
The Shut down command shuts the computer down
completely. When you start up again, the computer runs a
self-test and loads the operating system. Y oumust open
any programs and files you want to use.
Factorswhen choosing Shut down:
No poweris used while the computer isshutdown. This
is the most efficient mode if you will be awayfrom your
computer for an extended time.
Restarting from Shut down uses the most time and
battery power.
84
When starting up again, the system does not
automatically open programs and files you were
previouslyusing.
Standby command
The Standby command puts the computer into a powersaving mode. Standby holds the current state of the
computer in memory so that, when you restart the
computer,you can continue working from where youleft off.
Factorswhenchoosing Standby:
While in Standby mode, the computer uses some
battery power. A fully charged battery will last
approximately eight hours in Standby mode.
Part I: Getting to Know Y ourComputer

Learning the Basics
T ur ning o ff th e compu ter
Restarting from Standby mode uses less time and
battery power than restarting from Shut down or
Hibernation mode.
When starting up again, the computer returns to the
mode in which you left it, including all open programs
and files you were using.
NOTE: If you power down using the Standby command and
the battery discharges fully, your information will be lost. Be
sure to save your work first.
Hibernation command
Hibernation mode shuts the computerdowncompletely,but
it first saves the current state of the computer to the hard
disk. Since Hibernation mode does not require power to
maintain the saved information, the system settings are
retained indefinitely. Restoring information from the hard
drive takeslonger than restoring it from memory .Whenyou
start up again, the computer runs a self-test, loads the
operatingsystem,and then returns to the state inwhichyou
left it.
85
Factorswhenchoosing Hibernation mode:
While in Hibernation mode, the computer uses no
battery power.
Because the state of the system is held on the hard
disk, no data is lost if the battery discharges.
Restarting from Hibernation mode uses less time and
battery power than restarting from Shut down.
Part I: Getting to Know Y ourComputer

Learning the Basics
T ur ning o ff th e compu ter
Restarting from Hibernation mode uses a little more
time and battery power than restarting from Standby
because information is being retrieved from the hard
disk instead of memory.
When starting up again, the computer returns to the
state in which you left it, including all open programs
and files you were using.
TECHNICAL NOTES: Before using any of these methods to
power down your computer, save your fi les and make sure
the disk activity lig hts are off.
If you change your mind and decide to continue working
after all, wait a few seconds before turning the computer on
again.
Using Shut down
86
To power down the computer using the Shut down
command, click Start, Shut Down, select Shut down from
the drop down menu, then click OK.
The computer shuts down completely.
Shutting down more quickly
You can also shut down the computer by pressing the
power button or closing the display panel.
To use either of these methods,youfirst need to turn on the
featurein Toshiba’s Power Sav erutility.
1 Open the Start menu, point to Settings, then click
Control Panel.
2 If the Toshiba PowerSav ericon is not present: click
View all control panel options ontheleftsideofthe
panel.
Part I: Getting to Know Y ourComputer

Learning the Basics
T ur ning o ff th e compu ter
3 In the Control Panel window ,double-clic kthe Toshiba
PowerSaver icon.
4 In theRunn i ngon batteries area,click the Detai ls
button, then select the System Power Mode tab.
5 Select Shutdown for the options you want.
When I press the power button
Set this option to Shutdown to have the computer
shut down when you press the power button.
When I close the lid
Set this option to Shutdown to have the computer
shut down when you close the display panel.
6 Click Override all Modes with settings here.
7 In the Set to range dialog box, do one of the following:
Click DC only for the settings to apply only when
you are using battery power.
87
Click All forthe settings to apply whether you are
using battery power or outlet power .
8 Click OK.
9 Click OK again, then close the Control Panel.
NOTE: For more information about the Power Saver utility,
see Power Saver on page 187.
Starting again after Shut down
To start the computer up again, press the powerbuttonuntil
the on/off light changes to green.
Part I: Getting to Know Y ourComputer

Learning the Basics
T ur ning o ff th e compu ter
Using Standby
To power down the computer using the Standby command,
click Start, Shut Down,selectStand by from the drop
down menu, then click OK.
The computer saves the status of all open programs and
files to memory,turns off the display, and goes into a lowpower mode. The on/off light blinks amber indicating the
machine is in Standby mode.
Going into Standby mode more quickly
You can also put the computer into Standby mode by either
pressing the power button or closing the display panel.
To use any of these methods, you first need to enable them
in T oshiba’s Power Sav er utility.
1 Open the Start menu, point to Settings, then click
Control Panel.
88
2 In the Control Panel window ,double-clic kthe Power
Saver icon. If the T oshiba P ow er Savericon is not
present:clickView allcontrol paneloptionson theleft
side of the panel.
3 In theRunn i ngon batteries area,click the Detai ls
button, then select the System Power Mode tab.
4 Select Standby for the options you want.
When I press the power button
Set this option to Standby for the computer to go
into Standby mode when you press the power
button.
When I close the lid
Set this option to Standby for the computer to go
into Standby mode when you close the display
panel.
Part I: Getting to Know Y ourComputer

Learning the Basics
T ur ning o ff th e compu ter
5 Click Override all Modes with settings here.
6 In the Set to range dialog box, do one of the following:
Click DC only for the settings to apply only when
you are using battery power.
Click All forthe settings to apply whether you are
using battery power or outlet power .
7 Click OK.
8 Click OK again, then close the Control Panel.
NOTE: For more information about the Power Saver utility,
see Power Saver on page 187.
Starting again from Standby
To start the computer from Standby mode, press the power
button until the on/off light changes to green. The computer
returns to the screen you were using.
89
If you put the computer in Standby mode by closing the
displaypanel, you can start again by opening the display
panel.
Using Hibernation mode
To power down the computer using the Hibernation option,
click Start, Shut Down,selectHibernate, then click OK.
The computer saves the state of the system, including all
open programs and files, to the hard disk, and then powers
down completely.
Part I: Getting to Know Y ourComputer

Learning the Basics
T ur ning o ff th e compu ter
Going into Hibernation mode more quickly
You can also put the computer into Hibernation mode by
pressing the power button or closing the display panel.
To use eitherofthese methods, you firstneedtoturn it on in
Toshiba’sPowerSaverutility.
1 Open the Start menu, point to Settings, then click
Control Panel.
2 In the Control Panel window ,double-clic kthe Power
Saver icon. If the T oshiba P ow er Savericon is not
present:clickView allcontrol paneloptionson theleft
side of the panel.
3 In theRunn i ngon batteries area,click the Detai ls
button, then select the System Power Mode tab.
4 Select Hibernationfor the options you want.
When I press the power button
Set thisoptionto Hibernation forthe computer to go
into Hibernation mode when you press the power
button.
90
When I close the lid
Set thisoptionto Hibernation forthe computer to go
into Hibernation mode when you close the display
panel.
5 Click Override all Modes with settings here.
6 In the Set to range dialog box, do one of the following:
Click DC only for the settings to apply only when
you are using battery power.
Click All forthe settings to apply whether you are
using battery power or outlet power .
7 Click OK.
Part I: Getting to Know Y ourComputer

Learning the Basics
T ur ning o ff th e compu ter
8 Click OK again, then close the Control Panel.
NOTE: For more information about the Power Saver utility,
see Power Saver on page 187.
Starting again from Hibernation mode
To start the computer from Hibernation mode, press the
powerb uttonuntil the on/off lightturnsgreen.The computer
returns to the screen you were using.
If you put the computer in Hibernation mode by closing the
displaypanel, you can start it again by opening the display
panel.
91
Part I: Getting to Know Y ourComputer

Chapter 4

Mobile Computing
This chapter covers all aspects of using your computer
while trav eling.
Toshiba’s energy-saver design
Toshiba is a partner in the Environmental Protection
Agency’s (EPA)Energy Star Program and has designed
this product to meet the Energy Star guidelines for energy
efficiency.
Your computer enters a low-power standbymode when it is
not being used, thereby conserving energy and saving
moneyinthe process.Ithas a number of other featuresthat
enhance its energy efficiency.
Many of these energy-saving features hav e been set by
Toshiba. We recommend you leave these featuresactiv e,
allowing your computer to operate at its maximum energy
efficiency, so that you can use it for longer periods while
trav eling.
93

Mobile Computing
Running the computer on battery power
Running the computer on battery power
The computer contains a removablelithium ion (Li-ion)
high-capacity battery that provides power when you are
awa yfrom an AC outlet. You can recharge it many times.
In addition, the computer has an internal real-time clock
(RTC)battery. This is a nickelmetalhydride(NiMH) battery .
The RTC battery powers the RTC memory, which stores
your system configuration settingsand the current time and
date for up to a month while the computer is turned off.
Using additional battery packs
If you spend a lot of time trave ling and need to work for
many hours without an AC power source, you may want to
carry additional charged batteries with you. You can then
replace a discharged battery and continue working.
94
Battery safety precautions
Nevertry to disassemble a battery.
Neverov erchargeor rev ersecharge a battery .
Overcharging will shorten its life and rev ersecharging
could destroy it, causing the release of toxic fumes.
Av oidtouching the metal terminals of the battery with
another metal object. Short-circuiting the battery will
cause it to overheat and may cause permanent
damage to the battery or the computer.
Neverincineratea spent battery as this will cause it to
explode,releasing toxic materials.
If a battery is leaking or damaged, replace it
immediately. Use protective gloves when handling a
damaged battery.
Part I: Getting to Know Y ourComputer

Mobile Computing
Charging batteries
Toreplacethe mainbattery, usean identical battery thatyo u
can purchase through the Toshiba Accessories Catalog.
Maximizing battery life
A main battery can be recharged many times. Gradually
overtimeit will lose its ability to hold a charge. To maximize
thelifeofyourmainbattery:
Av oid leavingthe computer plugged in and unused for
more than a few hours. Overcharging the main battery
may shorten its life.
If you are not going to use the computer for a long
period of time, remove the battery.
Alternate between batteries if you have a spare.
Make sure yourcomputeristurned off or in Hibernation
mode when you are replacing the battery .
95
Store spare batteries in a cool dry place out of direct
sunlight.
Charging batteries
The mainbattery needstobe charged before youcan use it
to power the computer. You can charge the battery using
your computer,or you can use an optional battery charger.
CAUTION: Never leave batteries in the battery charger for
more than a week at a time. Doing so may reduce the
potential char g e of th e ba tt ery.
Use only battery chargers designed to work with your
notebook compute r. Y ou c an o rde r a Toshiba battery char ge r
through the Toshiba Accessories Catalog.
Part I: Getting to Know Y ourComputer

Mobile Computing
Charging batteries
Charging the main battery
To charge the main battery while it is in your computer, plug
the computer into a live wall outlet. It takes sever alhours to
charge the battery with the computer off. It takes much
longer to charge the battery while the computer is on.
TECHNICAL NOTE: The batte ry does not charge while the
computer is consuming full power.
The battery may not start charging immediately if:
The battery is extremely hot or cold.
To ensure that the battery charges to its full capacity,
waituntil it reachesroomtemperature (50to80 degrees
Fahrenheit,10 to 26 degrees Celsius).
The battery is almost completely discharged.
96
Leavethe power connected, and the battery should
begin charging after a few minutes.
HINT: Once a battery is fully charged, we recommend that
you operate your c omputer on batte ry power until the bat tery
discharges completely. Doing this extends battery life and
helps ensure accurate monitoring of battery capacity.
Part I: Getting to Know Y ourComputer

Mobile Computing
Monitoring battery power
Charging the RTC battery
The computer contains an internal battery that provides
power forthe real-time clock (RTC)and calendar.
During normal use, the main battery keeps the RTC battery
adequately charged. Occasionally,the RTCbattery may
lose its charge completely ,especiallyif you hav ehad the
computer turned off for a long time.
To recharge the RTC battery,plug in the computer and turn
it on for at least 24 hours.
NOTE: It is seldom necessary to charge the RTC battery
because it charges while the computer is on. If the RT C
battery is low, the real-time clock and cale ndar may display
the incorrect time an d da te or stop working.
When Hibernation mode is enabled and the RTC battery is
completely discharged, a warning prompts you to reset the
real-time clock.
97
The computer can be used while the RTC battery is being
charged, although the charging status of the RTC battery
cannot be monitored. If the power is on, it takes
approximately 24 hours to fully charge the RTC battery. If
the power is off, the RTC battery will not charge.
Monitoring battery power
Thebattery lightindicates the mainbattery’s currentcharge .
It glows green when the battery is fully charged. It glows
amber while the battery is being charged. It does not glowif
thee xternalpowersource isdisconnectedor if thebattery is
completely discharged.
Part I: Getting to Know Y ourComputer

Mobile Computing
Monitoring battery power
Determining remaining battery power
NOTE: Wait at least 16 seco nd s afte r tu rn in g on t he
computer before trying to monitor the remaining battery
power. The computer needs this time to check the battery’s
remaining capacity and perform its calculations.
1 Click Start,pointtoSettings, and then click Control
Panel.
2 Double-clickthe Power Saver icon.
3 Choose the Power Save Modes tab, then under the
Running on Batteries section, click Details.
4 Click the Po werSaveMode tab. The current power
source and battery power remaining section displays
the current charge state of the battery.The value
displaysas a percentage of remaining battery charge.
98
TECHNICAL NOTE: The co mput er dr ai ns the bat tery fa st er at
low temperatures. Check y our remai ning ch arge fr equent ly if
you are working in temperatures below 50 degrees
Fahrenheit.
The computer calc ulat es t he remain in g ba tt ery charge bas ed
on your current rate of power use and other factors such as
the age of the battery .
Part I: Getting to Know Y ourComputer

Mobile Computing
Monitoring battery power
Conserving battery power
How long a fully charged battery lasts when you are using
the computer depends on a number of factors,such as:
How the computer is configured.
How much you use the display panel instead of an
external monitor.
How much you use the hard disk and other drives.
Whether you use any optional devices to which the
battery supplies power.
Where you are working—since operating time
decreases at low temperatures.
Toshiba’s power-saving options greatly increase the length
of time you can use the computer before it becomes
necessary to recharge the battery.
99
Toshiba has combined these options into three preset
power usage modes:
Long Life
Normal
High Power
To change the power usage mode, hold down both the
and F2 keys. You may also set individual power-saving
options to suit your own needs. See Power Saver on page
187 for details.
Part I: Getting to Know Y ourComputer
Fn

Mobile Computing
Monitoring battery power
What to do when the battery runs low
When the battery runs low you can:
Plug the computer into an external power source and
recharge the battery.
Put the computer in Hibernation mode and replace the
battery with a charged spare.
Saveyourwork and turn off the computer.
If you don’t manage to do any of these things before the
battery completely runs out of power, the computer
automatically enters Standby mode and turns itself off.
Standbymodekeeps trackofwhere youwere so,whenyou
turn on the power again, you can continue where you left
off.
The computer stores the information on what you were
doing until the battery runs out of power . If you hav e
Hibernation mode enabled (the default), the computer
copies the details of your open programs and files to the
hard disk before shutting down.
100
Setting alarms
Your computer can be configured to warn you when the
battery is running low.
You can set multiple alarms. Each alarm can be set to alert
you when a specified percentage of remaining battery
powerhasbeen reached.You can set how the alarm action
occurs—soundan alarm, displayamessage, both, ornone.
You can also set the computer to enter Standby mode or
Hibernation mode, or to Shutdown when the alarm goes off.
Part I: Getting to Know Y ourComputer
 Loading...