

Page 1

Integrated High Definition
LCD Television
HIGH-DEFINITION TELEVISION
42LX177
46LX177
52LX177
57LX177
For an overview of steps for setting up your new TV, see page 10.
Note: To display a High Definition picture, the TV must be receiving a
High Definition signal (such as an over-the-air High Definition TV
broadcast, a High Definition digital cable program, or a High Definition
digital satellite program). For details, please contact your TV antenna
installer, cable provider, or satellite provider.
© 2007 TOSHIBA CORPORATION
All Rights Reserved
Owner’s Record
The model number and serial number are on the back of
your TV. Record these numbers in the spaces below.
Refer to these numbers whenever you communicate
with your Toshiba dealer about this TV.
Model number:
Serial number:
YC/M
VX1A00045900
Page 2
Dear Customer,
Thank you for purchasing this Toshiba LCD TV. This manual
will help you use the many exciting features of your new LCD
TV. Before operating your LCD TV, please read this manual
completely, and keep it nearby for future reference.
Child Safety
It Makes A Difference
Safety Precautions
WARNING: TO REDUCE THE RISK OF FIRE OR
ELECTRIC SHOCK, DO NOT EXPOSE THIS APPLIANCE
TO RAIN OR MOISTURE.
WARNING
RISK OF ELECTRIC SHOCK
DO NOT OPEN.
WARNING: TO REDUCE THE RISK OF ELECTRIC
SHOCK, DO NOT REMOVE COVER (OR BACK).
NO USER-SERVICEABLE PARTS INSIDE. REFER
SERVICING TO QUALIFIED SERVICE PERSONNEL.
The lightning flash with arrowhead symbol, within an
equilateral triangle, is intended to alert the user to the
presence of uninsulated “dangerous voltage” within
the product’s enclosure that may be of sufficient
magnitude to constitute a risk of electric shock to
persons.
The exclamation point within an equilateral triangle is
intended to alert the user to the presence of important
operating and maintenance (servicing) instructions in
the literature accompanying the appliance.
WARNING
To prevent injury, this apparatus must be securely attached to
the floor/wall in accordance with the installation instructions.
See item 20 on page 3.
WARNING: If you decide to wall mount this television,
always use a UL Listed wall bracket appropriate for the size
and weight of this television. The use of any wall bracket
other than a UL Listed wall bracket appropriate for the size
and weight of this television for wall mounting this television
could result in serious bodily injury and/or property damage.
See “Removing the Pedestal Stand” (- page 5).
NOTE TO CATV INSTALLERS
This is a reminder to call the CATV system installer’s attention
to Article 820-40 of the U.S. NEC, which provides guidelines for
proper grounding and, in particular, specifies that the cable
ground shall be connected to the grounding system of the
building, as close to the point of cable entry as practical. For
additional antenna grounding information, see items 27 and 28
on page 4.
Where Your TV Stands
Congratulations on your purchase! As you enjoy
your new TV, keep these safety tips in mind:
The Issue
a If you are like most consumers, you have a TV in your
home. Many homes, in fact, have more than one TV.
a The home theater entertainment experience is a growing
trend, and larger TVs are popular purchases; however,
they are not always supported on the proper TV stands.
Sometimes TVs are improperly secured or inappropriately
a
situated on dressers, bookcases, shelves, desks, audio
speakers, chests, or carts. As a result, TVs may fall over,
causing unnecessary injury.
Toshiba Cares!
a The consumer electronics
industry is committed to
making home entertainment
enjoyable and safe.
a
The Consumer Electronics
Association formed the
Home Entertainment
Support Safety Committee,
comprised of TV and
consumer electronics
furniture manufacturers, to
advocate children’s safety and
educate consumers and their
families about television safety.
Tune Into Safety
a One size does NOT fit all! Use appropriate
furniture large enough to support the weight of your TV
(and other electronic components).
a Use appropriate angle braces, straps, and anchors to
secure your furniture to the wall (but never screw
anything directly into the TV).
a Carefully read and understand the other enclosed
instructions for proper use of this product.
a Do not allow children to climb on or play with furniture
and TVs.
a Avoid placing any item on top of your TV (such as a VCR,
remote control, or toy) that a curious child may reach for.
Remember that children can become excited while watching
a
a program and can potentially push or pull a TV over.
a Share our safety message about this hidden hazard of
the home with your family and friends. Thank you!
2500 Wilson Blvd.
Arlington, VA 22201 U.S.A.
www.CE.org
CEA is the Sponsor, Producer and
Manager of the International CES
®
2
Page 3
Important Safety Instructions
1) Read these instructions.
2) Keep these instructions.
3) Heed all warnings.
4) Follow all instructions.
5) Do not use this apparatus near water.
6) Clean only with dry cloth.
7) Do not block any ventilation openings. Install in
accordance with the manufacturer’s instructions.
8) Do not install near any heat sources such as radiators,
heat registers, stoves, or other apparatus (including
amplifiers) that produce heat.
9) Do not defeat the safety purpose of
the polarized or grounding type
plug. A polarized plug has two blades
with one wider than the other.
A grounding type plug has two blades
and a third grounding prong. The wide blade or the third
prong are provided for your safety. If the provided plug
does not fit into your outlet, consult an electrician for
replacement of the obsolete outlet.
10) Protect the power cord from being walked
on or pinched, particularly at plugs,
convenience receptacles, and the point
where they exit from the apparatus.
11) Only use attachments/accessories specified by the
manufacturer.
12) Use only with the cart, stand, tripod,
bracket, or table specified by the
manufacturer, or sold with the
apparatus. When a cart is used, use
caution when moving the cart/apparatus
combination to avoid injury from tip-over.
13) Unplug this apparatus during lightning storms or
when unused for long periods of time.
14) Refer all servicing to qualified service personnel.
Servicing is required when the apparatus has been
damaged in any way, such as power-supply cord or plug
is damaged, liquid has been spilled or objects have fallen
into the apparatus, the apparatus has been exposed to
rain or moisture, does not operate normally, or has been
dropped.
Additional Safety Precautions
14a) CAUTION: If the TV is dropped and the cabinet or
enclosure surface has been damaged or the TV does not
operate normally, take the following precautions:
• ALWAYS turn off the TV and unplug the power cord to
avoid possible electric shock or fire.
• NEVER allow your body to come in contact with any
broken glass or liquid from the damaged television. The
LCD panel inside the TV contains glass and a toxic
liquid. If the liquid comes in contact with your mouth or
eyes, or your skin is cut by broken glass, rinse the
affected area thoroughly with water and consult your
doctor.
• ALWAYS contact a service technician to inspect the TV
any time it has been damaged or dropped.
Wide blade
15) CAUTION:
• To reduce the risk of electric shock, do not use the
polarized plug with an extension cord, receptacle, or
other outlet unless the blades can be inserted
completely to prevent blade exposure.
• To prevent electric shock, match wide blade of plug to
wide slot; fully insert.
16) WARNING:
To prevent the spread of fire, keep candles or other open
flames away from this product at all times.
Installation, Care, and Service
Installation
Follow these recommendations and precautions and heed all
warnings when installing your TV:
17) Never modify this equipment. Changes or modifications
may void: a) the warranty, and b) the user’s authority to
operate this equipment under the rules of the Federal
Communications Commission.
18) DANGER: RISK OF
SERIOUS PERSONAL
INJURY, DEATH, OR
EQUIPMENT DAMAGE!
Never place the TV on an unstable cart,
stand, or table. The TV may fall, causing
serious personal injury, death, or serious
damage to the TV.
19) To avoid damage to this product, never place or store the
TV in direct sunlight; hot, humid areas; or areas subject to
excessive dust or vibration.
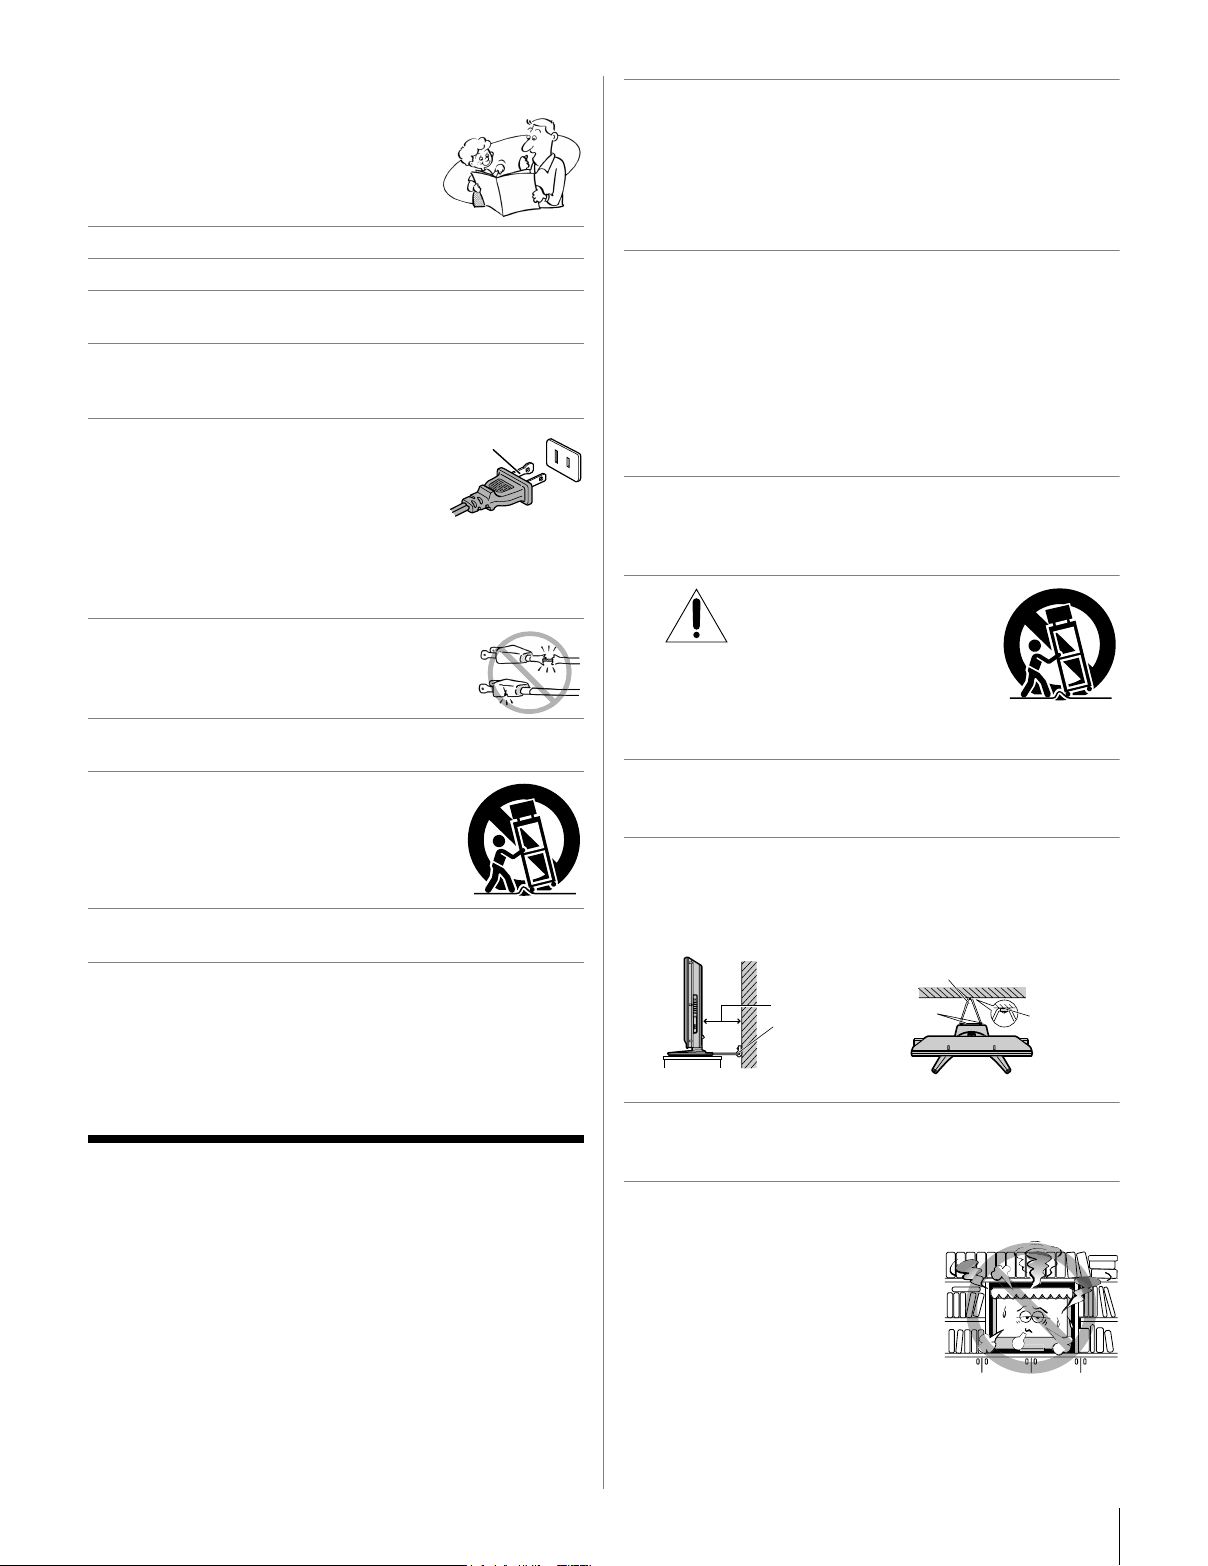
20) Always place the TV on the floor or a sturdy, level, stable
surface that can support the weight of the unit. To secure
the TV, use a sturdy tie from the hooks on the rear of the
TV pedestal to a wall, pillar, or other immovable structure.
Make sure the tie is tight, secure, and parallel to the floor.
Sturdy tie (as short as possible)
4"
min.
Clip
TV side TV top
21) The apparatus shall not be exposed to dripping or
splashing and that no objects filled with liquids, such as
vases, shall be placed on the apparatus.
22) Never block or cover the slots or openings in the TV
cabinet back, bottom, and sides. Never place the TV:
• on a bed, sofa, rug, or similar
surface;
• too close to drapes, curtains, or
walls; or
• in a confined space such as a
bookcase, built-in cabinet, or
any other place with poor
ventilation.
The slots and openings are provided to protect the TV from
overheating and to help maintain reliable operation of the
TV. Leave a space of at least 4 (four) inches around the TV.
Hooks
Clip
(continued)
3
Page 4
23) Always place the back of the television at least four (4)
inches away from any vertical surface (such as a wall) to
allow proper ventilation.
24) Never allow anything to rest on or roll over the power cord,
and never place the TV where the power cord is subject to
wear or abuse.
25) Never overload wall outlets and extension cords.
26) Always operate this equipment from a 120 VAC, 60 Hz
power source only.
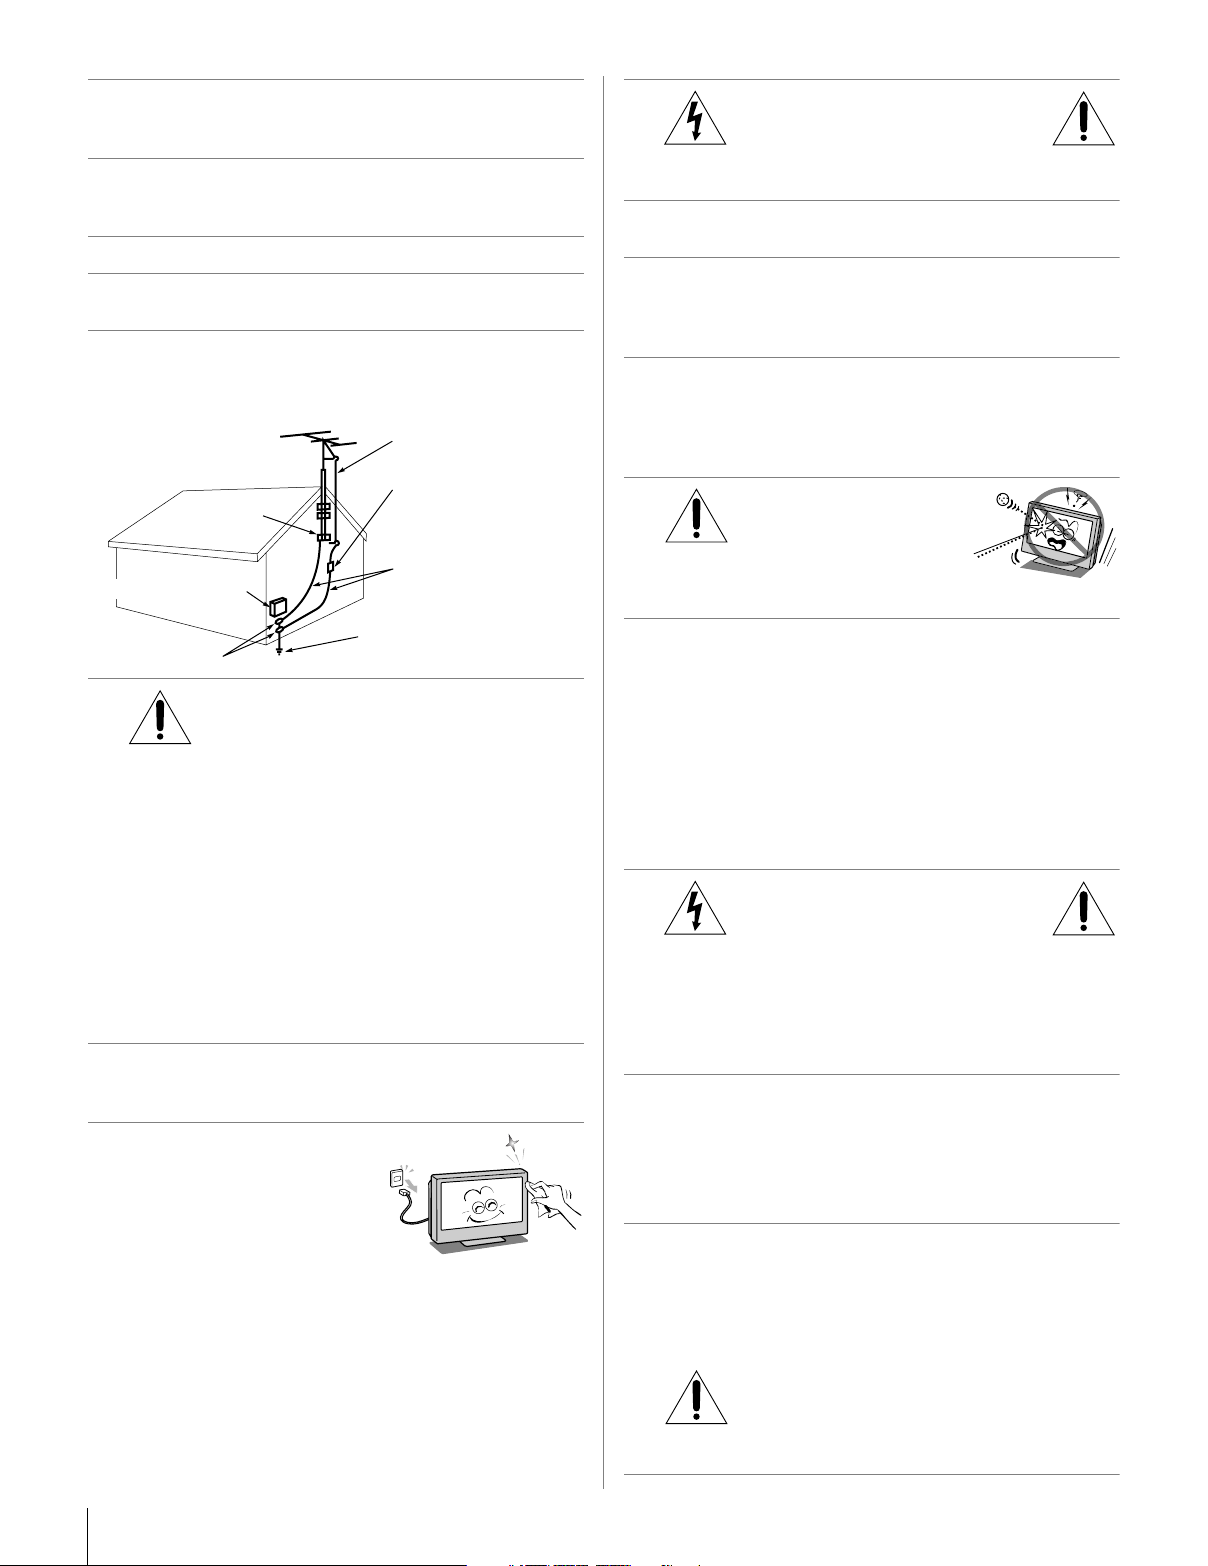
27) Always make sure the antenna system is properly
grounded to provide adequate protection against voltage
surges and built-up static charges (see Section 810 of the
National Electric Code).
Antenna lead-in wire
Antenna discharge unit
Ground clamp
Electric service equipment
(NEC Section 810-20)
Grounding conductors
(NEC Section 810-21)
31)
WARNING:
RISK OF ELECTRIC SHOCK!
Never spill liquids or push objects of any kind into the TV
cabinet slots.
32) While it is thundering, do not touch the connecting cables
or apparatus.
33) For added protection of your TV from lightning and power
surges, always unplug the power cord and disconnect the
antenna from the TV if you leave the TV unattended or
unused for long periods of time.
34) During normal use, the TV may make occasional snapping
or popping sounds. This is normal, especially when the
unit is being turned on or off. If these sounds become
frequent or continuous, unplug the power cord and contact
a Toshiba Authorized Service Center.
35)
WARNING: RISK OF
SERIOUS PERSONAL
INJURY OR EQUIPMENT
DAMAGE!
Never strike the screen with a sharp
or heavy object.
Power service grounding
electrode system (NEC Art 250 Part-H)
28)
Ground clamps
DANGER: RISK OF SERIOUS
PERSONAL INJURY OR DEATH!
• Use extreme care to make sure you are never in a
position where your body (or any item you are in contact
with, such as a ladder or screwdriver) can accidentally
touch overhead power lines. Never locate the antenna
near overhead power lines or other electrical circuits.
• Never attempt to install any of the following during
lightning activity: a) an antenna system; or b) cables,
wires, or any home theater component connected to an
antenna or phone system.
Care
For better performance and safer operation of your TOSHIBA
TV, follow these recommendations and precautions:
29) If you use the TV in a room whose temperature is 32 ºF
(0 ºC) or below, the picture brightness may vary until the
LCD warms up. This is not a sign of malfunction.
30) Always unplug the TV before
cleaning. Gently wipe the
display panel surface (the TV
screen) using a dry, soft cloth
only (cotton, flannel, etc.). A
hard cloth may damage the
surface of the panel. Avoid
contact with alcohol, thinner, benzene, acidic or alkaline
solvent cleaners, abrasive cleaners, or chemical cloths,
which may damage the surface. Never spray volatile
compounds such as insecticide on the cabinet. Such
products may damage or discolor the cabinet.
36) • The LCD screen of this product can be damaged by
ultraviolet radiation from the sun. When selecting a
location for the television, avoid locations where the
screen may be exposed to direct sunlight, such as in
front of a window.
• Never touch, press, or place anything on the LCD
screen. These actions will damage the LCD screen. If
you need to clean the LCD screen, follow the
instructions in item 30 on this page.
Service
37)
RISK OF ELECTRIC SHOCK!
Never attempt to service the TV yourself. Opening and
removing the covers may expose you to dangerous
voltage or other hazards. Failure to follow this WARNING
may result in death or serious injury. Refer all servicing not
specified in this manual to a Toshiba Authorized Service
Center.
38) If you have the TV serviced:
• Ask the service technician to use only replacement
parts specified by the manufacturer.
• Upon completion of service, ask the service technician
to perform routine safety checks to determine that the
TV is in safe operating condition.
39) The cold cathode fluorescent lamp in the LCD panel
contains a small amount of mercury.
When the TV reaches the end of its useful life, dispose of
the used TV by the approved method for your area, or ask
a qualified service technician to properly dispose of the
TV.
Note: The lamp(s) inside this product contain
mercury. Disposal may be regulated due to
environmental considerations. For disposal or
recycling information, contact your local authorities or the
Electronics Industries Alliance (www.eiae.org).
WARNING:
4
Page 5
Choosing a location for your LCD TV
To Display your LCD TV on the included Pedestal
Stand:
Observe the following safety precautions:
1) Read and Follow the pedestal assembly instructions included
with the pedestal.
CAUTION: Before beginning pedestal assembly, carefully lay
the front of the LCD Panel face down on a flat, cushioned
surface such as a quilt or blanket. Leave the bottom of the unit
protruding over the edge of the surface and assemble the
pedestal as indicated below.
Note: Extreme care should always be used when attaching
the pedestal stand to avoid damage to the LCD panel.
2) Place the TV on a sturdy, level surface that can support the
weight of the TV.
3) Be sure to secure the TV to a wall, pillar, surface, or other
immovable structure. To secure the TV in this manner, use the
included strap located at the rear of the pedestal stand. (- item
20, page 3).
To Display your LCD TV using a Wall Bracket:
If you decide to wall mount your LCD TV, always use a ULlisted wall bracket appropriate for the size and weight of the
LCD TV (- page 2) :
1) CAUTION: Two people are required for installation.
2) Unplug and remove any cables and/or other component
connectors from the rear of the TV.
3) Follow the instructions provided with your wall bracket.
Before proceeding, make sure the appropriate bracket(s) are
attached to the wall and the back of the TV as described in the
instructions provided with the wall bracket.
4) After attaching the appropriate bracket(s) to the wall and the
back of the TV, remove the pedestal stand from the TV as
described below.
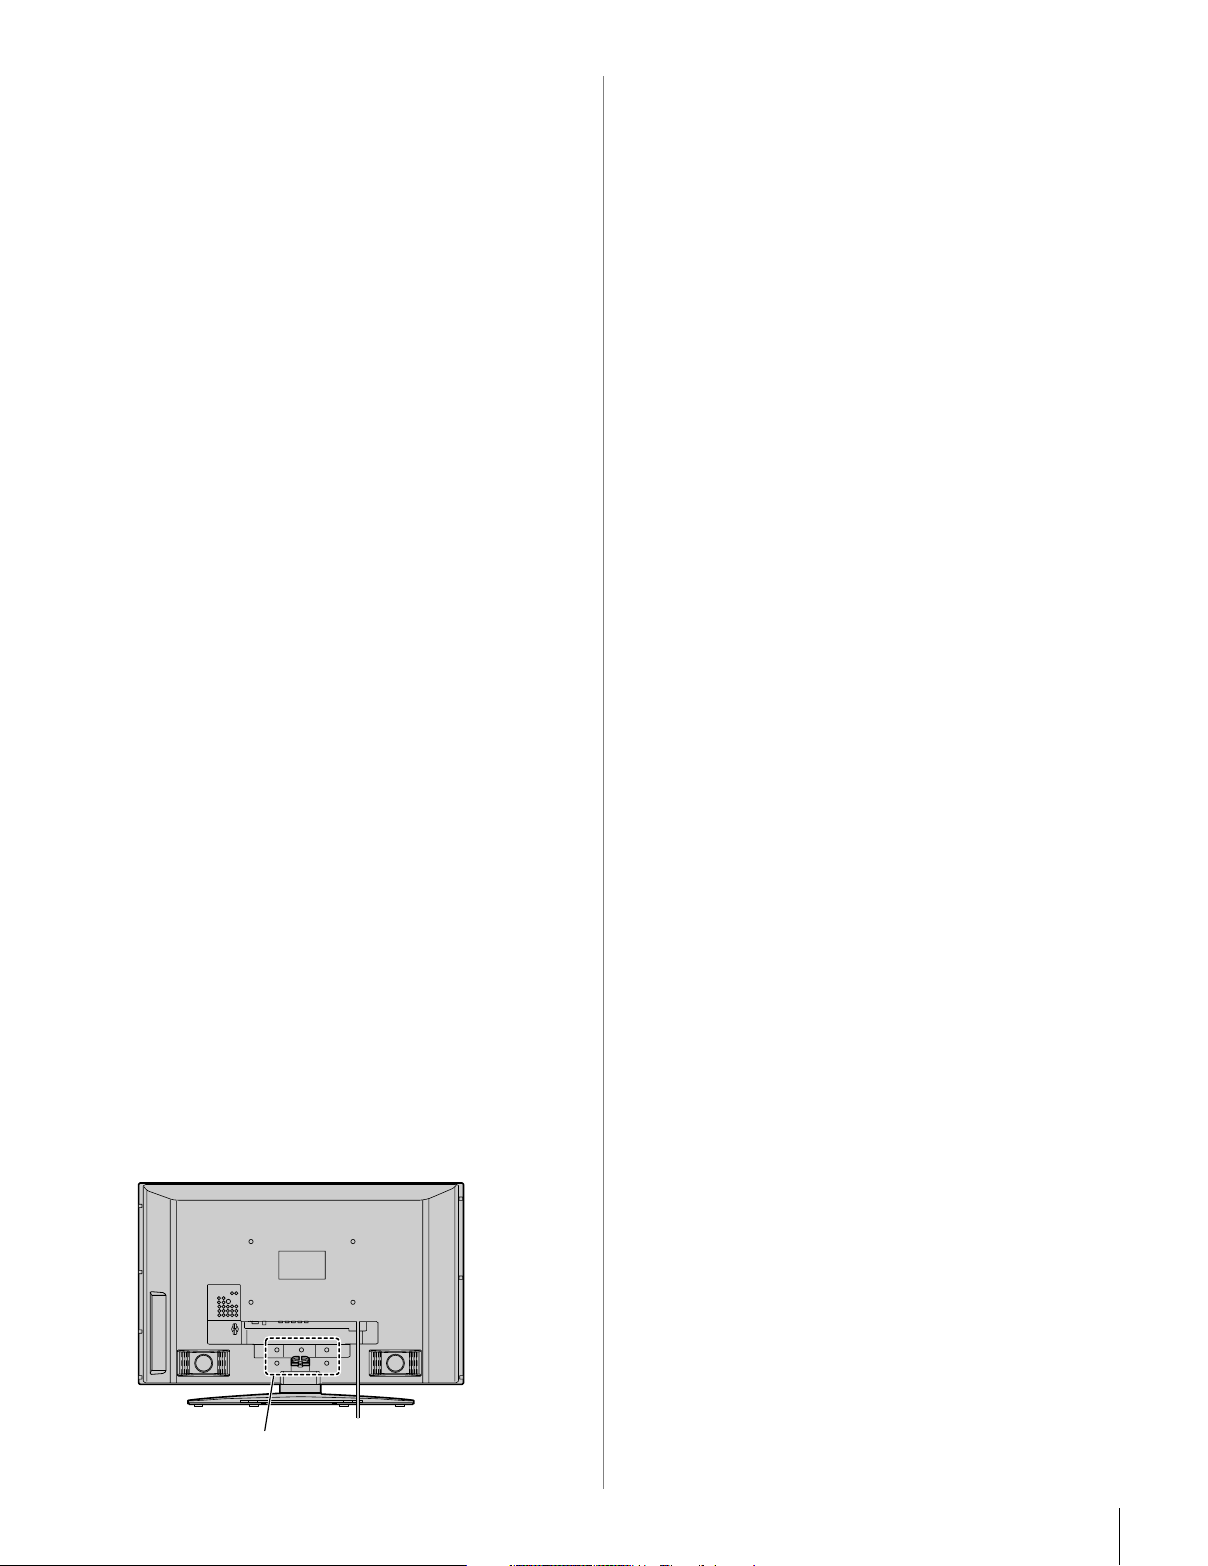
Removing the Pedestal Stand
1) Carefully lay the front of the unit face down on a flat,
cushioned surface such as a quilt or blanket. Leave the stand
protruding over the edge of the surface.
Note: Extreme care should always be used when removing
the pedestal stand to avoid damage to the LCD panel.
2) Remove the jack pack cover on the back of the TV to expose
the pedestal stand screws. The jack pack cover can be removed
without tools.
3) Remove the five screws shown in the diagram below. This will
allow removal of the pedestal stand.
4) Once you have removed all five screws holding the pedestal
stand in place, remove the pedestal stand from the TV by
sliding the pedestal stand away from the TV.
Five screws
5
Page 6

FCC Declaration of Conformity
Important notes about your LCD
Compliance Statement
(Part 15):
The Toshiba 42LX177, 46LX177, 52LX177, and 57LX177
Televisions
Operation is subject to the following two conditions: (1) this
device may not cause harmful interference, and (2) this device
must accept any interference received, including interference that
may cause undesired operation.
The party responsible for compliance to these rules is:
Toshiba America Consumer Products, L.L.C.
82 Totowa Rd. Wayne, NJ 07470.
Ph: 1-800-631-3811
Note: This equipment has been tested and found to comply
with the limits for a Class B digital device, pursuant to Part 15
of the FCC rules. These limits are designed to provide
reasonable protection against harmful interference in a
residential installation. This equipment generates, uses, and
can radiate radio frequency energy and, if not installed and
used in accordance with the instructions, may cause harmful
interference to radio communications. However, there is
no guarantee that interference will not occur in a particular
installation. If this equipment does cause harmful interference
to radio or television reception, which can be determined by
removing and applying power to the equipment, the user is
encouraged to try to correct the interference by one or more of
the following measures:
• Reorient or relocate the receiving antenna.
• Increase the separation between the equipment and the
receiver.
• Connect the equipment into an outlet on a circuit different
from that to which the receiver is connected.
• Consult the dealer or an experienced radio/TV technician for
help.
Caution: Changes or modifications to this equipment not
expressly approved by Toshiba could void the user’s authority
to operate this equipment.
comply with Part 15 of the FCC rules.
TV
The following symptoms are technical limitations of LCD
Display technology and are not an indication of malfunction;
therefore, Toshiba is not responsible for perceived issues
resulting from these symptoms.
1) An afterimage (ghost) may appear on the screen if a fixed, nonmoving image is displayed for a long period of time. The
afterimage is not permanent and will disappear in a short period
of time.
2) The LCD panel contained in this TV is manufactured using an
extremely high level of precision technology; however, there
may be an occasional pixel (dot of light) that does not operate
properly (does not light, remains constantly lit, etc.). This is a
structural property of LCD technology, is not a sign of
malfunction, and is not covered under your warranty. Such
pixels are not visible when the picture is viewed from a normal
viewing distance.
Note: Interactive video games that involve shooting a “gun”
type of joystick at an on-screen target may not work with this
TV.
Trademark Information
• WOW, TruSurround, SRS and l symbol are trademarks of SRS
Labs, Inc.
WOW and TruSurround technologies are incorporated under
license from SRS Labs, Inc.
• Manufactured under license from Dolby Laboratories.
Dolby, Pro Logic and the double-D symbol are registered
trademarks of Dolby Laboratories.
• HDMI, the HDMI logo and High-Definition Multimedia Interface are
trademarks or registered trademarks of HDMI Licensing LLC.
• Deep Color is trademark of HDMI Licensing LLC.
6
Page 7

Contents
Important Safety Instructions .......................................... 3
Installation, Care, and Service ........................................ 3
Chapter 1: Introduction . . . . . . . . . . . . . . . . . . . . . . . . . . . . 9
Welcome to Toshiba . . . . . . . . . . . . . . . . . . . . . . . . . . . . . . . . 9
Features of your new TV . . . . . . . . . . . . . . . . . . . . . . . . . . . . 9
Overview of steps for installing, setting up, and using
your new TV . . . . . . . . . . . . . . . . . . . . . . . . . . . . . . . . . 10
TV front and side panel controls and connections . . . . . . . . 11
TV back panel connections. . . . . . . . . . . . . . . . . . . . . . . . . . 12
Chapter 2: Connecting your TV . . . . . . . . . . . . . . . . . . . . . . .14
Overview of cable types . . . . . . . . . . . . . . . . . . . . . . . . . . . . 14
About the connection illustrations . . . . . . . . . . . . . . . . . . . . 14
Connecting a VCR and antenna or Cable TV
(no Cable box) . . . . . . . . . . . . . . . . . . . . . . . . . . . . . . . . 15
Connecting a VCR with S-video and a cable box . . . . . . . . 16
Connecting a DVD player with ColorStream
®
(component video), a VCR, and a satellite receiver. . . . 17
Connecting a device to the IR OUT infrared terminal
using the IR blaster cable for IR pass-through device
control . . . . . . . . . . . . . . . . . . . . . . . . . . . . . . . . . . . . . . 18
Connecting an IR receiver/repeater control system to the
IR IN infrared terminal. . . . . . . . . . . . . . . . . . . . . . . . . . 19
Connecting a camcorder . . . . . . . . . . . . . . . . . . . . . . . . . . . . 19
Connecting an HDMI
™
or DVI device to the HDMI
input . . . . . . . . . . . . . . . . . . . . . . . . . . . . . . . . . . . . . . . . 20
CE-Link connection . . . . . . . . . . . . . . . . . . . . . . . . . . . . . . . 21
Connecting a digital audio system . . . . . . . . . . . . . . . . . . . . 22
Connecting an audio system . . . . . . . . . . . . . . . . . . . . . . . . . 22
Connecting a personal computer (PC) . . . . . . . . . . . . . . . . . 23
Connecting a home network . . . . . . . . . . . . . . . . . . . . . . . . . 24
Chapter 3: Using the remote control . . . . . . . . . . . . . . . . . . .26
Installing the remote control batteries . . . . . . . . . . . . . . . . . 26
Remote control effective range. . . . . . . . . . . . . . . . . . . . . . . 26
Learning about the remote control . . . . . . . . . . . . . . . . . . . . 27
Remote Control functional key chart . . . . . . . . . . . . . . . . . . 29
Using the remote control to operate your other devices . . . . 31
Programming the remote control to operate your other
devices . . . . . . . . . . . . . . . . . . . . . . . . . . . . . . . . . . . . . . 31
Device code setup . . . . . . . . . . . . . . . . . . . . . . . . . . . . . 31
Searching and sampling the code of a device
(8500) . . . . . . . . . . . . . . . . . . . . . . . . . . . . . . . . . . . 32
Using the volume lock feature (8000) . . . . . . . . . . . . . . 32
Operational feature reset (8900). . . . . . . . . . . . . . . . . . . 32
Multi-brand remote control device codes . . . . . . . . . . . . . . . 33
Chapter 4: Menu layout and navigation . . . . . . . . . . . . . . . . .40
Main menu layout. . . . . . . . . . . . . . . . . . . . . . . . . . . . . . . . . 40
Setup/Installation menu layout . . . . . . . . . . . . . . . . . . . . . . . 41
™
THINC
menu . . . . . . . . . . . . . . . . . . . . . . . . . . . . . . . . . . . 41
Navigating the menu system. . . . . . . . . . . . . . . . . . . . . . . . . 42
Chapter 5: Setting up your TV. . . . . . . . . . . . . . . . . . . . . . . .43
Setting the Demo Mode . . . . . . . . . . . . . . . . . . . . . . . . . . . . 43
Selecting the menu language . . . . . . . . . . . . . . . . . . . . . . . . 43
Configuring the antenna input source for the ANT
terminal . . . . . . . . . . . . . . . . . . . . . . . . . . . . . . . . . . . . . 44
Programming channels into the TV’s channel memory . . . . 44
Programming channels automatically . . . . . . . . . . . . . . 44
Manually adding and deleting channels in the channel
memory . . . . . . . . . . . . . . . . . . . . . . . . . . . . . . . . . . 45
Setting the Auto Input feature. . . . . . . . . . . . . . . . . . . . . . . . 46
Labeling channels . . . . . . . . . . . . . . . . . . . . . . . . . . . . . . . . . 47
Setting the HDMI
™
audio mode. . . . . . . . . . . . . . . . . . . . . . 48
Viewing the digital signal meter. . . . . . . . . . . . . . . . . . . . . . 49
Viewing the system status. . . . . . . . . . . . . . . . . . . . . . . . . . . 49
Selecting the Power-On Mode . . . . . . . . . . . . . . . . . . . . . . . 50
Selecting the Demo Mode. . . . . . . . . . . . . . . . . . . . . . . . . . . 50
Chapter 6: Using the TV’s features . . . . . . . . . . . . . . . . . . . .51
Selecting the video input source to view . . . . . . . . . . . . . . . 51
Labeling the video input sources . . . . . . . . . . . . . . . . . . . . . 52
Tuning channels . . . . . . . . . . . . . . . . . . . . . . . . . . . . . . . . . . 53
Tuning channels using the Channel Browser
™
. . . . . . . 53
Tuning to the next programmed channel . . . . . . . . . . . . 55
Tuning to a specific channel
(programmed or unprogrammed) . . . . . . . . . . . . . . 55
Switching between two channels using Channel
Return . . . . . . . . . . . . . . . . . . . . . . . . . . . . . . . . . . . 55
Switching between two channels using SurfLock
Selecting the picture size . . . . . . . . . . . . . . . . . . . . . . . . . . . 56
Scrolling the TheaterWide
®
picture
™
. . . . 55
(TheaterWide 2 and 3 only) . . . . . . . . . . . . . . . . . . . . . . 58
Using the auto aspect ratio feature . . . . . . . . . . . . . . . . . . . . 58
Using the FREEZE feature . . . . . . . . . . . . . . . . . . . . . . . . . . 59
Using the POP features. . . . . . . . . . . . . . . . . . . . . . . . . . . . . 59
Using the POP double-window feature . . . . . . . . . . . . . 59
Selecting the POP window audio out. . . . . . . . . . . . . . . 60
Adjusting the picture. . . . . . . . . . . . . . . . . . . . . . . . . . . . . . . 60
Selecting the picture mode. . . . . . . . . . . . . . . . . . . . . . . 60
Adjusting the picture quality . . . . . . . . . . . . . . . . . . . . . 61
Using the TheaterLock
™
feature. . . . . . . . . . . . . . . . . . . . . . 61
Using the closed caption mode. . . . . . . . . . . . . . . . . . . . . . . 62
Base closed captions . . . . . . . . . . . . . . . . . . . . . . . . . . . 62
Digital CC Settings . . . . . . . . . . . . . . . . . . . . . . . . . . . . 63
CC Selector . . . . . . . . . . . . . . . . . . . . . . . . . . . . . . . . . . 63
Using the Closed Caption button on the remote
control . . . . . . . . . . . . . . . . . . . . . . . . . . . . . . . . . . . 63
Adjusting the audio. . . . . . . . . . . . . . . . . . . . . . . . . . . . . . . . 64
Muting the sound . . . . . . . . . . . . . . . . . . . . . . . . . . . . . . 64
Using the digital audio selector . . . . . . . . . . . . . . . . . . . 64
Selecting stereo/SAP broadcasts . . . . . . . . . . . . . . . . . . 64
Adjusting the audio quality . . . . . . . . . . . . . . . . . . . . . . 65
Using the StableSound
®
feature. . . . . . . . . . . . . . . . . . . 65
Turning off the built-in speakers . . . . . . . . . . . . . . . . . . 66
Selecting the optical audio output format . . . . . . . . . . . 66
Using the Dolby
®
Digital Dynamic Range Control
feature . . . . . . . . . . . . . . . . . . . . . . . . . . . . . . . . . . . 66
Using the Locks menu . . . . . . . . . . . . . . . . . . . . . . . . . . . . . 67
Entering the PIN code . . . . . . . . . . . . . . . . . . . . . . . . . . 67
If you cannot remember your PIN code. . . . . . . . . . . . . 67
Changing your PIN code . . . . . . . . . . . . . . . . . . . . . . . . 67
Blocking TV programs and movies by rating
(V-Chip) . . . . . . . . . . . . . . . . . . . . . . . . . . . . . . . . . 68
Downloading an additional rating system for blocking
TV programs and movies . . . . . . . . . . . . . . . . . . . . 68
Blocking channels . . . . . . . . . . . . . . . . . . . . . . . . . . . . . 69
Unlocking programs temporarily. . . . . . . . . . . . . . . . . . 70
Using the input lock feature. . . . . . . . . . . . . . . . . . . . . . 70
Using the GameTimer
®
. . . . . . . . . . . . . . . . . . . . . . . . . 71
Using the control panel lock feature . . . . . . . . . . . . . . . 71
Using the PC settings feature . . . . . . . . . . . . . . . . . . . . . . . . 72
Setting the PC Audio . . . . . . . . . . . . . . . . . . . . . . . . . . . . . . 72
Setting the sleep timer. . . . . . . . . . . . . . . . . . . . . . . . . . . . . . 73
Using CE-Link . . . . . . . . . . . . . . . . . . . . . . . . . . . . . . . . . . . 73
CE-Link playback device (HD DVD player, etc.)
control . . . . . . . . . . . . . . . . . . . . . . . . . . . . . . . . . . . 73
CE-Link input source selection . . . . . . . . . . . . . . . . . . . 74
Audio Receiver VOLUME and MUTE control. . . . . . . 74
Other CE-Link functions . . . . . . . . . . . . . . . . . . . . . . . . 74
Using the HDMI settings feature . . . . . . . . . . . . . . . . . . . . . 75
(continued)
7
Page 8

Displaying TV status information. . . . . . . . . . . . . . . . . . . . . 76
Understanding the auto power off feature . . . . . . . . . . . . . . 76
Understanding the last mode memory feature . . . . . . . . . . . 76
Chapter 7: Using the TV’s advanced features . . . . . . . . . . . . .77
Using the advanced picture settings features . . . . . . . . . . . . 77
Using dynamic contrast . . . . . . . . . . . . . . . . . . . . . . . . . 77
Using the static gamma feature . . . . . . . . . . . . . . . . . . . 77
Selecting the color temperature . . . . . . . . . . . . . . . . . . . 78
Using the Vertical Edge Enhancer feature . . . . . . . . . . . 78
Selecting the cinema mode (480i and 1080i signals). . . 79
Using the ClearFrame
Using the Film Stabilization feature . . . . . . . . . . . . . . . 80
Using CableClear
Using MPEG noise reduction. . . . . . . . . . . . . . . . . . . . . 81
Using the ColorMaster
™
feature . . . . . . . . . . . . . . . . . . . 79
®
digital noise reduction . . . . . . . . . . 80
™
Pro feature . . . . . . . . . . . . . . . 81
Using xvYCC Selection feature. . . . . . . . . . . . . . . . . . . 83
Using the Game Mode feature . . . . . . . . . . . . . . . . . . . . 83
Using the advanced audio settings features . . . . . . . . . . . . . 84
Using the SRS WOW
Using the virtual surround sound feature
®
(Dolby
Virtual and SRS TruSurround™). . . . . . . . 84
™
surround sound feature . . . . . . 84
Using the Help feature . . . . . . . . . . . . . . . . . . . . . . . . . . . . . 85
Chapter 8: Using the THINC™ home network feature . . . . . . . .87
A. Connecting the TV to your home network . . . . . . . . . . . 87
B. Setting up the network address . . . . . . . . . . . . . . . . . . . . 88
Automatically setting up the network address . . . . . . . . 88
Manually setting up the network address. . . . . . . . . . . . 89
Resetting the network address . . . . . . . . . . . . . . . . . . . . 90
C. Setting up file sharing on your PC . . . . . . . . . . . . . . . . . . 90
Compatible operating systems . . . . . . . . . . . . . . . . . . . . 90
Setting up file sharing on a PC with Microsoft
Windows
Setting up file sharing on a PC with Microsoft®
Windows
®
XP Service Pack 2 or higher. . . . . . . . . 90
®
2000. . . . . . . . . . . . . . . . . . . . . . . . . . . . 92
®
D. Setting up file sharing on the TV. . . . . . . . . . . . . . . . . . . 93
Using the software keyboard . . . . . . . . . . . . . . . . . . . . . 94
About the Software Upgrade feature . . . . . . . . . . . . . . . 94
E. Viewing/playing shared files on the TV. . . . . . . . . . . . . . 95
Media specifications. . . . . . . . . . . . . . . . . . . . . . . . . . . . 95
Using the Picture Viewer . . . . . . . . . . . . . . . . . . . . . . . . 96
Using the Audio Player . . . . . . . . . . . . . . . . . . . . . . . . . 98
F. Setting up the Personal E-mail feature . . . . . . . . . . . . . . . 99
Required information and services. . . . . . . . . . . . . . . . . 99
Setting up Personal E-mail. . . . . . . . . . . . . . . . . . . . . . . 99
Description of fields in the “E-mail Account Setup”
window . . . . . . . . . . . . . . . . . . . . . . . . . . . . . . . . . 101
G. Using the Personal E-mail feature . . . . . . . . . . . . . . . . . 102
Unread E-mail Notification . . . . . . . . . . . . . . . . . . . . . 102
E-mail Inbox. . . . . . . . . . . . . . . . . . . . . . . . . . . . . . . . . 102
Read View . . . . . . . . . . . . . . . . . . . . . . . . . . . . . . . . . . 103
Chapter 9: Troubleshooting . . . . . . . . . . . . . . . . . . . . . . . .104
General troubleshooting . . . . . . . . . . . . . . . . . . . . . . . . . . . 104
Home network troubleshooting . . . . . . . . . . . . . . . . . . . . . 106
LED indications . . . . . . . . . . . . . . . . . . . . . . . . . . . . . . . . . 108
Chapter 10: Appendix . . . . . . . . . . . . . . . . . . . . . . . . . . . .109
Specifications . . . . . . . . . . . . . . . . . . . . . . . . . . . . . . . . . . . 109
Limited United States Warranty
for LCD Televisions 26” and Larger . . . . . . . . . . . . . . 111
Limited Canadian Warranty
for Toshiba Brand Flat Panel Televisions . . . . . . . . . . 112
Index . . . . . . . . . . . . . . . . . . . . . . . . . . . . . . . . . . . . . . .115
8
Page 9

Chapter 1: Introduction
Welcome to Toshiba
Thank you for purchasing this Toshiba LCD TV, one of the
most innovative LCD TVs on the market. This digital
television is capable of receiving analog basic, digital basic
and digital premium cable television programming by direct
connection to a cable system providing such programming. A
security card provided by your cable operator is required to
view encrypted digital programming. Certain advanced and
interactive digital cable services such as video-on-demand, a
cable operator’s enhanced program guide and data-enhanced
television services may require the use of a set-top box. For
more information call your local cable operator.
Features of your new TV
The following are just a few of the many exciting features of
your new Toshiba widescreen, integrated HD, LCD TV:
• Integrated digital tuning (8VSB ATSC and QAM)
eliminates the need for a separate digital converter set-top
box (in most cases).
• ClearFrame
• 1080p output resolution.
• Three HDMI
interfaces capable of supporting up to 1080p sources
(- page 20).
• HDMI new capabilities
Lip-Sync Latency feature activates an auto audio/video
display timing adjustment function that allows HDMI
source devices to accurately perform synchronization
automatically.
Deep Color feature allows to HDMI source to increase
available colors bits within the boundaries defined by the
RGB or YCbCr color space.
xvYCC feature expands the acceptable color range (limits)
in the HDMI signals, then allows sending wider color
signals from HDMI source.
• Two sets of ColorStream
video inputs (- page 17).
• SRS WOW
audio technologies (- page 84).
• Digital Audio Out optical audio connection with Dolby
Digital optical output format (- page 66).
• CableClear
(- page 80).
• Double-window POP feature (- page 59).
• PC IN (Analog RGB) computer terminal (- page 23).
• Ethernet (RJ-45) (THINC
to a home network to enable file sharing (JPEG, MP3), and
use of personal e-mail (- Chapter 8).
• Channel Labeling allows you to put the Call Letters (e.g.
ABC, HBO, etc.) on the screen along with the station
numbers, so you always know what you’re watching
(- page 47).
• IR IN and IR OUT infrared terminals using the IR blaster
cable for IR pass-through device control (- pages 14, 18,
and 19).
• ColorMaster
colors and create up to three additional custom colors.
(- page 81).
• CE-Link allows control of external devices from the TV via
HDMI connection (- page 73).
• The Personal E-mail feature allows you to access your
e-mail server through the TV (- page 99).
• Help feature allows you to research and analyze commonly
misunderstood behavior directly from your TV (-
page 85).
™
new 120Hz anti-blur feature (- page 79)
™
digital, high-definition multimedia
®
HD high-resolution component
™
and Dolby Virtual and SRS TruSurround™
®
digital picture noise reduction
™
) port for connecting the TV
™
Pro allows you to adjust the TV’s standard
®
9
Page 10

Chapter 1: Introduction
Overview of steps for installing,
setting up, and using your new TV
Follow these steps to set up your TV and begin using its many
exciting features.
1 Carefully read the important safety, installation, care, and
service information. Keep this manual for future
reference.
2 Observe the following when choosing a location for the
TV:
• Read “Important notes about your LCD TV”
(- page 6).
• Place the TV on the floor or a sturdy, level, stable
surface that can support the weight of the unit. Secure
the TV to a wall, pillar, or other immovable structure
(- page 3).
• Place the TV in a location where light does not reflect
on the screen.
• Place the TV far enough from walls and other objects to
allow proper ventilation. Inadequate ventilation may
cause overheating, which will damage the TV. THIS
TYPE OF DAMAGE IS NOT COVERED UNDER
THE TOSHIBA WARRANTY.
3 Do not plug in any power cords until AFTER you have
connected all cables and devices to your TV.
4 BEFORE connecting cables or devices to the TV, learn
the functions of the TV’s connections and controls
(
- pages 11–13).
5 Connect your other electronic device(s) to the TV
(
- pages 14–25).
6 Install the batteries in the remote control (- page 26).
7 See “Learning about the remote control” (- page 27) for
an overview of the buttons on the remote control.
8 Program the remote control to operate your other
device(s) (
9 AFTER connecting all cables and devices, plug in the
power cords for your TV and other devices. The yellow
LED will blink until the TV goes into standby mode.
When the TV is in standby mode, press POWER on the
TV control panel or remote control to turn on the TV.
If the TV stops responding to the controls on the remote
control or TV control panel and you cannot turn the TV
off or on, press and hold the POWER button for 5
seconds to reset the TV.
- pages 31–39).
10 See “Menu layout and navigation” for a quick overview of
navigating the TV’s menu system (
- page 40).
11 Programming channels into the TV’s channel memory
(
- page 44).
12 For details on using the TV’s features, see Chapters 6
and 7.
13 For details on connecting the TV to a home network to
enable file sharing and personal e-mail, see Chapter 8.
14 For help, refer to the Troubleshooting Guide, Chapter 9.
15 For technical specifications and warranty information, see
Chapter 10.
16 Enjoy your new TV!
Note: After you turn on the TV, the Menu
Language selection and Demo Mode selection
menus appear automatically by default.
You can turn off the On-Screen demonstration
mode by selecting the Demo Mode Normal
(
- page 43).
10
Page 11
Chapter 1: Introduction
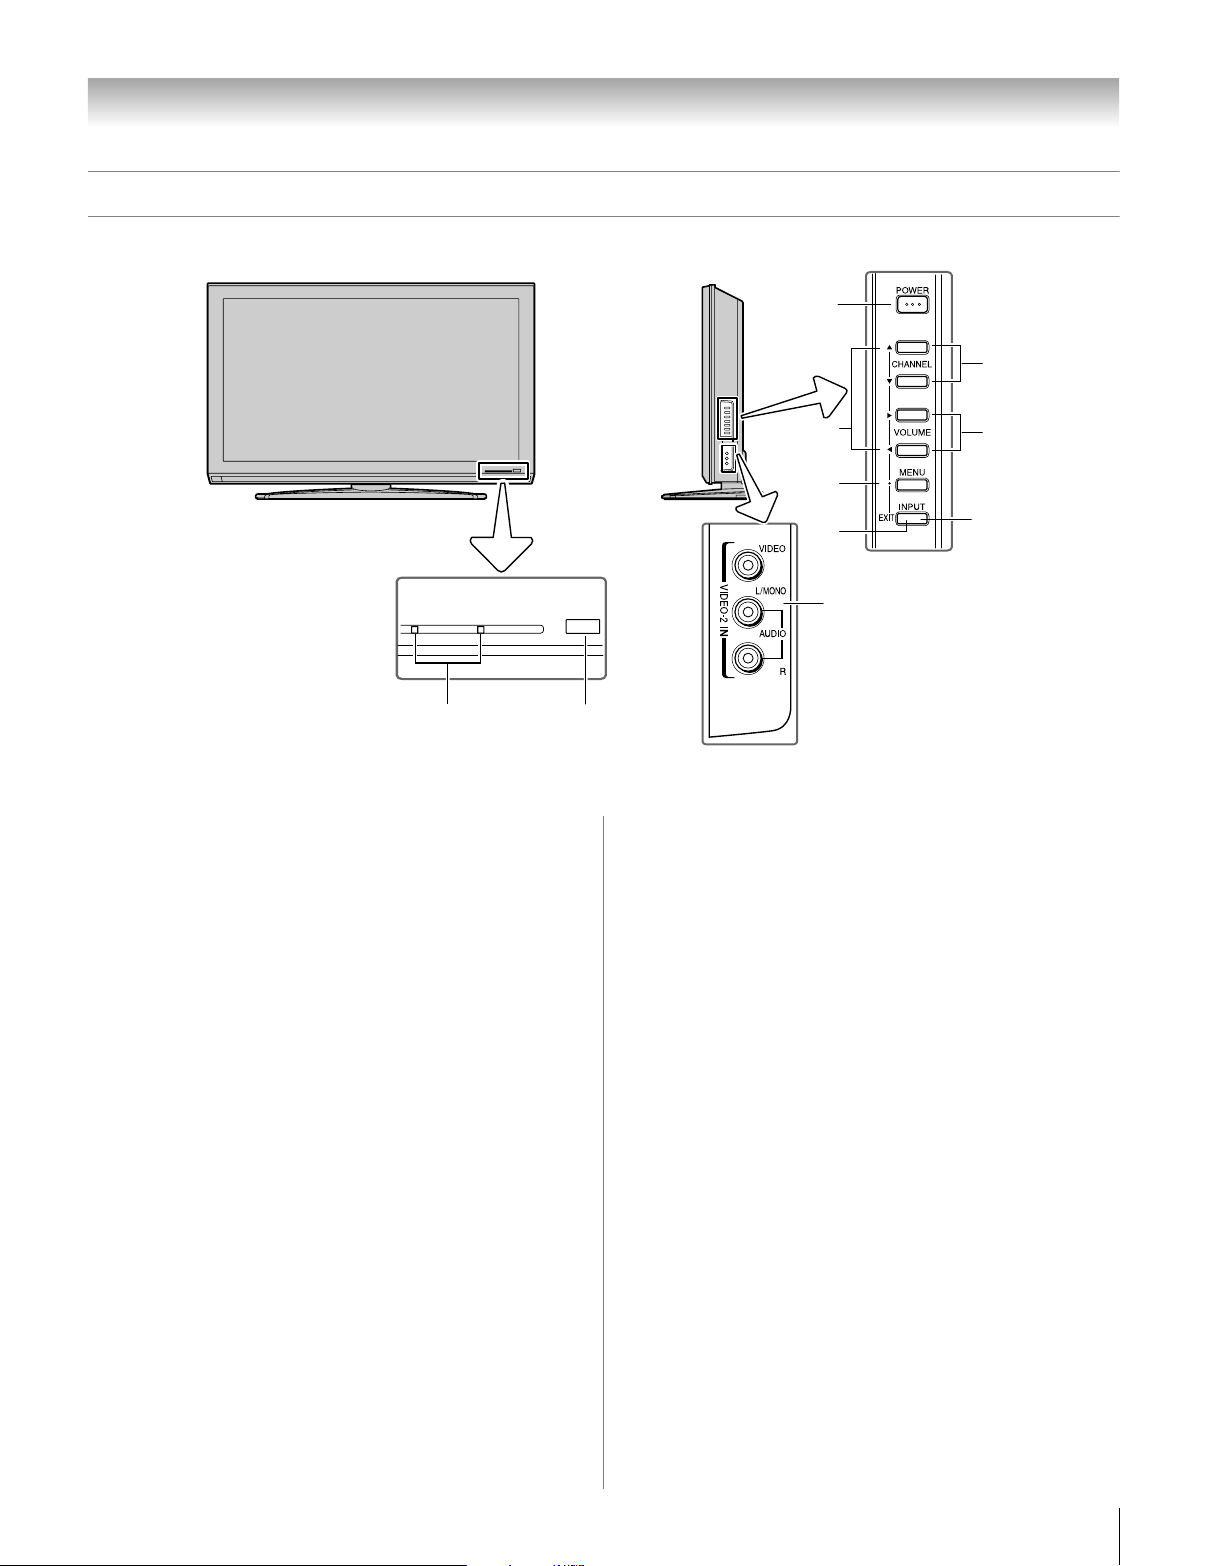
TV front and side panel controls and connections
TV front
POWER
12
1 Green and Yellow LEDs
Green = Power indicator
Yellow = Power-On Mode indicator (- “Selecting the
Power-On Mode” on page 50)
See “LED indications” on page 108 for additional
information.
2 Remote sensor — Point the remote control toward this
remote sensor (- “Remote control effective range” on
page 26).
Right side panel
4
8
5
9
6
7
Control panel
10
3
8 CHANNEL Bb — When no menu is on-screen, these
buttons change the channel (programmed channels only;
- page 44).
9 VOLUME C c — These buttons adjust the volume level.
10 INPUT — Repeatedly press to change the source you are
viewing (ANT, VIDEO 1, VIDEO 2, ColorStream
HD1, ColorStream HD2, HDMI 1, HDMI 2, HDMI 3,
PC) (- page 51).
3 VIDEO-2 IN — The side panel A/V connections are
referred to as “VIDEO 2” and include standard A/V
connections.
4 POWER — Press to turn the TV on and off.
If the TV stops responding to the controls on the remote
control or TV control panel and you cannot turn off the
TV, press and hold the POWER button on the TV control
panel for 5 or more seconds to reset the TV.
5 ARROWS BbC c — When a menu is on-screen, these
buttons function as up/down/left/right menu navigation
buttons.
6 MENU (ENTER) — Press to access the menu system
(- pages 40–41). When a menu is on-screen, the MENU
button on the TV’s control panel functions as the ENTER
button.
7 EXIT — Press to instantly close an on-screen menu.
11
Page 12
Chapter 1: Introduction
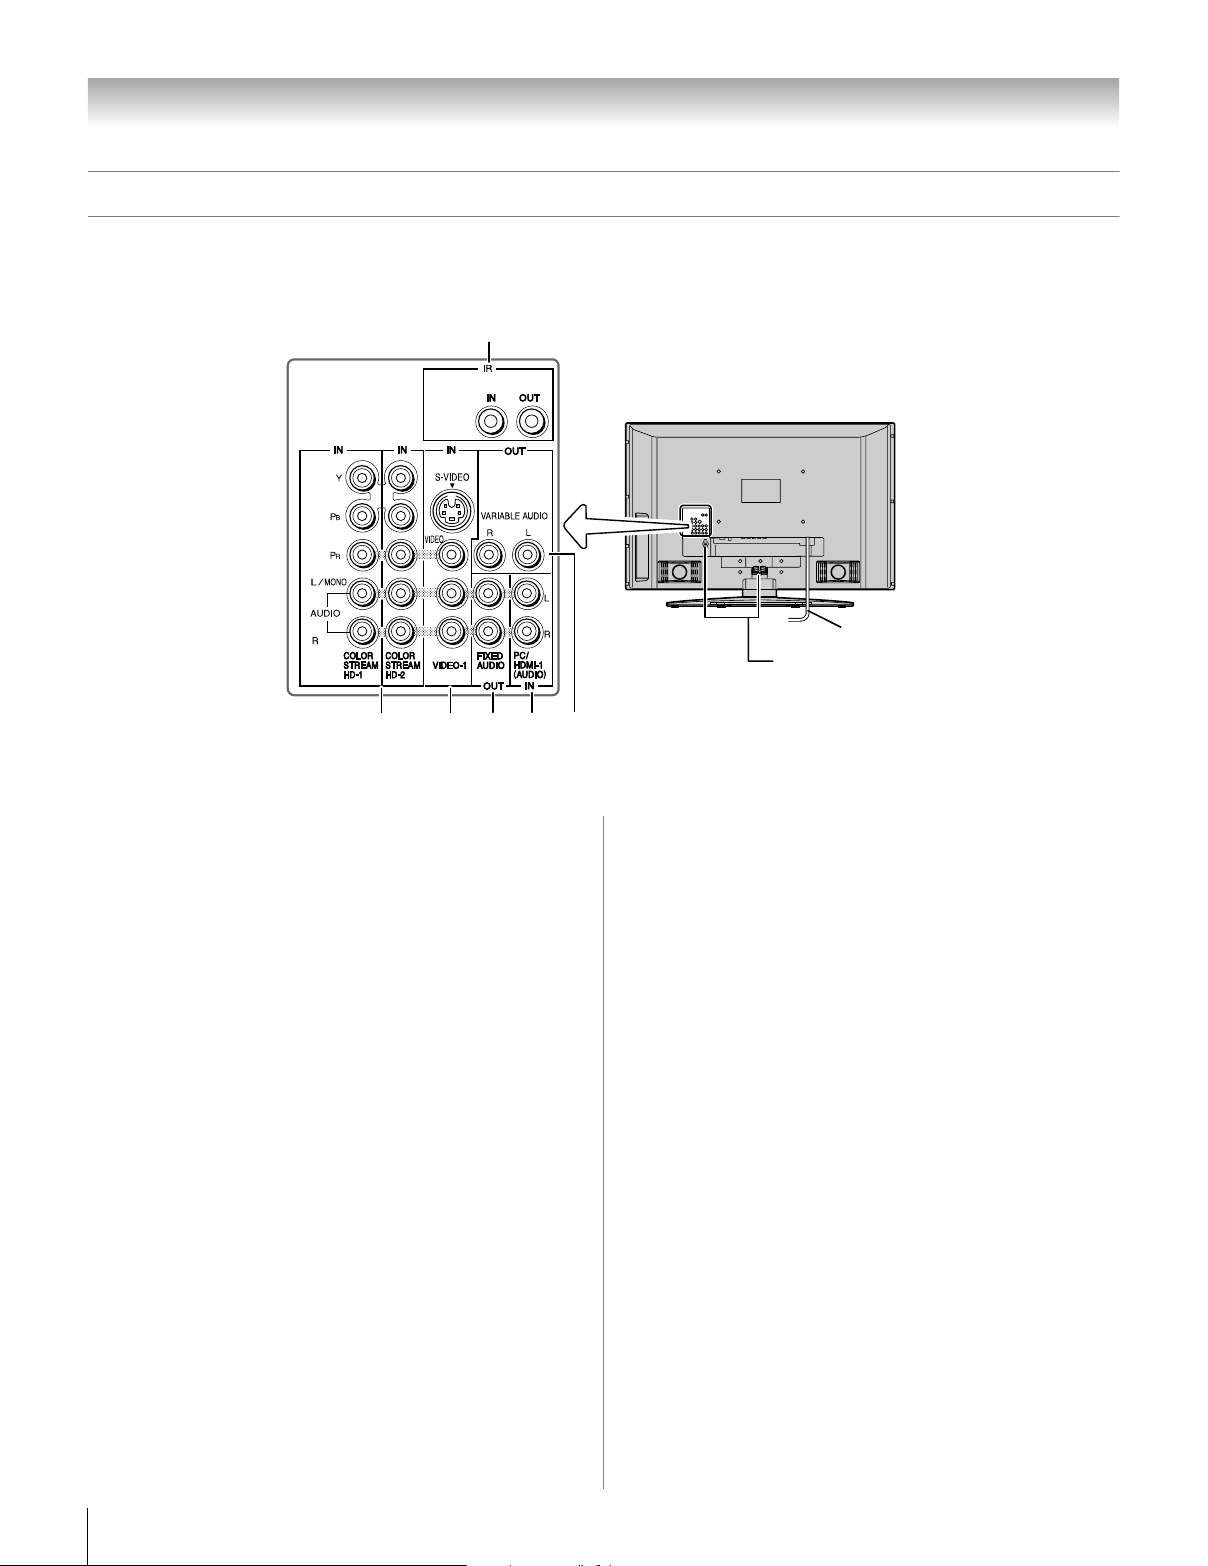
TV back panel connections
For an explanation of cable types and connections, see pages 14–23.
1
TV back
Power cord
Cable Clamper
4 562 3
1 IR OUT — For controlling infrared remote-controlled
devices through the TV. You can connect up to two
devices with an optical IR blaster cable (- pages 14 and
18), and then control the devices using the TV’s IR passthrough features.
IR IN — For connecting to IR OUT on other devices
(- page 19).
2 ColorStream
Two sets of ColorStream
video inputs (with standard stereo audio inputs) for
connecting devices with component video output, such as
a Toshiba DVD player with ColorStream
Note: Component video cables carry only video
information; separate audio cables are required for a
complete connection.
3 VIDEO-1 IN — Standard (composite) video and standard
audio inputs plus optional S-video inputs for connecting
devices with composite video or S-video output.
Note: Standard (composite) video and S-video cables
carry only video information; separate audio cables are
required for a complete connection.
®
HD-1 and ColorStream® HD-2 —
®
high-definition component
®
.
5 PC/HDMI-1 (AUDIO) IN — PC audio input terminals
are shared with HDMI-1 analog audio input terminals, and
their use can be configured in the Audio Setup menu
(- page 72).
6 Variable Audio OUT — Standard analog audio outputs
for connecting an analog amplifier with external speakers.
When the POP double-window is open, the active window
sound is output (- page 60).
4 Fixed Audio OUT — Analog audio outputs for
connecting an audio amplifier.
When the POP double-window is open, the active window
sound is output (- page 59).
12
Page 13
Chapter 1: Introduction
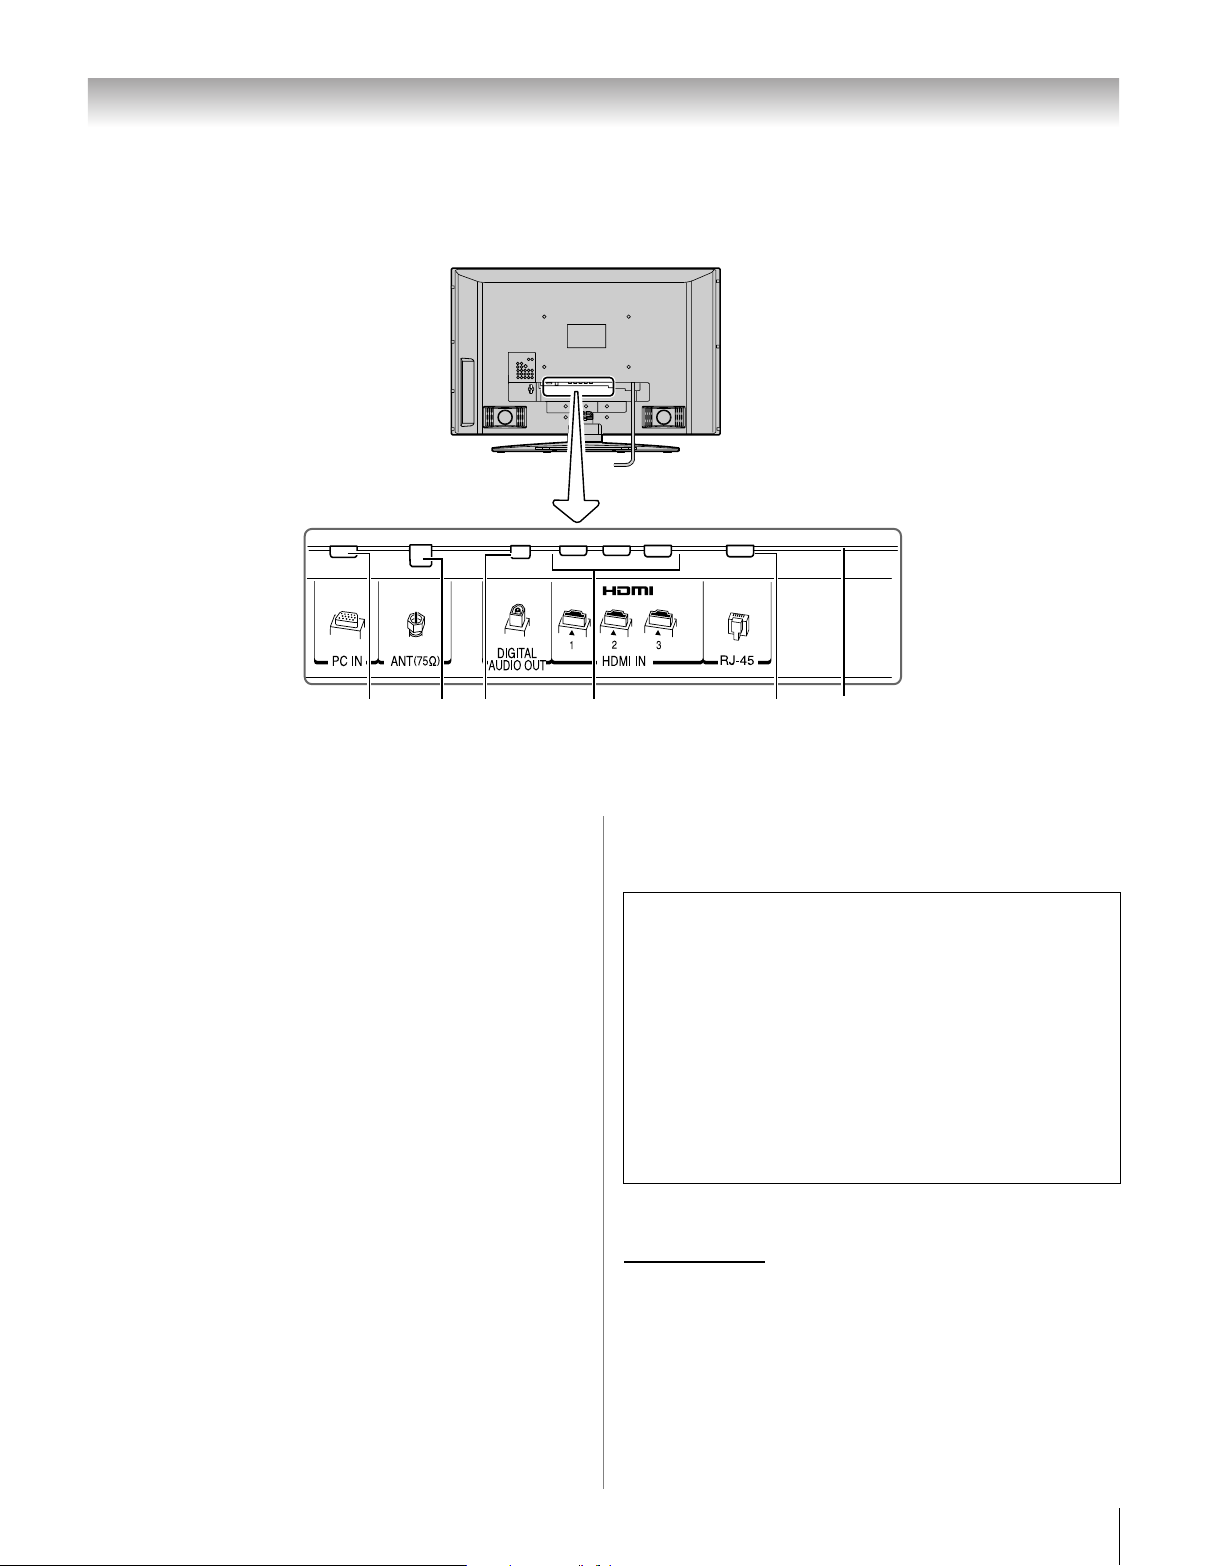
TV back
89
7 PC IN — For use when connecting a personal computer.
8 ANT — Antenna input that supports analog (NTSC) and
digital (ATSC) off-air antenna signals and analog and
digital Cable TV (QAM) signals.
9 Digital Audio OUT — Optical audio output in Dolby
Digital or PCM (pulse-code modulation) format for
connecting an external Dolby Digital decoder, amplifier,
A/V receiver, or home theater system with optical audio
input.
10 HDMI
™
IN — High-Definition Multimedia Interface
input receives digital audio and uncompressed digital
video from an HDMI device or uncompressed digital
video from a DVI device. Also see item 5 on previous
page. HDMI connection is necessary to receive 1080p
signals.
10
11 RJ-45 (Ethernet) (THINC
11 127
™
system*) — For
connecting the TV to your home network. See boxed note
below.
*THINC™ system
(Toshiba Home Interactive Network Connection)
The RJ-45 (Ethernet) port allows your Toshiba TV to
connect to your home network. You can use this
revolutionary home entertainment networking system to
access MP3 audio files and JPEG picture files that are
stored as shared files on a networked PC and play/display
them on your TV.
You also can play your shared MP3 audio files through a
connected audio system.
Personal e-mail is also enabled with the THINC system.
See Chapter 8 for details. Also see pages 24 and 25.
12 Service port — For service use only. Used for updating
the television’s firmware.
HDMI, the HDMI logo and High-Definition Multimedia Interface are
trademarks or registered trademarks of HDMI Licensing LLC.
Manufactured under license from Dolby Laboratories.
Dolby, Pro Logic, and the double-D symbol are registered trademarks
of Dolby Laboratories.
13
Page 14

Chapter 2: Connecting your TV
Overview of cable types
Cables can be purchased from most stores that sell audio/video
devices. Before purchasing any cables, be sure of connector
types required by your devices and the length of each cable.
Coaxial (F-type) cable
Coaxial (F-type) cable is used for connecting your antenna,
cable TV service, and/or cable converter box to the ANT input
on your TV.
HDMI (High-Definition Multimedia Interface) cable is for use
with devices with an HDMI output. An HDMI cable delivers
digital audio and video in its native format. This cable carries
both video and audio information; therefore, separate audio
cables are not required for a complete HDMI device
connection (- page 20 and page 23).
Note: HDMI cable provides better picture performance than a
standard (composite) video or S-video cable.
Dual-wand IR blaster cable
Standard A/V cables (red/white/yellow)
Standard A/V cables (composite video) usually come in sets of
three, and are for use with video devices with analog audio and
composite video output. These cables (and the related inputs
on your TV) are typically color-coded according to use: yellow
for video, red for stereo right audio, and white for stereo left
(or mono) audio.
S-video cable
S-video cable is for use with video devices with S-video
output. Separate audio cables are required for a complete
connection.
Note: An S-video cable provides better picture performance
than a composite video cable. If you connect an S-video cable,
be sure to disconnect the standard (composite) video cable or
the picture performance will be unacceptable.
Component video cables (red/green/blue)
Dual-wand IR blaster cable is for use with video devices with
IR (infrared) remote control. This cable can be used with the
TV’s IR pass-through feature (- page 18).
To obtain IR blaster cable:
Visit www.ceaccessories.toshiba.com.
Optical audio cable
Optical audio cable is for connecting receivers with Dolby
Digital or PCM (pulse-code modulation) optical audio input to
the TV’s DIGITAL AUDIO OUT terminal (- page 22).
Analog RGB (15-pin) computer cable
Analog RGB (15-pin) computer cable is for connecting a PC to
the TV’s PC IN terminal (- page 23).
Ethernet (RJ-45) cable
Component video cables come in sets of three and are for use
with video devices with component video output.
(ColorStream
cables are typically color-coded red, green, and blue. Separate
audio cables are required for a complete connection.
Note: Component video cables provide better picture
performance than a standard (composite) video or S-video
cable.
®
is Toshiba’s brand of component video.) These
HDMI™ cable (with HDMI Logo “ ”)
14
Ethernet (RJ-45) cable is used to connect the TV to your home
network (- page 24 and Chapter 8).
About the connection illustrations
You can connect different types and brands of devices to your
TV in several different configurations. The connection
illustrations in this manual are representative of typical device
connections only. The input/output terminals on your devices
may differ from those illustrated herein. For details on
connecting and using your specific devices, refer to each
device’s owner’s manual.
Page 15
Chapter 2: Connecting your TV
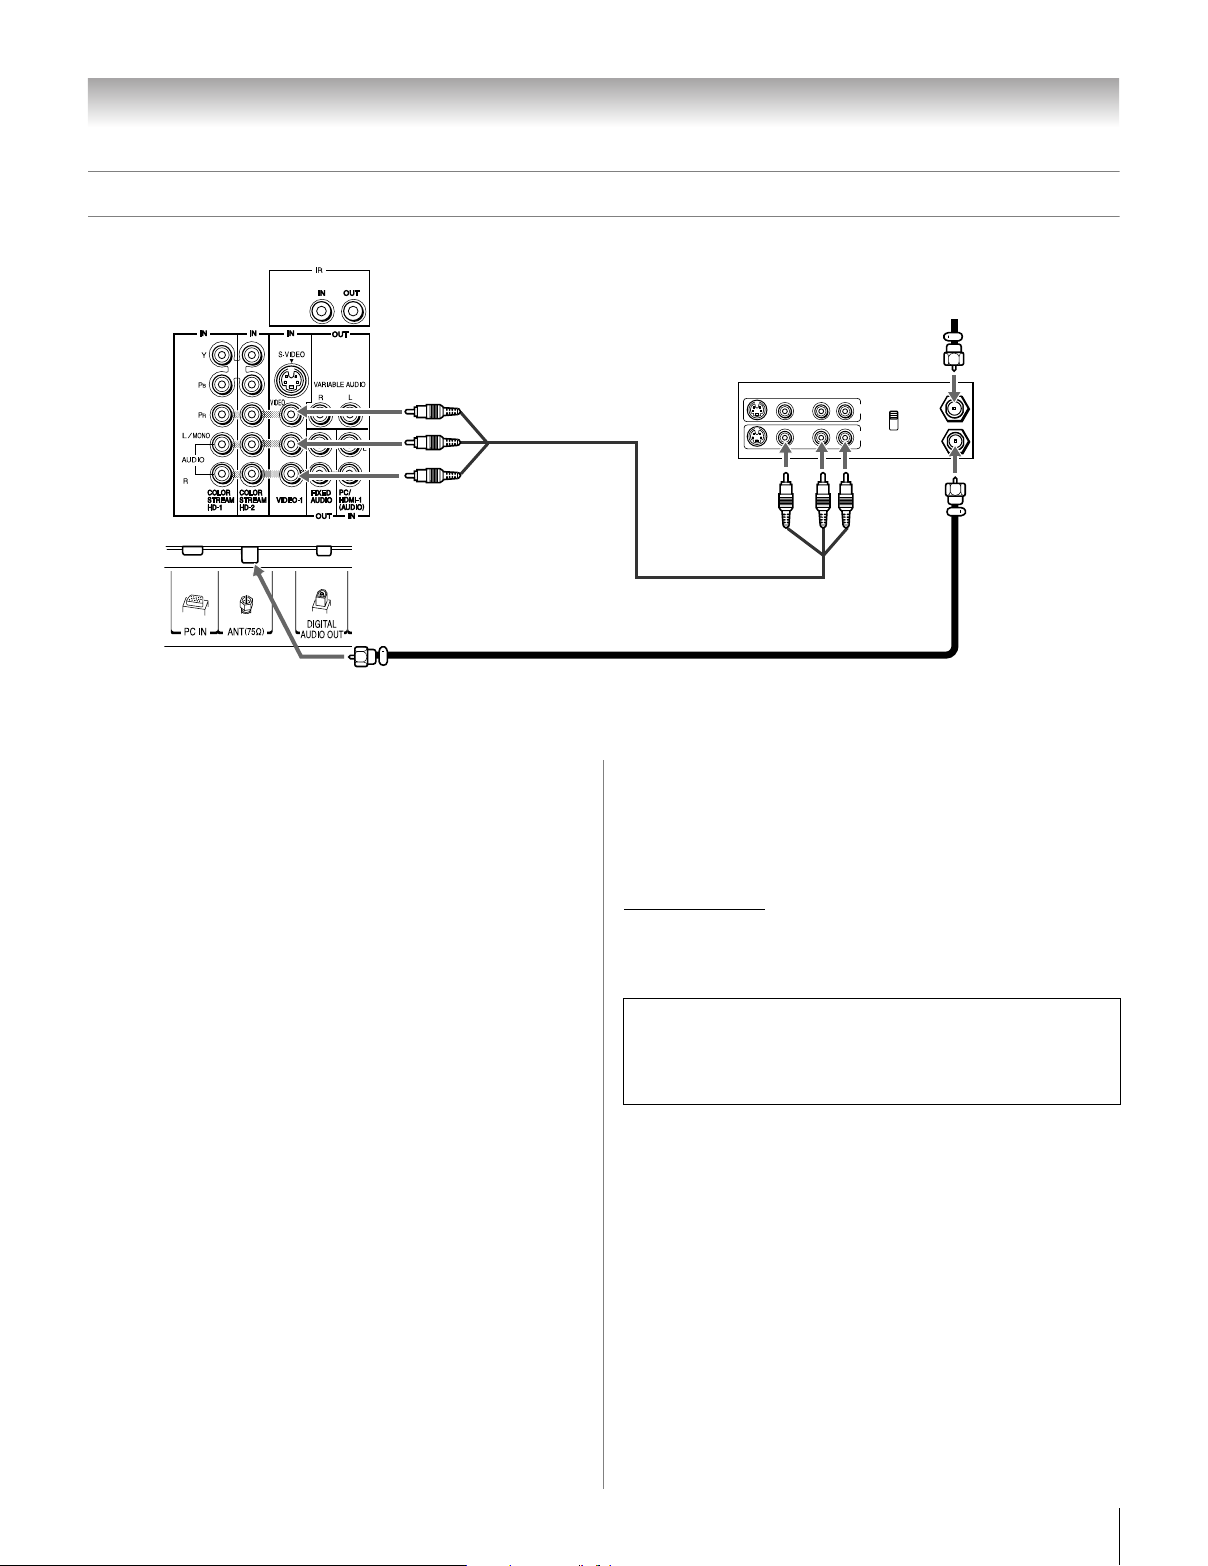
a
Connecting a VCR and antenna or Cable TV (no Cable box)
TV upper back panel
From Cable TV or antenn
Stereo VCR
VIDEO AUDIO
LR
IN
CH 3
CH 4
OUT
R
L
TV lower back panel
IN from ANT
OUT to TV
You will need:
• coaxial cables
• standard A/V cables
– For better picture performance, if your VCR has S-video,
use an S-video cable (plus the audio cables) instead of
the standard video cable. Do not connect both types of
video cable to VIDEO 1 at the same time or the picture
performance will be unacceptable.
– If you have a mono VCR, connect L/MONO on the TV to
your VCR’s audio out terminal using the white audio cable
only.
To view the antenna or Cable signal:
Select the ANT video input source on the TV.*
To view the VCR:
Turn ON the VCR. Select the VIDEO 1 video input source on
the TV.*
* To select the video input source, press INPUT on the remote control
(- page 27). To program the TV remote control to operate other
devices, see Chapter 3.
The unauthorized recording, use, distribution, or revision of
television programs, videotapes, DVDs, and other materials is
prohibited under the Copyright Laws of the United States and
other countries, and may subject you to civil and criminal
liability.
15
Page 16

Chapter 2: Connecting your TV
V
Connecting a VCR with S-video and a cable box
An S-video connection will provide better picture performance than a standard (composite) video cable.
TV upper back panel
Cable box
IN
CH 3
CH 4
stereo VCR
VIDEO AUDIO
LR
IN
CH 3
CH 4
OUT
R
L
TV lower back panel
From Cable T
OUT
IN from ANT
OUT to TV
You will need:
• coaxial cables
• S-video cable
– Do not connect both types of video cable to VIDEO 1 at
the same time or the picture performance will be
unacceptable.
•
standard audio cables
– If you have a mono VCR, connect L/MONO on the TV to
your VCR’s audio out terminal using the white audio cable
only.
Note: When you use a Cable box, you may not be able to use
the remote control to program or access certain features on the
TV.
To view basic and premium Cable channels:
Turn OFF the VCR. Select the ANT video input source on the
TV.* Tune the TV to channel 3 or 4 (whichever channel the
Cable box output is set to). Use the Cable box controls to
change channels.
To view the VCR:
Turn ON the VCR. Select the VIDEO 1 video input source on
the TV.*
* To select the video input source, press INPUT on the remote control
(- page 27). To program the TV remote control to operate other
devices, see Chapter 3.
The unauthorized recording, use, distribution, or revision of
television programs, videotapes, DVDs, and other materials is
prohibited under the Copyright Laws of the United States and
other countries, and may subject you to civil and criminal
liability.
16
Page 17
Chapter 2: Connecting your TV
a
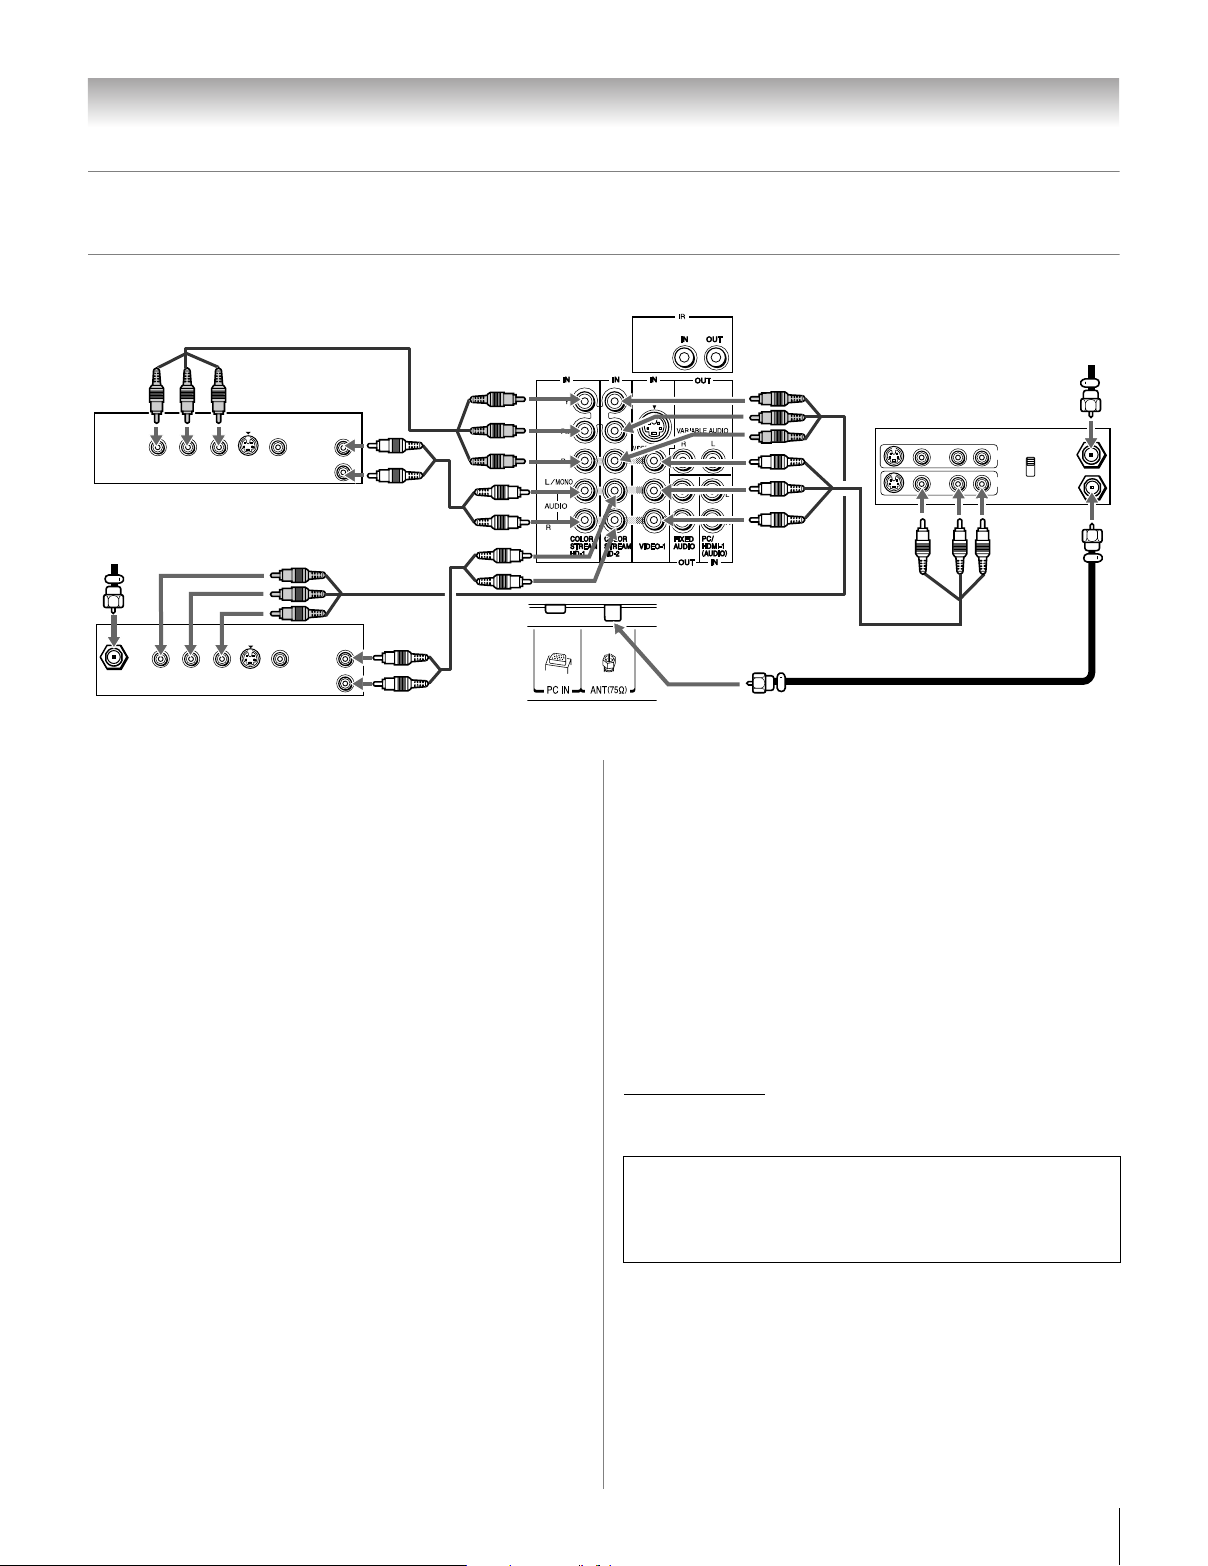
Connecting a DVD player with ColorStream® (component video), a VCR,
and a satellite receiver
Your TV has two sets of ColorStream® (component video) inputs.
TV upper back panel
AUDIO
OUT
Y
P
B
COMPONENT VIDEO
P
R
VIDEO
S-VIDEO
OUT
OUT
L
R
DVD player with component video
From satellite dish
AUDIO
OUT
Y
P
R
P
B
Satellite
IN
COMPONENT VIDEO
S-VIDEO
OUT
VIDEO
OUT
Satellite receiver with component video
L
R
TV lower back panel
You will need:
• coaxial cables
• standard A/V cables
– For better picture performance, if your VCR has S-video,
use an S-video cable (plus the audio cables) instead of
the standard video cable. Do not connect both types of
video cable to VIDEO 1 at the same time or the picture
performance will be unacceptable.
– If you have a mono VCR, connect L/MONO on the TV to
your VCR’s audio out terminal using the white audio cable
only.
•
standard audio cables
• component video cables
– You can connect the component video cables (plus audio
cables) from the DVD player or satellite receiver to either
set of ColorStream terminals on the TV (HD-1 or HD-2).
The ColorStream HD-1 and HD-2 terminals can be used
with Progressive (480p, 720p) and Interlaced (480i, 1080i)
scan systems. A 1080i signal will provide the best picture
performance (1080p is not supported).
– If your DVD player or satellite receiver does not have
component video, connect a standard A/V cable to
VIDEO 2 on the side panel. If your DVD player has HDMI
video, see page 20.
From antenn
Stereo VCR
VIDEO AUDIO
LR
IN
IN from ANT
CH 3
CH 4
OUT
OUT to TV
R
L
To view satellite programs using the component video
connections:
Turn on the satellite receiver. Select the ColorStream HD-2
video input source on the TV.*
To view the VCR or view and record antenna
channels:
Turn ON the VCR. Tune the VCR to the channel you want to
watch. Select the VIDEO 1 video input source on the TV.*
To record a TV program while watching a DVD:
Turn ON the VCR. Tune the VCR to the channel to record.
Select the ColorStream HD-1 video input source on the TV*
to view the DVD.
* To select the video input source, press INPUT on the remote control
(- page 27). To program the TV remote control to operate other
devices, see Chapter 3.
The unauthorized recording, use, distribution, or revision of
television programs, videotapes, DVDs, and other materials is
prohibited under the Copyright Laws of the United States and
other countries, and may subject you to civil and criminal
liability.
To view antenna or Cable channels:
Select the ANT video input source on the TV.*
To view the DVD player:
Turn ON the DVD player. Select the ColorStream HD-1
video input source on the TV.*
17
Page 18
Chapter 2: Connecting your TV
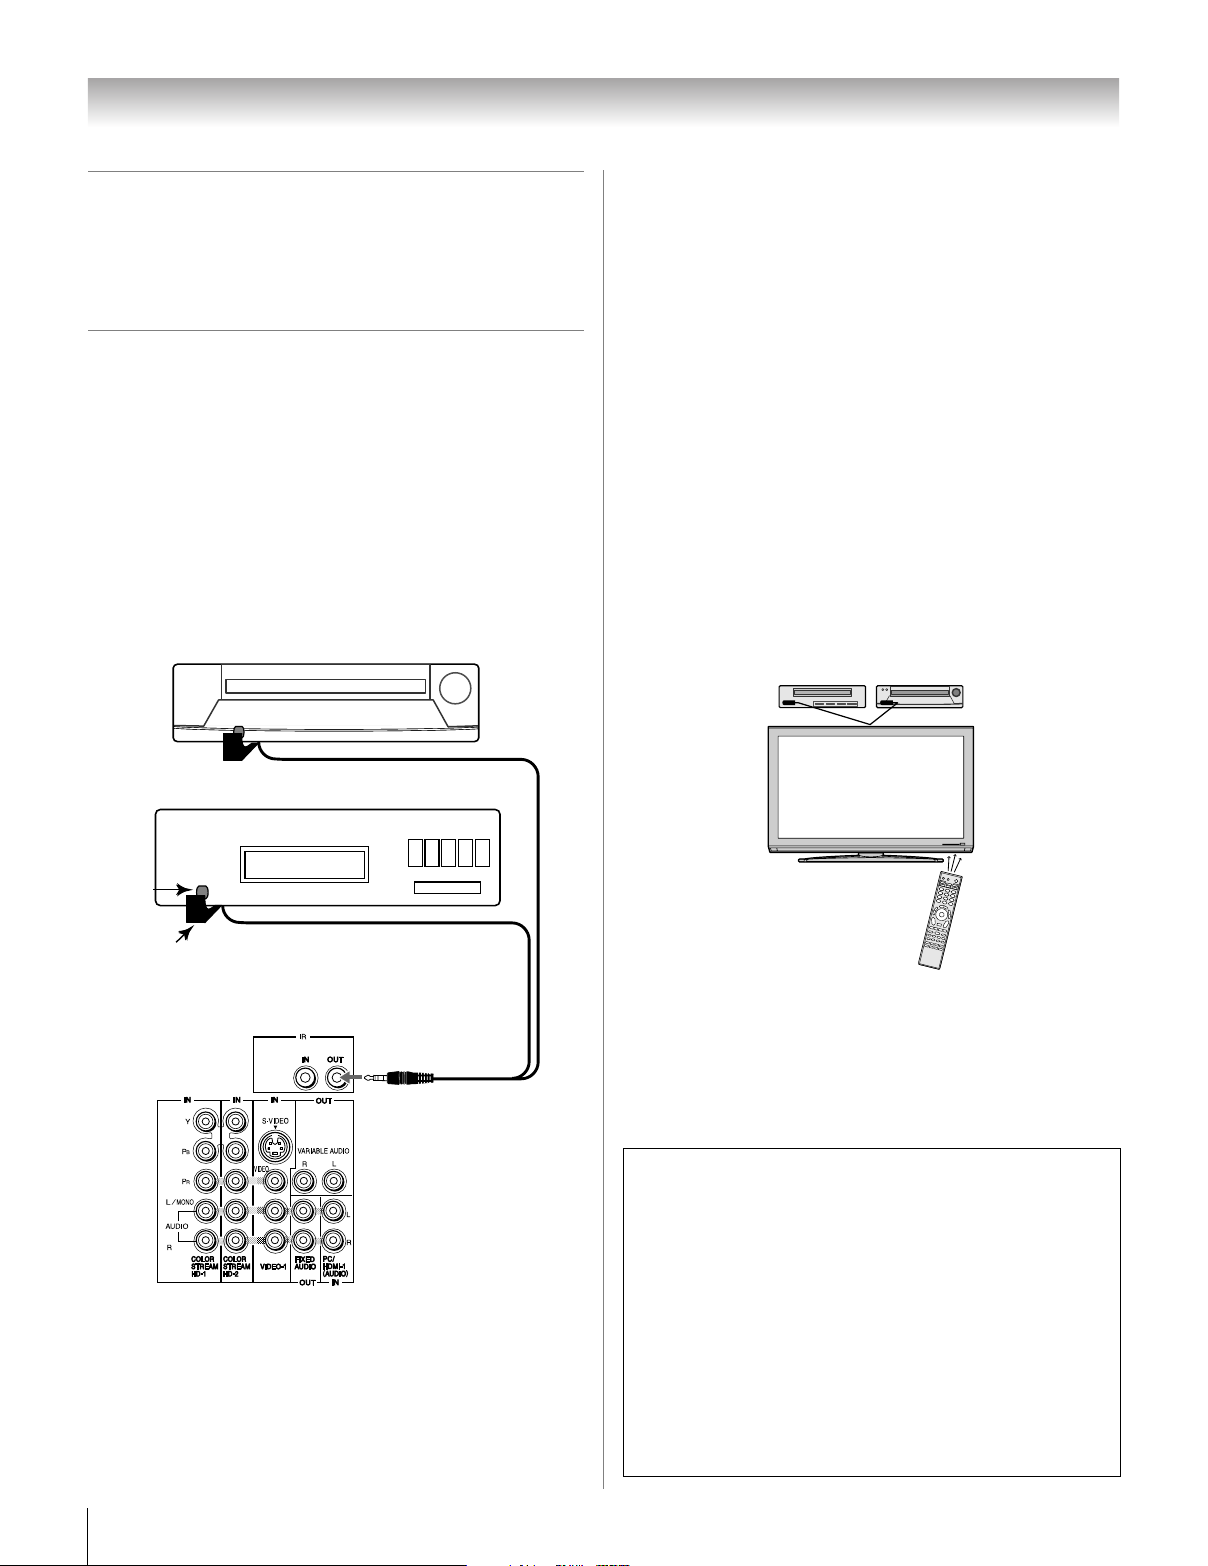
Connecting a device to the IR OUT
infrared terminal using the IR
blaster cable for IR pass-through
device control
You can use the TV’s IR OUT terminal (infrared passthrough) to remotely operate (through the TV) many infrared
remote-controlled devices (such as Toshiba infrared remotecontrolled VCRs or DVD players) enclosed within an
entertainment center or similar cabinet. Without the IR OUT
connection, the device typically would need to be visible to
operate it remotely.
You will need:
• dual-wand IR blaster cable (- page 14)
• other audio/video cables as required to connect the device(s)
to the TV (- pages 15–20)
Front of IR-controlled DVD player (for example)
To connect the IR blaster cable:
1 Locate the infrared sensor on the front of your device.
This sensor is marked on some devices.*
2 Align one of the IR blaster cable’s wands about 1 inch
away from the infrared sensor on the front of the device
and attach it using double-sided mounting tape. If you
have a second device, attach the second wand in a similar
manner. (See illustration.)
Note: If you do not have a second device, coil the second
wand with a rubber band and leave it behind the TV.
3 Plug the IR blaster cable’s plug into the TV’s IR OUT
terminal.
To control the device(s):
Point either the device’s remote control or the TV remote
control (that you previously programmed to operate the
device; - Chapter 3) toward the front of the TV and press the
button for the desired function. The signal passes from the
remote control through the TV to the device via the IR blaster
cable.
Front of IR-controlled audio device (for example)
Infrared
sensor
IR blaster cable wand
(approx.1 inch from device)
TV upper back panel
Note:
• If you use the device’s remote control to operate the device,
you also will need to use the TV’s remote control to operate
the TV.
• The IR pass-through feature does not support all
IR-controlled devices; satisfactory performance may not be
attainable with certain devices.
*If you cannot locate the device’s infrared sensor:
1 Turn OFF the device.
2 Starting at the lower left corner of the device, place the
end of the device’s remote control (with the infrared
emitter) so it touches the front of the device and press
POWER. (Do not use the TV’s remote control for this
step.)
3 If the device turns on, the point at which the remote
control touched the device is the location of the sensor.
4 If the device does not turn on, move the remote control
slightly to the right and press POWER again.
5 Repeat step 4 until you locate the device’s infrared
sensor.
18
Page 19
Chapter 2: Connecting your TV
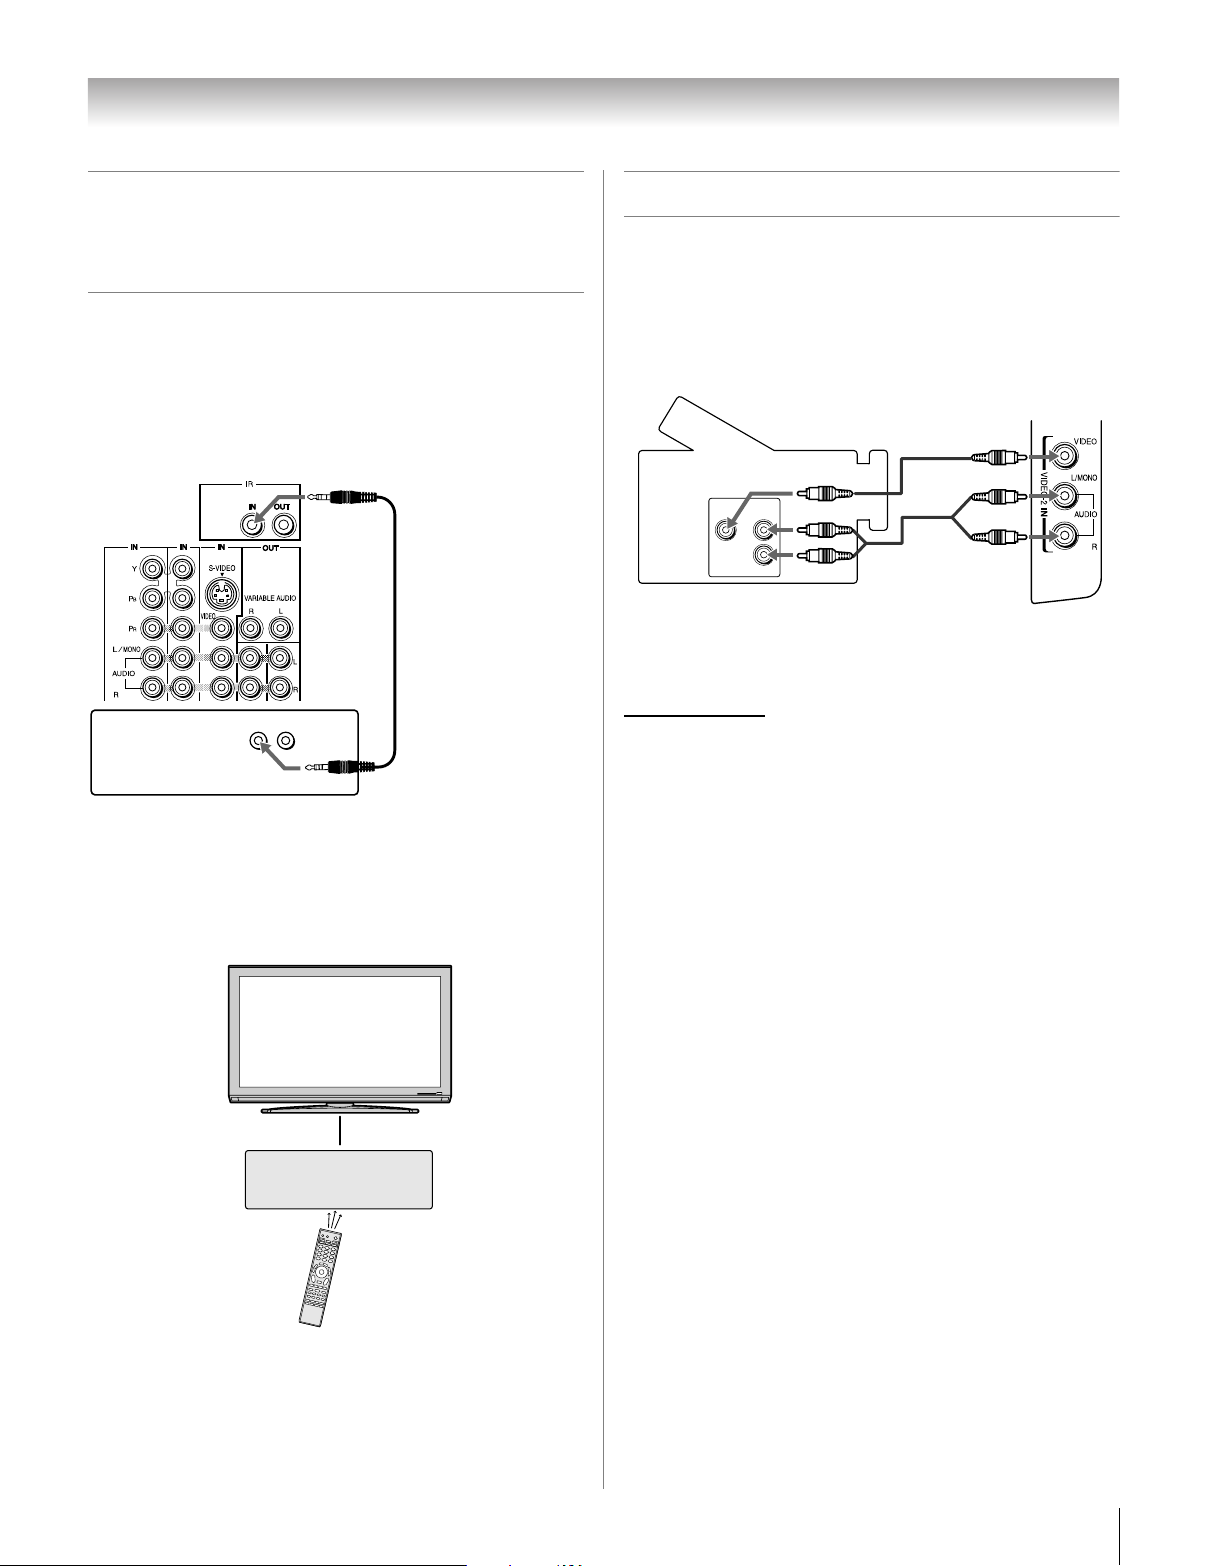
Connecting an IR receiver/repeater
control system to the IR IN infrared
terminal
For additional control options for your home theater system,
you can connect an IR receiver/repeater control system (not
included) to the TV’s IR IN terminal.
You will need:
• IR cable
TV upper back panel
IN
OUT
Connecting a camcorder
You will need:
• standard A/V cables
– For better picture performance, if your camcorder has
S-video, connect an S-video cable (plus the audio cables)
to VIDEO 1 on the TV back instead of the VIDEO 2 on the
TV right side panel.
Camcorder
VIDEO
AUDIO
OUT
L
R
VIDEO 2 inputs on TV right side panel
To view the camcorder video:
Select the VIDEO 2 video input source on the TV.*
* To select the video input source, press INPUT on the remote control
(- page 27). To program the TV remote control to operate other
devices, see Chapter 3.
Back of IR receiver/repeater
control system (not included)
To operate the TV with this connection, point the Toshiba TV
remote control toward the front of the IR receiver/repeater
control system.
IR receiver/repeater
control system
19
Page 20
Chapter 2: Connecting your TV
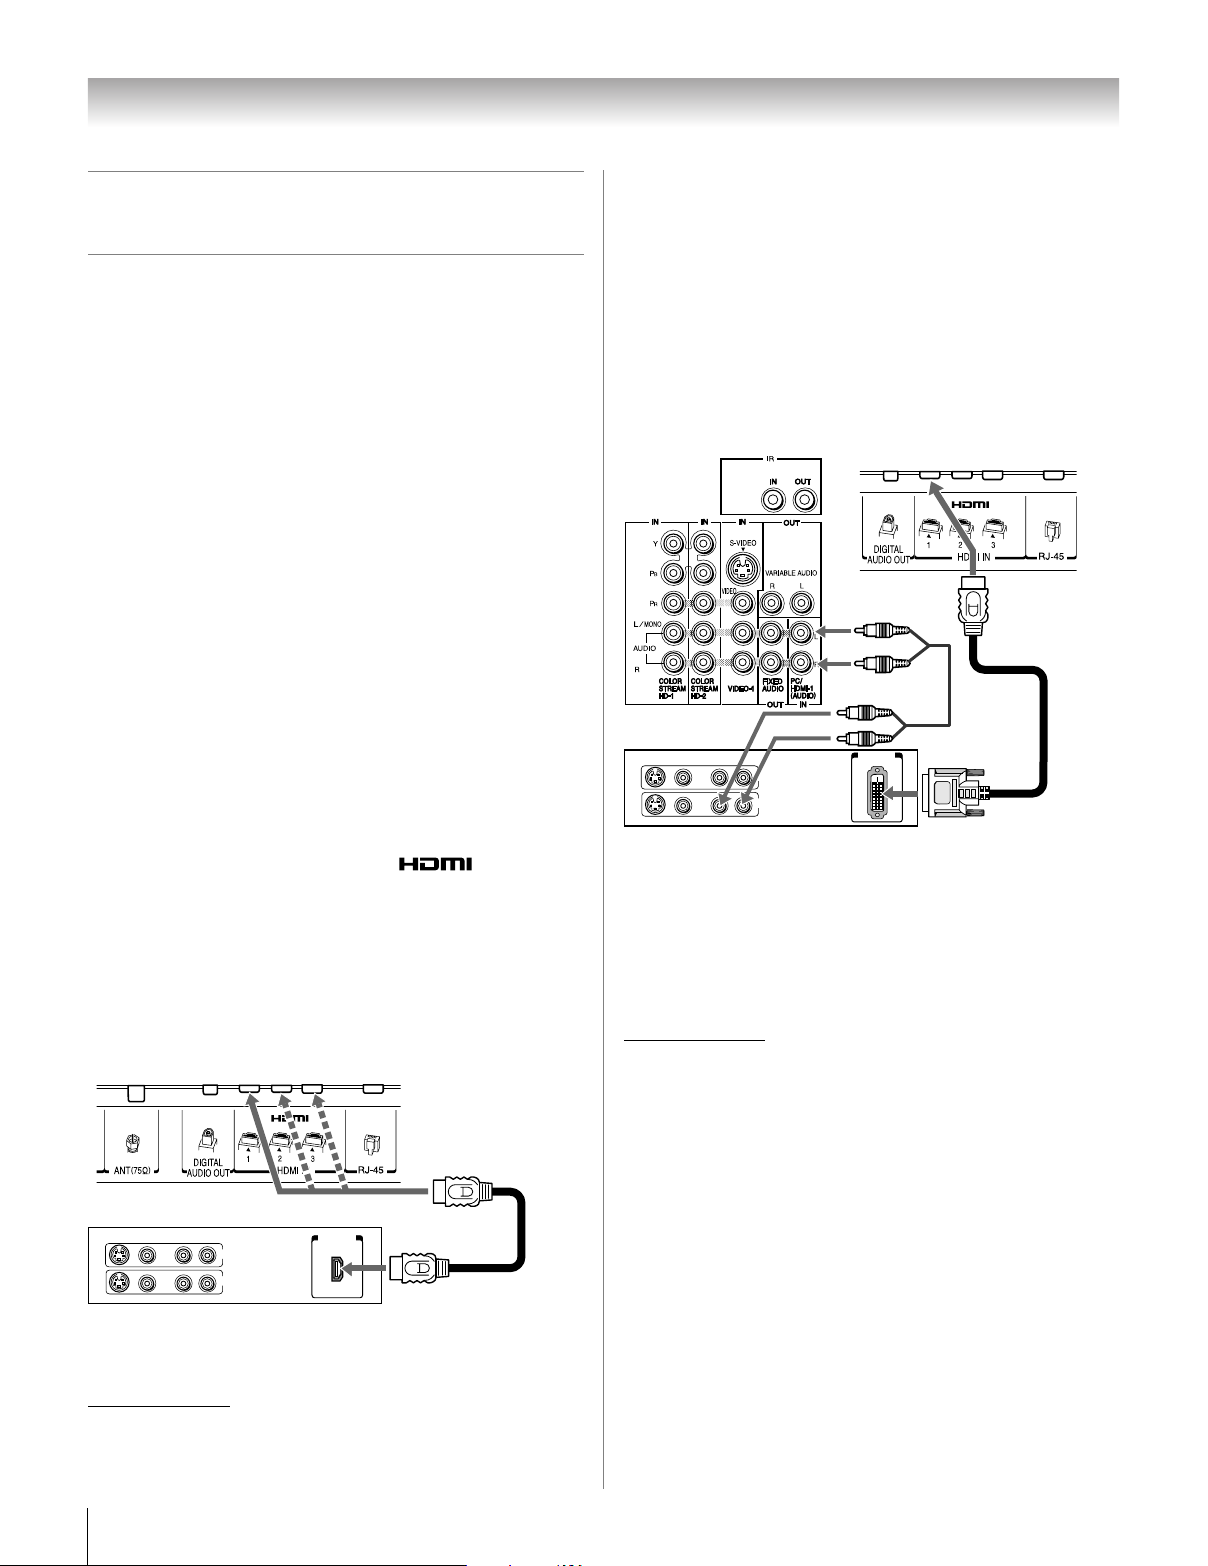
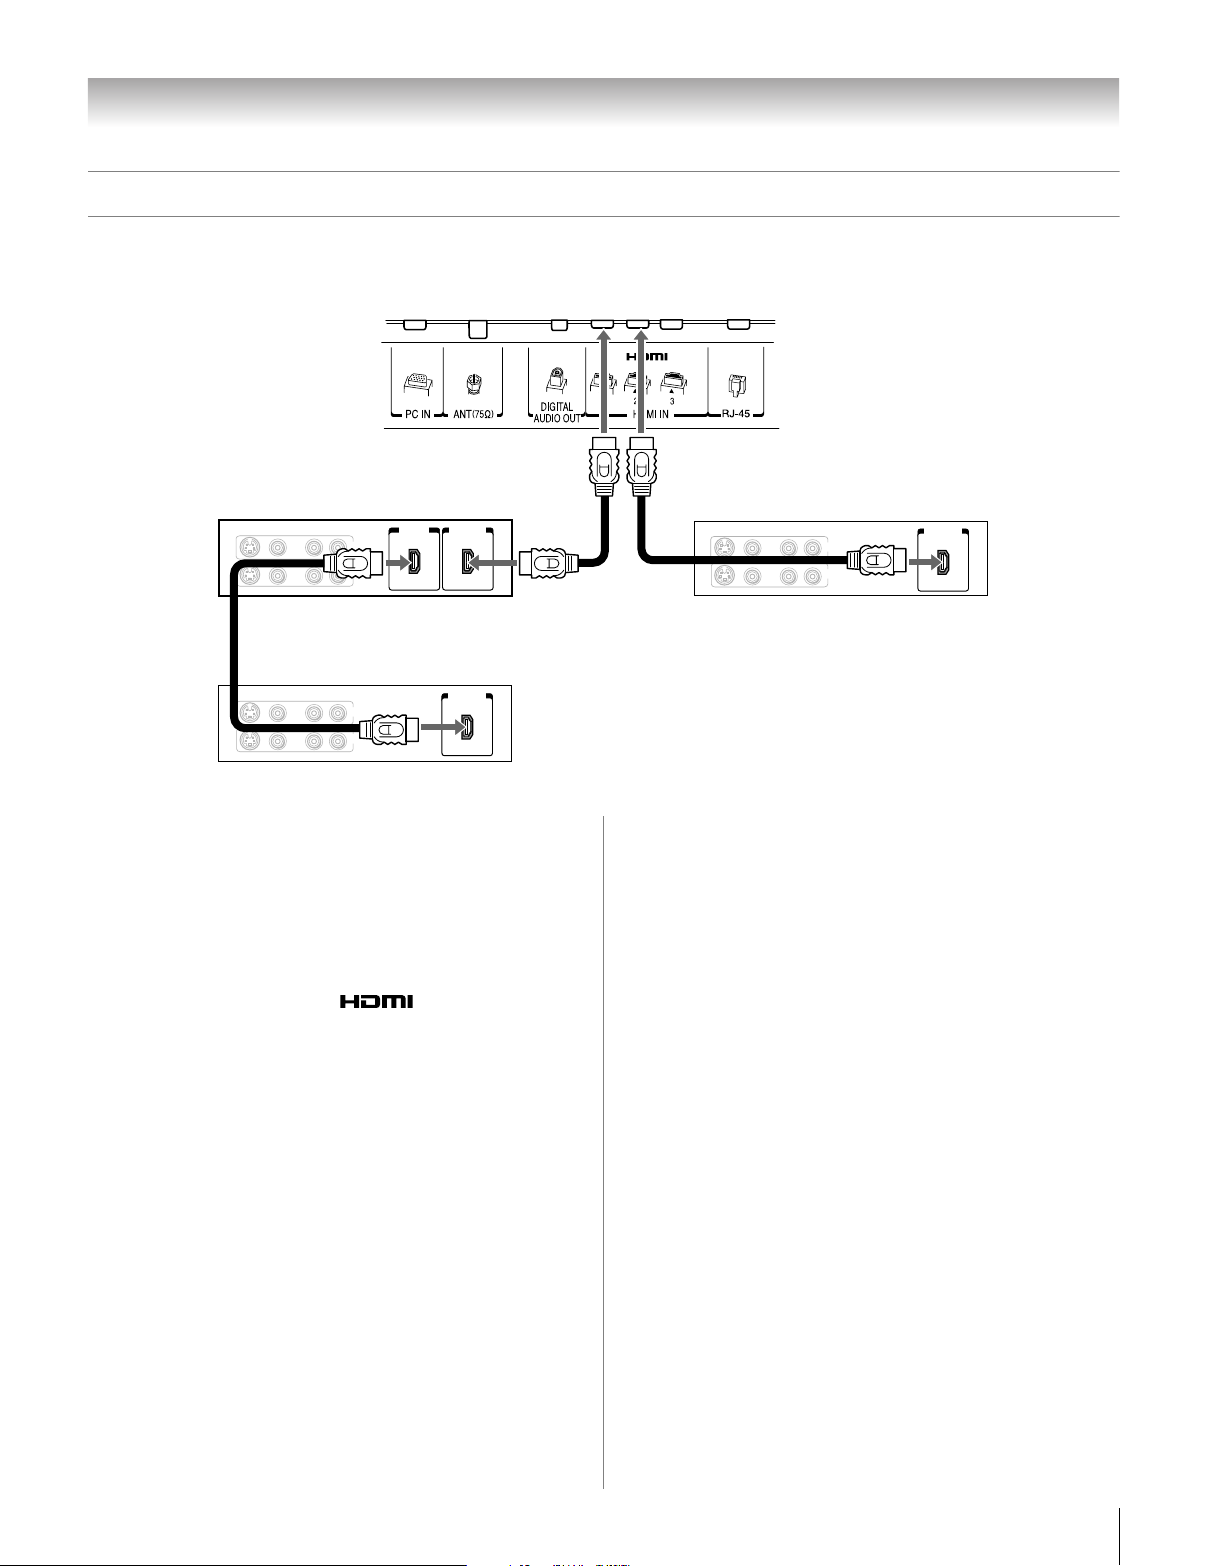
Connecting an HDMI™ or DVI device
to the HDMI input
The HDMI input on your TV receives digital audio and
uncompressed digital video from an HDMI source device, or
uncompressed digital video from a DVI (Digital Visual
Interface) source device.
This input is designed to accept HDCP (High-Bandwidth
Digital-Content Protection) program material in digital form
from EIA/CEA-861-D–compliant
devices (such as a set-top box or DVD player with HDMI or
DVI output).
The HDMI input can accept and display VGA, 480i (60Hz),
480p (60Hz), 720p (60Hz), 1080i (60Hz), and 1080p (24Hz/
60Hz) signal formats. For detailed signal specifications, see
page 109.
Note:
• Some of legacy HDMI sources may not work properly with
your latest HDMI TV, due to new standard adoption. Please
try to set Off the following three options (Lip-Sync Latency,
Deep Color, xvYCC). Your legacy HDMI source should
operate properly with your TV. See page 75.
• Supported Audio format : Linear PCM, sampling rate 32/
44.1/48kHz
To connect an HDMI device, you will need:
• one HDMI cable (type A connector) per HDMI device
– For proper operation, it is recommended that you use an
HDMI cable with the HDMI Logo ( ).
– If your HDMI connection is capable of 1080p and/or your
TV is capable of refresh rates greater than 60Hz or
supports Deep Color™, you will need a Category 2 cable.
Conventional HDMI/DVI cable may not work properly with
this mode.
– HDMI cable transfers both video and audio. Separate
analog audio cables are not required (see illustration).
– See “Setting the HDMI
TV lower back panel
[1]
consumer electronic
™
audio mode” (- page 48).
To connect a DVI device, you will need:
• one HDMI-to-DVI adapter cable (HDMI type A connector)
per DVI device
– For proper operation, the length of an HDMI-to-DVI
adapter cable should not exceed 9.8 ft (3m). The
recommended length is 6.6 ft (2m).
•
one pair of standard analog audio cables per DVI device
– An HDMI-to-DVI adapter cable transfers video only.
Separate analog audio cables are required (see
illustration).
™
– See “Setting the HDMI
TV upper back panel
DVI device
VIDEO AUDIO
LR
IN
IN
OUT
R
L
Note: To ensure that the HDMI or DVI device is reset properly,
it is recommended that you follow these procedures:
• When turning on your electronic components, turn on the
TV first, and then the HDMI or DVI device.
• When turning off your electronic components, turn off the
HDMI or DVI device first, and then the TV.
[1] EIA/CEA-861-D compliance covers the transmission of
uncompressed digital video with high-bandwidth digital content
protection, which is being standardized for reception of highdefinition video signals. Because this is an evolving technology, it
is possible that some devices may not operate properly with the TV.
audio mode” (- page 48).
TV lower back panel
DVI/ HDCP
OUT
HDMI device
VIDEO AUDIO
LR
L
IN
IN
OUT
R
HDMI OUT
To view the HDMI device video:
Select the HDMI 1, HDMI 2, or HDMI 3 video input source on
the TV.*
* To select the video input source, press INPUT on the remote control
(- page 27). To program the TV remote control to operate other
devices, see Chapter 3.
20
HDMI, the HDMI logo and High-Definition Multimedia Interface are
trademarks or registered trademarks of HDMI Licensing LLC.
Page 21
Chapter 2: Connecting your TV
CE-Link connection
You can control the basic functions of connected audio/video devices using the TV’s remote control if you connect a
CE-Link compatible audio receiver or playback device. For an explanation of setup and operations, see pages 73–74.
TV lower back panel
Playback device
(CE-Link HD DVD player,etc.)
VIDEO
AUDIO
LR
OUT
R
L
IN
HDMI OUT
VIDEO
AUDIO
LR
R
L
IN
OUT
Audio receiver
IN
Playback device
(CE-Link HD DVD player,etc.)
VIDEO
AUDIO
LR
OUT
R
L
IN
HDMI OUTHDMI
HDMI OUT
To connect an Audio Receiver and Playback Device,
you will need:
• three HDMI cables (- page 20)
Note:
• If several devices are connected, the CE-Link feature may
not operate properly.
• For proper operation, it is recommended that you use HDMI
cables with the HDMI Logo ( ).
Before controlling the device(s):
• After completing the above connections, set the CE-Link
Setup menu as you desire (- page 75).
• The connected devices must also be set. For details, see the
operation manual for each device.
• The CE-Link feature uses CEC technology as regulated by
the HDMI standard.
• This feature is limited to models incorporating Toshiba’s
CE-Link. However, Toshiba is not liable for those
operations. Refer to individual instruction manuals for
compatibility information.
21
Page 22
Chapter 2: Connecting your TV
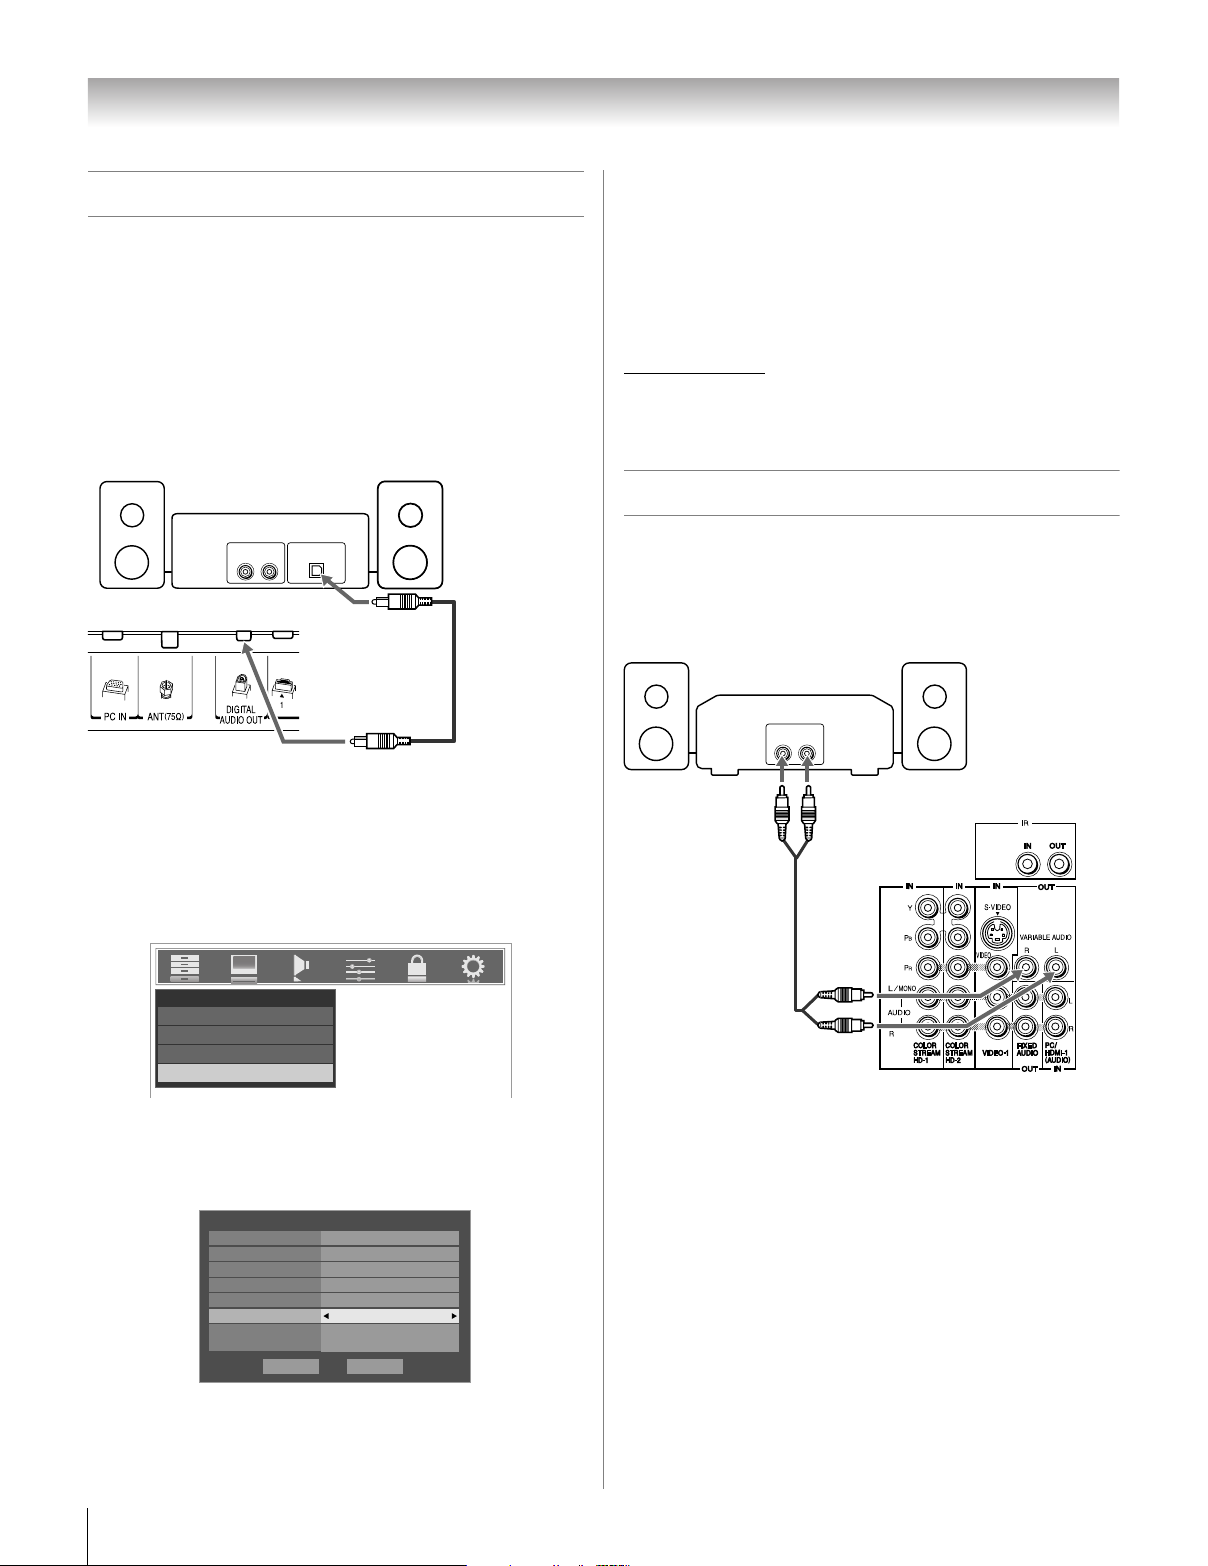
Connecting a digital audio system
The TV’s DIGITAL AUDIO OUT terminal outputs a Dolby®*
Digital or 2-channel down-mixed PCM (pulse-code
modulation) signal for use with an external Dolby
decoder or other external audio system with optical audio
input.
You will need:
• optical audio cable (Use an optical audio cable that has the
larger “TosLink” connector and not the smaller “minioptical” connector.)
Dolby Digital decoder or
other digital audio system
Optical
Audio IN
LINE IN
LR
®
Digital
Note:
• Some audio systems may not be compatible with Dolby
Digital bitstream signals. Older audio systems that are not
compatible with standard optical out signals may not work
properly, creating a high noise level that may damage
speakers or headphones. THIS DAMAGE IS NOT COVERED
BY YOUR WARRANTY.
• The DIGITAL AUDIO OUT terminal may not output some
digital audio sources because of copy restrictions.
* Manufactured under license from Dolby Laboratories.
Dolby, Pro Logic, and the double-D symbol are registered
trademarks of Dolby Laboratories.
Connecting an audio system
This connection allows you to use external speakers with an
external analog audio amplifier to adjust the sound level.
TV lower back panel
To control the audio:
1 Turn on the TV and the digital audio device.
2 Press Y on the TV’s remote control and open the
Audio menu.
3 Highlight Audio Setup and press T.
Audio
Digital Audio Selector
Audio Settings
Advanced Audio Settings
Audio Setup
4 In the Optical Output Format field, select either
Dolby Digital or PCM, depending on your device
(
- “Selecting the optical audio output format” on
page 66).
Audio Setup
PC Audio No
HDMI 1 Audio
MTS Stereo
Language
Speakers
Optical Output Format
Dolby Digital
Dynamic Range Control
Reset
Auto
English
On
Dolby Digital
Compressed
Done
You will need:
• standard audio cables
Analog audio amplifier
LINE IN
LR
TV upper back panel
To control the audio:
1 Turn on the TV and the stereo amplifier.
2 Turn off the TV’s built-in speakers (- page 66).
Note: To hear sound when using an external audio amplifier,
the volume of both the TV and the amplifier must be set to a
reasonable listening level.
22
Page 23
Chapter 2: Connecting your TV
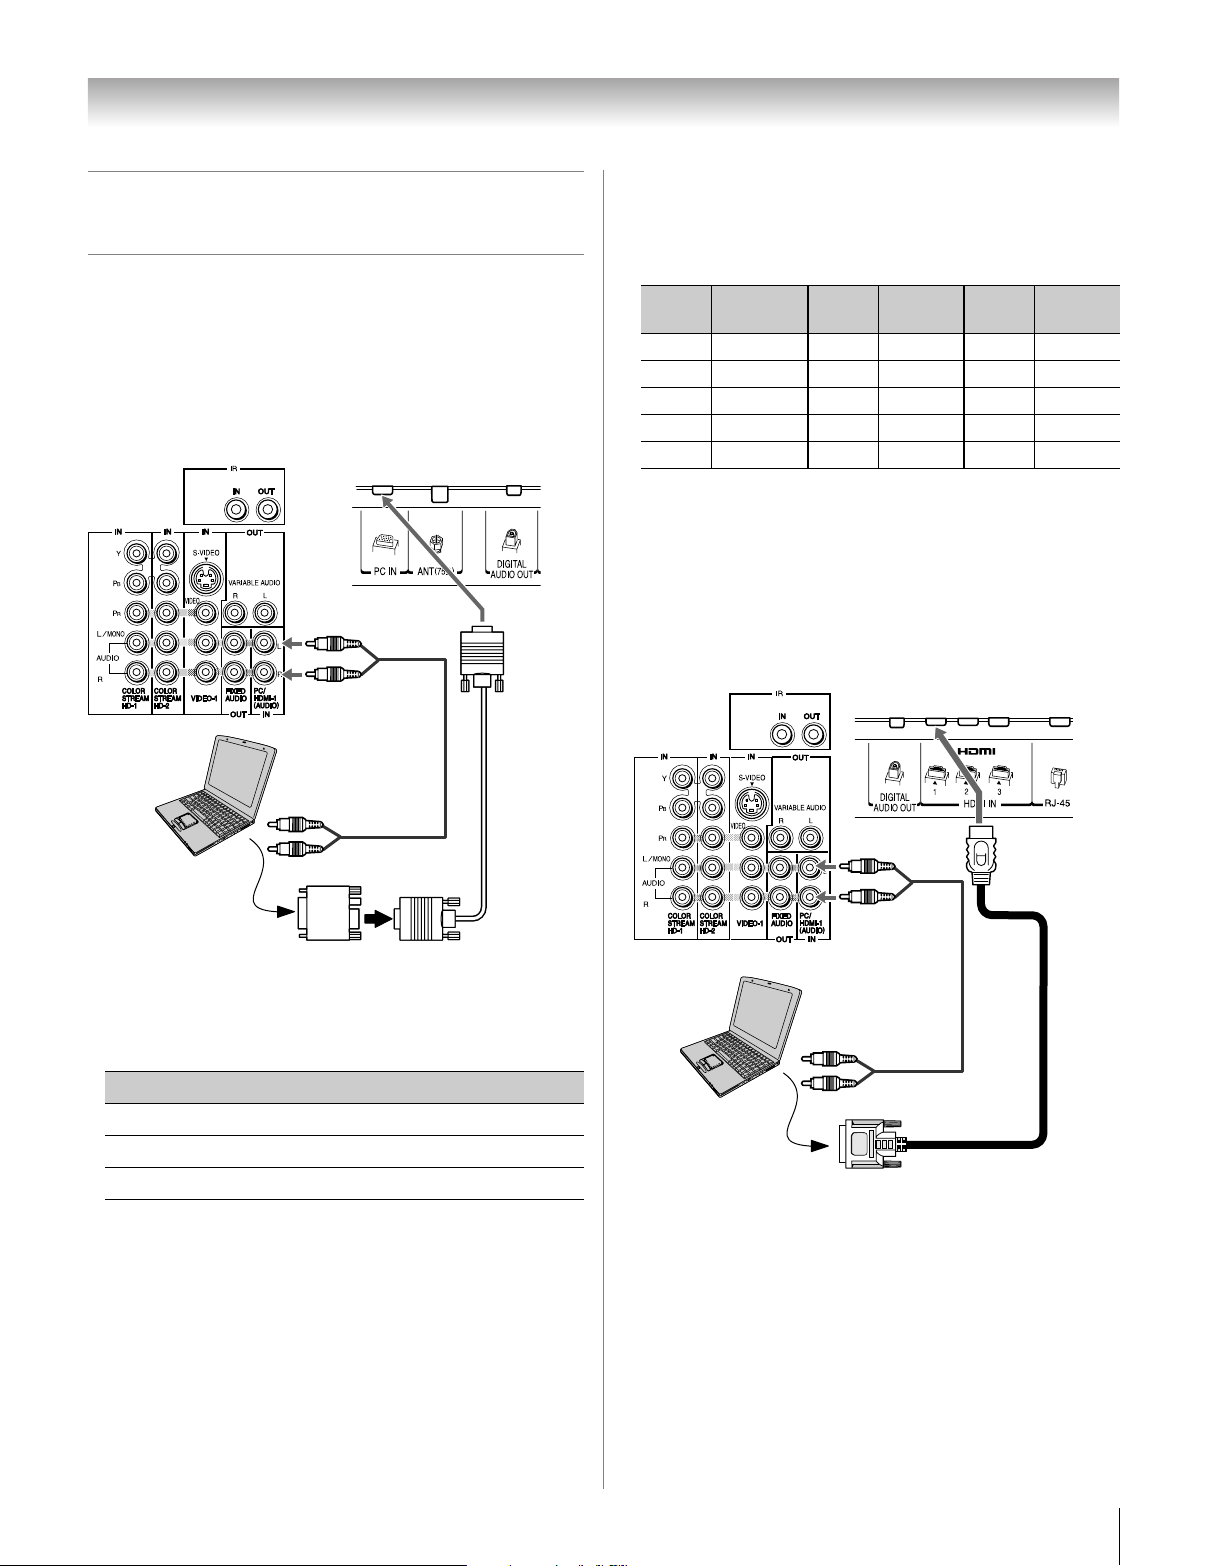
Connecting a personal computer
(PC)
With either the PC IN or HDMI connection, you can watch
your computer’s display on the TV and hear the sound from the
TV’s speakers.
To connect a PC to the PC IN terminal on the TV:
When connecting a PC to the PC IN terminal on the TV, use an
analog RGB (15-pin) computer cable and a PC audio cable.
TV upper back panel
TV lower back panel
• Depending on the DVD’s title and the specifications of the
PC on which you are playing the DVD-Video, some scenes
may be skipped or you may not be able to pause during
multi-angle scenes.
•
Signal names for mini D-sub 15-pin connector
Pin No.
1R 6Ground11NC
2G 7Ground12NC
3 B 8 Ground 13 H-sync
4 NC * 9 NC 14 V-sync
5 NC 10Ground15NC
*NC=Not connected
Signal
name
Pin No.
Signal
name
Pin No.
Signal
name
To connect a PC to the HDMI terminal on the TV:
When connecting a PC to the HDMI terminal on the TV, use
an HDMI-to DVI adapter cable and analog audio cables.
If connecting a PC with an HDMI terminal, use an HDMI cable
(type A connector). Separate analog cables are not necessary
(- page 20).
PC audio
Computer
PC audio
output
Conversion adapter
(if necessary)
• To use a PC, set the monitor output resolution on the PC
cable
before connecting it to the TV. The following signals can be
displayed:
Format Resolution V. Frequency
VGA 640 × 480 60Hz
SVGA 800 × 600 60Hz
XGA 1024 × 768 60Hz
Other formats or non-standard signals will not be displayed
correctly.
• To display the optimum picture, use the PC setting feature
(
- “Using the PC settings feature” on page 72).
Note:
• The PC audio input terminals on the TV are shared with the
HDMI-1 analog audio input terminals (- page 72).
• Some PC models cannot be connected to this TV.
• An adapter is not needed for computers with a compatible
mini D-sub15-pin terminal.
TV upper back panel
Computer
PC audio
cable
PC audio
output
TV lower back panel
The HDMI input can accept and display VGA, 480i (60Hz),
480p (60Hz), 720p (60Hz), 1080i (60Hz), and 1080p (24Hz/
60Hz) signal formats. For detailed signal specifications, see
page 109.
Note:
• The edges of the images may be hidden.
• If receiving a 720p, 1080i, or 1080p signal program, Native
mode scales the video to display the entire picture within the
borders of the screen (i.e. no overscanning).
23
Page 24

Chapter 2: Connecting your TV
Connecting a home network
The Toshiba Home Interactive Network Connection
(THINC
home PC (personal computer), which will allow access to the
TV’s file sharing and personal e-mail features.
File sharing
You can access JPEG and MP3 files that are stored on your
networked home PC and view/play them on the TV.
• Connect your TV to your home network according to either
• Does NOT require Internet/e-mail service.
Personal E-mail
You can receive a personal e-mail via your TV. (This
connection also allows access to file sharing, as described
above.)
• Connect your TV to your home network according to
• Requires the following:
• Contact your ISP (Internet Service Provider) to obtain and
• See Chapter 8 for details on configuring and using
Note:
• The TV’s home network feature is compatible with
• The TV’s home network connection allows access to file
• If you use an Ethernet crossover cable to connect your PC
• If you use a hub or switch to connect the TV to your home
• If you use a router with built-in DHCP functionality, use the
™
) feature allows you to network the TV with your
Example #1 at right or Example #2 on the next page.
Example #3 on the next page.
– Home Internet service.
– A personal e-mail address.
set up Internet/e-mail service.
personal e-mails, file sharing, the JPEG Picture Viewer,
and the MP3 Audio Player.
Microsoft
version of Microsoft
higher. See Chapter 8 for details.
sharing only. You will NOT be able to use the TV to access
the Internet.
directly to the TV, you will not be able to use the automatic
setup and must manually set up the network address.
network, you will not be able to use the automatic setup and
must manually set up the network address.
automatic setup. Manual setup may not work.
®
Windows® 2000, and the Home or Professional
®
Windows® XP Service Pack 2 or
Example #1: Connecting the TV to a home network
without an Internet connection
You will need:
• standard Ethernet (RJ-45) cables
• hub or switch
TV lower back panel
Hub or switch
PC
PC
Microsoft and Windows are either registered trademarks or
trademarks of Microsoft Corporation in the United States and/or other
countries.
24
Page 25
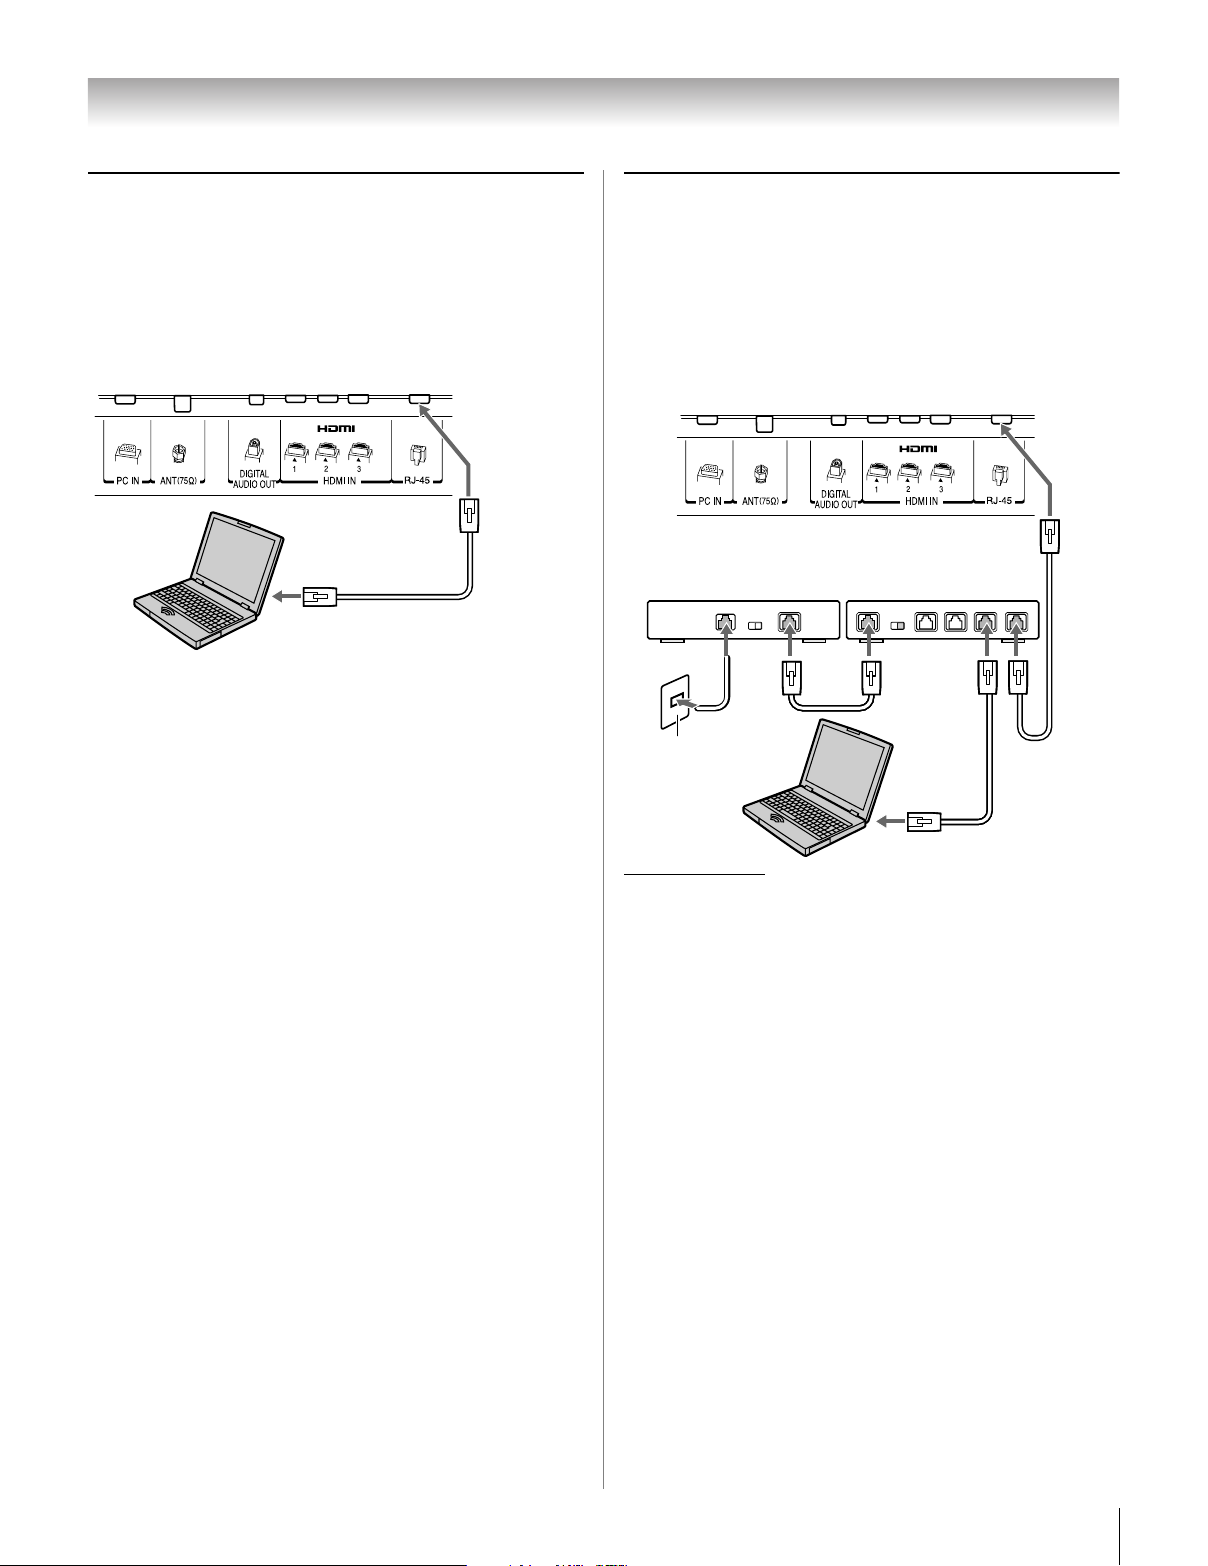
Chapter 2: Connecting your TV
Example #2: Connecting the TV directly to a PC without
an Internet connection
You will need:
• Ethernet crossover cable (i.e., a PC-to-PC direct file
transfer cable)
Note: Do not use standard Ethernet cable with this connection.
TV lower back panel
Ethernet
PC
crossover
cable
Example #3: Connecting the TV to a home network with
an Internet connection
You will need:
• coaxial or telephone cable (depending on your modem)
• standard Ethernet (RJ-45) cables
[2]
[1]
[4]
[2]
Router/switch
[3]
[1]
[3]
• router/switch
• modem (DSL or cable)
TV lower back panel
Modem (DSL or cable)
Cable or phone jack
[3]
PC
[1] Your router/switch may be part of your DSL or cable modem. Your
switch may be separate from your router. For assistance, contact
your ISP or an IT professional.
[2] Coaxial or telephone cable (depending on your modem type)
[3] Standard Ethernet (RJ-45) cable
[4] Do NOT connect a phone jack directly to the TV's RJ-45 (Ethernet)
port.
25
Page 26
Chapter 3: Using the remote control
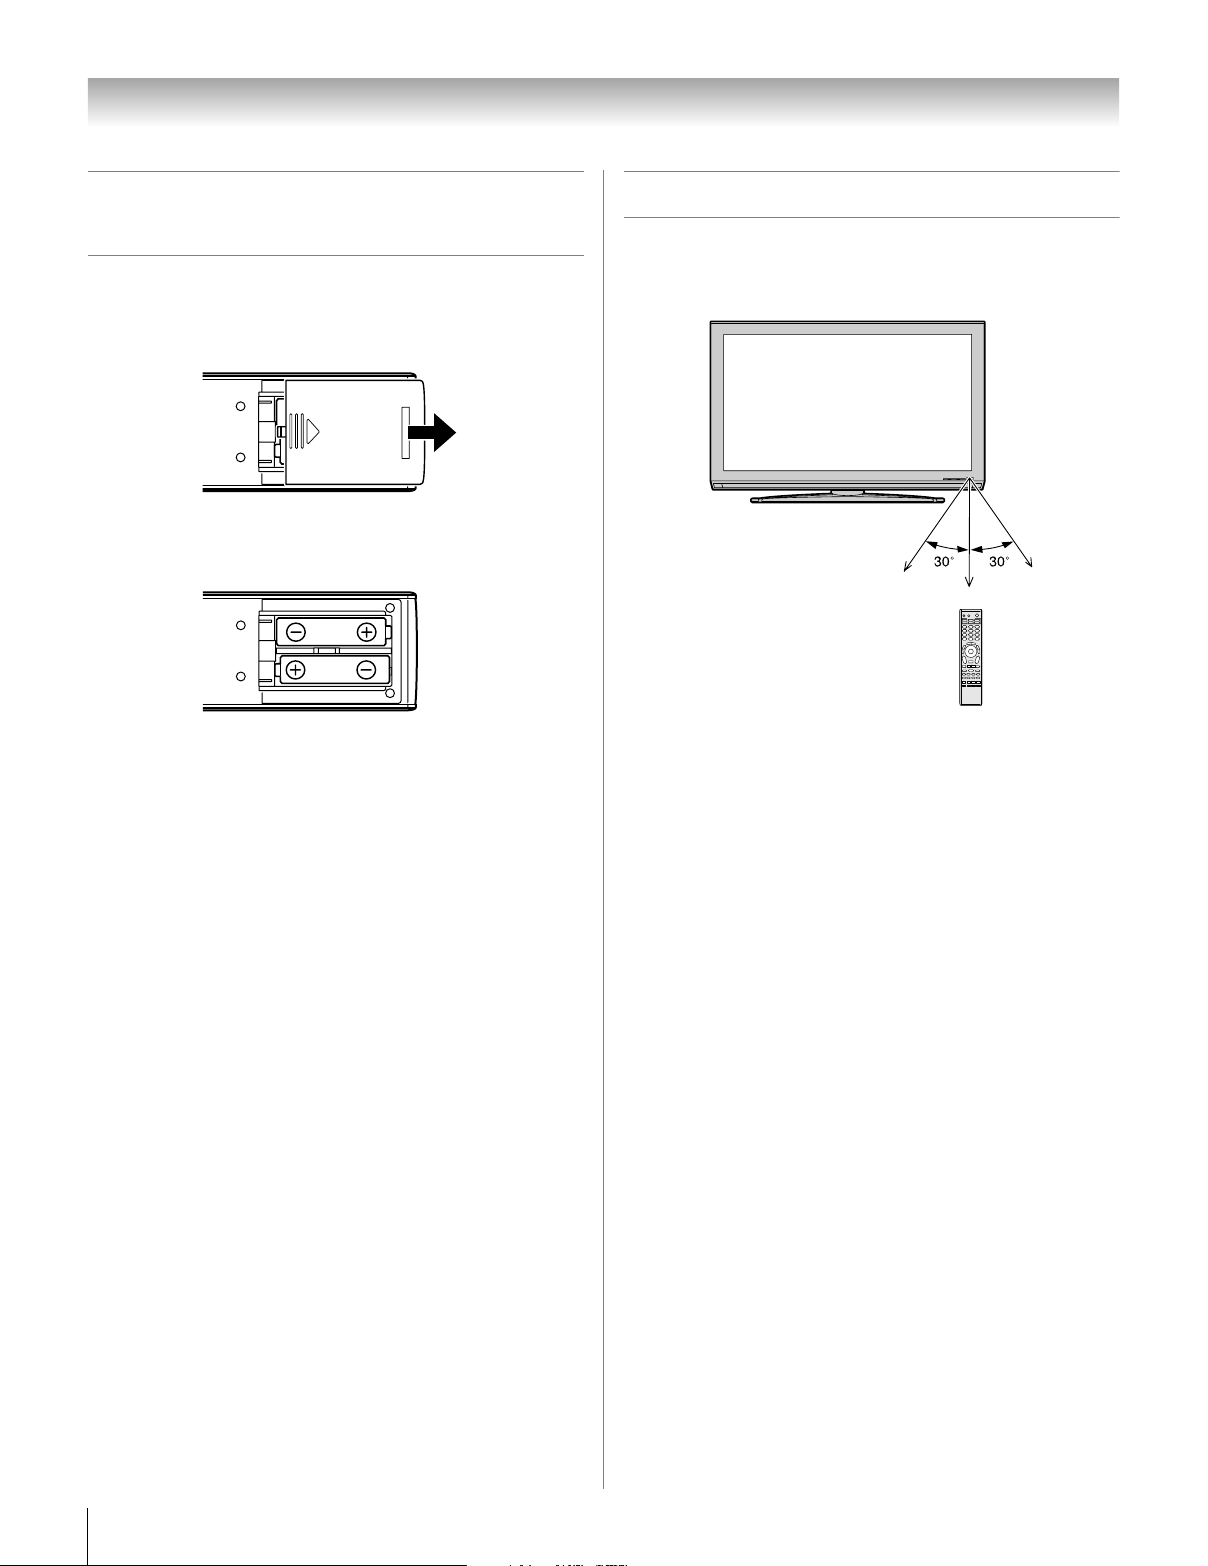
Installing the remote control
batteries
To install the remote control batteries:
1 Slide the battery cover off the back of the remote control.
2 Install two “AA” size alkaline batteries. Match the + and
– symbols on the batteries to the symbols on the battery
compartment.
3 Slide the battery cover on to the remote control until the
lock snaps.
Caution: Never throw batteries into a fire.
Note:
• Be sure to use AA size alkaline batteries.
• Dispose of batteries in a designated disposal area.
• Batteries should always be disposed of with the
environment in mind. Always dispose of batteries in
accordance with applicable laws and regulations.
• If the remote control does not operate correctly, or if the
operating range becomes reduced, replace batteries with
new ones.
• When necessary to replace batteries in the remote control,
always replace both batteries with new ones. Never mix
battery types or use new and used batteries in combination.
• Always remove the batteries from the remote control if they
are dead or if the remote control is not to be used for an
extended period of time. This will prevent battery acid from
leaking into the battery compartment.
Remote control effective range
For optimum performance, aim the remote control directly at
the TV remote sensor. Make sure there are no obstructions
between the remote control and the TV.
Point remote control
toward remote sensor
on front of TV.
16.4 ft (5m)
26
Page 27
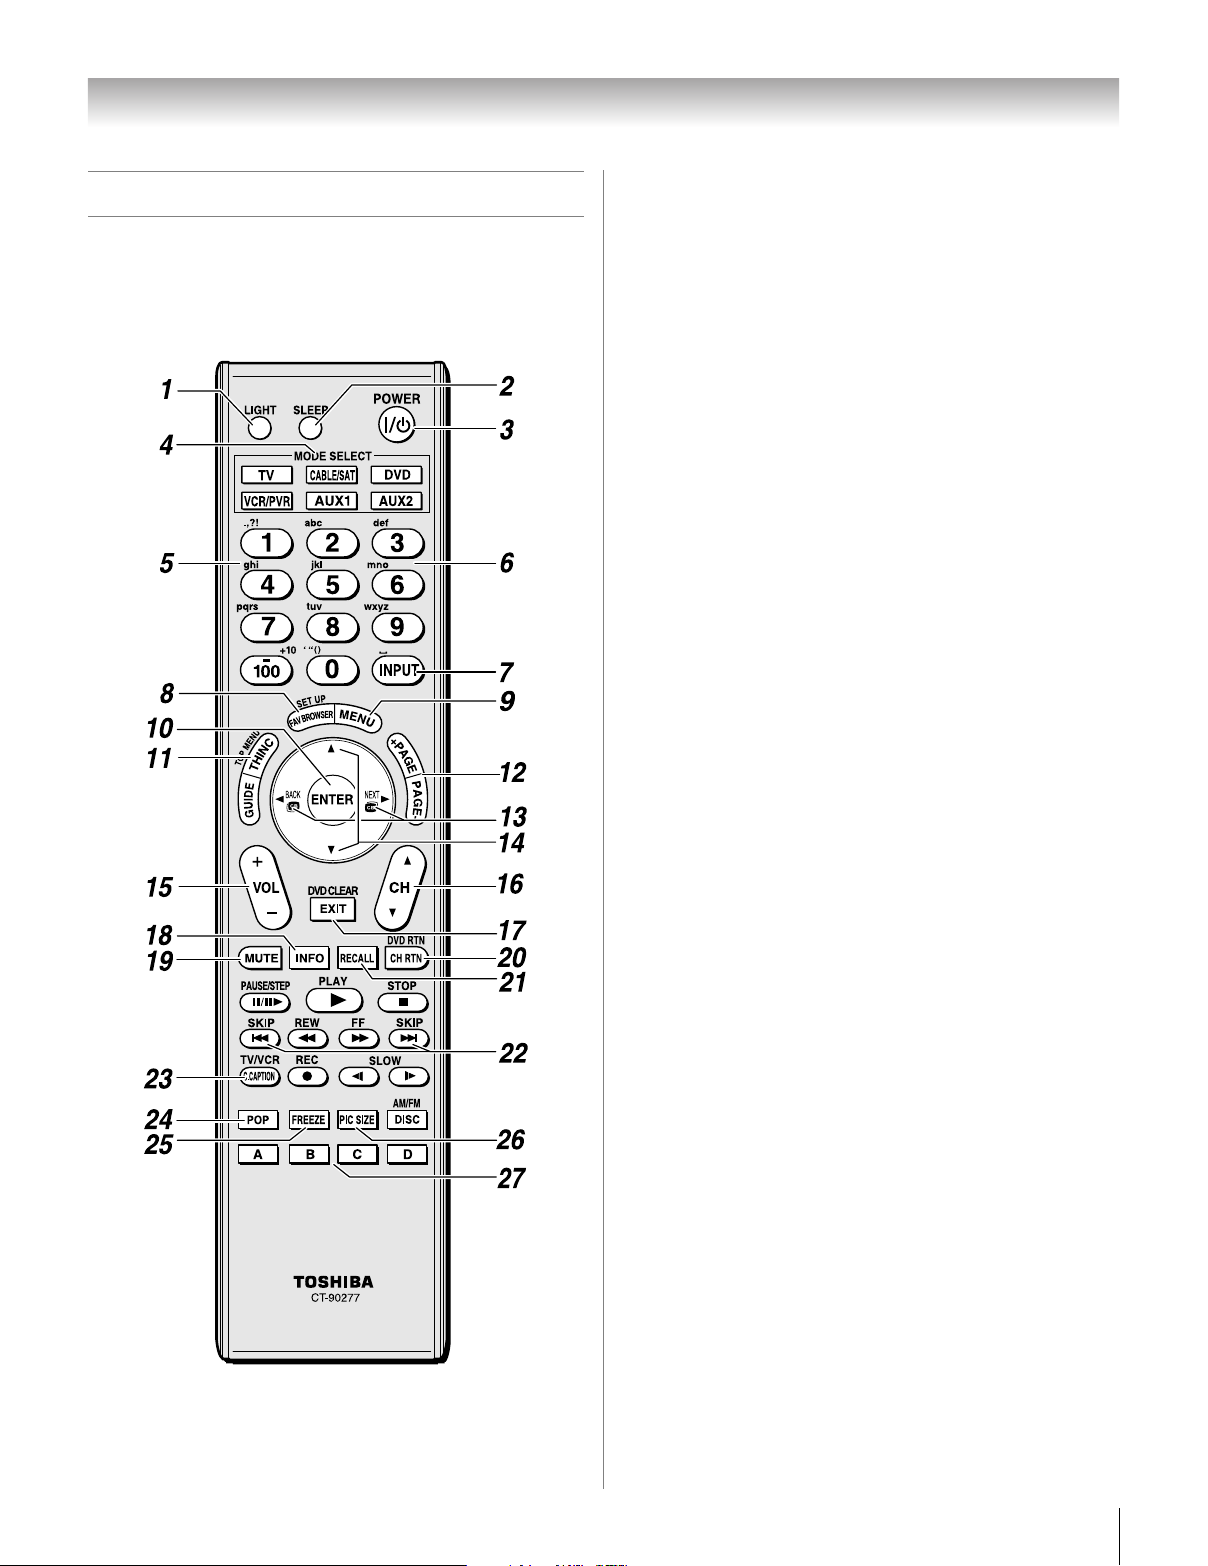
Chapter 3: Using the remote control
Learning about the remote control
The buttons used for operating the TV only are described here.
For the CE-Link remote control functions, see the section
“Using CE-Link” (- page 73). For a complete list of the
remote control’s functions, see the remote control functional
key chart (- pages 29–30).
1 LIGHT illuminates the keypad for five seconds.
The MODE SELECT key that is currently selected blinks
three times.
2 SLEEP accesses the sleep timer (
- page 73).
3 POWER turns the TV on and off. When the TV is on, the
green LED indicator on the TV front will be illuminated.
4 MODE SELECT sets the six remote control device
modes: TV, CABLE/SAT, DVD, VCR/PVR, AUX 1,
and AUX 2. Press TV until the keypad blinks 3 times to
control the TV.
The selected MODE key blinks each time any key is
pressed. (
- page 31). When the Auto Input feature is set,
these keys can also be used to change inputs on the TV
(- page 46).
5 Software Keyboard (0-9, –/100, INPUT) used for
entering alpha-numeric data primarily in conjunction with
the THINC features (
- page 94).
6 Channel Numbers (0–9, –/100) directly tune
channels. The = button is used to tune digital channels
(
- page 55) or to edit the Favorites List (- page 53).
7 INPUT selects the video input source (
- page 51).
8 FAV BROWSER accesses the Favorites List in the
Channel Browser
9 MENU accesses the main TV menu system (
™
(- page 53).
- pages 40
and 41).
10 ENTER activates highlighted items in the main menu
system.
11 THINC accesses the THINC menu (
- page 41).
12 PAGE + / - are used for paging up and down in the
Personal E-mail feature.
13 3 C / # c While watching TV, these buttons open the
Channel Browser
™
and tune to the previous/next channel
in the channel history (- page 54). (Also see “Arrow
buttons.”)
14 Arrow buttons (BbC c) When a menu is on-screen,
these buttons select or adjust programming menus. (Also
see 3 C / # c.)
15 VOL + - adjusts the volume level.
16 CH Bb cycles through programmed channels when no
menu is on-screen (
- page 44).
17 EXIT closes on-screen menus.
18 INFO displays TV status information as well as program
details, when available (- page 76).
Note: The error message “Not Available” may appear if you
press a key for a function that is not available.
19 MUTE reduces or turns off the sound (- page 64).
20 CH RTN returns to the last viewed channel or source
(- page 55), or stops the Picture Viewer slide show
(- page 97). Also can be used to switch between the
Song Select view and File Select view in the Audio Player
(- page 98).
(continued)
27
Page 28

Chapter 3: Using the remote control
21 RECALL displays TV status information (- page 76).
22 SKIP Z and SKIP z can be used for jumping to the
beginning and end of a line when used with the software
keyboard (- page 94).
23 C.CAPTION (TV/VCR) opens the closed caption/audio
selector screen. (The audio selector is not available for
analog channels.) (- page 63.) By using this button, it is
also possible to select TV mode and view one program
while another is being recorded.
24 POP opens the POP double-window (- page 59).
25 FREEZE freezes the picture. Press again to restore to
moving picture (- page 59).
26 PIC SIZE cycles through the picture sizes: Natural,
TheaterWide 1/2/3, Full, 4:3 HD, and Native
(
- page 56).
27 f and j are used with the ColorMaster Pro (- page
81) and THINC features (- page 102).
28
Page 29

Chapter 3: Using the remote control
Remote Control functional key chart
•
DVD/VCR
REMOTE
CONTROL KEY
Toshiba TV
(TV)
CABLE
SAT
(satellite)
VCR
combo
• DVD/
DVD-R
MODE
SELECT
LIGHT Lights the remote control keys.
SLEEP Sleep timer s TV s TV s TV s TV s TV s TV s TV
POWER Power Power Power Power Power Power Power Power
1 (. , ? !) Digit 1
2 (a b c) Digit 2
3 (d e f) Digit 3
4 (g h i) Digit 4
5 (j k l) Digit 5
6 (m n o) Digit 6
7 (p q r) Digit 7
8 (t u v) Digit 8
9 (w x y z) Digit 9
0 (‘ “ ( )) Digit 0
100/–/+10
INPUT ( )
PIC SIZE
MENU
FAV
BROWSER/
SET UP
THINC/
TOP MENU
GUIDE Guide* Guide Guide --- Guide --- --- Guide
INFO Guide Info Info Info --- Display --- --- Info
ENTER Enter Select Select --- Select --- --- Select
B
b
C 3 # c
EXIT/
DVD CLEAR
PAGE +/–
VOL +/–
Remote control device mode selection
*1
*2
*2
*2
*2
*2
*2
*2
*2
*2
*2
– (digital
separator)
TV/Video
*2
select
Selects the
image shape
Menu/Guide
Menu
FAV
BROWSER
Digit 1 Digit 1 Digit 1 Digit 1 AV input 1 Digit 1 Digit 1
Digit 2 Digit 2 Digit 2 Digit 2 AV input 2 Digit 2 Digit 2
Digit 3 Digit 3 Digit 3 Digit 3 AV input 3 Digit 3 Digit 3
Digit 4 Digit 4 Digit 4 Digit 4 AV input 4 Digit 4 Digit 4
Digit 5 Digit 5 Digit 5 Digit 5 CD Digit 5 Digit 5
Digit 6 Digit 6 Digit 6 Digit 6 Tuner Digit 6 Digit 6
Digit 7 Digit 7 Digit 7 Digit 7 Phono Digit 7 Digit 7
Digit 8 Digit 8 Digit 8 Digit 8 Cassette Digit 8 Digit 8
Digit 9 Digit 9 Digit 9 Digit 9 Aux Digit 9 Digit 9
Digit 0 Digit 0 Digit 0 Digit 0 --- Digit 0, 10 Digit 0
---
*2
+10,
+100
+100
–/--,
–/--,
+10,
+100
s TV s TV s TV s TV Input s TV s TV
s TV s TV s TV s TV s TV s TV s TV
Menu Menu --- Menu Menu Menu Menu
--- --- --- Setup --- --- ---
THINC s TV s TV s TV Top menu s TV s TV s TV
Menu select
up
Menu select
down
Cursor up Cursor up --- Cursor up --- --- Cursor up
Cursor
down
Cursor
down
---
Cursor
down
Menu select
left/right
3 Back
Cursor left/
right
Cursor left/
right
---
Cursor left/
right
# Next
Exit Exit Exit --- DVD clear --- --- Exit
Page up/
down
Volume up/
*3
down
Page up/
down
Volume up/
*3
down
Page up/
down
Volume up/
*3
down
---
Volume up/
*3
down
Page up/
down
Volume up/
down
Receiver/
AMP
--- --- ---
--- ---
--- ---
--- --- ---
*3
Volume up/
down
CD
(AUDIO)
Volume
up/down
PVR
Cursor
down
Cursor left/
right
Volume
up/down
*3
(continued)
29
Page 30

Chapter 3: Using the remote control
•
REMOTE
CONTROL KEY
Toshiba TV
(TV)
CABLE
SAT
(satellite)
VCR
DVD/VCR
combo
• DVD/
Receiver/
AMP
CD
(AUDIO)
PVR
DVD-R
CH RTN/
DVD RTN
RECALL
MUTE Sound mute
SLOW
SKIP z
SKIP Z
REW Rewind* Rewind Rewind Rewind Rewind --- Rewind Rewind
PAUSE/STEP Pause* Pause Pause Pause Pause --- Pause Pause
PLAY Play* Play Play Play Play --- Play Play
FF Fast FWD* Fast FWD Fast FWD Fast FWD Fast FWD --- Fast FWD Fast FWD
C.CAPTION
TV/VCR
DISC/AM/FM --- --- --- --- ---
STOP Stop* Stop Stop Stop Stop --- Stop Stop
REC
CH B b
POP Split s TV s TV s TV s TV s TV s TV s TV
FREEZE Freeze s TV s TV s TV s TV s TV s TV s TV
A and D A and D --- --- --- --- --- --- ---
Previous
channel
On-screen
display
Slow FWD*
Slow REW*
*2
DAY+
*2
DAY–
Previous
channel
Previous
channel
--- DVD RTN --- --- ---
s TV s TV s TV s TV s TV s TV s TV
Sound
*3
mute
--- ---
--- --- ---
Sound
mute
*3
mute
*3
Slow FWD
Slow REW
Sound
Sound
mute
Slow FWD
Slow REW
Skip FWD
Skip REW
C.Caption --- TV/SAT TV/VCR ---
REC Menu*
(Single
click)
Channel up/
down
Record
(Double
click)
Channel up/
down
Record
(Double
click)
Channel up/
down
Record
(Double
click)
Channel
up/down
Record
(Double
click)
Channel
up/down
*3
mute
--- ---
---
Sound
*4
*5
--- --- ---
AM/FM
Sound
mute
Skip FWD
Skip REW
Disc SKIP
Disc select
Sound
*3
mute
Slow FWD
Slow REW
---
Instant
replay
Record
*6
--- ---
Channel
up/down
---
(Double
click)
Channel
up/down
Note:
• “---” = key does not send a signal in that remote control mode.
• “s TV” = key will affect the TV, even though the remote control is in another mode.
• * Not available for your TV. However, you can use the certain remote buttons to control the CE-Link devices (- page 73).
*1
Does not send IR signal.
*2
In Software Keyboard mode, repeatedly pressing the key toggles through all available characters for that key. See “Using the software
keyboard” on page 94.
*3
Volume will affect the TV by default. When the volume is unlocked, all the devices will have their own volume if their ID has volume data. The
AUDIO modes (receiver, CD) will have their own volume if volume lock is set on TV, CABLE/SAT, VCR/PVR, or DVD mode. See “Using the
volume lock feature” (- page 32).
*4
DVD/VCR combo : TV/VCR
*5
DVD/VCR combo : DVD/VCR
*6
DVD/DVD-R : RECORD is only for DVD-R, no function is picked for DVD.
30
Page 31

Chapter 3: Using the remote control
Using the remote control to operate
your other devices
Your TV remote control has one dedicated TV mode and three
programmable multi-brand modes: CABLE/SAT, DVD,
VCR/PVR, AUX 1, and AUX 2. The default device modes
and programmable device modes are listed below.
Note: The TV remote control is preprogrammed to operate
most Toshiba devices. To operate a non-Toshiba device or a
Toshiba device that the remote control is not preprogrammed
to operate, you will need to program the remote control. See
“Programming the remote control to operate your other
devices” (at right).
MODE SELECT
TV Toshiba TV
CABLE/SAT Toshiba Satellite receiver
DVD Orion DVD
VCR/PVR Toshiba VCR
AUX 1 Yamaha Audio receiver
AUX 2 Onkyo Audio receiver
MODE SELECT Device mode control after programming
TV Toshiba TV
CABLE/SAT
DVD
VCR/PVR
AUX 1
AUX 2
Note: Although your new TV’s remote control includes codes
for many devices, it may not include codes for some or all of
the features on certain devices you wish to control. If you are
unable to program the TV’s remote control to operate your
device or some of the features on that device, use the device’s
remote control or the controls on the device.
Default device mode control (before
programming)
Multi-brand video/audio devices
Programming the remote control to
operate your other devices
Device code setup
1
Find the code for your device brand in the remote control
device code table on pages 33–39.
If more than one code is listed, try each one separately
until you find one that works.
2 Press the applicable MODE SELECT button (CABLE/
SAT, DVD, VCR/PVR, AUX 1, or AUX 2), until the
MODE SELECT button blinks 3 times.
3 While holding down E, press the five-digit device code
for your device.
• If a valid code is entered, the MODE SELECT button
will blink twice.
• If an invalid code is entered, the MODE SELECT
button will blink one long blink.
4 Point the remote control at the device and press p to test
the code.
• If the device responds to the remote control, you have
entered the correct code.
• If the device does not respond to the remote control,
repeat steps 3 and 4 using another code.
Note: After programming the remote control, make sure
all necessary keys on the TV remote control (in addition to
p) operate your device. If some keys are not
operational, repeat the device code setup using another
code (if other codes are listed for your device). If, after
trying all listed codes, the necessary keys do not operate
your device, use the device’s original remote control.
5 To control the TV, press the “TV” MODE SELECT
button.
Note:
• Although the TV remote control includes codes for many
devices, it may not include codes for some or all of the
features on certain devices you want to control. If you are
unable to program the TV remote control to operate your
device or some of the features on that device, use the
device’s original remote control (or the control buttons on
the device).
• Every time you change the batteries you will need to
reprogram the remote control.
• Some newer VCRs respond to either of two codes. These
VCRs have a switch labeled “VCR1/VCR2.” If your VCR has
this kind of switch and does not respond to the codes for
your VCR brand, set the switch to the other position (“VCR1”
or “VCR2”) and reprogram the remote control.
31
Page 32

Chapter 3: Using the remote control
Searching and sampling the code of a
device (8500)
If you do not know the device code for a particular device, you
can cycle the remote control through the available codes for
that device mode and sample the functions to find the code that
operates the target device. The keys available to be sampled,
provided they are applicable to that mode, are p, 1, z, <,
and S. Invalid keys will be ignored while in program mode.
To cycle through each available device code and
sample its functions:
1 Press the appropriate MODE SELECT button on the
remote control.
2 While holding down E, press 8, 5, 0, 0. The remote
control will enter program mode.
3 Point the remote control at the target device and press p
(or other function buttons that are available to be
sampled).
4 If the device responds to the remote control:
Press E to store the device code. The MODE
SELECT button will blink two times and the remote
control will exit the program mode.
If the device does not respond to the remote control:
Press B, and then press p. Repeat this step until the
device responds to the remote control, and then press
E.
Note: When a search cycle is completed, the MODE
SELECT button will blink three times. The remote control
will begin to cycle through the available codes again. If no
key is pressed within 10 seconds during programming,
the remote control will exit the program mode and return
to the previous code.
Using the volume lock feature (8000)
By default (factory setting), the remote control’s volume keys
(z Z and W) are locked to the “TV” device mode.
The remote control will operate the TV’s volume, even when
“TV” is not the current device mode. (This includes all remote
control device modes except AUX 1 and AUX 2).
If you unlock the remote control’s volume keys, each device
mode will have its own volume (if the device ID has volume
data). The remote control will operate the volume of the device
associated with the current device mode. (This includes all
remote control device modes.)
If you lock the remote control’s volume keys to a specific
device mode, the remote control will operate the volume of the
device associated with the locked mode, even when the locked
mode is not the current device mode. (This includes all device
modes except AUX 1 and AUX 2).
When the remote control is in AUX 1 (or AUX 2) mode, the
remote control will operate the volume of the device associated
with the AUX 1 (or AUX 2) mode, even when the volume is
locked to another mode.
See “Using the remote control to operate your other devices”
on page 31.
To lock the remote control’s volume keys to a specific
mode (CABLE/SAT in this example):
1 Press CABLE/SAT.
2 While holding down the E button, press 8, 0, 0, 0.
3 Press z. The CABLE/SAT MODE SELECT button will
blink two times (locked).
The remote control’s volume keys will now operate the
volume of the device associated with the CABLE/SAT
mode, even when CABLE/SAT is not the current device
mode (for all device modes except AUX 1 and AUX 2).
32
To unlock the remote control’s volume keys:
1 While holding down E, press 8, 0, 0, 0.
2 Press Z. The CABLE/SAT MODE SELECT button will
blink four times (unlocked).
Operational feature reset (8900)
This feature clears all programmed remote control features not
related to “Device code setup” and resets the volume lock to
the “TV” device mode.
To reset the remote control:
While holding down E, press 8, 9, 0, 0. The MODE
SELECT button will respond with four blinks.
Page 33

Chapter 3: Using the remote control
Multi-brand remote
control device codes
TVs
Brand Code
Toshiba 01524
Cable boxes
Brand Code
A-Mark 10008, 10144
ABC 10237, 10003,
10008, 10014,
10017
Accuphase 10003, 10014,
10017
Acorn 10237
Action 10237
Active 10237
Americast 10899
Amino 11822
Archer 10237
BCC 10276
Bell & Howell 10014
Bell South 10899
British Telecom 10003
Century 10008
Citation 10017
Clearmaster 10883
ClearMax 10883
Cool Box 10883
Coolmax 10883
Digeo 11187
Digi 10637
Director 10476
Dumont 10637
Emerson 10014
Fosgate 10276
GE 10144
Motorola/GI/Jerrold 10014, 10276,
10476, 10810
GI/Jerrold 10003, 10012
Motorola 11106, 11187,
11376
Gibralter 10003
GMI 10883
GoldStar 10144
Hamlin 10009, 10273
Hitachi 10003, 10008,
10009
Insight 10476, 10810
Jebsee 10014
Memorex 10000
Mitsubishi 10003
Multitech 10883
Myrio 11822
Nova Vision 10008
Novaplex 10008, 10017
NSC 10012, 10637
Oak 10017
Pace 11877, 10877,
10237, 10008
Panasonic 10000, 10008,
10144, 10107
Panther 10637
Paragon 10000, 10008,
10525
Penney 10000, 10637
Philips 11305, 10317
Pioneer 11877, 10877,
10144, 10533
Prism 10012
Pulsar 10000
Quasar 10000
RadioShack 10883
RCA 11256
Regal 10276, 10279,
10273
Runco 10000
Samsung 10003, 10144
Scientific Atlanta 11877, 10877,
10477, 10237,
10003, 10000,
10008, 10012,
10017
Sony 11006
Sprucer 10144
Starcom 10003, 10014
Stargate 10014
Storm 10637
Supercable 10276
Supermax 10883
Thomson 11256
Tocom 10012
Torx 10003
Toshiba 10000
Tristar 10883
United Cable 10276, 10003,
10014
US Electronics 10276, 10003,
10008, 10017
V2 10883
Videoway 10000
Viewmaster 10883
Vision 10883
Vortex View 10883
Zenith 10000, 10525,
10899, 10017
Satellite receivers
Brand Code
AlphaStar 10772
Bell ExpressVu 10775
Chaparral 10216
Coolsat1 1806
Crossdigital1 1109
DirecTV 11377, 10392,
10566, 10639,
11639, 11142,
10247, 10749,
11749, 10724,
10819, 11856,
11076, 11108,
10099, 11109,
11414, 11442,
11609, 11392,
11640
Dish Network System 11505, 11005,
Dishpro 11505, 11005,
Echostar 11505, 11005,
Expressvu 10775, 11775
Fortec Star 11821
Funai 11377
GE 10392, 10566
General Instrument 10869
GOI 10775, 11775
Hitachi 10749, 10819
Houston 10775
HTS 10775, 11775
Hughes Network
Systems
Humax 11790
Innova 10099
Jerrold 10869
JVC 10775, 11170,
LG 11226, 11414
Magnavox 10724, 10722
McIntosh 10869
Memorex 10724
Mitsubishi 10749
Motorola 10869
Netsat 10099
Next Level 10869
Optimus 10724
Panasonic 10247, 10701
Pansat 11807
Paysat 10724
Philips 11142, 10749,
Pioneer 11142, 11442
Primestar 10869
Proscan 10392, 10566
RadioShack 10566, 10775,
RCA 10392, 10566,
Samsung 11377, 11142,
SKY 10099
Sony 10639, 11639,
Star Choice 10869
Star Trak 10772, 10869
Thomson 10392, 10566
Tivo 11142, 11442
Toshiba 10749, 11749,
UltimateTV 11392, 11640
10775, 11170,
11775
10775, 11775
10775, 11170,
11775
11142, 10749,
11749, 11442
11775
11749, 10775,
10724, 10819,
11076, 10722,
10099, 11442
10869
11142, 10775,
10855, 10143,
11392, 11442
11276, 11108,
11109, 11442,
11609
11640
10790, 10819,
11285, 11286,
11287, 11289,
11857, 11858
(continued)
33
Page 34

Chapter 3: Using the remote control
Ultrasat 11806
Uniden 10724, 10722
Voom 10869
Zenith 11856
DVDs
Brand Code
3D LAB 20503, 20539
Accurian 21072, 21416
Advent 21016
Afreey 20698
Aiwa 20641
Akai 20695, 20705,
20770, 20899,
21089
Alba 20672, 20717
Alco 20790
Allegro 20869
Apex Digital 20533, 20672,
20717, 20755,
20794, 20796,
20797, 20830,
21004, 21020,
21056, 21061,
21100
Arrgo 21023
Aspire Digital 21168, 21407
Audiovox 20717, 20790,
21041, 21071,
21072, 21121,
21122
Axion 21071, 21072
Blaupunkt 20717
Blue Parade 20571
Blue Sky 20695
Bose 21895
Brandt 20651
Broksonic 20695, 20868
California Audio Labs 20490
Celestial 21020
Centrex 20672, 21004
Cinea 20831
CineVision 20876, 20833,
20869
Citizen 21003, 21277
Clairtone 20571
Coby 20778, 21086,
21107, 21177
Craig 20831
Creative 20503, 20539
Curtis Mathes 21087
CyberHome 20816, 20874,
21023, 21024,
21117, 21129,
21502
Cytron 20705
Daewoo 20784, 20705,
20770, 20833,
20869, 21169,
21172, 21234,
21242
Dansai 20770
Decca 20770
Denon 20490, 20634
Denver 20778
Desay 21407
Digitrex 20672
Disney 20675, 21270
DiViDo 20705
Dual 20675, 21068
Durabrand 21127
DVD2000 20521
Electrohome 21003
Emerson 20591, 20675,
20821, 21268
Enterprise 20591
Entivo 20503, 20539
Enzer 20770
ESA 20821, 21268
Firstline 20651
Fisher 20670
Funai 20675, 21268,
21334
Gateway 21073, 21158
GE 20522, 20815,
20717
Go Video 20573, 20744,
20717, 20715,
20741, 20783,
20833, 20869,
21044, 21075,
21099, 21158,
21304, 21730
Go Vision 21071, 21072
GoldStar 20741, 20801,
20869
Goodmans 20790
Gradiente 20490, 20651
Greenhill 20717
Grundig 20539, 20705
Harman/Kardon 20582, 20702
Hitachi 20573, 20664,
21247
Hiteker 20672
Humax 21588
iLo 21348
Initial 20717
Insignia 21268
Integra 20571, 20627
IRT 20783
JBL 20702
Jensen 21016
JMB 20695
JVC 20558, 20623,
20867, 21164
Kawasaki 20790
Kenwood 20490, 20534
KLH 20717, 20790,
21020, 21149
Kloss 20533
Koss 20651, 21061
Lasonic 20627, 20798
Lecson 21533
Lenoxx 21127
LG 20591, 20741,
20801, 20869
LiteOn 21058, 21158,
21416, 21440
Loewe 20511, 20741
Logix 20783
Magnasonic 20651, 20675
Magnavox 20503, 20539,
20646, 20675,
20821, 21268
Marantz 20503, 20539,
20675
McIntosh 21533
Medion 20651
Memorex 20695, 20831,
21270
Microsoft 20522, 21708
Minato 20752
Mintek 20839, 20717
Mitsubishi 21521, 20521
NAD 20591, 20741
Naiko 20770
NEC 20785, 20869
Nesa 20717
NexxTech 21402
Norcent 21003, 21107,
21265
Onkyo 20503, 20627,
20792
Optimus 20571
Orion 21854
Oritron 20651
Palsonic 20672
Panasonic 20503, 20490,
20571, 20703,
21362, 21462,
21490, 21762
Philips 20503, 20539,
20646, 20675,
20854, 21260,
21267, 21354
PianoDisc 21024
Pioneer 20525, 20571,
20631
Polaroid 21020, 21061,
21086
PolkAudio 20539
Portland 20770
Presidian 20675, 21072
Prima 21016
Proceed 20672
Proscan 20522
ProVision 20778
Qwestar 20651
Radionette 20741
RadioShack 20571
RCA 20522, 20571,
20717, 20790,
20822, 21022,
21132
Realistic 20571
Reoc 20752
Rio 20869
Rotel 20623
Rowa 21004
Saba 20651
Sampo 20698, 20752
Samsung 20490, 20573,
20744, 20820,
20899, 21044,
21075
Sansui 20695
Sanyo 20670, 20675,
20695, 20873,
21334
34
Page 35

Chapter 3: Using the remote control
Schneider 20783
Schwaiger 20752
Sensory Science 21158
Sharp 20630, 20675,
20752, 21256
Sharper Image 21117
Sherwood 20770, 21043
Shinsonic 20533, 20839
Slim Art 20784
Sonic Blue 20573, 20715,
20783, 20869,
21099
Sony 20533, 21533,
20864, 21033,
21070, 21431
Sova 21122
Superscan 20821
SVA 20717
Sylvania 20675, 20821,
21268
Symphonic 20675, 20821,
21268, 21334
Tatung 20770
Teac 20571, 20717,
20790
Technics 20490, 20703
Technika 20770
Tevion 20651
Theta Digital 20571
Thomson 20522, 20511
Tivo 21503, 21588
Toshiba 20503, 20573,
20539, 20695,
21045, 21154,
21503, 21588,
21854
Unimax 20770
Universum 20591
Urban Concepts 20503, 20539
US Logic 20839
V 21064, 21226
Venturer 20790
Visio 21064, 21226
Vizio 21064, 21226
Xbox 20522, 21708
Yamaha 20490, 20539,
20545
Zenith 20503, 20591,
20741, 20869
Zeus 20784
Zoece 21265
DVD-R
Brand Code
Accurian 21416
Apex Digital 21056
Aspire Digital 21168
Coby 21086
CyberHome 21129, 21502
Funai 20675, 21334
Gateway 21073, 21158
Go Video 20741, 21158,
21304, 21730
iLo 21348
JVC 21164
LG 20741
LiteOn 21158, 21416,
21440
Magnavox 20646, 20675
Panasonic 20490
Philips 20646
Pioneer 20631
Polaroid 21086
RCA 20522
Samsung 20490
Sensory Science 21158
Sharp 20675
Sony 21033, 21070,
21431
Sylvania 20675
Zenith 20741
DVD/VCR Combo
Brand Code
Allegro 20869
Apex Digital 21061
Broksonic 20695
CineVision 20833, 20869
Daewoo 20833, 20869
Emerson 20675
Funai 20675
Go Video 20744, 20715,
20741, 20833,
20869, 21044,
21075
GoldStar 20741
Hitachi 20664
JVC 20867, 21164
LG 20741
Magnavox 20675
Memorex 20695
Panasonic 21762
Philips 20675, 21267
Polaroid 21061
Presidian 20675
RCA 20522, 20822
Samsung 20820, 21044,
21075
Sansui 20695
Sanyo 20670, 20873
Sharp 20630
Sony 20864, 21033,
21070, 21431
Sylvania 20675
Symphonic 20675
Toshiba 20503, 21854
Zenith 20741, 20869
Emerson 31593
Funai 31593
Hitachi 30000
Magnavox 31593
Presidian 31593
RCA 30060
Sanyo 30104
Sharp 30848
Sylvania 30000, 30593,
31593
Symphonic 30000, 31593
Toshiba 41788
VCRs
Brand Code
A-Mark 30037, 30240,
30000, 30278,
30046
ABS 31972
Admiral 30060, 30048,
30039, 30047,
30104, 30209,
30020, 30062,
30479
Adventura 30037, 30240,
30000
Adyson 30072
Aiko 30278
Aiwa 30037, 30000,
30124, 30307
Akai 30041, 30061,
30106, 30175
Alba 30209, 30072,
30278
Alienware 31972
Allegro 30039
America Action 30278
American High 30035, 30081
Amstrad 30000
Asha 30240
Astra 30035, 30240
Audiovox 30037, 30278,
30038
Avis 30000, 30072
Beaumark 30240
Bell & Howell 30035, 30048,
30039, 30000,
30104, 30046,
30479
Broksonic 30184, 30121,
30209, 30002,
30208, 30479,
31479
Calix 30037
Candle 30037, 30038
Canon 30035
Capehart 30002, 30020,
30062
Carrera 30240
Carver 30035, 30081
CCE 30072, 30278
Cineral 30278
Citizen 30035, 30037,
30240, 30000,
30209, 30278,
30479, 31278
Classic 30037
Colortyme 30060, 30035,
30045, 30278
Colt 30000, 30072
Craig 30037, 30047,
30240, 30072,
30271
Criterion 30000, 30072
Crosley 30035, 30081,
30000, 30149
Crown 30072, 30278
(continued)
35
Page 36

Chapter 3: Using the remote control
Curtis Mathes 30060, 30035,
30162, 30240,
30000, 30041,
30278, 30432,
30760, 31035
Cybernex 30240
CyberPower 31972
Daewoo 30037, 30045,
30278, 30020,
30046, 30561,
31278
Daytron 30037, 30278,
30020
Dell 31972
Denon 30081, 30042
Derwent 30041
DirecTV 30739
Dual 30000
Durabrand 30039, 30038
Dynatech 30240, 30000
Electrohome 30060, 30037,
30240, 30000,
30043, 30209,
30061
Electrophonic 30037
Emerald 30184, 30121
Emerex 30032
Emerson 30037, 30184,
30240, 30000,
30121, 30043,
30209, 30002,
30278, 30202,
30208, 30061,
30479, 30561,
30593, 31278,
31479, 31593
Fisher 30039, 30047,
30000, 30104,
30046
Fuji 30035, 30033
Fujitsu 30000
Funai 30037, 30000,
30072, 30278,
30593, 31593
Garrard 30000
Gateway 31972
GE 30060, 30035,
30048, 30240,
30000, 30149,
30202, 30760,
30807, 31035,
31060
Gemini 30060
Genexxa 30037, 30000,
30278
Go Video 30240, 30432,
30526, 30614
GoldStar 30035, 30037,
30039, 30000,
30278, 30038,
31237
Goodmans 30037, 30081,
30000, 30072,
30278, 30020,
30062
Gradiente 30000, 30008
Granada 30081, 30042
Grundig 30081
Harley Davidson 30000
Harman/Kardon 30081, 30038
Harvard 30072
Harwood 30072
Headquarter 30046
Hewlett Packard 31972
HI-Q 30035, 30047,
30000
Hitachi 30035, 30037,
30045, 30000,
30042, 30041,
30089, 30105
Howard Computers 31972
HP 31972
Hughes Network
Systems 30042, 30739
Humax 30739
Hush 31972
Hytek 30047, 30000,
30072
iBUYPOWER 31972
ITT Nokia 30240, 30041
Janeil 30240
Jensen 30067, 30041
JVC 30067, 30041,
30008, 30061,
31162
KEC 30037, 30278
Kenwood 30067, 30041,
30038, 30046
KLH 30072
Kodak 30035, 30037
KTV 30000
LG 30037, 30240,
30038, 31037
Linksys 31972
Lloyd’s 30240, 30000,
30072, 30038,
30208
Loewe 30081
Logik 30240, 30000,
30072
Lumatron 30278
Luxor 30046, 30106
LXI 30037, 30000,
30042, 30067
M Electronic 30240
Magnasonic 30037, 30240,
30000, 30072,
30278, 30020,
30593, 31278
Magnavox 30035, 30037,
30048, 30039,
30081, 30240,
30000, 30149,
30563, 30593,
30618, 31593,
31781
Magnin 30240
Marantz 30035, 30081,
30038, 30062
Marta 30037
Matsui 30037, 30209
Matsushita 30035, 30162,
30081, 31162
Media Center PC 31972
MEI 30035
Memorex 30035, 30162,
30037, 30048,
30039, 30047,
30240, 30000,
30104, 30209,
30072, 30278,
30062, 30046,
30307, 30479,
31037, 31162,
31237, 31262
Metz 30037
MGA 30060, 30240,
30043, 30061
MGN Technology 30240
Microsoft 31972
Midland 30240
Mind 31972
Minolta 30042, 30105
Mitsubishi 30060, 30048,
30047, 30000,
30042, 30067,
30043, 30041,
30061, 30807
Motorola 30035, 30048
Movie Walker 30072
MTC 30240, 30000,
30072
MTX 30000
Multitech 30039, 30000,
30072
NAD 30240, 30104
NEC 30104, 30067,
30041, 30038
New Tech 30072
Nikko 30037, 30278
Nikkodo 30037, 30278
Nishi 30240
Niveus Media 31972
Noblex 30240
Northgate 31972
Olympus 30035, 30162,
30104
Onkyo 30222
Optimus 31062, 30035,
30162, 30037,
30048, 30047,
30240, 30000,
30104, 30062,
30432, 30593,
31048, 31162,
31262
Optonica 30062
Orion 30184, 30240,
30000, 30104,
30121, 30209,
30002, 30278,
30208, 30479,
31479
Panama 30035
Panasonic 31062, 30035,
30162, 30000,
30020, 30225,
30614, 30616,
31035, 31162,
31262
36
Page 37

Chapter 3: Using the remote control
Penney 30035, 30162,
30037, 30047,
30081, 30240,
30000, 30042,
30067, 30038,
31035, 31237
Pentax 30042, 30105
Philco 30035, 30081,
30000, 30209,
30479
Philips 30035, 30162,
30048, 30081,
30045, 30000,
30209, 30062,
30616, 30618,
30739, 31081,
31181
Pilot 30037
Pioneer 30162, 30081,
30042, 30067
Polk Audio 30081
Portland 30278, 30020
Presidian 31593
Profitronic 30240
Proscan 30060, 30202,
30760, 31060
Protec 30000, 30072
Protech 30072
Pulsar 30039, 30240,
30278
Pulser 30240
Quarter 30046
Quartz 30035, 30047,
30046
Quasar 30035, 30162,
30002, 31035,
31162
RadioShack 30035, 30162,
30037, 30048,
30047, 30240,
30000, 30104,
30046, 30062,
31037, 31162
Radix 30037
Randex 30037
RCA 30060, 30035,
30048, 30240,
30045, 30000,
30042, 30149,
30105, 30106,
30202, 30760,
30807, 30880,
31035, 31060
Realistic 30035, 30162,
30037, 30048,
30047, 30240,
30000, 30104,
30121, 30278,
30046, 30062,
31162
ReplayTV 30614, 30616
Ricavision 31972
Runco 30039
Samsung 30060, 30240,
30045, 30000,
30038, 30432,
30739, 31014
Samtron 30240
Sanky 30048, 30039
Sansui 30240, 30000,
30067, 30209,
30041, 30072,
30002, 30271,
30479, 31479
Sanyo 30047, 30240,
30000, 30104,
30046, 30159,
30479
Scientific Atlanta 30008
Scott 30184, 30045,
30121, 30043,
30208, 30210
Sears 30060, 30035,
30162, 30037,
30048, 30039,
30047, 30033,
30045, 30000,
30042, 30104,
30067, 30043,
30209, 30041,
30072, 30046,
30105, 31237
Sharp 30048, 30047,
30032, 30000,
30062, 30807,
30848
Shintom 30039, 30240,
30000, 30072,
30208
Shogun 30240
Siemens 30037, 30104
Signature 30060, 30035,
30037, 30048,
30000, 30149,
30046, 30479
Singer 30037, 30240,
30072
Sonic Blue 30614, 30616
Sonographe 30046
Sony 30035, 30047,
30032, 30033,
30000, 30067,
30046, 30636,
31032, 31232,
31972
Soundmaster 30000
Stack 9 31972
STS 30042, 30105
SV2000 30000, 30072
SVA 30000
Sylvania 30035, 30081,
30000, 30043,
30593, 31593,
31781
Symphonic 30240, 30000,
30002, 30593,
31593
Systemax 31972
Tagar Systems 31972
Tandy 30000, 30104
Tatung 30048, 30081,
30000, 30067,
30041, 30008
Teac 30000, 30067,
30041
Technics 30035, 30162,
30037, 30000
Teknika 30035, 30037,
30000
Telecorder 30240
Telefunken 30041, 30208
Tevion 30479
Thomas 30000, 30002
Thomson 30060, 30041,
30202
Tisonic 30278
Tivo 30618, 30636,
30739, 31996
TMK 30240, 30000,
30208
TNIX 30037
Tocom 30240
Toshiba 30240, 30045,
30000, 30043,
30209, 30041,
30062, 30210,
30845, 31008,
31145, 31972,
31996
Tosonic 30278
Totevision 30037, 30240
Touch 31972
Trix 30037
Ultra 30045, 30278,
30020
Unitech 30240
Vector 30045
Vector Research 30184, 30038
Vextra 30072
Victor 30067, 30041,
30008
Video Concepts 30045, 30061,
30210
Videomagic 30037
Videosonic 30240, 30000,
30072
Viewsonic 31972
Villain 30000
Voodoo 31972
Wards 30060, 30035,
30037, 30048,
30047, 30081,
30033, 30240,
30045, 30000,
30042, 30043,
30041, 30072,
30038, 30149,
30046, 30062,
30479, 30760
Wharfedale 30593
White Westinghouse 30000, 30209,
30072, 30278,
30479
World 30209, 30002,
30479
XR-1000 30035, 30240,
30000, 30072,
30208
Yamaha 30041, 30038
Zenith 30037, 30039,
30033, 30000,
30209, 30041,
30278, 30479,
31139, 31479
ZT Group 31972
(continued)
37
Page 38

Chapter 3: Using the remote control
PVRs
Brand Code
ABS 31972
Alienware 31972
CyberPower 31972
Dell 31972
DirecTV 30739
Gateway 31972
Hewlett Packard 31972
Howard Computers 31972
HP 31972
Hughes Network
Systems 30739
Humax 30739
Hush 31972
iBUYPOWER 31972
Linksys 31972
Media Center PC 31972
Microsoft 31972
Mind 31972
Niveus Media 31972
Northgate 31972
Panasonic 30616
Philips 30618, 30739
RCA 30880
ReplayTV 30614, 30616
Samsung 30739
Sonic Blue 30614, 30616
Sony 30636, 31972
Stack 9 31972
Systemax 31972
Tagar Systems 31972
Tivo 30618, 30636,
30739
Toshiba 31008, 31972,
31996
Touch 31972
Viewsonic 31972
Voodoo 31972
ZT Group 31972
Cable/PVR Combo
Brand Code
Americast 10899
Amino 11822
Digeo 11187
Motorola/GI/Jerrold 10810
Motorola 11106, 11187,
11376
Myrio 11822
Pace 11877, 10237
Pioneer 11877, 10877
RCA 11256
Scientific Atlanta 11877, 10877
Sony 11006
Supercable 10276
Thomson 11256
Zenith 10899
DBS/PVR Combo
Brand Code
DirecTV 11377, 10392,
10639, 11142,
11076, 10099,
11392, 11442,
11640
Dish Network System 11505, 10775
Dishpro 11505, 10775
Echostar 11505, 10775,
11170
Expressvu 10775
Hughes Network
Systems 11142, 11442
JVC 11170
Motorola 10869
Philips 11142, 11442
Proscan 10392
RCA 11392
Samsung 11442
Sony 10639, 11640
Star Choice 10869
Hughes Network
Systems 30739
Philips 30739
Samsung 30739
Audio Amp
Brand Code
Adcom 40577
Bose 40674
Carver 40892
Curtis Mathes 40300
GE 40078
Harman/Kardon 40892
JVC 40331
Left Coast 40892
Marantz 40892
NEC 40264
Optimus 40013, 40300,
40823
Philips 40892
Pioneer 40013, 40300,
40823
Polk Audio 40892
RCA 40013, 40300,
40823
Realistic 40013
Shure 40264
Sony 40689, 40815
Soundesign 40078
Victor 40331
Wards 40078, 40013
Yamaha 40354, 40133
CD players
Brand Code
Acoustic Research 50420
Aiwa 50157
Arcam 50157
Audio Research 50157
Burmester 50420
Cairn 50157
California Audio Labs 50029, 50303
Cambridge
Soundworks
Carver 50157, 50179
Curtis Mathes 50032
Denon 50003, 50034
DKK 50000
DMX Electronics 50157
Fisher 50000, 50179
Garrard 50420
Genexxa 50032
Grundig 50157
Hafler 50173
Harman/Kardon 50100, 50157,
Hitachi 50032
Inkel 50157, 50180
Integra 50101
Jerrold 50003
JVC 50032, 50072
Kenwood 50626, 50000,
KLH 51711
Krell 50157
Linn 50157
LXI 50179
Magnavox 50157, 50274
Marantz 50626, 50029,
Matsui 50157
McIntosh 50256
MCS 50029
Memorex 50000, 50032,
Micromega 50157
Miro 50000
Mission 50157
Modulaire 50000, 50032,
MTC 50420
NSM 50157
Onkyo 51327, 50101
Optimus 50000, 50032,
Panasonic 50029, 50303,
Parasound 50420
Penney 50029
Philips 50626, 50157,
Pioneer 51062, 50032,
PolkAudio 50157
Proceed 50420
Proton 50157
QED 50157
Quad 50157
Quasar 50029
RadioShack 50000, 50032,
50157
50173
50029, 50028,
50037, 50190
50157, 50180
50179, 50420,
50468
50087, 50179,
50180, 50420,
50468
50037, 50087,
50179, 50420,
50468
50388, 50752
50274
51087, 50468
50179, 50180,
50420, 50468
38
Page 39

Chapter 3: Using the remote control
RCA 51062, 50032,
50053, 50179,
50420, 50468
Realistic 50000, 50032,
50087, 50179,
50180, 50420,
50468
Revox 50157
Rotel 50157, 50420
SAE 50157
Sansui 50000, 50157
Sanyo 50000, 50087,
50179
Sears 50179
Sharp 50037, 50180
Sherwood 50180
Sonic Frontiers 50157
Sony 50490, 50000,
50100, 51364,
50185
Sugden 50157
Sylvania 50157
Symphonic 50180
TAG McLaren 50157
Tandy 50032
Tascam 50420
Teac 50490, 50180,
50420
Technics 50029, 50303
Techwood 50303
Thule Audio 50157
Victor 50072
Wards 50032, 50157,
50053, 50087,
50179
Yamaha 50490, 50036,
51292
Yorx 50000
Audio Amp/Tuners
Brand Code
ADC 40531
Aiwa 41405, 40189,
40121, 41388,
41641
Alco 41390
AMC 41077
Anam 41609, 41074
Apex Digital 41774
Arcam 41189
Audiotronic 41189
Audiovox 41390
B&K 40701, 40820
Bose 41229, 40639,
41253, 41933
Cairn 40189
Capetronic 40531
Carver 41189, 40189,
40121, 41289
Curtis Mathes 40014
Denon 41360, 40121,
40771, 41142,
41306
Emerson 40531
Fisher 41801
Grundig 40189
Harman/Kardon 40110, 40189,
40891, 41289,
41304, 41306
Hitachi 41273, 41801
Integra 40135, 40842,
41298, 41320
JBL 40110, 41306
JVC 41058, 40074,
41374, 41495,
41811
Kawasaki 41390
Kenwood 41313, 41570,
41569, 40186
KLH 41390, 41428
Koss 41366, 41497
LG 41293
Linn 40189
Liquid Video 41497
Magnavox 41189, 41269,
40189, 40531,
41266, 41514
Marantz 41189, 41269,
40189, 40891,
41289
McIntosh 41289
Micromega 41189, 40189
Mitsubishi 41393
Myryad 41189
Nakamichi 41313
Onkyo 40135, 40842,
41298, 41320,
41531
Optimus 41023, 40074,
40014, 40121,
40186, 40531,
41074
Oritron 41366, 41497
Panasonic 41308, 41518,
40309, 41288,
41316, 41548,
41633, 41763,
41764
Philips 41189, 41269,
40189, 40891,
41266
Pioneer 41023, 40014,
40150, 40531,
40630, 41384
Polaroid 41508
Polk Audio 40189, 41289
Proscan 41254
RadioShack 41609
RCA 41023, 41609,
41254, 40531,
41074, 41390,
41511
Realistic 41609, 40121,
40186
Revox 40189
Samsung 41295, 41304,
41500
Sansui 41189, 40189
Sanyo 41251, 41469,
41801
Sharp 40186
Sherwood 41077
Sirius 41811
Sony 41058, 41441,
41258, 41622,
41658, 41758,
41858
Stereophonics 41023
Sunfire 41313
Teac 41074, 41390
Technics 41308, 41518,
40309, 41633
Thorens 41189
Toshiba 40135, 40842,
41788
Venturer 41390
Victor 40074
Wards 40189, 40014
Yamaha 41023, 40176,
40186, 41176,
41276, 41331,
41375
Zenith 41293
39
Page 40

Chapter 4: Menu layout and navigation
Main menu layout
The tables below and on the next page provide a quick overview of your TV’s menu system.
To open the main menus (illustrated below), press Y on the remote control or TV control panel.
Icon Item Option Page
Applications
Video
Audio
Preferences
Locks
Setup
Picture Viewer S [Launches the JPEG Picture Viewer] 96
Audio Player S [Launches the MP3 Audio Player] 98
Personal E-mail S [Launches Personal E-mail] 102
Channel Browser
™
S [Launches the Channel Browser™]53
Help S [Opens the Help menu] 85
Start Demo S [Launches Demo Mode] 43
Mode S
Sports/Standard/Movie/Document/Preference/Pro1/Pro2
60
Picture Settings S [Opens the Picture Settings menu] 61
Noise Reduction S [Opens the Noise Reduction menu] 80
ColorMaster Pro S [Opens the ColorMaster Pro menu] 81
xvYCC Selection S Auto/On/Off 83
Game Mode S On/Off 83
Theater Settings S [Opens the Theater Settings menu] 56
TheaterLock
™
S On/Off 61
Digital Audio Selector S [Launches the temporary Audio Selector] 64
Audio Settings S [Opens the Audio Settings menu] 65
Advanced Audio Settings S [Opens the Advanced Audio Settings menu] 84
Audio Setup S [Opens the Audio Setup menu] 64
CC Selector S [Launches the temporary CC Selector] 63
Base CC Mode S Off/CC1/CC2/CC3/CC4/T1/T2/T3/T4 62
Digital CC Settings S [Opens the Digital CC Setup menu] 63
Auto Input S [Opens the Auto Input Setup menu] 46
Input Labeling S [Opens the Input Labeling menu] 52
Channel Labeling S [Opens the Channel Labeling menu] 47
Menu Language S English/French/Spanish 43
Channel Browser Setup S [Opens the Channel Browser Setup menu] 53
Enable Rating Blocking S Off/On 68
Edit Rating Limits S [Opens the Edit Rating Limits menu] 68
Channels Block S [Opens the Channels block menu] 69
Input Lock S Off/Video/Video+ 70
Front Panel Lock S Off/On 71
GameTimer
®
S Off/30 Min/60 Min/90 Min/120 Min 71
New PIN Code S [Opens the New PIN Code entry screen] 67
Installation S [Opens the Installation menu] 44
CE-Link Setup S [Opens the CE-Link Setup menu] 75
Sleep Timer S [Opens the Sleep Timer menu] 73
HDMI Settings S [Opens the HDMI Settings menu] 75
PC Settings S [Opens the PC Settings menu] 72
Slide Show Interval S 2 Sec/5 Sec/10 Sec/15 Sec/20 Sec 97
Power-On Mode S Power-Saving/Fast 50
Demo Mode S On/Off 50
40
Page 41

Chapter 4: Menu layout and navigation
Setup/Installation menu layout
The Installation menu contains the Terrestrial, Network, and System Status menus.
To open the Installation menu (illustrated below), press Y on the remote control or TV control panel, open the Setup menu,
select Installation, and press T.
Icon Item Option Page
Press Y,
open the
Setup menu,
and then
open the
Installation
sub-menu.
Terrestrial
Network
System Status
Input Configuration S [Opens the Input Configuration menu] 44
Channel Program S [Start] S [Scans for new channels on ANT] 44
Channel Add/Delete S [Opens the Channel Add/Delete menu] 45
Signal Meter S [Opens the Signal Meter menu] 49
Basic Network Setup S [Opens the Basic Network Setup menu] 88
Personal E-mail Setup S [Opens the Personal E-mail Setup menu] 99
Home File Server Setup S [Opens the Home File Server Setup menu] 93
Software Upgrade S [Opens the Software Upgrade menu] 94
System Information S [Opens the System Information screen] 49
THINC™ menu
The THINC* menu provides access to the CE-Link Player
Control, Picture Viewer, Audio Player, Personal
E-mail, Channel Browser, and Favorites Browser
features.
The THINC menu is not part of the main menu system. You
can only view the THINC menu by pressing C on the
remote control.
THINC Applications
CE-Link Player Control
Picture
Viewer
Audio Player
Personal E-mail
Channel Browser
Favorites Browser
* Toshiba Home Interactive Network Connection.
CB
41
Page 42

Chapter 4: Menu layout and navigation
Navigating the menu system
You can use the buttons on the remote control or TV control
panel to access and navigate your TV’s on-screen menu
system.
• Press Y to open the menu system.
• When a menu is open, use the up/down/left/right arrow
buttons (BbC c) on the remote control or TV control panel
to move in the corresponding direction in the menu.
• Press T to save your menu settings or select a highlighted
item. (A highlighted menu item appears in a different color
in the menu.)
• All menus close automatically if you do not make a selection
within 60 seconds, except the signal meter menu, which
closes automatically after about 5 minutes.
• To close a menu instantly, press O.
Note: The menu background may sometimes appear black,
depending on the signal the TV is receiving. This is not a sign
of malfunction.
Video
Mode Sports
Picture Settings
Noise Reduction
ColorMaster Pro
xvYCC Selection Off
Game Mode
Theater Settings
TheaterLock
Navigate
ENTER
Off
Off
Select
Back Exit
CH RTN
EXIT
42
Page 43

Chapter 5: Setting up your TV
Setting the Demo Mode
When you first turn on the TV, menu language selection and
Demo Mode selection windows will appear by default.
To select settings:
1 From the menu language selection window, select your
preferred language.
Initial Setup Menu Language
Please select a language.
English Español Français
2 Highlight OK and press T. Next the Demo Mode setting
window will appear.
Initial Setup Demo Mode
To use the demo, please select [Store (On)].
For normal TV usage, please select [Normal (Off)].
Normal(Off) Store (On)
Selecting the menu language
You can choose from three different languages (English,
French and Spanish) for the on-screen display of menus and
messages.
To select the menu language:
1 Press Y and open the Preferences menu.
2 Highlight Menu Language and press c.
3 Press B or b to select your preferred menu language and
press T.
Preferences
CC Selector
Base CC Mode
Digital CC Settings
Auto Input
Input Labeling
Channel Labeling
Menu Language
Channel Browser Setup
4 Press O to close the Preferences menu.
Off
English
English
Français
Español
For normal TV usage, select Normal (Off).
If you do not make a selection within 120 seconds, the
Demo Mode setting window will automatically disappear.
The TV will switch to Normal mode.
To enable the on-screen demonstration, select Store
(On). The ClearFrame
™
demonstration window will
display for 60 seconds. To restart the on-screen
demonstration, press Y on the remote or on the TV for
2 seconds.
Note: The on-screen demonstration will automatically
restart if you do not make a selection within 120 seconds.
To exit the demo mode:
Press MENU and VOLUMEC buttons on the TV control panel
at the same time and hold for about 2 seconds, or set Demo
Mode to Off in the Setup menu (- page 50).
43
Page 44

Chapter 5: Setting up your TV
Configuring the antenna input
source for the ANT terminal
To configure the ANT input source:
1 Press Y and open the Setup menu.
2 Highlight Installation and press T.
Setup
Installation
CE-Link Setup
Sleep Timer
HDMI Settings
PC Settings
Slide Show Interval
Power-On Mode
Demo Mode Off
3 (A new set of Installation menu icons will appear, as
shown below.) Open the Terrestrial menu, highlight
Input Configuration, and press T.
Installation
4 Press C or c to select the input source (Cable or
Antenna) for the ANT input on the TV.
Input Configuration
Antenna In Cable
Cancel Done
5 To save your new settings, highlight Done and press T.
To revert to your original settings, highlight Cancel and
press T.
2 Sec
Power-Saving
Terrestrial
Input Configuration
Channel Program
Channel Add/Delete
Signal Meter
Programming channels into the
TV’s channel memory
When you press < or , on the remote control or TV control
panel, your TV will stop only on the channels you programmed
into the TV’s channel memory.
Follow the steps below to program channels into the TV’s
channel memory.
Programming channels automatically
Your TV can automatically detect all active channels in your
area and store them in its memory. After the channels are
programmed automatically, you can manually add or erase
individual channels in the channel memory.
Note:
• You must configure the antenna input source before
programming channels (- at left).
• If the Antenna input signal type is set to Cable, the automatic
channel programming process erases channels that were
previously programmed into the TV’s memory.
• If the Antenna input signal type is set to Antenna, the
automatic channel programming process adds newly found
channels to the existing set of programmed channels (and
does NOT erase channels that were previously
programmed into the TV’s memory.) To remove an Antenna
source channel from the memory, you must manually delete
it.
• To tune the TV to a channel not programmed in the channel
memory, you must use the Channel Number buttons on the
remote control.
• Programming channels when the antenna input is
configured for Cable will take substantially longer than when
the antenna input is configured for Antenna. This is normal;
however, once channel programming is finished, you should
not have to repeat the programming process again unless
your Cable TV service lineup changes significantly.
To program channels automatically:
1 Configure the antenna input source, if you have not
already done so (
2 Press Y and open the Setup menu.
3 Highlight Installation and press T.
- at left).
44
Setup
Installation
CE-Link Setup
Sleep Timer
HDMI Settings
PC Settings
Slide Show Interval
Power-On Mode
Demo Mode Off
2 Sec
Power-Saving
Page 45

Chapter 5: Setting up your TV
4 (A new set of Installation menu icons will appear, as
shown below.) Open the Terrestrial menu, highlight
Channel Program to bring up the Start, and press T
again to begin channel programming.
Installation
Terrestrial
Input Configuration
Channel Program
Channel Add/Delete
Signal Meter
ANT Antenna
Scanning channels, please wait ...
Number of Channels Found - 73
Scanning Digital Channels
Found Channel - 118
Abort
Start
52%
The TV will automatically cycle through all the antenna
channels, and store all active channels in the channel
memory. While the TV is cycling through the channels,
the message “Scanning channels, please wait” appears (as
shown above).
5 To cancel channel programming, press O on the remote
control (or highlight Abort in the on-screen display and
press T).
When channel programming is finished, press < or , to
view the programmed channels.
Manually adding and deleting channels
in the channel memory
After automatically programming channels into the channel
memory, you can manually add or delete individual channels.
To add or delete channels in the channel memory:
1 Press Y and open the Setup menu.
2 Highlight Installation and press T.
3 (A new set of Installation menu icons will appear, as
shown below.) Open the Terrestrial menu, highlight
Channel Add/Delete, and then press T.
To add a channel to the channel memory:
Highlight the unchecked box next to the channel number you
want to add, and then press T to check the box.
To manually add digital subchannels on a physical
channel:
Use the Channel Numbers and the Dash (=) on the remote
control to enter the channel number (for example, 56–1).
If the channel is found, the number will be added to the list and
the box will be checked.
If the channel is not found, a message will appear.
To remove a channel from the channel memory:
Highlight the checked box next to the channel number you
want to remove, and then press T to uncheck the box.
To save your new settings:
Highlight Done and press T.
To revert to your original settings:
Highlight Cancel and press T before saving.
To remove all channels from the channel memory:
Highlight Reset and press T, and then highlight Done and
press T.
Channel Add/Delete
2
2-1
2-2
3
4
5
6
7
7-1
8
Analog
Digital
Digital
Analog
Analog
Digital
Analog
Analog
Digital
Analog
Reset
Cancel
Done
To remove encrypted channels from the channel
memory:
If an encrypted channel is accidentally added to the channel list
by programming channels, you can remove the unwanted
encrypted (non-viewable) channel while you are channel
surfing. When you tunes to an encrypted channel, the
following message will appear.
Digital Channel Is Encrypted - Press 1 on remote to remove channel
Installation
Terrestrial
Input Configuration
Channel Program
Channel Add/Delete
Signal Meter
Press “1” button while the message is on the screen to
remove the unnecessary channel from the channel list.
45
Page 46

Chapter 5: Setting up your TV
Setting the Auto Input feature
This feature allows you to change TV inputs using the mode
select buttons—TV, CABLE/SAT, DVD, VCR/PVR,
AUX1, AUX2—on the remote control. Once an input has been
set for a specific mode select button, the TV will automatically
switch to that input when that mode select button is pressed.
Auto Input settings options for each mode select button are
shown below.
• TV: ANT
• CABLE/SAT: ANT, Video 1, Video 2, ColorStream HD1,
ColorStream HD2, HDMI 1, HDMI 2, HDMI 3, PC
• DVD: Video 1, Video 2, ColorStream HD1,
ColorStream HD2, HDMI 1, HDMI 2, HDMI 3, PC
• VCR/PVR: ANT, Video 1, Video 2, ColorStream HD1,
ColorStream HD2, HDMI 1, HDMI 2, HDMI 3, PC
• AUX1: Video 1, Video 2, ColorStream HD1,
ColorStream HD2, HDMI 1, HDMI 2, HDMI 3, PC
• AUX2: Video 1, Video 2, ColorStream HD1,
ColorStream HD2, HDMI 1, HDMI 2, HDMI 3, PC
Note: The TV mode select button will be restricted to the ANT
input.
4 Press B or b to select the mode field you want to set.
Auto Input
Use this menu to enable your TV's automatic input switching feature when
changing modes on your remote control.
LIGHT
VCR/PVR
TV
SLEEP
MODE SELECT
CABLE/SAT
AUX1
POWER
DVD
AUX2
Enable Auto Input
TV
CABLE/SAT ColorStream HD1
DVD
VCR/PVR Video 1
AUX1
AUX2
Reset
Done
On
--
HDMI 1
--
--
5 Press C or c to select the desired input source for that
mode.
6 Repeat steps 4 and 5 for other modes.
7 To save your settings, highlight Done and press T.
To turn off the Auto Input:
Select Off in step 3.
Note: Setting the feature to Off will not cancel any settings;
however, all items will be grayed out.
To reset Auto Input:
To set the Auto Input:
1 Press Y and open the Preferences menu.
2 Highlight Auto Input and press T.
Preferences
CC Selector
Base CC Mode
Digital CC Settings
Auto Input
Input Labeling
Channel Labeling
Menu Language
Channel Browser Setup
Off
English
3 Press B or b to highlight Enable Auto Input and then
press C or c to select On.
Auto Input
Use this menu to enable your TV's automatic input switching feature when
changing modes on your remote control.
LIGHT
TV
VCR/PVR
SLEEP
MODE SELECT
CABLE/SAT
AUX1
POWER
DVD
AUX2
Enable Auto Input
TV
CABLE/SAT ColorStream HD1
DVD
VCR/PVR Video 1
AUX1
AUX2
Reset
Done
On
--
HDMI 1
--
--
1 Press Y and open the Preferences menu.
2 Highlight Auto Input and press T.
3 Highlight Reset and press T.
46
Page 47

Chapter 5: Setting up your TV
Labeling channels
A list of common channel labels (logos) for various channels
(ABC, CBS, etc.) will be programmed into the TV. You will
be able to view and assign these logos from the Channel
Labeling window. If the desired channel label is not provided
in the list, you will be able to manually enter/edit labels using
the software keyboard.
To assign channel labels:
1 Press Y and open the Preferences menu.
2 Highlight Channel Labeling and press T.
The Channel Labeling window opens.
Preferences
CC Selector
Base CC Mode
Digital CC Settings
Auto Input
Input Labeling
Channel Labeling
Menu Language
Channel Browser Setup
Channel Labeling
{No Label}
ABC
ABCFAM
ABCHD
AMAX
AMAXW
AMC
ANIMAL
3 Press < or , to select the channel you want to label.
4 Press BbC c to highlight the desired channel label and
press T.
5 Repeat steps 3 and 4 for other channels.
6 To save your settings, highlight Done and press T.
Channel Labeling
{No Label}
ABCFAM
ABCHD
AMAX
AMAXW
ANIMAL
The maximum number of labels that can be stored is 128.
A&E
A&E
ABC
AMC
Off
English
ANT
24
A&E
Press CH UP/DOWN to
change channels.
Custom
Clear All
Done
ANT
24
A&E
Press CH UP/DOWN to
change channels.
Custom
Clear All
Done
To remove channel labels:
1 Open the Channel Labeling window.
2 Press < or , to select the channel for which you want to
remove the label.
3 Press BbC c to highlight No Label and press T.
Channel Labeling
{No Label}
A&E
ABC
ABCFAM
ABCHD
AMAX
AMAXW
AMC
ANIMAL
ANT
24
Press CH UP/DOWN to
change channels.
Custom
Clear All
Done
4 Repeat steps 2 and 3 for other channels.
5 To save your settings, highlight Done and press T.
If the desired channel label is not available from the list of
presets, you can create a custom label.
To create and assign a custom label:
1 Open the Channel Labeling window.
2 Press < or , to select a channel you want to label.
3 Press Bb c to highlight Custom and press T.
The software keyboard will appear.
Channel Labeling
{No Label}
A&E
ABC
ABCFAM
ABCHD
AMAX
AMAXW
AMC
ANIMAL
1
4
7
_
_
100
ANT
24
1
A&E
Press CH UP/DOWN to
GHIghi4
change channels.
PQRSpq r s 7
Backspace
Clear All
Done
ABCa bc 2
2
5
JKLj k l 5
TUVt u v8
8
0
0
Send
DEFd e f 3
3
MNOmno 6
6
9
WXY Z wx y z 9
INPUT
Space
4 Repeatedly press the corresponding key on the remote
control to highlight the desired character on the on-screen
software keyboard.
5 The highlighted character is entered after you either press
a different key, press c key, or after a two-second pause.
6 Repeat steps 4 and 5 until you have entered all desired
text.
7 When finished, press T.
8 (New labels will be added to the list in alphabetical order
and marked with an icon to indicate that they are
custom.) Highlight the new custom label and press T to
assign.
Assigned channel labels will be displayed in the banner,
Channel Add/Delete window, and Channels Block
window.
(continued)
47
Page 48

Chapter 5: Setting up your TV
To delete the custom label:
1 Open the Channel Labeling window.
2 Highlight the label to be deleted and press =.
3 Highlight Yes from the deletion confirmation window
and press T.
Channel Labeling
TIMES
TLC
TMC
TMCX
TMCXw
TMCw
TNT
TNTHD
TOCDEFG
ANT
24
Delete the selected custom label?
A&E
Press CH UP/DOWN to
change channels.
Custom
Clear All
Done
YesNo
4 Highlight Done and press T to save changes, and go
back to the Channel Labeling window.
Setting the HDMI™ audio mode
To set the HDMI audio mode:
1 Press Y and open the Audio menu.
2 Highlight Audio Setup and press T.
3 Press B or b to select HDMI 1 Audio and then press
C or c to select the HDMI 1 audio mode (Auto, Digital,
or Analog). (Auto is the recommended mode.) See
“Connecting an HDMI or DVI device to the HDMI input”
(- page 20).
Audio Setup
PC Audio No
HDMI 1 Audio
MTS Stereo
Language
Speakers
Optical Output Format
Dolby Digital
Dynamic Range Control
Reset
Note: Because the PC and HDMI-1 inputs share the same set
of analog audio inputs, the PC Audio menu setting influences
the HDMI 1 Audio menu setting. If PC Audio is set to “No,” the
HDMI 1 Audio setting changes to “Auto.” If PC Audio is set to
“Yes,” the HDMI 1 Audio setting is set to “Digital” and is
grayed out in the menu. (Also see item 5 on page 12 and
“Setting the PC Audio” on page 72.)
Auto
English
On
Dolby Digital
Compressed
Done
48
Page 49

Chapter 5: Setting up your TV
Viewing the digital signal meter
You can view the digital signal meter in the ANT digital TV
input source only.
To view the digital signal meter:
1 Press Y and open the Setup menu.
2 Highlight Installation and press T.
3 A new set of Installation menu icons will appear, as shown
below. Open the Terrestrial menu, highlight Signal
Meter, and press T.
Installation
Terrestrial
Input Configuration
Channel Program
Channel Add/Delete
Signal Meter
4 Press BbC c to select the antenna input and digital
channel whose signal you want to check.
Note: The physical digital channel number listed in the
Signal Meter screen may not correspond to a virtual TV
channel number. Contact your local broadcasters to
obtain the RF channel numbers for your local digital
stations.
Signal Meter
Signal Locked
0
0
Peak
Physical Digital Channel
Virtual Digital Channel
To close the screen and return to the Terrestrial
menu:
Highlight Done and press T.
4
4-1
DoneAdvanced
Viewing the system status
To view the system status:
1 Press Y and open the Setup menu.
2 Highlight Installation and press T.
3 A new set of Installation menu icons will appear, as shown
below. Open the System Status menu, highlight
System Information, and press T.
Installation
System Status
System information
4 Press C c to scroll through the menu bar to select the
Software Version and view the related information.
System Information
Software Version
LX107
3.1.42.0
Apr 11 2007 - 01:08:19
FW: 22
Done
To close the screen and return to the Installation
menu:
Highlight Done and press T.
To return to normal viewing:
Press O.
Reset Factory Defaults
To reset all settings and channels to their factory
default values:
To return to normal viewing:
Press O.
1 Press Y and open the Setup menu.
2 Highlight Installation and press T. A new set of
Installation menu icons will appear.
3 Open the System Status menu, highlight System
Information, and press T.
4 Press C c to scroll through the menu bar to select
Factory Defaults.
System Information
Factory Defaults
This window provides the ability to reset the TV
settings.Type in your PIN now (or "0000" if no
PIN has been set) to restore settings to their
factory default values.
Done
5 Enter your PIN code (or 0000 if no PIN code has been set).
(continued)
49
Page 50

Chapter 5: Setting up your TV
6 Highlight Yes and press T. The TV will turn off
automatically after a few seconds. After the TV turns off,
unplug the TV power cord and then plug it in again to
complete the reset process.
System Information
Press YES to confirm. After the TV
turns off, unplug it and plug it back
in to complete the reset.
YesNo
To cancel the reset:
Highlight No and press T.
Selecting the Power-On Mode
You can select either Power-Saving or Fast mode.
• Power-Saving mode keeps power consumption in standby
mode to below 3W. As a result, it takes a bit longer for the
TV to turn on.
• Fast mode increases power consumption in standby mode.
As a result, the TV will turn on more quickly. While in Fast
mode, the yellow LED on the front of the TV will be lit.
Selecting the Demo Mode
You can select the TV’s demo mode on or off.
This feature is provided for demonstrational purposes only.
To select the Demo Mode:
1 Press Y, and open the Setup menu.
2 Highlight Demo Mode and press c.
3 Press B or b to select either On or Off.
Setup
Installation
CE-Link Setup
Sleep Timer
HDMI Settings
PC Settings
Slide Show Interval
Power-On Mode
Demo Mode On
Note: If the demo mode has been set to On, the Demo mode
will run automatically when you turn on the TV.
2 Sec
Power-Saving
On
Off
To set the Power-On Mode feature:
1 Press Y, and open the Setup menu.
2 Highlight Power-On Mode and press c.
3 Press B or b to select either Power-Saving or Fast.
Setup
Installation
CE-Link Setup
Sleep Timer
HDMI Settings
PC Settings
Slide Show Interval
Power-On Mode
Demo Mode On
2 Sec
Power-Saving
Power-Saving
Fast
50
Page 51

Chapter 6: Using the TV’s features
Selecting the video input source
to view
To select the video input source to view:
1 Press + on the remote control or TV control panel.
2 And then either:
a) Press 0–8; or
b) Repeatedly press Bb on the remote control and then
press T to change the input; or
c) Repeatedly press + on the remote control or TV
control panel to change the input.
The current signal source displays in the top right corner
of the Input Selection screen.
Input Selection ANT
0
ANT
1
Video 1
2
Video 2
3
ColorStream HD1
4
ColorStream HD2
CE-Link
HDMI 1
5
6
HDMI 2
7
HDMI 3
8
PC
8
0
INPUT
- / to Select
Note:
• You can label the video input sources according to the
specific devices you have connected to the TV
(- “Labeling the video input sources” on the next page).
• Sources can also be “hidden” (- “Labeling the video input
sources” on the next page).
• “No Video Signal” will appear randomly on the screen if no
signal is received in video input mode.
• If a CEC device is connected to an HDMI input, the CE-Link
icon will appear.
Navigate
Note:
• If you select the CE-Link input source from the popup
window using +, some CE-Link devices may automatically
turn on.
• When selecting the input source using B b, you will have to
press T to actually select a particular device from the
popup window.
To switch the video input source using the mode select
buttons:
Press CABLE/SAT, DVD, VCR/PVR, AUX1, AUX2.
Note: To use this function, you must set up the Auto Input
feature (- page 46).
If a CE-Link device with HDMI switching capability
(e.g. Audio Receiver) is connected to the HDMI input:
Press + on the remote or TV control panel repeatedly to
highlight HDMI 1, HDMI 2. or HDMI 3.
If the connected CEC device has any connected devices, a
separate device selection popup window will appear.
Input Selection ANT
ANT
0
1
Video 1
2
Video 2
3
ColorStream HD1
4
ColorStream HD2
CE-Link
HDMI 1
5
6
HDMI 2
7
HDMI 3
8
PC
8
0
INPUT
- / to Select
Navigate
Press + repeatedly to highlight a desired input source, and
then press O.
HDMI 1-1 Audio Receiver
HDMI 1-2 Player
HDMI 1-3 Recorder
51
Page 52

Chapter 6: Using the TV’s features
Labeling the video input sources
You can label each video input source according to the type of
device you connected to each source, from the following preset
list of labels:
• – – (default label)
• Audio Receiver
• Cable
• Compact Disc
• DTV
• DVD
• Game Console
• HD DVD
• HDMI Switch
• Laser Disk
• Satellite/DSS
• VCR
• Video Recorder
•
Hide (to hide an unused input in the
and in the Channel Browser Inputs list)
Note: If you select PC in the Input Selection screen, you can
choose only “– –” or “Hide” as the label.
To label the video input sources:
1 Press Y and open the Preferences menu.
2 Highlight Input Labeling and press T.
Input Selection
screen
4 Press C or c to select the desired label for that input
source. If a particular input is not used, you can select
Hide as the label, which will cause that input to be
“grayed out” in the Input Selection screen and skipped
over when you press + on the remote control.
5 To save the new input labels, highlight Done and
press T.
To revert to the factory default labels, highlight Reset
and press T.
Input labeling example:
The screen below left shows the default Input Selection
screen (with none of the inputs labeled as a specific device).
The screen below right is an example of how you could label
the inputs if you connected a VCR to VIDEO 1, Cable TV to
VIDEO 2, a video recorder to ColorStream HD1, a DTV settop box to HDMI 1, a satellite/DSS set-top box to HDMI 2, and
a DVD player to HDMI 3. Also note that the ColorStream HD2
input is labeled “Hidden,” which means that input will be
skipped over when + is pressed.
Input Selection ANT
0
ANT
1
Video 1
2
Video 2
3
ColorStream HD1
4
ColorStream HD2
CE-Link
HDMI 1
5
6
HDMI 2
7
HDMI 3
8
PC
8
0
INPUT
- / to Select
Navigate
Input Selection screen with
no inputs labeled.
Input Selection ANT
0
ANT
1
VCR
2
Cable
Video Recorder
3
ColorStream HD2 (Hidden)
4
5
DTV
Satellite/DSS
6
7
DVD
8
PC
8
0
INPUT
- / to Select
Navigate
Input Selection screen with
all inputs labeled except input 4,
which has been hidden.
Preferences
CC Selector
Base CC Mode
Digital CC Settings
Auto Input
Input Labeling
Channel Labeling
Menu Language
Channel Browser Setup
Off
English
3 Press B or b to highlight the video source you want to
label.
Input Labeling
Video 1 VCR
Video 2 Cable
ColorStream HD 1 Video Recorder
ColorStream HD 2 Hide
HDMI 1 DTV
HDMI 2
HDMI 3 DVD
PC
Reset
Satellite/DSS
--
Done
To clear the input labels:
1 Press Y and open the Preferences menu.
2 Highlight Input Labeling and press T.
3 Highlight Reset and press T.
52
Page 53

Chapter 6: Using the TV’s features
Tuning channels
Tuning channels using the
Channel Browser
The Channel Browser™ provides an easy navigation interface
for all your channels and inputs. This feature allows you to:
• Navigate the contents of all of your inputs.
• Keep a list of your favorite channels (see “Favorites
Browser,” below).
• Keep a history of the last 32 channels or inputs viewed.
• Quickly surf and tune your recently viewed channels/inputs
from the Channel Browser
next page).
• Surf via Browse mode (to immediately tune channels as you
highlight them in the Channel Browser
surf over channels in the Channel Browser
select one to tune).
• Quickly change inputs from the Inputs List.
Favorites Browser
The Favorites Browser allows you to quickly set up a favorite
channels/inputs list that is integrated into the Channel Browser
To add a favorite channel/input:
1 Tune to the channel or input.
2 Press and hold n for 3 seconds.
Note: Additions are added to the beginning of the Favorites list
on the left side of the Channel Browser™.
™
™
History List (illustrated on the
™
) or Select mode (to
™
before you
™
To set up the Channel Browser™:
1 Press Y and open the Preferences menu.
2 Highlight Channel Browser Setup and press T.
3 Press B to highlight Navigation, and then press C or c
to select either Browse Mode or Select Mode.
Channel Browser Setup
Navigation
History List
ANT List On
Inputs List On
Favorites List On
Reset
Select Mode
Power Off Clear (On)
Done
4 Press b to highlight History List, and then press C or c
to select the setting you prefer: either Power Off Clear
(On), On, or Off.
Note: When History List is set to On and the Power-On
Mode (- page 50) is in Fast mode, the channels and
inputs stored in the list will be saved every power on/off
cycle. When History List is set to Power Off Clear (On),
the channels and inputs stored in the list will be cleared
with every power on/off cycle of the TV.
5 Press b to highlight ANT List, and then press C or c to
select On or Off.
6 Press b to highlight Inputs List, and then press C or c
.
to select On or Off.
7 Press b to highlight Favorites List, then press C or c to
select On or Off.
8 To save your entries, highlight Done and press T.
To return to factory defaults, highlight Reset and
press T.
To delete a favorite channel/input:
1 Press n to open the Favorites browser list.
2 Highlight the channel or input to delete by pressing
3 C or # c.
3 Press and hold = for 3 seconds. The channel/input will
be removed from the Favorites list.
Picture Preview
• A small thumbnail preview of the current channel or input
will appear in the list.
• Picture snapshots will be taken when a source change occurs
from the Channel Browser
• Up to 32 picture previews can be stored in the Channel
Browser
™
across all lists. If you add a new picture when the
total = 32, the oldest thumbnail will be deleted.
One thumbnail is counted only once against the total, no
matter how many times it appears in various lists.
• Turning off the TV deletes all of the current thumbnails.
™
.
(continued)
53
Page 54

Chapter 6: Using the TV’s features
To open the Channel Browser™:
• Press 3 C or # c on the remote control.
• Press 3 C to surf backward through the previously tuned 32
channels in the History list, the channels in the ANT channel
list, the inputs in the Inputs list, or the favorite channels/
inputs in the Favorites list.
• Press # c to surf forward through the channel History, the
ANT channel list, the Inputs list, or the favorite channels/
inputs in the Favorites list.
Elements of the Channel Browser
™
1 2 43
History
PC DTV
TVLAND WEATHER
88
5
Video Rec.. Satellite/..
6
8
1 Current list (History, ANT, Inputs, or Favorites)
2 Input type
3 Channel or input currently being viewed
4 Channel or input that is currently highlighted in the
browser
5 Channels stored in the History List
6 Channel labels
To toggle among the available lists:
After opening the Channel Browser™, press B or b to toggle
among History, ANT, Inputs, and Favorites.
Note:
• The Channel Browser™ opens in History List by default.
Once another list has been selected, the Channel Browser
will open in the last selected list.
• If all lists are turned off, pressing
display the Channel Browser™. If Favorites List is turned
off, n will have no effect.
• Pressing n will bring up the Channel Browser
list regardless of the last selected list in the
Channel Browser
™
.
3 C, # c, or n will not
™
Favorites
To tune to a channel or input in Browse mode:
1 While watching TV, press 3 C or # c to open the
Channel Browser
surf forward to the next item in the list.
In Browse mode, when you stop on an item in the
Channel Browser
automatically tune to the channel or input.
2 Press O to close the Channel Browser
To tune to a channel or input in Select mode:
™
and surf back to a previous item or
™
, it will be highlighted and the TV will
™
.
1 While watching TV, press 3 C or # c to open the
Channel Browser
forward to the next item in the list.
In Select mode, when you stop on an item in the Channel
Browser
™
tune the TV to the highlighted item.
™
and surf back to a previous item or
, it will be highlighted but you must press T to
2 Press T to tune the TV to the highlighted item.
3 Press O to close the Channel Browser
Adding and clearing channels and inputs in the
History List
Adding channels and inputs to the History List:
As a channel or input is tuned, the Channel Browser™ adds it
to the History List and displays it on the “right side” of the
Channel Browser
“shifted” to the left, eventually moving off the left side. Press
3 C to surf backward through the previously tuned channels/
inputs. Any channel or input that is tuned repeatedly will not
be repeated in the History List, but instead is moved to the end
of the list on the right side of the Channel Browser
The Channel Browser
™
• All channels that are tuned using the numeric buttons on the
remote control.
• All channels that are tuned using < or , on the remote
control.
Note: Whenever an item is selected that cannot be tuned (for
various reasons), the TV will automatically tune to the
previously viewed channel or input.
™
. Previously tuned channels/inputs are
™
will store the following channels:
™
.
™
.
54
Clearing channels from the History List:
• Reconfiguring the ANT input will clear the History List.
Note: See page 44 for details on configuring the antenna
input.
• Once 32 channels or inputs are stored in the History List, the
oldest item will be removed from the list when a new
channel or input is tuned.
• If History List in the Channel Browser Setup is set to
“Power Off Clear (On),” turning off the TV will clear the
History List.
Page 55

Chapter 6: Using the TV’s features
Tuning to the next programmed channel
To tune to the next programmed channel:
Press < or , on the remote control or TV control panel.
Note:This feature will not work unless you program channels
into the TV’s channel memory (- page 44).
Tuning to a specific channel (programmed
or unprogrammed)
Tuning analog channels:
Press the Channel Number (0–9) on the remote control. For
example, to select channel 125, press 1, 2, 5.
Tuning digital channels:
Press the Channel Number (0–9) on the remote control,
followed by the dash (=) button and then the sub-channel
number. For example, to select digital channel 125-1, press 1,
2, 5, –, 1.
Note: If a digital channel is not programmed—either through
the automatic channel scan (- page 44) or the channel add/
delete function (- page 45)—you will have to tune the RF
channel using the Channel Number and dash (
remote control.
=) on the
Switching between two channels using
Channel Return
The Channel Return feature allows you to switch between two
channels without entering an actual channel number each time.
1 Select the first channel you want to view.
2 Select a second channel using the Channel Number
buttons (and the dash (=) button if selecting a digital
channel).
3 Press R on the remote control. The previous channel
will display. Each time you press R, the TV will switch
back and forth between the last two channels that were
tuned.
Note: If you press R from a non-antenna input, the TV
will return to the last-viewed input.
Switching between two channels using
SurfLock
The SurfLock™ feature temporarily “memorizes” one channel
to the R button, so you can return to that channel quickly
from any other channel by pressing R. To memorize a
channel to the R button:
™
1 Tune the TV to the channel you want to program into the
R button.
2 Press and hold R for about 2 seconds until the message
“Channel Memorized” appears on-screen. The channel
has been programmed to the R button.
3 You can then change channels repeatedly, and when you
press R, the memorized channel will be tuned.
The TV will return to the memorized channel one time only.
Once you press R and then change channels again, the CH
RTN memory will be cleared and the button will function as
Channel Return, by switching back and forth between the last
two channels that are tuned.This feature also works for
external inputs.
55
Page 56

Chapter 6: Using the TV’s features
Selecting the picture size
You can view many program formats in a variety of picture
sizes—Natural, TheaterWide 1, TheaterWide 2,
TheaterWide 3, Full, 4:3 HD and Native.
Note: The “picture size” illustrations are examples only. The
format of the image (in any of the picture sizes) will vary
depending on the format of the signal you are currently
watching. Select the picture size that displays the current
program the way that looks best to you.
You can save separate picture size preferences for each input
on your TV.
To select the picture size using the remote control:
1 Press I on the remote control.
2 While the Picture Size screen is open, you can do one of
the following to select the desired picture size:
• Repeatedly press I.
• Press the corresponding Number button (0–6) while the
Picture Size screen is open.
• Press B or b while the Picture Size screen is open.
Picture Size
0
Natural
1
TheaterWide 1
2
TheaterWide 2
3
TheaterWide 3
Full
4
4:3 HD
5
6
Native
6
0
- / to Select
PIC SIZE
To select the picture size using the menus:
1 Select Picture Size in the Theater Settings menu.
2 Press C or c to select the desired picture size setting.
3 Highlight Done and press T.
Theater Settings
Picture Size Full
Picture Scroll
Auto Aspect Ratio On
Reset
0
Mode: Sports
Done
Note: If you select one of the TheaterWide
®
picture sizes, the
top and bottom edges of the picture (including subtitles or
captions) may be hidden. To view the hidden edges, either
scroll the picture (TheaterWide 2 and 3 only) or try viewing the
program in Full or Natural picture size.
Natural picture size
• The image is displayed close to its originally formatted
proportion. Some program formats will display with
sidebars and/or bars at the top and bottom.
Natural picture size example
TheaterWide 1 picture size (for 4:3 format programs)
• The center of the picture remains close to its original
proportion, but the left and right edges are stretched wider to
fill the screen.
TheaterWide 1 picture size example
TheaterWide 2 picture size (for letter box programs)
• The picture is stretched wider to fill the width of the screen,
but only slightly stretched taller.
• The top and bottom edges of the picture may be hidden. To
view the hidden areas, see “Scrolling the TheaterWide
picture” (- page 58).
A B C D E F G - - - - - - - - - - - - - - - -
TheaterWide 2 picture size example
®
Note: Some of the picture sizes may not be available
depending on the receiving signal format (those will be
“grayed out” in the Picture Size screen).
Using these functions to change the picture size (i.e.,
changing the height/ width ratio) for any purpose other than
your private viewing may be prohibited under the Copyright
Laws of the United States and other countries, and may
subject you to civil and criminal liability.
56
Page 57

Chapter 6: Using the TV’s features
TheaterWide 3 picture size (for letter box programs
with subtitles)
• The picture is stretched wider to fill the width of the screen,
but only slightly stretched taller.
• The top and bottom edges are hidden. To view the hidden
areas (such as subtitles or captions), see “Scrolling the
TheaterWide
A B C D E F G - - - - - - - - - - - - - - - -
®
picture on the next page.”
A B C D E F G - - - - - - - - - - - - - - - - - - - - - - - - - -
TheaterWide 3 picture size example
Full picture size (for 16:9 [480i, 480p] source
programs only)
• If receiving a squeezed 4:3 format program, the picture is
stretched wider to fill the width of the screen, but not
stretched taller.
• None of the picture is hidden.
Native picture size (for 720p, 1080i, and 1080p signal
programs)
• If receiving a 720p, 1080i, or 1080p signal program, Native
mode scales the video to display the entire picture within the
borders of the screen (i.e. no overscanning).
• This is especially useful for external HD sources such as
HD-DVD, DVHS movies, or PC graphics.
Note:
• Native picture size is available for 720p, 1080i, and 1080p
signals only. If the signal being received is other than 1080i,
1080p, or 720p, “Native” will be grayed out in the Picture
Size screen.
• This mode is supported only for HDMI and ColorStream
inputs.
• Depending on the input signals, the border of the picture
may be hidden, displayed in black, or noisy.
Native picture size example
Full picture size example
4:3 HD picture size (for 720p, 1080i, and 1080p
program sources only)
• Sidebars fill the empty vertical spaces.
• Picture is not distorted from original size.
4:3 HD picture size example
57
Page 58

Chapter 6: Using the TV’s features
Scrolling the TheaterWide® picture
(TheaterWide 2 and 3 only)
You can set separate scroll settings for the TheaterWide 2 and
TheaterWide 3 modes for each input.
To set the scroll settings:
1 Press Y and open the Video menu.
2 Highlight Theater Settings and press T.
Video
Mode Sports
Picture Settings
Noise Reduction
ColorMaster Pro
xvYCC Selection Off
Game Mode
Theater Settings
TheaterLock
3 In the Picture Size field, select either TheaterWide 2
or TheaterWide 3 (you cannot scroll in any other mode).
4 Press b to highlight the Picture Scroll field.
5 Press C or c to scroll the picture up and down as needed,
from –10 to +20.
Theater Settings
Picture Size TheaterWide 2
Picture Scroll
Auto Aspect Ratio On
6 To save the new settings, highlight Done and press T.
To revert to the factory defaults, highlight Reset and
press T.
Reset
Off
Off
Mode: Sports
-5
Done
Using the auto aspect ratio feature
When the auto aspect ratio feature is set to On, the TV will
automatically select the picture size when one of the following
input sources is received:
• A 480i signal from the VIDEO 1, VIDEO 2, ColorStream
HD-1, or ColorStream HD-2 input.
• A 480i, 480p, 720p, 1080i, 1080p, or VGA signal from the
HDMI input.
Aspect ratio of
signal source
4:3 normal Natural (with sidebars)
4:3 letter box TheaterWide 2
16:9 full Full
Not defined
(no ID-1 data
or HDMI
aspect data)
Note: The auto aspect ratio feature is not applicable to
antenna or cable input sources.
To turn on the auto aspect ratio feature:
1 Press Y and open the Video menu.
2 Highlight Theater Settings and press T.
3 In the Auto Aspect Ratio field, select On.
4 To save the new settings, highlight Done and press T.
To revert to the factory defaults, highlight Reset and
press T.
Automatic aspect size (automatically
selected when Auto Aspect is On)
The current picture size you set under
“Selecting the picture size” on page 56.
Theater Settings
Picture Size Natural
Picture Scroll
Auto Aspect Ratio On
Reset
0
Done
Mode: Sports
58
To turn off the auto aspect ratio feature:
Select Off in step 3 above.
Page 59

Chapter 6: Using the TV’s features
Using the FREEZE feature
To use the FREEZE feature:
1 When viewing the TV, press B to make the picture a
still picture.
2 To return to moving picture, press B again.
Note:
• If the TV is left in FREEZE mode for more than 15
minutes, the FREEZE mode will automatically be
released and the TV will return to moving picture.
• The FREEZE feature is not available when the POP
double-window is open. If you press B, the message
“Not Available” will appear.
Still pictureMoving picture
Using the FREEZE function for any purpose other than your
private viewing may be prohibited under the Copyright Laws
of the United States and other countries, and may subject
you to civil and criminal liability.
Using the POP features
Using the POP double-window feature
The POP (picture-out-picture) double-window feature splits
the screen into two windows so you can watch two programs
at the same time.
To display a program in the POP window:
1 Press P to open the POP double-window.
POP double-window
Left window Right window
Gray border
(denotes active window)
2 Press C or c to highlight the desired window. When
highlighted, the window will have a gray border.
3 Press + to open the Input Selection window. Select
the input source for the POP window by pressing the
corresponding Number button (0–8). The current source
displays in yellow.
Left window Right window
Input Selection ANT
0
ANT
1
Video 1
2
Video 2
3
ColorStream HD1
4
ColorStream HD2
CE-Link
HDMI 1
5
6
HDMI 2
7
HDMI 3
8
PC
8
0
INPUT
- / to Select
Navigate
Input Selection
0
ANT
1
Video 1
2
Video 2
ColorStream HD1
3
ColorStream HD2 (Hidden)
4
CE-Link
HDMI 1
5
6
HDMI 2
7
HDMI 3
8
PC
8
0
INPUT
- / to Select
ColorStream HD1
Navigate
Left window — ANT input is selectable.
Right window — ColorStream HD1 and HD2 (only for
480p, 1080i, and 720p), and HDMI 1, HDMI 2, HDMI 3
are selectable.
Note:
• The message “Current video format cannot be
displayed” will appear if you press P when the TV is
in ColorStream HD1 or HD2 mode and is receiving a
480i format signal.
• The FREEZE feature is not available when the POP
double-window is open. If you press B when the POP
double-window is open, the message “Not Available”
will appear.
(continued)
59
Page 60

Chapter 6: Using the TV’s features
• If you labeled all of the inputs as HIDE (- page 52), the
POP feature will be disabled and the message “Not
Available” will appear if you try to open the POP doublewindow.
• The message “Not Available” will appear If you try to
open the POP double-window when the Input Lock
feature is in Video or Video+ mode.
To tune to the highlighted window (and close the POP
double-window):
Press T after highlighting the window you want to view as a
normal picture.
Selecting the POP window audio out
While the POP double-window is open, press C or c to select
which audio (left or right POP window) to be output from the
TV speakers (and also from the VARIABLE AUDIO OUT
and AUDIO OUT terminals).
The window with the active audio is outlined with a gray
border.
Example: Press
Adjusting the picture
Selecting the picture mode
You can select your desired picture settings from different
modes, as described below.
Mode Picture Quality
Sports Bright and dynamic picture (factory setting)
Standard Standard picture settings (factory setting)
Movie
Document
Preference Your personal preferences
Pro 1
Pro 2
Lower contrast for darkened room (factory
setting)
Designed for viewing of tables/documents
from a PC (factory setting)
Custom settings based on Standard mode
(factory settings)
Custom settings based on Movie mode
(factory settings)
Example: Press
Note: Document mode is available for HDMI input sources
only (grayed out for other input sources).
To select the picture mode:
1 Press Y and open the Video menu.
2 Highlight Mode and press T.
Video
Mode Sports
Picture Settings
Noise Reduction
ColorMaster Pro
xvYCC Selection Off
Game Mode
Theater Settings
TheaterLock
Off
Off
3 Press B or b to select the picture mode you prefer and
press T.
Sports
Standard
Movie
Document
Preference
Pro 1
Pro 2
60
Note: The picture mode you select affects the current
input only. You can select a different picture mode for
each input.
Page 61

Chapter 6: Using the TV’s features
Adjusting the picture quality
You can adjust the picture quality (Contrast, Back Light,
DynaLight™, Brightness, Color, Tint, and Sharpness) to your
personal preferences.
Selection Pressing C Pressing c
Contrast lower higher
Back Light* darker lighter
DynaLight** On/Off On/Off
Brightness darker lighter
Color paler deeper
Tint reddish greenish
Sharpness softer sharper
* Back Light
This feature adjusts the brightness of the entire screen. When in
video mode and no signal is input, this will automatically be set to 0.
(Settings are stored in memory.)
**DynaLight
This function automatically strengthens the black coloring of dark
areas in the video according to the level of darkness.
To adjust the picture quality:
1 Press Y and open the Video menu.
2 Highlight Picture Settings and press T.
3 Press B or b to select the picture quality you want to
adjust (Contrast, Back Light, DynaLight,
Brightness, Color, Tint, or Sharpness), and then
press C or c to adjust the setting, as described in the table
above.
Picture Settings
Contrast 100
Back Light 100
DynaLight
Brightness
Color
Tint
Advanced Picture Settings
Reset
Contrast 70
50
50
0
50Sharpness
Mode: Sports
On
Done
4 To save the new settings, highlight Done and press T.
You can use any of the picture modes (- “Selecting the
picture mode,” on the previous page) as a starting point for
adjusting the picture settings.
To revert back to the base mode that you began adjusting
the picture settings from, highlight Reset and press T.
Note:
• If you select a picture mode other than Pro 1 or Pro 2,
the picture qualities you adjusted are automatically
saved in the Preference mode (- “Selecting the
picture mode,” on the previous page).
• If you select picture mode Pro 1 (or Pro 2) and then
change a picture quality setting, those values are
saved in picture mode Pro 1 (or Pro 2).
Using the TheaterLock™ feature
The TheaterLock™ feature allows you to “lock” all items that
affect the picture mode setting. In other words, those settings
that when adjusted cause the Mode setting to automatically
change to “Preference” will be grayed out and unavailable
when the TheaterLock setting is set to “On”. Items that do not
influence Mode status will not be affected e.g., Noise
Reduction, xvYCC Selection, Game Mode, etc.
To turn on TheaterLock™:
1 Press Y and open the Video menu.
2 Press B or b to highlight the TheaterLock field, and
then press C or c to select On.
Video
Mode Sports
Picture Settings
Noise Reduction
ColorMaster Pro
xvYCC Selection On
Game Mode
Theater Settings
TheaterLock
To turn off TheaterLock™:
Select Off in step 2 above.
Note: When TheaterLock is set to On, a lock icon ( ) will also
be displayed in all Video menu windows where items are
disabled.
Picture Settings
Contrast 100
Back Light 100
DynaLight
Brightness
Color
Tint
Advanced Picture Settings
Reset
Off
Off
Off
On
Mode: Sports
On
50
50
0
50Sharpness
Done
61
Page 62

Chapter 6: Using the TV’s features
Using the closed caption mode
Base closed captions
The closed caption mode has two options:
• Captions—An on-screen display of the dialogue, narration,
and sound effects of TV programs and videos that are closed
captioned (usually marked “CC” in program guides).
• Text—An on-screen display of information not related to
the current program, such as weather or stock data (when
provided by individual stations).
To view captions or text:
1 Press Y and open the Preferences menu.
2 Highlight Base CC Mode and press c.
3 Press B or b to select the desired closed caption mode and
press T.
Note: A closed caption signal may not display in the following
situations:
• When a videotape has been dubbed
• When the signal reception is weak
• When the signal reception is non-standard
Preferences
CC Selector
Base CC Mode
Digital CC Settings
Auto Input
Input Labeling
Channel Labeling
Menu Language
Channel Browser Setup
English
Off
Off
CC1
CC2
CC3
CC4
T1
T2
T3
T4
• To view captions:
Highlight CC1, CC2, CC3, or CC4. (CC1 displays
translation of the primary language in your area.)
Giant pandas eat leaves.
Note: If the program or video you selected is not closed
captioned, no captions will display on-screen.
• To view text:
Highlight T1, T2, T3, or T4.
WORLD WEATHER
Temps Current
F C Weather
LONDON 51 11
MOSCOW
PARIS
ROME
TOKYO
57 14
53 12
66 19
65 18
Clear
Cloudy
Clear
Cloudy
Rain
Note: If text is not available in your area, a black rectangle
may appear on screen. If this happens, set the Base CC
Mode to Off.
•
To turn off the closed caption mode:
Select Off in step 3 above.
62
Page 63

Chapter 6: Using the TV’s features
Digital CC Settings
You can customize the closed caption display characteristics
by changing the background color, text size, opacity, type,
edge, and color.
Note:
• This feature is available for digital channels only.
• You cannot set the Caption Text and Background as the
same color.
To customize the closed captions:
1 Press Y and open the Preferences menu.
2 Highlight Digital CC Settings and press T.
3 Press B or b to highlight the characteristic you want to
change, and then press C or c to select the format for that
characteristic (see table below).
Digital CC Settings
Caption Size Auto
Caption Text Edge
Caption Text Color
Text Foreground Opacity
Background Color
Text Background Opacity
Caption Text Edge Color
Reset
Done
AutoCaption Text Type
Auto
Auto
Auto
Auto
Auto
Auto
ABC123
Preview
window
4 To save the new settings, highlight Done and press T.
To revert to the factory defaults, highlight Reset and
press T.
Caption Size Auto, Small, Standard, Large
Caption Text
Type
Caption Text
Edge
Caption Text
Color
Text Foreground
Opacity
Background
Color
Text Background
Opacity
Caption Text
Edge Color
Auto, Default, Mono w. Serif, Prop. w.
Serif, Mono w/o Serif, Prop. w/o Serif,
Casual, Cursive, Small Capitals
Auto, None, Raised, Depressed, Uniform,
Left Drop Shadow, Right Drop shadow
Auto, Black, White, Red, Green, Blue,
Yellow, Magenta, Cyan
Auto, Transparent, Translucent,
Flashing, Solid
Auto, Black, White, Red, Green, Blue,
Yellow, Magenta, Cyan
Auto, Transparent, Translucent,
Flashing, Solid
Auto, Black, White, Red, Green, Blue,
Yellow, Magenta, Cyan
CC Selector
You can use the CC Selector to temporarily override the
default analog caption mode (set in Base CC Mode) for a
particular channel. However, once you change to another
analog channel, the closed caption setting will automatically
change back to the current Base CC Mode setting.
You can also use the CC Selector to select digital closed
caption services (if available). When such services are not
available, the CC Selector presents a default list of services.
If the selected service is not available, the next best service will
be used instead.
To select closed captions:
1 Press Y and open the Preferences menu.
2 Highlight CC Selector and press T.
Preferences
CC Selector
Base CC Mode
Digital CC Settings
Auto Input
Input Labeling
Channel Labeling
Menu Language
Channel Browser Setup
Off
English
3 Press B or b to select Closed Caption, and then press
C or c to select the desired service.
Closed Caption
Audio
CC1
None
4 Press O.
Using the Closed Caption button on
the remote control
If you press ; when an analog channel is tuned:
• The CC selector will be active and will display CC1-4 and
T1-4 as the options.
• The audio selector will be disabled.
If you press ; when a digital channel is tuned:
• The CC selector will be active and will display the possible
caption options (available languages) for that channel or
service. For example, in addition to English, a channel
might offer closed captions in Spanish and/or French.
• The audio selector will be active and will offer different
audio choices for the digital channel (Dolby or AC3, for
example).
63
Page 64

Chapter 6: Using the TV’s features
Adjusting the audio
Muting the sound
Press W to partially reduce (1/2 MUTE) or turn off (MUTE)
the sound. Each time you press W, the mute mode will
change in the following order:
Volume1/2 Mute Mute
If the closed caption mode is set to Off when you select
“MUTE” mode, the closed caption feature is automatically
activated. To mute the audio without automatically activating
the closed caption feature, use Z to set the volume to 0. See
“Using the closed caption mode” (- page 62) for more
information on closed caption modes.
Using the digital audio selector
You can use the Digital Audio Selector to conveniently
switch between audio tracks on a digital channel (for those
channels that have multiple audio tracks). This temporarily
overrides the audio track chosen by the language option under
Audio Setup (- “Selecting stereo/SAP broadcasts” at
right).
To use the digital audio selector:
1 Press Y and open the Audio menu.
2 Highlight Digital Audio Selector and press T.
Audio
Digital Audio Selector
Audio Settings
Advanced Audio Settings
Audio Setup
3 Press B or b to select Audio, and then press C or c to
select the desired service.
CC 1Closed Caption
Audio
4 Press O.
None
Selecting stereo/SAP broadcasts
The multi-channel TV sound (MTS) feature allows you to
output high-fidelity stereo sound. MTS can also transmit a
second audio program (SAP) containing a second language,
music, or other audio information (when provided by
individual stations).
When the TV receives a stereo or SAP broadcast, the word
“STEREO” or “SAP” appears on-screen when E is pressed.
The MTS feature is not available when the TV is in VIDEO
mode.
To listen to stereo sound:
1 Press Y and open the Audio menu.
2 Highlight Audio Setup and press T.
Audio
Digital Audio Selector
Audio Settings
Advanced Audio Settings
Audio Setup
3 In the MTS field, select Stereo.
Audio Setup
PC Audio No
HDMI 1 Audio
MTS Stereo
Language
Speakers
Optical Output Format
Dolby Digital
Dynamic Range Control
Reset
Auto
English
On
Dolby Digital
Compressed
Done
4 To save the new settings, highlight Done and press T.
To reset the settings to the factory defaults, highlight
Reset and press T.
Note:
• You can typically leave the TV in Stereo mode because
it will automatically output the type of sound being
broadcast (stereo or monaural).
• If the stereo sound is noisy, select Mono to reduce the
noise.
64
To listen to an alternate language on an ATSC digital
station (if available):
Highlight the Language field in step 3 above, and then press
C or c to select the language you prefer.
Page 65

Chapter 6: Using the TV’s features
To listen to a second audio program on an analog
station (if available):
Select SAP in step 3 on the previous page.
Note:
• A second audio program (SAP) can be heard only on those
TV stations that offer it. For example, a station might
broadcast another language as a second audio program. If
you have SAP on, you will see the current program on the
screen but hear the other language instead of the program’s
normal audio.
• If you have SAP on and the station you are watching is not
broadcasting a second audio program, the station’s normal
audio will be output. However, occasionally there is no
sound at all in SAP mode. If this happens, set the MTS
feature to Stereo mode.
Adjusting the audio quality
You can adjust the audio quality by adjusting the bass, treble,
and balance.
To adjust the audio quality:
1 Press Y and open the Audio menu.
2 Highlight Audio Settings and press T.
3 Press b or B to highlight the item you want to adjust
(Bass, Treble, or Balance).
Audio Settings
Bass 100
Treble
Balance
StableSound Off
Reset
100
0
Done
Using the StableSound® feature
The StableSound® feature limits the highest volume level to
prevent extreme changes in volume when the signal source
changes (for example, to prevent the sudden increase in
volume that often happens when a TV program switches to a
commercial).
To turn on the StableSound® feature:
1 Press Y and open the Audio menu.
2 Highlight Audio Settings and press T.
3 In the StableSound field, select On.
Audio Settings
Bass 100
Treble
Balance
StableSound On
Reset
100
0
Done
4 To save the new settings, highlight Done and press T.
To revert to the factory defaults, highlight Reset and
press T.
Note: The RESET function returns your audio adjustments
to the following factory settings:
Bass . . . . . . . . center (50)
Treble . . . . . . center (50)
Balance . . . . . center (0)
StableSound . . Off
To turn off the StableSound feature:
Select Off in step 3 above.
4 Press C or c to adjust the level.
• C makes the bass or treble weaker or increases the
balance in the left channel (depending on the item
selected).
• c makes the bass or treble stronger or increases the
balance in the right channel (depending on the item
selected).
5 To save the new settings, highlight Done and press T.
To reset the settings to the factory defaults, highlight
Reset and press T.
65
Page 66

Chapter 6: Using the TV’s features
Turning off the built-in speakers
You can use this feature to turn off the TV speakers when you
connect an audio system to your TV (- “Connecting a digital
audio system” and “Connecting an audio system” on page 22).
To turn off the built-in speakers:
1 Press Y and open the Audio menu.
2 Highlight Audio Setup and press T.
3 In the Speakers field, select Off.
Audio Setup
PC Audio No
HDMI 1 Audio
MTS Stereo
Language
Speakers
Optical Output Format
Dolby Digital
Dynamic Range Control
Reset
Auto
English
On
Dolby Digital
Compressed
Done
4 To save the new settings, highlight Done and press T.
To revert to the factory defaults, highlight Reset and
press T.
To turn on the built-in speakers:
Select On in step 3 above.
Selecting the optical audio output format
You can use this feature to select the optical audio output
format when you connect a Dolby Digital decoder or other
digital audio system to the Optical Audio Out terminal on
the TV (see “Connecting a digital audio system” on page 22).
Using the Dolby® Digital Dynamic Range
Control feature
This dynamic range control feature causes the ATSC dynamic
range to be further compressed, allowing you to switch from
ATSC to analog broadcasts at the same dynamic range.
To use the Dolby Digital Dynamic Range Control:
1 Press Y and open the Audio menu.
2 Highlight Audio Setup and press T.
3 In the Dolby Digital Dynamic Range Control field,
select Compressed. When Standard is selected, the
audio is output with minimal compression.
Audio Setup
PC Audio No
HDMI 1 Audio
MTS Stereo
Language
Speakers
Optical Output Format
Dolby Digital
Dynamic Range Control
Reset
Auto
English
On
Dolby Digital
Compressed
Done
4 To save the new settings, highlight Done and press T.
To revert to the factory defaults, highlight Reset and
press T.
Note:
• This item will be grayed out for NTSC signals, Video,
ColorStream, and PC inputs.
• The Dolby Digital Dynamic Range Control will function in
relation to Optical Output Format (PCM mode).
To select the optical audio output format:
1 Press Y and open the Audio menu.
2 Highlight Audio Setup and press T.
3 In the Optical Output Format field, select either
Dolby Digital or PCM, depending on your device.
Audio Setup
PC Audio No
HDMI 1 Audio
MTS Stereo
Language
Speakers
Optical Output Format
Dolby Digital
Dynamic Range Control
Reset
Auto
English
On
Dolby Digital
Compressed
Done
4 To save the new settings, highlight Done and press T.
To revert to the factory defaults, highlight Reset and
press T.
66
Page 67

Using the Locks menu
Chapter 6: Using the TV’s features
When the correct PIN code is entered, the Locks menu opens.
The Locks menu includes the Enable Rating Blocking, Edit
Rating Limits, Channels Block, Input Lock, Front (control)
Panel Lock, Game Timer, and New PIN Code features. You
can use these features after entering the correct PIN code.
Entering the PIN code
1
Press Y and highlight the Locks menu icon.
Locks
Enable Rating Blocking
Edit Rating Limits
Channels Block
Input Lock
Front Panel Lock
Game Timer
New PIN Code
Off
Off
Off
Off
2 Press b, which displays the PIN code entry screen.
• The Lock System screen (below) appears if a PIN
code has not been stored. Press the Channel Number
buttons to enter a new four-digit code, enter the code a
second time to confirm, and press T.
Lock System
Please enter a 4 digit PIN code
****
Confirm PIN code
****
Cancel Done
Locks
Enable Rating Blocking
Edit Rating Limits
Channels Block
Input Lock
Front Panel Lock
Game Timer
New PIN Code
Off
Off
Off
Off
If you cannot remember your PIN code
While the PIN code entering screen is displayed, press E four
times within five seconds. The PIN code will be cleared and
you can enter a new PIN code.
Changing your PIN code
1
Press Y and highlight the Locks menu icon.
2 Press b to display the PIN code entering screen.
3 Enter your four-digit PIN code and press T.
4 Press b to highlight New PIN Code and press T.
Locks
Enable Rating Blocking
Edit Rating Limits
Channels Block
Input Lock
Front Panel Lock
Game Timer
New PIN Code
Off
Off
Off
Off
• The Locks/Active screen (below) appears if the PIN
code is already stored. Use the Number buttons to enter
your four-digit code and press T.
Locks Active
Please enter the 4 digit PIN code
****
Cancel
Done
If the wrong PIN code is entered, the message “Incorrect PIN
code, please try again!” appears. Highlight Retry and press
T. Enter the code again and press T.
5 Press the Number buttons to enter a new four-digit code.
Reenter the PIN code to confirm it.
6 Press T. The new PIN code is now active.
New PIN Code
Please enter a 4 digit PIN code
****
Confirm PIN code
****
Cancel Done
67
Page 68

Chapter 6: Using the TV’s features
Blocking TV programs and movies
by rating (V-Chip)
Some TV programs and movies include signals that classify
the content of the program (violence, sex, dialog, language).
The V-Chip feature in this TV detects the signals and blocks
the programs according to the ratings you select. (For rating
descriptions, see the tables on the next page.)
Note: Rating blocking is a function of the V-Chip feature in this
TV, which supports the U.S. V-Chip system only.
To block and unblock TV programs and movies:
1 Press Y and highlight the Locks menu icon.
2 Press b to display the PIN code entering screen.
3 Enter your four-digit PIN code and press T.
4 Press b to highlight Enable Rating Blocking.
5 Press c and b to select On, and then press T.
Locks
Enable Rating Blocking
Edit Rating Limits
Channels Block
Input Lock
Front Panel Lock
Game Timer
New PIN Code
Off
Off
Off
Off
Off
On
6 Press b to highlight Edit Rating Limits and press T.
The Edit Rating Limits screen (below) appears.
7 Press BbC c and then press T to select the level of
blocking you prefer. A box with an “5” is a rating that will
be blocked. As you highlight a rating, a definition for the
rating appears at the bottom of the screen.
8 When done selecting the ratings you want to block,
highlight Done and press T.
Edit Rating Limits
TV
(V-CHIP) FV
D L S V
TV-Y
TV-Y7
TV-G
TV-PG
TV-14
TV-MA
"None" Rated or "No Rating"
Movies
G
PG
PG-13
R
NC-17
X
Children
Youth
Alt RS
Cancel
Done
Downloading an additional rating system
for blocking TV programs and movies
In the future, an additional rating system may become
available for use in selectively blocking programs.
Note: The currently tuned station must be receiving a digital
signal before an additional rating system can be downloaded.
To download the additional rating system
(if available):
1 Press Y and highlight the Locks menu icon.
2 Press b to display the PIN code entering screen.
3 Enter your four-digit PIN code and press T.
4 Press b to highlight Enable Rating Blocking.
5 Press c and b to select On, and press T.
6 Press b to highlight Edit Rating Limits and press T.
The Edit Rating Limits screen appears.
7 Highlight Alt RS and press T. The Edit Alternate
Ratings screen will appear.
Note:
• The Alt RS button will only be available if an additional
rating system is currently available.
• It may take several minutes for the TV to download the
additional rating system.
• The information displayed in the Alternate Ratings
screen will depend on the configuration of the
additional rating system available at the time of
download.
8 Press B b C c and then press T to select the level of
blocking you prefer. A box with an “5” is a rating that will
be blocked.
9 When you are finished selecting the ratings you want to
block, highlight Done and press T.
10 In the Edit Rating Limits screen, highlight Done and
press T.
Note:
• The additional rating system can only be downloaded one
time. You will not be able to download any updates to the
rating system should such updates become available.
• The additional rating system is not designed, transmitted, or
controlled by the TV or Toshiba, nor is the availability of an
additional rating system determined or controlled by
Toshiba. Similarly, the rating of programs in an additional
rating system is not determined, transmitted, or controlled
by the TV or Toshiba.
• The additional rating system is an evolving technology;
therefore, availability, content, and format may vary.
68
Page 69

Chapter 6: Using the TV’s features
Independent rating system for broadcasters
Ratings Description and Content themes
Mature Audience Only (This program is specifically
designed to be viewed by adults and therefore may
TV-MA
TV-14
TV-PG
TV-G
TV-Y7,
TV-Y7FV
TV-Y
be unsuitable for children under 17.)
L) Crude or indecent language S) Explicit sexual
activity V) Graphic violence
Parents Strongly Cautioned (This program contains
some material that many parents would find
unsuitable for children under 14 years of age.)
Intensely suggestive dialog L) Strong, coarse
D)
language
violence
Parental Guidance Suggested (This program
contains material parents may find unsuitable for
younger children.)
D)
language
violence
General Audience (Most parents would find this
program suitable for all ages.)
Directed to Older Children (This program is designed
for children age 7 and above. Note: Programs in
which fantasy violence may be more intense or more
combative than other programs in this category are
designated TV-Y7FV.)
All Children (This program is designed to be
appropriate for all children.)
S) Intense sexual situations V) Intense
Some suggestive dialog L) Infrequent coarse
S) Some sexual situations V) Moderate
Blocking channels
With the Channels Block feature, you can block specific
channels. You will not be able to tune blocked channels unless
you unlock them.
To block channels:
1 Press Y and highlight the Locks menu icon.
2 Press b to display the PIN code entering screen.
3 Enter your four-digit PIN code and press T
(- page 67).
4 Press b to highlight Channels Block and then press T.
A list of the channels available for that input will be
displayed along with the call letters for each channel, if
available.
Locks
Enable Rating Blocking
Edit Rating Limits
Channels Block
Input Lock
Front Panel Lock
Game Timer
New PIN Code
Off
Off
Off
Off
Independent rating system for movies
Ratings Description and Content themes
X
NC-17
R
PG-13
PG
G
Note:
• If you place an “5” in the box next to “ ‘None’ Rated,”
programs rated “None” will be blocked; however, programs
that do not provide any rating information will not be
blocked.
• To display the rating of the program you are watching, press
X-rated (For adults only)
Not intended for anyone 17 and under
Restricted (Under 17 requires accompanying parent
or adult)
Parents Strongly Cautioned (Some material may be
inappropriate for children under 13)
Parental Guidance Suggested (Some material may
not be suitable for children)
General Audience (Appropriate for all ages)
E on the remote control. If it is rated “None,” the word
“NONE” appears in the RECALL screen (as shown below
right). If rating information is not provided, no rating will
appear in the RECALL screen.
TV - PG L V NONE
5 Press Bb to highlight the channel you want to block and
press T, which puts an “5” in the box next to that
channel.
Channels Block
1
2
3
4
5
6
7
8
9
10
Allow All
Block All
Cancel
Done
6 Repeat step 5 for other channels you want to block.
7 Highlight Done and press T.
To unblock individual channels:
In step 5 above, press Bb to highlight the channel you want to
unblock, press T to remove the “5” from the box, highlight
Done and press T.
(continued)
69
Page 70

Chapter 6: Using the TV’s features
To block all channels at once:
Highlight Block All in step 5 on previous page and then
highlight Done and press T.
To unblock all locked channels at once:
Highlight Allow All in step 5 on previous page and then
highlight Done and press T.
Channels Block
1
2
3
4
5
6
7
8
9
10
Allow All
Block All
Cancel
Done
Unlocking programs temporarily
If you try to tune the TV to a program that exceeds the rating
limits you set, the TV will enter program lock mode and the
following message will appear on-screen:
This program exceeds the rating limit you set.
Push 'MUTE' to enter PIN.
You can either temporarily unlock the program or select an
unlocked program to watch.
To temporarily unlock the program:
1 Press W.
2 Enter your four-digit PIN code and press T. If the correct
code is entered, the program lock mode is released and the
normal picture appears. All locking is disabled until the
TV is turned off, and will be enabled when the TV is
turned on again.
Locks Active
Enter PUN code to temporarily unblock.
Using the input lock feature
You can use the Input Lock feature to lock the video inputs
(VIDEO 1, VIDEO 2, ColorStream HD-1, ColorStream
HD-2, HDMI 1, HDMI 2, HDMI 3 and PC) and channels 3 and
4. You will not be able to view the input sources or channels
until you unlock the inputs.
To lock/unlock the video inputs:
1 Press Y and highlight the Locks menu icon.
2 Press b to display the PIN code entering screen.
3 Enter your four-digit PIN code and press T.
4 Press b to highlight Input Lock and press c.
5 Press B or b to select the level of video input locking you
prefer, as described below.
Video: Locks VIDEO 1, VIDEO 2, ColorStream HD1/
HD2, HDMI 1, HDMI 2, HDMI 3, and PC.
Video+: Locks VIDEO 1, VIDEO 2, ColorStream HD1/
HD2, HDMI 1, HDMI 2, HDMI 3, PC and channels 3 and
4.
• Select Video+ if you play video tapes via an ANT
input.
Locks
Enable Rating Blocking
Edit Rating Limits
Channels Block
Input Lock
Front Panel Lock
Game Timer
New PIN Code
Off
Off
Off
Off
Off
Video
Video +
Off: Unlocks all video inputs and channels 3 and 4.
6 Press T.
70
Cancel
****
Done
Page 71

Chapter 6: Using the TV’s features
Using the GameTimer
®
You can use the GameTimer to set a time limit for playing a
video game (30–120 minutes). When the GameTimer expires,
the TV enters Input Lock mode and locks out the input source
for the video game device.
To set the GameTimer®:
1 Press Y and highlight the Locks menu icon.
2 Press b to display the PIN code entering screen.
3 Enter your four-digit PIN code and press T.
4 Press b to highlight Game Timer and press c.
5 Press B or b to select the length of time until the Input
Lock is activated (30, 60, 90, or 120 minutes) and press
T.
Locks
Enable Rating Blocking
Edit Rating Limits
Channels Block
Input Lock
Front Panel Lock
Game Timer
New PIN Code
To cancel the GameTimer®:
Select Off in step 5 above.
To deactivate the Input Lock once the GameTimer
has activated it:
Set the Input Lock to Off (- “Using the input lock feature”
on the previous page).
Note:
• A message will appear when 10 minutes, 3 minutes, and 1
minute remain on the GameTimer.
• If the TV loses power with time remaining on the GameTimer,
when power is restored the TV will enter Input Lock mode
(as if the GameTimer had been activated) and you will have
to deactivate the Input Lock (as described above).
Off
Off
Off
Off
Off
30 min
60 min
90 min
120 min
Using the control panel lock feature
You can lock the control panel to prevent your settings from
being changed accidentally (by children, for example). When
the control panel lock is On, none of the controls on the TV
control panel will operate except POWER.
To lock the control panel:
1 Press Y and highlight the Locks menu icon.
2 Press b to display the PIN code entering screen.
3 Enter your four-digit PIN code and press T.
4 Press b to highlight Front Panel Lock.
5 Press c and C or c to highlight On and press T. When
the control panel is locked and any button on the control
panel (except POWER) is pressed, the message “Not
Available” appears.
Locks
Enable Rating Blocking
Edit Rating Limits
Channels Block
Input Lock
Front Panel Lock
Game Timer
New PIN Code
To unlock the control panel:
Highlight Off in step 5 above, or press and hold the
VOLUME C button on the TV control panel for about 10
seconds until the volume bar appears.
Off
Off
Off
Off
Off
On
71
Page 72

Chapter 6: Using the TV’s features
Using the PC settings feature
You can view an image from a PC on the TV screen.
When a PC is connected to the TV's PC IN terminal, you can
use the PC Settings feature to make adjustments to the image.
If the edges of the picture are cut off, readjust the Horizontal
Position and Vertical Position. If the picture is affected by
interference, readjust the Clock Phase and Sampling
Clock.
To adjust the PC settings:
1 Repeatedly press + to select PC input mode
(- “Selecting the video input source to view” page 51).
2 Press Y and open the Setup menu.
3 Highlight PC Settings and press T.
Setup
Installation
CE-Link Setup
Sleep Timer
HDMI Settings
PC Settings
Slide Show Interval
Power-On Mode
Demo Mode On
Note: If a PC is not connected or there is no pc input
signal, this feature will be grayed out in the Setup menu.
4 Press B or b to highlight the item you want to adjust.
5 Press C or c to make the appropriate adjustments.
PC Settings
Horizontal Position 0
Vertical Position
Clock Phase
Sampling Clock
Reset
2 Sec
Power-Saving
0
0
0
Done
Setting the PC Audio
This function allows you to output the sound from your PC (if
connected) or mute the sound from your PC and output the
sound from your HDMI (DVI) connection. (- page 23)
To set the PC Audio:
1 Press Y and open the Audio menu.
2 Highlight Audio Setup and press T.
3 Press B or b to select PC Audio and then press C or c
to select No or Yes.
Yes: Outputs the sound from your PC.
No: Mutes the sound from your PC, and outputs the
sound from the HDMI-1 connection.
Audio Setup
PC Audio No
HDMI 1 Audio
MTS Stereo
Language
Speakers
Optical Output Format
Dolby Digital
Dynamic Range Control
Reset
Note: Because the PC and HDMI-1 inputs share the same
set of analog audio inputs, the PC Audio menu setting
influences the HDMI 1 Audio menu setting. If PC Audio is
set to “No,” the HDMI 1 Audio setting changes to “Auto.”
If PC Audio is set to “Yes,” the HDMI 1 Audio setting is
set to “Digital” and is grayed out in the menu. (Also see
item 5 on page 12 and “Setting the HDMI
on page 48.)
Auto
English
On
Dolby Digital
Compressed
Done
™
Audio mode”
Note: The screen is disrupted momentarily when
adjusting the PC settings. This is not a sign of malfunction.
• Horizontal Position:
Moves the picture left/right.
The adjustment range is within ±10 from center.*
• Vertical Position:
Moves the picture up/down.
The adjustment range is within ±10 from center.*
• Clock Phase:
Helps to reduce noise and sharpen the picture.
The adjustment range is within ±2 from center.*
• Sampling Clock:
Helps to reduce noise and minimize periodic vertical stripes
on the screen.
The adjustment range is within ±5 from center.*
* The default settings may vary depending on the input signal format.
72
Page 73

Chapter 6: Using the TV’s features
Setting the sleep timer
You can set the sleep timer to turn off the TV after a set length
of time (maximum of 180 minutes).
To set the sleep timer using the remote control:
Press [ on the remote control to set the length of time until
the TV turns off. Repeatedly press [ to increase the time in
10-minute increments, or press B or b to increase or decrease
the time in 10-minute increments, to a maximum of 180
minutes.
To set the sleep timer using the on-screen menus:
1 Press Y and open the Setup menu.
2 Highlight Sleep Timer and press T.
Setup
Installation
CE-Link Setup
Sleep Timer
HDMI Settings
PC Settings
Slide Show Interval
Power-On Mode
Demo Mode On
3 Press the Number buttons to enter the length of time in
10-minute increments.
Sleep Timer
Enter total minutes until the TV
turns off automatically (Maximum
2 Sec
Power-Saving
180 minutes)
120
Using CE-Link
This is a new feature that uses CEC technology and allows you
to control Toshiba CE-Link compatible devices from the TV
remote via HDMI connection (- page 21).
When the Enable CE-Link item in the CE-Link setup menu
(- page 74) is set to On, individual CE-Link functions also
set to On will be activated.
CE-Link playback device (HD DVD player,
etc.) control
With your TV’s remote control, or using the CE-Link Control
menu, you can control the connected CE-Link playback device
you are watching.
Available remote control key functions:
Before using the following key functions, first select the TV
mode by pressing the TV mode select button until the keypad
blinks 3 times.
• S begins playback.
• D stops playback.
• A pauses the picture during play or record mode.
• G skips forward.
• F skips backward.
• J fast-forwards.
• H rewinds/reverses.
• B b C c navigate the Contents Menu, etc.
• T enters the Contents Menu, etc.
• O returns to the previous menu.
Note: These functions depend on the device connected.
Cancel Done
4 Highlight Done and press T.
Note: When a power failure occurs, the sleep timer setting
may be cleared.
To display the remaining sleep time:
Press [.
Sleep Timer
120 minutes
Note: A message will display on-screen when there is one
minute remaining on the sleep timer.
To cancel the sleep timer:
Repeatedly press [ until it is set to 0 minutes.
(continued)
73
Page 74

Chapter 6: Using the TV’s features
CE-Link Player Control menu functions:
1 Press C and open the THINC Applications menu.
2 Press B or b to highlight CE-Link Player Control and
press T.
THINC Applications
CE-Link Player Control
Picture
Viewer
Audio Player
Personal E-mail
Channel Browser
Favorites Browser
CB
3 Press B or b to select the item you want to control and
press T.
CE-Link Player Control
Recorder
Top Menu
Menu
Contents Menu
Navigate Select Exit
ENTER
– POWER turns the selected device on and off.
– Top Menu accesses the top menu of a DVD.
– Menu accesses the menu of a DVD.
– Contents Menu accesses the contents list when you
press T. At this time, the CE-Link Player Control
menu will disappear.
Note:
• These functions depend on the devices that are connected.
• The CE-Link Player Control item will be grayed out in the
following conditions:
- A non-HDMI input is currently selected.
- The Enable CE-Link item is set to Off.
- The connected device is not a playback or recording
device.
Power
EXIT
CE-Link input source selection
If a CE-Link device with HDMI switching capability (e.g.
Audio Receiver) is connected to the HDMI input, you can
select another CE-Link device that is connected to the master
HDMI device using the TV’s INPUT button. See page 51 for
details.
Audio Receiver VOLUME and MUTE control
With your TV’s remote control, you can adjust or mute the
sound volume of the speakers connected to the TV via an audio
receiver. First, select TV mode by pressing the TV button
under MODE SELECT on the remote control.
• z Z adjust the volume level.
• W turns off the sound.
Note:
• To use this function:
- Set Speaker Preference to Audio Receiver in the CE-
Link Setup menu.
- Confirm that a connected CE-Link device (such as HD
DVD player, etc) is selected for the Audio Receiver input
source.
• You can also use this function when the audio receiver is
connected to the TV’s DIGITAL AUDIO OUT terminal (not
HDMI connection). In this case, select a digital audio input
mode on the Audio Receiver.
• These functions depend on the device connected.
Other CE-Link functions
When the Enable CE-Link is set to On, the following
functions can be enabled by setting them to On.
• TV Auto Input Switch
If a connected HDMI device starts playing video or audio,
the TV will automatically switch to the appropriate HDMI
input.
• TV Auto Power
If a CE-Link device is turned on or off, the TV turns on or
off automatically.
• Device Auto Standby
If the TV is turned off, the TV will send a message to turn
off all of the CE-Link devices connected to the TV.
• Speaker Preference
From this item, you can set your audio output preference to
the TV speakers or the audio receiver speakers. When this
item is set to Audio Receiver, the TV remote can be used to
adjust or mute the volume of the audio. This item will be
grayed out unless a CE-Link compatible audio receiver is
connected.
Note: When you turn on the Audio Receiver, change its input
source, or adjust the sound volume, the sound will be output
from the audio receiver’s speakers even if TV Speakers has
been selected. Turn the TV off and on again to output the
sound from the TV Speakers.
74
Page 75

Chapter 6: Using the TV’s features
To set the CE-Link Setup:
1 Press Y and open the Setup menu.
2 Highlight CE-Link Setup and press T.
Setup
Installation
CE-Link Setup
Sleep Timer
HDMI Settings
PC Settings
Slide Show Interval
Power-On Mode
Demo Mode On
2 Sec
Power-Saving
3 Press B or b to highlight Enable CE-Link.
CE-Link Setup
Enable CE-Link On
TV Auto Input Switch
TV Auto Power Off
Device Auto Standby
Speaker Preference
Reset
On
On
TV Speakers
Done
4 Press C or c to select On.
Note: If you set Enable CE-Link to Off, the all other items
will be grayed out.
5 Press B or b to highlight the CE-Link setup item you
want to use, and press C or c to select On/Off or the
desired speakers mode.
• TV Auto Input Switch: On/Off
• TV Auto Power: On/Off
• Device Auto Standby: On/Off
• Speaker Preference: TV Speakers/Audio Receiver (See
details on the previous page.)
CE-Link Setup
Enable CE-Link On
TV Auto Input Switch
TV Auto Power Off
Device Auto Standby
Speaker Preference
Reset
On
On
TV Speakers
Done
6 To save the new settings, highlight Done and press T.
To revert to the factory defaults, highlight Reset and
press T.
Using the HDMI settings feature
This menu consists of the following 3 items (new HDMI
capabilities) and will be grayed out on non-HDMI inputs.
Some HDMI legacy sources may not work properly with your
HDMI TV, please try setting the following three options (LipSync Latency, Deep Color, and xvYCC) to Off. Adjusting
these settings should allow your HDMI legacy source to
operate properly with your TV.
• Lip-Sync Latency: On
This option activates an auto audio/video display timing
adjustment function that allows HDMI source devices to
accurately perform synchronization automatically.
• Deep Color: On
This feature allows to HDMI source to increase available
colors bits within the boundaries defined by the RGB or
YCbCr color space.
• xvYCC: On
This feature expands the acceptable color range (limits) in
the HDMI signals, then allows sending wider color signals
from HDMI source.
All above HDMI settings need proper HDMI source device.
If HDMI source products does not support these features,
the TV may not work properly by activating these features.
Note: If your HDMI connection is capable of 1080p and/or
your TV is capable of refresh rates greater than 60Hz or
supports Deep Color, you will need a Category 2 cable.
Conventional HDMI/DVI cables may not work properly with this
mode.
To set the HDMI Settings:
1 Select the appropriate HDMI input mode (HDMI 1,
HDMI 2, or HDMI 3).
2 Press Y and open the Setup menu.
3 Highlight HDMI Settings and press T.
4 Press B or b to highlight the item you want to set.
HDMI Settings HDMI 1
Lip-Sync Latency On
Deep Color
xvYCC On
Once you have changed On/Off settings, please press
Done and wait for changes completed message.
Warning: DO NOT TURN OFF OR UNPLUG THE TV UNTIL
COMPLETED MESSAGE IS DISPLAYED!!
Reset
On
Done
5 Press C or c to select On or Off .
6 To save the new settings, highlight Done and press T.
To revert to the factory defaults, highlight Reset and
press T.
75
Page 76

Chapter 6: Using the TV’s features
Displaying TV status information
To display TV status information using RECALL:
Press E on the remote control.
The following information will display (if applicable):
• Current input (ANT, VIDEO 1, etc.)
• If ANT is the current input, either “CABLE” (for cable TV)
or “ANT” (for over-the-air broadcasts).
• Channel number (if in ANT mode)
• Channel label (if set)
• Digital signal strength indicator (bar graph in lower right
corner of box; for ATSC signal only)
• Stereo, Mono or SAP audio status (when HDMI input mode,
Dolby Digital or PCM)
• Video resolution
• Aspect ratio of incoming video signals (4:3 or 16:9)
• V-Chip rating status
• GameTimer (if set)
• xvYCC status of incoming signal
ANT
123-456
ABCHD
: 120min
Stereo SAP
16:9
xvYCC TV-PG L V1080i
9:00pm
.
Understanding the auto power off
feature
The TV will automatically turn itself off after approximately
15 minutes if it is tuned to a vacant channel or a station that
completes its broadcast for the day. This feature functions in
ANT mode only.
Understanding the last mode
memory feature
If the power is cut off while you are viewing the TV, the
Last Mode Memory feature automatically turns on the TV
when the power is resupplied.
Note: You should unplug the TV’s power cord if it is possible
that you will be away from the TV for an extended period of time
after the power is restored.
To close the RECALL screen:
Press E again.
To display TV status information using INFO:
Press Q on the remote control.
The following additional information will display for off air
digital channels (if applicable):
• Title
• Duration
• Detailed description
ANT
123-456
ABCHD
ABCHD
: 120min
Stereo SAP
MLB Young,s XXX...
Today,s Major League Baseball.
Note: The location of the banner can be moved to the top or
bottom of the screen by pressing B or b while the RECALL or
INFO display is on-screen. (The last position will be stored to
memory.)
1080i
16:9
xvYCC TV-PG L V
East 9:00pm -11:00pm
76
Page 77

Chapter 7: Using the TV’s advanced features
Using the advanced picture settings
features
Using dynamic contrast
When dynamic contrast is set to Low, Middle, or High, the
TV will detect changes in the picture quality that affect the
appearance of your contrast settings and then automatically
adjust the video.
To select dynamic contrast preferences:
1 Press Y and open the Video menu.
2 Highlight Picture Settings and press T.
Video
Mode Sports
Picture Settings
Noise Reduction
ColorMaster Pro
xvYCC Selection Off
Game Mode
Theater Settings
TheaterLock
3 Highlight Advanced Picture Settings and press T.
Picture Settings
Contrast 100
Back Light 100
DynaLight
Brightness
Color
Tint
Advanced Picture Settings
4 In the Dynamic Contrast field, select either Off, Low,
Middle or High.
\
Advanced Picture Settings Mode: Preference
Dynamic Contrast
Static Gamma
Color Temperature
Vertical Edge Enhancer
Cinema Mode
ClearFrame
Film Stabilization
5 To save the new settings, highlight Done and press T.
To revert to the factory defaults, highlight Reset and
press T.
Note: If you select one of the factory-set picture modes
(Sports, Standard, Movie, or Document) and then
change the dynamic contrast setting, the picture mode
automatically changes to Preference.
Reset
Reset
Off
Off
Mode: Sports
On
50
50
0
50Sharpness
Done
Off
0
Cool
High
Film
On
Off
Done
Using the static gamma feature
The static gamma feature allows you to adjust the levels of
black in the picture.
To adjust the static gamma settings:
1 Press Y and open the Video menu.
2 Highlight Picture Settings and press T.
Video
Mode Sports
Picture Settings
Noise Reduction
ColorMaster Pro
xvYCC Selection Off
Game Mode
Theater Settings
TheaterLock
Off
Off
3 Highlight Advanced Picture Settings and press T.
Picture Settings
Contrast 100
Back Light 100
DynaLight
Brightness
Color
Tint
Advanced Picture Settings
Reset
50
50
0
50Sharpness
Mode: Sports
On
Done
4 In the Static Gamma field, press C or c to adjust the
static gamma.
The adjustment range is within ±4 from center.
Advanced Picture Settings Mode: Preference
Dynamic Contrast
Static Gamma
Color Temperature
Vertical Edge Enhancer
Cinema Mode
ClearFrame
Film Stabilization
Reset
High
0
Cool
High
Film
On
Off
Done
• If the setting is moved in the minus direction, the detail
of black colors will be decreased.
• If the setting is moved in the plus direction, the detail of
black colors will be increased.
5 To save the new settings, highlight Done and press T.
To revert the factory defaults, highlight Reset and
press T.
Note: If you select one of the factory-set picture modes
(Sports, Standard, Movie, or Document) and then
change the static gamma setting, the picture mode
automatically changes to Preference.
77
Page 78

Chapter 7: Using the TV’s advanced features
Selecting the color temperature
You can change the quality of the picture by selecting from
three preset color temperatures (Cool, Medium, and Warm), as
described below.
Mode Picture Quality
Cool blueish
Medium neutral
Warm reddish
To select the color temperature:
1 Press Y and open the Video menu.
2 Highlight Picture Settings and press T.
3 Highlight Advanced Picture Settings and press T.
4 Highlight Color Temperature and press T.
Advanced Picture Settings Mode: Preference
Dynamic Contrast
Static Gamma
Color Temperature
Vertical Edge Enhancer
Cinema Mode
ClearFrame
Film Stabilization
Reset
Off
0
Cool
High
Film
On
Off
Done
5 In the Color Temperature field, select the mode you
prefer (Cool, Medium, or Warm).
Color Temperature Mode: Preference
Color Temperature
B Drive
G Drive
Reset
Cool
0
0
Done
Using the Vertical Edge Enhancer feature
The Vertical Edge Enhancer feature strengthens video contour.
To turn on the Vertical Edge Enhancer feature:
1 Press Y and open the Video menu.
2 Highlight Picture Settings and press T.
3 Highlight Advanced Picture Settings and press T.
4 In the Vertical Edge Enhancer field, select the mode
you prefer (Off, Low, Middle, or High).
Advanced Picture Settings Mode: Preference
Dynamic Contrast
Static Gamma
Color Temperature
Vertical Edge Enhancer
Cinema Mode
ClearFrame
Film Stabilization
Reset
Off
0
Cool
High
Film
On
Off
Done
5 To save the new settings, highlight Done and press T.
To revert to the factory defaults, highlight Reset and
press T.
Note:
• If you select one of the factory-set picture modes (Sports,
Standard, Movie, or Document) and then change the
Vertical Edge Enhancer setting, the picture mode
automatically changes to Preference.
• When the input is changed to PC, this feature is
automatically set to High and grayed out in the menu.
6 Press B or b to select either B Drive or G Drive, and
then press C or c to adjust the settings.
B Drive
G Drive
• B Drive: c makes the picture blueish.
• G Drive: c makes the picture greenish.
Note: The B Drive and G Drive settings are connected to
the Color Temperature settings and will change based
on which setting is selected in step 5 above.
1
1
7 To save the new settings, highlight Done and press T.
To revert to the factory defaults, highlight Reset and
press T.
Note: If you select one of the factory-set picture modes
(Sports, Standard, Movie, or Document) and then
change the color temperature mode, the picture mode
automatically changes to Preference.
78
Page 79

Chapter 7: Using the TV’s advanced features
Selecting the cinema mode (480i and 1080i
signals)
When you view a DVD (3:2 pulldown processed) from a DVD
player connected to the VIDEO 1, VIDEO 2, ColorStream
HD-1, ColorStream HD-2 (component video), or HDMI
inputs on the TV, smoother motion can be obtained by setting
the Cinema Mode to Film.
To set the Cinema Mode to Film:
1 Press Y and open the Video menu.
2 Highlight Picture Settings and press T.
3 Highlight Advanced Picture Settings and press T.
4 In the Cinema Mode field, select Film.
Advanced Picture Settings Mode: Preference
Dynamic Contrast
Static Gamma
Color Temperature
Vertical Edge Enhancer
Cinema Mode
ClearFrame
Film Stabilization
Reset
Off
0
Cool
High
Film
On
Off
Done
5 To save the new settings, highlight Done and press T.
To revert to the factory defaults, highlight Reset and
press T.
To set the Cinema Mode to Video:
Select Video in step 4 above.
Note: When the Cinema Mode is set to Video, the Film
Stabilization feature (- page 80) will not be available (grayed
out and set to Off).
Using the ClearFrame™ feature
The new ClearFrame 120 Hz anti-blur technology doubles the
frame rate from 60 frames per second to 120 frames per
second, virtually eliminating motion blur without adding
flicker or reducing image brightness.
To turn on the ClearFrame:
1 Press Y and open the Video menu.
2 Highlight Picture Settings and press T.
3 Highlight Advanced Picture Settings and press T.
4 In the ClearFrame field, select On.
Advanced Picture Settings Mode: Preference
Dynamic Contrast
Static Gamma
Color Temperature
Vertical Edge Enhancer
Cinema Mode
ClearFrame
Film Stabilization
Reset
Off
0
Cool
High
Film
On
Off
Done
5 To save the new settings, highlight Done and press T.
To revert to the factory defaults, highlight Reset and
press T.
Note:
• If you select one of the factory-set picture modes (Sports,
Standard, Movie, or Document) and then change the
ClearFrame setting, the picture mode automatically
changes to Preference.
• When the ClearFrame is set to Off, the Film Stabilization
feature (- page 80) will not be available (grayed out and
set to Off).
79
Page 80

Chapter 7: Using the TV’s advanced features
Using the Film Stabilization feature
This feature helps to eliminate video shaking that can occur
when Cinema Mode is set to Film (3:2 pull down process
enabled).
To turn on Film Stabilization:
1 Press Y and open the Video menu.
2 Highlight Picture Settings and press T.
3 Highlight Advanced Picture Settings and press T.
4 In the Film Stabilization field, select On.
Advanced Picture Settings Mode: Preference
Dynamic Contrast
Static Gamma
Color Temperature
Vertical Edge Enhancer
Cinema Mode
ClearFrame
Film Stabilization
Reset
Off
0
Cool
High
Film
On
On
Done
5 To save the new settings, highlight Done and press T.
To revert to the factory defaults, highlight Reset and
press T.
Note:
• If you select one of the factory-set picture modes (Sports,
Standard, Movie, or Document) and then change the Film
Stabilization setting, the picture mode automatically
changes to Preference.
• When the Cinema Mode is set to Video or the ClearFrame
is set to Off (- page 79), Film Stabilization will be grayed
out and set to off automatically.
Using CableClear® digital noise reduction
The CableClear® digital noise reduction feature allows you to
reduce visible interference in your TV picture. This may be
useful when receiving a broadcast with a weak signal
(especially a Cable channel) or playing a noisy video tape or
disc.
To change the CableClear settings:
1 Press Y and open the Video menu.
2 Highlight Noise Reduction and press T.
Video
Mode Sports
Picture Settings
Noise Reduction
ColorMaster Pro
xvYCC Selection Off
Game Mode
Theater Settings
TheaterLock
Off
Off
3 In the CableClear field, select your desired setting.
Noise Reduction ANT
CableClear
MPEG Noise Reduction
Reset
Done
Auto
Low
Note:
• If the current input is ANT, VIDEO 1, or VIDEO 2, the
menu will display the text “CableClear.” The available
selections are Off, Auto, Low, Middle, and High.
• If the current input is ColorStream HD1, ColorStream
HD2, HDMI 1, HDMI 2, or HDMI 3, the menu will display
the text “DNR.” The available selections are Off, Auto,
Low, Middle, and High. Auto will react proportionally
to the strength of the noise. Low, Middle, and High will
reduce the noise in varying degrees, from lowest to
highest, respectively.
4 To save the new settings, highlight Done and press T.
To revert to the factory defaults, highlight Reset and
press T.
80
Page 81

Chapter 7: Using the TV’s advanced features
Using MPEG noise reduction
The MPEG noise reduction feature allows you to reduce
visible interference caused by MPEG compression. Choices
for MPEG noise reduction are Off, Low, Middle, and High.
Off is automatically selected when this feature is disabled
(“grayed out”).
To select the MPEG noise reduction level:
1 Press Y and open the Video menu.
2 Highlight Noise Reduction and press T.
3 Press B or b to highlight the MPEG Noise Reduction
field, and then press C or c to select either Off, Low,
Middle or High.
Noise Reduction ANT
CableClear
MPEG Noise Reduction
Reset
Done
Auto
Low
4 To save the new settings, highlight Done and press T.
To revert to the factory defaults, highlight Reset and
press T.
Using the ColorMaster™ Pro feature
The ColorMaster Pro feature allows you to adjust standard
colors as well as create 3 custom user colors.
The menu will consist of 3 items:
ColorMaster Pro, Color Palette Adjustment, and Reset.
To turn on ColorMaster Pro:
1 Press Y and open the Video menu.
2 Highlight ColorMaster Pro and press T.
Video
Mode Sports
Picture Settings
Noise Reduction
ColorMaster Pro
xvYCC Selection Off
Game Mode
Theater Settings
TheaterLock
Off
Off
3 In the ColorMaster Pro field, select On.
ColorMaster Pro
ColorMaster Pro
Color Palette Adjustment
Reset
ANT
On
Note: If you select one of the factory-set picture modes
(Sports, Standard, Movie, or Document) and then change
the ColorMaster Pro setting, the picture mode automatically
changes to Preference.
To turn off ColorMaster Pro:
Select Off in Step 3 above.
Using Color Palette Adjustment
When Color Palette Adjustment is selected, the list of base
colors and user colors will be displayed. You can select a base
color to adjust or choose to create a user color.
Note: To use Color Palette Adjustment, ColorMaster Pro
must be set to On.
To adjust the Base Colors:
1 From the ColorMaster Pro menu, highlight Color
Palette Adjustment and press T.
ColorMaster Pro
ColorMaster Pro
Color Palette Adjustment
Reset
ANT
On
(continued)
81
Page 82

Chapter 7: Using the TV’s advanced features
2 The Select Standard Color window will be displayed.
Press B or b to highlight the color you want to adjust, and
then press T.
Select Standard Color
Base Colors
Red
Green
Blue
Yellow
Magenta
Cyan
User Colors
User 1
User 2
User 3
3 The Color Adjustment window will be displayed.
Press B to freeze the picture.
To return to moving picture, press B again.
Color Adjustment
Hue 0
-
Saturation
-
Brightness
-
Red
Standard Color
After Adjustment
+
0
+
0
+
4 Press B or b to select either Hue, Saturation, or
Brightness, and then press C and c to adjust the setting.
Note: To revert to the factory settings of Hue, Saturation,
and Brightness for the selected color, press f.
5 Press R to return to the previous menu.
6 Repeat steps 2 through 5 to adjust any other color.
To create a User Colors:
1 From the ColorMaster Pro menu, highlight Color
Palette Adjustment, and then press T.
2 The Select Standard Color window will be displayed.
Press B or b to highlight either User 1, User 2, or
User 3, and then press T.
Select Standard Color
Base Colors
Red
Green
Blue
Yellow
Magenta
Cyan
User Colors
User 1
User 2
User 3
3 The Color Adjustment window will be displayed.
Press B or b to highlight Change Standard Color, and
then press T.
Color Adjustment
-
-
-
User 1
Standard Color
After Adjustment
Change Standard Color
Hue 0
Saturation
Brightness
+
0
+
0
+
The video on-screen will automatically freeze and the
cross hairs will appear on the video.
Note: Release the video anytime by pressing B.
Navigate
Select
Back
CH RTNENTER
Freeze/Unfreeze Exit
FREEZE
EXIT
4 Press BbC c to move the cross hairs to the color you
want to adjust, and then press T.
Navigate
Select
Back
CH RTNENTER
Freeze/Unfreeze Exit
FREEZE
EXIT
5 Press B or b to select either Hue, Saturation, or
Brightness, and then press C or c to adjust the setting.
Color Adjustment
-
-
-
Note: You can reset the Hue, Saturation, and
Brightness to "0" for any user color by pressing f.
User 1
Standard Color
After Adjustment
Change Standard Color
Hue 0
Saturation
Brightness
+30
+11
+
+
+
6 Repeat step 5 for other items.
7 Press O.
82
Page 83

Chapter 7: Using the TV’s advanced features
To reset ColorMaster to its factory settings:
1 From the ColorMaster menu, highlight Reset, and then
press T.
ColorMaster Pro
ColorMaster Pro
Color Palette Adjustment
Reset
ANT
On
2 A confirmation message will appear. Highlight OK, and
then press T.
Are you sure?
OKCancel
3 Press O.
Using xvYCC Selection feature
The color range “xvYCC” is an international standard and
enables a wider color range than conventional video
applications.
If the xvYCC Selection is set to Auto, your TV will
automatically detect images supported by xvYCC.
Note: If a non-HDMI input is selected or the xvYCC setting in
the HDMI Settings menu is set to Off, this feature will appear
grayed out in the Video menu.
To change the xvYCC Selection:
Using the Game Mode feature
You can use the Game Mode feature for shorter frame delays
when playing a video game requiring split-second timing
between the on-screen display and input from the controller
(such as music creation and high-action games).
This feature is more effective for 480i and 1080i input signals.
Note: To use the Game Mode feature, the current video input
must be Video 1, Video 2, ColorStream HD1,
ColorStream HD2, HDMI 1, HDMI 2, or HDMI 3. The Game
Mode cannot be turned on when any other video input is
selected.
To turn on Game Mode:
1 Press Y and open the Video menu.
2 Press B or b to highlight the Game Mode field, and then
press C or c to select On.
Video
Mode Sports
Picture Settings
Noise Reduction
ColorMaster Pro
xvYCC Selection On
Game Mode
Theater Settings
TheaterLock
Off
Off
Off
On
1 Press Y, and open the Video menu.
2 Press B or b to highlight xvYCC Selection, and then
press C or c to select the settings you prefer (Auto, On
or Off).
Video
Mode Sports
Picture Settings
Noise Reduction
ColorMaster Pro
xvYCC Selection On
Game Mode
Theater Settings
TheaterLock
Off
Off
Auto
On
Off
To turn off Game Mode:
Select Off in step 2 above, change the video input, or turn the
TV off and then on again.
Note:
• You can change the video input by pressing + on the
remote control (- page 51).
• When the Game Mode is set to On, the following features
(- pages 79 and 80) are not available (grayed out).
-Cinema Mode: grayed out and set to Video
-Clear Frame: grayed out and set to Off
-Film Stabilization: grayed out and set to Off
83
Page 84

Chapter 7: Using the TV’s advanced features
Using the advanced audio settings
features
Using the SRS WOW™ surround sound
feature
SRS WOW™ is a special combination of SRS Labs audio
technologies (SRS 3D, SRS Focus, and SRS TruBass) that
creates a thrilling surround sound experience with deep, rich
bass from stereo sound sources. Your TV’s audio will sound
fuller, richer, and wider.
To adjust the WOW™ settings:
1 Put the TV in STEREO mode (- “Selecting stereo/SAP
broadcasts” on page 64).
2 Press Y and open the Audio menu.
3 Highlight Advanced Audio Settings and press T.
4 Press b or B to highlight the WOW feature you want to
adjust, and then press C or c to adjust the item.
Advanced Audio Settings
WOW: SRS 3D
WOW: SRS Focus
WOW: SRS TruBass Low
Dolby Virtual
SRS TruSurround
Reset
• WOW: SRS 3D — To turn the surround sound effect
On or Off.
Note: If the broadcast is monaural, the SRS 3D effect
will not work.
•
WOW: SRS Focus — To turn the vocal emphasis effect
On or Off.
• WOW: SRS TruBass — To select the desired bass
expansion level (Off, Low, or High).
5 To save the new settings, highlight Done and press T.
To revert to the factory defaults, highlight Reset and
press T.
Off
Off
On
Done
Using the virtual surround sound feature
®
(Dolby
Virtual and SRS TruSurround™)
The Dolby Virtual and SRS TruSurround feature allows you to
enjoy virtual surround sound from the TV’s speakers.
To turn on the Dolby Virtual and SRS TruSurround
feature:
1 Press Y and open the Audio menu.
2 Highlight Advanced Audio Settings and press T.
3 In the Dolby Virtual and SRS TruSurround field,
select On.
Advanced Audio Settings
WOW: SRS 3D
WOW: SRS Focus
WOW: SRS TruBass Low
Dolby Virtual
SRS TruSurround
Reset
Off
Off
On
Done
4 To save the new settings, highlight Done and press T.
To revert to the factory defaults, highlight Reset and
press T.
To turn off the Dolby Virtual and SRS TruSurround
feature:
Select Off in step 3 above.
Note: The Dolby Virtual and SRS TruSurround and WOW
SRS 3D features cannot be on at the same time. If you set one
to On, the other will automatically be set to Off.
WOW, TruSurround, SRS and l symbol are trademarks of SRS Labs,
Inc.
WOW and TruSurround technologies are incorporated under license
from SRS Labs, Inc.
84
Page 85

Chapter 7: Using the TV’s advanced features
Using the Help feature
The Help feature provides explanations for commonly
misunderstood behavior using a friendly menu format.
To open the Help menu:
1 Press Y and open the Applications menu.
2 Highlight Help and press T.
Applications
Picture Viewer
Audio Player
Personal E-mail
Channel Browser
Help
Start Demo
3 The Help top menu will appear.
Select the item you want to display.
INFO
Info
How may I help you?
Exit
EXIT
Customer Assistance
Audio
Video
Network
Connection
Tuning
Miscellaneous
Select
ENTER
Browse
Controlling the Help Feature:
• B b C c will allow movement (change of focus) around the
window.
• T will select an item and show the contents of that item, or
take action if the item has an associated action.
• R will return to the previous item.
• Q will display helpful information about the currently
selected item.
• O will close the Help menu.
Help Main Menu
The main menu consists of the following 6 major categories:
• Audio: Issues related to audio processing, output, settings,
etc.
• Video: Issues related to video processing, output, settings,
etc.
• Network: Issues related to the network features on the TV.
• Connection: Issues related to connection of external
devices.
• Tuning: Issues related to tuning of various types of channels.
• Miscellaneous: Important issues that do not fit into the other
categories.
INFO
Info
How may I help you?
Exit
EXIT
Customer Assistance
Audio
Video
Network
Connection
Tuning
Miscellaneous
Browse
ENTER
Select
Press B or b to select your desired category and press T.
The subgroups menu will appear (see below).
Help Subgroups
Each major category will consist of the following 3 subgroups:
• FAQ List (Frequently Asked Questions) provides answers
to common user questions about the selected category.
• HowTo List provides guidance on how to perform certain
operations on the TV.
• Diagnostics List provides users with information on how
to diagnose problems they are experiencing.
Customer Assistance
Audio FAQ List
Audio HowTo List
Audio Diagnostics List
Audio
Browse
ENTER
Select
INFO
Info
CHRTN
Back
EXIT
Exit
To select a subgroup:
Press B or b to select a subgroup and press T.
(continued)
85
Page 86

Chapter 7: Using the TV’s advanced features
Specific Help Items
Within each subgroup, there will be a list of related items.
From this window, you can select a specific topic by using B
b C c and T.
Info
CHRTN
Audio Diagnostics List
Exit
Back
EXIT
Customer Assistance
No audio output regardless of input selected
No/incorrect audio on some channels
Poor Audio Quality
Stable Sound has little effect
Audio lags/leads video
No digital audio output sometimes
Select
ENTER
Browse
INFO
Operational Items
Certain windows will provide not only information, but will
also allow you to actually perform some operation on the TV.
For example, in the following case, you will be able to turn off
the SAP audio feature on the TV by simply selecting this item
from the list and pressing T with the focus on OK.
Customer Assistance
No/incorrect audio on some channels
Second Audio Program (SAP) is enabled. Press " OK " to disable
SAP and set to Stereo (default) , or enter the " Audio Setup "
mode through Audio menu and switch from SAP to Stereo or MTS
mode
Audio Diagnostics List
Cancel OK
Exit
Select
Navigate
ENTER
EXIT
Once the operation has been successfully completed, a
confirmation message will be shown.
Select
Audio Diagnostics List
Exit
EXIT
Customer Assistance
Help Operation Completed!
Navigate
OK
ENTER
After you select OK, the window will transition back to the
previous list with the last item still highlighted.
86
Page 87

Chapter 8: Using the THINC™ home network feature
The Toshiba Home Interactive Network Connection
(THINC
™
) feature allows you to connect the TV to your home
network, which will enable access to file sharing and personal
e-mail features.
File sharing
You can access JPEG and MP3 files that are stored on your
networked home PC and view/play them on the TV.
Note: Requires a home network* (- page 24). Does NOT
require Internet/e-mail service.
Personal E-mail
The Personal E-mail feature allows you to access your e-mail
server through the TV.
Note:
• Contact your Internet Service Provider (ISP) to obtain
and set up Internet/e-mail service.
• You will NOT be able to access or browse the Internet
through the TV.
Follow the steps in sections A through D (- pages 87–93)
to set up and use the TV’s home network features.
* The TV’s home network feature is compatible with Microsoft®
Windows
Professional SP2 or higher.
Microsoft and Windows are either registered trademarks or
trademarks of Microsoft Corporation in the United States and/or
other countries.
®
2000 and Microsoft® Windows® XP Home/
A. Connecting the TV to your home
network
1 Connect the TV to your home network via the TV’s
RJ-45 (Ethernet) port. See pages 24 and 25 for connection
instructions.
2 If you want to use file sharing only and do not have
Internet service in your home:
Go to section B, “Setting up the network address,” on the
next page.
Note: If you do not have Internet service, you will not be
able to use the Personal E-mail feature.
If you want to use file sharing and personal e-mail:
a) You must have Internet service in your home and your
personal e-mail address. Contact your ISP to obtain and
set up Internet/e-mail service in your home.
b) After you have obtained Internet/e-mail service in your
home (from your ISP), go to section B, “Setting up the
network address” on the next page.
For home network troubleshooting tips, see Chapter 9.
The unauthorized recording, use, distribution, or revision of
television programs, videotapes, DVDs, and other materials is
prohibited under the Copyright Laws of the United States and
other countries, and may subject you to civil and criminal
liability.
87
Page 88

Chapter 8: Using the THINC™ home network feature
B. Setting up the network address
To set up the network address:
1 First, try automatically setting up the network address
(below).
2 If the automatic setup is not successful, you can either
retry the automatic setup (below) or try manually setting
up the network address (- page 89).
Note:
• If you used an Ethernet crossover cable to connect your PC
directly to the TV, you will not be able to use the automatic
setup, and must manually set up the network address.
• If you used a hub or switch to connect the TV to your home
network, you will not be able to use the automatic setup, and
must manually set up the network address.
• If you used a router with built-in DHCP functionality, use the
automatic setup. Manual setup may not work.
Router technology, like all new and emerging technologles,
may from time to time cause compatibility issues because of
the differences in router systems implemented by the
various router manufacturers; however, most issues can be
easily resolved. If you think your Toshiba TV and router
might have compatibility problems, please contact the
following:
•
In the U.S.
5469
contact.asp
• In Canada, call TCL Customer Service at
1-800-268-3404 or visit http://www.toshiba.ca.
, call TACP Consumer Solutions at
or visit
http://www.tacp.com/customersupport/
.
1-800-575-
5 The message “Obtain network address automatically?”
will display. Highlight Yes and press T.
Basic Network Setup
Obtain network address automatically?
Yes No
6 The message “Please wait…” will display while the TV is
attempting to load the network address information from
the DHCP server.
Basic Network Setup
Please wait...
If the automatic network address setup is successful,
go to step 7.
If the automatic network address setup is not
successful, go to step 8.
7 If the automatic network address setup is successful, the
following screen will appear:
Basic Network Setup
Done! Network address information has been found!
DNS (Domain Name Server)
IP Address 000 0
255 255 225 0
Subnet Mask
Gateway (Router)
000 0
000 0
OK
a) Press T to close the screen and return to the Network
menu.
b) Skip to section C, “Setting up file sharing on your PC”
(- page 90).
8 If the automatic network address setup is not successful,
the following screen will appear:
Automatically setting up the network
address
1
Press Y and open the Setup menu.
2 Highlight Installation and press T. The Installation
menu appears.
3 Open the Network menu.
4 Highlight Basic Network Setup and press T.
Installation
Network
Basic Network Setup
Personal E-mail Setup
Home File Server Setup
Software Upgrade
88
There may be a problem with the network
connection. Please check network cables
and settings.
AbortRetry
a) Make sure all cables for your home network are
securely connected.
b) Make sure your home network is set up properly. See
page 24 for TV connection information. Also consult
the owner’s manuals for your other components.
c) Make sure the DHCP and security settings on your
home router are correct. Consult the owner’s manual
for your router.
d) Retry the automatic network address setup by following
these steps:
(1) Highlight OK and press T.
(2) Repeat steps 1–6. (If you have already repeated
this setup process, go to step 9.)
Page 89

Chapter 8: Using the THINC™ home network feature
9 If, after repeating steps 1–6, you receive the error
message shown in step 8:
Either…
a) Highlight “OK” and press T.
b) Go to “Manually setting up the network address.”
Or…
a) Highlight “OK” and press T.
b) Continue to sections C, D, and E (- pages 90–95)
(to set up and use file sharing) and/or to sections F and
G (- pages 99–102) (to set up and use personal
e-mail).
If the file sharing and/or Personal E-mail features
work correctly, then the automatic network address
setup was successful (even though the TV displayed the
error message).
Manually setting up the network address
This setup requires the data listed below. You can get this
data from either your ISP or the configuration utility for
your DSL/cable modem or router.
IP address:
___ ___ ___ . ___ ___ ___ . ___ ___ ___ . ___ ___ ___
Subnet mask:
___ ___ ___ . ___ ___ ___ . ___ ___ ___ . ___ ___ ___
Gateway (Router) address:
___ ___ ___ . ___ ___ ___ . ___ ___ ___ . ___ ___ ___
DNS (Domain Name Server) address:
___ ___ ___ . ___ ___ ___ . ___ ___ ___ . ___ ___ ___
8 Press b to highlight the Gateway (Router) field, and
then use the Number buttons to input the Gateway
(Router) address.
9 Press b to highlight the DNS (Domain Name Server)
field, and then use the Number buttons to input the DNS
address.
10 When finished, highlight Done and press T.
The Basic Network Setup menu closes and the
Network menu appears.
11 Go to section C, “Setting up file sharing on your PC.”
1 Press Y and open the Setup menu.
2 Highlight Installation and press T. The Installation
menu appears.
3 Open the Network menu.
4 Highlight Basic Network Setup and press T.
5 The message “Obtain network address automatically?”
appears.
Highlight No and press T.
Basic Network Setup
Obtain network address automatically?
Yes No
6 The Basic Network Setup menu appears.
Press B or b to highlight the IP Address field, and then
use the Number buttons on the remote control to input the
IP address.
Basic Network Setup
Please enter your Network Address Information
IP Address 0 00 0
Subnet Mask
Gateway (Router)
DNS (Domain Name Server)
Cancel Done
255 255 255 0
000 0
000 0
7 Press b to highlight the Subnet Mask field, and then use
the Number buttons to input the Subnet Mask.
89
Page 90

Chapter 8: Using the THINC™ home network feature
Resetting the network address
1
Press Y and open the Setup menu.
2 Highlight Installation and press T. The Installation
menu appears.
3 Open the Network menu.
4 Highlight Basic Network Setup and press T.
5 The message “Your Basic Network Setup is complete.
Would you like to start over?” will appear.
To continue, highlight Yes and press T.
To return to the Network menu, highlight No and press
T.
Basic Network Setup
Your Basic Network Setup is complete. Would you like to start over?
Yes No
6 If you selected Yes in step 5, the message “Obtain
network address automatically?” will appear.
Basic Network Setup
Obtain network address automatically?
Yes No
To obtain the network address automatically, go to step 5
under “Automatically setting up the network address”
(- page 88).
To manually enter the network address, go to “Manually
setting up the network address.”
For home network troubleshooting tips, see Chapter 9.
C. Setting up file sharing on your PC
Compatible operating systems
The following operating systems or higher are compatible for
file sharing with the TV:
• Microsoft
(Home Edition and Professional) [See setup details below]
• Microsoft
No other operating systems are compatible with the TV.
Note:
• The name of any directory/folder on your PC that you are
setting up for file sharing with the TV cannot be longer than
12 characters and cannot contain any special characters.
• See “Media specifications” (- page 95) for details on
compatible JPEG and MP3 files.
• The network (NETBIOS) name of your PC that you are setting
up for file sharing must be 15 characters or less.
To determine which operating system and service
pack (if applicable) are on your PC:
1 On your PC, click the “Start” button.
2 Click “Settings | Control Panel.”
3 In the Control Panel, double-click “System.”
4 Select the “General” tab, which will display your PC’s
current operating system and service pack.
®
Windows® XP Service Pack 2 or higher
®
Windows® 2000 [See setup details on page 92]
Setting up file sharing on a PC with
®
Microsoft
Windows® XP Service Pack 2 or
higher
1
On your PC:
a) Right-click
the folder
to be shared.
b) Click “Sharing
and Security...”
(which will open
the Properties
window for the
selected folder.)
* Microsoft product screen shot(s) reprinted with permission from
Microsoft Corporation.
90
Page 91

Chapter 8: Using the THINC™ home network feature
2 If the “Sharing” tab on your PC does not have a
“Permissions” button, follow step 2.1 below.
If the “Sharing” tab on your PC has a “Permissions”
button, follow step 2.2 below.
2.1
a) Click to display
the “Sharing” tab.
b) Click to select
“Share this folder
on the network.”
c) Click “OK”
(which will close the
Permissions window
for the selected folder).
Go to section D, “Setting up file sharing on the TV,” on
page 93.
2.2
a) Click to display
the “Sharing” tab.
3 In the Permissions window for the selected folder:
a) Click “Add...”
and then select the
user to be given
sharing privileges.*
*This user must match
the user stored in the
TV’s “Home File Server
Setup” menu.
b) Click to check
“Allow” next to
“Full Control.”
c) Click “Apply.”
d) Click “OK”
to close the window.
4 Go to section D, “Setting up file sharing on the TV,” on
page 93.
b) Click to select
“Share this folder.”
c) Click “Permissions”
(which will open
the Permissions
window for the
selected folder).
Go to step 3.
91
Page 92

Chapter 8: Using the THINC™ home network feature
Setting up file sharing on a PC with
®
Microsoft
1
On your PC:
a) Right-click
the folder
to be shared.
b) Click “Sharing...”
(which will open
the Properties
window for the
selected folder).
Windows® 2000
2 In the Properties window for the selected folder:
a) Click to display
the “Sharing” tab.
4 In the Properties window:
Click “OK”
(which closes
the Properties
window).
5 The shared folder will display with a “shared folder” icon
(a hand holding a folder).
b) Click to select
“Share this folder.”
c) Click “Permissions”
(which will open
the Permissions
window for the
selected folder).
3 In the Permissions window for the selected folder:
a) Click “Add...”
and then select the
user to be given
sharing privileges.*
*This user must match
the user stored in the
TV’s “Home File Server
Setup” menu.
b) Click to check
“Allow” next to
“Full Control.”
c) Click “Apply.”
d) Click “OK”
(which closes the
Permissions window).
6 Go to section D, “Setting up file sharing on the TV,” on
the next page.
For home network troubleshooting tips, see Chapter 9.
92
Page 93

Chapter 8: Using the THINC™ home network feature
D. Setting up file sharing on the TV
1 Press Y and open the Setup menu.
2 Highlight Installation and press T. The Installation
menu will appear.
Open the Network menu.
Installation
Network
Basic Network Setup
Personal E-mail Setup
Home File Server Setup
Software Upgrade
3 Highlight Home File Server Setup and press T. The
Home File Server Setup window will appear.
After a few moments, the message “Please Wait...” will
appear until the network finds your networked PC.
The networked PC will act as the “Home Server” for file
sharing with the TV.
Home File Server Setup
Please enter your Home File Server Setup Information.
Home Server Name
User Name
Password
JPEG Picture Directory
MP3 Music Directory
Software Upgrade Directory
Cancel Done
ABCD
XYZ
*******
Pics
MP3,s
--
7 Press Bb to highlight either JPEG Picture Directory
or MP3 Music Directory.
Note: The first time you highlight either of these fields, the
message “Please Wait...” will appear until the field is
populated with the files in your PC’s shared folder(s).
Home File Server Setup Please Wait..
Please enter your Home File Server Setup Information.
Home Server Name
User Name
Password
JPEG Picture Directory
MP3 Music Directory
Software Upgrade Directory
Cancel Done
ABCD
XYZ
*******
--
--
--
8 Press C c to select the shared folder (on your PC) that
contains the JPEG and/or MP3 files you want to view/play
on the TV.
Note: Make sure you select the correct folder in this step.
9 To exit the window and save your settings, highlight
Done and press T.
To exit the window without saving your settings, highlight
Cancel and press T.
4 Press Bb to highlight Home Server Name, and then
press C c to select the name of the PC you set up for file
sharing.
If you have multiple PCs on your home network that have
shared folders, press C c to select the PC (home server)
from which you want to access files.
Home File Server Setup
Please enter your Home File Server Setup Information.
Home Server Name
User Name
Password
JPEG Picture Directory
MP3 Music Directory
Software Upgrade Directory
Cancel Done
ABCD
XYZ
*******
Pics
MP3,s
--
5 a. Press Bb to highlight User Name and then press T
to open the software keyboard for that field.
b. Enter the User Name for your PC using the software
keyboard. See “Using the software keyboard” on the
next page.
Note: The User Name is case sensitive.
c. When finished entering all characters, highlight Done
and press T.
6 Repeat step 5 for the Password field.
Note: The Password is case sensitive.
93
Page 94

Chapter 8: Using the THINC™ home network feature
Using the software keyboard
Typing text on the software keyboard is similar to typing text
on a cell phone. The number keys on the remote control have
corresponding letters or symbols printed next to them.
Repeatedly press a key to cycle through the available
characters for that key.
For example, repeatedly pressing the “q” key toggles through
several punctuation symbols and the numeral 1; repeatedly
pressing the “w” key toggles through the letters a, b, and c,
and the numeral 2, and so forth.
To enter text using the software keyboard:
1 Repeatedly press the corresponding key on the remote
control to highlight the desired character on the on-screen
software keyboard.
2 The highlighted character is entered after you either press
a different key, press the c key, or after a two-second
pause.
3 Repeat steps 1 and 2 until you have entered all desired
text.
Software keyboard example
1.,?!:;&$ @% #~_| \ `
1
gh i 4GH I
4
7
pqr s7PQRS
_
Backspace
100
ab c 2ABC
2
5
jkl5JKL
tuv8TUV
8
0 '" () =/+-^<*>[]{}
0
def 3DEF
3
mno 6 MNO
6
9
wxy z 9WXYZ
INPUT
Space
About the Software Upgrade feature
Home Network:
This feature allows you to download software updates to your
television from a shared folder on your home network. If you
experience any difficulties that can only be resolved by a
software update, your Toshiba customer service representative
will provide you with the appropriate upgrade files and assist
you in the proper use of this feature.
Internet:
This feature allows your television to search the Internet for an
updated version of its system software. If a newer version of
software is available, you will be given the option to download
and install it.
Note: Your television must have a working Internet connection
in order to use this feature.
4 Press R to close the software keyboard and return to the
previous screen.
Note: Help instructions are provided in the on-screen
display and include specific remote control key functions
that are applicable only in certain views.
For example:
x X = page up and down.
Z = Home.
z = End of Line.
T = New Line.
O = Closes the screen WITHOUT saving entries.
94
Page 95

Chapter 8: Using the THINC™ home network feature
E. Viewing/playing shared files on
the TV
You can use the Picture Viewer to view compatible JPEGformat photos on the TV.
You can use the Audio Player to play compatible MP3 files
on the TV.
The TV can access JPEG and/or MP3 files stored on a
networked PC (as described on pages 96–98 and also see pages
24 and 25).
Note:
• If you are viewing/playing files stored on a networked PC,
IT IS RECOMMENDED THAT YOU BACK UP YOUR DATA.
Toshiba is not liable for any damage caused by the use of
any networked PC or shared files with this TV. Toshiba will
not compensate for any lost data or recording(s) caused by
the use of such PCs or data.
• The technical criteria set out in this manual are meant as a
guide only.
• You must obtain any required permission from
copyright owners to download or use copyrighted
content. Toshiba cannot and does not grant such
permission.
Media specifications
File/folder name specifications
– Maximum file name length: 255 characters.
– Maximum shared folder* name length: 12 characters.
– File names must contain US-ASCII characters only.
– File and folder names cannot contain any special
characters, such as \ / : ? “ ” < > | .
* The words “folder” and “directory” are used interchangeably.
Picture Viewer/JPEG file specifications
– Maximum JPEG file size: 32 MB
• JPEG files larger than 32 MB will not display.
– Maximum JPEG image resolution: 1920 5 1080 pixels
• Images with a resolution higher than 1920 5 1080 pixels
will be scaled.
– The Picture Viewer is designed to display only pictures
stored in compatible JPEG formats with a file extension of
“.jpg.”
– JPEG images processed and/or edited on a personal
computer (PC) may not display properly or at all.
– Some digital cameras may store images in a format that is
not compatible with the TV.
– JPEG files stored on a networked PC that are not in a file
and folder format compatible with the TV will not
display on the TV.
Audio Player/MP3 file specifications
– Maximum MP3 file size: 50 MB
• MP3 files larger than 50 MB will not play.
– The Audio Player is designed to play only music files
stored in compatible MP3 formats with a file extension of
“.mp3”.
– MP3 files processed and/or edited on a PC may not play
properly or at all. Some MP3 files may be in a format that is
not compatible with the TV.
– MP3 files must be in the following format:
• MPEG1 (ISO/IEC 11172-3) Layer3.
• Sampling frequency—MPEG1: 32 kHz, 44.1 kHz,
48 kHz.
• Bitrate—MPEG1: 32–320 kbps.
• Channels—Stereo, Joint stereo, Dual channel, Single
channel.
• ID3 Ver. 1, Ver. 2.
– The meta-data for MP3 files (artist name, album name,
song title, etc.) must be in the following format:
ISO-8859-1 (US-ASCII/ Western European) character
sets
– MP3 files stored on a networked PC that are not in a file
and folder format compatible with the TV will not play
on the TV.
(continued)
95
Page 96

Chapter 8: Using the THINC™ home network feature
Networked PC specifications
Maximum number of files per shared folder:
– JPEG = 1,000
• All JPEG files over the 1,000th in a shared folder will not
display.
– MP3 = 1,000
• All MP3 files over the 1,000th in a shared folder will not
play.
Maximum number of nested folder levels: 10 levels
• Files in folders more than 10 levels down from the top level
folder will not display/play.
• See pages 87–93 for details on networking your TV and PC
for file sharing.
Using the Picture Viewer
You can use the TV’s Picture Viewer to display your digital
photos (JPEG files) on your TV’s screen in thumbnail mode or
as a slide show.
Note:
• You cannot use the Picture Viewer and Audio Player at the
same time.
• You must obtain any required permission from
copyright owners to download or use copyrighted
content. Toshiba cannot and does not grant such
permission.
Accessing JPEG files stored on a networked PC
1 Make sure you have correctly set up your home network
and file sharing (- pages 87–93; also see pages 24 and
25).
2 Press Y and open the Applications menu.
3 Highlight Picture Viewer and press T.
Applications
Picture Viewer
Audio Player
Personal E-mail
Channel Browser
Help
Start Demo
If the network is available, it will retrieve the JPEG
picture list via the network.
4 Press B or b to access the folder or directory that contains
the JPEG pictures you want to view.
Picture Viewer
//BEARD-DESK/C
C
+
Copy of isi mip
+
IQAWG_A
+
INCD
+
isiImip
+
WINNT
+
Documents and Settings
ExitSelectImage Select
EXIT
ENTERCH RTN
Navigate
To expand a particular folder to view a list of images,
press c on the folder.
To close the folder or directory, press C on the folder.
Pressing C on a file will move the focus up to the folder
that contains the file.
Pressing c on a file will move the focus down to the next
folder.
If you press T on a particular folder, the first file in the
folder will be displayed as the first file in the thumbnail
list.
If you press T on a particular file, that file will be
displayed as the first file in the thumbnail list.
Note: You can use R to toggle between the thumbnail
and folder views. The last item selected will be highlighted
upon return to the Picture Viewer.
96
Page 97

Chapter 8: Using the THINC™ home network feature
Viewing JPEG files on the TV
1 After accessing your JPEG files from your networked PC
(- page 96), the images automatically display on-screen,
with one as a large picture and six in thumbnail format.
Picture Viewer
//ALLENMPC/Pics/Directory3/Subdirectory1/shelby concept.jpg.
1 of 8
Nov 2 05
2 of 8
Jun 25 01
3 of 8
Feb 10 05
4 of 8
Feb 8 05
5 of 8
Jun 25 01
6 of 8
Feb 10 05
Rotate Next
ENTERCH RTN
ExitSlide ShowFile Select
EXIT
2 Press C to rotate the large picture 90° counterclockwise.
Picture Viewer
//ALLENMPC/Pics/Directory3/Subdirectory1/shelby concept.jpg.
1 of 8
Nov 2 05
2 of 8
Jun 25 01
3 of 8
Feb 10 05
4 of 8
Feb 8 05
5 of 8
Jun 25 01
6 of 8
Feb 10 05
CH RTN
File Select
Rotate Next
ENTER
ExitSlide Show
EXIT
3 Press c to rotate the large picture 90° clockwise.
Picture Viewer
//ALLENMPC/Pics/Directory3/Subdirectory1/shelby concept.jpg.
1 of 8
Nov 2 05
2 of 8
Jun 25 01
3 of 8
Feb 10 05
4 of 8
Feb 8 05
5 of 8
Jun 25 01
6 of 8
Feb 10 05
CH RTN
Rotate Next
ENTER
ExitSlide ShowFile Select
EXIT
4 Press B or b to select another picture as the large picture.
5 Press T to view your pictures in a slide show.
To set the slide show interval:
1 Press O to close the Picture Viewer (if it is open).
2 Press Y and open the Setup menu.
3 Highlight Slide Show Interval and press T.
4 Select the interval from the menu sidebar (2, 5, 10, 15, or
20 seconds).
Setup
Installation
CE-Link Setup
Sleep Timer
HDMI Settings
PC Settings
Slide Show Interval
Power-On Mode
Power-Saving
Demo Mode On
To close the Picture Viewer:
Press O to close the Picture Viewer and return to normal
TV watching.
2 Sec
2 Sec
5 Sec
10 Sec
15 Sec
20 Sec
During the slide show:
• To stop on an image during the slide show, press T.
• To resume the slide show, press T again.
• To rotate the picture, press C or c.
• To select another image, press B or b.
You can zoom in on a picture up to 16x during the slide show.
• To zoom in, press <.
• To zoom out, press ,.
The current magnification will be displayed in the upper left
corner of the screen.
• To stop the slide show and return to the picture viewer, press
R.
• To stop the slide show and return to the regular TV screen,
press O.
97
Page 98

Chapter 8: Using the THINC™ home network feature
Using the Audio Player
You can use the TV’s Audio Player to listen to MP3 files on
the TV.
Note:
• Make all desired adjustments to the TV’s audio features
(e.g., surround, bass, treble, balance) before starting the
Audio Player.
• You cannot use the Picture Viewer and Audio Player at the
same time.
• You must obtain any required permission from
copyright owners to download or use copyrighted
content. Toshiba cannot and does not grant such
permission.
Playing MP3 files stored on a networked PC
1 Make sure you have correctly set up your home network
and file sharing (- pages 87–93; also see pages 24 and
25).
2 Press Y and open the Applications menu.
3 Highlight Audio Player and press T.
Applications
Picture Viewer
Audio Player
Personal E-mail
Channel Browser
Help
Start Demo
If the network is available, the TV will retrieve the MP3
file through the network.
4 Press B or b to access the folder or directory that contains
the MP3 files you want to play.
Audio Player
//ALLENMPC/MP3's/Dir1/Queen - pain Is Close to Pleasure.mp3
MP3,s
-
Dir 1
Picture Viewer
-
Sub 1
//BEARD-DESK/C
03 - Take Five.mp3
C
Lá Breá Fán Dtuath.mp3
04 -
+
Copy of isi mip
05 - An Tûll.mp3
+
IQAWG_A
+
INCD
+
Sub 2
+
isiImip
+
+
WINNT
Dir 2
+
Documents and Settings
Queen - A Kinnd of Magic.mp3
Queen - Forever.mp3
Queen - Gimme the Prize.mp3
Queen - One Vision.mp3
Queen - Pain is So Close to Pleasure.mp3
Simon and Garfunkel - Cecilial.mp3
Navigate
ENTERCH RTN
Navigate
ExitSelectImage Select
EXIT
ENTERCH RTN
EXIT
VOL
ExitSelectSong Select
If you press T on a particular folder, the first file in the
folder will display as the first file in the list in Song Select
view.
If you press T on a particular file, that file will display as
the first file in the list in Song Select view.
Note: You can use R to toggle between the thumbnail
and folder. The last item selected will be highlighted upon
return to the Audio Player.
Audio Player
//ALLENMPC/MP3's/Dir1/Sub1/03-Moonlight Sonata.mp3
Title
Ser No.1 in D, Op.11... SCO/Sir Charles...
Requiem, Op. 5: IV. R... Robert Shaw/Atla...
Rapsodie Espagnole:... Jesus Lopez-Cobo...
III. Sanctus: Sanctu... Boston Baroque/M...
Piano Sonata, K. 545... A-M Classical
Pathétique Sonata, m... A-M Classical
Chopin Prelude No. ... Andrys
Piano Sonata, K. 545...
Moolight Sonata, mo...
Artist
A-M Classical
A-M Classical
Navigate
Moolight Sonata, movement
A-M Classical
EXIT
ENTERCH RTN
VOL
ExitSelectFile Select
5 The Audio Player will begin playing the first MP3 file
in the list. Press BbC c to navigate to the rewind, pause,
fast forward, skip backward, skip forward, volume, and
mute buttons—or to select another MP3 file—and then
press T.
During playback:
• To stop playback, press A.
• To resume playback, press S.
• To restart the same song from the beginning, press F.
• Pressing F repeatedly skips to previous songs in the song
list.
• Pressing G skips to the next song in the song list.
To adjust or mute the volume:
Press z Z or W on the remote control (see page 64 for
details on muting the sound), or press Bb C c to navigate to
the on-screen VOL and MUTE ( ) buttons and press T.
To close the Audio Player:
Press O to close the Audio Player and return to the regular
TV screen.
To expand a particular folder to view a list of images,
press c on the folder.
To close the folder, press C on the folder.
Pressing C on a file will move the focus up to the folder
which contains the file.
Pressing c on a file will move the focus down to the next
folder.
98
Page 99

Chapter 8: Using the THINC™ home network feature
F. Setting up the Personal E-mail
feature
The Personal E-mail feature allows you to access your e-mail
server through the TV.
IMPORTANT NOTE
If you connect the TV to the Internet, anyone with access to
the TV will be able to configure the TV to access e-mail
accounts for which they have account access information
(user name, password and server addresses).
If you set up any personal e-mail accounts on the TV,
anyone with access to the TV will be able to read e-mail
from those accounts unless you lock the profile for
each e-mail account (step 8).
You should consider these factors when deciding whether
to set up personal e-mail accounts and whether to keep the
TV set connected (or make available easy connection) to the
internet.
The Personal E-mail Setup will allow up to 4 users to set up
profiles from which each profile may access their e-mail
account.
Setting up Personal E-mail
1
Press Y and open the Setup menu.
2 Highlight Installation and press T. The Installation
menu appears.
3 Open the Network menu.
4 Highlight Personal E-mail Setup and press T.
Installation
Network
Basic Network Setup
Personal E-mail Setup
Home File Server Setup
Software Upgrade
5 The Personal E-mail Setup window appears.
Press B or b to highlight one of the blank profiles and
press T.
Personal E-mail Setup
Please select a profile
--
--
--
--
Required information and services
Before you can set up the Personal E-mail feature, you must
have the following information and related services:
a) A valid POP3 e-mail account that you normally use to
receive e-mails.
b) Login and password settings for above.
c) Name or IP address of the incoming (POP3) mail server.
To obtain the required e-mail services listed above, contact
your ISP.
To obtain the required addresses and settings listed above,
either contact your ISP or use the configuration utility for
your DSL/cable modem or router.
Note: If all four profiles have been created, you can select
an existing profile and modify it.
6 The E-mail Profile Setup window will appear.
E-mail Profile Setup
Display Name
Time Zone
Check for New Mail
Profile Lock
Cancel
Enter PIN Code
E-mail Account Setup
Eastern
Disabled
Enabled
Done
Highlight the Display Name field and press T. The
software keyboard will appear.
Software keyboard example
1.,?!:;&$ @% #~_| \ `
1
gh i 4GH I
4
7
pqr s7PQRS
_
Backspace
100
ab c 2ABC
2
5
jkl5JKL
tuv8TUV
8
0 '" () =/+-^<*>[]{}
0
def3DEF
3
mno 6 MNO
6
9
wxy z 9WXYZ
INPUT
Space
Use the software keyboard to enter the display name. (“Using the software keyboard” on page 94).
7 Press b to highlight Time Zone, then press C or c to
select your desired setting. You can choose from the
following options:
Eastern, Central, Mountain, Pacific, Alaska, Hawaii,
Atlantic, Newfoundland.
8 Press b to highlight Check for New Mail, then press C
or c to select your desired setting.
• You can choose to have the TV check for new e-mail
every 5, 15, 30 minutes, or 1 hour. When the Check
for New Mail interval is set to DISABLED, new
e-mail notifications will not appear.
(continued)
99
Page 100

Chapter 8: Using the THINC™ home network feature
9 You can use the Profile Lock to protect your profile
settings and prevent other users from viewing your
personal e-mails.
Note: Each of the four e-mail profiles must be locked
individually.
To lock an e-mail profile:
a) Press b to highlight the Profile Lock field.
b) Press C or c to select Enabled.
c) Highlight the Enter PIN Code field and press T.
E-mail Profile Setup
Display Name
Time Zone
Check for New Mail
Profile Lock
Enter PIN Code
E-mail Account Setup
Cancel
d) Use the Number buttons to enter a four-digit PIN code.
e) Enter the code a second time to confirm, and then press
T.
E-mail Account Setup
Please enter a 4 digit PIN code
****
Confirm PIN code
****
Cancel Done
Note: If the profile is already locked, the E-mail Profile
Unlock window will appear. You must enter the correct
PIN code to unlock the account.
E-mail Profile Unlock
Please enter the 4 digit PIN code
****
Cancel
Disabled
Done
Done
Eastern
Enabled
The E-mail Account Setup window appears
(illustrated below).
E-mail Account Setup tvtest2
E-mail Address
POP3 Server Address
POP3 Port Number
POP3 User Name
POP3 Password
Test Done
Cancel
11 Highlight a field and press T. The software keyboard will
appear (as shown in step 6).
Note: The software keyboard layout will vary based on the
buttons that are available for the current item.
Using the software keyboard, enter the appropriate
information in the fields.
• E-mail Address
• POP3 Server Address
• POP3 Port Number (uses default if left blank)
• POP3 User Name (same as e-mail account login)
• POP3 Password: password
See “Description of fields in the E-mail Account Setup
window” (- page 101) for details on the settings for
these fields.
12 Highlight Test and press T to confirm that the e-mail
account settings work correctly.
13 When testing is finished, a message will appear indicating
whether the e-mail account test passed or not.
If the e-mail account test succeeds, the following
message appears:
E-Mail Account Test
All tests were successful.
OK
If the e-mail account test fails, the following message
appears:
If you cannot remember your PIN code, while the E-mail
Profile Unlock window is displayed, press E four (4)
times within five (5) seconds. The PIN code will be cleared
and you can enter a new PIN code.
10 Highlight the E-mail Account Setup field, and
press T.
E-mail Profile Setup
Display Name
100
Time Zone
Check for New Mail
Profile Lock
Cancel
Enter PIN Code
E-mail Account Setup
Eastern
Disabled
Enabled
Done
E-Mail Account Test
All tests failed.
OK
Make sure you entered the correct information for the
fields in the E-mail Account Setup window.
14 Press T.
15 To exit the window and save your settings, highlight
Done and press T.
To exit the window without saving your settings, highlight
Cancel and press T.
 Loading...