

Page 1
AIR CONDITIONER (SPLIT TYPE)
Installation manual
Outdoor Unit
Model name:
RAV-SP180AT2-UL
For OUTDOOR USE only
Not accessible to the general public
Vente interdite au grand public
Kein öffentlicher Zugang
Non accessibile a clienti generici
No destinado al público en general
Não acessível ao público em geral
Niet geschikt voor huishoudelijk gebruik
Μη προσβάσιμο από το γενικό κοινό
Недоступен для посторонних
Genel erişime açık değildir
Installation manual
Air conditioner
Manuel d'installation
Climatiseur
(Split type)
(Type split)
1
19
English
Français
Page 2

Outdoor Unit
Please read this Installation Manual carefully before installing the Air Conditioner.
• This Manual describes the installation method of the outdoor unit.
• For installation of the indoor unit, refer to the Installation Manual attached to the indoor unit.
Installation Manual
ADOPTION OF NEW REFRIGERANT
This Air Conditioner uses R410A an environmentally friendly refrigerant.
Contents
1 DIMENSION . . . . . . . . . . . . . . . . . . . . . . . . . . . . . . . . . . . . . . . . . . . . . . . . . . . . . . . . . . 2
2 ACCESSORY PARTS. . . . . . . . . . . . . . . . . . . . . . . . . . . . . . . . . . . . . . . . . . . . . . . . . . . 3
3 SYSTEM REQUIREMENTS . . . . . . . . . . . . . . . . . . . . . . . . . . . . . . . . . . . . . . . . . . . . . . 4
4 PRECAUTIONS FOR SAFETY. . . . . . . . . . . . . . . . . . . . . . . . . . . . . . . . . . . . . . . . . . . . 5
5 INSTALLATION OF NEW REFRIGERANT AIR CONDITIONER. . . . . . . . . . . . . . . . . . 7
6 REFRIGERANT PIPING . . . . . . . . . . . . . . . . . . . . . . . . . . . . . . . . . . . . . . . . . . . . . . . . 12
7 ELECTRICAL CONNECTIONS . . . . . . . . . . . . . . . . . . . . . . . . . . . . . . . . . . . . . . . . . . 14
8 EVACUATE AND DEHYDRATE THE SYSTEM. . . . . . . . . . . . . . . . . . . . . . . . . . . . . . 15
9 FINISHING. . . . . . . . . . . . . . . . . . . . . . . . . . . . . . . . . . . . . . . . . . . . . . . . . . . . . . . . . . . 17
10 TEST RUN. . . . . . . . . . . . . . . . . . . . . . . . . . . . . . . . . . . . . . . . . . . . . . . . . . . . . . . . . . . 17
11 PERIODIC MAINTENANCE . . . . . . . . . . . . . . . . . . . . . . . . . . . . . . . . . . . . . . . . . . . . . 17
12 UNIT PUMP DOWN. . . . . . . . . . . . . . . . . . . . . . . . . . . . . . . . . . . . . . . . . . . . . . . . . . . . 18
13 POWER SAVE . . . . . . . . . . . . . . . . . . . . . . . . . . . . . . . . . . . . . . . . . . . . . . . . . . . . . . . 18
1-EN
–1–
Page 3
Outdoor Unit
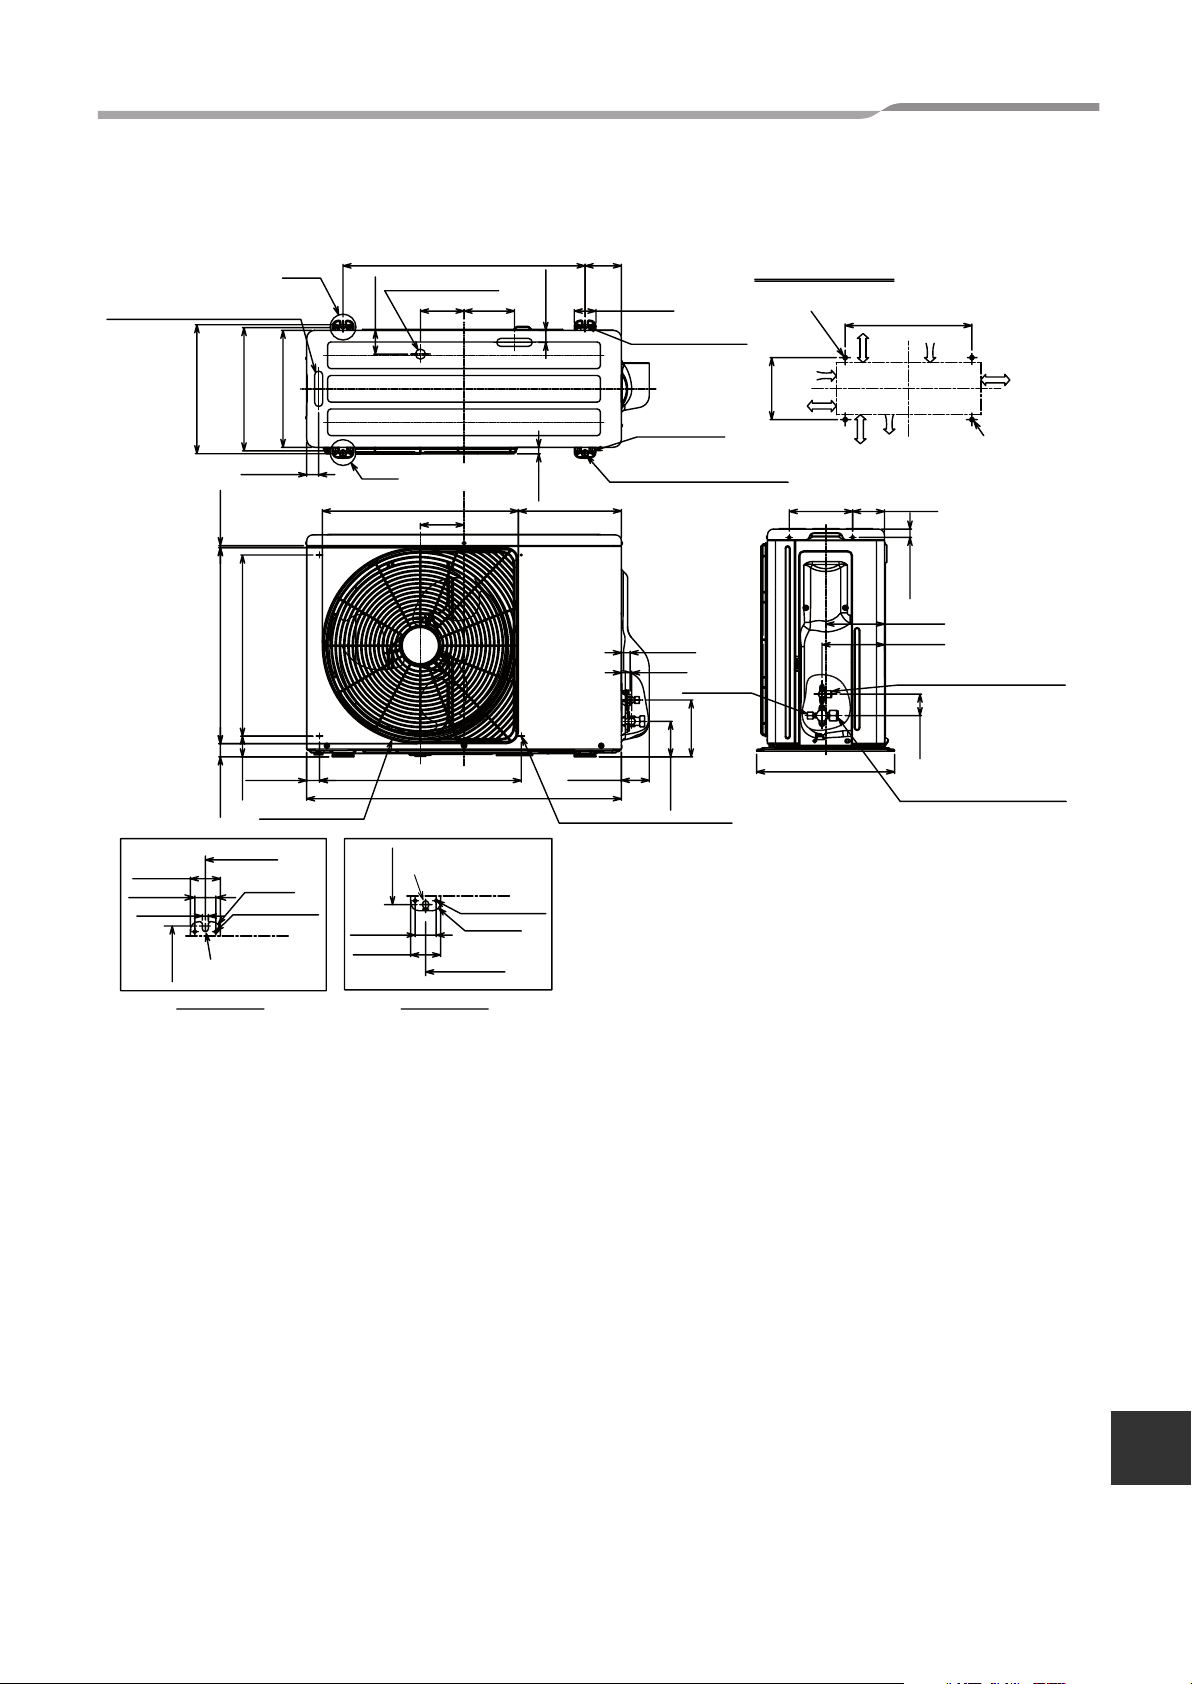
1 DIMENSION
Installation Manual
(2-
Ø0.7"(20) × 3.5"(88) long hole)
2.1"(54)
1.5"(38)
0.4"(11)
12.6"(320)
Drain hole
12"(306)
12.6"(320)
For anchor bolt)
(Long hole pitch
1.2"(30)
0.2"(5)19.1"(486)1.3"(33)
2"(51) 17.7"(449)
23.6"(600)
R0.6"(15)
2-Ø0.2"(6) hole
Product
external line
Ø0.4"(11)×0.6"(14)
U-shape hole
A legs
11.4"(290)
Ø0.2"(6) hole pitch
Discharge guard
23.6"(600) 3.5"(90)
Drain hole(
2.4"(60)
B legs
19.1"(486) 10"(255)
19.7"(500)1.3"(32)
12.6"(320)
1.5"(38)
2.1"(54)
Ø1"(25))
4.3"(108)
30.7"(780)
Ø0.4"(11)×0.6"(14)
U-shape hole
Product
external line
2-Ø0.2"(6) hole
R0.6"(15)
23.6"(600)
Details of B legsDetails of A legs
1.2"(30)
0.6"(16)
2.7"(69)
Discharge guide mounting hole
(4-Ø1.8"(4.5) embossing)
2.1"(54)4.9"(125)4.3"(108)
2-Ø0.4"(11)-0.6"(14)
U-shape hole
(For Ø0.3"(8)-0.4"(10)
8-Ø0.2"(6) hole
(For fixing outdoor unit)
2-Ø0.4"(11)×0.6"(14) long hole
(For Ø0.3"(8)-0.4"(10) anchor bolts)
0.9"(22)
1"(26)
3.5"(88)
anchor bolts)
Charge port
5.6"(141)
Space required for service
2-Ø0.4"(11)×0.6"(14) U-shape holes
(For Ø0.3"(8)-0.4"(10) anchor bolt)
5.9"(150)
or more
12.6"(320)
19.7"(500)
or more
6.2"(157) 3.1"(79)
13.5"(342)
23.6"(600)
Air intake
5.9"(150)
or more
Air discharge
5.7"(145)
6.1"(155)
Refrigerant pipe
connecting port
(
Ø0.3"(6.4) flare at liquid side)
Refrigerant pipe
connecting port
(
11.8"(300)
or more
(Minimum
distance up to wall)
2-Ø0.4"(11)×0.6"(14) long hole
(For Ø0.3"(8)-0.4"(10) anchor bol
0.8"(21)
2"(53)
Ø0.5"(12.7) flare at gas side)
–2–
EN
2-EN
Page 4

Outdoor Unit
2 ACCESSORY PARTS
Part name Q’ty Shape Usage
Installation manual 1 This manual (Hand this directly to the customer.)
Drain nipple 1
Waterproof rubber cap 2
NOTE
Use drain nipple and waterproof rubber cap as necessary.
Installation Manual
3-EN
–3–
Page 5
Outdoor Unit
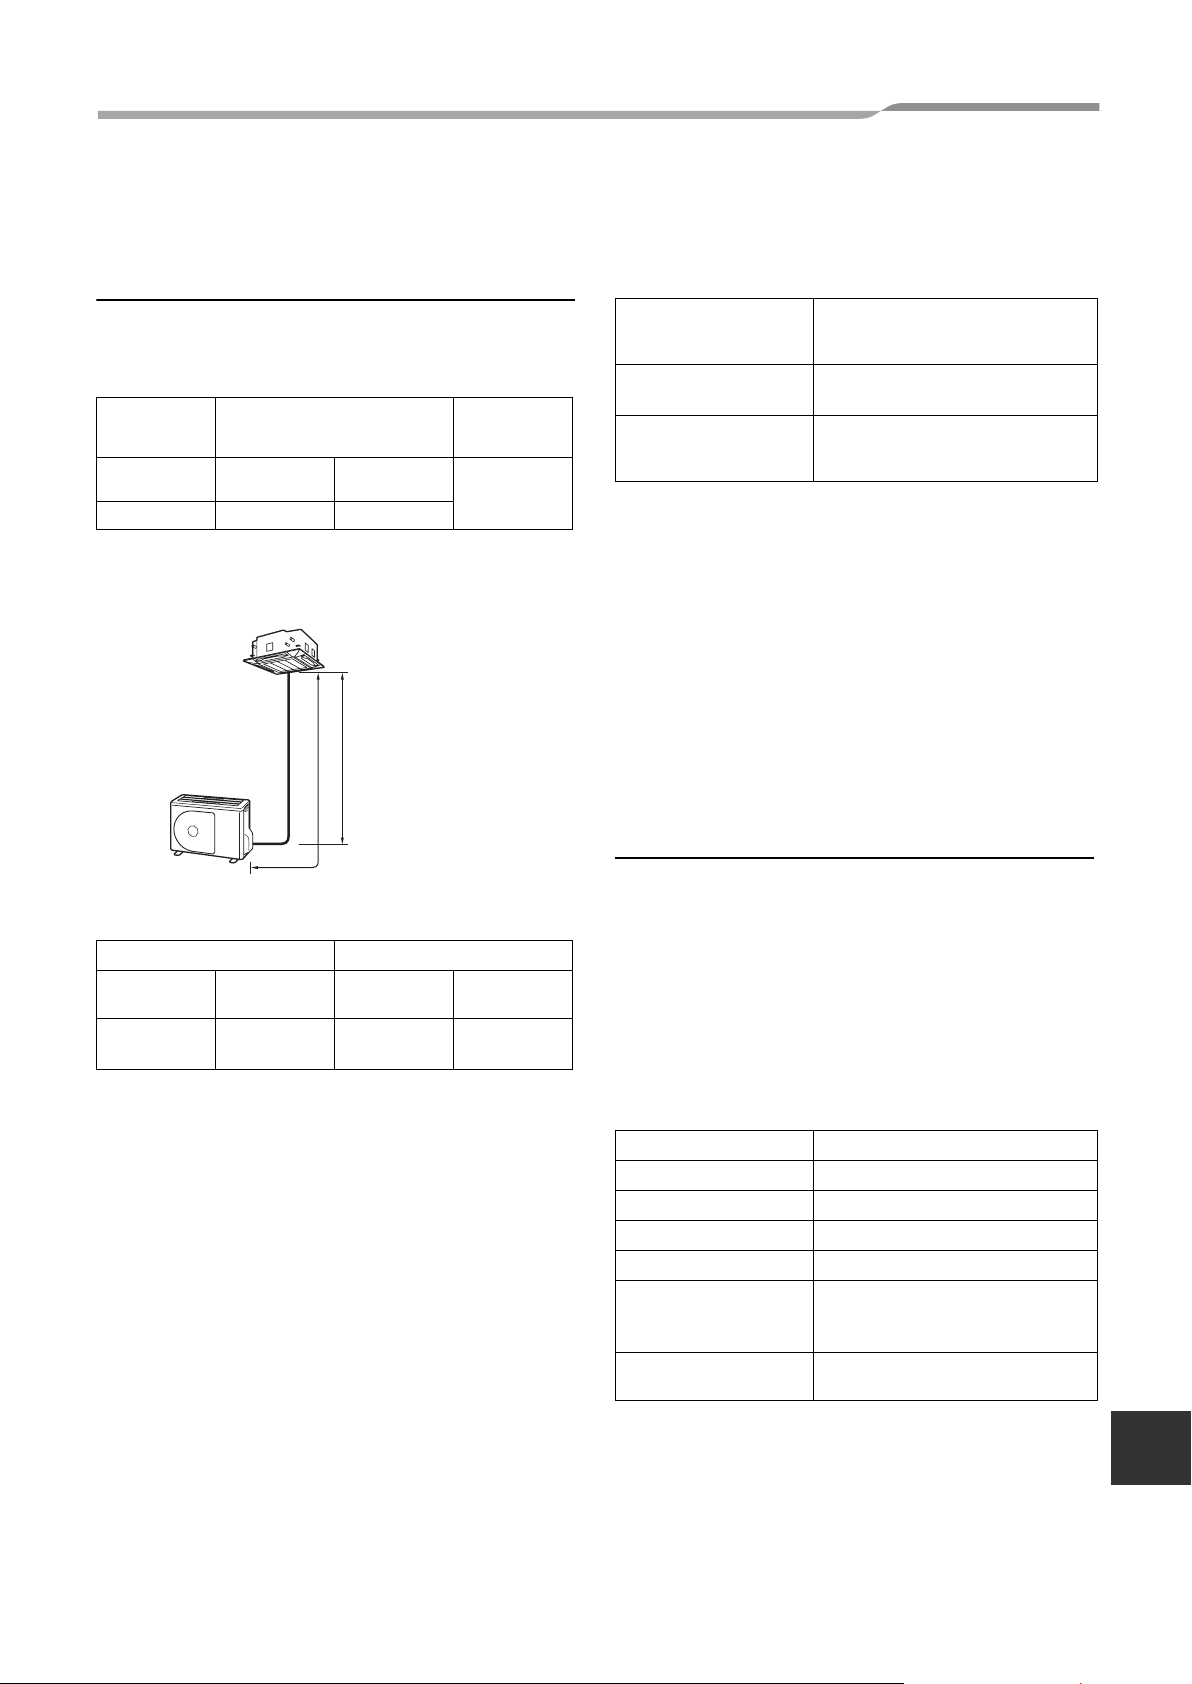
3 SYSTEM REQUIREMENTS
Installation Manual
Piping (Field supplied)
• Minimum refrigerant line length between the outdoor
unit and indoor unit is 16.5” (5 m)
• Maximum pipe lengths
Allowable
pipe length
(ft (m))
Total length LIndoor unit:
164’1” (50) 98’5” (30) 98’5” (30)
Figure of Single
Outdoor Unit
Height difference
(Indoor-outdoor H)
(ft (m))
Upper
Indoor Unit
Outdoor unit:
L
H
Lower
Number of
bent portions
10 or less
Refrigerant charge
Length of refrigerant
pipe connected to
indoor/outdoor unit
16’5” - 65’7”
(5 - 20 m)
*65’7” - 164’1”
(20 - 50 m)
Additional refrigerant
None
Add 0.22 oz/ft (20 g/m) of
refrigerant for piping that exceeds
65’7” (20 m) up to 164’1” (50 m).
* Caution during addition of refrigerant
Max. amount of additional refrigerant is 1.8 lbs (800
g).
Charge the refrigerant accurately. Overcharging
may cause serious trouble with the compressor.
* Minimum refrigerant pipe is 16’5”(5 m).
This may cause a malfunction of the compressor or
other devices.
Metering Device is an electronic EXV (PMV) in
outdoor unit.
Connecting power and control
cables (Field supplied)
Refrigerant sizes
Liquid side Gas side
Outer
diameter
Ø1/4”
(6.4 mm)
Thickness
0.03”
(0.8 mm)
Outer
diameter
Ø1/2”
(12.7 mm)
Thickness
0.03”
(0.8 mm)
Flare nuts and flaring
• The flare nuts and flaring are different from those for
the conventional refrigerant.
Use the flare nuts supplied with the air conditioner or
those for R410A.
• Before performing flaring, carefully read
“REFRIGERANT PIPING”
Insulation
Both lines need to be insulated. Use a minimum 0.4”
(10 mm) wall thickness.
• The main power is supplied to the outdoor unit. The
field supplied connecting cables from the outdoor
unit to the indoor unit consist for 4 wires and provides
the power for the indoor unit as well as the
communication signal between the outdoor and
indoor unit.
• Consult local building codes, NEC (National
Electrical Code) or CEC (Canadian Electrical Code)
for special requirements.
• The following are the electrical requirements.
Model RAV- SP180
Power supply 208/230 V~, 60 Hz
MCA 17 A
MOCP (MAX Fuse/CB) 30 A
Breaker 20 A
Maximum 65’7” (20 m)
Power wire
System
interconnection wires
MCA = Minimum Circuit Amps
MOCP =Maximum Over Protection Device Amps.
2 x AWG12
Ground : AWG14
4 x AWG12
EN
–4–
4-EN
Page 6
Outdoor Unit
Installation Manual
4 PRECAUTIONS FOR SAFETY
Installing, starting up, and servicing air--conditioning equipment can be hazardous due to system pressures,
electrical components, and equipment location (roofs, elevated structures, etc.).
Only trained, qualified installers and service mechanics should install, start--up, and service this equipment.
Untrained personnel can perform basic maintenance functions such as cleaning coils. All other operations should
be performed by trained service personnel.
When working on the equipment, observe precautions in the literature and on tags, stickers, and labels attached
to the equipment.
Follow all safety codes. Wear safety glasses and work gloves. Keep quenching cloth and fire extinguisher nearby
when brazing. Use care in handling, rigging, and setting bulky equipment.
Read these instructions thoroughly and follow all warnings or cautions included in literature and attached to the
unit. Consult local building codes and National Electrical Code (NEC) for special requirements. Recognize safety
information. This is the safety--alert symbol . When you see this symbol on the unit and in instructions or
manuals, be alert to the potential for personal injury.Understand these signal words: DANGER, WARNING, and
CAUTION. These words are used with the safety--alert symbol.
DANGER identifies the most serious hazards which will result in severe personal injury or death. WARNING
signifies hazards which could result in personal injury or death. CAUTION is used to identify unsafe practices which
may result in minor personal injury or product and property damage. NOTE is used to highlight suggestions which
will result in enhanced installation, reliability, or operation.
WARNING
•
Ask an authorized dealer or qualified installation professional to install/maintain the air conditioner.
Perform installation work properly according to the Installation Manual.
Inappropriate installation may result in water leakage, electric shock or fire.
• Be sure to ground the equipment
Improper grounding may cause an electric shock.
Do not connect ground wires to gas pipes, water pipes, lightning rods or ground wires for telephone wires.
• Turn off the circuit breaker before attempting any electrical work and maintenance.
Make sure the circuit breaker is off. Failure to do so may cause electric shock.
Use an exclusive power circuit for the air conditioner. Use the rated voltage.
• When moving the air conditioner for installation to another place, be very careful not to allow the specified
refrigerant (R410A) to become mixed with any other gaseous body into the refrigeration cycle.
If air or any other gas mixes with the refrigerant, the gas pressure in the refrigeration cycle will become abnormally
high and it may result in the pipe bursting or personal injuries.
• Do not modify this unit by removing any of the safety guards or by by-passing any of the safety interlock
switches.
• Do not touch the intake or aluminium fins of the outdoor unit.
Doing so may result in injury.
• Tighten the flare nut with a torque wrench in the specified manner.
Excessive tightening of the flare nut may cause a crack in the flare nut after a long period, which may result in
refrigerant leakage.
• Install the air conditioner securely in a location where the base can sustain the weight of the unit adequately.
• If refrigerant gas has leaked during the installation work, ventilate the room immediately.
If the leaked refrigerant gas comes in contact with fire, noxious gas may be generated.
• After the installation work, confirm that refrigerant gas does not leak.
If refrigerant gas leaks into the room and flows near a fire source, such as a cooking range, noxious gas may be
generated.
• Electrical work must be performed by a qualified electrician in accordance with the NEC and local code. Make
sure the air conditioner uses an exclusive power supply.
An insufficient power supply capacity or inappropriate installation may cause fire.
• Use only the specified wiring during the unit installation. Ensure that all terminals are securely fixed, so
preventing any external forces having a negative effect on the terminals.
5-EN
–5–
Page 7

Outdoor Unit
Installation Manual
WARNING
• When the air conditioner cannot cool or heat a room well, contact the dealer from whom you purchased the
air conditioner as refrigerant leakage is considered as the cause.
In the case of repair that requires refill of refrigerant, ask service personnel about details of the repair.
The refrigerant used in the air conditioner is harmless.
Generally, the refrigerant does not leak. However, if the refrigerant leaks in a room and a heater or stove burner in
the room catches fire, it may generate toxic gas.
When you ask service personnel for repairing refrigerant leakage, confirm that the leakage portion has been
completely repaired.
• Do not install the air conditioner in a location that may be subjected to a risk of exposure to a combustible
gas.
If a combustible gas leaks and becomes concentrated around the unit, a fire may occur.
• Install the refrigerant pipe securely during the installation work before operating the air conditioner.
If the compressor is operated with the valve open and without the refrigerant pipe, the compressor sucks air and the
refrigeration cycle is over pressurized, which may cause a burst or injury.
• When carrying out the pump-down work, shut down the compressor before disconnecting the refrigerant
pipe.
Disconnecting the refrigerant pipe with the service valve left open and with the compressor still operating will cause
air, etc. to be sucked in, raising the pressure inside the refrigeration cycle to an abnormally high level, and possibly
resulting in rupturing, injury, etc.
CAUTION
• Do not climb onto or place objects on top of the outdoor unit.
You may fall or the objects may fall off of the outdoor unit and result in injury.
• Wear heavy gloves during the installation work to avoid injury.
EQUIPMENT DAMAGE HAZARD
Failure to follow this caution may result in equipment damage or improper operation.
Do not bury more than 36 in. (914 mm) of refrigerant pipe in the ground. If any section of pipe is buried, there must be
a 6 in. (152 mm) vertical rise to the valve connections on the outdoor units. If more than the recommended length is
buried, refrigerant may migrate to the cooler buried section during extended periods of system shutdown. This causes
refrigerant slugging and could possibly damage the compressor at start-up.
–6–
EN
6-EN
Page 8

Outdoor Unit
Installation Manual
5 INSTALLATION OF NEW REFRIGERANT
AIR CONDITIONER
CAUTION
New Refrigerant Air Conditioner Installation
• THIS AIR CONDITIONER ADOPTS THE NEW HFC REFRIGERANT (R410A) WHICH DOES NOT DESTROY
OZONE LAYER.
R410A refrigerant is apt to be affected by impurities such as water, oxidizing membrane, and oils because the working
pressure of R410A refrigerant is approx. 1.6 times as that of refrigerant R22. Accompanied with the adoption of the new
refrigerant, the refrigerant oil has also been changed. Therefore, during installation work, be sure that water, dust,
former refrigerant, or refrigerant oil does not enter the new type refrigerant R410A air conditioner cycle.
To prevent mixing of refrigerant or refrigerant oil, the sizes of connecting sections of charging port on main unit and
installation tools are different from those of the conventional refrigerant units. Accordingly, special tools are required for
the new refrigerant (R410A) units. For connecting pipes, use new and clean piping materials with high pressure fittings
made for R410A only, so that water and/or dust does not enter.
Required Tools/Equipment and Precautions for Use
Prepare the tools and equipment listed in the following table before starting the installation work.
: R410A exclusive
: Generic
Tools/equipment Use
Manifold gauge*
Charging hose
Gas leak detector Gas leak check
Vacuum pump with backflow
prevention function
Flare tool Flare machining of pipes Usable if dimensions are adjusted.
Bender Bending pipes
Refrigerant recovery equipment Refrigerant recovery
Torque wrench Tightening flare nuts Ø1/4” (6.4 mm) and Ø1/2” (12.7 mm)
Pipe cutter Cutting pipes
Brazing torch and nitrogen
cylinder
Refrigerant charging scales Charging refrigerant
4 mm hexagon wrench Opening liquid valve
Vacuuming/charging refrigerant
and operation check
Vacuum drying
Braze pipes
7-EN
–7–
Page 9

Outdoor Unit
Installation Manual
Installation Location
WARNING
Install the outdoor unit in a location that can support
the weight of the outdoor unit.
Insufficient durability may cause the outdoor unit to fall,
which may result in injury.
CAUTION
Do not install the outdoor unit in a location that is
subject to combustible gas leaks.
Accumulation of combustible gas around the outdoor
unit may cause a fire.
Install the outdoor unit in a location that meets the
following conditions.
• A well-ventilated location free from obstacles near the
air inlets and air outlet
• A location that does not increase the operating noise
or vibration of the outdoor unit
• A location that does not produce any drainage
problems from discharged water
• Location with easy access to power.
Do not install the outdoor unit in the following
location.
• A location with a saline atmosphere (coastal area) or
one that is full of sulfide gas (hot-spring area) (Special
maintenance is required.)
• A location subject to oil, vapor, oily smoke, or
corrosive gases
• A location in which organic solvent is used
• A location where high-frequency equipment (including
inverter equipment, private power generator, medical
equipment, and communication equipment) is used
(Installation in such a location may cause malfunction
of the air conditioner, abnormal control or problems
due to noise from such equipment.)
• A location in which the discharged air of the outdoor
unit blows against the window of a neighboring house
• A location where the operating noise of the outdoor
unit is transmitted
• When the outdoor unit is installed in an elevated
position, be sure to secure its feet.
• A location in which drain water poses any problems.
When an outdoor unit is installed in a location that is
always exposed to strong winds like a coast or on
the high stories of a building, one of the following is
recommended.
• Install the unit so that its discharge faces the wall of
the structure.
Keep a distance 19.7” (500 mm) or more between the
unit and wall.
19.7" (500 mm)
• Install the unit so that the discharge is at a right angle
relative to the wind direction.
Strong wind
Strong wind
• Use wind baffle. Produce those parts in the field.
• When outside temperature conditions are 23 °F (-5
°C) or lower and unit is running in cooling mode.
<Example>
Wind baffle
Wind baffle
–8–
EN
8-EN
Page 10

Outdoor Unit
Installation Manual
Required Clearances Unit : in (mm)
Barrier at rear side
▼ Upper side is free
1. Single unit installation
2. Barrier on right, left and rear.
or more
7.9” (200)
5.9” (150)
or more
3. Multiple units installation
or more
5.9” (150)
The height of the
barrier should be
lower than the height
of the outdoor unit.
11.8” (300) or more
Barrier in front
▼ Above unit is free
1. Single unit installation
2. Multiple units installation
▼ Barrier also above unit
39.4” (1000)
or more
19.7”(500)
or more
39.4” (1000)
or more
5.9”
(150)
or more
The height of the obstacle should be lower than the
height of the outdoor unit.
11.8”
(300)
or more
11.8”
(300)
or more
▼ Barrier also above unit
19.7” (500)
or more
11.8”
(300)
or more
5.9” (150)
or more
39.4” (1000)
or more
7.9” (200) or more
9-EN
–9–
Page 11

Outdoor Unit
Installation Manual
Barriers in front and back of unit
Open above and to the right and left of the unit.
The height of an barrier in both the front and rear of the
unit, should be lower than the height of the outdoor
unit.
▼ Standard installation
1. Single unit installation
5.9” (150)
or more
39.4” (1000)
or more
2. Multiple unit installation
a. Intake and supply parallel
Installation of Outdoor Unit
• Before installation, check the strength and horizontal
of the base so that abnormal sounds do not
emanate.
• According to the following base diagram, fix the base
firmly with the anchor bolts.
(Anchor bolt, nut: 3/8” (M10) x 4 pairs)
3.5” (90)
12.1” (306)
13.0” (330)
2.4”
Ø
Drain hole
23.6” (600)
4.3” (108)
(60)
1.0” (25)
1) Field fabricate a snow or an ice stand for the
unit using the above dimension.
2) Place snow or ice stand on a foundation/pad
and secure it to the foundation/pad and secure
it to the foundation/pad by anchor bolts.
NOTE
3.5” (90)
11.8” (300) or more
b. Intake and supply in line
Open above and to the right and left of the unit.
The height of an obstacle in both the front and
rear of the unit should be lower than the height
of the outdoor unit.
▼ Standard installation
39.4”
(1000)
or more
11.8”
(300) or
more
59.1”
(1500)
or more
11.8” (300)
or more
78.7”
(2000)
or more
7.9” (200)
39.4” (1000)
7.9”
(200)
or more
or more
or more
When the outdoor unit is anchored directly on
the foundation/pad (cooling only protrude a
minimum of 0.6” (15 mm)).
0.6” (15 mm) or less
–10–
EN
10-EN
Page 12

Outdoor Unit
3) Place unit on stand. Make sure it is level and
fasten securely to the stand.
• As shown in the figure below, install the
foundation and vibration-proof rubber pads to
directly support the bottom surface of the fixing
leg that is in contact with the bottom plate of the
outdoor unit.
• When installing the foundation for an outdoor
unit with downward piping, consider the piping
work.
GOOD
Mounting leg
Foundation
Drain nipple
Drain nipple
Installation Manual
Waterproof rubber cap
(2pcs.)
Waterproof rubber
cap
Base plate
GOOD
Bottom plate
of outdoor unit
Foundation
Support the bottom surface of the
mounting leg that is in contact with
and underneath the bottom plate of
the outdoor unit.
If only the end of the
mounting leg is
supported, it may
deform.
Foundation
NO GOOD
• When water is to be drained through the drain hose,
attach the following drain nipple and waterproof
rubber cap, and use the drain hose (Inner diameter:
0.6” (16 mm)) sold on the market. Also seal the
screws securely with silicone material, etc., to
prevent water from leaking.
Some conditions may cause condensation or
dripping of water.
• When collectively draining discharged water
completely, use a drain pan.
Do not support
the outdoor unit
only with the
mounting leg.
For Reference
If a heating operation is to be continuously performed
for a long time under the condition that the outdoor
temperature is 32 °F (0 °C) or lower, draining defrosted
water may be difficult due to the bottom plate freezing,
resulting in trouble with the cabinet or fan.
11-EN
–11–
Page 13

Outdoor Unit
6 REFRIGERANT PIPING
Installation Manual
CAUTION
TAKE NOTE OF THESE 4 IMPORTANT
POINTS BELOW FOR PIPING WORK
1. Keep dust and moisture away from inside the
connecting pipes.
2. Tightly connect the connection between pipes
and the unit.
3. Evacuate the air in the connecting pipes using a
VACUUM PUMP.
4. Check for gas leaks at connected points.
Flaring
1. Cut the pipe with a pipe cutter.
Be sure to remove burrs that may cause a gas leak.
2. Insert the supplied flare nut into the pipe, and then
flare the pipe.
As the flaring sizes of R410A differ from those of
refrigerant R22, the flare tools newly manufactured
for R410A are recommended.
However, the conventional tools
can be used by adjusting the
projection margin of the copper
pipe.
▼ Projection margin in flaring : B (Unit : in (mm))
Rigid (Clutch type)
Outer diameter of
copper pipe
1/4” (6.4)
1/2” (12.7)
R410A tool
used
R410A
0 - 0.02” (0 - 0.5)
Conventional
tool used
0.04” - 0.06”
(1.0 - 1.5)
Tightening of Flare
Connections
1. Align the centers of the flare connections and fully
tighten the flare nuts with your fingers.
Valve at liquid side
2. Use two wrenches to loosen or tighten the flare nut
B
on the gas service valve as shown in the figure.
Use only one wrench to loosen or tighten the flare
not on the liquid service valve.
The final tightening with a torque wrench should be
to the specifications shown in table below.
Unit : ft•lbs (N•m)
Outer diameter of copper pipe Tightening torque
1/4” (6.4 mm) 10 - 13 (14 - 18)
1/2” (12.7 mm) 37 - 46 (50 - 62)
Valve at gas side
▼ Flaring diameter size : A (Unit : in (mm))
Outer diameter of copper pipe A
1/4” (6.4) 0.39” (9.9)
1/2” (12.7) 0.65” (16.6)
* In case of flaring for R410A with the
conventional flare tool, pull the tool out
approx. 0.02” (0.5 mm) more than that for
R22 to adjust it to the specified flare size.
The copper pipe gauge is useful for
adjusting the projection margin size.
+0
-0.02" (–0.4)
A
–12–
EN
12-EN
Page 14

Outdoor Unit
• After the installation work, be sure to check for gas
leaks of the pipe connections with nitrogen.
NO GOOD
CAUTION
1. Do not put the crescent wrench on the charge
orifice or cover.
The valve may be broken.
2. If applying excessive torque, the nut may break
according to some installation conditions.
Installation Manual
• Pressure of R410A is higher than that of R22
(Approx. 1.6 times).
Therefore, using a torque wrench, tighten the flare
pipe connecting sections that connect the indoor/
outdoor units at the specified tightening torque.
Incomplete connections may cause not only a gas
leak, but also trouble with the refrigeration cycle.
Do not apply refrigerant oil to the flared
surface.
13-EN
–13–
Page 15

Outdoor Unit
7 ELECTRICAL CONNECTIONS
Installation Manual
WARNING
ELECTRICAL SHOCK HAZARD
Failure to follow this warning could result in
personal injury or death.
• The unit cabinet must have an uninterrupted or
unbroken ground to minimize personal injury if an
electrical fault should occur. The ground may consist
of electrical wire or metal conduit when installed in
accordance with existing electrical codes.
• Before performing service or maintenance, be sure
main power switch is turned OFF.
CAUTION
UNIT DAMAGE HAZARD
Failure to follow this caution may result in damage
or improper operation.
• Unit failure as a result of operation on improper line
voltage or excessive phase imbalance constitutes
abuse and may cause damage to electrical
components.
• Wrong wiring may cause a burn-out of some electrical
parts.
• Do not damage or scratch the conductive core or inner
insulator of the power and inter-connecting wires
when peeling them.
Field wiring
The dashed lines show field wiring.
(Main circuit)
Input
power
208/230 V~,
60 Hz
circuit breaker
ground
• Connect the indoor/outdoor connecting wires to the
identical terminal numbers on the terminal block of
each unit.
Incorrect connection may cause a failure.
1. With the valve cover removed the electrical control
box is exposed the side of the unit.
2. Terminate the field wiring conduit (if used) at the
conduit connection holes provided.
3. Route the field power wires and the system
interconnection wires (indoor to outdoor). Terminate
the wires at field wiring terminal blocks.
Field wiring terminal blocks
(Indoor/outdoor
connecting wires)
L
L
1
L
1
L
2
L
2
S
Outdoor unit Indoor unit
L1 L2 SL1 L2
1
L
2
S
Remote
controller
System
interconnection wires
Valve cover
Field power
supply wires
Conduit
L1 L2 L1 L2S
Ground screw
System interconnection
wires
Field power
supply wires
Wiring
All wiring and connections must comply with NEC,
CEC, local codes.
1. Connect all wires to the correct terminal on the
wiring terminal blocks.
2. Make sure that all connectors are secure.
3. Size connectors per the ratings listed in the system
requirement section.
4. System interconnections should be minimum, 16
AWG.
EN
–14–
14-EN
Page 16

Outdoor Unit
8 EVACUATE AND DEHYDRATE THE
SYSTEM
Installation Manual
CAUTION
UNIT DAMAGE HAZARD
Failure to follow this caution may result in equipment
damage or improper operation.
Never use the system compressor as a vacuum pump.
Refrigerant tubes and indoor heat exchanger should
be evacuated using the recommended deep vacuum
method of 500 microns. The alternate triple evacuation
method may be used if the procedure outlined below is
followed. Always break a vacuum with dry nitrogen.
SYSTEM VACUUM AND
CHARGE
Using Vacuum Pump
1. Completely tighten flare nuts A, B, C, D, connect
manifold gage charge hose to a charge port of the
low side service valve.
Service Valve
Outdoor Unit
Service Valve
A
B
Refrigerant
Low Side
High Side
Indoor Unit
C
D
5. Evacuate using either deep vacuum or triple
evacuation method.
6. After evacuation is complete, fully close the low side
of manifold gage and stop operation of vacuum
pump.
Deep Vacuum Method
The deep vacuum method requires a vacuum pump
capable of pulling a vacuum of 500 microns and a
vacuum gage capable of accurately measuring this
vacuum depth. The deep vacuum method is the most
positive way of assuring a system is free of air and
liquid water.
Deep Vacuum Graph
5000
4500
MICRONS
4000
3500
3000
2500
2000
1500
1000
500
0
1 2 3 4 5 6 7
MINUTES
LEAK IN
SYSTEM
VACUUM TIGHT
TOO WET
TIGH T DRY
SYSTEM
2. Connect charge hose to vacuum pump.
3. Fully open the low side of manifold gage.
Manifold
500 microns
Low side valve
Charge hose
Charge port
(Valve core (Setting pin))
Manifold Gage
High side valve
Charge hose
Vacuum pump
Packed valve at gas side
4. Start vacuum pump.
Triple Evacuation Method
The triple evacuation method should only be used
when vacuum pump is only capable of pumping down
to 28 in. of mercury vacuum and system does not
contain any liquid water.
Refer to “Triple Evacuation Method chart” and proceed
as follows:
1. Pump system down to 28 in. of mercury and allow
pump to continue operating for an additional 15
minutes.
2. Close service valves and shut off vacuum pump.
3. Connect a nitrogen cylinder and regulator to system
and open until system pressure is 2 psig.
4. Close service valve and allow system to stand for 1
hr. During this time, dry nitrogen will be able to
diffuse throughout the system absorbing moisture.
5. Repeat this procedure as indicated in the chart.
System will then be free of any cotaminants and
water vapor.
15-EN
–15–
Page 17

Outdoor Unit
Installation Manual
Triple Evacuation Method chart
EVACUATE
▼
BREAK VACUUM WITH DRY NITROGEN
▼
WAIT
▼
EVACUATE
▼
BREAK VACUUM WITH DRY NITROGEN
▼
WAIT
▼
EVACUATE
▼
CHECK FOR TIGHT, DRY SYSTEM
(IF IT HOLDS DEEP VACCUM)
▼
RELEASE CHARGE INTO SYSTEM
Final Tubing Check
IMPORTANT:
Check to be certain factory tubing on both indoor and
outdoor unit has not shifted during shipment. Ensure
tubes are not rubbing against each other or any sheet
metal. Pay close attention to feeder rubes, making sure
wire ties on feeder tubes are secure and tight.
Open service valves
Open or close the valve.
▼ Liquid and gas side
Open the valve with a 4 mm hexagon wrench.
[Hexagonal wrench is required.]
)
m
m
4
(
”
6
1
.
0
• While the valve is fully opened, after the screwdriver
has reached the stopper, do not apply torque
exceeding 4 ft•lbs (5 N•m). Applying excessive
torque may damage the valve.
Valve handling precautions
• Open the valve stem until it reaches the stop.
It is unnecessary to apply further force.
• Securely tighten the cap with a torque wrench.
• Cap tightening torque
Valve size
Charge port 10 - 13 ft•lbs (14 - 18 N•m)
Ø1/4” (6.4 mm) 10 - 13 ft•lbs (14 - 18 N•m)
Ø1/2” (12.7 mm) 24 - 31 ft•lbs (33 - 42 N•m)
–16–
EN
16-EN
Page 18

Outdoor Unit
Installation Manual
9 FINISHING
After the refrigerant pipe, inter-unit wires, and drain pipe have been connected, make sure they are supported and
fixed in place for the entire length.
Keep the power wires and system interconnection wires away from all factory wiring and piping.
10TEST RUN
• Turn on the circuit breaker at least 12 hours before starting the system to preheat the compressor and
prevent damage.
To protect the compressor, power is supplied from the 208/230 VAC input to the unit to preheat the compressor.
• Check the following before starting a test run:
• That all pipes are connected securely without leaks.
• That the valve is open.
If the compressor is operated with the valve closed, the outdoor unit will become over pressurized, which may
damage the compressor or other components.
If there is a leak at a connection, air can be sucked in and the internal pressure further increases, which may
cause a burst or injury.
• Operate the air conditioner using the correct procedure as specified in the Owner’s Manual.
11PERIODIC MAINTENANCE
• For an air conditioning system that is operated on a regular basis, cleaning and maintenance of the indoor/
outdoor units are strongly recommended.
As a general rule, if an indoor unit is operated for about 8 hours daily, the indoor/outdoor units will need to be
cleaned at least once every 3 months. This cleaning and maintenance should be carried out by a qualified
service person.
Failure to clean the indoor/outdoor units regularly will result in poor performance, icing, water leaking and even
compressor failure.
17-EN
–17–
Page 19

Outdoor Unit
Installation Manual
12UNIT PUMP DOWN
• Use the refrigerant recovery switch on the terminal
block of the outdoor units to pump down the unit.
Procedure
1. Start cooling operation for a while, and then stop the
operation.
2. Turn on the power of the air conditioner.
3. Select the FAN mode for indoor unit operation with
the remote controller.
4. Press reftigerant recovery switch for 2 seconds or
more. The air conditioner enters the forced cooling
mode for up to 10 minutes.
Pump down the unit during this 10 minutes.
5. Upon completion of pump down the unit, close the
valve and press refrigerant recovery switch for at
least 2 second to stop operation.
6. Turn off the power.
Refrigerant recovery switch
SW801
SW801
ON
123
... Power save setting
* All switches are OFF as factory default.
CAUTION
Do not touch SW801 dip switch 1, 3.
If any changes are made, the unit may not work properly.
DANGER
Be careful of electric shock because the P.C. board has
an electrical current running through it.
13POWER SAVE
• Power save can be set by setting SW801 dip switch.
Procedure
1. Turn on the SW801 dip switch 2 to activate Power
save.
Power save controls reducing compressor periodicity
(by approx. 10%) depending on the indoor unit heat
exchanger temperature in heating operation
EN
–18–
18-EN
Page 20

EH99865301
 Loading...