

o
a
n
d
C
C
l
e
USER MANUAL
Safety Precautions
Operating Instructions
Installation Instructions
Care and Cleaning
Care
Troubleshooting Tips
Troublesho
Remote control and App
instructions
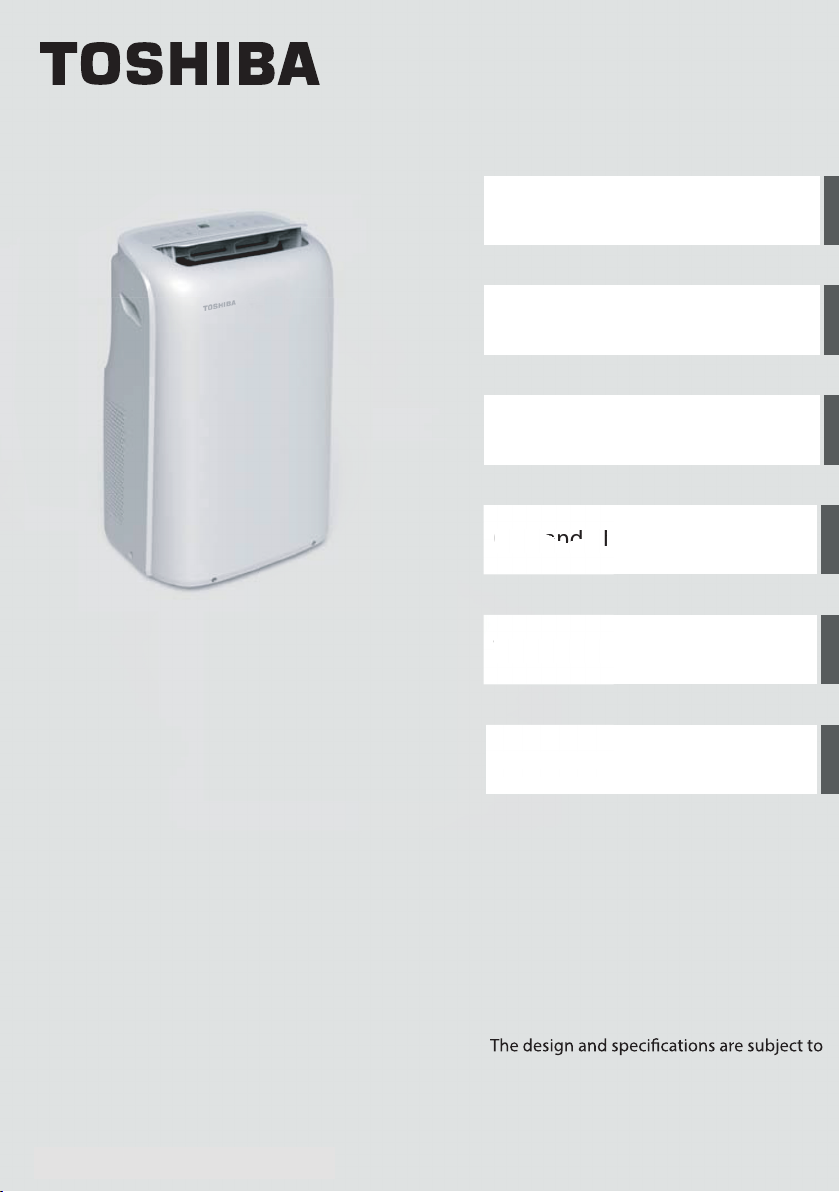
Portable Type
Room Air Conditioner
RAC-PD0812CRRC
RAC-PD1213CWRC
version A - 01 - 2020 (PREVIEW01)
Warning notices: Before using this product,
please read this manual carefully and keep
it for future reference.
change without prior notice for product
improvement. Consult with your dealer or
the manufacturer for details.

User Manual
Safety Precautions .................................................................................................................... 3
Operating Instructions ............................................................................................................ 8
Installation Instructions ........................................................................................................ 13
Care and Cleaning .................................................................................................................. 18
Troubleshooting Tips ............................................................................................................. 19
Remote Control and App Instructions ............................................................................ 20
Read This Manual
Inside you’ll nd many helpful hints on how to use and maintain your air conditioner properly.
Just a little preventive care on your part can save you a great deal of time and money
over the life of your air conditioner. You’ll nd many answers to common problems in the
troubleshooting tips - you should be able to x most of them quickly before calling service.
These instructions may not cover every possible condition of use, so common sense and
attention to safety is required when installing, operating and maintaining this product.
CAUTION
• For support, please call the Service Center at 1-855-238-5607.
• This appliance is not intended for use by persons (including children) with reduced physical,
sensory or mental capabilities or lack of experience and knowledge, unless they have been
given supervision or instruction concerning use of the appliance by a person responsible for
their safety.
• Children should be supervised to ensure that they do not play with the air conditioner.
• The appliance shall be installed in accordance with national wiring regulations.
• Do not operate your air conditioner in a humid room such as a bathroom or laundry room.
Page 2 User Manual
SAFETY PRECAUTIONS
To prevent injury to the user or other people and property damage, the instructions shown here must be
followed. Incorrect operation due to ignoring of instructions may cause harm or damage. The level of risk
is shown by the following indications.
Precautions
Safety
WARNING
CAUTION
NOTICE
This symbol indicates a hazardous situation which, if not avoided,
could result in death or serious injury.
This symbol indicates a hazardous situation, which, if not avoided,
could result in minor or moderate injury.
This symbol addresses practices not related to physical injury.
WARNING
• Be sure the air conditioner has been securely and correctly installed according to the
installation instructions in this manual. Save this manual for possible future use in removing or
installing this unit.
• Plug in power cord plug properly.
Otherwise, it may cause electric shock or re due to excess heat generation.
• Do not modify power cord length or share the outlet with other appliances as it may cause
electric shock or re due to overheating.
• Always ensure e ective grounding.
Incorrect grounding may cause electric shock.
• Unplug the unit if you notice unusual sounds or smells or smoke coming from it.
A damaged product may cause re and electric shock.
• Ventilate room before operating the air conditioner if there is a gas leakage from another
appliance.
• Do not operate or stop the unit by inserting or pulling out the power cord plug.
• Do not operate with wet hands or in very humid environments.
It may cause electric shock.
• Do not allow water to come into contact with any electric parts.
It may cause failure or electric shock.
• Do not use the socket if it is loose or damaged.
It may cause re and electric shock.
• Do not use or keep the power cord close to heating appliances.
It may cause re and electric shock.
• Do not use any devices or materials for installation that are not recommended in this manual.
• Do not disassemble or modify unit.
It may cause failure and electric shock.
User Manual Page 3
Precautions
Safety
WARNING
• Do not damage or use an alternate power cord.
It may cause re and electric shock.
If the power cord is damaged, it must be replaced by the manufacturer or an authorized service
center or a similarly quali ed person in order to avoid a hazard.
• Do not direct air ow straight into persons to avoid possible health hazard.
• Do not open the unit during operation.
It may cause electric shock.
• Do not use the power cord near ammable gas or combustibles, such as gasoline, benzene,
thinner, etc.
It may cause an explosion or re.
• Do not let children hang on the air conditioner or bracket.
A serious injury may occur.
• Avoid re hazard or electric shock. Do not use an extension cord or an adaptor plug. Do not
remove any prongs from the power cord.
• Be sure the air conditioner is properly grounded. To minimize shock and re hazards, proper
grounding is important. The power cord is equipped with a three-prong grounding plug for
protection against shock hazards.
• Your air conditioner must be used in a properly grounded wall receptacle. If the wall receptacle
you intend to use is not adequately grounded or protected by a time delay fuse or circuit
breaker, have a quali ed electrician install the proper receptacle. Ensure the receptacle is
accessible after the unit installation.
• Be sure the electrical service is adequate for the model you have chosen. This information can be
found on the serial plate, which is located on the side of the cabinet and behind the grille.
CAUTION
• When the air lter is to be removed, do not touch the metal parts of the unit.
It may cause injury.
• When the unit needs cleaning, switch o , and turn o the circuit breaker.
Do not clean unit when power is on as it may cause re, electric shock or injury.
• Do not place obstacles around air inlets or inside of air outlet.
It may cause failure or accident.
• Clean with a soft cloth only. Do not use strong detergents that contain wax or thinners as it may
damage the product.
• Use caution when unpacking and installing. Sharp edges could cause injury.
• Do not clean the air conditioner with water.
Water may enter the unit and degrade the insulation which could lead to electric shock.
• Do not put a pet or house plant where it will be exposed to direct air ow.
This could injure the pet or harm the plant.
Page 4 User Manual
CAUTION
• Hold the plug by the head of the power plug when taking it out.
Otherwise, it may cause electric shock and damage.
• Ensure that the installation is properly secured to prevent the product from potentially falling.
• Do not place heavy objects on the power cord and ensure that the cord is not compressed.
Otherwise, there is danger of re or electric shock.
• If water is spilled on the unit, turn o the unit and switch o the circuit breaker. Isolate supply by
taking the power-plug out and contact a quali ed service technician.
• Do not use near gas stove or other gas burning appliances, as air ow may a ect gas
combustion.
• Do not use for any purpose other than room comfort.
Do not use this air conditioner to preserve precision devices, food, pets, plants, and art objects.
It may cause deterioration.
• Turn o the main power switch if the unit is not to be used for an extended time.
• Always insert the lters securely. Clean lter once every two weeks.
Operation without lters may cause failure.
• Do not drink water drained from the air conditioner.
Precautions
Safety
Caution: Risk of fire/
flammable materials
(Required for R32/R290 units only)
User Manual Page 5
IMPORTANT NOTE: Read this manual
carefully before installing or operating
your new air conditioning unit. Make sure
to save this manual for future reference.
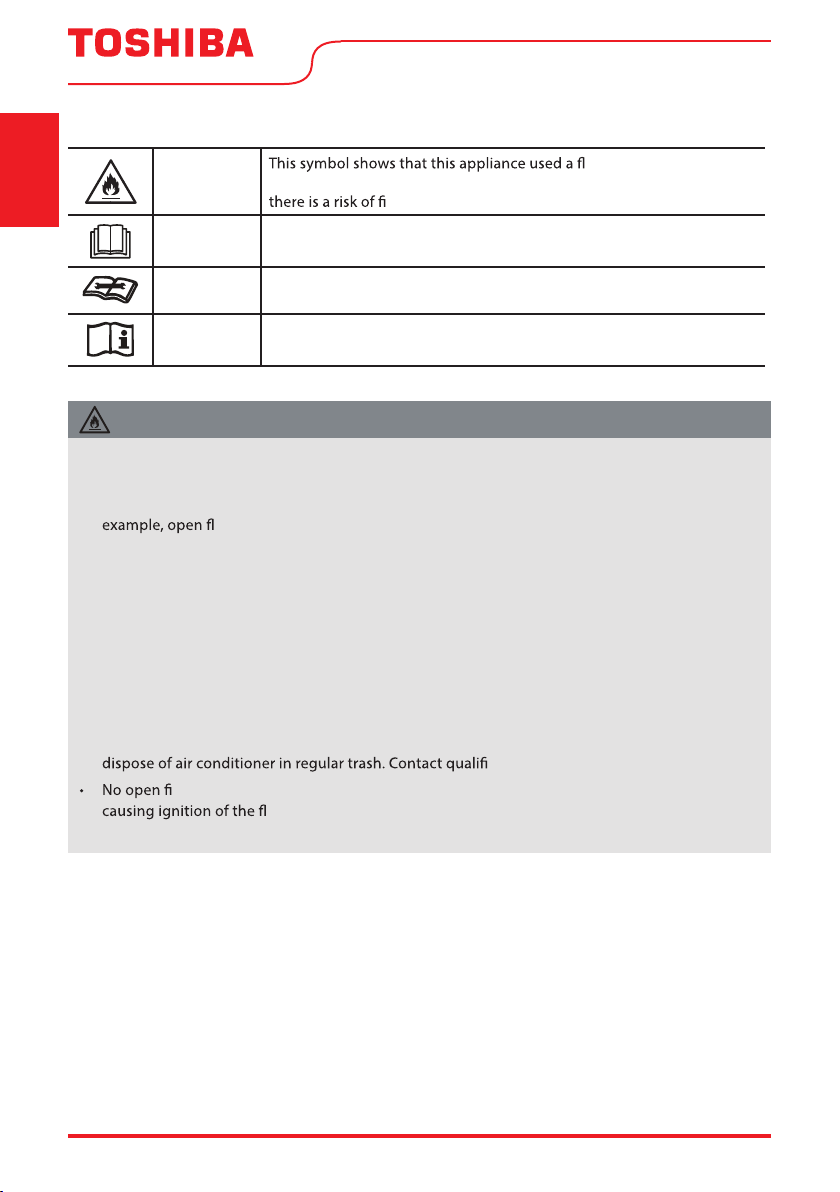
EXPLANATION OF SYMBOLS DISPLAYED ON THE UNIT
Precautions
Safety
WARNING
If the refrigerant is leaked and exposed to an external ignition source,
re.
ammable refrigerant.
CAUTION
CAUTION
CAUTION
This symbol shows that the operation manual should be read carefully.
This symbol shows that a service personnel should be handling this
equipment with reference to the installation manual.
This symbol shows that information is available such as the operating
manual or installation manual.
WARNING (for using R32 refrigerant only)
• Do not try to accelerate the defrosting process or methods of cleaning that are not
recommended by the manufacturer.
• The appliance shall be stored in a room without a continuously operating ignition source (for
ames or an operating gas appliance) or an ignition source (for example, an
operating electric heater) close to the appliance. The appliance shall also be stored in a room
without ignition sources.
• Do not pierce or burn.
• Be aware that the refrigerants may not contain an odor.
• Keep ventilation openings clear of obstruction.
• Unit is only to be serviced by a Toshiba authorized servicer, please call Customer Service at
1-855-238-5607 for support.
• Flammable refrigerant R32 is used within air conditioner. Please follow the instructions carefully
to handle, install, clean, and service the air conditioner to avoid damage or hazard. Do not
ed agency for proper disposal.
re or devices that generate spark/arcing shall be around the air conditioner to avoid
ammable refrigerant used. Please follow the instructions carefully to
store or maintain the air conditioner to prevent mechanical damage from occurring.
Page 6 User Manual
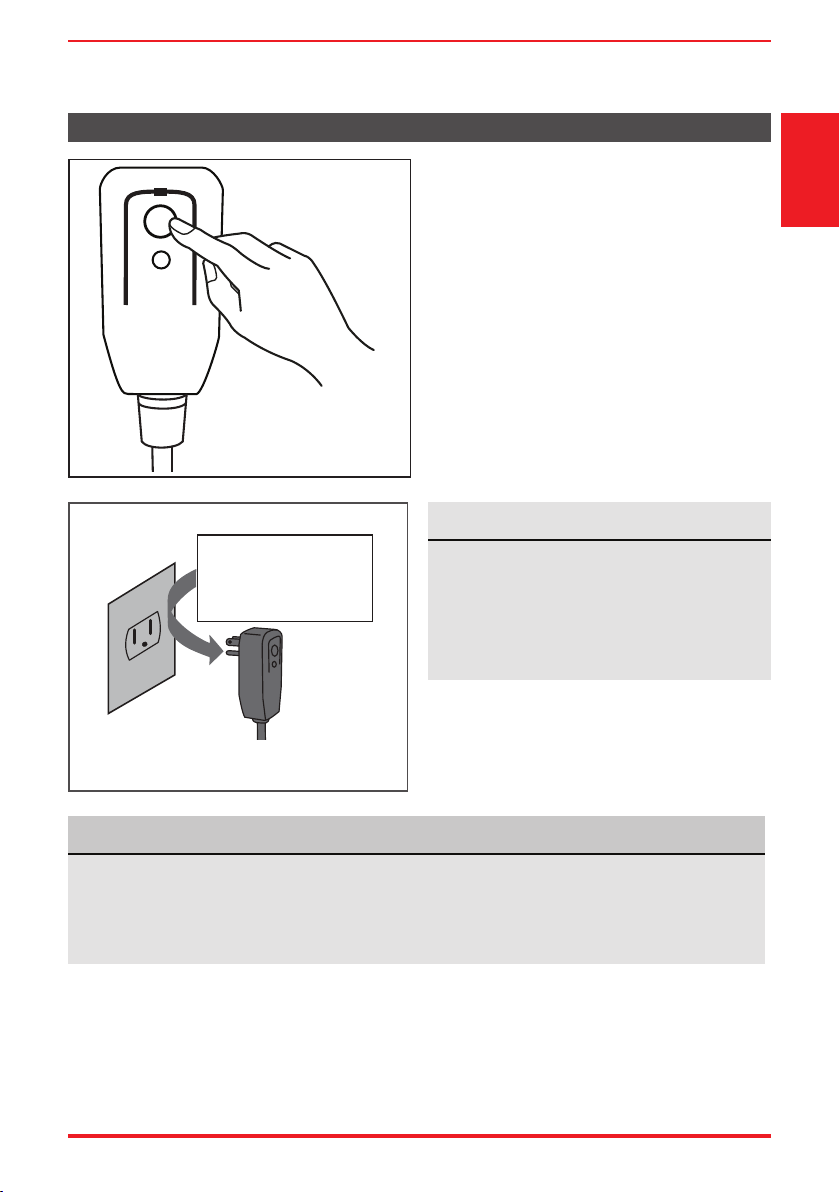
Operation of Current Device
Plug in & press RESET
RESET
TEST
The power supply cord contains a current
measuring device that detects damage to the
power cord. Test your power supply cord as
follows:
1. Plug in the air conditioner.
2. The power supply cord will have TWO
buttons on the plug head. Press the TEST
button. You will notice a click as the RESET
button pops out.
3. Press the RESET Button. You will notice a click
as the button engages.
4. The power supply cord is now supplying
electricity to the unit. (On some products this
is also indicated by a light on the plug head.)
Precautions
Safety
Grounding type wall receptacle
Do not, under any
circumstances, cut,
remove or bypass
the grounding prong.
NOTICE
The power supply cord with this air conditioner
contains a current detection device designed
to reduce the risk of re.
In the event that the power supply cord is
damaged, it can not be repaired. It must be
replaced with a cord from the manufacturer.
Power supply cord with 3-prong grounding
plug and current detection device.
NOTICE
• Do not use this device to turn the unit on or o .
• Always make sure the RESET button is pushed in for correct operation.
• The power supply cord must be replaced if it fails to reset when either the TEST button is pushed,
or it can not be reset. Please contact Customer Service.
User Manual Page 7
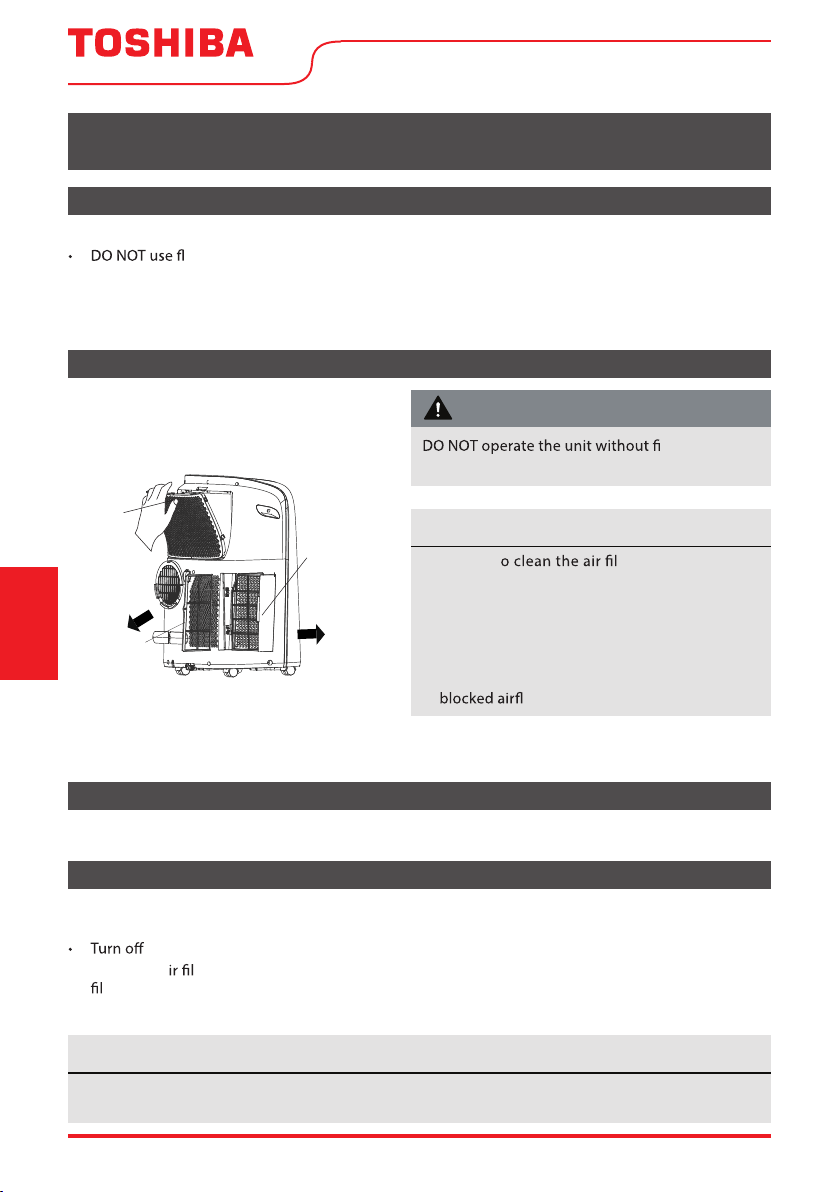
Instructions
OPERATING INSTRUCTIONS
Preparation
control panel
horizontal louver
blade
(automatic swing)
handle
(both sides)
Operating
Panel
upper air filter
( Integrated
design air filter )
upper air intake
drain outlet
air outlet
lower air filter
lower air intake
drain outlet
(only for pump
heating mode)
Caster
power cord buckle
power cord outlet
tnorF
bottom tray
drain outlet
raeR
Design and Compliance Notes
Design Notice:
remote control are subject to change without prior notice.
Energy Rating Information:
The Energy Rating for this unit is based on an installation using an unextended exhaust duct without
adaptors A or B (as shown in the Installation section of this manual).
Unit Temperature Range:
Heat (heat pump mode) 5°C ~ 30°C (41°F ~ 86°F)
Heat (electrical heat mode) ≤ 30°C (86°F)
Exhaust Hose Installation:
The exhaust hose and adaptor must be installed or removed in accordance with the usage mode.
For COOL, HEAT (heat pump type) or AUTO mode, exhaust hose must be installed.
For FAN, DEHUMIDIFY or HEAT (electrical heat type) exhaust hose must be removed.
cations of the unit and
egnaR erutarepmeTedoM
)F°59 ~ F°26( C°53 ~ C°71looC
)F°59 ~ F°55( C°53 ~ C°31yrD
Page 8 User Manual
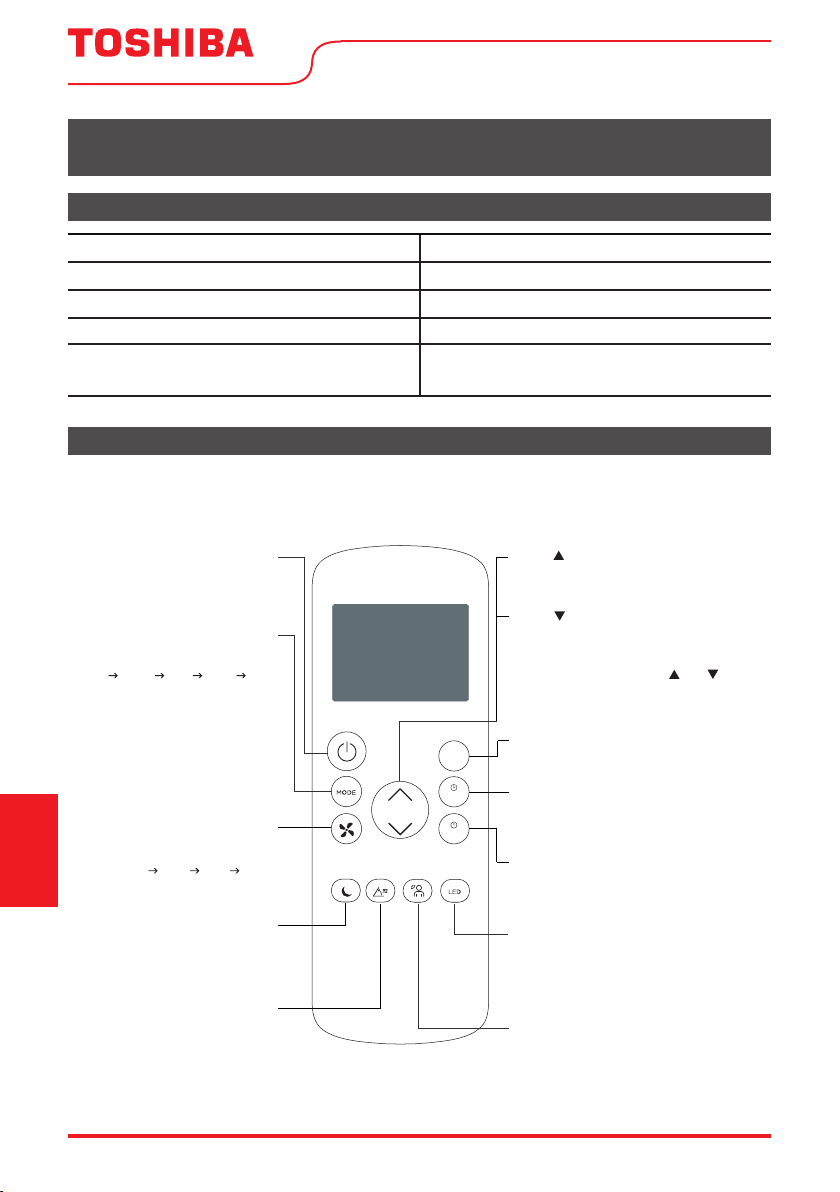
Control Panel Features
(Press 3s)
(Presse 3s)
Follow Me
LED Display
VENT CONSTANT(Presse 3s)
Connect Indicator Light
(Smart models only)
Swing
Button
Swing Button
Used to initiate the Auto Swing feature. When the
operation is ON, pressing the SWING button can
stop the louver at the desired angle.
Connect Button (Smart models only)
Also used to initiate the wireless connection mode.
To initiate the wireless connection mode, power on
the air conditioner then press the SWING button
for 3 seconds. The LED DISPLAY will show ‘AP’ to
indicate the unit is in wireless connection mode.
Refer to the app connection instructions to nish
the connection process.
Timer
Button
Mode
Button
Up (
) and Down ( )
Buttons
Fan
Button
Sleep
Button
Power
Button
Mode button
Selects the desired operating mode. Each time you
press the button, a mode is selected in a sequence
that goes from AUTO, COOL, DRY, FAN and HEAT
(cooling only models excluded). The mode light
illuminates and indicates the selected mode.
Up ( ) and Down ( ) buttons
Used to adjust (increasing/decreasing) temperature
settings in 1°C/1°F(or 2°F) increments in a range of
17°C/62°F to 30°C/86°F or the TIMER setting in a range
of 0 ~ 24hrs.
NOTICE
If the connection is successful, the unit will exit
wireless connection mode and illuminate the
wireless LED. If the connection fails, the unit will
exit wireless connection mode automatically after 8
minutes and the wireless LED does not illuminate.
Note: The wireless connection process must be
completed within 8 minutes after powering t
he air
conditioner on.
Timer button
Used to initiate the AUTO ON start time and AUTO OFF
stop time program, in conjuction with the Up ( )
and Down ( light will
illuminate depending on the selected setting.
Fan button
Controls the fan speed. Press to control the fan speed
in four steps - LOW, MID, HIGH and AUTO. The selected
fan speed light (except AUTO) will illuminate. When
AUTO is selected, no lights will illuminate.
NOTE: In ing or Dry mode, press the Fan button
for 3
function. When the function is turned on, the
constant fan light will illuminate, identifying the fan
continuous run for cooling. When the function is
identifying the fan cycle run with compressor stop.
Cool
onstant fan light will go out,
The control is capable of displaying temperature in
degrees Fahrenheit or degrees Celsius. To convert
from one to the other, press and hold the Up and
Down buttons at the same time for 3 seconds.
Power button
Power switch on/o .
Sleep button
Used to initiate the SLEEP operation.
LED display
Shows the set temperature in °C (Degrees
Celsius) or °F (Degrees Fahrenheit) and the
Auto-timer settings. While on DRY and FAN
modes, it shows the room temperature.
Shows Error codes and protection code:
E1 - Room temperature sensor error.
E2 - Evaporator temperature sensor error.
E3 - Condenser temperature sensor error
(select models).
E4 - Display panel communication error.
P1 - Bottom tray is full - Connec t the drain
hose and drain the collected water
away. If protection co
for ser vice.
de repeats, call
User Manual Page 9
Instructions
Operating
Operating Instructions
NOTICE
When one of the above malfunctions
the unit and check for
any obstructions. Restart the Unit. If the
the unit
and unplug the power cord. Contact the
manufacturer or its service agents or a
ed person for service.
COOL operation
• Press the “MODE” button until the “COOL”
Instructions
Operating
indicator light comes on.
• Press the ADJUST buttons Up (
Down (
temperature. The temperature can be set
within a range of 17°C~30°C/62°F~86°F.
• Press the “FAN SPEED” button to choose the fan
speed.
) to select your desired room
) or
HEAT operation
(available on HEAT models only)
• Press the “MODE” button until the “
indicator light comes on.
• Press the ADJUST buttons Up (
Down ( ) to select your desired room
temperature. The temperature can be set
within a range of 17°C~30°C/62°F~86°F.
• Press the “FAN SPEED” button to choose the fan
speed. For some models, the fan speed cannot
be adjusted while in HEAT mode.
”
) or
DRY operation
• Press the “MODE” button until the “DRY”
indicator light comes on.
• While in this mode, you cannot select a fan
speed or adjust the temperature. The fan
motor operates at LOW speed.
• Keep windows and doors closed for the best
• Do not connect the duct to a window.
ect.
AUTO operation
• When you set the air conditioner to AUTO mode,
it will automatically select cooling, heating
(cooling only models excluded), or fan only
operation depending on what temperature you
have selected and the current room temperature.
• The air conditioner will control room
temperature automatically according to the
temperature point set by you.
• Under AUTO mode, you cannot select the fan
speed.
Page 10 User Manual
FAN operation
• Press the “MODE” button until the ”FAN“
indicator light comes on.
• Press the “FAN SPEED” button to choose the fan
speed. The temperature cannot be adjusted.
• Do not connect the duct to a window.
TIMER operation
• When the unit is on, pressing the Timer button
OFF indicator light illuminates. Press the Up (
or Down (
Press the TIMER button again within 5 seconds.
The Auto-on start program is initiated and the
TIMER ON indicator light illuminates. Press the
Up (
desired Auto-on start time.
initiate the Auto-on start program. Pressing it
stop program.
• Press or hold the Up (
button to change the Auto time by 0.5 hour
increments, up to 10 hours, then at 1 hour
increments up to 24 hours. The control will
count down the time remaining until start.
• The system will automatically revert back to
display the previous temperature setting if there
is no operation within 5 seconds.
• Turning the unit ON or OFF at any time or
adjusting the timer setting to 0.0 will cancel the
Auto Start/Stop timer program.
• Should a malfunction occur, the Auto Start/Stop
timed program will also be cancelled.
) button to select the desired time.
) or Down ( ) button to select the
stop program. The TIMER
, press the Timer button to
ve seconds will initiate the Auto-
) or Down ( )
SLEEP operation
Pressing this button will increase (during cooling
operation) or decrease (during heating operation,
applicable models) 1°C/1°F after 30 minutes.
The temperature will again increase (cooling) or
decrease (heating) by another 1°C/1°F after an
additional 30 minutes. This new temperature will
be maintained for 7 hours before returning
originally selected temperature. This ends the
Sleep mode and the unit will continue to operate
as originally programmed.
NOTICE
This feature is unavailabe in FAN or DRY mode.
)
to the
Other Features
FOLLOW ME/TEMP SENSING feature
This feature can be activated from the remote control ONLY. The remote control serves as a remote
thermostat allowing for the precise temperature control at its location. To activate the Follow Me/Temp
Sensing feature, point the remote control towards the unit and press the Follow Me/Temp Sensing
button. The remote control will send this signal to the air conditioner until press the Follow Me/Temp
Sensing button again. If the unit does not receive the Follow Me/Temp Sensing signal during any 7
minutes interval, the unit will exit the Follow Me/Temp Sensing mode.
NOTE: This feature is unavailabe under FAN or DRY mode.
AUTO-RESTART
If the unit shuts o unexpectedly due to a power outage, it will restart with the previously set function
automatically when the power resumes.
WAIT 3 MINUTES BEFORE RESUMING OPERATION
After the unit has stopped, it cannot be restarted until 3 minutes time has elapsed. This is to protect the
unit. Operation will automatically resume after 3 minutes.
AIRFLOW DIRECTION ADJUSTMENT
The louver can be adjusted automatically. Adjust the air ow direction automatically.
• When the Power is ON, the louver opens fully.
• Press the SWING button on the panel or remote controller to initiate the Auto Swing feature. The
louver will swing up and down automatically.
• Please do not adjust the louver manually.
Instructions
Operating
WATER DRAINAGE
Remove
the upper
drain plug
Continuous
drain hose
• During dehumidifying modes, remove the upper drain plug
from the back of the unit and install the drain connector (5/8”
universal female mender) with 3/4” hose (locally purchased).
For models without drain connector, just attach the drain hose
to the hole. Place the open end of the hose directly over the
drain area in your basement oor.
¥
User Manual Page 11
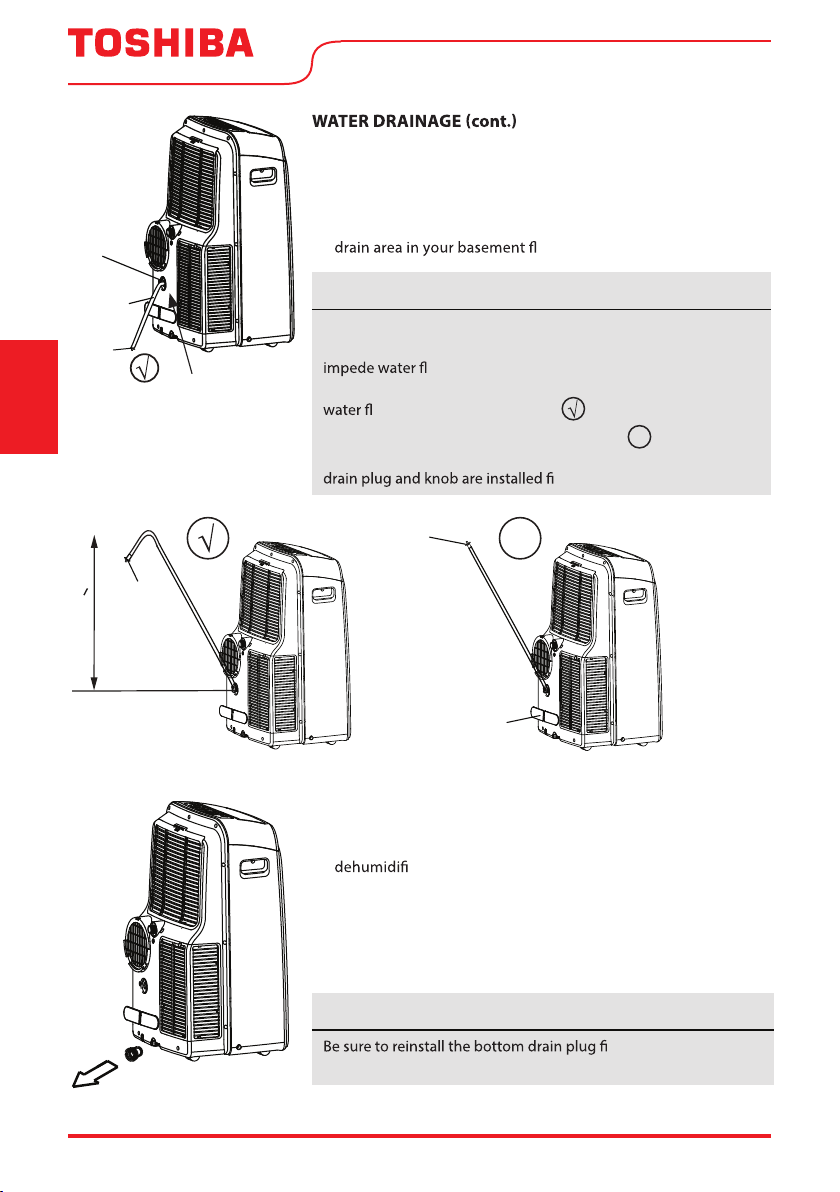
Remove the
lower drain
plug
• During heating mode, remove the lower drain plug from the
back of the unit and install the drain connector (5/8” universal
female mender) with 3/4” hose (locally purchased). For models
without drain connector, just attach the drain hose to the
hole. Place the open end of the hose adaptor directly over the
oor.
Instructions
Continuous
drain hose
Drain hose
adaptor
Operating
Delivery lift <1.8m
Drain
hose
adaptor
Units with
Pump Only
NOTICE
Make sure the hose is secure so there are no leaks. Direct the hose
toward the drain, making sure that there are no kinks that will
ow. Place the end of the hose into the drain and
make sure the end of the hose is directed downward to let the
ow smoothly. (See Figs with ).
Installation not recommended. (See Figs with
continuous drain hose is not used, ensure that the corresponding
rmly to prevent leakage.
). When the
X
Drain hose
adaptor
X
Press the power
cord buckle into
the rear cover.
Units with Pump Only
• When the water level of the bottom tray reaches a
predetermined level, the unit beeps 8 times. The digital
display shows “P1.” At this time the air conditioning/
cation process will immediately stop. However, the
fan motor will continue to operate (this is normal). Carefully
move the unit to a drain location, remove the bottom drain
plug and let the water drain away. Reinstall the bottom drain
plug and restart the machine until the “P1” symbol disappears.
If the error repeats, call for service.
NOTICE
rmly to prevent
leakage before using the unit.
Page 12 User Manual
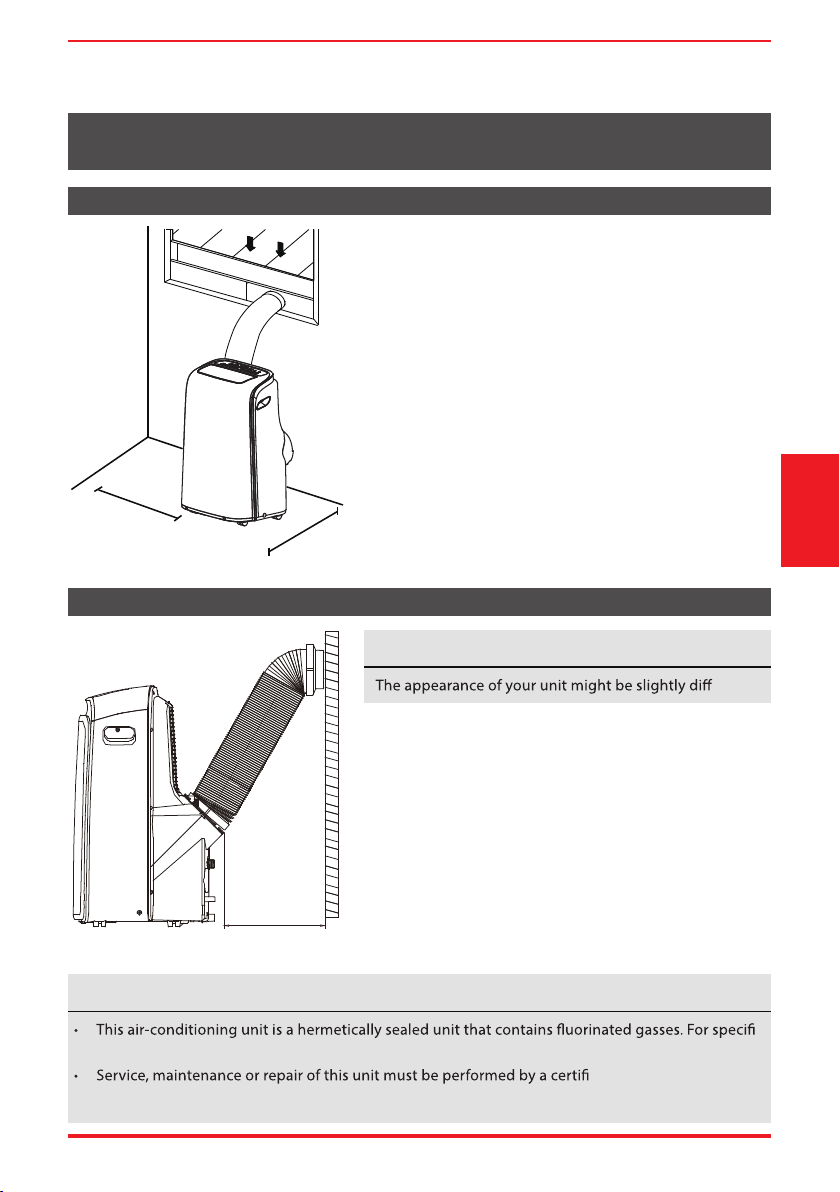
INSTALLATION INSTRUCTIONS
Choosing the Right Location
Your installation location should meet the following
requirements:
• Make sure that you install your unit on an even
surface to minimize noise and vibration.
• The unit must be installed near a grounded plug, and
the Collection Tray Drain (found on the back of the
unit) must be accessible.
The unit should be located at least 50 cm (19.7”) from
•
the nearest wall to ensure proper air conditioning.
• DO NOT cover the Intakes, Outlets or Remote Signal
Receptor of the unit, as this could cause
50 cm
19.7 inch
50 cm
19.7 inch
Recommended Installation
the unit.
NOTICE
damage to
erent.
Instructions
Installation
50cm
19.7inch
NOTICE About Fluorinated Gasses
c
information on the type of gas and the amount, please refer to the relevant label on the unit itself.
ed technician.
• Product recycling must be done according to local regulations.
User Manual Page 13
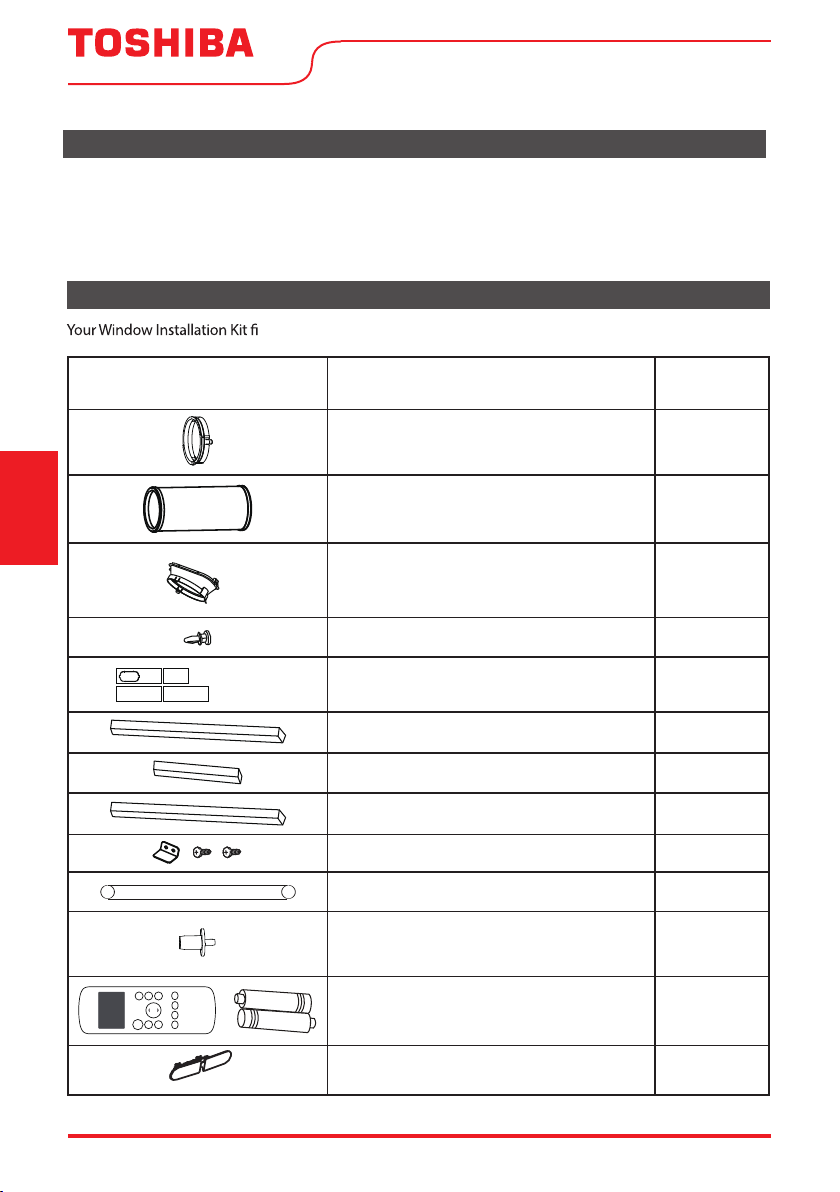
Tools Needed
•
Medium Phillips screwdriver
•
Tape measure or ruler
•
Knife or scissors
•
Saw (optional, to shorten window adaptor for narrow windows).
ts
Accessories
Instructions
Installation
windows 19.4''-62.2''(49.3-158.1cm) .
noitpircseDtraP
Unit adaptor
Exhaust hose
Air exhaust passage
Bolt
Window Sliders
Foam seal A (adhesive)
Foam seal B (adhesive)
Foam seal C (Non-adhesive)
Security bracket and 2 screws
Quantity
1 pc
1 pc
1 pc
3 pc
1 pc
4 pc
2 pc
2 pc
1 set
Drain hose
Drain hose adaptor
(For heat pump mode only)
Remote controller and battery
(For remote control models only)
Power Cord Buckle
Page 14 User Manual
1 pc
1 pc
1 set
1 pc
Window Installation Kit
Exhaust hose
Exhaust hose
assembly
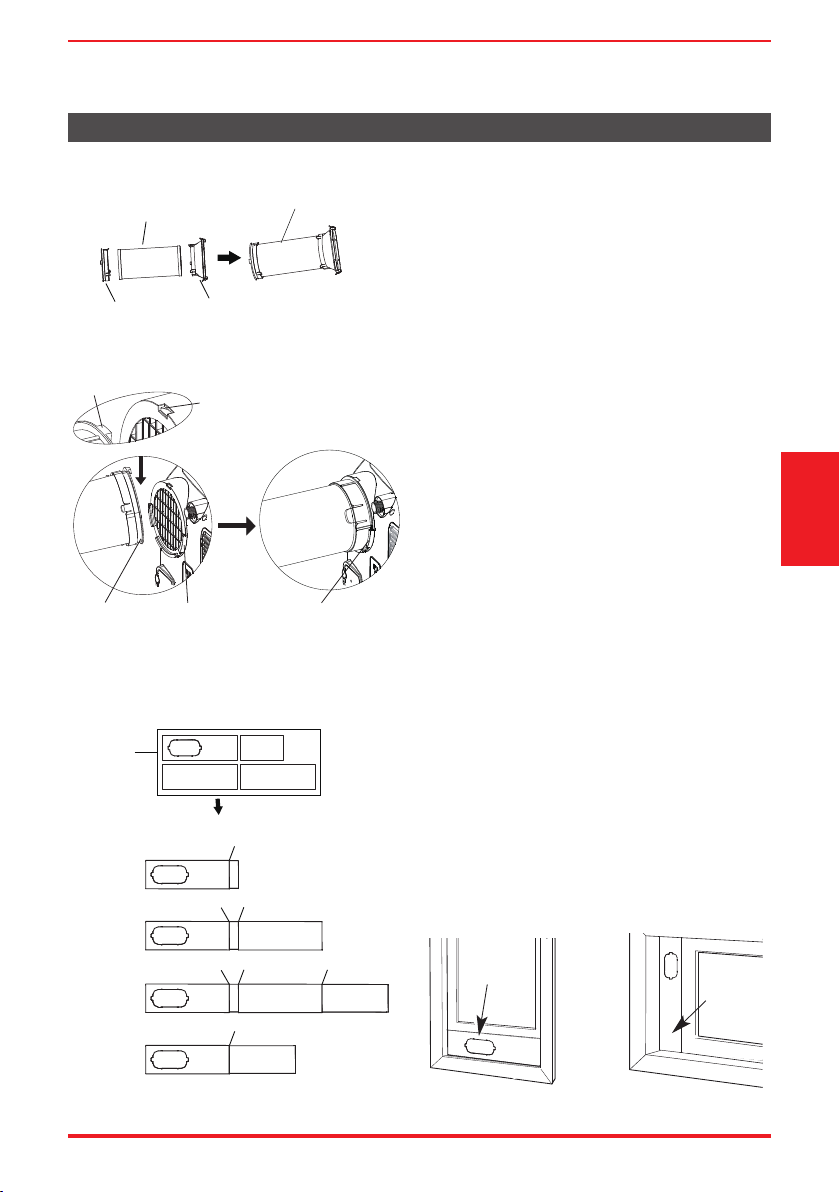
Step One: Preparing the exhaust hose
assembly
Press the exhaust hose into the Air exhaust
passanger and unit adaptor, clamp automatically
by elastic buckles of the adaptors.
Unit adaptor
Hook
Adaptor
Window
Sliders
1+2:
1+2+3:
1+2+3+4:
1+4:
Air exhaust
passage
Hole Seat
Lower
groove
Before assembly
After assembly
Make sure the adaptor
is inserted into the
lower groove of the
air outlet.
Bolt
Bolt
Bolt
BoltBolt
Bolt
Bolt
Step Two: Install the exhaust hose
assembly to the unit
Insert unit adaptor of the Exhaust hose assembly
into the lower groove of the air outlet of the
unit with the hook of the adaptor aligned with
the hole seat of the air outlet and slide down
the Exhaust hose assembly along the direction
indicated by the arrow for installation.
Step Three: Preparing the adjustable
window slider
1. Choose the window sliders according to
the size of your window. Sometimes, sliders
need to be cut short to meet the window
size, please take extra care to cut it properly.
2. Use bolts to fasten the window sliders once
they are adjusted to the proper length.
Windows Type
Window
slider A
Window
slider A
Instructions
Installation
Hung Window Sliding Window
User Manual Page 15
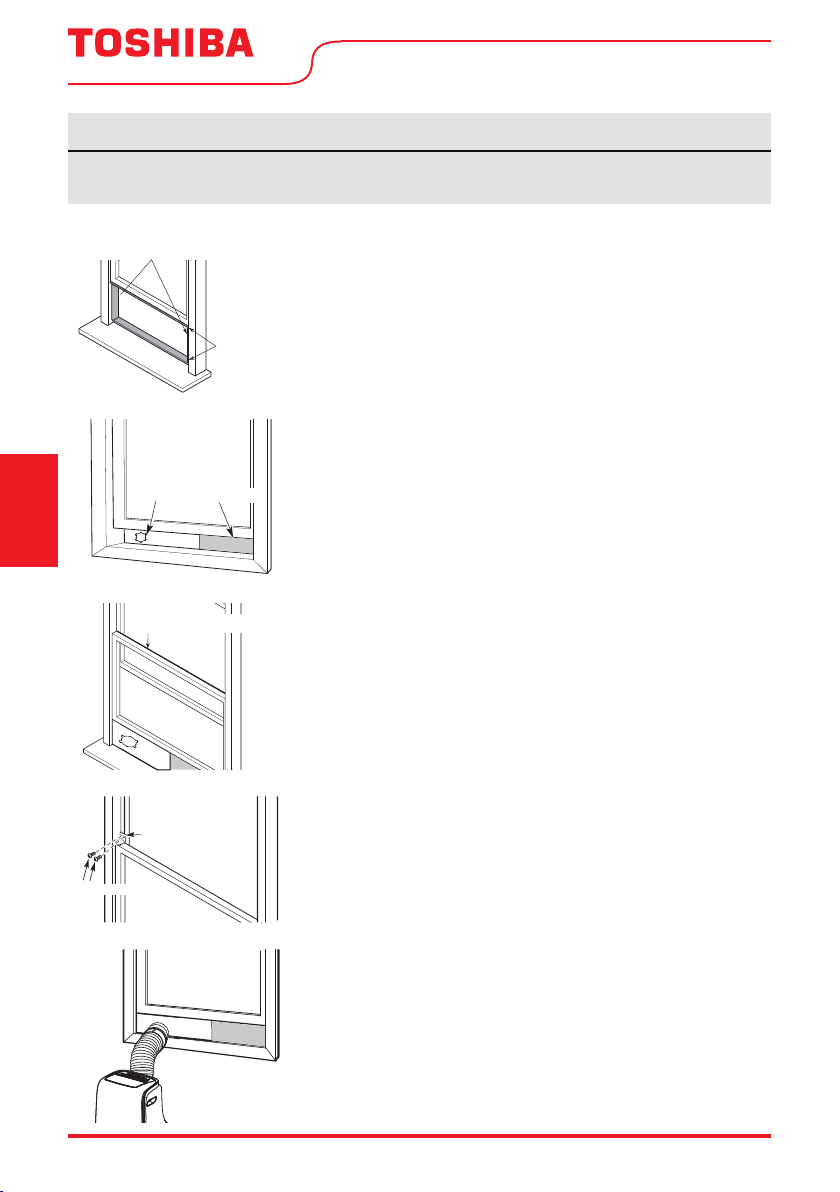
NOTICE
Once the Exhaust Hose assembly and Adjustable Window Slider are prepared, choose from one of
the following two installation methods.
Instructions
Foam seal B
(Adhesive type-shorter)
Installation
Foam
seal A
(Adhesive
type)
Window
slider A
Foam seal C
(Non-adhesive type)
Window
slider B
(if required)
Type 1: Hung window installation
1. Cut the adhesive foam seal A and B strips to the proper lengths,
and attach them to the window sash and frame as shown.
2. Insert the window slider assembly into the window opening.
3. Cut the non-adhesive foam seal C strip to match the width of
the window. Insert the seal between the glass and the window
frame to prevent air and insects from getting into the room.
4. If desired, install the security bracket with 2 screws as shown.
2 Screws
Security Bracket
5. Insert the window slider adaptor into the hole of the window
slider.
User ManualPage 16
Foam seal A
(Adhesive
type)
Foam seal B
(Adhesive
type-shorter)
Window slider B
(if required)
Window slider A
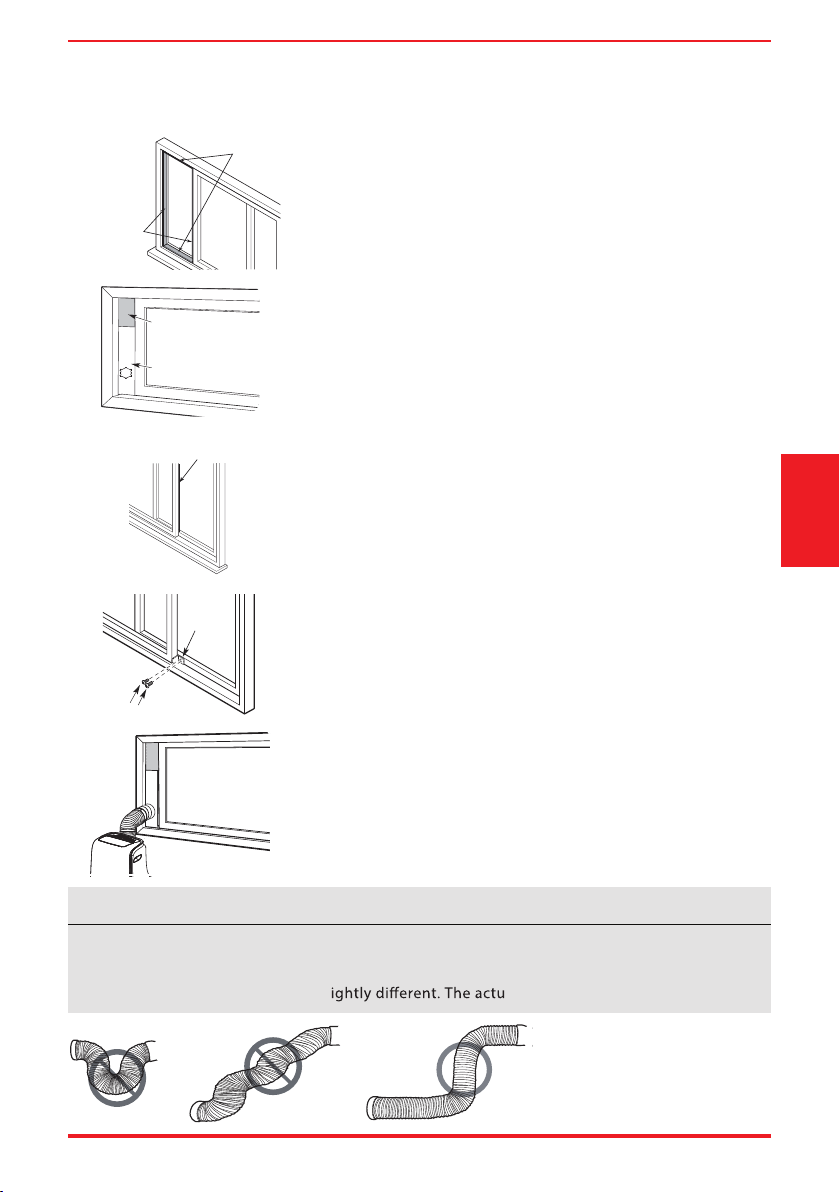
Type 2: Sliding window installation
1. Cut the adhesive foam seal A and B strips to the proper lengths,
and attach them to the window sash and frame as shown.
2. Insert the window slider assembly into the window opening.
Foam seal C
(Non-adhesive type)
3. Cut the non-adhesive foam seal C strip to match the window
height. Insert the foam seal between the glass and the window
frame to prevent air and insects from getting into the room.
4. If desired, install the security bracket with 2 screws as shown.
2 Screws
Security
Bracket
5. Insert the window slider adaptor into the hole of the window
slider.
NOTICE
To ensure proper functioning, DO NOT overextend or bend the hose. Make sure that there is
no obstacle around the air outlet of the exhaust hose (in the range of 500mm) in order for the
exhaust system to work properly. All illustrations in this manual are for explanation purposes
only. Your air conditioner may be sl al shape shall prevail.
Instructions
Installation
User Manual Page 17
CARE AND CLEANING
Safety Precautions
• Always unplug the unit before cleaning or servicing.
ammable liquids or chemicals to clean the unit.
• DO NOT wash the unit under running water. Doing so causes electrical danger.
• DO NOT operate the machine if the power supply was damaged during cleaning. A damaged
power cord must be replaced with a new cord from the manufacturer.
Air Filter Cleaning
CAUTION
dirt and lint will clog it and reduce performance.
Integrated
design air filter
(take out)
Care and Cleaning
lower filter B
(take out)
lower filter A
(Press the grill
down slightly
and pull the
lower filter A out
at the same time)
Maintenance Tips
• Be sure t ter ever y 2 weeks
for optimal performance.
• The water collection tray should be drained
immediately after P1 error occurs, and before
storage to prevent mold.
• In households with animals, you will have to
periodically wipe down the grill to prevent
ow due to animal hair.
lter because
Unit Cleaning
Clean the unit using a damp, lint-free cloth and mild detergent. Dry the unit with a dry, lint-free cloth.
Store the Unit When Not in Use
• Drain the unit’s water col
• Run the unit on FAN mode for 12 hours in a warm room to dry it and prevent mold.
the unit and unplug it.
• Clean the a
ter before storing.
• Remove the batteries from the remote control.
ter according to the instructions in the previous section. Reinstall the clean, dry
lection tray according to the instructions in the following section.
NOTICE
Be sure to store the unit in a cool, dark place. Exposure to direct sunlight or extreme heat can
shorten the lifespan of the unit.
Page 18 User Manual
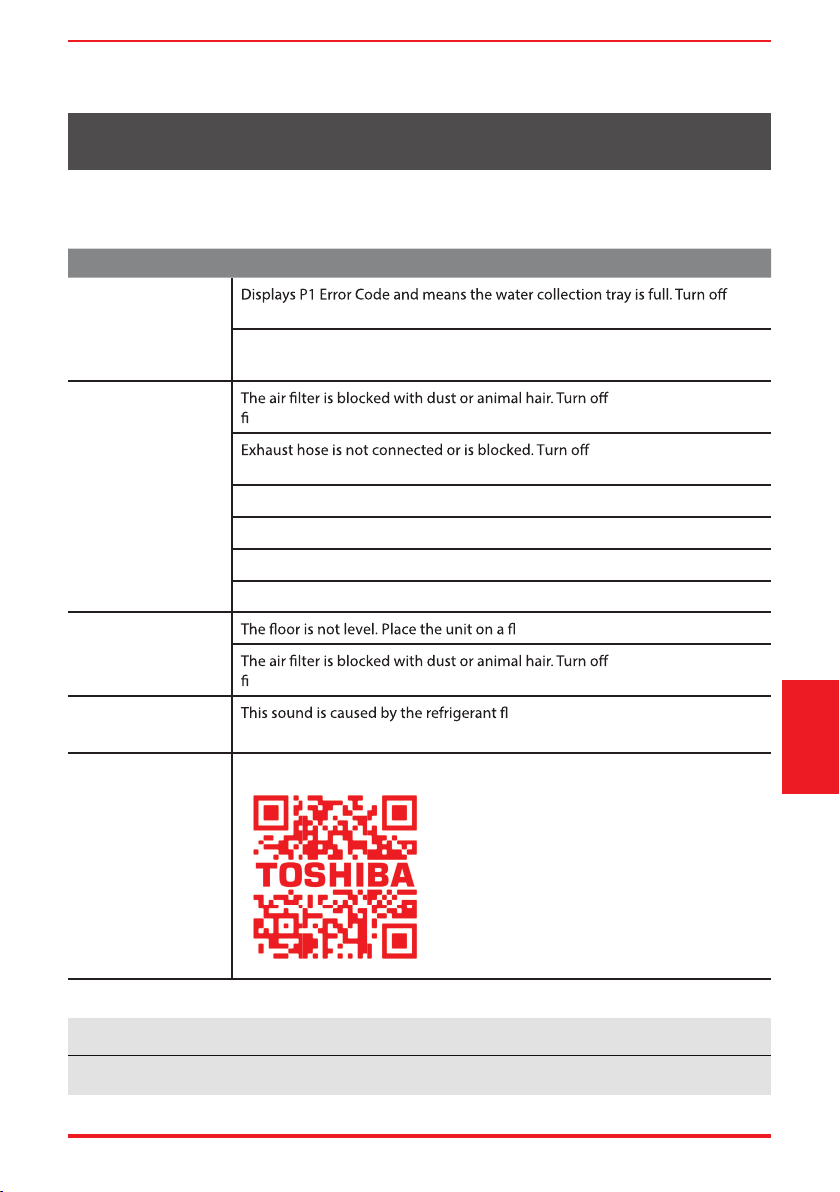
TROUBLESHOOTING TIPS
Before calling service, review this list. It may save you time and expense. This list includes common
occurences that are not the result of defective workmanship or materials of this appliances.
Problem Solution
Unit does not turn
on when pressing
ON/OFF button
Unit does not cool
well
The unit is noisy and/
or vibrates too much
The unit makes a
gurgling sound
unit, drain the water from the water collection tray, and restart the unit.
If room temperature is lower than the set temperature in COOL mode, reset
the temperature.
the unit and clean the
lter according to the instructions.
the unit, disconnect the
hose, check for blockage and reconnect the hose.
Temperature setting is too high; decrease the set temperature.
Make sure all windows and doors are closed.
The room area could be too large; doublecheck the cooling area.
Check the room for possible heat sources and remove them if possible.
at, level surface.
the unit and clean the
lter according to the instructions.
ow inside the unit and is normal.
the
Troubleshooting
Tips
Unit will not connect
to Wireless or App
does not work (some
modesl)
For additional support and troubleshooting tips, follow the link in the QR code:
NOTICE
Do not add extension to the exhaust hose(s)!
User Manual Page 19
REMOTE CONTROL INSTRUCTIONS
Remote Control Specifi cations
RG57H4(B)/BGEFledoM
Rated voltage 3.0V (Dry batteries R03/LR03x2)
Signal receiving range 8 m (approx. 26 ft.)
Environment -5°C ~ 60°C (23°F ~ 140°F)
ote
N
Function Buttons
Before you begin using your new air conditioner, make sure to familiarize yourself with its remote
control. The following is a brief introduction to the remote control itself. For instructions on how to
operate your air conditioner, refer to the Operating Instructions section of this manual.
To prevent damage,remove the batteries when not
being used for a long time.
Turns the unit on or off.
Scrolls through operation modes
AUTO COOL DRY HEAT FAN
NOTE:
Please do not select HEAT mode
if the machine you purchased is
cool-only type. Heat mode is not
supported by cool-only models.
Remote control and
App instructions
Selects fan speeds in the
AUTO LOW MED HIGH
ON/OFF
MODE
as follows:
FAN SPEED
following order:
Saves energy during
louver movement.
SLEEP
sleeping hours.
SWING
Starts and stops
PRESET
MARCHE/
ON
ARRÊTER/
OFF
TEMP
Increases temperature in 1°C (1°F) increments.
Max. temperature is 30°C (86°F).
TEMP
Decreases temperature in 1°C (1°F) increments.
Max. temperature is 17°C (62°F).
NOTE: Pressing and holding and buttons
together for 3 seconds will alternate the
temperature display between the °C & °F scale.
SHORT CUT
Sets and activates your favorite pre-settings.
TIMER ON
Sets timer to turn unit on (see How to Use
Basic Functions for instructions)
TIMER OFF
Sets timer to turn unit off (see How to Use
Basic Functions for instructions)
LED
Turns indoor unit's LED display on and off.
If you are sensitive to light while sleeping,
you can press the LED button to turn off
the LED display on the unit. Press the
button again to turn it back on.
FOLLOW ME
Temperature sensing and room
temperature display button.
Page 20 User Manual

Handling the Remote Control
NOT SURE WHAT A FUNCTION DOES?
Refer to the Operating Instructions section of this manual for a detailed description of how to use your
air conditioner.
SPECIAL NOTE
Button designs on your unit may differ slightly from the example shown.
If the unit does not have a particular function, pressing that function’s button on the remote
control will have no effect.
When there are significant differences between features or operation implied by the remote
control illustration and the actual functions described in the USER’S MANUAL, the descriptions in
the USER’S MANUAL shall prevail.
INSERTING AND REPLACING BATTERIES
Your air conditioning unit comes with two AAA batteries. Insert the
batteries in the remote control before use.
1. Slide the back cover of the remote control downward, exposing
the battery compartment.
2. Insert the batteries, paying attention to align the (+) and (-) ends
of the batteries with the symbols inside the battery compartment.
3. Slide the battery cover back into place.
BATTERY NOTES
For optimum product performance:
• Do not mix old and new batteries, or batteries of di erent types.
• Do not leave batteries in the remote control if you don’t plan
on using the device for more than 2 months.
BATTERY DISPOSAL
Do not dispose of batteries as unsorted municipal waste. Refer to
local laws for proper disposal of batteries.
TIPS FOR USING REMOTE CONTROL
• The remote control must be used within 8 meters / 26 feet of
the unit.
• The unit will beep when remote signal is received.
• Curtains, other materials and direct sunlight can interfere with
the infrared signal receiver.
• Remove batteries if the remote will not be used more than 2
months.
User Manual Page 21
Remote control and
App instructions

Remote LED Screen Indicators
Transmission Indicator
Lights up when remote sends signal to unit
MODE display
Displays the current
mode, including:
AUTO
COOL
DRY
HEAT
FAN
FAN SPEED display
Displays selected FAN SPEED:
HIGH
MED
LOW
This display is blank when
set to AUTO speed.
Remote control and
App instructions
ON/OFF display
Appears when the unit is turned on and disappears when it is turned off
TIMER ON display
Displays when
TIMER ON is set
SILENT display
Not available on this unit
Temperature/Timer display
Displays the set temperature by default, or timer setting
when using TIMER ON/OFF functions:
- Temperature range: 17-30°C (62°F-86°F)
- Timer setting range: 0-24 hours
This display is blank when operating in FAN mode.
TIMER OFF display
Displays when
TIMER OFF is set
ECO display
Not available on this unit
Battery display
Low battery detection
SLEEP display
Displays when SLEEP
function is activated
FOLLOW ME display
Indicates that the
FOLLOW ME
function is on
Not available on this unit
Page 22 User Manual

Basic Functions
3
1
4
1
3
PRESET
MARCHE/
ARRÊTER/
SETTING THE DESIRED TEMPERATURE
The operating temperature range for this unit is 17-30°C (62°F-86°F).
You can increase or decrease the set temperature in 1°C (1°F)
increments.
2
PRESET
MARCHE/
ON
ARRÊTER/
OFF
AUTO operation
In AUTO mode, the unit will automatically select the COOL, FAN,
HEAT or DRY mode based on the set temperature.
1. Press the MODE button to select Auto mode.
2. Set your desired temperature using the Temp or Temp
button.
3. Press the ON/OFF button to start the unit.
NOTICE
FAN SPEED cannot be set in AUTO mode.
COOL operation
1. Press the MODE button to select COOL mode.
2
2. Set your desired temperature using the Temp
ON
OFF
button.
3. Press the FAN button to select the fan speed: AUTO, LOW, MED,
or HIGH.
4. Press the ON/OFF button to start the unit.
or Temp
DRY operation (dehumidifying)
1. Press the MODE button to select DRY mode.
2. Set your desired temperature using the Temp
button.
2
3
1
PRESET
MARCHE/
ON
ARRÊTER/
OFF
3. Press the ON/OFF button to start the unit.
NOTICE
FAN SPEED cannot be set in DRY mode.
User Manual Page 23
or Temp
Remote control and
App instructions

Basic Functions (cont.)
3
1
2
4
1
3
Remote control and
App instructions
PRESET
MARCHE/
ARRÊTER/
ON
OFF
PRESET
MARCHE/
ARRÊTER/
FAN operation
1. Press the MODE button to select FAN mode.
2. Press FAN button to select the fan speed: AUTO, LOW, MED or
HIGH.
3. Press the ON/OFF button to start the unit.
NOTICE
You cannot set temperature in FAN mode. As a result, your
remote control’s LCD screen will not display temperature.
HEAT operation
1. Press the MODE button to select HEAT mode.
2. Set your desired temperature using the Temp
button.
3. Press the FAN button to select the fan speed: AUTO, LOW, MED,
2
or HIGH.
ON
OFF
4. Press the ON/OFF button to start the unit.
or Temp
NOTICE
As outdoor temperature drops, the performance of your
unit’s HEAT function may be affected. In such instances, we
recommend using this air conditioner in conjunction with
another heating appliance.
Page 24 User Manual

Timer Functions
1
TIMER ON TIMER ON
3
ON/OFF
MODE
SHORT
CUT
F
AN
TEMP
TIMER ON
S
L
E
EP
TIMER OF
F
Example: Setting unit to turn
on after 2.5 hours.
1sec
2
x5
4
2s ec
Your air conditioning unit has two timer-related functions:
TIMER ON - sets the amount of time after which the unit will
automatically turn on.
TIMER OFF - sets the amount of time after which the unit will
automatically turn off.
TIMER ON function
The TIMER ON function allows you to set a period of time after
which the unit will automatically turn on, such as when you come
home from work.
1. Press the TIMER ON button. By default, the last time period that
you set and an “
h” (indicating hours) will appear on the display.
NOTICE
This number indicates the amount of time after the current time
after which you want the unit to turn on.
For example, if you set TIMER ON for 2 hours, “2.0h“ will appear on
the screen, and the unit will turn on after 2 hours.
2. Press the TIMER ON button repeatedly to set the time that you
want the unit to turn on.
3. Wait 2 seconds, then the TIMER ON function will be activated.
The digital display on your remote control will then return to the
temperature display.
1
2
x10
TIMER OFF function
The TIMER OFF function allows you to set a period of time after
which the unit will automatically turn o , such as when you wake up.
TIMER OFF
TIMER OFF
1. Press the TIMER OFF button. By default, the last time period that
you set and an “h” (indicating hours) will appear on the display.
NOTICE
This number indicates the amount of time after the current time
1sec
4
2sec
3
after which you want the unit to turn o .
For example, if you set TIMER OFF for 2 hours, “2.0h“ will
appear on the screen, and the unit will turn off after 2 hours.
ON/OFF
MODE
SHORT
CUT
F
AN
TEMP
TIMER ON
S
LEEP
TIMER OF
F
2. Press the TIMER OFF button repeatedly to set the time that you
want the unit to turn o .
Example: Setting unit to turn
o after 5 hours.
User Manual Page 25
Remote control and
App instructions

Timer Functions (cont.)
Tim er on
Continue
to press
PRESET
TIMER ON
MARCHE/
or
ON
TIMER OFF
ARRÊTER/
OFF
until desired
time is
reached.
3. Wait 2 seconds, then the TIMER OFF function will be activated.
The digital display on your remote control will then return to
the temperature display.
NOTICE
When setting the TIMER ON or TIMER OFF functions, up to 10
hours, the time will increase in 30 minute increments with each
press. After 10 hours and up to 24, it will increase in 1 hour
increments. The timer will revert to zero after 24 hours.
You can turn o either function by setting the timer to “0.0h“.
1
TIMER ON
2
TIMER ON
X12
3
4
Setting both TIMER ON and
TIMER OFF at the same time
sec
Keep in mind that the time periods
you set for both functions refer to
hours after the current time. For
example, say that the current time
is 1:00 PM, and you want the unit to
turn on automatically at 7:00 PM and
want it to operate for 2 hours, then
automatically turn o at 9:00 PM.
sec
Do the following (side gure):
5
Remote control and
App instructions
TIMER OFF
6
TIMER OFF
X16
ON/OFF
MODE
SHORT
CUT
TEMP
TIMER ON
7
8
ON/OFF
MODE
SHORT
CUT
TEMP
TIMER ON
Example: Setting the unit to turn on after 6 hours, operate for 2 hours, then turn o (see the gure below).
Your remote display
Timer On
Timer Off
Timer is set
To turn ON
6 hours from
current time
Timer is set
To turn OFF
8 hours from
current time
Timer
Starts
Current
Time 1PM
2PM 3PM
4PM 5PM
6 hours later
8 hours later
Unit turns
ON
6PM 7PM 8PM 9PM
Unit turns
OFF
Page 26 User Manual

How to Use the Advanced Functions
SLEEP Function
The SLEEP function is used to decrease
energy use while you sleep (and don’t need
the same temperature settings to stay
comfortable). This function can only be
activated via remote control.
Note:
The SLEEP function is not
available in FAN or DRY mode.
SWING Function
Used t
o stop or start louver movement and set the
desired up/down air flow direction. The louver
angle changes in 6 degree increments with each
press (not all models). By pressing for more than 2
seconds, the louver auto swing feature is activated.
PRESET
MARCHE/
ARRÊTER/
ON
OFF
FOLLOW ME function
The FOLLOW ME function enables the
remote control to measure the temperature at its current location. When using
AUTO, COOL, or HEAT functions,
measuring ambient temperature from
the remote control (instead of from the
indoor unit itself) will enable the air
conditioner to optimize the temperature
around you and ensure maximum comfort.
1. Press FOLLOW ME button to activate
function. The remote control will send
temperature signal to the unit every
three minutes.
2. Press FOLLOW ME button again to
turn off this function.
SHORTCUT Function
Used to restore the current settings or resume
previous settings.
Push this button when remote controller is on,
the system will automatically revert back to the
previous settings including operating mode,
setting temperature, fan speed level and sleep
feature (if activated).
By pressing for more than 2 seconds, the
system will automatically restore the current
operation settings including operating mode,
setting temperature, fan speed level and sleep
feature (if activated).
NOTES
• Button con guration shown in illustrations is based on a typical model and may be slightly
di erent from the actual one you purchased. In this case, the actual physical remote shall prevail.
• All the functions described can also be accomplished by using the unit’s control panel. If the
unit is without this feature, there will be no corresponding operation when pressing the relevant
button on the remote controller.
• When there are differences between features or operation implied by the remote control
illustration and the actual functions described in the USER MANUAL, the descriptions in the
USER MANUAL shall prevail.
User Manual Page 27
Remote control and
App instructions

DECLARATION OF CONFORMITY
We hereby declare that this AC is in compliance with the essential requirements and other relevant
provisions of Directive 1999/5/EC.
SPECIFICATION OF WIRELESS MODULE
Model: US-OSK103 Dimensions: 41 x 24 x 5 (mm)
Standard: IEEE 802.11 b/g/n Operation Temperature: 0°C ~ 45°C / 32°F ~ 113°F.
Antenna Type: External omnidirectional Antenna Operation Humidity: 10% ~ 85%
Frequency: 2.4 GHz (wireless) Power Input: DC 5V/300 mA
Maximum Transmitted Power: 19.8 dBm Max
PRECAUTIONS
1. Supports operating systems: iOS 7+ or Android 4+.
2. In the event of a OS update, there may be a delay between the update of the OS and a related
software update during which your OS may or may not be supported until a new version is
c mobile phone or problems in your network may prevent the system
from working and Toshiba will not be responsible for any problems that could be caused by
incompatibility or network issues.
3. This Smart AC only supports WPA-PSK/WPA2-PSK (recommended) encryption.
Please check the Toshiba Lifestyle website, us.toshiba-lifestyle.com, for updated information.
4. To ensure proper scanning of the QR code, your smart phone must have at least a 5-megapixel
camera.
5. Due to unstable network connectivity, requests may time out. If this happens, re-run the network
Remote control and
App instructions
guration.
6. Due to unstable network connectivity, commands may time out. If this happens, the smartphone
icting information. The information displayed on the
actual product is always the most accurate available. Refresh the app to re-sync.
NOTICE
Toshiba will not be responsible for any problems that could be caused by incompatibility or network
issues, your wireless router and mobile phone.
Page 28 User Manual

SYSTEM OVERVIEW
Devices required to use the Smart AC:
1. Smart Phone with compatible iOS or Android system.
2. Wireless Router (a 2.4GHz network is required to connect).
3. Smart Air Conditioner.
DOWNLOAD AND INSTALL THE APP
Android QR code Apple QR code
Scan to download app.
• You can also go to Google Play or App Store and search for Toshiba NA AC. For more information,
please refer to Toshiba Lifestyle website: us.toshiba-lifestyle.com.
NOTICE
All the images in this manual are for reference only, your product and app may look slightly
different. The actual product and app instructions have to be considered.
User Manual Page 29
Remote control and
App instructions

CREATE YOUR ACCOUNT
• Make sure your smartphone is connected to your wireless router and your wireless router has a
working 2.4GHz internet connection.
• It is recommended to activate your account immediately to be able to recover your password by email.
6.1 Press “Sign Up”. 6.2 Enter your email address and password.
Remote control and
App instructions
6.3 Press “Registration”. 6.4 If you forget your password, press
“Forgot password?” on the main
menu and enter your email address.
Then press “Reset Password”.
NOTICE
• Make sure your smartphone is able to connect to the wireless network which will be used.
• Make sure also that the device is not connecting to other networks in range.
Page 30 User Manual

ADDITIONAL APP AND SMART HOME FUNCTIONS
For additional instructions regarding the features of the app and Smart Home skill capabilities, scan
the QR code below.
User Manual Page 31
Remote control and
App instructions


Précautions de sécurité
d
n
n
d
n
Instructions d’exploitation
Instructions
Instructions d'installation
structions
tretien et
Entretien et nettoyage
Conseils de dépannage
Conseils de d
Instructions de la télécommande
et de l'application
GUIDE D'UTILISATEURGUIDE D'UTILLIISSAATTEEUR
Type Portable
Climatiseur de pièce
RAC-PD0812CRRC
RAC-PD1213CWRC
version A - 01 - 2020 - (APERÇU 01)
Avertissements: Avant d'utiliser ce produit,
veuillez lire ce manuel attentivement et le
conserver pour référence ultérieure.
améliorer le produit. Consultez votre
revendeur ou le fabricant pour plus de détails.
us.toshiba-lifestyle.com

Manuel du propriétaire
Précautions de sécurité ......................................................................................... 35
Instructions d’exploitation .................................................................................... 40
Instructions d’installation ..................................................................................... 46
Entretien et nettoyage ........................................................................................... 51
Conseils de dépannage ......................................................................................... 52
Instructions de la télécommande et de l'application ................................. 53
Veuillez lire ce guide
Vous y trouverez de nombreux conseils utiles sur la manière d’utiliser et d’entretenir correctement votre
climatiseur. Quelques soins préventifs vous permettront d’économiser beaucoup de temps et d’argent
sur la durée de vie de votre climatiseur. Vous trouverez de nombreuses réponses à des problèmes
communs dans le chapitre Conseils de Dépannage et vous devriez être en mesure de résoudre la
plupart d’entre eux rapidement avant d’appeler le service client. Ces instructions peuvent ne pas
couvrir toutes les conditions d’utilisation possibles, il est donc conseillé d’utiliser du bon sens et de
l’attention à la sécurité lors de l’installation, de l’utilisation et de l’entretien de ce produit.
MISE EN GARDE
• Cet appareil n'est pas destiné à être utilisé par des personnes (y compris des enfants)
ayant des capacités physiques, sensorielles ou mentales réduites ou un manque
d'expérience et de connaissances, à moins qu'elles n'aient reçu une supervision ou
des instructions concernant l'utilisation de l'appareil par une personne responsable
de leur sécurité.
• Pour obtenir de l'aide, veuillez appeler le centre de service au 1-855-238-5607.
• Les enfants doivent être surveillés pour s'assurer qu'ils ne jouent pas avec le climatiseur.
• L'appareil doit être installé conformément aux réglementations nationales en matière
de câblage.
• N'utilisez pas votre climatiseur dans une pièce humide telle qu'une salle de bain
ou une buanderie.
Page 34 Guide d’Utilisateur

PRÉCAUTIONS DE SÉCURITÉ
Pour éviter des blessures à l'utilisateur ou à d'autres personnes et des dommages matériels, les
instructions indiquées ici doivent être suivies. Un fonctionnement incorrect dû au non-respect des
instructions peut entraîner des blessures ou des dommages. Le niveau de risque est indiqué par les
indications suivantes.
ATTENTION
Ce symbole indique une situation dangereuse qui, si elle n'est pas
évitée, pourrait entraîner la mort ou des blessures graves
Précautions
de sécurité
MISE EN GARDE
AVIS
Ce symbole indique une situation dangereuse qui, si elle n'est pas
évitée, pourrait entraîner des blessures mineures ou modérées.
Ce symbole concerne les pratiques non liées aux blessures
physiques.
ATTENTION
• Assurez-vous que le climatiseur a été correctement et solidement installé conformément aux
instructions d'installation de ce manuel. Conservez ce manuel pour une éventuelle utilisation
future lors du retrait ou de l'installation de cet appareil.
• Branchez correctement la che du cordon d'alimentation.
Sinon, cela peut provoquer un choc électrique ou un incendie en raison d'une chaleur excessive.
• Ne modiez pas la longueur du cordon d'alimentation et ne partagez pas la prise avec d'autres
appareils, car cela pourrait provoquer un choc électrique ou un incendie en raison d'une
surchaue.
• Assurez-vous toujours une mise à la terre ecace.
Une mise à la terre incorrecte peut provoquer un choc électrique.
• Débranchez l'appareil si vous remarquez des sons, des odeurs ou de la fumée inhabituels. Un
produit endommagé peut provoquer un incendie et un choc électrique.
• Aérez la pièce avant de faire fonctionner le climatiseur s'il y a une fuite de gaz d'un autre
appareil.
• N'utilisez pas et n'arrêtez pas l'appareil en insérant ou en retirant la che du cordon
d'alimentation.
• N'utilisez pas l'appareil avec les mains mouillées ou dans des environnements très humides.
Cela peut provoquer un choc électrique.
• Ne laissez pas l'eau entrer en contact avec les pièces électriques. Cela peut provoquer une
panne ou un choc électrique.
• N'utilisez pas la prise si elle est desserrée ou endommagée. Cela peut provoquer un incendie
et un choc électrique.
• N'utilisez pas et ne gardez pas le cordon d'alimentation à proximité d'appareils de chauage.
Cela peut provoquer un incendie et un choc électrique.
• N'utilisez pas d'appareils ou de matériaux pour l'installation qui ne sont pas recommandés
dans ce manuel.
• Ne démontez pas et ne modiez pas l'appareil.
Cela peut provoquer une panne et un choc électrique.
Guide d’Utilisateur
Page 35

Précautions
de sécurité
ATTENTION
• N'endommagez pas et n'utilisez pas un autre cordon d'alimentation.
Cela peut provoquer un incendie et un choc électrique.
Si le cordon d'alimentation est endommagé, il doit être remplacé par le fabricant ou un
centre de service agréé ou une personne de qualication similaire an d'éviter tout danger.
• Ne dirigez pas le ux d'air directement vers les personnes pour éviter tout risque pour la santé.
• N'ouvrez pas l'appareil pendant son fonctionnement. Cela peut provoquer un choc électrique.
• N'utilisez pas le cordon d'alimentation à proximité de gaz ou de combustibles inammables,
tels que l'essence, le benzène, le diluant, etc.
Cela peut provoquer une explosion ou un incendie.
• Ne laissez pas les enfants s'accrocher au climatiseur ou au support. Une blessure grave peut
survenir.
• Évitez tout risque d'incendie ou d'électrocution. N'utilisez pas de rallonge ni de che
d'adaptateur. Ne retirez aucune broche du cordon d'alimentation.
• Assurez-vous que le climatiseur est correctement mis à la terre. Pour minimiser les risques
d'électrocution et d'incendie, une mise à la terre appropriée est importante. Le cordon
d'alimentation est équipé d'une che de mise à la terre à trois broches pour la protection
contre les risques d'électrocution.
• Votre climatiseur doit être utilisé dans une prise murale correctement mise à la terre. Si la prise
murale que vous avez l'intention d'utiliser n'est pas correctement mise à la terre ou protégée
par un fusible temporisé ou un disjoncteur, demandez à un électricien qualié d'installer la
prise appropriée. Assurez-vous que le réceptacle est accessible après l'installation de l'unité.
• Assurez-vous que le service électrique est adéquat pour le modèle que vous avez choisi. Ces
informations se trouvent sur la plaque signalétique située sur le côté de l'armoire et derrière
la grille.
MISE EN GARDE
• Lorsque le ltre à air doit être retiré, ne touchez pas les parties métalliques de l'unité. Cela peut
provoquer des blessures.
• Lorsque l'appareil a besoin d'être nettoyé, éteignez et désactivez le disjoncteur.
Ne nettoyez pas l'appareil lorsqu'il est sous tension car cela pourrait provoquer un incendie, un
choc électrique ou des blessures.
• Nettoyez uniquement avec un chion doux. N'utilisez pas de détergents puissants contenant
de la cire ou des diluants car cela pourrait endommager le produit.
• Soyez prudent lors du déballage et de l'installation. Les bords tranchants peuvent causer des
blessures.
• Ne nettoyez pas le climatiseur avec de l'eau.
De l'eau peut pénétrer dans l'unité et dégrader l'isolation, ce qui peut provoquer un choc
électrique.
• Ne placez pas un animal domestique ou une plante d'intérieur là où il sera exposé à un ux d'air
direct. Cela pourrait blesser l'animal ou endommager la plante.
Page 36
Guide d’Utilisateur

MISE EN GARDE
• Tenez la che par la tête de la che d'alimentation lorsque vous la retirez. Sinon, cela pourrait
provoquer un choc électrique et des dommages.
• Assurez-vous que l'installation est correctement sécurisée pour éviter que le produit ne tombe.
• Ne placez pas d'objets lourds sur le cordon d'alimentation et assurez-vous que le cordon n'est
pas comprimé. Sinon, il existe un risque d'incendie ou d'électrocution.
• Si de l'eau est renversée sur l'unité, éteignez l'unité et coupez le disjoncteur. Isolez l'alimentation
en débranchant la che d'alimentation et contactez un technicien de maintenance qualié.
• Ne pas utiliser à proximité d'une cuisinière à gaz ou d'autres appareils à gaz, car le débit d'air
peut aecter la combustion du gaz.
• Ne l'utilisez pas à d'autres ns que le confort de la pièce.
N'utilisez pas ce climatiseur pour conserver des appareils de précision, de la nourriture, des
animaux domestiques, des plantes et des objets d'art. Cela peut entraîner une détérioration.
• Éteignez l'interrupteur d'alimentation principal si l'appareil ne doit pas être utilisé pendant une
période prolongée.
• Insérez toujours les ltres correctement. Nettoyez le ltre une fois toutes les deux semaines.
Un fonctionnement sans ltre peut provoquer une panne.
• Ne buvez pas l'eau évacuée du climatiseur.
Précautions
de sécurité
Caution: Risk of fire/
flammable materials
(Requis pour les unités
R32 / R290 uniquement)
REMARQUE IMPORTANTE: Lisez
attentivement ce manuel avant d'installer
ou d'utiliser votre nouveau climatiseur.
Assurez-vous de conserver ce manuel
pour référence future.
Page 37Guide d’Utilisateur

EXPLICATION DES SYMBOLES AFFICHÉS SUR L'UNITÉ
Précautions
de sécurité
Ce symbole indique que cet appareil a utilisé un réfrigérant inammable.
ATTENTION
Si le réfrigérant fuit et est exposé à une source d'allumage externe,
il y a un risque d'incendie.
MISE EN GARDE
MISE EN GARDE
MISE EN GARDE
Ce symbole indique que le manuel d'utilisation doit être lu attentivement.
Ce symbole indique qu'un personnel de service doit manipuler cet
équipement en se référant au manuel d'installation.
Ce symbole indique que des informations sont disponibles telles que le
manuel d'utilisation ou le manuel d'installation.
AVERTISSEMENT (pour l'utilisation du réfrigérant R32 uniquement)
• N'essayez pas d'accélérer le processus de dégivrage ou les méthodes de nettoyage non
recommandées par le fabricant.
• L'appareil doit être stocké dans une pièce sans source d'allumage fonctionnant en continu (pour
un appareil à gaz ou un appareil à gaz en chauage électrique) à proximité de l'appareil. L'appareil
doit également être stocké dans une pièce sans source d'inammation.
• Ne pas percer ni brûler.
• Sachez que les réfrigérants peuvent ne pas contenir d'odeur.
• Gardez les ouvertures de ventilation libres de toute obstruction.
• L'unité ne doit être réparée que par un réparateur agréé Midea, veuillez appeler le service
clientèle au 1-855-238-5607 pour obtenir de l'aide.
• Le réfrigérant inammable R32 est utilisé dans le climatiseur. Veuillez suivre attentivement les
instructions pour manipuler, installer, nettoyer et entretenir le climatiseur an d'éviter tout
dommage ou danger. Ne pas agence pour une élimination appropriée.
Le ou les dispositifs qui génèrent des étincelles / des arcs doivent être autour du climatiseur pour
éviter l'utilisation de réfrigérant ammable. Veuillez suivre attentivement les instructions pour
entreposer ou entretenir le climatiseur pour éviter tout dommage mécanique.
Page 38 Guide d’Utilisateur

Fonctionnement de l'appareil actuel
Branchez et appuyez
sur RESET
RESET
TEST
Le cordon d'alimentation contient un appareil
actuel qui détecte les dommages sur le cordon
d'alimentation. Testez votre cordon
d'alimentation comme suit:
1. Branchez le climatiseur.
2. Le cordon d'alimentation aura DEUX boutons
sur la tête de la che. Appuyez sur le bouton
TEST. Vous remarquerez un clic lorsque le
bouton RESET apparaîtra.
3. Appuyez sur le bouton RESET. Vous remarquerez
un clic lorsque le bouton s'engage.
4. Le cordon d'alimentation fournit maintenant de
l'électricité à l'unité. (Sur certains produits, cela
est également indiqué par un voyant sur la tête
de la che.)
Précautions
de sécurité
Prise murale avec mise à la terre
Ne coupez pas et ne
retirez en aucun cas
la broche de mise à
la terre.
AVIS
Le cordon d'alimentation de ce climatiseur
contient un dispositif de détection de courant
conçu pour réduire le risque d'incendie.
Si le cordon d'alimentation est endommagé, il
ne peut pas être réparé. Il doit être remplacé
par un cordon du fabricant.
Cordon d'alimentation avec prise de terre
à 3 broches et dispositif de détection de
courant.
AVIS
• N'utilisez pas cet appareil pour allumer ou éteindre l'appareil.
• Assurez-vous toujours que le bouton RESET est enfoncé pour un fonctionnement correct.
• Le bloc d'alimentation doit être remplacé s'il ne parvient pas à se réinitialiser lorsque le bouton
TEST est enfoncé ou s'il ne peut pas être réinitialisé. Veuillez contacter le service client.
Guide d’Utilisateur
Page 39

INSTRUCTIONS D’EXPLOITATION
Préparation
d’exploitation
Instructions
Notes de conception et de conformité
Avis de Conception:
ecaf aL
able sans préavis.
Panneau de commande
Lame de persienne
horizontale
(bascule automatiquement)
Poignée
(les deux côtés)
Panneau
Roulette
Filtre à air
supérieur
(filtre à air de
la conception
intégrée)
Entrée d'air
supérieure
Sortie de purge
Sortie d'air
Filtre à air inférieur
L’entrée d'air inférieure
Sortie de purge
(uniquement pour le mode
de chauffage de la pompe)
Boucle de cordon d'alimentation
Cordon d'alimentation
sortie de purge
du bac inférieur
cations de conception de l’unité et de la
erèirra’L
Informa tion Énergétique:
cation énergétique de cette unité est basée sur une installation utilisant un conduit d’évacuation
non étendu sans adaptateurs A ou B (comme indiqué dans la section Installation de ce manuel).
Plage de Température de l’Unité:
erutarépmet ed egalPedoM
« Cool » (Refroidissement) 17°C ~ 35°C (62°F ~ 95°F)
« Dry » (Séchage) 13°C ~ 35°C (55°F ~ 95°F)
age) (mode pompe à chaleur) 5°C ~ 30°C (41°F ~ 86°F)
age électrique) ≤ 30°C (86°F)
Installation du Flexible d’Échappement:
exible d’échappement et l’adaptateur doivent être installés ou retirés conformément au mode d’utilisation.
exible d’échappement doit être installé.
exible d’échappement doit être retiré.
Page 40
Guide d’Utilisateur

Fonctions du panneau de commande
SUI
VEZ-MOI
(Press 3s)
(Presse 3s)
chage LED
VENT CONSTANT(Presse 3s)
Voyants Smart (modèles
Smart uniquement)
d’exploitation
Instructions
Bouton
d’oscillation
Bouton
Minuteur
Bouton
de Mode
Haut ( ) Bas ( )
Boutons
Bouton d’oscillation
Utilisé pour lancer la fonction d’oscillation
automatique. Lorsque l’opération est EN MARCHE,
appuyez sur le bouton SWING peut arrêter les
lames de l’évent à l’angle souhaité.
Bouton de connexion (modèles Smart
uniquement)
Également utilisé pour lancer le mode de
connexion sans l.
Pour lancer le mode de connexion sans l, allumez
le climatiseur puis appuyez sur le bouton SWING
pendant 3 secondes. L’AFFICHAGE LED achera
‘AP’ à indiquent que l'appareil est en mode de
connexion sans l.
Reportez-vous aux instructions de connexion de
l'application pour terminer le processus de
connexion.
Si la connexion réussit, l'appareil se fermera
mode de connexion sans l et allumez le
LED sans l. Si la connexion échoue, l'appareil
quitter le mode de connexion sans l
automatiquement après 8 minutes et le voyant
sans l ne s’allume pas.
Remarque: le processus de connexion sans l doit
être terminé dans les 8 minutes après la mise sous
tension de l'air conditionneur en marche.
Bouton Minuteur
Utilisé pour lancer le programme de démarrage
et automatique AUTO ON et AUTO OFF, avec
les boutons Haut ( ) et Bas ( ). Le voyant
d’activation ou de désactivation de la minuterie
s’allume en fonction du réglage sélectionné.
Bouton de Ventilateur
Contrôle la vitesse du ventilateur. Appuyez pour
contrôler la vitesse du ventilateur en quatre étapes
- LOW, MID, HIGH et AUTO. Le voyant de vitesse
du ventilateur sélectionné (sauf AUTO) s’allume. Si
AUTO est sélectionné, aucun voyant ne s’allume.
Guide d’Utilisateur
Bouton de
Ventilateur
Bouton de
veille/economie
Bouton
d’alimentation
Mode Bouton
Sélectionne le mode de fonctionnement
désiré. Chaque fois que vous appuyez sur le
bouton, un mode est sélectionné selon la
séquence AUTO, COOL, SEC, FAN et HEAT (les
modèles n’ que le refroidissement sont
exclus). Le voyant de mode s’allume et indique
le mode sélec tionné.
Boutons Haut (
) et Bas ( )
Utilisé pour ajuster (augmenter/diminuer) les
réglages de température par incréments de 1°C/1°F
dans une plage de 17°C/62°F à 30°C/86°F ou le
réglage MINUTEUR dans une plage de 0 ~ 24hrs.
REMARQUE
La température peut être en degrés
Fahrenheit ou Celsius. Pour passer de l’une
à l’autre, appuyez et maintenez enfoncés les
boutons Haut et Bas en même temps pendant
3 secondes.
Bouton d’Alimentation
Interrupteur marche-arrêt.
Bouton Sommeil
À utiliser pour lancer le mode SLEEP.
Page 41

d’exploitation
Fonctions du panneau de commande (comm.)
Écran LED
che la température réglée en °C (degrés
Celsius) ou en °F (degrés Fahrenheit) et les
réglages de la minuterie automatique. En modes
DRY (SEC) et FAN (VENTILATION), la température
chera.
Instructions
che les codes d’erreur et le code de protection:
E1 - Erreur du capteur de température
ambiante.
E2 - Erreur du capteur de température de
l’évaporateur.
E3 - Erreur du capteur de température du
condenseur (certains modèles).
E4 - Erreur de communication du panneau
d’achage.
P1 - Le bac inférieur est rempli - Connectez le
tuyau de vidange et évacuez l’eau collectée.
Si le code de protection se répète, appelez
le service d’assistance.
AVIS
Lorsque l’un des dysfonctionnements suivants
ez s’il n’y
a pas d’obstructions. Redémarrez l’Unité. Si
le dysfonctionnement persiste, désactivez
l’unité et débranchez le cordon d’alimentation.
Communiquez avec le fabricant ou ses agents
ée.
Page 42
Guide d’Utilisateur

Instructions d’exploitation
Mode COOL (REFROIDISSEMENT)
• Appuyez sur le bouton « MODE » jusqu’à ce que
le voyant « COOL » s’allume.
• Appuyez sur les boutons ADJUST (AJUSTER)
Haut (/\) ou Bas (\/) pour choisir la température
de la pièce. La température peut être réglée
dans une plage de 17°C~30°C/62°F~86°F.
• Appuyez sur le bouton FAN SPEED (VITESSE
DE VENTILATION) pour choisir la vitesse du
ventilateur.
Mode HEAT (CHAUFFAGE)
(Disponible sur les modèles HEAT)
• Appuyez sur le bouton « MODE » jusqu’à ce
que le voyant « HEAT » s’allume.
• Appuyez sur les boutons ADJUST (AJUSTER)
Haut (/\) ou bas (\/) pour choisir la température
de la pièce. La température peut être réglée
dans une plage de 17°C~30°C/62°F~86°F.
• Appuyez sur le bouton FAN SPEED (VITESSE DE
VENTILATION) pour choisir la vitesse du ventilateur.
Pour certains modèles, la vitesse du ventilateur ne
peut pas être ajustée en mode HEAT.
Mode DRY (DÉSHUMIDIFICATION)
• Appuyez sur le bouton « MODE » jusqu’à ce
que le voyant « DRY » s’allume.
• Dans ce mode, il n’est
une vitesse de ventilation ou d’ajuster la
température. Le moteur du ventilateur fonctionne
à BASSE vitesse.
• Gardez les fenêtres et les portes fermées
cier d’une meilleure capacité de
• Ne connectez pas le conduit à une fenêtre.
pas possible de sélectionner
cation.
Mode AUTO (REFROIDISSEMENT)
• Si vous réglez le climatiseur en mode AUTO,
celui-ci sélectionnera automatiquement les
rant seulement le refroidissement sont exclus)
ou ventilation en fonction de la température
que vous avez sélectionnée et de la température
ambiante actuelle.
• Le climatiseur contrôlera la température de
la pièce automatiquement en fonction de la
température que vous avez sélectionné.
• En mode AUTO, vous ne pouvez pas sélectionner
la vitesse du ventilateur.
Mode FAN (VENTILATEUR)
• Commandes de la vitesse du ventilateur :
appuyez sur cette touche pour contrôler la
vitesse du ventilateur en quatre modes : LOW,
MID, HIGH et AUTO. Le témoin lumineux de
vitesse du ventilateur sélectionné (sauf AUTO)
s’allumera. Lorsque le mode AUTO est
sélectionné, aucun voyant ne s’allume.
age (les modèles
• REMARQUE : En mode Cool ou Day, appuyez sur le
bouton Fan pendant trois secondes pour activer ou
désactiver la fonction de ventilation constante.
Lorsque la fonction est activée, le témoin lumineux
du ventilateur s’allumera, conrmant le
fonctionnement continu du ventilateur pour le
refroidissement. Lorsque la fonction est désactivée,
le témoin lumineux du ventilateur s'éteint,
conrmant que le cycle de ventilation en cours avec
le compresseur est en mode arrêt.
Mode TIMER (MINUTEUR)
• Lorsque l’unité est allumée, appuye sur le bouton
Timer lancera le programme d’arrêt automatique.
Le voyant TIMER OFF s’allume. Appuyez sur le
bouton Haut ou Bas pour sélectionner le temps
désiré. Appuyez sur le bouton TIMER à nouveau
dans les 5 secondes. Le programme de démarrage
automatique et le voyant TIMER ON s’allument.
Appuyez sur le bouton Haut ou Bas pour
sélectionner le temps de démarrage désiré.
• Lorsque l’unité est éteinte, appuyez sur le bouton
Timer pour lancer le programme de démarrage
automatique. Si vous appuyez sur le bouton à
nouveau dans les cinq secondes, cela lancera le
programme d’arrêt automatique.
la durée du mode Auto par incréments de 30
minutes, jusqu’à 10 heures, puis par incréments de
1 heure jusqu’à 24 heures. Le contrôle comptera le
temps restant avant le début.
• Le système reviendra automatiquement en arrière
chera le réglage de température précédent
si aucune opération n’est faite dans les 5 secondes.
• Allumer ou éteindre l’appareil à tout moment
ou ajuster le minuteur sur 0.0 annulera le
programme de démarrage/arrêt automatique.
• En cas de dysfonctionnement, le programme
de démarrage/arrêt automatique s’annulera
également.
er
Mode SLEEP/ECO (VEILLE/ÉCO)
Appuyer sur le bouton augmentera (durant le
mode de refroidissement) ou diminuera (durant le
mode de chau age sur les modèles applicables)
de 1°C/1°F après 30 minutes. La température
augmentera à nouveau (refroidissement) ou
diminuera (chau age) de 1°C/1°F après 30 minutes
supplémentaires. Cette nouvelle température sera
conservée pendant 7 heures avant de revenir à la
température initialement sélectionnée. Ceci met
n au Mode Sleep/Eco et l’unité continuera de
fonctionner tel qu’initialement programmée.
AVIS
Cette fonction n’est pas disponible pour les
modes FAN ou DRY.
d’exploitation
Instructions
Guide d’Utilisateur
Page 43

Autres fonctions
Cette fonction peut être activée à partir de la télécommande uniquement. La télécommande sert de
télécommande thermostat permettant le contrôle précis de la température à son emplacement.
Pour activer le Follow Me / Temp
Cette fonction peut être activée à partir de la télécommande UNIQUEMENT.
La télécommande sert de thermostat à distance permettant un contrôle précis de la température à
son emplacement. Pour activer la fonction Follow Me / Temp Sensing, pointez la télécommande vers
d’exploitation
Instructions
l’appareil et appuyez sur le bouton Follow Me / Temp Sensing. La télécommande enverra ce signal au
climatiseur jusqu'à ce que vous appuyiez à nouveau sur le bouton Follow Me / Temp Sensing. Si
l'appareil ne reçoit pas le signal de détection Follow Me / Temp au cours d'un intervalle de 7 minutes,
il quitte le mode de détection Follow Me / Temp.
REMARQUE: Cette fonctionnalité n'est pas disponible en mode FAN ou DRY.
REDÉMARRAGE AUTOMATIQUE
é s’éteint de manière inattendue en raison d’une panne de courant, elle redémarrera
Si l’unit
automatiquement dans la fonction précédemment réglée à la reprise du courant.
ATTENDEZ 3 MINUTES AVANT DE REPRENDRE L’OPÉRATION
Après l’arrêt de l’unité, vous devrez attendre au moins 3 minutes avant de la redémarrer. Ceci sert à
protéger l’unité. Le fonctionnement reprendra automatiquement après 3 minutes.
RÉGLAGE DE LA DIRECTION DU FLUX D’AIR
• Quand l’unité est sur ON, le volet s’ouvre complètement.
• Appuyez sur le bouton SWING sur le panneau ou sur la télécommande pour lancer la fonction Auto
Swing. Le volet se balancera automatiquement de haut en bas.
• Veuillez ne pas régler le volet manuellement.
ux d’air.
DRAINAGE DE L’EAU
Retirez le
bouchon de
vidange
supérieur
Tuyau de
vidange
continu
Page 44 Guide d’Utilisateur
• En mode déshumidication, retirez le bouchon de vidange
supérieur qui se trouve à l’arrière de l’unité et installez le
raccord de vidange (bouchon femelle universel 5/8 po) avec
un tuyau ¾ po (acheté localement). Pour les modèles sans
raccord de vidange, attachez le tuyau de vidange au trou.
Placez l’extrémité ouverte du tuyau directement sur la zone de
drain dans le plancher du sous-sol.

Retirez le
bouchon de
vidange
inférieur
Tuyau de
vidange
continu
Adaptateur
de tuyau
de vidange
Unités avec
pompe
uniquement
age, retirez le bouchon de vidange inférieur
qui se trouve à l’arrière de l’unité et installez le raccord de
vidange (bouchon femelle universel 5/8 po) avec un tuyau
¾ po (acheté localement). Pour les modèles sans raccord de
vidange, attachez juste le tuyau de vidange au trou. Placez
l’extrémité ouverte de l’adaptateur du tuyau directement sur
la zone de drain dans le plancher du sous-sol.
AVIS
Assurez-vous que le tuyau est sécurisé qu’il n’y ait pas de
fuite. Dirigez le tuyau vers le drain, en vous assurant qu’il n’y
a pas de plis qui gêneraient le débit d’eau. Placez l’extrémité
du tuyau dans le drain et assurez-vous que l’extrémité du
tuyau est dirigée vers le bas pour laisser l’eau s’écouler
doucement. (Voir les images
L’installation n’est pas recommandée. ( Voir les images
Quand le tuyau de vidange continu n’est pas utilisé, assurez
-vous que le bouchon de vidange et le bouton
correspondants sont bien installés pour éviter les fuites.
).
X
d’exploitation
Instructions
).
< 1,8 m
Hauteur de
refoulement
de drainage
Adaptateur
du tuyau
Adaptateur
X
de tuyau
de drainage
Unités avec
pompe uniquement
• Quand le niveau de l’eau au niveau du plateau inférieur
atteint un niveau prédéterminé, l’unité émet 8 bips. La
che « P1 ». À ce moment,
cation s’arrêtera
immédiatement. Toutefois, le moteur du ventilateur continuera
à fonctionner (ceci est normal). Déplacez soigneusement
l’unité vers un emplacement de vidange, retirez le bouchon
de vidange inférieur et laissez l’eau s’écouler. Réinstallez le
bouchon de vidange inférieur et redémarrez la machine
jusqu’à ce que le symbole « P1 » disparaisse. Si l’erreur se
répète, appelez le service.
AVIS
Assurez-vous de réinstaller fermement le bouchon de vidange
inférieur pour éviter les fuites avant d’utiliser l’unité.
Guide d’Utilisateur
Page 45

d’installation
INSTRUCTIONS D’INSTALLATION
Choisir le bon emplacement
Votre emplacement d’installation doit répondre aux
exigences suivantes:
Instructions
50 cm
19,7po
Installation recommandée
• Assurez-vous d’installer votre unité sur une surface
plane
• L’unité doit être installée à proximité d’une prise de
mise à la terre et le drain du bac de collecte (situé au
dos de l’unité) doit être accessible.
• L’unité doit être située à au moins 50 cm (19,7 po)
du mur le plus proche pour assurer une bonne
climatisation.
• NE COUVREZ PAS les entrées, les sorties ou le
récepteur de signal à distance de l’unité, car cela
pourrait endommager l’unité.
50 cm
19,7 po
AVIS
Dans le manuel, toutes les images sont fournies à titre
de minimiser le bruit et les vibrations.
érente.
50 cm
19,7 po
AVIS À propos des gaz fl uorés
ques sur le type et la quantité de gaz, veuillez consulter l’étiquette
correspondante sur l’unité.
Page 46
uorés. Pour obtenir
é.
ectué conformément aux réglementations locales.
Guide d’Utilisateur

Outils nécessaires
• Tournevis Phillips moyen
• Ruban à mesurer ou règle
• Couteau ou ciseaux
• Scie (en option, pour raccourcir l’adaptateur de fenêtre pour les fenêtres étroites).
Accessoires
Votre kit d’installation de fenêtre s’adapte aux fenêtres de 67,5-123 cm (26,5 -48 po) et peut être raccourci
pour les fenêtres plus petites.
.4
noitpircseDeitraP
Adaptateur d'unité A
Tuyau
Adaptateur de fenêtre B
Boulon
Adaptateur de fenêtre
Joint en mousse A (adhésif)
Joint en mousse B (adhésif)
Joint en mousse C (Non-adhésif)
Support de sécurité et 2 vis
Tuyau de drainage
Adaptateur de tuyau de drainage
(Pour le mode pompe à chaleur)
Télécommande et batterie
(Pour les modèles à télécommande)
Quantité
1 pièce
1 pièce
1 pièce
3 pièce
1 pièce
4 pièce
2 pièce
2 pièce
1 jeu
1 pièce
1 pièce
1 jeu
d’installation
Instructions
Guide d’Utilisateur
Boucle de cordon d'alimentation
1 jeu
Page 47

Kit d’installation de fenêtre
Tuyau d'échappement Ensemble de tuyau
Adaptateur
d'unité
Adaptateur
de fenêtre
d'échappement
Première étape: Préparation de l’ensemble
tuyau d’échappement
Enfoncez le tuyau d’évacuation dans l’adaptateur
de fenêtre et l’adaptateur d’unité, serrez
automatiquement par les boucles élastiques des
adaptateurs.
d’installation
Instructions
Crochet
Adaptateur
Adaptateur
de fenêtre
1+2:
1+2+3:
1+2+3+4:
1+4:
Trou de siège
Rainure
inférieure
Avant assemblage
Après assemblage
Boulon
Boulon
Boulon
BoulonBoulon
Boulon
Assurez-vous que
l'adaptateur est inséré
dans la rainure inférieure
de la sortie d'air
Boulon
Deuxième étape: Installez le tuyau
d’échappement à l’unité
Insérez l’adaptateur de tuyau d’échappement
dans la rainure inférieure de la sortie d’air
de l’unité avec le crochet de l’adaptateur
aligné avec le trou de la sortie d’air et le
tuyau d’échappement glissez vers le bas
dans la direction indiquée par la èche pour
l’installation.
Troisième étape: Préparation du adaptateur
de fenêtre réglable
1. Sélectionnez le curseur de fenêtre en
fonction de la taille de la fenêtre.Parfois, le
curseur doit être coupé pour répondre à la
taille de la fenêtre.
2. Après ajustement de la glissière de fenêtre
sur une longueur appropriée, elle est xée
au moyen d 'un boulon.
Type de fenêtres
Adaptateur
de la
fenêtre A
Adaptateur
de la
fenêtre A
Page 48
Fenêtre à guillotine Fenêtre coulissante
Guide d’Utilisateur

AVIS
Lorsque le tuyau d’échappement et l’adaptateur de la fenêtre ajustable sont prêts, choisissez l’une
des deux méthodes d’installation suivantes.
Joint en mousse B
(Type d'adhésif – plus court)
Joint en
mousse A
(type
adhésif)
Adaptateur
de fenêtre
Joint en mousse C
(Type non adhésif)
Adaptateur
de fenêtre B
A
(si nécessaire)
Support de
sécurité
Type 1: Installation de la fenêtre coulissantee
1. Coupez les bandes adhésives en mousse A et B aux
longueurs appropriées et xez-les à la vitre et au cadre de
la fenêtre comme indiqué.
2. Insérez l’assemblage de l’adaptateur de fenêtre dans
l’ouverture de la fenêtre.
3. Coupez la bande de joint en mousse non adhésive C pour
qu’elle corresponde à la largeur de la fenêtre. Insérez le joint
entre le verre et le cadre de la fenêtre pour empêcher l’air et
les insectes d’entrer dans la pièce.
4. Si vous le souhaitez, installez le support de sécurité avec 2 vis
comme indiqué.
d’installation
Instructions
2 vis
Guide d’Utilisateur
5. Insérez l’adaptateur de l’adaptateur de fenêtre dans le trou de
l’adaptateur de la fenêtre.
Page 49

d’installation
Instructions
Joint en
mousse A
(type
adhésif)
Joint en mousse B
(type adhésifplus court)
Adaptateur de la
fenêtre B
(si nécessaire)
Adaptateur de la
fenêtre A
Joint en mousse C
(type non-adhésif)
Type 2: Installation de fenêtre coulissante
1. Coupez les bandes adhésives en mousse A et B en aux
xez-les à la vitre et au cadre de la
fenêtre comme indiqué.
2. Insérez l’assemblage de l’adaptateur de fenêtre dans l’ouverture
de la fenêtre.
3. Coupez la bande C en mousse non adhésive pour l’adapter à la
hauteur de la fenêtre. Insérez le joint en mousse entre le verre et
le cadre de la fenêtre pour empêcher l’air et les insectes d’entrer
dans la pièce.
4. Si vous le souhaitez, installez le support de sécurité avec 2 vis
comme indiqué.
2 Vis
Sécurité
Support
5. Insérez l’adaptateur du curseur de fenêtre dans le trou du
curseur de la fenêtre.
AVIS
Pour assurer un bon fonctionnement, assurez-vous de NE PAS trop étendre ou plier le tuyau. Assurezvous qu’il n’y a pas d’obstacle autour de la sortie d’air du tuyau d’échappement (un rayon de 50 cm) pour
que le système d’échappement fonctionne correctement. Toutes les illustrations de ce manuel sont à titre
Page 50
érent. La forme réelle doit prévaloir.
Guide d’Utilisateur

ENTRETIEN ET NETTOYAGE
Précautions de sécurité
• Débranchez toujours l’appareil avant de le nettoyer ou de l’entretenir.
ammables ou de produits chimiques pour nettoyer l’appareil.
• NE lavez PAS l’unité sous l’eau courante. Cela crée un danger électrique.
• N’utilisez PAS la machine si l’alimentation électrique a été endommagée pendant le nettoyage. Un
cordon d’alimentation endommagé doit être remplacé par un nouveau cordon du fabricant.
Nettoyage du fi ltre à air
MISE EN GARDE
ltre, car la saleté et les
ltre à air toutes les
d’air bloqué par
filtre à air de
la conception
intégrée
(retirer)
lower filtrer B
(retirer)
lower filtrer A
(Presse le gril
légèrement
inférieur et tirez
le filtre en même
temps)
peluches l’obstruent et réduisent les performances.
Conseils de Maintenance
2 semaines pour un rendement optimal.
• Le bac de récupération d’eau doit être vidé
immédiatement après l’apparition de l’erreur P1,
et avant le stockage pour éviter les moisissures.
• Dans les maisons où des animaux sont
présents, vous devrez périodiquement essuyer
la gr
des poils d’animaux.
Entret ien et
netto yage
Nettoyage de l’unité
on humide non pelucheux et d’un détergent doux. Séchez
on sec et non pelucheux.
Stocker l’unité lorsqu’elle n’est pas utilisée
• Vidangez le bac collecteur d’eau de l’unité en suivant les instructions de la section suivante.
• Faites fonctionner l’appareil en mode FAN pendant 12 heures dans une pièce chaude pour le sécher
et éviter les moisissures.
• Éteignez l’appareil et débranchez-le.
ltre
propre et sec avant de le ranger.
• Retirez les piles de la télécommande.
AVIS
Assurez-vous de ranger l’appareil dans un endroit frais et sombre. L’exposition à la lumière directe
du soleil ou à une chaleur extrême peut réduire la durée de vie de l’appareil.
Guide d’Utilisateur
Page 51

DES CONSEILS DE DÉPANNAGE
Avant d'appeler le service, consultez cette liste. Cela peut vous faire économiser du temps et de l'argent.
Cette liste comprend des événements courants qui ne sont pas le résultat d'un défaut de fabrication ou
de matériaux de cet appareil.
Problème Solution
L'appareil ne
s'allume pas lorsque
vous appuyez sur le
bouton ON / OFF
L'appareil, vidangez l'eau du bac de récupération d'eau et redémarrez l'appareil.
Si la température ambiante est inférieure à la température réglée en mode
REFROIDISSEMENT, réinitialisez la température.
L'unité ne refroidit
pas bien
Des conseils de
L'appareil est
bruyant et / ou
vibre trop.
La unidad emite un
gorgoteo
L'unité ne se
connecte pas au
l'application ne
fonctionne pas
(certains modesl)
Theter est bloqué par de la poussière ou des poils d' animaux. L'appareil et le
nettoyeur conformément aux instructions.
Le tuyau d'échappement n'est pas connecté ou est bloqué. Tournez l'unité, débranchez le
Le réglage de la température est trop élevé; diminuer la température de
consigne.
Assurez-vous que toutes les fenêtres et portes sont fermées.
Theor n'est pas de niveau. Placez l'apparei l sur une surface plane.
Theter est bloqué par de la poussière ou des poils d' animaux. L'appareil et
le nettoyeur conformément aux instructions.
Ce son est causé par le réfrigérant situé à côté de l'unité et est normal.
Pour obtenir une assistance supplémentaire et des
conseils de dépannage, suivez le lien dans le code QR:
AVIS
N'ajoutez pas de rallonge au (x) tuyau (s) d'échappement!
Page 52
Guide d’Utilisateur

INSTRUCTIONS D’UTILISATION DE LA TÉLÉCOMMANDE
Les spécifi cations de la télécommande
Modèle
Tension nominale
Portée de la réception signal
Environnement
Remarque
RG57H4(B)/BGEF
3.0 V (Piles sèches R03/LR03 x 2)
8 m (environ 26 ft. )
-5°C ~ 60°C (26 ft. ~ 140°F)
Pour éviter tout dommage, retirez les piles lorsque
vous ne l'utilisez pas pendant une longue période.
Boutons de fonction
Avant de commencer à utiliser votre nouveau climatiseur, familiarisez-vous avec la télécommande. Ce qui
suit est une introduction brève à la télécommande. Pour des instructions concernant le fonctionnement
de votre climatiseur, faites référence aux Instructions de fonctionnement dans ce manuel.
ALLUMÉ/ÉTEINT
Allume ou éteint l’appareil.
Parcourir les réglages comme suit:
AUTO COOL (REFROIDIR) DRY (SEC)
HEAT (CHAUFFER) FAN (VENTILER)
REMARQUE:
Veuillez ne pas sélectionner le mode
HEAT si votre appareil ne fait que
refroidir. Le mode de chauffage ne
fonctionne pas avec des modèles
de refroidissement.
VITESSE DU VENTILATEUR
Sélectionne la vitesse du ventilateur
AUTO FAIBLE MOYEN ÉLEVÉ
Economise de l’énergie pendant
les heures de sommeil.
Commence et arrête les
mouvements de persienne.
MODE
Comme suit:
VEILLE
OSCILLATION
PRESET
MARCHE/
ON
ARRÊTER/
OFF
TEMP
Augmente la température de 1°C (1°F).
La température maximale est 30°C (86°F).
TEMP
Réduire la température de 1°C (1°F).
La température minimale est 17°C (62°F).
REMARQUE:
et en même temps pendant 3 secondes
pour changer l’affichage de température entre
°C & °F scale.
RACCOURCI
Définit et active vos paramètres préférés à
l’avance.
MINUTERIE ALLUMÉE
Règle la minuterie pour allumer l’appareil
(voir Comment utiliser les fonctions de base
pour les instructions).
MINUTERIE ÉTEINTE
Règle la minuterie pour éteindre l’appareil
(voir Comment utiliser les fonctions de
base pour les instructions).
LED
Allumer et éteindre la LED de l’appareil
intérieur. Si vous êtes sensible à la lumière
quand vous dormez, appuyez sur le bouton
LED pour éteindre l’affichage LED de
l’appareil Appuyez sur le bouton à nouveau
pour le rallumer.
SUIVEZ-MOI
Bouton de détection de
température et d’affichage
de la température ambiante.
Appuyez et maintenez les bouto
ns
(avectélécommande)
Le mode d’emploi
Guide d’Utilisateur
Page 53

Gestion de la télécommande
VOUS NE COMPRENEZ PAS UNE FONCTIONNALITÉ?
Consultez le mode d’emploi de ce manuel pour avoir une description détaillée des différentes
fonctionnalités de votre climatiseur.
REMARQUE SPÉCIALE
Il est possible que les boutons soient légèrement différents que ceux montrés.
Si l’appareil ne dispose pas d’une certaine fonctionnalité, l’utilisation du bouton correspondant
n’aura pas d’effet.
Quand il y a des différences importantes entre les fonctionnalités et les utilisations implicites de
l’illustration de la télécommande et les fonctionnalités décrites dans le GUIDE D’UTILISATEUR, les
descriptions qui se trouvent dans le GUIDE D’UTILISATEUR règnent.
INSÉRER ET CHANGER LES PILES
Votre climatiseur est muni de deux piles AAA. Insérez les piles dans la
télécommande avant l’utilisation.
1. Faites glisser le couvercle arrière de la télécommande vers le bas
a n de voir le compartiment des piles.
2. Insérez les piles en faisant attention à l’extrémité positive (+) et
négative (-), les symboles se trouvent dans le compartiment des piles.
3. Replacez le couvercle des piles.
INFORMATIONS DES PILES
Pour une performance optimale:
télécommande et
Instructions de la
de l'application
• Ne mélangez pas de vieilles piles avec celles qui sont nouvelles,
ou des piles de marques di érentes.
• Ne laissez pas de pile dans la télécommande si vous ne comptez
pas utiliser l’appareil pour une période supérieure à deux mois.
Page 54
ÉLIMINATION DE PILES
Ne jetez pas de piles dans les déchets municipaux non triés.
Renseignez-vous auprès de la législation locale pour l’élimination
appropriée des piles.
CONSEILS POUR L’UTILISATION DE LA TÉLÉCOMMANDE
• Il faut une distance de 8 mètres entre la télécommande et
l’appareil.
• L’appareil émettra un son quand le signal de la télécommande
est reçu.
• Des rideaux, d’autres objets et du soleil peuvent bloquer le
récepteur infrarouge.
• Enlevez les deux piles si vous ne comptez pas utiliser la
télécommande pour une durée de temps supérieure à deux mois.
Guide d’Utilisateur

Indicateurs de télécommande LED
Indicateurs de transmission
S’allument quand la télécommande émet un signal à l’appareil
L’affichage ALLUMER/ÉTEINDRE
S’affiche quand l’appareil est allumé et quand il est éteint
Affichage MODE
Affiche le mode
actuel, y compris:
AUTO
REFROIDIR
SÉCHER
CHAUFFER
VENTILER
L’affichage VITESSE DU VENTILATEUR
Affichage sélectionné VITESSE DU
VENTILATEUR :
ÉLEVÉ
MOYEN
FAIBLE
Cet affichage est vide quand
la vitesse AUTO est activée.
Affichage MINUTERIE
ALLUMÉE
S’affiche quand
MINUTERIE ALLUMÉE
est activée
Température/Affichage de minuterie
Affiche la température choisie par défaut, ou les réglages de
minuterie quand vous utilisez les fonctionnalités MINUTERIE
ALLUMÉE/ÉTEINTE :
- Plage de température: 17-30°C (62°F-86°F)
- Plage de réglages de minuterie: 0-24 heures
Cet affichage est vide quand vous utilisez le mode VENTILATEUR.
Affichage MINUTERIE
ÉTEINTE
S’affiche quand
MINUTERIE ÉTEINTE
est activée
Écran SILENT
Non disponible sur cet appareil
Affichage ÉCOLOGIQUE
Non disponible sur cet
appareil
Affichage de batterie
Détection de batterie faible
Affichage VEILLE
S’afficher quand la
fonctionnalité VEILLE
est activée
Affichage SUIVEZ-MOI
Indique que la fonction
FOLLOW ME est activée
Non disponible sur cet
appareil
télécommande et
Instructions de la
de l'application
Guide d’Utilisateur
Page 55

télécommande et
Instructions de la
de l'application
Fonctionnalités de base
3
1
4
1
3
PRESET
MARCHE/
ARRÊTER/
PRESET
MARCHE/
ON
ARRÊTER/
OFF
2
ON
OFF
2
TEMPÉRATURE DÉSIRÉE
La plage de température de fonctionnement pour cet appareil est
entre 62°F-86°F (17-30°C). Vous pouvez augmenter ou réduire la
température de 1°F (1°C).
Mode AUTO (REFROIDISSEMENT)
En utilisant le mode AUTO, l’appareil sélectionnera automatiquement
le mode de COOL (REFROIDIR), FAN (VENTILER), HEAT (CHAUFFER) ou
DRY (SEC) selon la température réglée.
1. Appuyez sur le bouton MODE pour sélectionner le mode Auto.
2. Choississez la température souhaitée en utilisant Temp
ou le
bouton Temp .
3. Appuyez sur le bouton ALLUMER/ÉTEINDRE pour allumer l’appareil.
AVIS
FAN SPEED (VITESSE DU VENTILATEUR) non disponible en mode AUTO.
Mode COOL (REFROIDISSEMENT)
1. Appuyez sur le bouton MODE pour sélectionner le mode COOL
(REFROIDIR).
2. Choississez la température souhaitée en utilisant le bouton Temp
ou le bouton Temp .
3. Appuyez sur le bouton FAN (VENTILATEUR) pour sélectionner la
vitesse du ventilateur: AUTO, FAIBLE, MOYEN ou ÉLEVÉ.
4. Appuyez sur le bouton ALLUMER/ÉTEINDRE pour allumer l’appareil.
3
1
Page 56
Fonctionalité SEC (DÉSHUMIDIFICATION)
1. Appuyez sur le bouton MODE pour sélectionner le mode DRY (SEC).
2. Choississez la température souhaitée en utilisant le bouton Temp
ou le bouton Temp .
2
PRESET
MARCHE/
ON
ARRÊTER/
OFF
3. Appuyez sur le bouton ALLUMER/ÉTEINDRE pour allumer l’appareil.
AVIS
FAN SPEED (VITESSE DU VENTILATEUR) non disponible en mode AUTO.
Guide d’Utilisateur

Fonctionnalités de base (suite)
Mode FAN (VENTILATEUR)
1. Appuyez sur le bouton MODE pour sélectionner le mode FAN
(VENTILATEUR).
2. Appuyez sur le bouton FAN (VENTILATEUR) pour sélectionner la
vitesse du ventilateur: AUTO, FAIBLE, MOYEN ou ÉLEVÉ.
3
1
2
PRESET
MARCHE/
ARRÊTER/
ON
OFF
3. Appuyez sur le bouton ALLUMER/ÉTEINDRE pour allumer
l’appareil.
AVIS
Vous ne pouvez pas régler la température dans le mode FAN
(VENTILATEUR). Par conséquent, l’achage LCD de votre
télécommande n’achera pas la température.
Mode HEAT (CHAUFFER)
1. Appuyez sur le bouton MODE pour sélectionner le mode HEAT
(CHAUFFER).
2. Choississez la température souhaitée en utilisant le bouton
Temp
2
4
1
3
PRESET
MARCHE/
ARRÊTER/
ON
OFF
3. Appuyez sur le bouton FAN (VENTILATEUR) pour sélectionner la
vitesse du ventilateur: AUTO, FAIBLE, MOYEN ou ÉLEVÉ.
4. Appuyez sur le bouton ALLUMER/ÉTEINDRE pour allumer
l’appareil.
ou le bouton Temp .
télécommande et
Instructions de la
de l'application
Guide d’Utilisateur
AVIS
Lorsque la température extérieure baisse, la performance de la
fonctionnalité HEAT (CHAUFFER) de votre appareil serait peut-
ectée. Dans ce cas, nous vous recommandons d’utiliser ce
age.
Page 57

Fonctions de la minuterie
1
MARCHE/ON MARCHE/ON
3
ON/OFF
MODE
SHORT
CUT
F
AN
TEMP
TIMER ON
S
L
E
EP
TIMER OF
F
Exemple: Réglage de l’unité pour
démarrage après 2,5 heures.
1sec
2
x5
4
2sec
Votre unité de climatisation possède deux fonctions de minuterie:
MARCHE /ON - règle la durée après laquelle l’unité se mettra en
marche automatiquement.
ARRÊTER/OFF - règle la durée après laquelle l’unité s’éteindra
automatiquement.
La fonction MINUTERIE ALLUMÉE (MARCHE /ON)
La fonction MARCHE /ON permet de régler la période de temps après
laquelle l’unité se mettra en marche automatiquement, par exemple
lorsque vous allez au travail.
1. Appuyez sur le bouton MARCHE /ON. La dernière période réglée
het un » (indiquant l’heure) apparaitront par défaut sur l’écran.
«
AVIS
Ce nombre indique la durée après l’heure en cours après laquelle
vous souhaitez mettre en marche l’unité.
Par exemple, si vous réglez MARCHE /ON pour 2 heures, « 2.0h »
apparaitra sur l’écran et l’unité se mettra en marche après 2 heures.
2. Appuyez plusieurs fois sur le bouton MARCHE /ON pour régler l’heure à
laquelle vous souhaitez que l’unité se mette en marche.
3. Attendez 2 secondes puis la fonction MARCHE /ON sera activée.
L’écran numérique sur la télécommande reviendra alors sur
l’écran de la température.
télécommande et
Instructions de la
de l'application
1
2
x10
La fonction MINUTERIE ÉTEINTE (ARRÊTER/OFF)
La fonction ARRÊTER/OFF permet de régler la période de temps après
laquelle l’unité s’éteindra automatiquement, par exemple lorsque vous
ARRÊTER/OFF ARRÊTER/OFF
vous réveillez.
1. Appuyez sur le bouton ARRÊTER/OFF. La dernière période réglée
het un » (indiquant l’heure) apparaitront par défaut sur l’écran.
«
1sec
4
2sec
AVIS
3
Ce nombre indique la durée après l’heure en cours après laquelle
vous souhaitez éteindre l’unité.
Par exemple, si vous réglez ARRÊTER/OFF pour 2 heures, « 2.0h »
ON/OFF
MODE
SHORT
CUT
F
AN
TEMP
TIMER ON
S
LEEP
TIMER OFF
Exemple: Réglage de l’unité
pour éteindre après 5 heures.
apparaitra sur l’écran et l’unité s’éteindra après 2 heures.
2. Appuyez plusieurs fois sur le bouton ARRÊTER/OFF pour régler
l’heure à laquelle vous souhaitez que l’unité s’éteigne.
Page 58 Guide d’Utilisateur

Fonctions de la minuterie (suite)
3. Attendez 2 secondes puis la fonction ARRÊTER/OFF sera activée.
L’écran numérique sur la télécommande reviendra alors sur
l’écran de la température.
Tim e r on
PRESET
MARCHE/
ARRÊTER/
ON
OFF
Continuez
d’appuyer
sur
Continue
MINUTERIE
to press
ALLUMÉE
TIMER ON
ou
or
MINUTERIE
TIMER OFF
ÉTEINTE
until desired
lorsque
time is
le temps
reached.
souhaité est
atteint.
AVIS
Lors du réglage des fonctions MINUTERIE ALLUMÉE (MARCHE
/ON) ou MINUTERIE ÉTEINTE (ARRÊTER/OFF) jusqu’à 10 heures,
le temps augmentera progressivement de 30 minutes à
chaque appui. Entre 10 à 24 heures, le temps augumentera
progressivement de 1 heure. La minuterie se remettra à zéro
après 24 heures.
Vous pouvez aussi désactiver chaque fonction en réglant la
minuterie à « 0.0h ».
1
MARCHE/ON MARCHE/ON
2
X12
3
4
Réglage simultané de MARCHE
/ON et ARRÊTER/OFF
sec
N’oubliez pas que les périodes de
temps que vous réglez pour les
deux fonctions se réfèrent au temps
ON/OFF
MODE
SHORT
CUT
TEMP
TIMER ON
5
6
ARRÊTER/OFF ARRÊTER/OFF
X16
7
8
après l’heure en cours. Par exemple,
supposons que l’heure actuelle est
13:00 et vous souhaitez que l’unité se
mette automatiquement en marche
à 19:00 pour fonctionner pendant 2
sec
heures puis qu’elle s’éteigne à 21:00.
gure sur le
côté):
ON/OFF
MODE
SHORT
CUT
TEMP
TIMER ON
Exemple: Réglage de l’unité pour mettre en marche après 6 heures pendant 2 heures puis pour éteindre
gure ci-dessous).
L’écran de votre télécommande
MINUTERIE ALLUMÉE (Timer On)
MINUTERIE ÉTEINTE (Timer Off)
La minuterie est
réglée.
Pour se mettre
en marche 6
heures après
L’heure actuelle.
La minuterie est
réglée.
Éteindre 8 heures
après L’heure
actuelle
Début de la
minuterie
Heure
actuelle
13:00
14:00 15:00
16:00 17:00
6 heures après
8 heures après
L’unité est
en mode ON
18:00 19:00 20:00 21:00
L’unité est
en mode OFF
avec comman e
télécommande et
Instructions de la
de l'application
Guide d’Utilisateur
Page 59

Comment utiliser les fonctions avancées
La fonction VEILLE
La fonction VEILLE est utilisée pour diminuer
la consommation d’énergie lorsque vous
dormez (et vous n’avez pas besoin des
réglages de la même température pour être
confortable). Cette fonction peut seulement
être activée avec la télécommande.
télécommande et
Instructions de la
de l'application
Remarque:
La fonction VEILLE n’est
pas disponible pour les
modes FAN ou DRY.
La fonction BALANÇOIRE
Utilisée pour arrêter ou démarrer un mouvement
du volet et régler la direction du flux d’air souhaitée,
vers le haut ou vers le bas. L’angle des volets change
progressivement de 6 degrés à chaque appui (pas
sur tous les modèles). Si vous maintenez enfoncé le
bouton pendant plus de 2 secondes, le fonction
AUTO SWING du volet sera activée.
Fonction SUIVEZ-MOI
La fonction SUlVEZ-MOl permet à la
télécommande de mesurer la température
à son emplacement actuel. Lorsque vous
utilisez les fonctions AUTO,
REFROIDISSEMENT ou CHAUFFAGE, la
mesure de la température ambiante à
partir de la télécommande(au lieu de celle
de l’unité intérieure elle-même) permettra
au climatiseur d’optimiser la température
autour de vous et d'assurer un confort
maximal.
1.Appuyez sur le bouton SUIVEZ-MOl pour
activer la fonction. La télécommande
enverra un signal de température à
l’appareil toutes les trois minutes.
2.Appuyez à nouveau sur le bouton
La fonction RACCOURCI
Utilisée pour remettre les réglages actuels ou pour
poursuivre avec les réglages précédents.
Appuyez sur ce bouton lorsque la télécommande est
allumée, le système reviendra automatiquement sur les
réglages précédents en incluant le mode de
fonctionnement, la température réglée, le niveau de
vitesse du ventilateur et la fonction de veille (si activée).
Si vous maintenez enfoncé le bouton pendant plus de
2 secondes, le système reviendra automatiquement sur
les réglages de fonctionnement actuel en incluant le
mode de fonctionnement, la température réglée, le
niveau de vitesse du ventilateur et la fonction de veille
(si activée).
SUIVEZ-MOI pour désactiver cette fonction.
PRESET
MARCHE/
ARRÊTER/
ON
OFF
Page 60
Guide d’Utilisateur

1. DÉC
LARATION DE CONFORMITÉ
Nous déclarons par la présente que ce climatiseur est conforme aux exigences
essentielles et aux autres dispositions pertinentes de la directive 1999/5 / CE.
2. SPÉCIFICATION DU MODULE SANS FIL
Modèle :
US-OSK103
La Norme : IEEE 802.11 b / g / n
Type d'antenne: Antenne omnidirectionnelle externe
La fréquence: 2,4 GHz (sans )
Puissance Maximale Transmise : 19.8 dBm max
Dimensions : 41 x 24 x 5 (mm)
Température de Fonctionnement : 0 ° C - 45 ° C / 32°F ~ 113°F
Opération Humidité : 10% - 85%
Entrée d’Alimentation : DC 5V/300 mA
3. PRÉCAUTIONS
Prend en charge les systèmes d’exploitation : iOS 7+ ou Android 4+.
1.
En cas de mise à jour du système d'exploitation, il peut exister un délai entre la mise à
2.
jour du système d'exploitation et une mise à jour logicielle correspondante, au cours
duquel votre système d'exploitation peut être pris en charge ou non jusqu'à la
publication d'une nouvelle version. Votre téléphone portable sp
problèmes sur votre réseau peuvent empêcher le système de fonctionner et Toshiba ne
pourra être tenu responsable de tout problème pouvant être causé par une
incompatibilité ou des problèmes de réseau.
Ce climatiseur intelligent prend uniquement en charge le cryptage WPA-PSK / WPA2-PSK
3.
(recommandé).
Veuillez consulter le site Web Toshiba Lifestyle, us.toshiba-lifestyle.com, pour obtenir des
informations actualisées.
Pour assurer une numérisation correcte du code QR, votre téléphone intelligent doit
4.
disposer d’un appareil photo d’au moins 5 mégapixels.
5.
.uaesér ud noitarugifnoc al zetucéxeér
télécommande et
Instructions de la
de l'application
,tiudorp es alec iS .reripxe tnevuep sednamed sel ,elbatsni uaesér étivitcennoc enu'd nosiar nE
Guide d’Utilisateur
Page 61

En raison d'une connectivité réseau instable, les commandes peuvent expirer. Si cela
6.
se produit, l'application pour téléphone intelligent et le produit réel peuvent afficher
des informations contradictoires. Les informations affichées sur le produit réel sont
toujours les plus précises disponibles. Actualisez
l'application pour la resynchroniser.
REMARQUE
Toshiba ne sera pas responsable des problèmes pouvant être causés par une incompatibilité
ou des problèmes de réseau, de votre routeur sans fil et de votre téléphone portable.
APERÇU DE SYSTÈME
4.
Périp
hériques requis pour utiliser le climatiseur intelligent :
Téléphone Intelligent avec système compatible iOS ou Android.
1.
Routeur Sans l (Il faut un réseau de 2,4 GHz pour se connecter)
2.
Climatiseur Intelligent
3.
TELECHARGEMENT ET INSTALLATION DE L'APPLICATION
5.
Code QR Android Code QR Apple
télécommande et
Instructions de la
de l'application
Numérisez pour télécharger l'application.
Vous pouvez également aller sur Google Play ou App Store et rechercher
•
Toshiba Climatiseur Intelligent. Pour plus d'informations, consultez le site
Web Toshiba Lifestyle: us.toshiba-lifestyle.com.
REMARQUE
Toutes les images de ce ma
votre application peuvent être légèrement différents. Les instructions relatives au produit
et à l'application doivent être prises en compte.
Page 62
nuel sont fournies à titre indicatif uniquement. Votre produit et
Guide d’Utilisateur

CRÉEZ VOTRE COMPTE
6.
Assurez-vous que votre téléphone intelligent est connecté à votre routeur sans l
•
et que votre routeur sans l dispose d'une connexion Internet opérationnelle.
Assurez - vous que votre téléphone mobile intelligent est connecté à un routeur sans l
•
et que votre routeur sans l possède une connexion Internet de 2,4 GHz fonctionnant
normalement.
Il est recommandé d'activer votre compte immédiatement pour pouvoir récupérer
•
votre mot de passe par courriel.
6.1 Appuyez sur « I
6.3 Appuyez sur « Inscription ».
nscription ».
6.2 Entrez votr
passe.
6.4 Si vous avez oublié votre mot de passe, appuyez
sur « Mot de Passe oublié ? » dans le menu principal
et entrez votre adresse de courriel. Puis appuyez sur
"Réinitialiser le mot de passe".
e adresse de courriel et votre mot de
Page 63Guide d’Utilisateur
télécommande et
Instructions de la
de l'application

REMARQUES
Assurez-vous que votre telephone intelligent est capable de se
•
connecter au réseau sans fil qui sera utilisé.
Assurez-vous également que l'appareil ne se connecte pas à d'autres
•
réseaux à portée.
APPLICATION SUPPLÉMENTAIRE ET FONCTIONS SMART HOME
Pour obtenir des instructions supplémentaires concernant les fonctionnalités de l'application et les
capacités de compétences Smart Home, scannez le code QR ci-dessous.
télécommande et
Instructions de la
de l'application
Page 64 Guide d’Utilisateur
 Loading...