

Page 1
TEC Electronic Cash Register
MA-79 (US & CA VERSION)
TOKYO ELECTRIC CO-, LTD.
Page 2

WARNING
This equipment generates, uses, and can radiate radio frequency energy and if not
installed and used in accordance with the instructions manual, may cause interfer
ence to radio communications. It has been tested and found to comply with the limits
for a Class A computing device pursuant to Subpart J of Part 15 of FCC Rules, which
are designed to provide reasonable protection against such interference when operat
ed in a commercial environment. Operation of this equipment in a residential area
is likely to cause interference in which case the user at his own expense will be re
quired to take whatever measures may be required to correct the interference.
Page 3

El-01397
TABLE OF CONTENTS
Page
1. TO OUR CUSTOMERS ...................................................................................................................................................... 1
2. PRECAUTIONS ................................................................................................................................................................. 1
3. APPEARANCE AND NOMENCLATURE ........................................................................................................................... 2
4. MODE LOCK AND MODE SELECTOR KEYS ................................................................................................................ 2
5. DISPLAY ............................................................................................................................................................................. 3
6. KEYBOARD LAYOUT ........................................................................................................................................................ 5
7. FUNCTIONS OF EACH KEY .............................................................................................................................................. 5
8. REGISTERING PROCEDURE FOR SALES AND OPERATION SAMPLES .................................................................. 14
a READ (X) AND RESET (Z) REPORTS ............................................................................................................................... 37
10. PROGRAMMING OPERATIONS ..................................................................................................................................... 42
11. VERIFICATION OF PROGRAMMED DATA .................................................................................................................... 59
12. MAINTENANCE ............................................................................................................................................................... 62
13. SPECIFICATIONS ............................................................................................................................................................ 68
Copyright © 19S8
by Tokyo Electric Co., Ltd.
All Rights Reserved
1-14-10 Uchikanda. Chiyoda-ku, Tokyo, Japan
Page 4

TO OUR CUSTOMERS
Thank you for choosing the TEC electronic cash register MA-79 series. This instruction manual
provides a description of the functions and handling of this register and should be read carefully to
ensure optimum performance. Since every consideration has been given to safety and reliability,
there is no danger of damaging the machine by incorrect operation.
Please refer to this manual whenever you have any questions concerning the machine. This
machine has been manufactured under strict quality control and should give you full satisfaction.
However, if the machine is damaged during transit, or there are any unclear points in this manual,
please contact your local TEC representative.
« The specifications described in this manual may be modified by TEC, if necessary.
• Be sure to keep this manual for future reference.
2. PRECAUTIONS
El-01397
The ECR is a precision machine. Please handle it carefully considering the following guidelines.
REMARKS ON THE LOCATION
• Place it where no unusual temperature changes are expected.
• Place it on a flat and level surface with little dust, humidity, vibration, etc.
« Keep it away from water sources.
• Do not use it in direct sunlight for a long time.
e Ensure proper ventilation so that the machine is not exposed to excessive heat.
• Be certain to connect a grounding wire to prevent the generation of static electricity and
noise troubles. Never share the same power outlet with many other electric appliances.
REMARKS ON OPERATING THE ECR
• The keys on the keyboard function with a light touch. Avoid pressing the keys too hard.
• Do not handle the machine with wet hands, since this may cause electrical malfunctions
and corrosion of parts.
• Do not apply thinner, benzine, or other volatile materials to the cabinet or other plastic
parts. Such liquids will cause discoloration or deterioration of the cover. If dirty, wipe off
with a piece of cloth soaked in a neutral detergent and wrung out thoroughly.
® Turn off the power switch when the operations are over for the day.
« Ask your TEC representative to provide periodical maintenance to ensure the optimum
performance of the machine.
9 As for other operations, follow the instructions in this manual.
-1 -
Page 5
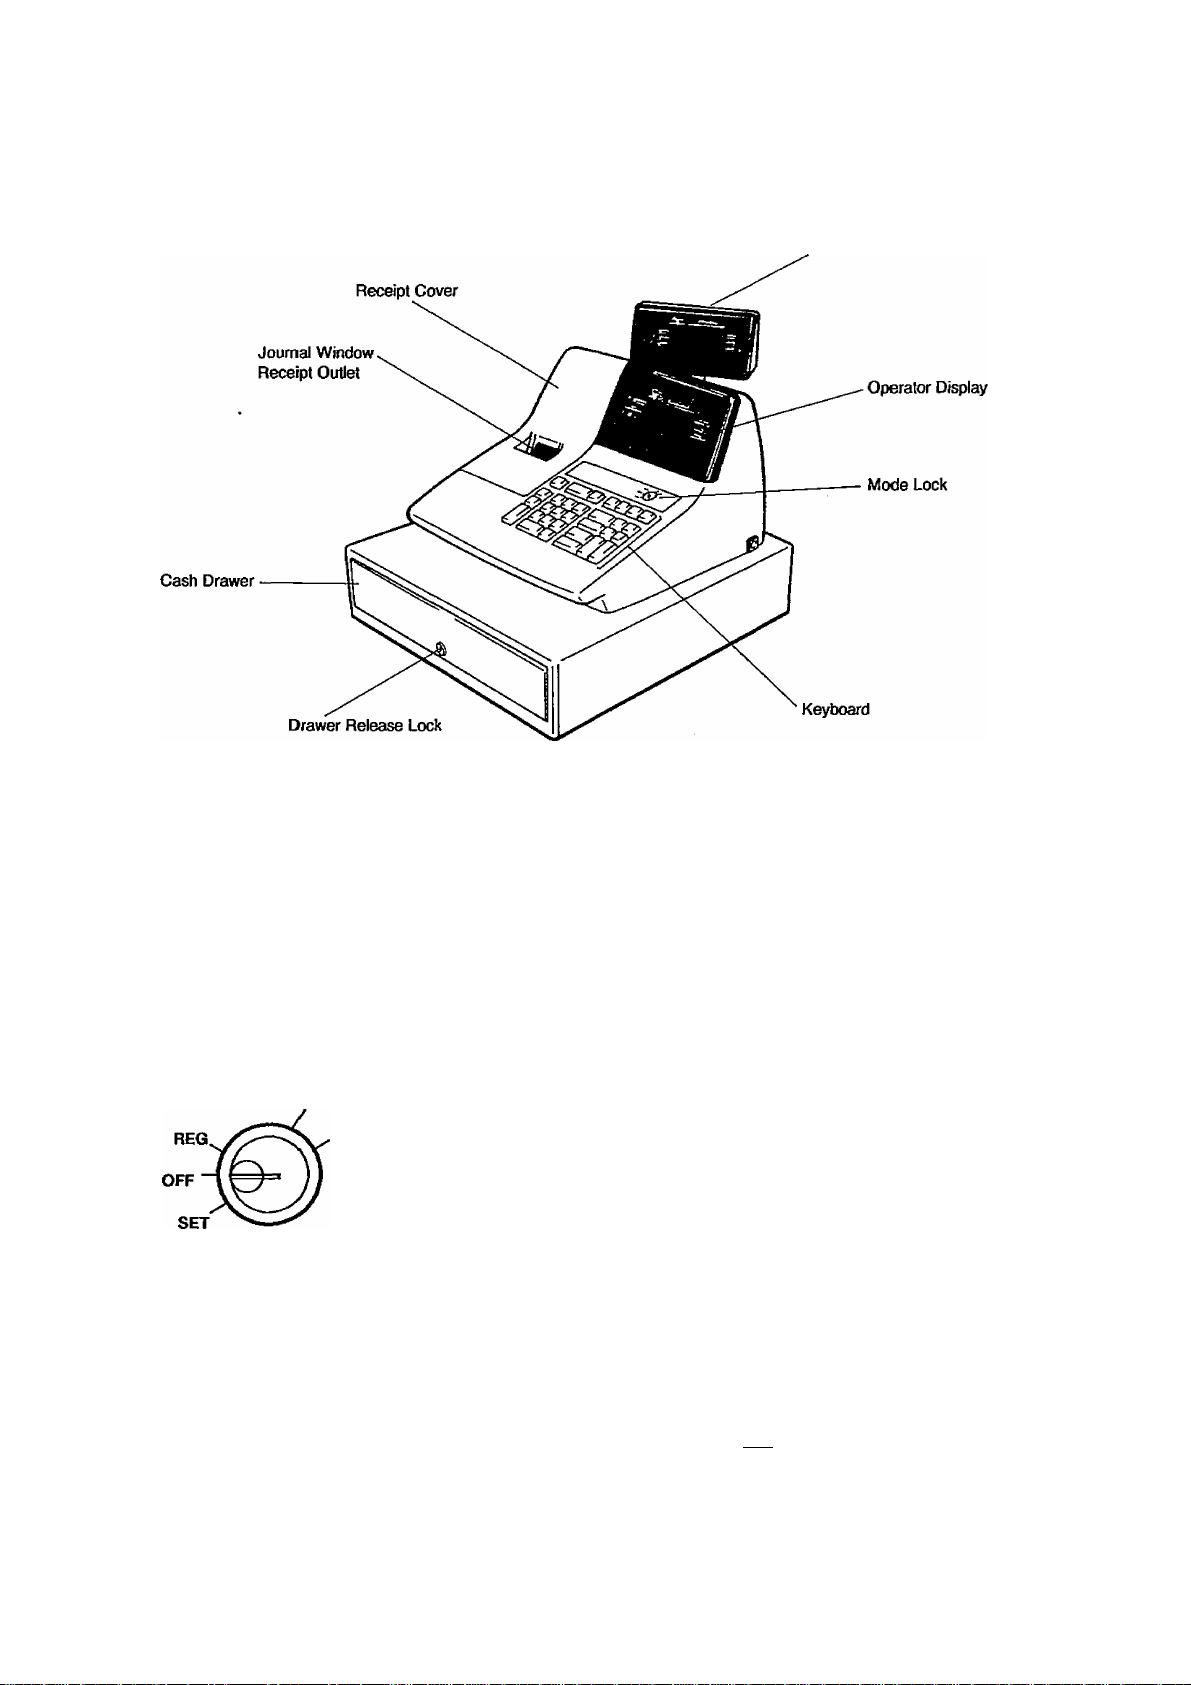
3. APPEARANCE AND NOMENCLATURE
El-01397
Customer Display
4. MODE LOCK AND MODE SELECTOR KEYS
MODE LOCK
MA
Key
SET
Key
REG
A.
(POSITION)
i
Key
SET
OFF
REG
In this position, the register will allow
programming operations.
The power of the register is turned off in
this position. The displayed data
disappears and the register operations are
locked.
Normal cash register operations are carried
out in this mode. The current time is
displayed when the Mode Lock is turned to
this position from any other.
The sale totals can be read and the
programmed data can be verified in this
position.
All the resettable totals and their counters
are read and reset in this position.
(FUNCTION)
-2 -
Page 6
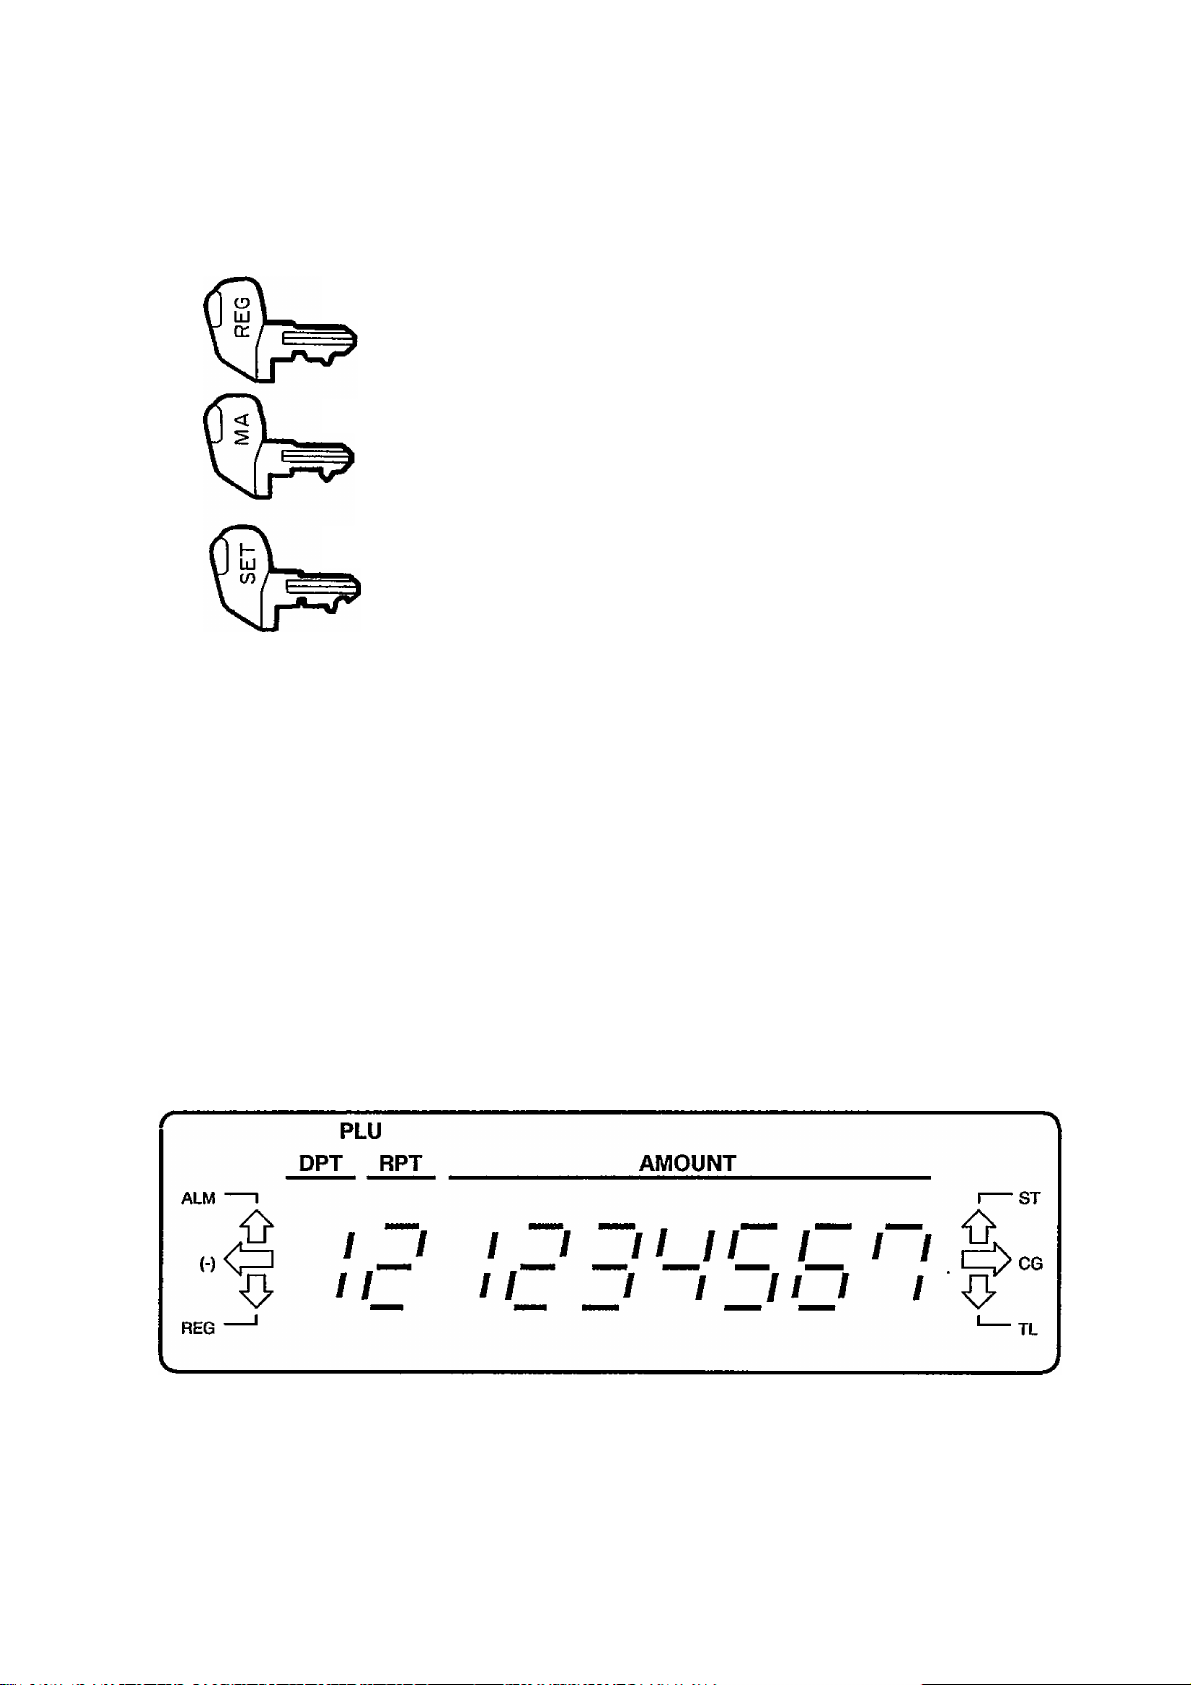
MODE SELECTOR KEYS
El-01397
5. DISPLAY
REG Key:
MA Key:
SET Key:
All the keys can be removed at the “OFF” or “REG” position.
The REG Key is used by the cashier who operates the register.
This key can access the positions of OFF and REG.
The MA Key is used by the store manager who will daily supervise
the collection of money and the printing of transactions recorded
by the register. This key can access the positions of OFF, REG,
X, and Z.
The SET Key is used by the programmer or the store manager
who will change the program data on a daily, weekly, or monthly
basis. This key can access the positions of OFF and SET.
The Operator Display (front display) is located at the top of the register just above the keyboard.
The Customer Display can be fixed as a rear display or moved to form a remote display. It can be
moved up, down, to the right, and to the left and thus is fully adjustable according to the position of
the customer.
-3 -
Page 7

DISPLAY CONTENT
Numeric Display
AMOUNT {7 digits): Displays numeric data, such as amount, quantity, time, etc. When
the amount obtained by a subtotal, total, or % operation results in 8
digits, the 8th digit will be displayed in the “RPT” portion.
RPT (1 digit): Displays the repeat count. It indicates nothing on the first item
entry, showing 2, 3, 4, etc., from the second item entry on. Since it
has only one digit, 0 will be displayed for count 10, 1 for 11, etc.
DPT {1 digit): Displays the code which represents each Department Key.
PLU (2 digits; sharing the common digits with RPT and DPT):
Displays the PLU Code of the PLU that has been entered.
Arrow Mark Descriptor Lamps
ALM: Lights up when an error has occurred.
(-): Lights up when a negative item has been entered, such as Item Correct,
Returned Merchandise, %-, or Dollar Discount.
El >01397
It also lights up when the obtained subtotal or total balance is negative.
REG: Lights up when a sale item has been entered, and goes out when the sale has
been finalized.
ST: Lights up when the amount being displayed is the subtotal including lax.
It also lights up when a short-tendered amount has been entered, indicating
that the displayed amount is the balance due.
It also lights up when the [TAX] key is depressed without a prior amount
entry, indicating that the displayed amount is the non-taxable portion total of
the sale.
CG: Lights up when an over-tendered amount has been entered, indicating that the
displayed amount is the change due.
TL: Lights up when the sale has been finalized without an amount tendered,
indicating that the displayed amount is the sale total.
TIME DISPLAY
The current time is displayed in the AMOUNT portion when the Mode Lock is turned to the
“REG” from any other position.
The time being displayed will disappear when any key-in operation is started. (The time will
not be displayed if so programmed.)
TIME DISPLAY FORMAT
Example:
1:24 p.m.
(13:24)
-4-
/ _/
/ /
/ / /
/ /
Page 8
6. KEYBOARD LAYOUT
The following is the keyboard layout of the MA-79 series.
El-01397
FEED
ITEM
CORR
RTN
MDSE
@/FOR
PLU
#/NS
7 8
4
1
TX/M
9
5 6
2 3
0 00
7. FUNCTIONS OF EACH KEY
FEED
PAPER FEED KEY ([FEED])
This key is used to feed the paper. As long as this key is depressed, the
paper keeps on feeding. This key will function in any position of the Mode
Lock except in the “OFF” position.
%
DOLL
DISC
R/A
TAX Chg
1
EX
2
3
ST AT/TL
4
PO
CHK
TND
ITEM
CORR
ITEM CORRECT KEY ([ITEM CORR]) - LAST LINE VOID KEY
This key is used to delete the last item within a transaction. Depressing this
key once will remove the last line from the bill, printing the same item symbol
and amount with tiie “VD” added below the last item print line.
The item-correct function is effective even when a numeric entry and a [C]
key depression are performed between the item entry to be corrected and
the [ITEM CORR] key depression. However, if any other key-in operation
including an error-and-clear sequence comes inbetween, the item-correct will
not function.
The [ITEM CORR] key can function to correct any last item entered through
a department, PLU, [DOLL DISC], [TAX], or [%] key. But a department or
PLU item entered with the [RTN MDSE] key, a negative department item, a
Non-add Number, an [EX] key entry, nor any media tender amount can be
item-corrected. Neither can any item entered through the [R/A] or [PO] key
be item-corrected.
When this key is operated to delete the last item, the “( - )” arrow lamp
lights.
-5 -
Page 9

E1-01397
RTN
MDSE
@/FOR
RETURNED MERCHANDISE KEY ([RTN MDSE])
This key is used to make a subtracting entry for a returned item. This key is
also used to invalidate an item entered before the last item within a
transaction, in which case the [ITEM CORR] key cannot invalidate the
designated item any longer.
To operate, depress the [RTN MDSE] key before or during a department or
PLU entry sequence; it must be depressed before the last key of the
sequence {i.e. the Department Key or the [PLU] key). Then the item is
registered as a returned item.
AT/FOR (Quantity Extension and Split Package Pricing) KEY {[©/FOR])
This key is used to multiply a department or PLU entry by a quantity.
The multiplication order is: QUANTITY X UNIT PRICE
A maximum of 3 digits for the QUANTITY and a maximum of 6 digits for the
UNIT PRICE are allowed. The product must not exceed 7 digits.
This key is also used to enter a purchased quantity when a Split Package
Pricing entry is operated through a department.
PLU
#/NS
PLU (Price-Look-Up) KEY ([PLU])
A PLU (Price-Look-Up) is an item programmed with a code (1 to 99), a
preset unit price (max. 6 digits), and its linked department. A maximum of
99 PLUS may be programmed on this register.
Instead of entering a sale item through a department key, entering It through
a specific PLU will automatically recall its preset price and register the item.
The sale of tfie item will be processed into that specific PLU memory as well
as its linked department memory. Thus, in read or reset reports, you can
read the sale total of the individual PLU item, as well as the sale total of the
department to which the PLU is linked. The taxable/non-taxable status of a
PLU is determined by that of the department to which the PLU is linked.
To operate, enter the PLU Code (1 to 99) assigned to the item, and depress
the [PLU] key.
NON-ADD NUMBER PRINT / NO-SALE KEY ([#/NS])
This is a dual-function key.
1. NON-ADD NUMBER PRINT FUNCTION
When any number is entered before depressing this key, it functions as
the Non-add Number Print Key. A non-add number is a number or code
used for future reference such as Customer No., Check No., Account
No., etc. A maximum of 7 digits may be entered and printed as a non
add number.
-6-
Page 10

El-01397
To Operate, enter the required number and depress the [#/NS] key. It
may be operated as the first line of the sale, between tv/o line items, or
after the subtotal amount if before finalizing the sale. However, when a
non-add number is entered, a no-sale transaction {by depressing [#/NS]
again without a prior number entry) will not be accepted.
2. NO-SALE FUNCTION
When the register is outside a sale and this key is depressed without any
prior numeric entry, it functions as a No-sale Key for opening the cash
drawer without relating to any sales, such as giving change, testing the
register print condition, etc.
To operate, simply depress this key with the Mode Lock positioned to
“REG” in an out-of-sale condition. The “NS” symbol is printed to
indicate a no-sale transaction, and the drawer opens.
This key can also be used, when the Mode Lock is in the “X” position, to
issue a Cash-in-drawer Read Report.
TX/M
TAX MODIFIER KEY (|TX/M])
This key is used to reverse the tax status (taxable/non-taxable) of a
department or PLU for one entry only. If a department (or PLU) is
programmed with taxable status, depressing the [TX/M] key prior to the
[DEPT] (or [PLU]) key will enter the item as non-taxable. Depressing the
[TX/M] key during a non-taxable department or PLU item entry will reverse
the status into taxable.
CLEAR KEY ([C])
This key is used to correct a numeric, [RTN MDSE], or [TX/M] key entry
error if prior to depressing any other function key that activates printing, or to
correct any error condition and cancel the error alarm buzzer.
If this key is depressed before depressing a Department Key or the [PLU]
key in a quantity extension or split package pricing sequence, all of the
quantity, [@/FOR] key, and unit price entries are cleared.
If the [C] key Is depressed after a subtotal is obtained, the subtotal amount is
then displayed. If depressed after a short-tendered is entered with the
balance due displayed, the balance due is again displayed.
If the [C] key is depressed after the [EX] key is once depressed to obtain the
post-tax-exempted sale total due, the post-tax-exempted total is again
displayed.
The [C] key may be operated regardless of any Mode Lock position except
“OFF”.
-7-
Page 11

El-01397
7 8 9
4
5 6
1
2 3
0 00
%
NUMERIC KEYS (|
These keys are used to enter numeric values such as amount, quantity, and
non-add numbers.
Depressing the [00] key once is the same as depressing the [0] key twice
consecutively.
The maximum listing capacity for numeric entry is 7 digits. However,
amount entries through departments or tender media keys may be limited by
the Listing Capacity setting for each key.
PERCENT KEY ([%
This key is programmed as a [%-] (Percent Discount) or [% + ] (Percent
Charge) key according to the store’s requirement.
Percent Discount Key ([%-])
This key is used to enter a discount calculated on a percent rate. When
this key is depressed after a department or PLU item, the discount is
calculated on the preset or manually entered rate and subtracted from
the department or PLU item amount This key can also be operated in
the same way after depressing the [ST] key if the percent discounting is
performed for the entire sale total.
A percent rate can be preset on this key; however, if another rate is
entered through the numeric keyboard prior to the depression of the [%-]
key, the entered rate prevails. The preset rate will be applied by a
simple depression of the [%-] key.
The percent discount is effective only once for each department or PLU
item and any number of times for the subtotal.
A percent discounting is allowed even on a returned merchandise item
entry, but not on a negative department or subtotal entry.
The [%-] (or [% + ]) key is fixed with the non-taxable status, i.e. the
amount subject to the % calculation is the pre-taxed amount. However,
when the [%-] key must function with the taxable status (i.e. when the
amount subject to the % calculation must be post-taxed amount),
depress the [TX/MJ key prior to the [%-] key depression. Then the
status of the [%-] key is reversed from non-taxable to taxable for one
entry only.
Percent Charge Key ([% + ])
This key operates the same as the [%-] key, except that the [% + ] key
will add the calculated amount to instead of subtracting from the item or
the subtotal.
-8-
Page 12

E1-01397
DOLL
DISC
R/A
DOLLAR DISCOUNT KEY ([DOLL DISC])
This key is used to subtract an amount from the safe total, such as a
discount during a sale. An amount exceeding the sale total cannot normally
be entered. However, if the “Credit Balance Allowed” option is selected,
over-subtraction of the sale is allowed through this key.
To operate, enter the discount amount on the numeric keys, and then
depress the [DOLL DISC] key.
This key is fixed with the non-taxable status, i.e. the amount subtracted
through this key is always not with tax. However, when a doilar-discounting
is required with tax-subtraction (i.e. when the [DOLL DISC] key should be
reversed to the taxable status temporarily), depress the [TX/M] key prior to
the [DOLL DISC] key.
RECEIVED-ON-ACCOUNT KEY ([R/A])
A received-on-account transaction is used to identify money which is in the
drawer but not business, such as change reserve into the drawer, payments
received from a customer for a charge sale account made in the past, etc.
The amount entered is thus included in the “Cash-in-drawer” memory but not
in the sales totals.
PO
To operate, enter an amount of payment, and then depress the [R/A] key
whilst the register is in an out-of-sale condition. The drawer immediately
opens. No entries with a zero amount are allowed through this key.
PAID-OUT KEY ([PO])
A paid-out transaction is used when an amount of money is removed from
the cash drawer without relating to a sale, such as paying for merchandise to
a wholesaler, money collection for banking purposes (Pick Up), etc. When
the [PO] key is used, the amount entered is subtracted from the “Cash-in
drawer” memory but does not affect the sale totals (reverse process of
[R/A]).
To operate, enter the cash amount taken from the drawer and depress the
[PO] key whilst the register is in an out-of-sale condition. The drawer
immediately opens to enable cash payout. No entries with a zero amount
are allowed through this key.
-9 -
Page 13

El-01397
to
1.
These are department keys through which sales items are registered.
These keys may be programmed as either ‘PRESET' keys or ‘OPEN’ keys.
OPEN DEPARTMENT KEY ([Open DEPT])
A key which has no preset price programmed is an ‘OPEN’ key and must
have a price entered into it manually. The price is rung up on the
numeric keyboard and then the appropriate department key is depressed.
The price is then displayed and printed.
When the same department key is depressed more than once after a
price entry, the price entered is repeated as many times as it is
depressed. A 0 (zero) amount cannot be entered.
PRESET DEPARTMENT KEY ([Preset DEPT])
A preset key is a key which already has a price programmed in it. It is
therefore unnecessary to enter the price of an item: simply depress the
key to register the sale of one item.
Quantity extension (multiplication) is possible through a department key by
entering a quantity and depressing the [@/FOR] key prior to the department
entry sequence.
DEPARTMENT KEYS {[DEPT], or [DEPT 1] to [DEPT 4])
4,
Split Package Pricing entries are also allowed through department keys.
Enter the PURCHASED QUANTITY first through [@/FOR], enter the WHOLE
PACKAGE QUANTITY next through [@/FOR], and then the normal
department entry sequence. In this case, the manually-entered or preset
price entered with the department-key is regarded as the WHOLE PACKAGE
PRICE.
Each department key can be programmed to be a positive or negative
department. A negative department cannot be operated with the [RTN
MDSE] key, nor will an open and negative department allow repeat entries.
Each department key can also be programmed as an Itemized Department or
Single-item Department.
Itemized Department Key
An amount entered through this key will not be finalized until a media
key ([AT/TL], [CHK TND], or [Chg]) is operated. That is, more
than one item of different departments or with different amounts may
be entered in a sale.
-10-
Page 14

Single-item Department Key
When an amount is entered through this key and when no other sale
items have been entered within the sale, the sale is immediately
finalized as cash without operating the [AT/TL] key. Quantity
extension and Returned Merchandise operations are also possible
with this key. but Percent Discount/Charge, Dollar Discount, or
Repeat Entries are not possible for the item entered as Single-item.
Nor will the [ITEM CORR] key be effective to delete a Single-item
entry.
However, when this key is used inside a sale, (i.e. when any other
sale items have already been entered in the sale), the key functions
just as an Itemized Department Key.
Each department is programmed with taxable or non-taxable status. If
taxable, the “T” symbol is printed to the right of the department item.
However, the symbol will not be printed when the item is entered as
Returned Merchandise or Item Correct.
El-01397
TAX
MANUAL TAX KEY (\TAX\)
This is a dual-function key.
MANUAL TAX ENTRY
When an amount is entered and this key is depressed, the amount is
added to the sale as manual tax and printed with the “TX” symbol. The
Manual Tax entry is used to enter an irregular tax amount that cannot be
handled with the auto-tax table (pre-programmed tax breaks or rate autocalculated and added in the sale finalization).
NON-TAXABLE SALE PORTION AMOUNT READ
When the [TAX] key is depressed without a prior amount entry during a
sale, the non-taxable portion amount of the sale (i.e. the total of the sale
portion not subject to the auto-tax addition) is read in the display with the
“ST" arrow lamp lit.
This function may be used to read the non-taxable portion amount, before
actually entering a manual tax amount using the other function of the
[TAX] key described above.
This key will not be used in areas where no irregular tax entries are
necessary.
-11 -
Page 15
El-01397
EX
TAX EXEMPT KEY ([EX])
This key is used to exempt tax from the sale.
After all the sale items have been entered, depressing the [EX] key declares
tax exemption, which displays the sale total (the displayed amount is already
tax-exempt) with the “ST” arrow lamp lit and prints the tax-exempted total of
the taxable item portion of the sale. The manual tax (amount entered
through [TAX]), if any, will not be exempted in this case.
After operating the [EX] key, no other operations than sale finalization will be
accepted. When the [C] key is depressed to clear a numeric entry, an
error, etc., after the [EX] key is operated, the tax-exempted sale total will
again be displayed.
SUBTOTAL KEY ([ST])
This key is used to obtain the subtotal amount during a sale, printing the
amount without tax and displaying the amount with tax of the items so far
entered. But the sale is not finalized, and additional items may be entered if
necessary. At the same time the “ST” arrow lamp lights. When the
displayed subtotal amount is negative, the arrow lamp lights along with
the “ST” lamp.
If the [ST] key is depressed more than once consecutively, the first
depression only will print and display the subtotal; further depression will
display but not print the subtotal amount.
CASH AMOUNT TENDER / TOTAL KEY ([ATyTL])
This key is used to finalize a cash sale.
This key can be programmed to be used as one of the following three types;
1. AMOUNT TENDER KEY
If so programmed, this key requires a tendered amount entry prior to
depressing this key. Tax is calculated and printed with the “TX” symbol.
The sale total with tax with the “TL” symbol (if [ST] has not been
depressed)i cash tendered amount with the “AT” symbol, and the
change due with the “CG” symbol are each printed on separate lines.
Meanwhile, the display shows the amount of change due.
When the tendered amount is less than the sale total, all the printing
sequence above will be the same except that the balance due is
displayed (not printed) instead of the change due. In this case, the sale
is not yet finalized and another media tendering or totalling using
[AT/TL], [CHK TND], or [Chg] will be required.
When the sale total is negative, as in some cases with returned
merchandise entries, the [AT/TL] key must be depressed without a prior
amount entry, as described in “2. TOTAL KEY” below.
-12 -
Page 16

2. TOTAL KEY
If so programmed, this key can be depressed without a prior amount
entry for sale finalization. Tax is calculated and printed with the “TX”
symbol. The sale total is printed with the “CA” symbol.
When the sale total is negative, the sale total is printed with the “ - ” as
well as the “CA” symbol. The display shows the sale total amount with
the “TL” and arrow lamps lit. In this case, the operator must
refund the amount in cash to the customer.
3. AMOUNT TENDER / TOTAL KEY
If so programmed, this key will function as TENDER KEY (as described in
1 above) when any prior amount is entered, and will function as TOTAL
KEY (as described in 2 above) when depressed without an amount entry.
E1-01397
CHK
TND
Chg
CHECK TENDER KEY ([CHK TND])
This key is used to finalize a sale as a check payment, as an alternative
method of payment instead of cash.
Since this is a TENDER KEY, a tendered amount entry is always required
prior to depressing this key. The operation will be the same as described in
“1. TENDER KEY” of the [AT/TL] key, except that a negative-balance sale
cannot be finalized by this key (in which case, use [AT/TL] to refund the
balance in cash or [Chg] to process the balance as a charge account).
CHARGE TOTAL KEY ([Chg])
This key is used as an alternative method of payment for a charge sale.
Since this is the TOTAL KEY, operate the same as described in “2. TOTAL
KEY” of the [AT/TL] key. A negative-balance sale may also be finalized by
this key.
-13-
Page 17
8. REGISTERING PROCEDURE FOR SALES AND
OPERATION SAMPLES
The following are registering operation patterns and actual operation samples. In the
patterns, “I_________I” indicates an input through the numeric keys, “[ i” indicates a
depression of the transaction key, and “ — ** indicates other registering and/or finalizing
operations. In referring to the sample operations, please note that the programmed data on
some keys or items (such as Department Keys and individual PLUs) may be different from
those programmed for your store.
For registering operations, be certain to turn the Mode Lock to the “REG” position.
NO-SALE (must be operated outside a sale)
[#/NS]
El-01397
You want to test the
printer condition before
starting operations for
the day.
Or a customer requests
to break a bill.
.........
..... ..........................................
[#/NS]
The drawer opens.
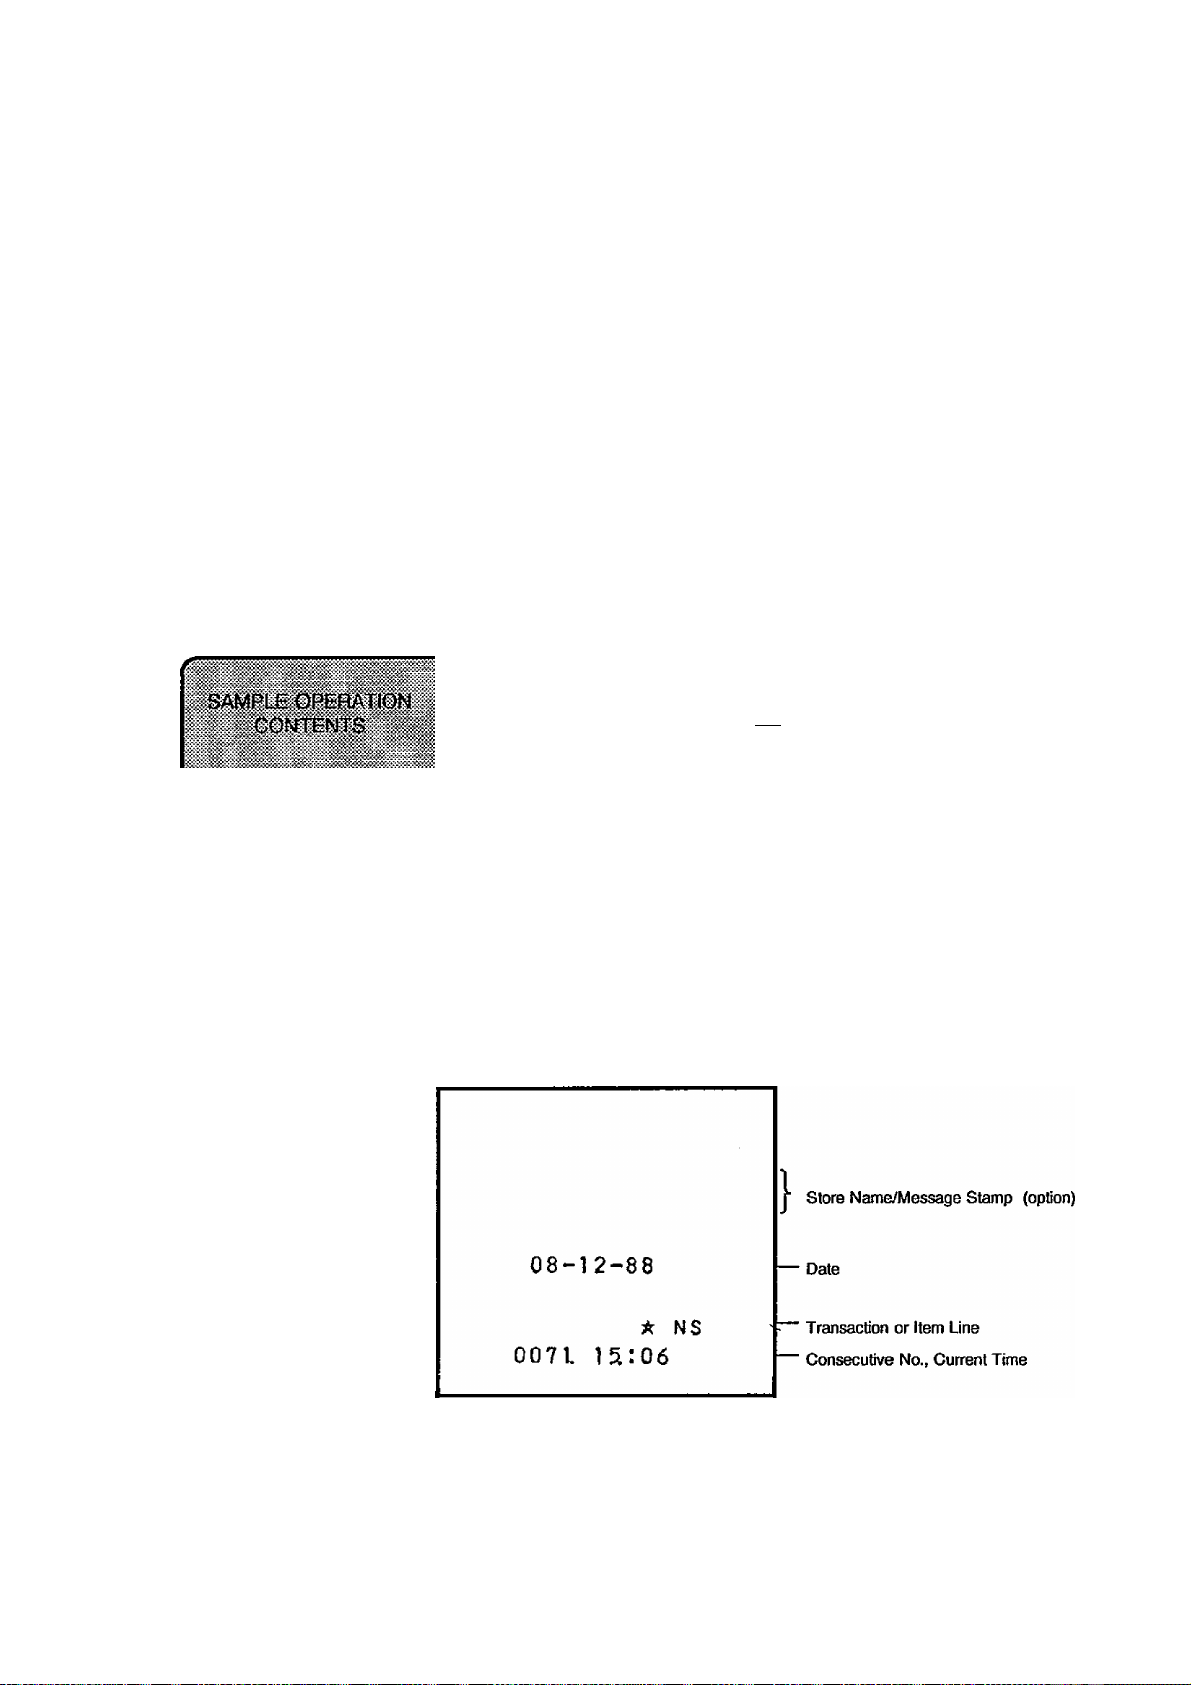
(Print Sample With Receipt-format Option)
DISPLAY
.PUi
A M iO U N T i
á
{When the Journal-format Option is selected, the
Store Name Stamp and the date will not be printed.)
- 14 -
Page 18
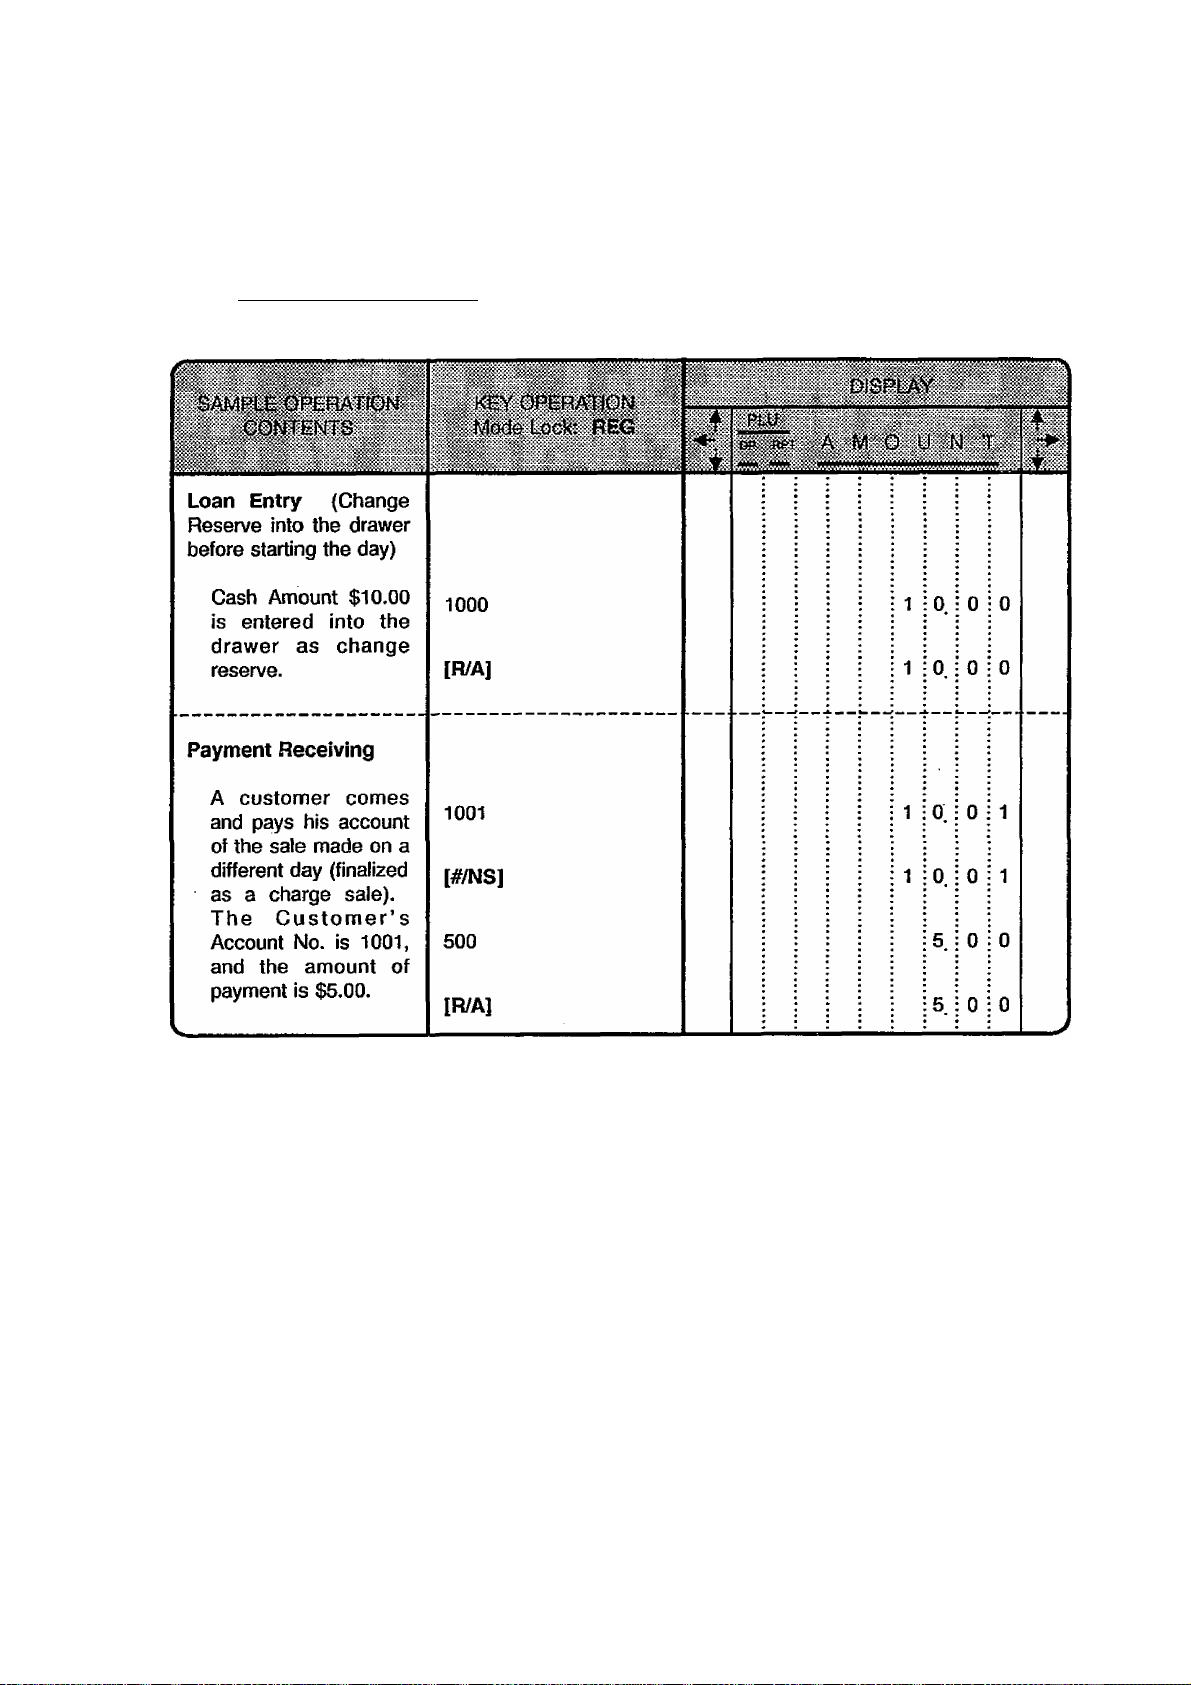
RECEIVED-ON-ACCOUNT (must be operated outside a sale)
I Amount of Payment Received | [R/A]
El-01397
08-12-88
>iria00 RA
0072 1S:06
08-12-88
#10Q1
A:500 RA
oo?:i 15:06
- 15
Page 19

PAID-OUT (must be operated outside a sale)
I Amount to be paid out | [PO]
El-01397
.¿$AMPLEi)PfiftAtlCS>i
CONTCNfiS 1
Payout to a wholesaler
You must pay for
merchandise the
store has purchased.
You assign Code No.
2003 to this wholesaler for future
reference.
Pick Up (Collection of
money from the drawer
during the day for
banking purposes, etc.)
You collect a cash
amount of $15.00
during business hours
for banking purposes.
^ "
■ Key OPERATION :■
Mad» Lode rt^
i sA*sAws *
J.y A*r,AWS * ’ irtV* ‘ ‘
2003
[#/NS]
800
[PO]
1500
[PO]
X ’ ^
: ¡5;iCh®6f>E^y £::.•::
vw^ry* '■ _ ^
№ ftfr. 'A Mj'O;- U "M T 'i
%
|0.
;o. 0 3
|8 0 0
|8.
|5 0 0
i5.
■-'WKssw
0 3
K
0 0
0 0
____________________________________________
08-12-88
#20Q3
*aoo PO
0074 15.:07
08-12-88
*15.00 PO
0075 15:07
-16-
Page 20

DEPARTMENT ENTRY
El-01397
Open Department (Itemized Dept)
-► ) I Price I (Open DEPTJ -
Preset Department (Itemized Dept)
(-- “► ) [Preset DEPTl -► --
Single-Item Department
Operates the same as itemized
Departments, except that the sale is
finalized as cash in case a Single-item
Department Is entered when operated
outside a sale.
-17 -
Page 21

PLU ENTRY
El-01397
Itemized PLU
(™ -► ) I PLU Code 1IPLU]
Single-item PLU
A PLU linked to a Single-item ^
Department will automatically function
as a Single-item PLU, and immediately
finalizes the sale as cash on an entry'
when operated outside a sale.
-18-
Page 22
REPEAT ENTRY OF DEPARTMENT OR PLU ITEM (for Itemized Dept or PLU only)
El-01397
Open Dept Repeat
{— -► ) I Price I [Open DEPT] [Same DEPT]... “► •
Preset Dept Repeat
(— “► ) [Preset DEPT] [Same DEPT]... “► —
PLU Repeat
(-- -► ) I PLU Code I [PLU] [PLU]... -► —
To enter the following
item within a sale:
3 items of Dept.1
(open dept), unit price
$1.20
120
[DEPT 1]
[DEPT 1]
[DEPT 1]
j
_______I____________
PLV
» ppf A
REG
1:2!
REG
REG
1 i 3 i
Depress the last key of
the sequence ([DEPT]
or [PLU]) as many
times as the desired
count.
(Watch the count
displayed in the “RPT”
digit of the display.)
CV'I'X'C' :-i W' X’l
i 1. i 2 I 0
: 1 :2 I 0
j 1 i 2 i 0
: 1 i 2 i 0
2 items of Dept.2
(preset dept), preset
price $2.50
4 items of PLU No.22
(preset price $3.00)
[DEPT 2]
[DEPT 2]
22
[PLU]
[PLU]
[PLU]
[PLU]
1
*1.20 T
1 *1.20 T
1
2
2
*1.20
*250
*250
22ii *3i00
22^
22s!
22i
*^00
*3.00
*300
2 : i i • • • 2. : 5 : 0
REG
2 i 2 ; ; i ! i 2. ! 5 j 0
REG
REG
REG
REG
REG
REG
2:2: j
j 2 I I
\3\ I
14! I
j : 0. i 2 : 2
i |3 i 0 i 0
i3 :0 :0
: 3, : 0 : 0
l3 ! 0 i 0
T
- 19-
Page 23

QUANTITY EXTENSION
(MULTIPLICATION OF DEPARTMENT OR PLU ITEM)
El-01397
open Dept: (™
Preset Dept: (—
PLU: (™
Single-item Dept or PLU : Operates the same as above, except that the sale is
) I Quantity I [@/FOR] | Unit Price | [Open DEPT]
) I Quantity I [@/FOR] [Preset DEPT] —
) 1 Quantity I [@/FOR] \ PLU Code | [PLU] -► -
immediately finalized as cash if operated outside a sale.
-20-
Page 24

SPLIT PACKAGE PRICING
El'fl 1397
(„. -
NOTE: PLUs cannot be used for Split Package Pricing entries.
) I Purchased Quantity | [@/FOR]
max. 3 digits;
1 to 999
I Whole Package Price | [Open Dept] “► — ... through an Open Dept
max. 6 digits;
[Preset DEPT] “► — ... through a Preset Dept.
(The preset price is regarded as Whole Package
Price.)
I Whole Package Quantity | [@/FOR]
max. 3 digits;
1 to 999
- 21 -
Page 25

NEGATIVE DEPARTMENT ENTRY
Operates the same as positive departments. However, the [RTN MDSE] key cannot be
used with a negative department, nor is a Repeat Entry possible for a negative item
entry. A negative department item cannot be deleted by the [ITEM CORR] key. ^
An entry through a negative department will subtract the amount from the ^ale total. It
may be used for bottle return amount, coupon amount entries, etc., during a sale.
El-01397
-22-
Page 26

RETURNED MERCHANDISE or DESIGNATED LINE VOID
Depress [RTN MDSE] before or any time during any of the following operation patterns but
it must be depressed before the final key (i.e. [DEPT] or [PLU]) of the sequence:
DEPARTMENT ENTRY (page 17)
PLU ENTRY (page 18)
QUANTITY EXTENSION (page 20)
SPLIT PACKAGE PRICING (Page 21)
El-01397
... I
Return Entry Outside a
Sale
A customer comes up
to return a $5.00 item
of Dept. 1. No other
sale items at this time.
The sale total is now
negative,
therefore the
total amount
displayed
must be paid
back to the
customer in
cash.
[RTN MDSE]
500
[DEPT 1]
[AT/TL]
08-12-88
1 ikSOO RT
-0.50 TX
-5.50 CA
0085 1S:12
.1^.
\wvi. " ■ V!.yv-vv
rt^tlw;мlwsiil¡^w;^>tl I iiimm, ii,, ■iimit|[|t|[;ii idi.
1
iwsn AMi>UNT
REG
REG
(-)
(-)
iiTOVTiffiVir
0. 0 0
5. 0 0
0 0
5.
5. 5 0
TL
Return or Designated
Line Void Inside a Sale
A customer, during a
sale, returns an item
already registered in
this sale or in some
other sale in the past.
The returned item is
PLU No. 12.
Other sale item
entries or sale
finalization
will follow.
Some sale items have
already been entered.
[RTN MDSE]
12
[PLU]
12s! *240 RT
- 23 -
REG
REG
REG
(-)
Page 27

PERCENT DISCOUNT
(PERCENT CHARGE operates the same with [% + ] instead of [%-])
Discount from a Department or PLU item :
(— —► ) Department or PLU item entry (discount with the preset rate)
^ I Rate I [%-] -► ™
(discount with a manual rate;
rate 1 to 99 (%))
Discount from the Entire Sale Total:
r-^ [%-] -► ™
j__ j jgjj —(discount with the preset rate)
!-► I Rate I [%-] -► —
(discount with a manual rate; rate 1 to 99 (%))
El-01397
-24-
Page 28

Percent Discount (or Percent Charge) on a Returned Item
When a Percent Discount/Charge is operated after a returned Department or PLU item, the
percent rate is discounted from {or added to ) the returned item amount, i.e. a set of a
Deparlment/PLU item and a %- (or % +) is returned.
El-01397
-25 -
Page 29

DOLLAR DISCOUNT
El-01397
(-“ “► ) I Amount to be discounted | [DOLL DISC]
{An amount exceeding the
subtotal cannot be entered
through the [DOLL DISC] key
unless the option "Credit
Balance Allowed” is selected.)
NON-ADD NUMBER PRINT
(— —► ) I Number to be printed as reference \ [#/NS]
max. 7 digits; 1 to 9999999
Operation Samples in:
RECEIVED-ON-ACCOUNT (page 15)
PAID-OUT {page 16)
CHARGE SALE TOTAL {page 33)
-26-
Page 30

ITEM CORRECT (Last Line Voiding)
DEPARTMENT ENTRY (except Single-item or
(”■
NOTES: 1) When [ITEM CORR] is operated after a REPEAT ENTRY, only the last item of
PLU ENTRY (except Single-item PLU) (page 18)
REPEAT ENTRY (page 19)
QUANTITY EXTENSION (page 20)
SPLIT PACKAGE PRICING (page 21)
PERCENT DISCOUNT or CHARGE
DOLLAR DISCOUNT (page 26)
MANUAL TAX (page 28)
the repeated entries is deleted.
2) When [ITEM CORR] is operated after a QUANTITY EXTENSION, or SPLIT
PACKAGE PRICING, the entire product (the result of multiplication) is deleted.
Negative Dept) (page 17)
(except
Single-item
or Negative
Dep№LU)
(page 24)
El-01397
[ITEM CORR]“^ ™
The very last item in
the sale will be deleted
from the sale total.
-27-
Page 31

TAX STATUS MODIFICATION
Depress [TX/M] before or any time during any of: the following operation patterns but it must
be depressed before №e final key (i.e. [DEPT] or [PLU]) of the sequence.
DEPARTMENT ENTRY {page 17)
PLU ENTRY (page 18)
REPEAT ENTRY {page 19)
QUANTITY EXTENSION (page 19)
SPLIT PACKAGE PRICING (page 21)
NEGATIVE DEPARTMENT ENTRY (page 22)
RETURNED MERCHANDISE (page 23)
Then a taxable item is reversed to non-taxable, and a non-taxable item is reversed to
taxable. No display indication appears by operating [TX/M]. But in print, the taxable
symbol “T” is attached to an item indicated as taxable, and nothing is attached to an item
indicated as non-taxable.
The [TX/M] key can be depressed prior to the [%-] (or [% + ]) or [DOLL DISC] key. In
this case the non-taxable status (fixed status) of the key will reversed to taxable.
El-01397
NON-TAXABLE PORTION READ
> [TAX]
See the operation sample on the next page.
MANUAL TAX
I Tax amount to be added to the sale | [TAX]
This operation applies only to areas where irregular tax additions (besides the tax autocalculated by the preprogrammed tax table) are necessary.
See the operation sample on the next page.
The non-taxable portion of the sale (i.e. the total of
the sale portion not subject to the auto-tax
addition) is displayed with the “ST” arrow lamp lit.
-28 -
Page 32

NON-TAXABLE PORTION READ and MANUAL TAX operation sample:
In the following, the tax rate of 10% is preprogrammed as Tax Table.
El-01397
-29 -
Page 33

SUBTOTAL
El-01397
[STl
The sale total of the items so far entered is displayed and
printed. The sale is not finalized yet, and additional items
may be entered if necessary. The displayed afnount
includes tax, while the printed amount does not include tax.
-30 -
Page 34

TAX EXEMPT
El-01397
- -►([STD
Displays Sale
Total amount
including tax.
“►([EX]) —
1
Displays
Tax-exempted
Sale Total due.
Only sale finalization can follow.
(Refer to the following pages.)
-31 -
Page 35

CASH SALE TOTAL, CASH TENDER
El-01397
Cash Sale Total: (— -► ) ([ST])
Cash Tender; (— —► ) ([ST])
Sale items have been
entered.
The customer wants to
know the sale total.
The customer pays with
the exact amount of
cash.
[ST]
[AT/TL]
00?a 15:38
*500 ST
*0.50 TX
*550 CA
[AT/TL]
I Cash Amount Tendered | [AT/TL]
REG
ST
TL
Sale items have been
entered.
The customer wants to
know the sale total.
The customer tenders
$10.00 cash.
The change $4,50 is
displayed. Pay it back
to the customer in cash.
[ST]
1000
[AT/TL]
*500 ST
*Q50 TX
*550 TL
*ia00 AT
*4,50 CG
0099. 15:38
I
REG
REG
ST
CG
-32-
Page 36

CHECK TENDER
([ST]) “► I Check Amount Tendered | [CHK TND]
CHARGE SALE TOTAL
([ST]) -►[Chg]
\
_____________
Check Tender
:
"SSaSii^"
El-01397
..
Sale items have been
entered.
The customer pays
with a check in the
amount of $10.00
The change $4.50 is
displayed, which
should be
given
to the
customer
in cash.
Charge Sale Total
Sale items have been
entered.
The customer wants
to put it on his charge
account. You enter
his Customer Account
No. 1001 as
reference.
1ST]
1000
[CHK TND]
*500 ST
*Q50 TK
*550 TL
*1000 CK
*450 C6
0100 15:39
[ST]
1001 [#/NS]
[Chg]
*500 $T
«1001
*050 TX
*550 CH
0101. 15:39
I —
REG
REG
REG
REG
ST
CG
ST
TL
-33-
Page 37

MULTI-TENDER
(Short-tender repeated multiple times by the same media)
- -► ([ST]) -► I Cash Amount Tendered | [AT/TL] (The [AT/TL] may be
i------------------------------------------------------------------ ' replaced by [CHK TND] if
I Cash Amount Tendered | [AT/TL] “i a check is tendered. Also
I
--------------------------------—-------------------------------( I Cash Amount Tendered | ) [AT/TL] on the next page.)
* refer to SPLIT-TENDER ;
El-01397
-34-
Page 38

SPLIT-TENDER (Short-tender repeated by different medias)
El-01397
([ST])
([ST]) I Cash Amount Tendered | [AT/TL] —► [Chg] **• Cash & Charge
NOTES: 1) In both MULTI-TENDER and SPLIT-TENDER operations, the sale is finalized
and the drawer opens on reaching the sale total amount.
2) If [AT/TL] is programmed to allow TOTAL function only, neither MULTI
TENDER nor SPLIT-TENDER can be operated by [AT/TL]. If [Chg] or
TOTAL-only [AT/TL] key is used in SPLIT-TENDER, it should be used as
the last key. The TOTAL media key immediately finalizes the sale on its
depression.
Check Amount Tendered [CHK TND]"
(I Cash Amount Tendered I) lAT/TL] Check & Cash
I Cash Amount Tendered | [AT/TL] —► [Chg]
[Chg]
Check
& Charge
Check, Cash
& Charge
-35 -
Page 39

POWER FAILURE DURING OPERATIONS
If a power failure occurs, the sales memory is protected by the back-up battery; registration
and printing will normally be performed on regaining the power. ' However, please note the
following cases: ''
Case 1: Numerics, [TX/M], and/or [RTN MDSE] have been entered outsiders sale.
Power fails.
Power is recovered.
Time is displayed (or 0.00 is displayed when the option “Time Displayed” is not
selected), i.e. the numerics and/or declaration key entry has been cleared. Do
the operation from the numerics and/or declaration key entry over again.
Case 2: Numerics, [TX/M], and/or [RTN MDSE] have been entered inside a sale.
Power fails.
Power is recovered.
El-01397
The display regains the original content before the power failed. Operations
may norm^Iy be continued.
Case 3: A department or PLU item is being printed.
Power fails.
Power is recovered.
The department or PLU item may not be printed correctly depending on the
power failure timing. In this case, the subtotal amount Is displayed along with
the “ST” arrow lamp lit. /^so, the power-fail symbol *-*-*-* is printed below
the incomplete line, to indicate that the incomplete line was printed due to a
power failure. And then the subtotal amount with the “ST” symbol is
automatically printed, in which amount the incomplete-print line amount is
included correctly. Operations may normally be continued.
Case 4: Other items tiian department or PLU are being printed.
Power fails.
Power is recovered.
i
The item may not be printed correctly depending on the power failure timing.
And the power-fail symbol, as in Case 3, is printed below the incomplete print
line. However, in this case, the incomplete line is correctly reprinted after the
power-fail symbol line. Operations may normally be continued.
If a power failure occurs, it is recommended to check the print content before finalizing the
sale or giving the change to the customer.
-36-
Page 40

9. READ (X) AND RESET (Z) REPORTS
The following table shows available reports and the key operations to issue those respective
reports. The contents of the X and Z reports are the same if both are available, except that:
1. Symbol X for X (Read) reports, and Z for Z (Reset) reports are printed as the header.
2. A reset count is printed near the end of a Z report (but not on X reports).
3. All the resettable counters and totals will be reset on a Z report issuance, while they will
not be reset on an X report issuance. Therefore, X reports may be taken at any time and
any number of times during the day or at the end of the day. But the Z report is
expected to be taken only once a day usually at the end of tiie day.
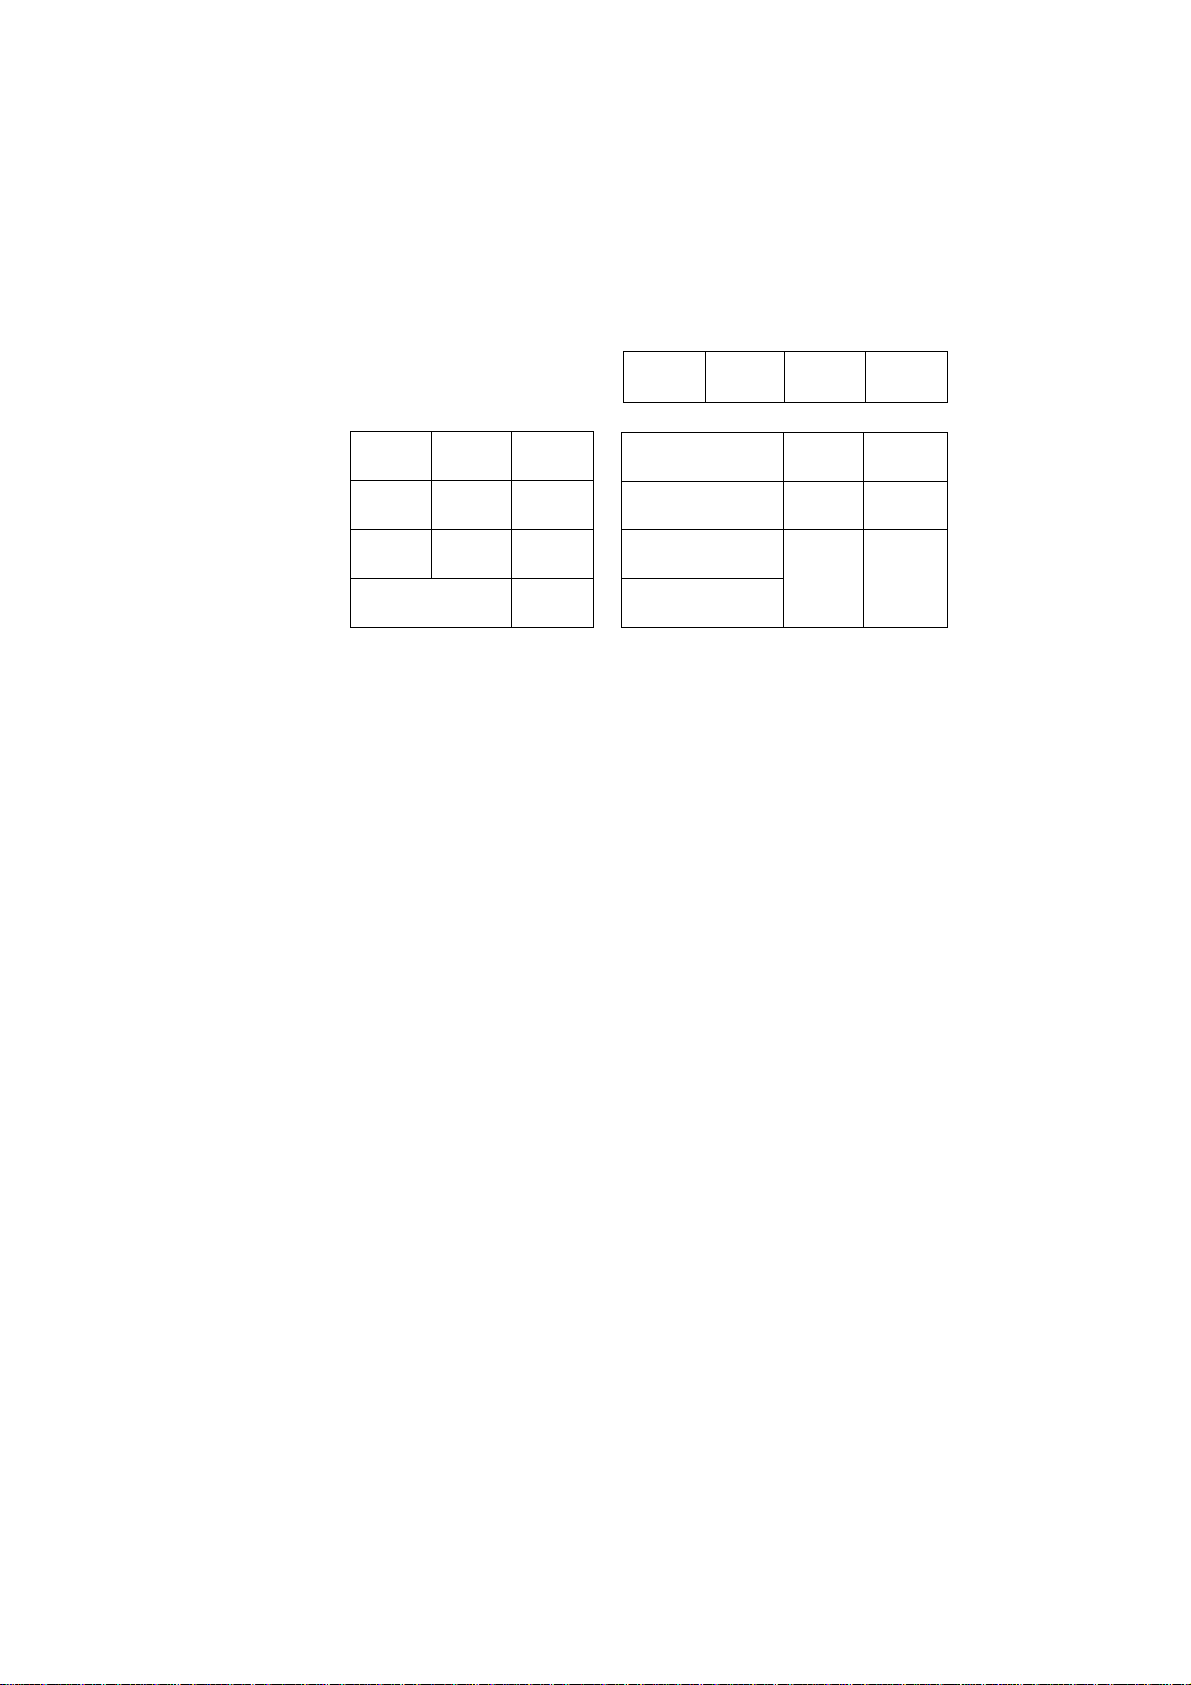
TABLE OF X AND Z REPORTS
ШШ
i
El-01397
Cash-in-drawer Read (Read only)
PLU Read /моте
PLU Reset
Daily Read /моте o\
Daily Reset
GT Read /моте q\
GT Reset (MOTE3)
NOTES: 1) PLUS with zero sales data will be skipped in reports.
2) Print Contents: Departments
3) Print Contents: Departments
Refer to the report print samples on the following pages.
Cash-in-drawer Read Report ................................................................................... 38
PLU Read or Reset Report ....................................................................................... 38
Daily Read or Reset Report ...................................................................................... 39
GT Read or Reset Report .......................................................................................... 41
X
X
z
X
z
X
z
Financial
Hourly Ranges
i
Financial
[#/NS] (Drawer opens.)
J [PLU] (Drawer does not open.)
] [ATyTL] (Drawer opens.)
] 20 [AT/TL] (Drawer opens.)
page
(The program verification printings, which are available in the “X” position of the Mode
Lock, are placed in the chapter of VERIFICATION OF PROGRAMMED DATA.)
-37-
Page 41

Cash-in-drawer Read Report (Read only) Mode Lock: X, depress [#/NS].
El-01397
08*12-88
X
*8294
4
*2270
0105 15:43
PLU Read or Reset Report
ID
CK
ID
Dale
Read Report Symbol
Casti-in-drawer Amount
Check-in-drawer Count
” Amount
Mode Lock: X for Read
Mode Lock: Z for Reset
Reset Report Sample
depress IPLU].
08-12*88
1U IQ
*1Q00
-I
*240
22i 5
*1500
31 ai I
*Q70
OQOl 2
0109. 15;44
Reset Report Symbol
PLU Code, Sales Item Count
” * Amount
Reset Report Count (printed only in Reset Reports)
H o*
one PLU
-38-
Page 42

El-01397
Daily Read or Reset Report
08-12-88
Ai5i08 ax
66
>kl5A08 GS
56
A7X53
*4^667
2
*210
2
-110
*699 TX
Mode Lock: X for Read
Mode Lock: Z for Reset
Reset Report Sample
Reset Report Syrntwl
Gr^d Total (non-resettaWe)
Gross Sale Item Count
” ” Amount
DepLi Item Count
” Amount
DepL2
Depl3
DepL4
(Percent Charge Count and Amount; if I%]
key is programmed as [% + ])
Tax Amount (of the auto-tax)
depress [AT/TLJ.
1
*Q25 TX
57.
*12824
4
*Q60 X-
*150 -
continued
Manual Tax Amount (through [TAX])
Net Sate with Tax, Item Count
Amount
Percent Discount Count
” ” Amount
Dollar Discount Count
" " Amount
-39-
Page 43

Daily Read or Reset Report
— Con^ued -
El-01397
2a
25
*10244 CA
2
*ia20 CK
1
*550 CH
2
*1500 RA
2
*2500 PO
*89.94 ID
4 CK
*2270 ID
2
*9.00 VO
2
-110
5
*1474 RT
I
*500 £X
**
08-00
1 2-00
13-00
13-00
2a
*12224
1 8 —00
0001 2
0110 15:44
TL
AN Media Sales, Cuslomer Count
” " " Amount
Cash Sales Customer Count
n »
Amount
Check Sales Custormer Count
" * Amount
Charge Sales Customer Count
IV n
Received-on-Account Count
PakJ-Out Count
” Amount
Cash-in-drawer Amount
Check -in-drawer Count
Item Correct Count
n n
Negative Deparbnents Item Count
” " Amount
Returned Merchandise Item Count
” " Amount
Tax-exempted Custoimer Count
" Sales Amount
HOURLY RANGE SALES DATA:
Up to 8:00... no sales data recorded
D 8:00 to 12:00 ... no sales data recorded
H 12:00 to 13:00... no sales data recorded
H 13:00 to 15:00 ... no sales data recorded
15:00 to 18:00
---------------------------------Sales Item Count
1 18:00 to 8:00
Daily Reset Report Count (pnor on Reset Reports only)
Amount
” Amount
” Amount
Amount
” Amount
-40-
Page 44

El*01397
GT Read or Reset Report
Mode Lock: X for Read
Mode Lock: Z for Reset
Read Report Sample
The print items are the same as in the Daily Read or Reset, except that
no data for Hourly Ranges Sales will be printed in a GT Read or Reset
Report
Please note that in GT reports, the sales data are not totals for one day
but are accumulated for a certain period (weekly, monthly, etc.,
depending on the store’s designated period for GT Reset Report
taking).
When a GT Reset Report has been taken, all the counters and totals
(except GT) will be reset (cleared) to zero. Therefore, for example, if
the store wants monthly sales data from GT Read or Reset Reports,
take a GT Reset Report once a month on a certain date (on tiie 1st of
every month, etc.). GT Read Reports may be taken any number of
times at any time, and sales data accumulated from №e last time a GT
Reset Report was taken up to then mil be read, and tile sates counters
and memories will not be cleared.
enter 20, depress
[AT/TL]
-41 -
Page 45

10. PROGRAMMING OPERATIONS
TABLE OF CONTENTS
SETTING BASIC REGISTER REQUIREMENTS BY 7-DIGIT CODE ENTRY.................................................... 43
DEPARTMENT STATUS SETTING OR CHANGING ........................................................................................ 44
PLU TABLE SETTING OR CHANGING ............................................................................................................ 46
TIME SETTING OR ADJUSTMENT ................................................................................................................... 47
DATE SETTING OR ADJUSTMENT......................................................................................................................... 47
HOURLY RANGE SETTING OR CHANGING ................................................................................................... 48
El-01397
page
DEPARTMENT LISTING CAPACITY SETTING OR CHANGING ..................................................................... 49
SETTING LONG-FEED OPTION (for RECEIPT USE) or JOURNAL-FEED OPTION ...................................... 50
DEPARTMENT PRESET PRICE SETTING OR CHANGING ............................................................................ 51
MEDIA TENDER LISTING CAPACIPr' SETTING OR CHANGING
%-(or%+) PRESET RATE SETTING OR CHANGING ................................................................................... 53
PLU PRESET PRICE CHANGING ..................................................................................................................... 54
PLU TABLE DELETION ......................................................................................................................................... 55
TAX TABLE SETTING .............................................................................................................................................. 56
..................................................................
52
-42-
Page 46

SETTING BASIC REGISTER REQUIREMENTS
BY 7-DIGIT CODE ENTRY
This determines basic register functions and specifications for the market and for your store.
After Daily Reset, GT Reset, and PLU Reset
Mode Lock: SET
Enter a 7-digit code, depress [STJ
ex.)
El 4)1397
0
*— Time Display and Print
Fraction Rounding and GT Print
Oorl: ROUNDOFF
2or3: DISCARD
4or5“|
6 or 7 : ROUND UP
8 or 9-1
Odd Number
*- Even Number: GT Non-print
(For example, tf “1" is eniered, fractions are
rounded off and GT is printed.)
Hourly Range Report Balance
0: US Balance (Hourly Range Sales Total
= Net Sale With Tax)
1: CA Balance (Hourly Range Sales Total
= Net Sale Without Tax)
-> [STJ
L
Date Set and Print Order
0: DAY-MONTH-YEAR
1: YEAR-MONTH-DAY
2; MONTH-DAY-YEAR
0: Display, Print
1; Display, Non-print
2: Non-diSplay, Print .
3: Non-display, Non-print
L M.—. Qj Qp Reports
[AT/TL] key Function 0: Tender and Total
[%] Key Function
0: [%-] Key
1: [% + ]Key
*— Credit Balance (Over-subtraction of subtotal using
[DOLL DISC] key)
0: Prohibited
1: Allowed
1: Total only (no tendering allowed)
2: Tender only (always enforces tendered
amount entry)
-43-
Page 47

NOTES: 1) Initial zeros may be omitted. For example only “102” may be entered instead
of “0000102”.
2) When a numeric value larger than those specified is entered, it will result in
the same as the maximum numeric value of those specified.
SAMPLE OPERATION To set ttie following requirements:
[%I Function " [%-]: 0
[AT/TL] Function - Tender & Total: 0
Credit Balance ™ Prohibited: 0
Hourly Range Sales Total - US Balance: 0
Fraction -- ROUND OFF “j
GT - Print J ■
Time - Display & Print: 0
Date - MONTH-DAY-YEAR: 2
> # OO.qOL02
0005 0Q:19
Mode Lock to “SET”.
El-01397
Enter 0000102 {or 102), depress [ST].
DEPARTMENT STATUS SETTING OR CHANGING
(Submode No. 3)
After Daily Reset, GT Reset, and PLU Reset
Mode Lock: SET
3[@/FOR] -T
Î
Program
Submode No.
^ [RTN MDSE] -
to reverse
Positive/Negative
status
no change
-► [TXfflfl]
to reverse
Taxable/ Nontaxable status
no change
AM
-► 0
to set Itemized
Dept status
AAA
-----
► 1
-------------
to set Single-item
Dept status
Repeat for another department.
-44-
T
[DEPT]
[AT/TL]
Page 48

* : Depressing [RTN MDSE] will reverse the positive/negative status of the
department. When the department is set to be negative, the arrow lamp
“( - )” will be lit on depressing the [DEPT] key. if the lamp remains unlit
when the [DEPT] key is depressed, the department is positive.
** : Depressing [TX/M] will reverse the current tax status of the department.
When the department is taxable, it will reverse the department into non-taxable.
When non-taxable, it will reverse into taxable. You can only verify the
resulting status on the program receipt.
El-01397
: Enter “0** to obtain Itemized Dept status.
Enter "1” to obtain Single-item Dept status.
: Depress the Department Key (of 1 to 4) whose status is now being
programmed.
NOTES: 1) Even when the status of a department is changed, the preset price (if set)
will not be cleared. Neither will the Listing Capacity of the department be
cleared.
2) The procedure of the key-in sequences marked with to may be
changed Interchangeably as long as they are operated before depressing
the [DEPT] key.
No other keys than [RTN MDSE], [TX/M], [0], and [1] can be entered
3)
before the [DEPT] key.
SAMPLE OPERATION To set each department with the following status:
Dept. 1 Positive, Taxable, Itemized
Dept. 2 Positive, Non-taxable, Itemized
Dept. 3 Positive, Taxable, Single-item
Dept. 4 Negative, Non-taxable, Itemized
2 regardless of the
preprogrammed status.
Mode Lock to “SET”,
Enter 3, depress [@/FOR].
(Under the condition that all the
departments are set to be positive
and non-taxable before this sample
operation)
[TX^] 0 [DEPT 1] (Displays 0.00)
0 [DEPT 2] (Displays 0.00)
[TXfflfl] 1 [DEPT 3] (Displays 0.01)
[RTN MDSE] 0 [DEPT 4] (Displays 0.00, and Arrow
Lamp “(-)” lights.)
[AT/TL] to end this submode.
-45 -
Page 49

PLU TABLE SETTING OR CHANGING (Submode No.4)
This submode allows programming or changing PLUs (Price-Look-Ups) linked to a
department. When a PLU is entered as a sale item in the “REG” mode, the sale item count
is processed into that particular PLU item memory as well as into its linked department
memory. Thus you can read in the “X” or “Z” reports the sales data of the individual item
as well as the sales total data of the department to which the individual item is linked.
After PLU Reset to change PLU table data once programmed, or any time
outside a sale to program new PLUs.
Mode Lock : SET
El-01397
4 [@/FORl
t
Submode
No.
NOTES: 1) A maximum of 99 PLUS may be programmed.
2) A zero price may be preset if “0” is entered as “Preset Unit Price”. The
Preset Price entry is compulsory on this register; no open-price PLUs may
be programmed.
3) When the linked department is a Single-item Department, the PLU will also
function as a Single-item PLU. The Tax Status of the PLU is determined by
its linked Department status. When the linked department is a negative
department, no errors result in this programming operation but no entries
through that PLU are possible in the “REG” mode.
1 PLU Code 1 rPLUl ^ ^ 1 Preset Unit Price | fDEPTl
1 to 99;
No. assigned to
each PLU item $0.00 to $9999.99
* Dept.
Repeat for another PLU.
(*: Repeatable from here if the PLU Code is sequential from that of the previous
PLU. if the sequence “| PLU Code | [PLU]” is omitted after the submode
No. entry (i.e. 4 [@/FOR]}, PLU Code No.1 is automatically be assigned.)
0 to 999999
(6 digits), resulting in
Link<
-► [AT/TL]
3d
ex.) To set the following new PLUs:
Key Operation
Mode Lock to “SET”,
enter 4, depress [@/FOR].
11 [PLU]
(12 [PLU])
21 [PLU]
(22 [PLU)
[AT/TL]
PLU
Code
11
12
21
22
PLU Table
Preset
Price
$1.00 Depti
$0.50 DepLi
$2.30 DepL2
$3.10 DepL2
Linked
Depl
100 [DEPTI]
50 (DEPT 1]
230 [DEPT 2]
310 [DEPT 2]
-46-
Page 50

TIME SETTING OR ADJUSTMENT (Submode No.5)
A standard calendar and a TOD (TIME-OF-DAY) clock circuit are installed in the series MA-
79 model. Therefore, once the date and the time are set, seldom is adjustment necessary.
The extra day in a leap year is also counted automatically in the circuit.
Any time outside a sale
Mode Lock : SET
El-01397
J
5 [@/FOR]
t
Submode
No.
ex.) To set the time to “13:51”
(1:51 p.m.):
Mode Lock to “SET”, enter 6, depress [@/FOR].
Enter 13 5 1, depress [AT/TL],
♦ LU L
I
Hour
Oto 23
-----
Minute
00 to 59
► [AT/TL]
NOTES:
1) If an hour value of more than 23
2) The date will not be changed by
DATE SETTING OR ADJUSTMENT (Submode No.6)
Any time outside a sale
or a minute value of more than
59 is entered, no errors wilt
result.
However, in this case, set the
time again with correct values.
setting or adjusting the time.
it-0^
13.:51
0012. 13:51
6 I@/FORJ
t
Submode
No.
*■ LU UJ UJ Iat/tl]
I I I
Month Day Year
1-12 01-31 88, 89, etc.
I I I
Year Month Day
88, etc 01-12 01-31
I I I
Day Month Year
1-31 01-12 88, etc..
ex.) To set the date to
“August 12, 1988”:
Mode Lock to “SET”, enter 6, depress [@/FOR].
Enter 8 1 2 8 8, depress [AT/TL]. — ^
-47-
’ (if YEAR-MONTH'DAY option is selected)
■ (if DAY-MONTH-YEAR option is selected)
ÍÍ-06
08-12-88
0014 13:52
Page 51

HOURLY RANGE SETTING OR CHANGING (Submode No. 7)
(for report purposes)
A maximum of 24 hourly ranges may be set in order to read sales data in each hourly range
as part of the Daily X or 2 reports.
After Daily Reset
El-01397
7 I@/FOR]
t
Submode
No.
LU
Hour
1 to 24
Enter the time to end
each hourly range, in
the 24-hour system.
Repeat for all hourly
ranges required.
t#/NS]
[AT/TL]
NOTES:
1) If an hour value “0” or more than 24 is
entered, no error results. But the sales
data will not be processed correctly in
this case.
2) Do not set an hourly range across 24:00,
such as “from 23:00 to 1:00”.
3) To change the table of hourly ranges
once set, partially or entirely, do the
entire setting operation over again. The
old table will then be cleared.
4) To reset the hourly range table:
Mode Lock : SET,
7 [@/FOR] 0 [#/NS] [AT7TL]
Then no hourly range sates data will be
outputted on the reports.
ex.) To set the following table of hourly ranges:
Table
^ up to 8:00 8 [#/NS]
8:00 to 12:00 12 [#/NS]
12:00 to 13:00 13 [#/NS]
13:00 to 15:00 15 [#/NS]
15:00 to 18:00 -i 18 [#/NS]
____ __ ________1
Kev Operation
Mode Lock to “SET”.
7 [@/FOR]
[AT/TL]
-48-
«-07.
08-00
12-ao
1 3-00
1 5-00
18-00
0016. 13. :54
Page 52

DEPARTMENT LISTING CAPACITY SETTING OR CHANGING (Submode No. 8)
Each department may be set with a listing capacity (a digit limit for amount entries at the
time of sales). By setting a listing capacity, an excessive amount entry (due perhaps to a
mistake by the operator) will be prevented at the earliest stage (i.e. an error will result on
entering an excessive amount through the department key).
After Daily Reset
Mode Lock: SET
El-01397
8 [@/FOR]
t
Submode
No.
ex.) To set each department with the
Mode Lock to “SET”, enter 8, depress
Tl
following Listing Capacity:
Dept.1
Dept.2
Dept.3 3 digits ($9,99)
Dept.4
Number of digits allowed
for a sale entry
1 to 7 (unit: digits)*
(0, 8, or 9 will reset the limit,
i.e. any amount up to 7 digits
will be allowed.)
Repeatable for other departments.
LC fdioit limit)
___________
5 digits ($999.99)
4 digits ($99.99)
2 digits ($0.99)
[DEPT]
[AT/TL]
For example, if “4”
is entered, up to
99990 ($99.99) will
be allowed as a sale
entry amount
through the
department.
Enter 5, depress (DEPT 1].
Enter 4, depress [DEPT 2].
Enter 3, depress [DEPT 3].
Enter 2, depress [DEPT 4].
[AT/TL] to end this submode.
NOTE: Since the Listing Capacity is provided to check the amounts entered in the
“REG” mode, it will be disregarded when a preset price is set on a department
(In a separate operation described later).
#“08.
1 *
2*
k-k
0018
U:14
-49 -
5
4
3
2 ‘
Page 53

SETTING LONG-FEED OPTION (for RECEIPT USE) or JOURNAL-FEED OPTION (Submode No. 9)
The printer of the MA-79 series can be programmed to be used for Receipt Issuance or
Journal Printing, according to the store’s requirement.
Any time outside a sale
Mode Lock : SET
El-01397
Submode
No.
NOTE:
9 [@/FOR]
I 1 or 9 I
---------
t
1: for Long-feed
(Receipt Use)
9; for Journal-feed
(Other numbers will
result in errors.)
When the long-feed Option is
selected, the Store Name Stamp
print action will be executed and the
date will be printed on every receipt.
Long-feed Option
► [AT/TL]
PRINT FORMATS
Journal-feed Option
-60-
Page 54

DEPARTMENT PRESET PRICE SETTING OR CHANGING
Each department may be set with a preset price or remain as an open-price department.
Any time outside a sale
^ Mode Lock: SET
El-01397
Preset Unit Price | [DEPT]
max. 6 digits
(0 to 999999; resulting $0.00 to $9999.99)
Repeatable for other departments.
NOTE: When the “Preset Unit Price” is skipped and only the [DEPT] key is depressed
in the above operation sequence, the department will be an open-price
department (i.e. an amount entry is always required before the [DEPT] key in
the “REG” mode).
ex.) To set Preset Unit Price $2.50 to
Dept. 2, and $1.40 to Dept. 3:
Mode Lock to “SET”.
Enter 250, depress [DEPT 2].
Enter 140, depress [DEPT 3].
-------------------------------
-► [ATH-L]
ii
2* *2.50
*1.40
[AT^TL] to end.
0024 14:20
ex.) To reset the Preset Unit Price ($1.40) of
Dept.3 that was once set (i.e. to change it
into an open-price department):
Mode Lock to “SET”.
Simply depress [DEPT 3].
[AT/TL] to end.
-51 -
ti
3 *
0026. 1 4:22
Page 55

MEDIA TENDER LISTING CAPACITY SETTING OR CHANGING
A listing capacity (limit digit) may also be set for each media tendering of cash or check.
After Daily Reset
iM® Mode Lock : SET
El-01397
Number of digits for cash
amount tendered to be allowed.
1 to 7 (same as Dept. LC)
Number of digits for check
amount tendered to be allowed.
(Since [Chg] is always a Total-only key, this setting operation is
not applicable to the key.)
ex.) To set the following media tender LG’s:
7 digits for [AT/TL] (Cash)
6 digits for [CHK TND] (Check)
Mode Lock to “SET”.
[AT/TL] (This setting is effective
-► [CHK TND]
only when the [AT/TL] key
is set as Tender-only key
or Tender-and-Total key.)
Enter 7, depress [AT/TL].
Enter 6, depress [CHK TND].
7 AT
C 0 2 9. K : 2 3
6 CK
0030 14:24
-52-
Page 56

%- (or % + ) PRESET RATE SETTING OR CHANGING
A preset rate may be set to the [%-] (or [% + ]) keys. If a rate is once preset on the %
key, the preset rate will be applied by simply depressing the % key in a sale entry. When a
rate different from the preset one is required in a sale entry, enter the required rate value
before depressing the % key. The manually-entered rate will be applied then.
Any time outside a sale
Mode Lock: SET
I Rate I
-------------------
(Rate : max. 2 digits; 1 to 99 (%))
To clear the rate once set, operate;
Mode Lock: SET, 0--------------------► [%-] (or [ % + ])
► [%-] (for preset rate of %-)
(or [% + ]) (for preset rate of % +)
El-01397
(In this case, the % key will always require a manual
rate before the key in a sale entry.)
ex.) To set “5%” on the [%- ] key:
Mode Lock to “SET”.
Enter 5, depress [%-].
5. %
0032. 14:26
-53 -
Page 57

PLU PRESET PRICE CHANGING
To newly set PLUs or change programmed data already set, Submode No.4 should be used.
However, only to change the preset prices of PLUs, it is easier to use the operation
introduced here.
Any time outside a sale
Mode Lock : SET
El-01397
,JPLU Code|iPLUl
1 to 99
(must be one of those (0 to 9999990; resulting
set in Submode No. 4) $0.00 to $9999.99)
Repeatable for other PLUs’ price changes.
NOTE: To change each PLU’s linked department, the Submode No. 4 operation must be
used. To delete a PLU once programmed, a PLU DELETION must be operated
(which is described on the next page).
ex.) To change the following PLUs’ preset prices:
PLU Code Old Price New Preset Price
12
22
—► 1 New Preset Price | i#/NSl
max. 6 digits
$2.30
$3.10
$2,40
$3.00
--------
-► [AT/TL]
►
Mode Lock to “SET”.
Enter 12, depress [PLU].
Enter 240, depress [#/NS].
Enter 22, depress [PLU].
Enter 300, depress [#/NS].
[AT/TL] to end.
-54-
Page 58

PLU TABLE DELETION (Submode No. 4)
Unnecessary PLUs may be deleted from the PLU program table file.
After PLU Reset
mwmMmm) Mode Lock: SET
El-01397
4 [@/FOR]
t
Submode
No.
Same as PLU |
Table Setting. I
NOTES: 1) The PLU Code entered in the above operation is one of those set in the
PLU TABLE SETTING OR CHANGING operation.
2) Deletion is performed for one PLU after another. No operation to delete
all the PLUS at once is provided.
3) The above operation will result in an error if operated during another setting
operation.
ex.) To delete PLU No. 21:
flTEWI CORR] PLU Code I [PLU]
of the PLU to
be deleted.
Repeatable for other PLUs to be deleted.
> [AT/TL]
Mode Lock to “SET”, enter 4, depress [@/FOR].
[ITEM CORR] 21 [PLU].
[AT/TL] to end.
if-04
21 ^
■VD
CG38. 14:31
-55 -
Page 59

TAX TABLE SETTING
The MA-79 model can automatically calculate tax using one of the following three methods.
1. FULL-BREAK METHOD (Combination of Non-Cyclic Breaks and Cyclic
2. COMBINATION OF NON-CYCLIC BREAKS AND % RATE
(maximum 32 breaks programmable)
3. % RATE ONLY
After Daily Reset
Mode Lock: SET
1 ■ FULL-BREAK METHOD
Non-cvciic Breaks
1) Enter tfie first break point of price that is the non-taxable limit, and depress
[TX/M].
El-01397
Breaks; maximum 32 breaks programmable)
2) Enter the next break point of price that is the limit to collect the tax amount of
10, and depress [TXffl/l].
3) Repeat Step 2) above, with alternating each limit price for collecting tax amount
of 20, 30, 40, ... until the non-cyclic breaks are all entered.
4) Depress [ST] to end the non-cyclic break entries.
Cyclic Breaks
5) Do the same operation as Step 3) above, entering each limit price for each tax
amount that increases by 10, following by the [TX/M] key. Enter the last price
so that the difference between the last non-cyclic break price already entered
and the last cyclic one will be a multiple of one dollar ($9.00 maximum).
Otherwise, the tax calculation will not correctly function.
6) Depress [AT/TLJ to complete the cyclic break entries and the entire tax
program.
SAMPLE OPERATION To program the following tax table:
Tax table
Non-cyclic Breaks
(from) (to)
00 120 00 12
13
35
60
Cyclic Breaks
88 112
113
138 162 6 162
163
188
137
187 7 187 UX/M]
212
(tax) (Enter) —► (Depress)
34 1 34 [TX/M]
59 2 59 UX/M]
87 3 87
4 112
5
8
Key Operation
Mode Lock to SET.
[TX/M]
[TX/M]
[sn
[TX/M]
137 UX/M]
UXfflfl]
[AT/TL]
-56 -
Page 60

2. COMBINATION OF NON-CYCLIC BREAKS AND % RATE
Non-cvciic Breaks
1) Enter all the non-cyclic breaks following Steps 1) through 4) of Method 1 (FULL-
BREAK METHOD) on the previous page (up to the [ST] key depression).
% Rate
5) Enter the tax percent rate applied to any amount exceeding the last non-cyclic
breaks. (The rate is entered in maximum 5 digits; 2 integral and 3 decimal
digits. For example, to set 4%, enter 4000. The 3 decimal digits must be
entered.)
6) Depress [AT/TL] to complete the percent rate entry and the entire tax program.
SAMPLE OPERATION To program the following tax table:
El-01397
Tax table
Non-cyclic Breaks
om) (to)
00
13
35
60
(tax)
120 00
34 1
59
87 3
5% is applied to any
amount exceeding
870.
2
Key Operation
Mode Lock to SET.
(Enter) —►
(Depress)
12 [TX/M]
34
59
87
5000
[TX/M]
rrxflvi]
[TX/M]
isn
[AT/TL]
-57 -
Page 61

3. % RATE ONLY
1) Enter “O” (zero), depress [TX/M], and depress [ST].
2) Enter the percent rate in the same manner as in Step 5) of Method 2 on the
previous page.
3) Depress [AT/TL] to end the percent rate entry and the entire tax program.
SAMPLE OPERATION To program the following tax table:
El-01397
Tax table
Key Operation
Mode Lock to SET.
10% is applied to
any amount.
0 [TX/M]
[ST]
10000 [AT/TL]
NOTES: 1) A maximum of a 3-digit value is entered for each break (9990 i.e. $9.99).
It will result in an error with a 4-digit value or more.
2) If an incorrect value has been entered through [TX/M], first complete the
entire tax table program (up to the [AT/TL] key operation), and do the
correct tax table program entry over again from the first step.
- 58 -
Page 62

11. VERIFICATION OF PROGRAMMED DATA
TABLE OF PROGRAM VERIFYING OPERATIONS
Mode Lock : X
El *01397
operation
1. DEPARTMENT PRESET PRICE READ
2. DEPARTMENT LC AND STATUS READ
3. PLU TABLE READ ................................................................... 3 [ST]
4. OTHER PROGRAMMED DATA READ
5. TAX CALCULATION TEST....................................................... [ Amount | iTXfflfll ....................... 61
......................................
.....................................
....................................
1 [ST]
2 [ST]
4 [ST]
1. DEPARTMENT PRESET PRICE READ
Mode Lock : X, enter 1, depress [ST],
page
59
60
60
61
Department
Code
Preset Price
(Blank indicates that the department is
an open department)
(Print Format With ReceipWeed Option)
-59-
Page 63

2. DEPARTMENT LC AND STATUS READ
Mode Lock : X, enter 2, depress [STJ.
’ Listing Capacity (digit limit)
Department
Code
3. PLU TABLE READ
0; Itemized Department
1: Single-item Department
^Blank: Positive Deparbnent
— : Negative Department
- 60 -
Linked Department Code
Preset Unit Price
Page 64

4. OTHER PROGRAMMED DATA READ
Mode Lock : X, enter 4, depress [ST].
El-01397
5. TAX CALCULATION TEST
Mode Lock: X
Enter any amount, then depress [TX/MI.
Displays the Displays
entered amount. the tax due.
This operation may be repeated any number of times with any amount.
No printing will occur.
- 61 -
Page 65

12. MAINTENANCE
PAPER SETTING
On Model MA-79, the printer may be used for journal-format print or receipt-format print. If
used for receipt-format print, double-sheeted non-carbon copy rolls (which are specified on
the last page of this manual) can be used, which enables issuing the original copy (the upper
sheet) as receipt and keeping the other (the bottom sheet) as journal record. The following
shows the procedure for setting a double-sheeted roll.
El-01397
1) Remove the Receipt Cover. (Rg. 1)
2) Place the paper roll into the paper
pocket. (Rg. 2)
3) Insert the paper ends into the paper inlet
located on the rear side of the printer,
and press the [FEED] key on the
keyboard until the paper ends come out
of the outlet. (Fig. 3)
Before inserting, fold the paper (of a
single-sheeted or double-sheeted roll) at
the tip so that the paper may easily be
inserted.
Fig. 2
-62-
Page 66

El-01397
4) Then insert the paper ends into the
Stamp Unit located on the upper side of
the printer, and pull up the paper a little
so that the paper may correctly be
tensed. (Fig. 4)
5) Wind the paper end of the journal sheet
(the bottom sheet) around the Journal
Winding Reel two or three times, set the
reel to the holder, and press the [FEED]
key for a white to tense the journal paper.
(Fig- 5)
6) Attach the Receipt Cover with the paper
end of the receipt sheet (the upper sheet)
coming out of the Receipt Outlet located
on the Receipt Cover. (Fig. 6)
Journal Winding Reel
Fig. 5
Journal Sheet
Receipt Sheet
For a single-sheeted roll, simply attach
the Receipt Cover. The Receipt Outlet
is used as a Journal V\flndow.
7) When replacing the roll, first tear off the
paper of the old roll anywhere between
the roll and the paper inlet. Then press
the [FEED] key to remove the remaining
paper piece from the printer, but do not
pull it forcedly by hand.
Fig. 6
-63-
Page 67

REPLENISHING THE STORE NAME STAMP WITH INK
When the store name is printed too lightly, replenish ink in the following manner.
1) Turn off the power of the register (or turn
the Mode Lock to the “OFF” position).
2) Remove the Receipt Cover.
3) Remove the Stamp from the Stamp Print
Unit by pulling out toward the rear of the
register with your fingers on the notches
of both sides as shown in the figure.
(Fig- 7)
4) Apply ink to the pad on the rear side of
the Stamp. The amount of the refilling
should be adjusted according to the
density of the printed message, but the
Fig. 7
limit of 2 cc should not be exceeded.
(The ink bottle supplied contains 5 cc of
ink.) (Fig. 8)
El-01397
Fig. 8
Ink Bottle
NOTES: 1) Replenish the ink drop by drop
several times until the pad will
not absorb any more.
2) Use TEC genuine ink for
replenishment.
5. Reassembly is the reverse procedure.
-64-
Page 68

RIBBON EXCHANGE
El-01397
Ribbon detector
Ribbon
1) Install one of the ribbon spools as shown
in Fig. 9, while moving the ribbon
detector so that the ribbon is not caught.
2) Thread the ribbon through the ribbon
buffer, and then install the other ribbon
spool while moving the ribbon detector so
that it does not catch, as shown in Fig.
10.
Spool 3) Turn the ribbon spools a few times to
remove the slack in the ribbon.
LOCKING THE CASH DRAWER
(for MINI DRAWER)
The cash drawer is locked by inserting the
Drawer Protection Key into the Drawer Lock
and turning the key by 90 degrees clockwise.
The key may be removed then. The reverse
operation will unlock the drawer.
-65-
Page 69

MANUAL DRAWER RELEASE AND LOCK (for MINI DRAWER)
• Releasing
El-01397
REAR-SIDE VIEW
Usually the drawer is released
automatically. However, in an
emergency the drawer can be released
manually.
Push the Drawer Release Lever located
on the rear bottom, and the drawer will
open. However, if the Drawer Lock is
locked by the Drawer Protection Key, the
drawer will not open by the lever
operation.
a Removing the Drawer
Lift up the drawer and pull it out.
To install the drawer, fit the rollers of the
drawer onto the rails of the register and
push it ail tile way in.
MANUAL DRAWER RELEASE AND LOCK (for SP or MIDI DRAWER)
Fig. 1
e Releasing
The drawer opens automatically when a
registration is made. In the event of a
power failure or other troubles, the
drawer can be opened in the following
manner,
1) Insert the Drawer Release Key into the
drawer release lock and turn the key 45
degrees clockwise. The drawer will now
open. (Fig. 1)
2) The Drawer Release Key can be taken
out by returning it to the original position.
3) When the drawer is closed, it is
automatically locked and will not open
without the Drawer Release Key.
-66-
Page 70

• Removing the Drawer
1) To remove the drawer, lift it up by the
stoppers attached on both sides and pull
it out. (Rg. 2)
2) When installing the drawer, fit its rollers
onto the rails of the register and push it
all the way in. (Rg. 2) The coin case
can be removed from the drawer, by
lifting it up at the front.
CDC (Cash Drawer Cover) LOCK
FOR SP DRAWER (Rg. 3)
• Locking
Push the Cash Drawer Cover to the
drawer-end plate so that the parts at the
end of the cover indicated by arrow go
under and the remaining parts go over
the plate. (Fig. 3)
El-01397
Fig. 3
Press the cover lightly, insert the key into
the key-hole on the cover, and turn
clockwise. Now the cover is locked.
• Opening
Unlock the cover using the key, and lift
up the cover at the front end.
FOR MIDI DRAWER (Fig. 4)
• Locking
Keep the end of the money case lifted up
while in the drawer.
Close the cover so that the part of the
case indicated by arrow goes under the
corresponding part of the money case.
Insert the key (the same key for locking
the Drawer) into the key-hole on the
cover, and turn clockwise. The cover Is
now locked.
• Opening
-67-
Unlock the cover using the key, lift it up
with the money case, and pull out
frontward while lifting it up.
Page 71

13. SPECIFICATIONS
SIZE ..................................................................... 397mm (width) x 423mm (depth) x 320mm (height)
El-01397
with a MIDI DRAWER
WEIGHT
POWER REQUIRED
POWER CONSUMED ......................................... 13W (operating), 6W (standby)
AMBIENT TEMPERATURE
SIZE AND SPECIFICATION OF RECEIPT / JOURNAL TAPE
..............................................................
...........................................
................................
Width 58mm
Diameter Max. 80mm
Recommended
Quality and
Product
11kg
AC 100V. 110V, 117V, 220V, 240V; 50/60HZ
(The voltage varies depending on the destination of the
product.)
0.2A (operating), 0.07A (Stand-by) at 117V
O^C to 40*’C, 10% to 90% (relative humidity)
Ordinary Paper
(Single-sheet Roll)
High-quality Paper 45kg
Non-carbon Copy Paper
(Double-sheet Roll)
58mm
Max. 80mm
Receipt Sheet:
High-quality Paper 45kg
Journal Sheet:
Mitsubishi NCR Paper
DIA SELF N40
Paper Color: white
Copy Print Color; blue
(or the equivalent)
- 68 -
Page 72

TOKYO ELECTRIC CO., LTD.
PRINTED IN JAPAN
El-01397 88092000 © D
 Loading...