

Page 1
TECBectto'^'^ ^qQ
I %mmm
MA-305
TEC
. rasV^
/Programming
TOKVO
Gtf’^
CO
•f
UTO.
Page 2

WARNING
This equipment generates, uses, and can radiate radio frequency energy and if not installed
and used in accordance with the instruction manual, may cause interference to radio
communications. It has been tested and found to comply with the limits for a Class A
computing device pursuant to Subpart J of Part 15 of FCC Rules, which are designed to
provide reasonable protection against such interference when operated in a commercial
environment. Operation of this equipment in a residential area is likely to cause interference
in which case the user at his own expense will be required to take whatever measures may
be required to correct the interference.
WARNING
“THIS DIGITAL APPARATUS DOES NOT EXCEED THE CLASS A LIMITS FOR RADIO
NOISE EMISSIONS FROM DIGITAL APPARATUS SET OUT IN THE RADIO INTERFERENCE REGULATIONS OF THE CANADIAN DEPARTMENT OF COMMUNICATIONS.” "
“LE PRÉSENT APPAREIL NUMÉRIQUE N’EMET PAS DE BRUITS RADIOÉLECTRIQUES
DÉPASSANT LES LIMITES APPLICABLES AUX APPAREILS NUMÉRIQUES DE LA
CLASSE A PRESCRITES DANS LE RÉGLEMENT SUR LE BROUILLAGE RADIOÉLEC
TRIQUE ÉDICTÉ PAR LE MINISTÈRE DES COMMUNICATIQNS DU CANADA.”
Copyright (© 1993
by Tokyo Electric Co., Ltd.
All Rights Reserved
1-14'10 Uchikanda, Chlyoda-ku, Tokyo, JAPAN
Page 3

1. Introduction
Thank you for choosing the TEC electronic cash register MA-305 series. This
instruction manual provides a description of the functions and handling of this
register and should be read carefully to ensure optimum performance. Since
every consideration has been given to safety and reliability, there is no danger
of damaging the machine by incorrect operation.
Please refer to this manual whenever you have any questions concerning the
machine. This machine has been manufactured under strict quality control and
should give you full satisfaction. However, if the machine is damaged during
transit, or there are any unclear points in this manual:
EO1-11068
Please have the following information available when
you call:
Product Name: TEC Electronic Cash Register
Model: MA-305-100
Serial Number:
Place Purchased:
_______________________
________________________
Date of Purchase:
If for any reason this product is to be returned to the
store where purchased, it must be packed in the original
carton.
The specifications described in this manual may be modified by TEC, if
necessary.
Be sure to keep this manual for future reference.
1 -
Page 4

2. Unpacking
E01-11068
CD Ink Roll (1 pc.)
® Control Key
(REG Key. MA Key, S Key; 2 pcs. respectively)
O Drawer Key (2 pcs.)
® Journal Take-up Reel (1 pc.)
® Paper Roll 45mm x 050mm (2 pcs.)
© Stamp Ink (1 pc.)
® Owner’s Manual (1 pc.)
- 2 -
Page 5

3. Precautions
The ECR is a precision machine. Please handle it carefully considering the
following guidelines.
Remarks on the Location
Do not place it where unusual temperature
changes are expected or where it will be
subjected to direct sunlight.
EOI-11068
Keep it away from water sources.
Place it on a flat and level surface with little
dust, humidity, vibration, etc.
Be certain that the power voltage in your
area matches that required for the
machine. (The rated voltage is 117V AC.)
The socket-outlet shall be Installed near
the equipment and shall be easily
accessible.
- 3 -
Page 6
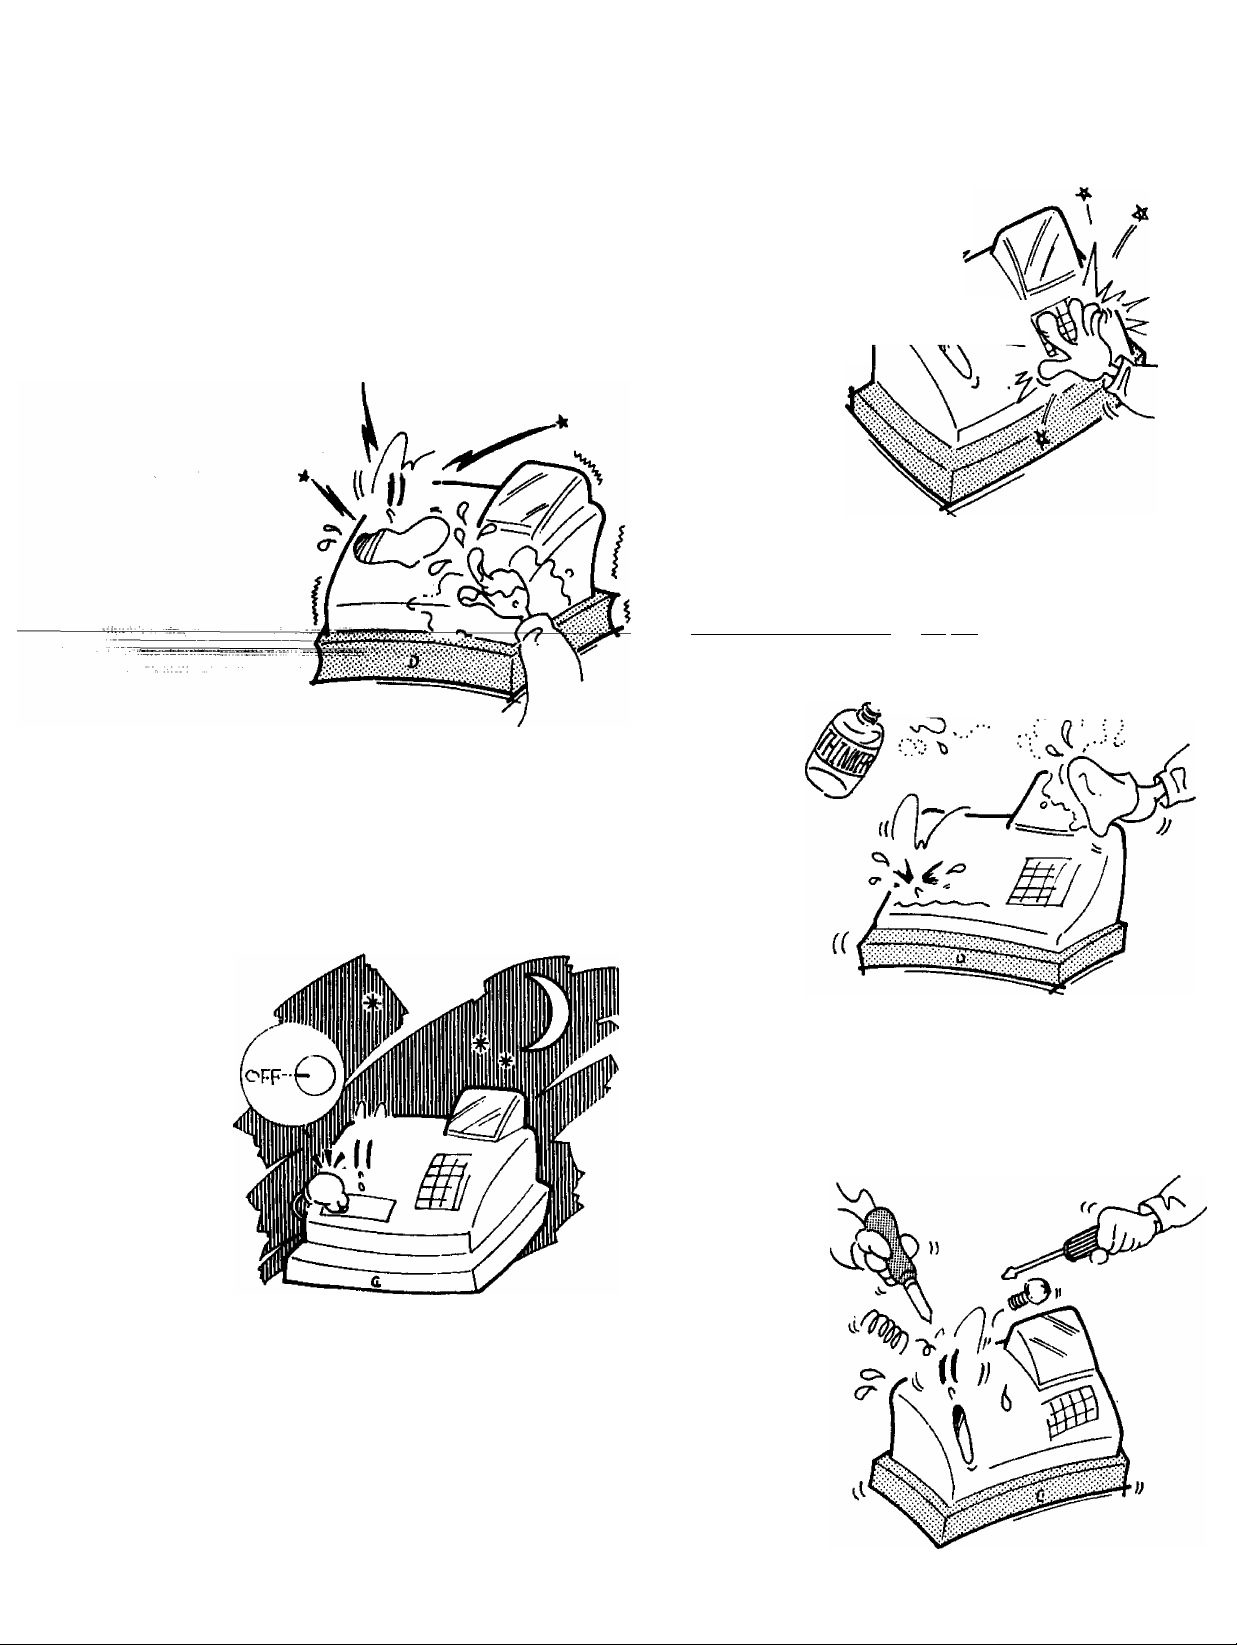
Remarks on Operating the ECR
- ^
The keys on the keyboard function with a ‘^\\V
light touch. Avoid pressing the keys too
hard. \ ItK >'
Do not handle the machine with wet
hands, since this may cause electrical
malfunctions and corrosion of parts.
EOl-11068
Do not apply thinner, benzine, or other
volatile materials to the cabinet or other
plastic parts. Such liquids will cause
discoloration or deterioration. If dirty, wipe
off with a piece of cloth soaked in a neutral
detergent and wrung out thoroughly.
Turn the Control Lock to OFF position
when all operations are completed after
business hours.
N. J
Never try to repair the ECR. Call dealer or
reseller for information of your local TEC
representative.
-4-
Page 7

4. Table of Contents
EOl-11068
page
1. Introduction
................................................................................... 1
2. Unpacking........................................................................................ 2
3. Precautions.................................................................................... 3
Remarks on the Location ................................................................................................................. 3
Remarks on Operating the ECR....................................................................................................... 4
5. Outline of Preparation Procedure Before Operating the ECR 8
6. Appearance and Nomenclature
....................................................
7. Control Lock and Control Keys .................................................... 11
---------
Control Keys—........ v rr r. . ; vv . v . . . ..... ... 11
Control Lock ................................................................................................................................. 11
8. Display .......................................................................................... 12
Operator’s Display .......................................................................................................................... 12
Customer’s Display ........................................................................................................................ 12
Numeric Display............................................................................................................................... 13
Message Descriptors
......
............................................................................................................... 13
10
9. Keyboard ...................................................................................... 14
Standard Keyboard Layout ............................................................................................................ 14
10. Installing the Receipt/Journal Roll ................................................ 15
Installing the Receipt Roll .............................................................................................................. 15
Installing the Journal Roll .............................................................................................................. 17
11. Installing the Ink Roll
....................................................................
18
12. Setting the Time and Date ............................................................. 19
Setting the Time .............................................................................................................................. 19
Setting the Date .............................................................................................................................. 20
Displaying the Time ....................................................................................................................... 21
Printing Time and Date .................................................................................................................. 21
13. Tax Table Setting .......................................................................... 22
Setting the U.S. (or PST) Tax Tables ........................................................................................... 22
Setting the GST Rate ...................................................................................................................... 26
Setting the Non-taxable Limit Amount
Tax Calculation Test........................................................................................................................ 28
..........................................................................................
27
14. Register No. Setting ...................................................................... 29
- 5 -
Page 8

15. Optional Key Setting...................................................................... 30
List of Keys ...................................................................................................................................... 30
Key Installation Setting .................................................................................................................. 31
Blank Keyboard Sketch (for your planning aid) ......................................................................... 31
EOV11068
16. Daily Operation Flow
....................................................................
17. Setting Preparation of Each Key and Transaction Entries . 34
Cashier Sign ON & Sign OFF ....................................................................................................... 34
Receipt-issue/Non-issue Selection ............................................................................................. 35
Clearing Errors, or Clearing Wrong Declaration Key or Wrong Numeric Entries
Department Keys .......................................................................................................................... 37
Programming Department Keys ........................................................................................... 37
Sale Item Entries Using Department Keys ........................................................................... 41
PLU (Price-Look-Up) ..................................................................................................................... 46
Programming PLUs ............................................................................................................... 46
Saje jtem Entries of PLUs
Listing Capacity Open................................................................................................................... 52
Percent Charge, Percent Discount .............................................................................................. 53
Setting Preset Rate for % Keys ............................................................................................ 53
% Key Operations in Sale Entries
Dollar Discount ............................................................................................................................. 55
Tax Modification ........................................................................................................................... 56
Item Correction (Last Line Voiding) ............................................................................................ 57
Returned Merchandise- ................................................................................................................ 58
Void (Designated Line Voiding) ................................................................................................... 59
All Void (Transaction Cancel) ...................................................................................................... 60
Non-add Number Print ................................................................................................................. 61
Subtotal Read & Print ................................................................................................................... 62
Taxable Total Read ....................................................................................................................... 63
Cash Total, Cash Tender .............................................................................................................. 64
Non-cash Media Total, Non-cash Media Tender ........................................................................ 66
Multi-tender, Split Tender ............................................................................................................ 67
Tax Exemption .............................................................................................................................. 68
Check Cashing .............................................................................................................................. 69
No-sale .......................................................................................................................................... 70
Received-on-Account Payment ................................................................................................... 71
Paid Out ......................................................................................................................................... 72
Sale Paid in Foreign Currencies .................................................................................................. 73
Programming Foreign Currency Keys ................................................................................. 73
Entering Sale Paid in a Foreign Currency 1 ........................................................................ 74
Post-issue Receipt ....................................................................................................................... 76
Print/Non-print Options on Sale Receipts .................................................................................. 77
.................................................................... . ^
.........................................................................................
....................
...........................
33
36
49
54
18. Read and Reset Reports
Programming Operations Relating to Reports
Programming Hourly Range Table ....................................................................................... 78
Selecting Print/Non-print Items on Reports
Taking Read and Reset Reports .................................................................................................. 80
Fundamental Concepts of Various Types of Reports
Report Taking Operation
......................................................................................................
...................................................... 78
..........................................................................
........................................................................
........................................................
- 6 -
78
79
80
81
Page 9

Daily Read Reports ........................................................................................................... 81
Daily Reset Reports............................................................................................................ 83
Periodical Read Reports.................................................................................................... 84
Periodical Reset Reports ................................................................................................. 85
Report Sample Format .................................................................................
Financial Read or Reset Report (Daily or Periodical).......................................................... 86
- Memory Balance - .................................................................................................................. 88
Cashier Read or Reset Report (Daily or Periodical) ............................................................ 89
Daily Hourly Sales Read or Reset Report ............................................................................ 90
Daily PLU Read or Reset Report (All or Zone)
Daily Media Sales & In-drawer Read Report ........................................................................ 92
....................................................................
................................
EOl-11068
85
91
19. System Option Setting
Programming Procedure ................................................................................................................ 93
Address 1 95
Address 2 ......................................................................................................................................... 95
Address 3 ......................................................................................................................................... 96
Address 6 ......................................................................................................................................... 96
Address? .......................................................................................................................................... 97
.
___
Address 8
..............
Address 11 98
Address 12 ....................................................................................................................................... 99
Address 13 ....................................................................................................................................... 99
Address 14 ..................................................................................................................................... 100
Address 15 ................................................................................................................................... 101
Address 16 ..................................................................................................................................... 102
................................ . . . .. .. . . . . w . v. . . v . . . .; . . . . . . . . . . . 98
.................................................................
93
20. Program Data Verification ........................................................... 103
Operating Procedure .................................................................................................................... 103
Department Preset Price Read .................................................................................................. 104
Department LC and Status Read .............................................................................................. 104
PLU Table Read ............................................................................................................................. 105
Other Programmed Data Read .................................................................................................. 105
System Option Read 1 ..............................................................................................................
System Option Read 2 .................................................................................................................. 106
106
21. Paper Roll Replacement and Other Maintenance
Replacing the Receipt Roll .......................................................................................................... 107
Replacing the Journal Roll .......................................................................................................... 108
Replacing the Ink Roll .................................................................................................................. 109
Replenishing Ink to the Store Name Stamp ............................................................................. 110
Manual Drawer Release and Lock .............................................................................................. 111
Removing the Drawer ................................................................................................................... 113
.......................
107
22. Troubleshooting .......................................................................... 114
23. Status Clear and Memory Clear Operations ................................ 118
Status Clear ................................................................................................................................... 118
Sales Memory Clear ..................................................................................................................... 119
All Memory Clear .......................................................................................................................... 120
24. Specifications ............................................................................ 121
- 7 -
Page 10
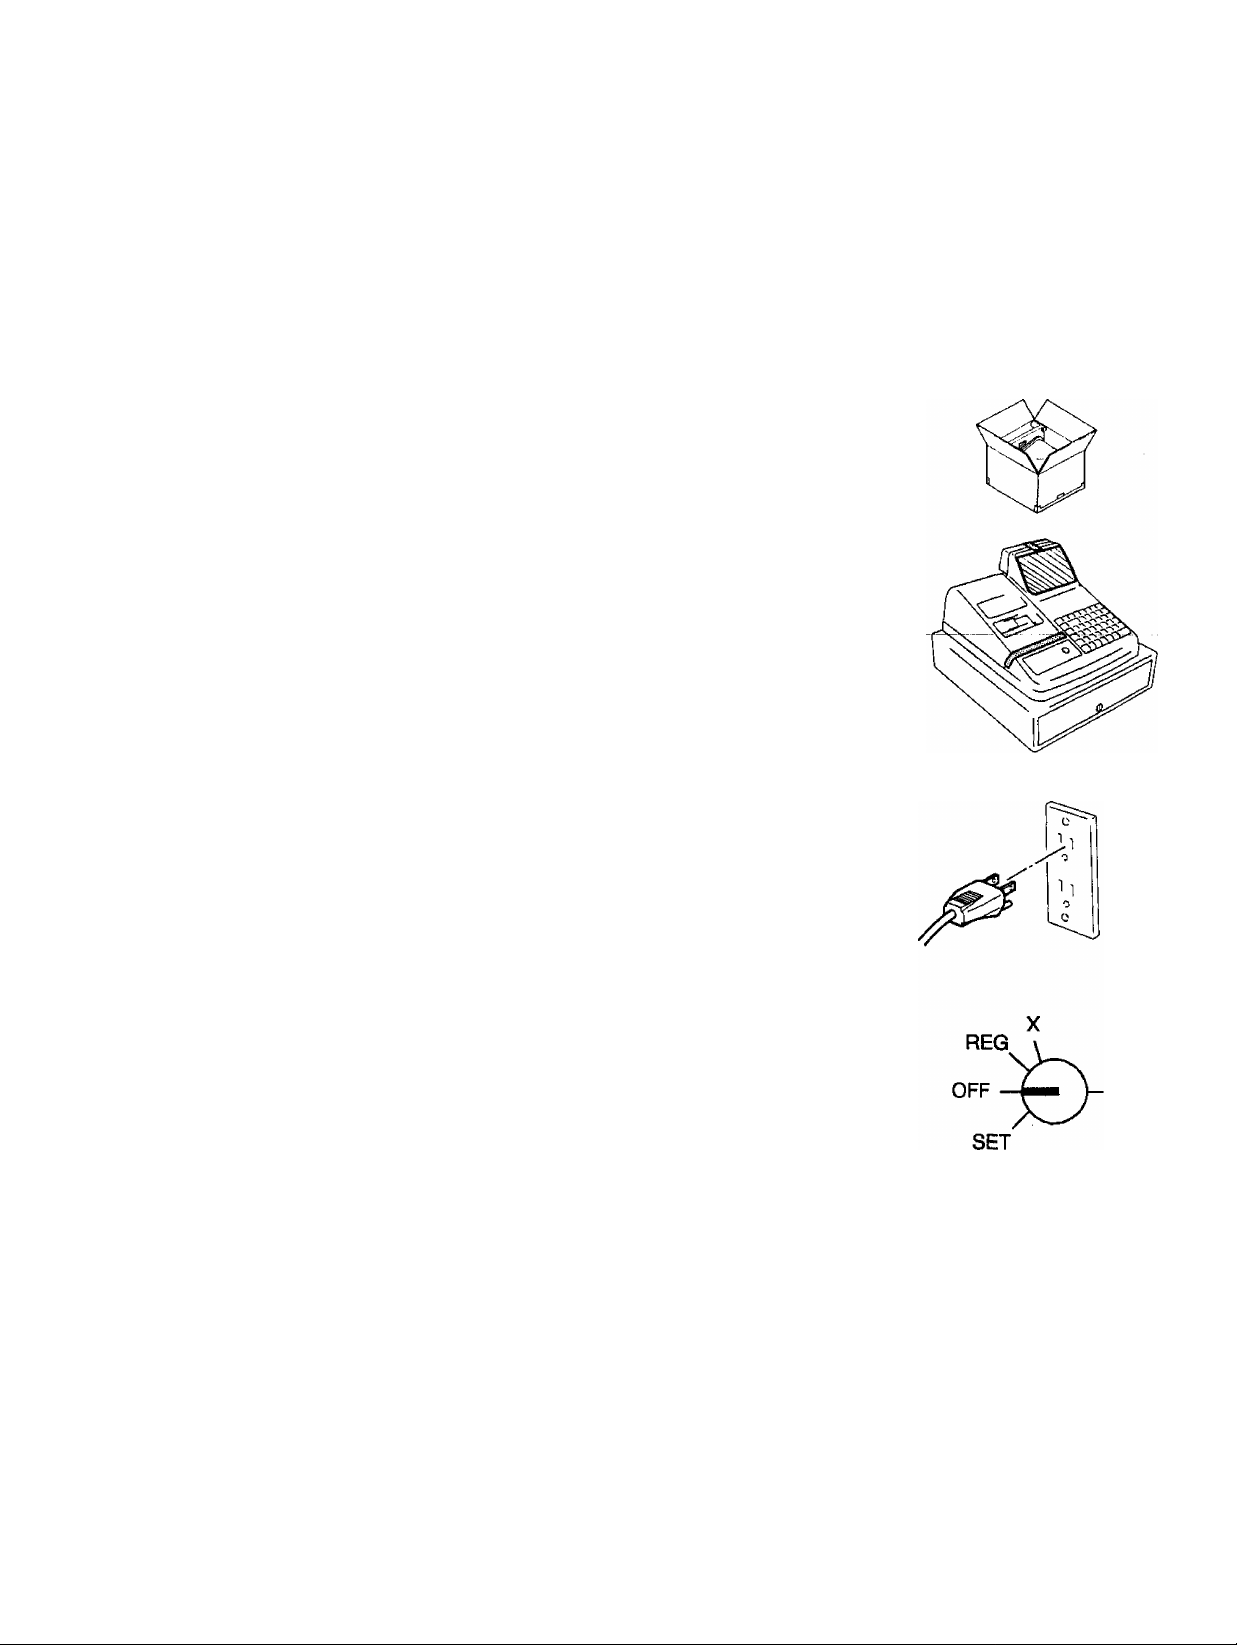
5. Outline of Preparation Procedure Before Operating
the ECR
This chapter shows the outline of set-up procedure of the ECR before actually
starting the ECR operation. <s> ^ cp .
_____________
Remove the cash register from the carton,
referring to Chapter “2. Unpacking" on page 2.
And take out all the parts and accessories.
Remove the tapes and seals for holding parts or
protecting the register surfaces.
T
EOl-11068
!
Plug the power cord of the register into a wall
outlet. Make sure that the outlet voltage matches
that of the power required for the register.
Insert the MA key into the Control Lock.
Turn the Control Lock to the REG position.
REG \
OFF Z
SET
-8-
Page 11

install the Receipt and Journal rolls (referring to
Chapter "70. Instalimg the ReceiptiJournal
Roll''), Also, install the Ink Roll (referring to
Chapter "77. Installing the Ink Roll").
If any optional keys are installed or relocated on
the keyboard, the optional key setting
programming must be performed first before any
other programming. Refer to Chapter “15.
Optional Key Setting.“
EOl-11068
Set the time and date correctly, referring to
Chapter “12. Setting the Time and Date”.
Set the tax tables, referring to the Chapter “13.
Tax Table Setting”.
When multiple registers are used in one store, or
to distinguish this register from others used by
other stores in the same chain, set the Register
Number referring to Chapter “14. Setting the
Register No.”
Perform programming the register, such as
Departments and PLUs, according to the
requirement of the market and your store (refer
to Chapter 16 and thereafter).
- 9 -
Page 12
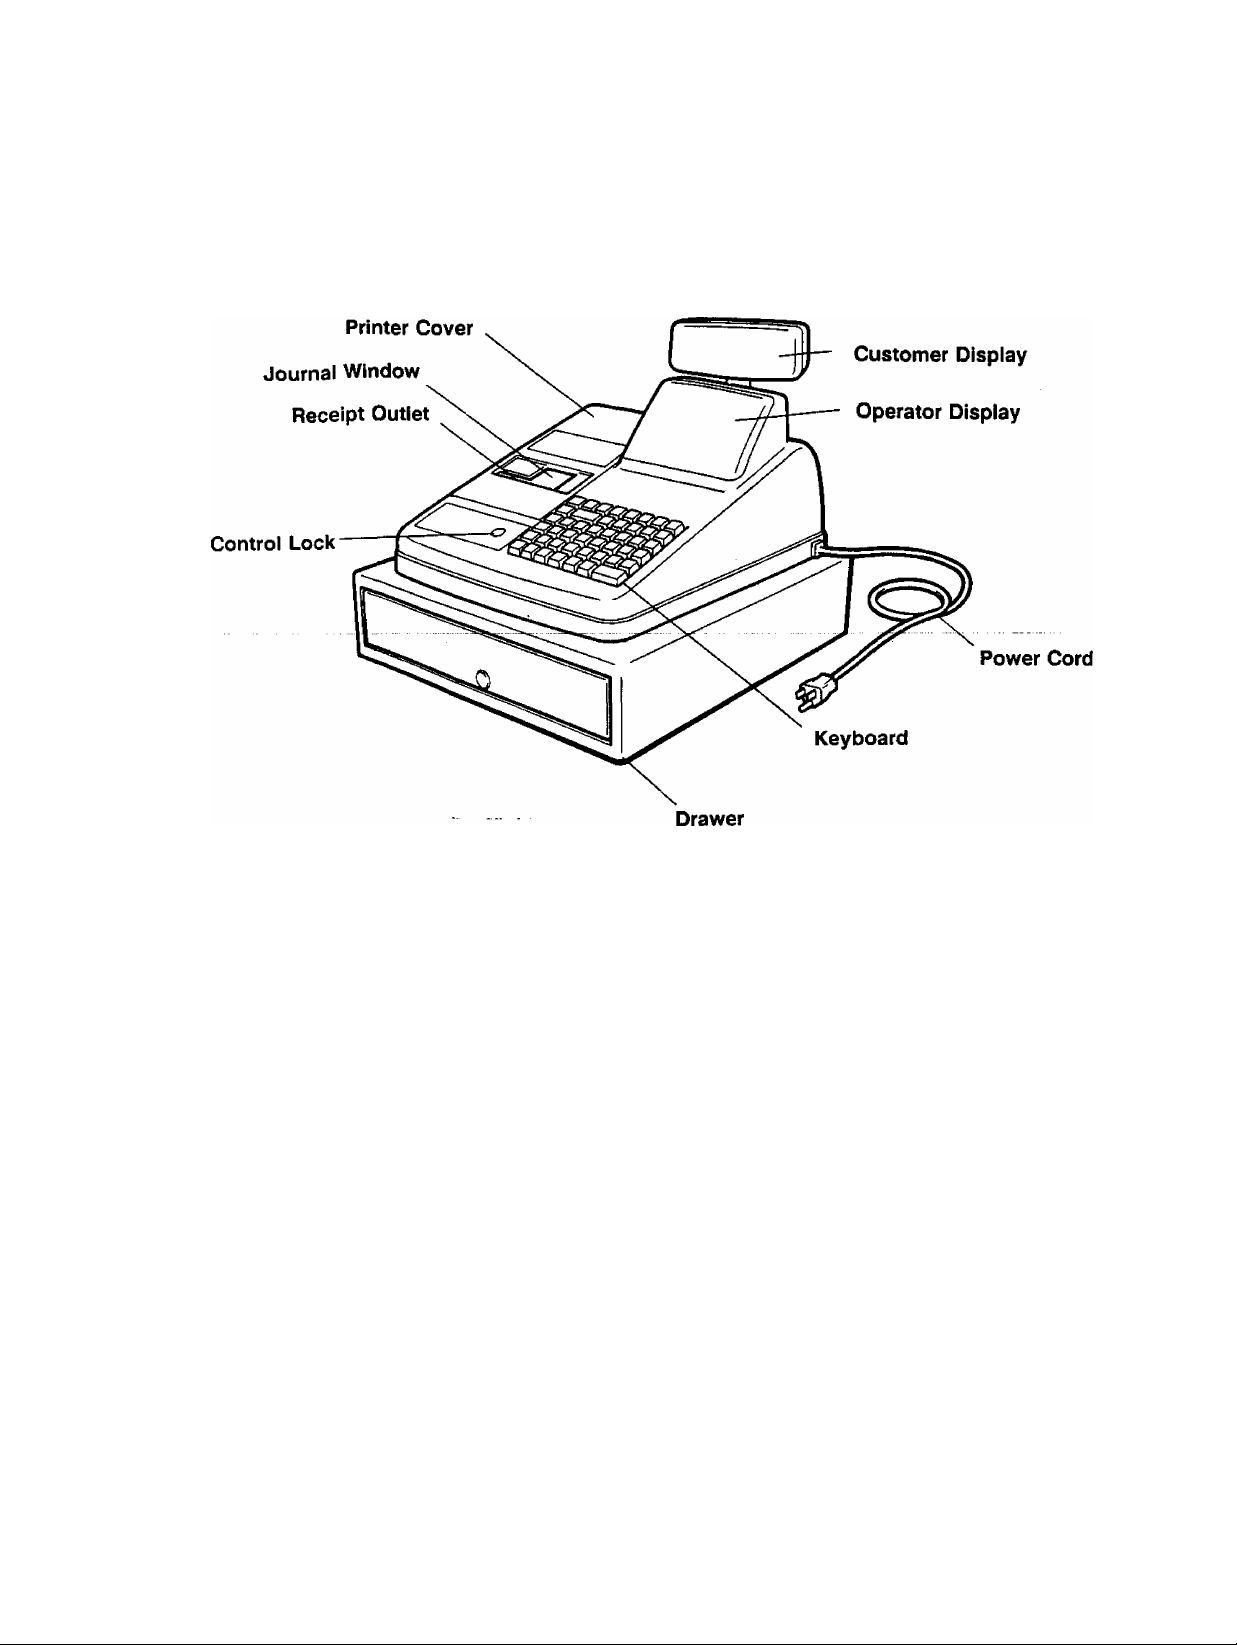
6. Appearance and Nomenclature
EOl-11068
Operator Display
Used by the operator to confirm the entry
contents and the status of the register,
(page 12)
Customer Display
Provided for the customer to see the amount
entered for each item and sale total, (page
12)
Receipt Outlet
The receipt for the finalized sale is issued.
Printer Cover
The cover for the Receipt/Journal printer.
Journal Window
The operator can see which items have
already been entered through this window.
Control Lock
It selects the type of register operations,
(page 11)
Keyboard
Used to enter sale items, (page 14)
Journal Take-up Reel
It winds up the journal paper portion already
printed.
Store Name Stamp
It is the stamp to be printed on the receipt.
You can order your own store’s stamp,
(page 122)
Drawer
Cash and other media are kept here. It
automatically opens on finalizing a sale.
- 10 -
Page 13

7. Control Lock and Control Keys
Control Keys
There are three types of Control keys: the REG (registration) key, the MA
(manager) key, and the S (service) key.
REG Key: The REG key is used by the cashier or clerk who operates
ordinary transaction entries. This key can access the
positions of OFF and REG of the Control Lock.
MA Key: The MA Key is used by the store manager or owner who will
daily supervise the collection of money and printout of
transactions recorded by the register. This key is also used
by programmer. This key can access the positions of SET,
OFF, REG, X, and Z.
EOl-11068
S Key:
The S^key is used by the _ Thi®
position Tncludirig B^^^^^ of the Control Lock. However, to
prevent programmed data and sales data from being
changed by mistake, use the REG or MA keys for
transaction entries or report taking purposes.
Control Lock
The Control Lock has five effective positions for different modes of
operation, which are accessed by the appropriate Control Keys.
(position) (function)
REG \
OFF —Z
SET isUNb"
X
U__
* not actually
printed.
SET
OFF
REG
J
The register allows programming operations.
Nothing appears on the display in this position.
However, the power is being supplied to the
register.
Transaction entries are carried out in this mode.
Displays the current time while no entries are
under way.
X
Z
BLIND
The sale totals in memory can be read (X
reports) and the programmed data can be
verified in this position.
All the resettable totals and their respective
counters in memory will be read and reset in this
position (Z reports)
The register allows special programming
operations and memory clear operations.
-11 -
Page 14

8. Display
The Operator’s Display (front display) is located at the top of the register just
above the keyboard. The Customer’s Display may be used only as a rear
display if left in the retracted position or it can be positioned for viewing at
other angles by pulling it upward and turning it to the desired position. The
display has two types of display portions - numeric display and message
descriptors (triangular lamps).
Operator’s Display
r
pm
EOl'11068
SIGN
r
ON ◄
ALM ◄
R ◄
OFF
DP RPT AMOUNT
I I I I I I I I I I I I I I I
I- I- I-I I-I I-I I-I ►TL
II 1 ~l 1 n I n ~l I I
Customer’s Display
AMOUNT
^ST
J
I I r r n n n n
~l ~l n I n “/ / /
-12-
► TL
► ST
^ CG
Page 15

Numeric Display
AMOUNT (8 digits for total display, 7 digits for entries):
Displays the numeric data, such as amount, quantity, etc.
When the obtained total or subtotal amount is 8-digit, the
RPT digit is also used for the amount display. When no
entries are under way and the Control Lock is in the REG
position, the current time is displayed.
DP (2 digits): Displays the code which represents each Department key.
It stays lit when repeating the same department entry.
RPT (1 digit): Displays the repeat count of the same item. The count is
indicated from the second entry on, and only the last digit
will be displayed even if the count exceeds nine.
PLU“{3 dfgits of th^DP and RPT are used for this^u rpbse):
Displays the PLU code when any PLU is entered. It goes
out when repeating the same PLU entry, then only the
RPT digit will be displayed for the repeat entry count.
EOl-11068
Message Descriptors (Triangular Lamps)
SIGN .
ON *
ALM
R
OFF
TL :
ST ;
Illuminates when a cashier has signed ON.
Illuminates with the alarm buzzer to indicate that the last
operation or numeric entry was an error. To clear the error
condition, depress the [C] key.
Illuminates when the Receipt-OFF mode is declared by the
[LOG/RECEIPTJ key. In this condition, no receipts will be
issued for a sale to be entered. To extinguish this lamp (i.e., to
change into Receipt-ON mode for issuing receipts), simply
depress the [LOG/RECEIPT] key again.
illuminates with the total amount displayed when a sale is
finalized without any amount tendered.
Illuminates with the subtotal amount displayed when the [ST] or
[TXBL TL] key is depressed.
CG :
When an amount tendering operation has been performed, this
lamp illuminates with the amount of change due displayed.
-13-
Page 16

9. Keyboard
The following is the standard keyboard layout, which was initially set at the
factory. This register is designed to be capable of programming most of the
keys at desired locations or adding some optional keys in place of the current
keys. If you are in need of changing the locations or adding keys, see Chapter
“15. Optional Key Setting”.
Standard Keyboard Layout
EO1-11068
LOG
RECEIPT
RTN
MDSE
TX/M
PLU
AMT
ITEM
CORR
#/NS
RF JF
C @/FOR
7 8 9
4
1
0
5
2
00
6
3
RECEIPT
ISSUE
.........
•
LC
OPEN
1
2
3 8
4
5 10
% +
R/A
6
DOLL
7
DISC
Chg CUR
ST
9
% -
PO
EX
CHK
TND
Ai m
. 14 .
Page 17
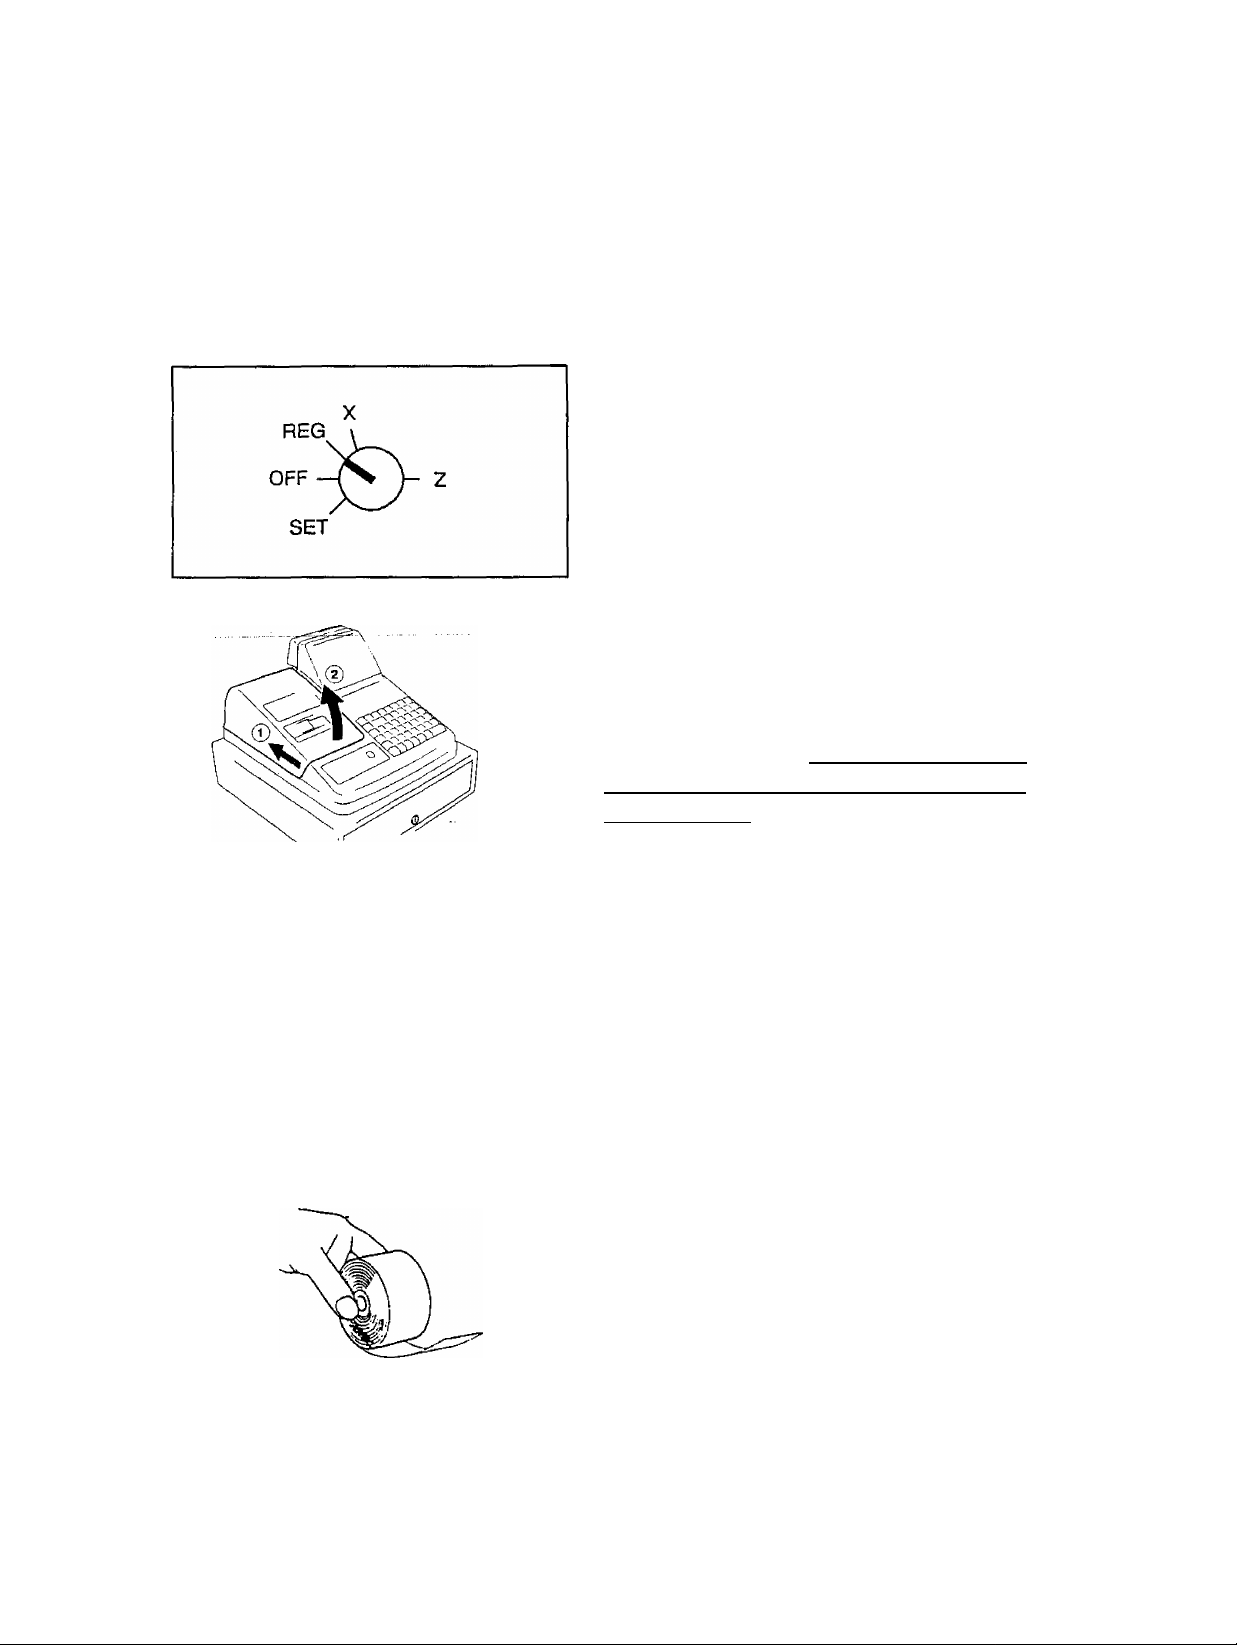
10. Installing the Receipt/Journal Roll
Installing the Receipt Roll
Turn the Control Lock to the REG
position using a Control Key.
E01-11068
-1^
To remove the Printer Cover, lift the
Printer Cover in the direction of the
arrow mark @ while pushing the
Printer Cover in the direction of the
arrow mark 0.
Cut the paper end to make it sharp.
Hold the paper roll so that the paper
end will be fed from the bottom.
- 15 -
Page 18

Place the paper roll in the outer side
holder of the two roll holders.
Insert the paper end into the space
behind the printer.
EOl-11068
Press the [RF] key until about 4
inches (about 10 cm) of paper comes
out of the printer.
Attach the Printer Cover, and cut the
excess paper with the attached cutter.
-16-
Page 19

Installing the Journal Roll
Follow Steps 1 to 7 for
“Installing the Receipt Roll”
on the preceding page,
except that the paper roll
should be placed inner side of
the two holders and the [JF]
key should be used for the
journal roll.
EOl-11068
insert the paper end into the slit on
the Take-up Reel and wind it around
the reel two or three times.
Set the Journal Take-up Reel into the
Reel Holder.
Attach the Printer Cover.
-17-
Page 20
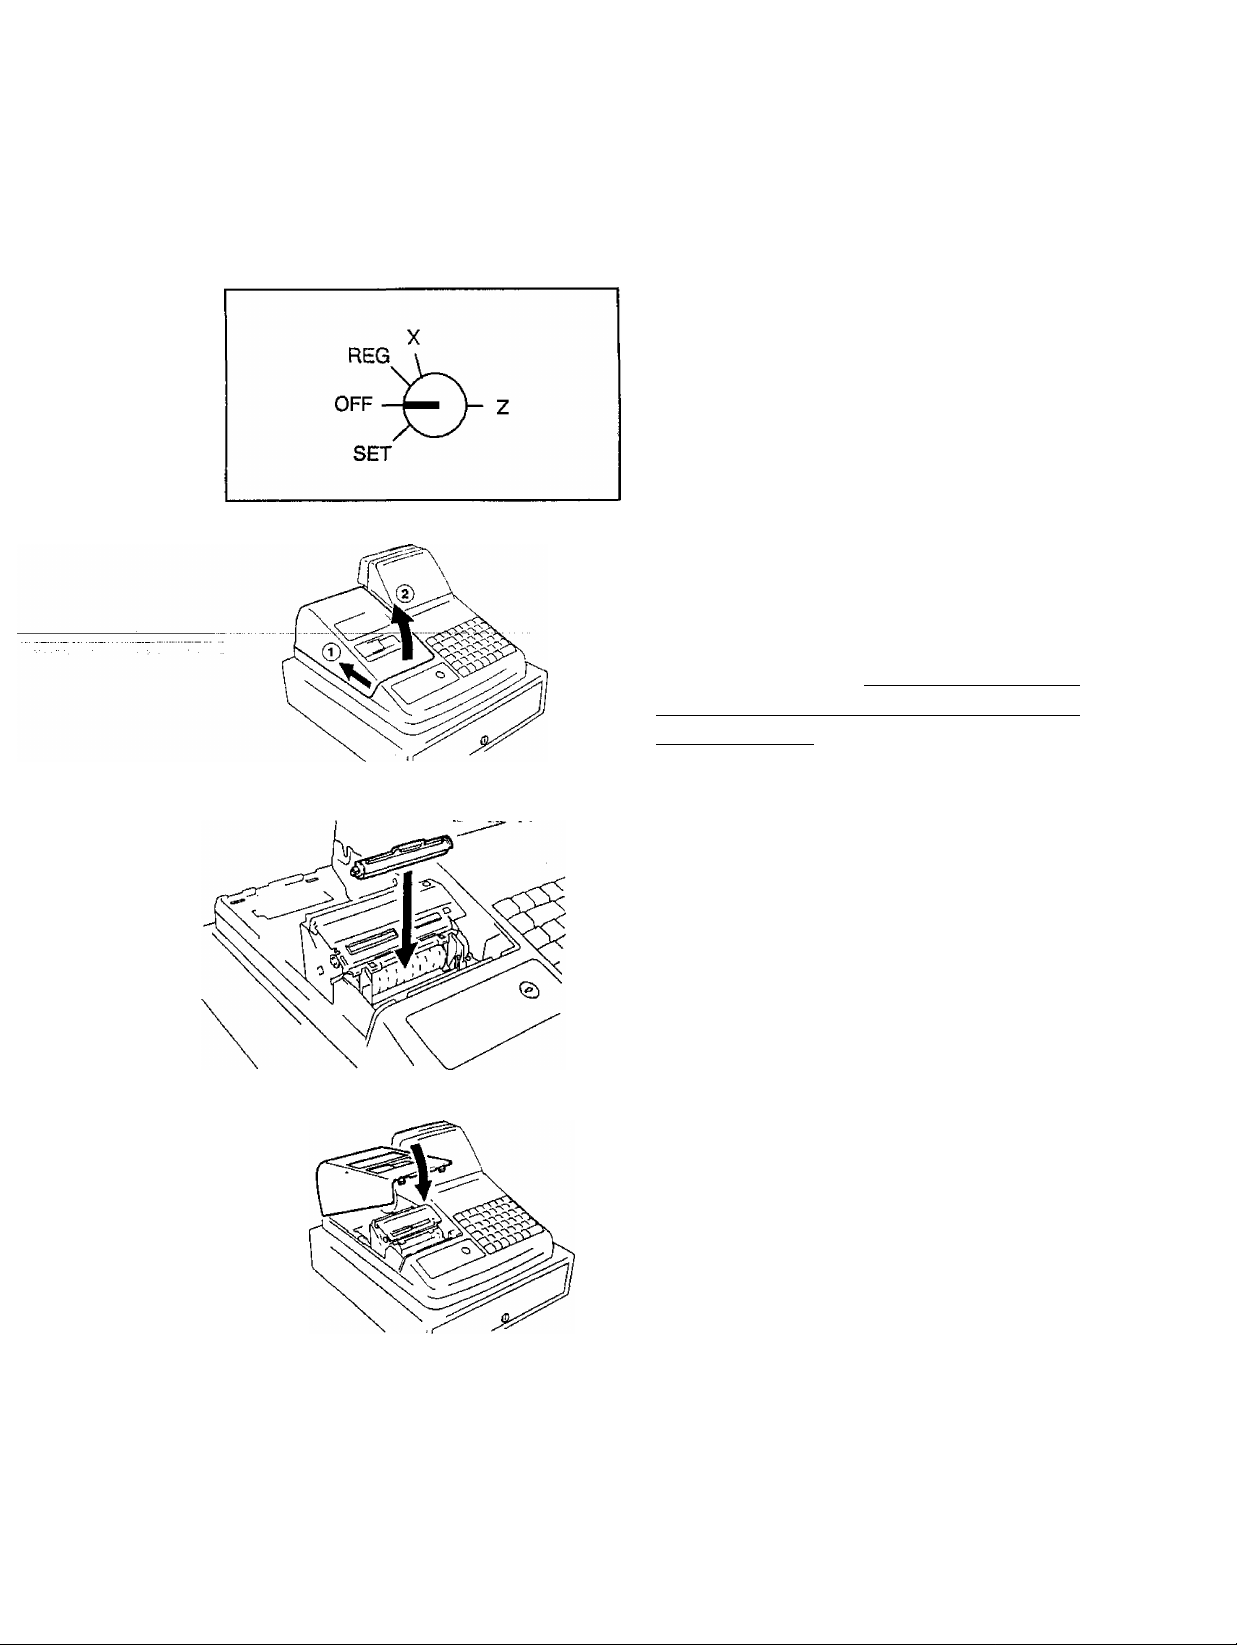
11. Installing the Ink Roll
EOl-11068
Turn the Control Lock to the OFF
position.
To remove the Printer Cover, lift the
Prints CbveM
arrow mark (2) while pushing the
Printer Cover in the direction of the
arrow mark (D.
Install the Ink Roil in the direction of
the arrow mark.
Attach the Printer Cover.
- 18 -
Page 21
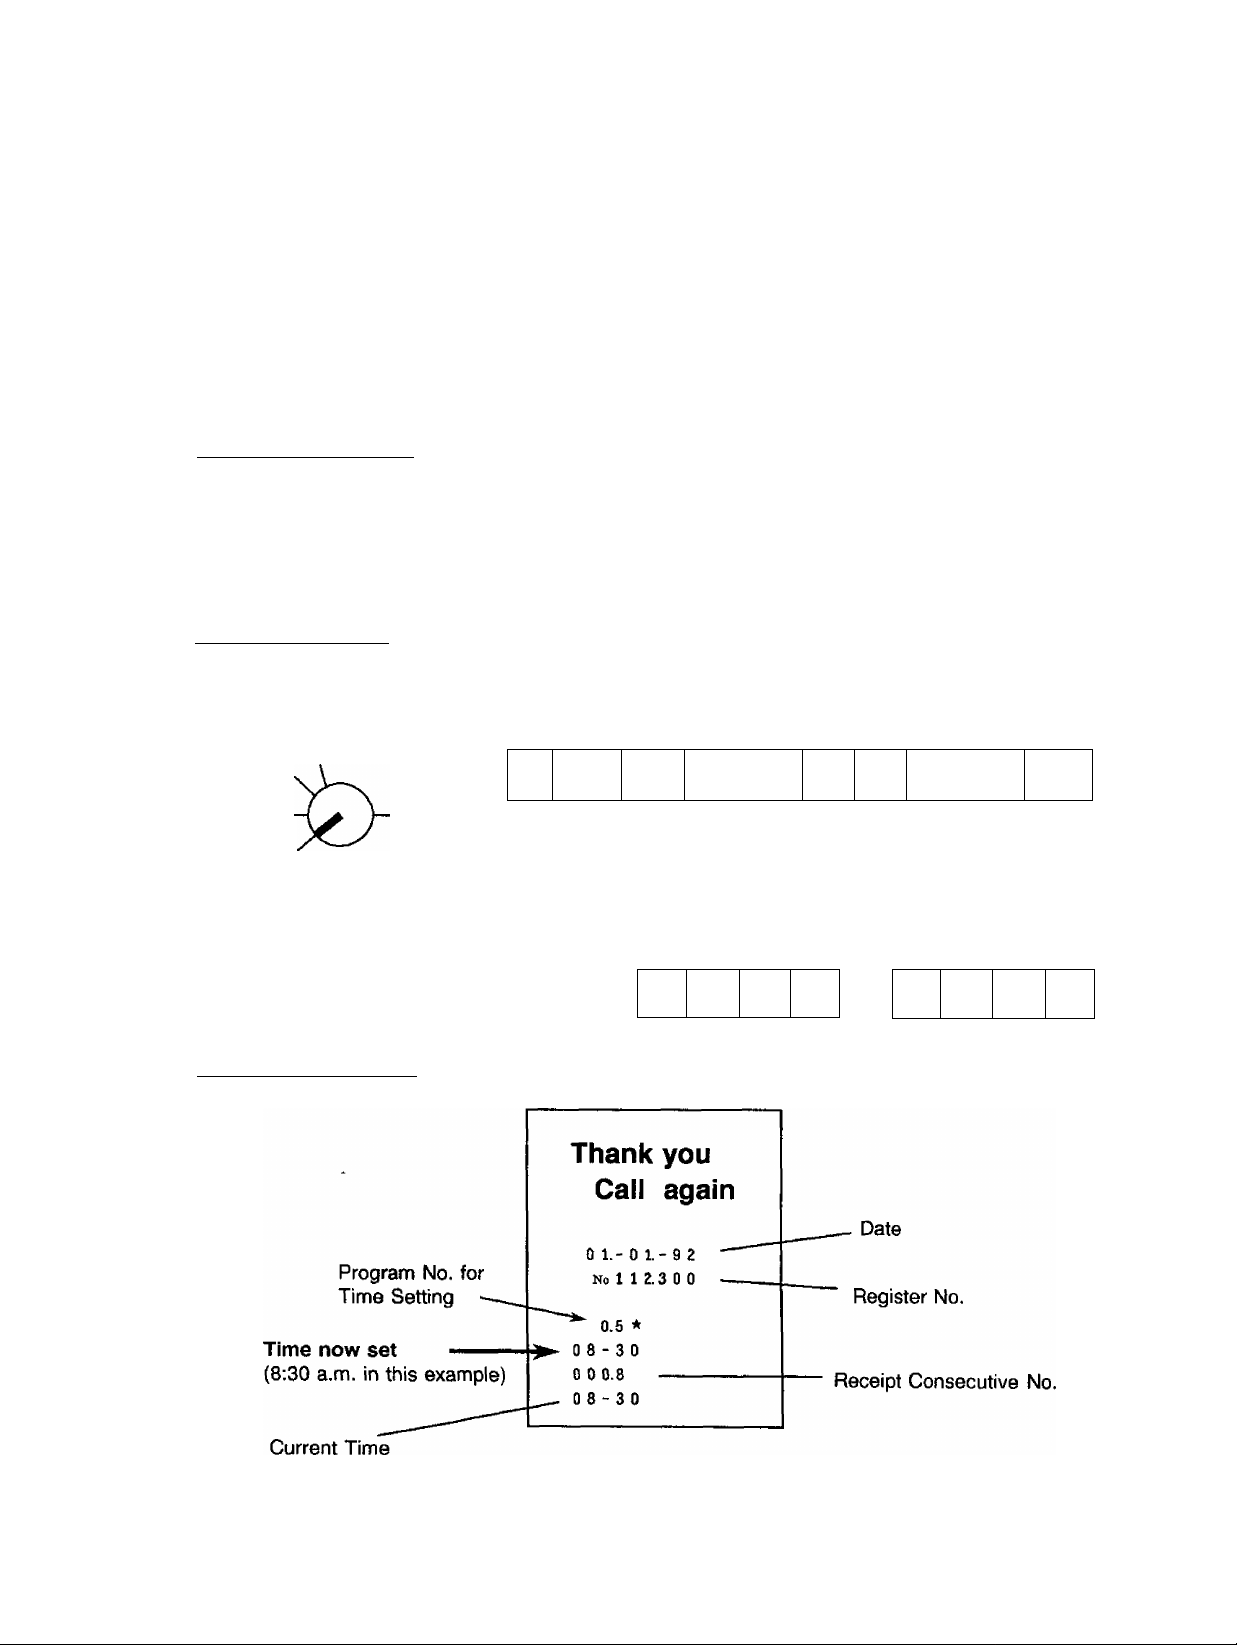
12. Setting the Time and Date
Setting the Time
The register has a clock function. Once the time is set, the time is kept even
when the power is turned off. The 24-hour system (the military time) is used
for time setting, display, and printing. Time setting is allowed any time outside
a sale.
Condition for Setting: Must be signed off.
NOTE on “Condition”:
This is necessary for all program changes.
Setting Prooedure
Use the MA Key to turn the
Control Lock to “SET”.
□
EOl'11068
Numeric Key
Function Key
REG
OFF
SET
Receipt Print Format
-►
©/FOR
5
Declaration of Program
No. 6 for Time Setting
Examples)
0
1:05 a.m.:
1
0
Hour Minute
(00 to 24) (00 to 59)
_
_________
_J
5
1
^
1:32 p.m.:
3
3
AT/TL
Issues a
receipt.
2
- 19 -
Page 22
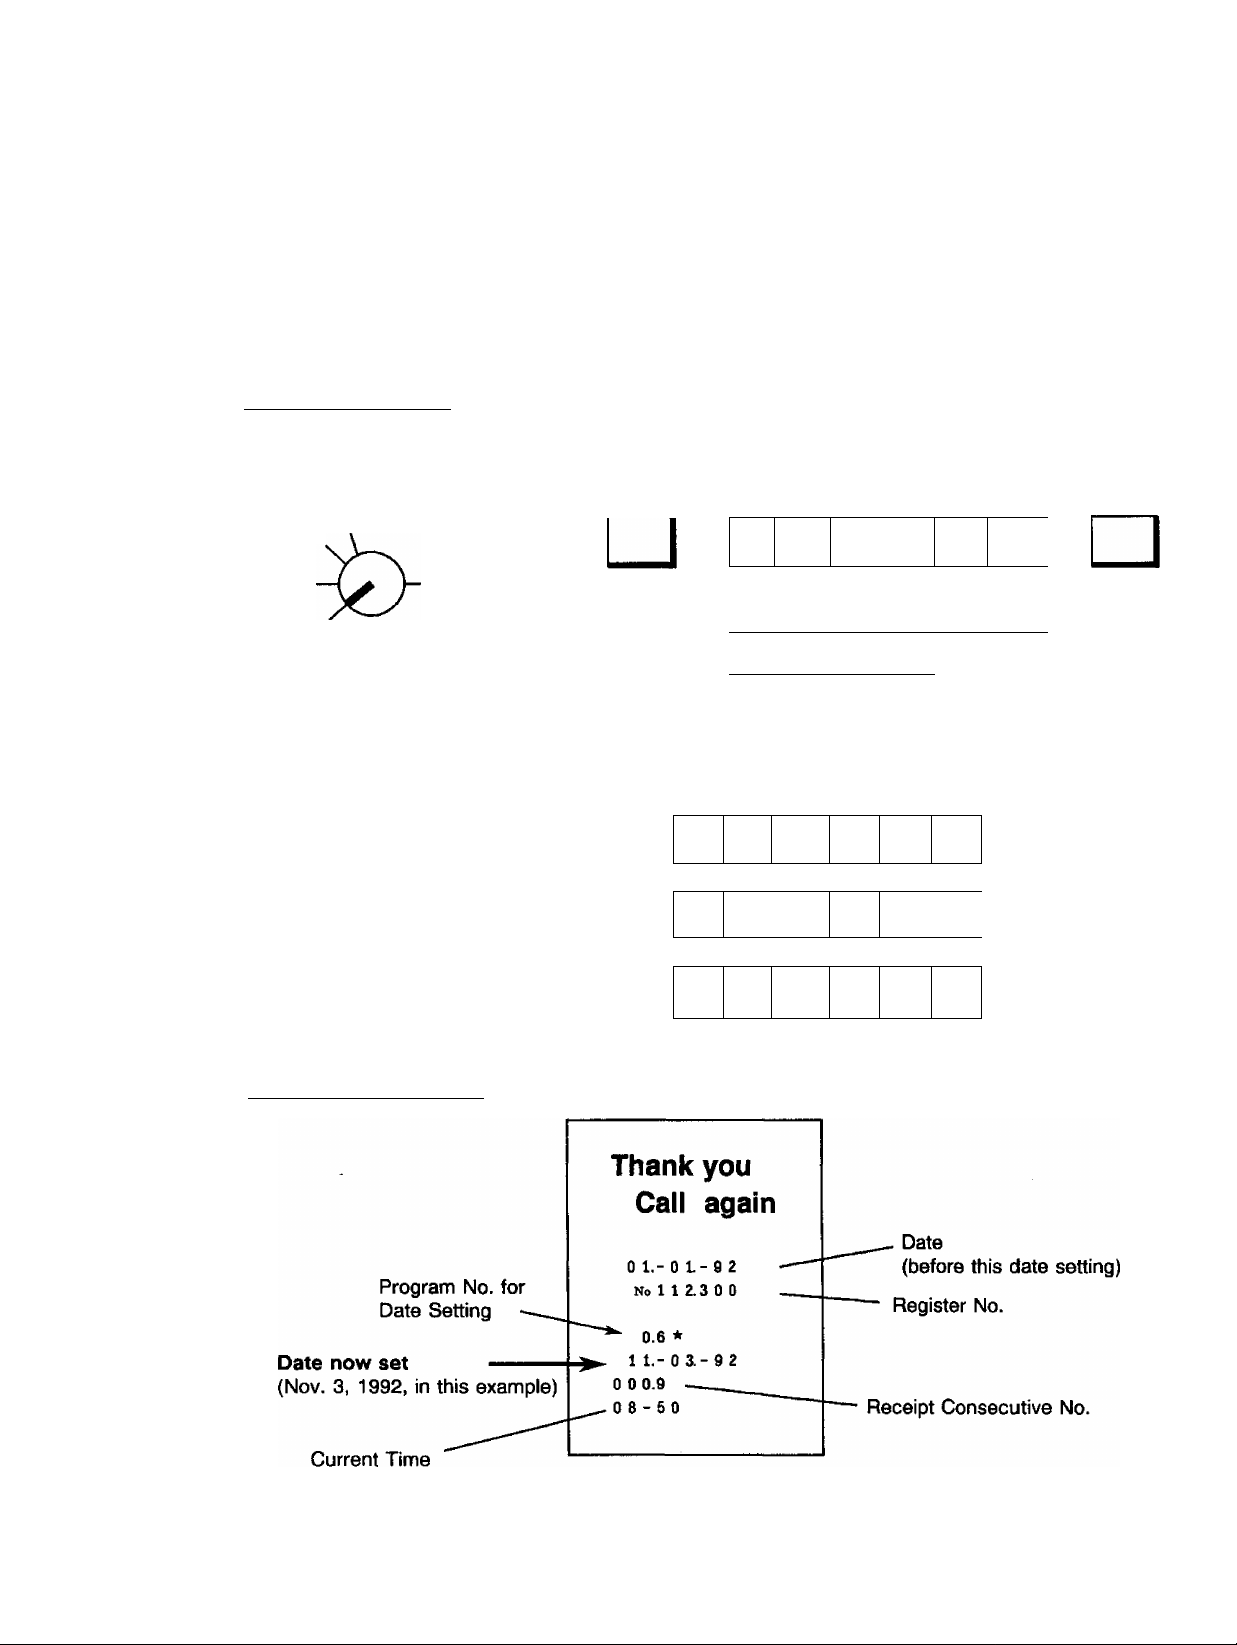
Setting the Date
The register has a calendar function. Once the date and time are correctly
set, the day automatically advances at midnight even when the power is
turned off. The extra day of a leap year is also computed automatically.
Setting Procedure
Use the MA Key to turn the
Control Lock to “SET”.
EOl-11068
REG
OFF
SET
NOTE: The date set/phnt order is Month-Day-Year. If you want to change the order
into Day-Month-Year or Year-Month-Day, select appropriate status of Bits 1
and 8 in Address 18 in Chapter “f9. System Option Setting”.
Examples) To set May 28, 1993:
Receipt Print Format
©/FOR
Declaration of Program
No. 6 for Date Setting
1 1 1
Month
(00 to 12) (00 to 31) (93, 94, etc
5
0
Month
2
Day
9 3
Year
L!_
1 ^
H
1 ° 1
Day
Month
Month
Day
1«^ II —
8
9
Year
5
iJ
Year
5
1 ^
Day
Year
Month-Day-Year
3
Day-Month-Year
Year-Month-Day
8
AT/TL
receipt.
order
order
order
-20-
Page 23

Displaying the Time
The current time is displayed in the “AMOUNT” area when the Control Lock is
turned to REG from any other position. When the Control Lock position is
changed or any entry operation starts, the displayed time disappears.
EOl-11068
Time Display Format:
(Example: 1:45 p.m.)
/ "/
/ 1
I I r
I 1
Printing the Time and Date
The current time is printed on every receipt, as the bottom line (refer to the
Rece/ptPr/nt For/iiat^ ¿fte-preGedwg page); The time can be programmed
®7i^-priht,S necessary, by a System Option selection (refer to Chapter “t9.
System Option Setting”, Address 1 - Bit 1).
The date is printed on every receipt, as the top line below the Store Name
Stamp print (refer to the Receipt Print Format on the preceding page). The
quickest way to verify the date print with the Control Lock in REG position is to
issue a Sign ON, Sign OFF, or No-sale receipt fsee Chapter 16).
21 -
Page 24

13. Tax Table Setting
For details about the actual tax table, contact to the location where the register
was purchased.
Setting the U.S. Tax Tables (also applicable to PST in Canada)
There are three ways to set state and local tax tables. Select one that suits
the tax table required to be set.
Condition for Setting: After Daily Financial Reset
NOTE on "Condition’*:
Unless the register satisPes this condition, the programming operations will not he
allowed.
“After ... Reset” means that the designated reset report must be taken before
entering the programming (setting) operation. An error will result if the operation is
attempted without taking the report.
However, it does not necessarily mean “immediately after...” When the designated
reset report has already been taken and then some operations are performed in the
“X”, “2”, or “SET” mode, the condition “After ... Reset” is still satisfied and the
programming operation is still allowed.
EOl-11068
On the contrary, when the designated reset report has been taken hut then some
sales data relating to that report’s output data are entered in the “REG” mode, the
prograrnming operation will no longer be allowed and the same reset report must be
taken again.
Thus the condition “After ... Reset” indicates that all the sales data relating to the
report data must be zero (except non-resettable memory data). Because of this
“Condition” requirement, the report data will be protected from any inconsistencies
of sales data entered in the period from a resetting of the report to another resetting
of the same report next time. When no condition is specified to a programming
(setting) operation, it means that the operation is allowed any time outside a sale but
the cashier must be signed off.
Setting Procedure:
Use the MA Key to turn the
Control Lock to “SET”.
REG
OFF
SET
—^ Go to 1), 2), or 3) on the following pages.
Indications of types of keys on the k)llowing pages:
□
I
______
□ ..................... Function Key
......
Individual Numeric Key
I ........ Data to be entered through Numeric Keys
- 22 -
Page 25

1) Tax 1; Full Breaks (Non-cvciic Breaks + Cyclic Breaks)
[max, amount non-taxable| —► |txi/m
EOI'11068
[max, amount for 1C tax levied|
[max, amount for 2<t tax leviedj
i Repeat up to the “A” Break.
[max, amount for Ng tax levied] -
(to indicate the “A*’ Break entry)
[max, amount for N +1 a tax levied] —*
[max, amount for N + 2& tax levied] —►
Repeat up to the “B” Break.
*B" Break]
aTjtu I -fto complete this tax table sef^7
NOTE: Each amount (break) entry may be a maximum of 4-digit value (99990).
TXI/M I (*‘B" Break - “A” Break
TXl/M
TXI/M
'
= a multiple of $1.00)
........
“A*’Break
Non-cyclic
Tax Breaks
Cyclic
Tax Breaks
2) Tax 1: “A” Break and % Rate Combination (Non-cvclic Breaks + % Rate)
First, set all the non-cyclic breaks up to the “A” Break entry and the [ST] key
depression shown in the above case of “1) Tax 1 Full Breaks”.
i
[Tax Rate applied when exceeding the “A” Break amount]
{Max. 6 digits up to 99.9999%. Use the [. ] key for a decimal value. Examples: To
set 5%, enter 5. To set 5.26%, enter 5->[ . ]->2->6. The fraction of the amount
resulting from this % rate calculation will be rounded off.)
I
3) Tax 1: % Rate Only
0
[Tax Rate applied to any amount] —► I at/TL
(The description for the Tax Rate in the above case 2) is also applied to this case.)
TXI/M I (to indicate that no breaks are entered)
I (to complete this tax table setting)
-23-
Page 26

NOTES 1. In a single-tax area, the [TX1/M] key may be labeled as [TX/M] key.
2. For Tax 2 table setting in a multi-tax area, follow the same procedure in 1), 2), or
3) above, using the [TX2/M] key instead of [TX1/M].
To install the [TX2IMJ key on the keyboard, refer to Chapter “75. Optional Key
Setting”.
3. If two tax tables are to be set, the Tax 1 table must be set first. The Tax 1 table
setting will automatically reset the old Tax 1 and Tax 2 tables.
4. No second depression of the [ST] key is allowed within one tax table setting. A
maximum of 64 breaks may be entered for Tax 1 and Tax 2 tables altogether.
Setting Examples:
ex. 1) Tax 1; Full Breaks
EOI-11068
Tax Table
Amount Range Tax Levied
$0.00 to $0.10 00
$0.11 to $0.22 “1C
$0.23 to $0.39 20
$0.40 to $0.56 30
$0.57 to $0.73 40
$0.74 to $0.90 50
$0.91 to $1.08 60
... “A” Break
$1.09 to $1.24 70
$1.25 to $1.41 80
$1.42 to $1.58 90
$1.59 to $1.74 100
$1.75 to $1.91 110
$1.92 to $2.08 120
Key Operation
Control Lock: SET
□0
00
00
00
00
00
000
"ir
TX1/M
TX1/M
TXl/M
TXl/M
TXl/M
TXl/M
TXl/M
000 ITX1/M
000
000
000
000
2lfÒir8
TXl/M
TXl/M
TXl/M
TXl/M
TXl/M
Thank you
Call again
1 1.
-03-92
No 1 1 2.3 0 0
0.0*
0 0 *ai 0
0 1 *32 2
0 2 *33 9
08
0 0 1.6
5 4
* 35 6
* 10 8 ST
* 12 4
* 14 1
* 2 0 8 TL
0 3
0 4 *37 3
0 5 *39 0
0 6 * 10 8
0 7
0 9 *158
1 0 * 17 4
1 1 * 19 1
1 2 *20 8
0 8-
TX I
... “B” Break
-24-
Page 27

ex. 2) Tax 1; “A” Break and % Rate Combination
E01-11068
Tax Table
Amount Ranae Tax Levied
$0.00 to $0.09 OC
$0.10 to $0.29 10
$0.30 to $0.59 20
$0.60 to $0.84 30
$0.85 to $1.12 40
... “A” Break
—5%-is-applied-to-any
amount exceeding the
“A” Break.
Key Operation
Control Lock: SET
liJ
TXI^
TX1/m|
dill]
[UB
0
..........
txi/m|
txi/m)
Thank you
Call again
1 1,- 0 a - 9 2
No 1 1 ^ 3 0 0
0.0*
0 0 ★ao 9
*02 9
0 1
*05 9
0 2
*08 4
0 3
0 4
★ 112
* 11 2 ST
5.
0 0 1.7
0 8-54
TX I
ex. 3) Tax 1; % Rate Only
Thank you
Call again
1 1.- 0 3. - 9 2
No 1 1 2.3 0 0
TX I
0.0 *
0 0 * 0.0 0
* 0 0 0 ST
10. %
0 0 1.8
0 8-54
- 25 -
Page 28

Setting the GST Rate (applicable to Canada only)
Please note the following before operating the GST rate setting. The following
preparations are required:
1) Select the “GST Active” status in Chapter “19. System Option Setting”, Address 14 Bit 1 (some other options can also be selected relating to GST in the same Address).
2) Install the [GST/M] (GST Modifier) key on the keyboard (in place of unnecessary key)
referring to Chapter “15. Optional Key Setting”.
Condition for Setting: After Daily Financial Reset
(refer to “NOTE on Condition” on page 22.)
Setting Procedure:
Use the MA Key to turn the^
Control Lock to “SET”.
REG \
This^Dortion -is required
only when any decimal
portion is contained in the
rate.
_
__________A,__________
_
EOl-11068
SET
Examples)
7%
12% 1
8.55%
To reset the rate
once set:
H
□ □ □□
-----------------V------------------GST Rate 0 to 99.99(%)
1
|2
8
I •
5 5
GST Rate 7%
is set.
Thank you
Call again
ii.-oa-92
No 1 1 2. 3 0 0
0.0 *
—► 7.
0 0 1.5
0 8-54
FS
-26-
Page 29
Setting the Non-taxable Limit Amount
(applicable to only certain areas in Canada)
This non-taxable amount limit must be set only in certain areas in Canada.
EOl-11068
Condition for Setting:
Setting Procedure:
Use the MA Key to turn the
Control Lock to “SET”.
SET
Example) $20.00
After Daily Financial Reset
(refer to “NOTE on Condition” on page
22.)
2
11
D0ctaratiomэ^Progгann
No. 12 for Non-taxable
Limit Amount Setting
©/FOR AT/TL
-►
Non-taxable“Limit Amount
(max. 4 digits: 1 to 99990,
or enter 00 to reset the limit)
■olFo"
Thank you
Call again
11.- 0 a- 9 2
No 1 1 2.3 0 0
0.0 *
h. .1. 0 n n n
0 0 2.4
0 9-00
NOTES 1. When the sum of the safe portion subject to Tax (PST) 1 and the sale portion
subject to Tax (PST) 2 exceeds the Non-taxable Limit Amount programmed here, all
the amount subject to either of the two taxes are all taxed. When the sum is less
than the programmed limit. Tax 1 is tax-exempted and only Tax 2 is calculated on
the sale portion subject to Tax 2.
2.
When the sum of the sale portion subject to Tax (PST) 1 and the sale portion
subject to Tax (PST) 2 is negative, the portion subject to Tax 1 will not be taxed.
3.
When the sale portion subject to Tax 1 is tax-exempted, the taxable amount is not
stored in Tax 1 memory.
4.
An error results when the [GST/MJ key is depressed in sale entries on the ECR with
Non-taxable Limit Amount programmed.
- 27 -
Page 30
Tax Calculation Test
Tax calculation can be tested in the following procedure. This operation will not
affect any sales data.
Operating Procedure:
Use the MA Key to turn the
Control Lock to “X”.
X
REG
|Amount|
OFF
TXI/M or
EOl-11068
TXBL
TL
SET
Enter any amount
through Numeric Keys.
The^tërëd amounris“
displayed.
The tax amount (total of all the
taxes due) is displayed in the
AMOUNT portion.
(The Non-taxable Limit Amount
setting is disregarded from this
display.)
-28-
Page 31

14. Register No. Setting
When multiple registers are used in one store, or to distinguish this register
from others used by other stores in the same chain, set the Register Number in
the following procedure.
Condition for Setting: Any time outside a sale and signed off.
Setting Procedure:
Use the MA Key to turn the
Control Lock to “SET”.
EOl-11068
REG
OFF
SET
Example)
No. 112300:
NOTES 1. The Decimal Point cannot be entered in the Register Number.
2. Preceding zeros, if any, will not be printed. For example, if ‘W1234” is entered,
**No. 1234” will be printed.
3. The Register Number set here will be printed on the second line below the Store
Name Stamp print (just below the Date print line) on every receipt to be issued.
Register Number
max. 6 digits; 0 to 999999
#/NS
(°^| I)
Thank you
Call again
11.- 01-92 ^
No 1 1 2.3 0 0
- 29 -
Store Name Stamp
print space
Date
- Register No.
Page 32

15. Optional Key Setting
This chapter introduces optional keys (keys not installed on the current
Standard Keyboard) that can be programmed. Please note, however, that
adding an optional key means to sacrifice another key already installed. If you
plan to install any of the Optional Keys or change locations of any of the
current keys, this operation must be performed first before any other
programming or setting operation (refer to NOTE 9 at the end of this chapter).
List of Keys
The following is the list of the all the keys that can be programmed on the keyboard. Numeric
Keys 0 to 9 are fixed as to their locations, therefore, not included in the list. The “Key Code”
assigned to each key in the list is used In the setting procedure below. For detail functions and
operations of each key, refer to Chapter “17. Settings and Operations Relating to Each
Key”. For a brief information of the Optional Keys, refer to NOTE 8 at the end of this chapter.
..........
nm
I I ...................Optional Keys
(All those keys, not only the Optional Keys, can be eliminated or changed as to their locations
on the keyboard. However, please do not eliminate the keys of minimum requirements.)
Keys that must be installed as minimum requirement
..........
Keys that are already installed on the Standard Keyboard
EOl-11068
Key
Code
Code to deactivate the key.
0
Department Keys 1 to 10
11 to 15
...
.......
1
Department Keys 11 to 15
ei
RF (Receipt Feed)
JF (Journal Feed)
62
00 (Double-zero)
• (Decimal Point)
DOLL DISC (Dollar Discount)
% + (Percent Charge)
\
% — (Percent Discount)
71
RTN MDSE (Returned Merchandise)
ITEM CORR (Item Correct)
7B
74 VOID (Void)
ALL VOID (All Void)
75
AT/TL (Cash Tender/Total)
CHK TEND (Check Tender)
77
Chg (Charge Total)
79" '
ST (Subtotal)
R/A (Received-on-Account)
93
Key Name
Key
Code
PO (Paid Out)
NS (No-sale)
85
LC OPEN (Listing Capacity Open)
# (Non-add Number Print)
90
rw
<j.UAUJWAUjJ.M.li.
..
i<ie
1 127
#/NS (Non-add Number/No-sale)
PLU (Price-Look-Up)
@/FOR (AVFor; Multiplication) |
RECEIPT ISSUE (Post-receipt)
94
C (Clear) 1
TX/M or TX1/M (Tax 1 Modifier)
TX2/M (Tax 2 Modifier)
98
TXBL TL (Taxable Total)
99
101 i
EX (Tax Exempt)
AMT (Amount)
.
GST/M (GST Modifier)
115
CUR or CUR1 (Foreign Currency 1)
iai
122
CUR2 (Foreign Currency 2)
LOG/RECEIPT (Log/Receipt)
Key Name
*2
*2
*1. At least one Department Key is required to be installed.
*2. The [#/NS] key has both [#] and [NS] functions. Therefore, when /#/WSJ is installed,
neither /#J nor [NS] are necessary.
-30 -
Page 33

Key Installation Setting
E01-11068
Condition for Setting:
Setting Procedure:
Use the S Key to turn the
Control Lock to the “BLIND”
position.
X
REG
OFF
SET
(The BUND position is the unmarked
step next to “Z”.}
Only to read the Key Code currently set on ttie key.
Z
(BUND)
Key Code
the List of Keys on
the preceding AMOUNT
page.> - portion, as it is
After all Daily and Periodical Resets
(refer to “NÓTE on Condition” on page 22,)
AT/TL
To declare Key Installation
Setting.
Repeat for all the
keys to be newly
installed, for location
changes, or for
reading-Key Godes-
^ready set
□
Displays tíie
entered.
Depress the key
to be set with the
Key Code.
Dispiays the Key
Code set or read,
in the AMOUNT
portion.
Depress the [AT/TL] key
to complete the Key
Installation Setting
operation.
AT/TL
Blank Keyboard Sketch (for your planning aid)
Fill in:
Key Name
Key Code
(Refer to the "List
of Keys” on the
preceding page)
For the Standard
Keyboard Layout,
refer to Chapter "9.
Keyboard”.
(
)
( )
)
(
(
)
(
)
(
(
1
)
)
(
7
4
0
( )
)
( ) (
( )
8
5
2
( ) ( )
9
6
3
)
( )
(
)
(
(
)
(
(
)
(
(
) (
(
(
)
)
) (
)
) (
)
(
(
(
(
)
(
)
(
)
)
(
)
(
AT/TL
)
)
)
)
)
- 31 -
Page 34

EO1-11068
NOTES 1. If Key Installation Setting is operated for the first time, all the keys are already set as in
the Standard keyboard Layout Therefore, set only the keys that are to be changed as
to their locations or newly installed.
2. If a wrong code has been entered and the key has also been depressed (i.e., a wrong
code has been set on a key), enter the correct code and depress the key. The code
entered last will be effective.
3. If “0” is entered as Key Code, the key will be dead and its memory will also be
closed.
4. Each of the keys programmed in this operation will have its memory (if any) opened
automatically.
5. The [C] key, if once set with Key Code 95, may be used to clear an error, but it
cannot be used immediately after a Key Code entry (hr the purpose of clearing the
wrong Key Code error). If any Key Code is entered and then the [CJ key is
depressed, that Key Code will be set on the key that was once the [C] key.
6. On depressing the final [ATITL] key, “0.00” is displayed in the AMOUNT portion,
indicating that the setting operation is completed. No printing occurs.
7. Use the Blank Keyboard Layout on the preceding page, if necessary, for your own
keyboard plan behre starting the setting procedure.
Brief Information on Optional Keys:
Department Keys 11 to 15
Install additional Department Keys if the current Department Keys (1 to 10) are not
enough to classify the merchandise in your store.
[VOID] (Void Key)
it can delete an item entered before the last item within a sale, which cannot be
deleted by the [ITEM CORR] key.
[ALL VOID] (All Void Key)
It is used to cancel the contents in the current sale all at once.
[NS] (No-sale Key), [#] (Non-add Number Print Key)
These keys are not necessary If the [#/NS] key is installed. If the [#/NS] is not
installed, those keys should be separately installed for Non-add Number printing
and No-sale entries respectively.
[TX2™i] (Tax 2 Modifier Key)
It is necessary in the dual-tax (PST) area, in addition to [TX1/M], for reversing the
Tax 2 taxable/non-taxable status of items,
[TXBL TL] (Taxable Total Key)
it simply reads the Taxable Total (sale total amount + taxes due) during a sale.
Since the [ST] can have the same function, it is usually not necessary. However,
when the [ST] is programmed to be used to obtain the sale total amount without
taxes, [TXBL TL] is necessary.
[GST/M]
It is necessary in the GST-applicable area in Canada, it reverses the GST
taxable/non-taxable status of items.
[CUR2]
An additional Foreign Currency key besides [CUR] (or [CUR1]).
9. If any of the hllowing keys are newly installed or its location is changed, its relevant
programming operations are further required (even if once programmed, re
programming is necessary because the program data has been cleared):
Each Department Key... Department Status, LC (if required), Preset Prices (if
required) of the Department
[PLU] ... PLU Table
[TX(1)/M], [TX2/M], [GST/M] ... Respective Tax Tables or Rates (Tax 1, Tax 2, GST)
[%+],[%-] ... Respective Preset % Rates (if required)
[CUR1], [CUR2] ... Respective Foreign Currency Exchange Rates
-32-
Page 35

16. Daily Operation Flow
The following shows a typical daily operation flow on the register.
• Ensure that the register is firmly
plugged in the wall outlet.
• Check if enough portions of Receipt
and Journal rolls are left.
• Check the time, date, and print
condition.
Check the time, date, and print by
issuing a No-sate Receipt. ...
EOl-11068
Reference
Chapter
10
17
Setting the time or date
Opening the store
• Transaction entries on the register
• Taking Read (X) Reports periodically.
Closing the store
• Taking Daily Reset (Z) Reports
• Tear off the print portion of Journal
Paper (optional).
• Leave the drawer open, and turn the
Mode Lock to “OFF”.
12
17
18
18
21
21
• Take all the cash and other contents
from the drawer to the office with the
torn Journal and printed Reset Reports.
- 33
Page 36

17. Setting Preparation of Each Key and Transaction
Entries
This chapter describes individual key operations on transaction entries, and
setting requirements for the key if necessary.
Before starting actual transaction entries, the following are important
operations using the [LOG/RECEIPTl key*
EOI-11068
Cashier Sign ON & Sign OFF
A cashier needs to “sign ON” for starting transaction entries on the register and identifying the
operator. The signed-ON condition is held until a “sign OFF” is operated. A cashier can sign
ON only when the register is in the signed-OFF condition.
LOG
RECEIPT
(LOG/RECEIPT Key)
Sign ON (operable in signed-OFF condition)
Use the REG Key to
turn the Control Lock to
the REG position.
REG
OFF
SET
The code being entered
is not displayed.
— Cashier Code assigned to each cashier by
Secret Code generated by the cashier
(2 digits; any number from 01 to 99)
See NOTE 1 below.
The "SIGN ON" triangular lamp
illuminates, and a Sign ON receipt
is issued (see the next page).
LOG
RECEIPT
the store (1 digit; 1 to 4)
Transaction entries are
now possible (see the
following pages).
Sign OFF (operable in signed-ON condition)
REG \
—► E-
OFF —^ V 2
SET
NOTES 1. The two-digit Secret Code portion, once entered for a cashier*s Sign ON, is set in
the memory of the register. The Secret Code of the same cashier is checked every
time his/her Sign ON is operated until the Daily Financial Reset Report is taken at
the end of the day. Then the Secret Code is reset and a new Secret Code entry will
be allowed.
When the Secret Code is within the range of 01 to 09, it is omissible to enter the
preceding zero.
2. If the [LOG/RECEIPT] key is simply depressed without a prior numeric entry, the
Receipt ON/OFF function is activated (refer to the next page) but not Sign ON/OFF.
The "SIGN ON" triangular
lamp is extinguished, and a
Sign OFF receipt is issued
(see (he next page).
LOG
RECEIPT
No operations in REG
mode will be allowed
until a Sign ON is
operated by a cashier.
(Operations in X, Z, or
SET are possible even
in this condition.)
-34-
Page 37

EOI-11068
Sign ON Receipt Format
Thank you
Call again
1 1. - 0 3. - 9 2 /
No 1 1 2.3 0 0
* * 1 CL
0 10.1 1 CL
0 9-10
^ Cashier Code
(1 to 4)
^ The signed-ON
Cashier Code is
printed on every sale
receipt.
(The Secret Code
portion is never
printed.)
Sian OFF Receipt Format
Thank you
Call again
ll.-0a-92 X
No 1 1 2. 3 0 0
★ * 0 CL
0 1 3.0
10-44
Sign OFF Code
(always 0)
Rece¡pt-issue/Non-issue Selection rJ^ptI (log/receipt Key)
Receipts are issued or not issued according to the “R OFF” triangular lamp illuminated/
extinguished status on the Operator Display panel.
“R OFF” (Receipt OFR Lamp Status Change Operations
Control Lock may be in
any position except
OFF.
NOTES1. The Control Lock may be in any position (except OFF position) for changing the
Receipt ON/OFF status in the signed-ON or signed-OFF condition.
2. The "R OFF” lamp status at the starting of a transaction entry decides whether a
receipt will be issued for the transaction or not. Switching the Receipt ON/OFF
status during a transaction will not be effective.
3. If a transaction entered with the “R OFF” lamp extinguished and finalized but a
receipt is required, the [RECEIPT ISSUE] (Post-issue Receipt) key can be operated
to issue a receipt (see *Vost-issue Receipt” on page 76).
4. Simply depress the [LOG/RECEIPT] key without a numeric entry. If the key is
depressed with a prior numeric entry in REG mode, it may turn out to be a Sign ON
or Sign OFF operation (refer to the preceding page).
Extinguished
Receipt ON
Status
LOG
RECEIPT
i L
r
1
LOG 1
RECEIPT!
I '
lUuminated
Receipt OFF
Status
-35-
Page 38

E01-11068
Clearing Errors, or Clearing Wrong Declaration
(Clear Key)
Key or Wrong Numeric Entries
When in sale entries an error has occurred with an alarm buzzer (beeps for about 2 seconds
only), a wrong Declaration Key (such as [RTN MDSE], [TX/M], [GST/M], etc.) has been
depressed, or a wrong numeric data has been entered; depress the [C] key.
1) Error has occurred (the
alarm buzzer is
generated and the
“ALM” lamp illuminates),
and the keyboard is
locked.
2) Declaration Key has
been depressed.
ex.)
3) Numeric Keys are
entered.
ex.)
4) Declaration Key(s)
+ Numeric Keys
ex.)
RTN
MDSE
H
The error condition is cleared (the
buzzer tone stops and the “ALM”
lamp is extinguished). Find the cause
of the error, and do the operation
again. Refer to “Possible Cause of
Error” attached where an error may
occur in each operation sequence on
the following procedure.
The entered data are all cleared at
once.
5) Numeric Keys + Nonmotorized Key (key that
does not trigger printing)
ex.)
6) Combination of 2) to 5)
7) Combination of 6) + 1)
NOTE When data is already entered and printed (through a Department Key, etc.), it cannot be
1
The entered data are all cleared at
once, and the error condition is
cleared also. Refer to 1) for finding
the cause of error.
cleared by the [C] key any longer. In need of deleting such data, see the following:
Item Correction (Last Line Voiding)
Void (Designated Line Voiding)
All Void (Transaction Cancel)
VOID
ALL
VOID
page 57
page 59
page 60
- 36 -
Page 39

EOl-11068
Department Keys
Dept.
1
Dept.
to
15
Programming Department Keys
These are department keys through which sales items are registered. A maximum of 15 keys
may be installed (Depts 11 to 15 are optional keys).
Programming Department Status;
To use Department Keys, first program how each Department Key is to be used, in
accordance with merchandise categories, taxation, operativity of the key, etc.
Condition: After Daily Financial Reset and Periodical Financial Reset for Positive/Negative
Status Change, or
Any time outside a sale for other status changes
(refer to “NOTE on Condition” on page 22)
Programming Procedure:
Use the MA Key to turn the
Control Lock to “SET".
REG
OFF
SET
As for items marked with “NOTE”, refer to ifte corresponding
NOTE No. on the next page for farmer description.
@/FOR
Declaration of Program
No. 3 for Department Status
programming
Repeat for programming
other Department Keys
Depress the required key(s) to obtain the appropriate status
for the department:
RTN
MDSE
TX1/M
TX2/M
GST/M
To set Negative status
NOTES 4, 5
To set Tax 1 taxable status
NOTES 1, 3
To set Tax 2 taxable status
NOTES 1, 3
To set GST taxable status
NOTE 4
The status is
reversed by
^ pressing the
same key
again.
NOTE 2
To set Single-item Key status
To set Itemized Key status
i. Key Type
To set Other Income Key status
To set Single-item
7
+ Other Income Key status
To regain the initial sfaiuses, i.e., Positive, Nontaxabte, Non-GST, and Itemized statuses);
it may be useful when you are confused with
various status selechons for a departnent
status
NOTES
Repeat for
setting other
status or
correcting the
statuses once
set.
Depress the
Department Key
to obtain the
selected
statuses.
Dept.
I:
AirrL
N0TE3
To complete
this operation
and issue
a program
receipt
- 37 -
Page 40

EOl-11068
NOTES 1,
The tax tables of Чах V’, Чах 2“ and “GST” should be programmed in
Chapter 43. Tax Table Setting". Those tax tables will become effective in
REG mode for adding the taxes to sale items entered through a Department
Keys only when the Department Key is programmed with taxable status for
the required tax in this operation.
Every time each of the [RTNMDSE], [TX1/M], [ТХ2Ш and [GSTiM] keys
2.
in this operation is pressed, the preset status is reversed. For example, if a
Department Key is already set with Чах 1 Taxable” status and the [TX1/M]
key is pressed during the setting sequence of that Department Key, it is
now set with Чах 1 Non-taxable” status. If [TXVM] is again pressed, Чах
1 Taxable” status is again obtained.
The tax (PST) status obtained (as the result of [TX1/M] and/or [TX2/M]
3.
depressions) can be verified by reading the numeric value displayed in the
rightmost digit of the AMOUNT portion when the individual Department Key
is pressed. Similarly, the Key Type status is displayed in the 2nd digit (next
to the rightmost digit).
Display:
DP AMOUNT
0. ПП
Displays the
Department
No.:
01 to 15
-- - ■
1—
1
Displays 0, 1, 4, or 5 to
indicate the Key Type status.
0: Itemized
1: Single-item
4: Other Income
5: Single-item & Other
“0” fixed
Income (1 + 4)
T 1 1 x_
riicnla\/c n 1 0 nr
to indicate the
obtained Tax (PST)
status.
0: Non-taxable
1: Tax 1 Taxable
2: Tax 2 Taxable
3: Both Tax 1 &
Tax 2 Taxable
(These status codes are also printed on the program receipt issued when
the ^nal [AT/TL] key is pressed; refer to the Receipt Format on next page.)
4.
The Negative/Positive status and GST status can only be verified on the
program receipt (refer to next page) but not in the display. If a wrong status
has been set, correct it by performing the programming operation again.
5.
If a Department Key is set with Negative status, an amount entered through
that key is subtracted from the sale total. It may be used for item entries of
coupons, returned bottles, etc.
6.
Key Type Description
Itemized Key: When a sale item amount is entered through this
key, the sale is not Realized until a media key (such
as [AT/TL]) is operated. Other items can be
entered within one sale receipt sequence.
Single-item Key: A sale item entry through this key will automatically
finalize the sale as cash outside a sale (i.e. when
no other items have been entered within one receipt
sequence). However, it will function just as an
Itemized Key if operated inside a sale.
Other Income Key: It is used to enter items which do not directly
become sales for the store, such as lottery,
postage, gift wrapping fee, size adjustment fee,
utility (payment of electricity and gas), and donation.
-38-
Page 41

E01-11068
Department Status Program Receipt Format:
Key Operation
Control Lock: SET
[3ll®/FOR|
Thank you
Call again
iKev Tvoe Status i
n 0:
1 0:
Itemized >
! 1: Single-item i
! 4:
Other Income <
Single-item «
i
L
¡Tax Status fPST)
1 1:
1 ^
i_ - _
& Other Income'
___
Non-taxable
Tax 1 Taxable
Tax 2 Taxable
Both Tax 1 &
Tax 2 Taxable
Positive/Neoative
Status )
Blank: Positive i
- : Negative j
^GST Status
FS: GST Taxable
Blank:_GST Noh-^able
Programming Department LCs (Listing Capacities):
The LC setting is used to check an amount limit error. By setting the LC, an amount entry
(due perhaps to a mistake by the operator) will be prevented at the earliest stage (i.e. an
error will result on entering an excessive amount through the department key).
Condition: After Daily Financial Reset
(refer to '‘NOTE on Condition*’ on page 22}
Programming Procedure:
Use the MA Key to turn the
Control Lock to “SET”.
X
REG
As for items marked with "NOTE”, refer to the corresponding
NOTE No. on //7© next page for further description.
@/FOR
0
OFF
SET
Repeat for setting LCs of other deparpnents.
2-digit LC code
for each department NOTES 1, 2
Declaration of Program
No. 8 for Department LC
programming
Dept
Common 2-digit LC code
for all departments AfOTES 1, 2
AT/TL
ex.) 3
indicates $ 39.99
-4 digits
-Value of the top digit
---------
00 diait
-39-
-----
Allows to enter equal to
or smaller than $39.99 in
sale entries.
1
Page 42

NOTES 1. If the individual LC of a department is set, it prevails over the common LC for
all departments.
2. To reset a LC once set, enter “0” in place of the 2-digit LC code. Then a
maximum of 7-digit amount can be entered in sale entries.
Department LC Program Receipt Format:
EOl-11068
Setting Department Preset Prices:
If a fixed price is always entered through a Department Key in sale entries, a preset price
can be set on the Department Key. Please note that once set with a preset price, the
Department Key will not accept any other price (open price) until the Department Key is
again programmed to be an open department.
Condition: Any time outside a sale and signed off.
Programming Procedure:
Use the MA Key to turn the
Control Lock to “SET”.
To set Open Department
(to allow manual amount entries)
X
REG
OFF
SET
Preset Price
(max. 6 digits; 0 to 999993; resulting
in $0.00 to $9999.99) NOTES 1, 2
Repeat for other Department Keys, if necessary.
NOTES 1. All the Department Keys are open departments (no preset price set) as initial
status.
2. If a Department Key is pressed with no Preset Price entry, the Key is set as
an open-price Department Key.
3. If “0” is entered as Preset Price, the Department Key is set with Preset
Price of $0.00.
NOTES 1, 2
Dept.
NOTES 1,2,3
AT^L
-40-
Page 43

Department Preset Price Setting Receipt Format:
EO1-11068
Sale Item Entries Using Department Keys
Various types of department entries are shown below.
Use the REG Key to turn the
Control Lock to “REG”.
Entry of One Item;
Open-price Department
Dept.
Price of the item
(max. 7 digits; or
limited by the
Department LC)
If an error occurs here:
Possible cause of error:
• The price entered exceeds the LC.
-* See the Listing Capacity Open Entry.
• The Department Key is a preset-price key.
-»■ Use an open-price Department Key, or see the “Presetprice Department" entry procedure on next page.
Depress the
appropriate
Department Key
for open price
Cashier Sign ON is necessary,
if the register is in signed-OFF
condition. (Refer to the top of
Chapter 17.)
Receipt Print Format
TM: Tax 1 or Tax 2 (PST) Taxable
FM: GST Taxable
TMFM: Tax (PST) Taxable and
GST Taxable
Blank Not applicable to any of the
above status.
-41 -
Page 44

EOl-11068
Preset-price Department
Dept.
Depress the
appropriate
Department Key
tor preset price
-- If an error occurs here:
Possible cause of error:
• The Department Key is an open-price key.
-> Use a preset-price Department Key,
or see the “Open-price Department”
entry on the preceding page.
Receipt Print Format
Department
No.
Status Symbol
See the description for the Receipt
Print Format on the preceding page.
Department Repeat Entry:
Depress again the Department Key used for the department item entry just entered. The
item entry is repeated as many times as the Department Key is depressed. (A negative
Department entry cannot be repeated.)
Gpen-priee Department Repeat
Price
Dept.
Dept.
Depress the
same Department
Key
0 1
0 I
* 1.2 3 TM
* 12 3 TM
Preset-price Department Repeat
Dept.
I-
Dept
Depress the
same Department
Key
0 4
0 4
* 2.3 0
* 2.3 0
Other Income Department:
Other Income Department Key is used to enter items which do not directly become sales
for the store, such as lottery, postage, gift wrapping fee, size adjustment fee, utility
(payment of electricity and gas), and donation. Only the difference from ordinary
Department Keys is that the amounts entered through this key are processed separately
from the ordinary sales total (refer to Chapter “18. Read & Reset Reports’'^.
The operation procedure is the same as ordinary (itemized) Department Keys.
ex.) If Dept. 6 is programmed with no preset price and status of “Other Income”,
“Itemized”, "Non-taxable”:
Price
—►
Dept
6
Depress the
Other Income
Department Key.
0 6 * 4.5 0
- 42 -
Page 45

Department Quantity Extension (Multiplication);
When more than three or four items are to be entered with the same Department and
price, the Quantity Extension (multiplication) is quicker than the Repeat Entry.
Open-price
Department
/ Product must not \
\ exceed 7 digits. /
If an error occurs here:
I Possible cause of error
I
! • Exceeding the digit limit
□
........
max. 6 digits
0.001 to 999.999
□
Quantity;
@/FOR
Unit Price;
max. 6 digits
If an error occurs here:
Possible cause of error:
• Exceeding the LC of the
Department
->■ Check the Unit Price.
-> See Listing
Capacity Open.
• Product exceeding 7 digits.
-* Check-the Quantity
and Unit Price.
E01-11068
Preset-price
Department
□□□□□□□
3 digits for
integer (max.)
Required only for any
decimal portion entry.
ex.)
123:
23.4:
0.234:
NOTES 1. The product obtained by Quantity Extension cannot be repeated.
2. The decimal portion of the Quantity entry is processed down to the 2 digits
below the decimal point. The fraction rounding at this time is fixed to ROUND
OFF.
' 3. You can select the rounding process of the fractions of the product (result of
multiplication) - ROUND OFF (initial setting), ROUND UP, or ROUND DOWN.
(Refer to Chapter “19. System Option Setting” Address 2 - Bits 1 and 2.
3 digits for
decimal (max.)
m[^m
lUdlllll
([o])Q[l][Il0
Dept.
f Product must not ^
\ exceed 7 digits. /
If an error occurs here:
Possible cause of error:
• Product exceeding 7 digits.
-► Check the Quantity.
Receipt Print Format for Department Quantity Extension
Department
No.
- 43 -
Quantity
Unit Price
Product
Page 46

Department SPP (Split-Package-PrIcIng);
This operation is used when a customer purchases only part but not all of the items in a
package {example: only two tomatoes in a priced package of three tomatoes).
Open-price Department
Dept
□
.......
□
Price
If an error occurs here:
Possible cause of error:
Exceeding the LC of the
Department
-► Check the Whole
Package Price.
-*■ See Listing
Capacity Open.
Product exceeding 7 digits.
Check the Q-ties and
Whole Package
Price.
Dept
Purchased Q’ty
max. 3 digits
(integer only)
(Q’ty = Quantity)
@/FOR
If an error occurs here:
Possible cause of error:
• Q'ty Error
Whole Package Q’ty
max. 3 digits
(integer only)
Decimal Point is not
allowed in either Q'ty.
-* Check the Q’ty digits.
Whole Package
max. 6 digits
@/FOR
Preset-price Department
The preset price is regarded
as the Whole Package Price
EO1-11068
NOTES 1.
The product (final result amount) obtained by SPP (Split-Package-Pricing)
cannot be repeated.
2.
The product must not exceed 7 digits.
The rounding process of the fractions of the product resulted from the
3.
calculation is fixed to ROUND UP (the final result amount is rounded up).
4.
SPP is not possible using PLUs.
Example)
Purchased Quantity = 2
Whole Package Quantity = 3
Whole Package Price = $1.00
Entered through Dept, 1 (open-
price, Taxable department)
[2]|@/for||3|[@/for
If an error occurs here:
Possible cause of error:
Product exceeding 7 digits.
Check the Q’ties.
Receipt Print Format for Department SPP
Whole Package Price
Purchased
Quantity
- 44 -
Page 47

Single-Item Department Entry:
If a Department Key is programmed with Single-item status, an entry through the key
immediately finalizes the sale as cash and issues a receipt without operating a media key.
Such keys are operated in the same way as ordinary (itemized) Department Keys already
described, except that Repeat Entry is not possible using Single-item Department Keys.
NOTES 1. A sale item entry through this key will automatically finalize the sale as cash
outside a sale (i.e. when no other items have been entered within one receipt
sequence). However, it will function just as an Itemized Key if operated inside
a sale.
2. Quantity Extension and SPP are also possible using Single-item Department
Keys.
Receipt Print Format for Single-item Department Entries
EOl-11068
Example 1) - Entry outside a sale -
When no sale is under way, an
item of $10.00 is entered through
Dept. 7 which is a Single-item
department.
The sale is automatically finalized
as cash and a receipt is issued.
'0I°100Elì1
Receipt Consecutive No.
Example 2) - Entry inside a sale -
An item of $5.00 is first entered
through Dept. 1 which is an
Itemized department.
Then an item of $10.00 is entered
through Dept. 7 which is a Single
item department.
The sale is not finalized until a
media key is operated.
1 0 0 0 Pept. 7
Dept. 1
Thank you
Call again
1 1.- 0 3. - 9 2
No 1 1 2.3 0 0
0 7 * 1 0.0 0
* 1 0. 0 0
0 1 0.3
0 9-12
1 CL
f
Current Time Cashier Code
Thank you
Call again
1 1.- 0 3." 9 2
No 1 1 2. 3 0 0
0 1 *6.0 0
0 7 * 1 0.0 0
CATL
TM
Store Name
Stamp space
Date
Register No.
Automatically
finalized as
cash sale
{Cash Total)
-45 -
Page 48

EO1-11068
PLU (Price-Look-Up)
PLU I (PLU Key)
A “PLU” is an individual merchandise item programmed with its own item code (PLU Code), its
link department (and mostly with a Preset Price). By programming PLUS, you can enter an
individual item by entering its PLU Code (which should be written on the price tag of the item),
instead of entering the price through a Department Key. By taking PLUs Reports, you can
analyze the sales data of each individual item. A maximum of 200 PLUs can be programmed.
Programming PLUs
Programming PLU Table:
Condition: To change settings of a PLU: When the required PLU sales total memory is
zero (i.e. when no sales are made or after a PLU Reset Report is taken to
reset the sales data of the PLU into zero)
To add new PLUs: Any time outside a sale and signed off.
(refer to ‘'NOTE on Condition'’ on page 22)
Programming Procedure:
.......-......
Use the MA Key to turn the...................................................
Control Lock to “SET”.
NOTES 1.
When sequentially programming the PLUs, the code specification can be
omitted. When it is omitted at the very first PLU, PLU Code “V* is
automatically assigned.
2.
An Open-price PLU always requires a price entry through Numeric Keys in
sale entries, and may be used for an item that frequently changes its price.
3.
The Department Key must not be an Other Income Department. If an Other
Income Department Key is depressed, no error occurs here but will occur on
entering the PLU in sale entries.
4.
The statuses (Positive/Negative Status, Tax (PST) 1 & 2 Status, GST Status,
and Key Type Status except Other Income) of each PLU is decided by the
statuses of the Department to which the PLU is linked.
- 46 -
Page 49

E01-11068
Deleting Individual PLUs;
When any of the PLUs once programmed are not handled any more in the store, they can
be deleted.
Condition: When the required PLU sales total memory is zero (i,e. when no sales are
made or after a PLU Reset Report is taken to reset the sales data of the PLU
into zero)
(refer to **NOTE on Condition" on page 22)
Deleting Procedure:
X
REG
___________
OFF
Declaration same as
PLU Programming on
the preceding page.
SET
Repeat for other PLUs to be deleted, if any,
ITEM
CORR
NOTES 1. Deletions are possible PLU by PLU.
2. If all the PLUs must be deleted (i.e., the PLU system itself is not necessary),
close the [PLU] Key. (Refer to Chapter 15.)
©/FOR
PLU
PLU Code of the PLU
to be deleted
AT/TL
47 -
Page 50

PLU Deletion Receipt Format:
E01'11068
Key Operation
Control Lock: SET
|@/FOFr|
[ITEM CORRI 1 0
PLU Code
of PLU to
be deleted
Thank you
Call again
1 1. - 0 3. - 9 2
No 1 1 2.3 0 0
13-16
PLU Code deleted
Deletion Symbol
Line
Total number of
PLUS remaining
set in memory
iGihanglng PLU -Preset Prices!
When only changing preset prices of PLUs as part of daily requirements, this operation is
quicker than operating “Programming PLU Table”.
Condition: Any time outside a sale and signed off.
Programming Procedure:
Use the MA Key to turn the
Control Lock to “SET”. Repeat for other PLUS, if necessary.
SET
X
The PLU Codes must exist in the PLU table file already programmed.
If "0” is entered as the New Preset Price, price of $0.00 is set. Neither price
2.
setting nor changing is possible for Open-price PLUs in this operation.
3.
For sequentially accessing PLU Codes, the code specification can be omitted.
REG
OFF
NOTES 1.
PLU Price Change Setting
Receipt Format:
Key Operation
Control Lock: SET
PLU 1
New Preset Price
1 2
PLU Code
1
li
PLU Code
Link
4 5
3
#/NS
Department No.
New Preset Price
- 48 -
Page 51

Sale ttem Entries of PLUs
Various types of PLU entries are shown below.
EOl-11068
Use the REG Key to turn the
Control Lock to “REG”.
Entry of One PLU Item:
Preset-price PLU
PLU
PLU Code
max. 3 digits;
1 to 200
If an error occurs here:
Possible cause of error:
# Undefined PLU God^h^beeiventered.
Open-price PLU
PLU Code
max. 3 digits;
1 to 200
X
REG
OFF
SET
-*■ Enter a code of those PLUS
programmed.
AMT
Price
max. 6 digits
If an error occurs here:
Possible cause of error:
• Exceeding the price digit limit
-*■ Check the price.
• The PLU Code entered is a Preset-price PLU.
“♦ In that case the PLU item is already entered and printed
on the [PLU] key depression. Check if the PLU Code
and the price are correct
Cashier Sign ON is necessary,
if the register is in signed~OPF
condition. (Refer to the top of
Chapter 17.)
Price Entered
(When the price is within
PLU Code
Status Symbol (same with Dept.
Items)
TMt Tax 1 or Tax 2 (PST) Taxable
FM; GST Taxable
TMFM: Tax (PST) Taxable and
Blank. Not applicable to any of the
3 digits, it is printed on
GST Taxable
above status.
PLU Repeat Entry:
Depress again the last key of the sequence for “Entry of One PLU Item” above. The item
entry is repeated as many times as the last key is depressed. (A negative PLU entry
cannot be repeated.)
Preset-price PLU
PLU Code
to repeat
Open-price PLU
PLU Code
PLU
Price
-49-
AMT
AMT
to repeat
Page 52

PLU Quantity Extension (Muitipiication):
When more than three or four items are to be entered with the same PLU item, the
Quantity Extension (multiplication) is quicker than the Repeat Entry.
Preset-price PLU
□
.........
max. 6 digits
0.001 to 999.999
□
Quantiy;
.1.
□□□□□□□
3 digits for
integer (max.)
Required only for any
decimal portion entry.
ex.) 123: [1
23.4: 00Q4
0.234: (0)|Tl2 00
3 digits for
decimal (max.)
If an error occurs here:
Possible cause of error:
• Product exceeding 7 digite.
Check the Quantity.
if an error occurs here:
Possible cause of error:
• Exceeding the digit limit
If an error occurs here:
Poss/b/e cause of error;
• Exceeding the LC of the link
Department
Check the Unit Price.
-*■ See Listing
Capacity Open.
• Product exceeding 7 digits.
EOl-11068
Open-price PLU
PLU 1 -► □„
max. 3 digits;
1 to 200
max. 6 digits
0.001 to 999.999
^-1 t......
®/FOR 1
max. 6 digits
NOTES 1. The product obtained by Quantity Extension cannot be repeated.
2. The decimal portion of the Quantity entry is processed down to the 2 digits
below the decimal point. The fraction rounding at this time is fixed to ROUND
OFF.
3. You can select the rounding process of the fractions of the product (result of
multiplication) - ROUND OFF (initial setting), ROUND UP, or ROUND DOWN.
(Refer to Chapter *‘19. System Option Setting'* Address 2 - Bits 1 and 2.)
Receipt Print Format for PLU Quantity Extension
and L
AMT
- 50 -
Page 53

Single-item PLU Entry:
if a Department Key is programmed with Single-item status, an entry through a PLU which
links to the Department immediately finalizes the sale as cash and issues a receipt without
operating a media key (just as the operation using a Single-item Department Key).
Such PLUS are operated in the same way as ordinary (itemized) PLUs already described,
except that Repeat Entry is not possible using Single-item PLUs.
NOTES 1.2.An item entry through such a PLU will automatically finalize the sale as cash
outside a sale (i.e. when no other items have been entered within one receipt
sequence). However, it will function just as an Itemized PLU if operated inside
a sale.
Quantity Extension is also possible using Single-item PLUs.
Receipt Print Format for Single-item PLU Entries
Example 1) - Entry outside a sa/e -
When no” sale is^ way, a
PLU item (PLU Code 101, Preset
Price $3.40, linking to a Single
item and Non-taxable department)
is entered .
The sale is automatically finalized
as cash and a receipt is issued.
Thank you
Call again
1 1.- 0 3,- 9 2
No 1 1 2.3 0 0
EOl'11068
Example 2) - Entry inside a sale -
An item of $5.00 is first entered
through Dept. 1 which is an
Itemized department.
Then an item of PLU Code 101
(defined as in Example 1) above
is entered.
The sale is not finalized until a
media key is operated.
PL 1 0.1 *3.4 0
* 3. 4 0 CATL
0 10 7 1 CL
0 9 -.1 8
Thank you
Call again
1 1.- 0 3, - 9 2
No 1 1 2.3 0 0
0 1 * 5.0 0 TM
PL 1 0.1 *3.4 0
-51 -
Page 54

EO1-11068
Listing Capacity Open
LC
OPEN
(Listing Capacity Open Key)
As for setting LCs, see “Programming Department LCs” in the “Department Keys'* section.
When an item entry price exceeds the LC in sale entries, an error will result. To enter a price
larger than the limit defined by the LC, use the [LC OPEN] key.
Depress
LC
OPEN
prior to or any time during the entry sequence of the following operations
for Open-price Departments and PLUs already described;
Entry of One Department Item
Department Repeat Entry
Other Income Department
Department Quantity Extension
Department SPP
Single-item Department Entry
Entry of One PLU Item
_
___
PLU Repeat Entry
PLU Quantity Extension
Single-item PLU Entry
Please note that the [LC OPEN] key must be pressed, at the latest, before the final key of the
required Department or PLU entry sequence. The LC for the department or PLU will be
extended with two higher digits for that entry only.
Example 1) Department Quantity Extension sequence:
□
........
Quantity k
□
@/FOR
I
Depress
LC
OPEN
Unit Price
at any of these positions.
Example 2) PLU Quantity Extension sequence:
©/FOR
PLU Code
....
Quantity
□
1
Depress
IQ I
OPEN I these positions.
Dept.
LJ
F/na/ Key of
the sequence
1-»n-n. ■
f Unit Price f F/na/Key Of
I
__________
1 the sequent
- 52 -
Page 55

EO1-11068
Percent Charge, Percent Discount
These keys are used to add or subtract a percent rate to or from an individua) sale entry item or
the entire sale. Each of the keys can function with a rate manually entered or a preset rate. To
activate the preset rate entry, rate setting is necessary.
%+
(%+ Key)
%-
(%- Key)
Setting Preset Rate for % Keys
Condition: Any time outside a sale and signed off.
Programming Procedure:
This portion is required
Use the MA Key to turn the only when any decimal
Control Lock to “SET”. portion is contained in the
rate. .
_
REG
X
for % + rate
________Av_______
_
% +
□□□□
OFF
SET
for % - rate V
--------------V-----------
% rate 0 to 99.999
Ü
Examples)
To reset the rate
once set;
Thank you
Call again
1 1.- 0 3. - 9 2
No 1 1 2.3 0 0
0
7
1
I ^
When “0” is set, the % key will always
require a manual rate entry to be operated in
sale entries.
7%:
12%:
8.55%: gQ[5][T]
12.345%; [T][2]Q[3]00
Thank you
Call again
1 1.- 0 a - 9 2
No 1 1 2 3 0 0
0.0 *
0 0 1.3
0 8 -.5 4
1 0.
%+
%-F 10%
is set.
-53-
0.0 *
0 0 1.4
0 8 -.5 4
%-
% - 5%
is set.
Page 56

% Key Operations in Sale Entries
Use the REG Key to turn the
Control Lock to “REG”.
EOl-11068
% +
J Operation Patterns (
operates the same except that the calculated
amount will subtract from instead of adding to
the sale amount.
Percent Charge on a Department or PLU Item:
Department or PLU
Item Entry
-►(
TX/M
For reversing
the tax status
of the [% + ]
key.
)
□□(BDDD)
max. 2 dig. max. 3 dig. ^ ^
V
Depress
-----------
TX/M
^
Manual Rate
at either of two positions for reversing the tax
status of the [% + ] key
CAUTION
Percent Charge on Sale Total:
% + I {for the Preset Rate)
CAUTION
% +
(for the Manual Rate)
Sale Item Entries
Depress
CAUTION: [% + h f% “ 1 QTtd [DOLL DISC] (see next page) keys are non-taxable by themselves
(the tax is calculated based on an original price, not discount or premium price). In
order to reverse the status, enter [TX/M] key before [% +], [% -] or [DOLL DISC]
key entry.
ST
.............
CAUTION
- 54 -
I at either of two positions for reversing the tax
i status of the [% + J key
( TX/M ) % +
For reversing
the tax status
of the [% + ]
key.
□□(BDDD)
max. 2 dig. max. 3 di^f
Manual Rate
(for the Preset Rate)
% +
(for the
Manual
Rate)
Page 57

NOTES 1. When a rate is manually entered through a % key preset with a rate, the manual
rate prevails.
2. A % entry will cause an error if operated after an Other Income Department or
Negative Department entry.
3. A % entry after obtaining a Subtotal is usually allowed only once. However, it can
be programmed to allow multiple times. (Refer to Chapter "79. System Option
Setting*’, Address 16 ■ Bit 2.
4. You can select the rounding process of the fractions of the product (result of
multiplication) - ROUND OFF (initial setting), ROUND UP, or ROUND DOWN.
(Refer to Chapter “19. System Option Setting“ Address 2 - Bits 1 and 2.)
EOl'11068
Example of % Discount on Item
0 1 * 6.0 0 TM
5. % -
- 0.3 0
Dollar Discount
Dollar Discount is used to subtract an amount from the sale total.
Use the REG Key to turn the
Control Lock to “REG”.
Sale Item Entries
■ Dept. 1 $6.00
1— 5% on $6.00
I]
DOLL
DISC
= $0.30
is discounted
(Dollar Discount Key)
REG
OFF
SET
Example of % Charge on Sale Total
X
■Ln
.......
Amount to be
(max. 7 digits)
★ 1 5.0 0 ST ^
10 % +
□
discounted
* 1.5 0
DOLL
DISC
.Subtotal $15.00
’ obtained.
10% on $15.00
* $1.50
is added
__ Depress
either of two positions
for reversing the tax
status of the [DOLL
DISCI key.
CAUTION; See previous page.
TX/M
at
NOTE For entering a Dollar Discount that will cause the sale total into negative (credit
balance), refer to Chapter “19. System Option Setting” Address 2 - Bit 3:
If status “Credit Balance Prohibited” (initial status) is selected:
Over^subtraction of the safe total by Dollar Discount causes an error.
If status “Credit Balance Allowed" is selected:
Over-subtraction of the sale total by Dollar Discount is possible.
Example of Dollar Discount Entry
“04 0
- 55 -
.An amount of $0.40 is
entered as Dollar Discount
Page 58

EOl -11068
Tax Modification
Each of these keys is used to reverse the tax status of a required Department or PLU item to be
entered in a sale. It is also used to reverse the Non-taxable status of [% + l, [%-], and
TX/M I ( TX1/M I ) Tax (PST) 1 Modifier Key
TX2/M
GST/M
Tax (PST) 2 Modifier Key
GST Modifier Key
[DOLL DISC] keys into Taxable status. The Modifier Keys are effective only for one entry.
• Depress the required Modifier Key(s) prior to or any time during (before the final key at the
latest) the entry sequence of the following operations for Departments and PLUs already
described. More than one Modifier Keys can be depressed for the same item entry:
Entry of One Department Item
Department Repeat Entry
Other Income Department
Department Ouaritity Extension
-The tax status is reversed:
Department SPP
Single-item Department Entry
Entry of One PLU Item
• Taxable -* Non-taxable
• Non-taxable -* Taxable
PLU Repeat Entry
PLU Quantity Extension
Single-item PLU Entry
Example) Reversing Tax (PST) 1 status of a Department item Department Quantity
Extension sequence:
□ |@FOR I
Quantity
Depress the required Modifier Key(s) prior to or any time during (before the final key at the
latest) the entry sequence of the following operations for Departments and PLUs already
described. More than one Modifier Keys can be depressed for the same item entry:
Percent Charge
Percent Discount
Dollar Discount
Example) Reversing Tax (PST) 1 status of Dollar Discount entry:
Sale Item Entries
----------------------------
1
Depress
^ \°^ I
1
Unit Price
TX/M
The Non-taxable Status (not programmable) is reversed into
Taxable.
at any of these positions for reversing the tax
status of the department (final key)
□
.......
Amount to be
discounted
Final Key of
(he sequence
o,[^
Final Key of
tfie sequence
Depress
at any of these positions for reversing the tax
status of the [DOLL DISC] key
-56-
Page 59

EOl-noee
Item Correction (Last Line Voiding)
The last line item (any of the following items that has just been entered within the current
transaction) can be deleted by the [ITEM CORR] key.
ITEM
CORR
(Item Correct Key)
Entry of One Department Item
Department Repeat Entry (note i)
Other Income Department
Department Quantity Extension (note 2)
Department SPP (note 2)
Entry of One PLU Item
ITEM
CORR
PLU Repeat Entry (note i)
PLU Quantity Extension (note 2)
Percent Charge or Percent Discount
Doiiar Discount
Received-on-Account Item
Paid Out Item
NOTES 1.
When the [ÍTEM CORR] key is depressed after repeated items, only the last item
of the repeated is deleted, decrementing the "HPT’ count in the display.
2.
When the [ITEM CORR] key is depressed after a Quantity Extension or SPP, the
entire product (result of the calculation) is deleted.
3.
Negative Department, Negative PLU, Void, Returned Merchandise items cannot be
deleted by the [ITEM CORR] key. Neither can any media amount be itemcorrected even if it is short-tendered.
4.
When the [C] key is used to clear any numeric data, the item-correct function is
still active for the preceding item. However, if the [C] key is used to clear an
error, the preceding item can no longer be item-corrected.
0i--*&00 - TM
■ Dept. 1 $6.00 is entered but ¡tem-corrected.
■■----------------------” indicates an Item Correction.
- 57 -
Page 60

EOl-11068
Returned Merchandise
A Department or PLU item once purchased (i.e. the sale is already finalized) then returned by a
customer can be entered as a Returned Merchandise item. If the [VOID] key is not installed on
your register, this function may also used as Void entry (refer to Void entries on the next page).
• Depress the [RTN MDSE] key prior to or any time (before the final key at the latest) during a
required Department or PLU item entry sequence. (The only difference is a depression of the
[RTN MDSE] key):
Entry of One Department Item
Other Income Department
Department Quantity Extension
Department SPP
Single-item Department Entry
Entry of One PLU Item
PLU Quantity Extension
Single-item PLU Entry
(Repeat entry is not possible using
the [RTN MDSE] key.)
Example) Items once entered through an Open-price Department in a Quantity Extension
sequence at purchase are now returned:
RTN
MDSE
(Returned Merchandise Key)
“RT" ... Symbol of
Returned Merchandise
0 1 * 6. 0 0 R7TM
□ ■■■■■;□ I I -► □ □
Dept.
Quantity
t
Depress
When an item once purchased with a Percent Charge or Percent Discount is returned, the
item can be returned with the Percent Charge/Discount by attaching the [RTN MDSE] key to
the same entry procedure as purchase:
Example) Dept. 1, $6.00 with 5% discount, purchased and returned.
At purchase
0 1 * & 0 0 TM
5. % -
The process of the amount resulted from % calculation is reversed at Return.
NOTES 1. The Returned Merchandise entries are possible outside as well as inside a sale.
2. Over-subtraction of the sale is allowed for Returned Merchandise entries.
3. Neither Negative Department nor Negative PLU items can be entered as Returned
Merchandise.
4. A Returned Merchandise cannot be item-corrected.
1
RTN
MDSE
as 0
Unit Price
at any of these positions for declaring Returned
Merchandise.
RTN MDSE
i
At return
Final Key of
the sequence
0 1 ★ 6. 0 0 RTTM
5. %* 0.3 0
- 58 -
Page 61

EOl-11068
Void (Designated Line Voiding)
A Department or PLU item entered before the last item but canceled in the current sale (which
can no longer be deleted by [ITEM CORR]) Is entered as a Void item using the [VOID] key. If
this key is not installed on your register, the [RTN MDSE] key may be used for voiding purposes
(refer to the preceding page). If both [VOID] and [RTN MDSE] are installed, [VOID] should be
used to cancel (delete) an item already entered within the current transaction while [RTN MDSE]
should be used to record an item that was purchased in a past sale and is now returned.
• Depress the [VOID] key prior to or any time (before the final key at the latest) during a
required Department or PLU item entry sequence. (The only difference is a depression of the
[VOID] key):
Entry of One Department Item
Other Income Department
Department Quantity Extension
Department SPP
Single-Item Department Entry
Entry of One PLU Item
PLU Quantity Extension
Single-Item PLU Entry
(Repeat entry is not possible using
the [VOID] key.)
Example) Items once entered through an Open-price Department in a Quantity Extension
sequence at purchase are now voided:
VOID I (Void Key)
“VD” ... Symbol of
Void item
0 1 ★ 6. 0 0 VDTM
, □
......
y Quantity I
When an item previously entered with a Percent Charge or Percent Discount is canceled, the
item can be voided with the Percent Charge/Discount by attaching the [VOID] key to the same
entry procedure as the previous entry:
Example) Dept. 7, $6.00 with 5% discount entered then voided in a safe:
D
At Entry
@/FOR
Depress
]
VOID
□
...
Q
Unit Price I
-----------------------
at any of these positions for declaring Void.
[H00[^
ID
The process of the amount resulted from % calculation is reversed at Void.
NOTES 1. The Void entries are usually possible only inside a sale. However, when the
option ‘'Credit Balance Allowed’* is selected, they are allowed outside a sale as
well and over-subtraction of the sale is also allowed. (Refer to Chapter “19.
System Option Setting”, Address 2 ■ Bit 3.)
3. Neither Negative Department nor Negative PLU items can be entered as Void
items
4. A Void entry cannot be /fem-correcfed.
Dept.
ibe sequence
At Void
0 1 * 6. 0 0 VDTM
5. % * 0.3 0
- 59 -
Page 62

EO1-11068
All Void (Transaction Cancel)
ALL
VOID
(All Void Key)
When some items have already been entered in the current sale and the customer cancels the
entire contents of the sale, the [ALL VOID] key is used.
Sale Item ^
Entries "" ^
ALL 1 ^
Declares a
Transaction Cancel.
ITEM
CORR
(Executes the Transaction
Cancel, clears the displayed
data, and an All Void receipt
is issued.)
(Clears the Transaction
Cancel declaration to
continue the sale.)
Thank you
Call again
1 1.- 0 1- 9 2
No 1 1 2.3 0 0
0 2 *4.50
Items already
entered in this
sale.
Prints the subtotal (sale total before
taxed) when Transaction Cancel Is
executed. (NOTE 1)
All Void (Transaction
Cancel) Symbol
Line.
PL2 0.0
1 4.
0 3 * 4.2 0
* 1 0.0 0
★ 1 a7 0
******
0 1 2.7
13-42
3 0
ST
VD
2 CL
TM
TM
TM
NOTES 1. The sale is canceled; therefore, no payment should occur. However, subtotal
amount printed on the All Void receipt is processed into the '‘AH Void'' total of
the report memory.
2. The All Void operation is no longer acceptable when any media key (such as
[AT/TLJ) is entered including short-tendering.
3. If Tax Exempt (using the [EX] key) is entered, the sale can no longer be all-
voided.
4. The AH Void function is not effective for Received-on-Account or Paid Out
transactions.
-60-
Page 63

EO1-11068
Non-add Number Print
When any code number is to be recorded for future reference, such as a Check No., Customer
No., Credit Card No., House Charge Account No., etc., a Non-add Number Print function is used.
REG
OFF
SET
#/NS
]□□□□□[
Code Number; max. 8 digits
(Decimal Point is not allowed.)
Example)
T|r2ir3||4li5l|6l|7
NOTES 1. A Non-add Number can be entered at the starting of a sale or any time during
a sale if it is not finalized. It is operable any number of times within a sale.
However, when operated at the starting, a transaction entry must follow.
2. The entered number will not affect any sales data. It is merely a print for
reference.
3. The preceding zeros, if any, will not be printed. For example, if ‘V12300” is
entered, “12300” is printed.
3. Usually, Non-add Number entries are allowed at the starting of a No-sale
transaction (i.e, Non-add Numbers can be printed on a No-sale receipt).
However, a No-sale entry can be programmed to be prohibitive after a Non-add
Number entry (refer to Chapter “19. System Option Setting”, Address 15 -
Bki).
4. The [#/NS] key operates and functions the same. When this key is simply
depressed without a prior numeric entry in REG mode, it functions as the [NS]
(No-sale) key. (Refer to the section of No-sale Transaction.)
(Non-add Number Print / No-sale Key)
(Non-add Number Print Key)
or
1.2 3 4.5 6 7 #
#/NS
#
NOTE 4
-61
Page 64

EOl-11068
Subtotal Read & Print
When the sale total of the current sale is to be read by the customer’s request or the operator’s
requirement, the [ST] key is used.
REG
OFF
SET
NOTES 1.
When the [ST] key is depressed, the sale total is displayed and printed.
However, you can select not to print (display only) by a system option. (Refer
to Chapter “79. System Option Setting” - Address 1 - Bit 3.) Even if this
non-print option is selected, the subtotal amount is automatically printed when
a Percent Charge/Discount or Dollar Discount entry follows a subtotal entry.
2.
The displayed subtotal amount includes the taxes due (Tax 1, Tax 2, & GST)
while the printed subtotal amount is the pre-taxed amount (amount not
including taxes due). As for the displayed amount, you can select to display
the pre-taxed amount by a system option. (Refer to Chapter “19. System
Option Setting” - Address IS ■ Bit 4.) This option is recommended only
when both [ST] and [TXBL TL] (Taxable Total) keys are installed. In that case,
[ST] displays pre-taxed amount while [TXBLTL] displays post-taxed amount
(amount including taxes due).
If the option “Taxable Total Compulsory” is selected with the function of
3.
subtotal display including taxes due (refer to NOTE 2 above), the [ST] key
must always be depressed before operating media keys for finalizing a sale.
When the [ST] key is depressed more than once consecutively, the subtotal
4,
amount is only displayed but no print occurs from the second time one. If the
[C] key is operated to clear a numeric entry or error, etc. after a subtotal is
once obtained, the subtotal amount is again displayed.
ST
Sale Item
Entries
(Subtotal Key)
The sale total of the items so far entered is
displayed in the AMOUNT portion with the
“ST” triangular lamp illuminated. At the
same time, the sale total is printed. The
sale is not finalized yet.
ST
Subtotal Amount
(pre-taxed amount)
Symbol tor Subtotal
- 62 -
Page 65

EO1-11068
Taxable Total Read
This is an Optional Key, used only to display the Taxable Total (sate total including taxes) during a
sale. The key is usually not necessary since the |ST] key contains this function. If it is installed,
however, it is recommended to program the [ST] key to display the pre-taxed amount (for
distinguishing it from the [TXBL TL] key function). Refer to NOTE 2 attached to the section of
“Subtotal Read & Print” on the preceding page.
REG
OFF
SET
NOTES 1. If the option “Taxable Total Compulsory" is selected, the [TXBL TL] key must
always be depressed before operating media keys for finalizing a sale.
2. If the [C] key is operated to clear a numeric entry or error, etc. after a Taxable
Total is once obtained, the Taxable Total amount is again displayed.
TXBL
TL
Sale Item
Entries
(Taxable Total Key)
TXBL
TL
The sale total of the items so far entered is
displayed in the AMOUNT portion with the
“ST” triangular lamp illuminated. The sale
total amount displayed includes taxes due
(Tax 1, Tax 2, & GST). No print occurs.
The sale is not finalized yet.
- 63 -
Page 66

EOI-11068
Cash Total, Cash Tender
AT/TL| (Cash Amount Tender/Total Key)
When sale items have all been entered and the customer will pay in cash, this key finalizes the
sale and issues a receipt. When the customer will pay in other media (non-cash media), refer to
the next section “Non-cash Media Total, Non-cash Media Tender”.
X
REG
OFF
All the items are
entered for the
customer.
ST
TXBL
TL
or
SET
To finalize without tendering (Total function):
AT/TL
Displays the sale total amount (including taxes) with the “TL” lamp
illuminated and “REG” lamp extinguished.
The sale is finalized, the drawer opens, and a receipt is issued,
printing the “TX” (tax amount) and “CATL” (cash total amount
including tax) on separate lines
★ 0.4 1 TX
* 3.3 1 CATL
0 11.5 ICU
'Tax amount (added to the sale)
'Cash Total (sale total including tax)
10-01
To finalize with a cash amount tendered (Tender Function):
AT/TL
Tendered Amount; max. 8 digits
When the amount tendered is eoual to or larger than the sale total:
Displays the amount of change due with the “CG” lamp
illuminated.
The sale is finalized, the drawer opens, and a receipt is issued,
printing the “TX” (tax amount), “TL” (sale total including tax),
“CA” (cash amount tendered), and “CG” (change due).
★ 0.4 1
★ 3.3 1
A 4.0 0 CA
A 0.6 9 CG
0 1 1.6
10-01
TX
TL
ICL
When the amount tendered is smaller than the sale total:
Displays the balance due (shortage).
Prints “TX”, “TL”, and “CA”(short-tendered cash amount).
The sale is not finalized. (Refer to the section “Multi-tender,
Split-tender".)
— Tax amount (added to the sale)
—Sale Total including tax
—Cash Amount tendered
— Change due
* 0.4 1 TX
* 3.3 1 TL
* 3.0 0 CA
- 64 -
' Tax amount (added to the sale)
■Sale Total including tax
■ Cash Amount tendered (short-tender)
Page 67

EOl-11068
NOTES 1.
The [AT/TL] key functions as Total Key if simply pressed, or as Tender Key if
pressed with a prior amount entry. However, it can be programmed to be
used as Tender Key only (refer to Chapter “19. System Option Setting",
Address S~ B UI).
2.
When the sale total is zero or negative, only the Total Key function is effective
regardless of the key option selection described in NOTE 1 above.
When the option “Taxable Total Compulsory” (refer to Chapter “19. System
3.
Option Setting", Address 2~ Bit 4) is selected, the sale is finalized only after
reading the sale total (by [ST] or [TXBL TL]).
4.
When the option “Short-tendering Prohibited” is selected (refer to Chapter “19.
System Option Setting”, Address 11- Bit 1), short-tendering is not possible.
5.
The [AT/TL] key is also used to finalize a Received-on-Account or Paid Out
transaction. (Refer to the respective sections.)
- 65 -
Page 68

EO1-11068
Non-cash Media Total, Non-cash Media Tender
These keys are non-cash media keys to be used for finalizing a
sale as alternative media. The keys operate the same as FAT/TLI
key. (Refer to the section “Cash Total, Cash Tender".)
Finalizing a Sale as Check:
Use the [CHK TND] key instead of [AT/TL] for finalizing a sale paid for in check.
NOTES 1.
The [CHK TND] key functions as Tender Key only. However, it can be
programmed to have both Tender and Total functions (refer to Section “79.
System Option Setting**. Address 7 • Bit 1). Also, oyer-tendering can be
programtmdto^ b^^^^^ necessary (Address 7 - Bit 4).
When the key is programmed as Tender-only key, attempting to finalize a
2.
negative-balance sale will cause an error.
When the option “Taxable Total Compulsory" (refer to Chapter “19. System
3.
Option Setting", Address 2- Bit 4) is selected, the sale is finalized only after
reading the sale total (by [ST] or [TXBL TL]).
4.
When the option “Short-tendering Prohibited” is selected (refer to Chapter “19.
System Option Setting", Address 77- Bit 1), short-tendering is not possible.
When programmed as Tender-only Key and the option “Over-tendering
5.
Prohibited” is selected (refer to Chapter “19. System Option Setting”, Address
7 - Bit 4), over-tendering is not possible.
6.
The [CHK TND] key is also used to finalize a Received-on-Account or Paid Out
transaction. (Refer to the respective sections.)
CHK
TND
(Check Tender)
Chg I (Charge Total Key)
Tax amount (added to the sale)
-Sale Total including tax
’ Check Amount tendered
’ Change due (returned in cash)
Finalizing a Sale as Charge:
Use the [Chg] key instead of [AT/TL] for finalizing a sale to be processed as Charge account.
The key may be used to finalize in any other media than cash and check, such as house
charge, credit card, etc. (whatever media the store defines to be acceptable).
NOTES 1.
* 0.4 1 TX -*
* 3.3 1 CHTL -<■
0 11.8 ICL
10-03
The [Chg] key functions as Total Key only. However, it can be programmed to
have both Tender and Total functions (refer to Section “19. System Option
Setting”, Address 8 ~ B UI).
2.
When the option “Taxable Total Compulsory” (refer to Chapter “19. System
Option Setting”, Address 2- Bit 4) is selected, the sale is finalized only after
reading the sale total (by [ST] or [TXBL TL]).
3.
When the option “Short-tendering Prohibited" is selected (refer to Chapter “19.
System Option Setting”, Address 11- Bit 1), short-tendering is not possible.
4.
When programmed as Tender-and-Total Key and the option “Over-tendering
Prohibited” is selected (refer to Chapter “19. System Option Setting", Address
8- Bit 4), over-tendering is not possible.
- 66 -
■Tax amount (added to the sale)
■ Charge Total (sale total including tax)
Page 69

EO V11068
Multi-tender, Split Tender
AT^L
CHK
TND
Chg I
Multi-tender (Short-tender repeated by the same media):
REG
X
OFF
SET
Example) AH the items are
entered for the
customer.
Short-tendered Amount: max. 8 digits
ST
^([
Equal- or Over-tendered Amount; max. 8 digits
* 0.5 0
*1 0.3 0
★ 1 0.0 0
★ 10 0
* 0.7 0
0 1 1.7
10-04
TX
TL
CA
GA
CQ
ICL
(media keys)
□
AT/TL
AmL
■Tax amount {added to the sale)
■Sale Total (sale total including tax)
■1st Cash-tendered (short)
■ 2nd Cash-tendered (over)
■Change due
Split-tender (Short-tender repeated by the different media):
X Example)
REG
OFF
SET
All the items are
entered for the
customer.
Short-tendered Amount; max. 8 digits
ST
or
CHK
TND
DD)
Equal- or Over-tendered Amount; max. 8 digits
•Tax amount (added to the sale)
■Sale Total (sate total including tax)
1 St media (Check) tendered (short)
■ 2nd media (Cash) total
NOTES 1.
In both Multi-tender and Split-tender operations, the sale is finalized and a receipt is
issued on reaching the sale total amount.
2.
Only the media keys programmed to have 'Tender"' function and to allow “Short
tendering” can be operated with a short-tendered amount entry in the above operation
sequences.
If a media key is depressed without an amount tender entry and is programmed to
function as Total key, the sale is then finalized on that stage processing the balance
at that moment into that media.
TXBL
TL
ATn-L
])
:i
-67-
Page 70

EOl-11068
Tax Exemption
EX
(Tax Exempt Key)
When an entire sale must be exempted from designated or all taxes (Tax/PST 1, Tax/PST 2,
GST), the [EX] key is used near the end of the sale finalization. (To exempt an individual item
from designated taxes, only Tax Modifier Keys are used in entering the item. Refer to the section
'Tax Modification".)
NOTES 1.
2.
★ 2.5 0 EXFS
EX I
10 0
EX n
2 0 0
— Sale portion (pre-taxed) exempted from GST
— Sale portion (pre-taxed) exempted from Tax/PST 1
Sale portion (pre-taxed) exempted from Tax/PST 2
At the same time, the display shows the Sale Tot^ due
(excluding all taxes).
The Tax Exempt entry cannot be Hem-corrected.
After depressing the [EX] key, the sale must only be finalized (for payment
through media keys).
3.
If the “Non-taxable Amount Limit" is set for certain areas in Canada, using the
the [GST/M] key will cause an error and GST Exemption is not allowed.
-68-
Page 71

EO1-11068
Check Cashing
Check cashing requested by a customer is entered through a non-cash media key. It is operable
only outside a sale (i.e. when no sale is underway on the register).
Operable outside a sale only
REG
OFF
SET
TND I (Check Tender)
Chg
To cash a check:
(Charge Total Key)
]□□□□□[
Check гunnount to be cashed;
max. 7 digits
CHK
TND
NOTE 2
Thank you
Call again
Example) To enter $10.00:
1H000
(or 1T]0H)
1 1.- 0 3. - 9 2
No 1 1 2.3 0 0
* 1 0. 0 0 CKTL
0 1 2.3 ICL
1 0 -.3 0
To cash other non-cash media:
NOTES
Chg
I
Non-cash media amount to be cashed;
NOTES 1. When the media key is depressed, the drawer opens to enable exchanging the
check (or other non-cash media) into cash.
2. The [CHK TND] key is programmed to prohibit cashing. To allow cashing
using the key, it must be programmed to allow it (Refer to Chapter “t9.
System Option Setting'', Address 7 - Bit 3.)
3. Similarly, cashing using the [Chg] key is programmed to allow cashing. It can
be programmed to prohibit cashing. (Refer to Chapter “79. System Option
Setting", Address 8 - Bit 3.)
4. The cashing operation will not increment the No-sale Counter of the report
memory.
max. 7 digits
- 69 -
Page 72

EOl-11068
No-sale
The No-sale transaction is used to open the drawer without relating to a sale, for such purposes of
giving changes (to break a large-amount bill), checking the receipt/journai print condition, date or
time accuracy, etc. This operation must be performed outside a sale only.
OFF —j— Z I ^
SET
#/NS I (Non-add Number Print / No-sale Key)
X Ooerable outside a sale only
#/NS I (or
NS
NS I (No-sale Key)
)
Thank you
Call again
1 1,- 0 3.- 9 2
No 1 1 2.3 0 0
No-sale Transaction Symbol
NOTES 1. The drawer opens, and a No-sa!e receipt is issued.
2. Usually, Non-add Number entries are prohibited at the starting of a No-sale
transaction (i.e. Non-add Numbers cannot be printed on a No-sale receipt).
However, a No-sale entry can be programmed to be allowable after a Non-add
Number entry (refer to Chapter “19. System Option Setting“, Address 15 Biti).
3 The [^/NS] key operates and functions the same. When this key is depressed
with a prior number entry, it functions as the Non-add Number Print key.
(Refer to the section of Non-add Number Print.)
- 70 -
Page 73

E01 “11068
Received-on-Account Payment
A received-on-account transaction is used to identify money which is in the drawer but not due to
business. For example, a customer pays for a sale finalized as a charge on a past day, or the
cashier records the change reserve in the drawer loaned from the store office. This operation
must be performed outside a sale only.
Operable outside a sale only
R/A
(Received-on-Account Key)
Thank you
Call again
1 1.- 0 3. - 9 2
No 1 1 2.3 0 0
★ 1 0.0 0 RA —
* 2.5 0 RA —
* I 2.5 0 CATL
0 1 0.3 ICL
0 9-10
NOTES 1. For finalizing the transaction, the [Chg] key cannot be used. For further
operation using the media keys, refer to the sections “Cash Total, Cash
Tender“ and “Non-cash Media Total, Non-cash Media Tender“. Also refer
to the section “Mutti-tender, Split-tender“.
2. The R/A Counter in the report memory increments on each [R/A] key
depression.
- Individual Amounts
Total Amount received in cash
- 71 -
Page 74

EO1-11068
Paid Out
A paid-out transaction is used when an amount of money is removed from the drawer without
relating to a sale, for the purpose of paying to wholesalers, etc. This operation must be
performed outside a sale only.
REG
OFF
SET
PO
Operable outside a sale only
„ Repeat, if multiple amounts are paid out in this transaction.
Z
□□□□□□□
Paid-out Amount
max. 7 digits
PO
AT/TL
NOTE 1
Individual pad-out amounts
Total Amount paid out
NOTES 1. For finalizing the transaction, only the [AT/TL] key can be used (i.e., only cash
can be paid out) without entering a prior amount
2. The PO Counter in the report memory increments on each [PO] key
depression.
• 72 -
Page 75

EOl-11068
Sale Paid in Foreign Currencies
Foreign currencies may be tendered for payment of a sale. A maximum of two Foreign Currency
Keys are available; the [CUR2] key is an Optional Key. One currency should be assigned for
each key.
CUR I (or
(Foreign Currency Keys)
CUR11 )
CUR2
Programming Foreign Currency Keys
Before operating the keys, the following programming operations are necessary.
Setting Foreign Currency Exchange Rate:
Set the exchange rate of the currency. Change the rate daily, if necessary.
Condition; Any time outside a sale and signed off.
Programming Procedure:
Use the MA Key to
turn the Control Lock
to the ‘SET” position.
!□□□ □ □□□□□[
Exchange Ttate; max. 10 digits, 0.000001 to 9999.999999) NOTES 1, 2
]□
NOTES 1. Obtain the rate by calculating in the subsidiary currency unit values for both the
domestic and the foreign currency. (In case of calculating the rate from the
domestic to a foreign currency with the same zero-suppress form, such as
from U.S. $ to French Franc, it will be no problem. However, in case of
exchanging from a domestic currency such as U.S. $ to a foreign currency
such as Japanese yen, this rule must be obeyed; otherwise a wrong rate will
result.)
2. Calculate the required foreign currency value equivalent to the domestic
currency value “1 Then the obtained value is the Exchange Rate value to be
entered in the setting operation above.
Example) Domestic Currency is US$:
1C = xxxx.xxxxxx centimes (French Franc)
= xxxx.xxxxxx pfennigs (Deutsche Mark)
= xxxx.xxxxxx yen (Japanese yen)
etc. V
------------
,
CUR1
CUR2|
Enter this value as the foreign currency exchange rate,
3. If “0” is set as the exchange rate, that key cannot be used in sate entries.
-73-
Page 76

Example) 0.7143 for Currency 1:
Setting Foreign CurFency Amount Division Position (Display Form);
EOI'11068
Select the appropriate amount division position for each foreign currency -- “0.00” (initial
status) such as US$ or “0” such as Japanese yen. The currency tender amount is
displayed in the selected form.
Refer to Chapter "19. System Option Setting”:
Address 12 - Bit 5 for Foreign Currency 1 ([CUR1])
Address 12 - Bit 6 for Foreign Currency 2 ([CUR2])
Entering Sale Paid in a Foreign Currency 1
Use the REG Key
to turn the Control
Lock to the
“REG” position.
Can be cleared by the [C] key.
CURI
NOTE 2
Displays the sale total
in the the foreign currency.
All the items are
entered for the
customer.
□
.............
Foreign Currency i
Amount tendered;
max. 8 digits
Displays the amount
as it is entered.
□
CURI
NOTE 2
Displays the
domestic currency
value equivalent to
the tendered
foreign currency.
ST K
Displays the sale total
in the domestic currency
NOTE 1
TXBL
or
TL
Aim
(or other tender-
ailow media keys)
The sale is finalized
if over-tendered, or
not finalized if
short-tendered.
NOTES
NOTES 3, 4
- 74 -
Page 77

NOTES 1. The [ST] (or [TXBL TL] key is not required after a short-tender entry.
2. The [CUR2] key operates the same for tendering Foreign Currency 2.
3. When over-tendered:
The sale is finalized, the drawer opens, and the change due is displayed in
the domestic currency which is to be returned to the customer.
When short-tendered:
The sale is not finalized. Any other media tendering may follow (refer to
the section *^MuHi-tendehng, Split-tendering'*.
4. The tendered amount is processed into the following in the report memory:
• Domestic media (of the key operated -- Cash, Check, or Charge) total
• Foreign Currency (of the key operated - CUR1 or CUR2) in the foreign
currency value.
• The amount is not processed into the corresponding media-in-drawer
total.
5. The final media key must be programmed to allow tendering.
6. A negative-balance sale cannot be fnal'ized with a Foreign Currency key.
7. The Foreign Currency keys cannot be used to finalize Received-on-Account
,
....
payment entries.
E01-11068
Example)
Key Operation and Display
(or I TXBL tl| )
(Displays: 1.15, the sale total
in domestic currency)
(Displays: equivalent value in the
Foreign Currency 2 to the sale
total.)
□
...........
Amount tendered
The sale is
finalized, and Oie
change due is
displayed in the
domesfi'c currency.
□
in CUR2
(Displays the
domestic currency
value equivalent to
the tendered
foreign currency.)
The amount tendered is not printed in the foreign currency value (but domestic value
only). Neither is the exchange rate printed.
Thank you
Call again
210987654321
11.~ 0 a - 9 2
No 1 1 2. 3 0 0
TM
TX
TL
CA
CG
ICL
■ 75 -
Page 78

EOl-11068
Post-issue Receipt
RECEIPT
ISSUE
(Post-issue Receipt Key)
When a sale is finalized with the “R OFF” lamp extinguished (the illuminated/extinguished status
can be switched by the [LOG/RECEIPT] key), a receipt is automatically issued. However, if a
sale is finalized with the “R OFF” lamp illuminated but a receipt is required by the customer, this
key works.
REG
OFF
A sale is finalized, but no
receipt is issued.
RECEIPT
ISSUE
(When the “R OFF” lamp is
SET
illuminated.)
A post-issue receipt for the
sale just finalized.
NOTES 1. When a sale has conienfs of 20 print lines or less, the post-issue receipt will
be an itemized receipt, just as the ordinary receipt
2. When a sate has contents of more than 20 print lines, the post-issue receipt
will be a total-only receipt
Post-issue Receipt
(for a sale containing 20
print lines or less)
Post-issue Receipt
(for a sale containing
more than 20 print lines)
Thank you
Call again
1 1,- 0 3.- 9 2
No 11 2.3 0 0
* 2.0 0
0 5
0 5
* too
* 4.0 0 ST
1 0.
- 0.4 0
0 1
★ 0.5 5
* 0.0 6
* 4.2 1
0 1 0.6
0 9-14
ICL
Thank you
Call again
11-0 a-9 2
No 11 a 3 0 0
* 2 4.0 0 TL
0 1 0.7 ICL
09-15
% -
TM
TX
CATL
- 76 -
Page 79

Print/Non-print Options on Sale Receipts
The following are items that can be programmed to be printed or not on sale receipts.
To change the print/non-print status, refer to Chapter *‘19. System Option Setting”. For
changing the print!non-print status of each item, further refer to the Address No. and Bit No. in
the chapter.
.-I
Tax Lines
Address 14 • Bit 4
Initial Status:
GST Print
Address 14 - Bit 5
initial Status:
Tax/PST and GST
EO1-11068
*0.0 7
* 0.4 8
Optional Status:
Consolidated Amount
Print for TAX/PST and
GST on one line
Address 13 - Bit 3
Initial Status:
Consolidated Tax
(PST) Amount Print on
one line
* 0.4 8 TX
Optional Status:
Separate Lines for
Individual Taxes (PST)
(“Separate** status
must be selected for
Address 14 - Bit 5 in
this case.)
FS
TK
Number of Purchased Items:
Address 1 - Bit 2
Initial Status: Non-print
'^Receipt Consecutive No.:
Address 15 - Bit 2
Initial Status: Print
Address 1 - Bit 1
Initial Status: Print
*0.0 7
*0.4 8
TXI
ТХП
___
j
-77-
Page 80

18. Read and Reset Reports
This chapter describes the operation to take each report and its contents. The
report function is one of the most beneficial features of this register. As sales
data are entered, the register processes the data into appropriate totals and
counters in the report memory. The reports are not only a form of sales data
records but will also be a valuable guide to a more prosperous future of your
store if you fully utilize and analyze them.
Programming Operations Relating to Reports
Programming Hourly Range Table
The “Hourly Sales Report” is available as part of the report function. Hoiwever, sales data
entered in REG mode are processed into Hourly Ranges only after programming an Hourly
Range Table. If you have started operations on the register without this programming
operation performed, the “Hourly Sales Report” cannot take. The Hourly Sales Report table
must be programmed in order to obtain Hourly Sales Reports during operations.
EOl-11068
Condition: After Hourly Sales Reset
(refer to “NOTE on Condition'' on page 22)
Programming Procedure:
Use the MA Key to turn the
Control Lock to “SET”.
Enter the time that ends the Hourly
Range, in the 24-hour system using
the military time. (The time to start is
the time entered for the preceding
Hourly Range.)
(See NOTES 2, 3)
NOTES 1. A maximum of 24 hourly ranges may be set
2. Do not set an hourly range across 24:00, such as “from 23:00 to 1:00”. Such
setting does not cause an error in programming but the sales data will not be
processed into that hourly range.
- 78 -
Page 81

3. If an hour value of more than 23 or a minute value of more than 60 is set, it will
not result in an error but the data will not be processed into that hourly range.
4. To change the table of hourly ranges once set, partially or entirely, do the
entire setting operation over again.
5. To clear the hourly range table once set, operate in SET mode
EOI-11068
0
©/FOR
-►
0
#/NS
AT/TL
Selecting Print/Non-prInt Items on Reports
The following table shows the items on reports that can be programmed to be printed or nonprinted according to your store’s requirements. For further details of programming, refer to
Chapter “19. System Option Setting”. If you have started operations on the register without
this programming operation performed, print or non-print status of each item is determined by
the “Initial Status” in the following table. It is recommended, therefore, to change Print/Nonprint status of each item after once taking all the reports.
Item
GT (Grand Total) Print
Sum of Negative Departments Non-print
Sum of All Departments (except Other income Depts)
Sum of Other Income Departments
Net Sale With Taxes
Net Sale Without Taxes
Receipt Consecutive No. on Journal and every
Receipt
Receipt Consecutive No. Resetting
Initial Status
Before Change
Non-print
Non-print
Print
Non-print Address 13 - Bit 2
Print
Non-resettable
System Option
Address No. - Bit No.
Address 1 - Bit 4
Address 1 - Bit 6
Address 11 - Bit 2
Address 11 - Bit 3
Address 13 - Bit 1
Address 15 - Bit 2
Address 15 - Bit 3
- 79 -
Page 82

Taking Read and Reset Reports
Fundamental Concepts of Various Types of Reports
Four types of Reports are available in connection with the Control Lock positions and the
periods of data accumulation:
EOl-11068
Daily Read Report:
Daily Reset Report:
Periodical Read Report;
It can be issued at any time and any number of times during the
day. It allows to read the sales data recorded up to the moment
since the corresponding Reset Report was issued yesterday.
Taking this type of report will not affect any sales data in the report
memory.
The contents and format are the same as the Daily Read Report.
However, it should be issued only once at the end of the day
usually after closing the store. It Is the “final”report that should be
[№Tile^ Taking thi^ typo OTreport will clear all the resetta^^^
totals and counters in the report memory after the report is issued.
It can be issued at any time and any number of times during a
certain period defined by the store (one week, one month,
etc.). Thus it allows to read the sales data accumulated up to
the moment since the corresponding Reset Report was issued
last time.
Periodical Reset Report: The contents and format are the same as the Periodical Read
Report. However, it should be issued only once at the end of
the defined period as the “final” report and be kept in file.
Taking this type of report will clear all the resettable totals and
counters in the report memory after the report is issued.
In addition, Read Reports (Daily or Periodical) are called “X” reports since the reports are
taken with the Control Lock positioned to “X” and the header “X” is printed. Reset Reports
(Daily or Periodical) are called “Z” reports, taken with the Control Lock positioned to “Z”,
printing the header “Z”. Please also note the Reset Report Counter is printed on each Reset
(Z) Report only. By this counter, you be sure that no illegal Reset Reports were taken
between the one taken at the end of yesterday and the one taken now.
1---------------------------------------------------------------------------------------------------------------------------------------------1
! OAUTtON: Whenever you turn the Control Lock to the “Z” position, be sure that you are 1
1 taking Reset Reports (final reports) and that the sales data will be cleared by 1
1 the operation to follow. 1
I___________________________________________________________________________________ I
-80-
Page 83

Report Taking Operation
The following are the key operations to take specific reports. Be certain that the “R OFF"
lamp status suits your requirement:
\ / Illuminated: Read Reports are printed
“R OFF” Lamp
on journal only. However,
Reset Reports are printed
on both journal and receipt.
£xt/ngu/s/}ee/: Read and Reset Reports
are printed on both journal
and receipt.
Reverse the status,
if necessary, by
depressing
LOG
RECEIPT
y
The [RECEIPT ISSUE] key is not effective in X
or Z mode.
Daily Read Reports:
EOl-11068
Daily_Einancial Bead (X)
The drawer opens
&■
Use MA Key.
AT/TL
___
Report
Print
Starts
Department Sales Data &
Financial Sales Data
Daily Cashier Read (X) Report (operable in signed-OFF condition only)
Use MA Key.
REG
OFF
SET
LOG
RECEIPT
Cashier Code
1 to 4
(assigned by the r:
store) of the occurs.-
cashier whose data ¡* register signed-
is to be read. '
--------------------
I* Wrong code?
--------------
The drawer opens
&
Report
Print
Starts
Sales data recorded by
the cashier
Daily Hourly Sales Read (X) Report
See page 86 for
sample format
See page 89 for
sample format
Use MA Key.
X
REG
OFF
SET
1
“10” is fixed for
Hourly Sales
Read.
- 81 -
-►
ATyTL
The drawer does not open.
Report
Print
Starts
See page 90 for
sample format
Sales data in each Hourly
Range.
(Refer to the "Programmmg Hourly
Range Table" on the first page of this
chapter.)
Page 84

All PLU Sales Read (X) Report
EO1-11068
Use MA Key.
REG
PLU
OFF
SET
Zone PLU Sales Read (X) Report
Use MA Key.
SET
X
PLU Code that
starts the required
zone (range) for
this report
(max. 3 digits).
REG
OFF
The drawer does not open.
—►
Report
Print
Starts
See page 91 for
sample format.
Sales data of all the PLUs with
any sales data recorded.
(PLUS with zero sales data are
skipped.)
1
(§/FOR
-►
PLU Code that
ends the zone
(max. 3 digits).
The drawer does not open.
PLU I—I
The Start PiU Code must be equal to or
smaller than the End PLU Code. When equal,
Uie data of only one PLU is read.
Media Sales and In-drawer Read (X) Report
Use MA Key.
REG
X
OFF
SET
NOTE: This report must be taken, if
necessary, before the Daily Financial
Reset (Z) Report is taken. Otherwise,
ail the media data are reset by the
Financial Reset.
or
#/NS
#
Report
Print
Starts
See page 91 for
sample format
Sales data of the PLUs of the
codes in the range of the
designated zone.
(PLUs with zero sales data are
skipped.)
The drawer opens.
&
Report
Print
Starts
See page 92 for
sample format
Each Media Sales Total,
Each Media-in-drawer Amount
- 82 -
Page 85

Daily Reset Reports:
EO1-11068
Daily Financial Reset (Z) Report
Use MA Key.
REG
X
___
b
ATH'L
The drawer opens
&
Report
Print
Starts
OFF
Department Sales Data &
SET
Financial Sales Data
Daily Cashier Reset (Z) Report (operable in signed-OFF condition only)
Use MA Key.
X
Cashier Code
1 to 4
(assigned by the
store) of the
cashier whose data
is to be read.
LOG
RECEIPT
If an error occurs:
• Is the register signed-
OFF?
• Wrong code?
The drawer opens
&
Report
Print
Starts
Sales data recorded by
the cashier
See page 86 for
sample format
See page 89 for
sample format
Daily Hourly Sales Reset (Z) Report
Use MA Key.
‘10" is fixed for
Hourly Sales
Reset.
All PLU Sales Reset (Z) Report
Use MA Key.
REG
X
OFF
SET
PLU
AT/TL
The drawer does not open.
Report
Print
Starts
See page 90 for
sample format
Sales data in each Hourly
Range.
(Refer to the "Programming Hourly
Range Table" on the first page of this
chapter.)
The drawer does not open.
Report
Print
Starts
See page 91 for
sample format
Sales data of all the PLUs with
any sales data recorded.
(PLUS with zero sales data are
skipped.)
-83-
Page 86

Zone PLU Sales Reset (Z) Report
Use MA Key.
EO1-11068
REG
OFF
SET
NOTE:
The Start PLU Code must be equal to or
smaller than ftie End PLU Code. When equal,
the data of only one PLU is read.
If this reset report is necessary, it
must be taken before the "All PLU
‘Reset Report" (i.e., all (he PLUs
sales data are reset by Ail PLU
Reset).
PLU Code that
starts the required
zone (range) for
this report
(max. 3 digits).
Periodical Read Reports:
Periodical Financial Read (X) Report
Use MA Key.
@/FOR
-►
PLU Code that
ends the zone
(max. 3 digits).
The drawer does not open.
Report
Print
Starts
Sales data of the PLUs of the
codes in the range of the
designated zone.
zero sates a
skipped.)
The drawer opens
&
PLU
]-i
See page 91 for
sampie format.
AT/TL
“20” is fixed for
Periodica!
Financial Read.
Report
Print
St£UlS
See page 86 for
sample format.
Department Sales Data &
Financial Sales Data for the
period
Periodical All Cashier Read (X) Report (operable in signed-OFF condition only)
Use MA Key.
X -----------------
REG
OFF
SET
0
"4” is fixed for
Periodical Alt
Cashier Read.
AT^L
I If an error occurs:
!• is the register signedI OFF?
The drawer opens
&
Report
Print
Starts
See page 89 for
sample format
Sales data recorded for
the period by each
cashier.
{Cashiers with zero
sales data are not
printed but their cashier
codes.)
-84-
Page 87

Periodical Reset Reports:
EOl-11068
Periodical Financial Reset (Z) Report
Use MA Key.
REG
OFF
SET
2 0
“20" is fixed for
z
Periodical
Financial Reset.
-►
Arm
The drawer opens
&
Report
-►
Print
Starts
Department Sales Data &
Financial Sales Data for the
period
See page 86 for
sample format.
Periodical All Cashier Reset (Z) Report (operable in signed-OFF condition only)
Use MA Key.
X
REG
OFF
SET
"4" is fixed for
Periodical All
Cashier Reset.
AT/TL
I If an error occurs:
!• Is the register signed1 OFF?
The drawer opens
&
Report
Print
Starts
Sales data recorded for
the period by each
cashier.
(Cashiers with zero
sales data are not
printed but their cashier
codes.)
See page 89 for
sample format.
Report Sample Format
On the following pages are sample formats of respective reports,
please note the following conditions;
e In each report format, all the items that can be programmed to print are placed. (Refer
to ‘‘Selecting PrintfNon-print Items on Reports" on the second page of this chapter
for further information.)
• The data contents are merely examples to show the report format. The numeric data
may not balance correctly. (Refer to the “Memory Balance" attached to the Daily
Financial Read or Reset Report.) Neither the programmed contents nor sales data
placed as examples in various operating procedures in Chapter “17. Setting Preparation
of Each Key and Transaction Entries" or any other chapters are related to the numeric
data in the report formats.
•
-85-
In referring to those formats,
Page 88

Financial Read or Reset Report (Daily or Perlodicah
EOl-11068:
Thank you
Call again
ii.-oa-92
No 1 1 2.3 0 0
★ 13.41 ae 4 GT
5 14. GS
*13.41 ae 4 GS
0 1 1 4 cu
2 7.
* 4 8. 7 5
0 2 6 CU
6 6. - -
★ 3 5.0 6
0 3 8 CU
3 8 4.
A1 2.0 7 5.5 0
0 4 2 cu
2.
- 2.0 0
0 5 ■ 1 cu ‘
3.
A 1.5 0
0 6 1 cu 0
3. 0
A 0.15 a
0 7 1 cu
1.
A 1 0.0 0
0 8 0 cu
0.
A 0.0 0
0 9 1 cu
4.
- 1 2.0 0
10 0 cu
0.
*0.0 0
4 8 0. TL
A1 2.1 5 a 8 1 TL
' X: Daly Read
Z: Daily Reset
20X: Periodical Read
. 202: Periodical Reset
Date
Register No.
Report Type Symbol —
Grand Total (non-resettable) (initial Status: Print)
Gross Sale: Item Count
Amount
Dept 1 Sales: Customer Count
Item Count
Amount
Dept 2 Sales: Customer Count
- Item Count
Amount
Dept. 3 Sales: Customer Count
Item Count
Amount
Dept 4 Sales: Customer Count
Item Count
Amount
Dept 5 Sales; Customer Count
hem Count
Amount
Dept 6 Sales: Customer Count (“@” indicates Other Income Dept)
Item Count
Amount
Dept. 7 Sales: Customer Count
Item Count
Amount
Dept, 8 Sales: Customer Count
Item Count
Amount
Dept. 9 Sales: Customer Count
Item Count
Amount
Dept 10 Sales: Customer Count
Item Count
Amount
Sum ot All Depts. except Other Income Depts.: Item Count ”1 (initial Sfafus;
Amount J Non-print)
-86-
Page 89

EOl-11068
1
% +
★ 0.9 5
4 8 0.
1 2.1 5 7. 7 6
★ 0.0 7
1.2 0 7.4 1
★ 2.8 8
4 8 0.
1 3.3 6 8.1 2
% +
NS
NS
FS
7X I
TX II
NS
NS
3. @
★ 0.1 6
e
1
%-
★ 0.4 0
i
1
*0.4 0
2 3 CU TL
1 3.3 6 7.4 7
TL
2 0 CUCA
1 3.3 5 1.9 0
—-—
--------★ 7.2 6
★ 8.3 1
1 2.5 0
★ 6.50
1 3 3 5 2.6 6
1 0.5 0
★ 8.3 1
★ 3.0 3
1 LO 0
★ 0.1 5
1 8.7 0
CATL
1 CUCK -
CKTL
2
CUCH
CHTL
2
RA
3
CAID
2
CK
CKID
2
CH
CHtO
2
VD
VD
2
VO II
VD 11
1
VD in
VD m
1
VD IV
VD IV
RA
PO
PO
1
. ★ 0.3 2
6.
- 1 4.0 0
I
5. RT
* 1.3 0
★ 0.1 7
★ 1.0 0
RT
TX -
FSTL
Percent Charge Count
Net Sate Without Tax; Item Count
GST Amount
Tax(PST) 1 Amount
Tax(PST) 2 Amount
Net Sale With Tax: Item Count
Sum ot Other Income Departments;
Percent Discount on Subtotal:
% -
-
Dollar Discount Count
“
Total Customer Count
All Media Sales Amount
Cash Sales; Customer
Amount
Check Sales; Customer
Amount
Charge Sales: Customer
Amount
Received-on-Account Payment:
Paid Out: Count
Amount
Cash-in-drawer Amount
Check Count
Check-in-drawer Amount
Charge Count
Charge-in-drawer Amount ^ j
Item Correct Count
Amount
Void; Count
Amount
Misc. Void: Count
Amount
All Void: Count
Amount
% -
% ~
Percent Discount on Item:
Sum of Negative Departments: Item Count
Returned Merchandise; Item Count
Negative or Returned Tax Amount
Total of Sale Amount subject to GST
Amount
Amount
Amount
Amount
~l (Initial Status:
Non-print)
(Initial Status:
Print)
Item Count
Amount Non-print)
Count
Amount
Count
Amount
These items are
printed on Daily
Reports only but
not on Periodical
Reports.
I (Item Corr and Void on other items
_| than Departments and PLUs.
Count
Amount
”1 (Initial Status:
Amount
Amount
Non-print)
-87-
Page 90

1
*1.2 0 7 4.0 9
L
★
5 7.5 7
* 1.0 0
*6.0 0
*8.0 0
1
*0.0 0
2
* 1.0 0
0 0.0 1 Z
0 2.0 7
13-53
EOI-11068
TXTL
TXn.
EX
2
EXFS
EX I
EX II
0
ID
1
ID
Total of Sate Amount subject to Tax(PST) i
Total of Sale Amount subject to Tax(PST) 2
Total Tax Exempt Customer Count
GST Exempt Amount
Tax(PST) 1 Exempt Amount
Tax(PST) 2 Exempt Amount
Foreign Currency 1: i
Tender Count i
Amount-in-drawer
Foreign Currency 2: j
Tender Count !
Amount ;
No-sale Count
Reset Count (of each Reset Report); prints on Reset Reports only
Receipt Consecutive No.
Current Time
These items are
printed on Daily
Reports only but
not on Periodical
Reports.
- Memory Batanee --
Grand Total - Sum of Daily Gross Sales
NOTE
Gross Sale = (Sum of All Depts) + (Sum of Tax/PST 1 & 2) + (Percent Charge)
+ (Percent Discount on Item) + (Sum of Negative Depts) + (Item Correct)
+ (Void) + (Returned Merchandise) + (Negative Tax) + (GST) + (All Void)
Net Sale With Tax
NOTE
(Sum of All Depts) + (Sum of Tax/PST 1 & 2) + (Percent Charge)
+ (GST)
(Gross Sale) - (Percent Discount on Item) - (Sum of Negative Depts)
- (Item Correct) - (Void) - (Returned Merchandise) - (Negative Tax)
- (All Void)
All Media Sales
= (Net Sale With Tax) - (Percent Discount on Subtotal) - (Dollar Discount)
+ (Sum of Other Depts.)
= (Cash Sales) + (Check Sales) + (Charge Sales)
Sum of All Hourly Range Sales = Net Sale With Tax
Sum of Sales (Gross Sale) by All Cashiers = Gross Sale
NOTE: "Sum of All Depts” does not include Other Income Depts.
- 88 -
Page 91

Cashier Read or Reset Report (Daily or Periodical)
Daily Cashier Read or Reset Report
EOl-11068
^-1----.
............................• ---
--------------------—..
.........
---
Thank you
Call again
1
1 1.- 0 3.-9 2
No 1 1 2.3 0 0
ill
—r—zr
* ★ 2 CL
★ 1 1 5.2 3 GS
---------
0 2 0.5
13-43
Z
3 9. GS
* 0.1 5 0
n- n f) I' 7 "
8 cu
3. 0
--------
Report Type Symbol —
Cashier Code (i to 4)
Gross Sale: Customer Count
Other Income Depts Total: Item Count ~1 status:
"■
; Re^Cbuht-oTliaGh-G^hiel^s on Res4trReports only)
Periodical Cashier Read or Reset Report
Thank you
Call
again
X: Daily Read
Z: Daily Reset
Item Count
Amount
Amount _J Non-print)
4X: Periodical All Cashier Read
4Z: Periodical All Cashier Reset
11. - 0 3, - 9 2
No 1 1 2.3 0 0
if ★
★ 1 3.3 0 1.4 1 GS
0. 0
★ 0.0 0 0
if if
if if
if if
0 0.0 1 z
0 2 0.6
13-43
4 Z
1 CL
1 5 CU
4 7 5. GS
2 CL
3 CL
4 CL
Report Type Symbol
S^es Data by Cashier 1 (same as in the Daily Report above)
Sales Data by Cashier 2 (same as in the Daily Report above)
Sales Data by Cashier 3 (same as in the Daily Report above)
Sales Data by Cashier 4 (same as in the Daily Report above)
Reset Count o1 this Reset Report (prints on Reset Reports only)
-89-
Page 92

Daily Hourly Sales Read or Reset Report
EOl-11068
_________________
Thank you
Call again
1 1.- 0 3,- 9 2
No 1 1 2.3 0 0
1 0 Z
★ ★
0 8-00
0 9-00
1 0 CU
* 1 2.0 6 7.2 2
10-00
1-3-eu-
* 9 0.5 4
13-00
16-30
18-00
0 0.0 1 Z
0 2 0.4
13-43
iij
10X: Daily Read
10Z: Daily Reset
Report Type Symbol
Sales Data in Hourly Range from 18:00 yesterday to 8:00 ... No sales recorded
Sales Data in Hourly Range from 8:00 to 9:00 ... No sales recorded
Customer Count
Net Sale With Tax
Customer Count—Net Sale With Tax
Sales Data in Hourly Range from 13:00 to 16:30 ... No sales recorded
Sales Data in Hourly Range from 16:30 to 18:00 ... No sales recorded
Reset Count of this Reset Report (printed on Reset Reports only)
[ Sales Data in Hourly Range from 9:00 to 10:00
Sales Data in Hourly Range from 10:00 to 13:00
-90-
Page 93

Dally PLU Read or Reset Report (All or Zone)
Daily All PLU Read or Reset Report
Report Type Symbol —
PLU Code 50 (disregard the decimal point in the code);
Sale Item Count
Sale Amount
PLU Code 100 :
Sale Item Count
PLU Code 200:
Sale item Count
Sale Amount
Total of all plus: Sale Item Count (Positive PLUs only)
Amount (Positive PLUs - Negative PLUs)
Reset Count of PLU Reset Report (including Zone Reset): printed on Reset
_
___
X: Daily Read
' Z; Daily Reset
EO1-11068
Reports only
Daily Zone PLU Read or Reset Report
The format is the same as “A// PLU Read or Reset Report" above. Only the
difference is that the Zone Read or Reset Report outputs only the PLUs in the
zone designated by the key operation to take the report.
-91 -
Page 94

Dally Media Sales & In-drawer Read Report
Thank you
Call again
1 t- 0 3. - 9 2
No 1 1 2.3 0 0
X Report Type Symbol (Daily Read Report only)
2 3 CU TL
* 1 3.3 6 7.4 7 TL
* 1 3.3 5 2.6 6 CAiD
2 CK
* 1 0.5 0 CKID
2 CH
0. 3 1
...
CHiD_
1 Foreign Currency 1:
0
* 0.0 0 ID
2 Foreign Currency 2:
1
* 1.0 0 ID
0 2 0.3
13-42
Total Customer Count
Ail Media Sales Amount
Cash-in-drawer Amount
Check Count
Check-in-drawer Count
Charge Count
.......
Ghai^ie-in-dfawer Count: :::::::: ^
Count
Amount-in-drawer
Count
Amount-in-drawer
EO1'11068
- 92 -
Page 95

19. System Option Setting
This chapter is provided for your selections of the register’s basic functions
according to the market and your requirements, some of which are already
indicated for reference in other chapters as to print/non-print items, key
functions, etc.
Programming Procedure
The System Options are divided into 12 addresses (Addresses 1 to 16; Addresses 4, 5, 9 and
10 are vacant) and each address is further divided into a maximum of 8 bits (Bits 1 to 8).
Each Address table is placed on the following pages.
Condition: After Daily Financial Reset
(refer to “NOTE on Condition” on page 22)
Programming Procedure:
Use the MA Key to turn the
Control Lock to “SET" or the S Key to turn the Gontrot bock to: “BblND”.
EOl-11068
Enter a maximum of eight-digit number composed of Bit Nos. whose status must be
set to the “SET” status in the Address. If there is no Bit Nos. to be set to the
“SET” status, enter “0” for the Address.
Examples) To SET Bit 2 only ................................................. Enter 2.
To SET Bits 2 and 3
To SET alt the Bits
To RESET all the Bits
To change any Bit in an Address, enter the Address No. and enter all the SET Bit
Nos again. If a Bit No. is not included in the SET Bit Nos, the Bit will be RESET.
..........................................
.............................................
.......................................
Enter 23.
Enter 12345678.
Enter 0.
-93-
Page 96

EOl-11068
NOTES 1. Any Bit No. shaded and filled with vacant in the Address tables on the
following pages will be disregarded even if it is SET or RESET. (However, if ever
SET, it will not result in an error.)
2. The Initial Status of each Bit is indicated by a dotted frame such as: \
If you have never changed the Bit statuses in the Address before, the Initial Status
is active. Therefore, only the Bit status changes of the required Addresses may
be entered. If an All Memory Clear is operated (refer to Chapter *'23. Status
Clear and Memory Clear Operations”), all the Bits in all the Address
automatically regain the Initial Status.
Programming Example) To select the following options:
Address 1 (refer to the next page)
Bit 1: Time NON-PRINT (SET status)
Bit 2: Purchased Item Count NON-PRINT (SET status)
_______
\
:^beralhRESBT-(PRIN-T-)-^-^^^^-^
Control Lock; BLIND
18 ©/FOR
#/N^
Thank you
Call again
ll.-0a-92
No 1 1 2,3 0 0
■ ^ 1.8*
- ^ n 1
___________ 1 2
0 0 1.2
0 8-53
-94-
Page 97

EOl-11068
Address: |T[
(Non-print Options 1)
Bit
No.
Time on Journal and Every Receipt in
1
REG, X, Z, SET modes
Purchased Item Count on Sale Receipts
2
in REG mode
Manual Subtotal on Sale Receipts in
3
REG mode
GT (Grand Total) on Financial Reports
4
(in X and Z modes)
iiB
Sum of Negative Department Data on
6
Financial Reports (in X and Z-.modes) -
.
..............
"r, e 'I
Content
................................
.
...................
¡Initial SET Bit Nos.; ►
Your Selection ►
Selective Status
RESET
r PRINT 1
i
__________
r PRINT i
r PRINT 1
.
---------
PRINT
PRINT ! NON-PRINT i
.
□□□□□
SET
NON-PRINT
. -J
r NON-PRINT 1
NON-PRINT
NON-PRINT
..........................................'pr
Address:
(Optional Functions 1)
Bit
No.
Fraction Rounding Process on Quantity
1
Extension or % Calculations
Fraction Rounding Process on Quantity
2
Extension or % Calculations
Credit Balance (over-subtraction of the
3
sale by [DOLL DISC] or [VOID] keys)
in REG mode
Obtaining Taxable Total (sale total
4
including taxes) by [TXBL TL] or [ST]
key before finalizing each sale
SuDDlementarv Description:
Bit 1 & Bit 2: If both RESET, ROUND OFF status is obtained.
Bit 3: The [RTN MDSE] key is operable to turn the sale into negative regardless of this bit
status selection.
Content
If both SET, Bit 2 status prevails, i.e., ROUND DOWN.
(Fraction Rounding Process on tax/PST calculations is fixed to ROUND UP, out
of the application of the process selected here. As for GST, see Address 14 -
Bits 2 & 3)
¡Initial SET Bit Nos. ¡' ^
Your Selection ---------------^
Selective Status
RESET
I Round OFF I
! Follow Bit 1 status, j
1 PROHIBITED 1
1 1
1 NOT COMPULSORY 1
i I
i
0
□□□□
SET
ROUND UP
ROUND DOWN
ALLOWED
COMPULSORY
- 95 -
Page 98

EOl-11068
Address:
(GST Status)
Bit
No.
4 [% + ] key
5 |%-1 key
6
SuDOiementarv Description:
Bit 4 & Bit 5: SET status
-- Addresses 4, 5 are vacant --
Content
[DOLL DISC] key
i Initial SET Bit Nos. j ►
Your Selection
Selective Status
RESET
■.............................................1
[ GST NO N-tA)0^B LE' j
L 5?Tl NPJ^:T^?LE 2
[ GST NblvI-t/^BrE' J
[% + ] and [%-] keys become GST Taxable if they are used
after depressing the [ST] key. [% + ] and [%-] keys obey
Department GST status if they are used after depressing
[DEPT] key. ,
___
.
___
GST TAXABLE
GST TAXABLE
GST TAXABLE
_______________
□□
SET
Address:
([AT/TLJ Key Function)
Bit
No.
Tender and Total Functions in finalizing
1
a sale in REG mode
Supplementary Description:
Bit 1: RESET status .
SET status
Content
j Initial SET Bit Nos. j
......
Your Selection ►
Selective Status
RESET
r TENDER or TOTAL
The key functions as Tender Key with a prior amount entry or as
Total Key without any amount entry.
The key always requires a tender amount entry.
SET
TENDER only
0
-96-
Page 99

EO1-11068
Address: ¡initial set Bit Nos.
([CHK TND] Key Function) Your Selection ►
Bit
No,
Tender and Total Functions in finalizing
1
a sale in REG mode
' "a
....
Cashing with no purchase, using this
3
key.
Over-tendering (tendering an amount
larger than the sale total, resulting in
4
calculation of change due)
Supplementary Description:
- Bit 1; Refer to the-'-Supplementary Deseription” of Bit 1 attaehed^tfrAddress
Bit 3: RESET status ... Customers’ checks cannot be cashed outside a sale.
SET status ... Customers’ checks can be cashed with no purchase outside a sale.
Bit 4: This Bit status selection is effective only in tendering operation,
SET status ... If this bit Is SET and also Address 11 - Bit 1 is SET (for Short
Content
RESET
TENDER or TOTAL
PROHIBITED
1 ALLOWED 1
i
_________________
tendering Prohibited), an amount equal to the sale total is always
required for tendering.
Selective Status
0
□□□
SET
r TENDER only
i ALLOWED i
PROHIBITED
. .J
-97-
Page 100

EOl-11068
Address:
([Ohg] Key Function)
Bit
No.
Tender and Total Functions in finalizing
1
a sale in REG mode
8
Content
¡Initiai SET Bit Nos. \ ^
Your Selection
---------------
RESET
TENDER or TOTAL
^
Selective Status
i TOTAL only i
........
Cashing with no purchase, using this key
3
Over-tendering (tendering an amount
larger than the sale total, resulting in
4
calculation of change due): effective only
when Bit 1 is RESET
■"v "
Bit 1: RESET status
SET status
Bit 3: RESET status
SET status
Bit 4: This Bit status selection is effective only in tendering operation and only when Bit 1 is
RESET. ■ SET status ... If this bit Is SET and also Address 11 - Bit 1 is SET (for Short
The key functions as Tender Key with a prior amount entry or as
Total Key without any amount entry.
The key functions as Total Key only.
Cashing with no purchase is prohibited.
Cashing with no purchase is allowed outside a sale
tendering Prohibited), an amount equal to the sale total is always
required for tendering.
i PROHIBITED i ALLOWED
j I
1 ALLOWED 1
i i
□□
SET
PROHIBITED
Addresses 9, 10 are vacant. -
Address:
1 1
(Optional Functions 2)
Bit
No.
Short-tendering using any media key.
1
(applicable to [ATH-L], [CHK TND],
IChgl)
Sum of all Departments (except Other
2
Income Departments) on Financial
Reports
Sum of all Income Departments on
3
Financial Reports
4 to 8
Content
j initial SET Bit Nos. j ^
Your Selection — ►
RESET
I
i 1
I NON-PRINT !
i i
r NON-PRINT
i______________________1
ALLOWED
-98-
Selective Status
I
0
□□
SET
PROHIBITED
PRINT
PRINT
 Loading...