

Page 1
Owners Manual
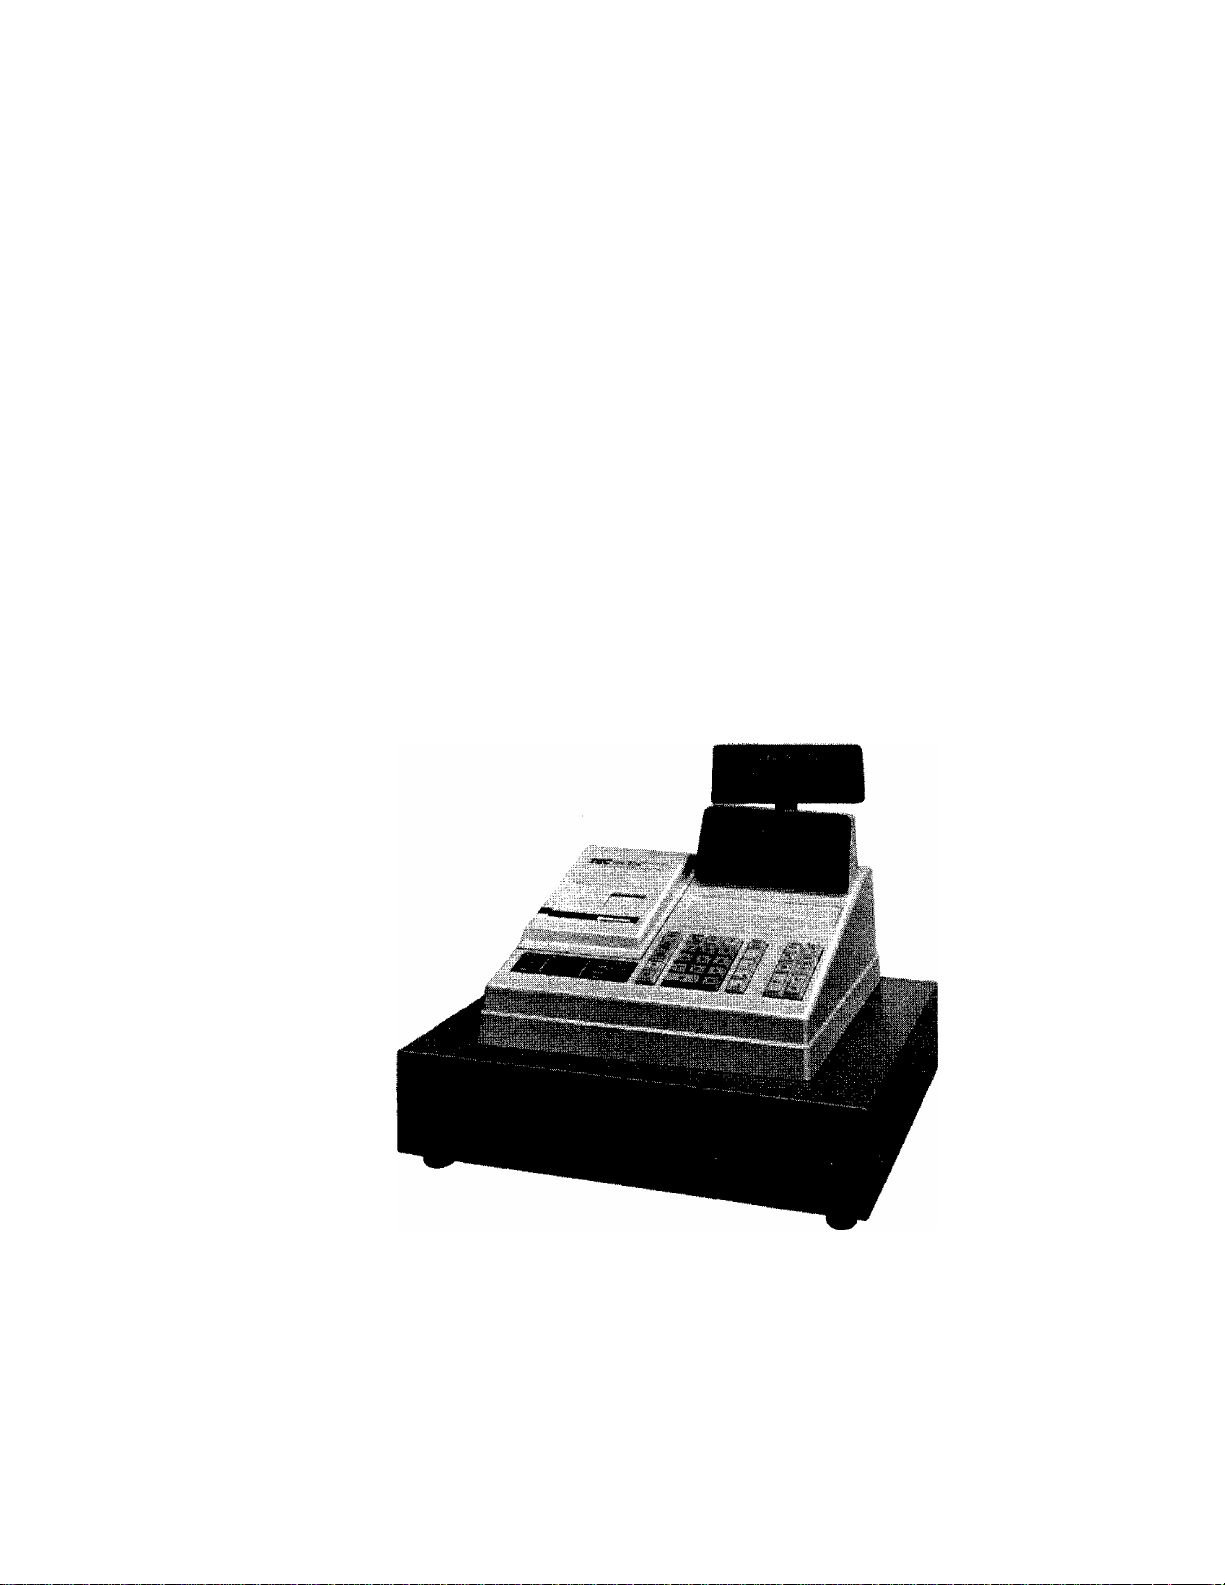
TEC ELECTRONIC CASH REGISTER
Myl-205-10 SmiUES
TEQ
TOKYO ELECTRIC CO., LTD.
Page 2

TABLE OF CONTENTS
Page
TO OUR CUSTOMERS
PRECAUTIONS
.......................................
APPEARANCE AND NOMENCLATURE
MODE LOCK AND MODE SELECTOR KEYS
DISPLAY
...........................................
KEYBOARD LAYOUT
FUNCTION OF EACH KEY
REGISTERING PROCEDURE FOR SALES
REGISTERING RECEIPT SAMPLES
READ (X) AND RESET (2) REPORTS
REPORT SAMPLES
PROGRAMMING OF THE REGISTER
PROGRAM VERIFICATION
..................................
.......................
..................
...................................
..............................
..................
.....................
...................
..................................
.....................
.............................
1
1
1
2
3
4
5
11
15
20
21
23
31
PAPER ROLL REPLACEMENT AND OTHER MAINTENANCE OPERATIONS ... 32
SPECIFICATIONS
...................................
36
Page 3

WARNING
This equipment generates, uses, and can radiate radio frequency energy and if not
installed and used in accordance with the instructions manual, may cause interfer
ence to radio communications. It has been tested and found to comply with the limits
for a Class A computing device pursuant to Subpart J of Part 15 of FCC Rules, which
are designed to provide reasonable protection against such interference when operat
ed in a commercial environment. Operation of this equipment in a residential area
is likely to cause interference in which case the user at his own expense will be re
quired to take whatever measures may be required to correct the interference.
Page 4
TO OUR CUSTOMERS
Thank you for choosing a TEC electronic cash register MA-205 series. This
instruction manual provides a description of the functions and handling of
this register and should be read carefully to obtain maximum performance.
Since every consideration has been given to safety, there is no danger of
damaging the machine by incorrect operation.
Please refer to this manual whenever you have any doubts concerning the
macjiine. This machine has been manufactured under strict quality control and
should give you full satisfaction. However, if the machine is damaged during
transit, or there are any unclear points in this manual, please contact your
local TEC representative.
[] The specifications described in this manual may be modified by TEC, if
necessary.
[] Be sure to keep this manual for future reference.
PRECAUTIONS
1. The keys on the keyboard work with a light touch. Avoid pressing the keys
too hard.
2. Avoid handling the machine with wet hands.
3. Do not apply thinner or other volatile oils to the cabinet or other plastic
parts. If dirty, wipe off with a piece of cloth soaked in neutral detergent
and squeezed tightly.
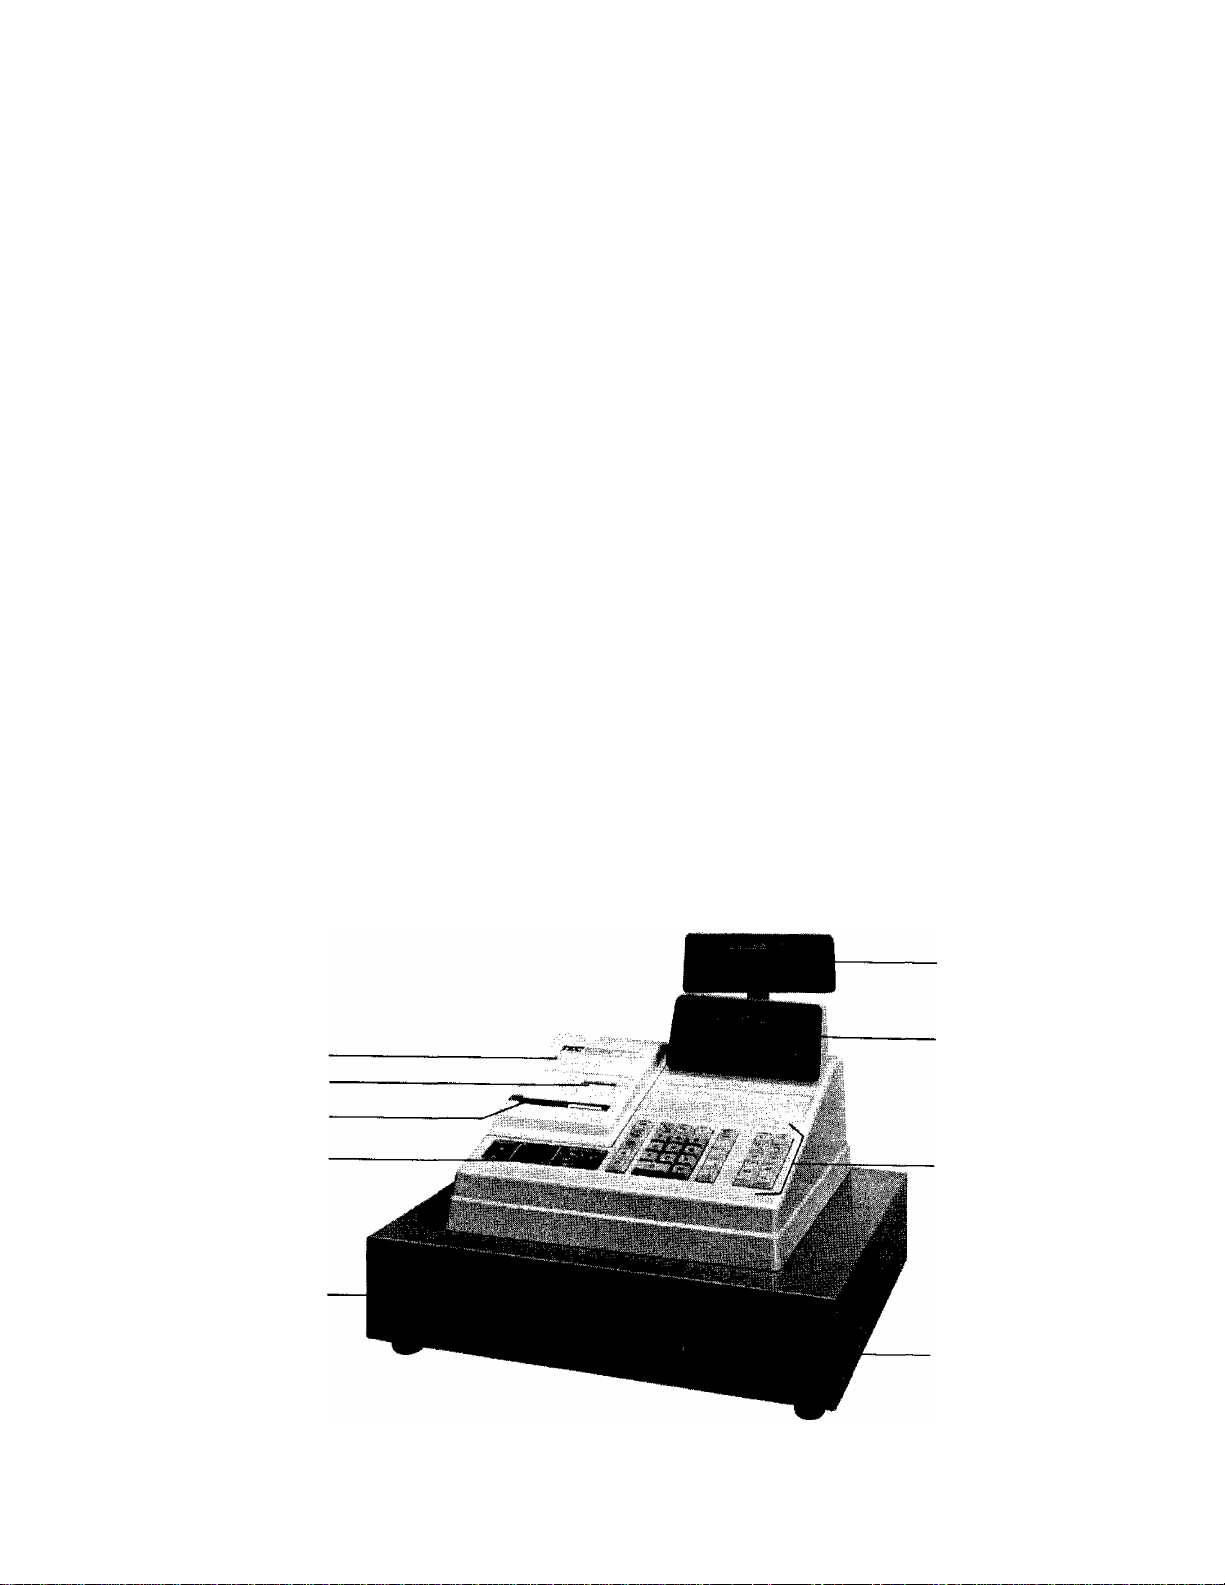
APPEARANCE AND NOMENCLATURE
Paper Cover
Journal Window
Receipt Outlet
Mode Lock
Cash Drawer
Rear/Remote Display
Front Display
Keyboard
Drawer Release Lock
- 1 -
Page 5

MODE LOCK AND MODE SELECTOR KEYS
MODE LOCK (POSITION)
“y" SET
REG V
OFF^
SET
MA Key
SET Key
OFF
REG Key
REG
(FUNCTION)
In this position, the register
will allow programming
operations.
No keys on the keyboard are
accepted. Nothing is
indicated in the display.
Normal cash register
operations are carried out in
this mode. When the Mode Lock
is changed from another
position to this position, the
current time is autoamtically
displayed. The time display
disappears on operating any
key on the keyboard, power
from OFF to ON, or Mode Lock
position changes.
The sale totals can be read
and the programmed data can be
verified in this position.
MODE SELECTOR KEYS
REG Key:
MA Key:
SET Key:
The keys may be inserted or pulled out at the "OFF" or "REG" position.
All the resettable totals and
their counters will be read
and reset in this position.
The REG Key is used by the cashier who operates the
register. This key can access the positions of OFF
and REG.
The MA Key is used by the store manager who will daily
supervise the collection of money and printout of
transactions recorded by the register. This key can
access the positions of OFF, REG, X, and Z.
The SET Key is used by the programmer.
access the positions of OFF and SET.
This key can
-2-
Page 6
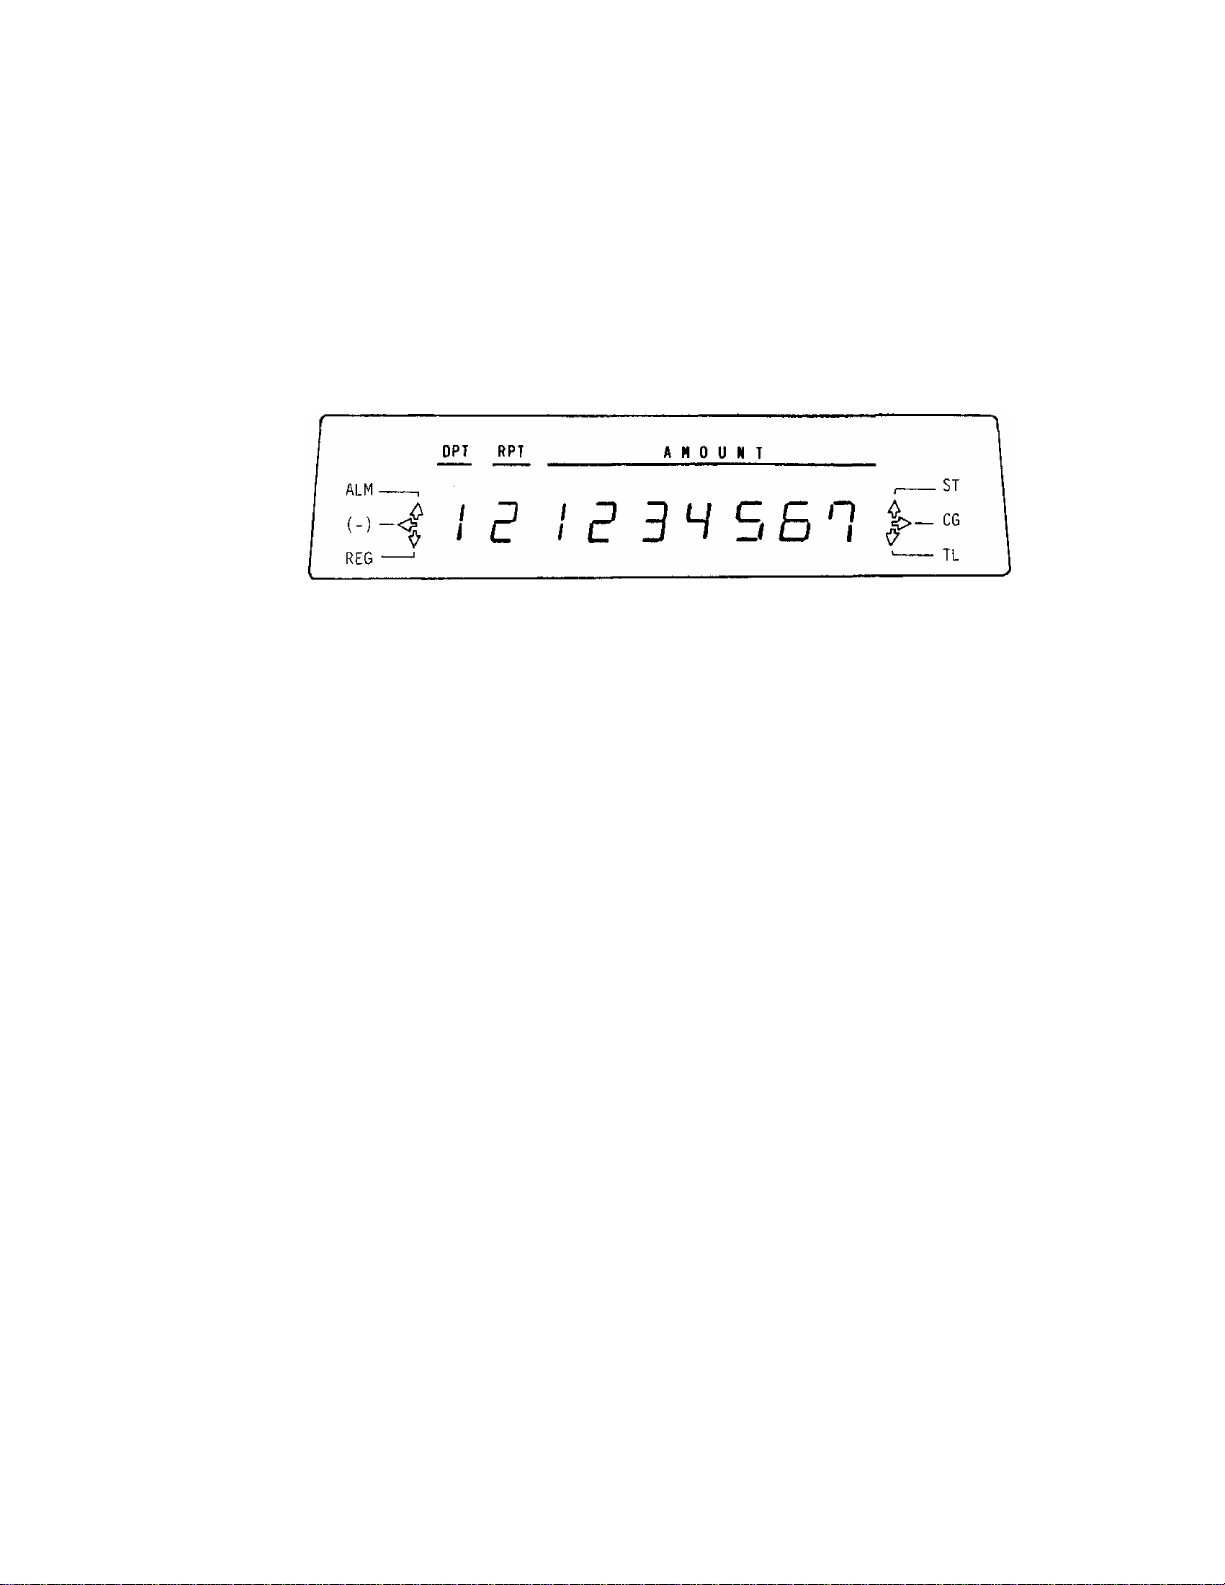
DISPLAY
The Operator's Display (front display) is located at the top of the register
just above the keyboard. The Customer's Display may be used as Rear Display
if it is kept in the receptacle or used as Remote Display if it is stretched
up and turned to the required direction. The display has two types of
indications -- numeric display and message descriptors.
The angle of the Operator's Display in the up-and-down direction is
adjustable.
NUMERIC DISPLAY
AMOUNT (7 digits): Displays the numeric data, such as amount, quantity,
time, etc.
RPT (1 digit):
DPT (1 digit):
Displays the repeat count of the same item. The count
is indicated from the second entry on, and only the
first digit will be displayed even if the count exceeds
nine.
Displays the code which represents each Department Key.
It stays lit when repeating the same department entry.
MESSAGE DESCRIPTORS (Arrow Marks)
ALM: Lights up to indicate that the last operation or numeric entry has
resulted in an error. To clear the error condition, depress the [C]
key.
(“) ! Lights up when the [RTN MDSE] , [ITEM CORR] , or [%-] key has been
operated. It also light up when the [ST], [TXBL TL] or one of the
media total keys has been depressed and the displayed amount is
negative.
REG: Lights up when a sale item has been entered.
ST: Lights up when the subtotal amount is displayed after the [ST] key
has been depressed. And it also lights up when the [TXBL TL] key
has been operated.
CG: When an amount tendering operation has been performed, this lamp lights
up with the change due displayed.
TL; Lights up on a finalizing operation with the total amount displayed
when finalized without any amount tendered.
-3-
Page 7

TIME DISPLAY
When the Mode Lock is turned to the "REG" position from any other position,
the current time is automatically displayed in the AMOUNT por tion. The
displayed time will disappear on changing the mode to another, turning the
power from OFF to ON, or starting any key-in operations on the keyboard.
TIME DISPLAY FORMAT
ex,) 8:05 a.m.
1:24 p.m. (13:24)
KEYBOARD LAYOUT
The following is the keyboard layout for the MA-205 series
NS
TX/M
RTN
MDSE
ITEM
CORK
c
RF
JF
7 8 9
4 5 6
1
0
2 3
00
RCPT
ISSUE
R/A
TXBL
ST
TL
H
j _/
I U U I
#
PO
Chg
AT/TL
____
u o
/ /_/
2
departments
-4-
4 departments
RCPT
ISSUE
TXBL
NON
TXBL
Page 8

FUNCTION OF EACH KEY
ON
OFF
RF
JF
RECEIPT ON/OFF SWITCH ([RECEIPT ON/OFF])
This switch has two positions available: 'OFF' and 'ON' positions.
When in the 'OFF' , no receipt is issued from the register and
sales are printed on the journal only. When the switch is set to
the 'ON' position, sales are printed on both receipt roll and
journal roll, then a receipt is issued which is handed to the
customer,
Alternating the switch position during a registration will not
result an error. In this case, the position at the time of the
registration starting will rule whether a receipt is issued or
not. When a reset (Z) report is taken, however, the data will be
pirnted also on the receipt roll regardless of the switch
posit ion.
RECEIPT FFED KEY ([RF])
This key is used to feed the receipt paper. As long as this key
is depressed, the receipt paper keeps on feeding. Receipt feeding
is possible even during a sale as standard feature. This key
functions at any Mode Lock position except "OFF".
JOURNAL FEED KEY ([JF])
RCPT
ISSUE
NS
This key is used to feed the journal paper. As long as this key
is depressed, the journal paper keeps on feeding. Journal feeding
is possible even during a sale. This key will function at any
position of the Mode Lock except "OFF".
RECEIPT POST-ISSUE KEY ([RCPT ISSUE])
This key is used to issue the receipt of a sale when the sale has
already been finalized with the [RECEIPT ON/OFF] switch positioned
to OFF.
To operate, depress the [RCPT ISSUE] key without a numeric entry
and with the [RECEPT ON/OFF] switch held to the OFF position. The
receipt for the last sale is then issued, with only the sale total
(but not the sale items) printed. This key will not function if
another sale has already been under way.
NO-SALE KEY ([NS])
This key is used to open the cash drawer for no-sale
registrations, such as giving change, testing the register receipt
print condition, etc.
To operate, simply depress this key with the Mode Lock positioned
at "REG", A no-sale receipt is issued and the drawer is opened.
-5-
Page 9

NON-ADD NUMBER PRINT KEY C[^M)
When the Mode Lock is in the "REG'' position, this key is used to
print a non-add number such as Code No., Account No., etc. on the
receipt and journal for future reference. A maximum of 7-digit
non-add number can be printed.
To operate, enter the required number and depress the [#] key.
It may be operated as the first line of the sale, between two line
items, or after the subtotal amount if before finalizing the sale.
RTN
MDSE
ITEM
CORR
RETURNED MERCHANDISE KEY ([RTN MDSE])
This key is used to make a subtracting entry for a returned item.
This key is also used to invalidate an item entered before the
last entry within a transaction, in which case the [ITEM CORK] key
cannot invalidate the designated item.
To operate, depress the [RTN MDSE] before or after the amount
entry, and then depress the department key from which the amount
should be subtracted.
ITEM CORRECT KEY ([ITEM CORR])
This key is used to delete the last item within a transaction.
Depressing this key once will remove the last item from the bill,
printing a line through that item on the receipt and journal.
The item-correct funtion is effective even when a numeric entry
and a [C] key depression are already performed between the
item-to-be-corrected and the [ITEM CORR] key depression. However,
if any other key-in operation including an error comes inbetween,
the item-correct will not function for the last item any longer.
The [ITEM CORR] key may function to correct any last item entered
through a department, [%-]key. But a department item entered with
the [RTN MDSE] key cannot be item-corrected.
%-
PERCENT DISCOUNT KEY ([%-])
This key is used to enter a discount calculated on a percentage
rate. When this key is depressed after a department item, the
discount amount is calculated on the preset or manual-entry rate
and subtracted from the department item amount. This key can also
be operated in the same way after pressing the [ST] key if the
percent discounting is performed for the sale total.
A percent rate can be preset on this key; however, if another rate
is entered through the numeric keyboard prior to the depression of
the [%-] key, the entered rate prevails. The preset rate will be
active by a simple depression of the [%-] key.
The percent discounting is effective only once for each department
item and subtotal amount.
-6-
Page 10

The [%-] entry may be item-corrected (by [ITEM CORR]), but it will
not be processed to the ITEM CORRECT total memory.
A percent discounting is allowed even on a returned merchandise
item entry.
TX/M
TAX MODIFIER KEY ([TX/M])
This key is used to reverse the tax status of departments and
the [%-] key. When this key is depressed prior to depressing
a Department Key or the [%-] key, a taxable department is reversed
to non-taxable, while a non-taxable deapartment or the [%-] key
(fixed as a non-taxable key) is reversed to taxable.
This key can be depressed before or after the amount entry, but
must be depressed before the department or the [%-] key.
QUANTITY EXTENSION (MULTIPLICATION) KEY ([X])
This key is used to multiply a department entry by a quantity.
The multiplication order is as follows:
[quantity I [X] [unit price I [DEPARTMENT KEY]
max. 3 digits max. 6 digits The product must not
exceed 7 digits
CLEAR KEY ([C])
This key is used to correct a numeric entry error if prior to
depressing any other function key, or to correct any error
condition and cancel the alarm buzzer.
7
8 9
4
5 6
1 2 3
0 00
If this key is depressed before depressing the Department Key in a
quantity extension sequence, all of the quantity entry, the [X]
key entry, and the unit price entry are cleared at a time.
If the [C] key is depressed after a subtotal is obtained, the
subtotal is then displayed.
The [C] key may be operated regardless of any position of the Mode
Lock except "OFF".
NUMREIC KEYS (j__|)
These are used to enter numeric values such as amount, quantity,
and non-add number.
Depressing the [00] key once is the same as depressing the [0] key
twice consecutively.
The maximum listing capacity for numeric entry is 8 digits.
-7 -
Page 11

DEPARTMENT KEYS ([DEPT]) 2-dept. model 4-dept. model
TXBL
1
1
NON
TXBL
2
2
3
4
These are department keys through which sales items are registered.
Usually, Department 1 Key is programmed to be used to enter
taxable items, and Department 2 Key is programmed to enter nontaxable items. However, each department key can be programmed
to enter either taxable or non-taxable items.
To operate, enter the amount of the item and depress the
appropriate department key. A consecutive depression of the same
department key will repeat the same amount entry, which can be
repeated as many times as required. However, the amount of "O”
cannot be entered through any of the department keys.
The maximum digits for a department entry is limited by the
programmed listing capacity. If no specific listing capacity is
programmed, a maximum of 7-digit amount can be entered.
Refer to the [X] key description on page 7 as to QUANTITY
EXTENSION using department keys.
R/Â
PO
RECEIVED ON ACCOUNT KEY ([R/A])
A received-on-account transaction is used to identify money which
is in the drawer but not bus iness. The amount entered is thus
included in the '’Cash - in-drawer" total but not in the sales
totals.
To operate, enter an amount of payment and then depress the [R/A]
key whilst the register is in an out-of-sale condition. A receipt
is issued, and the drawer opens. No entry with a "0" amount is
allowed through the [R/A] key.
PAID OUT KEY ([PO])
A paid-out transaction is used when an amount of money is removed
from the cash drawer without relating to a sale (reverse to R/A).
When the [PO] key is used, the amount entered is subtracted from
the "Cash-in-drawer" total but does not affect the sales totals.
To operate, enter a cash amount to be taken from the drawer and
depress the [PO] key whilst the register is in an out-of-sale
condition. A receipt is issued, and the drawer opens to enable
cash payout. No entry with a "0" amount is allowed through the
[PO] key.
-8-
Page 12

SUBTOTAL KEY ([ST])
ST
AT/TL
This key is used to obtain the subtotal amount during a sale.
When this key is depressed after all the items have been rung up,
the subtotal of the sale is printed and displayed,
If the [ST] key is depressed more than once consecutively, the
first depression only will print and display the subtotal; further
depressions will only display but not print the subtotal amount.
CASH AMOUNT TENDER / TOTAL KEY ([AT/TL])
This key is used to finalize a cash sale.
This key can be programmed to be used as one of the following
three types of keys:
1. AMOUNT TENDER KEY
If so programmed, this key requires a tendered amount
entry prior to depressing the key. The tax on the sale
is calculated and printed (if any) with the "TX" symbol,
the sale total including the tax is printed with the "TL"
symbol, the cash tendered amount is printed with the "AT"
symbol, and the change due with the "CG" symbol (if any)
on separate lines.
When the tendered amount is less than the sale total, all
the printing sequence above will be the same except that
the balance due is displayed (not printed) instead of the
change due. In this case, the sale is not yet finalized;
and another cash tendering must be done, or the [Chg]
key may be depressed if the balance due is processed as
an alternative method of payment.
When the sale total is negative, as in some cases with
returned merchandise entries, the [AT/TL] must be
depressed without a prior amount entry, as described in
"2. TOTAL KEY" below,
2. TOTAL KEY
If so programmed, this key is depressed without a prior
amount entry for sale finalization. The tax on the sale
is calculated and printed, and the sale total including
the tax is printed with the "CA" symbol.
When the sale total is negative, the sale total including
the tax is printed with the as well as the "CA"
symbol. In this case, the operator must refund the
amount in cash to the customer.
3. AMOUNT TENDER / TOTAL KEY
If so programmed, this key will function as TENDER KEY
(as described in 1 above) when any prior amount is
entered, and will function as TOTAL KEY (as described
in 2 above) when depressed without an amount entry.
-9-
Page 13

Chg
TXBL
TL
CHARGE TOTAL KEY ([Chg])
This key is usually used as "Charge Total" key. However, i t may
be used for other media such as payments in check or credit card.
Thus this key is used as an alternative method of payment for
media other than cash. To operate, depress the [Chg] key for sale
finalization instead of [AT/TL] • This key operates the same as
the [AT/TL] key when it is programmed as "2. TOTAL KEY".
This key can be combined with the [AT/TL] key if a payment for the
sale is split by cash and charge. In such cases, the [Chg] key
must be depressed as the last key to finalize the sale. (If the
[AT/TL] key is programmed as Type 2, TOTAL KEY, this sp 1 it-tender
ing operation will not be allowed.)
The [Chg] key can even finalize a negative sale total.
TAXABLE TOTAL KEY ( [iXBL TL] )
This key is used to obtain the contents of the main itemizer £_Ius
tax due. The amount will only display but not print.
In order to allow add-on operations
key, the taxes are not added into
finalization is initiated.
to fol low the
any totals
unt i 1
use
of this
actual
-10-
Page 14

REGISTERING PROCEDURE FOR SALES
The following are patterns for actual registering operations. In the
following examples, "|
"[ ]" indicates a depression of the transaction key, and '*--" indicates
other registering and/or finalizing operations.
NO-SALE (Mode Lock: REG, must operate outside a sale)
[NS]
DEPARTMENT ENTRY (Mode Lock: REG)
___
|" indicates an input thorugh the numeric keys,
I AMOUNT I [DEPARTMENT Key]
TAX MODIFICATION:
[TX/M] I amount! [non-taxable DEPTj
or
amount! [TX/M] [non-taxable DEPT]
[TX/M] 1 amount! [taxable DEPT]
or
; amount! [TX/M] [taxable DEPT] ^
REPEAT ENTRY (Mode Lock: REG)
!amount! [dept] ^ [same DEPT] ♦ [Same DEPT] ---
Repeat depressing the same Department Key as many times as
the desired count.
-
--to reverse a non-taxable
----
Department into taxable
-to reverse a taxable Depart
ment to non-taxable
--
QUANTITY EXTENSION (MULTIPLICATION) (Mode Lock: REG)
!quantity! [X] !unit price! [dept]
max. 3 dig. max. 6 dig.
(The product must not
exceed 7 digits.)
ITEM CORRECT (Mode Lock: REG)
!aMOUNT! [DEPT] [ITEM CORR] (The item marked with is
invalidated from the sale.)
AMOUNT! [DEPT] [Same DEPT] [Same DEPT] [ITEM CORR] + ---
* (An item-correct after repeat
entries will invalidate only the
last one item of the repeated.)
-11-
Page 15

QUANTITY I [X] I UNIT PRICE | [DEPT] [ITEM CORK] -► ---
(An item-correct after a quantity
extension will invalidate the
product that is resulted from the
multiplication.)
--- CI MANUAL RATE|) [%-] [ITEMCORR] +
RETURNED MERCHANDISE or DESIGNATED LINE VOID (Mode Lock: REG)
[RTN MDSE] [amount TO BE RETURNED or VOIDED| [DEPT] ^ --
or
[amount to be RETURNED or VOIDED! [RTN MDSE] [DEPT]
Return or Void With Quantity Extension:
Depress [RTN MDSE] at any one of the positions marked with below:
-
I QUANTITY I [X] [unit PRICE] [DEPT] ---
* it -k -k
PERCENT DISCOUNT (Mode Lock: REG)
I AMOUNT I [DEPT]
[%-] ^
(discount with the preset rate)
Irate! [%-] ■> ---
(discount with a manual rate; enter in 1 or 2 digits,
1 to 99%)
Discounting from
a Department item
--- -► [ST]
NOTE : The [TX/M] key may be operated to reverse the [%-] key
status from non-taxable to taxable. The [ITEM CORR] key is
also operative to invalidate the last [%-] key entry.
NON-ADD NUMBER PRINT (Mode Lock: REG)
[%-] . —
(discount with the preset rate)
» [rate] [%-] ^ ---
(discount with a manual rate; enter in 1 or 2 digits;
1 to 99%)
Discounting from the
entire sale total
(--- -► ) I NUMBER I [#J ---
max. 7 digits
RECEIVED QN ACCOUNT (Mode Lock: REG, must operate outside a sale)
[payment AMOUNT REGEIVEP] [R/A]
PAID OUT (Mode Lock: REG, must operate outside a sale)
[amount to BE PAID OUT FROM THE CASH DRAWER] [PO]
-12-
Page 16

SUBTOTAL READ (Mode Lock: REG)
__
^ [ST] + __ ... The sale total so far is displayed and printed, but
the sale is not finalized.
TAXABLE TOTAL READ (Mode Lock: REG)
--
^ [TXBL TL] ->
CASH TOTAL (Mode Lock: REG)
---
... The amount of sale total including the tax due
so far is displayed (not printed).
([ST]) ^ ([TXBL TL]) ^ [AT/TL] .
CASH TENDERING (Mode Lock: REG)
--
^ ([ST]) -» ([TXBL TL]) ¡TENDERED CASH AMOUNT j [AT/TL]
... The change due (if any) is displayed, the
CHARGE TOTAL (Mode Lock: REG)
--
-»([ST]) -» ([TXBL TL]) -» [Chg]
MULTI-TENDERING (Mode Lock: REG)
--
-» ([ST]) ->([TXBL TL])
n
. The drawer opens, the sale total
including tax is displayed and
printed, and a receipt is issued
drawer opens, and a receipt is issued with
the sale total, amount tendered, and change
due printed.
.. The drawer opens, the sale total
is desplayed and printed, and a
receipt is issued.
. Short tendering repeated multiple
times by cash.
AMOUNT tendered! [AT/TL]
1
L
AMOUNT TENDERED I [AT/TL]
-(¡AMOUNT TENDERED I) [AT/TL]
SPLIT-TENDERING (Mode Lock: REG)
--
^ ([ST]) ([TXBL TL]) -> ¡CASH AMOUNT TENDERED! [AT/TL]
. Short tendering repeated by different
media keys
J
[Chg]
NOTES: 1. In both MULTl-TENDERlNG and SPLIT-TENDERING operations, the
sale is finalized, a receipt is issued, and the drawer opens
on reaching the sale total amount.
-13-
Cash and Charge
Page 17

1£ [AT/TL] is programmed to allow total function only, split
tendering or multi-tendering cannot be operated. If [AT/TL]
is programmed to allow tendering, the "1 AMOUNT TENDERED![AT/TL]"
sequence must be operated first, and the [Chg] depression
must be the last in a sp1it-tendering operation.
RECEIPT POST-ISSUE (Mode Lock: REG, [RECEIPT ON/OFF] Switch to OFF)
When a sale has just been finalized with the [RECEIPT ON/OFF] switch set
to OFF but the customer then claims the receipt for the sale. In this
case, simply depress the [RCPT ISSUE] key. A receipt with only the sale
total amount of the last sale printed is issued.
The receipt post-issue operation is no more available when another sale
is already been under way on the register.
-14-
Page 18

REGISTERING RECEIPT SAMPLES
HO-SALE
Receipt
Consecutive No.
Current Time
DEPARTMENT ENTRY,
REPEAT ENTRY
T h a n k
you
Call again
Thank you
Call again
1 2
.- 2 0.- 8 6 ■
0 0 0,3 8
1 0 - 1 3
Store Name/Message Stamp is printed here.
Date
No-sale Symbol
QUANTITY EXTENTION
(MULTIPLICATION)
Thank you
Coll again
1 2 - 2 0 . - 8 6
1 * I 2 3 ^
2 * 4 , 5 6
2 * 4 5 6
2 * 4.5 6
* 1 4 9 1 S
* 0 , 0 5
*1 49 6 S
0 0 1 5 8
1 0 - 2 1
1 2 - 2 0 . - 8 6
— Taxable Symbol
1 —
i
—Dept.l $1.23
—Dept.2 $4.56
|The above item is
■-^repeated two more times.
— Sub-total
— Tax due
^
— Finalized as cash sale
1 *6 00 0 E
2 * 8 . 0 0
0 0 1 6 §
1 0 - 2 2
-15-
12 X
5 . 0 0
4 X
20 0 §
* 6 8,0 0 ci)
* 2 4 0 2
* 0 . 4 0 3
Page 19

ITEN CORRECT
on DEPARTMENT ITEM
Thank you
Call again
1 2 - 2 0 , - 8 6
1 A 1 .
0 0 ^
e — §
2 *4 00
* 7. 0 0 S
* 0 . 0 4 i
*
7 . 0 4 5
0 0 1 7 ?
1 0 - 2 4
—Dept.2 $5,00, but
item-corrected
ITEM CORRECT on %- ENTRY
Thank you
Call again
1 2 - 2 0 . - 8 6
1 * L 2 3 E
*
1 2 3 S
10, % -
----------
0 : 3 : 2 -
§
* I
2 3
*
0 . 0 5 i
^
H . 2 8 5
0 0 1 . 3 g
1 0 - 2 6
10% of the above sub-total
amount is calculated,
]
but i tern-corrected.
CHARGE SALE,
NON-ADD NUMBER PRINT
Thank you
Call again
1 2 , - 2 0 . - 8 6
1 * 1 , 2 3 i
2 * 4 5 6
* 5 . 7 9
iJi
ff
1 2 3 4 . 5 6
* 0 . 0 5 i
* 5 . 8 4 5
0 0 1 , 9 g
1 0 - 3 5
—Customer No.
(non-add No.)
—Finalized as charge
%- on Dept, and Sub-total
Thank you
Call again
1 2 . - 2 0 , - 8 6
1 * 1 0 0 ^
5 .
%-
- 0 . 0 5
2 * 2 . 0 0
* 2 9 5
1 0 .
%-
- 0 . 3 0
* 2 . 6 5
«
* 0 . 0 4
* 2 . 6 9 S
0 0 2 . 0 ' g
1 0 - 3 7
-5% from the above item
^ ( 0.05 is calculated and
subtracted.)
^ -loss from the sub-total
^ ($0.30 is calculated and
subtracted.)
-16-
Page 20

PAID OUT
RECEIVED ON ACCOUNT
Thank you
Call again
1 2 - 2 0 . - 8 6
* 5.
0 0
£
0 0 2 1
§
1 0 - 4 0
SHORT TENDERING,
NULTI-TENDERIHG,
CHANGE CONFUTATION
$5.00 is paid out.
Thank you
Call again
1 2 - 2 0 . - 8 6
* 1 0 . 0 0 s
0 0 2 3 9
1 0 - 4 1
SPLIT-TENDERING
.... II
$10.00 is received
on account.
Thank you
Call again
1 2 - 2 0 - 8 6
1 * 3 0 0
^
* 0 . 1 2
* 3 1 2
*
Q 3 0 5
* 1 0 . C 0
*
7 . 1 8 S
0 0 2 6 9
1 n - 4 4
Sale Total
$0.30 tendered, but short.
Another $10.00 tendered,
and Change $7.18 is
calculated, displayed and
printed.
Thank you
Call again
1 2 - 2 0 , - 8 6
2
* 5.0 0
1 * 3 . 0
0 ^
* 8.0 0
*0,12 i
* 8,1 2 f!
*
5 . 0 0 i
* 3 1 2 5
0 0 2 7 9
1 0 - 4 6
Sale Total
$5.00 Cash Tendered
The balance $3.12 is
finalized as Charge
-17-
Page 21

RETURNED MERCHANDISE
WITHIN A SALE
RETURNED MERCHANDISE
OUTSIDE A SALE
Thank you
Call again
1 2 - 2 0. - 8 6
1
*
1 2 0 0
n
1
1
* 3 0 0
* 1 2 . 0 0
* 1 0 . 0 0
^noo
*0,40
E 1- 1
1- cc 1
* 1 3 . 4 0
0 0 2 8
§
1^-48
NON-TAXABLE
[t-] OPERATION
^ 1
ISale Item
1 Sale Item
B Returned Item of Dept.l
^ 1
■ Sale Item
1
The balance is paid
in cash.
Thank you
Call again
1 2
- 2 0. - 8
6
1 * 5 , 0 0
- 0 . 2 0
- 5 . 2 0
0 0 2 , 9 g
1 0 - 4 9
TAXABLE
[Ï-] OPERATION
Returned Item of Dept
Tax to be returned
Total is negative,
soit must be paid
to the customer in
cash.
Thank you
Call again
1 2 - 2 0. - 8 6
1 * 4 5 6 Î
2 * 2 5 6
* 7 1 2 Eii
10, %- -V| 10 [%-] results :
-0 71 F
*0.16
*6.57 5
0 0
3
1 §
10-52
non-taxable discount
----
Compare the tax due.
Thank you
Call again
1 2 - 2 0. - 8 6
1 *456 Î
2 * 2, 5 6
-------
. * 0.1 8
0030S
10-50
-18-
* 7,1 2 S
10. %-
-0.71
*659 S
[TX/M] 10 [%-] results
taxable discount
1
Page 22

RECEIPT POST-ISSUE
When the register is operated with the [RECEIPT ON/OFF] switch positioned to
"OFF", no receipt will be issued but the sales content is recorded on the
journal roll only. If the customer claims the sale receipt in that case,
depress the [RCPT ISSUE] key before going into another sale. The receipt with
only the sale total printed will be issued, no matter in what media that sale
was finalized.
Journal Print
......
2 * 5.0 G
1 * 5 0 0z1-
*8.0 0
*0.12
X
*8,1 2
*5.00
*3,1 2Xo
0 0 3 4 g
11-01
IF POWER FAILS DURING
PRINTING OF AN ITEM...
Receipt Post-issued
The receipt
prints only
the total
amount of
1—
C/J
J
11-
cr
the sale,
whatever media
the sale was
paid in.
Thank you
Call again
1 2
- 2 0, - 8
6
* 8 J 2 h!
1 1 - 3 1
Page 23

READ (X) AND RESET (Z) REPORTS
The following table shows the key operation to take each report. The "X" and
"Z" reports have exactly the same print content, except that:
1. The ”X" report allows to read the totals but not clear memories, while
the "Z" report allow to read the totals and at the same time all the
resettable memories will be cleared when the report has been taken.
2. The symbol "X" is printed as the header of a "X" report, while "Z" is
printed on a "Z" report, to indicate the type of report.
3. A reset count is printed near the bottom of a "Z" report only.
TABLE OF OPERATIONS FOR X AND Z REPORTS
REMPORT NAME KEY OPERATION
AUTO READ
AUTO RESET
GT READ
GT RESET
NOTES: AUTO READ/RESET reports are for the daily accumulated sales data.
GT READ/RESET reports are for the accumulated sales data in a week or
a month (the reset period depends on each store).
VERIFYING THE PROGRAMMED DATA and TAX CALCULATION TEST, which are also
available in the "X” mode.
As for these operations and print samples, refer to the page 31.
Mode Lock: X
w . . 1 [at/tl]
Mode Lock: Z
Mode Lock: X
Mode Lock: Z
] 20 [AT/TL]
SAMPLE
PAGE
21
22
-20-
Page 24

AUTO READ REPORT SAMPLE
AUTO RESET REPORT SAMPLE
Thank you
Call again
12-20.-8 6
A
2 5 5.1 8
5 6.
* 2 1 2 7 4
1 29
A 1 0 9. 8 1
2 2 4
A
7 6. 3 6
3 0.
A
0,0 0
4 0.
A C. 0 0
A 43 7
21 3
A
1 9 C, 5 4
A
*1.7 7
la 3
A 1 7 6, 6 9
3 0
A
1 2 0 8
1,
A 1 0. C 0
2
A 1 0. 0 0
*176:69
1.
*5.00
n
* 17.2 0
0 0 4 2 ?
11-17
X ^
OT
U
to
(5
X
1-
-J
tn
z
0/
/0
-
/0
ec
U
« J
U 1-
I
u
I J
U H
d
«
d
o
Q.
9
Q. h"
CC □
U H
o
o
I—
\r
1—
X
Mode Lock : X
Depress [AT/TL]
Date
-------
Grande Total (nbn-resettable)
Gross Sale Item Count
Gross Sale Amount Total
Dept : 1 Sales Item Count
Dept. 2
Dept. 3
Dept. 4
Tax Total
Total Customer Count
Net Sale Amount Total
Percent Discount Count
Percent Discount Total
Cash Sales Customer Count
Cash Sales Amount Total
Charge Customer Count
Charge Sales Amount Total
Received on Account Count
Received on Account Total
Paid Out Count
Paid Out Total
Cash-in -Drawer Amount Total
Item Correct Count
Item Correct Total
Returned Merchandise Item Count
Returned Merchandise Total
Consecutive No.
Current Time
Sales Amount Total
—(Hourly Range Sales
Customer Counts and
Amount Totals, if
Hourly Range Table
has been programmed.)
Mode Lock : Z
Depress [AT/TL]
Reset Report Symbol-Read Report Symbol
Reset Count
Thank
Call again
1 2 - 2
—^
A
2 5 5 . 1 8
5 6 .
A
2 1 2 7 4
1 2 9 .
A
1 0 9 . 8 1
2
A
3
4
*0.0 0
A
1 9 0 . 5 4
* 1 7 6 . 6 9
* 1 0. 0 0
A 1 0.0 0
A
1 7 6 . 6 9
A
A
—►
0 , 0 0 3 . Z
0 0 4 4
?
- 1 8
1 1
y o u
P, -
Z
2 4
7 6 . 3 6
0.
* 0 . 0 0
0.
* 4 3 7
2 1 . 5
/,
* 1 . 7 7
1 8 .
* 1 2 0 8
1 .
2
1 .
5 , 0 C
n
L,
1 7 2 0
8 6
Du
3 0
o
(0
o
CO
o
X
to
z
7o
/0 *
O H
I
U
T J
U H
a
cr
Spi
o
fl.
o u
Q, heC O
o H
o
o
(tr
-21 -
Page 25

GT READ REPORT SAMPLE
Thank you
Cdl again
The print items and their print order
are the same as in AUTO READ/RESET
reports, except that there is no
Hourly Range Sales data memory is
provided for GT READ/RESET reports.
GT RESET REPORT SAMPLE
Thank you
Call again
12.-2a-86
X 20
*19438
4 9
«194J8
2 7.
1
*10217
2
19
*6 9 9 2
3
a
*ao
4
a
*ao
*409
*17218
1
*16267
*aa
I
*iao o
1 .
*50 0
*16767
1
*50 0
2
* 1 7. 2 0
0 0 28 i
-11
11
0
0
I d 3
* 8 7 1
n 3
3 3
0
'
(-
cn
(3
«
(3
X
1-
§
%-
<x
u
et -1
U h*
X
u
I _l
U H
<x
a.
<X -1
cc t-
£
O _J
0. h<t □
O H
%-
Q
g
È
■GT Read Header
■GT Reset Header
GT Reset Count
12.“2a-86
Z 2 0
* 1 9 4 3 8
* 1 9 4 3 8 g
1 2 7 .
* 1 0 2 . 1 7
2 19
* 6 9 9 2
3
a
*ao
4 a
* 0 . 0 0
* 4 0 9 i
I d 3 r i
* 1 7 2 1 8 §
1 %-
* 0 . 7 1
U 3 5
* 1 6 26 7 5f^
3 3 5
* 8 8 0 u (=!
L 5
* i a 0 0
1. £
* 9 0 0
* 1 6 7 . 6 7 5 S
1 ' g .
* 9 0 0 g
2 £
* 1 7 . 2 0 £
a 0 0 J . Z
0 0 2 9 i
11-12
5
4 9 . S
0
%-
-22-
Page 26

PROGRAMMING OF THE REGISTER
SETTING BASIC REGISTER REQUIREMENTS BY 6-DIGIT CODE ENTRY
This determines the GT print/non-print, CA Balance print/non-print,
Consecutive No. print/non-print, [AT/TL] key function, Time
display/non-display, Time print/non-print, Date print order, and %- rounding
selection.
CONDITION: After a reset
OPERATION: Mode Lock: SET
Enter a 6-digit code, depress fST].
ex.)0 0 1 0
[AT/TL] Key Function:
0: Amount Tender and Cash Total
1: Cash Total only
2: Amount Tender only (NOTE 1 next page.)
Time Display/ Non-display
Time Print/Non-print on receipts:
0: Time Non-display, Time Print
1: Time Display, Time Print
2: Time Non-display, Time Non-print
3: Time Display, Time Non-print
1
GTCGrand Total) Print/ Non-Print
CA Balance Print/ Non-print
0: Non-print (us)
1: Print (US)
2: Non-print (CA)
3: Print (CA)
Consecutive No. Print/Non-print
on receipts:
0 : Non-print
1 : Print
ST
Date Set and Print Order
0: MONTH-DAY-YEAR
1: DAY-MONTH-YEAR
2: YEAR-MONTH-DAY
Fraction Rounding Selection for %- Calculation:
0: Round Off
1: Round Up
2: Round Down
-23-
Page 27

NOTES: 1. Even when the [AT/TL] key is set as "Amount Tender only" (Code
2), the key will function as Total Key without a tendered amount
entry if the sale total is negative.
2. The preceding O's may be omitted. As in this example, 1011 may
be entered instead of 001011.
3. If a value other than the designated above is ever entered in the
above operation, the maximum value of the designated will auto
matically be regarded as the set value, (e.g.: If "3" is entered
for the %- rounding selection, it will result as the code "2"
(Round Down) is selected.
SAMPLE OPERATION:
To set the following requirements:
GT Print/ Non-print-- Print: 1
Consecutive No. Print-- Print: 1
[AT/TL]-- Amount Tender and Cash Total: 0
Time Display/Non Display, Time Print/Non-
print-- Display, Print: 1
Date Set and Print Order-- MONTH-DAY-YEAR : 0
%- Rounding Selection-- Round Off: 0
OPERATION: Turn the Mode Lock to SET.
Enter 001011 (or 1011),
depress [ST].
SETTING THE LISTING CAPACITY
The Listing Capacity (LC) is set in order to prevent an excessive amount
entry mistake by the operator at the earliest stage. For example, if the
LC is set to 5 digits and when the operator indexes 100000 ($1,000.00) for
a $100.00-priced commodity by mistake, the register will go into an error.
The LC to be set here will be effective in entering an amount through any
of the department keys in the "REG" mode.
CONDITION: After a reset
OPERATION: Mode Lock: SET
Thank you
Call again
1 ? - 2 0. - ? 6
0,01
an
0 0 4 5 §
11-23
Enter one-digit code (1 to 7) to designate
the limit digits for a registration, and
depress [#]
NOTE: Code 0, 8, or 9 cannot be set.
It will result in an error if
ever attempted.
SAMPLE OPERATION:
To set "5 digits" for the Listing Capacity:
Mode Lock to SET.
Enter 5, depress [#]
-24-
Thank you
Call again
1 2
- 2 a - 8 6
if QO 5
0 0 4 6 8
11-24
Page 28

SETTING TAX TABLE
The MA-205 model can calculate tax using one of three methods of tax
calculation, which can be programmed in the programmable memory. The three
methods are:
1. FULL-BREAK METHOD (COMBINATION OF NON-CYCLIC BREAKS AND CYCLIC BREAKS)
(Maximum 32 breaks programmable)
2. COMBINATION OF NON-CYCLIC BREAKS AND X RATE
(Maximum 32 breaks programmable)
3. % RATE ONLY
CONDITION: After a reset
OPERATION: Mode Lock: SET
Select one of the following three methods to meet your tax status:
1. FULL BREAK METHOD
Non-cycllc Breaks
1) Enter the first break point of price that is non-taxable limit,
and depress LTX/Mj .
2) Enter the next break point of price chat is the limit to collect
the tax amount l(i, and depress ГТХ/М1.
3) Repeat Step 2) above, with alternating each limit price for
collecting tax amount of 2é, 3^, 4¿ ... until the non-cyclic breaks
are all entered.
4) Depress [ST] to end the non-cyclic break entries.
Cyc lie Breaks
1 ) Do the same operation as in Step 1) above, entering each limit
price for each tax amount that increases by \i, followed by the
[TX/M] key. Enter the last price so that the difference between
the last non-cyclic break price already entered and the last cyclic
one will be a multiple of one dollar ($9.00 maximum). Otherwise,
the tax calculation will not function.
2) Depress [AT/TLI to end the cyclic break entries as well as the
entire tax program.
2, COMBINATION OF NON-CYCLIC BREAKS AND X RATE
Non-cyclie Breaks
1) Do the same operation stated above in 1 from Steps 1) through 4)
of Non-cyclie Breaks.
X Rate
1) Enter the tax percentage rate above the non-cyclic breaks. (The
rate may be entered in maximum 5 digits; 2 digits above the decima1
and 3 digits below the decimal point. For example, to set 4X,
enter "4000".)
2) Depress [AT/TL] to end the percentage rate entry as well as the
entire tax table program.
-25-
Page 29

3, 7o RATE ONLY
1) Enter "0", depress [TX/M], and depress [ST].
2) Enter the percentage rate in the same manner as in 2 Step 1) above.
Then depress [AT/TL] to end the entire tax table program.
NOTES: (1) A maximum of 3-digit value is entered for each break. It will
result in an error with a 4-digit value or more.
(2) If any incorrect value is found to have been set during program
ming, first complete the entire tax table program (up to the
[AT/TL] key operation), and do the correct tax table program
operation over againfrom the first.
(3) The tax table is reset with the rate 07o and no breaks when a
RAM clear has been operated.
-26-
Page 30

3. 7o RATE ONLY
107o to any amount
SETTING THE DATE
A standard calendar (up to the year of 2099) and TIME-OF-DAY (TOD) clock
circuit is installed in MA-205 model. Therefore, once the date and the time
is set, seldom is adjustment necessary. Neither is a leap year adjustment
necessary up to the year of 2099.
CONDITION: Any time outside a sale
OPERATION: Mode Lock; SET
6 [X] IMONTH I DAY I YEAR I
Mode Lock: SET
0 [TX/M]
[ST]
10000 [AT/TL]
-----
, [AT/TL]
I
1 to 12
01 to 31
8 6 , 8 7 , e t c.
The entry order may be DAY-MONTH-YEAR or
YEAR-MONTH-DAY instead of MONTH-DAY-YEAR
if so detemined in the operation "SETTING
BASIC REGISTER REQUIREMENTS BY 6-DIGIT
CODE ENTRY" on page 22.
OPERATION: Mode Lock: SET
5 [X] ^ I HOUR I MINUTE I -
0 to 24
00 to 59
[AT/TL]
-27-
Page 31

SAMPLE OPERATION:
To set the time ”10:00 a.m.”:
Mode Lock to SET.
Enter 1000, depress [AT/TL].
SETTING THE DEPARTMENT KEYS TO TAXABLE OR NON-TAXABLE STATUS
This sets each department key to taxable or non-taxable status.
CONDITION: After a reset
OPERATION: Mode Lock: SET
Depress [TX/M] followed by the Department Key whose taxable/non-taxable
status is to be reversed.
NOTES: 1. The [TX/M] key funct ions as status-reverse key in the SET
mode. Therefore, if it is depressed before a non-taxable
department key, the department is now set as a taxable depart
ment. If it is depressed before a taxable department, the
department is now set as a non-taxable department. If the
AMOUNT DISPLAY shows 0.01, the department is now set as
taxable. If it shows 0.00, the department is now set as nontaxable .
2. The [%-] k ey cannot be set to taxable status. It is always
a non-taxable key. However, the taxable status of the [%-]
key can also be reversed by using the [TX/M] key In the REG
mode, just as the taxable/non-taxable status of any department
can be reversed in the REG mode by using the [TX/m] key.
Thank you
Call again
0 0
. - 0 0. - 0
10- 00
0 0 0. 5 i
10-00
0
SAMPLE OPERATION:
To set Department 1 to be a taxable department (presumed that Dept.l has
been a non-taxable department):
KEY OPERATION
Mode Lock to "SET'
[TX/M]
[DEPT r
Then, to reset Department 1 to a non-taxable dept.:
Mode Lock to "SET"
[TX/M]
[DEPT 1]
(No prining will take place in this programming operation.)
-28-
AMOUNT DISPLAY
0.00
0.01
0.00
0.00
indicates "taxable’
, indicates
"non-taxable"
Page 32

SETTING THE %- PRESET RATE
A preset rate from 0% to 99% may be set on the [%-] key. Once a rate is set,
a simple depression of the [%-] key will function with the preset rate in the
REG mode. If a manual rate is entered before [%-], it will function with the
manual rate instead. If 0% is preset, the [%-] key will always require a
manual rate entry in REG mode operations.
SETTING AND RESETTING DRAWER-CLOSE COMPULSION
If the DRAWER CLOSE COMPULSION is set, all the key operations except [RF],
[JF], and [C] with the drawer kept open will result in errors.
CONDITION: After a reset
OPERATION: Mode Lock; SET
To set DRAWER-CLOSE COMPULSION;
Enter 1, depress [AT/TL],
To reset DRAWER-CLOSE COMPULSION;
Enter 0, depress [AT/TL],
NOTE: If any number other than
0 and 1 is entered in the
above operation, it will
be regarded the same as 1
(for set) is entered.
-29-
Page 33

SETTING HOURLY RANGE TABLE
This sets the hourly ranges for the report purpose. A maximum of 16 hourly
ranges may be set and the time division entry value must be 2-digit (i.e.
unit of one hour). When hourly ranges are set here, the sales data
registered in the REG mode will be processed into each hourly range memory
and the houry range sales data will be printed in the Read and Reset
reports, along with Department and Financial data.
CONDITION: After a reset
OPERATION: Mode Lock: SET
7 [X]
Ending time of each hourly rangej
Enter 0 to 23 (max. 2 digits)
to indicate the hour value
(no minute value may be entered.)
Repeat until all the required hourly
ranges are set. A maximum of 16 hourly
ranges may be set.
SAMPLE OPERATION:
To set the following hourly range table of
5 hourly ranges:
Mode Lock to SET.
from to Enter 7
22:00
10:00 Enter
, depress [X]
10, depress
(previous day)
10:00 12:00 Enter
12:00
15:00 Enter
15:00 22:00 Enter
12, depress
15, depress
22, depress
m
[#]
m
m
m
[AT/TL]
Depress [AT/TL] to end,
NOTES: 1. In setting the hourly ranges, enter from the
early ending time to later ones correctly in
order.
2. Do not set an hourly range across 24:00.
If ever set, the sales data in that hourly
range will not be processed. The hourly
range from the last time division (ending
time) to the first time division will auto
matically be set as the first hourly range,
as can be seen in the SAMPLE OPERATION.
3. In need of resetting the hourly range table
once set, operate as follows:
Mode Lock to SET, 7 [X] 0 [y>] [AT/TL]
4. In need of changing the hourly range table
once set, partially or entirely, do the
entire hourly range table setting operation
again.
-30-
Page 34

PROGRAM VERIFICATION
VERIFYING THE PROGRAMMED DATA
The programmed data may
be read by issuing a
program verification
receipt by the following
operation:
Thank you
Call again
OPERATION: Mode Lock: X
Depress [ST
1 2. - 2 0. - 8 6
0,0 10.1 1
C C 5
10.
10 0
0 0 5 5 s
1 1 - 3 4
Date
6-digit Code for Basic Requirements
Listing Capacity
Taxable Department
Non-Taxble Departments
[%-] Key Preset Rate
Drawer-close Non-compulsory
Consecutive No.
Current Time
TAX CALCULATION TEST
Calculation test may be performed to check if the programmed tax table
functions properly.
OPERATION^ Mode Lock: X
Enter any amount through the numeric keys, and depress [TXBL TL] . The
tax due to the entered amount will be displayed. (No printing will take
place. The amount entered or the obtained tax amount will not affect
any sales total memories.) Repeat the amount entry and the [TXBL TL]
operation as many times as desired, alternating the amount, until the
programmed tax table is found to be set properly.
ex.) KEY OPERATION
Control Lock to X.
Enter 200
Depress [TXBL TL]
Enter 1245
Depress [TXBL TL]
VERIFYING THE TIME
The current time can also be read by turning the . Mode Lock to Che "REG"
position. Refer to "TIME DISPLAY" on page 4.
AMOUNT DISPLAY
2.00 -- entered amount
0.20 -- tax due
12.45 -- entered amount
1.25 -- tax due
(in case tax rate of 107o
has been programmed)
-3 1 -
Page 35

PAPER ROLL REPLACEMENT AND OTHER MAINTENANCE OPERATIONS
INSTALLING THE RECEIPT PAPER
Fig. 2
Fig. 3
Turn the
Mode Lock to the "REG"
position .
Remove the Paper Cover, and remove
the Journal Winding Reel. (Fig. 1)
Hold a new paper in the direction as
shown in Fig. 2 so that the paper end
will be fed from the bottom.
Fold the paper end firmly as shown in
Fig. 3 to ease the insertion.
Place the paper roll in the
outer-side holder of the two roll
holders. (Fig. 4)
Insert the paper end into the Receipt
Inlet, feed the paper in while
pressing down the [RF] key. (Fig. 5)
7
When all the folded portion comes
out, tear off the unnecessary part
with the attached cutting edge. (Fig.
6)
8
Go on to INSTALLING THE JOURNAL PAPER
steps if necessary, or go on to Step
9 below if not.
9. Attach the Paper Cover.
10. Depress the [NS] key to issue a
receipt to check if the paper has
properly been set.
Fig. 4
Fig. 5
Receipt
Inlet
Fig. 6
Cut the paper with tne edge.
-32-
Page 36

REMOVING THE RECEIPT PAPER
Fig. 7
Journal
Inlet
Fig. 9
1. Remove the Paper Cover.
2. Press the Free Lever down and pull
the old paper core upward to remove
the remaining paper end. (Fig.7)
INSTALLING THE JOURNAL PAPER
1. Turn the
Mode Lock to the "REG"
position.
2. Remove the Paper Cover by pulling it
upward, and remove the Journal
Winding Reel. (Fig.l)
3. Follow Steps 3 and 4 of INSTALLING
THE RECEIPT PAPER on the previous
page.
in
the
the
two
4. Place the paper roll
inner-side roll holder of
holders. (Fig.8)
5. Insert the paper end into the Journal
Inlet, feed the paper in while
pressing down the [JF] key. (Fig.9)
6. When the paper comes out for a enough
length, open the folded end.
(Fig.10)
7. Wind the paper end on the Journal
Winding Reel two or three times as
shown in Fig.11.
Set the Journal Winding Reel to the
8
Reel Holder. (Fig.12)
Attach the paper cover.
Mg. 10
Fig. 11
REMOVING THE JOURNAL PAPER
1. Remove the Paper Cover.
2. Press the [JF] key to wind up enough
portion of the journal paper, and
then tear off the paper, holding the
Journal Winding Reel.
3. The wound-up portion of the paper can
easily be removed from the Reel by
pulling it side way. (Fig.13)
4. If enough paper remains on the roll,
follow Steps 6 through 9 above; if
paper is running out, follow Steps 1
through 9 above.
Fig. 13
-33-
Page 37

REPLACING THE INK ROLL
rig. 1
Fig. 2
_)\i Pig- 3
When the receipt and journal print
becomes too light to read, replace the
Ink Roll in the following manner.
1. Turn the Mode Lock to the "OFF”
position.
2. Remove the Paper Cover. (Fig.l)
3. Hold the Ink Roll Knob and pull it
upward. The Ink Roll will be
removed. (Fig.2)
4. Insert a new Ink Roll into the space
between the Ink Roll Holder and the
Frame. (Fig.3)
5. When replacement is completed, attach
the Paper Cover (Fig.4) and turn the
Mode Lock to the "REG" position.
* The Ink Roll is a comsumable product
and a geni’ ine part supplied by TEC.
Ask your TEC representative for an
additional order. (Fig.5)
REPLENISHING INK TO THE STORE MESSAGE STAMP
Ink Roll
Fig. 5
Fig. 4
When the store message is printed too
lightly, replenish ink in the following
manner.
1. Turn the Mode Lock to the "OFF"
position.
2. Open the Paper Cover. (Fig. 1)
3. Hold the both sides of the stamp unit
with your fingers and remove it by
pulling it upward. (Fig.6)
4. Apply ink to the replenishment pad
at the back of the stamp unit. The
amount of refilling should be
adjusted according to the density of
the printed message. (The supplied
ink bottle contains 5cc of ink.)
(Fig.7)
5. When replenishing of ink is
completed, attach the Paper Cover
(Fig.4) and turn the Mode Lock to the
"REG" position.
Fig. 6
Ink Bottle
Fig. 7
Stamp Pad
Page 38

Fig. 1
MANUAL DRAWER RELEASING
The drawer opens automatically when a
registration is performed. In the event
of a power failure or other troubles,
the drawer can be opened manually in the
following manner,
1. Insert the Drawer Release Key into
the Drawer Release Lock and turn the
key clockwise. The drawer will now
open. C Fig,1)
2. The Drawer Release Key can be taken
out by returning it to the original
position.
3. When the drawer is closed, it is
automatically locked and will not
open without the Drawer Release Key
or normal registering operation,
REMOVING THE DRAWER
1. Pull the drawer out, and when it
stops by the stopper, lift the drawer
up and pull it again (Fig.2). When
it stops again by the roller fixed in
the drawer case, lift it and pull it
again (Fig.3).
2, When returning to drawer, follow the
reverse procedure to removing.
GDC (Cash Drawer Cover) LOCK
Locking CFig.4)
1, Push the Cash Drawer Cover to
the drawer-end.
2. Press the cover lightly, insert
the key into the key-hole on the
cover, and turn it to lock.
Opening
Release the lock by the key, and
lift the front end of the cover.
-35-
Page 39

SPECIFICATIONS
SIZE
.......................
.....................
.............
..........
.............
........
POWER REQUIRED
POWER CONSUMED
SIZE OF RECEIPT AND JOURNAL TAPE
AMBIENT TEMPERATURE
WEIGHT
400mra(width) x 460mm(depth) x 381min(height)
14.5kg
AC lOOV, llOV, 117V, 220V, 240V; 50/60Hz
(depending on the destination)
4.8W when non-operating
19W when operating
38mm(width) x 70Tnm(diameter)
0°C to 40°C, 15% to 90% Relative Humidity
-36-
Page 40

Page 41

 Loading...