

Page 1

TEC Electronic Cash Register
MA-1900 (M/S SYSTEM)
TEC
-y. V .■! V
A -l ;■
■: I-
TOKYO ELECTRIC CO., LTD,
Page 2

This equipment generates, uses, and can radiate redio frequency energy and if not installed
WARNING
and used in accordance with the instruction manual, may cause interference to radio
communications. It has been tested and found to comply with the limits for a Class A
computing device pursuant to Subpart J of Part 15 of FCC Rules, which are designed to
provide reasonable protection against such interference when operated in a commercial
environment. Operation of this equipment in a residential area is likely to cause interference
in which case the user at his own expense will be required to take whatever measures may
be required to correct the interference.
-—^~—
"THIS DIGITAL APPARATUS DOES NOT EXCEED THE CLASS A LIMITS FOR RADIO
NOISE EMISSONS FROM DIGITAL APPARATUS SET OUT IN THE TADIO INTERFER
ENCE REGULATIONS OF THE CANADIAN DEPARTMENT OF COMMUNICATIONS."
"LE PRÉSENT APPAREIL NUMÉRIQUE N’EMET PAS DE BRUITS RADIOÉLECTRIQUES
DÉPASSANT LES LIMITES APPLICABLES AUX APPAREILS NUMÉRIQUES DE LA
CLASSE A PRESCRITES DANS LE RÉGLEMENT SUR LE BROUILLAGE RADIOÉLEC
TRIQUE ÉDICTÉ PAR LE MINISTÈRE DES COMMUNICATIONS DU CANADA."
.......................
—— WARNING — ■ ■ —
..........
■ ■
These technical data are subject to export control law
of Japan/COCOM regulations, and diversion contrary
thereto is prohibited.
TOKYO ELECTRIC CO.. LTD.
Page 3

TABLE OF CONTENTS
1. INTRODUCTION ......................................................................................................................... 1
2. SYSTEM CONFIGURATION........................................................................................................ 1
3. HARDWARE DESCRIPTION ...................................................................................................... 2
3-1. COMMUNICATION SEQUENCE .................................................................................................. 2
3-2. HARDWARE COMPOSITION ....................................................................................................... 2
3-3. HARDWARE DIFFERENCES FROM STAND-ALONE ECR
4. ADDITIONAL FUNCTION KEYS AND REGISTERING PROCEDURE ....................................... 4
.................................................
2
E01-11006
page
5. MANAGER’S OWN OPERATIONS IN “MGR” MODE
.........................................................
6
5-1. RE-ENTRY OF TRANSACTION DATA RECORDED OUT OF TRANSACTION BUFFER 6
5-2. RE-ENTRY OF CHECK TRACK SALES DATA .......................................................................... 7
5-3. REVERSING THE CARD CHECK FUNCTION STATUS ........................................................... 8
6. DAILY OPERATION FLOW OF MASTER-SATELLITE SYSTEM
..............................................
9
7. READ AND RESET REPORTS ................................................................................................ 11
7-1. TERMINAL REPORTS ............................................................................................................... 11
7-2. IN-LINE REPORTS .................................................................................................................... 12
8. PROGRAMMING OPERATIONS............................................................................................... 22
9. DLL (Down Line Loading) OPERATIONS
..............................................................................
22
10. OTHER OPERATIONS.............................................................................................................. 23
Copyright © 1989
by Tokyo Electric Co., Ltd.
All Rights Reserved
1-14-10 Uchikanda, Chiyoda-ku, Tokyo, Japan
Page 4

Page 5
1. INTRODUCTION
Making the most of the functions of the previously developed MA-1900 stand-alone, the MA-1900
can be developed into a master-satellite system.
Using a master terminal designed by adding a master IFU board to an MA-1900 stand-alone and
satellite terminals to which satellite IFU boards are added, the MA-1900 M/S system can comprise
an M/S Manual PLU Entry system made up of up to 32 units or an M/S Scanning System by which
system files having up to 8,200 items can be held by a maximum of 4 units. By connecting a PC,
the system can also be expanded into a transaction data capture system.
Operational functions on each terminal ECR basically stay the same as on a stand-alone ECR,
except those deleted, changed, or added for this M/S system use which are described in this
manual.
Therefore, any detail information not described here, please refer to the Owner’s Manual for the MA-
1900 series issued for the stand-alone level.
EOl-11006
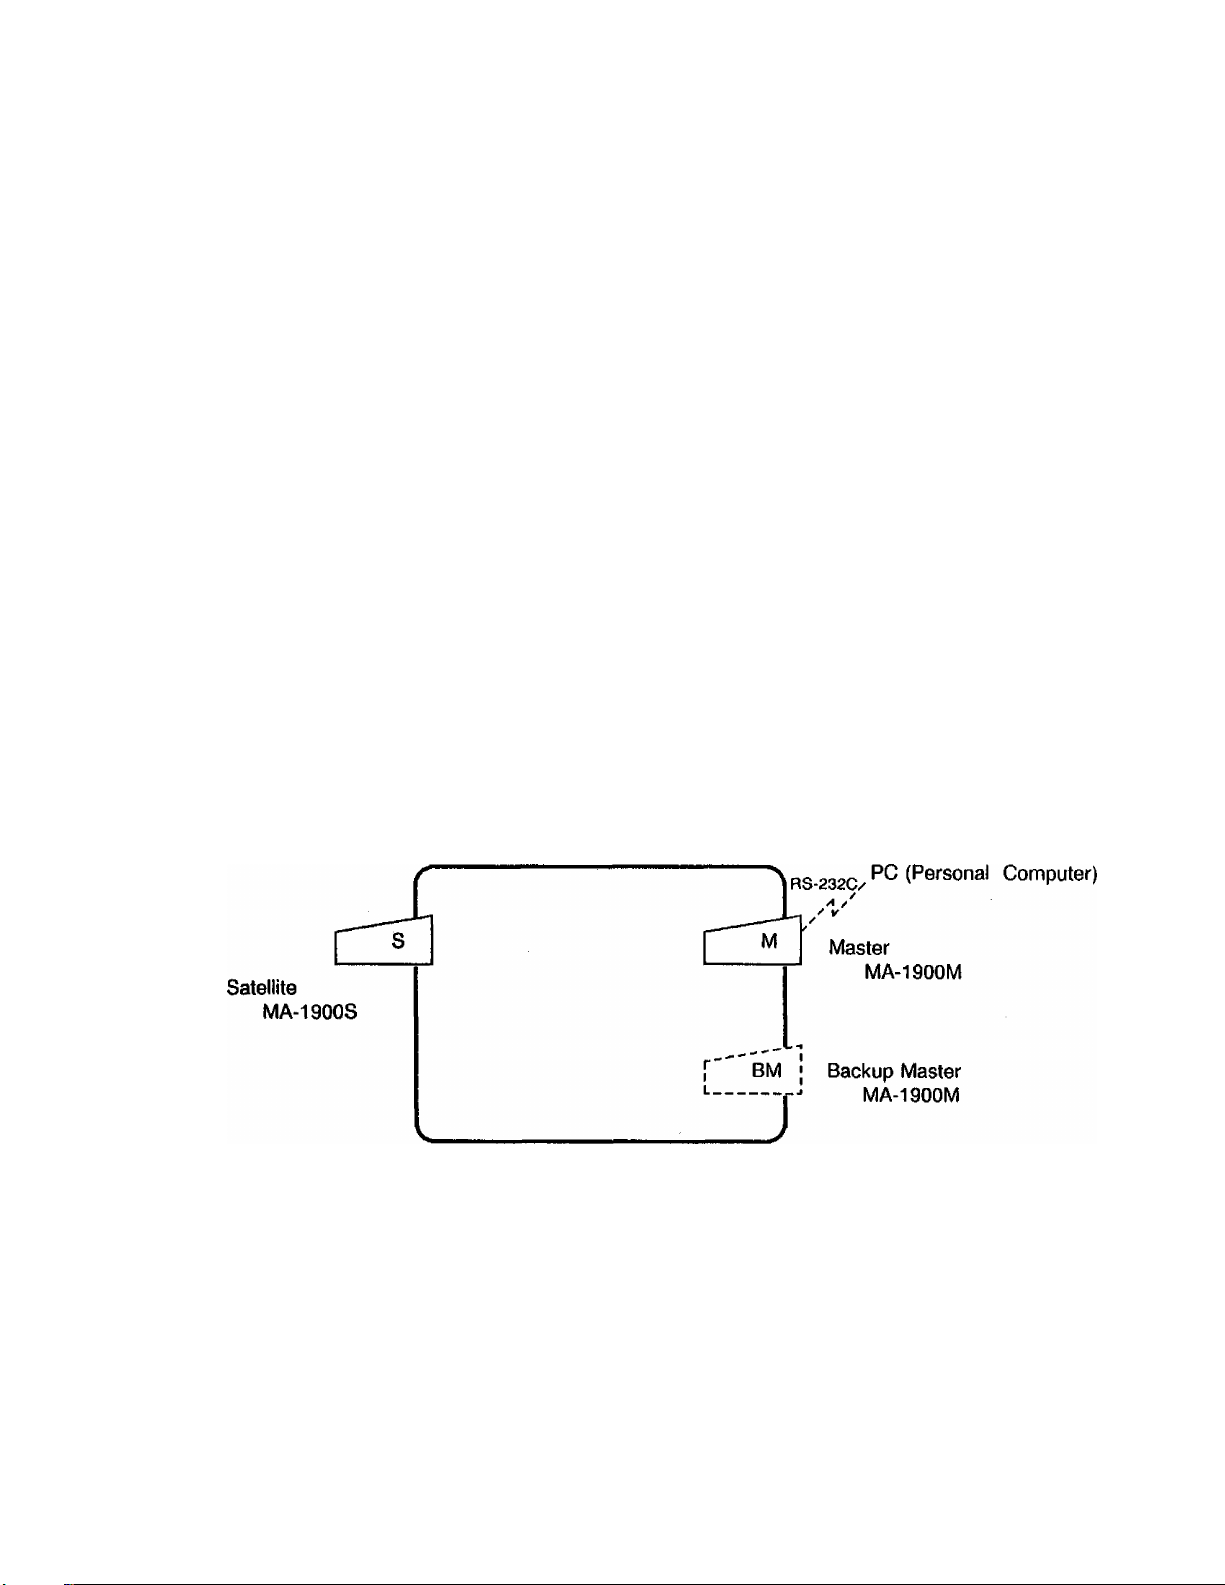
2. SYSTEM CONFIGURATION
J
This system can be configured as one of the following two system types. The number of MA-1900
ECR units that can be connected in each system is indicated below.
(1) M/S Manual PLU entry System Type Max. 32 units
(2) M/S Scanning System Type Max. 4 units
TDLC 31.25KBPS
- 1 -
Page 6

3. HARDWARE DESCRIPTION
3-1 COMMUNICATION SEQUENCE
TDLC (TEC Data Link Control) / 31.25KBPS
3-2 HARDWARE COMPOSITION
A Master-Satellite System is realized by adding the following in-line units to each stand
alone ECR:
Master (or Backup Master) ECR
Stand-alone Spec. + Master In-line Unit
Satellite ECR
EOl'11006
• Interface Board
• In-line Cable
• RTR position (on GT Lock) and RTR Key
Stand-alone Spec. + Satellite In-line Unit
• Interface Board
• In-line Cable
NOTE: The components for the Backup Master ECR is exactly the same as those for the
Master ECR. The distinction in an actual system loop will be made by the “RTR**
position of the GT Lock for the Master use and the Neutral Position for Backup
Master use. (A key operation to declare the change from Master to Backup Master,
or vice versa, is further necessary.)
3-3 HARDWARE DIFFERENCES FROM STAND-ALONE ECR
1) GT LOCK (for Master ECR or Backup Master ECR)
The “RTR” position is newly provided.
\ * / QJ2 (For a Satellite ECR, the lock remains the same as a
stand-alone ECR.)
“RTR” position
Must be turned to this position when the ECR is
installed as the Master ECR and any in-line mode
operations are required.
(Neutral Position) . .
A Backup Master ECR must keep this potion while it is
used as a Satellite ECR. When the original Master
ECR becomes down, the Lock can be turned to the
“RTR” position to enable this ECR to be used as a
new Master ECR of the system. (Refer to the NOTE in
3.2 above.)
-2 -
Page 7
2) DISPLAY (common for Master, Backup Master, and Satellite ECRs)
EOl-11006
55^
■ M
W'
2^
DPT
a
s
RPT
/ n Q
1 U J
V V V
SIGN SLP
ON
This triangular lamp flickers on a Satellite ECR when an in-line commu
nication is being performed with the Master ECR, or on the Master ECR
with the PC.
In-line Mode Initial Display fon Master ECR only)
)
RTR/SETMode: -> r~t r—1 r
/
V
TRA)
NING
......
;í.íí^
fli
¿SSií
A
A r
/
J z
L J
V V
REG (-)
4 3 2 1
.... Upper Row
Lower Row
Digit No.
:d00
RTR/X Mode:
RTR/Z Mode;
RTR/MGR Mode:
:d00
:d00
:d00
IN-LINE ERROR CODE AND MESSAGE TABLE
(to be added to the table for the Stand-alone Level)
Error
Code
21
22
23 DLL Receiving Error
24
25
26
27
28
29
30 Check Digit Error
31
32
33 PLU Table DLL Receiving (from PC) Error
Error Message
Content or Cause of Error
Satellite BUSY Error
Master BUSY Error
Sending No Good in DLL Receiving
NAK (Not Acknowledged) Received in Inquiry
The Check Track Code Being in Use
PLU Table Version does not match.
The Card entered through [CARD CHK] is
prohibited. (Or call Manaaer.l
- vacant ”
HOLD Error for a Sign ON
Consolidated Area is in use.
-3-
Page 8

4. ADDITIONAL FUNCTION KEYS AND REGISTERING
PROCEDURE
The following are keys that can be installed on a MA-1900 ECR of Master or Satellite specifications,
in addition to the stand-alone specifications, and the registering procedure using each of the keys.
EOl-11006
PLU
PLU ADD KEY ([PLU ADD])
ADD
This key is used to add the table of an unprogrammed PLU item (Manual Entry
PLU or Barcode Label Item) to the PLU program file memory of the ECR.
The PLU can be entered by first depressing this key, next entering the PLU Code
(or by scanning the barcode), and then entering the link Department Code and the
preset price. The PLU entered in this way can be entered normally from the next
time on.
REGISTERING PROCEDURE FOR AN URGENT PLU TABLE ADDITION
This operation is effective when an “E04” error (undefined code) occurs on entering a PLU
code or scanning a barcode of an item in the ordinary entry procedure. The error means
that the PLU code has not been programmed in the PLU file. By operating the following
procedure, the PLU is entered as a sale item, and at the same time, it is programmed as an
additional PLU so that it can be entered as an ordinary PLU thereafter.
Mode Lock: REG, MGR, or El / GT Lock: Neutral (operable on Master or Satellite ECRs)
[PLU ADD] -► ( |Quantitv| [X] )
in case of quantity extension
|PLU Code| [PLU]
Or, scan the barcode.
ex.)
[DEPT]
|Price| [AMT]
—► |Dept Code] [DP#]
Link Department Designation
An operator attempts to enter 4 items of PLU Code 1234 at unit price $2.00 (linked to
Department 3) during a sale, but an '*E04” error results. Therefore, the following is
operated to enter and program this PLU item.
Mode Lock & GT Lock positions: same as preceding item entries.
(NOTE: [X] = [@/FOR] ;
[PLU ADD] (to declare an additional PLU entry and programming)
4[X] (to enter the quantity "4")
12345 [PLU] (to enter the PLU Code; can be replaced by scanning the barcode)
3 [DP#1 (to enter the Link Department Code)
200 [AMT] (to enter the unit price of the item)
-4-
Page 9

E01-11006
CARD
CARD CHECK KEY ([CARD CHK])
CHK
This key is used to enter the specific card No. of the credit card for payment of a
sale of a customer. (Please note that the [CARD No.] key is used to enter a
Credit Card Company Classification Code but not the specific No. printed on each
card.)
On a card No. entry through this key, the No. is inquired to the "Card No. Negative
Check List" programmed in the Master ECR file. When the No. is not found in the
list, the card No. will normally be entered and a finalizing operation using a Media
Key can follow. When the No. is found in the list, an "E28” error results and the
status code No. 1 to 9 (indicating why the card cannot be accepted) is displayed in
the AMOUNT portion of the Operator Display. The operator should call the
manager as to handling of this card.
REGISTERING PROCEDURE FOR A PAYMENT WITH A CARD
Mode Lock: REG / GT Lock: Neutral (operable on Master or Satellite ECRs)
— —► [Number printed on the card| [CARD CHK] —► —
This operation is allowed at the top of a sale or any time during a sale if before finalizing
the sale. When an “E28" error results, the operator calls the manager. The manager
then can select one of the following solutions:
1. Tells the customer that the card cannot be accepted referring to the displayed
status code (1 to 9). (Or, lets the operator do so without calling the manager.)
2. To allow payment by this card as an exceptional case for some reason, turns
the Mode Lock to “MGR” position using the MGR or MA key, and depresses
the [CARD CHK] key. The card No. is then accepted and printed.
NOTE: The card check function is activated in the REG mode only; in MGR or □ mode,
the card No. entry is accepted without an inquiry to the “Card No. Negative
Check List“. Please also note that the card check function can be set to
“active" or “non-active" in the SET or MGR mode.
ex.) An operator enters sale items of a customer. When all the items have been entered,
the customer says that he wants to pay for the sale with his “ABC Credit Company”
card. The No. printed on the card is 12345-678-901. (Presumed that the Card
No. 1234-678-901 is not in the Card No. Negative Check List, and that the store assigns
Code 1 to the “ABC Credit Card Company”.)
Mode Lock& GT Lock positions: same as preceding item entries.
The sale items have been entered.
[ST] or [TXBL TL] (to obtain the sale total on the display)
12345678901 [CARD CHK] (Card No. Entry)
1 [CARD NO.] (to dassify the Credit Card Company; i tor “ABC Credit Card Company")
Finalize the sale using the [CRT] (tor EU models) or [Chg] (tor us/CA models) key.
-5 -
Page 10

5. MANAGER’S OWN OPERATIONS IN “MGR” MODE
5-1. RE-ENTRY OF TRANSACTION DATA RECORDED OUT OF
TRANSACTION BUFFER
This operation is applied only when a PC (Personal Computer) is connected to the system
and the system option “Transaction Data Sending YES’* is selected.
The transaction data, arising from sale entries on the ECR, are first stored into the
“Transaction Buffer” of the ECR. Usually, the data in the Transaction Buffer are
automatically sent to the PC via the Master ECR in any of the following conditions:
When the empty area of the Transaction Buffer of the ECR becomes less than the
1.
programmed percent. In this case, the “REG” triangular lamp flickers to warn of the
near-full condition of the buffer. When the empty area regains more than the
programmed percent, the lamp flickering is canceled.
When a Transaction Data Collection command is sent from the PC to the ECR via
2.
the Master ECR.
However, in case Transaction Buffer becomes full before sending the transaction data in the
buffer to the PC, the message “ = = - = =TRAN FULL= = = = = ” is printed after the
Trailer Line (the line of Date, Time, Register No., Clerk ID, Consecutive No.) on the journal.
Sale entries thereafter can normally be registered but the data cannot be stored into the
Transaction Buffer. These data should be re-entered later in the “RE-ENTRY MODE”, as in
the following, to be sent to the PC as transaction data, referring to the sale entry record
marked with the TRAN FULL message on the journal.
EOI-11006
Any time outside a sale (Sign On or Cashier Key ON is required.)
Operable on Master or Satellite ECRs
1 [Trainina Mode Sign-ON/OFF Code] [#1 ( = [#/C?D])
“1" is
fixed.
|DAY-MONTH-YEAR| —]
|MONTH-DAY-YEAR| -
|YEAR-MONTH-DAYl -
The date entry order is determined by the
system option s^ection.
01 to 99
l#l
|Register No.
Max. 6 digits
L». [Cashier Code| [Consecutive No.|
z digits
4 digits
[#]
[#]
Sale item entries.
1,
to RE-ENTRY Mode
End on the next page
- 6 -
Page 11

END. (Mode Lock; MGR / GT Lock; Neutral)
Same as the RE-ENTRY MODE START operation.
NOTES 1, The Consecutive No. will not increment by any entries in the RE-ENTRY Mode.
2. The data entered in the RE-ENTRY Mode will not be processed into any sales or report
total memory.
3. Print occurs on both the receipt and the journal.
4. The drawer will not open.
5. No print occurs on the Remote Slip Printer.
5-2. RE-ENTRY OF CHECK TRACK SALES DATA
This operation is applied only when the system option “Check Track (Customer File
Memory)” is selected instead of a Previous Balance Manual Entry. When a sale is entered
in the Charge Posting Mode and the sale data cannot be sent to the Check Track file
memory in the Master ECR, an “E26” error results, indicating that the specific Customer
File is in the in-use condition. Thereafter, that specific Customer File No. cannot be used on
any ECR connected to the in-line cable. In this case, the in-use condition of the Customer
File can be released by the following operation procedure.
EOI-11006
When an “E26” error occurs for a charge posting procedure.
2 [Training Mode Sion-ON/OFF Code| [#] (= [#/CID])
T
“2" is
fixed.
[Customer File Code| [PICK UP BAL]
Same as the CHECK TRACK RE-ENTRY START operation.
01 to 99
(Mode Lock; MGR / GT Lock: Neutral)
[New Balance Amount] [AWIT]
for a positive (debit) balance
[RTN MDSE] [New Balance Amount] [AMT]
for a negative (credit) balance
1
to CHECK
TRACK RE
ENTRY END
operation
- 7 -
Page 12

NOTES 1. No transaction data to be sent to the PC will arise by operations in the CHECK TRACK
RE-ENTRY Mode.
2. The operation is accepted even when the designated Customer File Code is not actually
in the “IN-USE” condition.
3. As the “New Balance Amount”, a maximum of 10 digits can be entered within the range
from -1000000000 70,000,000.00; to +8999999999 ($89,999,999.99).
5-3. REVERSING THE CARD CHECK FUNCTION STATUS
As described for the (CARD CHK] key on page 5, it is programmable whether the Card No.
entered through the [CARD CHK] key is inquired to the “Card No. Negative Check List” or
not. The status can be set or reversed in the SET mode, and it can also be reversed in the
MGR mode as in the following operation procedure.
EOM1006
Any time outside a sale
(Mode Lock: MGR / GT Lock: Neutral)
3 [Training Mode Sion-ON/OFF Code| [#j (= [#/CID])
T
“3” is
fixed.
01 to 99
- 8 -
Page 13

6. DAILY OPERATION FLOW OF MASTER-SATELLITE
) SYSTEM
In a Master-Satellite System, a certain order of jobs on the Master and Satellite terminals are
provided. If the necessary jobs are not proceeded in the correct order, sale entries may not be
operated or report collections may not be possible. The following chart shows the basic daily
operation flow on the Master and Satellite terminals.
EOl-11006
MASTER TERMINAL
SATELLITE TERMINALS
STORE OPEN
(To be continued on the next page.)
-9-
Page 14

STORE CLOSE
EOl-11006
(Continued from the preceding page.).
(MASTER TERMINAL) (SATELLITE TERMINALS)
[For the “HOLD RESET” type, In-line Report cannot be taken for a terminal from ,
¡the Master Terminal and the “HOLD” condition of the terminal cannot be released [
¡for some reason, an “ENFORCED HOLD RELEASE” can be operated on the }
[terminal. (Refer to Chapter 10.)
r ^
f
Turn OFF the power of every terminal to end the business for the day.
- 10 -
I
Page 15

7. READ AND RESET REPORTS
7-1. TERMINAL REPORTS
Since most reports are taken as in-line reports on the Master Terminal, many reports which
are available on the individual stand-alone ECR basis cannot be taken on Master or Satellite
ECRs of the in-line system. The following are the reports which are listed in the
MANAGER'S GUIDE of the Owners Manual for the MA-1900 stand-alone level but cannot
be taken on any ECRs of the in-line system. Other reports not listed below can be taken
even in the in-line system. (Before taking those reports, however, please read the next
section 7-2: In-line Reports.)
TERMINAL REPORTS that cannot be taken on any ECRs of the in-line system
DAILY REPORTS GT REPORTS
EO1-11006
Report
Header
Z13
X14 PLU STOCK READ REPORTS
X15
PLU RESET REPORTS
• Zone PLU Reset
• Sort PLU Reset
• All PLU Reset
• Individual PLU Stock Read
• Zone PLU Stock Read
• Sort PLU Stock Read
• All PLU Stock Read
CUSTOMER FILE READ REPORTS
(for Check Track Memory type only)
• All Files Read
• Individual File Read
• Zone Files Read
• Zero-balance Files Read
• Debit-balance Files Read
• Credit-balance Files Read
REPORT NAME
Report
Header
GTX04
GTZ04
GTX05
GTZ05
GTX13
GTZ13
REPORT NAME
CASHIER GT READ AND RESET
REPORTS
• All Cashiers GT Read
• All Cashier GT Reset
SALESPERSON GT READ AND
RESET REPORTS
• All Salespersons GT Read
• All Salespersons GT Reset
PLU GT READ AND RESET
REPORTS
• Individual PLU GT Read
• Zone PLU GT Read
• Zone PLU GT Reset
• Sort PLU GT Read
• Sort PLU GT Reset
• All PLU GT Read
• All PLU GT Reset
NOTES: When the **HOLD RESET” type is selected for in-line reset operations, reset
report takings on individual ECRs must first be operated to make the ECRs into
the “HOLD” condition, followed by in-line reset report collection command
entries on the Master ECR. As for details, refer to the next section (7-2).
- 11 -
Page 16

7-2 IN-LINE REPORTS
NON-HOLD RESET AND HOLD RESET
There are two types of In-line reset report takings -- NON-HOLD RESET and HOLD
RESET. One of the two types is selected by system option. The following are the
differences between the two reset types; the reset command executions on the Master
Terminal are the same.
1) NON-HOLD RESET
This type is helpful to a store where only the store manager or a person authorized
by the manager is in charge of taking reset reports at the end of the day and no one
else is expected to help him. In this method, the operator (or manager) can execute
In-line Reset Commands on the Master Terminal only and no operations are
required on each Satellite Terminal.
EXCEPTIONAL RESET REPORTS
• Cashier Resets
EOl-11006
Cashier Key Method
Individual Cashier Reset reports can be taken as manual resets on
each terminal regardless of the option “Manual Resets on Individual
Terminals Allowed“. In this case, however, the report data memory
is cleared, and In-line Cashier Reset Reports on the Master
Terminal will no longer be possible. (When the “Money Declaration
Feature“ is selected, follow the description for “Money Declaration“
in the MANAGER’S GUIDE of the Owner’s Manual for the MA-1900
stand-alone level.)
Cashier Signing Method
Individual Cashier Reset reports can be taken as manual resets on
each terminal if the option “Manual Resets on Individual Terminals
Allowed" is selected. In this case, however, the report data
memory is cleared, and In-line Cashier Reset Reports on the Master
Terminal will no longer be possible.
• AH Salesperson Resets
The same is applied as the “Cashier Signing Method” above.
PROGRAMMABLE OPTIONS
• Manual Resets on Individual Terminals Allowed
If this option is selected and a terminal is manually reset, the terminal
will go into the “HOLD” condition just as in the HOLD RESET type later
described. Thereafter, the terminal can only take other manual reset
reports or wait for the In-line Reset Report Collection command from the
Master Terminal.
• Each Terminal Reset Report of and from the individual terminal Issued on a
Master Terminal’s In-line Reset Report Collection Command
- 12 -
Page 17

• Financial Reset Report of each terminal Issued from Master Terminal as part
2) HOLD RESET
This type is designed to take In-line Reset Reports on the Master Terminal by the
store manager after taking the individual' manual resets on each terminal. Thus this
method may be useful for a store where the last cashiers of the day who are
responsible for the respective terminals take care of reset report takings of each
terminal at the end of the day and the manager will start collection of the data of
these terminals thereafter.
The following are the reset reports to be taken as manual resets on each terminal.
When any one of them is executed on a terminal, the message “HOLD” is displayed
in the upper row of the Operator Display and no operations will be allowed except
other reset report takings or an ENFORCED CLEAR OF HOLD CONDITION
operation (the HOLD condition is cleared when In-line Reset Report Collection
commands are sent from the Master Terminal thereafter). Please note that all the
reset reports listed below should be taken, one after another, on this stage.
Otherwise, at the time of In-line Reset Report Command executions on the Master
ECR, the data not yet reset on a terminal will not be able to be sent to the Master
Terminal.
E01-11006
This option may be useful if the store wants sales data recorded by
each terminal as well as the entire store’s consolidated data issued by
the Master Terminal.
of In-line Financial Reset Report.
This option may be useful if the store wants sales data of the financial
data recorded by each terminal. (This option may not be needed if the
option “Manual Resets on Individual Terminals Allowed” is selected.
Manual Reset Reports on Each Terminal (including the Master Terminal as
Satellite Function):
DAILY RESET REPORTS TO RESULT IN “HOLD" CONDITION
(Mode Lock; Z / GT Lock: Neutral)
• Financial Reset (Daily)... 3 [AT/TLJ
• Hourly Range Reset (Daily)... 10 [AT/TL]
• All Department Reset (Daily)... 11 [AT/TL]
GT RESET REPORTS TO RESULT IN “HOLD” CONDITION
(Mode Lock: Z / GT Lock: GTZ)
The following reports may only be taken on a certain period basis (weekly,
monthly, etc.) but not daily.
Financial Reset (GT) ... 3 [AT/TL]
All Department Reset (GT) ... 11 [AT/TL]
Day-of-Week Reset... 16 [AT/TL]
Day-of-Month Reset... 17 [AT/TL]
- 13 -
Page 18

HANDLING OF OTHER MANUAL RESET REPORTS
• Individual Cashier Resets
Cashier Key Method ... Set the Cashier Key of the required
cashier, 4 [AT/TL]
Cashier Reset reports can be taken as manual resets on each
terminal regardless of the option '‘Manual Resets on Individual
Terminals Allowed”. In this case, the sales data memory is
cleared on taking the reset report and In-line Cashier Reports on
the Master Terminal will no longer be possible. (When the
"Money Declaration Feature” is selected, follow the description
for “Money Declaration” in the MANAGER*S GUIDE of the
Owner*s Manual for the MA-1900 stand-alone level.)
Cashier Signing Method ... [Cashier Code| [LOG]
Cashier Reset reports can be taken as manual resets on each
terminal if the options “Manual Resets on Individual Terminals
Allowed” is selected. In this case, the sates data memory is
cleared on taking the reset report and In-line Cashier Reports on
the Master Terminal will no longer be possible.
EOI-11006
• All Salesperson Reset ... 5 [AT/TL]
The description for the “Individual Cashier Resets" is applied to the
Salesperson Resets.
PLU Reset reports can by no means be taken as manual reset reports
on individual terminals.
PROGRAMMABLE OPTIONS
• Manual Resets on Individual Terminals Allowed
For the HOLD RESET type, this option is only applicable to the Cashier
Reset (under the Cashier Signing Method) and Salesperson Reset
reports. Taking any of those manual reset reports will immediately clear
the report data memory and will not make the terminal into the HOLD
condition. (Refer tothe Individual Cashier Resets and All Salesperson
Resets above.)
• Financial Reset Report of each terminal Issued from Master Terminal as part
of In-line Financial Reset Report.
This option may be useful if the store wants sales data of the financial
data recorded by each terminal. (This option may not be needed if the
option “Manual Resets on Individual Terminals Allowed” is selected.
- 14-
Page 19

IN-LINE REPORT COMMAND EXECUTIONS
EOl-11006
)
Before taking in-line reports, please note the following:
1) When the “NON-HOLD RESET” type is selected for in-line report operations, In-line
Reset Reports (as well as Read Reports) can be taken on the Master Terminal as
long as the Satellite Terminals are in the “Signed OFF” condition (for Cashier
Signing Method) or in the outside-sale condition (for Cashier Key Method).
2) When the “HOLD RESET” type is selected for in-line reset report operations, first
take terminal reset reports on individual Master and Satellite terminals and make the
terminals into the“HOLD” condition. Then In-line Reset Report takings are allowed
on the Master Terminal. (In-line Read Reports, however, can be taken any time on
the Master Terminal.)
3) When In-line Reports are taken, the power of each Satellite terminal must be turned
ON but the Mode Lock and GT Lock can be in any positions.
The operation flow for taking In-line Reports is shown on the next page, and the table of In
line Reports is on the following pages.
The key operation for each In-line Daily Report is the same as the corresponding terminal
report available on the stand-alone ECR except for the GT Lock position. Please note that
each In-line GT Report requires a 3-digit Report Code instead of a 1 or 2-digit code of the
corresponding stand-alone terminal report (for example 108 instead of 8, 117 instead of 17,
etc.).
Conditions required on terminals for In-line Report takings:
)
Read Reports (Daily or GT)
Master Terminal: Any time outside a sale
Satellite Terminals: Any time outside a sale
Reset Reports fPailv or GT)
(Refer to “NON-HOLD RESET AND HOLD RESET" on Uie previous pages.)
Master Terminal; Any time outside a sale (for Cashier Key Method)
Signed-OFF condition (for Cashier Signing Method)
Satellite Terminals: After its own individual Terminal Reset Reports (for HOLD
RESET type)
Any time outside a sale (for Cashier Key Method of NON
HOLD RESET type)
Signed-OFF condition (for Cashier Signing Method of NON
HOLD RESET type)
Lock Positions Required
Master Terminal: Mode Lock: X / GT Lock RTR for read reports
Mode Lock: Z / GT Lock RTR for reset reports
Satellite Terminals: Any positions
- 15 -
Page 20

OPERATION FLOW OF IN-LINE READ OR RESET REPORTS
EOl-11006
- 16 -
Page 21

TABLE OF IN-LINE REPORT OPERATIONS
EOl-11006
)
( IX] - [@/FOR] N
[OPEN] = [LC OPEN] = [PR OPEN] /
GT Lock: RTR
Report
Header
COMBINATION REPORTS
• Combination 1 Read: Daily
• Combination 2 Read: Daily
• Combination 3 Read: Daily
• Combination 1 Reset: Daily
• Combination 2 Reset: Daily
• Combination 3 Reset: Daily
FINANCIAL REPORTS
X03
GTX03
)
Z03
GTZ03
• Financial Read: Daily
• Financial Reset: Daily
CASHIER REPORTS (Daily only)
Report Name
GT
GT X
GT X 102 [AT/TL]
GT
GT
GT
GT X
GT z
Mode
Lock
[ATH-L]
X
X 100 [AT/TL]
X 1 [All’Ll
101 [AT/TL]
X 2 [AT/TL]
z [AT/TL]
z 100 [AT/TL]
z 1 [AT/TL]
z 101 [AT/TL]
2 [AT/TL]
z
z 102 [AT/TL]
3 [AT/TL]
X
103 [AT/TL]
z 3 [AT/TL]
103 [AT/TL]
Key Operation
X04
X04
X04
Z04 • Indiv. Terminal All Cashier Reset
Z04
Z04
X05
X05
Z05
Z05
• Indiv, Terminal All Cashier Read
(for Cashier Key Method only)
•All-store All Cashier Read
(for Signing Method only)
• All-store Indiv. Cashier Read
(for Cashier Key Method only)
• All-store All Cashier Reset
(for Signing Method only)
(Not available when connected to PC)
•All-store Indiv. Cashier Reset
SALESPERSON REPORTS
• All-store All Salesperson Read
•All-store Indiv. Salesperson Read
•All-store All Salesperson Reset
(Not available when connected to PC)
•All-store All Salesperson Reset
4 [AT/TL]
X
X 4 [AT/TL]
X
|3-diait Cashier Code| [LOG!
z 4 [AT/TL]
4 [AT/TL]
z
z
|3-diait Cashier Code| [LOG]
X 5 [AT/TL]
jSalesoerson Codej [SALES PERSON]
X
z 5 [AT/TL]
z
|Salesoerson Code| [SALES PERSON]
(To be continued on next page)
- 17 -
Page 22

TABLE OF IN-LINE REPORT OPERATIONS (continued)
( [X] = l@/FOR] \
'' [OPEN] = [LC OPEN] = [PR OPEN] /
GT Lock: RTR
EOI-11006
Report
Header
X06
GTX06
X07
GTX07
X08
GTX08
X09
GTX08
Report Name
CREDIT CARD COMPANY SALES
REPORTS (Read only)
• Credit Card Company Sales
Read: Daily
GT
DEPARTMENT GROSS PROFIT
REPORTS (Read only)
• Gross Profit Read; Daily
GT
DEPARTMENT GROUP REPORTS
(Read only)
• Department Group Read: Daily
GT
MEDIA SALES AND IN-DRAWER
REPORTS (Read only)
• Media Sales and In-drawer Read:
Daily
GT X
Mode
Lock
X
6 [AT/TL]
X 106 [AT/TL]
(Process Reports)
7 [ATH*L]
X
107 [AT/TL]
X
8 [AT/TL]
X
X 108 [AT/TL]
9 [AT/TL]
X
109 [AT/TL]
Key Operation
XI0
ZIO
XII
GTX11
ZÌI
GTZ11
X11
GTX11
XI2
HOURLY RANGE REPORTS
• Hourly Read (Daily only)
• Hourly Reset (Daily only)
DEPARTMENT REPORTS
• AH Department Read: Daily
GT
* All Department Reset: Daily
GT
• Indiv. Department Read:
Daily
GT
ALL MEDIA SALES TOTAL AND
CASH-IN-DRAWER READ (Daily only)
X 10 [AT/TL]
10 [AT/TL]
z
X {[OPEN]) 11 [AT/TL]
([OPEN]) 111 [AT/TL]
X
11 [AT/TL]
z
111 [AT/TL]
z
{Process Reports)
X
11 r#l -► [DEPT! (or |Codel iDP#l) ^ ifSTl)
Repeat for required departments.
[AT/TL] (to end)
X
Start with 111 instead of 11 in the above pattern.
12 [AT/TL]
X
(To be continued pn next page)
- 18 -
Page 23

TABLE OF IN-LINE REPORT OPERATIONS icontinuecH
EOl-11006
)
Report
Header
XI3
PLU REPORTS (Daily only)
• Individual PLU Read
Report Name
GT Lock: RTR
Mode
Lock
X
([OPEN] key for non-print; NOTE 1)
Barcode Scanning “i
[OPEN] = [LC OPEN] = [PR OPEN] J
Key Operation
^ |PLU Codel rPLU] dST]) ^ [AT/TL]
( [X] = [@/FORl \
XI3
XI3
• All PLU Read
• Designated Dept PLU Read
X ([OPEN]) [PLU]
([OPEN]) [DEPT] (or |Code| [DP#])
X
-^[PLU]
X
X13
• Zone PLU Read
fiOPENl) [Zone-start PLU Code| fXl ^
[Zone-end PLU Code] fPLUl
XI3
• Designated Dept Zone PLU Read
X ([OPEN]) [DEPT] (or [Code[ [DP#])-*
[Zone-start PLU Code] fXl -*
[Zone-end PLU Code[ TPLUl
XI3
Z13
• Sort PLU Read
• All PLU Reset
Z13 • Designated Dept PLU Reset
X [PLU-sort Code[ fPLUl (Process Reoorti
z [PLU]
z TDEPTl (or [Code[ fDP#!) -> fPLUl
Z13
Z13
• Zone PLU Reset
• Designated Dept Zone PLU
Reset
CUSTOMER FILE READ (for Check
Track Memory type only) (Read only)
XI5 • All Files Read
XI5
• Zone Files Read
XI5 • individual File Read
XI5 • Zero-balance Files Read X
XI5 • Debit-balance Files Read X
XI5 • Credit-balance Files Read
DAY-OF-WEEK REPORTS (GT only)
GTX16
GTZ16
• Day-of-Week GT Read
• Day-of-Week GT Reset
DAY-OF-MONTH REPORTS (GT only)
z [Zone-start PLU Code| fXl -*
[Zone-end PLU Code[ fPLUl
[DEPT] (or [Code[ [DP#])^
z
[Zone-start PLU Code[ fXl
[Zone-end PLU Code[ [PLU]
X [PICK UP BAL]
X
[Zone-start File Code| fXl -*
[Zone-end File Code| [PICK UP BALI
X
[ File Code[ fPICK UP BALI
0 [PICK UP BAL]
1 [PICK UP BAL]
X 2 [PICK UP BAL]
X
116 [AT/TL]
z 116 [AT/TL]
GTX17 • Day-of-Month GT Read X 117 [AT/TL]
GTZ17
X20
• Day-of-Month GT Reset z 117 [AT/TL]
INACTIVE PLU READ
{To iae continued on next page)
X
0 [PLU] (Process Report)
- 19 -
Page 24

TABLE OF IN-LINE REPORT OPERATIONS (continued^
( [X] = [@/FOR], [#] = [#/CID] \
GT Lock; RTR [OPEN] = [LC OPEN] = (PR OPEN] J
EOl-11006
Report
Header
X21
X21
X22
X22
X23
X23
Report Name
DEPARTMENT AND PLU ABC
ANALYSIS REPORTS (Read only)
• Best Selling Departments in
Quantity: Daily
• Best Selling PLUs in Quantity
(Link Department Designation): Daily only
• Best Selling Departments in
Amount: Daily
• Best Selling PLUs in Amount (Link
Department Designation): Daily only
• Worst Selling Departments in
Quantity: Daily
• Worst Selling PLUs in Quantity
(Link Department Designation): Daily only
GT
GT
GT
Mode
Lock
Key Operation
(Process Reports)
1 r#l i|Endino Rank No.|) FAT/TLl
X
X 101 (Follow from [#] above)
1 [#1 ->(iDEPTl for |Code| tDP#D) -►
X
ijEndino Rank No.|1 TPLUl
X 2 r#l -► ((Ending Rank No.[) fAT/TLl
102 (Follow from [#] above)
X
2 (#1 -^(fDEPT] for |Code| TDP#!)) ->
X
((Endina Rank No.|l FPLUl
3 [#1 -> f|Endina Rank No.|) [AT/TLl
X
X 103 (Follow from [#] above)
3 [#] -^(rOEPT] (or |Code| iDP#l))
X
((Ending Rank No.() fPLUl
X24
X24
• Worst Selling Departments in
Amount: Daily
• Worst Selling PLUs in Amount
(Link Department Designation): Daily only
GT
4 r#l -» ((Ending Rank No.|) [AT/TLl
X
104 (Follow from (#] above)
X
4 r#l -KfDEPTJ (or |Code| tDP#lrt -»
X
((Endina Rank No.|) [PLU]
NOTES 1. When the operation is precede with “([OPEN])”, it indicates that the report data will only be
collected and stored into the Consolidated Memory of the Master Terminal but not print out
This operation is useful in taking a “Process Report” thereafter but not requiring the print out
of that report itself.
2. When the “Process Report” is marked, the report can only be taken after taking another
report which consolidates the corresponding data to be based on. Also refer to NOTE 1
above.
3. As for other miscellaneous operations available in RTR/X or RTR/Z mode, see the last
chapter of this manual.
- 20 -
Page 25

IN-LINE REPORT PRINT FORMAT
The print format of each report is basically the same as the format of the corresponding
stand-alone terminal report except that some indications are additionally printed as in-line
operation job IDs.
MASTER TERMINAL (In-line Reports)
Print Format
EOl-11006
^ * lit 4c 4c ^
#1 ddddddAdddd
Designated or Link Department Name
Designated Data ID No.
Best in Quantity
#1
#2
Best in Amount
Worst in Quantity
#3
Worst in Amount
#4
RTR Job Symbol, & Separator between Individual
Terminal Report Data
Consolidated Data Report Indication. {..
Report ID No. such as X03, GTX03, etc.)
Process Report Indication (<
= Report ID No.
such as X03, GTX03, etc.)
Subtitle of ABC Analysis Reports (Report Title X21 or
GTX21)
JOURNAL INDICATIONS ON INDIVIDUAL TERMINALS (when report data is collected)
X03
A
15:40TM *
A
Read Report Collection Indication
Time of data collection
Report ID No. (X is replaced by Z on reset reports. “GT" is added on
GT reports. The No. is always printed in 2 digits. For example for Dayof-Week GT Read, "GTX16^ is printed.)
Reset Report Collection Indication
Z03H
Z03H
15:40TM *
15:40TM =
“H" is printed in case of a HOLD RESET type.
Time of Clear Command receiving
- 21 -
Page 26

8. PROGRAMMING OPERATIONS
The system should be programmed fully according to the user’s requirements at the time of delivery
so that daily operations can immediately start. However, some data must be added or changed daily
or in a longer period. Please consult with your TEC representative about what programmings are
needed as user’s daily jobs and what programmings are to be contained as your TEC representative
service. Since the volume of programming contents for the system is large, the TEC representative
is entirely responsible of service and information on programming operations. Please also note that
some of the programming operations available on stand-alone ECR basis are not acceptable on
terminals of an in-line system.
9. DLL (Down Line Loading) OPERATIONS
In a Master-Satellite system, most programming data are set on the Master Terminal and down-lineloaded (DLL) to Satellite Terminals. Since DLL operations are deeply connected with programming
operations, it is also your TEC representative’s responsibility to service or inform on DLL operations,
(Some of them are introduced in Chapter 6 and Chpater 10 of this manual.)
EO1-110Q6
- 22 -
Page 27

10. OTHER OPERATIONS (relating to In-line Service)
)
The following are other operations relating to in-line service operations but not described in the
preceding chapters.
TABLE OF CONTENTS
TIME OUT .................................................................................................................................................. 24
EOI’11006
page
SUSPENDING ..................................................................................................
RETRY
INCOMPLETE ENDING
CANCEL
TERMINAL OPEN CHECK .......................................................................................................................... 27
SIGN-OFF / HOLD CHECK
CONSOLIDATED REPORT DATA CHECK ................................................................................................ 28
ENFORCED CLEAR OF CONSOLIDATED REPORT DATA ................................................................... 28
PLU VERSION CHECK ............................................................................................................................... 29
PLU VERSION MATCHING ......................................................................................................................... 29
ENFORCED CLEAR OF HOLD CONDITION ........................................................................................... 30
MASTER AND BACKUP MASTER ALTERNATION ................................................................................ 31
.............................
...................................................................................................................... 27
.........
...................................................................................... 25
........................................
25
25
26
-23-
Page 28

TIME OUT
A Time-Out condition arises when the Master Terminal is making an in-line service operation,
such as X/Z report collection, DLL, etc. to the Satellite Terminals. The service timer is provided
for servicing each of the Satellite Terminals, thus on exceeding the time limit, a Time-Out
condition will occur. In this case, either a “RETRY”, “SUSPENDING”, “INCOMPLETE
ENDING", or “CANCEL” operation will be accepted.
ex. 1) In a system with a Master Terminal and 3 Satellite Terminals:
When a report collection is executed on the Master Terminal, a series of data collections from
each terminal (S1 to S3) will be performed, but services tor S1 and S2 will be skipped due to
their “busy" conditions. Thereafter, services will again be attempted to S1 and S2. As a limit of
30 seconds is provided for servicing each terminal, the total service time In this case will be 30
sec. X 2 units = 60 sec. If data collection is successfully done from SI within this time limit,
servicing S2 follows for the rest of the time, and on reaching the time limit, the Time-Out
condition arises, displaying on the Master Terminal the number of not-yet collected terminals)
and the Store/Register No. of the last serviced terminal. On this stage, the operator may only go
on to “SUSPENDING” (to wait for a while until S2 clears the “busy” condition), or to “RETRY”
(to execute collection service to S2 again, expecting that S2 has already cleared the “busy”
condition), or to “INCOMPLETE ENDING” (to abandon the service to S2 and end with collection
of the data of so-far collected terminals only), or to “CANCEL” operation. If “RETRY” is
operated, the service time now is 30 seconds because only one terminal remains uncollected.
E01 -11006
In this case, S2 is in a “No response” condition and S1 is in a “busy” condition. As only one
terminal is responding with some kind of status, a time out limit of 30 seconds is given (the “No
response” status is not subject to the service timer). However, if S2 turns into a “Power ON”
condition, it will also be subject to the service timer.
-24-
Page 29

SUSPENDING
This is to be operated for the purpose of suspending an in-line service being executed, when any
terminals remain unserviced, and of going on to a “RETRY”, “INCOMPLETE ENDING”, or
“CANCEL” operation as the next step.
OPERATION ON MASTER TERMINAL: (Same Lock positions as the in-line job being performed)
Depress [ITEM CORR] or [VOID] until the key-in tone is generated.
DESCRIPTION:
The SUSPENDING operation is allowed any time during an in-line service procedure.
If suspending by the [ITEM CORR] or [VOID] key is accepted, the Master terminal’s display
indicates the number of unserviced terminals and the last service-attempted terminal’s
Register/ID No., and now a “RETRY” or “INCOMPLETE ENDING” operation can be
selected as the next step.
EOl-11006
RETRY
This is to be operated for the purpose of re-attempting the In-line service that has been stopped
due to “TIME OUT” or that has just been suspended by “SUSPENDING” operation.
OPERATION ON MASTER TERMINAL: (Same Lock positions as the in-line job being performed)
Depress [AT/TL].
DESCRIPTION:
The in-tine service will again be attempted to the unserviced terminals. This operation is
possible any number of times after a “TIME OUT” condition or a “SUSPENDING” operation
as long as any terminals remain unserviced.
INCOMPLETE ENDING
This is to be operated to abandon services to unservIced terminals, and ends the in-line service
with the services to service-completed terminals only.
OPERATION MASTER TERMINAL: (Same Lock positions as the in-line job being performed)
Depress [NS].
DESCRIPTION:
If an in-line service being executed does not seem to end normally due perhaps to some
abnormal status of any Satellite Terminals after “TIME OUT”, “SUSPENDING”, and/or
“RETRY” operations, the [NS] key can be depressed to end the in-line service with only the
service-completed terminals serviced and the unserviced terminals remaining unserviced. In
case of In-line X or Z Report Collection sequences, reports of only the service-completed
terminals will be issued.
-25-
Page 30

As part of the print out, the Store/Reg. No. of the terminal and its status will be printed.
Status Print Format
No nnnnnn ?
Status Symbol
Store/Begister No.
? : No response (power off, etc.)
BUSY: The terminal is busy (during a sale, etc.)
Blank: Other statuses
CANCEL
This can be operated when a SUSPENDING condition arises due to a TIME OUT or a
SUSPENDING operation. The entire in-line service being performed is canceled. This operation
is effective to in-line read report operations but not to any in-line reset report operations.
EOl-11006
OPERATION MASTER TERMINAL: (Mode Lock: X / GT Lock: RTR)
Depress [X] or [@/FOR].
DESCRIPTION:
The CANCEL symbol is printed as in the following.
CANCEL Print Format
-26-
Page 31

TERMINAL OPEN CHECK
This can be operated to check if terminals are properly connected to the in-line cable.
OPERATION MASTER TERMINAL: fMode Lock: X / GT Lock: RTR)
30 [ATH’L]
DESCRIPTION:
All the terminals are checked if they are opened, referring to the Terminal Connection Table
set in the Master Terminal. The Store/Register Nos of the terminals with no responses are
printed on a receipt. When all the terminals are correctly opened, only the header (X30) will
be printed on the receipt.
Print Format
No nnnnnn
EOl-11006
Store/Register No. of the terminal not opened.
SIGN-OFF / HOLD CHECK
This can be operated before taking in-line reset reports, to check if there are any terminals in a
signed-ON condition (for NON-HOLD Reset type with Signing Method) or a not-HOLD condition
(for HOLD Reset type).
OPERATION MASTER TERMINAL: fMode Lock: X / GT Lock: RTR)
31 [AT/TL]
DESCRIPTION:
The Store/Register No. and its signed-ON Cashier codes will be printed (for NON-HOLD
Reset type) or the Store/Register No. and its not-HOLD terminal report Nos will be printed
(for HOLD Reset type) on a receipt. When all the terminals are correctly signed off or in all
report HOLD conditions, only the header (X31) will be printed on the receipt.
Print Foimat for NON-HOLD Reset type
with Signing Method
Print Format for HOLD Reset type
No nnnnnn
i C02 C46 C15 C34
Store/Register No.
of the terminal not
signed OFF.
Cashier Code of the
Cashier not yet
signed OFF
Storefftegister No.
- 27 -
No nnnnnn
003 004 Oil 016 117
Report No. of the report not yet in the
HOLD condition (GT Report Nos are
indicated with 3-digit No. just as " 117"
instead of "17".)
Page 32

CONSOLIDATED REPORT DATA CHECK
This can be operated only when a PC is connected, to check which report data are remaining in
the Consolidation Memory of the Master Terminal.
OPERATION MASTER TERMINAL: fMode Lock: X/ GT Lock: RTR)
33 [AT/TL]
DESCRIPTION:
The Report Titles of the consolidated data (of reset reports) are printed on a receipt. When
no consolidated data are remaining in the memory, only the header (X33) is printed on the
receipt.
Print Format
EOl-11006
003 004 oil 016 017
Report Nos of the report data still remaining
in the Consolidation Memory
ENFORCED CLEAR OF CONSOLIDATED REPORT DATA
This can be operated only when a PC is connected, to enforcedly clear the reset report data that
are remaining in the Master Terminal and should be sent to the PC.
OPERATION MASTER TERMINAL: (Mode Lock: Z / GT Lock: RTRI
8888 [AT/TLl
DESCRIPTION:
All the reset reports of the remaining data are issued, and the Consolidation Memory is
cleared.
-28-
Page 33

PLU VERSION CHECK
This can be operated to check the matching of the PLU program data between the Master and
the Satellite Terminals.
OPERATION ON MASTER TERMINAL: (Mode Lock: X or Z / GT Lock: RTR)
32 [ATyTL]
DESCRIPTION:
The Version No. of PLUs in the Master Terminal and the Version No. of each of the
designated Satellite Terminals are printed. Even when the Version No. in a Satellite
Terminal is correctly matching, the Store/Register Nos of the terminal will be printed.
Print Format
E01-11006
Main PLU TaWe
Version No.
0032.0000 0021,0000
NoNNNNNNN
0031.0000 0020.0000
Additional PLU Table
Version No.
Version Nos in Master Terminal
Store/Reg. No. of a unmatched Satellite Terminal
“ Version Nos in the Satellite Terminal
NoNNNNNNN
Store/Reg. No. of a matching Satellite Terminal
(Version Nos are not printed.)
PLU VERSION MATCHING
When the PLU Versions of a Satellite Terminal is found to unmatch those of the Master
Terminal by the above operation or by the auto PLU Check on the Satellite Terminal power-on
(described in Chapter 6), the following may be operated to match the Versions.
OPERATION ON THE SATELLITE TERMINAL: (Mode Lock: MGR / GT Lock: Neutral)
7 X X [#] (x X = Training Mode Sign ON/OFF Code)
DESCRIPTION:
Then the Master Terminal will automatically loads the necessary PLU Table Files (Main or
Additional or both which Version Nos have not been matching in the Satellite Terminal).
-29-
Page 34

ENFORCED CLEAR OF HOLD CONDITION (on Individual Terminals)
This can be operated when the HOLD condition on a terminal by no means be cleared because
the terminal cannot receive a Clear Command from the Master Terminal for some reason (the
Master Terminal becomes down, etc.)-
OPERATION ON ANY TERMINAL IN HOLD CONDITION: (Mode Lock: X or Z / GT Lock: Neutral)
9999 [AT/TL]
DESCRIPTION:
On this operation, the HOLD condition is cleared, issuing again all the reset reports that have
already been taken as Manual Resets (with the Consecutive Nos identical to those already
issued as Manual Resets) and allowing any key-in operations. However, this operation is
regarded as an emergent measure to cope with such a trouble as the Master Terminal
becomes down, etc. and thus no other solutions can be chosen, because the sales data
memory of those reports can no longer be collected by the Master Terminal.
EOI-11006
-30-
Page 35

MASTER AND BACKUP MASTER ALTERNATION
The Backup Master Terminal can be changed to be used as the Master Terminal when the
Master Terminal becomes down, etc. And the Master Terminal can be changed to be used as
the Backup Master when it combes back from repairment, etc.
To switch from the Backup Master Terminal function to the Master Terminal function:
Mode Lock: MGR / Control Lock; RTR
6 X X [ # ] (x X = Training Sign ON/OFF Code)
The In-line ID No. will automatically be set to No.01 (Master Terminal).
NOTE: This operation must be performed while the original Master Terminal is down (i.e. in
an off-line condition).
To switch from the Master Terminal function to the Backup Master Terminal function:
E01-11006
Mode Lock; MGR / Control Lock: RTR
6xx[ # ]{xx = Training Sign ON/OFF Code) ... Same as the operation
The In-line ID No. will automatically be set to No.02 (Backup Master
Terminal).
Print Format for Master Declaration
(from Backup to Master)
M E C R
from Backup Master to
Master above.
Print Format for Backup Master Declaration
(from Master to Backup)
B M E C R
-31 -
Page 36

))
Page 37

Page 38

Page 39

1
Page 40

1
TOKYO ELECTRIC CO., LTD.
PRINTED IN JAPAN
E01 -11006 89081000 © D
 Loading...