

Page 1

TEC Electronic Cash Register
Table of Contents
MA-156-1 SERIES
Owner’s Manual
Page 2

NOTICE
This equipment has been tested and found to comply with the limits for a Class A digital
device, pursuant to Part 15 of the FCC Rules. These limits are designed to provide reasonable protection against harmful interference when the equipment is operated in a commercial
environment. This equipment generates, uses, and can radiate radio frequency energy and,
if not installed and used in accordance with the instruction manual, may cause harmful
interference to radio communications. Operation of this equipment in a residential area is
likely to cause harmful interference in which case the user will be required to correct the
interference at his own expense. Changes or modifications not expressly approved by
manufacturer for compliance could void the user’s authority to operate the equipment.
WARNING
“This Class A digital apparatus meets all requirements of the Canadian Interference-Causing
Equipment Regulations.”
“Cet appareil numénque de la classe A respecte toutes les exigences du Règlement sur le
matériel brouilleur du Canada.”
Copyright © 1999
by TOSHIBA TEC CORPORATION
All Rights Reserved
570 Ohito, Ohito-cho, Tagata-gun, Shizuoka-ken, JAPAN
Page 3
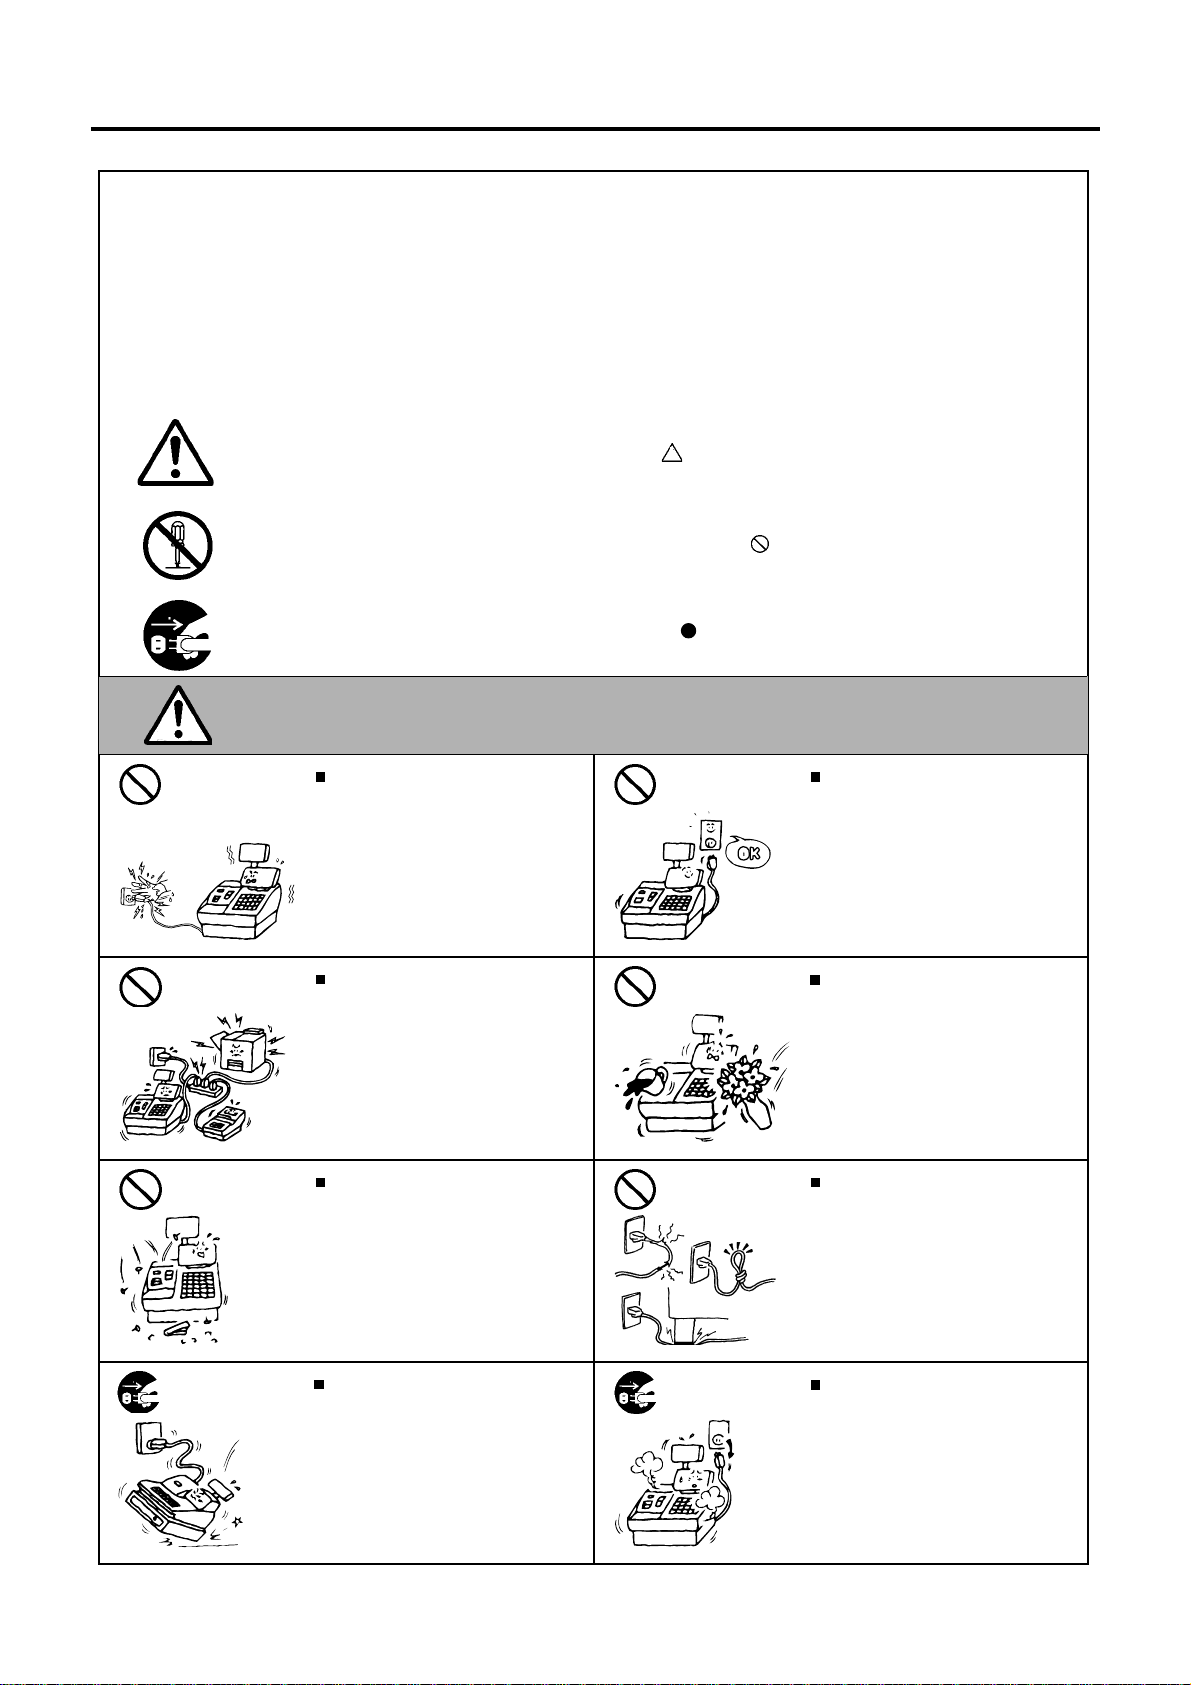
Safety Summary
Safety Summary
Personal safety in handling or maintaining the equipment is extremely important. Warnings and Cautions
necessary for safe handling are included in this manual. All warnings and cautions contained in this
manual should be read and understood before handling or maintaining the equipment.
Do not attempt to effect repairs or modifications to this equipment. If a fault occurs that cannot be rectified
using the procedures described in this manual, turn off the power, unplug the machine, then contact your
authorized TOSHIBA TEC representative for assistance.
Meanings of Each Symbol
This symbol indicates warning items (including cautions).
Specific warning contents are drawn inside the symbol.
(The symbol on the left indicates a general caution.)
This symbol indicates prohibited actions (prohibited items).
Specific prohibited contents are drawn inside or near the symbol.
(The symbol on the left indicates “no disassembling”.)
This symbol indicates actions which must be performed.
Specific instructions are drawn inside or near the symbol.
(The symbol on the left indicates “disconnect the power cord plug from the outlet”.)
EO1-11099
This indicates that there is the risk of death or serious injury if the
WARNING
Prohibited
Prohibited
Prohibited Prohibited
Do not plug in or unplug the power
cord plug with wet hands as this may
cause electric shock.
If the machines share the same
outlet with any other electrical
appliances which consume large
amounts of power, the voltage will
fluctuate widely each time these
appliances operate. Be sure to
provide an exclusive outlet for the
machine as this may cause the
machines to malfunction.
Do not insert or drop metal,
flammable or other foreign objects into
the machines through the ventilation
slits, as this may cause fire or electric
shock.
machines are improperly handled contrary to this indication.
Any other than the
specified AC voltage
is prohibited.
Prohibited
Do not use voltages other than the
voltage (AC) specified on the rating
plate, as this may cause fire or
electric shock.
Do not place metal objects or
water-filled containers such as flower
vases, flower pots or mugs, etc. on
top of the machines. If metal objects
or spilled liquid enter the machines,
this may cause fire or electric
shock.
Do not scratch, damage or modify
the power cords. Also, do not place
heavy objects on, pull on, or excessively bend the cords, as this may
cause fire or electric shock.
Disconnect
the plug.
If the machines are dropped or their
cabinets damaged, first turn off the
power switches and disconnect the
power cord plugs from the outlet, and
then contact your authorized
TOSHIBA TEC representative for
assistance. Continued use of the
machine in that condition may cause
fire or electric shock.
(i)
Disconnect
the plug.
Continued use of the machines in an
abnormal condition such as when the
machines are producing smoke or
strange smells may cause fire or elec-
tric shock. In these cases, immediately turn off the power switches and
disconnect the power cord plugs from
the outlet. Then, contact your authorized TOSHIBA TEC representative for
assistance.
Page 4
Safety Summary
EO1-11099
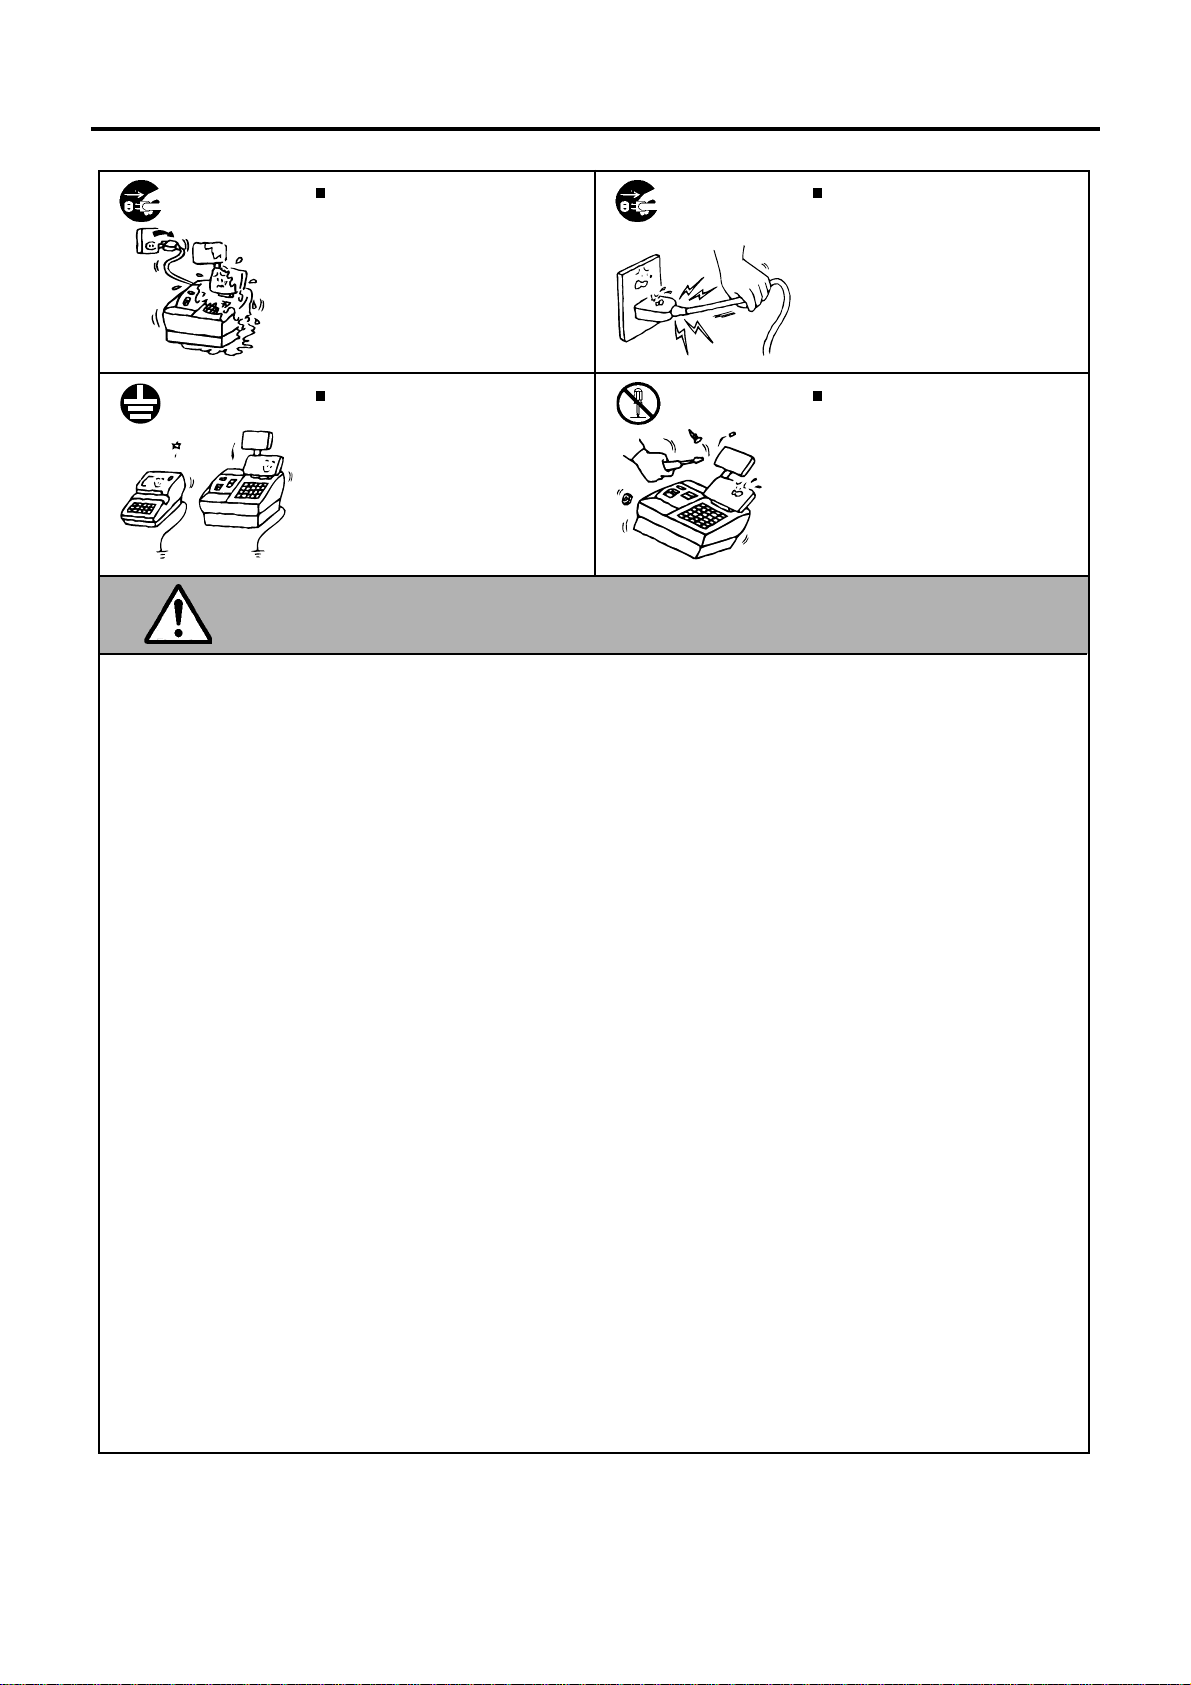
Disconnect
the plug.
Connect a
grounding
wire.
If foreign objects (metal fragments,
water, liquids) enter the machines,
first turn off the power switches and
disconnect the power cord plugs from
the outlet, and then contact your
authorized TOSHIBA TEC representative for assistance. Continued
use of the machine in that condition
may cause fire or electric shock.
Ensure that the equipment is
properly grounded. Extension cables
should also be grounded. Fire or
electric shock can occur on improperly grounded equipment.
Disconnect
the plug.
No
disassembling.
When unplugging the power
cords, be sure to hold and pull on
the plug portion. Pulling on the cord
portion may cut or expose the internal wires and cause fire or electric
shock.
Do not remove covers, repair or
modify the machine by yourself. You
may be injured by high voltage, very
hot parts or sharp edges inside the
machine.
Unauthorized modification is prohibited.
This indicates that there is the risk of personal Injury or damage to
CAUTION
objects if the machines are improperly handled contrary to this indication.
Precaution
The following precautions will help to ensure that this machine will continue to function correctly.
• Try to avoid locations that have the following adverse conditions:
* Temperatures out of the specification * Direct sunlight * High humidity
* Shared power socket * Excessive vibration * Dust/Gas
• Do not subject the machine to sudden shocks.
• Do not press the keys too hard. Keys will operate correctly if they are touched lightly.
• Clean the cover and keyboard, etc. by wiping with a dry cloth or a cloth soaked with detergent and wrung out
thoroughly. Never use thinner or other volatile solvent for cleaning.
• At the end of the day, turn the power OFF, then clean and inspect the exterior of the machine.
• Try to avoid using this equipment on the same power supply as high voltage equipment or equipment likely to
cause mains interference.
• USE ONLY TOSHIBA TEC SPECIFIED consumables.
• DO NOT STORE the consumables where they might be exposed to direct sunlight, high temperatures, high
humidity, dust, or gas.
• When moving the machine, take hold of the drawer and lift the machine.
• Do not place heavy objects on top of the machines, as these items may become unbalanced and fall causing
injury.
• Do not block the ventilation slits of the machines, as this will cause heat to build up inside the machines and
may cause fire.
• Do not lean against the machine. It may fall on you and could cause injury.
Request Regarding Maintenance
• Utilize our maintenance services.
After purchasing the machines, contact your authorized TOSHIBA TEC representative for assistance once per year or
so to have the inside of the machines cleaned. Otherwise, dust will build up inside the machines and may cause fire or
malfunction. Cleaning is particularly effective before humid rainy seasons.
• Our maintenance service performs the periodic checks and other work required to maintain the quality and
performance of the machines, preventing accidents beforehand.
For details, please consult your authorized TOSHIBA TEC representative for assistance.
• Using insecticides and other chemicals
Do not expose the machines to insecticides or other volatile solvents, as this will deteriorate the cabinet or other parts
or cause the paint to peel.
(ii)
Page 5

EO1-11099
TABLE OF CONTENTS
Page
1.Introduction....................................................................................................................................1
2.Unpacking.......................................................................................................................................2
3.Outline of Preparation Procedure Before Operating the ECR...................................................3
4.Appearance and Nomenclature....................................................................................................5
5.Mode Select Switch........................................................................................................................5
6.Display.............................................................................................................................................6
7.Keyboard.........................................................................................................................................7
Functions of Each Key.............................................................................................................................................7
8.Installing the Paper Roll................................................................................................................9
9.Programming................................................................................................................................11
System Option Setting...........................................................................................................................................12
Department Status Setting.....................................................................................................................................14
Time Setting...........................................................................................................................................................15
Date Setting...........................................................................................................................................................15
Department HALC Setting.....................................................................................................................................16
Secret Code Setting...............................................................................................................................................17
% Rate Setting.......................................................................................................................................................17
PLU Setting............................................................................................................................................................18
PLU Deletion..........................................................................................................................................................19
Amount Format Setting..........................................................................................................................................19
Tax Table Setting....................................................................................................................................................20
10.Verification of Programmed Data................................................................................................24
11.Daily Operation Flow....................................................................................................................25
12.Transaction Entries......................................................................................................................26
When an error has occurred .................................................................................................................................26
Displaying the Time................................................................................................................................................26
No-sale...................................................................................................................................................................27
Sale Item Entries (Department Entries).................................................................................................................27
Sale Item Entries (PLU Entries).............................................................................................................................28
Dollar Discount.......................................................................................................................................................30
Percent Discount or Percent Charge.....................................................................................................................30
Void........................................................................................................................................................................31
Returned Merchandise...........................................................................................................................................31
Non-add Number Print...........................................................................................................................................32
Subtotal Read and Print.........................................................................................................................................32
Finalizing a Sale.....................................................................................................................................................32
Tax Exemption.......................................................................................................................................................35
Received-on-Account Payment.............................................................................................................................35
Paid Out.................................................................................................................................................................35
13.Read (X) and Reset (Z) Reports..................................................................................................39
14.Maintenance..................................................................................................................................39
Replacing the Paper Roll.......................................................................................................................................39
Replacing the Ink Roller.........................................................................................................................................40
Manual Drawer Release........................................................................................................................................40
Removing the Drawer............................................................................................................................................41
Battery Exchange...................................................................................................................................................41
15.Specifications...............................................................................................................................42
CAUTION:
1. This manual may not be copied in whole or in part without prior written permission of
TOSHIBA TEC.
2. The contents of this manual may be changed without notification.
3. Please refer to your local Authorized Service representative with regard to any queries
you may have in this manual.
Page 6

Page 7

1. Introduction
Thank you for choosing the MA-156 series. This instruction manual provides a
description of the functions and handling of this register and should be read carefully
to ensure optimum performance. Since every consideration has been given to safety
and reliability, there is no danger of damaging the machine by incorrect operation.
Please refer to this manual whenever you have any questions concerning the
machine. This machine has been manufactured under strict quality control and
should give you full satisfaction. However, if the machine is damaged during transit,
or there are any unclear points in this manual:
For supplies, service or assistance call:
EO1-11099
Please have the following information available when you
call:
Product: Electronic Cash Register
Model: MA-156-1
Serial Number:
Place Purchased:
Date of Purchase:
If for any reason this product is to be returned to the store where
purchased, it must be packed in the original carton.
• The specifications described in this manual may be modified by the manufacturer,
if necessary.
• Be sure to keep this manual for future reference.
- 1 -
Page 8

2. Unpacking
5
EO1-11099
6
4
3
2
1
1 Journal Take-up Reel (1 pc.) 4 Printer Cover/Drawer Key (2 pcs.)
2 Paper Roll 57 mm x ø50 mm (1 pc.) 5 Owner's Manual (1 pc.)
3 Dry Batteries (SUM-3 1.5V; 3 pcs.) 6 Warranty Registration Card (1 pc.)
- 2 -
Page 9

EO1-11099
3. Outline of Preparation Procedure Before Operating
the ECR
This chapter shows the outline of set-up procedure of the ECR before actually starting
the ECR operation.
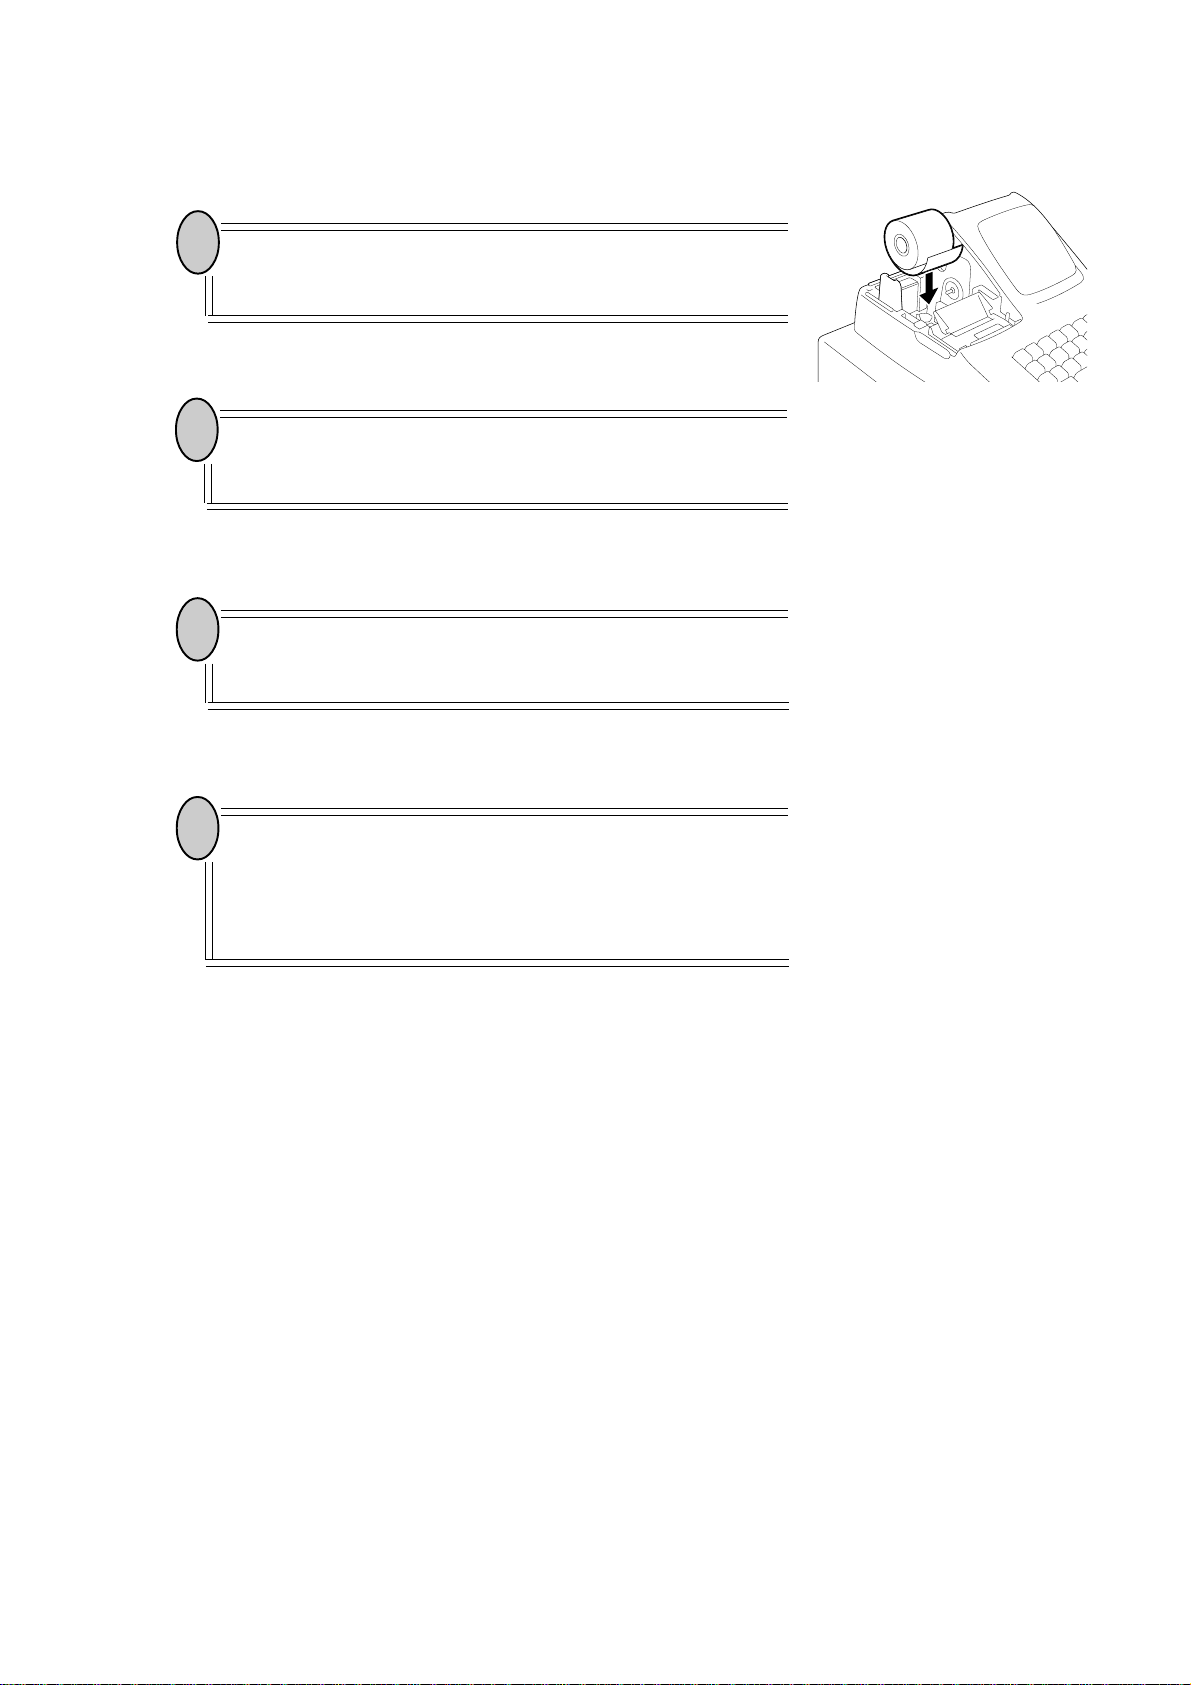
1
Remove the cash register from the carton, referring to
Chapter “2. Unpacking” on page 2. And take out all
the parts and accessories.
2
Remove the tapes and seals that are holding parts or
protecting the register surfaces.
3
Plug the power cord of the register into a wall outlet.
Make sure that the outlet voltage matches that of the
power required for the register.
WARNING: Be sure to plug in the power cord first, then insert the
batteries.
4
Detach the Printer Cover and the Battery Cover, then
insert the batteries (3 pieces). After inserting the
batteries, attach the Battery Cover.
WARNING: Be certain to insert the batteries enclosed in the
package. If they are not insert and the power is
turned OFF (including a power failure occurrence),
the sales data and the programmed data will be
cleared.
5
Set the Mode Select Switch to the REG position.
SET
OFF
- 3 -
REG
X
Z
Page 10
6
Install the Receipt or Journal roll (referring to Chapter
"8. Installing the Paper Roll").
7
Set the time and date correctly, referring to "Setting
the Time and Date" in Chapter 9.
8
Set the tax tables, referring to "Tax Table Setting" in
Chapter 9.
EO1-11099
9
Perform other programming operations, such as programming of Departments, according to the requirement of the market and your store (refer to Chapter 9
and thereafter).
- 4 -
Page 11

4. Appearance and Nomenclature
EO1-11099
Journal Window
or
Receipt Outlet
Mode Select Switch
Drawer Keyboard
Printer Cover
The cover for the Receipt or Journal paper holder
and the printer.
Printer Cover Display
Power Cord
External Battery
Kit Connector
Display (Operator and Customer)
Used to confirm the entry contents and the status
of the register. (page 6)
Receipt Outlet or Journal Window
The receipt for the finalized sale is issued.
Or, the operator can see which items have already
been entered through this window.
External Battery Kit Connector
The External Battery Kit (K-BAP-QM) is available as an option. By connecting this kit into the
connector, the register is operable without AC
power.
5. Mode Select Switch
SET
OFF
REG
X
Z
SET ............Used to program preset data.
OFF ............Stops register operations and extinguishes the display. How-
REG ...........Used to register normal sales .
X................. Used to read sales totals processed in the register report
Mode Select Switch
The Mode Select Switch is provided inside the
Printer Cover.
It selects the type of register operations. (page 5)
Keyboard
Used to enter sale items. (page 7)
Drawer
Cash and other media are kept here. It automatically opens on finalizing a sale.
ever, the power is being supplied to the register.
memory (X report). Received-on-Account and Paid Out
operations are also performed in this position. Also used to
read preset data.
Z .................Used to read and reset sales totals in the register report
memory (Z report).
- 5 -
Page 12

6. Display
▲
Department Code
Message Descriptor
Amount
Repeat Count
▲
...
EO1-11099
Message Descriptor in case
of the mode change error
▲
Description
Amount
Repeat Count
Department Code
Message Descriptor:
Displays the numeric data, such as amount, quantity, etc.
Displays the current time or date when the [X/TIME] key is
depressed in the REG mode.
Displays the repeat count of the same item being entered.
The count display shows up from the second entry on, and
only the last digit will be displayed even if the count exceeds
nine.
Displays the Department Code (1 to 8) when the corresponding Department Key is depressed for any sale item entry.
(Subtotal)
Indicates that the displayed amount is the current
subtotal of the sale.
(Total)
Indicates that the sale is finalized and the displayed
amount is the sale total.
(Change)
Indicates that the sale is finalized with an amount
tendered and the displayed amount is the change
due.
(Negative Mark)
When a Void, Dollar Discount, Percent Discount, or
Returned Merchandise item has been entered, the
Negative Mark is displayed.
The mark is also displayed when the subtotal or sale
total is obtained and the amount is negative.
(Error)
Indicates that the last operation has caused an error.
In case of the mode change error, "M" is displayed
together with "E".
- 6 -
Page 13

7. Keyboard
The following shows the key layout on the MA-156 keyboard:
EO1-11099
FEED
#
RA
NS
VD
PLU
X
78
4
1
TIME
PO
C
Functions of Each Key
KEY
C
Clear Key: Used to clear a wrong entry or operation error.
9
5
6
23
000
1
2
3
4
FUNCTION
5
6
7
8
-
TAX
ST
AT/TL
%
%
CHK
CH
X
TIME
FEED
789
4
516
23
000
1
to
8
Multiplication / Time Display Key: Used to enter sale
items by multiplication inside a sale. Also used to display
the time outside a sale.
Feed Key: Used to feed the receipt or journal paper.
Numeric Keys: Used to enter numeric data, such as
amounts, quantities, and code numbers.
The [00] key functions the same as depressing the [0] key
twice consecutively.
Department Keys 1 to 8: Used to enter sale items and
process the amount into appropriate departments.
- 7 -
Page 14

EO1-11099
KEY
TAX
%
ST
CH
AT/TL
FUNCTION
Tax Modifier: Used inside a sale to reverse the Tax status
of departments, PLUs, Dollar Discount, and Percent
Charge/Discount from taxable to non-taxable, or vice
versa.
Percent Charge or Discount Key: Used to add or subtract
a percent rate, preset or manually entered, to or from the
sale or an individual sale item. Whether the key is used as
Percent Charge or Percent Discount can be programmed.
Subtotal Key: Used to obtain a subtotal (sale total amount
up to the moment).
Charge Key: Used to finalize a sale as charge (non-cash
media sales, such as house charge, credit cards, etc.
defined by the store) by a simple depression without any
numeric entry (Total Function only).
Cash Amount Tender / Total Key: Used to finalize a sale
as cash by depressing with a prior tendered amount entry
(Tender Function) or by a simple depression without any
numeric entry (Total Function).
CHK
VD
#
RA
NS
PO
PLU
Check Amount Tender/Total Key: Used to finalize a sale
as check by depressing with a prior tendered amount entry
(Tender Function) or by a simple depression without any
numeric entry (Total Function).
Returned Merchandise/Void Key: Used inside a sale to
delete items already entered in the current sale. When
outside a sale, it is used to refund money to a customer who
has returned items already purchased.
Non-add Number Print/Received-on-Account Key (X
Mode): When depressed with a prior number entry, it
function as Non-add Number Print Key. When used in X
mode, it functions to record received-on-account payment
amounts.
No-sale/Paid Out Key (X Mode): Used outside a sale to
open the drawer without relating to a sale. When used in X
mode, it functions to record amounts paid out of the drawer
without relating to a sale.
PLU (Price-Look-Up) Key: Used to enter a PLU which is
linked to a department.
-
Dollar Discount Key: Used to subtract an amount from the
sale such as a discount.
- 8 -
Page 15
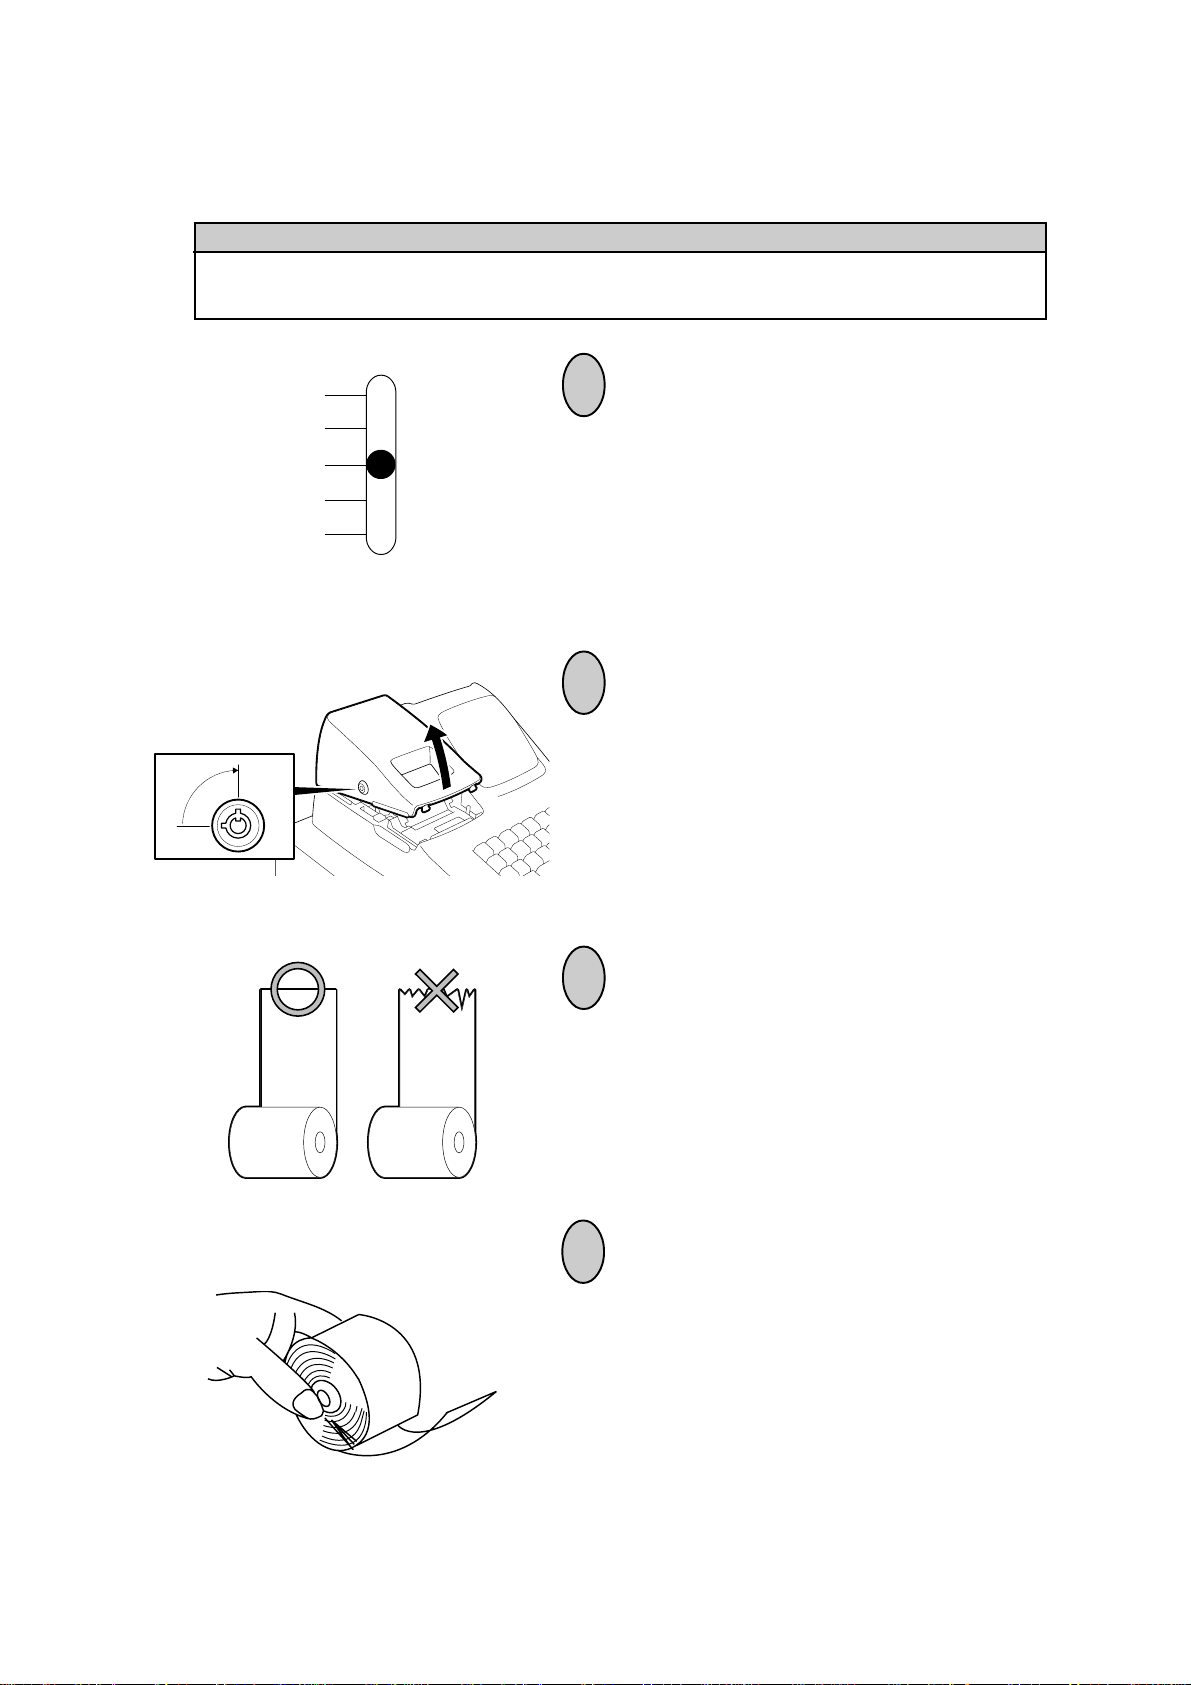
8. Installing the Paper Roll
WARNING!
Care must be taken not to injure yourself with the paper cutter.
EO1-11099
SET
OFF
REG
X
Z
1
Set the Mode Select Switch to REG
positon.
2
To remove the Printer Cover, insert the
Printer Cover/Drawer Key to the Printer
Cover Lock, and then Turn it 90° clockwise.
3
Cut the paper end to make it sharp.
4
Hold the paper roll so that the paper end
will be fed from the bottom.
- 9 -
Page 16

5
Place the paper roll in the paper pocket.
6
Insert the paper end into the Paper Inlet
located on the rear side of the printer, and
hold down the [FEED] key on the keyboard
until the paper end comes out of the outlet.
EO1-11099
7
If the printer is used for journal,fold the top
end of the paper and insert the folded end
into the slit of the Take-up Reel. Then wind
the paper two or three times, set the reel to
the holder, and hold down the [FEED] key
for a while to tense the paper.
If the printer is used for receipts, do not
wind the paper end around the Journal
Take-up Reel.
- 10 -
Page 17

8
If the printer is used for journal, simply
attach the Printer Cover. The Receipt
Outlet is used as Journal Window.
If the printer is used for receipts, attach the
Printer Cover with the paper end coming
out of the Receipt Outlet located on the
Printer Cover.
EO1-11099
9. Programming
The time and date should be adjusted and such data as status of each department, percent
rate, etc. should be programmed before starting sale entries. Printing occurs as programming
is proceeded.
• The programmed data will be retained by dry batteries even if the power
of the machine is turned OFF or a power failure occurs.
• Set the Mode Select Switch to the SET position before starting any
programming operation.
• Key indications in the operation patterns in this manual:
...................Entry through a Numeric Key ............................. Function Key depression
SET
OFF
REG
X
Z
- 11 -
Page 18

EO1-11099
System Option Setting
(Available after the Financial Reset (Z) Report is
taken.)
ST
HALC for tender amount of the [CHK] key
1 to 7 (NOTE 1 on the next page)
Date Entry Order
0 : Day-Month-Year
1 : Year-Month-Day
2 : Month-Day-Year
Time Print
0 : Print
1 : Non-print
GT Print
Even Number: Non-print
Odd Number: Print
The First Decimal Place Rounding
Process
0 or 1 : Round Off
2 or 3 : Round Up
4 or more : Round Down
Credit Balance (NOTE 2 on the next page)
0 : Prohibited
1 : Allowed
Use of the [CHK] key
0 : Total & Tender Functions
1 : Total Function only
2 : Tender Function only
Use of the [%] key
0 :% 1 : %+
Use of the Printer
0 : Journal
1 : Receipt
- 12 -
Page 19

EO1-11099
NOTES: 1. HALC (High Amount Listing Capacity) is used to check excessively high
amounts entered by mistake. For example, if "3" is entered, it means 3
digits and the high amount limit is 999 ($9.99).
2. Credit Balance means that amount entries through the [ - ] key will result
in over-subtraction of the subtotal amount at the time of the entry through
this key. If the status "Allowed" is selected, over-subtraction using the
[ - ] key will be allowed. The [VD] key is not subject to this "Credit
Balance" status selection.
3. Numeric values in bold face are those of the initial setting.
Sample Programming Operation
To set the following system options:
The printer is used for receipts: 1
The [%] key is used as the [% -] key: 0
The [CHK] key is used for "Tender" function only: 2
Credit Balance is allowed: 1
GT Print (Print) & The First Decimal Place Rounding Process (Round Up): 3
Time is printed: 0
Date Entry Order (Month-Day-Year): 2
Tender amount through the [CHK] key is allowed up to 5 digits ($999.99): 5
Key Operation)
1 0 2 1 3 0 2 5 ST
-- Print Sample --
10213025
0002
00-00
00-00-00
- 13 -
Values which were
programmed
#
Consecutive No.
Time
Date
Page 20

Department Status Setting
TAX
Repeatable for other department
EO1-11099
AL/TLX/TIME3 TX/M Dept.
AT/TL
Submode No.
Depress this key only
when setting a
department with
taxable status
Status Code:
0: Itemized
1: Single-item
(NOTE below)
NOTES: 1. When a department is set to be an "Itemized" department, a sale item entry
through that Department Key will not immediately finalize the sale and will
allow other item entries until a media key ([AT/TL], [CHK] or [CH]) is
operated.
When a department is set to be a "Single-item" department, a sale item entry
through that Department Key will immediately finalize the sale as cash and
issue a receipt if it is operated outside a sale. However, when a Single-item
department is operated during a sale, it functions the same as an Itemized
department.
2. Initial setting is as follows.
All departments .......Non-taxable & Itemized status
Sample Programming Operation
To set the following department status:
Department 1 ...... Taxable & Single-item
Department 2 ...... Non-taxable & Itemized
Department 3 ...... Taxable & Itemized
Department 4 ...... Non-taxable & Single-item
Key Operation)
1
-- Print Sample --
3
1
0
0
1
0003
00-01
00-00-00
0
2
TAXTAX
TX/M
#
1∗
2
3∗
4
Submode No.
Taxable Status Symbol
Department Code
Status Code
0: Itemized
1: Single-item
0
1
3
4
AL/TLX/TIME3 TX/M 1
AT/TL
- 14 -
Page 21

Time Setting
AT/TL
AL/TLX/TIME5
EO1-11099
Submode No.
Hour
(00 to 23)
Sample Programming Operation
To set the time to 13:35 (1:35 p.m):
Key Operation)
Date Setting
Submode No.
Month
(01 to 12)
AL/TLX/TIME5 1 3 3 5
AT/TL
Day
Minute
(00 to 59)
(01 to 31)
-- Print Sample --
13-35
0004
13-35
00-00-00
Year
(95, 96, etc.)
5
#
Time which was
programmed
AL/TLX/TIME6
AT/TL
NOTE: The date entry order above shows the initial set order. The entry order of Day-
Month-Year or Year-Month-Day can be selected instead of Month-Day-Year by
the System Option Setting described in page 12.
Sample Programming Operation
To set the date to October 3, 1995:
Key Operation)
6
AL/TLX/TIME5 1 0 9 50 3
AT/TL
-- Print Sample --
6
#
10-03-95
0005
13-46
10-03-95
Date which was
programmed
- 15 -
Page 22

Department HALC Setting
The HALC (High Amount Listing Capacity) is used to check excessively high amounts
entered by mistake. By setting HALCs, such mistakes will be prevented at the earliest
stage.
Repeatable for other department
AT/TL
8
0 to 7; For example, if "3" is entered, it means 3 digits and the
high amount limit is 999 ($9.99).
NOTE: Initial setting is as follows.
All departments..........Price entry up to 7 digits ($99999.99) is allowed.
Dept.
AL/TLX/TIME
EO1-11099
Sample Programming Operation
To set the following department HALCs:
Department 1 ...... 3 digits
Department 2 ...... 4 digits
Department 3 ...... 5 digits
Department 4 ...... 6 digits
Key Operation)
1
4
-- Print Sample --
2
0006
14-15
10-03-95
#
8
1
3
2
4
3
5
4
6
AT/TL
5
6
3
Department Code
HALC which was programmed
AL/TLX/TIME8 3
4
- 16 -
Page 23

Secret Code Setting
When this code is set, operations in the "Z" mode will be prohibited without this code
entry.
AT/TL
AL/TLX/TIME99
Secret Code: 1 to 9999
(0 to clear the secret code)
Sample Programming Operation
To set a secret code of 2428:
Key Operation)
EO1-11099
AT/TL
AL/TLX/TIME9 2 4 2 89
-- Print Sample --
99
#
2428
0007
14-45
10-03-95
Secret Code which was
programmed
% Rate Setting
%
Rate: 1 to 99
(0 to clear the % rate)
NOTE: Whether the % key is used as the function of %+ or %- is determined by the
System Option Setting described in page 12.
Sample Programming Operation
To set 5% on the [%] key:
Key Operation)
5
%
-- Print Sample --
5
0008
15-01
10-03-95
- 17 -
#
%-
"%+" is printed if the
[%] key is used as the
[%+] key
% Rate which was
programmed
Page 24

PLU Setting
Repeatable for other PLU
AT/TL
AL/TLPLU Dept.
EO1-11099
PLU Code:
1 to 100
Preset Price:
max. 6 digits
($9999.99)
NOTE below
Linked department
NOTE: When 0 is entered as a preset price in above key sequence, the preset price of $0.00
will be programmed.
Sample Programming Operation
To set the following PLUs:
PLU 6 (Preset Price: $1.50, Linked Department: Department 1)
PLU 24 (Preset Price: $2.50, Linked Department: Department 2)
PLU 28 (Preset Price: $1.75, Linked Department: Department 3)
PLU 30 (Preset Price: $2.00, Linked Department: Department 4)
Key Operation)
PLU6 1
1 7 5
5 0 2 PLU
3
1
03 PLU 2 0 0
4
-- Print Sample --
10-03-95
2 5 0
1.50
24
2.50
28
1.75
30
2.00
0011
15-47
6
4
1 @
2 @
3 @
4 @
2
AT/TL
AL/TL
PLU Code
Linked Department Code
Preset Price
82 PLU
- 18 -
Page 25

PLU Deletion
Repeatable for other PLU to be deleted
EO1-11099
V D
PLURTN/I.C
PLU Code:
1 to 100
AT/TL
AL/TL
Sample Programming Operation
To delete the PLU Code 30 which was programmed in the preceding page:
Key Operation)
AT/TL
V D
3
0
AL/TLPLURTN/I.C
-- Print Sample --
30
------0012
16-07
10-03-95
----
PLU Code which was
deleted
Deletion Symbol
Amount Format Setting
This operation determines the Amount Format for display and print.
AT/TL
AL/TL
1: Amount Format ( 0)
or
3: Amount Format (0.00) Initial Setting
Sample Programming Operation
To set the Amount Format of " 0":
Key Operation)
AT/TL
AL/TL
1
-- Print Sample --
0013
16-13
10-03-95
0
Amount Format which
was programmed
- 19 -
Page 26

EO1-11099
Tax Table Setting
TYPE 1: TAX FULL BREAKS (COMBINATION OF NON-CYCLIC AND CYCLIC BREAKS)
TAX
TX/M
Max. 4 digits; 0 to 9999 (¢)
TX/M
TAX
TAX
TX/M
(Max. amount non-taxable)
(Max. amount for 1¢ tax levied)
(Max. amount for 2¢ tax levied)
Repeat up to the "A" Break (Non-cyclic Break Limit)
TAX
TX/M
(Max. amount for N¢ tax levied)
ST
(to indicate the completion of Non-cyclic Breaks)
TAX
TX/M
(Max. amount for N+1¢ tax levied; Beginning of Cyclic
Breaks)
TX/M
TAX
(Max. amount for N+2¢ tax levied)
Repeat up to the "B" Break ("B" Break - "A" Break = Multiple of $1.00; max.
$99.00)
AL/TL
AT/TL
(to complete the Tax Table Setting)
NOTE: A maximum of 32 breaks can be programmed for the tax table.
- 20 -
Page 27

TYPE 2: TAX % ONLY
EO1-11099
TAX
TX/M
ST0
max. 5 digits; 0.001% to 99.999%
NOTE below
AT/TL
AL/TL
NOTES: 1. As for a numeric value to be entered, be certain to include down to three
decimal places. For example, to set 4%, enter "4000".
2. % Calculation Fraction Rounding Process for Tax is fixed to "Round Off".
TYPE 3: COMBINATION OF NON-CYCLIC BREAKS AND % RATE
First, complete the setting of Non-cyclic Breaks as shown in TYPE 1.
(Tax rate applied when exceeding the Non-cyclic
Break amount)
The description for
the Tax Rate in
TYPE 2 is also
applied to this case.
AT/TL
AL/TL
- 21 -
Page 28

Sample Programming Operation
TYPE 1: TAX FULL BREAKS
To set the following Tax Break Table:
Breaks Tax
EO1-11099
Amount Difference
from Previous Break
$0.01 to $0.10
$0.11 to $0.21
$0.22 to $0.35
$0.36 to $0.50
$0.51 to $0.64
$0.65 to $0.78
$0.79 to $0.92
$0.93 to $1.07
$1.08 to $1.21
$1.22 to $1.35
$1.36 to $1.50
Key Operation)
0¢
1¢
2¢
3¢
4¢
5¢
6¢
7¢
8¢
9¢
10¢
.
.
.
.
.
.
$0.10
$0.11
$0.14
$0.15
$0.14
$0.14
$0.14
$0.15
$0.14
$0.14
.
.
.
Non-cyclic Breaks
One cycle of
Cyclic Breaks
Cyclic Breaks
The same cycle
repeats.
1 0
2 2
3 5
ST
5 0
6 4
7 8
9 2
0 71
2 11
3 51
AT/TL
AL/TL
TX/M
TAX
TX/M
TAX
TX/M
TAX
TX/M
TAX
TX/M
TAX
TX/M
TAX
TX/M
TAX
TX/M
TAX
TX/M
TAX
TAX
TX/M
-- Print Sample --
0.10
0.21
0.35
0.35
0.50
0.64
0.78
0.92
1.07
1.21
1.35
1.35
0014
16-29
10-03-95
#
TX
TX
TX
ST
TX
TX
TX
TX
TX
TX
TX
TA
- 22 -
Page 29

TYPE 2: TAX % ONLY
To apply 15% to any amount:
EO1-11099
Key Operation)
TAX
AL/TLTX/M ST0 1 5 0 0 0
AT/TL
-- Print Sample --
TYPE 3: COMBINATION OF NON-CYCLIC BREAKS AND % RATE
To set the following Tax Break Table:
Breaks Tax
$0.01 to $0.10
$0.11 to $0.22
$0.23 to $0.39
$0.40 to $0.56
$0.57 to $0.73
$0.74 to $0.90
$0.91 to $1.08
0¢
1¢
2¢
3¢
4¢
5¢
6¢
Amount Difference
from Previous Break
$0.10
$0.12
$0.17
$0.17
$0.17
$0.17
Non-cyclic Breaks
. . .
0.00
0.00
15.00
0016
16-36
10-03-95
#
TX
ST
0 %
Key Operation)
1 0
2 2
3 9
5 6
7 3
9 0
0 81
ST
0 006
TX/M
TAX
TX/M
TAX
TX/M
TAX
TX/M
TAX
TX/M
TAX
TAX
TX/M
TX/M
TAX
AT/TL
% Rate of 6%
- 23 -
-- Print Sample --
0.10
0.22
0.39
0.56
0.73
0.90
1.08
1.08
6.00
0017
16-38
10-03-95
#
TX
TX
TX
TX
TX
TX
TX
ST
0 %
Page 30

EO1-11099
10. Verification of Programmed Data
The set data of the programming operations can be verified by the following operations. A
receipt is issued for each operation.
SET
OFF
REG
Mode Select
Switch: X
X
Z
To read Department Status
ST
2
X
1∗
1
2
0
3∗
0
4
1
5
0
6
0
7
0
8
0
0021
16-25
10-03-95
Taxable Status
Symbol
Department Code
Status Code
0: Itemized
1: Single-item
To read PLU Tables
ST
3
X
6
1 @
1.50
24
2 @
2.50
28
3 @
1.75
0022
16-26
10-03-95
PLU Code
Linked
Department Code
Preset Price
To read % Rate and the contents of
the System Option
ST
4
10213025
0023
16-27
10-03-95
X
%-
5
#
% Rate
System Option
Setting
To calculate Tax Amount
Displays the tax
amount.
Any amount
TX/M
TAX
NOTE: Result of the Tax Calculation
Test is not printed.
- 24 -
Page 31

11. Daily Operation Flow
The following shows a typical daily operation flow on the register.
Before Opening the Store...
Ensure that the register is firmly plugged
in the wall outlet.
Check to see if sufficient portion of paper
roll remains.
EO1-11099
Reference
Page
3
9
During Business Hours...
After Closing the Store...
Check the time, and print condition.
Opening the store
Ordinary transaction entries
Received-on-Account and Paid Out trans-
actions
Taking Read (X) Report.
Closing the store
Taking Reset (Z) Report
26, 27
27
35
36
36
Tear off the print portion of Journal Paper
(if the printer is used for journal recording).
Leave the drawer open, and Set the
Mode Select Switch to OFF.
Take all the cash from the drawer to the
office with the journal and Reset (Z) Report.
- 25 -
39
40
40
Page 32

12. Transaction Entries
EO1-11099
If the register is programmed with all requirements, it is ready
to accept transaction entries. Before starting to enter transactions, set the Mode Select Switch to the REG position.
WARNING!
When opening the cash drawer, be careful not to let the drawer hit any person.
SET
OFF
REG
X
Z
When an error has occurred...
When the buzzer sounds continuously and "E" is indicated in the leftmost digit of the display,
the last operation has caused an error and the keyboard is locked. In that case:
Press the key to cancel the error condition and the keyboard is now operable.
C
This function of the [C] key is also applied to operations in other Mode Select Switch
positions.
If errors occur repeatedly on operating the same key sequence, check the cause of the
error. The following are possible causes of error:
■ The Mode Select Switch position is wrong.
■ The numeric value entered exceeds the high amount limit.
■ A numeric value has not been entered where required.
■ A numeric value has been entered where prohibited.
■ The key sequence is wrong, or a wrong key has been pressed.
■ The operation is not allowed at the current timing.
Displaying the Time
The time can be displayed on the register any time when the register is outside a sale.
X/TIME
........... Displays the current time.
minutehour
The time display will disappear when any key excluding the [FEED] key is pressed on the
keyboard or the Mode Select Switch position is changed.
- 26 -
Page 33

No-sale
The No-sale transaction is used to open the drawer without relating to a sale, for
such purposes of money exchanges, checking the print condition on the paper roll,
etc.
EO1-11099
NS/PO
The drawer opens.
NS
No-sale Symbol
Sale Item Entries (Department Entries)
1) Entry of One Item
Price
Dept.
Price
2.50 2
NOTE: The Price entry is possible up to 7 digits. However, it is limited by the
Department HALC (High Amount Listing Capacity).
Department
Code
2) Repeat Entry
Price
Dept. Dept.
Same Department Key
2.50
2.50 2 2
NOTE: Depress again the Department key that has been depressed for one
item entry. The item entry will be repeated as many times as the key is
depressed.
3) Quantity Extension (Multiplication)
X/TIME
Quantity (max. 3 digits)
Unit Price
Dept.
2.50
7.50
3
X
@
2
Quantity
Unit Price
Product
NOTE: The product (obtained by multiplication) must not exceed 7 digits.
- 27 -
Page 34

4) Single-item Department
If a Department Key is programmed with
Single-item status, any entry through the
key will immediately finalize the sale as
cash without operating any media key.
The operation is the same as ordinary
itemized Department keys already
described (Entry of One Item, Quantity
Extension), except that Repeat Entry is
not possible using a Single-item
Department key.
1.50
0.09
1.59
0052
15-10
10-03-95
1∗
TX
CA
Dept. Item, Taxable
Symbol
Tax
Cash Total
5) Tax Modification (applicable to Add-on Tax Feature)
Each department is programmed with its own Tax status (Non-taxable, or
Taxable ). To reverse the Tax status (from taxable to non-taxable, or vice
versa), depress the following key before or during the required department item
entry (before the Department Key, at the latest). (Refer to Entry of One Item,
Repeat Entry, Quantity Extension.)
EO1-11099
TX/M
TAX
... to reverse Tax status
NOTES: 1. The tax-modified status declared by the Tax Modifier key will be
held until another item is entered. The modified status is held
even when the item is repeated.
2. When a Department item is tax-modified and repeated and the
same item (with the same price and department) must still be
entered consecutively within a sale with the original tax status
regained, depress the [C] key before entering original tax-status
item.
Sale Item Entries (PLU Entries)
1) Entry of One Item
PLU
PLU Code; 1 to 100
Linked Department
Code
Preset Price
1.75 3*
2) Repeat Entry
PLU PLU
1.75
PLU Code; 1 to 100
Same PLU Key
1.75
3*
3*
NOTE: Depress again the PLU key that has been depressed for one item entry.
The item entry wil be repeated as many times as the key is depressed.
- 28 -
Page 35

3) Quantity Extension (Multiplication)
EO1-11099
X/TIME
Quantity (max. 3 digits)
PLU Code; 1 to 100
PLU
1.75
7.00
X
4
@
3∗
Quantity
Preset Price
Product
NOTE: The product (obtained by multiplication) must not exceed 7 digits.
4) Single-item PLU
If a PLU is linked to a Department
with Single-item status, the entry
of this PLU will immediately finalize the sale as cash without operating any media key.
The operation is the same as
ordinary itemized PLU already
1.50
0.09
1.59
0056
15-26
10-03-95
1∗
TX
CA
Preset Price, Linked
Dept. Code, Taxable
Symbol
Tax
Cash Total
described (Entry of One Item,
Quantity Extension), except that
Repeat Entry is not possible using
a Single-item PLU.
5) Tax Modification (applicable to Add-on Tax Feature)
Tax status (Non-taxable, or Taxable) for each PLU is determined by that of the
linked Department. To reverse the Tax status (from taxable to non-taxable, or
vice versa), depress the following key before or during the required PLU item
entry (before the PLU Entry, at the latest). (Refer to Entry of One Item, Repeat
Entry, Quantity Extension.)
TX/M
TAX
... to reverse Tax status
NOTES: 1. The tax-modified status declared by the Tax Modifier key will be
held until another item is entered. The modified status is held
even when the item is repeated.
2. When a PLU item is tax-modified and repeated and the same item
must still be entered consecutively within a sale with the original
tax status regained, depress the [C] key before entering original
tax-status item.
- 29 -
Page 36

Dollar Discount
%
%
1) Dollar Discount on a Department Item or a PLU Item
EO1-11099
Department or PLU Entry
2) Dollar Discount on Subtotal
Sale Item Entries
NOTE: The discount amount must not exceed the item amount or the subtotal
unless the "Credit Balance" option is selected.
Percent Discount or Percent Charge
Discount Amount
Discount Amount
-
DISC
8.00
-1.50
DISCST
-
ST
Subtotal
Dollar Discount of
$1.50
The [%] key can be programmed to function Percent Discount or Percent Charge.
1) Percent Discount/Charge on a Department Item or a PLU Item
Department or PLU Entry
(to activate the preset rate)
(to activate a manual rate)
Manual Rate; max. 2 digits
1 (1%) to 99 (99%)
2) Percent Discount/Charge on Subtotal
(to activate the preset rate)
Sale Item Entries
ST
NOTE: When a Manual Rate is
entered, the preset rate is
disregarded.
%
(to activate a manual rate)
%
Manual Rate; max. 2 digits
1 (1%) to 99 (99%)
2.00
2
5
%-
-0.10
5%
Discount
- 30 -
Page 37

RTN/I.C
Void
Sale items once entered within the current sale can be voided.
1) Last Line Voiding
When the last line item (that has just been entered within the current transaction) is a Department item, a PLU item, Dollar Discount item, or Percent
Discount/Charge item, it can be voided by simply pressing the [VD] key.
Department or PLU Entry
Dollar Discount
Percent Discount/Charge
VD
2.00
2.00
2
2VD
EO1-11099
Voided
2) Designated Line Voiding
When a Department or a PLU item entered before the last item is canceled
before the sale is finalized, it can be voided. To operate it, follow the ordinary
Department or PLU entry procedure (Entry of One Item, Quantity Extension)
except that the [VD] key is depressed just before the Department or PLU key
depression.
Example)
1 0 0
2 0 0
1 0 0
Dept.1
Dept.2
VD
RTN/I.C
Dept.1
2.00
1.00
2.00
2
1∗
2RF
Returned Merchandise
The Returned Merchandise transaction is used to refund money to a customer who
has returned items already purchased. This operation must be performed outside
a sale only.
Voided
RTN/I.C
VD
Entry of sale item (Department or PLU) to be returned
(Entry of One Item, Quantity Extension)
- 31 -
3.00
-0.18
-3.18
1RF
TX
CA
Returned item
Cash to be returned
Page 38

Non-add Number Print
This function is to print any code number for future reference, such as Customer
No., Credit Card No., House Charge Account No., etc. Non-add numbers can be
entered at the starting of a sale or during a sale if the sale is not finalized. Multiple
non-add numbers can be entered in a sale.
EO1-11099
#/RA
Non-add Number; max. 7 digits
1234567 Non-add Number
#
Subtotal Read and Print
To read the total of the current sale by the customer's request or the operator's
requirement, simply depress the [ST] key.
Sale Item Entries
ST
Displays the subtotal (sale total including taxes up to the
moment).
NOTE: The subtotal amount to be printed is
the pre-taxed sale total.
11.50
Finalizing a Sale
1) Cash Total
5.00
0.18
5.18
0060
16-00
AT/TLST
ST
TX
CA
Subtotal
Tax
Cash Sale Total
Sale Item Entries
(
)
10-03-95
ST
2) Cash Tender
Sale Item Entries
(
)
Cash Tendered Amount
5.00
0.18
5.18
6.00
0.82
0063
16-10
10-03-95
ST
TX
NT
AT
CG
AT/TLST
Subtotal
Tax
Sale Total including Tax
Cash tendered
Change due
NOTE: The sale is finalized as in the sample receipt above when the tendered
amount is equal to or larger than the sale total (including taxes). When the
tendered amount is smaller than the sale total (short-tendered), the
balance due is displayed and the sale is not finalized. In such cases, refer
to "6) Multi-tender" and "7) Split Tender" on the page 34.
- 32 -
Page 39

3) Charge or Credit Total
Sale Item Entries
EO1-11099
(
)
ChgST
CH
4) Check Total
Sale Item Entries
5) Check Tender
Sale Item Entries
5.00
ST
0.18
TX
5.18
CH
0064
16-11
10-03-95
5.00
0.18
5.18
0067
16-15
CHKST
ST
TX
CK
(
(
)
10-03-95
)
Subtotal
Tax
Charge or Credit
Sale Total
Subtotal
Tax
Check Sale Total
CHKST
Check Tendered Amount
5.00
0.18
5.18
10.00
4.82
0068
16-20
10-03-95
ST
TX
NT
CK
CG
Subtotal
Tax
Sale Total including tax
Check tendered
Change due
NOTE: The System Option Setting allows you to select the following functions of
the [CHK] key.
Total & Tender functions
Total function only
Tender function only
- 33 -
Page 40

6) Multi-tender
Sale Item Entries
EO1-11099
(
)
Cash (or Check) Tendered
Amount less than the sale total
Cash (or Check) Tendered Amount
equal to or larger than the sale total
CHKAT/TLST
(
or
CHKAT/TL
or
(
)
)
7) Split Tender
Sale Item Entries
10-03-95
(
5.00
0.18
5.18
3.00
5.00
2.82
0069
16-23
)
ST
TX
TA
AT
AT
CG
Cash Tendered Amount
less than the sale total
Subtotal
Tax
Sale Total including tax
Cash tendered (short-tendered)
Cash tendered (over-tendered)
Change due
CHKAT/TLST
(
or
CHK Chg
Check Tendered Amount less than
the sale total-cash tendered amount
)
CH
15.00
0.90
15.90
3.00
5.00
7.90
0070
16-25
10-03-95
ST
TX
TA
AT
CK
CH
Subtotal
Tax
Sale Total including tax
Cash tendered (short-tendered)
Check tendered (short-tendered)
Charge or Credit Total
NOTES: 1. A maximum of 7 digits can be entered as Tendered Amount (up to
$99999.99).
2. When the sale total is zero or negative, the sale can only be finalized
by Cash Total function.
- 34 -
Page 41

Tax Exemption
The Tax Exemption transaction is used to exempt all taxes from the sale total.
EO1-11099
Sale Item Entries
(
)
TX/MST
TAX
5.00
1.75
6.75
6.75
Finalizing a sale
3∗
3∗
ST
CA
Sale item Entries with
Taxable Status
Cash Sale Total
without Tax
The following operations require the X position of the Mode Select Switch.
SET
OFF
REG
X
Z
Received-on-Account Payment
(Mode Select Switch: X)
The Received-on-Account transaction is used to identify money which is in the
drawer but not due to business. For example, a customer pays for a sale finalized
as house charge on a past day, or the operator records the change reserve in the
drawer loaded from the store office. This operation must be performed outside a
sale only.
The drawer opens to enable money entry into the drawer.
10.00
RA
Payment Amount Received;
max. 7 digits (up to $99999.99)
Paid Out
#/RA
(Mode Select Switch: X)
The Paid Out transaction is used when an amount of money is removed from the
drawer without relating to a sale, for the purpose of paying to a wholesaler, etc. This
operation must be performed outside a sale only.
NS/PO
Amount to be paid out;
max. 7 digits (up to $99999.99)
The drawer opens to enable paying out.
12.00
PO
- 35 -
Page 42

13. Read (X) and Reset (Z) Reports
PLU
AT/TL
(
)
(
)
This Chapter describes the operation to take Read and Reset reports and their print
formats.
Before Taking Reports...
The Read (X) Report allows to read the totals but not clear the memory, while the
Reset (Z) Report allows to read the totals and, at the same time, clear all the
resettable totals when the report has been issued.
The symbol "X" is printed at the top right of a Read Report, while "Z" is printed on
a Reset Report to indicate the type of report. The contents of the two types of
reports are the same if both are taken at the same time.
WARNING!
When opening the cash drawer, be careful not to let the drawer hit any person.
EO1-11099
OPERATION
Read (X) Report
SET
OFF
REG
X
Z
Reset (Z) Report
SET
OFF
REG
Financial Read (X) Report:
AT/TL
(The drawer opens.)
Cash-in-drawer Read (X) Report:
#/RA
(The drawer opens.)
PLU Read (X) Report:
PLU
(The drawer opens.)
Financial Reset (Z) Report:
(The drawer opens.)
X
Z
Secret code if
programmed
PLU Reset (Z) Report:
(The drawer opens.)
Secret code if
programmed
- 36 -
Page 43

Memory Balance
Grand Total = (Sum of Gross Sale)
Gross Sale = (Depts. Total) + (Tax Amount) + (Returned Merchandise & Desig-
nated Line Voiding) + (Last Line Voiding) + (%+)
NOTE 1
NOTE 2
Net Sale with Tax = (Depts. Total) + (Tax Amount) + (%+)
NOTE 2
Media Total = (Cash Sales) + (Check Sales) + (Charge Sales)
= (Net Sale with Tax) - (%-) - (Dollar Discount)
NOTE 3
Customer Total = (Cash Sales Customer) + (Check Sales Customer) + (Charge
Sales Customer)
Returned Merchandise & Designated Line Voiding
= (Returned Merchandise & Designated Line Voiding) +
(Negative Tax Amount)
NOTE 4
EO1-11099
NOTES: 1. The void transaction of %- and Dollar Discount is not processed to the
Void Memory. However, the void transaction of %+ is processed to
its memory.
2. In case that the [%] key is used as the [%+] key.
3. In case that the [%] key is used as the [%-] key.
4. "Negative Tax Amount" means a tax amount to be returned to a
customer with an amount of a returned item.
- 37 -
Page 44

Report Sample Format
EO1-11099
Financial Report
257.06
28
83.06
8.20
29.00
3.50
3.20
5.50
16.30
4.80
1.00
1.96
25
73.46
0.90
6.50
16
66.06
12
34.75
5.41
25.90
32.60
10.00
52.76
10.00
3.60
6.00
0003
0096
19-20
10-03-95
Z
#
∗
4
1
7
2
2
3
2
4
2
5
5
6
2
7
1
8
TX
NS
1
%-
4
-
NT
CA
1
CK
3
CH
3
RA
1
PO
∗TA
∗CK
1
VD
2
RF
Z
Cash-in-drawer Report
Reset Report Symbol
("X" for Read Report)
Grand Total (non-resettable)
Gross Sale: Item Count
Amount
Dept. 1 Sale:Item Count
Amount
Dept. 8 Sales:Item Count
Amount
Tax Total
Net Sale with Tax: Item Count
Amount
%- Count
Amount
Dollar Discount
Amount
Total Customer Count
Media Total
Cash Sales:Customer Count
Amount
Check Sales: Customer Count
Amount
Charge or Credit Sales: Customer Count
Amount
Received-on-account Count
Amount
Paid Out Count
Amount
Cash-in-drawer Amount
Check-in-drawer Amount
Last Line Voiding Count
Amount
Returned Merchandise & Designated
Line Voiding: Item Count, Amount
Reset Counter
Consecutive No.
Time
Date
52.76
0090
19-05
10-03-95
PLU Report
4.50
10.00
12.25
2.00
0002
0092
19-10
10-03-95
24
28
30
X
∗TA
Z
6
3
4
7
1
Z
Cash-in-drawer
Amount
PLU Code 6
Sales:Count
Amount
PLU Code 30
Sales:Count
Amount
Reset Counter
- 38 -
Page 45

14. Maintenance
Care must be taken not to injure yourself with the paper cutter.
Replacing the Paper Roll
EO1-11099
WARNING!
1
To remove the Printer Cover, insert the
Printer Cover/Drawer key to the Printer
Cover Lock, and then turn it 90° clockwise.
2
If the printer is used for Journal, hold down
the [FEED] key to wind up the printed
portion of paper, then cut the paper as
shown in the figure. Hold down the
[FEED] key again to advance the remaining paper end.
If the printer is used for Receipt, cut the
paper roll as shown in the figure. Then
hold down the [FEED] key to advance the
remaining paper end.
The wound-up portion of the paper (when
used for Journal) can easily be removed
from the Reel by pulling it sideways.
3
Set the paper roll ready for print.
Chapter "8. Installing the Paper Roll".
- 39 -
Refer to
Page 46

Replacing the Ink Roller
EO1-11099
1
To remove the Printer Cover, insert the
Printer Cover/Drawer key to the Printer
Cover Lock, and then turn it 90° clockwise.
2
Pinch the Ink Roller Knob with your fingers, and pull it upward.
Manual Drawer Release
3
Insert the new Ink Roller in the slot of the
carriage by pushing it all the way in until it
is firmly settled with a "click" sound.
The drawer will automatically open on appropriate operations. However, in the event of a
power failure, etc., the drawer can be released
manually.
First, insert the Printer Cover/Drawer Key to the
Drawer Key Lock, then turn it 90° counterclockwise.
Next, push the Drawer Release Lever located
on the bottom side of the register in the direction
of the arrow, and the drawer opens.
- 40 -
Page 47

Removing the Drawer
When opening the cash drawer, be careful not to let the drawer hit any person.
EO1-11099
Pull out the drawer all the way until it hits the
stopper. Then lift up the drawer and pull it again.
WARNING!
Battery Exchange
WARNING: Be certain to replace batteries with new ones
every year. If they run down, the programmed
data and sales data will all be cleared.
1
To exchange batteries, please keep the power
cord of the register connected to the wall outlet.
If the batteries are removed with the power
cord disconnected, the programmed data and
sales data will all be cleared.
2
To remove the Printer Cover, insert the
Printer Cover/Drawer key to the Printer Cover
Lock, and then turn it 90° clockwise.
3
Remove the Battery Cover.
- 41 -
Page 48

15. Specifications
EO1-11099
4
Replace the old batteries with new ones,
while confirming that the positive (+) and
negative (-) ends face the proper directions.
(Batteries: SUM-3 1.5V x 3 pieces)
NOTE: Do not mix used and new batteries in
the battery compartment.
5
Return the item removed in Step 3, and attach
the Printer Cover.
Size ................................... 350 mm (width) x 400 mm (depth) x 250.8 mm
(height including rubber feet)
Weight ............................... 4.76 kg
Power Required ................ 117V±10%, 60Hz
Power Consumed.............. 0.08A
Operating Temperature..... 0°C to 40°C
Operating Humidity ........... 10% to 90% RH
Size of Paper Roll ............. 57.5±0.5mm (width) x max. 80mm (diameter),
0.06 to 0.085mm (thickness)
Memory Protection ............ Dry Battery SUM-3 1.5 V x 3 pieces;
Life of about 1 year
(Be certain to replace batteries with new ones every
year.)
Handling the Batteries
When inserting batteries, place them so that the positive (+) and negative
(-) ends face the proper directions as shown in the battery compartment.
Do not mix used and new batteries in the battery compartment. Replace all
batteries at the same time.
Do not leave discharged batteries in the battery compartment. Leakage
from such batteries may damage the register.
Do not dispose the batteries in a fire. If put in a fire, they may explode.
Specifications are subject to change without notice.
- 42 -
Page 49

Page 50

Toshiba TEC Corporation
 Loading...