

Page 1
Owners Manual
TEC ELECTRONIC CASH REGISTER
MA-141-100 SERIES
TEC
T OKY O EL EC TRI C CO. ,L TD .
Page 2

WARNING
This equipment generates, uses, and can radiate radio frequency energy and if
not installed and used in accordance with the instructions manual, may cause
interference to radio communications. It has been tested and found to comply
with the limits for a Class A computing device pursuant to Subpart J of Part 15
of FCC Rules, which are designed to provide reasonable protection against
such interference when operated in a commercial environment. Operation of
this equipment in a residential area is likely to cause interference in which cause
the user at his own expense will required to take whatever measures may be re
quired to correct the interference.
Page 3

TEC ELECTRONIC CASH REGISTER
MA-Wl-lOO SERIES
Owners Manual
TABLE OF CONTENTS
page
TO OUR CUSTOMERS ................................................... 1
PRECAUTIONS ........................................................ 1
APPEARANCE AND NOMENCLATURE ........................................ 1
CONTROL LOCKS AND MODE SELECTOR KEYS
DISPLAY ............................................................ 4
KEYBOARD LAYOUT .................................................... 5
FUNCTION OF EACH KEY ............................................... 6
OTHER OPTIONAL KEYS ............................................... 15
REGISTERING PROCEDURE FOR SALES ................................... 17
READ(X) AND RESET{Z) REPORT ....................................... 26
PROGRAMMING OF THE REGISTER ....................................... 39
VERIFICATION OF PROGRAMMED DATA
INSTALLING AND REMOVING THE RECEIPT PAPER ROLL
INSTALLING AND REMOVING THE JOURNAL PAPER ROLL
WHEN A POWER FAILURE OCCURS ..................................... 56
OPENING AND REMOVING THE DRAWER ................................... 56
REPLACING THE INK ROLLER .......................................... 56
REPLENISHING INK ................................................. 57
SPECIFICATIONS .................................................... 57
BEFORE CALLING FOR SERVICE ........................................ 57
...................................
...............................
....................
....................
2
52
55
55
Page 4

Page 5
TO OUR CUSTOMERS
Thank you for choosing a TEC electronic cash register MA-141-100 series. This
instruction manual provides a description of the functions and handling of
this register and should be read carefully to obtain maximum performance.
Since every consideration has been given to safety, there is no danger of
damaging the machine by incorrect operation.
Please refer to this manual whenever you have any doubts concerning the
machine. This machine has been manufactured under strict quality control
and should give you full satisfaction. However, if the machine is damaged
during transit, or there are any unclear points in this manual, please contact
your TEC representative listed in this booklet.
I The specifications described in this manual may be modified by TEC, if
necessary.
I Be sure to keep this manual for future reference.
PRECAUTIONS
1. The keys on the keyboard work with a light touch. Avoid pressing the keys
too hard,
2. Avoid handling the machine with wet hands.
3. Do not apply thinner or other volatile oils to the cabinet or other plastic
parts. If the dirt is very bad, wipe off with a piece of cloth soaked
in neutral detergent and squeezed tightly.
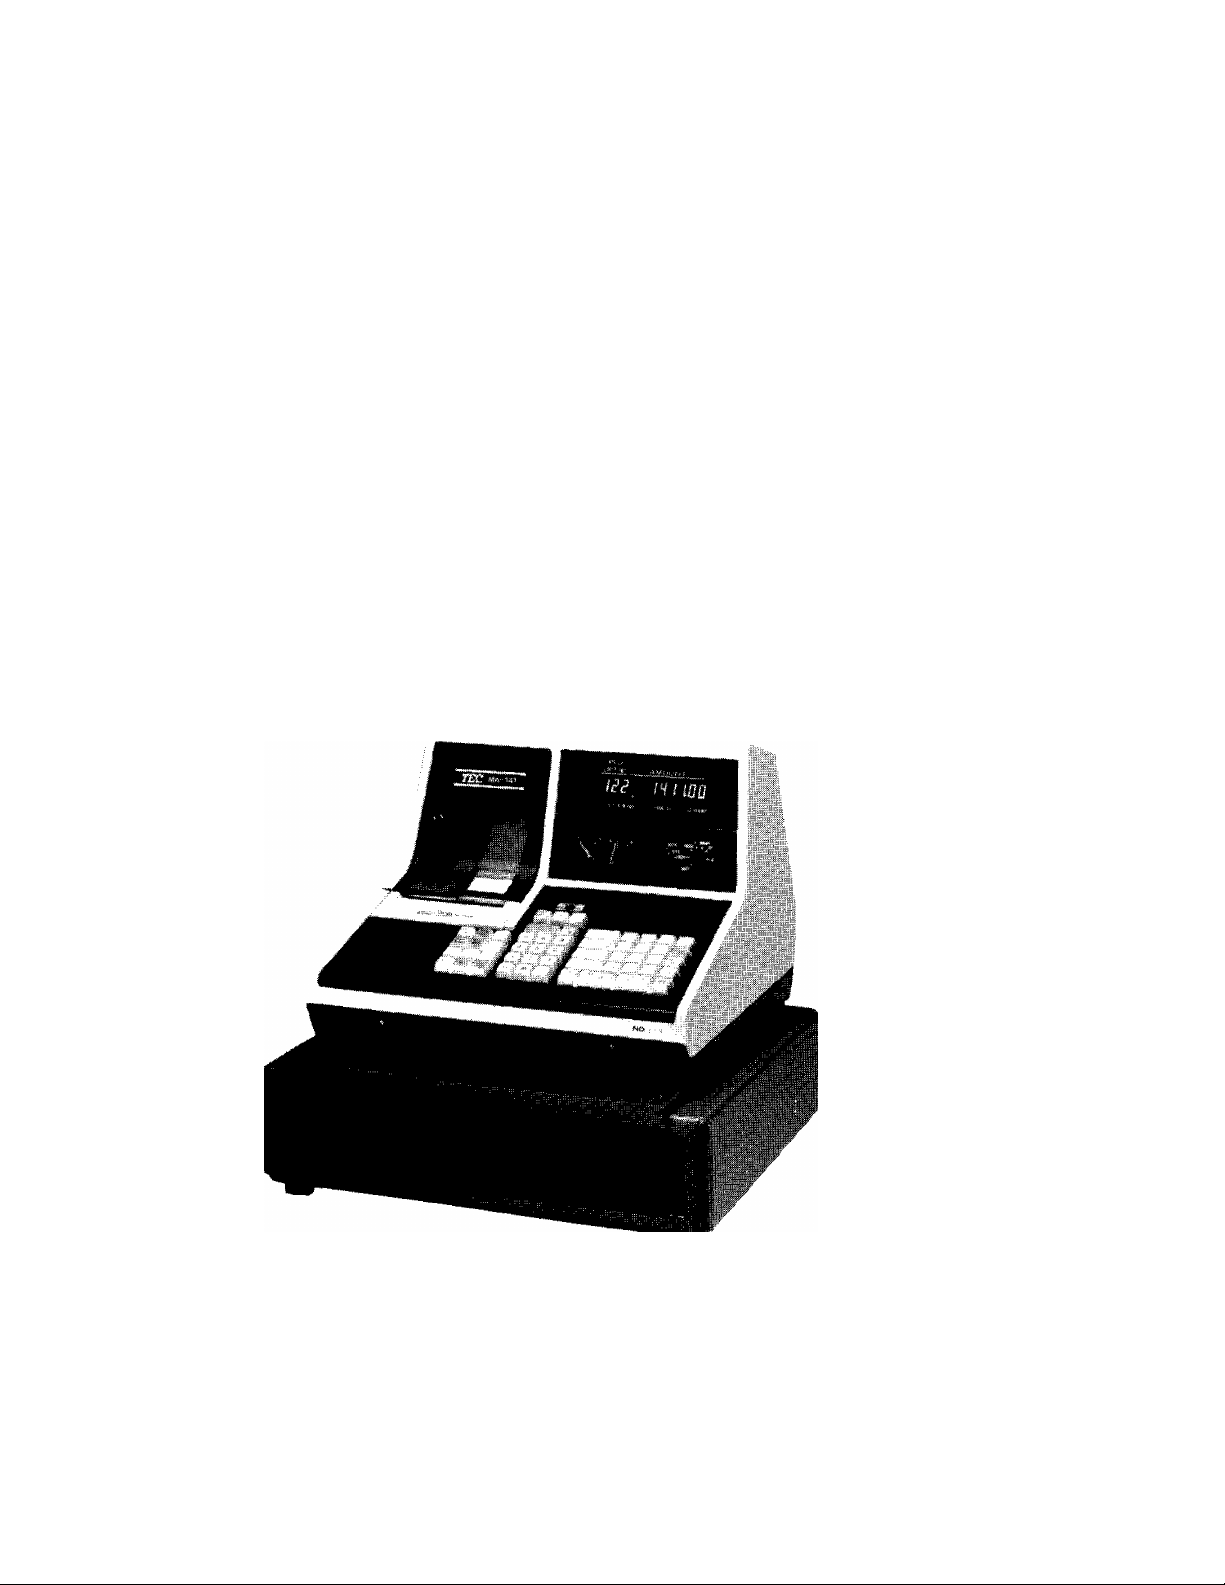
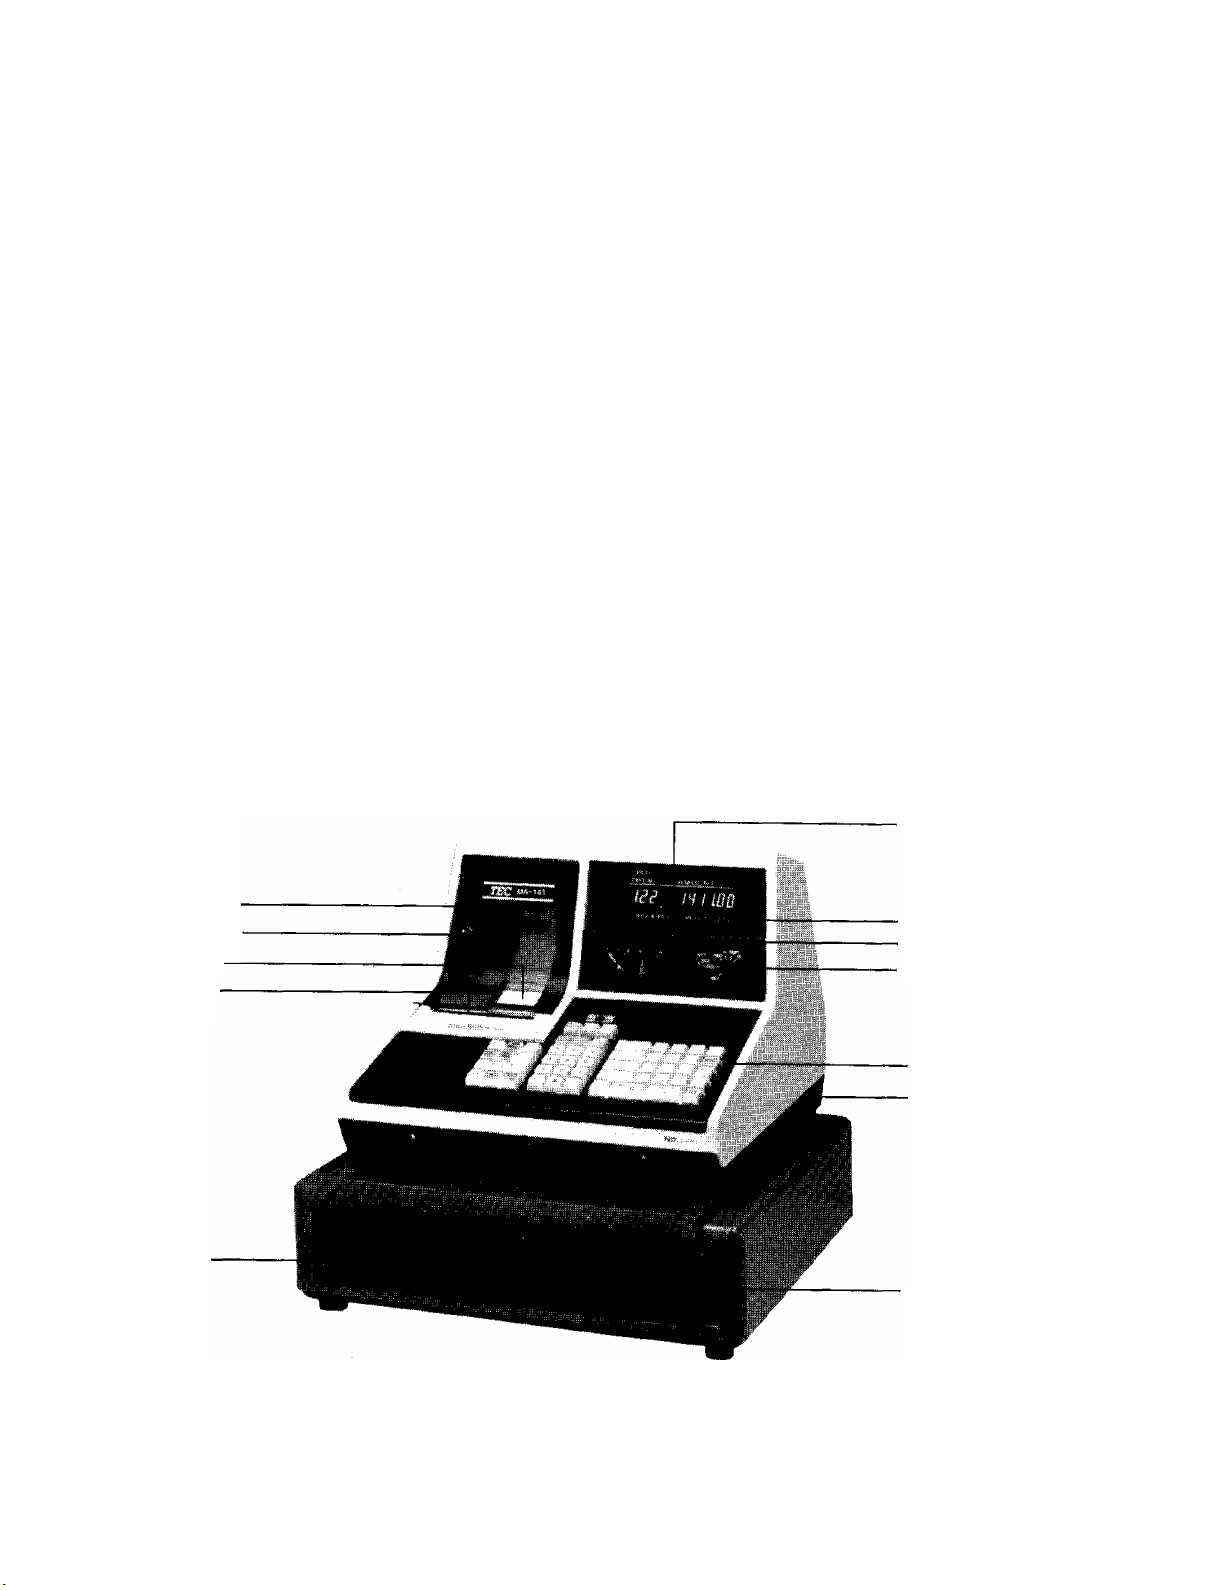
APPEARANCE AND NOMENCLATURE
Paper CoverPaper Cover Lock
Printed Journal
Receipt Outlet
Slip Inlet
)
Cash Drawer
Display
Cashier Lock
GT Lock
Control Lock
Keyboard
Power Switch
Drawer Release Lock
Power Switch
The power switch is provided at the -righthand side of
the cabinet. The AC power is turned on when the switch
is pushed to ON, and turned off when the switch is
pushed to OFF.
Page 6
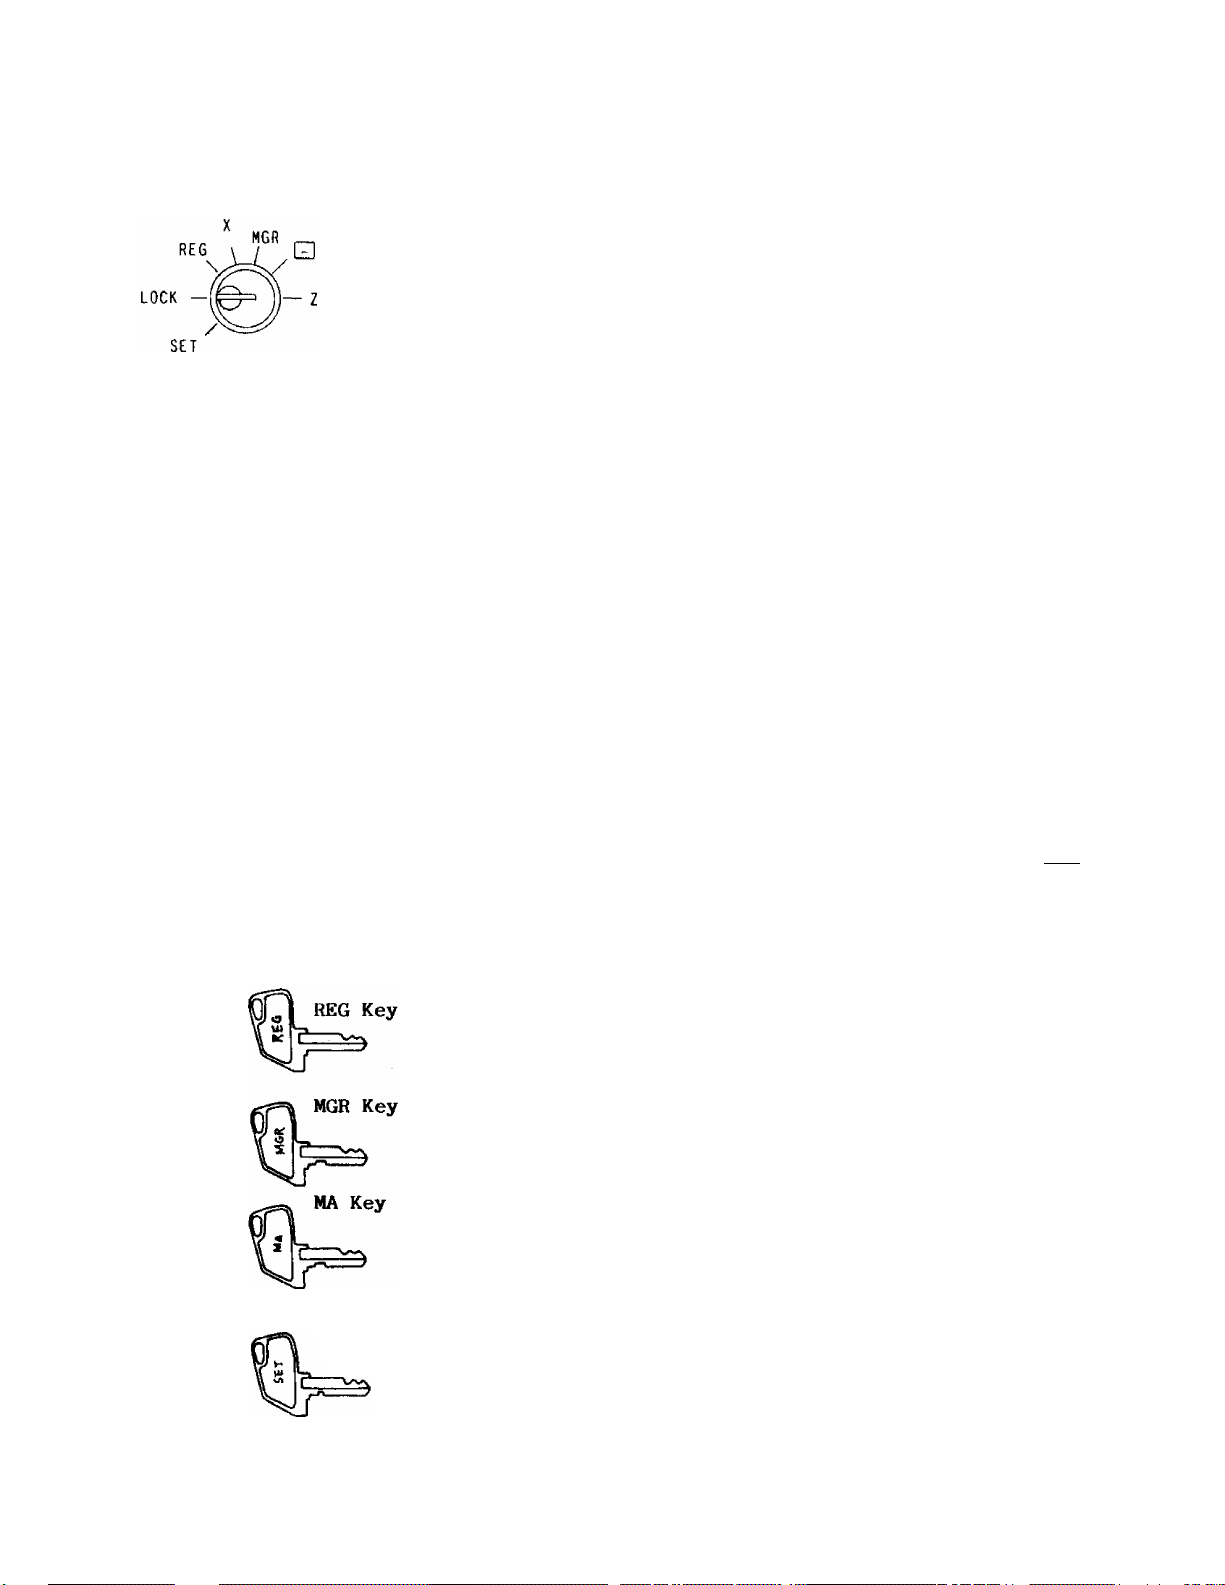
CONTROL LOCKS AND MODE SELECTOR KEYS
Mode Lock
(POSITION)
(FUNCTION)
LOCK . .
REG
MGR
The register operations are locked
when the Mode Lock is set to this
position. Displays the current time.
Normal cash register operations are
carried out in this mode. However,
the operations using the keys that
have been programmed to require the
"MGR" position cannot be done in this
mode.
The sale totals can be read and the
programmed data can be verified in
this position.
This position allows to register all
normal cash register operations to
be carried out in the REG mode and
the operations using the keys that
have been programmed to reguire the
"MGR" position.
This is the "Negative Mode", which
automatically process all the entries
in the reverse way, i.e,, positive
items into negative, and the negative
items into positive.
All the resettable totals and their
respective counters will be read and
reset in this position.
SET
register.
and REG.
authorized by the manager. This key can access the
positions of LOCK, REG, ^X, and MGR.
The MA Key is used by the store manager who will daily
supervise the collection of money and the printout
of transactions recorded by the register. This key
can access the positions of LOCK, REG, X, MGR, Q t
and Z.
SET Key The SET Key is used by the programmer. This key can
access the positions of LOCK and SET.
In this position, the register will
allow programming operations.'
This key can access the positions of LOCK
Page 7
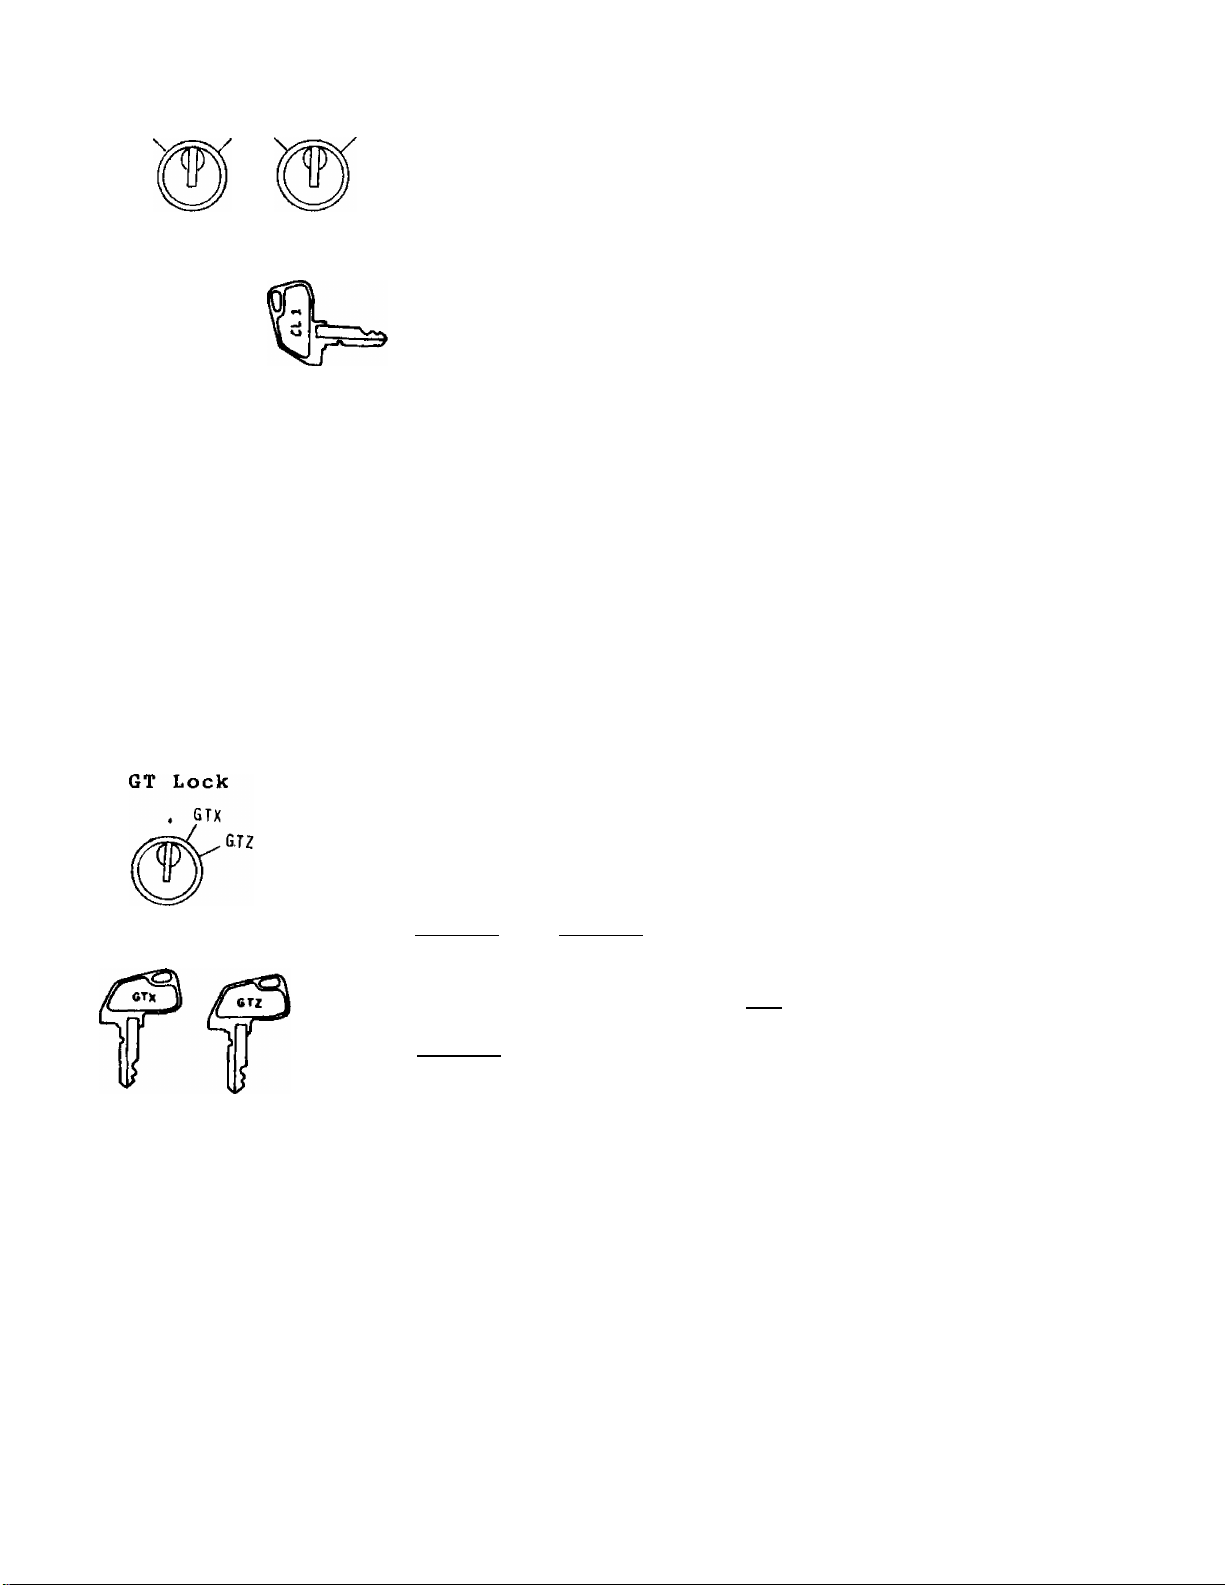
Clerk Locks
These locks are used to identify which clerk
is operating the register.
CLERK KEYS (CL 1. CL 2, CL 3, CL 4)
Each clerk should keep his/her clerk key. The register
will not operate unless one of these keys is inserted
and set to the corresponding position on the Clerk
Locks. Each of the keys may be inserted and pulled
out in the neutral position marked with the (point),
NOTES: 1. The push-style Clerk Keys may be installed in place of the Clerk
Locks.
2, The Clerk Locks or push-style Clerk Keys may be used as Major
Group Keys if so programmed xn the system option.
This lock is provided to read or reset the accumulated
sales totals not on the daily but on weekly or monthly
basis.
GTX Position:
This positition allows to read the accumulated totals.
The GTX Key and GTZ Key can access this position.
GTZ Position:
This position allows to read and reset the accumulated
totals.
The GTZ Key can access this position.
NOTE: When the GT Lock is turned to either the GTX or GTZ
position, the Mode Lock position and any Clerk Key
ON/OFF condition will be disregarded.
Page 8
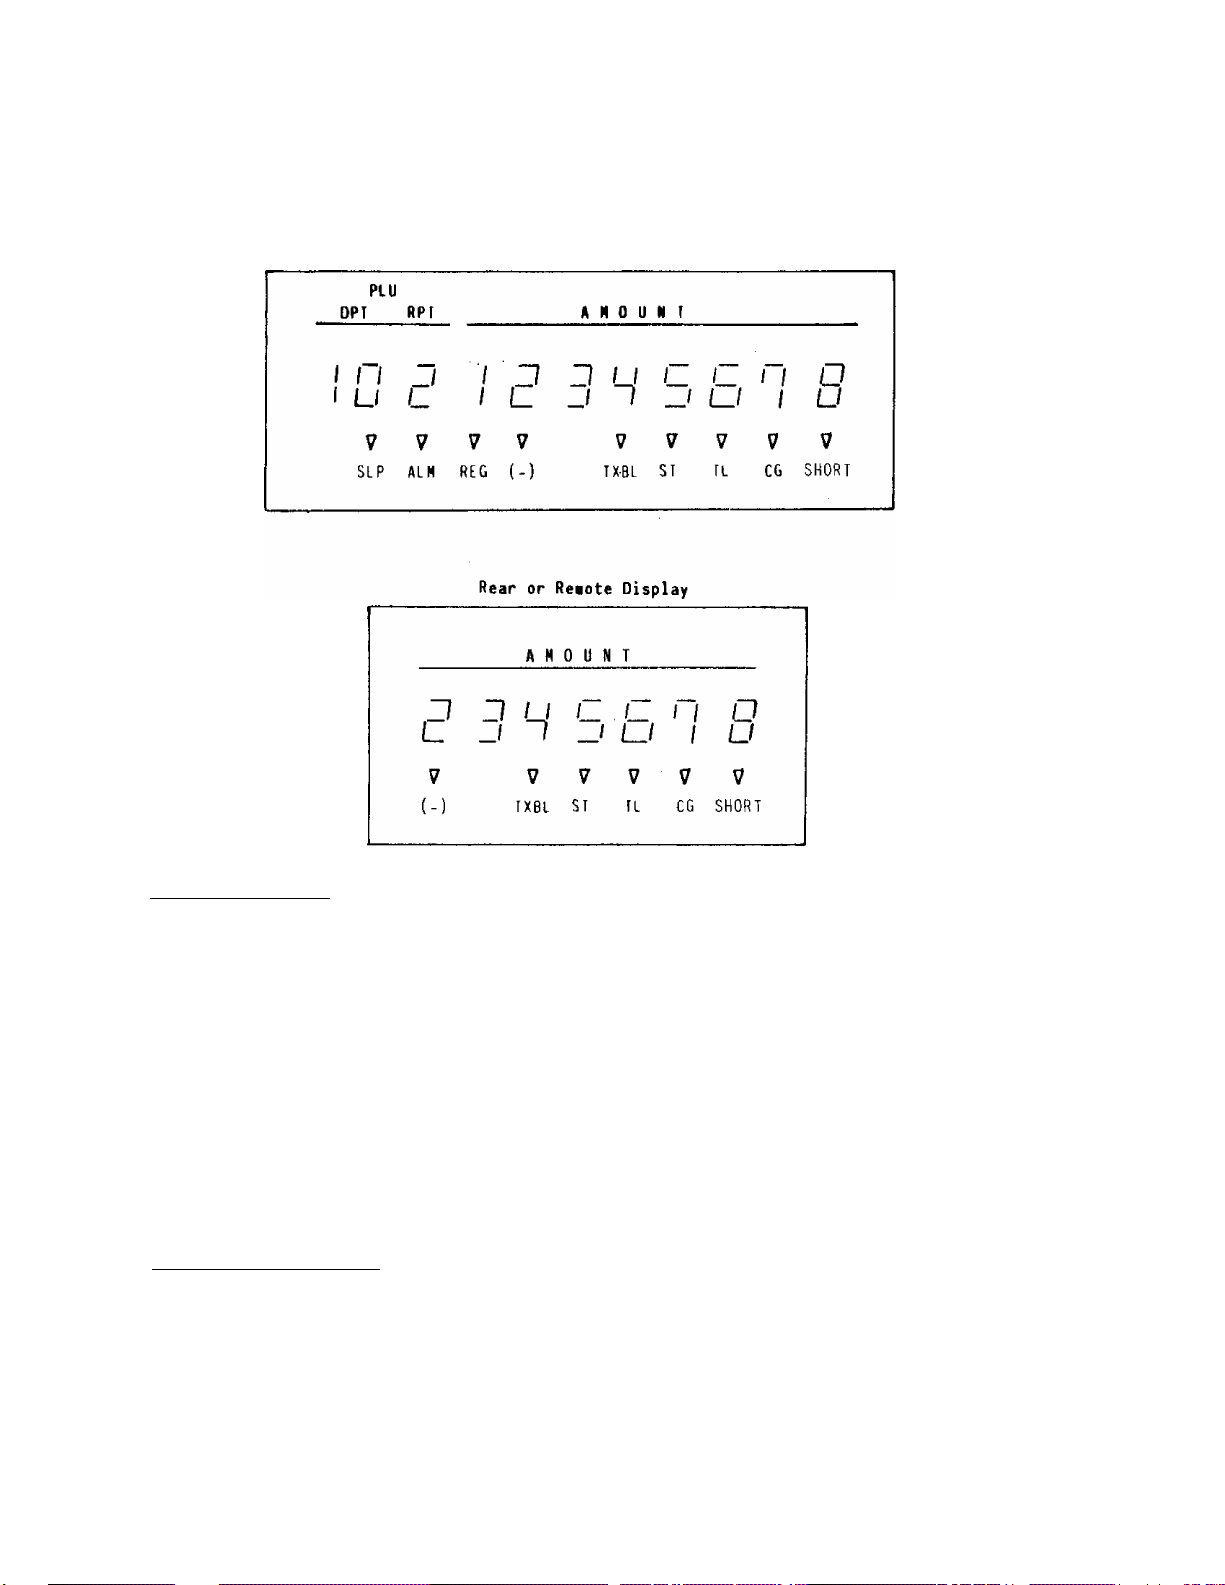
DISPLAY
The front display is located at the top of the register just above the
keyboard. The display has two types of display — numeric display and message
descriptors.
Front Display
Numeric Display
AMOUNT {8 digits) Displays the numeric data, such as amount, quantity,
etc.
DPT (2 digits)
RPT (1 digit)
PLU (3 digits, commonly used with the DPT and RPT digits)
Message Descriptors
SLIP Lights up when a slip has been properly inserted to allow
validation.
It flashes to require a slip insertion when validation
compulsion is programmed on a transaction key.
ALM
Lights up with the alarm buzzer to indicate that the last
operation or numeric entry has resulted in an error. To clear
the erroneous condition, depress the key.
Dispalys the code which represents each Department Key.
It stays lit when repeating the same department entry.
Displays the repeat department entry count.
Displays the PLU code when any PLU is entered. It goes
out when repeating the same PLU entry.
Page 9
REG
Lights up when sale items have been entered into a department.
(-)
TXBL
ST
TL
CG
SHORT
Lights up when the ¡RTN MDSE | , ¡DOLL DISC | , .
It also lights up when the fST[ or one of the total keys has
been depressed and the displayed amount is negative.
It lights up also when an amount is entered in the "Q" mode.
Lights up when a taxable department or PLU is entered.
It also lights up with the 'ST' Lamp when the jTXBL TL| key
is depressed.
Lights up when the sub-total amount is displayed after the
Lights up on a finalizing operation with the total amount
displayed when finalized without any amount tendered.
When an amount tendering operation has been performed, this
lamp lights up with the change due displayed.
Lights up when the amount tendered is less than the sale total
with the shortage amount displayed.
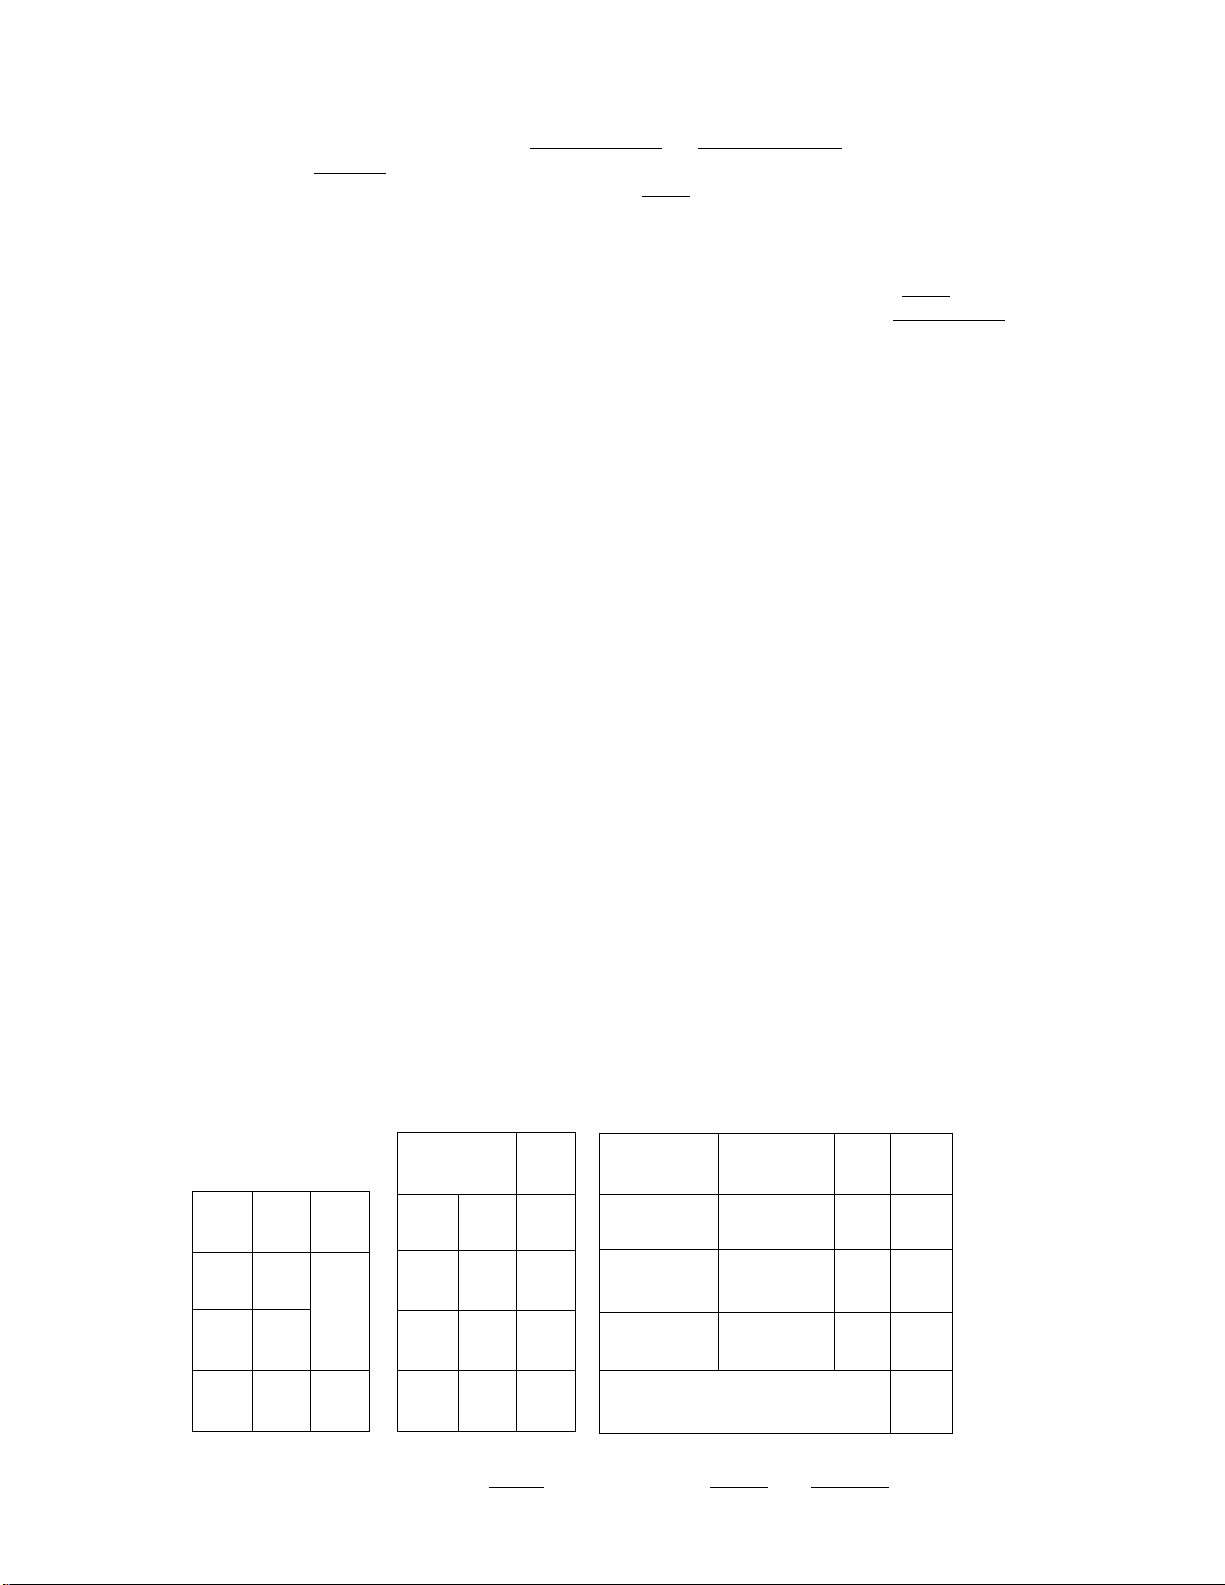
KEYBOARD LAYOUT
or
IC/VDI key has been operated.
____
key has been depressed.
The following is a typical keyboard layout for the MA-141-100 series. Since
this series is designed to be capable of programming most of the keys to be
located in the desired position on the keyboard, it is merely an example.
Please consult your TEC representative if any other alternative or additional
keys must be installed, referring to the description of the "FUNCTION OF EACH
KEY" and "OTHER OPTIONAL KEYS" on the following pages.
TYPICAL KEYBOARD LAYOUTS
RECEIPT
KA-Ì141-112
^Standard Keyboard)
#/NS
OPEN
OPEN
RTN
MDSE
LC
BTL
RTN
PR
DOLL
DISC
%+ %~
X
PLU
1C/
VD
OFF C3I ON
VALI
DATE
C
7
4
1
0
_
______
RF
8
5
2
00
JF
TX/M
9
6
3
*
1
2
3
h
TXBL -T,,, CHECK
TL '' ' TEND
10
11
12
R/A
9
PO
MSC
TND
Chg
ST
5
6
7
8
*N0TE: The rfxTfTl key is replaced by ffxT/Hl and ITX~2/Mi in
a dual-tax area.
Page 10

FUNCTION OF EACH KEY
RECEIPT
OFF I
ON
Clear Key
This key is used to correct a numeric entry error prior to depressing
any other key or to correct any error condition and cancel the alarm
buzzer.
If the key is depressed after a sub-total is obtained, the sub
total is displayed.
I validate] Validation Key
Receipt ON/OFF Switch
This switch has two positions available — 'OFF' position and 'ON'
poisition. When in the 'OFF' position, no receipt is issued from
the register and sales are printed on the audit roll only. When
the switch is turned to the 'ON' position, sales are printed on both
the receipt roll and audit roll, then a receipt is issued which is
torn off and given to the customer.
This key is used to over print a validation slip.
To operate, after registering an item or finalizing a sale, insert
a slip into the validation slot and depress the ¡~V AL I DATE] key.
The item, the amount, and the date and/or consecutive number will
be printed on one line on the slip.
The system option provides program selections as to the printing
position, single- or multi-validation, validation compulsion on some
transaction keys, etc.
If the SLIP Lamp flashes, it means that validation compulsion is
programmed for the last item entered. In this case, insert a slip
into the validation slot and depress the ¡VALIDATE | key; no other
operation is allowed until the compulsory validation has been done.
IRFI Receipt Feed Key
This key is used to advance the receipt roll. It is operated by
depressing the key and holding it in that position until the paper
has advanced to the required position.
[ j¥] Journal Feed Key
This key is used to advance the audit roll in the same fashion as
the RF key. These two keys are useful if the cashier, due perhaps
to an interruption whilst ringing up a sale, is unsure which items
have already been, entered. By using the feed key the cashier can
see which figures have actually been printed.
PR OPENI Preset Open Key
This key is used to modify the status of preset department keys.
When the | PR OPEN | key is depressed prior to depressing a preset
department key (either before or after the numeric entry), the preset
Page 11

department key is reversed to non-preset and allows amount entry
through the numeric keyboard.
If a preset department is entered with a price through the numeric
keybaord using the ¡PR OP]^ key, no repeat operation is then
possible for that department key.
The I PR OPEN] key cannot be used with the 1PLU| key.
;LC OPEWTI Listing Capacity Open Key
This key is used to release the listing capacity on each Department
or finalizing key. To operate, depress the [Lc OPE^ key before
depressing the department or fianalizing key (either before or after
the numeric entry).
By depressing the j LC OPEN| key, the HALC (High Amount Listing
Capacity) will be released to allow a numeric entry with two further
digits, and the LALC (Low Amount Listing Capacity) will be 1-digit
less than the programmed value, as to the department keyá. As for
the finalizing keys, the HALC will be extended to allow one further
digit.
In order to allow a numeric entry outside the values defined above,
the Mode Lock must be turned to the 'MGR' position using the MA or
MGR Key.
Repeat operation will be possible on any department key even when
"the ILC open] key is depressed before the department key.
[R/A| Received on Account Key
A received on account transaction is used to identify money which
is in the drawer but not business. The amount entered is thus
included in the "Cash-in-drawer" total but not in the sales totals.
To operate, enter an amount of payment and then depress the [r/A¡
key. Repeat this operation if multiple payments are entered at a
time. The payments entered are usually finalized by the IAT/TLI
(if paid in cash), 1CHK Tt^ (if paid in check), or IMSC TEND 1 (if
paid in mise, media). The fcTi^ key may function to finalize pay
ments received on account if so programmed in the system option.
The above operation can only be done when the register is outside
a ^ale.
The I IC/VD~1 l^ey is effective to delete a payemnt just recorded
with the depression of the [r/a] key, if before finalized by a media
key.
|POl Paid Out Key
A paid out transaction is used when an amount of money is removed
from the cash drawer without relating to a sale. When the I PÒI key
is used, the amount entered is subtracted from the "Cash-in-drawer"
total but does not affect the sales totals.
To operate, enter an amount taken from the cash drawer and depress
'*"he fpo'l key whilst the register is in an out-of-sale condition.
This operation may be carried out as many times as required if
multiple paid-out items are registered at a time. The paid-out
amounts recorded are finalized by the j AT/TL[ key only.
Page 12

FrTN MDSeI Returned Merchandise Key
This is the Returned Merchandise Key which is used for refunding
money to a customer who has returned goods to the store.
To operate, depress the IRTN MDSE 1 key either before or after ringing
up the amount to be refunded, and then depress the appropriate depart
ment key (the department key may be replaced by a PLU code and the
i FLU I key combination). The amount is automatically printed and
deducted from the bill.
The 1RTN MDSFI key can be used outside as well as inside a sale.
m
Quantity Extension Key
This key is used to multiply a department or PLU item entry by a
quantity.
The basic order of multiplication is:
¡QUANTITY I-» (3 PRICE I
As for details of multiplication for various cases, refer to the
"REGISTERING PROCEDURE FOR SALES".
The quantity can be of maximum 3 integral digits and 3 digits below
the decimal point. The price can be of maximum 6 digits. The
product must not exceed 7 digits.
Usually, the fraction below the least effective digit will be rounded
off. However, it may be programmed to be discarded or rounded up
by the system option.
I Non-add Number Print / No-sale Key
This is a dual-function key.
NON-ADD NUMBER PRINT FUNCTION
This key is used, when the Mode Lock is in the REG or Q position,
to print a non-adding number (such as Customer No., Check No,,
Credit Card No., etc.) on the receipt and journal for future
reference. To operate, enter a maximum of 8-digit number and then
depress the l#/№[key. The number is then printed. This operation
may be done any time between items, before or after all the sale
items, if the sale has not been finalized yet. Usually, non-add
numbers may be entered as many times as required within a sale.
However, it is programmable to prohibit more than one number entry
within a sale.
NO-SALE FUNCTION
This key is used, when the Mode Lock is in the REG position, to
open the cash drawer while the machine is outside a sale. To
operate, depress this key once. A non-add number may usually be
entered prior to a no-sale operation. However, it can be
programmed to prohibit a non-add number when a no-sale is
operated.
Page 13

0 ~ [9]* 1001 Numeric keys
These keys are used to enter numeric values such as amount, quantity,
date, or code number.
Depressing the 100J key once is the same as depressing the key
twice consecutively.
fTI Decimal Point Key
This key is used, as part of numeric keys, to designate the position
of the decimal point when entering a percent rate or a quantity.
For example, to enter 0.5%, index 0—»p —>5. or \~T[ —»5.
When entering a price or amount such as $0.25, just index 2->‘5. In
this case, depression of the [T] key is not necessary and will cause
an error.
121 (MA-141-112) Department Keys
These are department keys through which sales items are registered.
These keys may be programmed as either 'PRESET' keys or 'OPEN' keys.
OPEN DEPARTMENT KEY
A department key which has no preset price programmed is an 'OPEN'
key and must have a price entered into it manually each time.
The price is rung up on the numeric keyboard and the appropriate
department key is depressed. The price is then displayed and
printed on the receipt and audit rolls.
When the same department key is depressed more than once after
a price entry, the price entry is repeated as many times as the
department key is depressed.
To enter a price extended by multiplication, enter the quantity
first, depress the [x] key, enter the price, and then depress the
appropriate department key. A multiplication entry may not be
repeated by depressing the department key again,
PRESET DEPARTMENT KEY
A preset key is a key which has already a price programmed in it.
It is therefore unnecessary to enter the price of an item; simply
depress the key to register the sale of one item.
To repeat the same preset item, depress the department key as many
times as desired.
To multiply a preset department price by a quantity, enter the
quantity first, depress the [Y] key (the [x] key may be omitted
if the preceding quantity is a one-digit value), and then depress
the preset department key.
If a non-preset price must be entered on the keyboard into a preset
department, depress the I PR: OPE^I key either before or after the
price entry, prior to the |DEPT| key depression.
Page 14

Each department key can be programmed with a unit price, either
positive or negative use, a HALC (High Amount Listing Capacity),
a LALC (Low Amount Listing Capacity), and tax status.
When a department is programmed as a negative department, a price
entry may not be repeated by depressing the department key again.
Neither may a price entry be repeated when the | RTN MDSE | or | PR
OPEN I key has bee depressed prior to any department key depression.
IIC/VDI Item Correct / Void Key
This is a dual-function key.
ITEM CORRECT FUNCTION
Depressing this key once will remove the last item from the bill,
printing a line through that item on the receipt and journal.
The item correct function is effective even when a numeric entry
and a key depression are done between the department entry
to be corrected and the I IC/VD I key depression. However, if any
other key-in operation including an error cleared by the key
comes in between them, the | IC/VDJ cannot function to correct the
last line item.
The I IC/VD] key may function to correct any last line item entered
through a department, 1PLUl, |%+1, \%~\, |R/A|, i POI, I TAX],
or I DOLL DISCI key.
VOID FUNCTION
The I IC/VD I key is also used to void an item entered previously
within a sale.
To operate, depress the I IC/VD1 key before or after entering the
amount to be deleted, and then depress the appropriate department
or "PLU code and IPLU| key” combination.
To void a preset department item previously entered within a sale,
enter the quantity ("1” for a single item), depress the key
(the key may be omitted if the quantity is cne-digit), and then
depress the appropriate preset department key. If the quantity
is not entered prior to the I IC/VD I key depression, it will
function as the "ITEM CORRECT” key described above and result in
deleting the last item entered.
The I IC/VD 1 key may function to void any previous items through
a positive department, |PLU| (with a positive PLU), combination
of "positive department plus 1%T| or 1%-| ” or "positive PLU plus
or
%+ \
PLUl
Price-Look-Up Key
This key is used to enter a PLU that is linked to a department,
TO ENTER THE PRICE THROUGH A PLU:
IPLU CODE I-^1PLU
Page 15

As for quantity extension involving PLUs, refer to the "REGISTERING
PROCEDURE FOR SALES".
Each PLU is programmed with a 3-digit PLU Code, a 2-digit link
department code, and a maximum 6-digit preset price. Each PLU is
also programmed with the taxable/non-taxable status.
To modify the link department, to modify the status, to delete PLUs,
or to re-program the entire PLU table, the entire PLUs sales totals
must be reset beforehand. However, additional PLU programming and
preset price changes of individual PLUs may be carried out anytime
if the register is outside a saie. But please not that if a unit
price of any PLU is changed between sales (but not after resetting),
the accurate data of the PLU total may not be printed in the X and
Z reports due to the change.
11 Percent Chctrge Key
This key is used to add a percentage rate to a sale. If the pre
programmed percentage rate is to be added, depress the |^+1 key
without a prior numeric entry. If a rate different from the pre
programmed % rate is to be added, enter the desired rate on the
numeric keyboard and then depress the [%+] key. (The manual rate
will take priority.)
The preset price will automatically be read and
entered.
To repeat the same PLU price, depress the |PLU|
key only, after the above operation.
To operate, depress the |%+1 key either immeidately after a depart
ment entry if only that item requires the percentage addition, or
after the [ST| key has been depressed if required on the total bill.
The percentage rate and the amount are printed and will be added
to the sales total.
The percentage rate may be within the range from 0.001 to 99.999%.
The fraction resulted from the percentage calculation is usually
programmed to be rounded off. However, it can be programmed to be
rounded up or discarded.
Usually, if the 1%+] key is depressed after a second |ST | key
depression within a sale, it adds the rate to the sale total of the
items entered between the first and the second |ST| key depressions.
However, it can be programmed to add the rate to the entire sale
by the system option.
|%-1 Percent Discount Key
This key operates in the same fashion as the |%+1 key except that
operation will subtract from instead of adding to a sale.
I DOLL DISC I Dollar Discount Key
This key is used to subtract an amount from the sale total such as
a discount during a sale. This key cannot normally be used outside
a sale. An amount exceeding the sales total cannot normally be
entered. However, when the "Credit Balance" option has been selected,
this key can be used inside or outside the sale and over-subtraction
of the sale total is allowed.
Page 16

To operate, enter the discount amount on the numeric keyboard, and
then depress the [DOLL DISC} key.
I ST I Sub-total Key
This key is used to obtain the sub-total amount during a sale. When
this key is depressed after all the items have been rung up, the
sub-total of the sale is printed and displayed.
If the I ST) key is depressed more than once consecutively, the first
depression only will print and display the sub-total; further
depressions will only display but not print the sub-total amount.
The system option provides the selection not to print but only
display the sub-total on the depression of the |ST 1 key.
In charge posting, a depression of the I ST | key displays the amount
without tax and without previous balance.
IAT/TL| Amount Tendered / Cash Total Key
This key is used to record all cash paid on transactions, and will
be able to finalize a sale operation. Usually the key is programmed
to function as both amount tendered and cash total key. However,
the key may be programmed to operate with enforced tendering or as
a cash total key.
AMOUNT TENDERED FUNCTION
After the iTXBLTLjkey has been depressed, enter the amount tendered
by the customer in payment of the sale, and then depress the
1AT/TL1 key. The change is automatically computed, displayed,
and printed.
If the amount tendered is smaller than the sale total, it prints
the amount tendered on the receipt with the balance still due
displayed, but the drawer is not yet opened. In this case, ask
the customer for additional payment in cash and repeat the same
amount tendering operation, or depress another media key if the
balance due is processed as a sale in that media.
TOTAL KEY FUNCTION
To obtain the total and finalize a cash sale, depress the |AT/TL|
key only. The sale is finalized with the total printed and
displayed, and the drawer opens.
NOTES: 1. If the |AT/tL| key has been programmed to function as
the "AMOUNT TENDERED" key only and the sale total is
"0" or negative, no amount tendering can be entered.
In this case, the [AT/TLI key will function as the "TOTAL
KEY", so just depress the jAT/TLj to obtain the total
and finalize the sale.
2. If the "TXBL TL CcfTpulsciry" option has been selected in the
system option, the I TXBLTL I key depressions for obtaining
the sale total is required before finalizing any sale.
Page 17

3. If the "TOTAL VALIDATION COMPULSORY" option has been
selected in the system option, each sale can only be
finalized after operating the total validation..
The IAT/TL| key is also used to finalize received on account payment
entries or paid out amounts.
The I AT/TL I key can be programmed with the HALC (High Amount Listing
Capacity) of the amount tendered. If the HALC has been set, the
amount tendered must not exceed the programmed value; otherwise,
it will result in an error. If the | LC OPEI^ key is used prior to
the I AT/TL I key depression, the HALC will be extended by one
additional digit. If an amount still grreater must be tendered,
the MA or MGR Key is required to turn the Mode Lock to the MGR
position.
CHK TNdI or [check tend I Check Tendered Key
This key is used to cash a check when the register is outside a sale,
or to finalize the transaction as a check payment.
CHECK CASHING
When the register is outside a sale, enter the check amount and
depress the j CHK TNDj key. A receipt is issued and the drawer
is opened to enable the exchange.
C5heck cashing may be prohibited if so programmed in the system
dption.
FINALIZING AS CHECK PAYMENT
On finalizing a sale, enter the amount of the check given by the
customer and depress the [CHK TNDj key. If the amount received
is greater than the sale total, the receipt is issued with the
change due printed and displayed. Then the change is given to
the customer in cash. {The "Check Over-tendering Prohibi ted"
option can be selected in the system option, if necessary. In
this case, an amount equal to or less than the sale total may be
tendered.) If the amount received is smaller than the sale total,
the shortage is displayed, and the customer may pay the additional
amount in cash to finalize the sale by depressing the [at/TlI key.
The rCHK T1to~| key is also used to final ize received on account pay
ment entries if paid in check.
As for the HALC of the check tendered,• the description will be the
same as the HALC of the amount tendered for the j AT/TL| key.
Also refer to the [ AT/TL j key description as to other functions and
related programmabilities, except the fCHK TND | key is usually
programmed to function as the "Tendered" key only.
1Chg| Charge Total Key
This key is used as an alternative method of payment for charge sales.
To operate, depress the j Chg [ key, instead the [ AT7tL~| , to obtain
the total and finalize the sale.
Page 18

As’ for other functions and programmabilities, see the (AT/TL| key
description, except that the jChg| key is usually programmed as a
"Total" key only but not as a "Tender" key.
1MSC TND1 Miscellaneous Tendered Key
This key is provided to tender and finalize a sale in miscellaneous
media, which cannot be processed by any other media key. It has
the same functions and programmabilities as the fCHK TnH] key.
IBTL RTNl Bottle Return Key
This is a credit key to enter a bottle return amount. This key can
be programmed as either a motorized or non-motorized key, but must
be used inside a sale in either way.
WHEN PROGRAMMED AS MOTORIZED KEY
To operate, enter the bottle return amount and then depress the
BTL RTN key.
The amount entered through the | BTL RT^ key must not exceed the
taxable item total if the [BTL RTN| key has been programmed taxable,
unless the "Credit Balance" option is selected.
The [BTL RT^ can be programmed with its own tax status, which
can be modified by the |TX/M1 key when necessary.
WHEN PROGRAMMED AS NON-MOTORIZED KEY
To operate, depress the |BTL RTNl key before the bottle
return amount entry, and then depress the appropriate department
key.
The tax status of the | BTL RTN] key follows that of the department
through which the amount is entered.
The amount entered with 1 BTL RTN| key will subtract the department
total but will not affect the department counter.
No PLU entry is possible using the |BTL RTf^ key.
The r IC/VD I key is effective to delete the last amount entered
through or declared by the [BTL RTN| key.
Quantity extension using the |BTL RT^| key is possible, but split
pricing is not.
The I BTL RTN 1 key can be programmed with its own listing capacity.
To release this listing capacity, the Mode Lock must be turned to
the MGR position.
The amount entered using the | BTL RTI^ key must not exceed the sale
total unless the "Credit Balance" option is selected.
Page 19

frX/Ml (or iTXl/M], ITX2/MI for Dual-tax Area) Tax Modifier Key
This key is used to reverse the taxable/non-taxable status on depart
ments and other tax-programmable keys for one entry only. For dual-
tax areas, two keys should be provided — | TXl/M| and |TX2/M| —
in place of the |TX/M| key. The two tax modifier keys will function
independently each with its own tax table pre-programmed for taxable
items.
The tax modifier key(s) will be effective to reverse the tax status
programmed on Department keys, iDOLL DISC| » [S3 » [S3! » iVND CPN| ,
IBTL RTNj, and PLUs.
To operate, depress the |TX/M| key prior to depressing any of these
motorized keys above listed, i.e., either before or after the amount
entry.
ITXBL TlI Taxable Total Key
This key is used to display the contents of the main itemizer plus
any taxes due. The amount will display only but not be printed.
In order to allow add-on operation following the use of this key,
the taxes are not added into any totals until actual finalization
is‘initiated.
Mandatory depression of this key prior to finalizing is a program
mable option.
If the "TOTAL VALIDATION AFTER |TXBL TLI" is selected in the system
option, depressing the jVALIDAl^ key after a |TXBL TL[ key operation
prints the sale total on the validation slip, and therefore, only
a finalizing operation is allowed.
OTHER OPTIONAL KEYS
The following keys are not shown in the KEYBOARD LAYOUT on page 5. However,
any of them may be installed if the customer requires. But please note that
some of the present keys may have to be dispensed with or additional memories
may have to be installed to gain additional functions. Please contact your
TEC reperesentative if any of the following keys is necessary.
I T^l Manual Tax Key
This key is used to enter an irregular tax amount that cannot be
calculated on the basis of the programmed tax table, and to add it
to the sale total.
To operate, enter the desired amount of tax, and then depress the
[taxI key. The tax amount entered is then printed. This tax amount
is processed into the TAX 2 memory. Therefore, the tax amount
automatically calculated and printed at finalizing the sale (TAXI)
does not include a manual-entered tax, while the entire sale total
printed on the receipt last line includes the manual-entered tax
also.
Page 20

This key is also used, if depressed without an amount entry within
a sale, to display the total of only non-taxable items so far entered,
Usually, this non-taxable items total is only displayed. However,
it may be programmed to print it also.
IRECEIPT ISSUE I Receipt Issue Key
This key is used to issue the receipt of a sale when the sale has
already been finalized with the |RECEIPT 0FF/0N| Switch positioned
in OFF.
To operate, depress the |RECEIPT ISSUEI key without numeric entry.
The receipt for the last sale is then issued. This key will not
function if another sale has already been under way.
lOPENl
nPl (or I#/CIDI) Non-add Number Print Key
(NSI No-sale Key
IITEM CORRI Item Correct Key
IVOIDI Void Key
LC/PR Open Key
This is a key provided with both ILC OPEN I and I PR OPE^I key
functions. Depressing this key once enables to release the presetprice and the listing capacity of department at a time.
This key has only the function of non-add number printing. The
function is the same as stated in the "NON-ADD NUMBER PRINT FUNCTION"
of the 1#7nSI key description.
This key has only the no-sale function. The fucntion is the same
as stated in the "NO-SALE FUNCTION" in the |#/NS| key..
This is used as the "ITEM CORR" key only. The function is the same
as stated in the "ITEM CORRECT FUNCTION" of the |IC/VP| key
description.
This key is used as the "VOID KEY" only. The function is the same
as stated in the "VOID FUNCTION" of the |IC/VD| key description.
Additional Department Keys
Additional PLUs
Page 21

REGISTERING PROCEDURE FOR SALES
Here are patterns for actual registering operations. In the following
examples, "|
a depression of the transaction key, and "
and/or totalling operations.
NO-SALE (Mode Lock: REG)
DEPARTMENT ENTRY (Mode Lock: REG or Q)
____
|" indicates an input through numeric keys, "j 1" indicates
{or iw/m)
-----
" indicates other registering
I PRICE I—»I OPEN DEPT I
I PRESET DEPT I-»
-
-
I PR OPEN i-» I PR^j-» [preset DEPT
NOTE: When a price to override the listing capacity is entered, the
OPEN I key may be depressed either before or after the price entry
but before the department key depression. In this case, a price
two-digit larger or 1-digit smaller may be entered for one entry
only. To allow a price even larger or smaller than this, the MA
or MGR key is required and set to the MGR position of the Mode
Lock.
PLU ENTRY {Mode Lock: REG or Q)
tPLU CODE trPUJl->
REPEAT ENTRY (Mode Lock: REG or 0)
----
PRESET DE~PT1-» I PRESET DEPT |-» | PRESET DEPT |
(Repeat depressing the same key as many times as the desired count.)
I PRICE I-»I OPEN DEPfl->■ I OPEN DEPT |~»[OPEN DEPT1 —>
I PLU CODE |-»|PLUi-^|TLUl--»iPLU|--»
! ^ ^ 1
--
-------
Repeat
Page 22

NOTES: 1. Repeat entry is not possible when the iPR OPEN~| , IrTN MDSE I .
or 1IC/VDI (when used as "VOID" key) has been depressed prior
■to a 1 DEPT I or the | PLU | key.
2. The ILC OPEN 1 key is effective on repeat operation.
QUANTITY EXTENSION (Mode Lock: REG or 0
I QUANTITY 01 ~1 ^ I PRESET DEPT) —
^—{May be omitted if the quantity is one-digit.)
-
1 PR OPEN 11 QUANTITY|I X | —> 1 PRICE|[PRESET DEpf]
1 QUANTITY I—> I X i—»I PRICE I—>1 OPEN РЁРТ'М
[QUANTITY 1-^1 X • 1-^1 PLU
NOTE: The QUANTITY may be max. 3-digit integral and 3-digit below
the decimal point. (Use the 0(point)key for a quantity includ
ing the decimal point.) The PRICE may be max. 6-digit. The
product must not exceed 8 digits for a department and 7 digits
for a PLU entry.
BOTTLE RETURN (motorized |BTL RTNI key) (Mode Lock: REG or 0; or MGR if so
DEPT or PLU entries BOTTLE RETURN AMOUNT 0[BTL RTN[-»
NOTES: 1. The BOTTLE REURN AMOUNT must not exceed the sub-total, or
if IBTL RTN) key is programmed to be taxable, must not exceed
the taxable item total, unless the "Credit Balance" option
is selected.
2. The tax modifier(s) may be operated if necessary.
CODE
|PLU|
-
programmed)
-------
BOTTLE RETURN (non-motorized |BTL RTNI key) (Mode Lock: REG or 0; or MGR if
so programmed)
[BTL RTNI-> I PRESET DEPT I-»
iBTL RTN 01 BOTTLE RETURN AMOUNT [-»[OPEN DEPTI ^
NOTES: 1. Other declaration keys except |RTN MDSE j and j VOID 1 may function
along with the [BTL RTNI key.
2. The tax modifier key(s) may be used to reverse each
department status through which the bottle return amount is
entered. The rUTL RTI^ key itself does not have tax or SI
status.
3. Quantity extension is possible.
-
--
Page 23

RETURNED MERCHANDISE (Mode Lock: REG or Q ; or MGR if so programmed)
IRTN MDSE1--» I PRESET DEPT I-»-----
i RTN WSE I ->I PRICE I -»I OPEN DEPT [ ------
IRTN MDSE I-»I PR OP^I-^ I PRICE I-^[PRESET DEPT
I RTN MDSE II PLU CODE l->|PLU l-^
-------
DOLLAR DISCOUNT (Mode Lock: REG or Qi or MGR if so programmed)
I DISCOUNT AMOUNT II DOLL DISC]
NOTES: 1. The ITX/mI (|TX1/m| and/or |TX2/M|) key may be either before
or after the DISCOUNT AMOUNT entry if the tax status of the
I DOLL DISC I key is reversed.
2. Unless the "Credit Balance" option has been selected, no
discount amount exceeding the sale total will be allowed.
If dollar discounting is made on a taxable item, no amount
exceeding the taxable item amount will be allowed.
3. Unless the "Credit Balance" option has been selected, no dollar
discount operation outside a sale will be allowed.
PERCENT DISCOUNT (Mode Lock: REG or □ : or MGR if so programmed)
(1) To discount from the sub-total:
--
... to discount by the preset % rate
Sf|->|RATE|
3—*
----
••• to discount by a manual rate
(2) To discount from an individual department item:
I DEPT I —»1%-1 —>------... to discount by the preset % rate
(dept I —> i RATE I —»I%-1 —»-... to discount by a manual rate
NOTES: 1. The rate may be~ entered within the range up to 99.999%. If
the rate contains the decimal point, use the key.
2. The above 1 DEPT| keys may be replaced by a PLU entry.
3. The tax modifier may be used prior to the |%-| key if necessary.
PERCENT CHARGE (SPECIAL FEE ENTRY) (Mode Lock: REG or Q)
This operates the same as in the "PERCENT DISCOUNT" operations above,
except that the |%+| is used instead of the [%-| key.
Page 24

ITEM CORRECTION (LAST LINE VOIDING) (Mode Lock: fiEG or Q)
1 PRESET DEPT]->r^C/VD ~1
, PRICE 1 I OPEN DEPTH -
IRTN MDSE I-»I PR DEPT I
iRTN MDSEI-^I PRICE 1-^1 OPEN DEPT]
[PRESET PLU CODE I-> IPLUI
IC/VD
ic7vd
IC/VD
IC/VD
NOTES: 1. The j. IC/VD 1 key depression will delete the last line item
already printed within a sale,
2. The 1 IC/VD 1 key functions to delete the last line item,
even if the | DEPT j keys in the above example are replaced by
the [S , [%3 , IWaI , Hg , I DOLL "DISC"! , , or
[BTL RT^(motorized key).
NON-ADD NUMBER PRINT (Mode Lock: REG or Q)
I NUMBER
“TZ
(Check No., Customer No., Credit Card No., etc.)
{or a])
NOTES: 1. If the "Non-add Number Print Allowed Only Once in a Sale" has
been selected in the system option, a second non-add number
entry will result in an error,
2. The [7] key cannot be used to enter a non-add number. Neither
can any other key be used along with the [ #/NS | to print a
non-add number.
SUB-TOTAL (Mode Lock: REG or [3 )
I DEPT 1 . . . [ DE^I [S3
The sale total without tax so far is
-----
.
displayed and printed, but the sale is
not finalized.
NOTES: 1. If the [c] key is depressed after once obtaining a sub-total,
the sub-total amount will be displayed.
2. If the |ST[ key is depressed more than once consecutively,
the first depression only will print and display the sub-total;
further depression will only display but not print the sub
total .
TAXABLE TOTAL (Mode Lock: REG or [3)
I DEPT I ... I DEPT I 1TXBL TL! .The sale total with tax so far is display
ed but not printed. The sale is not
finalized.
NOTES: 1. If the (3 key is depressed after' the I TXBL t17| has once been
depressed, the sale total with tax is then displayed.
Page 25

MANUAL TAX ENTRY (Mode Lock: REG or [^ )
Itax amount I1 tax I
NON-TAXABLE ITEM TOTAL READ (Mode Lock: REG or Q)
--
dept] ... iDEPT I-»¡TAX I
DESIGNATED VOID (Mode Lock: REG or [^ ; or MGR if so programmed)
111—»(in )—»|ic/vd]-»|preset deptI-^ —
. . . The total of the non-taxable item(s)
so far entered within the sale is
displayed. It is usually not printed,
but programmable to print if required.
IPRICE TO BE VOIDED I ^[icTvDl-^rOPEN dept]-»
I PRICE TO BE VOIDED I-» |IC7to~|
—»1% CHARGE RATE TO BE VOIDED ALONG WITH THE DEPT PRICE
jPLU code! IIC/VDl
NOTES: 1. Designated voiding cannot be made on a department that has
been preset as a negative department.
2. Unless the "Credit Balance" option has been selected, voiding
to result the sale total into negative will go into an error.
RECEIVED ON ACCOUNT (Mode Lock: REG)
AMOUNT OF PAYMENT
HZÂ]
PLU
[ÂfjTL I ... if paid in cash
--
-
I OPEN DEPf]
[H!
(A i^+^l or \%-1 key operation may follow,
just as in the above, if necessary.)
L
Repeat if multiple
payments are entered.
NOTE: The |Chg| key may finalize payments received on account if
so programmed in the system option.
PAID OUT (Mode Lock: REG; or MGR if so programmed)
I AMOUNT TO BE PAID OUT j —»fPOl —> rMTTL]
I--------^------------------1
Repeat if multiple amounts
to be paid out are entered.
____
1
( I AMOUNT I) -»-I CHK TNDI ...if paid in check
(|AMOUNT|)-»rMSC~ TNDi if paid in mise, media
Page 26

CASH TOTAL (Mode Lock: REG or Q)
pDEPTI ... 1 DEPT I —»I AT/TL] ... The drawer opens, the sale total is dispaly-
ed and printed, and a receipt is issued.
CASH TENDERING (Mode Lock: REG or 0)
I DEPT I . . . |DEPT|-i>( ItXBL TL| )->|CASH TENDERED |->1 AT/Tl1
CHECK TENDERING (Mode Lock; REG or 0)
IdEPT'I . . . I DEPT I—»( ITXBL TL I )-»| AMOUNT OF CHECK TENDERED
CHARGE TOTAL (Mode Lock: REG or 0)
I DEPT I...|DEPT|-»(ITXBL TLI)-^|Chg|
MISC. TENDERING (Mode Lock: REG or 0)
j DEPT 1 ... !dept'1-»( Itxbl tlI )—>1 amount of misc.tendered|-»|msc TND
NOTE; The above operations of CHECK, CHARGE, and MISC Keys are based
on the standard programming. If any of those keys are programmed
to be used the other way ,(i.e., Total key instead of Tender key
or vice versa,)do the operation as shown in "CASH TOTAL" and "CASH
TENDERING".
MULTI-TENDRING. SPLIT-TENDERING (Mode Lock: REG or 0)
MULTI-TENDERING (Short tendering repeated multiple times by the same media)
IDPET1 .,. |DEPT1-»(ITXBL TLI)-^[AMOUNT TENDERED| ^| CHK TNDj
[
AMOUNT TENDERED CHK TND
CHK tndI
r
AMOUNT TENDERED CHK TND
□
AMOUNT TENDERED
The I CHK TND~] key may be replaced by any other media key if it
is programmed to allow tendering.
CHK TND
Page 27

SPLIT-TENDERING {Short tendering repeated by different media keys)
[dept I . . . I DEPT I-^( ItXBL TLI )-»| CHECK AMOUNT TENDERED |-> j'CHK TND j
( I CASH, AMOUNT TENDERED 1 ) —j AT/TL|
CASH AMOUNT TENDERED I-^rAT7^1-»rChfi]
NOTES: 1. In both MULTI-TENDERING and SPLIT-TENDERING operations, the
sale is finalized, a receipt is issued, and the drawer opens
on reaching the sale total amount.
2. If a media key is depressed without an amount tendering entry
(if that key can function as a "Total” key), the sale is
then finalized on that stage, processing all the balance
due into that media.)
CHECK CASHING (Mode Lock: REG)
[AMOUNT OF CHECK TO BE CASHED|—> fCHK TND| .
NOTES: 1. Check cashing is allowed only outside a sale.
2. The system option provides a selection to prohibit check cash
ing operations, if necessary.
3. The flMSC TND| key may be programmed to allow cashing, if
necessary.
VALIDATION PRINT (Mode Lock: REG or Q)
After entering an item
through a transaction
key or a media key
NOTES: 1. No other operations can follow until the validation slip once
printed is withdrawn.
2. Validation printing cannot be done after a non-add number or
no-sale registration.
3. The following are the selections that can be programmed in
the system option related to validation:
Insert a validation slip into
the validation slot. Make sure
that the "SLP" Lamp is lit.
The drawer opens and a
receipt is issued. Receive
the check and pay the
amount in cash to the
customer.
VALI
DATE
(1) PRINT FORMAT
a) AMOUNT only
b) DATE (MONTH, DAY, YEAR) and AMOUNT
c) MONTH, DAY, AMOUNT, and CONSECUTIVE NO.
(2) MULTI-VALIDATION or SINGLE-VALIDATION
(3) VALIDATION COMPULSORY on various transaction keys
Page 28

RECEIPT SAMPLES
NO-SALE
Thank you
Call again
02 -1 0-8 2
SL 25 456
“> 4-
1
U
OO áO i
^4-24
DP ENTRY
Store Name/Message
Stamp
Date
Reg. No.
----
No-sale Symbol
Clerk ID
Consecutive No.
Time
RECEIVED ON ACCOUNT
Thank you
Call again
02 -1 0-8 2
SL 25 456
*1 00 00 I
#1 5
.....
Id
OO dl g
S U- 25 .
* 5; §0 i
* 5, 5 0 I
* 1 0 5 ,5 0 5 d
—|-Item received on account
Non-add Number
Item received on account,
item-corrected
Item received on xcount
Total received in check
Thank you
Call again
02 -1 0-8 2
Í1 .2 H56
01
*
05 *
*1 25
* 5. 00
*a 45
* 4. 6 8
*L00
* 4, 0 0
Id
* 0. 52
0 0 Z 5 i
SU -5 á
DP 1 ■ Amount
'Taxable
Doll Discount, :
which is item-corrected
Tax Amount
Sale Total(with tax)
5?'
Cash Tendered SplitCheck Tendered^ Tendering
S?-
Change ckie
PAID OU'
Thank you
Call again
02 -1 0-8 2
ÍL 2 5 4.5 6
*10.0 0
---*?ftO&
*
2. 0 0
*
1
12 .0 0
0 0 6.4 Í
f U- 26 .
O
Item paid out
Q.
O
Item paid out, item-corrected
a
o
Item paid out
0.
O -I
*
Paid Out Total
Q.
Page 29

RECEIPT SAMPLES -Continued-
% ENTRY
Thank you
Call again
0 2-
iL2 5 4.5 6
01 *
04 *
#
15.
Id
OOZOi
f H -5 4 .
10 -8 2
*L 25
1
* 2. 75
* 4 . 0 0 m
* 4. 00
%-■
- 0. 6 0 -
*a i) i
* 5. 55
%- (iSSi)
X~ amount
RETURNED MERCHANDISE
Thank you
Call again
02 -1 0-8 2
iL 2 5 4 ,5 6
07 *
Id
00d8g
*L 00 I
-1.0 0 5 d
f U- 55
QUANTITY EXTENSION
Returned Item into OP 7
Balance die
(to be paid back to the
customer in cash, in
this case)
PLU ENTRY
Thank you
Call again
02 -1 0-8 2
iL 2H 56
45 d?
* 5. 00
* 0, 50
1 d
* 55 0
0 0 8.4 g
?U -4 5,
X
h< -J
O h
PLU No.456
Amount
Thank you
Call again
02 -1 0-8 2
11 25 456
5. X
0 8* * 1 0 .0 0
7 . X
1 1* * 1 0 5. 0 0
2 d * 1 1 5. 0 0
oiaoi
51 4- 55
2 ,0 0
1 5. 0 0
Quantity {5)
Price ($2.00)
Product ($10.00)
<C -I
u t-
Page 30

READ(X) AND RESET(Z) REPORT
The following table shows the key operation to take each report and its
content. The "X" and "Z" reports have exactly the same content printed,
except that:
1, The "X" reports allow to read the totals but not clear memories, while
the "Z" reports allow to read the totals and at the same time all
the resettable memories will be cleared when the reports have been
issued,
2, The symbol "X" is printed on the top line of a "X" report, while "Z"
is printed on a "Z" report, to indicate the type of report.
3, A reset count is printed on the bottom of a "Z" report only.
TABLE OF X AND Z REPORTS
(REPORT .NAME)
AUTO SCAN READ
AUTO SCAN RESET
PLU AUTO SCAN READ
PLU AUTO SCAN RESET
INDIV. DEPT. READ
(KEY OPERATION)
Mode Lock: X —i
I 1AT/TL1 Totals that have memories
Mode Lock: Z
Mode Lock: X
Mode Lock: Z —
Mode Lock: X
ex.) I DEPT Ti ^ |DEPT2~1
IDEPT 3l->|PEPf^
-----
* 7. opened.
I PLU^I that have been set. (The
-»rwi
UtTtlI
(CONTENT & REMARKS)
All DEPT & Transaction
All the totals of PLUs
Z report will not clear
the preset prices.)
Designated Department Item
Count, and Total (Customer
Count—optional)
([ST I...to obtain the sub
total of the departments
printed between two |ST]
key depressions.
IAT/TLI...to obtain the
total of all the depart
ments printed so far and
to finalize the report.)
INDIV. PLU READ
PLU ZONE READ
Mode Lock: X
ex)IPLU CODE 1 1PLU1
t J
may repeat
may
repat
... IAT/TLI
Mode Lock: X
I START PLU CODE]
X I
—»[END PLU CODE
-i.[PLUl
[sU
Designated PLU Total
([Sf] and FaT/TL] funtion
the same way as in the
INDIV.DEPT.READ operation
above.)
Totals of the PLUs desig
nated by the zone (from the
START PLU through the END
PLU)
Page 31

TABLE OF X AND Z REPORTS — Continued —
{REPORT NAME)
HOURLY TOTAL READ
INDIV. CLERK READ
INDIV. CLERK RESET
INDIV. TRANSACTION READ
Cash-in-drawer
(KEY OPERATION)
Mode Lock: X
10 Fat/tl]
Mode Lock: X
Mode Lock: Z
■♦Clerk 1 Key ON»
Enter 1, r^7TL I
-♦Clerk 2 Key ON,
Enter 2, !AT/tTI
-♦Clerk 3 Key ON,
Enter 3, FaT/TL j
—♦Clerk 4 Key ON,
Enter 4, ['Af/Tri
Mode Lock: X
fWMSi (or II])
(CONTENT & REMARKS)
Item Count (and Customer
Count—optional) and Total
of each Hourly Range
Totals of the sales opera
ted by the designated clerk
Total Customer Count,
(Cash Customer Count) —i
(Cash Sales Total)—^—'
Cash-in-drawer Total
1
optional
Check-in-Drawer ICHK TND
Mise.-in-drawer
Charge-in-drawer
Percent Charge
Percent Discount
Tax
MSC.. TND
[cHa
i%-i
ITXBL TL
(Check Cus. Count) —,
(Check Sales Total)-^°^
Check-in-drawer Count
Check-in-drawer Total
(Mise. Cus. Count)
(Mise. Sales Total)
Misc-in-drawer Count
Misc-in-drawer Total
(Charge Cus. Count)
(Charge Sales Total)
Charge-in-drawer Count
Charge-in-drawer Total
“]opt
Jopt
%+ Count
%+ Total
%- Count—1 entered after
%- Total-J dr]
%- Count—I entered after
%- Total—* departments
Tax 1 Total
Taxable Total 1
Tax 2 Total
Taxable Total 2
Page 32

TABLE OF X AND 2 REPORTS — Continued —
(REPORT NAME) (KEY OPERATION)
INDIV. TRANSACTION READ (Continued)
Mode Lock: X
Bottle Returned
IBTL RTN■
Returned Merchandise |RTN MDSE
Dollar Discount
Paid Out
DOLL Disci
[p^
Received on Account |R/A|
(CONTENT & REMARKS)
Bottle Returned Count
Bottle Returned Total
Returned Merchandise Item
Count
Returned Merchandise Total
Dollar Discount Count
Dollar Discount Total
Paid Out Count
Paid Out Total
Received on Account Count
Received on Account Total
Item Correction &
Voiding
GTX (Accumulated
Totals Read)
GTZ (Accumulated
Totals Reset)
ITEM COM]
VOID]
or
or
ic/vd!
GT Lock: GTX
, IAT/TLI
GT Lock: GTZ
[AT/TL
NOTE
When the GT Lock
is turned to GTX
or GTZ, the Mode
Lock position is
disregarded wherever
it may be.
Item Correct Count
Item Correct Total
(on DEPTs(+) and %+)
Void Count
Void Total
(on DEPTs(+) and %+)
Other Void Count
Other Void Total
All the accumulated
totals are printed.
All the accumulated
totals are printed and
resettable totals will
be cleared when the
report has been issued.
NOTE: No Clerk Key is necessary to issue any of the reports except the
INDIVIDUAL CLERK READ/RESET reports.
Page 33

)
) smu
Key Operation
Mode Lock; X
DEEm
IDEPT 21
PdepOI
m
[gEEO
MnH}
isT i
REPORT SAMPLES
Tha nk yo u
Cal l aga in
02- 10-82
S12 H56
X
01*
244 E
*21 45
02* 19.6 E
*15 645
05^
8. E
*25 .25
52 E
*21 015
05*
2, E
*9. 50
0 6 * 4 E
*9. 50
i
E
*19 .00
5 8 . 1
*2 2 9.1 5
2d
015 .9g
-0 9.
IKDIVIOUAL DEPARTHENT READ
_
Read Report Symbol
DP 1 Item Count
DP 1 Sales Total
h
10-
(0P1+DP2+DP3) Item Count
h-
W"
(DP1+DP2+DP3) Sales Total
h"
W-
(DP5+DP6) Item Count
H
(DP5+DP6) Sales Total
(O'
«J
Total Item Count of DPs read in this report
-J
Total Sales Amount of DPs read in this report
h-
Page 34

REPORT SAMPLES -Continued-
Key Operation
Mode Lock: X
iPOn
([HI)
UT/TL'l
Thank you
Call again
02-10-82
gL2 H56
45d l
0H6g
^15.-12.
X
2d6
*15 .50
2d6
*15 .50
INDIVIDUAL PLU READ
Read Report Symbol
PLU No.456, Item Count
Sales Total
Total Item Count of PLUs read here
Total Sales Amount of PLUs read here
|5I IQ/FOR'I (Start PLU)
14561iPLUl (End PLU)
Thank you
Call again
02- 10-82
^12 5456
0 0 5l^
45d3
2d
fll44g
?n-lL
PLU ZONE READ
Read Report Symbol
PLU No.5(Start PLU), Item Count
Sales Total
(More PLUs should be printed here
if any sales data have been recorded,^
PLU No.456(End PLU), Item Count
Sales Total
Total Item Count of PLUs in the Zone
Total Sales Amount of PLUs in the Zone
Page 35

Key Operation
Mode Lock: X
REPORT SAMPLES
-Continued-
HOURLY TOTAL READ
1101 lAT/TLI
Thank you
Call again
02-10 -8 2
^ ★ A At
oL-oa
^L2H56
Read Report Symbol
Hourly Report Symbol
Time Range 1:00 ~ 9:00 (No sale recorded)
- Time Range 9:00 - 17:00
Customer Count
Sales Total
Time Range 17:00 - (No sale recorded)
Page 36

Thank you
Call again
02- 10-82
ÌL2 H56
REPORT SAMPLES —Continued—
PLU AUTO SCAN RESET
Mode Lock: Z rPLÌTl
I
OOi ? 46
*04 6
12
).? a
*aoQ
456 ? 266
*15 50
7 8 9.? 2.
*5. 78
5 3 .2
*19 .74
2rf 00022 014 7i —
Ì15 .-12.
Reset Report Symbol
PLU No.5, Item Count
— Sales Total
PLU No.123
PLU No.if56
PLU N0.789
Total Item Count of all PLUs
Total Sales Amount of all PLUs
Reset Count
Consecutive No.
Time
Page 37

REPORT SAMPLES -Continued-
mOIVlDUAL CLERK RESET
Thank you
02- 10-82
gl2 J456
Id**
Call again
724
*50 d99
6 7 .4
*28 621
H
*27 5i42
*76 77
*2 2 5.6 0
*U6 4
*ia i4
*20 78
*52 .84
*111.0 0
*
12.0 0
E “
s
(0
0
z
(A
Z
< O.
U H
^ Q
u H
I Q
O H
№ O
£ H
Mode Lock; 1
Reset Report Symbol
Clerk 1 Report
“ Item Count (for Gross Sales)
“ Gross Sales
- Item Count (for Net Sales)
Net Sales
- Customer Count
- Total (= CftTL + CKTL + CHTL + MSTL)
Cash-in-drawer
- Check-in-drawer
Charge-in-drawer
Wise.-in-drawer
NEG 1 = NE6 SALE + VDl + VD2 + BTR2
+ V(ITM)
NEG 2 = Si-{TL) + DOLL DISC + BTR + V03
Received on Account
Paid Out
Clerk 1 Key ON,
111 ITt/tU
RTN + RTN2
1
0148g
Ì15-15
00022
-
— Clerk 1 Reset Count
Consecutive No,
Time
Page 38

REPORT SAMPLES —Continued—
AUTO SCAN RESET
Thank you
Call again
02- 10-82
ÌL2 H56
Mode Lock: Z ÌAT/Tll
Reset Report Symbol
Grand Total (non-resettable)
Item Count (for Gross Sales)
Gross Sales
DP 1 Item Count
-----
Sale Total
Page 39

^—
6.
*5. 55
1 *7. 4 5
12L
*44 228
2
*L5 9
2.
*tt 55
d
ID
DC
m
a
-ai 5
44
*45 149
24
*50 411
5.
*16 .15
5.
*2 9.9 7
5
*d6 4
5.
*11 100
*12 00
*21 7.27
9,
* 2 2 7. 6 0
5.
*29 .97
4
*U1 4
1
*ai 5
2
2
5
a
*0. 00
4
5 *51 05
2
2
2.
*0. 72
REPORT SAMPLES
(AUTO SCAM RESET —Contintued—)
Hi
X
h
IS
V)
z
%-
%-
§
<
U H
X J
u 1-
85
I ^
u (-
(0 -I
Z
£
CC
S - 1
i h
I
O
a
O -I
Q. H
<
U H
X
o
X □
U H
X
u
X Q
U H
m
z
(0 o
Z H
%%-
X+ Count
— %+ Total
—Tax Total (Taxi and Tax2 print separately on a dual-tax
—Net Sales Item Count
—Net Sales Total with Tax (NS without Tax — optional)
— %- Count on ST
— %- Total on ST
-
— Dollar Discount Count
-
Dollar Discount Total
—Bottle Returned Count (Inside Sale, as motorized key)
— Bottle Returned Total
— Total Customer Count
— Total = CAR + CKTL + CHTL + MSR
h
Cash Customer Count
-1
— Cash Sales Total
—Check Customer Count
— Check Sales Total
— Charge Customer Count
Charge Total
—Misc. Customer Count
h
— Hisc. Media total
—Received on Account Count
—Received on Account Total
— Paid Out Count
— Paid Out Total
Q
— Cash-in-drawer
—Check-in-drawer Count
Check-in-drawer
—Charge-in-drawer Count
'—-Charge-in-drawer
—■ Hisc.-in-drawer Count
—Hisc.-in-drawer
o
— Item Correct Count
>
o
— Item Correct Total-^
>
o
— Void Count
>
Q
—Void Total
>
o
>
— Item Correct and Void Count n
Q
— Item Correct and Void Total
—Count on DP line item
___
%- Total on OP Line Item
4. T +. DP( + ) and %+)
(on DP(+) and %+)
]
, „ . . , , 1(on other items)
-Continued-
Page 40

2
1
2
2
5.
*8.15
1.
*12.44
*75.H
0.
REPORT SAMPLES —Continued—
(AUTO SCAN RESET —Continued—)
2
— Returned Merchandise Count
E
fc
2
k
“Returned Merchandise Total
2
—Q Mode Count
k
2
l^l Mode Total
k
X
u
—Taxable Total 1
h
— Validation Counter
{Taxable Total 2 on a dual-tax ECR)
Id**
0 0 0.2 Z
2d**
0 0 0.2 Z
5 u * *
0 0 0.2 Z
4 d**
0 0 0.2 Z
^ A * ★
Q.
*
0.00
^01-00.
0.
*
0.00
^o9.-oa
4 7.
*4 4 2.2 8
^7.-00.
Od 0 0 0.2 Z
015.2Ì
H5.-H
— Clerk 1 Sales Data:
— Reset Count
“Clerk 2 Sales Data:
— Reset Count
—Clerk 3 Sales Data;
— Reset Count
— Clerk k Sales Data:
— Reset Count
“Hourly Total Data:
before 1:00
1:00 ~ 9:00
— Customer Count
— Sales Total
Clerk ID when this report is issued, Reset Count
Consecutive No.
Time
— NOTE: The sales data of the
clerks here have been
reset because the
INDIVIDUAL CLERK RESET
has been operated for
each Clerk prior to
this AUTO SCAN RESET.
If this AUTO SCAN RESET
is issued prior to
the Clerk Resets, the
sales data are printed
here. See each item
description in the
INDIVIDUAL CLERK RESET.
00 - 17;00
Ì 9:
Page 41

Thank you
Call again
02- 10-82
SL2 U56
REPORT SAMPLES —Continued—
GTZ (Accuiiilated Totals Reset)
— GTZ Symbol
—Non-resettable Grand Total
— Item Count (for Gross Sales)
—Gross Sales
— DP 1 Item Count
Sales Total
Page 42

*4 4 2.2 8
1
^7. 45
12L
4^1
*45 149
24
*50 411
5.
*U1 5
5.
*2 9.9 7
*d6 4
5.
*11 L00
L
*12 ,00
*7 5.51
REPORT SAMPLES
(GTZ —Continued—)
X
■—Taxi Total
— Item Count (for Net Sales with Tax)
to
— Net Sales with Tax
z
— Total Customer Count
J
— Total = CATL + CKTL + CHTL + HSTL + P8 mC
h
— Cash Customer Count
< -j
— Cash Sales Total
U H
8i
—Check Customer Count
X -i
— Check Sales Total
o 1-
— Charge Customer Count
85
X J
— Charge Sales Total
O 1-
312
—Misc. Customer Count
(0 -1
— Wise. Sales Total
Z h
— Received on Account Count
(C
i ^
— Received on Account Total
a: h
o
— Paid Out Count
fl.
O -J
—Paid Out Total
0. 1X _1
— Taxable Total 1
h h
-Continued-
0 u
0 0 0. 2 Z
015.5i
— Clerk ID, Reset Count
— Consecutive No.
— Time
Page 43

PROGRAMMING OF THE REGISTER
CUSTOMER'S SYSTEM OPTION PROGRAMMING (Condition; after a Z reset and a GTZ
reset)
To change or newly program various selections provided in the costomer
system option;
Mode Lock: SET Key Operation
IZl i i I Address No.j
3
CBit No.— .8 7 6 5 if 3 2 1 )
Address No.
1
-----
-^1 I I I I I I I I S]
L
J
I AT/TLi
Enter a 8-digit number composed of "0" or "1”
on each digit as each Bit status selection.
|o|o|oii|0|1|0|0|
This indicates that Bit Nos 5 and 3
are selected to have "1" status, and
other Bit Nos are selected to have "0"
status. The top "0"s (the first three
"0"s in this case) may be omitted.
See the Address Nos and Bit Nos in the tables below and on the
following pagefe.
CUSTOMER SYSTEM OPTION TABLES
Contents
MEDIA FUNCTION I
Bit
No.
1
CASH MEDIA KEY
2
CASH MEDIA KEY
3
CHECK MEDIA KEY
A
CHECK MEDIA KEY
5
CHARGE MEDIA KEY
6
CHARGE MEDIA KEY
1
MISC. MEDIA KEY
8
MISC. MEDIA KEY
Itei
Selective Status
0
1
TOTAL KEY only
0
1
TENDER KEY only
0
i
TOTAL KEY only
0
TENDER KEY only
1
0
1
TOTAL KEY only
0
ll
TENDER KEY only
0
1
TOTAL KEY only
0
1
TENDER KEY only
Standard
Status
*
*
*
•tt-
*
*
*
Renarks
If both " 0 "t it functions as
TENDER and TOTAL Key.
3
—'
If both " 0 ”, it functions as
TENDER and TOTAL Key.
If both ” 0 ”, it functions as
TENDER and TOTAL Key.
If both 0 ", it functions as
TENDER and TOTAL Key.
Page 44

Address No,
Contents
MGR REQUIREMENT I
Bit
No.
1
iRTN MOSEt
2
W
3
IDOLL DISC 1
Negative DEPT^
A
lfi.TL RTNI
5
1VOIDI
6
Lid
— vacant —
1
8
— vacant —
Ite#
0
FREE
1
COMPULSORY
0
FREE
. 1
COMPULSORY
0
FREE
1
COMPULSORY
0
FREE
1
COMPULSORY
0
FREE
1
COMPULSORY
0
FREE
1
COMPULSORY
0
1
Q
. 1
Selective S^tus
Standard
Status
*
*
*
*
*
*
*
Reiarks
This option is applied to the 1IC/VD1
kev when used .as the "VOID" kev.
Address No.
3
Bit
No.
1
IRTN MDSEI
2
1X01
3
Eza
A
ICHK TNDI
5
IChql.
6
lAT/TLi
1HoC 1 NO 1
1
8
1VOIDI
Contents
VALIDATION COMPULSORY I
tei
I
Selective Status
0.
FREE
COMPULSORY
1
FREE
0
COMPULSORY
1
FREE
0
1 COMPULSORY
FREE
0
1 COMPULSORY
FREE
0
COMPULSORY
1
FREE
0
COMPULSORY
1
FREE
0
COMPULSORY
1
FREE
0
COMPULSORY
1
Standard
Status
*
*
*
*
*
*
*
*
This
O Dt i o n
key when used as
Reiarks
is
a pp l i e d t o t he
t he
"VOID"
IIC/VDI
k ev .
Page 45

Address No.
4 VALIDATION COMPULSORY II
Contents
Bit
No,
1
2
3
4
Negative DEPT
5
6
— vacant —
7
— vacant —
8
— vacant —
I tei
IITEH CORRI
IDOLI DISCI
L^l
IBTL RTNI
Selective Status
0.
FREE
1
COMPULSORY
0
FREE
1
COMPULSORY
0
FREE
1
COMPULSORY
0 '
FREE
1
COMPULSORY
0
FREE
1
COMPULSORY
0
1
0.
L
0
1
Standard
Status
*
»
*
-H-
*
-H-
Remarks
This option is applied to the QC/VD 1
key when used as the "ITEM CORR" key.
1
Address No. Contents
5 FRACTION ROUNDING
Bit
No.
1
2
3
4
S
6
7
8
Item Selective Status
QUANTITY EXTEN
SION PRODUCT
QUANTITY EXTEN
SION PRODUCT
z+ i
CALCULATION
%+ & %~
CALCULATION
— vacant —
— vacant —
— vacant —
— vacant —
0
1
0
1
0
1
0
1
0
■1
01
Q
1
0
1
ROUND UP
DISCARD
ROUND UP
DISCARD
Standard
Status
*
*
*
*
*
*
*
*
Remarks
If both " 0 ", it will be rounded off.
if both " 0 ", it will be rounded off
-J
Page 46

Address No.
Contents
Bit
No.
1
2
3
A
5
6
7
8
6
I tei
S3
S3
tDOLL DISCI
iBTi RTNl
— vacant —
— vacant —
— vacant —
— vacant —
TAX 1 STATUS
Selective Status
NON-TAXABLE
0
1
TAXABLE
0
NON-TAXABLE
1 ,
TAXABLE
0 ■
NON-TAXABLE
1
TAXABLE
0 ■
NON-TAXABLE
1
TAXABLE
0 ■
1
0
1
, 0
1
0
1
Standard
Status
«
*
*
*
*
*
*■
Renarks
Address No.
7
Bit
No.
1
S3
2
, Sc^l
3
lOOLL DISCI
A
IBTL RTNl
S
— vacant —
6
— vacant —
7
— vacant —
8
— vacant —
I ten
Contents
TAX 2 STATUS
Selective Status
NON-TAXABLE
0
1
TAXABLE
NON-TAXABLE
O'
,1
TAXABLE
NON-TAXABLE
0
1
TAXABLE
NON-TAXABLE
0
1
TAXABLE
0
1
0
1
0
1
0
1
Standard
Status
*
*
*
*
*
*
*■
*
Renarks
Page 47

SETTNG OR CHANGING THE STORE/REGISTER NUMBER (Condition: after a Z reset and a
GTZ reset)
Mode Lock: SET
Key Operation:
[ NUMBER I -» r# I
(0 ~ 999999)
(or [?7ns1
NOTE; The Q key is not allowed
in the number entry.
SETTING THE DATE (Condition: anytime outside a sale)
Mode Lock: SET Key Operation:
|6l-»[ X I
------
> [Month I Day | YEAR|-> | AT/TL 1
1 or 2 digits
(1~12)
2 digits
(01 ^31)
2 digits
(82, 83, etc.)
SETTING THE TIME (Condition: anytime outside a sale)
Mode Lock: SET Key Operation:
'"NOTE: The date entry order
may be DAY--H0NTH-
YEAR, if so programmed
in the system option.
)5|^| X I
-------
>[ HOUR I MINUTE]
---
>-|AT/TL|
1 or 2 dig.
(0~23)
2 digits
NOTE: Enter the hour in
the 24-hour system.
(00-59)
SETTING INDIVIDUAL DEPARTMENT STATUS (Condition: after a Z reset; also requires
a GTZ reset and PLU reset if the negative
status is to be changed also.)
Mode Lcpck: SET
Key Operation:
*( l TX/M| )------
11! —> 1 X 1
for single
tax status
change
|TX1/M| ) —( I TX2/MI )
Repeat until
all the re
for Tax 1 for Tax 2 status change
status change
quired DEPTs
are set or
changed with
^the staus.
L RTN MDSE I)-
for negative
department
-»I DEPT I
i AT/TLI
status change
Page 48

NOTES: 1. Among iTXl/M| (|TX/M1) and 1TX2/M| keys, depress
the key(s) for the required status change(s} for each
department. The I RTN^MDSEI is depressed to set or reset
the negative DEPT status.
2. Depressing any of the three keys above,
status reverses. For example, depressing
reverses a non-taxable DEPT to a taxable,
to non-taxable. Each department status is
number indicated on the display when each depart
ment key is depressed in the above operation. , The numbers
and their respective statuses are:
0: Non-taxable
1 : Tax 1 only
2: Tax 2 only
3; Tax 1 and Tax 2
Watching the number, adjust the status by depressing
those keys. See the examples below:
the related
the [TX.Vm!
or taxable
read by the
'STATUS NUMBER
BEFORE change"
0
0
0
1
1
2
2
3
3. In order to simplify the status setting operation, each
department status may be reset to "0" by entering "0"
and depressing the department key. (This can only be
done after a GTZ reset and a FLU Z reset.) Then the
required status is set simply by depressing the keys
ITXI/Ml (¡TX/m|) and/or |TX2/m1, each only once.
KEY-IN FOR CHANGE
PRIOR TO I DEPT I key”
1txi/m1
ITXI/MlITX2/MI
|TX2/M|
etc.
iTXl/Ml
—> 1TX2/M1
—> !txi/m|1tx2/m| 2(Tax2 only)
etc.
i TX2/M1
^ 1TXl/M1
|txi/m1
etc
--
—^
—^
NEW NUMBER AND
STATUS OBTAINED
l(Taxl only)
3(Taxl and Tax2'
2(Tax2 only)
0(Non-txbll
3{Taxl and Tax2)
>
0(non-taxable)
3(Taxl and Tax2)
2(Tax2 only)
Page 49

SETTING OR CHANGING DEPARTMENT PRESET PRICE (Condition: anytime outside a sale.)
Mode Lock: SET Key Operation:
J Preset Pricel —fPEPTl--lAiyTiTl
max.6 digits
Repeat for all the _
required departments.
NOTES: 1. To preset the price of "0", enter "O'* in place
of [Preset Price] in the above operation.
2. If no price is entered at the j Preset Price j ,
the department is set as an open department.
PROGRAMMING PLU TABLE (Condition: after a Z reset to renew the PLU table,
or anytime ouside a sale to program additional
plus)
Mode Lock: SET
Key Operation:
NOTES: 1. As for the functions and operations of the j TXl/M j
([TX/M[), and ITX2/MI keys, see the description in
the SETTING OR CHANGING DEPARTMENT STATUS.
2. When the link department has been programmed to be
negative, any PLU to be linked to it is automatically
set as a negative PLU. Reversing this negative status
is not possible unless the link department itself is re
programmed to be positive.
3. A maximon of 150 PLUs can be programmed.
Page 50

DELETING INDIVIDUAL PLU (Condition: after a PLU Z reset)
Mode Lock; SET Key Operation:
1^1”^ I X I
llTEM C0M1-»|PLU Codel—»|PLU|-»r^/TL|
for the PLU
to be deleted
—Repeat until all the required—^
PLUS are deleted.
CHANGING PLU PRESET PRICE (Condition: anytime outside a sale)
Mode Lock; SET Key Operation:
I PLU Code!—>[PLU]—»|New Price]—>>12]—IAT/TLI
for the PLU
whose price
is to be changed
- To change the price
of another PLU
NOTES: 1, To preset the price of "0”, enter "0" in place of the |New
Price I in the above operation.
To change the
next sequencial
PLU
-----------------
(or [l/NS])'
price of the
2. In this operation, changes of PLU stautus, its link department,
etc. are not possible.
Page 51

PROGRAMMING TAX TABLE (Condition: after a Z reset and GTZ reset)
Mode Lock: SET
1) TAX 1 FULL BREAKS
Key Operation: |max. amount non-taxable] ITXl/M-l
I max, amount for tax levied!|TXl/M|
[ max. amount for 2^ tax levied I ~-»[Txi7m1
Repeat until the "A" Break is entered.
I max, amount for Ngf tax levied [ —»| TXl/^ . . . "A" Break
I ST I (to indicate the "A" Break entry)
I max, amount for N+ljii tax levied ¡—» I TXl/wl
[max, amount for N+2j^ tax levied 1—>[TX1/^
Repeat until the "B" Break is entered.
1AT/TL 1 (to end)
NOTE: The amount etnry may be maximum 4-digit value (up to 9999?i).
2) TAX 1 "A" BREAK AND % RATE COMBINATION
Key Operation: First set the "A" Break following the same operation
up to the "A" Break entry and the j ST[ key depression
in "1) TAX 1 FULL BREAKS" above.
i
[tax rate applied when exceeding the "A" Break amount
(max, 4 digits, up to 99.99%. Do not use the [T]
key. The fraction of the amount resulted from this
% rate calculation will be rounded off.)
IAT/TLI (to end)
3) TAX 1 % RATE ONLY
Key Operation: joj
iTXi/Ml—»I~sf1-^|TAX rateI—»I^'/tlI
(The conditions
of the rate are
the same as the
above TAX RATE.)
NOTES: 1. If only one tax modifier key ( |TX/MI ) is installed on the key
board, use the | TX/M | in place of the 1 TXl/M I in the descrip
tion 1), 2), or 3) above.
Page 52

2. For TAX 2 Table programming, follow the same procedure in the
1), 2), or 3) above, using the |TX2/M| instead of the [TXl/MI.
3. If both TAX 1 and TAX 2 tables are programmed, the TAX 1 must
be set first. The TAX 1 table entry will automatically reset
both the TAX 1 and TAX 2 tables that have been programmed.
4. No second depression of the | ST 1 key is allowed within one
tax table programming.
SETTING NON-TAXABLE LIMIT AMOUNT (for a certain area only)
(Condition: after a Z reset)
This rtiay be programmed only when one tax modifier key ( | TX/M1 ) is
installed. The tax levied when exceeding this limit amount will be
calculated by the TAX 1 table.
Mode Lock': SET Key Operation:
I 9 I —» I X I —>1 Non-taxable Limit Amount |—>| AT/tIT|
NOTES: 1. If this program has been set, the tax is calculated and added
to the sale total which exceeds the limit amount even when
the sale is entirely composed of non-taxable items.
2. To reset the limt amount once set, enter "0" in place of the
¡Non-taxable Limit Amount] in the above operation.
3, This tax calculation program will be disregarded when the sale
total turns out to be negative.
^ In case the limit amount "$3.25'* is set:
Case 1: Normal Department Entry; (Mode Lock: REG)
I 3261^ rnon-taxable DEPT| -> [AT/TL|
....
The entered ■amount $3.26 is greater than the
limit amount $3.25. It will therefore be taxed.
Case 2: Returned Merchandise Entry: (Mode Lock: REG)
IrTN mdse i 13261 -> 1non-taxable"dept] ->j AT/TL1
The non-taxable total is negative. The tax
already levied will therefore not be returned.
Page 53

SETTING THE LISTING CAPACITY OF DEPARTMENT
(Condition: after a Z reset)
Mode Lock: SET
Key Operation:
2 dig. 2^dig.
121 I X 1-^1HALCILALC|-^1 DEPT] -»|HALC|LALC| ~>rAT/TL|
T
-----
(NOTE 1)(N0TE 2)
Repeat until all
-the required indiv.^
department L.C.'s
\
7 r
(NOTE 1)(N0TE2)
I-
for common L.C. for all
the departments.
are set.
NOTE 1: HALC
....
High Amount Listing Capacity
ex.)
Number of digits
[314j indicates 3999
Value of the top digit
NOTE 2: LALC
....
Low Amount Listing Capacity
ex.)
'-—A H -i nr —
--------------------
4 dig.
---
-Value of the_
top digit
^
►Number of digits
►Value of the top digit
[2 I 2J indicates 29
I
-
?. Hi
-2- dig.
Value of the
top digit
The amount range allowed to be entered:
equal to or smaller than the HALC,
and larger than the LALC
NOTES: 1. If the individual listing capacity of a department has
been set, it prevails over the common listing capacity
of all the departments.
2. To reset an individual department listing capacity, enter
"0" before the |DEPT| key in the above operation. Then
the common listing capacity of all the departments, if
pre-programmed, will prevail.
SETTING TENDER LISTING CAPACITIES (Condition: after a Z reset)
Mode Lock: SET Key Operation:
2 digits
‘HALCI --IAT/TLI (Cash Tender Listing Capacity)
ICHk~"fNDl (Check Tender Listing Capacity)
Refer to the
HALC descrip
tion above.
IChgl (Charge Tender Listing Capacity)
MSC
(Misc. Tender Listing Capacity)
TND
Page 54

NOTE: To reset the tender listing capacity of a media key once program
med, enter "0" and depress the media key in the SET mode.
SETTING BOTTLE RETURN AMOUNT LIMIT (Condition: after a Z reset)
Mode Lock: SET Key Operation:
I Bottle Return Limit Amount]->|BTL RTN|
max 4 digits (up to 9999ii)
NOTES: 1. If quantity extension is operated with the |BTL RTN| key,
the multiplier is subject to the amount limit not the product.
2. To reset the limit amount once set, operate in the SET mode:
|0l-^|BTL rtnI
SETTING DOLLAR DISCOUNT LIMIT (Condition: after a Z reset)
Mode Lock: SET Key Operation:
1 Doitlar Discount Limit Amount| —»|P0LL DISC|
max. 4 digits
(up to 9999?i)
NOTE: To reset the limit amount once set, operate in the SET mode:
DOLL DISCI
PROGRAMMING THE PRESET RATES OF [g] AND [Q KEYS (Condition; anytime outside
a sale)
Mode Lock: SET Key Operation
1) To set a rate of a integral value:
I RATE IFCT
I RATE I—
max 12 digits
2) To set a rate containing the deciaml point:
I Integral Portion| |.| |Decimal Portion|-p» |%+\
max. 2 digits max. 3 digits > \%~\
(up to 99.999%)
Page 55

3) To reset the rate once set:
101 —> I %+ I
|o|-»|33
SETTING HOURLY RANGES (Condition: after a Z reset)
Mode Lock: SET Key Operation:
|4l-^L.X..J—,
NOTE^: 1. A maximum of 24 hourly ranges may be set.
2. To change the table of hourly ranges once set, partially
or entirely, do the entire setting operation over again.
3. To reset the hourly range table once sej^:
Mode Lock; SET, |4|—»["'x : I--» ! Q I —»1 # K or l#/NSj )-»l AT/TL|
4. Do not set an hourly range across 24:00, such as "from 23:00
to 1:00",
lor 2 dig. 2 dig. Ur l^/.NS|)
HOUR I MINUTE I-»| AT7'tl'1
(the time to end —-
each hourly range,
in the 24-hour
system)
Repeat until all
the time ranges
are entered.
Page 56

VERIFICATION OF PROGRAMMED DATA
1. DEPARTMENT PRESET PRICE READ
Mode Lock: X
Key Operation: !11 -
2. DEPARTMENT STATUS READ
Mode Lock: X
Key Operation: |21 —> 1ST]
Dept.No."
0 1 *
0
2
0 3 *
0 4*
0 5*
06*
0 7 *
\
* 1.2 5 @
*
* 3.2 5
* 4.7 5
Preset Price
©
©
©
©
Page 57

4. OTHER PRESET DATA
Mode Lock: X
Key Operation: |4
%+ Preset Rate
%- Preset Rate
Common Listing Capacity of All Oepts,
Cash Tender Listing Capacity
Check Tender Listing Capacity
Charge Tender Listing Capacity
Misc. Tender Listing Capacity
Bottle Return Amount Limit
Dollar Discount Limit
5. CUSTOMER SYSTEM OPTION SELECTION READ
Mode Lock; X
Key Operation: 15l—»[StH
Address No.'
0 1# 0 0,0 0 0.0 0 0
0 2# 0 0.0 0 0.0 0 0
0 3# 0 0.0 0 0.0 0 0
0 A # 0 0.0 0 0.0 0 0
0 5# 0 0.0 0 1.0 0 0
0 6# 0 0.0 0 0.0 1 0
t f
Bit No . 8 Bit No, 1
Page 58

6. TESTING TAX CALCULATION
Mode Lock: X
Key Operation: |Free Amount| —»ITXBL TL|
I
i
Amount
entered
I—Hi
displayed
A receipt is issued each time an amount is entered
followed by the |TXBL TL 1 key, with the taxi and
tax2 printed separately on two lines (if dual-tax
tables have been programmed).
Tax due
(Taxi and Tax2)
_J
(Repeat this operation,
alternating the amount
entry with various amounts.)
Page 59

INSTALLING AND REMOVING THE RECEIPT PAPER ROLL
Fig. ^
Installing the Receipt Paper
11 Open the paper cover and install a new paper roll of the recommended type.
2) Install it with the receipt paper coming from the bottom of the roll (see Fig. 1).
31 Fold the paper end at a right-angle and thread it through the receipt paper inlet (see Fig. 2).
4) Depress the R.F. key until the paper end appears at the receipt paper outlet. If the paper ends
do not come out of the receipt paper outlet after the R.F key is depressed, for a while, the paper
is not properly threaded through the paper feed mechanism. Push the paper end through the
receipt paper inlet while keeping the R.F. key depressed (see Fig, 3).
■ Removing the Receipt Paper
When receipts with a red line are issued, the register is running out of the receipt paper. Replace the
receipt paper roll according to the procedure discribed below.
1) Open the paper cover.
2) Remove the paper core from the paper holder, pull out the release lever and pull the paper core
upwards to remove the old paper tail (see Fig. 4).
INSTALLING AND REMOVING THE JOURNAL PAPER ROLL
Fold the paper end at a right angle and thread it through the journal paper inlet.
1)
Depress the J.F. key until a paper length of about 40 cm is out of the journal paper guide and
2)
wind it around the journal receiving shaft two or three turns in the direction of the arrow (see Fig.
5).
Reinstall the journal receiving shaft in the register (see Fig. 6).
3)
Removing the Journal Paper
When the register is cleared or has run out of the journal paper, remove the journal paper according
to the procedure described below.
1} Open the paper cover.
2) Depress the J.F. key until unprinted journal paper appears.
3) Lift up the printed journal paper with the journal receiving shaft and tear the unprinted portion.
Do not use scissors to cut the journal paper, so that the Torn ends can be matched later, if
necessary (see Fig. 7).
4) The printed journal roll wound onto the receiving shaft, can be removed, by sliding it off.
Page 60

WHEN A POWER FAILURE OCCURS
When power is restored, the register will display the last item entered before the power failure
if the item was entered through a motorized key (such as I DC PT1. media keys, etc.}. In this
case, contiue the registering operation. However, if the register displays "FAIL" when the power
is restored, it indicates that the last item entry was not completed (i.e., only numeric keys
or a declaration key such as IftTN MDSE I were operated but not any motorized key). In this case,
first depress the [0 key to clear the "FAIL" condition, and then do the registering operation
again from the numeric or declaration key entry. In the event of a power failure, be sure to
check the receipt before it is handed to the customer.
OPENING AND REMOVING THE DRAWER
■ Opening the Drawer (Fig. 8)
The drawer opens automatically when a registration is made. In the event of a power failure or other
troubles the drawer can be opened in the following manner.
1) Insert the drawer release key into the drawer release lock and turned the key clockwise 45 deg.
The drawer will now open.
2) The drawer release key can be taken out by returning it to the original position.
■ Removing the Drawer (Fig. 9)
1} To remove the drawer, lift it up by the stoppers attached on both sides and pull it out.
2) When installing the drawer, the rollers on the rails of the register and push it all the way in.
• The coin case can be removed from the drawer, by lifting it up at the front.
REPLACING THE INK ROLLER
When the receipt and journal paper print is too light, replace the ink roller in the following manner.
Ink Roll and Stamp Ass v
Vinyl
Fig. 11
1) Place the control lock in the LOCK position and remove the stamp cover (see Fig. 10).
2) Remove the ink roller holder (see Fig. 11)
3) Remove the ink roll (see Fig. 12). When removing it wear a vinyl glove or cover the ink roll with a
strip of vinyl sheet to avoid contact with the hands.
Page 61

REPLENISHIfSIG INK
When the store message is printed too lightly, replenish the ink in the following manner.
1) Place the control lock in the LOCK position and remove the stamp cover (see Fig. 10).
2) Remove the ink roll holder (see Fig. 11).
3) Pull out the store message stamp in the direction of the arrow (see Fig. 13).
4) Apply Ink to the replenishment pad at the back of the store message stamp. The amount of
refilling should be adjusted accoring to the density of the printed message, but the limit of 2 cc
should not be exceeded. (The ink bottle supplied contains 5 cc of ink), (see Fig. 14).
)
5) Reassembly is the reverse procedure.
SPECIFICATIONS
Size....................................................................................................................... 460niin(width) X 441mm(depth) x 413mni( height )
Weight............................................
............................
Approx. 23kg
AC power required.................................................. AC 117V ^10% 60Hz (Varies depending on each area.
Power consumed..................................................... 60W
Size of receipt and journal tape
........................
45mm(
wi dt h)
x 100mm(diafn. )
Ambient temperature............................................ 0°~ 40°C,10 - 90% (Relative Humidity)
BEFORE CALLING FOR SERVICE
It is your dealer's primary concern to give full satisfaction and better service to our customers. So if any
problems arise in connection with the operation of this cash register , contact your TEC
representative listed on this papge. However, before calling for service, please check the following
)points once again.
□ In. case the register is inoperative with a blank display and the printer will not turn
• Is the register power switch turned on?
• Is the power cord of the register connected to the wall socket properly?
• Is AC power applied to the outlet? (Plug in a lamp or light fixture to check.)
• Has the fuse blown, or has the circuit breaker been turned off?
□ In case the receipt does not come out of the receipt outlet.
• Can the red lines on the receipt or journal paper be seen?
In this case, replace the receipt of journal tape with a new roll immediately.
• The receipt paper is jammed at the receipt cutter. In this case remove the printer cover and check
the installation of the receipt paper.
YOUR TEC REPRESENTATIVE:
ADDRESS;.
PHONE:„^
____
________________________________________________________________________
Page 62

Page 63

Page 64

PRINTED IN JAPAN
 Loading...